Post Syndicated from Anand Komandooru original https://aws.amazon.com/blogs/big-data/implement-a-full-stack-serverless-search-application-using-aws-amplify-amazon-cognito-amazon-api-gateway-aws-lambda-and-amazon-opensearch-serverless/
Designing a full stack search application requires addressing numerous challenges to provide a smooth and effective user experience. This encompasses tasks such as integrating diverse data from various sources with distinct formats and structures, optimizing the user experience for performance and security, providing multilingual support, and optimizing for cost, operations, and reliability.
Amazon OpenSearch Serverless is a powerful and scalable search and analytics engine that can significantly contribute to the development of search applications. It allows you to store, search, and analyze large volumes of data in real time, offering scalability, real-time capabilities, security, and integration with other AWS services. With OpenSearch Serverless, you can search and analyze a large volume of data without having to worry about the underlying infrastructure and data management. An OpenSearch Serverless collection is a group of OpenSearch indexes that work together to support a specific workload or use case. Collections have the same kind of high-capacity, distributed, and highly available storage volume that’s used by provisioned Amazon OpenSearch Service domains, but they remove complexity because they don’t require manual configuration and tuning. Each collection that you create is protected with encryption of data at rest, a security feature that helps prevent unauthorized access to your data. OpenSearch Serverless also supports OpenSearch Dashboards, which provides an intuitive interface for analyzing data.
OpenSearch Serverless supports three primary use cases:
- Time series – The log analytics workloads that focus on analyzing large volumes of semi-structured, machine-generated data in real time for operational, security, user behavior, and business insights
- Search – Full-text search that powers applications in your internal networks (content management systems, legal documents) and internet-facing applications, such as ecommerce website search and content search
- Vector search – Semantic search on vector embeddings that simplifies vector data management and powers machine learning (ML) augmented search experiences and generative artificial intelligence (AI) applications, such as chatbots, personal assistants, and fraud detection
In this post, we walk you through a reference implementation of a full-stack cloud-centered serverless text search application designed to run using OpenSearch Serverless.
Solution overview
The following services are used in the solution:
- AWS Amplify is a set of purpose-built tools and features that enables frontend web and mobile developers to quickly and effortlessly build full-stack applications on AWS. These tools have the flexibility to use the breadth of AWS services as your use cases evolve. This solution uses the Amplify CLI to build the serverless movie search web application. The Amplify backend is used to create resources such as the Amazon Cognito user pool, API Gateway, Lambda function, and Amazon S3 storage.
- Amazon API Gateway is a fully managed service that makes it straightforward for developers to create, publish, maintain, monitor, and secure APIs at any scale. We use API Gateway as a “front door” for the movie search application for searching movies.
- AWS CloudFront accelerates the delivery of web content such as static and dynamic web pages, video streams, and APIs to users across the globe by caching content at edge locations closer to the end-users. This solution uses CloudFront with Amazon S3 to deliver the search application user interface to the end users.
- Amazon Cognito makes it straightforward for adding authentication, user management, and data synchronization without having to write backend code or manage any infrastructure. We use Amazon Cognito for creating a user pool so the end-user can log in to the movie search application through Amazon Cognito.
- AWS Lambda is a serverless, event-driven compute service that lets you run code for virtually any type of application or backend service without provisioning or managing servers. Our solution uses a Lambda function to query OpenSearch Serverless. API Gateway forwards all requests to the Lambda function to serve up the requests.
- Amazon OpenSearch Serverless is a serverless option for OpenSearch Service. In this post, you use common methods for searching documents in OpenSearch Service that improve the search experience, such as request body searches using domain-specific language (DSL) for queries. The query DSL lets you specify the full range of OpenSearch search options, including pagination and sorting the search results. Pagination and sorting are implemented on the server side using DSL as part of this implementation.
- Amazon Simple Storage Service (Amazon S3) is an object storage service that offers industry-leading scalability, data availability, security, and performance. The solution uses Amazon S3 as storage for storing movie trailers.
- AWS WAF helps protects web applications from attacks by allowing you to configure rules that allow, block, or monitor (count) web requests based on conditions that you define. We use AWS WAF to allow access to the movie search app from only IP addresses on an allow list.
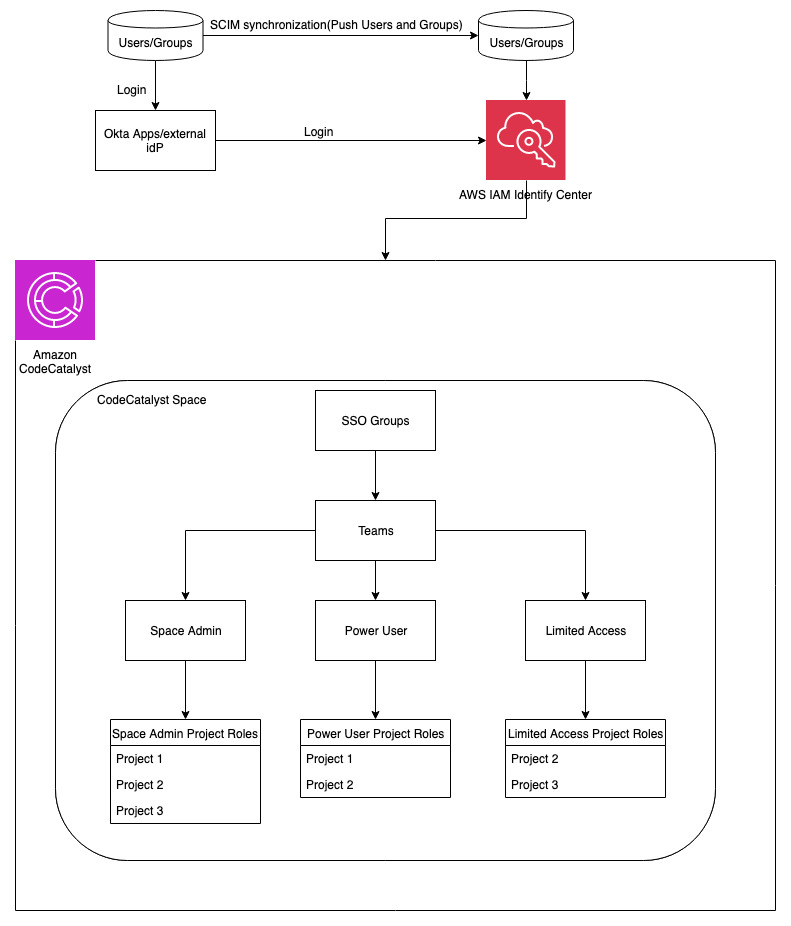
The following diagram illustrates the solution architecture.

The workflow includes the following steps:
- The end-user accesses the CloudFront and Amazon S3 hosted movie search web application from their browser or mobile device.
- The user signs in with their credentials.
- A request is made to an Amazon Cognito user pool for a login authentication token, and a token is received for a successful sign-in request.
- The search application calls the search API method with the token in the authorization header to API Gateway. API Gateway is protected by AWS WAF to enforce rate limiting and implement allow and deny lists.
- API Gateway passes the token for validation to the Amazon Cognito user pool. Amazon Cognito validates the token and sends a response to API Gateway.
- API Gateway invokes the Lambda function to process the request.
- The Lambda function queries OpenSearch Serverless and returns the metadata for the search.
- Based on metadata, content is returned from Amazon S3 to the user.
In the following sections, we walk you through the steps to deploy the solution, ingest data, and test the solution.
Prerequisites
Before you get started, make sure you complete the following prerequisites:
- Install Nodejs latest LTS version.
- Install and configure the AWS Command Line Interface (AWS CLI).
- Install awscurl for data ingestion.
- Install and configure the Amplify CLI. At the end of configuration, you should successfully set up the new user using the amplify-dev user’s
AccessKeyIdandSecretAccessKeyin your local machine’s AWS profile. - Amplify users need additional permissions in order to deploy AWS resources. Complete the following steps to create a new inline AWS Identity and Access Management (IAM) policy and attach it to the user:
-
- On the IAM console, choose Users in the navigation pane.
- Choose the user amplify-dev.

- On the Permissions tab, choose the Add permissions dropdown menu, then choose Inline policy.

- In the policy editor, choose JSON.


You should see the default IAM statement in JSON format.

-
- Copy the file contents in AddionalPermissions-Amplify, replacing the tags with your target AWS Region, account, and environment.
This environment name needs to be used when performing amplify init when bringing up the backend. The actions in the IAM statement are largely open (*) but restricted or limited by the target resources; this is done to satisfy the maximum inline policy length (2,048 characters).
-
- Enter the updated JSON into the policy editor, then choose Next.

- For Policy name, enter a name (for this post,
AddionalPermissions-Amplify).

- Choose Create policy.

- Enter the updated JSON into the policy editor, then choose Next.


You should now see the new inline policy attached to the user.

Deploy the solution
Complete the following steps to deploy the solution:
- Clone the repository to a new folder on your desktop using the following command:
- Deploy the movie search backend.
- Deploy the movie search frontend.
Ingest data
To ingest the sample movie data into the newly created OpenSearch Serverless collection, complete the following steps:
- On the OpenSearch Service console, choose Ingestion: Pipelines in the navigation pane.
- Choose the pipeline movie-ingestion and locate the ingestion URL.

- Replace the ingestion endpoint and Region in the following snippet and run the
awscurlcommand to save data into the collection:
You should see a 200 OK response.
- On the Amazon S3 console, open the trailer S3 bucket (created as part of the backend deployment.
- Upload some movie trailers.

Make sure the file name matches the ID field in sample movie data (for example, tt1981115.mp4, tt0800369.mp4, and tt0172495.mp4). Uploading a trailer with ID tt0172495.mp4 is used as the default trailer for all movies, without having to upload one for each movie.
Test the solution
Access the application using the CloudFront distribution domain name. You can find this by opening the CloudFront console, choosing the distribution, and copying the distribution domain name into your browser.
Sign up for application access by entering your user name, password, and email address. The password should be at least eight characters in length, and should include at least one uppercase character and symbol.

After you’re logged in, you’re redirected to the Movie Finder home page.

You can search using a movie name, actor, or director, as shown in the following example. The application returns results using OpenSearch DSL.

If there’s a large number of search results, you can navigate through them using the pagination option at the bottom of the page. For more information about how the application uses pagination, see Paginating search results.

You can choose movie tiles to get more details and watch the trailer if you took the optional step of uploading a movie trailer.

You can sort the search results using the Sort by feature. The application uses the sort functionality within OpenSearch.

There are many more DSL search patterns that allow for intricate searches. See Query DSL for complete details.
Monitoring OpenSearch Serverless
Monitoring is an important part of maintaining the reliability, availability, and performance of OpenSearch Serverless and your other AWS services. AWS provides Amazon CloudWatch and AWS CloudTrail to monitor OpenSearch Serverless, report when something is wrong, and take automatic actions when appropriate. For more information, see Monitoring Amazon OpenSearch Serverless.
Clean up
To avoid unnecessary charges, clean up the solution implementation by running the following command at the project root folder you created using the git clone command during deployment:
You can also clean up the solution by deleting the AWS CloudFormation stack you deployed as part of the setup. For instructions, see Deleting a stack on the AWS CloudFormation console.
Conclusion
In this post, we implemented a full-stack serverless search application using OpenSearch Serverless. This solution seamlessly integrates with various AWS services, such as Lambda for serverless computing, API Gateway for constructing RESTful APIs, IAM for robust security, Amazon Cognito for streamlined user management, and AWS WAF for safeguarding the web application against threats. By adopting a serverless architecture, this search application offers numerous advantages, including simplified deployment processes and effortless scalability, with the benefits of a managed infrastructure.
With OpenSearch Serverless, you get the same interactive millisecond response times as OpenSearch Service with the simplicity of a serverless environment. You pay only for what you use by automatically scaling resources to provide the right amount of capacity for your application without impacting performance and scale as needed. You can use OpenSearch Serverless and this reference implementation to build your own full-stack text search application.
About the Authors
 Anand Komandooru is a Principal Cloud Architect at AWS. He joined AWS Professional Services organization in 2021 and helps customers build cloud-native applications on AWS cloud. He has over 20 years of experience building software and his favorite Amazon leadership principle is “Leaders are right a lot“.
 Rama Krishna Ramaseshu is a Senior Application Architect at AWS. He joined AWS Professional Services in 2022 and with close to two decades of experience in application development and software architecture, he empowers customers to build well architected solutions within the AWS cloud. His favorite Amazon leadership principle is “Learn and Be Curious”.
 Sachin Vighe is a Senior DevOps Architect at AWS. He joined AWS Professional Services in 2020, and specializes in designing and architecting solutions within the AWS cloud to guide customers through their DevOps and Cloud transformation journey. His favorite leadership principle is “Customer Obsession”.
 Molly Wu is an Associate Cloud Developer at AWS. She joined AWS Professional Services in 2023 and specializes in assisting customers in building frontend technologies in AWS cloud. Her favorite leadership principle is “Bias for Action”.
 Andrew Yankowsky is a Security Consultant at AWS. He joined AWS Professional Services in 2023, and helps customers build cloud security capabilities and follow security best practices on AWS. His favorite leadership principle is “Earn Trust”.
 Anna Montalat is the Product Marketing lead for AWS analytics and streaming data services, including Amazon Managed Streaming for Apache Kafka (MSK), Kinesis Data Streams, Kinesis Video Streams, Amazon Data Firehose, and Amazon Managed Service for Apache Flink, among others. She is passionate about bringing new and emerging technologies to market, working closely with service teams and enterprise customers. Outside of work, Anna skis through winter time and sails through summer.


 Krishna Gogineni is a Principal Solutions Architect at AWS helping financial services customers. Krishna is Cloud-Native Architecture evangelist helping customers transform the way they build software. Krishna works with customers to learn their unique business goals, and then super-charge their ability to meet these goals through software delivery that leverages industry best practices/tools such as DevOps, Data Lakes, Data Analytics, Microservices, Containers, and Continuous Integration/Continuous Delivery.
 Dayananda Shenoy is a Senior Solution Architect with over 20 years of experience designing and architecting backend services for financial services products. Currently, he leads the design and architecture of distributed, high-performance, low latency analytics services for a data provider. He is passionate about solving scalability and performance challenges in distributed systems leveraging emerging technology which improve existing tech stacks and add value to the business to enhance customer experience.
 Vishal Balani is a Sr. Customer Solutions Manager based out of New York. He works closely with Financial Services customers to help them leverage cloud for businesses agility, innovation and resiliency. He has extensive experience leading large-scale cloud migration programs. Outside of work he enjoys spending time with family, tinkering with a new project or riding his bike.
 Ranjan Burman is a Sr. PostgreSQL Database Specialist SA. He specializes in RDS & Aurora PostgreSQL. He has more than 18 years of experience in different database and data warehousing technologies. He is passionate about automating and solving customer problems with the use of cloud solutions.
 Muthuvelan Swaminathan is an Enterprise Solutions Architect based out of New York. He works with enterprise customers providing architectural guidance in building resilient, cost-effective and innovative solutions that address business needs.