Post Syndicated from Matt Granger original https://www.youtube.com/watch?v=7V6IfQqrFIQ
Chinese Hacking of US Critical Infrastructure
Post Syndicated from Bruce Schneier original https://www.schneier.com/blog/archives/2023/05/chinese-hacking-of-us-critical-infrastructure.html
Everyone is writing about an interagency and international report on Chinese hacking of US critical infrastructure.
Lots of interesting details about how the group, called Volt Typhoon, accesses target networks and evades detection.
Widespread Exploitation of Zyxel Network Devices
Post Syndicated from Drew Burton original https://blog.rapid7.com/2023/05/31/etr-widespread-exploitation-of-zyxel-network-devices/

Rapid7 is tracking reports of ongoing exploitation of CVE-2023-28771, a critical unauthenticated command injection vulnerability affecting multiple Zyxel networking devices.
The vulnerability is present in the default configuration of vulnerable devices and is exploitable in the Wide Area Network (WAN) interface, which is intended to be exposed to the internet. A VPN does not need to be configured on a device for it to be vulnerable. Successful exploitation of CVE-2023-28771 allows an unauthenticated attacker to execute code remotely on the target system by sending a specially crafted IKEv2 packet to UDP port 500 on the device.
Zyxel released an advisory for CVE-2023-28771 on April 25, 2023. On May 19, Rapid7 researchers published a technical analysis of the vulnerability on AttackerKB, underscoring the likelihood of exploitation.
As of May 19, there were at least 42,000 instances of Zyxel devices on the public internet. However, as Rapid7 researchers noted, this number only includes devices that expose their web interfaces on the WAN, which is not a default setting. Since the vulnerability is in the VPN service, which is enabled by default on the WAN, we expect the actual number of exposed and vulnerable devices to be much higher.
As of May 26, the vulnerability is being widely exploited, and compromised Zyxel devices are being leveraged to conduct downstream attacks as part of a Mirai-based botnet. Mirai botnets are frequently used to conduct DDoS attacks.
While CVE-2023-28771 is currently garnering large-scale threat actor attention, Zyxel published an advisory for two additional vulnerabilities — CVE-2023-33009 and CVE-2023-33010 — on May 24, 2023. CVE-2023-33009 and CVE-2023-33010 are buffer overflow vulnerabilities that can allow unauthenticated attackers to cause a DoS condition or execute arbitrary code on affected devices.
We strongly recommend that users of the affected Zyxel products update to the latest firmware on an emergency basis. At time of writing, the latest firmware version is 5.36 Patch 2, or 4.73 Patch 2 for ZyWALL/USG. See Zyxel’s advisory for additional details.
Rapid7 Customers
For InsightVM and Nexpose customers, a remote vulnerability check for CVE-2023-28771 has been available since the May 19, 2023 content release.
Additional remote vulnerability checks for CVE-2023-33009 and CVE-2023-33010 are expected to ship in the May 31, 2023 content release.
Large-scale digital biomarker computation with AWS serverless services
Post Syndicated from Avni Patel original https://aws.amazon.com/blogs/architecture/large-scale-digital-biomarker-computation-with-aws-serverless-services/
Digital biomarkers are quantitative, objective measures of physiological and behavioral data. They are collected and measured using digital devices that better represent free-living activity in contrast to a highly structured in-clinic setting. This approach generates large amounts of data that requires processing.
Digital biomarker data is typically saved in different formats, and various sources require different (and often multiple) processing steps. In 2020, the Digital Sciences and Translational Imaging group at Pfizer developed a specialized pipeline using AWS services for analyzing incoming sensor data from wrist devices for sleep and scratch activity.
In time, the original pipeline needed updating to compute digital biomarkers at scale while maintaining reproducibility and data provenance. The key component in re-designing the pipeline is flexibility so the platform can:
- Handle various incoming data sources and different algorithms
- Handle distinct sets of algorithm parameters
These goals were accomplished with a framework for handling file analysis that uses a two-part approach:
- A Python package using a custom common architecture
- An AWS-based pipeline to handle processing mapping and computing distribution
This blog post introduces this custom Python package data processing pipeline using AWS services. The AWS architecture maintains data provenance while enabling fast, efficient, and scalable data processing. These large data sets would otherwise consume significant local resources.
Let’s explore each part of this framework in detail.
Custom Python package for data processing
Computation of digital biomarkers requires specific algorithms. Typically, these algorithms—for example, gait, activity, and more—had separate code repositories. Little thought was given to interaction and reproducibility.
Pfizer addressed this issue by creating the SciKit-Digital-Health Python package (SKDH) to implement these algorithms and data ingestion methods. As the SKDH framework is designed with reproducibility and integration in mind, modules can be chained together in a pipeline structure and run sequentially. Pipelines can be saved and loaded later; a key feature in enabling dynamic pipeline selection and reproducibility.
AWS framework for file analysis
While SKDH is the core that computes the digital biomarkers, it requires an operational framework for handling all the data files. To that end, Pfizer and AWS designed the following architecture to handle file analysis on a study-by-study basis, as shown in Figure 1:

Figure 1. Digital biomarker catalog and file processing workflow
The overall platform can be broken into two components: the Catalog and File Processing AWS Step Functions workflows. Let’s explore each of these components, along with the necessary configuration file to process a study.
Catalog Step Functions workflow
The Catalog workflow searches study Amazon Simple Storage Service (Amazon S3) buckets for files that need processing. These files are defined in a study configuration document. The workflow consists of the following steps:
- The Catalog Step Function is manually triggered.
- If the study configuration file is found and the S3 Study buckets specified in the configuration file exist, search the S3 Study buckets for any files matching those enumerated in the study configuration file.
- If the configuration file or S3 Study bucket are not found, send a message to an Amazon Simple Queue Service (Amazon SQS) queue.
- For any cataloged files, start a new Processing workflow for each of these files.
File processing Step Functions workflow
The Processing workflow verifies processing requirements and processes both study data files and metadata files through the following steps:
- From the study configuration file, the workflow gets relevant details for the file. This includes metadata processing requirements as needed, and the specified set of SKDH algorithms to run.
- If the file contains metadata, a special AWS Lambda function cleans the data and saves it to the metadata Amazon DynamoDB table. Otherwise, check whether all requirements are met, including processing requirements (for example, height for gait algorithms) and logistics requirements (for example, file name information extraction functions).
- For missing requirements, the workflow will send a message to an Amazon SQS queue and try waiting for them to be met.
- If all requirements are met, it will start a batch job for the file.
- The batch job runs on AWS Fargate with a custom Docker image with a specified version of SKDH. This allows for easy versioning and reproducibility.
- The Docker image loads the specified SKDH pipeline and computes the digital biomarkers. Any results generated are then uploaded back to the S3 Study bucket at the end of processing.
Study configuration file
The configuration file defines everything necessary for processing a study. This includes which S3 bucket(s) the study data is located in, under which prefixes, and the list of file patterns of files to be processed. Figure 2 offers a sample configuration file example:
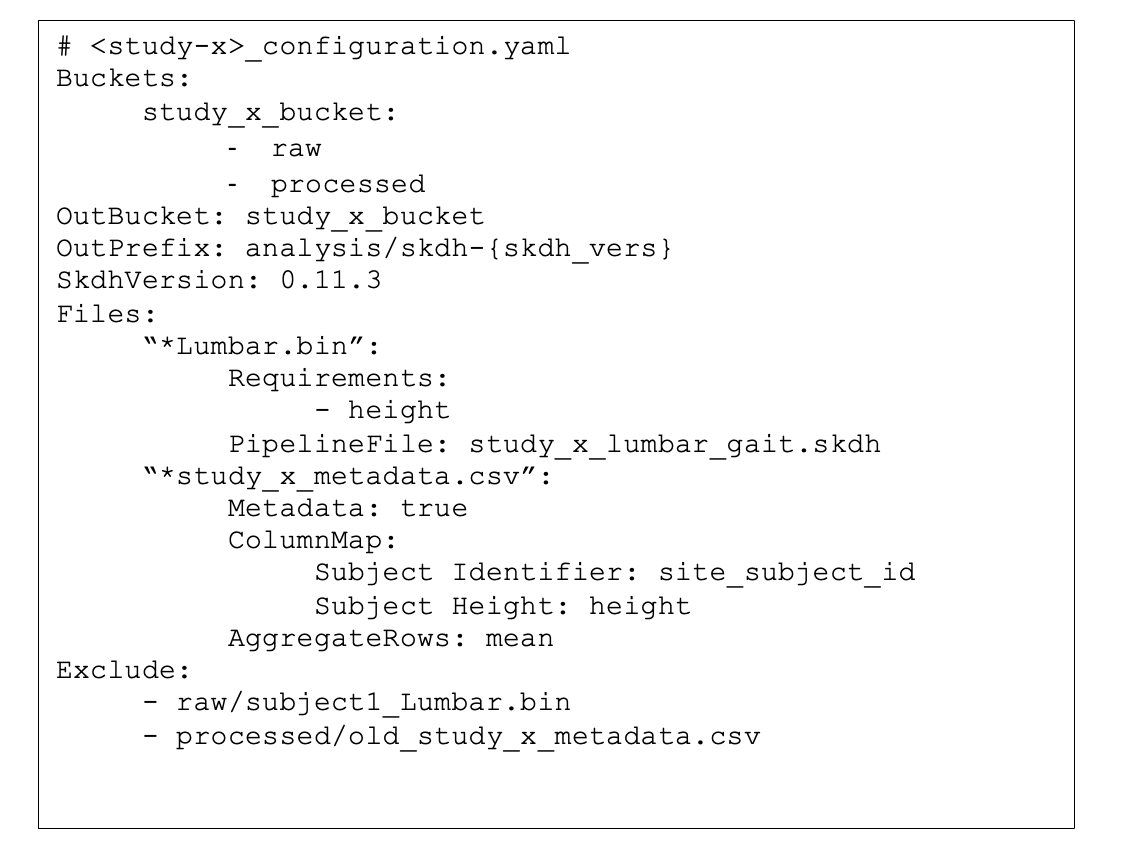
Figure 2. Sample study configuration file
Building a stack with AWS CloudFormation
AWS CloudFormation provisions and configures all of the resources for the pipeline, allowing AWS services to be easily added and removed. CloudFormation integration with Github makes it easy to keep track of service changes. AWS Step Functions can also be integrated into CloudFormation template files, which gives an AWS specification in essentially one master file.
To iterate and update the stack, a combination of Python, Amazon SDK for Python (Boto3), and AWS Command Line Interface (AWS CLI) tools are used. Python allows for a more intricate command line script with positional and keyword arguments depending on the process. For example, updating the pipeline is a simple command, where <env> is the dev/stage/prod environment that needs to be updated:

Figure 3. Updating the pipeline with a simple command
Meanwhile, the Python function would be something like the following:

Figure 4. Sample Python function
While it might seem unconventional to use both SDK for Python and a call to the AWS CLI from Python in the same script, the AWS CLI has some useful features that make the CloudFormation packaging and stack creation much easier. The end of the example file in Figure 3 pertains to the main utility in using the Python argparse package, which provides an easy to write user-friendly CLI.
This could also be achieved using AWS Cloud Development Kit (AWS CDK), an open source software development framework that allows you to define infrastucture in familiar programming languages. AWS CDK uses constructs that can be customized and reused.
Conclusion
This blog post shared a custom data processing pipeline using AWS services that, through intentional integration with a Python package, can run arbitrary algorithms to process data. By using AWS as the framework for this pipeline, data provenance is maintained while enabling fast, efficient, and scalable processing of large amounts of data that would typically consume significant company resources.
Managing data confidentiality for Scope 3 emissions using AWS Clean Rooms
Post Syndicated from Sundeep Ramachandran original https://aws.amazon.com/blogs/architecture/managing-data-confidentiality-for-scope-3-emissions-using-aws-clean-rooms/
Scope 3 emissions are indirect greenhouse gas emissions that are a result of a company’s activities, but occur outside the company’s direct control or ownership. Measuring these emissions requires collecting data from a wide range of external sources, like raw material suppliers, transportation providers, and other third parties. One of the main challenges with Scope 3 data collection is ensuring data confidentiality when sharing proprietary information between third-party suppliers. Organizations are hesitant to share information that could potentially be used by competitors. This can make it difficult for companies to accurately measure and report on their Scope 3 emissions. And the result is that it limits their ability to manage climate-related impacts and risks.
In this blog, we show how to use AWS Clean Rooms to share Scope 3 emissions data between a reporting company and two of their value chain partners (a raw material purchased goods supplier and a transportation provider). Data confidentially requirements are specified by each organization before participating in the data AWS Clean Rooms collaboration (see Figure 1).
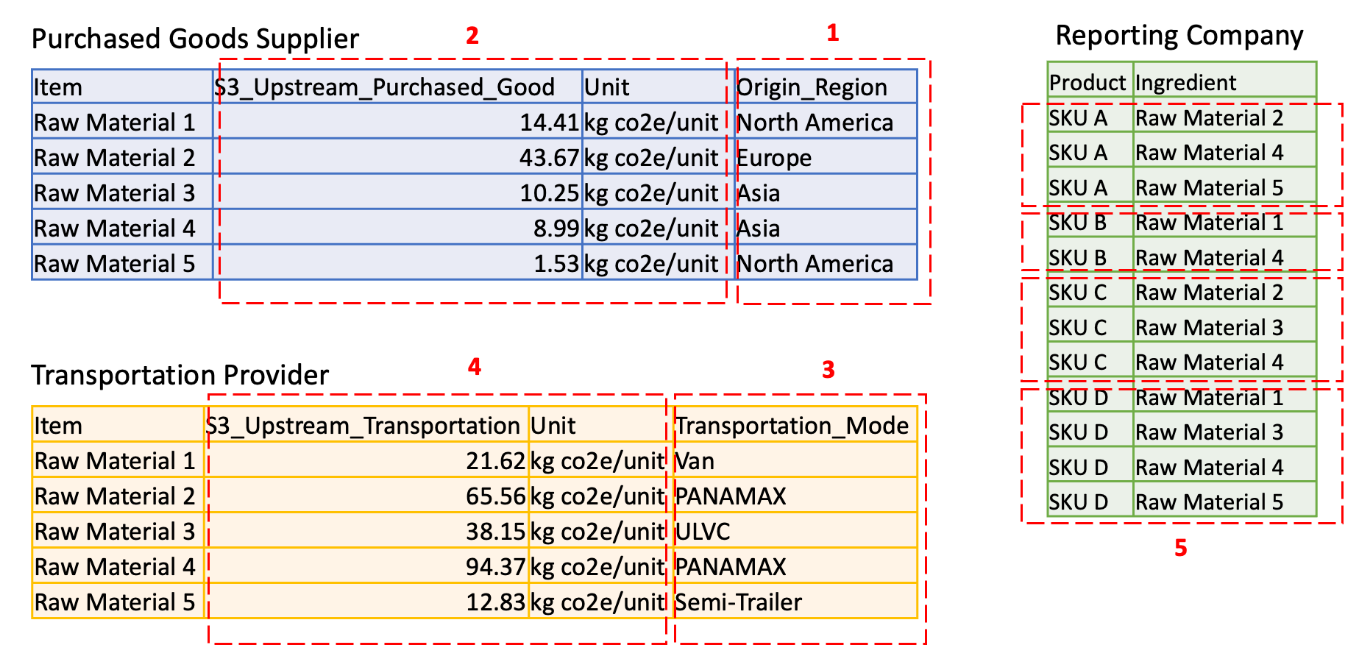
Figure 1. Data confidentiality requirements of reporting company and value chain partners
Each account has confidential data described as follows:
- Column 1 lists the raw material Region of origin. This is business confidential information for supplier.
- Column 2 lists the emission factors at the raw material level. This is sensitive information for the supplier.
- Column 3 lists the mode of transportation. This is business confidential information for the transportation provider.
- Column 4 lists the emissions in transporting individual items. This is sensitive information for the transportation provider.
- Rows in column 5 list the product recipe at the ingredient level. This is trade secret information for the reporting company.
Overview of solution
In this architecture, AWS Clean Rooms is used to analyze and collaborate on emission datasets without sharing, moving, or revealing underlying data to collaborators (shown in Figure 2).
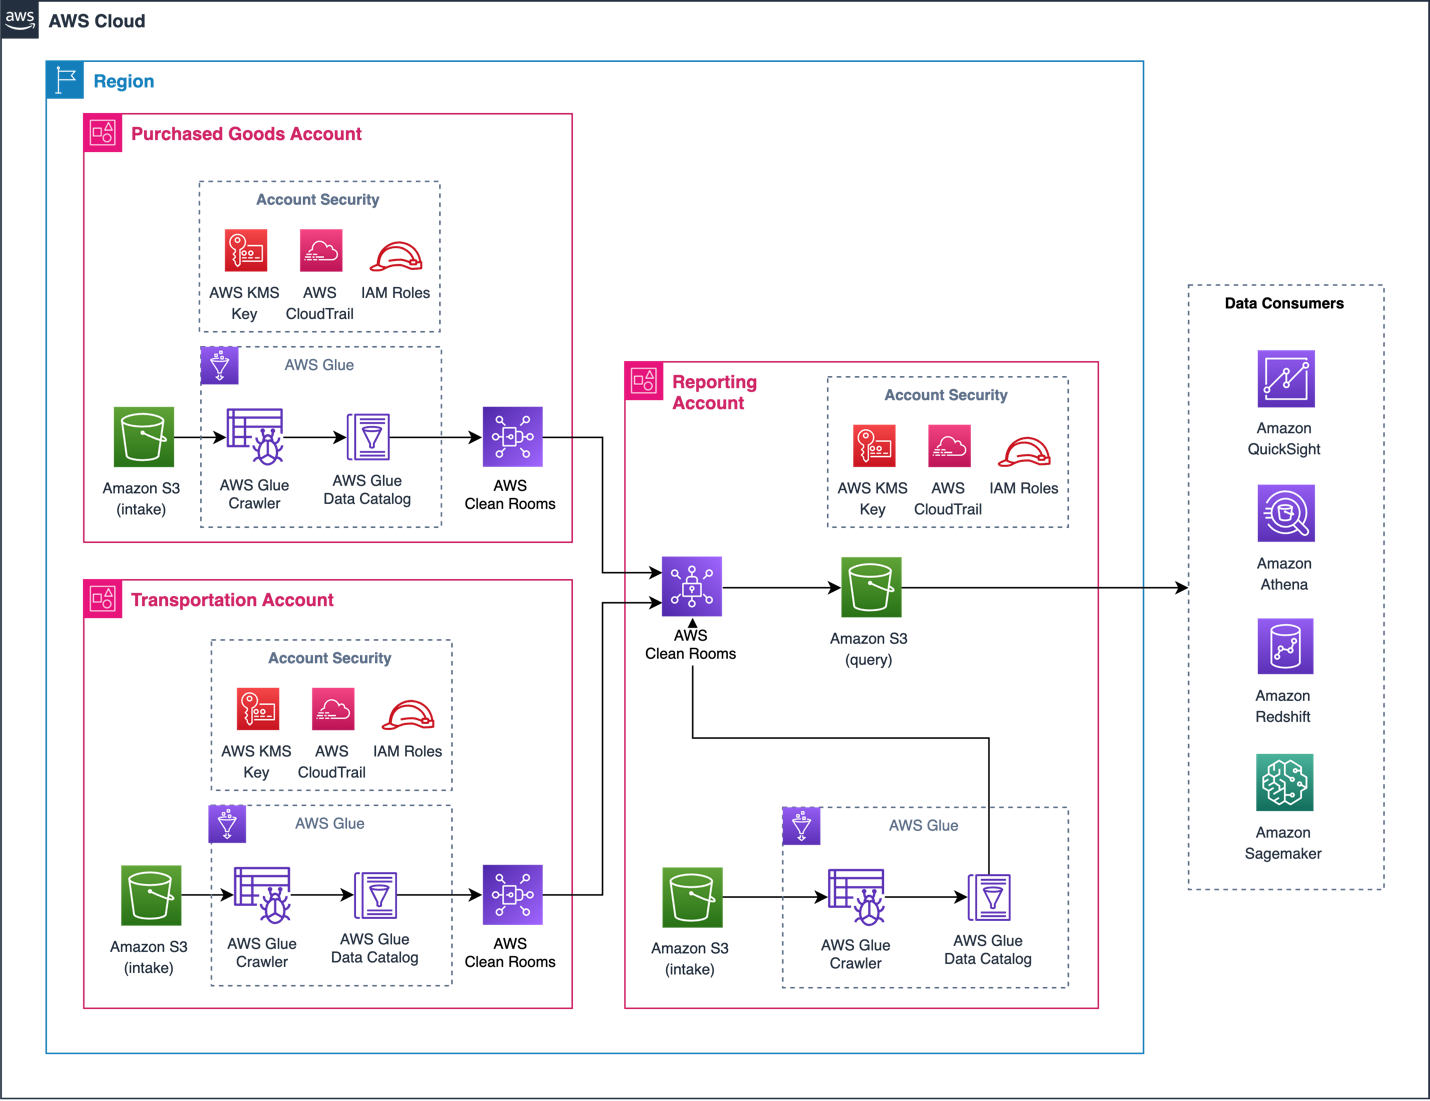
Figure 2. Architecture for AWS Clean Rooms Scope 3 collaboration
Three AWS accounts are used to demonstrate this approach. The Reporting Account creates a collaboration in AWS Clean Rooms and invites the Purchased Goods Account and Transportation Account to join as members. All accounts can protect their underlying data with privacy-enhancing controls to contribute data directly from Amazon Simple Storage Service (S3) using AWS Glue tables.
The Purchased Goods Account includes users who can update the purchased goods bucket. Similarly, the Transportation Account has users who can update the transportation bucket. The Reporting Account can run SQL queries on the configured tables. AWS Clean Rooms only returns results complying with the analysis rules set by all participating accounts.
Prerequisites
For this walkthrough, you should have the following prerequisites:
- Three AWS accounts in the same AWS Region
- An Amazon S3 bucket in each account with emissions data (see Figure 1)
- An AWS Glue Data Catalog for the emissions data stored in each S3 bucket
Although Amazon S3 and AWS Clean Rooms are free-tier eligible, a low fee applies to AWS Glue. Clean-up actions are provided later in this blog post to minimize costs.
Configuration
We configured the S3 buckets for each AWS account as follows:
- Reporting Account: reportingcompany.csv
- Purchased Goods Account: purchasedgood.csv
- Transportation Account: transportation.csv
Create an AWS Glue Data Catalog for each S3 data source following the method in the Glue Data Catalog Developer Guide. The AWS Glue tables should match the schema detailed previously in Figure 1, for each respective account (see Figure 3).
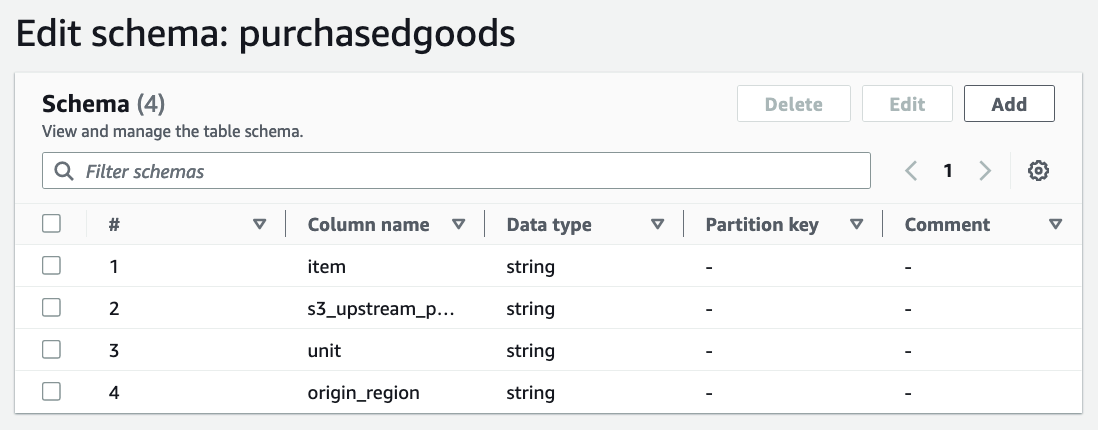
Figure 3. Configured AWS Glue table for ‘Purchased Goods’
Data consumers can be configured to ingest, analyze, and visualize queries (refer back to Figure 2). We will tag the Reporting Account Glue Database as “reporting-db” and the Glue Table as “reporting.” Likewise, the Purchased Goods Account will have “purchase-db” and “purchase” tags.
Security
Additional actions are recommended to secure each account in a production environment. To configure encryption, review the Further Reading section at the end of this post, AWS Identity and Access Management (IAM) roles, and Amazon CloudWatch.
Walkthrough
This walkthrough consists of four steps:
- The Reporting Account creates the AWS Clean Rooms collaboration and invites the Purchased Goods Account and Transportation Account to share data.
- The Purchased Goods Account and Transportation Account accepts this invitation.
- Rules are applied for each collaboration account restricting how data is shared between AWS Clean Rooms collaboration accounts.
- The SQL query is created and run in the Reporting Account.
1. Create the AWS Clean Rooms collaboration in the Reporting Account
(The steps covered in this section require you to be logged into the Reporting Account.)
- Navigate to the AWS Clean Rooms console and click Create collaboration.
- In the Details section, type “Scope 3 Clean Room Collaboration” in the Name field.
- Scroll to the Member 1 section. Enter “Reporting Account” in the Member display name field.
- In Member 2 section, enter “Purchased Goods Account” for your first collaboration member name, with their account number in the Member AWS account ID box.
- Click Add another member and add “Transportation Account” as the third collaborator with their AWS account number.
- Choose the “Reporting Account” as the Member who can query and receive result in the Member abilities section. Click Next.
- Select Yes, join by creating membership now. Click Next.
- Verify the collaboration settings on the Review and Create page, then select Create and join collaboration and create membership.
Both accounts will then receive an invitation to accept the collaboration (see Figure 4). The console reveals each member status as “Invited” until accepted. Next, we will show how the invited members apply query restrictions on their data.
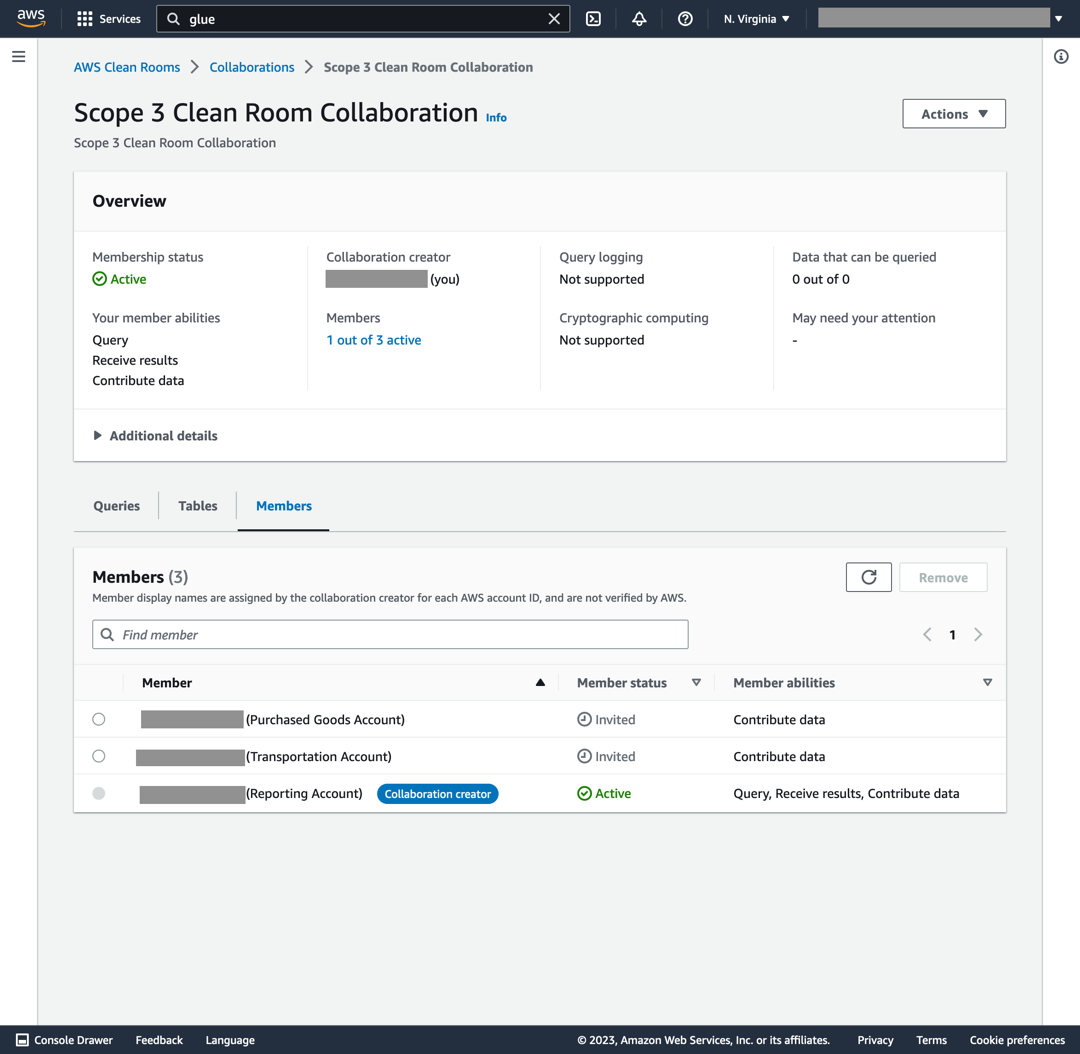
Figure 4. New collaboration created in AWS Clean Rooms
2. Accept invitations and configure table collaboration rules
Steps in this section are applied to the Purchased Goods Account and Transportation Account following collaboration environment setup. For brevity, we will demonstrate steps using the Purchased Goods Account. Differences for the Transportation Account are noted.
- Log in to the AWS account owning the Purchased Goods Account and accept the collaboration invitation.
- Open the AWS Clean Rooms console and select Collaborations on the left-hand navigation pane, then click Available to join.
- You will see an invitation from the Scope 3 Clean Room Collaboration. Click on Scope 3 Clean Room Collaboration and then Create membership.
- Select Tables, then Associate table. Click Configure new table.
The next action is to associate the Glue table created from the purchasedgoods.csv file. This sequence restricts access to the origin_region column (transportation_mode for the Transportation Account table) in the collaboration.
- In the Scope 3 Clean Room Collaboration, select Configured tables in the left-hand pane, then Configure new table. Select the AWS Glue table associated with purchasedgoods.csv (shown in Figure 5).
- Select the AWS Glue Database (purchase-db) and AWS Glue Table (purchase).
- Verify the correct table section by toggling View schema from the AWS Glue slider bar.
- In the Columns allowed in collaboration section, select all fields except for origin_region. This action prevents the origin_region column being accessed and viewed in the collaboration.
- Complete this step by selecting Configure new table.
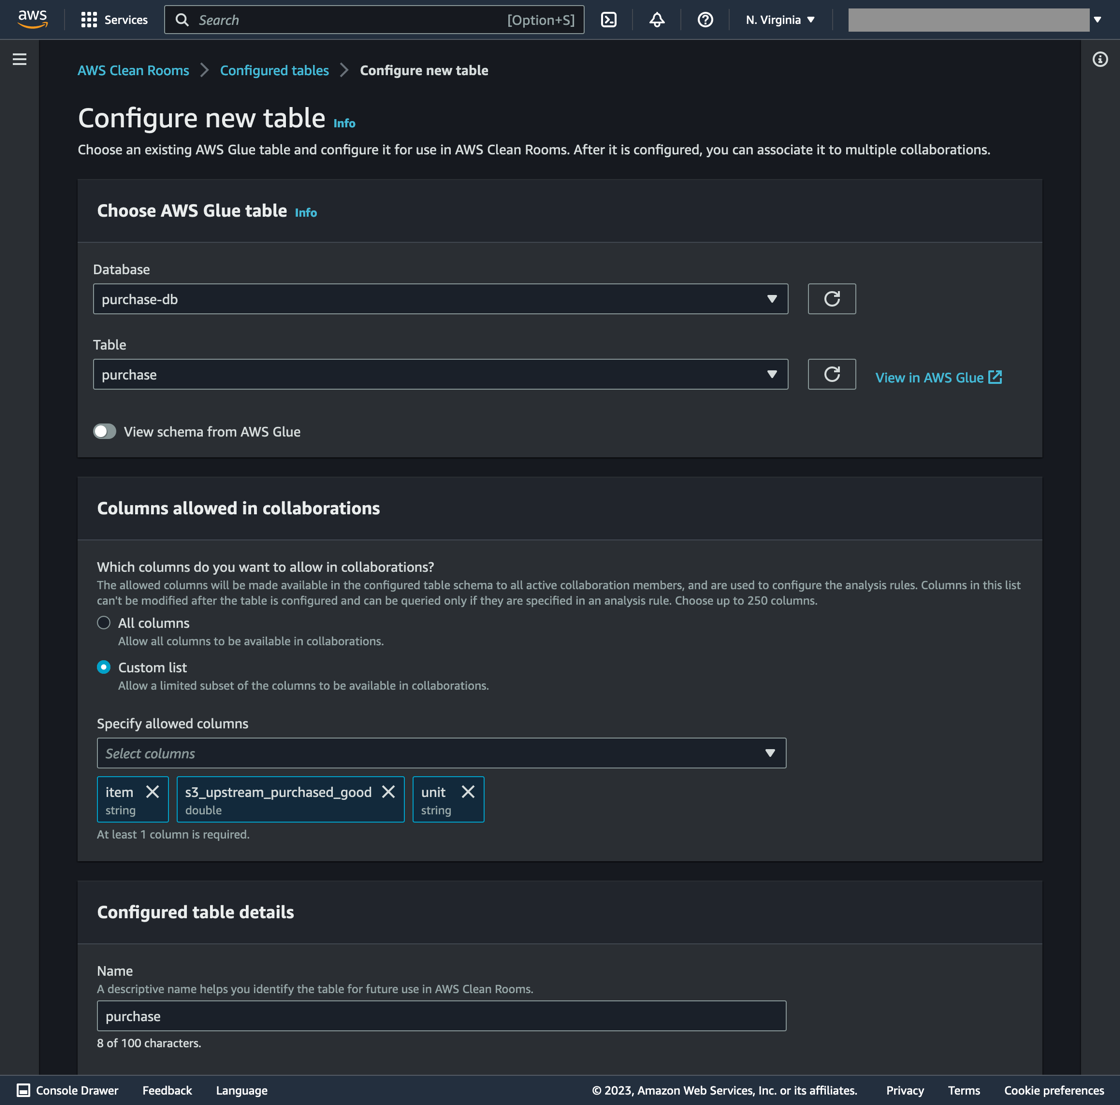
Figure 5. Purchased Goods account table configuration
- Select Configure analysis rule (see Figure 6).
- Select Aggregation type then Next.
- Select SUM as the Aggregate function and s3_upstream_purchased_good for the column.
- Under Join controls, select Specify Join column. Select “item” from the list of options. This permits SQL join queries to execute on the “item” column. Click Next.
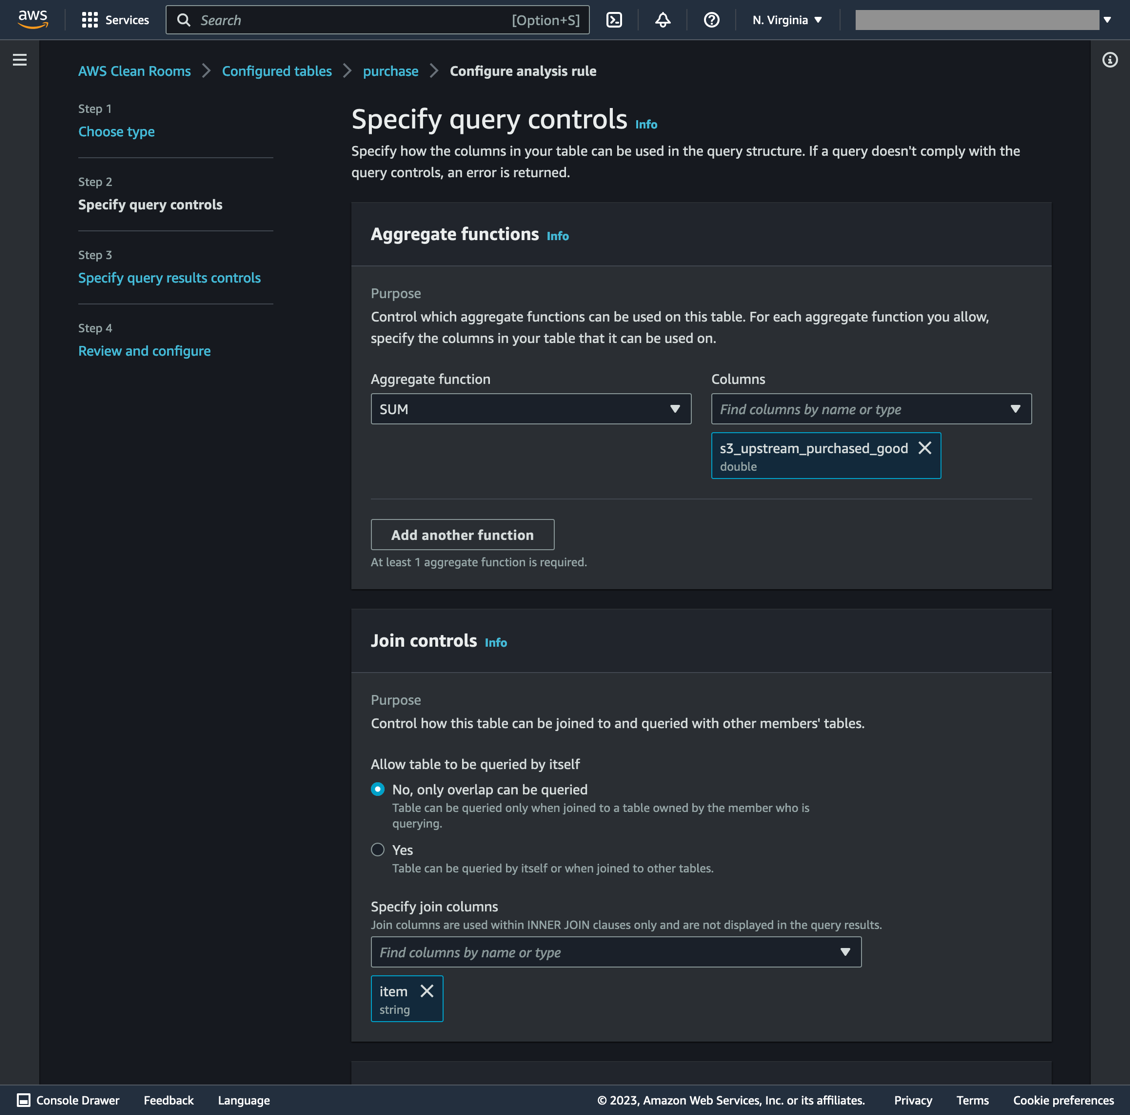
Figure 6. Table rules for the Purchased Goods account
- The next page specifies the minimum number of unique rows to aggregate for the “join” command. Select “item” for Column name and “2” for the Minimum number of distinct values. Click Next.
- To confirm the table configuration query rules, click Configure analysis rule.
- The final step is to click Associate to collaboration and select Scope 3 Clean Room Collaboration in the pulldown menu. Select Associate table after page refresh.
The procedure in this section is repeated for the Transportation Account, with the following exceptions:
- The columns shared in this collaboration are item, s3_upstream_transportation, and unit.
- The Aggregation function is a SUM applied on the s3_upstream_transportation column.
- The item column has an Aggregation constraint minimum of two distinct values.
3. Configure table collaboration rules inside the Reporting Account
At this stage, member account tables are created and shared in the collaboration. The next step is to configure the Reporting Account tables in the Reporting Account’s AWS account.
- Navigate to AWS Clean Rooms. Select Configured tables, then Configure new table.
- Select the Glue database and table associated with the file reportingcompany.csv.
- Under Columns allowed in collaboration, select All columns, then Configure new table.
- Configure collaboration rules by clicking Configure analysis rule using the Guided workflow.
- Select Aggregation type, then Next.
- Select SUM as the Aggregate function and ingredient for the column (see Figure 7).
- Only SQL join queries can be executed on the ingredient column by selecting it in the Specify join columns section.
- In the Dimension controls, select product. This option permits grouping by product name in the SQL query. Select Next.
- Select None in the Scalar functions section. Click Next. Read more about scalar functions in the AWS Clean Rooms User Guide.
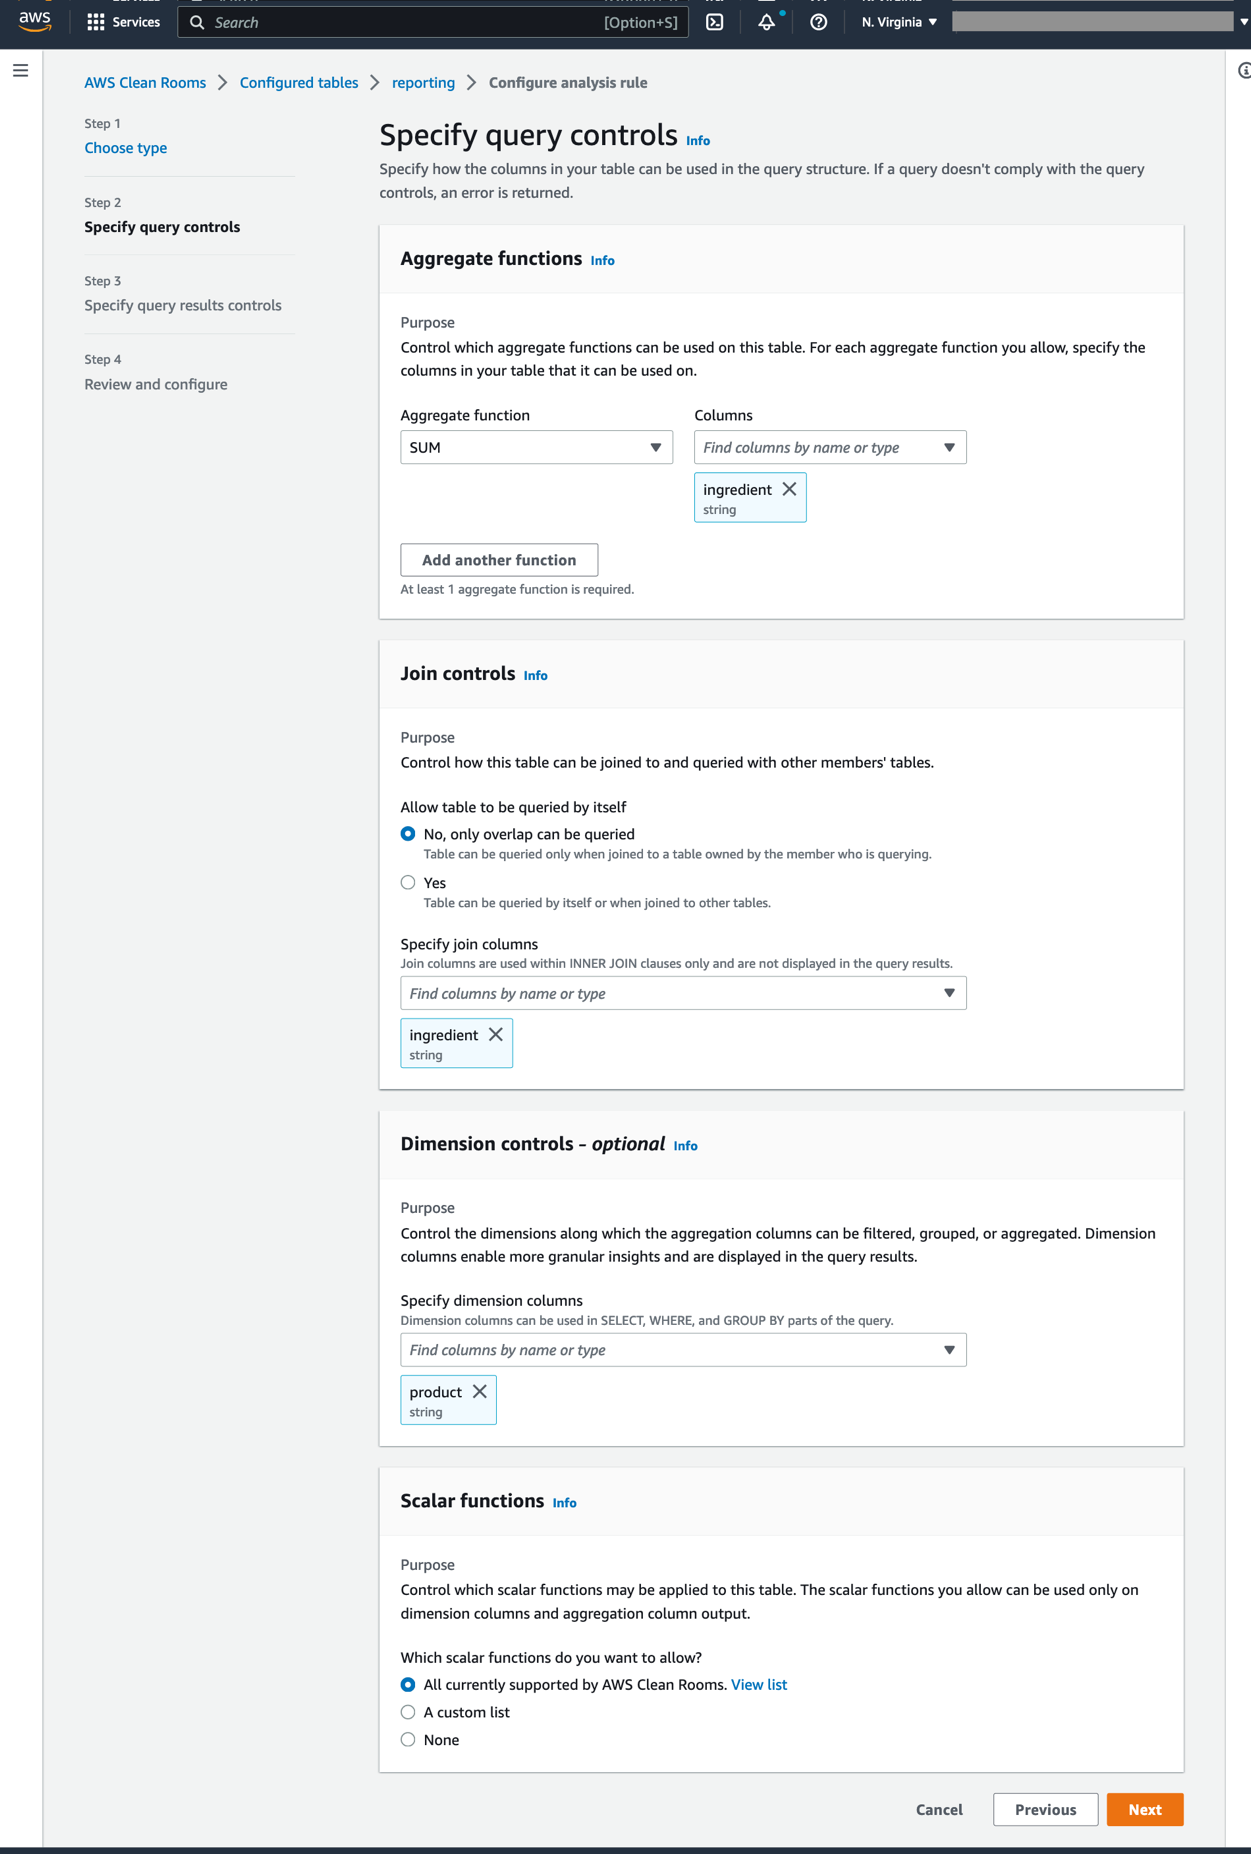
Figure 7. Table rules for the Reporting account
- On the next page, select ingredient for Column name and 2 for the Minimum number of distinct values. Click Next. To confirm query control submission, select Configure analysis rule on the next page.
- Validate the setting in the Review and Configure window, then select Next.
- Inside the Configured tables tab, select Associate to collaboration. Assign the table to the Scope 3 Clean Rooms Collaboration.
- Select the Scope 3 Clean Room Collaboration in the dropdown menu. Select Choose collaboration.
On the Scope 3 Clean Room Collaboration page, select reporting, then Associate table.
4. Create and run the SQL query
Queries can now be run inside the Reporting Account (shown in Figure 8).

Figure 8. Query results in the Clean Rooms Reporting Account
- Select an S3 destination to output the query results. Select Action, then Set results settings.
- Enter the S3 bucket name, then click Save changes.
- Paste this SQL snippet inside the query text editor (see Figure 8):
SELECT
r.product AS “Product”,
SUM(p.s3_upstream_purchased_good) AS “Scope_3_Purchased_Goods_Emissions”,
SUM(t.s3_upstream_transportation) AS “Scope_3_Transportation_Emissions”
FROM
reporting r
INNER JOIN purchase p ON r.ingredient = p.item
INNER JOIN transportation t ON p.item = t.item
GROUP BY
r.product
- Click Run query. The query results should appear after a few minutes on the initial query, but will take less time for subsequent queries.
Conclusion
This example shows how Clean Rooms can aggregate data across collaborators to produce total Scope 3 emissions for each product from purchased goods and transportation. This query was performed between three organizations without revealing underlying emission factors or proprietary product recipe to one another. This alleviates data confidentially concerns and improves sustainability reporting transparency.
Clean Up
The following steps are taken to clean up all resources created in this walkthrough:
- Member and Collaboration Accounts:
- AWS Clean Rooms: Disassociate and delete collaboration tables
- AWS Clean Rooms: Remove member account in the collaboration
- AWS Glue: Delete the crawler, database, and tables
- AWS IAM: Delete the AWS Clean Rooms service policy
- Amazon S3: Delete the CSV file storage buckets
·
- Collaboration Account only:
-
- Amazon S3: delete the SQL query bucket
- AWS Clean Rooms: delete the Scope 3 Clean Room Collaboration
Further Reading:
- Greenhouse Gas Protocol Scope 3 Standard
- AWS Clean Rooms
- AWS Clean Rooms User Guide
- Getting started with the AWS Glue Data Catalog
- Analyzing Data in S3 using Amazon Athena
Security Practices
- AWS Clean Rooms security practices
- Create IAM Roles to enforce S3 and Clean Rooms access policies through least privilege permissions
- Apply encryption rules on S3 buckets with key rotation
- Use CloudTrail to record AWS Clean Rooms API calls
- Encrypt Glue tables using KMS keys
Home Assistant 2023.6 Release Party
Post Syndicated from Home Assistant original https://www.youtube.com/watch?v=C1eLZLtvc_k
Comic for 2023.05.31 – Voodoo Doll
Post Syndicated from Explosm.net original https://explosm.net/comics/voodoo-doll
New Cyanide and Happiness Comic
Sinking of SMS Grosser Kurfürst, 1878
Post Syndicated from The History Guy: History Deserves to Be Remembered original https://www.youtube.com/watch?v=aaAB_EGBt6c
Security updates for Wednesday
Post Syndicated from original https://lwn.net/Articles/933360/
Security updates have been issued by Debian (connman and kamailio), Fedora (texlive-base), Mageia (cups-filters, postgresql, qtbase5, tcpreplay, tomcat, and vim), Slackware (openssl), SUSE (amazon-ssm-agent, cni, cni-plugins, compat-openssl098, installation-images, libaom, openssl, openssl-1_0_0, openssl-1_1, terraform, terraform-provider-helm, tiff, tomcat, and wireshark), and Ubuntu (batik, flask, linux-oem-5.17, linux-oem-6.0, linux-oem-6.1, linux-oracle, linux-oracle-5.4, mozjs102, nanopb, openssl, openssl1.0, snapd, and texlive-bin).
Моето „Времеубежище“
Post Syndicated from Светла Енчева original https://www.toest.bg/moeto-vremeubezhishte/

Късно вечерта на 23 май 2023 г. романът на Георги Господинов „Времеубежище“ (в превод на английски от Анджела Родел) спечели престижната награда Booker International. Едва ли има читатели на настоящата статия, които не са запознати с този факт. За романа вече много се е писало и със сигурност тепърва ще се пише. Какво бих могла да добавя?
Не искам да влизам във възникналия спор дали отличието е само за автора и преводачката, или за цяла България – и двете страни в него си имат своите сериозни основания. Давам си сметка обаче, че преживявам наградата, сякаш по някакъв начин тя е и лично за мен. Едва ли съм единствената, която се чувства така. Ето защо този път ще си позволя по-личен текст от обикновено. Защото какъв е смисълът на художествената литература, ако тя не докосва човека, а се ограничава само в професионалните анализи?
На най-горния рафт, до Мишел Турние
Започнах да чета системно книгите на Георги Господинов сравнително късно – едва преди няколко години. След като „Физика на тъгата“ ми влезе дълбоко под кожата, се опитах да се снабдя с всичко от Господинов, налично в книжарниците. Дори за един празник бях разпределила кой от близките ми кои негови книги да ми подари. Но „Времеубежище“ ме „засмука“ така, както не бях очаквала. В библиотеката на душата ми романът се нареди на най-горния рафт, до „Горски цар“ и „Метеорите“ на Мишел Турние, които в по-ранни периоди от живота ми са имали сходно засмукващо въздействие върху мен.
Между тези романи на Турние и „Времеубежище“ впрочем има сходни елементи. В тях става дума за истории на индивидуално равнище, които на следващ етап експанзират и обхващат обществените процеси. В книгата на Господинов обаче липсва метафизичният елемент на експанзирането, характерен за френския писател. Както Турние, така и Господинов прави сериозни проучвания на реални социално-исторически процеси, контексти, събития, така че литературният текст придобива фактологическа плътност. В предишни книги на Георги Господинов срещаме и Гаустин, и Ема, а главният герой – разказвач на романите, узрява заедно с тях. Абел Тифож, протагонистът в „Горски цар“, пък се появява в една-единствена, но ключова сцена от „Метеорите“.
Постепенно приближаване на световете
За разлика от Турние обаче, с Георги Господинов сме от България, освен това и двамата сме от т.нар. поколение Х, което идва след бейбибумърите. И двамата сме били деца по време на социализма и сме се учили да се справяме като големи през 90-те. Макар „Естествен роман“ да ми харесва и макар той да изразява духа на 90-те, не се припознавам в него толкова, колкото във „Физика на тъгата“ и особено във „Времеубежище“. Човек може да живее на една географска територия с някого, но двамата да обитават различни светове и да се движат по паралелни траектории.
Ала изглежда, с годините моят свят и този на Господинов (когото лично познавам твърде бегло, за да мога изобщо да кажа, че го познавам) са се приближили дотолкова, че във „Времеубежище“ разпознавам своя свят. Чувствам се споделена, защото виждам, че моят свят не е само мой. В по-предишното изречение първоначално по погрешка написах „своя страх“ вместо „своя свят“. Грешката е вярна, защото не става дума за свят само в смисъла на общество, или ако щете, на социален „балон“. Нито просто за това, че с автора ходим по едни и същи протести. А и за вътрешния ми свят – заедно с най-дълбоките му страхове.
Остаряването, смъртта, деменцията
Моето поколение остарява, остарявам и аз, колкото и да не ми се ще да го вярвам. Една талантлива журналистка, чиято работа следя (тук и тук) с интерес и надежда за бъдещето, напоследък стана на „цели“ 22 години, а съзнанието ми трудно приема как е възможно това и на колко повече години съм аз. Хората от моето поколение сме на възраст, на която на човек още му е трудно да свикне с мисълта, че по-голямата половина от живота по всяка вероятност е минала, младите ни смятат за хора на средна възраст и както е тръгнало, май-май в следващите няколко десетилетия ще се мре.
Ако нещо ме ужасява повече и от смъртта, това е деменцията. Преди няколко години участвах в социологическо изследване на близки на хора с деменция. Там научих, че вероятността човек да развие деменция е една четвърт. Една от участничките каза: „Ако не си умреш от рака, ще си умреш от алцхаймера. Има и инфаркт, но той е за щастливците.“ Това се загнезди в съзнанието ми и си остана там. „Времеубежище“ разчовърква най-големия ми страх. На моменти четенето на романа ми причинява буквално физическа болка. Особено когато разказвачът и главен герой забрави името не на кого да е, а на бившата си жена Ема – същата Ема от „Естествен роман“. Почувствах се, сякаш на мен се е случило. И в същото време бях благодарна, че страховете ми са споделени и изговорени в литературно произведение.
Що е то времеубежищен кич?
Ако не сте срещали този израз, то е, защото аз си го измислих – за да назовавам с него (в ума си, а понякога и във Facebook) две неща, които уж са различни, но всъщност не съвсем. Соцносталгията и възрожденско-патриотарският патос не просто не са ми по вкуса, а ги смятам и за опасни. Защото се опитват да подменят настоящето ни, че и възможните идеи за бъдещето с някакви идеализирани представи за миналото. И посредством това се опитват да ни набутат в свят, в който всъщност никога не сме били, но си мислим, че именно този свят е автентичният, а настоящето е ерзац. Точно това наричам „времеубежищен кич“, защото на референдума във „Времеубежище“ България гласува да се върне паралелно в две епохи – времето на националноосвободителните борби през XIX век и социализма.
За кич говорим, когато някакво произведение се опитва да имитира нещо автентично или високото изкуство. Но пък се харесва на масовия вкус. Кичът може да си има и ценни страни. Впрочем Александър, любимият ми герой от „Метеорите“ на Турние, е обсебен от събирачеството на копия на автентични предмети и копия на копията. Да не говорим, че жанрове в изкуството като попарта (а защо не и като сюрреализма) се заиграват точно с кича и го издигат до равнището на високото изкуство. Но когато става дума за подмяна на исторически периоди с цел политическата им експлоатация, кичът престава да е невинен.
Примери за времеубежищен кич: възстановки на Априлското въстание; мъжки хора̀ на Йордановден; рипане на хора̀ пред Народния театър и пред Кьолнската катедрала; ученици преписват „История славянобългарска“; водещи на национална телевизия рецитират с апломб „Върви, народе възродени“; на великденски концерт по друга национална телевизия естрадни звезди от времето на социализма пеят на фона на балет от пионерчета с минижупи; докато „Времеубежище“ получава световна награда, българското Министерство на културата награждава агент на Държавна сигурност и член на Политбюро (изпълнителния орган на БКП по времето на социализма, който всъщност управлява държавата). Може да продължите списъка сами.
Натъкванията на „Времеубежище“
Иронизирането на соцносталгията и патриотарщината във „Времеубежище“ ми помага да понасям по-леко социално-политическия живот в България и процесите в други държави, но „попадам“ на книгата и на много други места. Понякога – съвсем неочаквани. И то без да имам предвид моя добър италиански приятел Марко. След като стана онлайн свидетел на възторга ми от романа, той ми прати снимка на електронната си книга, на чийто екран се виждаше корицата на „Времеубежище“. Беше си го купил. На италиански.
Други срещи обаче имам предвид. Може би е по-точно да кажа „натъквания“. Например гледам Alabama Song в изпълнение на Дейвид Боуи с прекрасната Гейл Ан Дорси в Берлин. Боуи и Берлин си имат история. И си спомням нещо, което научих от Георги Господинов, тъй като той нееднократно е казвал и писал, включително във „Времеубежище“ – тази песен всъщност не е на The Doors, а на Курт Вайл, а оригиналният текст на немски е на Бертолт Брехт. Замислям се, че изпълнението на Боуи всъщност повече се доближава до оригинала от това на Джим Морисън. По-берлинско е. Берлин е любимият ми град. И градът, в който Господинов е писал романа. За разлика от изпълненията на Alabama Song на Морисън и Лоте Леня (съпругата на Курт Вайл), това на Боуи не е част от плейлиста на „Времеубежище“, предоставен от Господинов на „Букър“. Но пък знаковата му песен Space Oddity е в плейлиста на автора.
Друго неочаквано натъкване имах съвсем наскоро. 24 май премина под знака на наградата на Господинов и Родел и завърши със… смъртта на Тина Търнър. Тина е починала в околностите на Цюрих, където е живяла от средата на 90-те със съпруга си германец. Веднага се сетих за „Времеубежище“:
Освен за живите, Швейцария е и раят за умиращите. Няколко години подред Цюрих е неизменно вторият най-добър град за живеене в света. Вероятно е първият най-добър за умиране, цяло чудо е, че не се правят такива класации, поне не официално. Най-добри градове за умиране.
Гледам документалния филм на HBO за Тина Търнър. Час и 41 минути след началото му се вижда изгледът от къщата на певицата. Като изваден от описанието в романа:
Цюрих е град за остаряване. Светът се е забавил, реката на живота се е утаила в езеро, бавно, спокойно на повърхността, луксът на скуката и слънце на хълма за старите кокали. Времето в цялата му относителност. Никак не е случайно, че две открития на ХХ век, свързани тъкмо с времето, са се случили именно тук, в Швейцария – теорията на относителността на Айнщайн и „Вълшебната планина“ на Томас Ман.
Малко по-нататък във „Времеубежище“ се разказва за швейцарските организации, предлагащи луксозна смърт срещу заплащане – асистирано самоубийство (евтаназия). Задавам си въпроса дали Тина се е възползвала от услугите на някоя. След кратко търсене установявам, че отговорът е и да, и не. Официалната информация, в която нямам основания да се съмнявам, е, че е починала от естествена смърт. Но в Швейцария тя е научила за съществуването на тези организации и дори се е била записала в една от тях. Макар и не в същата, която описва Господинов.
Пророчески роман ли е „Времеубежище“?
На фона на социално-политическото развитие в България, а и в Европа, доста хора наричат „Времеубежище“ пророчески роман. Мога да разбера защо го правят, но самата аз се въздържам от подобни квалификации. Защото човек може да ги приеме буквално и така да нареди Георги Господинов до Ванга. И до чудотворните икони и мощи на светци (от тези на Йоан Кръстител не знам вече колко скелета могат да се сглобят). След високото признание за романа е плашещо лесно той да бъде „канонизиран“ по такъв начин, че да се окаже натикан в калъпа на тази антиутопия, за чийто възход предупреждава. А на автора да му се наложи да разширява пукнатините на канона отвътре, а не отвън.
Не, „Времеубежище“ не е пророчески роман. Просто е по рядко срещан начин социално (и човешки) адекватен. Или поне адекватен на начина, по който много хора, между които и аз, възприемат света си. Включително и много далече от България.
Затова и приемам международния „Букър“ за романа лично. Тази награда носи признание и публична легитимност на светоусещането ми. Дава ми да разбера, че не съм просто една неконформистка, която упорито се опитва да разбива стени с глава, но всъщност се рее като свободен електрон. Или поне има възможен свят, в който не съм само това. С популяризирането на романа този свят се разширява и ставаме все повече. Защото книгите не просто описват, а и променят света. Аз сме. Но това беше от друга книга…
This is the 4-node Dual CPU Compute Blade HPE Cray EX420
Post Syndicated from Cliff Robinson original https://www.servethehome.com/this-is-the-4-node-dual-intel-xeon-blade-hpe-cray-ex420-amd/
At ISC 2023 we saw a HPE Cray EX420. Labeled as an Intel Xeon Sapphire Rapids 4-node blade, it actually had AMD EPYC CPUs
The post This is the 4-node Dual CPU Compute Blade HPE Cray EX420 appeared first on ServeTheHome.
Optimize software development with Amazon CodeWhisperer
Post Syndicated from Dhaval Shah original https://aws.amazon.com/blogs/devops/optimize-software-development-with-amazon-codewhisperer/
Businesses differentiate themselves by delivering new capabilities to their customers faster. They must leverage automation to accelerate their software development by optimizing code quality, improving performance, and ensuring their software meets security/compliance requirements. Trained on billions of lines of Amazon and open-source code, Amazon CodeWhisperer is an AI coding companion that helps developers write code by generating real-time whole-line and full-function code suggestions in their IDEs. Amazon CodeWhisperer has two tiers: the individual tier is free for individual use, and the professional tier provides administrative capabilities for organizations seeking to grant their developers access to CW. This blog provides a high-level overview of how developers can use CodeWhisperer.
Getting Started
Getting started with CodeWhisperer is straightforward and documented here. After setup, CodeWhisperer integrates with the IDE and provides code suggestions based on comments written in the IDE. Use TAB to accept a suggestion, ESC to reject the suggestion ALT+C (Windows)/Option + C(MAC) to force a suggestion, and left and right arrow keys to switch between suggestions.
CodeWhisperer supports code generation for 15 programming languages. CodeWhisperer can be used in various IDEs like Amazon Sagemaker Studio, Visual Studio Code, AWS Cloud9, AWS Lambda and many JetBrains IDEs. Refer to the Amazon CodeWhisperer documentation for the latest updates on supported languages and IDEs.
Contextual Code Suggestions
CodeWhisperer continuously examines code and comments for contextual code suggestions. It will generate code snippets using this contextual information and the location of your cursor. Illustrated below is an example of a code suggestion from inline comments in Visual Studio Code that demonstrates how CodeWhisperer can provide context-specific code suggestions without requiring the user to manually replace variables or parameters. In the comment, the file and Amazon Simple Storage Service (Amazon S3) bucket are specified, and CodeWhisperer uses this context to suggest relevant code.

CodeWhisperer also supports and recommends writing declarative code and procedural code, such as shell scripting and query languages. The following example shows how CodeWhisperer recommend the blocks of code in a shell script to loop through servers to execute the hostname command and save their response to an output file.
In the following example, based on the comment, CodeWhisperer suggests Structured Query Language (SQL) code for using common table expression.

CodeWhisperer works with popular Integrated Development Environments (IDEs), for more information on IDE’s supported please refer to CodeWhisperer’s documentation. Illustrated below is CodeWhisperer integrated with AWS Lambda console.
Amazon CodeWhisperer is a versatile AI coding assistant that can aid in a variety of tasks, including AWS-related tasks and API integrations, as well as external (non AWS) API integrations. For example, illustrated below is CodeWhisperer suggesting code for Twilio’s APIs.
Now that we have seen how CodeWhisperer can help with writing code faster, the next section explores how to use AI responsibly.
Use AI responsibly
Developers often leverage open-source code, however run into challenges of license attribution such as attributing the original authors or maintaining the license text. The challenge lies in properly identifying and attributing the relevant open-source components used within a project. With the abundance of open-source libraries and frameworks available, it can be time-consuming and complex to track and attribute each piece of code accurately. Failure to meet the license attribution requirements can result in legal issues, violation of intellectual property rights, and damage to a developer’s reputation. Code Whisperer’s reference tracking continuously monitors suggested code for similarities with known open-source code, allowing developers to make informed decisions about incorporating it into their project and ensuring proper attribution.
![]()
Shift left application security
CodeWhisperer can scan code for hard-to-find vulnerabilities such as those in the top ten Open Web Application Security Project (OWASP), or those that don’t meet crypto library best practices, AWS internal security best practices, and others. As of this writing, CodeWhisperer supports security scanning in Python, Java, and JavaScript languages. Below is an illustration of identifying the most known CWEs (Common Weakness Enumeration) along with the ability to dive deep into the problematic line of code with a click of a button.

In the following example, CodeWhisperer provides file-by-file analysis of CWE’s and highlights the top 10 OWASP CWEs such as Unsensitized input is run as code, Cross-site scripting, Resource leak, Hardcoded credentials, SQL injection, OS command injection and Insecure hashing.

Generating Test Cases
A good developer always writes tests. CodeWhisperer can help suggest test cases and verify the code’s functionality. CodeWhisperer considers boundary values, edge cases, and other potential issues that may need to be tested. In the example below, a comment referring to using fact_demo() function leads CodeWhisperer to suggest a unit test for fact_demo() while leveraging contextual details.
Also, CodeWhisperer can simplify creating repetitive code for unit testing. For example, if you need to create sample data using INSERT statements, CodeWhisperer can generate the necessary inserts based on a pattern.
CodeWhisperer with Amazon SageMaker Studio and Jupyter Lab
CodeWhisperer works with SageMaker Studio and Jupyter Lab, providing code completion support for Python in code cells. To utilize CodeWhisperer, follow the setup instructions to activate it in Amazon SageMaker Studio and Jupyter Lab. To begin coding, see User actions.
The following illustration showcases CodeWhisperer’s code recommendations in SageMaker Studio. It demonstrates the suggested code based on comments for loading and analyzing a dataset.
Conclusion
In conclusion, this blog has highlighted the numerous ways in which developers can leverage CodeWhisperer to increase productivity, streamline workflows, and ensure the development of secure code. By adopting Code Whisperer’s AI-powered features, developers can experience enhanced productivity, accelerated learning, and significant time savings.
To take advantage of CodeWhisperer and optimize your coding process, here are the next steps:
1. Visit feature page to learn more about the benefits of CodeWhisperer.
2. Sign up and start using CodeWhisperer.
3. Read about CodeWhisperer success stories
About the Authors
Ruling Out
Post Syndicated from original https://xkcd.com/2783/

Mesh++ S618 – Self-contained Solar Powered Mesh WiFi
Post Syndicated from Crosstalk Solutions original https://www.youtube.com/watch?v=ytFH2HlBLBU
Get custom data into Amazon Security Lake through ingesting Azure activity logs
Post Syndicated from Adam Plotzker original https://aws.amazon.com/blogs/security/get-custom-data-into-amazon-security-lake-through-ingesting-azure-activity-logs/
Amazon Security Lake automatically centralizes security data from both cloud and on-premises sources into a purpose-built data lake stored on a particular AWS delegated administrator account for Amazon Security Lake.
In this blog post, I will show you how to configure your Amazon Security Lake solution with cloud activity data from Microsoft Azure Monitor activity log, which you can query alongside your existing AWS CloudTrail data. I will walk you through the required steps — from configuring the required AWS Identity and Access Management (IAM) permissions, AWS Glue jobs, and Amazon Kinesis Data Streams required on the AWS side to forwarding that data from within Azure.
When you turn on Amazon Security Lake, it begins to collect actionable security data from various AWS sources. However, many enterprises today have complex environments that include a mix of different cloud resources in addition to on-premises data centers.
Although the AWS data sources in Amazon Security Lake encompass a large amount of the necessary security data needed for analysis, you may miss the full picture if your infrastructure operates across multiple cloud venders (for example, AWS, Azure, and Google Cloud Platform) and on-premises at the same time. By querying data from across your entire infrastructure, you can increase the number of indicators of compromise (IOC) that you identify, and thus increase the likelihood that those indicators will lead to actionable outputs.
Solution architecture
Figure 1 shows how to configure data to travel from an Azure event hub to Amazon Security Lake.

Figure 1: Solution architecture
As shown in Figure 1, the solution involves the following steps:
- An AWS user instantiates the required AWS services and features that enable the process to function, including AWS Identity and Access Management (IAM) permissions, Kinesis data streams, AWS Glue jobs, and Amazon Simple Storage Service (Amazon S3) buckets, either manually or through an AWS CloudFormation template, such as the one we will use in this post.
- In response to the custom source created from the CloudFormation template, a Security Lake table is generated in AWS Glue.
- From this point on, Azure activity logs in their native format are stored within an Azure cloud event hub within an Azure account. An Azure function is deployed to respond to new events within the Azure event hub and forward these logs over the internet to the Kinesis data stream that was created in the preceding step.
- The Kinesis data stream forwards the data to an AWS Glue streaming job fronted by the Kinesis data.
- The AWS Glue job then performs the extract, transfer, and load (ETL) mapping to the appropriate Open Cybersecurity Schema Framework (OCSF) (specified for API Activity events at OCSF API Activity Mappings).
- The Azure events are partitioned with respect to the required partitioning requirements in Amazon Security Lake tables and stored in S3.
- The user can query these tables by using Amazon Athena alongside the rest of their data inside Amazon Security Lake.
Prerequisites
Before you implement the solution, complete the following prerequisites:
- Verify that you have enabled Amazon Security Lake in the AWS Regions that correspond to the Azure Activity logs that you will forward. For more information, see What is Amazon Security Lake?
- Preconfigure the custom source logging for the source AZURE_ACTIVITY in your Region. To configure this custom source in Amazon Security Lake, open the Amazon Security Lake console, navigate to Create custom data source, and do the following, as shown in Figure 2:
- For Data source name, enter AZURE_ACTIVITY.
- For Event class, select API_ACTIVITY.
- For Account Id, enter the ID of the account which is authorized to write data to your data lake.
- For External Id, enter “AZURE_ACTIVITY-<YYYYMMDD>“

Figure 2: Configure custom data source

For more information on how to configure custom sources for Amazon Security Lake, see Collecting data from custom sources.
Step 1: Configure AWS services for Azure activity logging
The first step is to configure the AWS services for Azure activity logging.
- To configure Azure activity logging in Amazon Security Lake, first prepare the assets required in the target AWS account. You can automate this process by using the provided CloudFormation template — Security Lake CloudFormation — which will do the heavy lifting for this portion of the setup.
Note: I have predefined these scripts to create the AWS assets required to ingest Azure activity logs, but you can generalize this process for other external log sources, as well.
The CloudFormation template has the following components:
- securitylakeGlueStreamingRole — includes the following managed policies:
- AWSLambdaKinesisExecutionRole
- AWSGlueServiceRole
- securitylakeGlueStreamingPolicy — includes the following attributes:
- “s3:GetObject”
- “s3:PutObject”
- securitylakeAzureActivityStream — This Kinesis data stream is the endpoint that acts as the connection point between Azure and AWS and the frontend of the AWS Glue stream that feeds Azure activity logs to Amazon Security Lake.
- securitylakeAzureActivityJob — This is an AWS Glue streaming job that is used to take in feeds from the Kinesis data stream and map the Azure activity logs within that stream to OCSF.
- securitylake-glue-assets S3 bucket — This is the S3 bucket that is used to store the ETL scripts used in the AWS Glue job to map Azure activity logs.
Running the CloudFormation template will instantiate the aforementioned assets in your AWS delegated administrator account for Amazon Security Lake.
- securitylakeGlueStreamingRole — includes the following managed policies:
- The CloudFormation template creates a new S3 bucket with the following syntax: securityLake-glue-assets-<ACCOUNT-ID>–<REGION>. After the CloudFormation run is complete, navigate to this bucket within the S3 console.
- Within the S3 bucket, create a scripts and temporary folder in the S3 bucket, as shown in Figure 4.

Figure 4: Glue assets bucket
- Update the Azure AWS Glue Pyspark script by replacing the following values in the file. You will attach this script to your AWS Glue job and use it to generate the AWS assets required for the implementation.
- Replace <AWS_REGION_NAME> with the Region that you are operating in — for example, us-east-2.
- Replace <AWS_ACCOUNT_ID> with the account ID of your delegated administrator account for Amazon Security Lake — for example, 111122223333.
- Replace <SECURITYLAKE-AZURE-STREAM-ARN> with the Kinesis stream name created through the CloudFormation template. To find the stream name, open the Kinesis console, navigate to the Kinesis stream with the name securityLakeAzureActivityStream — <STREAM-UID>, and copy the Amazon Resource Name (ARN), as shown in the following figure.

Figure 5: Kinesis stream ARN
- Replace <SECURITYLAKE-BUCKET-NAME> with the name of your data lake S3 bucket root name — for example, s3://aws-security-data-lake-DOC-EXAMPLE-BUCKET.
After you replace these values, navigate within the scripts folder and upload the AWS Glue PySpark Python script named azure-activity-pyspark.py, as shown in Figure 6.
Figure 6: AWS Glue script
- Within your AWS Glue job, choose Job details and configure the job as follows:
- For Type, select Spark Streaming.
- For Language, select Python 3.
- For Script path, select the S3 path that you created in the preceding step.
- For Temporary path, select the S3 path that you created in the preceding step.
- Save the changes, and run the AWS Glue job by selecting Save and then Run.
- Choose the Runs tab, and make sure that the Run status of the job is Running.
Figure 7: AWS Glue job status


At this point, you have finished the configurations from AWS.
Step 2: Configure Azure services for Azure activity log forwarding
You will complete the next steps in the Azure Cloud console. You need to configure Azure to export activity logs to an Azure cloud event hub within your desired Azure account or organization. Additionally, you need to create an Azure function to respond to new events within the Azure event hub and forward those logs over the internet to the Kinesis data stream that the CloudFormation template created in the initial steps of this post.
For information about how to set up and configure Azure Functions to respond to event hubs, see Azure Event Hubs Trigger for Azure Functions in the Azure documentation.
Configure the following Python script — Azure Event Hub Function — in an Azure function app. This function is designed to respond to event hub events, create a connection to AWS, and forward those events to Kinesis as deserialized JSON blobs.
In the script, replace the following variables with your own information:
- For <SECURITYLAKE-AZURE-STREAM-ARN>, enter the Kinesis data stream ARN.
- For <SECURITYLAKE-AZURE-STREAM-NAME>, enter the Kinesis data stream name.
- For <SECURITYLAKE-AZURE-STREAM-KEYID>, enter the AWS Key Management Service (AWS KMS) key ID created through the CloudFormation template.
The <SECURITYLAKE-AZURE-STREAM-ARN> and securityLakeAzureActivityStream—<STREAM-UID> are the same variables that you obtained earlier in this post (see Figure 5).
You can find the AWS KMS key ID within the AWS KMS managed key policy associated with securityLakeAzureActivityStream. For example, in the key policy shown in Figure 8, the <SECURITYLAKE-AZURE-STREAM-KEYID> is shown in line 3.
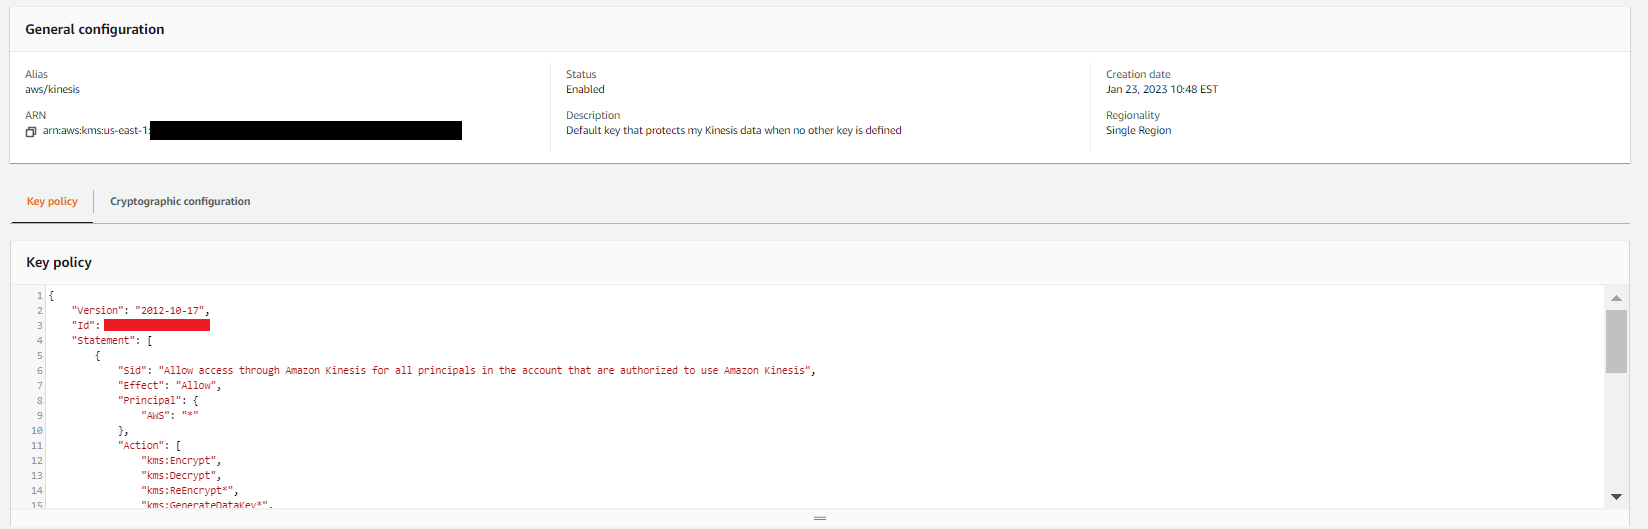
Figure 8: Kinesis data stream inputs
Important: When you are working with KMS keys retrieved from the AWS console or AWS API keys within Azure, you should be extremely mindful of how you approach key management. Improper or poor handling of keys could result in the interception of data from the Kinesis stream or Azure function.
It’s a best security practice to use a trusted key management architecture that uses sufficient encryption and security protocols when working with keys that safeguard sensitive security information. Within Azure, consider using services such as the AWS Azure AD integration for seamless and ephemeral credential usage inside of the azure function. See – Azure AD Integration – for more information on how the Azure AD Integration works to safeguard and manage stored security keys and help make sure that no keys are accessible to unauthorized parties or stored as unencrypted text outside the AWS console.
Step 3: Validate the workflow and query Athena
After you complete the preceding steps, your logs should be flowing. To make sure that the process is working correctly, complete the following steps.
- In the Kinesis Data Streams console, verify that the logs are flowing to your data stream. Open the Kinesis stream that you created previously, choose the Data viewer tab, and then choose Get records, as shown in Figure 9.
Figure 9: Kinesis data stream inputs
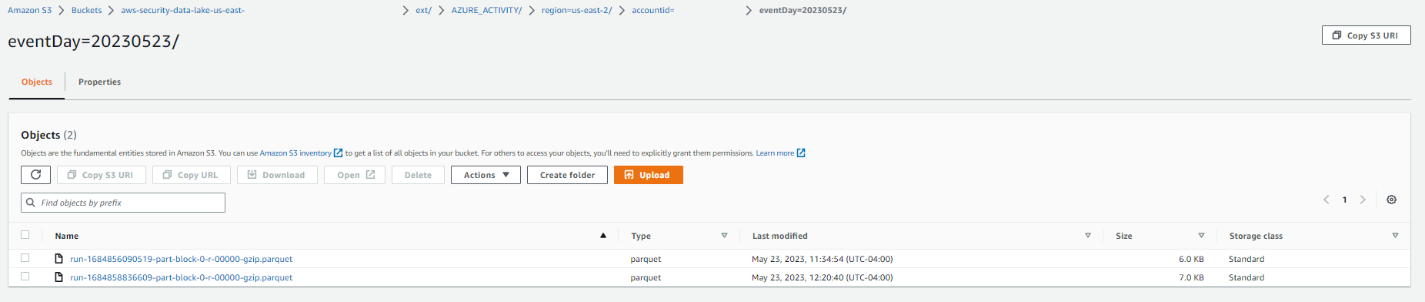
- Verify that the logs are partitioned and stored within the correct Security Lake bucket associated with the configured Region. The log partitions within the Security Lake bucket should have the following syntax — “region=<region>/account_id=<account_id>/eventDay=<YYYYMMDD>/”, and they should be stored with the expected parquet compression.
Figure 10: S3 bucket with object
- Assuming that CloudTrail logs exist within your Amazon Security Lake instance as well, you can now create a query in Athena that pulls data from the newly created Azure activity table and examine it alongside your existing CloudTrail logs by running queries such as the following:
Figure 11: Query Azure activity and CloudTrail together in Athena


For additional guidance on how to configure access and query Amazon Security Lake in Athena, see the following resources:
- Managing query access for Security Lake subscribers
- Example Security Lake queries
- Getting started in Amazon Athena
Conclusion
In this blog post, you learned how to create and deploy the AWS and Microsoft Azure assets needed to bring your own data to Amazon Security Lake. By creating an AWS Glue streaming job that can transform Azure activity data streams and by fronting that AWS Glue job with a Kinesis stream, you can open Amazon Security Lake to intake from external Azure activity data streams.
You also learned how to configure Azure assets so that your Azure activity logs can stream to your Kinesis endpoint. The combination of these two creates a working, custom source solution for Azure activity logging.
To get started with Amazon Security Lake, see the Getting Started page, or if you already use Amazon Security Lake and want to read additional blog posts and articles about this service, see Blog posts and articles.
If you have feedback about this blog post, submit comments in the Comments section below. If you have questions about this blog post, start a new thread on Amazon Security Lake re:Post or contact AWS Support.
Want more AWS Security news? Follow us on Twitter.
Amazon Security Lake is now generally available
Post Syndicated from Ross Warren original https://aws.amazon.com/blogs/security/amazon-security-lake-is-now-generally-available/
Today we are thrilled to announce the general availability of Amazon Security Lake, first announced in a preview release at 2022 re:Invent. Security Lake centralizes security data from Amazon Web Services (AWS) environments, software as a service (SaaS) providers, on-premises, and cloud sources into a purpose-built data lake that is stored in your AWS account. With Open Cybersecurity Schema Framework (OCSF) support, the service normalizes and combines security data from AWS and a broad range of security data sources. This helps provide your team of analysts and security engineers with broad visibility to investigate and respond to security events, which can facilitate timely responses and helps to improve your security across multicloud and hybrid environments.
Figure 1 shows how Security Lake works, step by step. In this post, we discuss these steps, highlight some of the most popular use cases for Security Lake, and share the latest enhancements and updates that we have made since the preview launch.

Figure 1: How Security Lake works
Target use cases
In this section, we showcase some of the use cases that customers have found to be most valuable while the service was in preview.
Facilitate your security investigations with elevated visibility
Amazon Security Lake helps to streamline security investigations by aggregating, normalizing, and optimizing data storage in a single security data lake. Security Lake automatically normalizes AWS logs and security findings to the OCSF schema. This includes AWS CloudTrail management events, Amazon Virtual Private Cloud (Amazon VPC) Flow Logs, Amazon Route 53 Resolver query logs, and AWS Security Hub security findings from Amazon security services, including Amazon GuardDuty, Amazon Inspector, and AWS IAM Access Analyzer, as well as security findings from over 50 partner solutions. By having security-related logs and findings in a centralized location, and in the same format, Security Operations teams can streamline their process and devote more time to investigating security issues. This centralization reduces the need to spend valuable time collecting and normalizing logs into a specific format.
Figure 2 shows the Security Lake activation page, which presents users with options to enable log sources, AWS Regions, and accounts.

Figure 2: Security Lake activation page with options to enable log sources, Regions, and accounts
Figure 3 shows another section of the Security Lake activation page, which presents users with options to set rollup Regions and storage classes.

Figure 3: Security Lake activation page with options to select a rollup Region and set storage classes
Simplify your compliance monitoring and reporting
With Security Lake, customers can centralize security data into one or more rollup Regions, which can help teams to simplify their regional compliance and reporting obligations. Teams often face challenges when monitoring for compliance across multiple log sources, Regions, and accounts. By using Security Lake to collect and centralize this evidence, security teams can significantly reduce the time spent on log discovery and allocate more time towards compliance monitoring and reporting.
Analyze multiple years of security data quickly
Security Lake offers integration with third-party security services such as security information and event management (SIEM) and extended detection and response (XDR) tools, as well as popular data analytics services like Amazon Athena and Amazon OpenSearch Service to quickly analyze petabytes of data. This enables security teams to gain deep insights into their security data and take nimble measures to help protect their organization. Security Lake helps enforce least-privilege controls for teams across organizations by centralizing data and implementing robust access controls, automatically applying policies that are scoped to the required subscribers and sources. Data custodians can use the built-in features to create and enforce granular access controls, such as to restrict access to the data in the security lake to only those who require it.
Figure 4 depicts the process of creating a data access subscriber within Security Lake.

Figure 4: Creating a data access subscriber in Security Lake
Unify security data management across hybrid environments
The centralized data repository in Security Lake provides a comprehensive view of security data across hybrid and multicloud environments, helping security teams to better understand and respond to threats. You can use Security Lake to store security-related logs and data from various sources, including cloud-based and on-premises systems, making it simpler to collect and analyze security data. Additionally, by using automation and machine learning solutions, security teams can help identify anomalies and potential security risks more efficiently. This can ultimately lead to better risk management and enhance the overall security posture for the organization. Figure 5 illustrates the process of querying AWS CloudTrail and Microsoft Azure audit logs simultaneously by using Amazon Athena.

Figure 5: Querying AWS CloudTrail and Microsoft Azure audit logs together in Amazon Athena
Updates since preview launch
Security Lake automatically normalizes logs and events from natively supported AWS services to the OCSF schema. With the general availability release, Security Lake now supports the latest version of OCSF, which is version 1 rc2. CloudTrail management events are now normalized into three distinct OCSF event classes: Authentication, Account Change, and API Activity.
We made various improvements to resource names and schema mapping to enhance the usability of logs. Onboarding is made simpler with automated AWS Identity and Access Management (IAM) role creation from the console. Additionally, you have the flexibility to collect CloudTrail sources independently including management events, Amazon Simple Storage Service (Amazon S3) data events, and AWS Lambda events.
To enhance query performance, we made a transition from hourly to daily time partitioning in Amazon S3, resulting in faster and more efficient data retrieval. Also, we added Amazon CloudWatch metrics to enable proactive monitoring of your log ingestion process to facilitate the identification of collection gaps or surges.
New Security Lake account holders are eligible for a 15-day free trial in supported Regions. Security Lake is now generally available in the following AWS Regions: US East (Ohio), US East (N. Virginia), US West (Oregon), Asia Pacific (Singapore), Asia Pacific (Sydney), Asia Pacific (Tokyo), Europe (Frankfurt), Europe (Ireland), Europe (London), and South America (São Paolo).
Ecosystem integrations
We have expanded our support for third-party integrations and have added 23 new partners. This includes 10 source partners — Aqua Security, Claroty, Confluent, Darktrace, ExtraHop, Gigamon, Sentra, Torq, Trellix, and Uptycs — enabling them to send data directly to Security Lake. Additionally, we have integrated with nine new subscribing partners — ChaosSearch, New Relic, Ripjar, SOC Prime, Stellar Cyber, Swimlane, Tines, Torq, and Wazuh. We have also established six new services partners, including Booz Allen Hamilton, CMD Solutions, part of Mantel Group, Infosys, Insbuilt, Leidos, and Tata Consultancy Services.
In addition, Security Lake supports third-party sources that provide OCSF security data. Notable partners include Barracuda Networks, Cisco, Cribl, CrowdStrike, CyberArk, Lacework, Laminar, NETSCOUT, Netskope, Okta, Orca, Palo Alto Networks, Ping Identity, Tanium, The Falco Project, Trend Micro, Vectra AI, VMware, Wiz, and Zscaler. We have integrated with various third-party security, automation, and analytics tools. This includes Datadog, IBM, Rapid7, SentinelOne, Splunk, Sumo Logic, and Trellix. Lastly, we have partnered with service partners such as Accenture, Eviden , Deloitte, DXC Technology, Kyndryl, PwC, and Wipro, that can work with you and Security Lake to deliver comprehensive solutions.
Get help from AWS Professional Services
The AWS Professional Services organization is a global team of experts that can help customers realize their desired business outcomes when using AWS. Our teams of data architects and security engineers engage with customer Security, IT, and business leaders to develop enterprise solutions. We follow current recommendations to support customers in their journey to integrate data into Security Lake. We integrate ready-built data transformations, visualizations, and AI/machine learning (ML) workflows that help Security Operations teams rapidly realize value. If you are interested in learning more, reach out to your AWS Professional Services account representative.
Summary
We invite you to explore the benefits of using Amazon Security Lake by taking advantage of our 15-day free trial and providing your feedback on your experiences, use cases, and solutions. We have several resources to help you get started and build your first data lake, including comprehensive documentation, demo videos, and webinars. By giving Security Lake a try, you can experience firsthand how it helps you centralize, normalize, and optimize your security data, and ultimately streamline your organization’s security incident detection and response across multicloud and hybrid environments.
If you have feedback about this post, submit comments in the Comments section below. If you have questions about this post, contact AWS Support.
Want more AWS Security news? Follow us on Twitter.
Join a streaming data source with CDC data for real-time serverless data analytics using AWS Glue, AWS DMS, and Amazon DynamoDB
Post Syndicated from Manish Kola original https://aws.amazon.com/blogs/big-data/join-streaming-source-cdc-glue/
Customers have been using data warehousing solutions to perform their traditional analytics tasks. Recently, data lakes have gained lot of traction to become the foundation for analytical solutions, because they come with benefits such as scalability, fault tolerance, and support for structured, semi-structured, and unstructured datasets.
Data lakes are not transactional by default; however, there are multiple open-source frameworks that enhance data lakes with ACID properties, providing a best of both worlds solution between transactional and non-transactional storage mechanisms.
Traditional batch ingestion and processing pipelines that involve operations such as data cleaning and joining with reference data are straightforward to create and cost-efficient to maintain. However, there is a challenge to ingest datasets, such as Internet of Things (IoT) and clickstreams, at a fast rate with near-real-time delivery SLAs. You will also want to apply incremental updates with change data capture (CDC) from the source system to the destination. To make data-driven decisions in a timely manner, you need to account for missed records and backpressure, and maintain event ordering and integrity, especially if the reference data also changes rapidly.
In this post, we aim to address these challenges. We provide a step-by-step guide to join streaming data to a reference table changing in real time using AWS Glue, Amazon DynamoDB, and AWS Database Migration Service (AWS DMS). We also demonstrate how to ingest streaming data to a transactional data lake using Apache Hudi to achieve incremental updates with ACID transactions.
Solution overview
For our example use case, streaming data is coming through Amazon Kinesis Data Streams, and reference data is managed in MySQL. The reference data is continuously replicated from MySQL to DynamoDB through AWS DMS. The requirement here is to enrich the real-time stream data by joining with the reference data in near-real time, and to make it queryable from a query engine such as Amazon Athena while keeping consistency. In this use case, reference data in MySQL can be updated when the requirement is changed, and then queries need to return results by reflecting updates in the reference data.
This solution addresses the issue of users wanting to join streams with changing reference datasets when the size of the reference dataset is small. The reference data is maintained in DynamoDB tables, and the streaming job loads the full table into memory for each micro-batch, joining a high-throughput stream to a small reference dataset.
The following diagram illustrates the solution architecture.

Prerequisites
For this walkthrough, you should have the following prerequisites:
- An AWS account.
- A host with the installed MySQL utility, such as an Amazon Elastic Compute Cloud (Amazon EC2) instance, AWS Cloud9, your laptop, and so on. The host is used to access an Amazon Aurora MySQL-Compatible Edition cluster that you create and to run a Python script that sends sample records to the Kinesis data stream.
Create IAM roles and S3 bucket
In this section, you create an Amazon Simple Storage Service (Amazon S3) bucket and two AWS Identity and Access Management (IAM) roles: one for the AWS Glue job, and one for AWS DMS. We do this using an AWS CloudFormation template. Complete the following steps:
- Sign in to the AWS CloudFormation console.
- Choose Launch Stack::

- Choose Next.
- For Stack name, enter a name for your stack.
- For DynamoDBTableName, enter
tgt_country_lookup_table. This is the name of your new DynamoDB table. - For S3BucketNamePrefix, enter the prefix of your new S3 bucket.
- Select I acknowledge that AWS CloudFormation might create IAM resources with custom names.
- Choose Create stack.
Stack creation can take about 1 minute.
Create a Kinesis data stream
In this section, you create a Kinesis data stream:
- On the Kinesis console, choose Data streams in the navigation pane.
- Choose Create data stream.
- For Data stream name, enter your stream name.
- Leave the remaining settings as default and choose Create data stream.
A Kinesis data stream is created with on-demand mode.
Create and configure an Aurora MySQL cluster
In this section, you create and configure an Aurora MySQL cluster as the source database. First, configure your source Aurora MySQL database cluster to enable CDC through AWS DMS to DynamoDB.
Create a parameter group
Complete the following steps to create a new parameter group:
- On the Amazon RDS console, choose Parameter groups in the navigation pane.
- Choose Create parameter group.
- For Parameter group family, select
aurora-mysql5.7. - For Type, choose DB Cluster Parameter Group.
- For Group name, enter
my-mysql-dynamodb-cdc. - For Description, enter
Parameter group for demo Aurora MySQL database. - Choose Create.
- Select
my-mysql-dynamodb-cdc, and choose Edit under Parameter group actions. - Edit the parameter group as follows:
| Name | Value |
| binlog_row_image | full |
| binlog_format | ROW |
| binlog_checksum | NONE |
| log_slave_updates | 1 |
- Choose Save changes.

Create the Aurora MySQL cluster
Complete following steps to create the Aurora MySQL cluster:
- On the Amazon RDS console, choose Databases in the navigation pane.
- Choose Create database.
- For Choose a database creation method, choose Standard create.
- Under Engine options, for Engine type, choose Aurora (MySQL Compatible).
- For Engine version, choose Aurora (MySQL 5.7) 2.11.2.
- For Templates, choose Production.
- Under Settings, for DB cluster identifier, enter a name for your database.
- For Master username, enter your primary user name.
- For Master password and Confirm master password, enter your primary password.
- Under Instance configuration, for DB instance class, choose Burstable classes (includes t classes) and choose db.t3.small.
- Under Availability & durability, for Multi-AZ deployment, choose Don’t create an Aurora Replica.
- Under Connectivity, for Compute resource, choose Don’t connect to an EC2 compute resource.
- For Network type, choose IPv4.
- For Virtual private cloud (VPC), choose your VPC.
- For DB subnet group, choose your public subnet.
- For Public access, choose Yes.
- For VPC security group (firewall), choose the security group for your public subnet.
- Under Database authentication, for Database authentication options, choose Password authentication.
- Under Additional configuration, for DB cluster parameter group, choose the cluster parameter group you created earlier.
- Choose Create database.
Grant permissions to the source database
The next step is to grant the required permission on the source Aurora MySQL database. Now you can connect to the DB cluster using the MySQL utility. You can run queries to complete the following tasks:
- Create a demo database and table and run queries on the data
- Grant permission for a user used by the AWS DMS endpoint
Complete the following steps:
- Log in to the EC2 instance that you’re using to connect to your DB cluster.
- Enter the following command at the command prompt to connect to the primary DB instance of your DB cluster:
- Run the following SQL command to create a database:
- Run the following SQL command to create a table:
- Run the following SQL command to populate the table with data:
- Run the following SQL command to create a user for the AWS DMS endpoint and grant permissions for CDC tasks (replace the placeholder with your preferred password):
Create and configure AWS DMS resources to load data into the DynamoDB reference table
In this section, you create and configure AWS DMS to replicate data into the DynamoDB reference table.
Create an AWS DMS replication instance
First, create an AWS DMS replication instance by completing the following steps:
- On the AWS DMS console, choose Replication instances in the navigation pane.
- Choose Create replication instance.
- Under Settings, for Name, enter a name for your instance.
- Under Instance configuration, for High Availability, choose Dev or test workload (Single-AZ).
- Under Connectivity and security, for VPC security groups, choose default.
- Choose Create replication instance.
Create Amazon VPC endpoints
Optionally, you can create Amazon VPC endpoints for DynamoDB when you need to connect to your DynamoDB table from the AWS DMS instance in a private network. Also make sure that you enable Publicly accessible when you need to connect to a database outside of your VPC.
Create an AWS DMS source endpoint
Create an AWS DMS source endpoint by completing the following steps:
- On the AWS DMS console, choose Endpoints in the navigation pane.
- Choose Create endpoint.
- For Endpoint type, choose Source endpoint.
- Under Endpoint configuration, for Endpoint identifier, enter a name for your endpoint.
- For Source engine, choose Amazon Aurora MySQL.
- For Access to endpoint database, choose Provide access information manually.
- For Server Name, enter the endpoint name of your Aurora writer instance (for example,
mycluster.cluster-123456789012.us-east-1.rds.amazonaws.com). - For Port, enter
3306. - For User name, enter a user name for your AWS DMS task.
- For Password, enter a password.
- Choose Create endpoint.
Crate an AWS DMS target endpoint
Create an AWS DMS target endpoint by completing the following steps:
- On the AWS DMS console, choose Endpoints in the navigation pane.
- Choose Create endpoint.
- For Endpoint type, choose Target endpoint.
- Under Endpoint configuration, for Endpoint identifier, enter a name for your endpoint.
- For Target engine, choose Amazon DynamoDB.
- For Service access role ARN, enter the IAM role for your AWS DMS task.
- Choose Create endpoint.
Create AWS DMS migration tasks
Create AWS DMS database migration tasks by completing the following steps:
- On the AWS DMS console, choose Database migration tasks in the navigation pane.
- Choose Create task.
- Under Task configuration, for Task identifier, enter a name for your task.
- For Replication instance, choose your replication instance.
- For Source database endpoint, choose your source endpoint.
- For Target database endpoint, choose your target endpoint.
- For Migration type, choose Migrate existing data and replicate ongoing changes.
- Under Task settings, for Target table preparation mode, choose Do nothing.
- For Stop task after full load completes, choose Don’t stop.
- For LOB column settings, choose Limited LOB mode.
- For Task logs, enable Turn on CloudWatch logs and Turn on batch-optimized apply.
- Under Table mappings, choose JSON Editor and enter the following rules.
Here you can add values to the column. With the following rules, the AWS DMS CDC task will first create a new DynamoDB table with the specified name in target-table-name. Then it will replicate all the records, mapping the columns in the DB table to the attributes in the DynamoDB table.

- Choose Create task.
Now the AWS DMS replication task has been started.
- Wait for the Status to show as Load complete.

- On the DynamoDB console, choose Tables in the navigation pane.
- Select the DynamoDB reference table, and choose Explore table items to review the replicated records.
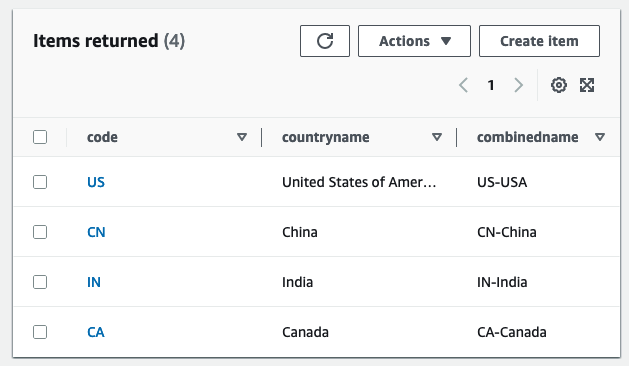
Create an AWS Glue Data Catalog table and an AWS Glue streaming ETL job
In this section, you create an AWS Glue Data Catalog table and an AWS Glue streaming extract, transform, and load (ETL) job.
Create a Data Catalog table
Create an AWS Glue Data Catalog table for the source Kinesis data stream with the following steps:
- On the AWS Glue console, choose Databases under Data Catalog in the navigation pane.
- Choose Add database.
- For Name, enter
my_kinesis_db. - Choose Create database.
- Choose Tables under Databases, then choose Add table.
- For Name, enter
my_stream_src_table. - For Database, choose
my_kinesis_db. - For Select the type of source, choose Kinesis.
- For Kinesis data stream is located in, choose my account.
- For Kinesis stream name, enter a name for your data stream.
- For Classification, select JSON.
- Choose Next.
- Choose Edit schema as JSON, enter the following JSON, then choose Save.
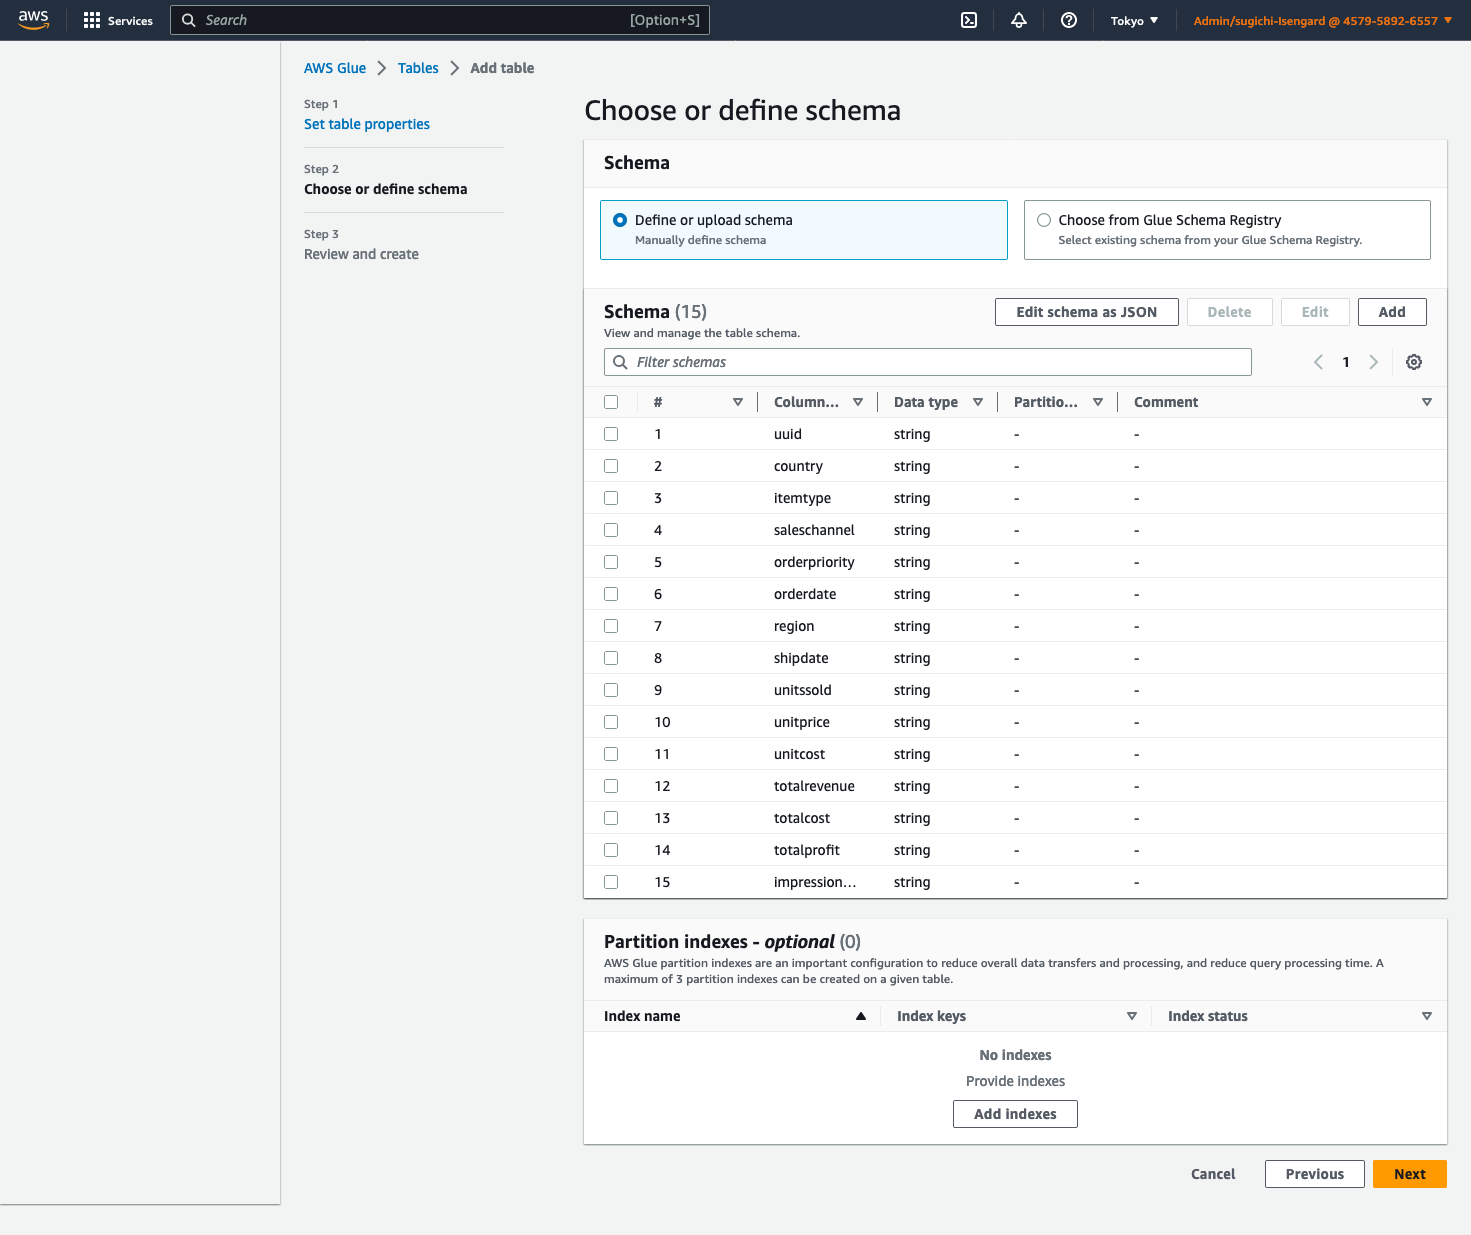
-
- Choose Next, then choose Create.
Create an AWS Glue streaming ETL job
Next, you create an AWS Glue streaming job. AWS Glue 3.0 and later supports Apache Hudi natively, so we use this native integration to ingest into a Hudi table. Complete the following steps to create the AWS Glue streaming job:
- On the AWS Glue Studio console, choose Spark script editor and choose Create.
- Under Job details tab, for Name, enter a name for your job.
- For IAM Role, choose the IAM role for your AWS Glue job.
- For Type, select Spark Streaming.
- For Glue version, choose Glue 4.0 – Supports spark 3.3, Scala 2, Python 3.
- For Requested number of workers, enter
3. - Under Advanced properties, for Job parameters, choose Add new parameter.
- For Key, enter
--conf. - For Value, enter
spark.serializer=org.apache.spark.serializer.KryoSerializer --conf spark.sql.hive.convertMetastoreParquet=false. - Choose Add new parameter.
- For Key, enter
--datalake-formats. - For Value, enter
hudi. - For Script path, enter
s3://<S3BucketName>/scripts/. - For Temporary path, enter
s3://<S3BucketName>/temporary/. - Optionally, for Spark UI logs path, enter
s3://<S3BucketName>/sparkHistoryLogs/.

- On the Script tab, enter the following script into the AWS Glue Studio editor and choose Create.
The near-real-time streaming job enriches data by joining a Kinesis data stream with a DynamoDB table that contains frequently updated reference data. The enriched dataset is loaded into the target Hudi table in the data lake. Replace <S3BucketName> with your bucket that you created via AWS CloudFormation:
- Choose Run to start the streaming job.
The following screenshot shows examples of the DataFrames data_frame, country_lookup_df, and final_frame.
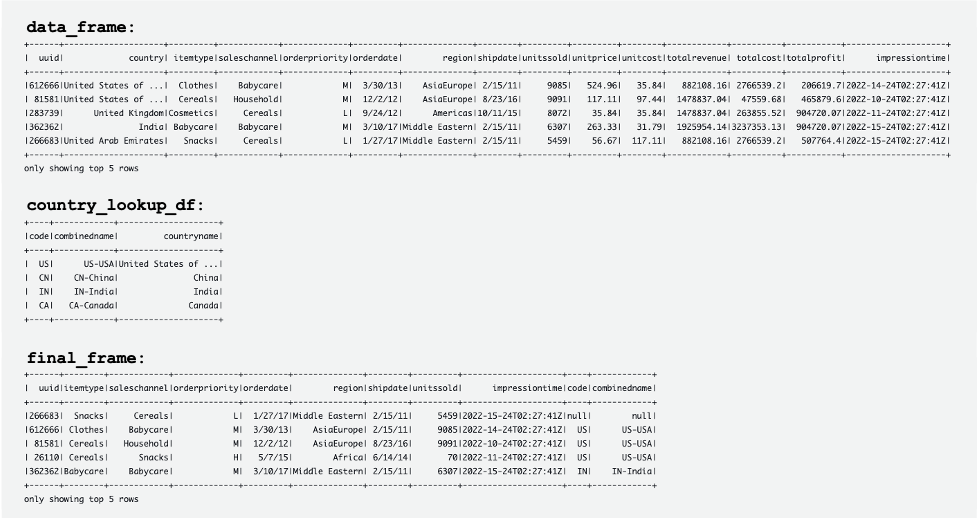
The AWS Glue job successfully joined records coming from the Kinesis data stream and the reference table in DynamoDB, and then ingested the joined records into Amazon S3 in Hudi format.
Create and run a Python script to generate sample data and load it into the Kinesis data stream
In this section, you create and run a Python to generate sample data and load it into the source Kinesis data stream. Complete the following steps:
- Log in to AWS Cloud9, your EC2 instance, or any other computing host that puts records in your data stream.
- Create a Python file called
generate-data-for-kds.py:
- Open the Python file and enter the following script:
This script puts a Kinesis data stream record every 2 seconds.
Simulate updating the reference table in the Aurora MySQL cluster
Now all the resources and configurations are ready. For this example, we want to add a 3-digit country code to the reference table. Let’s update records in the Aurora MySQL table to simulate changes. Complete the following steps:
- Make sure that the AWS Glue streaming job is already running.
- Connect to the primary DB instance again, as described earlier.
- Enter your SQL commands to update records:
Now the reference table in the Aurora MySQL source database has been updated. Then the changes are automatically replicated to the reference table in DynamoDB.

The following tables show records in data_frame, country_lookup_df, and final_frame. In country_lookup_df and final_frame, the combinedname column has values formatted as <2-digit-country-code>-<3-digit-country-code>-<country-name>, which shows that the changed records in the referenced table are reflected in the table without restarting the AWS Glue streaming job. It means that the AWS Glue job successfully joins the incoming records from the Kinesis data stream with the reference table even when the reference table is changing.

Query the Hudi table using Athena
Let’s query the Hudi table using Athena to see the records in the destination table. Complete the following steps:
- Make sure that the script and the AWS Glue Streaming job is still working:
- The Python script (
generate-data-for-kds.py) is still running. - The generated data is being sent to the data stream.
- The AWS Glue streaming job is still running.
- The Python script (
- On the Athena console, run the following SQL in the query editor:
The following query result shows the records that are processed before the referenced table was changed. Records in the combinedname column are similar to <2-digit-country-code>-<country-name>.

The following query result shows the records that are processed after the referenced table was changed. Records in the combinedname column are similar to <2-digit-country-code>-<3-digit-country-code>-<country-name>.

Now you understand that the changed reference data is successfully reflected in the target Hudi table joining records from the Kinesis data stream and the reference data in DynamoDB.
Clean up
As the final step, clean up the resources:
- Delete the Kinesis data stream.
- Delete the AWS DMS migration task, endpoint, and replication instance.
- Stop and delete the AWS Glue streaming job.
- Delete the AWS Cloud9 environment.
- Delete the CloudFormation template.
Conclusion
Building and maintaining a transactional data lake that involves real-time data ingestion and processing has multiple variable components and decisions to be made, such as what ingestion service to use, how to store your reference data, and what transactional data lake framework to use. In this post, we provided the implementation details of such a pipeline, using AWS native components as the building blocks and Apache Hudi as the open-source framework for a transactional data lake.
We believe that this solution can be a starting point for organizations looking to implement a new data lake with such requirements. Additionally, the different components are fully pluggable and can be mixed and matched to existing data lakes to target new requirements or migrate existing ones, addressing their pain points.
About the authors
 Manish Kola is a Data Lab Solutions Architect at AWS, where he works closely with customers across various industries to architect cloud-native solutions for their data analytics and AI needs. He partners with customers on their AWS journey to solve their business problems and build scalable prototypes. Before joining AWS, Manish’s experience includes helping customers implement data warehouse, BI, data integration, and data lake projects.
 Santosh Kotagiri is a Solutions Architect at AWS with experience in data analytics and cloud solutions leading to tangible business results. His expertise lies in designing and implementing scalable data analytics solutions for clients across industries, with a focus on cloud-native and open-source services. He is passionate about leveraging technology to drive business growth and solve complex problems.
 Chiho Sugimoto is a Cloud Support Engineer on the AWS Big Data Support team. She is passionate about helping customers build data lakes using ETL workloads. She loves planetary science and enjoys studying the asteroid Ryugu on weekends.
 Noritaka Sekiyama is a Principal Big Data Architect on the AWS Glue team. He is responsible for building software artifacts to help customers. In his spare time, he enjoys cycling with his new road bike.
Unlocking Media Collaboration: How to Use Hybrid Cloud to Boost Productivity
Post Syndicated from Vinodh Subramanian original https://www.backblaze.com/blog/unlocking-media-collaboration-how-to-use-hybrid-cloud-to-boost-productivity/
In today’s fast-paced media landscape, efficient collaboration is essential for success. With teams managing large files between geographically dispersed team members on tight deadlines, the need for a robust, flexible storage solution has never been greater. Hybrid cloud storage addresses this need by combining the power of on-premises solutions, like network attached storage (NAS) devices, with cloud storage, creating an ideal setup for enhanced productivity and seamless collaboration.
In this post, I’ll walk you through some approaches for optimizing media workflows using hybrid cloud storage. You’ll learn how to unlock fast local storage, easy file sharing and collaboration, and enhanced data protection, which are all essential components for success in the media and entertainment industry.
Plus, we’ll share specific media workflows for different types of collaboration scenarios and practical steps you can take to get started with your hybrid cloud approach today using Synology NAS and Backblaze B2 Cloud Storage as an example.
Common Challenges for Media Teams
Before we explore a hybrid cloud approach that combines NAS devices with cloud storage, let’s first take a look at some of the common challenges media teams face, including:
- Data storage and accessibility.
- File sharing and collaboration.
- Security and data protection.
Data Storage and Accessibility Challenges
It’s no secret that recent data growth has been exponential. This is no different for media files. Cameras are creating larger and higher-quality files. There are more projects to shoot and edit. And editors and team members require immediate access to those files due to the high demand for fresh content.
File Sharing and Collaboration Challenges
Back in 2020, everyone was forced to go remote and the workforce changed. Now you can hire freelancers and vendors from around the world. This means you have to share assets with external contributors, and, in the past, this used to exclusively mean shipping hard drives to said vendors (and sometimes, it can still be necessary). Different contractors, freelancers, and consultants may use different tools and different processes.
Security and Data Protection Challenges
Data security poses unique challenges for media teams due to the industry’s specific requirements including managing large files, storing data on physical devices, and working with remote teams and external stakeholders. The need to protect sensitive information and intellectual property from data breaches, accidental deletions, and device failures adds complexity to data protection initiatives.
How Does Hybrid Cloud Help Media Teams Solve These Challenges?
As a quick reminder, the hybrid cloud refers to a computing environment that combines the use of both private cloud and public cloud resources to achieve the benefits of each platform.
A private cloud is a dedicated and secure cloud infrastructure designed exclusively for a single tenant or organization. It offers a wide range of benefits to users. With NAS devices, organizations can enjoy centralized storage, ensuring all files are accessible in one location. Additionally, it offers fast local access to files that helps streamline workflows and productivity.
The public cloud, on the other hand, is a shared cloud infrastructure provided by cloud storage companies like Backblaze. With public cloud, organizations can scale their infrastructure up or down as needed without the up-front capital costs associated with traditional on-premises infrastructure.
By combining cloud storage with NAS, media teams can create a hybrid cloud solution that offers the best of both worlds. Private local storage on NAS offers fast access to large files while the public cloud securely stores those files in remote servers and keeps them accessible at a reasonable price.
How To Get Started With A Hybrid Cloud Approach
If you’d like to get started with a hybrid cloud approach, using NAS on-premises is an easy entry point. Here are a few tips to help you choose the right NAS device for your data storage and collaboration needs.
- Storage Requirements: Begin by assessing your data volume and growth rate to determine how much storage capacity you’ll need. This will help you decide the number of drives required to support your data growth.
- Compute Power: Evaluate the NAS device’s processor, controller, and memory to ensure it can handle the workloads and deliver the performance you need for running applications and accessing and sharing files.
- Network Infrastructure: Consider the network bandwidth, speed, and port support offered by the NAS device. A device with faster network connectivity will improve data transfer rates, while multiple ports can facilitate the connection of additional devices.
- Data Collaboration: Determine your requirements for remote access, sync direction, and security needs. Look for a NAS device that provides secure remote access options, and supports the desired sync direction (one-way or two-way) while offering data protection features such as encryption, user authentication, and access controls.
By carefully reviewing these factors, you can choose a NAS device that meets your storage, performance, network, and security needs. If you’d like additional help choosing the right NAS device, download our complete NAS Buyer’s Guide.

Real-World Examples: Using Synology NAS + Backblaze B2
Let’s explore a hybrid cloud use case. To discuss specific media workflows for different types of collaboration scenarios, we’re going to use Synology NAS as the private cloud and Backblaze B2 Cloud Storage as the public cloud as examples in the rest of this article.
Scenario 1: Working With Distributed Teams Across Locations
In the first scenario, let’s assume your organization has two different locations with your teams working from both locations. Your video editors work in one office, while a separate editorial team responsible for final reviews operates from the second location.
To facilitate seamless collaboration, you can install a Synology NAS device at both locations and connect them to Backblaze B2 using Cloud Sync.
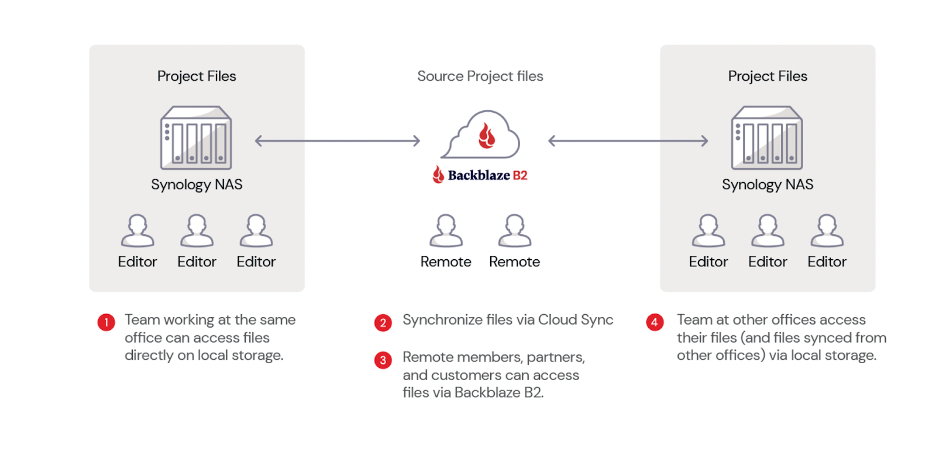
Here’s a video guide that demonstrates how to synchronize Synology NAS to Backblaze B2 using cloud sync.
This hybrid cloud setup allows for fast local access, easy file sharing, and real-time synchronization between the two locations, ensuring that any changes made at one site are automatically updated in the cloud and mirrored at the other site.
Scenario 2: Working With Distributed Teams
In this second scenario, you have teams working on your projects from different regions, let’s say the U.S. and Europe. Downloading files from different parts of the world can be time-consuming, causing delays and impacting productivity. To solve this, you can use Backblaze B2 Cloud Replication. This allows you to replicate your data automatically from your source bucket (U.S. West) to a destination bucket (EU Central).
Source files can be uploaded into B2 Bucket on the U.S. West region. These files are then replicated to the EU Central region so you can move data closer to your team in Europe for faster access. Vendors and teams in Europe can configure their Synology NAS devices with Cloud Sync to automatically sync with the replicated files in the EU Central data center.
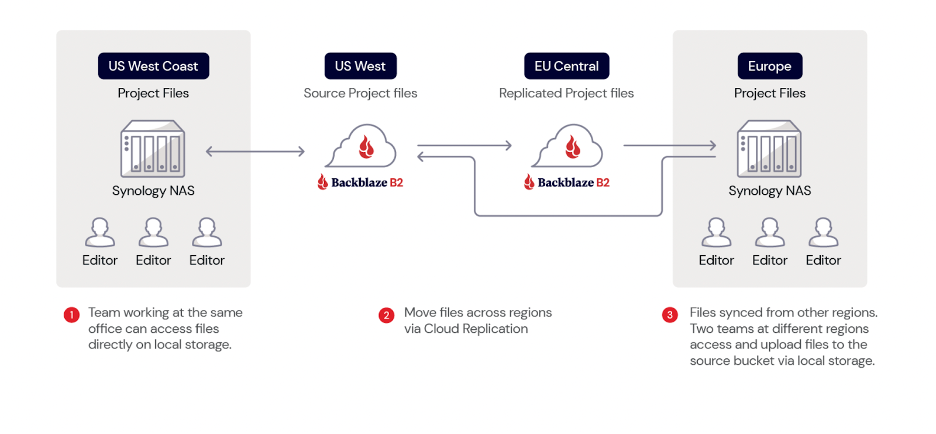
Scenario 3: Working With Freelancers
In both scenarios discussed so far, file exchanges can occur between different companies or within the same company across various regions of the world. However, not everyone has access to these resources. Freelancers make up a huge part of the media and entertainment workforce, and not every one of them has a Synology NAS device.
But that’s not a problem!
In this case, you can still use a Synology NAS to upload your project files and sync them with your Backblaze B2 Bucket. Instead of syncing to another NAS or replicating to a different region, freelancers can access the files in your Backblaze B2 Bucket using third-party tools like Cyberduck.
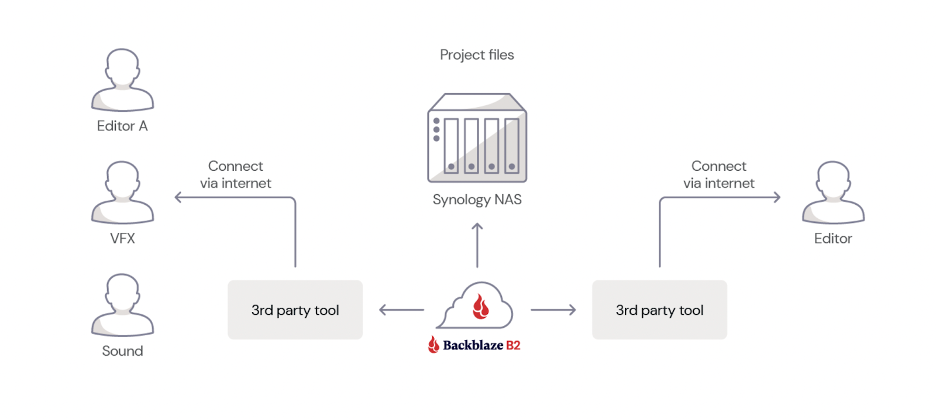
This approach allows anyone with an internet connection and the appropriate access keys to access the required files instantly without needing to have a NAS device.
Scenario 4: Working With Vendors
In this final scenario, which is similar to the first one, you collaborate with another company or vendor located elsewhere instead of working with your internal team. Both parties can install their own Synology NAS device at their respective locations, ensuring centralized access, fast local access, and easy file sharing and collaboration.
The two NAS devices are then connected to a Backblaze B2 Bucket using Cloud Sync, allowing for seamless synchronization of files and data between the two companies.
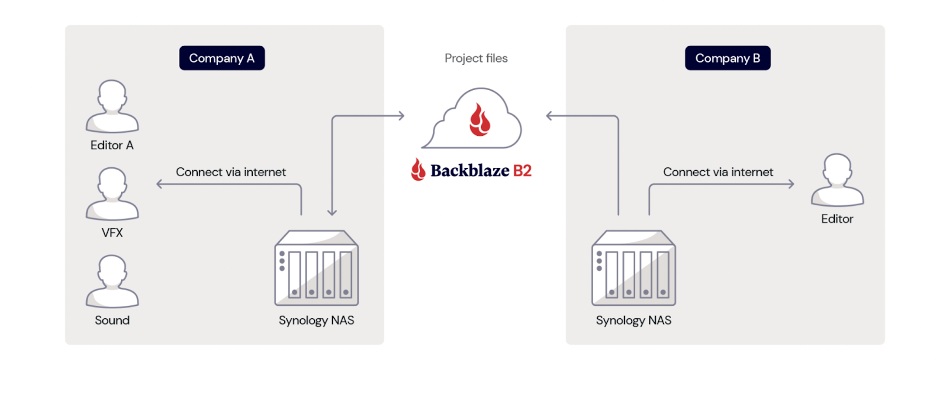
Whenever changes are made to files by one company, the updated files are automatically synced to Backblaze B2 and subsequently to the other company’s Synology NAS device. This real-time synchronization ensures that both companies have access to the latest versions of the files, allowing for increased efficiency and collaboration.
Making Hybrid Cloud Work for Your Production Team
As you can see, there are several different ways you can move your media files around and get them in the hands of the right people—be it another one of your offices, vendors, or freelancers. The four scenarios discussed here are just a few common media workflows. You may or may not have the same scenario. Regardless, a hybrid cloud approach provides you with all the tools you need to customize your workflow to best suit your media collaboration needs.
Ready to Get Started?
With Backblaze B2’s pre-built integration with Synology NAS’s Cloud Sync, getting started with your hybrid cloud approach using Synology NAS and Backblaze B2 is simple and straightforward. Check out our guide, or watch the video below as Pat Patterson, Backblaze Chief Technical Evangelist, walks through how to get your Synology NAS data into B2 Cloud Storage in under 10 minutes using Cloud Sync.
Your first step is creating an account.
In addition to Synology NAS, Backblaze B2 Cloud Storage integrates seamlessly with other NAS devices such as Asustor, Ctera, Dell Isilon, iOsafe, Morro Data, OWC JellyFish, Panzura, QNAP, TrueNAS, and more. Regardless of which NAS device you use, getting started with a hybrid cloud approach is simple and straightforward with Backblaze B2.
Hybrid Cloud Unlocks Collaboration and Productivity for Media Teams
Easing collaboration and boosting productivity in today’s fast-paced digital landscape is vital for media teams. By leveraging a hybrid cloud storage solution that combines the power of NAS devices with the flexibility of cloud storage, organizations can create an efficient, scalable, and secure solution for managing their media assets.
This approach not only addresses storage capacity and accessibility challenges, but also simplifies file sharing and collaboration, while ensuring data protection and security. Whether you’re working within your team from different locations, collaborating with external partners, or freelancers, a hybrid cloud solution offers a seamless, cost-effective, and high-performance solution to optimize your media workflows and enhance productivity in the ever-evolving world of media and entertainment.
We’d love to hear about other different media workflow scenarios. Share with us how you collaborate with your media teams and vendors in the comments below.
The post Unlocking Media Collaboration: How to Use Hybrid Cloud to Boost Productivity appeared first on Backblaze Blog | Cloud Storage & Cloud Backup.
8 years of box throwing in 60 seconds #shorts #crosstalk #technology
Post Syndicated from Crosstalk Solutions original https://www.youtube.com/watch?v=8GZjCxR0KoA