Anthropic’s Claude 3 Haiku model is now available on Amazon Bedrock

Post Syndicated from Channy Yun original https://aws.amazon.com/blogs/aws/anthropics-claude-3-haiku-model-is-now-available-in-amazon-bedrock/

Last week, Anthropic announced their Claude 3 foundation model family. The family includes three models: Claude 3 Haiku, the fastest and most compact model for near-instant responsiveness; Claude 3 Sonnet, the ideal balanced model between skills and speed; and Claude 3 Opus, the most intelligent offering for top-level performance on highly complex tasks. AWS also announced the general availability of Claude 3 Sonnet in Amazon Bedrock.

Today, we are announcing the availability of Claude 3 Haiku on Amazon Bedrock. The Claude 3 Haiku foundation model is the fastest and most compact model of the Claude 3 family, designed for near-instant responsiveness and seamless generative artificial intelligence (AI) experiences that mimic human interactions. For example, it can read a data-dense research paper on arXiv (~10k tokens) with charts and graphs in less than three seconds.

With Claude 3 Haiku’s availability on Amazon Bedrock, you can build near-instant responsive generative AI applications for enterprises that need quick and accurate targeted performance. Like Sonnet and Opus, Haiku has image-to-text vision capabilities, can understand multiple languages besides English, and boasts increased steerability in a 200k context window.

Claude 3 Haiku use cases
Claude 3 Haiku is smarter, faster, and more affordable than other models in its intelligence category. It answers simple queries and requests with unmatched speed. With its fast speed and increased steerability, you can create AI experiences that seamlessly imitate human interactions.

Here are some use cases for using Claude 3 Haiku:

  • Customer interactions: quick and accurate support in live interactions, translations
  • Content moderation: catch risky behavior or customer requests
  • Cost-saving tasks: optimized logistics, inventory management, fast knowledge extraction from unstructured data

To learn more about Claude 3 Haiku’s features and capabilities, visit Anthropic’s Claude on Amazon Bedrock and Anthropic Claude models in the AWS documentation.

Claude 3 Haiku in action
If you are new to using Anthropic models, go to the Amazon Bedrock console and choose Model access on the bottom left pane. Request access separately for Claude 3 Haiku.

To test Claude 3 Haiku in the console, choose Text or Chat under Playgrounds in the left menu pane. Then choose Select model and select Anthropic as the category and Claude 3 Haiku as the model.

To test more Claude prompt examples, choose Load examples. You can view and run examples specific to Claude 3 Haiku, such as advanced Q&A with citations, crafting a design brief, and non-English content generation.

Using Compare mode, you can also compare the speed and intelligence between Claude 3 Haiku and the Claude 2.1 model using a sample prompt to generate personalized email responses to address customer questions.

By choosing View API request, you can also access the model using code examples in the AWS Command Line Interface (AWS CLI) and AWS SDKs. Here is a sample of the AWS CLI command:

aws bedrock-runtime invoke-model \
     --model-id anthropic.claude-3-haiku-20240307-v1:0 \
     --body "{\"messages\":[{\"role\":\"user\",\"content\":[{\"type\":\"text\",\"text\":\"Write the test case for uploading the image to Amazon S3 bucket\\nCertainly! Here's an example of a test case for uploading an image to an Amazon S3 bucket using a testing framework like JUnit or TestNG for Java:\\n\\n...."}]}],\"anthropic_version\":\"bedrock-2023-05-31\",\"max_tokens\":2000}" \
     --cli-binary-format raw-in-base64-out \
     --region us-east-1 \
     invoke-model-output.txt

To make an API request with Claude 3, use the new Anthropic Claude Messages API format, which allows for more complex interactions such as image processing. If you use Anthropic Claude Text Completions API, you should upgrade from the Text Completions API.

Here is sample Python code to send a Message API request describing the image file:

def call_claude_haiku(base64_string):

    prompt_config = {
        "anthropic_version": "bedrock-2023-05-31",
        "max_tokens": 4096,
        "messages": [
            {
                "role": "user",
                "content": [
                    {
                        "type": "image",
                        "source": {
                            "type": "base64",
                            "media_type": "image/png",
                            "data": base64_string,
                        },
                    },
                    {"type": "text", "text": "Provide a caption for this image"},
                ],
            }
        ],
    }

    body = json.dumps(prompt_config)

    modelId = "anthropic.claude-3-haiku-20240307-v1:0"
    accept = "application/json"
    contentType = "application/json"

    response = bedrock_runtime.invoke_model(
        body=body, modelId=modelId, accept=accept, contentType=contentType
    )
    response_body = json.loads(response.get("body").read())

    results = response_body.get("content")[0].get("text")
    return results

To learn more sample codes with Claude 3, see Get Started with Claude 3 on Amazon Bedrock, Diagrams to CDK/Terraform using Claude 3 on Amazon Bedrock, and Cricket Match Winner Prediction with Amazon Bedrock’s Anthropic Claude 3 Sonnet in the Community.aws.

Now available
Claude 3 Haiku is available now in the US West (Oregon) Region with more Regions coming soon; check the full Region list for future updates.

Claude 3 Haiku is the most cost-effective choice. For example, Claude 3 Haiku is cheaper, up to 68 percent of the price per 1,000 input/output tokens compared to Claude Instant, with higher levels of intelligence. To learn more, see Amazon Bedrock Pricing.

Give Claude 3 Haiku a try in the Amazon Bedrock console today and send feedback to AWS re:Post for Amazon Bedrock or through your usual AWS Support contacts.

— Channy

[$] Questions about machine-learning models for Fedora

Post Syndicated from jzb original https://lwn.net/Articles/964739/

Kaitlyn Abdo of Fedora’s AI/ML
SIG
opened an issue with the
Fedora Engineering Steering Committee (FESCo) recently that carried a few tricky
questions about packaging machine-learning (ML) models for Fedora.
Specifically, the SIG is looking for guidance on whether pre-trained weights for
PyTorch constitute code or content. And, if the models are released under a
license approved by the
Open Source Initiative (OSI),
does it matter what data the models were trained on? The issue was quickly
tossed over to Fedora’s legal
mailing list
and sparked an interesting discussion about how to
handle these items, and a temporary path forward.

Gain insights from historical location data using Amazon Location Service and AWS analytics services

Post Syndicated from Alan Peaty original https://aws.amazon.com/blogs/big-data/gain-insights-from-historical-location-data-using-amazon-location-service-and-aws-analytics-services/

Many organizations around the world rely on the use of physical assets, such as vehicles, to deliver a service to their end-customers. By tracking these assets in real time and storing the results, asset owners can derive valuable insights on how their assets are being used to continuously deliver business improvements and plan for future changes. For example, a delivery company operating a fleet of vehicles may need to ascertain the impact from local policy changes outside of their control, such as the announced expansion of an Ultra-Low Emission Zone (ULEZ). By combining historical vehicle location data with information from other sources, the company can devise empirical approaches for better decision-making. For example, the company’s procurement team can use this information to make decisions about which vehicles to prioritize for replacement before policy changes go into effect.

Developers can use the support in Amazon Location Service for publishing device position updates to Amazon EventBridge to build a near-real-time data pipeline that stores locations of tracked assets in Amazon Simple Storage Service (Amazon S3). Additionally, you can use AWS Lambda to enrich incoming location data with data from other sources, such as an Amazon DynamoDB table containing vehicle maintenance details. Then a data analyst can use the geospatial querying capabilities of Amazon Athena to gain insights, such as the number of days their vehicles have operated in the proposed boundaries of an expanded ULEZ. Because vehicles that do not meet ULEZ emissions standards are subjected to a daily charge to operate within the zone, you can use the location data, along with maintenance data such as age of the vehicle, current mileage, and current emissions standards to estimate the amount the company would have to spend on daily fees.

This post shows how you can use Amazon Location, EventBridge, Lambda, Amazon Data Firehose, and Amazon S3 to build a location-aware data pipeline, and use this data to drive meaningful insights using AWS Glue and Athena.

Overview of solution

This is a fully serverless solution for location-based asset management. The solution consists of the following interfaces:

  • IoT or mobile application – A mobile application or an Internet of Things (IoT) device allows the tracking of a company vehicle while it is in use and transmits its current location securely to the data ingestion layer in AWS. The ingestion approach is not in scope of this post. Instead, a Lambda function in our solution simulates sample vehicle journeys and directly updates Amazon Location tracker objects with randomized locations.
  • Data analytics – Business analysts gather operational insights from multiple data sources, including the location data collected from the vehicles. Data analysts are looking for answers to questions such as, “How long did a given vehicle historically spend inside a proposed zone, and how much would the fees have cost had the policy been in place over the past 12 months?”

The following diagram illustrates the solution architecture.
Architecture diagram

The workflow consists of the following key steps:

  1. The tracking functionality of Amazon Location is used to track the vehicle. Using EventBridge integration, filtered positional updates are published to an EventBridge event bus. This solution uses distance-based filtering to reduce costs and jitter. Distanced-based filtering ignores location updates in which devices have moved less than 30 meters (98.4 feet).
  2. Amazon Location device position events arrive on the EventBridge default bus with source: ["aws.geo"] and detail-type: ["Location Device Position Event"]. One rule is created to forward these events to two downstream targets: a Lambda function, and a Firehose delivery stream.
  3. Two different patterns, based on each target, are described in this post to demonstrate different approaches to committing the data to a S3 bucket:
    1. Lambda function – The first approach uses a Lambda function to demonstrate how you can use code in the data pipeline to directly transform the incoming location data. You can modify the Lambda function to fetch additional vehicle information from a separate data store (for example, a DynamoDB table or a Customer Relationship Management system) to enrich the data, before storing the results in an S3 bucket. In this model, the Lambda function is invoked for each incoming event.
    2. Firehose delivery stream – The second approach uses a Firehose delivery stream to buffer and batch the incoming positional updates, before storing them in an S3 bucket without modification. This method uses GZIP compression to optimize storage consumption and query performance. You can also use the data transformation feature of Data Firehose to invoke a Lambda function to perform data transformation in batches.
  4. AWS Glue crawls both S3 bucket paths, populates the AWS Glue database tables based on the inferred schemas, and makes the data available to other analytics applications through the AWS Glue Data Catalog.
  5. Athena is used to run geospatial queries on the location data stored in the S3 buckets. The Data Catalog provides metadata that allows analytics applications using Athena to find, read, and process the location data stored in Amazon S3.
  6. This solution includes a Lambda function that continuously updates the Amazon Location tracker with simulated location data from fictitious journeys. The Lambda function is triggered at regular intervals using a scheduled EventBridge rule.

You can test this solution yourself using the AWS Samples GitHub repository. The repository contains the AWS Serverless Application Model (AWS SAM) template and Lambda code required to try out this solution. Refer to the instructions in the README file for steps on how to provision and decommission this solution.

Visual layouts in some screenshots in this post may look different than those on your AWS Management Console.

Data generation

In this section, we discuss the steps to manually or automatically generate journey data.

Manually generate journey data

You can manually update device positions using the AWS Command Line Interface (AWS CLI) command aws location batch-update-device-position. Replace the tracker-name, device-id, Position, and SampleTime values with your own, and make sure that successive updates are more than 30 meters in distance apart to place an event on the default EventBridge event bus:

aws location batch-update-device-position --tracker-name <tracker-name> --updates "[{\"DeviceId\": \"<device-id>\", \"Position\": [<longitude>, <latitude>], \"SampleTime\": \"<YYYY-MM-DDThh:mm:ssZ>\"}]"

Automatically generate journey data using the simulator

The provided AWS CloudFormation template deploys an EventBridge scheduled rule and an accompanying Lambda function that simulates tracker updates from vehicles. This rule is enabled by default, and runs at a frequency specified by the SimulationIntervalMinutes CloudFormation parameter. The data generation Lambda function updates the Amazon Location tracker with a randomized position offset from the vehicles’ base locations.

Vehicle names and base locations are stored in the vehicles.json file. A vehicle’s starting position is reset each day, and base locations have been chosen to give them the ability to drift in and out of the ULEZ on a given day to provide a realistic journey simulation.

You can disable the rule temporarily by navigating to the scheduled rule details on the EventBridge console. Alternatively, change the parameter State: ENABLED to State: DISABLED for the scheduled rule resource GenerateDevicePositionsScheduleRule in the template.yml file. Rebuild and re-deploy the AWS SAM template for this change to take effect.

Location data pipeline approaches

The configurations outlined in this section are deployed automatically by the provided AWS SAM template. The information in this section is provided to describe the pertinent parts of the solution.

Amazon Location device position events

Amazon Location sends device position update events to EventBridge in the following format:

{
    "version":"0",
    "id":"<event-id>",
    "detail-type":"Location Device Position Event",
    "source":"aws.geo",
    "account":"<account-number>",
    "time":"<YYYY-MM-DDThh:mm:ssZ>",
    "region":"<region>",
    "resources":[
        "arn:aws:geo:<region>:<account-number>:tracker/<tracker-name>"
    ],
    "detail":{
        "EventType":"UPDATE",
        "TrackerName":"<tracker-name>",
        "DeviceId":"<device-id>",
        "SampleTime":"<YYYY-MM-DDThh:mm:ssZ>",
        "ReceivedTime":"<YYYY-MM-DDThh:mm:ss.sssZ>",
        "Position":[
            <longitude>, 
            <latitude>
	]
    }
}

You can optionally specify an input transformation to modify the format and contents of the device position event data before it reaches the target.

Data enrichment using Lambda

Data enrichment in this pattern is facilitated through the invocation of a Lambda function. In this example, we call this function ProcessDevicePosition, and use a Python runtime. A custom transformation is applied in the EventBridge target definition to receive the event data in the following format:

{
    "EventType":<EventType>,
    "TrackerName":<TrackerName>,
    "DeviceId":<DeviceId>,
    "SampleTime":<SampleTime>,
    "ReceivedTime":<ReceivedTime>,
    "Position":[<Longitude>,<Latitude>]
}

You could apply additional transformations, such as the refactoring of Latitude and Longitude data into separate key-value pairs if this is required by the downstream business logic processing the events.

The following code demonstrates the Python application logic that is run by the ProcessDevicePosition Lambda function. Error handling has been skipped in this code snippet for brevity. The full code is available in the GitHub repo.

import json
import os
import uuid
import boto3

# Import environment variables from Lambda function.
bucket_name = os.environ["S3_BUCKET_NAME"]
bucket_prefix = os.environ["S3_BUCKET_LAMBDA_PREFIX"]

s3 = boto3.client("s3")

def lambda_handler(event, context):
    key = "%s/%s/%s-%s.json" % (bucket_prefix,
                                event["DeviceId"],
                                event["SampleTime"],
                                str(uuid.uuid4())
    body = json.dumps(event, separators=(",", ":"))
    body_encoded = body.encode("utf-8")
    s3.put_object(Bucket=bucket_name, Key=key, Body=body_encoded)
    return {
        "statusCode": 200,
        "body": "success"
    }

The preceding code creates an S3 object for each device position event received by EventBridge. The code uses the DeviceId as a prefix to write the objects to the bucket.

You can add additional logic to the preceding Lambda function code to enrich the event data using other sources. The example in the GitHub repo demonstrates enriching the event with data from a DynamoDB vehicle maintenance table.

In addition to the prerequisite AWS Identity and Access Management (IAM) permissions provided by the role AWSBasicLambdaExecutionRole, the ProcessDevicePosition function requires permissions to perform the S3 put_object action and any other actions required by the data enrichment logic. IAM permissions required by the solution are documented in the template.yml file.

{
    "Version":"2012-10-17",
    "Statement":[
        {
            "Action":[
                "s3:ListBucket"
            ],
            "Resource":[
                "arn:aws:s3:::<S3_BUCKET_NAME>"
            ],
            "Effect":"Allow"
        },
        {
            "Action":[
                "s3:PutObject"
            ],
            "Resource":[
                "arn:aws:s3:::<S3_BUCKET_NAME>/<S3_BUCKET_LAMBDA_PREFIX>/*"
            ],
            "Effect":"Allow"
        }
    ]
}

Data pipeline using Amazon Data Firehose

Complete the following steps to create your Firehose delivery stream:

  1. On the Amazon Data Firehose console, choose Firehose streams in the navigation pane.
  2. Choose Create Firehose stream.
  3. For Source, choose as Direct PUT.
  4. For Destination, choose Amazon S3.
  5. For Firehose stream name, enter a name (for this post, ProcessDevicePositionFirehose).
    Create Firehose stream
  6. Configure the destination settings with details about the S3 bucket in which the location data is stored, along with the partitioning strategy:
    1. Use <S3_BUCKET_NAME> and <S3_BUCKET_FIREHOSE_PREFIX> to determine the bucket and object prefixes.
    2. Use DeviceId as an additional prefix to write the objects to the bucket.
  7. Enable Dynamic partitioning and New line delimiter to make sure partitioning is automatic based on DeviceId, and that new line delimiters are added between records in objects that are delivered to Amazon S3.

These are required by AWS Glue to later crawl the data, and for Athena to recognize individual records.
Destination settings for Firehose stream

Create an EventBridge rule and attach targets

The EventBridge rule ProcessDevicePosition defines two targets: the ProcessDevicePosition Lambda function, and the ProcessDevicePositionFirehose delivery stream. Complete the following steps to create the rule and attach targets:

  1. On the EventBridge console, create a new rule.
  2. For Name, enter a name (for this post, ProcessDevicePosition).
  3. For Event bus¸ choose default.
  4. For Rule type¸ select Rule with an event pattern.
    EventBridge rule detail
  5. For Event source, select AWS events or EventBridge partner events.
    EventBridge event source
  6. For Method, select Use pattern form.
  7. In the Event pattern section, specify AWS services as the source, Amazon Location Service as the specific service, and Location Device Position Event as the event type.
    EventBridge creation method
  8. For Target 1, attach the ProcessDevicePosition Lambda function as a target.
    EventBridge target 1
  9. We use Input transformer to customize the event that is committed to the S3 bucket.
    EventBridge target 1 transformer
  10. Configure Input paths map and Input template to organize the payload into the desired format.
    1. The following code is the input paths map:
      {
          EventType: $.detail.EventType
          TrackerName: $.detail.TrackerName
          DeviceId: $.detail.DeviceId
          SampleTime: $.detail.SampleTime
          ReceivedTime: $.detail.ReceivedTime
          Longitude: $.detail.Position[0]
          Latitude: $.detail.Position[1]
      }

    2. The following code is the input template:
      {
          "EventType":<EventType>,
          "TrackerName":<TrackerName>,
          "DeviceId":<DeviceId>,
          "SampleTime":<SampleTime>,
          "ReceivedTime":<ReceivedTime>,
          "Position":[<Longitude>, <Latitude>]
      }

  11. For Target 2, choose the ProcessDevicePositionFirehose delivery stream as a target.
    EventBridge target 2

This target requires an IAM role that allows one or multiple records to be written to the Firehose delivery stream:

{
    "Version": "2012-10-17",
    "Statement": [
        {
            "Action": [
                "firehose:PutRecord",
                "firehose:PutRecords"
            ],
            "Resource": [
                "arn:aws:firehose:<region>:<account-id>:deliverystream/<delivery-stream-name>"
            ],
            "Effect": "Allow"
        }
    ]
}

Crawl and catalog the data using AWS Glue

After sufficient data has been generated, complete the following steps:

  1. On the AWS Glue console, choose Crawlers in the navigation pane.
  2. Select the crawlers that have been created, location-analytics-glue-crawler-lambda and location-analytics-glue-crawler-firehose.
  3. Choose Run.

The crawlers will automatically classify the data into JSON format, group the records into tables and partitions, and commit associated metadata to the AWS Glue Data Catalog.
Crawlers

  1. When the Last run statuses of both crawlers show as Succeeded, confirm that two tables (lambda and firehose) have been created on the Tables page.

The solution partitions the incoming location data based on the deviceid field. Therefore, as long as there are no new devices or schema changes, the crawlers don’t need to run again. However, if new devices are added, or a different field is used for partitioning, the crawlers need to run again.
Tables

You’re now ready to query the tables using Athena.

Query the data using Athena

Athena is a serverless, interactive analytics service built to analyze unstructured, semi-structured, and structured data where it is hosted. If this is your first time using the Athena console, follow the instructions to set up a query result location in Amazon S3. To query the data with Athena, complete the following steps:

  1. On the Athena console, open the query editor.
  2. For Data source, choose AwsDataCatalog.
  3. For Database, choose location-analytics-glue-database.
  4. On the options menu (three vertical dots), choose Preview Table to query the content of both tables.
    Preview table

The query displays 10 sample positional records currently stored in the table. The following screenshot is an example from previewing the firehose table. The firehose table stores raw, unmodified data from the Amazon Location tracker.
Query results
You can now experiment with geospatial queries.The GeoJSON file for the 2021 London ULEZ expansion is part of the repository, and has already been converted into a query compatible with both Athena tables.

  1. Copy and paste the content from the 1-firehose-athena-ulez-2021-create-view.sql file found in the examples/firehose folder into the query editor.

This query uses the ST_Within geospatial function to determine if a recorded position is inside or outside the ULEZ zone defined by the polygon. A new view called ulezvehicleanalysis_firehose is created with a new column, insidezone, which captures whether the recorded position exists within the zone.

A simple Python utility is provided, which converts the polygon features found in the downloaded GeoJSON file into ST_Polygon strings based on the well-known text format that can be used directly in an Athena query.

  1. Choose Preview View on the ulezvehicleanalysis_firehose view to explore its content.
    Preview view

You can now run queries against this view to gain overarching insights.

  1. Copy and paste the content from the 2-firehose-athena-ulez-2021-query-days-in-zone.sql file found in the examples/firehose folder into the query editor.

This query establishes the total number of days each vehicle has entered ULEZ, and what the expected total charges would be. The query has been parameterized using the ? placeholder character. Parameterized queries allow you to rerun the same query with different parameter values.

  1. Enter the daily fee amount for Parameter 1, then run the query.
    Query editor

The results display each vehicle, the total number of days spent in the proposed ULEZ, and the total charges based on the daily fee you entered.
Query results
You can repeat this exercise using the lambda table. Data in the lambda table is augmented with additional vehicle details present in the vehicle maintenance DynamoDB table at the time it is processed by the Lambda function. The solution supports the following fields:

  • MeetsEmissionStandards (Boolean)
  • Mileage (Number)
  • PurchaseDate (String, in YYYY-MM-DD format)

You can also enrich the new data as it arrives.

  1. On the DynamoDB console, find the vehicle maintenance table under Tables. The table name is provided as output VehicleMaintenanceDynamoTable in the deployed CloudFormation stack.
  2. Choose Explore table items to view the content of the table.
  3. Choose Create item to create a new record for a vehicle.
    Create item
  4. Enter DeviceId (such as vehicle1 as a String), PurchaseDate (such as 2005-10-01 as a String), Mileage (such as 10000 as a Number), and MeetsEmissionStandards (with a value such as False as Boolean).
  5. Choose Create item to create the record.
    Create item
  6. Duplicate the newly created record with additional entries for other vehicles (such as for vehicle2 or vehicle3), modifying the values of the attributes slightly each time.
  7. Rerun the location-analytics-glue-crawler-lambda AWS Glue crawler after new data has been generated to confirm that the update to the schema with new fields is registered.
  8. Copy and paste the content from the 1-lambda-athena-ulez-2021-create-view.sql file found in the examples/lambda folder into the query editor.
  9. Preview the ulezvehicleanalysis_lambda view to confirm that the new columns have been created.

If errors such as Column 'mileage' cannot be resolved are displayed, the data enrichment is not taking place, or the AWS Glue crawler has not yet detected updates to the schema.

If the Preview table option is only returning results from before you created records in the DynamoDB table, return the query results in descending order using sampletime (for example, order by sampletime desc limit 100;).
Query results
Now we focus on the vehicles that don’t currently meet emissions standards, and order the vehicles in descending order based on the mileage per year (calculated using the latest mileage / age of vehicle in years).

  1. Copy and paste the content from the 2-lambda-athena-ulez-2021-query-days-in-zone.sql file found in the examples/lambda folder into the query editor.
    Query results

In this example, we can see that out of our fleet of vehicles, five have been reported as not meeting emission standards. We can also see the vehicles that have accumulated high mileage per year, and the number of days spent in the proposed ULEZ. The fleet operator may now decide to prioritize these vehicles for replacement. Because location data is enriched with the most up-to-date vehicle maintenance data at the time it is ingested, you can further evolve these queries to run over a defined time window. For example, you could factor in mileage changes within the past year.

Due to the dynamic nature of the data enrichment, any new data being committed to Amazon S3, along with the query results, will be altered as and when records are updated in the DynamoDB vehicle maintenance table.

Clean up

Refer to the instructions in the README file to clean up the resources provisioned for this solution.

Conclusion

This post demonstrated how you can use Amazon Location, EventBridge, Lambda, Amazon Data Firehose, and Amazon S3 to build a location-aware data pipeline, and use the collected device position data to drive analytical insights using AWS Glue and Athena. By tracking these assets in real time and storing the results, companies can derive valuable insights on how effectively their fleets are being utilized and better react to changes in the future. You can now explore extending this sample code with your own device tracking data and analytics requirements.


About the Authors

Alan Peaty is a Senior Partner Solutions Architect at AWS. Alan helps Global Systems Integrators (GSIs) and Global Independent Software Vendors (GISVs) solve complex customer challenges using AWS services. Prior to joining AWS, Alan worked as an architect at systems integrators to translate business requirements into technical solutions. Outside of work, Alan is an IoT enthusiast and a keen runner who loves to hit the muddy trails of the English countryside.

Parag Srivastava is a Solutions Architect at AWS, helping enterprise customers with successful cloud adoption and migration. During his professional career, he has been extensively involved in complex digital transformation projects. He is also passionate about building innovative solutions around geospatial aspects of addresses.

Build a RAG data ingestion pipeline for large-scale ML workloads

Post Syndicated from Randy DeFauw original https://aws.amazon.com/blogs/big-data/build-a-rag-data-ingestion-pipeline-for-large-scale-ml-workloads/

For building any generative AI application, enriching the large language models (LLMs) with new data is imperative. This is where the Retrieval Augmented Generation (RAG) technique comes in. RAG is a machine learning (ML) architecture that uses external documents (like Wikipedia) to augment its knowledge and achieve state-of-the-art results on knowledge-intensive tasks. For ingesting these external data sources, Vector databases have evolved, which can store vector embeddings of the data source and allow for similarity searches.

In this post, we show how to build a RAG extract, transform, and load (ETL) ingestion pipeline to ingest large amounts of data into an Amazon OpenSearch Service cluster and use Amazon Relational Database Service (Amazon RDS) for PostgreSQL with the pgvector extension as a vector data store. Each service implements k-nearest neighbor (k-NN) or approximate nearest neighbor (ANN) algorithms and distance metrics to calculate similarity. We introduce the integration of Ray into the RAG contextual document retrieval mechanism. Ray is an open source, Python, general purpose, distributed computing library. It allows distributed data processing to generate and store embeddings for a large amount of data, parallelizing across multiple GPUs. We use a Ray cluster with these GPUs to run parallel ingest and query for each service.

In this experiment, we attempt to analyze the following aspects for OpenSearch Service and the pgvector extension on Amazon RDS:

  • As a vector store, the ability to scale and handle a large dataset with tens of millions of records for RAG
  • Possible bottlenecks in the ingest pipeline for RAG
  • How to achieve optimal performance in ingestion and query retrieval times for OpenSearch Service and Amazon RDS

To understand more about vector data stores and their role in building generative AI applications, refer to The role of vector datastores in generative AI applications.

Overview of OpenSearch Service

OpenSearch Service is a managed service for secure analysis, search, and indexing of business and operational data. OpenSearch Service supports petabyte-scale data with the ability to create multiple indexes on text and vector data. With optimized configuration, it aims for high recall for the queries. OpenSearch Service supports ANN as well as exact k-NN search. OpenSearch Service supports a selection of algorithms from the NMSLIB, FAISS, and Lucene libraries to power the k-NN search. We created the ANN index for OpenSearch with the Hierarchical Navigable Small World (HNSW) algorithm because it’s regarded as a better search method for large datasets. For more information on the choice of index algorithm, refer to Choose the k-NN algorithm for your billion-scale use case with OpenSearch.

Overview of Amazon RDS for PostgreSQL with pgvector

The pgvector extension adds an open source vector similarity search to PostgreSQL. By utilizing the pgvector extension, PostgreSQL can perform similarity searches on vector embeddings, providing businesses with a speedy and proficient solution. pgvector provides two types of vector similarity searches: exact nearest neighbor, which results with 100% recall, and approximate nearest neighbor (ANN), which provides better performance than exact search with a trade-off on recall. For searches over an index, you can choose how many centers to use in the search, with more centers providing better recall with a trade-off of performance.

Solution overview

The following diagram illustrates the solution architecture.

Let’s look at the key components in more detail.

Dataset

We use OSCAR data as our corpus and the SQUAD dataset to provide sample questions. These datasets are first converted to Parquet files. Then we use a Ray cluster to convert the Parquet data to embeddings. The created embeddings are ingested to OpenSearch Service and Amazon RDS with pgvector.

OSCAR (Open Super-large Crawled Aggregated corpus) is a huge multilingual corpus obtained by language classification and filtering of the Common Crawl corpus using the ungoliant architecture. Data is distributed by language in both original and deduplicated form. The Oscar Corpus dataset is approximately 609 million records and takes up about 4.5 TB as raw JSONL files. The JSONL files are then converted to Parquet format, which minimizes the total size to 1.8 TB. We further scaled the dataset down to 25 million records to save time during ingestion.

SQuAD (Stanford Question Answering Dataset) is a reading comprehension dataset consisting of questions posed by crowd workers on a set of Wikipedia articles, where the answer to every question is a segment of text, or span, from the corresponding reading passage, or the question might be unanswerable. We use SQUAD, licensed as CC-BY-SA 4.0, to provide sample questions. It has approximately 100,000 questions with over 50,000 unanswerable questions written by crowd workers to look similar to answerable ones.

Ray cluster for ingestion and creating vector embeddings

In our testing, we found that the GPUs make the biggest impact to performance when creating the embeddings. Therefore, we decided to use a Ray cluster to convert our raw text and create the embeddings. Ray is an open source unified compute framework that enables ML engineers and Python developers to scale Python applications and accelerate ML workloads. Our cluster consisted of 5 g4dn.12xlarge Amazon Elastic Compute Cloud (Amazon EC2) instances. Each instance was configured with 4 NVIDIA T4 Tensor Core GPUs, 48 vCPU, and 192 GiB of memory. For our text records, we ended up chunking each into 1,000 pieces with a 100-chunk overlap. This breaks out to approximately 200 per record. For the model used to create embeddings, we settled on all-mpnet-base-v2 to create a 768-dimensional vector space.

Infrastructure setup

We used the following RDS instance types and OpenSearch service cluster configurations to set up our infrastructure.

The following are our RDS instance type properties:

  • Instance type: db.r7g.12xlarge
  • Allocated storage: 20 TB
  • Multi-AZ: True
  • Storage encrypted: True
  • Enable Performance Insights: True
  • Performance Insight retention: 7 days
  • Storage type: gp3
  • Provisioned IOPS: 64,000
  • Index type: IVF
  • Number of lists: 5,000
  • Distance function: L2

The following are our OpenSearch Service cluster properties:

  • Version: 2.5
  • Data nodes: 10
  • Data node instance type: r6g.4xlarge
  • Primary nodes: 3
  • Primary node instance type: r6g.xlarge
  • Index: HNSW engine: nmslib
  • Refresh interval: 30 seconds
  • ef_construction: 256
  • m: 16
  • Distance function: L2

We used large configurations for both the OpenSearch Service cluster and RDS instances to avoid any performance bottlenecks.

We deploy the solution using an AWS Cloud Development Kit (AWS CDK) stack, as outlined in the following section.

Deploy the AWS CDK stack

The AWS CDK stack allows us to choose OpenSearch Service or Amazon RDS for ingesting data.

Pre-requsities

Before proceeding with the installation, under cdk, bin, src.tc, change the Boolean values for Amazon RDS and OpenSearch Service to either true or false depending on your preference.

You also need a service-linked AWS Identity and Access Management (IAM) role for the OpenSearch Service domain. For more details, refer to Amazon OpenSearch Service Construct Library. You can also run the following command to create the role:

aws iam create-service-linked-role --aws-service-name es.amazonaws.com

npm install
cdk deploy

This AWS CDK stack will deploy the following infrastructure:

  • A VPC
  • A jump host (inside the VPC)
  • An OpenSearch Service cluster (if using OpenSearch service for ingestion)
  • An RDS instance (if using Amazon RDS for ingestion)
  • An AWS Systems Manager document for deploying the Ray cluster
  • An Amazon Simple Storage Service (Amazon S3) bucket
  • An AWS Glue job for converting the OSCAR dataset JSONL files to Parquet files
  • Amazon CloudWatch dashboards

Download the data

Run the following commands from the jump host:

stack_name="RAGStack"
output_key="S3bucket"

export AWS_REGION=$(curl -s http://169.254.169.254/latest/meta-data/placement/availability-zone | sed 's/\(.*\)[a-z]/\1/')
aws configure set region $AWS_REGION

bucket_name=$(aws cloudformation describe-stacks --stack-name "$stack_name" --query "Stacks[0].Outputs[?OutputKey=='bucketName'].OutputValue" --output text )

Before cloning the git repo, make sure you have a Hugging Face profile and access to the OSCAR data corpus. You need to use the user name and password for cloning the OSCAR data:

GIT_LFS_SKIP_SMUDGE=1 git clone https://huggingface.co/datasets/oscar-corpus/OSCAR-2301
cd OSCAR-2301
git lfs pull --include en_meta
cd en_meta
for F in `ls *.zst`; do zstd -d $F; done
rm *.zst
cd ..
aws s3 sync en_meta s3://$bucket_name/oscar/jsonl/

Convert JSONL files to Parquet

The AWS CDK stack created the AWS Glue ETL job oscar-jsonl-parquet to convert the OSCAR data from JSONL to Parquet format.

After you run the oscar-jsonl-parquet job, the files in Parquet format should be available under the parquet folder in the S3 bucket.

Download the questions

From your jump host, download the questions data and upload it to your S3 bucket:

stack_name="RAGStack"
output_key="S3bucket"

export AWS_REGION=$(curl -s http://169.254.169.254/latest/meta-data/placement/availability-zone | sed 's/\(.*\)[a-z]/\1/')
aws configure set region $AWS_REGION

bucket_name=$(aws cloudformation describe-stacks --stack-name "$stack_name" --query "Stacks[0].Outputs[?OutputKey=='bucketName'].OutputValue" --output text )

wget https://rajpurkar.github.io/SQuAD-explorer/dataset/train-v2.0.json
cat train-v2.0.json| jq '.data[].paragraphs[].qas[].question' > questions.csv
aws s3 cp questions.csv s3://$bucket_name/oscar/questions/questions.csv

Set up the Ray cluster

As part of the AWS CDK stack deployment, we created a Systems Manager document called CreateRayCluster.

To run the document, complete the following steps:

  1. On the Systems Manager console, under Documents in the navigation pane, choose Owned by Me.
  2. Open the CreateRayCluster document.
  3. Choose Run.

The run command page will have the default values populated for the cluster.

The default configuration requests 5 g4dn.12xlarge. Make sure your account has limits to support this. The relevant service limit is Running On-Demand G and VT instances. The default for this is 64, but this configuration requires 240 CPUS.

  1. After you review the cluster configuration, select the jump host as the target for the run command.

This command will perform the following steps:

  • Copy the Ray cluster files
  • Set up the Ray cluster
  • Set up the OpenSearch Service indexes
  • Set up the RDS tables

You can monitor the output of the commands on the Systems Manager console. This process will take 10–15 minutes for the initial launch.

Run ingestion

From the jump host, connect to the Ray cluster:

sudo -i
cd /rag
ray attach llm-batch-inference.yaml

The first time connecting to the host, install the requirements. These files should already be present on the head node.

pip install -r requirements.txt

For either of the ingestion methods, if you get an error like the following, it’s related to expired credentials. The current workaround (as of this writing) is to place credential files in the Ray head node. To avoid security risks, don’t use IAM users for authentication when developing purpose-built software or working with real data. Instead, use federation with an identity provider such as AWS IAM Identity Center (successor to AWS Single Sign-On).

OSError: When reading information for key 'oscar/parquet_data/part-00497-f09c5d2b-0e97-4743-ba2f-1b2ad4f36bb1-c000.snappy.parquet' in bucket 'ragstack-s3bucket07682993-1e3dic0fvr3rf': AWS Error [code 15]: No response body.

Usually, the credentials are stored in the file ~/.aws/credentials on Linux and macOS systems, and %USERPROFILE%\.aws\credentials on Windows, but these are short-term credentials with a session token. You also can’t override the default credential file, and so you need to create long-term credentials without the session token using a new IAM user.

To create long-term credentials, you need to generate an AWS access key and AWS secret access key. You can do that from the IAM console. For instructions, refer to Authenticate with IAM user credentials.

After you create the keys, connect to the jump host using Session Manager, a capability of Systems Manager, and run the following command:

$ aws configure
AWS Access Key ID [None]: <Your AWS Access Key>
AWS Secret Access Key [None]: <Your AWS Secret access key>
Default region name [None]: us-east-1
Default output format [None]: json

Now you can rerun the ingestion steps.

Ingest data into OpenSearch Service

If you’re using OpenSearch service, run the following script to ingest the files:

export AWS_REGION=$(curl -s http://169.254.169.254/latest/meta-data/placement/availability-zone | sed 's/\(.*\)[a-z]/\1/')
aws configure set region $AWS_REGION

python embedding_ray_os.py

When it’s complete, run the script that runs simulated queries:

python query_os.py

Ingest data into Amazon RDS

If you’re using Amazon RDS, run the following script to ingest the files:

export AWS_REGION=$(curl -s http://169.254.169.254/latest/meta-data/placement/availability-zone | sed 's/\(.*\)[a-z]/\1/')
aws configure set region $AWS_REGION

python embedding_ray_rds.py

When it’s complete, make sure to run a full vacuum on the RDS instance.

Then run the following script to run simulated queries:

python query_rds.py

Set up the Ray dashboard

Before you set up the Ray dashboard, you should install the AWS Command Line Interface (AWS CLI) on your local machine. For instructions, refer to Install or update the latest version of the AWS CLI.

Complete the following steps to set up the dashboard:

  1. Install the Session Manager plugin for the AWS CLI.
  2. In the Isengard account, copy the temporary credentials for bash/zsh and run in your local terminal.
  3. Create a session.sh file in your machine and copy the following content to the file:
#!/bin/bash
echo Starting session to $1 to forward to port $2 using local port $3
aws ssm start-session --target $1 --document-name AWS-StartPortForwardingSession --parameters ‘{“portNumber”:[“‘$2’“], “localPortNumber”:[“‘$3’“]}'
  1. Change the directory to where this session.sh file is stored.
  2. Run the command Chmod +x to give executable permission to the file.
  3. Run the following command:
./session.sh <Ray cluster head node instance ID> 8265 8265

For example:

./session.sh i-021821beb88661ba3 8265 8265

You will see a message like the following:

Starting session to i-021821beb88661ba3 to forward to port 8265 using local port 8265

Starting session with SessionId: abcdefgh-Isengard-0d73d992dfb16b146
Port 8265 opened for sessionId abcdefgh-Isengard-0d73d992dfb16b146.
Waiting for connections...

Open a new tab in your browser and enter localhost:8265.

You will see the Ray dashboard and statistics of the jobs and cluster running. You can track metrics from here.

For example, you can use the Ray dashboard to observe load on the cluster. As shown in the following screenshot, during ingest, the GPUs are running close to 100% utilization.

You can also use the RAG_Benchmarks CloudWatch dashboard to see the ingestion rate and query response times.

Extensibility of the solution

You can extend this solution to plug in other AWS or third-party vector stores. For every new vector store, you will need to create scripts for configuring the data store as well as ingesting data. The rest of the pipeline can be reused as needed.

Conclusion

In this post, we shared an ETL pipeline that you can use to put vectorized RAG data in both OpenSearch Service as well as Amazon RDS with the pgvector extension as vector datastores. The solution used a Ray cluster to provide the necessary parallelism to ingest a large data corpus. You can use this methodology to integrate any vector database of your choice to build RAG pipelines.


About the Authors

Randy DeFauw is a Senior Principal Solutions Architect at AWS. He holds an MSEE from the University of Michigan, where he worked on computer vision for autonomous vehicles. He also holds an MBA from Colorado State University. Randy has held a variety of positions in the technology space, ranging from software engineering to product management. He entered the big data space in 2013 and continues to explore that area. He is actively working on projects in the ML space and has presented at numerous conferences, including Strata and GlueCon.

David Christian is a Principal Solutions Architect based out of Southern California. He has his bachelor’s in Information Security and a passion for automation. His focus areas are DevOps culture and transformation, infrastructure as code, and resiliency. Prior to joining AWS, he held roles in security, DevOps, and system engineering, managing large-scale private and public cloud environments.

Prachi Kulkarni is a Senior Solutions Architect at AWS. Her specialization is machine learning, and she is actively working on designing solutions using various AWS ML, big data, and analytics offerings. Prachi has experience in multiple domains, including healthcare, benefits, retail, and education, and has worked in a range of positions in product engineering and architecture, management, and customer success.

Richa Gupta is a Solutions Architect at AWS. She is passionate about architecting end-to-end solutions for customers. Her specialization is machine learning and how it can be used to build new solutions that lead to operational excellence and drive business revenue. Prior to joining AWS, she worked in the capacity of a Software Engineer and Solutions Architect, building solutions for large telecom operators. Outside of work, she likes to explore new places and loves adventurous activities.

Cerebras WSE-3 AI Chip Launched 56x Larger than NVIDIA H100

Post Syndicated from Patrick Kennedy original https://www.servethehome.com/cerebras-wse-3-ai-chip-launched-56x-larger-than-nvidia-h100-vertiv-supermicro-hpe-qualcomm/

The Cerebras WSE-3 is a giant AI training engineering marvel with 44GB of on-chip memory, 900,000 cores, and 125PF of AI compute

The post Cerebras WSE-3 AI Chip Launched 56x Larger than NVIDIA H100 appeared first on ServeTheHome.

Security updates for Wednesday

Post Syndicated from jzb original https://lwn.net/Articles/965278/

Security updates have been issued by Fedora (edk2, freeipa, kernel, and liblas), Oracle (kernel), Red Hat (docker, edk2, kernel, kernel-rt, and kpatch-patch), SUSE (axis, fontforge, gnutls, java-1_8_0-openjdk, kernel, python3, sudo, and zabbix), and Ubuntu (dotnet7, dotnet8, libgoogle-gson-java, openssl, and ovn).

[$] A new filesystem for pidfds

Post Syndicated from corbet original https://lwn.net/Articles/963749/

The pidfd abstraction is a Linux-specific
way of referring to processes that avoids the race conditions inherent in
Unix process ID numbers. Since a pidfd is a file descriptor, it needs a
filesystem to implement the usual operations performed on files. As the
use of pidfds has grown, they have stressed the limits of the simple
filesystem that was created for them. Christian Brauner has created
a new filesystem for pidfds
that seems likely to debut in the 6.9
kernel, but it ran into a little bump along the way, demonstrating that
things you cannot see can still hurt you.

Our commitment to OpenTelemetry

Post Syndicated from Goutham Veeramachaneni (@Gouthamve) and Carrie Edwards (@carrieedwards) original https://prometheus.io/blog/2024/03/14/commitment-to-opentelemetry/

The OpenTelemetry project is an Observability framework and toolkit designed to create and manage telemetry data such as traces, metrics, and logs. It is gaining widespread adoption due to its consistent specification between signals and promise to reduce vendor lock-in which is something that we’re excited about.

Looking back at 2023

Over the past few years, we have collaborated with the OpenTelemetry community to make sure that OpenTelemetry and Prometheus support each other bidirectionally. This led to the drafting of the official specification to convert between the two systems, as well as the implementations that allow you to ingest Prometheus metrics into OpenTelemetry Collector and vice-versa.

Since then, we have spent a significant amount of time understanding the challenges faced by OpenTelemetry users when storing their metrics in Prometheus and based on those, explored how we can address them. Some of the changes proposed need careful considerations to avoid breaking either side’s operating promises, e.g. supporting both push and pull. At PromCon Berlin 2023, we attempted to summarize our ideas in one of the talks.

At our dev summit in Berlin, we spent the majority of our time discussing these changes and our general stance on OpenTelemetry in depth, and the broad consensus is that we want “to be the default store for OpenTelemetry metrics”!

We’ve formed a core group of developers to lead this initiative, and we are going to release a Prometheus 3.0 in 2024 with OTel support as one of its more important features. Here’s a sneak peek at what’s coming in 2024.

The year ahead

OTLP Ingestion GA

In Prometheus v2.47.0, released on 6th September 2023, we added experimental support for OTLP ingestion in Prometheus. We’re constantly improving this and we plan to add support for staleness and make it a stable feature. We will also mark our support for out-of-order ingestion as stable. This involves also GA-ing our support for native / exponential histograms.

Support UTF-8 metric and label names

OpenTelemetry semantic conventions push for “.” to be the namespacing character. For example, http.server.request.duration. However, Prometheus currently requires a more limited character set, which means we convert the metric to http_server_request_duration when ingesting it into Prometheus.

This causes unnecessary dissonance and we’re working on removing this limitation by adding UTF-8 support for all labels and metric names. The progress is tracked here.

Native support for resource attributes

OpenTelemetry differentiates between metric attributes (labels to identify the metric itself, like http.status_code) and resource attributes (labels to identify the source of the metrics, like k8s.pod.name), while Prometheus has a more flat label schema. This leads to many usability issues that are detailed here.

We’re exploring several solutions to this problem from many fronts (Query, UX, storage, etc.), but our goal is to make it quite easy to filter and group on resource attributes. This is a work in progress, and feedback and help are wanted!

OTLP export in the ecosystem

Prometheus remote write is supported by most of the leading Observability projects and vendors already. However, OpenTelemetry Protocol (OTLP) is gaining prominence and we would like to support it across the Prometheus ecosystem.

We would like to add support for it to the Prometheus server, SDKs and the exporters. This would mean that any service instrumented with the Prometheus SDKs will also be able to push OTLP and it will unlock the rich Prometheus exporter ecosystem for OpenTelemetry users.

However, we intend to keep and develop the OpenMetrics exposition format as an optimized / simplified format for Prometheus and pull-based use-cases.

Delta temporality

The OpenTelemetry project also supports Delta temporality which has some use-cases for the Observability ecosystem. We have a lot of Prometheus users still running statsd and using the statsd_exporter for various reasons.

We would like to support the Delta temporality of OpenTelemetry in the Prometheus server and are working towards it.

Call for contributions!

As you can see, a lot of new and exciting things are coming to Prometheus! If working in the intersection between two of the most relevant open-source projects around observability sounds challenging and interesting to you, we’d like to have you on board!

This year there is also a change of governance in the works that will make the process of becoming a maintainer easier than ever! If you ever wanted to have an impact on Prometheus, now is a great time to get started.

Our first focus has always been to be as open and transparent as possible on how we are organizing all the work above so that you can also contribute. We are looking for contributors to support this initiative and help implement these features. Check out the Prometheus 3.0 public board and Prometheus OTel support milestone to track the progress of the feature development and see ways that you can contribute.

Conclusion

Some of the changes proposed are large and invasive or involve a fundamental departure from the original data model of Prometheus. However, we plan to introduce these gracefully so that Prometheus 3.0 will have no major breaking changes and most of the users can upgrade without impact.

We are excited to embark on this new chapter for Prometheus and would love your feedback on the changes suggested.

Today’s hardware vulnerability: register file data sampling

Post Syndicated from corbet original https://lwn.net/Articles/965167/

The mainline kernel has just received a set of commits addressing the
“register file data sampling” hardware vulnerability.

RFDS may allow a malicious actor to infer data values previously
used in floating point registers, vector registers, or integer
registers. RFDS does not provide the ability to choose which data
is inferred

Only Atom cores are affected, but those cores can be found inside a number
of processors. See this documentation
commit
for more information.

Infrastructure as Code development with Amazon CodeWhisperer

Post Syndicated from Eric Z. Beard original https://aws.amazon.com/blogs/devops/infrastructure-as-code-development-with-amazon-codewhisperer/

At re:Invent in 2023, AWS announced Infrastructure as Code (IaC) support for Amazon CodeWhisperer. CodeWhisperer is an AI-powered productivity tool for the IDE and command line that helps software developers to quickly and efficiently create cloud applications to run on AWS. Languages currently supported for IaC are YAML and JSON for AWS CloudFormation, Typescript and Python for AWS CDK, and HCL for HashiCorp Terraform. In addition to providing code recommendations in the editor, CodeWhisperer also features a security scanner that alerts the developer to potentially insecure infrastructure code, and offers suggested fixes than can be applied with a single click.

In this post, we will walk you through some common scenarios and show you how to get the most out of CodeWhisperer in the IDE. CodeWhisperer is supported by several IDEs, such as Visual Studio Code and JetBrains. For the purposes of this post, we’ll focus on Visual Studio Code. There are a few things that you need to follow along with the examples, listed in the prerequisites section below.

Prerequisites

CloudFormation

Now that you have the toolkit configured, open a new source file with the yaml extension. Since YAML files can represent a wide variety of different configuration file types, it helps to add the AWSTemplateFormatVersion: '2010-09-09' header to the file to let CodeWhisperer know that you are editing a CloudFormation file. Just typing the first few characters of that header is likely to result in a recommendation from CodeWhisperer. Press TAB to accept recommendations and Escape to ignore them.

AWSTemplateFormatVersion header

AWSTemplateFormatVersion header

If you have a good idea about the various resources you want to include in your template, include them in a top level Description field. This will help CodeWhisperer to understand the relationships between the resources you will create in the file. In the example below, we describe the stack we want as a “VPC with public and private subnets”. You can be more descriptive if you want, using a multi-line YAML string to add more specific details about the resources you want to create.

VPC1

Creating a CloudFormation template with a description

After accepting that recommendation for the parameters, you can continue to create resources.

VPC2

Creating CloudFormation resources

You can also trigger recommendations with inline comments and descriptive logical IDs if you want to create one resource at a time. The more code you have in the file, the more CodeWhisperer will understand from context what you are trying to achieve.

CDK

It’s also possible to create CDK code using CodeWhisperer. In the example below, we started with a CDK project using cdk init, wrote a few lines of code to create a VPC in a TypeScript file, and CodeWhisperer proposed some code suggestions using what we started to write. After accepting the suggestion, it is possible to customize the code to fit your needs. CodeWhisperer will learn from your coding style and make more precise suggestions as you add more code to the project.

CDK

Create a CDK stack

You can choose whether you want to get suggestions that include code with references with the professional version of CodeWhisperer. If you choose to get the references, you can find them in the Code Reference Log. These references let you know when the code recommendation was a near exact match for code in an open source repository, allowing you to inspect the license and decide if you want to use that code or not.

References

References

Terraform HCL

After a close collaboration between teams at Hashicorp and AWS, Terraform HashiCorp Configuration Language (HCL) is also supported by CodeWhisperer. CodeWhisperer recommendations are triggered by comments in the file. In this example, we repeat a prompt that is similar to what we used with CloudFormation and CDK.

Terraform

Terraform code suggestion

Security Scanner

In addition to CodeWhisperer recommendations, the toolkit configuration also includes a built in security scanner. Considering that the resulting code can be edited and combined with other preexisting code, it’s good practice to scan the final result to see if there are any best-practice security recommendations that can be applied.

Expand the CodeWhisperer section of the AWS Toolkit to see the “Run Security Scan” button. Click it to initiate a scan, which might take up to a minute to run. In the example below, we defined an S3 bucket that can be read by anyone on the internet.

Security Scanner

Security scanner

Once the security scan completes, the code with issues is underlined and each suggestion is added to the ‘Problems’ tab. Click on any of those to get more details.

Scan results

Scan results

CodeWhisperer provides a clickable link to get more information about the vulnerability, and what you can do to fix it.

Scanner link

Scanner Link

Conclusion

The integration of generative AI tools like Amazon CodeWhisperer are transforming the landscape of cloud application development. By supporting Infrastructure as Code (IaC) languages such as CloudFormation, CDK, and Terraform HCL, CodeWhisperer is expanding its reach beyond traditional development roles. This advancement is pivotal in merging runtime and infrastructure code into a cohesive unit, significantly enhancing productivity and collaboration in the development process. The inclusion of IaC enables a broader range of professionals, especially Site Reliability Engineers (SREs), to actively engage in application development, automating and optimizing infrastructure management tasks more efficiently.

CodeWhisperer’s capability to perform security scans on the generated code aligns with the critical objectives of system reliability and security, essential for both developers and SREs. By providing insights into security best practices, CodeWhisperer enables robust and secure infrastructure management on the AWS cloud. This makes CodeWhisperer a valuable tool not just for developers, but as a comprehensive solution that bridges different technical disciplines, fostering a collaborative environment for innovation in cloud-based solutions.

Bio

Eric Beard is a Solutions Architect at AWS specializing in DevOps, CI/CD, and Infrastructure as Code, the author of the AWS Sysops Cookbook, and an editor for the AWS DevOps blog channel. When he’s not helping customers to design Well-Architected systems on AWS, he is usually playing tennis or watching tennis.

Amar Meriche is a Sr Technical Account Manager at AWS in Paris. He helps his customers improve their operational posture through advocacy and guidance, and is an active member of the DevOps and IaC community at AWS. He’s passionate about helping customers use the various IaC tools available at AWS following best practices.

AWS completes the annual Dubai Electronic Security Centre certification audit to operate as a Tier 1 cloud service provider in the Emirate of Dubai

Post Syndicated from Vishal Pabari original https://aws.amazon.com/blogs/security/aws-completes-the-annual-dubai-electronic-security-centre-certification-audit-to-operate-as-a-tier-1-cloud-service-provider-in-the-emirate-of-dubai/

We’re excited to announce that Amazon Web Services (AWS) has completed the annual Dubai Electronic Security Centre (DESC) certification audit to operate as a Tier 1 cloud service provider (CSP) for the AWS Middle East (UAE) Region.

This alignment with DESC requirements demonstrates our continuous commitment to adhere to the heightened expectations for CSPs. Government customers of AWS can run their applications in AWS Cloud-certified Regions with confidence.

The independent third-party auditor BSI evaluated AWS on behalf of DESC on January 23, 2024. The Certificate of Compliance that illustrates the compliance status of AWS is available through AWS Artifact. AWS Artifact is a self-service portal for on-demand access to AWS compliance reports. Sign in to AWS Artifact in the AWS Management Console, or learn more at Getting Started with AWS Artifact.

The certification includes 25 additional services in scope, for a total of 87 services. This is a 40% increase in the number of services in the Middle East (UAE) Region that are in scope of the DESC CSP certification. For up-to-date information, including when additional services are added, see the AWS Services in Scope by Compliance Program webpage and choose DESC CSP.

AWS strives to continuously bring services into the scope of its compliance programs to help you meet your architectural and regulatory needs. If you have questions or feedback about DESC compliance, reach out to your AWS account team.

To learn more about our compliance and security programs, see AWS Compliance Programs. As always, we value your feedback and questions; reach out to the AWS Compliance team through the Contact Us page.

If you have feedback about this post, submit comments in the Comments section below.

Vishal Pabari

Vishal Pabari

Vishal is a Security Assurance Program Manager at AWS, based in London, UK. Vishal is responsible for third-party and customer audits, attestations, certifications, and assessments across EMEA. Vishal previously worked in risk and control, and technology in the financial services industry.

Patch Tuesday – March 2024

Post Syndicated from Adam Barnett original https://blog.rapid7.com/2024/03/12/patch-tuesday-march-2024/

Patch Tuesday - March 2024

Microsoft is addressing 60 vulnerabilities this March 2024 Patch Tuesday. Microsoft indicated that they aren’t aware of prior public disclosure or exploitation in the wild for any of the vulnerabilities patched today, which means no new additions to CISA KEV at time of writing. Microsoft is patching a single critical remote code execution (RCE) in Windows, which could allow virtual machine escape from a Hyper-V guest. Four browser vulnerabilities were published separately this month, and are not included in the total.

Windows Hyper-V: critical RCE VM escape

Attackers hoping to escape from a Hyper-V guest virtual machine (VM) and achieve RCE on the Hyper-V host will be interested in CVE-2024-21407. Microsoft describes attack complexity as high: an attacker must first gather information specific to the environment and carry out unspecified preparatory work. Exploitation is via specially crafted file operation requests on the VM to hardware resources on the VM. Every supported version of Windows receives a patch. The advisory describes that no privileges are required for exploitation of the Hyper-V host, although an attacker will presumably need an existing foothold on a guest VM.

Exchange: RCE

A single Exchange vulnerability receives a patch this month. Microsoft describes CVE-2024-26198 as a RCE vulnerability for Exchange, where an attacker places a specially-crafted DLL file into a network share or other file-sharing resource, and convinces the user to open it. Although the FAQ on the advisory asks: “What is the target context of the remote code execution?”, the answer boils down to ”[exploitation] results in loading a malicious DLL”. Since the context of the user opening the malicious file is not specified — an Exchange admin? a user running a mail client connecting to Exchange? something else altogether? — it remains unclear what an attacker might be able to achieve.

It remains vitally important to patch any on-premises instances of Exchange, a perennial attacker favourite. Exchange 2016 admins who were dismayed by the lack of patch for last month’s CVE-2024-21410 may feel somewhat reassured that Microsoft has issued a patch which claims to fully remediate this month’s CVE-2024-26198, but in the absence of any explicit advice to the contrary, a fully-patched Exchange 2016 remains unprotected against CVE-2024-21410 unless the guidance on that advisory is followed.

SharePoint: arbitrary code execution

SharePoint receives a patch for CVE-2024-21426, which Microsoft describes as RCE via the attacker convincing a user to open a malicious file. Although the context of code execution isn’t stated in the advisory, exploitation is local to the user, and could lead to a total loss of confidentiality, integrity, and availability, including downtime for the affected environment.

Azure Kubernetes Service Confidential Containers: confidentiality impact

Azure Kubernetes admins should take note of CVE-2024-21400, which allows an unauthenticated attacker to take over confidential guests and containers, with other outcomes including credential theft and resource impact beyond the scope managed by the Azure Kubernetes Service Confidential Containers (AKSCC). Microsoft describes AKSCC as providing a set of features and capabilities to further secure standard container workloads when working with sensitive data such as PII. The advisory describes additional steps for remediation beyond merely patching AKSCC, including upgrading to the latest version of the az confcom Azure CLI confidential computing extension and Kata Image.

Windows 11: compressed folder tampering

Defenders responsible for Windows 11 assets can protect assets against exploitation of CVE-2024-26185, which Microsoft describes as a compressed folder tampering vulnerability. The advisory is sparse on detail, so while we know that an attacker must convince the user to open a specially crafted file, it’s not clear what the outcome of successful exploitation might be. Since the only impact appears to be to integrity, it’s possible that an attacker could modify a compressed folder but not necessarily read from it. Microsoft expects that exploitation is more likely.

Windows Print Spooler: elevation to SYSTEM

Another site of “exploitation more likely” vulnerabilities this month: the Windows Print Spooler service. A local attacker who successfully exploits CVE-2024-21433 via winning a race condition could elevate themselves to SYSTEM privileges.

Exploitation in the wild: status updates

In the days following February 2024 Patch Tuesday, Microsoft announced several updates where the known exploited status of more than one vulnerability changed, as noted by Rapid7. It remains to be seen if those changes were exceptional or the start of a pattern.

Microsoft products lifecycle review

There are no significant changes to the lifecycle phase of Microsoft products this month.

Summary Charts

Patch Tuesday - March 2024
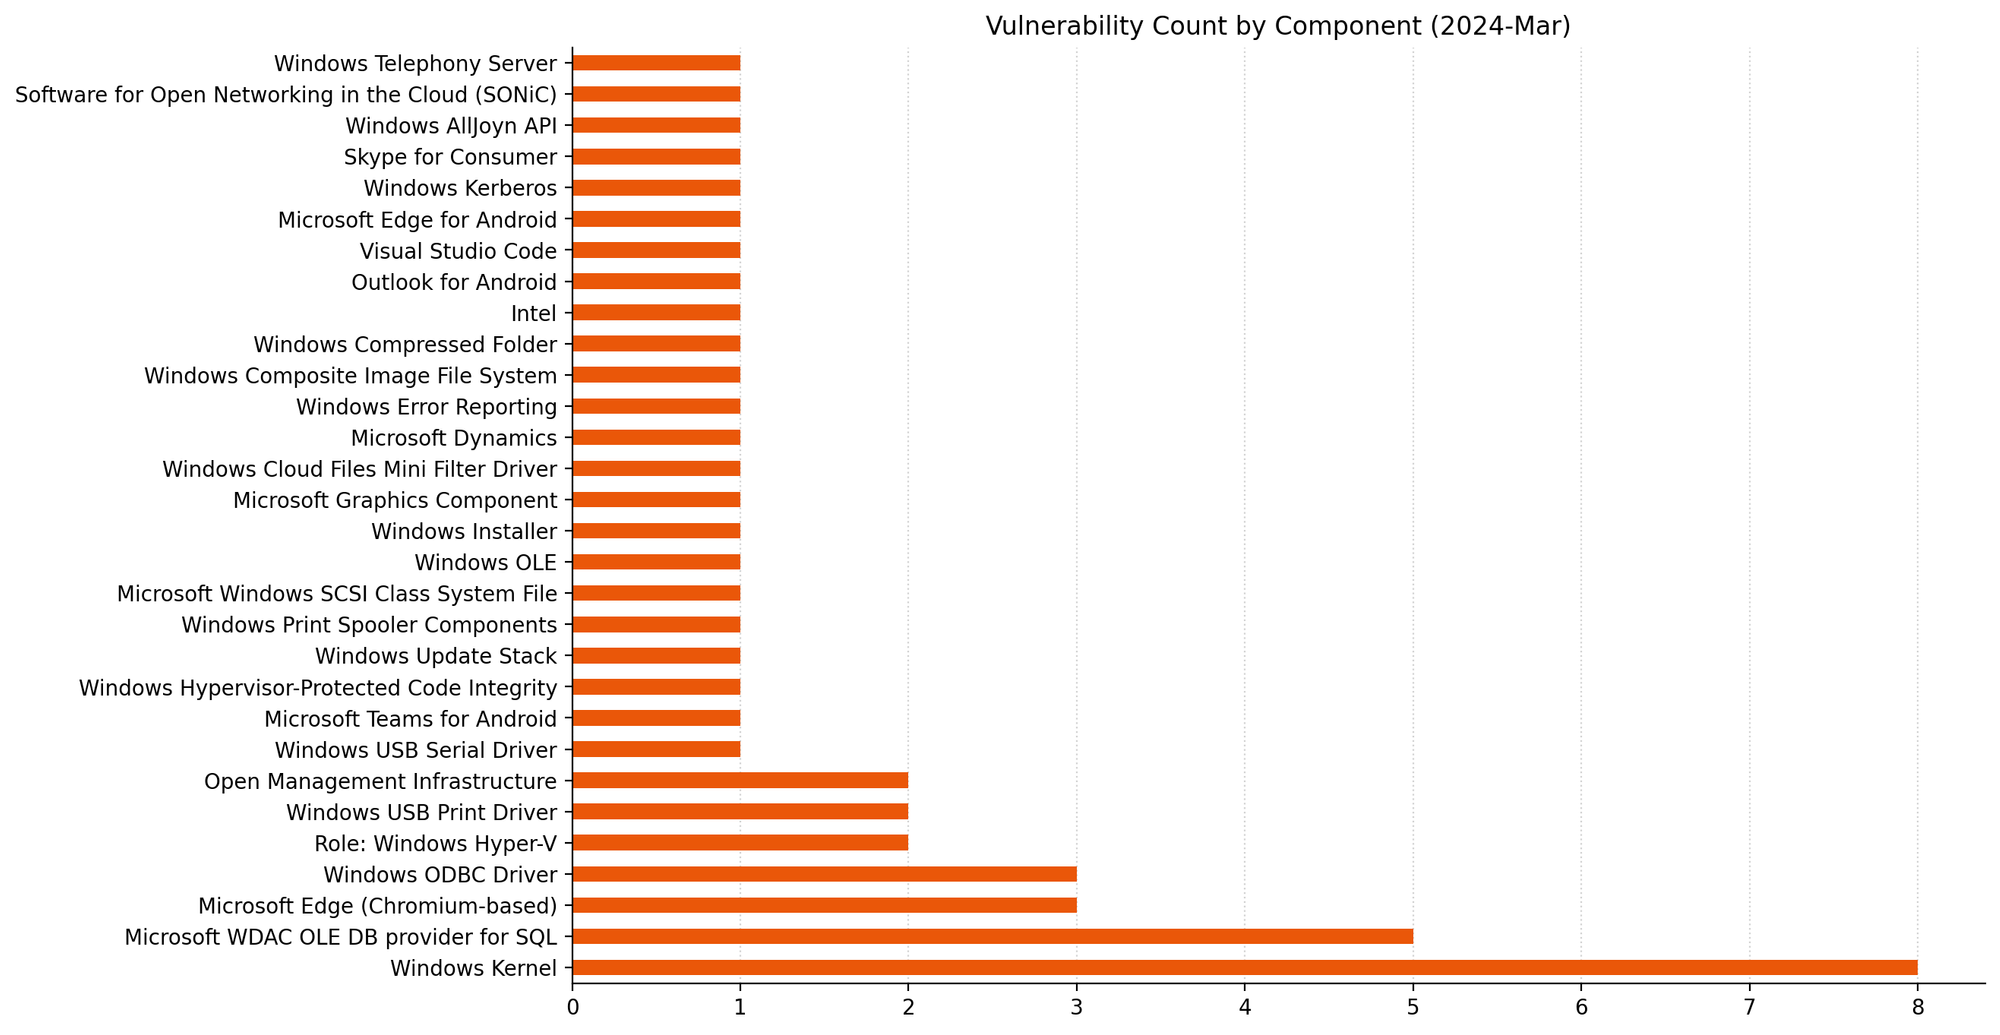
Windows Kernel: get the popcorn
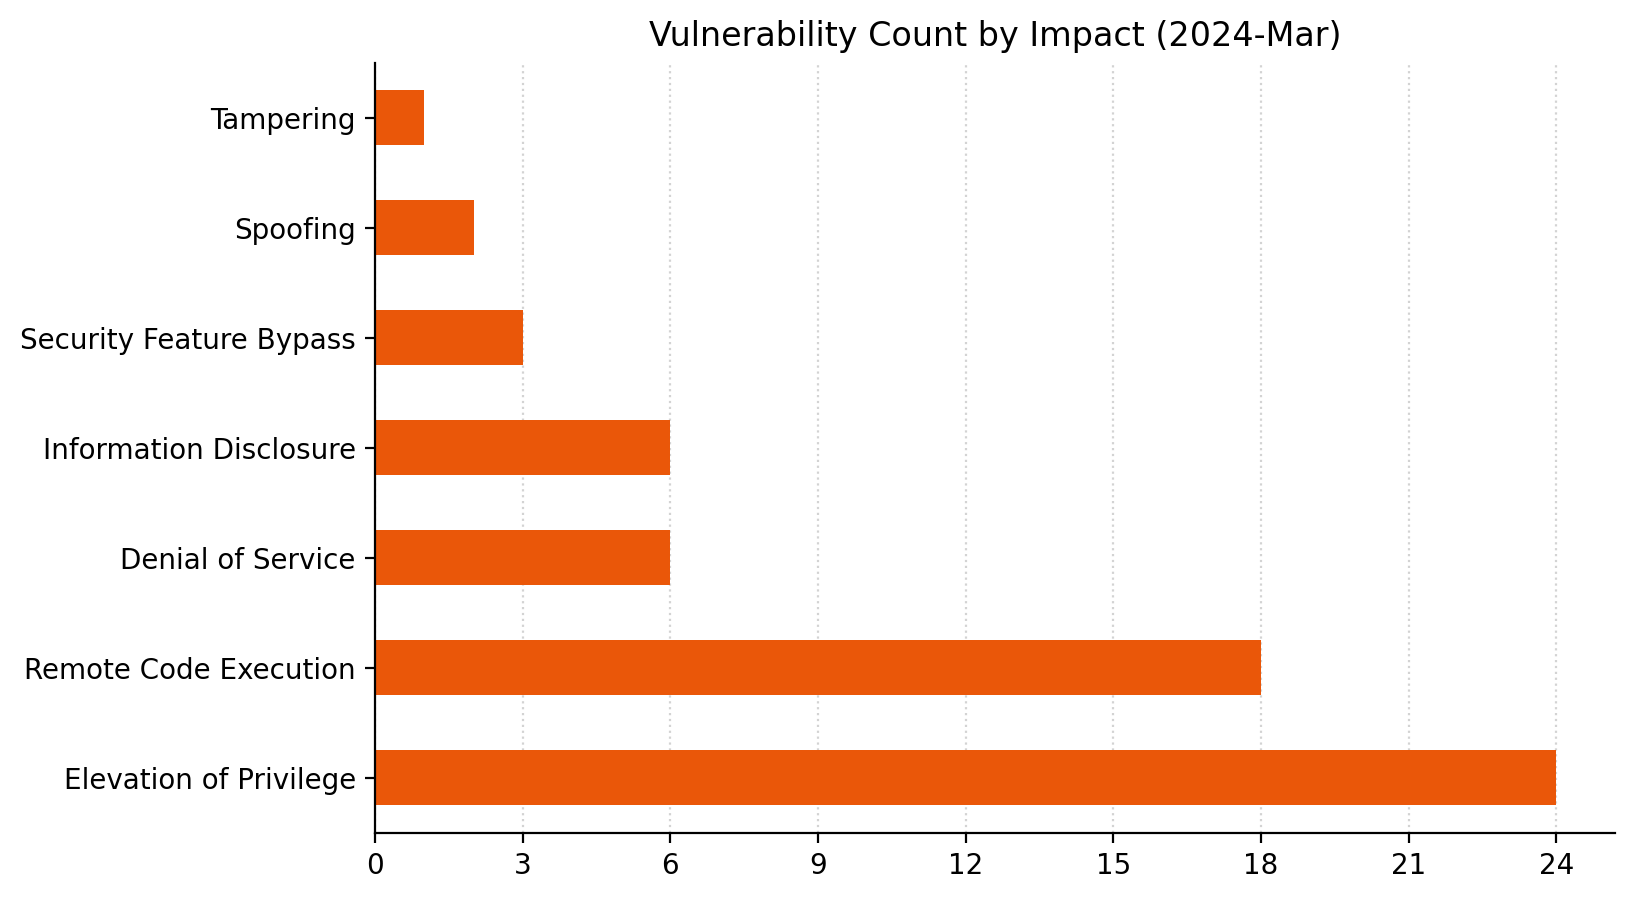
Patch Tuesday - March 2024
A comparatively rare outing for Tampering, and a somewhat unusual second place for RCE.
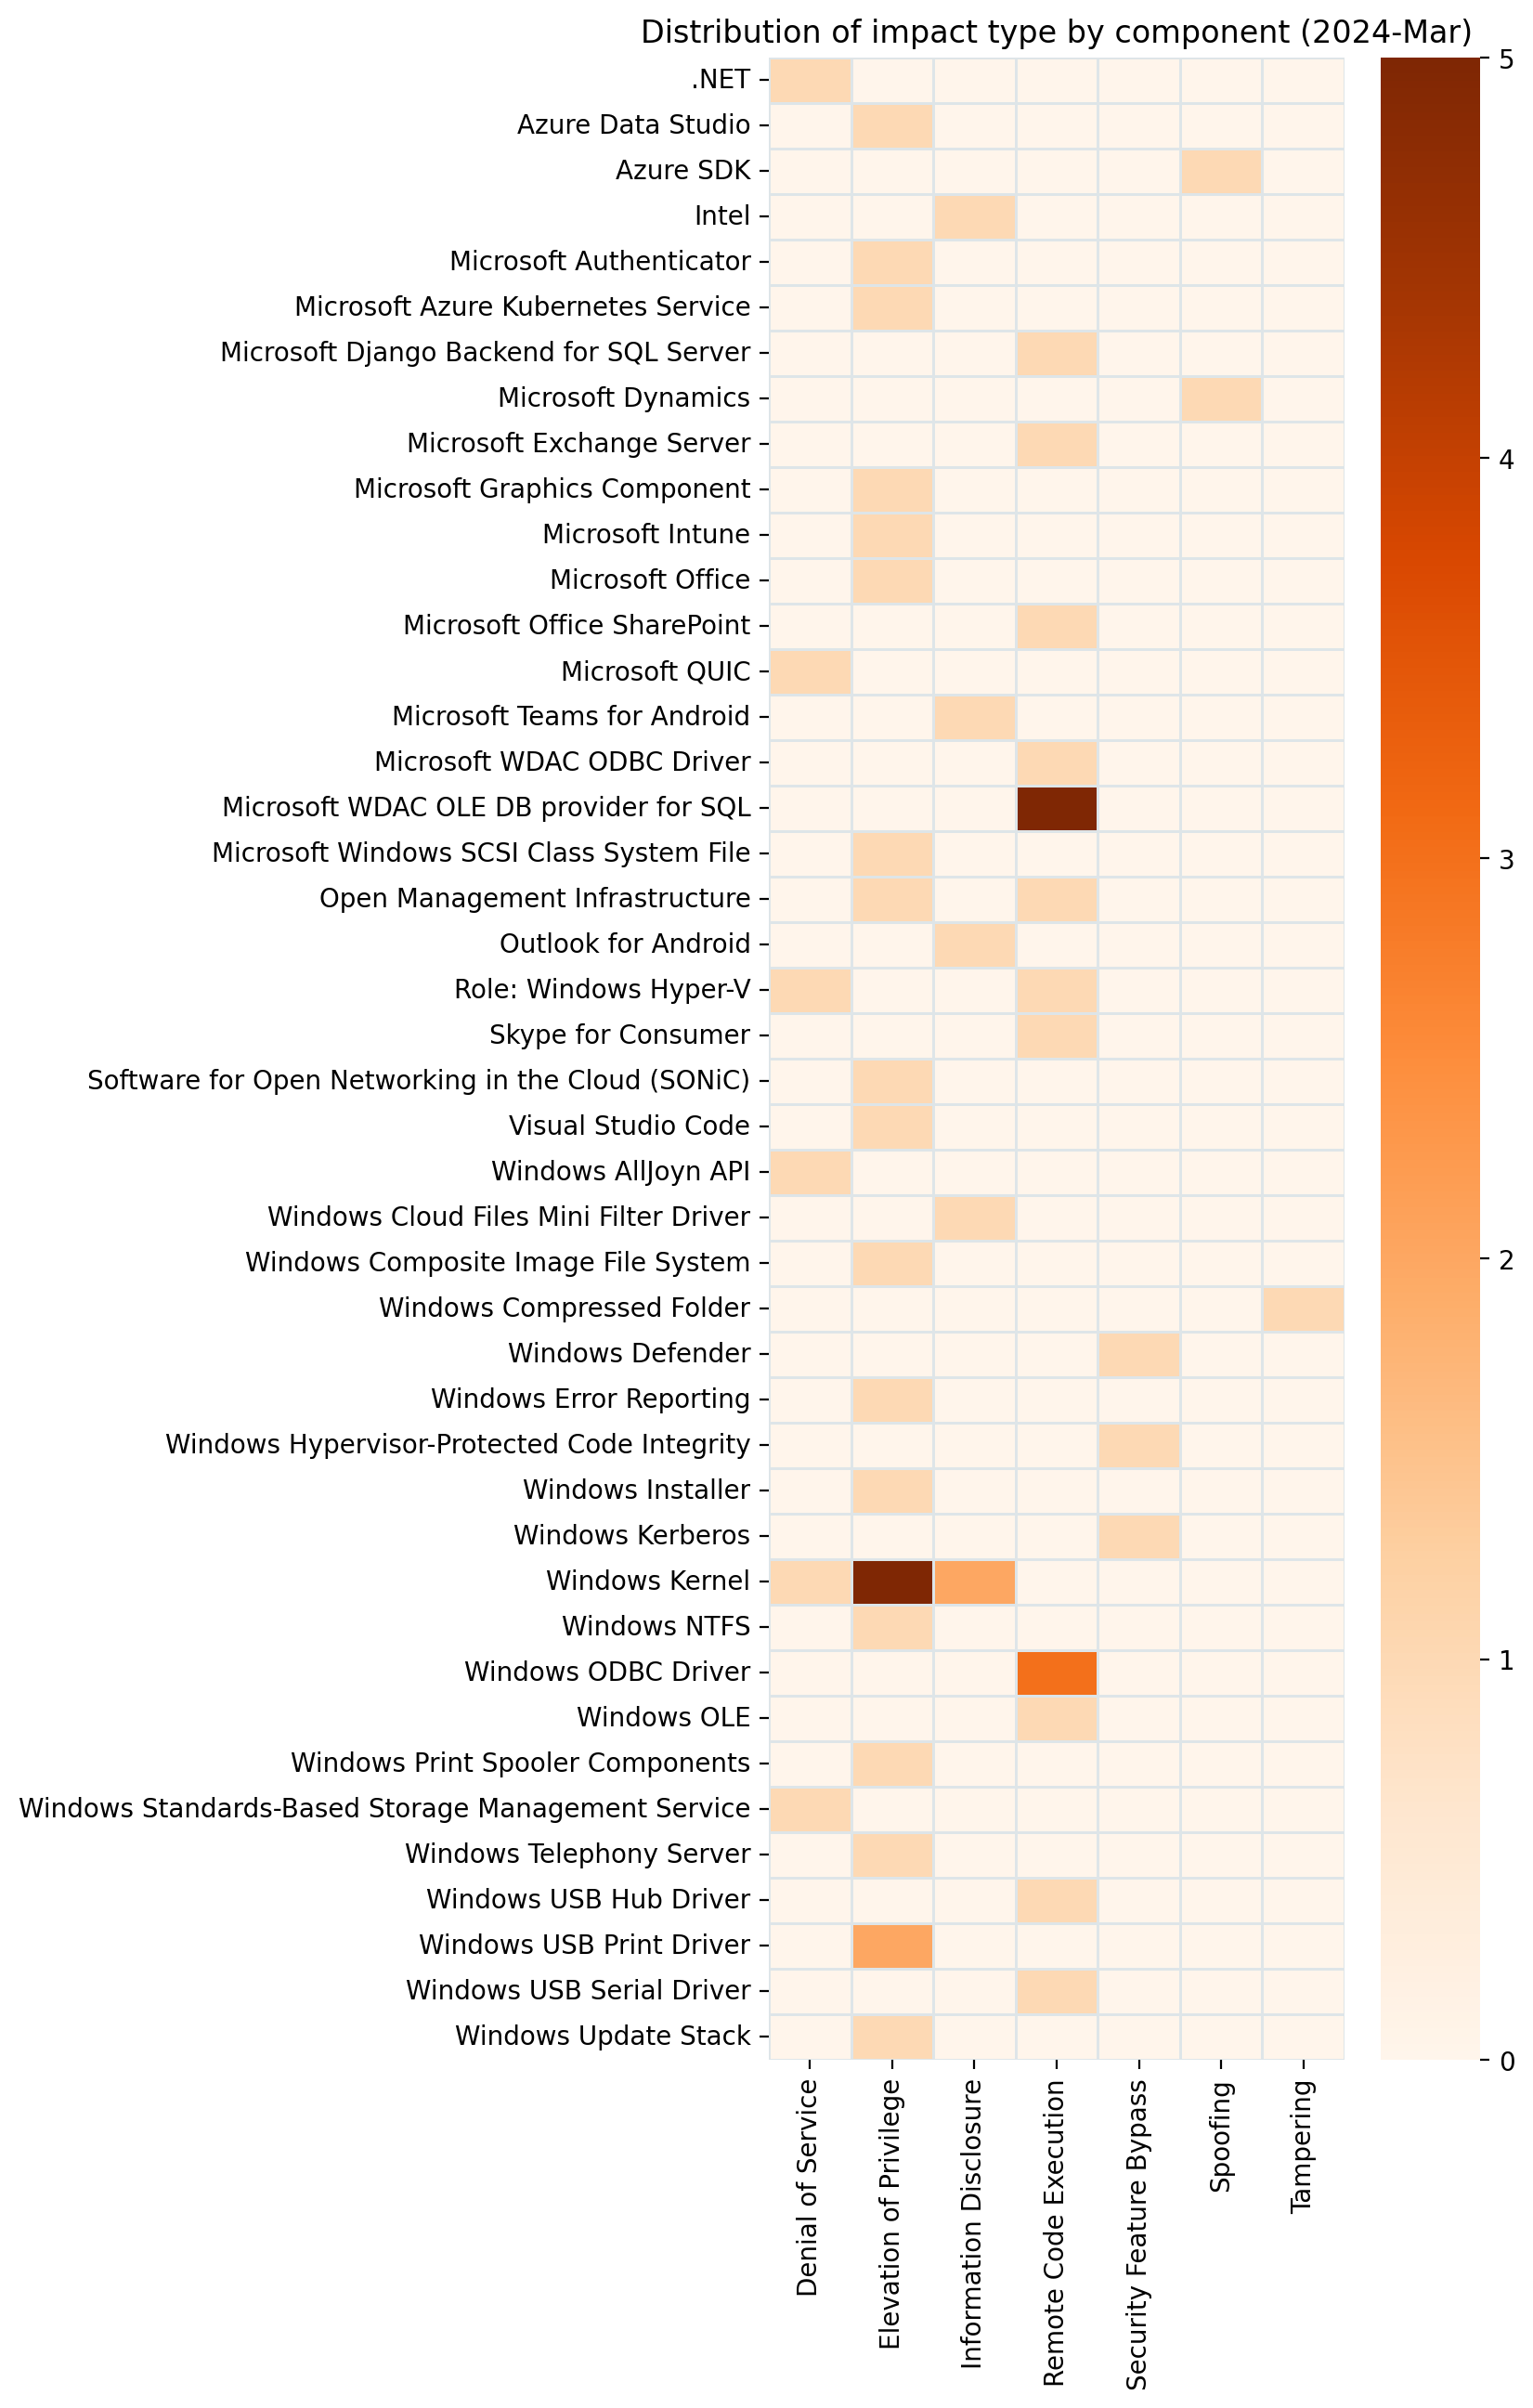
Patch Tuesday - March 2024
Similar to last month: a significant round of WDAC patches, but this time current versions of Windows get a patch too.

Summary Tables

Apps vulnerabilities

CVE Title Exploited? Publicly disclosed? CVSSv3 base score
CVE-2024-21411 Skype for Consumer Remote Code Execution Vulnerability No No 8.8
CVE-2024-26204 Outlook for Android Information Disclosure Vulnerability No No 7.5
CVE-2024-21390 Microsoft Authenticator Elevation of Privilege Vulnerability No No 7.1
CVE-2024-26201 Microsoft Intune Linux Agent Elevation of Privilege Vulnerability No No 6.6

Azure vulnerabilities

CVE Title Exploited? Publicly disclosed? CVSSv3 base score
CVE-2024-21400 Microsoft Azure Kubernetes Service Confidential Container Elevation of Privilege Vulnerability No No 9
CVE-2024-21418 Software for Open Networking in the Cloud (SONiC) Elevation of Privilege Vulnerability No No 7.8
CVE-2024-21421 Azure SDK Spoofing Vulnerability No No 7.5
CVE-2024-26203 Azure Data Studio Elevation of Privilege Vulnerability No No 7.3

Azure System Center vulnerabilities

CVE Title Exploited? Publicly disclosed? CVSSv3 base score
CVE-2024-21334 Open Management Infrastructure (OMI) Remote Code Execution Vulnerability No No 9.8
CVE-2024-21330 Open Management Infrastructure (OMI) Elevation of Privilege Vulnerability No No 7.8

Browser vulnerabilities

CVE Title Exploited? Publicly disclosed? CVSSv3 base score
CVE-2024-26167 Microsoft Edge for Android Spoofing Vulnerability No No 4.3
CVE-2024-2176 Chromium: CVE-2024-2176 Use after free in FedCM No No N/A
CVE-2024-2174 Chromium: CVE-2024-2174 Inappropriate implementation in V8 No No N/A
CVE-2024-2173 Chromium: CVE-2024-2173 Out of bounds memory access in V8 No No N/A

Developer Tools vulnerabilities

CVE Title Exploited? Publicly disclosed? CVSSv3 base score
CVE-2024-26165 Visual Studio Code Elevation of Privilege Vulnerability No No 8.8
CVE-2024-21392 .NET and Visual Studio Denial of Service Vulnerability No No 7.5

Developer Tools Windows vulnerabilities

CVE Title Exploited? Publicly disclosed? CVSSv3 base score
CVE-2024-26190 Microsoft QUIC Denial of Service Vulnerability No No 7.5

ESU Windows vulnerabilities

CVE Title Exploited? Publicly disclosed? CVSSv3 base score
CVE-2024-21441 Microsoft WDAC OLE DB provider for SQL Server Remote Code Execution Vulnerability No No 8.8
CVE-2024-21444 Microsoft WDAC OLE DB provider for SQL Server Remote Code Execution Vulnerability No No 8.8
CVE-2024-21450 Microsoft WDAC OLE DB provider for SQL Server Remote Code Execution Vulnerability No No 8.8
CVE-2024-26161 Microsoft WDAC OLE DB provider for SQL Server Remote Code Execution Vulnerability No No 8.8
CVE-2024-26166 Microsoft WDAC OLE DB provider for SQL Server Remote Code Execution Vulnerability No No 8.8
CVE-2024-21451 Microsoft ODBC Driver Remote Code Execution Vulnerability No No 8.8
CVE-2024-26159 Microsoft ODBC Driver Remote Code Execution Vulnerability No No 8.8
CVE-2024-21440 Microsoft ODBC Driver Remote Code Execution Vulnerability No No 8.8
CVE-2024-26162 Microsoft ODBC Driver Remote Code Execution Vulnerability No No 8.8
CVE-2024-21407 Windows Hyper-V Remote Code Execution Vulnerability No No 8.1
CVE-2024-26173 Windows Kernel Elevation of Privilege Vulnerability No No 7.8
CVE-2024-26176 Windows Kernel Elevation of Privilege Vulnerability No No 7.8
CVE-2024-26178 Windows Kernel Elevation of Privilege Vulnerability No No 7.8
CVE-2024-21436 Windows Installer Elevation of Privilege Vulnerability No No 7.8
CVE-2024-21437 Windows Graphics Component Elevation of Privilege Vulnerability No No 7.8
CVE-2024-26169 Windows Error Reporting Service Elevation of Privilege Vulnerability No No 7.8
CVE-2024-21446 NTFS Elevation of Privilege Vulnerability No No 7.8
CVE-2024-21427 Windows Kerberos Security Feature Bypass Vulnerability No No 7.5
CVE-2024-21432 Windows Update Stack Elevation of Privilege Vulnerability No No 7
CVE-2024-21439 Windows Telephony Server Elevation of Privilege Vulnerability No No 7
CVE-2024-21433 Windows Print Spooler Elevation of Privilege Vulnerability No No 7
CVE-2024-21429 Windows USB Hub Driver Remote Code Execution Vulnerability No No 6.8
CVE-2024-26197 Windows Standards-Based Storage Management Service Denial of Service Vulnerability No No 6.5
CVE-2024-21430 Windows USB Attached SCSI (UAS) Protocol Remote Code Execution Vulnerability No No 5.7
CVE-2024-26174 Windows Kernel Information Disclosure Vulnerability No No 5.5
CVE-2024-26177 Windows Kernel Information Disclosure Vulnerability No No 5.5
CVE-2024-26181 Windows Kernel Denial of Service Vulnerability No No 5.5
CVE-2023-28746 Intel: CVE-2023-28746 Register File Data Sampling (RFDS) No No N/A

Exchange Server vulnerabilities

CVE Title Exploited? Publicly disclosed? CVSSv3 base score
CVE-2024-26198 Microsoft Exchange Server Remote Code Execution Vulnerability No No 8.8

Microsoft Dynamics vulnerabilities

CVE Title Exploited? Publicly disclosed? CVSSv3 base score
CVE-2024-21419 Microsoft Dynamics 365 (on-premises) Cross-site Scripting Vulnerability No No 7.6

Microsoft Office vulnerabilities

CVE Title Exploited? Publicly disclosed? CVSSv3 base score
CVE-2024-21426 Microsoft SharePoint Server Remote Code Execution Vulnerability No No 7.8
CVE-2024-26199 Microsoft Office Elevation of Privilege Vulnerability No No 7.8
CVE-2024-21448 Microsoft Teams for Android Information Disclosure Vulnerability No No 5

SQL Server vulnerabilities

CVE Title Exploited? Publicly disclosed? CVSSv3 base score
CVE-2024-26164 Microsoft Django Backend for SQL Server Remote Code Execution Vulnerability No No 8.8

System Center vulnerabilities

CVE Title Exploited? Publicly disclosed? CVSSv3 base score
CVE-2024-20671 Microsoft Defender Security Feature Bypass Vulnerability No No 5.5

Windows vulnerabilities

CVE Title Exploited? Publicly disclosed? CVSSv3 base score
CVE-2024-21435 Windows OLE Remote Code Execution Vulnerability No No 8.8
CVE-2024-21442 Windows USB Print Driver Elevation of Privilege Vulnerability No No 7.8
CVE-2024-26182 Windows Kernel Elevation of Privilege Vulnerability No No 7.8
CVE-2024-26170 Windows Composite Image File System (CimFS) Elevation of Privilege Vulnerability No No 7.8
CVE-2024-21434 Microsoft Windows SCSI Class System File Elevation of Privilege Vulnerability No No 7.8
CVE-2024-21431 Hypervisor-Protected Code Integrity (HVCI) Security Feature Bypass Vulnerability No No 7.8
CVE-2024-21438 Microsoft AllJoyn API Denial of Service Vulnerability No No 7.5
CVE-2024-21443 Windows Kernel Elevation of Privilege Vulnerability No No 7.3
CVE-2024-21445 Windows USB Print Driver Elevation of Privilege Vulnerability No No 7
CVE-2024-26185 Windows Compressed Folder Tampering Vulnerability No No 6.5
CVE-2024-21408 Windows Hyper-V Denial of Service Vulnerability No No 5.5
CVE-2024-26160 Windows Cloud Files Mini Filter Driver Information Disclosure Vulnerability No No 5.5

The collective thoughts of the interwebz