Технология на скалъпването

Post Syndicated from Екип на Биволъ original https://bivol.bg/valya_ahchieva.html

вторник 12 март 2024


След убийството на Мартин Божанов – Нотариуса, отново се заговори за кръгове на влияние в съдебната ни система, за мрежа за рекет и за паралелно правосъдие. Болезнено стои въпросът –…

Herb Sutter on increasing safety in C++

Post Syndicated from daroc original https://lwn.net/Articles/965147/

Herb Sutter, chair of the ISO C++ standards committee,

writes
about the current problems with writing secure C++,
and his personal opinion on next steps to address this while maintaining
backward compatibility.

If there were 90-98% fewer C++ type/bounds/initialization/lifetime
vulnerabilities we wouldn’t be having this discussion.
All languages have CVEs,
C++ just has more (and C still more); so far in 2024,

Rust has 6 CVEs
, and

C and C++ combined have 61 CVEs
. So zero isn’t the goal; something like a 90%
reduction is necessary, and a 98% reduction is sufficient, to achieve security
parity with the levels of language safety provided by MSLs [memory-safe languages]… and has the strong
benefit that I believe it can be achieved with perfect backward link
compatibility
(i.e., without changing C++’s object model, and its lifetime
model which does not depend on universal tracing garbage collection and is not
limited to tree-based data structures) which is essential to our being able to
adopt the improvements in existing C++ projects as easily as we can adopt other
new editions of C++. — After that, we can pursue additional improvements to
other buckets, such as thread safety and overflow safety.

Message delivery status tracking with Amazon Pinpoint

Post Syndicated from Brijesh Pati original https://aws.amazon.com/blogs/messaging-and-targeting/message-delivery-status-tracking-with-amazon-pinpoint/

In the vast landscape of digital communication, reaching your audience effectively is key to building successful customer relationships. Amazon Pinpoint – Amazon Web Services’ (AWS) flexible, user-focused messaging and targeting solution goes beyond mere messaging; it allows businesses to engage customers through email, SMS, push notifications, and more.

What sets Amazon Pinpoint apart is its scalability and deliverability. Amazon Pinpoint supports a multitude of business use cases, from promotional campaigns and transactional messages to customer engagement journeys. It provides insights and analytics that help tailor and measure the effectiveness of communication strategies.

For businesses, the power of this platform extends into areas such as marketing automation, customer retention campaigns, and transactional messaging for updates like order confirmations and shipping alerts. The versatility of Amazon Pinpoint can be a significant asset in crafting personalized user experiences at scale.

Use Case & Solution overview – Tracking SMS & Email Delivery Status

In a business setting, understanding whether a time-sensitive email or SMS was received can greatly impact customer experience as well as operational efficiency. For instance, consider an e-commerce platform sending out shipping notifications. By quickly verifying that the message was delivered, businesses can preemptively address any potential issues, ensuring customer satisfaction.

Amazon Pinpoint tracks email and SMS delivery and engagement events, which can be streamed using Amazon Kinesis Firehose for storage or further processing. However, third party applications don’t have a direct API to query and obtain the latest status of a message.

To address the above challenge, this blog presents a solution that leverages AWS services for data streaming, storage, and retrieval of Amazon Pinpoint events using a simple API call. At the core of the solution is Amazon Pinpoint event stream capability, which utilizes Amazon Kinesis services for data streaming.

The architecture for message delivery status tracking with Amazon Pinpoint is comprised of several AWS services that work in concert. To streamline the deployment of these components, they have been encapsulated into an AWS CloudFormation template. This template allows for automated provisioning and configuration of the necessary AWS resources, ensuring a repeatable and error-free deployment.

The key components of the solution are as follows:

  1. Event Generation: An event is generated within Amazon Pinpoint when a user interacts with an application, or when a message is sent from a campaign, journey, or as a transactional communication. The event name and metadata depends on the channel SMS or Email.
  2. Amazon Pinpoint Event Data Streaming: The generated event data is streamed to Amazon Kinesis Data Firehose. Kinesis Data Firehose is configured to collect the event information in near real-time, enabling the subsequent processing and analysis of the data.
  3. Pinpoint Event Data Processing: Amazon Kinesis Data Firehose is configured to invoke a specified AWS Lambda function to transform the incoming source data. This transformation step is set up during the creation of the Kinesis Data Firehose delivery stream, ensuring that the data is in the correct format before it is stored, enhancing its utility for immediate and downstream analysis. The Lambda function acts as a transformation mechanism for event data ingested through Kinesis Data Firehose. The function decodes the base64-encoded event data, deserializes the JSON payload, and processes the data depending on the event type (email or SMS)- it parses the raw data, extracting relevant attributes before ingesting it into Amazon DynamoDB. The function handles different event types, specifically email and SMS events, discerning their unique attributes and ensuring they are formatted correctly for DynamoDB’s schema.
  4. Data Ingestion into Dynamo DB: Once processed, the data is stored in Amazon DynamoDB. DynamoDB provides a fast and flexible NoSQL database service, which facilitates the efficient storage and retrieval of event data for analysis.
  5. Data Storage: Amazon DynamoDB stores the event data after it’s been processed by AWS Lambda. Amazon DynamoDB is a highly scalable NoSQL database that enables fast queries, which is essential for retrieving the status of messages quickly and efficiently, thereby facilitating timely decision-making based on customer interactions.
  6. Customer application/interface: Users or integrated systems engage with the messaging status through either a frontend customer application or directly via an API. This interface or API acts as the conduit through which message delivery statuses are queried, monitored, and managed, providing a versatile gateway for both user interaction and programmatic access.
  7. API Management: The customer application communicates with the backend systems through Amazon API Gateway. This service acts as a fully managed gateway, handling all the API calls, data transformation, and transfer between the frontend application and backend services.
  8. Event Status Retrieval API: When the API Gateway receives a delivery status request, it invokes another AWS Lambda function that is responsible for querying the DynamoDB table. It retrieves the latest status of the message delivery, which is then presented to the user via the API.

DynamoDB Table Design for Message Tracking:

The tables below outline the DynamoDB schema designed for the efficient storage and retrieval of message statuses, detailing distinct event statuses and attributes for each message type such as email and SMS:

Attributes for Email Events:

Attribute Data type Description
message_id String The unique message ID generated by Amazon Pinpoint.
event_type String The value would be ’email’.
aws_account_id String The AWS account ID used to send the email.
from_address String The sending identity used to send the email.
destination String The recipient’s email address.
client String The client ID if applicable
campaign_id String The campaign ID if part of a campaign
journey_id String The journey ID if part of a journey
send Timestamp The timestamp when Amazon Pinpoint accepted the message and attempted to deliver it to the recipient
delivered Timestamp The timestamp when the email was delivered, or ‘NA’ if not delivered.
rejected Timestamp The timestamp when the email was rejected (Amazon Pinpoint determined that the message contained malware and didn’t attempt to send it.)
hardbounce Timestamp The timestamp when a hard bounce occurred (A permanent issue prevented Amazon Pinpoint from delivering the message. Amazon Pinpoint won’t attempt to deliver the message again)
softbounce Timestamp The timestamp when a soft bounce occurred (A temporary issue prevented Amazon Pinpoint from delivering the message. Amazon Pinpoint will attempt to deliver the message again for a certain amount of time. If the message still can’t be delivered, no more retries will be attempted. The final state of the email will then be SOFTBOUNCE.)
complaint Timestamp The timestamp when a complaint was received (The recipient received the message, and then reported the message to their email provider as spam (for example, by using the “Report Spam” feature of their email client).
open Timestamp The timestamp when the email was opened (The recipient received the message and opened it.)
click Timestamp The timestamp when a link in the email was clicked. (The recipient received the message and clicked a link in it)
unsubscribe Timestamp The timestamp when a link in the email was unsubscribed (The recipient received the message and clicked an unsubscribe link in it.)
rendering_failure Timestamp The timestamp when a link in the email was clicked (The email was not sent due to a rendering failure. This can occur when template data is missing or when there is a mismatch between template parameters and data.)

Attributes for SMS Events:

Attribute Data type Description
message_id String The unique message ID generated by Amazon Pinpoint.
event_type String The value would be ‘sms’.
aws_account_id String The AWS account ID used to send the email.
origination_phone_number String The phone number from which the SMS was sent.
destination_phone_number String The phone number to which the SMS was sent.
record_status String Additional information about the status of the message. Possible values include:
– SUCCESSFUL/DELIVERED – Successfully delivered.
– PENDING – Not yet delivered.
– INVALID – Invalid destination phone number.
– UNREACHABLE – Recipient’s device unreachable.
– UNKNOWN – Error preventing delivery.
– BLOCKED – Device blocking SMS.
– CARRIER_UNREACHABLE – Carrier issue preventing delivery.
– SPAM – Message identified as spam.
– INVALID_MESSAGE – Invalid SMS message body.
– CARRIER_BLOCKED – Carrier blocked message.
– TTL_EXPIRED – Message not delivered in time.
– MAX_PRICE_EXCEEDED – Exceeded SMS spending quota.
– OPTED_OUT – Recipient opted out.
– NO_QUOTA_LEFT_ON_ACCOUNT – Insufficient spending quota.
– NO_ORIGINATION_IDENTITY_AVAILABLE_TO_SEND – No suitable origination identity.
– DESTINATION_COUNTRY_NOT_SUPPORTED – Destination country blocked.
– ACCOUNT_IN_SANDBOX – Account in sandbox mode.
– RATE_EXCEEDED – Message sending rate exceeded.
– INVALID_ORIGINATION_IDENTITY – Invalid origination identity.
– ORIGINATION_IDENTITY_DOES_NOT_EXIST – Non-existent origination identity.
– INVALID_DLT_PARAMETERS – Invalid DLT parameters.
– INVALID_PARAMETERS – Invalid parameters.
– ACCESS_DENIED – Account blocked from sending messages.
– INVALID_KEYWORD – Invalid keyword.
– INVALID_SENDER_ID – Invalid Sender ID.
– INVALID_POOL_ID – Invalid Pool ID.
– SENDER_ID_NOT_SUPPORTED_FOR_DESTINATION – Sender ID not supported.
– INVALID_PHONE_NUMBER – Invalid origination phone number.
iso_country_code String The ISO country code associated with the destination phone number.
message_type String The type of SMS message sent.
campaign_id String The campaign ID if part of a campaign, otherwise N/A.
journey_id String The journey ID if part of a journey, otherwise N/A.
success Timestamp The timestamp when the SMS was successfully accepted by the carrier/delivered to the recipient, or ‘NA’ if not applicable.
buffered Timestamp The timestamp when the SMS is still in the process of being delivered to the recipient, or ‘NA’ if not applicable.
failure Timestamp The timestamp when the SMS delivery failed, or ‘NA’ if not applicable.
complaint Timestamp The timestamp when a complaint was received (The recipient received the message, and then reported the message to their email provider as spam (for example, by using the “Report Spam” feature of their email client).
optout Timestamp The timestamp when the customer received the message and replied by sending the opt-out keyword (usually “STOP”), or ‘NA’ if not applicable.
price_in_millicents_usd Number The amount that was charged to send the message.

Prerequisites

  • AWS Account Access (setup) with admin-level permission.
  • AWS CLI version 2 with named profile setup. If a locally configured IDE is not convenient, you can use the AWS CLI from the AWS CloudShell in your browser.
  • A Pinpoint project that has never been configured with an event stream (PinpointEventStream).“
  • The Pinpoint ID from the project you want to monitor. This ID can be found in the AWS Pinpoint console on the project’s main page (it will look something like “79788ecad55555513b71752a4e3ea1111”). Copy this ID to a text file, as you will need it shortly.
    • Note, you must use the ID from a Pinpoint project that has never been configured with the PinpointEventStream option.

Solution Deployment & Testing

Deploying this solution is a straightforward process, thanks to the AWS CloudFormation template we’ve created. This template automates the creation and configuration of the necessary AWS resources into an AWS stack. The CloudFormation template ensures that the components such as Kinesis Data Firehose, AWS Lambda, Amazon DynamoDB, and Amazon API Gateway are set up consistently and correctly.

Deployment Steps:

  • Download the CloudFormation Template from this GitHub sample repository. The CloudFormation template is authored in JSON and named PinpointAPIBlog.yaml.
  • Access the CloudFormation Console: Sign into the AWS Management Console and open the AWS CloudFormation console.
  • Create a New Stack:
    • Choose Create Stack and select With new resources (standard) to start the stack creation process.
    • Under Prerequisite – Prepare template, select Template is ready.
    • Under ‘Specify template’, choose Upload a template file, and then upload the CloudFormation template file you downloaded in Step 1.
  • Configure the Stack:
    • Provide a stack name, such as “pinpoint-yourprojectname-monitoring” and paste the Pinpoint project (application) ID. Press Next.
    • Review the stack settings, and make any necessary changes based on your specific requirements. Next.
  • Initiate the Stack Creation: Once you’ve configured all options, acknowledge that AWS CloudFormation might create IAM resources with custom names, and then choose Create stack.
    • AWS CloudFormation will now provision and configure the resources as defined in the template This will take about 20 minutes to fully deploy. You can view the status in the AWS CloudFormation console.

Testing the Solution:

After deployment is complete you can test (and use) the solution.

  • Send Test Messages: Utilize the Amazon Pinpoint console to send test email and SMS messages. Documentation for this can be found at:
  • Verify Lambda Execution:
    • Navigate to the AWS CloudWatch console.
    • Locate and review the logs for the Lambda functions specified in the solution (`aws/lambda/{functionName}`) to confirm that the Kinesis Data Firehose records are being processed successfully. In the log events you should see messages including INIT_START, Raw Kinesis Data Firehouse Record, etc.
  • Check Amazon DynamoDB Data:
    • Navigate to Amazon DynamoDB in the AWS Console.
    • Select the table created by the CloudFormation template and choose ‘Explore Table Items‘.
    • Confirm the presence of the event data by checking if the message IDs appear in the table.
    • The table should have one or more message_id entries from the test message(s) you sent above.
    • Click on a message_id to review the data, and copy the message_id to a text editor on your computer. It will look like “0201123456gs3nroo-clv5s8pf-8cq2-he0a-ji96-59nr4tgva0g0-343434”
  • API Gateway Testing:
    • In the API Gateway console, find the MessageIdAPI.
    • Navigate to Stages and copy the Invoke URL provided.

    • Open the text editor on your computer and paste the APIGateway invoke URL.
    • Create a curl command with you API Gateway + ?message_id=message_id. It should look like this: “https://txxxxxx0.execute-api.us-west-2.amazonaws.com/call?message_id=020100000xx3xxoo-clvxxxxf-8cq2-he0a-ji96-59nr4tgva0g0-000000”
    • Copy the full curl command in your browser and enter.
    • The results should look like this (MacOS, Chrome):

By following these deployment and testing steps, you’ll have a functioning solution for tracking Pinpoint message delivery status using Amazon Pinpoint, Kinesis Fire Hose, DynamoDB and CloudWatch.

Clean Up

To help prevent unwanted charges to your AWS account, you can delete the AWS resources that you used for this walkthrough.

To delete the stack follow these following instructions:

Open the AWS CloudFormation console.

  • In the AWS CloudFormation console dashboard, select the stack you created (pinpoint-yourprojectname-monitoring).
  • On the Actions menu, choose Delete Stack.
  • When you are prompted to confirm, choose Yes, Delete.
  • Wait for DELETE_COMPLETE to appear in the Status column for the stack.

Next steps

The solution on this blog provides you an API endpoint to query messages’ status. The next step is to store and analyze the raw data based on your business’s requirements. The Amazon Kinesis Firehose used in this blog can stream the Pinpoint events to an AWS database or object storage like Amazon S3. Once the data is stored, you can catalogue them using AWS Glue, query them via SQL using Amazon Athena and create custom dashboards using Amazon QuickSight, which is a cloud-native, serverless, business intelligence (BI) with native machine learning (ML) integrations.

Conclusion

The integration of AWS services such as Kinesis, Lambda, DynamoDB, and API Gateway with Amazon Pinpoint transforms your ability to connect with customers through precise event data retrieval and analysis. This solution provides a stream of real-time data, versatile storage options, and a secure method for accessing detailed information, all of which are critical for optimizing your communication strategies.

By leveraging these insights, you can fine-tune your email and SMS campaigns for maximum impact, ensuring every message counts in the broader narrative of customer engagement and satisfaction. Harness the power of AWS and Amazon Pinpoint to not just reach out but truly connect with your audience, elevating your customer relationships to new heights.

Considerations/Troubleshooting

When implementing a solution involving AWS Lambda, Kinesis Data Streams, Kinesis Data Firehose, and DynamoDB, several key considerations should be considered:

  • Scalability and Performance: Assess the scalability needs of your system. Lambda functions scale automatically, but it’s important to configure concurrency settings and memory allocation based on expected load. Similarly, for Kinesis Streams and Firehose, consider the volume of data and the throughput rate. For DynamoDB, ensure that the table’s read and write capacity settings align with your data processing requirements.
  • Error Handling and Retries: Implement robust error handling within the Lambda functions to manage processing failures. Kinesis Data Streams and Firehose have different retry behaviors and mechanisms. Understand and configure these settings to handle failed data processing attempts effectively. In DynamoDB, consider the use of conditional writes to handle potential data inconsistencies.
  • Security and IAM Permissions: Secure your AWS resources by adhering to the principle of least privilege. Define IAM roles and policies that grant the Lambda function only the necessary permissions to interact with Kinesis and DynamoDB. Ensure that data in transit and at rest is encrypted as required, using AWS KMS or other encryption mechanisms.
  • Monitoring and Logging: Utilize AWS CloudWatch for monitoring and logging the performance and execution of Lambda functions, as well as Kinesis and DynamoDB operations. Set up alerts for any anomalies or thresholds that indicate issues in data processing or performance bottlenecks.

About the Authors

Brijesh Pati

Brijesh Pati

Brijesh Pati is an Enterprise Solutions Architect at AWS. His primary focus is helping enterprise customers adopt cloud technologies for their workloads. He has a background in application development and enterprise architecture and has worked with customers from various industries such as sports, finance, energy and professional services. His interests include serverless architectures and AI/ML.

Pavlos Ioannou Katidis

Pavlos Ioannou Katidis

Pavlos Ioannou Katidis is an Amazon Pinpoint and Amazon Simple Email Service Senior Specialist Solutions Architect at AWS. He enjoys diving deep into customers’ technical issues and help in designing communication solutions. In his spare time, he enjoys playing tennis, watching crime TV series, playing FPS PC games, and coding personal projects.

Anshika Singh

Anshika Singh

Anshika Singh is an Associate Solutions Architect at AWS specializing in building for GenAI applications. She helps enable customers to use the cloud through the use of code samples and starter projects.

Measure performance of AWS Glue Data Quality for ETL pipelines

Post Syndicated from Ruben Afonso original https://aws.amazon.com/blogs/big-data/measure-performance-of-aws-glue-data-quality-for-etl-pipelines/

In recent years, data lakes have become a mainstream architecture, and data quality validation is a critical factor to improve the reusability and consistency of the data. AWS Glue Data Quality reduces the effort required to validate data from days to hours, and provides computing recommendations, statistics, and insights about the resources required to run data validation.

AWS Glue Data Quality is built on DeeQu, an open source tool developed and used at Amazon to calculate data quality metrics and verify data quality constraints and changes in the data distribution so you can focus on describing how data should look instead of implementing algorithms.

In this post, we provide benchmark results of running increasingly complex data quality rulesets over a predefined test dataset. As part of the results, we show how AWS Glue Data Quality provides information about the runtime of extract, transform, and load (ETL) jobs, the resources measured in terms of data processing units (DPUs), and how you can track the cost of running AWS Glue Data Quality for ETL pipelines by defining custom cost reporting in AWS Cost Explorer.

This post is Part 6 of a six-part series of posts to explain how AWS Glue Data Quality works.

Check out the other posts in the series:

Solution overview

We start by defining our test dataset in order to explore how AWS Glue Data Quality automatically scales depending on input datasets.

Dataset details

The test dataset contains 104 columns and 1 million rows stored in Parquet format. You can download the dataset or recreate it locally using the Python script provided in the repository. If you opt to run the generator script, you need to install the Pandas and Mimesis packages in your Python environment:

pip install pandas mimesis

The dataset schema is a combination of numerical, categorical, and string variables in order to have enough attributes to use a combination of built-in AWS Glue Data Quality rule types. The schema replicates some of the most common attributes found in financial market data such as instrument ticker, traded volumes, and pricing forecasts.

Data quality rulesets

We categorize some of the built-in AWS Glue Data Quality rule types to define the benchmark structure. The categories consider whether the rules perform column checks that don’t require row-level inspection (simple rules), row-by-row analysis (medium rules), or data type checks, eventually comparing row values against other data sources (complex rules). The following table summarizes these rules.

Simple Rules Medium Rules Complex Rules
ColumnCount DistinctValuesCount ColumnValues
ColumnDataType IsComplete Completeness
ColumnExist Sum ReferentialIntegrity
ColumnNamesMatchPattern StandardDeviation ColumnCorrelation
RowCount Mean RowCountMatch
ColumnLength . .

We define eight different AWS Glue ETL jobs where we run the data quality rulesets. Each job has a different number of data quality rules associated to it. Each job also has an associated user-defined cost allocation tag that we use to create a data quality cost report in AWS Cost Explorer later on.

We provide the plain text definition for each ruleset in the following table.

Job name Simple Rules Medium Rules Complex Rules Number of Rules Tag Definition
ruleset-0 0 0 0 0 dqjob:rs0 –
ruleset-1 0 0 1 1 dqjob:rs1 Link
ruleset-5 3 1 1 5 dqjob:rs5 Link
ruleset-10 6 2 2 10 dqjob:rs10 Link
ruleset-50 30 10 10 50 dqjob:rs50 Link
ruleset-100 50 30 20 100 dqjob:rs100 Link
ruleset-200 100 60 40 200 dqjob:rs200 Link
ruleset-400 200 120 80 400 dqjob:rs400 Link

Create the AWS Glue ETL jobs containing the data quality rulesets

We upload the test dataset to Amazon Simple Storage Service (Amazon S3) and also two additional CSV files that we’ll use to evaluate referential integrity rules in AWS Glue Data Quality (isocodes.csv and exchanges.csv) after they have been added to the AWS Glue Data Catalog. Complete the following steps:

  1. On the Amazon S3 console, create a new S3 bucket in your account and upload the test dataset.
  2. Create a folder in the S3 bucket called isocodes and upload the isocodes.csv file.
  3. Create another folder in the S3 bucket called exchange and upload the exchanges.csv file.
  4. On the AWS Glue console, run two AWS Glue crawlers, one for each folder to register the CSV content in AWS Glue Data Catalog (data_quality_catalog). For instructions, refer to Adding an AWS Glue Crawler.

The AWS Glue crawlers generate two tables (exchanges and isocodes) as part of the AWS Glue Data Catalog.

AWS Glue Data Catalog

Now we will create the AWS Identity and Access Management (IAM) role that will be assumed by the ETL jobs at runtime:

  1. On the IAM console, create a new IAM role called AWSGlueDataQualityPerformanceRole
  2. For Trusted entity type, select AWS service.
  3. For Service or use case, choose Glue.
  4. Choose Next.

AWS IAM trust entity selection

  1. For Permission policies, enter AWSGlueServiceRole
  2. Choose Next.
    AWS IAM add permissions policies
  3. Create and attach a new inline policy (AWSGlueDataQualityBucketPolicy) with the following content. Replace the placeholder with the S3 bucket name you created earlier:
    {
      "Version": "2012-10-17",
      "Statement": [
        {
          "Effect": "Allow",
          "Action": "s3:GetObject",
          "Resource": [
            "arn:aws:s3:::<your_Amazon_S3_bucket_name>/*"
          ]
        }
      ]
    }

Next, we create one of the AWS Glue ETL jobs, ruleset-5.

  1. On the AWS Glue console, under ETL jobs in the navigation pane, choose Visual ETL.
  2. In the Create job section, choose Visual ETL.x
    Overview of available jobs in AWS Glue Studio
  3. In the Visual Editor, add a Data Source – S3 Bucket source node:
    1. For S3 URL, enter the S3 folder containing the test dataset.
    2. For Data format, choose Parquet.

    Overview of Amazon S3 data source in AWS Glue Studio

  4. Create a new action node, Transform: Evaluate-Data-Catalog:
  5. For Node parents, choose the node you created.
  6. Add the ruleset-5 definition under Ruleset editor.
    Data quality rules for ruleset-5
  7. Scroll to the end and under Performance Configuration, enable Cache Data.

Enable Cache data option

  1. Under Job details, for IAM Role, choose AWSGlueDataQualityPerformanceRole.
    Select previously created AWS IAM role
  2. In the Tags section, define dqjob tag as rs5.

This tag will be different for each of the data quality ETL jobs; we use them in AWS Cost Explorer to review the ETL jobs cost.

Define dqjob tag for ruleset-5 job

  1. Choose Save.
  2. Repeat these steps with the rest of the rulesets to define all the ETL jobs.

Overview of jobs defined in AWS Glue Studio

Run the AWS Glue ETL jobs

Complete the following steps to run the ETL jobs:

  1. On the AWS Glue console, choose Visual ETL under ETL jobs in the navigation pane.
  2. Select the ETL job and choose Run job.
  3. Repeat for all the ETL jobs.

Select one AWS Glue job and choose Run Job on the top right

When the ETL jobs are complete, the Job run monitoring page will display the job details. As shown in the following screenshot, a DPU hours column is provided for each ETL job.

Overview of AWS Glue jobs monitoring

Review performance

The following table summarizes the duration, DPU hours, and estimated costs from running the eight different data quality rulesets over the same test dataset. Note that all rulesets have been run with the entire test dataset described earlier (104 columns, 1 million rows).

ETL Job Name Number of Rules Tag Duration (sec) # of DPU hours # of DPUs Cost ($)
ruleset-400 400 dqjob:rs400 445.7 1.24 10 $0.54
ruleset-200 200 dqjob:rs200 235.7 0.65 10 $0.29
ruleset-100 100 dqjob:rs100 186.5 0.52 10 $0.23
ruleset-50 50 dqjob:rs50 155.2 0.43 10 $0.19
ruleset-10 10 dqjob:rs10 152.2 0.42 10 $0.18
ruleset-5 5 dqjob:rs5 150.3 0.42 10 $0.18
ruleset-1 1 dqjob:rs1 150.1 0.42 10 $0.18
ruleset-0 0 dqjob:rs0 53.2 0.15 10 $0.06

The cost of evaluating an empty ruleset is close to zero, but it has been included because it can be used as a quick test to validate the IAM roles associated to the AWS Glue Data Quality jobs and read permissions to the test dataset in Amazon S3. The cost of data quality jobs only starts to increase after evaluating rulesets with more than 100 rules, remaining constant below that number.

We can observe that the cost of running data quality for the largest ruleset in the benchmark (400 rules) is still slightly above $0.50.

Data quality cost analysis in AWS Cost Explorer

In order to see the data quality ETL job tags in AWS Cost Explorer, you need to activate the user-defined cost allocation tags first.

After you create and apply user-defined tags to your resources, it can take up to 24 hours for the tag keys to appear on your cost allocation tags page for activation. It can then take up to 24 hours for the tag keys to activate.

  1. On the AWS Cost Explorer console, choose Cost Explorer Saved Reports in the navigation pane.
  2. Choose Create new report.
    Create new AWS Cost Explorer report
  3. Select Cost and usage as the report type.
  4. Choose Create Report.
    Confirm creation of a new AWS Cost Explorer report
  5. For Date Range, enter a date range.
  6. For Granularity¸ choose Daily.
  7. For Dimension, choose Tag, then choose the dqjob tag.
    Report parameter selection in AWS Cost Explorer
  8. Under Applied filters, choose the dqjob tag and the eight tags used in the data quality rulesets (rs0, rs1, rs5, rs10, rs50, rs100, rs200, and rs400).
    Select the eight tags used to tag the data quality AWS Glue jobs
  9. Choose Apply.

The Cost and Usage report will be updated. The X-axis shows the data quality ruleset tags as categories. The Cost and usage graph in AWS Cost Explorer will refresh and show the total monthly cost of the latest data quality ETL jobs run, aggregated by ETL job.

The AWS Cost Explorer report shows the costs associated to executing the data quality AWS Glue Studio jobs

Clean up

To clean up the infrastructure and avoid additional charges, complete the following steps:

  1. Empty the S3 bucket initially created to store the test dataset.
  2. Delete the ETL jobs you created in AWS Glue.
  3. Delete the AWSGlueDataQualityPerformanceRole IAM role.
  4. Delete the custom report created in AWS Cost Explorer.

Conclusion

AWS Glue Data Quality provides an efficient way to incorporate data quality validation as part of ETL pipelines and scales automatically to accommodate increasing volumes of data. The built-in data quality rule types offer a wide range of options to customize the data quality checks and focus on how your data should look instead of implementing undifferentiated logic.

In this benchmark analysis, we showed how common-size AWS Glue Data Quality rulesets have little or no overhead, whereas in complex cases, the cost increases linearly. We also reviewed how you can tag AWS Glue Data Quality jobs to make cost information available in AWS Cost Explorer for quick reporting.

AWS Glue Data Quality is generally available in all AWS Regions where AWS Glue is available. Learn more about AWS Glue Data Quality and AWS Glue Data Catalog in Getting started with AWS Glue Data Quality from the AWS Glue Data Catalog.


About the Authors


Ruben Afonso Francos
Ruben Afonso is a Global Financial Services Solutions Architect with AWS. He enjoys working on analytics and AI/ML challenges, with a passion for automation and optimization. When not at work, he enjoys finding hidden spots off the beaten path around Barcelona.


Kalyan Kumar Neelampudi (KK)
is a Specialist Partner Solutions Architect (Data Analytics & Generative AI) at AWS. He acts as a technical advisor and collaborates with various AWS partners to design, implement, and build practices around data analytics and AI/ML workloads. Outside of work, he’s a badminton enthusiast and culinary adventurer, exploring local cuisines and traveling with his partner to discover new tastes and experiences.

Gonzalo Herreros
Gonzalo Herreros
is a Senior Big Data Architect on the AWS Glue team.

AWS completes the annual UAE Information Assurance Regulation compliance assessment

Post Syndicated from Vishal Pabari original https://aws.amazon.com/blogs/security/aws-completes-the-annual-uae-information-assurance-regulation-compliance-assessment/

Amazon Web Services (AWS) is pleased to announce the publication of our annual compliance assessment report on the Information Assurance Regulation (IAR) established by the Telecommunications and Digital Government Regulatory Authority (TDRA) of the United Arab Emirates (UAE). The report covers the AWS Middle East (UAE) Region.

The IAR provides management and technical information security controls to help establish, implement, maintain, and continuously improve information assurance. AWS alignment with IAR requirements demonstrates our ongoing commitment to adhere to the heightened expectations for cloud service providers. As such, IAR-regulated customers can continue to use AWS services with confidence.

Independent third-party auditors from BDO evaluated AWS for the period of November 1, 2022, to October 31, 2023. The assessment report that illustrates the status of AWS compliance is available through AWS Artifact. AWS Artifact is a self-service portal for on-demand access to AWS compliance reports. Sign in to AWS Artifact in the AWS Management Console, or learn more at Getting Started with AWS Artifact.

AWS strives to continuously bring services into the scope of its compliance programs to help you meet your architectural and regulatory needs. If you have questions or feedback about IAR compliance, reach out to your AWS account team.

To learn more about our compliance and security programs, see AWS Compliance Programs. As always, we value your feedback and questions; reach out to the AWS Compliance team through the Contact Us page.

If you have feedback about this post, submit comments in the Comments section below.

Vishal Pabari

Vishal Pabari

Vishal is a Security Assurance Program Manager at AWS, based in London, UK. Vishal is responsible for third-party and customer audits, attestations, certifications, and assessments across EMEA. Vishal previously worked in risk and control, and technology in the financial services industry.

How the GoDaddy data platform achieved over 60% cost reduction and 50% performance boost by adopting Amazon EMR Serverless

Post Syndicated from Brandon Abear original https://aws.amazon.com/blogs/big-data/how-the-godaddy-data-platform-achieved-over-60-cost-reduction-and-50-performance-boost-by-adopting-amazon-emr-serverless/

This is a guest post co-written with Brandon Abear, Dinesh Sharma, John Bush, and Ozcan IIikhan from GoDaddy.

GoDaddy empowers everyday entrepreneurs by providing all the help and tools to succeed online. With more than 20 million customers worldwide, GoDaddy is the place people come to name their ideas, build a professional website, attract customers, and manage their work.

At GoDaddy, we take pride in being a data-driven company. Our relentless pursuit of valuable insights from data fuels our business decisions and ensures customer satisfaction. Our commitment to efficiency is unwavering, and we’ve undertaken an exciting initiative to optimize our batch processing jobs. In this journey, we have identified a structured approach that we refer to as the seven layers of improvement opportunities. This methodology has become our guide in the pursuit of efficiency.

In this post, we discuss how we enhanced operational efficiency with Amazon EMR Serverless. We share our benchmarking results and methodology, and insights into the cost-effectiveness of EMR Serverless vs. fixed capacity Amazon EMR on EC2 transient clusters on our data workflows orchestrated using Amazon Managed Workflows for Apache Airflow (Amazon MWAA). We share our strategy for the adoption of EMR Serverless in areas where it excels. Our findings reveal significant benefits, including over 60% cost reduction, 50% faster Spark workloads, a remarkable five-times improvement in development and testing speed, and a significant reduction in our carbon footprint.

Background

In late 2020, GoDaddy’s data platform initiated its AWS Cloud journey, migrating an 800-node Hadoop cluster with 2.5 PB of data from its data center to EMR on EC2. This lift-and-shift approach facilitated a direct comparison between on-premises and cloud environments, ensuring a smooth transition to AWS pipelines, minimizing data validation issues and migration delays.

By early 2022, we successfully migrated our big data workloads to EMR on EC2. Using best practices learned from the AWS FinHack program, we fine-tuned resource-intensive jobs, converted Pig and Hive jobs to Spark, and reduced our batch workload spend by 22.75% in 2022. However, scalability challenges emerged due to the multitude of jobs. This prompted GoDaddy to embark on a systematic optimization journey, establishing a foundation for more sustainable and efficient big data processing.

Seven layers of improvement opportunities

In our quest for operational efficiency, we have identified seven distinct layers of opportunities for optimization within our batch processing jobs, as shown in the following figure. These layers range from precise code-level enhancements to more comprehensive platform improvements. This multi-layered approach has become our strategic blueprint in the ongoing pursuit of better performance and higher efficiency.

Seven layers of improvement opportunities

The layers are as follows:

  • Code optimization – Focuses on refining the code logic and how it can be optimized for better performance. This involves performance enhancements through selective caching, partition and projection pruning, join optimizations, and other job-specific tuning. Using AI coding solutions is also an integral part of this process.
  • Software updates – Updating to the latest versions of open source software (OSS) to capitalize on new features and improvements. For example, Adaptive Query Execution in Spark 3 brings significant performance and cost improvements.
  • Custom Spark configurations – Tuning of custom Spark configurations to maximize resource utilization, memory, and parallelism. We can achieve significant improvements by right-sizing tasks, such as through spark.sql.shuffle.partitions, spark.sql.files.maxPartitionBytes, spark.executor.cores, and spark.executor.memory. However, these custom configurations might be counterproductive if they are not compatible with the specific Spark version.
  • Resource provisioning time – The time it takes to launch resources like ephemeral EMR clusters on Amazon Elastic Compute Cloud (Amazon EC2). Although some factors influencing this time are outside of an engineer’s control, identifying and addressing the factors that can be optimized can help reduce overall provisioning time.
  • Fine-grained scaling at task level – Dynamically adjusting resources such as CPU, memory, disk, and network bandwidth based on each stage’s needs within a task. The aim here is to avoid fixed cluster sizes that could result in resource waste.
  • Fine-grained scaling across multiple tasks in a workflow – Given that each task has unique resource requirements, maintaining a fixed resource size may result in under- or over-provisioning for certain tasks within the same workflow. Traditionally, the size of the largest task determines the cluster size for a multi-task workflow. However, dynamically adjusting resources across multiple tasks and steps within a workflow result in a more cost-effective implementation.
  • Platform-level enhancements – Enhancements at preceding layers can only optimize a given job or a workflow. Platform improvement aims to attain efficiency at the company level. We can achieve this through various means, such as updating or upgrading the core infrastructure, introducing new frameworks, allocating appropriate resources for each job profile, balancing service usage, optimizing the use of Savings Plans and Spot Instances, or implementing other comprehensive changes to boost efficiency across all tasks and workflows.

Layers 1–3: Previous cost reductions

After we migrated from on premises to AWS Cloud, we primarily focused our cost-optimization efforts on the first three layers shown in the diagram. By transitioning our most costly legacy Pig and Hive pipelines to Spark and optimizing Spark configurations for Amazon EMR, we achieved significant cost savings.

For example, a legacy Pig job took 10 hours to complete and ranked among the top 10 most expensive EMR jobs. Upon reviewing TEZ logs and cluster metrics, we discovered that the cluster was vastly over-provisioned for the data volume being processed and remained under-utilized for most of the runtime. Transitioning from Pig to Spark was more efficient. Although no automated tools were available for the conversion, manual optimizations were made, including:

  • Reduced unnecessary disk writes, saving serialization and deserialization time (Layer 1)
  • Replaced Airflow task parallelization with Spark, simplifying the Airflow DAG (Layer 1)
  • Eliminated redundant Spark transformations (Layer 1)
  • Upgraded from Spark 2 to 3, using Adaptive Query Execution (Layer 2)
  • Addressed skewed joins and optimized smaller dimension tables (Layer 3)

As a result, job cost decreased by 95%, and job completion time was reduced to 1 hour. However, this approach was labor-intensive and not scalable for numerous jobs.

Layers 4–6: Find and adopt the right compute solution

In late 2022, following our significant accomplishments in optimization at the previous levels, our attention moved towards enhancing the remaining layers.

Understanding the state of our batch processing

We use Amazon MWAA to orchestrate our data workflows in the cloud at scale. Apache Airflow is an open source tool used to programmatically author, schedule, and monitor sequences of processes and tasks referred to as workflows. In this post, the terms workflow and job are used interchangeably, referring to the Directed Acyclic Graphs (DAGs) consisting of tasks orchestrated by Amazon MWAA. For each workflow, we have sequential or parallel tasks, and even a combination of both in the DAG between create_emr and terminate_emr tasks running on a transient EMR cluster with fixed compute capacity throughout the workflow run. Even after optimizing a portion of our workload, we still had numerous non-optimized workflows that were under-utilized due to over-provisioning of compute resources based on the most resource-intensive task in the workflow, as shown in the following figure.

This highlighted the impracticality of static resource allocation and led us to recognize the necessity of a dynamic resource allocation (DRA) system. Before proposing a solution, we gathered extensive data to thoroughly understand our batch processing. Analyzing the cluster step time, excluding provisioning and idle time, revealed significant insights: a right-skewed distribution with over half of the workflows completing in 20 minutes or less and only 10% taking more than 60 minutes. This distribution guided our choice of a fast-provisioning compute solution, dramatically reducing workflow runtimes. The following diagram illustrates step times (excluding provisioning and idle time) of EMR on EC2 transient clusters in one of our batch processing accounts.

Furthermore, based on the step time (excluding provisioning and idle time) distribution of the workflows, we categorized our workflows into three groups:

  • Quick run – Lasting 20 minutes or less
  • Medium run – Lasting between 20–60 minutes
  • Long run – Exceeding 60 minutes, often spanning several hours or more

Another factor we needed to consider was the extensive use of transient clusters for reasons such as security, job and cost isolation, and purpose-built clusters. Additionally, there was a significant variation in resource needs between peak hours and periods of low utilization.

Instead of fixed-size clusters, we could potentially use managed scaling on EMR on EC2 to achieve some cost benefits. However, migrating to EMR Serverless appears to be a more strategic direction for our data platform. In addition to potential cost benefits, EMR Serverless offers additional advantages such as a one-click upgrade to the newest Amazon EMR versions, a simplified operational and debugging experience, and automatic upgrades to the latest generations upon rollout. These features collectively simplify the process of operating a platform on a larger scale.

Evaluating EMR Serverless: A case study at GoDaddy

EMR Serverless is a serverless option in Amazon EMR that eliminates the complexities of configuring, managing, and scaling clusters when running big data frameworks like Apache Spark and Apache Hive. With EMR Serverless, businesses can enjoy numerous benefits, including cost-effectiveness, faster provisioning, simplified developer experience, and improved resilience to Availability Zone failures.

Recognizing the potential of EMR Serverless, we conducted an in-depth benchmark study using real production workflows. The study aimed to assess EMR Serverless performance and efficiency while also creating an adoption plan for large-scale implementation. The findings were highly encouraging, showing EMR Serverless can effectively handle our workloads.

Benchmarking methodology

We split our data workflows into three categories based on total step time (excluding provisioning and idle time): quick run (0–20 minutes), medium run (20–60 minutes), and long run (over 60 minutes). We analyzed the impact of the EMR deployment type (Amazon EC2 vs. EMR Serverless) on two key metrics: cost-efficiency and total runtime speedup, which served as our overall evaluation criteria. Although we did not formally measure ease of use and resiliency, these factors were considered throughout the evaluation process.

The high-level steps to assess the environment are as follows:

  1. Prepare the data and environment:
    1. Choose three to five random production jobs from each job category.
    2. Implement required adjustments to prevent interference with production.
  2. Run tests:
    1. Run scripts over several days or through multiple iterations to gather precise and consistent data points.
    2. Perform tests using EMR on EC2 and EMR Serverless.
  3. Validate data and test runs:
    1. Validate input and output datasets, partitions, and row counts to ensure identical data processing.
  4. Gather metrics and analyze results:
    1. Gather relevant metrics from the tests.
    2. Analyze results to draw insights and conclusions.

Benchmark results

Our benchmark results showed significant enhancements across all three job categories for both runtime speedup and cost-efficiency. The improvements were most pronounced for quick jobs, directly resulting from faster startup times. For instance, a 20-minute (including cluster provisioning and shut down) data workflow running on an EMR on EC2 transient cluster of fixed compute capacity finishes in 10 minutes on EMR Serverless, providing a shorter runtime with cost benefits. Overall, the shift to EMR Serverless delivered substantial performance improvements and cost reductions at scale across job brackets, as seen in the following figure.

Historically, we devoted more time to tuning our long-run workflows. Interestingly, we discovered that the existing custom Spark configurations for these jobs did not always translate well to EMR Serverless. In cases where the results were insignificant, a common approach was to discard previous Spark configurations related to executor cores. By allowing EMR Serverless to autonomously manage these Spark configurations, we often observed improved outcomes. The following graph shows the average runtime and cost improvement per job when comparing EMR Serverless to EMR on EC2.

Per Job Improvement

The following table shows a sample comparison of results for the same workflow running on different deployment options of Amazon EMR (EMR on EC2 and EMR Serverless).

Metric EMR on EC2
(Average)
EMR Serverless
(Average)
EMR on EC2 vs
EMR Serverless
Total Run Cost ($) $ 5.82 $ 2.60 55%
Total Run Time (Minutes) 53.40 39.40 26%
Provisioning Time (Minutes) 10.20 0.05 .
Provisioning Cost ($) $ 1.19 . .
Steps Time (Minutes) 38.20 39.16 -3%
Steps Cost ($) $ 4.30 . .
Idle Time (Minutes) 4.80 . .
EMR Release Label emr-6.9.0 .
Hadoop Distribution Amazon 3.3.3 .
Spark Version Spark 3.3.0 .
Hive/HCatalog Version Hive 3.1.3, HCatalog 3.1.3 .
Job Type Spark .

AWS Graviton2 on EMR Serverless performance evaluation

After seeing compelling results with EMR Serverless for our workloads, we decided to further analyze the performance of the AWS Graviton2 (arm64) architecture within EMR Serverless. AWS had benchmarked Spark workloads on Graviton2 EMR Serverless using the TPC-DS 3TB scale, showing a 27% overall price-performance improvement.

To better understand the integration benefits, we ran our own study using GoDaddy’s production workloads on a daily schedule and observed an impressive 23.8% price-performance enhancement across a range of jobs when using Graviton2. For more details about this study, see GoDaddy benchmarking results in up to 24% better price-performance for their Spark workloads with AWS Graviton2 on Amazon EMR Serverless.

Adoption strategy for EMR Serverless

We strategically implemented a phased rollout of EMR Serverless via deployment rings, enabling systematic integration. This gradual approach let us validate improvements and halt further adoption of EMR Serverless, if needed. It served both as a safety net to catch issues early and a means to refine our infrastructure. The process mitigated change impact through smooth operations while building team expertise of our Data Engineering and DevOps teams. Additionally, it fostered tight feedback loops, allowing prompt adjustments and ensuring efficient EMR Serverless integration.

We divided our workflows into three main adoption groups, as shown in the following image:

  • Canaries – This group aids in detecting and resolving any potential problems early in the deployment stage.
  • Early adopters – This is the second batch of workflows that adopt the new compute solution after initial issues have been identified and rectified by the canaries group.
  • Broad deployment rings – The largest group of rings, this group represents the wide-scale deployment of the solution. These are deployed after successful testing and implementation in the previous two groups.

Rings

We further broke down these workflows into granular deployment rings to adopt EMR Serverless, as shown in the following table.

Ring # Name Details
Ring 0 Canary Low adoption risk jobs that are expected to yield some cost saving benefits.
Ring 1 Early Adopters Low risk Quick-run Spark jobs that expect to yield high gains.
Ring 2 Quick-run Rest of the Quick-run (step_time <= 20 min) Spark jobs
Ring 3 LargerJobs_EZ High potential gain, easy move, medium-run and long-run Spark jobs
Ring 4 LargerJobs Rest of the medium-run and long-run Spark jobs with potential gains
Ring 5 Hive Hive jobs with potentially higher cost savings
Ring 6 Redshift_EZ Easy migration Redshift jobs that suit EMR Serverless
Ring 7 Glue_EZ Easy migration Glue jobs that suit EMR Serverless

Production adoption results summary

The encouraging benchmarking and canary adoption results generated considerable interest in wider EMR Serverless adoption at GoDaddy. To date, the EMR Serverless rollout remains underway. Thus far, it has reduced costs by 62.5% and accelerated total batch workflow completion by 50.4%.

Based on preliminary benchmarks, our team expected substantial gains for quick jobs. To our surprise, actual production deployments surpassed projections, averaging 64.4% faster vs. 42% projected, and 71.8% cheaper vs. 40% predicted.

Remarkably, long-running jobs also saw significant performance improvements due to the rapid provisioning of EMR Serverless and aggressive scaling enabled by dynamic resource allocation. We observed substantial parallelization during high-resource segments, resulting in a 40.5% faster total runtime compared to traditional approaches. The following chart illustrates the average enhancements per job category.

Prod Jobs Savings

Additionally, we observed the highest degree of dispersion for speed improvements within the long-run job category, as shown in the following box-and-whisker plot.

Whisker Plot

Sample workflows adopted EMR Serverless

For a large workflow migrated to EMR Serverless, comparing 3-week averages pre- and post-migration revealed impressive cost savings—a 75.30% decrease based on retail pricing with 10% improvement in total runtime, boosting operational efficiency. The following graph illustrates the cost trend.

Although quick-run jobs realized minimal per-dollar cost reductions, they delivered the most significant percentage cost savings. With thousands of these workflows running daily, the accumulated savings are substantial. The following graph shows the cost trend for a small workload migrated from EMR on EC2 to EMR Serverless. Comparing 3-week pre- and post-migration averages revealed a remarkable 92.43% cost savings on the retail on-demand pricing, alongside an 80.6% acceleration in total runtime.

Sample workflows adopted EMR Serverless 2

Layer 7: Platform-wide improvements

We aim to revolutionize compute operations at GoDaddy, providing simplified yet powerful solutions for all users with our Intelligent Compute Platform. With AWS compute solutions like EMR Serverless and EMR on EC2, it provided optimized runs of data processing and machine learning (ML) workloads. An ML-powered job broker intelligently determines when and how to run jobs based on various parameters, while still allowing power users to customize. Additionally, an ML-powered compute resource manager pre-provisions resources based on load and historical data, providing efficient, fast provisioning at optimum cost. Intelligent compute empowers users with out-of-the-box optimization, catering to diverse personas without compromising power users.

The following diagram shows a high-level illustration of the intelligent compute architecture.

Insights and recommended best-practices

The following section discusses the insights we’ve gathered and the recommended best practices we’ve developed during our preliminary and wider adoption stages.

Infrastructure preparation

Although EMR Serverless is a deployment method within EMR, it requires some infrastructure preparedness to optimize its potential. Consider the following requirements and practical guidance on implementation:

  • Use large subnets across multiple Availability Zones – When running EMR Serverless workloads within your VPC, make sure the subnets span across multiple Availability Zones and are not constrained by IP addresses. Refer to Configuring VPC access and Best practices for subnet planning for details.
  • Modify maximum concurrent vCPU quota – For extensive compute requirements, it is recommended to increase your max concurrent vCPUs per account service quota.
  • Amazon MWAA version compatibility – When adopting EMR Serverless, GoDaddy’s decentralized Amazon MWAA ecosystem for data pipeline orchestration created compatibility issues from disparate AWS Providers versions. Directly upgrading Amazon MWAA was more efficient than updating numerous DAGs. We facilitated adoption by upgrading Amazon MWAA instances ourselves, documenting issues, and sharing findings and effort estimates for accurate upgrade planning.
  • GoDaddy EMR operator – To streamline migrating numerous Airflow DAGs from EMR on EC2 to EMR Serverless, we developed custom operators adapting existing interfaces. This allowed seamless transitions while retaining familiar tuning options. Data engineers could easily migrate pipelines with simple find-replace imports and immediately use EMR Serverless.

Unexpected behavior mitigation

The following are unexpected behaviors we ran into and what we did to mitigate them:

  • Spark DRA aggressive scaling – For some jobs (8.33% of initial benchmarks, 13.6% of production), cost increased after migrating to EMR Serverless. This was due to Spark DRA excessively assigning new workers briefly, prioritizing performance over cost. To counteract this, we set maximum executor thresholds by adjusting spark.dynamicAllocation.maxExecutor, effectively limiting EMR Serverless scaling aggression. When migrating from EMR on EC2, we suggest observing the max core count in the Spark History UI to replicate similar compute limits in EMR Serverless, such as --conf spark.executor.cores and --conf spark.dynamicAllocation.maxExecutors.
  • Managing disk space for large-scale jobs – When transitioning jobs that process large data volumes with substantial shuffles and significant disk requirements to EMR Serverless, we recommend configuring spark.emr-serverless.executor.disk by referring to existing Spark job metrics. Furthermore, configurations like spark.executor.cores combined with spark.emr-serverless.executor.disk and spark.dynamicAllocation.maxExecutors allow control over the underlying worker size and total attached storage when advantageous. For example, a shuffle-heavy job with relatively low disk usage may benefit from using a larger worker to increase the likelihood of local shuffle fetches.

Conclusion

As discussed in this post, our experiences with adopting EMR Serverless on arm64 have been overwhelmingly positive. The impressive results we’ve achieved, including a 60% reduction in cost, 50% faster runs of batch Spark workloads, and an astounding five-times improvement in development and testing speed, speak volumes about the potential of this technology. Furthermore, our current results suggest that by widely adopting Graviton2 on EMR Serverless, we could potentially reduce the carbon footprint by up to 60% for our batch processing.

However, it’s crucial to understand that these results are not a one-size-fits-all scenario. The enhancements you can expect are subject to factors including, but not limited to, the specific nature of your workflows, cluster configurations, resource utilization levels, and fluctuations in computational capacity. Therefore, we strongly advocate for a data-driven, ring-based deployment strategy when considering the integration of EMR Serverless, which can help optimize its benefits to the fullest.

Special thanks to Mukul Sharma and Boris Berlin for their contributions to benchmarking. Many thanks to Travis Muhlestein (CDO), Abhijit Kundu (VP Eng), Vincent Yung (Sr. Director Eng.), and Wai Kin Lau (Sr. Director Data Eng.) for their continued support.


About the Authors

Brandon Abear is a Principal Data Engineer in the Data & Analytics (DnA) organization at GoDaddy. He enjoys all things big data. In his spare time, he enjoys traveling, watching movies, and playing rhythm games.

Dinesh Sharma is a Principal Data Engineer in the Data & Analytics (DnA) organization at GoDaddy. He is passionate about user experience and developer productivity, always looking for ways to optimize engineering processes and saving cost. In his spare time, he loves reading and is an avid manga fan.

John Bush is a Principal Software Engineer in the Data & Analytics (DnA) organization at GoDaddy. He is passionate about making it easier for organizations to manage data and use it to drive their businesses forward. In his spare time, he loves hiking, camping, and riding his ebike.

Ozcan Ilikhan is the Director of Engineering for the Data and ML Platform at GoDaddy. He has over two decades of multidisciplinary leadership experience, spanning startups to global enterprises. He has a passion for leveraging data and AI in creating solutions that delight customers, empower them to achieve more, and boost operational efficiency. Outside of his professional life, he enjoys reading, hiking, gardening, volunteering, and embarking on DIY projects.

Harsh Vardhan is an AWS Solutions Architect, specializing in big data and analytics. He has over 8 years of experience working in the field of big data and data science. He is passionate about helping customers adopt best practices and discover insights from their data.

[$] Insecurity and Python pickles

Post Syndicated from daroc original https://lwn.net/Articles/964392/

Serialization is the process of transforming Python objects into a sequence of
bytes which can be used to recreate a copy of the object later — or on another
machine.

pickle
is Python’s native serialization module. It can store complex Python
objects,
making it an appealing prospect for moving data without having to write
custom serialization code. For example, pickle is an integral component of
several file
formats
used for machine learning. However, using pickle to deserialize
untrusted files is a major security risk, because doing so can invoke arbitrary
Python functions. Consequently, the machine-learning community is working to address the
security issues caused by widespread use of pickle.

Security updates for Tuesday

Post Syndicated from corbet original https://lwn.net/Articles/965113/

Security updates have been issued by Debian (qemu), Mageia (libtiff and thunderbird), Red Hat (kernel, kpatch-patch, postgresql, and rhc-worker-script), SUSE (compat-openssl098, openssl, openssl1, python-Django, python-Django1, and wpa_supplicant), and Ubuntu (accountsservice, libxml2, linux-bluefield, linux-raspi-5.4, linux-xilinx-zynqmp, linux-oem-6.1, openvswitch, postgresql-9.5, and ruby-rack).

Huston: KeyTrap!

Post Syndicated from corbet original https://lwn.net/Articles/965067/

Geoff Huston digs into the
details
of the KeyTrap DNS vulnerability, which was disclosed in February.

It’s by no means “devasting” for the DNS, and the fix is much the
same as the previous fix. As well as limiting the number of queries
that a resolver can generate to resolve a queried name, a careful
resolver will limit both the elapsed time and perhaps the amount of
the resolver’s processing resources that are used to resolve any
single query name.

It’s also not a novel discovery by the ATHENE folk. The
vulnerability was described five years ago by a student at the
University of Twente. I guess the issue was that the student failed
to use a sufficient number of hysterical adjectives in describing
this DNS vulnerability in the paper!

Physics on AWS: Optimizing wind turbine performance using OpenFAST in a digital twin

Post Syndicated from Marco Masciola original https://aws.amazon.com/blogs/architecture/physics-on-aws-optimizing-wind-turbine-performance-using-openfast-in-a-digital-twin/

Wind energy plays a crucial role in global decarbonization efforts by generating emission-free power from an abundant resource. In 2022, wind energy produced 2100 terawatt-hours (TWh) globally, or over 7% of global electricity, with expectations to reach 7400 TWh by 2030.

Despite its potential, several challenges must be addressed to help meet grid decarbonization targets. As wind energy adoption grows, issues like gearbox fatigue and leading-edge erosion need to be resolved to ensure a predictable supply of energy. For example, in the United States, wind turbines underperform by as much as 10% after 11 years of operation, despite expectations for the machine to operate at full potential for 25 years.

This blog reveals a digital twin architecture using the National Renewable Energy Laboratory’s (NREL) OpenFAST, an open-source multi-physics wind turbine simulation tool, to characterize operational anomalies and continuously improve wind farm performance. This approach can be used to support an overall maintenance strategy to optimize performance and profitability while reducing risk.

While a digital twin can take many forms, this architecture represents it with a physical wind turbine connected to the cloud using IoT devices to monitor performance and augmented knowledge using on-demand simulations. The insight gained from simulations can update the physical asset control system in near real-time to balance operational performance.

Why build this?

This digital twin can catch reliability assessment discrepancies by benchmarking real-world time series with simulations. Aeroelastic simulators like OpenFAST define operational envelopes as part of wind turbine design and certification in accordance with IEC 61400-1 and 61400-3. However, subtle, unanticipated changes in environmental conditions not accounted for in the initial design certification, such as higher turbulence intensity, accelerate degradation.

This architecture can be used to validate if a controller change can limit gradual performance damage before the controller changes are deployed by using the same simulation software for wind turbine design. This example scenario, one that operators currently struggle with, is threaded in the next section.

Digital twin architecture

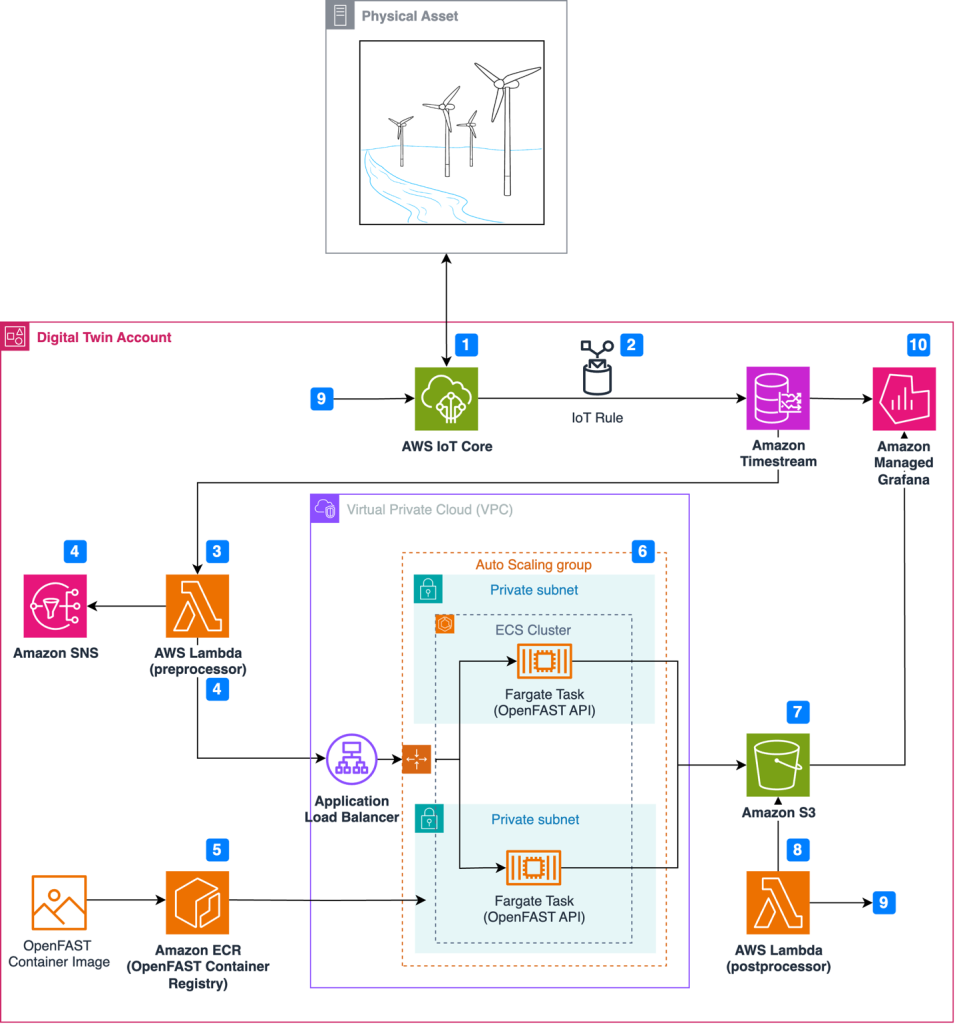
Figure 1 illustrates the event-driven architecture in which resources launch on-demand simulations as anomalies occur.

Architecture for wind turbine digital twin solution

Figure 1. Architecture for wind turbine digital twin solution

Simulation and real-world results can feed into a calculation engine to update the wind turbine controller software and improve operational performance through this workflow:

  1. Wind turbine sensors are connected to the AWS cloud using AWS IoT Core.
  2. An IoT rule forwards sensor data to Amazon Timestream, a purpose-built time series database.
  3. A scheduled AWS Lambda function queries Timestream to detect anomalies in time-series data.
  4. Upon anomaly detection, Amazon Simple Notification Service (Amazon SNS) publishes notifications and OpenFAST simulation input files are prepared in the Lambda preprocessor.
  5. Simulations are executed on demand, where the latest OpenFAST simulation is pulled from Amazon Elastic Container Registry (Amazon ECR).
  6. Simulations are dispatched through RESTful API and run using AWS Fargate.
  7. Simulation results are uploaded to Amazon Simple Storage Service (Amazon S3).
  8. Simulation time-series data is processed using AWS Lambda, where a decision is made to update the controller software based on the anomaly.
  9. The Lambda post-processer initiates a wind turbine controller software update, which is communicated to the wind turbine through AWS IoT Core.
  10. Results are visualized in Amazon Managed Grafana.

An example of an anomaly in step 3 is a controller overspeed alarm. Simple rule-based anomaly detection can be used to detect exceedance thresholds. You can also incorporate more sophisticated forms of anomaly detection using machine learning through Amazon SageMaker. The workflow above preserves four elements to create a digital twin. We will explore these four elements in the next section:

Event-driven architecture

Event-driven architectures enable decoupled systems and asynchronous communications between services. An event-driven workflow is initiated automatically as events occur. An event might be an active alarm or an OpenFAST output file uploaded to Amazon S3. This means that the number of actively monitored wind turbines can scale from one to 100 (or more) without allocating new resources.

AWS Lambda provides instant scaling to increase the number of OpenFAST simulations available for processing. Additionally, Fargate removes the need to provision or manage the underlying OpenFAST compute instances. Leveraging serverless compute services removes the need to manage underlying infrastructure, provides demand-based scaling, and reduces costs compared to statically provisioned infrastructure.

In practice, event-driven architecture provides teams with flexibility to automatically prepare input files, dispatch simulations, and post-process results without manually provisioning resources.

Containerization

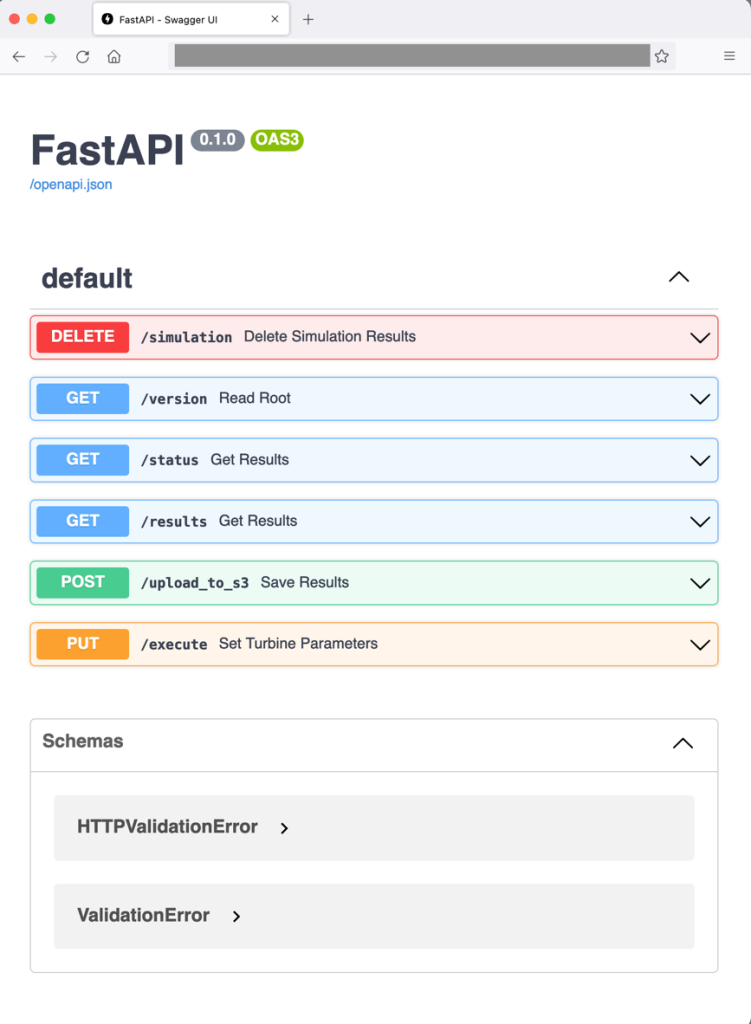
Containerization is a process to deploy an application with libraries needed for execution. Docker creates a container image that bundles the OpenFAST executable. FastAPI is also included in the OpenFAST container so that simulations can be dispatched through a web RESTful API, as demonstrated in Figure 2. Note that OpenFAST and FastAPI are independent projects. The RESTful API for OpenFAST is provisioned with commands to:

  • Run the simulation with initial conditions (PUT: /execute)
  • Upload simulation results to Amazon S3 (POST: /upload_to_s3)
  • Provide simulation status (GET: /status)
  • Delete simulation results (DELETE: /simulation)

This setup enables engineering teams to pull an OpenFAST simulation version aligned with physical wind turbines in operation without manual configuration.

Web frontend showing the RESTfulAPI commands available for dispatching OpenFAST simulations

Figure 2. Web frontend showing the RESTfulAPI commands available for dispatching OpenFAST simulations

Load balancing and auto scaling

The architecture uses Amazon EC2 Auto Scaling and an ALB to manage fluctuating processing demands and enable concurrent OpenFAST simulations. EC2 Auto Scaling dynamically scales the number of OpenFAST containers based on the volume of simulation requests and offers cost savings to avoid idle resources. Paired with an ALB, this setup evenly distributes simulation requests across OpenFAST containers, ensuring desired performance levels and high availability.

Data visualization

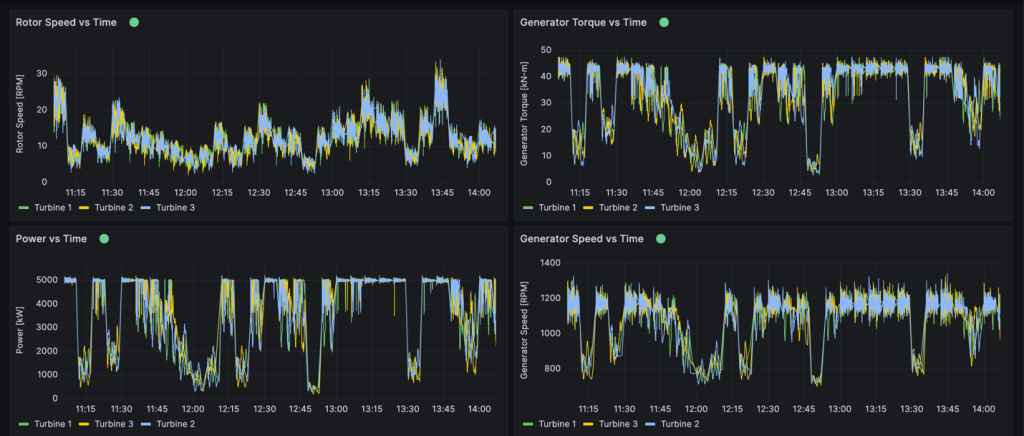
Amazon Timestream collects and archives real-time metrics from physical wind turbines. Timestream can store any metric from the physical asset collected through IoT Core, including rotor speed, generator power, generator speed, generator torque, or wind turbine control system alarms, as shown in Figure 3. One distinctive Timestream feature is scheduled queries that can regularly perform automated tasks like measuring 10-minute average wind speeds or tracking down units with controller alarms.

This provides operations teams the ability to view granular insights in real time or query historical data using SQL. Amazon Managed Grafana is also connected to OpenFAST results stored in Amazon S3 to compare simulation results with real-world operational data and view the response of simulated components. Engineering teams benefit from Amazon Managed Grafana because it provides a window into how the simulation responds to controller changes. Engineers can then verify whether the physical machine responds in the expected manner.

Example Amazon Managed Grafana dashboard

Figure 3. Example Amazon Managed Grafana dashboard

Conclusion

The AWS Cloud offers services and infrastructure to provide organization resources to process data and build digital twins. Organizations can leverage open-source models to improve operational performance and physics-based simulations to improve accuracy. By integrating technology paradigms such as event-drive architectures, wind turbine operators can make data-driven decisions in real time. Organizations can create virtual replicas of physical wind turbines to diagnose the source of alarms and adopt strategies to limit excessive wear before permanent damage occurs.

AWS Wickr achieves FedRAMP High authorization

Post Syndicated from Anne Grahn original https://aws.amazon.com/blogs/security/aws-wickr-achieves-fedramp-high-authorization/

Amazon Web Services (AWS) is excited to announce that AWS Wickr has achieved Federal Risk and Authorization Management Program (FedRAMP) authorization at the High impact level from the FedRAMP Joint Authorization Board (JAB).

FedRAMP is a U.S. government–wide program that promotes the adoption of secure cloud services by providing a standardized approach to security and risk assessment for cloud technologies and federal agencies.

Customers find security and control in Wickr

Wickr is an end-to-end encrypted messaging and collaboration service with features designed to help keep your communications secure, private, and compliant. Wickr protects one-to-one and group messaging, voice and video calling, file sharing, screen sharing, and location sharing with 256-bit encryption, and provides data retention capabilities.

You can create Wickr networks through the AWS Management Console. Administrative controls allow your Wickr administrators to add, remove, and invite users, and organize them into security groups to manage messaging, calling, security, and federation settings. You maintain full control over data, which includes addressing information governance polices, configuring ephemeral messaging options, and deleting credentials for lost or stolen devices.

You can log internal and external communications—including conversations with guest users, contractors, and other partner networks—in a private data store that you manage. This allows you to retain messages and files that are sent to and from your organization, to help meet requirements such as those that fall under the Federal Records Act (FRA) and the National Archives and Records Administration (NARA).

The FedRAMP milestone

In obtaining a FedRAMP High authorization, Wickr has been measured against a rigorous set of security controls, procedures, and policies established by the U.S. Federal Government, based on National Institute of Standards and Technology (NIST) standards.

“For many federal agencies and organizations, having the ability to securely communicate and share information—whether in an office or out in the field—is key to helping achieve their critical missions. AWS Wickr helps our government customers collaborate securely through messaging, calling, file and screen sharing with end-to-end encryption. The FedRAMP High authorization for Wickr demonstrates our commitment to delivering solutions that give government customers the control and confidence they need to support their sensitive and regulated workloads.” — Christian Hoff, Director, US Federal Civilian & Health at AWS

FedRAMP on AWS

AWS is continually expanding the scope of our compliance programs to help you use authorized services for sensitive and regulated workloads. We now offer 150 services that are authorized in the AWS US East/West Regions under FedRAMP Moderate authorization, and 132 services authorized in the AWS GovCloud (US) Regions under FedRAMP High authorization.

The FedRAMP High authorization of Wickr further validates our commitment at AWS to public-sector customers. With Wickr, you can combine the security of end-to-end encryption with the administrative flexibility you need to secure mission-critical communications, and keep up with recordkeeping requirements. Wickr is available under FedRAMP High in the AWS GovCloud (US-West) Region.

For up-to-date information, see our AWS Services in Scope by Compliance Program page. To learn more about AWS Wickr, visit the AWS Wickr product page, or email [email protected].

If you have feedback about this blog post, let us know in the Comments section below.

Anne Grahn

Anne Grahn

Anne is a Senior Worldwide Security GTM Specialist at AWS, based in Chicago. She has more than a decade of experience in the security industry, and focuses on effectively communicating cybersecurity risk. She maintains a Certified Information Systems Security Professional (CISSP) certification.

Randy Brumfield

Randy Brumfield

Randy leads technology business for new initiatives and the Cloud Support Engineering team for AWS Wickr. Prior to joining AWS, Randy spent close to two and a half decades in Silicon Valley across several start-ups, networking companies, and system integrators in various corporate development, product management, and operations roles. Randy currently resides in San Jose, California.

The collective thoughts of the interwebz