Today, we announced the next generation of Amazon SageMaker, which is a unified platform for data, analytics, and AI, bringing together widely-adopted AWS machine learning and analytics capabilities. At its core is SageMaker Unified Studio (preview), a single data and AI development environment for data exploration, preparation and integration, big data processing, fast SQL analytics, model development and training, and generative AI application development. This announcement includes Amazon SageMaker Lakehouse, a capability that unifies data across data lakes and data warehouses, helping you build powerful analytics and artificial intelligence and machine learning (AI/ML) applications on a single copy of data.
In addition to these launches, I’m happy to announce data catalog and permissions capabilities in Amazon SageMaker Lakehouse, helping you connect, discover, and manage permissions to data sources centrally.
Organizations today store data across various systems to optimize for specific use cases and scale requirements. This often results in data siloed across data lakes, data warehouses, databases, and streaming services. Analysts and data scientists face challenges when trying to connect to and analyze data from these diverse sources. They must set up specialized connectors for each data source, manage multiple access policies, and often resort to copying data, leading to increased costs and potential data inconsistencies.
The new capability addresses these challenges by simplifying the process of connecting to popular data sources, cataloging them, applying permissions, and making the data available for analysis through SageMaker Lakehouse and Amazon Athena. You can use the AWS Glue Data Catalog as a single metadata store for all data sources, regardless of location. This provides a centralized view of all available data.
Data source connections are created once and can be reused, so you don’t need to set up connections repeatedly. As you connect to the data sources, databases and tables are automatically cataloged and registered with AWS Lake Formation. Once cataloged, you grant access to those databases and tables to data analysts, so they don’t have to go through separate steps of connecting to each data source and don’t have to know built-in data source secrets. Lake Formation permissions can be used to define fine-grained access control (FGAC) policies across data lakes, data warehouses, and online transaction processing (OLTP) data sources, providing consistent enforcement when querying with Athena. Data remains in its original location, eliminating the need for costly and time-consuming data transfers or duplications. You can create or reuse existing data source connections in Data Catalog and configure built-in connectors to multiple data sources, including Amazon Simple Storage Service (Amazon S3), Amazon Redshift, Amazon Aurora, Amazon DynamoDB (preview), Google BigQuery, and more.
Getting started with the integration between Athena and Lake Formation To showcase this capability, I use a preconfigured environment that incorporates Amazon DynamoDB as a data source. The environment is set up with appropriate tables and data to effectively demonstrate the capability. I use the SageMaker Unified Studio (preview)interface for this demonstration.
To begin, I go to SageMaker Unified Studio (preview) through the Amazon SageMaker domain. This is where you can create and manage projects, which serve as shared workspaces. These projects allow team members to collaborate, work with data, and develop ML models together. Creating a project automatically sets up AWS Glue Data Catalog databases, establishes a catalog for Redshift Managed Storage (RMS) data, and provisions necessary permissions.
To manage projects, you can either view a comprehensive list of existing projects by selecting Browse all projects, or you can create a new project by choosing Create project. I use two existing projects: sales-group, where administrators have full access privileges to all data, and marketing-project, where analysts operate under restricted data access permissions. This setup effectively illustrates the contrast between administrative and limited user access levels.
In this step, I set up a federated catalog for the target data source, which is Amazon DynamoDB. I go to Data in the left navigation pane and choose the + (plus) sign to Add data. I choose Add connection and then I choose Next.
I choose Amazon DynamoDB and choose Next.
I enter the details and choose Add data. Now, I have the Amazon DynamoDB federated catalog created in SageMaker Lakehouse. This is where your administrator gives you access using resource policies. I’ve already configured the resource policies in this environment. Now, I’ll show you how fine-grained access controls work in SageMaker Unified Studio (preview).
I begin by selecting the sales-group project, which is where administrators maintain and have full access to customer data. This dataset contains fields such as zip codes, customer IDs, and phone numbers. To analyze this data, I can execute queries using Query with Athena.
Upon selecting Query with Athena, the Query Editor launches automatically, providing a workspace where I can compose and execute SQL queries against the lakehouse. This integrated query environment offers a seamless experience for data exploration and analysis.
In the second part, I switch to marketing-project to show what an analyst experiences when they run their queries and observe that the fine-grained access control permissions are in place and working.
In the second part, I demonstrate the perspective of an analyst by switching to the marketing-project environment. This helps us verify that the fine-grained access control permissions are properly implemented and effectively restricting data access as intended. Through example queries, we can observe how analysts interact with the data while being subject to the established security controls.
Using the Query with Athena option, I execute a SELECT statement on the table to verify the access controls. The results confirm that, as expected, I can only view the zipcode and cust_id columns, while the phone column remains restricted based on the configured permissions.
With these new data catalog and permissions capabilities in Amazon SageMaker Lakehouse, you can now streamline your data operations, enhance security governance, and accelerate AI/ML development while maintaining data integrity and compliance across your entire data ecosystem.
Now available Data catalog and permissions in Amazon SageMaker Lakehouse simplifies interactive analytics through federated query when connecting to a unified catalog and permissions with Data Catalog across multiple data sources, providing a single place to define and enforce fine-grained security policies across data lakes, data warehouses, and OLTP data sources for a high-performing query experience.
You can use this capability in US East (N. Virginia), US West (Oregon), US East (Ohio), Europe (Ireland), and Asia Pacific (Tokyo) AWS Regions.
AWS Lake Formation makes it straightforward to centrally govern, secure, and globally share data for analytics and machine learning (ML).
With Lake Formation, you can centralize data security and governance using the AWS Glue Data Catalog, letting you manage metadata and data permissions in one place with familiar database-style features. It also delivers fine-grained data access control, so you can make sure users have access to the right data down to the row and column level.
Lake Formation also makes it straightforward to share data internally across your organization and externally, which lets you create a data mesh or meet other data sharing needs with no data movement.
Additionally, because Lake Formation tracks data interactions by role and user, it provides comprehensive data access auditing to verify the right data was accessed by the right users at the right time.
In this two-part series, we show how to integrate custom applications or data processing engines with Lake Formation using the third-party services integration feature.
In this post, we dive deep into the required Lake Formation and AWS Glue APIs. We walk through the steps to enforce Lake Formation policies within custom data applications. As an example, we present a sample Lake Formation integrated application implemented using AWS Lambda.
The second part of the series introduces a sample web application built with AWS Amplify. This web application showcases how to use the custom data processing engine implemented in the first post.
By the end of this series, you will have a comprehensive understanding of how to extend the capabilities of Lake Formation by building and integrating your own custom data processing components.
In this section, we dive deeper into the steps required to establish trust between Lake Formation and an external application, the API operations that are involved, and the AWS Identity and Access Management (IAM) permissions that must be set up to enable the integration.
Lake Formation application integration external data filtering
In Lake Formation, it’s possible to control which third-party engines or applications are allowed to read and filter data in Amazon Simple Storage Service (Amazon S3) locations registered with Lake Formation.
To do so, you can navigate to the Application integration settings page on the Lake Formation console and enable Allow external engines to filter data in Amazon S3 locations registered with Lake Formation, specifying the AWS account IDs from where third-party engines are allowed to access locations registered with Lake Formation. In addition, you have to specify the allowed session tag values to identify trusted requests. We discuss in later sections how these tags are used.
Lake Formation application integration involved AWS APIs
The following is a list of the main AWS APIs needed to integrate an application with Lake Formation:
sts:AssumeRole – Returns a set of temporary security credentials that you can use to access AWS resources.
glue:GetUnfilteredTableMetadata – Allows a third-party analytical engine to retrieve unfiltered table metadata from the Data Catalog.
lakeformation:GetTemporaryGlueTableCredentials – Allows a caller in a secure environment to assume a role with permission to access Amazon S3. To vend such credentials, Lake Formation assumes the role associated with a registered location, for example an S3 bucket, with a scope down policy that restricts the access to a single prefix.
lakeformation:GetTemporaryGluePartitionCredentials – This API is identical to GetTemporaryTableCredentials except that it’s used when the target Data Catalog resource is of type Partition. Lake Formation restricts the permission of the vended credentials with the same scope down policy that restricts access to a single Amazon S3 prefix.
Later in this post, we present a sample architecture illustrating how you can use these APIs.
External application and IAM roles to access data
For an external application to access resources in an Lake Formation environment, it needs to run under an IAM principal (user or role) with the appropriate credentials. Let’s consider a scenario where the external application runs under the IAM role MyApplicationRole that is part of the AWS account 123456789012.
In Lake Formation, you have granted access to various tables and databases to two specific IAM roles:
AccessRole1
AccessRole2
To enable MyApplicationRole to access the resources that have been granted to AccessRole1 and AccessRole2, you need to configure the trust relationships for these access roles. Specifically, you need to configure the following:
Allow MyApplicationRole to assume each of the access roles (AccessRole1 and AccessRole2) using the sts:AssumeRole
Allow MyApplicationRole to tag the assumed session with a specific tag, which is required by Lake Formation. The tag key should be LakeFormationAuthorizedCaller, and the value should match one of the session tag values specified in the Application integration settings page on the Lake Formation console (for example, “application1“).
The following code is an example of the trust relationships configuration for an access role (AccessRole1 or AccessRole2):
Additionally, the data access IAM roles (AccessRole1 and AccessRole2) must have the following IAM permissions assigned in order to read Lake Formation protected tables:
For our solution, Lambda serves as our external trusted engine and application integrated with Lake Formation. This example is provided in order to understand and see in action the access flow and the Lake Formation API responses. Because it’s based on a single Lambda function, it’s not meant to be used in production settings or with high volumes of data.
Moreover, the Lambda based engine has been configured to support a limited set of data files (CSV, Parquet, and JSON), a limited set of table configurations (no nested data), and a limited set of table operations (SELECT only). Due to these limitations, the application should not be used for arbitrary tests.
In this post, we provide instructions on how to deploy a sample API application integrated with Lake Formation that implements the solution architecture. The core of the API is implemented with a Python Lambda function. We also show how to test the function with Lambda tests. In the second post in this series, we provide instructions on how to deploy a web frontend application that integrates with this Lambda function.
Access flow for unpartitioned tables
The following diagram summarizes the access flow when accessing unpartitioned tables.
The workflow consists of the following steps:
User A (authenticated with Amazon Cognito or other equivalent systems) sends a request to the application API endpoint, requesting access to a specific table inside a specific database.
The API endpoint, created with AWS AppSync, handles the request, invoking a Lambda function.
The function checks which IAM data access role the user is mapped to. For simplicity, the example uses a static hardcoded mapping (mappings={ "user1": "lf-app-access-role-1", "user2": "lf-app-access-role-2"}).
The function invokes the sts:AssumeRole API to assume the user-related IAM data access role (lf-app-access-role-1AccessRole1). The AssumeRole operation is performed with the tag LakeFormationAuthorizedCaller, having as its value one of the session tag values specified when configuring the application integration settings in Lake Formation (for example, {'Key': 'LakeFormationAuthorizedCaller','Value': 'application1'}). The API returns a set of temporary credentials, which we refer to as StsCredentials1.
Using StsCredentials1, the function invokes the glue:GetUnfilteredTableMetadata API, passing the requested database and table name. The API returns information like table location, a list of authorized columns, and data filters, if defined.
Using StsCredentials1, the function invokes the lakeformation:GetTemporaryGlueTableCredentials API, passing the requested database and table name, the type of requested access (SELECT), and CELL_FILTER_PERMISSION as the supported permission types (because the Lambda function implements logic to apply row-level filters). The API returns a set of temporary Amazon S3 credentials, which we refer to as S3Credentials1.
Using S3Credentials1, the function lists the S3 files stored in the table location S3 prefix and downloads them.
The retrieved Amazon S3 data is filtered to remove those columns and rows that the user is not allowed access to (authorized columns and row filters were retrieved in Step 5) and authorized data is returned to the user.
Access flow for partitioned tables
The following diagram summarizes the access flow when accessing partitioned tables.
The steps involved are almost identical to the ones presented for partitioned tables, with the following changes:
After invoking the glue:GetUnfilteredTableMetadata API (Step 5) and identifying the table as partitioned, the Lambda function invokes the glue:GetUnfilteredPartitionsMetadata API using StsCredentials1 (Step 6). The API returns, in addition to other information, the list of partition values and locations.
For each partition, the function performs the following actions:
Invokes the lakeformation:GetTemporaryGluePartitionCredentials API (Step 7), passing the requested database and table name, the partition value, the type of requested access (SELECT), and CELL_FILTER_PERMISSION as the supported permissions type (because the Lambda function implements logic to apply row-level filters). The API returns a set of temporary Amazon S3 credentials, which we refer to as S3CredentialsPartitionX.
Uses S3CredentialsPartitionX to list the partition location S3 files and download them (Step 8).
The function appends the retrieved data.
Before the Lambda function returns the results to the user (Step 9), the retrieved Amazon S3 data is filtered to remove those columns and rows that the user is not allowed access to (authorized columns and row filters were retrieved in Step 5).
Prerequisites
The following prerequisites are needed to deploy and test the solution:
Lake Formation should be enabled in the AWS Region where the sample application will be deployed
The steps must be run with an IAM principal with sufficient permissions to create the needed resources, including Lake Formation databases and tables
Deploy solution resources with AWS CloudFormation
We create the solution resources using AWS CloudFormation. The provided CloudFormation template creates the following resources:
One S3 bucket to store table data (lf-app-data-<account-id>)
Two IAM roles, which will be mapped to client users and their associated Lake Formation permission policies (lf-app-access-role-1 and lf-app-access-role-2)
Two IAM roles used for the two created Lambda functions (lf-app-lambda-datalake-population-role and lf-app-lambda-role)
One AWS Glue database (lf-app-entities) with two AWS Glue tables, one unpartitioned (users_tbl) and one partitioned (users_partitioned_tbl)
One Lambda function used to populate the data lake data (lf-app-lambda-datalake-population)
One Lambda function used for the Lake Formation integrated application (lf-app-lambda-engine)
One IAM role used by Lake Formation to access the table data and perform credentials vending (lf-app-datalake-location-role)
One Lake Formation data lake location (s3://lf-app-data-<account-id>/datasets) associated with the IAM role created for credentials vending (lf-app-datalake-location-role)
One Lake Formation data filter (lf-app-filter-1)
One Lake Formation tag (key: sensitive, values: true or false)
Tag associations to tag the created unpartitioned AWS Glue table (users_tbl) columns with the created tag
To launch the stack and provision your resources, complete the following steps:
Download the code zip bundle for the Lambda function used for the Lake Formation integrated application (lf-integrated-app.zip).
Upload the zip bundles to an existing S3 bucket location (for example, s3://mybucket/myfolder1/myfolder2/lf-integrated-app.zip and s3://mybucket/myfolder1/myfolder2/datalake-population-function.zip)
Choose Launch Stack.
This automatically launches AWS CloudFormation in your AWS account with a template. Make sure that you create the stack in your intended Region.
Choose Next to move to the Specify stack details section
For Parameters, provide the following parameters:
For powertoolsLogLevel, specify how verbose the Lambda function logger should be, from the most verbose to the least verbose (no logs). For this post, we choose DEBUG.
For s3DeploymentBucketName, enter the name of the S3 bucket containing the Lambda functions’ code zip bundles. For this post, we use mybucket.
For s3KeyLambdaDataPopulationCode, enter the Amazon S3 location containing the code zip bundle for the Lambda function used to populate the data lake data (datalake-population-function.zip). For example, myfolder1/myfolder2/datalake-population-function.zip.
For s3KeyLambdaEngineCode, enter the Amazon S3 location containing the code zip bundle for the Lambda function used for the Lake Formation integrated application (lf-integrated-app.zip). For example, myfolder1/myfolder2/lf-integrated-app.zip.
Choose Next.
Add additional AWS tags if required.
Choose Next.
Acknowledge the final requirements.
Choose Create stack.
Enable the Lake Formation application integration
Complete the following steps to enable the Lake Formation application integration:
On the Lake Formation console, choose Application integration settings in the navigation pane.
Enable Allow external engines to filter data in Amazon S3 locations registered with Lake Formation.
For Session tag values, choose application1.
For AWS account IDs, enter the current AWS account ID.
Choose Save.
Enforce Lake Formation permissions
The CloudFormation stack created one database named lf-app-entities with two tables named users_tbl and users_partitioned_tbl.
To be sure you’re using Lake Formation permissions, you should confirm that you don’t have any grants set up on those tables for the principal IAMAllowedPrincipals. The IAMAllowedPrincipals group includes any IAM users and roles that are allowed access to your Data Catalog resources by your IAM policies, and it’s used to maintain backward compatibility with AWS Glue.
To confirm Lake Formations permissions are enforced, navigate to the Lake Formation console and choose Data lake permissions in the navigation pane. Filter permissions by Database=lf-app-entities and remove all the permissions given to the principal IAMAllowedPrincipals.
Check the created Lake Formation resources and permissions
The CloudFormation stack created two IAM roles—lf-app-access-role-1 and lf-app-access-role-2—and assigned them different permissions on the users_tbl (unpartitioned) and users_partitioned_tbl (partitioned) tables. The specific Lake Formation grants are summarized in the following table.
IAM Roles
lf-app-entities (Database)
users _tbl (Table)
_tbl _partitioned_tbl (Table)
lf-app-access-role-1
No access
Read access on columns uid, state, and city for all the records. Read access to all columns except for address only on rows with value state=united kingdom.
lf-app-access-role-2
Read access on columns with the tag sensitive = false
Read access to all columns and rows.
To better understand the full permissions setup, you should review the CloudFormation created Lake Formation resources and permissions. On the Lake Formation console, complete the following steps:
Review the data filters:
Choose Data filters in the navigation pane.
Inspect the lf-app-filter-1
Review the tags:
Choose LF-Tags and permissions in the navigation pane.
Inspect the sensitive
Review the tag associations:
Choose Tables in the navigation pane.
Choose the users_tbl
Inspect the LF-Tags associated to the different columns in the Schema
Review the Lake Formation permissions:
Choose Data lake permissions in the navigation pane.
Filter by Principal = lf-app-access-role-1 and inspect the assigned permissions.
Filter by Principal = lf-app-access-role-2 and inspect the assigned permissions.
Test the Lambda function
The Lambda function created by the CloudFormation template accepts JSON objects as input events. The JSON events have the following structure:
Although the identity field is always needed in order to identify the called identity, depending on the requested operation (fieldName), different arguments should be provided. The following table lists these arguments.
Operation
Description
Needed Arguments
Output
getDbs
List databases
No arguments needed
List of databases the user has access to
getTablesByDb
List tables
db: <db_name>
List of tables inside a database the user has access to
To troubleshoot the Lambda function, you can navigate to the Monitoring tab, choose View CloudWatch logs, and inspect the latest log stream.
Clean up
If you plan to explore Part 2 of this series, you can skip this part, because you will need the resources created here. You can refer to this section at the end of your testing.
Complete the following steps to remove the resources you created following this post and avoid incurring additional costs:
On the AWS CloudFormation console, choose Stacks in the navigation pane.
Choose the stack you created and choose Delete.
Additional considerations
In the proposed architecture, Lake Formation permissions were granted to specific IAM data access roles that requesting users (for example, the identity field) were mapped to. Another possibility is to assign permissions in Lake Formation to SAML users and groups and then work with the AssumeDecoratedRoleWithSAML API.
Conclusion
In the first part of this series, we explored how to integrate custom applications and data processing engines with Lake Formation. We delved into the required configuration, APIs, and steps to enforce Lake Formation policies within custom data applications. As an example, we presented a sample Lake Formation integrated application built on Lambda.
The information provided in this post can serve as a foundation for developing your own custom applications or data processing engines that need to operate on an Lake Formation protected data lake.
Refer to the second part of this series to see how to build a sample web application that uses the Lambda based Lake Formation application.
About the Authors
Stefano Sandonà is a Senior Big Data Specialist Solution Architect at AWS. Passionate about data, distributed systems, and security, he helps customers worldwide architect high-performance, efficient, and secure data platforms.
Francesco Marelli is a Principal Solutions Architect at AWS. He specializes in the design, implementation, and optimization of large-scale data platforms. Francesco leads the AWS Solution Architect (SA) analytics team in Italy. He loves sharing his professional knowledge and is a frequent speaker at AWS events. Francesco is also passionate about music.
In this post, we explore how to deploy a fully functional web client application, built with JavaScript/React through AWS Amplify (Gen 1), that uses the same Lambda function as the backend. The provisioned web application provides a user-friendly and intuitive way to view the Lake Formation policies that have been enforced.
For the purposes of this post, we use a local machine based on MacOS and Visual Studio Code as our integrated development environment (IDE), but you could use your preferred development environment and IDE.
Solution overview
AWS AppSync creates serverless GraphQL and pub/sub APIs that simplify application development through a single endpoint to securely query, update, or publish data.
GraphQL is a data language to enable client apps to fetch, change, and subscribe to data from servers. In a GraphQL query, the client specifies how the data is to be structured when it’s returned by the server. This makes it possible for the client to query only for the data it needs, in the format that it needs it in.
Amplify streamlines full-stack app development. With its libraries, CLI, and services, you can connect your frontend to the cloud for authentication, storage, APIs, and more. Amplify provides libraries for popular web and mobile frameworks, like JavaScript, Flutter, Swift, and React.
Prerequisites
The web application that we deploy depends on the Lambda function that was deployed in the first post of this series. Make sure the function is already deployed and working in your account.
We create a JavaScript application using the React framework.
In the terminal, enter the following command:
npm create vite@latest
Enter a name for your project (we use lfappblog), choose React for the framework, and choose JavaScript for the variant.
You can now run the next steps, ignore any warning messages. Don’t run the npm run dev command yet.
Enter the following command:
cd lfappblog && npm install
You should now see the directory structure shown in the following screenshot.
You can now test the newly created application by running the following command:
npm run dev
By default, the application is available on port 5173 on your local machine.
The base application is shown in the workspace browser.
You can close the browser window and then the test web server by entering the following in the terminal: q + enter
Set up and configure Amplify for the application
To set up Amplify for the application, complete the following steps:
Run the following command in the application directory to initialize Amplify:
amplify init
Refer to the following screenshot for all the options required. Make sure to change the value of Distribution Directory Path to dist. The command creates and runs the required AWS CloudFormation template to create the backend environment in your AWS account.
Install the node modules required by the application with the following command:
The output of this command will vary depending on the packages already installed on your development machine.
Add Amplify authentication
Amplify can implement authentication with Amazon Cognito user pools. You run this step before adding the function and the Amplify API capabilities so that the user pool created can be set as the authentication mechanism for the API, otherwise it would default to the API key and further modifications would be required.
Run the following command and accept all the defaults:
amplify add auth
Add the Amplify API
The application backend is based on a GraphQL API with resolvers implemented as a Python Lambda function. The API feature of Amplify can create the required resources for GraphQL APIs based on AWS AppSync (default) or REST APIs based on Amazon API Gateway.
Run the following command to add and initialize the GraphQL API:
amplify add api
Make sure to set Blank Schema as the schema template (a full schema is provided as part of this post; further instructions are provided in the next sections).
Make sure to select Authorization modes and then Amazon Cognito User Pool.
Add Amplify hosting
Amplify can host applications using either the Amplify console or Amazon CloudFront and Amazon Simple Storage Service (Amazon S3) with the option to have manual or continuous deployment. For simplicity, we use the Hosting with Amplify Console and Manual Deployment options.
Run the following command:
amplify add hosting
Copy and configure the GraphQL API schema
You’re now ready to copy and configure the GraphQL schema file and update it with the current Lambda function name.
In the schema.graphql file, you can see that the lf-app-lambda-engine function is set as the data source for the GraphQL queries.
Copy and configure the AWS AppSync resolver template
AWS AppSync uses templates to preprocess the request payload from the client before it’s sent to the backend and postprocess the response payload from the backend before it’s sent to the client. The application requires a modified template to correctly process custom backend error messages.
From the project directory, run the following command to verify all resources are ready to be created on AWS:
amplify status
Run the following command to publish the full application:
amplify publish
This will take several minutes to complete. Accept all defaults apart from Enter maximum statement depth [increase from default if your schema is deeply nested], which must be set to 5.
All the resources are now deployed on AWS and ready for use.
Use the application
You can start using the application from the Amplify hosted domain.
Run the following command to retrieve the application URL:
amplify status
At first access, the application shows the Amazon Cognito login page.
Choose Create Account and create a user with user name user1 (this is mapped in the application to the role lf-app-access-role-1 for which we created Lake Formation permissions in the first post).
Enter the confirmation code that you received through email and choose Sign In.
When you’re logged in, you can start interacting with the application.
Controls
The application offers several controls:
Database – You can select a database registered with Lake Formation with the Describe permission.
Table – You can choose a table with Select permission.
Number of records – This indicates the number of records (between 5–40) to display on the Data Because this is a sample application, no pagination was implemented in the backend.
Row type – Enable this option to display only rows that have at least one cell with authorized data. If all cells in a row are unauthorized and checkbox is selected, the row is not displayed.
Outputs
The application has four outputs, organized in tabs.
Unfiltered Table Metadata
This tab displays the response of the AWS Glue API GetUnfilteredTableMetadata policies for the selected table. The following is an example of the content:
This tab displays the response of the AWS Glue API GetUnfileteredPartitionsMetadata policies for the selected table. The following is an example of the content:
This tab displays a table that shows the columns, rows, and cells that the user is authorized to access.
A cell is marked as Unauthorized if the user has no permissions to access its contents, according to the cell filter definition. You can choose the unauthorized cell to view the relevant cell filter condition.
In this example, the user can’t access the value of column surname in the first row because for the row, state is canada, but the cell can only be accessed when state=’united kingdom’.
If the Only rows with authorized data control is unchecked, rows with all cells set to Unauthorized are also displayed.
All Data
This tab contains a table that contains all the rows and columns in the table (the unfiltered data). This is useful for comparison with authorized data to understand how cell filters are applied to the unfiltered data.
Test Lake Formation permissions
Log out of the application and go to the Amazon Cognito login form, choose Create Account, and create a new user with called user2 (this is mapped in the application to the role lf-app-access-role-2 that we created Lake Formation permissions for in the first post). Get table data and metadata for this user to see how Lake Formation permissions are enforced and so the two users can see different data (on the Authorized Data tab).
The following screenshot shows that the Lake Formation permissions we created grant access to the following data (all rows, all columns) of table users_partitioned_tbl to user2 (mapped to lf-app-access-role-2).
The following screenshot shows that the Lake Formation permissions we created grant access to the following data (all rows, but only city, state, and uid columns) of table users_tbl to user2 (mapped to lf-app-access-role-2).
Considerations for the GraphQL API
You can use the AWS AppSync GraphQL API deployed in this post for other applications; the responses of the GetUnfilteredTableMetadata and GetUnfileteredPartitionsMetadata AWS Glue APIs were fully mapped in the GraphQL schema. You can use the Queries page on the AWS AppSync console to run the queries; this is based on GraphiQL.
You can use the following object to define the query variables:
In this post, we showed how to implement a web application that uses a GraphQL API implemented with AWS AppSync and Lambda as the backend for a web application integrated with Lake Formation. You should now have a comprehensive understanding of how to extend the capabilities of Lake Formation by building and integrating your own custom data processing applications.
Try out this solution for yourself, and share your feedback and questions in the comments.
About the Authors
Stefano Sandonà is a Senior Big Data Specialist Solution Architect at AWS. Passionate about data, distributed systems, and security, he helps customers worldwide architect high-performance, efficient, and secure data platforms.
Francesco Marelli is a Principal Solutions Architect at AWS. He specializes in the design, implementation, and optimization of large-scale data platforms. Francesco leads the AWS Solution Architect (SA) analytics team in Italy. He loves sharing his professional knowledge and is a frequent speaker at AWS events. Francesco is also passionate about music.
In today’s data-driven world , enterprises are increasingly reliant on vast amounts of data to drive decision-making and innovation. With this reliance comes the critical need for robust data security and access control mechanisms. Fine-grained access control restricts access to specific data subsets, protecting sensitive information and maintaining regulatory compliance. It allows organizations to set detailed permissions at various levels, including database, table, column, and row. This precise control mitigates risks of unauthorized access, data leaks, and misuse. In the unfortunate event of a security incident, fine-grained access control helps limit the scope of the breach, minimizing potential damage. AWS is introducing general availability of fine-grained access control based on AWS Lake Formation for Amazon EMR Serverless on Amazon EMR 7.2. Enterprises can now significantly enhance their data governance and security frameworks. This new integration supports the implementation of modern data lake architectures, such as data mesh, by providing a seamless way to manage and analyze data. You can use EMR Serverless to enforce data access controls using Lake Formation when reading data from Amazon Simple Storage Service (Amazon S3), enabling robust data processing workflows and real-time analytics without the overhead of cluster management.
In this post, we discuss how to implement fine-grained access control in EMR Serverless using Lake Formation. With this integration, organizations can achieve better scalability, flexibility, and cost-efficiency in their data operations, ultimately driving more value from their data assets.
Key use cases for fine-grained access control in analytics
The following are key use cases for fine-grained access control in analytics:
Customer 360 – You can enable different departments to securely access specific customer data relevant to their functions. For example, the sales team can be granted access only to data such as customer purchase history, preferences, and transaction patterns. Meanwhile, the marketing team is limited to viewing campaign interactions, customer demographics, and engagement metrics.
Financial reporting – You can enable financial analysts to access the necessary data for reporting and analysis while restricting sensitive financial details to authorized executives.
Healthcare analytics – You can enable healthcare researchers and data scientists to analyze de-identified patient data for medical advancements and research, while making sure Protected Health Information (PHI) remains confidential and accessible only to authorized healthcare professionals and personnel.
Supply chain optimization – You can grant logistics teams visibility into inventory and shipment data while limiting access to pricing or supplier information to relevant stakeholders.
Solution overview
In this post, we explore how to implement fine-grained access control on Iceberg tables within an EMR Serverless application, using the capabilities of Lake Formation. If you’re interested in learning how to implement fine-grained access control on open table formats in Amazon EMR running on Amazon Elastic Compute Cloud (Amazon EC2) instances using Lake Formation, refer to Enforce fine-grained access control on Open Table Formats via Amazon EMR integrated with AWS Lake Formation. With the data access control features available in Lake Formation, you can enforce granular permissions and govern access to specific columns, rows, or cells within your Iceberg tables. This approach makes sure sensitive data remains secure and accessible only to authorized users or applications, aligning with your organization’s data governance policies and regulatory compliance requirements.
A cross-account modern data platform on AWS involves setting up a centralized data lake in a primary AWS account, while allowing controlled access to this data from secondary AWS accounts. This setup helps organizations maintain a single source of truth for their data, provides consistent data governance, and uses the robust security features of AWS across multiple business units or project teams.
To demonstrate how you can use Lake Formation to implement cross account fine-grained access control within an EMR Serverless environment, we use the TPC-DS dataset to create tables in the AWS Glue Data Catalog in the AWS producer account and provision different user personas to reflect various roles and access levels in the AWS consumer account, forming a secure and governed data lake.
The following diagram illustrates the solution architecture.
The producer account contains the following persona:
Data engineer – Tasks include data preparation, bulk updates, and incremental updates. The data engineer has the following access:
Table-level access – Full read/write access to all TPC-DS tables.
The consumer account contains the following personas:
Finance analyst – We run a sample query that performs a sales data analysis to guide marketing, inventory, and promotion strategies based on demographic and geographic performance. The finance analyst has the following access:
Table-level access – Full access to tables store_sales, catalog_sales, web_sales, item, and promotion for comprehensive financial analysis.
Column-level access – Limited access to cost-related columns in the sales tables to avoid exposure to sensitive pricing strategies. Limited access to sensitive columns like credit_rating in the customer_demographics table.
Row-level access – Access only to sales data from the current fiscal year or specific promotional periods.
Product analyst – We run a sample query that does a customer behavior analysis to tailor marketing, promotions, and loyalty programs based on purchase patterns and regional insights. The product analyst has the following access:
Table-level access – Full access to tables item, store_sales, and customer tables to evaluate product and market trends.
Column-level access – Restricted access to personal identifiers in the customer table, such as customer_address , email_address, and date of birth.
Prerequisites
You should have the following prerequisites:
Access to the producer account and consumer account with adequate permissions to create and deploy AWS CloudFormation stacks, upload files to S3 buckets, accept shared resources in AWS Resource Access Manager (AWS RAM), and other actions taken in this post.
An AWS Glue database and tables on external public S3 buckets of TPC-DS data
An AWS Glue database for the data lake
An IAM role and polices
Set up Lake Formation for the data engineer in the producer account
Set up Lake Formation cross-account data sharing version settings:
Open the Lake Formation console with the Lake Formation data lake administrator in the producer account.
Under Data Catalog settings, pick Version 4 under Cross-account version settings.
To learn more about the differences between data sharing versions, refer to Updating cross-account data sharing version settings. Make sure Default permissions for newly created databases and tables is unchecked.
Register the Amazon S3 location as the data lake location
When you register an Amazon S3 location with Lake Formation, you specify an IAM role with read/write permissions on that location. After registering, when EMR Serverless requests access to this Amazon S3 location, Lake Formation will supply temporary credentials of the provided role to access the data. We already created the role LakeFormationServiceRole using the CloudFormation template. To register the Amazon S3 location as the data lake location, complete the following steps:
Open the Lake Formation console with the Lake Formation data lake administrator in the producer account.
In the navigation pane, choose Data lake locations under Administration.
Choose Register location.
For Amazon S3 path, enter s3://<DatalakeBucketName>. (Copy the bucket name from the CloudFormation stack’s Outputs tab.)
For IAM role, enter LakeFormationServiceRoleDatalake.
For Permission mode, select Lake Formation.
Choose Register location.
Generate TPC-DS tables in the producer account
In this section, we generate TPC-DS tables in Iceberg format in the producer account. Grant database permissions to the data engineer First, let’s grant database permissions to the data engineer IAM role Amazon-EMR-ExecutionRole_DE that we will use with EMR Serverless. Complete the following steps:
Open the Lake Formation console with the Lake Formation data lake administrator in the producer account.
Choose Databases and Create database.
Enter iceberg_db for Name and s3://<DatalakeBucketName> for Location.
Choose Create database.
In the navigation pane, choose Data lake permissions and choose Grant.
In the Principles section, select IAM users and roles and choose Amazon-EMR-ExecutionRole_DE.
In the LF-Tags or catalog resources section, select Named Data Catalog resources and choose tpc-source and iceberg_db for Databases.
Select Super for both Database permissions and Grantable permissions and choose Grant.
Create an EMR Serverless application
Now, let’s log in to EMR Serverless using Amazon EMR Studio and complete the following steps:
On the Amazon EMR console, choose EMR Serverless.
Under Manage applications, choose my-emr-studio. You will be directed to the Create application page on EMR Studio. Let’s create a Lake Formation enabled EMR Serverless application
Under Application settings, provide the following information:
For Name, enter a name emr-fgac-application.
For Type, choose Spark.
For Release version, choose emr-7.2.0.
For Architecture, choose x86_64.
Under Application setup options, select Use custom settings.
Under Interactive endpoint, select Enable endpoint for EMR studio
Under Additional configurations, for Metastore configuration, select Use AWS Glue Data Catalog as metastore, then select Use Lake Formation for fine-grained access control.
Under Network connections, choose emrs-vpc for the VPC, enter any two private subnets, and enter emr-serverless-sg for Security groups.
Choose Create and start application.
Create a Workspace
Complete the following steps to create an EMR Workspace:
On the Amazon EMR console, choose Workspaces in the navigation pane and choose Create Workspace.
Enter the Workspace name emr-fgac-workspace.
Leave all other settings as default and choose Create Workspace.
Choose Launch Workspace. Your browser might request to allow pop-up permissions for the first time launching the Workspace.
After the Workspace is launched, in the navigation pane, choose Compute.
For Compute type¸ select EMR Serverless application and enter emr-fgac-application for the application and Amazon-EMR-ExecutionRole_DE as the runtime role.
Make sure the kernel attached to the Workspace is PySpark.
Navigate to the File browser section and choose Upload files.
Update the data lake bucket name, AWS account ID, and AWS Region accordingly.
Choose the double arrow icon to restart the kernel and rerun the notebook.
To verify that the data is generated, you can go to the AWS Glue console. Under Data Catalog, Databases, you should see TPC-DS tables ending with _iceberg for the database iceberg_db.
Share the database and TPC-DS tables to the consumer account
We now grant permissions to the consumer account, including grantable permissions. This allows the Lake Formation data lake administrator in the consumer account to control access to the data within the account.
Grant database permissions to the consumer account
Complete the following steps:
Open the Lake Formation console with the Lake Formation data lake administrator in the producer account.
In the navigation pane, choose Databases.
Select the database iceberg_db, and on the Actions menu, under Permissions, choose Grant.
In the Principles section, select External accounts and enter the consumer account.
In the LF-Tagsor catalog resources section, select Named Data Catalog resources and choose iceberg_db for Databases.
In the Database permissions section, select Describe for both Database permissions and Grantable permissions.
This allows the data lake administrator in the consumer account to describe the database and grant describe permissions to other principals in the consumer account.
Grant table permissions to the consumer account
Repeat the preceding steps to grant table permissions to the consumer account. Choose All tables under Tables and provide select and describe permissions for Table permissions and Grantable permissions.
Set up Lake Formation in the consumer account
For the remaining section of the post, we focus on the consumer account. Deploy the following CloudFormation stack to set up resources:
The template will create the Amazon EMR runtime role for both analyst user personas. Log in to the AWS consumer account and accept the AWS RAM invitation first:
Open the AWS RAM console with the IAM identity that has AWS RAM access.
In the navigation pane, choose Resource shares under Shared with me.
You should see two pending resource shares from the producer account.
Accept both invitations.
You should be able to see the iceberg_db database on the Lake Formation console.
Create a resource link for the shared database
To access the database and table resources that were shared by the producer AWS account, you need to create a resource link in the consumer AWS account. A resource link is a Data Catalog object that is a link to a local or shared database or table. After you create a resource link to a database or table, you can use the resource link name wherever you would use the database or table name. In this step, you grant permission on the resource links to the job runtime roles for EMR Serverless. The runtime roles will then access the data in shared databases and underlying tables through the resource link. To create a resource link, complete the following steps:
Open the Lake Formation console with the Lake Formation data lake administrator in the consumer account.
In the navigation pane, choose Databases.
Select the iceberg_db database, verify that the owner account ID is the producer account, and on the Actions menu, choose Create resource links.
For Resource link name, enter the name of the resource link (iceberg_db_shared).
For Shared database’s region, choose the Region of the iceberg_db database.
For Shared database, choose the iceberg_db database.
For Shared database’s owner ID, enter the account ID of the producer account.
Choose Create.
Grant permissions on the resource link to the EMR job runtime roles
Grant permissions on the resource link to Amazon-EMR-ExecutionRole_Finance and Amazon-EMR-ExecutionRole_Product using the following steps:
Open the Lake Formation console with the Lake Formation data lake administrator in the consumer account.
In the navigation pane, choose Databases.
Select the resource link (iceberg_db_shared) and on the Actions menu, choose Grant.
In the Principles section, select IAM users and roles, and choose Amazon-EMR-ExecutionRole_Finance and Amazon-EMR-ExecutionRole_Product.
In the LF-Tags or catalog resources section, select Named Data Catalog resources and for Databases, choose iceberg_db_shared.
In the Resource link permissions section, select Describe for Resource link permissions.
This allows the EMR Serverless job runtime roles to describe the resource link. We don’t make any selections for grantable permissions because runtime roles shouldn’t be able to grant permissions to other principles. Choose Grant.
Grant table permissions for the finance analyst
Complete the following steps:
Open the Lake Formation console with the Lake Formation data lake administrator in the consumer account.
In the navigation pane, choose Databases.
Select the resource link (iceberg_db_shared) and on the Actions menu, choose Grantontarget.
In the Principles section, select IAM users and roles, then choose Amazon-EMR-ExecutionRole_Finance.
In the LF-Tags or catalog resources section, select Named Data Catalog resources and specify the following:
For Databases, choose iceberg_db.
For Tables¸ choose store_sales_iceberg.
In the Table permissions section, for Table permissions, select Select.
In the Data permissions section, select Column-based access.
Select Exclude columns and choose all cost-related columns (ss_wholesale_cost and ss_ext_wholesale_cost).
Choose Grant.
Similarly, grant access to table customer_demographics_iceberg and exclude the column cd_credit_rating.
Following the same steps, grant All data access for tables store_iceberg and item_iceberg.
For the table date_dim_iceberg, we provide selective row-level access.
Similar to the preceding table permissions, select date_dim_iceberg under Tables and in the Data filters section, choose Create new.
For Data filter name, enter FA_Filter_year.
Select Access to all columns under Column-level access.
Select Filter rows and for Row filter expression, enter d_year=2002 to only provide access to the 2002 year.
Choose Save changes.
Choose Create filter.
Make sure FA_Filter_year is selected under Data filters and grant select permissions on the filter.
Grant table permissions for the product analyst
You can provide permissions for the next set of tables required for the product analyst role using the Lake Formation console. Alternatively, you can use the AWS Command Line Interface (AWS CLI) to grant permissions. We provide grant on target permissions for the resource link iceberg_db_shared to IAM role Amazon-EMR-ExecutionRole_Product.
Similar to steps followed in previous sections, for table store_sales_iceberg, date_dim_iceberg, store_iceberg, and house_hold_demographics_iceberg, provide select permissions for All data access. Make sure the role selected is Amazon-EMR-ExecutionRole_Product.
For table customer_iceberg, we limit access to personally identifiable information (PII) columns.
Under Data permissions, select Column-based access and Exclude columns.
Choose columns c_birth_day, c_birth_month, c_birth_year, c_current_addr_sk, c_customer_id, c_email_address, and c_birth_country.
Verify access using interactive notebooks from EMR Studio
Complete the following steps to test role access:
Log in to the AWS consumer account and open the Amazon EMR console.
Choose EMR Serverless in the navigation pane and choose an existing EMR Studio.
If you don’t have EMR Studio configured, choose Get Started and select Create and launch EMR Studio.
Create a Lake Formation enabled EMR Serverless application as described in previous sections.
Create an EMR Studio Workspace as described in previous sections.
Use emr-studio-service-role for Service role and datalake-resources-<account_id>-<region> for Workspace storage, then launch your Workspace.
Now, let’s verify access for the finance analyst.
Make sure the compute type inside your Workspace is pointing to the EMR Serverless application created in the prior step and Amazon-EMR-ExecutionRole_Finance as the interactive runtime role.
Go to File browser in the navigation pane, choose Upload files, and add Notebook_FA.ipynb to your Workspace.
Run all the cells to verify fine-grained access.
Now let’s test access for the product analyst.
In the same Workspace, detach and attach the same EMR Serverless application with Amazon-EMR-ExecutionRole_Product as the interactive runtime role.
Run all the cells to verify fine-grained access for the product analyst.
In a real-world scenario, both analysts will likely have their own Workspace with restricted rights to assume only the authorized interactive runtime role.
Considerations and limitations
EMR Serverless with Lake Formation uses Spark resource profiles to create two profiles and two Spark drivers for access control. Read this white paper to learn about the feature details. The user profile runs the supplied code, and the system profile enforces Lake Formation policies. Therefore, it’s recommended that you have a minimum of two Spark drivers when pre-initialized capacity is used with Lake Formation enabled jobs. No change in executor count is required. Refer to Using EMR Serverless with AWS Lake Formation for fine-grained access control to learn more about the technical implementation of the Lake Formation integration with EMR Serverless. You can expect a performance overhead after enabling Lake Formation. The level of access (table, column, or row) and the amount of data filtered will have significant impact on query performance.
Clean up
To avoid incurring ongoing costs, complete the following steps to clean up your resources:
In your secondary (consumer) account, log in to the Lake Formation console.
Drop the resource share table.
In your primary (producer) account, log in to the Lake Formation console.
Revoke the access you configured.
Drop the AWS Glue tables and database.
Delete the AWS Glue job.
Delete the S3 buckets and any other resources that you created as part of the prerequisites for this post.
Conclusion
In this post, we showed how to integrate Lake Formation with EMR Serverless to manage access to Iceberg tables. This solution showcases a modern way to enforce fine-grained access control in a multi-account open data lake setup. The approach simplifies data management in the main account while carefully controlling how users access data in other secondary accounts.
Try out the solution for your own use case, and let us know your feedback and questions in the comments section.
About the Authors
Anubhav Awasthi is a Sr. Big Data Specialist Solutions Architect at AWS. He works with customers to provide architectural guidance for running analytics solutions on Amazon EMR, Amazon Athena, AWS Glue, and AWS Lake Formation.
Nishchai JM is an Analytics Specialist Solutions Architect at Amazon Web services. He specializes in building Big-data applications and help customer to modernize their applications on Cloud. He thinks Data is new oil and spends most of his time in deriving insights out of the Data.
This post is cowritten with Ruben Simon and Khalid Al Khalili from BMW.
BMW’s ambition is to continuously accelerate innovation and improve decision-making across their global operations. To achieve this, they aimed to break down data silos and centralize data from various business units and countries into the BMW Cloud Data Hub (CDH). The CDH is used to create, discover, and consume data products through a central metadata catalog, while enforcing permission policies and tightly integrating data engineering, analytics, and machine learning services to streamline the user journey from data to insight. By building the CDH, BMW realized improved efficiency, performance and sustainability throughout the automotive lifecycle, from design to after-sales services.
With over 10 PB of data across 1,500 data assets, 1,000 data use cases, and more than 9000 users, the BMW CDH has become a resounding success since BMW decided to build it in a strategic collaboration with Amazon Web Services (AWS) in 2020. However, the initial version of CDH supported only coarse-grained access control to entire data assets, and hence it was not possible to scope access to data asset subsets. This led to inefficiencies in data governance and access control.
AWS Lake Formation is a service that streamlines and centralizes the data lake creation and management process. One of its key features is fine-grained access control, which allows customers to granularly control access to their data lake resources at the table, column, and row levels. This level of control is essential for organizations that need to comply with data governance and security regulations, or those that deal with sensitive data.
With fine-grained access control, customers can define and enforce data access policies based on various criteria, such as user roles, data classifications, or data sensitivity levels. This makes sure that only authorized users or applications can access specific data sets or portions of data, but also reduces the risk of unauthorized access or data breaches. Additionally, Lake Formation integrates with AWS Identity and Access Management (IAM) and other AWS services so customers can use existing security and access management practices within their data lake environment.
This post explores how BMW implemented AWS Lake Formation‘s fine-grained access control (FGAC) in the CDH and how this saves them up to 25% on compute and storage costs.
The Solution: How BMW CDH solved data duplication
The CDH is a company-wide data lake built on Amazon Simple Storage Service (Amazon S3). The CDH serves as a centralized repository for petabytes of data from engineering, manufacturing, sales, and vehicle performance and provides BMW employees with a unified view of the organization and acts as a starting point for new development initiatives. It streamlines access to various AWS services, including Amazon QuickSight, for building business intelligence (BI) dashboards and Amazon Athena for exploring data. Many of these services are embedded into the CDH data portal, which offers a web-based user interface for accessing and interacting with the platform. It allows users to discover datasets, manage data assets, and consume data for their use cases. The architecture is shown in the following figure.
The BMW CDH follows a decentralized, multi-account architecture to foster agility, scalability, and accountability. It comprises distinct AWS account types, each serving a specific purpose. The following account types are relevant for implementation:
Resource accounts: Accounts are used for centralized storage repositories, hosting the datasets and their associated metadata across different stages (such as development, integration, and production) and AWS Regions.
Consumer accounts: Used by data consumers to implement use cases insights and build applications tailored to their business needs.
CDH control plane account: This account contains the APIs for creating filter packages and controlling access. A filter package provides a restricted view of a data asset by defining column and row filters on the tables.
The following are the three key roles within the CDH’s decentralized architecture:
Data providers, who provision data assets in resource accounts
Data stewards, who govern data assets
Use cases (data consumers), which use data assets to derive insights and build applications inside of consumer accounts to support decision-making processes.
For example, a global sales dataset is created by a team of data engineers with the data provider role. A data analyst in a local market who wants to derive insights from the global sales data can create a use case with a dedicated AWS consumer account and request access to the dataset from a data steward.
This multi-account strategy promotes a clear separation of concerns, empowering data producers and consumers to operate independently while using the centralized governance and services provided by the solution. The following figure illustrates how Lake Formation is used across the resource and consumer accounts in the CDH to provide FGAC to use cases.
The CDH uses the AWS Glue in resource accounts as a technical metadata catalog and data assets are stored in Amazon S3. Both the data catalog and the locations in Amazon S3 are registered with Lake Formation so that it can govern data access. Data catalogs and tables are shared with consumer accounts and use cases through AWS Resource Access Manager (AWS RAM). With Lake Formation, BMW can control access to data assets at different granularities, such as permissions at the table, column, or row level. Users can then use a Lake Formation integrated engine such as Amazon Athena to access only the data they need, removing the need to duplicate data. For example, to restrict access to a global sales data asset, BMW can now specify row filters in Lake Formation using the PartiQL language, filtering rows based on the country column of the data asset.
Data stewardship: Managing fine-grained access control
At the core of the CDH FGAC implementation lies the concept of filter packages. A filter package provides a selective view of a data asset by defining column and row filters on the tables. Multiple filter packages can be defined for a data asset to create suitable views for different use cases. In our example of the global sales dataset, a data steward creates a filter package for each local market that restricts access to the relevant rows and columns. Data stewards create and manage these packages through the CDH interface. These filter packages are implemented using Lake Formation row-level and column-level access control mechanisms. The following figure illustrates these concepts.
When creating a filter package, data stewards can specify the desired access level for individual tables within their data asset: Full access grants permissions to all columns and rows, None denies access to an entire table, while Filtered allows for granular row-level and column-level access controls.
For filtered access, data stewards use PartiQL queries to define row-level filters on tables, selecting only the rows that meet specific criteria. Additionally, they can specify column-level filters by selecting the accessible columns.
After filter packages have been created and published, they can be requested. Data stewards can review incoming requests and grant or deny access through the CDH interface, making sure that only authorized environments can access sensitive data.
Using fine-grained access control in use cases
Use case owners can browse and search for relevant data assets in the CDH, and then request full or scoped access. The CDH provides a clear overview of the available filter packages, allowing them to select the appropriate level of access based on their use case.
After access is granted to a filter package by the data steward, the filters are enforced for the use case using Lake Formation. Use case owners can further control access at the row and column level for individual users or roles within their use case account using Lake Formation. For example, they can create another column filter to hide a particular column for a particular group of users and provide unfiltered access to another group of users.
Gradual deployment with Lake Formation hybrid access mode
One of the challenges in implementing changes in access control within an existing data lake such as the CDH is the need to coordinate migration between data providers and consumers. To address this, Lake Formation offers a hybrid access mode to facilitate a gradual transition to FGAC without disrupting existing data access patterns.
In hybrid access mode, data providers can activate Lake Formation for new dataset consumers while existing consumers continue to access the data using the legacy permission model. This approach makes sure that consumers can migrate to FGAC at their own pace, minimizing the impact on their existing workloads and processes. A use case account is only switched to Lake Formation permissions for a dataset when it requests access to a filter package. This hybrid approach allows providers and consumers to migrate at their own pace, maintaining a smooth transition to the new access control model.
How BMW saves money by using Lake Formation
As the CDH grew, it became apparent that data was often duplicated for access control purposes. This issue was particularly evident with data assets containing sales data of all markets where BMW operates. Local markets were only eligible to see their own data, and to achieve this, subsets of global data assets had to be duplicated to create isolated local variants. While this approach succeeded in fulfilling access control requirements, it led to increased storage costs, higher compute expenses for data processing and drift detection, and project delays because of time-consuming provisioning processes and governance overhead. At one point, 25% of all data assets in the CDH were duplicates, a natural consequence of these measures.
With Lake Formation, creating these duplicates is no longer necessary. Data stewards can restrict access to global datasets on column and row level to comply with governance requirements. Not only does this reduce the cost for data processing, storage, development and maintenance, it also minimizes the opportunity cost of delayed data access.
Conclusion
By using AWS Lake Formation fine-grained access control capabilities, BMW has transparently implemented finer data access management within the Cloud Data Hub. The integration of Lake Formation has enabled data stewards to scope and grant granular access to specific subsets of data, reducing costly data duplication. This approach enables BMW to save up to 25% on compute and storage costs while reducing governance overhead costs. The hybrid access mode implementation further facilitates a smooth transition to the new access control model, allowing data providers and consumers to migrate at their own pace without disrupting existing workloads and processes. To dive deeper into how to replicate BMWs data success story, check out the AWS blog post on building a data mesh with Amazon Lake Formation and AWS Glue.
About the authors
Ruben Simon is a Head of Product for BMW’s Cloud Data Hub, the company’s largest data platform. He is passionate about driving digital transformation in aata, analytics, and AI, and thrives on collaborating with international teams. Outside the office, Ruben cherishes family time and has a keen interest in continual learning.
Khalid Al Khalili is a Data Architect at BMW Group, leading the architecture of the Cloud Data Hub, BMW’s central platform for data innovation. He is a strong advocate for creating seamless data experiences, transforming complex requirements into efficient, user-friendly solutions. When he’s not building new features, Khalid enjoys collaborating with his peers and cross-functional teams to advance and shape BMW’s data strategy, ensuring it stays ahead in a rapidly evolving landscape.
Florian Seidel is a Global Solutions Architect specializing in the automotive sector at AWS. He guides strategic customers in harnessing the full potential of cloud technologies to drive innovation in the automotive industry. With a passion for analytics, machine learning, AI, and resilient distributed systems, Florian helps transform cutting-edge concepts into practical solutions. When not architecting cloud strategies, he enjoys cooking for family and friends and experimenting with electronic music production.
Aishwarya Lakshmi Krishnan is a Senior Customer Solutions Manager with AWS Automotive. She is passionate about solving business problems using generative AI and cloud based technologies.
Durga Mishra is a Principal solutions architect at AWS. Outside of work, Durga enjoys spending time building new things and spend time with family and loves to hike on Appalachian trails and spend time in nature.
After December 31, 2024, customers will no longer be able to create Governed Tables transactions (lakeformation:StartTransaction), write to Governed Tables (lakeformation:UpdateTableObjects), or query your Governed Tables using Amazon Athena. Customers will still be able to access their table state information by calling the lakeformation:GetTableObjects and transaction information by calling lakeformation:ListTransactions until February 17, 2025. After February 17, 2025, all Governed Table APIs will start to fail. Governed Tables metadata will continue to exist within the AWS Glue Data Catalog, and the Governed Tables data will remain in your S3 buckets. No other table types will be affected by this change, including Hive (Apache Parquet, CSV, ORC, and so on), Iceberg, Hudi, and Delta Lake tables.
Migrating your Governed Tables
Customers can migrate their tables from Governed Tables to one of the open source formats by copying their governed table data directly to Apache Iceberg using Amazon Athena. To migrate data to Iceberg, you can use the Amazon Athena CREATE TABLE AS (CTAS) statement, as shown in the following code example.
CREATE TABLE my_iceberg_table WITH (
    table_type = 'ICEBERG',
    is_external = false,
    location = 's3://mybucket/myicebergdata/'
) AS
SELECT * FROM my_governed_table
In today’s rapidly evolving digital landscape, enterprises across regulated industries face a critical challenge as they navigate their digital transformation journeys: effectively managing and governing data from legacy systems that are being phased out or replaced. This historical data, often containing valuable insights and subject to stringent regulatory requirements, must be preserved and made accessible to authorized users throughout the organization.
Failure to address this issue can lead to significant consequences, including data loss, operational inefficiencies, and potential compliance violations. Moreover, organizations are seeking solutions that not only safeguard this legacy data but also provide seamless access based on existing user entitlements, while maintaining robust audit trails and governance controls. As regulatory scrutiny intensifies and data volumes continue to grow exponentially, enterprises must develop comprehensive strategies to tackle these complex data management and governance challenges, making sure they can use their historical information assets while remaining compliant and agile in an increasingly data-driven business environment.
In this post, we explore a solution using AWS Lake Formation and AWS IAM Identity Center to address the complex challenges of managing and governing legacy data during digital transformation. We demonstrate how enterprises can effectively preserve historical data while enforcing compliance and maintaining user entitlements. This solution enables your organization to maintain robust audit trails, enforce governance controls, and provide secure, role-based access to data.
Solution overview
This is a comprehensive AWS based solution designed to address the complex challenges of managing and governing legacy data during digital transformation.
In this blog post, there are three personas:
Data Lake Administrator (with admin level access)
User Silver from the Data Engineering group
User Lead Auditor from the Auditor group.
You will see how different personas in an organization can access the data without the need to modify their existing enterprise entitlements.
Note: Most of the steps here are performed by Data Lake Administrator, unless specifically mentioned for other federated/user logins. If the text specifies “You” to perform this step, then it assumes that you are a Data Lake administrator with admin level access.
In this solution you move your historical data into Amazon Simple Storage Service (Amazon S3) and apply data governance using Lake Formation. The following diagram illustrates the end-to-end solution.
The workflow steps are as follows:
You will use IAM Identity Center to apply fine-grained access control through permission sets. You can integrate IAM Identity Center with an external corporate identity provider (IdP). In this post, we have used Microsoft Entra ID as an IdP, but you can use another external IdP like Okta.
The data ingestion process is streamlined through a robust pipeline that combines AWS Database Migration service (AWS DMS) for efficient data transfer and AWS Glue for data cleansing and cataloging.
You will use AWS LakeFormation to preserve existing entitlements during the transition. This makes sure the workforce users retain the appropriate access levels in the new data store.
User personas Silver and Lead Auditor can use their existing IdP credentials to securely access the data using Federated access.
For analytics, Amazon Athena provides a serverless query engine, allowing users to effortlessly explore and analyze the ingested data. Athena workgroups further enhance security and governance by isolating users, teams, applications, or workloads into logical groups.
The following sections walk through how to configure access management for two different groups and demonstrate how the groups access data using the permissions granted in Lake Formation.
Prerequisites
To follow along with this post, you should have the following:
Set up IAM Identity Center with Entra ID as an external IdP.
In this post, we use users and groups in Entra ID. We have created two groups: Data Engineering and Auditor. The user Silver belongs to the Data Engineering and Lead Auditor belongs to the Auditor.
Configure identity and access management with IAM Identity Center
Entra ID automatically provisions (synchronizes) the users and groups created in Entra ID into IAM Identity Center. You can validate this by examining the groups listed on the Groups page on the IAM Identity Center console. The following screenshot shows the group Data Engineering, which was created in Entra ID.
If you navigate to the group Data Engineering in IAM Identity Center, you should see the user Silver. Similarly, the group Auditor has the user Lead Auditor.
You now create a permission set, which will align to your workforce job role in IAM Identity Center. This makes sure that your workforce operates within the boundary of the permissions that you have defined for the user.
On the IAM Identity Center console, choose Permission sets in the navigation pane.
Click Create Permission set. Select Custom permission set and then click Next. In the next screen you will need to specify permission set details.
Provide a permission set a name (for this post, Data-Engineer) while keeping rest of the option values to its default selection.
To enhance security controls, attach the inline policy text described here to Data-Engineer permission set, to restrict the users’ access to certain Athena workgroups. This additional layer of access management makes sure that users can only operate within the designated workgroups, preventing unauthorized access to sensitive data or resources.
For this post, we are using separate Athena workgroups for Data Engineering and Auditors. Pick a meaningful workgroup name (for example, Data-Engineer, used in this post) which you will use during the Athena setup. Provide the AWS Region and account number in the following code with the values relevant to your AWS account.
Edit the inline policy for Data-Engineer permission set. Copy and paste the following JSON policy text, replace parameters for the arn as suggested earlier and save the policy.
The preceding inline policy restricts anyone mapped to Data-Engineer permission sets to only the Data-Engineer workgroup in Athena. The users with this permission set will not be able to access any other Athena workgroup.
Next, you assign the Data-Engineer permission set to the Data Engineering group in IAM Identity Center.
Select AWS accounts in the navigation pane and then select the AWS account (for this post, workshopsandbox).
Select Assign users and groups to choose your groups and permission sets. Choose the group Data Engineering from the list of Groups, then select Next. Choose the permission set Data-Engineer from the list of permission sets, then select Next. Finally review and submit.
Follow the previous steps to create another permission set with the name Auditor.
Use an inline policy similar to the preceding one to restrict access to a specific Athena workgroup for Auditor.
Assign the permission set Auditor to the group Auditor.
This completes the first section of the solution. In the next section, we create the data ingestion and processing pipeline.
Create the data ingestion and processing pipeline
In this step, you create a source database and move the data to Amazon S3. Although the enterprise data often resides on premises, for this post, we create an Amazon Relational Database Service (Amazon RDS) for Oracle instance in a separate virtual private cloud (VPC) to mimic the enterprise setup.
Create an RDS for Oracle DB instance and populate it with sample data. For this post, we use the HR schema, which you can find in Oracle Database Sample Schemas.
Create source and target endpoints in AWS DMS:
The source endpoint demo-sourcedb points to the Oracle instance.
The target endpoint demo-targetdb is an Amazon S3 location where the relational database will be stored in Apache Parquet format.
The source database endpoint will have the configurations required to connect to the RDS for Oracle DB instance, as shown in the following screenshot. The target endpoint for the Amazon S3 location will have an S3 bucket name and folder where the relational database will be stored. Additional connection attributes, like DataFormat, can be provided on the Endpoint settings tab. The following screenshot shows the configurations for demo-targetdb. Set the DataFormat to Parquet for the stored data in the S3 bucket. Enterprise users can use Athena to query the data held in Parquet format. Next, you use AWS DMS to transfer the data from the RDS for Oracle instance to Amazon S3. In large organizations, the source database could be located anywhere, including on premises.
On the AWS DMS console, create a replication instance that will connect to the source database and move the data.
You need to carefully select the class of the instance. It should be proportionate to the volume of the data. The following screenshot shows the replication instance used in this post.
Provide the database migration task with the source and target endpoints, which you created in the previous steps.
The following screenshot shows the configuration for the task datamigrationtask.
After you create the migration task, select your task and start the job.
The full data load process will take a few minutes to complete.
You have data available in Parquet format, stored in an S3 bucket. To make this data accessible for analysis by your users, you need to create an AWS Glue crawler. The crawler will automatically crawl and catalog the data stored in your Amazon S3 location, making it available in Lake Formation.
When creating the crawler, specify the S3 location where the data is stored as the data source.
Provide the database name myappdb for the crawler to catalog the data into.
Run the crawler you created.
After the crawler has completed its job, your users will be able to access and analyze the data in the AWS Glue Data Catalog with Lake Formation securing access.
On the Lake Formation console, choose Databases in the navigation pane.
You will find mayappdb in the list of databases.
Configure data lake and entitlement access
With Lake Formation, you can lay the foundation for a robust, secure, and compliant data lake environment. Lake Formation plays a crucial role in our solution by centralizing data access control and preserving existing entitlements during the transition from legacy systems. This powerful service enables you to implement fine-grained permissions, so your workforce users retain appropriate access levels in the new data environment.
On the Lake Formation console, choose Data lake locations in the navigation pane.
Choose Register location to register the Amazon S3 location with Lake Formation so it can access Amazon S3 on your behalf.
For Amazon S3 path, enter your target Amazon S3 location.
For IAM role¸ keep the IAM role as AWSServiceRoleForLakeFormationDataAccess.
For the Permission mode, select Lake Formation option to manage access.
Create an LF-Tag data classification with the following values:
General – To imply that the data is not sensitive in nature.
Restricted – To imply generally sensitive data.
HighlyRestricted – To imply that the data is highly restricted in nature and only accessible to certain job functions.
Navigate to the database myappdb and on the Actions menu, choose Edit LF-Tags to assign an LF-Tag to the database. Choose Save to apply the change.
As shown in the following screenshot, we have assigned the value General to the myappdb database.
The database myappdb has 7 tables. For simplicity, we work with the table jobs in this post. We apply restrictions to the columns of this table so that its data is visible to only the users who are authorized to view the data.
Navigate to the jobs table and choose Edit schema to add LF-Tags at the column level.
Tag the value HighlyRestricted to the two columns min_salary and max_salary.
Choose Save as new version to apply these changes.
The goal is to restrict access to these columns for all users except Auditor.
Choose Databases in the navigation pane.
Select your database and on the Actions menu, choose Grant to provide permissions to your enterprise users.
For IAM users and roles, choose the role created by IAM Identity Center for the group Data Engineer. Choose the IAM role with prefix AWSResrevedSSO_DataEngineer from the list. This role is created as a result of creating permission sets in IAM identity Center.
In the LF-Tags section, select option Resources matched by LF-Tags. The choose Add LF-Tag key-value pair. Provide the LF-Tag key data classification and the values as General and Restricted. This grants the group of users (Data Engineer) to the database myappdb as long as the group is tagged with the values General and Restricted.
In the Database permissions and Table permissions sections, select the specific permissions you want to give to the users in the group Data Engineering. Choose Grant to apply these changes.
Repeat these steps to grant permissions to the role for the group Auditor. In this example, choose IAM role with prefix AWSResrevedSSO_Auditor and give the data classification LF-tag to all possible values.
This grant implies that the personas logging in with the Auditor permission set will have access to the data that is tagged with the values General, Restricted, and Highly Restricted.
You have now completed the third section of the solution. In the next sections, we demonstrate how the users from two different groups—Data Engineer and Auditor—access data using the permissions granted in Lake Formation.
Log in with federated access using Entra ID
Complete the following steps to log in using federated access:
On the IAM Identity Center console, choose Settings in the navigation pane.
Choose your job function Data-Engineer (this is the permission set from IAM Identity Center).
Perform data analytics and run queries in Athena
Athena serves as the final piece in our solution, working with Lake Formation to make sure individual users can only query the datasets they’re entitled to access. By using Athena workgroups, we create dedicated spaces for different user groups or departments, further reinforcing our access controls and maintaining clear boundaries between different data domains.
You can create Athena workgroup by navigating to Amazon Athena in AWS console.
Select Workgroups from left navigation and choose Create Workgroup.
On the next screen, provide workgroup name Data-Engineer and leave other fields as default values.
For the query result configuration, select the S3 location for the Data-Engineer workgroup.
Chose Create workgroup.
Similarly, create a workgroup for Auditors. Choose a separate S3 bucket for Athena Query results for each workgroup. Ensure that the workgroup name matches with the name used in arn string of the inline policy of the permission sets.
In this setup, users can only view and query tables that align with their Lake Formation granted entitlements. This seamless integration of Athena with our broader data governance strategy means that as users explore and analyze data, they’re doing so within the strict confines of their authorized data scope.
This approach not only enhances our security posture but also streamlines the user experience, eliminating the risk of inadvertent access to sensitive information while empowering users to derive insights efficiently from their relevant data subsets.
Let’s explore how Athena provides this powerful, yet tightly controlled, analytical capability to our organization.
When user Silver accesses Athena, they’re redirected to the Athena console. According to the inline policy in the permission set, they have access to the Data-Engineer workgroup only.
After they select the correct workgroup Data-Engineer from the Workgroup drop-down menu and the myapp database, it displays all columns except two columns. The min_sal and max_sal columns that were tagged as HighlyRestricted are not displayed.
This outcome aligns with the permissions granted to the Data-Engineer group in Lake Formation, making sure that sensitive information remains protected.
If you repeat the same steps for federated access and log in as Lead Auditor, you’re similarly redirected to the Athena console. In accordance with the inline policy in the permission set, they have access to the Auditor workgroup only.
When they select the correct workgroup Auditor from the Workgroup dropdown menu and the myappdb database, the job table will display all columns.
This behavior aligns with the permissions granted to the Auditor workgroup in Lake Formation, making sure all information is accessible to the group Auditor.
Enabling users to access only the data they are entitled to based on their existing permissions is a powerful capability. Large organizations often want to store data without having to modify queries or adjust access controls.
This solution enables seamless data access while maintaining data governance standards by allowing users to use their current permissions. The selective accessibility helps balance organizational needs for storage and data compliance. Companies can store data without compromising different environments or sensitive information.
This granular level of access within data stores is a game changer for regulated industries or businesses seeking to manage data responsibly.
Clean up
To clean up the resources that you created for this post and avoid ongoing charges, delete the following:
IAM Identity Center application in Entra ID
IAM Identity Center configurations
RDS for Oracle and DMS replication instances.
Athena workgroups and the query results in Amazon S3
S3 buckets
Conclusion
This AWS powered solution tackles the critical challenges of preserving, safeguarding, and scrutinizing historical data in a scalable and cost-efficient way. The centralized data lake, reinforced by robust access controls and self-service analytics capabilities, empowers organizations to maintain their invaluable data assets while enabling authorized users to extract valuable insights from them.
By harnessing the combined strength of AWS services, this approach addresses key difficulties related to legacy data retention, security, and analysis. The centralized repository, coupled with stringent access management and user-friendly analytics tools, enables enterprises to safeguard their critical information resources while simultaneously empowering sanctioned personnel to derive meaningful intelligence from these data sources.
If your organization grapples with similar obstacles surrounding the preservation and management of data, we encourage you to explore this solution and evaluate how it could potentially benefit your operations.
For more information on Lake Formation and its data governance features, refer to AWS Lake Formation Features.
About the authors
Manjit Chakraborty is a Senior Solutions Architect at AWS. He is a Seasoned & Result driven professional with extensive experience in Financial domain having worked with customers on advising, designing, leading, and implementing core-business enterprise solutions across the globe. In his spare time, Manjit enjoys fishing, practicing martial arts and playing with his daughter.
Neeraj Roy is a Principal Solutions Architect at AWS based out of London. He works with Global Financial Services customers to accelerate their AWS journey. In his spare time, he enjoys reading and spending time with his family.
Evren Sen is a Principal Solutions Architect at AWS, focusing on strategic financial services customers. He helps his customers create Cloud Center of Excellence and design, and deploy solutions on the AWS Cloud. Outside of AWS, Evren enjoys spending time with family and friends, traveling, and cycling.
Generative artificial intelligence (AI) is now a household topic and popular across various public applications. Users enter prompts to get answers to questions, write code, create images, improve their writing, and synthesize information. As people become familiar with generative AI, businesses are looking for ways to apply these concepts to their enterprise use cases in a simple, scalable, and cost-effective way. These same needs are shared by a variety of security stakeholders. For example, if security directors want to summarize their security posture in natural language, a security architect will need to triage alerts or findings and investigate AWS CloudTrail logs to identify high priority remediation actions or detect potential threat actors by identifying potentially malicious activity. There are many ways to deploy solutions for these use cases.
In this blog post, we review a fully serverless solution for querying data stored in Amazon Security Lake using natural language (human language) with Amazon Q in QuickSight. This solution has multiple use cases, such as generating visualizations and querying vulnerability information for vulnerability management using tools such as Amazon Inspector that feed into AWS Security Hub. The solution helps reduce the time from detection to investigation by using natural language to query CloudTrail logs and Amazon Virtual Private Cloud (VPC) Flow Logs, resulting in quicker response to threats in your environment.
Amazon Security Lake is a fully managed security data lake service that automatically centralizes security data from AWS environments, software as a service (SaaS) providers, and on-premises and cloud sources into a purpose-built data lake that’s stored in your AWS account. The data lake is backed by Amazon Simple Storage Service (Amazon S3) buckets, and you retain ownership over your data. Security Lake converts ingested data into Apache Parquet format and a standard open source schema called the Open Cybersecurity Schema Framework (OCSF). With OCSF support, Security Lake normalizes and combines security data from AWS and a broad range of enterprise security data sources.
Amazon QuickSight is a cloud-scale business intelligence (BI) service that delivers insights to stakeholders, wherever they are. QuickSight connects to your data in the cloud and combines data from a variety of different sources. With QuickSight, users can meet varying analytic needs from the same source of truth through interactive dashboards, reports, natural language queries, and embedded analytics. With Amazon Q in QuickSight, business analysts and users can use natural language to build, discover, and share meaningful insights.
The recent announcements for Amazon Q in QuickSight, Security Lake, and the OCSF present a unique opportunity to apply generative AI to fully managed hybrid multi-cloud security related logs and findings from over 100 independent software vendors and partners.
Solution overview
The solution uses Security Lake as the data lake which has native ingestion for CloudTrail, VPC Flow Logs, and Security Hub findings as shown in Figure 1. Logs from these sources are sent to S3 buckets in your AWS account and are maintained by Security Lake. We then create Amazon Athena views from tables created by Security Lake for Security Hub findings, CloudTrail logs, and VPC Flow Logs to define the interesting fields from each of the log sources. Each of these views are ingested into a QuickSight dataset. From these datasets, we generate analyses and dashboards. We use Amazon Q topics to label columns in the dataset that are human-readable and create a named entity to present contextual and multi-visual answers in response to questions. After the topics are created, users can perform their analysis using Q topics, QuickSight analyses, or QuickSight dashboards.
Figure 1: Solution architecture
You can use the rollup AWS Region feature in Security Lake to aggregate logs from multiple Regions into a single Region. Specifying a rollup Region can help you adhere to regional compliance requirements. If you use rollup Regions, you must set up the solution described in this post for datasets only in rollup Regions. If you don’t use a rollup Region, you must deploy this solution for each Region you that want to collect data from.
Prerequisites
To implement the solution described in this post, you must meet the following requirements:
Basic understanding of Security Lake, Athena, and QuickSight.
Security Lake is already deployed and accepting CloudTrail management events, VPC Flow Logs, and Security Hub findings as sources. If you haven’t deployed Security Lake yet, we recommend following the best practices established in the security reference architecture.
This solution uses Security Lake data source version 2 to create the dashboards and visualizations. If you aren’t already using data source version 2, you will see a banner in your Security Lake console with instructions to update.
An existing QuickSight deployment that will be used to visualize Security Lake data or an account that is able to sign up for QuickSight to create visualizations.
QuickSight Author Pro and Reader Pro licenses are needed for using Amazon Q features in QuickSight. Non-pro Authors and Readers can still access Q topics if an Author Pro or Admin Pro user shares the topic with them. Non-pro Authors and Readers can also access data stories if a Reader Pro, Author Pro, or Admin Pro shares one with them. Review Generative AI features supported by each QuickSight licensing tiers.
In the following section, we walk through the steps to ingest Security Lake data into QuickSight using Athena views and then using Amazon Q in QuickSight to create visualizations and query data using natural language.
Provide cross-account query access
In alignment with our security reference architecture, it’s a best practice to isolate the Security Lake account from the accounts that are running the visualization and querying workloads. It’s recommended that QuickSight for security use cases be deployed in the security tooling account. See How to visualize Amazon Security Lake findings with Amazon QuickSight for information on how to set up cross-account query access. Follow the steps in the Configure a Security Lake subscriber section and configure Athena to visualize your data section.
When you get to the create resource link steps, create a resource link for data source version 2 for Security Hub, CloudTrail, and VPC flow log tables for a total of three resource links. The way to identify data source version 2 tables is by their name; it ends in _2_0. For example:
For the remainder of this post, we will be referencing the database name security_lake_visualization and the resource link names for Security Hub findings, CloudTrail logs, and VPC Flow Logs respectively, as shown in Figure 2:
We will call the QuickSight account the visualization account. If you plan to use same account as the Security Lake delegated administrator and QuickSight, then skip this step and go to the next section where you will create views in Athena.
Create views in Athena
A view in Athena is a logical table that helps simplify your queries by working with only a subset of the relevant data. Follow these steps to create three views in Athena, one each for Security Hub findings, CloudTrail logs, and the VPC Flow Logs in the visualization account.
These queries default to the previous week’s data starting from the previous day, but you can change the time frame by modifying the last line in the query from 8 to the number of days you prefer. Keep in mind that there is a limitation on the size of each SPICE table of 1 TB. If you want to limit the volume of data, you can delete the rows that you find unnecessary. We included the fields customers have identified as relevant to reduce the burden of writing the parsing details yourself.
To create views:
Sign in to the AWS Management Console in the visualization account and navigate to the Athena console.
If a Security Lake rollup Region is used, select the rollup Region.
Choose Launch Query Editor.
If this is the first time you’re using Athena, you will need to choose a bucket to store your query results.
Choose Edit Settings.
Choose Browse S3.
Search for your bucket name.
Select the radio button next to the name of your bucket.
Select Choose.
For Data Source, select AWSDataCatalog.
Select Database as security_lake_visualization. If you used a different name for the database for cross account query access, then select that database.
Figure 3: Athena database selection
Copy the query for the security_hub_view from the GitHub repo for this post. If you’re using a different name for the database and table resource link than the one specified in this post, edit the FROM statement at the bottom of the query to reflect the correct names.
Paste the query in the query editor and then choose Run. The name of the view is set in the first line of the query which is security_insights_security_hub_vw2.
To confirm this view was created correctly, choose the three dots next to the view that was created and select Preview View.
Figure 4: Previewing the view
Repeat steps 5–9 to create the CloudTrail and VPC Flow Logs views. The queries for each can be found in the GitHub repo.
Figure 5: Athena views
Create QuickSight dataset
Now that you’ve created the views, use Athena as the data source to create a dataset in QuickSight. Repeat these steps for the Security Hub findings, CloudTrail logs, and VPC Flow Logs. Start by creating a dataset for the Security Hub findings.
To configure permissions on tables:
Sign in to the QuickSight console in the visualization account. If a Security Lake rollup Region is used, select the rollup Region.
Although there are multiple ways to sign in to QuickSight, we used IAM based access to build the dashboards. To use QuickSight with Athena and Lake Formation, you first need to authorize connections through Lake Formation.
When using a cross-account configuration with AWS Glue Data Catalog, you need to configure permissions on tables that are shared through Lake Formation. For the use case in this post, use the following steps to grant access on the cross-account tables in the Glue Catalog. You must perform these steps for each of the Security Hub, CloudTrail, and VPC Flow Logs tables that you created in the preceding cross-account query access section. Because granting permissions on a resource link doesn’t grant permissions on the target (linked) database or table, you will grant permission twice, once to the target (linked table) and then to the resource link.
In the Lake Formation console, navigate to the Tables section and select the resource link for the Security Hub table. For example:
Select Actions. Under Permissions, select Grant on target.
For the next step, you need the Amazon Resource Name (ARN) of the QuickSight users or groups that need access to the table. To obtain the ARN through the AWS Command Line Interface (AWS CLI), run following commands (replacing account ID and Region with that of the visualization account.) You can use AWS CloudShell for this purpose.
After you have the ARN of the user or group, copy it and go back to the LakeFormation console Grant on Target page. For Principals, select SAML users and groups, and then add the QuickSight user’s ARN.
Figure 6: Selecting principals
For LF-Tags or catalog resources, keep the default settings.
Figure 7: Table grant on target permissions
For Table permissions, select Select for both Table Permissions and Grantable Permissions, and then choose Grant.
Figure 8: Selecting table permissions
Navigate back to the Tables section and select the resource link for the Security Hub table. For example:
Select Actions. This time under Permissions, and then choose Grant.
For Principals, select SAML users and groups, and then add the QuickSight user’s ARN captured earlier.
For the LF-Tags or catalog resources section, use the default settings.
For Resource link permissions choose Describe for both Table Permissions and Grantable Permissions.
Repeat steps a–k for the CloudTrail and VPC Flow Logs resource links.
To create datasets from views:
After permissions are in place, you create three datasets from the views created earlier. Because both Quicksight and Lake Formation are Regional services, verify that you’re using QuickSight in the same Region where Lake Formation is sharing the data. The simplest way to determine your Region is to check the QuickSight URL in your web browser. The Region will be at the beginning of the URL, such as us-east-1. To change the Region, select the settings icon in the top right of the QuickSight screen and select the correct Region from the list of available Regions in the drop-down menu.
Navigate back to the QuickSight console.
Select Datasets, and then choose New dataset.
Select Athena from the list of available data sources.
Enter a Data source name, for example security_lake_securityhub_dataset and leave the Athena workgroup as [primary]. Choose Create data source.
At the Choose your table prompt, for Catalog, select AwsDataCatalog. For Database, select security_lake_visualization. If you used a different name for the database for cross-account query access, then select that database. For Tables, select the view name security_insights_security_hub_vw2 to build your dashboards for Security Hub findings. Then choose Select.
Figure 9: Choose a table during QuickSight dataset creation
At the Finish dataset creation prompt, select Import to SPICE for quicker analytics. Choose Visualize. This will create a new dataset in QuickSight using the name of the Athena view, which is security_insights_security_hub_vw2. You will be taken to the Analysis page, exit out of it.
Go back to the QuickSight console and repeat steps 3–8 for the CloudTrail and VPC Flow Log datasets.
Create a topic
Now that you have created a dataset, you can create a topic. Q topics are collections of one or more datasets that represent a subject area for your business users to ask questions. Topics allow users to ask questions in natural language and to build visualizations using natural language.
To create a Q topic:
Navigate to the QuickSight console.
Choose Topics in the left navigation pane.
Figure 10: QuickSight navigation pane
Choose New topic. Create one topic each for the Security Hub findings, CloudTrail logs, and VPC Flow Logs
Figure 11: QuickSight topic creation
On the New topic page, do the following:
For Topic name, enter a descriptive name for the topic. Name the first one SecurityHubTopic. Your business users will identify the topic by this name and use it to ask questions.
For Description, enter a description for the topic. Your users can use this description to get more details about the topic.
Choose Continue.
On the Add data to topic page, choose the dataset you created in the Create a QuickSight dataset section. Start with the Security Hub dataset security_insights_security_hub_vw2.
Choose Continue. It will take a few minutes to create the topic.
Now that your topic has been created, navigate to the Data tab of the topic.
Your Data Fields sub-tab should be selected already. If not, choose Data Fields.
Figure 12: Topics data fields
For each of the fields in the list, turn on Include to make sure that all fields are included. For this example, we selected all fields, but you can adjust the included columns as needed for your use case. Note, you might see a banner at the top of the page indicating that the indexing is in progress. Depending on the size of your data, it might take some time for Q to make those fields available for querying. Most of the time, indexing is complete in less than 15 minutes.
Review the Synonyms column. These alternate representations of your column name are automatically generated by Amazon Q. You can add and remove synonyms as needed for your use case.
At this point, you’re ready to ask questions about your data using Amazon Q in QuickSight. Choose Ask a question about SecurityHubTopic at the top of the page.
Figure 13: Ask questions using Q
You can now ask questions about Security Hub findings in the prompt. Enter Show me findings with compliance status failed along with control id.
Figure 14: Q answers
Under the question, you will see how it was interpreted by QuickSight.
Repeat steps 1–13 to create CloudTrail and VPC Flow Log QuickSight topics.
Create named entities for your topics
Now that you’ve created your topics, you will now add named entities. Named entities are optional, but we’re using them in the solution to help make queries more effective. The information contained in named entities, the ordering of fields, and their ranking make it possible to present contextual, multi-visual answers in response to even vague questions.
To create a named entity:
In the QuickSight console, navigate to Topics.
Select the Security Hub topic that you created in the previous section.
Under the Data tab, select the Named Entity subtab, and choose Add Named Entity.
Figure 15: Named entity subtab
Enter Security Findings as the entity name.
Select the following datafields: Status, Metadata Product Name, Finding Info Title, Region, Severity, Cloud Account Uid, Time Dt, Compliance Status, and AccountId. The order of the fields helps Q to prioritize the data, so rearrange your data fields as needed.
Choose Save in the top right corner to save your results.
Repeat steps 1–6 with the CloudTrail dataset using the following datafields: API operation, Time Dt, Region, Status, AccountId, API Response Error, Actor User Credential Uid, Actor User Name, Actor User Type, Api Service Name, Actor Idp Name, Cloud Provider, Session Issuer, and Unmapped.
Figure 17: CloudTrail named entity creation
Repeat steps 1–6 with the VPC Flow Log dataset using the following datafields: Src Endpoint IP, Src Endpoint Port, Dst Endpoint IP, Dst Endpoint Port, Connection Info Direction, Traffic Bytes, Action, Accountid, Time Dt, and Region.
Figure 18: VPC Flow log named entity creation
Create visualizations using natural language
After your topic is done indexing, you can start creating visualizations using natural language. In QuickSight, an analysis is the same thing as a dashboard, but is only accessible by the authors. You can keep it private and make it as robust and detailed as you want. When you decide to publish it, the shared version is called a dashboard.
To create visualizations:
Open the QuickSight console and navigate to the Analysis tab.
In the top right, select New analysis.
Select the dataset you created previously, it will have the same naming convention as the Athena view. For reference, the Athena view query created a Security Hub dataset called security_insights_security_hub_vw2.
Validate the information about the data set you’re going to use in the analysis and choose USE IN ANALYSIS.
On the pop up, select the interactive sheet option and choose Create.
For datasets that have a corresponding Q topic, which you created in a previous step, choose Build visual at the top of the screen.
Figure 19: Build visual using natural language
Enter your prompt and choose BUILD. For example, enter findings with product security hub group by control id include count. Q automatically generates a visualization.
Figure 20: Q response
To add to your dashboard, choose ADD TO ANALYSIS to see your new visualization module in your current analysis.
The supplied questions are targeted towards a Security Hub findings topic, where you can ask questions about your security hub findings data. For example, show all Security Hub findings for critical severity for a specific resource or ARN.
If you use Amazon Inspector for software vulnerability management and you want to monitor top common vulnerabilities and exposures (CVEs) affecting your organization, choose Build visual and enter show all ACTIVE findings with product inspector group by Title add count in the prompt. We used the keyword ACTIVE because ACTIVE is a finding state in Security Hub that indicates the finding is still active as per the finding source and Amazon Inspector has not closed the finding yet. If Amazon Inspector has closed the finding, the finding will have a state of ARCHIVED.
Figure 21: Q Response for an Amazon Inspector findings question
To add the remaining datasets, which allows you to visualize data from multiple datasets in a single view, select the dropdown in the left navigation under Dataset.
Select Add a new dataset.
Search the name of the remaining datasets you created previously.
Select anywhere on the name of the dataset to make the radial button blue for the single dataset you want to add. Choose Select.
Repeat steps 7–12 in this section to add all the corresponding datasets you created previously.
Note: When you add additional datasets to the same Analysis and use Build visual to generate visualizations using natural language, the corresponding datasets with Q Topics are populated in the drop down under the prompt. Be sure to choose the correct dataset when asking questions.
Figure 22: Choosing a QuickSight dataset
To create dashboards:
After you’ve created the visual and are ready to publish the analysis as a dashboard, select PUBLISH in the top right corner.
Enter a name for your dashboard.
Choose Publish Dashboard.
After your dashboard is published, your users can ask questions about the data through the dashboard as well. This dashboard can be shared with other users. Users with QuickSight Reader Pro licenses can ask questions using Amazon Q.
To ask questions using the dashboard:
Navigate to the Dashboards section on the left navigation.
Select the dashboard you previously published.
Select Ask a question about [Topic Name] at the top of the screen. A module will open from the side of your screen. Questions can only be addressed to a single topic. To change the topic, select the name of the topic and a drop-down will appear. Select the name of the current topic to see other options and select the topic you want to ask a question about. For this example, select CloudTrailTopic.
Figure 23: Selecting a topic
Enter a question in the prompt. For this example, enter show top API operations in the last 24 hours with accessdenied.
Figure 24: CloudTrail question 1
Enter show all activity by user johndoe in the last 3 days.
Figure 25: CloudTrail question 2
Q will automatically build a small dashboard based on the questions provided.
Now change the topic to VPCFlowTopic as described in step 3.
Enter show me the top 5 dst ip by bytes for outbound traffic with dst port 443.
Figure 26: VPC Flow Log question
You can build executive summaries using QuickSight data stories, which also use generative AI. Data stories use Amazon Q prompts and visuals to produce a draft that incorporates the details that you provide. For example, you can create a data story about how a specific CVE affects your organization by asking Q questions, then add visuals from analyses you already created.
Conclusion
In this blog post, you learned how to use generative AI for your security use cases. We showed you how to use cross-account query access to allow a QuickSight visualization account to subscribe to Security Lake data for Security Hub findings, CloudTrail logs, and VPC Flow Logs. We then provided instructions for creating, Athena views, QuickSight datasets, Q topics, named entities, and for using natural language to build dashboards and query your data. You can customize the Athena views to create, update, or delete columns and column names as needed for your use case. You can also customize the Q topics and named entities to use naming conventions and structure responses based on your organization’s needs.
If you have feedback about this post, submit comments in the Comments section below. If you have questions about this post, contact AWS Support.
This post is co-written with Julien Lafaye from CFM.
Capital Fund Management (CFM) is an alternative investment management company based in Paris with staff in New York City and London. CFM takes a scientific approach to finance, using quantitative and systematic techniques to develop the best investment strategies. Over the years, CFM has received many awards for their flagship product Stratus, a multi-strategy investment program that delivers decorrelated returns through a diversified investment approach while seeking a risk profile that is less volatile than traditional market indexes. It was first opened to investors in 1995. CFM assets under management are now $13 billion.
A traditional approach to systematic investing involves analysis of historical trends in asset prices to anticipate future price fluctuations and make investment decisions. Over the years, the investment industry has grown in such a way that relying on historical prices alone is not enough to remain competitive: traditional systematic strategies progressively became public and inefficient, while the number of actors grew, making slices of the pie smaller—a phenomenon known as alpha decay. In recent years, driven by the commoditization of data storage and processing solutions, the industry has seen a growing number of systematic investment management firms switch to alternative data sources to drive their investment decisions. Publicly documented examples include the usage of satellite imagery of mall parking lots to estimate trends in consumer behavior and its impact on stock prices. Using social network data has also often been cited as a potential source of data to improve short-term investment decisions. To remain at the forefront of quantitative investing, CFM has put in place a large-scale data acquisition strategy.
As the CFM Data team, we constantly monitor new data sources and vendors to continue to innovate. The speed at which we can trial datasets and determine whether they are useful to our business is a key factor of success. Trials are short projects usually taking up to a several months; the output of a trial is a buy (or not-buy) decision if we detect information in the dataset that can help us in our investment process. Unfortunately, because datasets come in all shapes and sizes, planning our hardware and software requirements several months ahead has been very challenging. Some datasets require large or specific compute capabilities that we can’t afford to buy if the trial is a failure. The AWS pay-as-you-go model and the constant pace of innovation in data processing technologies enable CFM to maintain agility and facilitate a steady cadence of trials and experimentation.
In this post, we share how we built a well-governed and scalable data engineering platform using Amazon EMR for financial features generation.
AWS as a key enabler of CFM’s business strategy
We have identified the following as key enablers of this data strategy:
Managed services – AWS managed services reduce the setup cost of complex data technologies, such as Apache Spark.
Elasticity – Compute and storage elasticity removes the burden of having to plan and size hardware procurement. This allows us to be more focused on the business and more agile in our data acquisition strategy.
Governance – At CFM, our Data teams are split into autonomous teams that can use different technologies based on their requirements and skills. Each team is the sole owner of its AWS account. To share data to our internal consumers, we use AWS Lake Formation with LF-Tags to streamline the process of managing access rights across the organization.
Data integration workflow
A typical data integration process consists of ingestion, analysis, and production phases.
CFM usually negotiates with vendors a download method that is convenient for both parties. We see a lot of possibilities for exchanging data (HTTPS, FPT, SFPT), but we’re seeing a growing number of vendors standardizing around Amazon Simple Storage Service (Amazon S3).
CFM data scientists then look up the data and build features that can be used in our trading models. The bulk of our data scientists are heavy users of Jupyter Notebook. Jupyter notebooks are interactive computing environments that allow users to create and share documents containing live code, equations, visualizations, and narrative text. They provide a web-based interface where users can write and run code in different programming languages, such as Python, R, or Julia. Notebooks are organized into cells, which can be run independently, facilitating the iterative development and exploration of data analysis and computational workflows.
We invested a lot in polishing our Jupyter stack (see, for example, the open source project Jupytext, which was initiated by a former CFM employee), and we are proud of the level of integration with our ecosystem that we have reached. Although we explored the option of using AWS managed notebooks to streamline the provisioning process, we have decided to continue hosting these components on our on-premises infrastructure for the current timeline. CFM internal users appreciate the existing development environment and switching to an AWS managed environment would imply a change to their habits, and a temporary drop in productivity.
Exploration of small datasets is entirely feasible within this Jupyter environment, but for large datasets, we have identified Spark as the go-to solution. We could have deployed Spark clusters in our data centers, but we have found that Amazon EMR considerably reduces the time to deploy said clusters and provides many interesting features, such as ARM support through AWS Graviton processors, auto scaling capabilities, and the ability to provision transient clusters.
After a data scientist has written the feature, CFM deploys a script to the production environment that refreshes the feature as new data comes in. These scripts often run in a relatively short amount of time because they only require processing a small increment of data.
Interactive data exploration workflow
CFM’s data scientists’ preferred way of interacting with EMR clusters is through Jupyter notebooks. Having a long history of managing Jupyter notebooks on premises and customizing them, we opted to integrate EMR clusters into our existing stack. The user workflow is as follows:
The user provisions an EMR cluster through the AWS Service Catalog and the AWS Management Console. Users can also use API calls to do this, but usually prefer using the Service Catalog interface. You can choose various instance types that include different combinations of CPU, memory, and storage, giving you the flexibility to choose the appropriate mix of resources for your applications.
The user starts their Jupyter notebook instance and connects to the EMR cluster.
The user interactively works on the data using the notebook.
The user shuts down the cluster through the Service Catalog.
Solution overview
The connection between the notebook and the cluster is achieved by deploying the following open source components:
Apache Livy – This service that provides a REST interface to a Spark driver running on an EMR cluster.
Sparkmagic – This set of Jupyter magics provides a straightforward way to connect to the cluster and send PySpark code to the cluster through the Livy endpoint.
Sagemaker-studio-analytics-extension – This library provides a set of magics to integrate analytics services (such as Amazon EMR) into Jupyter notebooks. It is used to integrate Amazon SageMaker Studio notebooks and EMR clusters (for more details, see Create and manage Amazon EMR Clusters from SageMaker Studio to run interactive Spark and ML workloads – Part 1). Having the requirement to use our own notebooks, we initially didn’t benefit from this integration. To help us, the Amazon EMR service team made this library available on PyPI and guided us in setting it up. We use this library to facilitate the connection between the notebook and the cluster and to forward the user permissions to the clusters through runtime roles. These runtime roles are then used to access the data instead of instance profile roles assigned to the Amazon Elastic Compute Cloud (Amazon EC2) instances that are part of the cluster. This allows more fine-grained access control on our data.
The following diagram illustrates the solution architecture.
Set up Amazon EMR on an EC2 cluster with the GetClusterSessionCredentials API
A runtime role is an AWS Identity and Access Management (IAM) role that you can specify when you submit a job or query to an EMR cluster. The EMR get-cluster-session-credentials API uses a runtime role to authenticate on EMR nodes based on the IAM policies attached runtime role (we document the steps to enable for the Spark terminal; a similar approach can be expanded for Hive and Presto). This option is generally available in all AWS Regions and the recommended release to use is emr-6.9.0 or later.
Connect to Amazon EMR on the EC2 cluster from Jupyter Notebook with the GCSC API
Jupyter Notebook magic commands provide shortcuts and extra functionality to the notebooks in addition to what can be done with your kernel code. We use Jupyter magics to abstract the underlying connection from Jupyter to the EMR cluster; the analytics extension makes the connection through Livy using the GCSC API.
On your Jupyter instance, server, or notebook PySpark kernel, install the following extension, load the magics, and create a connection to the EMR cluster using your runtime role:
CFM has implemented an architecture based on dozens of pipelines: data is ingested from data on Amazon S3 and transformed using Amazon EMR Serverless with Spark; resulting datasets are published back to Amazon S3.
Each pipeline runs as a separate EMR Serverless application to avoid resource contention between workloads. Individual IAM roles are assigned to each EMR Serverless application to apply least privilege access.
To control costs, CFM uses EMR Serverless automatic scaling combined with the maximum capacity feature (which defines the maximum total vCPU, memory, and disk capacity that can be consumed collectively by all the jobs running under this application). Finally, CFM uses an AWS Graviton architecture to optimize even more cost and performance (as highlighted in the screenshot below).
After some iterations, the user produces a final script that is put in production. For early deployments, we relied on Amazon EMR on EC2 to run those scripts. Based on user feedback, we iterated and investigated for opportunities to reduce cluster startup times. Cluster startups could take up to 8 minutes for a runtime requiring a fraction of that time, which impacted the user experience. Also, we wanted to reduce the operational overhead of starting and stopping EMR clusters.
Those are the reasons why we switched to EMR Serverless a few months after its initial release. This move was surprisingly straightforward because it didn’t require any tuning and worked instantly. The only drawback we have seen is the requirement to update AWS tools and libraries in our software stacks to incorporate all the EMR features (such as AWS Graviton); on the other hand, it led to reduced startup time, reduced costs, and better workload isolation.
At this stage, CFM data scientists can perform analytics and extract value from raw data. Resulting datasets are then published to our data mesh service across our organization to allow our scientists to work on prediction models. In the context of CFM, this requires a strong governance and security posture to apply fine-grained access control to this data. This data mesh approach allows CFM to have a clear view from an audit standpoint on dataset usage.
Data governance with Lake Formation
A data mesh on AWS is an architectural approach where data is treated as a product and owned by domain teams. Each team uses AWS services like Amazon S3, AWS Glue, AWS Lambda, and Amazon EMR to independently build and manage their data products, while tools like the AWS Glue Data Catalog enable discoverability. This decentralized approach promotes data autonomy, scalability, and collaboration across the organization:
Autonomy – At CFM, like at most companies, we have different teams with difference skillsets and different technology needs. Enabling teams to work autonomously was a key parameter in our decision to move to a decentralized model where each domain would live in its own AWS account. Another advantage was improved security, particularly the ability to contain the potential impact area in the event of credential leaks or account compromises. Lake Formation is key in enabling this kind of model because it streamlines the process of managing access rights across accounts. In the absence of Lake Formation, administrators would have to make sure that resource policies and user policies align to grant access to data: this is usually considered complex, error-prone, and hard to debug. Lake Formation makes this process a lot less complicated.
Scalability – There are no blockers that prevent other organization units from joining the data mesh structure, and we expect more teams to join the effort of refining and sharing their data assets.
Collaboration – Lake Formation provides a sound foundation for making data products discoverable by CFM internal consumers. On top of Lake Formation, we developed our own Data Catalog portal. It provides a user-friendly interface where users can discover datasets, read through the documentation, and download code snippets (see the following screenshot). The interface is tailor-made for our work habits.
Lake Formation documentation is extensive and provides a collection of ways to achieve a data governance pattern that fits every organization requirement. We made the following choices:
LF-Tags – We use LF-Tags instead of named resource permissioning. Tags are associated to resources, and personas are given the permission to access all resources with a certain tag. This makes scaling the process of managing rights straightforward. Also, this is an AWS recommended best practice.
Centralization – Databases and LF-Tags are managed in a centralized account, which is managed by a single team.
Decentralization of permissions management – Data producers are allowed to associate tags to the datasets they are responsible for. Administrators of consumer accounts can grant access to tagged resources.
Conclusions
In this post, we discussed how CFM built a well-governed and scalable data engineering platform for financial features generation.
Lake Formation provides a solid foundation for sharing datasets across accounts. It removes the operational complexity of managing complex cross-account access through IAM and resource policies. For now, we only use it to share assets created by data scientists, but plan to add new domains in the near future.
Lake Formation also seamlessly integrates with other analytics services like AWS Glue and Amazon Athena. The ability to provide a comprehensive and integrated suite of analytics tools to our users is a strong reason for adopting Lake Formation.
Last but not least, EMR Serverless reduced operational risk and complexity. EMR Serverless applications start in less than 60 seconds, whereas starting an EMR cluster on EC2 instances typically takes more than 5 minutes (as of this writing). The accumulation of those earned minutes effectively eliminated any further instances of missed delivery deadlines.
If you’re looking to streamline your data analytics workflow, simplify cross-account data sharing, and reduce operational overhead, consider using Lake Formation and EMR Serverless in your organization. Check out the AWS Big Data Blog and reach out to your AWS team to learn more about how AWS can help you use managed services to drive efficiency and unlock valuable insights from your data!
About the Authors
Julien Lafaye is a director at Capital Fund Management (CFM) where he is leading the implementation of a data platform on AWS. He is also heading a team of data scientists and software engineers in charge of delivering intraday features to feed CFM trading strategies. Before that, he was developing low latency solutions for transforming & disseminating financial market data. He holds a Phd in computer science and graduated from Ecole Polytechnique Paris. During his spare time, he enjoys cycling, running and tinkering with electronic gadgets and computers.
Matthieu Bonville is a Solutions Architect in AWS France working with Financial Services Industry (FSI) customers. He leverages his technical expertise and knowledge of the FSI domain to help customer architect effective technology solutions that address their business challenges.
Joel Farvault is Principal Specialist SA Analytics for AWS with 25 years’ experience working on enterprise architecture, data governance and analytics, mainly in the financial services industry. Joel has led data transformation projects on fraud analytics, claims automation, and Master Data Management. He leverages his experience to advise customers on their data strategy and technology foundations.
The AWS Glue Data Catalog now enhances managed table optimization of Apache Iceberg tables by automatically removing data files that are no longer needed. Along with the Glue Data Catalog’s automated compaction feature, these storage optimizations can help you reduce metadata overhead, control storage costs, and improve query performance.
Iceberg creates a new version called a snapshot for every change to the data in the table. Iceberg has features like time travel and rollback that allow you to query data lake snapshots or roll back to previous versions. As more table changes are made, more data files are created. In addition, any failures during writing to Iceberg tables will create data files that aren’t referenced in snapshots, also known as orphan files. Time travel features, though useful, may conflict with regulations like GDPR that require permanent data deletion. Because time travel allows accessing data through historical snapshots, additional safeguards are needed to maintain compliance with data privacy laws. To control storage costs and comply with regulations, many organizations have created custom data pipelines that periodically expire snapshots in a table that are no longer needed and remove orphan files. However, building these custom pipelines is time-consuming and expensive.
With this launch, you can enable Glue Data Catalog table optimization to include snapshot and orphan data management along with compaction. You can enable this by providing configurations such as a default retention period and maximum days to keep orphan files. The Glue Data Catalog monitors tables daily, removes snapshots from table metadata, and removes the data files and orphan files that are no longer needed. The Glue Data Catalog honors retention policies for Iceberg branches and tags referencing snapshots. You can now get an always-optimized Amazon Simple Storage Service (Amazon S3) layout by automatically removing expired snapshots and orphan files. You can view the history of data, manifest, manifest lists, and orphan files deleted from the table optimization tab on the AWS Glue Data Catalog console.
In this post, we show how to enable managed retention and orphan file deletion on an Apache Iceberg table for storage optimization.
Solution overview
For this post, we use a table called customer in the iceberg_blog_db database, where data is added continuously by a streaming application—around 10,000 records (file size less than 100 KB) every 10 minutes, which includes change data capture (CDC) as well. The customer table data and metadata are stored in the S3 bucket. Because the data is updated and deleted as part of CDC, new snapshots are created for every change to the data in the table.
Managed compaction is enabled on this table for query optimization, which results in new snapshots being created when compaction rewrites several small files into a few compacted files, leaving the old small files in storage. This results in data and metadata in Amazon S3 growing at a rapid pace, which can become cost-prohibitive.
Snapshots are timestamped versions of an iceberg table. Snapshot retention configurations allow customers to enforce how long to retain snapshots and how many snapshots to retain. Configuring a snapshot retention optimizer can help manage storage overhead by removing older, unnecessary snapshots and their underlying files.
Orphan files are files that are no longer referenced by the Iceberg table metadata. These files can accumulate over time, especially after operations like table deletions or failed ETL jobs. Enabling orphan file deletion allows AWS Glue to periodically identify and remove these unnecessary files, freeing up storage.
The following diagram illustrates the architecture.
In the following sections, we demonstrate how to enable managed retention and orphan file deletion on the AWS Glue managed Iceberg table.
Prerequisite
Have an AWS account. If you don’t have an account, you can create one.
Set up resources with AWS CloudFormation
This post includes a CloudFormation template for a quick setup. You can review and customize it to suit your needs. The template generates the following resources:
An S3 bucket to store the dataset, Glue job scripts, and so on
Data Catalog database
An AWS Glue job that creates and modifies sample customer data in your S3 bucket with a Trigger every 10 mins
To launch the CloudFormation stack, complete the following steps:
Sign in to the AWS CloudFormation console.
Choose Launch Stack.
Choose Next.
Leave the parameters as default or make appropriate changes based on your requirements, then choose Next.
Review the details on the final page and select I acknowledge that AWS CloudFormation might create IAM resources.
Choose Create.
This stack can take around 5-10 minutes to complete, after which you can view the deployed stack on the AWS CloudFormation console.
Note down the role glueroleouput value that will be used when enabling optimization setup.
From the Amazon S3 console, note the Amazon S3 bucket and you can monitor how the data will be continuously updated every 10 mins with the AWS Glue Job.
Enable snapshot retention
We want to remove metadata and data files of snapshots older than 1 day and the number of snapshots to retain a maximum of 1. To enable snapshot expiry, you enable snapshot retention on the customer table by setting the retention configuration as shown in the following steps, and AWS Glue will run background operations to perform these table maintenance operations, enforcing these settings one time per day.
Sign in to the AWS Glue console as an administrator.
Under Data Catalog in the navigation pane, choose Tables.
Search for and select the customer table.
On the Actions menu, choose Enable under Optimization.
Specify your optimization settings by selecting Snapshot retention.
Under Optimization configuration, select Customize settings and provide the following:
For IAM role, choose role created as CloudFormation resource.
Set Snapshot retention period as 1 day.
Set Minimum snapshots to retain as 1.
Choose Yes for Delete expire files.
Select the acknowledgement check box and choose Enable.
We want to remove metadata and data files that aren’t referenced of snapshots older than 1 day and the number of snapshots to retain a maximum of 1. Complete the steps to enable orphan file deletion on the customer table, and AWS Glue will run background operations to perform these table maintenance operations enforcing these settings one time per day.
Under Optimization configuration, select Customize settings and provide the following:
For IAM role, choose role created as CloudFormation resource.
Set Delete orphan file period as 1 day.
Select the acknowledgement check box and choose Enable.
Alternatively, you can use the AWS CLI to enable orphan file deletion:
The following metrics show a steep increase in the bucket size as streaming of customer data happens along with CDC, leading to an increase in the metadata and data objects as snapshots are created. When snapshot retention (“snapshotRetentionPeriodInDays“: 1, “numberOfSnapshotsToRetain“: 50) and orphan file deletion (“orphanFileRetentionPeriodInDays“: 1) enabled, there is drop in the total bucket size for the customer prefix and the total number of objects as the maintenance takes place, eventually leading to optimized storage.
Clean up
To avoid incurring future charges, delete the resources you created in the Glue, Data Catalog, and S3 bucket used for storage.
Conclusion
Two of the key features of Iceberg are time travel and rollbacks, allowing you to query data at previous points in time and roll back unwanted changes to your tables. This is facilitated through the concept of Iceberg snapshots, which are a complete set of data files in the table at a point in time. With these new releases, the Data Catalog now provides storage optimizations that can help you reduce metadata overhead, control storage costs, and improve query performance.
A special thanks to everyone who contributed to the launch: Sangeet Lohariwala, Arvin Mohanty, Juan Santillan, Sandya Krishnanand, Mert Hocanin, Yanting Zhang and Shyam Rathi.
About the Authors
Sandeep Adwankar is a Senior Product Manager at AWS. Based in the California Bay Area, he works with customers around the globe to translate business and technical requirements into products that enable customers to improve how they manage, secure, and access data.
Srividya Parthasarathy is a Senior Big Data Architect on the AWS Lake Formation team. She enjoys building data mesh solutions and sharing them with the community.
Paul Villena is a Senior Analytics Solutions Architect in AWS with expertise in building modern data and analytics solutions to drive business value. He works with customers to help them harness the power of the cloud. His areas of interests are infrastructure as code, serverless technologies, and coding in Python.
Today’s data lakes are expanding across lines of business operating in diverse landscapes and using various engines to process and analyze data. Traditionally, SQL views have been used to define and share filtered data sets that meet the requirements of these lines of business for easier consumption. However, with customers using different processing engines in their data lakes, each with its own version of views, they’re creating separate views per engine, adding to maintenance overhead. Furthermore, accessing these engine-defined views requires customers to have elevated access levels, granting them access to both the SQL view itself and the underlying databases and tables referenced in the view’s SQL definition. This approach impedes granting consistent access to a subset of data using SQL views, hampering productivity and increasing management overhead.
Glue Data Catalog views is a new feature of the AWS Glue Data Catalog that customers can use to create a common view schema and single metadata container that can hold view-definitions in different dialects that can be used across engines such as Amazon Redshift and Amazon Athena. By defining a single view object that can be queried from multiple engines, Data Catalog views enable customers to manage permissions on a single view schema consistently using AWS Lake Formation. A view can be shared across different AWS accounts as well. For querying these views, users need access to the view object only and don’t need access to the referenced databases and tables in the view definition. Further, all requests against the Data Catalog views, such as requests for access credentials on underlying resources, will be logged as AWS CloudTrail management events for auditing purposes.
In this blog post, we will show how you can define and query a Data Catalog view on top of open source table formats such as Iceberg across Athena and Amazon Redshift. We will also show you the configurations needed to restrict access to the underlying database and tables. To follow along, we have provided an AWS CloudFormation template.
Use case
An Example Corp has two business units: Sales and Marketing. The Sales business unit owns customer datasets, including customer details and customer addresses. The Marketing business unit wants to conduct a targeted marketing campaign based on a preferred customer list and has requested data from the Sales business unit. The Sales business unit’s data steward (AWS Identity and Access Management (IAM) role: product_owner_role), who owns the customer and customer address datasets, plans to create and share non-sensitive details of preferred customers with the Marketing unit’s data analyst (business_analyst_role) for their campaign use case. The Marketing team analyst plans to use Athena for interactive analysis for the marketing campaign and later, use Amazon Redshift to generate the campaign report.
In this solution, we demonstrate how you can use Data Catalog views to share a subset of customer details stored in Iceberg format filtered by the preferred flag. This view can be seamlessly queried using Athena and Amazon Redshift Spectrum, with data access centrally managed through AWS Lake Formation.
Prerequisites
For the solution in this blog post, you need the following:
An AWS account. If you don’t have an account, you can create one.
You have created a data lake administrator Take note of this role’s Amazon Resource Name (ARN) to use later. For simplicity’s sake, this post will use IAM Admin role as the Datalake Admin and Redshift Admin but make sure that in your environment you follow the principle of least privilege.
Under Data Catalog settings, have the default settings in place. Both of the following options should be selected:
Use only IAM access control for new databases
Use only IAM access control for new tables in new databases
Get started
To follow the steps in this post, sign in to the AWS Management Console as the IAM Admin and deploy the following CloudFormation stack to create the necessary resources:
Choose to deploy the CloudFormation template.
Provide an IAM role that you have already configured as a Lake Formation administrator.
Complete the steps to deploy the template. Leave all settings as default.
Select I acknowledge that AWS CloudFormation might create IAM resources, then choose Submit.
The CloudFormation stack creates the following resources. Make a note of these values—you will use them later.
IAM roles: product_owner_role and business_analyst_role
Virtual private cloud (VPC) with the required network configuration, which will be used for compute
AWS Glue database: customerdb, which contains the customer and customer_address tables in Iceberg format
Glue database: customerviewdb, which will contain the Data Catalog views
Redshift Serverless cluster
The CloudFormation stack also registers the data lake bucket with Lake Formation in Lake Formation access mode. You can verify this by navigating to the Lake Formation console and selecting Data lake locations under Administration.
Solution overview
The following figure shows the architecture of the solution.
As a requirement to create a Data Catalog view, the data lake S3 locations for the tables (customer and customer_address) need to be registered with Lake Formation and granted full permission to product_owner_role.
The Sales product owner: product_owner_role is also granted permission to create views under customerviewdb using Lake Formation.
After the Glue Data Catalog View (customer_view) is created on the customer dataset with the required subset of customer information, the view is shared with the Marketing analyst (business_analyst_role), who can then query the preferred customer’s non sensitive information as defined by the view without having access to underlying customer tables.
Enable Lake Formation permission mode on the customerdbdatabase and its tables.
Grant the database (customerdb) and tables (customer and customer_address) full permission to product_owner_role using Lake Formation.
Enable Lake Formation permission mode on the database (customerviewdb) where the multiple dialect Data Catalog view will be created.
Grant full database permission to product_owner_role using Lake Formation.
Create Data Catalog views as product_owner_role using Athena and Amazon Redshift to add engine dialects.
Share the database and Data Catalog views read permission to business_analyst_role using Lake Formation.
Query the Data Catalog view using business_analyst_role from Athena and Amazon Redshift engine.
With the prerequisites in place and an understanding of the overall solution, you’re ready to set up the solution.
Set up Lake Formation permissions for product_owner_role
Sign in to the LakeFormation console as a data lake administrator. For the examples in this post, we use the IAM Admin role, Admin as the data lake admin.
Enable Lake Formation permission mode on customerdb and its tables
In the Lake Formation console, under Data Catalog in the navigation pane, choose Databases.
Choose customerdb and choose Edit.
Under Default permissions for newly created tables, clear Use only IAM access control for new tables in this database.
Choose Save.
Under Data Catalog in the navigation pane, choose Databases.
Select customerdb and under Action, select View
Select the IAMAllowedPrincipal from the list and choose Revoke.
Repeat the same for all tables under the database customerdb.
Grant the product_owner_role access to customerdb and its tables
Grant product_owner_roleall permissions to the customerdbdatabase.
On the Lake Formation console, under Permissions in the navigation pane, choose Data lake permissions.
Choose Grant.
Under Principals, select IAM users and roles.
Select product_owner_role.
Under LF-Tags or catalog resources, select Named Data Catalog resourcesand select customerdb for Databases.
Select SUPER for Database permissions.
Choose Grant to apply the permissions.
Grant product_owner_role all permissions to the customer and customer_address tables.
On the Lake Formation console, under Permissions in the navigation pane, choose Data lake permission
Choose Grant.
Under Principals, select IAM users and roles.
Choose the product_owner_role.
Under LF-Tags or catalog resources, choose Named Data Catalog resourcesand select customerdb for databases and customer and customer_address for tables.
Choose SUPER for Table permissions.
Choose Grant to apply the permissions.
Enable Lake Formation permission mode
Enable Lake Formation permission mode on the database where the Data Catalog view will be created.
In the Lake Formation console, under Data Catalog in the navigation pane, choose Databases.
Select customerviewdb and choose Edit.
Under Default permissions for newly created tables, clear Use only IAM access control for new tables in this database.
Choose Save.
Choose Databases from Data Catalog in the navigation pane.
Select customerviewdb and under Action select View.
Select the IAMAllowedPrincipal from the list and choose Revoke.
Grant the product_owner_role access to customerviewdb using Lake Formation mode
Grant product_owner_role all permissions to the customerviewdb database.
On the Lake Formation console, under Permissions in the navigation pane, choose Data lake permissions.
Choose Grant
Under Principals, select IAM users and roles.
Choose product_owner_role
Under LF-Tags or catalog resources, choose Named Data Catalog resourcesand select customerviewdb for Databases.
Select SUPER for Database permissions.
Choose Grant to apply the permissions.
Create Glue Data Catalog views as product_owner_role
Now that you have Lake Formation permissions set on the databases and tables, you will use the product_owner_role to create Data Catalog views using Athena and Amazon Redshift. This will also add the engine dialects for Athena and Amazon Redshift.
Add the Athena dialect
In the AWS console, either sign in using product_owner_role or, if you’re already signed in as an Admin, switch to product_owner_role.
Launch query editor and select the workgroup athena_glueview from the upper right side of the console. You will create a view that combines data from the customer and customer_address tables, specifically for customers who are marked as preferred. The tables include personal information about the customer, such as their name, date of birth, country of birth, and email address.
Run the following in the query editor to create the customer_view view under thecustomerviewdb database.
create protected multi dialect view customerviewdb.customer_view
security definer
as
select c_customer_id, c_first_name, c_last_name, c_birth_day, c_birth_month,
c_birth_year, c_birth_country, c_email_address,
ca_country,ca_zip
from customerdb.customer, customerdb.customer_address
where c_current_addr_sk = ca_address_sk and c_preferred_cust_flag='Y';
Run the following query to preview the view you just created.
select * from customerviewdb.customer_view limit 10;
Run following query to find the top three birth years with the highest customer counts from the customer_view view and display the birth year and corresponding customer count for each.
select c_birth_year,
	count(*) as count
from "customerviewdb"."customer_view"
group by c_birth_year
order by count desc
limit 3
Output:
To validate that the view is created, go to the navigation pane and choose Views under Data catalog on the Lake Formation console
Select customer_view and go to the SQL definition section to validate the Athena engine dialect.
When you created the view in Athena, it added the dialect for Athena engine. Next, to support the use case described earlier, the marketing campaign report needs to be generated using Amazon Redshift. For this, you need to add the Redshift dialect to the view so you can query it using Amazon Redshift as an engine.
Add the Amazon Redshift dialect
Sign in to the AWS console as an Admin, navigate to Amazon Redshift console and sign in to Redshift Qurey editor v2.
Connect to the Serverless cluster as Admin (federated user) and run the following statements to grant permission on the Glue automount database (awsdatacatalog) access to product_owner_role and business_analyst_role.
create user  "IAMR:product_owner_role" password disable;
create user  "IAMR:business_analyst_role" password disable;

grant usage on database awsdatacatalog to "IAMR:product_owner_role";
grant usage on database awsdatacatalog to "IAMR:business_analyst_role";
Sign in to the Amazon Redshift console as product_owner_role and sign in to the QEv2 editor using product_owner_role (as a federated user). You will use the following ALTER VIEW query to add the Amazon Redshift engine dialect to the view created previously using Athena.
Run the following in the query editor:
alter external view awsdatacatalog.customerviewdb.customer_view AS
select c_customer_id, c_first_name, c_last_name, c_birth_day, c_birth_month,
c_birth_year, c_birth_country, c_email_address,
ca_country, ca_zip
from awsdatacatalog.customerdb.customer, awsdatacatalog.customerdb.customer_address
where c_current_addr_sk = ca_address_sk and c_preferred_cust_flag='Y'
Run following query to preview the view.
select * from awsdatacatalog.customerviewdb.customer_view limit 10;
Run the same query that you ran in Athena to find the top three birth years with the highest customer counts from the customer_view view and display the birth year and corresponding customer count for each.
select c_birth_year,
	count(*) as count
from awsdatacatalog.customerviewdb.customer_view
group by c_birth_year
order by count desc
limit 3
By querying the same view and running the same query in Redshift, you obtained the same result set as you observed in Athena.
Validate the dialects added
Now that you have added all the dialects, navigate to the Lake Formation console to see how the dialects are stored.
On the Lake Formation console, under Data catalog in the navigation pane, choose Views.
Select customer_view and go to SQL definitions section to validate that the Athena and Amazon Redshift dialects have been added.
Alternatively, you can also create the view using Redshift to add Redshift dialect and update in Athena to add the Athena dialect.
Next, you will see how the business_analyst_role can query the view without having access to query the underlying tables and the Amazon S3 location where the data exists.
Set up Lake Formation permissions for business_analyst_role
Sign in to the Lake Formation console as the DataLake administrator (For this blog, we use the IAM Admin role, Admin, as the Datalake admin).
Grant business_analyst_role access to the database and view using Lake Formation
On the Lake Formation console, under Permissions in the navigation pane, choose Data lake permissions.
Choose Grant
Under Principals, select IAM users and roles.
Select business_analyst_role.
Under LF-Tags or catalog resources, select Named Data Catalog resources and select customerviewdb for Databases.
Select DESCRIBE for Database permissions.
Choose Grant to apply the permissions.
Grant the business_analyst_role SELECT and DESCRIBE permissions to customer_view
On the Lake Formation console, under Permissions in the navigation pane, choose Data lake permission.
Choose Grant.
Under Principals, select IAM users and roles.
Select business_analyst_role.
Under LF-Tags or catalog resources, choose Named Data Catalog resources and select customerviewdb for Databases and customer_view for Views.
Choose SELECT and DESCRIBE for View permissions.
Choose Grant to apply the permissions.
Query the Data Catalog views using business_analyst_role
Now that you have set up the solution, test it by querying the data using Athena and Amazon Redshift.
Using Athena
Sign in to the Athena console as business_analyst_role.
Launch query editor and select the workgroup athena_glueview. Select database customerviewdb from the dropdown on the left and you should be able to see the view created previously using product_owner_role. Also, notice that no tables are shown because business_analyst_role doesn’t have access granted for the base tables.
Run the following in the query editor to query the view query.
select * from customerviewdb.customer_view limit 10
As you can see in the preceding figure, business_analyst_role can query the view without having access to the underlying tables.
Next, query the table customer on which the view is created. It should give an error.
SELECT * FROM customerdb.customer limit 10
Using Amazon Redshift
Navigate to the Amazon Redshift console and sign in to Amazon Redshift query editor v2. Connect to the Serverless cluster as business_analyst_role (federated user) and run the following in the query editor to query the view.
Select the customerviewdb on the left side of the console. You should see the view customer_view. Also, note that you cannot see the tables from which the view is created. Run the following in the query editor to query the view.
SELECT * FROM "awsdatacatalog"."customerviewdb"."customer_view";
The business analyst user can run the analysis on the Data Catalog view without needing access to the underlying databases and tables on from which the view is created.
Glue Data Catalog views offer solutions for various data access and governance scenarios. Organizations can use this feature to define granular access controls on sensitive data—such as personally identifiable information (PII) or financial records—to help them comply with data privacy regulations. Additionally, you can use Data Catalog views to implement row-level, column-level, or even cell-level filtering based on the specific privileges assigned to different user roles or personas, allowing for fine-grained data access control. Furthermore, Data Catalog views can be used in data mesh patterns, enabling secure, domain-specific data sharing across the organization for self-service analytics, while allowing users to use preferred analytics engines like Athena or Amazon Redshift on the same views for governance and consistent data access.
Clean up
To avoid incurring future charges, delete the CloudFormation stack. For instructions, see Deleting a stack on the AWS CloudFormation console. Ensure that the following resources created for this blog post are removed:
S3 buckets
IAM roles
VPC with network components
Data Catalog database, tables and views
Amazon Redshift Serverless cluster
Athena workgroup
Conclusion
In this post, we demonstrated how to use AWS Glue Data Catalog views across multiple engines such as Athena and Redshift. You can share Data Catalog views so that different personas can query them. For more information about this new feature, see Using AWS Glue Data Catalog views.
About the Authors
Pathik Shah is a Sr. Analytics Architect on Amazon Athena. He joined AWS in 2015 and has been focusing in the big data analytics space since then, helping customers build scalable and robust solutions using AWS analytics services.
Srividya Parthasarathy is a Senior Big Data Architect on the AWS Lake Formation team. She enjoys building data mesh solutions and sharing them with the community.
Paul Villena is a Senior Analytics Solutions Architect in AWS with expertise in building modern data and analytics solutions to drive business value. He works with customers to help them harness the power of the cloud. His areas of interests are infrastructure as code, serverless technologies, and coding in Python.
Derek Liu is a Senior Solutions Architect based out of Vancouver, BC. He enjoys helping customers solve big data challenges through AWS analytic services.
Most organizations manage their workforce identity centrally in external identity providers (IdPs) and are comprised of multiple business units that produce their own datasets and manage the lifecycle spread across multiple AWS accounts. These business units have varying landscapes, where a data lake is managed by Amazon Simple Storage Service (Amazon S3) and analytics workloads are run on Amazon Redshift, a fast, scalable, and fully managed cloud data warehouse that allows you to process and run your complex SQL analytics workloads on structured and semi-structured data.
Business units that create data products like to share them with others, without copying the data, to promote analysis to derive insights. Also, they want tighter control on user access and the ability to audit access to their data products. To address this, enterprises usually catalog the datasets in the AWS Glue Data Catalog for data discovery and use AWS Lake Formation for fine-grained access control to adhere to the compliance and operating security model for their business units. Given the diverse range of services, fine-grained data sharing, and personas involved, these enterprises often want a streamlined experience for enterprise user identities when accessing their data using AWS Analytics services.
AWS IAM Identity Center enables centralized management of workforce user access to AWS accounts and applications using a local identity store or by connecting corporate directories using IdPs. Amazon Redshift and AWS Lake Formation are integrated with the new trusted identity propagation capability in IAM Identity Center, allowing you to use third-party IdPs such as Microsoft Entra ID (Azure AD), Okta, Ping, and OneLogin.
With trusted identity propagation, Lake Formation enables data administrators to directly provide fine-grained access to corporate users and groups, and simplifies the traceability of end-to-end data access across supported AWS services. Because access is managed based on a user’s corporate identity, end-users don’t need to use database local user credentials or assume an AWS Identity and Access Management (IAM) role to access data. Furthermore, this enables effective user permissions based on collective group membership and supports group hierarchy.
In this post, we cover how to enable trusted identity propagation with AWS IAM Identity Center, Amazon Redshift, and AWS Lake Formation residing on separate AWS accounts and set up cross-account sharing of an S3 data lake for enterprise identities using AWS Lake Formation to enable analytics using Amazon Redshift. Then we use Amazon QuickSight to build insights using Redshift tables as our data source.
Solution overview
This post covers a use case where an organization centrally manages corporate users within their IdP and where the users belong to multiple business units. Their goal is to enable centralized user authentication through IAM Identity Center in the management account, while keeping the business unit that analyzes data using a Redshift cluster and the business unit that produces data cataloged using the Data Catalog in separate member accounts. This allows them to maintain a single authentication mechanism through IAM Identity Center within an organization while retaining access control, resource, and cost separation through the use of separate AWS accounts per business units and enabling cross-account data sharing using Lake Formation.
For this solution, AWS Organizations is enabled in the central management account and IAM Identity Center is configured for managing workforce identities. The organization has two member accounts: one account that manages the S3 data lake using the Data Catalog, and another account that runs analytical workloads on Amazon Redshift and QuickSight, with all the services enabled with trusted identity propagation. Amazon Redshift will access cross-account AWS Glue resources using IAM Identity Center users and groups set up in the central management account using QuickSight in member account 1. In member account 2, permissions on the AWS Glue resources are managed using Lake Formation and are shared with member account 1 using Lake Formation data sharing.
The following diagram illustrates the solution architecture.
The solution consists of the following:
In the centralized management account, we create a permission set and create account assignments for Redshift_Member_Account. We integrate users and groups from the IdP with IAM Identity Center.
Member account 1 (Redshift_Member_Account) is where the Redshift cluster and application exist.
Member account 2 (Glue_Member_Account) is where metadata is cataloged in the Data Catalog and Lake Formation is enabled with IAM Identity Center integration.
We assign permissions to two IAM Identity Center groups to access the Data Catalog resources:
awssso-sales – We apply column-level filtering for this group so that users belonging to this group will be able to select two columns and read all rows.
awssso-finance – We apply row-level filtering using data filters for this group so that users belonging to this group will be able to select all columns and see rows after row-level filtering is applied.
We apply different permissions for three IAM Identity Center users:
User Ethan, part of awssso-sales – Ethan will be able to select two columns and read all rows.
User Frank, part of awssso-finance – Frank will be able to select all columns and see rows after row-level filtering is applied.
User Brian, part of awssso-sales and awssso-finance – Brian inherits permissions defined for both groups.
We set up QuickSight in the same account where Amazon Redshift exists, enabling authentication using IAM Identity Center.
Prerequisites
You should have the following prerequisites alreday set up:
A centralized management account where IAM Identity Center is enabled with member accounts added. For more information, see Enabling AWS IAM Identity Center.
Optionally, connect IAM Identity Center with your preferred IdP and sync users and groups. For instructions, refer to Getting started tutorials.
Member account 2 (Glue_Member_Account) where metadata is cataloged in the Data Catalog.
Member account 2 configuration
Sign in to the Lake Formation console as the data lake administrator. To learn more about setting up permissions for a data lake administrator, see Create a data lake administrator.
In this section, we walk through the steps to set up Lake Formation, enable Lake Formation permissions, and grant database and table permissions to IAM Identity Center groups.
Set up Lake Formation
Complete the steps in this section to set up Lake Formation.
Create AWS Glue resources
You can use an existing AWS Glue database that has a few tables. For this post, we use a database called customerdb and a table called reviews whose data is stored in the S3 bucket lf-datalake-<account-id>-<region>.
Register the S3 bucket location
Complete the following steps to register the S3 bucket location:
On the Lake Formation console, in the navigation pane, under Administration, choose Data lake locations.
Choose Register location.
For Amazon S3 location, enter the S3 bucket location that contains table data.
Complete the following steps to set your cross-account version:
Sign in to the Lake Formation console as the data lake admin.
In the navigation pane, under Administration, choose Data Catalog settings.
Under Cross-account version settings, keep the latest version (Version 4) as the current cross-account version.
Choose Save.
Add permissions required for cross-account access
If the AWS Glue Data Catalog resource policy is already enabled in the account, then you can either remove the policy or add the following permissions to the policy that are required for cross-account grants. The provided policy enables AWS Resource Access Manager (AWS RAM) to share a resource policy while cross-account grants are made using Lake Formation. For more information, refer to Prerequisites. Please skip to the following step if your policy is blank under Catalog Settings.
Sign in to the AWS Glue console as an IAM admin.
In the navigation pane, under Data Catalog, choose Catalog settings.
Under Permissions, add the following policy, and provide the account ID where your AWS Glue resources exist:
To enable cross-account sharing for IAM Identity Center users and groups, add the target recipient accounts to your Lake Formation IAM Identity Center integration under the AWS account and organization IDs.
Sign in to the Lake Formation console as a data lake admin.
In the navigation pane, under Administration, choose IAM Identity Center integration.
Under AWS account and organization IDs, choose Add.
Enter your target accounts.
Choose Add.
Enable Lake Formation permissions for databases
For Data Catalog databases that contain tables that you might share, you can stop new tables from having the default grant of Super to IAMAllowedPrincipals. Complete the following steps:
Sign in to the Lake Formation console as a data lake admin.
In the navigation pane, under Data Catalog, choose Databases.
Select the database customerdb.
Choose Actions, then choose Edit.
Under Default permissions for newly created tables, deselect Use only IAM access control for new tables in this database.
Choose Save.
For Data Catalog databases, remove IAMAllowedPrincipals.
Under Data Catalog in the navigation pane, choose Databases.
Select the database customerdb.
Choose Actions, then choose View.
Select IAMAllowedPrincipals and choose Revoke.
Repeat the same steps for tables under the customerdb database.
Grant database permissions to IAM Identity Center groups
Complete the following steps to grant database permissions to your IAM Identity Center groups:
On the Lake Formation console, under Data Catalog, choose Databases.
Select the database customerdb.
Choose Actions, then choose Grant.
Select IAM Identity Center.
Choose Add and select Get Started.
Search for and select your IAM Identity Center group names and choose Assign.
Select Named Data Catalog resources.
Under Databases, choose customerdb.
Under Database permissions, select Describe for Database permissions.
Choose Grant.
Grant table permissions to IAM Identity Center groups
In the following section, we will grant different permissions to our two IAM Identity Center groups.
Column filter
We first add permissions to the group awssso-sales. This group will have access to the customerdb database and be able to select only two columns and read all rows.
On the Lake Formation console, under Data Catalog in the navigation pane, choose Databases.
Select the database customerdb.
Choose Actions, then choose Grant.
Select IAM Identity Center.
Choose Add and select Get Started.
Search for and select awssso-sales and choose Assign.
Select Named Data Catalog resources.
Under Databases, choose customerdb.
Under Tables, choose reviews.
Under Table permissions, select Select for Table permissions.
Select Column-based access.
Select Include columns and choose product_title and star_rating.
Choose Grant.
Row filter
Next, we grant permissions to awssso-finance. This group will have access to customerdb and be able to select all columns and apply filters on rows.
We need to first create a data filter by performing the following steps:
On the Lake Formation console, choose Data filters under Data Catalog.
Choose Create data filter.
For Data filter name, provide a name.
For Target database, choose customerdb.
For Target table, choose reviews.
For Column-level access, select Access to all columns.
For Row-level access, choose Filter rows and apply your filter. In this example, we are filtering reviews with star_rating as 5.
Choose Create data filter.
Under Data Catalog in the navigation pane, choose Databases.
Select the database customerdb.
Choose Actions, then choose Grant.
Select IAM Identity Center.
Choose Add and select Get Started.
Search for and select awssso-finance and choose Assign.
Select Named Data Catalog resources.
Under Databases, choose customerdb.
Under Tables, choose reviews.
Under Data Filters, choose the High_Rating
Under Data Filter permissions, select Select.
Choose Grant.
Member account 1 configuration
In this section, we walk through the steps to add Amazon Redshift Spectrum table access in member account 1, where the Redshift cluster and application exist.
Accept Invite from RAM
You should have received a Resource Access Manager (RAM) invite from member account 2 when you added member account 1 under IAM Identity Center integration in Lake Formation at the member account 1.
Navigate to Resource Access Manager(RAM) from admin console.
Under Shared with me, click on resource shares.
Select the resource name and click on Accept resource share.
Please make sure that you have followed this entire blog to establish the Redshift Integration with IAM Identity Center before following the next steps.
Set up Redshift Spectrum table access for the IAM Identity Center group
Complete the following steps to set up Redshift Spectrum table access:
Sign in to the Amazon Redshift console using the admin role.
Navigate to Query Editor v2.
Choose the options menu (three dots) next to the cluster and choose Create connection.
Connect as the admin user and run the following commands to make the shared resource link data in the S3 data lake available to the sales group (use the account ID where the Data Catalog exists):
create external schema if not exists <schema_name> from DATA CATALOG database '<glue_catalog_name>' catalog_id '<accountid>';
grant usage on schema <schema_name> to role "<role_name>";
For example:
create external schema if not exists cross_account_glue_schema from DATA CATALOG database 'customerdb' catalog_id '932880906720';
grant usage on schema cross_account_glue_schema to role "awsidc:awssso-sales";
grant usage on schema cross_account_glue_schema to role "awsidc:awssso-finance";
Validate Redshift Spectrum access as an IAM Identity Center user
Complete the following steps to validate access:
On the Amazon Redshift console, navigate to Query Editor v2.
Choose the options menu (three dots) next to the cluster and choose Create connection.
Select IAM Identity Center.
Enter your Okta user name and password in the browser pop-up.
When you’re connected as a federated user, run the following SQL commands to query the cross_account_glue_schema data lake table.
select * from "dev"."cross_account_glue_schema"."reviews";
The following screenshot shows that user Ethan, who is part of the awssso-sales group, has access to two columns and all rows from the Data Catalog.
The following screenshot shows that user Frank, who is part of the awssso-finance group, has access to all columns for records that have star_rating as 5.
The following screenshot shows that user Brian, who is part of awssso-sales and awssso-finance, has access to all columns for records that have star_rating as 5 and access to only two columns (other columns are returned NULL) for records with star_rating other than 5.
Subscribe to QuickSight with IAM Identity Center
In this post, we set up QuickSight in the same account where the Redshift cluster exists. You can use the same or a different member account for QuickSight setup. To subscribe to QuickSight, complete the following steps:
Sign in to your AWS account and open the QuickSight console.
Choose Sign up for QuickSight.
Enter a notification email address for the QuickSight account owner or group. This email address will receive service and usage notifications.
Select the identity option that you want to subscribe with. For this post, we select Use AWS IAM Identity Center.
Enter a QuickSight account name.
Choose Configure.
Next, assign groups in IAM Identity Center to roles in QuickSight (admin, author, and reader.) This step enables your users to access the QuickSight application. In this post, we choose awssso-sales and awssso-finance for Admin group.
Specify an IAM role to control QuickSight access to your AWS resources. In this post, we select Use QuickSight managed role (default).
For this post, we deselect Add Paginated Reports.
Review the choices that you made, then choose Finish.
Enable trusted identity propagation in QuickSight
Trusted identity propagation authenticates the end-user in Amazon Redshift when they access QuickSight assets that use a trusted identity propagation enabled data source. When an author creates a data source with trusted identity propagation, the identity of the data source consumers in QuickSight is propagated and logged in AWS CloudTrail. This allows database administrators to centrally manage data security in Amazon Redshift and automatically apply data security rules to data consumers in QuickSight.
To configure QuickSight to connect to Amazon Redshift data sources with trusted identity propagation, configure Amazon Redshift OAuth scopes to your QuickSight account:
For QuickSight to connect to a Redshift instance, you must add an appropriate IP address range in the Redshift security group for the specific AWS Region. For more information, see AWS Regions, websites, IP address ranges, and endpoints.
Test your IAM Identity Center and Amazon Redshift integration with QuickSight
Now you’re ready to connect to Amazon Redshift using QuickSight.
In the management account, open the IAM Identity Center console and copy the AWS access portal URL from the dashboard.
Sign out from the management account and enter the AWS access portal URL in a new browser window.
In the pop-up window, enter your IdP credentials.
After successful authentication, you’ll be logged in to the AWS Management Console as a federated user.
On the Applications tab, select the QuickSight app.
After you federate to QuickSight, choose Datasets.
Select New Dataset and then choose Redshift (Auto Discovered).
Enter your data source details. Make sure to select Single sign-on for Authentication method.
Choose Create data source.
Congratulations! You’re signed in using IAM Identity Center integration with Amazon Redshift and are ready to explore and analyze your data using QuickSight.
The following screenshot from QuickSight shows that user Ethan, who is part of the awssso-sales group, has access to two columns and all rows from the Data Catalog.
The following screenshot from QuickSight shows that user Frank, who is part of the awssso-finance group, has access to all columns for records that have star_rating as 5.
The following screenshot from QuickSight shows that user Brian, who is part of awssso-sales and awssso-finance, has access to all columns for records that have star_rating as 5 and access to only two columns (other columns are returned NULL) for records with star_rating other than 5.
Clean up
Complete the following steps to clean up your resources:
Delete the data from the S3 bucket.
Delete the Data Catalog objects that you created as part of this post.
Delete the Lake Formation resources and QuickSight account.
If you created new Redshift cluster for testing this solution, delete the cluster.
Conclusion
In this post, we established cross-account access to enable centralized user authentication through IAM Identity Center in the management account, while keeping the Amazon Redshift and AWS Glue resources isolated by business unit in separate member accounts. We used Query Editor V2 for querying the data from Amazon Redshift. Then we showed how to build user-facing dashboards by integrating with QuickSight. Refer to Integrate Tableau and Okta with Amazon Redshift using AWS IAM Identity Center to learn about integrating Tableau and Okta with Amazon Redshift using IAM Identity Center.
Srividya Parthasarathy is a Senior Big Data Architect on the AWS Lake Formation team. She enjoys building data mesh solutions and sharing them with the community.
Maneesh Sharma is a Senior Database Engineer at AWS with more than a decade of experience designing and implementing large-scale data warehouse and analytics solutions. He collaborates with various Amazon Redshift Partners and customers to drive better integration.
Poulomi Dasgupta is a Senior Analytics Solutions Architect with AWS. She is passionate about helping customers build cloud-based analytics solutions to solve their business problems. Outside of work, she likes travelling and spending time with her family.
Over the years, organizations have invested in creating purpose-built, cloud-based data lakes that are siloed from one another. A major challenge is enabling cross-organization discovery and access to data across these multiple data lakes, each built on different technology stacks. A data mesh addresses these issues with four principles: domain-oriented decentralized data ownership and architecture, treating data as a product, providing self-serve data infrastructure as a platform, and implementing federated governance. Data mesh enables organizations to organize around data domains with a focus on delivering data as a product.
In 2019, Volkswagen AG (VW) and Amazon Web Services (AWS) formed a strategic partnership to co-develop the Digital Production Platform (DPP), aiming to enhance production and logistics efficiency by 30 percent while reducing production costs by the same margin. The DPP was developed to streamline access to data from shop-floor devices and manufacturing systems by handling integrations and providing standardized interfaces. However, as applications evolved on the platform, a significant challenge emerged: sharing data across applications stored in multiple isolated data lakes in Amazon Simple Storage Service (Amazon S3) buckets in individual AWS accounts without having to consolidate data into a central data lake. Another challenge is discovering available data stored across multiple data lakes and facilitating a workflow to request data access across business domains within each plant. The current method is largely manual, relying on emails and general communication, which not only increases overhead but also varies from one use case to another in terms of data governance. This blog post introduces Amazon DataZone and explores how VW used it to build their data mesh to enable streamlined data access across multiple data lakes. It focuses on the key aspect of the solution, which was enabling data providers to automatically publish data assets to Amazon DataZone, which served as the central data mesh for enhanced data discoverability. Additionally, the post provides code to guide you through the implementation.
Introduction to Amazon DataZone
Amazon DataZone is a data management service that makes it faster and easier for customers to catalog, discover, share, and govern data stored across AWS, on premises, and third-party sources. Key features of Amazon DataZone include a business data catalog that allows users to search for published data, request access, and start working on data in days instead of weeks. Amazon DataZone projects enable collaboration with teams through data assets and the ability to manage and monitor data assets across projects. It also includes the Amazon DataZone portal, which offers a personalized analytics experience for data assets through a web-based application or API. Lastly, Amazon DataZone governed data sharing ensures that the right data is accessed by the right user for the right purpose with a governed workflow.
Architecture for Data Management with Amazon DataZone
Figure 1: Data mesh pattern implementation on AWS using Amazon DataZone
The architecture diagram (Figure 1) represents a high-level design based on the data mesh pattern. It separates source systems, data domain producers (data publishers), data domain consumers (data subscribers), and central governance to highlight key aspects. This cross-account data mesh architecture aims to create a scalable foundation for data platforms, supporting producers and consumers with consistent governance.
A data domain producer resides in an AWS account and uses Amazon S3 buckets to store raw and transformed data. Producers ingest data into their S3 buckets through pipelines they manage, own, and operate. They are responsible for the full lifecycle of the data, from raw capture to a form suitable for external consumption.
A data domain producer maintains its own ETL stack using AWS Glue, AWS Lambda to process, AWS Glue Databrew to profile the data and prepare the data asset (data product) before cataloguing it into AWS Glue Data Catalog in their account.
A second pattern could be that a data domain producer prepares and stores the data asset as table within Amazon Redshift using AWS S3 Copy.
Data domain producers publish data assets using datasource run to Amazon DataZone in the Central Governance account. This populates the technical metadata in the business data catalog for each data asset. The business metadata, can be added by business users to provide business context, tags, and data classification for the datasets. Producers control what to share, for how long, and how consumers interact with it.
Producers can register and create catalog entries with AWS Glue from all their S3 buckets. The central governance account securely shares datasets between producers and consumers via metadata linking, with no data (except logs) existing in this account. Data ownership remains with the producer.
With Amazon DataZone, once data is cataloged and published into the DataZone domain, it can be shared with multiple consumer accounts.
The Amazon DataZone Data portal provides a personalized view for users to discover/search and submit requests for subscription of data assets using a web-based application. The data domain producer receives the notification of subscription requests in the Data portal and can approve/reject the requests.
Manual process to publish data assets to Amazon DataZone
To publish a data asset from the producer account, each asset must be registered in Amazon DataZone as a data source for consumer subscription. The Amazon DataZone User Guide provides detailed steps to achieve this. In the absence of an automated registration process, all required tasks must be completed manually for each data asset.
How to automate publishing data assets from AWS Glue Data Catalog from the producer account to Amazon DataZone
Using the automated registration workflow, the manual steps can be automated for any new data asset that needs to be published in an Amazon DataZone domain or when there’s a schema change in an already published data asset.
The automated solution reduces the repetitive manual steps to publish the data sources (AWS Glue tables) into an Amazon DataZone domain.
Architecture for automated data asset publish
Figure 2 Architecture for automated data publish to Amazon DataZone
To automate publishing data assets:
In the producer account (Account B), the data to be shared resides in an Amazon S3 bucket (Figure 2). An AWS Glue crawler is configured for the dataset to automatically create the schema using AWS Cloud Development Kit (AWS CDK).
Once configured, the AWS Glue crawler crawls the Amazon S3 bucket and updates the metadata in the AWS Glue Data Catalog. The successful completion of the AWS Glue crawler generates an event in the default event bus of Amazon EventBridge.
An EventBridge rule is configured to detect this event and invoke a dataset-registration AWS Lambda function.
The AWS Lambda function performs all the steps to automatically register and publish the dataset in Amazon Datazone.
Steps performed in the dataset-registration AWS Lambda function
The AWS Lambda function retrieves the AWS Glue database and Amazon S3 information for the dataset from the Amazon Eventbridge event triggered by the successful run of the AWS Glue crawler.
It obtains the Amazon DataZone Datalake blueprint ID from the producer account and the Amazon DataZone domain ID and project ID by assuming an IAM role in the central governance account where the Amazon Datazone domain exists.
It enables the Amazon DataZone Datalake blueprint in the producer account.
It registers the Amazon S3 location of the dataset in Lake Formation in the producer account.
The function creates a data source within the Amazon DataZone project and monitors the completion of the data source creation.
Finally, it checks whether the data source sync job in Amazon DataZone needs to be started. If new AWS Glue tables or metadata is created or updated, then it starts the data source sync job.
Prerequisites
As part of this solution, you will publish data assets from an existing AWS Glue database in a producer account into an Amazon DataZone domain for which the following prerequisites need to be performed.
One AWS account will act as the data domain producer account (Account B) which will contain the AWS Glue dataset to be shared.
The second AWS account is the central governance account (Account A), which will have the Amazon DataZone domain and project deployed. This is the Amazon DataZone account.
Ensure that both the AWS accounts belong to the same AWS Organization
Make sure in both AWS accounts that you have cleared the checkbox for Default permissions for newly created databases and tables under the Data Catalog settings in Lake Formation (Figure 3).
Figure 3: Clear default permissions in AWS Lake Formation
This IAM role is called dz-assumable-env-dataset-registration-role in this example. Adding this role will enable you to successfully run the dataset-registration Lambda function. Replace the account-region, account id, and DataZonekmsKey in the following policy with your information. These values correspond to where your Amazon DataZone domain is created and the AWS KMS key Amazon Resource Name (ARN) used to encrypt the Amazon DataZone domain.
Add the AWS account in the trust relationship of this role with the following trust relationship. Replace ProducerAccountId with the AWS account ID of Account B (data domain producer account).
After completing the pre-requisites, use the AWS CDK stack provided on GitHub to deploy the solution for automatic registration of data assets into DataZone domain
Clone the repository from GitHub to your preferred IDE using the following commands.
git clone https://github.com/aws-samples/automate-and-simplify-aws-glue-data-asset-publish-to-amazon-datazone.git

cd automate-and-simplify-aws-glue-data-asset-publish-to-amazon-datazone
At the base of the repository folder, run the following commands to build and deploy resources to AWS.
npm install
npm run lint
Sign in to the AWS account B (the data domain producer account) using AWS Command Line Interface (AWS CLI) with your profile name.
Bootstrap the CDK environment with the following commands at the base of the repository folder. Replace <PROFILE_NAME> with the profile name of your deployment account (Account B). Bootstrapping is a one-time activity and is not needed if your AWS account is already bootstrapped.
export AWS_PROFILE=<PROFILE_NAME>
npm run cdk bootstrap
Replace the placeholder parameters (marked with the suffix _PLACEHOLDER) in the file config/DataZoneConfig.ts (Figure 4).
Amazon DataZone domain and project name of your Amazon DataZone instance. Make sure all names are in lowercase.
The AWS account ID and Region.
The assumable IAM role from the prerequisites.
The deployment role starting with cfn-xxxxxx-cdk-exec-role-.
Figure 4: Edit the DataZoneConfig file
In the AWS Management Console for Lake Formation, select Administrative roles and tasks from the navigation pane (Figure 5) and make sure the IAM role for AWS CDK deployment that starts with cfn-xxxxxx-cdk-exec-role- is selected as an administrator in Data lake administrators. This IAM role needs permissions in Lake Formation to create resources, such as an AWS Glue database. Without these permissions, the AWS CDK stack deployment will fail.
Figure 5: Add cfn-xxxxxx-cdk-exec-role- as a Data Lake administrator
Use the following command in the base folder to deploy the AWS CDK solution
npm run cdk deploy --all
During deployment, enter y if you want to deploy the changes for some stacks when you see the prompt Do you wish to deploy these changes (y/n)?
After the deployment is complete, sign in to your AWS account B (producer account) and navigate to the AWS CloudFormation console to verify that the infrastructure deployed. You should see a list of the deployed CloudFormation stacks as shown in Figure 6.
Figure 6: Deployed CloudFormation stacks
Test automatic data registration to Amazon DataZone
Download the Online Retail.csv file from Kaggle dataset.
Login to AWS Account B (producer account) and navigate to the Amazon S3 console, find the DataZone-test-datasource S3 bucket, and upload the csv file there (Figure 7).
Figure 7: Upload the dataset CSV file
The AWS Glue crawler is scheduled to run at a specific time each day. However for testing, you can manually run the crawler by going to the AWS Glue console and selecting Crawlers from the navigation pane. Run the on-demand crawler starting with DataZone-. After the crawler has run, verify that a new table has been created.
Go to the Amazon DataZone console in AWS account A (central governance account) where you deployed the resources. Select Domains in the navigation pane (Figure 8), then Select and open your domain.
Figure 8: Amazon DataZone domains
After you open the Datazone Domain, you can find the Amazon Datazone data portal URL in the Summary section (Figure 9). Select and open data portal.
Figure 9: Amazon DataZone data portal URL
In the data portal find your project (Figure 10). Then select the Data tab at the top of the window.
Figure 10: Amazon DataZone Project overview
Select the section Data Sources (Figure 11) and find the newly created data source DataZone-testdata-db.
Figure 11: Select Data sources in the Amazon Datazone Domain Data portal
Verify that the data source has been successfully published (Figure 12).
Figure 12: The data sources are visible in the Published data section
Figure 13: Example data discovery in the Amazon DataZone portal
Clean up
Use the following steps to clean up the resources deployed through the CDK.
Empty the two S3 buckets that were created as part of this deployment.
Go to the Amazon DataZone domain portal and delete the published data assets that were created in the Amazon DataZone project by the dataset-registration Lambda function.
Delete the remaining resources created using the following command in the base folder:
npm run cdk destroy --all
Conclusion
By using AWS Glue and Amazon DataZone, organizations can make their data management easier and allow teams to share and collaborate on data smoothly. Automatically sending AWS Glue data to Amazon DataZone not only makes the process simple but also keeps the data consistent, secure, and well-governed. Simplify and standardize publishing data assets to Amazon DataZone and streamline data management with Amazon DataZone. For guidance on establishing your organization’s data mesh with Amazon DataZone, contact your AWS team today.
About the Authors
Bandana Das is a Senior Data Architect at Amazon Web Services and specializes in data and analytics. She builds event-driven data architectures to support customers in data management and data-driven decision-making. She is also passionate about enabling customers on their data management journey to the cloud.
Anirban Saha is a DevOps Architect at AWS, specializing in architecting and implementation of solutions for customer challenges in the automotive domain. He is passionate about well-architected infrastructures, automation, data-driven solutions and helping make the customer’s cloud journey as seamless as possible. Personally, he likes to keep himself engaged with reading, painting, language learning and traveling.
Chandana Keswarkar is a Senior Solutions Architect at AWS, who specializes in guiding automotive customers through their digital transformation journeys by using cloud technology. She helps organizations develop and refine their platform and product architectures and make well-informed design decisions. In her free time, she enjoys traveling, reading, and practicing yoga.
Sindi Cali is a ProServe Associate Consultant with AWS Professional Services. She supports customers in building data driven applications in AWS.
In this post, we delve into the key aspects of using Amazon EMR for modern data management, covering topics such as data governance, data mesh deployment, and streamlined data discovery.
One of the key challenges in modern big data management is facilitating efficient data sharing and access control across multiple EMR clusters. Organizations have multiple Hive data warehouses across EMR clusters, where the metadata gets generated. To address this challenge, organizations can deploy a data mesh using AWS Lake Formation that connects the multiple EMR clusters. With the AWS Glue Data Catalog federation to external Hive metastore feature, you can now now apply data governance to the metadata residing across those EMR clusters and analyze them using AWS analytics services such as Amazon Athena, Amazon Redshift Spectrum, AWS Glue ETL (extract, transform, and load) jobs, EMR notebooks, EMR Serverless using Lake Formation for fine-grained access control, and Amazon SageMaker Studio. For detailed information on managing your Apache Hive metastore using Lake Formation permissions, refer to Query your Apache Hive metastore with AWS Lake Formation permissions.
In this post, we present a methodology for deploying a data mesh consisting of multiple Hive data warehouses across EMR clusters. This approach enables organizations to take advantage of the scalability and flexibility of EMR clusters while maintaining control and integrity of their data assets across the data mesh.
Use cases for Hive metastore federation for Amazon EMR
Hive metastore federation for Amazon EMR is applicable to the following use cases:
Governance of Amazon EMR-based data lakes – Producers generate data within their AWS accounts using an Amazon EMR-based data lake supported by EMRFS on Amazon Simple Storage Service (Amazon S3)and HBase. These data lakes require governance for access without the necessity of moving data to consumer accounts. The data resides on Amazon S3, which reduces the storage costs significantly.
Centralized catalog for published data – Multiple producers release data currently governed by their respective entities. For consumer access, a centralized catalog is necessary where producers can publish their data assets.
Consumer personas – Consumers include data analysts who run queries on the data lake, data scientists who prepare data for machine learning (ML) models and conduct exploratory analysis, as well as downstream systems that run batch jobs on the data within the data lake.
Cross-producer data access – Consumers may need to access data from multiple producers within the same catalog environment.
Data access entitlements – Data access entitlements involve implementing restrictions at the database, table, and column levels to provide appropriate data access control.
Solution overview
The following diagram shows how data from producers with their own Hive metastores (left) can be made available to consumers (right) using Lake Formation permissions enforced in a central governance account.
Producer and consumer are logical concepts used to indicate the production and consumption of data through a catalog. An entity can act both as a producer of data assets and as a consumer of data assets. The onboarding of producers is facilitated by sharing metadata, whereas the onboarding of consumers is based on granting permission to access this metadata.
The solution consists of multiple steps in the producer, catalog, and consumer accounts:
Deploy the AWS CloudFormation templates and set up the producer, central governance and catalog, and consumer accounts.
Test access to the producer cataloged Amazon S3 data using EMR Serverless in the consumer account.
Test access using Athena queries in the consumer account.
Test access using SageMaker Studio in the consumer account.
Producer
Producers create data within their AWS accounts using an Amazon EMR-based data lake and Amazon S3. Multiple producers then publish this data into a central catalog (data lake technology) account. Each producer account, along with the central catalog account, has either VPC peering or AWS Transit Gateway enabled to facilitate AWS Glue Data Catalog federation with the Hive metastore.
For each producer, an AWS Glue Hive metastore connector AWS Lambda function is deployed in the catalog account. This enables the Data Catalog to access Hive metastore information at runtime from the producer. The data lake locations (the S3 bucket location of the producers) are registered in the catalog account.
Central catalog
A catalog offers governed and secure data access to consumers. Federated databases are established within the catalog account’s Data Catalog using the Hive connection, managed by the catalog Lake Formation admin (LF-Admin). These federated databases in the catalog account are then shared by the data lake LF-Admin with the consumer LF-Admin of the external consumer account.
Data access entitlements are managed by applying access controls as needed at various levels, such as the database or table.
Consumer
The consumer LF-Admin grants the necessary permissions or restricted permissions to roles such as data analysts, data scientists, and downstream batch processing engine AWS Identity and Access Management (IAM) roles within its account.
Data access entitlements are managed by applying access control based on requirements at various levels, such as databases and tables.
Prerequisites
You need three AWS accounts with admin access to implement this solution. It is recommended to use test accounts. The producer account will host the EMR cluster and S3 buckets. The catalog account will host Lake Formation and AWS Glue. The consumer account will host EMR Serverless, Athena, and SageMaker notebooks.
Set up the producer account
Before you launch the CloudFormation stack, gather the following information from the catalog account:
Catalog AWS account ID (12-digit account ID)
Catalog VPC ID (for example, vpc-xxxxxxxx)
VPC CIDR (catalog account VPC CIDR; it should not overlap 10.0.0.0/16)
The VPC CIDR of the producer and catalog can’t overlap due to VPC peering and Transit Gateway requirements. The VPC CIDR should be a VPC from the catalog account where the AWS Glue metastore connector Lambda function will be eventually deployed.
The CloudFormation stack for the producer creates the following resources:
S3 bucket to host data for the Hive metastore of the EMR cluster.
VPC with the CIDR 10.0.0.0/16. Make sure there is no existing VPC with this CIDR in use.
VPC peering connection between the producer and catalog account.
A database and external tables, pointing to the downloaded sample data, in its Hive metastore.
Complete the following steps:
Launch the template PRODUCER.yml. It’s recommended to use an IAM role that has administrator privileges.
Gather the values for the following on the CloudFormation stack’s Outputs tab:
VpcPeeringConnectionId (for example, pcx-xxxxxxxxx)
DestinationCidrBlock (10.0.0.0/16)
S3ProducerDataLakeBucketName
Set up the catalog account
The CloudFormation stack for the catalog account creates the Lambda function for federation. Before you launch the template, on the Lake Formation console, add the IAM role and user deploying the stack as the data lake admin.
For the RouteTableId parameter, use the catalog account VPC RouteTableId. This is the VPC where the AWS Glue Hive metastore connector Lambda function will be deployed.
On the stack’s Outputs tab, copy the value for LFRegisterLocationServiceRole (arn:aws:iam::account-id: role/role-name).
Confirm if the Data Catalog setting has the IAM access control options un-checked and the current cross-account version is set to 4.
Log in to the producer account and add the following bucket policy to the producer S3 bucket that was created during the producer account setup. Add the ARN of LFRegisterLocationServiceRole to the Principal section and provide the S3 bucket name under the Resource section.
In the producer account, on the Amazon EMR console, navigate to the primary node EC2 instance to get the value for Private IP DNS name (IPv4 only) (for example, ip-xx-x-x-xx.us-west-1.compute.internal).
The default Region is set to us-east-1. Change it to your desired Region before deploying the function.
Use the VPC that was used as the CloudFormation input for the VPC CIDR. You can use the VPC’s default security group ID. If using another security group, make sure the outbound allows traffic to 0.0.0.0/0.
Next, you create a federated database in Lake Formation.
On the Lake Formation console, choose Data sharing in the navigation pane.
Choose Create database.
Provide the following information:
For Connection name, choose your connection.
For Database name, enter a name for your database.
For Database identifier, enter emrhms_salesdb (this is the database created on the EMR Hive metastore).
Choose Create database.
On the Databases page, select the database and on the Actions menu, choose Grant to grant describe permissions to the consumer account.
Under Principals, select External accounts and choose your account ARN.
Under LF-Tags or catalog resources, select Named Data Catalog resources and choose your database and table.
Under Table permissions, provide the following information:
For Table permissions¸ select Select and Describe.
For Grantable permissions¸ select Select and Describe.
Under Data permissions, select All data access.
Choose Grant.
On the Tables page, select your table and on the Actions menu, choose Grant to grant select and describe permissions.
Under Principals, select External accounts and choose your account ARN.
Under LF-Tags or catalog resources, select Named Data Catalog resources and choose your database.
Under Database permissions¸ provide the following information:
For Database permissions¸ select Create table and Describe.
For Grantable permissions¸ select Create table and Describe.
Choose Grant.
Set up the consumer account
Consumers include data analysts who run queries on the data lake, data scientists who prepare data for ML models and conduct exploratory analysis, as well as downstream systems that run batch jobs on the data within the data lake.
The consumer account setup in this section shows how you can query the shared Hive metastore data using Athena for the data analyst persona, EMR Serverless to run batch scripts, and SageMaker Studio for the data scientist to further use data in the downstream model building process.
For EMR Serverless and SageMaker Studio, if you’re using the default IAM service role, add the required Data Catalog and Lake Formation IAM permissions to the role and use Lake Formation to grant table permission access to the role’s ARN.
Data analyst use case
In this section, we demonstrate how a data analyst can query the Hive metastore data using Athena. Before you get started, on the Lake Formation console, add the IAM role or user deploying the CloudFormation stack as the data lake admin.
If the catalog and consumer accounts are not part of the organization in AWS Organizations, navigate to the AWS Resource Access Manager (AWS RAM) console and manually accept the resources shared from the catalog account.
On the Lake Formation console, on the Databases page, select your database and on the Actions menu, choose Create resource link.
Under Database resource link details, provide the following information:
For Resource link name, enter a name.
For Shared database’s region, choose a Region.
For Shared database, choose your database.
For Shared database’s owner ID, enter the account ID.
Choose Create.
Now you can use Athena to query the table on the consumer side, as shown in the following screenshot.
Batch job use case
Complete the following steps to set up EMR Serverless to run a sample Spark job to query the existing table:
On the Amazon EMR console, choose EMR Serverless in the navigation pane.
Choose Get started.
Choose Create and launch EMR Studio.
Under Application settings, provide the following information:
For Name, enter a name.
For Type, choose Spark.
For Release version, choose the current version.
For Architecture, select x86_64.
Under Application setup options, select Use custom settings.
Under Additional configurations, for Metastore configuration, select Use AWS Glue Data Catalog as metastore, then select Use Lake Formation for fine-grained access control.
Choose Create and start application.
On the application details page, on the Job runs tab, choose Submit job run.
Under Job details, provide the following information:
For Name, enter a name.
For Runtime role¸ choose Create new role.
Note the IAM role that gets created.
For Script location, enter the S3 bucket location created by the CloudFormation template (the script is emr-serverless-query-script.py).
Choose Submit job run.
Add the following AWS Glue access policy to the IAM role created in the previous step (provide your Region and the account ID of your catalog account):
On the Databases page, select the database and on the Actions menu, choose Grant to grant Lake Formation access to the EMR Serverless runtime role.
Under Principals, select IAM users and roles and choose your role.
Under LF-Tags or catalog resources, select Named Data Catalog resources and choose your database.
Under Resource link permissions, for Resource link permissions, select Describe.
Choose Grant.
On the Databases page, select the database and on the Actions menu, choose Grant on target.
Provide the following information:
Under Principals, select IAM users and roles and choose your role.
Under LF-Tags or catalog resources, select Named Data Catalog resources and choose your database and table
Under Table permissions, for Table permissions, select Select.
Under Data permissions, select All data access.
Choose Grant.
Submit the job again by cloning it.
When the job is complete, choose View logs.
The output should look like the following screenshot.
Data scientist use case
For this use case, a data scientist queries the data through SageMaker Studio. Complete the following steps:
Set up SageMaker Studio.
Confirm that the domain user role has been granted permission by Lake Formation to SELECT data from the table.
Follow steps similar to the batch run use case to grant access.
The following screenshot shows an example notebook.
Clean up
We recommend deleting the CloudFormation stack after use, because the deployed resources will incur costs. There are no prerequisites to delete the producer, catalog, and consumer CloudFormation stacks. To delete the Hive metastore connector stack on the catalog account (serverlessrepo-GlueDataCatalogFederation-HiveMetastore), first delete the federated database you created.
Conclusion
In this post, we explained how to create a federated Hive metastore for deploying a data mesh architecture with multiple Hive data warehouses across EMR clusters.
By using Data Catalog metadata federation, organizations can construct a sophisticated data architecture. This approach not only seamlessly extends your Hive data warehouse but also consolidates access control and fosters integration with various AWS analytics services. Through effective data governance and meticulous orchestration of the data mesh architecture, organizations can provide data integrity, regulatory compliance, and enhanced data sharing across EMR clusters.
We encourage you to check out the features of the AWS Glue Hive metastore federation connector and explore how to implement a data mesh architecture across multiple EMR clusters. To learn more and get started, refer to the following resources:
Sudipta Mitra is a Senior Data Architect for AWS, and passionate about helping customers to build modern data analytics applications by making innovative use of latest AWS services and their constantly evolving features. A pragmatic architect who works backwards from customer needs, making them comfortable with the proposed solution, helping achieve tangible business outcomes. His main areas of work are Data Mesh, Data Lake, Knowledge Graph, Data Security and Data Governance.
Deepak Sharma is a Senior Data Architect with the AWS Professional Services team, specializing in big data and analytics solutions. With extensive experience in designing and implementing scalable data architectures, he collaborates closely with enterprise customers to build robust data lakes and advanced analytical applications on the AWS platform.
Nanda Chinnappa is a Cloud Infrastructure Architect with AWS Professional Services at Amazon Web Services. Nanda specializes in Infrastructure Automation, Cloud Migration, Disaster Recovery and Databases which includes Amazon RDS and Amazon Aurora. He helps AWS Customer’s adopt AWS Cloud and realize their business outcome by executing cloud computing initiatives.
Analytics are vital to the success of a contact center. Having insights into each touchpoint of the customer experience allows you to accurately measure performance and adapt to shifting business demands. While you can find common metrics in the Amazon Connect console, sometimes you need to have more details and custom requirements for reporting based on the unique needs of your business.
Starting today, the Amazon Connect analytics data lake is generally available. As announced last year as preview, this new capability helps you to eliminate the need to build and maintain complex data pipelines. Amazon Connect data lake is zero-ETL capable, so no extract, transform, or load (ETL) is needed.
Here’s a quick look at the Amazon Connect analytics data lake:
Improving your customer experience with Amazon Connect Amazon Connect analytics data lake helps you to unify disparate data sources, including customer contact records and agent activity, into a single location. By having your data in a centralized location, you now have access to analyze contact center performance and gain insights while reducing the costs associated with implementing complex data pipelines.
With Amazon Connect analytics data lake, you can access and analyze contact center data, such as contact trace records and Amazon Connect Contact Lens data. This provides you the flexibility to prepare and analyze data with Amazon Athena and use the business intelligence (BI) tools of your choice, such as, Amazon QuickSight and Tableau.
Get started with the Amazon Connect analytics data lake To get started with the Amazon Connect analytics data lake, you’ll first need to have an Amazon Connect instance setup. You can follow the steps in the Create an Amazon Connect instance page to create a new Amazon Connect instance. Because I’ve already created my Amazon Connect instance, I will go straight to showing you how you can get started with Amazon Connect analytics data lake.
First, I navigate to the Amazon Connect console and select my instance.
Then, on the next page, I can set up my analytics data lake by navigating to Analytics tools and selecting Add data share.
This brings up a pop-up dialog, and I first need to define the target AWS account ID. With this option, I can set up a centralized account to receive all data from Amazon Connect instances running in multiple accounts. Then, under Data types, I can select the types I need to share with the target AWS account. To learn more about the data types that you can share in the Amazon Connect analytics data lake, please visit Associate tables for Analytics data lake.
Once it’s done, I can see the list of all the target AWS account IDs with which I have shared all the data types.
Besides using the AWS Management Console, I can also use the AWS Command Line Interface (AWS CLI) to associate my tables with the analytics data lake. The following is a sample command:
Next, I need to approve (or reject) the request in the AWS Resource Access Manager (RAM) console in the target account. RAM is a service to help you securely share resources across AWS accounts. I navigate to AWS RAM and select Resource shares in the Shared with me section.
Then, I select the resource and select Accept resource share.
At this stage, I can access shared resources from Amazon Connect. Now, I can start creating linked tables from shared tables in AWS Lake Formation. In the Lake Formation console, I navigate to the Tables page and select Create table.
I need to create a Resource link to a shared table. Then, I fill in the details and select the available Database and the Shared table’s region.
Then, when I select Shared table, it will list all the available shared tables that I can access.
Once I select the shared table, it will automatically populate Shared table’s database and Shared table’s owner ID. Once I’m happy with the configuration, I select Create.
To run some queries for the data, I go to the Amazon Athena console.The following is an example of a query that I ran:
With this configuration, I have access to certain Amazon Connect data types. I can even visualize the data by integrating with Amazon QuickSight. The following screenshot show some visuals in the Amazon QuickSight dashboard with data from Amazon Connect.
Customer voice During the preview period, we heard lots of feedback from our customers about Amazon Connect analytics data lake. Here’s what our customer say:
Joulica is an analytics platform supporting insights for software like Amazon Connect and Salesforce. Tony McCormack, founder and CEO of Joulica, said, “Our core business is providing real-time and historical contact center analytics to Amazon Connect customers of all sizes. In the past, we frequently had to set up complex data pipelines, and so we are excited about using Amazon Connect analytics data lake to simplify the process of delivering actionable intelligence to our shared customers.”
Things you need to know
Pricing — Amazon Connect analytics data lake is available for you to use up to 2 years of data without any additional charges in Amazon Connect. You only need to pay for any services you use to interact with the data.
Availability — Amazon Connect analytics data lake is generally available in the following AWS Regions: US East (N. Virginia), US West (Oregon), Africa (Cape Town), Asia Pacific (Mumbai, Seoul, Singapore, Sydney, Tokyo), Canada (Central), and Europe (Frankfurt, London)
Learn more — For more information, please visit Analytics data lake documentation page.
Many organizations use external identity providers (IdPs) such as Okta or Microsoft Azure Active Directory to manage their enterprise user identities. These users interact with and run analytical queries across AWS analytics services. To enable them to use the AWS services, their identities from the external IdP are mapped to AWS Identity and Access Management (IAM) roles within AWS, and access policies are applied to these IAM roles by data administrators.
Given the diverse range of services involved, different IAM roles may be required for accessing the data. Consequently, administrators need to manage permissions across multiple roles, a task that can become cumbersome at scale.
To address this challenge, you need a unified solution to simplify data access management using your corporate user identities instead of relying solely on IAM roles. AWS IAM Identity Center offers a solution through its trusted identity propagation feature, which is built upon the OAuth 2.0 authorization framework.
With trusted identity propagation, data access management is anchored to a user’s identity, which can be synchronized to IAM Identity Center from external IdPs using the System for Cross-domain Identity Management (SCIM) protocol. Integrated applications exchange OAuth tokens, and these tokens are propagated across services. This approach empowers administrators to grant access directly based on existing user and group memberships federated from external IdPs, rather than relying on IAM users or roles.
In this post, we showcase the seamless integration of AWS analytics services with trusted identity propagation by presenting an end-to-end architecture for data access flows.
Solution overview
Let’s consider a fictional company, OkTank. OkTank has multiple user personas that use a variety of AWS Analytics services. The user identities are managed externally in an external IdP: Okta. User1 is a Data Analyst and uses the Amazon Athena query editor to query AWS GlueData Catalog tables with data stored in Amazon Simple Storage Service (Amazon S3). User2 is a Data Engineer and uses Amazon EMR Studionotebooks to query Data Catalog tables and also query raw data stored in Amazon S3 that is not yet cataloged to the Data Catalog. User3 is a Business Analyst who needs to query data stored in Amazon Redshift tables using the Amazon Redshift Query Editor v2. Additionally, this user builds Amazon QuickSight visualizations for the data in Redshift tables.
OkTank wants to simplify governance by centralizing data access control for their variety of data sources, user identities, and tools. They also want to define permissions directly on their corporate user or group identities from Okta instead of creating IAM roles for each user and group and managing access on the IAM role. In addition, for their audit requirements, they need the capability to map data access to the corporate identity of users within Okta for enhanced tracking and accountability.
To achieve these goals, we use trusted identity propagation with the aforementioned services and use AWS Lake Formation and Amazon S3 Access Grants for access controls. We use Lake Formation to centrally manage permissions to the Data Catalog tables and Redshift tables shared with Redshift datashares. In our scenario, we use S3 Access Grants for granting permission for the Athena query result location. Additionally, we show how to access a raw data bucket governed by S3 Access Grants with an EMR notebook.
Data access is audited with AWS CloudTrail and can be queried with AWS CloudTrail Lake. This architecture showcases the versatility and effectiveness of AWS analytics services in enabling efficient and secure data analysis workflows across different use cases and user personas.
We use Okta as the external IdP, but you can also use other IdPs like Microsoft Azure Active Directory. Users and groups from Okta are synced to IAM Identity Center. In this post, we have three groups, as shown in the following diagram. User1 needs to query a Data Catalog table with data stored in Amazon S3. The S3 location is secured and managed by Lake Formation. The user connects to an IAM Identity Center enabled Athena workgroup using the Athena query editor with EMR Studio. The IAM Identity Center enabled Athena workgroups need to be secured with S3 Access Grants permissions for the Athena query results location. With this feature, you can also enable the creation of identity-based query result locations that are governed by S3 Access Grants. These user identity-based S3 prefixes let users in an Athena workgroup keep their query results isolated from other users in the same workgroup. The following diagram illustrates this architecture. User2 needs to query the same Data Catalog table as User1. This table is governed using Lake Formation permissions. Additionally, the user needs to access raw data in another S3 bucket that isn’t cataloged to the Data Catalog and is controlled using S3 Access Grants; in the following diagram, this is shown as S3 Data Location-2.
The user uses an EMR Studio notebook to run Spark queries on an EMR cluster. The EMR cluster uses a security configuration that integrates with IAM Identity Center for authentication and uses Lake Formation for authorization. The EMR cluster is also enabled for S3 Access Grants. With this kind of hybrid access management, you can use Lake Formation to centrally manage permissions for your datasets cataloged to the Data Catalog and use S3 Access Grants to centrally manage access to your raw data that is not yet cataloged to the Data Catalog. This gives you flexibility to access data managed by either of the access control mechanisms from the same notebook.
User3 uses the Redshift Query Editor V2 to query a Redshift table. The user also accesses the same table with QuickSight. For our demo, we use a single user persona for simplicity, but in reality, these could be completely different user personas. To enable access control with Lake Formation for Redshift tables, we use data sharing in Lake Formation.
Data access requests by the specific users are logged to CloudTrail. Later in this post, we also briefly touch upon using CloudTrail Lake to query the data access events.
In the following sections, we demonstrate how to build this architecture. We use AWS CloudFormation to provision the resources. AWS CloudFormation lets you model, provision, and manage AWS and third-party resources by treating infrastructure as code. We also use the AWS Command Line Interface (AWS CLI) and AWS Management Console to complete some steps.
The following diagram shows the end-to-end architecture.
Prerequisites
Complete the following prerequisite steps:
Have an AWS account. If you don’t have an account, you can create one.
Have IAM Identity Center set up in a specific AWS Region.
Make sure you use the same Region where you have IAM Identity Center set up throughout the setup and verification steps. In this post, we use the us-east-1 Region.
After the Okta groups are pushed to IAM Identity Center, you can see the users and groups on the IAM Identity Center console, as shown in the following screenshot. You need the group IDs of the three groups to be passed in the CloudFormation template.
For enabling User2 access using the EMR cluster, you need have an SSL certificate .zip file available in your S3 bucket. You can download the following sample certificate to use in this post. In production use cases, you should create and use your own certificates. You need to reference the bucket name and the certificate bundle .zip file in AWS CloudFormation. The CloudFormation template lets you choose the components you want to provision. If you do not intend to deploy the EMR cluster, you can ignore this step.
Have an administrator user or role to run the CloudFormation stack. The user or role should also be a Lake Formation administrator to grant permissions.
Deploy the CloudFormation stack
The CloudFormation template provided in the post lets you choose the components you want to provision from the solution architecture. In this post, we enable all components, as shown in the following screenshot. Run the provided CloudFormation stack to create the solution resources. Refer to the following table for a list of important parameters.
Parameter Group
Description
Parameter Name
Expected Value
Choose components to provision.
Choose the components you want to be provisioned.
DeployAthenaFlow
Yes/No. If you choose No, you can ignore the parameters in the “Athena Configuration” group.
DeployEMRFlow
Yes/No. If you choose No, you can ignore the parameters in the “EMR Configuration” group.
DeployRedshiftQEV2Flow
Yes/No. If you choose No, you can ignore the parameters in the “Redshift Configuration” group.
CreateS3AGInstance
Yes/No. If you already have an S3 Access Grants instance, choose No. Otherwise, choose Yes to allow the stack create a new S3 Access Grants instance. The S3 Access Grants instance is needed for User1 and User2.
Identity Center Configuration
IAM Identity Center parameters.
IDCGroup1Id
Group ID corresponding to Group1 from IAM Identity Center.
IDCGroup2Id
Group ID corresponding to Group2 from IAM Identity Center.
IDCGroup3Id
Group ID corresponding to Group3 from IAM Identity Center.
IAMIDCInstanceArn
IAM Identity Center instance ARN. You can get this from the Settings section of IAM Identity Center.
Redshift Configuration
Redshift parameters.
Ignore if you chose DeployRedshiftQEV2Flow as No.
RedshiftServerlessAdminUserName
Redshift admin user name.
RedshiftServerlessAdminPassword
Redshift admin password.
RedshiftServerlessDatabase
Redshift database to create the tables.
EMR Configuration
EMR parameters.
Ignore if you chose parameter DeployEMRFlow as No.
SSlCertsS3BucketName
Bucket name where you copied the SSL certificates.
SSlCertsZip
Name of SSL certificates file (my-certs.zip) to use the sample certificate provided in the post.
Athena Configuration
Athena parameters.
Ignore if you chose parameter DeployAthenaFlow as No.
IDCUser1Id
User ID corresponding to User1 from IAM Identity Center.
The CloudFormation stack provisions the following resources:
A VPC with a public and private subnet.
If you chose the Redshift components, it also creates three additional subnets.
S3 buckets for data and Athena query results location storage. It also copies some sample data to the buckets.
Registers the source S3 bucket with Lake Formation.
An AWS Glue database named oktank_tipblog_temp and a table named customer under the database. The table points to the Amazon S3 location governed by Lake Formation.
Allows external engines to access data in Amazon S3 locations with full table access. This is required for Amazon EMR integration with Lake Formation for trusted identity propagation. As of this writing, Amazon EMR supports table-level access with IAM Identity Center enabled clusters.
An S3 Access Grants instance.
S3 Access Grants for Group1 to the User1 prefix under the Athena query results location bucket.
S3 Access Grants for Group2 to the S3 bucket input and output prefixes. The user has read access to the input prefix and write access to the output prefix under the bucket.
An Amazon Redshift Serverless namespace and workgroup. This workgroup is not integrated with IAM Identity Center; we complete subsequent steps to enable IAM Identity Center for the workgroup.
An AWS Cloud9 integrated development environment (IDE), which we use to run AWS CLI commands during the setup.
Note the stack outputs on the AWS CloudFormation console. You use these values in later steps. Choose the link for Cloud9URL in the stack output to open the AWS Cloud9 IDE. In AWS Cloud9, go to the Window tab and choose New Terminal to start a new bash terminal.
Set up Lake Formation
You need to enable Lake Formation with IAM Identity Center and enable an EMR application with Lake Formation integration. Complete the following steps:
In the AWS Cloud9 bash terminal, enter the following command to get the Amazon EMR security configuration created by the stack:
Note the value for IdcApplicationARN from the output.
Enter the following command in AWS Cloud9 to enable the Lake Formation integration with IAM Identity Center and add the Amazon EMR security configuration application as a trusted application in Lake Formation. If you already have the IAM Identity Center integration with Lake Formation, sign in to Lake Formation and add the preceding value to the list of applications instead of running the following command and proceed to next step.
aws lakeformation create-lake-formation-identity-center-configuration --catalog-id <Replace with CatalogId value from Cloudformation output> --instance-arn <Replace with IDCInstanceARN value from CloudFormation stack output> --external-filtering Status=ENABLED,AuthorizedTargets=<Replace with IdcApplicationARN value copied in previous step>
After this step, you should see the application on the Lake Formation console. This completes the initial setup. In subsequent steps, we apply some additional configurations for specific user personas.
Validate user personas
To review the S3 Access Grants created by AWS CloudFormation, open the Amazon S3 console and Access Grants in the navigation pane. Choose the access grant you created to view its details.
The CloudFormation stack created the S3 Access Grants for Group1 for the User1 prefix under the Athena query results location bucket. This allows User1 to access the prefix under in the query results bucket. The stack also created the grants for Group2 for User2 to access the raw data bucket input and output prefixes.
Set up User1 access
Complete the steps in this section to set up User1 access.
Create an IAM Identity Center enabled Athena workgroup
Let’s create the Athena workgroup that will be used by User1.
Enter the following command in the AWS Cloud9 terminal. The command creates an IAM Identity Center integrated Athena workgroup and enables S3 Access Grants for the user-level prefix. These user identity-based S3 prefixes let users in an Athena workgroup keep their query results isolated from other users in the same workgroup. The prefix is automatically created by Athena when the CreateUserLevelPrefix option is enabled. Access to the prefix was granted by the CloudFormation stack.
aws athena create-work-group --cli-input-json '{
"Name": "AthenaIDCWG",
"Configuration": {
"ResultConfiguration": {
"OutputLocation": "<Replace with AthenaResultLocation from CloudFormation stack>"
},
"ExecutionRole": "<Replace with TIPStudioRoleArn from CloudFormation stack>",
"IdentityCenterConfiguration": {
"EnableIdentityCenter": true,
"IdentityCenterInstanceArn": "<Replace with IDCInstanceARN from CloudFormation stack>"
},
"QueryResultsS3AccessGrantsConfiguration": {
"EnableS3AccessGrants": true,
"CreateUserLevelPrefix": true,
"AuthenticationType": "DIRECTORY_IDENTITY"
},
"EnforceWorkGroupConfiguration":true
},
"Description": "Athena Workgroup with IDC integration"
}'
Grant access to User1 on the Athena workgroup
Sign in to the Athena console and grant access to Group1 to the workgroup as shown in the following screenshot. You can grant access to the user (User1) or to the group (Group1). In this post, we grant access to Group1.
Grant access to User1 in Lake Formation
Sign in to the Lake Formation console, choose Data lake permissions in the navigation pane, and grant access to the user group on the database oktank_tipblog_temp and table customer.
With Athena, you can grant access to specific columns and for specific rows with row-level filtering. For this post, we grant column-level access and restrict access to only selected columns for the table. This completes the access permission setup for User1.
Verify access
Let’s see how User1 uses Athena to analyze the data.
Copy the URL for EMRStudioURL from the CloudFormation stack output.
Open a new browser window and connect to the URL.
You will be redirected to the Okta login page.
Log in with User1.
In the EMR Studio query editor, change the workgroup to AthenaIDCWG and choose Acknowledge.
Run the following query in the query editor:
SELECT * FROM "oktank_tipblog_temp"."customer" limit 10;
You can see that the user is only able to access the columns for which permissions were previously granted in Lake Formation. This completes the access flow verification for User1.
Set up User2 access
User2 accesses the table using an EMR Studio notebook. Note the current considerations for EMR with IAM Identity Center integrations.
Complete the steps in this section to set up User2 access.
Grant Lake Formation permissions to User2
Sign in to the Lake Formation console and grant access to Group2 on the table, similar to the steps you followed earlier for User1. Also grant Describe permission on the default database to Group2, as shown in the following screenshot.
Copy the URL for EMR Studio from the EMRStudioURL value from the CloudFormation stack output.
Log in to EMR Studio as User2 on the Okta login page.
Create a Workspace, giving it a name and leaving all other options as default.
This will open a JupyterLab notebook in a new window.
Connect to the EMR Studio notebook
In the Compute pane of the notebook, select the EMR cluster (named EMRWithTIP) created by the CloudFormation stack to attach to it. After the notebook is attached to the cluster, choose the PySpark kernel to run Spark queries.
Verify access
Enter the following query in the notebook to read from the customer table:
spark.sql("select * from oktank_tipblog_temp.customer").show()
The user access works as expected based on the Lake Formation grants you provided earlier.
Run the following Spark query in the notebook to read data from the raw bucket. Access to this bucket is controlled by S3 Access Grants.
Let’s write this data to the same bucket and input prefix. This should fail because you only granted read access to the input prefix with S3 Access Grants.
Customer managed policy redshift-idc-policy-tip. This policy is already created by the CloudFormation stack, so you don’t have to create it.
Provide a name (tip-blog-qe-v2-permission-set) to the permission set.
Set the relay state as https://<region-id>.console.aws.amazon.com/sqlworkbench/home (for example, https://us-east-1.console.aws.amazon.com/sqlworkbench/home).
Choose Create.
Assign Group3 to the account in IAM Identity Center, select the permission set you created, and choose Submit.
Create the Redshift IAM Identity Center application
Enter the following in the AWS Cloud9 terminal:
aws redshift create-redshift-idc-application \
--idc-instance-arn '<Replace with IDCInstanceARN value from CloudFormation Output>' \
--redshift-idc-application-name 'redshift-iad-<Replace with CatalogId value from CloudFormation output>-tip-blog-1' \
--identity-namespace 'tipblogawsidc' \
--idc-display-name 'TIPBlog_AWSIDC' \
--iam-role-arn '<Replace with TIPRedshiftRoleArn value from CloudFormation output>' \
--service-integrations '[
  {
    "LakeFormation": [
    {
     "LakeFormationQuery": {
     "Authorization": "Enabled"
    }
   }
  ]
 }
]'
Enter the following command to get the application details:
Keep a note of the IdcManagedApplicationArn, IdcDisplayName, and IdentityNamespace values in the output for the application with IdcDisplayName TIPBlog_AWSIDC. You need these values in the next step.
Enable the Redshift Query Editor v2 for the Redshift IAM Identity Center application
Complete the following steps:
On the Amazon Redshift console, choose IAM Identity Center connections in the navigation pane.
Choose the application you created.
Choose Edit.
Select Enable Query Editor v2 application and choose Save changes.
On the Groups tab, choose Add or assign groups.
Assign Group3 to the application.
The Redshift IAM Identity Center connection is now set up.
Enable the Redshift Serverless namespace and workgroup with IAM Identity Center
The CloudFormation stack you deployed created a serverless namespace and workgroup. However, they’re not enabled with IAM Identity Center. To enable with IAM Identity Center, complete the following steps. You can get the namespace name from the RedshiftNamespace value of the CloudFormation stack output.
On the Amazon Redshift Serverless dashboard console, navigate to the namespace you created.
Choose Query Data to open Query Editor v2.
Choose the options menu (three dots) and choose Create connections for the workgroup redshift-idc-wg-tipblog.
Choose Other ways to connect and then Database user name and password.
Use the credentials you provided for the Redshift admin user name and password parameters when deploying the CloudFormation stack and create the connection.
Create resources using the Redshift Query Editor v2
You now enter a series of commands in the query editor with the database admin user.
Create an IdP for the Redshift IAM Identity Center application:
CREATE IDENTITY PROVIDER "TIPBlog_AWSIDC" TYPE AWSIDC
NAMESPACE 'tipblogawsidc'
APPLICATION_ARN '<Replace with IdcManagedApplicationArn value you copied earlier in Cloud9>'
IAM_ROLE '<Replace with TIPRedshiftRoleArn value from CloudFormation output>';
Enter the following command to check the IdP you added previously:
SELECT * FROM svv_identity_providers;
Next, you grant permissions to the IAM Identity Center user.
Create a role in Redshift. This role should correspond to the group in IAM Identity Center to which you intend to provide the permissions (Group3 in this post). The role should follow the format <namespace>:<GroupNameinIDC>.
Create role "tipblogawsidc:Group3";
Run the following command to see role you created. The external_id corresponds to the group ID value for Group3 in IAM Identity Center.
Select * from svv_roles where role_name = 'tipblogawsidc:Group3';
Create a sample table to use to verify access for the Group3 user:
CREATE TABLE IF NOT EXISTS revenue
(
account INTEGER ENCODE az64
,customer VARCHAR(20) ENCODE lzo
,salesamt NUMERIC(18,0) ENCODE az64
)
DISTSTYLE AUTO
;

insert into revenue values (10001, 'ABC Company', 12000);
insert into revenue values (10002, 'Tech Logistics', 175400);
Grant access to the user on the schema:
-- Grant usage on schema
grant usage on schema public to role "tipblogawsidc:Group3";
To create a datashare and add the preceding table to the datashare, enter the following statements:
CREATE DATASHARE demo_datashare;
ALTER DATASHARE demo_datashare ADD SCHEMA public;
ALTER DATASHARE demo_datashare ADD TABLE revenue;
Grant usage on the datashare to the account using the Data Catalog:
GRANT USAGE ON DATASHARE demo_datashare TO ACCOUNT '<Replace with CatalogId from Cloud Formation Output>' via DATA CATALOG;
Authorize the datashare
For this post, we use the AWS CLI to authorize the datashare. You can also do it from the Amazon Redshift console.
Enter the following command in the AWS Cloud9 IDE to describe the datashare you created and note the value of DataShareArn and ConsumerIdentifier to use in subsequent steps:
aws redshift describe-data-shares
Enter the following command in the AWS Cloud9 IDE to the authorize the datashare:
aws redshift authorize-data-share --data-share-arn <Replace with DataShareArn value copied from earlier command’s output> --consumer-identifier <Replace with ConsumerIdentifier value copied from earlier command’s output >
Accept the datashare in Lake Formation
Next, accept the datashare in Lake Formation.
On the Lake Formation console, choose Data sharing in the navigation pane.
In the Invitations section, select the datashare invitation that is pending acceptance.
Choose Review invitation and accept the datashare.
Provide a database name (tip-blog-redshift-ds-db), which will be created in the Data Catalog by Lake Formation.
Choose Skip to Review and Create and create the database.
Grant permissions in Lake Formation
Complete the following steps:
On the Lake Formation console, choose Data lake permissions in the navigation pane.
Choose Grant and in the Principals section, choose User3 to grant permissions with the IAM Identity Center-new option. Refer to the Lake Formation access grants steps performed for User1 and User2 if needed.
Choose the database (tip-blog-redshift-ds-db) you created earlier and the table public.revenue, which you created in the Redshift Query Editor v2.
For Table permissions¸ select Select.
For Data permissions¸ select Column-based access and select the account and salesamt columns.
Choose Grant.
Mount the AWS Glue database to Amazon Redshift
As the last step in the setup, mount the AWS Glue database to Amazon Redshift. In the Query Editor v2, enter the following statements:
create external schema if not exists tipblog_datashare_idc_schema from DATA CATALOG DATABASE 'tip-blog-redshift-ds-db' catalog_id '<Replace with CatalogId from CloudFormation output>';

grant usage on schema tipblog_datashare_idc_schema to role "tipblogawsidc:Group3";

grant select on all tables in schema tipblog_datashare_idc_schema to role "tipblogawsidc:Group3";
You are now done with the required setup and permissions for User3 on the Redshift table.
Verify access
To verify access, complete the following steps:
Get the AWS access portal URL from the IAM Identity Center Settings section.
Open a different browser and enter the access portal URL.
This will redirect you to your Okta login page.
Sign in, select the account, and choose the tip-blog-qe-v2-permission-set link to open the Query Editor v2.
If you’re using private or incognito mode for testing this, you may need to enable third-party cookies.
Choose the options menu (three dots) and choose Edit connection for the redshift-idc-wg-tipblog workgroup.
Use IAM Identity Center in the pop-up window and choose Continue.
If you get an error with the message “Redshift serverless cluster is auto paused,” switch to the other browser with admin credentials and run any sample queries to un-pause the cluster. Then switch back to this browser and continue the next steps.
Run the following query to access the table:
SELECT * FROM "dev"."tipblog_datashare_idc_schema"."public.revenue";
You can only see the two columns due to the access grants you provided in Lake Formation earlier.
This completes configuring User3 access to the Redshift table.
Set up QuickSight for User3
Let’s now set up QuickSight and verify access for User3. We already granted access to User3 to the Redshift table in earlier steps.
Choose Group3 for the author and reader for this post.
For IAM Role, choose the IAM role matching the RoleQuickSight value from the CloudFormation stack output.
Next, you add a VPC connection to QuickSight to access the Redshift Serverless namespace you created earlier.
On the QuickSight console, manage your VPC connections.
Choose Add VPC connection.
For VPC connection name, enter a name.
For VPC ID, enter the value for VPCId from the CloudFormation stack output.
For Execution role, choose the value for RoleQuickSight from the CloudFormation stack output.
For Security Group IDs, choose the security group for QSSecurityGroup from the CloudFormation stack output.
Wait for the VPC connection to be AVAILABLE.
Enter the following command in AWS Cloud9 to enable QuickSight with Amazon Redshift for trusted identity propagation:
aws quicksight update-identity-propagation-config --aws-account-id "<Replace with CatalogId from CloudFormation output>" --service "REDSHIFT" --authorized-targets "< Replace with IdcManagedApplicationArn value from output of aws redshift describe-redshift-idc-applications --output json which you copied earlier>"
Verify User3 access with QuickSight
Complete the following steps:
Sign in to the QuickSight console as User3 in a different browser.
On the Okta sign-in page, sign in as User 3.
Create a new dataset with Amazon Redshift as the data source.
Choose the VPC connection you created above for Connection Type.
Provide the Redshift server (the RedshiftSrverlessWorkgroup value from the CloudFormation stack output), port (5439 in this post), and database name (dev in this post).
Under Authentication method, select Single sign-on.
Choose Validate, then choose Create data source.
If you encounter an issue with validating using single sign-on, switch to Database username and password for Authentication method, validate with any dummy user and password, and then switch back to validate using single sign-on and proceed to the next step. Also check that the Redshift serverless cluster is not auto-paused as mentioned earlier in Redshift access verification.
Choose the schema you created earlier (tipblog_datashare_idc_schema) and the table public.revenue
Choose Select to create your dataset.
You should now be able to visualize the data in QuickSight. You are only able to only see the account and salesamt columns from the table because of the access permissions you granted earlier with Lake Formation.
This finishes all the steps for setting up trusted identity propagation.
Audit data access
Let’s see how we can audit the data access with the different users.
Access requests are logged to CloudTrail. The IAM Identity Center user ID is logged under the onBehalfOf tag in the CloudTrail event. The following screenshot shows the GetDataAccess event generated by Lake Formation. You can view the CloudTrail event history and filter by event name GetDataAccess to view similar events in your account. You can see the userId corresponds to User2.
You can run the following commands in AWS Cloud9 to confirm this.
Get the identity store ID:
aws sso-admin describe-instance --instance-arn <Replace with your instance arn value> | jq -r '.IdentityStoreId'
Describe the user in the identity store:
aws identitystore describe-user --identity-store-id <Replace with output of above command> --user-id <User Id from above screenshot>
One way to query the CloudTrail log events is by using CloudTrail Lake. Set up the event data store (refer to the following instructions) and rerun the queries for User1, User2, and User3. You can query the access events using CloudTrail Lake with the following sample query:
SELECT eventTime,userIdentity.onBehalfOf.userid AS idcUserId,requestParameters as accessInfo, serviceEventDetails
FROM 04d81d04-753f-42e0-a31f-2810659d9c27
WHERE userIdentity.arn IS NOT NULL AND eventName='BatchGetTable' or eventName='GetDataAccess' or eventName='CreateDataSet'
order by eventTime DESC
The following screenshot shows an example of the detailed results with audit explanations.
Clean up
To avoid incurring further charges, delete the CloudFormation stack. Before you delete the CloudFormation stack, delete all the resources you created using the console or AWS CLI:
Manually delete any EMR Studio Workspaces you created with User2.
Delete the Athena workgroup created as part of the User1 setup.
Delete the QuickSight VPC connection you created.
Delete the Redshift IAM Identity Center connection.
Deregister IAM Identity Center from S3 Access Grants.
Delete the CloudFormation stack.
Manually delete the VPC created by AWS CloudFormation.
Conclusion
In this post, we delved into the trusted identity propagation feature of AWS Identity Center alongside various AWS Analytics services, demonstrating its utility in managing permissions using corporate user or group identities rather than IAM roles. We examined diverse user personas utilizing interactive tools like Athena, EMR Studio notebooks, Redshift Query Editor V2, and QuickSight, all centralized under Lake Formation for streamlined permission management. Additionally, we explored S3 Access Grants for S3 bucket access management, and concluded with insights into auditing through CloudTrail events and CloudTrail Lake for a comprehensive overview of user data access.
For further reading, refer to the following resources:
Shoukat Ghouse is a Senior Big Data Specialist Solutions Architect at AWS. He helps customers around the world build robust, efficient and scalable data platforms on AWS leveraging AWS analytics services like AWS Glue, AWS Lake Formation, Amazon Athena and Amazon EMR.
In this post, we show you how to use the new views feature the AWS Glue Data Catalog. SQL views are a powerful object used across relational databases. You can use views to decrease the time to insights of data by tailoring the data that is queried. Additionally, you can use the power of SQL in a view to express complex boundaries in data across multiple tables that can’t be expressed with simpler permissions. Data lakes provide customers the flexibility required to derive useful insights from data across many sources and many use cases. Data consumers can consume data where they need to across lines of business, increasing the velocity of insights generation.
Customers use many different processing engines in their data lakes, each of which have their own version of views with different capabilities. The AWS Glue Data Catalog and AWS Lake Formation provide a central location to manage your data across data lake engines.
AWS Glue has released a new feature, SQL views, which allows you to manage a single view object in the Data Catalog that can be queried from SQL engines. You can create a single view object with a different SQL version for each engine you want to query, such as Amazon Athena, Amazon Redshift, and Spark SQL on Amazon EMR. You can then manage access to these resources using the same Lake Formation permissions that are used to control tables in the data lake.
Solution overview
For this post, we use the Women’s E-Commerce Clothing Review. The objective is to create views in the Data Catalog so you can create a single common view schema and metadata object to use across engines (in this case, Athena). Doing so lets you use the same views across your data lakes to fit your use case. We create a view to mask the customer_id column in this dataset, then we will share this view to another user so that they can query this masked view.
Prerequisites
Before you can create a view in the AWS Glue Data Catalog, make sure that you have an AWS Identity and Access Management (IAM) role with the following configuration:
When the stack is complete, you can see a table called clothing_parquet on the Lake Formation console, as shown in the following screenshot.
Create a view on the Athena console
Now that you have your Lake Formation managed table, you can open the Athena console and create a Data Catalog view. Complete the following steps:
In the Athena query editor, run the following query on the Parquet dataset:
SELECT * FROM "clothing_reviews"."clothing_parquet" limit 10;
In the query results, the customer_id column is currently visible.
Next, you create a view called hidden_customerID and mask the customer_id column.
Create a view called hidden_customerID:
CREATE PROTECTED MULTI DIALECT VIEW clothing_reviews.hidden_customerid SECURITY DEFINER AS
SELECT * FROM clothing_reviews.clothing_parquet
In the following screenshot, you can see a view called hidden_customerID was successfully created.
Run the following query to mask the first four characters of the customer_id column for the newly generated view:
ALTER VIEW clothing_reviews.hidden_customerid UPDATE DIALECT AS
SELECT '****' || substring(customer_id, 4) as customer_id,clothing_id,age,title,review_text,rating,recommend_ind,positive_feedback,division_name,department_name,class_name
FROM clothing_reviews.clothing_parquet
You can see in the following screenshot that the view hidden_customerID has the customer_id column’s first four characters masked.
The original table clothing_parquet remains the same unmasked.
Grant access of the view to another user to query
Data Catalog views allow you to use Lake Formation to control access. In this step, you grant this view to another user called amazon_business_analyst and then query from that user.
Sign in to the Lake Formation console as admin.
In the navigation pane, choose Views.
As shown in the following screenshot, you can see the hidden_customerid view.
Sign in as the amazon_business_analyst user and navigate to the Views page.
This user has no visibility to the view.
Grant permission to the amazon_business_analyst user from the data lake admin.
Sign in again as amazon_business_analyst and navigate to the Views page.
On the Athena console, query the hidden_customerid view.
You have successfully shared a view to the user and queried it from the Athena console.
In this post, we demonstrated how to use the AWS Glue Data Catalog to create views. We then showed how to alter the views and mask the data. You can share the view with different users to query using Athena. For more information about this new feature, refer to Using AWS Glue Data Catalog views.
About the Authors
Leonardo Gomez is a Principal Analytics Specialist Solutions Architect at AWS. He has over a decade of experience in data management, helping customers around the globe address their business and technical needs. Connect with him on LinkedIn
Michael Chess – is a Product Manager on the AWS Lake Formation team based out of Palo Alto, CA. He specializes in permissions and data catalog features in the data lake.
Derek Liu – is a Senior Solutions Architect based out of Vancouver, BC. He enjoys helping customers solve big data challenges through AWS analytic services.
This is a guest post co-authored with Kanehito Miyake, Engineer at Fujitsu Japan.
Fujitsu Limited was established in Japan in 1935. Currently, we have approximately 120,000 employees worldwide (as of March 2023), including group companies. We develop business in various regions around the world, starting with Japan, and provide digital services globally. To provide a variety of products, services, and solutions that are better suited to customers and society in each region, we have built business processes and systems that are optimized for each region and its market.
However, in recent years, the IT market environment has changed drastically, and it has become difficult for the entire group to respond flexibly to the individual market situation. Moreover, we are challenged not only to revisit individual products, services, and solutions, but also to reinvent entire business processes and operations.
To transform Fujitsu from an IT company to a digital transformation (DX) company, and to become a world-leading DX partner, Fujitsu has declared a shift to data-driven management. We built the OneFujitsu program, which standardizes business projects and systems throughout the company, including the domestic and overseas group companies, and tackles the major transformation of the entire company under the program.
To achieve data-driven management, we built OneData, a data utilization platform used in the four global AWS Regions, which started operation in April 2022. As of November 2023, more than 200 projects and 37,000 users were onboarded. The platform consists of approximately 370 dashboards, 360 tables registered in the data catalog, and 40 linked systems. The data size stored in Amazon Simple Storage Service (Amazon S3) exceeds 100 TB, including data processed for use in each project.
In this post, we introduce our OneData initiative. We explain how Fujitsu worked to solve the aforementioned issues and introduce an overview of the OneData design concept and its implementation. We hope this post will provide some guidance for architects and engineers.
Challenges
Like many other companies struggling with data utilization, Fujitsu faced some challenges, which we discuss in this section.
Siloed data
In Fujitsu’s long history, we restructured organizations by merging affiliated companies into Fujitsu. Although organizational integration has progressed, there are still many systems and mechanisms customized for individual context. There are also many systems and mechanisms overlapping across different organizations. For this reason, it takes a lot of time and effort to discover, search, and integrate data when analyzing the entire company using a common standard. This situation makes it difficult for management to grasp business trends and make decisions in a timely manner.
Under these circumstances, the OneFujitsu program is designed have one system per one business globally. Core systems such as ERP and CRM are being integrated and unified in order to not have silos. It will make it easier for users to utilize data across different organizations for specific business areas.
However, to spread a culture of data-driven decision-making not only in management but also in every organization, it is necessary to have a mechanism that enables users to easily discover various types of data in organizations, and then analyze the data quickly and flexibly when needed.
Excel-based data utilization
Microsoft Excel is available on almost everyone’s PC in the company, and it helps lower the hurdles when starting to utilize data. However, Excel is mainly designed for spreadsheets; it’s not designed for large-scale data analytics and automation. Excel files tend to contain a mixture of data and procedures (functions, macros), and many users casually copy files for one-time use cases. It introduces complexity to keep both data and procedures up to date. Furthermore, it tends to require domain-specific knowledge to manage the Excel files for individual context.
For those reasons, it was extremely difficult for Fujitsu to manage and utilize data at scale with Excel.
Solution overview
OneData defines three personas:
Publisher – This role includes the organizational and management team of systems that serve as data sources. Responsibilities include:
Load raw data from the data source system at the appropriate frequency.
Provide and keep up to date with technical metadata for loaded data.
Perform the cleansing process and format conversion of raw data as needed.
Grant access permissions to data based on the requests from data users.
Consumer – Consumers are organizations and projects that use the data. Responsibilities include:
Look for the data to be used from the technical data catalog and request access to the data.
Handle the process and conversion of data into a format suitable for their own use (such as fact-dimension) with granted referencing permissions.
Configure business intelligence (BI) dashboards to provide data-driven insights to end-users targeted by the consumer’s project.
Use the latest data published by the publisher to update data as needed.
Promote and expand the use of databases.
Foundation – This role encompasses the data steward and governance team. Responsibilities include:
Provide a preprocessed, generic dataset of data commonly used by many consumers.
Manage and guide metrics for the quality of data published by each publisher.
Each role has sub-roles. For example, the consumer role has the following sub-roles with different responsibilities:
Data engineer – Create data process for analysis
Dashboard developer – Create a BI dashboard
Dashboard viewer – Monitor the BI dashboard
The following diagram describes how OneData platform works with those roles.
Let’s look at the key components of this architecture in more detail.
Publisher and consumer
In the OneData platform, the publisher is per each data source system, and the consumer is defined per each data utilization project. OneData provides an AWS account for each.
This enables the publisher to cleanse data and the consumer to process and analyze data at scale. In addition, by properly separating data and processing, it becomes effortless for the teams and organizations to share, manage, and inherit processes that were traditionally confined to individual PCs.
Foundation
When the teams don’t have a robust enough skillset, it can require more time to model and process data, and cause longer latency and lower data quality. It can also contribute to lower utilization by end-users. To address this, the foundation role provides an already processed dataset as a generic data model for data commonly use cases used by many consumers. This enables high-quality data available to each consumer. Here, the foundation role takes the lead in compiling the knowledge of domain experts and making data suitable for analysis. It is also an effective approach that eliminates duplicates for consumers. In addition, the foundation role monitors the state of the metadata, data quality indicators, data permissions, information classification labels, and so on. It is crucial in data governance and data management.
BI and visualization
Individual consumers have a dedicated space in a BI tool. In the past, if users wanted to go beyond simple data visualization using Excel, they had to build and maintain their own BI tools, which caused silos. By unifying these BI tools, OneData lowers the difficulty for consumers to use BI tools, and centralizes operation and maintenance, achieving optimization on a company-wide scale.
Additionally, to keep portability between BI tools, OneData recommends users transform data within the consumer AWS account instead of transforming data in the BI tool. With this approach, BI tool loads data from AWS Glue Data Catalog tables through an Amazon Athena JDBC/ODBC driver without any further transformations.
Deployment and operational excellence
To provide OneData as a common service for Fujitsu and group companies around the world, Regional OneData has been deployed in several locations. Regional OneData represents a unit of system configurations, and is designed to provide lower network latency for platform users, and be optimized for local languages, working hours for system operations and support, and region-specific legal restrictions, such as data residency and personal information protection.
The Regional Operations Unit (ROU), a virtual organization that brings together members from each region, is responsible for operating regional OneData in each of these regions. OneData HQ is responsible for supervising these ROUs, as well as planning and managing the entire OneData.
In addition, we have a specially positioned OneData called Global OneData, where global data utilization spans each region. Only the properly cleansed and sanitized data is transferred between each Regional OneData and Global OneData.
Systems such as ERP and CRM are accumulating data as a publisher for Global OneData, and the dashboards for executives in various regions to monitor business conditions with global metrics are also acting as a consumer for Global OneData.
Technical concepts
In this section, we discuss some of the technical concepts of the solution.
Large scale multi-account
We have adopted a multi-account strategy to provide AWS accounts for each project. Many publishers and consumers are already onboarded into OneData, and the number is expected to increase in the future. With this strategy, future usage expansion at scale can be achieved without affecting the users.
Also, this strategy allowed us to have clear boundaries in security, costs, and service quotas for each AWS service.
Although we provide independent AWS accounts for each publisher and consumer, both operational costs and resource costs would be enormous if we accommodated individual user requests, such as, “I want a virtual machine or RDBMS to run specific tools for data processing.” To avoid such continuous operational and resource costs, we have adopted AWS serverless services for all the computing resources necessary for our activities as a publisher and consumer.
We use AWS Glue to preprocess, cleanse, and enrich data. Optionally, AWS Lambda or Amazon Elastic Container Service (Amazon ECS) with AWS Fargate can also be used based on preferences. We allow users to set up AWS Step Functions for orchestration and Amazon CloudWatch for monitoring. In addition, we provide Amazon Aurora Serverless PostgreSQL as standard for consumers, to meet their needs for data processing with extract, load, and transform (ELT) jobs. With this approach, only the consumer who requires those services will incur charges based on usage. We are able to take advantage of lower operational and resource costs thanks to the unique benefit of serverless (or more accurately, pay-as-you-go) services.
AWS provides many serverless services, and OneData has integrated them to provide scalability that allows active users to quickly provide the required capability as needed, while minimizing the cost for non-frequent users.
Data ownership and access control
In OneData, we have adopted a data mesh architecture where each publisher maintains ownership of data in a distributed and decentralized manner. When the consumer discovers the data they want to use, they request access from the publisher. The publisher accepts the request and grants permissions only when the request meets their own criteria. With the AWS Glue Data Catalog and AWS Lake Formation, there is no need to update S3 bucket policies or AWS Identity and Access Management (IAM) policies every time we allow access for individual data on an S3 data lake, and we can effortlessly grant the necessary permissions for the databases, tables, columns, and rows when needed.
Conclusion
Since the launch of OneData in April 2022, we have been persistently carrying out educational activities to expand the number of users and introducing success stories on our portal site. As a result, we have been promoting change management within the company and are actively utilizing data in each department. Regional OneData is being rolled out gradually, and we plan to further expand the scale of use in the future.
With its global expansion, the development of basic functions as a data utilization platform will reach a milestone. As we move forward, it will be important to make sure that OneData platform is used effectively throughout Fujitsu, while incorporating new technologies related to data analysis as appropriate. For example, we are preparing to provide more advanced machine learning functions using Amazon SageMaker Studio with OneData users and investigating the applicability of AWS Glue Data Quality to reduce the manual quality monitoring efforts. Furthermore, we are currently in the process of implementing Amazon DataZone through various initiatives and efforts, such as verifying its functionality and examining how it can operate while bridging the gap between OneData’s existing processes and to the ideal process we are aiming for ideals.
We have had the opportunity to discuss data utilization with various partners and customers and although individual challenges may differ in size and its context, the issues that we are currently trying to solve with OneData are common to many of them.
This post describes only a small portion of how Fujitsu tackled challenges using the AWS Cloud, but we hope the post will give you some inspiration to solve your own challenges.
About the Author
Kanehito Miyake is an engineer at Fujitsu Japan and in charge of OneData’s solution and cloud architecture. He spearheaded the architectural study of the OneData project and contributed greatly to promoting data utilization at Fujitsu with his expertise. He loves rockfish fishing.
Junpei Ozono is a Go-to-market Data & AI solutions architect at AWS in Japan. Junpei supports customers’ journeys on the AWS Cloud from Data & AI aspects and guides them to design and develop data-driven architectures powered by AWS services.
To enable your workforce users for analytics with fine-grained data access controls and audit data access, you might have to create multiple AWS Identity and Access Management (IAM) roles with different data permissions and map the workforce users to one of those roles. Multiple users are often mapped to the same role where they need similar privileges to enable data access controls at the corporate user or group level and audit data access.
AWS IAM Identity Center enables centralized management of workforce user access to AWS accounts and applications using a local identity store or by connecting corporate directories via identity providers (IdPs). IAM Identity Center now supports trusted identity propagation, a streamlined experience for users who require access to data with AWS analytics services.
Amazon EMR Studio is an integrated development environment (IDE) that makes it straightforward for data scientists and data engineers to build data engineering and data science applications. With trusted identity propagation, data access management can be based on a user’s corporate identity and can be propagated seamlessly as they access data with single sign-on to build analytics applications with Amazon EMR (EMR Studio and Amazon EMR on EC2).
AWS Lake Formation allows data administrators to centrally govern, secure, and share data for analytics and machine learning (ML). With trusted identity propagation, data administrators can directly provide granular access to corporate users using their identity attributes and simplify the traceability of end-to-end data access across AWS services. Because access is managed based on a user’s corporate identity, they don’t need to use database local user credentials or assume an IAM role to access data.
In this post, we show how to bring your workforce identity to EMR Studio for analytics use cases, directly manage fine-grained permissions for the corporate users and groups using Lake Formation, and audit their data access.
Solution overview
For our use case, we want to enable a data analyst user named analyst1 to use their own enterprise credentials to query data they have been granted permissions to and audit their data access. We use Okta as the IdP for this demonstration. The following diagram illustrates the solution architecture.
This architecture is based on the following components:
Okta is responsible for maintaining the corporate user identities, related groups, and user authentication.
IAM Identity Center connects Okta users and centrally manages their access across AWS accounts and applications.
Lake Formation provides fine-grained access controls on data directly to corporate users using trusted identity propagation.
EMR Studio is an IDE for users to build and run applications. It allows users to log in directly with their corporate credentials without signing in to the AWS Management Console.
For this setup, we have created two users, analyst1 and engineer1, and assigned them to the corresponding Okta application. You can validate the integration is working by navigating to the Users page on the IAM Identity Center console, as shown in the following screenshot. Both enterprise users from Okta are provisioned in IAM Identity Center.
The following exact users will not be listed in your account. You can either create similar users or use an existing user.
Each provisioned user in IAM Identity Center has a unique user ID. This ID does not originate from Okta; it’s created in IAM Identity Center to uniquely identify this user. With trusted identity propagation, this user ID will be propagated across services and also used for traceability purposes in CloudTrail. The following screenshot shows the IAM Identity Center user matching the provisioned Okta user analyst1.
Choose the link under AWS access portal URL and log in with the analyst1 Okta user credentials that are already assigned to this application.
If you are able to log in and see the landing page, then all your configurations up to this step are set correctly. You will not see any applications on this page yet.
Set up EMR Studio
In this step, we demonstrate the actions needed from the data lake administrator to set up EMR Studio enabled for trusted identity propagation and with IAM Identity Center integration. This allows users to directly access EMR Studio with their enterprise credentials.
Note: All Amazon S3 buckets (created after January 5, 2023) have encryption configured by default (Amazon S3 managed keys (SSE-S3)), and all new objects that are uploaded to an S3 bucket are automatically encrypted at rest. To use a different type of encryption, to meet your security needs, please update the default encryption configuration for the bucket. See Protecting data for server-side encryption for further details.
On the Amazon EMR console, choose Studios in the navigation pane under EMR Studio.
Choose Create Studio.
For Setup options¸ select Custom.
For Studio name, enter a name (for this post, emr-studio-with-tip).
For S3 location for Workspace storage, select Select existing location and enter an existing S3 bucket (if you have one). Otherwise, select Create new bucket.
For Service role to let Studio access your AWS resources, choose View permissions details to get the trust and IAM policy information that is needed and create a role with those specific policies in IAM. In this case, we create a new role called emr_tip_role.
For Service role to let Studio access your AWS resources, choose the IAM role you created.
For Workspace name, enter a name (for this post, studio-workspace-with-tip).
For Authentication, select IAM Identity Center.
For User role¸ you can create a new role or choose an existing role. For this post, we choose the role we created (emr_tip_role).
To use the same role, add the following statement to the trust policy of the service role:
Select Enable trusted identity propagation to allow you to control and log user access across connected applications.
For Choose who can access your application, select All users and groups.
Later, we restrict access to resources using Lake Formation. However, there is an option here to restrict access to only assigned users and groups.
In the Networking and security section, you can provide optional details for your VPC, subnets, and security group settings.
Choose Create Studio.
On the Studios page of the Amazon EMR console, locate your Studio enabled with IAM Identity Center.
Copy the link for Studio Access URL.
Enter the URL into a web browser and log in using Okta credentials.
You should be able to successfully sign in to the EMR Studio console.
Create an AWS Identity Center enabled security configuration for EMR clusters
EMR security configurations allow you to configure data encryption, Kerberos authentication, and Amazon S3 authorization for the EMR File System (EMRFS) on the clusters. The security configuration is available to use and reuse when you create clusters.
To integrate Amazon EMR with IAM Identity Center, you need to first create an IAM role that authenticates with IAM Identity Center from the EMR cluster. Amazon EMR uses IAM credentials to relay the IAM Identity Center identity to downstream services such as Lake Formation. The IAM role should also have the respective permissions to invoke the downstream services.
Create a role (for this post, called emr-idc-application) with the following trust and permission policy. The role referenced in the trust policy is the InstanceProfile role for EMR clusters. This allows the EC2 instance profile to assume this role and act as an identity broker on behalf of the federated users.
Upload my-certs.zip to an S3 location that will be used to create the security configuration.
The EMR service role should have access to the S3 location. The key allows access to the issuer’s EMR cluster instances in the us-west-2 Region as specified by the *.us-west-2.compute.internal domain name as the common name. You can change this to the Region your cluster is in.
You can view the security configuration on the Amazon EMR console.
Create a Service Catalog product template to create EMR clusters
EMR Studio with trusted identity propagation enabled can only work with clusters created from a template. Complete the following steps to create a product template in Service Catalog:
On the Service Catalog console, choose Portfolios under Administration in the navigation pane.
Choose Create portfolio.
Enter a name for your portfolio (for this post, EMR Clusters Template) and an optional description.
Choose Create.
On the Portfolios page, choose the portfolio you just created to view its details.
On the Products tab, choose Create product.
For Product type, select CloudFormation.
For Product name, enter a name (for this post, EMR-7.0.0).
Use the security configuration IdentityCenterConfiguration-with-lf-tip you created in previous steps with the appropriate Amazon EMR service roles.
Choose Create product.
The following is an example CloudFormation template. Update the account-specific values for SecurityConfiguration, JobFlowRole, ServiceRole, LogUri, Ec2KeyName, and Ec2SubnetId. We provide a sample Amazon EMR service role and trust policy in Appendix A at the end of this post.
Trusted identity propagation is supported from Amazon EMR 6.15 onwards. For Amazon EMR 6.15, add the following bootstrap action to the CloudFormation script:
The portfolio now should have the EMR cluster creation product added.
Grant the EMR Studio role emr_tip_role access to the portfolio.
Grant Lake Formation permissions to users to access data
In this step, we enable Lake Formation integration with IAM Identity Center and grant permissions to the Identity Center user analyst1. If Lake Formation is not already enabled, refer to Getting started with Lake Formation.
To use Lake Formation with Amazon EMR, create a custom role to register S3 locations. You need to create a new custom role with Amazon S3 access and not use the default role AWSServiceRoleForLakeFormationDataAccess. Additionally, enable external data filtering in Lake Formation. For more details, refer to Enable Lake Formation with Amazon EMR.
Complete the following steps to manage access permissions in Lake Formation:
On the Lake Formation console, choose IAM Identity Center integration under Administration in the navigation pane.
Lake Formation will automatically specify the correct IAM Identity Center instance.
Choose Create.
You can now view the IAM Identity Center integration details.
For this post, we have a Marketing database and a customer table on which we grant access to our enterprise user analyst1. You can use an existing database and table in your account or create a new one. For more examples, refer to Tutorials.
The following screenshot shows the details of our customer table.
On the Lake Formation console, choose Data lake permissions under Permissions in the navigation pane.
Choose Grant.
Select Named Data Catalog resources.
For Databases, choose your database (marketing).
For Tables, choose your table (customer).
For Table permissions, select Select and Describe.
For Data permissions, select All data access.
Choose Grant.
The following screenshot shows a summary of permissions that user analyst1 has. They have Select access on the table and Describe permissions on the databases.
Test the solution
To test the solution, we log in to EMR Studio as enterprise user analyst1, create a new Workspace, create an EMR cluster using a template, and use that cluster to perform an analysis. You could also use the Workspace that was created during the Studio setup. In this demonstration, we create a new Workspace.
You need additional permissions in the EMR Studio role to create and list Workspaces, use a template, and create EMR clusters. For more details, refer to Configure EMR Studio user permissions for Amazon EC2 or Amazon EKS. Appendix B at the end of this post contains a sample policy.
When the cluster is available, we attach the cluster to the Workspace and run queries on the customer table, which the user has access to.
User analyst1 is now able to run queries for business use cases using their corporate identity. To open a PySpark notebook, we choose PySpark under Notebook.
When the notebook is open, we run a Spark SQL query to list the databases:
%%sql
show databases
In this case, we query the customer table in the marketing database. We should be able to access the data.
%%sql
select * from marketing.customer
Audit data access
Lake Formation API actions are logged by CloudTrail. The GetDataAccess action is logged whenever a principal or integrated AWS service requests temporary credentials to access data in a data lake location that is registered with Lake Formation. With trusted identity propagation, CloudTrail also logs the IAM Identity Center user ID of the corporate identity who requested access to the data.
The following screenshot shows the details for the analyst1 user.
Choose View event to view the event logs.
The following is an example of the GetDataAccess event log. We can trace that user analyst1, Identity Center user ID c8c11390-00a1-706e-0c7a-bbcc5a1c9a7f, has accessed the customer table.
In this post, we demonstrated how to set up and use trusted identity propagation using IAM Identity Center, EMR Studio, and Lake Formation for analytics. With trusted identity propagation, a user’s corporate identity is seamlessly propagated as they access data using single sign-on across AWS analytics services to build analytics applications. Data administrators can provide fine-grained data access directly to corporate users and groups and audit usage. To learn more, see Integrate Amazon EMR with AWS IAM Identity Center.
About the Authors
Pradeep Misra is a Principal Analytics Solutions Architect at AWS. He works across Amazon to architect and design modern distributed analytics and AI/ML platform solutions. He is passionate about solving customer challenges using data, analytics, and AI/ML. Outside of work, Pradeep likes exploring new places, trying new cuisines, and playing board games with his family. He also likes doing science experiments with his daughters.
Deepmala Agarwal works as an AWS Data Specialist Solutions Architect. She is passionate about helping customers build out scalable, distributed, and data-driven solutions on AWS. When not at work, Deepmala likes spending time with family, walking, listening to music, watching movies, and cooking!
Abhilash Nagilla is a Senior Specialist Solutions Architect at Amazon Web Services (AWS), helping public sector customers on their cloud journey with a focus on AWS analytics services. Outside of work, Abhilash enjoys learning new technologies, watching movies, and visiting new places.
Appendix A
Sample Amazon EMR service role and trust policy:
Note: This is a sample service role. Fine grained access control is done using Lake Formation. Modify the permissions as per your enterprise guidance and to comply with your security team.
Note: This is a sample service role. Fine grained access control is done using Lake Formation. Modify the permissions as per your enterprise guidance and to comply with your security team.
Last week, we announced the general availability of the integration between Amazon DataZone and AWS Lake Formationhybrid access mode. In this post, we share how this new feature helps you simplify the way you use Amazon DataZone to enable secure and governed sharing of your data in the AWS Glue Data Catalog. We also delve into how data producers can share their AWS Glue tables through Amazon DataZone without needing to register them in Lake Formation first.
Overview of the Amazon DataZone integration with Lake Formation hybrid access mode
Amazon DataZone is a fully managed data management service to catalog, discover, analyze, share, and govern data between data producers and consumers in your organization. With Amazon DataZone, data producers populate the business data catalog with data assets from data sources such as the AWS Glue Data Catalog and Amazon Redshift. They also enrich their assets with business context to make it straightforward for data consumers to understand. After the data is available in the catalog, data consumers such as analysts and data scientists can search and access this data by requesting subscriptions. When the request is approved, Amazon DataZone can automatically provision access to the data by managing permissions in Lake Formation or Amazon Redshift so that the data consumer can start querying the data using tools such as Amazon Athena or Amazon Redshift.
To manage the access to data in the AWS Glue Data Catalog, Amazon DataZone uses Lake Formation. Previously, if you wanted to use Amazon DataZone for managing access to your data in the AWS Glue Data Catalog, you had to onboard your data to Lake Formation first. Now, the integration of Amazon DataZone and Lake Formation hybrid access mode simplifies how you can get started with your Amazon DataZone journey by removing the need to onboard your data to Lake Formation first.
Lake Formation hybrid access mode allows you to start managing permissions on your AWS Glue databases and tables through Lake Formation, while continuing to maintain any existing AWS Identity and Access Management (IAM) permissions on these tables and databases. Lake Formation hybrid access mode supports two permission pathways to the same Data Catalog databases and tables:
In the first pathway, Lake Formation allows you to select specific principals (opt-in principals) and grant them Lake Formation permissions to access databases and tables by opting in
The second pathway allows all other principals (that are not added as opt-in principals) to access these resources through the IAM principal policies for Amazon Simple Storage Service (Amazon S3) and AWS Glue actions
With the integration between Amazon DataZone and Lake Formation hybrid access mode, if you have tables in the AWS Glue Data Catalog that are managed through IAM-based policies, you can publish these tables directly to Amazon DataZone, without registering them in Lake Formation. Amazon DataZone registers the location of these tables in Lake Formation using hybrid access mode, which allows managing permissions on AWS Glue tables through Lake Formation, while continuing to maintain any existing IAM permissions.
Amazon DataZone enables you to publish any type of asset in the business data catalog. For some of these assets, Amazon DataZone can automatically manage access grants. These assets are called managed assets, and include Lake Formation-managed Data Catalog tables and Amazon Redshift tables and views. Prior to this integration, you had to complete the following steps before Amazon DataZone could treat the published Data Catalog table as a managed asset:
Identity the Amazon S3 location associated with Data Catalog table.
Register the Amazon S3 location with Lake Formation in hybrid access mode using a role with appropriate permissions.
Publish the table metadata to the Amazon DataZone business data catalog.
The following diagram illustrates this workflow.
With the Amazon DataZone’s integration with Lake Formation hybrid access mode, you can simply publish your AWS Glue tables to Amazon DataZone without having to worry about registering the Amazon S3 location or adding an opt-in principal in Lake Formation by delegating these steps to Amazon DataZone. The administrator of an AWS account can enable the data location registration setting under the DefaultDataLake blueprint on the Amazon DataZone console. Now, a data owner or publisher can publish their AWS Glue table (managed through IAM permissions) to Amazon DataZone without the extra setup steps. When a data consumer subscribes to this table, Amazon DataZone registers the Amazon S3 locations of the table in hybrid access mode, adds the data consumer’s IAM role as an opt-in principal, and grants access to the same IAM role by managing permissions on the table through Lake Formation. This makes sure that IAM permissions on the table can coexist with newly granted Lake Formation permissions, without disrupting any existing workflows. The following diagram illustrates this workflow.
Solution overview
To demonstrate this new capability, we use a sample customer scenario where the finance team wants to access data owned by the sales team for financial analysis and reporting. The sales team has a pipeline that creates a dataset containing valuable information about ticket sales, popular events, venues, and seasons. We call it the tickit dataset. The sales team stores this dataset in Amazon S3 and registers it in a database in the Data Catalog. The access to this table is currently managed through IAM-based permissions. However, the sales team wants to publish this table to Amazon DataZone to facilitate secure and governed data sharing with the finance team.
The steps to configure this solution are as follows:
The Amazon DataZone administrator enables the data lake location registration setting in Amazon DataZone to automatically register the Amazon S3 location of the AWS Glue tables in Lake Formation hybrid access mode.
After the hybrid access mode integration is enabled in Amazon DataZone, the finance team requests a subscription to the sales data asset. The asset shows up as a managed asset, which means Amazon DataZone can manage access to this asset even if the Amazon S3 location of this asset isn’t registered in Lake Formation.
The sales team is notified of a subscription request raised by the finance team. They review and approve the access request. After the request is approved, Amazon DataZone fulfills the subscription request by managing permissions in the Lake Formation. It registers the Amazon S3 location of the subscribed table in Lake Formation hybrid mode.
The finance team gains access to the sales dataset required for their financial reports. They can go to their DataZone environment and start running queries using Athena against their subscribed dataset.
Prerequisites
To follow the steps in this post, you need an AWS account. If you don’t have an account, you can create one. In addition, you must have the following resources configured in your account:
An S3 bucket
An AWS Glue database and crawler
IAM roles for different personas and services
An Amazon DataZone domain and project
An Amazon DataZone environment profile and environment
An Amazon DataZone data source
If you don’t have these resources already configured, you can create them by deploying the following AWS CloudFormation stack:
Choose Launch Stack to deploy a CloudFormation template.
Complete the steps to deploy the template and leave all settings as default.
Select I acknowledge that AWS CloudFormation might create IAM resources, then choose Submit.
After the CloudFormation deployment is complete, you can log in to the Amazon DataZone portal and manually trigger a data source run. This pulls any new or modified metadata from the source and updates the associated assets in the inventory. This data source has been configured to automatically publish the data assets to the catalog.
On the Amazon DataZone console, choose View domains.
You should be logged in using the same role that is used to deploy CloudFormation and verify that you are in the same AWS Region.
Find the domain blog_dz_domain, then choose Open data portal.
Choose Browse all projects and choose Sales producer project.
On the Data tab, choose Data sources in the navigation pane.
Locate and choose the data source that you want to run.
This opens the data source details page.
Choose the options menu (three vertical dots) next to tickit_datasource and choose Run.
The data source status changes to Running as Amazon DataZone updates the asset metadata.
Enable hybrid mode integration in Amazon DataZone
In this step, the Amazon DataZone administrator goes through the process of enabling the Amazon DataZone integration with Lake Formation hybrid access mode. Complete the following steps:
On a separate browser tab, open the Amazon DataZone console.
Verify that you are in the same Region where you deployed the CloudFormation template.
Choose View domains.
Choose the domain created by AWS CloudFormation, blog_dz_domain.
Scroll down on the domain details page and choose the Blueprints tab.
A blueprint defines what AWS tools and services can be used with the data assets published in Amazon DataZone. The DefaultDataLake blueprint is enabled as part of the CloudFormation stack deployment. This blueprint enables you to create and query AWS Glue tables using Athena. For the steps to enable this in your own deployments, refer to Enable built-in blueprints in the AWS account that owns the Amazon DataZone domain.
Choose the DefaultDataLake blueprint.
On the Provisioning tab, choose Edit.
Select Enable Amazon DataZone to register S3 locations using AWS Lake Formation hybrid access mode.
You have the option of excluding specific Amazon S3 locations if you don’t want Amazon DataZone to automatically register them to Lake Formation hybrid access mode.
Choose Save changes.
Request access
In this step, you log in to Amazon DataZone as the finance team, search for the sales data asset, and subscribe to it. Complete the following steps:
Return to your Amazon DataZone data portal browser tab.
Switch to the finance consumer project by choosing the dropdown menu next to the project name and choosing Finance consumer project.
From this step onwards, you take on the persona of a finance user looking to subscribe to a data asset published in the previous step.
In the search bar, search for and choose the sales data asset.
Choose Subscribe.
The asset shows up as managed asset. This means that Amazon DataZone can grant access to this data asset to the finance team’s project by managing the permissions in Lake Formation.
Enter a reason for the access request and choose Subscribe.
Approve access request
The sales team gets a notification that an access request from the finance team is submitted. To approve the request, complete the following steps:
Choose the dropdown menu next to the project name and choose Sales producer project.
You now assume the persona of the sales team, who are the owners and stewards of the sales data assets.
Choose the notification icon at the top-right corner of the DataZone portal.
Choose the Subscription Request Created task.
Grant access to the sales data asset to the finance team and choose Approve.
Analyze the data
The finance team has now been granted access to the sales data, and this dataset has been to their Amazon DataZone environment. They can access the environment and query the sales dataset with Athena, along with any other datasets they currently own. Complete the following steps:
On the dropdown menu, choose Finance consumer project.
On the right pane of the project overview screen, you can find a list of active environments available for use.
Choose the Amazon DataZone environment finance_dz_environment.
In the navigation pane, under Data assets, choose Subscribed.
Verify that your environment now has access to the sales data.
It may take a few minutes for the data asset to be automatically added to your environment.
Choose the new tab icon for Query data.
A new tab opens with the Athena query editor.
For Database, choose finance_consumer_db_tickitdb-<suffix>.
This database will contain your subscribed data assets.
Generate a preview of the sales table by choosing the options menu (three vertical dots) and choosing Preview table.
Clean up
To clean up your resources, complete the following steps:
Switch back to the administrator role you used to deploy the CloudFormation stack.
On the Amazon DataZone console, delete the projects used in this post. This will delete most project-related objects like data assets and environments.
On the AWS CloudFormation console, delete the stack you deployed in the beginning of this post.
On the Amazon S3 console, delete the S3 buckets containing the tickit dataset.
On the Lake Formation console, delete the Lake Formation admins registered by Amazon DataZone.
On the Lake Formation console, delete tables and databases created by Amazon DataZone.
Conclusion
In this post, we discussed how the integration between Amazon DataZone and Lake Formation hybrid access mode simplifies the process to start using Amazon DataZone for end-to-end governance of your data in the AWS Glue Data Catalog. This integration helps you bypass the manual steps of onboarding to Lake Formation before you can start using Amazon DataZone.
Utkarsh Mittal is a Senior Technical Product Manager for Amazon DataZone at AWS. He is passionate about building innovative products that simplify customers’ end-to-end analytics journeys. Outside of the tech world, Utkarsh loves to play music, with drums being his latest endeavor.
Praveen Kumar is a Principal Analytics Solution Architect at AWS with expertise in designing, building, and implementing modern data and analytics platforms using cloud-centered services. His areas of interests are serverless technology, modern cloud data warehouses, streaming, and generative AI applications.
Paul Villena is a Senior Analytics Solutions Architect in AWS with expertise in building modern data and analytics solutions to drive business value. He works with customers to help them harness the power of the cloud. His areas of interests are infrastructure as code, serverless technologies, and coding in Python
The collective thoughts of the interwebz
Manage Consent
To provide the best experiences, we use technologies like cookies to store and/or access device information. Consenting to these technologies will allow us to process data such as browsing behavior or unique IDs on this site. Not consenting or withdrawing consent, may adversely affect certain features and functions.
Functional
Always active
The technical storage or access is strictly necessary for the legitimate purpose of enabling the use of a specific service explicitly requested by the subscriber or user, or for the sole purpose of carrying out the transmission of a communication over an electronic communications network.
Preferences
The technical storage or access is necessary for the legitimate purpose of storing preferences that are not requested by the subscriber or user.
Statistics
The technical storage or access that is used exclusively for statistical purposes.The technical storage or access that is used exclusively for anonymous statistical purposes. Without a subpoena, voluntary compliance on the part of your Internet Service Provider, or additional records from a third party, information stored or retrieved for this purpose alone cannot usually be used to identify you.
Marketing
The technical storage or access is required to create user profiles to send advertising, or to track the user on a website or across several websites for similar marketing purposes.


 Stefano Sandonà is a Senior Big Data Specialist Solution Architect at AWS. Passionate about data, distributed systems, and security, he helps customers worldwide architect high-performance, efficient, and secure data platforms.
 Francesco Marelli is a Principal Solutions Architect at AWS. He specializes in the design, implementation, and optimization of large-scale data platforms. Francesco leads the AWS Solution Architect (SA) analytics team in Italy. He loves sharing his professional knowledge and is a frequent speaker at AWS events. Francesco is also passionate about music.


 Anubhav Awasthi is a Sr. Big Data Specialist Solutions Architect at AWS. He works with customers to provide architectural guidance for running analytics solutions on Amazon EMR, Amazon Athena, AWS Glue, and AWS Lake Formation.
 Nishchai JM is an Analytics Specialist Solutions Architect at Amazon Web services. He specializes in building Big-data applications and help customer to modernize their applications on Cloud. He thinks Data is new oil and spends most of his time in deriving insights out of the Data.


 Ruben Simon is a Head of Product for BMW’s Cloud Data Hub, the company’s largest data platform. He is passionate about driving digital transformation in aata, analytics, and AI, and thrives on collaborating with international teams. Outside the office, Ruben cherishes family time and has a keen interest in continual learning.
 Khalid Al Khalili is a Data Architect at BMW Group, leading the architecture of the Cloud Data Hub, BMW’s central platform for data innovation. He is a strong advocate for creating seamless data experiences, transforming complex requirements into efficient, user-friendly solutions. When he’s not building new features, Khalid enjoys collaborating with his peers and cross-functional teams to advance and shape BMW’s data strategy, ensuring it stays ahead in a rapidly evolving landscape.
 Florian Seidel is a Global Solutions Architect specializing in the automotive sector at AWS. He guides strategic customers in harnessing the full potential of cloud technologies to drive innovation in the automotive industry. With a passion for analytics, machine learning, AI, and resilient distributed systems, Florian helps transform cutting-edge concepts into practical solutions. When not architecting cloud strategies, he enjoys cooking for family and friends and experimenting with electronic music production.
 Aishwarya Lakshmi Krishnan is a Senior Customer Solutions Manager with AWS Automotive. She is passionate about solving business problems using generative AI and cloud based technologies.
 Durga Mishra is a Principal solutions architect at AWS. Outside of work, Durga enjoys spending time building new things and spend time with family and loves to hike on Appalachian trails and spend time in nature.
 Mert Hocanin is a Principal Big Data Architect with AWS Lake Formation.


 Manjit Chakraborty is a Senior Solutions Architect at AWS. He is a Seasoned & Result driven professional with extensive experience in Financial domain having worked with customers on advising, designing, leading, and implementing core-business enterprise solutions across the globe. In his spare time, Manjit enjoys fishing, practicing martial arts and playing with his daughter.
 Neeraj Roy is a Principal Solutions Architect at AWS based out of London. He works with Global Financial Services customers to accelerate their AWS journey. In his spare time, he enjoys reading and spending time with his family.
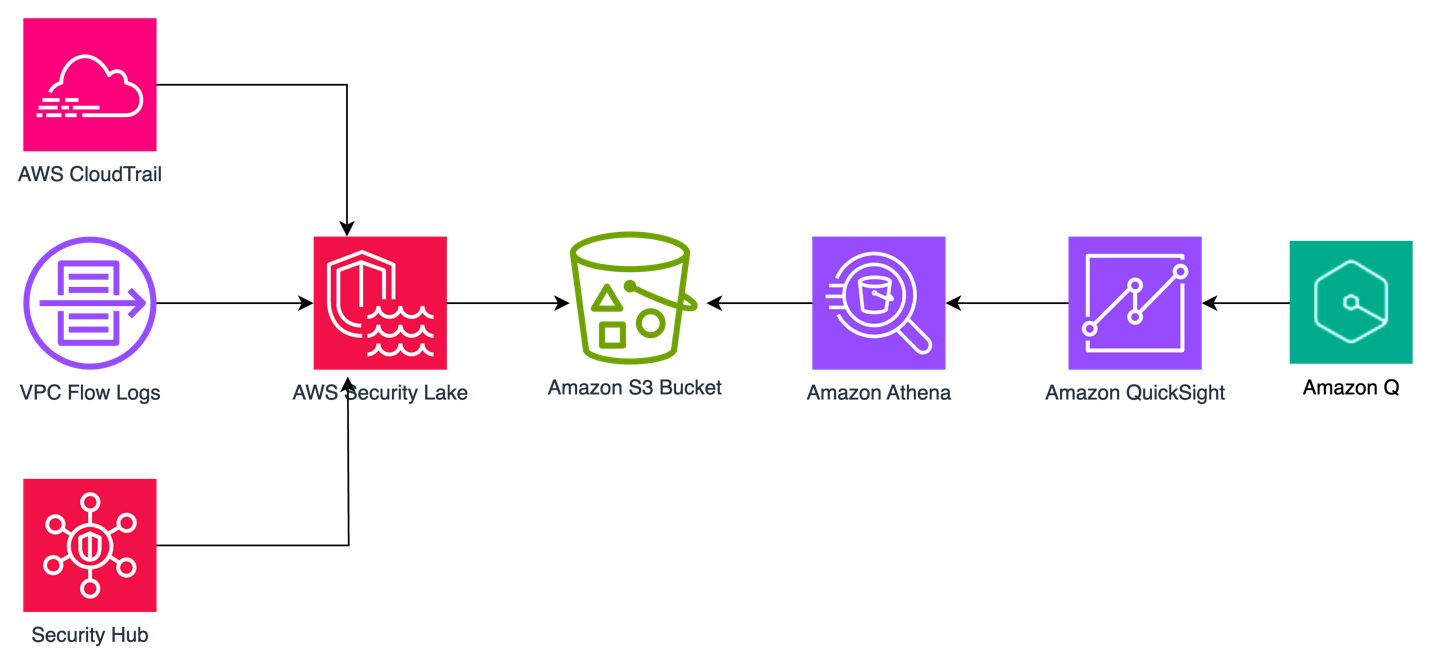


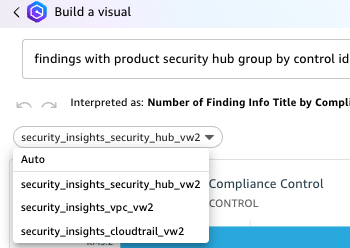


 Julien Lafaye is a director at Capital Fund Management (CFM) where he is leading the implementation of a data platform on AWS. He is also heading a team of data scientists and software engineers in charge of delivering intraday features to feed CFM trading strategies. Before that, he was developing low latency solutions for transforming & disseminating financial market data. He holds a Phd in computer science and graduated from Ecole Polytechnique Paris. During his spare time, he enjoys cycling, running and tinkering with electronic gadgets and computers.
 Matthieu Bonville is a Solutions Architect in AWS France working with Financial Services Industry (FSI) customers. He leverages his technical expertise and knowledge of the FSI domain to help customer architect effective technology solutions that address their business challenges.
 Joel Farvault is Principal Specialist SA Analytics for AWS with 25 years’ experience working on enterprise architecture, data governance and analytics, mainly in the financial services industry. Joel has led data transformation projects on fraud analytics, claims automation, and Master Data Management. He leverages his experience to advise customers on their data strategy and technology foundations.


 Sandeep Adwankar is a Senior Product Manager at AWS. Based in the California Bay Area, he works with customers around the globe to translate business and technical requirements into products that enable customers to improve how they manage, secure, and access data.
 Srividya Parthasarathy is a Senior Big Data Architect on the AWS Lake Formation team. She enjoys building data mesh solutions and sharing them with the community.
 Paul Villena is a Senior Analytics Solutions Architect in AWS with expertise in building modern data and analytics solutions to drive business value. He works with customers to help them harness the power of the cloud. His areas of interests are infrastructure as code, serverless technologies, and coding in Python.


 Pathik Shah is a Sr. Analytics Architect on Amazon Athena. He joined AWS in 2015 and has been focusing in the big data analytics space since then, helping customers build scalable and robust solutions using AWS analytics services.
 Derek Liu is a Senior Solutions Architect based out of Vancouver, BC. He enjoys helping customers solve big data challenges through AWS analytic services.


 Maneesh Sharma is a Senior Database Engineer at AWS with more than a decade of experience designing and implementing large-scale data warehouse and analytics solutions. He collaborates with various Amazon Redshift Partners and customers to drive better integration.
 Poulomi Dasgupta is a Senior Analytics Solutions Architect with AWS. She is passionate about helping customers build cloud-based analytics solutions to solve their business problems. Outside of work, she likes travelling and spending time with her family.
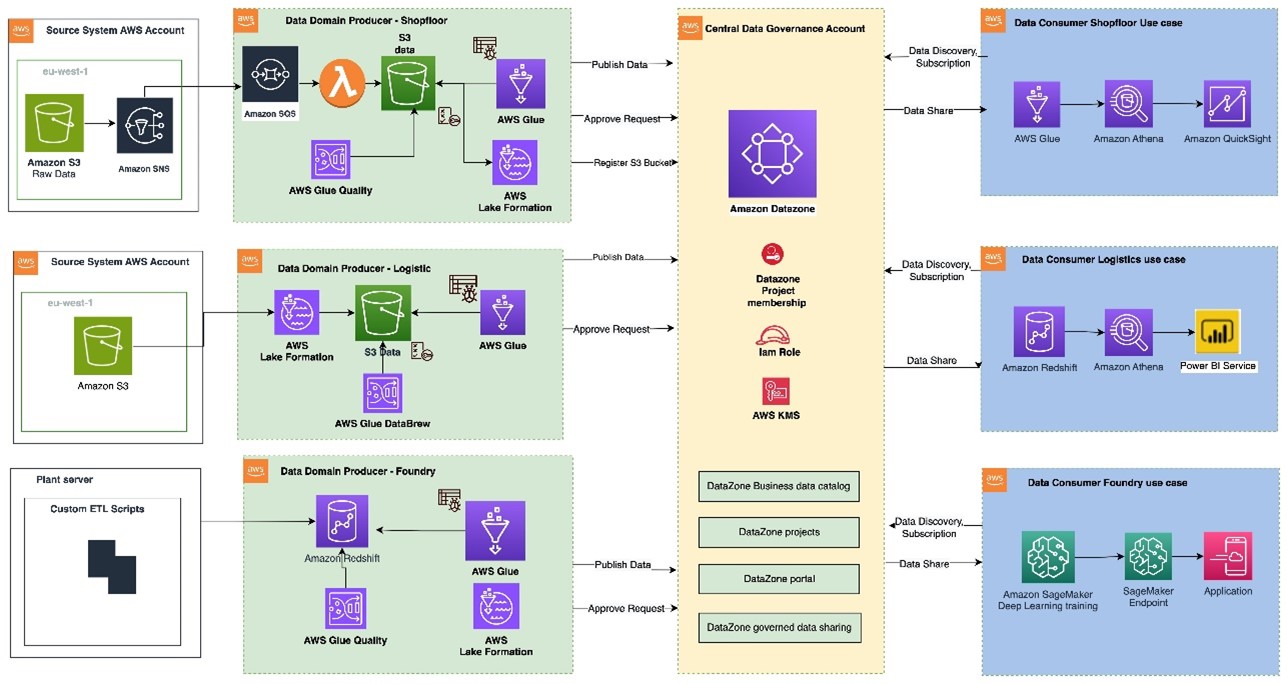
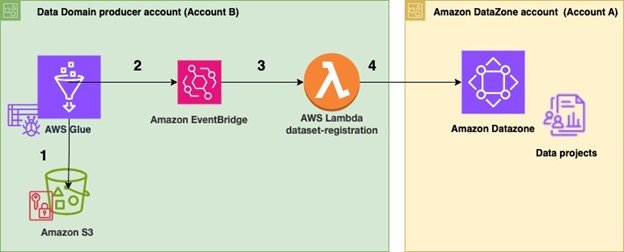

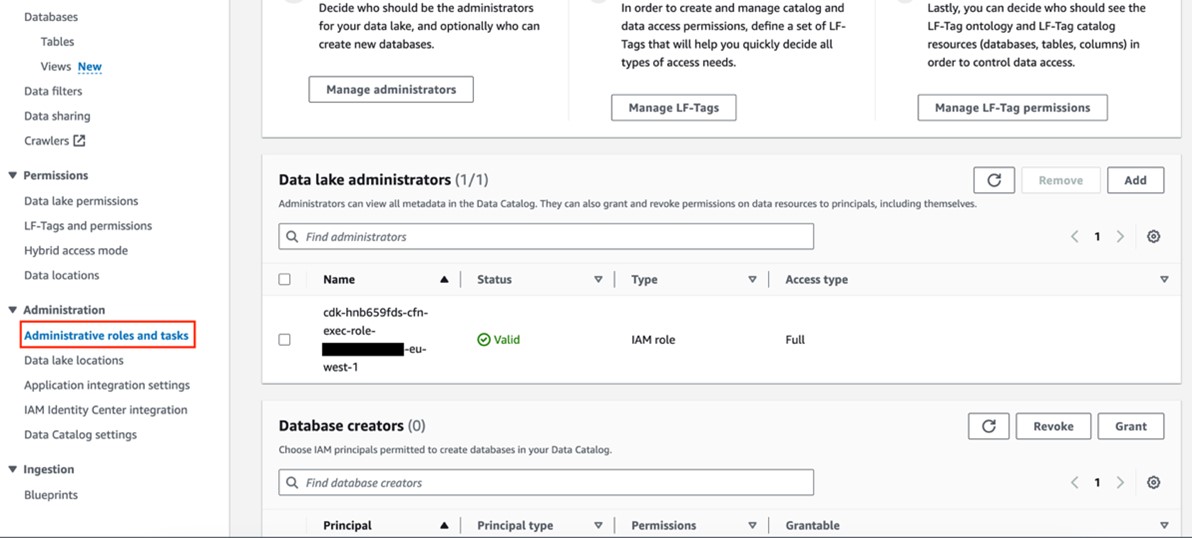


 Bandana Das is a Senior Data Architect at Amazon Web Services and specializes in data and analytics. She builds event-driven data architectures to support customers in data management and data-driven decision-making. She is also passionate about enabling customers on their data management journey to the cloud.
 Anirban Saha is a DevOps Architect at AWS, specializing in architecting and implementation of solutions for customer challenges in the automotive domain. He is passionate about well-architected infrastructures, automation, data-driven solutions and helping make the customer’s cloud journey as seamless as possible. Personally, he likes to keep himself engaged with reading, painting, language learning and traveling.
 Chandana Keswarkar is a Senior Solutions Architect at AWS, who specializes in guiding automotive customers through their digital transformation journeys by using cloud technology. She helps organizations develop and refine their platform and product architectures and make well-informed design decisions. In her free time, she enjoys traveling, reading, and practicing yoga.
 Sindi Cali is a ProServe Associate Consultant with AWS Professional Services. She supports customers in building data driven applications in AWS.


 Sudipta Mitra is a Senior Data Architect for AWS, and passionate about helping customers to build modern data analytics applications by making innovative use of latest AWS services and their constantly evolving features. A pragmatic architect who works backwards from customer needs, making them comfortable with the proposed solution, helping achieve tangible business outcomes. His main areas of work are Data Mesh, Data Lake, Knowledge Graph, Data Security and Data Governance.
 Deepak Sharma is a Senior Data Architect with the AWS Professional Services team, specializing in big data and analytics solutions. With extensive experience in designing and implementing scalable data architectures, he collaborates closely with enterprise customers to build robust data lakes and advanced analytical applications on the AWS platform.
 Nanda Chinnappa is a Cloud Infrastructure Architect with AWS Professional Services at Amazon Web Services. Nanda specializes in Infrastructure Automation, Cloud Migration, Disaster Recovery and Databases which includes Amazon RDS and Amazon Aurora. He helps AWS Customer’s adopt AWS Cloud and realize their business outcome by executing cloud computing initiatives.


 Shoukat Ghouse is a Senior Big Data Specialist Solutions Architect at AWS. He helps customers around the world build robust, efficient and scalable data platforms on AWS leveraging AWS analytics services like AWS Glue, AWS Lake Formation, Amazon Athena and Amazon EMR.


 Leonardo Gomez is a Principal Analytics Specialist Solutions Architect at AWS. He has over a decade of experience in data management, helping customers around the globe address their business and technical needs. Connect with him on
  Michael Chess – is a Product Manager on the AWS Lake Formation team based out of Palo Alto, CA. He specializes in permissions and data catalog features in the data lake.
 Derek Liu – is a Senior Solutions Architect based out of Vancouver, BC. He enjoys helping customers solve big data challenges through AWS analytic services.


 Junpei Ozono is a Go-to-market Data & AI solutions architect at AWS in Japan. Junpei supports customers’ journeys on the AWS Cloud from Data & AI aspects and guides them to design and develop data-driven architectures powered by AWS services.


 Pradeep Misra is a Principal Analytics Solutions Architect at AWS. He works across Amazon to architect and design modern distributed analytics and AI/ML platform solutions. He is passionate about solving customer challenges using data, analytics, and AI/ML. Outside of work, Pradeep likes exploring new places, trying new cuisines, and playing board games with his family. He also likes doing science experiments with his daughters.
 Deepmala Agarwal works as an AWS Data Specialist Solutions Architect. She is passionate about helping customers build out scalable, distributed, and data-driven solutions on AWS. When not at work, Deepmala likes spending time with family, walking, listening to music, watching movies, and cooking!
 Abhilash Nagilla is a Senior Specialist Solutions Architect at Amazon Web Services (AWS), helping public sector customers on their cloud journey with a focus on AWS analytics services. Outside of work, Abhilash enjoys learning new technologies, watching movies, and visiting new places.


 Utkarsh Mittal is a Senior Technical Product Manager for Amazon DataZone at AWS. He is passionate about building innovative products that simplify customers’ end-to-end analytics journeys. Outside of the tech world, Utkarsh loves to play music, with drums being his latest endeavor.
 Praveen Kumar is a Principal Analytics Solution Architect at AWS with expertise in designing, building, and implementing modern data and analytics platforms using cloud-centered services. His areas of interests are serverless technology, modern cloud data warehouses, streaming, and generative AI applications.
 Paul Villena is a Senior Analytics Solutions Architect in AWS with expertise in building modern data and analytics solutions to drive business value. He works with customers to help them harness the power of the cloud. His areas of interests are infrastructure as code, serverless technologies, and coding in Python