Post Syndicated from Tim Kingdon original https://aws.amazon.com/blogs/security/how-to-automatically-disable-users-in-aws-managed-microsoft-ad-based-on-guardduty-findings/
Organizations are facing an increasing number of security threats, especially in the form of compromised user accounts. Manually monitoring and acting on suspicious activities is not only time-consuming but also prone to human error. The lack of automated responses to security incidents can lead to disastrous consequences, such as data breaches and financial loss.
In this blog post, I show you how to detect suspicious events using Amazon GuardDuty and create an automation from those findings to disable user accounts in AWS Directory Service for Microsoft Active Directory.
This post addresses scenarios where, for example, you have a web server that uses a Microsoft Active Directory user account (service account) to access an application or database resources on other servers, and you want to automate disabling the user account if suspicious activity is detected.
I walk you through how to deploy Microsoft Active Directory in AWS Directory Services, set up GuardDuty to monitor Amazon Elastic Compute Cloud (Amazon EC2) instances, and configure Amazon EventBridge with AWS Step Functions to trigger AWS Systems Manager Run Command to obtain the username and disable the user in Active Directory.
Solution overview
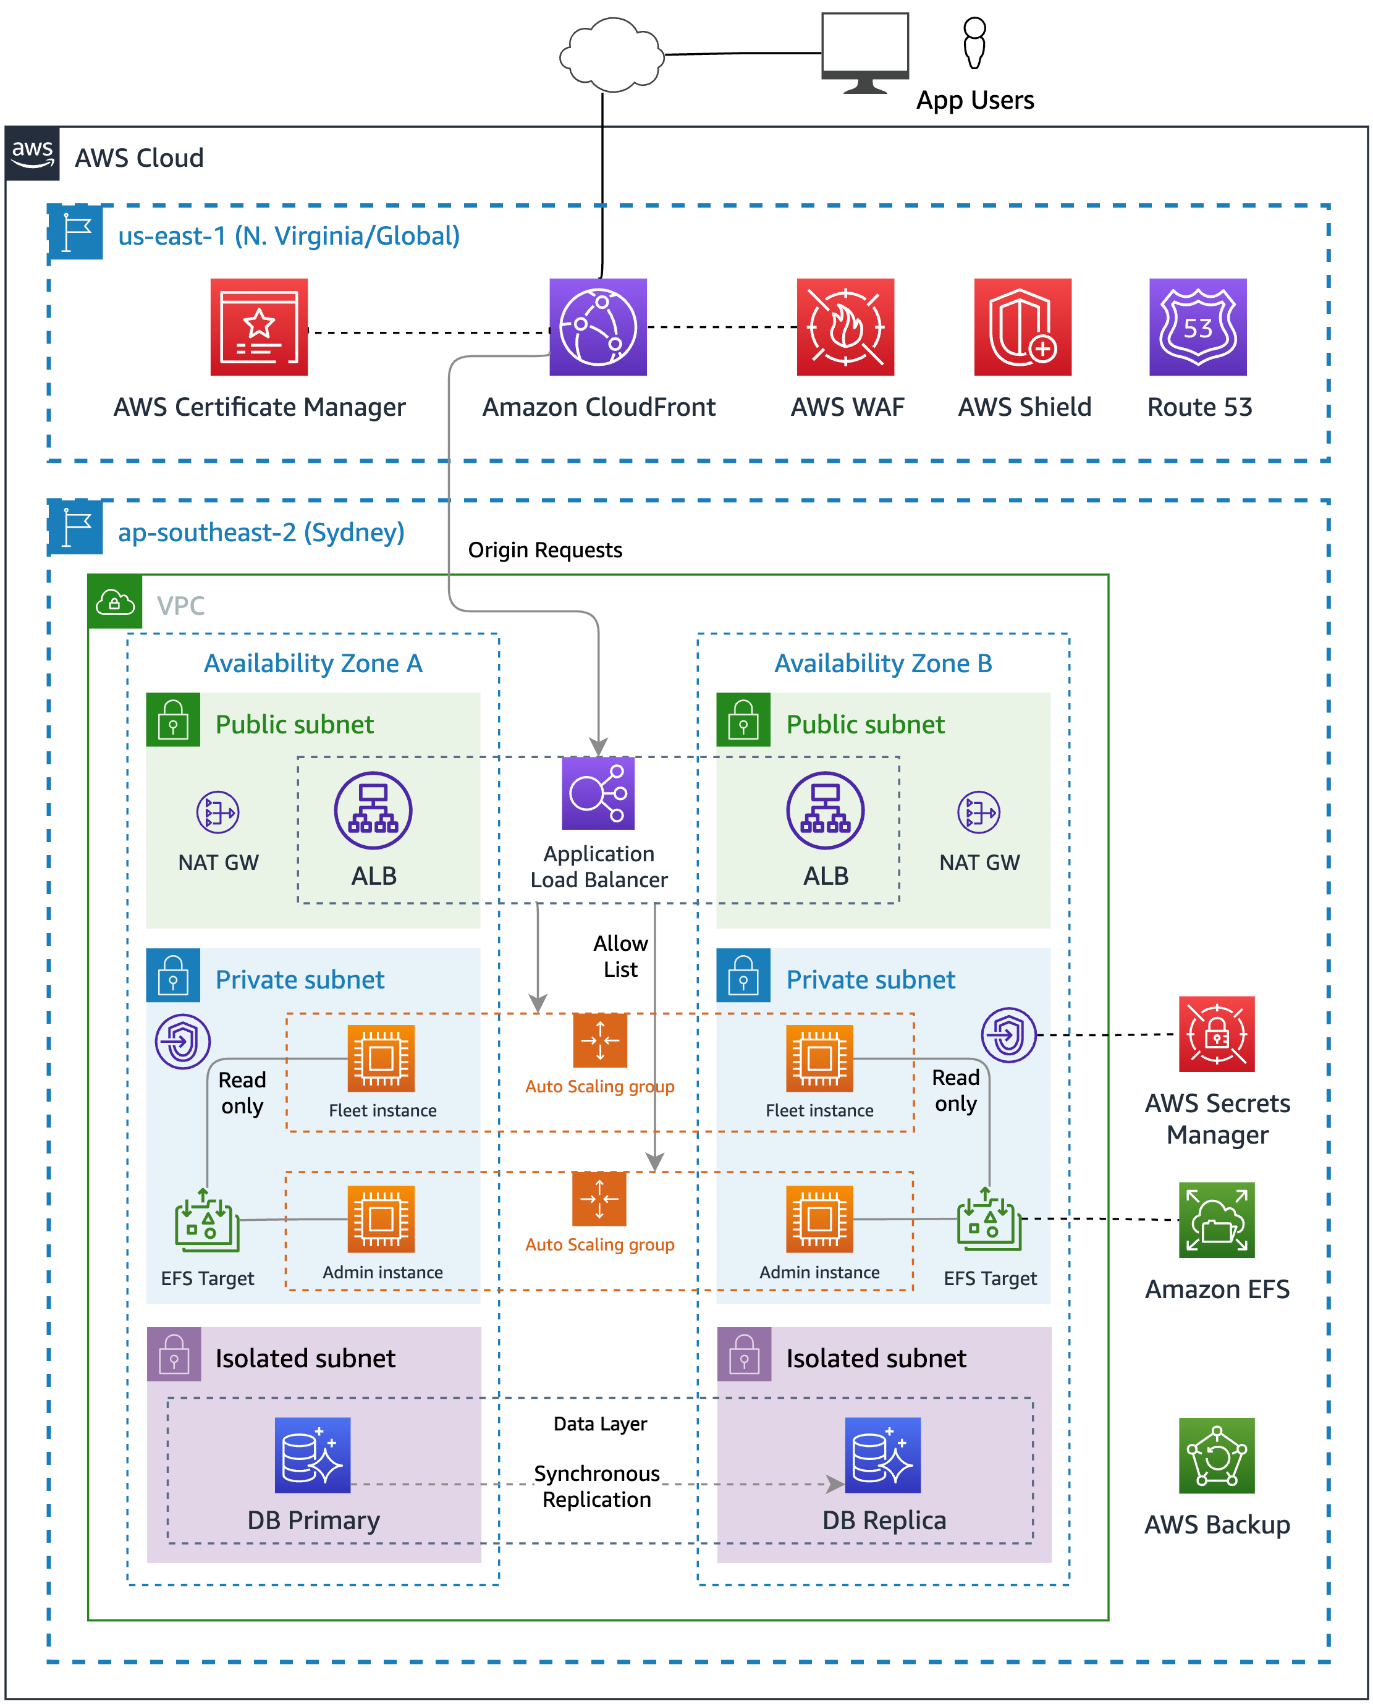
In this example, shown in Figure 1, you deploy a test EC2 instance and enable GuardDuty runtime monitoring. Findings will trigger an EventBridge rule that executes a Step Functions state machine, which runs two Systems Manager Run Command documents that discover the username and disable that user using the directory administration EC2 instance.
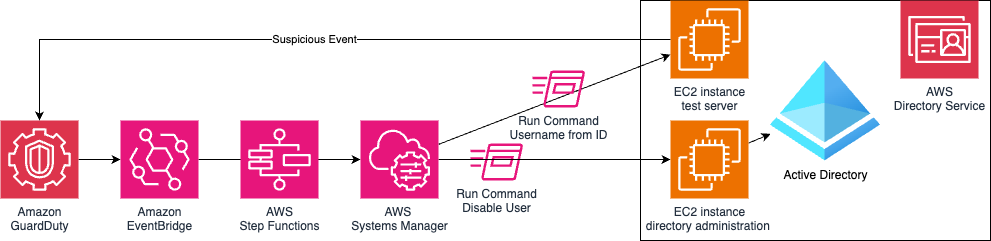
Figure 1: Solution architecture
GuardDuty
GuardDuty is an automated threat detection service that continuously monitors for suspicious activity and unauthorized behavior to protect your AWS accounts, workloads, and data stored in Amazon Simple Storage Service (Amazon S3).
To activate GuardDuty:
- Go to GuardDuty on the AWS Management Console.
- If you’re activating GuardDuty for the first time, under Try threat detection with GuardDuty, select All Features and then choose Get Started.
- If you’ve used GuardDuty before, select Runtime Monitoring and then choose Enable under Runtime Monitoring.

Figure 2: GuardDuty Runtime Monitoring enabled with EC2 monitoring

AWS Managed Microsoft AD
AWS Managed Microsoft AD provides a fully managed service for Microsoft Active Directory (AD) in the AWS Cloud. When you create your directory, AWS deploys two domain controllers in separate Availability Zones that are exclusively yours for high availability. For use cases that require even higher resilience and performance in a specific AWS Region or during specific hours, you can scale AWS Managed Microsoft AD by deploying additional domain controllers to meet your needs. These domain controllers can help load balance, increase overall performance, or provide additional nodes to protect against temporary availability issues. Using AWS Managed Microsoft AD, you can define the correct number of domain controllers for your directory based on your use case.
To deploy a new AWS Managed Microsoft AD:
- Go to the Directory Service console.
- Choose Set up directory and select AWS Managed Microsoft AD.
- Select Standard Edition and enter a Directory DNS name and password.
- Select a virtual private cloud (VPC), for this example use the Default VPC.
- Choose Create directory.
Directory administration EC2 instance
This directory administration EC2 instance will be used to control the Microsoft Active Directory using AWS Systems Manager.
To deploy the directory administration EC2 instance:
- If you have deployed a new directory, you might need to wait 20–45 minutes until the directory status is Active.
- Select the Directory ID.
- Choose Actions and select Launch directory Administration EC2 Instance, using the default options.
Alternatively, you can build your own Windows EC2 instances with a role that has the AmazonSSMManagedInstanceCore policy, join it to the Active Directory domain, and install Active Directory management tools.
To remotely connect to the directory administration EC2 instance:
- Go to the Systems Manager console.
- Open Fleet Manager from the navigation pane.
- Select the Node ID for the instance with the name ending managementInstance.
- Choose Node Actions (top right), select Connect, and then choose Connect with Remote Desktop.
- Enter the username admin and the directory password that you set earlier.
Create a test Active Directory user
You will use this test user account to sign in to an EC2 instance and initiate a command that simulates suspicious activity that results in this account being disabled.
To use the directory administration EC2 instance to create a test user on the Active Directory:
- From the management EC2 instance, open the start menu, select Windows Administrative Tools and then open Active Directory Users and Computers.
- Browse to your Domain, the Domain OU, and then the Users OU, right-click and choose New and then select User.
- Create a TestUser user, making sure that you don’t select Account is disabled.
Create a privileged domain service account
You will create this domain user account with delegated permissions to be used by Systems Manager Windows Service.
To use the directory administration EC2 instance to create a service account in AD:
- From the management EC2 instance, open the start menu, select Windows Administrative Tools, and then open Active Directory Users and Computers.
- Browse to your Domain, the Domain OU, and then the Users OU. Right-click and select New, and then select User
- Create an SSMService user, making sure that you don’t select Account is disabled.
To delegate permission to the service account in AD:
- Right-click on the Users OU and select Delegate Control.
- Choose Next on the Delegation of Control Wizard.
- Add the new service user you created earlier and choose Next.
- Select Create a custom task to delegate and choose Next.
- Select Only the following objects in the folder and select User Objects, then choose Next.
- Select General and Property-specific to show the permissions, select Read userAccountControl and Write userAccountControl (near the end of the list), then choose Next and Finish.
To add a service account to the local administrators group:
- From the management EC2 instance, open the start menu, select Windows Administrative Tools, and then open Computer Management.
- Browse to Local Users and Groups, then to Groups.
- Right-click on Administrators and select Properties.
- Choose Add to add the new service user you created earlier and choose OK.
Configure Systems Manager
Configure Systems Manager on the directory administration EC2 instance with permission to manage the Active Directory.
To configure Systems Manager:
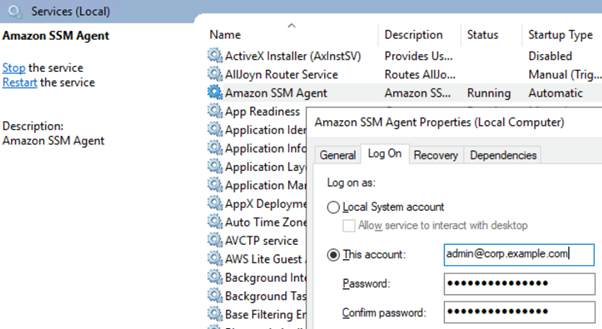
- From the management EC2 instance from the Start Menu, select Windows Administrative Tools, and then open Services.
- Locate the Amazon SSM Agent, right-click, and select Properties.
- Select the Log On tab and select This account.
- Within This account enter the privileged domain username you created earlier followed by
@and then the domain name, for example[email protected]. Enter your password and choose OK.

Figure 3: Microsoft Windows Services showing Systems Manager Agent settings
- Choose OK on the This account has been granted Log On As A Service right and The new logon name will not take effect until you stop and restart the service popups.
- Right-click Amazon SSM Agent and select Restart.
Systems Manager Run Command
Run Command is a feature of Systems Manager that can remotely and securely manage the configuration of your managed nodes. You can use Run Command to automate common administrative tasks and perform one-time configuration changes at scale. You can use Run Command from the console, the AWS Command Line Interface (AWS CLI), AWS Tools for PowerShell, or the AWS SDKs. Run Command is offered at no additional cost.
To create a Run Command document with a PowerShell command to disable domain user accounts:
- Go to the AWS Systems Manager console.
- Select Documents under Change Management Tools.
- Choose Create document and select Command or Session.
- Enter a name, for example
DisableADUser. - Select document type Command.
- Select YAML and then enter the following code:
- Choose Create document.
To create a Run Command document with a bash command to find a username from a UserID:
- Follow steps 1–3 from the previous procedure.
- Enter a name, for example
GetUsernameFromID. - Select document type Command.
- Select YAML and then enter the following code:
- Choose Create document.
Step Functions
Step Functions is a serverless orchestration service that you can use to coordinate multiple AWS services, microservices, and third-party integrations into business-critical applications. Step Functions is widely used for orchestrating complex workflows, such as loan processing, fraud detection, risk management, and compliance processes. By breaking down these processes into a series of steps, Step Functions provides a clear overview and control of the entire workflow. This helps make sure that it executes each stage correctly and in the right order. One of the critical aspects of using Step Functions in regulated industries is the importance of security and data protection.
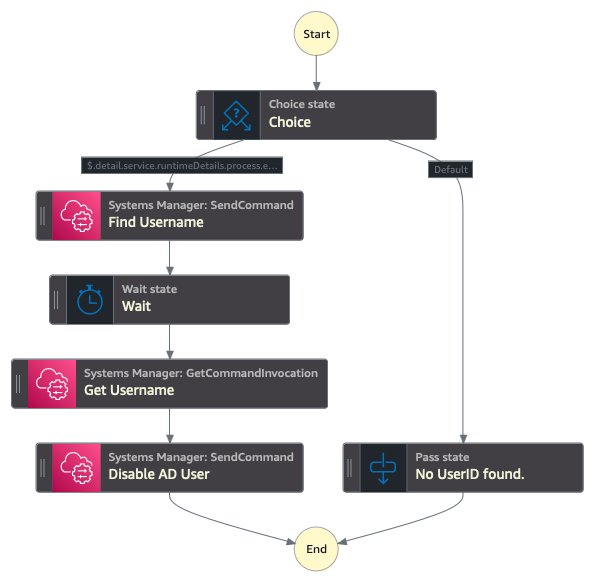
By the end of this section, your state machine should have a sequential flow that starts with a choice that defaults to No UserID found and with the UserID present, includes the steps Find Username, Wait, Get Username, and Disable AD User. If it doesn’t, you can drag the actions into the correct order or change the next state associated with each action. Alternatively, copy this state machine definition JSON and import it directly into Step Functions.
To create a Step Functions state machine to execute the Systems Manager Run Commands:
- Go to the Step Functions console.
- Choose Get Started.
- Choose Create your own.
- Enter a name for the state machine, select Standard, and choose Continue.
- Select JSONPath as the state machine query language.
- From the navigation pane, search for and add the Pass action by dragging the action to the center window.
- Add the Systems Manager: SendCommand Action for Finding the Username using Run Command.
- Select the SendCommand, change the state name to
Find Username, and then enter the following code into API Parameters on the right side of the screen. - With SendCommand selected, select the Input/Output tab, select Add original input to output using ResultPath, select Combine original input with result, and enter the following:
- Add a Wait Action and set the number of seconds to wait before resuming the execution to 5 seconds.
- Add a Systems Manager: GetCommandInvocation action, which will get the Username value from Run Command and change the state name to Get Username, then enter the following API Parameters.
- On the Input/Output tab, select Transform result with ResultSelector and enter the following:
- Add a Systems Manager: SendCommand action which will disable the Active Directory user using Run Command. Change the state name to Disable AD User then enter the following API Parameters, changing the InstanceIds value to the ID of your Active Directory Management server.
- Add a Choice action, choose the pencil icon next to Rule #1, choose Edit conditions, enter the variable
$.detail.service.runtimeDetails.process.euid, select operator is present, value true, leave Not as blank, and choose Save Conditions. - Re-arrange the state machine layout to the same structure as displayed in Figure 4, with a sequential flow that starts with a choice that defaults to No UserID found and with the UserID present includes the steps Find Username, Wait, Get Username, and Disable AD User.

Figure 4: Step Functions state machine structure
- Choose Create (top right) and then Confirm to create the step function state machine.
To add permissions to enable the State Machine to run System Manager commands:
- Within the newly created state machine, choose Config (top center).
- Choose View in IAM, under Permissions, Execution role.
- Choose Add permissions, Attach Polices (center right).
- Search for and select AmazonSSMAutomationRole and choose Add permission.
EventBridge
EventBridge helps developers build event-driven architectures (EDA) by connecting loosely coupled publishers and consumers using event routing, filtering, and transformation. To create an EventBridge rule that triggers the Systems Manger Run Command document you created earlier:
- Go to the Amazon EventBridge console and select Create rule with EventBridge Rule.
- Enter a name, for example
GuardDutyDisableADuser. - Select Rule with an event pattern and choose Next.
- Under the Event pattern JSON window, choose Edit pattern and enter the following:
- Choose Next.
- Select AWS Service.
- Select Step Functions state machine as the target.
- Select the state machine you created earlier, for example MyStateMachine-A123456789.
- Choose Next twice and choose Create rule
Create a test EC2 instance
To generate alerts on GuardDuty, you create a domain joined Linux EC2 instance. For this example, you’ll use two separate EC2 instances so you can monitor for activity from each instance within GuardDuty and use EventBridge to create automations.
To create an AWS Identity and Access Management (IAM) role to permit the EC2 instance to join the AD:
- Go to the IAM console.
- Select Policies from the navigation pane.
- Choose Create policy (top right).
- Select Policy editor JSON, enter the following code and choose Next.
- Enter the Policy name, for example
SecretsManagerGetSecrets, and choose Create policy. - Select Roles from navigation pane.
- Choose Create role (top right).
- Select AWS service and choose EC2 from the service or use case selection, then choose Next.
- Search for and select the following policies and choose Next
- AmazonSSMDirectoryServiceAccess
- AmazonSSMManagedInstanceCore
- SecretsManagerGetSecrets (created earlier)
- Enter the role name, for example
EC2DomainJoin, and choose Create role.
To create a secret that will be used to store privileged credentials used to join EC2 instances to the domain:
- Go to the Secrets Manager console.
- Select Store a new secret.
- Select Other type of secret.
- Add the following keys with the corresponding value of a domain username and password that have permissions to join computers to the domain:
- awsSeamlessDomainUsername
- awsSeamlessDomainPassword
- Choose Next.
- Enter the following secret name, replacing
<d-1234567890>with your directory ID. - Choose Next twice, then Store.
For more information more, see Seamlessly joining an Amazon EC2 Linux instance to your AWS Managed Microsoft AD Active Directory.
To create a domain joined EC2 instance for testing this GuardDuty automation:
- Go to the Amazon EC2 console.
- Select Instances from navigation pane.
- Choose Launch Instances.
- Select Amazon Linux AMI.
- Select an existing Key Pair or create a new key pair.
- Scroll to the bottom and select Advanced details.
- Within Domain join directory, select the domain
- Within IAM instance profile, select the EC2DomainJoin role that you created earlier.
- Choose Launch Instance.
Testing
To simulate a threat, use a GuardDuty test domain that GuardDuty will recognize as a command and control server.
- Go to the Amazon EC2 console.
- Choose Instances from the navigation pane.
- Select the test EC2 instance that you created earlier.
- Choose Connect, select the Session Manager tab, and choose Connect
- Authenticate with your test user by entering
sufollowed by the test user with the domain name that you created earlier. For examplesu [email protected], then enter the password. - Enter the command
curl guarddutyc2activityb.com.- You will receive an error because the page won’t resolve, but GuardDuty will have detected suspicious events.
- Go to the GuardDuty console and select Findings from the navigation pane.
- Within 3–5 minutes, you should see a high severity finding for Backdoor:EC2/C&CActivity.B!DNS.
Note: You must archive the GuardDuty finding before re-running this test, because the EventBridge rule only runs once against a GuardDuty finding with the same details. To archive the finding, select the check box next to the Backdoor:EC2/C&CActivity.B!DNS finding, choose Actions (top right), and select Archive.
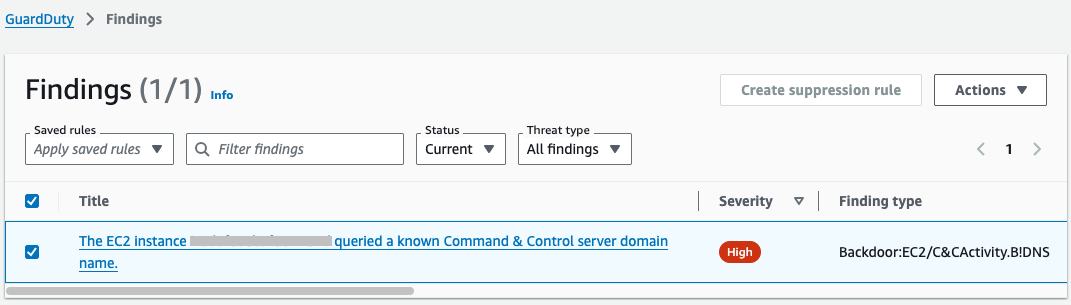
Figure 5: GuardDuty simulated findings
If you go back to Active Directory Users and Computers on the Directory Administration EC2 instance, you should see that the Test User is now disabled. You can enable the user by right-clicking on the user and selecting Enable Account.
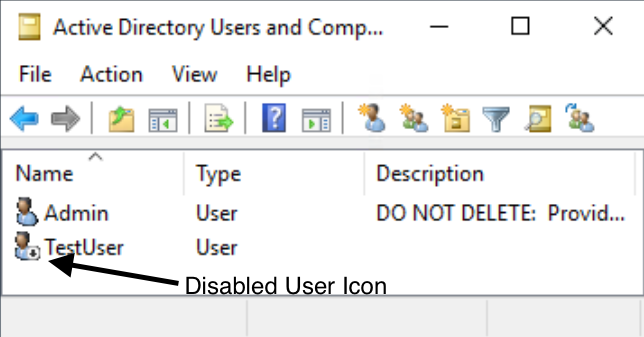
Figure 6: Active Directory Users and Computers showing the disabled test use
Conclusion
In this post, you learned how to deploy AWS Managed AD, Systems Manager Run Command, EventBridge, Step Functions, and GuardDuty to monitor for suspicious events and disable the associated Active Directory user account.
You can expand this scenario by creating Run Command documents that reset Active Directory passwords, disable computer accounts, or Active Directory tasks supported by Microsoft PowerShell. Additionally, you can add steps within the Step Functions state machine to notify administrators through Amazon Simple Notification Service (Amazon SNS) or add additional checks with AWS Lambda.
Although this post uses AWS Managed Microsoft AD, the same functionality can be achieved with a manual deployment of Active Directory on Amazon EC2 or on-premises, either by using an EC2 instance joined to the Active Directory domain with the Active Directory administration tools installed or by installing Systems Manager agent onto a management server on-premises.
If you have feedback about this post, submit comments in the Comments section below. If you have questions about this post, start a new thread on AWS re:Post GuardDuty or contact AWS Support.