Tag Archives: Networking & Content Delivery*

Field Notes: How to Scale Your Networks on Amazon Web Services

Post Syndicated from Androski Spicer original https://aws.amazon.com/blogs/architecture/field-notes-how-to-scale-your-networks-on-amazon-web-services/

As AWS adoption increases throughout an organization, the number of networks and virtual private clouds (VPCs) to support them also increases. Customers can see growth upwards of tens, hundreds, or in the case of the enterprise, thousands of VPCs.

Generally, this increase in VPCs is driven by the need to:

  • Simplify routing, connectivity, and isolation boundaries
  • Reduce network infrastructure cost
  • Reduce management overhead

Overview of solution

This blog post discusses the guidance customers require to achieve their desired outcomes. Guidance is provided through a series of real-world scenarios customers encounter on their journey to building a well-architected network environment on AWS. These challenges range from the need to centralize networking resources, to reduce complexity and cost, to implementing security techniques that help workloads to meet industry and customer specific operational compliance.

The scenarios presented here form the foundation and starting point from which the intended guidance is provided. These scenarios start as simple, but gradually increase in complexity. Each scenario tackles different questions customers ask AWS solutions architects, service teams, professional services, and other AWS professionals, on a daily basis.

Some of these questions are:

  • What does centralized DNS look like on AWS, and how should I approach and implement it?
  • How do I reduce the cost and complexity associated with Amazon Virtual Private Cloud (Amazon VPC) interface endpoints for AWS services by centralizing that is spread across many AWS accounts?
  • What does centralized packet inspection look like on AWS, and how should we approach it?

This blog post will answer these questions, and more.

Prerequisites

This blog post assumes that the reader has some understanding of AWS networking basics outlined in the blog post One to Many: Evolving VPC Design. It also assumes that the reader understands industry-wide networking basics.

Simplify routing, connectivity, and isolation boundaries

Simplification in routing starts with selecting the correct layer 3 technology. In the past, customers used a combination of VPC peering, Virtual Gateway configurations, and the Transit VPC Solution to achieve inter–VPC routing, and routing to on-premises resources. These solutions presented challenges in configuration and management complexity, as well as security and scaling.

To solve these challenges, AWS introduced AWS Transit Gateway. Transit Gateway is a regional virtual router that customers can attach their VPCs, site-to-site virtual private networks (VPNs), Transit Gateway Connect, AWS Direct Connect gateways, and cross-region transit gateway peering connections, and configure routing between them. Transit Gateway scales up to 5,000 attachments; so, a customer can start with one VPC attachment, and scale up to thousands of attachments across thousands of accounts. Each VPC, Direct Connect gateway, and peer transit gateway connection receives up to 50 Gbps of bandwidth.

Routing happens at layer 3 through a transit gateway. Transit Gateway come with a default route table to which all default attachment association happens. If route propagation and association is enabled at transit gateway creation time, AWS will create a transit gateway with a default route table to which attachments are automatically associated and their routes automatically propagated. This creates a network where all attachments can route to each other.

Adding VPN or Direct Connect gateway attachments to on-premises networks will allow all attached VPCs and networks to easily route to on-premises networks. Some customers require isolation boundaries between routing domains. This can be achieved with Transit Gateway.

Let’s review a use case where a customer with two spoke VPCs and a shared services VPC (shared-services-vpc-A) would like to:

  • Allow all spoke VPCs to access the shared services VPC
  • Disallow access between spoke VPCs

Figure 1. Transit Gateway Deployment

To achieve this, the customer needs to:

  1. Create a transit gateway with the name tgw-A and two route tables with the names spoke-tgw-route-table and shared-services-tgw-route-table.
    1. When creating the transit gateway, disable automatic association and propagation to the default route table.
    2. Enable equal-cost multi-path routing (ECMP) and use a unique Border Gateway Protocol (BGP) autonomous system number (ASN).
  1. Associate all spoke VPCs with the spoke-tgw-route-table.
    1. Their routes should not be propagated.
    2. Propagate their routes to the shared-services-tgw-route-table.
  1. Associate the shared services VPC with the shared-services-tgw-route-table and its routes should be propagated or statically added to the spoke-tgw-route-table.
  2. Add a default and summarized route with a next hop of the transit gateway to the shared services and spoke VPCs route table.

After successfully deploying this configuration, the customer decides to:

  1. Allow all VPCs access to on-premises resources through AWS site-to-site VPNs.
  2. Require an aggregated bandwidth of 10 Gbps across this VPN.
Figure 2. Transit Gateway hub and spoke architecture, with VPCs and multiple AWS site-to-site VPNs

Figure 2. Transit Gateway hub and spoke architecture, with VPCs and multiple AWS site-to-site VPNs

To achieve this, the customer needs to:

  1. Create four site-to-site VPNs between the transit gateway and the on-premises routers with BGP as the routing protocol.
    1. AWS site-to-site VPN has two VPN tunnels. Each tunnel has a dedicated bandwidth of 1.25 Gbps.
    2. Read more on how to configure ECMP for site-to-site VPNs.
  1. Create a third transit gateway route table with the name WAN-connections-route-table.
  2. Associate all four VPNs with the WAN-connections-route-table.
  3. Propagate the routes from the spoke and shared services VPCs to WAN-connections-route-table.
  4. Propagate VPN attachment routes to the spoke-tgw-route-table and shared-services-tgw-route-table.

Building on this progress, the customer has decided to deploy another transit gateway and shared services VPC in another AWS Region. They would like both shared service VPCs to be connected.

Transit Gateway peering connection architecture

Figure 3. Transit Gateway peering connection architecture

To accomplish these requirements, the customer needs to:

  1. Create a transit gateway with the name tgw-B in the new region.
  2. Create a transit gateway peering connection between tgw-A and tgw-B. Ensure peering requests are accepted.
  3. Statically add a route to the shared-services-tgw-route-table in region A that has the transit-gateway-peering attachment as the next for hop traffic destined to the VPC Classless Inter-Domain Routing (CIDR) range for shared-services-vpc-B. Then, in region B, add a route to the shared-services-tgw-route-table that has the transit-gateway-peering attachment as the next for hop traffic destined to the VPC CIDR range for shared-services-vpc-A.

Reduce network infrastructure cost

It is important to design your network to eliminate unnecessary complexity and management overhead, as well as cost optimization. To achieve this, use centralization. Instead of creating network infrastructure that is needed by every VPC inside each VPC, deploy these resources in a type of shared services VPC and share them throughout your entire network. This results in the creation of this infrastructure only one time, which reduces the cost and management overhead.

Some VPC components that can be centralized are network address translation (NAT) gateways, VPC interface endpoints, and AWS Network Firewall. Third-party firewalls can also be centralized.

Let’s take a look at a few use cases that build on the previous use cases.

Figure 4. Centralized interface endpoint architecture

Figure 4. Centralized interface endpoint architecture

The customer has made the decision to allow access to AWS Key Management Service (AWS KMS) and AWS Secrets Manager from their VPCs.

The customer should employ the strategy of centralizing their VPC interface endpoints to reduce the potential proliferation of cost, management overhead, and complexity that can occur when working with this VPC feature.

To centralize these endpoints, the customer should:

  1. Deploy AWS VPC interface endpoints for AWS KMS and Secrets Manager inside shared-services-vpc-A and shared-services-vpc-B.
    1. Disable each Private DNS.

Figure 5. Centralized interface endpoint step-by-step guide (Step 1)

  1. Use the AWS default DNS name for AWS KMS and Secrets Manager to create an Amazon Route 53 private hosted zone (PHZ) for each of these services. These are:
    1. kms.<region>.amazonaws.com
    2. secretsmanager.<region>.amazonaws.com
Figure 6. Centralized interface endpoint step-by-step guide (Step 2)

Figure 6. Centralized interface endpoint step-by-step guide (Step 2)

  1. Authorize each spoke VPC to associate with the PHZ in their respective region. This can be done from the AWS Command Line Interface (AWS CLI) by using the command aws route53 create-vpc-association-authorization –hosted-zone-id <hosted-zone-id> –vpc VPCRegion=<region>,VPCId=<vpc-id> –region <AWS-REGION>.
  2. Create an A record for each PHZ. In the creation process, for the Route to option, select the VPC Endpoint Alias. Add the respective VPC interface endpoint DNS hostname that is not Availability Zone specific (for example, vpce-0073b71485b9ad255-mu7cd69m.ssm.ap-south-1.vpce.amazonaws.com).
Figure 7. Centralized interface endpoint step-by-step guide (Step 3)

Figure 7. Centralized interface endpoint step-by-step guide (Step 3)

  1. Associate each spoke VPC with the available PHZs. Use the CLI command aws route53 associate-vpc-with-hosted-zone –hosted-zone-id <hosted-zone-id> –vpc VPCRegion=<region>,VPCId=<vpc-id> –region <AWS-REGION>.

This concludes the configuration for centralized VPC interface endpoints for AWS KMS and Secrets Manager. You can learn more about cross-account PHZ association configuration.

After successfully implementing centralized VPC interface endpoints, the customer has decided to centralize:

  1. Internet access.
  2. Packet inspection for East-West and North-South internet traffic using a pair of firewalls that support the Geneve protocol.

To achieve this, the customer should use the AWS Gateway Load Balancer (GWLB), Amazon VPC endpoint services, GWLB endpoints, and transit gateway route table configurations.

Figure 8. Illustrated security-egress VPC infrastructures and route table configuration

Figure 8. Illustrated security-egress VPC infrastructures and route table configuration

To accomplish these centralization requirements, the customer should create:

  1. A VPC with the name security-egress VPC.
  2. A GWLB, an autoscaling group with at least two instance of the customer’s firewall which are evenly distributed across multiple private subnets in different Availability Zones.
  3. A target group for use with the GWLB. Associate the autoscaling group with this target group.
  4. An AWS endpoint service using the GWLB as the entry point. Then create AWS interface endpoints for this endpoint service inside the same set of private subnets or create a /28 set of subnets for interface endpoints.
  5. Two AWS NAT gateways spread across two public subnets in multiple Availability Zones.
  6. A transit gateway attachment request from the security-egress VPC and ensure that:
    1. Transit gateway appliance mode is enabled for this attachment as it ensures bidirectional traffic forwarding to the same transit gateway attachments.
    2. Transit gateway–specific subnets are used to host the attachment interfaces.
  1. In the security-egress VPC, configure the route tables accordingly.
    1. Private subnet route table.
      1. Add default route to the NAT gateway.
      2. Add summarized routes with a next-hop of Transit Gateway for all networks you intend to route to that are connected to the Transit Gateway.
    1. Public subnet route table.
      1. Add default route to the internet gateway.
      2. Add summarized routes with a next-hop of the GWLB endpoints you intend to route to for all private networks.

Transit Gateway configuration

  1. Create a new transit gateway route table with the name transit-gateway-egress-route-table.
    1. Propagate all spoke and shared services VPCs routes to it.
    2. Associate the security-egress VPC with this route table.
  1. Add a default route to the spoke-tgw-route-table and shared-services-tgw-route-table that points to the security-egress VPC attachment, and remove all VPC attachment routes respectively from both route tables.
Illustrated routing configuration for the transit gateway route tables and VPC route tables

Figure 9. Illustrated routing configuration for the transit gateway route tables and VPC route tables

Illustrated North-South traffic flow from spoke VPC to the internet

Figure 10. Illustrated North-South traffic flow from spoke VPC to the internet

Figure 11. Illustrated East-West traffic flow between spoke VPC and shared services VPC

Figure 11. Illustrated East-West traffic flow between spoke VPC and shared services VPC

Conclusion

In this blog post, we went on a network architecture journey that started with a use case of routing domain isolation. This is a scenario most customers confront when getting started with Transit Gateway. Gradually, we built upon this use case and exponentially increased its complexity by exploring other real-world scenarios that customers confront when designing multiple region networks across multiple AWS accounts.

Regardless of the complexity, these use cases were accompanied by guidance that helps customers achieve a reduction in cost and complexity throughout their entire network on AWS.

When designing your networks, design for scale. Use AWS services that let you achieve scale without the complexity of managing the underlying infrastructure.

Also, simplify your network through the technique of centralizing repeatable resources. If more than one VPC requires access to the same resource, then find ways to centralize access to this resource which reduces the proliferation of these resources. DNS, packet inspection, and VPC interface endpoints are good examples of things that should be centralized.

Thank you for reading. Hopefully you found this blog post useful.

Field Notes provides hands-on technical guidance from AWS Solutions Architects, consultants, and technical account managers, based on their experiences in the field solving real-world business problems for customers.

How to Accelerate Performance and Availability of Multi-region Applications with Amazon S3 Multi-Region Access Points

Post Syndicated from Alex Casalboni original https://aws.amazon.com/blogs/aws/s3-multi-region-access-points-accelerate-performance-availability/

Building multi-region applications allows you to improve latency for end users, achieve higher availability and resiliency in case of unexpected disasters, and adhere to business requirements related to data durability and data residency. For example, you might want to reduce the overall latency of dynamic API calls to your backend services . Or you might want to extend a single-region deployment to handle internet routing issues, failures of submarine cables, or regional connectivity issues – and therefore avoid costly downtime. Today, thanks to multi-region data replication functions such as Amazon DynamoDB global tables, Amazon Aurora global database, Amazon ElastiCache global datastore, and Amazon Simple Storage Service (Amazon S3) cross-region replication, you can build multi-region applications across 25 AWS Regions worldwide.

Yet, when it comes to implementing multi-region applications, you often have to make your code region-aware and take care of the heavy lifting of interacting with the correct regional resources, whether it’s the closest or the most available. For example, you might have three S3 buckets with object replication across three AWS Regions. Your application code needs to be aware of how many copies of the bucket exist and where they are located, which bucket is the closest to the caller, and how to fall back to other buckets in case of issues. The complexity grows when you add new regions to your multi-region architecture and redeploy your stack in each region whenever a global configuration changes.

Today, I’m happy to announce the general availability of Amazon S3 Multi-Region Access Points, a new S3 feature that allows you to define global endpoints that span buckets in multiple AWS Regions. With S3 Multi-Region Access Points, you can build multi-region applications with the same simple architecture used in a single region.

S3 Multi-Region Access Points deliver built-in network resilience, building on top AWS Global Accelerator to route S3 requests over the AWS global network. This is especially important to minimize network congestion and overall latency, while maintaining a simple application architecture. AWS Global Accelerator constantly monitors for regional availability and can shift requests to another region within seconds. By dynamically routing your requests to the lowest latency copy of your data, S3 Multi-Region Access Points increase upload and download performance by up to 60%. This is great not just for server-side applications that rely on S3 for reading configuration files or application data, but also for edge applications that need a performant and reliable write-only endpoint, such as IoT devices or autonomous vehicles.

S3 Multi-Region Access Points in Action
To get started, you create an S3 Multi-Region Access Point in the S3 console, via API, or with AWS CloudFormation.

Let me show you how to create one using the S3 console. Each access point needs a name, unique at the account level.

After it’s created, you can access it through its alias, which is generated automatically and globally unique. The alias will look like a random string ending with .mrap – for example, mmqdt41e4bf6x.mrap. It can also be accessed over the internet via https://mmqdt41e4bf6x.mrap.s3-global.amazonaws.com, via VPC, or on-premises using AWS PrivateLink.
Then, you associate multiple buckets (new or existing) to the access point, one per Region. If you need data replication, you’ll need to enable bucket versioning too.

Finally, you configure the Block Public Access settings for the access point. By default, all public access is blocked, which works fine for most cases.

The creation process is asynchronous, you can view the creation status in the Console or by listing the S3 Multi-Region Access Points from the CLI. When it becomes Ready, you can configure optional settings for the access point policy and object replication.

Similar to regular access points, you can customize the access control policy to limit the use of the access point with respect to the bucket’s permission. Keep in mind that both the access point and the underlying buckets must permit a request. S3 Multi-Region Access Points cannot extend the permissions, just limit (or equal) them. You can also use IAM Access Analyzer to verify public and cross-account access for buckets that use S3 Multi-Region Access Points and preview access to your buckets before deploying permissions changes.

Your S3 Multi-Region Access Point access policy might look like this:

{
  "Version": "2012-10-17",
  "Statement": [
    {
      "Sid": "Default",
      "Effect": "Allow",
      "Principal": {
        "AWS": "YOUR_ACCOUNT_ID" 
      },
      "Action": ["s3:GetObject", "s3:PutObject"],
      "Resource": "arn:aws:s3::YOUR_ACCOUNT_ID:accesspoint/YOUR_ALIAS/object/*"
    }
   ]
}

To replicate data between buckets used with your S3 Multi-Region Access Point, you configure S3 Replication. In some cases, you might want to store different content in each bucket, or have a portion of a regional bucket for use with a global endpoint and other portions that aren’t replicated and used only with a regional access point or direct bucket access. For example, an IoT device configuration might include references to other regional API endpoints or regional resources that will be different for each bucket.

The new S3 console provides two basic templates that you can use to easily and centrally create replication rules:

  • Replicate objects from one or more source bucket to one or more destination buckets: This is ideal for ready-only use cases where data is always generated in a specific AWS Region and you want it to be available in all other Regions, too.
  • Replicate objects among all specified buckets: This is ideal for the IoT scenario I mentioned, where you’d define a write-only access point that devices use to upload data to the closest region, and you need this data to be available in all regions.

Of course, thanks to filters and conditions, you can create more sophisticated replication setups. For example, you might want to replicate only certain objects based on a prefix or tags.

Keep in mind that bucket versioning must be enabled for cross-region replication.

The console will take care of creating and configuring the replication rules and IAM roles. Note that to add or remove buckets, you would create a new the S3 Multi-Region Access Point with the revised list.

In addition to the replication rules, here is where you configure replication options such as Replication Time Control (RTC), replication metrics and notifications, and bidirectional sync. RTC allows you to replicate most new objects in seconds, and 99.99% of those objects within 15 minutes, for use cases where replication speed is important; replications metrics allow you to monitor how synchronized are your buckets in terms of object and byte count; bidirectional sync allows you to achieve an active-active configuration for put-heavy use cases in which object metadata needs to be replicated across buckets too.

After replication is configured, you get a very useful visual and interactive summary that allows you to verify which AWS Regions are enabled. You’ll see where they are on the map, the name of the regional buckets, and which replication rules are being applied.

After the S3 Multi-Region Access Point is defined and correctly configured, you can start interacting with it through the S3 API, AWS CLI, or the AWS SDKs. For example, this is how you’d write and read a new object using the CLI (don’t forget to upgrade to the latest CLI version):

# create a new object
aws s3api put-object --bucket arn:aws:s3::YOUR_ACCOUNT_ID:accesspoint/YOUR_ALIAS --key test.png --body test.png
# retrieve the same object
aws s3api get-object --bucket arn:aws:s3::YOUR_ACCOUNT_ID:accesspoint/YOUR_ALIAS --key test.png test.png

Last but not least, you can use bucket metrics in Amazon CloudWatch to keep track of how user requests are distributed across buckets in multiple AWS Regions.

CloudFormation Support at Launch
Today, you can start using two new CloudFormation resources to easily define an S3 Multi-Region Access Point: AWS::S3::MultiRegionAccessPoint and AWS::S3::MultiRegionAccessPointPolicy.

Here is an example:

Resources:
  MyS3MultiRegionAccessPoint:
    Type: AWS::S3::MultiRegionAccessPoint
    Properties:
      Regions:
        - Bucket: regional-bucket-ireland
        - Bucket: regional-bucket-australia
        - Bucket: regional-bucket-us-east
      PublicAccessBlockConfiguration:
        BlockPublicAcls: true
        IgnorePublicAcls: true
        BlockPublicPolicy: true
        RestrictPublicBuckets: true
  MyMultiRegionAccessPointPolicy:
    Type: AWS::S3::MultiRegionAccessPointPolicy
    Properties:
      MrapName: !Ref MyS3MultiRegionAccessPoint
      Policy:
        Version: 2012-10-17
        Statement:
          - Action: '*'
            Effect: Allow
            Resource: !Sub
              - 'arn:aws:s3::${AWS::AccountId}:accesspoint/${mrapalias}/object/*'
              - mrapalias: !GetAtt
                  - MyS3MultiRegionAccessPoint
                  - Alias
            Principal: {"AWS": !Ref "AWS::AccountId"}

The AWS::S3::MultiRegionAccessPoint resource depends only on the S3 bucket names. You don’t need to reference other regional stacks and you can easily centralize the S3 Multi-Region Access Point definition into its own stack. On the other hand, cross-region replication needs to be configured on each S3 bucket.

Cost considerations
When you use an S3 Multi-Region Access Point to route requests within the AWS global network, you pay a data routing cost of $0.0033 per GB processed, in addition to the standard charges for S3 requests, storage, data transfer, and replication. If your applications access the S3 Multi-Region Access Point over the internet, you’re also charged an internet acceleration cost per GB. This cost depends on the transfer type (upload or download) and whether the client and the bucket are in the same or different locations. For details, visit the S3 pricing page and select the data transfer tab.

Let me share a few practical examples:

  • All traffic within an AWS Region: In this simple case, your application runs in US East (N. Virginia) and you configure two S3 buckets in US East (N. Virginia) and US West (Oregon). The application uploads 100GB of data and the lowest latency bucket is in US East(N. Virginia). All the data is routed by your S3 Multi-Region Access Point in the same region and the total cost is $0.33.
  • All traffic across two AWS Regions: In this case, your application runs in US East (N. Virginia) and you configure two S3 buckets in US East (Ohio) and US West (Oregon). The application uploads 100GB of data and the lowest latency bucket is in US East (Ohio). All the data is routed by your S3 Multi-Region Access Point across two AWS Regions. The data routing cost for 100GB is the same of the previous example ($0.33), plus the S3 data transfer cost of $0.01 per GB, resulting in a total cost of $1.33.
  • All traffic over the internet across North America, Europe, and Asia Pacific (download and upload): In this case, your application runs on customer devices in North America, Europe, and Asia, and you configure two S3 buckets in US East (N. Virginia) and Europe (Ireland). One customer in North America uploads 50GB of data, which is routed to the bucket in US East (N. Virginia); a second customer in Europe downloads 50GB of data from the bucket in Europe (Ireland); a third customer in Asia downloads 50GB of data from the bucket in Europe (Ireland). The data routing cost for 150GB is $0.495. Plus the data transfer out from S3 to Europe of $0.09 per GB ($9), the internet acceleration cost from North America to the S3 bucket in US East (N. Virginia) of $0.0025 per GB ($0.125), the internet acceleration cost from the S3 bucket in Europe (Ireland) to Europe of $0.005 per GB ($0.25), and the internet acceleration cost from the S3 bucket in Europe (Ireland) to Asia of $0.05 per GB ($2.5). The total cost is $12.37. Please note that this example is intended to demonstrate how the internet acceleration cost works across continents. Also note that the internet acceleration cost to Asia might be reduced by an order of magnitude with an additional S3 bucket in Asia (see next example).
  • All the traffic over the internet across North America, Europe, and Asia Pacific (only upload): In this case, we consider the same conditions of the previous example. The only difference is that all customers only upload data and that you configure an additional bucket in Asia Pacific (Singapore). The data routing cost is the same ($0.495). Plus the internet acceleration cost from North America to the S3 bucket in US East (N. Virginia) of $0.0025 per GB ($0.125), the internet acceleration cost from Europe to the S3 bucket in Europe (Ireland) of $0.0025 per GB ($0.125), and the internet acceleration cost from Asia to the S3 bucket in Asia Pacific (Singapore) of $0.01 per GB ($0.5). The total cost is $1.24.

In other words, the routing cost is easy to estimate and doesn’t depend on the application type or data access pattern. The internet acceleration cost depends on the access pattern (downloads are more expensive than uploads) and on the client location with respect to the closest AWS Region. For global applications that upload or download data over the internet, you can minimize the internet acceleration cost by configuring at least one S3 bucket in each continent.

Available Today
Amazon S3 Multi-Region Access Points allow you to increase resiliency and accelerate application performance up to 60% when accessing data across multiple AWS Regions. We look forward to feedback about your use cases so that we can iterate quickly and simplify how you design and implement multi-region applications.

You can get started using the S3 API, CLI, SDKs, AWS CloudFormation or the S3 Console. This new functionality is available in 17 AWS Regions worldwide (see the full list of supported AWS Regions).

Learn More

Watch this video to hear more about S3 Multi-Region Access Points and see a short demo.

Check out the technical documentation for S3 Multi-Region Access Points.

Alex

Authenticate AWS Client VPN users with AWS Single Sign-On

Post Syndicated from Sylvia Qi original https://aws.amazon.com/blogs/security/authenticate-aws-client-vpn-users-with-aws-single-sign-on/

AWS Client VPN is a managed client-based VPN service that enables users to use an OpenVPN-based client to securely access their resources in Amazon Web Services (AWS) and in their on-premises network from any location. In this blog post, we show you how you can integrate Client VPN with your existing AWS Single Sign-On via a custom SAML 2.0 application to authenticate and authorize your Client VPN connections and traffic.

Maintaining a separate set of credentials to authenticate users and authorize access for each resource is not only tedious, it’s not scalable. A common way to solve this challenge is to use a central identity store such as AWS SSO, which functions as your identity provider (IdP). You can then use Security Assertion Markup Language 2.0 (SAML 2.0) to integrate AWS SSO with each of your resources or applications, also known as service providers (SPs). The IdP authenticates users and passes their identity and security information to the SP via SAML. With SAML, you can enable a single sign-on experience for your users across many SAML-enabled applications and services. Users authenticate with the IdP once using a single set of credentials, and then have access to multiple applications and services without additional sign-ins.

Client VPN supports identity federation with SAML 2.0 for Client VPN endpoints. Deploying custom SAML applications can present some challenges, specifically around the mapping of attributes between what the SP expects to receive and what the IdP can provide. We’ve taken the guesswork out of the process and show you the exact mappings needed for the Client VPN to AWS SSO integration. The integration lets you use AWS SSO groups to not only grant access to create a Client VPN connection, but also to allow access to specific network ranges based upon group membership. We walk you through setting up all of the components required to implement the authentication workflow described in Figure 1. This consists of creating the custom SAML applications and tying them into AWS Identity and Access Management (IAM), creating and configuring the Client VPN endpoint, creating a Client VPN connection with an AWS SSO user, and testing your connectivity.
 

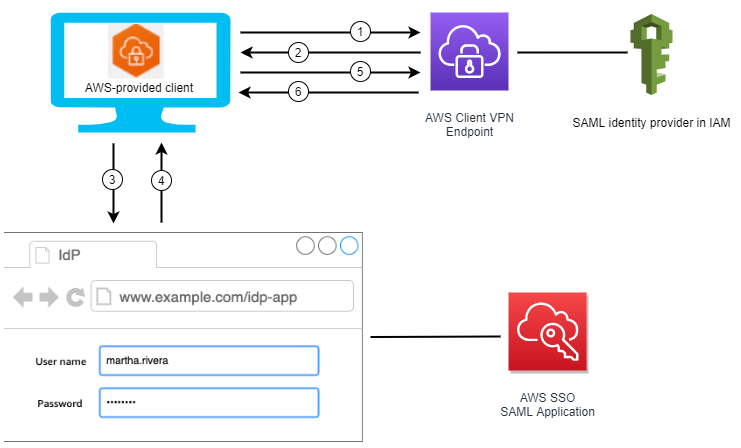
Figure 1: Authentication workflow

Figure 1: Authentication workflow

The steps illustrated in Figure 1 are:

  1. The user opens the AWS-provided VPN client on their device and initiates a connection to the Client VPN endpoint.
  2. The Client VPN endpoint sends an IdP URL and authentication request back to the client, based on the information that was provided in the IAM SAML provider.
  3. The AWS provided VPN client opens a new browser window on the user’s device. The browser makes a request to the IdP and displays a sign-in page. This is the same sign-in experience as the AWS SSO user portal, as the IdP URL points to a custom SAML application created within AWS SSO.
  4. The user enters their credentials on the sign-in page, and the IdP sends a signed SAML assertion back to the client in the form of an HTTP POST to the AWS provided VPN client.
  5. The SAML assertion is passed from the AWS provided VPN client to the Client VPN endpoint.
  6. The endpoint validates the assertion and either allows or denies access to the user.

Prerequisites

Here are the requirements to complete the VPN and SSO setup:

  • AWS SSO is configured to use the internal AWS SSO identity store. Refer to the AWS Single Sign-On Getting Started guide for help configuring AWS SSO. AWS SSO can exist in a different AWS account than the account where you deploy Client VPN endpoints. The steps outlined in this blog post are specific to the internal AWS SSO identity store, however they could be adapted to support other identity stores that support SAML 2.0.
  • Two AWS SSO users and two AWS SSO groups for testing. Each user should be a member of only one of the SSO groups. The purpose of this configuration is to demonstrate how access can be allowed or denied based upon group membership.
  • An Amazon Virtual Private Cloud (Amazon VPC) with an Amazon Elastic Compute Cloud (Amazon EC2) instance for connectivity testing.
  • An x.509 certificate imported into AWS Certificate Manager (ACM). You can generate a self-signed certificate for this walkthrough, however you should review the prerequisites for importing certificates into ACM. This certificate will be used for encrypted communication between the client VPN software and the client VPN endpoint.
  • Administrative access to your AWS environment, or at least sufficient access to create AWS SSO applications, ACM certificates, EC2 Instances, and Client VPN endpoints.
  • A client device running Windows or macOS with the latest version of Client VPN software installed. You can download it from the AWS Client VPN download.

Solution walkthrough

For this solution, you’ll complete the following steps:

  1. Establish trust with your IdP
  2. Create and configure Client VPN SAML applications in AWS SSO.
  3. Integrate the Client VPN SAML applications with IAM.
  4. Create and configure the Client VPN endpoint.
  5. Test the solution.
  6. Cleanup the test environment.

Establish trust with your IdP

In this walkthrough, Client VPN is the SAML SP and AWS SSO is the SAML IdP. One of the key steps to deploying this solution is to establish trust between the SP and IdP. This one-time configuration is done by creating custom SAML applications within AWS SSO and exporting application-specific metadata information from the applications. This metadata is then uploaded—in the form of IAM IdPs—into your AWS account where the Client VPN endpoint is created. IAM IdPs let you manage your user identities in a centralized identity store, such as AWS SSO, and grant those user identities permissions to AWS resources within your account. For organizations with multiple AWS accounts, the use of IAM IdPs resolves the management, scalability, and security issues associated with creating IAM users directly within each account.

Create and configure the Client VPN SAML applications in AWS SSO

Create two custom SAML 2.0 applications in AWS SSO. One will be the IdP for the Client VPN software, the other will be a self-service portal that allows users to download their Client VPN software and client configuration file.

To create the VPN client SAML application:

  1. In the AWS SSO console, select Applications from the left pane and select Add a new application.
  2. Select Add a custom SAML 2.0 application to use as the IdP for the Client VPN software.
     
    Figure 2: Add a SAML application

    Figure 2: Add a SAML application

  3. In the Details section, set Display name to VPN Client.
  4. In the Application Metadata section, select If you don’t have a metadata file, you can manually type your metadata values and enter the following values:
    • Application ACS URL: http://127.0.0.1:35001
    • Application SAML audience: urn:amazon:webservices:clientvpn
  5. Accept the default values for all other fields.
  6. Choose Save Changes.
  7. Select the Attribute mappings tab and configure the mappings as shown in the table and Figure 3 below.

    Note: For production environments, you should grant access to these applications via an AWS SSO group instead of individual users as shown in this walkthrough.

    User attribute in the application Maps to this string value or user attribute in AWS SSO Format
    Subject ${user:email} emailAddress
    Name ${user:email} unspecified
    FirstName ${user:givenName} unspecified
    LastName ${user:familyName} unspecified
    memberOf ${user:groups} unspecified
    Figure 3: VPN client attribute mappings

    Figure 3: VPN client attribute mappings

  8. On the Assign users tab, add your two test user accounts.
  9. On the application configuration page, choose the download link for AWS SSO SAML metadata. Save the file to use in a later step.

To create the VPN client self-service SAML application

  1. In the AWS SSO console, select Applications from the left pane and select Add a new application.
  2. Select Add a custom SAML 2.0 application to use as the application that will serve as the IdP for the Client VPN software.
     
    Figure 4: Add a SAML application

    Figure 4: Add a SAML application

  3. In the Details section, set Display name to VPN Client Self Service.
  4. In the Application Metadata section, select If you don’t have a metadata file, you can manually type your metadata values and enter the following values:
    • Application ACS URL: https://self-service.clientvpn.amazonaws.com/api/auth/sso/saml
    • Application SAML audience: urn:amazon:webservices:clientvpn
  5. Accept the default values for all other fields.
  6. Choose Save Changes.
  7. Choose the Attribute mappings tab and configure the mappings as shown in the following table and in Figure 5.

    Note: For production environments you should grant access to these applications via an AWS SSO group instead of individual users as shown in this walkthrough. For the purposes of this walkthrough, you grant individual users access to the SAML applications but grant network access via group membership. This is done to allow easier demonstration of the ability to grant or deny network specific access via groups when testing the solution.

    User attribute in the application Maps to this string value or user attribute in AWS SSO Format
    Subject ${user:email} emailAddress
    Name ${user:email} unspecified
    FirstName ${user:givenName} unspecified
    LastName ${user:familyName} unspecified
    memberOf ${user:groups} unspecified
    Figure 5: VPN Client self-service attribute mappings

    Figure 5: VPN Client self-service attribute mappings

  8. On the Assign users tab, add your two test user accounts.
  9. On the application’s Configuration page, choose the download link for AWS SSO SAML metadata. Save the file to use in a later step.

Integrate the Client VPN SAML applications with IAM

Client VPN requires a unique IdP definition in IAM. You must set up the IdP in the same AWS account where the Client VPN endpoint will be created.

To create the IAM IdP:

  1. In the IAM console, select Identity providers and Add provider. Name the provider aws-client-vpn and upload the metadata document that you downloaded from the VPN Client SAML application.
  2. Add a second provider, name the provider aws-client-vpn-self-service and upload the metadata document that you downloaded from the VPN Client Self Service SAML application.

Create and configure the Client VPN endpoint

All Client VPN sessions end at the Client VPN endpoint. You configure the Client VPN endpoint to manage and control all Client VPN sessions. In the following steps, you create a Client VPN endpoint and configure it to use the newly added IAM IdPs. You then associate the endpoint with a VPC and configure authorization rules to allow traffic into the VPC, then set up the Client VPN self-service portal.

To create the Client VPN endpoint

  1. Open the AWS VPC console and select Client VPN Endpoints and then select Create Client VPN endpoint.
  2. Enter a Name Tag and Description for the endpoint.
  3. Enter 172.16.0.0/22 for the Client IPv4 CIDR. This is the IP range that will be allocated to your VPN clients. It shouldn’t overlap the CIDR of your AWS VPCs or of the network that your client device is connected to and must be at least a /22 bitmask. You can adjust this value as needed for your specific network requirements. The Client IPv4 CIDR value can only be set during endpoint creation.

    Note: For production environments you should review the Client VPN documentation for scaling considerations before you create the endpoint.

  4. In the Server certificate ARN drop down menu, select the ACM certificate that you created for your VPN clients.
  5. Set the Authentication Options to Use user-based authentication with Federated authentication. Select the aws-client-vpn IAM IdP for the SAML provider ARN, and select the aws-client-vpn-self-service IAM IdP as the Self-service SAML provider ARN.
     
    Figure 6: Authentication settings

    Figure 6: Authentication settings

  6. For this walkthrough, set Connection Logging to No. Connection logging is a feature of Client VPN that enables you to capture connection logs for your Client VPN endpoint. Those logs are published to an Amazon CloudWatch Logs log group in your account. For production environments or for troubleshooting purposes, you can enable connection logging while or after you create the endpoint.
  7. Select the VPC ID to associate with the endpoint. This should be the VPC with an EC2 instance deployed that can be used to test connectivity. You can select an existing security group, or create a new one for the VPN endpoint. The only requirement for this walkthrough is that it has outbound rules that allow access to your test EC2 instance. For additional flexibility, you can create and apply multiple security groups that use different rulesets to the endpoint to provide fine-grained control of which resources can be accessed within the VPC.
  8. Select Enable self-service portal and—if desired—select Enable split-tunnel. Split tunneling is designed to ensure that only client traffic destined for the IP ranges configured on the Client VPN endpoint is routed to your VPC. By default, all traffic, including internet bound traffic, is routed through your VPC.
  9. Choose Create Client VPN endpoint.

To configure the Client VPN endpoint

  1. On the Client VPN endpoint Associations tab, select Associate. Select the same VPC that you chose when you set up the endpoint and select a subnet to associate. This creates an elastic network interface (ENI) in the selected subnet that will be the ingress point from VPN clients into your AWS VPC. For production environments, you should select at least two subnets based upon your redundancy requirements.
  2. Authorizing VPN ingress traffic from your users can be done either globally for all users or via group membership. When granting access via an AWS SSO group, you must use the group ID of the AWS SSO group, not the friendly name of the group. After selecting a group in the AWS SSO management console, you can find group ID in the Details section. You can also obtain the group ID by using AWS Command Line Interface (AWS CLI) to issue the following command, replacing the <AWSRegion>, <Identity Store ID>, and <AWS SSO Group Display Name> variables with your information. This command should be issued within the same AWS account where AWS SSO is configured. The identity store ID can be found in the AWS SSO console under Settings.
    aws identitystore list-groups --region <AWSRegion> --identity-store-id <Identity Store ID> --filter AttributePath=DisplayName,AttributeValue=<AWS SSO Group Display Name>
    

  3. Create an ingress authorization rule by selecting Authorize Ingress on the Authorization tab. Configure the destination network to enable as 0.0.0.0/0, set Grant access to: Allow access to users in a specific access group and enter the access group ID that you discovered in the previous step. This should be the group that contains one of your test user accounts. For production environments, you should follow the principle of least privilege and narrow the destination network range to only what is required. Ingress authorization rules can be used to restrict network access to specific network ranges based upon IdP group membership. You can use a client connection handler to enforce additional security policies on Client VPN connections. Refer to the Client VPN documentation for additional details.
    Figure 7: Add authorization rule

    Figure 7: Add authorization rule

  4. From the Client VPN Endpoint Summary tab, copy the Self-service portal URL to use in the next step.

To set up the Client VPN self-service portal

  1. Open the Client VPN self-service SAML application in the AWS SSO management console to edit the configuration.
  2. In the Application start URL textbox, paste the Client VPN endpoint self-service portal URL that you copied in the previous section. This ties the Client VPN self-service SAML application to the self-service portal URL for the specific Client VPN endpoint that you created, allowing users to download their AWS VPN Client configuration file.
     
    Figure 8: Client VPN self-service portal

    Figure 8: Client VPN self-service portal

Test the solution

During the testing phase, you download the VPN client configuration file and configure the VPN client application. You then create a Client VPN connection and validate that you have access to your target VPC. You also test the Client VPN connection with multiple user accounts in order to confirm that the ingress authorization rules are functioning as expected.

To test the Client VPN solution:

  1. Open an internet browser and sign in to your AWS SSO user portal as a user who has access to the VPN Client SAML applications and is a member of the AWS SSO group defined in the VPN endpoint ingress authorization rule. You should see two new SAML applications. Select the VPN client self-service application.
  2. In the VPN Client Self Service portal, you can download the AWS VPN Client software if you haven’t already done so. Select Download client configuration and save the file on your local device. Close the browser window that you used to sign in to the AWS SSO user portal.
  3. Open the AWS VPN Client application and configure a new profile, selecting the client configuration file that you downloaded in the previous step. Once your client profile has been created, select Connect.
     
    Figure 9: VPN Client ready to connect

    Figure 9: VPN Client ready to connect

  4. A new browser window should open automatically to an AWS SSO sign-in page. Enter the credentials of your test user who is a member of the AWS SSO group defined in your ingress authorization rule.
  5. Upon a successful connection through the VPN client, you can make a management connection (RDP, SSH, HTTP, or other) to one of the EC2 instances within your VPC. Connect to the private IPv4 address of your EC2 instance (rfc1918)—you should not attempt to connect to your EC2 instance through an EIP. You might need to adjust the security group rules on your EC2 instance to allow traffic from the subnets that you selected when you created the VPN endpoint associations.
  6. Once you have a successful connection to your test EC2 instance and you know that your Client VPN connectivity is working, you should also validate that access is denied for users who aren’t a member of the group specified in your ingress authorization rule.
    1. Disconnect from your Client VPN connection and close all browser windows.
    2. Depending upon your internet browser and its configuration, you might need to delete any cookies associated with your AWS SSO user portal in order to sign in as a different AWS SSO user.
    3. Initiate a new Client VPN connection and sign in as the test user account that is not a member of the AWS SSO group specified in the ingress authorization rule.
    4. You should be able to successfully establish the Client VPN connection, but not to access your test EC2 instance. This validates that the ingress authorization rule isn’t allowing Client VPN traffic from users who aren’t a member of the AWS SSO group to enter your VPC.

Troubleshooting

If you have any issues completing the walkthrough and testing, here are some things that you can check:

  • In the AWS VPC management console, review the Connections tab to verify that you see a connection from your test user account and that it’s active.
  • Confirm that your test user account is in the group that was defined in your ingress authorization rule.
  • Confirm that the access group ID specified in the ingress authorization rule is for the AWS SSO group that your test user is a member of.
  • Confirm that the AWS SSO group still exists and hasn’t been deleted. You might encounter an error message similar to the one shown in Figure 10 if you attempt a Client VPN connection but the AWS SSO group no longer exists.
     
    Figure 10: Error message

    Figure 10: Error message

  • If you receive a credential error when attempting to sign in to the AWS SSO browser window that’s launched by the VPN Client application, you might have an issue with the ACM certificate that you’re using. There can be authentication related issues if the root CA certificates aren’t correct or if any part of the certificate chain is missing.
  • Validate your EC2 instance security group rules and VPC route table configuration. From a routing perspective, your test EC2 instance must be accessible from the subnet that you selected when you created the Client VPN endpoint association.
  • If you want to see the SAML assertion that’s being sent to the AWS VPN client application. Sign in to the AWS SSO user portal, and hold down the Shift key while selecting the VPN client SAML application. A new browser tab will open with the SAML assertion visible. The SAML assertion contains the access group IDs of all groups that your test user is a member of. You can use this information to validate that the correct group memberships and group IDs are defined in your ingress authorization rules.
  • Make sure that TCP port 35001 is available on your client device. It shouldn’t be used by any other process or blocked by a firewall. Port 35001 only needs to be open on your localhost interface. The SAML assertion is sent to localhost on port 35001 as an HTTP POST from the browser window opened by the AWS VPN client application after a successful sign-in.

Clean up the test environment

To avoid charges for the use of AWS EC2, Client VPN, SSO, or ACM services, remove any components that were created as part of this walkthrough. Components that can be deleted if applicable are:

  1. The Client VPN endpoint. You must first remove all associations that were created for the endpoint.
  2. The EC2 instance and VPC.
  3. The test IdPs from IAM.
  4. The VPN client custom SAML applications from AWS SSO.
  5. AWS SSO users and groups.
  6. The ACM certificate.

Conclusion

In this blog post, we’ve shown how you can integrate Client VPN and AWS SSO to provide a familiar and seamless VPN connection experience to your users. By adding the Client VPN self-service portal, you can reduce the effort needed to deploy the solution by allowing users to perform their own VPN client application installation and configuration. We demonstrated the creation of IdPs using AWS SSO custom applications and then showed you how to configure a Client VPN endpoint to use SAML-based federated authentication and associate it with the IdPs. Client VPN users can then use their centralized credentials to connect to the Client VPN endpoint and access specific network ranges based upon their group membership or further refined through a client connection handler.

If you have feedback about this post, submit comments in the Comments section below.

Want more AWS Security how-to content, news, and feature announcements? Follow us on Twitter.

Author

Drew Marumoto

Drew is a DevOps Consultant with Aws Professional Service. A long time system administrator with a passion for automation and orchestration, he enjoys solving difficult problems for customers and helping them achieve their business goals.

Author

Sylvia Qi

Sylvia is a DevOps Consultant focusing on architecting and automating DevOps processes, helping customers through their DevOps transformation journey, and achieving their goals. In her spare time, she enjoyes biking, swimming, painting, and photograhy.

Understanding VPC links in Amazon API Gateway private integrations

Post Syndicated from Eric Johnson original https://aws.amazon.com/blogs/compute/understanding-vpc-links-in-amazon-api-gateway-private-integrations/

This post is written by Jose Eduardo Montilla Lugo, Security Consultant, AWS.

A VPC link is a resource in Amazon API Gateway that allows for connecting API routes to private resources inside a VPC. A VPC link acts like any other integration endpoint for an API and is an abstraction layer on top of other networking resources. This helps simplify configuring private integrations.

This post looks at the underlying technologies that make VPC links possible. I further describe what happens under the hood when a VPC link is created for both REST APIs and HTTP APIs. Understanding these details can help you better assess the features and benefits provided by each type. This also helps you make better architectural decisions when designing API Gateway APIs.

This article assumes you have experience in creating APIs in API Gateway. The main purpose is to provide a deeper explanation of the technologies that make private integrations possible. For more information on creating API Gateway APIs with private integrations, refer to the Amazon API Gateway documentation.

Overview

AWS Hyperplane and AWS PrivateLink

There are two types of VPC links: VPC links for REST APIs and VPC links for HTTP APIs. Both provide access to resources inside a VPC. They are built on top of an internal AWS service called AWS Hyperplane. This is an internal network virtualization platform, which supports inter-VPC connectivity and routing between VPCs. Internally, Hyperplane supports multiple network constructs that AWS services use to connect with the resources in customers’ VPCs. One of those constructs is AWS PrivateLink, which is used by API Gateway to support private APIs and private integrations.

AWS PrivateLink allows access to AWS services and services hosted by other AWS customers, while maintaining network traffic within the AWS network. Since the service is exposed via a private IP address, all communication is virtually local and private. This reduces the exposure of data to the public internet.

In AWS PrivateLink, a VPC endpoint service is a networking resource in the service provider side that enables other AWS accounts to access the exposed service from their own VPCs. VPC endpoint services allow for sharing a specific service located inside the provider’s VPC by extending a virtual connection via an elastic network interface in the consumer’s VPC.

An interface VPC endpoint is a networking resource in the service consumer side, which represents a collection of one or more elastic network interfaces. This is the entry point that allows for connecting to services powered by AWS PrivateLink.

Comparing private APIs and private integrations

Private APIs are different to private integrations. Both use AWS PrivateLink but they are used in different ways.

A private API means that the API endpoint is reachable only through the VPC. Private APIs are accessible only from clients within the VPC or from clients that have network connectivity to the VPC. For example, from on-premises clients via AWS Direct Connect. To enable private APIs, an AWS PrivateLink connection is established between the customer’s VPC and API Gateway’s VPC.

Clients connect to private APIs via an interface VPC endpoint, which routes requests privately to the API Gateway service. The traffic is initiated from the customer’s VPC and flows through the AWS PrivateLink to the API Gateway’s AWS account:

Consumer connected to provider through VPC Link

Consumer connected to provider through VPC Link

When the VPC endpoint for API Gateway is enabled, all requests to API Gateway APIs made from inside the VPC go through the VPC endpoint. This is true for private APIs and public APIs. Public APIs are still accessible from the internet and private APIs are accessible only from the interface VPC endpoint. Currently, you can only configure REST APIs as private.

A private integration means that the backend endpoint resides within a VPC and it’s not publicly accessible. With a private integration, API Gateway service can access the backend endpoint in the VPC without exposing the resources to the public internet.

A private integration uses a VPC link to encapsulate connections between API Gateway and targeted VPC resources. VPC links allow access to HTTP/HTTPS resources within a VPC without having to deal with advanced network configurations. Both REST APIs and HTTP APIs offer private integrations but only VPC links for REST APIs use AWS PrivateLink internally.

VPC links for REST APIs

When you create a VPC link for a REST API, a VPC endpoint service is also created, making the AWS account a service provider. The service consumer in this case is API Gateway’s account. The API Gateway service creates an interface VPC endpoint in their account for the Region where the VPC link is being created. This establishes an AWS PrivateLink from the API Gateway VPC to your VPC. The target of the VPC endpoint service and the VPC link is a Network Load Balancer, which forwards requests to the target endpoints:

VPC Link for REST APIs

VPC Link for REST APIs

Before establishing any AWS PrivateLink connection, the service provider must approve the connection request. Requests from the API Gateway accounts are automatically approved in the VPC link creation process. This is because the AWS accounts that serve API Gateway for each Region are allow-listed in the VPC endpoint service.

When a Network Load Balancer is associated with an endpoint service, the traffic to the targets is sourced from the NLB. The targets receive the private IP addresses of the NLB, not the IP addresses of the service consumers.

This is helpful when configuring the security groups of the instances behind the NLB for two reasons. First, you do not know the IP address range of the VPC that’s connecting to the service. Second, NLB’s elastic network interfaces do not have any security groups attached. This means that they cannot be used as a source in the security groups of the targets. To learn more, read how to find the internal IP addresses assigned to an NLB.

To create a private API with a private integration, two AWS PrivateLink connections are established. The first is from a customer VPC to API Gateway’s VPC so that clients in the VPC can reach the API Gateway service endpoint. The other is from API Gateway’s VPC to the customer VPC so that API Gateway can reach the backend endpoint. Here is an example architecture:

Private API with private integrations

Private API with private integrations

VPC links for HTTP APIs

HTTP APIs are the latest type of API Gateway APIs that are cheaper and faster than REST APIs. VPC links for HTTP APIs do not require the creation of VPC endpoint services so a Network Load Balancer is not necessary. With VPC Links for HTTP APIs, you can now use an ALB or an AWS Cloud Map service to target private resources. This allows for more flexibility and scalability in the configuration required on both sides.

Configuring multiple integration targets is also easier with VPC links for HTTP APIs. For example, VPC links for REST APIs can be associated only with a single NLB. Configuring multiple backend endpoints requires some workarounds such as using multiple listeners on the NLB, associated with different target groups.

In contrast, a single VPC link for HTTP APIs can be associated with multiple backend endpoints without additional configuration. Also, with the new VPC link, customers with containerized applications can use ALBs instead of NLBs and take advantage of layer-7 load-balancing capabilities and other features such as authentication and authorization.

AWS Hyperplane supports multiple types of network virtualization constructs, including AWS PrivateLink. VPC links for REST APIs rely on AWS PrivateLink. However, VPC links for HTTP APIs use VPC-to-VPC NAT, which provides a higher level of abstraction.

The new construct is conceptually similar to a tunnel between both VPCs. These are created via elastic network interface attachments on the provider and consumer ends, which are both managed by AWS Hyperplane. This tunnel allows a service hosted in the provider’s VPC (API Gateway) to initiate communications to resources in a consumer’s VPC. API Gateway has direct connectivity to these elastic network interfaces and can reach the resources in the VPC directly from their own VPC. Connections are permitted according to the configuration of the security groups attached to the elastic network interfaces in the customer side.

Although it seems to provide the same functionality as AWS PrivateLink, these constructs differ in implementation details. A service endpoint in AWS PrivateLink allows for multiple connections to a single endpoint (the NLB), whereas the new approach allows a source VPC to connect to multiple destination endpoints. As a result, a single VPC link can integrate with multiple Application Load Balancers, Network Load Balancers, or resources registered with an AWS Cloud Map service on the customer side:

VPC Link for HTTP APIs

VPC Link for HTTP APIs

This approach is similar to the way that other services such as Lambda access resources inside customer VPCs.

Conclusion

This post explores how VPC links can set up API Gateway APIs with private integrations. VPC links for REST APIs encapsulate AWS PrivateLink resources such as interface VPC endpoints and VPC endpoint services to configure connections from API Gateway’s VPC to customer’s VPC to access private backend endpoints.

VPC links for HTTP APIs use a different construct in the AWS Hyperplane service to provide API Gateway with direct network access to VPC private resources. Understanding the differences between the two is important when adding private integrations as part of your API architecture design.

For more serverless learning resources, visit Serverless Land.

Integrating Amazon API Gateway private endpoints with on-premises networks

Post Syndicated from Eric Johnson original https://aws.amazon.com/blogs/compute/integrating-amazon-api-gateway-private-endpoints-with-on-premises-networks/

This post was written by Ahmed ElHaw, Sr. Solutions Architect

Using AWS Direct Connect or AWS Site-to-Site VPN, customers can establish a private virtual interface from their on-premises network directly to their Amazon Virtual Private Cloud (VPC). Hybrid networking enables customers to benefit from the scalability, elasticity, and ease of use of AWS services while using their corporate network.

Amazon API Gateway can make it easier for developers to interface with and expose other services in a uniform and secure manner. You can use it to interface with other AWS services such as Amazon SageMaker endpoints for real-time machine learning predictions or serverless compute with AWS Lambda. API Gateway can also integrate with HTTP endpoints and VPC links in the backend.

This post shows how to set up a private API Gateway endpoint with a Lambda integration. It uses a Route 53 resolver, which enables on-premises clients to resolve AWS private DNS names.

Overview

API Gateway private endpoints allow you to use private API endpoints inside your VPC. When used with Route 53 resolver endpoints and hybrid connectivity, you can access APIs and their integrated backend services privately from on-premises clients.

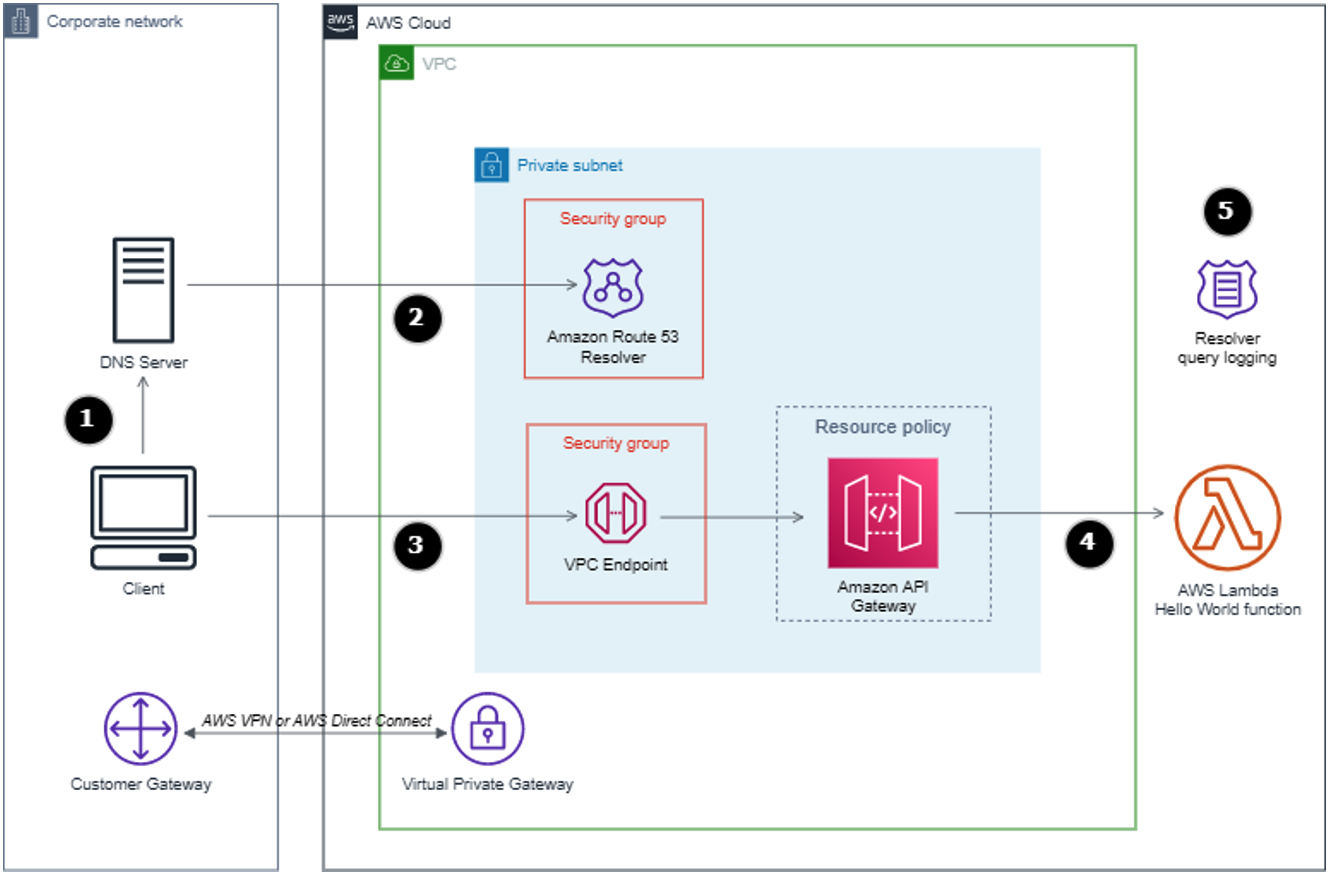
You can deploy the example application using the AWS Serverless Application Model (AWS SAM). The deployment creates a private API Gateway endpoint with a Lambda integration and a Route 53 inbound endpoint. I explain the security configuration of the AWS resources used. This is the solution architecture:

Private API Gateway with a Hello World Lambda integration.

Private API Gateway with a Hello World Lambda integration.


  1. The client calls the private API endpoint (for example, GET https://abc123xyz0.execute-api.eu-west-1.amazonaws.com/demostage).
  2. The client asks the on-premises DNS server to resolve (abc123xyz0.execute-api.eu-west-1.amazonaws.com). You must configure the on-premises DNS server to forward DNS queries for the AWS-hosted domains to the IP addresses of the inbound resolver endpoint. Refer to the documentation for your on-premises DNS server to configure DNS forwarders.
  3. After the client successfully resolves the API Gateway private DNS name, it receives the private IP address of the VPC Endpoint of the API Gateway.
    Note: Call the DNS endpoint of the API Gateway for the HTTPS certificate to work. You cannot call the IP address of the endpoint directly.
  4. Amazon API Gateway passes the payload to Lambda through an integration request.
  5. If Route 53 Resolver query logging is configured, queries from on-premises resources that use the endpoint are logged.

Prerequisites

To deploy the example application in this blog post, you need:

  • AWS credentials that provide the necessary permissions to create the resources. This example uses admin credentials.
  • Amazon VPN or AWS Direct Connect with routing rules that allow DNS traffic to pass through to the Amazon VPC.
  • The AWS SAM CLI installed.
  • Clone the GitHub repository.

Deploying with AWS SAM

  1. Navigate to the cloned repo directory. Alternatively, use the sam init command and paste the repo URL:

    SAM init example

    SAM init example

  2. Build the AWS SAM application:
    sam build
  3. Deploy the AWS SAM application:
    sam deploy –guided

This stack creates and configures a virtual private cloud (VPC) configured with two private subnets (for resiliency) and DNS resolution enabled. It also creates a VPC endpoint with (service name = “com.amazonaws.{region}.execute-api”), Private DNS Name = enabled, and a security group set to allow TCP Port 443 inbound from a managed prefix list. You can edit the created prefix list with one or more CIDR block(s).

It also deploys an API Gateway private endpoint and an API Gateway resource policy that restricts access to the API, except from the VPC endpoint. There is also a “Hello world” Lambda function and a Route 53 inbound resolver with a security group that allows TCP/UDP DNS port inbound from the on-premises prefix list.

A VPC endpoint is a logical construct consisting of elastic network interfaces deployed in subnets. The elastic network interface is assigned a private IP address from your subnet space. For high availability, deploy in at least two Availability Zones.

Private API Gateway VPC endpoint

Private API Gateway VPC endpoint

Route 53 inbound resolver endpoint

Route 53 resolver is the Amazon DNS server. It is sometimes referred to as “AmazonProvidedDNS” or the “.2 resolver” that is available by default in all VPCs. Route 53 resolver responds to DNS queries from AWS resources within a VPC for public DNS records, VPC-specific DNS names, and Route 53 private hosted zones.

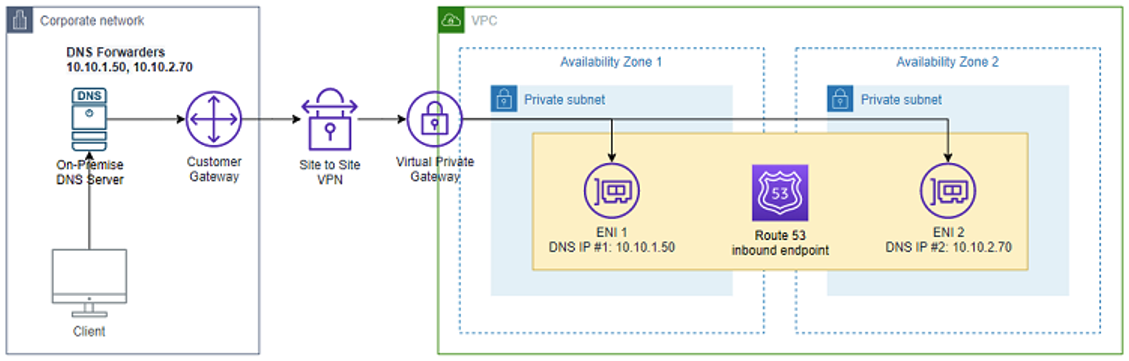
Integrating your on-premises DNS server with AWS DNS server requires a Route 53 resolver inbound endpoint (for DNS queries that you’re forwarding to your VPCs). When creating an API Gateway private endpoint, a private DNS name is created by API Gateway. This endpoint is resolved automatically from within your VPC.

However, the on-premises servers learn about this hostname from AWS. For this, create a Route 53 inbound resolver endpoint and point your on-premises DNS server to it. This allows your corporate network resources to resolve AWS private DNS hostnames.

To improve reliability, the resolver requires that you specify two IP addresses for DNS queries. AWS recommends configuring IP addresses in two different Availability Zones. After you add the first two IP addresses, you can optionally add more in the same or different Availability Zone.

The inbound resolver is a logical resource consisting of two elastic network interfaces. These are deployed in two different Availability Zones for resiliency.

Route 53 inbound resolver

Route 53 inbound resolver

Configuring the security groups and resource policy

In the security pillar of the AWS Well-Architected Framework, one of the seven design principles is applying security at all layers: Apply a defense in depth approach with multiple security controls. Apply to all layers (edge of network, VPC, load balancing, every instance and compute service, operating system, application, and code).

A few security configurations are required for the solution to function:

  • The resolver security group (referred to as ‘ResolverSG’ in solution diagram) inbound rules must allow TCP and UDP on port 53 (DNS) from your on-premises network-managed prefix list (source). Note: configure the created managed prefix list with your on-premises network CIDR blocks.
  • The security group of the VPC endpoint of the API Gateway “VPCEndpointSG” must allow HTTPS access from your on-premises network-managed prefix list (source). Note: configure the crated managed prefix list with your on-premises network CIDR blocks.
  • For a private API Gateway to work, a resource policy must be configured. The AWS SAM deployment sets up an API Gateway resource policy that allows access to your API from the VPC endpoint. We are telling API Gateway to deny any request explicitly unless it is originating from a defined source VPC endpoint.
    Note: AWS SAM template creates the following policy:

    {
      "Version": "2012-10-17",
      "Statement": [
          {
              "Effect": "Allow",
              "Principal": "*",
              "Action": "execute-api:Invoke",
              "Resource": "arn:aws:execute-api:eu-west-1:12345678901:dligg9dxuk/DemoStage/GET/hello"
          },
          {
              "Effect": "Deny",
              "Principal": "*",
              "Action": "execute-api:Invoke",
              "Resource": "arn:aws:execute-api:eu-west-1: 12345678901:dligg9dxuk/DemoStage/GET/hello",
              "Condition": {
                  "StringNotEquals": {
                      "aws:SourceVpce": "vpce-0ac4147ba9386c9z7"
                  }
              }
          }
      ]
    }


The AWS SAM deployment creates a Hello World Lambda. For demonstration purposes, the Lambda function always returns a successful response, conforming with API Gateway integration response.

Testing the solution

To test, invoke the API using a curl command from an on-premises client. To get the API URL, copy it from the on-screen AWS SAM deployment outputs. Alternatively, from the console go to AWS CloudFormation outputs section.

CloudFormation outputs

CloudFormation outputs

Next, go to Route 53 resolvers, select the created inbound endpoint and note of the endpoint IP addresses. Configure your on-premises DNS forwarder with the IP addresses. Refer to the documentation for your on-premises DNS server to configure DNS forwarders.

Route 53 resolver IP addresses

Route 53 resolver IP addresses

Finally, log on to your on-premises client and call the API Gateway endpoint. You should get a success response from the API Gateway as shown.

curl https://dligg9dxuk.execute-api.eu-west-1.amazonaws.com/DemoStage/hello

{"response": {"resultStatus": "SUCCESS"}}

Monitoring and troubleshooting

Route 53 resolver query logging allows you to log the DNS queries that originate in your VPCs. It shows which domain names are queried, the originating AWS resources (including source IP and instance ID) and the responses.

You can log the DNS queries that originate in VPCs that you specify, in addition to the responses to those DNS queries. You can also log DNS queries from on-premises resources that use an inbound resolver endpoint, and DNS queries that use an outbound resolver endpoint for recursive DNS resolution.

After configuring query logging from the console, you can use Amazon CloudWatch as the destination for the query logs. You can use this feature to view and troubleshoot the resolver.

{
    "version": "1.100000",
    "account_id": "1234567890123",
    "region": "eu-west-1",
    "vpc_id": "vpc-0c00ca6aa29c8472f",
    "query_timestamp": "2021-04-25T12:37:34Z",
    "query_name": "dligg9dxuk.execute-api.eu-west-1.amazonaws.com.",
    "query_type": "A",
    "query_class": "IN",
    "rcode": "NOERROR",
    "answers": [
        {
            "Rdata": "10.0.140.226”, API Gateway VPC Endpoint IP#1
            "Type": "A",
            "Class": "IN"
        },
        {
            "Rdata": "10.0.12.179", API Gateway VPC Endpoint IP#2
            "Type": "A",
            "Class": "IN"
        }
    ],
    "srcaddr": "172.31.6.137", ONPREMISES CLIENT
    "srcport": "32843",
    "transport": "UDP",
    "srcids": {
        "resolver_endpoint": "rslvr-in-a7dd746257784e148",
        "resolver_network_interface": "rni-3a4a0caca1d0412ab"
    }
}

Cleaning up

To remove the example application, navigate to CloudFormation and delete the stack.

Conclusion

API Gateway private endpoints allow use cases for building private API–based services inside your VPCs. You can keep both the frontend to your application (API Gateway) and the backend service private inside your VPC.

I discuss how to access your private APIs from your corporate network through Direct Connect or Site-to-Site VPN without exposing your endpoints to the internet. You deploy the demo using AWS Serverless Application Model (AWS SAM). You can also change the template for your own needs.

To learn more, visit the API Gateway tutorials and workshops page in the API Gateway developer guide.

For more serverless learning resources, visit Serverless Land.

New – VPC Reachability Analyzer

Post Syndicated from Harunobu Kameda original https://aws.amazon.com/blogs/aws/new-vpc-insights-analyzes-reachability-and-visibility-in-vpcs/

With Amazon Virtual Private Cloud (VPC), you can launch a logically isolated customer-specific virtual network on the AWS Cloud. As customers expand their footprint on the cloud and deploy increasingly complex network architectures, it can take longer to resolve network connectivity issues caused by misconfiguration. Today, we are happy to announce VPC Reachability Analyzer, a network diagnostics tool that troubleshoots reachability between two endpoints in a VPC, or within multiple VPCs.

Ensuring Your Network Configuration is as Intended
You have full control over your virtual network environment, including choosing your own IP address range, creating subnets, and configuring route tables and network gateways. You can also easily customize the network configuration of your VPC. For example, you can create a public subnet for a web server that has access to the Internet with Internet Gateway. Security-sensitive backend systems such as databases and application servers can be placed on private subnets that do not have internet access. You can use multiple layers of security, such as security groups and network access control list (ACL), to control access to entities of each subnet by protocol, IP address, and port number.

You can also combine multiple VPCs via VPC peering or AWS Transit Gateway for region-wide, or global network connections that can route traffic privately. You can also use VPN Gateway to connect your site with your AWS account for secure communication. Many AWS services that reside outside the VPC, such as AWS Lambda, or Amazon S3, support VPC endpoints or AWS PrivateLink as entities inside the VPC and can communicate with those privately.

When you have such rich controls and feature set, it is not unusual to have unintended configuration that could lead to connectivity issues. Today, you can use VPC Reachability Analyzer for analyzing reachability between two endpoints without sending any packets. VPC Reachability analyzer looks at the configuration of all the resources in your VPCs and uses automated reasoning to determine what network flows are feasible. It analyzes all possible paths through your network without having to send any traffic on the wire. To learn more about how these algorithms work checkout this re:Invent talk or read this paper.

How VPC Reachability Analyzer Works
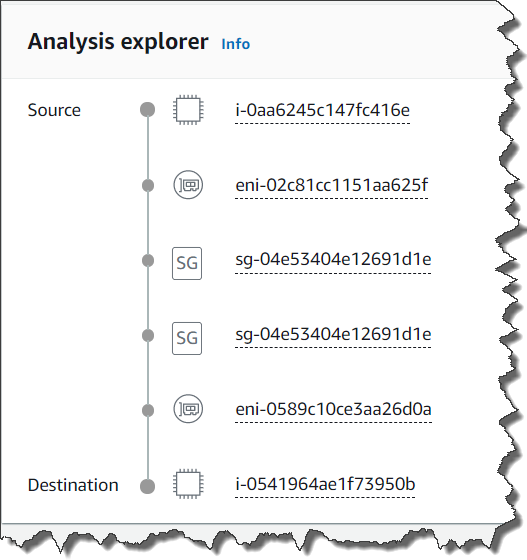
Let’s see how it works. Using VPC Reachability Analyzer is very easy, and you can test it with your current VPC. If you need an isolated VPC for test purposes, you can run the AWS CloudFormation YAML template at the bottom of this article. The template creates a VPC with 1 subnet, 2 security groups and 3 instances as A, B, and C. Instance A and B can communicate with each other, but those instances cannot communicate with instance C because the security group attached to instance C does not allow any incoming traffic.

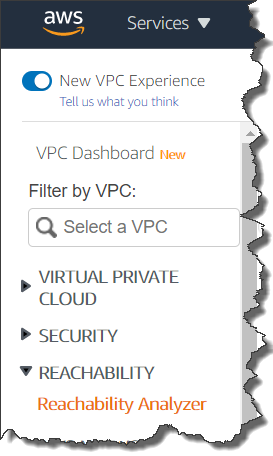
You see Reachability Analyzer in the left navigation of the VPC Management Console.

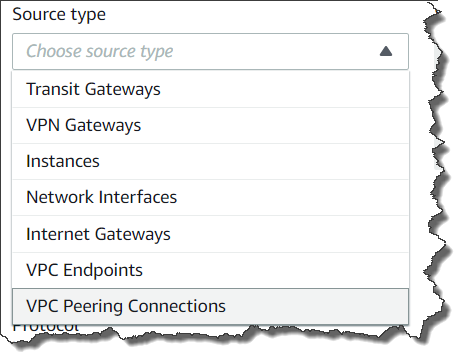
Click Reachability Analyzer, and also click Create and analyze path button, then you see new windows where you can specify a path between a source and destination, and start analysis.

You can specify any of the following endpoint types: VPN Gateways, Instances, Network Interfaces, Internet Gateways, VPC Endpoints, VPC Peering Connections, and Transit Gateways for your source and destination of communication. For example, we set instance A for source and the instance B for destination. You can choose to check for connectivity via either the TCP or UDP protocols. Optionally, you can also specify a port number, or source, or destination IP address.

Configuring test path

Finally, click the Create and analyze path button to start the analysis. The analysis can take up to several minutes depending on the size and complexity of your VPCs, but it typically takes a few seconds.

You can now see the analysis result as Reachable. If you click the URL link of analysis id nip-xxxxxxxxxxxxxxxxx, you can see the route hop by hop.

The communication from instance A to instance C is not reachable because the security group attached to instance C does not allow any incoming traffic.

If you click nip-xxxxxxxxxxxxxxxxx for more detail, you can check the Explanations for details.

Result Detail

Here we see the security group that blocked communication. When you click on the security group listed in the upper right corner, you can go directly to the security group editing window to change the security group rules. In this case adding a properly scoped ingress rule will allow the instances to communicate.

Available Today
This feature is available for all AWS commercial Regions except for China (Beijing), and China (Ningxia) regions. More information is available in our technical documentation, and remember that to use this feature your IAM permissions need to be set up as documented here.

– Kame

CloudFormation YAML template for test

---
Description: An AWS VPC configuration with 1 subnet, 2 security groups and 3 instances. When testing ReachabilityAnalyzer, this provides both a path found and path not found scenario.
AWSTemplateFormatVersion: 2010-09-09

Mappings:
  RegionMap:
    us-east-1:
      execution: ami-0915e09cc7ceee3ab
      ecs: ami-08087103f9850bddd

Resources:
  # VPC
  VPC:
    Type: AWS::EC2::VPC
    Properties:
      CidrBlock: 172.0.0.0/16
      EnableDnsSupport: true
      EnableDnsHostnames: true
      InstanceTenancy: default

  # Subnets
  Subnet1:
    Type: AWS::EC2::Subnet
    Properties:
      VpcId: !Ref VPC
      CidrBlock: 172.0.0.0/20
      MapPublicIpOnLaunch: false

  # SGs
  SecurityGroup1:
    Type: AWS::EC2::SecurityGroup
    Properties:
      GroupDescription: Allow all ingress and egress traffic
      VpcId: !Ref VPC
      SecurityGroupIngress:
        - CidrIp: 0.0.0.0/0
          IpProtocol: "-1" # -1 specifies all protocols

  SecurityGroup2:
    Type: AWS::EC2::SecurityGroup
    Properties:
      GroupDescription: Allow all egress traffic
      VpcId: !Ref VPC

  # Instances
  # Instance A and B should have a path between them since they are both in SecurityGroup 1
  InstanceA:
    Type: AWS::EC2::Instance
    Properties:
      ImageId:
        Fn::FindInMap:
          - RegionMap
          - Ref: AWS::Region
          - execution
      InstanceType: 't3.nano'
      SubnetId:
        Ref: Subnet1
      SecurityGroupIds:
        - Ref: SecurityGroup1

  # Instance A and B should have a path between them since they are both in SecurityGroup 1
  InstanceB:
    Type: AWS::EC2::Instance
    Properties:
      ImageId:
        Fn::FindInMap:
          - RegionMap
          - Ref: AWS::Region
          - execution
      InstanceType: 't3.nano'
      SubnetId:
        Ref: Subnet1
      SecurityGroupIds:
        - Ref: SecurityGroup1

  # This instance should not be reachable from Instance A or B since it is in SecurityGroup 2
  InstanceC:
    Type: AWS::EC2::Instance
    Properties:
      ImageId:
        Fn::FindInMap:
          - RegionMap
          - Ref: AWS::Region
          - execution
      InstanceType: 't3.nano'
      SubnetId:
        Ref: Subnet1
      SecurityGroupIds:
        - Ref: SecurityGroup2


Introducing AWS Gateway Load Balancer – Easy Deployment, Scalability, and High Availability for Partner Appliances

Post Syndicated from Channy Yun original https://aws.amazon.com/blogs/aws/introducing-aws-gateway-load-balancer-easy-deployment-scalability-and-high-availability-for-partner-appliances/

Last year, we launched Virtual Private Cloud (VPC) Ingress Routing to allow routing of all incoming and outgoing traffic to/from an Internet Gateway (IGW) or Virtual Private Gateway (VGW) to the Elastic Network Interface of a specific Amazon Elastic Compute Cloud (EC2) instance. With VPC Ingress Routing, you can now configure your VPC to send all […]

New – Application Load Balancer Support for End-to-End HTTP/2 and gRPC

Post Syndicated from Danilo Poccia original https://aws.amazon.com/blogs/aws/new-application-load-balancer-support-for-end-to-end-http-2-and-grpc/

Thanks to its efficiency and support for numerous programming languages, gRPC is a popular choice for microservice integrations and client-server communications. gRPC is a high performance remote procedure call (RPC) framework using HTTP/2 for transport and Protocol Buffers to describe the interface. To make it easier to use gRPC with your applications, Application Load Balancer (ALB) […]

New – Use AWS PrivateLink to Access AWS Lambda Over Private AWS Network

Post Syndicated from Harunobu Kameda original https://aws.amazon.com/blogs/aws/new-use-aws-privatelink-to-access-aws-lambda-over-private-aws-network/

AWS Lambda is a serverless computing service that lets you run code without provisioning or managing servers. You simply upload your code and Lambda does all the work to execute and scale your code for high availability. Many AWS customers today use this serverless computing platform to significantly improve their productivity while developing and operating applications.

Today, I am happy to announce that AWS Lambda now supports AWS PrivateLink which lets you invoke Lambda functions securely from inside your virtual private cloud (VPC) or on-premises data centers without exposing traffic to the public Internet.

Until now, in order to call Lambda functions, a VPC required an Internet Gateway, network address translation (NAT) gateway, and/or public IP address. With this update, PrivateLink routes the call through the AWS private network, eliminating the need for Internet access. Additionally, you can now call the Lambda API directly from your on-premises data centers by connecting to a VPC using AWS Direct Connect or AWS VPN Connections.

Some customers wanted to manage and call Lambda functions from a VPC that doesn’t have internet access due to internal IT governance requirements. With this update, you will be able to use Lambda. Also, customer who have maintained NAT Gateway to access Lambda from a VPC, can use a VPC endpoint instead of the NAT Gateway thus saving the cost of NAT Gateway. Security is further improved because you no longer need to allow Internet access to your VPC to call Lambda functions, and network architecture becomes more simple, and easily manageable. Previously, in the case of VPC-enabled Lambda function calling another Lambda function, such a call had to go through a NAT GW but now customer’s can use a VPC endpoint instead.

How to Get Started With AWS PrivateLink

AWS PrivateLink uses an elastic network interface called the “Interface VPC endpoint” to act as an entry point for traffic targeting AWS services. Interface endpoints limit all network traffic to AWS internal network and provide secure access to your services. The Interface VPC endpoint is a redundant, highly available VPC component that has a private IP address and is scaled horizontally.

Getting Started Using the AWS Management Console

To get started, you can use the AWS Management Console, AWS CLI, or AWS CloudFormation. In this first example, I’ll show the Management Console.

First, you access the VPC management console, and click “Endpoints.”

Click “Create Endpoint” button.

Type “lambda” in the search bar, and you’ll see Service Name. Select it, and choose the VPC where you want to create the interface endpoint.

After that, you are prompted to specify subnets where you may want to create endpoints.

If you want, you can set your own DNS name to the endpoint with Amazon Route53 private hosted zones when you enable “Enable DNS name” option. With this option enabled, any request for Lambda functions in your public subnet can not invoke Lambda via your Internet Gateway, and communications has to go through via VPC endpoints in Private subnet.

Next, specify “Security Group” for protocols, port, and source/target IP address control.

Then, set the policy to control who has access to the VPC endpoint. By default, “Full Access” is selected, but we always recommend you first grant access only to the minimum necessary principal; you can modify this later.

Following is a sample you can customize to create your “Policy.” With this sample, only the IAM user “MyUser” can invoke a Lambda function of “my-function.”

{
    "Statement": [
        {
            "Principal": "arn:aws:iam::123412341234:user/MyUser",
            "Action": [
                "lambda:InvokeFunction"
            ],
            "Effect": "Allow",
            "Resource": [
               "arn:aws:lambda:us-east-2:123456789012:function:my-function:1”
            ]
        }
    ]
}

Now, it’s time for the final step. Click the “Create endpoint” button. You’ll see the success dialog shown below.

Now you can invoke Lambda functions with the endpoint DNS name. You can also invoke Lambda functions from another VPC connected to the original VPC via VPC peering, AWS Transit Gateway, or you can even do so from another AWS account.

Getting Started Using the AWS Command Line Interface (CLI)

Using AWS CLI is more precise and easy if you already have the AWS CLI environment. 

aws ec2 create-vpc-endpoint --vpc-id vpc-ec43eb89 \
        --vpc-endpoint-type Interface --service-name lambda.<region code>.amazonaws.com \
        --subnet-id subnet-abababab --security-group-id sg-1a2b3c4d

Available Today

AWS PrivateLink support by AWS Lambda is now available in all AWS Regions except for Africa (Cape Town) and Europe (Milan). Supporting those regions are on our roadmap, and is coming soon. Standard AWS PrivateLink pricing apply to Lambda interface endpoints. You will be billed each hour the interface endpoint is provisioned in each Availability Zone, and for the data processed through the interface endpoint. No additional fee is required for AWS Lambda. See the AWS PrivateLink pricing page, and documentation for more detail.

– Kame;