The pressisreporting a massive hack of US government networks by sophisticated Russian hackers.
Officials said a hunt was on to determine if other parts of the government had been affected by what looked to be one of the most sophisticated, and perhaps among the largest, attacks on federal systems in the past five years. Several said national security-related agencies were also targeted, though it was not clear whether the systems contained highly classified material.
[…]
The motive for the attack on the agency and the Treasury Department remains elusive, two people familiar with the matter said. One government official said it was too soon to tell how damaging the attacks were and how much material was lost, but according to several corporate officials, the attacks had been underway as early as this spring, meaning they continued undetected through months of the pandemic and the election season.
The attack vector seems to be a malicious update in SolarWinds’ “Orion” IT monitoring platform, which is widely used in the US government (and elsewhere).
SolarWinds’ comprehensive products and services are used by more than 300,000 customers worldwide, including military, Fortune 500 companies, government agencies, and education institutions. Our customer list includes:
More than 425 of the US Fortune 500
All ten of the top ten US telecommunications companies
All five branches of the US Military
The US Pentagon, State Department, NASA, NSA, Postal Service, NOAA, Department of Justice, and the Office of the President of the United States
All five of the top five US accounting firms
Hundreds of universities and colleges worldwide
I’m sure more details will become public over the next several weeks.
Persuasion is as old as our species. Both democracy and the market economy depend on it. Politicians persuade citizens to vote for them, or to support different policy positions. Businesses persuade consumers to buy their products or services. We all persuade our friends to accept our choice of restaurant, movie, and so on. It’s essential to society; we couldn’t get large groups of people to work together without it. But as with many things, technology is fundamentally changing the nature of persuasion. And society needs to adapt its rules of persuasion or suffer the consequences.
Democratic societies, in particular, are in dire need of a frank conversation about the role persuasion plays in them and how technologies are enabling powerful interests to target audiences. In a society where public opinion is a ruling force, there is always a risk of it being mobilized for ill purposes — such as provoking fear to encourage one group to hate another in a bid to win office, or targeting personal vulnerabilities to push products that might not benefit the consumer.
In this regard, the United States, already extremely polarized, sits on a precipice.
There have long been rules around persuasion. The US Federal Trade Commission enforces laws that claims about products “must be truthful, not misleading, and, when appropriate, backed by scientific evidence.” Political advertisers must identify themselves in television ads. If someone abuses a position of power to force another person into a contract, undue influence can be argued to nullify that agreement. Yet there is more to persuasion than the truth, transparency, or simply applying pressure.
Persuasion also involves psychology, and that has been far harder to regulate. Using psychology to persuade people is not new. Edward Bernays, a pioneer of public relations and nephew to Sigmund Freud, made a marketing practice of appealing to the ego. His approach was to tie consumption to a person’s sense of self. In his 1928 book Propaganda, Bernays advocated engineering events to persuade target audiences as desired. In one famous stunt, he hired women to smoke cigarettes while taking part in the 1929 New York City Easter Sunday parade, causing a scandal while linking smoking with the emancipation of women. The tobacco industry would continue to market lifestyle in selling cigarettes into the 1960s.
Emotional appeals have likewise long been a facet of political campaigns. In the 1860 US presidential election, Southern politicians and newspaper editors spread fears of what a “Black Republican” win would mean, painting horrific pictures of what the emancipation of slaves would do to the country. In the 2020 US presidential election, modern-day Republicans used Cuban Americans’ fears of socialism in ads on Spanish-language radio and messaging on social media. Because of the emotions involved, many voters believed the campaigns enough to let them influence their decisions.
The Internet has enabled new technologies of persuasion to go even further. Those seeking to influence others can collect and use data about targeted audiences to create personalized messaging. Tracking the websites a person visits, the searches they make online, and what they engage with on social media, persuasion technologies enable those who have access to such tools to better understand audiences and deliver more tailored messaging where audiences are likely to see it most. This information can be combined with data about other activities, such as offline shopping habits, the places a person visits, and the insurance they buy, to create a profile of them that can be used to develop persuasive messaging that is aimed at provoking a specific response.
Our senses of self, meanwhile, are increasingly shaped by our interaction with technology. The same digital environment where we read, search, and converse with our intimates enables marketers to take that data and turn it back on us. A modern day Bernays no longer needs to ferret out the social causes that might inspire you or entice you — you’ve likely already shared that by your online behavior.
Some marketers posit that women feel less attractive on Mondays, particularly first thing in the morning — and therefore that’s the best time to advertise cosmetics to them. The New York Times once experimented by predicting the moods of readers based on article content to better target ads, enabling marketers to find audiences when they were sad or fearful. Some music streaming platforms encourage users to disclose their current moods, which helps advertisers target subscribers based on their emotional states.
The phones in our pockets provide marketers with our location in real time, helping deliver geographically relevant ads, such as propaganda to those attending a political rally. This always-on digital experience enables marketers to know what we are doing — and when, where, and how we might be feeling at that moment.
All of this is not intended to be alarmist. It is important not to overstate the effectiveness of persuasive technologies. But while many of them are more smoke and mirrors than reality, it is likely that they will only improve over time. The technology already exists to help predict moods of some target audiences, pinpoint their location at any given time, and deliver fairly tailored and timely messaging. How far does that ability need to go before it erodes the autonomy of those targeted to make decisions of their own free will?
Right now, there are few legal or even moral limits on persuasion — and few answers regarding the effectiveness of such technologies. Before it is too late, the world needs to consider what is acceptable and what is over the line.
For example, it’s been long known that people are more receptive to advertisements made with people who look like them: in race, ethnicity, age, gender. Ads have long been modified to suit the general demographic of the television show or magazine they appear in. But we can take this further. The technology exists to take your likeness and morph it with a face that is demographically similar to you. The result is a face that looks like you, but that you don’t recognize. If that turns out to be more persuasive than coarse demographic targeting, is that okay?
Another example: Instead of just advertising to you when they detect that you are vulnerable, what if advertisers craft advertisements that deliberately manipulate your mood? In some ways, being able to place ads alongside content that is likely to provoke a certain emotional response enables advertisers to do this already. The only difference is that the media outlet claims it isn’t crafting the content to deliberately achieve this. But is it acceptable to actively prime a target audience and then to deliver persuasive messaging that fits the mood?
Further, emotion-based decision-making is not the rational type of slow thinking that ought to inform important civic choices such as voting. In fact, emotional thinking threatens to undermine the very legitimacy of the system, as voters are essentially provoked to move in whatever direction someone with power and money wants. Given the pervasiveness of digital technologies, and the often instant, reactive responses people have to them, how much emotion ought to be allowed in persuasive technologies? Is there a line that shouldn’t be crossed?
Finally, for most people today, exposure to information and technology is pervasive. The average US adult spends more than eleven hours a day interacting with media. Such levels of engagement lead to huge amounts of personal data generated and aggregated about you — your preferences, interests, and state of mind. The more those who control persuasive technologies know about us, what we are doing, how we are feeling, when we feel it, and where we are, the better they can tailor messaging that provokes us into action. The unsuspecting target is grossly disadvantaged. Is it acceptable for the same services to both mediate our digital experience and to target us? Is there ever such thing as too much targeting?
The power dynamics of persuasive technologies are changing. Access to tools and technologies of persuasion is not egalitarian. Many require large amounts of both personal data and computation power, turning modern persuasion into an arms race where the better resourced will be better placed to influence audiences.
At the same time, the average person has very little information about how these persuasion technologies work, and is thus unlikely to understand how their beliefs and opinions might be manipulated by them. What’s more, there are few rules in place to protect people from abuse of persuasion technologies, much less even a clear articulation of what constitutes a level of manipulation so great it effectively takes agency away from those targeted. This creates a positive feedback loop that is dangerous for society.
In the 1970s, there was widespread fear about so-called subliminal messaging, which claimed that images of sex and death were hidden in the details of print advertisements, as in the curls of smoke in cigarette ads and the ice cubes of liquor ads. It was pretty much all a hoax, but that didn’t stop the Federal Trade Commission and the Federal Communications Commission from declaring it an illegal persuasive technology. That’s how worried people were about being manipulated without their knowledge and consent.
It is time to have a serious conversation about limiting the technologies of persuasion. This must begin by articulating what is permitted and what is not. If we don’t, the powerful persuaders will become even more powerful.
This essay was written with Alicia Wanless, and previously appeared in Foreign Policy.
This is a weird story of a building owner commissioning an artist to paint a mural on the side of his building — except that he wasn’t actually the building’s owner.
The fake landlord met Hawkins in person the day after Thanksgiving, supplying the paint and half the promised fee. They met again a couple of days later for lunch, when the job was mostly done. Hawkins showed him photographs. The patron seemed happy. He sent Hawkins the rest of the (sorry) dough.
But when Hawkins invited him down to see the final result, his client didn’t answer the phone. Hawkins called again. No answer. Hawkins emailed. Again, no answer.
[…]
Two days later, Hawkins got a call from the real Comte. And that Comte was not happy.
Comte says that he doesn’t believe Hawkins’s story, but I don’t think I would have demanded to see a photo ID before taking the commission.
The Aspen Institute’s Aspen Cybersecurity Group — I’m a member — has released its cybersecurity policy agenda for the next four years.
The next administration and Congress cannot simultaneously address the wide array of cybersecurity risks confronting modern society. Policymakers in the White House, federal agencies, and Congress should zero in on the most important and solvable problems. To that end, this report covers five priority areas where we believe cybersecurity policymakers should focus their attention and resources as they contend with a presidential transition, a new Congress, and massive staff turnover across our nation’s capital.
The Finnish psychotherapy clinic Vastaamo was the victim of a data breach and theft. The criminals tried extorting money from the clinic. When that failed, they started extorting money from the patients:
Neither the company nor Finnish investigators have released many details about the nature of the breach, but reports say the attackers initially sought a payment of about 450,000 euros to protect about 40,000 patient records. The company reportedly did not pay up. Given the scale of the attack and the sensitive nature of the stolen data, the case has become a national story in Finland. Globally, attacks on health care organizations have escalated as cybercriminals look for higher-value targets.
[…]
Vastaamo said customers and employees had “personally been victims of extortion” in the case. Reports say that on Oct. 21 and Oct. 22, the cybercriminals began posting batches of about 100 patient records on the dark web and allowing people to pay about 500 euros to have their information taken down.
FireEye was hacked by — they believe — “a nation with top-tier offensive capabilities”:
During our investigation to date, we have found that the attacker targeted and accessed certain Red Team assessment tools that we use to test our customers’ security. These tools mimic the behavior of many cyber threat actors and enable FireEye to provide essential diagnostic security services to our customers. None of the tools contain zero-day exploits. Consistent with our goal to protect the community, we are proactively releasing methods and means to detect the use of our stolen Red Team tools.
We are not sure if the attacker intends to use our Red Team tools or to publicly disclose them. Nevertheless, out of an abundance of caution, we have developed more than 300 countermeasures for our customers, and the community at large, to use in order to minimize the potential impact of the theft of these tools.
We have seen no evidence to date that any attacker has used the stolen Red Team tools. We, as well as others in the security community, will continue to monitor for any such activity. At this time, we want to ensure that the entire security community is both aware and protected against the attempted use of these Red Team tools. Specifically, here is what we are doing:
We have prepared countermeasures that can detect or block the use of our stolen Red Team tools.
We have implemented countermeasures into our security products.
We are sharing these countermeasures with our colleagues in the security community so that they can update their security tools.
We will continue to share and refine any additional mitigations for the Red Team tools as they become available, both publicly and directly with our security partners.
Consistent with a nation-state cyber-espionage effort, the attacker primarily sought information related to certain government customers. While the attacker was able to access some of our internal systems, at this point in our investigation, we have seen no evidence that the attacker exfiltrated data from our primary systems that store customer information from our incident response or consulting engagements, or the metadata collected by our products in our dynamic threat intelligence systems. If we discover that customer information was taken, we will contact them directly.
From the New York Times:
The hack was the biggest known theft of cybersecurity tools since those of the National Security Agency were purloined in 2016 by a still-unidentified group that calls itself the ShadowBrokers. That group dumped the N.S.A.’s hacking tools online over several months, handing nation-states and hackers the “keys to the digital kingdom,” as one former N.S.A. operator put it. North Korea and Russia ultimately used the N.S.A.’s stolen weaponry in destructive attacks on government agencies, hospitals and the world’s biggest conglomerates - at a cost of more than $10 billion.
The N.S.A.’s tools were most likely more useful than FireEye’s since the U.S. government builds purpose-made digital weapons. FireEye’s Red Team tools are essentially built from malware that the company has seen used in a wide range of attacks.
This new protocol, called Oblivious DNS-over-HTTPS (ODoH), hides the websites you visit from your ISP.
Here’s how it works: ODoH wraps a layer of encryption around the DNS query and passes it through a proxy server, which acts as a go-between the internet user and the website they want to visit. Because the DNS query is encrypted, the proxy can’t see what’s inside, but acts as a shield to prevent the DNS resolver from seeing who sent the query to begin with.
Abstract: The Domain Name System (DNS) is the foundation of a human-usable Internet, responding to client queries for host-names with corresponding IP addresses and records. Traditional DNS is also unencrypted, and leaks user information to network operators. Recent efforts to secure DNS using DNS over TLS (DoT) and DNS over HTTPS (DoH) havebeen gaining traction, ostensibly protecting traffic and hiding content from on-lookers. However, one of the criticisms ofDoT and DoH is brought to bear by the small number of large-scale deployments (e.g., Comcast, Google, Cloudflare): DNS resolvers can associate query contents with client identities in the form of IP addresses. Oblivious DNS over HTTPS (ODoH) safeguards against this problem. In this paper we ask what it would take to make ODoH practical? We describe ODoH, a practical DNS protocol aimed at resolving this issue by both protecting the client’s content and identity. We implement and deploy the protocol, and perform measurements to show that ODoH has comparable performance to protocols like DoH and DoT which are gaining widespread adoption,while improving client privacy, making ODoH a practical privacy enhancing replacement for the usage of DNS.
Healthcare organizations collect vast amounts of patient information every day, from family history and clinical observations to diagnoses and medications. They use all this data to try to compile a complete picture of a patient’s health information in order to provide better healthcare services. Currently, this data is distributed across various systems (electronic medical records, laboratory systems, medical image repositories, etc.) and exists in dozens of incompatible formats.
Emerging standards, such as Fast Healthcare Interoperability Resources (FHIR), aim to address this challenge by providing a consistent format for describing and exchanging structured data across these systems. However, much of this data is unstructured information contained in medical records (e.g., clinical records), documents (e.g., PDF lab reports), forms (e.g., insurance claims), images (e.g., X-rays, MRIs), audio (e.g., recorded conversations), and time series data (e.g., heart electrocardiogram) and it is challenging to extract this information.
It can take weeks or months for a healthcare organization to collect all this data and prepare it for transformation (tagging and indexing), structuring, and analysis. Furthermore, the cost and operational complexity of doing all this work is prohibitive for most healthcare organizations.
Today, we are happy to announce Amazon HealthLake, a fully managed, HIPAA-eligible service, now in preview, that allows healthcare and life sciences customers to aggregate their health information from different silos and formats into a centralized AWS data lake. HealthLake uses machine learning (ML) models to normalize health data and automatically understand and extract meaningful medical information from the data so all this information can be easily searched. Then, customers can query and analyze the data to understand relationships, identify trends, and make predictions.
How It Works Amazon HealthLake supports copying your data from on premises to the AWS Cloud, where you can store your structured data (like lab results) as well as unstructured data (like clinical notes), which HealthLake will tag and structure in FHIR. All the data is fully indexed using standard medical terms so you can quickly and easily query, search, analyze, and update all of your customers’ health information.
With HealthLake, healthcare organizations can collect and transform patient health information in minutes and have a complete view of a patients medical history, structured in the FHIR industry standard format with powerful search and query capabilities.
From the AWS Management Console, healthcare organizations can use the HealthLake API to copy their on-premises healthcare data to a secure data lake in AWS with just a few clicks. If your source system is not configured to send data in FHIR format, you can use a list of AWS partners to easily connect and convert your legacy healthcare data format to FHIR.
HealthLake is Powered by Machine Learning HealthLake uses specialized ML models such as natural language processing (NLP) to automatically transform raw data. These models are trained to understand and extract meaningful information from unstructured health data.
For example, HealthLake can accurately identify patient information from medical histories, physician notes, and medical imaging reports. It then provides the ability to tag, index, and structure the transformed data to make it searchable by standard terms such as medical condition, diagnosis, medication, and treatment.
Queries on tens of thousands of patient records are very simple. For example, a healthcare organization can create a list of diabetic patients based on similarity of medications by selecting “diabetes” from the standard list of medical conditions, selecting “oral medications” from the treatment menu, and refining the gender and search.
Healthcare organizations can use Juypter Notebook templates in Amazon SageMaker to quickly and easily run analysis on the normalized data for common tasks like diagnosis predictions, hospital re-admittance probability, and operating room utilization forecasts. These models can, for example, help healthcare organizations predict the onset of disease. With just a few clicks in a pre-built notebook, healthcare organizations can apply ML to their historical data and predict when a diabetic patient will develop hypertension in the next five years. Operators can also build, train, and deploy their own ML models on data using Amazon SageMaker directly from the AWS management console.
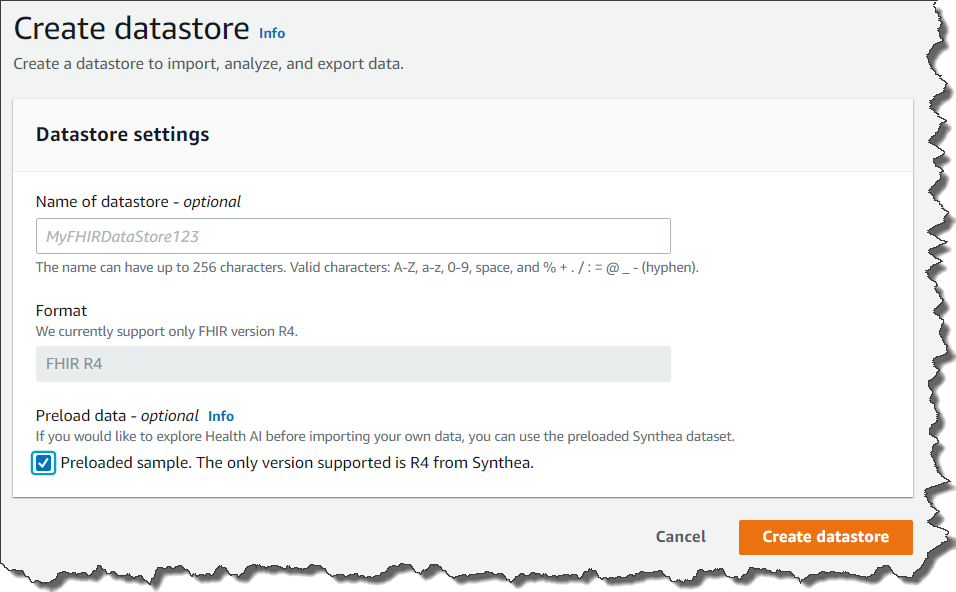
Let’s Create Your Own Data Store and Start to Test Starting to use HealthLake is simple. You access AWS Management Console, and click select Create a datastore.
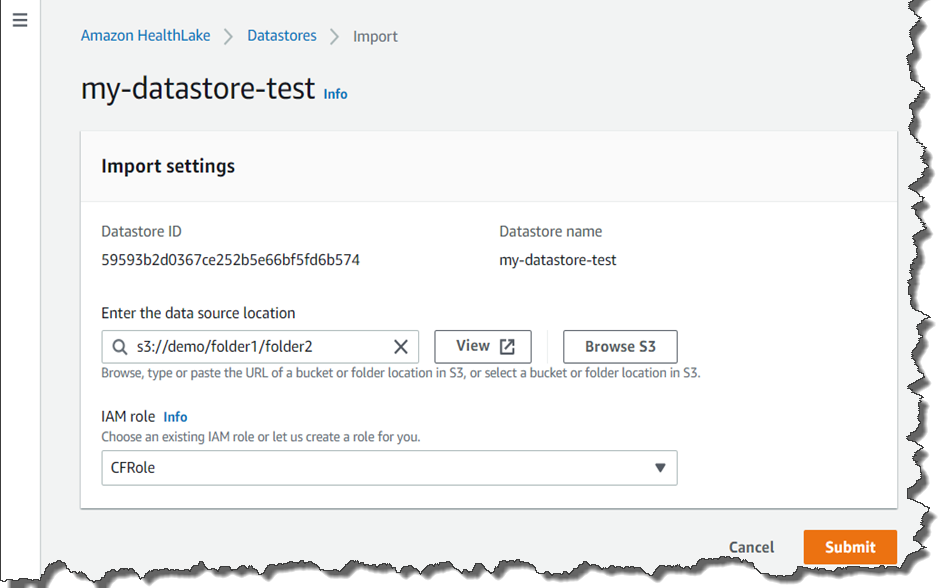
If you click Preload data, HealthLake will load test data and you can start to test its features. You can also upload your own data if you already have FHIR 4 compliant data. You upload it to S3 buckets, and import it to set its bucket name.
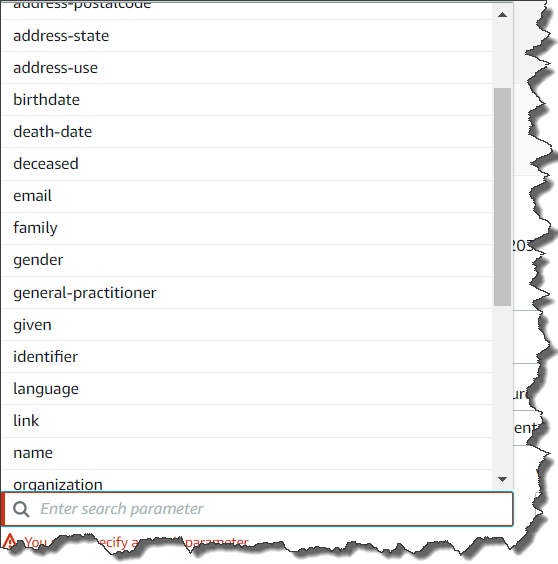
Once your Data Store is created, you can perform a Search, Create, Read, Update or Delete FHIR Query Operation. For example, if you need a list of every patient located in New York, your query setting looks like the screenshots below. As per the FHIR specification, deleted data is only hidden from analysis and results; it is not deleted from the service, only versioned.
You can choose Add search parameter for more nested conditions of the query as shown below.
Amazon HealthLake is Now in Preview Amazon HealthLake is in preview starting today in US East (N. Virginia). Please check our web site and technical documentation for more information.
This new malware was discovered by researchers at Dutch cyber-security company Sansec that focuses on defending e-commerce websites from digital skimming (also known as Magecart) attacks.
The payment skimmer malware pulls its sleight of hand trick with the help of a double payload structure where the source code of the skimmer script that steals customers’ credit cards will be concealed in a social sharing icon loaded as an HTML ‘svg’ element with a ‘path’ element as a container.
The syntax for hiding the skimmer’s source code as a social media button perfectly mimics an ‘svg’ element named using social media platform names (e.g., facebook_full, twitter_full, instagram_full, youtube_full, pinterest_full, and google_full).
A separate decoder deployed separately somewhere on the e-commerce site’s server is used to extract and execute the code of the hidden credit card stealer.
This tactic increases the chances of avoiding detection even if one of the two malware components is found since the malware loader is not necessarily stored within the same location as the skimmer payload and their true purpose might evade superficial analysis.
The workshop on Economics and Information Security is always an interesting conference. This year, it will be online. Here’s the program. Registration is free.
This post is courtesy of Mithun Mallick, AWS Sr. Messaging Specialist Solutions Architect, and Sam Dengler, AWS Principal Serverless Specialist Solutions Architect.
Message brokers can be used to solve a number of needs in application integration, including managing workload queues and broadcasting messages to a number of subscribers. Amazon MQ is a managed message broker service for RabbitMQ and Apache ActiveMQ that makes it easy to set up and operate message brokers on AWS. RabbitMQ is a popular open-source message broker that supports AMQP 0-9-1 (Advanced Message Queuing Protocol). More details on AMQP can be found in RabbitMQ documentation. Customers can migrate their workloads that use AMQP 0-9-1 to Amazon MQ for RabbitMQ. In this blog, we will look at some of the common integration patterns using RabbitMQ, migrating from self-managed RabbitMQ to Amazon MQ, and using plugins like Federation to build hybrid architectures. We will also explore the architectural details of Amazon MQ for RabbitMQ for its different deployment models.
Architecture
Amazon MQ for RabbitMQ offers two deployment options – single instance and three node cluster. Single instance deployments are only recommended for development environments or workloads that need to avoid latency due to replication. There are a variety of instance types that are supported. The list of supported instance types can be found in our developer guide. We recommend using t3.micro instance types only for development or testing environments. Three node cluster is the recommended deployment model for production workloads. These nodes are deployed across different Availability Zones (AZ) to provide high availability. Amazon MQ uses classic mirrored queues with automatic synch up and replication across all nodes which provides maximum durability. Both single node as well as cluster deployments provide a single endpoint for accessing the RabbitMQ web console as well as API’s for management and monitoring of nodes. We support both public as well as private brokers. Public brokers provide a public endpoint that can be accessed using broker credentials. Publicly accessible brokers can be useful for connecting on-premises client applications or integrate partners. The private broker option restricts access to broker within a specific VPC and subnet. The overall architecture for a single node and a multi-node cluster are shown in the following diagrams:
Single instance standalone
Publicly accessible broker
In a public broker architecture, a client application accesses the broker using a Network Load Balancer (NLB) that is deployed in a public subnet within an AWS managed account. The NLB endpoint provides a single interface for both the broker management APIs as well for message processing.
Private broker
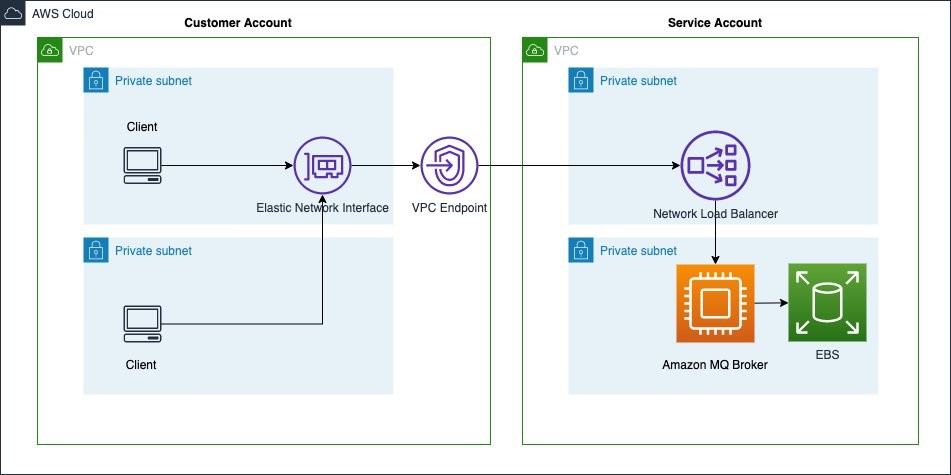
In the case of a private broker, clients running in a customer VPC access an elastic network interface provisioned in a private subnet. The elastic network interface connects to an NLB running in a service account using a VPC endpoint. As in the case of a public broker, the NLB provides a single endpoint for connecting to the broker instance.
Multi-broker cluster
Amazon MQ for RabbitMQ supports a three-node cluster spanning across multiple AZ’s providing high availability for the broker endpoint. It also supports both public and private accessibility. Below is the architecture for public and private clusters:
Publicly accessible cluster
A publicly accessible cluster also runs in a service owned account. The NLB is deployed in a public subnet. Clients can connect to the public NLB for accessing the broker.
Private cluster
In both deployment models, an NLB is used as the entry point through which the broker instances are accessed. In the case of a private broker, an elastic network interface is deployed in your VPC, which accesses an NLB running in AWS service account. The NLB in turn points to specific brokers running in a service account. You will only have the elastic network interface’s deployed in your account.
Broker security
Amazon MQ for RabbitMQ encrypts messages at rest as well as in transit. Currently, Amazon MQ for RabbitMQ only supports service owned keys for encryption at rest. Messages in transit are encrypted using SSL. Private brokers can be restricted using specific security group rules. Broker management is also restricted using IAM policies. It meets compliance standards like HIPAA, PCI, SOC, and several others. For more details on compliance, please refer to the services in scope documentation.
Common integration patterns
RabbitMQ uses a concept of exchanges and bindings to facilitate message routing and filtering. It is based on the AMQP 0-9-1 protocol. Although RabbitMQ supports the JMS API via a plugin, we have not enabled it for Amazon MQ for RabbitMQ as we believe ActiveMQ is the best option for JMS support. More details on RabbitMQ messaging concepts can be found in their official documentation. Let’s look at some of the common messaging patterns and code examples:
Simple send: Simple send is the most basic way to send messages in RabbitMQ. It is based on the AMQP 0-9-1 protocol. For more details on AMQP protocol concepts, please refer to the AMQP documentation for RabbitMQ. In this pattern, a message sender uses the default exchange and directly specifies the queue name as a routing key. The receiver gets the message directly from the queue. The following is a snippet of a sample code in Python using Pika library that sends messages directly on a queue using default exchange:
channel.queue_declare(queue='hello')
channel.basic_publish(exchange='', routing_key='hello', body='Hello World!')
print(" [x] Sent 'Hello World!'")
In Amazon MQ for RabbitMQ, we only support the secure version of AMQP using TLS. The code snippet below demonstrates AMQPS connection using Pika library. Please note that we do not support peer verification on server side.
Direct send: Direct send is the pattern that explicitly uses the concept of exchanges in sending messages. It decouples the message destination from the sender. In this pattern, messages are sent on a specific exchange with a routing key. Consumers always read messages from queues but they bind their queue to the exchange with a binding key. A message goes to all queues with a binding key that exactly matches the routing key of the message. The following is a code snippet that shows sending and receiving messages from an exchange using a routing key and binding key. The sender may specify durability options of the exchange, which indicate whether the messages will be stored on disk or kept in memory.
Fanout: The fanout pattern is RabbitMQ’s implementation of publish/subscribe. It allows messages to be sent to all destinations that are bound to an exchange irrespective of their binding key. So, effectively routing keys have no impact if the exchange type is set as fanout. In such cases, an exchange acts like a topic through which messages are sent to all subscribers.
Topic: The topic pattern is RabbitMQ’s implementation of message filtering and routing. In this pattern, message sender will put a message in an exchange with a routing key. However, the queue bindings can use a wild-card pattern to filter out specific messages for that queue. Messages with routing key that don’t match the binding key pattern are discarded.
In this section, we covered some of the basic concepts of messaging in RabbitMQ. RabbitMQ is much more advanced and offers several features. You can refer to the RabbitMQ tutorial for an extensive list of code examples in various languages.
Migrating to Amazon MQ from self-managed RabbitMQ
You can export the configuration from your self-managed RabbitMQ cluster and import it into Amazon MQ. Currently, we only support the Federation, Shovel, and Management plugins. All the queue and exchange definitions can be imported as is. Any existing user definitions as well as policy definitions are also imported. Amazon MQ does have an enforced policy of ‘ha-mode=all and ‘ha-sync-mode=automatic’ which will override any custom policy you may have related to these keys. Also, we do not support Quorum queues at this time. You can edit the exported JSON from the existing RabbitMQ cluster to remove the definitions that are not supported. The following steps can be performed to export and import the definitions from an existing RabbitMQ cluster.
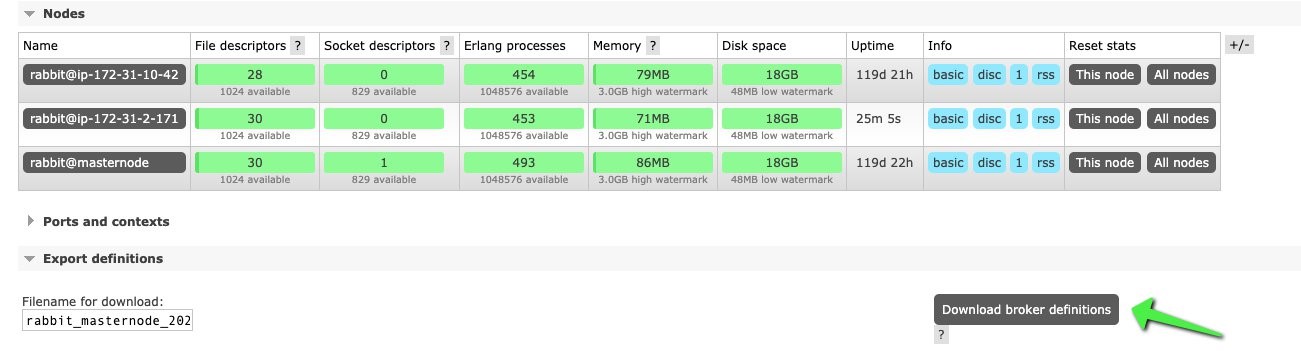
Go to the RabbitMQ console of your existing cluster by signing on to any of the brokers. Click on the overview tab and you will see an option to ‘Export Definitions’. Click on that. It will have a link to export the definition. The export is a JSON file that can be saved to your local disk.
Next, login to the Amazon MQ RabbitMQ console. Click on the overview tab and you will see an option to import definitions. Click on the import definitions and you will be able to upload the config file that was exported in the previous step. Once it’s imported, you will be able to see all the queues and exchange definitions that were defined in the self-managed broker.
Building hybrid architectures
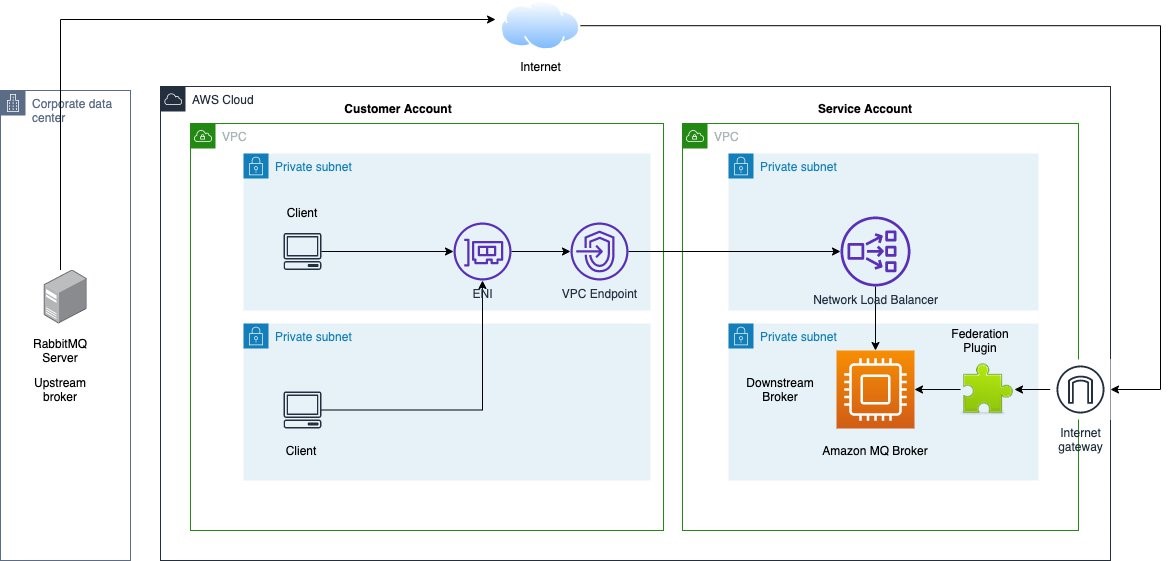
One of the biggest advantages of using RabbitMQ is its ability to federate messages across multiple clusters. As described in RabbitMQ documentation, federation provides an opinionated distribution of messages across brokers. Amazon MQ supports the Federation plugin and you can import your existing federation configurations into Amazon MQ. Federation may be used to extend your message processing capabilities beyond data center resources. The other plugin that is widely used for moving messages across exchanges or queue is the Shovel plugin. We will explore the various deployment topologies that can be set up with federation and Shovel. We will also look at the various use cases that can be addressed by these deployment architectures:
Federation
Federation plugin can be used to build hybrid architecture between Amazon MQ broker and on-premises broker. It facilitates moving messages from an upstream(source) broker to a downstream(destination) broker. The plugin needs to be configured on the downstream broker, which in our case is the Amazon MQ broker. The pattern can be described as below:
This architecture gives the simplest way to configure Amazon MQ as the federated broker. The pattern can be applied for extending message processing to the cloud. Federating the Amazon MQ broker on queues allows some consumers to be available on the cloud while some can remain on-premises. The key consideration with Amazon MQ broker is that it only has direct access to resources over public internet. It means that for federation to access the upstream broker, it needs to be either publicly accessible or have a public proxy. If the on-premises broker has access to Amazon MQ broker, it can also set up the Amazon MQ broker as the upstream broker, which can create a pair topology.
Shovel
Shovel is a flexible plugin that can provide utility tasks within the broker to unidirectionally move messages. It can move messages between queues and exchanges within the same broker or it can act as a bridge between two different brokers. The flexibility of Shovel plugin can address the following hybrid patterns:
On-premises private RabbitMQ broker without internet access
In this pattern, Shovel plugin is used to move messages from an on-premises private RabbitMQ broker to a private Amazon MQ broker. The on-premises broker in this case does not have internet access. In order to implement this pattern, we will need to have a self-managed RabbitMQ broker running in a private subnet. The on-premises broker will have the Shovel plugin configured to push messages to the self-managed RabbitMQ broker. Shovel plugin is also configured on the self-managed RabbitMQ broker to push the messages to Amazon MQ for RabbitMQ MQ broker. It does require VPN connection between the customer VPC and the on-premises network. This pattern also assumes that the on-premises RabbitMQ server can access the self-managed RabbitMQ broker in private subnet. We cannot create a direct Shovel from on-premises broker to Amazon MQ broker due to limitations in transitive networking from VPN gateway to VPC endpoint. More details on this networking limitation can be found in VPC documentation. The self-managed RabbitMQ can be deployed in a variety of ways like a Amazon EC2 instance or a Docker container.
On-premises private RabbitMQ broker with internet access
In this pattern, Shovel plugin is used to build a bridge between an on-premises RabbitMQ broker with internet access and a private Amazon MQ broker. A public Amazon MQ broker is used as the bridge in this pattern. We set up the Shovel plugin on the private on-premises broker that has internet connectivity. It pushes messages to the public Amazon MQ for RabbitMQ broker. Queues or exchanges in public broker act like a staging area. The Shovel plugin configured on the private broker is able to pull messages from the public Amazon MQ for RabbitMQ broker. In this pattern, Shovel plugin is configured on the on-premises broker as well as on the private Amazon MQ for RabbitMQ broker.
Conclusion
In this blog, we have described the overall architecture of Amazon MQ for RabbitMQ. We also covered some of the basics around messaging using RabbitMQ. You can get more details on specific RabbitMQ features from the official documentation of RabbitMQ. We also looked at various deployment architectures to support hybrid patterns with Amazon MQ using the Federation and Shovel plugin. You can get more details on Amazon MQ for RabbitMQ in our developer guide.
German divers searching the Baltic Sea for discarded fishing nets have stumbled upon a rare Enigma cipher machine used by the Nazi military during World War Two which they believe was thrown overboard from a scuttled submarine.
Thinking they had discovered a typewriter entangled in a net on the seabed of Gelting Bay, underwater archaeologist Florian Huber quickly realised the historical significance of the find.
Well, in a year as disrupted and strange as 2020, it’s nice to know that there are some things you can rely on, for example the traditional end-of-year new release of Raspberry Pi OS, which we launch today. Here’s a run-through of the main new features that you’ll find in it.
Chromium
We’ve updated the Chromium browser to version 84. This has taken us a bit longer than we would have liked, but it’s always quite a lot of work to get our video hardware acceleration integrated with new releases of the browser. That’s done now, so you should see good-quality video playback on sites like YouTube. We’ve also, given events this year, done a lot of testing and tweaking on video conferencing clients such as Google Meet, Microsoft Teams, and Zoom, and they should all now work smoothly on your Raspberry Pi’s Chromium.
There’s one more thing to mention on the subject of web browsers. We’ve been shipping Adobe’s Flash Player as part of our Chromium install for several years now. Flash Player is being retired by Adobe at the end of the year, so this release will be the last that includes it. Most websites have now stopped requiring Flash Player, so this hopefully isn’t something that anyone notices!
PulseAudio
From this release onwards, we are switching Raspberry Pi OS to use the PulseAudio sound server.
First, a bit of background. Audio on Linux is really quite complicated. There are multiple different standards for handling audio input and output, and it does sometimes seem that what has happened, historically, is that whenever anyone wanted to use audio in Linux, they looked at the existing libraries and programs and went “Hmmm… I don’t like that, I’ll write something new and better.” This has resulted in a confused mass of competing and conflicting software, none of which quite works the way anyone wants it to!
The most common audio interface, which lies underneath most Linux systems somewhere, is called ALSA, the Advanced Linux Sound Architecture. This is a fairly reliable low-level audio interface — indeed, it is what Raspberry Pi OS has used up until now — but it has quite a lot of limitations and is starting to show its age. For example, it can only handle one input and one output at a time. So for example, if ALSA is being used by your web browser to play sound from a YouTube video to the HDMI output on your Raspberry Pi, nothing else can produce sound at the same time; if you were to try playing a video or an audio file in VLC, you’d hear nothing but the audio from YouTube. Similarly, if you want to switch the sound from your YouTube video from HDMI to a USB sound card, you can’t do it while the video is playing; it won’t change until the sound stops. These aren’t massive problems, but most modern operating systems do handle audio in a more flexible fashion.
More significant is that ALSA doesn’t handle Bluetooth audio at all, so various other extensions and additional bits of software are required to even get audio into and out of Bluetooth devices on an ALSA-based system. We’ve used a third-party library called bluez-alsa for a few years now, but it’s an additional piece of code to maintain and update, so this isn’t ideal.
PulseAudio deals with all of this. It’s a piece of software that sits as a layer between all the audio hardware and all the applications that send and receive audio, and it automatically routes everything to the right places. It can mix the audio from multiple applications together, so you can hear VLC at the same time as YouTube, and it allows the output to be moved around between different devices while it is playing. It knows how to talk to Bluetooth devices, and it greatly simplifies the job of managing default input and output devices, so it makes it much easier to make sure audio ends up where it is supposed to be!
One area where it is particularly helpful is in managing audio input and output streams to web browsers like Chromium; in our testing, the use of PulseAudio made setting up video conferencing sessions much easier and more reliable, particularly with Bluetooth headsets and webcam audio.
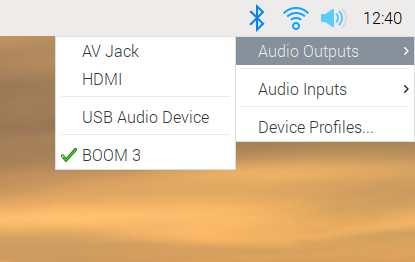
The good news for Raspberry Pi users is that, if we’ve got it right, you shouldn’t even notice the change. PulseAudio now runs by default, and while the volume control and audio input/output selector on the taskbar looks almost identical to the one in previous releases of the OS, it is now controlling PulseAudio rather than ALSA. You can use it just as before: select your output and input devices, adjust the volume, and you’re good to go.
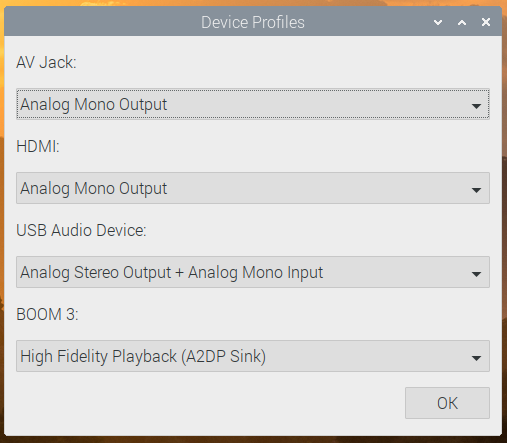
There is one small change to the input/output selector, which is the menu option at the bottom for Device Profiles. In PulseAudio, any audio device has one or more profiles, which select which outputs and inputs are used on any device with multiple connections. (For example, some audio HATs and USB sound cards have both analogue and digital outputs — there will usually be a profile for each output to select where the audio actually comes out.)
Profiles are more important for Bluetooth devices. If a Bluetooth device has both an input and an output (such as a headset with both a microphone and an earphone), it usually supports two different profiles. One of these is called HSP (HeadSet Profile), and this allows you to use both the microphone and the earphone, but with relatively low sound quality — equivalent to that you hear on a mobile phone call, so fine for speech but not great for music. The other profile is called A2DP (Advanced Audio Distribution Profile), which gives much better sound quality, but is output-only: it does not allow you to use the microphone. So if you are making a call, you want your Bluetooth device to use HSP, but if you are listening to music, you want it to use A2DP.
We’ve automated some of this, so if you select a Bluetooth device as the default input, then that device is automatically switched to HSP. If you want to switch a device which is in HSP back to A2DP, just reselect it from the output menu. Its microphone will then be deactivated, and it will switch to A2DP. But sometimes you might want to take control of profiles manually, and the Device Profiles dialog allows you to do that.
(Note that if you are only using the Raspberry Pi’s internal sound outputs, you don’t need to worry about profiles at all, as there is only one, and it’s automatically selected for you.)
Some people who have had experience of PulseAudio in the past may be a little concerned by this change, because PulseAudio hasn’t always been the most reliable piece of software, but it has now reached the point where it solves far more problems than it creates, which is why many other Linux distributions, such as Ubuntu, now use it by default. Most users shouldn’t even notice the change; there may be occasional issues with some older applications such as Sonic Pi, but the developers of these applications will hopefully address any issues in the near future.
Printing
One thing which has always been missing from Raspberry Pi OS is an easy way to connect to and configure printers. There is a Linux tool for this, called CUPS, the Common Unix Printing System. (It’s actually owned by Apple and is the underlying printing system used by macOS X, but it is still free software and available for use by Linux distributions.)
CUPS has always been available in apt, so could be installed on any Raspberry Pi, but the standard web-based interface is a bit unfriendly. Various third-party front-end tools have been written to make CUPS a bit easier to use, and we have decided to use one called system-config-printer. (Like PulseAudio, this is also used as standard by Ubuntu.)
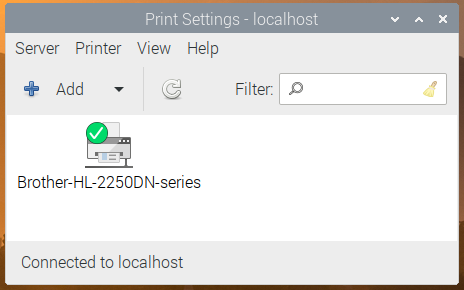
So both CUPS and system-config-printer are now installed as part of Raspberry Pi OS. If you are a glutton for punishment, you can access the CUPS web interface by opening the Chromium browser and going to http://localhost:631, but instead of doing that, we suggest just going into the Preferences section in the main menu and opening Print Settings.
This shows the system-config-printer dialog, from which you can add new printers, remove old ones, set one as the default, and access the print queue for each printer, just as you should be familiar with from other operating systems.
Like most things in Linux, this relies on user contributions, so not every printer is supported. We’ve found that most networked printers work fine, but USB printers are a bit hit-and-miss as to whether there is a suitable driver; in general, the older your printer is, the more likely it is to have a CUPS driver available. The best thing to do is to try it and see, and perhaps ask for help on our forums if your particular printer doesn’t seem to work.
This fills in one of the last things missing in making Raspberry Pi a complete desktop computer, by making it easy to set up a printer and print from applications such as LibreOffice.
Accessibility
One of the areas we have tried to improve in the Desktop this year is to make it more accessible to those with visual impairments. We added support for the Orca screen reader at the start of the year, and the display magnifier plugin over the summer.
While there are no completely new accessibility features this time, we have made some improvements to Orca support in applications like Raspberry Pi Configuration and Appearance Settings, to make them read what they are doing in a more helpful fashion; we’ve also worked with the maintainers of Orca to raise and fix a few bugs. It’s still not perfect, but we’re doing our best!
One of the benefits of switching to PulseAudio is that it now means that screen reader audio can be played through Bluetooth devices; this was not possible using the old ALSA system, so visually-impaired users who wish to use the screen reader with a Bluetooth headset or external speaker can now do so.
One feature we have added is an easy way to install Orca; it is still available through Recommended Software as before, but given that is not easy to navigate for a visually-impaired person, there is now a keyboard shortcut: just hold down ctrl and alt and press the space bar to automatically install Orca. A dialog box will be shown on the screen, and voice prompts will let you know when the install has started and finished.
And if you can’t remember that shortcut, when you first boot a new image, if you don’t do anything for thirty seconds or so, the startup wizard will now speak to you to remind you how to do it…
Finally, we had hoped to be able to say that Chromium was now compatible with Orca; screen reader support was being added to versions 8x. Unfortunately, for now this seems to only have been added for Windows and Mac versions, not the Linux build we use. Hopefully Google will address this in a future release, but for now if you need a web browser compatible with Orca, you’ll need to install Firefox from apt.
New hardware options
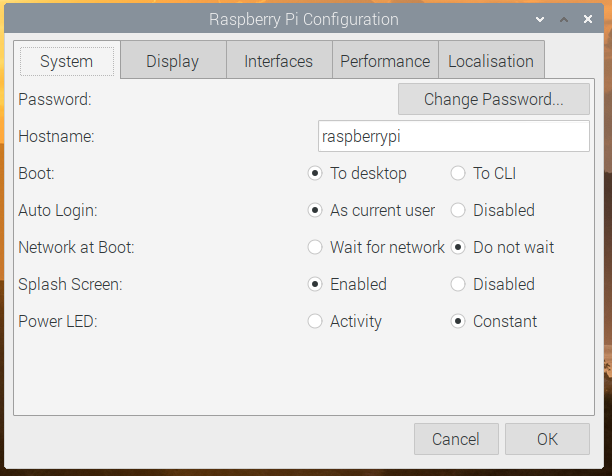
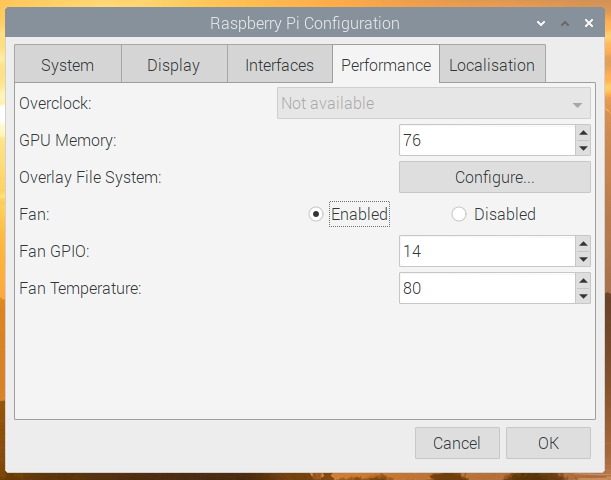
We’ve added a couple of options to the Raspberry Pi Configuration tool.
On the System tab, if you are running on Raspberry Pi with a single status LED (i.e. a Raspberry Pi Zero or the new Raspberry Pi 400), there is now an option to select whether the LED just shows that the power is on, or if it flickers off to show drive activity.
On the Performance tab, there are options to allow you to control the new Raspberry Pi Case Fan: you can select the GPIO pin to which it is connected and set the temperature at which it turns on and off.
To swap over the volume and input selector on the taskbar from ALSA to PulseAudio, after your Raspberry Pi has restarted, right-click a blank area on the taskbar and choose Add / Remove Panel Items. Find the plugin labelled Volume Control (ALSA/BT) in the list, select it and click Remove; then click the Add button, find the plugin labelled Volume Control (PulseAudio) and click Add. Alternatively, just open the Appearance Settings application from the Preferences section of the Main Menu, go to the Defaults tab and press one of the Set Defaults buttons.
As ever, do let us know what you think in the comments.
Way back in 1999, I wrote about open-source software:
First, simply publishing the code does not automatically mean that people will examine it for security flaws. Security researchers are fickle and busy people. They do not have the time to examine every piece of source code that is published. So while opening up source code is a good thing, it is not a guarantee of security. I could name a dozen open source security libraries that no one has ever heard of, and no one has ever evaluated. On the other hand, the security code in Linux has been looked at by a lot of very good security engineers.
We have some new research from GitHub that bears this out. On average, vulnerabilities in their libraries go four years before being detected. From a ZDNet article:
GitHub launched a deep-dive into the state of open source security, comparing information gathered from the organization’s dependency security features and the six package ecosystems supported on the platform across October 1, 2019, to September 30, 2020, and October 1, 2018, to September 30, 2019.
Only active repositories have been included, not including forks or ‘spam’ projects. The package ecosystems analyzed are Composer, Maven, npm, NuGet, PyPi, and RubyGems.
In comparison to 2019, GitHub found that 94% of projects now rely on open source components, with close to 700 dependencies on average. Most frequently, open source dependencies are found in JavaScript — 94% — as well as Ruby and .NET, at 90%, respectively.
On average, vulnerabilities can go undetected for over four years in open source projects before disclosure. A fix is then usually available in just over a month, which GitHub says “indicates clear opportunities to improve vulnerability detection.”
Open source means that the code is available for security evaluation, not that it necessarily has been evaluated by anyone. This is an important distinction.
Earlier this year, Apple patched one of the most breathtaking iPhone vulnerabilities ever: a memory corruption bug in the iOS kernel that gave attackers remote access to the entire device — over Wi-Fi, with no user interaction required at all. Oh, and exploits were wormable — meaning radio-proximity exploits could spread from one nearby device to another, once again, with no user interaction needed.
[…]
Beer’s attack worked by exploiting a buffer overflow bug in a driver for AWDL, an Apple-proprietary mesh networking protocol that makes things like Airdrop work. Because drivers reside in the kernel — one of the most privileged parts of any operating system — the AWDL flaw had the potential for serious hacks. And because AWDL parses Wi-Fi packets, exploits can be transmitted over the air, with no indication that anything is amiss.
[…]
Beer developed several different exploits. The most advanced one installs an implant that has full access to the user’s personal data, including emails, photos, messages, and passwords and crypto keys stored in the keychain. The attack uses a laptop, a Raspberry Pi, and some off-the-shelf Wi-Fi adapters. It takes about two minutes to install the prototype implant, but Beer said that with more work a better written exploit could deliver it in a “handful of seconds.” Exploits work only on devices that are within Wi-Fi range of the attacker.
There is no evidence that this vulnerability was ever used in the wild.
Researchers at the time said that they were able to launch inaudible commands by shining lasers — from as far as 360 feet — at the microphones on various popular voice assistants, including Amazon Alexa, Apple Siri, Facebook Portal, and Google Assistant.
[…]
They broadened their research to show how light can be used to manipulate a wider range of digital assistants — including Amazon Echo 3 — but also sensing systems found in medical devices, autonomous vehicles, industrial systems and even space systems.
The researchers also delved into how the ecosystem of devices connected to voice-activated assistants — such as smart-locks, home switches and even cars — also fail under common security vulnerabilities that can make these attacks even more dangerous. The paper shows how using a digital assistant as the gateway can allow attackers to take control of other devices in the home: Once an attacker takes control of a digital assistant, he or she can have the run of any device connected to it that also responds to voice commands. Indeed, these attacks can get even more interesting if these devices are connected to other aspects of the smart home, such as smart door locks, garage doors, computers and even people’s cars, they said.
Another article. The researchers will present their findings at Black Hat Europe — which, of course, will be happening virtually — on December 10.
I can’t believe that check washing is still a thing:
“Check washing” is a practice where thieves break into mailboxes (or otherwise steal mail), find envelopes with checks, then use special solvents to remove the information on that check (except for the signature) and then change the payee and the amount to a bank account under their control so that it could be deposited at out-state-banks and oftentimes by a mobile phone.
The article suggests a solution: stop using paper checks.
The collective thoughts of the interwebz
Manage Consent
To provide the best experiences, we use technologies like cookies to store and/or access device information. Consenting to these technologies will allow us to process data such as browsing behavior or unique IDs on this site. Not consenting or withdrawing consent, may adversely affect certain features and functions.
Functional
Always active
The technical storage or access is strictly necessary for the legitimate purpose of enabling the use of a specific service explicitly requested by the subscriber or user, or for the sole purpose of carrying out the transmission of a communication over an electronic communications network.
Preferences
The technical storage or access is necessary for the legitimate purpose of storing preferences that are not requested by the subscriber or user.
Statistics
The technical storage or access that is used exclusively for statistical purposes.The technical storage or access that is used exclusively for anonymous statistical purposes. Without a subpoena, voluntary compliance on the part of your Internet Service Provider, or additional records from a third party, information stored or retrieved for this purpose alone cannot usually be used to identify you.
Marketing
The technical storage or access is required to create user profiles to send advertising, or to track the user on a website or across several websites for similar marketing purposes.