Post Syndicated from Curious Droid original https://www.youtube.com/watch?v=JO7HX3Irq14
Yearly Archives: 2024
Introducing quorum queues on Amazon MQ for RabbitMQ
Post Syndicated from Chris Munns original https://aws.amazon.com/blogs/compute/introducing-quorum-queues-on-amazon-mq-for-rabbitmq/
This post is written by Vignesh Selvam (Senior Product Manager – Amazon MQ), Simon Unge (Senior software development engineer – Amazon MQ).
Amazon MQ for RabbitMQ announced support for quorum queues, a type of replicated queue designed for higher availability and data safety. This post presents an overview of this queue type, describes when you should use it, and best practices you can follow. The post also describes how Amazon MQ has also improved quorum queues in the open-source RabbitMQ community.
Overview of quorum queues
A quorum queue is a replicated first in, first out queue type offered by open-source RabbitMQ that uses the Raft consensus algorithm to maintain data consistency. Each quorum queue has a leader and multiple followers (replicas), which ensure that messages are replicated and persisted across a majority of nodes, thus providing resilience against node failures. Quorum queues only need a majority of member nodes (a quorum) to make decisions about data. If a RabbitMQ node hosting a leader becomes unavailable, another node hosting one of the followers is automatically elected as the leader. Once the node becomes available again, the node will become a follower for the quorum queue and catch up or synchronize with the new leader. Quorum queues can detect network failures faster and recover quicker than classic mirrored queues, thus improving the resiliency of the message broker as a whole.
Quorum queues share most of the fundamental features that are key to RabbitMQ replicated queue types such as consumption, consumer acknowledgements, cancelling consumers, purging and deletion. Poison message handling is a unique feature of quorum queues which help developers manage unprocessed messages more efficiently. A poison message is a message that cannot be processed and ends up being repeatedly requeued. Quorum queues keep track of the number of unsuccessful delivery attempts and expose it in the ‘x-delivery-count’ header that is included with any redelivered message. A delivery limit can be set using a policy argument for ’delivery-limit’. If the limit is reached, the message can be dropped or put in a dead-letter queue. This feature further improves the data reliability of a quorum queue.
You can get started with quorum queues by explicitly specifying the ‘x-queue-type’ parameter as ’quorum’ on a RabbitMQ broker running version 3.13 and above. We recommend that you change the default vhost queue type to ’quorum’ to ensure that all queues are created as quorum queues by default inside a vhost.

RabbitMQ queues console
When should you use quorum queues?
You should use quorum queues when you need higher availability and consistency for their messaging infrastructure. Quorum queues are ideal for scenarios where data durability and fault tolerance are critical, such as financial transaction systems, e-commerce data processing systems, or any application requiring high reliability. They are particularly beneficial in environments where node failures are more likely or where maintaining data consistency across distributed systems is essential.
When should you NOT use quorum queues?
Quorum queues are not meant to be temporary. They do not support transient or exclusive queues and are not meant to be used in scenarios with high queue churn (declaration and deletion rates). They are also not recommended for unreplicated queues.
Best practices for quorum queues
Quorum queues perform better when the queues are short. You can set the maximum queue length using a policy or queue arguments to limit the total memory usage by queues (max-length, max-length-bytes).

Add a new queue dialog
Amazon MQ recommends publishers to use publisher confirms and consumers to use manual acknowledgements on quorum queues. Publisher confirms will only be issued once a published message has been successfully replicated to a quorum of nodes and is considered safe within the context of the system. Publisher confirms can also serve as a form of back pressure and protect the availability of the broker during periods of high workload. Manual acknowledgements are used to ensure messages that are not processed can be returned to the queue for reprocessing.
Open-source improvements by Amazon MQ
Amazon MQ contributed multiple improvements to the open-source RabbitMQ community to improve quorum queues for operators and users.
Automatic membership reconciliation
Quorum queues depend on a majority of replicas being available for the Raft consensus algorithm. Amazon MQ identified that many users and operators would prefer to maintain a certain minimal number of replicas (generally 3 or 5) at all times to ensure a majority always exists. The quorum queue replica management was also initially available only via CLI tools. Amazon MQ engineers introduced automatic membership reconciliation to improve this experience. Now, RabbitMQ can be configured to identify any queues that are below a target group member size, and automatically grow or add a node to the queue members. Thus ensuring a certain minimum number of replicas always exist.
Voter status
RabbitMQ considers a quorum queue member node to be a full member even if the member has not caught up or fully synced to the quorum. The CLI command rabbitmq-queues check_if_node_is_ quorum_critical can provide a false positive, and indicate a node is safe to remove, even though another node has queue members that are still synchronizing to the quorum. Amazon MQ introduced a new ‘non-voter’ state for a queue member node to indicate a member that is still catching up or synchronizing to the quorum. If a queue has a member in this state, it is not considered a full member. Once the member is fully synchronized, it is automatically promoted to the voter status, and is considered a full member. The command rabbitmq-queues check_if_node_is_quorum_critical now takes this into account and correctly reports if a node can be safely terminated without any queues becoming unavailable due to a loss of majority.
Inconsistent state management
When a broker is overloaded, a quorum queue can end up in an inconsistent state, where the quorum queue membership state stored in the Raft state machine differs from the RabbitMQ internal state for the queue. Amazon MQ introduced a periodic check per quorum queue that identifies if a queue has an inconsistent state and takes action to fix it.
Default queue type
The default queue type for a RabbitMQ broker vhost was classic queues. You could declare a different queue type by explicitly stating the ’x-queue-type’ as a queue creation argument. Amazon MQ introduced a global default queue type in the configuration file (rabbit.conf) that provides the ability to define a default queue type at the broker level. Now, an operator can change the default queue type to quorum queues if not specified during creation.
Membership management permissions
RabbitMQ users are able to configure the quorum queue membership using the management API. This can interfere with automatic membership reconciliation. Amazon MQ introduced the ability for an operator to turn off the membership management permissions available through the management API. Thus, preventing customers from accidentally affecting their broker.
Conclusion
Quorum queues on RabbitMQ provide a robust solution for scenarios requiring high availability and resilience. By leveraging the Raft consensus protocol, quorum queues ensure that messages are safely stored and replicated across a quorum of nodes, making them an excellent choice for modern, distributed message queuing systems.
Amazon MQ recommends that you adopt quorum queues as the preferred replicated queue type on RabbitMQ 3.13 brokers. For more details, see Amazon MQ documentation. To know more about the open-source feature, see quorum queues.
Get started with quorum queues on Amazon MQ for RabbitMQ 3.13 with a few clicks.
Inside a Marvell Teralynx 10 51.2T 64-port 800GbE Switch
Post Syndicated from Patrick Kennedy original https://www.servethehome.com/inside-a-marvell-teralynx-10-51-2t-64-port-800gbe-switch/
We dive into a 64-port 800GbE switch. We got to take apart a 51.2T Marvell Teralynx 10 switch before seeing it running traffic
The post Inside a Marvell Teralynx 10 51.2T 64-port 800GbE Switch appeared first on ServeTheHome.
How to use the AWS Secrets Manager Agent
Post Syndicated from Eduardo Patrocinio original https://aws.amazon.com/blogs/security/how-to-use-the-aws-secrets-manager-agent/
AWS Secrets Manager is a service that helps you manage, retrieve, and rotate database credentials, application credentials, OAuth tokens, API keys, and other secrets throughout their lifecycles. You can use Secrets Manager to replace hard-coded credentials in application source code with a runtime call to the Secrets Manager service to retrieve credentials dynamically when you need them. Storing the credentials in Secrets Manager helps to avoid unintended access by anyone who inspects your application’s source code, configuration, or components.
In this blog post, we introduce a new feature, the Secrets Manager Agent, and walk through how you can use it to retrieve Secretes Manager secrets.
New approach: Secrets Manager Agent
Previously, if you had an application that used Secrets Manager and needed to retrieve secrets, you had to use the AWS SDK or one of our existing caching libraries. Both these options are specific to a certain coding language and allow only limited scope for customization.
The Secrets Manager Agent is a client-side agent that allows you to standardize consumption of secrets from Secrets Manager across your AWS compute environments. (AWS has published the code for the agent as open source code.) Secrets Manager Agent pulls and caches secrets in your compute environment and allows your applications to consume secrets directly from the in-memory cache. The Secrets Manager Agent opens a localhost port inside your application environment. With this port, you fetch the secret value from the local agent instead of making network calls to the service. This allows you to improve the overall availability of your application while reducing your API calls. Because the Secrets Manager Agent is language agnostic, you can install the binary file of the agent on many types of AWS compute environments.
Although you can use this feature to retrieve and cache secrets in your application’s compute environment, the access controls for Secrets Manager secrets remain unchanged. This means that AWS Identity and Access Management (IAM) principals need the same permissions as if they were to retrieve each of the secrets. You will need to provide GetSecretValue and DescribeSecret permissions to the secrets that you want to consume by using the Secrets Manager Agent.
The Secrets Manager Agent offers protection against server-side request forgery (SSRF). When you install the Secrets Manager Agent, the script generates a random SSRF token on startup and stores it in the file /var/run/awssmatoken. The token is readable by the awssmatokenreader group that the install script creates. The Secrets Manager Agent denies requests that don’t have an SSRF token in the header or that have an invalid SSRF token.
Solution overview
The Secrets Manager Agent provides a language-agnostic way to consume secrets in your application code. It supports various AWS compute services, such as Amazon Elastic Compute Cloud (Amazon EC2), Amazon Elastic Container Service (Amazon ECS), Amazon Elastic Kubernetes Service (Amazon EKS), and AWS Lambda functions. In this solution, we share how you can install the Secrets Manager Agent on an EC2 machine and retrieve secrets in your application code by using CURL commands. See the AWS Secrets Manager Agent documentation to learn how you can use this agent with other types of compute services.
Prerequisites
You need to have the following:
Follow the steps on the Install or update to the latest version of the AWS CLI page to install the AWS CLI and the Configure the AWS CLI page to configure it.
Create the secret
The first step will be to create a secret in Secrets Manager by using the AWS CLI.
To create a secret
- Enter the following command in a terminal to create a secret:
You will see an output like the following:
Record the secret ARN as <SECRET_ARN>, because you will use it in the next section.
Create the IAM role
The Lambda function, the EC2 instance, and the ECS task definition need an IAM role that grants permission to retrieve the secret you just created.
To create the IAM role
- Using an editor, create a file named ec2_iam_policy.json with the following content:
- Type the following command in a terminal to create the IAM role:
- Create a file named iam_permission.json with the following content, replacing <SECRET_ARN> with the secret ARN you noted earlier:
- Type the following command to create a policy:
Record the Arn as <POLICY_ARN>, because you will need that value next.
- Type the following command to add this policy to the IAM role, replacing <POLICY_ARN> with the value you just noted:
- Type the following command to add the AWS Systems Manager policy to the role:
Launch an EC2 instance
Use the steps in this section to launch an EC2 instance.
To create an instance profile
- Type the following command to create an instance profile:
- Type the following command to associate this instance profile with the role you just created:
To create a security group
- Type the following command to create a security group:
Record the group ID as <GROUP_ID>, because you will need this value in the next step.
To launch an EC2 instance
- Run the following command to launch an EC2 instance, replacing <GROUP_ID> with the security group ID:
Record the InstanceId value as <INSTANCE_ID>.
- Check the status of this launch by running the following command:
You will see a response like the following, which shows that the instance is running:
- After the instance is in running state, type the following command to connect to the EC2 instance, replacing <INSTANCE_ID> with the value you noted earlier:
Leave the session open, because you will use it in the next step.
Install the Secrets Manager Agent to the EC2 instance
Use the steps in this section to install the Secrets Manager Agent in the EC2 instance. You will run these commands in the EC2 instance you created earlier.
To download the Secrets Manager Agent code
- Type the following command to install git in the EC2 instance:
- Type the following command to download the Secrets Manager Agent code:
To install the Secrets Manager Agent
- Type the following command to install the Secrets Manager Agent:
To grant permission to read the token file
- Type the following command to copy the token file and grant permission for the current user (ec2-user) to read it:
Retrieve the secret
Now you can use the local web server to retrieve the agent. Processes running in this EC2 instance can retrieve the secret with a REST API call from the web server.
To retrieve a secret
Retrieving a secret is now possible for the process in this EC2 instance, thanks to the local agent.
- Run the following command to retrieve the secret:
You will see the following output:
- Exit from the EC2 instance by typing exit.
Clean up
Follow the steps in this section to clean up the resources created by the solution.
To terminate the EC2 instance and associated resources
- Type the following command to stop the EC2 instance, replacing <INSTANCE_ID> with the EC2 InstanceId received at the time of instance launch:
- Run the following command to delete the security group:
- Run the following command to delete the IAM role from the instance profile:
- Run these commands to delete the instance profile:
To clean up the IAM role
- Run the following command to delete the policy role, replacing <POLICY_ARN> with the value you noted earlier:
- Run the following command to detach the policy from the role:
- Run the following command to delete the IAM role:
To clean up the secret
- Run the following command to delete the secret:
Conclusion
In this post, we introduced the Secrets Manager Agent and showed how to install it in an EC2 instance, allowing the retrieval of secrets from Secrets Manager. An application can call this web server to retrieve secrets without using the AWS SDK. See the AWS Secrets Manager Agent documentation to learn more about how you can use this Secrets Manager Agent in other compute environments.
To learn more about AWS Secrets Manager, see the AWS Secrets Manager documentation.
If you have feedback about this post, submit comments in the Comments section below. If you have questions about this post, contact AWS Support.
Maestro: Netflix’s Workflow Orchestrator
Post Syndicated from Netflix Technology Blog original https://netflixtechblog.com/maestro-netflixs-workflow-orchestrator-ee13a06f9c78
By Jun He, Natallia Dzenisenka, Praneeth Yenugutala, Yingyi Zhang, and Anjali Norwood
TL;DR
We are thrilled to announce that the Maestro source code is now open to the public! Please visit the Maestro GitHub repository to get started. If you find it useful, please give us a star.
What is Maestro
Maestro is a general-purpose, horizontally scalable workflow orchestrator designed to manage large-scale workflows such as data pipelines and machine learning model training pipelines. It oversees the entire lifecycle of a workflow, from start to finish, including retries, queuing, task distribution to compute engines, etc.. Users can package their business logic in various formats such as Docker images, notebooks, bash script, SQL, Python, and more. Unlike traditional workflow orchestrators that only support Directed Acyclic Graphs (DAGs), Maestro supports both acyclic and cyclic workflows and also includes multiple reusable patterns, including foreach loops, subworkflow, and conditional branch, etc.
Our Journey with Maestro
Since we first introduced Maestro in this blog post, we have successfully migrated hundreds of thousands of workflows to it on behalf of users with minimal interruption. The transition was seamless, and Maestro has met our design goals by handling our ever-growing workloads. Over the past year, we’ve seen a remarkable 87.5% increase in executed jobs. Maestro now launches thousands of workflow instances and runs half a million jobs daily on average, and has completed around 2 million jobs on particularly busy days.
Scalability and Versatility
Maestro is a fully managed workflow orchestrator that provides Workflow-as-a-Service to thousands of end users, applications, and services at Netflix. It supports a wide range of workflow use cases, including ETL pipelines, ML workflows, AB test pipelines, pipelines to move data between different storages, etc. Maestro’s horizontal scalability ensures it can manage both a large number of workflows and a large number of jobs within a single workflow.
At Netflix, workflows are intricately connected. Splitting them into smaller groups and managing them across different clusters adds unnecessary complexity and degrades the user experience. This approach also requires additional mechanisms to coordinate these fragmented workflows. Since Netflix’s data tables are housed in a single data warehouse, we believe a single orchestrator should handle all workflows accessing it.
Join us on this exciting journey by exploring the Maestro GitHub repository and contributing to its ongoing development. Your support and feedback are invaluable as we continue to improve the Maestro project.
Introducing Maestro
Netflix Maestro offers a comprehensive set of features designed to meet the diverse needs of both engineers and non-engineers. It includes the common functions and reusable patterns applicable to various use cases in a loosely coupled way.
A workflow definition is defined in a JSON format. Maestro combines user-supplied fields with those managed by Maestro to form a flexible and powerful orchestration definition. An example can be found in the Maestro repository wiki.
A Maestro workflow definition comprises two main sections: properties and versioned workflow including its metadata. Properties include author and owner information, and execution settings. Maestro preserves key properties across workflow versions, such as author and owner information, run strategy, and concurrency settings. This consistency simplifies management and aids in trouble-shootings. If the ownership of the current workflow changes, the new owner can claim the ownership of the workflows without creating a new workflow version. Users can also enable the triggering or alerting features for a given workflow over the properties.
Versioned workflow includes attributes like a unique identifier, name, description, tags, timeout settings, and criticality levels (low, medium, high) for prioritization. Each workflow change creates a new version, enabling tracking and easy reversion, with the active or the latest version used by default. A workflow consists of steps, which are the nodes in the workflow graph defined by users. Steps can represent jobs, another workflow using subworkflow step, or a loop using foreach step. Steps consist of unique identifiers, step types, tags, input and output step parameters, step dependencies, retry policies, and failure mode, step outputs, etc. Maestro supports configurable retry policies based on error types to enhance step resilience.
This high-level overview of Netflix Maestro’s workflow definition and properties highlights its flexibility to define complex workflows. Next, we dive into some of the useful features in the following sections.
Workflow Run Strategy
Users want to automate data pipelines while retaining control over the execution order. This is crucial when workflows cannot run in parallel or must halt current executions when new ones occur. Maestro uses predefined run strategies to decide whether a workflow instance should run or not. Here is the list of predefined run strategies Maestro offers.
Sequential Run Strategy
This is the default strategy used by maestro, which runs workflows one at a time based on a First-In-First-Out (FIFO) order. With this run strategy, Maestro runs workflows in the order they are triggered. Note that an execution does not depend on the previous states. Once a workflow instance reaches one of the terminal states, whether succeeded or not, Maestro will start the next one in the queue.
Strict Sequential Run Strategy
With this run strategy, Maestro will run workflows in the order they are triggered but block execution if there’s a blocking error in the workflow instance history. Newly triggered workflow instances are queued until the error is resolved by manually restarting the failed instances or marking the failed ones unblocked.
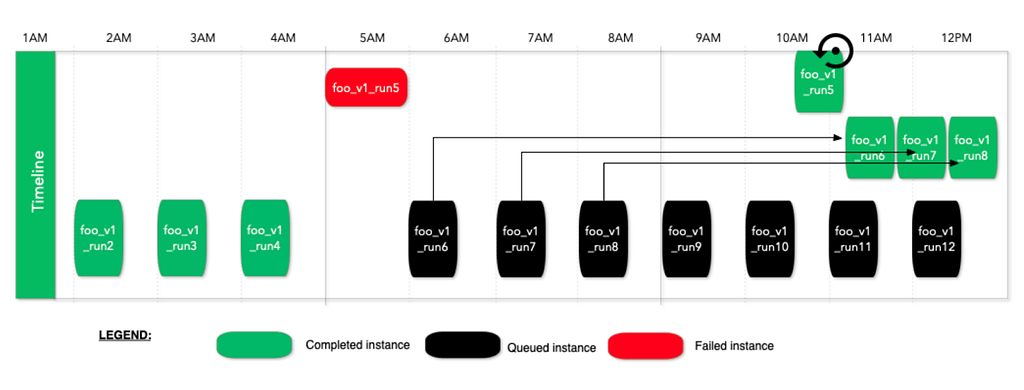
In the above example, run5 fails at 5AM, then later runs are queued but do not run. When someone manually marks run5 unblocked or restarts it, then the workflow execution will resume. This run strategy is useful for time insensitive but business critical workflows. This gives the workflow owners the option to review the failures at a later time and unblock the executions after verifying the correctness.
First-only Run Strategy
With this run strategy, Maestro ensures that the running workflow is complete before queueing a new workflow instance. If a new workflow instance is queued while the current one is still running, Maestro will remove the queued instance. Maestro will execute a new workflow instance only if there is no workflow instance currently running, effectively turning off queuing with this run strategy. This approach helps to avoid idempotency issues by not queuing new workflow instances.
Last-only Run Strategy
With this run strategy, Maestro ensures the running workflow is the latest triggered one and keeps only the last instance. If a new workflow instance is queued while there is an existing workflow instance already running, Maestro will stop the running instance and execute the newly triggered one. This is useful if a workflow is designed to always process the latest data, such as processing the latest snapshot of an entire table each time.
Parallel with Concurrency Limit Run Strategy
With this run strategy, Maestro will run multiple triggered workflow instances in parallel, constrained by a predefined concurrency limit. This helps to fan out and distribute the execution, enabling the processing of large amounts of data within the time limit. A common use case for this strategy is for backfilling the old data.
Parameters and Expression Language Support
In Maestro, parameters play an important role. Maestro supports dynamic parameters with code injection, which is super useful and powerful. This feature significantly enhances the flexibility and dynamism of workflows, allowing using parameters to control execution logic and enable state sharing between workflows and their steps, as well as between upstream and downstream steps. Together with other Maestro features, it makes the defining of workflows dynamic and enables users to define parameterized workflows for complex use cases.
However, code injection introduces significant security and safety concerns. For example, users might unintentionally write an infinite loop that creates an array and appends items to it, eventually crashing the server with out-of-memory (OOM) issues. While one approach could be to ask users to embed the injected code within their business logic instead of the workflow definition, this would impose additional work on users and tightly couple their business logic with the workflow. In certain cases, this approach blocks users to design some complex parameterized workflows.
To mitigate these risks and assist users to build parameterized workflows, we developed our own customized expression language parser, a simple, secure, and safe expression language (SEL). SEL supports code injection while incorporating validations during syntax tree parsing to protect the system. It leverages the Java Security Manager to restrict access, ensuring a secure and controlled environment for code execution.
Simple, Secure, and Safe Expression Language (SEL)
SEL is a homemade simple, secure, and safe expression language (SEL) to address the risks associated with code injection within Maestro parameterized workflows. It is a simple expression language and the grammar and syntax follow JLS (Java Language Specifications). SEL supports a subset of JLS, focusing on Maestro use cases. For example, it supports data types for all Maestro parameter types, raising errors, datetime handling, and many predefined utility methods. SEL also includes additional runtime checks, such as loop iteration limits, array size checks, object memory size limits and so on, to enhance security and reliability. For more details about SEL, please refer to the Maestro GitHub documentation.
Output Parameters
To further enhance parameter support, Maestro allows for callable step execution, which returns output parameters from user execution back to the system. The output data is transmitted to Maestro via its REST API, ensuring that the step runtime does not have direct access to the Maestro database. This approach significantly reduces security concerns.
Parameterized Workflows
Thanks to the powerful parameter support, users can easily create parameterized workflows in addition to static ones. Users enjoy defining parameterized workflows because they are easy to manage and troubleshoot while being powerful enough to solve complex use cases.
- Static workflows are simple and easy to use but come with limitations. Often, users have to duplicate the same workflow multiple times to accommodate minor changes. Additionally, workflow and jobs cannot share the states without using parameters.
- On the other hand, completely dynamic workflows can be challenging to manage and support. They are difficult to debug or troubleshoot and hard to be reused by others.
- Parameterized workflows strike a balance by being initialized step by step at runtime based on user defined parameters. This approach provides great flexibility for users to control the execution at runtime while remaining easy to manage and understand.
As we described in the previous Maestro blog post, parameter support enables the creation of complex parameterized workflows, such as backfill data pipelines.
Workflow Execution Patterns
Maestro provides multiple useful building blocks that allow users to easily define dataflow patterns or other workflow patterns. It provides support for common patterns directly within the Maestro engine. Direct engine support not only enables us to optimize these patterns but also ensures a consistent approach to implementing them. Next, we will talk about the three major building blocks that Maestro provides.
Foreach Support
In Maestro, the foreach pattern is modeled as a dedicated step within the original workflow definition. Each iteration of the foreach loop is internally treated as a separate workflow instance, which scales similarly as any other Maestro workflow based on the step executions (i.e. a sub-graph) defined within the foreach definition block. The execution of sub-graph within a foreach step is delegated to a separate workflow instance. Foreach step then monitors and collects the status of these foreach workflow instances, each managing the execution of a single iteration. For more details, please refer to our previous Maestro blog post.
The foreach pattern is frequently used to repeatedly run the same jobs with different parameters, such as data backfilling or machine learning model tuning. It would be tedious and time consuming to request users to explicitly define each iteration in the workflow definition (potentially hundreds of thousands of iterations). Additionally, users would need to create new workflows if the foreach range changes, further complicating the process.
Conditional Branch Support
The conditional branch feature allows subsequent steps to run only if specific conditions in the upstream step are met. These conditions are defined using the SEL expression language, which is evaluated at runtime. Combined with other building blocks, users can build powerful workflows, e.g. doing some remediation if the audit check step fails and then run the job again.
Subworkflow Support
The subworkflow feature allows a workflow step to run another workflow, enabling the sharing of common functions across multiple workflows. This effectively enables “workflow as a function” and allows users to build a graph of workflows. For example, we have observed complex workflows consisting of hundreds of subworkflows to process data across hundreds tables, where subworkflows are provided by multiple teams.
These patterns can be combined together to build composite patterns for complex workflow use cases. For instance, we can loop over a set of subworkflows or run nested foreach loops. One example that Maestro users developed is an auto-recovery workflow that utilizes both conditional branch and subworkflow features to handle errors and retry jobs automatically.
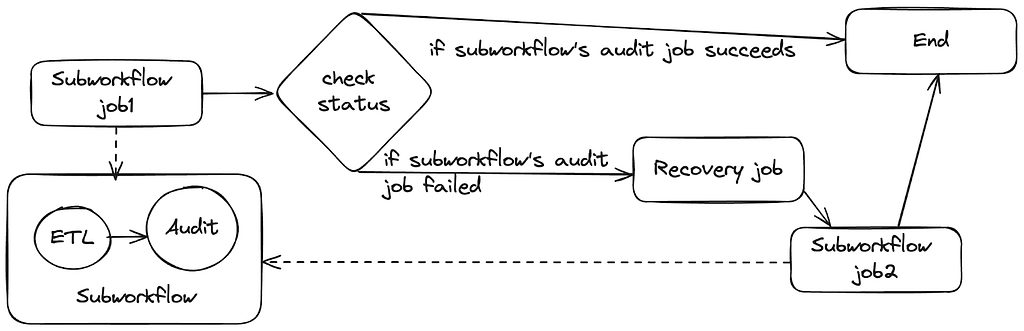
In this example, subworkflow `job1` runs another workflow consisting of extract-transform-load (ETL) and audit jobs. Next, a status check job leverages the Maestro parameter and SEL support to retrieve the status of the previous job. Based on this status, it can decide whether to complete the workflow or to run a recovery job to address any data issues. After resolving the issue, it then executes subworkflow `job2`, which runs the same workflow as subworkflow `job1`.
Step Runtime and Step Parameter
Step Runtime Interface
In Maestro, we use step runtime to describe a job at execution time. The step runtime interface defines two pieces of information:
- A set of basic APIs to control the behavior of a step instance at execution runtime.
- Some simple data structures to track step runtime state and execution result.
Maestro offers a few step runtime implementations such as foreach step runtime, subworkflow step runtime (mentioned in previous section). Each implementation defines its own logic for start, execute and terminate operations. At runtime, these operations control the way to initialize a step instance, perform the business logic and terminate the execution under certain conditions (i.e. manual intervention by users).
Also, Maestro step runtime internally keeps track of runtime state as well as the execution result of the step. The runtime state is used to determine the next state transition of the step and tell if it has failed or terminated. The execution result hosts both step artifacts and the timeline of step execution history, which are accessible by subsequent steps.
Step Parameter Merging
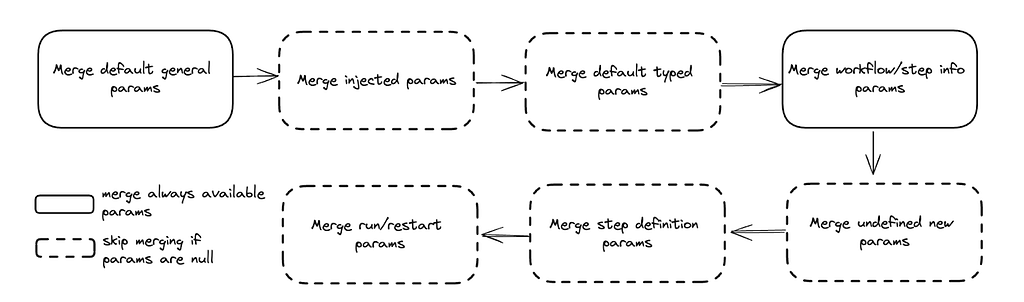
To control step behavior in a dynamic way, Maestro supports both runtime parameters and tags injection in step runtime. This makes a Maestro step more flexible to absorb runtime changes (i.e. overridden parameters) before actually being started. Maestro internally maintains a step parameter map that is initially empty and is updated by merging step parameters in the order below:
- Default General Parameters: Parameters merging starts from default parameters that in general every step should have. For example, workflow_instance_id, step_instance_uuid, step_attempt_id and step_id are required parameters for each maestro step. They are internally reserved by maestro and cannot be passed by users.
- Injected Parameters: Maestro then merges injected parameters (if present) into the parameter map. The injected parameters come from step runtime, which are dynamically generated based on step schema. Each type of step can have its own schema with specific parameters associated with this step. The step schema can evolve independently with no need to update Maestro code.
- Default Typed Parameters: After injecting runtime parameters, Maestro tries to merge default parameters that are related to a specific type of step. For example, foreach step has loop_params and loop_index default parameters which are internally set by maestro and used for foreach step only.
- Workflow and Step Info Parameters: These parameters contain information about step and the workflow it belongs to. This can be identity information, i.e. workflow_id and will be merged to step parameter map if present.
- Undefined New Parameters: When starting or restarting a maestro workflow instance, users can specify new step parameters that are not present in initial step definition. ParamsManager merges these parameters to ensure they are available at execution time.
- Step Definition Parameters: These step parameters are defined by users at definition time and get merged if they are not empty.
- Run and Restart Parameters: When starting or restarting a maestro workflow instance, users can override defined parameters by providing run or restart parameters. These two types of parameters are merged at the end so that step runtime can see the most recent and accurate parameter space.
The parameters merging logic can be visualized in the diagram below.
Step Dependencies and Signals
Steps in the Maestro execution workflow graph can express execution dependencies using step dependencies. A step dependency specifies the data-related conditions required by a step to start execution. These conditions are usually defined based on signals, which are pieces of messages carrying information such as parameter values and can be published through step outputs or external systems like SNS or Kafka messages.
Signals in Maestro serve both signal trigger pattern and signal dependencies (a publisher-subscriber) pattern. One step can publish an output signal (a sample example) that can unblock the execution of multiple other steps that depend on it. A signal definition includes a list of mapped parameters, allowing Maestro to perform “signal matching” on a subset of fields. Additionally, Maestro supports signal operators like <, >, etc., on signal parameter values.
Netflix has built various abstractions on top of the concept of signals. For instance, a ETL workflow can update a table with data and send signals that unblock steps in downstream workflows dependent on that data. Maestro supports “signal lineage,” which allows users to navigate all historical instances of signals and the workflow steps that match (i.e. publishing or consuming) those signals. Signal triggering guarantees exactly-once execution for the workflow subscribing a signal or a set of joined signals. This approach is efficient, as it conserves resources by only executing the workflow or step when the specified conditions in the signals are met. A signal service is implemented for those advanced abstractions. Please refer to the Maestro blog for further details on it.
Breakpoint
Maestro allows users to set breakpoints on workflow steps, functioning similarly to code-level breakpoints in an IDE. When a workflow instance executes and reaches a step with a breakpoint, that step enters a “paused” state. This halts the workflow graph’s progression until a user manually resumes from the breakpoint. If multiple instances of a workflow step are paused at a breakpoint, resuming one instance will only affect that specific instance, leaving the others in a paused state. Deleting the breakpoint will cause all paused step instances to resume.
This feature is particularly useful during the initial development of a workflow, allowing users to inspect step executions and output data. It is also beneficial when running a step multiple times in a “foreach” pattern with various input parameters. Setting a single breakpoint on a step will cause all iterations of the foreach loop to pause at that step for debugging purposes. Additionally, the breakpoint feature allows human intervention during the workflow execution and can also be used for other purposes, e.g. supporting mutating step states while the workflow is running.
Timeline
Maestro includes a step execution timeline, capturing all significant events such as execution state machine changes and the reasoning behind them. This feature is useful for debugging, providing insights into the status of a step. For example, it logs transitions such as “Created” and “Evaluating params”, etc. An example of a timeline is included here for reference. The implemented step runtimes can add the timeline events into the timeline to surface the execution information to the end users.
Retry Policies
Maestro supports retry policies for steps that reach a terminal state due to failure. Users can specify the number of retries and configure retry policies, including delays between retries and exponential backoff strategies, in addition to fixed interval retries. Maestro distinguishes between two types of retries: “platform” and “user.” Platform retries address platform-level errors unrelated to user logic, while user retries are for user-defined conditions. Each type can have its own set of retry policies.
Automatic retries are beneficial for handling transient errors that can be resolved without user intervention. Maestro provides the flexibility to set retries to zero for non-idempotent steps to avoid retry. This feature ensures that users have control over how retries are managed based on their specific requirements.
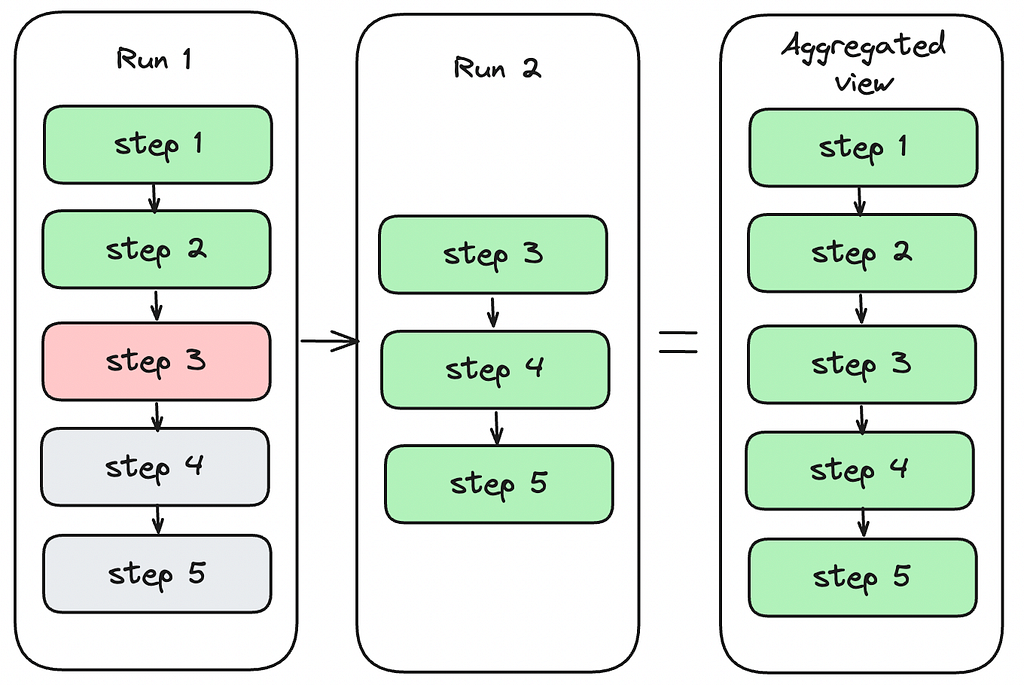
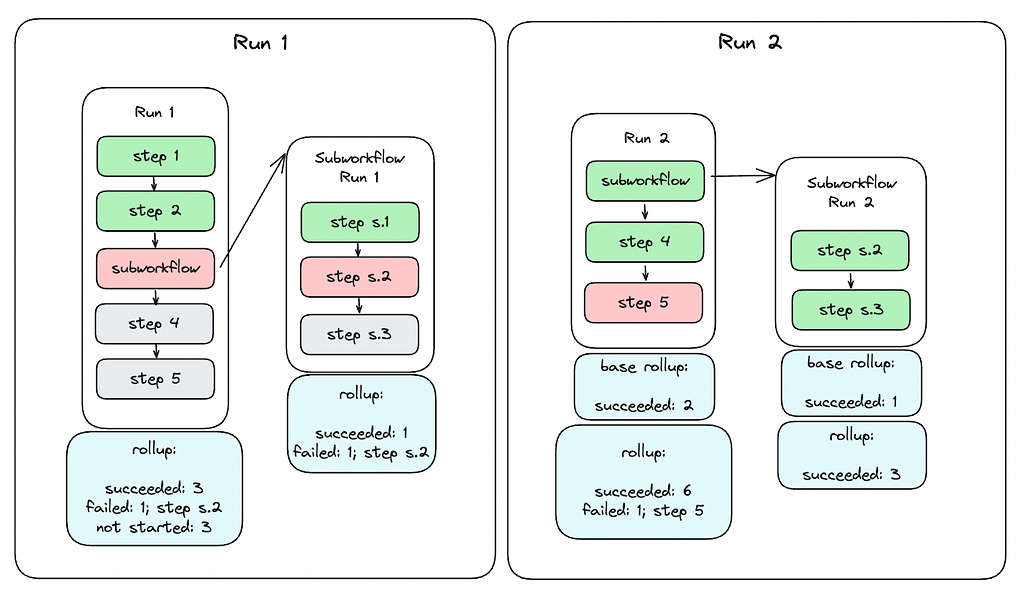
Aggregated View
Because a workflow instance can have multiple runs, it is important for users to see an aggregated state of all steps in the workflow instance. Aggregated view is computed by merging base aggregated view with current runs instance step statuses. For example, as you can see on the figure below simulating a simple case, there is a first run, where step1 and step2 succeeded, step3 failed, and step4 and step5 have not started. When the user restarts the run, the run starts from step3 in run 2 with step1 and step2 skipped which succeeded in the previous run. After all steps succeed, the aggregated view shows the run states for all steps.
Rollup
Rollup provides a high-level summary of a workflow instance, detailing the status of each step and the count of steps in each status. It flattens steps across the current instance and any nested non-inline workflows like subworkflows or foreach steps. For instance, if a successful workflow has three steps, one of which is a subworkflow corresponding to a five-step workflow, the rollup will indicate that seven steps succeeded. Only leaf steps are counted in the rollup, as other steps serve merely as pointers to concrete workflows.
Rollup also retains references to any non-successful steps, offering a clear overview of step statuses and facilitating easy navigation to problematic steps, even within nested workflows. The aggregated rollup for a workflow instance is calculated by combining the current run’s runtime data with a base rollup. The current state is derived from the statuses of active steps, including aggregated rollups for foreach and subworkflow steps. The base rollup is established when the workflow instance begins and includes statuses of inline steps (excluding foreach and subworkflows) from the previous run that are not part of the current run.
For subworkflow steps, the rollup simply reflects the rollup of the subworkflow instance. For foreach steps, the rollup combines the base rollup of the foreach step with the current state rollup. The base is derived from the previous run’s aggregated rollup, excluding the iterations to be restarted in the new run. The current state is periodically updated by aggregating rollups of running iterations until all iterations reach a terminal state.
Due to these processes, the rollup model is eventually consistent. While the figure below illustrates a straightforward example of rollup, the calculations can become complex and recursive, especially with multiple levels of nested foreaches and subworkflows.
Maestro Event Publishing
When workflow definition, workflow instance or step instance is changed, Maestro generates an event, processes it internally and publishes the processed event to external system(s). Maestro has both internal and external events. The internal event tracks changes within the life cycle of workflow, workflow instance or step instance. It is published to an internal queue and processed within Maestro. After internal events are processed, some of them will be transformed into external event and sent out to the external queue (i.e. SNS, Kafka). The external event carries maestro status change information for downstream services. The event publishing flow is illustrated in the diagram below:
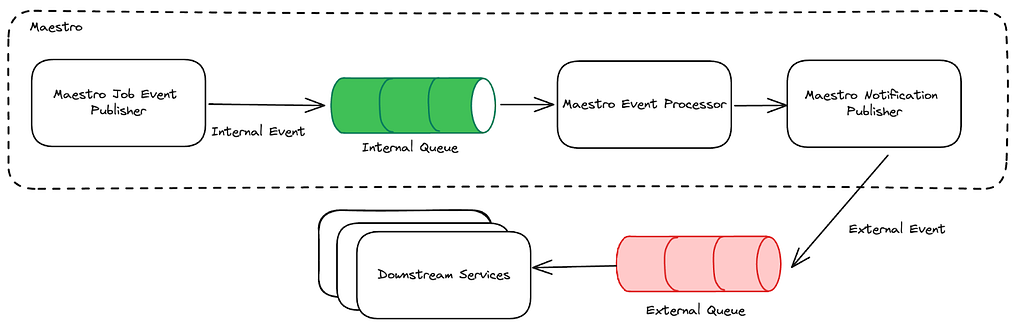
As shown in the diagram, the Maestro event processor bridges the two aforementioned Maestro events. It listens on the internal queue to get the published internal events. Within the processor, the internal job event is processed based on its type and gets converted to an external event if needed. The notification publisher at the end emits the external event so that downstream services can consume.
The downstream services are mostly event-driven. The Maestro event carries the most useful message for downstream services to capture different changes in Maestro. In general, these changes can be classified into two categories: workflow change and instance status change. The workflow change event is associated with actions at workflow level, i.e definition or properties of a workflow has changed. Meanwhile, instance status change tracks status transition on workflow instance or step instance.
Get Started with Maestro
Maestro has been extensively used within Netflix, and today, we are excited to make the Maestro source code publicly available. We hope that the scalability and usability that Maestro offers can expedite workflow development outside Netflix. We invite you to try Maestro, use it within your organization, and contribute to its development.
You can find the Maestro code repository at github.com/Netflix/maestro. If you have any questions, thoughts, or comments about Maestro, please feel free to create a GitHub issue in the Maestro repository. We are eager to hear from you.
We are taking workflow orchestration to the next level and constantly solving new problems and challenges, please stay tuned for updates. If you are passionate about solving large scale orchestration problems, please join us.
Acknowledgements
Thanks to other Maestro team members, Binbing Hou, Zhuoran Dong, Brittany Truong, Deepak Ramalingam, Moctar Ba, for their contributions to the Maestro project. Thanks to our Product Manager Ashim Pokharel for driving the strategy and requirements. We’d also like to thank Andrew Seier, Romain Cledat, Olek Gorajek, and other stunning colleagues at Netflix for their contributions to the Maestro project. We also thank Prashanth Ramdas, Eva Tse, David Noor, Charles Smith and other leaders of Netflix engineering organizations for their constructive feedback and suggestions on the Maestro project.
![]()
Maestro: Netflix’s Workflow Orchestrator was originally published in Netflix TechBlog on Medium, where people are continuing the conversation by highlighting and responding to this story.
Reaching your global players – message on a single, scalable communication hub
Post Syndicated from Richard Perez original https://aws.amazon.com/blogs/messaging-and-targeting/reaching-your-global-players-message-on-a-single-scalable-communication-hub/
Introduction
AWS provides solutions to address industry challenges, enabling customers to address the risk of potentially significant financial and reputational damage. This blog discusses how customers that have adopted Amazon Pinpoint have been able to deliver time-sensitive messages reliably and securely. Specifically, it can mitigate the risk associated with reaching players who have voluntarily self-excluded from marketing communications.
Regulated workloads in the betting and gaming industry refer to specific activities, systems, and processes that are subject to government regulations, oversight, and compliance requirements. The role of the gambling regulator is to ensure adherence to these requirements and maintain fairness, security, and responsible behavior within the industry. Regulators also exist to protect players, subject to their jurisdiction, by regulating the businesses that provide gambling services, imposing controls for operators, the Internet Software Vendor’s (ISVs) and players themselves. By way of example, the UK Gambling Commission (GC) is one such organization with the responsibility of regulating the individuals and businesses that provide gambling services in Great Britain. The UK GC and their counterparts across the globe regulate and license betting and gaming businesses to ensure they adhere to standards, and investigate and prosecute those that breach regulations and their conditions of licensure.
Player engagement
Player engagement in the Betting and Gaming industry refers to the level of involvement, enjoyment, and interaction that individuals experience when participating in various gambling activities. It encompasses aspects like personalized gaming experiences, social interactions, rewards, and challenges. Maintaining a strong relationship with players is vital for operators as it fosters loyalty, increases player retention, and drives engagement. Engaged players are more likely to return, deposit, and recommend the brand to others. Additionally, a positive operator-regulator relationship that promotes responsible gambling and regulatory compliance creates a trustworthy reputation, a key component for an operator’s long-term success in the industry. Player expectations and betting options are constantly changing and require operators to develop more engaging and sophisticated games to maintain participation and loyalty. At their core, they typically include:
Responsible Gaming
Proactively preventing messages being delivered to players that have self-excluded, mitigating the risk of incurring fines, and sending an SMS message for the purpose of interrupting gambling behavior or sending an email with guidance or support.
Transactional history
Sending statements of fact about the transactions that have completed and providing information to the player about the bets placed, and suspicious account activity. Send Real-time notifications that can include game results or betting odd changes. These can be delivered in multi-channel formats, subject to the player preferences.
Player Engagement
Deliver personalized notifications that are tailored to the gaming experience of the player. This can include games suggestions based on player’s preference, offering customized bonuses, or providing recommendations for in-game actions or new games. After confirming that a player is not on an exclusion list and opted to receive messaging with you can send notifications with bonuses and promotions offering attractive incentives to maintain player engagement. These can include welcome bonuses, free game access, and loyalty programs.
Account settings & Security messaging
This can be in the form of SMS to provide seamless account creation, onboarding verification and deliver one-time-passwords to accelerate player identification. Access codes can be delivered where a unique code is delivered to the player in a time sensitive window to provide access to a particular game.
Responsible Gaming
Operators face several challenges when it comes to maintaining player engagement while adhering to regulatory mandated responsible gambling standards, requiring they balance engagement and retention strategies with player well-being and safe-play requirements. A common challenge faced by operators is ingesting multiple self-exclusion lists to ensure self-excluded users do not receive engagement and retention offers. Operators do employ various activities, such as educational initiatives, such as providing players with information about responsible gambling, offering responsive customer support to address player issues and queries promptly, and use machine learning to identify problematic gambling and take proactive actions. It is also worth noting that operators collaborate with problem gambling support organizations to provide resources and assistance to affected individuals.
Players can also take decisive action themselves and are free to opt-out of all gambling notifications for a set length of time, usually between 6 months and five years. The gambling operators in that jurisdiction are required to observe this request by law or face million-dollar fines and reputational damage. With increased player participation, ensuring you have the right tools and services in place in critical, as highlighted by an AWS customer.
Betting and Gaming has become one of the fastest growing sectors in the last 20 years. Everyday millions of people use these platforms for their betting and entertainment needs. tombola recognize the importance of having a reliable and scalable outbound communication hub for engaging with and protecting our players. Reliable communication is essential for a safe, engaging and sustainable customer experience.
James Conway, Technology Director, tombola
How to build Player Engagement solutions in the Betting and Gaming industry with AWS
AWS offers robust solutions that can benefit the Betting and Gaming industry. With the challenges discussed in this blog, AWS provides the infrastructure and solutions necessary to address these challenges effectively.
In a series of blogs, we will be sharing how AWS and Amazon Pinpoint can support industry focused use cases. Other solutions in this series are;
- How you can use AIML and GenAI to create player recommendations to improve player engagement
- How you use Amazon Pinpoint for improved onboarding and user authentication
- Identify player trends and next best actions using Amazon Pinpoint and AIML
The first in this four-part series is how we are supporting customers with responsible gaming, and how they can mitigate the risk of contacting players that have chosen not to receive any more communication.
Amazon Pinpoint is a key service in this solution. Pinpoint is a purpose-built, customer engagement service with multi-channel capabilities, message delivery, management, and optimization. This allows AWS customers to send personalized messages, promotions, and notifications to users via various channels, through a single console. Customers view Amazon Pinpoint as their communication hub because they can consolidate the services and tools used for their outbound channels to just one. It becomes the central service for managing and facilitating communications between different stakeholders. It streamlines and creates efficiency for front and back-office teams as they are able to concentrate on the player’s experience. Customers are looking for an easy, optimized, and consolidated solution to manage their digital communications. Customers often have different services or tools for each communication channel, causing operational complexity that can lead to system issues, inefficiencies and breaches in regulatory obligations. Operators face issues when different teams and stakeholders have to sync between their customer data repository and these services and tools. Maintaining the integrity of these systems can be cumbersome and increase the risk in the event of a sync or systems error. By maintaining a single service for outbound communications and simplifying the customer data, you are able to innovate and deliver player centric solutions. Below we have provided a selection of use cases focusing on player engagement.
Responsible Gaming – Mitigate the Risk of Targeting Self-Excluded Players on AWS
Under the UK gaming regulations, operators are required to observe a self-exclusion list, managed by GAMSTOP. Amazon Pinpoint queries GAMSTOP’s API in real time before sending the message to a customer. The above is possible with the use of Amazon Pinpoint’s Campaign Hooks and Journey Hooks. Campaign and Journey hooks can be used for other use cases that require reaching out to a 3rd party service in real time, such as players’ balance check before sending a message. Gamstop has been used in this example but can apply to any self-exclusion site or an internal exclusion list.
Tombola, who operate the largest online bingo website in Europe, successfully adopted Pinpoint across all their territories said,
‘At Tombola, we needed a communication tool that helped us deliver on one of our core values: responsible gambling. Players can opt out of marketing communications from online gambling operators by registering themselves on an independent self-exclusion scheme. We needed a system that helped deliver consistency with evolving changing requirements and ensure, in real-time, we have the controls in place not to contact the wrong people. Amazon Pinpoint allowed us to consolidate the various communication systems we had deployed across territories and allowed us to continually evaluate the content and the recipients of our communication. Only Pinpoint’s system could keep up with our shifting requirements, so we can easily connect with the players who want to hear from us, but never contact those who had self-excluded.’

About the Authors

Richard Perez
Richard Perez is a Principle Go-to-Market Specialist for Communication Developer Services at AWS. He enjoys diving deep into customers’ issues and helping to deliver communication solutions. In his spare time, he enjoys watching and participating in sports, and reading historical novels.
AWS Weekly Roundup: Global AWS Heroes Summit, AWS Lambda, Amazon Redshift, and more (July 22, 2024)
Post Syndicated from Donnie Prakoso original https://aws.amazon.com/blogs/aws/aws-weekly-roundup-global-aws-heroes-summit-aws-lambda-amazon-redshift-and-more-july-22-2024/
Last week, AWS Heroes from around the world gathered to celebrate the 10th anniversary of the AWS Heroes program at Global AWS Heroes Summit. This program recognizes a select group of AWS experts worldwide who go above and beyond in sharing their knowledge and making an impact within developer communities.
Matt Garman, CEO of AWS and a long-time supporter of developer communities, made a special appearance for a Q&A session with the Heroes to listen to their feedback and respond to their questions.
Here’s an epic photo from the AWS Heroes Summit:

As Matt mentioned in his Linkedin post, “The developer community has been core to everything we have done since the beginning of AWS.” Thank you, Heroes, for all you do. Wishing you all a safe flight home.
Last week’s launches
Here are some launches that caught my attention last week:
Announcing the July 2024 updates to Amazon Corretto — The latest updates for the Corretto distribution of OpenJDK is now available. This includes security and critical updates for the Long-Term Supported (LTS) and Feature (FR) versions.

New open-source Advanced MYSQL ODBC Driver now available for Amazon Aurora and RDS — The new AWS ODBC Driver for MYSQL provides faster switchover and failover times, and authentication support for AWS Secrets Manager and AWS Identity and Access Management (IAM), making it a more efficient and secure option for connecting to Amazon RDS and Amazon Aurora MySQL-compatible edition databases.

Productionize Fine-tuned Foundation Models from SageMaker Canvas — Amazon SageMaker Canvas now allows you to deploy fine-tuned Foundation Models (FMs) to SageMaker real-time inference endpoints, making it easier to integrate generative AI capabilities into your applications outside the SageMaker Canvas workspace.

AWS Lambda now supports SnapStart for Java functions that use the ARM64 architecture — Lambda SnapStart for Java functions on ARM64 architecture delivers up to 10x faster function startup performance and up to 34% better price performance compared to x86, enabling the building of highly responsive and scalable Java applications using AWS Lambda.
Amazon QuickSight improves controls performance — Amazon QuickSight has improved the performance of controls, allowing readers to interact with them immediately without having to wait for all relevant controls to reload. This enhancement reduces the loading time experienced by readers.
Amazon OpenSearch Serverless levels up speed and efficiency with smart caching — The new smart caching feature for indexing in Amazon OpenSearch Serverless automatically fetches and manages data, leading to faster data retrieval, efficient storage usage, and cost savings.
Amazon Redshift Serverless with lower base capacity available in the Europe (London) Region — Amazon Redshift Serverless now allows you to start with a lower data warehouse base capacity of 8 Redshift Processing Units (RPUs) in the Europe (London) region, providing more flexibility and cost-effective options for small to large workloads.
AWS Lambda now supports Amazon MQ for ActiveMQ and RabbitMQ in five new regions — AWS Lambda now supports Amazon MQ for ActiveMQ and RabbitMQ in five new regions, enabling you to build serverless applications with Lambda functions that are invoked based on messages posted to Amazon MQ message brokers.
From community.aws
Here’s my top 5 personal favorites posts from community.aws:
- A Developer’s Guide to Advanced Chunking and Parsing with Amazon Bedrock by Suman Debnath.
- Enhancing Document Analysis with Embedding Adapters on AWS by Mehdi Nemlaghi.
- De-Bugging with Amazon Q and Generative AI by Kasun de Silva.
- Using Amazon Q Developer to update Valkey client code by Ricardo Sueiras.
- Software coding practices in an AI assistant world by cak Derek Bingham.
Upcoming AWS events
Check your calendars and sign up for upcoming AWS events:
AWS Summits — Join free online and in-person events that bring the cloud computing community together to connect, collaborate, and learn about AWS. To learn more about future AWS Summit events, visit the AWS Summit page. Register in your nearest city: AWS Summit Taipei (July 23–24), AWS Summit Mexico City (Aug. 7), and AWS Summit Sao Paulo (Aug. 15).
AWS Community Days — Join community-led conferences that feature technical discussions, workshops, and hands-on labs led by expert AWS users and industry leaders from around the world. Upcoming AWS Community Days are in Aotearoa (Aug. 15), Nigeria (Aug. 24), New York (Aug. 28), and Belfast (Sept. 6).
You can browse all upcoming in-person and virtual events.
That’s all for this week. Check back next Monday for another Weekly Roundup!
— Donnie
This post is part of our Weekly Roundup series. Check back each week for a quick roundup of interesting news and announcements from AWS!
Countdown to Paris 2024 Olympics: France leads in web interest
Post Syndicated from João Tomé original https://blog.cloudflare.com/countdown-to-paris-2024-france-leads-in-olympic-web-interest
This post is also available in Français, Deutsch and Español.
The 2024 Summer Olympics, or Paris 2024, is set from July 26 to August 11 in France. The opening ceremony, scheduled for Friday, July 26 at 17:30, will take place for the first time not in a stadium but in the open space of the Jardins du Trocadéro by the Seine River in Paris. We’ll monitor relevant Internet insights throughout the event, but here we analyze some pre-event trends, from the popularity of Olympic websites by country to the increase in Olympics-related spam and malicious emails.
This year’s Olympics will host 329 events across 32 sports, featuring the debut of breakdancing as an Olympic event and the return of skateboarding, sport climbing, and surfing from 2020. Similar to our 2024 elections coverage, we will maintain a Paris 2024 Olympics report on Cloudflare Radar, updating it as significant Internet trends related to the event emerge.
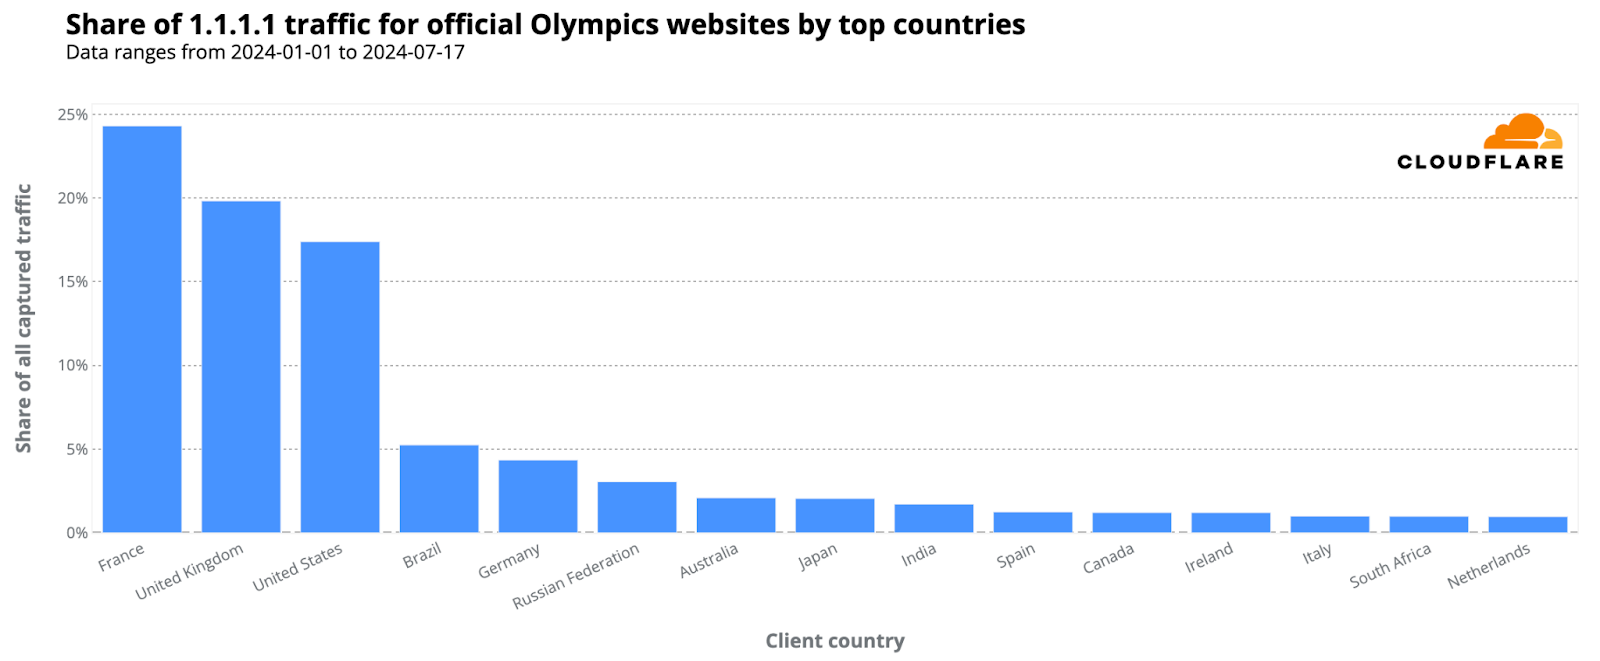
From our 1.1.1.1 resolver, DNS trends show heightened interest in the Olympics, especially from France. 24% of DNS requests for official Olympic-related websites came from the host country, followed by the United Kingdom and the United States, with 20% and 17% respectively.
Here’s the breakdown of countries responsible for at least 1% of 1.1.1.1. traffic for Olympic sites (percentages rounded):
-
France: 24%
-
United Kingdom: 20%
-
United States: 17%
-
Brazil: 5%
-
Germany: 4%
-
Russia: 3%
-
Australia: 2%
-
Japan: 2%
-
India: 2%
-
Spain: 1%
-
Ireland: 1%
-
Canada: 1%
-
South Africa: 1%
-
Netherlands: 1%
-
Italy: 1%
Days with the highest “Olympic” spikes
Analyzing the evolution of DNS traffic to official Olympic websites since January 2024, we’ve noted multiple spikes associated with specific Olympic events or ticket sales. The following ranking offers a global perspective via our 1.1.1.1 resolver, illustrating that as the event draws near and Paris readies itself, more recent dates are emerging prominently in the data.
Top 5 days with higher DNS traffic to Olympic official sites in 2024:
-
January 31: Eve of the 2024 Winter Youth Olympics closing ceremony in Gangwon, South Korea.
-
April 17: Over 250,000 new tickets for Olympic Games Paris 2024 went on sale – one of the last opportunities to get tickets to the main events.
-
January 19: Opening ceremony of the 2024 Winter Youth Olympics (South Korea).
-
June 26: One month before the opening ceremony; the Paris 2024 Main Operations Center starts full games operation; in Paris, areas like the Champ-de-Mars became full occupied by the Olympics; in the US, tickets for NBC’s Opening Ceremony coverage for the Paris 2024 in IMAX theaters went on sale.
-
July 1: Preparations in Paris with street and bridges closures and road signs added indicating fast track routes for Olympic related vehicles.
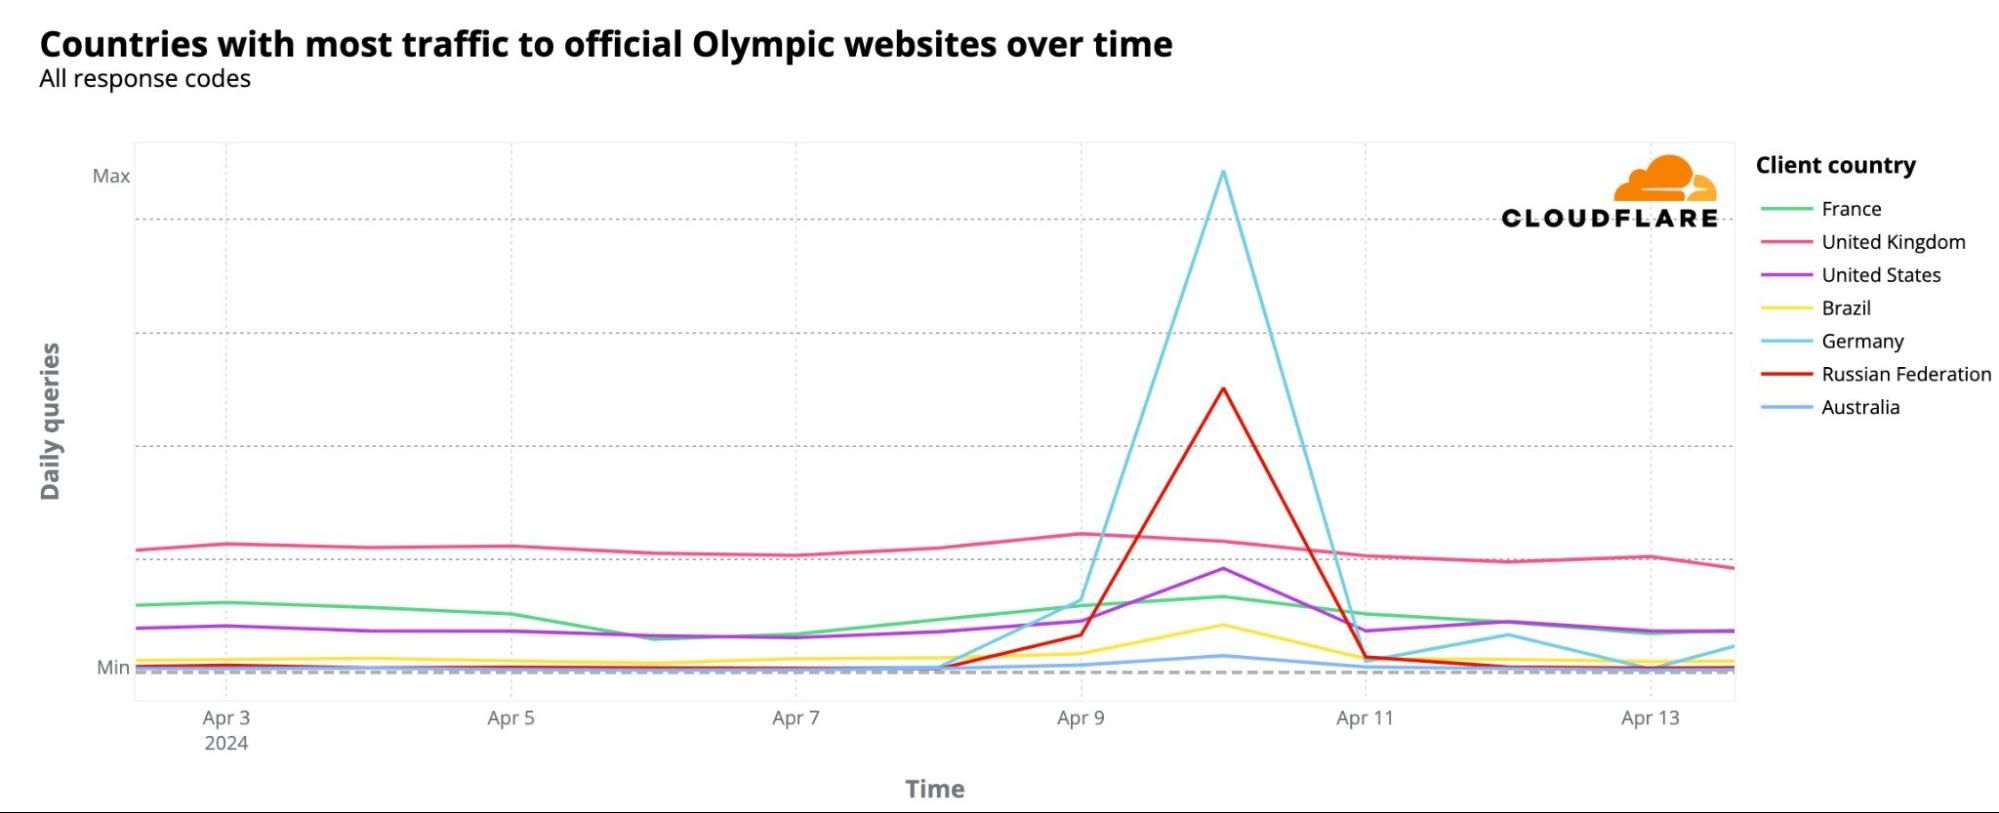
April 10 spikes in Germany, Russia and the US
On April 10, 2024, DNS traffic spikes were observed not just in France but also notably in Germany, Russia, and the US, among others. Despite France leading in overall DNS traffic to Olympic sites since January, as seen on the world map above, this particular day saw the largest spikes originating from other countries. These spikes were most prominent from Germany, Russia, the US, the UK, France, Brazil, and Australia, in that order.
What caused these spikes? Several press conferences related to the Olympics took place that day. One major announcement, covered globally, declared that for the first time, the Olympics would offer prize money, with track and field gold medalists receiving $50,000. The following chart illustrates the spike in DNS traffic in these countries on that day.
France’s trends: interest in tickets comes first
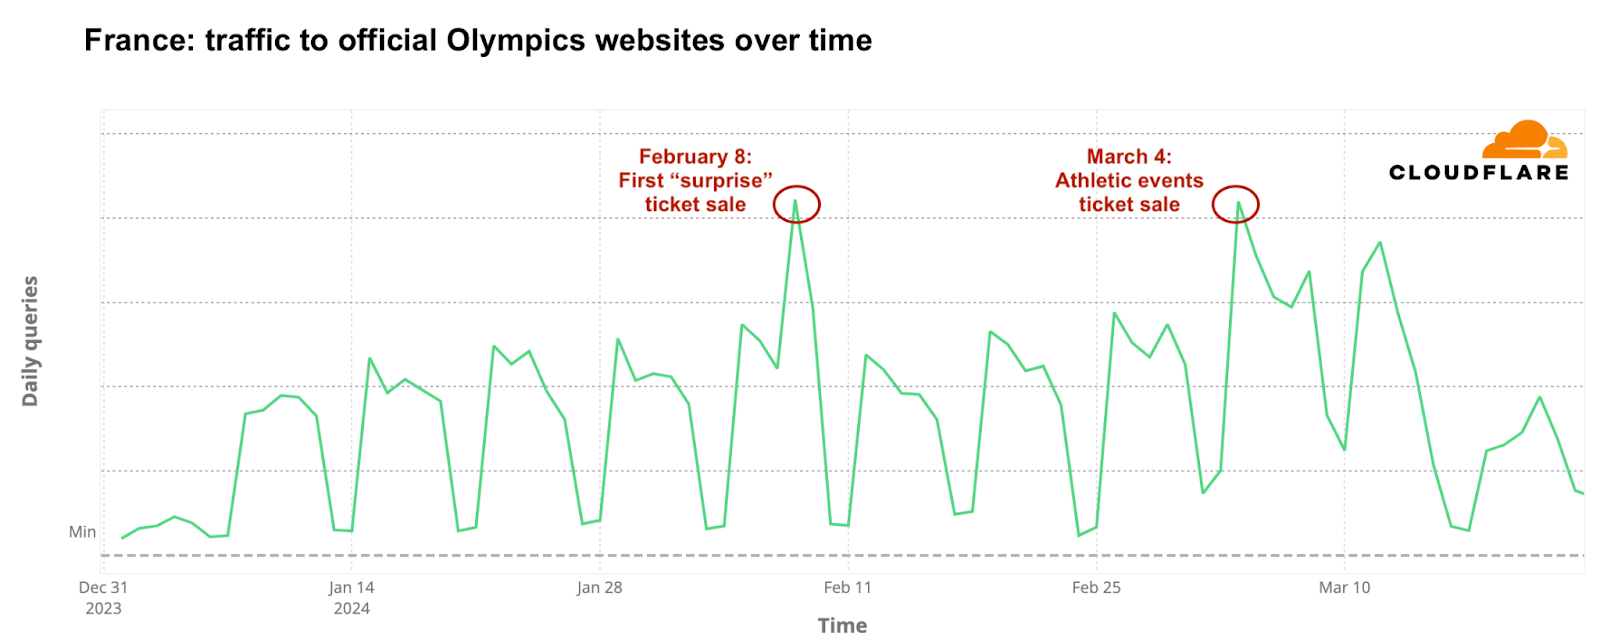
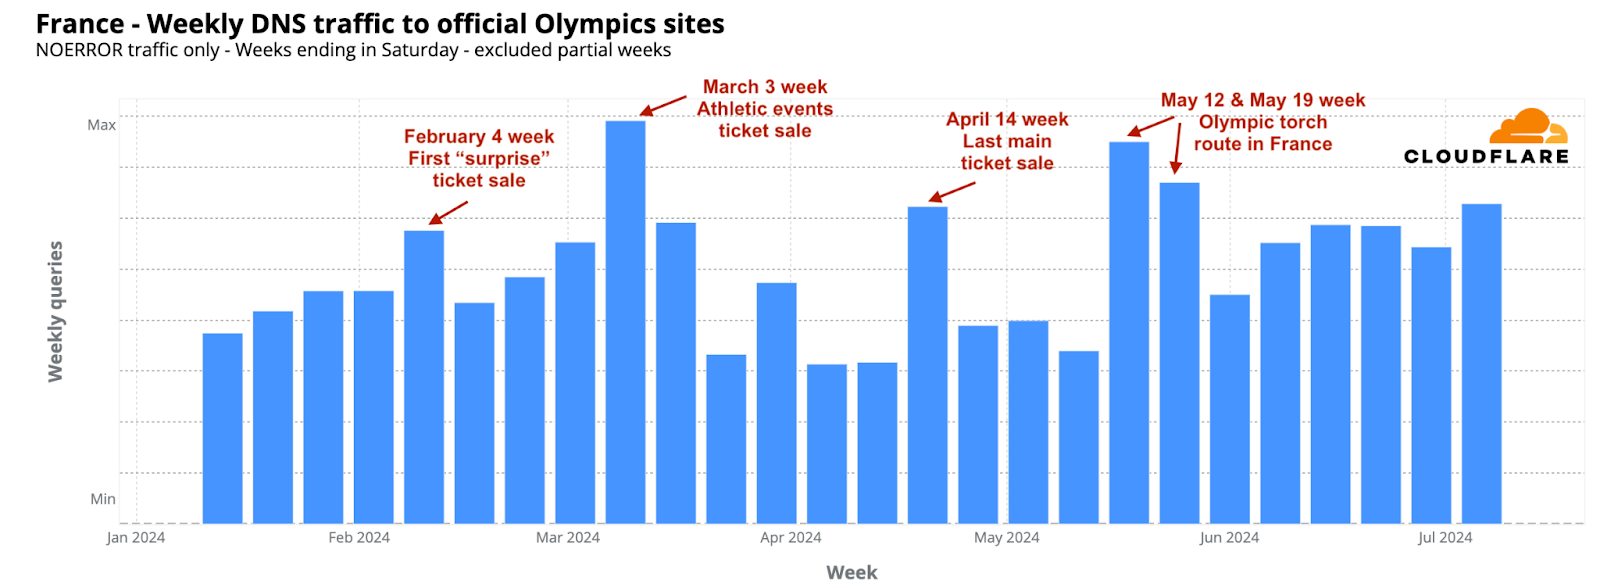
In France, the host nation, ticket sale days significantly influenced DNS traffic to official Olympic websites. The most obvious spike occurred on February 8, 2024, marking the start of the first phase of ticket sales for 2024, called the “Paris 2024 official ticketing website surprise releases.” On that day, daily DNS traffic was double that of the previous week. A significant surge was also observed at 10:00 local time, coinciding with the ticket release, which saw an hourly DNS traffic increase of 398% compared to the previous week.
The week of March 3, 2024, saw the highest DNS traffic to Olympic-related sites in France so far. The most significant increase occurred on March 4, the day the “Athletics Special” ticket sales began for events at the Stade de France, which also coincided with the unveiling of the Olympic poster. On this day, daily DNS traffic rose by 45% compared to the previous week. Other notable periods included the weeks of May 12 and May 19, when the Olympic torch arrived in France and started its journey through various cities. April 14 also marked a critical day, offering one of the last chances to purchase 250,000 tickets for major events.
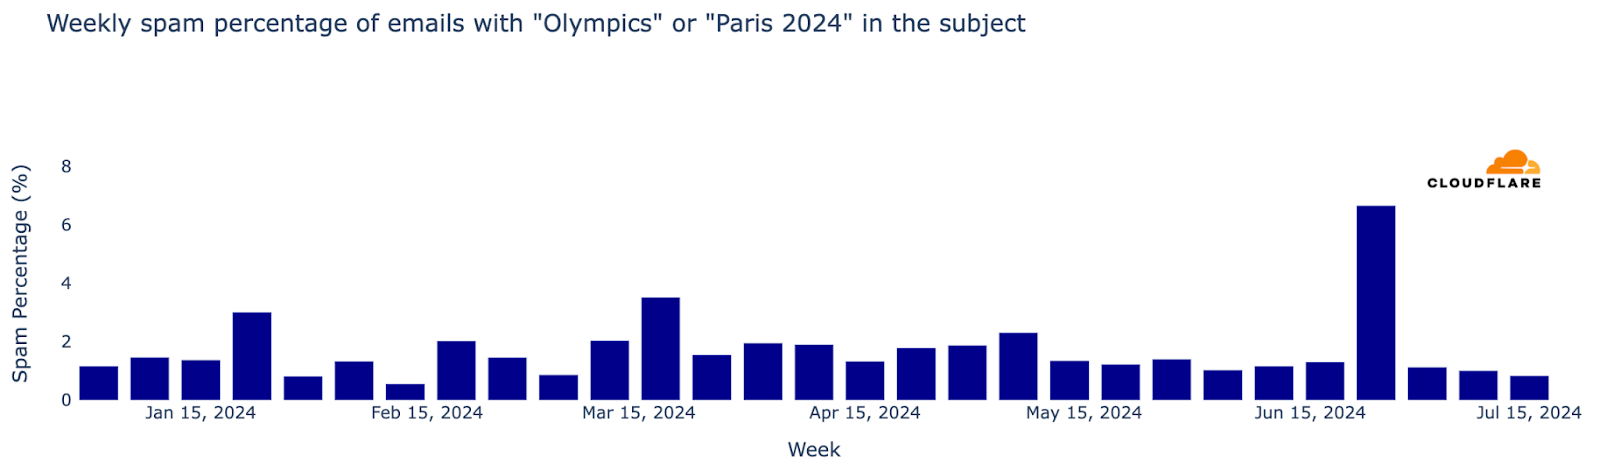
“Olympics” and “Paris 2024” emails on the rise
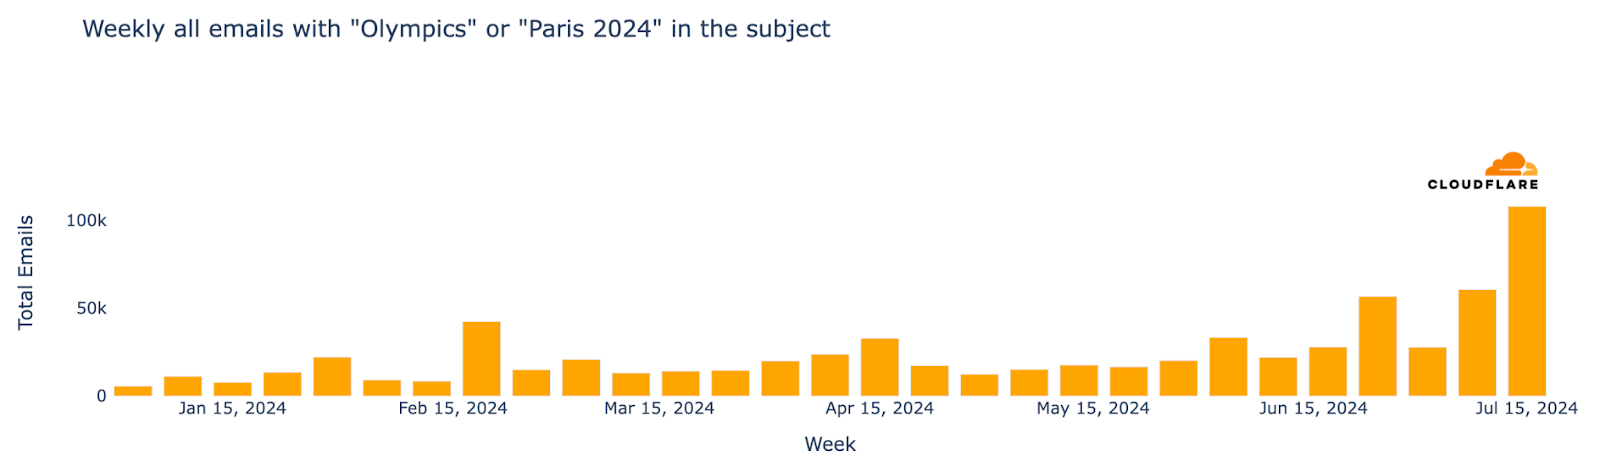
From a cybersecurity perspective, as major events often attract phishing and spam, we’ve analyzed email trends related to the Olympics—recently we did the same for the Biden vs Trump US presidential debate. From January 2024 up to late-July, Cloudflare’s Cloud Email Security service processed well over half a million emails containing “Olympics” or “Paris 2024” in the subject. The week of July 15 saw the highest number of such emails, marking a 694% increase compared to the busiest week in January.
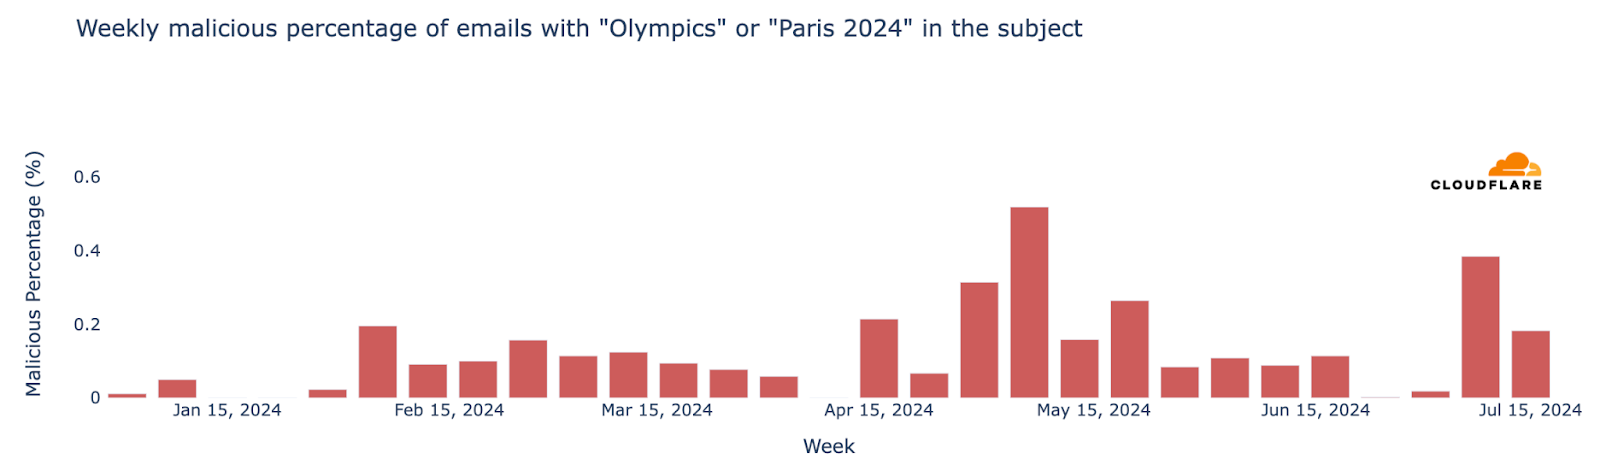
Regarding unwanted messages, spam accounted for 1.5% of all emails with “Olympics” or “Paris 2024” in the subject, while malicious emails made up 0.2%. This means that in a sample of 1000 emails, roughly 15 would be spam and about 2 would be malicious. The week with the highest percentage of malicious Olympic-related emails was May 6, with 0.6% classified as malicious. Declining after that peak, it ticked back up in July, to 0.4% on July 8.
Furthermore, the week of June 24 witnessed the highest proportion of spam emails for the year so far, at 7% of all emails.
As the Olympics opening ceremony approaches, we expect the volume of related emails, and the proportion of malicious and spam emails, to increase. We’ll provide an update of the first days of the Olympics next week.
Conclusion: “Citius, Altius, Fortius – Communiter” *
As the world turns its eyes to Paris for the 2024 Summer Olympics, our latest analysis provides a snapshot of the enthusiasm surrounding the games, with France, the host nation, clearly leading in terms of DNS traffic to official Olympic websites, followed by the UK, the US, and Australia.
With the games about to start, the best is yet to come, with the Olympics bringing over three hundred events in 32 sports to people all around the world.
As previously mentioned, we will maintain a Paris 2024 Olympics report on Cloudflare Radar, updating it as significant Internet trends related to the event emerge.
Let the games begin.
* “Citius, Altius, Fortius – Communiter” — Latin for “Faster, Higher, Stronger – Together.” The first three words comprise the original motto that was proposed by Pierre de Coubertin, a French historian and the “father” of the modern Olympic Games, upon the creation of the International Olympic Committee in 1894. It was updated in 2021 to include “Communiter”, highlighting the power of sports to bring people together.
Countdown to Paris 2024 Olympics: France leads in web interest
Post Syndicated from João Tomé original https://blog.cloudflare.com/countdown-to-paris-2024-france-leads-in-olympic-web-interest

The 2024 Summer Olympics, or Paris 2024, is set from July 26 to August 11 in France. The opening ceremony, scheduled for Friday, July 26 at 17:30, will take place for the first time not in a stadium but in the open space of the Jardins du Trocadéro by the Seine River in Paris. We’ll monitor relevant Internet insights throughout the event, but here we analyze some pre-event trends, from the popularity of Olympic websites by country to the increase in Olympics-related spam and malicious emails.
This year’s Olympics will host 329 events across 32 sports, featuring the debut of breakdancing as an Olympic event and the return of skateboarding, sport climbing, and surfing from 2020. Similar to our 2024 elections coverage, we will maintain a Paris 2024 Olympics report on Cloudflare Radar, updating it as significant Internet trends related to the event emerge.
From our 1.1.1.1 resolver, DNS trends show heightened interest in the Olympics, especially from France. 24% of DNS requests for official Olympic-related websites came from the host country, followed by the United Kingdom and the United States, with 20% and 17% respectively.

Here’s the breakdown of countries responsible for at least 1% of 1.1.1.1. traffic for Olympic sites (percentages rounded):
- France: 24%
- United Kingdom: 20%
- United States: 17%
- Brazil: 5%
- Germany: 4%
- Russia: 3%
- Australia: 2%
- Japan: 2%
- India: 2%
- Spain: 1%
- Ireland: 1%
- Canada: 1%
- South Africa: 1%
- Netherlands: 1%
- Italy: 1%
Days with the highest “Olympic” spikes
Analyzing the evolution of DNS traffic to official Olympic websites since January 2024, we’ve noted multiple spikes associated with specific Olympic events or ticket sales. The following ranking offers a global perspective via our 1.1.1.1 resolver, illustrating that as the event draws near and Paris readies itself, more recent dates are emerging prominently in the data.
Top 5 days with higher DNS traffic to Olympic official sites in 2024:
- January 31: Eve of the 2024 Winter Youth Olympics closing ceremony in Gangwon, South Korea.
- April 17: Over 250,000 new tickets for Olympic Games Paris 2024 went on sale – one of the last opportunities to get tickets to the main events.
- January 19: Opening ceremony of the 2024 Winter Youth Olympics (South Korea).
- June 26: One month before the opening ceremony; the Paris 2024 Main Operations Center starts full games operation; in Paris, areas like the Champ-de-Mars became full occupied by the Olympics; in the US, tickets for NBC’s Opening Ceremony coverage for the Paris 2024 in IMAX theaters went on sale.
- July 1: Preparations in Paris with street and bridges closures and road signs added indicating fast track routes for Olympic related vehicles.
April 10 spikes in Germany, Russia and the US
On April 10, 2024, DNS traffic spikes were observed not just in France but also notably in Germany, Russia, and the US, among others. Despite France leading in overall DNS traffic to Olympic sites since January, as seen on the world map above, this particular day saw the largest spikes originating from other countries. These spikes were most prominent from Germany, Russia, the US, the UK, France, Brazil, and Australia, in that order.
What caused these spikes? Several press conferences related to the Olympics took place that day. One major announcement, covered globally, declared that for the first time, the Olympics would offer prize money, with track and field gold medalists receiving $50,000. The following chart illustrates the spike in DNS traffic in these countries on that day.
France’s trends: interest in tickets comes first
In France, the host nation, ticket sale days significantly influenced DNS traffic to official Olympic websites. The most obvious spike occurred on February 8, 2024, marking the start of the first phase of ticket sales for 2024, called the “Paris 2024 official ticketing website surprise releases.” On that day, daily DNS traffic was double that of the previous week. A significant surge was also observed at 10:00 local time, coinciding with the ticket release, which saw an hourly DNS traffic increase of 398% compared to the previous week.
The week of March 3, 2024, saw the highest DNS traffic to Olympic-related sites in France so far. The most significant increase occurred on March 4, the day the “Athletics Special” ticket sales began for events at the Stade de France, which also coincided with the unveiling of the Olympic poster. On this day, daily DNS traffic rose by 45% compared to the previous week. Other notable periods included the weeks of May 12 and May 19, when the Olympic torch arrived in France and started its journey through various cities. April 14 also marked a critical day, offering one of the last chances to purchase 250,000 tickets for major events.
“Olympics” and “Paris 2024” emails on the rise
From a cybersecurity perspective, as major events often attract phishing and spam, we’ve analyzed email trends related to the Olympics—recently we did the same for the Biden vs Trump US presidential debate. From January 2024 up to late-July, Cloudflare’s Cloud Email Security service processed well over half a million emails containing “Olympics” or “Paris 2024” in the subject. The week of July 15 saw the highest number of such emails, marking a 694% increase compared to the busiest week in January.
Regarding unwanted messages, spam accounted for 1.5% of all emails with “Olympics” or “Paris 2024” in the subject, while malicious emails made up 0.2%. This means that in a sample of 1000 emails, roughly 15 would be spam and about 2 would be malicious. The week with the highest percentage of malicious Olympic-related emails was May 6, with 0.6% classified as malicious. Declining after that peak, it ticked back up in July, to 0.4% on July 8.
Furthermore, the week of June 24 witnessed the highest proportion of spam emails for the year so far, at 7% of all emails.
As the Olympics opening ceremony approaches, we expect the volume of related emails, and the proportion of malicious and spam emails, to increase. We’ll provide an update of the first days of the Olympics next week.
Conclusion: “Citius, Altius, Fortius” *
As the world turns its eyes to Paris for the 2024 Summer Olympics, our latest analysis provides a snapshot of the enthusiasm surrounding the games, with France, the host nation, clearly leading in terms of DNS traffic to official Olympic websites, followed by the UK, the US, and Australia.
With the games about to start, the best is yet to come, with the Olympics bringing over three hundred events in 32 sports to people all around the world.
As previously mentioned, we will maintain a Paris 2024 Olympics report on Cloudflare Radar, updating it as significant Internet trends related to the event emerge.
Let the games begin.
(Jorge Pacheco contributed to this blog post)
* “Citius, Altius, Fortius”—Latin for “Faster, Higher, Stronger.” This motto was proposed by Pierre de Coubertin, a French historian and the “father” of the modern Olympic Games, upon the creation of the International Olympic Committee in 1894.

[$] “Opt-in” metrics planned for Fedora Workstation 42
Post Syndicated from jzb original https://lwn.net/Articles/980598/
Red Hat, through members of the Fedora
Workstation Working Group, has taken another
swing at persuading the Fedora Project to allow metrics related to
the real-world use of the Workstation edition to be collected. The first
proposal, aimed for Fedora 40, was withdrawn to be reworked
based on feedback. This time around, the proponents have shifted from
asking for opt-out telemetry to opt-in metrics, with more detail about
what would be collected and the policies that would govern data collection. The
change seems to be on its way to approval by the Fedora Engineering
Steering Council (FESCo) and is set to take effect for
Fedora 42.
Security updates for Monday
Post Syndicated from jake original https://lwn.net/Articles/982845/
Security updates have been issued by Fedora (botan2, chromium, ffmpeg, fluent-bit, gtk3, httpd, suricata, tcpreplay, and thunderbird), Mageia (apache, chromium-browser-stable, libfm & libfm-qt, and thunderbird), Oracle (firefox, java-1.8.0-openjdk, java-11-openjdk, java-17-openjdk, java-21-openjdk, kernel, libndp, qt5-qtbase, ruby, skopeo, thunderbird, and virt:ol and virt-devel:rhel), Red Hat (containernetworking-plugins, firefox, libndp, qt5-qtbase, and thunderbird), SUSE (caddy, chromium, emacs, global, mockito, snakeyaml, testng, and opera), and Ubuntu (thunderbird).
Chaos at the Convention: The 1968 DNC
Post Syndicated from The History Guy: History Deserves to Be Remembered original https://www.youtube.com/watch?v=tKV4JVy2WoM
Snake Mimics a Spider
Post Syndicated from Bruce Schneier original https://www.schneier.com/blog/archives/2024/07/snake-mimics-a-spider.html
This is a fantastic video. It’s an Iranian spider-tailed horned viper (Pseudocerastes urarachnoides). Its tail looks like a spider, which the snake uses to fool passing birds looking for a meal.
Supermicro NVIDIA GB200 NVL72 System at Computex 2024
Post Syndicated from Cliff Robinson original https://www.servethehome.com/supermicro-nvidia-gb200-nvl72-system-at-computex-2024/
We checked out the Supermicro NVIDIA GB200 NVL72 rack at Computex 2024. This is a prime example of why power is becoming such a big deal
The post Supermicro NVIDIA GB200 NVL72 System at Computex 2024 appeared first on ServeTheHome.
S11 E17: “Migrant Crime,” the RNC & the World Games: 7/21/24: Last Week Tonight with John Oliver
Post Syndicated from LastWeekTonight original https://www.youtube.com/watch?v=5juExgl1OLY
Biden Steps Aside. How Might Harris Step Up?
Post Syndicated from The Atlantic original https://www.youtube.com/watch?v=3rrmIQnVwLw
The Dandelion, most populous flower on earth
Post Syndicated from The History Guy: History Deserves to Be Remembered original https://www.youtube.com/watch?v=zksvBuwljpo
Comic for 2024.07.22 – Self-Depreciating
Post Syndicated from Explosm.net original https://explosm.net/comics/self-depreciating
New Cyanide and Happiness Comic
President Venn Diagram
Post Syndicated from xkcd.com original https://xkcd.com/2962/

THE BASTILLE: The MOST Legendary PRISON in Paris
Post Syndicated from Geographics original https://www.youtube.com/watch?v=YL4gpZtD8ck