AWS Glue DataBrew offers over 350 pre-built transformations to automate data preparation tasks (such as filtering anomalies, standardizing formats, and correcting invalid values) that would otherwise require days or weeks writing hand-coded transformations.
You can now choose single or multiple output files instead of autogenerated files for your DataBrew recipe jobs. You can generate a single output file when the output is small or downstream systems need to consume it more easily, such as visualization tools. Alternatively, you can specify your desired number of output files when configuring a recipe job. This gives you the flexibility to manage recipe job output for visualization, data analysis, and reporting, while helping prevent you from generating too many files. In some cases, you may also want to customize the output file partitions for efficient storage and transfer.
In this post, we walk you through how to connect and transform data from an Amazon Simple Storage Service (Amazon S3) data lake and configure the output as a single file via the DataBrew console.
Solution overview
The following diagram illustrates our solution architecture.
DataBrew queries sales order data from the S3 data lake and performs data transformation. Then the DataBrew job writes the final output back to the data lake in a single file.
To implement the solution, you complete the following high-level steps:
Create a dataset.
Create a DataBrew project using the dataset.
Build a transformation recipe.
Create and run a DataBrew recipe job on the full data.
Prerequisites
To complete this solution, you should have an AWS account and the appropriate permissions to create the resources required as part of the solution.
You also need a dataset in Amazon S3. For our use case, we use a mock dataset. You can download the data files from GitHub. On the Amazon S3 console, upload all three CSV files to an S3 bucket.
Create a dataset
To create your dataset in DataBrew, complete the following steps:
On the Datasets page of the DataBrew console, choose Connect new dataset.
For Dataset name, enter a name (for example, order).
Enter the S3 bucket path where you uploaded the data files as part of the prerequisite steps.
Choose Select the entire folder.
For File type¸ select CSV and choose Comma (,) for CSV delimiter.
For Column header values, select Treat first row as header.
Choose Create dataset.
Create a DataBrew project using the dataset
To create your DataBrew project, complete the following steps:
On the DataBrew console, on the Projects page, choose Create project.
For Project Name, enter valid-order.
For Attached recipe, choose Create new recipe. The recipe name is populated automatically (valid-order-recipe).
You can see a success message along with our Amazon S3 order table with 500 rows.
After the project is opened, a DataBrew interactive session is created. DataBrew retrieves sample data based on your sampling configuration selection.
Build a transformation recipe
In a DataBrew interactive session, you can cleanse and normalize your data using over 350 pre-built transformations. In this post, we use DataBrew to perform a few transforms and filter only valid orders with order amounts greater than $0.
To do this, you perform the following steps:
Choose Column and choose Delete.
For Source columns, choose the columns order_id, timestamp, and transaction_date.
Choose Apply.
We filter the rows based on an amount value greater than $0 and add the condition as a recipe step.
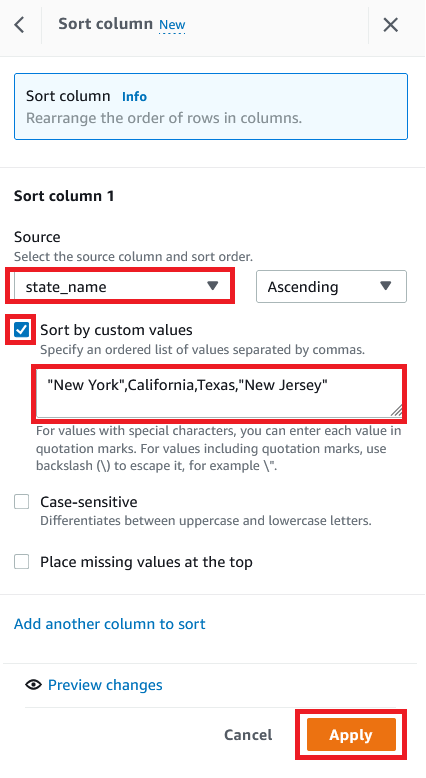
To create a custom sort based on state, choose SORT and choose Ascending.
For Source, choose the column state_name.
Select Sort by custom values.
Enter a list of state names separated by commas.
Choose Apply.
The following screenshot shows the full recipe that we applied to our dataset.
Create and run a DataBrew recipe job on the full data
Now that we have built the recipe, we can create and run a DataBrew recipe job.
On the project details page, choose Create job.
For Job name, enter valid-order.
For Output to, choose Amazon S3.
Enter the S3 path to store the output file.
Choose Settings.
For File output options, you have multiple options:
Autogenerate files – This is the default file output setting, which generates multiple files and usually results in the fastest job runtime
Single file output – This option generates a single output file
Multiple file output – With this option, you specify the maximum number of files you want to split your data into
For this post, select Single file output.
Choose Save.
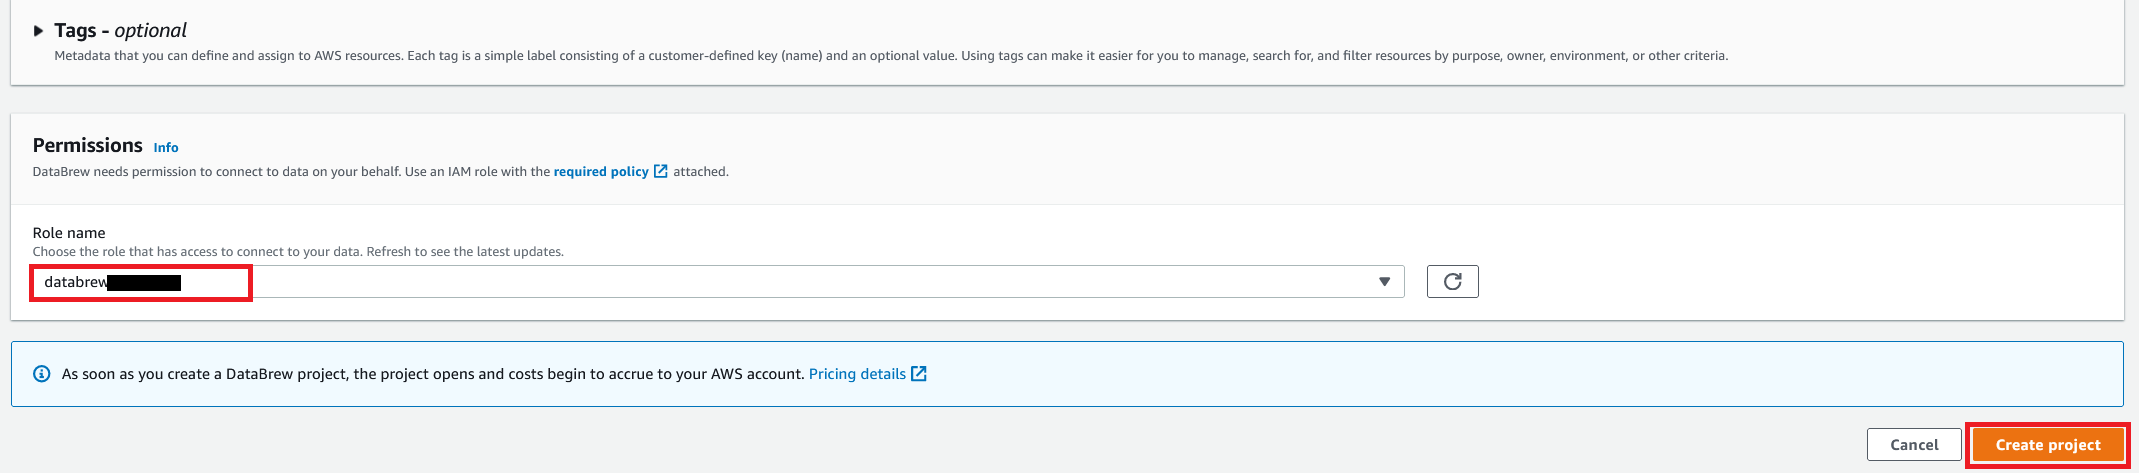
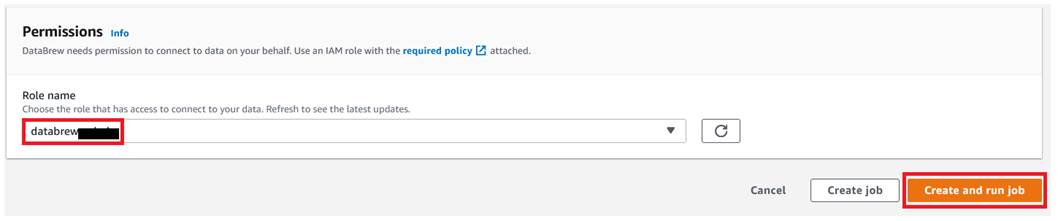
For Role name, choose the IAM role to be used with DataBrew.
Choose Create and run job.
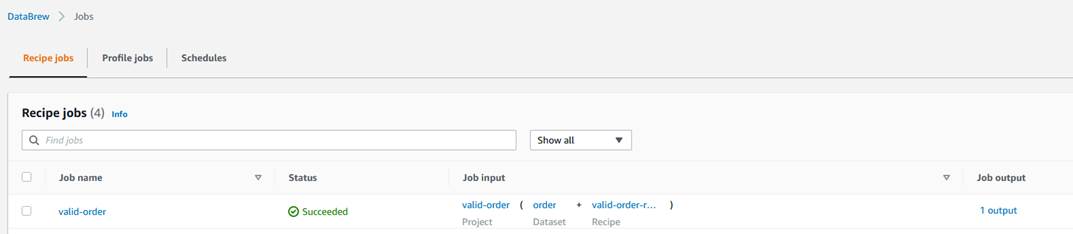
Navigate to the Jobs page and wait for the product-wise-sales-job job to complete.
Navigate to output S3 bucket to confirm that a single output file is stored there.
Clean up
To avoid incurring future charges, delete all the resources created during this walkthrough:
In this post, we showed how to connect and transform data from an S3 data lake and create a DataBrew dataset. We also demonstrated how we can bring data from our data lake into DataBrew, seamlessly apply transformations, and write the prepared data back to the data lake in a single output file.
Dhiraj Thakur is a Solutions Architect with Amazon Web Services. He works with AWS customers and partners to provide guidance on enterprise cloud adoption, migration, and strategy. He is passionate about technology and enjoys building and experimenting in the analytics and AI/ML space.
In this blog post, you’ll learn how to protect privileged business transactions that are exposed as APIs by using multi-factor authentication (MFA) or security challenges. These challenges have two components: what you know (such as passwords), and what you have (such as a one-time password token). By using these multi-factor security controls, you can implement step-up authentication to obtain a higher level of security when you perform critical transactions. In this post, we show you how you can use AWS services such as Amazon API Gateway, Amazon Cognito, Amazon DynamoDB, and AWS Lambda functions to implement step-up authentication by using a simple rule-based security model for your API resources.
Previously, identity and access management solutions have attempted to deliver step-up authentication by retrofitting their runtimes with stateful server-side management, which doesn’t scale in the modern-day stateless cloud-centered application architecture. We’ll show you how to use a pluggable, stateless authentication implementation that integrates into your existing infrastructure without compromising your security or performance. The Amazon API Gateway Lambda authorizer is a pluggable serverless function that acts as an intermediary step before an API action is invoked. This Lambda authorizer, coupled with a small SDK library that runs in the authorizer, will provide step-up authentication.
The reference architecture in this post uses a purpose-built step-up authorization workflow engine, which uses a custom SDK. The custom SDK uses the DynamoDB service as a persistent layer. This workflow engine is generic and can be used across any API serving layers, such as API Gateway or Elastic Load Balancing (ELB) Application Load Balancer, as long as the API serving layers can intercept API requests to perform additional actions. The step-up workflow engine also relies on an identity provider that is capable of issuing an OAuth 2.0 access token.
There are three parts to the step-up authentication solution:
An API serving layer with the capability to apply custom logic before applying business logic.
An OAuth 2.0–capable identity provider system.
A purpose-built step-up workflow engine.
The solution in this post uses Amazon Cognito as the identity provider, with an API Gateway Lambda authorizer to invoke the step-up workflow engine, and DynamoDB as a persistent layer used by the step-up workflow engine. You can see a reference implementation of the API Gateway Lambda authorizer in the step-up-auth GitHub repository. Additionally, the purpose-built step-up workflow engine provides two API endpoints (or API actions), /initiate-auth and /respond-to-challenge, which are realized using the API Gateway Lambda authorizer, to drive the API invocation step-up state.
Note: If you decide to use an API serving layer other than API Gateway, or use an OAuth 2.0 identity provider besides Amazon Cognito, you will have to make changes to the accompanying sample code in the step-up-auth GitHub repository.
Solution architecture
Figure 1 shows the high-level reference architecture.
First, let’s talk about the core components in the step-up authentication reference architecture in Figure 1.
Identity provider
In order for a client application or user to invoke a protected backend API action, they must first obtain a valid OAuth token or JSON web token (JWT) from an identity provider. The step-up authentication solution uses Amazon Cognito as the identity provider. The step-up authentication solution and the accompanying step-up API operations use the access token to make the step-up authorization decision.
Protected backend
The step-up authentication solution uses API Gateway to protect backend resources. API Gateway supports several different API integration types, and you can use any one of the supported API Gateway integration types. For this solution, the accompanying sample code in the step-up-auth GitHub repository uses Lambda proxy integration to simulate a protected backend resource.
Data design
The step-up authentication solution relies on two DynamoDB tables, a session table and a setting table. The session table contains the user’s step-up session information, and the setting table contains an API step-up configuration. The API Gateway Lambda authorizer (described in the next section) checks the setting table to determine whether the API request requires a step-up session. For more information about table structure and sample values, see the Step-up authentication data design section in the accompanying GitHub repository.
The session table has the DynamoDB Time to Live (TTL) feature enabled. An item stays in the session table until the TTL time expires, when DynamoDB automatically deletes the item. The TTL value can be controlled by using the environment variable SESSION_TABLE_ITEM_TTL. Later in this post, we’ll cover where to define this environment variable in the Step-up solution design details section; and we’ll cover how to set the optimal value for this environment variable in the Additional considerations section.
Authorizer
The step-up authentication solution uses a purpose-built request parameter-based Lambda authorizer (also called a REQUEST authorizer). This REQUEST authorizer helps protect privileged API operations that require a step-up session.
The authorizer verifies that the API request contains a valid access token in the HTTP Authorization header. Using the access token’s JSON web token ID (JTI) claim as a key, the authorizer then attempts to retrieve a step-up session from the session table. If a session exists and its state is set to either STEP_UP_COMPLETED or STEP_UP_NOT_REQUIRED, then the authorizer lets the API call through by generating an allow API Gateway Lambda authorizer policy. If the set-up state is set to STEP_UP_REQUIRED, then the authorizer returns a 401 Unauthorized response status code to the caller.
If a step-up session does not exist in the session table for the incoming API request, then the authorizer attempts to create a session. It first looks up the setting table for the API configuration. If an API configuration is found and the configuration status is set to STEP_UP_REQUIRED, it indicates that the user must provide additional authentication in order to call this API action. In this case, the authorizer will create a new session in the session table by using the access token’s JTI claim as a session key, and it will return a 401 Unauthorized response status code to the caller. If the API configuration in the setting table is set to STEP_UP_DENY, then the authorizer will return a deny API Gateway Lambda authorizer policy, therefore blocking the API invocation. The caller will receive a 403 Forbidden response status code.
The authorizer uses the purpose-built auth-sdk library to interface with both the session and setting DynamoDB tables. The auth-sdk library provides convenient methods to create, update, or delete items in tables. Internally, auth-sdk uses the DynamoDB v3 Client SDK.
Initiate auth endpoint
When you deploy the step-up authentication solution, you will get the following two API endpoints:
The initiate step-up authentication endpoint (described in this section).
The respond to step-up authentication challenge endpoint (described in the next section).
When a client receives a 401 Unauthorized response status code from API Gateway after invoking a privileged API operation, the client can start the step-up authentication flow by invoking the initiate step-up authentication endpoint (/initiate-auth).
The /initiate-auth endpoint does not require any extra parameters, it only requires the Amazon Cognito access_token to be passed in the Authorization header of the request. The /initiate-auth endpoint uses the access token to call the Amazon Cognito API actions GetUser and GetUserAttributeVerificationCode on behalf of the user.
After the /initiate-auth endpoint has determined the proper multi-factor authentication (MFA) method to use, it returns the MFA method to the client. There are three possible values for the MFA methods:
MAYBE_SOFTWARE_TOKEN_STEP_UP, which is used when the MFA method cannot be determined.
SOFTWARE_TOKEN_STEP_UP, which is used when the user prefers software token MFA.
SMS_STEP_UP, which is used when the user prefers short message service (SMS) MFA.
Let’s take a closer look at how /initiate-auth endpoint determines the type of MFA methods to return to the client. The endpoint calls Amazon Cognito GetUser API action to check for user preferences, and it takes the following actions:
Determines what method of MFA the user prefers, either software token or SMS.
If the user’s preferred method is set to software token, the endpoint returns SOFTWARE_TOKEN_STEP_UP code to the client.
If the user’s preferred method is set to SMS, the endpoint sends an SMS message with a code to the user’s mobile device. It uses the Amazon Cognito GetUserAttributeVerificationCode API action to send the SMS message. After the Amazon Cognito API action returns success, the endpoint returns SMS_STEP_UP code to the client.
When the user preferences don’t include either a software token or SMS, the endpoint checks if the response from Amazon Cognito GetUser API action contains UserMFASetting response attribute list with either SOFTWARE_TOKEN_MFA or SMS_MFA keywords. If the UserMFASetting response attribute list contains SOFTWARE_TOKEN_MFA, then the endpoint returns SOFTWARE_TOKEN_STEP_UP code to the client. If it contains SMS_MFA keyword, then the endpoint invokes the Amazon Cognito GetUserAttributeVerificationCode API action to send the SMS message (as in step 3). Upon successful response from the Amazon Cognito API action, the endpoint returns SMS_STEP_UP code to the client.
If the UserMFASetting response attribute list from Amazon Cognito GetUser API action does not contain SOFTWARE_TOKEN_MFA or SMS_MFA keywords, then the endpoint looks for phone_number_verified attribute. If found, then the endpoint sends an SMS message with a code to the user’s mobile device with verified phone number. The endpoint uses the Amazon Cognito GetUserAttributeVerificationCode API action to send the SMS message (as in step 3). Otherwise, when no verified phone is found, the endpoint returns MAYBE_SOFTWARE_TOKEN_STEP_UP code to the client.
The flowchart shown in Figure 2 illustrates the full decision logic.
Figure 2: MFA decision flow chart
Respond to challenge endpoint
The respond to challenge endpoint (/respond-to-challenge) is called by the client after it receives an appropriate MFA method from the /initiate-auth endpoint. The user must respond to the challenge appropriately by invoking /respond-to-challenge with a code and an MFA method.
The /respond-to-challenge endpoint receives two parameters in the POST body, one indicating the MFA method and the other containing the challenge response. Additionally, this endpoint requires the Amazon Cognito access token to be passed in the Authorization header of the request.
If the MFA method is SMS_STEP_UP, the /respond-to-challenge endpoint invokes the Amazon Cognito API action VerifyUserAttribute to verify the user-provided challenge response, which is the code that was sent by using SMS.
If the MFA method is SOFTWARE_TOKEN_STEP_UP or MAYBE_SOFTWARE_TOKEN_STEP_UP, the /respond-to-challenge endpoint invokes the Amazon Cognito API action VerifySoftwareToken to verify the challenge response that was sent in the endpoint payload.
After the user-provided challenge response is verified, the /respond-to-challenge endpoint updates the session table with the step-up session state STEP_UP_COMPLETED by using the access_token JTI. If the challenge response verification step fails, no changes are made to the session table. As explained earlier in the Data design section, the step-up session stays in the session table until the TTL time expires, when DynamoDB will automatically delete the item.
Deploy and test the step-up authentication solution
Otherwise, you can continue reading the rest of this post to review the details and code behind the step-up authentication solution.
Step-up solution design details
Now let’s dig deeper into the step-up authentication solution. Figure 3 expands on the high-level solution design in the previous section and highlights the sequence of events that must take place to perform step-up authentication. In this section, we’ll break down these sequences into smaller parts and discuss each by going over a detailed sequence diagram.
Let’s group the step-up authentication flow in Figure 3 into three parts:
Create a step-up session (steps 1-6 in Figure 3)
Initiate step-up authentication (steps 7-8 in Figure 3)
Respond to the step-up challenge (steps 9-12 in Figure 3)
In the next sections, you’ll learn how the user’s API requests are handled by the step-up authentication solution, and how the user state is elevated by going through an additional challenge.
Create a step-up session
After the user successfully logs in, they create a step-up session when invoking a privileged API action that is protected with the step-up Lambda authorizer. This authorizer determines whether to start a step-up challenge based on the configuration within the DynamoDB setting table, which might create a step-up session in the DynamoDB session table. Let’s go over steps 1–6, shown in the architecture diagram in Figure 3, in more detail:
Step 1 – It’s important to note that the user must authenticate with Amazon Cognito initially. As a result, they must have a valid access token generated by the Amazon Cognito user pool.
Step 2 – The user then invokes a privileged API action and passes the access token in the Authorization header.
Step 3 – The API action is protected by using a Lambda authorizer. The authorizer first validates the token by invoking the Amazon Cognito user pool public key. If the token is invalid, a 401 Unauthorized response status code can be sent immediately, prompting the client to present a valid token.
Step 4 – The authorizer performs a lookup in the DynamoDB setting table to check whether the current request needs elevated privilege (also known as step-up privilege). In the setting table, you can define which API actions require elevated privilege. You can additionally bundle API operations into a group by defining the group attribute. This allows you to further isolate privileged API operations, especially in a large-scale deployment.
Step 5 – If an API action requires elevated privilege, the authorizer will check for an existing step-up session for this specific user in the session table. If a step-up session does not exist, the authorizer will create a new entry in the session table. The key for this table will be the JTI claim of the access_token (which can be obtained after token verification).
Step 6 – If a valid session exists, then authorization will be given. Otherwise an unauthorized access response (401 HTTP code) will be sent back from the Lambda authorizer, indicating that the user requires elevated privilege.
Figure 4 highlights these steps in a sequence diagram.
Figure 4: Sequence diagram for creating a step-up session
Initiate step-up authentication
After the user receives a 401 Unauthorized response status code from invoking the privileged API action in the previous step, the user must call the /initiate-auth endpoint to start step-up authentication. The endpoint will return the response to the user or the client application to supply the temporary code. Let’s go over steps 7 and 8, shown in the architecture diagram in Figure 3, in more detail:
Step 7 – The client application initiates a step-up action by calling the /initiate-auth endpoint. This action is protected by the API Gateway built-in Amazon Cognito authorizer, and the client needs to pass a valid access_token in the Authorization header.
Step 8 – The call is forwarded to a Lambda function that will initiate the step-up action with the end user. The function first calls the Amazon Cognito API action GetUser to find out the user’s MFA settings. Depending on which MFA type is enabled for the user, the function uses different Amazon Cognito API operations to start the MFA challenge. For more details, see the Initiate auth endpoint section earlier in this post.
Figure 5 shows these steps in a sequence diagram.
Figure 5: Sequence diagram for invoking /initiate-auth to start step-up authentication
Respond to the step-up challenge
In the previous step, the user receives a challenge code from the /initiate-auth endpoint. Depending on the type of challenge code, user must respond by sending a one-time password (OTP) to the /respond-to-challenge endpoint. The /respond-to-challenge endpoint invokes an Amazon Cognito API action to verify the OTP. Upon successful verification, the /respond-to-challenge endpoint marks the step-up session in the session table to STEP_UP_COMPLETED, indicating that the user now has elevated privilege. At this point, the user can invoke the privileged API action again to perform the elevated business operation. Let’s go over steps 9–12, shown in the architecture diagram in Figure 3, in more detail:
Step 9 – The client application presents an appropriate screen to the user to collect a response to the step-up challenge. The client application calls the /respond-to-challenge endpoint that contains the following:
An access_token in the Authorization header.
A step-up challenge type.
A response provided by the user to the step-up challenge.
This endpoint is protected by the API Gateway built-in Amazon Cognito authorizer.
Step 10 – The call is forwarded to the Lambda function, which verifies the response by calling the Amazon Cognito API action VerifyUserAttribute (in the case of SMS_STEP_UP) or VerifySoftwareToken (in the case of SOFTWARE_TOKEN_STEP_UP), depending on the type of step-up action that was returned from the /initiate-auth API action. The Amazon Cognito response will indicate whether verification was successful.
Step 11 – If the Amazon Cognito response in the previous step was successful, the Lambda function associated with the /respond-to-challenge endpoint inserts a record in the session table by using the access_token JTI as key. This record indicates that the user has completed step-up authentication. The record is inserted with a time to live (TTL) equal to the lesser of these values: the remaining period in the access_token timeout, or the default TTL value that is set in the Lambda function as a configurable environment variable, SESSION_TABLE_ITEM_TTL. The /respond-to-challenge endpoint returns a 200 status code after successfully updating the session table. It returns a 401 Unauthorized response status code if the operation failed or if the Amazon Cognito API calls in the previous step failed. For more information about the optimal value for the SESSION_TABLE_ITEM_TTL variable, see the Additional considerations section later in this post.
Step 12 – The client application can re-try the original call (using the same access token) to the privileged API operations, and this call should now succeed because an active step-up session exists for the user. Calls to other privileged API operations that require step-up should also succeed, as long as the step-up session hasn’t expired.
Figure 6 shows these steps in a sequence diagram.
Figure 6: Invoke the /respond-to-challenge endpoint to complete step-up authentication
Additional considerations
This solution uses several Amazon Cognito API operations to provide step-up authentication functionality. Amazon Cognito applies rate limiting on all API operations categories, and rapid calls that exceed the assigned quota will be throttled.
The step-up flow for a single user can include multiple Amazon Cognito API operations such as GetUser, GetUserAttributeVerificationCode, VerifyUserAttribute, and VerifySoftwareToken. These Amazon Cognito API operations have different rate limits. The effective rate, in requests per second (RPS), that your privileged and protected API action can achieve will be equivalent to the lowest category rate limit among these API operations. When you use the default quota, your application can achieve 25 SMS_STEP_UP RPS or up to 50 SOFTWARE_TOKEN_STEP_UP RPS.
Certain Amazon Cognito API operations have additional security rate limits per user per hour. For example, the GetUserAttributeVerificationCode API action has a limit of five calls per user per hour. For that reason, we recommend 15 minutes as the minimum value for SESSION_TABLE_ITEM_TTL, as this will allow a single user to have up to four step-up sessions per hour if needed.
Conclusion
In this blog post, you learned about the architecture of our step-up authentication solution and how to implement this architecture to protect privileged API operations by using AWS services. You learned how to use Amazon Cognito as the identity provider to authenticate users with multi-factor security and API Gateway with an authorizer Lambda function to enforce access to API actions by using a step-up authentication workflow engine. This solution uses DynamoDB as a persistent layer to manage the security rules for the step-up authentication workflow engine, which helps you to efficiently manage your rules.
If you have feedback about this post, submit comments in the Comments section below. If you have any questions about this post, start a thread on the Amazon Cognito forum.
Want more AWS Security news? Follow us on Twitter.
Starting a Python application typically results in a flurry of imports as
modules from various locations (and the modules they import) get added
into the application process. All of that occurs before the application
even gets started doing whatever it is the user actually launched it for;
that delay can be significant—and annoying. Beyond that, many of those
imports may not be necessary at all for the code path being followed, so
eagerly doing the import is purely wasted time. A proposal back in May
would add a way for applications to choose lazy imports, where the import
is deferred until the module is actually used.
With the rapid growth in data coming from data platforms and applications, and the continuous improvements in state-of-the-art machine learning algorithms, data are becoming key assets for companies.
Modern data architectures include data mesh—a recent style that represents a paradigm shift, in which data is treated as a product and data architectures are designed around business domains. This type of approach supports the idea of distributed data, where each business domain focuses on the quality of the data it produces and exposes to the consumers.
In this edition of Let’s Architect!, we focus on data mesh and how it is designed on AWS, plus other approaches to adopt modern architectural patterns.
Domain Driven Design (DDD) is a software design approach where a solution is divided into domains aligned with business capabilities, software, and organizational boundaries. Unlike software architectures, most data architectures are often designed around technologies rather than business domains.
In this blog, you can learn about data mesh, an architectural pattern that applies the principles of DDD to data architectures. Data are organized into domains and considered the product that each team owns and offers for consumption.
A data mesh design organizes around data domains. Each domain owns multiple data products with their own data and technology stacks
In this video, discover how to use the data mesh approach in AWS. Specifically, how to implement certain design patterns for building a data mesh architecture with AWS services in the cloud.
This is a pragmatic presentation to get a quick understanding of data mesh fundamentals, the benefits/challenges, and the AWS services that you can use to build it. This video provides additional context to the aforementioned blog post and includes several examples on the benefits of modern data architectures.
This diagram demonstrates the pattern for sharing data catalogs between producer domains and consumer domains
In this blog, you can learn how to build a modern data strategy using AWS managed services to ingest data from sources like Salesforce. Also discussed is how to automatically create metadata catalogs and share data seamlessly between the data lake and data warehouse, plus creating alerts in the event of an orchestrated data workflow failure.
The second part of the post explains how a data warehouse can be built by using an agile data modeling pattern, as well as how ELT jobs were quickly developed, orchestrated, and configured to perform automated data quality testing.
A data platform architecture and the subcomponents used to build it
With a modern data architecture on AWS, architects and engineers can rapidly build scalable data lakes; use a broad and deep collection of purpose-built data services; and ensure compliance via unified data access, security, and governance. As data mesh is a modern architectural pattern, you can build it using a service like AWS Lake Formation.
Familiarize yourself with new technologies and services by not only learning how they work, but also to building prototypes and projects to gain hands-on experience. This workshop allows builders to become familiar with the features of AWS Lake Formation and its integrations with other AWS services.
A data catalog is a key component in a data mesh architecture. AWS Glue crawlers interact with data stores and other elements to populate the data catalog
See you next time!
Thanks for joining our discussion on data mesh! See you in a couple of weeks when we talk more about architectures and the challenges that we face every day while working with distributed systems.
This article makes LockBit sound like a legitimate organization:
The DDoS attack last weekend that put a temporary stop to leaking Entrust data was seen as an opportunity to explore the triple extortion tactic to apply more pressure on victims to pay a ransom.
LockBitSupp said that the ransomware operator is now looking to add DDoS as an extortion tactic on top of encrypting data and leaking it.
“I am looking for dudosers [DDoSers] in the team, most likely now we will attack targets and provide triple extortion, encryption + date leak + dudos, because I have felt the power of dudos and how it invigorates and makes life more interesting,” LockBitSupp wrote in a post on a hacker forum.
The gang also promised to share over torrent 300GB of data stolen from Entrust so “the whole world will know your secrets.”
LockBit’s spokesperson said that they would share the Entrust data leak privately with anyone that contacts them before making it available over torrent.
They’re expanding: locking people out of their data, publishing it if the victim doesn’t pay, and DDoSing their network as an additional incentive.
Cloud complexity is now a well-documented and widely felt phenomenon across technology teams — IT, development, and security alike. Multi-cloud architectures have become the norm, with 89% of organizations embracing a strategy that involves multiple cloud vendors. Not only are companies managing greater amounts of data than ever before, they’re also spread across an ever-increasing array of cloud services, applications, and devices.
Securing all this information and preventing data loss in a multi-cloud environment would be a tall task for any security team. Add to the mix an increasingly heightened threat landscape and an ongoing cybersecurity skills shortage, and the challenge becomes even greater.
Rapid7, Mimecast, and Netskope recently published a joint white paper outlining best practices for cloud data protection and pinpointing some key resources that organizations can leverage in this effort. Here are three key concepts the paper highlights.
1. Embrace AI
Artificial intelligence (AI) and machine learning are well-known technologies at this point, but their potential is only just beginning to be tapped when it comes to helping security teams become more efficient and more effective.
Machine learning won’t ever replace the trained eye and keen insight of a veteran cybersecurity analyst — but AI-based tools can take on some of the repetitive and time-consuming tasks that security pros face, allowing analysts to increase productivity and focus on the alerts and issues that matter most. The goal is human-machine collaboration, with AI augmenting and boosting the capabilities of the analyst.
2. Utilize automation
Automation and AI work together as a one-two punch of process improvement for security. If an AI-based tool detects an anomalous event, automation allows you to set up actions that can take place in response to that suspicious activity. This can help get the ball rolling faster on mitigating security issues — and speed is the name of the game when it comes to keeping out attackers.
In the context of a cloud security platform, built-in automation and remediation tools let you create bots that can carry out certain tasks, specified by:
Scope: What resources the bot should evaluate — i.e., specific cloud resource groups, or certain types of resources contained in those groups
Filters: The conditions in which a bot should act — e.g., what tags the resource has, or whether the ports are open
Actions: What task you want the bot to carry out — e.g., delete a resource, start or stop an instance, or send an email with key information about the resource in question
3. Leverage integrations
AI and automation can help drive efficiencies — but with a multitude of cloud services in play, there’s a risk that these automated actions proliferate and become unwieldy, making it tough for security teams to reap the full benefits. This is where integrations become critical: They allow teams to coordinate actions quickly and seamlessly across multiple vendor systems.
Integrations make it easier to create a holistic security environment formed by a consistent set of controls, rather than a patchwork of best practices. For example, if you have an integration that links your email security gateway to your security information and event management (SIEM) tool, you can create an alert when a user receives an email containing suspected ransomware or malware, and take automated remediation actions instantly. Or if your security service edge (SSE) platform detects a serious data exfiltration risk, you can build a customized workflow in your security orchestration, automation, and response (SOAR) to quarantine that resource or take it offline.
Dive deeper on cloud data protection
Keeping data secure in the cloud comes with its share of challenges, but integrations that leverage AI-based analytics and automated workflows can help you ensure you know where your data is, what security controls are in place, and what threats there might be in your environment.
We are looking for primary schools in England to get involved in our new research study investigating how to adapt Computing resources to make them culturally relevant for pupils. In a project in 2021, we created guidelines that included ideas about how teachers can modify Computing lessons so they are culturally relevant for their learners. In this new project, we will work closely with primary teachers to explore this adaptation process.
Designing equitable and authentic learning experiences requires a conscious effort to take into account the characteristics of all learners and their social environments.
This project will help increase the education community’s understanding of ways to widen participation in Computing. The need to do this is demonstrated (as only one example among many) by the fact that in England’s 2017 GCSE Computer Science cohort, Black students were the most underrepresented group. We will investigate how resources adapted to be culturally relevant might influence students’ ideas about computing and contribute to their sense of identity as a “computer person”.
We need to work to enable a more diverse group of learners to feel that they belong in computing, encouraging them to choose to continue with it as a discipline in qualifications and careers.
This study is funded by the Cognizant Foundation and we are grateful for their generous support. Since 2018, the Cognizant Foundation has worked to ensure that all individuals have equitable opportunities to thrive in the jobs driving the future. Their work aligns with our mission to enable young people to realise their full potential through the power of computing and digital technologies.
What will taking part in the project involve?
This project about culturally adapted resources will take place between October 2022 and July 2023. It draws from ideas on how to bridge the gap between academic research and classroom teaching, and we are looking for 12 primary teachers to work closely with our researchers and content writers in three phases using a tested co-creation model.
We will work closely with a group of teacher so we can learn from each other.
By taking part, you will gain an excellent understanding of culturally relevant pedagogy and develop your knowledge and skills in delivering culturally responsive Computing lessons. We will value your expertise and your insights into what works in your classroom, and we will listen to your ideas.
Phase 1 (November 2022)
We will kick off the project with a day-long workshop on 2 November at our head office in Cambridge, which will bring all the participating teachers together. (Funding is available for participating schools to cover supply costs and teachers’ travel costs.) In the workshop, we will first explore what culturally relevant and responsive computing means. Then we will work together to look at a half-term unit of work of Computing lessons and identify how it could be adapted. After the workshop day, we will produce an adapted version of the unit of work based on the teachers’ input and ideas.
Phase 2 (February to March 2023)
In the Spring Term, teachers will deliver the adapted unit of work to their class in the second half of the term. Through a survey before and after the set of lessons, students will be asked about their views of computing. Throughout this time, the research team will be available for online support. We may also visit your school to carry out an observation of one of the lessons.
Phase 3 (April to May 2023)
During this phase, the research team will ask participating teachers about their experiences, and about whether and how they further adapted the lessons. Teachers will likely spend 2 to 3 hours in either April or May sharing their insights and recommendations. After this phase, we will analyse the findings from the study and share the results both with the participating teachers and the wider computing education community.
Who are we looking for to take part in this study?
For this study, we are looking for primary teachers who teach Computing to Year 4 or Year 5 pupils in a school in England.
You may be a generalist primary class teacher who teaches all subjects to your year group, or you may be a specialist primary Computing teacher
To take part, your pupils will need access to desktop or laptop computers in the Spring Term, but your school will not need any specialist hardware or software
You will need to attend the in-person workshop in Cambridge on Wednesday 2 November and commit to the project for the rest of the 2022/2023 academic year; funding is available for participating schools to cover supply costs and teachers’ travel costs
Your headteacher will need to support your participation in the study
If you are an interested teacher, please apply to take part in this project by the closing date of Monday 26 September. If you have any questions, email us at [email protected].
Security updates have been issued by Fedora (curl, protobuf-c, and vim) and SUSE (gimp, java-1_8_0-openj9, libostree, openvswitch, python-bottle, python-Flask-Security-Too, and zabbix).
In recent evolution in data lake technologies, it became popular to bring ACID (atomicity, consistency, isolation, and durability) transactions on Amazon Simple Storage Service (Amazon S3). You can achieve that by introducing open-source data lake formats such as Apache Hudi, Apache Iceberg, and Delta Lake. Delta Lake is one of the common open-source data lake formats.
Delta Lake is available with multiple AWS services, such as AWS Glue Spark jobs, Amazon EMR, Amazon Athena, and Amazon Redshift Spectrum. To utilize Delta Lake from Glue Spark jobs, follow this blog series. To utilize Delta Lake from Athena and Redshift Spectrum, you need to have specific table definitions on the AWS Glue Data Catalog, and there is an extra step to make it queryable from Athena and Redshift Spectrum.
One of the key capabilities of Delta Lake and other data lake formats is reading consistent snapshot using ACID transactions. Even when there are many concurrent writes, you can guarantee consistent version of the tables at the specific point in time without retrieving intermediate or incomplete state. It is highly demanded capability especially in complex data pipelines.
AWS Glue crawlers are designed to populate table definitions on the Data Catalog based on data dynamically. This year, AWS Glue crawlers started supporting Delta Lake. It simplifies those use cases by creating table definitions of Delta tables dynamically, populating the metadata from the Delta Lake transaction logs, and creating the manifest files in Amazon S3 for Athena and Redshift Spectrum to consume. With Delta lake crawler, you can easily read consistent snapshot from Athena and Redshift Spectrum. AWS Glue crawler integration with Delta Lake also supports AWS Lake Formation access control. You can grant Lake Formation permissions on the Delta tables created by the crawler to AWS principals that then query through Athena and Redshift Spectrum to access data in Delta tables.
This post demonstrates how AWS Glue crawlers work with Delta tables, and describes typical use cases to query Delta tables.
How AWS Glue Crawler works with Delta Lake
Delta Lake provides an abstraction known as a Delta table that encapsulates all metadata, data files, and partitions under a transaction log. Delta Lake stores the metadata and schema within the distributed file system rather than in a central data catalog.
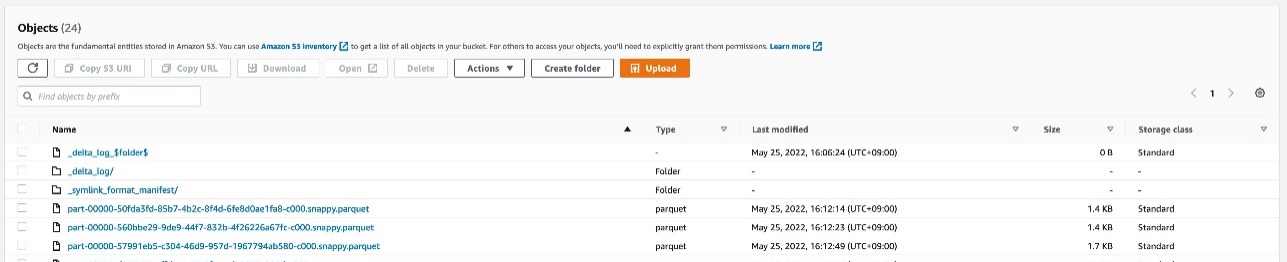
To access data using the Delta Lake protocol, Redshift Spectrum and Athena need a manifest file that lists all files that are associated to a particular Delta table, along with the table metadata populated in the AWS Glue Data Catalog. Traditionally, this manifest file creation required running a GENERATE symlink_format_manifest query on Apache Spark.
The AWS Glue crawler populates the metadata from the Delta Lake transaction log into the Data Catalog, and creates the manifest files in Amazon S3 for different query engines to consume. To simplify access to Delta tables, the crawler provides an option to select a Delta Lake data store, which encapsulates all parameters that are required for crawling. For each Delta Lake data store, the crawler scans the Delta table’s transaction log to detect metadata. It populates the _symlink_manifest folder with the manifest files that are partitioned by the partition keys, based on configuration parameters that you choose.
Crawl Delta Lake tables using AWS Glue Crawler
In this tutorial, let’s go through how to crawl delta tables using AWS Glue Crawler.
Prerequisites
Complete the following prerequisite steps for this tutorial:
You can create a Delta Lake crawler via the AWS Glue console, the AWS Glue SDK, or the AWS CLI. In the SDK, specify a DeltaTarget with the following configurations:
DeltaTables – A list of Amazon S3 DeltaPath values where the Delta tables are located. (Note that each path must be the parent of a _delta_log folder).
WriteManifest – A Boolean value indicating whether or not the crawler should write the manifest files for each DeltaPath.
ConnectionName – An optional connection name stored in the Data Catalog that the crawler should use to access Delta tables backed by a VPC.
To create your crawler on the AWS Glue console, complete the following steps:
On the AWS Glue console, choose Crawlers in the navigation pane.
Choose Create crawler.
For Name, enter delta-lake-crawler, and choose Next.
For Data source configuration, chooseNot yet.
For Data source, choose Add a data source.
For Data source, select Delta Lake.
For Include delta lake table paths, enter s3://your_s3_bucket/data/sample_delta_table/.
Select Enable write manifest, then choose Add a Delta Lake data source. Choose Next.
For IAM role, under Existing IAM role, choose your IAM role, then choose Next.
For Target database, choose Add database, then Create a database page is shown up. For Name, enter delta_lake, then choose Create database. Then come back to the previous page. For Target database, click the reload button, and select delta_lake database.
For Frequency under Crawler schedule, choose On demand, then choose Next.
Review your configuration, and choose Create crawler. You can trigger the crawler to run manually via the AWS Glue console, or through the SDK or AWS CLI using the StartCrawl API. You could also schedule a trigger via the AWS Glue console. For this post, we run the crawler via the AWS Glue console.
Select delta-lake-crawler, and choose Run.
Wait for the crawler to complete.
After the crawler runs, it writes a single manifest table in the Data Catalog for each DeltaPath under its configuration that has a valid Delta table. The manifest table uses the format SymlinkTextInputFormat and the manifest location s3://your_s3_bucket/data/sample_delta_table/_symlink_format_manifest/.
You can see the Delta table definition on the AWS Glue console. The table location points to the preceding manifest location.
The table definition also includes an AdditionalLocations field, which is an array that points to the location s3://your_s3_bucket/data/sample_delta_table/. You can access this additional field through the following AWS CLI command:
After you create the manifest table, AWS query engines such as Athena and Redshift Spectrum are able to query against the files by reading the manifest file locations to filter which data files to query in the Delta table.
Query from Athena
Athena users need to point their catalog to the AWS Glue Data Catalog. Open the Athena console in the same Region as where your table is registered in the Data Catalog, and confirm that the data source is set to AwsDataCatalog.
Now you’re ready to run queries on Athena. To access your Delta table, run the following query:
SELECT * FROM "delta_lake"."sample_delta_table" limit 10;
The following screenshot shows our output.
Query from Redshift Spectrum
Redshift Spectrum requires an external schema pointing to the database in which the Delta table was created.
To query with Redshift Spectrum, complete the following steps:
Create an IAM role for an Amazon Redshift cluster with the following configuration:
For permissions, use arn:aws:iam::aws:policy/AmazonS3ReadOnlyAccess, or your custom policy for reading your S3 bucket.
Create an external schema for the delta_lake database to use in Redshift Spectrum (replace <your IAM role ARN> with your IAM role ARN):
create external schema spectrum from data catalog
database 'delta_lake'
iam_role '<your IAM role ARN>'
create external database if not exists;
Run the following SQL against spectrum.sample_delta_table:
SELECT * FROM "dev"."spectrum"."sample_delta_table" LIMIT 10
The following screenshot shows our output.
Limitations of Delta crawlers and manifest tables
When the data or schema in a Delta table is updated, the manifest tables in the AWS Glue Data Catalog may become out of sync. It means that you can still query the manifest table and get the consistent result, but the result of the table is at the previous point of time. To get the latest result, you must update the manifest tables using the crawler or manually update the manifest table through the AWS Glue SDK or AWS CLI. When you want to keep the manifest table up-to-date, you can run Delta Lake crawlers on a schedule (for example, once an hour).
When the Delta table data is updated, the manifest files under the _symlink_manifest folder of your Delta tables may also become out of sync, in which case you need to rerun a crawler with writeManifest enabled.
Use of Delta tables in EMR and Glue Spark
The delta lake crawler is designed for use in Athena, Redshift Spectrum, and other engines compatible with parquet-based manifest tables. For EMR Spark or Glue Spark jobs, you do not need to create a manifest table by running the delta lake crawler, instead, you can read from and write to delta table directly using Delta Lake library. You can follow this blog series to understand how to process Delta tables on Glue Spark jobs.
Secure Delta tables using Lake Formation permissions
Manifest tables created by the Delta Lake crawler support Lake Formation access control, including cell-level security. It allows Data Lake administrators to filter specific rows and columns for certain users of their manifest tables. Through the use of CreateDataCellFilter and GrantPermissions APIs, you can grant row and column filters to the Delta manifest table. You can query the Delta manifest table from Athena and Redshift Spectrum with the use of these filters configured on the Delta manifest tables.
To learn more about Lake Formation cell-level security, refer to the following blog posts:
Delete your data under your S3 path: s3://your_s3_bucket/data/sample_delta_table/.
Delete the AWS Glue crawler delta-lake-crawler.
Delete the AWS Glue database delta_lake.
Conclusion
This post demonstrated how to crawl Delta tables using an AWS Glue crawler, and how to query against the crawled tables from Athena and Redshift Spectrum. With AWS Glue crawlers, the manifest files are automatically created, so you can easily integrate Delta tables with Athena and Redshift Spectrum without manual effort in maintaining manifest files. It also enables you to manage cell-level security on the Delta tables using Lake Formation permissions.
Let’s start using Glue crawlers for your own Delta tables. If you have comments or feedback, please feel free to leave them in the comments.
About the authors
Kyle Duong is a Software Development Engineer on the AWS Glue and AWS Lake Formation team. He is passionate about building big data technologies and distributed systems. In his free time, he enjoys cycling or playing basketball.
Noritaka Sekiyama is a Principal Big Data Architect on the AWS Glue team. He is responsible for building software artifacts to help customers. This summer, he enjoyed goldfish scooping with his children.
This month, Let’s Encrypt is turning on new infrastructure to support revoking certificates via Certificate Revocation Lists. Despite having been largely supplanted by the Online Certificate Status Protocol for over a decade now, CRLs are gaining new life with recent browser updates. By collecting and summarizing CRLs for their users, browsers are making reliable revocation of certificates a reality, improving both security and privacy on the web. Let’s talk about exactly what this new infrastructure does, and why it’s important.
A Brief History of Revocation
When a certificate becomes untrustworthy (for instance because its private key was compromised), that certificate must be revoked and that information publicized so that no one relies upon it in the future. However, it’s a well-worn adage in the world of the Web Public Key Infrastructure (the Web PKI) that revocation is broken. Over the history of the Web PKI, there have been two primary mechanisms for declaring that a TLS/SSL certificate should no longer be trusted: Certificate Revocation Lists (CRLs) and the Online Certificate Status Protocol (OCSP). Unfortunately, both have major drawbacks.
CRLs are basically just lists of all of the certificates that a given Certificate Authority (CA) has issued which have been revoked. This means that they’re often very large – easily the size of a whole movie. It’s inefficient for your browser to download a giant list of revoked certificates just to check if the single certificate for the site you’re visiting right now is revoked. These slow downloads and checks made web page loads slow, so OCSP was developed as an alternative.
OCSP is sort of like “what if there were a separate CRL for every single certificate”: when you want to check whether a given certificate has been revoked, your browser can check the status for just that one certificate by contacting the CA’s OCSP service. But because OCSP infrastructure has to be running constantly and can suffer downtime just like any other web service, most browsers treat getting no response at all as equivalent to getting a “not revoked” response. This means that attackers can prevent you from discovering that a certificate has been revoked simply by blocking all of your requests for OCSP information. To help reduce load on a CA’s OCSP services, OCSP responses are valid and can be cached for about a week. But this means that clients don’t retrieve updates very frequently, and often continue to trust certificates for a week after they’re revoked. And perhaps worst of all: because your browser makes an OCSP request for every website you visit, a malicious (or legally compelled) CA could track your browsing behavior by keeping track of what sites you request OCSP for.
So both of the existing solutions don’t really work: CRLs are so inefficient that most browsers don’t check them, and OCSP is so unreliable that most browsers don’t check it. We need something better.
Browser-Summarized CRLs
One possible solution that has been making headway recently is the idea of proprietary, browser-specific CRLs. Although different browsers are implementing this differently (e.g. Mozilla calls theirs CRLite, and Chrome’s are CRLSets), the basic idea is the same.
Rather than having each user’s browser download large CRLs when they want to check revocation, the browser vendor downloads the CRLs centrally. They process the CRLs into a smaller format such as a Bloom filter, then push the new compressed object to all of the installed browser instances using pre-existing rapid update mechanisms. Firefox, for example, is pushing updates as quickly as every 6 hours.
This means that browsers can download revocation lists ahead of time, keeping page loads fast and mitigating the worst problems of vanilla CRLs. It keeps revocation checks local, and the pushed updates can take immediate effect without waiting for a potentially days-long OCSP cache to expire, preventing all of the worst problems with OCSP.
Thanks to the promise of these browser-summarized CRLs, both the Apple and Mozilla root programs are requiring that all CAs begin issuing CRLs before October 1st, 2022. Specifically, they are requiring that CAs begin issuing one or more CRLs which together cover all certificates issued by that CA, and that the list of URLs pointing to those CRLs be disclosed in the Common CA Database (CCADB). This will allow Safari and Firefox to switch to using browser-summarized CRL checking for revocation.
Our New Infrastructure
When Let’s Encrypt was founded, we made an explicit decision to only support OCSP and not produce CRLs at all. This was because the root program requirements at the time only mandated OCSP, and maintaining both revocation mechanisms would have increased the number of places where a bug could lead to a compliance incident.
When we set out to develop CRL infrastructure, we knew we needed to build for scale, and do so in a way that reflects our emphasis on efficiency and simplicity. Over the last few months we have developed a few new pieces of infrastructure to enable us to publish CRLs in compliance with the upcoming requirements. Each component is lightweight, dedicated to doing a single task and doing it well, and will be able to scale well past our current needs.
Let’s Encrypt currently has over 200 million active certificates on any given day. If we had an incident where we needed to revoke every single one of those certificates at the same time, the resulting CRL would be over 8 gigabytes. In order to make things less unwieldy, we will be dividing our CRLs into 128 shards, each topping out at a worst-case maximum of 70 megabytes. We use some carefully constructed math to ensure that – as long as the number of shards doesn’t change – all certificates will remain within their same shards when the CRLs are re-issued, so that each shard can be treated as a mini-CRL with a consistent scope.
In line with the same best practices that we follow for our certificate issuance, all of our CRLs will be checked for compliance with RFC 5280 and the Baseline Requirements before they are signed by our issuing intermediates. Although the popular linting library zlint does not yet support linting CRLs, we have written our own collection of checks and hope to upstream them to zlint in the future. These checks will help prevent compliance incidents and ensure a seamless issuance and renewal cycle.
As part of developing these new capabilities, we have also made severalimprovements to the Go standard library’s implementation of CRL generation and parsing. We look forward to contributing more improvements as we and the rest of the Go community work with CRLs more frequently in the future.
Although we will be producing CRLs which cover all certificates that we issue, we will not be including those URLs in the CRL Distribution Point extension of our certificates. For now, as required by the Baseline Requirements, our certificates will continue to include an OCSP URL which can be used by anyone to obtain revocation information for each certificate. Our new CRL URLs will be disclosed only in CCADB, so that the Apple and Mozilla root programs can consume them without exposing them to potentially large download traffic from the rest of the internet at large.
The Future of Revocation
There’s still a long way to go before revocation in the Web PKI is truly fixed. The privacy concerns around OCSP will only be mitigated once all clients have stopped relying on it, and we still need to develop good ways for non-browser clients to reliably check revocation information.
We look forward to continuing to work with the rest of the Web PKI community to make revocation checking private, reliable, and efficient for everyone.
If you’re excited about our work developing more robust and private revocation mechanisms, you can support us with a donation, or encourage your company or organization to sponsor our work. As a nonprofit project, 100% of our funding comes from contributions from our community and supporters, and we depend on your support.
Every successful organization has a great salesforce. At Rapid7, the Business Development Representative (BDR) Program is a huge source of talent for our sales organization. Some of our most successful salespeople come from the program. So, what is it?
The BDR Program at Rapid7 is an entry-level program that aims to provide early careerists the opportunity to kickstart their career and grow their selling skills. As a part of the program, new hires develop the skills to uncover opportunities with prospects and customers and partner with account executives to continue to expand their knowledge around the entirety of the sales cycle.
As we gear up to welcome another round of applicants, our Talent Acquisition Partner, Lauren Coloumbe, shares five things we look for in BDRs and how we spot them in the interview process.
Lauren Coloumbe, Talent Acquisition Partner at Rapid7
1. An interest in the sales process
Sales gives you an opportunity to flex a lot of different problem-solving muscles. At Rapid7, we believe the key to solving problems effectively is through building strong relationships. Each customer has different needs and priorities, and building a relationship establishes trust and understanding that will help us learn more and determine how Rapid7 can meet those needs.
How we spot it: We’re looking for people who demonstrate a passion for problem-solving and are excited to build relationships. Sharing what you’re passionate about in your career and how a role in sales can help you use these skills is something we want to see.
2. Interest in or curiosity about cybersecurity
You don’t have to be a subject matter expert, but showing an interest in our industry is a great way to help you stand out. Our lives are becoming more digital and connected every day. While that comes with a lot of excitement and efficiency, it also opens up a lot of new risks to our information and communities.
How we spot it: Think about real-life examples of cybersecurity threats around you every day and how impactful it can be to play a role in protecting not only our customers, but our communities at large. We love when candidates can make a personal connection to our mission or share something interesting they may have learned when conducting some initial industry research.
3. People who are open to learning
We don’t expect you to come in with a ton of industry knowledge, but we do expect you to be prepared to learn, take direction, and ask thoughtful questions. As a BDR, you will be given a lot of opportunities for coaching and development. Being open to learning new things will help you grow and establish a strong foundation.
How we spot it: Natural curiosity drives opportunities for learning. Think of a time when you were especially curious about something or were put in a position where you had to learn a new skill or subject. The interview is also an opportunity for you to express your curiosity. Ask thoughtful questions and let us see your curiosity in action.
4. Team-oriented individuals
At Rapid7, selling is a team sport. You’ll have a group of people in your corner who are invested in your success and ready to lend a helping hand, and you’ll be encouraged to do the same when you get the opportunity. The more we partner together, the better outcomes we can create for our customers and for the company.
How we spot it: There’s nothing wrong with celebrating your wins, but how you got there and how you worked as part of a team are equally important. Share examples of how you worked as a team and either succeeded or failed together. Focus on the effort of the team and the collective impact rather than your own personal role in the process.
5. Challenging convention
Challenging convention means speaking up to share an idea when you feel it can benefit the team. This is a place where everyone is expected to check their ego at the door. This makes it easy for everyone to try new things, fail, learn, and try again. You don’t need to be a manager or a long-time employee to challenge convention, we all have an equal voice when it comes to creating positive customer outcomes.
How we spot it: Think of examples where you stood up for a new or different way of doing things. How did you challenge the status quo or share a new perspective that helped the final outcome?
Learn more about our BDR program and entry-level sales roles at Rapid7.
As the most widely used and fastest cloud data warehouse, Amazon Redshift makes it simple and cost-effective to analyze all your data using standard SQL, your existing ETL (extract, transform, and load), business intelligence (BI), and reporting tools quickly and securely. Tens of thousands of customers use Amazon Redshift to analyze exabytes of data per day and power analytics workloads such as BI, predictive analytics, and real-time streaming analytics without having to manage the data warehouse infrastructure. You can also gain up to three times better price performance with Amazon Redshift than other cloud data warehouses.
We are continuously innovating and releasing new features of Amazon Redshift for our customers, enabling the implementation of a wide range of data use cases and meeting requirements with performance and scale. One of the features recently announced is Amazon Redshift Streaming Ingestion for Amazon Kinesis Data Streams and Amazon Managed Streaming for Apache Kafka (Amazon MSK), which lets you experience performance at scale by ingesting real-time streaming data. Amazon Redshift with Kinesis Data Streams is fully managed and runs your streaming applications without requiring infrastructure management. You can use SQL to connect to and directly ingest data from multiple Kinesis data streams simultaneously with low latency and high bandwidth, allowing you to derive insights in seconds instead of minutes.
Previously, loading data from a streaming service like Kinesis Data Streams into Amazon Redshift included several steps. These included connecting the stream to an Amazon Kinesis Data Firehose and waiting for Kinesis Data Firehose to stage the data in Amazon Simple Storage Service (Amazon S3), using various-sized batches at varying-length buffer intervals. After this, Kinesis Data Firehose triggered a COPY command to load the data from Amazon S3 to a table in Amazon Redshift.
Rather than including preliminary staging in Amazon S3, streaming ingestion provides low-latency, high-speed ingestion of stream data from Kinesis Data Streams into an Amazon Redshift materialized view.
In this post, we walk through cross-account Amazon Redshift streaming ingestion by creating a Kinesis data stream in one account, and generating and loading streaming data into Amazon Redshift in a second account within the same Region using role chaining.
Solution overview
The following diagram illustrates our solution architecture.
We demonstrate the following steps to perform cross-account streaming ingestion for Amazon Redshift:
Create a Kinesis data stream in Account-1.
Create an AWS Identity and Access Management (IAM) role in Account-1 to read the data stream using AWS best practices around applying least privileges permissions.
Create an Amazon Redshift – Customizable IAM service role in Account-2 to assume the IAM role.
Create an Amazon Redshift cluster in Account-2 and attach the IAM role.
Modify the trust relationship of the Kinesis Data Streams IAM role in order to access the Amazon Redshift IAM role on its behalf.
Create an external schema using IAM role chaining.
Create a materialized view for high-speed ingestion of stream data.
Refresh the materialized view and start querying.
Account-1 setup
Complete the following steps in Account-1:
Create a Kinesis data stream called my-data-stream. For instructions, refer to Step 1 in Set up streaming ETL pipelines.
Send records to this data stream from an open-source API that continuously generates random user data. For instructions, refer to Steps 2 and 3 in Set up streaming ETL pipelines.
To verify if the data is entering the stream, navigate to the Amazon Kinesis -> Data streams -> my-data-stream -> Monitoring tab.
Find the PutRecord success – average (Percent) and PutRecord – sum (Bytes) metrics to validate record ingestion. Next, we create an IAM policy called KinesisStreamPolicy in Account-1.
On the IAM console, choose Policies in the navigation pane.
Choose Create policy.
Create a policy called KinesisStreamPolicy and add the following JSON to your policy (provide the AWS account ID for Account-1):
To set up streaming ingestion, complete the following steps:
Sign in to the Amazon Redshift console as Account-2.
Launch the Query Editor v2 or your preferred SQL client and run the following statements to access the data stream my-data-stream in Account-1.
Create an external schema using role chaining (replace the IAM role ARNs, separated by a comma without any spaces around it):
CREATE EXTERNAL SCHEMA schema_stream
FROM KINESIS
IAM_ROLE 'arn:aws:iam::<Account-2>:role/RedshiftStreamRole,
arn:aws:iam::<Account-1>:role/KinesisStreamRole';
Create a materialized view to consume the stream data and store stream records in semi-structured SUPER format:
CREATE MATERIALIZED VIEW my_stream_vw AS
    SELECT approximatearrivaltimestamp,
    partitionkey,
    shardid,
    sequencenumber,
    json_parse(from_varbyte(data, 'utf-8')) as payload
    FROM schema_stream."my-data-stream";
Refresh the view, which triggers Amazon Redshift to read from the stream and load data into the materialized view:
REFRESH MATERIALIZED VIEW my_stream_vw;
Query data in the materialized view using the dot notation:
SELECT payload.name.first, payload.name.last, payload.name.title,
payload.dob.date as dob, payload.cell, payload.location.city, payload.email
FROM my_stream_vw;
You can now view the results, as shown in the following screenshot.
Conclusion
In this post, we discussed how to set up two different AWS accounts to enable cross-account Amazon Redshift streaming ingestion. It’s simple to get started and you can perform rich analytics on streaming data, right within Amazon Redshift using existing familiar SQL.
Poulomi Dasgupta is a Senior Analytics Solutions Architect with AWS. She is passionate about helping customers build cloud-based analytics solutions to solve their business problems. Outside of work, she likes travelling and spending time with her family.
Raks Khare is an Analytics Specialist Solutions Architect at AWS based out of Pennsylvania. He helps customers architect data analytics solutions at scale on the AWS platform.
Linux Mint 21 “Vanessa” was released
on July 31. There are no real headline-grabbing features that come
with the new release, as the project generally seeks to make incremental
changes, rather than larger, potentially disruptive ones.
Changes in this release include a new Bluetooth manager that brings several
improvements, driverless printing and scanning
by default, a process monitor to inform the user
about resource-intensive background tasks, new functionality for the
Timeshift system backup tool, and several major under-the-hood improvements
to the Cinnamon
desktop environment.
At Backblaze, we love hearing from our customers about their unique and varied storage needs. Our media and entertainment customers have some of the most interesting use cases and often tell us about their workflow needs moving assets at every stage of the process, from camera to post-production and everywhere in between.
The desire to have more flexibility controlling data movement in their media management systems is a consistent theme. In the interest of helping customers with not just storing their data, but using their data, today we are publishing a new open-source custom integration we have created for Frame.io. Read on to learn more about how to use Frame.io to streamline your media workflows.
What is Frame.io?
Frame.io, an Adobe company, has built a cloud-based media asset management (MAM) platform allowing creative professionals to collaborate at every step of the video production process. For example, videographers can upload footage from the set after each take; editors can work with proxy files transcoded by Frame.io to speed the editing process; and production staff can share sound reports, camera logs, and files like Color Decision Lists.
The Backblaze B2 Custom Action for Frame.io
Creative professionals who use Frame.io know that it can be a powerful tool for content collaboration. Many of those customers also leverage Backblaze B2 for long-term archive, and often already have large asset inventories in Backblaze B2 as well.
What our Backblaze B2 Custom Action for Frame.io does is quite simple: it allows you to quickly move data between Backblaze B2 and Frame.io. Media professionals can use the action to export selected assets or whole projects from Frame.io to B2 Cloud Storage, and then later import exported assets and projects from B2 Cloud Storage back to Frame.io.
How to Use the Backblaze B2 Custom Action for Frame.io
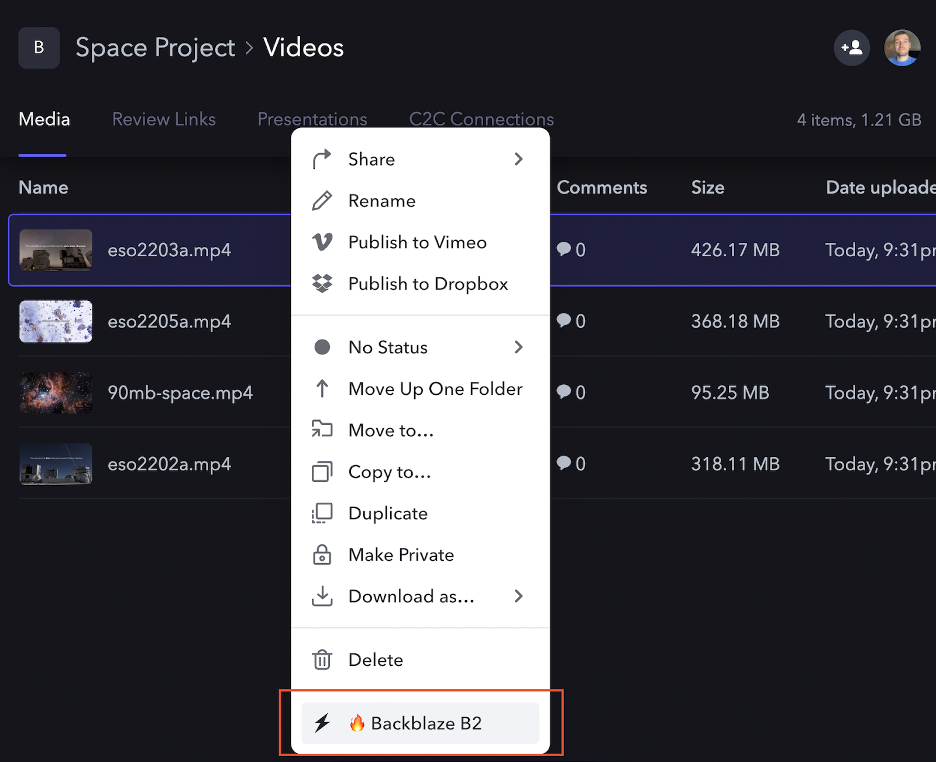
Let’s take a quick look at how to use the custom action:
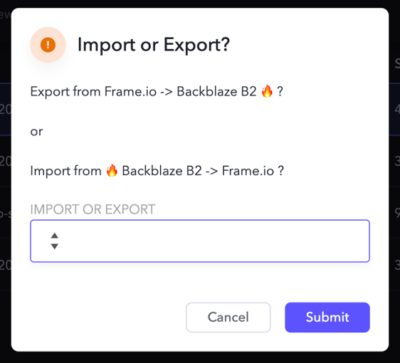
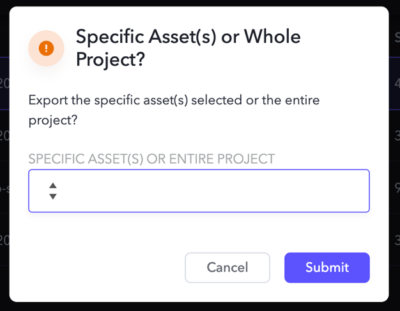
As you can see, after enabling the Custom Action, a new option appears in the asset context dropdown. Once you select the action, you are presented with a dialog to select Import or Export of data:
After selecting Export, you can choose whether you want just the single selected asset, or the entire project sent to Backblaze B2.
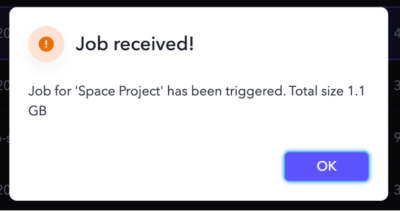
Once you make a selection, that’s it! The custom action handles the movement for you behind the scenes. The export is a point-in-time snapshot of the data from Frame.io—which remains as it was—to Backblaze B2.
The Custom Action creates a new exports folder in your B2 bucket, and then uploads the asset(s) to the folder. If you opt to upload the entire Project, it will be structured the same way it is organized in Frame.io.
How to Get Started With Backblaze B2 and Frame.io
To get started using the Custom Action described above, you will need:
A Frame.io account.
Access to a compute resource to run the custom action code.
A Backblaze B2 account.
If you don’t have a Backblaze B2 account yet, you can sign up here and get 10GB free, or contact us here to run a proof of concept with more than 10GB.
What’s Next?
We’ve written previously about similar open-sourced custom integrations for other tools, and by releasing this one we are continuing in that same spirit. If you are interested in learning more about this integration, you can jump straight to the source code on GitHub.
Watch this space for a follow-up post diving into more of the technical details. We’ll discuss how we secured the solution, made it deployable anywhere (including to options with free bandwidth), and how you can customize it to your needs.
We would love to hear your feedback on this integration, and also any other integrations you would like to see from Backblaze. Feel free to reach out to us in the comments below or through our social channels. We’re particularly active on Twitter and Reddit—let’s chat!
To provide the best experiences, we use technologies like cookies to store and/or access device information. Consenting to these technologies will allow us to process data such as browsing behavior or unique IDs on this site. Not consenting or withdrawing consent, may adversely affect certain features and functions.
Functional
Always active
The technical storage or access is strictly necessary for the legitimate purpose of enabling the use of a specific service explicitly requested by the subscriber or user, or for the sole purpose of carrying out the transmission of a communication over an electronic communications network.
Preferences
The technical storage or access is necessary for the legitimate purpose of storing preferences that are not requested by the subscriber or user.
Statistics
The technical storage or access that is used exclusively for statistical purposes.The technical storage or access that is used exclusively for anonymous statistical purposes. Without a subpoena, voluntary compliance on the part of your Internet Service Provider, or additional records from a third party, information stored or retrieved for this purpose alone cannot usually be used to identify you.
Marketing
The technical storage or access is required to create user profiles to send advertising, or to track the user on a website or across several websites for similar marketing purposes.


 Dhiraj Thakur is a Solutions Architect with Amazon Web Services. He works with AWS customers and partners to provide guidance on enterprise cloud adoption, migration, and strategy. He is passionate about technology and enjoys building and experimenting in the analytics and AI/ML space.