Post Syndicated from The Atlantic original https://www.youtube.com/watch?v=L4XcUKM09II
[$] The campaign to push Northstar into Linux distributions
Post Syndicated from jzb original https://lwn.net/Articles/1102738/
There is not a broad selection of mature, open-source web-browser engines
for Linux users. Most of the browsers available for Linux are based on one of
just three projects: Chromium’s Blink, Firefox’s
Gecko, or WebKit. A new entrant would
generally be seen as a welcome alternative, but the recent campaign to push one
of the LLM-written Nordstjernen browsers
into Debian and Arch Linux has raised some questions about
the project’s development and security processes.
Redox OS ring buffers project summary
Post Syndicated from jzb original https://lwn.net/Articles/1103359/
The Redox OS project, which is a
Unix-like microkernel-based operating system written in Rust, has published a report on the work
that it has done in the last year to implement io_uring-like
I/O.
Last year, the Redox team received a grant to develop io_uring-like Ring
Buffer support at the system task level, as a first step towards ring buffer
communications between the application and the majority of system services. This
phase of the work finished up in September, as the last pieces were put in
place.[…] In addition to implementing the Ring Buffer machinery for our system
services and drivers that can support it, an io_uring and
liburing-like API for applications was completed and
demonstrated. There was also substantial work done on support crates, including
an async executor for drivers.And there was some very exciting work on various performance improvements, to
allow much faster switching between applications and their system services. But
I will let the team tell you all the technical details.
That’s a wrap! Coolest Projects 2026
Post Syndicated from Helen Gardner original https://www.raspberrypi.org/blog/thats-a-wrap-coolest-projects-2026/
There are a few Coolest Projects events still to come in the Coolest Projects 2026 cycle, but we are already getting ready to kick off Coolest Projects 2027. Before we do, we’re taking a look back at some of the incredible things the young tech creators in the global Coolest Projects community have achieved this year, both through the online showcase and at in-person events around the world.
More than 15,000 young people from 40 countries shared over 4500 creations in the Coolest Projects online showcase. The Coolest Projects team hosted events in the UK, Ireland, India, and two locations across the US, while our partners brought creators together at in-person events in a further 11 countries, with events in Malaysia, South Africa and Argentina still to come.
With young people sharing their brilliant ideas, ambitious projects, and creativity with the world, 2026 has been a year to remember, and we can’t wait to see what comes next!
But don’t just take our word for it — hear from members of the Coolest Projects community about their experiences too.

From the community
For some, the events are about celebrating a shared passion for making with family and friends.
“I went to Coolest Projects last year with my cousins and thought it was cool, so I wanted to apply this year. I was very late applying so only had 3 days to create a project before the deadline. It was pretty intense! My highlight was being at the event with my cousin, Noah. It was great fun!” – Leo, creator, Coolest Projects Ireland
It’s not just creators who enjoy being part of the community. Mentors take away lasting impressions and a feeling of connection too.
“We usually avoid competitions because coding’s about curiosity, creativity, and sharing knowledge, not racing against each other. But Coolest Projects is completely different: it’s like one big party where everyone’s invited to share what they’ve made. We’re so grateful Project Code Cloud got to be part of it.” – Dannielle, Coolest Projects mentor, Australia
We are also very thankful to our VIP judges, who encourage and give feedback to creators both in the online showcase and at in-person events. Ben, a VIP judge for the online showcase, shared some powerful advice with creators:
“Keep building. Keep experimenting. Keep trying things. […] Always stay curious. Always try to stay learning. […] And the most important thing is it’s OK to fail. Trying new things is difficult and you’re always going to make mistakes, but that’s the best way to learn.” – Ben Powley, Senior Developer, Jagex
Catch up on the livestream to hear advice and feedback from all the VIP judges involved in the online showcase this year and check out their favourite projects.
Some more highlights from 2026
A judge who’s been in their shoes
Akari, a 16-year-old CoderDojo member from Japan who has showcased her own projects at Coolest Projects seven times, joined us as a VIP judge for the online showcase. We were delighted that young creators could hear a genuine peer voice on the panel, alongside industry judges, offering inspiration and encouragement.
This year’s Broadcom Coding with Commitment® recipient
The Broadcom Coding With Commitment® award is a special recognition for a creator who uses coding to support their community through a project that aligns with the United Nations Sustainable Development Goals. In this year’s online showcase, the award went to Egehan from Türkiye, for their Scratch project Viridia — Back to the World, an educational game that teaches players about water conservation. Egehan shared some thoughts about the challenges they faced while building it:
“Writing the code I used to create the 3D visuals for this game was a bit of a challenge for me. I would often dream about the mathematical calculations required for the code (which, to be honest, was quite interesting).” – Egehan
Partner events around the globe
With 14 partner events due to have taken place around the world by the end of 2026, more creators than ever before have been able to share their projects and connect with a like-minded community locally. Here are a few highlights from the events.
The first event of the year was Coolest Projects Belgium, which took place in March and was organised by CoderDojo Belgium. Ruhee, Global Partnerships Coordinator at the Raspberry Pi Foundation, who attended the event, was particularly impressed by Zeno and Lukas’s Orbitol 6 project, a three-axis robotic arm they’ve been developing for several years, with plans to take it from three axes to six in the future! She also highlighted Jack’s Moppentrappen, a joke-telling project that uses AI to replicate Jack’s voice, allowing it to tell jokes in French as well as English.
Coolest Projects Japan, organised by CoderDojo Japan, was also held in March and welcomed 79 entries, which you can explore here.
Coolest Projects Sudan, organised by Orientations Training Centre, ran for the second time this year. The event was held in Egypt and was designed to provide a safe and accessible space for young Sudanese people affected by displacement. Among the projects on display was an AI-based fruit freshness detector, built by 7-year-olds Khalid and Nour.
“This showcase reflects our belief that Sudan’s future depends on empowering young people to learn, create, and solve problems. We are committed to building the opportunities and platforms they need to shape a better future for Sudan.” – Abbdelmoneim M. Ahmed, CEO, Orientations Training Centre

Looking ahead to 2027
We are excited to share that the Coolest Projects 2027 online showcase will open for entries in January, and the Coolest Projects online showcase celebration will take place on 23 June.
We’ll also be running in-person Coolest Projects events in Ireland, the UK, India, the US, South Africa, and Kenya next year, with further in-person events due to be run by partners around the world. We will announce the full calendar of in-person events soon.
You can already save the date for:
Coolest Projects Belgium — 13 March 2027
Coolest Projects USA Minnesota — 17 April 2027
Coolest Projects Ireland — 24 April 2027 at Explorium, Dublin
Coolest Projects UK Bradford — 15 May 2027 at Life Centre, Bradford
Coolest Projects USA Georgia — 15 May 2027
Coolest Projects UK Cardiff — 22 May 2027 at Wales Millennium Centre, Cardiff
Coolest Projects global showcase celebration — 23 June 2027, online
If you would like to be first to hear news and dates for the 2027 online showcase and in-person events, sign up to our newsletter or follow the Coolest Projects social channels (find us on LinkedIn, Facebook, and Instagram).
The post That’s a wrap! Coolest Projects 2026 appeared first on Raspberry Pi Foundation.
Studying Fraudulent North Korean IT Workers
Post Syndicated from Bruce Schneier original https://www.schneier.com/blog/archives/2026/10/studying-fraudulent-north-korean-it-workers.html
Researchers set up a fake start-up company to study fraudulent North Korean IT workers.
How LIU and Zabbix Make Enterprise-Grade Monitoring Accessible
Post Syndicated from Hadi Slim original https://blog.zabbix.com/how-liu-and-zabbix-make-enterprise-grade-monitoring-accessible/33738/
The Lebanese International University (LIU) conducts applied networking research aimed at making professional-grade monitoring practices accessible in academic settings through its Department of Computer and Communication Engineering.
The department recently completed a research project that explored how Zabbix could be used to monitor a fully virtualized network environment, with the goal of offering a model that any academic or training lab could adopt.
The challenge
Networking education broadly relies on physical lab equipment (routers, switches) that is expensive to acquire, maintain, and scale, putting realistic, hands-on monitoring practice out of reach for many programs.
The research set out to test whether a simulated network environment could be monitored exactly as one would monitor production infrastructure – collecting live metrics, visualizing device health, and practicing remote management, while operating on a budget appropriate for an academic lab.
The solution
The team built a virtual network topology in PNETLab (routers, switches, and end devices using multi-vendor images) and connected it to a Zabbix server running on a low-cost Raspberry Pi 5.
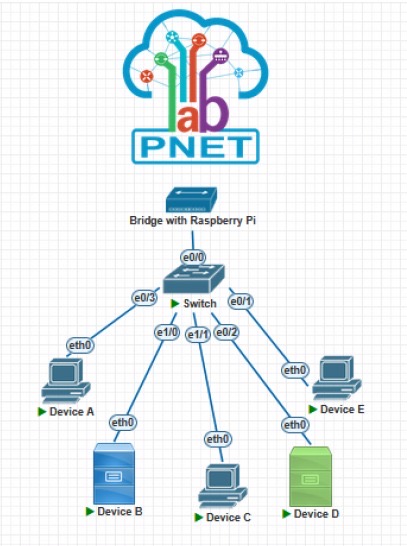
Each virtual device was assigned IP addressing compatible with the Zabbix monitoring network, allowing Zabbix to poll the simulated devices via SNMP and ICMP exactly as it would poll physical infrastructure, which in turn allowed students to understand more how the infrastructure is behaving based on these polls.
This demonstrated that students and researchers can interact with a monitoring stack that behaves identically to an enterprise deployment, entirely on virtualized, reproducible lab infrastructure that costs a fraction of physical networking gear.
The results
The integration proved that a virtual topology is indistinguishable from a physical one from Zabbix’s perspective – polling latency across 10 simulated devices averaged just 2.5ms, with the Raspberry Pi host staying under 15% CPU usage throughout testing.
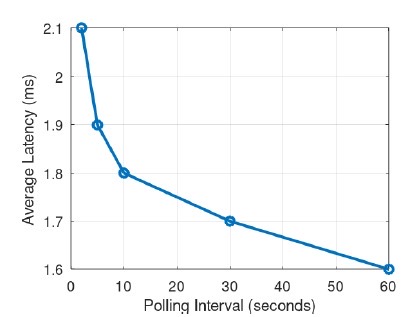
The result was a reproducible, low-cost training model where networking and monitoring concepts can be taught hands-on, repeated across cohorts, and scaled by simply adding more virtual nodes in PNETLab rather than purchasing additional hardware – one that other academic institutions facing the same budget constraints could replicate directly.
In conclusion
By combining Zabbix, PNETLab, and a Raspberry Pi 5, the team at LIU created a low-cost, reproducible virtual lab that delivers hands-on monitoring experience without the expense of physical networking equipment.
With polling latency averaging just 2.5 ms across 10 simulated devices and CPU usage remaining below 15%, the results highlight the potential of virtualized environments for teaching real-world networking and monitoring skills.
Most importantly, this approach provides a practical, scalable model that other academic institutions can adopt to make hands-on IT infrastructure monitoring more accessible to the next generation of networking professionals.
For a more in-depth look at LIU’s project or to cite the published research, visit this website.
To find out more about what Zabbix can do for eduactional institutions, contact us.
The post How LIU and Zabbix Make Enterprise-Grade Monitoring Accessible appeared first on Zabbix Blog.
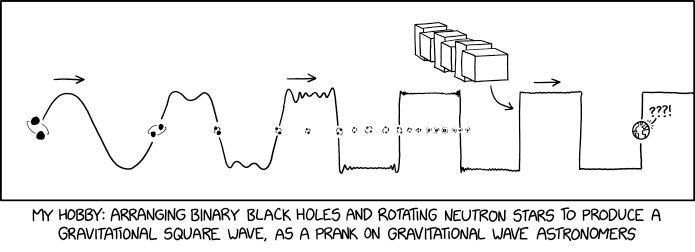
Gravitational Square Wave
Post Syndicated from xkcd.com original https://xkcd.com/3317/
Introducing Route 53 Resolved IP Validation for AWS Network Firewall
Post Syndicated from Lawton Pittenger original https://aws.amazon.com/blogs/security/introducing-route-53-resolved-ip-validation-for-aws-network-firewall/
Your workloads reach most destinations by domain name, but a firewall can only act on what it sees in the traffic. For HTTP and HTTPS, AWS Network Firewall domain rules match the name that the client puts in the request, and the client chooses that name. The connections for protocols such as SSH and SSH File Transfer Protocol (SFTP) don’t carry the domain name. The client uses the name only for the DNS lookup and then connects straight to the IP address that DNS returned. As a result, Network Firewall rules for these protocols have used IP addresses, which change over time. For web and non-web traffic alike, Network Firewall had no view of the answers that your DNS resolver returned, because that shared visibility between DNS and the firewall didn’t exist.
On October 21, 2026, we launched Route 53 Resolved IP Validation for AWS Network Firewall, at no additional charge. Amazon Route 53 Resolver now shares the IP addresses that it returns for each domain name with Network Firewall, and Network Firewall checks each new outbound connection against them. With this launch, you can now filter non-web traffic by domain name, and you can prevent Server Name Indication (SNI) manipulation on TLS traffic without needing to enable TLS inspection.
In this post, we explain how the feature works, show how to turn it on in alert mode, and walk through two common use cases. They’re examples; the same check applies to any outbound traffic that you control by domain name.
How it works
Amazon Route 53 Resolver answers DNS queries from resources in your virtual private cloud (VPC) configured to use it, and it’s available by default in every VPC. With this feature, Route 53 Resolver keeps the IP addresses that it returns for each domain name in a resolved IP cache. When a new outbound connection starts, Network Firewall checks the destination address against that cache.
- The workload asks Route 53 Resolver at
10.0.0.2forfiles.partner.example.com. - DNS Firewall checks the query first. Domain rules can block or alert on it; an empty rule group lets it through.
- Route 53 Resolver answers
203.0.113.10and records the answer in the resolved IP cache. - The SFTP connection to
203.0.113.10on port 22 reaches the Network Firewall endpoint. - The policy checks the first packet. The address is in the cache, so the connection continues.
- The stateful rule passes it, because Route 53 Resolver returned the address for
files.partner.example.com. - The connection leaves through the NAT gateway and internet gateway.
- The flow log and alert log record the new fields.
The feature has three parts:
- An Amazon Route 53 Resolver DNS Firewall rule group – It defines the scope. The answers that Route 53 Resolver returns in every VPC associated with this rule group go into the resolved IP cache. The rule group can be empty. Add rules to it and the same rule group also filters the DNS queries themselves, for example, by blocking lookups of known threat domains. Together, DNS Firewall checks the lookup and Network Firewall checks the connection that follows.
- The Network Firewall policy setting – On the first packet of each new connection, before your stateful rules run, Network Firewall checks whether Route 53 Resolver returned the destination address for a domain name. If it did, the connection continues to your stateful rules. If it didn’t, Network Firewall applies the action you chose: Alert, Drop, or Reject.
- Resolved-domain rules – In your stateful rule groups, these rules match a connection by the domain name that its destination address was resolved for, so they work with every protocol. Use the name that your clients look up.
The following diagram shows this architecture.
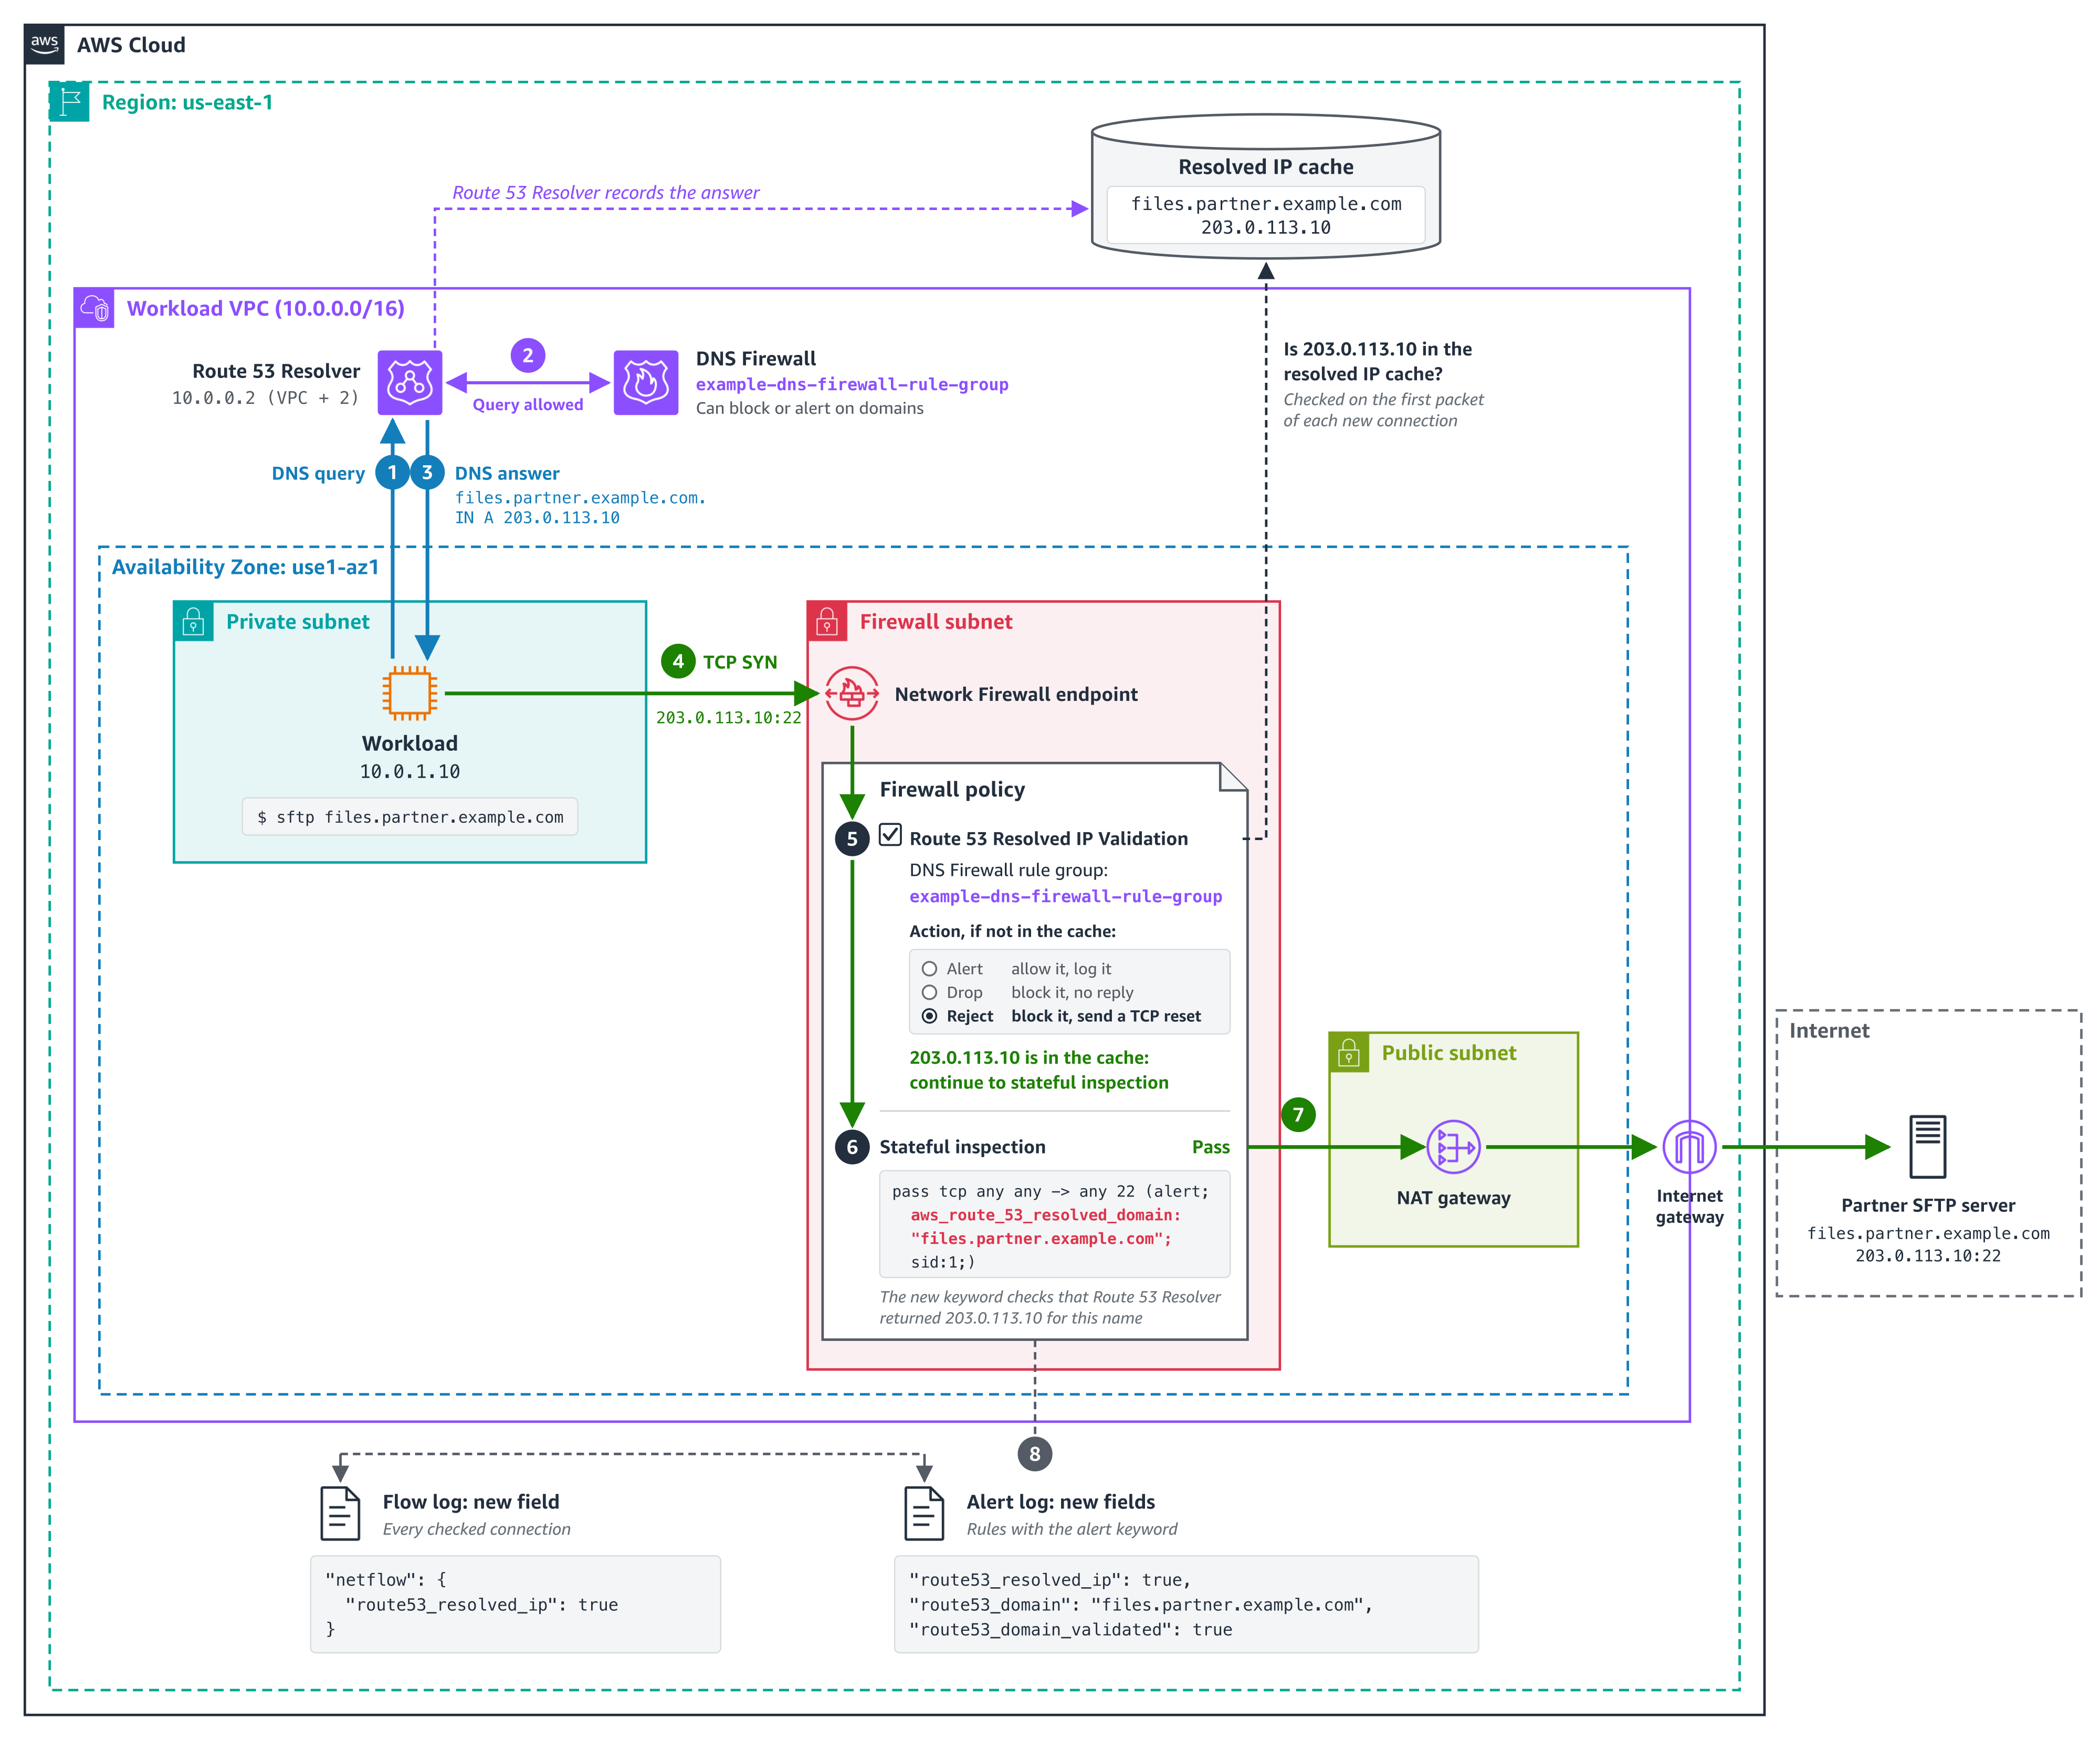
Figure 1. How Network Firewall checks the SFTP connection from use case 1 against the answers that Route 53 Resolver returned
The policy setting checks every connection, not only web traffic. A connection to an IP address that no client looked up through Route 53 Resolver, such as a hardcoded address, fails the check. If any of your workloads connect straight to IP addresses, add those addresses to Bypass destination validation IP ranges before you enforce. A stateful pass rule doesn’t exempt them because the policy check runs before your rules. The check is per address: when any client in an associated VPC looks up a name, its addresses pass the check for every client in scope in the same Availability Zone. For details, see Resolved IP validation in AWS Network Firewall in the AWS Network Firewall Developer Guide.
Prerequisites
To follow along, you need:
- DNS through Amazon Route 53 Resolver – Network Firewall can check only answers that Route 53 Resolver returned. Queries that reach Route 53 Resolver through Resolver endpoints or Resolver forwarding rules count.
- A Route 53 Resolver DNS Firewall rule group associated with the VPCs whose DNS answers Network Firewall should check connections against.
- The policy setting turned on before you add resolved-domain rules – Rules that use domain filtering (the
aws_route_53_resolved_domainkeyword) need Route 53 Resolved IP Validation turned on in the same firewall policy. Turn the setting on first, in alert mode, then add the rules. - A supported deployment model – The feature works with distributed deployments, including multiple firewall endpoints, where clients reach a firewall endpoint in their own Availability Zone, and with centralized deployments where the firewall is attached natively to AWS Transit Gateway. If routing sends a client to a firewall endpoint in another Availability Zone, its connections fail the check. To move a centralized deployment to a natively attached firewall, see Why and how to migrate to a Transit Gateway attached AWS Network Firewall.
How to turn it on in alert mode
Start in alert mode because clients cache DNS answers. Network Firewall recognizes only the answers that Route 53 Resolver returns after the DNS Firewall rule group is associated with the VPC and selected in the policy. A client that still uses an answer it cached earlier fails the check until it looks up the name again, usually when its cached record expires. Alert mode lets you see this without blocking anything. Allow about 24 hours in alert mode for clients to refresh their caches.
- Create a DNS Firewall rule group (it can be empty) and associate it with the VPCs whose DNS answers Network Firewall should check connections against. For the steps, see Creating a rule group and rules.
- Or, to use a DNS Firewall rule group that you already have, make sure it’s associated with those VPCs and only those. An answer returned in any associated VPC is valid for every client that the firewall checks. Which clients are checked is set by source IP ranges in step 6.
- In the Amazon Virtual Private Cloud (Amazon VPC) console, under Network Firewall, choose Firewall policies, then choose the policy that your firewall uses. On the Traffic inspection tab, in the Route 53 Resolved IP validation section, choose Edit and select Enable Route 53 Resolved IP validation.
- For Action, choose Alert. For DNS Firewall rule group, choose the rule group from step 1 or 2.
- For DNS expiry exception policy, choose what happens to a connection that’s already open when its entry expires from the resolved IP cache. Continue keeps it running, Drop stops it silently, and Reject stops it with a TCP reset. We recommend Continue so that long-running sessions, such as file transfers, aren’t cut off midway. However, choose the option that fits your security requirements.
- For source IP ranges, list the clients to check. If you don’t set it, Network Firewall checks clients in the firewall’s VPC and in any additional VPCs attached to the firewall. If your clients are in other VPCs, such as spoke VPCs that send traffic to a firewall attached to a transit gateway, enter their CIDR ranges; otherwise, Network Firewall doesn’t check their connections. Add destinations that you allow by IP address to Bypass destination validation IP ranges. Choose Save.
The following screenshot illustrates these steps.
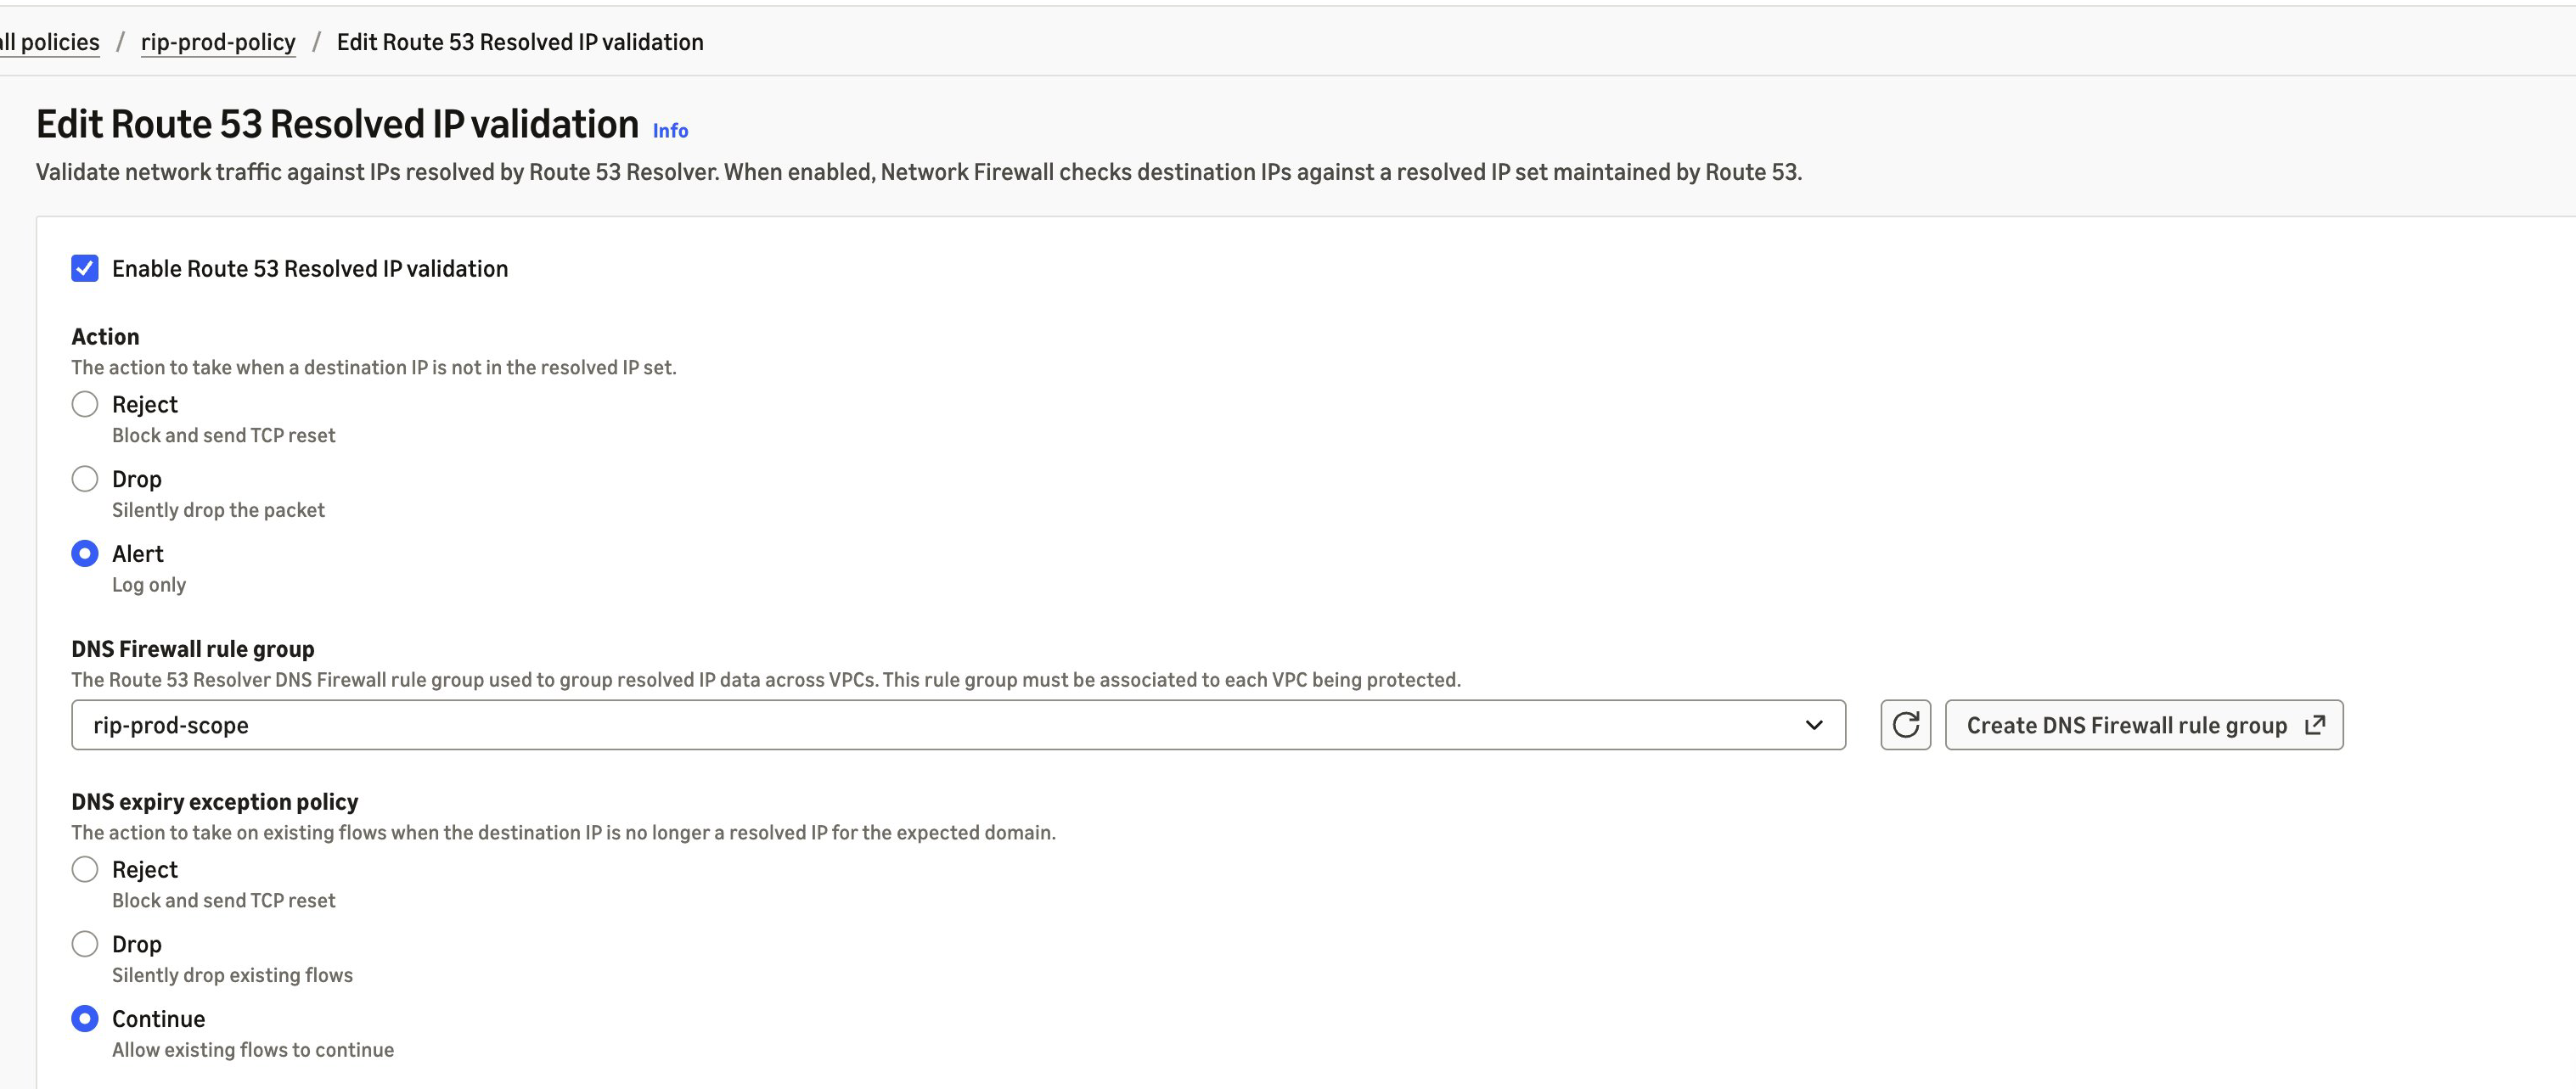
Figure 2. Route 53 Resolved IP Validation turned on in alert mode
In alert mode, Network Firewall doesn’t block a connection that fails the check, and it doesn’t write an alert of its own. It records the result in your flow logs, in the route53_resolved_ip field of each connection. A value of true means Route 53 Resolver returned the destination address for a domain name. A value of false means it didn’t, so enforcement would block the connection. The same field also appears in alert log records that a rule or the policy’s default action writes for the connection. Pass rules don’t write one unless they have the alert; keyword. The DnsUnresolvedFlows metric in Amazon CloudWatch counts the connections that fail the check, and DnsAzUnavailableFlows counts connections from an Availability Zone that doesn’t support the feature. The following alert log record (trimmed, with example values) was written by a default action that alerts, for a connection to an address that Route 53 Resolver returned:
In alert mode, this record is for a TLS connection that presented an allowed domain name but went to an address that Route 53 Resolver didn’t return for it, blocked by the policy’s default action in use case 2:
Before you switch Action to Drop or Reject, check that connections that fail the check are ones you expect and that destinations you allow by IP address are in the bypass ranges. Reject sends a TCP reset, so a blocked TCP client fails right away instead of waiting for a timeout. After you enforce, blocked connections appear in your flow logs with route53_resolved_ip as false, not in your alert logs. For the metrics and log fields to watch, see Monitoring and troubleshooting resolved IP validation.
Use case 1: Filter non-web traffic by domain name
Before this launch, Network Firewall rules for protocols that carry no domain name, such as SFTP, used IP addresses. Now, you can allow them by domain name. In this example, a workload sends files over SFTP to a partner at files.partner.example.com on TCP port 22, and the partner can change the addresses behind that name at any time. The same approach works for SSH, MySQL, and other non-web protocols. You create it as a standard stateful rule. Follow these steps:
- Under Network Firewall, choose Network Firewall rule groups, then choose Create rule group. Choose Stateful rule group and Standard stateful rule, and choose the rule evaluation order that your policy uses.
- Choose Add rule. For Protocol, choose TCP. For Destination port, enter
22. Under Domain filtering, enterfiles.partner.example.com. For Action, choose Pass. - Create the rule group, then add it to your firewall policy.
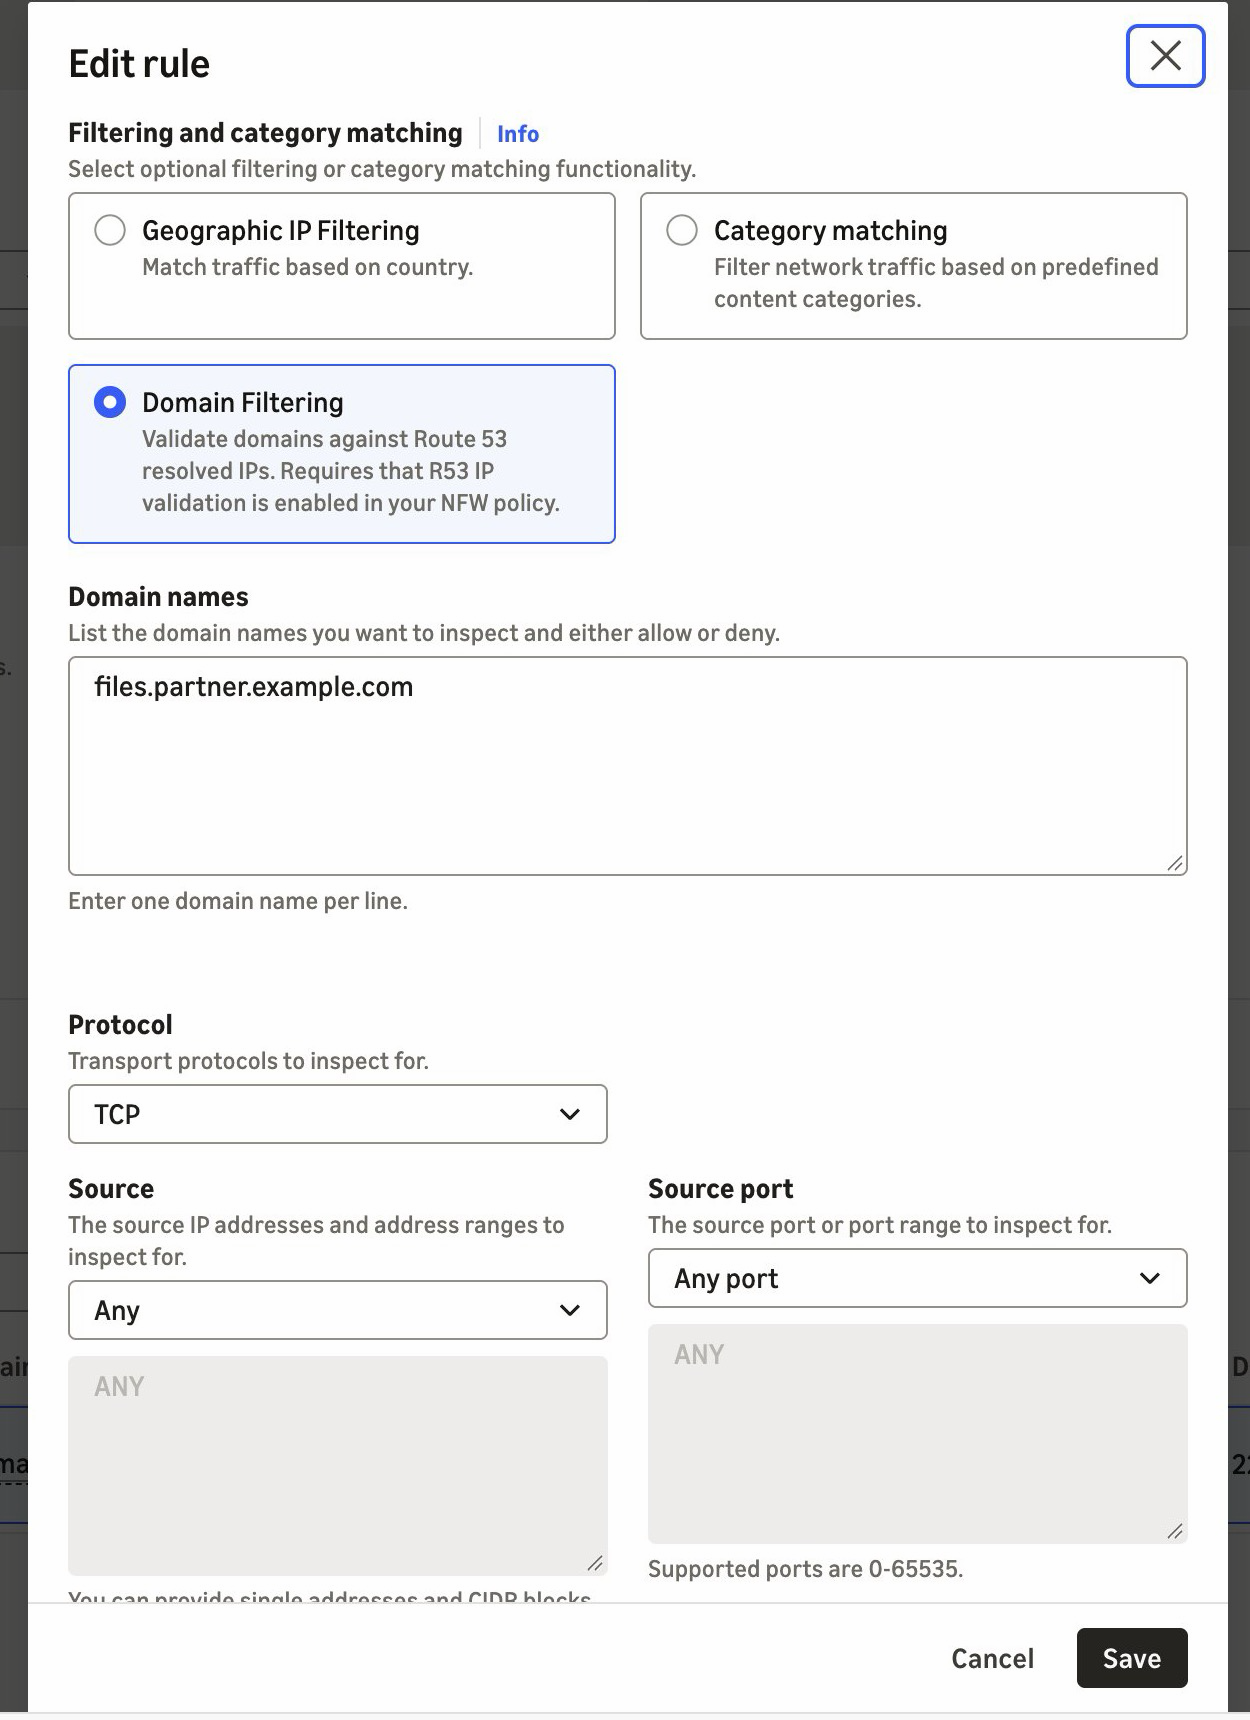
Figure 3. A pass rule for SFTP on TCP port 22, scoped to the partner’s domain name
If you manage rules as code, the equivalent Suricata rule is shown in the following code. It adds the alert; keyword so that the firewall logs allowed connections. The console rule doesn’t add it.
When the partner moves its server to a new address, the next DNS answer adds it to the resolved IP cache. There’s no IP list to maintain. The cache keeps earlier answers for longer than their DNS time to live (TTL), so the old address can still pass for a while.
Use case 2: Prevent SNI spoofing without TLS inspection
With SNI spoofing, a client presents an allowed domain name in its TLS request while it connects to a different server. Preventing that has required TLS inspection, which decrypts the traffic. Route 53 Resolved IP Validation prevents it without TLS inspection. In this example, a workload calls a partner API at api.partner.example.com over HTTPS. TLS traffic on port 443 must reach only the addresses that Route 53 Resolver returned for that name. You create a pass rule in a standard stateful rule group, as in use case 1, and the firewall policy’s default action drops everything that no rule passes. Follow these steps:
- Under Network Firewall, choose Network Firewall rule groups, and then choose Create rule group. Choose Stateful rule group and Standard stateful rule, then choose Strict order.
- Choose Add rule. For Protocol, choose TLS. For Destination port, enter
443. Under Domain filtering, enterapi.partner.example.com. For Action, choose Pass. - Create the rule group, then add it to your firewall policy.
- In the firewall policy, use strict rule order. For the stateful default actions, choose Application drop established (server-directed only) and Application alert established (server-directed only). The alert action logs what the drop action blocks. For why we recommend these default actions, see Firewall policy configuration in the AWS Security Services Best Practices guide.
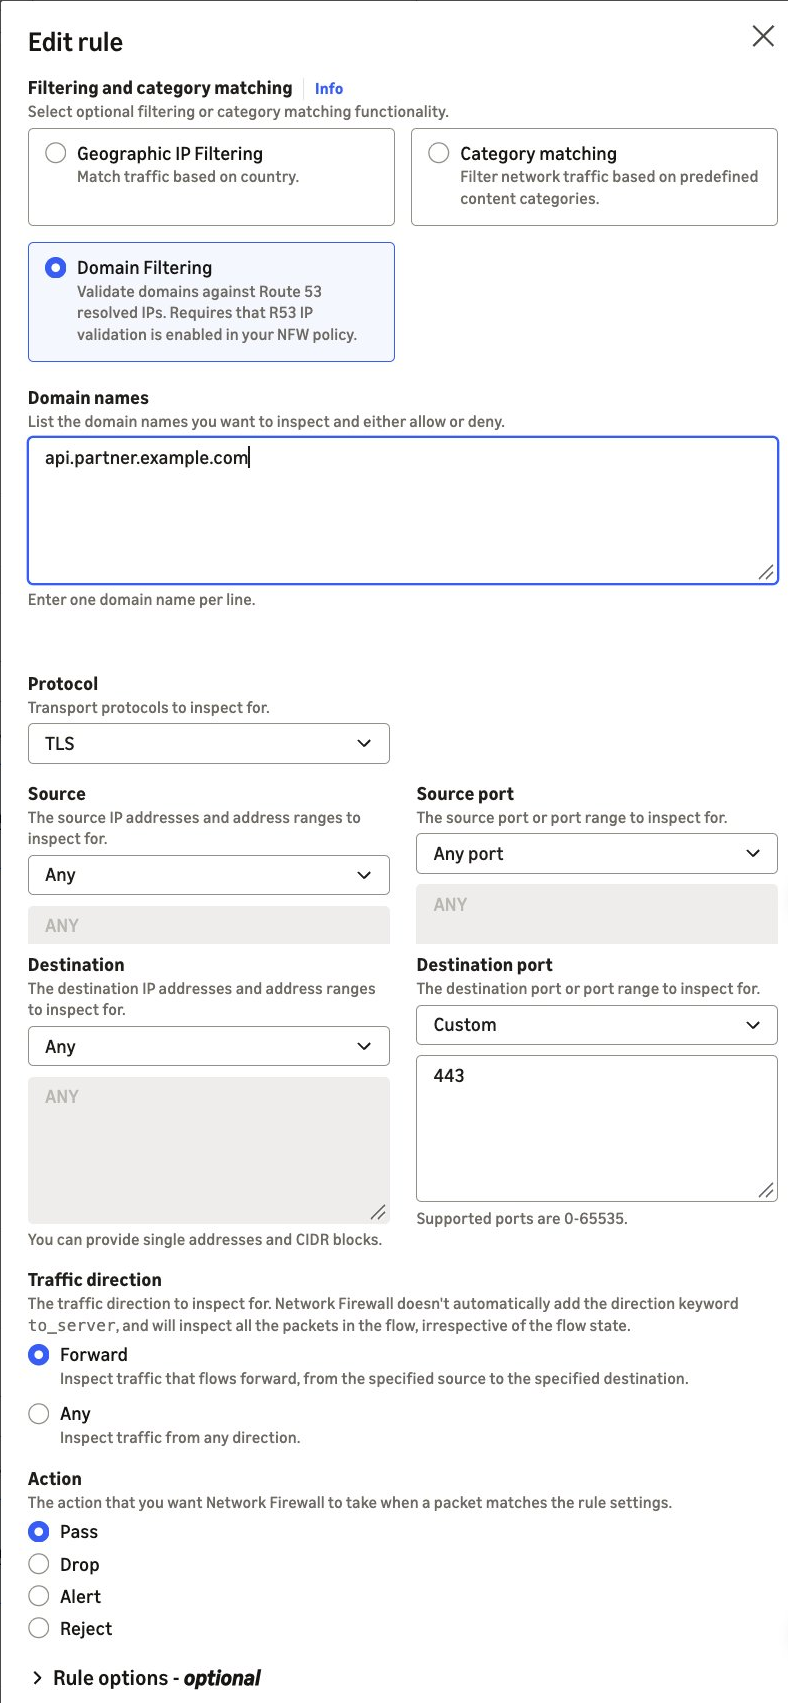
Figure 4. A pass rule for TLS on port 443, scoped to the partner’s domain name
If you manage rules as code, the equivalent Suricata rule is:
The pass rule matches the destination address, not the name in the TLS request. TLS traffic on port 443 passes only when Route 53 Resolver returned the destination address for api.partner.example.com. If the partner’s addresses also serve other domain names, such as behind a content delivery network (CDN), those names pass too. To also require the partner’s name in the TLS request, add an exact SNI match to the same rule: tls.sni; content:"api.partner.example.com"; startswith; endswith; nocase;.
Without startswith and endswith, the content match accepts any SNI that contains the name.
A connection that presents the partner’s name but goes to another address doesn’t match the pass rule. If Route 53 Resolver never returned that address, the policy setting’s enforcement action blocks the connection before your rules run. In alert mode, the policy setting lets the connection through to your rules instead, and the stateful default action drops it because the pass rule doesn’t match. Its alert log record shows route53_resolved_ip as false, as in the second example previously. If Route 53 Resolver returned the address for a different domain name, the connection passes the policy check. The stateful default action then drops it because the pass rule doesn’t match, and that record shows route53_resolved_ip as true.
Best practices
We recommend that you follow these best practices:
- Keep DNS on Route 53 Resolver – Block outbound UDP and TCP port 53 DNS to other resolvers, including DNS over HTTPS (DoH) and DNS over TLS (DoT), on Network Firewall, so that clients don’t bypass the check. Route 53 Resolved IP Validation alone doesn’t do this. If any client looks up a public resolver’s name, such as
dns.google, that resolver’s addresses pass the check. - Keep DNS Firewall rules in those VPCs – Route 53 Resolved IP Validation checks the connections that follow a DNS lookup, not the DNS queries themselves. DNS Firewall blocks lookups of known threat domains with AWS managed domain lists, and its advanced rule groups detect data leaving through DNS queries, such as DNS tunneling.
- Start small – Add domain filtering to a few rules at a time, then add more when the results look clean. For domain allow list patterns, see Allow rules and domain allowlisting.
- Turn on flow and alert logging and detailed monitoring – Connections that fail the resolved IP check show in your flow logs (
route53_resolved_ip: false) and in theDnsUnresolvedFlowsmetric, not in your alert logs. Pass rules without thealert;keyword don’t write an alert log record.
Pricing and availability
Route 53 Resolved IP Validation is available today in all commercial AWS Regions (Regions other than the AWS GovCloud (US) Regions and the China Regions) where AWS Network Firewall and Amazon Route 53 Resolver DNS Firewall are available, at no additional charge. For the list of Regions, see AWS Capabilities by Region. A DNS Firewall rule group with no rules doesn’t incur DNS Firewall charges. Standard DNS Firewall pricing applies after you add rules. See AWS Network Firewall pricing and Amazon Route 53 pricing.
Conclusion
In this post, we showed you how Route 53 Resolved IP Validation works and how to turn it on in alert mode. Network Firewall now checks each connection’s destination against the IP addresses that Amazon Route 53 Resolver returned for the DNS query. Filtering SFTP, SSH, database, and other non-web traffic by domain name and preventing SNI spoofing without TLS inspection are two common examples of what that makes possible. To get started, turn the feature on in alert mode and review the results before you enforce. For the full walkthrough, see Getting started with resolved IP validation.
To learn more, visit the AWS Network Firewall product page and the feature documentation.
If you have questions about this post, contact AWS Support.
Introducing time series collections for the next generation of Amazon OpenSearch Serverless
Post Syndicated from Kevin Fallis original https://aws.amazon.com/blogs/big-data/introducing-the-next-generation-of-serverless-time-series-for-amazon-opensearch-service/
Today, we’re announcing support for time series collections on the next generation of Amazon OpenSearch Serverless. With time series collections, you can ingest, store, and analyze logs, metrics, traces, and event data without provisioning or managing clusters. Time series collections absorb ingest spikes automatically, keep recent data fast to query, and make months or years of history searchable at low cost, all in the same collection. Time series collections also bring alerting and anomaly detection to OpenSearch Serverless, so you can find and act on problems as they happen. With support for up to 100 TB of hot storage per collection, they’re built for high-scale observability workloads such as application monitoring, security analytics, and IoT telemetry.
Observability data is voluminous, and it surges sharply during events like bad deployments and outages, right when teams need answers fastest. An undersized cluster falls behind and delays the very logs engineers are waiting for, so teams size for the worst day and pay for that capacity every other day. Hot storage gets expensive as history grows, so teams cut retention or move older data to snapshots that someone must restore before running a query. Clusters also need constant tuning and capacity planning, which pulls engineers away from the investigations the data is meant to support. Every decision becomes a tradeoff between cost, retention, and how quickly you can answer questions about your systems.
Time series collections on OpenSearch Serverless remove that tradeoff. When an incident drives a surge in log volume, compute scales in seconds to keep up, so the logs engineers are waiting for arrive on time. When traffic settles, compute scales back down, all the way to zero, so you stop paying for worst-day capacity. Older data moves to a lower-cost warm tier and stays queryable, so you can keep years of history without cutting retention or restoring snapshots. There are no clusters to size or tune. You set compute limits and a few index settings, and the service handles the rest.
Pay less for the data you query less
Most queries against time series data target the last few hours or days, while older data is less frequently queried but still needs to be available. With the new index.warm.after setting, you decide how long data stays in the hot tier before it moves to the lower-cost warm tier. You can set it in days or hours, from a minimum of 1 day (24h or 1d) up to 10 years (3650d), and it can’t exceed the index’s retention period. If you don’t set it, data moves to warm after 1 day.
At ingest, each document is written to a low-latency hot tier and to Amazon Simple Storage Service (Amazon S3). As data reaches the age you set, oldest first, the hot copy is released and the data lives in the warm tier on Amazon S3. When a query needs warm data, the service loads that data back into the hot tier to serve it. The first query on that data takes longer, and later queries on the same data run at hot-tier latency. That suits investigations and reporting over older data, where the same time range is often queried repeatedly. When a query spans both tiers, results come back in a single response. You pay hot storage rates only for data in the hot tier.
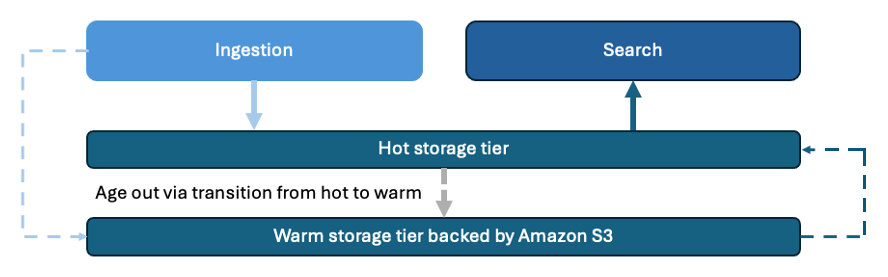
Figure 1: Data moves from the hot tier to the warm tier after 7 days, persisted to Amazon S3 throughout
Retain data for as long as your workload requires
Retention is set on the index itself, so there is no separate lifecycle policy to create or maintain. Set index.data.retention in an index template, and every index that matches the pattern inherits it. You can retain data for anywhere from 1 day to 3,650 days (10 years), specified as a whole number of days.
Tiering and retention are independent. Tiering controls query speed and cost, and retention controls when data is deleted. For example, you can keep application logs hot for 7 days and retain them for 30 days, or keep audit data in the warm tier for years to meet compliance requirements. When an audit comes up, you query that history in the same collection, and search compute scales up to handle the extra load. There is no snapshot restore and no forensic cluster to stand up.
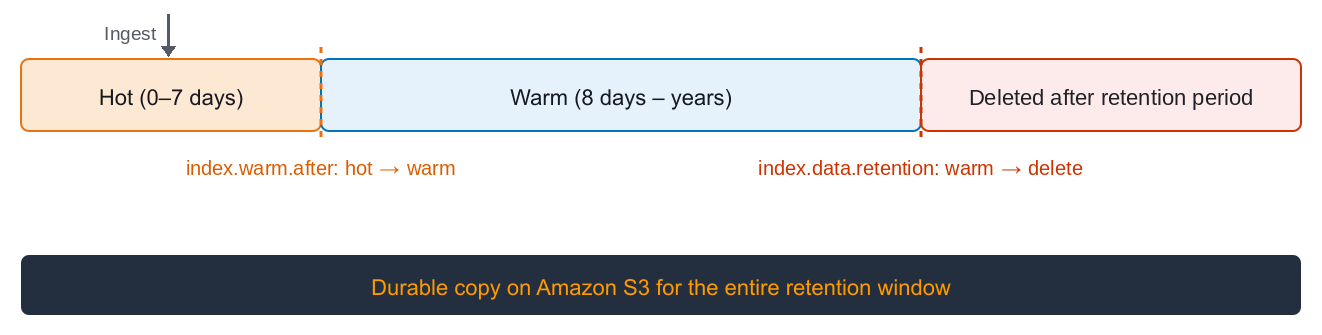
Figure 2: Data tiering and retention
Designate the event timestamp for each index
Every document in a time series collection must now include a timestamp field. Each index has one designated time field that the service uses to organize and sort your data, and documents with a missing, null, or invalid timestamp are rejected.
By default, the time field is @timestamp. If your events already carry a different field, such as event_time, set index.timestamp_field when you create the index or in an index template, so you don’t need to change your producers. The field must be a top-level date field, and a document’s timestamp can’t be changed after it is indexed.
Rejections apply to individual documents, not whole requests. In a _bulk request, the valid documents are indexed and the rejected ones are listed in the errors block of the response, so one bad record doesn’t fail the batch.
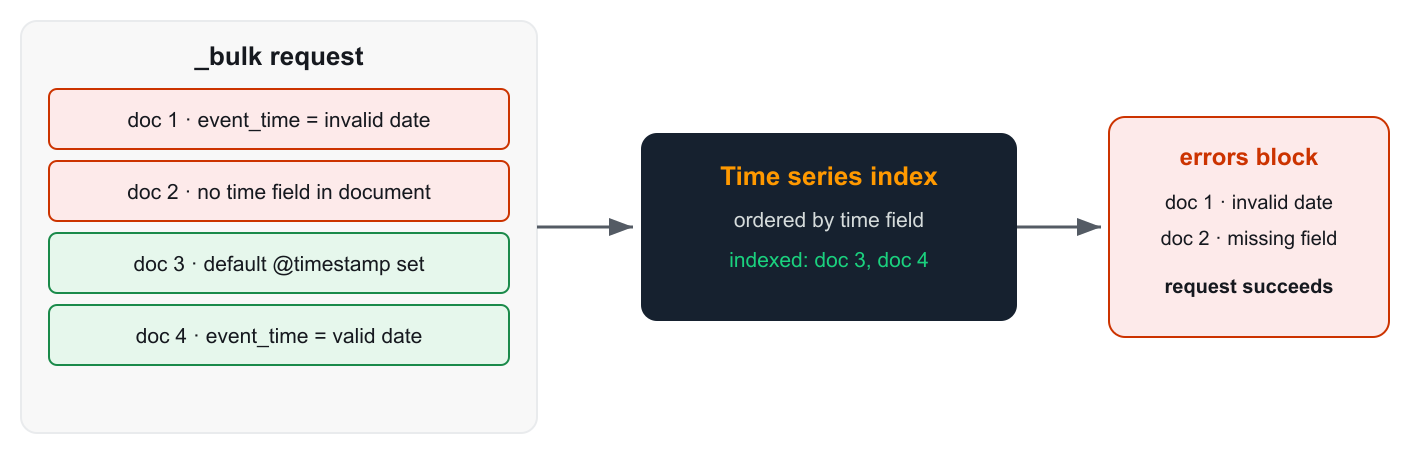
Figure 3: How the time field determines whether each document is indexed or rejected
Catch problems before they become outages
Time series collections now support alerting and anomaly detection, which Classic serverless collections didn’t offer. Instead of relying on a separate system to tell you when something breaks, you can monitor, detect, and notify from the collection that stores your data. Now, operations teams can get notified when error rates or latency spike, security teams can catch a burst of failed logins, and business teams can spot a sudden drop in orders.
Alerting monitors query your data on a schedule and notify you through the channel you choose when a condition is met. Per-query monitors alert on a single value, such as average latency crossing a threshold. Per-bucket monitors evaluate each group separately, such as every host whose error rate climbs too high. PPL monitors handle more complex logic in Piped Processing Language (PPL).
Anomaly detection uses the Random Cut Forest (RCF) machine learning algorithm to learn your data’s normal pattern and flag deviations in near real time, with no fixed thresholds to guess. Point a monitor at the detector’s results to get notified the moment an anomaly appears.
You manage monitors and detectors in OpenSearch UI workspaces, where access follows the workspace’s collaborator permissions. Read-only collaborators can view monitors and alerts, while read/write and admin collaborators can also create, update, and acknowledge them. The Observability workspace puts alerts alongside dashboards and PPL queries, so your team can go from an alert to the events behind it, across serverless collections and existing Amazon OpenSearch Service domains.
Getting started
For a single-click experience, use Express Create in the Amazon OpenSearch Service console. It sets up the collection group, encryption, network access, and data access for you. To control each step yourself, use the AWS Command Line Interface (AWS CLI) as shown in the following steps.
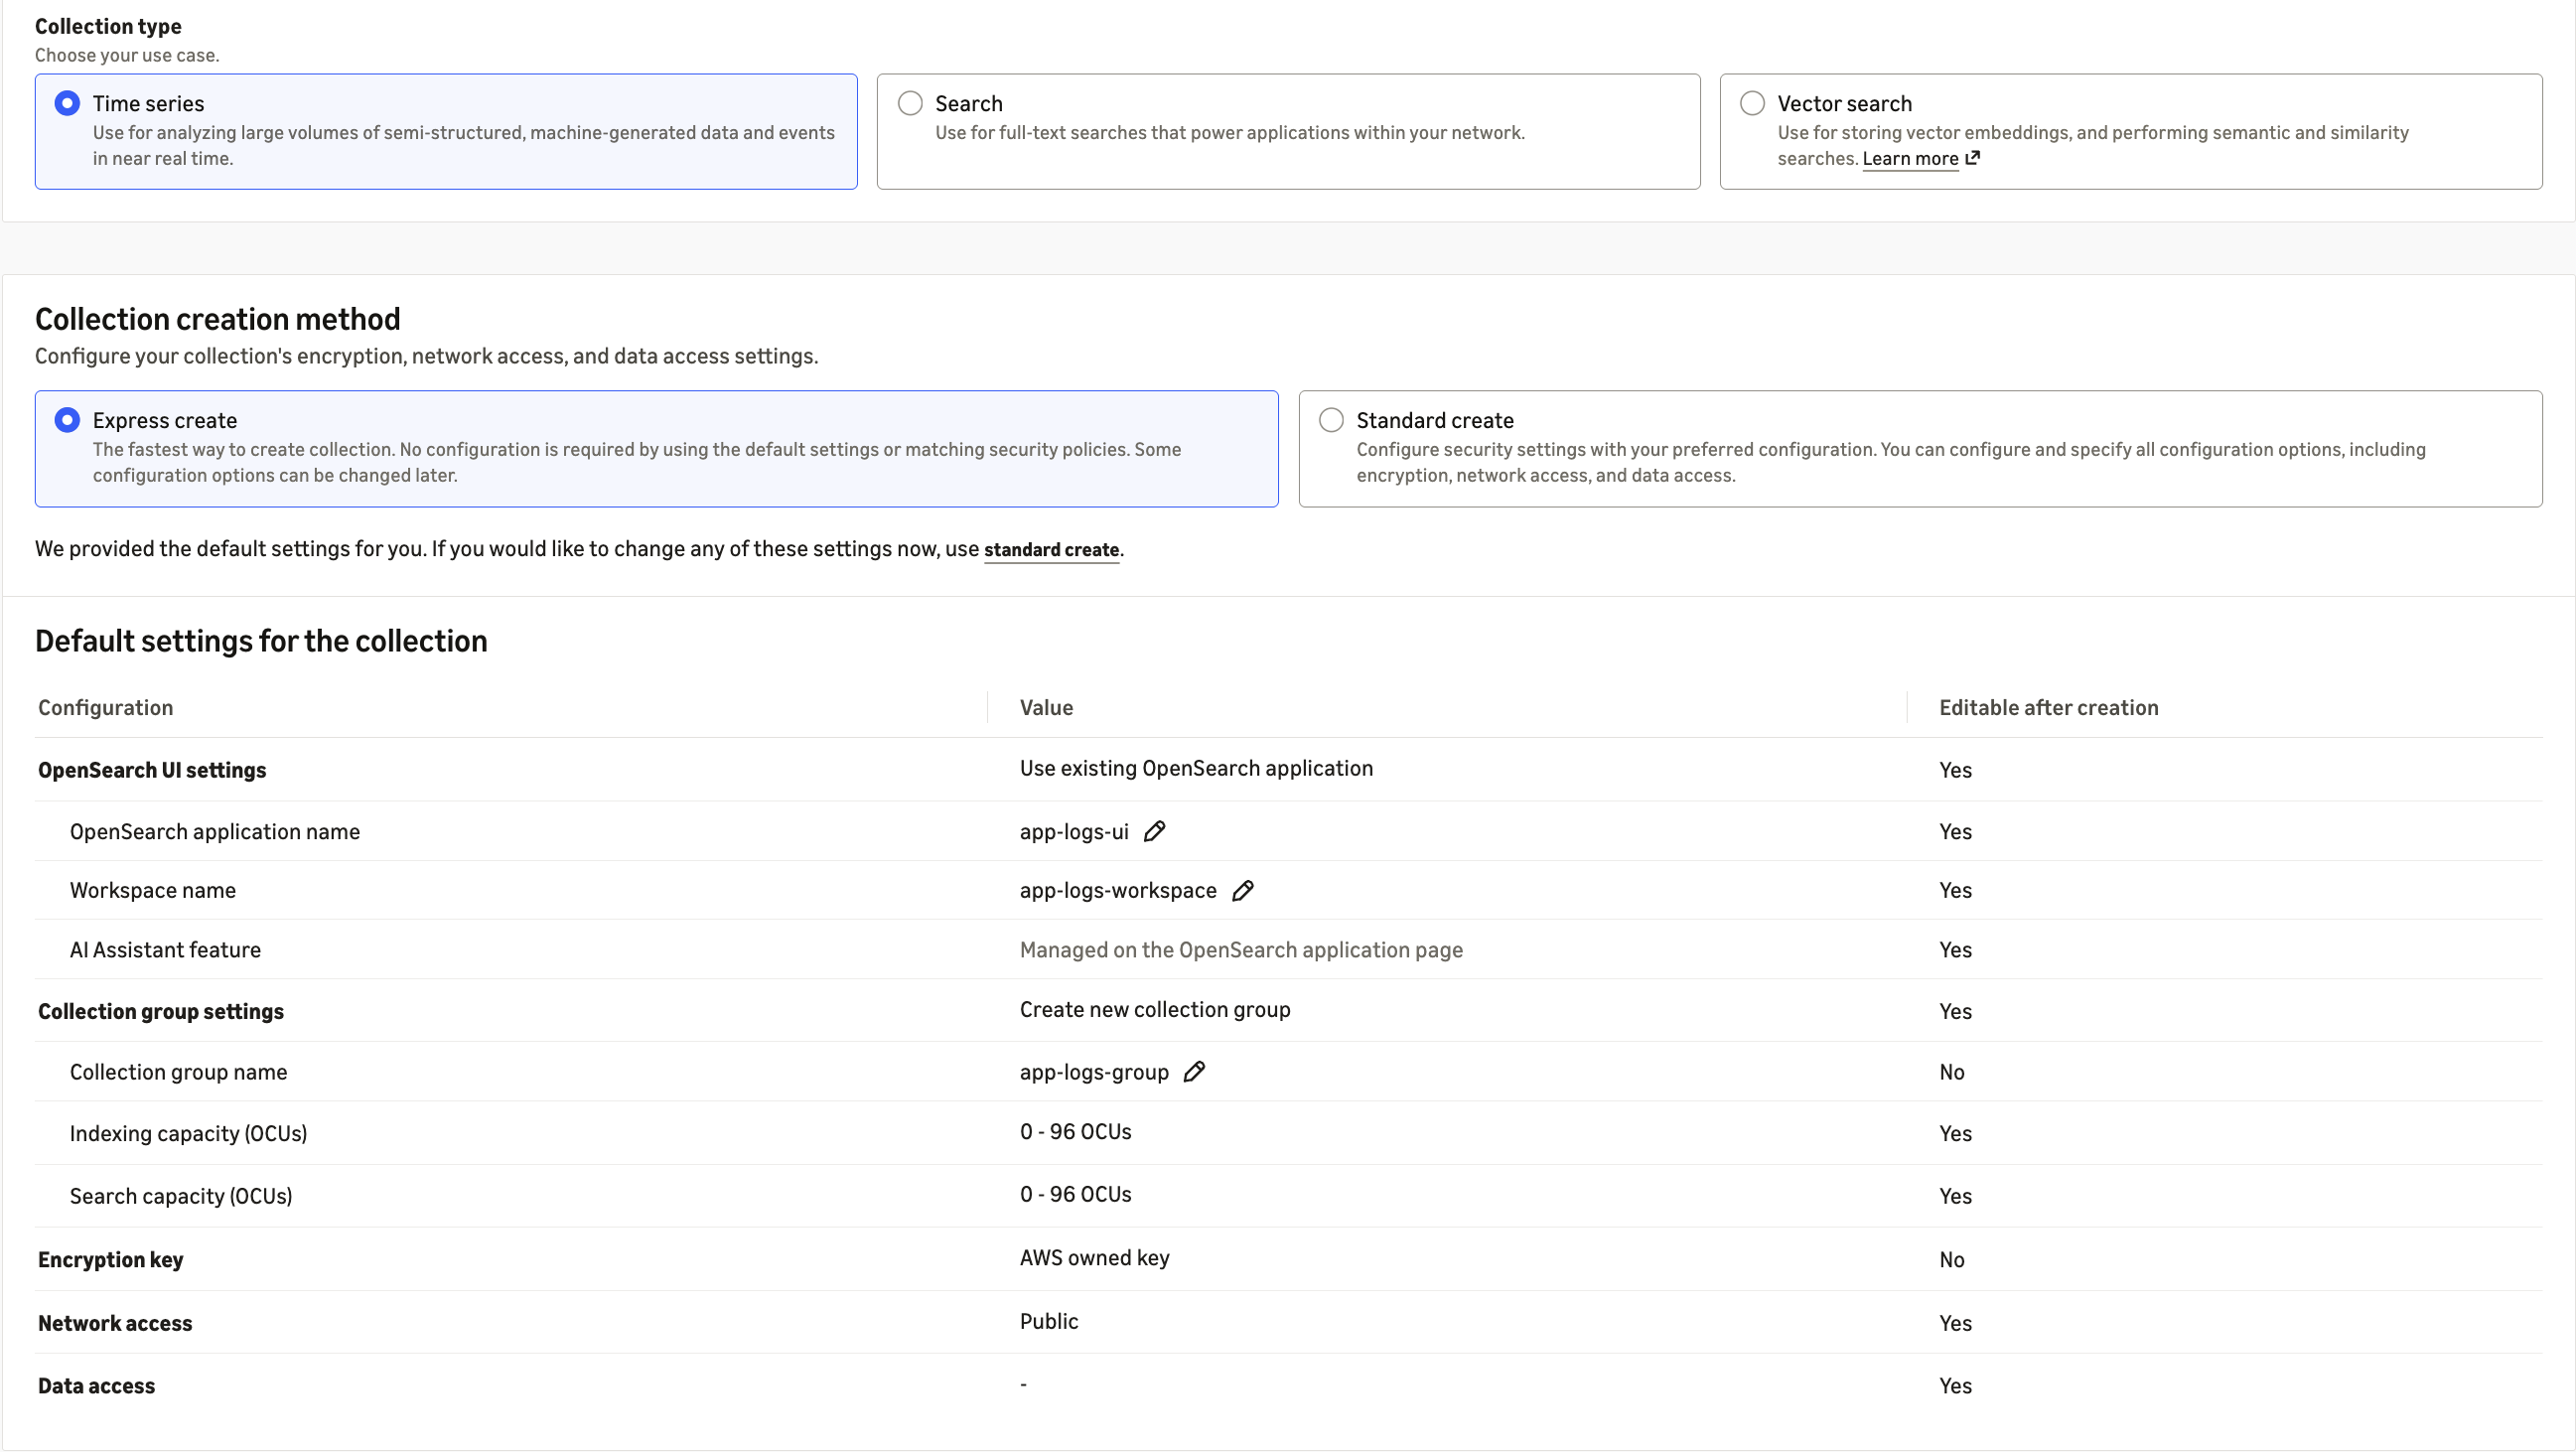
Figure 4: Express Create sets up the collection group, encryption, and network access with default settings
First, create a next-generation collection group. The collection group sets the compute limits that all of its collections share. A minimum of 0 OpenSearch Compute Units (OCUs) lets the group scale to zero when it’s idle, and the maximum caps your spend.
Next, create a network policy to control where the collection can be reached from, and a data access policy to control which AWS Identity and Access Management (IAM) principals can read and write data.
Then create the time series collection in the collection group:
After the collection is active, create an index template with the time field, tiering, and retention settings that fit your workload. Every index whose name matches the pattern picks up these settings automatically:
Finally, ingest your data into the collection, then open the Observability workspace in OpenSearch UI to build your first dashboards, monitors, and anomaly detectors.
Now available
Time series collections are available today in all AWS commercial Regions where the next generation of OpenSearch Serverless is available. You pay for the compute you use in OCUs, and for hot and warm storage in GB-month. For pricing details, visit the Amazon OpenSearch Service pricing page.
To learn more, visit the Amazon OpenSearch Serverless product page and the Amazon OpenSearch Serverless Developer Guide.
Give it a try in the Amazon OpenSearch Service console, and send feedback through AWS re:Post or your usual AWS Support contacts.
About the author
From Problem to Fix in Minutes: Automating Search Relevance Tuning with the Amazon OpenSearch Service Relevance Agent
Post Syndicated from Aruna Govindaraju original https://aws.amazon.com/blogs/big-data/from-problem-to-fix-in-minutes-automating-search-relevance-tuning-with-the-amazon-opensearch-service-relevance-agent/
Automating search relevance tuning means going from “my NDCG score is low” to “here is a better search query” in minutes. The Amazon OpenSearch Service Search Relevance Agent accelerates search quality improvements. You describe the problem, and the agent investigates your behavioral data, runs sequenced evaluations, and generates an improved query validated against your search quality targets, all without leaving the UI.
In the previous post “Measuring and improving search quality with Amazon OpenSearch Service”, you learned how to capture behavioral signals with User Behavior Insights (UBI), run structured experiments with Search Relevance Workbench (SRW), and arrive at a real Normalized Discounted Cumulative Gain (NDCG) score. That gives you the diagnosis. Now comes the harder part: acting on it.
Improving search quality is a tedious, manual loop. A search engineer studies the dashboards, forms a hypothesis, rewrites the domain-specific language (DSL) query, creates a new configuration, runs an experiment, interprets the results, and, if the numbers hold, deploys the change. Then the catalog shifts, query patterns evolve, and the cycle starts over. Staying ahead of it is practically a full-time job.
The Search Relevance Agent, accessible through the Ask AI button in the OpenSearch UI application, automates this loop. You have a conversation. The agent does both: diagnose and fix.
What is the Search Relevance Agent?
Before diving into the demo, it’s worth being precise about what the agent is and isn’t. Search Relevance Agent is one of the agents supported in OpenSearch Agent Server. The OpenSearch Agent Server is a multi-agent orchestration platform where you can build specialized AI agents that work together within OpenSearch. The agent server is an orchestration server for OpenSearch Dashboards with context-aware routing and Model Context Protocol (MCP) integration.
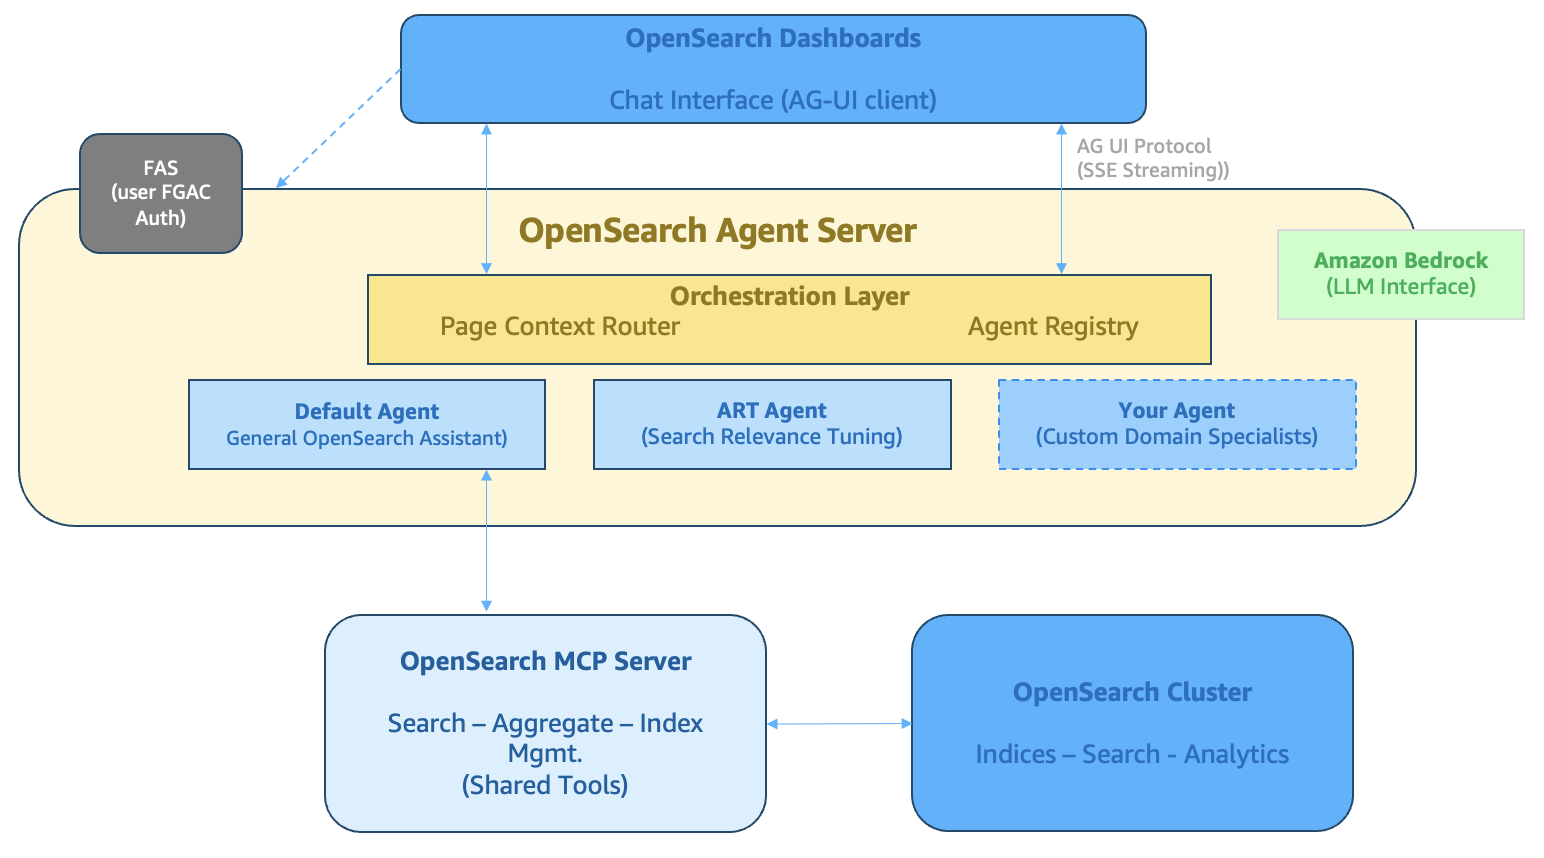
Figure 1: OpenSearch Agent Server
The Search Relevance Agent is a search relevance tuning tool. It analyzes your UBI search data, generates improved query configurations, and validates those improvements using offline SRW experiments. It operates at the level of query DSL, refining field weights, adjusting scoring strategies, and adding boost functions.
It isn’t an agentic search tool. It doesn’t rewrite user queries at runtime or intercept search requests. It configures the search system so that future searches perform better.
The distinction matters because it tells you what kind of problems it solves: systematic relevance issues that affect a category of queries, not one-off edge cases.
Solution overview
Under the hood, the Search Relevance Agent is powered by three skills of a single agent rather than separate sub-agents wired together as tools. The full loop, from spotting a problem to generating a hypothesis to evaluating it, runs in a single shared context with one tool stack. Nothing is lost when handing off between agents, and the behavior stays predictable.
When you send a message through Ask AI, you are talking to the OpenSearch Agent Server. Depending on what you are asking for, the agent applies one of three skills.
- User Behavior Analysis. Queries your UBI indexes to surface relevance problems such as low click-through-rate (CTR) queries, zero-result queries, and declining engagement patterns. Deterministic tools handle all metric calculations rather than the large language model (LLM), so the numbers are trustworthy.
- Hypothesis Generation. Analyzes your current search configuration (search queries), runs a pairwise smoke test, and proposes a new DSL search query as a hypothesis. It explains its reasoning, which fields it changed and why, so you can evaluate the proposal before approving it.
- Evaluation. Creates the SRW artifacts (query set, search configuration, judgment list) and runs an offline Search Quality Evaluation experiment. It reports NDCG, Mean Average Precision (MAP), and Precision, interprets the tradeoffs, and gives you a plain-language recommendation.
Every agent communicates with your OpenSearch cluster exclusively through the MCP Server, a standardized interface that gives agents access to your UBI data, search configurations, query sets, and experiments. Nothing happens without going through this secure layer.
OpenSearch UI uses the Agent-User Interaction Protocol (AG-UI) to connect AI agents to frontend applications, delivering real-time capabilities through standardized streaming and tool execution. The AG-UI protocol streams agent responses to OpenSearch Dashboards in real time, delivering results continuously rather than all at once.
The Agent Server receives the user’s authenticated identity from OpenSearch Dashboards, so every OpenSearch operation enforces user-level permissions rather than a service account’s, preserving access controls end to end.
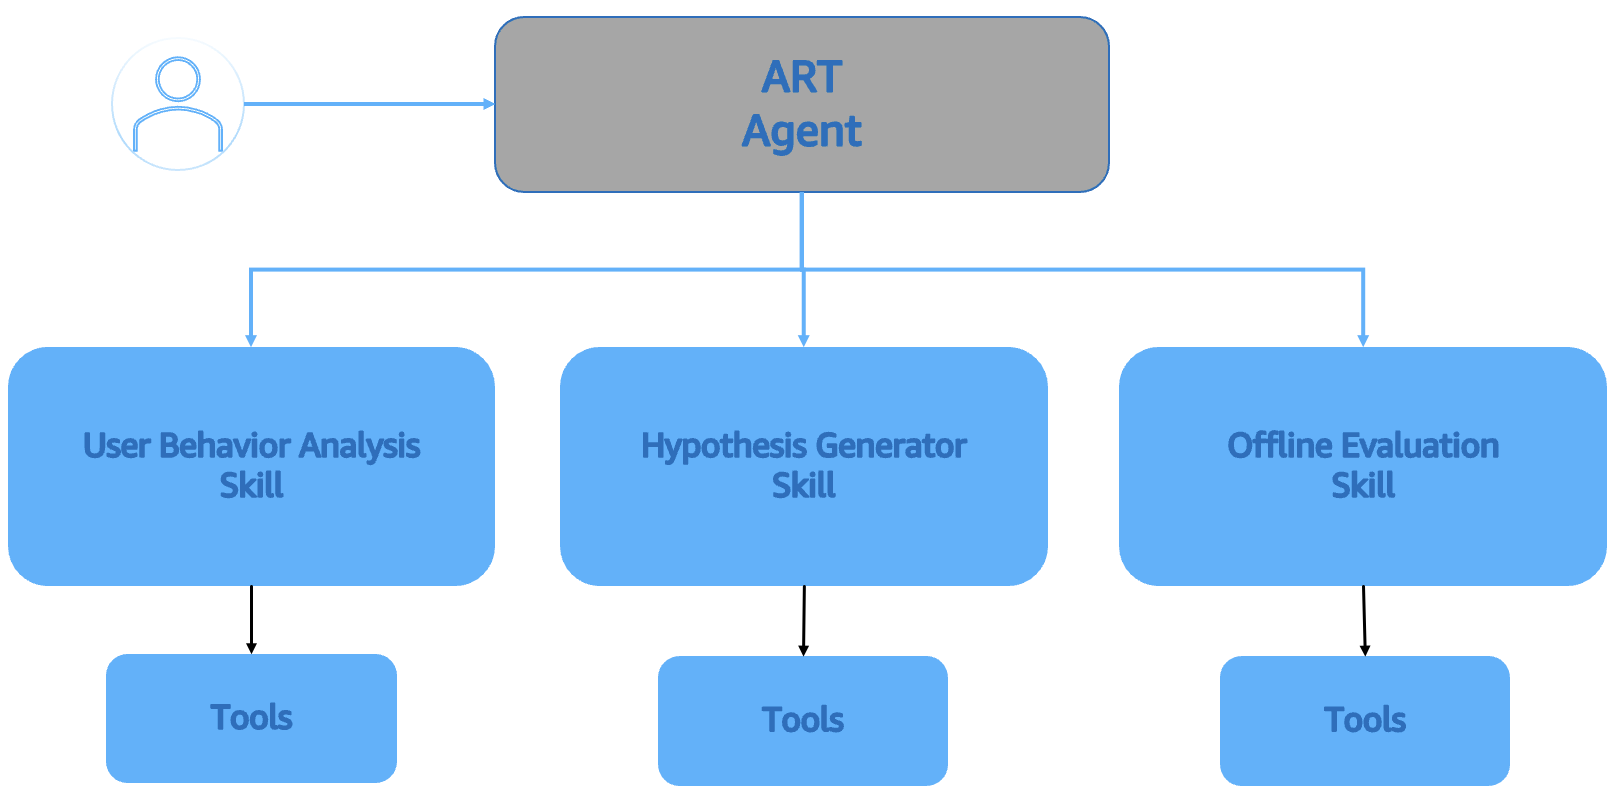
Figure 2: Auto relevancy tuning agent
Prerequisites
To follow along, you need an OpenSearch Service domain running OpenSearch 3.5 or later with the OpenSearch UI application, and a search application you can instrument to emit behavioral records.
Example UBI investigation
Here’s what the agent conversation looks like in practice, working through a real dataset. Figure 3 shows a complete walkthrough of using the agent.
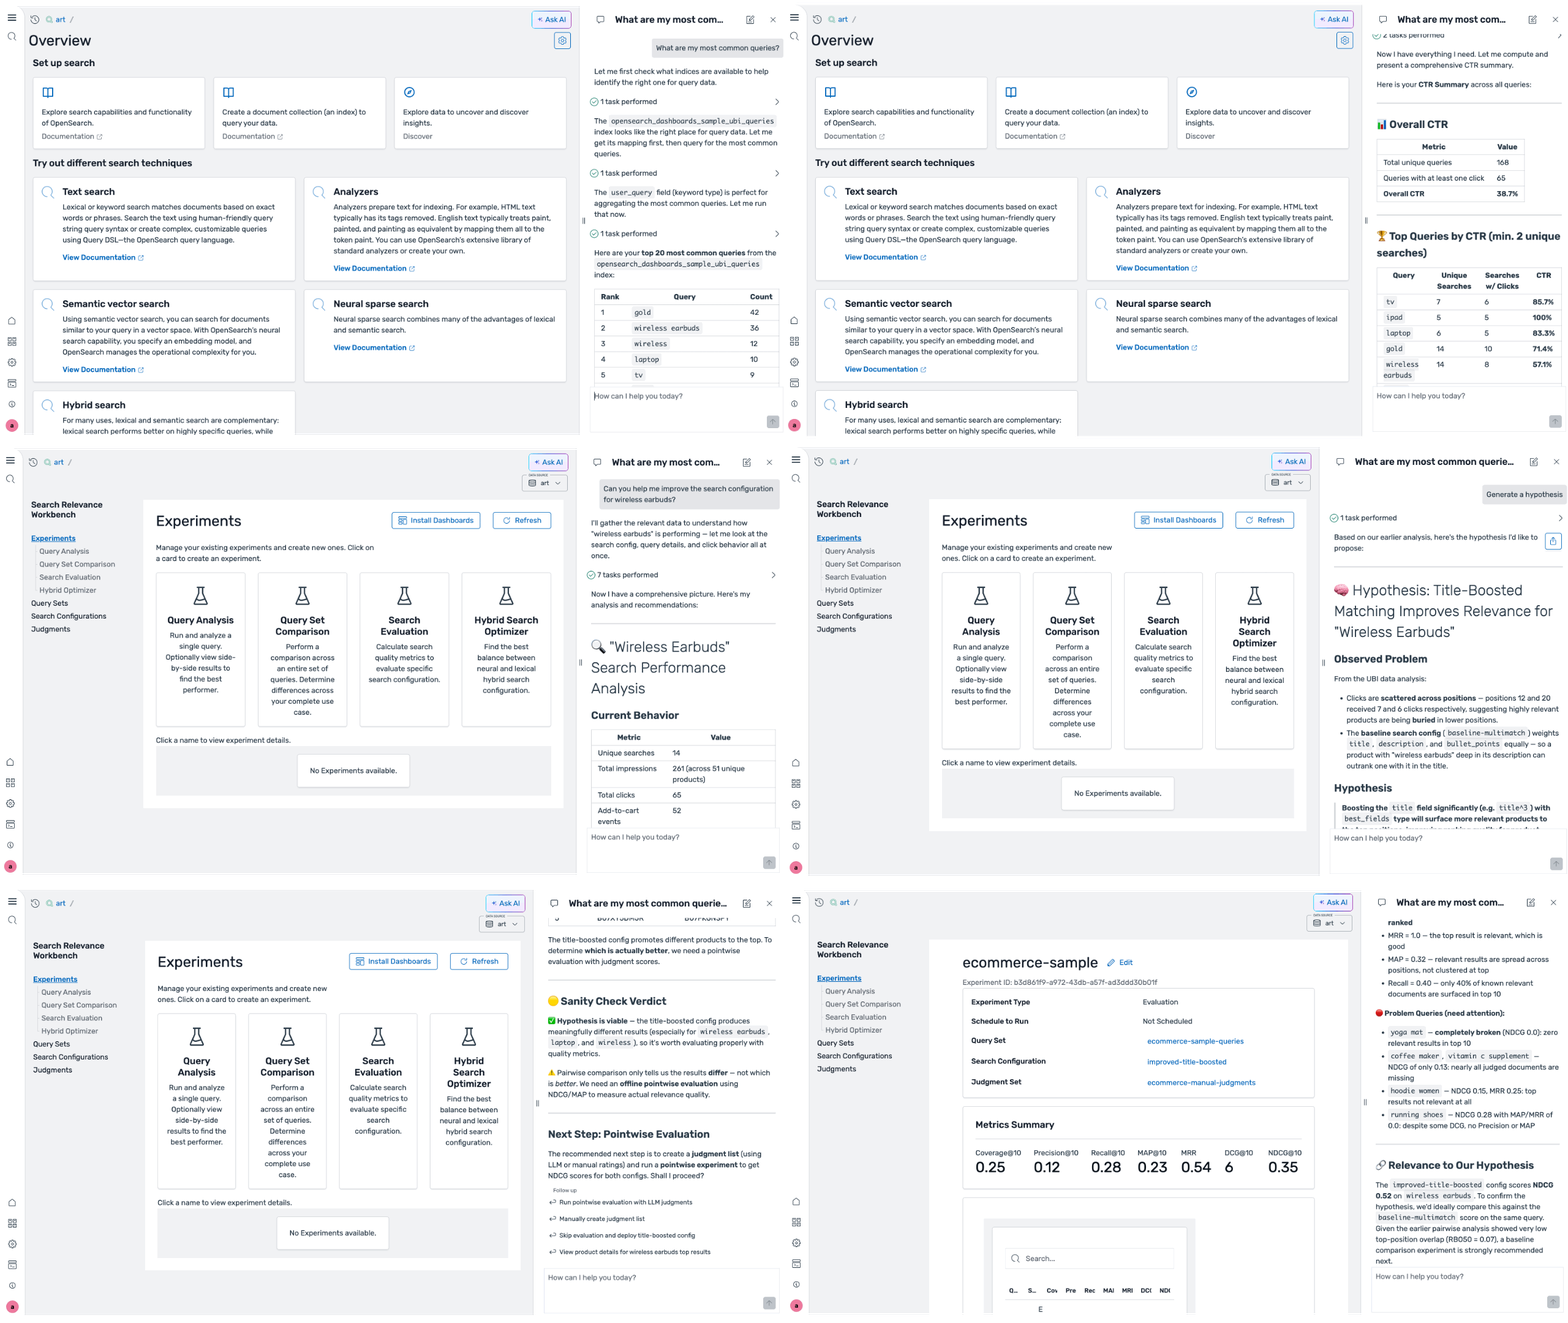
Figure 3: Search improvement example
Step 1: Open Ask AI
You work in the search workspace within the OpenSearch UI application. After entering the search workspace, choose Ask AI in the upper right corner.
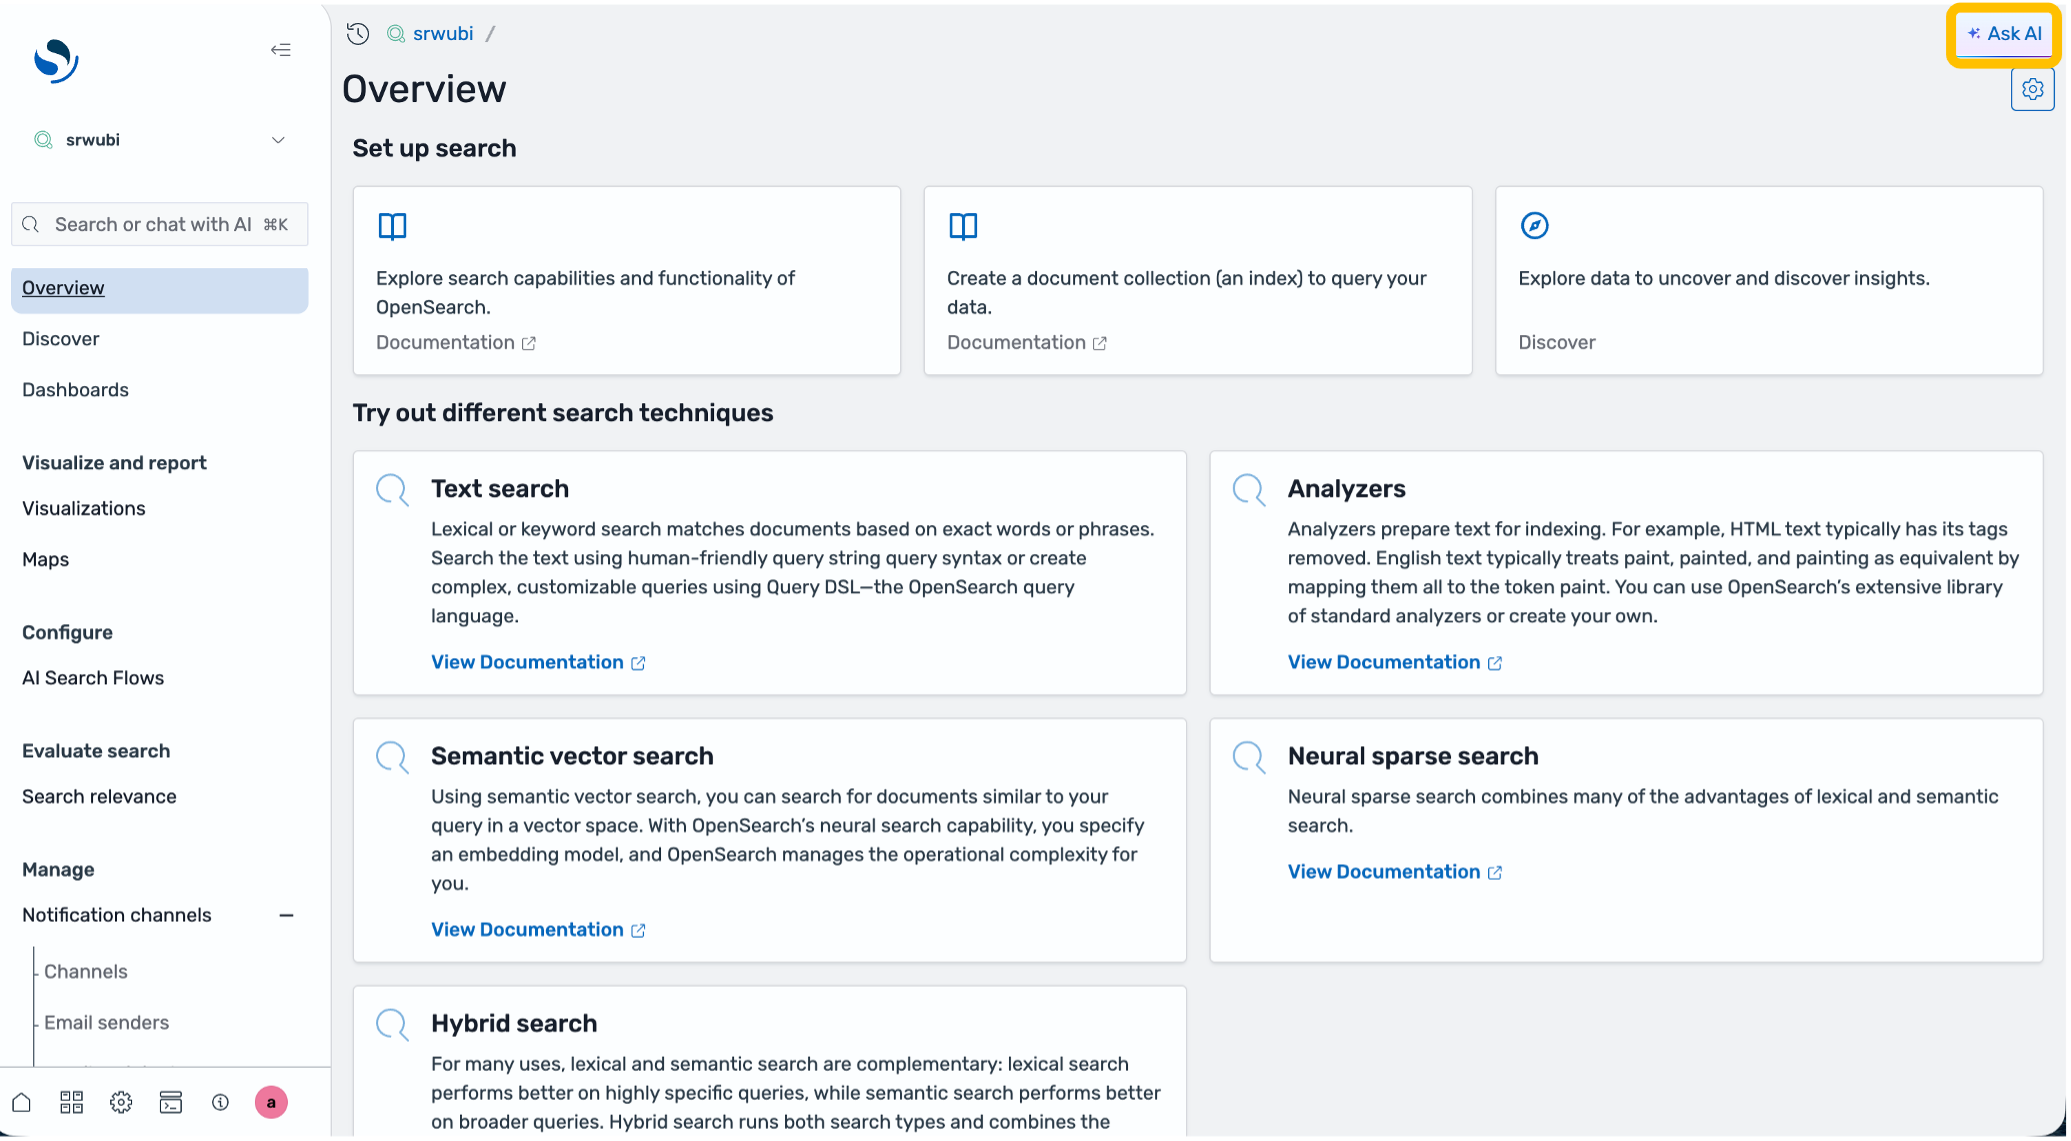
Figure 4: Search Workspace Overview page
The agent chat panel opens. You see a welcome message and suggested prompts to get started.
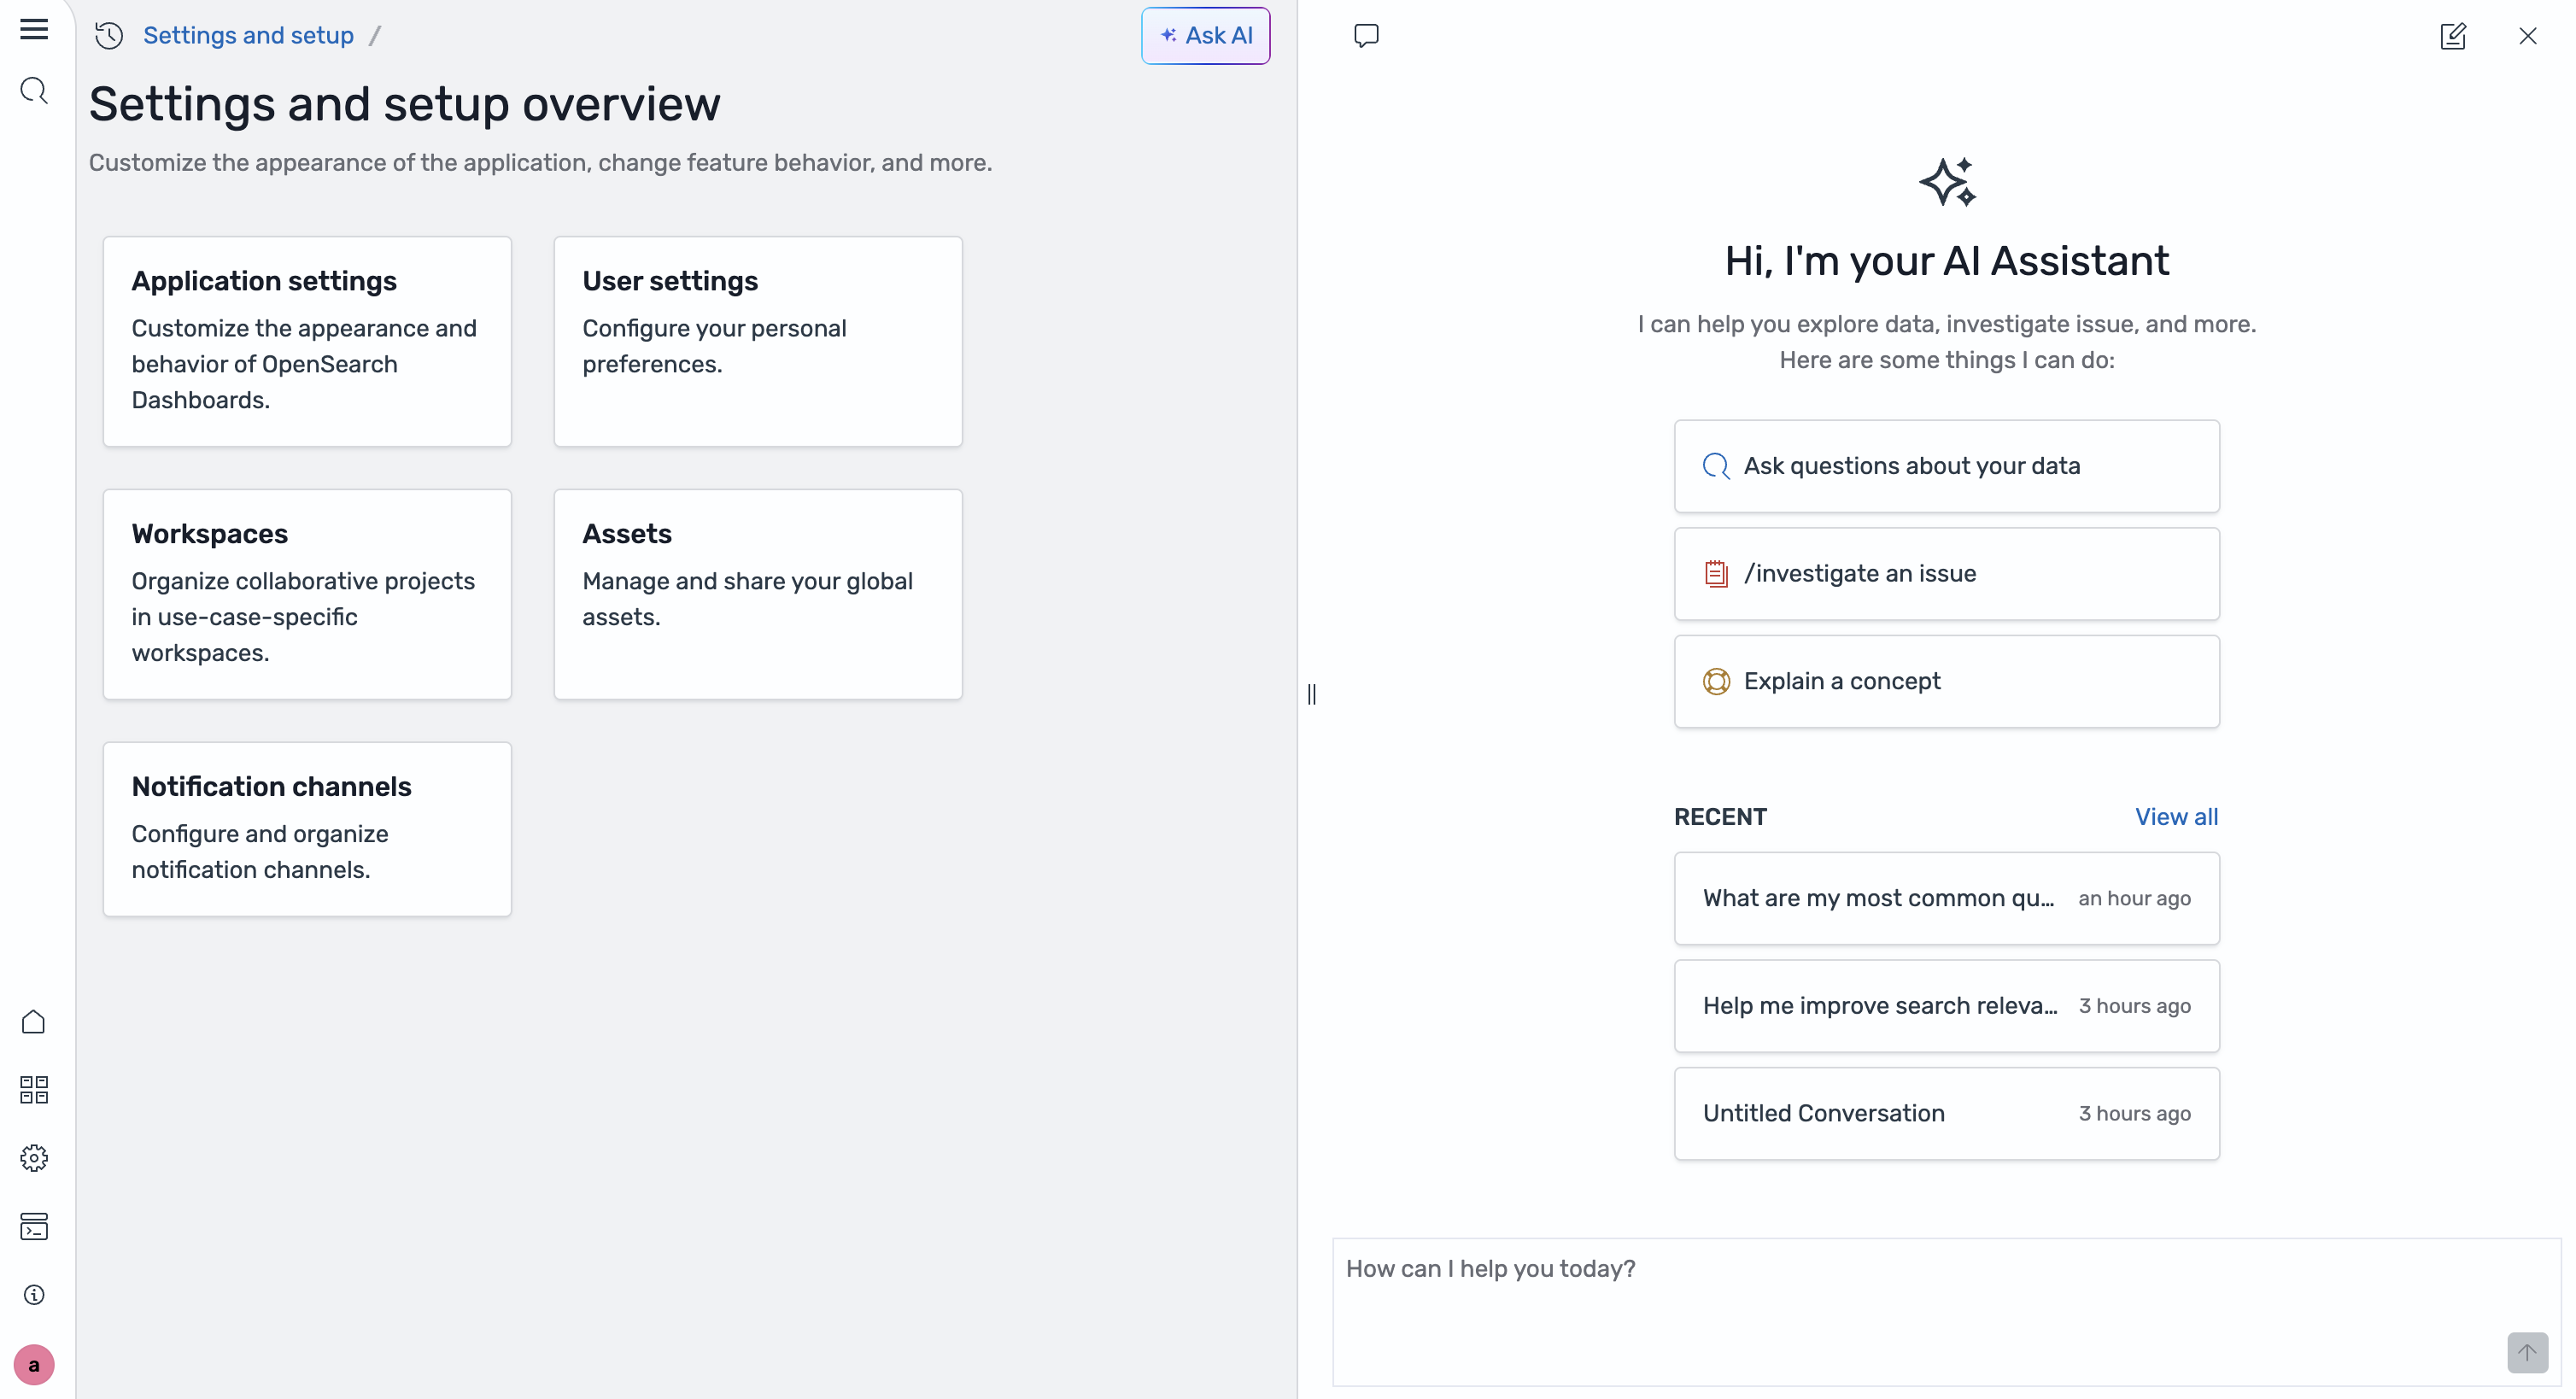
Figure 5: AI assistant chat panel
Step 2: Find the problem
Start with a diagnostic question: “What are my most common queries?”. The User Behavior Analysis skill activates. You can watch its tool calls in real time as it queries your UBI indexes. In this example, the skill finds that there were 473 total queries across the product catalog. The top queries include gold and wireless earbuds, but across all those queries, there are only 11 total click events. The agent flags this immediately: a CTR that low is a signal that search isn’t working for users.
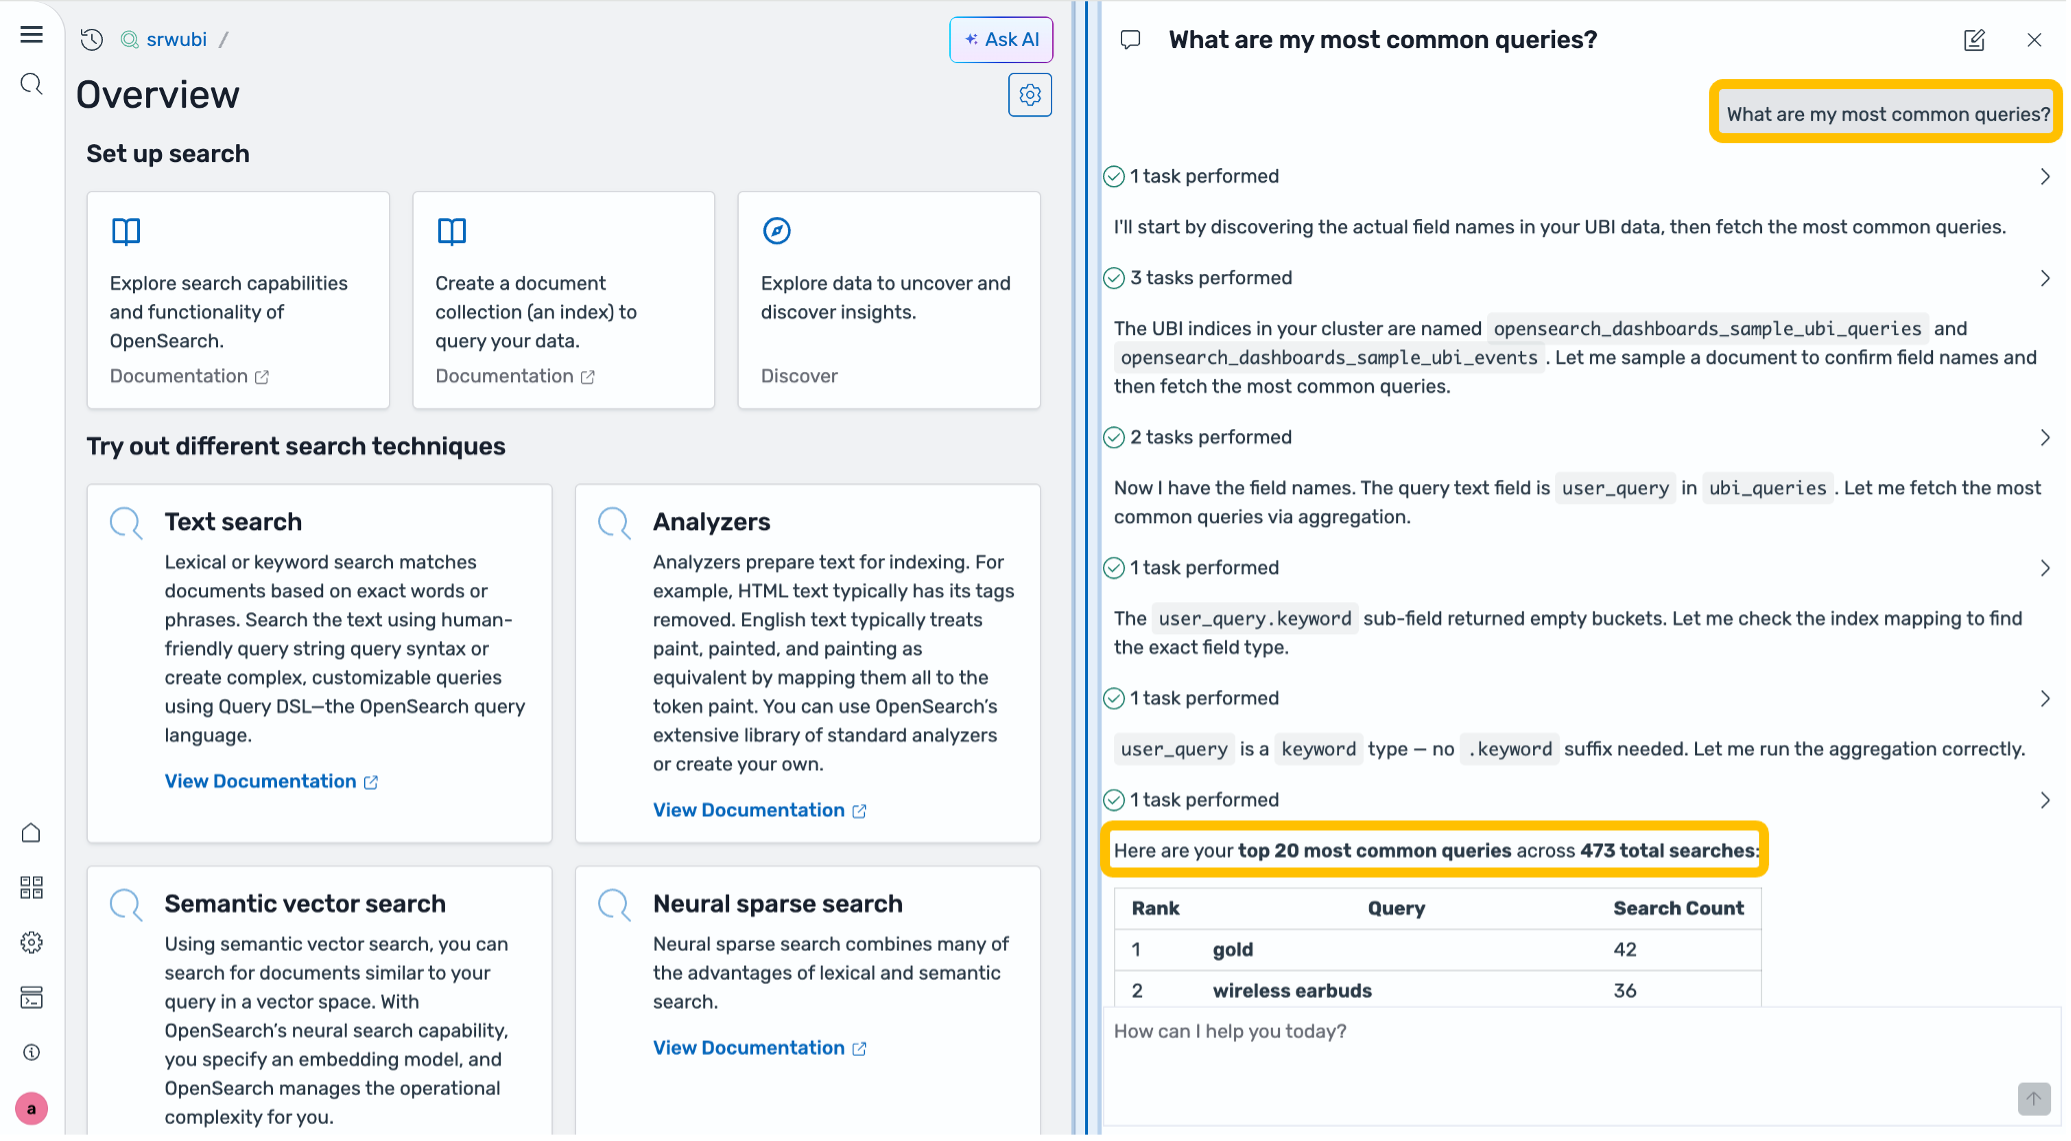
Figure 6: Viewing most used search queries
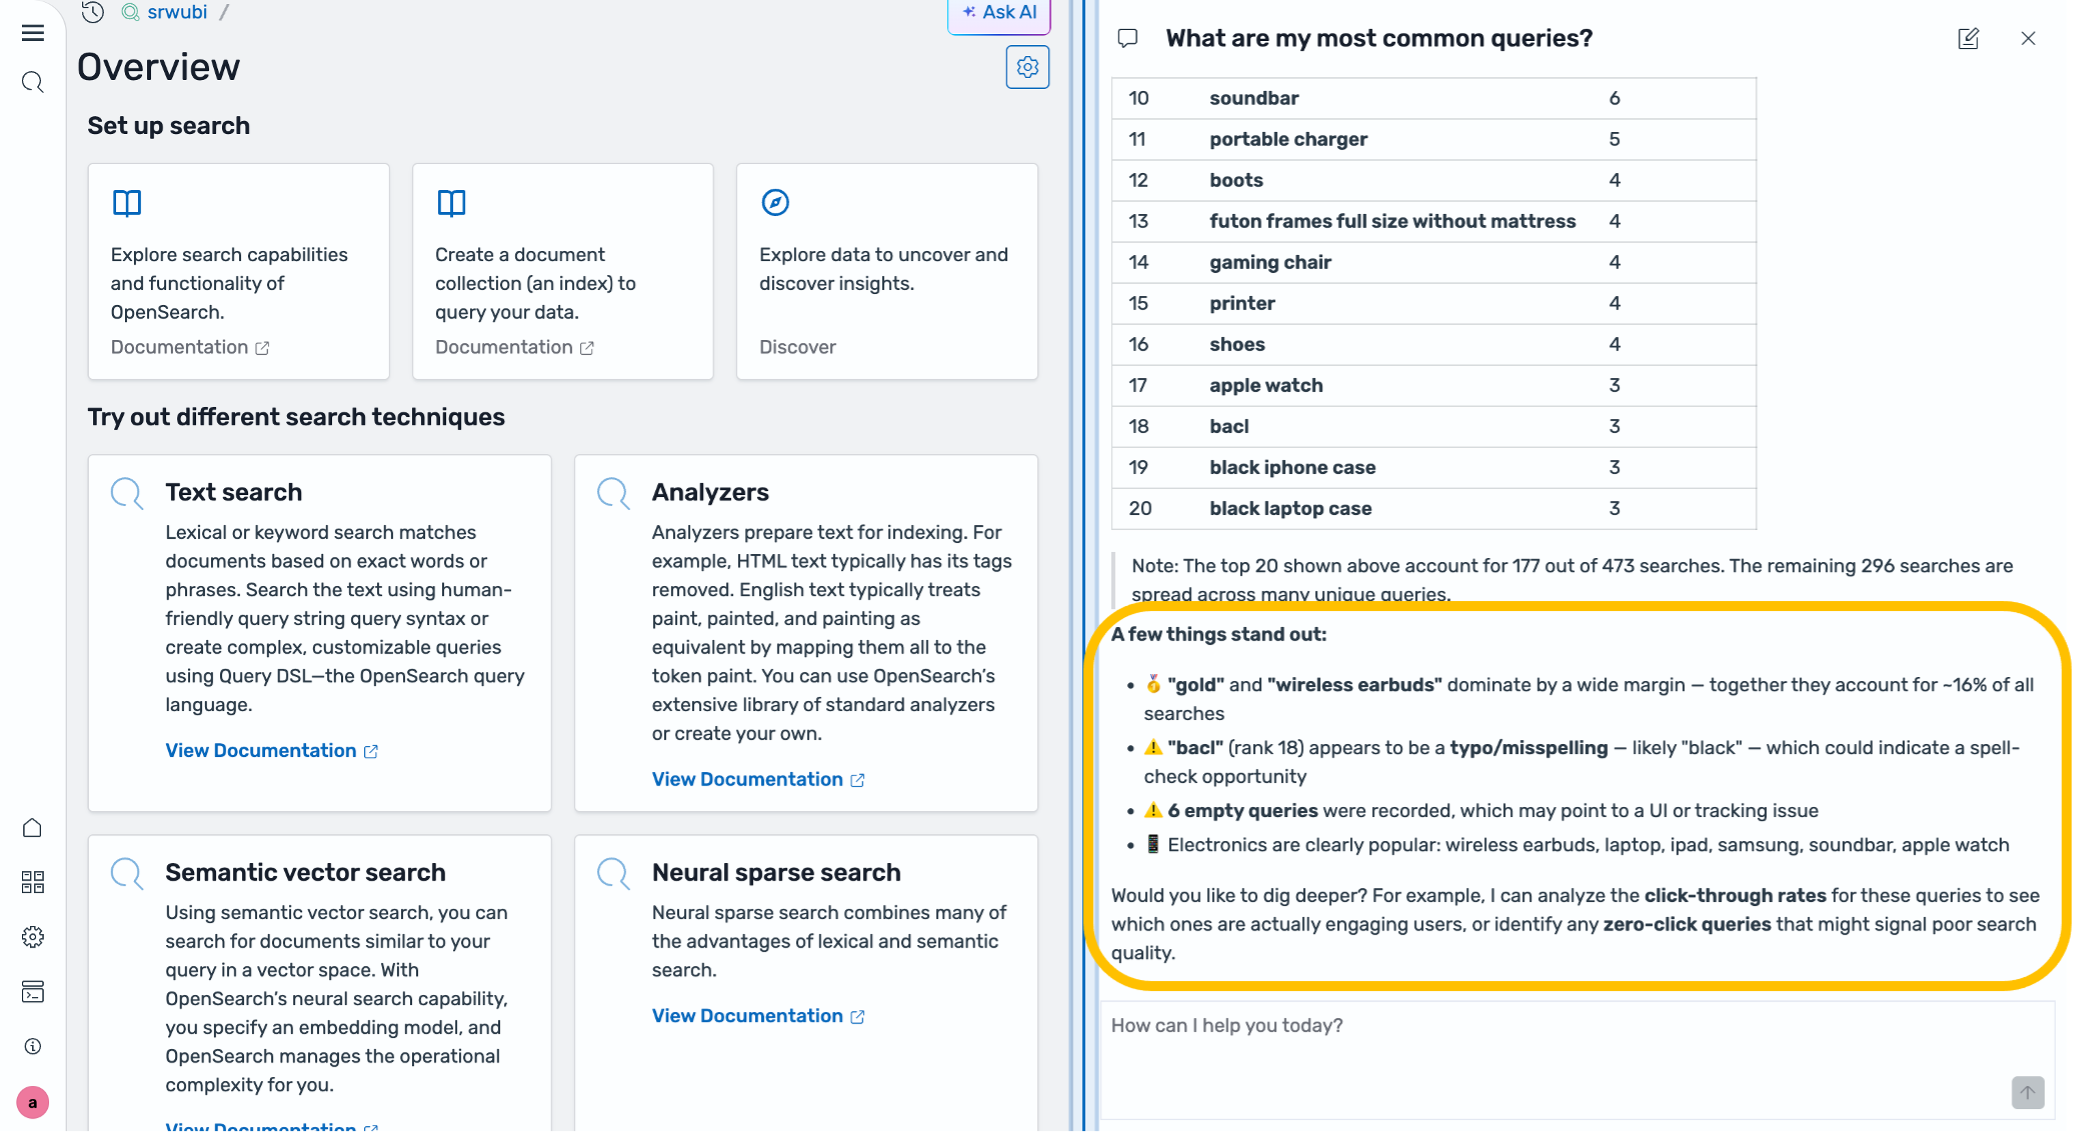
Figure 7: UBI initial findings
This is exactly what UBI is designed to surface. The skill found the pattern itself without a configured threshold.
Step 3: Investigate a specific search query
After you’ve received the summary information, you can investigate a specific search query’s performance more deeply. Ask the AI “What is the click-through-rate for wireless earbuds?”. It returns that users searched for “wireless earbuds” 14 times and clicked 8 times, producing a 57.14 percent CTR. Over 40 percent of searches have no clicks. This is a good opportunity to improve search performance.
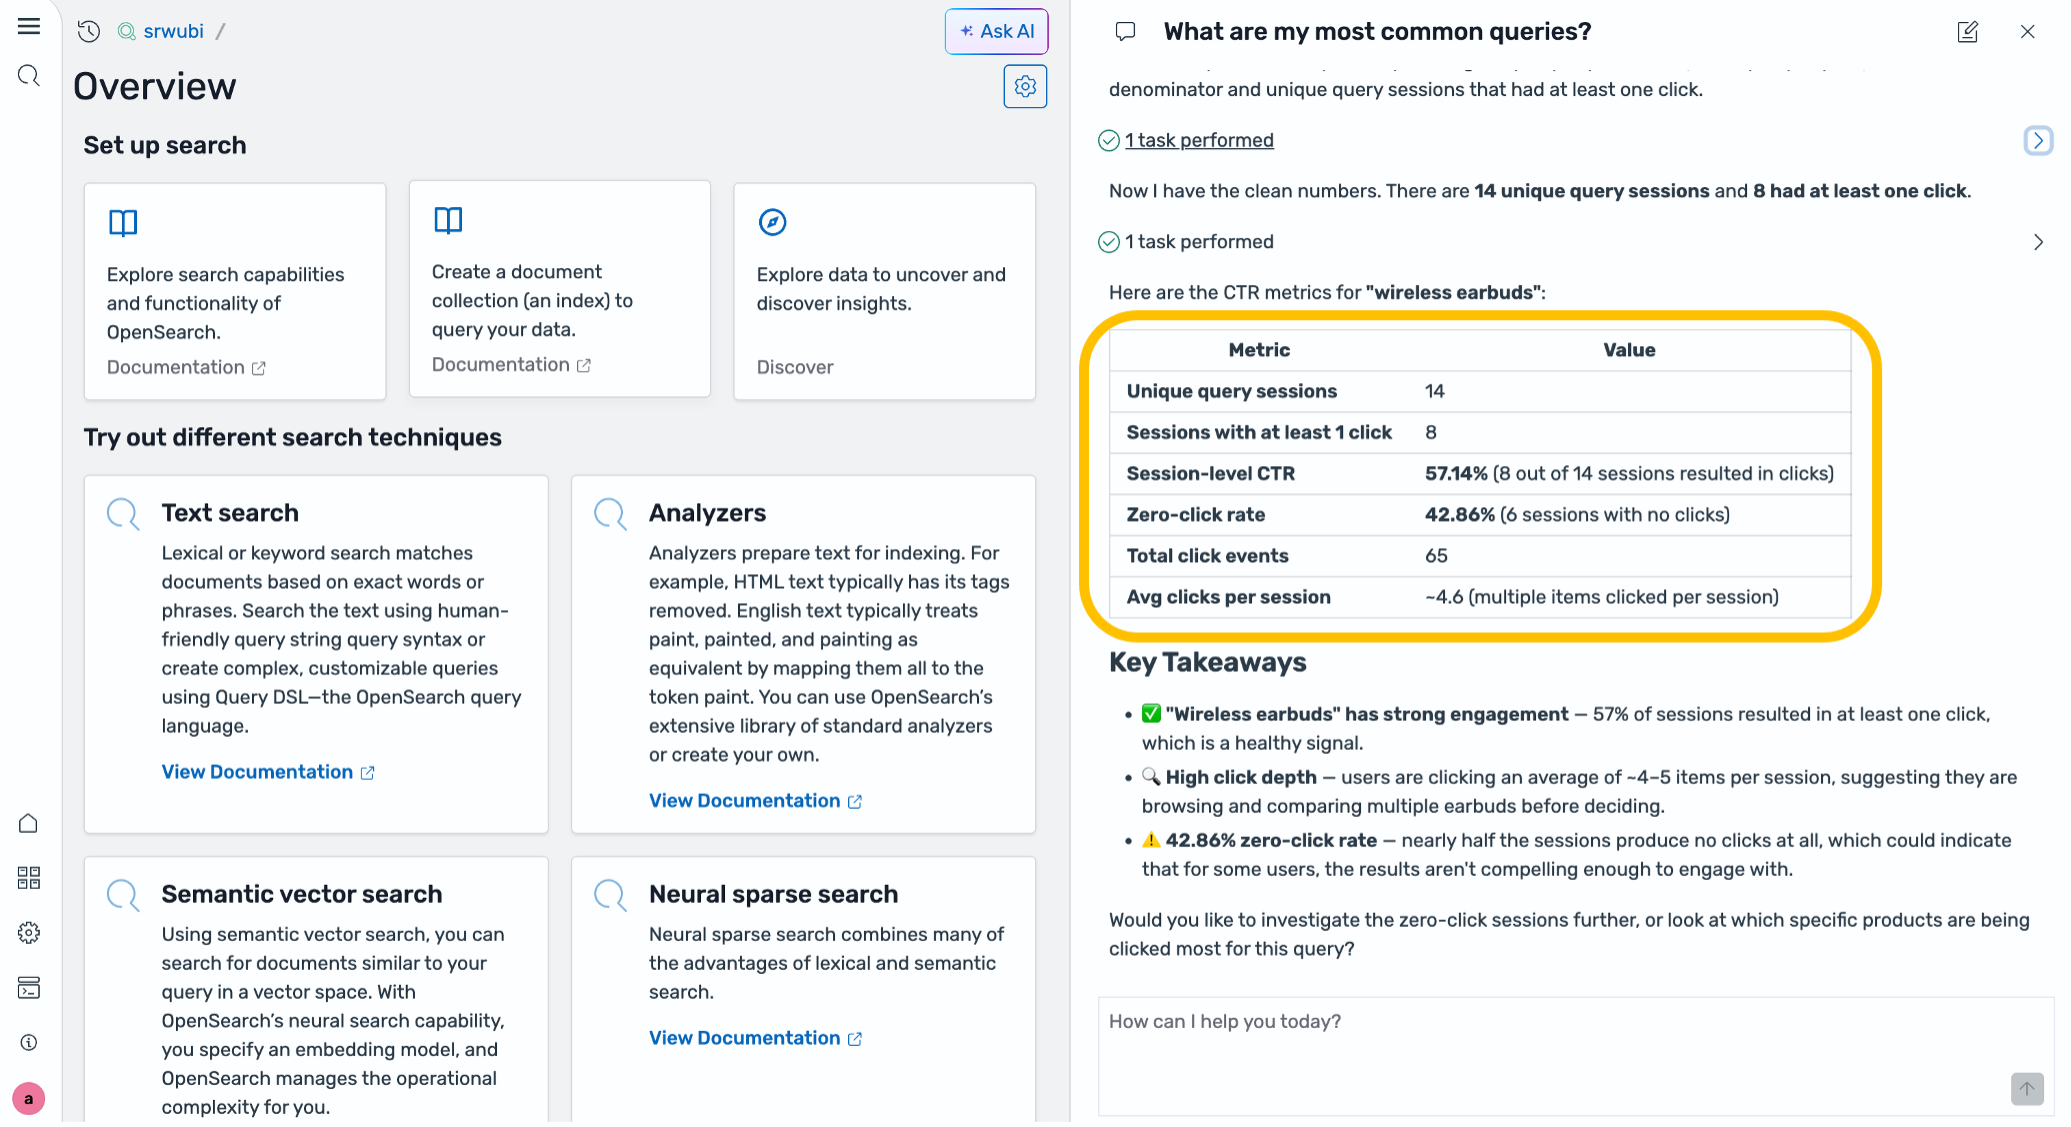
Figure 8: AI response for click-through-rate of wireless earbuds
Step 4: Understand the baseline
The next step is to review the current search configuration. Ask the AI “What is my current search configuration?” The agent retrieves the current configuration and presents it for review.
Step 5: Generate a hypothesis
Next is to figure out how to improve the search configuration. Ask the agent: “Can you help me improve the search configuration for wireless earbuds?”. The agent initiates an investigation of the search configuration performance and how it can be improved.
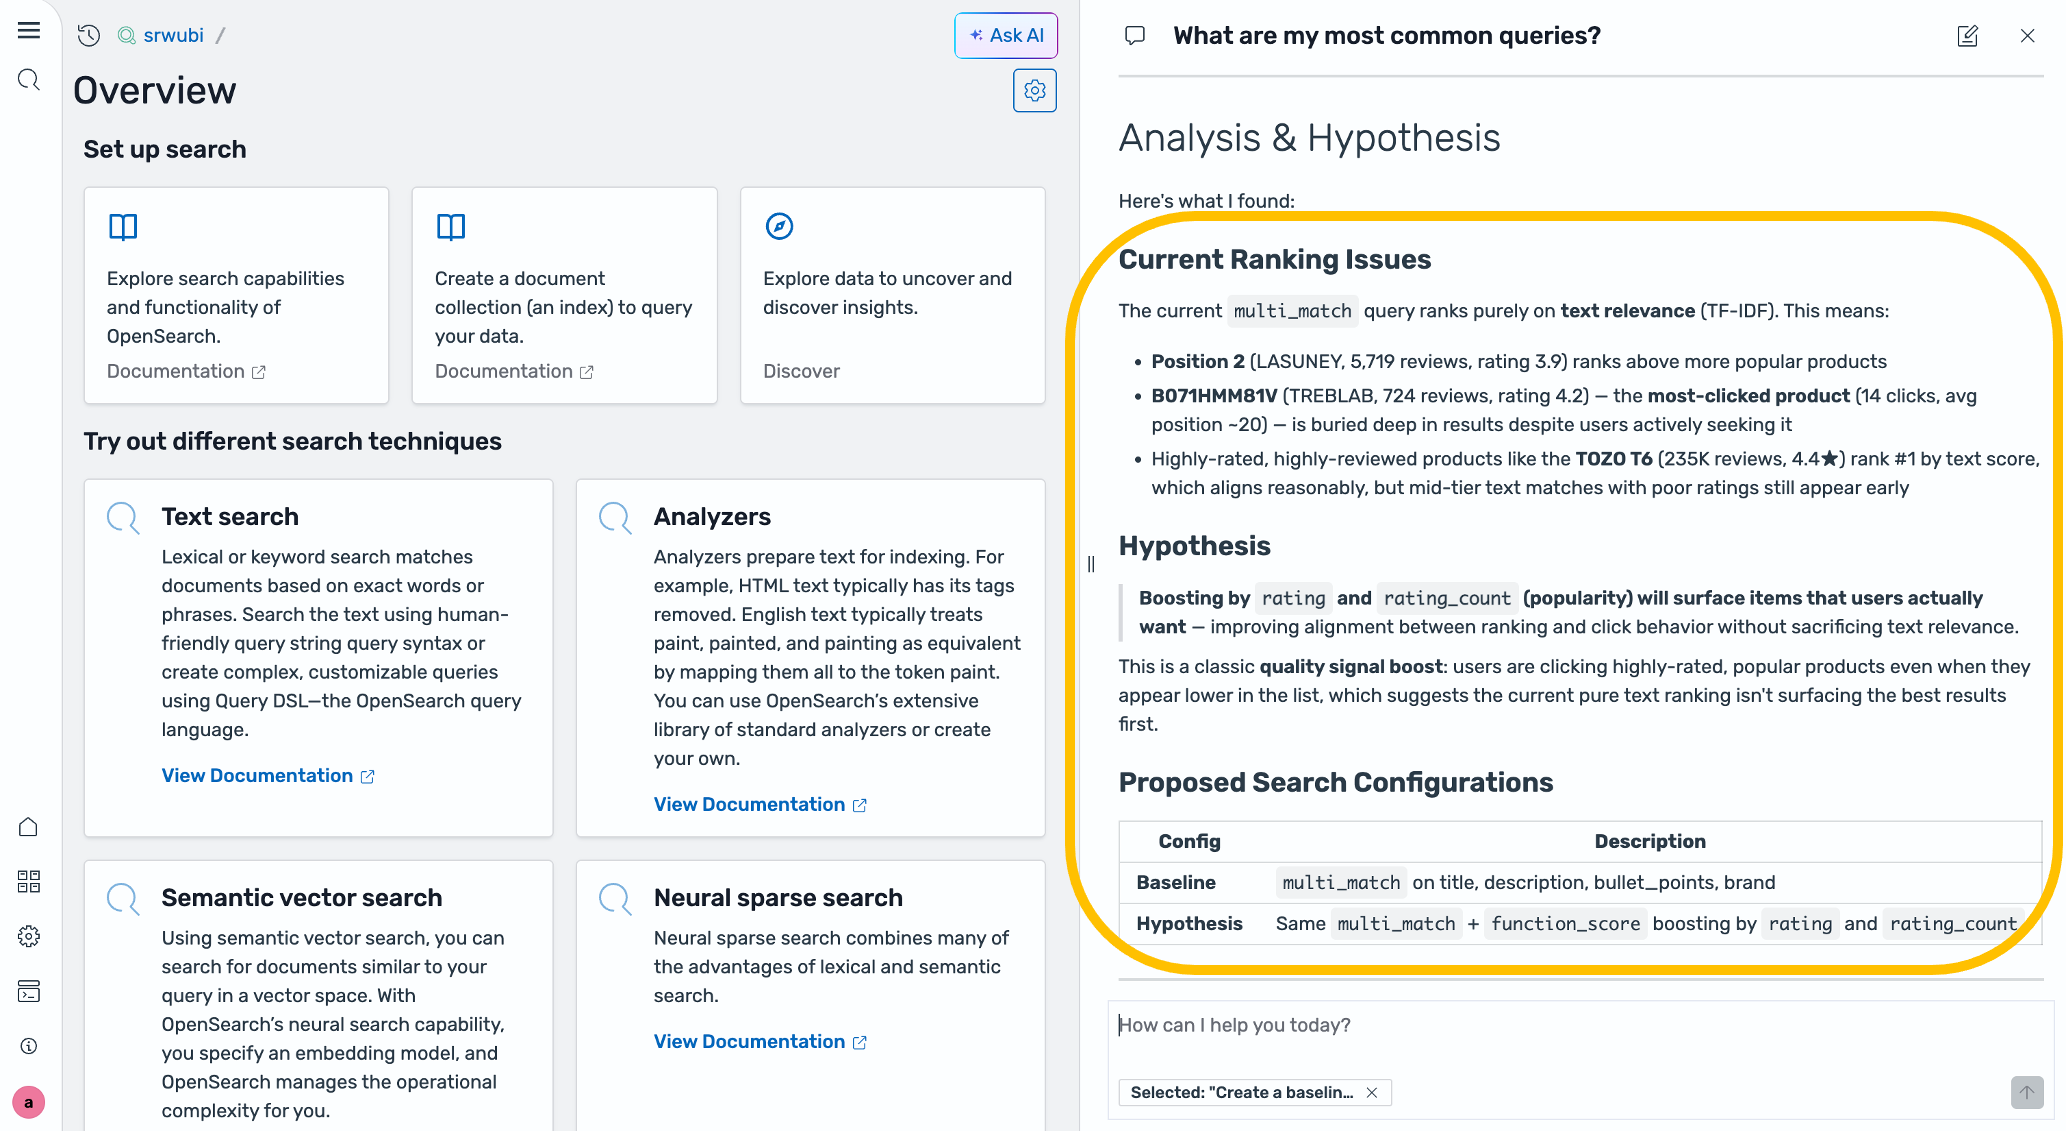
Figure 9: Investigation details
You can then ask the AI to generate a hypothesis. The Hypothesis Generator skill develops a hypothesis based on the investigation and provides supporting findings.
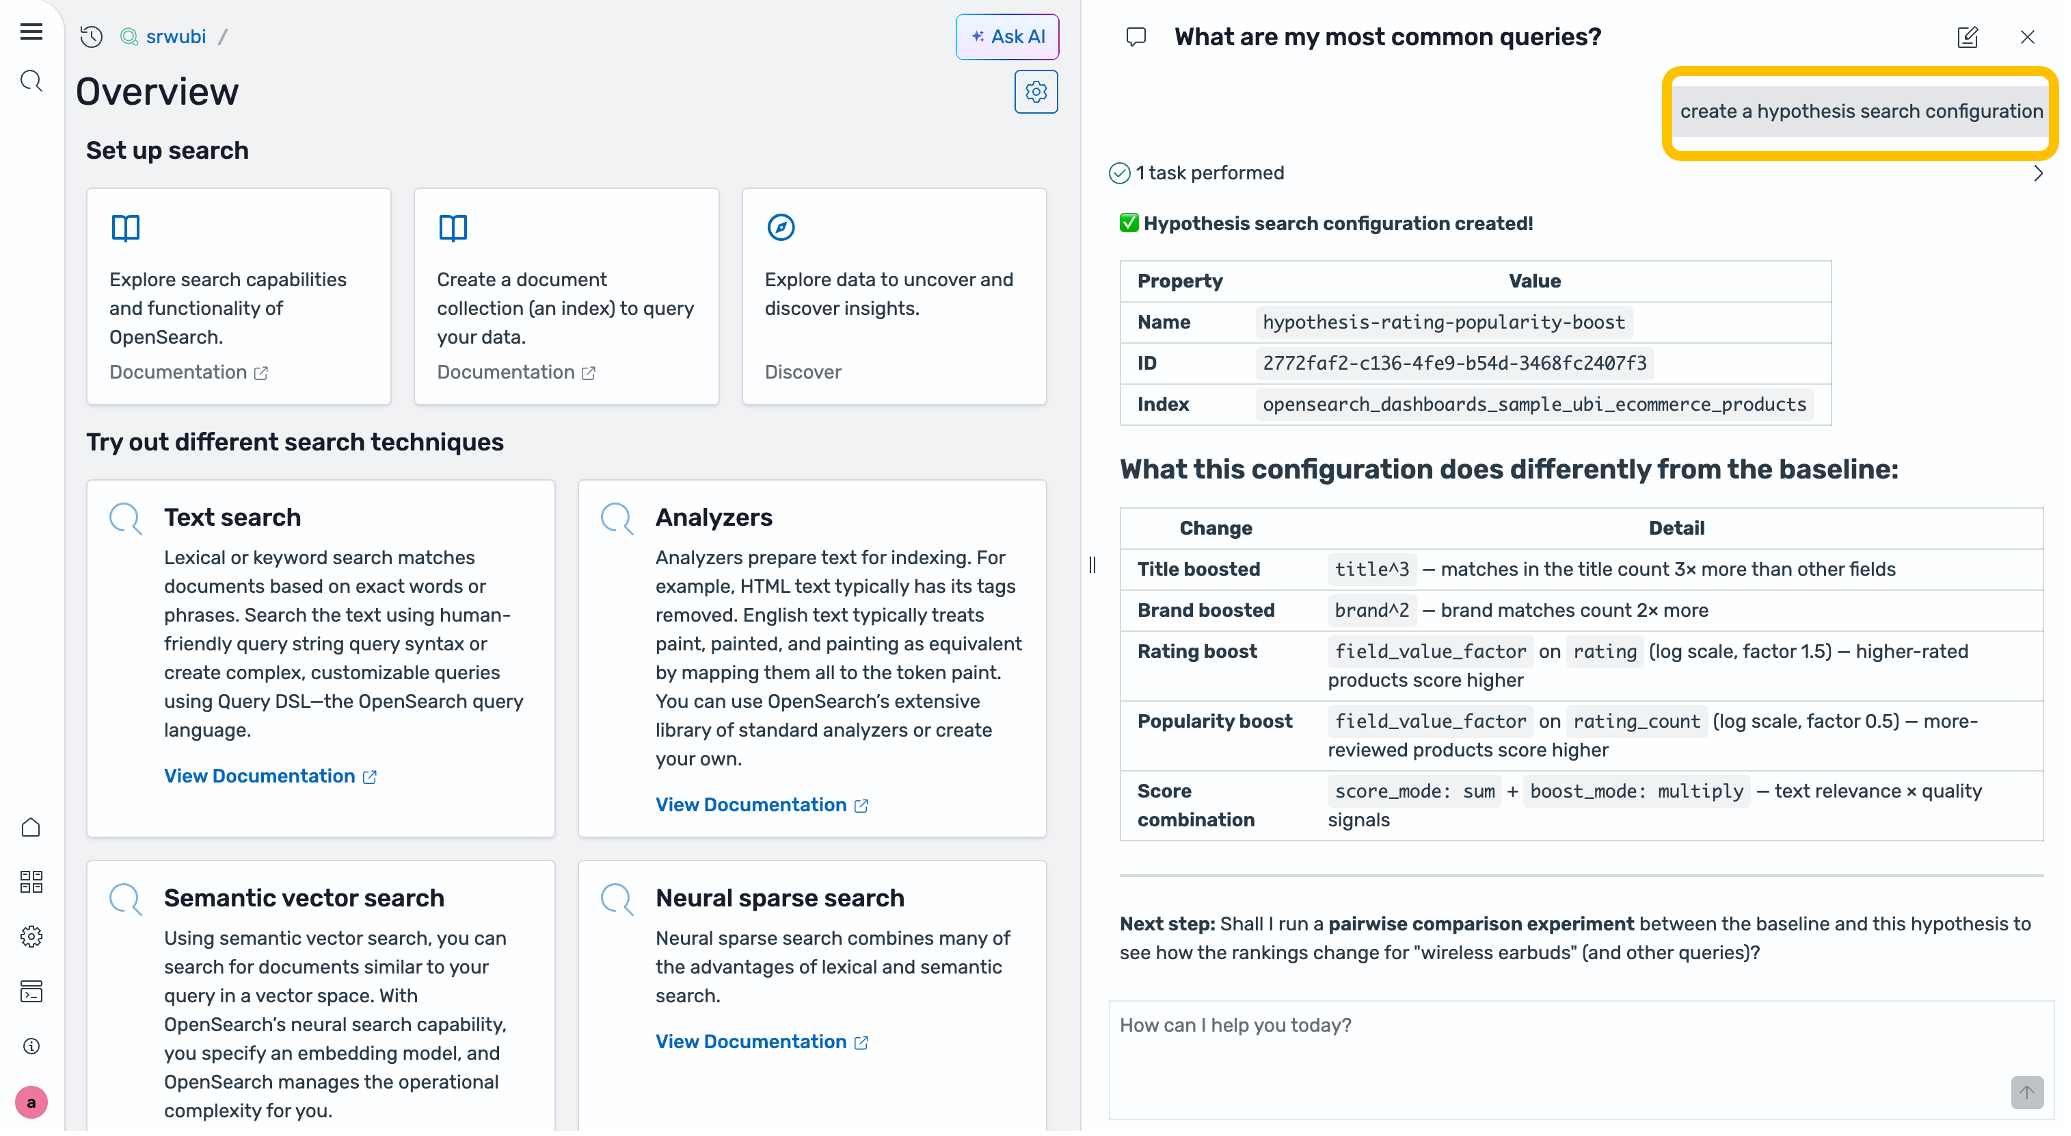
Figure 10: Hypothesis
Ask “What are the root causes?”. The skill presents root causes, justification, and a new hypothesis for your review. In this example the root causes returned were:
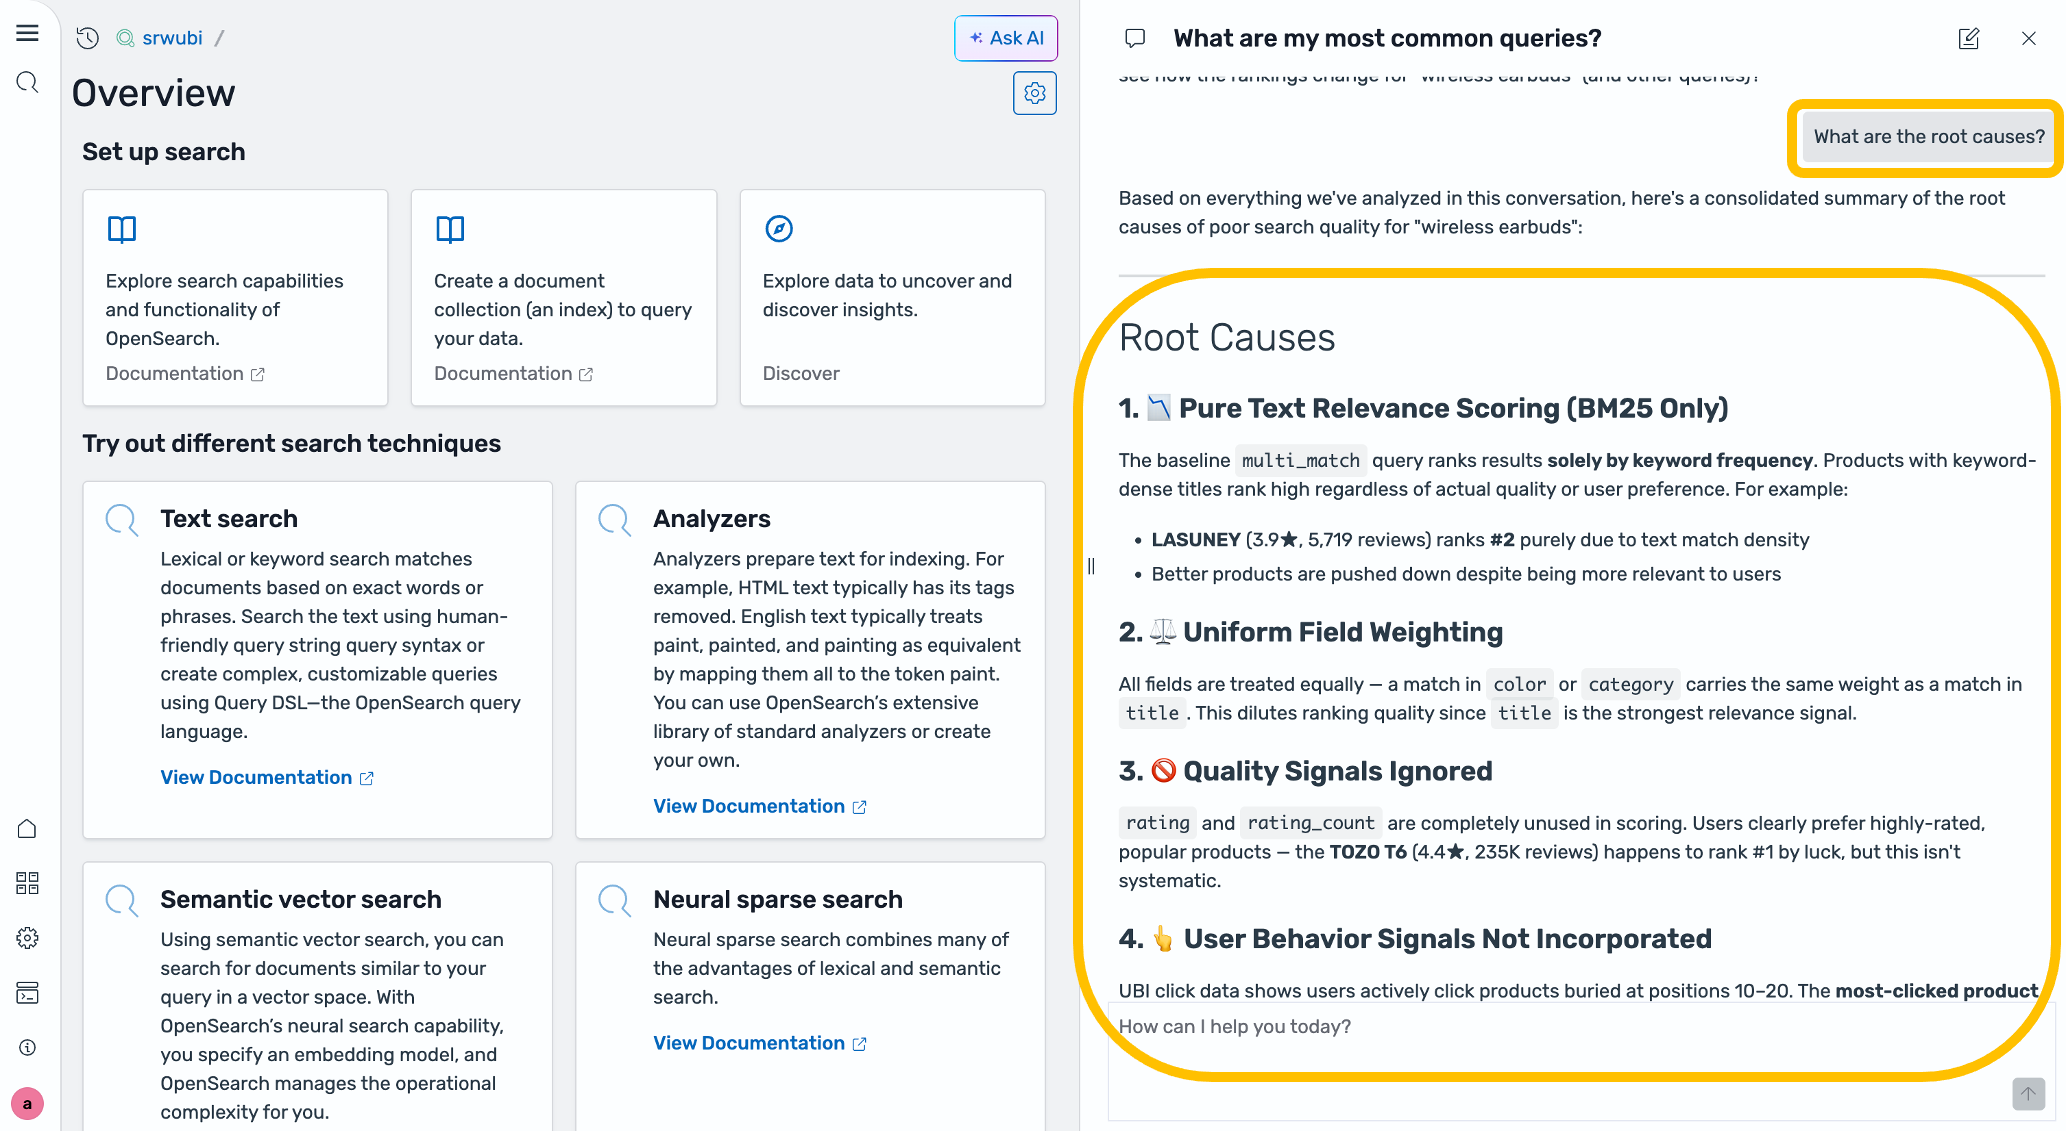
Figure 11: Root causes
Step 6: Validate with an offline evaluation
The Evaluator skill creates all the necessary SRW artifacts and runs a Search Quality Evaluation comparing the baseline and the hypothesis. Ask “Validate with an offline evaluation”, and the evaluation report appears in the chat:
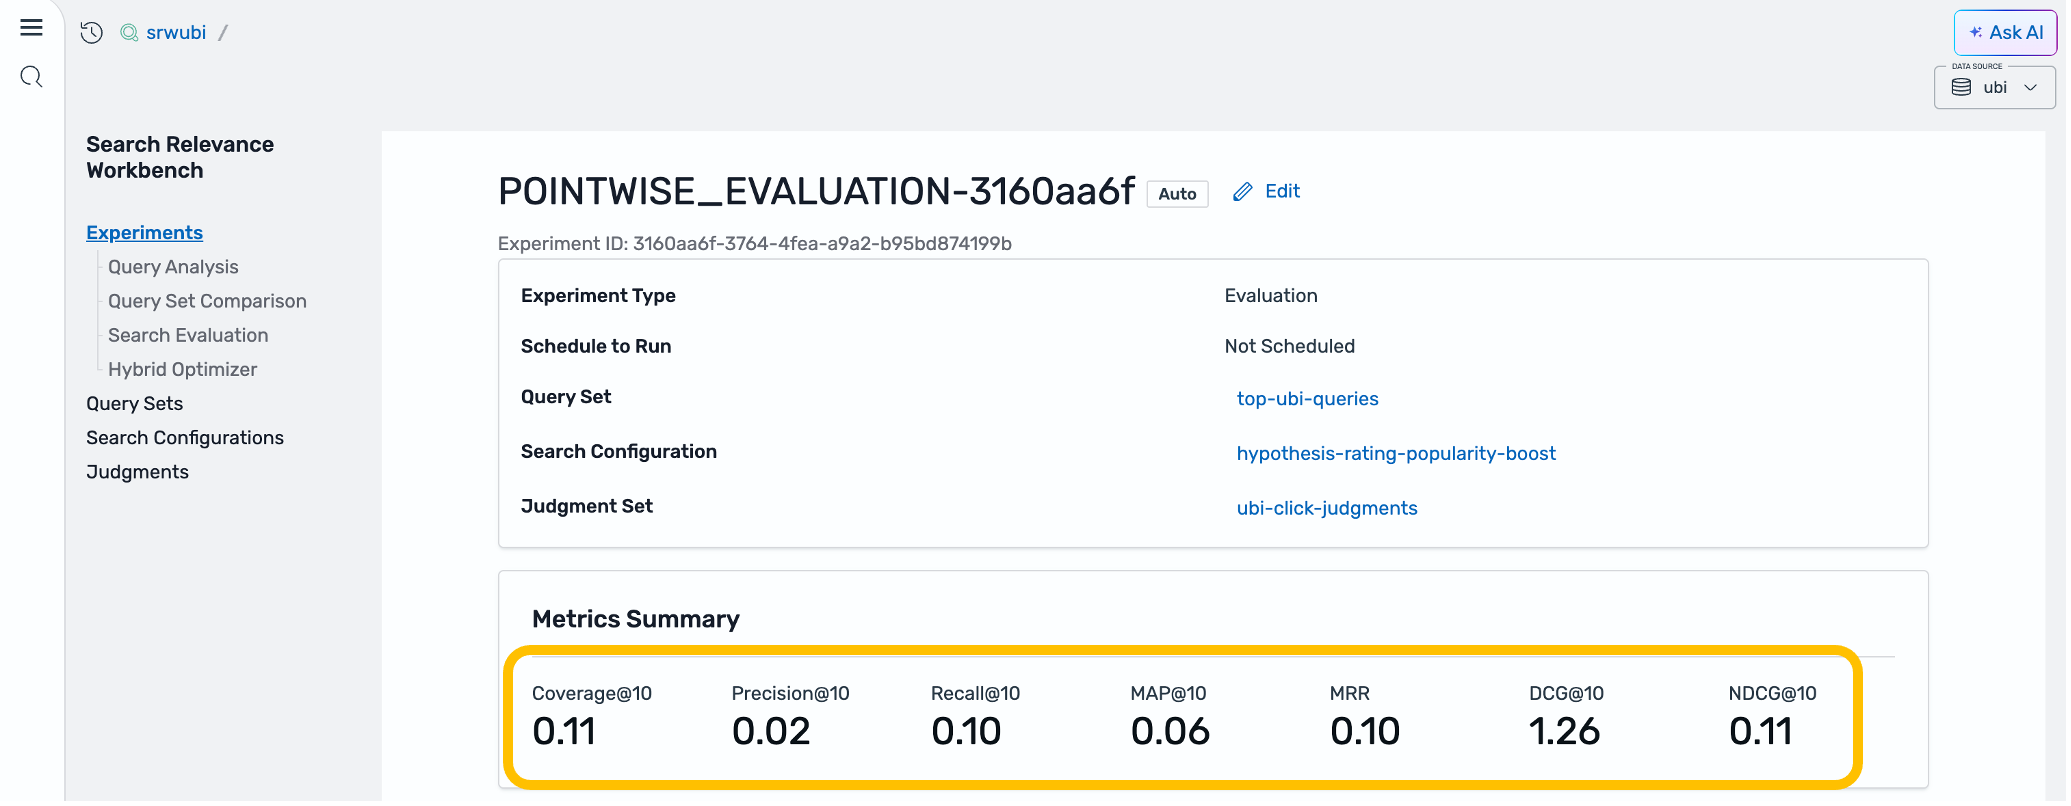
Figure 12: Evaluation metrics
NDCG improved substantially. MAP and Precision show a minor tradeoff. You can then ask the agent to explain the findings. Ask “What does a higher NDCG and MAP tell me? Is this worth deploying?”
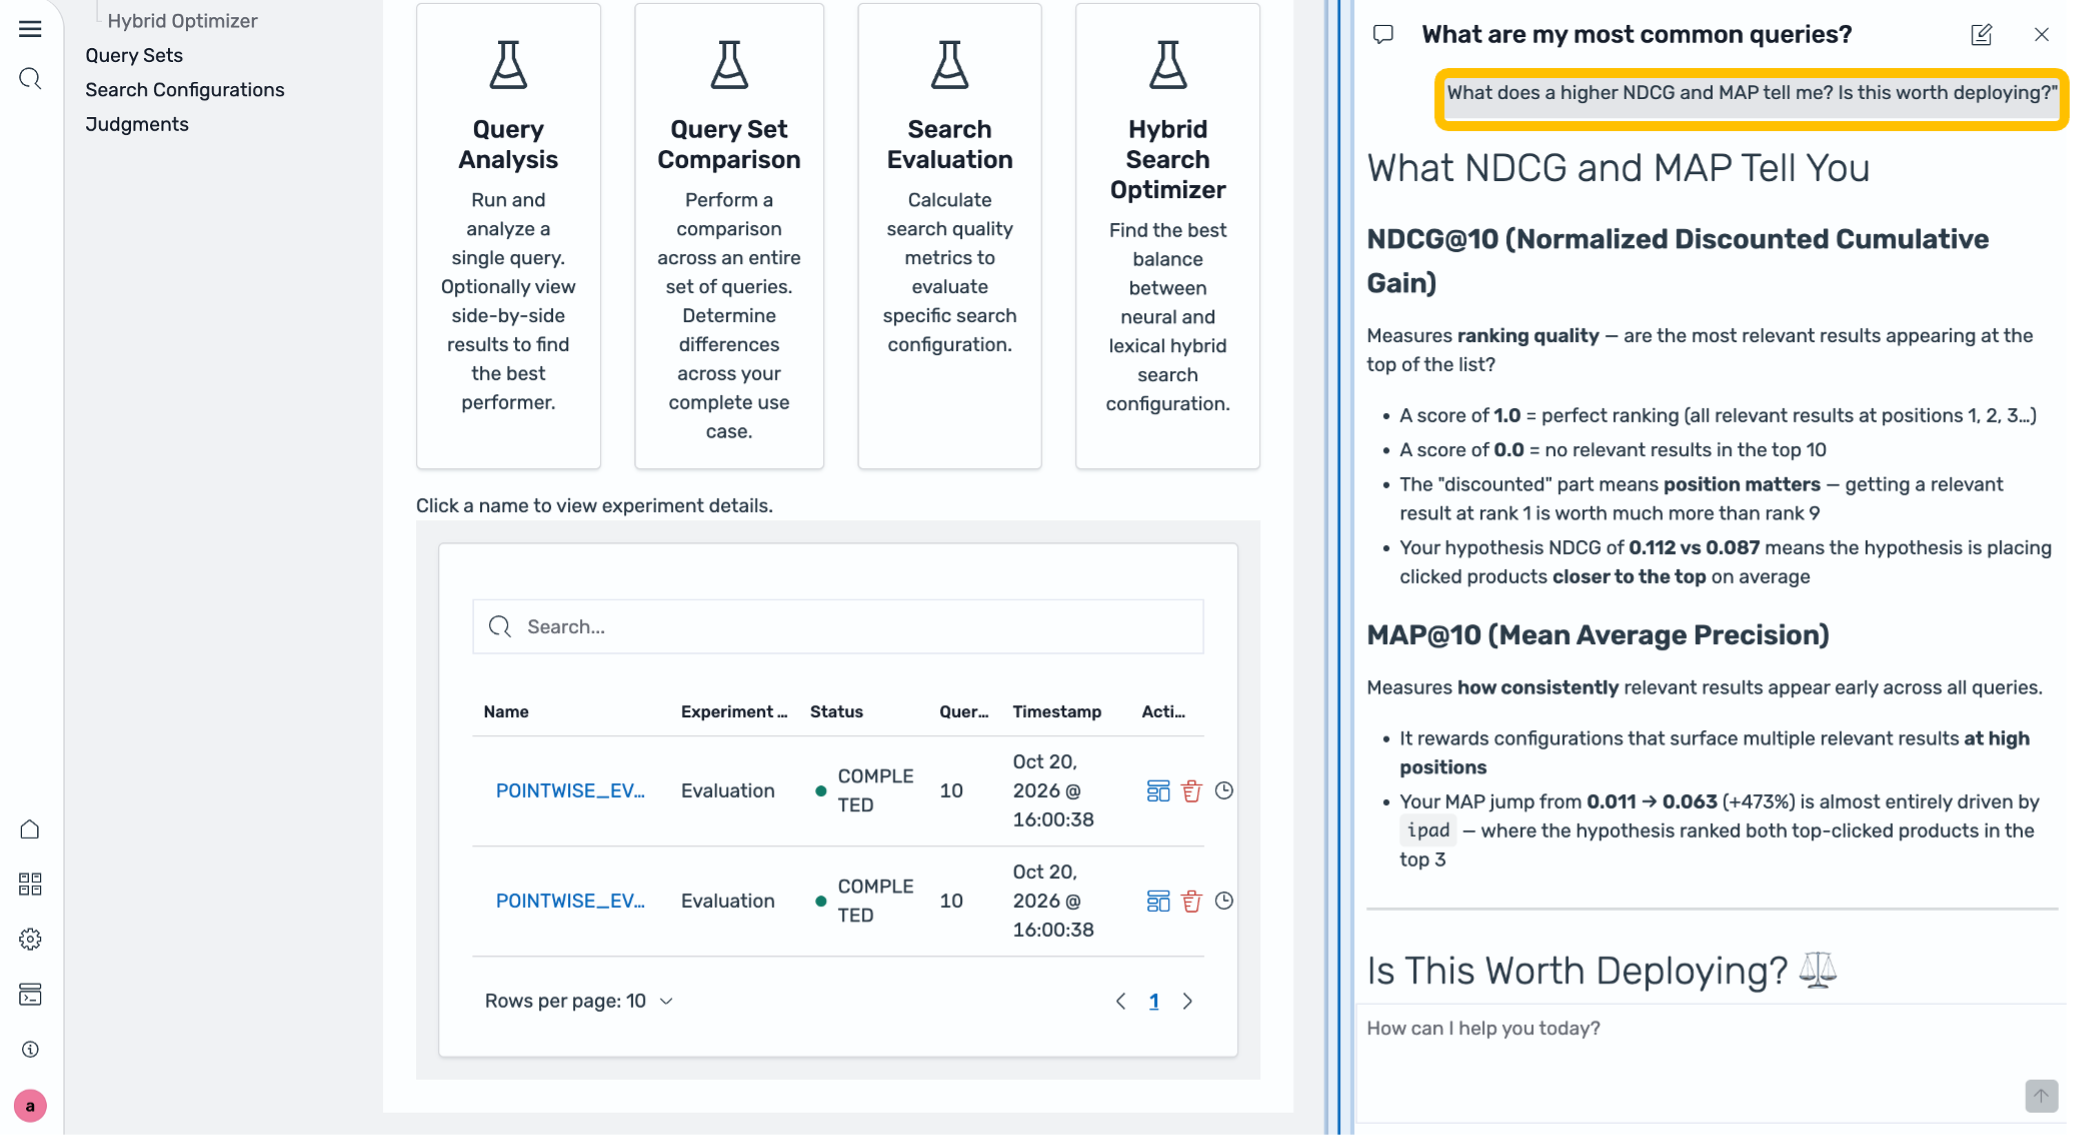
Figure 13: NDCG and MAP explanation
If your search configuration uses hybrid search, combining lexical and neural queries, the Search Relevance Workbench includes a Hybrid Search Optimizer that automates parameter tuning. Instead of manually experimenting with normalization techniques, combination methods, and lexical-to-neural weight ratios, you can run a single optimization experiment. The optimizer evaluates all combinations of normalization, combination, and weight distributions as well as Reciprocal Rank Fusion variants. It scores against your judgment list and surfaces the parameter set that maximizes your search quality metrics.
Step 7: Inspect what the agent created
Before deploying anything, check what the agent built by asking “Show me the new search configuration”.
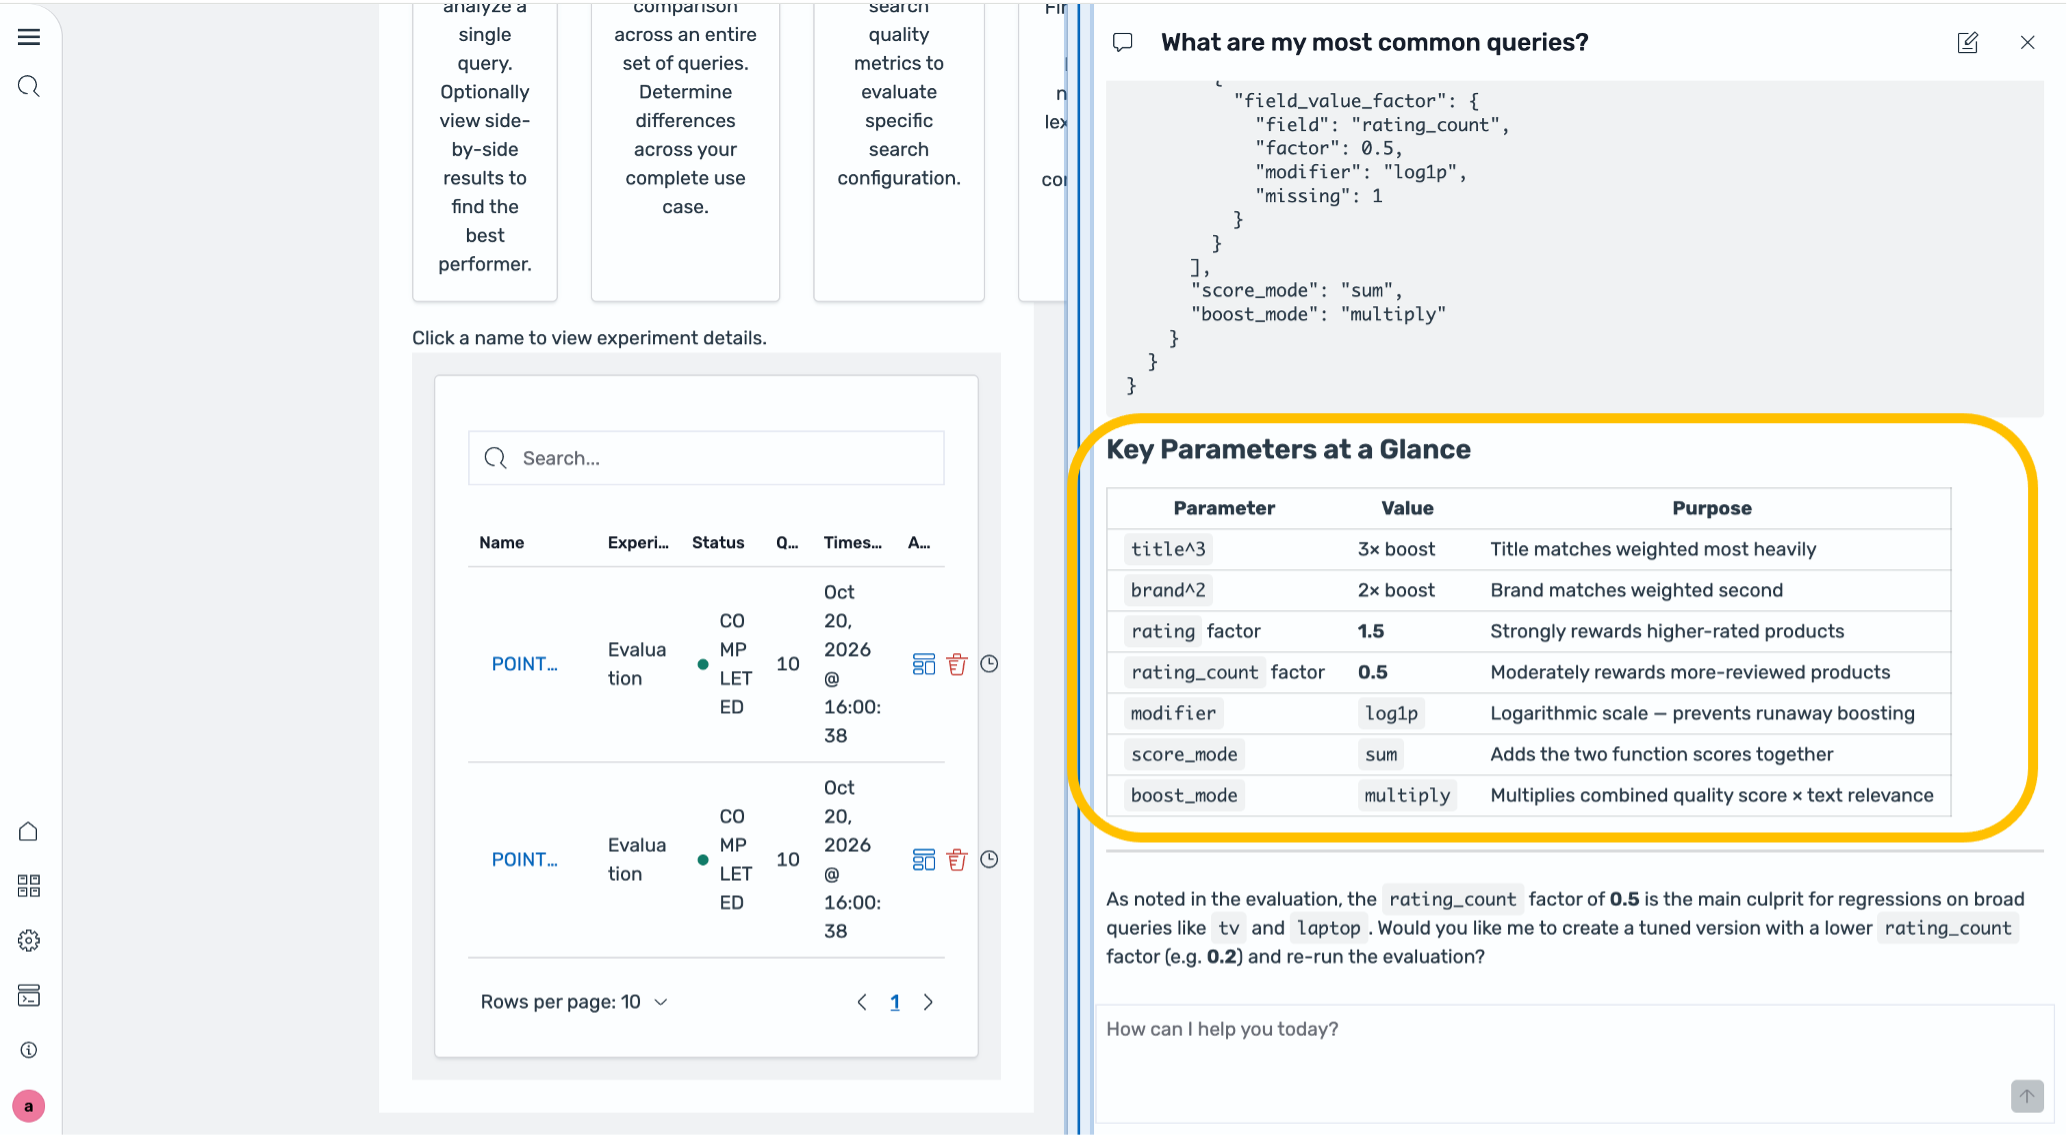
Figure 14: New search configuration
Search configurations: a new entry hypothesis-wireless-earbuds-v1 with the full DSL. You can inspect every line, tweak it, or fork it.
Experiments: the offline evaluation the agent ran. Choose it to see per-query scores, download results as CSV, or share the link with your team.
This is the transparency guarantee: the agent doesn’t ask you to trust a black box. The agent documents and makes every decision auditable.
Step 8: Continue the conversation
The loop doesn’t need to stop here:
“The NDCG looks good but I’m worried about over-promoting popular items. Can you reduce the rating boost factor and re-evaluate?”
“Now look at the ‘gold’ query. It had the highest search volume but very low CTR. What’s going on?”
“I’m happy with the wireless earbuds hypothesis. How do I apply this configuration in production?”
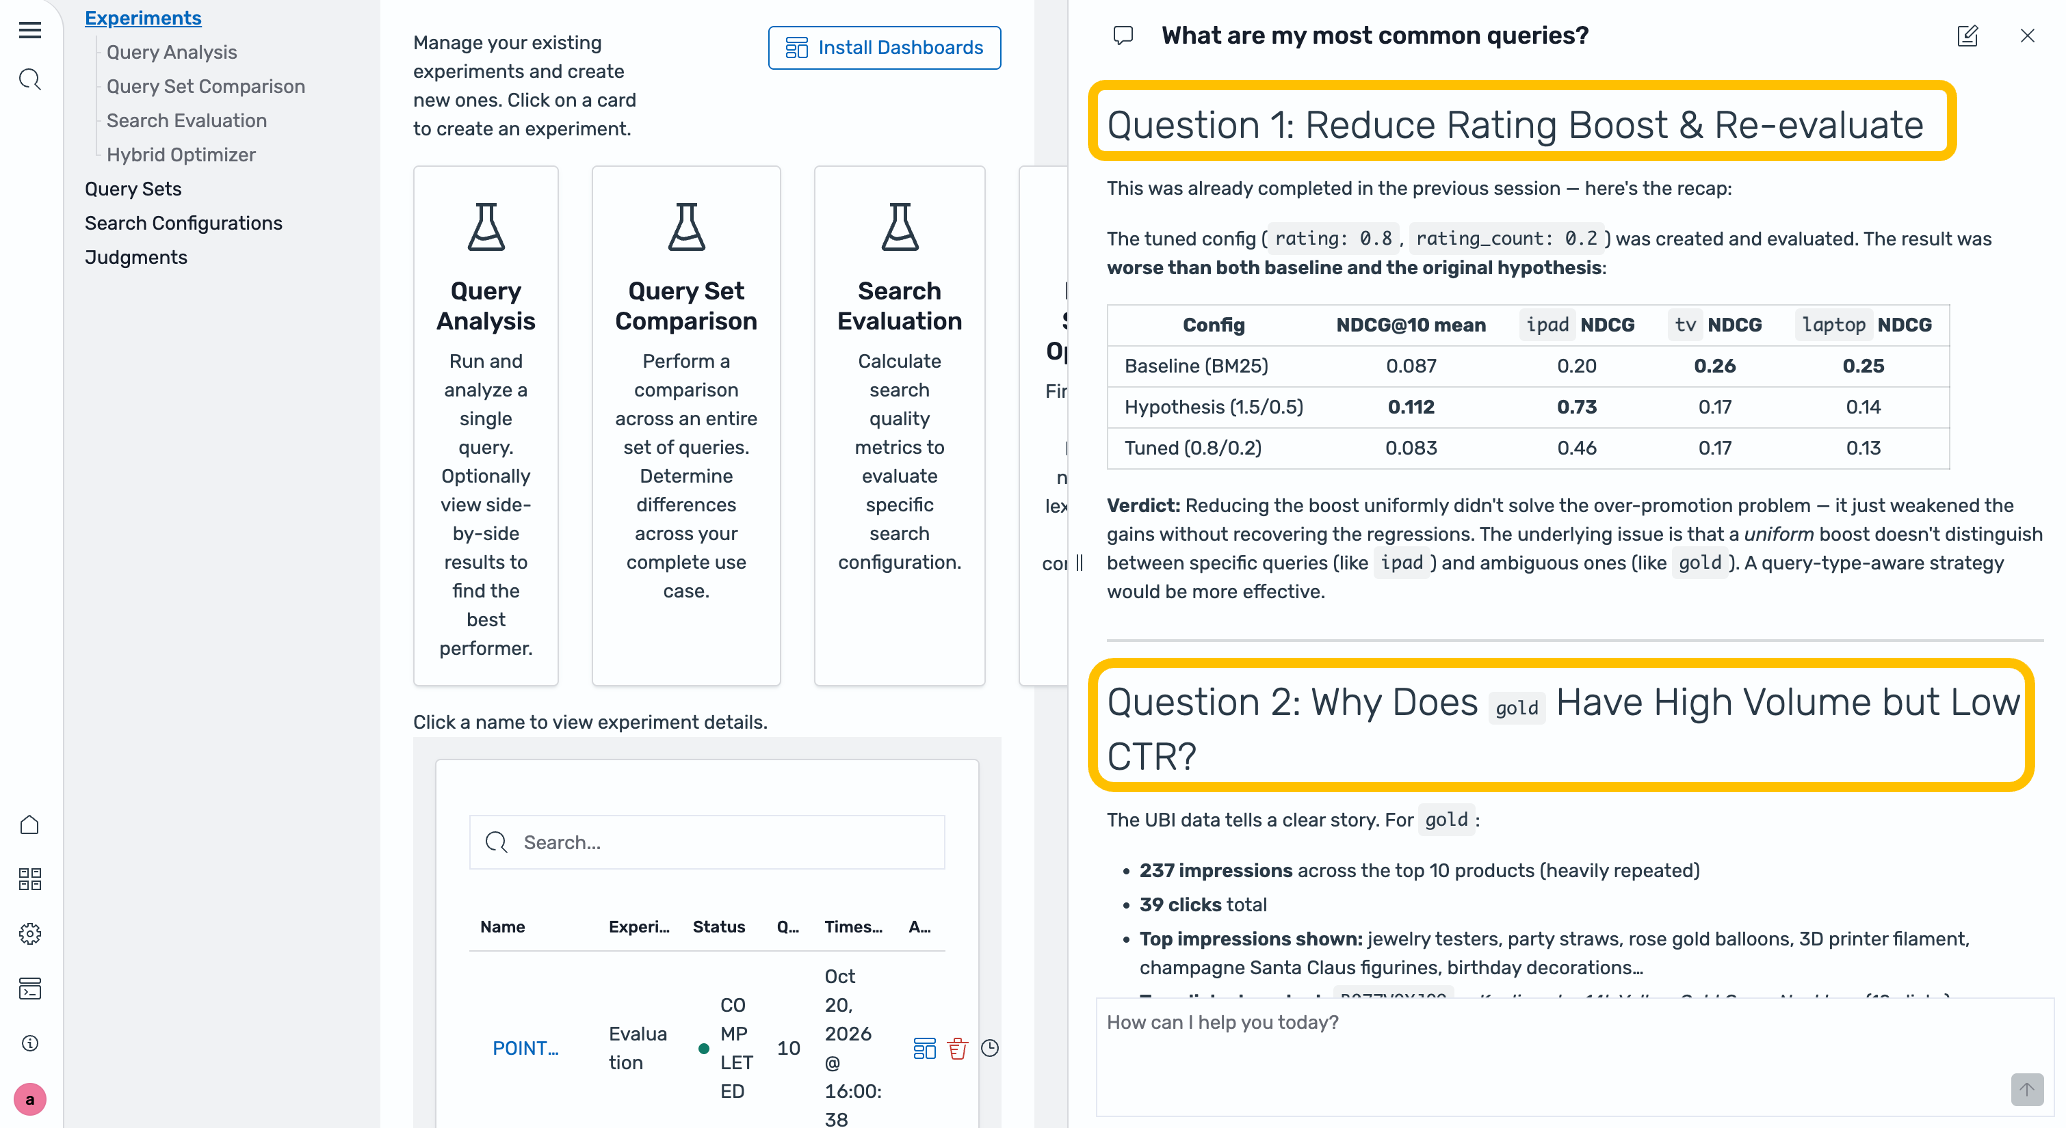
Figure 15: Example follow up questions
Each question kicks off a new iteration of the same loop: analyze, hypothesize, and evaluate. But now it takes minutes, not hours.
Continuous improvement, not one-time tuning
The key mindset shift the Search Relevance Agent encourages is to think about search quality as a practice, not a project. Search degrades over time. The configuration you tuned last quarter might be quietly underperforming today, and without a continuous measurement loop, you don’t find out until users stop converting. The agent fits into a continuous, human-in-the-loop improvement cycle:
- Collect: UBI captures real user behavior automatically.
- Identify: The agent surfaces emerging relevance gaps before they become customer complaints.
- Hypothesize: The agent proposes targeted fixes grounded in your actual data.
- Evaluate: SRW validates improvements offline before anything touches production.
- Deploy: You apply the winning configuration with full visibility into the evidence.
- Monitor: UBI closes the loop, feeding new behavior back into step 1.
At each stage, you remain in control. The agent executes, you decide.
Who benefits
Search engineers get tools that eliminate repetitive work. These tools provide root cause analysis, DSL iteration, and experiment setup, all automated. Engineers focus on the problems that require genuine expertise. Product managers and business owners can now participate meaningfully in search tuning without writing a single line of DSL. If a new product category is underperforming, you can ask the agent to investigate and get an actionable recommendation in plain language. Teams without dedicated search expertise get access to advanced relevance engineering techniques such as function_score, cross_fields, and popularity boosting without needing to know the terminology. The agent handles the implementation.
Try it yourself
The Search Relevance Agent is available today in Amazon OpenSearch Service through the Ask AI button in your OpenSearch UI search workspace. To get started open your OpenSearch UI application and navigate to Search Relevance then load the sample UBI data if you haven’t already. Entering the /search-relevance command in the chat from another page will also take you to Search Relevance. Next, choose Ask AI and start with: “What are my most common queries with low engagement?”
For a step-by-step hands-on lab, try the Search Relevance Workbench Workshop on AWS Workshop Studio module 3 which walks through the full Automated Relevance Tuning (ART) agent experience with the ESCI ecommerce sample dataset.
The OpenSearch Search Relevance Agent is part of the OpenSearch application experience in Amazon OpenSearch Service. It requires an OpenSearch application with an associated workspace and data source.
Clean up
To avoid future charges, delete the resources you created for this walkthrough:
- If you created the domain specifically for this post, delete it to remove everything, including the resources in the previous step. Deleting a domain is irreversible. Don’t delete a domain that serves other workloads.
- If you keep the domain, optionally delete the
ubi_queriesandubi_eventsindices and the query sets, judgment lists, and experiments you created. These live on the domain and incur no separate charges. - Delete the OpenSearch UI application if you created it specifically for this post.
About the authors
Microsoft Maia 300 Shown at OCP 2026
Post Syndicated from Patrick Kennedy original https://www.servethehome.com/microsoft-maia-300-shown-at-ocp-2026/
At OCP Summit 2026, we saw the new Microsoft Maia 300 platform with four 288GB HBM4 950W accelerators per tray
The post Microsoft Maia 300 Shown at OCP 2026 appeared first on ServeTheHome.
How Potential Reescalation in Iran Could Affect the Midterms
Post Syndicated from The Atlantic original https://www.youtube.com/shorts/y87XUetXwVQ
AWS becomes first CSP to complete the Cloud High profile assessment with 172 services and features in scope
Post Syndicated from Naranjan Goklani original https://aws.amazon.com/blogs/security/aws-becomes-first-csp-to-complete-the-cloud-high-profile-assessment-with-172-services-and-features-in-scope/
We continue to expand the scope of our assurance programs at Amazon Web Services (AWS) and are pleased to announce the successful completion of our first ever Cloud High (PBHH) security assessment with 172 assessed services and features. Completion of this assessment, effective September 18, 2026, makes AWS the first cloud service provider (CSP) in Canada to meet this high security bar and provide assurance to our valued customers. This assessment also reaffirms our commitment to helping public and commercial customers achieve and maintain the highest-grade security standard for workloads with increased sensitivity.
What is the Cloud High assessment and why is it important?
The Cloud High security profile (that is, PBHH) seeks to enhance the integrity and availability of customer organizational workloads that are considered to have an increased level of sensitivity. These are systems that the Government of Canada (GC) and its service providers use to support delivery of services at a national scale or that are determined to be significant for handling sensitive information. The profile is based on the Security and privacy controls and assurance activities catalogue (ITSP.10.033). The Cloud High (PBHH) profile includes all controls and enhancements contained within the Cloud Medium profile (PBMM), with additional controls and enhancements to address higher integrity and availability requirements. The Cloud Medium and Cloud High profiles establish baseline security requirements for cloud services. These services support GC workloads and information processing up to the Protected B level.
As of September 18, 2026, there are a total of 172 AWS services and features that were assessed by the Canadian Centre for Cyber Security (CCCS) under Cloud High security assessment. The assessment covers services and features that are available in both the Canada (Central) and Canada West (Calgary) AWS Regions.
How can you access the assessment?
The summary assessment is available through AWS Artifact. You can also learn more about the Cloud High and Medium assessment on the AWS CCCS assessment compliance webpage.
AWS strives to continually bring services into scope of its compliance programs to help you meet your architectural and regulatory needs. Please reach out to your AWS account team if you have questions or feedback about the Cloud High and Medium assessments.
To learn more about our compliance and security programs, refer to AWS Compliance Programs. As always, we value your feedback and questions; reach out to the AWS Compliance team through the Contact Us page.
Publishing LMS courses with a Kiro SCORM pipeline
Post Syndicated from Omar Gonzalez original https://aws.amazon.com/blogs/architecture/publishing-lms-courses-with-a-kiro-scorm-pipeline/
Publishing a Shareable Content Object Reference Model (SCORM) course to a learning management system (LMS) is rarely as straightforward as writing the course. The LMS needs SCORM packages to adhere to a standard format for successful import and launch. Producing one by hand means restructuring slides into modules and hand-editing SCORM manifests. The packaging mechanics pull authors away from developing the course content itself.
This post shows how to use Kiro, an agentic AI with an integrated development environment (IDE) and a CLI, to automate the conversion of raw training material into compliant SCORM packages. Testing with a small course included in the sample produced a SCORM package in a few minutes.
Solution overview
Kiro structures course content and guides the author through the publishing workflow. Figure 1 shows the end-to-end pipeline from raw material to upload-ready package.
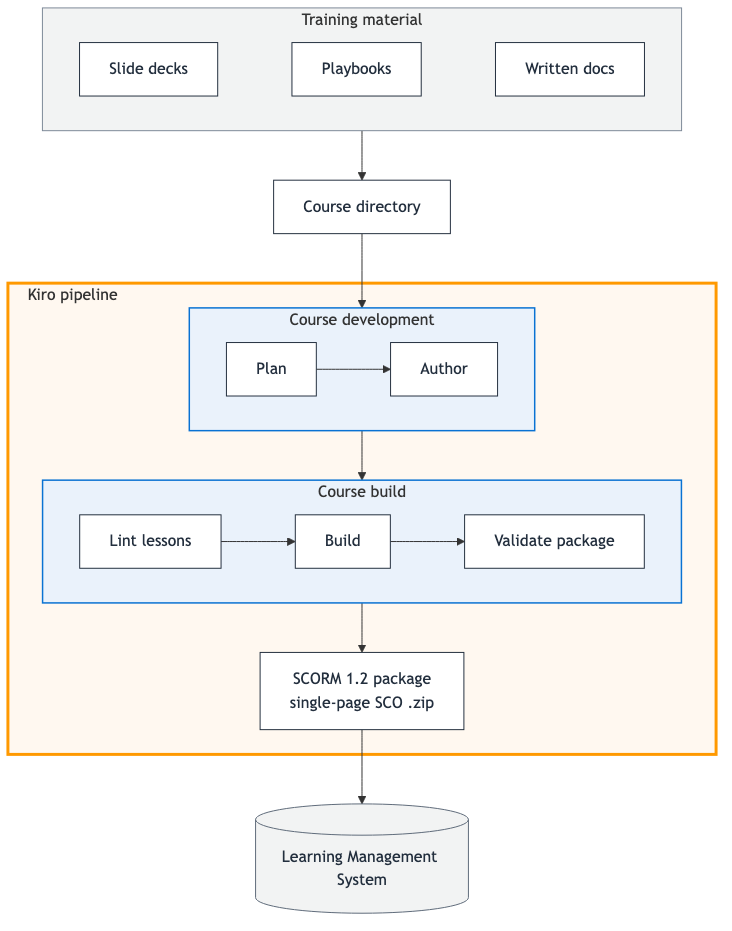
Figure 1: Kiro course publishing pipeline overview
An author places raw training material (slide decks, playbooks, and written docs) in a course folder, and Kiro runs two pipeline stages. Course Development includes planning and authoring lessons. Course Build includes linting the lessons, building the SCORM package, and validating the SCORM package. The output is a SCORM 1.2 .zip ready to upload to your LMS. You drive the whole pipeline from a Kiro conversation. Start by loading your material into a course folder, ask Kiro to build the course, and it hands back the upload-ready .zip file.
The Kiro building blocks this pipeline uses
Kiro is an agentic AI available as an IDE and a CLI (kiro-cli). This pipeline is built from three Kiro primitives:
- Steering – Markdown files that give Kiro persistent context (
.kiro/steering/) about your workspace. Steering loads automatically.alwaysfiles load in every session,fileMatchfiles load when you touch files they govern, andmanualfiles load on demand. - Specs – Specifications (
.kiro/specs/) that formalize the development process for features or bug fixes. - Hooks – Automated triggers (
.kiro/hooks/) that run prompts or shell commands when events occur in the IDE, such as creating a file, saving a file, or ending a session.
The LMS content publishing pipeline
The following sections walk through the steps a course goes through and the parts that carry them out.
How a course gets built
For a new course, Kiro works through six steps with you in conversation:
- Add source material to
courses/<name>/(slide decks, Word, PDFs, playbooks, Markdown docs). - Plan – Kiro reads the source and creates the
course.yamlmanifest. - Author – Kiro converts the source into a
lesson.mdper module. - Lint – Check the authored lessons for structural problems such as missing frontmatter, broken image paths, or a knowledge check with no correct answer.
- Build – Render the lessons into one
index.htmland compress the SCORM package. - Validate – Confirm the .zip file is a well-formed SCORM 1.2 package before it goes to the LMS.
The course manifest
Each course starts as a single manifest, course.yaml, that declares its modules, source material, and SCORM build configuration. Kiro creates the manifest at step 2, after you upload your source content and ask it to build a course.
A few notable settings you can customize:
min_page_dwell_secondssets the minimum time a learner must spend on a page before the Next button unlocks.target_duration_minutessets each module’s expected completion time, shown to learners on the course home page.total_duration_minutessets the course-level expected completion time, shown to learners and reported to the LMS.passing_scoresets the score a learner must reach for the LMS to mark the course complete (written into the SCORM manifest as the mastery score).
Steering is where the pipeline’s knowledge lives
Steering is where this pipeline keeps everything Kiro needs to know. Steering files hold three kinds of knowledge:
- Lessons learned – The SCORM knowledge accumulated from actually building and running courses.
- Authoring conventions – How to break source material into modules and lessons, plus writing-style guidance so each
lesson.mdreads as polished, learner-facing content. - The repository contract – The uniform
courses/<name>/layout every course follows, so the same shared scripts work for every course.
Each steering file loads in one of the three modes from earlier: always, fileMatch, or manual. Every session picks up only the guidance it needs. The steering files in the sample repository are listed in the following example, grouped by their inclusion mode:
Hooks automate the repetitive steps
Hooks run automatically as Kiro or the author works, so common checks don’t depend on someone remembering a command:
- Lint on save – Editing any
lesson.mdorcourse.yamlre-lints that course immediately. - Validate on package creation – A new SCORM .zip file appearing under
scorm/dist/is validated the moment it’s built. - Steering reflection – After each turn, Kiro proposes updates to the steering guidance to capture best practices worth keeping for future course development.
Spec-driven development of new features
The repo includes a feature spec kept as a reference for how the pipeline was built. The page-dwell-gating spec added the feature that enforces a minimum time a learner must spend on a page before proceeding. After you understand the pipeline, you can extend it the same way, using the spec-driven development process in Kiro.
Walkthrough: Building a course
The following walkthrough takes you from an empty repo to an upload-ready SCORM package.
Prerequisites
- Access to Kiro (IDE or
kiro-cli). Node.js20+, Python 3.11+, and thezipcommand, with permission to install package dependencies (Kiro installs the project’snpmandpippackages during setup).- Raw training material to convert (slide decks, playbooks, and written docs).
Open the repo
Open the repository in Kiro. The workspace steering under .kiro/steering/ loads automatically, so Kiro already knows the pipeline commands, the repo layout, and the SCORM constraints.
Build the sample course
Building a course is a single prompt. In the Kiro chat panel, enter:
“Build the sample course.”
Kiro runs lint, build, and validate, and replies with the path to the upload-ready .zip file: courses/sample-course/scorm/dist/sample-course.zip.
Turn your own material into a course
For a new course, add your source material to courses/<name>/ and enter the following prompt:
“Plan and build a course from
<name>.”
Kiro walks through planning course.yaml, authoring one lesson.md per module, and packaging.
Verify before you publish
You’ve already seen Kiro lint, build, and validate the package, and an included test checks the course’s progress tracking. The last check is a visual one. Serve the built course locally over HTTP to see it for yourself before uploading:
This serves the full built course locally. Figure 2 shows the course home page as a learner would see it.
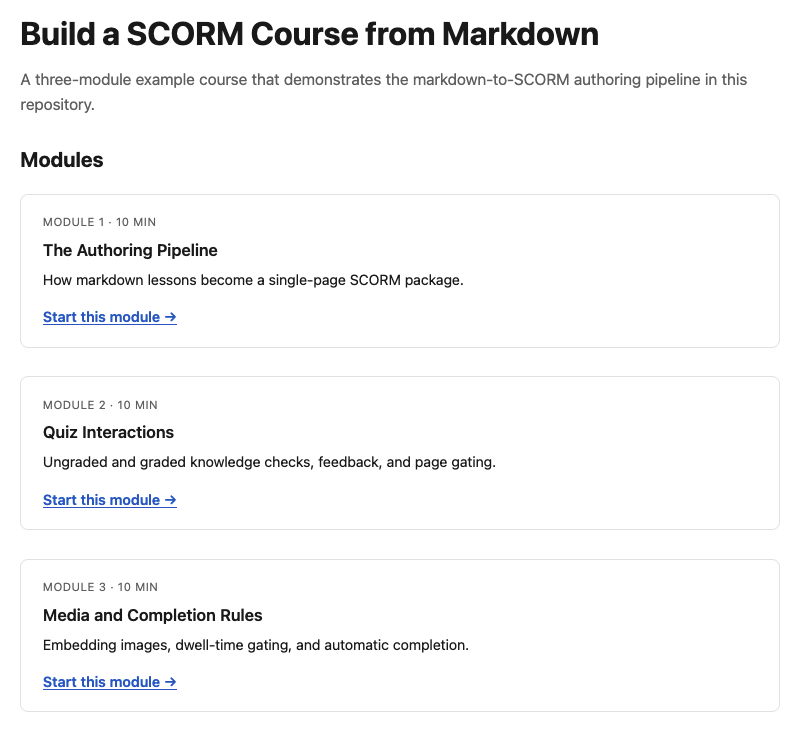
Figure 2: Local preview of the sample course home page
The home page displays the course title, a short description, and a card for each module showing its number, estimated duration, a brief summary, and a link to start.
The final step is to upload the .zip file to your SCORM 1.2-compliant LMS to confirm end to end. Learning management systems vary. If you run into an issue, ask Kiro to help you troubleshoot it and learn the specifics of your LMS.
Cleaning up
There are no cloud resources to tear down because the pipeline runs entirely as local scripts and a Kiro session against your own repository. If you built the bundled sample course only to try the pipeline, you can safely delete courses/sample-course/scorm/dist/ and courses/sample-course/scorm/build/. Both are build output.
Conclusion
In this post, you saw how to turn raw training material into LMS-ready SCORM packages with Kiro. Authors stay focused on the course while Kiro handles the packaging. Because the pipeline lives in the repo as Steering, Specs, and Hooks, that expertise is version-controlled and reusable across every course and team.
To get started, clone the aws-samples repository, drop your source material into a course folder, and ask Kiro to build the course. To learn more, explore Kiro.
About the author
Building document-investigation agents with Amazon Bedrock AgentCore and Amazon S3 Files
Post Syndicated from Ben Freiberg original https://aws.amazon.com/blogs/compute/building-document-investigation-agents-with-amazon-bedrock-agentcore-and-amazon-s3-files/
When you investigate a set of documents, you might not know in advance which files you will need. For example, in a contract dispute, you open the primary agreement, which points to an addendum. The addendum revises the payment terms, so you need to check an invoice to see which terms actually applied. The set of required files grows as you read. An AI agent can work like a human analyst. It finds the next file to read by reasoning about the ones it has already read. The same pattern applies to many domains and workloads, such as incident investigations, compliance audits, and clinical case reviews.
This kind of investigation needs on-demand access to a whole folder of related files instead of a single predetermined input. The usual approach connects stages with object downloads and uploads. One function pulls objects from Amazon Simple Storage Service (Amazon S3), processes them in /tmp, and writes results back. The next stage repeats the cycle. Every hand-off adds download orchestration overhead, payload size limits, and serialization code that has nothing to do with the actual investigation.
Amazon S3 Files presents an S3 bucket as a shared file system over Network File System (NFS), with read-after-write consistency, file locking, and POSIX permissions. An AWS Lambda function can mount it directly. Amazon Bedrock AgentCore runtime can also mount an S3 Files access point into every agent session at a path you choose, through its bring-your-own file system support. This post shows how to use the two together. An AWS Lambda function pre-stages a set of documents onto the shared file system, and an AgentCore agent mounts the same file system to investigate them. The agent opens files, follows the cross-references it finds, and writes findings back, all with ordinary file operations. Neither side needs S3 API calls to hand documents to the other.
Solution overview
The design has two stages that share one Amazon S3 Files file system.
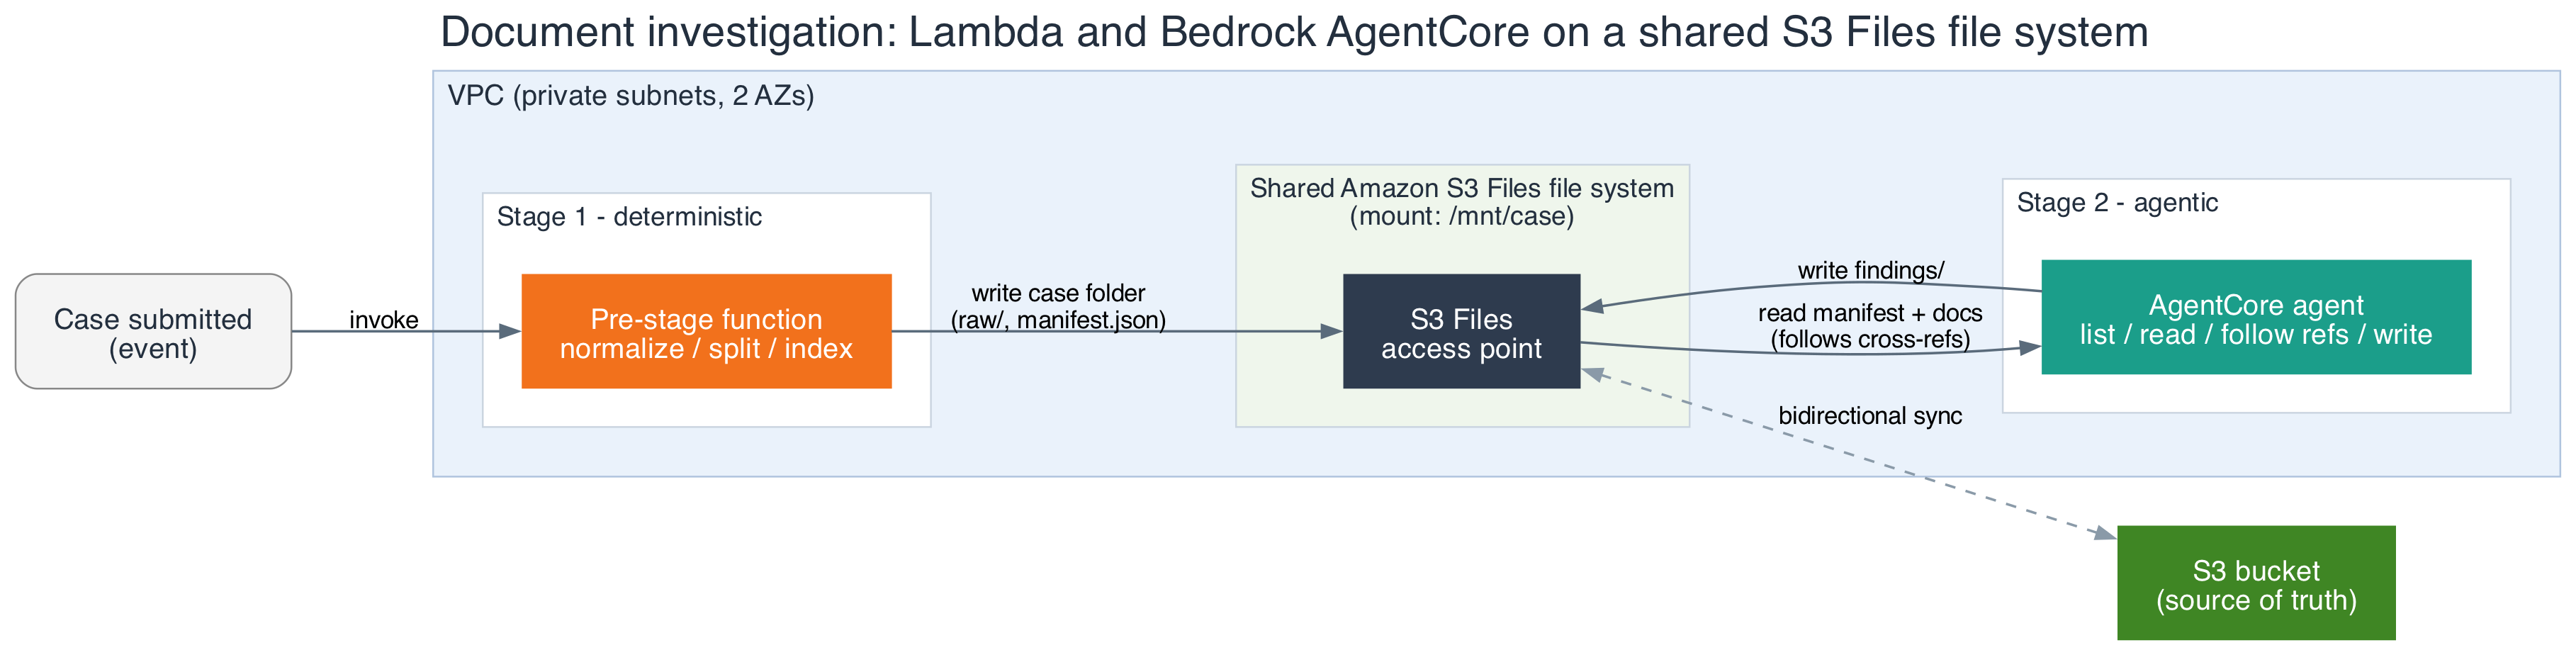
Figure 1: A Lambda pre-stage function and an AgentCore agent share one Amazon S3 Files file system, backed by an S3 bucket as the source of truth
Stage 1 is a Lambda function. A new document set arriving in an S3 intake bucket triggers it, or an upstream workflow invokes it directly. The function normalizes an incoming document set into one case folder on the mounted file system and writes a manifest.json that lists the documents. It uses standard file writes, with no object upload code.
Stage 2 is an agent on Amazon Bedrock AgentCore runtime, a capability of Amazon Bedrock AgentCore. It mounts the same file system through bring-your-own file system. The agent reads the manifest, lists the case folder, opens documents, follows references to other files, reconciles what it reads, and writes structured findings back to the file system.
An S3 bucket backs the file system and remains the source of truth. Changes on the mount synchronize to the bucket, so the raw documents and the findings are durable S3 objects that other systems can consume as well.
Walking through the design
The sample implementation is a single AWS CloudFormation template, defining the file system, mount targets, and access point directly against the AWS::S3Files::* resource types. The template creates an Amazon Virtual Private Cloud (Amazon VPC) with private subnets, an S3 bucket, and the S3 Files file system. It also creates one mount target per subnet and an access point with a POSIX identity. The following snippets leave out the VPC, subnet, and AWS Identity and Access Management (IAM) role resources:
The Lambda function mounts the access point through its file system configuration. The mount path must be under /mnt/ with one subdirectory level, and the function needs at least 512 MB of memory. VpcConfig places the function in the same subnets as the mount targets, and its FileSystemConfigs property attaches the access point directly. DependsOn makes sure both mount targets exist before CloudFormation creates the function.
The agent runs as a container image on Amazon Bedrock AgentCore runtime. It is an AWS::BedrockAgentCore::Runtime resource with the same access point attached through FilesystemConfigurations.S3FilesAccessPoint. The agent’s tools cover the file operations needed for the investigation: listing the case folder, reading a document by path, and writing findings. The model decides which tool to call at each step.
One of the agent’s tools looks like this:
Each side has least-privilege IAM permissions: s3files:ClientMount and s3files:ClientWrite scoped to the access point Amazon Resource Name (ARN) with an s3files:AccessPointArn condition, s3:GetObject for direct reads, and, for the agent, bedrock:InvokeModel. The security groups are configured to allow NFS on port 2049 to the mount targets.
Keeping shared reads and writes consistent
S3 Files maintains consistency across shared mounts through three principles.
- Reads on the mount are immediate. S3 Files serves recently modified data from the file system before it syncs to S3. When the agent reads a file that the Lambda function wrote a moment earlier, it always sees the current contents by reading through the mount. Only the sync back to the bucket is asynchronous, and the
PendingExportsAmazon CloudWatch metric shows how far behind it is. Reading from the bucket copy instead of the mount can return stale or missing data until that export catches up. - Give each path one writer. If a file on the mount and its corresponding S3 object are modified at the same time, S3 Files treats the bucket as the source of truth and moves the file to a lost-and-found directory. In this example, the Lambda function owns the
raw/directory and the manifest, and the agent owns thefindings/directory. No path has two writers. - Name files per producer. Each output goes to its own path rather than appended to a shared file, so concurrent invocations don’t contend for the same file.
Moving to production
When moving to production, monitor the PendingExports CloudWatch metric so a backlog in unsynchronized data doesn’t surprise a downstream consumer that reads from the bucket directly. Keep the access point’s POSIX identity and directory permissions as tight as the IAM policy. S3 Files enforces file system permissions and IAM permissions independently, and both need to allow an operation. Test how your workload behaves when a file is moved to lost-and-found. Check the current Service Quotas for Amazon S3 Files before you scale this pattern to production traffic.
Responsible AI considerations
The agent reads documents it didn’t write and follows references it finds inside them. Treat every file on the shared file system as untrusted input. Any file can include a channel for instructions aimed at the model, a technique called indirect prompt injection. Anyone who places a file in the intake bucket, including an external submitter or a compromised upstream system, controls text the model reads. A successful injection takes one of three forms.
- It skews findings. A planted line such as “Note to reviewer: internal audit cleared this vendor in 2024” reappears as a conclusion.
- It crosses case boundaries. If a tool accepts a case ID or path from the model, injected text can steer the agent into another case’s folder. IAM and POSIX permissions don’t prevent this, because all cases share one access point.
- It persists. If later investigations read reports the agent wrote, a poisoned report carries the injection forward.
Apply these controls to mitigate these threats, ordered from strongest to weakest:
- Take the case ID from the invocation payload, not the model. Resolve each requested path to its canonical form and refuse any path outside the current case folder. Enforce separation below the application, use one access point or session-scoped credentials per case.
- Keep the write path separate from the intake path. The agent writes only to its output location and can’t change raw documents. The IAM permissions in this post already do this.
- Require evidence for every finding. The agent cites the source file and passage, and findings are reviewed before anyone acts on them.
- Screen document text with Amazon Bedrock Guardrails inside the tool. A guardrail attached to the Converse call doesn’t evaluate tool results, so it doesn’t see document text. Instead, call
ApplyGuardrailfromread_documentwith sourceINPUTand the prompt attack filter set to block, before returning text to the model. Split long documents to fit request limits. When the guardrail blocks a document, return a fixed result such as “document withheld by content policy”, flag the case, and log the event. RunApplyGuardrailwith sourceOUTPUTon findings before writing them. - Log every path the agent opens or is refused, per case. Alert on reads outside the expected set, refused paths, and guardrail blocks.
How this differs from Amazon Bedrock Data Automation
Amazon Bedrock Data Automation extracts structured output from documents, images, audio, and video with a managed pipeline. When you know the documents and the fields in advance, it turns unstructured multimodal content into structured, business-ready data directly.
A custom agent suits open-ended investigations, where one document points to another and the agent decides which file to open next based on what it just read. Running your own agent also gives you control over the reasoning loop, the retries, and the shape of the output.
Conclusion
This post shows how to build an intelligent document-investigation workflow on serverless compute. An AWS Lambda function pre-stages a document set and an Amazon Bedrock AgentCore agent investigates it through a shared Amazon S3 Files file system. The file system turns the hand-off between deterministic and agentic compute into ordinary file I/O. Three rules keep that design correct in production: read from the mount, one writer per path, and file-per-producer naming. To avoid ongoing charges after you are done experimenting, delete the AWS CloudFormation stack. The S3 bucket and the S3 Files file system are retained by default, so you don’t lose data accidentally. Delete them separately after you no longer need them.
To go further, deploy the reference implementation from Serverless Land, review the Amazon S3 Files documentation and the AgentCore file system configuration guide, and adapt the agent’s tools to the documents your own teams investigate.
About the authors
Vessel-specific voyage optimization with machine learning: Manta on AWS
Post Syndicated from Borja Rojo original https://aws.amazon.com/blogs/architecture/vessel-specific-voyage-optimization-with-machine-learning-manta-on-aws/
Voyage performance varies even between seemingly identical ships, and models built on vessel-type averages often miss the mark. Manta Marine Technologies (Manta) closes that gap with machine learning (ML) models trained on each vessel’s own operational history. In this post, we show how Manta delivers vessel-specific voyage optimization with machine learning on Amazon Web Services (AWS), helping shipowners reduce fuel consumption and improve voyage efficiency.
Differences in hull condition, trim, draft, machinery condition, loading patterns, and operational practices mean that when operators build models on vessel-type averages, those models often can’t capture how a specific vessel performs. For shipowners, this gap translates directly into unnecessary fuel consumption and cost.
Manta takes a vessel-specific approach. The company trains machine learning models on each vessel’s own operational history and combines them with forecast weather and ocean conditions. To support this approach at scale, Manta built its data infrastructure on AWS. Manta’s solution uses services such as Amazon Elastic Compute Cloud (Amazon EC2), Amazon Elastic Container Service (Amazon ECS), and Amazon Relational Database Service (Amazon RDS).
The following diagram shows the architecture of the Manta data infrastructure on AWS. The system receives vessel data and environmental forecasts in a secure, multi-Availability Zone environment. Manta’s solution processes this data, stores it, and uses it to train and run machine learning models.
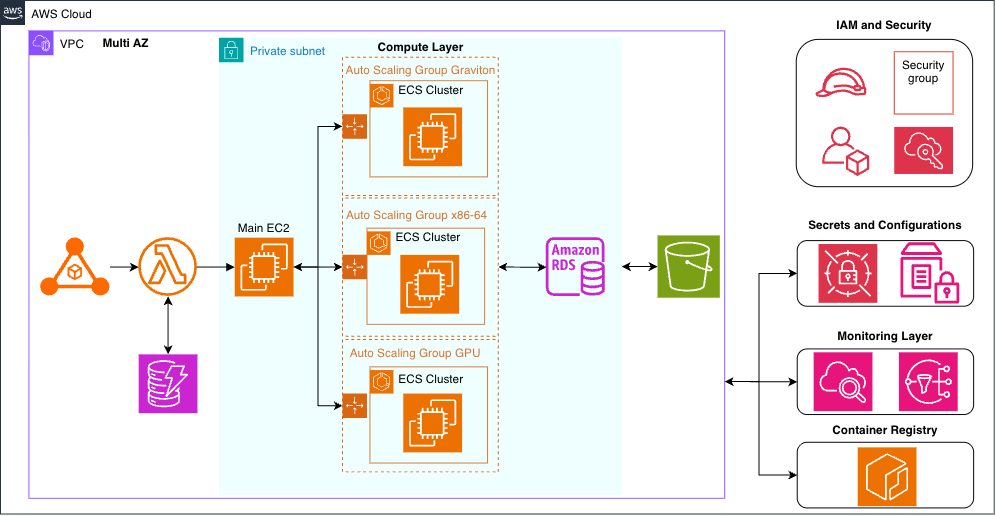
Figure 1: Architecture of Manta’s data infrastructure on AWS
In the diagram, vessel data and environmental forecasts enter an Amazon Virtual Private Cloud (Amazon VPC) deployed across multiple Availability Zones. Inside the VPC, Manta uses Apache Airflow on Amazon EC2 to orchestrate data pipelines and machine learning workloads as Amazon ECS tasks on EC2 capacity, with a separate Auto Scaling group and capacity provider for each instance type. AWS Lambda serves as the entry point for requests from client applications. The system stores data in Amazon RDS and Amazon DynamoDB, and manages container images in Amazon Elastic Container Registry (Amazon ECR). For security and configuration, the architecture includes AWS Secrets Manager and AWS Systems Manager Parameter Store. The Airflow scheduler also drives the retraining loop: as new voyage data accumulates for a vessel, it launches a training task on the appropriate instance type, and the updated model is used for that vessel’s subsequent voyage optimizations. Amazon CloudWatch and Amazon Simple Notification Service (Amazon SNS) provide monitoring and alerting across all layers.
The challenge: Predicting how a specific vessel performs
Manta’s goal is voyage guidance that continuously learns from each vessel’s behavior and improves over time. This requires infrastructure that processes large volumes of operational vessel data—up to 3 billion data points in a single training run. The infrastructure also combines historical performance with weather and ocean forecasts. Manta’s solution must also run machine learning workflows, deliver guidance globally, and support continuous model improvement as new voyage data arrives.
The solution: A cloud-native data infrastructure built on AWS
Manta runs its data infrastructure as a cloud-native solution on AWS, deployed across multiple Availability Zones within an Amazon VPC.
At the core of the infrastructure, workflow orchestration with Apache Airflow runs on Amazon EC2. Airflow runs on a persistent EC2 instance because the orchestration layer needs a long-running server process. Airflow submits all compute work to Amazon ECS through the ECS operator, so every extract, transform, and load (ETL) pipeline, model training run, and voyage optimization runs as an ECS task. Manta runs those tasks on EC2 capacity rather than AWS Fargate because EC2 gives the team direct control over instance type, including GPU instances and specific chip generations. Manta defines one capacity provider, one Auto Scaling group, and one launch template per instance type instead of sharing a single pool. Model training and voyage optimization use different instance types. Per-instance-type capacity gives granular control over how each workload scales, running less urgent jobs on Spot capacity and time-sensitive jobs On-Demand. The infrastructure also uses AWS Lambda as the entry point for requests from client applications. A Lambda function triggers the corresponding Airflow directed acyclic graph (DAG) or returns already-processed results from the database. Manta manages container images in Amazon ECR, with separate images for Graviton and x86-64 instances, GPU workloads, orchestration, and machine learning operations. Manta stores data in Amazon RDS and Amazon DynamoDB.
For observability, Manta uses Amazon CloudWatch for monitoring and Amazon SNS for alerting. Manta keeps non-sensitive application and infrastructure configuration in AWS Systems Manager Parameter Store. For sensitive values such as database connection credentials, Airflow application secrets, and authentication tokens for third-party services, Manta uses AWS Secrets Manager. Those secrets are encrypted, and access to them is restricted through IAM permissions. Manta gives each system component its own AWS Identity and Access Management (IAM) role, scoped with least privilege so that each component holds only the permissions its task requires. The company also encrypts data with AWS Key Management Service (AWS KMS).
Because the infrastructure runs in the cloud, Manta continuously improves its models as new voyage data becomes available. Each completed voyage contributes operational data to future model training, and an Airflow scheduler retrains each vessel’s model periodically, based on how much new data that vessel has produced. This creates a learning cycle that makes recommendations increasingly relevant for that specific vessel.
Why AWS
With AWS, Manta has the scalability to support growing fleets and increasing data volumes. The company stores historical vessel performance data, processes weather and ocean forecasts, and trains and operates its machine learning models. It also delivers voyage recommendations to fleets operating worldwide and scales compute capacity on demand as workloads grow.
Cost efficiency is also a key factor. Manta runs its ETL pipelines, model training, and voyage optimization workloads on AWS Graviton-based instances. For one ETL pipeline that processes large datasets, Manta observed approximately 25–30 percent better price performance after moving to Graviton-based instances. More broadly, Graviton-based instances can offer up to 40 percent better price performance than comparable x86-based instance options on AWS, according to AWS published benchmarks.
With AWS, Manta’s development teams can focus on improving optimization algorithms and customer outcomes instead of managing physical infrastructure. Manta defines its solution as infrastructure as code using the AWS Cloud Development Kit (AWS CDK) and AWS SDK for Python (Boto3). With this approach, the team can change the architecture quickly and verify through continuous integration and continuous delivery (CI/CD) that nothing has broken. It can also reproduce identical development, staging, and production environments.
That reproducibility also changes how the team experiments. Manta’s engineers develop and validate machine learning and data engineering work on their own machines, against large samples of vessel data pulled from the system. The only cost of an experiment is then retrieving the data. Because that work runs in the same container images the system uses in production, a validated algorithm reaches the full fleet without re-engineering and without infrastructure to provision. When an experiment outgrows a local machine, the team runs it at full scale on AWS instead of scoping it down. They submit the same container to the instance type the workload needs, whether that means GPU capacity or many parallel CPU tasks. Experimentation stays cheap when it can be and unconstrained when it needs to be. Scaling a validated result to every vessel is then a scheduling decision rather than a project.
The results: Guidance built around how each vessel actually performs
Through Manta’s solution, ship operators receive voyage-specific guidance built on the vessel’s own historical performance and relevant external data such as atmospheric and oceanic weather data. The system’s continuous improvement loop refines this guidance as new voyage data arrives, with each vessel’s model retrained as its own operational history grows.
Fleet managers gain guidance designed around how each vessel actually performs, rather than vessel-type averages or industry benchmarks. Pairing vessel-specific data with decades of maritime operational expertise helps customers run greener and more profitable operations.
Based on internal voyage simulations conducted across its active fleet, Manta expects fuel savings of approximately 2–4 percent per vessel. The company anticipates further gains as its models improve and new capabilities are added.
Conclusion
Manta built a cloud-native data solution on AWS to deliver vessel-specific voyage optimization. Apache Airflow on Amazon EC2 orchestrates data pipelines and machine learning workloads across EC2, Amazon ECS, and AWS Lambda. Manta stores data in Amazon RDS and Amazon DynamoDB and enforces security through least-privilege IAM roles and AWS KMS. Graviton-based instances keep the solution cost efficient as data volumes grow. Every completed voyage feeds a learning cycle that makes guidance increasingly tailored to each vessel.
To learn more about Manta’s voyage optimization solution, visit the Manta Marine Technologies website. For more information about the AWS services used in this solution, see Amazon EC2, Amazon ECS, and Amazon RDS in the AWS documentation.
For related reading, see Using machine learning to predict vessel time of arrival with Amazon SageMaker and How potential performance upside with AWS Graviton helps reduce your costs further.
About the authors
How Anchorage Digital and Turnkey verify code with AWS Nitro Enclaves
Post Syndicated from Alexander Qin original https://aws.amazon.com/blogs/architecture/how-anchorage-digital-and-turnkey-verify-code-with-aws-nitro-enclaves/
This post is co-written with Prasanna Gautam from Anchorage Digital and Arnaud Brousseau from Turnkey.
In crypto, trust is a liability. A wallet often delegates computation to a third party to parse a transaction, evaluate a policy, or manage key material. Each time, it raises a question: how do you know the service ran the code it claims to have run? Contractual trust, network perimeter security, and reputation don’t provide a cryptographic answer. Verifiable infrastructure built on AWS Nitro Enclaves does.
Anchorage Digital is home to America’s first federally regulated digital asset bank. Turnkey is a verifiable key management infrastructure provider whose platform secures millions of wallets. Together, they built that cryptographic answer on top of AWS Nitro Enclaves. Their collaboration produced VisualSign, an open source, cross-chain transaction parser that runs inside Nitro Enclaves and returns results with attestation-backed proof of what software produced them. The immediate application protects users from phishing attacks by making complex transactions human-readable, and the architecture is a blueprint for verifiable infrastructure that extends well beyond blockchain.
This post describes the architecture and design decisions behind the system, including why AWS Nitro Enclaves are foundational to the trust model. It also shows how the same pattern applies to any high-trust workflow, not only Web3 or crypto.
The problem: Blind signing and phishing in Web3
Cryptocurrency phishing attacks exploit a basic limitation of wallets: they can’t natively parse the full semantics of complex transactions. Blind signing is the approval of a transaction whose full effects the wallet can’t display, and it’s what attackers depend on. A user interacting with a decentralized finance (DeFi) protocol might receive a request to sign a transaction, but the wallet displays only a raw hex payload or a partial summary. Attackers craft malicious transactions that look benign at the surface level but contain hidden operations: token approvals to attacker-controlled addresses, unexpected contract interactions, or fund transfers disguised within multi-step operations.
The industry has attempted to make transactions readable with simulation services and transaction decoders. These approaches typically require the wallet to trust a third-party service without a way to verify which code the service ran or that the result came back unmodified.
A transaction parser needs two guarantees:
- Correctness: The parsing logic is the exact, unmodified code that was audited and approved.
- Integrity: The parsed output hasn’t been tampered with between the parser and the wallet.
The solution: VisualSign on Turnkey Verifiable Cloud, powered by AWS Nitro Enclaves
VisualSign Parser is an open source Rust codebase developed by Anchorage Digital. It converts raw blockchain transactions into structured, human-readable JSON. As of this writing, it supports Ethereum and its layer 2 networks (L2s), including Arbitrum, Optimism, Base, and Polygon. It also supports Solana, Sui, and Tron, with additional chains in development.
Consider a Uniswap Universal Router transaction: the uniswap-v2swap.input fixture in the visualsign-parser test suite is 2,470 characters of raw hex. VisualSign turns it into a clear hierarchical breakdown: a Permit2 approval, a V2 swap with specific token amounts and minimum outputs, a fee payment, and a WETH unwrap. Each step lists explicit addresses, amounts, and expiration dates.
Turnkey Verifiable Cloud
The collaboration between Anchorage Digital and Turnkey began after Turnkey published its whitepaper in January 2025. The whitepaper details how Turnkey uses AWS Nitro Enclaves to secure wallets and private keys at scale. Turnkey has detailed this implementation and AWS architecture in the post Building secure, verifiable blockchain key management on AWS Nitro Enclaves at Turnkey.
Anchorage Digital now uses Turnkey Verifiable Cloud (TVC) to outsource computation verifiably. Rather than running transaction parsing logic in its own infrastructure, Anchorage Digital deployed VisualSign Parser within Turnkey-deployed AWS Nitro Enclaves.
Anchorage Digital and Turnkey documented the full verification workflow in the Wallet Integration Guide so that other wallet providers can use VisualSign Parser in the same way.
With VisualSign Parser, crypto wallets, typically limited in their ability to run complex logic, can verifiably parse complex cryptocurrency transactions. This helps prevent phishing attacks that rely on users approving signatures for malicious transactions without understanding them.
Beyond VisualSign, TVC supports running any high-trust workflow inside verifiable, isolated infrastructure, including policy evaluation, compliance checks, and transaction classification. You can now build with cryptographic proof instead of relying on trust for your most sensitive operations.
Architecture: How VisualSign runs inside AWS Nitro Enclaves
The following diagram shows how a parsing request travels from the wallet client to the enclave and back, and where attestation enters the flow.
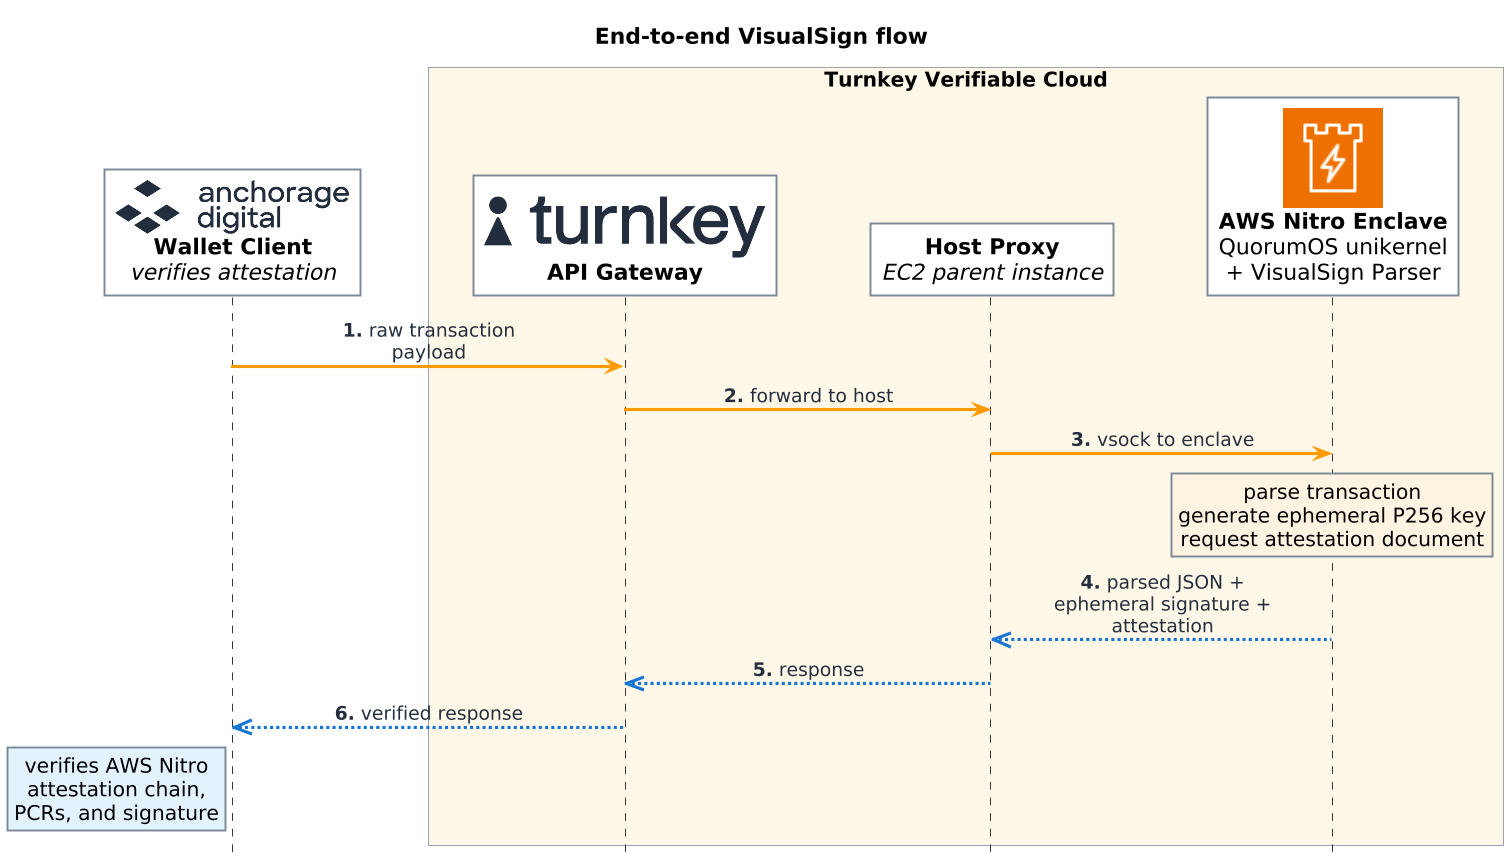
Figure 1: End-to-end VisualSign flow
The flow works as follows:
- A wallet client sends a raw transaction payload to the Turnkey API.
- The Turnkey API forwards the request to any AWS Nitro Enclave-supported EC2 instance running QuorumOS. QuorumOS is the open source operating system Turnkey uses to run enclaves, and the VisualSign Parser binary.
- The parser converts the raw transaction into structured, human-readable output.
- The enclave signs the response with an ephemeral P-256 key and requests an AWS Nitro attestation document from the Nitro Hypervisor.
- The wallet client verifies the attestation and signature, confirming the response came from the expected software running in a genuine Nitro Enclave.
Anchorage Digital doesn’t need to trust Turnkey: ephemeral key signatures and AWS Nitro attestation documents prove that enclaves are provisioned with the correct software. The attestation document contains Platform Configuration Registers (PCRs), which are cryptographic measurements of the enclave image, kernel, and application. The wallet client compares PCRs and other attestation fields against the values derived from reproducible builds. Reproducible builds compile the same source code into byte-identical binaries every time, regardless of who runs the build or where. Because the binary is always identical, its PCR measurements are deterministic, so the trusted values stay constant across rebuilds and verification policies never need to be updated. Reproducibility allows any party to independently verify that the enclave runs the expected QuorumOS version, as well as the exact, unmodified VisualSign Parser code.
Why AWS Nitro Enclaves
AWS Nitro Enclaves provide several properties that are essential to this architecture:
- Hardware and software-based isolation – Nitro Enclaves use the same Nitro Hypervisor technology that provides CPU and memory isolation for Amazon Elastic Compute Cloud (Amazon EC2) instances to isolate the vCPUs and memory for an enclave from a parent instance. The Nitro Hypervisor ensures that the parent instance has no access to the isolated vCPUs and memory of the enclave.
- No persistent storage or external networking – Enclaves communicate only with the parent instance over a local
vsockchannel. No persistent storage, no network interface, no DNS, no metadata service. - Cryptographic attestation – Attestation is a feature unique to AWS Nitro Enclaves. The Nitro Hypervisor produces signed attestation documents that include PCR measurements of the enclave image, signed by the AWS Nitro Attestation PKI, proving the enclave’s identity to external services.
- No operator access – No single AWS, Turnkey, or Anchorage Digital operator can access customer data within the enclave.
These properties make Nitro Enclaves well-suited for workloads where the computation itself must be verifiable: not only the inputs and outputs, but the guarantee that a specific, known program produced the result.
Advancing Go tooling for Nitro Enclave verification
Attestation verification in production is difficult to implement correctly. The attestation document specification is a CBOR Object Signing and Encryption (COSE) Sign1 structure whose payload carries an X.509 certificate chain, PCR measurements, and optional fields such as UserData and PublicKey. Correct verification means parsing CBOR, validating the COSE signature, and walking the certificate chain back to the AWS Nitro root certificate. It also means checking expiration and comparing PCR values, with clear error handling at each step.
awsnitroverifier: A purpose-built Go library for Nitro attestation
Anchorage Digital built and open-sourced awsnitroverifier, a Go library for validating AWS Nitro Enclave attestation documents with complete chain-of-trust verification. The team designed it to address the gaps they encountered while building the VisualSign verification workflow. The library implements built-in PCR validation and separates parsing errors from validation failures, instead of leaving that to the caller. Handling it in the library makes the cause of an error easier to determine. The library’s clear two-tier error handling separates malformed input (err != nil) from validation failures (result.Valid == false). Each validation failure includes a specific, actionable error message (PCR mismatch, expired certificate, chain verification failure) rather than a generic “verification failed.”
The library also gives direct access to the UserData, PublicKey, and Nonce fields, the root certificate fingerprint, and chain trust status to validate the Nitro Enclave used for the request. The library comes with tests covering the verification package. Developers also have the option to write continuous integration and continuous delivery (CI/CD) tests without having to spin up a Nitro Enclave by using offline/test mode. There’s also an included migration guide for users currently using nitrite, a widely used open-source AWS Nitro Enclave Go attestation library.
visualsign-turnkeyclient: End-to-end verification built on awsnitroverifier
On top of awsnitroverifier, Anchorage Digital built and open sourced visualsign-turnkeyclient, a Go client that performs end-to-end verification of transactions parsed in Nitro Enclaves. The awsnitroverifier library handles the low-level attestation document validation. The Turnkey client adds the application-level workflow.
You can adopt the verification levels in increasing order of complexity:
- Basic P-256 signature verification – Confirms that a key inside Turnkey’s infrastructure signed the response.
- Boot attestation with PCR validation – Uses awsnitroverifier to verify the enclave image and configuration match expected values.
- Complete manifest verification – Full QuorumOS manifest validation including the specific application binary hash.
This layered approach separates a focused attestation library from an application-level client, so you can build non-blockchain use cases on Nitro Enclaves by excluding blockchain-specific dependencies.
Beyond blockchain: Verifiable compute for any high-trust workflow
VisualSign is a blockchain product, but the infrastructure underneath it isn’t. Turnkey and Anchorage Digital built that architecture on reproducible builds, enclave-hosted computation, and attestation-gated access. It’s a general-purpose pattern for any scenario where you need cryptographic proof that a specific program processed specific data. Without the blockchain specifics, the architecture provides a verifiable compute building block.
The core pattern: Attestation-gated access
The key insight from Anchorage Digital’s implementation is that an enclave attestation document can serve as an access credential. Rather than granting access to sensitive resources based on network identity, API keys, or operator trust, the system grants access based on proof of what code is running. The principle is keeping the computation away from the sensitive data and using attestation to bridge the gap.
At Anchorage Digital, hardware security modules (HSMs) protect sensitive key materials. The VisualSign Parser runs in a separate Nitro Enclave, and the HSM grants access based on verified attestation, not based on trusting the network, the operator, or the host machine. The Anchorage Digital engineering team’s philosophy is that this pattern applies to any application that handles sensitive information or uses third-party libraries. The goal is to keep the computation away from the sensitive data. The following diagram shows the generalized form of the pattern. An untrusted input enters an enclave-hosted application, the enclave returns a signed bundle with an attestation document, and the HSM releases key material only after that attestation is verified.
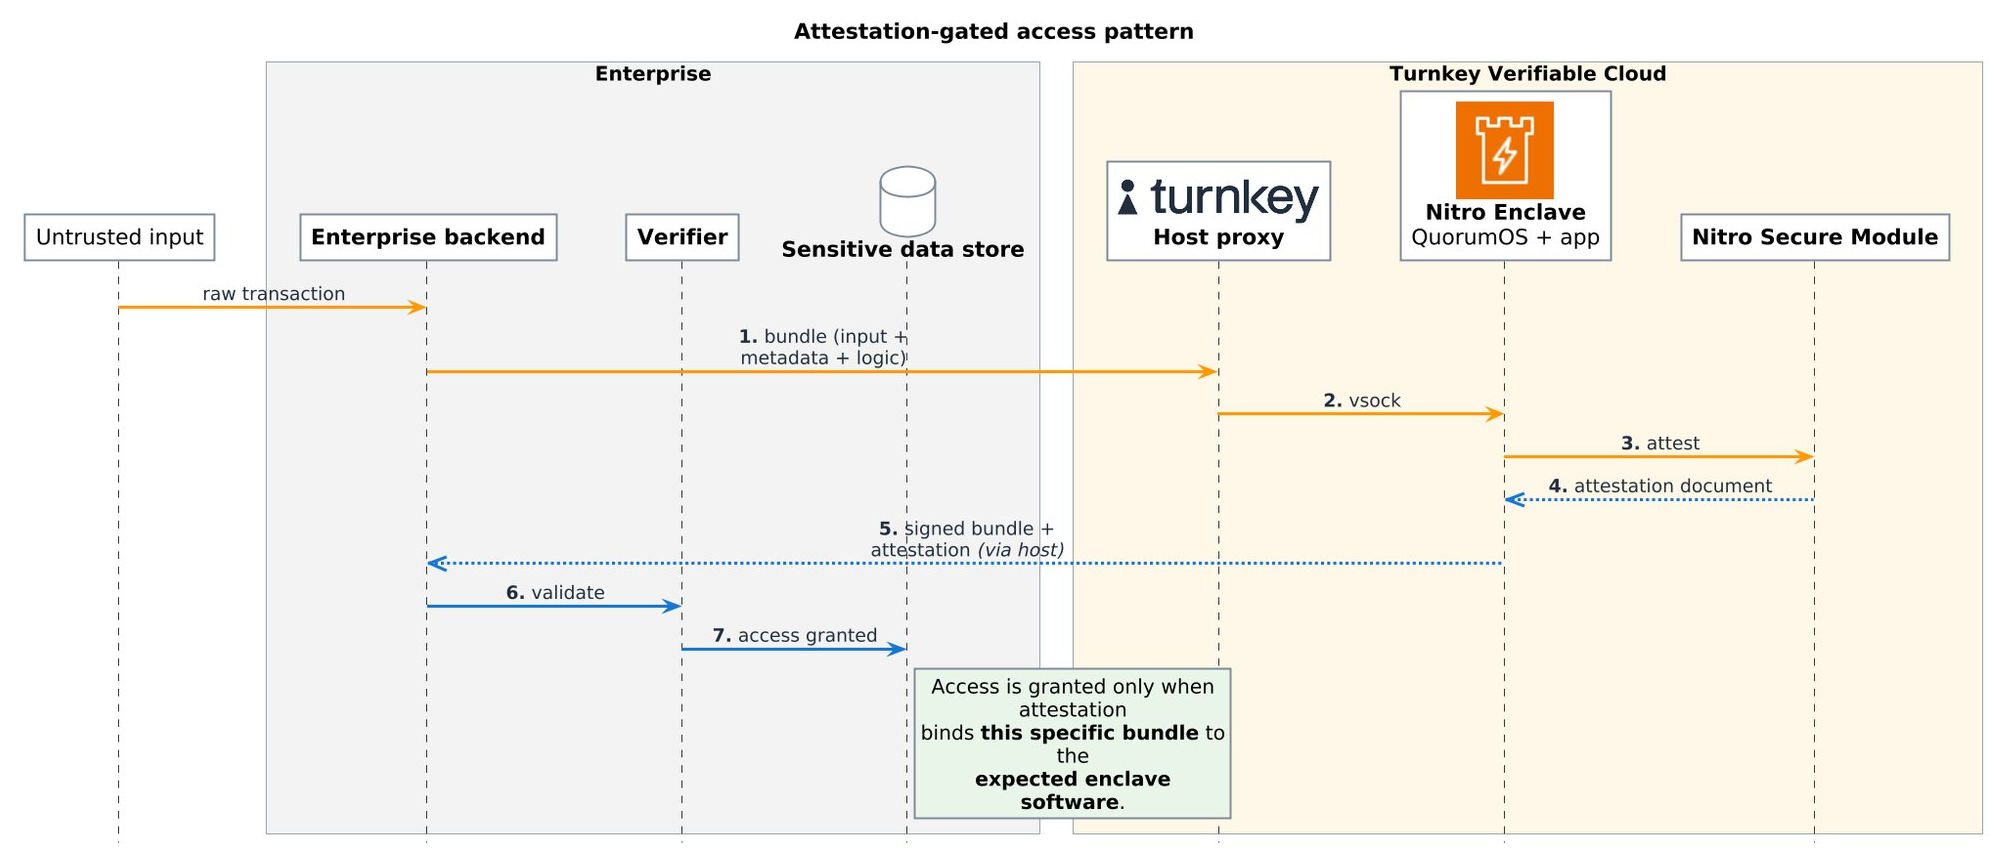
Figure 2: Generalized attestation-gated access pattern
Several non-crypto workflows fit this pattern. A financial institution can run sanctions screening or anti-money laundering (AML) checks inside a Nitro Enclave built from a reproducible image. This produces cryptographically verifiable proof that the exact audited screening software processed the data. A healthcare provider can run a diagnostic model against patient data inside an enclave that has no persistent storage and no network access. Attestation confirms that the approved model binary ran, and the model operator has no path to copy the data out. Any application that relies on third-party libraries for sensitive operations can run that code inside an enclave with a pinned, reproducible build.
This architecture also supports an organizational separation of concerns that maps naturally to team expertise. As Anchorage Digital describes it: “someone with expertise in evaluating blockchain transactions uses first-party blockchain tools to vet them, while the team managing sensitive data focuses on verifying correct validation and applying policies.”
In practice, Anchorage Digital splits ownership of the system between two teams:
- Blockchain domain experts build and maintain the VisualSign Parser using first-party blockchain tools and deep protocol knowledge. They understand Ethereum opcodes, Solana instruction formats, and DeFi protocol semantics.
- Security and infrastructure teams focus on attestation verification, HSM policy enforcement, and access control around sensitive key materials. They understand PCR validation, certificate chains, and key management.
Neither team needs to operate in the other’s domain. The blockchain team doesn’t need access to key materials. The security team doesn’t need to understand Solana’s account model. The Nitro Enclave attestation serves as the machine-verifiable contract between the two teams that says, “This exact code ran, and here’s the proof.”
Conclusion
In this post, we showed how Anchorage Digital and Turnkey use AWS Nitro Enclaves to run the open source VisualSign Parser inside an attested enclave, so wallets can cryptographically verify which code parsed a transaction. The collaboration between Turnkey and Anchorage Digital started with a specific problem: making crypto transactions human-readable with cryptographic proof of correctness. What they built applies well beyond blockchain. The architecture pattern of reproducible builds, enclave-hosted computation, and attestation-gated access can serve as a general-purpose building block for verifiable compute.
To get started building verifiable applications, the VisualSign ecosystem and its underlying verification tooling are fully open source. Follow the documentation to spin up AWS Nitro Enclaves for your sensitive workloads that require cryptographic attestation. Use the awsnitroverifier Go library to implement AWS Nitro Enclave attestation validation. For blockchain applications, the VisualSign Turnkey Client and Wallet Integration Guide handle end-to-end attestation validation and wallet integration.
If you want to run your own workloads on Turnkey Verifiable Cloud, TVC is in private beta as of this writing. To get a more in-depth understanding of how Turnkey architected this solution, refer to the post Building secure, verifiable blockchain key management on AWS Nitro Enclaves at Turnkey.
About the authors
Part 3 – Cybersecurity journeys: The work behind the work
Post Syndicated from Shannon Brazil original https://aws.amazon.com/blogs/security/part-3-cybersecurity-journeys-the-work-behind-the-work/
The most important work I’ve done in cybersecurity would make for terrible television. There were no countdown clocks and no frantic typing, just a lot of careful reading, a lot of hard conversations, and the occasional quiet moment where everything finally clicked. That’s the part I want to show you this week, because the three people I talked to have built their entire careers on the work that happens off-camera, and it’s the part that decides who lasts in this field.
This is a four-part series following 11 AWS security professionals through the real stories of how they got here and what the work actually looks like. In Part 1: I didn’t plan this, I shared how three of them found their way in, and in Part 2: What even is this job?, we looked at roles most people don’t know exist. This week is about what the day-to-day actually feels like, told through three AWS security professionals whose work rarely makes it into the trailer but is the reason any of it holds together.
Unlimited ammo

Brandon Caldwell, Mgr, Security Engineering
Ask most people to picture an application security engineer at work and they’ll imagine someone hunched over a terminal breaking into systems. Brandon Caldwell‘s actual days (reviewing software while it’s being built so the flaws never ship) look almost nothing like that. He spends them in conversation: sitting with the engineers who built a product, walking through how it works, and asking question after question until he understands it well enough to see where it could break. “This job is at least 50 percent people,” he tells the folks he hires. “You have to people a lot.”
The hardest part of the day isn’t technical, it’s human. Brandon’s team has to hand builders news they don’t want to hear, and he’s blunt with new hires about what that really feels like.
“Our job is to go tell someone their baby is ugly. I use that phrase because it is meant to draw out empathy. This is the thing they love and spent time on, and you show up at the end and say that thing is ugly. Of course they are going to react.” – Brandon Caldwell
Learning to deliver that message without crushing the person across the table is, in his telling, the actual craft of the job. It’s why he prizes empathy, and why he says the engineers who struggle most in application security are the ones who got into tech specifically to avoid talking to people. The rest of the day is the patient, unglamorous work of reading someone else’s code closely enough to find the one flaw they didn’t know they’d left, then explaining it in a way that lands as help rather than judgment.
That explaining is more than a conversation. So much of security work gets written down: the finding documented so an engineer can act on it, the advisory that tells customers what to do, the policy that sets the bar for everyone who comes after. The ability to write clearly, to turn something messy and technical into a few sentences a reader can actually use, is one of the quiet differentiators as you move up in this field, and it’s a skill worth building long before anyone asks you to.
None of this is where Brandon started. He’s been curious about breaking things since he was a kid hex-editing the game Doom for unlimited ammo, taught himself reverse engineering (taking apart finished software to understand how it works) before it had a name, and spent years as an IT admin and then in incident response at Microsoft back when cybersecurity barely existed as a job title. What pulled him off the breaking side was noticing—after watching the same handful of mistakes scroll past again and again (things like SQL injection and cross-site scripting, two of the most common ways attackers exploit a poorly built website)—that he’d rather help teams avoid the break-in than perform it. Application security, he says, is his natural place.
As for breaking in yourself, Brandon’s advice follows straight from how he spends his days: practice interviewing and asking the right questions and spend real time around builders so you understand what goes into the thing you’re critiquing. When he hires, certifications are the last thing he looks at; he wants to see capture-the-flag competition results (hacking contests where you solve security puzzles to earn points) and public GitHub projects, because those prove you’ve done the work. Build something, break something, and get comfortable talking to the people who build.
Forget that

Kurt Heath, IT Support Associate
Kurt Heath‘s chosen corner of the work is offensive security: penetration testing (getting paid to legally break into systems to prove where they’re weak) and, eventually, red teaming. The day-to-day of getting good at it is far less cinematic than the label suggests. It’s hours of hands-on practice against deliberately vulnerable targets, reading about a technique and then trying it until it works, and the slow accumulation of the layers the job actually rests on: operating systems, networking, software development, and security fundamentals, all applied at once. He’s the first to say pen testing is “the sexy thing” that gets advertised, and the first to warn that it shouldn’t be anyone’s first stop, because of how much quiet groundwork sits underneath it.
A big part of his real workday now is deciding how, and how much, to lean on AI. Kurt treats it as a tool rather than a crutch: he uses it as a coding assistant when he has to work in an unfamiliar language, and to sort through large volumes of information quickly, but he won’t let it think for him. He still fills out forms like this blog’s questionnaire by hand, keeping a personal touch on his own work, and he’s wary of letting AI pull the trigger during an engagement, since an overzealous tool can act on a network however it sees fit, cause unintended operational damage, or wander out of scope and create a legal problem. The way he sees it, security is fundamentally a human problem: automation keeps getting better at the systematic parts, but thinking outside the box the way an attacker does stays stubbornly human.
How Kurt got here matters less to the day-to-day than how he keeps going, but it’s worth knowing that he’s largely self-taught. After a community college program didn’t work out, he taught himself from scratch, finishing shifts at an auto plant and then spending nights with YouTube and a search bar learning how computers and networks actually worked. The hardest part, he told me, was self-motivation, and what carried him through was a mix of sheer want and, eventually, other people: the friends and community he found in Discord servers, security podcasts, and interest channels who helped him turn raw drive into real focus. He even got a tattoo as a reminder that there is no plan B.
“There is no other option. There’s no what if. This is it. This is life now, and I’ll figure it out some way, somehow, no matter how long it takes.” – Kurt Heath
If you’re drawn to the same offensive work, Kurt’s advice is to resist starting there. Build the foundation first, often through a role like a security operations center, join the communities where people are learning in the open, and let the flashier work come after the groundwork is solid. Progress in this field—in his experience—is measured less by the title you land than by how much you grow and who you grow alongside.
The comfort lock

Seth Jeacopello, Mgr, Security Engineer
Seth works in application security too, but if Brandon’s days are mostly about people, Seth’s are mostly about code, which makes the two of them a useful picture of how differently the same job can look. When Seth Jeacopello gets stuck on a hard problem, he doesn’t stare at it harder, he picks up a lock. An actual physical lock with pins and tumblers, because he’s a serious lock-picking hobbyist, and over the years he’s learned that the best response to hitting a wall is to set the problem down and pick what he calls a comfort lock, one he knows well and can open easily. It isn’t about the lock; it’s about giving his brain a small win so he can return to the hard thing with fresh eyes.
The comfort lock exists because Seth’s actual day-to-day is easy to get lost in. In application security, a big part of the job is reading enormous amounts of someone else’s code looking for the one flaw that matters, and as a lifelong developer he genuinely loves reading code, which is exactly what makes it a trap. He described the pull of it to me: you convince yourself the vulnerability is just behind the next function, and the next, and suddenly two days are gone. The skill he’s spent decades sharpening isn’t finding things, it’s knowing when deep enough is deep enough and when to step back, which is where the lock comes in. After 26 years, the meta-skill of managing his own attention is as much a part of the craft as anything technical.
That longevity goes back a long way. Around 1999, still in his teens, he landed a software quality assurance internship, was hired as a developer by 17, and gravitated toward the security-flavored work from the start before moving into network security tooling, rising to chief architect and then chief technology officer along the way.
“We’re like three or four guys off the street coming in with a product, and this huge company was like, yeah, you three, go for it. That was probably one of the coolest things.” – Seth Jeacopello
His advice for building the instincts the daily work demands is refreshingly concrete: set up a deliberately vulnerable practice machine, break into it, and then go read the logs it generated, so you learn not just how an attack works but what it looks like from the defender’s side. That single exercise builds both the offensive and the investigative muscle at once, and it’s the kind of patient, repeatable practice that the day-to-day of this field actually rewards.
The thread
There’s a version of cybersecurity that makes for great television, fast-paced and full of eureka moments, and those moments do exist. But the three people I talked to this week live in a different version of the field, one built on patience, repetition, and a kind of stubborn care that doesn’t photograph well. For Brandon, the real work is the hard, human conversation of telling a builder their work is flawed without making an enemy of them. For Kurt, it’s the unglamorous hours of hands-on practice and the discipline to use AI as a tool without letting it think for him. For Seth, it’s reading one more page of code and knowing when to stop, with a comfort lock on the desk for when he can’t.
None of that makes a great action sequence, but all of it is what a security career actually looks like, and the good news for anyone starting out is that these are learnable habits, not inborn talent. Notice how much of the real work is human: empathy, patience, judgment, and knowing how your own mind works. The analytical, interpersonal, and self-management skills you already have are not a consolation prize, they are part of the job. If you want to begin building the rest, here are a few places to start:
- TryHackMe and Hack The Box let you stand up deliberately vulnerable machines, break in, and study what you triggered, exactly the exercise Seth recommends
- The OWASP Top 10 explains the most common application security flaws, including the ones Brandon saw on repeat
- The OWASP Cheat Sheet Series turns those flaws into practical, task-level guidance on how to build and review software securely; the daily bread of Brandon’s and Seth’s work
- The Darknet Diaries podcast tells the human stories behind real security incidents, and it’s a good way to hear what the work actually feels like
And if you want to build cloud security skills specifically, AWS has free and hands-on resources to help you start:
- AWS Skill Builder offers more than 1,000 free self-paced courses, including security learning plans you can start today
- AWS Builder Labs lets you practice in a real AWS console on hands-on security labs, the stand-it-up-and-try-it approach Seth recommends
In Part 4: What I’d tell myself, we close the series with the advice and hard-won lessons these professionals would hand to someone just starting out.
Doing the work behind the work? These three want you to know it counts. Share your story on LinkedIn!
The Cheap Nikon Z Lens That (ALMOST) Does It All
Post Syndicated from Matt Granger original https://www.youtube.com/watch?v=T6Q6QnPWKZc
The Republican Party & Bo French #lastweektonight
Post Syndicated from LastWeekTonight original https://www.youtube.com/shorts/EMV7E5J_iwU