Backblaze Drive Stats for Q1 2022

Post Syndicated from original https://www.backblaze.com/blog/backblaze-drive-stats-for-q1-2022/

A long time ago, in a galaxy far, far away, Backblaze began collecting and storing statistics about the hard drives it uses to store customer data. As of the end of Q1 2022, Backblaze was monitoring 211,732 hard drives and SSDs in our data centers around the universe. Of that number, there were 3,860 boot drives, leaving us with 207,872 data drives under management. This report will focus on those data drives. We will review the hard drive failure rates for those drive models that were active as of the end of Q1 2022, and we’ll also look at their lifetime failure statistics. In between, we will dive into the failure rates of the active drive models over time. Along the way, we will share our observations and insights on the data presented and, as always, we look forward to you doing the same in the comments section at the end of the report.

“The greatest teacher, failure is.”1

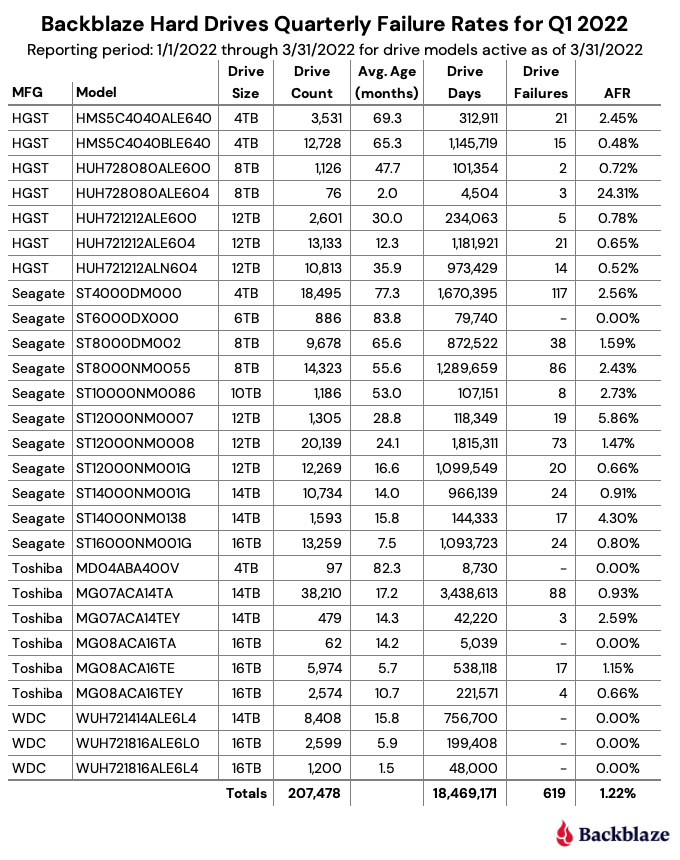
As of the end of Q1 2022, Backblaze was monitoring 207,872 hard drives used to store data. For our evaluation, we removed 394 drives from consideration as they were either used for testing purposes or were drive models which did not have at least 60 active drives. This leaves us with 207,478 hard drives to analyze for this report. The chart below contains the results of our analysis for Q1 2022.

“Always pass on what you have learned.”2

In reviewing the Q1 2022 table above and the data that lies underneath, we offer a few observations and caveats:

  • “The Force is strong with this one.”3 The 6TB Seagate (model: ST6000DX000) continues to defy time with zero failures during Q1 2022 despite an average age of nearly seven years (83.7 months). 98% of the drives (859) were installed within the same two-week period back in Q1 2015. The youngest 6TB drive in the entire cohort is a little over four years old. The 4TB Toshiba (model: MD04ABA400V) also had zero failures during Q1 2022 and the average age (82.3 months) is nearly as old as the Seagate drives, but the Toshiba cohort has only 97 drives. Still, they’ve averaged just one drive failure per year over their Backblaze lifetime.
  • “Great, kid, don’t get cocky.”4 There were a number of padawan drives (in average age) that also had zero drive failures in Q1 2022. The two 16TB WDC drives (models: WUH721816ALEL0 and WUH721816ALEL4) lead the youth movement with an average age of 5.9 and 1.5 months respectively. Between the two models, there are 3,899 operational drives and only one failure since they were installed six months ago. A good start, but surely not Jedi territory yet.
  • “I find your lack of faith disturbing.”5 You might have noticed the AFR for Q1 2022 of 24.31% for the 8TB HGST drives (model: HUH728080ALE604). The drives are young with an average age of two months, and there are only 76 drives with a total of 4,504 drive days. If you find the AFR bothersome, I do in fact find your lack of faith disturbing, given the history of stellar performance in the other HGST drives we employ. Let’s see where we are in a couple of quarters.
  • “Try not. Do or do not. There is no try.”6 The saga continues for the 14TB Seagate drives (model: ST14000NM0138). When we last saw this drive, the Seagate/Dell/Backblaze alliance continued to work diligently to understand why the failure rate was stubbornly high. Unusual it is for this model, and the team has employed multiple firmware tweaks over the past several months with varying degrees of success. Patience.

“I like firsts. Good or bad, they’re always memorable.”7

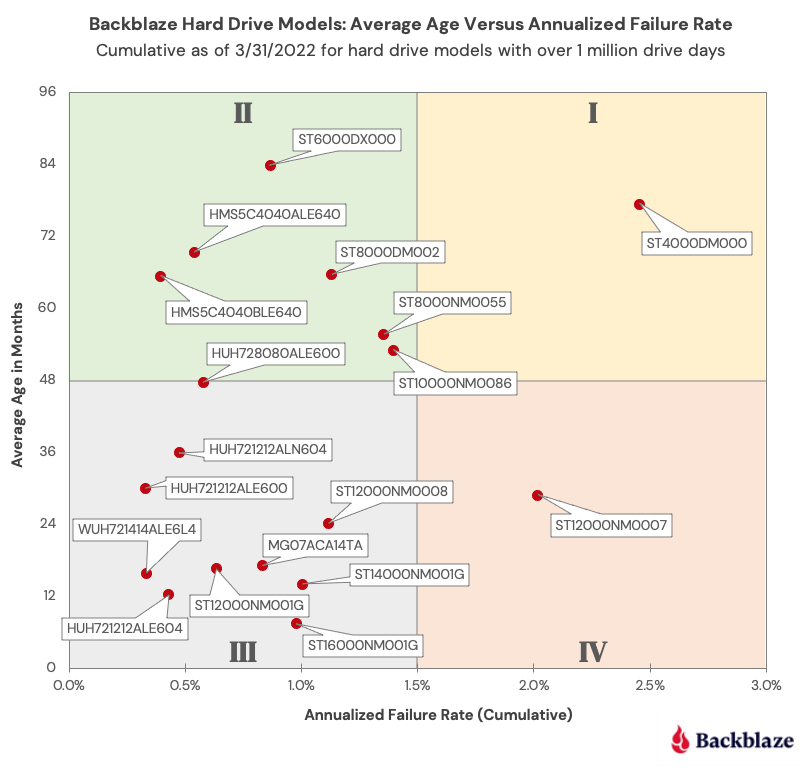
We have been delivering quarterly and annual Drive Stats reports since Q1 2015. Along the way, we have presented multiple different views of the data to help provide insights into our operational environment and the hard drives in that environment. Today we’d like to offer a different way to visualize comparing the average age of many of the different models we currently use versus the annualized failure rate of each of those drive models: the Drive Stats Failure Square:

“…many of the truths that we cling to depend on our viewpoint.”8

Each point on the Drive Stats Failure Square represents a hard drive model in operation in our environment as of 3/31/2022 and lies at the intersection of the average age of that model and the annualized failure rate of that model. We only included drive models with a lifetime total of one million drive days or with a confidence interval of all drive models included being 0.6 or less.

The resulting chart is divided into four equal quadrants, which we will categorize as follows:

  • Quadrant I: Retirees. Drives in this quadrant have performed well, but given their current high AFR level they are first in line to be replaced.
  • Quadrant II: Winners. Drives in this quadrant have proven themselves to be reliable over time. Given their age, we need to begin planning for their replacement, but there is no need to panic.
  • Quadrant III: Challengers. Drives in this quadrant have started off on the right foot and don’t present any current concerns for replacement. We will continue to monitor these drive models to ensure they stay on the path to the winners quadrant instead of sliding off to quadrant IV.
  • Quadrant IV: Muddlers. Drives in this quadrant should be replaced if possible, but they can continue to operate if their failure rates remain at their current rate. The redundancy and durability built into the Backblaze platform protects data from the higher failure rates of the drives in this quadrant. Still, these drives are a drain on data center and operational resources.

“Difficult to see; always in motion is the future.”9

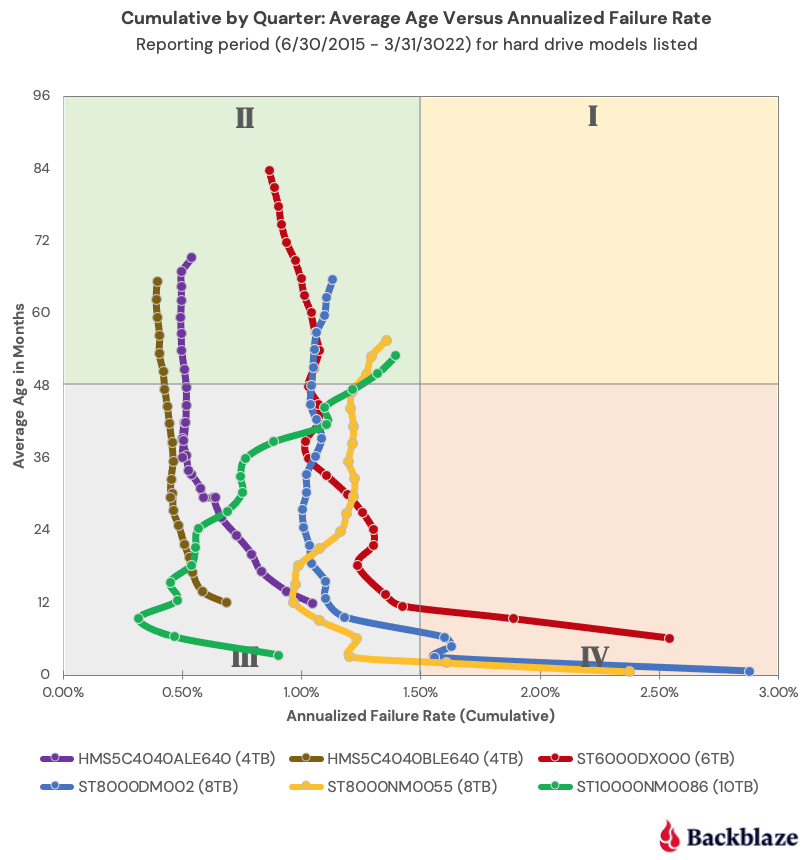
Obviously, the Winners quadrant is the desired outcome for all of the drive models we employ. But every drive basically starts out in either quadrant III or IV and moves from there over time. The chart below shows how the drive models in quadrant II (Winners) got there.

“Your focus determines your reality.”10

Each drive model is represented by a snake-like line (Snakes on a plane!?) which shows the AFR of the drive model as the average age of the fleet increased over time. Interestingly, each of the six models currently in quadrant II has a different backstory. For example, who could have predicted that the 6TB Seagate drive (model: ST6000DX000) would have ended up in the Winners quadrant given its less than auspicious start in 2015. And that drive was not alone; the 8TB Seagate drives (models: ST8000NM0055 and ST8000DM002) experienced the same behavior.

This chart can also give us a visual clue as to the direction of the annualized failure rate over time for a given drive model. For example, the 10TB Seagate drive seems more interested in moving into the Retiree quadrant over the next quarter or so and as such its replacement priority could be increased.

“In my experience, there’s no such thing as luck.”11

In the quarterly Drive Stats table at the start of this report, there is some element of randomness which can affect the results. For example, whether a drive is reported as a failure on the 31st of March at 11:59 p.m. or at 12:01 a.m. on April 1st can have a small effect on the results. Still, the quarterly results are useful in surfacing unexpected failure rate patterns, but the most accurate information regarding a given drive model is captured in the lifetime annualized failures rates.

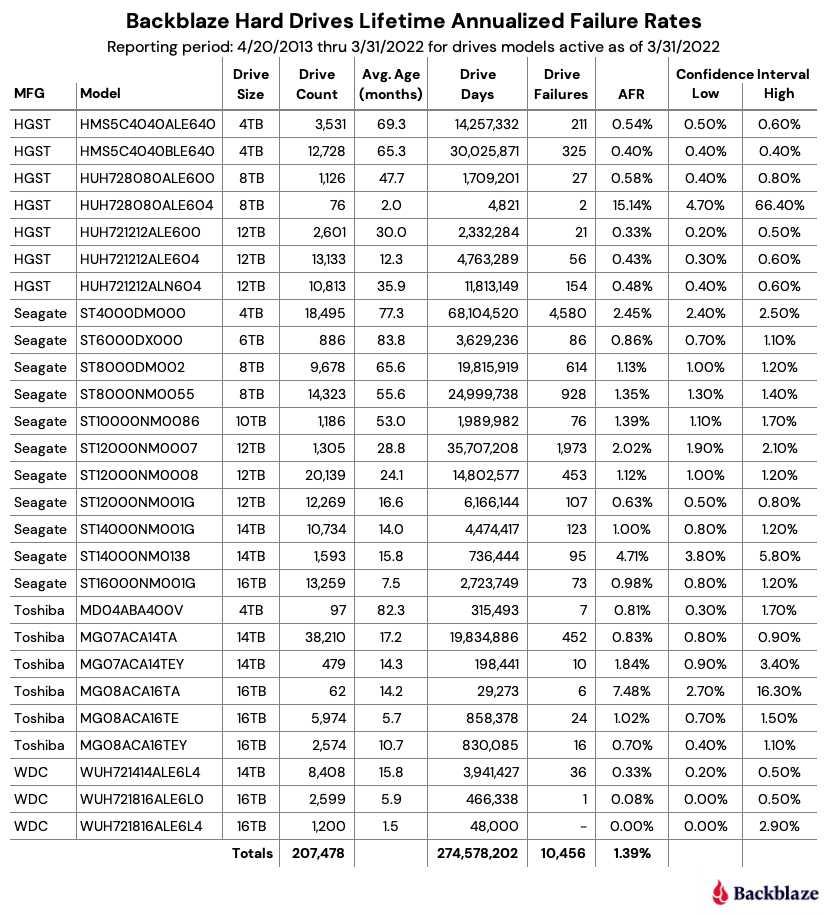
The chart below shows the lifetime annualized failure rates of all the drive models in production as of March 31, 2022.

“You have failed me for the last time…”12

The lifetime annualized failure rate for all the drives listed above is 1.39%. That was down from 1.40% at the end of 2021. One year ago (3/31/2021), the lifetime AFR was 1.49%.

When looking at the lifetime failure table above, any drive models with less than 500,000 drive days or a confidence interval greater than 1.0% do not have enough data to be considered an accurate portrayal of their performance in our environment. The 8TB HGST drives (model: HUH728080ALE604) and the 16TB Toshiba drives (model: MG08ACA16TA) are good examples of such drives. We list these drives for completeness as they are also listed in the quarterly table at the beginning of this review.

Given the criteria above regarding drive days and confidence intervals, the best performing drive in our environment for each manufacturer is:

  • HGST: 12TB, model: HUH721212ALE600. AFR: 0.33%
  • Seagate: 12TB model: ST12000NM001G. AFR 0.63%
  • WDC: 14TB model: WUH721414ALE6L4. AFR: 0.33%
  • Toshiba: 16TB model: MG08ACA16TEY. AFR 0.70%

“I never ask that question until after I’ve done it!”13

For those of you interested in how we produce this report, the data we used is available on our Hard Drive Test Data webpage. You can download and use this data for free for your own purpose. All we ask are three things: 1) you cite Backblaze as the source if you use the data, 2) you accept that you are solely responsible for how you use the data, and 3) you do not sell the data itself to anyone; it is free.

Good luck and let us know if you find anything interesting. And no, it’s not a trap.

Quotes Referenced

  1. “The greatest teacher, failure is.”—Yoda, “The Last Jedi”
  2. “Always pass on what you have learned.”—Yoda, “Return of the Jedi”
  3. “The Force is strong with this one.”—Darth Vader, “A New Hope”
  4. “Great, kid, don’t get cocky.”—Han Solo, “A New Hope”
  5. “I find your lack of faith disturbing.”—Darth Vader, “A New Hope”
  6. “Try not. Do or do not. There is no try.”—Yoda, “The Empire Strikes Back”
  7. “I like firsts. Good or bad, they’re always memorable.”—Ahsoka Tano, “The Mandalorian”
  8. “…many of the truths that we cling to depend on our viewpoint.”—Obi-Wan Kenobi, “Return of the Jedi”
  9. “Difficult to see; always in motion is the future.”—Yoda, “The Empire Strikes Back”
  10. “Your focus determines your reality.”—Qui-Gon Jinn, “The Phantom Menace”
  11. “In my experience, there’s no such thing as luck.”—Obi-Wan Kenobi, “A New Hope”
  12. “You have failed me for the last time…”—Darth Vader, “The Empire Strikes Back”
  13. “I never ask that question until after I’ve done it!”—Han Solo, “The Force Awakens”

The post Backblaze Drive Stats for Q1 2022 appeared first on Backblaze Blog | Cloud Storage & Cloud Backup.

[$] A memory-folio update

Post Syndicated from original https://lwn.net/Articles/893512/

The folio project is not yet two years old,
but it has already resulted in
significant changes to the kernel’s memory-management and filesystem
layers. While much work has been done, quite a bit remains. In the
opening plenary session at the 2022 Linux Storage,
Filesystem, Memory-management and BPF Summit
, Matthew Wilcox provided
an update on the folio transition and led a discussion on the work that
remains to be done.

Security updates for Wednesday

Post Syndicated from original https://lwn.net/Articles/893839/

Security updates have been issued by Debian (openjdk-17), Fedora (chromium and suricata), Oracle (mariadb:10.5), SUSE (amazon-ssm-agent, containerd, docker, java-11-openjdk, libcaca, libwmf, pcp, ruby2.5, rubygem-puma, webkit2gtk3, and xen), and Ubuntu (linux-raspi).

How to unit test and deploy AWS Glue jobs using AWS CodePipeline

Post Syndicated from Praveen Kumar Jeyarajan original https://aws.amazon.com/blogs/devops/how-to-unit-test-and-deploy-aws-glue-jobs-using-aws-codepipeline/

This post is intended to assist users in understanding and replicating a method to unit test Python-based ETL Glue Jobs, using the PyTest Framework in AWS CodePipeline. In the current practice, several options exist for unit testing Python scripts for Glue jobs in a local environment. Although a local development environment may be set up to build and unit test Python-based Glue jobs, by following the documentation, replicating the same procedure in a DevOps pipeline is difficult and time consuming.

Unit test scripts are one of the initial quality gates used by developers to provide a high-quality build. One must reuse these scripts during regression testing to make sure that all of the existing functionality is intact, and that new releases don’t disrupt key application functionality. The majority of the regression test suites are expected to be integrated with the DevOps Pipeline for its execution. Unit testing an application code is a fundamental task that evaluates  whether each (unit) code written by a programmer functions as expected. Unit testing of code provides a mechanism to determine that software quality hasn’t been compromised. One of the difficulties in building Python-based Glue ETL tasks is their ability for unit testing to be incorporated within DevOps Pipeline, especially when there are modernization of mainframe ETL process to modern tech stacks in AWS

AWS Glue is a serverless data integration service that makes it easy to discover, prepare, and combine data for analytics, machine learning (ML), and application development. AWS Glue provides all of the capabilities needed for data integration. This means that you can start analyzing your data and putting it to use in minutes rather than months. AWS Glue provides both visual and code-based interfaces to make data integration easier.

Prerequisites

GitHub Repository

Amazon ECR Image URI for Glue Library

Solution overview

A typical enterprise-scale DevOps pipeline is illustrated in the following diagram. This solution describes how to incorporate the unit testing of Python-based AWS Glue ETL processes into the AWS DevOps Pipeline.

Figure 1 Solution Overview

The GitHub repository aws-glue-jobs-unit-testing has a sample Python-based Glue job in the src folder. Its associated unit test cases built using the Pytest Framework are accessible in the tests folder. An AWS CloudFormation template written in YAML is included in the deploy folder. As a runtime environment, AWS CodeBuild utilizes custom container images. This feature is used to build a project utilizing Glue libraries from Public ECR repository, that can run the code package to demonstrate unit testing integration.

Solution walkthrough

Time to read  7 min
Time to complete  15-20 min
Learning level  300
Services used
AWS CodePipeline, AWS CodeCommit, AWS CodeBuild, Amazon Elastic Container Registry (Amazon ECR) Public Repositories, AWS CloudFormation

The container image at the Public ECR repository for AWS Glue libraries includes all of the binaries required to run PySpark-based AWS Glue ETL tasks locally, as well as unit test them. The public container repository has three image tags, one for each AWS Glue version supported by AWS Glue. To demonstrate the solution, we use the image tag glue_libs_3.0.0_image_01 in this post. To utilize this container image as a runtime image in CodeBuild, copy the Image URI corresponding to the image tag that you intend to use, as shown in the following image.

Figure 2 Select Glue Library from Public ECR

The aws-glue-jobs-unit-testing GitHub repository contains a CloudFormation template, pipeline.yml, which deploys a CodePipeline with CodeBuild projects to create, test, and publish the AWS Glue job. As illustrated in the following, use the copied image URL from Amazon ECR public to create and test a CodeBuild project.

  TestBuild:
    Type: AWS::CodeBuild::Project
    Properties:
      Artifacts:
        Type: CODEPIPELINE
      BadgeEnabled: false
      Environment:
        ComputeType: BUILD_GENERAL1_LARGE
        Image: "public.ecr.aws/glue/aws-glue-libs:glue_libs_3.0.0_image_01"
        ImagePullCredentialsType: CODEBUILD
        PrivilegedMode: false
        Type: LINUX_CONTAINER
      Name: !Sub "${RepositoryName}-${BranchName}-build"
      ServiceRole: !GetAtt CodeBuildRole.Arn  

The pipeline performs the following operations:

  1. It uses the CodeCommit repository as the source and transfers the most recent code from the main branch to the CodeBuild project for further processing.
  2. The following stage is build and test, in which the most recent code from the previous phase is unit tested and the test report is published to CodeBuild report groups.
  3. If all of the test results are good, then the next CodeBuild project is launched to publish the code to an Amazon Simple Storage Service (Amazon S3) bucket.
  4. Following the successful completion of the publish phase, the final step is to deploy the AWS Glue task using the CloudFormation template in the deploy folder.

Deploying the solution

Set up

Now we’ll deploy the solution using a CloudFormation template.

  • Using the GitHub Web, download the code.zip file from the aws-glue-jobs-unit-testing repository. This zip file contains the GitHub repository’s src, tests, and deploy folders. You may also create the zip file yourself using command-line tools, such as git and zip. To create the zip file on Linux or Mac, open the terminal and enter the following commands.
git clone https://github.com/aws-samples/aws-glue-jobs-unit-testing.git
cd aws-glue-jobs-unit-testing
git checkout master
zip -r code.zip src/ tests/ deploy/
  • Sign in to the AWS Management Console and choose the AWS Region of your choice.
  • Create an Amazon S3 bucket. For more information, see How Do I Create an S3 Bucket? in the AWS documentation.
  • Upload the downloaded zip package, code.zip, to the Amazon S3 bucket that you created.

In this example, I created an Amazon S3 bucket named aws-glue-artifacts-us-east-1 in the N. Virginia (us-east-1) Region, and used the console to upload the zip package from the GitHub repository to the Amazon S3 bucket.

Figure 3 Upload code.zip file to S3 bucket

Creating the stack

  1.  In the CloudFormation console, choose Create stack.
  2. On the Specify template page, choose Upload a template file, and then choose the pipeline.yml template, downloaded from the GitHub repository

Figure 4 Upload pipeline.yml template to create a new CloudFormation stack

  1. Specify the following parameters:.
  • Stack name: glue-unit-testing-pipeline (Choose a stack name of your choice)
  • ApplicationStackName: glue-codepipeline-app (This is the name of the CloudFormation stack that will be created by the pipeline)
  • BranchName: master (This is the name of the branch to be created in the CodeCommit repository to check-in the code from the Amazon S3 bucket zip file)
  • BucketName: aws-glue-artifacts-us-east-1 (This is the name of the Amazon S3 bucket that contains the zip file. This bucket will also be used by the pipeline for storing code artifacts)
  • CodeZipFile: lambda.zip (This is the key name of the sample code Amazon S3 object. The object should be a zip file)
  • RepositoryName: aws-glue-unit-testing (This is the name of the CodeCommit repository that will be created by the stack)
  • TestReportGroupName: glue-unittest-report (This is the name of the CodeBuild test report group that will be created to store the unit test reports)

Figure 5 Fill parameters for stack creation

  1. Choose Next, and again Next.
  1. On the Review page, under Capabilities, choose the following options:
  • I acknowledge that CloudFormation might create IAM resources with custom names.

Figure 6 Acknowledge IAM roles creation

  1. Choose Create stack to begin the stack creation process. Once the stack creation is complete, the resources that were created are displayed on the Resources tab. The stack creation takes approximately 5-7 minutes.

Figure 7 Successful completion of stack creation

The stack automatically creates a CodeCommit repository with the initial code checked-in from the zip file uploaded to the Amazon S3 bucket. Furthermore, it creates a CodePipeline view using the CodeCommit repository as the source. In the above example, the CodeCommit repository is aws-glue-unit-test, and the pipeline is aws-glue-unit-test-pipeline.

Testing the solution

To test the deployed pipeline, open the CodePipeline console and select the pipeline created by the CloudFormation stack. Select the Release Change button on the pipeline page.

Figure 8 Choose Release Change on pipeline page

The pipeline begins its execution with the most recent code in the CodeCommit repository.

When the Test_and_Build phase is finished, select the Details link to examine the execution logs.

Figure 9 Successfully completed the Test_and_Build stage

Select the Reports tab, and choose the test report from Report history to view the unit execution results.

Figure 10 Test report from pipeline execution

Finally, after the deployment stage is complete, you can see, run, and monitor the deployed AWS Glue job on the AWS Glue console page. For more information, refer to the Running and monitoring AWS Glue documentation

Figure 11 Successful pipeline execution

Cleanup

To avoid additional infrastructure costs, make sure that you delete the stack after experimenting with the examples provided in the post. On the CloudFormation console, select the stack that you created, and then choose Delete. This will delete all of the resources that it created, including CodeCommit repositories, IAM roles/policies, and CodeBuild projects.

Summary

In this post, we demonstrated how to unit test and deploy Python-based AWS Glue jobs in a pipeline with unit tests written with the PyTest framework. The approach is not limited to CodePipeline, and it can be used to build up a local development environment, as demonstrated in the Big Data blog. The aws-glue-jobs-unit-testing GitHub repository contains the example’s CloudFormation template, as well as sample AWS Glue Python code and Pytest code used in this post. If you have any questions or comments regarding this example, please open an issue or submit a pull request.

Authors:

Praveen Kumar Jeyarajan

Praveen Kumar Jeyarajan is a PraveenKumar is a Senior DevOps Consultant in AWS supporting Enterprise customers and their journey to the cloud. He has 11+ years of DevOps experience and is skilled in solving myriad technical challenges using the latest technologies. He holds a Masters degree in Software Engineering. Outside of work, he enjoys watching movies and playing tennis.

Vaidyanathan Ganesa Sankaran

Vaidyanathan Ganesa Sankaran is a Sr Modernization Architect at AWS supporting Global Enterprise customers on their journey towards modernization. He is specialized in Artificial intelligence, legacy Modernization and Cloud Computing. He holds a Masters degree in Software Engineering and has 12+ years of Modernization experience. Outside work, he loves conducting training sessions for college grads and professional starter who wants to learn cloud and AI. His hobbies are playing tennis, philately and traveling.

New Sophisticated Malware

Post Syndicated from Bruce Schneier original https://www.schneier.com/blog/archives/2022/05/new-sophisticated-malware.html

Mandiant is reporting on a new botnet.

The group, which security firm Mandiant is calling UNC3524, has spent the past 18 months burrowing into victims’ networks with unusual stealth. In cases where the group is ejected, it wastes no time reinfecting the victim environment and picking up where things left off. There are many keys to its stealth, including:

  • The use of a unique backdoor Mandiant calls Quietexit, which runs on load balancers, wireless access point controllers, and other types of IoT devices that don’t support antivirus or endpoint detection. This makes detection through traditional means difficult.
  • Customized versions of the backdoor that use file names and creation dates that are similar to legitimate files used on a specific infected device.
  • A live-off-the-land approach that favors common Windows programming interfaces and tools over custom code with the goal of leaving as light a footprint as possible.
  • An unusual way a second-stage backdoor connects to attacker-controlled infrastructure by, in essence, acting as a TLS-encrypted server that proxies data through the SOCKS protocol.

[…]

Unpacking this threat group is difficult. From outward appearances, their focus on corporate transactions suggests a financial interest. But UNC3524’s high-caliber tradecraft, proficiency with sophisticated IoT botnets, and ability to remain undetected for so long suggests something more.

From Mandiant:

Throughout their operations, the threat actor demonstrated sophisticated operational security that we see only a small number of threat actors demonstrate. The threat actor evaded detection by operating from devices in the victim environment’s blind spots, including servers running uncommon versions of Linux and network appliances running opaque OSes. These devices and appliances were running versions of operating systems that were unsupported by agent-based security tools, and often had an expected level of network traffic that allowed the attackers to blend in. The threat actor’s use of the QUIETEXIT tunneler allowed them to largely live off the land, without the need to bring in additional tools, further reducing the opportunity for detection. This allowed UNC3524 to remain undetected in victim environments for, in some cases, upwards of 18 months.

299 experiments from young people run on the ISS in Astro Pi Mission Space Lab 2021/22

Post Syndicated from Sam Duffy original https://www.raspberrypi.org/blog/299-experiments-young-people-iss-astro-pi-mission-space-lab-2021-22/

We and our partners at ESA Education are excited to announce that 299 teams have achieved flight status in Mission Space Lab of the 2021/22 European Astro Pi Challenge. This means that these young people’s programs are the first ever to run on the two upgraded Astro Pi units on board the International Space Station (ISS).

Two Astro Pi units on board the International Space Station.

Mission Space Lab gives teams of young people up to age 19 the opportunity to design and conduct their own scientific experiments that run on board the ISS. It’s an eight-month long activity that follows the European school year. The exciting hardware upgrades inspired a record number of young people to send us their Mission Space Lab experiment ideas.

Logo of Mission Space Lab, part of the European Astro Pi Challenge.

Teams who want to take on Mission Space Lab choose between two themes for their experiments, investigating either ‘Life in space’ or ‘Life on Earth’. From this year onwards, thanks to the new Astro Pi hardware, teams can also choose to use new sensors and a Coral machine learning accelerator during their experiment time.

Investigating life in space

Using the Astro Pi units’ sensors, teams can investigate life inside the Columbus module of the ISS. This year, 71 ‘Life in space’ experiments are running on the Astro Pi units. The 71 teams are investigating a wide range of topics: for example, how the Earth’s magnetic field is experienced on the ISS in space, how the environmental conditions that the astronauts experience compare with those on Earth beneath the ISS on its orbit, or whether the conditions in the ISS might be suitable for other lifeforms, such as plants or bacteria.

The mark 2 Astro Pi units spin in microgravity on the International Space Station.

For ‘Life in space’ experiments, teams can collect data about factors such as the colour and intensity of cabin light (using the new colour and luminosity sensor included in the upgraded hardware), astronaut movement in the cabin (using the new PIR sensor), and temperature and humidity (using the Sense HAT add-on board’s standard sensors).

Investigating life on Earth

Using the camera on an Astro Pi unit when it’s positioned to view Earth from a window of the ISS, teams can investigate features on the Earth’s surface. This year, for the first time, teams had the option to use visible-light instead of infrared (IR) photography, thanks to the new Astro Pi cameras.

An Astro Pi unit at a window on board the International Space Station.

228 teams’ ‘Life on Earth’ experiments are running this year. Some teams are using the Astro Pis’ sensors to determine the precise location of the ISS when images are captured, to identify whether the ISS is flying over land or sea, or which country it is passing over. Other teams are using IR photography to examine plant health and the effects of deforestation in different regions. Some teams are using visible-light photography to analyse clouds, calculate the velocity of the ISS, and classify biomes (e.g. desert, forest, grassland, wetland) it is passing over. The new hardware available from this year onward has helped to encourage 144 of the teams to use machine learning techniques in their experiments.

Testing, testing, testing

We received 88% more idea submissions for Mission Space Lab this year compared to last year: during Phase 1, 799 teams sent us their experiment ideas. We invited 502 of the teams to proceed to Phase 2 based on the quality of their ideas. 386 teams wrote their code and submitted computer programs for their experiments during Phase 2 this year. Achieving flight status, and thus progressing to Phase 3 of Mission Space Lab, is really a huge accomplishment for the 299 successful teams.

Three replica Astro Pi units on a wooden shelf.
Three replica Astro Pi units run tests on the Mission Space Lab programs submitted by young people.

For us, Phase 2 involved putting every team’s program through a number of tests to make sure that it follows experiment rules, doesn’t compromise the safety and security of the ISS, and will run without errors on the Astro Pi units. Testing means that April is a very busy time for us in the Astro Pi team every year. We run these tests on a number of exact replicas of the new Astro Pis, including a final test to run every experiment that has passed every test for the full 3 hours allotted to each team. The 299 experiments with flight status will run on board the ISS for over 5 weeks in total during Phase 3, and once they have started running, we can’t rely on astronaut intervention to resolve issues. So we have to make sure that all of the programs will run without any problems.

Part of the South Island (Te Waipounamu) of New Zealand (Aotearoa), photographed from the International Space Station using an Astro Pi unit.
The South Island (Te Waipounamu) of New Zealand (Aotearoa), photographed from the International Space Station using an Astro Pi unit. Click to enlarge.

Thanks to the team at ESA, we are delighted that 67 more Mission Space Lab experiments are running on the ISS this year compared to last year. In fact, teams’ experiments using the Astro Pi units are underway right now!

The 299 teams awarded flight status this year represent 23 countries and 1205 young people, with 32% female participants and an average age of 15. Spain has the most teams with experiments progressing to Phase 3 (38), closely followed by the UK (34), Italy (27), Romania (23), and Greece (22).

Four photographs of regions of the Earth taken on the International Space Station using an Astro Pi unit.
Four photographs of the Earth taken on the International Space Station using an Astro Pi unit. Click to enlarge.

Unfortunately, it isn’t possible to run every Mission Space Lab experiment submitted, as there is only limited time for the Astro Pis to be positioned in the ISS window. We wish we could run every experiment that is submitted, but unfortunately time on the ISS, especially on the nadir window, is limited. Eliminating programs was very difficult because of the high quality of this year’s submissions. Many unsuccessful teams’ programs were eliminated based on very small issues. 87 teams submitted programs this year which did not pass testing and so could not be awarded flight status.

The teams whose experiments are not progressing to Phase 3 should still be very proud to have designed experiments that passed Phase 1, and to have made a Phase 2 submission. We recognise how much work all Mission Space Lab teams have done, and we hope to see you again in next year’s Astro Pi Challenge.

What’s next?

Once the programs for all the experiments have run, we will send the teams the data collected by their experiments for Phase 4. In this final phase of Mission Space Lab, teams analyse their data and write a short report to describe their findings. Based on these reports, the ESA Education and Raspberry Pi Foundation teams will determine the winner of this year’s Mission Space Lab. The winning and highly commended teams will receive special prizes.

Congratulations to all Mission Space Lab teams who’ve achieved flight status! We are really looking forward to reading your reports.

Logo of the European Astro Pi Challenge.

The post 299 experiments from young people run on the ISS in Astro Pi Mission Space Lab 2021/22 appeared first on Raspberry Pi.

Embracing a Docs-as-Code approach

Post Syndicated from Grab Tech original https://engineering.grab.com/doc-as-code

The Docs-as-Code concept has been gaining traction in the past few years as more tech companies start implementing this approach. One of the most widely-known examples is Spotify, that ​​uses Docs-as-Code to publish documentation in an internal developer portal.

Since the start of 2021, Grab has also adopted a Docs-as-Code approach to improve our technical documentation. Before we talk about how this is done at Grab, let’s explain what this concept really means.

What is Docs-as-Code?

Docs-as-Code is a mindset of creating and maintaining technical documentation. The goal is to empower engineers to write technical documentation frequently and keep it up to date by integrating with their tools and processes.

This means that technical documentation is placed in the same repository as the code, making it easier for engineers to write and update. Next, we’ll go through the motivations behind this initiative.

Why embark on this journey?

After speaking to Grab engineers, we found that some of their biggest challenges are around finding and writing documentation. Like many other companies on the same journey, Grab is rather big and our engineers are split into many different teams. Within each team, technical documentation can be stored on different platforms and in different formats, e.g. Google drive documents, text files, etc. This makes it hard to find relevant information, especially if you are trying to find another team’s documentation.

On top of that, we realised that the documentation process is disconnected from an engineer’s everyday activities, making technical documentation an awkward afterthought. This means that even if people could find the information, there was a good chance that it would not be up to date.

To address these issues, we need a centralised platform, a single source of truth, so that people can find and discover technical documentation easily. But first, we need to change how we write technical documentation. This is where Docs-as-Code comes in.  

How does Docs-as-Code solve the problem?

With Docs-as-Code, technical documentation is:

  • Written in plaintext.
  • Editable in a code editor.
  • Stored in the same repository as the source code so it’s easier to update docs whenever a code change is committed.
  • Published on a central platform.

The idea is to consolidate all technical documentation on a central platform, making it easier to discover and find content by using an easy-to-navigate information architecture and targeted search.

How is Grab embracing Docs-as-Code?

We’ve developed an internal developer portal that simplifies the process of writing, reviewing and publishing technical documentation.

Here’s a brief overview of the process:

  1. Create a dedicated docs folder in a Git repository.
  2. Push Markdown files into the docs folder.
  3. Configure the developer portal to publish docs from the respective code repository.

The latest version of the documentation will automatically be built and published in the developer portal.

Point multiplier
Simplified documentation process

This way, technical documentation is closer to the source code and integrated into the code development process. Writing and updating technical documentation becomes part of writing code, and this encourages engineers to keep documentation updated.

Measuring success

Whenever there’s a change throughout big organisations like Grab, it can be tough to implement. But thankfully, our engineers recognised the importance of improving documentation and making it easier to maintain or update.

We surveyed our users and here’s what some have said about our Docs-as-Code initiative:

“[W]ith the doc and source code in one place, test backend engineers can now make doc changes via standard code review process and re-use the same content for CLI helper message and documentation.” – Kang Yaw Ong, Test Automation – Engineering Manager

“[Docs-as-Code] is a great initiative, as it keeps documentation in line and up-to-date with the development of a project. Managing documentation using a version control system and the same tools to handle merges and conflicts reduces overhead and friction in an engineer’s workflow.” – Eugene Chiang, Foundations – Engineering Manager

Progress and future optimisations

Since we first started the Docs-as-Code initiative in Grab, we’ve made a lot of progress in terms of adoption – approximately 80% of Grab services will have their technical documentation on the internal portal by April 2022.

We’ve also improved overall user experience by enhancing stability and performance, improving navigation and content formatting, and enabling feedback. But it doesn’t stop there; we are continuously improving the internal portal and providing more features for our engineers.

Apart from technical documentation, we are also applying the Docs-as-Code approach to our technical training content. This means moving both self-paced and workshop training content to a centralised repository and providing engineers a single platform for all their learning needs.


Special thanks to the Tech Learning – Documentation team for their contributions to this blog post.


We are hiring!

We are looking for more technical content developers to join the team. If you’re keen on joining our Docs-as-Code journey and improving developer experience, check out our open listings in Singapore and Malaysia.

Join us in driving this initiative forward and making documentation more approachable for everyone!

Join us

Grab is the leading superapp platform in Southeast Asia, providing everyday services that matter to consumers. More than just a ride-hailing and food delivery app, Grab offers a wide range of on-demand services in the region, including mobility, food, package and grocery delivery services, mobile payments, and financial services across 428 cities in eight countries.

Powered by technology and driven by heart, our mission is to drive Southeast Asia forward by creating economic empowerment for everyone. If this mission speaks to you, join our team today!

Is Your Kubernetes Cluster Ready for Version 1.24?

Post Syndicated from Alon Berger original https://blog.rapid7.com/2022/05/03/is-your-kubernetes-cluster-ready-for-version-1-24/

Is Your Kubernetes Cluster Ready for Version 1.24?

Kubernetes rolled out Version 1.24 on May 3, 2022, as its first release of 2022. This version is packed with some notable improvements, as well as new and deprecated features. In this post, we will cover some of the more significant items on the list.

The Dockershim removal

The new release has caught the attention of most users, mainly due to the official removal of Dockershim, a built-in Container Runtime Interface (CRI) in the Kubelet codebase, which has been deprecated since v1.20.

Docker is essentially a user-friendly abstraction layer, created before Kubernetes was introduced. Docker isn’t compliant with CRI, which is why Dockershim was needed in the first place. However, upon discovering maintenance overhead and weak points involving Docker and containerd, it was decided to remove Docker completely, encouraging users to utilize other CRI-compliant runtimes.

Docker-produced images are still able to run with all other CRI compliant runtimes, as long as worker nodes are configured to support those runtimes and any node customizations are properly updated based on the environment and runtime requirements. The release team also published an FAQ article dedicated entirely to the Dockershim removal.

Better security with short-lived tokens

A major update in this release is the reduction of secret-based service account tokens. This is a big step toward improving the overall security of service account tokens, which until now remained valid as long as their respective service accounts lived.

Now, with a much shorter lifespan, these tokens are significantly less susceptible to security risks, preventing attackers from gaining access to the cluster and from leveraging multiple attack vectors such as privileged escalations and lateral movement.

Network Policy status

Network Policy resources are implemented differently by different Container Network Interface (CNI) providers and often apply certain features in a different order.

This can lead to a Network Policy not being honored by the current CNI provider — worst of all, without notifying the user about the situation.

In this version, a new subresource status is added that allows users to receive feedback on whether a NetworkPolicy and its features have been properly parsed and help them understand why a particular feature is not working.

This is another great example of how developers and operation teams can benefit from features like this one, alleviating the often involved pain with troubleshooting a Kubernetes network issue.

CSI volume health monitoring

Container Storage Interface (CSI) drivers can now load an external controller as a sidecar that will check for volume health, and they can also provide extra information in the NodeGetVolumeStats function that Kubelet already uses to gather information on the volumes.

In this version, the Volume Health information is exposed as kubelet VolumeStats metrics. The kubelet_volume_stats_health_status_abnormal metric will have a persistentvolumeclaim label with a value of “1” if the volume is unhealthy, or “0” otherwise.

Additional noteworthy changes in Kubernetes Version 1.24

A few other welcome changes include new features like implementing new changes to the kubelet agent, Kubernetes’ primary component that runs on each node. Dockershim-related CLI flags were removed due to its deprecation. Furthermore, the Dynamic Kubelet Configuration feature, which allows dynamic Kubelet configurations, has been officially removed in this version, after it was announced as deprecated in earlier versions. This removal aims to simplify code and to improve its reliability.

Furthermore, the newly added kubectl create token command allows easier creation and retrieval of tokens for the Kubernetes API access and control management, or SIG-Auth.

This new command significantly improves automation processes throughout the CI/CD pipelines and will accelerate roles-based access control (RBAC) policy changes as well as hardening TokenRequest endpoint validations.

Lastly, a useful added feature for cluster operators is to identify Windows pods at API admission level authoritatively. This can be crucial for managing Windows containers by applying better security policies and constraints based on the operating system.

The first release for 2022 mainly introduces improvements towards providing helpful feedback for users, reducing the attack surface and improving security posture all around. The official removal of Dockershim support will push organizations and users to adapt and align with infrastructure changes, moving forward with new technology developments in Kubernetes and the cloud in general.

Additional reading:

NEVER MISS A BLOG

Get the latest stories, expertise, and news about security today.

[$] An overview of structural pattern matching for Python

Post Syndicated from original https://lwn.net/Articles/893193/

Python’s match statement, which provides a long-sought C-like
switch statement—though it is far more than that—has now been part of the
language for more than six months. One of the authors of the series of Python
Enhancement Proposals (PEPs) that described the
feature, Brandt Bucher, came to PyCon 2022 in Salt Lake City, Utah to talk
about
the feature. He gave an overview of its history, some of its many-faceted
abilities, a bit about how it was implemented, and some thoughts on its
future, in a presentation on
April 29, which was the first day of talks for the conference.

MDR, MEDR, SOCaaS: Which Is Right for You?

Post Syndicated from Aaron Wells original https://blog.rapid7.com/2022/05/03/mdr-medr-socaas-which-is-right-for-you/

Getting the most from managed services

MDR, MEDR, SOCaaS: Which Is Right for You?

Even if a security team was given a blank check to spend whatever they wanted and hire however they wanted, it would still be a massive effort to build a detection and response (D&R) program tailored to that organization’s specific needs. Thankfully, the plethora of managed services options available can help with that problem.

But with multiple types of managed services providers out there, how do you know which type of services are right for your organization? How can you effectively interview providers, attempt to then construct a D&R suite with the right vendor, and simultaneously continue to fortify your security program against threats?

For an organization beginning the search for a managed services partner that can actually add value, there is some starter legwork that can be done. There are many approaches to managed services providers along the D&R vein, such as:

  • Managed Detection and Response (MDR)
  • Managed Endpoint Detection and Response (MEDR)
  • Managed Security Service Provider (MSSP)

That last one, MSSP, is a blanket term for a provider that can assist with many specialized services like outsourced Security Operations Center-as-a-service (SOCaaS), MDR, or management of security tools such as a security information and event management (SIEM), firewalls, vulnerability risk management, and more. Knowing all this, while looking for the right managed service it’s simply a fact that you’re going to talk to a lot of vendors. Each one of them can say they’ll help you boost security defenses – they’ll say they have great people, they use the best technology, and they have a process to ensure your success.

The challenge? Every vendor’s marketing material will begin to sound the same. What it really comes down to is determining which provider’s strategy is best suited for your program’s needs. Let’s take a closer look at these three types of managed services to help you decide the best fit for your organization.

MDR

An MDR provider works with a customer to gain visibility and complete coverage across the customer’s entire environment. This helps a security practitioner better see when and where malicious-looking activity may be taking place.

MDR providers help solve operational challenges by instantly becoming an extension of their customers’ teams – providing headcount and extending coverage to 24x7x365. An MDR partner can also provide expertise and technologies to help find attacker behavior quickly and stop it before it becomes a wider issue.

More and more companies are becoming the focus of targeted attacks – specific aggressions designed to infiltrate an individual organization’s defenses. An MDR provider becomes a partner in helping to identify a targeted threat (read: reputational threat), repair affected systems, and focus efforts into both taking down the threat and providing recommendations for making the affected system more secure in the future.

There are a lot of MDR providers that go beyond “throwing alerts over the fence” to let clients parse and triage themselves. These days more MDR providers are finding it worth their while – and their bottom lines – to become a more strategic partner to security organizations. They help further security initiatives, build cyber resilience, and work with clients to get deeper visibility in their threat landscapes by:

  • Providing post-incident investigational insights
  • Weeding out benign events and only reporting true positive threats
  • Providing tailored remediation and mitigation recommendations

The role of XDR

More recently, managed services providers (including Rapid7) have integrated extended detection and response (XDR) into their overarching MDR solutions. This creates a more powerful and proactive D&R process by:    

  • Recognizing there is no perimeter for data as it’s rushing back and forth from endpoints to clouds and beyond
  • Relieving security teams of steep analytical analysis so more of the focus is on threat hunting, as parsing alerts is automatically incorporated into threat intelligence
  • Curating high-fidelity detections and actionable telemetry to create efficient responses

These are all great benefits in extending what is possible with D&R and being proactive about extinguishing threats. However, MDR providers incorporating XDR into their approaches can’t simply add the letter “X” into the list of services and call it a day. XDR must help the organization actually gain control and visibility across its entire attack surface, from the nearest endpoint(s) to compromised user accounts, network traffic, cloud sources, and more.

When folded into a cohesive strategy that places emphasis on more proactive efforts, products like InsightIDR can be that solution that takes in telemetry from these disparate sources, correlates the data, and provides greater context to a potential threat.

MEDR

MEDR is a flavor of MDR that’s aligned more as an add-on management service that sits on top of endpoint-protection technology deployment. While MEDR does provide benefits like gaining visibility across wherever agents are set up, the EDR-centric approach won’t show the full story of a threat and its scope; an agent will simply tell the service provider what it gathers from the endpoint.  

Many breaches, however, do begin at the endpoint. Why? Attackers can easily bypass firewalls and all sorts of implemented security controls by compromising just one endpoint, such as a user’s laptop. From there, they can move throughout a network, scooping up valuable internal/external data and quickly ruining a company’s reputation in the process. Even if they’re quickly found, what have they gotten away with?

Thus, focusing on endpoints is important. That’s simply an indisputable fact. EDR-based services are powerful tools within a managed services program. They provide advantages like:

  • Prevention aspects with integrated endpoint prevention platform (EPP) agent capabilities, such as Antivirus (NGAV) and stopping malicious file execution
  • Detecting compromised endpoints earlier in the attack chain
  • File integrity monitoring (FIM) capabilities so your team is alerted on changes to specific files on a given endpoint (if you’re monitoring for yourself)

Focusing only on endpoints, however, does miss key network- and cloud-spanning analysis that can deliver important telemetry in the fight against potential threats. MEDR typically lacks the ability to analyze network-spanning data, user analytics, and compliance behaviors, glean actionable insights, and use them to effectively respond to an incident. So the downside comes with the engagement model. Some MEDR players will rely on the tech to do most of the heavy lifting. Prevention is there to stop the threat early.

But if the attacker gets past this point, the managed services provider might take automated actions to handle alerts using the EDR tool or, worse, pass that alert on to their client for them to manage the investigation and response efforts. (And if you think that automated EDR actions are great, you’re encouraged to read about the risks associated with taking automated response actions without human intervention.)

SOCaaS

SOCaaS. That’s a heavy acronym. But the concept of “security operations center-as-a-service” is trying to fill a heavy need of any modern company: the implementation and management of a strong and sound cybersecurity program. Any MSSP who offers a holistic SOCaaS option should be able to provide the bottom-line benefit of enabling security practitioners to focus time and energy on innovations in other parts of the business.  

A team of experts who can proactively defend, respond to threats, and provide (hopefully) round-the-clock support on behalf of a customer is probably the closest definition to SOCaaS that’s been bandied about in recent years. They can be a virtual SOC for a company, serving as a tactical console to enable team members to perform day-to-day tasks. They’ll also help teams strategize amidst bigger, longer-term security trends. So, in what ways can SOCaaS providers act as that strategic detection-and-response center for security teams?

  • Advanced SIEM functionality – In the midst of potentially billions of security events each day, a SIEM can help to prioritize the ones that truly deserve follow-up. A good SOCaaS provider will contextualize a proper response plan by taking into account user- and attacker-behavior analytics, performance metrics, incident response, and endpoint detection.
  • The human element – In the incredibly competitive marketplace for today’s security talent, it can be a daunting task for company leadership to source, develop, and retain an entire SOC of capable personnel. This is particularly true in efforts to maintain diversity in cybersecurity hiring. For example, Forrester says that women currently make up just 24% of security professionals worldwide.
  • Established processes – It typically takes nothing less than an extremely sophisticated process framework – established over a long period of time and testing – to be able to accurately identify, prioritize, and remediate a potential threat. It can be an incredible benefit to a business to forgo having to build out their own SOC with key personnel that – even when assembled – must take the necessary trial-and-error time to be able to work together efficiently and respond to threats effectively.  
  • D&R expertise – If the goal of engaging SOCaaS is not to augment an existing D&R program, then vetting the provider for their expertise in that area is incredibly important. It really comes down to what you’re looking to achieve; as mentioned above, a modern MDR provider will leverage multiple sources of telemetry to detect and respond to threats. But when fully outsourcing a SOC, it’s incumbent upon security personnel representing the customer to figure out how D&R expertise figures into the larger picture of outsourced SOC operations at the vendor organization.  
  • Communications – Beyond anything at all to do with technology and security, a SOCaaS provider must have great communication skills. How will the provider present information – especially about a potentially dire threat that could affect the company, its reputation, and its bottom line – to their client’s customer and executive team? Is there a dedicated point-of-contact (POC) or a team with whom you’ll be regularly working and interfacing?

If this is looking like a menu from which security teams looking for managed services can choose, that’s because it is. However, in this context we’re discussing SOCaaS as a fully outsourced arm of a business. For whatever reason – the need for speed/growth in other parts of the business, lack of recruitment power for talented security practitioners, etc. – a business may simply wish to staff a security “skeleton crew” who interfaces with the SOCaaS provider and relies on that provider to run, monitor, manage, and support all of the functionalities.  

Bottom line: Choose the managed security services partner that best fits your needs

If your security organization is considering a managed services provider, that means your team is most likely looking to offload tedious and/or technical operational tasks that your existing security team simply doesn’t have the hours in a day to manage. Or you might need some augmentation and expertise to help with round-the-clock coverage. It also means you’re ready to find a partner to provide deep analysis and actionable insights so you can find out:

  • What is going on, and…
  • Is it something the company should worry about?

After that, your specialized provider should be able to make recommendations on how to respond – or, better yet, take those actions on your behalf. Because at the end of the day, it all depends on the outcome(s) you’re looking to achieve. Turnkey D&R services while your team focuses on other important things? Simple endpoint monitoring from a traditional MSSP? Or, are you looking to farm out your SOC operations and let someone else deal with all things security, not just some things security?

For those looking for that more comprehensive solution targeted at strictly strengthening the D&R muscle, leveraging an MDR provider with XDR capabilities is the way to go.

It’s going to take some budget, sure. But most of the time that same budget is earmarked for a similar cost as one of an open headcount (depending on the size of the environment). The capital expenditure (CapEx) cost is relative – and oftentimes far more affordable – when compared to the ongoing operating expenses (OpEx) outlay it takes to hire, train, and build an in-house SOC program. Whichever outcome your team is focused on, managed services as a whole is an affordable way to help build a D&R program at scale.

Looking for even more analysis to help you make an informed managed services decision? Check out the 2022 MDR Buyer’s Guide from Rapid7, or contact us for more info.

Additional reading:

NEVER MISS A BLOG

Get the latest stories, expertise, and news about security today.

Top Amazon QuickSight features and updates launched Q1 2022

Post Syndicated from Mia Heard original https://aws.amazon.com/blogs/big-data/top-amazon-quicksight-features-and-updates-launched-q1-2022/

Amazon QuickSight is a serverless, cloud-based business intelligence (BI) service that brings data insights to your teams and end users through machine learning (ML) powered dashboards and data visualizations, which can be access via QuickSight or embedded in apps and portals that your users access. This post shares the top QuickSight features and updates launched in Q1 2022.

Amazon QuickSight Community

In the new Amazon QuickSight Community, you can ask and answer questions, network with and learn from other BI users from across the globe, access learning content, and stay up to date with what’s new on QuickSight all in one place!

Join the global QuickSight Community today!

Groups Management UI

QuickSight now provides a user interface to manage user groups, allowing admins to efficiently and easily manage user groups via the QuickSight admin console. Groups Management UI is available to administrators with access to QuickSight admin console pages via AWS Identity and Access Management (IAM) credentials.

To learn more, see Creating and managing groups in Amazon QuickSight.

Comparative and cumulative date and time calculations

Amazon QuickSight authors can now quickly implement advanced date/time calculations without having to use complicated row offsets or pre-computed columns. You can add these calculations in regular business reporting, trend analysis, and time series analysis.

To learn more about the new period functions and their capabilities in various use cases, see Add comparative and cumulative date/time calculations in Amazon QuickSight.

Rich text formatting on visual titles and subtitles 

QuickSight authors can now add rich context to their visuals by choosing from various formatting options like font type, size, style, color and style. You can also better organize the text by choosing from various alignment and ordering options. Visual titles and subtitles now also support hyperlinks as well as parameter-based dynamic text.

To learn more, see Formatting a visual title and subtitle.

Custom subtotals at all levels on pivot table

QuickSight allows you to customize how subtotals are displayed in pivot tables, with options for display at multiple levels and for both rows and columns.

To learn more, see Displaying Totals and Subtotals.

Auto refresh direct query controls

QuickSight now supports automatic refreshes of values displayed in drop-down, multi-select and other controls in dashboards that are in direct query mode. Values within controls are updated every 24 hours to ensure the data is automatically updated without any end-user intervention.

For further details, see Refreshing data in Amazon QuickSight.

Conclusion

QuickSight serves millions of dashboard views weekly, enabling data-driven decision-making in organizations of all sizes, including customers like the NFL, 3M, Accenture, and more.

To stay up to date on all things new with QuickSight, visit What’s New with Analytics!


About the Author

Mia Heard is a product marketing manager for Amazon QuickSight, AWS’ cloud-native, fully managed BI service.

Access Apache Livy using a Network Load Balancer on a Kerberos-enabled Amazon EMR cluster

Post Syndicated from Bharat Gamini original https://aws.amazon.com/blogs/big-data/access-apache-livy-using-a-network-load-balancer-on-a-kerberos-enabled-amazon-emr-cluster/

Amazon EMR is a cloud big data platform for running large-scale distributed data processing jobs, interactive SQL queries, and machine learning (ML) applications using open-source analytics frameworks such as Apache Spark, Apache Hive, and Presto. Amazon EMR supports Kerberos for authentication; you can enable Kerberos on Amazon EMR and put the cluster in a private subnet to maximize security.

To access the cluster, the best practice is to use a Network Load Balancer (NLB) to expose only specific ports, which are access-controlled via security groups. By default, the NLB prevents Kerberos ticket authentication to any Amazon EMR service.

Apache Livy is a service that enables easy interaction with a Spark cluster over a REST interface. It enables easy submission of Spark jobs or snippets of Spark code, synchronous or asynchronous result retrieval, as well as SparkContext management, all via a simple REST interface or an RPC client library.

In this post, we discuss how to provide Kerberos ticket access to Livy for external systems like Airflow and Notebooks using an NLB. You can apply this process to other Amazon EMR services beyond Livy, such as Trino and Hive.

Solution overview

The following are the high-level steps required:

  1. Create an EMR cluster with Kerberos security configuration.
  2. Create an NLB with required listeners and target groups.
  3. Update the Kerberos Key Distribution Center (KDC) to create a new service principal and keytab changes.
  4. Update the Livy configuration file.
  5. Verify Livy is accessible via the NLB.
  6. Run the Python Livy test case.

Prerequisites

The advanced configuration presented in this post assumes familiarity with Amazon EMR, Kerberos, Livy, Python and bash.

Create an EMR cluster

Create the Kerberos security configuration using the AWS Command Line Interface (AWS CLI) as follows (this creates the KDC on the EMR primary node):

aws emr create-security-configuration --name kdc-security-config --security-configuration '{
   "EncryptionConfiguration":{
      "InTransitEncryptionConfiguration":{
         "TLSCertificateConfiguration":{
            "CertificateProviderType":"PEM",
            "S3Object":"s3://${conf_bucket}/${certs.zip}"
         }
      },
      "AtRestEncryptionConfiguration":{
         "S3EncryptionConfiguration":{
            "EncryptionMode":"SSE-S3"
         }
      },
      "EnableInTransitEncryption":true,
      "EnableAtRestEncryption":true
   },
   "AuthenticationConfiguration":{
      "KerberosConfiguration":{
         "Provider":"ClusterDedicatedKdc",
         "ClusterDedicatedKdcConfiguration":{
            "TicketLifetimeInHours":24
         }
      }
   }
}'

It’s a security best practice to keep passwords in AWS Secrets Manager. You can use a bash function like the following as the argument to the --kerberos-attributes option so no passwords are stored in the launch script or command line. The function outputs the required JSON for the --kerberos-attributes option after retrieving the password from Secrets Manager.

krbattrs() { # Pull the KDC password from Secrets Manager without saving to disk or var
cat << EOF
  {
    "Realm": "EC2.INTERNAL",
    "KdcAdminPassword": "$(aws secretsmanager get-secret-value \
        --secret-id KDCpasswd  |jq -r .SecretString)"
  }
EOF
}

Create the cluster using the AWS CLI as follows:

aws emr create-cluster \
  --name "<your-cluster-name>" \
  --release-label emr-6.4.0 \
  --log-uri "s3://<your-log-bucket>" \
  --applications Name=Hive Name=Spark \
  --ec2-attributes "KeyName=<your-key-name>,SubnetId=<your-private-subnet>" \
  --instance-groups InstanceGroupType=MASTER,InstanceCount=1,InstanceType=m3.xlarge InstanceGroupType=CORE,InstanceCount=1,InstanceType=m3.xlarge \
  --security-configuration <kdc-security-config> \
  --kerberos-attributes $(krbattrs) \
  --use-default-roles

Create an NLB

Create an internet-facing NLB with TCP listeners in your VPC and subnet. An Internet-facing load balancer routes requests from clients to targets over the internet.  Conversely, an Internal NLB routes requests to targets using private IP addresses. For instructions, refer to Create a Network Load Balancer.

The following screenshot shows the listener details.

Create target groups and register the EMR primary instance (Livy3) and KDC instance (KDC3). For this post, these instances are the same; use the respective instances if KDC is running on a different instance.

The KDC and EMR security groups must allow the NLB’s private IP address to access ports 88 and 8998, respectively. You can find the NLB’s private IP address by searching the elastic network interfaces for the NLB’s name. For access control instructions, refer to this article on the knowledge center. Now that the security groups allow access, the NLB health check should pass, but Livy isn’t usable via the NLB until you make further changes (detailed in the following sections). The NLB is actually being used as a proxy to access Livy rather than doing any load balancing.

Update the Kerberos KDC

The KDC used by the Livy service must contain a new HTTP Service Principal Name (SPN) using the public NLB host name.

  • You can create the new principle from the EMR primary host using the full NLB public host name:
sudo kadmin.local addprinc HTTP/[email protected]

Replace the fully qualified domain name (FQDN) and Kerberos realm as needed. Ensure the NLB hostname is all lowercase.

After the new SPN exists, you create two keytabs containing that SPN. The first keytab is for the Livy service. The second keytab, which must use the same KVNO number as the first keytab, is for the Livy client.

  • Create Livy service keytab as follows:
sudo kadmin.local ktadd -norandkey -k /etc/livy2.keytab livy/[email protected]
sudo kadmin.local ktadd -norandkey -k /etc/livy2.keytab HTTP/[email protected]
sudo chown livy:livy /etc/livy2.keytab
sudo chmod 600 /etc/livy2.keytab
sudo -u livy klist -e -kt /etc/livy2.keytab

Note the key version number (KVNO) for the HTTP principal in the output of the preceding klist command. The KVNO numbers for the HTTP principal must match the KVNO numbers in the user keytab. Copy the livy2.keytab file to the EMR cluster Livy host if it’s not already there.

  • Create a user or client keytab as follows:
sudo kadmin.local ktadd -norandkey -k /var/tmp/user1.keytab [email protected]
sudo kadmin.local ktadd -norandkey -k /var/tmp/user1.keytab HTTP/[email protected]

Note the -norandkey option used when adding the SPN. That preserves the KVNO created in the preceding livy2.keytab.

  • Copy the user1.keytab to the client machine running the Python test case as user1.

Replace the FQDN, realm, and keytab path as needed.

Update the Livy configuration file

The primary change on the EMR cluster primary node running the Livy service is to the /etc/livy/conf/livy.conf file. You change the authentication principal that Livy uses, as well as the associated Kerberos keytab created earlier.

  • Make the following changes to the livy.conf file with sudo:
livy.server.auth.kerberos.principal = HTTP/[email protected]
livy.server.auth.kerberos.keytab = /etc/livy2.keytab

Don’t change the livy.server.launch.kerberos.* values.

  • Restart and verify the Livy service:
sudo systemctl restart livy-server
sudo systemctl status livy-server
  • Verify the Livy port is listening:
sudo lsof -Pi :8998

COMMAND PID USER FD TYPE DEVICE SIZE/OFF NODE NAME
java 30106 livy 196u IPv6 224853844 0t0 TCP *:8998 (LISTEN)

You can automate these steps (modifying the KDC and Livy config file) by adding a step to the EMR cluster. For more information, refer to Tutorial: Configure a cluster-dedicated KDC.

Verify Livy is accessible via the NLB

You can now use user1.keytab to authenticate against the Livy REST endpoint. Copy the user1.keytab you created earlier to the host and user login, which run the Livy test case. The host running the test case must be configured to connect to the modified KDC.

  • Create a Linux user (user1) on client host and EMR cluster.

If the client host has a terminal available that the user can run commands in, you can use the following commands to verify network connectivity to Livy before running the actual Livy Python test case.

  • Verify the NLB host and port are reachable (no data will be returned by the nc command):
$ nc -vz mynlb-a0ac4b07f9f7f0a1.elb.us-west-2.amazonaws.com 8998
Ncat: Version 7.50 ( https://nmap.org/ncat )
Ncat: Connected to 44.242.1.1:8998.
Ncat: 0 bytes sent, 0 bytes received in 0.02 seconds.
  • Create a TLS connection, which returns the server’s TLS certificate and TCP packets:
openssl s_client -connect mynlb-a0ac4b07f9f7f0a1.elb.us-west-2.amazonaws.com:8998

If the openssl command doesn’t return a TLS server certificate, the rest of the verification doesn’t succeed. You may have a proxy or firewall interfering with the connection. Investigate your network environment, resolve the issue, and repeat the openssl command to ensure connectivity.

  • Verify the Livy REST endpoint using curl. This verifies Livy REST but not Spark.
kinit -kt user1.keytab [email protected]
curl -k -u : --negotiate https://mynlb-a0ac4b07f9f7f0a1.elb.us-west-2.amazonaws.com:8998/sessions
{"from":0,"total":0,"sessions":[]}

curl arguments:
  "-k"   - Ignore secure connection check
  "-u :" - Use user name and passwords from environment
  "--negotiate" – Enables negotiate(SPNEGO) authentication

Run the Python Livy test case

The Livy test case is a simple Python3 script named livy-verify.py. You can run this script from a client machine to run Spark commands via Livy using the NLB. The script is as follows:

#!/usr/bin/env python3
# pylint: disable=invalid-name,no-member

"""
Verify Livy (REST) service using pylivy module, install req modules or use PEX:
  sudo yum install python3-devel
  sudo python3 -m pip install livy==0.8.0 requests==2.27.1 requests_gssapi==1.2.3
  https://pypi.org/project/requests-gssapi/

Kerberos authN implicitly uses TGT from kinit in users login env
"""

import shutil
import requests
from requests_gssapi import HTTPSPNEGOAuth
from livy import LivySession

# Disable ssl-warnings for self-signed certs when testing
requests.packages.urllib3.disable_warnings()

# Set the base URI(use FQDN and TLS) to target a Livy service
# Redefine remote_host to specify the remote Livy hostname to connect to
remote_host="mynlb-a0ac4b07f9f7f0a1.elb.us-west-2.amazonaws.com"
livy_uri = "https://" + remote_host + ":8998"

def livy_session():
    ''' Connect to Livy (REST) and run trivial pyspark command '''
    sconf = {"spark.master": "yarn", "spark.submit.deployMode": "cluster"}

    if shutil.which('kinit'):
        kauth = HTTPSPNEGOAuth()
        # Over-ride with an explicit user principal
        #kauth = HTTPSPNEGOAuth(principal="[email protected]")
        print("kinit found, kauth using Krb cache")
    else:
        kauth = None
        print("kinit NOT found, kauth set to None")

    with LivySession.create(livy_uri, verify=False, auth=kauth, spark_conf=sconf) as ls:
        ls.run("rdd = sc.parallelize(range(100), 2)")
        ls.run("rdd.take(3)")

    return 'LivySession complete'

def main():
    """ Starting point """
    livy_session()

if __name__ == '__main__':
    main()

The test case requires the new SPN to be in the user’s Kerberos ticket cache. To get the service principal into the Kerberos cache, use the kinit command with the -S option:

kinit -kt user1.keytab -S HTTP/[email protected] [email protected]

Note the SPN and the User Principal Name (UPN) are both used in the kinit command.

The Kerberos cache should look like the following code, as revealed by the klist command:

klist
Ticket cache: FILE:/tmp/krb5cc_1001
Default principal: [email protected]

Valid starting Expires Service principal
01/20/2022 01:38:06 01/20/2022 11:38:06 HTTP/[email protected]
renew until 01/21/2022 01:38:06

Note the HTTP service principal in the klist ticket cache output.

After the SPN is in the cache as verified by klist, you can run the following command to verify that Livy accepts the Kerberos ticket and runs the simple PySpark script. It generates a simple array, [0,1,2], as the output. The preceding Python script has been copied to the /var/tmp/user1/ folder in this example.

/var/tmp/user1/livy-verify.py
kinit found, kauth using TGT
[0, 1, 2]

It can take a minute or so to generate the result. Any authentication errors will happen in seconds. If the test in the new environment generates the preceding array, the Livy Kerberos configuration has been verified.

Any other client program that needs to have Livy access must be a Kerberos client of the KDC that generated the keytabs. It must also have a client keytab (such as user1.keytab or equivalent) and the service principal key in its Kerberos ticket cache.

In some environments, a simple kinit as follows may be sufficient:

kdestroy
kinit -kt user1.keytab [email protected]

Summary

If you have an existing EMR cluster running Livy and using Kerberos (even in a private subnet), you can add an NLB to connect to the Livy service and still authenticate with Kerberos. For simplicity, we used a cluster-dedicated KDC in this post, but you can use any KDC architecture option supported by Amazon EMR. This post documented all the KDC and Livy changes to make it work; the script and procedure have been run successfully in multiple environments. You can modify the Python script as needed and try running the verification script in your environment.

For more details about the systems and processes described in this post, refer to the following:


About the Authors

John Benninghoff is a AWS Professional Services Sr. Data Architect, focused on Data Lake architecture and implementation.

Bharat Gamini is a Data Architect focused on Big Data & Analytics at Amazon Web Services. He helps customers architect and build highly scalable, robust and secure cloud-based analytical solutions on AWS. Besides family time, he likes watching movies and sports.

Using Pupil Reflection in Smartphone Camera Selfies

Post Syndicated from Bruce Schneier original https://www.schneier.com/blog/archives/2022/05/using-pupil-reflection-in-smartphone-camera-selfies.html

Researchers are using the reflection of the smartphone in the pupils of faces taken as selfies to infer information about how the phone is being used:

For now, the research is focusing on six different ways a user can hold a device like a smartphone: with both hands, just the left, or just the right in portrait mode, and the same options in horizontal mode.

It’s not a lot of information, but it’s a start. (It’ll be a while before we can reproduce these results from Blade Runner.)

Research paper.

What Is a Yottabyte?

Post Syndicated from original https://www.backblaze.com/blog/what-is-a-yottabyte/

A Yottabyte, We Will Define

A yottabyte (technically pronounced “yadda-a-bite,” not “yoda-bite,” but it’s the eve of May the Fourth and we couldn’t pass up a “Star Wars” reference) is a phenomenally huge number of bytes. As a refresher, a byte is a unit of digital storage made up of eight bits (short for binary digit which are either a one or a zero).

The prefix “yotta” is the largest unit recognized by the International System of Units (SI). It denotes a factor of 1024 or 1,000,000,000,000,000,000,000,000 (that’s 24 zeroes in case your eyes are crossing) or one septillion (not reptilian).

To compare, the last time we defined a big number, we looked at an exabyte, which is only a measly 1018.

Put it in other units of measure, one yottabyte =

  • one million (1,000,000) zettabytes
  • one billion (1,000,000,000) exabytes
  • one trillion (1,000,000,000,000) petabytes
  • one quadrillion (1,000,000,000,000,000) terabytes
  • one quintillion (1,000,000,000,000,000,000) gigabytes
  • one sextillion (1,000,000,000,000,000,000,000) megabytes
  • one septillion (1,000,000,000,000,000,000,000,000) bytes

Feel the force of the zeroes, you will!

To give you some examples of what these fantastic figures actually look like, we put together this infographic with some approximations to bring a yottabyte into perspective. Keep in mind, right now, nothing is actually measured in yottabyte scale—it’s a theoretical number that’s just sitting around waiting for the future of supercomputing to be put to good use.

How Big is a Yottabyte

If you want to share this infographic on your site, copy the code below and paste into a Custom HTML block. 

<div><div><strong>What is a Yottabyte</strong></div><a href="https://www.backblaze.com/blog/what-is-a-yottabyte/"><img src="https://www.backblaze.com/blog/wp-content/uploads/2022/05/compressed-v2_Backblaze_How-Big-is-a-Yottabyte_IG-copy-1-scaled.jpg" border="0" alt="how big is a yottabyte infographic" title="how big is a yottabyte infographic" /></a></div>

”Judge Me by My Size, Do You?”

“And, well, you should not,” in the words of Yoda. Now that you know what a yottabyte looks like, let’s look at how much data storage Backblaze has under management.

Way back in 2010, we passed 10 petabytes of cloud backup data under management. It was a big deal at the time and we celebrated it on our blog. We made an infographic about it and thus began our infographic journey into the world of big numbers.

10 Petabytes Visualized

In 2012, we passed 75 petabytes and visualized the data as an iTunes gift card, as one does in 2012…

iTunes Card

Just five months after that, we passed 100 petabytes and compared it to Mt. Shasta…

Mt. Shasta

We were really on a roll—150 petabytes in early 2015, 200 before the end of that year. The storage was accelerating, and we couldn’t mark every milestone with a cool visual. That was, until we hit one exabyte in 2020.

How Big is an Exabyte?

And it hasn’t slowed down since then. Today, we have over two exabytes of data storage under management. We’re nowhere near a yottabyte yet, but like Yoda says, “Patience, you must have.”

Two exabytes today. A yottabyte tomorrow. Maybe? Someday? Either way, you know we’ll be there with a handy infographic whenever the day comes.

The post What Is a Yottabyte? appeared first on Backblaze Blog | Cloud Storage & Cloud Backup.

The deluge of digital attacks against journalists

Post Syndicated from Andie Goodwin original https://blog.cloudflare.com/the-deluge-of-digital-attacks-against-journalists/

The deluge of digital attacks against journalists

“A free press can, of course, be good or bad, but, most certainly without freedom, the press will never be anything but bad.”
Albert Camus

The deluge of digital attacks against journalists

Since its founding in 1993, World Press Freedom Day has been a time to acknowledge the importance of press freedom and call attention to concerted attempts to thwart journalists’ essential work. That mission is also embedded in the foundations of our Project Galileo, which has a goal of protecting free expression online — after the war in Ukraine started, applications to the project increased by 177% in March 2022 alone.

In Uruguay today, UNESCO’s World Press Freedom Day Global Conference is underway, with a 2022 theme of “Journalism under Digital Siege.”

It is a fitting and timely theme.

While the Internet has limitless potential to make every person a publisher, bad actors — both individuals and governments — routinely deploy attacks to silence free expression. For example, Cloudflare data illustrate a trend of increased cyber attacks since the invasion of Ukraine, and journalists are frequent targets. Covering topics such as war, government corruption, and crime makes journalists vulnerable to aggression online and offline. Beyond the issue of cyber attacks, Russian authorities’ decision to block websites they find objectionable has hindered citizens’ ability to access news.

The UNESCO report Threats that Silence: Trends in the Safety of Journalists spotlights the methods that criminals use to interfere with press freedom, including hacking (such as to steal confidential data) and digital attacks (one example is DDoS attacks to overwhelm a site with traffic).

Traffic spikes and news cycles

Web traffic closely follows world events, and sudden increases in interest in a topic can leave sites struggling to adjust. For example, during and after the Oscars, movie news sites like Variety and The Hollywood Reporter see drastic changes in traffic. This year, the day after the Oscars, DNS requests rose to 1,200% more than usual.

We spot the same trend during elections. As polling stations closed for the recent French presidential race, traffic to news sites rose 142% while citizens tracked results.

In wartime, ensuring the availability of a wide variety of news sources is vital so that citizens can access information relevant to their safety. In an April blog post, we highlighted Russian authorities’ decisions to block news websites. Meanwhile, traffic to several Western media outlets rose as Russian citizens sought out international sources.

Take a look at the DNS traffic from Russia to one well-known US newspaper:

The deluge of digital attacks against journalists

DNS traffic from Russia for a large French news source also grew enormously:

The deluge of digital attacks against journalists

Keeping journalists online

As previously discussed on our blog, Project Galileo was born from a mistake we made during the Russian invasion of Crimea in 2014. Because of an attack, we stopped proxying traffic of an independent newspaper in Ukraine that had been covering the ongoing Russian invasion, and the site went offline. That day prompted reflection on how we could truly live up to our mission to help build a better Internet.

Particularly during wartime, news publishers need proper resources to prevent bad actors from knocking websites offline and to manage traffic spikes. As part of Project Galileo, we provide free security and performance services to journalists, humanitarian groups, and civil rights organizations around the world. Independent media and journalism organizations make up a majority of the domains protected under the project.

The number of cyber attacks on journalists is staggering. When we examined traffic data last year, we found that journalism and media sites protected under Project Galileo are subject to over 30 million cyber attacks per day.

To identify candidates for participation in Project Galileo, we partner with dozens of free speech, public interest, and civil society organizations, including Fourth Estate, Free Press, Reporters Sans Frontières, and Institute for War & Peace Reporting.

According to W. Jeffrey Brown, founder of Fourth Estate, “The right to freedom of expression and information is an essential element of free and democratic societies. Historically, times of war and conflict are rife with weaponized misinformation, disinformation, and propaganda. The work of the free press is essential in providing people with accurate, timely, and trustworthy information: news that saves lives and property and shines a light on war crimes and human rights abuses.”

Get to know Project Galileo participants

Since many of these organizations are particularly vulnerable and subject to backlash, we do not publicly discuss participants unless we receive explicit permission. We also have never removed an organization from protection in the face of political pressure.

Below are some journalism-related organizations that have agreed to publicly talk about their participation. Check out these case studies to see what makes journalism in the digital era so challenging:

How to join Project Galileo

Applications to Project Galileo have skyrocketed since the invasion began, with many coming from organizations within Ukraine and neighboring countries. We are rapidly onboarding sites dedicated to journalism, human rights, and nonprofits that are organizing refugee efforts.

Know a site that could use our help? Public interest groups can quickly apply online, and we engage our partners to identify the at-risk websites that can benefit from the project.

Organizations spotlighting chilling effects and on-the-job dangers

Our Project Galileo partners are excellent resources for understanding the challenges journalists face, both in Ukraine and the rest of the world. Here are a few examples:

  • Committee to Protect Journalists: Examine data on the deadly risks for journalists; CPJ finds that at least 27 journalists were killed in 2021 because of their work.
  • Access Now: Get security tips and view regular updates on how the invasion of Ukraine is affecting freedom of expression online.
  • Reporters Sans Frontières: View the interactive 2021 World Press Freedom Index. It incorporates criteria including media independence, transparency, and legislative frameworks.
  • Institute for War & Peace Reporting: Learn about the dangers of covering the war in Ukraine.
  • Center for International Media Assistance: See how news outlets are leveraging encrypted messaging apps to reach audiences in developing countries and emerging democracies.
  • Council of Europe: Read the new annual report by the Council of Europe Platform for the Protection of Journalism and the Safety of Journalists; it notes that 2021 was the deadliest year for journalists in Europe since 2015.

Coming up

The eighth anniversary of Project Galileo is just weeks away. Stay tuned for case studies highlighting new and long-time participants as well as updated data from Cloudflare Radar. And for a look back at 2021 highlights from Project Galileo, download our Impact Report.

Detecting data drift using Amazon SageMaker

Post Syndicated from Shibu Nair original https://aws.amazon.com/blogs/architecture/detecting-data-drift-using-amazon-sagemaker/

As companies continue to embrace the cloud and digital transformation, they use historical data in order to identify trends and insights. This data is foundational to power tools, such as data analytics and machine learning (ML), in order to achieve high quality results.

This is a time where major disruptions are not only lasting longer, but also happening more frequently, as discussed in a McKinsey article on risk and resilience. Any disruption—a pandemic, hurricane, or even blocked sailing routes—has a major impact on the patterns of data and can create anomalous behavior.

ML models are dependent on data insights to help plan and support production-ready applications. With any disruptions, data drift can occur. Data drift is unexpected and undocumented changes to data structure, semantics, and/or infrastructure. If there is data drift, the model performance will degrade and no longer provide an accurate guidance. To mitigate the effects of the disruption, data drift needs to be detected and the ML models quickly trained and adjusted accordingly.

This blog post explains how to approach changing data patterns in the age of disruption and how to mitigate its effects on ML models. We also discuss the steps of building a feedback loop to capture the request data in the production environment and create a data pipeline to store the data for profiling and baselining. Then, we explain how Amazon SageMaker Clarify can help detect data drift.

How to detect data drift

There are three stages to detecting data drift: data quality monitoring, model quality monitoring, and drift evaluation (see Figure 1).

Stages in detecting data drift

Figure 1. Stages in detecting data drift

Data quality monitoring establishes a profile of the input data during model training, and then continuously compares incoming data with the profile. Deviations in the data profile signal a drift in the input data.

You can also detect drift through model quality monitoring, which requires capturing actual values that can be compared with the predictions. For example, using weekly demand forecasting, you can compare the forecast quantities one week later with the actual demand. Some use cases can require extra steps to collect actual values. For example, product recommendations may require you to ask a selected group of consumers for their feedback to the recommendation.

SageMaker Clarify provides insights into your trained models, including importance of model features and any biases towards certain segments of the input data. Changes of these attributes between re-trained models also signal drift. Drift evaluation constitutes the monitoring data and mechanisms to detect changes and triggering consequent actions. With Amazon CloudWatch, you can define rules and thresholds that prompt drift notifications.

Figure 2 illustrates a basic architecture with the data sources for training and production (on the left) and the observed data concerning drift (on the right). You can use Amazon SageMaker Data Wrangler, a visual data preparation tool, to clean and normalize your input data for your ML task. You can store the features that you defined for your models in the Amazon SageMaker Feature Store, a fully managed, purpose-built repository to store, update, retrieve, and share ML features.

The white, rectangular boxes in the architecture diagram represent the tasks for detecting data and model drift. You can integrate those tasks into your ML workflow with Amazon SageMaker Pipelines.

Basic architecture on how data drift is detected using Amazon SageMaker

Figure 2. Basic architecture on how data drift is detected using Amazon SageMaker

The drift observation data can be captured in tabular format, such as comma-separated values or Parquet, on Amazon Simple Storage Service (S3) and analyzed with Amazon Athena and Amazon QuickSight.

How to build a feedback loop

The baselining task establishes a data profile from training data. It uses Amazon SageMaker Model Monitor and runs before training or re-training the model. The baseline profile is stored on Amazon S3 to be referenced by the data drift monitoring job.

The data drift monitoring task continuously profiles the input data, compares it with baseline, and the results are captured in CloudWatch. This tasks runs on its own computation resources using Deequ, which checks that the monitoring job does not slow down your ML inference flow and scales with the data. The frequency of running this task can be adjusted to control cost, which can depend on how rapidly you anticipate that the data may change.

The model quality monitoring task computes model performance metrics from actuals and predicted values. The origin of these data points depends on the use case. Demand forecasting use cases naturally capture actuals that can be used to validate past predictions. Other use cases can require extra steps to acquire ground-truth data.

CloudWatch is a monitoring and observability service with which you can define rules to act on deviation in model performance or data drift. With CloudWatch, you can setup alerts to users via e-mail or SMS, and it can automatically start the ML model re-training process.

Run the baseline task on your updated data set before re-training your model. Use the SageMaker model registry to catalog your ML models for production, manage model versions, and control the associate training metrics.

Gaining insight into data and models

SageMaker Clarify provides greater visibility into your training data and models, helping identify and limit bias and explain predictions. For example, the trained models may consider some features more strongly than others when generating predictions. Compare the feature importance and bias between model-provided versions for a better understanding of the changes.

Conclusion

As companies continue to use data analytics and ML to inform daily activity, data drift may become a more common occurrence. Recognizing that drift can have a direct impact on models and production-ready applications, it is important to architect to identify potential data drift and avoid downgrading the models and negatively impacting results. Failure to capture changes in data can result in loss of process confidence, downgraded model accuracy, or a bottom-line impact to the business.

SystemTap 4.7 released

Post Syndicated from original https://lwn.net/Articles/893682/

Version 4.7 of the SystemTap tracing system is out. “Enhancements to this release include: a new stap-profile-annotate
tool, a new –sign-module module signing option, -d is now implied for
processes specified with -c/-x
“.

The collective thoughts of the interwebz