Enable transparent connectivity to Oracle Data Guard environments using Amazon Route 53 CNAME records

Post Syndicated from Sudip Acharya original https://aws.amazon.com/blogs/architecture/enable-transparent-connectivity-to-oracle-data-guard-environments-using-amazon-route-53-cname-records/

Customers choose AWS for running their Oracle database workload to help increase resiliency, performance, and scalability of the database layer. A high availability (HA) solution for the database stack is an important aspect to consider when migrating or deploying Oracle databases in AWS to help ensure that the architecture can meet the service level agreement (SLA) of the application. Customers who run their Oracle databases on Amazon Elastic Compute Cloud (Amazon EC2) commonly choose Oracle Data Guard physical standby databases to help meet the HA and disaster recovery (DR) for their Oracle database workloads.

As discussed in this Oracle documentation, role-based services with multiple listener endpoints in the connection URL or tnsnames.ora entry is the preferred way to transparently connect to the database layer that is part of a Data Guard configuration. However, some application components and driver configurations don’t support multiple hostnames in the connection URL. Those applications require a single hostname or IP for the clients to connect to the Data Guard environment.

This post talks about the concept of using an Amazon Route 53 CNAME record in a Data Guard environment on EC2 and lists the artifacts to automatically route the connection between primary and standby environments in a Data Guard configuration based on the database role.

Solution overview

To help avoid the manual efforts to update DNS entries or tnsnames.ora file after a failover or switchover operation in a Data Guard environment, the solution uses an AFTER DB_ROLE_CHANGE trigger to automate the DNS failover process. This trigger runs a shell script on the database host, which in turn updates the CNAME record in Route 53 to point the CNAME records to reflect the role transition. The following diagram illustrates the solution architecture (Figure 1).
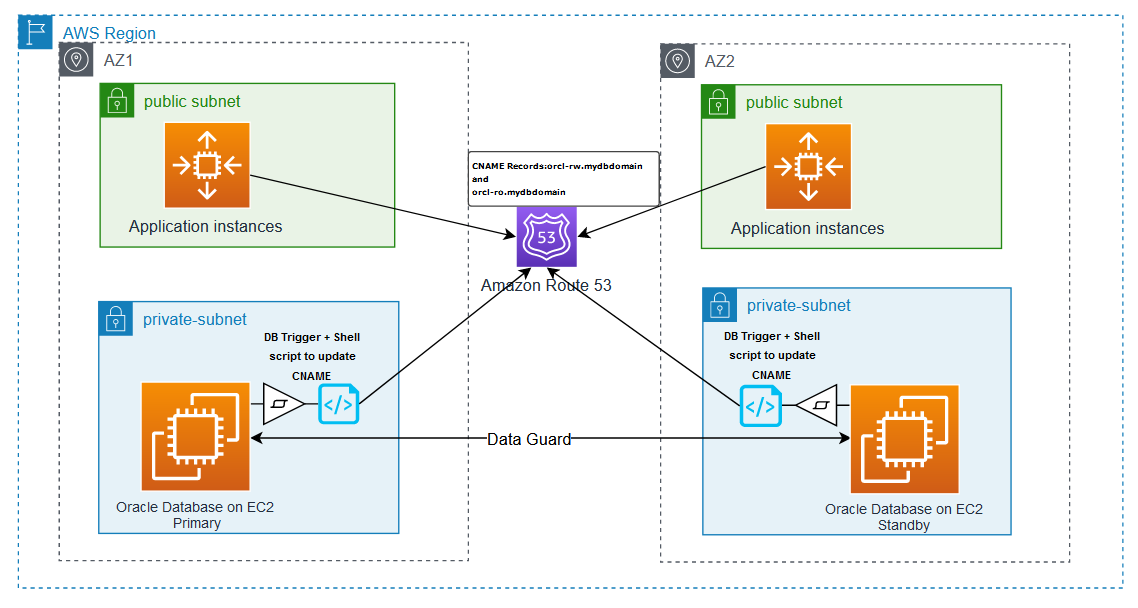
Figure 1. Solution architecture

Figure 1. Solution architecture

The solution discussed in this post covers routing new database connection requests to the right database post a Data Guard switchover activity. However, other factors such as application/client TTL settings and behavior of the connection pool to invalidate the connection handles created prior to the switchover activity can cause the application to connect to the database with a different role (like read-write workloads are connected to standby after switchover) and can generate errors, such as ORA-16000: database or pluggable database open for read-only access. It is a best practice to verify the database role before using the connection handles for transactions to verify that the application is connected to the database with the expected role.

The following workflow depicts the sequence of events that happens during a failover or switchover activity in a Data Guard environment to enable seamless connectivity for the application:

  1. A role transition event occurs in the Data Guard environment.
  2. The event triggers the AFTER DB_ROLE_CHANGE trigger.
  3. The trigger runs the shell script on the EC2 instance using a scheduler job.
  4. The shell script updates Route 53 to point the CNAME records to reflect the role transition.

Prerequisites

This post assumes the following prerequisites:

  • You should have an existing Data Guard configuration with one primary and one standby DB instance within a single VPC. Refer to the Oracle quick start template to deploy a Data Guard environment on Amazon EC2.
  • The steps discussed here are for self-managed Data Guard configuration on Amazon EC2 with Red Hat Linux AMI.
  • The scenario discussed in the post involves one primary and one standby database in the Data Guard configuration. For any other configurations, the scripts shown in this example require additional changes.
  • A private or public Route 53 hosted zone should be configured in the VPC where the DB environment exists.
  • The shell script uses the instance profile of the EC2 instance to run the AWS Command Line Interface (AWS CLI) commands. Make sure that the instance profile of the EC2 instances hosting the primary and standby databases has a policy attached that allows changing the record set in the hosted zone such as the following:
{
"Version": "2012-10-17",
"Statement": [
{
"Sid": "DBCnameFlipPloicy",
"Effect": "Allow",
"Action": [
"route53:ChangeResourceRecordSets",
"route53:ListResourceRecordSets"
],
"Resource": "arn:aws:route53:::hostedzone/<<YourHostedZoneId>>"
}
]
}
  • Nslookup, jq, and curl utilities must be installed on all of the DB hosts. If not installed, you can install the utility on RHEL Linux using the following command:
yum install -y bind-utils
yum install -y curl
yum install -y jq

Environment details

This post assumes a Data Guard configuration with two instances within a single VPC, one primary and one standby, with the following details and naming conventions:

  • Oracle database version – 19.10 configured in maximum performance mode with Active Data Guard
  • Route 53 domain name – mydbdomain
  • Database name – orcl
  • DB_UNIQUE_NAME – orcl_a and orcl_b
  • Instance names – orcl
  • Route 53 A record for the host in AZ1 – orcl-a-db.mydbdomain
  • Route 53 A record for the host in AZ2 – orcl-b-db.mydbdomain

Route 53 configuration

Two A records are created in Route 53 to point to the IPs of the primary and standby hosts. Two CNAME records are also created in Route 53, which are automatically updated during the Data Guard switchover and failover scenarios. The CNAME record orcl-rw.mydbdomain points to the instance in the primary role that can accept read/write transactions, and orcl-ro.mydbdomain points to the instance in the standby role that accepts read-only queries.

The A records configuration is as follows:

  • DB host IP in AZ1 (10.0.0.5 in this example) – orcl-a-db.mydbdomain
  • DB host IP in AZ2 (10.0.32.5 in this example) – orcl-b-db.mydbdomain

The CNAME records configuration is as follows:

  • orcl-a-db.mydbdomain – orcl-rw.mydbdomain
  • orcl-b-db.mydbdomain – orcl-ro.mydbdomain

The following screenshot shows the Route 53 console view of the domain mydbdomain.
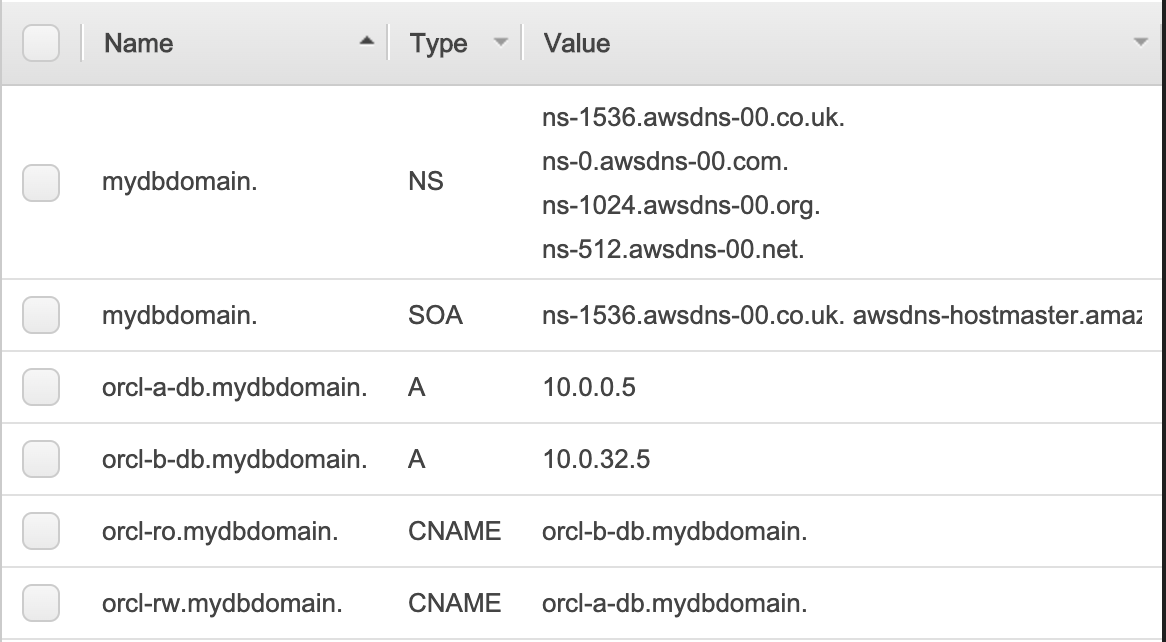
The Route 53 console view of the domain mydbdomain

Figure 2. The Route 53 console view of the domain mydbdomain

TNS configuration

The following tnsnames.ora file entries show how connections can be made to primary and standby databases using the CNAME records without a dependency on the actual IP address of the EC2 instances that host primary and standby databases. The entry orcl_a always points to the instance on orcl-a-db.mydbdomain, and orcl_b always points to the instance on orcl-b-db.mydbdomain, regardless of their roles. The entries orclrw and orclro direct the connection to the databases playing primary and standby roles, respectively.

orcl_a =
(description =
(address = (protocol = tcp)(host = orcl-a-db.mydbdomain)(port = 1525))
(connect_data =
(server = dedicated)
(service_name = orcl_a)
)
)

orcl_b =
(description =
(address = (protocol = tcp)(host = orcl-b-db.mydbdomain)(port = 1525))
(connect_data =
(server = dedicated)
(service_name = orcl_b)
)
)

orclrw =
(description =
(address = (protocol = tcp)(host = orcl-rw.mydbdomain)(port = 1525))
(connect_data =
(server = dedicated)
(service_name = orcl)
)
)

orclro =
(description =
(address = (protocol = tcp)(host = orcl-ro.mydbdomain)(port = 1525))
(connect_data =
(server = dedicated)
(service_name = orcl)
)
)

To enable connectivity using orclrw and orclro TNS entries, you can use either a role-based service or a static listener registration entry in both the primary and standby listener, as shown in the following code:

SID_DESC =
      (GLOBAL_DBNAME = orcl)
      (ORACLE_HOME = /opt/oracle/product/19c/dbhome_1)
      (SID_NAME = orcl)
    )

Implement the solution

To implement an automated DNS update during an Oracle switchover or failover, we use an Oracle database trigger and a shell script. The following are the high-level steps for the entire workflow:

  1. Create a DB_ROLE_CHANGE ON DATABASE trigger on the primary database
  2. The trigger in turn creates a DBMS job that calls a shell script with the cname_switch.sh.
  3. The shell script updates the Route 53 CNAME entries.

Database trigger

Use the following code for the database trigger:

CREATE OR REPLACE TRIGGER sys.cname_flip_post_role_change 
AFTER DB_ROLE_CHANGE ON DATABASE
DECLARE
  v_db_name VARCHAR2(9);
  v_db_role VARCHAR2(16);
BEGIN
  SELECT DATABASE_ROLE  INTO v_db_role FROM V$DATABASE;
  SELECT DB_UNIQUE_NAME INTO v_db_name FROM V$DATABASE;

  IF v_db_role = 'PRIMARY' THEN
    BEGIN
      dbms_scheduler.drop_job('RW_CNAME_FLIP');
    EXCEPTION
      WHEN OTHERS THEN NULL;
    END;

    dbms_scheduler.create_job(
      job_name   => 'RW_CNAME_FLIP',
      job_type   => 'EXECUTABLE',
      number_of_arguments => 1,
      job_action => '/home/oracle/admin/bin/cname_switch.sh',
      enabled    => false,
      auto_drop  => true);

    dbms_scheduler.set_job_argument_value(
      job_name          => 'RW_CNAME_FLIP',
      argument_position => 1,
      argument_value    => v_db_name);

    BEGIN
      dbms_scheduler.run_job('RW_CNAME_FLIP');
    EXCEPTION
    WHEN OTHERS THEN
      raise_application_error(-20101, 'CNAME flip failed, check script error');
    END;

  END IF;

EXCEPTION
  WHEN OTHERS THEN
    raise_application_error(-20102, 'CNAME flip failed due to error: ' || SQLERR
M);
END;
/

Shell script

This script determines the current CNAME, identifies the dependent A records, and maps the CNAME to the correct A records accordingly. This shell script is provided for reference assuming the naming conventions for db_name and db_unique_name as used in the sample configuration. You should review and modify the script to meet your specific requirements and organization standards.

As per the example shown earlier, the shell script is placed in the location /home/oracle/admin/bin/cname_switch.sh.

Note: it’s common to see production databases that are restored or cloned to lower environments.

If the script is run in those environments, it can potentially change the CNAME entries unexpectedly. To mitigate this, the shell script has the function restore_safeguard. This function checks that the IP assigned to the EC2 instance is actually matching with the A records configured for this database in Route 53. If no match is found, this will not perform CNAME failover.

#! /bin/bash
#set -x
​
# Variables may need to be changed to suit your environment
​
DB_NAME=$1
DB_IN=$1
echo "Orginal Input : ${DB_NAME}"
DB_NAME=`echo "${DB_NAME::-2}"`  # removing last 2 characters from DB_UNIQUE_NAME
DB_NAME=`echo "${DB_NAME}" | tr '[:upper:]' '[:lower:]'`
echo "Modified Input : ${DB_NAME}"
​
DB_DOMAIN=<<YOUR_AWS_ROUTE53_DOMAIN_NAME>>    # Update as per your AWS Route53 domian name
ZONE_ID=<<YOUR_AWS_ROUTE53_HOSTED_ZONE_ID>>   # Update as per your AWS Route53 hosted zone ID
EC2_METADATA='http://169.254.169.254/latest/dynamic/instance-identity/document'
​
# CNAME and A-Records related varables :
​
RW_CNAME=`echo "${DB_NAME}-rw.${DB_DOMAIN}"`
RO_CNAME=`echo "${DB_NAME}-ro.${DB_DOMAIN}"`
A_CNAME=`echo "${DB_NAME}-a-db.${DB_DOMAIN}"`
B_CNAME=`echo "${DB_NAME}-b-db.${DB_DOMAIN}"`
​
REGION=`curl -s ${EC2_METADATA}|grep region|awk -F\" '{print $4}'`
​
# Logfile configuration and file initilization
​
TS=`date +%Y%m%d_%H%M%S`
LOG_DIR=/tmp
CHANGE_SET_FILE=`echo "${LOG_DIR}/${DB_NAME}-CnameFlip-${TS}.json"`
LOG_FILE=`echo "${LOG_DIR}/${DB_NAME}-CnameFlip-${TS}.log"`
CONF_FILE=`echo "file://${CHANGE_SET_FILE}"`
​
# Function to check if current host IP matching with Route 53 configuration
​
IS_SAFE='Unsafe'
​
function restore_safeguard()
{
    AWS_TOKEN=`curl -X PUT "http://169.254.169.254/latest/api/token" -H "X-aws-ec2-metadata-token-ttl-seconds: 21600"`
    LOCAL_IPV4=`curl -sH "X-aws-ec2-metadata-token: $AWS_TOKEN" -v http://169.254.169.254/latest/meta-data/local-ipv4`
    PUBLIC_IPV4=`curl -sH "X-aws-ec2-metadata-token: $AWS_TOKEN" -v http://169.254.169.254/latest/meta-data/public-ipv4`
    NOT_FOUND=`echo ${PUBLIC_IPV4} | grep '404 - Not Found' | wc -l`
​
    if [ ${NOT_FOUND} == 1 ]; then
       PUBLIC_IPV4='No Public IP Assigned'
    fi
​
    A_IP=$(aws route53 list-resource-record-sets --hosted-zone-id ${ZONE_ID} \
           --query 'ResourceRecordSets[?Type==`A`].{Name: Name, Value:ResourceRecords[0].Value}' | \
           jq -cr --arg DB_NAME "${DB_NAME}-a" '.[] | select( .Name | contains($DB_NAME)).Value')
​
    B_IP=$(aws route53 list-resource-record-sets --hosted-zone-id ${ZONE_ID} \
           --query 'ResourceRecordSets[?Type==`A`].{Name: Name, Value:ResourceRecords[0].Value}' | \
           jq -cr --arg DB_NAME "${DB_NAME}-b" '.[] | select( .Name | contains($DB_NAME)).Value')
​
    PREVIOUS_RW_ID=$(aws route53 list-resource-record-sets --hosted-zone-id ${ZONE_ID} \
           --query 'ResourceRecordSets[?Type==`CNAME`].{Name: Name, Value:ResourceRecords[0].Value}' | \
           jq -cr --arg DB_NAME "${DB_NAME}-rw" '.[] | select( .Name | contains($DB_NAME)).Value' | cut -d'-' -f2)
​
    if [ ${PREVIOUS_RW_ID} == 'a' ]; then
       RW_NODE_IP=${A_IP}
       RO_NODE_IP=${B_IP}
    else
       RW_NODE_IP=${B_IP}
       RO_NODE_IP=${A_IP}
    fi
​
    # Looging Input values
​
    echo "Orginal Input   : ${DB_IN}"          | tee -a ${LOG_FILE}
    echo "Modified Input  : ${DB_NAME}"        | tee -a ${LOG_FILE}
    echo "Current RW ID   : ${PREVIOUS_RW_ID}" | tee -a ${LOG_FILE}
    echo "Host Private IP : ${LOCAL_IPV4}"     | tee -a ${LOG_FILE}
    echo "Host Public IP  : ${PUBLIC_IPV4}"    | tee -a ${LOG_FILE}
    echo "A Node IP       : ${A_IP}"           | tee -a ${LOG_FILE}
    echo "A Node IP       : ${B_IP}"           | tee -a ${LOG_FILE}
    echo "RW Node IP      : ${RW_NODE_IP}"     | tee -a ${LOG_FILE}
    echo "RO Node IP      : ${RO_NODE_IP}"     | tee -a ${LOG_FILE}
​
    if [ "${LOCAL_IPV4}" == "${RO_NODE_IP}" -o "${PUBLIC_IPV4}" == "${RO_NODE_IP}" ]; then
       IS_SAFE='Safe'
    else
       IS_SAFE='Unsafe'
    fi
}
​
restore_safeguard
​
if [ ${IS_SAFE} == 'Safe' ]; then
   echo "Safe for CNAME faliover..." | tee -a ${LOG_FILE}
else
   echo "Unsafe for CNAME faliover..." | tee -a ${LOG_FILE}
   echo "Aborting..."
   exit 1
fi
​
PRI_DB_ID=`nslookup ${RW_CNAME}|grep "canonical name"|cut -d'=' -f2|cut -d'-' -f2`
​
# Looging Input values :
echo "Orginal Input      : ${DB_IN}"     | tee    ${LOG_FILE}
echo "Modified Input     : ${DB_NAME}"   | tee -a ${LOG_FILE}
echo "Current RW host ID : ${PRI_DB_ID}" | tee -a ${LOG_FILE}
​
echo -e "\nChange to be done : \n" | tee -a ${LOG_FILE}
​
if [ ${PRI_DB_ID} == 'a' ]; then
   echo "Changing ${RW_CNAME} from ${A_CNAME} to ${B_CNAME}" | tee -a ${LOG_FILE}
   echo "Changing ${RO_CNAME} from ${B_CNAME} to ${A_CNAME}" | tee -a ${LOG_FILE}
   TO_BE_RW_CNAME=${B_CNAME}
   TO_BE_RO_CNAME=${A_CNAME}
else
   echo "Changing ${RW_CNAME} from ${B_CNAME} to ${A_CNAME}" | tee -a ${LOG_FILE}
   echo "Changing ${RO_CNAME} from ${A_CNAME} to ${B_CNAME}" | tee -a ${LOG_FILE}
   TO_BE_RW_CNAME=${A_CNAME}
   TO_BE_RO_CNAME=${B_CNAME}
fi
​
R53_CHANGE=`echo -e "
{
  \"Comment\": \"Flip CNAMEs\",
  \"Changes\": [
    {
      \"Action\" : \"UPSERT\",
      \"ResourceRecordSet\" : {
        \"Name\" : \"${RW_CNAME}.\",
        \"Type\" : \"CNAME\",
        \"TTL\"  : 60,
        \"ResourceRecords\" : [{ \"Value\": \"${TO_BE_RW_CNAME}.\" }]
      }
    },
    {
      \"Action\" : \"UPSERT\",
      \"ResourceRecordSet\" : {
        \"Name\" : \"${RO_CNAME}\",
        \"Type\" : \"CNAME\",
        \"TTL\"  : 60,
        \"ResourceRecords\" : [{ \"Value\": \"${TO_BE_RO_CNAME}.\" }]
      }
    }
  ]
}
"`
​
echo -e "\nRoute53 Change Set :\n" | tee -a ${LOG_FILE}
echo ${R53_CHANGE} | tee -a ${LOG_FILE}
echo ${R53_CHANGE} > ${CHANGE_SET_FILE}
​
echo -e "\nCommand to Execute : " | tee -a ${LOG_FILE}
echo -e "\naws route53 change-resource-record-sets --hosted-zone-id ${ZONE_ID} \
         --change-batch ${CONF_FILE} \n" | tee -a ${LOG_FILE}
​
echo -e "\nExecution Result :\n"
aws route53 change-resource-record-sets --hosted-zone-id ${ZONE_ID} \
--change-batch ${CONF_FILE} | tee -a ${LOG_FILE}
​
echo -e "\nAfter Change :\n "
aws route53 list-resource-record-sets --hosted-zone-id ${ZONE_ID} | tee -a ${LOG_FILE}

Test the solution

The following screenshot shows the Route 53 console view of the domain mydbdomain before the switchover. The primary database is running on orcl-a-db.mydomain because orcl-rw.mydomain is pointing to that.

Route 53 console view of the domain mydbdomain before the switchover

Figure 3. Route 53 console view of the domain mydbdomain before the switchover

The following SQL displays the current role of both primary and standby databases and host_name they are currently running on.

[oracle@ip-10-0-0-5 sql]$ cat db_info.sql

ALTER SESSION SET NLS_DATE_FORMAT='YYYY-MM-DD:HH24:MI';
set lines 150 pages 200
col HOST_NAME for a30 trunc

select d.NAME, d.db_unique_name, d.DATABASE_ROLE, d.OPEN_MODE, i.INSTANCE_NAME, 
i.HOST_NAME, i.STARTUP_TIME
from v$instance i, v$database d;

[oracle@ip-10-0-0-5 sql]$ sqlplus system@orclrw

SQL> @db_info

NAME  DB_UNIQUE_NAME DATABASE_ROLE OPEN_MODE INSTANCE_NAME HOST_NAME STARTUP_TIME
------ ---------------- -------------- ---------------- ------------------------------ ----------------
ORCL orcl_a PRIMARY READ WRITE orcl ip-10-0-0-5.us-west-2.compute. 2020-05-24:01:47

[oracle@ip-10-0-0-5 sql]$ sqlplus system@orclro

SQL> @db_info

NAME DB_UNIQUE_NAME DATABASE_ROLE OPEN_MODE INSTANCE_NAME HOST_NAME STARTUP_TIME
------ ---------------- -------------------- -------------- ------------------------------- ----------------
ORCL orcl_b PHYSICAL STANDBY READ ONLY WITH APPLY orcl ip-10-0-32-5.us-west-2.compute. 2020-05-24:05:50

Let’s initiate the switchover:

[oracle@ip-10-0-0-5 sql]$ dgmgrl /
DGMGRL for Linux: Release 12.2.0.1.0 - Production on Wed May 27 06:42:51 2020

Copyright (c) 1982, 2017, Oracle and/or its affiliates.  All rights reserved.

Welcome to DGMGRL, type "help" for information.
Connected to "orcl_a"
Connected as SYSDG.
DGMGRL> show configuration;

Configuration - awsguard

  Protection Mode: MaxPerformance
  Members:
  orcl_a - Primary database
    orcl_b - Physical standby database

Fast-Start Failover: DISABLED

Configuration Status:
SUCCESS   (status updated 39 seconds ago)

DGMGRL> switchover to orcl_b;
Performing switchover NOW, please wait...
Operation requires a connection to database "orcl_b"
Connecting ...
Connected to "orcl_b"
Connected as SYSDBA.
New primary database "orcl_b" is opening...
Oracle Clusterware is restarting database "orcl_a" ...
Switchover succeeded, new primary is "orcl_b"
DGMGRL>
DGMGRL> show configuration;

Configuration - awsguard

  Protection Mode: MaxPerformance
  Members:
  orcl_b - Primary database
    orcl_a - Physical standby database

Fast-Start Failover: DISABLED

Configuration Status:
SUCCESS   (status updated 67 seconds ago)

DGMGRL>

Now that the switchover is complete, let’s connect to the database using the orclrw and orclro TNS entries using the following code:

[oracle@ip-10-0-0-5 sql]$ sqlplus system@orclrw

SQL> @db_info

NAME DB_UNIQUE_NAME  DATABASE_ROLE  OPEN_MODE     INSTANCE_NAME  HOST_NAME                      STARTUP_TIME
----- -------------- ------------- -------------- ------------------------------ ----------------
ORCL  orcl_b PRIMARY        READ WRITE    orcl          ip-10-0-32-5.us-west-2.compute 2020-05-24:05:50


[oracle@ip-10-0-0-5 sql]$ sqlplus system@orclro

SQL> @db_info

NAME  DATABASE_ROLE     OPEN_MODE            INSTANCE_NAME  HOST_NAME            STARTUP_TIME
----- ----------------- -------------------- -------------- ------------------------------ ----------------
ORCL orcl_a PHYSICAL STANDBY  READ ONLY WITH APPLY orcl          ip-10-0-0-5.us-west-2.compute. 2020-05-27:06:43

The following screenshot shows the Route 53 console view of the domain mydbdomain after the switchover. The primary database is now running on orcl-b-db.mydomain because orcl-rw.mydomain is pointing to that.
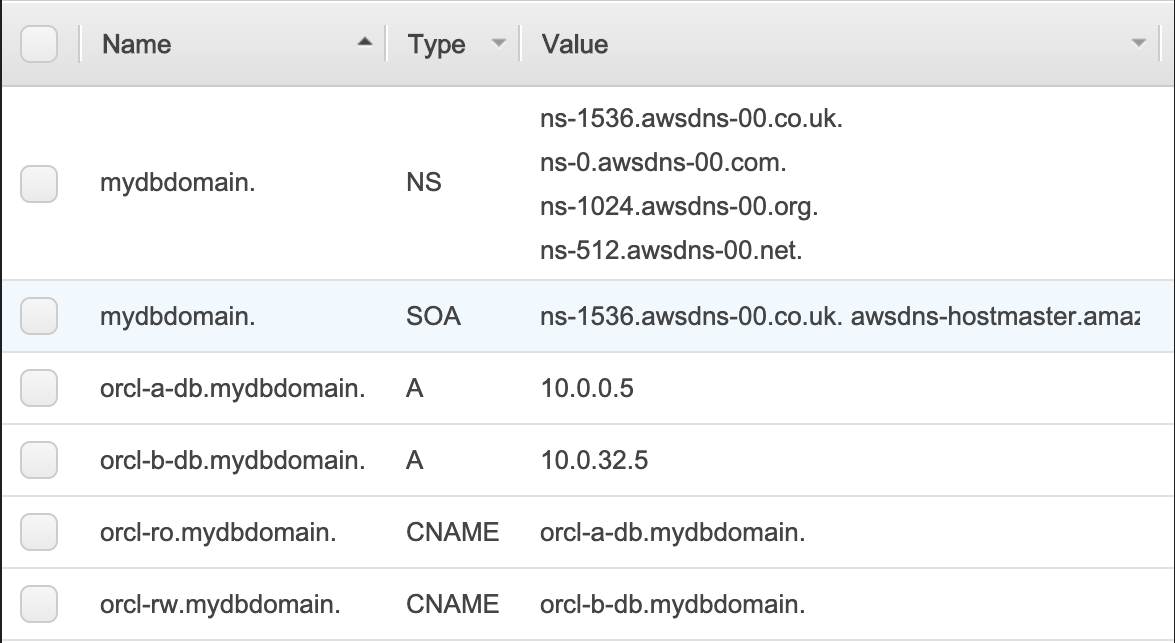
Route 53 console view of the domain mydbdomain after the switchover

Figure 4. Route 53 console view of the domain mydbdomain after the switchover

Conclusion

Application connectivity to a Data Guard environment can be challenging, especially when the application configuration doesn’t support multiple hostnames or listener endpoints. In this post, we discussed step-by-step details to enable seamless connectivity to Data Guard environments using Route 53 CNAME records, a database trigger, and a shell script. You can use these artifacts to direct the DB connections to the database with the right role seamlessly without application changes. If you are using Data Guard Observer for automated failover, another blog, Setup a high availability design for Oracle Data Guard (Fast-Start Failover) using Amazon Route 53 discusses an alternate mechanism to achieve the same result.


[$] Memory-management changes for CXL

Post Syndicated from original https://lwn.net/Articles/931416/

Kyungsan Kim began his talk at the 2023
Linux Storage, Filesystem, Memory-Management and BPF Summit
with a
claim that the Compute Express Link (CXL) technology is leading to
fundamental changes in computer architecture. The kernel will have to
respond with changes of its own, including in its memory-management layer.
Drawing on some experience gained at Samsung, Kim had a few suggestions on
the form those changes should take — suggestions that ran into some
disagreement from other memory-management developers.

[$] Faster CPython at PyCon, part two

Post Syndicated from original https://lwn.net/Articles/931197/

In part one of the tale, Brandt Bucher
looked specifically at the CPython optimizations that went into
Python 3.11 as part of the Faster CPython project. More of that work
will be appearing in future Python versions, but on day two of PyCon 2023 in Salt Lake City, Utah,
Mark Shannon provided an overall picture of CPython optimizations,
including efforts made over the last decade or more, with an eye toward the
other areas that have been optimized, such as the memory layout for the
internal C data structures of the interpreter. He also described some
additional optimization techniques that will be used in Python 3.12
and beyond.

Ted Chiang on the Risks of AI

Post Syndicated from Bruce Schneier original https://www.schneier.com/blog/archives/2023/05/ted-chiang-on-the-risks-of-ai.html

Ted Chiang has an excellent essay in the New Yorker: “Will A.I. Become the New McKinsey?”

The question we should be asking is: as A.I. becomes more powerful and flexible, is there any way to keep it from being another version of McKinsey? The question is worth considering across different meanings of the term “A.I.” If you think of A.I. as a broad set of technologies being marketed to companies to help them cut their costs, the question becomes: how do we keep those technologies from working as “capital’s willing executioners”? Alternatively, if you imagine A.I. as a semi-autonomous software program that solves problems that humans ask it to solve, the question is then: how do we prevent that software from assisting corporations in ways that make people’s lives worse? Suppose you’ve built a semi-autonomous A.I. that’s entirely obedient to humans­—one that repeatedly checks to make sure it hasn’t misinterpreted the instructions it has received. This is the dream of many A.I. researchers. Yet such software could easily still cause as much harm as McKinsey has.

Note that you cannot simply say that you will build A.I. that only offers pro-social solutions to the problems you ask it to solve. That’s the equivalent of saying that you can defuse the threat of McKinsey by starting a consulting firm that only offers such solutions. The reality is that Fortune 100 companies will hire McKinsey instead of your pro-social firm, because McKinsey’s solutions will increase shareholder value more than your firm’s solutions will. It will always be possible to build A.I. that pursues shareholder value above all else, and most companies will prefer to use that A.I. instead of one constrained by your principles.

EDITED TO ADD: Ted Chiang’s previous essay, “ChatGPT Is a Blurry JPEG of the Web” is also worth reading.

Magic in minutes: how to build a ChatGPT plugin with Cloudflare Workers

Post Syndicated from Kristian Freeman original http://blog.cloudflare.com/magic-in-minutes-how-to-build-a-chatgpt-plugin-with-cloudflare-workers/

Magic in minutes: how to build a ChatGPT plugin with Cloudflare Workers

Magic in minutes: how to build a ChatGPT plugin with Cloudflare Workers

Today, we're open-sourcing our ChatGPT Plugin Quickstart repository for Cloudflare Workers, designed to help you build awesome and versatile plugins for ChatGPT with ease. If you don’t already know, ChatGPT is a conversational AI model from OpenAI which has an uncanny ability to take chat input and generate human-like text responses.

With the recent addition of ChatGPT plugins, developers can create custom extensions and integrations to make ChatGPT even more powerful. Developers can now provide custom flows for ChatGPT to integrate into its conversational workflow – for instance, the ability to look up products when asking questions about shopping, or retrieving information from an API in order to have up-to-date data when working through a problem.

That's why we're super excited to contribute to the growth of ChatGPT plugins with our new Quickstart template. Our goal is to make it possible to build and deploy a new ChatGPT plugin to production in minutes, so developers can focus on creating incredible conversational experiences tailored to their specific needs.

How it works

Our Quickstart is designed to work seamlessly with Cloudflare Workers. Under the hood, it uses our command-line tool wrangler to create a new project and deploy it to Workers.

When building a ChatGPT plugin, there are three things you need to consider:

  1. The plugin's metadata, which includes the plugin's name, description, and other info
  2. The plugin's schema, which defines the plugin's input and output
  3. The plugin's behavior, which defines how the plugin responds to user input

To handle all of these parts in a simple, easy-to-understand API, we've created the @cloudflare/itty-router-openapi package, which makes it easy to manage your plugin's metadata, schema, and behavior. This package is included in the ChatGPT Plugin Quickstart, so you can get started right away.

To show how the package works, we'll look at two key files in the ChatGPT Plugin Quickstart: index.js and search.js. The index.js file contains the plugin's metadata and schema, while the search.js file contains the plugin's behavior. Let's take a look at each of these files in more detail.

In index.js, we define the plugin's metadata and schema. The metadata includes the plugin's name, description, and version, while the schema defines the plugin's input and output.

The configuration matches the definition required by OpenAI's plugin manifest, and helps ChatGPT understand what your plugin is, and what purpose it serves.

Here's what the index.js file looks like:

import { OpenAPIRouter } from "@cloudflare/itty-router-openapi";
import { GetSearch } from "./search";

export const router = OpenAPIRouter({
  schema: {
    info: {
      title: 'GitHub Repositories Search API',
      description: 'A plugin that allows the user to search for GitHub repositories using ChatGPT',
      version: 'v0.0.1',
    },
  },
  docs_url: '/',
  aiPlugin: {
    name_for_human: 'GitHub Repositories Search',
    name_for_model: 'github_repositories_search',
    description_for_human: "GitHub Repositories Search plugin for ChatGPT.",
    description_for_model: "GitHub Repositories Search plugin for ChatGPT. You can search for GitHub repositories using this plugin.",
    contact_email: '[email protected]',
    legal_info_url: 'http://www.example.com/legal',
    logo_url: 'https://workers.cloudflare.com/resources/logo/logo.svg',
  },
})

router.get('/search', GetSearch)

// 404 for everything else
router.all('*', () => new Response('Not Found.', { status: 404 }))

export default {
  fetch: router.handle
}

In the search.js file, we define the plugin's behavior. This is where we define how the plugin responds to user input. It also defines the plugin's schema, which ChatGPT uses to validate the plugin's input and output.

Importantly, this doesn't just define the implementation of the code. It also automatically generates an OpenAPI schema that helps ChatGPT understand how your code works — for instance, that it takes a parameter "q", that it is of "String" type, and that it can be described as "The query to search for". With the schema defined, the handle function makes any relevant parameters available as function arguments, to implement the logic of the endpoint as you see fit.

Here's what the search.js file looks like:

import { ApiException, OpenAPIRoute, Query, ValidationError } from "@cloudflare/itty-router-openapi";

export class GetSearch extends OpenAPIRoute {
  static schema = {
    tags: ['Search'],
    summary: 'Search repositories by a query parameter',
    parameters: {
      q: Query(String, {
        description: 'The query to search for',
        default: 'cloudflare workers'
      }),
    },
    responses: {
      '200': {
        schema: {
          repos: [
            {
              name: 'itty-router-openapi',
              description: 'OpenAPI 3 schema generator and validator for Cloudflare Workers',
              stars: '80',
              url: 'https://github.com/cloudflare/itty-router-openapi',
            }
          ]
        },
      },
    },
  }

  async handle(request: Request, env, ctx, data: Record<string, any>) {
    const url = `https://api.github.com/search/repositories?q=${data.q}`

    const resp = await fetch(url, {
      headers: {
        'Accept': 'application/vnd.github.v3+json',
        'User-Agent': 'RepoAI - Cloudflare Workers ChatGPT Plugin Example'
      }
    })

    if (!resp.ok) {
      return new Response(await resp.text(), { status: 400 })
    }

    const json = await resp.json()

    // @ts-ignore
    const repos = json.items.map((item: any) => ({
      name: item.name,
      description: item.description,
      stars: item.stargazers_count,
      url: item.html_url
    }))

    return {
      repos: repos
    }
  }
}

The quickstart smooths out the entire development process, so you can focus on crafting custom behaviors, endpoints, and features for your ChatGPT plugins without getting caught up in the nitty-gritty. If you aren't familiar with API schemas, this also means that you can rely on our schema and manifest generation tools to handle the complicated bits, and focus on the implementation to build your plugin.

Besides making development a breeze, it's worth noting that you're also deploying to Workers, which takes advantage of Cloudflare's vast global network. This means your ChatGPT plugins enjoy low-latency access and top-notch performance, no matter where your users are located. By combining the strengths of Cloudflare Workers with the versatility of ChatGPT plugins, you can create conversational AI tools that are not only powerful and scalable but also cost-effective and globally accessible.

Example

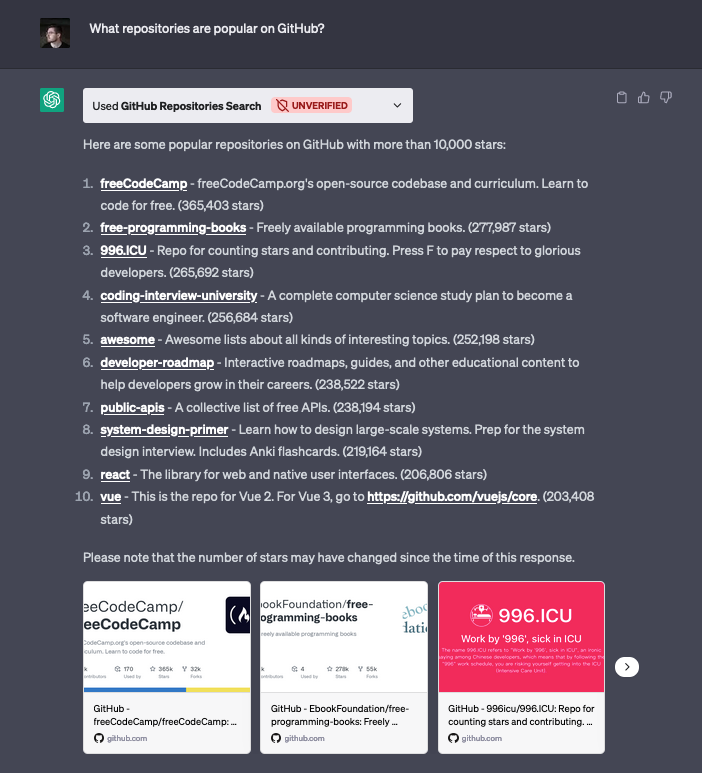
To demonstrate the capabilities of our quickstarts, we've created two example ChatGPT plugins. The first, which we reviewed above, connects ChatGPT with the GitHub Repositories Search API. This plugin enables users to search for repositories by simply entering a search term, returning useful information such as the repository's name, description, star count, and URL.

One intriguing aspect of this example is the property where the plugin could go beyond basic querying. For instance, when asked "What are the most popular JavaScript projects?", ChatGPT was able to intuitively understand the user's intent and craft a new query parameter for querying both by the number of stars (measuring popularity), and the specific programming language (JavaScript) without requiring any explicit prompting. This showcases the power and adaptability of ChatGPT plugins when integrated with external APIs, providing more insightful and context-aware responses.

Magic in minutes: how to build a ChatGPT plugin with Cloudflare Workers

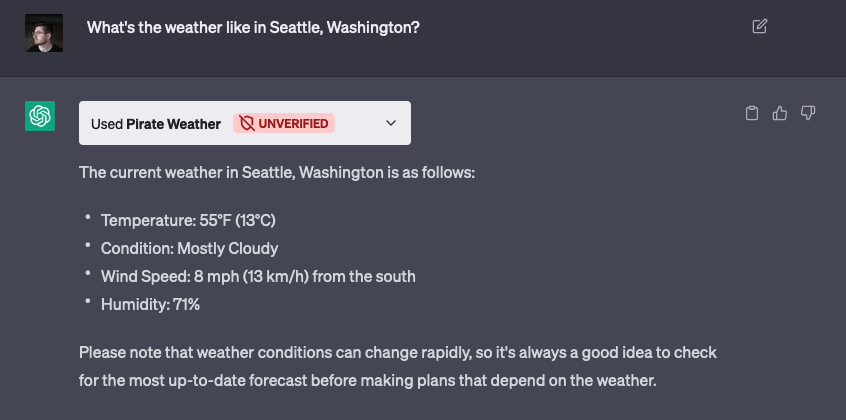
The second plugin uses the Pirate Weather API to retrieve up-to-date weather information. Remarkably, OpenAI is able to translate the request for a specific location (for instance, “Seattle, Washington”) into longitude and latitude values – which the Pirate Weather API uses for lookups – and make the correct API request, without the user needing to do any additional work.

Magic in minutes: how to build a ChatGPT plugin with Cloudflare Workers

With our ChatGPT Plugin Quickstarts, you can create custom plugins that connect to any API, database, or other data source, giving you the power to create ChatGPT plugins that are as unique and versatile as your imagination. The possibilities are endless, opening up a whole new world of conversational AI experiences tailored to specific domains and use cases.

Get started today

The ChatGPT Plugin Quickstarts don’t just make development a snap—it also offers seamless deployment and scaling thanks to Cloudflare Workers. With the generous free plan provided by Workers, you can deploy your plugin quickly and scale it infinitely as needed.

Our ChatGPT Plugin Quickstarts are all about sparking creativity, speeding up development, and empowering developers to create amazing conversational AI experiences. By leveraging Cloudflare Workers' robust infrastructure and our streamlined tooling, you can easily build, deploy, and scale custom ChatGPT plugins, unlocking a world of endless possibilities for conversational AI applications.

Whether you're crafting a virtual assistant, a customer support bot, a language translator, or any other conversational AI tool, our ChatGPT Plugin Quickstarts are a great place to start. We're excited to provide this Quickstart, and would love to see what you build with it. Join us in our Discord community to share what you're working on!

Help us understand UK students’ attitudes to coding

Post Syndicated from Hammad Kazi original https://www.raspberrypi.org/blog/uk-schools-attitudes-to-coding-code-club/

Non-formal learning initiatives are a popular way to engage children in computing from a young age and introduce them to the fun, creative world of coding and digital making. As part of our commitment to an evidence-based approach, we are partnering with Durham University on an exciting evaluation project to study the impact non-formal activities like Code Club have on young people in UK schools. Your school is invited to take part in the project.

A girl codes at a laptop while a woman looks on during a Code Club session.

We’re inviting UK schools to take part

The project will explore students’ attitudes to learning coding, and to learning generally. We hope to understand more about how extracurricular activities affect students’ confidence and skills. If you’re a teacher at a UK school, we would love for you to register your interest in taking part — your school doesn’t need to have a Code Club to participate. Taking part is easy: simply have some of your students fill in a few short surveys.

Two young people working together on a tech project.

As a token of our appreciation for your school’s involvement, you will receive some cool swag and an exclusive invitation to an online, educator-focused workshop where you will explore digital making with us. We’ll even provide you with all the kit you need to make something great, including a Raspberry Pi Pico. Your involvement will contribute to better computing education for UK students.

Computing in UK classrooms and in Code Clubs

In the UK, computing is taught at school, providing children with the opportunity to learn the importance of the subject and its many applications from a young age. In addition, non-formal education can play a pivotal role in fostering a positive learning experience, particularly in computing. Research on computing education indicates that non-formal settings are linked to improvement in students’ self-efficacy and interest in computing. Through participation in non-formal computing education, learners can gain valuable hands-on experience and develop problem-solving, collaboration, and presentation skills.

A child codes a Spiderman project at a laptop during a Code Club session.

That’s the thinking behind Code Clubs, which offer students a relaxed environment that encourages creativity, teamwork, and self-paced learning. By providing students with project-based learning opportunities and access to resources and mentors, Code Clubs help foster a passion for computing while also strengthening their understanding of key concepts.

A previous evaluation showed that students who participated in Code Clubs reported improvement in their coding skills and a positive perception about their coding abilities. Code Clubs have already made a significant impact on learners worldwide, with over 3500 Code Clubs around the world currently reaching tens of thousands of young people and inspiring a new generation of digital makers.

Help us with this project

Your school’s participation in this project will help increase our understanding of what works in computing education. Together we can ensure that young people are equipped with the skills and confidence to realise their full potential through the power of computing and digital technologies. 

To register your interest in joining the project, simply fill out our short form and we’ll be in touch soon.

The post Help us understand UK students’ attitudes to coding appeared first on Raspberry Pi Foundation.

How Pingora keeps count

Post Syndicated from Yuchen Wu original http://blog.cloudflare.com/how-pingora-keeps-count/

How Pingora keeps count

How Pingora keeps count

A while ago we shared how we replaced NGINX with our in-house proxy, Pingora. We promised to share more technical details as well as our open sourcing plan. This blog post will be the first of a series that shares both the code libraries that power Pingora and the ideas behind them.

Today, we take a look at one of Pingora’s libraries: pingora-limits.

pingora-limits provides the functionality to count inflight events and estimate the rate of events over time. These functions are commonly used to protect infrastructure and services from being overwhelmed by certain types of malicious or misbehaving requests.

For example, when an origin server becomes slow or unresponsive, requests will accumulate on our servers, which adds pressure on both our servers and our customers’ servers. With this library, we are able to identify which origins have issues, so that action can be taken without affecting other traffic.

The problem can be abstracted in a very simple way. The input is a (never ending) stream of different types of events. At any point, the system should be able to tell the number of appearances (or the rate) of a certain type of event.

In a simple example, colors are used as the type of event. The following is one possible example of a sequence of events:

red, blue, red, orange, green, brown, red, blue,...

In this example, the system should report that “red” appears three times.

The corresponding algorithms are straightforward to design. One obvious answer is to use a hash table, where the keys are the colors and the values are their corresponding appearances. Whenever a new event appears, the algorithm looks up the hash table and increases the appearance counter. It is not hard to tell that this algorithm’s time complexity is O(1) (per event) and the space complexity O(n) where n is the number of the types of events.

How Pingora does it

The hash table solution is fine in common scenarios, but we believe there are a few things that can be improved.

  • We observe traffic to millions of different servers when the misbehaving ones are only a few at a given time. It seems a bit wasteful to require space (memory) that holds the counter for all the keys.
  • Concurrently updating the hash table (especially when adding new keys) requires a lock. This behavior potentially forces all concurrent event processing to go through our system serialized. In other words, when lock contention is severe, the lock slows down the system.

The motivation to improve the above algorithm is even stronger considering such algorithms need to be deployed at scale. This algorithm operates on tens of thousands of machines. It handles more than twenty million requests per second. The benefits of efficiency improvement can be significant.

pingora-limits adopts a different approach: count–min sketch (CM sketch) estimation. CM sketch estimates the counts of events in O(1) (per event) but only using O(log(n)) of space (polylogarithmic, to be precise, more details here). Because of the simplicity of this algorithm, which we will discuss in a bit, it can be implemented without locks. Therefore, pingora-limits runs much faster and more efficiently compared to the hash table approach discussed earlier.

CM sketch

The idea of a CM sketch is similar to a Bloom filter. The mathematical details of the CM sketch can be found in this paper. In this section, we will just illustrate how it works.

A CM sketch data structure takes two parameters, H: number of hashes (rows) and N number of counters (columns) per hash (row). The rows and columns form a matrix. The space they take is H*N. Each row has its own independent hash function (hash_i()).

For this example, we use H=3 and N=4:

0 0 0 0
0 0 0 0
0 0 0 0

When an event, "red", arrives, it is counted by every row independently. Each row will use its own hashing function ( hash_i(“red”) ) to choose a column. The counter of the column is increased without worrying about collisions (see the end of this section).

The table below illustrates a possible state of the matrix after a single “red” event:

0 1 0 0
0 0 1 0
1 0 0 0

Then, let’s assume the event "blue" arrives, and we assume it collides with "red" at row 2: both hash to the third slot:

1 1 0 0
0 0 2 0
1 0 0 1

Let’s say after another series of events, “blue, red, red, red, blue, red”, So far the algorithm observed 5  “red”s and 3 “blue”s in total. Following the algorithm, the estimator eventually becomes:

3 5 0 0
0 0 8 0
5 0 0 3

Now, let’s see how the matrix reports the occurrence of each event. In order to retrieve the count of keys, the estimator just returns the minimal value of all the columns to which that key belongs. So the count of red is min(5, 8, 5) = 5 and blue is min(3, 8, 3) = 3.

This algorithm chooses the cells with the least collisions (via the min() operations). Therefore, collisions between events in single cells are acceptable because as long as there are collision free cells for a given type of event, the counting for that event is accurate.

The estimator can overestimate when two (or more) keys collide on all slots. Assuming there are only two keys, the probability of their total collision is 1/ N^H (1/64 in this example). On the other hand, it never underestimates because it never loses count of any events.

Practical implementation

Because the algorithm only requires hashing, array index and counter increment, it can be implemented in a few lines of code and lock-free.

The following is a code snippet of how it is implemented in Rust.

pub struct Estimator {
    estimator: Box<[(Box<[AtomicIsize]>, RandomState)]>,
}
 
impl Estimator {
    /// Increment `key` by the value given. Return the new estimated value as a result.
    pub fn incr<T: Hash>(&self, key: T, value: isize) -> isize {
        let mut min = isize::MAX;
        for (slot, hasher) in self.estimator.iter() {
            let hash = hash(&key, hasher) as usize;
            let counter = &slot[hash % slot.len()];
            let current = counter.fetch_add(value, Ordering::Relaxed);
            min = std::cmp::min(min, current + value);
        }
        min
    }
}

Performance

We compare the design above with the two hash table based approaches.

  1. naive: Mutex<HashMap<u32, usize>>. This approach references the simple hash table approach mentioned above. This design requires a lock on every operation.
  2. optimized: DashMap<u32, AtomicUsize>. DashMap leverages multiple hash tables in order to shard the keys to reduce contentions across different keys. We also use atomic counters here so that counting existing keys won't need a write lock.

We have two test cases, one that is single threaded and another that is multi-threaded. In both cases, we have one million keys. We generate 100 million events from the keys. The keys are uniformly distributed among the events.

The results below are performed on Debian VM running on M1 MacBook Pro.

Speed
Per event (the incr() function above) timing, lower is better:

pingora-limits naive optimized
Single thread 10ns 51ns 43ns
Eight threads 212ns 1505ns 212ns

In the single thread case, where there is no lock contention, our approach is 5x faster than the naive one and 4x faster than the optimized one. With multiple threads, there is a high amount of contention. Our approach is similar to the optimized version. Both are 7x faster than the naive one. The reason the performance of pingora-limits and the optimized hash table are similar is because in both approaches the hot path is just updating the atomic counter.

Memory consumption
Lower is better. The numbers are collected only from the single threaded test cases for simplicity.

peak memory bytes total allocations total allocated bytes
pingora-limits 26,184 9 26,184
naive 53,477,392 20 71,303,260
optimized 36,211,208 491 71,307,722

Pingora-limits at peak requires 1/2000 of the memory compared to the naive one and 1/1300 of the memory of the optimized one.

From the data above, pingora-limits is both CPU and memory efficient.

The estimator provided by Pingora-limits is a biased estimator because it is possible for it to overestimate the appearance of events.

In the case of accurate counting, where false positives are absolutely unacceptable, pingora-limits can still be very useful. It can work as a first stage filter where only the events beyond a certain threshold are fed to a hash table to perform accurate counting. In this case, the majority of low frequency event types are filtered out by the filter so that the hash table also consumes little memory without losing any accuracy.

How it is used in production

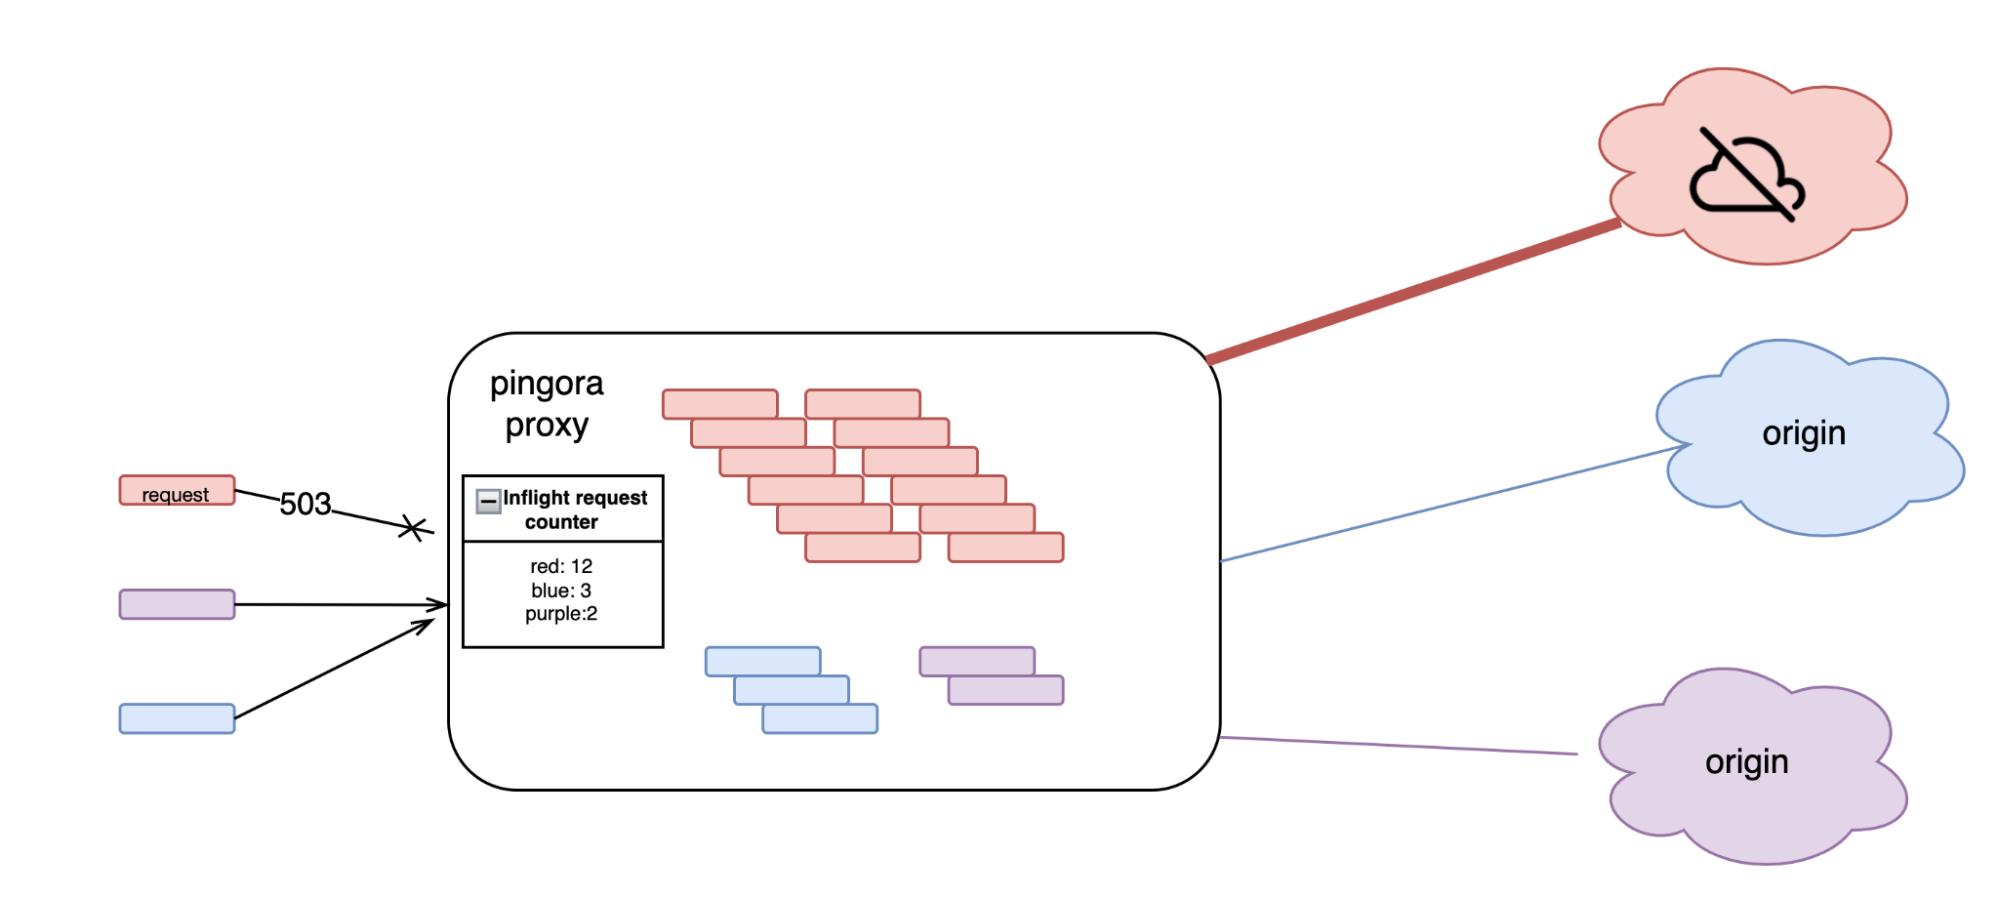
In production, pingora uses this library in a few places. The most common one is the connection limit feature. When our servers try to establish too many connections to a single origin server, in order to protect the server and our infrastructure from becoming overloaded, this feature will start rejecting new requests with 503 errors.

How Pingora keeps count

In this feature every incoming request increases a counter, shared by all other requests with the same customer ID, server IP and the server hostname. When the request finishes, the counter decreases accordingly. If the value of the counter is beyond a certain threshold, the request is rejected with a 503 error response. In our production environment we choose the parameters of the library so that a theoretical collision chance between two unrelated customers is about 1 / 2 ^ 52. Additionally, the rejection threshold is significantly higher than what a healthy customer’s traffic would reach. Therefore, even if multiple customers’ counters collide, it is not likely that the overestimated value would reach the threshold. So a false positive on the connection limit is not likely to happen.

Conclusion

Pingora-limits crate is available now on GitHub. Both the core functionality and the performance benchmark performed above can be found there.

In this blog post, we introduced pingora-limits, a library that counts events efficiently. We explained the core idea, which is based on a probabilistic data structure. We also showed through a performance benchmark that the pingora-limits implementation is fast and very efficient for memory consumption.

Not only that, but we will continue introducing and open sourcing Pingora components and libraries because we believe that sharing the idea behind the code is equally important as sharing the code itself.

Interested in joining us to help build a better Internet? Our engineering teams are hiring.

„Добрите“, „лошите“ и главният прокурор

Post Syndicated from Емилия Милчева original https://www.toest.bg/dobrite-loshite-i-glavniyat-prokuror/

„Добрите“, „лошите“ и главният прокурор

Оказа се, че над българския главен прокурор все пак има и друг освен Господ. Политиците, Онези-които-си-го-избраха. Джанката, която остава незасегната от всеки взрив, бил той фалитът на КТБ, къща в Барселона или офшорни сметки за мръсни пари. За първи път те обявиха, че искат той да напусне, макар едва да е преполовил 7-годишния си мандат.

Да, би било третото такова предложение за последните две години – Висшият съдебен съвет отхвърли предишните две, подкрепени единствено с по два гласа от съдийската колегия. Да, няма и дума за смяна на ВСС. Но и ВСС, и Гешев са функция на едни и същи интереси. Това пък от своя страна води до опасността настоящият ВСС, част от който е с изтекъл мандат, да избере и новия Гешев, селектиран от същите Онези.

Отстрел или алиби

Белязан ли е за отстрел обвинител №1, или публичните заявки от ГЕРБ и ДПС са алиби, чрез което да мотивират пред обществото едно съвместно управление? Знакови лица от двете партии попаднаха в двата списъка на санкционирани заради корупция по Глобалния закон „Магнитски“, а и ГЕРБ, и ДПС досега са се противопоставяли на съдебната реформа и са я шиканирали. Но скритият мотив зад оттеглянето на подкрепата за Гешев може да е именно препятстването на дълбока конституционна реформа, свързана и със статута и правомощията на главния прокурор.

Още преди изборите на 2 април лидерът на ГЕРБ Бойко Борисов беше казал, че партията ще подкрепи законовите промени, осигуряващи механизъм за контрол на главния прокурор. А първата публична изява на еврокомисарката Мария Габриел като кандидат за премиер на ГЕРБ–СДС тази седмица ще бъде запомнена не с призиви за твърд курс към еврото и Шенген, а със заявката за освобождаване на главния прокурор Иван Гешев. Друга конкретика липсваше.

От Южна Африка, където е на посещение, президентът Румен Радев се усъмни доколко сериозен е внезапният порив и няма ли зад него скрити интереси – „дали е плод на закъсняло с три години просветление, на внезапен катарзис, или на определен интерес на хората, които стоят зад г-жа Габриел“. Радев припомни как през 2019 г. е върнал предложението на ВСС за назначаването на г-н Гешев за главен прокурор, но с гласове от квотата на ГЕРБ във ВСС той е бил избран, как е поискал оставката на Гешев през 2020 г., но ГЕРБ са били в „колаборация с него“. Президентът заяви още:

Когато преди две години назначеният от мен служебен министър на правосъдието поиска отстраняването на Иван Гешев със същите мотиви, квотата на партията на г-жа Габриел го спаси, отново единодушно.

Анализатори и политически дейци побързаха да изтълкуват искането като адресирано към ПП–ДБ, за да подкрепят кабинет с първия мандат. В действителност това няма да доведе до промяна в тяхната категорична позиция да не участват в правителство с ГЕРБ. Независимо че съпредседателят на ДБ Христо Иванов оцени предложението като „важна политическа заявка“, която се ползва с неговата подкрепа, а колегата му от ПП акад. Николай Денков припомни, че с ГЕРБ нямали различия по законодателната програма. Но и Иванов, и други от „Промяната“ се усъмниха кой състав на ВСС би се произнесъл обективно по една такава инициатива, за да има резултат. Въпреки това около тази политическа заявка би могло да се сформира тематично мнозинство.

ГЕРБ и ДПС – единогласие

Отстраняването на Иван Гешев внезапно се нареди сред най-важните политически задачи пред бъдещо преходно правителство с премиер Мария Габриел. Досега такава задача пред ГЕРБ не стоеше – имаше „съдебна реформа“, „механизъм за разследване на главния прокурор“, укрепване на „върховенството на правото“. Но наименуването ѝ от Онези-които-си-избират-главен-прокурор я издигна до приоритет наравно с бюджета за 2023 г. Българската еврокомисарка само я озвучи:

В светлината на обстоятелствата от последните седмици първото, което ще направи министърът на правосъдието в моето правителство, е да внесе пред Висшия съдебен съвет искане за освобождаване на главния прокурор Иван Гешев поради уронване престижа на съдебната власт.

Скоро след това ДПС откликна толкова бързо и позитивно, като че са се наговорили с ГЕРБ. Председателят на Движението Мустафа Карадайъ заяви:

Идеята е добра, защото в момента има създадено напрежение в обществото и то трябва да бъде преодоляно по един или друг начин.

Никой политик от двете партии не уточнява какво са осветили обстоятелствата и от какво е породено моментното напрежение – дали е взривът край пътя, по който е минавал автомобилът на главния прокурор и охраната му, или противоречивите сигнали от разследващите.

Така нареченият атентат повече го дискредитира, отколкото виктимизира, а изявленията на заместника му и шеф на Националната следствена служба Борислав Сарафов, който само за седмица се обърна на 180 градуса и от пламенен защитник на Гешев се превърна в негов критик, показват, че ветровете са сменили посоката си.

Прокуратурата да излезе от политическия терен, където е нагазила дълбоко и да се върне в естествената си среда – в защита на справедливостта само и единствено в рамките на институционалните ѝ правомощия.

Това заяви в позиция до БТА Сарафов, който кара своя втори мандат начело на следствието с подкрепата на Гешев и доскоро му се отплащаше с лоялност. Толкова голяма, че допусна на местопрестъпление, където преди броени часове е бил извършен атентат срещу главния прокурор, непознат човек, пристигнал току-що в страната от Израел и воден от заместника му Ясен Тодоров. Но ето че сега твърди как се разследват всички версии за инцидента, включително и за инсценировка, с помощта на екипи от МВР, и вече поиска от ВСС да освободи същия Тодоров (близък до Иван Гешев).

Шапката му е скроена

Два дни преди политиците, експерт по конституционно право и известен бизнесмен заявиха, че главният прокурор трябва да се оттегли. По bTV на 9 май доц. Наталия Киселова го препоръча, за да не се хвърлят съмнения върху обективността на разследването. А по БНР доцентът по корпоративна сигурност Алексей Петров заяви: „Императивно Иван Гешев трябва да се оттегли от позицията, която заема, до приключване на разследването.“ А държавата да му помогне да си намери „друга подходяща работа“ (тоест да не се връща на предишната и след приключването на разследването, б.а.).

Петров, който рядко нарушава мълчанието си, е бивша барета, бивш съдружник на Бойко Борисов, с когото дълги години бяха в конфликт, бивш обвиняем по делото „Октопод“ и напълно оправдан, бивш съветник в ДАНС, спомогнал за създаването ѝ. Свързваната с него застрахователна компания „Лев Инс“ заведе дело за 1 млн. лв. срещу сайта Mediapool.bg заради цитат от министър в публикация за проблеми със системата „Зелена карта“. Лидерът на ДСБ Атанас Атанасов и бившият вътрешен министър Цветан Цветанов преди години публично обвързаха кариерата му в службите с тогавашния главен прокурор Никола Филчев.

Когато „добрите“, „лошите“ и „оперативно интересните“ заговорят в един глас за оставка на главния прокурор, шапката му е скроена, а наследникът на поста вече се моделира в поне един от лагерите. Кои обаче са „добрите“, скоро ще се размие в очите на обществото. Нали в крайна сметка всички ще викат „Вън Гешев!“ и „лоши“ няма да има.

Бюджетът за 2023 г. и освобождаването на главния прокурор могат да слепят правителство с първия мандат на ГЕРБ–СДС. Работата на „Продължаваме промяната – Демократична България“ е да не допуснат Гешев 2.0.

3 минути наука: Дете с трима родители

Post Syndicated from original https://yurukov.net/blog/2023/dete-s-trima-roditeli/

Видяхте заглавието за „детето с тримата родители“, може би сте видели възмутените коментари под него или сами сте написали такъв. За какво става дума?

Ето най-общо казано:

Мама и тати много като се обичат и се опитват да си направят бебе. Много рядко, но се случва децата да се раждат с увреждания, понякога такива застрашаващи живота им. Те може да се проявяват още в утробата, след раждането или на доста по-късна възраст. По-често уврежданията са заради дефекти при копирането на генетичния код и се случват на случаен принцип – при следващи бебета по-често няма такъв проблем. Понякога обаче са наследствени – идват пряко от родителите. Тогава е почти неизбежно децата да наследят дадена характеристика – като тъмна коса, оплешивяване или кръвна група.

Преди само 2-3 поколения най-често просто сме изоставяли децата. В наши дни може да откриваме тези проблеми още преди зародишът да е станал човек и дори преди опитите за зачеване. Освен в ядрото на клетката, имаме ДНК и в митохондриите – енергийните централи на тялото, ако си спомняте от уроците по биология. Те се предават само по майчин път. Е, понякога има дефекти в тях, които водят до нелечими състояния.

В случая са засекли това у майката на въпросното дете и механично сменят митохондриите в клетката ѝ с такива от друг здрав донор. Останалото ДНК си остава на майката. Няма генна терапия или пренаписване на каквото и да е. Целта е да има жената свое дете без огромния в конкретния случай риск от увреждания.

Впрочем, в последните години нашумяха няколко случая на деца в България, при които е имало заболявания именно свързани с вродени дефекти в митохондриите. Не всички са били наследствени, но както казахме, това не е единственият източник на проблеми. Имаше премного дарения, концерти и кампании за предполагаеми лечения, някои от които от откровено шарлатански клиники у нас и в чужбина, както за съжаление не е рядко в такива случаи. Някои от родителите дори обвиняваха рутинните ваксини за състоянието на децата им, въпреки, че всички лекари са им обяснявали ясно за какво става въпрос. Реакцията им е естествена и очаквана, още повече при липса на разбиране на тези състояния.

Е, сега вие се надявам да разбирате.

The post 3 минути наука: Дете с трима родители first appeared on Блогът на Юруков.

Automating stopping and starting Amazon MWAA environments to reduce cost

Post Syndicated from James Beswick original https://aws.amazon.com/blogs/compute/automating-stopping-and-starting-amazon-mwaa-environments-to-reduce-cost/

This was written by Uma Ramadoss, Specialist Integration Services, and Chandan Rupakheti, Solutions Architect.

This blog post shows how you can save cost by automating the stopping and starting of an Amazon Managed Workflows for Apache Airflow (Amazon MWAA) environment. It describes how you can retain the data stored in a metadata database and presents an automated solution you can use in your AWS account.

Customers run end to end data pipelines at scale with MWAA. It is a common best practice to run non-production environments for development and testing. A nonproduction environment often does not need to run throughout the day due to factors such as working hours of the development team. As there is no automatic way to stop an MWAA environment when not in use and deleting an environment causes metadata loss, customers often run it continually and pay the full cost.

Overview

Amazon MWAA has a distributed architecture with multiple components such as scheduler, worker, webserver, queue, and database. Customers build data pipelines as Directed Acyclic Graphs (DAGs) and run in Amazon MWAA. The DAGs use variables and connections from the Amazon MWAA metadata database. The history of DAG runs and related data are stored in the same metadata database. The database also stores other information such as user roles and permissions.

When you delete the Amazon MWAA environment, all the components including the database are deleted so that you do not incur any cost. As this normal deletion results in loss of metadata, you need a customized solution to back up the data and to automate the deletion and recreation.

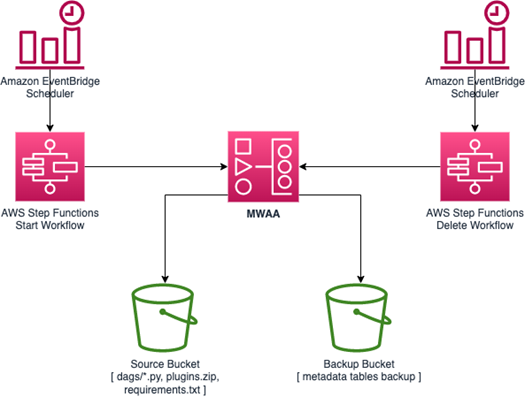
The sample application deletes and recreates your MWAA environment at a scheduled interval defined by you using Amazon EventBridge Scheduler. It exports all metadata into an Amazon S3 bucket before deletion and imports the metadata back to the environment after creation. As this is a managed database and you cannot access the database outside the Amazon MWAA environment, it uses DAGs to import and export the data. The entire process is orchestrated using AWS Step Functions.

Deployment architecture

The sample application is in a GitHub repository. Use the instructions in the readme to deploy the application.

Sample architecture

The sample application deploys the following resources –

  1. A Step Functions state machine to orchestrate the steps needed to delete the MWAA environment.
  2. A Step Functions state machine to orchestrate the steps needed to recreate the MWAA environment.
  3. EventBridge Scheduler rules to trigger the state machines at the scheduled time.
  4. An S3 bucket to store metadata database backup and environment details.
  5. Two DAG files uploaded to the source S3 bucket configured with the MWAA environment. The export DAG exports metadata from the MWAA metadata database to backup S3 bucket. The import DAG restores the metadata from the backup S3 bucket to the newly created MWAA environment.
  6. AWS Lambda functions for triggering the DAGs using MWAA CLI API.
  7. A Step Functions state machine to wait for the long-running MWAA creation and deletion process.
  8. Amazon EventBridge rule to notify on state machine failures.
  9. Amazon Simple Notification Service (Amazon SNS) topic as a target to the EventBridge rule for failure notifications.
  10. Amazon Interface VPC Endpoint for Step Functions for MWAA environment deployed in the private mode.

Stop workflow

At a scheduled time, Amazon EventBridge Scheduler triggers a Step Functions state machine to stop the MWAA environment. The state machine performs the following actions:

Stop workflow

  1. Fetch Amazon MWAA environment details such as airflow configurations, IAM execution role, logging configurations and VPC details.
  2. If the environment is not in the “AVAILABLE” status, it fails the workflow by branching to the “Pausing unsuccessful” state.
  3. Otherwise, it runs the normal workflow and stores the environment details in an S3 bucket so that Start workflow can recreate the environment with this data.
  4. Trigger an MWAA DAG using AWS Lambda function to export metadata to the Amazon S3 bucket. This step uses Step Functions to wait for callback token integration.
  5. Resume the workflow when the task token is returned from the MWAA DAG.
  6. Delete Amazon MWAA environment.
  7. Wait to confirm the deletion.

Start workflow

At a scheduled time, EventBridge Scheduler triggers the Step Functions state machine to recreate the MWAA environment. The steps in the state machine perform the following actions:

Start workflow

  1. Retrieve the environment details stored in Amazon S3 bucket by the stop workflow.
  2. Create an MWAA environment with the same configuration as the original.
  3. Trigger an MWAA DAG through the Lambda function to restore the metadata from the S3 bucket to the newly created environment.

Cost savings

Consider a small MWAA environment in us-east-2 with a minimum of one worker, a maximum of one worker, and 1GB data storage. At the time of this writing, the monthly cost of the environment is $357.80. Let’s assume you use this environment between 6 am and 6 pm on weekdays.

The schedule in the env file of the sample application looks like:

MWAA_PAUSE_CRON_SCHEDULE=’0 18 ? * MON-FRI *’
MWAA_RESUME_CRON_SCHEDULE=’30 5 ? * MON-FRI *’

As MWAA environment creation takes anywhere between 20 and 30 minutes, the MWAA_RESUME_CRON_SCHEDULE is set at 5.30 pm.

Assuming 21 weekdays per month, the monthly cost of the environment is $123.48 and is 65.46% less compared to running the environment continuously:

  • 21 weekdays * 12 hours * 0.49 USD per hour = $123.48

Additional considerations

The sample application only restores at-store data. Though the deletion process pauses all the DAGs before making the backup, it cannot stop any running tasks or in-flight messages in the queue. It also does not backup tasks that are not in completed state. This can result in task history loss for the tasks that were running during the backup.

Over time, the metadata grows in size, which can increase latency in query performance. You can use a DAG as shown in the example to clean up the database regularly.

Avoid setting the catchup by default configuration flag in the environment setting to true or in the DAG definition unless it is required. Catch up feature runs all the DAG runs that are missed for any data interval. When the environment is created again, if the flag is true, it catches up with the missed DAG runs and can overload the environment.

Conclusion

Automating the deletion and recreation of Amazon MWAA environments is a powerful solution for cost optimization and efficient management of resources. By following the steps outlined in this blog post, you can ensure that your MWAA environment is deleted and recreated without losing any of the metadata or configurations. This allows you to deploy new code changes and updates more quickly and easily, without having to configure your environment each time manually.

The potential cost savings of running your MWAA environment for only 12 hours on weekdays are significant. The example shows how you can save up to 65% of your monthly costs by choosing this option. This makes it an attractive solution for organizations that are looking to reduce cost while maintaining a high level of performance.

Visit the samples repository to learn more about Amazon MWAA. It contains a wide variety of examples and templates that you can use to build your own applications.

For more serverless learning resources, visit Serverless Land.

New – Amazon Aurora I/O-Optimized Cluster Configuration with Up to 40% Cost Savings for I/O-Intensive Applications

Post Syndicated from Channy Yun original https://aws.amazon.com/blogs/aws/new-amazon-aurora-i-o-optimized-cluster-configuration-with-up-to-40-cost-savings-for-i-o-intensive-applications/

Since Amazon Aurora launched in 2014, hundreds of thousands of customers have chosen Aurora to run their most demanding applications. Aurora provides unparalleled high performance and availability at global scale with full MySQL and PostgreSQL compatibility at up to one-tenth the cost of commercial databases.

Many customers benefit from the cost-effectiveness of Aurora’s current simple, pay-per-request pricing for input/output (I/O) usage, removing the need to provision I/Os in advance. Customers also benefit from additional cost-saving innovations such as Amazon Aurora Serverless v2 (ASv2), which provides seamless scaling in fine-grained increments based on the application’s demands. For workloads with spikes in demand, you can save up to 90 percent in costs vs. provisioning capacity for peak load with ASv2.

Today, we are announcing the general availability of Amazon Aurora I/O-Optimized, a new cluster configuration that offers improved price performance and predictable pricing for customers with I/O-intensive applications, such as e-commerce applications, payment processing systems, and more. Aurora I/O-Optimized offers improved performance, increasing throughput and reducing latency to support your most demanding workloads.

You can now confidently predict costs for your most I/O-intensive workloads, with up to 40 percent cost savings when your I/O spend exceeds 25 percent of your current Aurora database spend. If you are using Reserved Instances, you will see even greater cost savings.

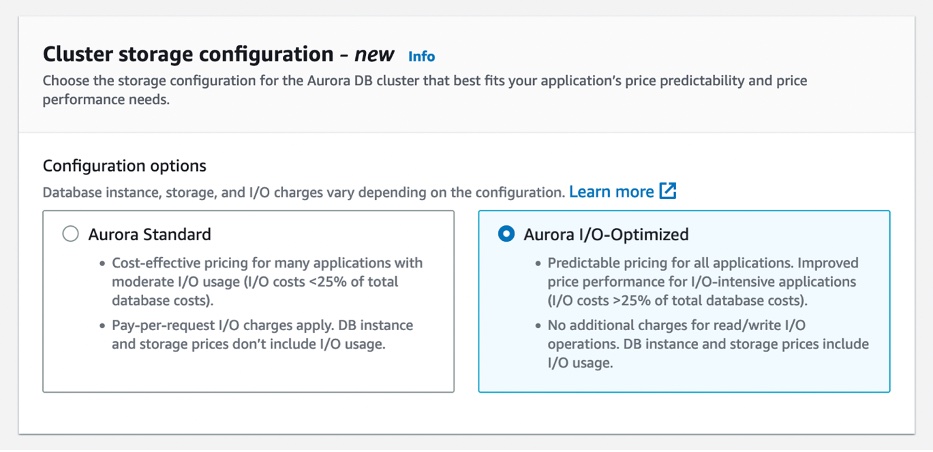
Now you have the flexibility to choose between the existing configuration newly called Aurora Standard, which is the existing pay-per-request pricing model that is cost-effective for applications with low-to-moderate I/O usage or the new Aurora I/O-Optimized configuration for I/O-intensive applications.

Getting Started with Aurora I/O-Optimized
You can create a new database cluster using the Aurora I/O-Optimized configuration or convert your existing database clusters with a few clicks in the AWS Management Console, AWS Command Line Interface (AWS CLI), or AWS SDKs.

For the Aurora MySQL-Compatible Edition and Aurora PostgreSQL-Compatible Edition, you can choose either the Aurora Standard or Aurora I/O-Optimized configuration.

Aurora I/O-Optimized configuration is available in the latest version of Aurora MySQL version 3.03.1 and higher, Aurora PostgreSQL v15.2 and higher, v14.7 and higher, and v13.10 and higher.

This configuration supports Intel-based Aurora database instance types such as t3, r5, and r6i, Graviton-based database instance types such as t4g, r7g, and x2g, Aurora Serverless v2, Aurora Global Database, on-demand Aurora database instances, and reserved instances.

R7g instances for Amazon Aurora are powered by the latest generation AWS Graviton3 processors, delivering up to 30 percent performance gains and up to 20 percent improved price performance for Aurora, as compared to R6g instances.

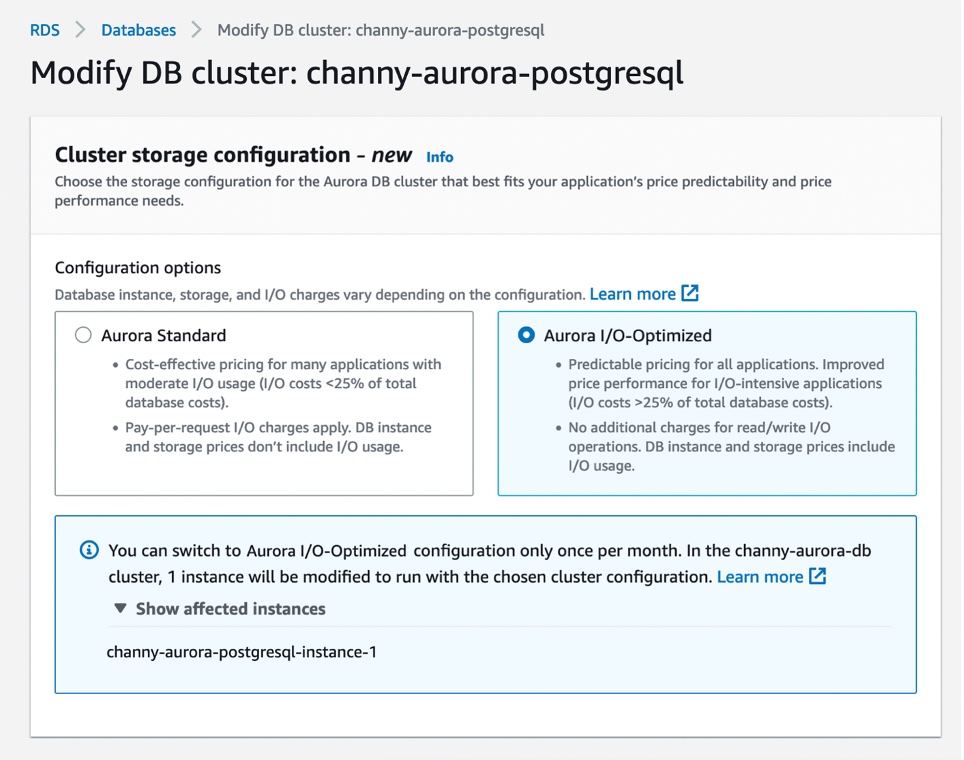
In your existing Aurora clusters, you can switch the storage configuration to Aurora I/O-Optimized once every 30 days or switch back to Aurora Standard at any time. You can change the cluster storage configuration only at the cluster level. The change applies to all instances in the cluster.

After changing the configuration, you don’t need to reboot the database instances within the cluster to take advantage of the price-performance benefits of Aurora I/O-Optimized.

Now Available
Amazon Aurora I/O-Optimized configuration is now generally available for Amazon Aurora MySQL-Compatible Edition and Aurora PostgreSQL-Compatible Edition in most AWS Regions where Aurora is available, with China (Beijing), China (Ningxia), AWS GovCloud (US-East), and AWS GovCloud (US-West) Regions coming soon.

Aurora is billed differently for the two configurations: Aurora Standard or Aurora I/O-Optimized. The latter doesn’t charge for I/Os, charging a set price for compute and storage relative to the former. For I/O-intensive applications, its price/performance will be better, and you can save up to 40 percent on costs. To see pricing examples, visit the Aurora Pricing page.

To learn more, read Amazon Aurora storage and reliability in the AWS documentation. Give it a try, and please send feedback to AWS re:Post for Amazon Aurora or through your usual AWS support contacts.

– Channy

[The Lost Bots] S03E03. The Rise of The Machines

Post Syndicated from Amy Hunt original https://blog.rapid7.com/2023/05/11/the-lost-bots-s03e03-the-rise-of-the-machines/

[The Lost Bots] S03E03. The Rise of The Machines

Artificial Intelligence (AI) is both a profound topic and now, a practical one too: cybersecurity marketers in particular are loving the letters “A” an “I.” But exactly where are we?

Everybody knows an early version of Bing AI spawned a weird personality named “Sidney” and expressed the desire to be both human and destructive. Then there’s that “AI pause” letter almost everybody signed. And now this, from the New York Times: the godfather of AI, Geoffrey Hinton, 75, is leaving Google. He wants to speak freely about the grave dangers he predicts: “It is hard to see how you can prevent the bad actors from using it for bad things.”

A part of him, Hinton said, has come to regret his life’s work.

According to Wired, security researchers are “jailbreaking large language models to get around safety rules.” Our life’s work? Yours? It’s more important than ever. We just might save humanity. But that’s for later…

Separating real and hype about AI and cybersecurity

Rapid7 Detection and Response Practice Advisor Jeffrey Gardner and Stephen Davis, Lead Technical Customer Advisor for MDR may get profound in the future—but this episode is 100% practical and useful right now.

Around the 5:00 mark, they go through exactly how AI is being used in cybersecurity today (and not used, no matter what you hear).

And around the 7:00 mark, heed Gardner’s passionate warning about what you and all your company staff need to think about every time you engage with an AI tool. Every time. In any way. Seriously. Gardner and Stephen are funny, but this warning sure isn’t.

A walk through AWS Verified Access policies

Post Syndicated from Riggs Goodman III original https://aws.amazon.com/blogs/security/a-walk-through-aws-verified-access-policies/

AWS Verified Access helps improve your organization’s security posture by using security trust providers to grant access to applications. This service grants access to applications only when the user’s identity and the user’s device meet configured security requirements. In this blog post, we will provide an overview of trust providers and policies, then walk through a Verified Access policy for securing your corporate applications.

Understanding trust data and policies

Verified Access policies enable you to use trust data from trust providers and help protect access to corporate applications that are hosted on Amazon Web Services (AWS). When you create a Verified Access group or a Verified Access endpoint, you create a Verified Access policy, which is applied to the group or both the group and endpoint. Policies are written in Cedar, an AWS policy language. With Verified Access, you can express policies that use the trust data from the trust providers that you configure, such as corporate identity providers and device security state providers.

Verified Access receives trust data or claims from different trust providers. Currently, Verified Access supports two types of trust providers. The first type is an identity trust provider. Identity trust providers manage the identities of digital users, including the user’s email address, groups, and profile information. The second type of trust provider is a device trust provider. Device trust providers manage the device posture for users, including the OS version of the device, risk scores, and other metrics that reflect device posture. When a user makes a request to Verified Access, the request includes claims from the configured trust providers. Verified Access customers permit or forbid access to applications by evaluating the claims in Cedar policies. We will walk through the types of claims that are included from trust providers and the options for custom trust data.

End-to-end Cedar policy use cases

Let’s look at how to use policies with your applications. In general, you use Verified Access to control access to an application for purposes of authentication and initial authorization. This means that you use Verified Access to authenticate the user when they log in and to confirm that the device posture of the end device meets minimum criteria. For authorization logic to control access to actions and resources inside the application, you pass the identity claims to the application. The application uses the information to authorize users within the application after authentication. In other words, not every identity claim needs to be passed or checked in Verified Access to allow traffic to pass to the application. You can and should put additional logic in place to make decisions for users when they gain access to the backend application after initial authentication and authorization by Verified Access. From an identity perspective, this additional criteria might be an email address, a group, and possibly some additional claims. From a device perspective, Verified Access does not at this time pass device trust data to the end application. This means that you should use Verified Access to perform checks involving device posture.

We will explore the evolution of a policy by walking you through four use cases for Cedar policy. You can test the claim data and policies in the Verified Access Cedar Playground. For more information about Verified Access, see Verified Access policies and types of trust providers.

Use case 1: Basic policy

For many applications, you only need a simple policy to provide access to your users. This can include the identity information only. For example, let’s say that you want to write a policy that uses the user’s email address and matches a certain group that the user is part of. Within the Verified Access trust provider configuration, you can include “openid email groups” as the scope, and your OpenID Connect (OIDC) provider will include each claim associated with the scopes that you have configured with the OIDC provider. When the user John in this example uses case logs in to the OIDC provider, he receives the following claims from the OIDC provider. For this provider, the Verified Access Trust Provider is configured for “identity” to be the policy reference name.

{
  "identity": {
    "email": "[email protected]",
    "groups": [
      "finance",
      "employees"
    ]
  }
}

With these claims, you can write a policy that matches the email domain and the group, to allow access to the application, as follows.

permit(principal, action, resource)
when {
    // Returns true if the email ends in "@example.com"
    context.identity.email like "*@example.com" &&
    // Returns true if the user is part of the "finance" group
    context.identity.groups.contains("finance")
};

Use case 2: Custom claims within a policy

Many times, you are also interested in company-specific or custom claims from the identity provider. The claims that exist with the user endpoint are dependent on how you configure the identity provider. For OIDC providers, this is determined by the scopes that you define when you set up the identity provider. Verified Access uses OIDC scopes to authorize access to details of the user. This includes attributes such as the name, email address, email verification, and custom attributes. Each scope that you configure for the identity provider returns a set of user attributes, which we call claims. Depending on which claims you want to match on in your policy, you configure the scopes and claims in the OIDC provider, which the OIDC provider adds to the user endpoint. For a list of standard claims, including profile, email, name, and others, see the Standard Claims OIDC specification.

In this example use case, as your policy evolves from the basic policy, you decide to add additional company-specific claims to Verified Access. This includes both the business unit and the level of each employee. Within the Verified Access trust provider configuration, you can include “openid email groups profile” as the scope, and your OIDC provider will include each claim associated with the scopes that you have configured with the OIDC provider. Now, when the user John logs in to the OIDC provider, he receives the following claims from the OIDC provider, with both the business unit and role as claims from the “profile” scope in OIDC.

{
  "identity": {
    "email": "[email protected]",
    "groups": [
      "finance",
      "employees"
    ],
    "business_unit": "corp",
    "level": 8
  }
}

With these claims, the company can write a policy that matches the claims to allow access to the application, as follows.

permit(principal, action, resource)
when {
    // Returns true if the email ends in "@example.com"
    context.identity.email like "*@example.com" &&
    // Returns true if the user is part of the "finance" group
    context.identity.groups.contains("finance") &&
    // Returns true if the business unit is "corp"
    context.identity.business_unit == "corp" &&
    // Returns true if the level is greater than 6
    context.identity.level >= 6
};

Use case 3: Add a device trust provider to a policy

The other type of trust provider is a device trust provider. Verified Access supports two device trust providers today: CrowdStrike and Jamf. As detailed in the AWS Verified Access Request Verification Flow, for HTTP/HTTPS traffic, the extension in the web browser receives device posture information from the device agent on the user’s device. Each device trust provider determines what risk information and device information to include in the claims and how that information is formatted. Depending on the device trust provider, the claims are static or configurable.

In our example use case, with the evolution of the policy, you now add device trust provider checks to the policy. After you install the Verified Access browser extension on John’s computer, Verified Access receives the following claims from both the identity trust provider and the device trust provider, which uses the policy reference name “crwd”.

{
  "identity": {
    "email": "[email protected]",
    "groups": [
      "finance",
      "employees"
    ],
    "business_unit": "corp",
    "level": 8
  },
  "crwd": {
    "assessment": {
      "overall": 90,
      "os": 100,
      "sensor_config": 80,
      "version": "3.4.0"
    }
  }
}

With these claims, you can write a policy that matches the claims to allow access to the application, as follows.

permit(principal, action, resource)
when {
    // Returns true if the email ends in "@example.com"
    context.identity.email like "*@example.com" &&
    // Returns true if the user is part of the "finance" group
    context.identity.groups.contains("finance") &&
    // Returns true if the business unit is "corp"
    context.identity.business_unit == "corp" &&
    // Returns true if the level is greater than 6
    context.identity.level >= 6 &&
    // If the CrowdStrike agent is present
    ( context has "crwd" &&
      // The overall device score is greater or equal to 80 
      context.crwd.assessment.overall >= 80 )
};

For more information about these scores, see Third-party trust providers.

Use case 4: Multiple device trust providers

The final update to your policy comes in the form of multiple device trust providers. Verified Access provides the ability to match on multiple device trust providers in the same policy. This provides flexibility for your company, which in this example use case has different device trust providers installed on different types of users’ devices. For information about many of the claims that each device trust provider provides to AWS, see Third-party trust providers. However, for this updated policy, John’s claims do not change, but the new policy can match on either CrowdStrike’s or Jamf’s trust data. For Jamf, the policy reference name is “jamf”.

permit(principal, action, resource)
when {
    // Returns true if the email ends in "@example.com"
    context.identity.email like "*@example.com" &&
    // Returns true if the user is part of the "finance" group
    context.identity.groups.contains("finance") &&
    // Returns true if the business unit is "corp"
    context.identity.business_unit == "corp" &&
    // Returns true if the level is greater than 6
    context.identity.level >= 6 &&
    // If the CrowdStrike agent is present
    (( context has "crwd" &&
      // The overall device score is greater or equal to 80 
      context.crwd.assessment.overall >= 80 ) ||
    // If the Jamf agent is present
    ( context has "jamf" &&
      // The risk level is either LOW or SECURE
      ["LOW","SECURE"].contains(context.jamf.risk) ))
};

For more information about using Jamf with Verified Access, see Integrating AWS Verified Access with Jamf Device Identity.

Conclusion

In this blog post, we covered an overview of Cedar policy for AWS Verified Access, discussed the types of trust providers available for Verified Access, and walked through different use cases as you evolve your Cedar policy in Verified Access.

If you want to test your own policies and claims, see the Cedar Playground. If you want more information about Verified Access, see the AWS Verified Access documentation.

Want more AWS Security news? Follow us on Twitter.

Riggs Goodman III

Riggs Goodman III

Riggs Goodman III is the Senior Global Tech Lead for the Networking Partner Segment at Amazon Web Services (AWS). Based in Atlanta, Georgia, Riggs has over 17 years of experience designing and architecting networking solutions for both partners and customers.

Bashuman Deb

Bashuman Deb

Bashuman is a Principal Software Development Engineer with Amazon Web Services. He loves to create delightful experiences for customers when they interact with the AWS Network. He loves dabbling with software-defined-networks and virtualized multi-tenant implementations of network-protocols. He is baffled by the complexities of keeping global routing meshes in sync.

The collective thoughts of the interwebz