Post Syndicated from LastWeekTonight original https://www.youtube.com/watch?v=Bd2bbHoVQSM
How to build LINE messaging into business communications
Post Syndicated from nnatri original https://aws.amazon.com/blogs/messaging-and-targeting/how-to-build-line-messaging-into-business-communications/
In today’s interconnected world, businesses need to communicate with their customers through multiple channels. This means using a variety of messaging apps, social media platforms, and other communication tools to reach customers where they are. One such platform that has gained immense popularity in select Asian markets is LINE. As the biggest social network in Japan, LINE offers businesses a unique opportunity to connect with customers in this region. Within Japan alone, LINE’s 2021 data shows 86 million users, constituting approximately 85% of Japan’s adult population. However, managing communication through multiple channels can be challenging for businesses.
That’s where Amazon Pinpoint comes in. Amazon Pinpoint is a flexible communication service for businesses that simplifies the process of sending targeted messages to customers across multiple channels. In this blog post, we’ll focus on how to integrate LINE with Amazon Pinpoint. This post is part of a series on integrating different communication channels with Amazon Pinpoint, and it is intended for both marketing operations and communication developers.
If you are already using LINE, this blog post will help you centralize management within Amazon Pinpoint. Additionally, if you are looking to integrate another messaging service with an open API, the steps outlined here will provide a helpful guide. Finally, if you’re a business looking to tap into Asian markets, this blog post is essential reading. By integrating LINE with Amazon Pinpoint, you’ll be able to reach your customers on the platform they are already using, providing seamless end-to-end customer engagements that will greatly enhances customer experience.
Note
Line is a third-party service that is subject to additional terms and charges. Amazon Web Services isn’t responsible for any third-party service that you use to send messages with custom channels.
Why Integrate LINE with Amazon Pinpoint?
Integrating LINE with Amazon Pinpoint has several benefits for businesses:
- Centralized communication management: With LINE integrated into Amazon Pinpoint, businesses can centralize the management of outbound communication channels and simplify their communication workflows.
- Increased flexibility for marketing campaigns: With LINE added as a custom channel in Amazon Pinpoint, businesses can create targeted messaging campaigns and reach customers through multiple channels, including LINE. Along with Pinpoint journeys, businesses can craft end-to-end customer engagement journeys that start from one channel and end in another.
- Access to LINE’s popular messaging platform: With LINE integrated into Amazon Pinpoint, businesses can tap into the app’s massive user base in select Asian markets and engage with their customers through a popular and widely used messaging platform. Having access to LINE’s demographics of approximately 50% office workers with high penetration into 20s-30s age band, brands can tap into this high-spending power segment to drive revenue for their products.
Architecture
This solution uses Amazon Pinpoint,AWS Lambda, Amazon API Gateway, Amazon Simple Storage Service (Amazon S3), AWS Secrets Manager and LINE Messaging API
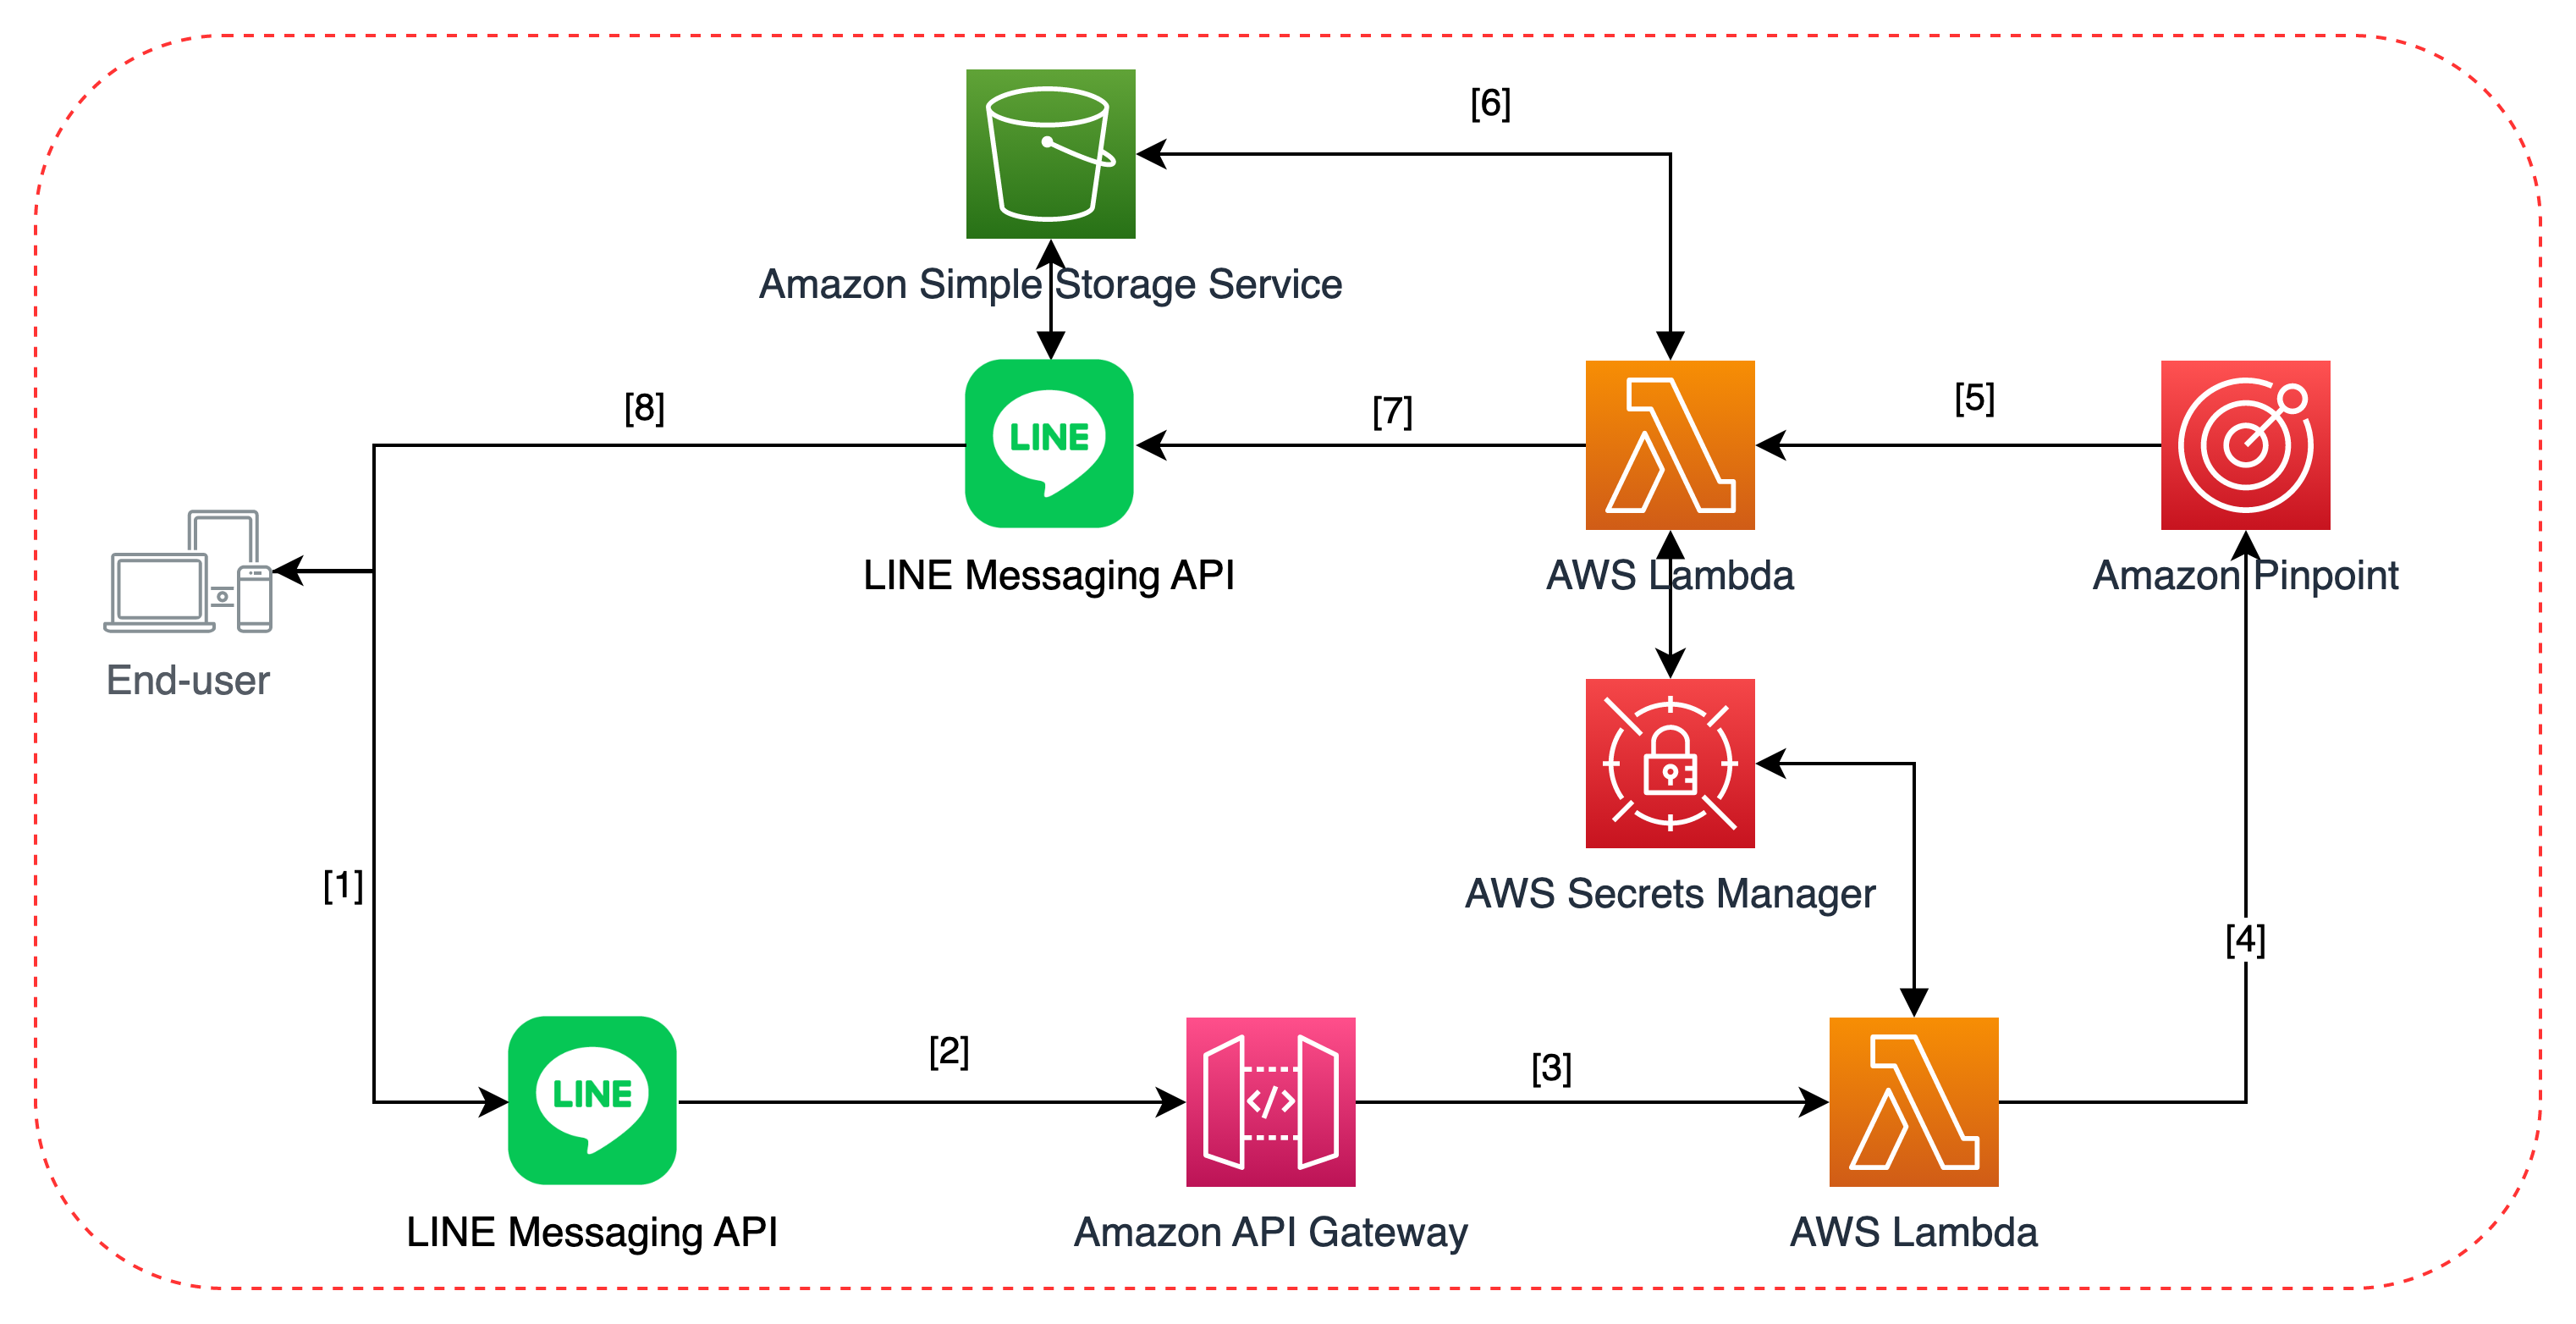
The solution architecture can be broken up into two main sections:
- Steps 1-4 cover handling inbound user events and managing user data within Amazon Pinpoint.
- Steps 5-8 cover how to send outbound campaigns via Amazon Pinpoint Custom Channel.
- The customer subscribes to the business’ LINE channel.
- The subscribe/unsubscribe event is received and checked via Amazon API Gateway.
- The edge-optimized Amazon API Gateway passes valid requests via a proxy integration to the backend Lambda.
- The backend Lambda compares the request body with the
x-line-signaturerequest header to confirm that the request was sent from the LINE Platform, as recommended by LINE API document. Afterwards, the Lambda function processes the user events:- If the user subscribes to the channel, a new endpoint will be added to Amazon Pinpoint’s user database.
- If the user unsubscribes from the channel, the corresponding endpoint (identified by the LINE User ID) is deleted from Amazon Pinpoint’s user database.
- Amazon Pinpoint initiates a call to a Lambda function via Custom Channel with a payload. Of particular importance would be the
Datafield contained within the payload, which can be specified within the Amazon Pinpoint console to modify the content of the message. - If the message contains image/audio/video files, the Lambda will request the file from the corresponding Amazon S3 buckets to be included for step 7. Amazon S3 then sends back the presigned URL containing the requested file(s).
- The Lambda function puts the message in the correct format expected by the LINE Messaging API and sends it over to the LINE Platform.
- The LINE Messaging API receives the request and processes the message content. If necessary, it will retrieve and download the file from Amazon S3 using the presigned URLs generated in step 6 then finally send the message to the corresponding user on the LINE Mobile App.
Step-by-Step Deployment Guide
Prerequisites
To deploy this solution, you must have the following:
- An AWS account, with the appropriate AWS CLI profile.
- Named Profile: Run
aws configurewith the--profileoption. The following steps assumed you have created a profile calledline-integrationto use with AWS CDK.
- Named Profile: Run
- Minimum Python v3.7, with
pipandvenv - AWS CDK v2 installed.
- Docker Engine installed. You can download and install the appropriate Docker Desktop Distribution for your system via this link
- A LINE Account.
- If you have never worked with LINE Messaging API before, you should login to to LINE Developers Console using one of the following accounts.
- LINE account
- Business account
- Afterwards, you should create a new provider.

- Within the provider page, you can then choose to create a new channel. For our Integration purposes, we will be choosing Messaging API channel type.

- If you have never worked with LINE Messaging API before, you should login to to LINE Developers Console using one of the following accounts.


Preparation
The source code can be found in this GitHub Repository.
- Fork the GitHub Repo into your account. This way you can experiment with changes as necessary to fit your workload.
- In your local compute environment, clone the GitHub Repository and
cdinto the project directory. - Run the following commands to create a virtual environment, activate it and install required dependencies.
python3 -m venv env \
&& source env/bin/activate \
&& python -m pip install -r requirements.txt
Deploy the CDK
- We can set the AWS CLI profile in CDK commands by adding the
--profileflag. Run the following commands to bootstrap your AWS environment, synthesize the CDK template and deploy to your environment.
cdk bootstrap --profile LINE-integration \
&& cdk synth --profile LINE-integration \
&& cdk deploy --profile LINE-integration
Note
Enterywhen prompted withDo you wish to deploy these changes (y/n)?
- After the deployment is done, the CDK template will output the API Gateway endpoint URL which takes the form of
https://[********].execute-api.[region].amazonaws.com/prod/. Copy down this information as you will need it to set up the webhook connection later on.
Getting LINE Official Account Credentials
- Log in to LINE developer console.

- Once inside, choose the channel you’d like to have integrated with Amazon Pinpoint. This assumes that you’ve created a provider and a channel as mentioned in the Prerequisite section.

- In the Basic settings tab, scroll down and note down the Channel Secret.
- In the Messaging API tab, scroll down and click on Edit under Webhook URL and enter the API Gateway endpoint URL you have noted down in step 5. Click on Update to save the changes.

NOTE Once you have finished entering your Channel Secret token in step 14, you can return to this page to Verify your webhook URL is set up correctly). - Finally, issue a Channel Access Token (at the bottom of the Messaging API tab) and note it down.


Registering Secrets in AWS Secrets Manager
- Navigate to the AWS Secrets Manager console. Make sure you’re in the same region as your CDK deployment region.
- Click on Secrets in the left side pane. You should find a secret with the name LINE_secrets
- Click on Retrieve Secret Value.

- Then click on Edit:
- Replace YOUR_CHANNEL_SECRET secret value with the channel secret you issued in step 10.
- Replace YOUR_CHANNEL_ACCESS_TOKEN secret value with the access token you issued in step 10

Marketing Operations Demonstration
Once you’ve successfully deployed the CDK and configured your secrets, you can immediately get started sending communications campaign to your customers.
LINE supports multimedia messaging formats, meaning that you can choose to send texts, images, audio and even video files to your customers as part of your campaigns. You just need to make sure that your customers have subscribed to your channel.
Create a segment of subscribed users
The deployed solution has integrated user database management with Amazon Pinpoint so once users start subscribing to your LINE channel, they will be added as endpoints. To start filtering out who we should send to, you can create segments of your subscribers.
- Navigate to the Amazon Pinpoint console.
- On the All projects page, a project named Line-Pinpoint-Project has been created for you.
- On the left-side pane, choose Segments and then Create a segment.

- Give your segment a descriptive name and add the appropriate criteria to filter down to your target audience (E.g.: filter down to customers who have Custom channel type).

- Confirm the number of endpoints that you will be sending in the Segment estimate section matches your expectations and then choose Create segment.


Upload media files for campaign
If you’d like to use your own image, audio and video files for the campaign, follow along with this section. Otherwise, proceed to the Create Campaigns section (step 9).
Note
Depending on the media type, there are restrictions imposed such as maximum file size and file format extensions. You can find more information here.
- Navigate to the Amazon S3 console.
- Here you will find a list of buckets which corresponds to the type of media files you want to upload:
part-1-stack-images3bucket...: contains image files.part-1-stack-audios3bucket...: contains audio files.part-1-stack-videos3bucket...: contains both video and image cover files.
- Upload the corresponding files that you want to use for your campaign by choosing Upload.


Create campaigns
- In the navigation pane, choose Campaigns, and then choose Create a campaign.
- Give your campaign a descriptive name. Under Campaign Type choose Standard campaign and under Channel, choose Custom. Click Next to confirm.

- On the Choose a segment page, choose the segment that you created in step 5, and then choose Next.
- In Create your message, depending on the type of message that you want to send, choose the corresponding Lambda function. Your function should be named
part-1-stack-send[text/image/audio/video]lambda...

- In the custom data section, you can choose to leave it blank, which will trigger the campaign to send the sample message.
- Otherwise, depending on the type of message, you can customize your campaigns to send the content that you want by inputting the following values into Custom Data.
- Text Campaign: Enter the Text Message that you want to send.
- Image Campaign: Enter the name of the image file you’ve uploaded in step 8 including the extension name (E.g.: sample_image.png)
- Audio Campaign: Enter the name of the audio file you’ve uploaded in step 8 including the extension name and the duration of the audio file in milliseconds separated by a comma (E.g.: sample_audio.mp3,5000)
- Video Campaign: Enter the name of the video file you’ve uploaded in step 8 including the extension name and the name of the image file you’ve uploaded in step 8 including the extension name, separated by a comma (E.g.: sample_video.mp4,sample_image.png)
- Choose Next and configure when to send the campaign depending on your needs. Once done, choose Next again.
- On the Review and launch page, verify all your information is correct and then click on Launch campaign.


That’s it! Your message will be sent through LINE to the designated recipients.
Cleanup
To delete the sample application that you created, use the AWS CDK.
cdk destroy
You’ll be asked:
Are you sure you want to delete: part-1-stack (y/n)?
Hit “y” and you’ll see your stack being destroyed.
What’s Next?
In conclusion, integrating LINE with Amazon Pinpoint provides businesses with a powerful tool to centralize their communication management, create more flexible marketing campaigns, and tap into LINE’s massive user base. With the step-by-step guide and demo provided in this blog post, you can easily get started with integrating LINE with Pinpoint and start leveraging its benefits for your business.
The solution presented in this blog post serves as a template that you can develop and customize to make it your own:
- Adding additional message types: The LINE messaging platform is famous for its rich messaging types and format. The deployed solution only utilized a fraction of what is available. You can add additional Lambda functions to send Stickers, Locations, Image Maps, Buttons or Carousel and more.
- Orchestrate LINE with other channels: Using Amazon Pinpoint Journeys, you can now meet the customer where they are most likely to see and respond to your message. Create a journey that starts with an SMS, send targeted communications based on yes/no or multivariate splits via emails and seal the deal with LINE. With Pinpoint and journey custom channel input and response support, you can craft the perfect omni-channel journey for your customers.
- Watch this space: Do stay tuned for the next blog post in this series, where we’ll show you how to manage inbound communications through LINE using Amazon Connect and Amazon Lex bots.
Kernel prepatch 6.3-rc3
Post Syndicated from original https://lwn.net/Articles/926534/
The 6.3-rc3 kernel prepatch is out for
testing. “So rc3 is fairly big, but that’s not hugely usual: it’s when
”
a lot of the fixes tick up as it takes a while before people find and start
reporting issues.
Salt Dome
Post Syndicated from original https://xkcd.com/2752/

Broadcom BCM57508 NetXtreme-E 200GbE OCP NIC 3.0 Adapter is FAST
Post Syndicated from Rohit Kumar original https://www.servethehome.com/broadcom-bcm57508-netxtreme-e-200gbe-ocp-nic-3-0-adapter-is-fast/
This Broadcom BCM57508 NetXtreme-E 200GbE OCP NIC 3.0 adapter is FAST offering up to 200GbE speeds from a single card.
The post Broadcom BCM57508 NetXtreme-E 200GbE OCP NIC 3.0 Adapter is FAST appeared first on ServeTheHome.
LLVM 16.0.0 released
Post Syndicated from original https://lwn.net/Articles/926485/
Version
16.0.0 of the LLVM compiler suite has been released. As usual, the
list of changes is long; see the specific release notes for
LLVM,
Clang,
Libc++,
and others linked from the announcement.
The FSF’s Free Software Awards
Post Syndicated from original https://lwn.net/Articles/926483/
The Free Software Foundation has announced
the recipients of this year’s Free Software Awards:
- Eli Zaretskii (advancement of free software)
- Tad (SkewedZeppelin) (outstanding new free software contributor)
- GNU Jami (project of social benefit)
Jenn Granneman | Sensitive #SHORTS
Post Syndicated from Talks at Google original https://www.youtube.com/watch?v=PzO75K7ugfY
Comic for 2023.03.19 – Drug Test
Post Syndicated from Explosm.net original https://explosm.net/comics/drug-test
New Cyanide and Happiness Comic
The Dancing Blade
Post Syndicated from Oglaf! -- Comics. Often dirty. original https://www.oglaf.com/dancingblade/


Account Security Analytics and Events: better visibility over all domains
Post Syndicated from Radwa Radwan original https://blog.cloudflare.com/account-security-analytics-and-events/


Cloudflare offers many security features like WAF, Bot management, DDoS, Zero Trust, and more! This suite of products are offered in the form of rules to give basic protection against common vulnerability attacks. These rules are usually configured and monitored per domain, which is very simple when we talk about one, two, maybe three domains (or what we call in Cloudflare’s terms, “zones”).
The zone-level overview sometimes is not time efficient
If you’re a Cloudflare customer with tens, hundreds, or even thousands of domains under your control, you’d spend hours going through these domains one by one, monitoring and configuring all security features. We know that’s a pain, especially for our Enterprise customers. That’s why last September we announced the Account WAF, where you can create one security rule and have it applied to the configuration of all your zones at once!
Account WAF makes it easy to deploy security configurations. Following the same philosophy, we want to empower our customers by providing visibility over these configurations, or even better, visibility on all HTTP traffic.
Today, Cloudflare is offering holistic views on the security suite by launching Account Security Analytics and Account Security Events. Now, across all your domains, you can monitor traffic, get insights quicker, and save hours of your time.
How do customers get visibility over security traffic today?
Before today, to view account analytics or events, customers either used to access each zone individually to check the events and analytics dashboards, or used zone GraphQL Analytics API or logs to collect data and send them to their preferred storage provider where they could collect, aggregate, and plot graphs to get insights for all zones under their account — in case ready-made dashboards were not provided.
Introducing Account Security Analytics and Events
The new views are security focused, data-driven dashboards — similar to zone-level views, both have similar data like: sampled logs and the top filters over many source dimensions (for example, IP addresses, Host, Country, ASN, etc.).
The main difference between them is that Account Security Events focuses on the current configurations on every zone you have, which makes reviewing mitigated requests (rule matches) easy. This step is essential in distinguishing between actual threats from false positives, along with maintaining optimal security configuration.
Part of the Security Events power is showing Events “by service” listing the security-related activity per security feature (for example, WAF, Firewall Rules, API Shield) and Events “by Action” (for example, allow, block, challenge).
On the other hand, Account Security Analytics view shows a wider angle with all HTTP traffic on all zones under the account, whether this traffic is mitigated, i.e., the security configurations took an action to prevent the request from reaching your zone, or not mitigated. This is essential in fine-tuning your security configuration, finding possible false negatives, or onboarding new zones.
The view also provides quick filters or insights of what we think are interesting cases worth exploring for ease of use. Many of the view components are similar to zone level Security Analytics that we introduced recently.
To get to know the components and how they interact, let’s have a look at an actual example.
Analytics walk-through when investigating a spike in traffic
Traffic spikes happen to many customers’ accounts; to investigate the reason behind them, and check what’s missing from the configurations, we recommend starting from Analytics as it shows mitigated and non-mitigated traffic, and to revise the mitigated requests to double check any false positives then Security Events is the go to place. That’s what we’ll do in this walk-through starting with the Analytics, finding a spike, and checking if we need further mitigation action.
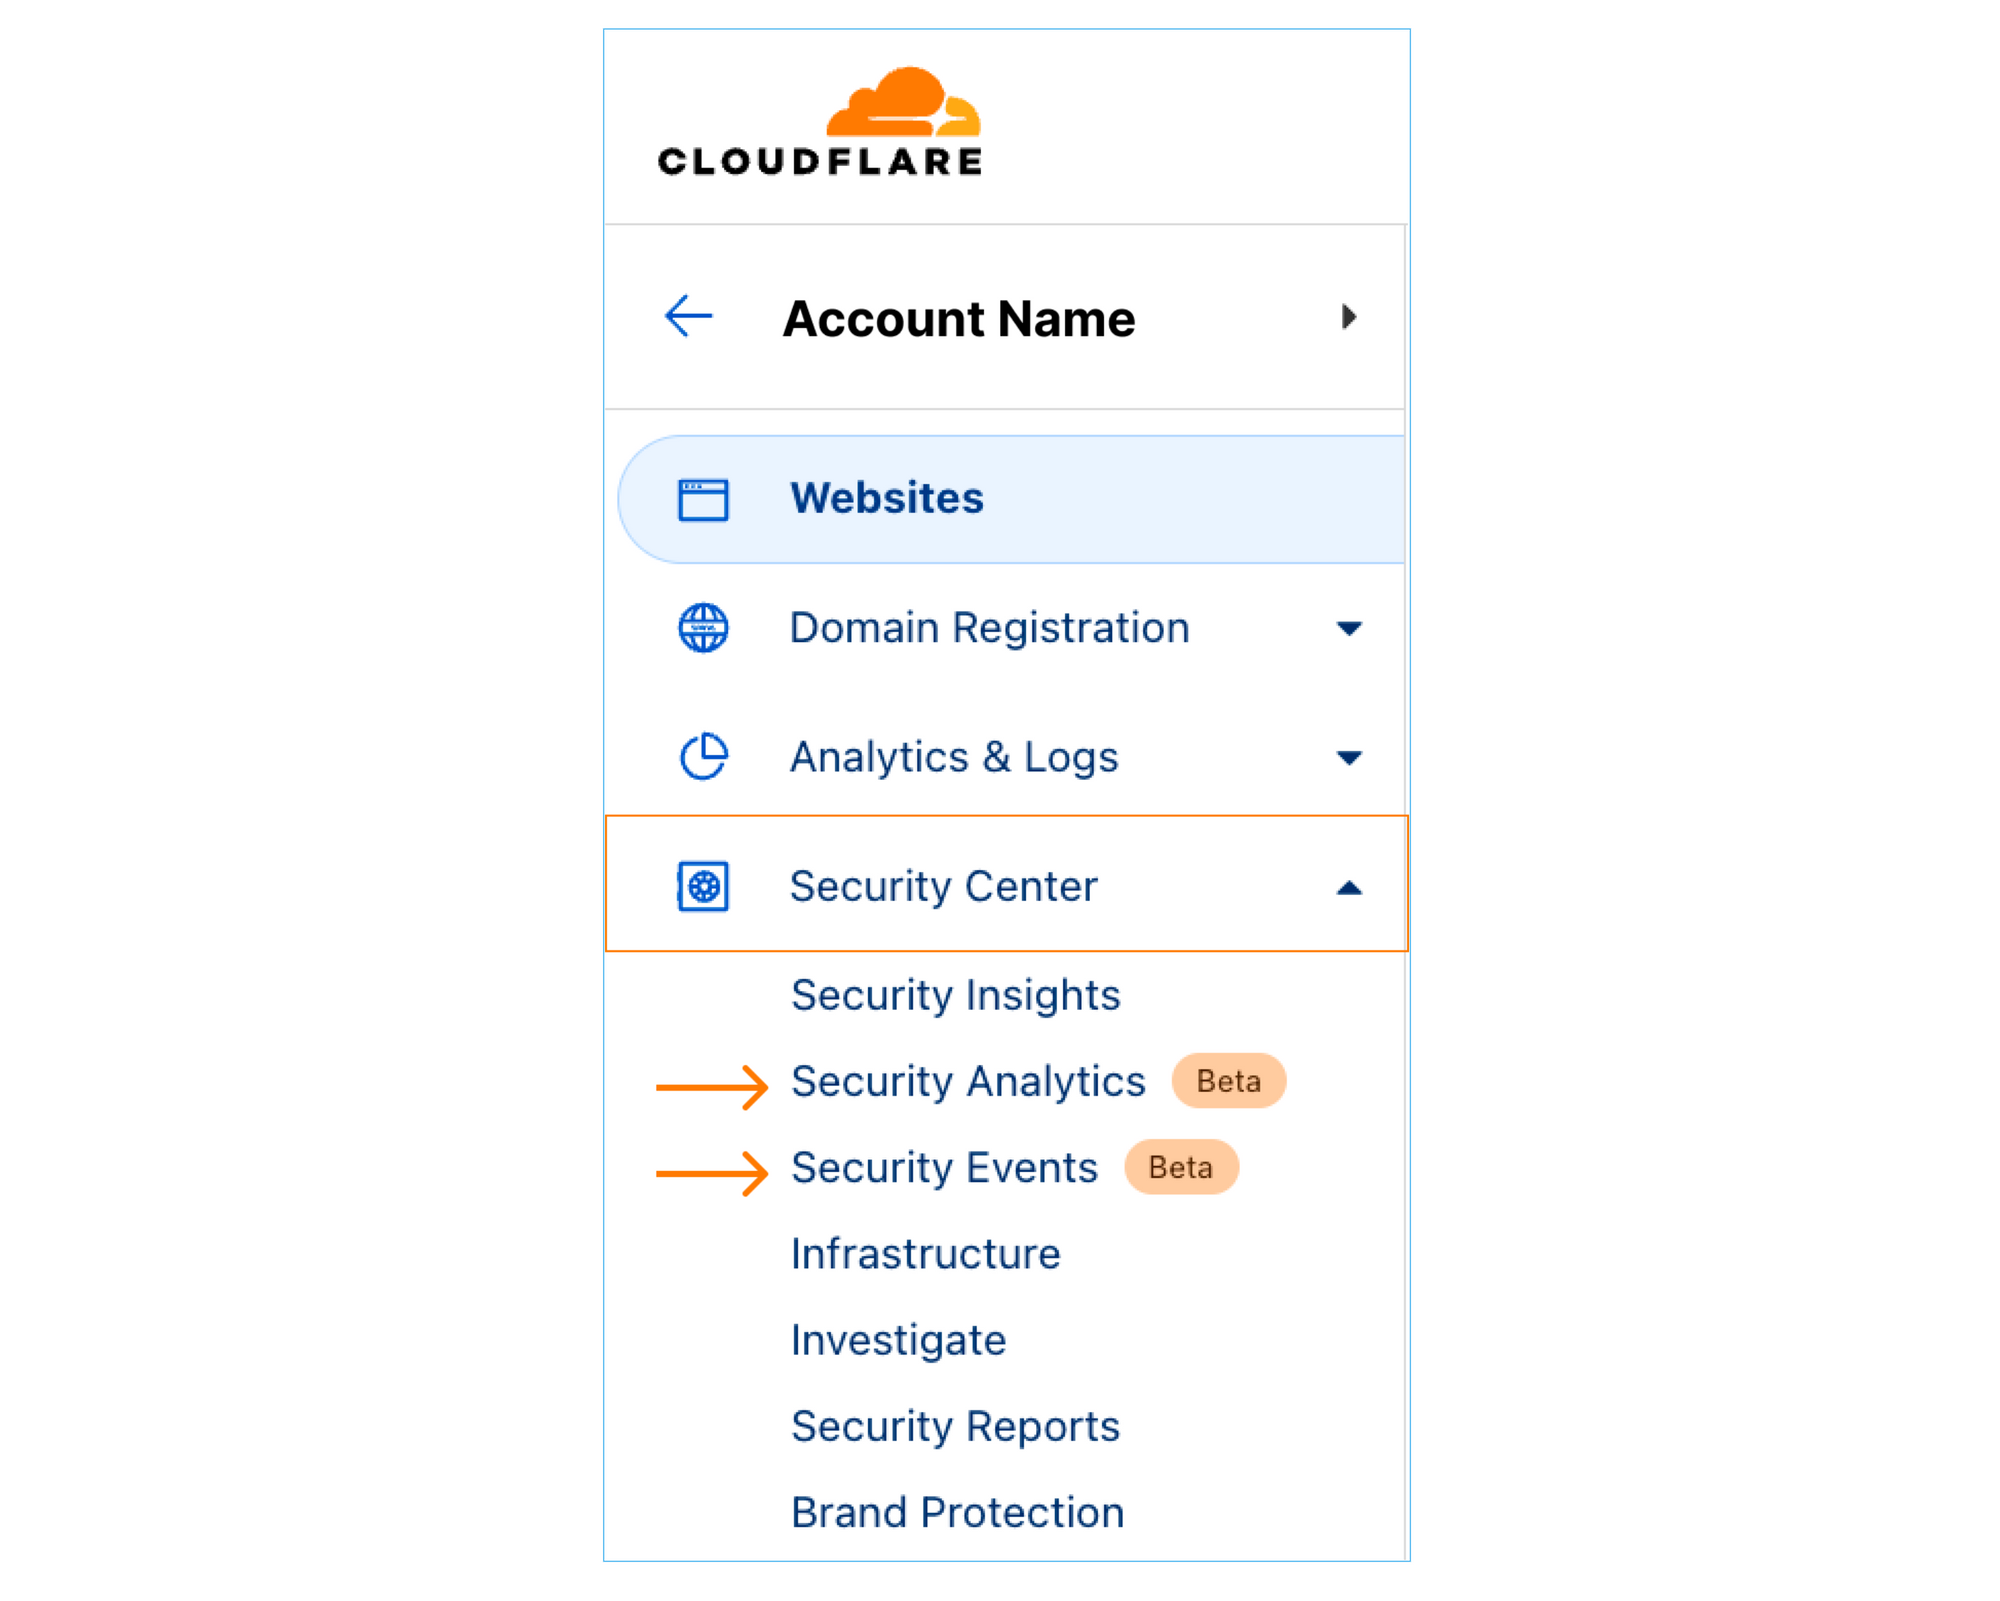
Step 1: To navigate to the new views, sign into the Cloudflare dashboard and select the account you want to monitor. You will find Security Analytics and Security Events in the sidebar under Security Center.
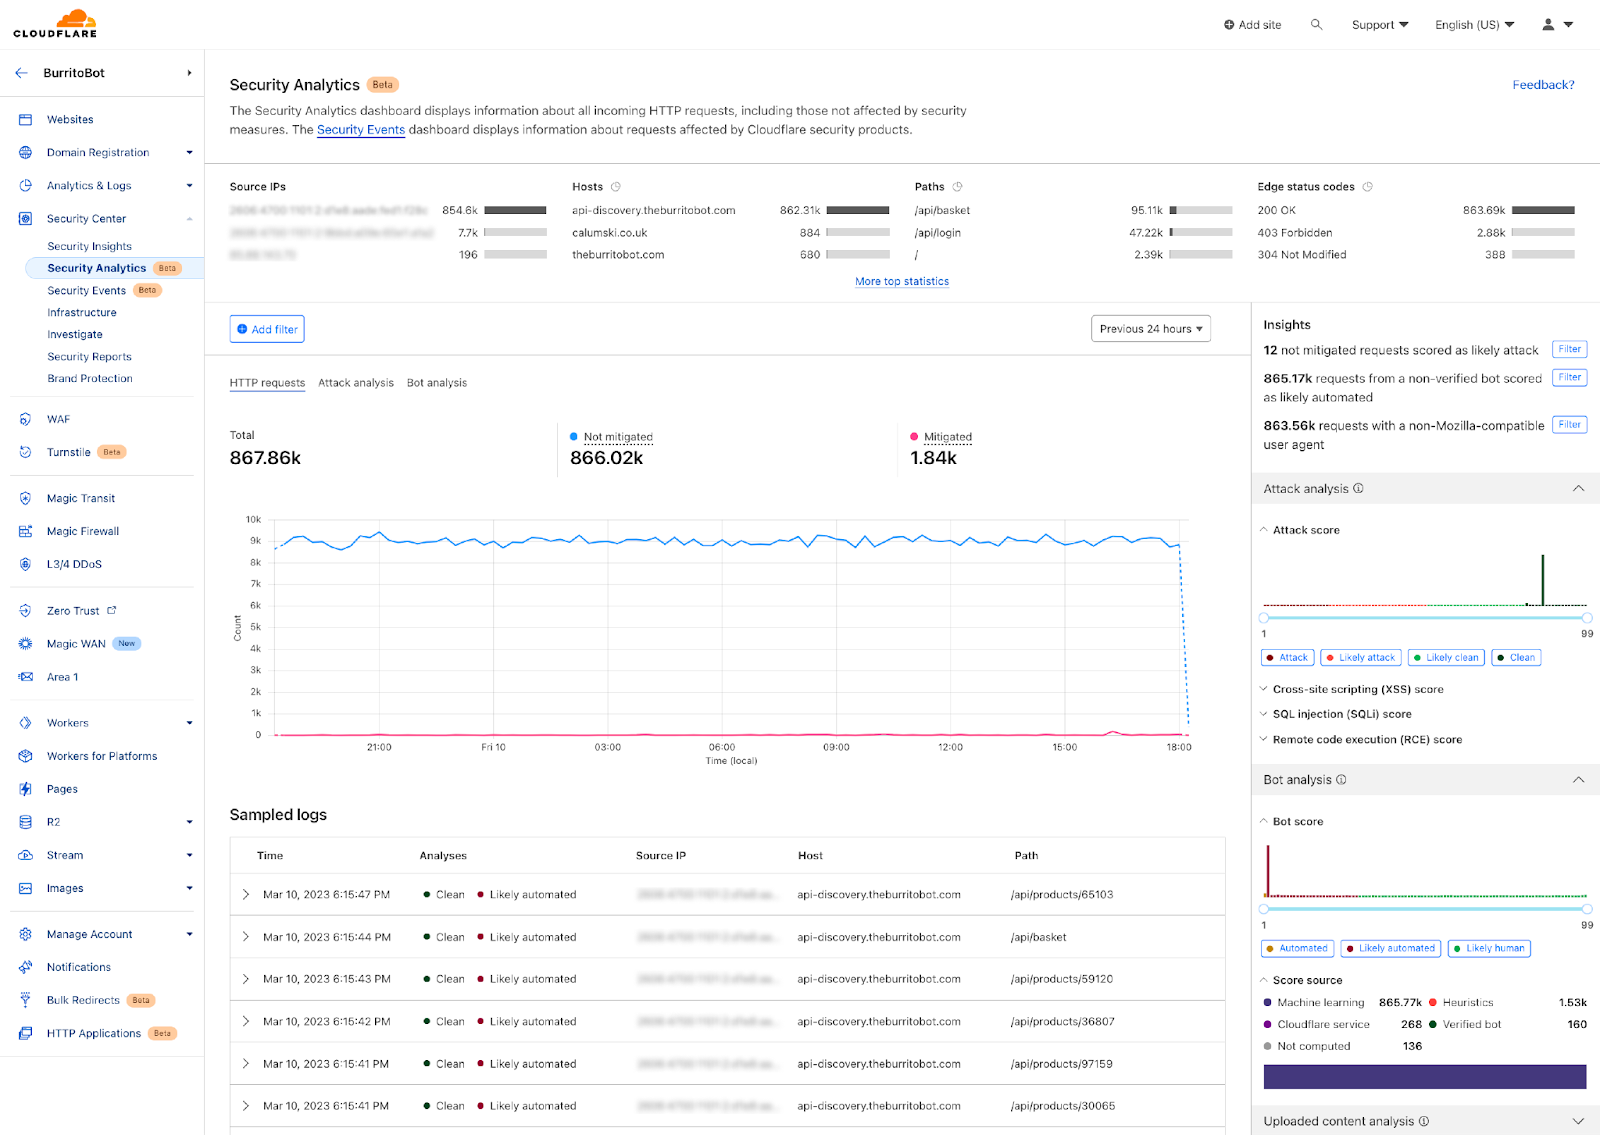
Step 2: In the Analytics dashboard, if you had a big spike in the traffic compared to the usual, there’s a big chance it’s a layer 7 DDoS attack. Once you spot one, zoom into the time interval in the graph.
By Expanding the top-Ns on top of the analytics page we can see here many observations:
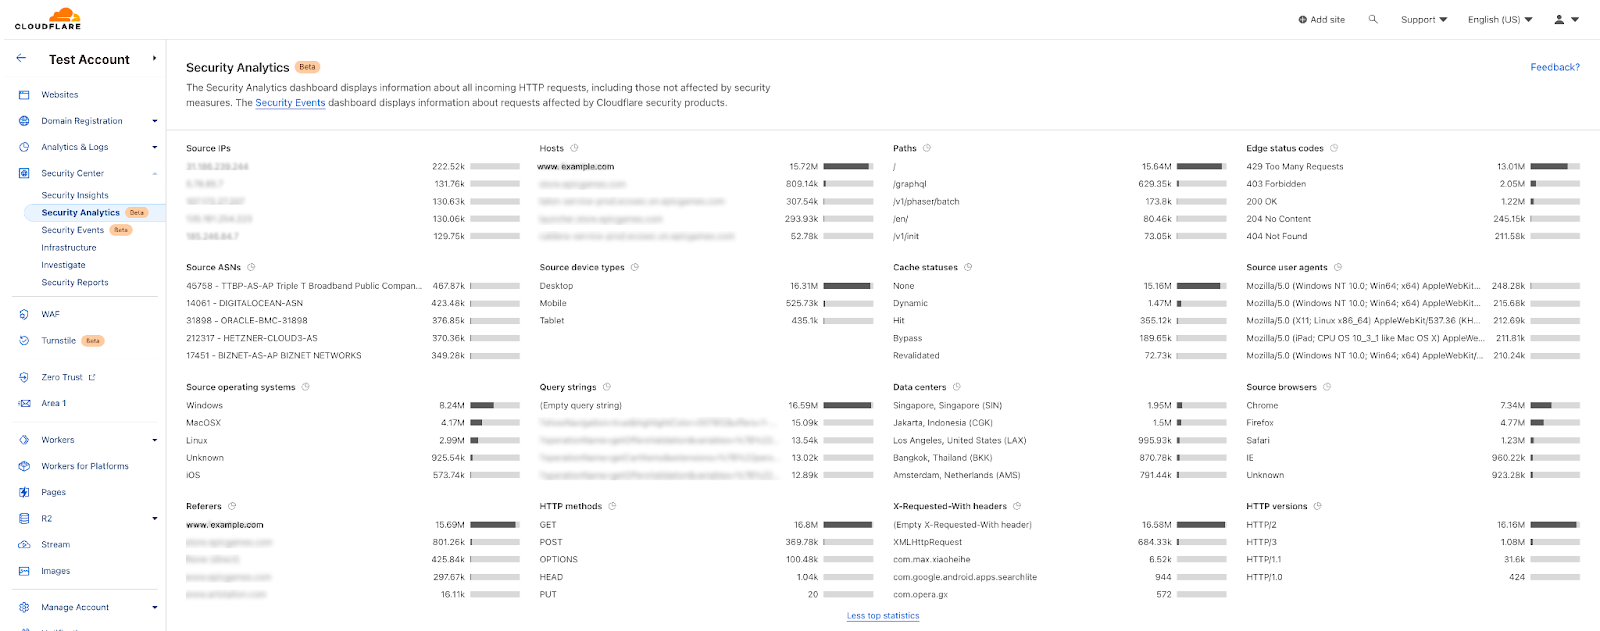
We can confirm it’s a DDoS attack as the peak of traffic does not come from one single IP address, It’s distributed over multiple source IPs. The “edge status code” indicates that there’s a rate limiting rule applied on this attack and it’s a GET method over HTTP/2.
Looking at the right hand side of the analytics we can see “Attack Analysis” indicating that these requests were clean from XSS, SQLi, and common RCE attacks. The Bot Analysis indicates it’s an automated traffic in the Bot Scores distribution; these two products add another layer of intelligence to the investigation process. We can easily deduce here that the attacker is sending clean requests through high volumetric attack from multiple IPs to take the web application down.
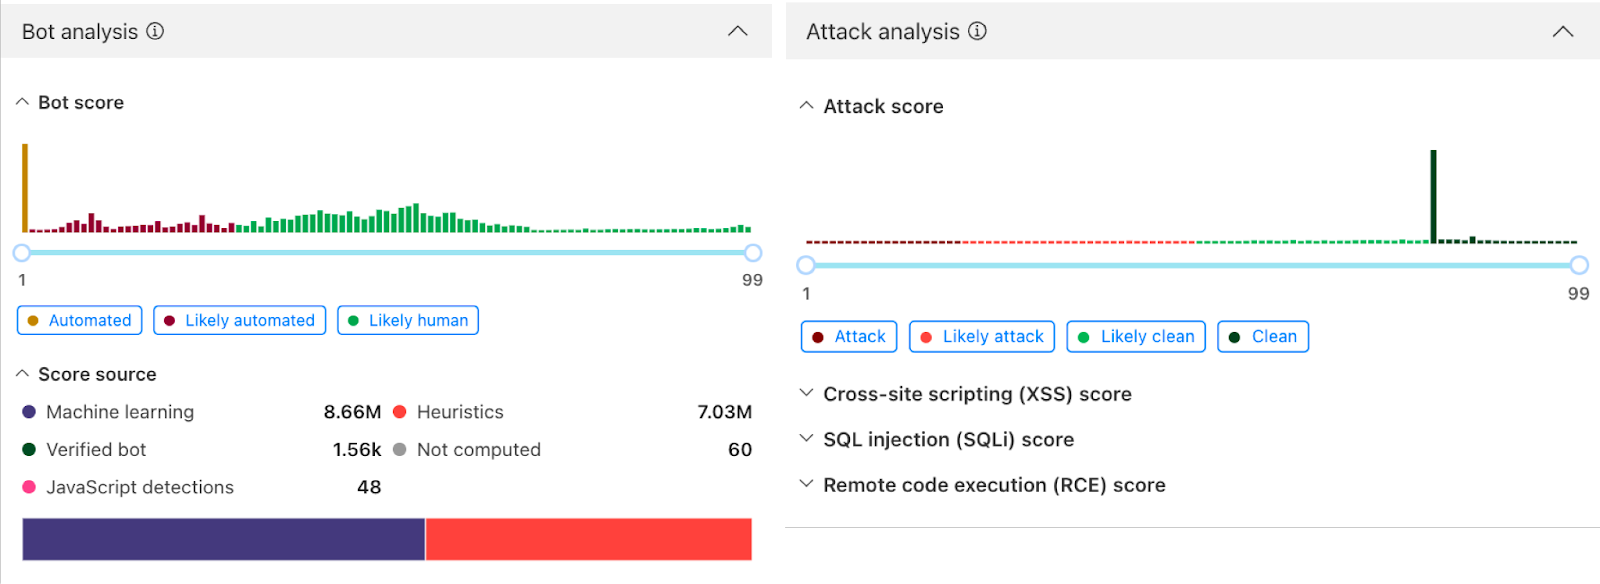
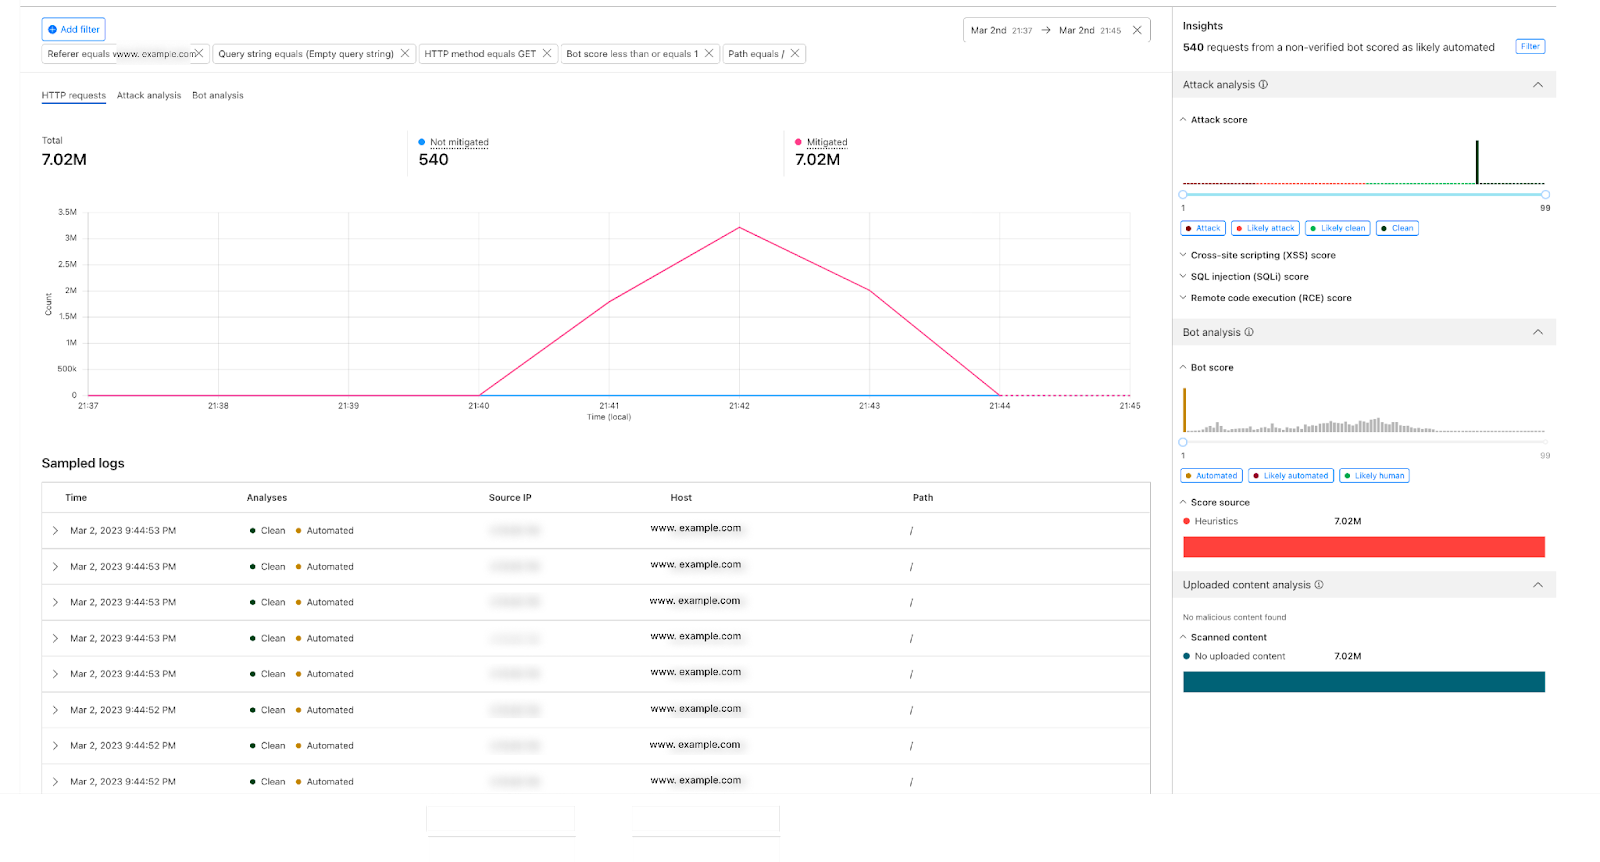
Step 3: For this attack we can see we have rules in place to mitigate it, with the visibility we get the freedom to fine tune our configurations to have better security posture, if needed. we can filter on this attack fingerprint, for instance: add a filter on the referer `www.example.com` which is receiving big bulk of the attack requests, add filter on path equals `/`, HTTP method, query string, and a filter on the automated traffic with Bot score, we will see the following:
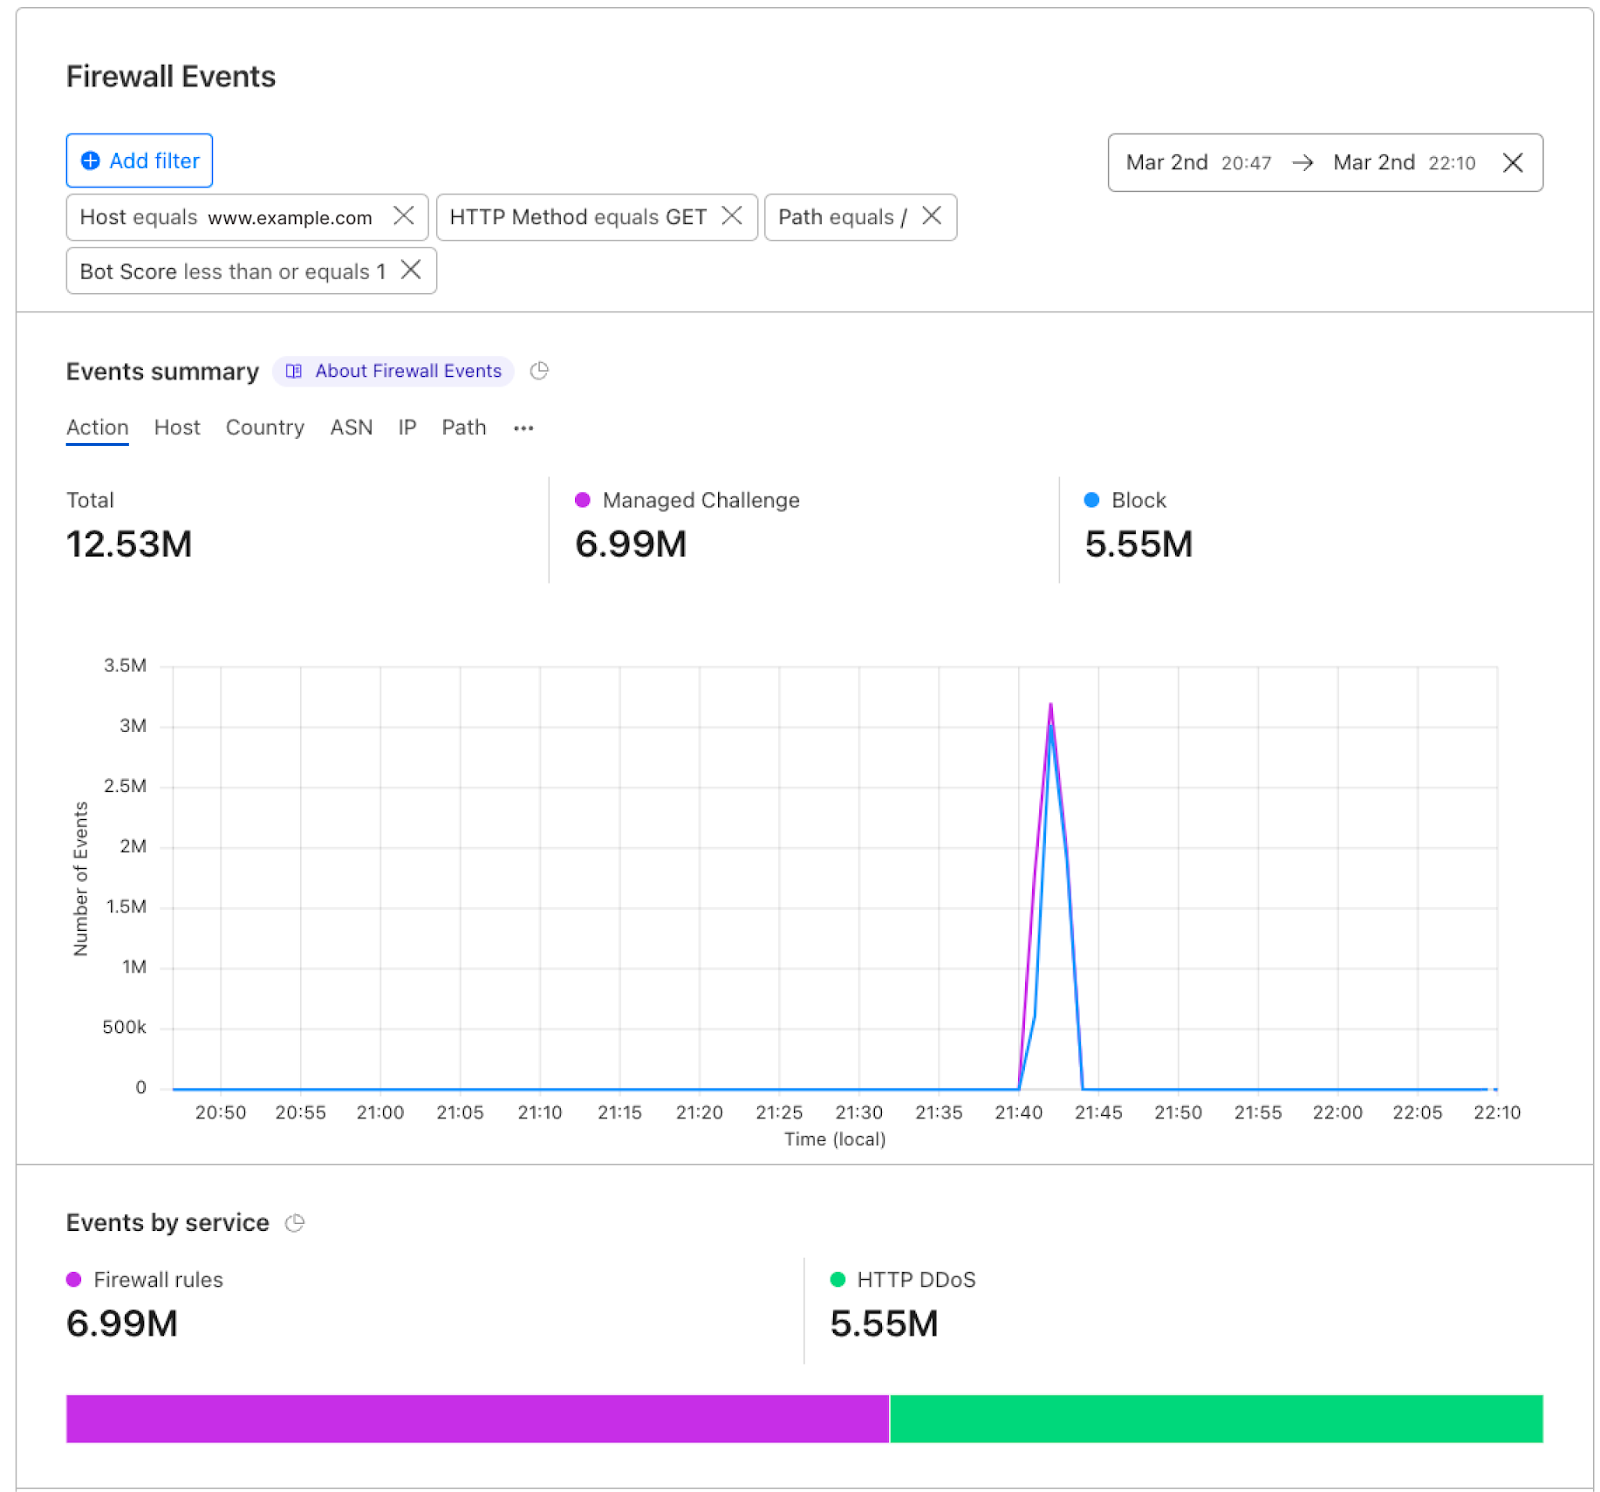
Step 4: Jumping to Security Events to zoom in on our mitigation actions in this case, spike fingerprint is mitigated using two actions: Managed Challenge and Block.
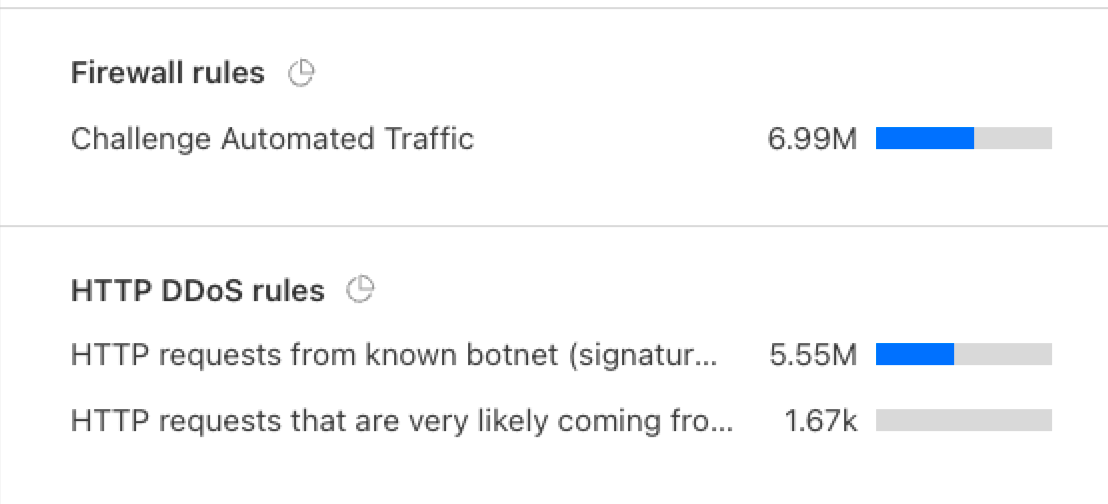
The mitigation happened on: Firewall rules and DDoS configurations, the exact rules are shown in the top events.
Who gets the new views?
Starting this week all our customers on Enterprise plans will have access to Account Security Analytics and Security Events. We recommend having Account Bot Management, WAF Attack Score, and Account WAF to have access to the full visibility and actions.
What’s next?
The new Account Security Analytics and Events encompass metadata generated by the Cloudflare network for all domains in one place. In the upcoming period we will be providing a better experience to save our customers’ time in a simple way. We’re currently in beta, log into the dashboard, check out the views, and let us know your feedback.
Wildcard and multi-hostname support in Cloudflare Access
Post Syndicated from Kenny Johnson original https://blog.cloudflare.com/access-wildcard-and-multi-hostname/


We are thrilled to announce the full support of wildcard and multi-hostname application definitions in Cloudflare Access. Until now, Access had limitations that restricted it to a single hostname or a limited set of wildcards. Before diving into these new features let’s review Cloudflare Access and its previous limitations around application definition.
Access and hostnames
Cloudflare Access is the gateway to applications, enforcing security policies based on identity, location, network, and device health. Previously, Access applications were defined as a single hostname. A hostname is a unique identifier assigned to a device connected to the internet, commonly used to identify a website, application, or server. For instance, “www.example.com” is a hostname.
Upon successful completion of the security checks, a user is granted access to the protected hostname via a cookie in their browser, in the form of a JSON Web Token (JWT). This cookie’s session lasts for a specific period of time defined by the administrators and any request made to the hostname must have this cookie present.
However, a single hostname application definition was not sufficient in certain situations, particularly for organizations with Single Page Applications and/or hundreds of identical hostnames.
Many Single Page Applications have two separate hostnames – one for the front-end user experience and the other for receiving API requests (e.g., app.example.com and api.example.com). This created a problem for Access customers because the front-end service could no longer communicate with the API as they did not share a session, leading to Access blocking the requests. Developers had to use different custom approaches to issue or share the Access JWT between different hostnames.
In many instances, organizations also deploy applications using a consistent naming convention, such as example.service123.example.com, especially for automatically provisioned applications. These applications often have the same set of security requirements. Previously, an Access administrator had to create a unique Access application per unique hostname, even if the services were functionally identical. This resulted in hundreds or thousands of Access applications needing to be created.
We aimed to make things easier for security teams as easier configuration means a more coherent security architecture and ultimately more secure applications.
We introduced two significant changes to Cloudflare Access: Multi-Hostname Applications and Wildcard Support.
Multi-Hostname Applications
Multi-Hostname Applications allow teams to protect multiple subdomains with a single Access app, simplifying the process and reducing the need for multiple apps.
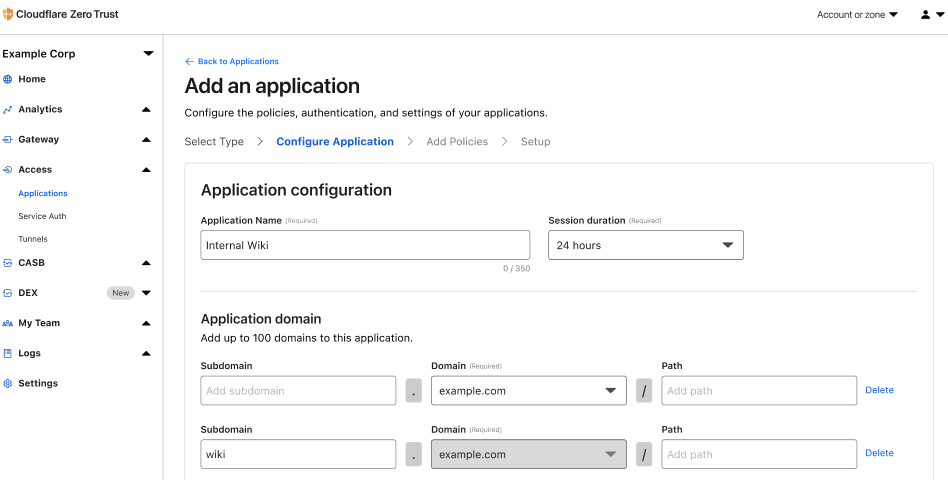
Access also takes care of JWT cookie issuance across all hostnames associated with a given application. This means that a front-end and API service on two different hostnames can communicate securely without any additional software changes.
Wildcards
A wildcard is a special character, in this case *, defines a specific application pattern to match instead of explicitly having to define each unique application. Access applications can now be defined using a wildcard anywhere in the subdomain or path of a hostname. This allows an administrator to protect hundreds of applications with a single application policy.
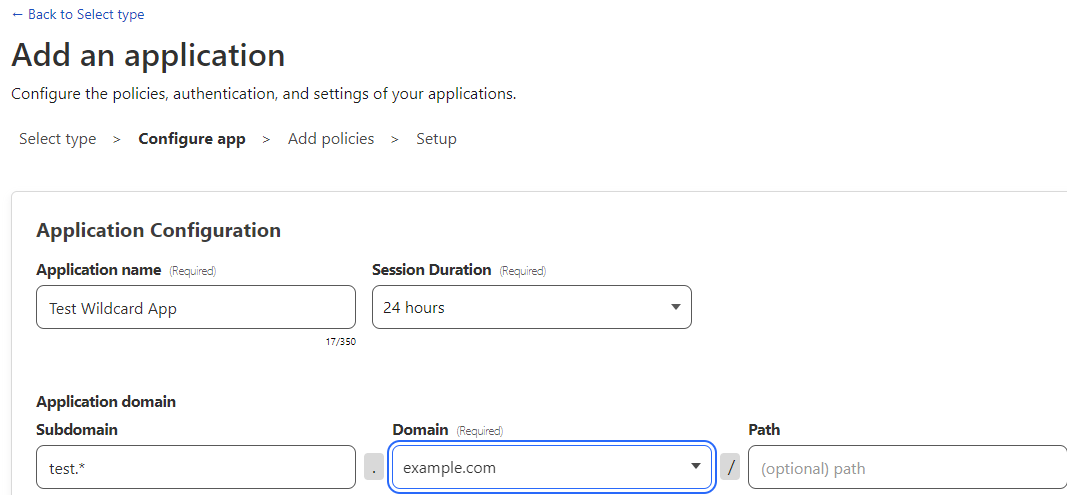
In a scenario where an application requires additional security controls, Access is configured such that the most specific hostname definition wins (e.g., test.example.com will take precedence over *.example.com).
Give it a try!
Wildcard Applications are now available in open beta on the Cloudflare One Dashboard. Multi Hostname support will enter an open beta in the coming weeks. For more information, please see our product documentation about Multi-hostname applications and wildcards.
AMD Versal 400Gbps In-Line IPSec Demo
Post Syndicated from Rohit Kumar original https://www.servethehome.com/amd-versal-400gbps-in-line-ipsec-demo/
The AMD Versal Premium ACAP was used to demonstrate 400Gbps in-line IPSec acceleration in an OFC 2023 demo
The post AMD Versal 400Gbps In-Line IPSec Demo appeared first on ServeTheHome.
One-click ISO 27001 certified deployment of Regional Services in the EU
Post Syndicated from Achiel van der Mandele original https://blog.cloudflare.com/one-click-iso-27001-deployment/


Today, we’re very happy to announce the general availability of a new region for Regional Services that allows you to limit your traffic to only ISO 27001 certified data centers inside the EU. This helps customers that have very strict requirements surrounding which data centers are allowed to decrypt and service traffic. Enabling this feature is a one-click operation right on the Cloudflare dashboard.
Regional Services – a recap
In 2020, we saw an increase in prospects asking about data localization. Specifically, increased regulatory pressure limited them from using vendors that operated at global scale. We launched Regional Services, a new way for customers to use the Cloudflare network. With Regional Services, we put customers back in control over which data centers are used to service traffic. Regional Services operates by limiting exactly which data centers are used to decrypt and service HTTPS traffic. For example, a customer may want to use only data centers inside the European Union to service traffic. Regional Services operates by leveraging our global network for DDoS protection but only decrypting traffic and applying Layer 7 products inside data centers that are located inside the European Union.
We later followed up with the Data Localization Suite and additional regions: India, Singapore and Japan.
With Regional Services, customers get the best of both worlds: we empower them to use our global network for volumetric DDoS protection whilst limiting where traffic is serviced. We do that by accepting the raw TCP connection at the closest data center but forwarding it on to a data center in-region for decryption. That means that only machines of the customer’s choosing actually see the raw HTTP request, which could contain sensitive data such as a customer’s bank account or medical information.
A new region and a new UI
Traditionally we’ve seen requests for data localization largely center around countries or geographic areas. Many types of regulations require companies to make promises about working only with vendors that are capable of restricting where their traffic is serviced geographically. Organizations can have many reasons for being limited in their choices, but they generally fall into two buckets: compliance and contractual commitments.
More recently, we are seeing that more and more companies are asking about security requirements. An often asked question about security in IT is: how do you ensure that something is safe? For instance, for a data center you might be wondering how physical access is managed. Or how often security policies are reviewed and updated. This is where certifications come in. A common certification in IT is the ISO 27001 certification:
Per the ISO.org:
“ISO/IEC 27001 is the world’s best-known standard for information security management systems (ISMS) and their requirements. Additional best practice in data protection and cyber resilience are covered by more than a dozen standards in the ISO/IEC 27000 family. Together, they enable organizations of all sectors and sizes to manage the security of assets such as financial information, intellectual property, employee data and information entrusted by third parties.”
In short, ISO 27001 is a certification that a data center can achieve that ensures that they maintain a set of security standards to keep the data center secure. With the new Regional Services region, HTTPS traffic will only be decrypted in data centers that hold the ISO 27001 certification. Products such as WAF, Bot Management and Workers will only be applied in those relevant data centers.
The other update we’re excited to announce is a brand new User Interface for configuring the Data Localization Suite. The previous UI was limited in that customers had to preconfigure a region for an entire zone: you couldn’t mix and match regions. The new UI allows you to do just that: each individual hostname can be configured for a different region, directly on the DNS tab:
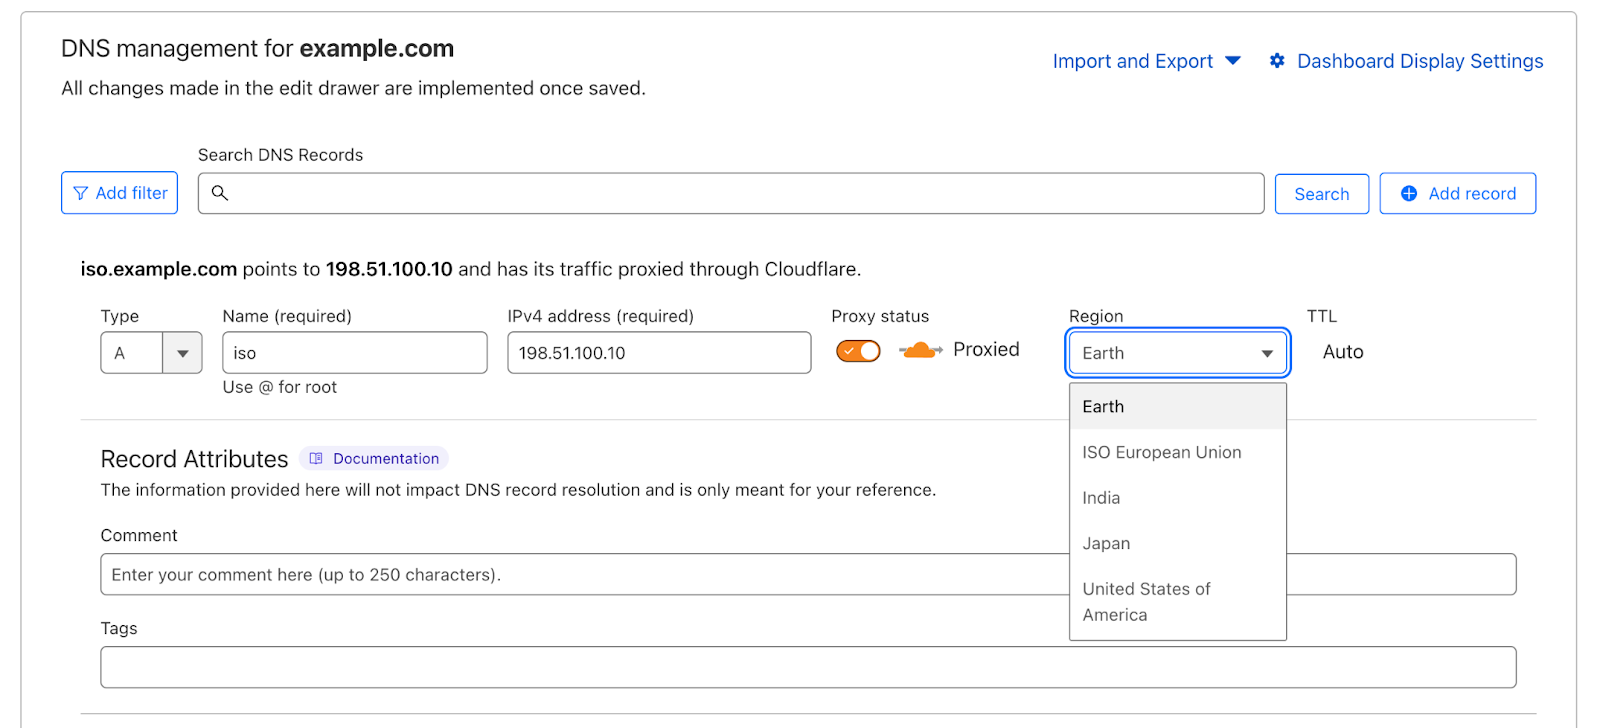
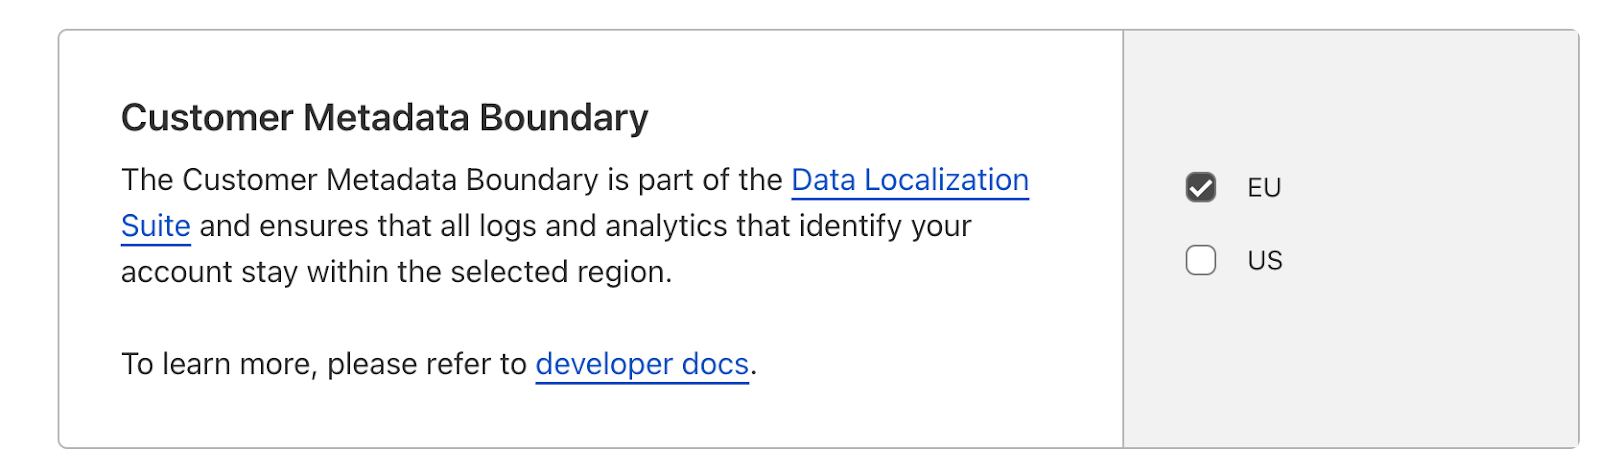
Configuring a region for a particular hostname is now just a single click away. Changes take effect within seconds, making this the easiest way to configure data localization yet. For customers using the Metadata Boundary, we’ve also launched a self-serve UI that allows you to configure where logs flow:
We’re excited about these new updates that give customers more flexibility in choosing which of Cloudflare’s data centers to use as well as making it easier than ever to configure them. The new region and existing regions are now a one-click configuration option right from the dashboard. As always, we love getting feedback, especially on what new regions you’d like to see us add in the future. In the meantime, if you’re interested in using the Data Localization Suite, please reach out to your account team.
Unboxing All Things- Zigbee, ESP Sensors, mmWave, TikStation, Pixel Art Speaker, SeedStudio
Post Syndicated from digiblurDIY original https://www.youtube.com/watch?v=srCgesFJhtA
Comic for 2023.03.18 – New Computer
Post Syndicated from Explosm.net original https://explosm.net/comics/new-computer
New Cyanide and Happiness Comic
Interesting things in cases #1 : Sanyo G-2615N
Post Syndicated from Techmoan original https://www.youtube.com/watch?v=Nkd0b4qh8E8
Седмицата (13–18 март)
Post Syndicated from Йовко Ламбрев original https://www.toest.bg/sedmitsata-13-18-mart/

Миналият уикенд беше необичайно натоварен с очаквания какво ще последва след новината за изпадналата в несъстоятелност Silicon Valley Bank. Събитието дръпна надолу акциите на много компании не само от финансовия сектор. И то не само в САЩ. Въпреки спешните публични декларации за устойчивостта на банковата система, редица ключови индекси потънаха. Седмица по-късно бурята сякаш е овладяна, но изглежда, че ще повлияе на стратегията за повишаване на основните лихви като инструмент за борба с инфлацията. Със сигурност дава и поводи за затягане на регулациите за банков контрол в САЩ.
Тревогата на пазарите не подмина и Европа, още повече след като в сряда трябваше да се търси спешна подкрепа и за швейцарската Credit Suisse, която преминава през поредица от трудни периоди и обвинения за пране на пари. Въпреки това Европейската централна банка не се отказа от предварителните си намерения да повиши основната депозитна лихва, която в четвъртък стана 3% – най-високото ниво от 2008 г. насам. Важен нюанс е, че заедно с това нямаше декларации за следващи увеличения.
И на целия този фон, в разгара на предизборната кампания, от българското Министерство на финансите изтече вътрешен документ, който разглежда хипотеза за сериозен дефицит в бюджета за тази година (което от своя страна възпрепятства приемането на еврото за неопределено време), промяна на валутния борд и дори заем от Международния валутен фонд. Едни определени медии веднага поеха топката и излязоха с бомбастични заглавия за финансов апокалипсис, а последвалата извънредна пресконференция на служебната финансова министърка Росица Велкова само наля масло в огъня.
Дали това прилича на случайна некадърност? Определено не. Нищо че дори БНБ определи твърденията за промяна на курса на лева спрямо еврото като „некомпетентни и безотговорни“. Колеги на Велкова споделят, че съвсем не е некомпетентна. А и ден по-късно тя заяви:
Държавата не е фалирала и няма риск. Няма риск и за валутния борд.
„Няма опасност от птеродактили!!! Е, то няма и птеродактили, но вече се говори за опасност. Елементарен инструмент. Отрича се нещо, което така или иначе не съществува, но самото непрекъснато говорене по темата натяга напрежението и вкарва „застрашаващи“ думи в обращение“, коментира в личния си Facebook профил комуникационният експерт Любомир Аламанов.
„Положителното от цялата работа е, че много хора ще разберат, че левът е вързан към еврото. Във валутния резерв на БНБ има евро. Валутният борд е стабилен и дори финансовият министър не може със своите приказки да го помръдне“, коментира пък икономистът Георги Ангелов в предаването „Денят с Веселин Дремджиев“.
Няма отговор обаче къде блее прокуратурата и защо Росица Велкова още е министър…
Това за прокуратурата е реторичен въпрос, разбира се. Понеже очевидно и тя бе заета да се включи в предизборната кампания със собствено шоу. В четвъртък пред медиите беше сервиран един екстатичен пърформанс с разхвърлени флашки, пачки, твърдения за планирани убийства и купчина имена и прякори без рационализирани връзки между тях. Толкова не се получи, че на придворните медии им отне половин ден, преди да успеят да съчинят някакъв преразказ на този злополучен самодеен театър. В петък министърът на вътрешните работи нарече мероприятието „мелодрама“ и се дистанцира от „сериала на Гешев“.
Помните, че миналата седмица „Лев Инс“ заведе иск срещу Mediapool за 1 млн. лв. заради цитат от стенограма на заседание на Министерския съвет, в който се споменава името на компанията. Тази седмица Асоциацията на европейските журналисти в България обяви кампания за набиране на средства, за да може медията да покрие разноските по съдебния процес. Добрата новина е, че нужната сума беше събрана за три дни. Поводът обаче доказва необходимостта и занапред да има фонд за юридическа защита на журналисти и малки медии от подобни „дела шамари“. Още повече че буквално по същото време имаше нов случай на натиск срещу колега журналист. Този път от МВР.
Извън злободневието на обществения дневен ред, в новия си материал за „Тоест“ Анастасия Орманджиева реши да разкаже за научните усилия около разчитането на човешкия геном. От популярните научни статии знаем, че това е станало още в началото на века, но всъщност последните 8% бяха дешифрирани едва преди година. Какво означава това и какви врати отваря пред науката занапред – разберете от статията „Да прочетеш непрочетимото – как разчетоха човешкия геном“.
Междувременно Зорница Христова се завърна от Международния панаир на детската книга в Болоня. В своя материал тя съпоставя сегашните си впечатления и препоръки с гледната си точка отпреди 8 години, когато също е писала статия за това събитие. Ролята ѝ на действащ издател, специализиран в детските книги, добавя важната тежест на опита извън страничния поглед на любопитен посетител.
В рубриката ни „На второ четене“ Стефан Иванов е решил да ни припомни книгата „Да бъдеш мъж и баща“ на датския семеен терапевт Йеспер Юл. Според Стефан прочитът на това заглавие е особено належащ днес и тук – заради прекомерното втвърдяване на традиционни и консервативни ценности, които системно ескалират до катастрофа. А родителството, за да е здравословно, трябва да почива на диалог и взаимодействие.
Седмицата донесе и една огромна новина за родната съвременна литература. Георги Господинов стана първият български писател, номиниран за престижната литературна награда „Букър“ с романа си „Времеубежище“. Ден по-късно книгата беше номинирана и в литературния конкурс на Европейската банка за внедряване и развитие.
Във връзка с това да не пропуснем и Оскарите. Както винаги, когато има замесено българско име, обществените реакции изпълват целия емоционален спектър. Дали разпъват няма да е даже по-подходящият глагол? Но докато сме на филмова вълна, така се случи, че гледах филма „Жена“ на Ян Артюс-Бертран и Анастасия Микова в същия ден, в който прочетох тазседмичната статия на Светла Енчева „Женска приказка за стълбата към стъкления таван“. Силно препоръчвам да направите и двете, дори да не е в един и същи ден.
Нека завършим с текст, вдъхновен от друго филмово заглавие – „Баншите от Инишерин“ (което, ако не сте гледали, е наистина огромен пропуск). В рубриката ни „От дума на дума“ Екатерина Петрова се впуска в любопитно изследване на етимологията на думата „банши“ и нямате дори идея докъде успява да стигне тя.
Приятно четене и гледане! И хубав уикенд!
Friday Squid Blogging: New Species of Vampire Squid Lives 3,000 Feet below Sea Level
Post Syndicated from Bruce Schneier original https://www.schneier.com/blog/archives/2023/03/friday-squid-blogging-new-species-of-vampire-squid-lives-3000-feet-below-sea-level.html
At least, it seems to be a new species.
As usual, you can also use this squid post to talk about the security stories in the news that I haven’t covered.
Read my blog posting guidelines here.
Родителска среща в Лиляната (Патриах Евтимий Пловдив) – ужасът за трезвомислещия родител – ЧАСТ 2
Post Syndicated from VassilKendov original http://kendov.com/roditelska-sreshta-lilianata-plovdiv/
 Родителска среща в Лиляната (Патриах Евтимий Пловдив) – ужасът за трезвомислещия родител – ЧАСТ 2
Преди 3 седмици бившата ни вече класна г-жа Ранджева, решава да направи родителска среща обявена като свързана с дисциплината. На срещата задължително трябваше да присъстват и децата.
Както пише в детските книги – Речено, сторено!
Съпругата ми ме праща като посланик, понеже тази родителска среща е ни в клин, ни в ръкав. Влизам и какво да видя…
След кратка анотация, че дисциплината по български и математика е отчайваща в класа и има деца, които рушат нормалния идеологично-възпитателен процес, следва разпит на свидетел. Ама такъв какъвто и съпругата ми адв. Кендова не може да направи.
Това се случва пред всички
г-жа Ранджева (класната) пита
– Ти Иване, кажи сега пред всички тука, защо говориш в час по математика?
– Ама аз госпожо, защото ме разсeйват и…
– И като те разсейват ти не можеш ли да си замълчиш? Защо трябва непременно да говориш? Кажи пред всички? – прекъсва го г-жа Ранджева.
момчето естeствено мълчи, но г-жа Ранджева продължава.
– Не знаеш така ли? Да видим Георги защо се върти в час по български. Кажи Георги пред всички, защо се въртиш?
– Ами аз госпожо защото си изпуснах химикала…
– И всеки час ли си го изпускаш този химикал? Кажи пред всички сега… И ти ли не знаеш? Добре тогава Драган да каже…
г-жа Ранджева продължи в този дух с още 5-6 дечица, а някои дори се насълзиха
За актуални финансови новини можете да използвате Telegram канала Kendov.com
Не знам как съм стискал зъби, но успях да си замълча. В главата ми се наби само репликата „Кажи пред всички!”. Казах си, че вече не мога да спася реномето на класната, дори и да искам. Не знам оттук нататък децата как изобщо биха възприели нещо от тази учителка. Но най-тъпото предстоеше. И това бяха мерките, които да се вземат за поправяне на дисциплината. Децата излязоха и останахме ние – незнаещите и глупави родители.
Естествено не всички бяха глупави. Имаше един баща на момиченце пред мен, който излезе със становище, че цитирам:
„Трябва да се наказват децата, ама така да се наказват, че да ги заболи.”
Не разбрах какво има предвид, но пак си замълчах. Така или иначе аз нямах намерение да наказвам, а да мотивирам детето си. Вече беше явно, че в училището няма да го мотивират.

Мерките
Започна една надпревара за мерки и се стигна до извода, че г-жа Ранджева е добре да предложи такива. И те бяха 1. Да се канят в часовете по български и математика директорката или зам. Директорката и 2. Да присъстват в часовете родители, които са свободни в момента и когато имат време.
WTF? Само аз ли си спомням че на откритите уроци мълчахме като партизани на разпит и после всичко си вървеше по старо му? Верно ли това е педагогическия подход за справяне с дисциплината?
Тук не издържах и взех думата.
– Добре де, само по български и математика ли е лоша дисциплината?
– Предимно. – отговори г-жа Ранджева.
– Добре де, а в другите класове така ли е? Има ли майки които са разпитвали в другите класове?
Намериха се разпитали майки.
– И в другите класове има проблеми, но не са чак такива. – отговориха те.
– Е не е ли тогава логично да обсъдим дали пък проблемът може да е в преподавателките? – попитах аз, знаейки че преподавателката по български е 23 годишна, а за математичката вече писах в ЧАСТ 1.
И тук обществото се раздели. Половината родители ме анатемосаха, една част си замълчаха, но имаше и неколцина които изразиха съгласие с мен и попитаха – А защо ги няма учителките по математика и български на тази родителска среща да си кажат какво точно им пречи?
В този момента г-жа Ранджева ми обяви:
– Като не Ви харесва тук. Ходете в друго училище!
Тук не си замълчах вече. Нямаше как при положение, че от моите данъци и плащат заплатата, да ми държи такъв тон. Даже си излезе от стаята за да не ме слуша. Явно усети, че е сгазила лука.
 Общо взето оттук нататък срещата приключи, а у мен останаха въпросите.
– Нормално ли е на децата да се прави такъв разпит? Това педагогическо ли е?
– Защо учителките по математика и български ги няма?
– Какво очакват да се промени с присъствието на директорката или родител? Това за всеки час ли ще е или е просто отбиване на номера?
В крана сметка 3 седмици по-късно, когато детето ми вече е в друго училище чувам, че щели да правят родителска среща за цялото училище свързана с дисциплината. Тази седмица ще е. И отново въпроси:
– Ама нали в другите класове беше по-добра дисциплината?
– Още ли твърдим, че няма проблем с учителския колектив и начина на преподаване?
– Това някаква превантивна мярка на директорката ли е, към сигнала който готвя към инспектората?
Прочетете също
Училище Патриарх Евтимий – Пловдив (Голямата Лиляна) ЧАСТ 1 – МАТЕМАТИЧКАТА КОЛЕВА
Хубавото е, че вече не ме касае отговорът на тези въпроси. При срещата ми с директорката и тя не можа да ми отговори, та се чудя оттук нататък какъв родител трябва да си за да запишеш детето си в 5 клас в Лиляната при Ранджева. Ами че на нея само наказания и санкции са и в главата.
Проверих и къде е сформиран този начин на мислене. В Тракийския университет в Стара Загора е формиран – специалност география и икономика.
Оказа се, че ми била колежка жената. Ако просто бях си поговорил с нея за начина на формиране на лихвата при ипотечните кредити или мерките за спасяването на Credit Suisse, сигурно щяхме да намерим общ език, колеги сме все пак.
С две думи педагогическите похвати ме изумиха. Целия свят е виновен, само не и учителките в Лиляната (Патриарх Евтимий Пловдив).
Докато не се признае като проблем педагогическия похват на учителите, то дисциплината никога няма да е на ниво. И за това основна роля има директорката. Но за срещите си с нея ще пиша друг път. До тогава ще се забавляваме с клюкини за административните хитринки с които се прикрива некомпетентността на някои от учителите.
П.П – Никога не записвайте детето си в обикновена паралелка в Лиляната. Тук слагат „Б” отбора на учителите. Или по-скоро „Я” отбора. За другите, специализирани паралелки съм чувал и добри неща, но там са други учителските колективи.
The post Родителска среща в Лиляната (Патриах Евтимий Пловдив) – ужасът за трезвомислещия родител – ЧАСТ 2 appeared first on Kendov.com.