Server-side rendering micro-frontends – UI composer and service discovery

Post Syndicated from James Beswick original https://aws.amazon.com/blogs/compute/server-side-rendering-micro-frontends-ui-composer-and-service-discovery/

This post is written by Luca Mezzalira, Principal Specialist Solutions Architect, Serverless.

The previous blog post describes the architecture for creating a server-side rendering micro-frontend in AWS. This and subsequent posts explain the different parts that compose this architecture in detail. The code for the example is available on a AWS Samples GitHub repository.

For context, this post covers the infrastructure related to the UI composer, and why you need an Amazon S3 bucket for storing static assets:
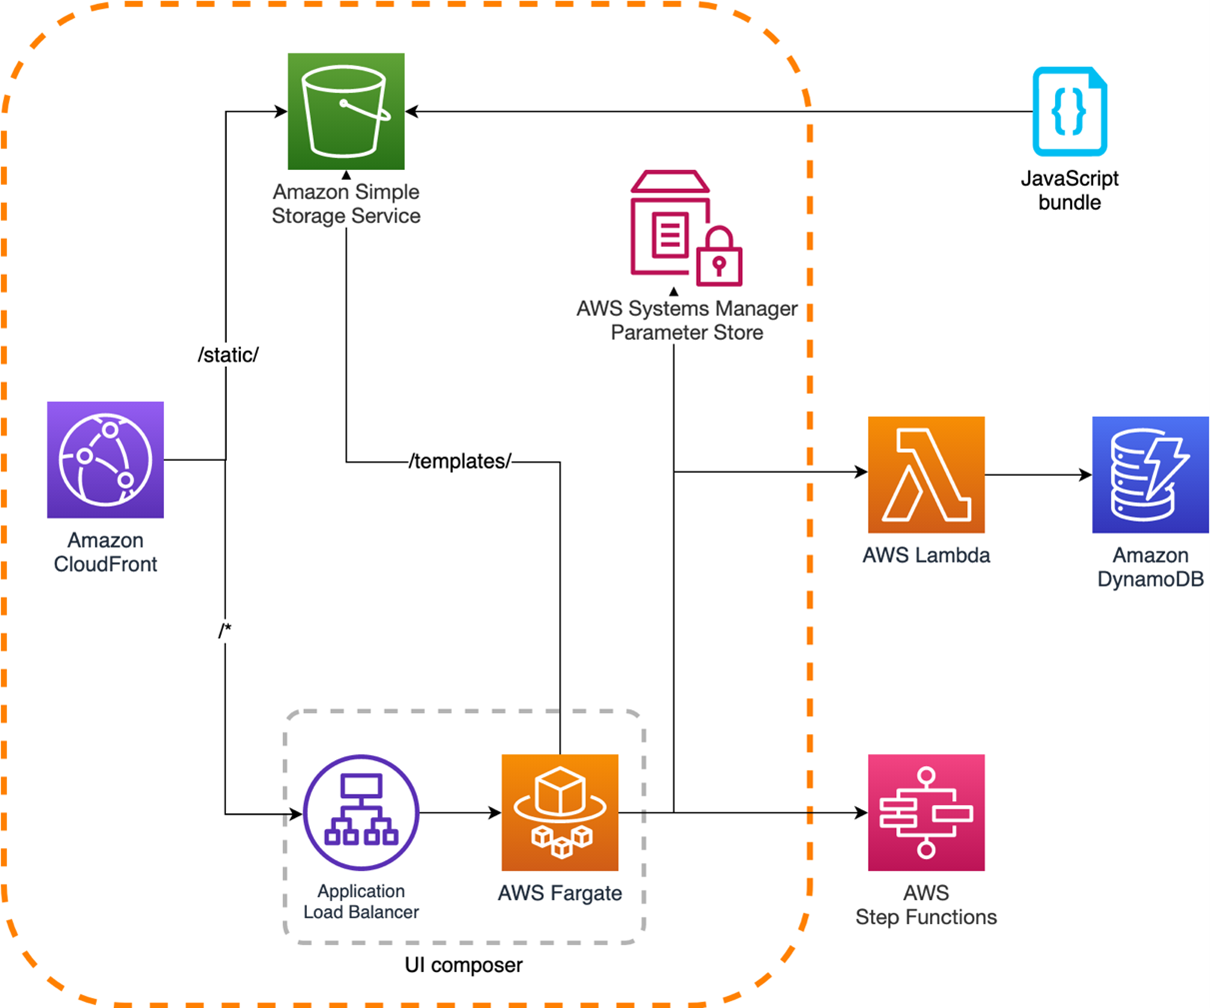
Architecture overview

The rest of the series explores the micro-frontends composition, how to design micro-frontends using serverless services, different caching and performance optimization strategies, and the organization structure implications associated with frontend distributed systems.

A user’s request journey

The best way to navigate through this distributed system is by simulating a user request that touches all the parts implemented in the architecture.

The application example shows a product details page of a hypothetical ecommerce platform:

Building micro-frontends

When a user selects an article from the catalog page, the DNS resolves the URL to an Amazon CloudFront distribution that is the reference CDN for this project.

The request is immediately fulfilled if the page is cached. Therefore, no additional logic is requested by the cloud infrastructure and the response is fast (less than the 500 ms shown in this example).

When the page is not available in the CloudFront points of presence (PoPs), the request is forwarded to the Application Load Balancer (ALB). It arrives at the AWS Fargate cluster where the UI Composer generates the page for fulfilling the request.

Using CloudFront in the architecture

CDNs are known for accelerating application delivery thanks to caching static files from nearby PoPs. CloudFront can also accelerate uncacheable content such as dynamic APIs or personalized content.

With a network of over 450 points of presence, CloudFront terminates user TCP/TLS connections within 20-30 milliseconds on average. Traffic to origin servers is carried over the AWS global network instead of the public internet. This infrastructure is a purpose-built, highly available, and low-latency private infrastructure built on a global, fully redundant, metro fiber network that is linked via terrestrial and trans-oceanic cables across the world. In addition to terminating connections close to users, CloudFront accelerates dynamic content thanks to modern internet protocols such as QUIC and TLS1.3, and persisting TCP connections to the origin servers.

CloudFront also has security benefits, offering protection in AWS against infrastructure DDoS attacks. It integrates with AWS Web Application Firewall and AWS Shield Advanced, giving you controls to block application-level DDoS attacks. CloudFront also offers native security controls such as HTTP to HTTPS redirections, CORS management, geo-blocking, tokenization, and managing security response headers.

UI Composer application logic

When the request is not fulfilled by the CloudFront cache, it is routed to the Fargate cluster. Here, multiple tasks compute and serve the page requested.

This example uses Fastify, a fast Node.js framework that is gaining popularity among the Node.js community. When the web server initializes, it loads external parameters and the template for composing a page.

const start = async () => {
  try {
    //load parameters
    MFElist = await init();
    //load catalog template
    catalogTemplate = await loadFromS3(MFElist.template, MFElist.templatesBucket)
    await fastify.listen({ port: PORT, host: '0.0.0.0' })
  } catch (err) {
    fastify.log.error(err)
    process.exit(1)
  }
}

To maintain team independence and avoid redeploying the UI composer for every application change, the HTML templates are loaded from an S3 bucket. All teams responsible for micro-frontends in the same page can position their micro-frontends into the right place of the HTML template and delegate the composition task to the UI composer.

In this demo, the initial parameters and the catalog template are retrieved once. However, in a real scenario, it’s more likely you retrieve the parameters at initialization and at a regular cadence. The template might be loaded at runtime for every request or have another background routine fetching the initialization parameters in a similar way.

When the request reaches the product details route, the web application logic calls a transformTemplate function. It passes the catalog template, retrieved from the S3 bucket at the server initialization. It returns a 200 response if the page is composed without any issues.

fastify.get('/productdetails', async(request, reply) => {
  try{
    const catalogDetailspage = await transformTemplate(catalogTemplate)
    responseStream(catalogDetailspage, 200, reply)
  } catch(err){
    console.log(err)
    throw new Error(err)
  }
})

The page composition is the key responsibility of the UI composer. There are several viable approaches for composing micro-frontends in a server-side rendering system, covered in the next post.

Micro-frontends discovery

To decouple workloads for multiple teams, you must use architectural patterns that support it. In a microservices architecture, a pattern that allows independent evolution of a service without coupling the DNS or IP to any microservice is the service discovery pattern.

In this example, AWS System Managers Parameters Store acts as a services registry. Every micro-frontend available in the workload registers itself once the infrastructure is provisioned.

In this way, the UI composer can request the micro-frontend ID found inside the HTML template. It can retrieve the correct way to consume the micro-frontend API using an ARN or a remote HTTP URL, for instance.

AWS System Managers Parameters Store

Using ARN over HTTP requests inside the workload network can help you to reduce the latency thanks to fewer network hops. Moreover, the security is delegated to IAM policies providing a robust security implementation.

The UI composer takes care to retrieve the micro-frontends endpoints at runtime before loading them into the HTML template. This is a simpler yet powerful approach for maintaining the boundaries within your organization and allowing independent teams to evolve their architecture autonomously.

Micro-frontends discovery evolution

Using Parameter Store as a service discovery system, you can deploy a new micro-frontend by adding a new key-value into the service discovery.

A more sophisticated option could be creating a service that acts as a registry and also shapes the traffic towards different micro-frontends versions using deployment strategies like canary releases or blue/green deployments.

You can start iteratively with a simple key-value store system and evolve the architecture with a more complex approach when the workload requires, providing a robust way to roll out micro-frontends services in your system.

When this is in place, it’s likely to increase the release cadence of your micro-frontends. This is because developers often feel safer releasing in production without affecting the entire user base and they can run tests alongside real traffic.

Performance considerations

This architecture uses Fargate for composing the micro-frontends instead of Lambda functions. This allows incremental rendering offered by browsers, displaying the HTML page partially before it’s completely returned.

Consider a scenario where a micro-frontend takes longer to render due to a downstream dependency or a faulty version deployed into production. Without the streaming capability, you must wait until all the micro-frontends responses arrive, buffer them in memory, compose the page and then send the final output to the browser.

Instead, by using the streaming API offered by Node.js frameworks, you can send a partial HTML page (for example, the head tag and subsequently the rest of the page), to be rendered by a browser.

Streaming also improves server overhead, because the servers don’t have to buffer entire pages. By incrementally flushing data to browsers, servers keep memory pressure low, which lets them process more requests and save overhead costs.

However, in case your workload doesn’t require these capabilities, one or multiple Lambda functions might be suitable for your project as well, reducing the infrastructure management complexity to handle.

Conclusion

This post looks at how to use the UI Composer and micro-frontends discoverability. Once this part is developed, it won’t need to change regularly. This represents the foundation for building server-side rendering micro-frontends using HTML-over-the-wire. There might be other approaches to follow for other frameworks such as Next.js due to the architectural implementation of the framework itself.

The next post will cover how the UI composer includes micro-frontends output inside an HTML template.

For more serverless learning resources, visit Serverless Land.

A vocational digital skills course in Kakuma refugee camp: Connecting to learners’ lives

Post Syndicated from Wariara Waireri original https://www.raspberrypi.org/blog/vocational-digital-skills-kakuma-refugee-camp-learners-experience/

We are working in partnership with Amala Education to pilot a vocational skills course for displaced learners aged 16 to 25 in Kakuma refugee camp, Kenya.

Learners in a classroom learning vocational digital skills.

Kakuma camp was set up in Kenya in 1992, following a civil war in neighbouring South Sudan in East Africa. Today, 2 million people are living in the camp, and 61% are 18 and younger.

An aerial view of living spaces in Kakuma refugee camp.

We’ve designed a 100-hour, 10-week course called Using online digital technologies to create change for the Amala learners in Kakuma camp. The course focused on digital skills including making media and websites, with its content we adapted from our Computing Curriculum. The course pilot was delivered alongside Amala’s High School Diploma programme, which is the first internationally accredited course programme enabling refugee and host community youth to complete their education through flexible study.

Our thanks go to the Ezrah Charitable Trust for generously funding our work in this partnership.

Sharing lessons we are learning

We are learning a lot during this pilot, so we are writing a set of three blogs to share these lessons with you.

Today’s blog is Amala Education‘s perspective on their learners in Kakuma Camp, the purpose of digital skills education, and the course design and facilitation. We will also share our approach to adapting learning resources for the context of the Amala learners and using data to assess the course, and what other support we’ve put in place to ensure this educational project is self-sustaining.

Want to make computing education meaningful? Make it connect to learners’ lived experience

By Polly Akhurst (Co-founder and Co-Executive Director, Amala Education), Louie Barnett (Education Lead, Amala Education) & Ajak Mayen Jok (Programme Coordinator, Amala Education)

Our learners wanted a course that develops not just their digital literacy, but one that aligns with Amala’s agency-based learning model, which gives young people the skills to improve their communities. Many of our learners have limited experience of using digital tools but a huge desire to develop these skills, which they see as essential to improving their lives and the lives of their community members.

Learners in a classroom learning vocational digital skills.

So we knew we needed a course that not just builds learners’ technical knowledge and skills but can also enrich their lived experience. 

How would we do it? 

Enter the Raspberry Pi Foundation team. We combined Amala’s agency-based educational approach with the Raspberry Pi Foundation’s experience in pedagogy and teaching about technology and digital literacy to design a course that truly resonates with our learners.

Developing a relevant digital skills course

Before developing the course, the Raspberry Pi Foundation team held focus groups with facilitators and learners in Kakuma camp to understand their needs. This helped them to pitch the 100 hours of course materials at the right level for the learners.

Learners in a classroom learning vocational digital skills.

We called the course Using online technologies to create change. It takes the learners on a journey, building their foundation elements of computing and digital literacy. Learners start by finding out how digital devices work using input, process, and output. Then they move on to understanding computer networks. The course includes hands-on activities related to creating media, like filming and reviewing content and creating and choosing sounds to use in a podcast. There is also some light-touch web development with HTML and JavaScript. At the end of the course, learners design and deliver a presentation that reflects the work they’ve completed.

“Before I joined the course, I really didn’t know much about how to operate technology, but through the learning and the process, now I am able to learn something that will be beneficial for me and the people in my community.” — Learner in Kakuma refugee camp

Throughout the course, learners use their newly gained skills and knowledge to make their own project aimed at creating positive change. One example project is this website developed by Shyaka Cedric and other learners, which shares how podcasts and remote learning helped their community stay safe and healthy during the pandemic. Another group of learners used their photography and design skills to develop ID cards to keep Amala students safe within the camp. Having an Amala student ID card protects learners because they can prove their identity to their community and the police.

Facilitators from the camp make the course relatable

One of the great things about this course is that the Amala facilitators who taught the learners look, speak, and sound like them. Amala facilitators are from within the camp, and that they are relatable is great for learners’ self-confidence.

A learner and a faciliator in a classroom learning digital skills.

Having the course facilitated by fellow refugees removes the stigmatisation that the learners are vulnerable and sets the precedent that they can do anything if they put their mind to it.

“It gave me power of… getting involved with new things…Any challenge that comes my way I am willing to take after the Raspberry Pi class now…” — Learner in Kakuma refugee camp

While the Raspberry Pi Foundation team worked to make the course content relevant for the learners, our facilitators further localised the content to ensure its relatability for learners. Local contextualisation helps students to understand what they are learning, and to identify with the content — it’s not something out of the blue for them. Localisation is also important because it helps implement one of Amala’s cornerstones: decolonising the African curriculum.

Digital literacy is an urgent need

Because the learners in Kakuma camp lead complex social lives and face high levels of precarity, we decided to make the pilot course optional through our existing Diploma programme. We anticipated a modest enrollment rate, but instead over 100 people within the Amala learner community expressed an interest in this 75-person course. This showed us that the value and urgency of digital literacy in refugee communities is more pertinent than ever.

In a world where a lack of access to technology and digital skills exacerbates existing inequalities, it is critically important for young people who are disadvantaged to access meaningful learning opportunities. As one learner put it:

“I want to study this course because the current world is a digital world and I would like to acquire the skills to boost my computer skills and be able to help myself by getting a job and transforming the community through the digital world.” — Learner in Kakuma refugee camp

So what’s happening next?

We have a blueprint of what works in Kakuma refugee camp, and we are also learning what doesn’t. Bringing these lessons together will help us offer the course to more learners in Kakuma, and adapt the content in other locations, like our site in Amman, Jordan. 

Look out for our follow-up blogs about the support we put in place to enable learners in Kakuma camp to participate in the course, and how we worked to create course content that is suitable for them.

The post A vocational digital skills course in Kakuma refugee camp: Connecting to learners’ lives appeared first on Raspberry Pi.

Българо-унгарската ос: Съюзниците на Путин в ЕС и НАТО

Post Syndicated from original https://www.toest.bg/bulgaro-ungarskata-os-suyiznitsite-na-putin-v-es-i-nato/

Слабите звена на ЕС и НАТО

Българо-унгарската ос: Съюзниците на Путин в ЕС и НАТО

България вече не е на обичайното последно място по корупция в Европейския съюз. Новината от тазгодишния доклад на „Трансперънси интернешънъл“ обаче не е никак позитивна, защото причината за този „прогрес“ на страната ни е влошаващият се корупционен индекс на Унгария, която вече заема последното място.

Освен че споделят дъното на подобни класации, София и Будапеща си правят компания и в друг черен списък – на най-верните приятели на Путин сред членовете на ЕС и НАТО. Връзката между двете тенденции не е случайна. Корупцията се смята за едно от най-опасните оръжия, които Русия използва срещу Запада, следователно не е изненада, че двете най-корумпирани страни се управляват от политици, изпълняващи заръките на Москва. България и Унгария играят заедно на страната на Русия по всички линии – от газови и петролни доставки, пасивност при изпращането на оръжие на Киев, икономически санкции, до въпроси, засягащи забраната за участие на руските спортисти в Олимпийските игри.

Режимите на Орбан в Унгария и на Радев в България използват комбинация от вътрешна диктатура, конфликти с формалните си съюзници в НАТО и ЕС, както и открита защита на руските интереси, за да поставят двете държави в услуга на Путинова Русия – страна, обвинена в тероризъм, геноцид и престъпления срещу човечеството.

Както предвидих три месеца преди началото на варварската руска инвазия в Украйна, президентът Румен Радев успешно надгради започнатата от правителствата на Борисов тежка зависимост на България от Русия. Бившият премиер Иван Костов, чието управление между 1997 г. и 2001 г. постави основите на членството ни в ЕС и НАТО, на два пъти нарече президента „руски агент“ – думи, които не бяха коментирани нито от Радев, нито от партиите. Според анализатори е очевидно, че президентът се възползва от кризата на партийната система, за да разширява собственото си политическо влияние, увеличавайки по този начин опасността от допълнително подронване на демокрацията в България. На практика страната прескочи идеите за президентска република и върви с бързи стъпки към президентска диктатура.

Унгария на Орбан също от години е пример за растящо авторитарно управление, липса на свободни медии и нарушаване на човешки права. През 2022 г. Европарламентът с голямо мнозинство прие доклад, според който положението в Унгария се влошава и тя вече не може да се смята за пълна демокрация, а за хибриден режим на „изборна автокрация“.

Енергийни зависимости

Руските енергийни доставки и действащите около тях мрежи за корупция и задкулисно влияние са основният инструмент, чрез който Москва контролира властта в София и в Будапеща.

Правителството, назначено от Радев на 2 август 2022 г., активно лобира в полза на „Лукойл“, с което открито показа шокиращи зависимости между руската енергийна компания и българската власт. Официалната среща през септември между президента и представители на руската петролна компания за обсъждане на „мерки за стабилизиране на икономическата среда“ остави впечатлението, че България се управлява от „Лукойл“.

Лобирането в полза на руските енергийни интереси през миналата година дойде не само от служебното правителство, но и от правителството на Кирил Петков. Кабинетът на четворната коалиция ПП–ДБ–БСП–ИТН успя да издейства изключение за България от общото за ЕС ембарго върху руския петрол, въпреки че финансовият министър потвърди техническата възможност бургаската рафинерия да работи с неруско гориво.

Паралелно със зависимостите от „Лукойл“ българската държава страда и от дългосрочни зависимости от другия руски енергиен гигант – „Газпром“. Третото правителство на ГЕРБ и лично бившият премиер Бойко Борисов носят отговорност пред обществото за незаконно построеното през България продължение на руския газопровод „Турски поток“. Освен че създаде абсурдната ситуация с изгубената пътна карта за проект, струващ 3 млрд. лв., газовата тръба през Балканите лиши Украйна от централната ѝ роля в транзита на руски газ към Европа и по този начин отвърза ръцете на Путин за военна агресия срещу Киев.

Нещо повече, доклад на ДАНС от 2017 г. до президента Радев и тогавашния премиер Борисов ясно посочва целта на Русия с този проект до 2020 г. да изолира Украйна от газовите доставки и по тръбата да не идва газ за България. Унгария беше една от страните, облагодетелствани най-много от експресно завършения „Балкански поток“ – по този начин Русия гарантира евтини енергийни доставки до Унгария и бетонира властта на Виктор Орбан. Енергийната политика на Борисов в услуга на Москва, негласно подкрепяна от президента Радев, не само даде условия Русия да увеличи натиска си върху Украйна, но паралелно с това гарантира и енергийните връзки между Русия и най-доверения приятел на Путин в Централна Европа.

Умело кръстеният от Емилия Милчева тандем Радев–Орбан успя да наложи и вето на обсъжданите в ЕС санкции за руската ядрена индустрия, като по този начин българският президент подпечата изграждането на унгарските ядрени реактори с руски пари и технологии. Самият Радев още през 2019 г. при срещата си с Путин предложи Русия да се включи в изграждането на АЕЦ „Белене“.

„Неутрални“, но на страната на агресора

След началото на пълномащабното руско нападение срещу Украйна позициите на Орбан и Радев спрямо Москва станаха почти паралелни. Унгария все още отказва да изпрати оръжие на Украйна и дори блокира потенциални оръжейни доставки за Киев през унгарска територия. Официално България също не се включи в първоначалните инициативи на страни от ЕС и НАТО за оръжейни доставки на Украйна.

Това беше съпътствано от истерично повтаряното мнение на Радев, че военната помощ за Киев би въвлякла България във войната и че страната ни трябва да запази „неутралност“. Това достойно за роман на Оруел твърдение е очевидно невярно, защото нито една от държавите, помагащи с въоръжение на Киев, не стана част от конфликта. Впоследствие се оказа, че България все пак е давала помощ на Украйна, и то още в началото. Доставките обаче са били тайни и през трети страни.

След като Народното събрание все пак одобри директната военна помощ през декември, Радев продължи с критиките си и дори едностранно се обяви за игнориране на решението на парламента. Именно заради това грубо погазване на конституционни правомощия беше повдигната темата за потенциален импийчмънт на президента.

Междувременно властите в Унгария отидоха още по-далеч във връзките си с Русия, след като външният министър Петер Сиярто стана единственият политик от страна членка на ЕС, посетил Москва след започването на войната.

Отмяната на икономическите санкции срещу Русия е друга тема, жизненоважна за Путин, по която Румен Радев и Виктор Орбан имат еднаква позиция, различаваща се от общоевропейската. На няколко пъти от встъпването си в длъжност българският президент повтаря дословно руската опорна точка, че „санкциите не са от полза за Европа“, като за последен път това стана в края на 2021 г. на предизборния дебат между Радев и кандидата на ГЕРБ Анастас Герджиков. Орбан също отдавна е защитник на руските интереси по темата за евентуална отмяна на икономическите санкции срещу Москва. В края на 2022 г. той дори ги определи като „стъпка към война“.

Радев и Орбан защитават руските интереси и по темата за евентуалното бъдещо членство на Украйна в НАТО. България и Унгария са единствените две страни членки, които се обявиха против включването на Киев в Северноатлантическия алианс. Според Радев „решение за присъединяване на Украйна към НАТО трябва да бъде взето едва след изработването на ясни параметри за мирното уреждане на конфликта между Русия и Украйна, които да бъдат приети и приложени и от двете воюващи държави“. По този начин президентът едновременно изолира България от позицията на нейните съюзници в региона и повтаря опорната точка на Кремъл, че Украйна трябва да се съгласи на мирни преговори, които да бъдат приемливи и за Русия.

Унгария от своя страна продължава да блокира началото на работата на комисията НАТО–Украйна, посочвайки като причина проблемите на унгарското малцинство в Украйна. Виктор Орбан си навлече гнева на Киев и заради свои изказвания от началото на 2023 г., когато заяви, че заради войната Украйна се е превърнала в „ничия земя“, и сравни състоянието ѝ с това на Афганистан. Впоследствие унгарският посланик в Киев беше привикан за обяснения в украинското Външно министерство, а дипломатическият скандал сякаш разшири пропастта между Унгария и онези страни от НАТО и ЕС, които подкрепят каузата на Украйна с всички сили.

В тази напрегната обстановка, само дни след предизвикалото скандал изказване на Орбан, българският президент отново избра да заеме проруска позиция. След посещението в София на унгарския президент Каталин Новак, Радев заяви, че „България и Унгария споделят убеждението, че решението на конфликта в Украйна няма да дойде с повече оръжия, а с повече воля, диалог и дипломатически усилия за деескалация и прекратяване на бойните действия“.

Докрай на грешната страна на историята?

Чрез бруталната терористична агресия срещу Украйна Москва се бори да запази това, което смята, че ѝ принадлежи – имперския контрол върху земите на старата руска и съветска империя. Русия, подобно на империите преди нея, не желае да се откаже от териториалните си цели, докато вярва, че е способна да ги контролира по един или друг начин. Предложенията за ранни преговори предполагат, че Русия може да бъде убедена доброволно да се откаже от правото си да контролира Украйна.

Всяко примирие, постигнато чрез такова усилие, би представлявало просто тактическа пауза от страна на Русия за превъоръжаване и подновяване на войната. Българският президент и унгарският премиер явно игнорират факта, че на 24 февруари 2022 г. Русия едностранно наруши мирните споразумения, подписани през 2015 г. На практика предлаганите от Орбан и Радев „мирни преговори“ просто биха възнаградили агресора.

Западните съюзници търсят начини за насърчаване на устойчив мир в Европа – такъв, който да сложи край на бруталното нападение на Русия срещу Украйна и да намали вероятността за подобни военни агресии в бъдеще. Трагично, но реалистично е да се очаква, че Русия, подобно на повечето империи в историята, ще трябва да претърпи съкрушителна военна загуба, преди да се откаже от войната като средство за доминиране върху своите съседи. Твърде вероятно е военното поражение да доведе и до териториален разпад на Русия, подобен на тези през 1917 и 1991 г.

Възможността за колапс на Руската федерация вече открито се обсъжда не само от западни анализатори, но и от самия Путин. От всичко казано дотук следва изводът, че реториката на Радев и Орбан на военна тема не е нищо повече от повтаряне на руската пропаганда и прокарване на позицията на Путин в ЕС и НАТО. Фактът, че тази пропаганда идва от управляващите в две столици на ЕС и НАТО, е особено притеснителен и ще доведе до задълбочаване на вътрешните проблеми на двата съюза паралелно с очакваната скорошна ескалация на войната.

Гражданското общество в България и проевропейските политически сили следва да осъзнават тази опасност за страната и да направят всичко възможно да ограничат властта на зависимия от Путин български президент – дори и чрез предсрочното му премахване от поста.

Migrating from Role to Attribute-based Access Control

Post Syndicated from Grab Tech original https://engineering.grab.com/migrating-to-abac

Grab has always regarded security as one of our top priorities; this is especially important for data platform teams. We need to control access to data and resources in order to protect our consumers and ensure compliance with various, continuously evolving security standards.

Additionally, we want to keep the process convenient, simple, and easily scalable for teams. However, as Grab continues to grow, we have more services and resources to manage and it becomes increasingly difficult to keep the process frictionless. That’s why we decided to move from Role-Based Access Control (RBAC) to Attribute-Based Access Control (ABAC) for our Kafka Control Plane (KCP).

In this article, you will learn how Grab’s streaming data platform team (Coban) deleted manual role and permission management of hundreds of roles and resources, and reduced operational overhead of requesting or approving permissions to zero by moving from RBAC to ABAC.

Introduction

Kafka is widely used across Grab teams as a streaming platform. For decentralised Kafka resource (e.g. topic) management, teams have the right to create, update, or delete based on their needs. As the data platform team, we implemented a KCP to ensure that these operations are only performed by authorised parties, especially on multi-tenant Kafka clusters.

For internal access management, Grab uses its own Identity and Access Management (IAM) service, based on RBAC, to support authentication and authorisation processes:

  • Authentication verifies the identity of a user or service, for example, if the provided token is valid or expired.
  • Authorisation determines their access rights, for example, whether users can only update and/or delete their own Kafka topics.

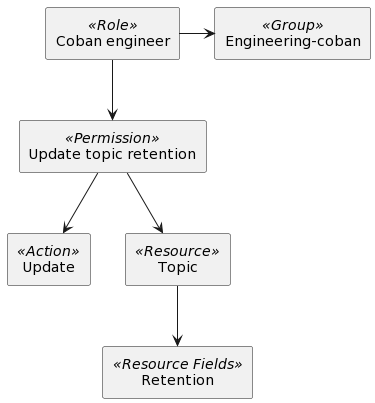
In RBAC, roles, permissions, actions, resources, and the relationships between them need to be defined in the IAM service. They are used to determine whether a user can access a certain resource.

In the following example, we can see how IAM concepts come together. The Coban engineer role belongs to the Engineering-coban group and has permission to update the retention topic. Any engineer added to the Engineering-coban group will also be able to update the topic retention.

Following the same concept, each team using the KCP has its own roles, permissions, and resources created in the system. However, there are some disadvantages to this approach:

  • It leads to a significant growth in the number of access control artifacts both platform and user teams need to manage, and increased time and effort to debug access control issues. We start off by finding which group the engineer belongs to and locating the group that should be used for KCP, and then trace to role and permissions.
  • All group membership access requests of new joiners need to be reviewed and approved by their direct managers. This leads to a lot of backlog as new joiners might have multiple groups to join and managers might not be able to review them timely. In some cases, roles need to be re-applied or renewed every 90 days, which further adds to the delay.
  • Group memberships are not updated to reflect active members in the team, leaving some engineers with access they don’t need and others with access they should have but don’t.

Solution

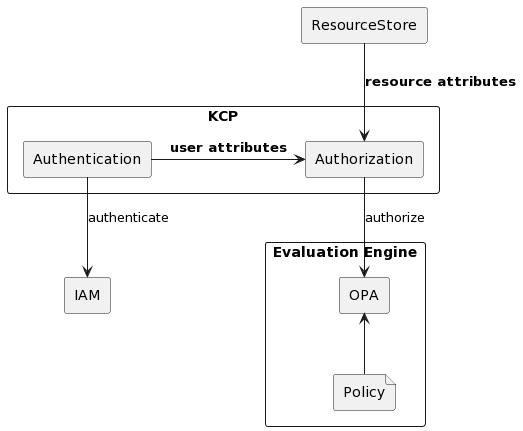
With ABAC, access management becomes a lot easier. Any new joiner to a specific team gets the same access rights as everyone on that team – no need for manual approval from a manager. However, for ABAC to work, we need these components in place:

  • User attributes: Who is the subject (actor) of a request?
  • Resource attributes: Which object (resource) does the actor want to deal with?
  • Evaluation engine: How do we decide if the actor is allowed to perform the action on the resource?

User attributes

All users have certain attributes depending on the department or team they belong to. This data is then stored and synced automatically with the human resource management system (HRMS) tool, which acts as a source of truth for Grab-wide data, every time a user switches teams, roles, or leaves the company.

Resource attributes

Resource provisioning is an authenticated operation. This means that KCP knows who sent the requests and what each request/action is about. Similarly, resource attributes can be derived from their creators. For new resource provisioning, it is possible to capture the resource tags and store them after authentication. For existing resources, a major challenge was the need to backfill the tagging and ensure a seamless transition from the user’s perspective. In the past, all resource provisioning operations were done by a centralised platform team and most of the existing resource attributes are still under platform team’s ownership.

Evaluation engine

We chose to use Open Policy Agent (OPA) as our policy evaluation engine mainly for its wide community support, applicable feature set, and extensibility to other tools and platforms in our system. This is also currently used by our team for Kafka authorisation. The policies are written in Rego, the default language supported by OPA.

Architecture and implementation

With ABAC, the access control process looks like this:

User attributes

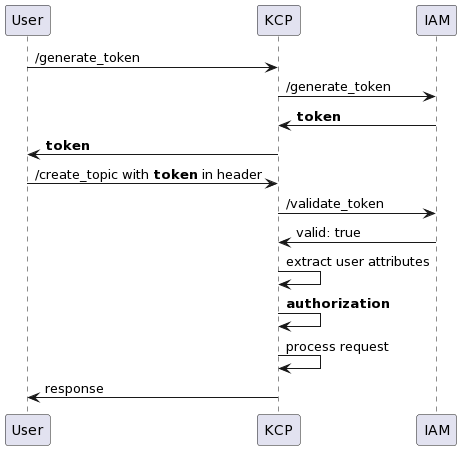
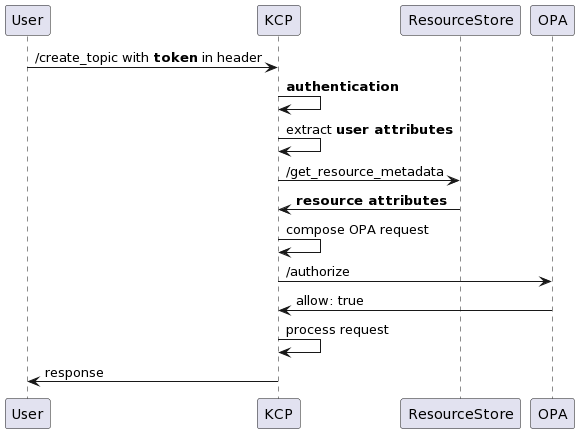
Authentication is handled by the IAM service. In the /generate_token call, a user requests an authentication token from KCP before calling an authenticated endpoint. KCP then calls IAM to generate a token and returns it to the user.

In the /create_topic call, the user includes the generated token in the request header. KCP takes the token and verifies the token validity with IAM. User attributes are then extracted from the token payload for later use in request authorisation.

Some of the common attributes we use for our policy are user identifier, department code, and team code, which provide details like a user’s department and work scope.

When it comes to data governance and central platform and identity teams, one of the major challenges was standardising the set of attributes to be used for clear and consistent ABAC policies across platforms so that their lifecycle and changes could be governed. This was an important shift in the mental model for attribute management over the RBAC model.

Resource attributes

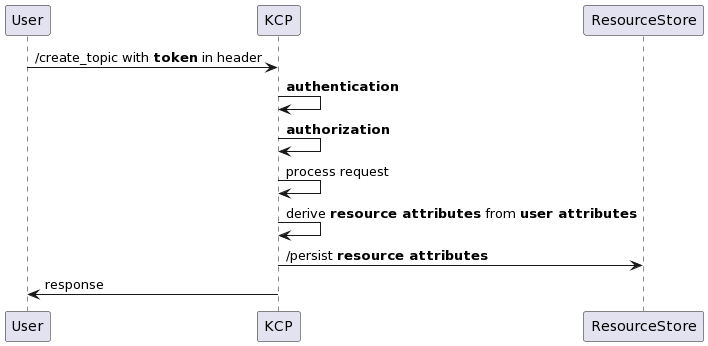
For newly created resources, attributes will be derived from user attributes that are captured during the authentication process.

Previously with RBAC, existing resources did not have the required attributes. Since migrating to ABAC, the implementation has tagged newly created resources and ensured that their attributes are up to standard. IAM was also still doing the actual authorisation using RBAC.

It is also important to note that we collaborated with data governance teams to backfill Kafka resource ownership. Having accurate ownership of resources like data lake or Kafka topics enabled us to move toward a self-service model and remove bottlenecks from centralised platform teams.

After identifying most of the resource ownership, we started switching over to ABAC. The transition was smooth and had no impact on user experience. The remaining unidentified resources were tagged to lost-and-found and could be reclaimed by service teams when they needed permission to manage them.

Open Policy Agent

The most common question when implementing the policy is “how do you define ownership by attributes?”. With respect to the principle of least privilege, each policy must be sufficiently strict to limit access to only the relevant parties. In the end, we aligned as an organisation on defining ownership by department and team.

We created a simple example below to demonstrate how to define a policy:

package authz

import future.keywords

default allow = false

allow if {
        input.endpoint == "updateTopic"
        is_owner(input.resource_attributes)
}

is_owner(md) if {
        md.department == input.user_attributes.department
        md.team == input.user_attributes.team
}

In this example, we start with denying access to everyone. If the updateTopic endpoint is called and the department and team attributes between user and resource are matched, access is allowed.

With a similar scenario, we would need 1 role, 1 action, 1 resource, and 1 mapping (a.k.a permission) between action and resource. We will need to keep adding resources and permissions when we have new resources created. Compared to the policy above, no other changes are required.

With ABAC, there are no further setup or access requests needed when a user changes teams. The user will be tagged to different attributes, automatically granted access to the new team’s resources, and excluded from the previous team’s resources.

Another consideration we had was making sure that the policy is well-written and transparent in terms of change history. We decided to include this as part of our application code so every change is accounted for in the unit test and review process.

Authorisation

The last part of the ABAC process is authorisation logic. We added the logic to the middleware so that we could make a call to OPA for authorisation.

To ensure token validity after authentication, KCP extracts user attributes from the token payload and fetches resource attributes from the resource store. It combines the request metadata such as method and endpoint, along with the user and resource attributes into an OPA request. OPA then evaluates the request based on the redefined policy above and returns a response.

Auditability

For ABAC authorisation, there are two key areas of consideration:

  • Who made changes to the policy, who deployed, and when the change was made
  • Who accessed what resource and when

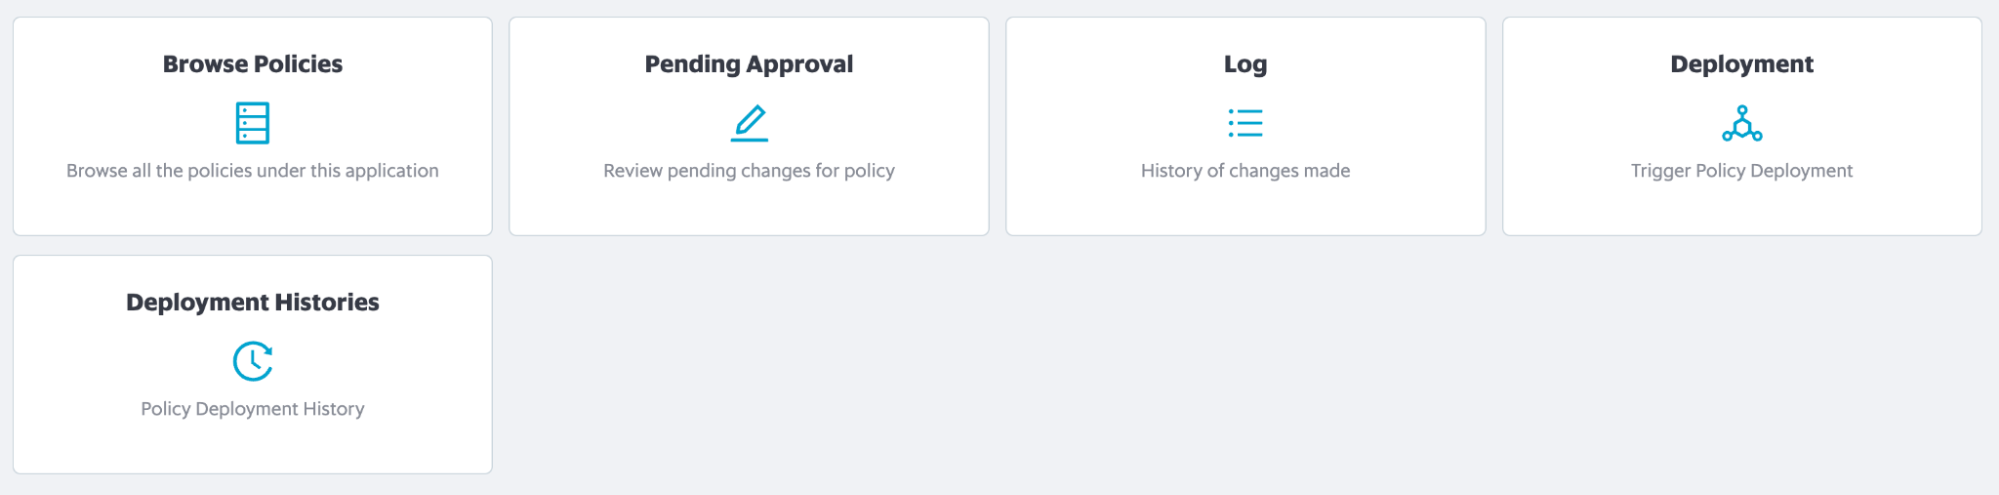
We manage policies in a dedicated GitLab repository and changes are submitted via merge requests. Based on the commit history, we can easily tell who made changes, reviewed, approved, and deployed the policy. 

For resource access, OPA produces a decision log containing user attributes, resource attributes, and the authorisation decision for every call it serves. The log is kept for five days in Kibana for debugging purposes, then moved to S3 where it is kept for 28 days.

Impact

The move to ABAC authorisation has improved our controls as compared to the previous RBAC model, with the biggest impact being fewer resources to manage. Some other benefits include:

  • Optimised resource allocation: Discarded over 200 roles, 200 permissions, and almost 3000 unused resources from IAM services, simplifying our debugging process. Now, we can simply check the user and resource attributes as needed.
  • Simplified resource management: In the three months we have been using ABAC, about 600 resources have been added without any increase in complexity for authorisation, which is significantly lesser than the RBAC model.
  • Reduction in delays and waiting time: Engineers no longer have to wait for approval for KCP access.
  • Better governance over resource ownership and costs: ABAC allowed us to have a standardised and accurate tagging system of almost 3000 resources.

Learnings

Although ABAC does provide significant improvements over RBAC, it comes with its own caveats:

  • It needs a reliable and comprehensive attribute tagging system to function properly. This only became possible after roughly three months of identifying and tagging the ownership of existing resources by both automated and manual methods.
  • Tags should be kept up to date with the company’s growth. Teams could lose access to their resources if they are wrongly tagged. It needs a mechanism to keep up with changes, or people will unexpectedly lose access when user and resource attributes are changed.

What’s next?

  • To keep up with organisational growth, KCP needs to start listening to the IAM stream, which is where all IAM changes are published. This will allow KCP to regularly update user attributes and refresh resource attributes when restructuring occurs, allowing authorisation to be done with the right data.
  • Constant collaboration with HR to ensure that we maintain sufficient user attributes (no extra unused information) that remain clean so ABAC works as expected.

References

Join us

Grab is the leading superapp platform in Southeast Asia, providing everyday services that matter to consumers. More than just a ride-hailing and food delivery app, Grab offers a wide range of on-demand services in the region, including mobility, food, package and grocery delivery services, mobile payments, and financial services across 428 cities in eight countries.

Powered by technology and driven by heart, our mission is to drive Southeast Asia forward by creating economic empowerment for everyone. If this mission speaks to you, join our team today!

Build an end-to-end change data capture with Amazon MSK Connect and AWS Glue Schema Registry

Post Syndicated from Kalyan Janaki original https://aws.amazon.com/blogs/big-data/build-an-end-to-end-change-data-capture-with-amazon-msk-connect-and-aws-glue-schema-registry/

The value of data is time sensitive. Real-time processing makes data-driven decisions accurate and actionable in seconds or minutes instead of hours or days. Change data capture (CDC) refers to the process of identifying and capturing changes made to data in a database and then delivering those changes in real time to a downstream system. Capturing every change from transactions in a source database and moving them to the target in real time keeps the systems synchronized, and helps with real-time analytics use cases and zero-downtime database migrations. The following are a few benefits of CDC:

  • It eliminates the need for bulk load updating and inconvenient batch windows by enabling incremental loading or real-time streaming of data changes into your target repository.
  • It ensures that data in multiple systems stays in sync. This is especially important if you’re making time-sensitive decisions in a high-velocity data environment.

Kafka Connect is an open-source component of Apache Kafka that works as a centralized data hub for simple data integration between databases, key-value stores, search indexes, and file systems. The AWS Glue Schema Registry allows you to centrally discover, control, and evolve data stream schemas. Kafka Connect and Schema Registry integrate to capture schema information from connectors. Kafka Connect provides a mechanism for converting data from the internal data types used by Kafka Connect to data types represented as Avro, Protobuf, or JSON Schema. AvroConverter, ProtobufConverter, and JsonSchemaConverter automatically register schemas generated by Kafka connectors (source) that produce data to Kafka. Connectors (sink) that consume data from Kafka receive schema information in addition to the data for each message. This allows sink connectors to know the structure of the data to provide capabilities like maintaining a database table schema in a data catalog.

The post demonstrates how to build an end-to-end CDC using Amazon MSK Connect, an AWS managed service to deploy and run Kafka Connect applications and AWS Glue Schema Registry, which allows you to centrally discover, control, and evolve data stream schemas.

Solution overview

On the producer side, for this example we choose a MySQL-compatible Amazon Aurora database as the data source, and we have a Debezium MySQL connector to perform CDC. The Debezium connector continuously monitors the databases and pushes row-level changes to a Kafka topic. The connector fetches the schema from the database to serialize the records into a binary form. If the schema doesn’t already exist in the registry, the schema will be registered. If the schema exists but the serializer is using a new version, the schema registry checks the compatibility mode of the schema before updating the schema. In this solution, we use backward compatibility mode. The schema registry returns an error if a new version of the schema is not backward compatible, and we can configure Kafka Connect to send incompatible messages to the dead-letter queue.

On the consumer side, we use an Amazon Simple Storage Service (Amazon S3) sink connector to deserialize the record and store changes to Amazon S3. We build and deploy the Debezium connector and the Amazon S3 sink using MSK Connect.

Example schema

For this post, we use the following schema as the first version of the table:

{ 
    “Database Name”: “sampledatabase”, 
    “Table Name”: “movies”, 
    “Fields”: [
         { 
            “name”: “movie_id”, 
            “type”: “INTEGER” 
         },
         { 
            “name”: “title”, 
            “type”: “STRING” 
         },
         { 
            “name”: “release_year”,
            “type”: “INTEGER” 
         }
     ] 
}

Prerequisites

Before configuring the MSK producer and consumer connectors, we need to first set up a data source, MSK cluster, and new schema registry. We provide an AWS CloudFormation template to generate the supporting resources needed for the solution:

  • A MySQL-compatible Aurora database as the data source. To perform CDC, we turn on binary logging in the DB cluster parameter group.
  • An MSK cluster. To simplify the network connection, we use the same VPC for the Aurora database and the MSK cluster.
  • Two schema registries to handle schemas for message key and message value.
  • One S3 bucket as the data sink.
  • MSK Connect plugins and worker configuration needed for this demo.
  • One Amazon Elastic Compute Cloud (Amazon EC2) instance to run database commands.

To set up resources in your AWS account, complete the following steps in an AWS Region that supports Amazon MSK, MSK Connect, and the AWS Glue Schema Registry:

  1. Choose Launch Stack:
  2. Choose Next.
  3. For Stack name, enter suitable name.
  4. For Database Password, enter the password you want for the database user.
  5. Keep other values as default.
  6. Choose Next.
  7. On the next page, choose Next.
  8. Review the details on the final page and select I acknowledge that AWS CloudFormation might create IAM resources.
  9. Choose Create stack.

Custom plugin for the source and destination connector

A custom plugin is a set of JAR files that contain the implementation of one or more connectors, transforms, or converters. Amazon MSK will install the plugin on the workers of the MSK Connect cluster where the connector is running. As part of this demo, for the source connector we use open-source Debezium MySQL connector JARs, and for the destination connector we use the Confluent community licensed Amazon S3 sink connector JARs. Both the plugins are also added with libraries for Avro Serializers and Deserializers of the AWS Glue Schema Registry. These custom plugins are already created as part of the CloudFormation template deployed in the previous step.

Use the AWS Glue Schema Registry with the Debezium connector on MSK Connect as the MSK producer

We first deploy the source connector using the Debezium MySQL plugin to stream data from an Amazon Aurora MySQL-Compatible Edition database to Amazon MSK. Complete the following steps:

  1. On the Amazon MSK console, in the navigation pane, under MSK Connect, choose Connectors.
  2. Choose Create connector.
  3. Choose Use existing custom plugin and then pick the custom plugin with name starting msk-blog-debezium-source-plugin.
  4. Choose Next.
  5. Enter a suitable name like debezium-mysql-connector and an optional description.
  6. For Apache Kafka cluster, choose MSK cluster and choose the cluster created by the CloudFormation template.
  7. In Connector configuration, delete the default values and use the following configuration key-value pairs and with the appropriate values:
    • name – The name used for the connector.
    • database.hostsname – The CloudFormation output for Database Endpoint.
    • database.user and database.password – The parameters passed in the CloudFormation template.
    • database.history.kafka.bootstrap.servers – The CloudFormation output for Kafka Bootstrap.
    • key.converter.region and value.converter.region – Your Region.
name=<Connector-name>
connector.class=io.debezium.connector.mysql.MySqlConnector
database.hostname=<DBHOST>
database.port=3306
database.user=<DBUSER>
database.password=<DBPASSWORD>
database.server.id=42
database.server.name=db1
table.whitelist=sampledatabase.movies
database.history.kafka.bootstrap.servers=<MSK-BOOTSTRAP>
database.history.kafka.topic=dbhistory.demo1
key.converter=com.amazonaws.services.schemaregistry.kafkaconnect.AWSKafkaAvroConverter
value.converter=com.amazonaws.services.schemaregistry.kafkaconnect.AWSKafkaAvroConverter
key.converter.region=<REGION>
value.converter.region=<REGION>
key.converter.registry.name=msk-connect-blog-keys
value.converter.registry.name=msk-connect-blog-values
key.converter.compatibility=FORWARD
value.converter.compatibility=FORWARD
key.converter.schemaAutoRegistrationEnabled=true
value.converter.schemaAutoRegistrationEnabled=true
transforms=unwrap
transforms.unwrap.type=io.debezium.transforms.ExtractNewRecordState
transforms.unwrap.drop.tombstones=false
transforms.unwrap.delete.handling.mode=rewrite
transforms.unwrap.add.fields=op,source.ts_ms
tasks.max=1

Some of these settings are generic and should be specified for any connector. For example:

  • connector.class is the Java class of the connector
  • tasks.max is the maximum number of tasks that should be created for this connector

Some settings (database.*, transforms.*) are specific to the Debezium MySQL connector. Refer to Debezium MySQL Source Connector Configuration Properties for more information.

Some settings (key.converter.* and value.converter.*) are specific to the Schema Registry. We use the AWSKafkaAvroConverter from the AWS Glue Schema Registry Library as the format converter. To configure AWSKafkaAvroConverter, we use the value of the string constant properties in the AWSSchemaRegistryConstants class:

  • key.converter and value.converter control the format of the data that will be written to Kafka for source connectors or read from Kafka for sink connectors. We use AWSKafkaAvroConverter for Avro format.
  • key.converter.registry.name and value.converter.registry.name define which schema registry to use.
  • key.converter.compatibility and value.converter.compatibility define the compatibility model.

Refer to Using Kafka Connect with AWS Glue Schema Registry for more information.

  1. Next, we configure Connector capacity. We can choose Provisioned and leave other properties as default
  2. For Worker configuration, choose the custom worker configuration with name starting msk-gsr-blog created as part of the CloudFormation template.
  3. For Access permissions, use the AWS Identity and Access Management (IAM) role generated by the CloudFormation template MSKConnectRole.
  4. Choose Next.
  5. For Security, choose the defaults.
  6. Choose Next.
  7. For Log delivery, select Deliver to Amazon CloudWatch Logs and browse for the log group created by the CloudFormation template (msk-connector-logs).
  8. Choose Next.
  9. Review the settings and choose Create connector.

After a few minutes, the connector changes to running status.

Use the AWS Glue Schema Registry with the Confluent S3 sink connector running on MSK Connect as the MSK consumer

We deploy the sink connector using the Confluent S3 sink plugin to stream data from Amazon MSK to Amazon S3. Complete the following steps:

    1. On the Amazon MSK console, in the navigation pane, under MSK Connect, choose Connectors.
    2. Choose Create connector.
    3. Choose Use existing custom plugin and choose the custom plugin with name starting msk-blog-S3sink-plugin.
    4. Choose Next.
    5. Enter a suitable name like s3-sink-connector and an optional description.
    6. For Apache Kafka cluster, choose MSK cluster and select the cluster created by the CloudFormation template.
    7. In Connector configuration, delete the default values provided and use the following configuration key-value pairs with appropriate values:
        • name – The same name used for the connector.
        • s3.bucket.name – The CloudFormation output for Bucket Name.
        • s3.region, key.converter.region, and value.converter.region – Your Region.
name=<CONNERCOR-NAME>
connector.class=io.confluent.connect.s3.S3SinkConnector
s3.bucket.name=<BUCKET-NAME>
key.converter=com.amazonaws.services.schemaregistry.kafkaconnect.AWSKafkaAvroConverter
value.converter=com.amazonaws.services.schemaregistry.kafkaconnect.AWSKafkaAvroConverter
s3.region=<REGION>
storage.class=io.confluent.connect.s3.storage.S3Storage
partitioner.class=io.confluent.connect.storage.partitioner.DefaultPartitioner
format.class=io.confluent.connect.s3.format.parquet.ParquetFormat
flush.size=10
tasks.max=1
key.converter.schemaAutoRegistrationEnabled=true
value.converter.schemaAutoRegistrationEnabled=true
key.converter.region=<REGION>
value.converter.region=<REGION>
value.converter.avroRecordType=GENERIC_RECORD
key.converter.avroRecordType=GENERIC_RECORD
value.converter.compatibility=NONE
key.converter.compatibility=NONE
store.kafka.keys=false
schema.compatibility=NONE
topics=db1.sampledatabase.movies
value.converter.registry.name=msk-connect-blog-values
key.converter.registry.name=msk-connect-blog-keys
store.kafka.headers=false
  1. Next, we configure Connector capacity. We can choose Provisioned and leave other properties as default
  2. For Worker configuration, choose the custom worker configuration with name starting msk-gsr-blog created as part of the CloudFormation template.
  3. For Access permissions, use the IAM role generated by the CloudFormation template MSKConnectRole.
  4. Choose Next.
  5. For Security, choose the defaults.
  6. Choose Next.
  7. For Log delivery, select Deliver to Amazon CloudWatch Logs and browse for the log group created by the CloudFormation template msk-connector-logs.
  8. Choose Next.
  9. Review the settings and choose Create connector.

After a few minutes, the connector is running.

Test the end-to-end CDC log stream

Now that both the Debezium and S3 sink connectors are up and running, complete the following steps to test the end-to-end CDC:

  1. On the Amazon EC2 console, navigate to the Security groups page.
  2. Select the security group ClientInstanceSecurityGroup and choose Edit inbound rules.
  3. Add an inbound rule allowing SSH connection from your local network.
  4. On the Instances page, select the instance ClientInstance and choose Connect.
  5. On the EC2 Instance Connect tab, choose Connect.
  6. Ensure your current working directory is /home/ec2-user and it has the files create_table.sql, alter_table.sql , initial_insert.sql, and insert_data_with_new_column.sql.
  7. Create a table in your MySQL database by running the following command (provide the database host name from the CloudFormation template outputs):
mysql -h <DATABASE-HOST> -u master -p < create_table.sql
  1. When prompted for a password, enter the password from the CloudFormation template parameters.
  2. Insert some sample data into the table with the following command:
mysql -h <DATABASE-HOST> -u master -p < initial_insert.sql
  1. When prompted for a password, enter the password from the CloudFormation template parameters.
  2. On the AWS Glue console, choose Schema registries in the navigation pane, then choose Schemas.
  3. Navigate to db1.sampledatabase.movies version 1 to check the new schema created for the movies table:
{
  "type": "record",
  "name": "Value",
  "namespace": "db1.sampledatabase.movies",
  "fields": [
    {
      "name": "movie_id",
      "type": "int"
    },
    {
      "name": "title",
      "type": "string"
    },
    {
      "name": "release_year",
      "type": "int"
    },
    {
      "name": "__op",
      "type": [
        "null",
        "string"
      ],
      "default": null
    },
    {
      "name": "__source_ts_ms",
      "type": [
        "null",
        "long"
      ],
      "default": null
    },
    {
      "name": "__deleted",
      "type": [
        "null",
        "string"
      ],
      "default": null
    }
  ],
  "connect.name": "db1.sampledatabase.movies.Value"
}

A separate S3 folder is created for each partition of the Kafka topic, and data for the topic is written in that folder.

  1. On the Amazon S3 console, check for data written in Parquet format in the folder for your Kafka topic.

Schema evolution

After the initial schema is defined, applications may need to evolve it over time. When this happens, it’s critical for the downstream consumers to be able to handle data encoded with both the old and the new schema seamlessly. Compatibility modes allow you to control how schemas can or can’t evolve over time. These modes form the contract between applications producing and consuming data. For detailed information about different compatibility modes available in the AWS Glue Schema Registry, refer to AWS Glue Schema Registry. In our example, we use backward combability to ensure consumers can read both the current and previous schema versions. Complete the following steps:

  1. Add a new column to the table by running the following command:
mysql -h <DATABASE-HOST> -u master -p < alter_table.sql
  1. Insert new data into the table by running the following command:
mysql -h <DATABASE-HOST> -u master -p < insert_data_with_new_column.sql
  1. On the AWS Glue console, choose Schema registries in the navigation pane, then choose Schemas.
  2. Navigate to the schema db1.sampledatabase.movies version 2 to check the new version of the schema created for the movies table movies including the country column that you added:
{
  "type": "record",
  "name": "Value",
  "namespace": "db1.sampledatabase.movies",
  "fields": [
    {
      "name": "movie_id",
      "type": "int"
    },
    {
      "name": "title",
      "type": "string"
    },
    {
      "name": "release_year",
      "type": "int"
    },
    {
      "name": "COUNTRY",
      "type": "string"
    },
    {
      "name": "__op",
      "type": [
        "null",
        "string"
      ],
      "default": null
    },
    {
      "name": "__source_ts_ms",
      "type": [
        "null",
        "long"
      ],
      "default": null
    },
    {
      "name": "__deleted",
      "type": [
        "null",
        "string"
      ],
      "default": null
    }
  ],
  "connect.name": "db1.sampledatabase.movies.Value"
}
  1. On the Amazon S3 console, check for data written in Parquet format in the folder for the Kafka topic.

Clean up

To help prevent unwanted charges to your AWS account, delete the AWS resources that you used in this post:

  1. On the Amazon S3 console, navigate to the S3 bucket created by the CloudFormation template.
  2. Select all files and folders and choose Delete.
  3. Enter permanently delete as directed and choose Delete objects.
  4. On the AWS CloudFormation console, delete the stack you created.
  5. Wait for the stack status to change to DELETE_COMPLETE.

Conclusion

This post demonstrated how to use Amazon MSK, MSK Connect, and the AWS Glue Schema Registry to build a CDC log stream and evolve schemas for data streams as business needs change. You can apply this architecture pattern to other data sources with different Kafka connecters. For more information, refer to the MSK Connect examples.


About the Author

Kalyan Janaki is Senior Big Data & Analytics Specialist with Amazon Web Services. He helps customers architect and build highly scalable, performant, and secure cloud-based solutions on AWS.

Work Smarter With Backblaze and Quantum H4000 Essential

Post Syndicated from Jennifer Newman original https://www.backblaze.com/blog/work-smarter-with-backblaze-and-quantum-h4000-essential/

A decorative image displaying the Backblaze and Quantum logos.

How much do you think it costs your creative team to manage data? How much time and money is spent organizing files, searching for files, and maybe never finding those files? Have you ever quantified it? One market research firm has. According to GISTICS, a creative team of eight people wastes more than $85,000 per year searching for and managing files—and larger teams waste even more than that.

Creative teams need better tools to work smarter. Backblaze has partnered with Quantum to simplify media workflows, provide easy remote collaboration, and free up on-premises storage space with seamless content archiving to the cloud. The partnership provides teams the tools needed to compete. Read on to learn more.

What Is Quantum?

Quantum is a data storage company that provides technology, software, and services to help companies make video and other unstructured data smarter—so data works for them and not the other way around. Quantum’s H4000 Essential (H4000E) asset management and shared storage solution offers customers an all-in-one appliance that integrates automatic content indexing, search, discovery, and collaboration. It couples the CatDV asset management platform with Quantum’s StorNext 7 shared storage.

How Does This Partnership Benefit Joint Customers?

By pairing Quantum H4000 Essential with Backblaze B2 Cloud Storage, you get award-winning asset management and shared storage with the ability to archive to the cloud. The partnership provides a number of benefits:

  • Better organization: Creative teams work visually, and the Quantum platform supports visual workflows. All content is available in one place, with automatic content indexing, metadata tagging, and proxy generation.
  • Searchable assets: All content and projects are searchable in an easy to use visual catalog.
  • Seamless collaboration: Teams can use production tools like Adobe Premiere Pro, Final Cut Pro X, and others to work on shared projects as well as tagging, markup, versioning, chat, and approval tools to streamline collaboration.
  • Robust archive management: Archived content can be restored easily from Backblaze B2 to CatDV to keep work in progress lean and focused.
  • On-premises efficiency: Once projects are complete, they can be quickly archived to the cloud to free up storage space on the H4000E for high-resolution production files and ongoing projects.
  • Simplified billing: Data is stored on always-hot storage, eliminating the management frustration that comes with multiple tiers and variable costs for egress and API calls.

Purchase Cloud Capacity the Same Way You Purchase On-Premises

With Backblaze B2 Reserve, you can purchase capacity-based storage starting at 20TB to pair with your Quantum H4000E if you prefer a predictable cloud spend versus consumption-based billing. Key features of B2 Reserve include:

  • Free egress up to the amount of storage purchased per month.
  • Free transaction calls.
  • Enhanced migration services.
  • No delete penalties.
  • Upgraded Tera support.

Who Would Benefit From Backblaze B2 + Quantum H4000E?

The partnership benefits any team that handles large amounts of data, specifically media files. The solution can help teams with:

  • Simplifying media workflows.
  • Easing remote project management and collaboration.
  • Cloud tiering.
  • Extending on-premises storage.
  • Implementing a cloud-first strategy.
  • Backup and disaster recovery planning.
  • Ransomware protection.
  • Managing consistent data growth.

Getting Started With Backblaze B2 and Quantum H4000E

The Quantum H4000E is a highly-integrated solution for collaborative shared storage and asset management. Configured with Backblaze B2 for content archiving and retrieval, it provides new menu options to perform cloud archiving and move, copy, and restore content, freeing up H4000 local storage for high-resolution files. You can easily add on cloud storage to improve remote media workflows, content collaboration, media asset protection, and archive.

With the H4000E, everything you need to get started is in the box, ready to connect to your 10GbE and higher network. And, a simple Backblaze B2 archive plugin connects the solution directly to your Backblaze B2 account.

Simply create a Backblaze account and configure the Backblaze CatDV panel with your credentials.

Join Backblaze at NAB Las Vegas

Join us at NAB to learn more about the Quantum + Backblaze solution. Our booths are neighbors! Schedule a meeting with us for a demo.

The post Work Smarter With Backblaze and Quantum H4000 Essential appeared first on Backblaze Blog | Cloud Storage & Cloud Backup.

[$] Removing support for DeltaRPMs in Fedora

Post Syndicated from original https://lwn.net/Articles/925348/

Way back in 2009, we looked at the presto
plugin for yum, which added support for DeltaRPMs to Fedora. That package
format allows just the binary differences (i.e. the delta) between an
installed RPM and its update to be transmitted, which saves network
bandwidth; the receiving system then
creates the new RPM from those two pieces before installing it. Support
for DeltaRPMs was eventually added to the distribution by default, though
the feature
has never really lived up to expectations—and hopes. Now, it would seem
that Fedora is ready to, in the words of project leader Matthew Miller,
“give DeltaRPMs a
sad, fond farewell
“.

Let’s Architect! Architecting a data mesh

Post Syndicated from Luca Mezzalira original https://aws.amazon.com/blogs/architecture/lets-architect-architecting-a-data-mesh/

Data architectures were mainly designed around technologies rather than business domains in the past. This changed in 2019, when Zhamak Dehghani introduced the data mesh. Data mesh is an application of the Domain-Driven-Design (DDD) principles to data architectures: Data is organized into data domains and the data is the product that the team owns and offers for consumption.

A data mesh architecture unites the disparate data sources within an organization through centrally managed data-sharing and governance guidelines. Business functions can maintain control over how shared data is accessed because data mesh also solves advanced data security challenges through distributed, decentralized ownership.

This edition of Let’s Architect! introduces data mesh, highlights the foundational concepts of data architectures, and covers the patterns for designing a data mesh in the AWS cloud with supporting resources.

Data lakes, lake houses and data mesh: what, why, and how?

Let’s explore a video introduction to data lakes, lake houses, and data mesh. This resource explains how to leverage those concepts to gain greater data insights across different business segments, with a special focus on best practices to build a well-architected, modern data architecture on AWS. It also gives an overview of the AWS cloud services that can be used to create such architectures and describes the fundamental pillars of designing them.

Take me to this intro to data lakes, lake houses, and data mesh video!

Data mesh is an architecture pattern where data are organized into domains and seen as products to expose for consumption

Data mesh is an architecture pattern where data are organized into domains and seen as products to expose for consumption

Building data mesh architectures on AWS

Knowing what a data mesh architecture is, here is a step-by-step video from re:Invent 2022 on designing one. It covers a use case on how GoDaddy considered and implemented data mesh, in addition to:

  • The fundamental pillars behind a well-architected data mesh in the cloud
  • Finding an approach to build a data mesh architecture using native AWS services
  • Reasons for considering a data mesh architecture where data lakes provide limitations in some scenarios
  • How data mesh can be applied in practice to overcome them
  • The mental models to apply during the data mesh design process

Take me to this re:Invent 2022 video!

In the data mesh architecture the producers expose their data for consumption to the consumers. Access is regulated through a centralized governance layer.

In the data mesh architecture the producers expose their data for consumption to the consumers. Access is regulated through a centralized governance layer.

Amazon DataZone: Democratize data with governance

Now let’s explore data accessibility as it relates to data mesh architectures.

Amazon DataZone is a new AWS business data catalog allowing you to unlock data across organizational boundaries with built-in governance. This service provides a unified environment where everyone in an organization—from data producers to data consumers—can access, share, and consume data in a governed manner.

Here is a video to learn how to apply AWS analytics services to discover, access, and share data across organizational boundaries within the context of a data mesh architecture.

Take me to this re:Invent 2022 video!

Amazon DataZone accelerates the adoption of the data mesh pattern by making it scalable to high number of producers and consumers.

Amazon DataZone accelerates the adoption of the data mesh pattern by making it scalable to high number of producers and consumers.

Build a data mesh on AWS

Feeling inspired to build? Hands-on experience is a great way to learn and see how the theoretical concepts apply in practice.

This workshop teaches you a data mesh architecture building approach on AWS. Many organizations are interested in implementing this architecture to:

  1. Move away from centralized data lakes to decentralized ownership
  2. Deliver analytics solutions across business units

Learn how a data mesh architecture can be implemented with AWS native services.

Take me to this workshop!

The diagrams shows how to separate the producers, consumers and governance components through a multi-account strategy.

The diagrams shows how to separate the producers, consumers and governance components through a multi-account strategy.

See you next time!

Thanks for exploring architecture tools and resources with us!

Next time we’ll talk about monitoring and observability.

To find all the posts from this series, check out the Let’s Architect! page of the AWS Architecture Blog.

a2ps 4.15 released

Post Syndicated from original https://lwn.net/Articles/925631/

Version 4.15 of the “anything to PostScript” filter a2ps has been released
— the first release since 2007.
“This release contains few user-visible changes. It does however
contain a lot of changes “under the hood”: code clean-up,
etc. Therefore, it’s likely that there are new bugs.
”

Kubernetes monitoring with Zabbix – Part 2: Understanding the discovered resources

Post Syndicated from Michaela DeForest original https://blog.zabbix.com/kubernetes-monitoring-with-zabbix-part-2-understanding-the-discovered-resources/25476/

In the previous blog post, we installed the Zabbix Agent Helm Chart and set up official Kubernetes templates to monitor a cluster in Zabbix. In this edition, part 2, we will explore the functionality provided by the Kubernetes integration in Zabbix and discuss use cases for monitoring and alerting on events in a cluster. (This post assumes that the Kubernetes integration has been set up in at least one cluster using the helm chart and provided templates.)

Want to see Kubernetes monitoring in action? Watch Part 2 of our Kubernetes monitoring video guide.

Node and Component Discovery

Following integration setup, the templates will discover control plane components, each node, and the kubelet associated with it using the Kubernetes API via a “Script” item type.

Note:

In the last blog post, I showed a managed EKS cluster. Control plane components cannot be discovered in an EKS cluster because AWS does not make them directly available through the API. For the sake of demonstrating the full capabilities of the integration, this post will use screenshots depicting a cluster that was created using the kubeadm utility.

In the latest version of Zabbix (6.2 at the time of writing), control plane components are discovered via node labels added only for clusters created with kubeadm. Depending on your setup, you may be able to add the same node labels to your own control plane nodes or modify the template to use your specific labels.

This example cluster has 4 worker nodes and 1 master node. The control plane runs entirely on the master node.

Zabbix’s “Low-Level Discovery” is the backbone of the Kubernetes integration. Zabbix discovers each node and creates two hosts to represent them in the cluster. The first host attaches the “Linux by Zabbix Agent” template to it, and the second attaches a custom Kubelet template called “Kubernetes Kubelet by HTTP. Zabbix also creates items for most standard objects like pods, deployments, replicasets, job, cronjob, etc.

Node and Kubernetes Performance Metrics

In this example, there are four discovered worker nodes with the “Linux by Zabbix Agent” template attached to them. The template will provide metrics about the machines running in the cluster.

Each worker host’s “System performance” dashboard shows system load, CPU usage, and memory usage metrics.

Zabbix will also collect Kubernetes-specific metrics related to the nodes. “Latest Data” for the Kubernetes Nodes host shows metrics such as the Allocatable CPU available to pods and the node’s memory capacity.

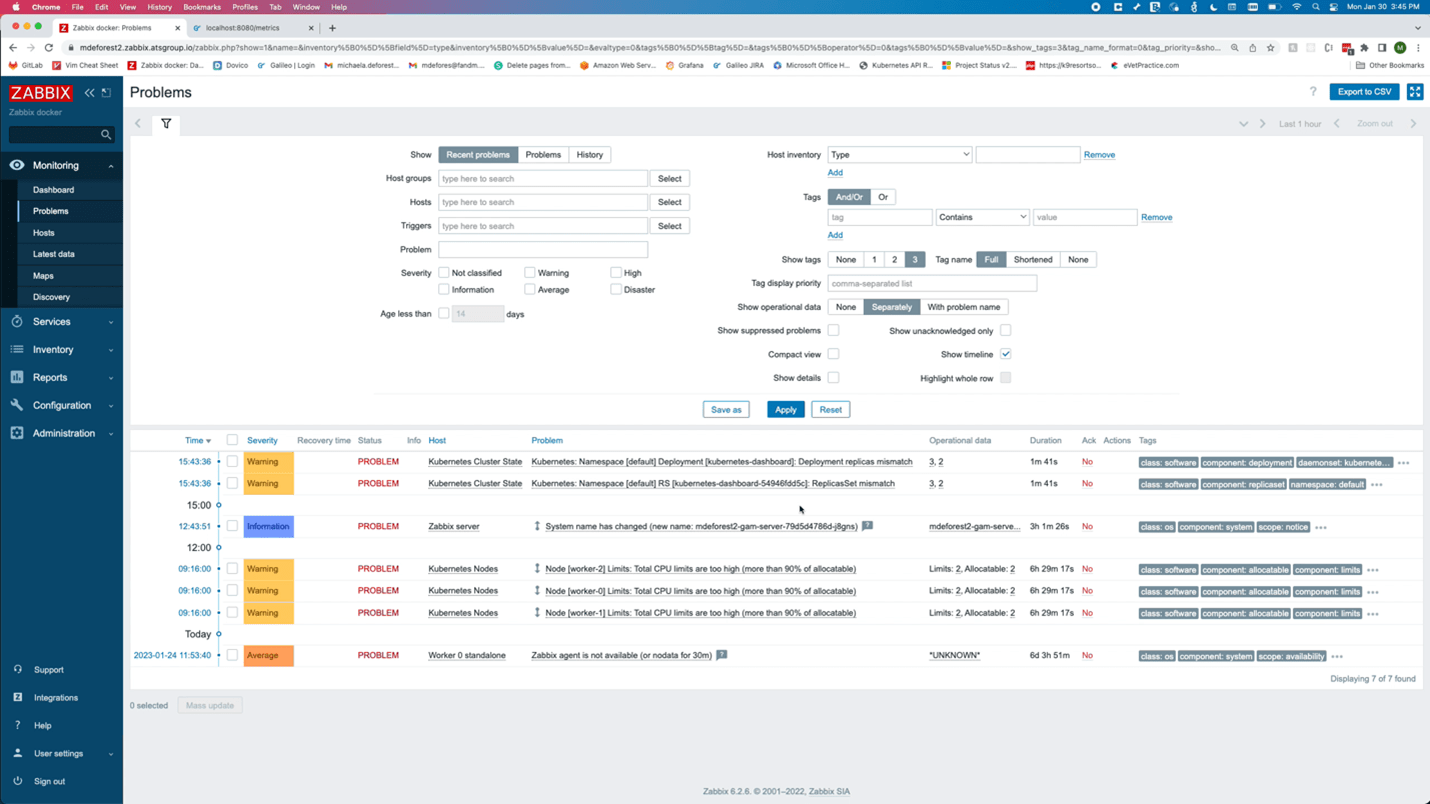
Alerts are generated for events such as the allocation of too much CPU. This could indicate that capacity should be increased, assuming that the memory and CPU limits set on the pod label are accurate.

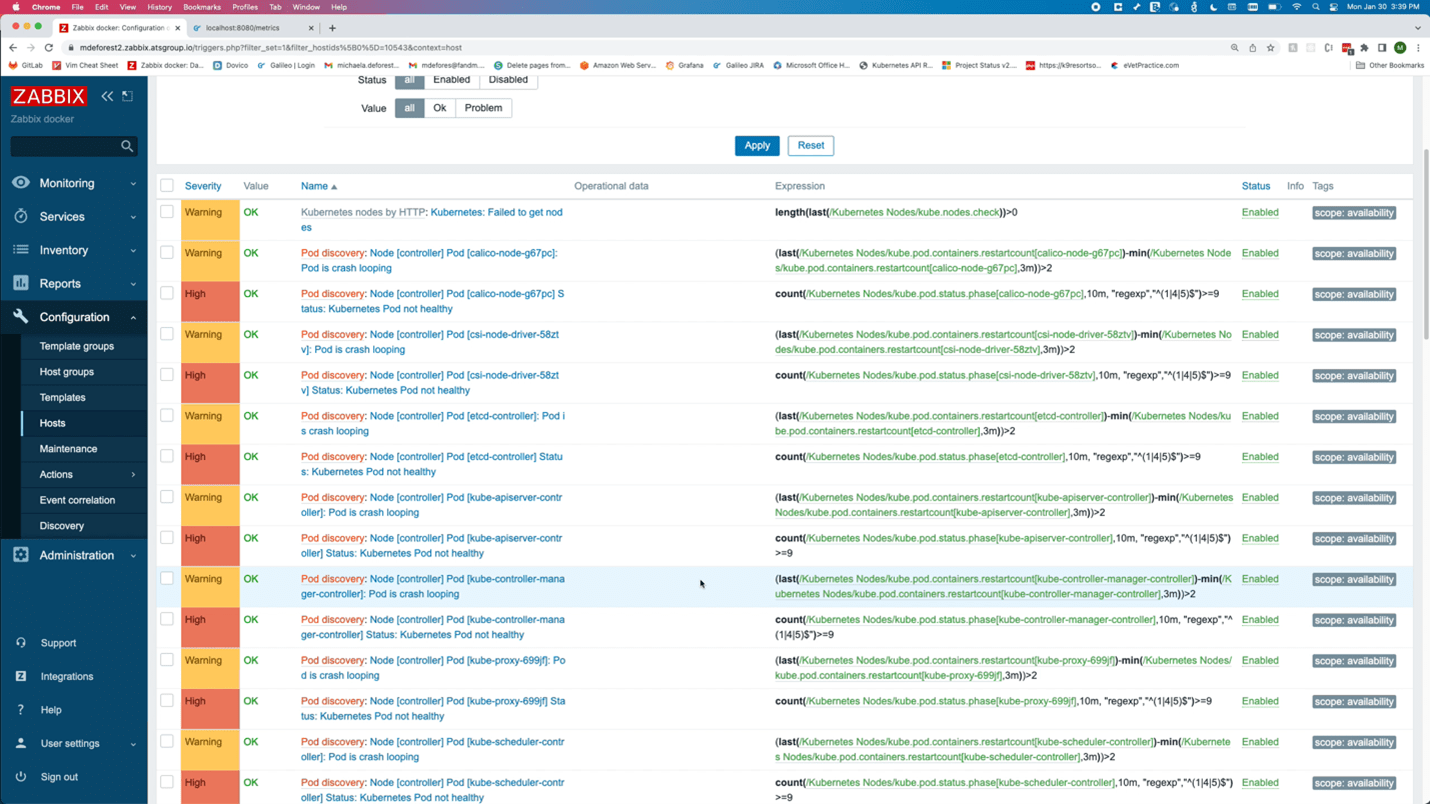
The Kubernetes integration also monitors object states. As a best practice, any tool used to monitor Kubernetes should be monitoring and alerting critical status changes within the cluster. The image above shows the triggers related to the health of a pod. There are also triggers when certain conditions are detected by the nodes, like memory or CPU pressure.

Zabbix discovers objects like pods, deployments, and Replicasets, and triggers on object states.  For example, pods that are not up or deployments that do not have the correct number of replicas up.

In this example, a cluster is running a Kubernetes dashboard deployment with 3 replicas. By running the following command, we can see that all 3 replicas are up. Under “Latest Data,” Zabbix shows those 3 replicas available out of the 3 desired.

kubectl get deployment kubernetes-dashboard


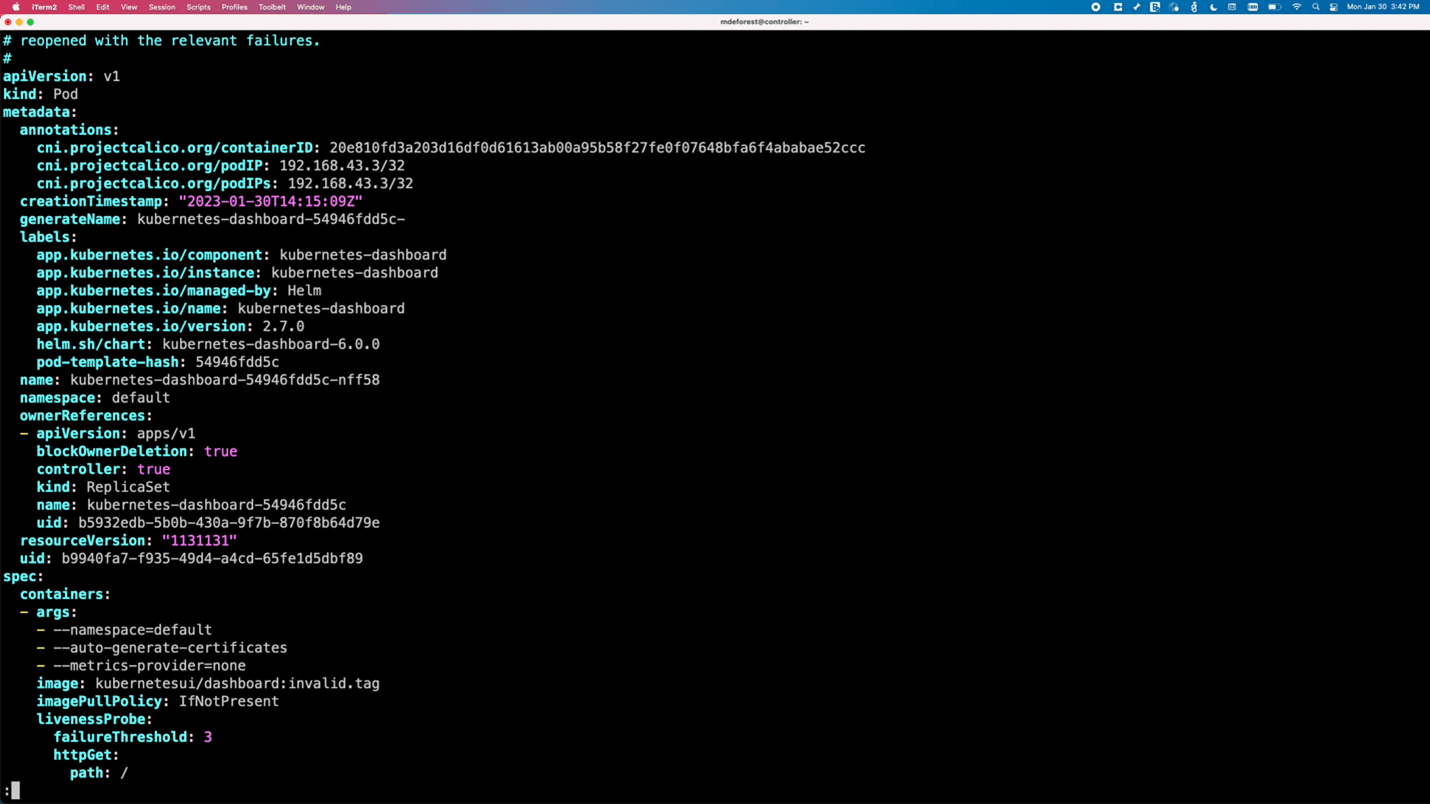
To mimic a pod crashing, the pod is edited to use an invalid image tag.

kubectl edit pod <pod name>

The image tag is changed to  “invalid.tag, “ which is unavailable for the image. This causes the pod to fail because it can no longer pull the image. Output now shows that one pod is no longer ready.

Looking at the data in Zabbix, the number of available replicas is only 3, while the number of unavailable replicas is now 1.

On the problems page, there are two new problems. Both alerted that there is a mismatch between the number of replicas for the dashboard and the number of desired replicas.

Changing the tag back to a valid one should cause those problems to be resolved.

The Kubernetes templates offer many metrics and triggers, including most provided by Prometheus and Alert Manager. With some Zabbix experience and the ability to navigate kube-state-metrics and Kubernetes APIs, creating new items is possible.

What’s Next?

Above is an example of the output from the kube-state-metrics API. Unlike most APIs that return data in JSON format, the kube-state-metrics API uses the Prometheus data model to supply metrics.

As you get comfortable with Kubernetes monitoring in Zabbix, you may want to parse your own metrics from kube-state-metrics and create new items.

In the next video, we will learn how to monitor applications with Prometheus in Zabbix.

About the Author

Michaela DeForest is a Platform Engineer for The ATS Group.  She is a Zabbix Certified Specialist on Zabbix 6.0 with additional areas of expertise, including Terraform, Amazon Web Services (AWS), Ansible, and Kubernetes, to name a few.  As ATS’s resident authority in DevOps, Michaela is critical in delivering cutting-edge solutions that help businesses improve efficiency, reduce errors, and achieve a faster ROI.

About ATS Group: The ATS Group provides a fully inclusive set of technology services and tools designed to innovate and transform IT.  Their systems integration, business resiliency, cloud enablement, infrastructure intelligence, and managed services help businesses of all sizes “get IT done.” With over 20 years in business, ATS has become the trusted advisor to nearly 500 customers across multiple industries.  They have built their reputation around honesty, integrity, and technical expertise unrivaled by the competition.

What Tech Companies Should Look For in Cloud Security

Post Syndicated from Marla Rosner original https://blog.rapid7.com/2023/03/08/what-tech-companies-should-look-for-in-cloud-security/

What Tech Companies Should Look For in Cloud Security

The cloud’s computing power and flexibility unlocks unprecedented speed and efficiency—a tech company’s two best friends. But with that speed and efficiency comes new environments and touchpoints in an organization’s footprint. That expanding attack surface brings along with it an expanding range of security concerns.

Rapid7’s Peter Scott joined Temporal Technologies’s Brandon Sherman and Ancestry’s Tony Black for a fireside chat to address today’s growing CloudSec challenges.

The key? Building technologies and security policies alongside one another—from the start. That applies to both companies that are moving to the cloud and those that are cloud-first.

Making Security an Enabler, Not a Blocker

When companies start to move and function in the cloud, SecOps must adapt their thinking and processes to ephemeral environments. That entails getting down in the trenches early on with tech teams as they innovate and create while spinning up new instances.

“We started working with the idea that everything should be ephemeral and short-lived… That really started getting us into that mindset of a true cloud infrastructure and architecture,” says Black. “It allowed us to start doing some things like tearing down our dead environments on the weekend if no one is using it. It reduces our attack surface and reduces our cost.”

Collaboration between tech and security teams drives secure cloud innovation. However, that level of collaboration requires consistent communication and most importantly, a willingness to build trust.

“If you don’t exercise that muscle of being engaged with those teams, then it’s going to atrophy,” says Sherman. “But if you keep working on it, then you get in earlier and earlier. Even with simple Slack conversations—if I can get involved at that part of it and help shape this whole process as it’s built out to help experiment securely… That’s awesome.”

Consistently collaborating with tech teams not only helps keep security top of mind and integrate cloudsec with DevOps; it also transforms SecOps from a dreaded blocker into a reliable enabler. This level of collaboration requires not only trust but also a mutual understanding that implementing security is a problem-solver, not a problem to be solved.

That gives SecOps the power to help dev teams accelerate into production with fewer bumps in the road—because each new feature is built securely from the start.

Cloud Risk Complete

Analyze, respond to, and remediate risks without a patchwork of solutions or additional costs.

LEARN MORE

Operationalization and Resiliency as Cloud Maturity Increases

Reframing security from a blocker to an enabler is indicative of a larger shift in security’s role across the entire enterprise. As companies’ cloud footprints grow and their maturity increases, CloudSec teams must ensure that their practices are not only scalable but also sustainable.

That means the security mindset needs to shift towards operationalization and resiliency.

“We want to be as reliable as running water,” says Sherman. “That is a really high bar to obtain. So you need really good operational metrics, rigor, and processes. But the nice thing about the cloud is that you can practice all those things.”

With the power of the cloud, tech companies have the freedom to rehearse their responses to even the most large-scale, potentially devastating attacks. By taking the time to practice building and breaking down high-risk environments, security teams can operationalize and, most importantly, plan for when—not if—new threats emerge.

To Black, it also comes down to establishing a consistent set of security practices that tech organizations hold to.

“A bunch of practices have to be in place. For example, no one should be able to touch a certain server, because if someone touches a certain server, then all of a sudden I can’t rebuild that the way it was before,” says Black, “Then, everything has to go through a pipeline. And that pipeline has to have controls … and checks in place to make sure that what we deploy is consistent and repeatable.”

Keeping track of that decision-making ripple effect is a major factor in how well security teams can operationalize their best practices for securing cloud-native environments.That dedication to operationalization and resiliency ensures a better experience for devs, sec, and—most importantly—clients.

Clients, the Cloud, and Securing Sensitive Data

Tech companies are (for better or for worse) held to a higher standard by users in terms of reliability, ease of use, and security. Meeting those standards is even more critical when users are trusting tech companies with personal information that might be as sensitive as DNA, as is the case with some of Ancestry’s clients.

What helps ensure and improve data protection in the cloud? A company-wide emphasis on customer trust.

“Fundamentally, our management team agrees that customer trust is part of the value proposition,” says Black. “We have to earn that trust every day… It really helps when the management team says that customer trust is part of the value proposition, so we have to spend money and take an effort to maintain that customer trust.”

Establishing a strong cloudsec foundation helps enable experiences that build customer trust. How can security teams create that base of security that keeps both dev teams and consumers happy? By approaching features as if they were to personally use them.

“Part of that comes down to being your own customer. If you trust your own company with your own data… You feel a lot better about it,” says Sherman.

Aligning the Evolution of Security and Technology

Security teams are no longer the department of “no.” With Gartner having predicted a 22% growth in worldwide cloud use by the end of 2022, tech companies should look out for this constant in cloud security: Change.

“The cloud changes beneath our feet. Things constantly evolve. If you’re stuck in a mentality of, ‘We do this thing, and this thing is security’,” says Sherman, “even if that’s best practice today, it might not be best practice tomorrow.”

Because of that constant change, success in the cloud is rooted in incremental progress. Taking on cloudsec challenges one bit at a time will ensure a smoother cloud journey for organizations looking to unlock the power of working in ephemeral environments.

Want deeper insights on how tech companies can tackle today’s cloud security challenges? Watch the full webinar below:

Security updates for Wednesday

Post Syndicated from original https://lwn.net/Articles/925606/

Security updates have been issued by Debian (apr), Fedora (c-ares), Oracle (curl, kernel, pesign, samba, and zlib), Red Hat (curl, gnutls, kernel, kernel-rt, and pesign), Scientific Linux (kernel, pesign, samba, and zlib), SUSE (libX11, python-rsa, python3, python36, qemu, rubygem-rack, xorg-x11-server, and xwayland), and Ubuntu (libtpms, linux-ibm, linux-raspi, linux-raspi, python3.7, python3.8, and sofia-sip).

Embrace equity on International Women’s Day (and every day)

Post Syndicated from Andie Goodwin original https://blog.cloudflare.com/international-womens-day-2023/

Embrace equity on International Women’s Day (and every day)

This post is also available in 简体中文, 日本語, 한국어, Deutsch, Français, Español.

Embrace equity on International Women’s Day (and every day)

Happy International Women’s Day! The global theme for 2023 is #EmbraceEquity, which is part of an ongoing effort to raise awareness around “Why equal opportunities are no longer enough.” Today is a time to highlight achievements made by women, but also an opportunity to become better informed, and collaborate and brainstorm about the path forward.

“People start from different places, so true inclusion and belonging require equitable action.” — internationalwomensday.com

Embrace equity on International Women’s Day (and every day)

Help put an end to gender bias and discrimination

Consider taking a few minutes today to learn about pervasive challenges affecting women, including in the workplace. Since unconscious bias is a major driver of hurdles holding women back, it is beneficial for people of all gender identities to educate ourselves about the varied experiences of others.

Here are some resources to get help get you started:

  • Recognize the difference between equity and equality and see why striving for equality can interfere with inclusion-related efforts.
  • Read highlights from the Women in the Workplace report from McKinsey and LeanIn.Org to examine factors that are holding women back from advancement and in many cases making them decide to leave a company. One notable statistic: “For every 100 men who are promoted from entry-level roles to manager positions, only 87 women are promoted, and only 82 women of color are promoted.”
  • Watch a five-minute video of the history of the concept of intersectionality, explained by Kimberlé Crenshaw, who coined the term. Intersectionality refers to the “double bind of simultaneous racial and gender prejudice.”
  • Better understand challenges within the tech sector in the report What (and Who) is Holding Women Back in Tech? One finding from this survey, conducted by Girls Who Code and Logitech, is that 90% of women report experiencing microaggressions at work. The report describes key career drivers and the importance of communities of support.

What is Womenflare and how are we celebrating International Women’s Day?

Womenflare is a Cloudflare employee resource group (ERG) for women and people who advocate for women. We are an employee-led group that is here to empower, represent, and support.

At Cloudflare, we are continuing our tradition of building community and celebrating women’s achievements together throughout March. We are also encouraging discussion on equity vs. equality and how we can champion equity for ourselves and those around us with these internal events in the weeks ahead:

  • Celebrating with comedy: We are kicking things off with some fun and jokes from Laugh.Events! Offering “Laughter as a Service (LaaS),” they will deliver stand-up comedy, musical comedy, and other comedic activities for a celebratory “Workplace Variety Hour.”
  • Equity and allyship chats: After our celebrations, we are opening forums to discuss equity and what this means for each of us in our unique intersectionalities. We have invited some of our fellow employee resource group leads from Asianflare, Nativeflare, and Proudflare to share with us and dive into how we can be both supported and supportive.
  • Equity leadership panel: Our internal leadership panels were always well received in previous years, so we decided not to mess with a good thing. This year, we will be inviting another group of inspirational women leaders in Cloudflare to share their experiences with us and explore the areas where we can promote equity in the workplace.
  • And more: We have so much more planned for March! From Book Club and meetups to Cloudflare TV episodes and networking events, we are partnering across teams to ensure there are plenty of opportunities to participate and join in on the fun and discussions.

No matter how you plan to celebrate International Women’s Day and Women’s History Month, consider how you can do your part to champion an equitable world. Join the #IWD2023 movement — #EmbraceEquity today (and every day)!

Embrace equity on International Women’s Day (and every day)

Life at Cloudflare

Learn more about how we are cultivating community, including through employee resource groups like Womenflare, via our careers page—and check out our open positions.

To read about our progress on the UN Ten Principles and the Sustainable Development Goals (SDGs), download our latest Impact Report.

Accelerate building resiliency into systems with Cloudflare Workers

Post Syndicated from Revathy Ramasundaram original https://blog.cloudflare.com/accelerate-building-resiliency-into-systems-with-cloudflare-workers/

Accelerate building resiliency into systems with Cloudflare Workers

Accelerate building resiliency into systems with Cloudflare Workers

In this blog post we’ll discuss how Cloudflare Workers enabled us to quickly improve the resiliency of a legacy system. In particular, we’ll discuss how we prevented the email notification systems within Cloudflare from outages caused by external vendors.

Email notification services

At Cloudflare, we send email notifications to customers such as billing invoices, password resets, OTP logins and certificate status updates. We rely on external Email Service Providers (ESPs) to deliver these emails to customers.

The following diagram shows how the system looks. Multiple services in our control plane dispatch emails through an external email vendor. They use HTTP Transmission APIs and also SMTP to send messages to the vendor. If dispatching an email fails, they are retried with exponential back-off mechanisms. Even when our ESP has outages, the retry mechanisms in place guarantee that we don’t lose any messages.

Accelerate building resiliency into systems with Cloudflare Workers

Why did we need to improve resilience?

In some cases, it isn’t sufficient to just deliver the email to the customer; it must be delivered on time. For example, OTP login emails are extremely time sensitive; their validity is short-lived such that a delay in sending them is as bad as not sending them at all. If the ESP is down, all emails including the critical ones will be delayed.

Some time ago our ESP suffered an outage; both the HTTP API and SMTP were unavailable and we couldn’t send emails to customers for a few hours. Several thousand emails couldn’t be delivered immediately and were queued.  This led to a delay in clearing out the backlogged messages in the retry queue in addition to sending new messages.

Critical emails not being sent is a major incident for us. A major incident impacts our customers, our business, and also our reputation. We take serious measures to prevent it from happening again in the future. Hence improving the resiliency of this system was our top priority.

Our concrete action items to reduce the failure possibilities were to improve availability by onboarding another email vendor and, when ESP has an outage, mitigate downtime by failing over from one vendor to another.

We wanted to achieve the above as quickly as possible so that our customers are not impacted again.

Step 1 – Improve Availability

Introducing a new vendor gives us the option to failover. But before we introduced it we had to consider another key component of email deliverability, which is the email sender reputation.  ISPs assign a sending score to any organization that sends emails. The higher the score, the higher the probability that the email sent by the organization reaches your inbox. Similarly the lower the score, the higher the probability it reaches your spam folder.

Adding a new vendor means emails will be delivered from a new IP address. Mailbox providers (such as Gmail or Hotmail) view new IP addresses as suspicious until they achieve a positive sending reputation. A positive sending reputation is determined by answering the question “did the recipient want this email?”. This is calculated differently for different mailbox providers, but the simplest measure would be that the recipient opened it, and perhaps clicked a link within. To build this reputation, it’s recommended to use an IP warm-up strategy. This usually involves increasing e-mail volume slowly over a matter of days and weeks.

Using this new vendor “only” during failovers would increase the probability of emails reaching our customer’s spam folder for the reasons outlined above. To avoid this and establish a positive sending reputation we want to send a constant stream of traffic between the two vendors.

Solution

We came up with a weighted traffic routing module, an algorithm to route emails to the ESPs based on the ratio of weights assigned to them. This is how the algorithm works roughly:

Accelerate building resiliency into systems with Cloudflare Workers

This algorithm solves the problem of maintaining a constant stream of traffic between the two vendors and to failover when outages happen.

Our next big question was “where” to implement this module? How should this be implemented so that we can build, deploy, and test as quickly as possible? Since there are multiple teams involved, how can we make it quicker for all of them? This leads to a perfect segue to our next step.

Step 2 – Mitigate downtime

Let’s discuss a few approaches on where to build this logic. Should this just be a library? Or should it be a service in itself? Or do we have an even better way?

Design 1 – A simple solution

Accelerate building resiliency into systems with Cloudflare Workers

In this proposed solution, we would implement the weighted traffic routing module in a library and import it in every service. The pros of this approach is that there are no major changes to the overall existing architecture. However, it does come with quite a few drawbacks.  Firstly, All of the services require a major code change and a considerable amount of development effort would  have to be spent on this integration and testing end-to-end. Furthermore, updating libraries can be slow and there is no guarantee that teams would update in a timely manner. This means we may see teams still sending only to the old ESP during an incident, and we have not solved the problem we set out to.

Design 2 – Extract email routing decisions to its own microservice

The first approach is simple and doesn’t disrupt the architecture, but is not a sustainable solution in the long run. This naturally leads to our next design.

Accelerate building resiliency into systems with Cloudflare Workers

In this iteration, the weighted-traffic-routing module is extracted to its own service. This service decides where to route emails. Although it’s better than the previous approach, it is not without its drawbacks.

Firstly, the positives. This approach requires no major code changes in each service. As long as we honor the original ESP contract, team’s should simply need to update the base URL. Furthermore, we achieve the Single Responsibility Principle. When outages happen, the configurations have to be changed only in the weighted-traffic-routing service and this is the only service to be modified.  Finally, we have much more control over retry semantics as they are implemented in a single place.

Some of the drawbacks of taking this approach are the time involved in spinning up a new service from scratch –  building, testing, and shipping it is not insignificant. Secondly, we are adding an additional network hop; previously the email-notification-services talked directly to the email service providers, now we are proxying it through another service. Furthermore, since all the upstream requests are funneled through this service, it has to be load-balanced and scaled according to the incoming traffic and we need to ensure we service every request.

Design 3 – The Workers way

The final design we considered; Implementing the weighted traffic routing module in a Cloudflare Worker.

Accelerate building resiliency into systems with Cloudflare Workers

There are a lot of positives to doing it this way.

Firstly, minimal code changes are required in each service. In fact, nothing beyond the environment variables need to be updated. As with the previous design, when email vendor outages happen, only the Email Weighted Traffic Router Worker configuration has to be changed. One positive of using a Cloudflare Worker is when an environment variable is changed and deployed, it’s deployed in all of Cloudflare’s network in a few milliseconds. This is a significant advantage for us because it means the failover process takes only a few milliseconds; time-critical emails will reach our customers’ inbox on time, preventing major incidents.

Secondly, As the email traffic increases, we don’t have to care about scaling or load balancing the weighted-traffic-routing module. A Worker automatically takes care of it.

Finally, the operational overhead to building and running this is incredibly low. We don’t have to spend time on spinning up new containers, configuring and deploying them. The majority of the work is just to programme the algorithm that we discussed earlier.

There are still some drawbacks here though.We are still introducing a new service and an additional network hop. However, we can make use of the templates available here to make bootstrapping as efficient as possible.

Building it the Workers way

Weighing the pros and cons of the above approaches, we went with implementing it in a Cloudflare Worker.

The Email Traffic Router Worker sits in between the Cloudflare control plane and the ESPs and proxies requests between them. We stream raw responses from the upstream; the internal service is completely agnostic of multiple ESPs, and how the traffic is routed.

We configure the percentage of traffic we want to send to each vendor using environment variables. Cloudflare Workers provide environment variables which is a convenient way to configure a worker application.

addEventListener('fetch', async (event: FetchEvent) => {
try {
    const finalInstance = ratioBasedRandPicker(
      parseFloat(VENDOR1_TO_VENDOR2_RATIO),
      API_ENDPOINT_VENDOR1,
      API_ENDPOINT_VENDOR2,
    )
    // stream request and response
    return doRequest(request, finalInstance)
  } catch (err) {
       // handle errors
    }
})  

export const ratioBasedRandPicker = (
  ratio: number,
  VENDOR1: string,
  VENDOR2: string,
  generator: () => number = Math.random,
): string => {
  if (isNaN(ratio) || ratio < 0 || ratio > 1) throw new ConfigurationError(`invalid ratio ${ratio}`)
  return generator() < ratio ? VENDOR1 : VENDOR2  
}

The Email Weighted Traffic Router Worker generates a random number between 0 (inclusive) and 1 with approximately uniform distribution over the range. When the ratio is set to 1, vendor 1 will be picked always, and similarly when it’s set to 0 vendor 2 will be picked all the time. For any values in between, the vendor is picked based on the weights assigned. Thus, when all the traffic has to be routed to vendor 1 we set the ratio to 1; the random numbers generated are always less than 1, hence vendor 1 will always be selected.

Doing a failover is as simple as updating the vendor1_to_vendor2 environment variable. In general, an environment variable for a Cloudflare Worker can be updated in one of the following ways:

Using Cloudflare Dashboard: All Worker environment variables are available to be configured in the Cloudflare Dashboard. Navigate to Workers -> Settings -> Variables -> Edit Variables and update the value

Using Wrangler (if your Worker is managed by wrangler): edit the environment variable in the wrangler.toml file and execute wrangler publish for the new values to kick in.

Once the variable is updated using one of the above methods, the Email Traffic Router Worker is deployed immediately in all Cloudflare data centers with this value. Hence all our emails will now be routed by the healthy vendor.

Now, we have built and shipped our weighted-traffic-routing logic in a Worker and building it in a Worker really accelerated our process of improving the resiliency.

The module is shipped, now what happens when the ESP is suffering an outage or a degraded performance? Let me conclude with a success story.

When an ESP outage happened

After deploying this Email Traffic Router Worker to production, we saw an outage declared by one of our vendors. We immediately configured our Traffic Router to send all traffic to the healthy vendor. Changing this configuration took about a few seconds, and deploying the change was even faster. Within a few milliseconds all the traffic was routed to the healthy instance, and all the critical emails reached their corresponding inboxes on time!

Looking at some timelines:

18:45 UTC – we get alerted that message delivery is slow/degraded from email provider 1. The other provider is not impacted

18:47 UTC – Teams within Cloudflare confirmed that their message outbound is experiencing delays

18:47 UTC – we decide to failover

18:50 UTC – we configured the Email Traffic Router Worker to dispatch all the traffic to the healthy email provider, deployed the changes

Starting 18:50 we saw a steady decrease in requests to email provider 1 and a steady uptick in the requests to the provider 2 instance.

Here’s our metrics dashboard:

Accelerate building resiliency into systems with Cloudflare Workers

Next steps

Currently, the failover step is manual. Our next step is to automate this process. Once we get notified that one of the vendors is experiencing outages, the Email Traffic Router Worker will failover automatically to the healthy vendor.

Conclusion

To reiterate our goals, we wanted to make our email notification systems resilient by

  1. adding another vendor
  2. having a simple and fast mechanism to failover when vendor outages happen
  3. achieving the above two objectives as quickly as possible to reduce customer impact

Thus our email systems are more reliable, and more resilient to any outages or failures of our email service providers. Cloudflare Worker makes it easy and simple to build and ship a production-ready service in no time; it also makes failovers possible without any code changes or downtime. It’s powerful that multiple services/teams within Cloudflare can rely on one place, the Email Traffic Router Worker, for uninterrupted email delivery.

The collective thoughts of the interwebz