Practical API Design at Netflix, Part 2: Protobuf FieldMask for Mutation Operations

Post Syndicated from Netflix Technology Blog original https://netflixtechblog.com/practical-api-design-at-netflix-part-2-protobuf-fieldmask-for-mutation-operations-2e75e1d230e4

By Ricky Gardiner, Alex Borysov

Background

In our previous post, we discussed how we utilize FieldMask as a solution when designing our APIs so that consumers can request the data they need when fetched via gRPC. In this blog post we will continue to cover how Netflix Studio Engineering uses FieldMask for mutation operations such as update and remove.

Example: Netflix Studio Production

Money Heist (La casa de papel) / Netflix

Previously we outlined what a Production is and how the Production Service makes gRPC calls to other microservices such as the Schedule Service and Script Service to retrieve schedules and scripts (aka screenplay) for a particular production such as La Casa De Papel. We can take that model and showcase how we can mutate particular fields on a production.

Mutating Production Details

Let’s say we want to update the format field from LIVE_ACTION to HYBRID as our production has added some animated elements. A naive way for us to solve this is to add an updateProductionFormatRequest method and gRPC endpoint just to update the productionFormat:

This allows us to update the production format for a particular production but what if we then want to update other fields such as titleor even multiple fields such as productionFormat, schedule, etc? Building on top of this we could just implement an update method for every field: one for Production format, another for title and so on:

This can become unmanageable when maintaining our APIs due to the number of fields on the Production. What if we want to update more than one field and do it atomically in a single RPC? Creating additional methods for various combinations of fields will lead to an explosion of mutation APIs. This solution is not scalable.

Instead of trying to create every single combination possible, another solution could be to have an UpdateProduction endpoint that requires all fields from the consumer:

The issue with this solution is two-fold as the consumer must know and provide every single required field in a Production even if they just want to update one field such as the format. The other issue is that since a Production has many fields the request payload can become quite large particularly if the production has schedule or scripts information.

What if, instead of all the fields, we send only the fields we actually want to update, and leave all other fields unset? In our example, we would only set the production format field (and ID to reference the production):

This could work if we never need to remove or blank out any fields. But what if we want to remove the value of the title field? Again, we can introduce one-off methods like RemoveProductionTitle, but as discussed above, this solution does not scale well. What if we want to remove a value of a nested field such as the planned launch date field from the schedule? We would end up adding remove RPCs for every individual nullable sub-field.

Utilizing FieldMask for Mutations

Instead of numerous RPCs or requiring a large payload, we can utilize a FieldMask for all our mutations. The FieldMask will list all of the fields we would like to explicitly update. First, let’s update our proto file to add in the UpdateProductionRequest, which will contain the data we want to update from a production, and a FieldMask of what should be updated:

Now, we can use a FieldMask to make mutations. We can update the format by creating a FieldMask for the format field by using the FieldMaskUtil.fromStringList() utility method which constructs a FieldMask for a list of field paths in a certain type. In this case, we will have one type, but will build upon this example later:

Since our FieldMask only specifies the format field that will be the only field that is updated even if we provide more data in ProductionUpdateOperation. It becomes easier to add or remove more fields to our FieldMask by modifying the paths. Data that is provided in the payload but not added in a path of a FieldMask will not be updated and simply ignored in the operation. But, if we omit a value it will perform a remove mutation on that field. Let’s modify our example above to showcase this and update the format but remove the planned launch date, which is a nested field on the ProductionSchedule as “schedule.planned_launch_date”:

In this example, we are performing both update and remove mutations as we have added “format” and “schedule.planned_launch_date” paths to our FieldMask. When we provide this in our payload these fields will be updated to the new values, but when building our payload we are only providing the format and omitting the schedule.planned_launch_date. Omitting this from the payload but having it defined in our FieldMask will function as a remove mutation:

Empty / Missing Field Mask

When a field mask is unset or has no paths, the update operation applies to all the payload fields. This means the caller must send the whole payload or, as mentioned above, any unset fields will be removed.

This convention has an implication on schema evolution: when a new field is added to the message, all the consumers must start sending its value on the update operation or it will get removed.

Suppose we want to add a new field: production budget. We will extend both the Production message, and ProductionUpdateOperation:

If there is a consumer that doesn’t know about this new field or hasn’t updated client stubs yet, it can accidentally null the budget field out by not sending the FieldMask in the update request.

To avoid this issue, the producer should consider requiring the field mask for all the update operations. Another option would be to implement a versioning protocol: force all callers to send their version numbers and implement custom logic to skip fields not present in the old version.

Bella Ciao

In this blog post series, we have gone over how we use FieldMask at Netflix and how it can be a practical and scalable solution when designing your APIs.

API designers should aim for simplicity, but make their APIs open for extension and evolution. It’s often not easy to keep APIs simple and future-proof. Utilizing FieldMask in APIs helps us achieve both simplicity and flexibility.


Practical API Design at Netflix, Part 2: Protobuf FieldMask for Mutation Operations was originally published in Netflix TechBlog on Medium, where people are continuing the conversation by highlighting and responding to this story.

OMIGOD: How to Automatically Detect and Fix Microsoft Azure’s New OMI Vulnerability

Post Syndicated from Chris DeRamus original https://blog.rapid7.com/2021/09/15/omigod-how-to-automatically-detect-and-fix-microsoft-azures-new-omi-vulnerability/

OMIGOD: How to Automatically Detect and Fix Microsoft Azure’s New OMI Vulnerability

On September 14, 2021, security researchers disclosed new vulnerabilities in Microsoft Azure’s implementation of Open Management Interface (OMI), with one critical unauthorized remote code execution vulnerability ranked 9.8 (CVSS 3.0).

OMI is pre-installed into Azure Linux VM instances as the byproduct of enabling certain logging, reporting, and host management options from the cloud provider’s user interface and APIs. OMI is most commonly used to manage desired-state configuration and is the Linux/Unix equivalent of Windows Management Instrumentation and Remote Management (WMI/WinRM). It normally allows administrators to remotely manage the state of systems including logging and configuration settings.

The specific remote code execution OMI vulnerability, nicknamed “OMIGOD,” could allow an attacker to gain remote access to Linux machines hosted on Azure via TCP ports 1270, 5985, and 5986. Once they have remote access, the attacker could theoretically escalate privileges, move laterally across the environment, and remotely execute code as root, allowing them to locate and exfiltrate sensitive data within the Azure environment.

Notably, while the vulnerability does allow for remote code execution (RCE) in the most severe cases, by default these services are firewalled off. Proof-of-concept exploit code is readily available, and exploitation in the wild is likely. As of publication, Shodan shows nearly 2.5 million hosts with the affected ports open to the public internet and at risk, including hosts in the IP space for most cloud providers.

Four separate CVEs have been identified but have not been submitted to MITRE as of publishing: CVE-2021-38647, CVE-2021-38648, CVE-2021-38645, and CVE-2021-38649. A fix to the vulnerable OMI library was made available (v1.6.8-1) on September 8 and requires end users to patch their Linux instances directly.  

As soon as the vulnerability was announced, our customer success and engineering teams quickly came together to understand how InsightCloudSec which provides continuous monitoring, reporting, and automated remediation of security issues in public cloud environments could help our customers identify signs of this vulnerability in their Azure environments and quickly remediate the potential risk.

Identifying Azure’s OMI vulnerability

This morning, just one day after the disclosure of this vulnerability, InsightCloudSec released an update (version 21.6.4) to all customers that includes a pre-built Insight that automatically identifies any Azure Virtual Machines in a running state that have the aforementioned TCP ports exposed to the public internet along with an associated public IP.

While native Microsoft Azure Firewall services should provide a layer of protection against this vulnerability, we strongly encourage customers to leverage this Insight to identify potential attack vectors and remediate accordingly.

OMIGOD: How to Automatically Detect and Fix Microsoft Azure’s New OMI Vulnerability

As you can see in the screenshot above, InsightCloudSec is now able to easily identify virtual machines across all of your Azure subscriptions from a single view. You can build notification workflows around the findings that this Insight identifies and take corrective action to close this attack vector.

Remediating Azure’s OMI vulnerability

All of our Insights include the ability to enable remediation workflows. This capability is extremely powerful and provides customers with choices of how to remediate across different areas of their cloud footprint. With a few clicks, an automation workflow can be put in place to not only remediate the current findings but also prevent misconfigurations that could be introduced in the future. It does all of this using our near real-time data collection capabilities.

OMIGOD: How to Automatically Detect and Fix Microsoft Azure’s New OMI Vulnerability

Leveraging the Create Bot option above allows the user to define the scope and desired remediation steps. For this particular issue we recommend that customers use the following workflow:

  • Flagging the resource as non-compliant
  • Creating a ticket to have the vulnerability addressed (JIRA, ServiceNow, etc.)
  • Sending a notification to the resource owner or technical point of contact that manages the Azure subscription (Slack, MS Teams, Email, etc.)
  • Optional: cleaning up offending security groups by removing the affected ports from their rules

Looking ahead

Misconfigurations and vulnerabilities such as these continue to be one of the most prevalent attack vectors for malicious users to take advantage of. We recently released a Cloud Misconfiguration Report that highlights the risk that cloud misconfigurations pose to organizations.

The rapid innovation of public clouds will continue to require both cloud security vendors and independent security researchers to collaborate and to proactively hunt for security issues and attack vectors across the Cloud Service Provider (CSP) landscape. This won’t be the last issue we see, and it’s a joint effort across all vendors that participate in this exciting space to help our customers consume these public cloud providers with peace of mind.

As these cloud security disclosures continue to increase in frequency, the speed and efficiency at which security teams can remediate the associated vulnerabilities will become absolutely critical to minimizing risk in complex cloud environments. We’re excited that our customers can quickly gain visibility to the parts of their Azure footprint that are susceptible to this vulnerability, and also have the power to continuously remediate the presence of the misconfiguration both now and in the future.

NEVER MISS A BLOG

Get the latest stories, expertise, and news about security today.

Discovering what’s slowing down your website with Web Analytics

Post Syndicated from Joao Sousa Botto original https://blog.cloudflare.com/web-analytics-vitals-explorer/

Discovering what’s slowing down your website with Web Analytics

Discovering what’s slowing down your website with Web Analytics

Web Analytics is Cloudflare’s privacy-focused real user measurement solution. It leverages a lightweight JavaScript beacon and does not use any client-side state, such as cookies or localStorage, to collect usage metrics. Nor does it “fingerprint” individuals via their IP address, User Agent string, or any other data.

Cloudflare Web Analytics makes essential web analytics, such as the top-performing pages on your website and top referrers, available to everyone for free, and it’s becoming more powerful than ever.

Focusing on Performance

Earlier this year we merged Web Analytics with our Browser Insights product, which enabled customers proxying their websites through Cloudflare to evaluate visitors’ experience on their web properties through Core Web Vitals such as Largest Contentful Paint (LCP) and First Input Delay (FID).

It was important to bring the Core Web Vitals performance measurements into Web Analytics given the outsized impact that page load times have on bounce rates. A page load time increase from 1s to 3s increases bounce rates by 32% and from 1s to 6s increases it by 106% (source).

Now that you know the impact a slow-loading web page can have on your visitors, it’s time for us to make it a no-brainer to take action. Read on.

Becoming Action-Oriented

We believe that, to deliver the most value to our users, the product should facilitate the following process:

  1. Measure the real user experience
  2. Grade this experience — is it satisfactory or in need of improvement?
  3. Provide actionable insights — what part of the web page should be tweaked to improve the user experience?
  4. Repeat
Discovering what’s slowing down your website with Web Analytics

And it all starts with Web Analytics Vitals Explorer, which started rolling out today.

Introducing Web Analytics Vitals Explorer

Vitals Explorer enables you to easily pinpoint which elements on your pages are affecting users the most, with accurate measurements from the visitors perspective and an easy-to-read impact grading.

To do that, we have automatically updated the Web Analytics JavaScript beacon so that it collects the relevant vital measurements from the browser. As always, we are not collecting any information that would invade your visitors’ privacy.

Usage

Once this new beacon is updated on your sites — and again the update will happen transparently to you — you can then navigate to the Core Web Vitals page on Web Analytics. When entering that page, you will see three graphs grading the user experience for Largest Contentful Paint (LCP), First Input Delay (FID), and Cumulative Layout Shift (CLS). Below each graph you can see the debug section with the top five elements with a negative impact on the metric. Lastly, when clicking on either of these elements shown in the data table, you will be presented with its impact and exact paths so that you can easily decide whether this is worth keeping on your website in its current format.

Discovering what’s slowing down your website with Web Analytics

In addition to this new Core Web Vitals content, we have also added First Paint and First Contentful Paint to the Page Load Time page. When you navigate to this page you will now see the page load summary and a graph representing page load timing. These will allow you to quickly identify any regressions to these important performance metrics.

Discovering what’s slowing down your website with Web Analytics

Measurement details

This additional debugging information for Core Web Vitals is measured during the lifespan of the page (until the user leaves the tab or closes the browser window, which updates visibilityState to a hidden state).

Here’s what we collect:

Common for all Core Web Vitals

  • Element is a CSS selector representing the DOM node. With this string, the developer can use `document.querySelector(<element_name>)` in their browser’s dev console to find out which DOM node has a negative impact on your scores/values.
  • Path is the URL path at the time the Core Web Vitals are captured.
  • Value is the metric value for each Core Web Vitals. This value is in milliseconds for LCP or FID and a score for CLS (Cumulative Layout Shift).

Largest Contentful Paint

  • URL is the source URL (such as image, text, web fonts).
  • Size is the source object’s size in bytes.

First Input Delay

  • Name is the type of event (such as mousedown, keydown, pointerdown).

Cumulative Layout Shift

Layout information is a JSON value that includes width, height, x axis position, y axis position, left, right, top, and bottom. You are able to observe layout shifts that happen on the page by observing these values.

  • CurrentRect is the largest source element’s layout information after the shift. This JSON value is shown as Current under Layout Shifts section in the Web Analytics UI.
  • PreviousRect is the largest source element’s layout information before the shift. This JSON value is shown as Previous under Layout Shifts section in the Web Analytics UI.

Paint Timings

Additionally, we have added two important paint timings

  • First Paint is the time between navigation and when the browser renders the first pixels to the screen.
  • First Contentful Paint is the time when the browser renders the first bit of content from the DOM.

A lot of this is based on standard browser measurements, which you can read about in detail on this blog post from Google.

Moving forward

And we are by no means done. Moving forward, we will bring this structured approach with grading and actionable insights into as Web Analytics measurements as possible, and keep guiding you through how to improve your visitors’ experience. So stay tuned.
And in the meantime, do let us know what you think about this feature and ask questions on the community forums.

Cloudflare Images Now Available to Everyone

Post Syndicated from Zaid Farooqui original https://blog.cloudflare.com/announcing-cloudflare-images/

Cloudflare Images Now Available to Everyone

Cloudflare Images Now Available to Everyone

Today, we are launching Cloudflare Images for all customers. Images is a single product that stores, resizes, optimizes and serves images. We built Cloudflare Images so customers of all sizes can build a scalable and affordable image pipeline in minutes.

Store images efficiently

Many legacy image pipelines are architected to take an image and create multiple copies of it to account for different sizes and formats. These copies are then stored in a storage bucket and delivered using a CDN. This architecture can be hard to maintain and adds infrastructure cost in unpredictable ways.

With Cloudflare Images, you don’t need to worry about creating and storing multiple versions of the same image in different sizes and formats. Cloudflare Images makes a clear distinction between your stored images and the variants. Once you upload an image, you can apply any defined variant to the uploaded image. The variants and different formats don’t count towards your stored images quota.

This means that when a user uploads a picture that you need to resize in three different ways and serve in two different formats, you pay for one stored image instead of seven different images (the original, plus three variants for each of the two formats.)

Built-in access control

Every image that is uploaded to Cloudflare Images can be marked private, so it can only be accessed using an expiring signed URL token. This is ideal for use cases like membership sites that sell premium content.

Signed URLs give you the flexibility to validate if someone is a paying member using your custom logic and only give them access to the set of images they have paid for.

Eliminate egress costs

Egress cost is the cost of getting your data out of a storage provider. The most common case being when you serve an image from storage you pay for the bits transmitted. And you end up paying every, single time that same image is displayed. It is easy to not account for this cost when you are doing cost-benefit analysis between different solutions. But egress costs add up rapidly, and it is not uncommon for customers to pay their storage provider a very large multiple of their total storage cost in egress.

When you use a multi-vendor solution for your image pipeline, you might use vendor A for storage, vendor B for resizing the images and vendor C for delivering the images. At face value, this solution might appear cheaper because you think “we’ve picked the most affordable option for each piece of our image pipeline.” But in this setup, the resizing service (vendor B) and the CDN (vendor C) still need to request images from vendor A.

With Cloudflare Images, you never have to worry about egress costs because the images are stored, optimized and delivered by a single product. And you will see only two line items on your bill for Cloudflare Images. You pay \$5/month for every 100,000 stored images and \$1 per 100,000 delivered images. There are no additional resizing, compute or egress costs.

Uploading Images

Cloudflare Images offers multiple ways to upload your images. We accept all the common file formats including JPEG, GIF and WEBP. Each image uploaded to Images can be up to 10 MB.

If you only have a few images or simply want a taste of the product, you can use the Images Dashboard. Simply drag and drop one or more images:

Cloudflare Images Now Available to Everyone
Cloudflare Images Dashboard

If you have an app that lets your users upload images, you can use the Direct Creator Uploads feature of Cloudflare Images.

The Direct Creator Uploads API lets you request single-use tokens. These one-time upload URLs can be used by your app to upload your user’s submissions without exposing your API Key or Token. Here is an example cURL that returns a one-use upload url:

curl --request POST \
  --url https://api.cloudflare.com/client/v4/accounts/:account_id/images/v1/direct_upload \
  --header 'Content-Type: application/json' \
  --header 'Authorization: Bearer :token'

If the call is successful, you’ll receive a response that looks like this:

{
  "result": {
    "id": "2cdc28f0-017a-49c4-9ed7-87056c839c2",
    "uploadURL": "https://upload.imagedelivery.net/2cdc28f0-017a-49c4-9ed7-87056c839c2"
  },
  "result_info": null,
  "success": true,
  "errors": [],
  "messages": []
}

Your client-side app can now upload the image directly to the uploadURL without exposing your account credentials to the client.

Resizing with Variants

Cloudflare Images lets you define variants and apply them to your uploaded images. You can define up to 20 different variants to support different use cases. Each variant has properties including the width and height of resized images.

Cloudflare Images Now Available to Everyone
Configure variants in Cloudflare Images

You can also configure the fit property to describe how the width and height dimensions should be interpreted.

Fit Option Behavior
Scale Down Image will be shrunk in size to fully fit within the given width or height, but won’t be enlarged.
Contain Image will be resized (shrunk or enlarged) to be as large as possible within the given width or height while preserving the aspect ratio.
Cover Image will be resized to exactly fill the entire area specified by width and height, and will be cropped if necessary.
Crop Image will be shrunk and cropped to fit within the area specified by width and height. The image won’t be enlarged. For images smaller than the given dimensions it’s the same as scale-down. For images larger than the given dimensions, it’s the same as cover.
Pad Image will be resized (shrunk or enlarged) to be as large as possible within the given width or height while preserving the aspect ratio, and the extra area will be filled with a background color (white by default)

We plan to add more properties to give you maximum flexibility. If there is a particular property you’d love to see, let us know.

Once you define your variants, you can begin using them with any image. From the Dashboard, simply click on Variants to quickly preview how any image would be rendered using each of your variants.

Cloudflare Images Now Available to Everyone
Previewing variants in Cloudflare Images

Optimized image delivery

Once you’ve uploaded your first image, you will see the Image Delivery URL in your Images Dashboard:

Cloudflare Images Now Available to Everyone
Serving images with Cloudflare Images

A typical Image Delivery URL looks like this:

https://imagedelivery.net/ZWd9g1K7eljCn_KDTu_OWA/:image_id/:variant_name

You can use this url template to form the final URL that returns any image and variant combination.

When a client requests an image, Cloudflare Images will pick the optimal format between WebP, PNG, JPEG and GIF. The format served to the eyeball is determined by client headers and the image type. Cloudflare Images will soon support AVIF, offering further compression. One of the best parts of using Cloudflare Images is that when we add support for newer formats such as AVIF, you will get the upside without needing to make any changes to your codebase.

What’s next

All Cloudflare customers can sign up to use Cloudflare Images this week. We built Cloudflare Images for developers. Check out the Cloudflare Images developer docs for examples of implementing common use-cases such as letting your users upload images directly to Images and using signed URLs to implement access control.

We’re just getting started with Cloudflare Images. Here are some of the features we plan to support soon:

  • AVIF support for even smaller file sizes and faster load times.
  • Variants that add a blur effect to your images.
  • Analytics to better understand your use of Images.

Optimizing images on the web

Post Syndicated from Greg Brimble original https://blog.cloudflare.com/optimizing-images/

Optimizing images on the web

Optimizing images on the web

Images are a massive part of the Internet. On the median web page, images account for 51% of the bytes loaded, so any improvement made to their speed or their size has a significant impact on performance.

Today, we are excited to announce Cloudflare’s Image Optimization Testing Tool. Simply enter your website’s URL, and we’ll run a series of automated tests to determine if there are any possible improvements you could make in delivering optimal images to visitors.

Optimizing images on the web

How users experience speed

Everyone who has ever browsed the web has experienced a website that was slow to load. Often, this is a result of poorly optimized images on that webpage that are either too large for purpose or that were embedded on the page with insufficient information.

Images on a page might take painfully long to load as pixels agonizingly fill in from top-to-bottom; or worse still, they might cause massive shifts of the page layout as the browser learns about their dimensions. These problems are a serious annoyance to users and as of August 2021, search engines punish pages accordingly.

Understandably, slow page loads have an adverse effect on a page’s “bounce rate” which is the percentage of visitors which quickly move off of the page. On e-commerce sites in particular, the bounce rate typically has a direct monetary impact and pages are usually very image-heavy. It is critically important to optimize all the images on your webpages to reduce load on and egress from your origin, to improve your performance in search engine rankings and, ultimately, to provide a great experience for your users.

Measuring speed

Since the end of August 2021, Google has used the Core Web Vitals to quantify page performance when considering search results rankings. These metrics are three numbers: Largest Contentful Paint (LCP), First Input Delay (FID), and Cumulative Layout Shift (CLS). They approximate the experience of loading, interactivity and visual stability respectively.

CLS and LCP are the two metrics we can improve by optimizing images. When CLS is high, this indicates that large amounts of the page layout is shifting as it loads. LCP measures the time it takes for the single largest image or text block in the viewport to render.

These can both be measured “in the field” with Real User Monitoring (RUM) analytics such as Cloudflare’s Web Analytics, or in a “lab environment” using Cloudflare’s Image Optimization Testing Tool.

How to optimize for speed

Dimensions

One of the most impactful performance improvements a website author can make is ensuring they deliver images with appropriate dimensions. Images taken on a modern camera can be truly massive, and some recent flagship phones have gigantic sensors. The Samsung Galaxy S21 Ultra, for example, has a 108 MP sensor which captures a 12,000 by 9,000 pixel image. That same phone has a screen width of only 1440 pixels. It is physically impossible to show every pixel of the photo on that device: for a landscape photo, only 12% of pixel columns can be displayed.

Embedding this image on a webpage presents the same problem, but this time, that image and all of its unused pixels are sent over the Internet. Ultimately, this creates unnecessary load on the server, higher egress costs, and longer loading times for visitors.. This is exacerbated even further for visitors on mobile since they are often using a slower connection and have limits on their data usage. On a fast 3G connection, that 108 MP photo might consume 26 MB of both the visitor’s data plan and the website’s egress bandwidth, and take more than two minutes to load!

It might be tempting to always deliver images with the highest possible resolution to avoid “blocky” or pixelated images, but when resizing is done correctly, this is not a problem. “Blocky” artifacts typically occur when an image is processed multiple times (for example, an image is repeatedly uploaded and downloaded by users on a platform which compresses that image). Pixelated images occur when an image has been shrunk to a size smaller than the screen it is rendered on.

So, how can website authors avoid these pitfalls and ensure a correctly sized image is delivered to visitors’ devices? There are two main approaches:

  • Media conditions with srcset and sizes

When embedding an image on a webpage, traditionally the author would simply pass a src attribute on an img tag:

<img src="hello_world_12000.jpg" alt="Hello, world!" />

Since 2017, all modern browsers have supported the more dynamic srcset attribute. This allows authors to set multiple image sources, depending on the matching media condition of the visitor’s browser:

<img srcset="hello_world_1500.jpg 1500w,
             hello_world_2000.jpg 2000w,
             hello_world_12000.jpg 12000w"
     sizes="(max-width: 1500px) 1500px,
            (max-width: 2000px) 2000px,
            12000px"
     src="hello_world_12000.jpg"
     alt="Hello, world!" />

Here, with the srcset attribute, we’re informing the browser that there are three variants of the image, each with a different intrinsic width: 1,500 pixels, 2,000 pixels and the original 12,000 pixels. The browser then evaluates the media conditions in the sizes attribute ( (max-width: 1500px) and (max-width: 2000px)) in order to select the appropriate image variant from the srcset attribute. If the browser’s viewport width is less than 1500px, the hello_world_1500.jpg image variant will be loaded; if the browser’s viewport width is between 1500px and 2000px, the hello_world_2000.jpg image variant will be loaded; and finally, if the browser’s viewport width is larger than 2000px, the browser will fallback to loading the hello_world_12000.jpg image variant.

Similar behavior is also possible with a picture element, using the source child element which supports a variety of other selectors.

  • Client Hints

Client Hints are a standard that some browsers are choosing to implement, and some not. They are a set of HTTP request headers which tell the server about the client’s device. For example, the browser can attach a Viewport-Width header when requesting an image which informs the server of the width of that particular browser’s viewport (note this header is currently in the process of being renamed to Sec-CH-Viewport-Width).

This simplifies the markup in the previous example greatly — in fact, no changes are required from the original simple HTML:

<img src="hello_world_12000.jpg" alt="Hello, world!" />

If Client Hints are supported, when the browser makes a request for hello_world_12000.jpg, it might attach the following header:

Viewport-Width: 1440

The server could then automatically serve a smaller image variant (e.g. hello_world_1500.jpg), despite the request originally asking for hello_world_12000.jpg image.

By enabling browsers to request an image with appropriate dimensions, we save bandwidth and time for both your server and for your visitors.

Format

JPEG, PNG, GIF, WebP, and now, AVIF. AVIF is the latest image format with widespread industry support, and it often outperforms its preceding formats. AVIF supports transparency with an alpha channel, it supports animations, and it is typically 50% smaller than comparable JPEGs (vs. WebP’s reduction of only 30%).

We added the AVIF format to Cloudflare’s Image Resizing product last year as soon as Google Chrome added support. Firefox 93 (scheduled for release on October 5, 2021) will be Firefox’s first stable release, and with both Microsoft and Apple as members of AVIF’s Alliance for Open Media, we hope to see support in Edge and Safari soon. Before these modern formats, we also saw innovative approaches to improving how an image loads on a webpage. BlurHash is a technique of embedding a very small representation of the image inside the HTML markup which can be immediately rendered and acts as a placeholder until the final image loads. This small representation (hash) produced a blurry mix of colors similar to that of the final image and so eased the loading experience for users.

Progressive JPEGs are similar in effect, but are a built-in feature of the image format itself. Instead of encoding the image bytes from top-to-bottom, bytes are ordered in increasing levels of image detail. This again produces a more subtle loading experience, where the user first sees a low quality image which progressively “enhances” as more bytes are loaded.

Optimizing images on the web

Quality

The newer image formats (WebP and AVIF) support lossless compression, unlike their predecessor, JPEG. For some uses, lossless compression might be appropriate, but for the majority of websites, speed is prioritized and this minor loss in quality is worth the time and bytes saved.

Optimizing where to set the quality is a balancing act: too aggressive and artifacts become visible on your image; too little and the image is unnecessarily large. Butteraugli and SSIM are examples of algorithms which approximate our perception of image quality, but this is currently difficult to automate and is therefore best set manually. In general, however, we find that around 85% in most compression libraries is a sensible default.

Markup

All of the previous techniques reduce the number of bytes an image uses. This is great for improving the loading speed of those images and the Largest Contentful Paint (LCP) metric. However, to improve the Cumulative Layout Shift (CLS) metric, we must minimize changes to the page layout. This can be done by informing the browser of the image size ahead of time.

On a poorly optimized webpage, images will be embedded without their dimensions in the markup. The browser fetches those images, and only once it has received the header bytes of the image can it know about the dimensions of that image. The effect is that the browser first renders the page where the image takes up zero pixels, and then suddenly redraws with the dimensions of that image before actually loading the image pixels themselves. This is jarring to users and has a serious impact on usability.

It is important to include dimensions of the image inside HTML markup to allow the browser to allocate space for that image before it even begins loading. This prevents unnecessary redraws and reduces layout shift. It is even possible to set dimensions when dynamically loading responsive images: by informing the browser of the height and width of the original image, assuming the aspect ratio is constant, it will automatically calculate the correct height, even when using a width selector.

<img height="9000"
     width="12000"
     srcset="hello_world_1500.jpg 1500w,
             hello_world_2000.jpg 2000w,
             hello_world_12000.jpg 12000w"
     sizes="(max-width: 1500px) 1500px,
            (max-width: 2000px) 2000px,
            12000px"
     src="hello_world_12000.jpg"
     alt="Hello, world!" />

Finally, lazy-loading is a technique which reduces the work that the browser has to perform right at the onset of page loading. By deferring image loads to only just before they’re needed, the browser can prioritize more critical assets such as fonts, styles and JavaScript. By setting the loading property on an image to lazy, you instruct the browser to only load the image as it enters the viewport. For example, on an e-commerce site which renders a grid of products, this would mean that the page loads faster for visitors, and seamlessly fetches images below the fold, as a user scrolls down. This is supported by all major browsers except Safari which currently has this feature hidden behind an experimental flag.

<img loading="lazy" … />

Hosting

Finally, you can improve image loading by hosting all of a page’s images together on the same first-party domain. If each image was hosted on a different domain, the browser would have to perform a DNS lookup, create a TCP connection and perform the TLS handshake for every single image. When they are all co-located on a single domain (especially so if that is the same domain as the page itself), the browser can re-use the connection which improves the speed it can load those images.

Test your website

Today, we’re excited to announce the launch of Cloudflare’s Image Optimization Testing Tool. Simply enter your website URL, and we’ll run a series of automated tests to determine if there are any possible improvements you could make in delivering optimal images to visitors.

We use WebPageTest and Lighthouse to calculate the Core Web Vitals on two versions of your page: one as the original, and one with Cloudflare’s best-effort automatic optimizations. These optimizations are performed using a Cloudflare Worker in combination with our Image Resizing product, and will transform an image’s format, quality, and dimensions.

We report key summary metrics about your webpage’s performance, including the aforementioned Cumulative Layout Shift (CLS) and Largest Contentful Page (LCP), as well as a detailed breakdown of each image on your page and the optimizations that can be made.

Cloudflare Images

Cloudflare Images can help you to solve a number of the problems outlined in this post. By storing your images with Cloudflare and configuring a set of variants, we can deliver optimized images from our edge to your website or app. We automatically set the optimal image format and allow you to customize the dimensions and fit for your use-cases.

We’re excited to see what you build with Cloudflare Images, and you can expect additional features and integrations in the near future. Get started with Images today from $6/month.

Building Cloudflare Images in Rust and Cloudflare Workers

Post Syndicated from Yevgen Safronov original https://blog.cloudflare.com/building-cloudflare-images-in-rust-and-cloudflare-workers/

Building Cloudflare Images in Rust and Cloudflare Workers

Building Cloudflare Images in Rust and Cloudflare Workers

This post explains how we implemented the Cloudflare Images product with reusable Rust libraries and Cloudflare Workers. It covers the technical design of Cloudflare Image Resizing and Cloudflare Images. Using Rust and Cloudflare Workers helps us quickly iterate and deliver product improvements over the coming weeks and months.

Reuse of code in Rusty image projects

We developed Image Resizing in Rust. It’s a web server that receives HTTP requests for images along with resizing options, fetches the full-size images from the origin, applies resizing and other image processing operations, compresses, and returns the HTTP response with the optimized image.

Rust makes it easy to split projects into libraries (called crates). The image processing and compression parts of Image Resizing are usable as libraries.

We also have a product called  Polish, which is a Golang-based service that recompresses images in our cache. Polish was initially designed to run command-line programs like jpegtran and pngcrush. We took the core of Image Resizing and wrapped it in a command-line executable. This way, when Polish needs to apply lossy compression or generate WebP images or animations, it can use Image Resizing via a command-line tool instead of a third-party tool.

Reusing libraries has allowed us to easily unify processing between Image Resizing and Polish (for example, to ensure that both handle metadata and color profiles in the same way).

Cloudflare Images is another product we’ve built in Rust. It added support for a custom storage back-end, variants (size presets), support for signing URLs and more. We made it as a collection of Rust crates, so we can reuse pieces of it in other services running anywhere in our network. Image Resizing provides image processing for Cloudflare Images and shares libraries with Images to understand the new URL scheme, access the storage back-end, and database for variants.

How Image Resizing works

Building Cloudflare Images in Rust and Cloudflare Workers

The Image Resizing service runs at the edge and is deployed on every server of the Cloudflare global network. Thanks to Cloudflare’s global Anycast network, the closest Cloudflare data center will handle eyeball image resizing requests. Image Resizing is tightly integrated with the Cloudflare cache and handles eyeball requests only on a cache miss.

There are two ways to use Image Resizing. The default URL scheme provides an easy, declarative way of specifying image dimensions and other options. The other way is to use a JavaScript API in a Worker. Cloudflare Workers give powerful programmatic control over every image resizing request.

How Cloudflare Images work

Building Cloudflare Images in Rust and Cloudflare Workers

Cloudflare Images consists of the following components:

  • The Images core service that powers the public API to manage images assets.
  • The Image Resizing service responsible for image transformations and caching.
  • The Image delivery Cloudflare Worker responsible for serving images and passing corresponding parameters through to the Imaging Resizing service.
  • Image storage that provides access and storage for original image assets.

To support Cloudflare Images scenarios for image transformations, we made several changes to the Image Resizing service:

  • Added access to Cloudflare storage with original image assets.
  • Added access to variant definitions (size presets).
  • Added support for signing URLs.

Image delivery

The primary use case for Cloudflare Images is to provide a simple and easy-to-use way of managing images assets. To cover egress costs, we provide image delivery through the Cloudflare managed imagedelivery.net domain. It is configured with Tiered Caching to maximize the cache hit ratio for image assets. imagedelivery.net provides image hosting without a need to configure a custom domain to proxy through Cloudflare.

A Cloudflare Worker powers image delivery. It parses image URLs and passes the corresponding parameters to the image resizing service.

How we store Cloudflare Images

There are several places we store information on Cloudflare Images:

  • image metadata in Cloudflare’s core data centers
  • variant definitions in Cloudflare’s edge data centers
  • original images in core data centers
  • optimized images in Cloudflare cache, physically close to eyeballs.

Image variant definitions are stored and delivered to the edge using Cloudflare’s distributed key-value store called Quicksilver. We use a single source of truth for variants. The Images core service makes calls to Quicksilver to read and update variant definitions.

The rest of the information about the image is stored in the image URL itself:
https://imagedelivery.net/<encoded account id>/<image id>/<variant name>

<image id> contains a flag, whether it’s publicly available or requires access verification. It’s not feasible to store any image metadata in Quicksilver as the data volume would increase linearly with the number of images we host. Instead, we only allow a finite number of variants per account, so we responsibly utilize available disk space on the edge. The downside of storing image metadata as part of <image id> is that <image id> will change on access change.

How we keep Cloudflare Images up to date

The only way to access images is through the use of variants. Each variant is a named image resizing configuration. Once the image asset is fetched, we cache the transformed image in the Cloudflare cache. The critical question is how we keep processed images up to date. The answer is by purging the Cloudflare cache when necessary. There are two use cases:

  • access to the image is changed
  • the variant definition is updated

In the first instance, we purge the cache by calling a URL:
https://imagedelivery.net/<encoded account id>/<image id>

Then, the customer updates the variant we issue a cache purge request by tag:
account-id/variant-name

To support cache purge by tag, the image resizing service adds the necessary tags for all transformed images.

How we restrict access to Cloudflare Images

The Image resizing service supports restricted access to images by using URL signatures with expiration. URLs are signed with an SHA-256 HMAC key. The steps to produce valid signatures are:

  1. Take the path and query string (the path starts with /).
  2. Compute the path’s SHA-256 HMAC with the query string, using the Images’ URL signing key as the secret. The key is configured in the Dashboard.
  3. If the URL is meant to expire, compute the Unix timestamp (number of seconds since 1970) of the expiration time, and append ?exp= and the timestamp as an integer to the URL.
  4. Append ? or & to the URL as appropriate (? if it had no query string; & if it had a query string).
  5. Append sig= and the HMAC as hex-encoded 64 characters.

A signed URL looks like this:

Building Cloudflare Images in Rust and Cloudflare Workers

A signed URL with an expiration timestamp looks like this:

Building Cloudflare Images in Rust and Cloudflare Workers

Signature of /hello/world URL with a secret ‘this is a secret’ is 6293f9144b4e9adc83416d1b059abcac750bf05b2c5c99ea72fd47cc9c2ace34.

https://imagedelivery.net/hello/world?sig=6293f9144b4e9adc83416d1b059abcac750bf05b2c5c99ea72fd47cc9c2ace34

Building Cloudflare Images in Rust and Cloudflare Workers

Direct creator uploads with Cloudflare Worker and KV

Similar to Cloudflare Stream, Images supports direct creator uploads. That allow users to upload images without API tokens. Everyday use of direct creator uploads is by web apps, client-side applications, or mobile apps where users upload content directly to Cloudflare Images.

Once again, we used our serverless platform to support direct creator uploads. The successful API call stores the account’s information in Workers KV with the specified expiration date. A simple Cloudflare Worker handles the upload URL, which reads the KV value and grants upload access only on a successful call to KV.

Future Work

Cloudflare Images product has an exciting product roadmap. Let’s review what’s possible with the current architecture of Cloudflare Images.

Resizing hints on upload

At the moment, no image transformations happen on upload. That means we can serve the image globally once it is uploaded to Image storage. We are considering adding resizing hints on image upload. That won’t necessarily schedule image processing in all cases but could provide a valuable signal to resize the most critical image variants. An example could be to generate an AVIF variant for the most vital image assets.

Serving images from custom domains

We think serving images from a domain we manage (with Tiered Caching) is a great default option for many customers. The downside is that loading Cloudflare images requires additional TLS negotiations on the client-side, adding latency and impacting loading performance. On the other hand, serving Cloudflare Images from custom domains will be a viable option for customers who set up a website through Cloudflare. The good news is that we can support such functionality with the current architecture without radical changes in the architecture.

Conclusion

The Cloudflare Images product runs on top of the Cloudflare global network. We built Cloudflare Images in Rust and Cloudflare Workers. This way, we use Rust reusable libraries in several products such as Cloudflare Images, Image Resizing, and Polish. Cloudflare’s serverless platform is an indispensable tool to build Cloudflare products internally. If you are interested in building innovative products in Rust and Cloudflare Workers, we’re hiring.

How Cloudflare Images can make your life easier

Post Syndicated from Rita Soares original https://blog.cloudflare.com/how-cloudflare-images-can-make-your-life-easier/

How Cloudflare Images can make your life easier

How Cloudflare Images can make your life easier

Imagine how a customer would feel if they get to your website, and it takes forever to load all the images you serve. This would become a negative user experience that might lead to lower overall site traffic and high bounce rates.

The good news is that regardless of whether you need to store and serve 100,000 or one million images, Cloudflare Images gives you the tools you need to build an entire image pipeline from scratch.

Customer pains

After speaking with many of Cloudflare customers, we quickly understood that whether you are an e-commerce retailer, a blogger or have a platform for creators, everyone shares the same problems:

  • Egress fees. Each time an image needs to go from Product A (storage) to Product B (optimize) and to Product C (delivery) there’s a fee. If you multiply this by the millions of images clients serve per day it’s easy to understand why their bills are so high.
  • Buckets everywhere. Our customers’ current pipelines involve uploading images to and from services like AWS, then using open source products to optimize images, and finally to serve the images they need to store them in another cloud bucket since CDN don’t have long-term storage. This means that there is a dependency on buckets at each step of the pipeline.
  • Load times. When an image is not correctly optimized the image can be much larger than needed resulting in an unnecessarily long download time. This can lead to a bad end user experience that might result in loss of overall site traffic.
  • High Maintenance. To maintain an image pipeline companies need to rely on several AWS and open source products, plus an engineering team to build and maintain that pipeline. This takes the focus away from engineering on the product itself.

How can Cloudflare Images help?  

Zero Egress Costs

The majority of cloud providers allow you to store images for a small price, but the bill starts to grow every time you need to retrieve that image to optimize and deliver. The good news is that with Cloudflare Images customers don’t need to worry about egress costs, since all storage, optimization and delivery are part of the same tool.

The buckets stop with Cloudflare Images

One small step for humankind, one giant leap for image enthusiasts!

With Cloudflare Images the bucket pain stops now, and customers have two options:

  1. One image upload can generate up to 100 variants, which allows developers to stop placing image sizes in URLs. This way, if a site gets redesigned there isn’t a need to change all the image sizes because you already have all the variants you need stored in Cloudflare Images.
  2. Give your users a one-time permission to upload one file to your server. This way developers don’t need to write additional code to move files from users into a bucket — they will be automatically uploaded into your Cloudflare storage.

Minimal engineering effort

Have you ever dreamed about your team focusing entirely on product development instead of maintaining infrastructure? We understand, and this is why we created a straightforward set of APIs as well as a UI in the Cloudflare Dashboard. This allows your team to serve and optimize images without the need to set up and maintain a pipeline from scratch.

Once you get access to Cloudflare Images your team can start:

  • Uploading, deleting and updating images via API.
  • Setting up preferred variants.
  • Editing with Image Resizing both with the UI and API.
  • Serving an image with one click.

Process images on the fly

We all know that Google and many other search engines use the loading speed as one of their ranking factors; Cloudflare Images helps you be on the top of that list. We automatically detect what browser your clients are using and serve the most optimized version of the image, so that you don’t need to worry about file extensions, configuring origins for your image sets or even cache hit rates.

Curious to have a sneak peek at Cloudflare Images? Sign up now!

Foot pressure sensors detect Parkinson’s disease

Post Syndicated from Ashley Whittaker original https://www.raspberrypi.org/blog/foot-pressure-sensors-detect-parkinsons-disease/

A team from National Yang Ming Chiao Tung University has developed a foot-pressure-sensing insole to detect Parkinson’s disease. Using our tiny computers, they managed to create something discreet that can monitor people as they walk around in their own shoes.

Check out Team Forelook‘s project video

What is Parkinson’s disease?

Parkinson’s disease is a neurodegenerative disorder that mostly affects people aged over 60, though it can affect younger people too. One symptom that can suggest a diagnosis of Parkinson’s disease is an abnormal gait – that is, when someone’s walk has changed from its usual pattern. It’s this that the project aims to detect.

While there is currently no cure for Parkinson’s, many people respond well to treatment with medication and physical therapy, and early detection gives people a better chance of a good quality of life for as long as possible.

Hardware

parksinson's detector

Eight FlexiForce sensors are placed evenly on each insole of a user’s shoes to measure their gait as they go about their day:

foot sensors on soles of shoes to detect parkinson's disease

A Raspberry Pi 3 is fixed to a strap around the user’s knee and paired with Himax WE-I Plus. Cables connect the knee- strapped hardware to the sensors in the insoles.

raspberry pi strapped to user's knee to detect Parkinson's Disease

How does it work?

The sensors in the user’s shoes detect pressure across the whole foot while walking. Data is then processed by the Raspberry Pi and the user’s gait is assessed. Users pair the device with a mobile app to see their results. The app also shows real-time data while they’re walking.

parksinson's detector
A user with the devices strapped to their knees, checking out real-time data from the sensors in their shoes

The team took advantage of a free online database that collects foot pressure data from both Parkinson’s disease patients and people without Parkinson’s who have a typical gait. They used this to train their own machine learning model, which predicts whether a user has a gait that may indicate Parkinson’s disease.

Check out a live demo from this point in the project video.

Award-winning design

The team submitted this project in the 2021 Synopsys ARC AIoT Design Contest and scored a second-place prize. Check out more project videos from this year’s submissions.

Assessing gait as part of a diagnosis of potential Parkinson’s disease usually requires that patients take trips to the hospital to have tests on large pressure-sensored walking mats. The team’s new device offers a much more portable and affordable approach.

The post Foot pressure sensors detect Parkinson’s disease appeared first on Raspberry Pi.

Patch Tuesday – September 2021

Post Syndicated from Adam Bunn original https://blog.rapid7.com/2021/09/15/patch-tuesday-september-2021/

Patch Tuesday - September 2021

Microsoft has fixed a total of 60 vulnerabilities this month, including two publicly disclosed 0-days. Fortunately there are only a few issues rated critical this month with the vast majority of the remainder being rated important. Here’s three big things you can go patch right now.

MSHTML Remote Code Execution 0-day (CVE-2021-40444)

The hot topic this month is the most recent remote code execution 0-day vulnerability in MSHTML. When it was first discovered it was only being used in a limited number of attacks, however this quickly changed once instructions for exploiting the vulnerability were published online. This vulnerability was severe enough to warrant publishing patches for older operating systems including Windows 7, Windows Server 2008 R2, and Windows Server 2008. Now that updates have been published for this vulnerability they should be applied as soon as possible.

Windows DNS Local Elevation of Privilege (CVE-2021-36968)

This is the second publicly disclosed vulnerability updated this month. While the details surrounding this CVE are sparse, we do know that Microsoft has not detected exploitation in the wild.

Updates to PrintNightmare (CVE-2021-1678)

Microsoft has made additional patches available for older operating systems. If you were previously unable to patch against this vulnerability you may want to review this new information.

Summary Graphs

Patch Tuesday - September 2021

Summary Tables

Azure Vulnerabilities

CVE Title Exploited Disclosed CVSS3 FAQ
CVE-2021-38647 Open Management Infrastructure Remote Code Execution Vulnerability No No 9.8 Yes
CVE-2021-38645 Open Management Infrastructure Elevation of Privilege Vulnerability No No 7.8 Yes
CVE-2021-38648 Open Management Infrastructure Elevation of Privilege Vulnerability No No 7.8 Yes
CVE-2021-38649 Open Management Infrastructure Elevation of Privilege Vulnerability No No 7 Yes
CVE-2021-40448 Microsoft Accessibility Insights for Android Information Disclosure Vulnerability No No 6.3 Yes
CVE-2021-36956 Azure Sphere Information Disclosure Vulnerability No No 4.4 Yes

Browser Vulnerabilities

CVE Title Exploited Disclosed CVSS3 FAQ
CVE-2021-38642 Microsoft Edge for iOS Spoofing Vulnerability No No 6.1 No
CVE-2021-38641 Microsoft Edge for Android Spoofing Vulnerability No No 6.1 No
CVE-2021-26439 Microsoft Edge for Android Information Disclosure Vulnerability No No 4.6 No
CVE-2021-38669 Microsoft Edge (Chromium-based) Tampering Vulnerability No No 6.4 Yes
CVE-2021-26436 Microsoft Edge (Chromium-based) Elevation of Privilege Vulnerability No No 6.1 No
CVE-2021-36930 Microsoft Edge (Chromium-based) Elevation of Privilege Vulnerability No No 5.3 No
CVE-2021-30632 Chromium: CVE-2021-30632 Out of bounds write in V8 No No Yes
CVE-2021-30624 Chromium: CVE-2021-30624 Use after free in Autofill No No Yes
CVE-2021-30623 Chromium: CVE-2021-30623 Use after free in Bookmarks No No Yes
CVE-2021-30622 Chromium: CVE-2021-30622 Use after free in WebApp Installs No No Yes
CVE-2021-30621 Chromium: CVE-2021-30621 UI Spoofing in Autofill No No Yes
CVE-2021-30620 Chromium: CVE-2021-30620 Insufficient policy enforcement in Blink No No Yes
CVE-2021-30619 Chromium: CVE-2021-30619 UI Spoofing in Autofill No No Yes
CVE-2021-30618 Chromium: CVE-2021-30618 Inappropriate implementation in DevTools No No Yes
CVE-2021-30617 Chromium: CVE-2021-30617 Policy bypass in Blink No No Yes
CVE-2021-30616 Chromium: CVE-2021-30616 Use after free in Media No No Yes
CVE-2021-30615 Chromium: CVE-2021-30615 Cross-origin data leak in Navigation No No Yes
CVE-2021-30614 Chromium: CVE-2021-30614 Heap buffer overflow in TabStrip No No Yes
CVE-2021-30613 Chromium: CVE-2021-30613 Use after free in Base internals No No Yes
CVE-2021-30612 Chromium: CVE-2021-30612 Use after free in WebRTC No No Yes
CVE-2021-30611 Chromium: CVE-2021-30611 Use after free in WebRTC No No Yes
CVE-2021-30610 Chromium: CVE-2021-30610 Use after free in Extensions API No No Yes
CVE-2021-30609 Chromium: CVE-2021-30609 Use after free in Sign-In No No Yes
CVE-2021-30608 Chromium: CVE-2021-30608 Use after free in Web Share No No Yes
CVE-2021-30607 Chromium: CVE-2021-30607 Use after free in Permissions No No Yes
CVE-2021-30606 Chromium: CVE-2021-30606 Use after free in Blink No No Yes

Developer Tools Vulnerabilities

CVE Title Exploited Disclosed CVSS3 FAQ
CVE-2021-36952 Visual Studio Remote Code Execution Vulnerability No No 7.8 No
CVE-2021-26434 Visual Studio Elevation of Privilege Vulnerability No No 7.8 No
CVE-2021-26437 Visual Studio Code Spoofing Vulnerability No No 5.5 No

ESU Vulnerabilities

CVE Title Exploited Disclosed CVSS3 FAQ
CVE-2021-38625 Windows Kernel Elevation of Privilege Vulnerability No No 7.8 No
CVE-2021-38626 Windows Kernel Elevation of Privilege Vulnerability No No 7.8 No
CVE-2021-36968 Windows DNS Elevation of Privilege Vulnerability No Yes 7.8 No

Microsoft Dynamics Vulnerabilities

CVE Title Exploited Disclosed CVSS3 FAQ
CVE-2021-40440 Microsoft Dynamics Business Central Cross-site Scripting Vulnerability No No 5.4 No

Microsoft Office Vulnerabilities

CVE Title Exploited Disclosed CVSS3 FAQ
CVE-2021-38656 Microsoft Word Remote Code Execution Vulnerability No No 7.8 Yes
CVE-2021-38651 Microsoft SharePoint Server Spoofing Vulnerability No No 7.6 No
CVE-2021-38652 Microsoft SharePoint Server Spoofing Vulnerability No No 7.6 No
CVE-2021-38653 Microsoft Office Visio Remote Code Execution Vulnerability No No 7.8 No
CVE-2021-38654 Microsoft Office Visio Remote Code Execution Vulnerability No No 7.8 Yes
CVE-2021-38650 Microsoft Office Spoofing Vulnerability No No 7.6 Yes
CVE-2021-38659 Microsoft Office Remote Code Execution Vulnerability No No 7.8 Yes
CVE-2021-38658 Microsoft Office Graphics Remote Code Execution Vulnerability No No 7.8 Yes
CVE-2021-38660 Microsoft Office Graphics Remote Code Execution Vulnerability No No 7.8 Yes
CVE-2021-38657 Microsoft Office Graphics Component Information Disclosure Vulnerability No No 6.1 Yes
CVE-2021-38646 Microsoft Office Access Connectivity Engine Remote Code Execution Vulnerability No No 7.8 Yes
CVE-2021-38655 Microsoft Excel Remote Code Execution Vulnerability No No 7.8 Yes

Windows Vulnerabilities

CVE Title Exploited Disclosed CVSS3 FAQ
CVE-2021-36967 Windows WLAN AutoConfig Service Elevation of Privilege Vulnerability No No 8 No
CVE-2021-36966 Windows Subsystem for Linux Elevation of Privilege Vulnerability No No 7.8 No
CVE-2021-38637 Windows Storage Information Disclosure Vulnerability No No 5.5 Yes
CVE-2021-36972 Windows SMB Information Disclosure Vulnerability No No 5.5 Yes
CVE-2021-36974 Windows SMB Elevation of Privilege Vulnerability No No 7.8 No
CVE-2021-36973 Windows Redirected Drive Buffering System Elevation of Privilege Vulnerability No No 7.8 No
CVE-2021-38624 Windows Key Storage Provider Security Feature Bypass Vulnerability No No 6.5 Yes
CVE-2021-36954 Windows Bind Filter Driver Elevation of Privilege Vulnerability No No 8.8 No
CVE-2021-36975 Win32k Elevation of Privilege Vulnerability No No 7.8 No
CVE-2021-38634 Microsoft Windows Update Client Elevation of Privilege Vulnerability No No 7.1 No
CVE-2021-38644 Microsoft MPEG-2 Video Extension Remote Code Execution Vulnerability No No 7.8 Yes
CVE-2021-38661 HEVC Video Extensions Remote Code Execution Vulnerability No No 7.8 Yes
CVE-2021-38632 BitLocker Security Feature Bypass Vulnerability No No 5.7 Yes

Windows ESU Vulnerabilities

CVE Title Exploited Disclosed CVSS3 FAQ
CVE-2021-36965 Windows WLAN AutoConfig Service Remote Code Execution Vulnerability No No 8.8 No
CVE-2021-26435 Windows Scripting Engine Memory Corruption Vulnerability No No 8.1 Yes
CVE-2021-36960 Windows SMB Information Disclosure Vulnerability No No 7.5 Yes
CVE-2021-36969 Windows Redirected Drive Buffering SubSystem Driver Information Disclosure Vulnerability No No 5.5 Yes
CVE-2021-38635 Windows Redirected Drive Buffering SubSystem Driver Information Disclosure Vulnerability No No 5.5 Yes
CVE-2021-38636 Windows Redirected Drive Buffering SubSystem Driver Information Disclosure Vulnerability No No 5.5 Yes
CVE-2021-38667 Windows Print Spooler Elevation of Privilege Vulnerability No No 7.8 Yes
CVE-2021-38671 Windows Print Spooler Elevation of Privilege Vulnerability No No 7.8 No
CVE-2021-40447 Windows Print Spooler Elevation of Privilege Vulnerability No No 7.8 No
CVE-2021-36962 Windows Installer Information Disclosure Vulnerability No No 5.5 Yes
CVE-2021-36961 Windows Installer Denial of Service Vulnerability No No 5.5 No
CVE-2021-36964 Windows Event Tracing Elevation of Privilege Vulnerability No No 7.8 No
CVE-2021-38630 Windows Event Tracing Elevation of Privilege Vulnerability No No 7.8 No
CVE-2021-36955 Windows Common Log File System Driver Elevation of Privilege Vulnerability No No 7.8 No
CVE-2021-36963 Windows Common Log File System Driver Elevation of Privilege Vulnerability No No 7.8 No
CVE-2021-38633 Windows Common Log File System Driver Elevation of Privilege Vulnerability No No 7.8 No
CVE-2021-36959 Windows Authenticode Spoofing Vulnerability No No 5.5 No
CVE-2021-38629 Windows Ancillary Function Driver for WinSock Information Disclosure Vulnerability No No 6.5 Yes
CVE-2021-38628 Windows Ancillary Function Driver for WinSock Elevation of Privilege Vulnerability No No 7.8 No
CVE-2021-38638 Windows Ancillary Function Driver for WinSock Elevation of Privilege Vulnerability No No 7.8 No
CVE-2021-38639 Win32k Elevation of Privilege Vulnerability No No 7.8 No
CVE-2021-40444 Microsoft MSHTML Remote Code Execution Vulnerability Yes Yes 8.8 Yes

How not to get caught in law-enforcement geofence requests

Post Syndicated from original https://blog.erratasec.com/2021/09/how-not-to-get-caught-in-law.html

I thought I’d write up a response to this question from well-known 4th Amendment and CFAA lawyer Orin Kerr:

First, let me address the second part of his tweet, whether I’m technically qualified to answer this. I’m not sure, I have only 80% confidence that I am. Hence, I’m writing this answer as blogpost hoping people will correct me if I’m wrong.

There is a simple answer and it’s this: just disable “Location” tracking in the settings on the phone. Both iPhone and Android have a one-click button to tap that disables everything.

The trick is knowing which thing to disable. On the iPhone it’s called “Location Services”. On the Android, it’s simply called “Location”.

If you do start googling around for answers, you’ll find articles upset that Google is still tracking them. That’s because they disabled “Location History” and not “Location”. This left “Location Services” and “Web and App Activity” still tracking them. Disabling “Location” on the phone disables all these things [*].

It’s that simple: one click and done, and Google won’t be able to report your location in a geofence request.

I’m pretty confident in this answer, despite what your googling around will tell you about Google’s pernicious ways. But I’m only 80% confident in my answer. Technology is complex and constantly changing.

Note that the answer is very different for mobile phone companies, like AT&T or T-Mobile. They have their own ways of knowing about your phone’s location independent of whatever Google or Apple do on the phone itself. Because of modern 4G/LTE, cell towers must estimate both your direction and distance from the tower. I’ve confirmed that they can know your location to within 50 feet. There are limitations to this, it depends upon whether you are simply in range of the tower or have an active phone call in progress. Thus, I think law enforcement prefers asking Google.

Another example is how my car uses Google Maps all the time, and doesn’t have privacy settings. I don’t know what it reports to Google. So when I rob a bank, my phone won’t betray me, but my car will.

Note that “disabling GPS” isn’t sufficient. I include the screenshot above because of how it mentions the phone relies upon WiFi, BlueTooth, and cell tower info to also confirm your location. Tricking GPS will do little to stop your phone from knowing your location.

I only know about this from the phone side of things and not actual legal cases. I’d love to see the sort of geofence results the FBI gets. There might be some subtle thing that I missed about how Android works with mobile companies, such as this old story where Android phones reported cell tower information to Google (since removed). Or worse, there might be something completely obvious I should’ve known about that everyone seems to know, but for some reason I simply forgot.

Both Apple and Google are upfront about what private information they do and don’t track and how to disable it. Thus, while I think they may do something on accident hidden from view, I don’t think there’s anything going on that isn’t documented. And what’s documented this concern is that simply turning off the “Location” button.


Update: Many comments note that Google does log the IP address of requests, and that IP addresses can sometimes be geolocated.

Well, yes and no. It’s not something companies log in that way. Thus, when given a geofence request for everything within a certain physical location, logs containing only IP addresses wouldn’t be something covered by the request. The log would need a record of the physical location to be covered. Moreover, geolocation by IP address is incredibly inaccurate, often telling you only what city or neighborhood where the IP address is located. Even if Google logged a record of the best-guess about location, I’m still not sure whether it would be an appropriate response to a geofence request.

In any event, this wouldn’t apply to mobile IP addresses. In America, consumer mobile phones don’t have public IP addresses by share the same pool of private addresses. Thus, the IP address from a mobile phone is meaningless for location purposes.

Now you can create a hypothetical situation like the following:

  • a Capitol Hill protestor logs onto a nearby WiFi (meaning: it’s not the mobile IP address in question, but the IP address of the WiFi hotspot)
  • the geolocation record of that WiFi hotspot is actually accurate
  • requests to Google resolves that geolocation when it logs the IP address
  • they give such IP/location logs in response to geofence request

Then, yes, my argument is defeated, a hypothetical geofence request might then get you.

Which I actually like. It’s a good demonstration of why I doubt myself at the top of the post. I don’t think this scenario is likely, and hence don’t consider it a reasonable rebuttal, but “unlikely” doesn’t mean “impossible”. I’m still pretty confident that a one-click disabling “Location” is all you need to defeat geofence warrants given to Google.

Note that the discussion of this blogpost is just about the “geofence request to Google”. This “Capital Hill WiFi” hypothetical is unlikely to help with requests by location, but of course would for requests by IP address. Law enforcement could certainly ask Google for a list of users that came in via the Capital Hill WiFi IP address.

How Amazon CodeGuru Reviewer helps Gridium maintain a high quality codebase

Post Syndicated from Aaqib Bickiya original https://aws.amazon.com/blogs/devops/codeguru-gridium-maintain-codebase/

Gridium creates software that lets people run commercial buildings at a lower cost and with less energy. Currently, half of the world lives in cities. Soon, nearly 70% will, while buildings utilize 40% of the world’s electricity. In the U.S. alone, commercial real estate value tops one trillion dollars. Furthermore, much of this asset class is still run with spreadsheets, clipboards, and outdated software. Gridium’s software platform collects large amounts of operational data from commercial buildings like offices, medical providers, and corporate campuses. Then, our analytics identifies energy savings opportunities that we work with customers to actualize.

Gridium’s Challenge

Data streams from utility companies across the U.S. are an essential input for Gridium’s analytics. This data is processed and visualized so that our customers can garner new insights and drive smarter decisions. In order to integrate a new data source into our platform, we often utilize third-party contractors to write tools that ingest data feeds and prepare them for analysis.

Our team firmly emphasizes our codebase quality. We strive for our code to be stylistically consistent, easily testable, swiftly understood, and well-documented. We write code internally by using agreed-upon standards. This makes it easy for us to review and edit internal code using standard collaboration tools.

We work to ensure that code arriving from contractors meets similar standards, but enforcing external code quality can be difficult. Contractor-developed code will be written in the style of each contractor. Furthermore, reviewing and editing code written by contractors introduces new challenges beyond those of working with internal code. We have used tools like PyLint to help stylistically align code, but we wanted a method for uncovering more complex issues without burdening the team and undermining the benefits of outside contractors.

Adopting Amazon CodeGuru Reviewer

We began evaluating Amazon CodeGuru Reviewer in order to provide an additional review layer for code developed by contractors, and to find complex corrections within code that traditional tools might not catch.

Initially, we enabled the service only on external repositories and generated reviews on pull requests. CodeGuru immediately provided us with actionable recommendations for maintaining Gridium’s codebase quality.

CodeGuru exception handling correction

The example above demonstrates a useful recurring recommendation related to exception-handling. Strictly speaking, there is nothing wrong with utilizing a general Exception class whenever needed. However, utilizing general Exception classes in production can complicate error-handling functions and generate ambiguity when trying to debug or understand code.

After a few weeks of utilizing CodeGuru Reviewer and witnessing its benefits, we determined that we wanted to use it for our entire codebase. Moreover, CodeGuru provided us with meaningful recommendations on our internal repositories.

CodeGuru highly depend functions suggestions

This example once again showcases CodeGuru’s ability to highlight subtle issues that aren’t necessarily bugs. Without diving through related libraries and functions, it would be difficult to find any optimizable areas, but CodeGuru found that this function could become problematic due to its dependency on twenty other functions. If any of the dependencies is updated, then it could break the entire function, thereby making debugging the root cause difficult.

The explanations following each code recommendation were essential in our quick adoption of CodeGuru. Simply showing what code to change would make it tough to follow through with a code correction. CodeGuru provided ample context, reasoning, and even metrics in some cases to explain and justify a correction.

Conclusion

Our development team thoroughly appreciates the extra review layer that CodeGuru provides. CodeGuru indicates areas that internal review might otherwise miss, especially in code written by external contractors.

In some cases, CodeGuru highlighted issues never before considered by the team. Examples of these issues include highly coupled functions, ambiguous exceptions, and outdated API calls. Each suggestion is accompanied with its context and reasoning so that our developers can independently judge if an edit should be made. Furthermore, CodeGuru was easily set up with our GitHub repositories. We enabled it within minutes through the console.

After familiarizing ourselves with the CodeGuru workflow, Gridium treats CodeGuru recommendations like suggestions that an internal reviewer would make. Both internal developers and third parties act on recommendations in order to improve code health and quality. Any CodeGuru suggestions not accepted by contractors are verified and implemented by an internal reviewer if necessary.

Over the twelve weeks that we have been utilizing Amazon CodeGuru, we have had 281 automated pull request reviews. These provided 104 recommendations resulting in fifty code corrections that we may not have made otherwise. Our monthly bill for CodeGuru usage is about $10.00. If we make only a single correction to our code over a whole month that we would have missed otherwise, then we can safely say that it was well worth the price!

About the Authors

Kimberly Nicholls is an Engineering Technical Lead at Gridium who loves to make data useful. She also enjoys reading books and spending time outside.

Adnan Bilwani is a Sr. Specialist-Builder Experience providing fully managed ML-based solutions to enhance your DevOps workflows.

Aaqib Bickiya is a Solutions Architect at Amazon Web Services. He helps customers in the Midwest build and grow their AWS environments.

Optimize costs by up to 70% with new Amazon T3 Dedicated Hosts

Post Syndicated from Emma White original https://aws.amazon.com/blogs/compute/optimize-costs-by-up-to-70-with-new-amazon-t3-dedicated-hosts/

This post is written by Andy Ward, Senior Specialist Solutions Architect, and Yogi Barot, Senior Specialist Solutions Architect.

Customers have been taking advantage of Amazon Elastic Compute Cloud (Amazon EC2) Dedicated Hosts to enable them to use their eligible software licenses from vendors such as Microsoft and Oracle since the feature launched in 2015. Amazon EC2 Dedicated Hosts have gained new features over the years. For example, Customers can launch different-sized instances within the same instance family and use AWS License Manager to track and manage software licenses. Host Resource Groups have enabled customers to take advantage of automated host management. Further, the ability to use license included Windows Server on Dedicated Hosts has opened up new possibilities for cost-optimization.

The ability to bring your own license (BYOL) to Amazon EC2 Dedicated Hosts has been an invaluable cost-optimization tool for customers. Since the introduction of Dedicated Hosts on Amazon EC2, customers have requested additional flexibility to further optimize their ability to save on licensing costs on AWS. We listened to that feedback, and are now launching a new type of Amazon EC2 Dedicated Host to enable additional cost savings.

In this blog post, we discuss how our customers can benefit from the newest member of our Amazon EC2 Dedicated Hosts family – the T3 Dedicated Host. The T3 Dedicated Host is the first Amazon EC2 Dedicated Host to support general-purpose burstable T3 instances, providing the most cost-efficient way of using eligible BYOL software on dedicated hardware.

Introducing T3 Dedicated Hosts

When we talk to our customers about BYOL, we often hear the following:

  • We currently run our workloads on-premises and want to move our workloads to AWS with BYOL.
  • We currently benefit from oversubscribing CPU on our on-premises hosts, and want to retain our oversubscription benefits when bringing our eligible BYOL software to AWS.
  • How can we further cost-optimize our AWS environment, increasing the flexibility and cost effectiveness of our licenses?
  • Some of our virtual servers use minimal resources. How can we use smaller instance sizes with BYOL?

T3 Dedicated Hosts differ from our other EC2 Dedicated Hosts. Where our traditional EC2 Dedicated Hosts provide fixed CPU resources, T3 Dedicated Hosts support burstable instances capable of sharing CPU resources, providing a baseline CPU performance and the ability to burst when needed. Sharing CPU resources, also known as oversubscription, is what enables a single T3 Dedicated Host to support up to 4x more instances than comparable general-purpose Dedicated Hosts. This increase in the number of instances supported can enable customers to save on licensing and infrastructure costs by as much as 70%.

Advantages of T3 Dedicated Hosts

 T3 Dedicated Hosts drive a lower total cost of ownership (TCO) by delivering a higher instance density than any other EC2 Dedicated Host. Burstable T3 instances allow customers to consolidate a higher number of instances with low-to-moderate average CPU utilization on fewer hosts than ever before.

T3 Dedicated Hosts also offer smaller instance sizes, in a greater number of vCPU and memory combinations, than other EC2 Dedicated Hosts. Smaller instance sizes can contribute to lower TCO and help deliver consolidation ratios equivalent to or greater than on-premises hosts.

AWS hypervisor management features provide consistent performance for customer workloads. Customers can choose between a wide selection of instance configurations with different vCPU and memory sizes, mixing and matching instances sizes from t3.nano up to t3.2xlarge

You can use your existing eligible per-socket, per-core, or per-VM software licenses, including licenses for Windows Server, SQL Server, SUSE Linux Enterprise Server and Red Hat Enterprise Linux. As licensing terms often change over time, we recommend checking eligibility for BYOL with your license vendor.

You can track your license usage using your license configuration in AWS License Manager. For more information, see the Track your license using AWS License Manager blog post and the Manage Software Licenses with AWS License Manager video on YouTube.

When to use T3 Dedicated Hosts

T3 Dedicated Hosts are best suited for running instances such as small and medium databases and application servers, virtual desktops, and development and test environments. In common with on-premises hypervisor hosts that allow CPU oversubscription, T3 Dedicated Hosts are less suitable for workloads that experience correlated CPU burst patterns.

T3 Dedicated Hosts support all instance sizes of the T3 family, with a wide variety of CPU and RAM ratios. Additionally, as T3 Dedicated Hosts are powered by the AWS Nitro System, they support multiple instance sizes on a single host. Customers can run up to 192 instances on a single T3 Dedicated Host, each capable of supporting multiple processes. The maximum instance limits are shown in the following table:

Instance Family Sockets Physical Cores nano micro small medium large xlarge 2xlarge
t3 2 48 192 192 192 192 96 48 24


Any combination of T3 instance types can be run, up to the memory limit of the host (768GB). Examples of supported blended instance type combinations are:

  • 132 t3.small and 60 t3.large
  • 128 t3.small and 64 t3.large
  • 24 t3.xlarge and 12 t3.2xlarge

Use Cases

If you are looking for ways to decrease your license costs and host footprint in order to achieve the lowest TCO, then using T3 Dedicated Hosts enables a set of previously unavailable scenarios to help you achieve this goal. The ability to run a greater number of instances per host compared to existing Dedicated Hosts leads directly to lower licensing and infrastructure costs on AWS, for suitable BYOL workloads.

The following three scenarios are typical examples of benefits that can be realized by customers using T3 Dedicated Hosts.

Retaining Existing Server Consolidation Ratios While Migrating to AWS

On-premises, you are taking advantage of the fact that you can easily oversubscribe your physical CPUs on VMware hosts and achieve high-levels of consolidation. As you can license Windows Server on a per-physical-core basis, you only need to license the physical cores of the VMware hosts, and not the vCPUs of the Windows Server virtual machines.

  • You are currently running 7 x 48 core VMware Hosts on-premises.
  • Each host is running 150 x 2 vCPU low average-CPU-utilization Windows Server virtual machines.
  • You have Windows Server Datacenter licenses that are eligible for BYOL to AWS.

In this scenario, T3 Dedicated Hosts enable you to achieve similar, or better, levels of consolidation. Additionally, the number of Windows Server Datacenter licenses required in order to bring your workloads to AWS is reduced from 336 cores to 288 cores – a saving of 14%.

On-Premises VMware Hosts T3 Dedicated Hosts Savings
Physical Servers (48 Cores) 7 6
2 vCPU VMs per Host 150 192
Total number of VMs 1000 1000
Total Windows Server Datacenter Licenses (Per Core) 336 288 14%

Reducing License Requirements While Migrating To AWS

On-premises you are taking advantage of the fact that you can easily oversubscribe your physical CPUs on VMware hosts and achieve high-levels of consolidation. You can now achieve far greater levels of consolidation by moving your virtual machines to T3 Dedicated Hosts, which have double the amount of RAM compared to your current on-premises VMware hosts.

  • You are currently using 10 x 36 core, 384GB RAM VMware Hosts on-premises.
  • Each host is running 96 x 2 vCPU, 4GB RAM low average-CPU-utilization Windows Server virtual machines.

By taking advantage of oversubscription and the increased RAM on T3 Dedicated Hosts, you can now achieve far greater levels of consolidation. Additionally, you are able to reduce the number of Windows Server Datacenter licenses required for BYOL. In this scenario, you can achieve a license reduction from 360 cores to 240 cores – a 33% saving.

On-Premises VMware Hosts T3 Dedicated Hosts Savings
Physical Servers 10 5
Physical Cores per Host 36 48
RAM per Host (GB) 384 768
2 vCPU, 4GB RAM VMs per Host 96 192
Total number of VMs 960 960
Total Windows Server Datacenter Licenses (Per Core) = Number of Servers * Physical Core Count 10 * 36 = 360 5 * 48 = 240 33%

Reducing License and Infrastructure Cost by Migrating from C5 Dedicated Hosts to T3 Dedicated Hosts

In this scenario, you are taking advantage of the fact that you can bring your own eligible Windows Server and SQL Server licenses to AWS for use on Dedicated Hosts. However, as your instances all have low average-CPU-utilization, your current C5 Dedicated Hosts, with fixed CPU resources, are largely underutilized.

  • You are currently using C5 EC2 Dedicated Hosts on AWS with eligible Windows Server Datacenter licenses and SQL Server 2017 Enterprise Edition (BYOL).
  • Each host is running 36 x 2 vCPU low average-CPU-utilization Windows Server virtual machines.

By migrating to T3 Dedicated Hosts, you can achieve a substantial reduction in licensing costs. As the total number of physical cores requiring licensing is reduced, you can benefit from a corresponding reduction in the number of SQL Server Enterprise Edition licenses required – a saving of 71%.

C5 Dedicated Hosts T3 Dedicated Hosts Savings
Total Number of Hosts Required 28 6
2 vCPU, 4GB VMs per Host 36 192
Total number of VMs 1008 1008
Total SQL Server EE Licenses = Number of Servers * Physical Core Count 36 * 28 = 1008 48 * 6 = 288 71%

Conclusion

In this blog post, we described the new T3 Dedicated Hosts and how they help customers benefit from running more instances per host in BYOL scenarios. We showed that heavily oversubscribed on-premises environments can be migrated to T3 Dedicated Hosts on AWS while lowering existing licensing and infrastructure costs. We further showed how significant licensing and infrastructure savings can be realized by moving existing workloads from EC2 Dedicated Hosts with fixed CPU resources to new T3 Dedicated Hosts.

Visit the Dedicated Hosts, AWS License Manager and host resource group pages to get started with saving costs on licensing and infrastructure.

AWS can help you assess how your company can get the most out of cloud. Join the millions of AWS customers that trust us to migrate and modernize their most important applications in the cloud. To learn more on modernizing Windows Server or SQL Server, visit Windows on AWS. Contact us to start your migration journey today.

[$] Roundup: managing issues for 20 years

Post Syndicated from original https://lwn.net/Articles/869118/rss

The Roundup Issue Tracker
is a flexible tool for managing issues via the web or
email. However, Roundup is useful for more than
web-based bug tracking or help-desk ticketing; it can be used as a simple
wiki
or to manage tasks
with the Getting Things
Done
(GTD)
methodology. The 20th-anniversary
edition
of
Roundup,
version 2.1.0, was
released in July; it is a maintenance release, but there have been a number
of larger improvements in the last year or so. Here we introduce
Roundup’s
features
along with the
recent developments that have helped make Roundup even more useful for tracking
issues to their resolution.

Field Notes: How to Enable Cross-Account Access for Amazon Kinesis Data Streams using Kinesis Client Library 2.x

Post Syndicated from Uday Narayanan original https://aws.amazon.com/blogs/architecture/field-notes-how-to-enable-cross-account-access-for-amazon-kinesis-data-streams-using-kinesis-client-library-2-x/

Businesses today are dealing with vast amounts of real-time data they need to process and analyze to generate insights. Real-time delivery of data and insights enable businesses to quickly make decisions in response to sensor data from devices, clickstream events, user engagement, and infrastructure events, among many others.

Amazon Kinesis Data Streams offers a managed service that lets you focus on building and scaling your streaming applications for near real-time data processing, rather than managing infrastructure. Customers can write Kinesis Data Streams consumer applications to read data from Kinesis Data Streams and process them per their requirements.

Often, the Kinesis Data Streams and consumer applications reside in the same AWS account. However, there are scenarios where customers follow a multi-account approach resulting in Kinesis Data Streams and consumer applications operating in different accounts. Some reasons for using the multi-account approach are to:

  • Allocate AWS accounts to different teams, projects, or products for rapid innovation, while still maintaining unique security requirements.
  • Simplify AWS billing by mapping AWS costs specific to product or service line.
  • Isolate accounts for specific security or compliance requirements.
  • Scale resources and mitigate hard AWS service limits constrained to a single account.

The following options allow you to access Kinesis Data Streams across accounts.

  • Amazon Kinesis Client Library (KCL) for Java or using the MultiLang Daemon for KCL.
  • Amazon Kinesis Data Analytics for Apache Flink – Cross-account access is supported for both Java and Python. For detailed implementation guidance, review the AWS documentation page for Kinesis Data Analytics.
  • AWS Glue Streaming – The documentation for AWS Glue describes how to configure AWS Glue streaming ETL jobs to access cross-account Kinesis Data Streams.
  • AWS Lambda – Lambda currently does not support cross-account invocations from Amazon Kinesis, but a workaround can be used.

In this blog post, we will walk you through the steps to configure KCL for Java and Python for cross-account access to Kinesis Data Streams.

Overview of solution

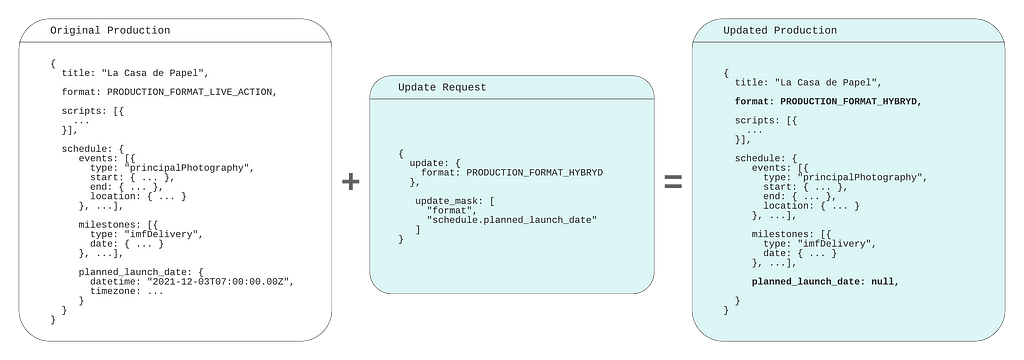
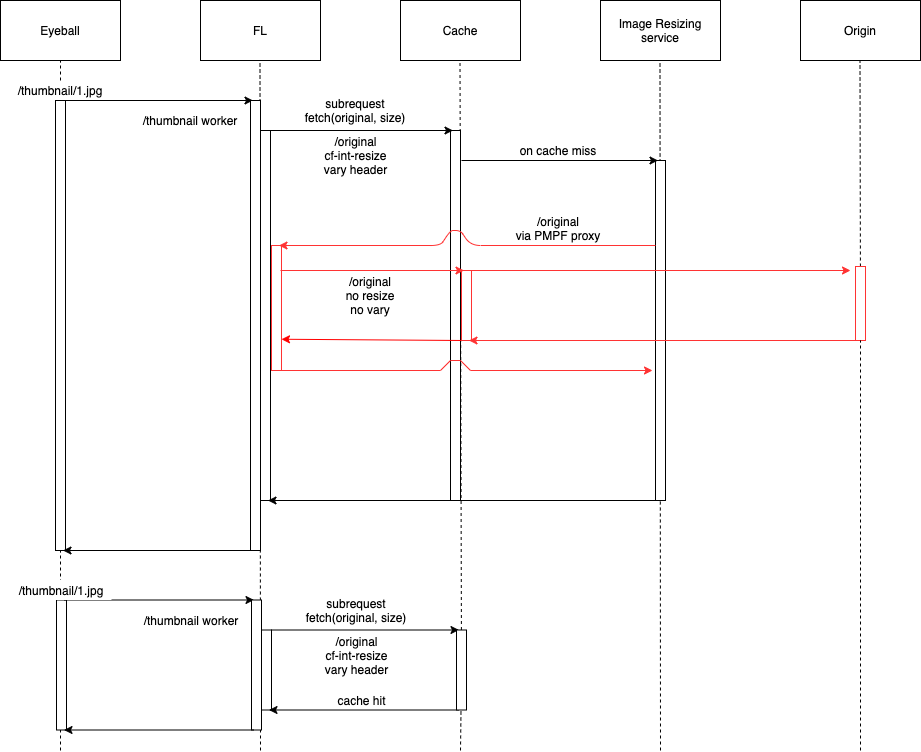
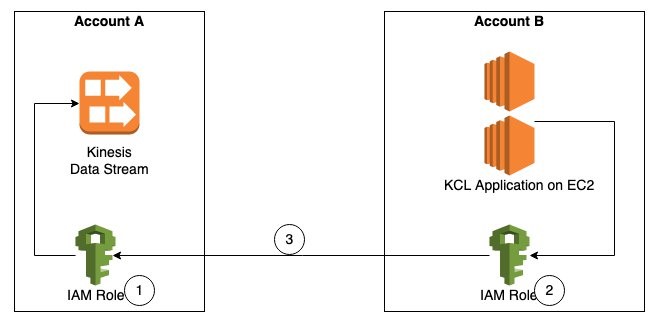
As shown in Figure 1, Account A has the Kinesis data stream and Account B has the KCL instances consuming from the Kinesis data stream in Account A. For the purposes of this blog post the KCL code is running on Amazon Elastic Compute Cloud (Amazon EC2).

Figure 1. Steps to access a cross-account Kinesis data stream

The steps to access a Kinesis data stream in one account from a KCL application in another account are:

Step 1 – Create AWS Identity and Access Management (IAM) role in Account A to access the Kinesis data stream with trust relationship with Account B.

Step 2 – Create IAM role in Account B to assume the role in Account A. This role is attached to the EC2 fleet running the KCL application.

Step 3 – Update the KCL application code to assume the role in Account A to read Kinesis data stream in Account A.

Prerequisites

  • KCL for Java version 2.3.4 or later.
  • AWS Security Token Service (AWS STS) SDK.
  • Create a Kinesis data stream named StockTradeStream in Account A and a producer to load data into the stream. If you do not have a producer, you can use the Amazon Kinesis Data Generator to send test data into your Kinesis data stream.

Walkthrough

Step 1 – Create IAM policies and IAM role in Account A

First, we will create an IAM role in Account A, with permissions to access the Kinesis data stream created in the same account. We will also add Account B as a trusted entity to this role.

  1. Create IAM policy kds-stock-trade-stream-policy to access Kinesis data stream in Account A using the following policy definition. This policy restricts access to specific Kinesis data stream.
{
    "Version": "2012-10-17",
    "Statement": [
        {
            "Sid": "Stmt123",
            "Effect": "Allow",
            "Action": [
                "kinesis:DescribeStream",
                "kinesis:GetShardIterator",
                "kinesis:GetRecords",
                "kinesis:ListShards",
                "kinesis:DescribeStreamSummary",
                "kinesis:RegisterStreamConsumer"
            ],
            "Resource": [
                "arn:aws:kinesis:us-east-1:Account-A-AccountNumber:stream/StockTradeStream"
            ]
        },
        {
            "Sid": "Stmt234",
            "Effect": "Allow",
            "Action": [
                "kinesis:SubscribeToShard",
                "kinesis:DescribeStreamConsumer"
            ],
            "Resource": [
                "arn:aws:kinesis:us-east-1:Account-A-AccountNumber:stream/StockTradeStream/*"
            ]
        }
    ]
}

Note: The above policy assumes the name of the Kinesis data stream is StockTradeStream.

  1. Create IAM role kds-stock-trade-stream-role in Account A.
aws iam create-role --role-name kds-stock-trade-stream-role --assume-role-policy-document "{\"Version\":\"2012-10-17\",\"Statement\":[{\"Effect\":\"Allow\",\"Principal\":{\"AWS\":[\"arn:aws:iam::Account-B-AccountNumber:root\"]},\"Action\":[\"sts:AssumeRole\"]}]}"
  1. Attach the kds-stock-trade-stream-policy IAM policy to kds-stock-trade-stream-role role.
aws iam attach-role-policy --policy-arn arn:aws:iam::Account-A-AccountNumber:policy/kds-stock-trade-stream-policy --role-name kds-stock-trade-stream-role

In the above steps, you will have to replace Account-A-AccountNumber with the AWS account number of the account that has the Kinesis data stream and Account-B-AccountNumber will need to be replaced with the AWS account number of the account that has the KCL application

Step 2 – Create IAM policies and IAM role in Account B

We will now create an IAM role in account B to assume the role created in Account A in Step 1. This role will also grant the KCL application access to Amazon DynamoDB and Amazon CloudWatch in Account B. For every KCL application, a DynamoDB table is used to keep track of the shards in a Kinesis data stream that are being leased and processed by the workers of the KCL consumer application. The name of the DynamoDB table is the same as the KCL application name. Similarly, the KCL application needs access to emit metrics to CloudWatch. Because the KCL application is running in Account B, we want to maintain the DynamoDB table and the CloudWatch metrics in the same account as the application code. For this blog post, our KCL application name is StockTradesProcessor.

  1. Create IAM policy kcl-stock-trader-app-policy, with permissions access to DynamoDB and CloudWatch in Account B, and to assume the kds-stock-trade-stream-role role created in Account A.
{
    "Version": "2012-10-17",
    "Statement": [
        {
            "Sid": "AssumeRoleInSourceAccount",
            "Effect": "Allow",
            "Action": "sts:AssumeRole",
            "Resource": "arn:aws:iam::Account-A-AccountNumber:role/kds-stock-trade-stream-role"
        },
        {
            "Sid": "Stmt456",
            "Effect": "Allow",
            "Action": [
                "dynamodb:CreateTable",
                "dynamodb:DescribeTable",
                "dynamodb:Scan",
                "dynamodb:PutItem",
                "dynamodb:GetItem",
                "dynamodb:UpdateItem",
                "dynamodb:DeleteItem"
            ],
            "Resource": [
                "arn:aws:dynamodb:us-east-1:Account-B-AccountNumber:table/StockTradesProcessor"
            ]
        },
        {
            "Sid": "Stmt789",
            "Effect": "Allow",
            "Action": [
                "cloudwatch:PutMetricData"
            ],
            "Resource": [
                "*"
            ]
        }
    ]
}

The above policy gives access to a DynamoDB table StockTradesProcessor. If you change you KCL application name, make sure you change the above policy to reflect the corresponding DynamoDB table name.

  1. Create role kcl-stock-trader-app-role in Account B to assume role in Account A.
aws iam create-role --role-name kcl-stock-trader-app-role --assume-role-policy-document "{\"Version\":\"2012-10-17\",\"Statement\":[{\"Effect\":\"Allow\",\"Principal\":{\"Service\":[\"ec2.amazonaws.com\"]},\"Action\":[\"sts:AssumeRole\"]}]}"
  1. Attach the policy kcl-stock-trader-app-policy to the kcl-stock-trader-app-role.
aws iam attach-role-policy --policy-arn arn:aws:iam::Account-B-AccountNumber:policy/kcl-stock-trader-app-policy --role-name kcl-stock-trader-app-role
  1. Create an instance profile with a name as kcl-stock-trader-app-role.
aws iam create-instance-profile --instance-profile-name kcl-stock-trader-app-role
  1. Attach the kcl-stock-trader-app-role role to the instance profile.
aws iam add-role-to-instance-profile --instance-profile-name kcl-stock-trader-app-role --role-name kcl-stock-trader-app-role
  1. Attach the kcl-stock-trader-app-role to the EC2 instances that are running the KCL code.
aws ec2 associate-iam-instance-profile --iam-instance-profile Name=kcl-stock-trader-app-role --instance-id <your EC2 instance>

In the above steps, you will have to replace Account-A-AccountNumber with the AWS account number of the account that has the Kinesis data stream, Account-B-AccountNumber will need to be replaced with the AWS account number of the account which has the KCL application and <your EC2 instance id> will need to be replaced with the correct EC2 instance id. This instance profile should be added to any new EC2 instances of the KCL application that are started.

Step 3 – Update KCL stock trader application to access cross-account Kinesis data stream

KCL application in java

To demonstrate the setup for cross-account access for KCL using Java, we have used the KCL stock trader application as the starting point and modified it to enable access to a Kinesis data stream in another AWS account.

After the IAM policies and roles have been created and attached to the EC2 instance running the KCL application, we will update the main class of the consumer application to enable cross-account access.

Setting up the integrated development environment (IDE)

To download and build the code for the stock trader application, follow these steps:

  1. Clone the source code from the GitHub repository to your computer.
$  git clone https://github.com/aws-samples/amazon-kinesis-learning
Cloning into 'amazon-kinesis-learning'...
remote: Enumerating objects: 169, done.
remote: Counting objects: 100% (77/77), done.
remote: Compressing objects: 100% (37/37), done.
remote: Total 169 (delta 16), reused 56 (delta 8), pack-reused 92
Receiving objects: 100% (169/169), 45.14 KiB | 220.00 KiB/s, done.
Resolving deltas: 100% (29/29), done.
  1. Create a project in your integrated development environment (IDE) with the source code you downloaded in the previous step. For this blog post, we are using Eclipse for our IDE, therefore the instructions will be specific to Eclipse project.
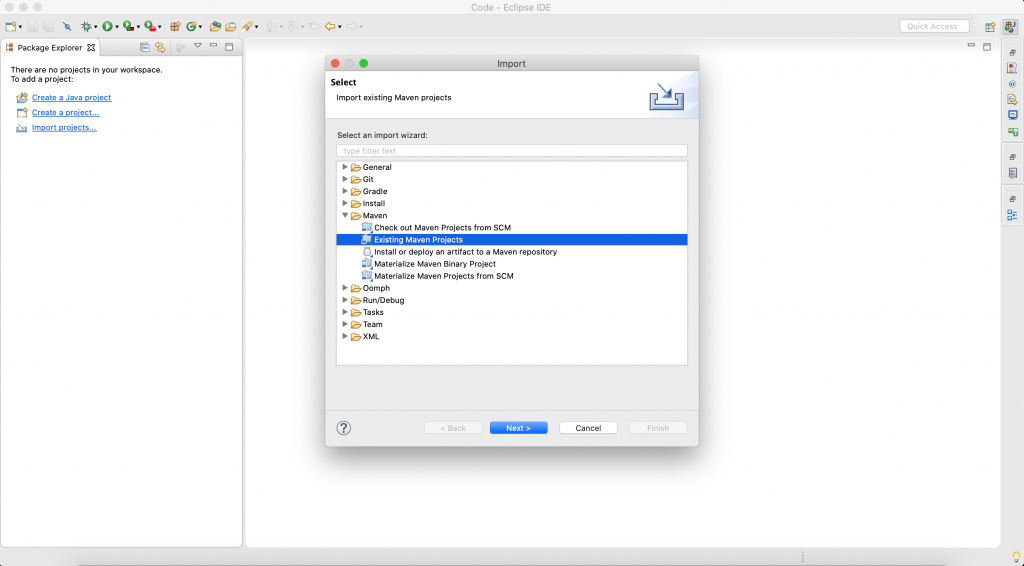
    1. Open Eclipse IDE. Select File -> Import.
      A dialog box will open, as shown in Figure 2.

Figure 2. Create an Eclipse project

  1. Select Maven -> Existing Maven Projects, and select Next. Then you will be prompted to select a folder location for stock trader application.

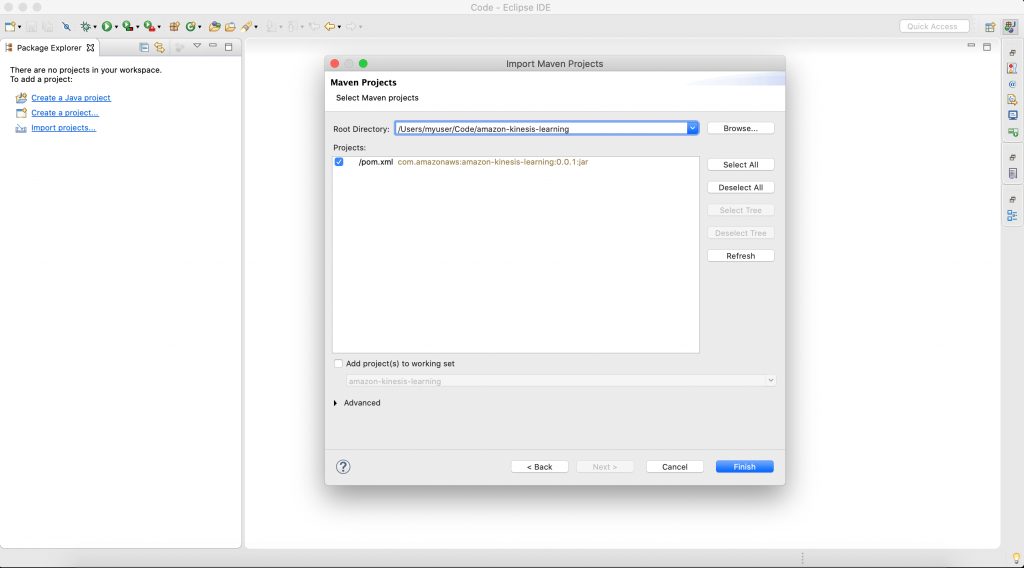
Figure 3. Select the folder for your project

Select Browse, and navigate to the downloaded source code folder location. The IDE will automatically detect maven pom.xml.

Select Finish to complete the import. IDE will take 2–3 minutes to download all libraries to complete setup stock trader project.

  1. After the setup is complete, the IDE will look like similar to Figure 4.
Figure 4. Final view of pom.xl file after setup is complete

Figure 4. Final view of pom.xl file after setup is complete

  1. Open pom.xml, and replace it with the following content. This will add all the prerequisites and dependencies required to build and package the jar application.
<project xmlns="http://maven.apache.org/POM/4.0.0"
         xmlns:xsi="http://www.w3.org/2001/XMLSchema-instance"
         xsi:schemaLocation="http://maven.apache.org/POM/4.0.0 https://maven.apache.org/maven-v4_0_0.xsd">
    <modelVersion>4.0.0</modelVersion>
    <groupId>com.amazonaws</groupId>
    <artifactId>amazon-kinesis-learning</artifactId>
    <packaging>jar</packaging>
    <name>Amazon Kinesis Tutorial</name>
    <version>0.0.1</version>
    <description>Tutorial and examples for aws-kinesis-client
    </description>
    <url>https://aws.amazon.com/kinesis</url>

    <scm>
        <url>https://github.com/awslabs/amazon-kinesis-learning.git</url>
    </scm>

    <licenses>
        <license>
            <name>Amazon Software License</name>
            <url>https://aws.amazon.com/asl</url>
            <distribution>repo</distribution>
        </license>
    </licenses>

    <properties>
        <aws-kinesis-client.version>2.3.4</aws-kinesis-client.version>
    </properties>

    <dependencies>
        <dependency>
            <groupId>software.amazon.kinesis</groupId>
            <artifactId>amazon-kinesis-client</artifactId>
            <version>2.3.4</version>
        </dependency>
        <dependency>
            <groupId>commons-logging</groupId>
            <artifactId>commons-logging</artifactId>
            <version>1.2</version>
        </dependency>
		<dependency>
		    <groupId>software.amazon.awssdk</groupId>
		    <artifactId>sts</artifactId>
		    <version>2.16.74</version>
		</dependency>
		<dependency>
       <groupId>org.slf4j</groupId>
       <artifactId>slf4j-simple</artifactId>
       <version>1.7.25</version>
   </dependency>
    </dependencies>

 	<build>
        <finalName>amazon-kinesis-learning</finalName>
        <plugins>

            <plugin>
                <groupId>org.apache.maven.plugins</groupId>
                <artifactId>maven-compiler-plugin</artifactId>
                <version>3.6.1</version>
                <configuration>
                    <source>1.8</source>
                    <target>1.8</target>
                </configuration>
            </plugin>

            <plugin>
                <groupId>org.apache.maven.plugins</groupId>
                <artifactId>maven-assembly-plugin</artifactId>
                <version>3.1.1</version>

                <configuration>
                    <descriptorRefs>
                        <descriptorRef>jar-with-dependencies</descriptorRef>
                    </descriptorRefs>
                </configuration>

                <executions>
                    <execution>
                        <id>make-assembly</id>
                        <phase>package</phase>
                        <goals>
                            <goal>single</goal>
                        </goals>
                    </execution>
                </executions>
    
            </plugin>
        </plugins>
    </build>


</project>

Update the main class of consumer application

The updated code for the StockTradesProcessor.java class is shown as follows. The changes made to the class to enable cross-account access are highlighted in bold.

package com.amazonaws.services.kinesis.samples.stocktrades.processor;

import java.util.UUID;
import java.util.logging.Level;
import java.util.logging.Logger;

import org.apache.commons.logging.Log;
import org.apache.commons.logging.LogFactory;

import software.amazon.awssdk.auth.credentials.AwsCredentialsProvider;
import software.amazon.awssdk.regions.Region;
import software.amazon.awssdk.services.dynamodb.DynamoDbAsyncClient;
import software.amazon.awssdk.services.cloudwatch.CloudWatchAsyncClient;
import software.amazon.awssdk.services.kinesis.KinesisAsyncClient;
import software.amazon.awssdk.services.sts.StsClient; import software.amazon.awssdk.services.sts.auth.StsAssumeRoleCredentialsProvider; import software.amazon.awssdk.services.sts.model.AssumeRoleRequest;
import software.amazon.kinesis.common.ConfigsBuilder;
import software.amazon.kinesis.common.KinesisClientUtil;
import software.amazon.kinesis.coordinator.Scheduler;

/**
 * Uses the Kinesis Client Library (KCL) 2.2.9 to continuously consume and process stock trade
 * records from the stock trades stream. KCL monitors the number of shards and creates
 * record processor instances to read and process records from each shard. KCL also
 * load balances shards across all the instances of this processor.
 *
 */
public class StockTradesProcessor {

    private static final Log LOG = LogFactory.getLog(StockTradesProcessor.class);

    private static final Logger ROOT_LOGGER = Logger.getLogger("");
    private static final Logger PROCESSOR_LOGGER =
            Logger.getLogger("com.amazonaws.services.kinesis.samples.stocktrades.processor.StockTradeRecordProcessor");

    private static void checkUsage(String[] args) {
        if (args.length != 5) {
            System.err.println("Usage: " + StockTradesProcessor.class.getSimpleName()
                    + " <application name> <stream name> <region> <role arn> <role session name>");
            System.exit(1);
        }
    }

    /**
     * Sets the global log level to WARNING and the log level for this package to INFO,
     * so that we only see INFO messages for this processor. This is just for the purpose
     * of this tutorial, and should not be considered as best practice.
     *
     */
    private static void setLogLevels() {
        ROOT_LOGGER.setLevel(Level.WARNING);
        // Set this to INFO for logging at INFO level. Suppressed for this example as it can be noisy.
        PROCESSOR_LOGGER.setLevel(Level.WARNING);
    }
    
    private static AwsCredentialsProvider roleCredentialsProvider(String roleArn, String roleSessionName, Region region) { AssumeRoleRequest assumeRoleRequest = AssumeRoleRequest.builder() .roleArn(roleArn) .roleSessionName(roleSessionName) .durationSeconds(900) .build(); LOG.warn("Initializing assume role request session: " + assumeRoleRequest.roleSessionName()); StsClient stsClient = StsClient.builder().region(region).build(); StsAssumeRoleCredentialsProvider stsAssumeRoleCredentialsProvider = StsAssumeRoleCredentialsProvider .builder() .stsClient(stsClient) .refreshRequest(assumeRoleRequest) .asyncCredentialUpdateEnabled(true) .build(); LOG.warn("Initializing sts role credential provider: " + stsAssumeRoleCredentialsProvider.prefetchTime().toString()); return stsAssumeRoleCredentialsProvider; }

    public static void main(String[] args) throws Exception {
        checkUsage(args);

        setLogLevels();

        String applicationName = args[0];
        String streamName = args[1];
        Region region = Region.of(args[2]);
        String roleArn = args[3]; String roleSessionName = args[4]; 
        
        if (region == null) {
            System.err.println(args[2] + " is not a valid AWS region.");
            System.exit(1);
        }
        
        AwsCredentialsProvider awsCredentialsProvider = roleCredentialsProvider(roleArn,roleSessionName, region); KinesisAsyncClient kinesisClient = KinesisClientUtil.createKinesisAsyncClient(KinesisAsyncClient.builder().region(region).credentialsProvider(awsCredentialsProvider));
        DynamoDbAsyncClient dynamoClient = DynamoDbAsyncClient.builder().region(region).build();
        CloudWatchAsyncClient cloudWatchClient = CloudWatchAsyncClient.builder().region(region).build();
        StockTradeRecordProcessorFactory shardRecordProcessor = new StockTradeRecordProcessorFactory();
        ConfigsBuilder configsBuilder = new ConfigsBuilder(streamName, applicationName, kinesisClient, dynamoClient, cloudWatchClient, UUID.randomUUID().toString(), shardRecordProcessor);

        Scheduler scheduler = new Scheduler(
                configsBuilder.checkpointConfig(),
                configsBuilder.coordinatorConfig(),
                configsBuilder.leaseManagementConfig(),
                configsBuilder.lifecycleConfig(),
                configsBuilder.metricsConfig(),
                configsBuilder.processorConfig(),
                configsBuilder.retrievalConfig()
        );
        int exitCode = 0;
        try {
            scheduler.run();
        } catch (Throwable t) {
            LOG.error("Caught throwable while processing data.", t);
            exitCode = 1;
        }
        System.exit(exitCode);

    }

}

Let’s review the changes made to the code to understand the key parts of how the cross-account access works.

AssumeRoleRequest assumeRoleRequest = AssumeRoleRequest.builder() .roleArn(roleArn) .roleSessionName(roleSessionName) .durationSeconds(900) .build();

AssumeRoleRequest class is used to get the credentials to access the Kinesis data stream in Account A using the role that was created. The value of the variable assumeRoleRequest is passed to the StsAssumeRoleCredentialsProvider.

StsClient stsClient = StsClient.builder().region(region).build();
StsAssumeRoleCredentialsProvider stsAssumeRoleCredentialsProvider = StsAssumeRoleCredentialsProvider .builder() .stsClient(stsClient) .refreshRequest(assumeRoleRequest) .asyncCredentialUpdateEnabled(true) .build();

StsAssumeRoleCredentialsProvider periodically sends an AssumeRoleRequest to the AWS STS to maintain short-lived sessions to use for authentication. Using refreshRequest, these sessions are updated asynchronously in the background as they get close to expiring. As asynchronous refresh is not set by default, we explicitly set it to true using asyncCredentialUpdateEnabled.

AwsCredentialsProvider awsCredentialsProvider = roleCredentialsProvider(roleArn,roleSessionName, region);
KinesisAsyncClient kinesisClient = KinesisClientUtil.createKinesisAsyncClient(KinesisAsyncClient.builder().region(region).credentialsProvider(awsCredentialsProvider));

  • KinesisAsyncClient is the client for accessing Kinesis asynchronously. We can create an instance of KinesisAsyncClient by passing to it the credentials to access the Kinesis data stream in Account A through the assume role. The values of Kinesis, DynamoDB, and the CloudWatch client along with the stream name, application name is used to create a ConfigsBuilder instance.
  • The ConfigsBuilder instance is used to create the KCL scheduler (also known as KCL worker in KCL versions 1.x).
  • The scheduler creates a new thread for each shard (assigned to this consumer instance), which continuously loops to read records from the data stream. It then invokes the record processor instance (StockTradeRecordProcessor in this example) to process each batch of records received. This is the class which will contain your record processing logic. The Developing Custom Consumers with Shared Throughput Using KCL section of the documentation will provide more details on the working of KCL.

KCL application in python

In this section we will show you how to configure a KCL application written in Python to access a cross-account Kinesis data stream.

A.      Steps 1 and 2 from earlier remain the same and will need to be completed before moving ahead. After the IAM roles and policies have been created, log into the EC2 instance and clone the amazon-kinesis-client-python repository using the following command.

git clone https://github.com/awslabs/amazon-kinesis-client-python.git

B.      Navigate to the amazon-kinesis-client-python directory and run the following commands.

sudo yum install python-pip
sudo pip install virtualenv
virtualenv /tmp/kclpy-sample-env
source /tmp/kclpy-sample/env/bin/activate
pip install amazon_kclpy

C.      Next, navigate to amazon-kinesis-client-python/samples and open the sample.properties file. The properties file has properties such as streamName, application name, and credential information that lets you customize the configuration for your use case.

D.      We will modify the properties file to change the stream name and application name, and to add the credentials to enable access to a Kinesis data stream in a different account. You can replace the sample.properties file and replace with the following snippet. The bolded sections show the changes we have made.

# The script that abides by the multi-language protocol. This script will

# be executed by the MultiLangDaemon, which will communicate with this script

# over STDIN and STDOUT according to the multi-language protocol.

executableName = sample_kclpy_app.py

# The name of an Amazon Kinesis stream to process.

streamName = StockTradeStream

# Used by the KCL as the name of this application. Will be used as the name

# of an Amazon DynamoDB table which will store the lease and checkpoint

# information for workers with this application name

applicationName = StockTradesProcessor

# Users can change the credentials provider the KCL will use to retrieve credentials.

# The DefaultAWSCredentialsProviderChain checks several other providers, which is

# described here:

# http://docs.aws.amazon.com/AWSJavaSDK/latest/javadoc/com/amazonaws/auth/DefaultAWSCredentialsProviderChain.html

#AWSCredentialsProvider = DefaultAWSCredentialsProviderChain

AWSCredentialsProvider = STSAssumeRoleSessionCredentialsProvider|arn:aws:iam::Account-A-AccountNumber:role/kds-stock-trade-stream-role|kinesiscrossaccount

AWSCredentialsProviderDynamoDB = DefaultAWSCredentialsProviderChain

AWSCredentialsProviderCloudWatch = DefaultAWSCredentialsProviderChain

# Appended to the user agent of the KCL. Does not impact the functionality of the

# KCL in any other way.

processingLanguage = python/2.7

# Valid options at TRIM_HORIZON or LATEST.

# See http://docs.aws.amazon.com/kinesis/latest/APIReference/API_GetShardIterator.html#API_GetShardIterator_RequestSyntax

initialPositionInStream = LATEST

# The following properties are also available for configuring the KCL Worker that is created

# by the MultiLangDaemon.

# The KCL defaults to us-east-1

#regionName = us-east-1

In the above step, you will have to replace Account-A-AccountNumber with the AWS account number of the account that has the kinesis stream.

We use the STSAssumeRoleSessionCredentialsProvider class and pass to it the role created in Account A which have permissions to access the Kinesis data stream. This gives the KCL application in Account B permissions to read the Kinesis data stream in Account A. The DynamoDB lease table and the CloudWatch metrics are in Account B. Hence, we can use the DefaultAWSCredentialsProviderChain for AWSCredentialsProviderDynamoDB and AWSCredentialsProviderCloudWatch in the properties file. You can now save the sample.properties file.

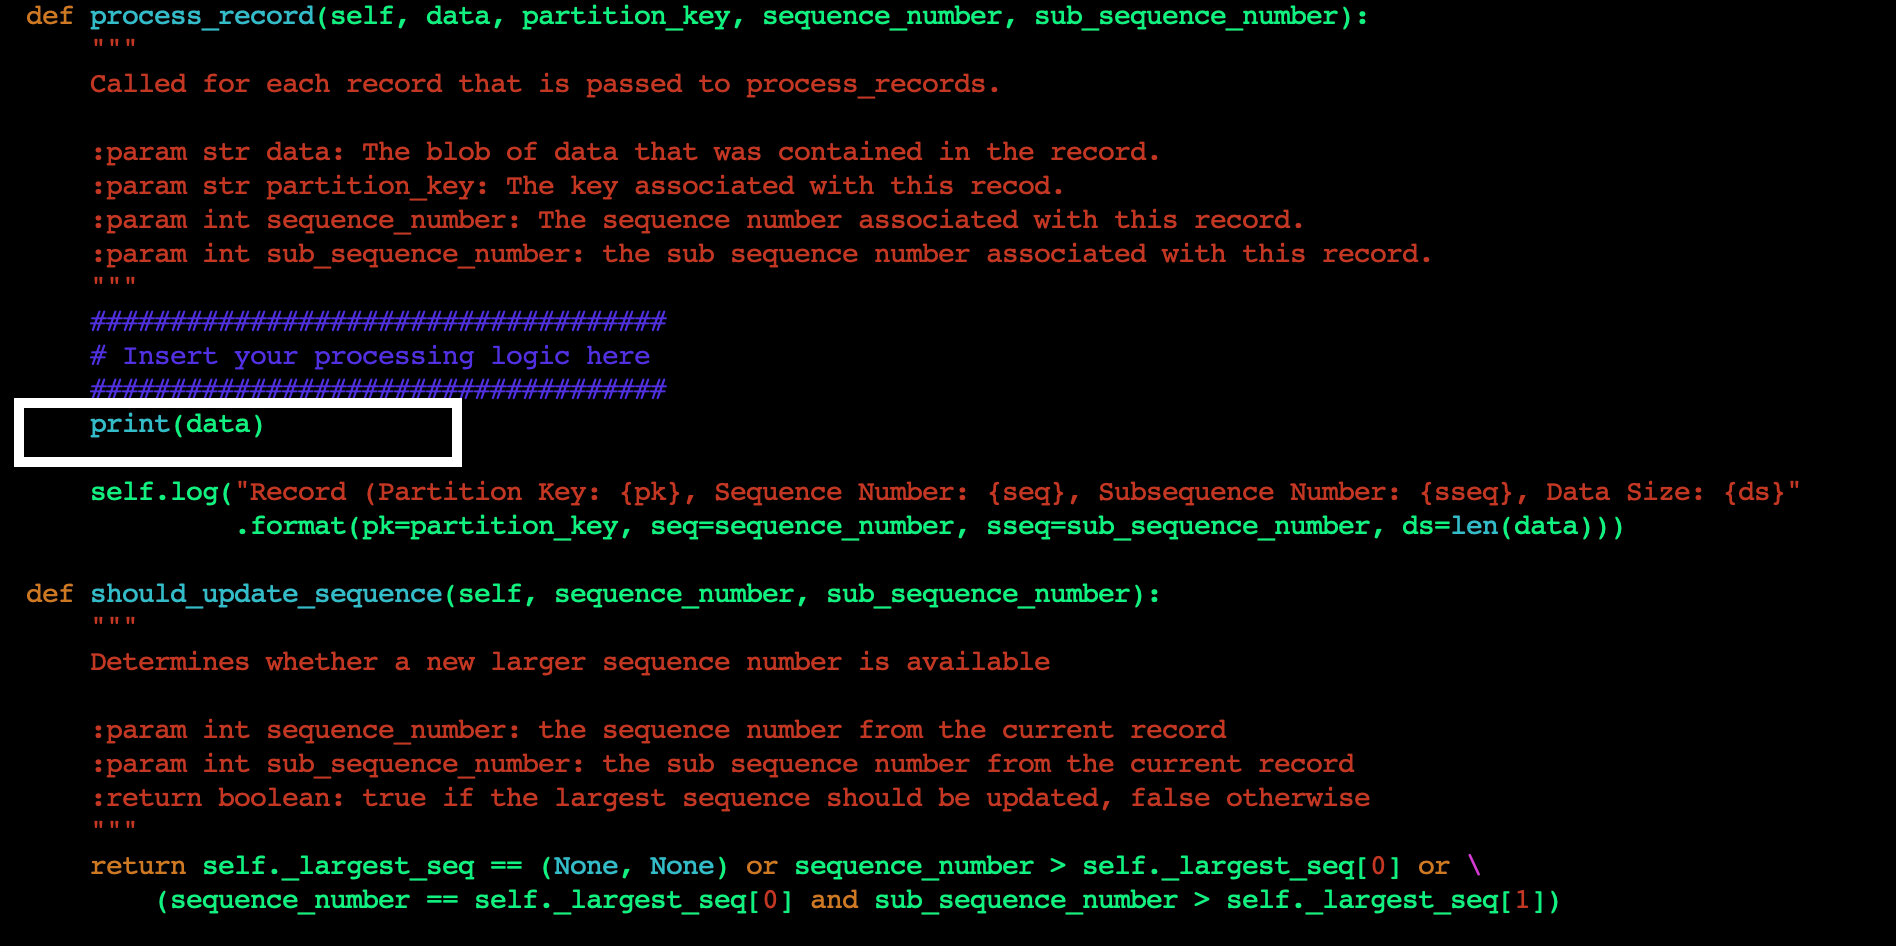
E.      Next, we will change the application code to print the data read from the Kinesis data stream to standard output (STDOUT). Edit the sample_kclpy_app.py under the samples directory. You will add all your application code logic in the process_record method. This method is called for every record in the Kinesis data stream. For this blog post, we will add a single line to the method to print the records to STDOUT, as shown in Figure 5.

Figure 5. Add custom code to process_record method

Figure 5. Add custom code to process_record method

F.       Save the file, and run the following command to build the project with the changes you just made.

cd amazon-kinesis-client-python/
python setup.py install

G.     Now you are ready to run the application. To start the KCL application, run the following command from the amazon-kinesis-client-python directory.

`amazon_kclpy_helper.py --print_command --java /usr/bin/java --properties samples/sample.properties`

This will start the application. Your application is now ready to read the data from the Kinesis data stream in another account and display the contents of the stream on STDOUT. When the producer starts writing data to the Kinesis data stream in Account A, you will start seeing those results being printed.

Clean Up

Once you are done testing the cross-account access make sure you clean up your environment to avoid incurring cost. As part of the cleanup we recommend you delete the Kinesis data stream, StockTradeStream, the EC2 instances that the KCL application is running on, and the DynamoDB table that was created by the KCL application.

Conclusion

In this blog post, we discussed the techniques to configure your KCL applications written in Java and Python to access a Kinesis data stream in a different AWS account. We also provided sample code and configurations which you can modify and use in your application code to set up the cross-account access. Now you can continue to build a multi-account strategy on AWS, while being able to easily access your Kinesis data streams from applications in multiple AWS accounts.

The collective thoughts of the interwebz