The Atlantic Council has published a report on securing the Internet of Things: “Security in the Billions: Toward a Multinational Strategy to Better Secure the IoT Ecosystem.” The report examines the regulatory approaches taken by four countries—the US, the UK, Australia, and Singapore—to secure home, medical, and networking/telecommunications devices. The report recommends that regulators should 1) enforce minimum security standards for manufacturers of IoT devices, 2) incentivize higher levels of security through public contracting, and 3) try to align IoT standards internationally (for example, international guidance on handling connected devices that stop receiving security updates).
This report looks to existing security initiatives as much as possible—both to leverage existing work and to avoid counterproductively suggesting an entirely new approach to IoT security—while recommending changes and introducing more cohesion and coordination to regulatory approaches to IoT cybersecurity. It walks through the current state of risk in the ecosystem, analyzes challenges with the current policy model, and describes a synthesized IoT security framework. The report then lays out nine recommendations for government and industry actors to enhance IoT security, broken into three recommendation sets: setting a baseline of minimally acceptable security (or “Tier 1”), incentivizing above the baseline (or “Tier 2” and above), and pursuing international alignment on standards and implementation across the entire IoT product lifecycle (from design to sunsetting). It also includes implementation guidance for the United States, Australia, UK, and Singapore, providing a clearer roadmap for countries to operationalize the recommendations in their specific jurisdictions—and push towards a stronger, more cohesive multinational approach to securing the IoT worldwide.
Note: One of the authors of this report was a student of mine at Harvard Kennedy School, and did this work with the Atlantic Council under my supervision.
It looks like my travel schedule is coupled with this Week In Review series of blog posts. This week, I am traveling to Fort-de-France in the French Caribbean islands to meet our customers and partners. I enjoy the travel time when I am offline. It gives me the opportunity to reflect on the past or plan for the future.
Last Week’s Launches Here are some of the launches that caught my eye last week:
Amazon SageMaker Autopilot – has added a new Ensemble training mode powered by AutoGluon that is 8X faster than the current Hyper parameter Optimization Mode and supports a wide range of algorithms, including LightGBM, CatBoost, XGBoost, Random Forest, Extra Trees, linear models, and neural networks based on PyTorch and FastAI.
Amazon Corretto 19 – Corretto is a no-cost, multiplatform, production-ready distribution of OpenJDK. Corretto is distributed by Amazon under an open source license. This version supports the latest OpenJDK feature release and is available on Linux, Windows, and macOS. You can download Corretto 19 from our downloads page.
Amazon CloudWatch Evidently – Evidently is a fully-managed service that makes it easier to introduce experiments and launches in your application code. Evidently adds support for Client Side Evaluations (CSE) for AWS Lambda, powered by AWS AppConfig. Evidently CSE allows application developers to generate feature evaluations in single-digit milliseconds from within their own Lambda functions. Check the client-side evaluation documentation to learn more.
Amazon S3on AWS Outposts – S3 on Outposts now supports object versioning. Versioning helps you to locally preserve, retrieve, and restore each version of every object stored in your buckets. Versioning objects makes it easier to recover from both unintended user actions and application failures.
Amazon Polly – Amazon Polly is a service that turns text into lifelike speech. This week, we announced the general availability of Hiujin, Amazon Polly’s first Cantonese-speaking neural text-to-speech (NTTS) voice. With this launch, the Amazon Polly portfolio now includes 96 voices across 34 languages and language variants.
X in Y – We launched existing AWS services in additional Regions:
Other AWS News Introducing the Smart City Competency program – The AWS Smart City Competency provides best-in-class partner recommendations to our customers and the broader market. With the AWS Smart City Competency, you can quickly and confidently identify AWS Partners to help you address Smart City focused challenges.
An update to IAM role trust policy behavior – This is potentially a breaking change. AWS Identity and Access Management (IAM) is changing an aspect of how role trust policy evaluation behaves when a role assumes itself. Previously, roles implicitly trusted themselves. AWS is changing role assumption behavior to always require self-referential role trust policy grants. This change improves consistency and visibility with regard to role behavior and privileges. This blog post shares the details and explains how to evaluate if your roles are impacted by this change and what to modify. According to our data, only 0.0001 percent of roles are impacted. We notified by email the account owners.
Upcoming AWS Events Check your calendar and sign up for an AWS event in your Region and language:
AWS re:Invent – Learn the latest from AWS and get energized by the community present in Las Vegas, Nevada. Registrations are open for re:Invent 2022 which will be held from Monday, November 28 to Friday, December 2.
AWS Summits – Come together to connect, collaborate, and learn about AWS. Registration is open for the following in-person AWS Summits: Bogotá (October 4), and Singapore (October 6).
Natural Language Processing (NLP) Summit – The AWS NLP Summit 2022 will host over 25 sessions focusing on the latest trends, hottest research, and innovative applications leveraging NLP capabilities on AWS. It is happening at our UK headquarters in London, October 5–6, and you can register now.
AWS Innovate for every app – This regional online conference is designed to inspire and educate executives and IT professionals about AWS. It offers dozens of technical sessions in eight languages (English, Spanish, French, German, Italian, Japanese, Korean, and Indonesian). Register today: Americas, September 28; Europe, Middle-East, and Africa, October 6; Asia Pacific & Japan, October 20.
AWS Fest – This third-party event will feature AWS influencers, community heroes, industry leaders, and AWS customers, all sharing AWS optimization secrets (this week on Wednesday, September). You can register for AWS Fest here.
Stay Informed That is my selection for this week! To better keep up with all of this news, please check out the following resources:
AWS on Air – Join us every Friday on Twitch, Twitter, and LinkedIn.
The Official AWS Podcast – Listen each week for updates on the latest AWS news and deep dives into exciting use cases. There are also official AWS podcasts in your local languages. Check the ones in Spanish, French, Italian, and German.
The CHERI
architecture is the product of a research program to extend common
CPU architectures
in a way that prevents many types of memory-related bugs (and
vulnerabilities). At the 2022 GNU Tools Cauldron,
Alex Coplan and Szabolcs Nagy described the work that has been done to
bring GCC and the GNU C Library (glibc) to this architecture. CHERI is a fundamentally
different approach to how memory is accessed, and supporting it properly is anything
but a trivial task.
Nowadays many customers are following a multi-cloud strategy. They might choose to use various cloud-managed services, such as Amazon Relational Database Service (Amazon RDS) for SQL Server and Azure SQL Managed Instances, to perform data analytics tasks, but still use traditional extract, transform, and load (ETL) tools to integrate and process the data. However, traditional ETL tools may require you to develop custom scripts, which makes ETL automation difficult.
In this post, I show you how to automate ETL jobs between Amazon RDS for SQL Server and Azure SQL Managed Instances using AWS Glue Studio, which is part of AWS Glue, a fully managed serverless integration service. AWS Glue Studio has a graphical interface that makes it easy to create, run, and monitor ETL jobs, and you can create a schedule to run your jobs at specific times.
Solution overview
To move data from one database to another, there are different services available either on-premise or in the cloud, varied by bandwidth limits, ongoing changes (CDC), schema and table modifications, and other features. Beyond that, we need to apply advanced data transformations, monitor, and automate the ETL jobs. This is where AWS Glue Studio can help us facilitate these activities.
As shown in the following diagram, we use AWS Glue Studio as the middleware to pull data from the source database (in this case an Azure SQL Managed Instance), then create and automate the ETL job using one of the pre-built transformations in AWS Glue Studio. Finally, we load the data to the target database (in this case an RDS for SQL Server instance).
The solution workflow consists of the following steps:
Create connections for the source and target databases.
Create and run AWS Glue crawlers.
Create and run an ETL job that transforms the data and loads it from source to target.
Create a source database table (Azure SQL Managed Instance). You can deploy the Azure database instance using the following QuickStart. For testing purposes, I import the public AdventureWorkssample database and use the dbo.Employee table. See the following code:
#Query table
SELECT * FROM [AdventureWorksLT2019].[dbo].[Employee]
Create the target database table (Amazon RDS for SQL Server). To deploy the RDS instance, refer to Create and Connect to a Microsoft SQL Server Database with Amazon RDS. You can create an empty database and table with the following statements. This is the table where the data coming from Azure will be stored.
#Create database
CREATE DATABASE AdventureWorksonRDS;
#Create table
CREATE TABLE Employee
(EmpID INT NOT NULL,
EmpName VARCHAR(50) NOT NULL,
Designation VARCHAR(50) NULL,
Department VARCHAR(50) NULL,
JoiningDate DATETIME NULL,
CONSTRAINT [PK_Employee] PRIMARY KEY CLUSTERED (EmpID)

#Query table
SELECT * FROM [AdventureWorksonRDS].[dbo].[Employee]
Create connections
The first step is to populate our AWS Glue Data Catalog with the schema information coming from our source and target data sources.
To do that, we first create connections. A connection is a Data Catalog object that stores connection information for a particular data store. Connections store login credentials, URI strings, VPC information, and more. Creating connections in the Data Catalog saves the effort of having to specify the connection details every time you create a crawler or job.
Create a connection for Azure SQL Managed Instance
To create the connection to our source database, complete the following steps:
On the AWS Glue console, choose AWS Glue Studio.
In the navigation pane of the AWS Glue Studio console, choose Connectors.
Choose Create connection.
For Name, enter AzureSQLManaged.
For Connection type, choose JDBC.
For JDBC URL, use the SQL Server syntax jdbc:protocol://host:port;database=db_name.
You can find the host and database name on the Azure SQL Managed Instance service console, on the Overview page.For this specific example, we use the following information for our Azure SQL Instance:
Enter your user name and password. Choose Create connection.
Create a connection for Amazon RDS for SQL Server
To create a connection for our target data source, complete the following steps:
On the AWS Glue Studio console, choose Connectors in the navigation pane.
Choose Create connection.
For Name, enter AWSRDSforSQL.
For Connection type, choose Amazon RDS.
For Database engine, choose Microsoft SQL Server.
For Database instances, choose your RDS DB instance.
For Database name, enter AdventureWorksonRDS.
Enter your user name and password.
Choose Create connection.
You can now see the two connections created in the Connections section.
Create and run AWS Glue crawlers
You can use a crawler to populate the AWS Glue Data Catalog with tables. This is the most common method used by most AWS Glue users. A crawler can crawl multiple data stores in a single run. Upon completion, it updates the Data Catalog with the tables it found. The ETL jobs that you define in AWS Glue use these Data Catalog tables as sources and targets.
Create a crawler for Azure SQL Managed Instance
To create a crawler for our source database, complete the following steps:
On the AWS Glue console, choose Crawlers in the navigation pane.
Choose Create crawler.
If the data hasn’t been mapped into an AWS Glue table, select Not yet and choose Add a data source.
For Data source¸ choose JDBC.
For Connection, choose AzureSQLManaged.
For Include path, specify the path of the database including the schema: AdventureWorksLT2019/dbo/%.
Choose Add a JDBC data source.
Choose Next.
Choose the IAM role created as part of the prerequisites and choose Next.
Choose Add database to create the target database in the AWS Glue Data Catalog.
For Name, enter azuresqlmanaged_db.
Choose Create database.
For Target database, choose azuresqlmanaged_db.
Choose Next.
Review if everything looks correct and choose Create crawler.
Create a crawler for Amazon RDS for SQL Server
Repeat the crawler creation steps to create the crawler for the target RDS for SQL Server database, using the following information:
Crawler name – AmazonRDSSQL_Crawler
Data source – JDBC
Connection – AWSRDSforSQL
Include path – AdventureWorksonRDS/dbo/%
IAM role – AWSGlueServiceRoleDefault
Database name – amazonrdssql_db
Run the crawlers
Now it’s time to run the crawlers.
On the AWS Glue console, choose Crawlers in the navigation pane.
Select the crawlers you created and choose Run.
When the crawler is complete, choose Databases in the navigation pane. Here you can find the databases discovered by the crawler.
Choose Tables in the navigation pane and explore the tables discovered by the crawler that correctly identified the data type as SQL Server.
Choose the table adventureworkslt2019_dbo_employee and review the schema created for the data source.
Create and run an ETL job
Now that we have crawled our source and target databases, and we have the data in the AWS Glue Data Catalog, we can create an ETL job to load and transform this data.
On the AWS Glue Studio console, choose Jobs in the navigation pane.
Select Visual with a blank canvas to use a visual interface to create our ETL jobs.
Choose Create.
On the Source menu, choose AWS Glue Data Catalog.
On the Data source properties tab, specify the database and table (for this post, azuresqlmanaged_db and adventureworkslt2019_dbo_employee).
On the Transform menu, choose Apply mapping to map the source fields to the target database.
On the Transform tab, you can see the data fields to be loaded, and you even can drop some of them if needed.
On the Target menu, choose AWS Glue Data Catalog.
On the Data target properties tab, choose the database and table where you want to load the transformed data (for this post, amazonrdssql_db and adventureworksrds_dbo_employee).
On the Job details tab, for Name, enter ETL_Azure_to_AWS.
For IAM Role, choose the appropriate role.
Choose Save.
Choose Run to run the job.
If the ETL job ran successfully, it should map the data from the source database (Azure SQL) to the target database (Amazon RDS for SQL). To confirm it, you can connect to the target database using SQL Server Management Studio (SSMS), and query the empty database/table AdventureWorksonRDS/dbo.Employee. It should have the data coming from the Azure SQL Managed Instance.
#Query table
SELECT * FROM [AdventureWorksonRDS].[dbo].[Employee]
Schedule your ETL job
In AWS Glue Studio, you can create a schedule to have your jobs run at specific times. This will reimport the full dataset and reference the use of bookmarks to do incremental loads. You can schedule your ETL jobs on an hourly, daily, weekly, monthly, or custom basis, depending on your needs. To schedule a job, complete the following steps:
On the AWS Glue Studio, navigate to the job you created.
On the Schedules tab, choose Create schedule.
For Name, enter a name (for example, dbo_employee_daily_load).
Choose your preferred frequency, start hour, and minute of the hour. For this post, we schedule it daily at 3:00 UTC.
For Description, enter an optional description.
Choose Create schedule.
Confirm on the Schedules tab that the schedule was created and activated successfully.
You have now automated your ETL job to run at your desired frequency.
Monitor your ETL job
The job monitoring dashboard provides an overall summary of the job runs, with totals for the jobs with a status of Running, Canceled, Success, or Failed.
The Runs tab shows the jobs for the specified date range and filters. You can filter the jobs on additional criteria, such as status, worker type, job type, and job name.
Conclusion
In this post, I went through the steps to automate ETL jobs using AWS Glue Studio, which is a user-friendly graphical interface to perform data integration tasks such as discovering and extracting data from various sources; enriching, cleaning, normalizing, and combining data; and loading and organizing data in databases, data warehouses, and data lakes. You can easily find and access this data using the AWS Glue Data Catalog. Data engineers and ETL developers can visually create, run, and monitor ETL workflows with a few clicks in AWS Glue Studio.
About the author
Daniel Maldonado is an AWS Solutions Architect, specializing in Microsoft workloads and big data technologies, and focused on helping customers migrate their applications and data to AWS. Daniel has over 13 years of experience working with information technologies and enjoys helping clients reap the benefits of running their workloads in the cloud.
Facteus Inc. is a leading provider of actionable insights from sensitive transaction data. Facteus safely transforms raw financial transaction data from legacy technologies into actionable information, without compromising data privacy, through its innovative synthetic data process. Quantamatics is one of Facteus’ core product offering.
Quantamatics accelerates the time it takes a user to go from raw alternative data to insights, by providing a cloud-based, turnkey research platform that handles data from ingestion to analysis. This platform saves the analysts, data researchers, and data scientists time by doing all the preparation and normalization efforts prior to working with the data for insight discovery. The provided cloud environment also allows for easy and flexible analysis of both provided and external data sources. Quantamatics is a SaaS offering with a subscription model that provides access to both the research platform and the associated Facteus datasets.
A great place to start when evaluating existing workloads for fault tolerance and reliability is the AWS Well-Architected Framework. The Well-Architected Framework is designed to help cloud architects build secure, high-performing, resilient, and efficient infrastructure for their applications. Based on six pillars—operational excellence, security, reliability, performance efficiency, cost optimization, and sustainability—the Framework provides a consistent approach for customers to evaluate architectures, and implement designs that will scale over time.
The AWS Well-Architected Tool, available at no charge in the AWS Management Console, lets you create self-assessments to identify and correct gaps in your current architecture. Adhering to Well-Architected principles, Facteus adopted managed services, such as Amazon EKS and Amazon Aurora Serverless, as they reduce efforts on provisioning, configuring, scaling, backing up, and so on. Additionally, using managed services helps to save on the overall costs of maintaining the services.
Facteus’ architecture overview
Before
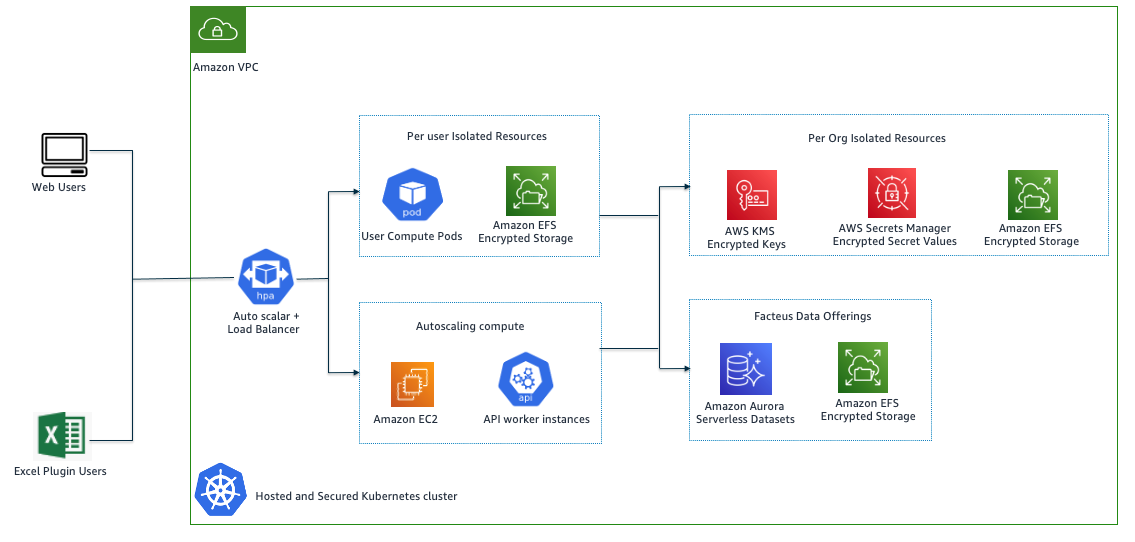
Users can access Quantamatics for their research either through a Jupyter notebook or a Microsoft Excel plugin. Facteus used EC2 instances to directly host the underlying JupyterHub deployments and AWS Elastic Beanstalk to deploy APIs.
The legacy architecture, while cloud-based, had multiple issues that made it ineffective from a maintenance, scalability, and cost perspective (as demonstrated in Figure 1):
JupyterHub does not currently support high availability (HA) natively. This meant an EC2 failover would require relatively long unavailability while a replacement EC2 node spun up or potentially double the cost to keep an idle node on standby.
Also, with the EC2 instances being specialized, portions of each EC2 instance will remain unused, resulting in unnecessary costs compared to more modern solutions such as Amazon EKS, which can pool and divide up instances in a more granular fashion.
Finally, as the EC2 instances were standalone, solutions would need to be set up to both monitor application health and perform the appropriate actions in case of an outage.
Although Elastic Beanstalk was a great way to deploy API instances in an HA and scalable way, to completely modernize and remain consistent throughout application to a microservice-based architecture, Facteus migrated their Elastic Beanstalk instances as well, to better utilize the pooled resources.
Figure 1. Cloud-based legacy architecture
Quantamatics requires a Data Warehouse solution to constantly run behind an API to allow for acceptable request and response times. While Snowflake is a great data warehousing and big data querying solution, Facteus found it expensive for their deployment. The queries that the Quantamatics APIs run are typically not computationally expensive but do end up returning relatively large amounts of data. This makes transferring the results back to the API over the internet a potential bottleneck.
To address these bottlenecks, Facteus re-architected their application into an Amazon EKS based one, backed with Aurora Serverless v2 (Postgres).
The new architecture resolves the previous problems in two ways (Figure 2):
By using Aurora Serverless v2 (Postgres) to store and query the datasets used by the API within the same VPC instead of Snowflake, it kept the query run time relatively the same but drastically decreased both the transfer time and the associated costs due to the locality of the database as well as the cost and scalability of Aurora Serverless v2.
By switching to Amazon EKS, the underlying EC2 nodes could easily be pooled and more thoroughly utilized across the various deployments, thus reducing costs. Additionally, as the deployments were now containerized, an outage would result in the quick relocation of those containerized apps (pods) to nodes with capacity, thus reducing downtime and cost.
As a side benefit with the move to managed nodes on Amazon EKS, this completely removed the node patching overhead, as Amazon EKS safely handles the patching of the underlying nodes with a single command.
Amazon EKS monitors and restarts pods automatically, which eliminated the need to set up and manage a solution that monitors pod health and takes the appropriate actions upon failures.
Figure 2. Contemporary architecture with Amazon EKS and Aurora Serverless v2 (Postgres)
Auto scaling with Amazon EKS and Aurora Serverless
Amazon EKS helped to greatly reduce the overhead of setting up and managing the auto scaling of Quantamatics in two ways:
User compute environments could be spun up as isolated pods, with Amazon EKS spinning nodes up and down automatically based on demand.
API instances could also be automatically spun up and down based on network throughput metrics queried by Amazon EKS to handle the requests made by users in a timely fashion.
Aurora Serverless v2
With Aurora Serverless v2, the needed compute capacity of the database automatically scales based on load generated by the corresponding API requests. This both reduced the cost as the load varies heavily throughout the day, reducing the management overhead of handling spinning up and down of read replicas if other solutions were used instead.
Snowflake vs. Aurora Serverless V2 (Postgres) – Quantamatics query performance and cost comparison
The following steps were performed to migrate data from Snowflake to Aurora Serverless v2:
Use the Snowflake COPY INTO <location> command to copy the data from the Snowflake database table into one or more files in an S3 bucket.
Create tables in Aurora Serverless. Use the create_s3_uri function to load variables.
This blog post describes importing data from Amazon S3 to Amazon Aurora PostgreSQL.
Testing strategy: Run the corresponding CLI database utility for each database (snowsql vs psql) from within the VPC. Run the same query on each dataset. Return and write the results as CSV to a local file. Data set size: ~178,000,000 rows Result set size: ~418,000 rows
Data source
Configuration
Results
Snowflake
Snowflake: Medium Warehouse (running), AWS based in same Region as APIs
Cost: ~$0.01 per query based on credit usage
21.99 seconds run time
3.36 seconds run time, 18.63 seconds transfer time
Aurora Serverless V2(Postgres)
Idling on four Aurora Compute Units (ACU)
Cost: ~$0.24 an hour
Tables and indexes tuned for Quantamatics use cases
7.00 seconds run time
3.58 seconds run time, 3.42 seconds transfer time
Conclusion
The customer was able to achieve similar run times for the given dataset and query, but faster transfer speeds from Aurora Serverless due to the locality of the database. They also realized up to ~40x runtime cost savings by using Aurora Serverless—1,000 queries in Aurora Serverless vs. ~24 queries in Snowflake for the same cost.
Note: These results are specific to Quantamatics use cases where queries are fixed and well-known, and relatively limited in terms of complexity. This allowed the tables and database in Aurora Serverless v2 to be tuned for those specific purposes.
AWS recommends customers review their workloads using the AWS Well-Architected Tool to help ensure that their workloads are performant, secure, and cost-optimized. Well-Architected Framework Reviews are excellent opportunities to work together with your AWS account team and key stakeholders to discuss how modern infrastructure can help you win in the market.
When an EC2 instance is suspected to have been compromised, it’s strongly recommended to investigate what happened to the instance. You should look for activities such as:
Open network connections
List of running processes
Processes that contain injected code
Memory-resident infections
Other forensic artifacts
When an EC2 instance is compromised, it’s important to take action as quickly as possible. Before you shut down the EC2 instance, you first need to capture the contents of its volatile memory (RAM) in a memory dump because it contains the instance’s in-progress operations. This is key in determining the root cause of compromise.
In order to capture volatile memory in Linux, you can use a tool like Linux Memory Extractor (LiME). This requires you to have the kernel modules that are specific to the kernel version of the instance for which you want to capture volatile memory. We also recommend that you limit the actions you take on the instance where you are trying to capture the volatile memory in order to minimize the set of artifacts created as part of the capture process, so you need a method to build the tools for capturing volatile memory outside the instance under investigation. After you capture the volatile memory, you can use a tool like Volatility2 to analyze it in a dedicated forensics environment. You can use tools like LiME and Volatility2 on EC2 instances that use x86, x64, and Graviton instance types.
An AWS Identity and Access Management (IAM) role with permissions to deploy the required resources in an AWS account. More details about these permissions follow in the next section.
Solution overview
The EC2 forensic module factory solution consists of the following resources:
Important: The SSM document clones the LiME and Volatility2 GitHub repositories, and these tools use version 2.0 of the GNU General Public License. This SSM document can be updated to include your preferred tools, like fmem or Volatility3, for forensic analysis and capture.
One security group for the EC2 instance that is provisioned during the automation
The solution uses the following VPC endpoints for AWS services:
ec2_endpoint
ec2_msg_endpoint
kms_endpoint
ssm_endpoint
ssm_msg_endpoint
s3_endpoint
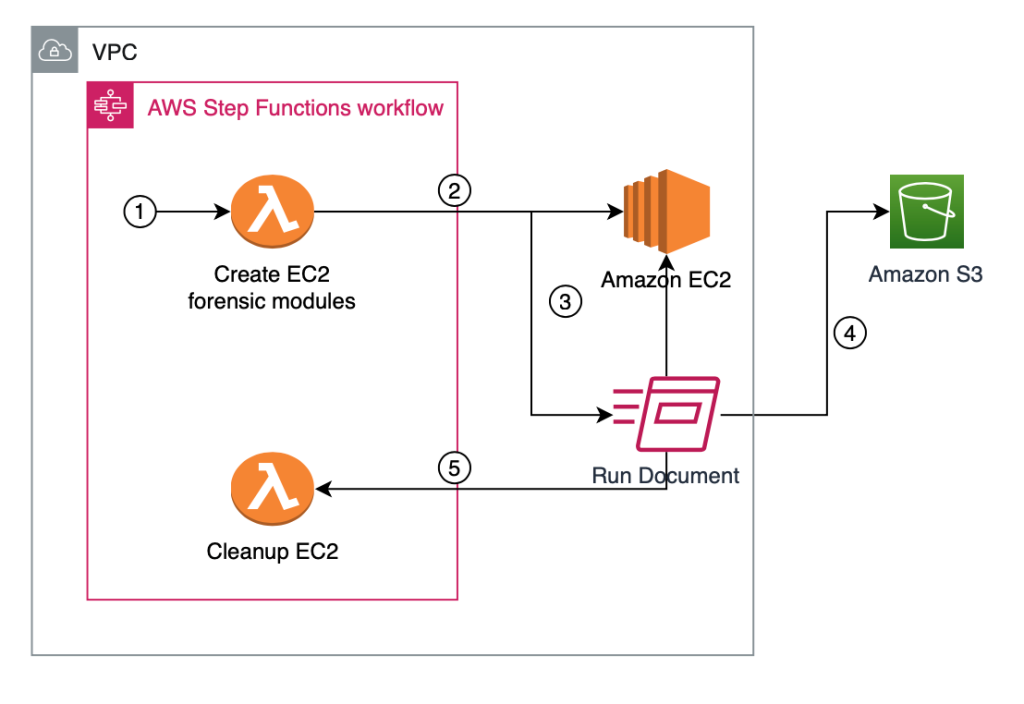
Figure 1 shows an overview of the EC2 forensic module factory solution workflow.
Figure 1: Automation to build forensic kernel modules for an Amazon Linux EC2 instance
The EC2 forensic module factory solution workflow in Figure 1 includes the following numbered steps:
A Step Functions workflow is started, which creates a Step Functions task token and invokes the first Lambda function, createEC2module, to create EC2 forensic modules.
A Step Functions task token is used to allow long-running processes to complete and to avoid a Lambda timeout error. The createEC2module function runs for approximately 9 minutes. The run time for the function can vary depending on any customizations to the createEC2module function or the SSM document.
The createEC2module function launches an EC2 instance based on the Amazon Machine Image (AMI) provided.
Once the EC2 instance is running, an SSM document is run, which includes the following steps:
If a specific kernel version is provided in step 1, this kernel version will be installed on the EC2 instance. If no kernel version is provided, the default kernel version on the EC2 instance will be used to create the modules.
If a specific kernel version was selected and installed, the system is rebooted to use this kernel version.
The prerequisite build tools are installed, as well as the LiME and Volatility2 packages.
The LiME kernel module and the Volatility2 profile are built.
The kernel modules for LiME and Volatility2 are put into the S3 bucket.
Upon completion, the Step Functions task token is sent to the Step Functions workflow to invoke the second cleanupEC2module Lambda function to terminate the EC2 instance that was launched in step 2.
Option 1: Deploy the solution with AWS CloudFormation (console)
Sign in to your preferred security tooling account in the AWS Management Console, and choose the following Launch Stack button to open the AWS CloudFormation console pre-loaded with the template for this solution. It will take approximately 10 minutes for the CloudFormation stack to complete.
Option 2: Deploy the solution by using the AWS CDK
To build the app when navigating to the project’s root folder, use the following commands. npm install -g aws-cdk npm install
Run the following commands in your terminal while authenticated in your preferred security tooling AWS account. Be sure to replace <INSERT_AWS_ACCOUNT> with your account number, and replace <INSERT_REGION> with the AWS Region that you want the solution deployed to. cdk bootstrap aws://<INSERT_AWS_ACCOUNT>/<INSERT_REGION> cdk deploy
Run the solution to build forensic kernel objects
Now that you’ve deployed the EC2 forensic module factory solution, you need to invoke the Step Functions workflow in order to create the forensic kernel objects. The following is an example of manually invoking the workflow, to help you understand what actions are being performed. These actions can also be integrated and automated with an EC2 incident response solution.
To manually invoke the workflow to create the forensic kernel objects (console)
At the input prompt, enter the following JSON values. { "AMI_ID": "ami-0022f774911c1d690", "kernelversion":"kernel-4.14.104-95.84.amzn2.x86_64" }
Choose Start execution to start the workflow, as shown in Figure 2.
Figure 2: Step Functions step input example to build custom kernel version using Amazon Linux 2 AMI ID
Workflow progress
You can use the AWS Management Console to follow the progress of the Step Functions workflow. If the workflow is successful, you should see the image when you view the status of the Step Functions workflow, as shown in Figure 3.
Figure 3: Step Functions workflow success example
Note: The Step Functions workflow run time depends on the commands that are being run in the SSM document. The example SSM document included in this post runs for approximately 9 minutes. For information about possible Step Functions errors, see Error handling in Step Functions.
To verify that the artifacts are built
After the Step Functions workflow has successfully completed, go to the S3 bucket that was provisioned in the EC2 forensic module factory solution.
Look for two prefixes in the bucket for LiME and Volatility2, as shown in Figure 4.
Figure 4: S3 bucket prefix for forensic kernel modules
Open each tool name prefix in S3 to find the actual module, such as in the following examples:
Now that the objects have been created, the solution has successfully completed.
Incorporate forensic module builds into an EC2 AMI pipeline
Each organization has specific requirements for allowing application teams to use various EC2 AMIs, and organizations commonly implement an EC2 image pipeline using tools like EC2 Image Builder. EC2 Image Builder uses recipes to install and configure required components in the AMI before application teams can launch EC2 instances in their environment.
The EC2 forensic module factory solution we implemented here makes use of an existing EC2 instance AMI. As mentioned, the solution uses an SSM document to create forensic modules. The logic in the SSM document could be incorporated into your EC2 image pipeline to create the forensic modules and store them in an S3 bucket. S3 also allows additional layers of protection such as enforcing default bucket encryption with an AWS Key Management Service Customer Managed Key (CMK), verifying S3 object integrity with checksum, S3 Object Lock, and restrictive S3 bucket policies. These protections can help you to ensure that your forensic modules have not been modified and are only accessible by authorized entities.
It is important to note that incorporating forensic module creation into an EC2 AMI pipeline will build forensic modules for the specific kernel version used in that AMI. You would still need to employ this EC2 forensic module solution to build a specific forensic module version if it is missing from the S3 bucket where you are creating and storing these forensic modules. The need to do this can arise if the EC2 instance is updated after the initial creation of the AMI.
Incorporate the solution into existing EC2 incident response automation
There are many existing solutions to automate incident response workflow for quarantining and capturing forensic evidence for EC2 instances, but the majority of EC2 incident response automation solutions have a single dependency in common, which is the use of specific forensic modules for the target EC2 instance kernel version. The EC2 forensic module factory solution in this post enables you to be both proactive and reactive when building forensic kernel modules for your EC2 instances.
You can use the EC2 forensic module factory solution in two different ways:
Ad-hoc – In this post, you walked through the solution by running the Step Functions workflow with specific parameters. You can do this to build a repository of kernel modules.
Automated – Alternatively, you can incorporate this solution into existing automation by invoking the Step Functions workflow and passing the AMI ID and kernel version. An example could be the following:
An existing EC2 incident response solution attempts to get the forensic modules to capture the volatile memory from an S3 bucket.
If the specific kernel version is missing in the S3 bucket, the solution updates the automation to StartExecution on the create_ec2_volatile_memory_modules state machine.
The Step Functions workflow builds the specific forensic modules.
After the Step Functions workflow is complete, the EC2 incident response solution restarts its workflow to get the forensic modules to capture the volatile memory on the EC2 instance.
Now that you have the kernel modules, you can both capture the volatile memory by using LiME, and then conduct analysis on the memory dump by using a Volatility2 profile.
To capture and analyze volatile memory on the target EC2 instance (high-level steps)
Copy the LiME module from the S3 bucket holding the module repository to the target EC2 instance.
Capture the volatile memory by using the LiME module.
Stream the volatile memory dump to a S3 bucket.
Launch an EC2 forensic workstation instance, with Volatility2 installed.
Copy the Volatility2 profile from the S3 bucket to the appropriate location.
Copy the volatile memory dump to the EC2 forensic workstation.
Run analysis on the volatile memory with Volatility2 by using the specific Volatility2 profile created for the target EC2 instance.
Automated self-service AWS solution
AWS has also released the Automated Forensics Orchestrator for Amazon EC2 solution that you can use to quickly set up and configure a dedicated forensics orchestration automation solution for your security teams. The Automated Forensics Orchestrator for Amazon EC2 allows you to capture and examine the data from EC2 instances and attached Amazon Elastic Block Store (Amazon EBS) volumes in your AWS environment. This data is collected as forensic evidence for analysis by the security team.
The Automated Forensics Orchestrator for Amazon EC2 creates the foundational components to enable the EC2 forensic module factory solution’s memory forensic acquisition workflow and forensic investigation and reporting service. Both the Automated Forensics Orchestrator for Amazon EC2, and the EC2 forensic module factory, are hosted in different GitHub projects. And you will need to reconcile the expected S3 bucket locations for the associated modules:
Customize the EC2 forensic module factory solution
The SSM document pulls open-source packages to build tools for the specific Linux kernel version. You can update the SSM document to your specific requirements for forensic analysis, including expanding support for other operating systems, versions, and tools.
You can also update the S3 object naming convention and object tagging, to allow external solutions to reference and copy the appropriate kernel module versions to enable the forensic workflow.
Clean up
If you deployed the EC2 forensic module factory solution by using the Launch Stack button in the AWS Management Console or the CloudFormation template ec2_module_factory_cfn, do the following to clean up:
In the AWS CloudFormation console for the account and Region where you deployed the solution, choose the Ec2VolModules stack.
Choose the option to Delete the stack.
If you deployed the solution by using the AWS CDK, run the following command.
cdk destroy
Conclusion
In this blog post, we walked you through the deployment and use of the EC2 forensic module factory solution to use AWS Step Functions, AWS Lambda, AWS Systems Manager, and Amazon EC2 to create specific versions of forensic kernel modules for Amazon Linux EC2 instances.
The solution provides a framework to create the foundational components required in an EC2 incident response automation solution. You can customize the solution to your needs to fit into an existing EC2 automation, or you can deploy this solution in tandem with the Automated Forensics Orchestrator for Amazon EC2.
If you have feedback about this post, submit comments in the Comments section below. If you have any questions about this post, start a thread on re:Post.
Want more AWS Security news? Follow us on Twitter.
I am delighted to announce a new collaboration between the Raspberry Pi Foundation and a leading AI company, DeepMind, to inspire the next generation of AI leaders.
The Raspberry Pi Foundation’s mission is to enable young people to realise their full potential through the power of computing and digital technologies. Our vision is that every young person — whatever their background — should have the opportunity to learn how to create and solve problems with computers.
With the rapid advances in artificial intelligence — from machine learning and robotics, to computer vision and natural language processing — it’s increasingly important that young people understand how AI is affecting their lives now and the role that it can play in their future.
Experience AI is a new collaboration between the Raspberry Pi Foundation and DeepMind that aims to help young people understand how AI works and how it is changing the world. We want to inspire young people about the careers in AI and help them understand how to access those opportunities, including through their subject choices.
Experience AI
More than anything, we want to make AI relevant and accessible to young people from all backgrounds, and to make sure that we engage young people from backgrounds that are underrepresented in AI careers.
The program has two strands: Inspire and Experiment.
Inspire: To engage and inspire students about AI and its impact on the world, we are developing a set of free learning resources and materials including lesson plans, assembly packs, videos, and webinars, alongside training and support for educators. This will include an introduction to the technologies that enable AI; how AI models are trained; how to frame problems for AI to solve; the societal and ethical implications of AI; and career opportunities. All of this will be designed around real-world and relatable applications of AI, engaging a wide range of diverse interests and useful to teachers from different subjects.
Experiment: Building on the excitement generated through Inspire, we are also designing an AI challenge that will support young people to experiment with AI technologies and explore how these can be used to solve real-world problems. This will provide an opportunity for students to get hands-on with technology and data, along with support for educators.
Our initial focus is learners aged 11 to 14 in the UK. We are working with teachers, students, and DeepMind engineers to ensure that the materials and learning experiences are engaging and accessible to all, and that they reflect the latest AI technologies and their application.
As with all of our work, we want to be research-led and the Raspberry Pi Foundation research team has been working over the past year to understand the latest research on what works in AI education.
Next steps
Development of the Inspire learning materials is underway now, and we will release the whole set of resources early in 2023. Throughout 2023, we will design and pilot the Experiment challenge.
If you want to stay up to date with Experience AI, or if you’d like to be involved in testing the materials, fill in this form to register your interest.
The Human
Interface Device (HID) standard dates back to the Windows 95 era.
It describes how devices like mice and keyboards present themselves to the
host computer, and has created a world where a single driver can handle a
wide variety of devices from multiple manufacturers. Or it would have, if
there weren’t actual device manufacturers involved. In the real world,
devices stretch and break the standard, each in its own special way. At
the 2022 Linux Plumbers Conference,
Benjamin Tissoires described how BPF can be used to simplify the
task of supporting HID devices.
Security updates have been issued by Debian (expat and poppler), Fedora (dokuwiki), Gentoo (fetchmail, grub, harfbuzz, libaacplus, logcheck, mrxvt, oracle jdk/jre, rizin, smarty, and smokeping), Mageia (tcpreplay, thunderbird, and webkit2), SUSE (dpdk, permissions, postgresql14, puppet, and webkit2gtk3), and Ubuntu (linux-gkeop and sosreport).
At Cloudflare, we’re excited about the quickly-approaching 5G future. Increasingly, we’ll have access to high throughput and low-latency wireless networks wherever we are. It will make the Internet feel instantaneous, and we’ll find new uses for this connectivity such as sensors that will help us be more productive and energy-efficient. However, this type of connectivity doesn’t have to come at the expense of security, a concern raised in this recent Wired article. Today we’re announcing the creation of a new partnership program for mobile networks—Zero Trust for Mobile Operators—to jointly solve the biggest security and performance challenges.
SASE for Mobile Networks
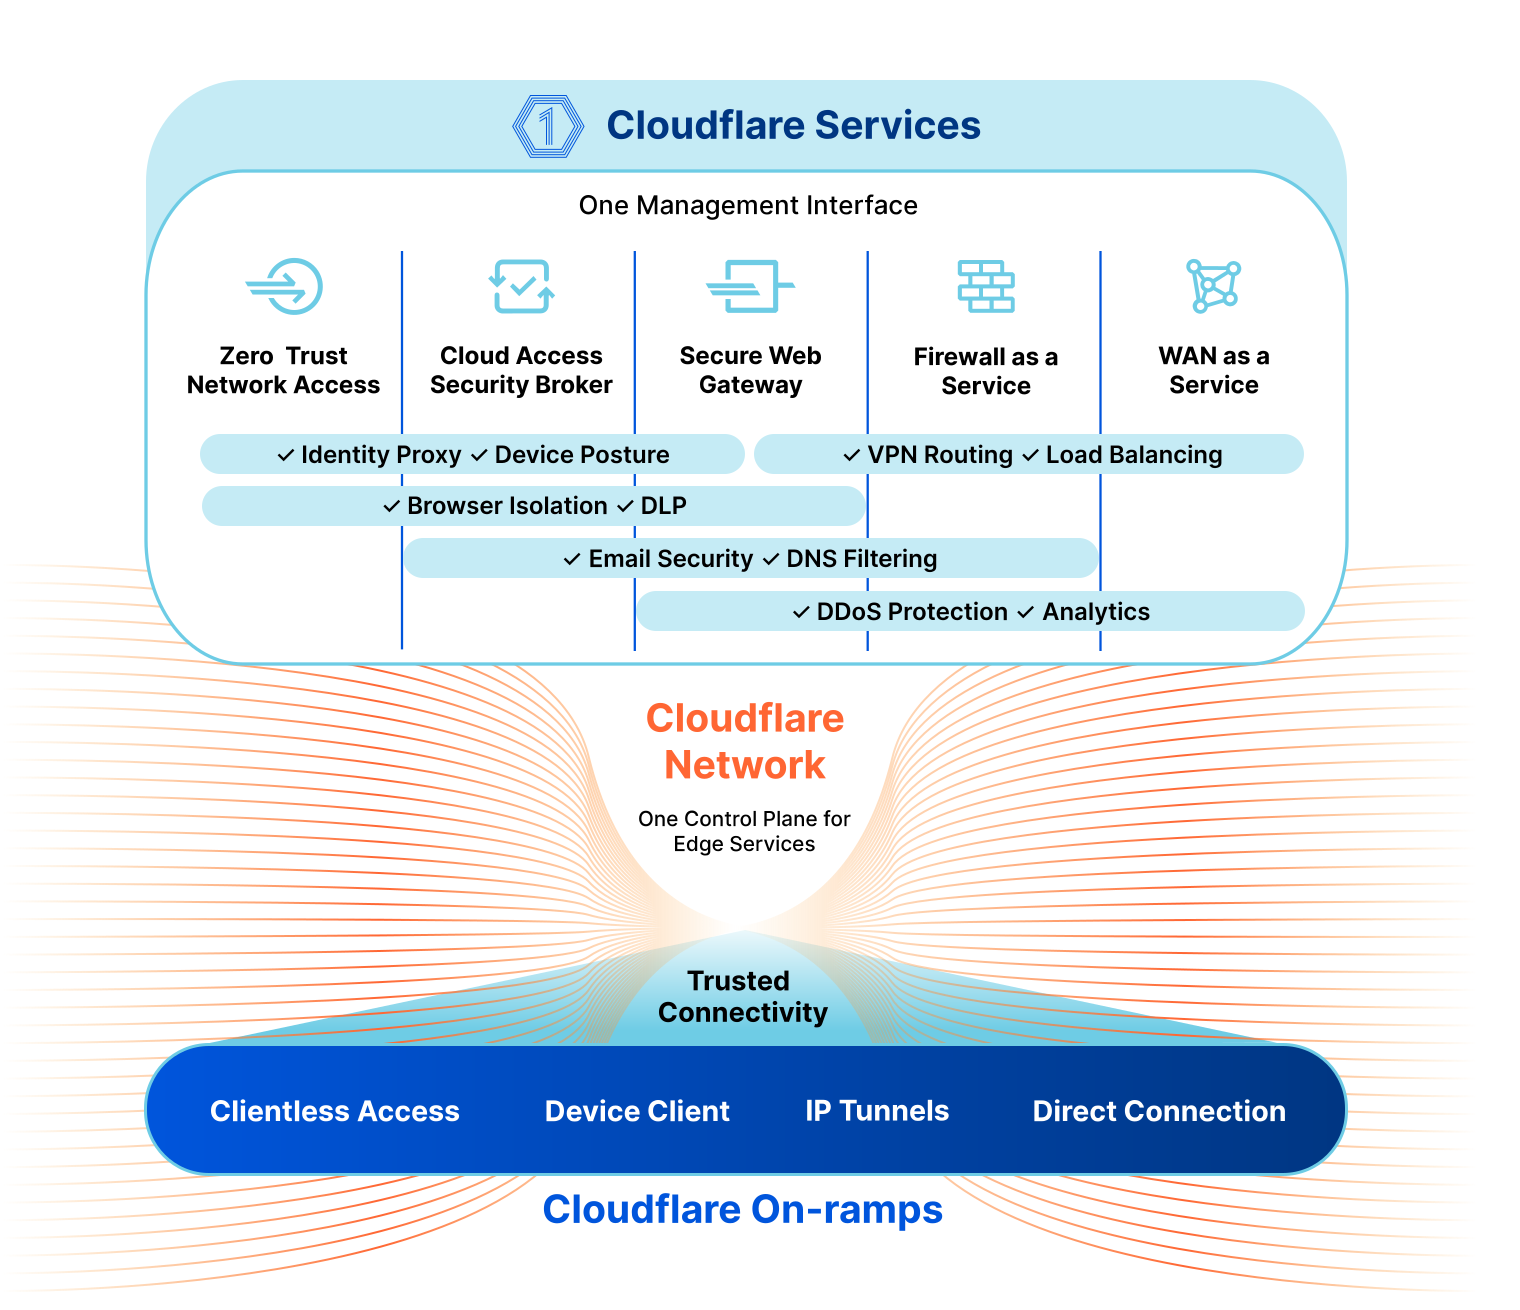
Every network is different, and the key to managing the complicated security environment of an enterprise network is having lots of tools in the toolbox. Most of these functions fall under the industry buzzword SASE, which stands for Secure Access Service Edge. Cloudflare’s SASE product is Cloudflare One, and it’s a comprehensive platform for network operators. It includes:
Magic WAN, which offers secure Network-as-a-Service (NaaS) connectivity for your data centers, branch offices and cloud VPCs and integrates with your legacy MPLS networks
Cloudflare Access, which is a Zero Trust Network Access (ZTNA) service requiring strict verification for every user and every device before authorizing them to access internal resources.
Gateway, our Secure Web Gateway, which operates between a corporate network and the Internet to enforce security policies and protect company data.
A Cloud Access Security Broker, which monitors the network and external cloud services for security threats.
Cloudflare Area 1, an email threat detection tool to scan email for phishing, malware, and other threats.
We’re excited to partner with mobile network operators for these services because our networks and services are tremendously complementary. Let’s first think about SD-WAN (Software-Defined Wide Area Network) connectivity, which is the foundation on which much of the SASE framework rests. As an example, imagine a developer working from home developing a solution with a Mobile Network Operator’s (MNO) Internet of Things APIs. Maybe they’re developing tracking software for the number of drinks left in a soda machine, or want to track the routes for delivery trucks.
The developer at home and their fleet of devices should be on the same wide area network, securely, and at reasonable cost. What Cloudflare provides is the programmable software layer that enables this secure connectivity. The developer and the developer’s employer still need to have connectivity to the Internet at home, and for the fleet of devices. The ability to make a secure connection to your fleet of devices doesn’t do any good without enterprise connectivity, and the enterprise connectivity is only more valuable with the secure connection running on top of it. They’re the perfect match.
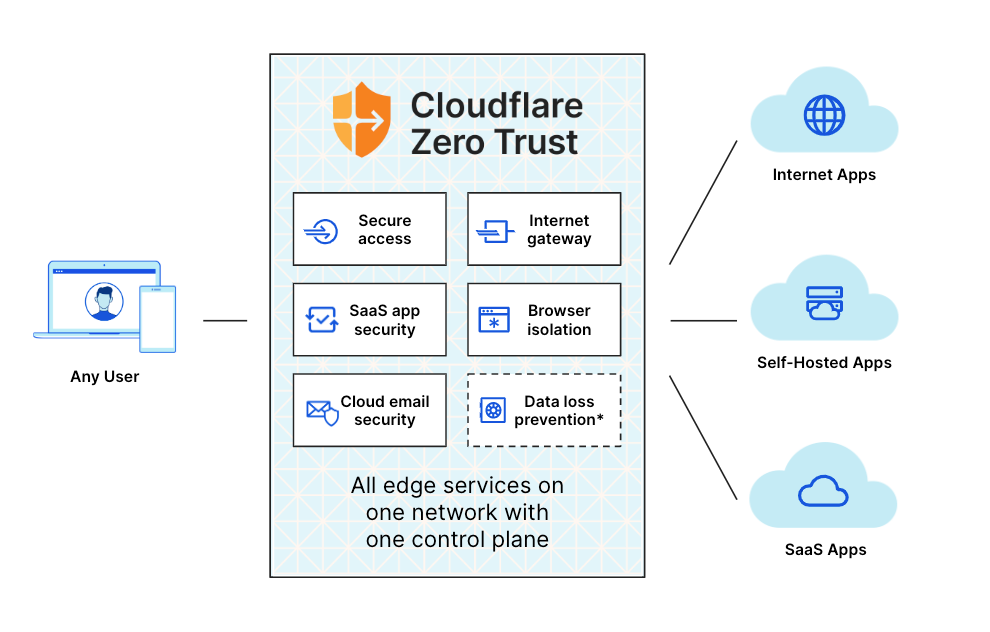
Once the connectivity is established, we can layer on a Zero Trust platform to ensure every user can only access a resource to which they’ve been explicitly granted permission. Any time a user wants to access a protected resource – via ssh, to a cloud service, etc. – they’re challenged to authenticate with their single-sign-on credentials before being allowed access. The networks we use are growing and becoming more distributed. A Zero Trust architecture enables that growth while protecting against known risks.
Edge Computing
Given the potential of low-latency 5G networks, consumers and operators are both waiting for a “killer 5G app”. Maybe it will be autonomous vehicles and virtual reality, but our bet is on a quieter revolution: moving compute – the “work” that a server needs to do to respond to a request – from big regional data centers to small city-level data centers, embedding the compute capacity inside wireless networks, and eventually even to the base of cell towers.
Cloudflare’s edge compute platform is called Workers, and it does exactly this – execute code at the edge. It’s designed to be simple. When a developer is building an API to support their product or service, they don’t want to worry about regions and availability zones. With Workers, a developer writes code they want executed at the edge, deploys it, and within seconds it’s running at every Cloudflare data center globally.
Some workloads we already see, and expect to see more of, include:
IoT (Internet of Things) companies implementing complex device logic and security features directly at the edge, letting them add cutting-edge capabilities without adding cost or latency to their devices.
eCommerce platforms storing and caching customized assets close to their visitors for improved customer experience and great conversion rates.
Financial data platforms, including new Web3 players, providing near real-time information and transactions to their users.
A/B testing and experimentation run at the edge without adding latency or introducing dependencies on the client-side.
Fitness-type devices tracking a user’s movement and health statistics can offload compute-heavy workloads while maintaining great speed/latency.
Retail applications providing fast service and a customized experience for each customer without an expensive on-prem solution.
The Cloudflare Case Studies section has additional examples from NCR, Edgemesh, BlockFi, and others on how they’re using the Workers platform. While these examples are exciting, we’re most excited about providing the platform for new innovation.
You may have seen last week we announcedWorkers for Platforms is now in General Availability. Workers for Platforms is an umbrella-like structure that allows a parent organization to enable Workers for their own customers. As an MNO, your focus is on providing the means for devices to send communication to clients. For IoT use cases, sending data is the first step, but the exciting potential of this connectivity is the applications it enables. With Workers for Platforms, MNOs can expose an embedded product that allows customers to access compute power at the edge.
Network Infrastructure
The complementary networks between mobile networks and Cloudflare is another area of opportunity. When a user is interacting with the Internet, one of the most important factors for the speed of their connection is the physical distance from their handset to the content and services they’re trying to access. If the data request from a user in Denver needs to wind its way to one of the major Internet hubs in Dallas, San Jose, or Chicago (and then all the way back!), that is going to be slow. But if the MNO can link to the service locally in Denver, the connection will be much faster.
One of the exciting developments with new 5G networks is the ability of MNOs to do more “local breakout”. Many MNOs are moving towards cloud-native and distributed radio access networks (RANs) which provides more flexibility to move and multiply packet cores. These packet cores are the heart of a mobile network and all of a subscriber’s data flows through one.
For Cloudflare – with a data center presence in 275+ cities globally – a user never has to wait long for our services. We can also take it a step further. In some cases, our services are embedded within the MNO or ISP’s own network. The traffic which connects a user to a device, authorizes the connection, and securely transmits data is all within the network boundary of the MNO – it never needs to touch the public Internet, incur added latency, or otherwise compromise the performance for your subscribers.
We’re excited to partner with mobile networks because our security services work best when our customers have excellent enterprise connectivity underneath. Likewise, we think mobile networks can offer more value to their customers with our security software added on top. If you’d like to talk about how to integrate Cloudflare One into your offerings, please email us at [email protected], and we’ll be in touch!
It’s hard to imagine life without our smartphones. Whereas computers were mostly fixed and often shared, smartphones meant that every individual on the planet became a permanent, mobile node on the Internet — with some 6.5B smartphones on the planet today.
While that represents an explosion of devices on the Internet, it will be dwarfed by the next stage of the Internet’s evolution: connecting devices to give them intelligence. Already, Internet of Things (IoT) devices represent somewhere in the order of double the number of smartphones connected to the Internet today — and unlike smartphones, this number is expected to continue to grow tremendously, since they aren’t bound to the number of humans that can carry them.
But the exponential growth in devices has brought with it an explosion in risk. We’ve been defending against DDoS attacks from Internet of Things (IoT) driven botnets like Mirai and Meris for years now. They keep growing, because securing IoT devices still remains challenging, and manufacturers are often not incentivized to secure them. This has driven NIST (the U.S. National Institute of Standards and Technology) to actively define requirements to address the (lack of) IoT device security, and the EU isn’t far behind.
It’s also the type of problem that Cloudflare solves best.
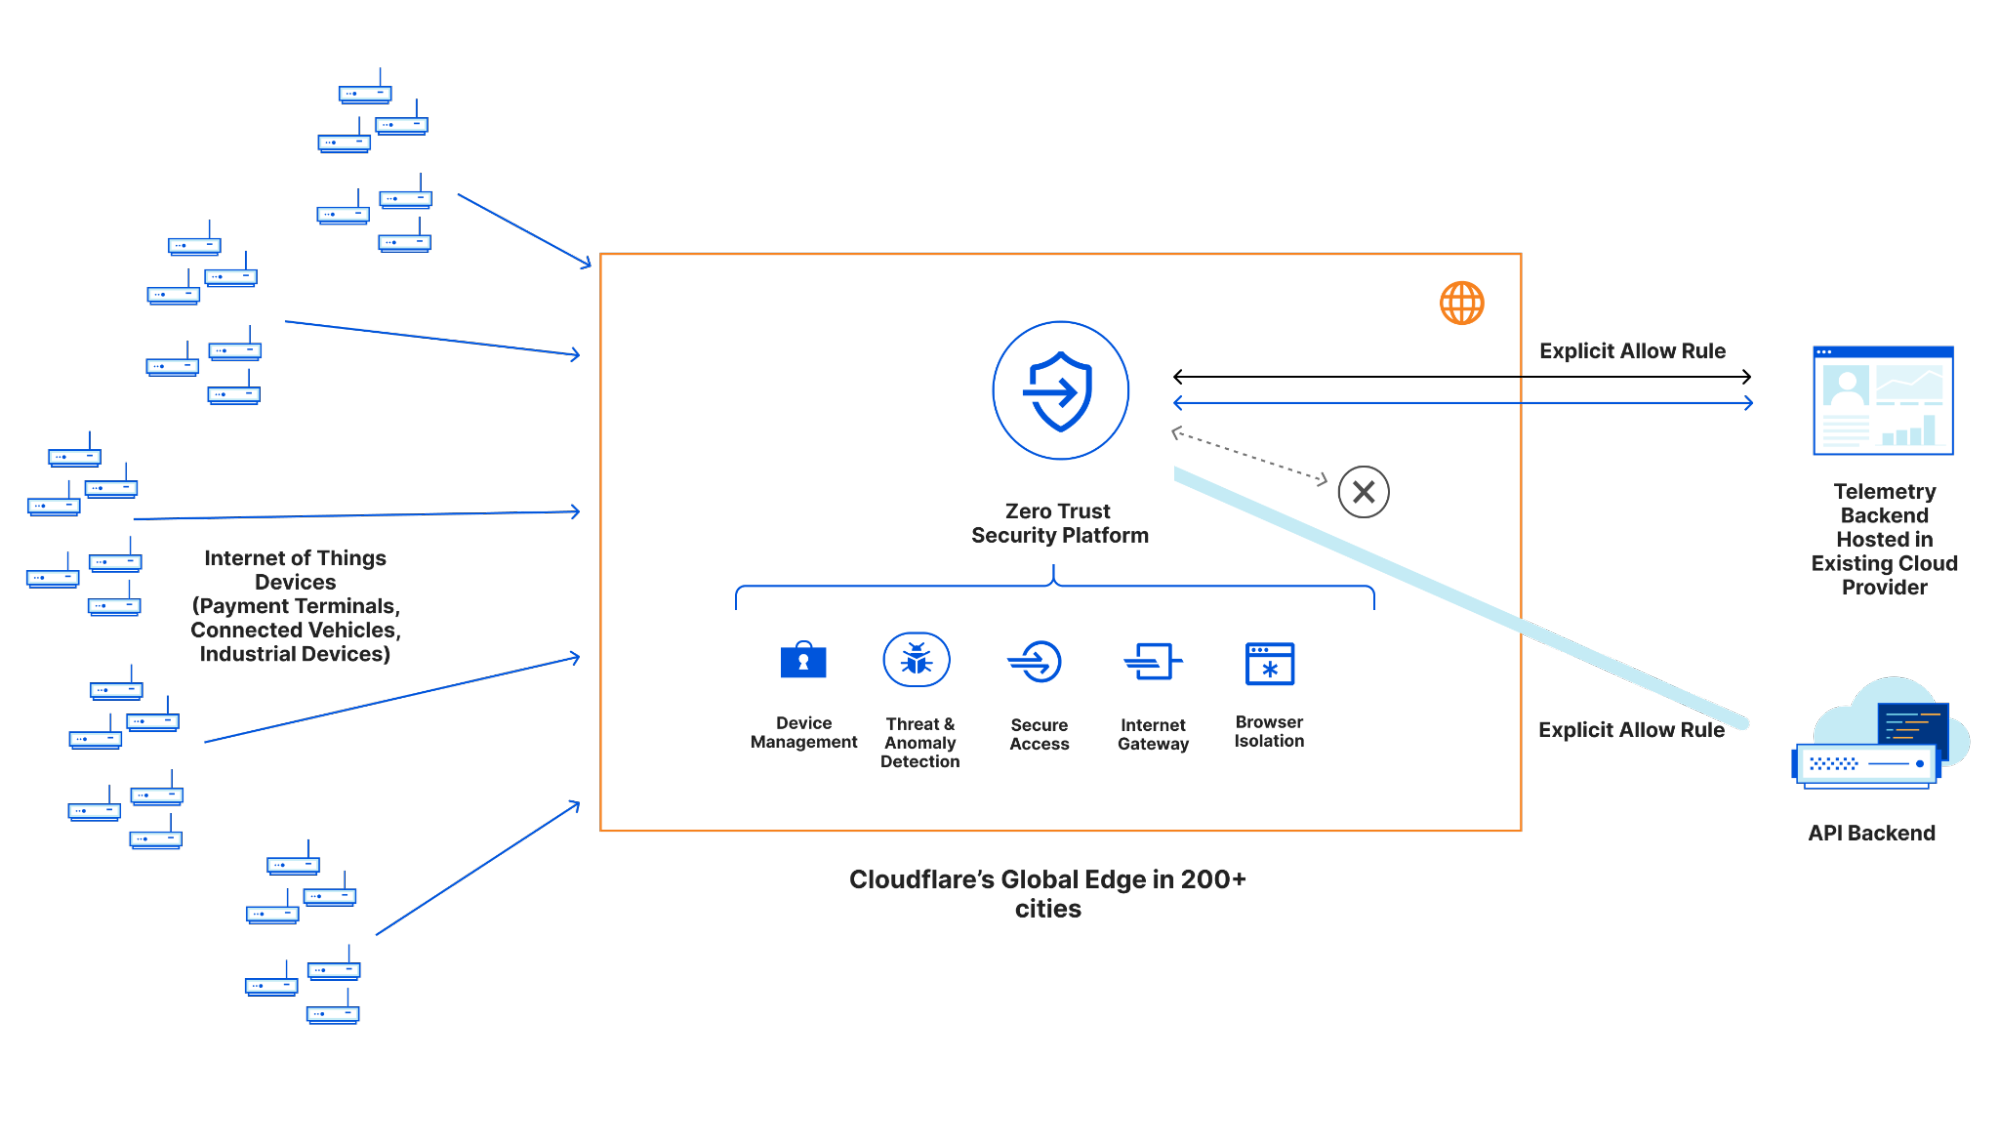
Today, we’re excited to announce our Internet of Things platform: with the goal to provide a single pane-of-glass view over your IoT devices, provision connectivity for new devices, and critically, secure every device from the moment it powers on.
Not just lightbulbs
It’s common to immediately think of lightbulbs or simple motion sensors when you read “IoT”, but that’s because we often don’t consider many of the devices we interact with on a daily basis as an IoT device.
Think about:
Almost every payment terminal
Any modern car with an infotainment or GPS system
Millions of industrial devices that power — and are critical to — logistics services, industrial processes, and manufacturing businesses
You especially may not realize that nearly every one of these devices has a SIM card, and connects over a cellular network.
Cellular connectivity has become increasingly ubiquitous, and if the device can connect independently of Wi-Fi network configuration (and work out of the box), you’ve immediately avoided a whole class of operational support challenges. If you’ve just read our earlier announcement about the Zero Trust SIM, you’re probably already seeing where we’re headed.
Hundreds of thousands of IoT devices already securely connect to our network today using mutual TLS and our API Shield product. Major device manufacturers use Workers and our Developer Platform to offload authentication, compute and most importantly, reduce the compute needed on the device itself. Cloudflare Pub/Sub, our programmable, MQTT-based messaging service, is yet another building block.
But we realized there were still a few missing pieces: device management, analytics and anomaly detection. There are a lot of “IoT SIM” providers out there, but the clear majority are focused on shipping SIM cards at scale (great!) and less so on the security side (not so great) or the developer side (also not great). Customers have been telling us that they wanted a way to easily secure their IoT devices, just as they secure their employees with our Zero Trust platform.
Cloudflare’s IoT Platform will build in support for provisioning cellular connectivity at scale: we’ll support ordering, provisioning and managing cellular connectivity for your devices. Every packet that leaves each IoT device can be inspected, approved or rejected by policies you create before it reaches the Internet, your cloud infrastructure, or your other devices.
Emerging standards like IoT SAFE will also allow us to use the SIM card as a root-of-trust, storing device secrets (and API keys) securely on the device, whilst raising the bar to compromise.
This also doesn’t mean we’re leaving the world of mutual TLS behind: we understand that not every device makes sense to connect over solely over a cellular network, be it due to per-device costs, lack of coverage, or the need to support an existing deployment that can’t just be re-deployed.
Bringing Zero Trust security to IoT
Unlike humans, who need to be able to access a potentially unbounded number of destinations (websites), the endpoints that an IoT device needs to speak to are typically far more bounded. But in practice, there are often few controls in place (or available) to ensure that a device only speaks to your API backend, your storage bucket, and/or your telemetry endpoint.
Our Zero Trust platform, however, has a solution for this: Cloudflare Gateway. You can create DNS, network or HTTP policies, and allow or deny traffic based not only on the source or destination, but on richer identity- and location- based controls. It seemed obvious that we could bring these same capabilities to IoT devices, and allow developers to better restrict and control what endpoints their devices talk to (so they don’t become part of a botnet).
At the same time, we also identified ways to extend Gateway to be aware of IoT device specifics. For example, imagine you’ve provisioned 5,000 IoT devices, all connected over cellular directly into Cloudflare’s network. You can then choose to lock these devices to a specific geography if there’s no need for them to “travel”; ensure they can only speak to your API backend and/or metrics provider; and even ensure that if the SIM is lifted from the device it no longer functions by locking it to the IMEI (the serial of the modem).
Building these controls at the network layer raises the bar on IoT device security and reduces the risk that your fleet of devices becomes the tool of a bad actor.
Get the compute off the device
We’ve talked a lot about security, but what about compute and storage? A device can be extremely secure if it doesn’t have to do anything or communicate anywhere, but clearly that’s not practical.
Simultaneously, doing non-trivial amounts of compute “on-device” has a number of major challenges:
It requires a more powerful (and thus, more expensive) device. Moderately powerful (e.g. ARMv8-based) devices with a few gigabytes of RAM might be getting cheaper, but they’re always going to be more expensive than a lower-powered device, and that adds up quickly at IoT-scale.
You can’t guarantee (or expect) that your device fleet is homogenous: the devices you deployed three years ago can easily be several times slower than what you’re deploying today. Do you leave those devices behind?
The more business logic you have on the device, the greater the operational and deployment risk. Change management becomes critical, and the risk of “bricking” — rendering a device non-functional in a way that you can’t fix it remotely — is never zero. It becomes harder to iterate and add new features when you’re deploying to a device on the other side of the world.
Security continues to be a concern: if your device needs to talk to external APIs, you have to ensure you have explicitly scoped the credentials they use to avoid them being pulled from the device and used in a way you don’t expect.
We’ve heard other platforms talk about “edge compute”, but in practice they either mean “run the compute on the device” or “in a small handful of cloud regions” (introducing latency) — neither of which fully addresses the problems highlighted above.
Instead, by enabling secure access to Cloudflare Workers for compute, Analytics Engine for device telemetry, D1 as a SQL database, and Pub/Sub for massively scalable messaging — IoT developers can both keep the compute off the device, but still keep it close to the device thanks to our global network (275+ cities and counting).
On top of that, developers can use modern tooling like Wrangler to both iterate more rapidly and deploy software more safely, avoiding the risk of bricking or otherwise breaking part of your IoT fleet.
Where do I sign up?
You can register your interest in our IoT Platform today: we’ll be reaching out over the coming weeks to better understand the problems teams are facing and working to get our closed beta into the hands of customers in the coming months. We’re especially interested in teams who are in the throes of figuring out how to deploy a new set of IoT devices and/or expand an existing fleet, no matter the use-case.
In the meantime, you can start building on API Shield and Pub/Sub (MQTT) if you need to start securing IoT devices today.
The humble cell phone is now a critical tool in the modern workplace; even more so as the modern workplace has shifted out of the office. Given the billions of mobile devices on the planet — they now outnumber PCs by an order of magnitude — it should come as no surprise that they have become the threat vector of choice for those attempting to break through corporate defenses.
The problem you face in defending against such attacks is that for most Zero Trust solutions, mobile is often a second-class citizen. Those solutions are typically hard to install and manage. And they only work at the software layer, such as with WARP, the mobile (and desktop) apps that connect devices directly into our Zero Trust network. And all this is before you add in the further complication of Bring Your Own Device (BYOD) that more employees are using — you’re trying to deploy Zero Trust on a device that doesn’t belong to the company.
It’s a tricky — and increasingly critical — problem to solve. But it’s also a problem which we think we can help with.
What if employers could offer their employees a deal: we’ll cover your monthly data costs if you agree to let us direct your work-related traffic through a network that has Zero Trust protections built right in? And what’s more, we’ll make it super easy to install — in fact, to take advantage of it, all you need to do is scan a QR code — which can be embedded in an employee’s onboarding material — from your phone’s camera.
Well, we’d like to introduce you to the Cloudflare SIM: the world’s first Zero Trust SIM.
In true Cloudflare fashion, we think that combining the software layer and the network layer enables better security, performance, and reliability. By targeting a foundational piece of technology that underpins every mobile device — the (not so) humble SIM card — we’re aiming to bring an unprecedented level of security (and performance) to the mobile world.
The threat is increasingly mobile
When we say that mobile is the new threat vector, we’re not talking in the abstract. Last month, Cloudflare was one of 130 companies that were targeted by a sophisticated phishing attack. Mobile was the cornerstone of the attack — employees were initially reached by SMS, and the attack relied heavily on compromising 2FA codes.
So far as we’re aware, we were the only company to not be compromised.
A big part of that was because we’re continuously pushing multi-layered Zero Trust defenses. Given how foundational mobile is to how companies operate today, we’ve been working hard to further shore up Zero Trust defenses in this sphere. And this is how we think about Zero Trust SIM: another layer of defense at a different level of the stack, making life even harder for those who are trying to penetrate your organization. With the Zero Trust SIM, you get the benefits of:
Preventing employees from visiting phishing and malware sites: DNS requests leaving the device can automatically and implicitly use Cloudflare Gateway for DNS filtering.
Mitigating common SIM attacks: an eSIM-first approach allows us to prevent SIM-swapping or cloning attacks, and by locking SIMs to individual employee devices, bring the same protections to physical SIMs.
Enabling secure, identity-based private connectivity to cloud services, on-premise infrastructure and even other devices (think: fleets of IoT devices) via Magic WAN. Each SIM can be strongly tied to a specific employee, and treated as an identity signal in conjunction with other device posture signals already supported by WARP.
By integrating Cloudflare’s security capabilities at the SIM-level, teams can better secure their fleets of mobile devices, especially in a world where BYOD is the norm and no longer the exception.
Zero Trust works better when it’s software + On-ramps
Beyond all the security benefits that we get for mobile devices, the Zero Trust SIM transforms mobile into another on-ramp pillar into the Cloudflare One platform.
Cloudflare One presents a single, unified control plane: allowing organizations to apply security controls across all the traffic coming to, and leaving from, their networks, devices and infrastructure. It’s the same with logging: you want one place to get your logs, and one location for all of your security analysis. With the Cloudflare SIM, mobile is now treated as just one more way that traffic gets passed around your corporate network.
Working at the on-ramp rather than the software level has another big benefit — it grants the flexibility to allow devices to reach services not on the Internet, including cloud infrastructure, data centers and branch offices connected into Magic WAN, our Network-as-a-Service platform. In fact, under the covers, we’re using the same software networking foundations that our customers use to build out the connectivity layer behind the Zero Trust SIM. This will also allow us to support new capabilities like Geneve, a new network tunneling protocol, further expanding how customers can connect their infrastructure into Cloudflare One.
We’re following efforts like IoT SAFE (and parallel, non-IoT standards) that enable SIM cards to be used as a root-of-trust, which will enable a stronger association between the Zero Trust SIM, employee identity, and the potential to act as a trusted hardware token.
Get Zero Trust up and running on mobile immediately (and easily)
Of course, every Zero Trust solutions provider promises protection for mobile. But especially in the case of BYOD, getting employees up and running can be tough. To get a device onboarded, there is a deep tour of the Settings app of your phone: accepting profiles, trusting certificates, and (in most cases) a requirement for a mature mobile device management (MDM) solution.
It’s a pain to install.
Now, we’re not advocating the elimination of the client software on the phone any more than we would be on the PC. More layers of defense is always better than fewer. And it remains necessary to secure Wi-Fi connections that are established on the phone. But a big advantage is that the Cloudflare SIM gets employees protected behind Cloudflare’s Zero Trust platform immediately for all mobile traffic.
It’s not just the on-device installation we wanted to simplify, however. It’s companies’ IT supply chains, as well.
One of the traditional challenges with SIM cards is that they have been, until recently, a physical card. A card that you have to mail to employees (a supply chain risk in modern times), that can be lost, stolen, and that can still fail. With a distributed workforce, all of this is made even harder. We know that whilst security is critical, security that is hard to deploy tends to be deployed haphazardly, ad-hoc, and often, not at all.
But in recent years, nearly every modern phone shipped today has an eSIM — or more precisely, an eUICC (Embedded Universal Integrated Circuit Card) — that can be re-programmed dynamically. This is a huge advancement, for two major reasons:
You avoid all the logistical issues of a physical SIM (mailing them; supply chain risk; getting users to install them!)
You can deploy them automatically, either via QR codes, Mobile Device Management (MDM) features built into mobile devices today, or via an app (for example, our WARP mobile app).
We’re also exploring introducing physical SIMs (just like the ones above): although we believe eSIMs are the future, especially given their deployment & security advantages, we understand that the future is not always evenly distributed. We’ll be working to make sure that the physical SIMs we ship are as secure as possible, and we’ll be sharing more of how this works in the coming months.
Privacy and transparency for employees
Of course, more and more of the devices that employees use for work are their own. And while employers want to make sure their corporate resources are secure, employees also have privacy concerns when work and private life are blended on the same device. You don’t want your boss knowing that you’re swiping on Tinder.
We want to be thoughtful about how we approach this, from the perspective of both sides. We have sophisticated logging set up as part of Cloudflare One, and this will extend to Cloudflare SIM. Today, Cloudflare One can be explicitly configured to log only the resources it blocks — the threats it’s protecting employees from — without logging every domain visited beyond that. We’re working to make this as obvious and transparent as possible to both employers and employees so that, in true Cloudflare fashion, security does not have to compromise privacy.
What’s next?
Like any product at Cloudflare, we’re testing this on ourselves first (or “dogfooding”, to those in the know). Given the services we provide for over 30% of the Fortune 1000, we continue to observe, and be the target of, increasingly sophisticated cybersecurity attacks. We believe that running the service first is an important step in ensuring we make the Zero Trust SIM both secure and as easy to deploy and manage across thousands of employees as possible.
We’re also bringing the Zero Trust SIM to the Internet of Things: almost every vehicle shipped today has an expectation of cellular connectivity; an increasing number of payment terminals have a SIM card; and a growing number of industrial devices across manufacturing and logistics. IoT device security is under increasing levels of scrutiny, and ensuring that the only way a device can connect is a secure one — protected by Cloudflare’s Zero Trust capabilities — can directly prevent devices from becoming part of the next big DDoS botnet.
We’ll be rolling the Zero Trust SIM out to customers on a regional basis as we build our regional connectivity across the globe (if you’re an operator: reach out). We’d especially love to talk to organizations who don’t have an existing mobile device solution in place at all, or who are struggling to make things work today. If you’re interested, then sign up here.
When using major web browsers like Chrome and Edge, your form data is transmitted to Google and Microsoft, respectively, should enhanced spellcheck features be enabled.
Depending on the website you visit, the form data may itself include PII—including but not limited to Social Security Numbers (SSNs)/Social Insurance Numbers (SINs), name, address, email, date of birth (DOB), contact information, bank and payment information, and so on.
The solution is to only use the spellchecker options that keep the data on your computer—and don’t send it into the cloud.
To provide the best experiences, we use technologies like cookies to store and/or access device information. Consenting to these technologies will allow us to process data such as browsing behavior or unique IDs on this site. Not consenting or withdrawing consent, may adversely affect certain features and functions.
Functional
Always active
The technical storage or access is strictly necessary for the legitimate purpose of enabling the use of a specific service explicitly requested by the subscriber or user, or for the sole purpose of carrying out the transmission of a communication over an electronic communications network.
Preferences
The technical storage or access is necessary for the legitimate purpose of storing preferences that are not requested by the subscriber or user.
Statistics
The technical storage or access that is used exclusively for statistical purposes.The technical storage or access that is used exclusively for anonymous statistical purposes. Without a subpoena, voluntary compliance on the part of your Internet Service Provider, or additional records from a third party, information stored or retrieved for this purpose alone cannot usually be used to identify you.
Marketing
The technical storage or access is required to create user profiles to send advertising, or to track the user on a website or across several websites for similar marketing purposes.



 For this specific example, we use the following information for our Azure SQL Instance: