ТЕЦ „Брикел“: История, която трябваше да свърши през 2010 г. 

Post Syndicated from Тоест original https://toest.bg/brikel-part1/

Ръждясали метални конструкции, липсващи стъкла по прозорците, плътен слой черен прах по повърхностите на площадката на ТЕЦ „Брикел“ напомнят на декор от индустриалната история на Гълъбово. Градчето се намира в Маришкия въглищен басейн в Старозагорска област, наричан „туптящото сърце“ на българската енергетика.

Облаците дим в различни нюанси на сивото се стелят летаргично, но упорито през 150-метровия комин. Промъкват се необезпокоявано и през дупките на липсващите прозорци и всеки процеп на сградата. На институционален език това се нарича „неорганизирани емисии“ и представлява отпадни газове от горенето на въглища, които съдържат коктейл от замърсители, вредни за човешкото здраве и околната среда.

Екипът, който проверяваше и прекара два часа на обекта, се почувства зле само след два часа. Не мога да повярвам, че в такива условия работят български граждани, и ще чакам в най-къс срок всички институции да ми дадат доклад, за да видим какви да бъдат следващите стъпки във връзка с това невероятно замърсяване, което се случва ежедневно на този обект.

Това заяви премиерът в оставка Кирил Петков на заседание на Министерския съвет след извънредното си посещение в топлоелектроцентралата на 19 юли т.г. Той също така съобщи, че е подал искане към Държавната агенция за национална сигурност да се установи дали Христо Ковачки е собственик на ТЕЦ „Брикел“ или има контрол върху това дружество. До редакционното приключване на статията резултати от исканите от Петков проверки не са публично оповестени.

При инспекцията на място бяха отчетени нива на замърсяване със серен диоксид от 5600 µg/m3 и с фини прахови частици от 1357 µg/m3. „Те цитираха едни данни от моментните измервания на станцията, които са некоректни“, заяви пред bTV изпълнителният директор на „Брикел“ Янилин Павлов три дни след проверката.

Нормите за опазване на човешкото здраве по тези показатели се осредняват за час, за денонощие и за година. В Европейския съюз, съответно и в българското законодателство, средночасовата норма за серен диоксид е 350 µg/m3, а средноденонощната – 125 µg/m3. Нормите за фини прахови частици с размер до 10 микрона (ФПЧ10) са: средноденонощна – до 50 µg/m3, и средногодишна – 40 µg/m3. Това означава, че при изненадващата инспекция на предприятието в Гълъбово на 19 юли, в която се включиха и РЗИ, РИОСВ, „Пожарна безопасност“ и Инспекцията по труда,

замърсяването е било поне 15 пъти над нормата за серен диоксид и поне 27 пъти – за ФПЧ10.

Трябва да се отбележи, че най-вероятно измерените стойности при проверката са моментни, а не средночасови или средноденонощни, и прякото им сравнение със законовите норми не е напълно коректно. Но дори така отчетените превишения са, меко казано, обезпокоителни.

Нормите за качеството на въздуха в Европейския съюз до голяма степен са плод на политически консенсус. Препоръките на Световната здравна организация, които са осъвременени през 2021 г. и се фокусират върху човешкото здраве, без да вземат предвид икономически съображения на индустрията и правителствата, са още по-строги. Допустимите норми според СЗО са между 2 и 3 пъти по-ниски от нормите на ЕС.

Дразненето на очите и лигавиците e сред най-разпознаваемите симптоми при замърсяването на въздуха. Хроничното излагане на замърсители като фини прахови частици и серен диоксид може да доведе до сърдечносъдови проблеми (сърдечна аритмия и инфаркт) и белодробни болести (астматични пристъпи, бронхит, рак на белия дроб). Според СЗО няма безопасно ниво на замърсяване с прахови частици.

„Всичко е в нормите и е в границите, които са ни поставени“,

повтори Павлов в друго интервю – пред „Нова телевизия“. Макар че на въпроса как си обяснява многобройните сигнали на природозащитни организации и протести на жителите на Гълъбово заради мръсния въздух в района, той потвърждава, че „това, което е очевадно, е така“.

Това, което стана очевадно след извънредната проверка и изостри общественото внимание, се е превърнало в нормално ежедневие за осемте хиляди жители на Гълъбово и е документирано на стотици снимки. Дори след края на плановия ремонт на инсталацията през юни т.г. ТЕЦ „Брикел“ дни наред бълва облаци черен дим.

Колаж от снимки от сигнали на граждани, изпратени до РИОСВ – Стара Загора в първата половина на юли 2022 г. © „Грийнпийс – България“

Ако „Брикел“ затвори, 1300 работници от предприятието ще останат без работа, както и още 1000 души от държавната „Мини Марица-изток“, предупреди още Янилин Павлов. Историята се повтаря: работниците не за първи път са използвани за спасяването на бизнеси около Христо Ковачки.

Машина на времето

Построена през 1964 г., ТЕЦ „Брикел“ е най-старата въглищна централа в Маришкия басейн и една от най-старите в България. Тя трябваше да затвори преди повече от десетилетие заради невъзможност да спази новите, по-високи изисквания за ограничаване на замърсяването след присъединяването на България към Европейския съюз през 2007 г. В подобно положение бяха и други стари централи: ТЕЦ „Бобов дол“, ТЕЦ „Република“ в Перник, ТЕЦ „Марица 3“ в Димитровград и ТЕЦ „Сливен“, които природозащитната организация „Грийнпийс“ сочи като част от „въглищната империя на Ковачки“.

„Брикел“ беше получила разрешение да работи 20 000 часа със заварената си инсталация и без пречиствателни съоръжения за периода между 2008 и 2011 г. Този лимит беше изчерпан, без предприятието да започне подготвителни дейности по затварянето на централата. Вместо да настоява за спазването на изискванията, кабинетът „Борисов 1“ два пъти моли Европейската комисия за отсрочка за замърсяващите тецове заради опасността да останат без работа „2000 работници и още няколко хиляди миньори заради затваряне на други производства“.

Синдикатите активно съдействат в процеса по удължаването на живота на замърсителите.

През 2010 г. Константин Тренчев, тогавашният президент на КТ „Подкрепа“, критикува кратките според него срокове за изграждането на пречистващите съоръжения, макар самите централи да са декларирали като проблем не сроковете, а размера на необходимите инвестиции. През октомври същата година работниците от „Брикел“ излизат на протест и от другия синдикат, КНСБ, настояват за отсрочка от 18 месеца, през които да бъде построена инсталация за очистване на серния диоксид от отпадните газове, въпреки информацията за отказа на собственика да предприеме тази стъпка.

Дни по-късно самият Христо Ковачки настоява за такава отсрочка, като обещава инвестиция в сероочистваща инсталация пред министрите на околната среда Нона Караджова и на енергетиката Трайчо Трайков. През зимния сезон предприятието работи със сероочистка назаем от ТЕЦ „Сливен“, определена от Караджова като „самоделка“. В същото време за доста кратък срок централата се сдобива със собствена сероочистка, изградена „с много труд и изцяло със собствени средства на дружеството“, с проектанти от компанията и външни специалисти и с банкова гаранция от Първа инвестиционна банка.

Когато през 2003 г. техният собственик е имал възможността да избира между това дали да работи 20 000 часа и да прибира печалбата, или да направи инвестиции, включително и в екологична насока, той е избрал големите пари, вместо да гарантира бъдещето на своето производство.

Думите са на Бойко Борисов по време на първия му мандат като министър-председател. В следващите два негови кабинета ТЕЦ „Брикел“ продължи работа с остаряващата си инсталация и все по-честo с нефункционираща сероочистваща инсталация. Междувременно на 12 май т.г.

Съдът на ЕС осъди България за системното замърсяване на въздуха със серен диоксид в района на Гълъбово между 2007 и 2018 г.

Ако „Брикел“ спре работа, Гълъбово, Сливен, Бобов дол и Русе ще останат без отопление за зимата, защото централата обогатява въглищата, които тецовете на тези места използват в производството си, предупреждава директорът Янилин Павлов през 2022 г. В края на 2010 г. правителството позволи на ТЕЦ „Брикел“ да работи на „минимални мощности“ за отоплителния сезон заради „невъзможността в краткосрочен план за намиране на решение за отоплението на град Гълъбово“. Повече от десетилетие по-късно „краткосрочният“ проблем няма решение и социалният аргумент все така прави черните пушеци по-малко черни в очите на управляващите и на голяма част от обществото.

Временното разрешение на правителството предвиждаше окончателното извеждане на ТЕЦ „Брикел“ от експлоатация да стане най-късно в края на април 2011 г. Месец преди крайния срок обаче предприятието внася в Изпълнителната агенция по околна среда заявление за издаване на комплексно разрешително, за да може да възстанови дейността си. Екоминистерството се ангажира „да съдейства за бързо провеждане на екологичните процедури“ за издаване на документа на предприятието, което предстои да се докаже като недосегаем хроничен замърсител.

На преден план – депото за отпадъци на ТЕЦ „Брикел“, по-известно като „черното езеро“, което често запрашава региона при силен вятър. На заден план – централите „Ей И Ес“ (вляво) и „Брикел“ (вдясно) през януари 2021 г. © „Грийнпийс – България“

Няма значение кой е собственикът на „Брикел“,

заявява днес Янилин Павлов. Той признава, че „коментират много теми“ с бизнесмена Христо Ковачки, който през годините се представя като консултант. В онзи период около 2010 г. обаче бизнесменът активно участва в преговорите за удължаването на работата на ТЕЦ „Брикел“, а медиите открито го наричат собственик на тази и други централи.

Дори тогавашният министър-председател Бойко Борисов изразява изненадата си от този факт пред Министерския съвет. „Между другото, много се удивих, когато видях онзи ден на преговорите за „Брикел“ с министър Трайков и Нона Караджова господин Ковачки, защото по документи той никъде не се води в „Брикел“, там се води някакво 25–26-годишно момиче, което сигурно преди пет-шест години е било доста по-младо, по моята теория за възрастта“, коментира Борисов според стенограмата от заседанието на 27 октомври 2010 г.

Става дума за Ива Цветкова, собственичка на дружеството „Калиста 2004“, което приватизира „Брикел“ ЕАД през 2004 г., когато тя е на 21 години, срещу сумата от 29,2 млн. лв. Фирмата е регистрирана на ул. „3020“ №34 в Индустриална зона „Орион“ в София, подобно на много други дружества, свързвани с Христо Ковачки.

Скоро след обрата със закриването, стигнало до удължаване на живота на „Брикел“, през 2011 г. това предприятие, както и няколко други дружества от енергийния сектор,

преминават в ръцете на офшорни фирми на Сейшелските острови

с позволението на Комисията за защита на конкуренцията. Мащабната рокада идва на фона на запор на имущество за 143 млн. лв. на Христо Ковачки заради съмнения, че е придобито от престъпна дейност. Запорът е наложен в рамките на съдебно дело за данъчни измами, по което бизнесменът впоследствие е оправдан.

Офшорната история обаче не свършва дотук – дружествата напускат данъчния рай с влизането в сила на Закона за икономическите и финансовите взаимоотношения с дружества, регистрирани в юрисдикции с преференциален данъчен режим и техните действителни собственици. Причината е, че компаниите с офшорна собственост не могат да участват в обществени поръчки, нито да получават достъп до държавни ресурси. Освен това те не могат да получават и разрешения за концесии или енергийни лицензи.

В рамките на няколко седмици над десет компании от Сейшелските острови с активи в българската енергетика се прехвърлят на новорегистрирани фирми в Кипър и Великобритания със седалища на няколко общи адреса. Комисията за защита на конкуренцията отново одобрява сделките без опасения за концентрация.

Днес тези връзки трябва да бъдат анализирани от ДАНС по заръка на премиера в оставка Кирил Петков, а името на Христо Ковачки все по-трудно се отронва от устите на политици, регулаторни органи, журналисти.

Очаквайте продължение…

Заглавна снимка: Стопкадър от видеоклип на „Грийнпийс – България“, заснет с дрон над ТЕЦ „Брикел“

Източник

[$] Digital autonomy and the GNOME desktop

Post Syndicated from original https://lwn.net/Articles/902463/

While GUADEC, the GNOME community’s annual conference, has always been held
in Europe (or online-only) since it began in 2000, this year’s edition
was held in North America, specifically in Guadalajara, México,
July 20-25. Rob McQueen gave a talk on the first day of the
conference about providing solutions that bring some level of digital
safety and
autonomy to users—and how GNOME can help make that happen. McQueen
is the CEO of the Endless OS
Foundation
, which is an organization geared toward those goals; he
was also
recently reelected as the president of the GNOME
Foundation
board of directors.

Active Exploitation of Atlassian’s Questions for Confluence App CVE-2022-26138

Post Syndicated from Glenn Thorpe original https://blog.rapid7.com/2022/07/27/active-exploitation-of-atlassians-questions-for-confluence-app-cve-2022-26138/

Active Exploitation of Atlassian’s Questions for Confluence App CVE-2022-26138

Exploitation is underway for one of the trio of critical Atlassian vulnerabilities that were published last week affecting several the company’s on-premises products. Atlassian has been a focus for attackers, as it was less than two months ago that we observed exploitation of CVE-2022-26134 in Confluence Server and Confluence Data Center.

CVE-2022-26138: Hardcoded password in Questions for Confluence app impacting:

  • Confluence Server
  • Confluence Data Center

CVE-2022-26136 & CVE-2022-26137: Multiple Servlet Filter vulnerabilities impacting:

  • Bamboo Server and Data Center
  • Bitbucket Server and Data Center
  • Confluence Server and Data Center
  • Crowd Server and Data Center
  • Crucible
  • Fisheye
  • Jira Server and Data Center
  • Jira Service Management Server and Data Center

CVE-2022-26138: Hardcoded password in Questions for Confluence app

The most critical of these three is CVE-2022-26138, as it was quickly exploited in the wild once the hardcoded password was released on social media. There is a limiting function here, however, as this vulnerability only exists when the Questions for Confluence app is enabled (and does not impact the Confluence Cloud instance). Once the app is enabled on affected versions, it will create a user account with a hardcoded password and add the account to a user group, which allows access to all non-restricted pages in Confluence. This easily allows a remote, unauthenticated attacker to browse an organization’s Confluence instance. Unsurprisingly, it didn’t take long for Rapid7 to observe exploitation once the hardcoded credentials were released, given the high value of Confluence for attackers who often jump on Confluence vulnerabilities to execute ransomware attacks.

Affected versions

  • Questions for Confluence 2.7.x

    • 2.7.34
    • 2.7.35
  • Questions for Confluence

    • 3.0.x
    • 3.0.2

Mitigation guidance

Organizations using on-prem Confluence should follow Atlassian’s guidance on updating their instance or disabling/deleting the account. Rapid7 recommends organizations impacted by this take steps immediately to mitigate the vulnerability. Atlassian’s advisory also includes information on how to look for evidence of exploitation. An FAQ has also been provided.

Please note: Atlassian’s Questions For Confluence Security Advisory 2022-07-20 has a very important call-out that “uninstalling the Questions for Confluence app does not remediate this vulnerability.”

CVE-2022-26136 & CVE-2022-26137: Multiple Servlet Filter vulnerabilities

Two other vulnerabilities were announced at the same time, CVE-2022-26136 and CVE-2022-26137, which are also rated critical by Atlassian. They both are issues with Servlet Filters in Java and can be exploited by remote, unauthenticated attackers. Cloud versions of Atlassian have already been fixed by the company.

The list of affected versions is long and can be found on Atlassian’s Security Advisory.

While the impact of these vulnerabilities will vary by organization, as mentioned above, attackers place a high value on many Atlassian products. Therefore, Rapid7 recommends that organizations update impacted product versions as there is no mitigation workaround available.

Rapid7 customers

InsightVM and Nexpose: Our engineering team is investigating the feasibility of a vulnerability check to help InsightVM and Nexpose customers assess exposure to CVE-2022-26138.

NEVER MISS A BLOG

Get the latest stories, expertise, and news about security today.

New for AWS Global Accelerator – Internet Protocol Version 6 (IPv6) Support

Post Syndicated from Danilo Poccia original https://aws.amazon.com/blogs/aws/new-for-aws-global-accelerator-internet-protocol-version-6-ipv6-support/

IPv6 adoption has consistently increased over the last few years, especially among mobile networks. The main reasons to move to IPv6 are:

  • The limited availability of IPv4 addresses can limit the ability to scale up public-facing web and applications servers.
  • IPv6 users from mobile networks experience better performance when their network traffic doesn’t need to manage IPv6 to IPv4 translation.
  • You might need to comply with regulatory rules (such as the Federal Acquisition Regulation in US) to run specific internet traffic over IPv6.

Based on this, we found that we could help improve the network path that your customers use to reach your applications by adding IPv6 support to AWS Global Accelerator. Global Accelerator uses the AWS global network to route network traffic and keep packet loss, jitter, and latency consistently low. Customers like Atlassian, New Relic, and SkyScanner already use Global Accelerator to improve the global availability and performance of their applications.

Global Accelerator provides two global static public IPs that act as a fixed entry point to your application. You can update your application endpoints without making user-facing changes to the IP address. If you configure more than one application endpoint, Global Accelerator automatically reroutes your traffic to your nearest healthy available endpoint to mitigate endpoint failure.

Starting today, you can provide better network performance by routing IPv6 traffic through Global Accelerator to your application endpoints running in AWS Regions. Global Accelerator now supports two types of accelerators: dual-stack and IPv4-only. With a dual-stack accelerator, you are provided with a pair of IPv4 and IPv6 global static IP addresses that can serve both IPv4 and IPv6 traffic.

For existing IPv4-only accelerators, you can update your accelerators to dual-stack to serve both IPv4 and IPv6 traffic. This update enables your accelerator to serve IPv6 traffic and doesn’t impact existing IPv4 traffic served by the accelerator.

Dual-stack accelerators supporting both IPv6 and IPv4 traffic require dual-stack endpoints in the back end. For example, Application Load Balancers (ALBs) can have their IP address type configured as either IPv4-only or dual stack, allowing them to accept both IPv4 or IPv6 client connections. Today, dual-stack ALBs are supported as endpoints for dual-stack accelerators.

Deploying a Dual-Stack Application
To test this new feature, I need a dual-stack application with an ALB entry point. The application must be deployed in Amazon Virtual Private Cloud (Amazon VPC) and support IPv6 traffic. I don’t happen to have IPv6-ready VPCs in my account. I can follow these instructions to migrate an existing VPC that supports IPv4 only to IPv6, or I can create a VPC that supports IPv6 addressing. For this post, I choose to create a VPC.

In the AWS Management Console, I navigate to the Amazon VPC Dashboard. I choose Launch VPC Wizard. In the wizard, I enter a value for the Name tag. This value will be used to auto-generate Name tags for all resources in the VPC. Then, I select the option to associate an Amazon-provided IPv6 CIDR block. I leave all other options to their default values and choose Create VPC.

Console screenshot.

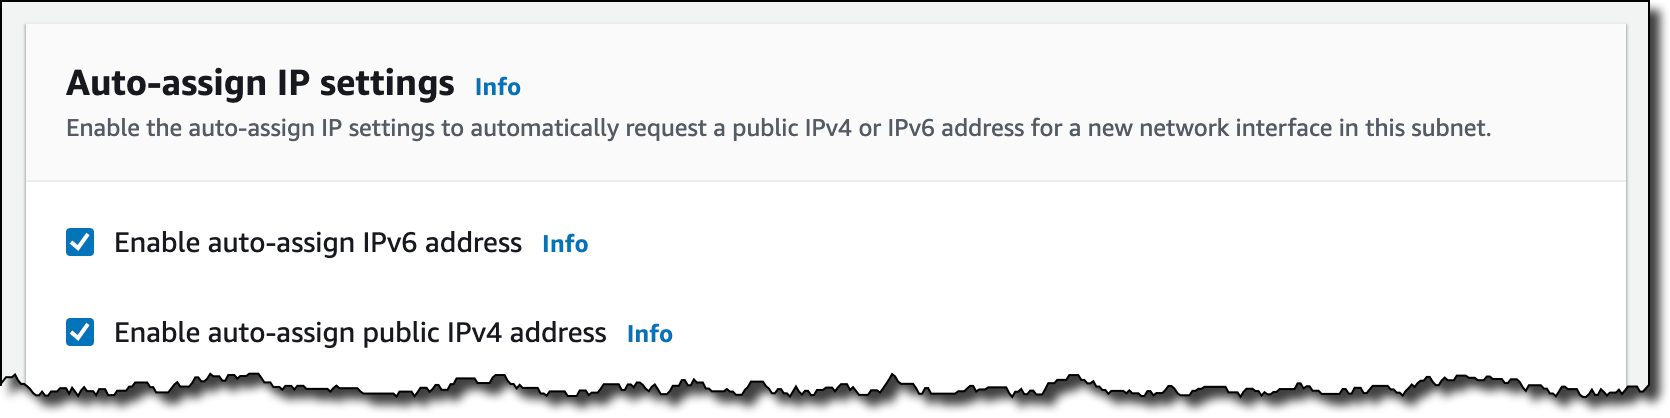
After less than a minute, the VPC is ready. I edit the settings of both public subnets to enable the Auto-assign IP settings to automatically request both a public IPv4 address and an IPv6 address for new network interfaces in this subnet.

Console screenshot.

Now, I want to deploy an application in this VPC. The application will be the endpoint for my accelerator. I view and download the WordPress scalable and durable AWS CloudFormation template from the Sample solutions section of the CloudFormation documentation. This template deploys a full WordPress website behind an ALB. The web tier is scalable and implemented as an EC2 Auto Scaling group. The MySQL database is managed by Amazon Relational Database Service (RDS).

Before deploying the stack, I edit the template to make a few changes. First, I add a DBSubnetGroup resource:

"DBSubnetGroup" : {
  "Type": "AWS::RDS::DBSubnetGroup",
  "Properties": {
    "DBSubnetGroupDescription" : "DB subnet group",
    "SubnetIds" : { "Ref" : "Subnets"}
  }
},

Then, I add the DBSubnetGroupName property to the DBInstance resource. In this way, the database created by the template will be deployed in the same subnets (and VPC) as the web servers.

"DBSubnetGroupName" : { "Ref" : "DBSubnetGroup" },

The last change adds the IpAddressType property to the ApplicationLoadBalancer resource to create a dual-stack load balancer that has IPv6 addresses and will be ready to be used with the new dual-stack option of Global Accelerator.

"IpAddressType": "dualstack",

Because IpAddressType is set to dualstack, the ALB created by the stack will also have IPv6 addresses and will be ready to be used with the new dual-stack option of Global Accelerator.

In the CloudFormation console, I create a stack and upload the template I just edited. In the template parameters, I enter a database user and password to use. For the VpcId parameter, I select the IPv6-ready VPC I just created. For the Subnets parameter, I select the two public subnets of the same VPC. After that, I go to the next steps and create the stack.

After a few minutes, the stack creation is complete. To access the website, I need to open network access to the load balancer. In the EC2 console, I create a security group that allows public access using the HTTP and HTTPS protocols (ports 80 and 443).

Console screenshot.

I choose Load balancers from the navigation pane and select the ALB used by my application. In the Security section, I choose Edit security groups and add the security group I just created to allow web access.

Console screenshot.

Now, I look for the dual-stack (A or AAAA Record) DNS name of the load balancer. I open a browser and connect using the DNS name to complete the configuration of WordPress.

Website.

When connecting again to the endpoint, I see my new (and empty) WordPress website.

Website.

Using Dual-Stack Accelerators with Support for Both IPv6 and IPv4 traffic
Now that my application is ready, I add a dual-stack accelerator in front of the dual-stack ALB. In the Global Accelerator console, I choose Create accelerator. I enter a name for the accelerator and choose the Standard accelerator type.

Console screenshot.

To route both IPv4 and IPv6 through this accelerator, I select the Dual-stack option for the IP address type.

Console screenshot.

Then I add a listener for port 80 using the TCP protocol.

Console screenshot.

For that listener, I configure an endpoint group in the AWS Region where I have my application deployed.

Console screenshot.

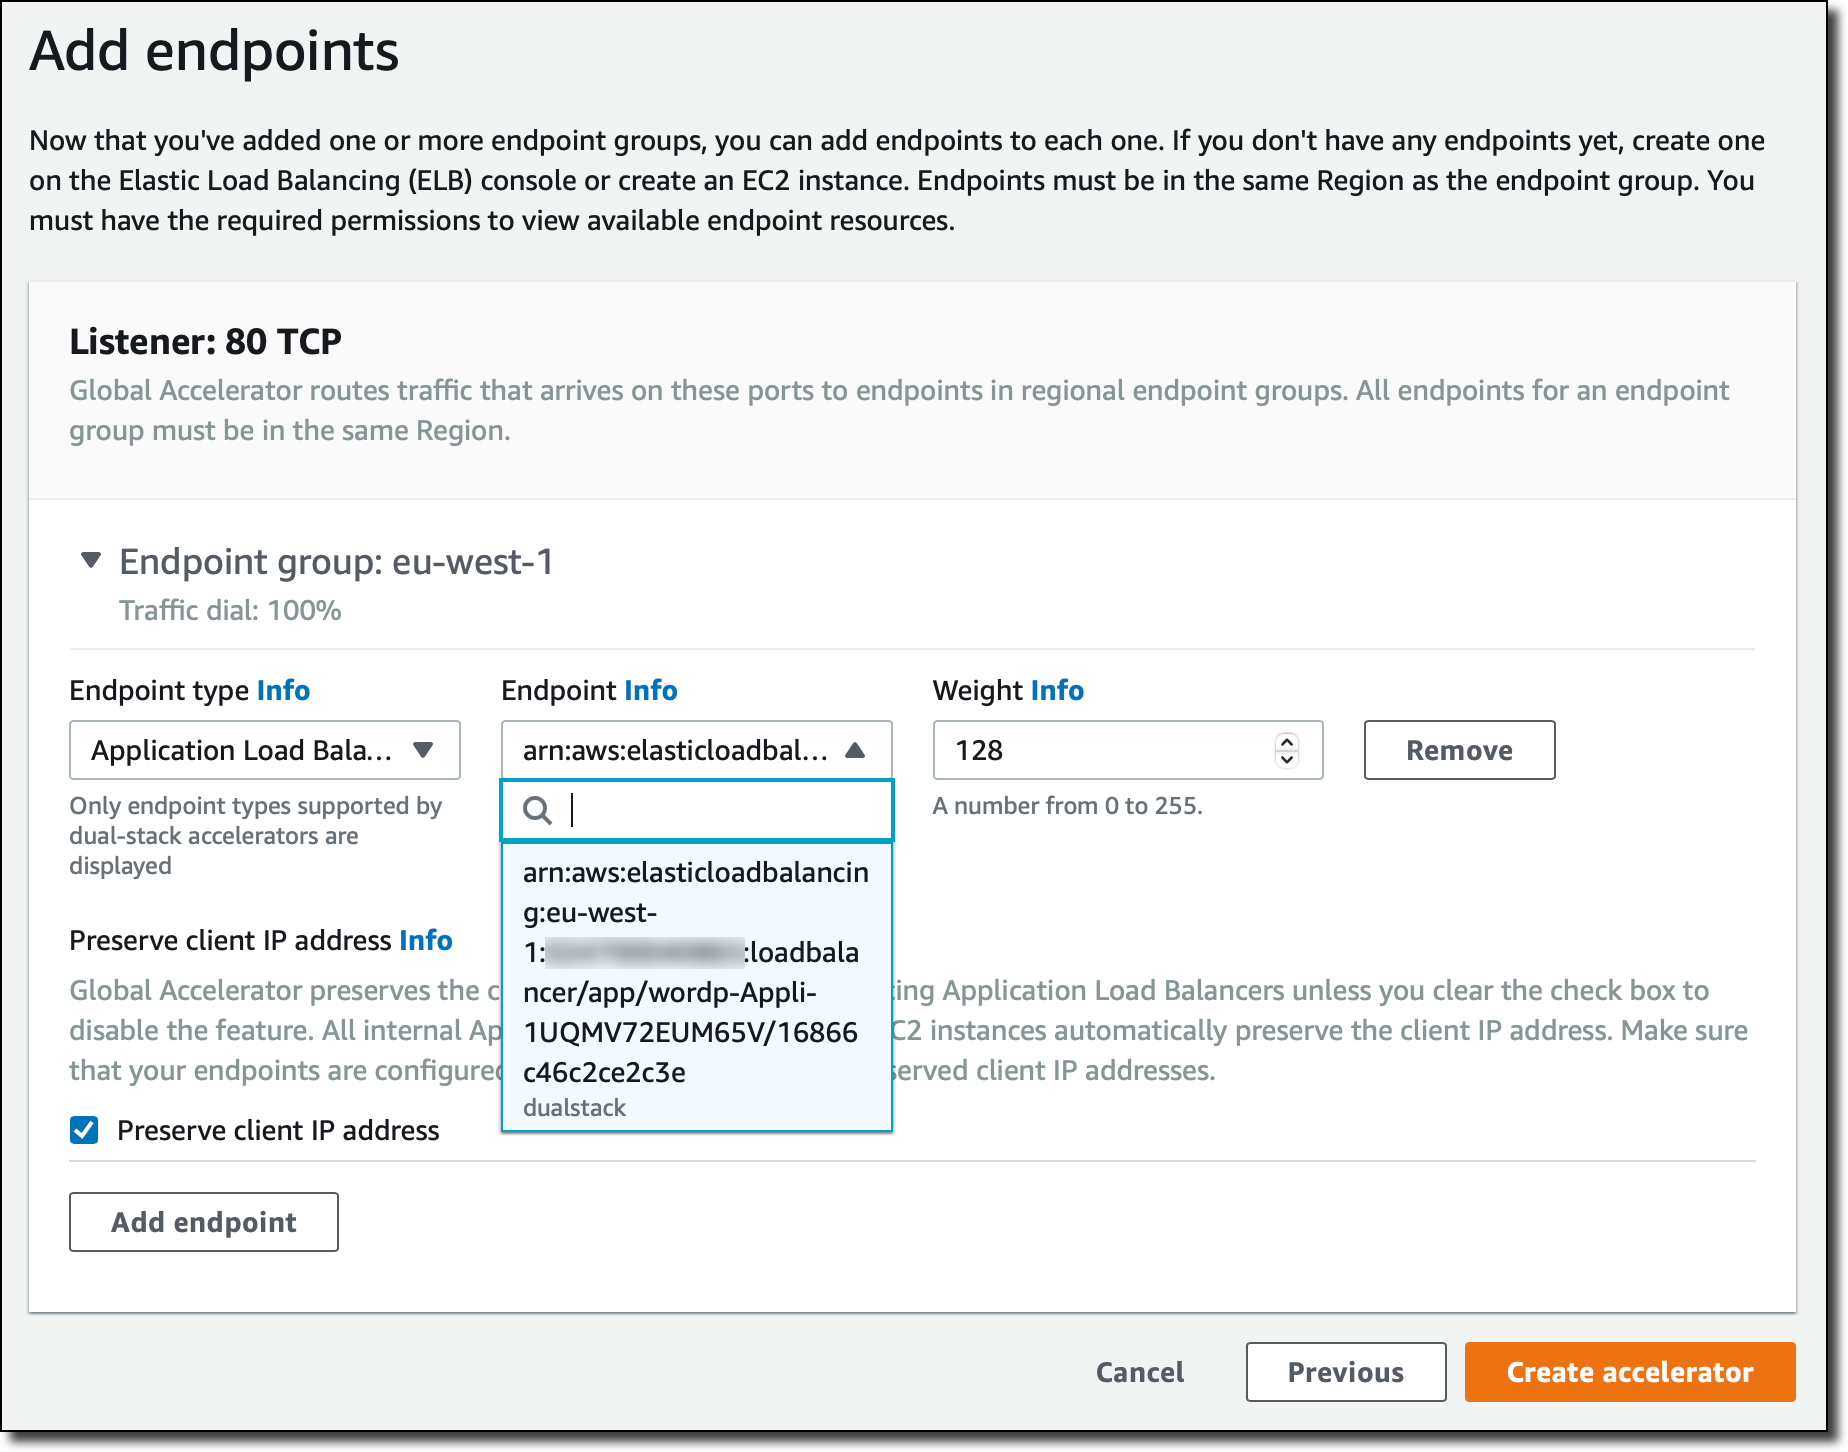
I choose Application Load Balancer for the Endpoint type and select the ALB in the CloudFormation stack.

Console screenshot.

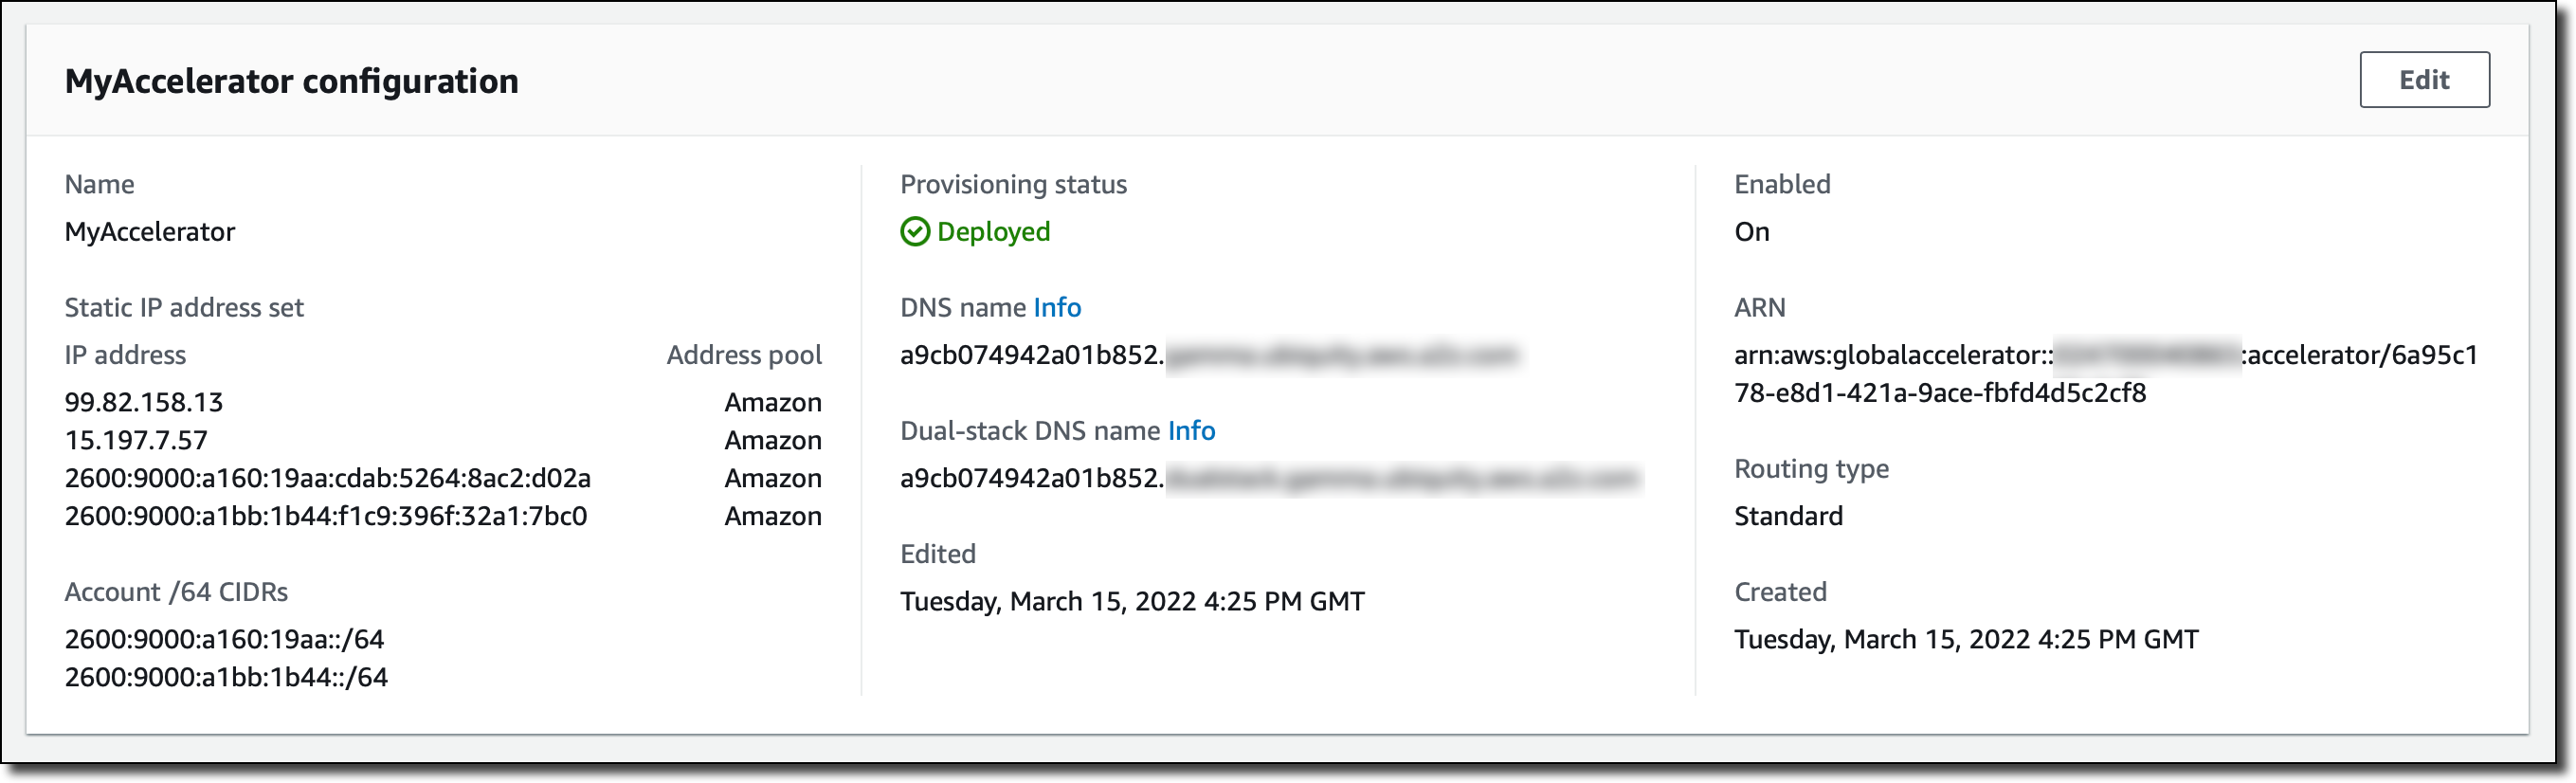
Then, I choose Create accelerator. After a few minutes, the accelerator is deployed, and I have a dual-stack DNS name to reach the ALB using IPv4 or IPv6 depending on the network used by the client.

Console screenshot.

Now, my customers can use the IPv4 and IPv6 addresses or, even better, the dual-stack DNS name of the accelerator to connect to the WordPress website. If there is a front-end or mobile application my customers use to connect to the WordPress REST APIs, I can use the dual-stack DNS name so that clients will connect using their preferred IPv4 or IPv6 route.

To understand if the communication between Global Accelerator and the ALB is working, I can monitor the new FlowsDrop Amazon CloudWatch metric. This metric tells me if Global Accelerator is unable to route IPv6 traffic through the endpoint. For example, that can happen if, after the creation of the accelerator, the configuration of the ALB is updated to use IPv4 only.

Availability and Pricing
You can configure dual-stack accelerators using the AWS Management Console, the AWS Command Line Interface (CLI), and AWS SDKs. You can use dual-stack accelerators to optimize access to your applications deployed in any commercial AWS Region.

Protocol translation is not supported, neither IPv4 to IPv6 nor IPv6 to IPv4. For example, Global Accelerator will not allow me to configure a dual-stack accelerator with an IPv4-only ALB endpoint. Also, for IPv6 ALB endpoints, client IP preservation must be enabled.

There are no additional costs for using dual-stack accelerators. You pay for the hours and the amount of data transfer in the dominant direction used by traffic to or from the accelerator. Data transfer costs depend on the location of your clients and the AWS Regions where you are running your applications. For more information, see the Global Accelerator pricing page.

Optimize the IPv6 and IPv4 network paths used by your customers to reach your applications with AWS Global Accelerator.

— Danilo

Scale Amazon QuickSight embedded analytics with new API-based domain allow listing

Post Syndicated from Vetri Natarajan original https://aws.amazon.com/blogs/big-data/scale-amazon-quicksight-embedded-analytics-with-new-api-based-domain-allow-listing/

Amazon QuickSight is a fully-managed, cloud-native business intelligence (BI) service that makes it easy to connect to your data, create interactive dashboards, and share these with tens of thousands of users, either within QuickSight itself or embedded in apps and portals.

QuickSight Enterprise Edition recently introduced the ability to dynamically allow list the domains where QuickSight content can be embedded. This allows developers to quickly embed dashboards across multiple apps, portals, or websites, without needing to make this change on the QuickSight administrative console every time. Together with QuickSight’s existing dashboard theming and templating capabilities, this new feature allows developers to rapidly develop and deploy QuickSight dashboards and visualizations for a variety of use cases across various applications with ease. Let’s take a look at how this works.

Solution overview

To embed a QuickSight dashboard using APIs, you can use one of the following embedding APIs:

In these APIs, you can now pass the domain where you want to embed your dashboard using the new parameter AllowedDomains:

POST /accounts/AwsAccountId/embed-url/registered-user HTTP/1.1
Content-type: application/json
 
{
   "AllowedDomains": [ "string" ],
   "ExperienceConfiguration": { 
      "Dashboard": { 
         "InitialDashboardId": "string"
      },
      "QSearchBar": { 
         "InitialTopicId": "string"
      },
      "QuickSightConsole": { 
         "InitialPath": "string"
      }
   },
   "SessionLifetimeInMinutes": number,
   "UserArn": "string"
}

You can add up to three domains in a single API call as an array list. All the domains need to be SSL enabled (using HTTPS protocol). If you want to test out the embedded dashboard on your local machine, you can allow list http://localhost via the AllowedDomains parameter. For example, if you want to embed a dashboard in your SaaS application called https://myorders.simplelogistics.com, you set AllowedDomains to be https://myorders.simplelogistics.com in the API call. You can also enable sub domains by passing *, for example, https://*.myorders.simplelogistics.com.

AllowedDomains is an optional parameter. If you don’t specify any domains via this parameter, you can still use the domains allow listed via the QuickSight console. But if you specify domains via this parameter, then the embedding URL returned as part of the API call is only embeddable in these domains (even if you have a list of static domains entered on the QuickSight console).

Prior to this capability, the Content-Service-Policy in the request header listed all the domains allow listed in QuickSight console. Now when allow listing the domains using the API, the Content-Service-Policy only shows the domains that are allow listed in the API call.

With this new capability, ISVs that have different applications for different customers can allow list specific domains at runtime, enabling them to scale easily for different customers and to hundreds of thousands of end-users.

As an added security, the AWS Identity and Access Management (IAM) admin of your QuickSight account can restrict the domains that can be allow listed. This can be done when your IAM admin sets up permissions for your application or server. As part of this step, you can specify the list of domains that can be allow listed via the embedding APIs. For example, let’s assume you want your developers to only allow list the following domains:

You can set these domains in the quicksight:AllowedEmbeddingDomain of the permissions setup. The following code is a sample for the GenerateEmbedURLForAnonymousUser API:

{
    "Version": "2012-10-17",
    "Statement": [
        {
            "Effect": "Allow",
            "Action": [
            "quicksight:GenerateEmbedUrlForAnonymousUser"
            ],
            "Resource": "arn:partition:quicksight:region:accountId:user/namespace/userName",
            "Condition": {
                "ForAllValues:StringEquals": {
                    "quicksight:AllowedEmbeddingDomains": [
                        "https://myorders.simplelogistics.com",
                        "https://cheapelectornics.simplelogistics.com",
                        "https://myreturns.simplelogistics.com"
                    ]
                }
            }
        }
    ]
}

Sample use case

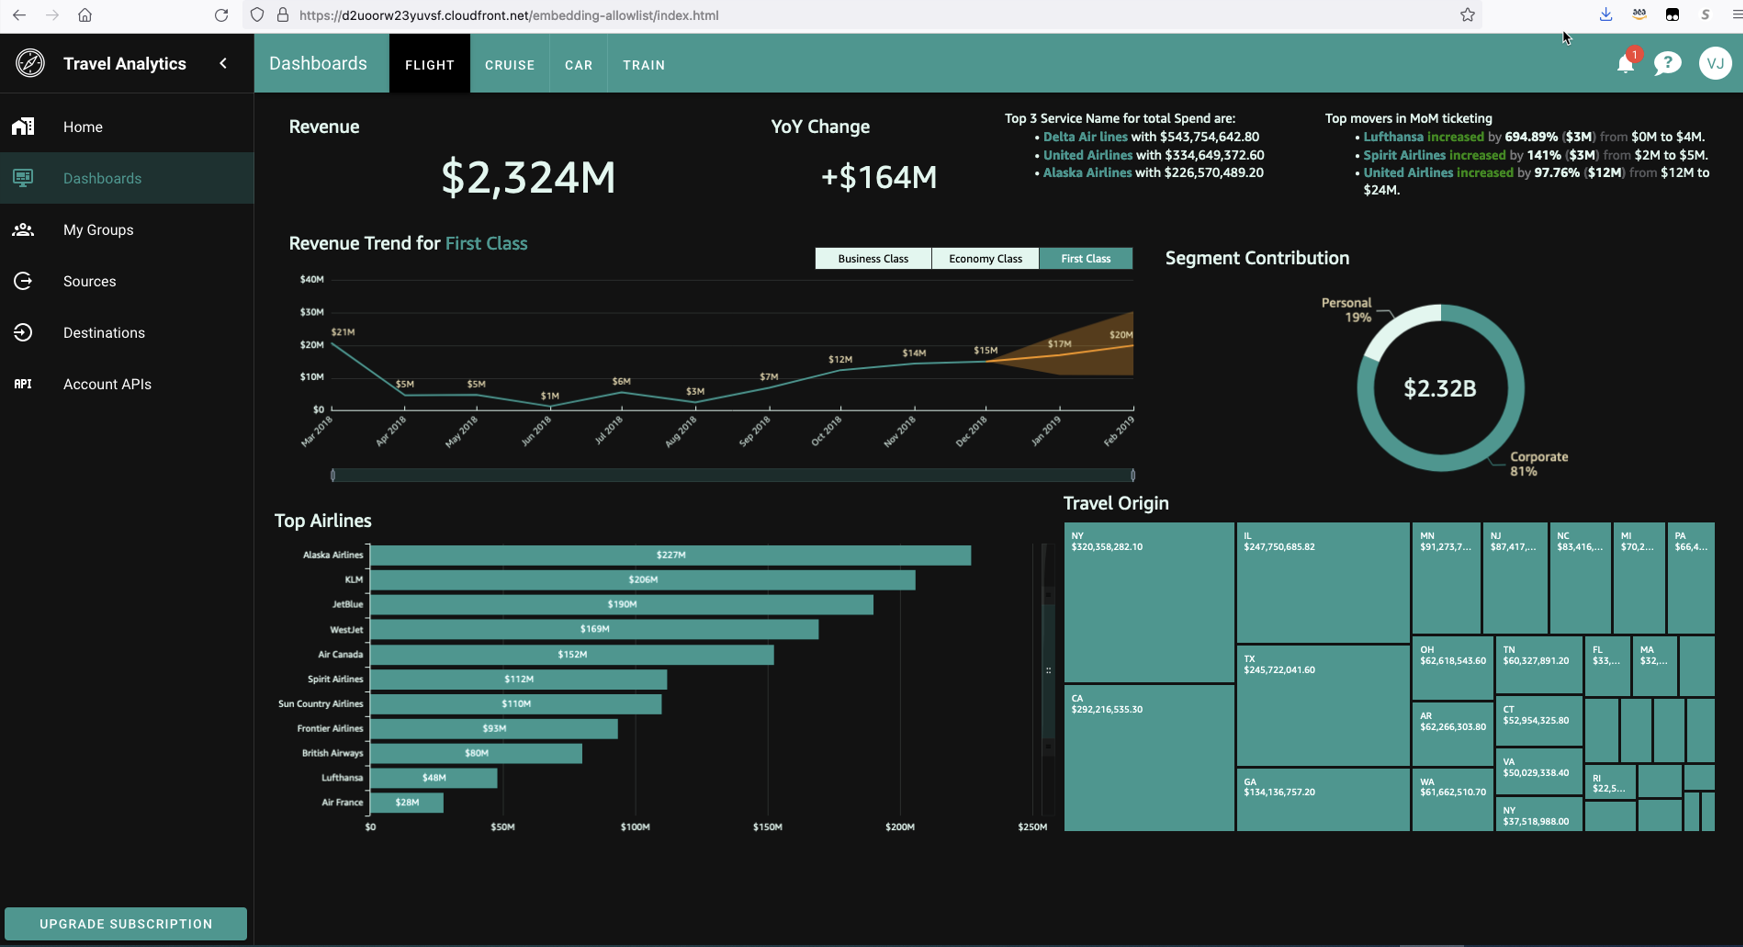
In this example use case, Travel Analytics is a software as a service (SaaS) provider with travel-related solutions for various travel agencies. They have a SaaS application for these agencies to track different metrics on how their business is performing. Because Travel Analytics is scaling their business, they have different sites for different travel agencies. With the newly launched domain allow listing with APIs, they’re able to scale with ease. They allow list the specific domains, depending on the customer, via the API when generating the embedding URL.

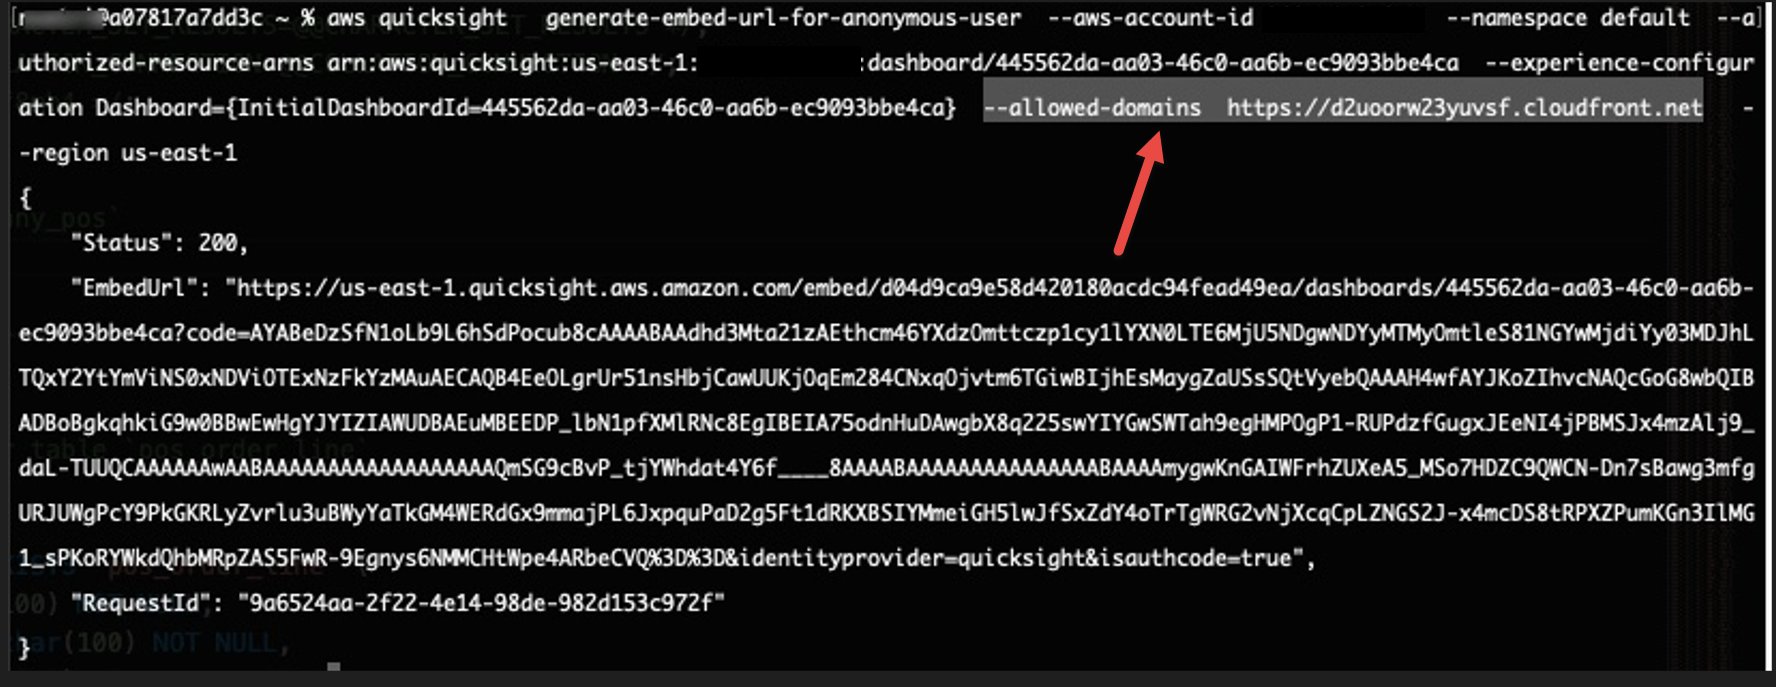
The following code shows their sample GenerateEmbedURLForAnonymousUser API call with the domain added to the request:

The returned URL can only be embedded in the domain that was allow listed as part of the preceding request. The following is a screenshot of the embedded dashboard in this domain.

The CSP header has only the specific allow listed domain via the API when the dashboard is embedded.

Conclusion

Runtime domain allow listing using embedding APIs enables developers to scale their embedded offerings with QuickSight dashboards, visuals, QuickSight Q (natural language querying), or authoring experience across different domains for their different customers easily. All of this is done without any infrastructure setup or management, while scaling to millions of users. For more information, refer to Amazon QuickSight Embedded Analytics and What’s New in the Amazon QuickSight User Guide.


About the authors

Vetri Natarajan is a Specialist Solutions Architect for Amazon QuickSight. Vetri has 15 years of experience implementing enterprise Business Intelligence (BI) solutions and greenfield data products. Vetri specializes in integration of BI solutions with business applications and enable data-driven decisions.

Kareem Syed-Mohammed is a Product Manager at Amazon QuickSight. He focuses on embedded analytics, APIs, and developer experience. Prior to QuickSight he has been with AWS Marketplace and Amazon retail as a PM. Kareem started his career as a developer and then PM for call center technologies, Local Expert and Ads for Expedia. He worked as a consultant with McKinsey and Company for a short while.

To Maze and Beyond: How the Ransomware Double Extortion Space Has Evolved

Post Syndicated from Tom Caiazza original https://blog.rapid7.com/2022/07/27/to-maze-and-beyond-how-the-ransomware-double-extortion-space-has-evolved/

To Maze and Beyond: How the Ransomware Double Extortion Space Has Evolved

We’re here with the final installment in our Pain Points: Ransomware Data Disclosure Trends report blog series, and today we’re looking at a unique aspect of the report that clarifies not just what ransomware actors choose to disclose, but who discloses what, and how the ransomware landscape has changed over the last two years.

Firstly, we should tell you that our research centered around the concept of double extortion. Unlike traditional ransomware attacks, where bad actors take over a victim’s network and hold the data hostage for ransom, double extortion takes it a step further and extorts the victim for more money with the threat (and, in some cases, execution) of the release of sensitive data. So not only does a victim experience a ransomware attack, they also experience a data breach, and the additional risk of that data becoming publicly available if they do not pay.

According to our research, there have been a handful of major players in the double extortion field starting in April 2020, when our data begins, and February 2022. Double extortion itself was in many ways pioneered by the Maze ransomware group, so it should not surprise anyone that we will focus on them first.

The rise and fall of Maze and the splintering of ransomware double extortion

Maze’s influence on the current state of ransomware should not be understated. Prior to the group’s pioneering of double extortion, many ransomware actors intended to sell the data they encrypted to other criminal entities. Maze, however, popularized another revenue stream for these bad actors, leaning on the victims themselves for more money. Using coercive pressure, Maze did an end run around one of the most important safeguards organizations can take against ransomware: having safely secured and regularly updated backups of their important data.

Throughout most of 2020 Maze was the leader of the double extortion tactic among ransomware groups, accounting for 30% of the 94 reported cases of double extortion between April and December of 2020. This is even more remarkable given the fact that Maze itself was shut down in November of 2020.

Other top ransomware groups also accounted for large percentages of data disclosures. For instance, in that same year, REvil/Sodinokibi accounted for 19%, Conti accounted for 14%, and NetWalker 12%. To give some indication of just how big Maze’s influence was and offer explanation for what happened after they were shut down, Maze and REvil/Sodinokibi accounted for nearly half of all double extortion attacks that year.

However, once Maze was out of the way, double extortion still continued, just with far more players taking smaller pieces of the pie. Conti and REvil/Sodinokibi were still major players in 2021, but their combined market share barely ticked up, making up just 35% of the market even without Maze dominating the space. Conti accounted for 19%, and REvil/Sodinokibi dropped to 16%.

But other smaller players saw increases in 2021. CL0P’s market share rose to 9%, making it the third most active group. Darkside and RansomEXX both went from 2% in 2020 to 6% in 2021. There were 16 other groups who came onto the scene, but none of them took more than 5% market share. Essentially, with Maze out of the way, the ransomware market splintered with even the big groups from the year before being unable to step in and fill Maze’s shoes.

What they steal depends on who they are

Even ransomware groups have their own preferred types of data to steal, release, and hold hostage. REvil/Sodinokibi focused heavily on releasing customer and patient data (present in 55% of their disclosures), finance and accounting data (present in 55% of their disclosures), employee PII and HR data (present in 52% of their disclosures), and sales and marketing data (present in 48% of their disclosures).

CL0P on the other hand was far more focused on Employee PII & HR data with that type of information present in 70% of their disclosures, more than double any other type of data. Conti overwhelmingly focused on Finance and Accounting data (present in 81% of their disclosures) whereas Customer & Patient Data was just 42% and Employee PII & HR data at just 27%.

Ultimately, these organizations have their own unique interests in the type of data they choose to steal and release during the double extortion layer of their ransomware attacks. They can act as calling cards for the different groups that help illuminate the inner workings of the ransomware ecosystem.

Thank you for joining us on this unprecedented dive into the world of double extortion as told through the data disclosures themselves. To dive even deeper into the data, download the full report.

Additional reading:

NEVER MISS A BLOG

Get the latest stories, expertise, and news about security today.

Create a most-recent view of your data lake using Amazon Redshift Serverless

Post Syndicated from George Komninos original https://aws.amazon.com/blogs/big-data/create-a-most-recent-view-of-your-data-lake-using-amazon-redshift-serverless/

Building a robust data lake is very beneficial because it enables organizations have a holistic view of their business and empowers data-driven decisions. The curated layer of a data lake is able to hydrate multiple homogeneous data products, unlocking limitless capabilities to address current and future requirements. However, some concepts of how data lakes work feel counter-intuitive for professionals with a traditional database background.

Data lakes are by design append-only, meaning that the new records with an existing primary key don’t update the existing values out-of-the box; instead the new values are appended, resulting in having multiple occurrences of the same primary key in the data lake. Furthermore, special care needs to be taken to handle row deletions, and even if there is a way to identify deleted primary keys, it’s not straightforward to incorporate them to the data lake.

Traditionally, processing between the different layers of data lakes is performed using distributed processing engines such as Apache Spark that can be deployed in a managed or serverless way using services such as Amazon EMR or AWS Glue. Spark has recently introduced frameworks that give data lakes a flavor of ACID properties, such as Apache Hudi, Apache Iceberg, and Delta Lake. However, if you’re coming from a database background, there is a significant learning curve to adopt these technologies that involves understanding the concepts, moving away from SQL to a more general-purpose language, and adopting a specific ACID framework and its complexities.

In this post, we discuss how to implement a data lake that supports updates and deletions of individual rows using the Amazon Redshift ANSI SQL compliant syntax as our main processing language. We also take advantage of its serverless offering to address scenarios where consumption patterns don’t justify creating a managed Amazon Redshift cluster, which makes our solution cost-efficient. We use Python to interact with the AWS API, but you can also use any other AWS SDK. Finally, we use AWS Glue auto-generated code to ingest data to Amazon Redshift Serverless and AWS Glue crawlers to create metadata for our datasets.

Solution overview

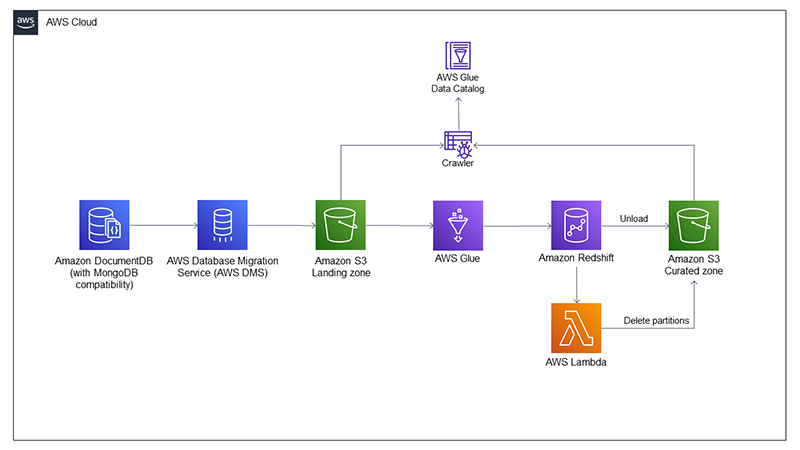
Most of the services we use for this post can be treated as placeholders. For instance, we use Amazon DocumentDB (with MongoDB compatibility) as our data source system, because one of the key features of a data lake is that it can support structured and unstructured data. We use AWS Database Migration Service (AWS DMS) to ingest data from Amazon DocumentDB to the data lake on Amazon Simple Storage Service (Amazon S3). The change data capture (CDC) capabilities of AWS Database Migration Service (AWS DMS) enable us to identify both updated and deleted rows that we want to propagate to the data lake. We use an AWS Glue job to load raw data to Redshift Serverless to use job bookmarks, which allows each run of the load job to ingest new data. You could replace the AWS Glue job with Amazon Redshift Spectrum or the Amazon Redshift COPY command if there is a different way to identify newly arrived data.

After new data is ingested to Amazon Redshift, we use it as our extract, transform, and load (ETL) engine. We trigger a stored procedure to curate the new data, upsert it to our existing table, and unload it to the data lake. To handle data deletions, we have created a scalar UDF in AWS Lambda that we can call from Amazon Redshift to delete the S3 partitions that have been affected by the newly ingested dataset before rewriting them with the updated values. The following diagram showcases the architecture of our solution.

Data ingestion

The dataset we use for this post is available on GitHub. After we create our Amazon DocumentDB instance (for this post, we used engine version 4.0.0 and the db.t3.medium instance class), we ingest the sample dataset. Ingested records look like the this:

{
	"_id": ObjectId("61f998d9b7599a1e904ae84d"),
	"Case_Type": "Confirmed",
	"Cases": 1661,
	"Difference": 135,
	"Date": "5/12/2020",
	"Country_Region": "Sudan",
	"Province_State": "N/A",
	"Admin2": "",
	"Combined_Key": "Sudan",
	"Lat": 12.8628,
	"Long": 30.2176,
	"Prep_Flow_Runtime": "6/5/2022 11:15:39 PM"
}

We then create an AWS DMS dms.t3.medium instance using engine version 3.4.6, a source endpoint for Amazon DocumentDB, and a target endpoint for Amazon S3, adding dataFormat=parquet; as an extra configuration, so that records are stored in Parquet format in the landing zone of the data lake. After we confirm the connectivity of the endpoints using the Test connection feature, we create a database migration task for full load and ongoing replication. We can confirm data is migrated successfully to Amazon S3 by browsing in the S3 location and choosing Query with S3 Select on the Parquet file that has been generated. The result looks like the following screenshot.

We then catalog the ingested data using an AWS Glue crawler on the landing zone S3 bucket, so that we can query the data with Amazon Athena and process it with AWS Glue.

Set up Redshift Serverless

Amazon Redshift is a fully managed, petabyte-scale data warehouse service in the cloud. You can start with just a few hundred gigabytes of data and scale to a petabyte or more. This enables you to use your data to acquire new insights for your business and customers. It’s not uncommon to want to take advantage of the rich features Amazon Redshift provides without having a workload demanding enough to justify purchasing an Amazon Redshift provisioned cluster. To address such scenarios, we have launched Redshift Serverless, which includes all the features provisioned clusters have but enables you to only pay for the workloads you run rather than paying for the entire time your Amazon Redshift cluster is up.

Our next step is to set up our Redshift Serverless instance. On the Amazon Redshift console, we choose Redshift Serverless, select the required settings (similar to creating a provisioned Amazon Redshift cluster), and choose Save configuration. If you intend to access your Redshift Serverless instance via a JDBC client, you might need to enable public access. After the setup is complete, we can start using the Redshift Serverless endpoint.

Load data to Redshift Serverless

To confirm our serverless point is accessible, we can create an AWS Glue connection and test its connectivity. The type of the connection is JDBC, and we can find our serverless JDBC URL from the Workgroup configuration section on our Redshift Serverless console. For the connection to be successful, we need to configure the connectivity between the Amazon Redshift and AWS Glue security groups. For more details, refer to Connecting to a JDBC Data Store in a VPC. After connectivity is configured correctly, we can test the connection and if the test is successful, we should see the following message.

We use an AWS Glue job to load the historical dataset to Amazon Redshift; however, we don’t apply any business logic at this step because we want to implement our transformations using ANSI SQL in Amazon Redshift. Our AWS Glue job is mostly auto-generated boilerplate code:

import sys
from awsglue.transforms import *
from awsglue.utils import getResolvedOptions
from pyspark.context import SparkContext
from awsglue.context import GlueContext
from awsglue.job import Job

args = getResolvedOptions(sys.argv, ["JOB_NAME"])
sc = SparkContext()
glueContext = GlueContext(sc)
spark = glueContext.spark_session
job = Job(glueContext)
job.init(args["JOB_NAME"], args)

datasource0 = glueContext.create_dynamic_frame.from_catalog(database = "document-landing", table_name = "cases", transformation_ctx = "datasource0")

glueContext.write_dynamic_frame.from_jdbc_conf(frame = datasource0, catalog_connection = "redshift-serverless", connection_options = {"dbtable": "cases_stage", "database": "dev"}, redshift_tmp_dir = args["TempDir"], transformation_ctx = "datasink4")

job.commit()

The job reads the table cases from the database document_landing from our AWS Glue Data Catalog, created by the crawler after data ingestion. It copies the underlying data to the table cases_stage in the database dev of the cluster defined in the AWS Glue connection redshift-serverless. We can run this job and use the Amazon Redshift query editor v2 on the Amazon Redshift console to confirm its success by seeing the newly created table, as shown in the following screenshot.

We can now query and transform the historical data using Redshift Serverless.

Transform stored procedure

We have created a stored procedure that performs some common transformations, such as converting a text to date and extracting the year, month, and day from it, and creating some boolean flag fields. After the transformations are performed and stored to the cases table, we want to unload the data to our data lake S3 bucket and finally empty the cases_stage table, preparing it to receive the next CDC load of our pipeline. See the following code:

CREATE OR REPLACE PROCEDURE public.historicalload() LANGUAGE plpgsql AS $$
DECLARE
  sql text;
  s3folder varchar(65535);
  iamrole varchar(1000);
  unload varchar(65535);
begin
  create table cases as (
  SELECT oid__id
  , case_type
  , cases
  , difference
  , TO_DATE(date, 'mm/dd/yyyy') date
  , country_region
  , province_state
  , admin2
  , combined_key
  , lat
  , long
  , TO_DATE(prep_flow_runtime, 'mm/dd/yyyy') prep_flow_runtime
  , fips
  , DATE_PART(year, TO_DATE(date, 'mm/dd/yyyy'))::smallint as year
  , DATE_PART(month, TO_DATE(date, 'mm/dd/yyyy'))::smallint as month
  , DATE_PART(day, TO_DATE(date, 'mm/dd/yyyy'))::smallint as day
  , CASE WHEN case_type = 'Deaths' then 1 else 0 end is_death
  , CASE WHEN case_type = 'Confirmed' then 1 else 0 end is_confirmed
  FROM "dev"."public"."cases_stage");
  sql:='select * from "dev"."public"."cases"';
  s3folder:= s3://object-path/name-prefix ';
  iamrole:='arn:aws:iam::<AWS account-id>:role/<role-name>';
  unload := 'unload ('''||sql||''') to '''||s3folder||''' iam_role '''||iamrole||''' ALLOWOVERWRITE MAXFILESIZE 100 MB PARALLEL PARQUET PARTITION BY (year,month,day)';
  execute unload;
  truncate "dev"."public"."cases_stage";
END;
$$

Note that for unloading data to Amazon S3, we need to create the AWS Identity and Access Management (IAM) role arn:aws:iam::<AWS account-id>:role/<role-name>, give it the required Amazon S3 permissions, and associate it with our Redshift Serverless instance. Calling the stored procedure after ingesting the historical dataset to the cases_stage table results in loading the transformed and partitioned dataset in the S3 folder specified in Parquet format. After we crawl the folder with an AWS Glue crawler, we can verify the results using Athena.

We can revisit the loading AWS Glue job we described before to automatically invoke the steps we triggered manually. We can use an Amazon Redshift postactions configuration to trigger the stored procedure as soon as the loading of the staging table is complete. We can also use Boto3 to trigger the AWS Glue crawler when data is unloaded to Amazon S3. Therefore, the revisited AWS Glue job looks like the following code:

import sys
import boto3
from awsglue.transforms import *
from awsglue.utils import getResolvedOptions
from pyspark.context import SparkContext
from awsglue.context import GlueContext
from awsglue.job import Job

args = getResolvedOptions(sys.argv, ["JOB_NAME"])
sc = SparkContext()
glueContext = GlueContext(sc)
spark = glueContext.spark_session
job = Job(glueContext)
job.init(args["JOB_NAME"], args)

glueClient = boto3.client('glue')

datasource0 = glueContext.create_dynamic_frame.from_catalog(database = "document-landing", table_name = "cases", transformation_ctx = "datasource0")

glueContext.write_dynamic_frame.from_jdbc_conf(frame = datasource0, catalog_connection = "redshift-serverless", connection_options = {"dbtable": "cases_stage", "database": "dev", "postactions":post_query}, redshift_tmp_dir = args["TempDir"], transformation_ctx = "datasink4")
glueClient = boto3.client('glue')
response = glueClient.start_crawler(Name='document-lake')
job.commit()

CDC load

Because the AWS DMS migration task we configured is for full load and ongoing replication, it can capture updates and deletions on a record level. Updates come with an OP column with value U, such as in the following example:

U,61f998d9b7599a1e843038cc,Confirmed,25,1,3/24/2020,Sudan,N/A,,Sudan,12.8628,30.2176,6/4/2020 11:15:39 PM,

Deletions have an OP column with value D, the primary key to be deleted, and all other fields empty:

D,61f998d9b7599a1e904ae941,,,,,,,,,,,,

Enabling job bookmarks for our AWS Glue job guarantees that subsequent runs of the job only process new data since the last checkpoint that was set in the previous run of the job without any changes in our code. After the CDC data is loaded in the staging table, our next step is to delete rows with OP column D, perform a merge operation to replace existing rows, and upload the result to our S3 bucket. However, because S3 objects are immutable, we need to delete the partitions that would be affected by the latest ingested dataset and rewrite them from Amazon Redshift. Amazon Redshift doesn’t have an out-of-the-box way to delete S3 objects; however, we can use a scalar Lambda UDF that takes as an argument the partition to be deleted and removes all the objects under the partition. The Python code of our Lambda function uses Boto3 and looks like the following example:

import json
import boto3

datalakeBucket = '<DATA-LAKE-BUCKET>'
folder = 'prod/cases/'
    
def lambda_handler(event, context):
    ret = {}
    res = []
    s3Resource = boto3.resource('s3')
    bucket = s3Resource.Bucket(datalakeBucket)
    for argument in event['arguments']:
        partition = argument[0]
        bucket.objects.filter(Prefix=folder + partition).delete()
        res.append(True)
    ret['success'] = True
    ret['results'] = res
    return json.dumps(ret)

We then need to register the Lambda UDF from in our Amazon Redshift cluster by running the following code:

create or replace external function deletePartition(path VARCHAR)
returns boolean stable 
LAMBDA 'deletePartition'
IAM_ROLE 'arn:aws:iam::<AWS account-id>:role/<role-name>';

The last edge case we might need to take care of is the scenario of a CDC dataset containing multiple records for the same dataset. The approach we take here is to use another date field that is available in the dataset, prep_flow_time, to keep the latest record. To implement this logic in SQL, we use a nested query with the row_number window function.

On a high level, the upsert stored procedure includes the following steps:

  1. Delete partitions that are being updated from the S3 data lake, using the scalar Lambda UDF.
  2. Delete rows that are being updated from Amazon Redshift.
  3. Implement the transformations and compute the latest values of the updated rows.
  4. Insert them into the target table in Amazon Redshift.
  5. Unload the affected partitions to the S3 data lake.
  6. Truncate the staging table.

See the following code:

CREATE OR REPLACE PROCEDURE upsert()
AS $$
DECLARE
  sql text;
  deletePartition text;
  s3folder varchar(65535);
  iamrole varchar(1000);
  unload varchar(65535);
begin
  
  drop table if exists affected_dates;
  create temp table affected_dates as select date from cases where oid__id in (select distinct oid__id from cases_stage cs);
  deletePartition:='select deletePartition(partitionPath) from 
  (select distinct ''year='' || year::VARCHAR || ''/month='' || month::VARCHAR || ''/day='' || day::VARCHAR partitionPath
  from cases
  where date in (select date from affected_dates));';
  execute deletePartition;
	
  delete from cases using cases_stage 
  where cases.oid__id = cases_stage.oid__id;
  insert into cases 
  select oid__id
  , case_type
  , cases
  , difference
  , date
  , country_region
  , province_state
  , admin2
  , combined_key
  , lat
  , long
  , prep_flow_runtime
  , fips
  , year
  , month
  , day
  , is_death
  , is_confirmed
from
(SELECT row_number() over (partition by oid__id order by TO_DATE(prep_flow_runtime, 'mm/dd/yyyy') desc) seq
  , oid__id
  , case_type
  , cases
  , difference
  , TO_DATE(date, 'mm/dd/yyyy') date
  , country_region
  , province_state
  , admin2
  , combined_key
  , lat
  , long
  , TO_DATE(prep_flow_runtime, 'mm/dd/yyyy') prep_flow_runtime
  , fips
  , DATE_PART(year, TO_DATE(date, 'mm/dd/yyyy'))::smallint as year
  , DATE_PART(month, TO_DATE(date, 'mm/dd/yyyy'))::smallint as month
  , DATE_PART(day, TO_DATE(date, 'mm/dd/yyyy'))::smallint as day
  , CASE WHEN case_type = 'Deaths' then 1 else 0 end is_death
  , CASE WHEN case_type = 'Confirmed' then 1 else 0 end is_confirmed
  from cases_stage where op = 'U') where seq = 1;
  
  sql:='select *
  from cases
  where date in (select date from affected_dates);';
  s3folder:='s3://<DATA-LAKE-BUCKET>/prod/cases/';
  iamrole:=' arn:aws:iam::<AWS account-id>:role/<role-name>';
  unload := 'unload ('''||sql||''') to ''' ||s3folder||''' iam_role '''||iamrole||''' ALLOWOVERWRITE MAXFILESIZE 100 MB PARALLEL PARQUET PARTITION BY (year,month,day)';    
  execute unload;
  truncate cases_stage;
END;
$$ LANGUAGE plpgsql;

Finally, we can modify the aforementioned AWS Glue job to use Boto3 to decide whether this is a historical load or a CDC by using Boto3 to check if the table exists in the AWS Glue Data Catalog. The final version of the AWS Glue job is as follows:

import sys
from awsglue.transforms import *
from awsglue.utils import getResolvedOptions
from pyspark.context import SparkContext
from awsglue.context import GlueContext
from awsglue.job import Job

args = getResolvedOptions(sys.argv, ['TempDir','JOB_NAME'])

sc = SparkContext()
glueContext = GlueContext(sc)
spark = glueContext.spark_session
spark.sql("set spark.sql.legacy.timeParserPolicy=LEGACY")
job = Job(glueContext)
job.init(args['JOB_NAME'], args)
glueClient = boto3.client('glue')
tableExists = True
post_query="call upsert();"
try:
    response = glueClient.get_table(DatabaseName='document-data-lake', Name='cases')
except glueClient.exceptions.EntityNotFoundException:
    tableExists = False
    post_query="call historicalLoad();"

datasource0 = glueContext.create_dynamic_frame.from_catalog(database = "document-landing", table_name = "cases", transformation_ctx = "datasource0")

glueContext.write_dynamic_frame.from_jdbc_conf(frame = datasource0, catalog_connection = "redshift-serverless", connection_options = {"dbtable": "cases_stage", "database": "dev", "postactions":post_query}, redshift_tmp_dir = args["TempDir"], transformation_ctx = "datasink4")
if not tableExists:
    response = glueClient.start_crawler(Name='document-lake')

job.commit()

Running this job for the first time with job bookmarks enabled loads the historical data to the Redshift Serverless staging table and triggers the historical load stored procedure, which in turn performs the transformations we implemented using SQL and unloads the result to the S3 data lake. Subsequent runs ingest newly arrived data from the landing zone, ingests them to the staging table, and performs the upsert process, deleting and repopulating the affected partitions in the data lake.

Conclusion

Building a modern data lake that maintains a most recent view involves some edge cases that aren’t intuitive if you come from a RDBMS background. In this post, we described an AWS native approach that takes advantage of the rich features and SQL syntax of Amazon Redshift, paying only for the resources used thanks to Redshift Serverless and without using any external framework.

The introduction of Amazon Redshift Serverless unlocks the hundreds of Redshift features released every year to users that do not require a cluster that’s always up and running. You can start experimenting with this approach of managing your data lake with Redshift, as well as addressing other use cases that are now easier to solve with Redshift Serverless.


About the author

George Komninos is a solutions architect for the AWS Data Lab. He helps customers convert their ideas to a production-ready data product. Before AWS, he spent three years at Alexa Information domain as a data engineer. Outside of work, George is a football fan and supports the greatest team in the world, Olympiacos Piraeus.

Let’s Architect! Designing Well-Architected systems

Post Syndicated from Luca Mezzalira original https://aws.amazon.com/blogs/architecture/lets-architect-designing-well-architected-systems/

Amazon’s CTO Werner Vogels says, “Everything fails, all the time”. This means we should design with failure in mind and assume that something unpredictable could happen.

The AWS Well-Architected Framework is designed to help you prepare your workload for failure. It describes key concepts, design principles, and architectural best practices for designing and running workloads in the cloud. Using this tool regularly will help you gain awareness of the status of your workloads and is in place to improve any workload deployed inside your AWS accounts.

In this edition of Let’s Architect!, we’ve collected solutions and articles that will help you understand the value behind the Well-Architected Framework and how to implement it in your software development lifecycle.

AWS Well-Architected Framework

AWS Well-Architected (AWS WA) helps cloud architects build secure, high-performing, resilient, and efficient infrastructure for a variety of applications and workloads. Built around six pillars—operational excellence, security, reliability, performance efficiency, cost optimization, and sustainability—AWS WA provides a consistent approach for customers and partners to evaluate architectures and implement scalable designs.

The AWS WA Framework includes domain-specific lenses, hands-on labs, and the AWS Well-Architected Tool. The AWS Well-Architected Tool (AWS WA Tool), available at no cost in the AWS Management Console, provides a mechanism for regularly evaluating workloads, identifying high-risk issues, and recording improvements.

The 6 pillars that composes the AWS Well-Architected framework

The 6 pillars that composes the AWS Well-Architected framework

Use templated answers to perform Well-Architected reviews at scale

For larger customers, performing AWS WA reviews often involves a combination of different teams. Coordinating participants from each team in order to perform a review increases the time taken and is expensive. In a large organization, there are often hundreds of AWS accounts where teams can store review documents, which means there is no way to quickly identify risks or spot common issues or trends that could influence improvements.

To address this, this blog post offers a solution to help you perform reviews easier and faster. It allows workload owners to automatically populate their reviews with templated answers to questions in the AWS WA Tool. These answers may be a shared responsibility between an application team and a centralized team such as platform, security, or finance. This way, application teams have fewer questions to answer and centralized team members have fewer reviews to attend, because answers that are common to all workloads are pre-populated in workload reviews. The solution also provides centralized reporting to provide a centralized view of AWS WA reviews conducted across the organization.

The components of the solution and the steps in the workflow

The components of the solution and the steps in the workflow

Machine Learning Lens

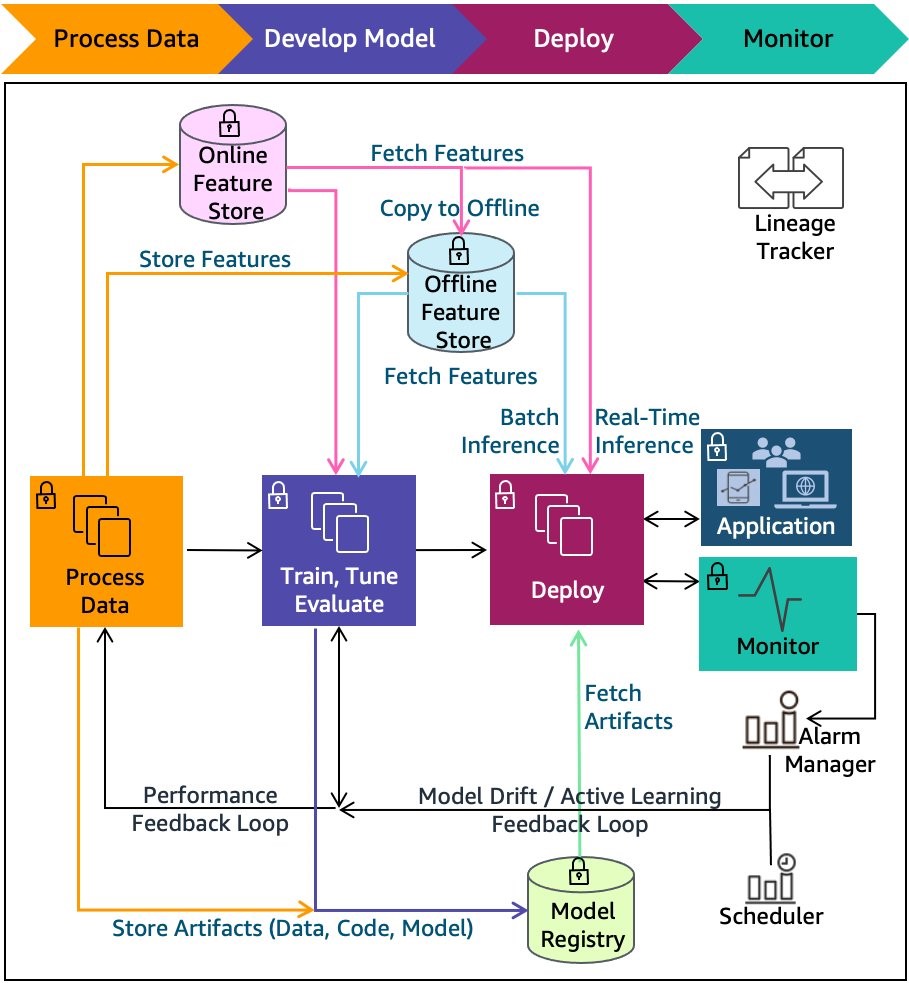
Machine learning (ML) is used to solve specific business problems and influence revenue. However, moving from experimentation (where scientists design ML models and explore applications) to a production scenario (where ML is used to generate value for the business) can present some challenges. For example, how do you create repeatable experiments? How do you increase automation in the deployment process? How do you deploy my model and monitor the performance?

This blog post and its companion whitepaper provide best practices based on AWS WA for each phase of putting ML into production, including formulating the problem and approaches for monitoring a model’s performance.

ML lifecycle phases with expanded components

ML lifecycle phases with expanded components

Establishing Feedback Loops Based on the AWS Well-Architected Framework Review

When you perform an AWS WA review using the AWS WA Tool, you’ll answer a set of questions. The tool then provides gives recommendations to improve your workloads.

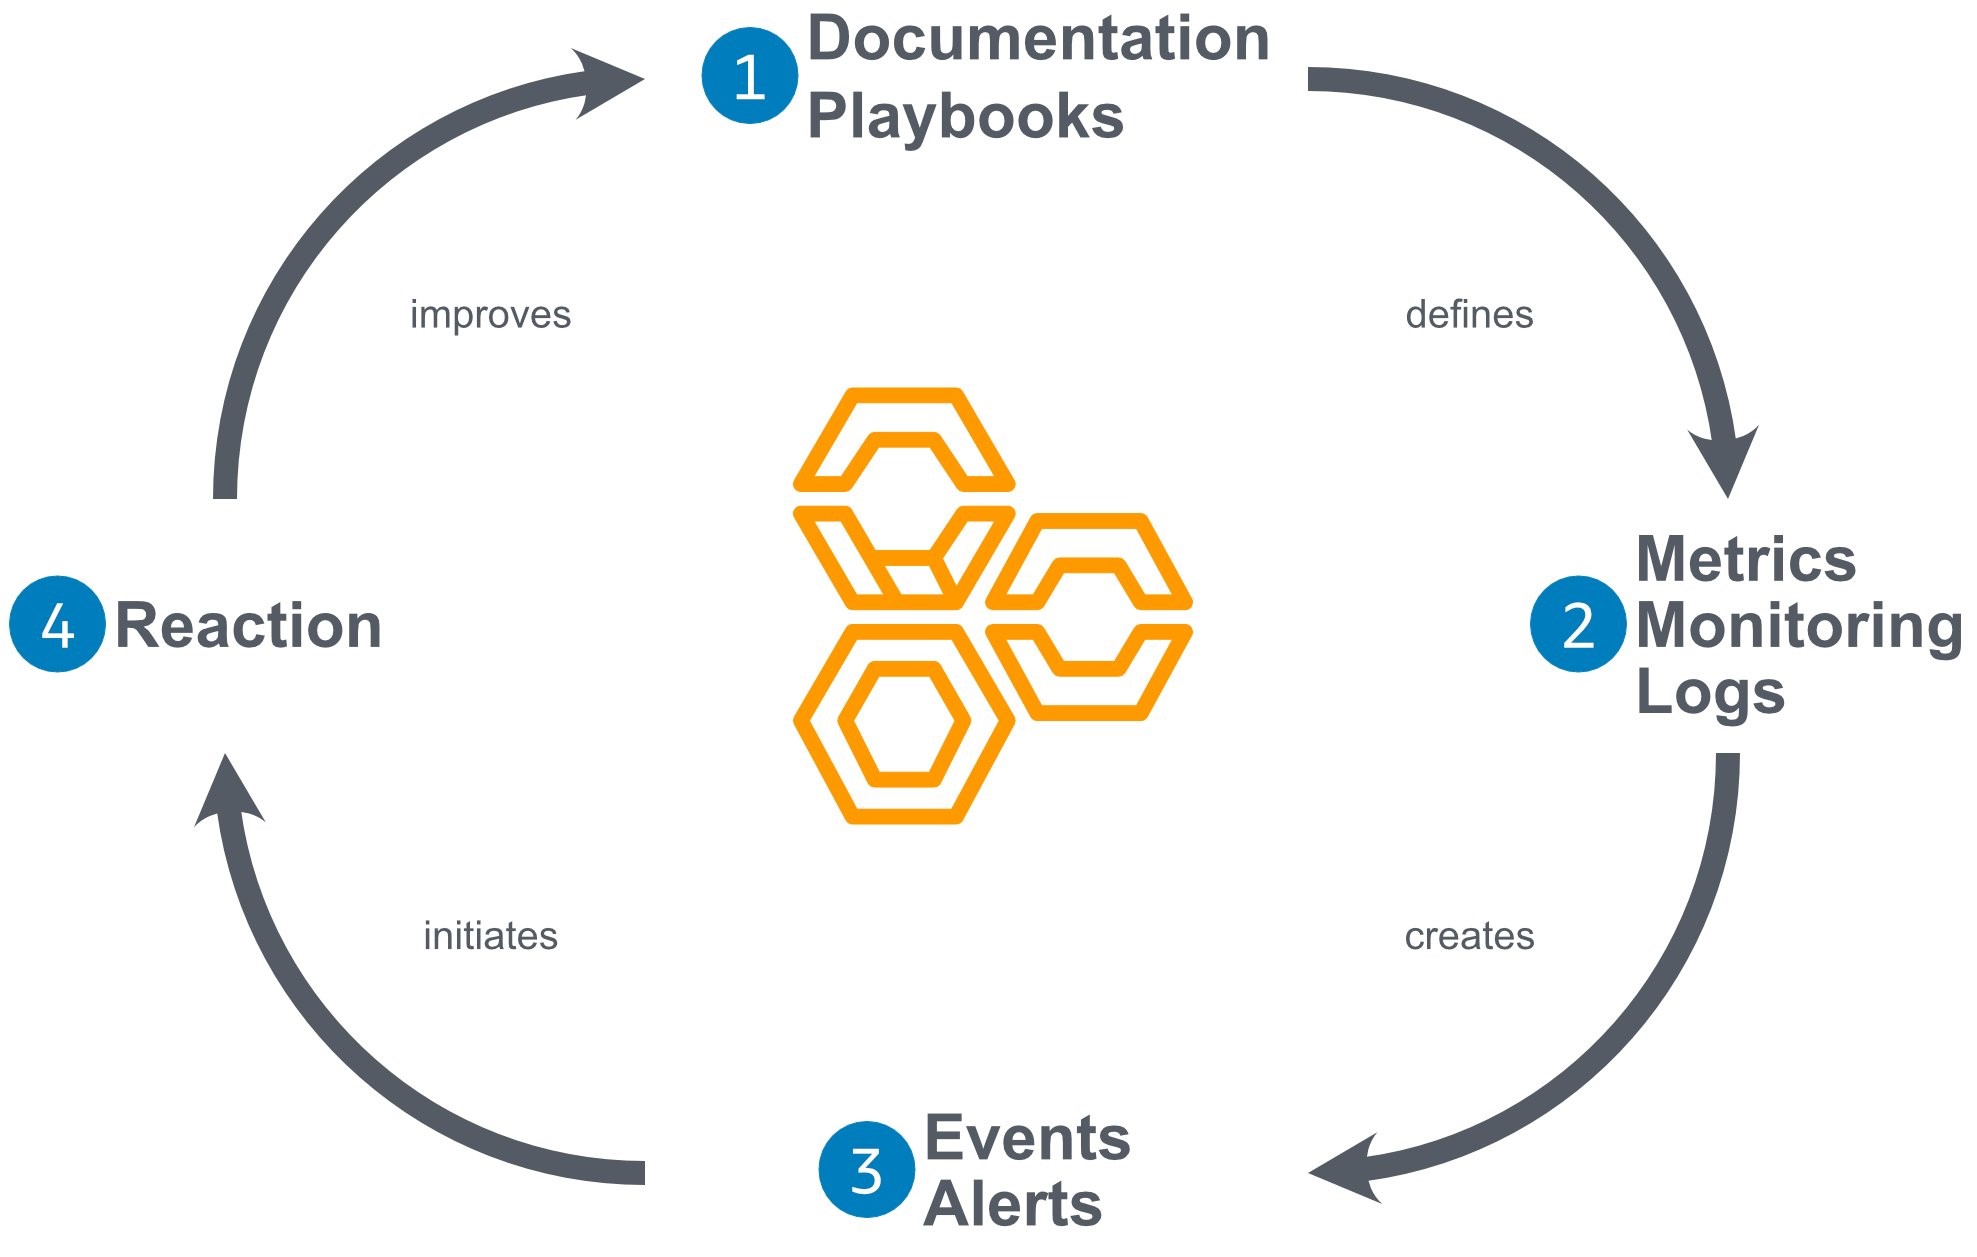
To apply these recommendations effectively, you must 1) define how you’ll apply them, 2) create systems to define what is monitored and which kind of metrics or logs are required, 3) establish automatic or manual process and for reporting, and 4) improve them through iteration. This process is called a feedback loop.

This blog post shows you how to iteratively improve your overall architecture with feedback loops based on the results of the AWS WA review.

Feedback loop based on the AWS WA review

Feedback loop based on the AWS WA review

See you next time!

Thanks for reading! See you in a couple of weeks when we discuss strategies for running serverless applications on AWS.

Other posts in this series

Looking for more architecture content?

AWS Architecture Center provides reference architecture diagrams, vetted architecture solutions, Well-Architected best practices, patterns, icons, and more!

Streaming Media with Backblaze B2: A Data Storage Guide

Post Syndicated from Pat Patterson original https://www.backblaze.com/blog/roll-camera-streaming-media-from-backblaze-b2/

A decorative image showing a cloud with the Backblaze logo, a media icon, and a user icon.

You can store petabytes of audio and video assets in Backblaze B2 Cloud Storage, and lots of our customers do. While many customers archive their digital assets for long-term safekeeping, a growing number of customers use Backblaze B2 to deliver media assets to their end consumers, often embedded in web pages.

Embedding audio and video files in web pages for playback in the browser is nothing new, but there are a lot of ingredients in the mix, and it can be tricky to get right. Streaming media from Backblaze B2 simplifies sharing stored data. Whether you’re delivering content for web applications or supporting business workflows, Backblaze B2 offers a seamless way to store, protect, and share data.

After reading this blog post, you’ll be ready to deliver media assets from Backblaze B2 to website users reliably and affordably. I’ll cover:

  • A little bit of history on how streaming media came to be.
  • A primer on the various strands of technology and how they work.
  • A how-to guide for streaming media from your Backblaze B2 account.

The evolution of internet media streaming

Back in the early days of the web, audio and video content was a rarity. Most people connected to the internet via a dial-up link, and just didn’t have the bandwidth to stream audio, let alone video, content to their computer. Consequently, the early web standards specified how browsers should show images in web pages via the <img> tag, but made no mention of audio/visual resources. Digital storage media like floppy disks and magnetic disks were often used for storing and sharing multimedia content offline.

As bandwidth increased to the point where it was possible for more of us to stream large media files, Adobe’s Flash Player became the de facto standard for playing audio and video in the web browser. Flash allowed websites to embed and stream media files directly, revolutionizing the way content was consumed online. When YouTube launched, for example, in early 2005, it required the Flash Player plug-in to be installed in the browser to view the videos.

However, reliance on Flash presented limitations, including security vulnerabilities and compatibility issues across devices. As a result, web developers began exploring native solutions for streaming media. This resulted in a significant milestone in digital data delivery, as browsers and devices started incorporating built-in capabilities for playing media.

Meanwhile, the evolution of data storage media, including external hard drives, solid-state drives (SSDs), and cloud storage solutions, allowed users to store and access large media libraries more efficiently.

The HTML5 video element: Transforming online media playback

At around the same time, a consortium of the major browser vendors started work on a new version of HTML, the markup language that had been a part of the web since its inception. A major goal of HTML5 was to support multimedia content natively, and so, in its initial release in 2008, the specification introduced new <audio> and <video> tags to embed audiovisual content directly in web pages, without requiring additional plugins like Flash.

This development was a game-changer in digital storage media and content delivery, as it eliminated the need for third-party software and made streaming video and audio more accessible across devices. The shift also facilitated better cross-platform compatibility, a critical feature for supporting consumer devices such as smartphones, tablets, and smart TVs.

While web pages are written in HTML, they are delivered from the web server to the browser via the HTTP protocol. Web servers don’t just deliver web pages, of course—images, scripts, audio, and video files are also delivered via HTTP.

HTML5’s multimedia capabilities also introduced support for various codecs, enabling better compression and playback quality for formats like MP4. This innovation marked a significant step forward in how websites handled and delivered rich media experiences.

How streaming technology works

Understanding the key components of streaming technology will help you set up seamless digital data delivery on your site. Here, we’ll cover:

  • Streaming vs. progressive download.
  • HTTP 1.1 byte range serving.
  • Media file formats.
  • MIME types.

Streaming vs. progressive download

In common usage, the term, “streaming,” in the context of web media, can refer to any situation where the user can request content (for example, press a play button) and consume that content almost immediately, as opposed to downloading a media file, where the user has to wait to receive the entire file before they can watch or listen. This is particularly useful for media files stored on data storage media such as solid-state drives or cloud-based storage media.

Technically, however, the term, “streaming,” refers to a continuous delivery method, and uses transport protocols such as RTSP rather than HTTP. This form of streaming requires specialized software to handle data traffic in real time

Progressive download blends aspects of downloading and streaming. When the user presses play on a video on a web page, the browser starts to download the video file. However, the browser may begin playback before the download is complete. So, the user experience of progressive download is much the same as streaming, and I’ll use the term, “streaming” in its colloquial sense in this blog post. Progressive downloads rely on efficient data storage technology and protocols like HTTP to deliver content to consumer devices, such as laptops or smartphones.

Both streaming and progressive download are widely used in cloud environments today, and enable websites to serve media content directly from servers—whether local or in the cloud.

HTTP 1.1 byte range serving

HTTP enables progressive download through a feature known as range serving. Introduced to HTTP in version 1.1 back in 1997, byte range serving allows an HTTP client, such as your browser, to request a specific range of bytes from a resource, such as a video file, rather than the entire resource all at once.

Imagine you’re watching a video online and realize you’ve already seen the first half. You can click the video’s slider control, picking up the action at the appropriate point. Without byte range serving, your browser would be downloading the whole video, and you might have to wait several minutes for it to reach the halfway point and start playing. With byte range serving, the browser can specify a range of bytes in each request, so it’s easy for the browser to request data from the middle of the video file, skipping any amount of content almost instantly.

Byte range serving significantly enhances user experience and optimizes network bandwidth. It’s especially beneficial when serving large media files stored in cloud storage.

Backblaze B2 supports byte range serving in downloads via both the Backblaze B2 Native and S3 Compatible APIs. (Check out this post for an explainer of the differences between the two.)

Here’s an example range request for the first 10 bytes of a file in a Backblaze B2 bucket, using the cURL command line tool. 

You can see the Range header in the request, specifying bytes zero to nine, and the Content-Range header indicating that the response indeed contains bytes zero to nine of a total of 555,214,865 bytes. Note also the HTTP status code: 206, signifying a successful retrieval of partial content, rather than the usual 200.

% curl -I https://metadaddy-public.s3.us-west-004.backblazeb2.com/
example.mp4 -H 'Range: bytes=0-9'

HTTP/1.1 206
Accept-Ranges: bytes
Last-Modified: Tue, 12 Jul 2022 20:06:09 GMT
ETag: "4e104e1bd9a2111002a74c9c798515e6-106"
Content-Range: bytes 0-9/555214865
x-amz-request-id: 1e90f359de28f27a
x-amz-id-2: aMYY1L2apOcUzTzUNY0ZmyjRRZBhjrWJz
x-amz-version-id: 4_zf1f51fb913357c4f74ed0c1b_f202e87c8ea50bf77_
d20220712_m200609_c004_v0402006_t0054_u01657656369727
Content-Type: video/mp4
Content-Length: 10
Date: Tue, 12 Jul 2022 20:08:21 GMT

I recommend that you use S3-style URLs for media content, as shown in the above example, rather than Backblaze B2-style URLs of the form: https://f004.backblazeb2.com/file/metadaddy-public/example.mp4.

The B2 Native API responds to a range request that specifies the entire content, e.g., Range: 0-, with HTTP status 200, rather than 206. Safari interprets that response as indicating that Backblaze B2 does not support range requests, and thus will not start playing content until the entire file is downloaded. 

The S3 Compatible API returns HTTP status 206 for all range requests, regardless of whether they specify the entire content, so Safari will allow you to play the video as soon as the page loads.

Media file formats for storage and streaming

The third ingredient in streaming media successfully is the file format. There are several container formats for audio and video data, with familiar file name extensions such as .mov, .mp4, and .avi. Within these containers, media data can be encoded in many different ways by software components known as codecs, an abbreviation of coder/decoder.

Codecs play a critical role in digital storage media. They compress and decompress the data to optimize storage capacity while preserving playback quality. Choosing the right codec ensures efficient long-term storage and seamless delivery of high-quality media.

We could write a whole series of blog articles on containers and codecs, but the important point is that the media’s metadata—information regarding how to play the media, such as its length, bit rate, dimensions, and frames per second—must be located at the beginning of the video file, so that this information is immediately available as download starts. This optimization is known as “Fast Start” and is supported by software such as ffmpeg and Premiere Pro. Without this, there might be playback delays, negatively impacting the user experience.

Understanding MIME types for reliable media playback

The final piece of the puzzle is the media file’s MIME type, which identifies the file format for the browser or media player. You can see a MIME type in the Content-Type header in the above example request: video/mp4. You must specify the MIME type when you upload a file to Backblaze B2. You can set it explicitly, or use the special value b2/x-auto to tell Backblaze B2 to set the MIME type according to the file name’s extension, if one is present. It is important to set the MIME type correctly for reliable playback.

For those managing high-capacity storage, getting MIME types right helps streamline delivery and maintain compatibility with newer software and streaming protocols.

Putting it all together

So, we’ve covered the ingredients for streaming media from Backblaze B2 directly to a web page:

  • The HTML5 <audio> and <video> elements.
  • HTTP 1.1 byte range serving.
  • Encoding media for Fast Start.
  • Storing media files in Backblaze B2 with the correct MIME type.

Here’s an HTML5 page with a minimal example of an embedded video file:

<!DOCTYPE html>
<html>
<body>
<h1>Video</h1>
<video controls src="my-video.mp4" width="640px"></video>
</body>
</html>

The controls attribute tells the browser to show the default set of controls for playback. Setting the width of the video element makes it a more manageable size than the default, which is the video’s dimensions. This short video shows the video element in action:

Managing download costs with efficient data storage solutions

When serving media files from your account, you need to consider download charges as part of your overall data management strategy. Backblaze offers a few ways to manage these charges. To start, the first 1GB of data downloaded from your Backblaze B2 account per day is free. After that, we charge $0.01/GB—notably less than AWS at $0.05+/GB, Azure at $0.04+, and Google Cloud Platform at $0.12.

We also cover the download fees between Backblaze B2 and many CDN partners like Cloudflare, Fastly, and Bunny.net, so you can serve content closer to your end users via their edge networks. You’ll want to make sure you understand if there are limits on your media downloads from those vendors by checking the terms of service for your CDN account. Some service levels do restrict downloads of media content.

Start streaming: Your media storage journey begins

Now you know everything you need to know to get started encoding, uploading, and serving audio/visual content from Backblaze B2 Cloud Storage. Backblaze B2 is a great way to experiment with multimedia—the first 10GB of storage is free, and Backblaze pricing includes free egress per month. 

Sign up free, no credit card required, and start building your long-term backup and streaming infrastructure with Backblaze B2.

The post Streaming Media with Backblaze B2: A Data Storage Guide appeared first on Backblaze Blog | Cloud Storage & Cloud Backup

5 SOAR Myths Debunked

Post Syndicated from Matthew Gardiner original https://blog.rapid7.com/2022/07/27/5-soar-myths-debunked/

5 SOAR Myths Debunked

A recently published ESG research ebook, sponsored by Rapid7, SOC Modernization and the Role of XDR, shows that organizations are increasingly leveraging security orchestration, automation, and response (SOAR) systems in an attempt to keep up with their security operations challenges. This makes sense, as every organization is facing the combined pressure of the growing threat landscape, expanding attack surface, and the cybersecurity skills shortage. To address these challenges, 88% of organizations report that they plan to increase their spending on security operations with the specific goal of better operationalizing threat intelligence, leveraging asset data in their SOC, improving their alert prioritization, and better measuring and improving their KPIs. All of these initiatives fall squarely into the purpose and value of SOAR.

In the same research, ESG also uncovered both praise and challenges for SOAR systems. On the praise side, there is very broad agreement that SOAR tools are effective for automating both complex and basic security operations tasks. But on the challenges side, the same respondents report unexpectedly high complexity and demands on programming and scripting skills that are getting in the way of SOAR-enabled value realization.

5 SOAR Myths Debunked

The SOC Modernization and the Role of XDR ebook, my years in the security industry, and my last year heavily focused on security operations and SOAR bring to mind five common SOAR myths worth debunking.

Myth #1: SOAR-enabled security automation is about eliminating security analysts

Security professionals, you can put away your wooden shoes (Sabot). There is no risk of job losses resulting from the use of SOAR tools. While in some cases, security tasks can be fully automated away, in the vast majority of SOAR-enabled automations, the value of SOAR is in teeing up the information necessary for security analysts to make good decisions and to leverage downstream integrations necessary to execute those decisions.

If you love manually collecting data from multiple internal and external sources necessary to make an informed decision and then manually opening tickets in IT service management systems or opening admin screens in various security controls to execute those decisions, stay away from using SOAR! Want to hear directly from an organization regarding this myth? Check out this Brooks case study and a supporting blog. The point of SOAR is to elevate your existing security professionals, not eliminate them.

Myth #2: SOAR requires programming skills

While SOARs require programming logic, they don’t generally require programming skills. If you know what process, data, decision points, and steps you need to get the job done, a SOAR system is designed to elevate the implementer of these processes out of the weeds of integrations and code-level logic steps necessary to get the job done.

The purpose of a well-designed SOAR is to elevate the security analyst out of the code and into the logic of their security operations. This is why a SOAR is not a general-purpose automation tool but is specifically designed and integrated to aid in the management and automation of tasks specific to security operations. Programming skills are not a prerequisite for getting value from a SOAR tool.

Myth #3: SOAR is only for incident response

While clearly the origin story of SOAR is closely connected to incident response (IR) and security operations centers (SOCs), it is a myth that SOARs are exclusively used to manage and automate IR-related processes. While responding effectively and quickly to incidents is critical, preparing your IT environment well through timely and efficient vulnerability management processes is equally important to the risk posture of the organization.

We see here at Rapid7 that just as many vulnerability management use cases are enabled with our SOAR product, InsightConnect, as are incident response ones. If you want to see some real life examples of incident response and vulnerability management use cases in action, check out these demos.

Myth #4: You must re-engineer your security processes before adopting SOAR

Some organizations get caught in a security catch-22. They are too busy with manual security tasks to apply automation to help reduce the time necessary to conduct these security tasks. This is a corollary to the problem of being too busy working to do any work. The beauty of SOAR solutions is that you don’t have to know exactly what your security processes need to be before using a SOAR. Fortunately, thousands of your peer organizations have been working on hundreds of these security processes for many years.

Why create from scratch when you can just borrow what has already been crowdsourced? Many SOAR users freely publish what they consider to be the best practice security process automations for the various security incidents and vulnerabilities that you will likely encounter. SOAR vendors, such as Rapid7, curate and host hundreds of pre-built automations that you can study and grab for free to apply (and customize as appropriate) to your organization. These crowdsourced libraries mean that you do not need to start your security automation projects with a blank sheet of paper.

Myth #5: SOAR tools are not needed if you use managed security service providers

There is no question that managed security service providers in general and managed detection and response (MDR) providers – such as Rapid7 – in particular can deliver critical security value to organizations. In fact, in the same ESG research, 88% of organizations reported that they would increase their use of managed services for security operations moving forward. The economic value of an MDR service like Rapid7’s was demonstrated in a newly published Forrester TEI report. But what happens to SOAR when you leverage an MDR provider?

The reality is that managed providers complement and extend your security teams and thus don’t fully replace them. While managed providers can and do automate aspects of your security operations – most typically detections and investigations – rarely are they given full reign to make changes in your IT and security systems or to drive responses directly into your organization. They provide well-vetted recommendations, and you, the staff security professionals, decide how and when best to implement those recommendations. This is where SOAR comes in, doing what it does best: helping you manage and automate the execution of those recommendations. In fact, debunking the myth, SOAR tools can directly complement and extend the value of managed security service providers.

Clearly, there is no shortage of things to do and improve in most organizations to bend the security curve in favor of the good guys. My hope is that this latest research from ESG and the SOAR myth-busting in this blog will help you and your organization bend the security curve in your favor.

Download the e-book today for more insights from ESG’s research.

Additional reading:

NEVER MISS A BLOG

Get the latest stories, expertise, and news about security today.

Vetter: Locking Engineering Principles

Post Syndicated from original https://lwn.net/Articles/902645/

Daniel Vetter offers some
advice
for developers of locking schemes in the kernel.

Validating locking by hand against all the other locking designs
and nesting rules the kernel has overall is nigh impossible,
extremely slow, something only few people can do with any chance of
success and hence in almost all cases a complete waste of time. We
need tools to automate this, and in the Linux kernel this is
lockdep.

Therefore if lockdep doesn’t understand your locking design your
design is at fault, not lockdep. Adjust accordingly.

Fortinet FortiCNP – Now Available in AWS Marketplace

Post Syndicated from Jeff Barr original https://aws.amazon.com/blogs/aws/fortinet-forticnp-now-available-in-aws-marketplace/

When I first started to talk about AWS in front of IT professionals, they would always listen intently and ask great questions. Invariably, a seasoned pro would raise there hand and ask “This all sounds great, but have you thought about security?” Of course we had, and for a while I would describe our principal security features ahead of time instead of waiting for the question.

Today, the field of cloud security is well-developed, as is the practice of SecOps (Security Operations). There are plenty of tools, plenty of best practices, and a heightened level of awareness regarding the important of both. However, as on-premises workloads continue to migrate to the cloud, SecOps practitioners report that they are concerned about alert fatigue, while having to choose tools that ensure the desired level of workload coverage. According to a recent survey conducted by Fortinet, 78% of the respondents were looking for a single cloud security platform that offers sufficient workload coverage to address all of their needs.

Fortinet FortiCNP
In response to this clear need for a single tool that addresses cloud workloads and cloud storage, Fortinet has launched FortiCNP (Cloud Native Protection). As the name implies, this security product is designed to offer simple & effective protection of cloud resources. It monitors and tracks multiple sources of security issues including configurations, user activity, and VPC Flow Logs. FortiCNP scans cloud storage for content that is sensitive or malicious, and also inspects containers for vulnerabilities and misconfigurations. The findings and alerts generated by all of this monitoring, tracking, and scanning is mapped into actionable insights and compliance reports, all available through a single dashboard.

Now in AWS Marketplace
I am happy to report that FortiCNP is now available in AWS Marketplace and that you can start your subscription today! It connects to multiple AWS security tools including Amazon Inspector, AWS Security Hub, and Amazon GuardDuty, with plans to add support for Amazon Macie, and other Fortinet products such as FortiEDR (Endpoint Detection and Response) and FortiGate-VM (next-generation firewall) later this year.

FortinCNP provides you with features that are designed to address your top risk management, threat management, compliance, and SecOps challenges. Drawing on all of the data sources and tools that I mentioned earlier, it runs hundreds of configuration assessments to identify risks, and then presents the findings in a scored, prioritized fashion.

Getting Started with FortiCNP
After subscribing to FortiCNP in AWS Marketplace, I set up my accounts and enable some services. In the screenshots that follow I will show you the highlights of each step, and link you to the docs for more information:

Enable Security Hub and EventBridge – Following the instructions in AWS Security Hub and EventBridge Configuration, I choose an AWS region to hold my aggregated findings, enable Amazon GuardDuty and Amazon Inspector, and route the findings to AWS Security Hub.

Add VPC Flow Logs – Again following the instructions (AWS Traffic Configuration), I enable VPC Flow Logs. This allows FortiCNP to access cloud traffic data and present it in the Traffic view.

Add AWS Accounts – FortiCNP can protect a single AWS account or all of the accounts in an entire Organization, or anywhere in-between. Accounts and Organizations can be added manually, or by using a CloudFormation template that sets up an IAM Role, enables CloudTrail, and takes care of other housekeeping. To learn more, read Amazon Web Services Account OnBoarding. Using the ADMIN page of FortiCNP, I choose to add a single account using a template:

Following the prompts, I run a CloudFormation template and review the resources that it creates:

After a few more clicks, FortiCNP verifies my license and then I am ready to go.

Enable Storage Guardian – I can enable data protection for individual S3 buckets, and initiate a scan (more info at Activate Data Protection on Bucket / Container).

With all of the setup steps complete, I can review and act on the findings. I start by reviewing the dashboard:

Because I just started using the product, the overall risk trend section at the top has just a few days worth of history. The Resource Overview shows that my resources are at low risk, with only informational messages. I have no exposed storage with sensitive data, and none with malware (always good to know).

I can click on a resource type to learn more the findings. Each resource has an associated risk score:

From here I can click on a resource to see which of the findings contribute to the risk score:

I can switch to the Changes tab to see all relevant configuration changes for the resource:

I can also add notes to the resource, and I can send notifications to several messaging and ticketing systems:

Compliance reports are generated automatically on a monthly, quarterly, and yearly basis. I can also generate a one-time compliance report to cover any desired time frame:

Reports are available immediately, and can be downloaded for review:

The policies that are used to generate findings are open and accessible,and can be enabled, disabled, and fine-tuned. For example, the Alert on activity from suspicious locations (sorry, all of you who are connecting from Antarctica):

There’s a lot more but I am just about out of space. Check out the online documentation to learn a lot more.

Available Today
You can subscribe to FortiCNP now and start enjoying the benefits today!

— Jeff;

Nethercote: Twenty years of Valgrind

Post Syndicated from original https://lwn.net/Articles/902643/

Nicholas Nethercote marks
the 20th anniversary of the Valgrind 1.0 release.

It’s both delightful and surreal to see that Valgrind is still in
wide use today. Julian [Seward’s] original goal was to raise the
bar when it came to correctness for C and C++ programs. This has
clearly been a huge success. Memcheck has found countless bugs in
countless programs, and is a standard part of the testing setup for
many of them.

Securing Open-Source Software

Post Syndicated from Bruce Schneier original https://www.schneier.com/blog/archives/2022/07/securing-open-source-software.html

Good essay arguing that open-source software is a critical national-security asset and needs to be treated as such:

Open source is at least as important to the economy, public services, and national security as proprietary code, but it lacks the same standards and safeguards. It bears the qualities of a public good and is as indispensable as national highways. Given open source’s value as a public asset, an institutional structure must be built that sustains and secures it.

This is not a novel idea. Open-source code has been called the “roads and bridges” of the current digital infrastructure that warrants the same “focus and funding.” Eric Brewer of Google explicitly called open-source software “critical infrastructure” in a recent keynote at the Open Source Summit in Austin, Texas. Several nations have adopted regulations that recognize open-source projects as significant public assets and central to their most important systems and services. Germany wants to treat open-source software as a public good and launched a sovereign tech fund to support open-source projects “just as much as bridges and roads,” and not just when a bridge collapses. The European Union adopted a formal open-source strategy that encourages it to “explore opportunities for dedicated support services for open source solutions [it] considers critical.”

Designing an institutional framework that would secure open source requires addressing adverse incentives, ensuring efficient resource allocation, and imposing minimum standards. But not all open-source projects are made equal. The first step is to identify which projects warrant this heightened level of scrutiny—projects that are critical to society. CISA defines critical infrastructure as industry sectors “so vital to the United States that [its] incapacity or destruction would have a debilitating impact on our physical or economic security or public health or safety.” Efforts should target the open-source projects that share those features.

The collective thoughts of the interwebz