OpenBSD 7.6 has been released. Notable new
features include work to improve suspend/resume on modern hardware,
support for the arm64 Qualcomm Snapdragon X Elite laptops, as well as many
improvements in hardware support and driver bug fixes.
With this release all files that existed in the first commit
in the OpenBSD source repository have been updated,
modified or replaced at some point in time, reaching OpenBSD of Theseus.
See the changelog
for all changes between OpenBSD 7.5 and 7.6.
The recent WordPress
controversy is not the first time there’s been tension between the WordPress community, the interests of Automattic as a business, and Matt
Mullenweg’s leadership as WordPress’s benevolent dictator for
life (BDFL). In particular, Mullenweg’s focus on pushing WordPress to use a new
“editing experience” called Gutenberg caused significant
friction—and led to the ClassicPress fork. Users who
want to preserve the “classic” WordPress experience without straying
too far from the WordPress fold may want to look into ClassicPress.
Last Friday, I had the privilege of attending China Engineer’s Day 2024(CED 2024) in Hangzhou as the Amazon Web Services (AWS) speaker. The event was organized by the China Computer Federation (CCF), one of the most influential professional developer communities in China.
At CED 2024, I spoke about how AI development tools can improve developer productivity. I was honored to receive a certificate of excellence from CCF, and Amazon Q garnered significant attention from the attendees.
Now, let’s turn to other exciting news in the AWS universe from last week.
Last week’s launches Here are some launches that got my attention:
NICE DCV renames to Amazon DCV – NICE DCV is rebranded to Amazon DCV. This high performance remote display protocol allows secure delivery of remote desktops and application streaming from any cloud or data center to any device, even over varying network conditions. Amazon DCV supports both Windows and major Linux distributions on the server side. Clients can use native DCV client for Windows, Linux, or macOS, as well as web browsers, to receive desktops and application streamings. The DCV server and client only transfer encrypted pixels, not data, ensuring no confidential information is downloaded. When using Amazon DCV on AWS with Amazon Elastic Compute Cloud (Amazon EC2), you can take advantage of the AWS 108 Availability Zones across the 33 geographic Regions and 31 local zones. The 2024.0 release now supports the latest Ubuntu 24.04 LTS. For more details, check out Sébastien Stormacq’snew launch blog post.
AWS re:Post launches re:Post Agent – AWS re:Post provides access to curated knowledge and a vibrant community that helps users become even more successful on AWS. re:Post Agent is a generative AI assistant designed to provide rapid, intelligent responses to questions in the re:Post community. It expands the available AWS knowledge base, and community experts will earn reputation points by reviewing the AI-generated answers.
A new stop ingestion API of Amazon Bedrock Knowledge Bases – This new API allows users to halt ongoing ingestion jobs at will. Providing greater control over data ingestion workflows, users can quickly stop accidental or unwanted ingestion processes without waiting for completion. By using the new StopIngestionJob API, you can respond rapidly to evolving needs and potentially reduce costs. This capability is available across all AWS Regions where Amazon Bedrock Knowledge Bases are offered.
Higher storage limit of Amazon AppStream 2.0 – Amazon AppStream 2.0 has expanded the default size limit for application settings persistence from 1 GB to 5 GB. This increase allows end users to store more application data and settings without manual intervention and without affecting performance or session setup time.
There were over 40 launches and releases last week. It was difficult for me to select the important ones. In addition to those already mentioned, here’s a list of potentially important feature updates:
For a full list of AWS announcements, be sure to keep an eye on AWS’s What’s New Feed page.
Other AWS news Here are some other noteworthy items from last week.
Amazon WorkSpaces Thin Client – Amazon WorkSpaces Thin Client inventory is now available to purchase in the UK on Amazon Business, in addition to the US, France, Germany, Italy, and Spain. It’s a sleek, cost-effective device that brings secure access to AWS end user computing services right to your fingertips. This nifty gadget is like a digital fortress, preventing unauthorized data storage and applications, while giving IT admins the tools to manage and monitor their fleet of thin clients with ease.
Helping communities impacted by Hurricane Helene – AWS Disaster Response team is working closely with local partners and humanitarian organizations to deliver critical supplies to those in need in the Southeast. We’re also deploying AWS technology to help with re-connectivity, aid relief operations on the ground, and support food distribution needs in the region.
The life of a prescription at Amazon Pharmacy – Read the Amazon Pharmacy AI use case to remove the complexity of the process of dispensing medications and improve patients’ experiences. The system transcribes raw prescription data into standardized formats, transforms medical abbreviations into full-text equivalents, and validates medication details against an industry database. This automated process, followed by pharmacist review, has reduced potential medication errors by 50 percent and improved processing speed by up to 90 percent, allowing pharmacists to focus on critical tasks and personalized care.
A thought leadership article on generative AI in the WIRED magazine – Read Antje‘s news column in Wired. It discusses how AWS opens the transformative power of AI to organizations of any size and level of experience. I recommend it to all AI enthusiasts and business innovators. AWS is on a mission to bring generative AI magic to businesses of all sizes, offering a buffet of AI tools for tech wizards and newcomers alike. Whether you’re a startup with big dreams or a corporate giant looking to stay ahead, AWS is rolling out the red carpet to the AI revolution. Don’t miss this chance to turn your wildest tech fantasies into reality!
Upcoming AWS events Check your calendars and sign up for these AWS events:
AWS re:Invent 2024 – Registration is now open for the annual tech extravaganza, taking place December 2 – 6 in Las Vegas. I’m eager to learn about the new launches and excited to contribute to two chalk talks focusing on security topics (Dev311 – Enhance code security with generative AI and SEC228 – Navigate multi-level protection scheme compliance in AWS China Regions).
AWS Community Days – Join community-led conferences featuring technical discussions, workshops, and hands-on labs led by expert AWS users and industry leaders from around the world. Don’t miss out on the AWS Community Days happening on October 12 in Sofia and October 19 in Vadodara, Spain, and Guatemala.
The core of the Android operating system, as represented by the Android Open Source Project (AOSP),
can only be considered one of the most successful open-source initiatives
ever created; its user count is measured in the billions. But few would
consider it to be a truly community-oriented project. At the 2024 Linux Plumbers Conference, Chris Simmonds
asked why the AOSP community is so hard to find, and what might be done
about the situation.
Version 2.47.0 of the Git
source-code management system has been released. The changes include a
long list of incremental improvements; see the announcement and this
GitHub blog post for details.
In today’s data-driven landscape, managing and analyzing vast amounts of data, especially logs, is crucial for organizations to derive insights and make informed decisions. However, handling large data while extracting insights is a significant challenge, prompting organizations to seek scalable solutions without the complexity of infrastructure management.
Amazon OpenSearch Serverless reduces the burden of manual infrastructure provisioning and scaling while still empowering you to ingest, analyze, and visualize your time-series data, simplifying data management and enabling you to derive actionable insights from data.
We recently announced a new capacity level of 30TB for time series data per account per AWS Region. The OpenSearch Serverless compute capacity for data ingestion and search/query is measured in OpenSearch Compute Units (OCUs), which are shared among various collections with the same AWS Key Management Service (AWS KMS) key. To accommodate larger datasets, OpenSearch Serverless now supports up to 500 OCUs per account per Region, each for indexing and search respectively, more than double from the previous limit of 200. You can configure the maximum OCU limits on search and indexing independently, giving you the reassurance of managing costs effectively. You can also monitor real-time OCU usage with Amazon CloudWatch metrics to gain a better perspective on your workload’s resource consumption. With the support for 30TB datasets, you can analyze data at the 30TB level to unlock valuable operational insights and make data-driven decisions to troubleshoot application downtime, improve system performance, or identify fraudulent activities.
This post discusses how you can analyze 30TB time series datasets with OpenSearch Serverless.
Innovations and optimizations to support larger data size and faster responses
Sufficient disk, memory, and CPU resources are crucial for handling extensive data effectively and conducting thorough analysis. These resources are not just beneficial but crucial for our operations. In time series collections, the OCU disk typically contains older shards that are not frequently accessed, referred to as warm shards. We have introduced a new feature called warm shard recovery prefetch. This feature actively monitors recently queried data blocks for a shard. It prioritizes them during shard movements, such as shard balancing, vertical scaling, and deployment activities. More importantly, it accelerates auto-scaling and provides faster readiness for varying search workloads, thereby significantly improving our system’s performance. The results provided later in this post provide details on the improvements.
A few select customers worked with us on early adoption prior to General Availability. In these trials, we observed up to 66% improvement in warm query performance for some customer workloads. This significant improvement shows the effectiveness of our new features. Additionally, we have enhanced the concurrency between coordinator and worker nodes, allowing more requests to be processed as the OCUs increases through auto scaling. This enhancement has resulted in up to a 10% improvement in query performance for hot and warm queries.
We have enhanced our system’s stability to handle time-series collections of up to 30 TB effectively. Our team is committed to improving system performance, as demonstrated by our ongoing enhancements to the auto-scaling system. These improvements comprised of enhanced shard distribution for optimal placement after rollover, auto-scaling policies based on queue length, and a dynamic sharding strategy that adjusts shard count based on ingestion rate.
In the following section we share an example test setup of a 30TB workload that we used internally, detailing the data being used and generated, along with our observations and results. Performance may vary depending on the specific workload.
Ingest the data
You can use the load generation scripts shared in the following workshop, or you can use your own application or data generator to create a load. You can run multiple instances of these scripts to generate a burst in indexing requests. As shown in the following screenshot, we tested with an index, sending approximately 30 TB of data over a period of 15 days. We used our load generator script to send the traffic to a single index, retaining data for 15 days using a data life cycle policy.
Test methodology
We set the deployment type to ‘Enable redundancy’ to enable data replication across Availability Zones. This deployment configuration will lead to 12-24 hours of data in hot storage (OCU disk memory) and the rest in Amazon Simple Storage Service (Amazon S3). With a defined set of search performance and the preceding ingestion expectation, we set the max OCUs to be 500 for both indexing and search.
As part of the testing, we observed auto-scaling behavior and graphed it. The indexing took around 8 hours to get stabilized at 80 OCU.
On the Search side, it took around 2 days to get stabilized at 80 OCU.
Observations:
Ingestion
The ingestion performance achieved was consistently over 2 TB per day
Search
Queries were of two types, with time ranging from 15 minutes to 15 days.
OpenSearch Serverless not only supports a larger data size than prior releases but also introduces performance improvements like warm shard pre-fetch and concurrency optimization for better query response. These features reduce the latency of warm queries and improve auto-scaling to handle varied workloads. We encourage you to take advantage of the 30TB index support and put it to the test! Migrate your data, explore the improved throughput, and take advantage of the enhanced scaling capabilities.
Satish Nandi is a Senior Product Manager with Amazon OpenSearch Service. He is focused on OpenSearch Serverless and has years of experience in networking, security and AI/ML. He holds a Bachelor’s degree in Computer Science and an MBA in Entrepreneurship. In his free time, he likes to fly airplanes and hang gliders and ride his motorcycle.
Milav Shah is an Engineering Leader with Amazon OpenSearch Service. He focuses on search experience for OpenSearch customers. He has extensive experience building highly scalable solutions in databases, real-time streaming and distributed computing. He also possesses functional domain expertise in verticals like Internet of Things, fraud protection, gaming and AI/ML. In his free time, he likes to ride cycle, hike, and play chess.
Qiaoxuan Xue is a Senior Software Engineer at AWS leading the search and benchmarking areas of the Amazon OpenSearch Serverless Project. His passion lies in finding solutions for intricate challenges within large-scale distributed systems. Outside of work, he enjoys woodworking, biking, playing basketball, and spending time with his family and dog.
Prashant Agrawal is a Sr. Search Specialist Solutions Architect with Amazon OpenSearch Service. He works closely with customers to help them migrate their workloads to the cloud and helps existing customers fine-tune their clusters to achieve better performance and save on cost. Before joining AWS, he helped various customers use OpenSearch and Elasticsearch for their search and log analytics use cases. When not working, you can find him traveling and exploring new places. In short, he likes doing Eat → Travel → Repeat.
Version 4.20 of
the RPM Package Manager (RPM) has been released. Major changes in this
release include a new plugin to prevent filesystem and network access
by scriptlets, the BuildSystem directive for declaring the
build system to be used by packaged software, and more. LWN covered the development of
RPM 4.20 in September.
In the dynamic evolution of AI and cloud computing, the deployment of efficient and reliable hardware is critical. As we roll out our Gen 12 hardware across hundreds of cities worldwide, the challenge of maintaining optimal thermal performance becomes essential. This blog post provides a deep dive into the robust thermal design that supports our newest Gen 12 server hardware, ensuring it remains reliable, efficient, and cool (pun very much intended).
The importance of thermal design for hardware electronics
Generally speaking, a server has five core resources: CPU (computing power), RAM (short term memory), SSD (long term storage), NIC (Network Interface Controller, connectivity beyond the server), and GPU (for AI/ML computations). Each of these components can withstand different temperature limits based on their design, materials, location within the server, and most importantly, the power they are designed to work at. This final criteria is known as thermal design power (TDP).
The reason why TDP is so important is closely related to the first law of thermodynamics, which states that energy cannot be created or destroyed, only transformed. In semiconductors, electrical energy is converted into heat, and TDP measures the maximum heat output that needs to be managed to ensure proper functioning.
Back in December 2023, we talked about our decision to move to a 2U form factor, doubling the height of the server chassis to optimize rack density and increase cooling capacity. In this post, we want to share more details on how this additional space is being used to improve performance and reliability supporting up to three times more total system power.
Standardization
In order to support our multi-vendor strategy that mitigates supply chain risks ensuring continuity for our infrastructure, we introduced our own thermal specification to standardize thermal design and system performance. At Cloudflare, we find significant value in building customized hardware optimized for our unique workloads and applications, and we are very fortunate to partner with great hardware vendors who understand and support this vision. However, partnering with multiple vendors can introduce design variables that Cloudflare then controls for consistency within a hardware generation. Some of the most relevant requirements we include in our thermal specification are:
Ambient conditions: Given our globally distributed footprint with presence in over 330 cities, environmental conditions can vary significantly. Hence, servers in our fleet can experience a wide range of temperatures, typically ranging between 28 to 35°C. Therefore, our systems are designed and validated to operate with no issue over temperature ranges from 5 to 40°C (following the ASHRAE A3 definition).
Thermal margins: Cloudflare designs with clear requirements for temperature limits on different operating conditions, simulating peak stress, average workloads, and idle conditions. This allows Cloudflare to validate that the system won’t experience thermal throttling, which is a power management control mechanism used to protect electronics from high temperatures.
Fan failure support to increase system reliability: This new generation of servers is 100% air cooled. As such, the algorithm that controls fan speed based on critical component temperature needs to be optimized to support continuous operation over the server life cycle. Even though fans are designed with a high (up to seven years) mean time between failure (MTBF), we know fans can and do fail. Losing a server’s worth of capacity due to thermal risks caused by a single fan failure is expensive. Cloudflare requires the server to continue to operate with no issue even in the event of one fan failure. Each Gen 12 server contains four axial fans providing the extra cooling capacity to prevent failures.
Maximum power used to cool the system: Because our goal is to serve more Internet traffic using less power, we aim to ensure the hardware we deploy is using power efficiently. Great thermal management must consider the overall cost of cooling relative to the total system power input. It is inefficient to burn power consumption on cooling instead of compute. Thermal solutions should look at the hardware architecture holistically and implement mechanical modifications to the system design in order to optimize airflow and cooling capacity before considering increasing fan speed, as fan power consumption proportionally scales to the cube of its rotational speed. (For example, running the fans at twice (2x) the rotational speed would consume 8x more power,)
System layout
Placing each component strategically within the server will also influence the thermal performance of the system. For this generation of servers, we made several internal layout decisions, where the final component placement takes into consideration optimal airflow patterns, preventing pre-heated air from affecting equipment in the rear end of the chassis.
Bigger and more powerful fans were selected in order to take advantage of the additional volume available in a 2U form factor. Growing from 40 to 80 millimeters, a single fan can provide up to four times more airflow. Hence, bigger fans can run at slower speeds to provide the required airflow to cool down the same components, significantly improving power efficiency.
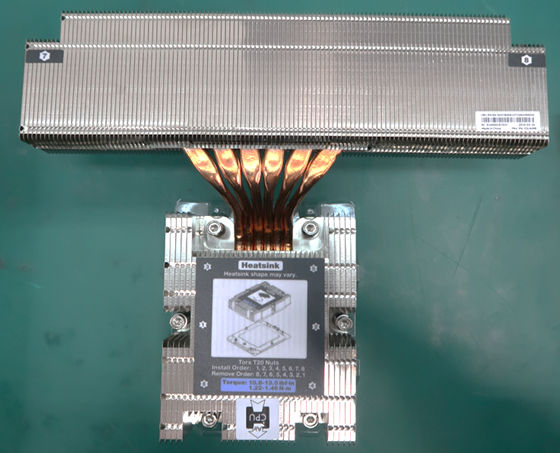
The Extended Volume Air Cooled (EVAC) heatsink was optimized for Gen 12 hardware, and is designed with increased surface area to maximize heat transfer. It uses heatpipes to move the heat effectively away from the CPU to the extended fin region that sits immediately in front of the fans as shown in the picture below.
EVAC heatsink installed in one of our Gen 12 servers. The extended fin region sits right in front of the axial fans. (Photo courtesy of vendor.)
The combination of optimized heatsink design and selection of high-performing fans is expected to significantly reduce the power used for cooling the system. These savings will vary depending on ambient conditions and system stress, but under a typical stress scenario at 25°C ambient temperature, power savings could be as much as 50%.
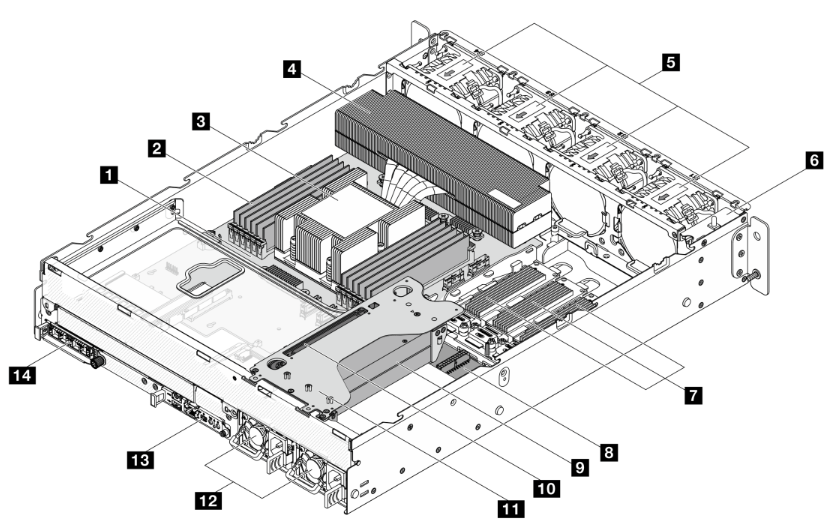
Additionally, we ensured that the critical components in the rear section of the system, such as the NIC and DC-SCM, were positioned away from the heatsink to promote the use of cooler available air within the system. Learning from past experience, the NIC temperature is monitored by the Baseboard Management Controller (BMC), which provides remote access to the server for administrative tasks and monitoring health metrics. Because the NIC has a built-in feature to protect itself from overheating by going into standby mode when the chip temperature reaches critical limits, it is important to provide air at the lowest possible temperature. As a reference, the temperature of the air right behind the CPU heatsink can reach 70°C or higher, whereas behind the memory banks, it would reach about 55°C under the same circumstances. The image below shows the internal placement of the most relevant components considered while building the thermal solution.
Using air as cold as possible to cool down any component will increase overall system reliability, preventing potential thermal issues and unplanned system shutdowns. That’s why our fan algorithm uses every thermal sensor available to ensure thermal health while using the minimum possible amount of energy.
Components inside the compute server from one of our vendors, viewed from the rear of the server. (Illustration courtesy of vendor.)
1️. Host Processor Module (HPM)
8. Power Distribution Board (PDB)
2️. DIMMs (x12)
9. GPUs (up to 2)
3️. CPU (under CPU heatsink)
10. GPU riser card
4. CPU heatsink
11. GPU riser cage
5. System fans (x4: 80mm, dual rotor)
12. Power Supply Units, PSUs (x2)
6. Bracket with power button and intrusion switch
13. DC-SCM 2.0 module
7. E1.S SSD
14. OCP 3.0 module
Making hardware flexible
With the same thought process of optimizing system layout, we decided to use a PCIe riser above the Power Supply Units (PSUs), enabling the support of up to 2x single wide GPU add-in cards. Once again, the combination of high-performing fans with strategic system architecture gave us the capability to add up to 400W to the original power envelope and incorporate accelerators used in our new and recently announced AI and ML features.
Hardware lead times are typically long, certainly when compared to software development. Therefore, a reliable strategy for hardware flexibility is imperative in this rapidly changing environment for specialized computing. When we started evaluating Gen 12 hardware architecture and early concept design, we didn’t know for sure we would be needing to implement GPUs for this generation, let alone how many or which type. However, highly efficient design and intentional due diligence analyzing hypothetical use cases help ensure flexibility and scalability of our thermal solution, supporting new requirements from our product teams, and ultimately providing the best solutions to our customers.
Rack-integrated solutions
We are also increasing the volume of integrated racks shipped to our global colocation facilities. Due to the expected increase in rack shipments, it is now more important that we also increase the corresponding mechanical and thermal test coverage from system level (L10) to rack level (L11).
Since our servers don’t use the full depth of a standard rack in order to leave room for cable management and Power Distribution Units (PDUs), there is another fluid mechanics factor that we need to consider to improve our holistic solution.
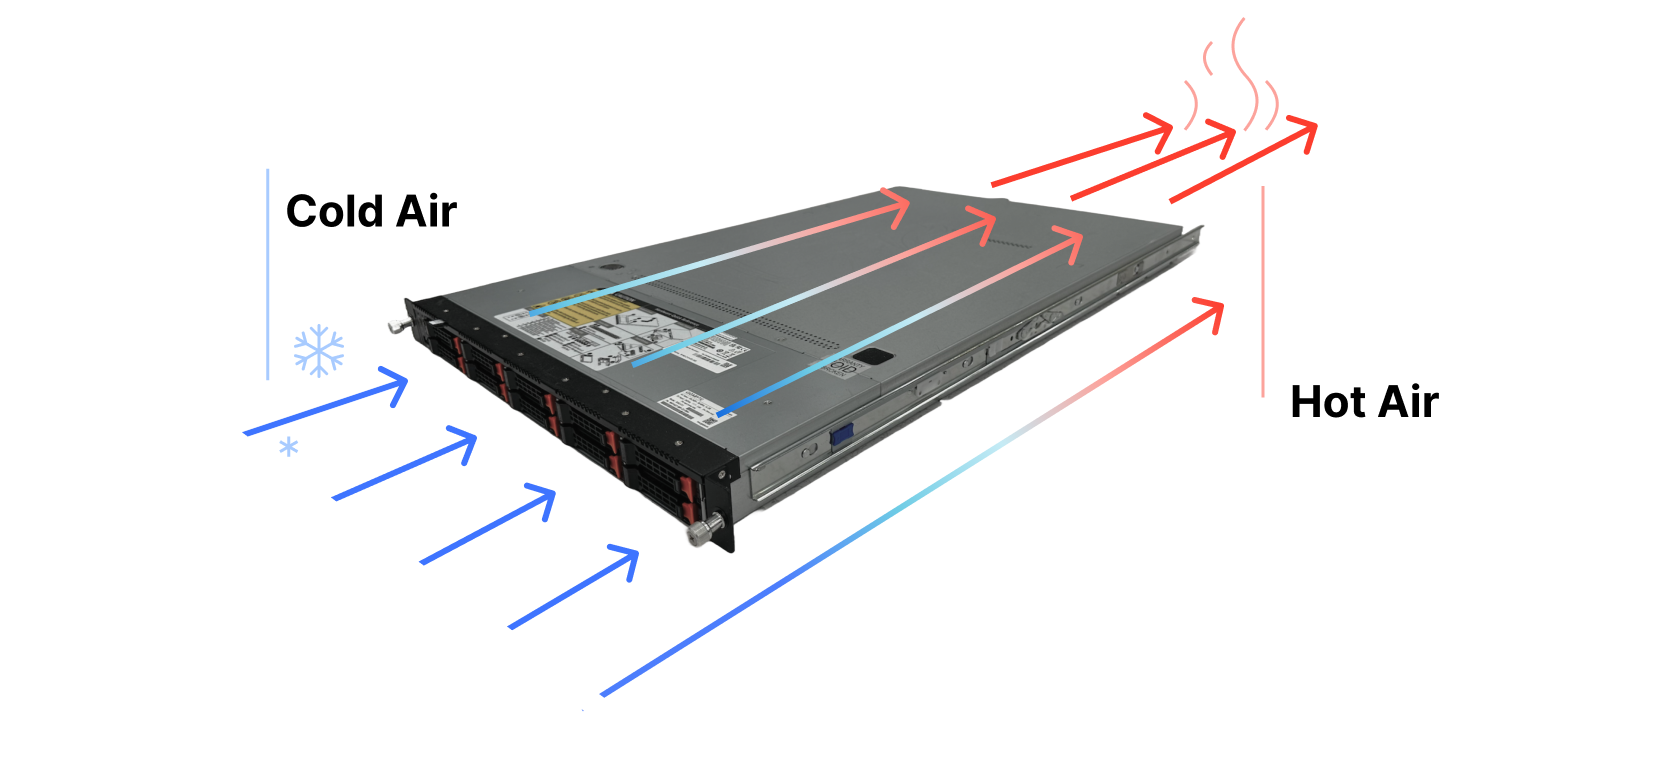
We design our hardware based on one of the most typical data center architectures, which have alternating cold and hot aisles. Fans at the front of the server pull in cold air from the corresponding aisle, the air then flows through the server, cooling down the internal components and the hot air is exhausted into the adjacent aisle, as illustrated in the diagram below.
A conventional air-flow diagram of a standard server where the cold air enters from the front of the server and hot air leaves through the rear side of the system.
In fluid dynamics, the minimum effort principle will drive fluids (air in this case) to move where there is less resistance — i.e. wherever it takes less energy to get from point A to point B. With the help of fans forcing air to flow inside the server and pushing it through the rear, the more crowded systems will naturally get less air than those with more space where the air can move around. Since we need more airflow to pass through the systems with higher power demands, we’ve also ensured that the rack configuration keeps these systems in the bottom of the rack where air tends to be at a lower temperature. Remember that heat rises, so even within the cold aisle, there can be a small but important temperature difference between the bottom and the top section of the rack. It is our duty as hardware engineers to use thermodynamics in our favor.
Conclusion
Our new generation of hardware is live in our data centers and it represents a significant leap forward in our efficiency, reliability, and sustainability commitments. Combining optimal heat sink design, thoughtful fan selection, and meticulous system layout and hardware architecture, we are confident that these new servers will operate smoothly in our global network with diverse environmental conditions, maintaining optimal performance of our Connectivity Cloud.
Come join us at Cloudflare to help deliver a better Internet!
When you walk into a vibrant Code Club, it is easy to see that the young creators are having fun with digital making. But are they actually learning anything? Our recent evaluation has shown that not only are they developing their coding skills, but there are many other benefits.
Code Club is a network of free coding clubs where young people learn how to create with technology. The Raspberry Pi Foundation supports Code Clubs through training and guidance for mentors, and by providing learning resources that lead to meaningful and lasting learning outcomes for the young people attending the clubs.
Founded in the UK in 2012, Code Club has grown into a global movement and has already inspired more than 2 million young people to learn how to build their own apps, games, animations, websites, and so much more. We are incredibly proud of the impact Code Club has already achieved and we want many more young people to benefit. Our ambitious goal for the next decade is to reach 10 million more young people through Code Club.
New impact insights about Code Club
We’re ambitious about Code Club because we know it works. Over the last year, the Durham University Evidence Centre for Education (DECE) conducted an independent evaluation of the programme that confirmed earlier evidence: attending Code Club leads to positive outcomes for young people.
The DECE evaluation showed that young people who attend Code Club build their coding skills. They also become more confident in learning coding, grow their interest in it, and develop a sense of belonging. Researchers observed how each young person has their individual projects to work on, which promote a sense of ownership and personalised learning, but that there are also opportunities for collaboration and celebrating their achievements with other creators in the club.
Young people also develop positive attitudes to coding and a range of life skills such as problem solving and communication. These skills and mindsets prepare young people to confidently engage with emerging technologies and with learning in a broader context.
“Coding is really fun when I know what to do, but sometimes it is hard. But I always keep trying.”
– Code Club creator.
Another finding was that Code Clubs are a place where young people who experience difficulties in formal classroom settings can thrive. This suggests Code Clubs can help educators engage a more diverse group of young people in creating with technology than formal education alone could.
“We see pupils in completely different roles when they are doing these Code Club activities. They enjoy more, and you can see they have skills to do things that we otherwise don’t notice.”
– Code Club mentor.
None of the benefits for young people would be possible without the volunteers who give their time and make Code Clubs the positive learning environments they are. Their support is crucial to young people’s engagement and skill development. The evaluation showed that mentors find the experience of volunteering rewarding, and pointed us towards areas where we can offer further support to help them run engaging, impactful Code Clubs.
“…volunteering with Code Club has helped me feel I’m a useful member of society in my old age, so the benefits have been good for me too.”
– Code Club mentor.
How we’re building on our support for clubs
With AI already transforming so many parts of our lives, learning how to create with technology has never been more important. Generative AI is changing how humans give instructions to computers, and at Code Club, young people can experiment with new technologies such as AI in a safe environment. New projects that support young people to learn about AI technologies will be added to the Code Club Projects site later this month, alongside support for club leaders and mentors on this topic.
The evaluation methods used by the DECE will help us hone our ongoing impact measurement work for Code Clubs running in communities all over the world. As we continue to support Code Clubs, we are taking into account that the independent evaluation ran in school-based Code Clubs in the UK only. In our work to grow the Code Club network across the globe, we are adapting our support and resources for local contexts in collaboration with partners who share their expertise.
This will ensure that Code Clubs can provide a fun, welcoming space for all young people. And while they’re having fun, they will also gain relevant learning experiences that empower them to engage confidently with a world that is being transformed by digital technologies.
If you’re interested in the DECE evaluation’s results, we’ve put together a summary for you to download.
Anyway, this isn’t one of the small rc2’s. But looking at
historical trends, being a bigger rc2 isn’t _that_ unusual, and
nothing in here looks all that odd. Yes, the diffstat may look a
bit unusual, in that we had a global header renaming
(asm/unaligned.h -> linux/unaligned.h) and we had a couple of
reverts that stand out as spikes in the stats, but everything else
looks nice and small.
Cloudflare just blocked the current record DDoS attack: 3.8 terabits per second. (Lots of good information on the attack, and DDoS in general, at the link.)
В точка 6 от приоритетите има доста неща, но ще опитам да ги обобщя: „6. Изменения в Закона за движението по пътищата за въвеждане на множество административни облекчения, вкл. отпадане на стикери, онлайн заявяване на регистрация на автомобил, уведомяване за изтичащи документи и др.“
Законопроектът, който внасям не знам кой поред парламент, се допълва с нови подобрения постоянно. Засега той не е стигнал второ четене, а през други закони са приети две негови части: възможността да плащаме глоби онлайн без преди това да ни връчат фиш присъствено и отпадането на синия талон. До стикерите на предното стъкло за съжаление не се стигаше. Ето списък с оставащите мерки, които са готови за внасяне:
1. Изцяло електронно заявяване на регистрация на автомобил, получаване на табели по куриер или в посочен час в МВР, минаване „на канал“ само в рискови случаи или на избран пункт за ГТП.
2. Отпадане на стикерите от предното стъкло. Излишни са, не носят допълнителна информация. Вторичната идентификация на автомобила, за която в момента служи чипа в екостикера, може да се постигне без да лепим всяка година неща по стъклата.
3. Спиране на пътя (след засичане от камери) с цел връчване на автомобили, чиито собственици имат повече от 5 невръчени електронни фиша или наказателни постановления. Публикуване на отворени данни с рецидивисти (нещо, което поисках със задължително разпореждане като министър, но МВР не изпълни)
4. Достъп на всеки собственик, вкл. юридически лица, до регистрите с автомобили и с нарушения, в т.ч до контролни точки. Достъпът ще е и чрез програмни интерфейси, с цел интеграция и автоматизация, вкл. плащане на много глоби накуп дистанционно от юридически лица.
5. Получаване на уведомления с sms или имейл за изтичащи документи: книжка, преглед, гражданска. След това: автоматизиран контрол, вкл. чрез камерите на АПИ, за липса на преглед и гражданска
6. Попълване на телефонни номера и имейли от базите данни на НАП, НОИ, АПИ, общинските дружества за паркиране, с цел повече хора да получават уведомленията за издаден фиш и тези за изтичащи документи.
7. Промяна на подсъдността на нарушенията за електронни фишове – компетентният съд да е по настоящ адрес на нарушителя, а не по местонарушение. За да не се разкарват шофьори или техни адвокати до другия край на страната, ако искат да обжалват фиш.
8. Премахване на действащия текст за дерегистрация на автомобил, когато той е бил предоставен на неправоспособно лице, ако е собственост на юридическо лице, за да не се вкарва бизнеса в разправии и невъзможност да я ползва, защото наемател или служител е направил глупост.
9. Интеграция на техническите прегледи с данни от тол системата с цел установяване на аномалии и фиктивни технически прегледи на камионите, които не са се връщали в страната.
10. Възможност за използване на камерите на АПИ за скорост, вкл. средна скорост в контролиран участък от пътя.
11. Доказване на образователна степен със справка в регистър или с документ за по-висока образователна степен – напр. ако не намирате дипломата за средно, но имате висше, това да е достатъчно.
12. Подобряване на реда за даване на сведения от свидетели на нарушения, за да могат такива да се подават онлайн, както и да се пази самоличността им.
13. Създаване на възможност за електронно водене на цялата документация за обученията за придобиване на правоспособност, с което да се ограничат злоупотребите.
14. Анулиране на глоби, получени заради невъзможност да се спази законово задължение заради неработеща система на държавата (както стана с невъзможността да се сключват застраховки преди няколко месеца, или ако се срине системата за технически прегледи).
15. Премахване на ръчното потвърждение от служители на МВР за електронни фишове (когато разпознаването на номера е с висока степен на сигурност), с цел избягване на корупция и по-бързо получаване на уведомленията за нарушението.
16. Подобряване на механизмите за разходване на средствата от фонда за пътна безопасност, който се пълни от глоби (в момента няма никаква прозрачност, общините на практика не могат да го ползват, а МВР може да купи каквото си иска, напр. купиха си БМВ-та).
Има много какво да се прави, за да се постигне както облекчение на добросъвестните шофьори, така и ограничаване на опасните такива. И за да прави второто, МВР трябва първо да намали бюрокрацията и да повиши доверието в своите действия чрез прозрачност, иначе всичко ще изглежда като „дайте още пари, докато ние сме в храстите след поредната дупка“.
Смятам, че горните промени са лесни за реализация, а ще подобрят значително както пътната безопасност, така и обслужването на гражданите.
To provide the best experiences, we use technologies like cookies to store and/or access device information. Consenting to these technologies will allow us to process data such as browsing behavior or unique IDs on this site. Not consenting or withdrawing consent, may adversely affect certain features and functions.
Functional
Always active
The technical storage or access is strictly necessary for the legitimate purpose of enabling the use of a specific service explicitly requested by the subscriber or user, or for the sole purpose of carrying out the transmission of a communication over an electronic communications network.
Preferences
The technical storage or access is necessary for the legitimate purpose of storing preferences that are not requested by the subscriber or user.
Statistics
The technical storage or access that is used exclusively for statistical purposes.The technical storage or access that is used exclusively for anonymous statistical purposes. Without a subpoena, voluntary compliance on the part of your Internet Service Provider, or additional records from a third party, information stored or retrieved for this purpose alone cannot usually be used to identify you.
Marketing
The technical storage or access is required to create user profiles to send advertising, or to track the user on a website or across several websites for similar marketing purposes.


 Satish Nandi is a Senior Product Manager with Amazon OpenSearch Service. He is focused on OpenSearch Serverless and has years of experience in networking, security and AI/ML. He holds a Bachelor’s degree in Computer Science and an MBA in Entrepreneurship. In his free time, he likes to fly airplanes and hang gliders and ride his motorcycle.
 Milav Shah is an Engineering Leader with Amazon OpenSearch Service. He focuses on search experience for OpenSearch customers. He has extensive experience building highly scalable solutions in databases, real-time streaming and distributed computing. He also possesses functional domain expertise in verticals like Internet of Things, fraud protection, gaming and AI/ML. In his free time, he likes to ride cycle, hike, and play chess.
 Qiaoxuan Xue is a Senior Software Engineer at AWS leading the search and benchmarking areas of the Amazon OpenSearch Serverless Project. His passion lies in finding solutions for intricate challenges within large-scale distributed systems. Outside of work, he enjoys woodworking, biking, playing basketball, and spending time with his family and dog.
 Prashant Agrawal is a Sr. Search Specialist Solutions Architect with Amazon OpenSearch Service. He works closely with customers to help them migrate their workloads to the cloud and helps existing customers fine-tune their clusters to achieve better performance and save on cost. Before joining AWS, he helped various customers use OpenSearch and Elasticsearch for their search and log analytics use cases. When not working, you can find him traveling and exploring new places. In short, he likes doing Eat → Travel → Repeat.