Т.Е. от Е.Т. – епизод 11

Post Syndicated from Тоест original https://www.toest.bg/t-e-ot-e-t-epizod-11/

Т.Е. от Е.Т. – епизод 11

Аз съм ту-туу.
Ти си ту-туу.
Той/тя/то е ту-туу.
Ние сме ту-туу.
Вие сте ту-туу.
Те са ту-туу.

В случай че искате да го използвате в изречение.

Следете видеорубриката на Елена Телбис за „Тоест“ и в Instagram и TikTok.

Announcing the AWS Well-Architected Generative AI Lens

Post Syndicated from Dan Ferguson original https://aws.amazon.com/blogs/architecture/announcing-the-aws-well-architected-generative-ai-lens/

We are delighted to introduce the new AWS Well-Architected Generative AI Lens. The AWS Well-Architected Framework provides architectural best practices for designing and operating generative AI workloads on AWS. The Generative AI Lens uses the Well-Architected Framework to outline the steps for performing a Well-Architected Framework Review for your generative AI workloads.

The Generative AI Lens provides a consistent approach for customers to evaluate architectures that use large language models (LLMs) to achieve their business goals. This lens addresses common considerations relevant to model selection, prompt engineering, model customization, workload integration, and continuous improvement. Specifically excluded from this lens are best practices associated with model training and advanced model customization techniques. We identify best practices that help you architect your cloud-based applications and workloads according to AWS Well-Architected design principles gathered from supporting thousands of customer implementations.

The Generative AI Lens joins a collection of Well-Architected lenses published under AWS Well-Architected Lenses.

What is the Generative AI Lens?

The Well-Architected Generative AI Lens focuses on the six pillars of the Well-Architected Framework across six phases of the generative AI lifecycle, as illustrated in the following figure.

The six phases are:

  1. Scoping the impact of generative AI in solving your problem.
  2. Selecting a model that sufficiently addresses the task.
  3. Customizing the model with prompts, data sources, or updated weights to improve performance.
  4. Integrating the model into your existing applications.
  5. Deploying the new generative AI capability into your environment.
  6. Iterating and improving on the generative AI capabilities you have released.

Unlike the traditional waterfall approach, an iterative approach is required to achieve a working prototype based on the six phases of the generative AI lifecycle. The lens provides you with a set of established cloud-agnostic best practices in the form of Well-Architected Framework pillars for each generative AI lifecycle phase.

You can also use the Well-Architected Generative AI Lens wherever you are on your cloud journey. You can choose to apply this guidance either during the design of your generative AI workloads or after your workloads have entered production as a part of the continuous improvement process.

What’s else is discussed in the Generative AI Lens?

The Generative AI Lens also discusses the following key topics:

  • Responsible AI – Responsible implementation of generative AI workloads is discussed in this paper. We describe some of the common considerations facing customers as they address the responsible implementation and deployment of generative AI.
  • Data architecture for generative AI – At the core of any AI workload is data. We feature a brief survey on the nuances of data architectures with regards to generative AI workloads.

Who should use the Generative AI Lens?

The Generative AI Lens is of use to many roles. Business leaders can use this lens to acquire a broader appreciation of the end-to-end implementation and benefits of generative AI. Data scientists and engineers can read this lens to understand how to use, secure, and gain insights from their data at scale. Risk and compliance leaders can understand how generative AI is implemented responsibly by providing compliance with regulatory and governance requirements.

Generative AI Lens components

The lens includes four focus areas:

  • The Well-Architected Generative AI Lens design principles – Design principles are the guidelines and value statements that frame the presented best practices.
  • The Generative AI lifecycle and the Well Architected Framework pillars – This considers all aspects of the generative AI lifecycle and reviews design strategies to align to the pillars of the overall Well-Architected Framework:
    • Operational excellence – Ability to support ongoing development, run operational workloads effectively, gain insight into your operations, and continuously improve supporting processes and procedures to deliver business value.
    • Security – Ability to protect data, systems, and assets, and to take advantage of cloud technologies to improve your security.
    • Reliability – Ability of a workload to perform its intended function correctly and consistently, and to automatically recover from failure situations.
    • Performance efficiency – Ability to use computing resources efficiently to meet system requirements, and to maintain that efficiency as system demand changes and technologies evolve.
    • Cost optimization – Ability to run systems to deliver business value at the lowest price point.
    • Sustainability – Addresses the long-term environmental, economic, and societal impact of your business activities.
  • Cloud-agnostic best practices – These are best practices for each generative AI lifecycle phase across the Well-Architected Framework pillars irrespective of your technology setting. The best practices are accompanied by:
    • Implementation guidance – The AWS implementation plans for each best practice with references to AWS technologies and resources.
    • Resources – A set of links to AWS documents, blogs, videos, and code examples as supporting resources to the best practices and their implementation plans.
  • Related generative AI architecture considerations – This includes discussions on the generative AI application lifecycle, and where the listed best practices in this lens could fit into the lifecycle. Additionally, we discuss elements of data architecture for generative AI workloads, and Well-Architected considerations for responsible AI.

What are the next steps?

The new Well-Architected Generative AI Lens is available now. Use the lens to make sure that your generative AI workloads are architected with operational excellence, security, reliability, performance efficiency, cost optimization, and sustainability in mind.

If you require support on the implementation or assessment of your generative AI workloads, please contact your AWS Solutions Architect or Account Representative.

Special thanks to everyone across the AWS Solution Architecture, AWS Professional Services, and Machine Learning communities who contributed to the Generative AI Lens. These contributions encompassed diverse perspectives, expertise, backgrounds, and experiences in developing the new AWS Well-Architected Generative AI Lens.

For additional reading, refer to the AWS Well-Architected Framework and pillar whitepapers, or use the AWS Well-Architected Machine Learning Lens and its custom lens accessible from the AWS Well-Architected Tool.


About the authors

Accelerate your analytics with Amazon S3 Tables and Amazon SageMaker Lakehouse

Post Syndicated from Sandeep Adwankar original https://aws.amazon.com/blogs/big-data/accelerate-your-analytics-with-amazon-s3-tables-and-amazon-sagemaker-lakehouse/

Amazon SageMaker Lakehouse is a unified, open, and secure data lakehouse that now seamlessly integrates with Amazon S3 Tables, the first cloud object store with built-in Apache Iceberg support. With this integration, SageMaker Lakehouse provides unified access to S3 Tables, general purpose Amazon S3 buckets, Amazon Redshift data warehouses, and data sources such as Amazon DynamoDB or PostgreSQL. You can then query, analyze, and join the data using Redshift, Amazon Athena, Amazon EMR, and AWS Glue. In addition to your familiar AWS services, you can access and query your data in-place with your choice of Iceberg-compatible tools and engines, providing you the flexibility to use SQL or Spark-based tools and collaborate on this data the way you like. You can secure and centrally manage your data in the lakehouse by defining fine-grained permissions with AWS Lake Formation that are consistently applied across all analytics and machine learning(ML) tools and engines.

Organizations are becoming increasingly data driven, and as data becomes a differentiator in business, organizations need faster access to all their data in all locations, using preferred engines to support rapidly expanding analytics and AI/ML use cases. Let’s take an example of a retail company that started by storing their customer sales and churn data in their data warehouse for business intelligence reports. With massive growth in business, they need to manage a variety of data sources as well as exponential growth in data volume. The company builds a data lake using Apache Iceberg to store new data such as customer reviews and social media interactions.

This enables them to cater to their end customers with new personalized marketing campaigns and understand its impact on sales and churn. However, data distributed across data lakes and warehouses limits their ability to move quickly, as it may require them to set up specialized connectors, manage multiple access policies, and often resort to copying data, that can increase cost in both managing the separate datasets as well as redundant data stored. SageMaker Lakehouse addresses these challenges by providing secure and centralized management of data in data lakes, data warehouses, and data sources such as MySQL, and SQL Server by defining fine-grained permissions that are consistently applied across data in all analytics engines.

In this post, we guide you how to use various analytics services using the integration of SageMaker Lakehouse with S3 Tables. We begin by enabling integration of S3 Tables with AWS analytics services. We create S3 Tables and Redshift tables and populate them with data. We then set up SageMaker Unified Studio by creating a company specific domain, new project with users, and fine-grained permissions. This lets us unify data lakes and data warehouses and use them with analytics services such as Athena, Redshift, Glue, and EMR.

Solution overview

To illustrate the solution, we are going to consider a fictional company called Example Retail Corp. Example Retail’s leadership is interested in understanding customer and business insights across thousands of customer touchpoints for millions of their customers that will help them build sales, marketing, and investment plans. Leadership wants to conduct an analysis across all their data to identify at-risk customers, understand impact of personalized marketing campaigns on customer churn, and develop targeted retention and sales strategies.

Alice is a data administrator in Example Retail Corp who has embarked on an initiative to consolidate customer information from multiple touchpoints, including social media, sales, and support requests. She decides to use S3 Tables with Iceberg transactional capability to achieve scalability as updates are streamed across billions of customer interactions, while providing same durability, availability, and performance characteristics that S3 is known for. Alice already has built a large warehouse with Redshift, which contains historical and current data about sales, customers prospects, and churn information.

Alice supports an extended team of developers, engineers, and data scientists who require access to the data environment to develop business insights, dashboards, ML models, and knowledge bases. This team includes:

Bob, a data analyst who needs to access to S3 Tables and warehouse data to automate building customer interactions growth and churn across various customer touchpoints for daily reports sent to leadership.

Charlie, a Business Intelligence analyst who is tasked to build interactive dashboards for funnel of customer prospects and their conversions across multiple touchpoints and make those available to thousands of Sales team members.

Doug, a data engineer responsible for building ML forecasting models for sales growth using the pipeline and/or customer conversion across multiple touchpoints and make those available to finance and planning teams.

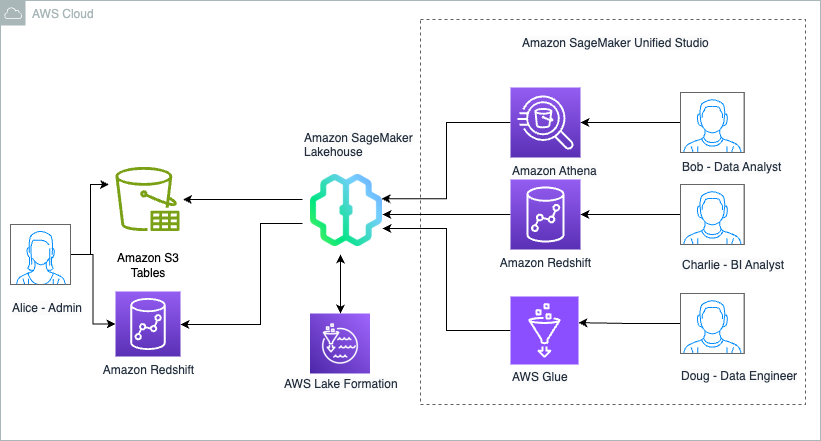
Alice decides to use SageMaker Lakehouse to unify data across S3 Tables and Redshift data warehouse. Bob is excited about this decision as he can now build daily reports using his expertise with Athena. Charlie now knows that he can quickly build Amazon QuickSight dashboards with queries that are optimized using Redshift’s cost-based optimizer. Doug, being an open source Apache Spark contributor, is excited that he can build Spark based processing with AWS Glue or Amazon EMR to build ML forecasting models.

The following diagram illustrates the solution architecture.

Implementing this solution consists of the following high-level steps. For Example Retail, Alice as a data Administrator performs these steps:

  1. Create a table bucket. S3 Tables stores Apache Iceberg tables as S3 resources, and customer details are managed in S3 Tables. You can then enable integration with AWS analytics services, which automatically sets up the SageMaker Lakehouse integration so that the tables bucket is shown as a child catalog under the federated s3tablescatalog in the AWS Glue Data Catalog and is registered with AWS Lake Formation for access control. Next, you create a table namespace or database which is a logical construct that you group tables under and create a table using Athena SQL CREATE TABLE statement.
  2. Publish your data warehouse to Glue Data Catalog. Churn data is managed in a Redshift data warehouse, which is published to the Data Catalog as a federated catalog and is available in SageMaker Lakehouse.
  3. Create a SageMaker Unified Studio project. SageMaker Unified Studio integrates with SageMaker Lakehouse and simplifies analytics and AI with a unified experience. Start by creating a domain and adding all users (Bob, Charlie, Doug). Then create a project in the domain, choosing project profile that provisions various resources and the project AWS Identity and Access Management (IAM) role that manages resource access. Alice adds Bob, Charlie, and Doug to the project as members.
  4. Onboard S3 Tables and Redshift tables to SageMaker Unified Studio. To onboard the S3 Tables to the project, in Lake Formation, you grant permission on the resource to the SageMaker Unified Studio project role. This enables the catalog to be discoverable within the lakehouse data explorer for users (Bob, Charlie, and Doug) to start querying tables .SageMaker Lakehouse resources can now be accessed from computes like Athena, Redshift, and Apache Spark based computes like Glue to derive churn analysis insights, with Lake Formation managing the data permissions.

Prerequisites

To follow the steps in this post, you must complete the following prerequisites:

Alice completes the following steps to create the S3 Table bucket for the new data she plans to add/import into an S3 Table.

  1. AWS account with access to the following AWS services:
    • Amazon S3 including S3 Tables
    • Amazon Redshift
    • AWS Identity and Access Management (IAM)
    • Amazon SageMaker Unified Studio
    • AWS Lake Formation and AWS Glue Data Catalog
    • AWS Glue
  2. Create a user with administrative access.
  3. Have access to an IAM role that is a Lake Formation data lake administrator. For instructions, refer to Create a data lake administrator.
  4. Enable AWS IAM Identity Center in the same AWS Region where you want to create your SageMaker Unified Studio domain. Set up your identity provider (IdP) and synchronize identities and groups with AWS IAM Identity Center. For more information, refer to IAM Identity Center Identity source tutorials.
  5. Create a read-only administrator role to discover the Amazon Redshift federated catalogs in the Data Catalog. For instructions, refer to Prerequisites for managing Amazon Redshift namespaces in the AWS Glue Data Catalog.
  6. Create an IAM role named DataTransferRole. For instructions, refer to Prerequisites for managing Amazon Redshift namespaces in the AWS Glue Data Catalog.
  7. Create an Amazon Redshift Serverless namespace called churnwg. For more information, see Get started with Amazon Redshift Serverless data warehouses.

Create a table bucket and enable integration with analytics services

Alice completes the following steps to create the S3 Table bucket for the new data she plans to add/import into an S3 Tables.

Follow the below steps to create a table bucket to enable integration with SageMaker Lakehouse:

  1. Sign in to the S3 console as user created in prerequisite step 2.
  2. Choose Table buckets in the navigation pane and choose Enable integration.
  3. Choose Table buckets in the navigation pane and choose Create table bucket.
  4. For Table bucket name, enter a name such as blog-customer-bucket.
  5. Choose Create table bucket.
  6. Choose Create table with Athena.
  7. Select Create a namespace and provide a namespace (for example, customernamespace).
  8. Choose Create namespace.
  9. Choose Create table with Athena.
  10. On the Athena console, run the following SQL script to create a table:
    CREATE TABLE customer (
      `c_salutation` string, 
      `c_preferred_cust_flag` string, 
      `c_first_sales_date_sk` int, 
      `c_customer_sk` int, 
      `c_login` string, 
      `c_current_cdemo_sk` int, 
      `c_first_name` string, 
      `c_current_hdemo_sk` int, 
      `c_current_addr_sk` int, 
      `c_last_name` string, 
      `c_customer_id` string, 
      `c_last_review_date_sk` int, 
      `c_birth_month` int, 
      `c_birth_country` string, 
      `c_birth_year` int, 
      `c_birth_day` int, 
      `c_first_shipto_date_sk` int, 
      `c_email_address` string)
      TBLPROPERTIES ('table_type' = 'iceberg')
      
    
    INSERT INTO customer VALUES
    ('Dr.','N',2452077,13251813,'Y',1381546,'Joyce',2645,2255449,'Deaton','AAAAAAAAFOEDKMAA',2452543,1,'GREECE',1987,29,2250667,'[email protected]'),
    ('Dr.','N',2450637,12755125,'Y',1581546,'Daniel',9745,4922716,'Dow','AAAAAAAAFLAKCMAA',2432545,1,'INDIA',1952,3,2450667,'[email protected]'),
    ('Dr.','N',2452342,26009249,'Y',1581536,'Marie',8734,1331639,'Lange','AAAAAAAABKONMIBA',2455549,1,'CANADA',1934,5,2472372,'[email protected]'),
    ('Dr.','N',2452342,3270685,'Y',1827661,'Wesley',1548,11108235,'Harris','AAAAAAAANBIOBDAA',2452548,1,'ROME',1986,13,2450667,'[email protected]'),
    ('Dr.','N',2452342,29033279,'Y',1581536,'Alexandar',8262,8059919,'Salyer','AAAAAAAAPDDALLBA',2952543,1,'SWISS',1980,6,2650667,'[email protected]'),
    ('Miss','N',2452342,6520539,'Y',3581536,'Jerry',1874,36370,'Tracy','AAAAAAAALNOHDGAA',2452385,1,'ITALY',1957,8,2450667,'[email protected]')

This is just an example of adding a few rows to the table, but generally for production use cases, customers use engines such as Spark to add data to the table.

S3 Tables customer is now created, populated with data and integrated with SageMaker Lakehouse.

Set up Redshift tables and publish to the Data Catalog

Alice completes the following steps to connect the data in Redshift to be published into the data catalog. We’ll also demonstrate how the Redshift table is created and populated, but in Alice’s case Redshift table already exists with all the historic data on sales revenue.

  1. Sign in to the Redshift endpoint churnwg as an admin user.
  2. Run the following script to create a table under the dev database under the public schema:
    CREATE TABLE customer_churn (
    customer_id BIGINT,
    tenure INT,
    monthly_charges DECIMAL(5,1),
    total_charges DECIMAL(5,1),
    contract_type VARCHAR(100),
    payment_method VARCHAR(100),
    internet_service VARCHAR(100),
    has_phone_service BOOLEAN,
    is_churned BOOLEAN
    );
    
    INSERT INTO customer_churn VALUES
    (10251783, 12, 70.5, 850.0, 'Month-to-Month', 'Credit Card', 'Fiber Optic', true, true),
    (13251813, 36, 55.0, 1980.0, 'One Year', 'Bank Transfer', 'DSL', true, false),
    (12755125, 6, 90.0, 540.0, 'Month-to-Month', 'Mailed Check', 'Fiber Optic', false, true),
    (26009249, 12, 70.5, 850.0, 'One Year', 'Credit Card', 'DSL', true, false),
    (3270685, 36, 55.0, 1980.0, 'One Year', 'Bank Transfer', 'DSL', true, false),
    (29033279, 6, 90.0, 540.0, 'Month-to-Month', 'Mailed Check', 'Fiber Optic', false, true),
    (6520539, 24, 60.0, 1440.0, 'Two Year', 'Electronic Check', 'DSL', true, false);

    This is just an example of adding a few rows to the table, but generally for production use cases, customers use several ways to add data to the table as documented in Loading data in Amazon Redshift.

  3. On the Redshift Serverless console, navigate to the namespace.
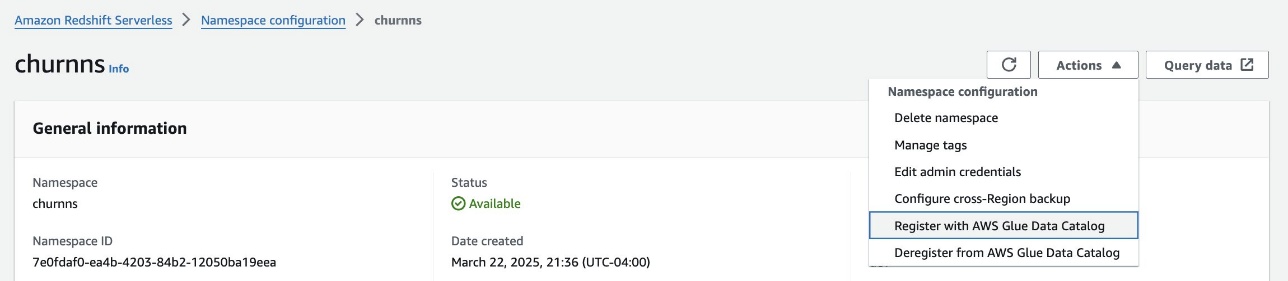
  4. On the Action dropdown menu, choose Register with AWS Glue Data Catalog to integrate with SageMaker Lakehouse.
  5. Choose Register.
  6. Sign in to the Lake Formation console as the data lake administrator.
  7. Under Data Catalog in the navigation pane, choose Catalogs and Pending catalog invitations.
  8. Select the pending invitation and choose Approve and create catalog.
  9. Provide a name for the catalog (for example, churn_lakehouse).
  10. Under Access from engines, select Access this catalog from Iceberg-compatible engines and choose DataTransferRole for the IAM role.
  11. Choose Next.
  12. Choose Add permissions.
  13. Under Principals, choose the datalakeadmin role for IAM users and roles, Super user for Catalog permissions, and choose Add.
  14. Choose Create catalog.

Redshift Table customer_churn is now created, populated with data and integrated with SageMaker Lakehouse.

Create a SageMaker Unified Studio domain and project

Alice now sets up SageMaker Unified Studio domain and projects so that she can bring users (Bob, Charlie and Doug) together in the new project.

Complete the following steps to create a SageMaker domain and project using SageMaker Unified Studio:

  1. On the SageMaker Unified Studio console, create a SageMaker Unified Studio domain and project using the All Capabilities profile template. For more details, refer to Setting up Amazon SageMaker Unified Studio. For this post, we create a project named churn_analysis.
  2. Setup AWS Identity center with users Bob, Charlie and Doug, Add them to domain and project.
  3. From SageMaker Unified Studio, navigate to the project overview and on the Project details tab, note the project role Amazon Resource Name (ARN).
  4. Sign in to the IAM console as an admin user.
  5. In the navigation pane, choose Roles.
  6. Search for the project role and add AmazonS3TablesReadOnlyAccess by choosing Add permissions.

SageMaker Unified Studio is now setup with domain, project and users.

Onboard S3 Tables and Redshift tables to the SageMaker Unified Studio project

Alice now configures SageMaker Unified Studio project role for fine-grained access control to determine who on her team gets to access what data sets.

Grant the project role full table access on customer dataset. For that, complete the following steps:

  1. Sign in to the Lake Formation console as the data lake administrator.
  2. In the navigation pane, choose Data lake permissions, then choose Grant.
  3. In the Principals section, for IAM users and roles, choose the project role ARN noted earlier.
  4. In the LF-Tags or catalog resources section, select Named Data Catalog resources:
    • Choose <account_id>:s3tablescatalog/blog-customer-bucket for Catalogs.
    • Choose customernamespace for Databases.
    • Choose customer for Tables.
  5. In the Table permissions section, select Select and Describe for permissions.
  6. Choose Grant.

Now grant the project role access to subset of columns  from customer_churn dataset.

  1. In the navigation pane, choose Data lake permissions, then choose Grant.
  2. In the Principals section, for IAM users and roles, choose the project role ARN noted earlier.
  3. In the LF-Tags or catalog resources section, select Named Data Catalog resources:
    • Choose <account_id>:churn_lakehouse/dev for Catalogs.
    • Choose public for Databases.
    • Choose customer_churn for Tables.
  4. In the Table Permissions section, select Select.
  5. In the Data Permissions section, select Column-based access.
  6. For Choose permission filter, select Include columns and choose customer_id, internet_service, and is_churned.
  7. Choose Grant.

All users in the project churn_analysis in SageMaker Unified Studio are now setup. They have access to all columns in the table and fine-grained access permissions for Redshift table where they have access to only three columns.

Verify data access in SageMaker Unified Studio

Alice can now do a final verification if the data is all available to ensure that each of her team members are set up to access the datasets.

Now you can verify data access for different users in SageMaker Unified Studio.

  1. Sign in to SageMaker Unified Studio as Bob and choose the churn_analysis
  2. Navigate to the Data explorer to view s3tablescatalog and churn_lakehouse under Lakehouse.

Data Analyst uses Athena for analyzing customer churn

Bob, the data analyst can now logs into to the SageMaker Unified Studio, chooses the churn_analysis project and navigates to the Build options and choose Query Editor under Data Analysis & Integration.

Bob chooses the connection as Athena (Lakehouse), the catalog as s3tablescatalog/blog-customer-bucket, and the database as customernamespace. And runs the following SQL to analyze the data for customer churn:

select * from "churn_lakehouse/dev"."public"."customer_churn" a, 
"s3tablescatalog/blog-customer-bucket"."customernamespace"."customer" b
where a.customer_id=b.c_customer_sk limit 10;

Bob can now join the data across S3 Tables and Redshift in Athena and now can proceed to build full SQL analytics capability to automate building customer growth and churn leadership daily reports.

BI Analyst uses Redshift engine for analyzing customer data

Charlie, the BI Analyst can now logs into the SageMaker Unified Studio and chooses the churn_analysis project. He navigates to the Build options and choose Query Editor under Data Analysis & Integration. He chooses the connection as Redshift (Lakehouse), Databases as dev, Schemas as public.

He then runs the follow SQL to perform his specific analysis.

select * from "dev@churn_lakehouse"."public"."customer_churn" a, 
"blog-customer-bucket@s3tablescatalog"."customernamespace"."customer" b
where a.customer_id=b.c_customer_sk limit 10;

Charlie can now further update the SQL query and use it to power QuickSight dashboards that can be shared with Sales team members.

Data engineer uses AWS Glue Spark engine to process customer data

Finally, Doug logs in to SageMaker Unified Studio as Doug and chooses the churn_analysis project to perform his analysis. He navigates to the Build options and choose JupyterLab under IDE & Applications. He downloads the churn_analysis.ipynb notebook and upload it into the explorer. He then runs the cells by selecting compute as project.spark.compatibility.

He runs the following SQL to analyze the data for customer churn:

Doug, now can use Spark SQL and start processing data from both S3 tables and Redshift tables and start  building forecasting models for customer growth and churn

Cleaning up

If you implemented the example and want to remove the resources, complete the following steps:

  1. Clean up S3 Tables resources:
    1. Delete the table.
    2. Delete the namespace in the table bucket.
    3. Delete the table bucket.
  2. Clean up the Redshift data resources:
    1. On the Lake Formation console, choose Catalogs in the navigation pane.
    2. Delete the churn_lakehouse catalog.
  3. Delete SageMaker project, IAM roles, Glue resources, Athena workgroup, S3 buckets created for domain.
  4. Delete SageMaker domain and VPC created for the setup.

Conclusion

In this post, we showed how you can use SageMaker Lakehouse to unify data across S3 Tables and Redshift data warehouses, which can help you build powerful analytics and AI/ML applications on a single copy of data. SageMaker Lakehouse gives you the flexibility to access and query your data in-place with Iceberg-compatible tools and engines. You can secure your data in the lakehouse by defining fine-grained permissions that are enforced across analytics and ML tools and engines.

For more information, refer to Tutorial: Getting started with S3 Tables, S3 Tables integration, and Connecting to the Data Catalog using AWS Glue Iceberg REST endpoint. We encourage you to try out the S3 Tables integration with SageMaker Lakehouse integration and share your feedback with us.


About the authors

Sandeep Adwankar is a Senior Technical Product Manager at AWS. Based in the California Bay Area, he works with customers around the globe to translate business and technical requirements into products that enable customers to improve how they manage, secure, and access data.

Srividya Parthasarathy is a Senior Big Data Architect on the AWS Lake Formation team. She works with the product team and customers to build robust features and solutions for their analytical data platform. She enjoys building data mesh solutions and sharing them with the community.

Aditya Kalyanakrishnan is a Senior Product Manager on the Amazon S3 team at AWS. He enjoys learning from customers about how they use Amazon S3 and helping them scale performance. Adi’s based in Seattle, and in his spare time enjoys hiking and occasionally brewing beer.

Announcing AWS Security Reference Architecture Code Examples for Generative AI

Post Syndicated from Ievgeniia Ieromenko original https://aws.amazon.com/blogs/security/announcing-aws-security-reference-architecture-code-examples-for-generative-ai/

Amazon Web Services (AWS) is pleased to announce the release of new Security Reference Architecture (SRA) code examples for securing generative AI workloads. The examples include two comprehensive capabilities focusing on secure model inference and RAG implementations, covering a wide range of security controls and best practices for AWS generative AI services.

These new code examples are available in the AWS SRA Examples Repository and include ready-to-deploy CloudFormation templates for implementing detective security controls such as network segmentation, identity management, encryption, prompt injection detection, and logging and monitoring. The solutions align with the AWS SRA Design Guidance page and demonstrate our commitment to helping customers secure their generative AI implementations.

Customers can get started with these examples by following the implementation instructions for each solution in the AWS SRA Examples Repository Solutions GenAI page. Additional documentation and implementation guidance is available in the AWS SRA Design Guidance Generative AI Architecture Deep Dive.

AWS strives to continuously provide security solutions that help customers meet their security architecture needs. Customers can reach out to the team by submitting an issue in the code repository.

If you have feedback about this post, submit comments in the Comments section below.

Ievgeniia Ieromenko

Ievgeniia Ieromenko

Ievgeniia a Security Engineer at AWS, focusing on cloud security architecture and best practices. She is a key contributor to the AWS Security Reference Architecture GitHub repository, helping customers implement secure cloud environments.

Liam Schneider

Liam Schneider

Liam is a Sr. Security Engineer with deep experience in cloud and application security, focused on reducing risk, improving system resilience, and aligning security with business needs. Liam has a strong background in compliance, team leadership, and building secure, scalable solutions across complex environments. He is known for practical, effective approaches to modern security challenges in both enterprise and cloud-first organizations.

Justin Kontny

Justin Kontny

Justin is a Sr. Security Engineer at AWS who combines his passion for software development with expertise in cloud security. He focuses on transforming security from a barrier to a business enabler through innovative AI-driven automation. When not pushing the boundaries of cloud security, Justin enjoys time with his children and being active outdoors.

How to help prevent hotlinking using referer checking, AWS WAF, and Amazon CloudFront

Post Syndicated from Alex Smith original https://aws.amazon.com/blogs/security/how-to-prevent-hotlinking-by-using-aws-waf-amazon-cloudfront-and-referer-checking/

Note: This post was first published April 21, 2016. The updated version aligns with the latest version of AWS WAF (AWS WAF v2) and includes screenshots that reflect the changes in the AWS console experience.


AWS WAF Classic has been deprecated and will be end-of-life (EOL) in September 2025. This update describes how to use the latest version of AWS WAF (WAFv2) to help prevent hotlinking. Updates have been made to the screenshots to reflect the changes in the AWS Management Console for AWS WAF.

Hotlinking—also known as inline linking—is a form of content leeching where an unauthorized third-party website embeds links to resources originally referenced in a primary site’s HTML. The third-party website doesn’t incur the cost of hosting the content, which means that your website can be charged for the content other sites use. It also results in slow loading times, lost revenue, and potential legal issues.

Now, you can use AWS WAF to help prevent hotlinking. AWS WAF is a web application firewall that’s closely integrated with Amazon CloudFront—a content delivery network (CDN)—and can help protect your web applications from common web exploits that could affect application availability, compromise security, and consume excessive resources. In this blog post, I show you how to help prevent hotlinking by using header inspection in AWS WAF, while still taking advantage of the improved user experience from a CDN such as CloudFront.

Solution overview

You can address hotlinking in various ways. For instance, you can validate the Referer header (sent by a browser to indicate to the server which page the visitor was referred from) at your web server (for example, by using the Apache module mod_rewrite), and either issue a redirect back to your site’s main page or return a 403 Forbidden error to the visitor’s browser.

If you’re using a CDN such as CloudFront to speed up your site’s delivery of content, validating the Referer header at the web server becomes less practical. The CDN stores a copy of your content in the edge of its network of servers, so even if your web server validates the original request’s headers (in this case, the referer), additional requests for that content must be validated by the CDN itself, because they are unlikely to reach the origin web server.

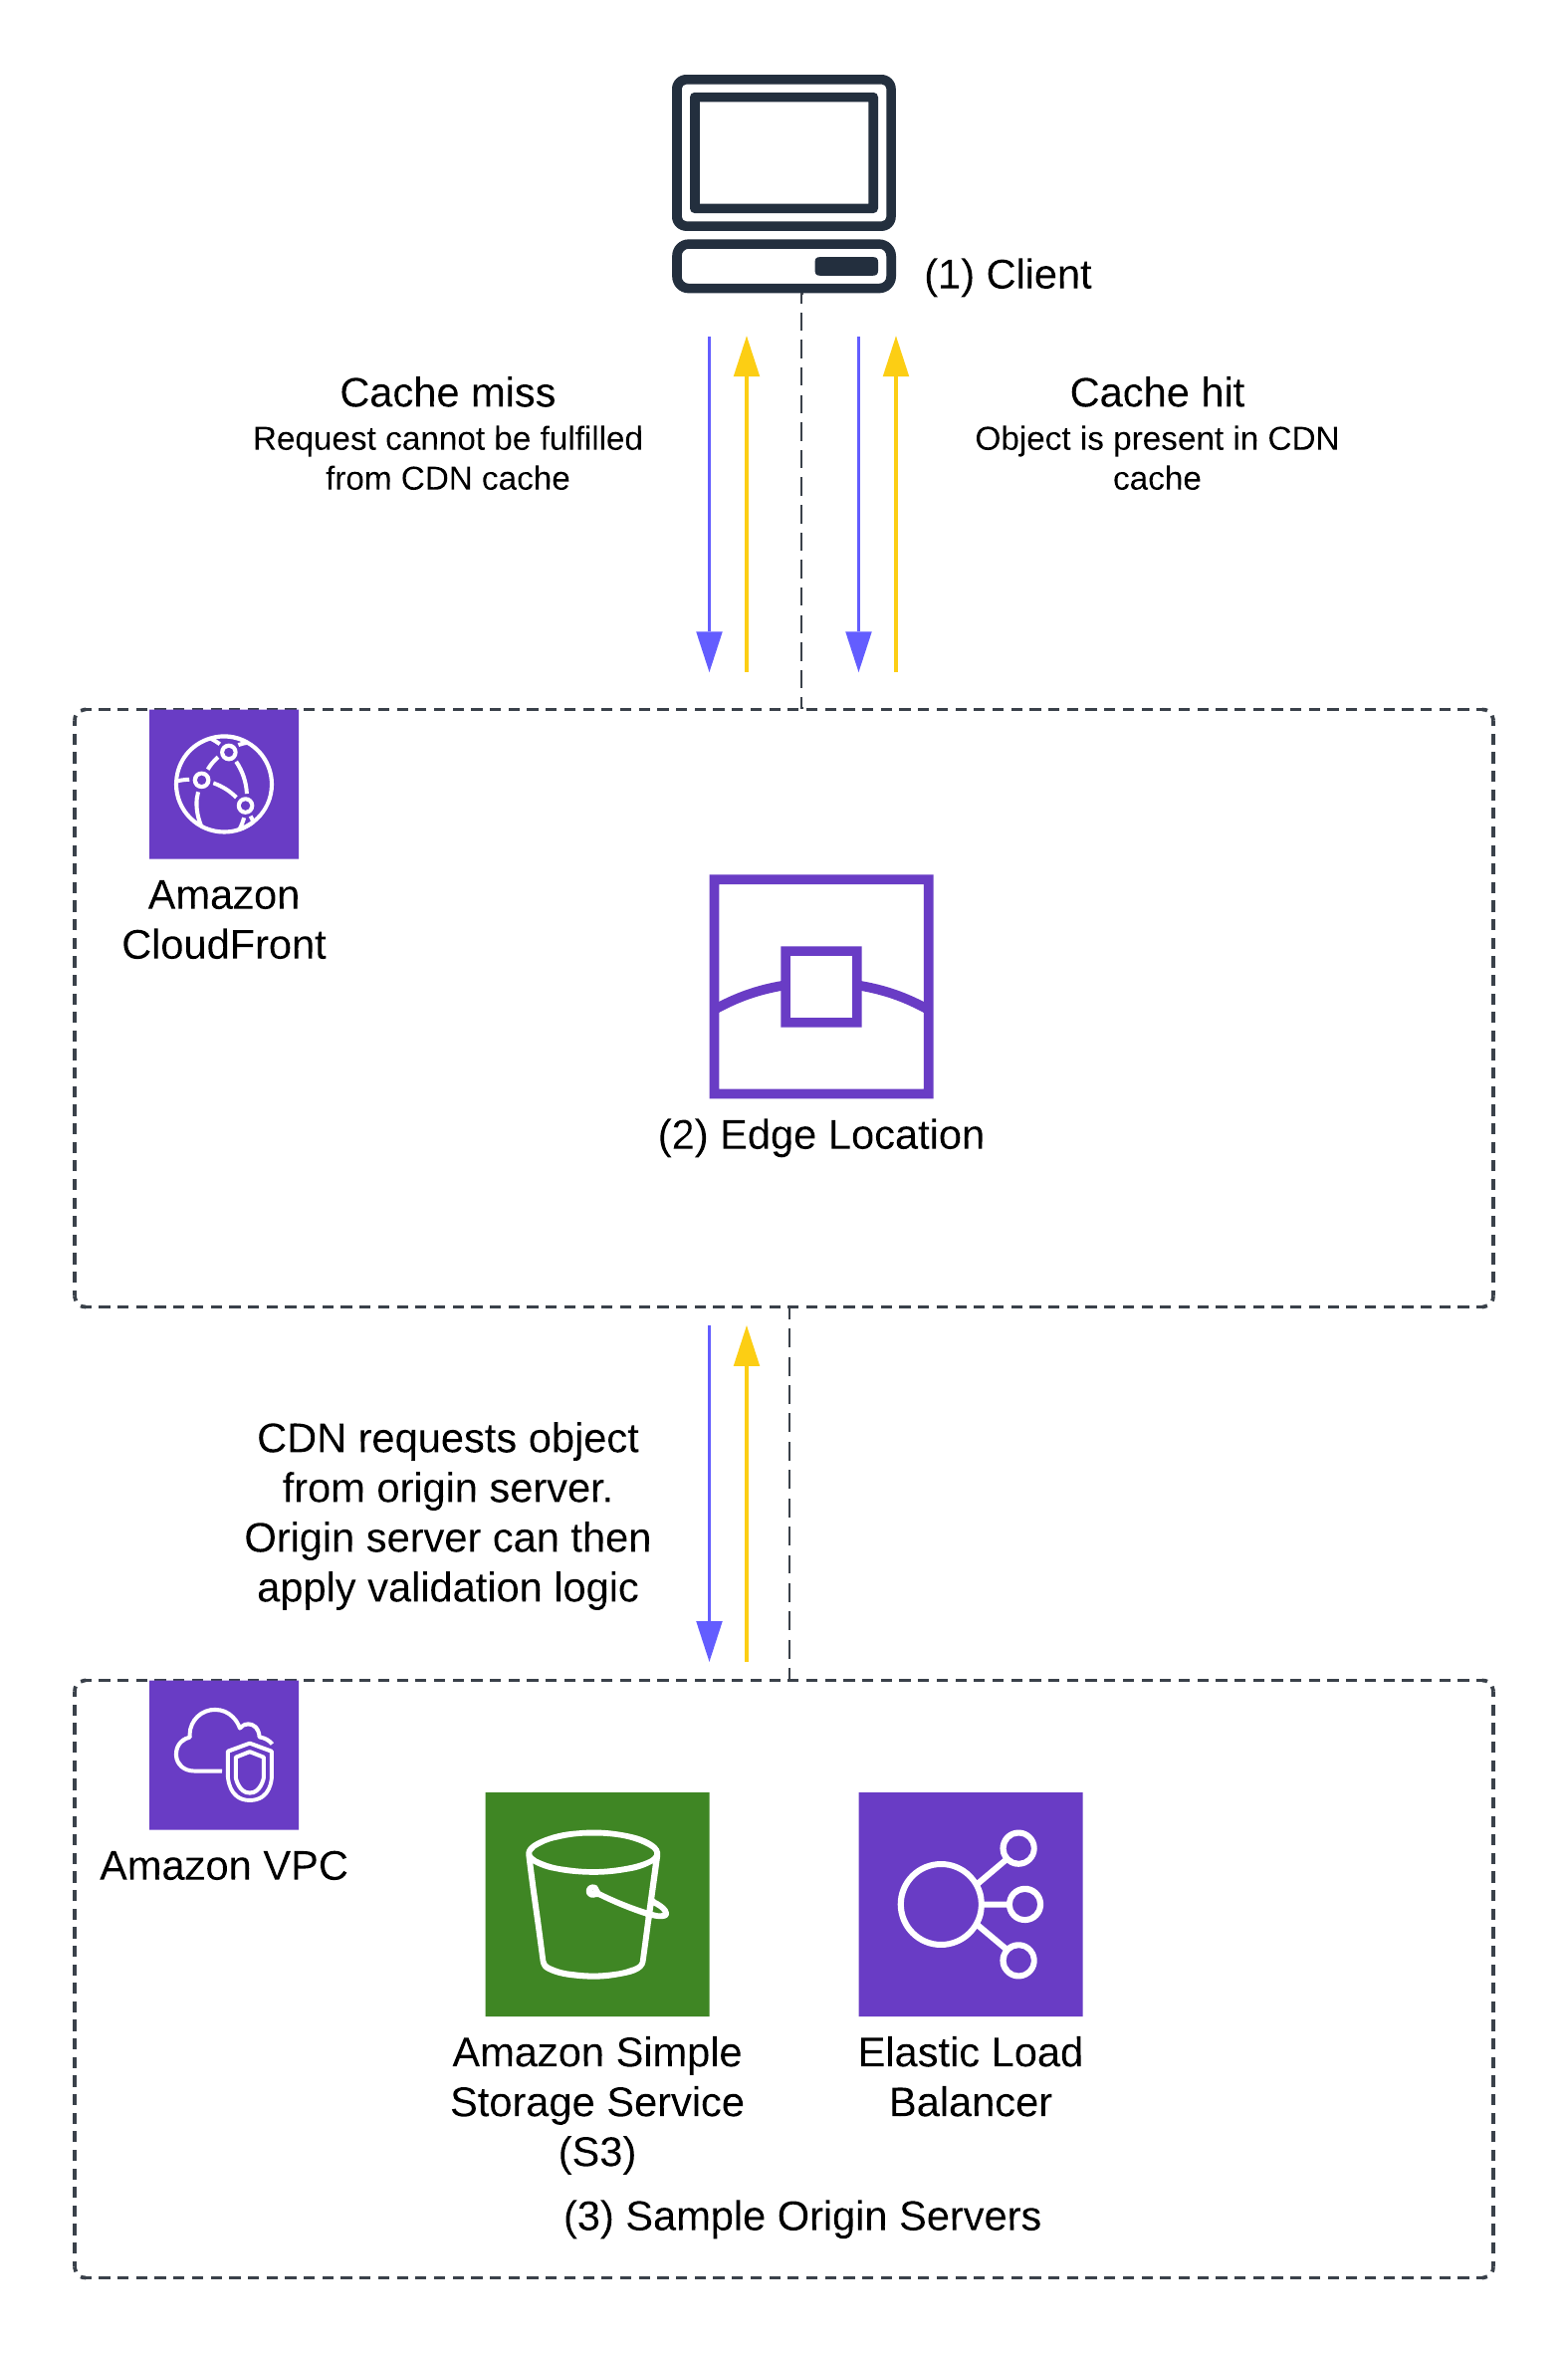
Figure 1 illustrates this process.

Figure 1: Request – response flow showing instances of a cache-miss and a cache-hit

Figure 1: Request – response flow showing instances of a cache-miss and a cache-hit

The process shown in Figure 1 is as follows:

  1. A request is received from a user client (1) at a CloudFront edge location (2).
  2. The edge location attempts to return a cached copy of the file requested. This request, if fulfilled from the cache, is considered a cache hit.
    1. In the case of a cache miss—when the content is either not in the edge or is not valid (for example, if the content is out of date)—the request is forwarded to the origin (3) (such as an Amazon Simple Storage Service (Amazon S3) bucket) for a new copy of the object.
    2. In the case of a cache hit, the origin cannot apply validation logic to the user’s request, because the edge server doesn’t need to contact the origin to fulfil the user’s request.

In the next section, I show you how to inspect the client-request headers using AWS WAF to allow or block requests at the CDN.

Solution implementation—two approaches

This post includes two ways to set up AWS WAF to help prevent hotlinking:

  • Using a separate subdomain: Static files (such as images or styling components) to be protected are moved to a separate subdomain such as static.example.com so that you only need to validate the Referer header.
  • Using the same domain: Static files are located under a directory on the same domain. This solution includes how to extend this example to check for an empty Referer header.

The choice of approach will depend on how your site is structured and the level of protection you want to implement. The first approach enables you to set up a Referer header check to make sure that requests for the images only come from an allowlisted sub-domain, while the second approach has an additional check for an empty Referer header. The second approach extends the first approach and allows for some flexibility for users to share direct links to the image while still preventing unaffiliated third-party sites from embedding the image links on their websites.

Terms

The following list includes key terms used in this post:

  • AWS WAF configurations consist of a web access control list (web ACL), associated with a given CloudFront distribution.
  • Each web ACL is a collection of one or more rules, and each rule can have one or more match conditions.
  • Match conditions are made up of one or more filters, which inspect components of the request (such as its headers or URI) to match for certain conditions.
  • Case-sensitivity: HTTP header names are case-insensitive. Referer and referer point to the same HTTP header. HTTP header values, however, are case-sensitive.

Prerequisites

You must have a CloudFront distribution set up before configuring an AWS WAF web ACL. For information about how to set up a CloudFront distribution with an S3 bucket as an origin, see Configure distributions.

Approach 1: A separate subdomain

In this example, you create an AWS WAF rule set that contains a single rule with a single match condition, which in turn has a single filter. The match condition checks the Referer header and verifies that it contains a given value. If the request matches the condition specified in the rule, the traffic is allowed. Otherwise, the AWS WAF rule blocks the traffic.

For this example, because all the static files are on a separate subdomain (static.example.com) accessed only from the site example.com, you will block hotlinking for any file that don’t have a referer that ends with example.com.

Use the following steps to set this up using the AWS WAF console.

Step 1: Create and name a new web ACL

  1. Sign in to the AWS WAF console.
  2. If you have not created a web ACL before, Choose Create web ACL on the AWS WAF console landing page.
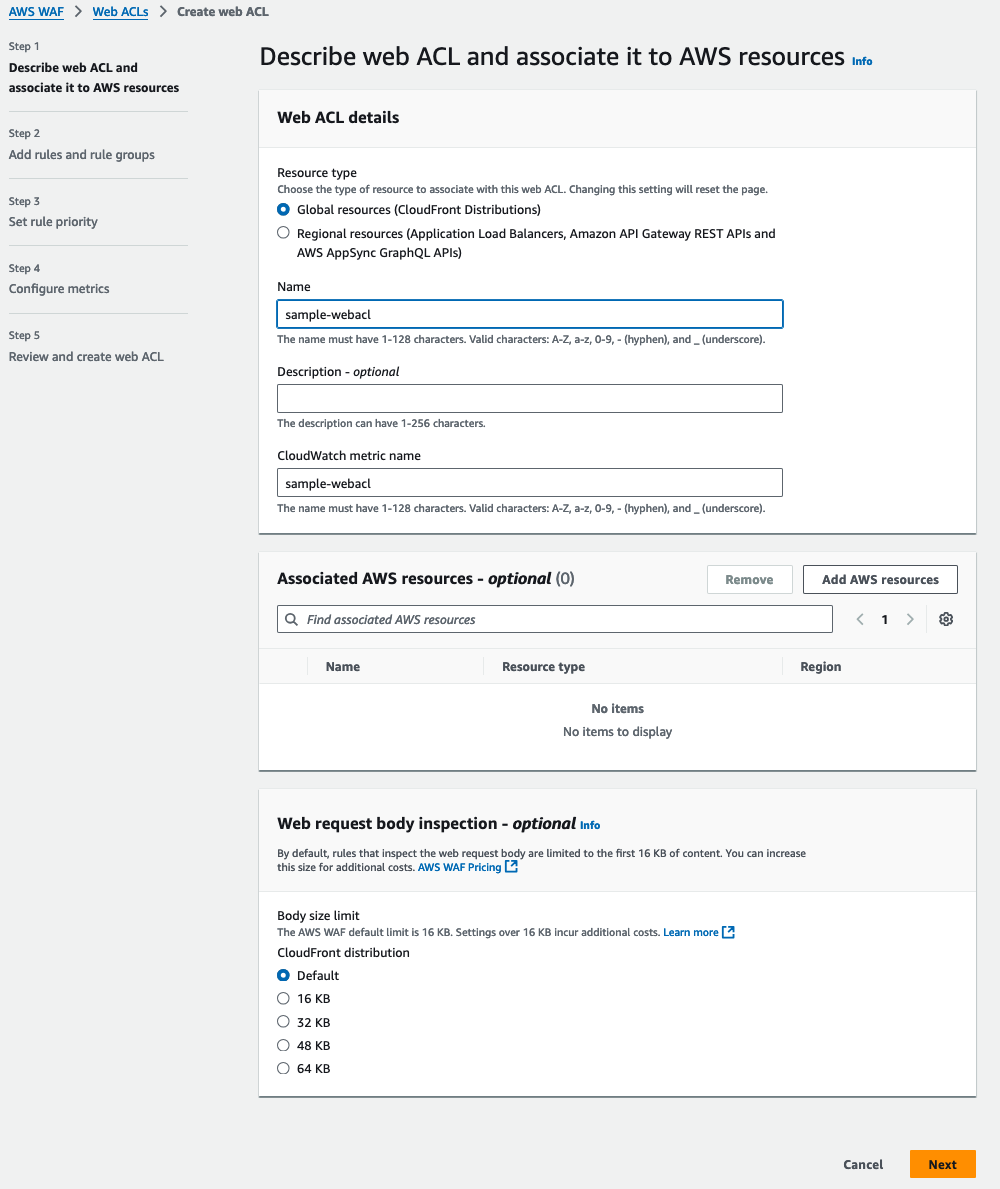
  3. Because you want to associate the web ACL with a CloudFront distribution, select Amazon CloudFront distributions as the Resource type.
    1. Enter a Name for the web ACL that you’re creating. For this example, I used the name sample-webacl. The page will automatically populate an associated Amazon CloudWatch metric name. CloudWatch is a monitoring service that allows you to gather and report on metrics of various services. This CloudWatch metric can be used later to report on how your newly created AWS WAF configuration is being used.
    2. After you have supplied the name of the web ACL, you can select the available AWS resources to be protected by this web ACL. In this example, you will fill that in later, so leave this field blank for now.
    3. By default, AWS WAF can inspect up to 16 KB of the web request body with additional values of 32, 48, and 64 KB for an additional cost. Leave the web request Body size limit at the default value of 16 KB.
    4. Choose Next.
  4. Figure 2: Describing the web ACL and associating it to resources

    Figure 2: Describing the web ACL and associating it to resources

Step 2: Create a string match condition on Referer header

AWS WAF ACLs can use AWS managed rule groups, rule groups from AWS Marketplace providers, or you can write your own rules and rule groups. For this example, you will create your own rules and rule groups.

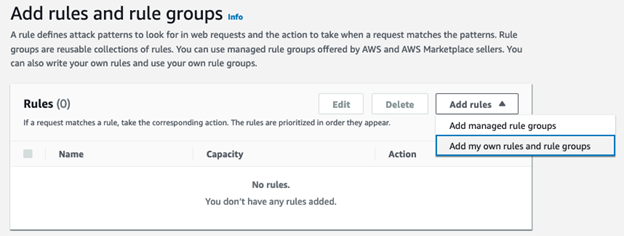
  1. In the AWS WAF console, choose Add rules, and select Add my own rules and rule groups to create the string match condition.
    Figure 3: Add rules and rule groups

    Figure 3: Add rules and rule groups

  2. This will bring you to the Rule visual editor page. The default Rule type will be set to Rule builder which you can leave unchanged. In the Rule builder section, select Regular rule.
    Figure 4: Rule type and Rule builder

    Figure 4: Rule type and Rule builder

  3. The next step is to construct a string match condition to match on the Referer header. Under Name, enter a name for the rule, such as Referer-check. Make sure that If a request is set to doesn’t match the statement (NOT). The string match condition is a negative match which means that if the Referer header field value does not match the value specified in the rule, the request will be blocked. This makes sure that requests for static.example.com which only originate from example.com are allowed. In the Statement section, use the following settings:
    1. Inspect: Select Single header.
    2. Header field name: Enter referer as the value.
    3. Match type: Select Exactly matches string.
    4. String to match: Enter example.com as the value.
    5. Text transformation: Select Lowercase. This isn’t required for most modern browsers, but is a good practice because HTTP header field values are case sensitive.
    Figure 5: Rule name and statement

    Figure 5: Rule name and statement

  4. In the Action section, select Block as the Action. Choose Add Rule.
    Figure 6: Rule Action

    Figure 6: Rule Action

    In the preceding rule statement, you’re configuring AWS WAF to inspect a header with the name Referer and checking if the value of the header matches the static string example.com. If the value of the Referer header is not example.com, then the request is blocked.

  5. The next page is Add rules and rule groups. It shows the following attributes of the web ACL:
    1. AWS WAF rules that have been added to the web ACL.
    2. Web ACL capacity units (WCUs).
    3. Default web ACL action.
    4. Token domain list.
    5. Because you’re only adding one rule to this web ACL, choose Next.
      Figure 7: Rules and rule groups, WCUs, and default web ACL action

      Figure 7: Rules and rule groups, WCUs, and default web ACL action

  6. On the next page, you will set the rule priority. Because you added only one rule, you will not need to adjust the rule priority. If there is more than one rule, you can select a particular rule and use the Move up or Move down options to organize the rule order. Choose Next.
    Figure 8: Set rule priority

    Figure 8: Set rule priority

  7. The Configure metrics page details can be left at the default values. Choose Next to proceed to the final step.
    Figure 9: Configure metrics

    Figure 9: Configure metrics

  8. The final step is to review the web ACL details. If you need to change one of the settings of the web ACL, you can choose Edit step for the corresponding step. Choose Create web ACL to finalize creating the AWS WAF web ACL.
    Figure 10: Review and create web ACL

    Figure 10: Review and create web ACL

Step 3: Associate the new rule with the relevant CloudFront distribution

You can now associate AWS resources with the web ACL that you created in the previous steps. In this case, the AWS resource is a CloudFront distribution.

  1. In the AWS WAF console, choose Web ACLs in the navigation pane. Select the web ACL named sample-webacl that you created previously.
    Figure 11: Select a Web ACL to configure

    Figure 11: Select a Web ACL to configure

  2. Choose Add AWS resources.
    Figure 12: Add AWS resources

    Figure 12: Add AWS resources

  3. Eligible AWS resources will be displayed in the pop-up page. Select the CloudFront distribution from the Resources list. Choose Add to associate the ACL sample-webacl with the CloudFront distribution.
    Figure 13: Select CloudFront distribution to associate with sample-webacl

    Figure 13: Select CloudFront distribution to associate with sample-webacl

  4. The next page is the Web ACLs page, which will show the CloudFront distribution selected in the previous step in the Associated AWS resources section.
    Figure 14: Web ACLs and Associated AWS resources

    Figure 14: Web ACLs and Associated AWS resources

Test the referer check rule

You’re ready to test the web ACL that you created by issuing a cURL command from the command line and confirming that the referer check is matched correctly. When you request files without the allowlisted Referer header, the requests are blocked at the CDN. However, valid requests still are allowed through.

When a third party embeds your content (request blocked at the CDN)

» curl –H "Referer: example.net -I https://static.example.com/favicon.ico
« HTTP/1.1 403 Forbidden

When you embed your content (request allowed through the CDN)

» curl –H "Referer: example.com -I https://static.example.com/favicon.ico
« HTTP/1.1 200 OK

Note: With Approach 1, you must make the request with an allowlisted Referer header. In this example, all paths are filtered.

Approach 2: All content under the same domain, with filtering by path

In the second approach, you allow a blank Referer header and filter by a given URL path. To do this, you will create an AWS WAF web ACL that contains multiple rules with additional match conditions, which in turn are comprised of multiple filters. As with the first approach, the match condition looks at the Referer header; however, you will validate the header in two ways. First, you validate whether the request contains the expected header, and if it does not, you apply the second validation, which checks to see whether it has a URL style Referer header. This enables you to access the assets directly in a browser when the assets aren’t embedded elsewhere in a website but still provides protection against hotlinking.

Accessing an image directly in the browser can be useful in situations where users might want to share the link to the image directly, thus helping to prevent a negative user experience when sharing the image link with other users. This approach makes it an improvement over the first approach where requests for the images must originate from the sub-domain.

You will also validate the path used in the request (in this example /wp-content), which allows AWS WAF to protect individual folders under a single domain name.

Step 1: Decide what to protect

As in the first approach, rather than filter on everything under a domain, you will filter based on the path. In this case, /wp-content. This allows you to protect your uploaded content that sits under /wp-content, but without having to put the content into a separate subdomain.

Step 2: Create and name a new web ACL

You can use the web ACL that you created for Approach 1, or you can repeat Step 1 of Approach 1 to create a new web ACL.

Step 3: Create string match conditions on the referer

For Approach 2, the assumption is that everything exists under a single domain, so instead of using the catch-all example.com, use the more secure https://example.com/ and mark the header as Starting with https://example.com.

Because you’re explicitly filtering on one header, you must watch out for two things:

  • Switching between www.example.com and example.com in your application.
  • Switching between https:// and http:// in your application.

If either of these switches occurs, you will see a 403 Forbidden error returned instead of your embedded files. In this example, all content is delivered directly through https://example.com/.

For this example, you will construct two rules, each of which will contain multiple string match conditions. AWS WAF allows for conditional match conditions within a rule so you can create nested logic statements. For example, a rule evaluation is true if all the statements within a rule statement are evaluated to true.

First rule: Validate a Referer header:

For this rule, you will set the following match conditions and AWS WAF actions:

Rule name: Validate-Referer-header

If Referer header value starts with https://example.com

AND

If URI path starts with /wp-content

THEN

ALLOW request

  1. Open the AWS Management Console for AWS WAF and navigate to WAF & Shield.
  2. Choose Web ACLs in the navigation pane and select Global (CloudFront) as the AWS Region.
    Figure 15: Web ACLs and AWS Regions

    Figure 15: Web ACLs and AWS Regions

  3. The page will refresh to show the Web ACL sample-webacl that you created in the preceding Step 2. Select sample-webacl.
    Figure 16: Web ACLs list

    Figure 16: Web ACLs list

  4. Select the Rules tab.
    Figure 17: Web ACL rules

    Figure 17: Web ACL rules

  5. Choose Add rules and select Add my own rules and rule groups. If you’re reusing the web ACL created in Approach 1, delete the Referer-check rule before adding new rules.
    Figure 18: Add rules and rule groups

    Figure 18: Add rules and rule groups

  6. For Rule type, select Rule builder.
    Figure 19: Rule type

    Figure 19: Rule type

  7. In the Rule section, use the following settings:
    1. Name: Enter Validate-referer-header as the value.
    2. Type: Select Regular rule.
    3. If a request: Select matches all the statements (AND).
    Figure 20: Rule name and match condition

    Figure 20: Rule name and match condition

  8. In the Statement 1 section, use the following settings:
    1. Inspect: Select Single header.
    2. Header field name: Enter referer as the value.
    3. Match type: Select Starts with string.
    4. String to match: Enter https://example.com as the value.
    5. Text transformation: Select Lowercase.
    Figure 21: First string match condition

    Figure 21: First string match condition

  9. Create the second string match condition (Statement 2). For the URL itself, you want to protect content under /wp-content, so you will create a string match to validate that case using the same steps as for the first string match condition, with two changes:
    1. For Inspect, select URI path.
    2. For String to match, enter /wp-content as the value.
    Figure 22: Second string match condition

    Figure 22: Second string match condition

  10. Change the Action to Allow and choose Add Rule at the bottom of the page.
    Figure 23: Set the Action to Allow

    Figure 23: Set the Action to Allow

  11. In the Set rule priority page, choose Save.
    Figure 24: Save the rule

    Figure 24: Save the rule

Second rule: Validate without a Referer header

For the second rule, you will set the following match conditions and rule actions:

Rule name: Validate- with-no-Referer-header

If Referer header contains ://

AND

If URI path starts with /wp-content

THEN

BLOCK request

The second rule is similar to the first rule, but it matches when the Referer header value includes ://. You use this match condition to check whether the Referer header has been set at all. If it has, you block the request.

  1. In the Web ACL page, choose Add rules and select Add my own rules and rule groups to be taken to the Rule type page.
    Figure 25: Create the second rule

    Figure 25: Create the second rule

  2. For Rule type and Rule builder, use the following settings:
    1. Rule type: Select Rule builder.
    2. Name: Enter Validate-with-no_Referer-header as the value.
    3. Type: Select Regular rule.
    4. If a request: Select matches all the statements (AND).
    Figure 26: Set the rule type and matching

    Figure 26: Set the rule type and matching

  3. For Statement 1, use the following settings:
    1. Inspect: Select Single header.
    2. Header field name: Enter Referer as the value.
    3. Match type: Select Contains string.
    4. String to match: Enter ://
    Figure 27: Configure Statement 1

    Figure 27: Configure Statement 1

  4. For Statement 2, use the following settings:
    1. Inspect: Select URI path.
    2. Match type: Select Starts with string.
    3. String to match: Enter /wp-content as the value.
    Figure 28: Configure Statement 2

    Figure 28: Configure Statement 2

  5. For Action, keep the default setting of Block and choose Add Rule.
    Figure 29: Add rule

    Figure 29: Add rule

  6. The resulting Set rule priority page will list the rules in the sample-webacl web ACL and will look like the following figure. It shows the name of the rule, the rule priority, the web capacity units (WCUs) and the AWS WAF response. Choose Save.
    Figure 30: Rule priority and web ACL units used the web ACL.

    Figure 30: Rule priority and web ACL units used the web ACL.

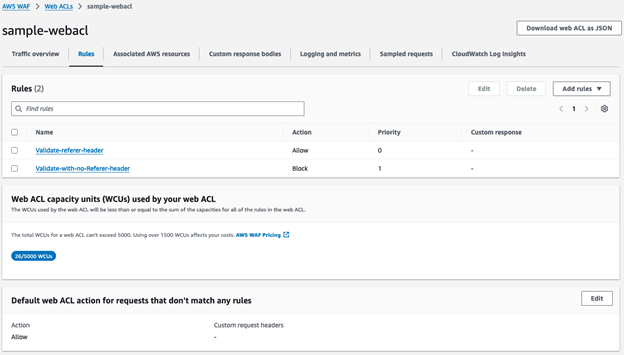
The Rules tab will now show both of the rules that you added with their corresponding AWS WAF actions in addition to the default action of Allow for requests that don’t match one of the rules.

Figure 31: Rules tab of sample-webacl web ACL

Figure 31: Rules tab of sample-webacl web ACL

Step 4: Associate the new rules with the relevant CloudFront distribution

  1. Select the Associated AWS Resources tab and choose Add AWS resources.
    Figure 32: Add AWS resources

    Figure 32: Add AWS resources

  2. Select the relevant CloudFront distribution and choose Add.
    Figure 33: Select the CloudFront distribution

    Figure 33: Select the CloudFront distribution

  3. The web ACLs page will show the CloudFront distribution in the Associated AWS resources tab.
    Figure 34: Associated AWS resources

    Figure 34: Associated AWS resources

Test the rules

Similar to Approach 1, you have filtering at the CDN, but this time the filtering is based on the path and direct linking is allowed (without a Referer header).

You can use cURL to verify that the new AWS WAF web ACL correctly protects your content. Use the –H argument to send a different Referer header to the CloudFront distribution, which allows you to test as if you are embedding the website content in an unauthorized page.

When a third party embeds your content

» curl –H "Referer: https://example.net/" -I https://example.com/wp-content/uploads/2013/03/shareable-image.jpg
« HTTP/1.1 403 Forbidden

When your content is directly linked (with no Referer)

» curl -I https://example.com/wp-content/uploads/2013/03/shareable-image.jpg
« HTTP/1.1 200 OK

When you embed your content

» curl –H "Referer: https://example.com/" -I https://example.com/wp-content/uploads/2013/03/shareable-image.jpg
« HTTP/1.1 200 OK

Conclusion

AWS WAF is a web application firewall that lets you monitor and control the HTTP(S) requests that are forwarded to your protected web application resources. In this post, you saw how to use the AWS WAF custom rule builder feature to prevent content hotlinking to protect your website’s content hosted in an Amazon S3 bucket.

The two approaches demonstrated in this post provide you with ways to implement a robust referer check solution that helps prevent unauthorized third-party websites from linking back to static assets on your website, thus helping to prevent increased bandwidth costs, bad user experience, and degraded performance because of resource leeching. Following the concept of least privilege, you can further restrict the AWS WAF rules to apply only to certain image file extensions (such as .jpg or .png).

While referer checking helps prevent unaffiliated sites from backlinking to your site’s images and benefitting by using your site’s bandwidth, more sophisticated exploits can carefully craft a request to bypass the referer check. Other web request mechanisms, such as web browser plugins, server-to-server requests that forge referer header values, or privacy-based web browsers may also cause inconsistencies in accurately evaluating the referer header value. Be aware of such inconsistencies and consider using additional private content mechanisms such as signed URLs and token authentication.

Web browsers don’t have a mechanism to validate if a Referer header has been tampered with. Referer checking should be implemented as part of a broader web application security strategy by using AWS WAF application protection rules, Bot Control, Fraud Control, and Distributed Denial of Service (DDOS) protection. Effective web traffic monitoring using AWS WAF logs, Amazon CloudWatch metrics, and web ACL traffic dashboards will help ensure that bad actors aren’t bypassing the AWS WAF rules that you have set up to protect your web traffic.

You can use AWS WAF to build on top of the referer check to implement more advanced content protection solutions such as rate-limiting, bot mitigation, and DDOS mitigations to further secure your website against a wide range of exploits.

If you have feedback about this post, submit comments in the Comments section below. If you have questions about this solution or its implementation, start a new thread on the AWS WAF forum.

Alex Smith was the original author of this post in 2016.

Sanchith Kandaka

Sanchith Kandaka

With over 15 years of experience in the Content Delivery and Application Security space, Sanchith is excited about all things edge related. He has worked as a Solutions Architect and a Solutions Engineer and is now a Specialist Solutions Architect at AWS focused on AWS Edge Services and Perimeter Protection services including Amazon CloudFront, AWS WAF, and AWS Shield.

Age Verification Using Facial Scans

Post Syndicated from Bruce Schneier original https://www.schneier.com/blog/archives/2025/04/age-verification-using-facial-scans.html

Discord is testing the feature:

“We’re currently running tests in select regions to age-gate access to certain spaces or user settings,” a spokesperson for Discord said in a statement. “The information shared to power the age verification method is only used for the one-time age verification process and is not stored by Discord or our vendor. For Face Scan, the solution our vendor uses operates on-device, which means there is no collection of any biometric information when you scan your face. For ID verification, the scan of your ID is deleted upon verification.”

I look forward to all the videos of people hacking this system using various disguises.

AI 101: How AI and Ransomware Are Reshaping Cybersecurity

Post Syndicated from Stephanie Doyle original https://www.backblaze.com/blog/ai-101-how-ai-and-ransomware-are-reshaping-cybersecurity/

A decorative image showing a shield, a chip, and the words "AI" over the chip.

AI is rewriting the rules of technology, for better or worse. Arguably one of the most “for better and worse” areas? Ransomware. It’s a full blown billion dollar business, and AI is supercharging both the offense and defense.  

Not only are we seeing AI give bad actors more sophisticated tools and campaigns to target business and consumers alike, we’re also seeing mitigation techniques and technologies deployed by good actors gain equally compelling AI-powered improvements. 

In other words, welcome to the future—where your data is the hostage and the bots are negotiating. Let’s dig in.

Some stage-setting: How much is ransomware costing us?

Despite ransomware payments exceeding an eye-watering $1 billion in 2023—and despite some high profile attacks in 2024, one of which extracted $75 million from a single victim—ransomware attacks actually fell overall in 2024. High profile law enforcement activity, like those against LockBit and BlackCat contributed to a huge drop in the second half of 2024. 

Don’t get too excited though: According to cryptocurrency tracing firm Chainanalysis, that still meant $814 million in 2024. And, the true cost of ransomware includes more than just payments extracted under threat. 

The economic ripple effects of a ransomware attack can include losing C-level talent, having to lay off employees, and ongoing downtime or business closure. Industry-wide, cyber insurance is a growing industry, and 2024 saw a staggering 31% of claims come from third-party risk. 

Reports show that cyber attackers are using ransomware data in new ways, including targeting critical backups and using hostage data to damage organizational reputation. 

Perhaps most concerningly, ransomware attackers are increasingly using exfiltration as a tactic to double and triple extortion, even using exfiltration data to launch targeted distributed denial-of-service (DDoS) attacks. According to a Check Point’s 2025 Cyber Security Report, some new actors have emerged as exclusively “data-selling platforms,” hosting dedicated data leak sites (DLS) and negotiation platforms.

The good news

  • Machine learning (ML) tools have underpinned modern cyber security techniques for years now—with excellent results. 
  • Sophisticated monitoring tools give us far more granular insights and alerts. 
  • AI-driven behavioral analysis is making it easier to detect anomalies and preempt attacks before they escalate.

What does this mean for defending against ransomware attacks?

Enterprises now have access to security platforms that analyze network behavior in real time, flagging unusual access patterns or lateral movement before a full ransomware payload can deploy. These platforms rely on machine learning models trained on massive datasets of known attack vectors, which allows them to flag and quarantine suspicious activity with impressive accuracy.

The interesting thing is that common knowledge says that “the AI revolution” has been happening recently, and quickly. But, when it comes to cybersecurity defense, many tools have been using ML algorithms for at least two decades. Palo Alto Networks (WildFire), for example, has been using ML since 2003. 

The line between “processing massive datasets and acting up on that info based on programmed parameters” and machine learning is subtle, but important. While the former follows set parameters, machine learning identifies patterns in data—sometimes with human guidance—to decide from multiple possible actions. 

It’s like teaching an assistant a series of tasks they can eventually do on their own. When you think about the progression from basic automation to ML, AI, and deep learning, the shift from rule-based actions to autonomous, chained decisions starts to make a lot of sense.

Zero trust architecture, enhanced by AI, is also gaining momentum. Instead of relying on perimeter-based defenses, AI-enhanced systems enforce granular access controls and continuously verify user and device trust levels. In practice, what this means is that systems no longer assume that you are you on the other end—not without evidence. Combine this with real-time threat intelligence sharing and automated incident response, and enterprises can shorten the window between detection and mitigation drastically. 

The bad news

  • Deep fakes are more convincing. 
  • The ability to generate code means there are more attacks, and those attacks are more sophisticated and responsive. 
  • Cyber criminals of all skill levels have access to more technical tools, including some that are specialized in malware. 
  • Enterprises are adjusting to a new way of working, which can create vulnerabilities.

Generative AI, phishing, and deep fakes

The low-hanging fruit in this discussion is that it’s easy to use generative AI to create more convincing phishing attacks. In the past, bad grammar or non-localized language choices have been an easy way to quickly identify a phishing attack. 

Assisted by generative AI, deep fakes of both the voice and video flavor are getting increasingly difficult to spot—so, while you know your CEO isn’t likely to text you to get a bunch of gift cards or send them company funds via Bitcoin or PayPal, you might believe a video of your CFO or a call from your CEO asking you to transfer funds to accounts that turn out to not be legitimate. 

How is generated code being used by ransomware bad actors?

Just as generative AI models have made everyone a poet, they’re also widely used to generate code. Tools like GitHub Copilot have seen wide adoption amongst enterprises looking to generate and test code. Gartner reports that by 2027, 70% of professional developers will use AI-powered coding tools, up from less than 10% in 2023. 

Given how AI code generation has made code generation easier on enterprises, it’s no surprise that the ransomware industry is following the same adoption trends. By January 2023, this had gone from a hypothetical to a reality, with ransomware bad actors of low levels of technical skill able to leverage LLMs to create malware scripts. 

By July 2023, cybercriminals were already discussing WormGPT, a malicious chatbot trained on ChatGPT which removed standard guardrails against creating illegal or inappropriate content. And, cybersecurity protection firms had executed a proof of concept to demonstrate that AI could generate truly polymorphic code on the fly—a technique used to make it much easier to evade detection by antivirus programs. By July 2024, one study showed that ChatGPT 4 was able to exploit 87% of one-day vulnerabilities. 

Couple that with the fact that ransomware bad actors have opposite success metrics vs. enterprises. Cyber criminals rely on enacting as many attacks as possible, and it only takes one of those attacks succeeding to see a significant upside. Enterprises, on the other hand, only need one failure to see a huge negative impact on their businesses.

What things can you implement to be ransomware ready?

There are a variety of best practices enterprises and users can implement to be more ransomware ready. Organizations like National Institute of Standards and Technology (NIST) and Cybersecurity and Infrastructure Security Agency (CISA) typically publish recommendations, as well as security bulletins and trends within the industry. 

Some of these recommendations are things that users can do on every platform they interact with, such as:  

  • Creating good, strong, unique passwords, and preferably using a password manager: A good password manager reduces password reuse and helps ensure best practices are followed enterprise-wide. 
  • Enabling multifactor authentication (MFA): Multi-factor authentication remains one of the strongest lines of defense, especially when paired with device verification and biometric options. 

On the enterprise side of the house, frameworks like cyber resilience help teams protect data they’ve been entrusted with. And, AI-powered cyber security tools can be a powerful tool in any business’s toolbox. That can look like a number of different things, including: 

  • Investing in AI-powered endpoint detection and response (EDR). These tools continuously monitor and analyze endpoint activities, flagging unusual behavior and isolating threats automatically.
  • Training teams on recognizing deep fakes and AI-enhanced phishing attempts. Security awareness training is evolving fast. Focused, frequent, and AI-aware sessions are critical for employees across departments.
  • Leveraging deception technology. Deploying decoy systems, fake credentials, and honeypots can help trap attackers early and gather valuable intel on their tactics.
  • Running tabletop simulations. Practicing breach scenarios—especially those involving AI-enabled threats—prepares teams to act decisively when seconds matter.

Cyber resilience isn’t static, and neither are the tools and tactics. One of the most important areas an enterprise can invest in is ongoing security and research. Enterprise leaders need to prioritize proactive measures. That means ongoing AI model audits, being nimble in response to new and changing best practices, and investing in cross-functional teams that bring together infosec, legal, and operational leadership. 

The future of AI and ransomware

Let’s level with each other—separately, the AI and ransomware spaces are both changing quickly. When you combine AI and ransomware and try to define how they’re affecting each other, you’re on pretty slippery ground. 

What we’re trying to do here is identify patterns that affect our everyday lives—but we’re also taking a peek at what folks are studying in the research realm, because quantum is just around the corner, and, frankly, too impactful to ignore. 

So, tell us if we need an update, or if you have another opinion! The comments section is open and we’re happy to chat. 

The post AI 101: How AI and Ransomware Are Reshaping Cybersecurity appeared first on Backblaze Blog | Cloud Storage & Cloud Backup

Tor Browser 14.5 released

Post Syndicated from jzb original https://lwn.net/Articles/1017923/

Version
14.5
of the Tor
Browser
has been released. Notable features in this release
include the addition of Connection Assist for the Android version of
the Tor Browser, and language support for Belarusian, Bulgarian, and
Portuguese for all versions of the browser.

Should Tor Browser fail to establish a direct connection to the Tor
network, Connection Assist will offer to find and try bridges for
you. But before this feature could be made available on Android, we
had to embark on a multi-year effort to refactor our tor integration
across each platform first. This project has now reached an important
milestone, and we’re proud to announce the release of Connection
Assist for Android today.

See the full
changelog
for all changes in this release, and the issues
page
for known problems.

[$] Memory controller performance improvements

Post Syndicated from corbet original https://lwn.net/Articles/1016856/

The kernel’s memory controller works within the control-group mechanism to
enforce memory-usage limits on groups of processes. This component has
often had performance problems, so there is continual interest in
optimizing it. Shakeel Butt led a session during the memory-management
track of the 2025 Linux Storage, Filesystem, Memory-Management, and BPF
Summit to look at the current state of the memory controller and what can
be done to reduce its overhead.

Security updates for Thursday

Post Syndicated from jake original https://lwn.net/Articles/1017919/

Security updates have been issued by Debian (chromium and libapache2-mod-auth-openidc), Oracle (expat, freetype, glibc, grub2, gvisor-tap-vsock, and kernel), Red Hat (grub2 and webkit2gtk3), and SUSE (apache2-mod_auth_openidc, cosign, gitoxide, govulncheck-vulndb, GraphicsMagick, haproxy, hauler, mozjs52, oci-cli, pam, perl-Data-Entropy, poppler, python-lxml-doc, python311-aiohttp, rekor, rubygem-rexml, and webkit2gtk3).

Announcing General Availability of GitLab Duo with Amazon Q

Post Syndicated from Ryan Bachman original https://aws.amazon.com/blogs/devops/announcing-general-availability-of-gitlab-duo-with-amazon-q/

Announcing General Availability of GitLab Duo with Amazon Q

Today, we’re excited to announce the general availability of GitLab Duo with Amazon Q. This new offering is an integrated product, bringing together GitLab’s DevSecOps platform with Amazon Q’s generative AI capabilities. Gitlab Duo with Amazon Q embeds Amazon Q agent capabilities directly in GitLab’s DevSecOps platform to accelerate complex, multi-step tasks across the entire software development lifecycle.

In today’s fast-paced software development environment, developers are constantly looking for ways to improve productivity while maintaining best practices for code quality, security, and deployment. The integration of GitLab Duo with Amazon Q addresses these needs by combining GitLab’s comprehensive DevSecOps platform with Amazon Q’s intelligent coding assistance.

This integration enables developers to leverage AI throughout their entire workflow—from idea conception to deployment—all within the familiar GitLab environment they already use. For new and existing Amazon Q Developer users, this integration also leverages the same Q Developer agents available in the IDE, providing a consistent experience across different interfaces.

Key Benefits and Features

The GitLab Duo with Amazon Q integration delivers significant value to development teams by creating a more efficient, secure, and collaborative workflow.

This integration eliminates the need to switch between different tools and environments, as developers can access powerful AI assistance directly within GitLab. GitLab helps automate building, testing, packaging, and deployment of secure code, streamlining the entire development lifecycle. What makes this particularly powerful is how the AI agents utilize the context throughout a GitLab project to keep the SLDC “loop” going. So whether you are troubleshooting a failed pipeline, investigating a vulnerability, or writing a new feature, Amazon Q agents can leverage the appropriate context to assist you with the task at hand.

Security and compliance are foundational elements of this integration. End-to-end security controls are built directly into the platform. The Amazon Q agents come with appropriate guardrails to help customers meet compliance without affecting development velocity, all while leveraging AWS’s cloud infrastructure to scale your AI-enhanced development workflows with confidence. You can ask Amazon Q agents to help remediate a finding in the project’s vulnerability reports or help troubleshoot a failed pipeline.

Throughout your development workflow, you’ll find collaborative AI agents ready to assist with various tasks. Whether you need to upgrade Java code from version 8 or 11 to 17, get AI-powered code review suggestions, automatically generate comprehensive test cases, or transform ideas into complete merge requests—Amazon Q is there to help at every step. These intelligent agents work alongside your team, enhancing productivity.

Use Cases and Examples

To demonstrate how GitLab and Amazon Q complement each other to accelerate development productivity and help organizations with application security, I’ll be using a Java application enjoyed by puzzle enthusiasts.

A Video of playing Q Words

Idea to Merge Request

Whether you are looking to scale your developer teams or streamline the processes between feature requests and production, GitLab Duo with Amazon Q is now integrated into GitLab’s platform, so you can begin development simply by assigning a GitLab issue to Amazon Q Developer agents.

I start by creating a task in my GitLab project. I want to create a new feature to support multiple languages in the Q words game.

Creating a new issue for the Q Dev agent

From here I assign the task directly to the Amazon Q agent by using GitLab’s quick action /q dev in the issue’s comment section.

Invoking the Q Dev Agent with a quick action

The agent will automatically open up a merge request for me to review with suggested code changes. Here you can see changes the agent made across 11 files, accounting for front-end, API, and styling changes. In the past I would have opened my IDE, cloned the project, and coded these changes myself. Using GitLab Duo with Amazon Q, I just review and test the new code before I am ready to deploy.

The merge request created by the Q Dev Agent

Code Reviews

Code reviews play a critical function during the development life-cycle. They act as a quality gate to help maintain high quality security and coding standards. While important, code reviews add latency to software delivery, especially when reviewers are not available or when changes are complex.

The Amazon Q agent for Code Reviews in GitLab helps teams move faster through their code review. Using the quick action /q review in a merge request comment field sends the merge request to Amazon Q, where it will identify security and quality risks associated with code changes in the merge request.

I start by opening an open merge request. In this example, another developer had the task to add authentication to the Q words application.

I then invoke the agent with the /q review quick action.

Invoking the Q review agent

The review is returned as inline code suggestions to the merge request. Here you can see an example of a finding from the review agent. Comments include a description of the findings as well as guidance and links to help improve the code.

Amazon Q Review adds comments to the merge request

I next use the Gitlab Duo with Amazon Q chat agent in the web interface to ask for a summary of the change and ask it to highlight any critical issues. GitLab Duo chat allows me to ask questions about the current resource in the URL. In this example it is the merge request, but it could also be a GitLab issue I want to explain or a summary of a code file in a repository.

Chatting with GitLab Dou with Amazon Q

Test Generation

Next, I ask GitLab Duo with Amazon Q to generate tests using the /q test quick action. Adding this action to the comment field will generate recommended tests when the MR lacks sufficient tests.

A test recommened by the Q test agent

The summary I receive from GitLab Duo with Amazon Q helps me understand the scope of the changes and focuses my attention to the more important aspects of the change. Along with the tests that Q Developer agents recommended, I am able to approve the merge request in less time.

Java Transformation

Upgrading Java applications from older versions to Java 17 can be time-consuming and error-prone. With GitLab Duo and Amazon Q, I can leverage the transform agent to help me automate the migration from the current Java 8 code to Java 17 along with upgrading the project’s dependencies. I start by creating a new issue in my GitLab project that indicates the Java upgrade.

Creating a new issue for the Q Transform agent

To begin the upgrade, I use the GitLab Q quick action /q transform to begin the upgrade process. The Amazon Q transformation agent asks me to update the gitlab-ci.yaml file to continue the process.

Instructions on how to update your .gitlab-ci.yaml file

I can follow the agent’s progress by watching for updates in the Issue’s details. GitLab Duo with Amazon Q will also add a transformation plan to the issue so I can understand what types of changes will be involved to complete the upgrade.

The Amazon Q Agent will provide a transformation plan before it begins

When the transform is complete, a new merge request is opened for me to review. As you can see, my pom.xml file was updated to compile on Java 17 as well as additional changes to ensure the project compiles. It also includes a report detailing next steps to consider before merging and deploying the updated Java code.

A completed summary from the Q transform agent

Conclusion

In this post, I demonstrated how GitLab Duo with Amazon Q can help scale and improve application development. Using GitLab Duo with Amazon Q, I was able to quickly add additional features, review code changes, and upgrade my application to Java 17 all within GitLab’s collaborative interface. I now have a secure and modern java app that I can use to practice my Español.

The general availability of GitLab Duo with Amazon Q marks a significant milestone in AI-assisted software development. By combining GitLab’s comprehensive DevSecOps platform with Amazon Q ‘s generative AI capabilities, this integration empowers development teams to work more efficiently while maintaining high standards of security and compliance.

Organizations can now leverage this powerful integration to accelerate their software development lifecycle, reduce manual effort, and ship more secure code faster. The seamless developer experience, enterprise-grade security, and collaborative AI agents throughout the workflow make this integration a valuable addition to any development team’s toolkit. We’re excited to see how customers leverage this integration to transform their development processes and achieve new levels of productivity and innovation.

Learn More

About the Author:
Ryan Bachman profile image

Ryan Bachman

Ryan Bachman is a Sr. Specialist Solutions Architect with Amazon Web Services (AWS) Next Generation Developer Experience Team. Ryan is passionate about helping customers adopt process and services that increase their efficiency developing applications for the cloud. He has over 20 years professional experience as a technologist, including roles in development, network architecture, and technical product management.

The collective thoughts of the interwebz