Deploy and manage OpenAPI/Swagger RESTful APIs with the AWS Cloud Development Kit

Post Syndicated from Luke Popplewell original https://aws.amazon.com/blogs/devops/deploy-and-manage-openapi-swagger-restful-apis-with-the-aws-cloud-development-kit/

This post demonstrates how AWS Cloud Development Kit (AWS CDK) Infrastructure as Code (IaC) constructs and AWS serverless technology can be used to build and deploy a RESTful Application Programming Interface (API) defined in the OpenAPI specification. This post uses an example API that describes  Widget resources and demonstrates how to use an AWS CDK Pipeline to:

  • Deploy a RESTful API stage to Amazon API Gateway from an OpenAPI specification.
  • Build and deploy an AWS Lambda function that contains the API functionality.
  • Auto-generate API documentation and publish it to an Amazon Simple Storage Service (Amazon S3)-hosted website served by the Amazon CloudFront content delivery network (CDN) service. This provides technical and non-technical stakeholders with versioned, current, and accessible API documentation.
  • Auto-generate client libraries for invoking the API and deploy them to AWS CodeArtifact, which is a fully-managed artifact repository service. This allows API client development teams to integrate with different versions of the API in different environments.

The diagram shown in the following figure depicts the architecture of the AWS services and resources described in this post.
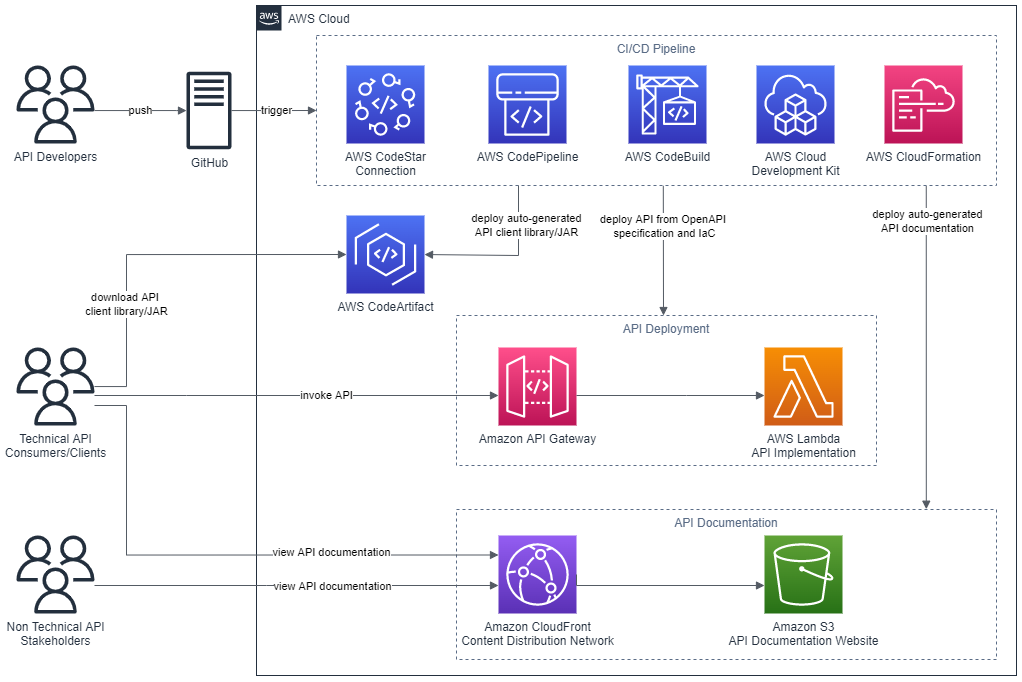
 The architecture described in this post consists of an AWS CodePipeline pipeline, provisioned using the AWS CDK, that deploys the Widget API to AWS Lambda and API Gateway. The pipeline then auto-generates the API’s documentation as a website served by CloudFront and deployed to S3. Finally, the pipeline auto-generates a client library for the API and deploys this to CodeArtifact.

Figure 1 – Architecture

The code that accompanies this post, written in Java, is available here.

Background

APIs must be understood by all stakeholders and parties within an enterprise including business areas, management, enterprise architecture, and other teams wishing to consume the API. Unfortunately, API definitions are often hidden in code and lack up-to-date documentation. Therefore, they remain inaccessible for the majority of the API’s stakeholders. Furthermore, it’s often challenging to determine what version of an API is present in different environments at any one time.

This post describes some solutions to these issues by demonstrating how to continuously deliver up-to-date and accessible API documentation, API client libraries, and API deployments.

AWS CDK

The AWS CDK is a software development framework for defining cloud IaC and is available in multiple languages including TypeScript, JavaScript, Python, Java, C#/.Net, and Go. The AWS CDK Developer Guide provides best practices for using the CDK.

This post uses the CDK to define IaC in Java which is synthesized to a cloud assembly. The cloud assembly includes one to many templates and assets that are deployed via an AWS CodePipeline pipeline. A unit of deployment in the CDK is called a Stack.

OpenAPI specification (formerly Swagger specification)

OpenAPI specifications describe the capabilities of an API and are both human and machine-readable. They consist of definitions of API components which include resources, endpoints, operation parameters, authentication methods, and contact information.

Project composition

The API project that accompanies this post consists of three directories:

  • app
  • api
  • cdk

app directory

This directory contains the code for the Lambda function which is invoked when the Widget API is invoked via API Gateway. The code has been developed in Java as an Apache Maven project.

The Quarkus framework has been used to define a WidgetResource class (see src/main/java/aws/sample/blog/cdkopenapi/app/WidgetResources.java ) that contains the methods that align with HTTP Methods of the Widget API.
api directory

The api directory contains the OpenAPI specification file ( openapi.yaml ). This file is used as the source for:

  • Defining the REST API using API Gateway’s support for OpenApi.
  • Auto-generating the API documentation.
  • Auto-generating the API client artifact.

The api directory also contains the following files:

  • openapi-generator-config.yaml : This file contains configuration settings for the OpenAPI Generator framework, which is described in the section CI/CD Pipeline.
  • maven-settings.xml: This file is used support the deployment of the generated SDKs or libraries (Apache Maven artifacts) for the API and is described in the CI/CD Pipeline section of this post.

This directory contains a sub directory called docker . The docker directory contains a Dockerfile which defines the commands for building a Docker image:

FROM ruby:2.6.5-alpine
 
RUN apk update \
 && apk upgrade --no-cache \
 && apk add --no-cache --repository http://dl-cdn.alpinelinux.org/alpine/v3.14/main/ nodejs=14.20.0-r0 npm \
 && apk add git \
 && apk add --no-cache build-base
 
# Install Widdershins node packages and ruby gem bundler 
RUN npm install -g widdershins \
 && gem install bundler 
 
# working directory
WORKDIR /openapi
 
# Clone and install the Slate framework
RUN git clone https://github.com/slatedocs/slate
RUN cd slate \
 && bundle install

The Docker image incorporates two open source projects, the NodeJS Widdershins library and the Ruby Slate-framework. These are used together to auto-generate the documentation for the API from the OpenAPI specification.  This Dockerfile is referenced and built by the  ApiStack class, which is described in the CDK Stacks section of this post.

cdk directory

This directory contains an Apache Maven Project developed in Java for provisioning the CDK stacks for the  Widget API.

Under the  src/main/java  folder, the package  aws.sample.blog.cdkopenapi.cdk  contains the files and classes that define the application’s CDK stacks and also the entry point (main method) for invoking the stacks from the CDK Toolkit CLI:

  • CdkApp.java: This file contains the  CdkApp class which provides the main method that is invoked from the AWS CDK Toolkit to build and deploy the  application stacks.
  • ApiStack.java: This file contains the   ApiStack class which defines the  OpenApiBlogAPI   stack and is described in the CDK Stacks section of this post.
  • PipelineStack.java: This file contains the   PipelineStack class which defines the OpenAPIBlogPipeline  stack and is described in the CDK Stacks section of this post.
  • ApiStackStage.java: This file contains the  ApiStackStage class which defines a CDK stage. As detailed in the CI/CD Pipeline section of this post, a DEV stage, containing the  OpenApiBlogAPI stack resources for a DEV environment, is deployed from the  OpenApiBlogPipeline pipeline.

CDK stacks

ApiStack

Note that the CDK bundling functionality is used at multiple points in the  ApiStack  class to produce CDK Assets. The post, Building, bundling, and deploying applications with the AWS CDK, provides more details regarding using CDK bundling mechanisms.

The  ApiStack  class defines multiple resources including:

  • Widget API Lambda function: This is bundled by the CDK in a Docker container using the Java 11 runtime image.
  • Widget  REST API on API Gateway: The REST API is created from an Inline API Definition which is passed as an S3 CDK Asset. This asset includes a reference to the  Widget API OpenAPI specification located under the  api folder (see  api/openapi.yaml ) and builds upon the SpecRestApi construct and API Gateway’s support for OpenApi.
  • API documentation Docker Image Asset: This is the Docker image that contains the open source frameworks (Widdershins and Slate) that are leveraged to generate the API documentation.
  • CDK Asset bundling functionality that leverages the API documentation Docker image to auto-generate documentation for the API.
  • An S3 Bucket for holding the API documentation website.
  • An origin access identity (OAI) which allows CloudFront to securely serve the S3 Bucket API documentation content.
  • A CloudFront distribution which provides CDN functionality for the S3 Bucket website.

Note that the  ApiStack class features the following code which is executed on the  Widget API Lambda construct:

CfnFunction apiCfnFunction = (CfnFunction)apiLambda.getNode().getDefaultChild();
apiCfnFunction.overrideLogicalId("APILambda");

The CDK, by default, auto-assigns an ID for each defined resource but in this case the generated ID is being overridden with “APILambda”. The reason for this is that inside of the  Widget API OpenAPI specification (see  api/openapi.yaml ), there is a reference to the Lambda function by name (“APILambda”) so that the function can be integrated as a proxy for each listed API path and method combination. The OpenAPI specification includes this name as a variable to derive the Amazon Resource Name (ARN) for the Lambda function:

uri:
	Fn::Sub: "arn:aws:apigateway:${AWS::Region}:lambda:path/2015-03-31/functions/${APILambda.Arn}/invocations"

PipelineStack

The  PipelineStack class defines a CDK CodePipline construct which is a higher level construct and pattern. Therefore, the construct doesn’t just map directly to a single CloudFormation resource, but provisions multiple resources to fulfil the requirements of the pattern. The post, CDK Pipelines: Continuous delivery for AWS CDK applications, provides more detail on creating pipelines with the CDK.

final CodePipeline pipeline = CodePipeline.Builder.create(this, "OpenAPIBlogPipeline")
.pipelineName("OpenAPIBlogPipeline")
.selfMutation(true)
      .dockerEnabledForSynth(true)
      .synth(synthStep)
      .build();

CI/CD pipeline

The diagram in the following figure shows the multiple CodePipeline stages and actions created by the CDK CodePipeline construct that is defined in the PipelineStack class.
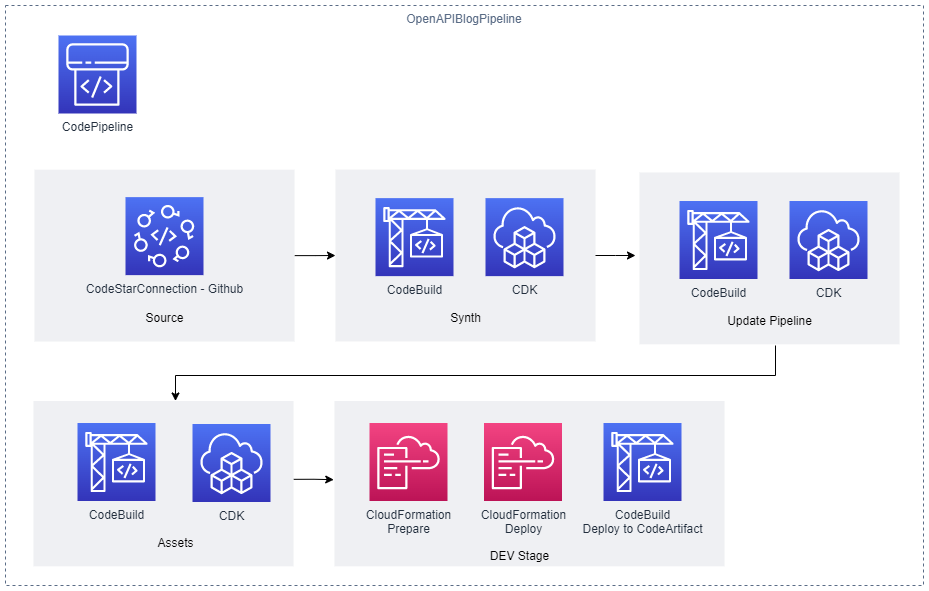
The CI/CD pipeline’s stages include the Source stage, the Synth stage, the Update pipeline, the Assets stage, and the DEV stage.

Figure 2 – CI/CD Pipeline

The stages defined include the following:

  • Source stage: The pipeline is passed the source code contents from this stage.
  • Synth stage: This stage consists of a Synth Action that synthesizes the CloudFormation templates for the application’s CDK stacks and compiles and builds the project Lambda API function.
  • Update Pipeline stage: This stage checks the OpenAPIBlogPipeline stack and reinitiates the pipeline when changes to its definition have been deployed.
  • Assets stage: The application’s CDK stacks produce multiple file assets (for example, zipped Lambda code) which are published to Amazon S3. Docker image assets are published to a managed CDK framework Amazon Elastic Container Registry (Amazon ECR) repository.
  • DEV stage: The API’s CDK stack ( OpenApiBlogAPI ) is deployed to a hypothetical development environment in this stage. A post stage deployment action is also defined in this stage. Through the use of a CDK ShellStep construct, a Bash script is executed that deploys a generated client Java Archive (JAR) for the Widget API to CodeArtifact. The script employs the OpenAPI Generator project for this purpose:
CodeBuildStep codeArtifactStep = CodeBuildStep.Builder.create("CodeArtifactDeploy")
    .input(pipelineSource)
    .commands(Arrays.asList(
           	"echo $REPOSITORY_DOMAIN",
           	"echo $REPOSITORY_NAME",
           	"export CODEARTIFACT_TOKEN=`aws codeartifact get-authorization-token --domain $REPOSITORY_DOMAIN --query authorizationToken --output text`",
           	"export REPOSITORY_ENDPOINT=$(aws codeartifact get-repository-endpoint --domain $REPOSITORY_DOMAIN --repository $REPOSITORY_NAME --format maven | jq .repositoryEndpoint | sed 's/\\\"//g')",
           	"echo $REPOSITORY_ENDPOINT",
           	"cd api",
           	"wget -q https://repo1.maven.org/maven2/org/openapitools/openapi-generator-cli/5.4.0/openapi-generator-cli-5.4.0.jar -O openapi-generator-cli.jar",
     	          "cp ./maven-settings.xml /root/.m2/settings.xml",
        	          "java -jar openapi-generator-cli.jar batch openapi-generator-config.yaml",
                    "cd client",
                    "mvn --no-transfer-progress deploy -DaltDeploymentRepository=openapi--prod::default::$REPOSITORY_ENDPOINT"
))
      .rolePolicyStatements(Arrays.asList(codeArtifactStatement, codeArtifactStsStatement))
.env(new HashMap<String, String>() {{
      		put("REPOSITORY_DOMAIN", codeArtifactDomainName);
            	put("REPOSITORY_NAME", codeArtifactRepositoryName);
       }})
      .build();

Running the project

To run this project, you must install the AWS CLI v2, the AWS CDK Toolkit CLI, a Java/JDK 11 runtime, Apache Maven, Docker, and a Git client. Furthermore, the AWS CLI must be configured for a user who has administrator access to an AWS Account. This is required to bootstrap the CDK in your AWS account (if not already completed) and provision the required AWS resources.

To build and run the project, perform the following steps:

  1. Fork the OpenAPI blog project in GitHub.
  2. Open the AWS Console and create a connection to GitHub. Note the connection’s ARN.
  3. In the Console, navigate to AWS CodeArtifact and create a domain and repository.  Note the names used.
  4. From the command line, clone your forked project and change into the project’s directory:
git clone https://github.com/<your-repository-path>
cd <your-repository-path>
  1. Edit the CDK JSON file at  cdk/cdk.json  and enter the details:
"RepositoryString": "<your-github-repository-path>",
"RepositoryBranch": "<your-github-repository-branch-name>",
"CodestarConnectionArn": "<connection-arn>",
"CodeArtifactDomain": "<code-artifact-domain-name>",
"CodeArtifactRepository": "<code-artifact-repository-name>"

Please note that for setting configuration values in CDK applications, it is recommend to use environment variables or AWS Systems Manager parameters.

  1. Commit and push your changes back to your GitHub repository:
git push origin main
  1. Change into the  cdk directory and bootstrap the CDK in your AWS account if you haven’t already done so (enter “Y” when prompted):
cd cdk
cdk bootstrap
  1. Deploy the CDK pipeline stack (enter “Y” when prompted):
cdk deploy OpenAPIBlogPipeline

Once the stack deployment completes successfully, the pipeline  OpenAPIBlogPipeline will start running. This will build and deploy the API and its associated resources. If you open the Console and navigate to AWS CodePipeline, then you’ll see a pipeline in progress for the API.

Once the pipeline has completed executing, navigate to AWS CloudFormation to get the output values for the  DEV-OpenAPIBlog  stack deployment:

  1. Select the  DEV-OpenAPIBlog  stack entry and then select the Outputs column. Record the REST_URL value for the key that begins with   OpenAPIBlogRestAPIEndpoint .
  2. Record the CLOUDFRONT_URL value for the key  OpenAPIBlogCloudFrontURL .

The API ping method at https://<REST_URL>/ping can now be invoked using your browser or an API development tool like Postman. Other API other methods, as defined by the OpenApi specification, are also available for invocation (For example, GET https://<REST_URL>/widgets).

To view the generated API documentation, open a browser at https://< CLOUDFRONT_URL>.

The following figure shows the API documentation website that has been auto-generated from the API’s OpenAPI specification. The documentation includes code snippets for using the API from multiple programming languages.
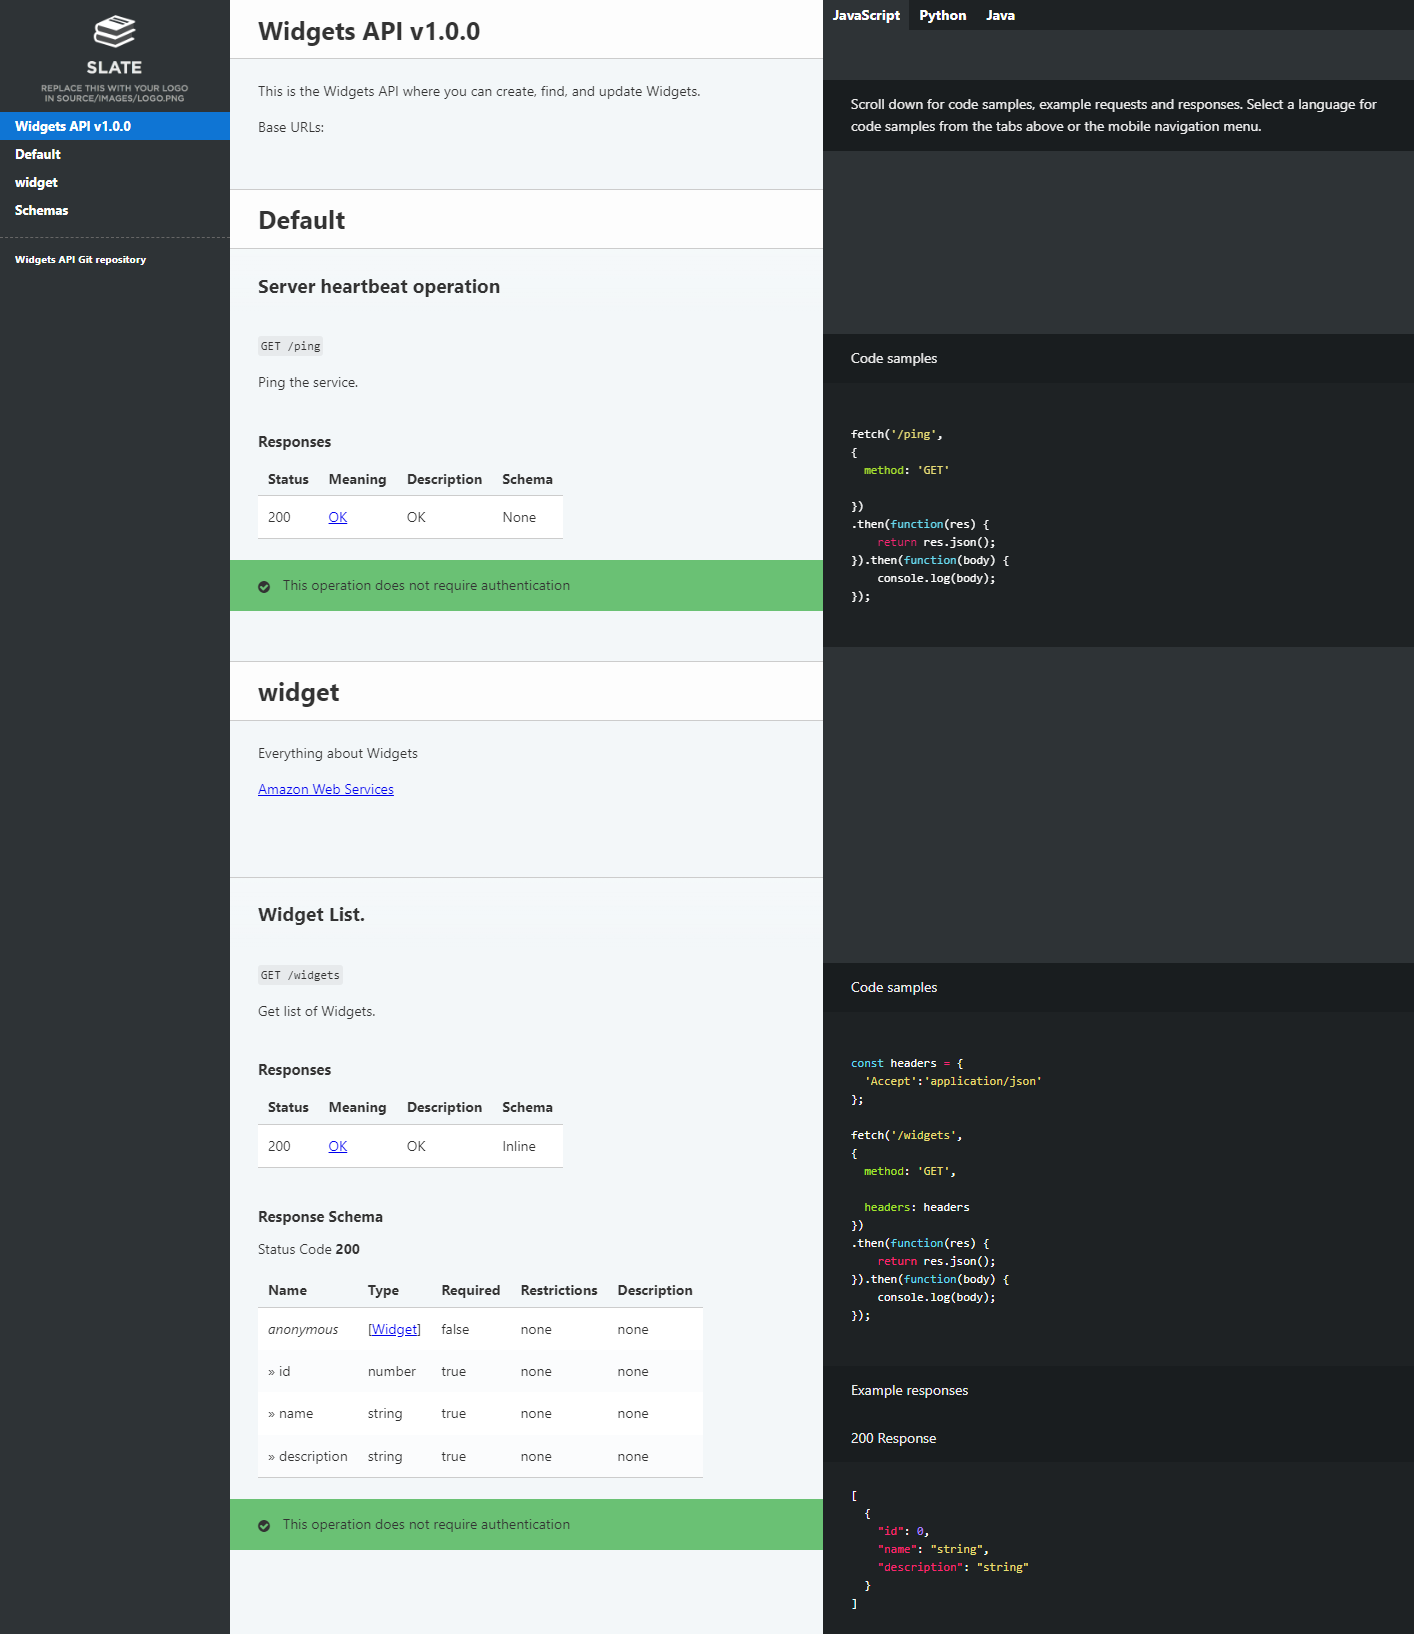
The API’s auto-generated documentation website provides descriptions of the API’s methods and resources as well as code snippets in multiple languages including JavaScript, Python, and Java.

Figure 3 – Auto-generated API documentation

To view the generated API client code artifact, open the Console and navigate to AWS CodeArtifact. The following figure shows the generated API client artifact that has been published to CodeArtifact.
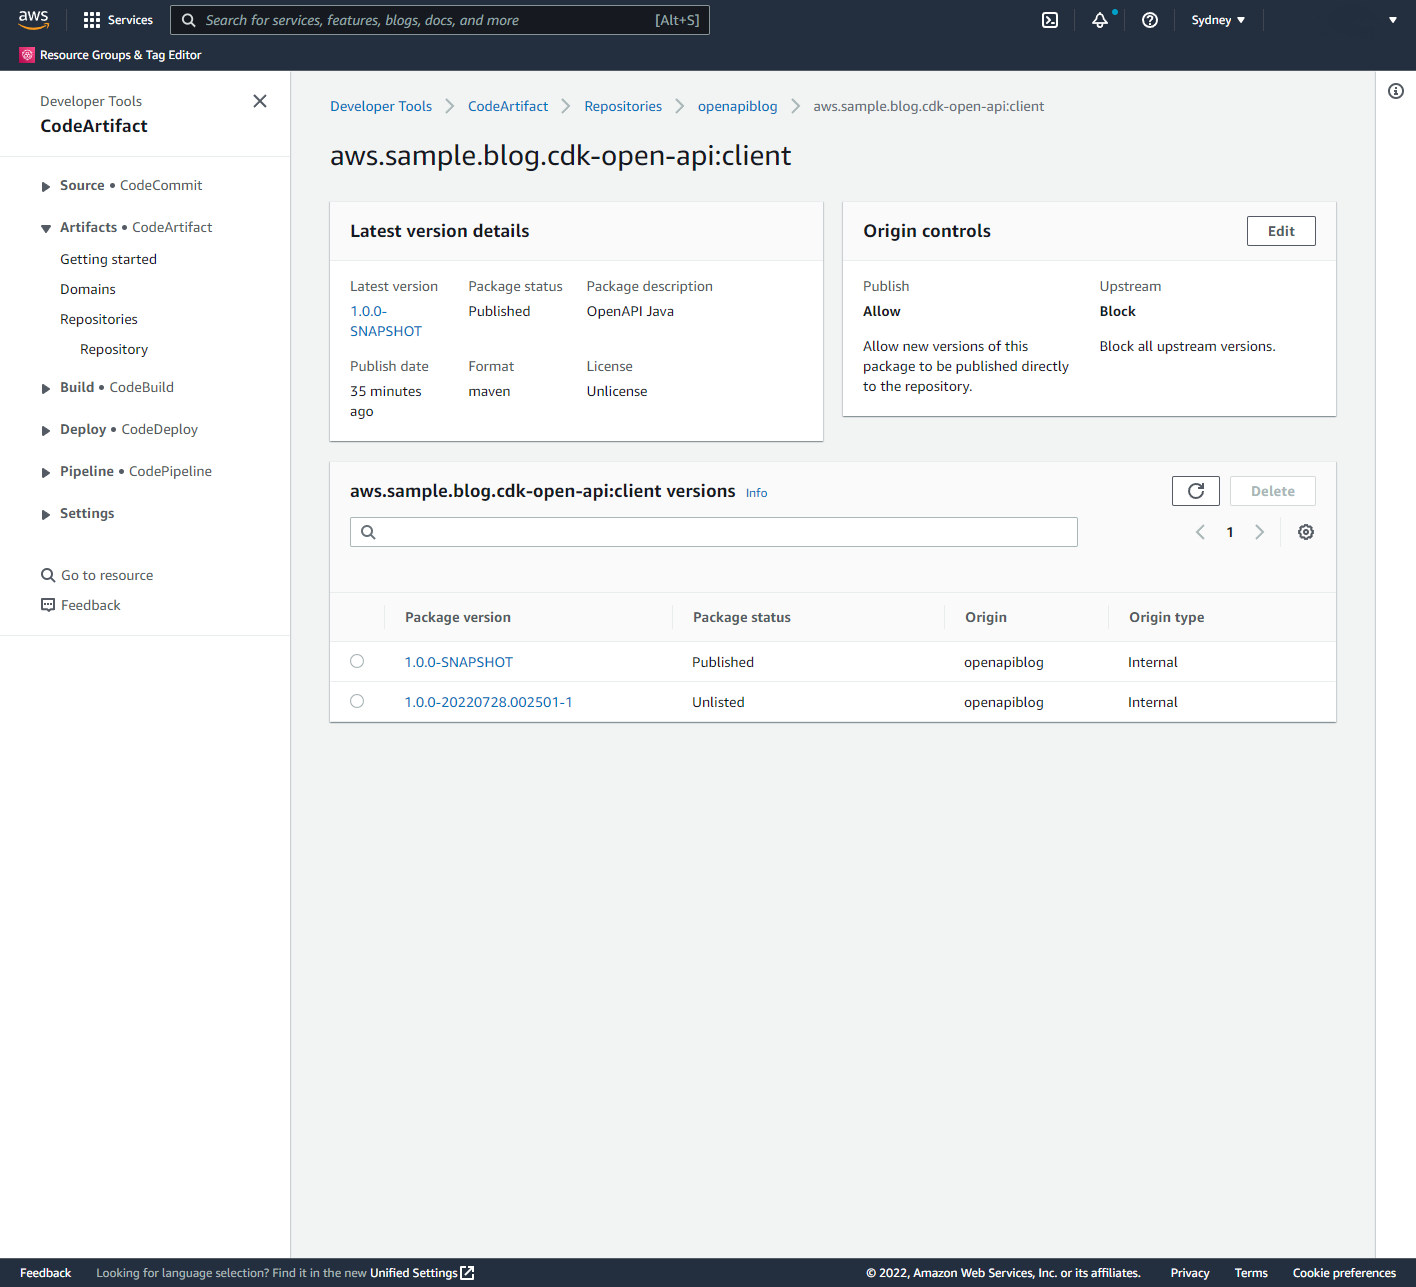
The CodeArtifact service user interface in the Console shows the different versions of the API’s auto-generated client libraries.

Figure 4 – API client artifact in CodeArtifact

Cleaning up

  1. From the command change to the  cdk directory and remove the API stack in the DEV stage (enter “Y” when prompted):
cd cdk
cdk destroy OpenAPIBlogPipeline/DEV/OpenAPIBlogAPI
  1. Once this has completed, delete the pipeline stack:
cdk destroy OpenAPIBlogPipeline
  1. Delete the S3 bucket created to support pipeline operations. Open the Console and navigate to Amazon S3. Delete buckets with the prefix  openapiblogpipeline .

Conclusion

This post demonstrates the use of the AWS CDK to deploy a RESTful API defined by the OpenAPI/Swagger specification. Furthermore, this post describes how to use the AWS CDK to auto-generate API documentation, publish this documentation to a web site hosted on Amazon S3, auto-generate API client libraries or SDKs, and publish these artifacts to an Apache Maven repository hosted on CodeArtifact.

The solution described in this post can be improved by:

  • Building and pushing the API documentation Docker image to Amazon ECR, and then using this image in CodePipeline API pipelines.
  • Creating stages for different environments such as TEST, PREPROD, and PROD.
  • Adding integration testing actions to make sure that the API Deployment is working correctly.
  • Adding Manual approval actions for that are executed before deploying the API to PROD.
  • Using CodeBuild caching of artifacts including Docker images and libraries.

About the author:

Luke Popplewell

Luke Popplewell works primarily with federal entities in the Australian Government. In his role as an architect, Luke uses his knowledge and experience to help organisations reach their goals on the AWS cloud. Luke has a keen interest in serverless technology, modernization, DevOps and event-driven architectures.

EFF: Code, Speech, and the Tornado Cash Mixer

Post Syndicated from original https://lwn.net/Articles/905663/

The Electronic Frontier Foundation has announced that it is representing cryptography professor Matthew Green, who has chosen to republish the sanctioned Tornado Cash open-source code as a GitHub repository.

EFF’s most central concern about OFAC’s [US Office of Foreign Assets Control] actions arose because, after the SDN [Specially Designated Nationals] listing of “Tornado Cash,” GitHub took down the canonical repository of the Tornado Cash source code, along with the accounts of the primary developers, including all their code contributions. While GitHub has its own right to decide what goes on its platform, the disappearance of this source code from GitHub after the government action raised the specter of government action chilling the publication of this code.

In keeping with our longstanding defense of the right to publish code, we are representing Professor Matthew Green, who teaches computer science at the Johns Hopkins Information Security Institute, including applied cryptography and anonymous cryptocurrencies. Part of his work involves studying and improving privacy-enhancing technologies, and teaching his students about mixers like Tornado Cash. The disappearance of Tornado Cash’s repository from GitHub created a gap in the available information on mixer technology, so Professor Green made a fork of the code, and posted the replica so it would be available for study. The First Amendment protects both GitHub’s right to host that code, and Professor Green’s right to publish (here republish) it on GitHub so he and others can use it for teaching, for further study, and for development of the technology.

Linux Foundation TAB election: call for nominees

Post Syndicated from original https://lwn.net/Articles/905651/

The 2022 election for members of the Linux Foundation Technical Advisory
Board (TAB) will be held during the Linux
Plumbers Conference
, September 12 to 14. The TAB represents
the kernel-development community to the Linux Foundation (and beyond) and
holds a seat on the Foundation’s board of directors. The call for nominees
for this year’s election has gone out; the deadline for nominations is
September 12.

Serving on the TAB is an opportunity to help the community; interested
members are encouraged to send in a nomination.

Extending your SaaS platform with AWS Lambda

Post Syndicated from Hasan Tariq original https://aws.amazon.com/blogs/architecture/extending-your-saas-platform-with-aws-lambda/

Software as a service (SaaS) providers continuously add new features and capabilities to their products to meet their growing customer needs. As enterprises adopt SaaS to reduce the total cost of ownership and focus on business priorities, they expect SaaS providers to enable customization capabilities.

Many SaaS providers allow their customers (tenants) to provide customer-specific code that is triggered as part of various workflows by the SaaS platform. This extensibility model allows customers to customize system behavior and add rich integrations, while allowing SaaS providers to prioritize engineering resources on the core SaaS platform and avoid per-customer customizations.

To simplify experience for enterprise developers to build on SaaS platforms, SaaS providers are offering the ability to host tenant’s code inside the SaaS platform. This blog provides architectural guidance for running custom code on SaaS platforms using AWS serverless technologies and AWS Lambda without the overhead of managing infrastructure on either the SaaS provider or customer side.

Vendor-hosted extensions

With vendor-hosted extensions, the SaaS platform runs the customer code in response to events that occur in the SaaS application. In this model, the heavy-lifting of managing and scaling the code launch environment is the responsibility of the SaaS provider.

To host and run custom code, SaaS providers must consider isolating the environment that runs untrusted custom code from the core SaaS platform, as detailed in Figure 1. This introduces additional challenges to manage security, cost, and utilization.

Distribution of responsibility between Customer and SaaS platform with vendor-hosted extensions

Figure 1. Distribution of responsibility between Customer and SaaS platform with vendor-hosted extensions

Using AWS serverless services to run custom code

Using AWS serverless technologies removes the tasks of infrastructure provisioning and management, as there are no servers to manage, and SaaS providers can take advantage of automatic scaling, high availability, and security, while only paying for value.

Example use case

Let’s take an example of a simple SaaS to-do list application that supports the ability to initiate custom code when a new to-do item is added to the list. This application is used by customers who supply custom code to enrich the content of newly added to-do list items. The requirements for the solution consist of:

  • Custom code provided by each tenant should run in isolation from all other tenants and from the SaaS core product
  • Track each customer’s usage and cost of AWS resources
  • Ability to scale per customer

Solution overview

The SaaS application in Figure 2 is the core application used by customers, and each customer is considered a separate tenant. For the sake of brevity, we assume that the customer code was already stored in an Amazon Simple Storage Service (Amazon S3) bucket as part of the onboarding. When an eligible event is generated in the SaaS application as a result of user action, like a new to-do item added, it gets propagated down to securely launch the associated customer code.

Example use case architecture

Figure 2. Example use case architecture

Walkthrough of custom code run

Let’s detail the initiation flow of custom code when a user adds a new to-do item:

  1. An event is generated in the SaaS application when a user performs an action, like adding a new to-do list item. To extend the SaaS application’s behavior, this event is linked to the custom code. Each event contains a tenant ID and any additional data passed as part of the payload. Each of these events is an “initiation request” for the custom code Lambda function.
  2. Amazon EventBridge is used to decouple the SaaS Application from event processing implementation specifics. EventBridge makes it easier to build event-driven applications at scale and keeps the future prospect of adding additional consumers. In case of unexpected failure in any downstream service, EventBridge retries sending events a set number of times.
  3. EventBridge sends the event to an Amazon Simple Queue Service (Amazon SQS) queue as a message that is subsequently picked up by a Lambda function (Dispatcher) for further routing. Amazon SQS enables decoupling and scaling of microservices and also provides a buffer for the events that are awaiting processing.
  4. The Dispatcher polls the messages from SQS queue and is responsible for routing the events to respective tenants for further processing. The Dispatcher retrieves the tenant ID from the message and performs a lookup in the database (we recommend Amazon DynamoDB for low latency), retrieves tenant SQS Amazon Resource Name (ARN) to determine which queue to route the event. To further improve performance, you can cache the tenant-to-queue mapping.
  5. The tenant SQS queue acts as a message store buffer and is configured as an event source for a Lambda function. Using Amazon SQS as an event source for Lambda is a common pattern.
  6. Lambda executes the code uploaded by the tenant to perform the desired operation. Common utility and management code (including logging and telemetry code) is kept in Lambda layers that get added to every custom code Lambda function provisioned.
  7. After performing the desired operation on data, custom code Lambda returns a value back to the SaaS application. This completes the run cycle.

This architecture allows SaaS applications to create a self-managed queue infrastructure for running custom code for tenants in parallel.

Tenant code upload

The SaaS platform can allow customers to upload code either through a user interface or using a command line interface that the SaaS provider provides to developers to facilitate uploading custom code to the SaaS platform. Uploaded code is saved in the custom code S3 bucket in .zip format that can be used to provision Lambda functions.

Custom code Lambda provisioning

The tenant environment includes a tenant SQS queue and a Lambda function that polls initiation requests from the queue. This Lambda function serves several purposes, including:

  1. It polls messages from the SQS queue and constructs a JSON payload that will be sent an input to custom code.
  2. It “wraps” the custom code provided by the customer using boilerplate code, so that custom code is fully abstracted from the processing implementation specifics. For example, we do not want custom code to know that the payload it is getting is coming from Amazon SQS or be aware of the destination where launch results will be sent.
  3. Once custom code initiation is complete, it sends a notification with launch results back to the SaaS application. This can be done directly via EventBridge or Amazon SQS.
  4. This common code can be shared across tenants and deployed by the SaaS provider, either as a library or as a Lambda layer that gets added to the Lambda function.

Each Lambda function execution environment is fully isolated by using a combination of open-source and proprietary isolation technologies, it helps you to address the risk of cross-contamination. By having a separate Lambda function provisioned per-tenant, you achieve the highest level of isolation and benefit from being able to track per-tenant costs.

Conclusion

In this blog post, we explored the need to extend SaaS platforms using custom code and why AWS serverless technologies—using Lambda and Amazon SQS—can be a good fit to accomplish that. We also looked at a solution architecture that can provide the necessary tenant isolation and is cost-effective for this use case.

For more information on building applications with Lambda, visit Serverless Land. For best practices on building SaaS applications, visit SaaS on AWS.

AWS re:Inforce 2022: Key announcements and session highlights

Post Syndicated from Marta Taggart original https://aws.amazon.com/blogs/security/aws-reinforce-2022-key-announcements-and-session-highlights/

AWS re:Inforce returned to Boston, MA, in July after 2 years, and we were so glad to be back in person with customers. The conference featured over 250 sessions and hands-on labs, 100 AWS partner sponsors, and over 6,000 attendees over 2 days. If you weren’t able to join us in person, or just want to revisit some of the themes, this blog post is for you. It summarizes all the key announcements and points to where you can watch the event keynote, sessions, and partner lightning talks on demand.

Key announcements

Here are some of the announcements that we made at AWS re:Inforce 2022.

Watch on demand

You can also watch these talks and learning sessions on demand.

Keynotes and leadership sessions

Watch the AWS re:Inforce 2022 keynote where Amazon Chief Security Officer Stephen Schmidt, AWS Chief Information Security Officer CJ Moses, Vice President of AWS Platform Kurt Kufeld, and MongoDB Chief Information Security Officer Lena Smart share the latest innovations in cloud security from AWS and what you can do to foster a culture of security in your business. Additionally, you can review all the leadership sessions to learn best practices for managing security, compliance, identity, and privacy in the cloud.

Breakout sessions and partner lightning talks

  • Data Protection and Privacy track – See how AWS, customers, and partners work together to protect data. Learn about trends in data management, cryptography, data security, data privacy, encryption, and key rotation and storage.
  • Governance, Risk, and Compliance track – Dive into the latest hot topics in governance and compliance for security practitioners, and discover how to automate compliance tools and services for operational use.
  • Identity and Access Management track – Hear from AWS, customers, and partners on how to use AWS Identity Services to manage identities, resources, and permissions securely and at scale. Learn how to configure fine-grained access controls for your employees, applications, and devices and deploy permission guardrails across your organization.
  • Network and Infrastructure Security track – Gain practical expertise on the services, tools, and products that AWS, customers, and partners use to protect the usability and integrity of their networks and data.
  • Threat Detection and Incident Response track – Learn how AWS, customers, and partners get the visibility they need to improve their security posture, reduce the risk profile of their environments, identify issues before they impact business, and implement incident response best practices.
  • You can also catch our Partner Lightning Talks on demand.

Session presentation downloads are also available on our AWS Event Contents page. Consider joining us for more in-person security learning opportunities by registering for AWS re:Invent 2022, which will be held November 28 through December 2 in Las Vegas. We look forward to seeing you there!

If you’d like to discuss how these new announcements can help your organization improve its security posture, AWS is here to help. Contact your AWS account team today.

 
If you have feedback about this post, submit comments in the Comments section below. If you have questions about this post, contact AWS Support.

Want more AWS Security news? Follow us on Twitter.

Author

Marta Taggart

Marta is a Seattle-native and Senior Product Marketing Manager in AWS Security Product Marketing, where she focuses on data protection services. Outside of work you’ll find her trying to convince Jack, her rescue dog, not to chase squirrels and crows (with limited success).

Author

Maddie Bacon

Maddie (she/her) is a technical writer for AWS Security with a passion for creating meaningful content. She previously worked as a security reporter and editor at TechTarget and has a BA in Mathematics. In her spare time, she enjoys reading, traveling, and all things Harry Potter.

How Fannie Mae built a data mesh architecture to enable self-service using Amazon Redshift data sharing

Post Syndicated from Kiran Ramineni original https://aws.amazon.com/blogs/big-data/how-fannie-mae-built-a-data-mesh-architecture-to-enable-self-service-using-amazon-redshift-data-sharing/

This post is co-written by Kiran Ramineni and Basava Hubli, from Fannie Mae.

Amazon Redshift data sharing enables instant, granular, and fast data access across Amazon Redshift clusters without the need to copy or move data around. Data sharing provides live access to data so that users always see the most up-to-date and transactionally consistent views of data across all consumers as data is updated in the producer. You can share live data securely with Amazon Redshift clusters in the same or different AWS accounts, and across Regions. Data sharing enables secure and governed collaboration within and across organizations as well as external parties.

In this post, we see how Fannie Mae implemented a data mesh architecture using Amazon Redshift cross-account data sharing to break down the silos in data warehouses across business units.

About Fannie Mae

Chartered by U.S. Congress in 1938, Fannie Mae advances equitable and sustainable access to homeownership and quality, affordable rental housing for millions of people across America. Fannie Mae enables the 30-year fixed-rate mortgage and drives responsible innovation to make homebuying and renting easier, fairer, and more accessible. We are focused on increasing operational agility and efficiency, accelerating the digital transformation of the company to deliver more value and reliable, modern platforms in support of the broader housing finance system.

Background

To fulfill the mission of facilitating equitable and sustainable access to homeownership and quality, affordable rental housing across America, Fannie Mae embraced a modern cloud-based architecture which leverages data to drive actionable insights and business decisions. As part of the modernization strategy, we embarked on a journey to migrate our legacy on-premises workloads to AWS cloud including managed services such as Amazon Redshift and Amazon S3. The modern data platform on AWS cloud serves as the central data store for analytics, research, and data science. In addition, this platform also serves for governance, regulatory and financial reports.

To address capacity, scalability and elasticity needs of a large data footprint of over 4PB, we decentralized and delegated ownership of the data stores and associated management functions to their respective business units. To enable decentralization, and efficient data access and management, we adopted a data mesh architecture.

Data mesh solution architecture

To enable a seamless access to data across accounts and business units, we looked at various options to build an architecture that is sustainable and scalable. The data mesh architecture allowed us to keep data of the respective business units in their own accounts, but yet enable a seamless access across the business unit accounts in a secure manner.  We reorganized the AWS account structure to have separate accounts for each of the business units wherein, business data and dependent applications were collocated in their respective AWS Accounts.

With this decentralized model, the business units independently manage the responsibility of hydration, curation and security of their data.  However, there is a critical need to enable seamless and efficient access to data across business units and an ability to govern the data usage. Amazon Redshift cross-account data sharing meets this need and enables us with business continuity.

To facilitate the self-serve capability on the data mesh, we built a web portal that allows for data discovery and ability to subscribe to data in the Amazon Redshift data warehouse and Amazon Simple Storage Service (Amazon S3) data lake (lake house). Once a consumer initiates a request on the web portal, an approval workflow is triggered with notification to the governance and business data owner. Upon successful completion of the request workflow, an automation process is triggered to grant access to the consumer, and a notification is sent to the consumer. Subsequently, the consumer is able to access the requested datasets. The workflow process of request, approval, and subsequent provisioning of access was automated using APIs and AWS Command Line Interface (AWS CLI) commands, and entire process is designed to complete within a few minutes.

With this new architecture using Amazon Redshift cross-account data sharing, we were able implement and benefit from the following key principles of a data mesh architecture that fit very well for our use case:

  • A data as a product approach
  • A federated model of data ownership
  • The ability for consumers to subscribe using self-service data access
  • Federated data governance with the ability to grant and revoke access

The following architecture diagram shows the high-level data mesh architecture we implemented at Fannie Mae. Data from each of the operational systems is collected and stored in individual lake houses and subscriptions are managed through a data mesh catalog in a centralized control plane account.

Fig 1. High level Data Mesh catalog architecture

Fig 1. High level Data Mesh catalog architecture

Control plane for data mesh

With a redesigned account structure, data are spread out across separate accounts for each business application area in S3 data lake or in Amazon Redshift cluster. We designed a hub and spoke point-to-point data distribution scheme with a centralized semantic search to enhance the data relevance. We use a centralized control plane account to store the catalog information, contract detail, approval workflow policies, and access management details for the data mesh. With a policy driven access paradigm, we enable fine-grained access management to the data, where we automated Data as a Service enablement with an optimized approach. It has three modules to store and manage catalog, contracts, and access management.

Data catalog

The data catalog provides the data glossary and catalog information, and helps fully satisfy governance and security standards. With AWS Glue crawlers, we create the catalog for the lake house in a centralized control plane account, and then we automate the sharing process in a secure manner. This enables a query-based framework to pinpoint the exact location of the data. The data catalog collects the runtime information about the datasets for indexing purposes, and provides runtime metrics for analytics on dataset usage and access patterns. The catalog also provides a mechanism to update the catalog through automation as new datasets become available.

Contract registry

The contract registry hosts the policy engine, and uses Amazon DynamoDB to store the registry policies. This has the details on entitlements to physical mapping of data, and workflows for the access management process. We also use this to store and maintain the registry of existing data contracts and enable audit capability to determine and monitor the access patterns. In addition, the contract registry serves as the store for state management functionality.

Access management automation

Controlling and managing access to the dataset is done through access management. This provides a just-in-time data access through IAM session policies using a persona-driven approach. The access management module also hosts event notification for data, such as frequency of access or number of reads, and we then harness this information for data access lifecycle management. This module plays a critical role in the state management and provides extensive logging and monitoring capabilities on the state of the data.

Process flow of data mesh using Amazon Redshift cross-account data sharing

The process flow starts with creating a catalog of all datasets available in the control plane account. Consumers can request access to the data through a web front-end catalog, and the approval process is triggered through the central control plane account. The following architecture diagram represents the high-level implementation of Amazon Redshift data sharing via the data mesh architecture. The steps of the process flow are as follows:

  1. All the data products, Amazon Redshift tables, and S3 buckets are registered in a centralized AWS Glue Data Catalog.
  2. Data scientists and LOB users can browse the Data Catalog to find the data products available across all lake houses in Fannie Mae.
  3. Business applications can consume the data in other lake houses by registering a consumer contract. For example, LOB1-Lakehouse can register the contract to utilize data from LOB3-Lakehouse.
  4. The contract is reviewed and approved by the data producer, which subsequently triggers a technical event via Amazon Simple Service Notification (Amazon SNS).
  5. The subscribing AWS Lambda function runs AWS CLI commands, ACLs, and IAM policies to set up Amazon Redshift data sharing and make data available for consumers.
  6. Consumers can access the subscribed Amazon Redshift cluster data using their own cluster.
Fig 2. Data Mesh architecture using Amazon Redshift data sharing

Fig 2. Data Mesh architecture using Amazon Redshift data sharing

The intention of this post is not to provide detailed steps for every aspect of creating the data mesh, but to provide a high-level overview of the architecture implemented, and how you can use various analytics services and third-party tools to create a scalable data mesh with Amazon Redshift and Amazon S3. If you want to try out creating this architecture, you can use these steps and automate the process using your tool of choice for the front-end user interface to enable users to subscribe to the dataset.

The steps we describe here are a simplified version of the actual implementation, so it doesn’t involve all the tools and accounts. To set up this scaled-down data mesh architecture, we demonstrate using cross-account data sharing using one control plane account and two consumer accounts. For this, you should have the following prerequisites:

  • Three AWS accounts, one for the producer <ProducerAWSAccount1>, and two consumer accounts: <ConsumerAWSAccount1> and <ConsumerAWSAccount2>
  • AWS permissions to provision Amazon Redshift and create an IAM role and policy
  • The required Amazon Redshift clusters: one for the producer in the producer AWS account, a cluster in ConsumerCluster1, and optionally a cluster in ConsumerCluster2
  • Two users in the producer account, and two users in consumer account 1:
    • ProducerClusterAdmin – The Amazon Redshift user with admin access on the producer cluster
    • ProducerCloudAdmin – The IAM user or role with rights to run authorize-data-share and deauthorize-data-share AWS CLI commands in the producer account
    • Consumer1ClusterAdmin – The Amazon Redshift user with admin access on the consumer cluster
    • Consumer1CloudAdmin – The IAM user or role with rights to run associate-data-share-consumer and disassociate-data-share-consumer AWS CLI commands in the consumer account

Implement the solution

On the Amazon Redshift console, log in to the producer cluster and run the following statements using the query editor:

CREATE DATASHARE ds;

ALTER DATASHARE ds ADD SCHEMA PUBLIC;
ALTER DATASHARE ds ADD TABLE table1;
ALTER DATASHARE ds ADD ALL TABLES IN SCHEMA sf_schema;

For sharing data across AWS accounts, you can use the following GRANT USAGE command. For authorizing the data share, typically it will be done by a manager or approver. In this case, we show how you can automate this process using the AWS CLI command authorize-data-share.

GRANT USAGE ON DATASHARE ds TO ACCOUNT <CONSUMER ACCOUNT>;

aws redshift authorize-data-share --data-share-arn <DATASHARE ARN> --consumer-identifier <CONSUMER ACCOUNT>

For the consumer to access the shared data from producer, an administrator on the consumer account needs to associate the data share with one or more clusters. This can be done using the Amazon Redshift console or AWS CLI commands. We provide the following AWS CLI command because this is how you can automate the process from the central control plane account:

aws redshift associate-data-share-consumer --no-associate-entire-account --data-share-arn <DATASHARE ARN> --consumer-arn <CONSUMER CLUSTER ARN>

/* Create Database in Consumer Account */
CREATE DATABASE ds_db FROM DATASHARE ds OF ACCOUNT <PRODUCER ACCOUNT> NAMESPACE <PRODUCER CLUSTER NAMESPACE>;

Optional:
CREATE EXTERNAL SCHEMA Schema_from_datashare FROM REDSHIFT DATABASE 'ds_db' SCHEMA 'public';

GRANT USAGE ON DATABASE ds_db TO user/group;

/* Optional:Grant usage on database to users or groups */
GRANT USAGE ON SCHEMA Schema_from_datashare TO GROUP Analyst_group;

To enable Amazon Redshift Spectrum cross-account access to AWS Glue and Amazon S3, and the IAM roles required, refer to How can I create Amazon Redshift Spectrum cross-account access to AWS Glue and Amazon S3.

Conclusion

Amazon Redshift data sharing provides a simple, seamless, and secure platform for sharing data in a domain-oriented distributed data mesh architecture. Fannie Mae deployed the Amazon Redshift data sharing capability across the data lake and data mesh platforms, which currently hosts over 4 petabytes worth of business data. The capability has been seamlessly integrated with their Just-In-Time (JIT) data provisioning framework enabling a single-click, persona-driven access to data. Further, Amazon Redshift data sharing coupled with Fannie Mae’s centralized, policy-driven data governance framework greatly simplified access to data in the lake ecosystem while fully conforming to the stringent data governance policies and standards. This demonstrates that Amazon Redshift users can create data share as product to distribute across many data domains.

In summary, Fannie Mae was able to successfully integrate the data sharing capability in their data ecosystem to bring efficiencies in data democratization and introduce a higher velocity, near real-time access to data across various business units. We encourage you to explore the data sharing feature of Amazon Redshift to build your own data mesh architecture and improve access to data for your business users.


About the authors

Kiran Ramineni is Fannie Mae’s Vice President Head of Single Family, Cloud, Data, ML/AI & Infrastructure Architecture, reporting to the CTO and Chief Architect. Kiran and team spear headed cloud scalable Enterprise Data Mesh (Data Lake) with support for Just-In-Time (JIT), and Zero Trust as it applies to Citizen Data Scientist and Citizen Data Engineers. In the past Kiran built/lead several internet scalable always-on platforms.

Basava Hubli is a Director & Lead Data/ML Architect at Enterprise Architecture. He oversees the Strategy and Architecture of Enterprise Data, Analytics and Data Science platforms at Fannie Mae. His primary focus is on Architecture Oversight and Delivery of Innovative technical capabilities that solve for critical Enterprise business needs. He leads a passionate and motivated team of architects who are driving the modernization and adoption of the Data, Analytics and ML platforms on Cloud. Under his leadership, Enterprise Architecture has successfully deployed several scalable, innovative platforms & capabilities that includes, a fully-governed Data Mesh which hosts peta-byte scale business data and a persona-driven, zero-trust based data access management framework which solves for the organization’s data democratization needs.

Rajesh Francis is a Senior Analytics Customer Experience Specialist at AWS. He specializes in Amazon Redshift and focuses on helping to drive AWS market and technical strategy for data warehousing and analytics. Rajesh works closely with large strategic customers to help them adopt our new services and features, develop long-term partnerships, and feed customer requirements back to our product development teams to guide the direction of our product offerings.

Kiran Sharma is a Senior Data Architect in AWS Professional Services. Kiran helps customers architecting, implementing and optimizing peta-byte scale Big Data Solutions on AWS.

AWS Week in Review – August 22, 2022

Post Syndicated from Marcia Villalba original https://aws.amazon.com/blogs/aws/aws-week-in-review-august-22-2022/

This post is part of our Week in Review series. Check back each week for a quick roundup of interesting news and announcements from AWS!

I’m back from my summer holidays and ready to get up to date with the latest AWS news from last week!

Last Week’s Launches
Here are some launches that got my attention during the previous week.

Amazon CloudFront now supports HTTP/3 requests over QUIC. The main benefits of HTTP/3 are faster connection times and fewer round trips in the handshake process. HTTP/3 is available in all 410+ CloudFront edge locations worldwide, and there is no additional charge for using this feature. Read Channy’s blog post about this launch to learn more about it and how to enable it in your applications.

Using QUIC in HTTP3 vs HTTP2

Amazon Chime has announced a couple of really cool features for their SDK. Now you can compose video by concatenating video with multiple attendees, including audio, content and transcriptions. Also, Amazon Chime SDK launched the live connector pipelines that send real-time video from your applications to streaming platforms such as Amazon Interactive Video Service (IVS) or AWS Elemental MediaLive. Now building real-time streaming applications becomes easier.

AWS Cost Anomaly Detection has launched a simplified interface for anomaly exploration. Now it is easier to monitor spending patterns to detect and alert anomalous spend.

Amazon DynamoDB now supports bulk imports from Amazon S3 to a new table. This new launch makes it easier to migrate and load data into a new DynamoDB table. This is a great use for migrations, to load test data into your applications, thereby simplifying disaster recovery, among other things.

Amazon MSK Serverless, a new capability from Amazon MSK launched in the spring of this year, now has support for AWS CloudFormation and Terraform. This allows you to describe and provision Amazon MSK Serverless clusters using code.

For a full list of AWS announcements, be sure to keep an eye on the What’s New at AWS page.

Other AWS News
Some other updates and news that you may have missed:

This week there were a couple of stories that caught my eye. The first one is about Grillo, a social impact enterprise focused on seismology, and how they used AWS to build a low-cost earthquake early warning system. The second one is from the AWS Localization team about how they use Amazon Translate to scale their localization in order to remove language barriers and make AWS content more accessible.

Podcast Charlas Técnicas de AWS – If you understand Spanish, this podcast is for you. Podcast Charlas Técnicas is one of the official AWS podcasts in Spanish, and every other week there is a new episode. The podcast is meant for builders, and it shares stories about how customers implemented and learned to use AWS services, how to architect applications, and how to use new services. You can listen to all the episodes directly from your favorite podcast app or at AWS Podcast en español.

Upcoming AWS Events
Check your calendars and sign up for these AWS events:

AWS Summits – Registration is open for upcoming in-person AWS Summits. Find the one closest to you: Chicago (August 28), Canberra (August 31), Ottawa (September 8), New Delhi (September 9), Mexico City (September 21–22), Bogota (October 4), and Singapore (October 6).

GOTO EDA Day 2022 – Registration is open for the in-person event about Event Driven Architectures (EDA) hosted in London on September 1. There will be a great line of speakers talking about the best practices for building EDA with serverless services.

AWS Virtual Workshop – Registration is open for the free virtual workshop about Amazon DocumentDB: Getting Started and Business Continuity Planning on August 24.

AWS .NET Enterprise Developer Days 2022Registration for this free event is now open. This is a 2-day, in-person event on September 7-8 at the Palmer Events Center in Austin, Texas, and a 2-day virtual event on September 13-14.

That’s all for this week. Check back next Monday for another Week in Review!

— Marcia

Identifying publicly accessible resources with Amazon VPC Network Access Analyzer

Post Syndicated from Patrick Duffy original https://aws.amazon.com/blogs/security/identifying-publicly-accessible-resources-with-amazon-vpc-network-access-analyzer/

Network and security teams often need to evaluate the internet accessibility of all their resources on AWS and block any non-essential internet access. Validating who has access to what can be complicated—there are several different controls that can prevent or authorize access to resources in your Amazon Virtual Private Cloud (Amazon VPC). The recently launched Amazon VPC Network Access Analyzer helps you understand potential network paths to and from your resources without having to build automation or manually review security groups, network access control lists (network ACLs), route tables, and Elastic Load Balancing (ELB) configurations. You can use this information to add security layers, such as moving instances to a private subnet behind a NAT gateway or moving APIs behind AWS PrivateLink, rather than use public internet connectivity. In this blog post, we show you how to use Network Access Analyzer to identify publicly accessible resources.

What is Network Access Analyzer?

Network Access Analyzer allows you to evaluate your network against your design requirements and network security policy. You can specify your network security policy for resources on AWS through a Network Access Scope. Network Access Analyzer evaluates the configuration of your Amazon VPC resources and controls, such as security groups, elastic network interfaces, Amazon Elastic Compute Cloud (Amazon EC2) instances, load balancers, VPC endpoint services, transit gateways, NAT gateways, internet gateways, VPN gateways, VPC peering connections, and network firewalls.

Network Access Analyzer uses automated reasoning to produce findings of potential network paths that don’t meet your network security policy. Network Access Analyzer reasons about all of your Amazon VPC configurations together rather than in isolation. For example, it produces findings for paths from an EC2 instance to an internet gateway only when the following conditions are met: the security group allows outbound traffic, the network ACL allows outbound traffic, and the instance’s route table has a route to an internet gateway (possibly through a NAT gateway, network firewall, transit gateway, or peering connection). Network Access Analyzer produces actionable findings with more context such as the entire network path from the source to the destination, as compared to the isolated rule-based checks of individual controls, such as security groups or route tables.

Sample environment

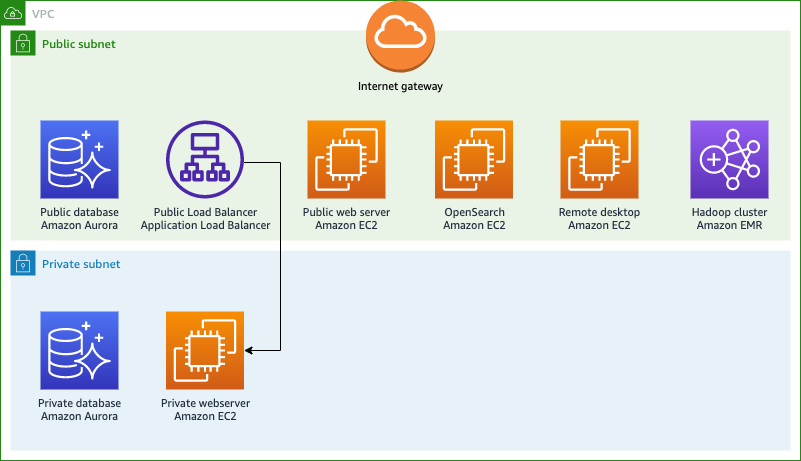
Let’s walk through a real-world example of using Network Access Analyzer to detect publicly accessible resources in your environment. Figure 1 shows an environment for this evaluation, which includes the following resources:

  • An EC2 instance in a public subnet allowing inbound public connections on port 80/443 (HTTP/HTTPS).
  • An EC2 instance in a private subnet allowing connections from an Application Load Balancer on port 80/443.
  • An Application Load Balancer in a public subnet with a Target Group connected to the private web server, allowing public connections on port 80/443.
  • An Amazon Aurora database in a public subnet allowing public connections on port 3306 (MySQL).
  • An Aurora database in a private subnet.
  • An EC2 instance in a public subnet allowing public connections on port 9200 (OpenSearch/Elasticsearch).
  • An Amazon EMR cluster allowing public connections on port 8080.
  • A Windows EC2 instance in a public subnet allowing public connections on port 3389 (Remote Desktop Protocol).
Figure 1: Example environment of web servers hosted on EC2 instances, remote desktop servers hosted on EC2, Relational Database Service (RDS) databases, Amazon EMR cluster, and OpenSearch cluster on EC2

Figure 1: Example environment of web servers hosted on EC2 instances, remote desktop servers hosted on EC2, Relational Database Service (RDS) databases, Amazon EMR cluster, and OpenSearch cluster on EC2

Let us assume that your organization’s security policy requires that your databases and analytics clusters not be directly accessible from the internet, whereas certain workload such as instances for web services can have internet access only through an Application Load Balancer over ports 80 and 443. Network Access Analyzer allows you to evaluate network access to resources in your VPCs, including database resources such as Amazon RDS and Amazon Aurora clusters, and analytics resources such as Amazon OpenSearch Service clusters and Amazon EMR clusters. This allows you to govern network access to your resources on AWS, by identifying network access that does not meet your security policies, and creating exclusions for paths that do have the appropriate network controls in place.

Configure Network Access Analyzer

In this section, you will learn how to create network scopes, analyze the environment, and review the findings produced. You can create network access scopes by using the AWS Command Line Interface (AWS CLI) or AWS Management Console. When creating network access scopes using the AWS CLI, you can supply the scope by using a JSON document. This blog post provides several network access scopes as JSON documents that you can deploy to your AWS accounts.

To create a network scope (AWS CLI)

  1. Verify that you have the AWS CLI installed and configured.
  2. Download the network-scopes.zip file, which contains JSON documents that detect the following publicly accessible resources:
    • OpenSearch/Elasticsearch clusters
    • Databases (MySQL, PostgreSQL, MSSQL)
    • EMR clusters
    • Windows Remote Desktop
    • Web servers that can be accessed without going through a load balancer

    Make note of the folder where you save the JSON scopes because you will need it for the next step.

  3. Open a systems shell, such as Bash, Zsh, or cmd.
  4. Navigate to the folder where you saved the preceding JSON scopes.
  5. Run the following commands in the shell window:
    aws ec2 create-network-insights-access-scope 
    --cli-input-json file://detect-public-databases.json 
    --tag-specifications 'ResourceType="network-insights-access-scope",
    Tags=[{Key="Name",Value="detect-public-databases"},{Key="Description",
    		   Value="Detects publicly accessible databases."}]' 
    --region us-east-1
    
    aws ec2 create-network-insights-access-scope 
    --cli-input-json file://detect-public-elastic.json 
    --tag-specifications 'ResourceType="network-insights-access-scope",
    Tags=[{Key="Name",Value="detect-public-opensearch"},{Key="Description",
    		   Value="Detects publicly accessible OpenSearch/Elasticsearch endpoints."}]' 
    --region us-east-1
    
    aws ec2 create-network-insights-access-scope 
    --cli-input-json file://detect-public-emr.json 
    --tag-specifications 'ResourceType="network-insights-access-scope",
    Tags=[{Key="Name",Value="detect-public-emr"},{Key="Description",
    		   Value="Detects publicly accessible Amazon EMR endpoints."}]'
    --region us-east-1
    
    aws ec2 create-network-insights-access-scope 
    --cli-input-json file://detect-public-remotedesktop.json 
    --tag-specifications 'ResourceType="network-insights-access-scope",
    Tags=[{Key="Name",Value="detect-public-remotedesktop"},{Key="Description",
    		   Value="Detects publicly accessible Microsoft Remote Desktop servers."}]' 
    --region us-east-1
    
    aws ec2 create-network-insights-access-scope 
    --cli-input-json file://detect-public-webserver-noloadbalancer.json 
    --tag-specifications 'ResourceType="network-insights-access-scope",
    Tags=[{Key="Name",Value="detect-public-webservers"},{Key="Description",
    		   Value="Detects publicly accessible web servers that can be accessed without using a load balancer."}]' 
    --region us-east-1


Now that you’ve created the scopes, you will analyze them to find resources that match your match conditions.

To analyze your scopes (console)

  1. Open the Amazon VPC console.
  2. In the navigation pane, under Network Analysis, choose Network Access Analyzer.
  3. Under Network Access Scopes, select the checkboxes next to the scopes that you want to analyze, and then choose Analyze, as shown in Figure 2.
    Figure 2: Custom network scopes created for Network Access Analyzer

    Figure 2: Custom network scopes created for Network Access Analyzer

If Network Access Analyzer detects findings, the console indicates the status Findings detected for each scope, as shown in Figure 3.

Figure 3: Network Access Analyzer scope status

Figure 3: Network Access Analyzer scope status

To review findings for a scope (console)

  1. On the Network Access Scopes page, under Network Access Scope ID, select the link for the scope that has the findings that you want to review. This opens the latest analysis, with the option to review past analyses, as shown in Figure 4.
    Figure 4: Finding summary identifying Amazon Aurora instance with public access to port 3306

    Figure 4: Finding summary identifying Amazon Aurora instance with public access to port 3306

  2. To review the path for a specific finding, under Findings, select the radio button to the left of the finding, as shown in Figure 4. Figure 5 shows an example of a path for a finding.
    Figure 5: Finding details showing access to the Amazon Aurora instance from the internet gateway to the elastic network interface, allowed by a network ACL and security group.

    Figure 5: Finding details showing access to the Amazon Aurora instance from the internet gateway to the elastic network interface, allowed by a network ACL and security group.

  3. Choose any resource in the path for detailed information, as shown in Figure 6.
    Figure 6: Resource detail within a finding outlining a specific security group allowing access on port 3306

    Figure 6: Resource detail within a finding outlining a specific security group allowing access on port 3306

How to remediate findings

After deploying network scopes and reviewing findings for publicly accessible resources, you should next limit access to those resources and remove public access. Use cases vary, but the scopes outlined in this post identify resources that you should share publicly in a more secure manner or remove public access entirely. The following techniques will help you align to the Protecting Networks portion of the AWS Well-Architected Framework Security Pillar.

If you have a need to share a database with external entities, consider using AWS PrivateLink, VPC peering, or use AWS Site-to-Site VPN to share access. You can remove public access by modifying the security group attached to the RDS instance or EC2 instance serving the database, but you should migrate the RDS database to a private subnet as well.

When creating web servers in EC2, you should not place web servers directly in a public subnet with security groups allowing HTTP and HTTPS ports from all internet addresses. Instead, you should place your EC2 instances in private subnets and use Application Load Balancers in a public subnet. From there, you can attach a security group that allows HTTP/HTTPS access from public internet addresses to your Application Load Balancer, and attach a security group that allows HTTP/HTTPS from your Load Balancer security group to your web server EC2 instances. You can also associate AWS WAF web ACLs to the load balancer to protect your web applications or APIs against common web exploits and bots that may affect availability, compromise security, or consume excessive resources.

Similarly, if you have OpenSearch/Elasticsearch running on EC2 or Amazon OpenSearch Service, or are using Amazon EMR, you can share these resources using PrivateLink. Use the Amazon EMR block public access configuration to verify that your EMR clusters are not shared publicly.

To connect to Remote Desktop on EC2 instances, you should use AWS Systems Manager to connect using Fleet Manager. Connecting with Fleet Manager only requires your Windows EC2 instances to be a managed node. When connecting using Fleet Manager, the security group requires no inbound ports, and the instance can be in a private subnet. For more information, see the Systems Manager prerequisites.

Conclusion

This blog post demonstrates how you can identify and remediate publicly accessible resources. Amazon VPC Network Access Analyzer helps you identify available network paths by using automated reasoning technology and user-defined access scopes. By using these scopes, you can define non-permitted network paths, identify resources that have those paths, and then take action to increase your security posture. To learn more about building continuous verification of network compliance at scale, see the blog post Continuous verification of network compliance using Amazon VPC Network Access Analyzer and AWS Security Hub. Take action today by deploying the Network Access Analyzer scopes in this post to evaluate your environment and add layers of security to best fit your needs.

 
If you have feedback about this post, submit comments in the Comments section below. If you have questions about this post, contact AWS Support.

Want more AWS Security news? Follow us on Twitter.

Author

Patrick Duffy

Patrick is a Solutions Architect in the Small Medium Business (SMB) segment at AWS. He is passionate about raising awareness and increasing security of AWS workloads. Outside work, he loves to travel and try new cuisines and enjoys a match in Magic Arena or Overwatch.

Peter Ticali

Peter Ticali

Peter is a Solutions Architect focused on helping Media & Entertainment customers transform and innovate. With over three decades of professional experience, he’s had the opportunity to contribute to architecture that stream live video to millions, including two Super Bowls, PPVs, and even a Royal Wedding. Previously he held Director, and CTO roles in the EdTech, advertising & public relations space. Additionally, he is a published photo journalist.

John Backes

John Backes

John is a Senior Applied Scientist in AWS Networking. He is passionate about applying Automated Reasoning to network verification and synthesis problems.

Vaibhav Katkade

Vaibhav Katkade

Vaibhav is a Senior Product Manager in the Amazon VPC team. He is interested in areas of network security and cloud networking operations. Outside of work, he enjoys cooking and the outdoors.

Happy 10th Anniversary, Amazon S3 Glacier – A Decade of Cold Storage in the Cloud

Post Syndicated from Channy Yun original https://aws.amazon.com/blogs/aws/happy-10th-anniversary-amazon-s3-glacier-a-decade-of-cold-storage-in-the-cloud/

Ten years ago, on August 20, 2012, AWS announced the general availability of Amazon Glacier, secure, reliable, and extremely low-cost storage designed for data archiving and backup. At the time, I was working as an AWS customer and it felt like an April Fools’ joke, offering long-term, secure, and durable cloud storage that allowed me to archive large amounts of data at a very low cost.

In Jeff’s original blog post for this launch, he noted that:

Glacier provides, at a cost as low as $0.01 (one US penny, one one-hundredth of a dollar) per Gigabyte per month, extremely low-cost archive storage. You can store a little bit, or you can store a lot (terabytes, petabytes, and beyond). There’s no upfront fee, and you pay only for the storage that you use. You don’t have to worry about capacity planning, and you will never run out of storage space.

Ten years later, Amazon S3 Glacier has evolved to be the best place in the world for you to store your archive data. The Amazon S3 Glacier storage classes are purpose-built for data archiving, providing you with the highest performance, most retrieval flexibility, and the lowest cost archive storage in the cloud.

You can now choose from three archive storage classes optimized for different access patterns and storage duration – Amazon S3 Glacier Instant Retrieval, Amazon S3 Glacier Flexible Retrieval (formerly Amazon S3 Glacier), and Amazon S3 Glacier Deep Archive. We’ll dive into each of these storage classes in a bit.

A Decade of Innovation in Amazon S3 Glacier
To understand how we got here, we’ll walk through through the last decade and revisit some of the most significant Amazon S3 Glacier launches that fundamentally changed archive storage forever:

August 2012 – Amazon Glacier: Archival Storage for One Penny per GB per Month
We launched Amazon Glacier to store any amount of data with high durability at a cost that allows you to get rid of your tape libraries and all the operational complexity and overhead that have been part of data archiving for decades. Amazon Glacier was modeled on S3’s durability and dependability but designed and built from the ground up to offer an archival storage to you at an extremely low cost. At that time, Glacier introduced the concept of a “vault” for storing archival data. You could then easily retrieve your archival data by initiating a request and then the data was made available to you for download in 3–5 hours.

November 2012 – Archiving Amazon S3 Data to Glacier
While Glacier was purpose-built from the ground up for archival data, many customers had object data that originated in S3 warmer storage that they would eventually want to move to colder storage. To make that easy for customers, Amazon S3’s Lifecycle Management (aka Lifecycle Rule) integrated S3 and Glacier and made the details visible via the storage class of each object. Lifecycle Management allows you to define time-based rules that can start Transition (changing S3 storage class to Glacier) and Expiration (deletion of objects). In 2014, we combined the flexibility of S3 versioned objects with Glacier, helping you to further reduce your overall storage costs.

November 2016 – Glacier Price Reductions and Additional Retrieval Options for Glacier
As part of AWS’s long-term focus on reducing costs and passing along those savings to customers, we reduced the price of Glacier storage to $0.004 (less than half a cent) in the case of 1 GB for 1 month in the US East (N. Virginia) Region, from $0.007 in 2015 and $0.010 in 2012. With storing data at a very low cost but having flexibility in how quickly they can retrieve the data, we introduced two more options for data retrieval that were based on the amount of data that you stored in Glacier and the rate at which you retrieved it. You could select expedited retrieval (typically taking 1–5 minutes), bulk retrieval (5–12 hours), or the existing standard retrieval method (3–5 hours).

November 2018 – Amazon S3 Glacier Storage Class to Integrate S3 Experiences
Glacier customers appreciated the way they could easily move data from S3 to Glacier via S3 lifecycle management, and wanted us to expand on that capability to use the most common S3 APIs to operate directly on S3 Glacier objects. So, we added S3 PUT API to S3 Glacier, which enables you to use the standard S3 PUT API and select any storage class, including S3 Glacier, to store the data. Data can be stored directly in S3 Glacier, eliminating the need to upload to S3 Standard and immediately transition to S3 Glacier with a zero-day lifecycle policy. So, you could PUT to S3 Glacier like any other S3 storage class.

March 2019 – Amazon S3 Glacier Deep Archive – the Lowest Cost Storage in the Cloud
While the original Glacier service offered an extremely low price for archival storage, we challenged ourselves to see if we could find a way to invent an even lower priced storage offering for very cold data. The Amazon S3 Glacier Deep Archive storage class delivers the lowest cost storage, up to 75 percent lower cost (than S3 Glacier Flexible Retrieval), for long-lived archive data that is accessed less than once per year and is retrieved asynchronously. At just $0.00099 per GB-month (or $1 per TB-month), S3 Glacier Deep Archive offers the lowest cost storage in the cloud at prices significantly lower than storing and maintaining data in on-premises tape or archiving data off-site.

November 2020 – Amazon S3 Intelligent-Tiering adds Archive Access and Deep Archive Access tiers
In November 2018, we launched Amazon S3 Intelligent-Tiering, the only cloud storage class that delivers automatic storage cost savings, up to 95 percent when data access patterns change, without performance impact or operational overhead. In order to offer customers the simplicity and flexibility of S3 Intelligent-Tiering and the low storage cost of archival data, we added the Archive Access tier providing the same performance and pricing as the S3 Glacier storage class as well as the Deep Archive Access tier which offers the same performance and pricing as the S3 Glacier Deep Archive storage class.

November 2021 – Amazon S3 Glacier Flexible Retrieval and S3 Glacier Instant Retrieval
The Amazon S3 Glacier storage class was renamed to Amazon S3 Glacier Flexible Retrieval and now includes free bulk retrievals along with an additional 10 percent price reduction across all Regions, making it optimized for use cases such as backup and disaster recovery.

Additionally, customers asked us for a storage solution that had the low costs of Glacier but allowed for fast access when data was needed very quickly. So, we introduced Amazon S3 Glacier Instant Retrieval, a new archive storage class that delivers the lowest cost storage for long-lived data that is rarely accessed and requires milliseconds retrieval. You can save up to 68 percent on storage costs compared to using the S3 Standard-Infrequent Access (S3 Standard-IA) storage class when your data is accessed once per quarter.

The Amazon S3 Intelligent-Tiering storage class also recently added a new Archive Instant Access tier, providing the same performance and pricing as the S3 Glacier Instant Retrieval storage class which delivers automatic 68% cost savings for customers using S3 Intelligent-Tiering with long-lived data.

Then and Now
Customers across all industries and verticals use the S3 Glacier storage classes for every imaginable archival workload. Accessing and using the S3 Glacier storage classes through the S3 APIs and S3 console provides enhanced functionality for data management and cost optimization.

As we discussed above, you can now choose from three archive storage classes optimized for different access patterns and storage duration:

  • S3 Glacier Instant Retrieval – For archive data that needs immediate access, such as medical images, news media assets, or genomics data, choose the S3 Glacier Instant Retrieval storage class, an archive storage class that delivers the lowest cost storage with milliseconds retrieval.
  • S3 Glacier Flexible Retrieval – For archive data that does not require immediate access but needs to have the flexibility to retrieve large sets of data at no cost, such as backup or disaster recovery use cases, choose the S3 Glacier Flexible Retrieval storage class, with retrieval in minutes or free bulk retrievals in 12 hours.
  • S3 Glacier Deep Archive – For retaining data for 7–10 years or longer to meet customer needs and regulatory compliance requirements, such as financial services, healthcare, media and entertainment, and public sector, choose the S3 Glacier Deep Archive storage class, the lowest cost storage in the cloud with data retrieval within 12–48 hours.

Watch a brief introduction video for an overview of the S3 Glacier storage classes.

All S3 Glacier storage classes are designed for 99.999999999% (11 9s) of durability for objects. Data is redundantly stored across three or more Availability Zones that are physically separated within an AWS Region. Here are some comparisons across the S3 Glacier storage classes at a glance:

Performances S3 Glacier
Instant Retrieval
S3 Glacier
Flexible Retrieval
S3 Glacier
Deep Archive
Availability 99.9% 99.99% 99.99%
Availability SLA 99% 99.9% 99.9%
Minimum capacity charge per object 128 KB 40 KB 40 KB
Minimum storage duration charge 90 days 90 days 180 days
Retrieval charge per GB per GB per GB
Retrieval time milliseconds Expedited (1–5 minutes),
Standard (3–5 hours),
Bulk (5–12 hours) free
Standard (within 12 hours),
Bulk (within 48 hours)

For data with changing access patterns that you want to automatically archive based on the last access of that data, choose the S3 Intelligent-Tiering storage class. Doing so will optimize storage costs by automatically moving data to the most cost-effective access tier when access patterns change. Its Archive Instant Access, Archive Access, and Deep Archive Access tiers have the same performance as S3 Glacier Instant Retrieval, S3 Glacier Flexible Retrieval, and S3 Glacier Deep Archive respectively. To learn more, see the blog post Automatically archive and restore data with Amazon S3 Intelligent-Tiering.

To get started with S3 Glacier, see the blog post Best practices for archiving large datasets with AWS for key considerations and actions when planning your cold data storage patterns. You can also use a hands-on lab tutorial that will help you get started with the S3 Glacier storage classes in just 20 minutes, and start archiving your data in the S3 Glacier storage classes in the S3 console.

Happy Birthday, Amazon S3 Glacier!
During the last AWS Storage Day 2022, Kevin Miller, VP & GM of Amazon S3, mentioned the 10th anniversary of S3 Glacier and its pace of innovation for many customer use cases throughout his interview with theCUBE.

In this expanding world of data growth, you have to have an archiving strategy. Everyone has archival data — every company, every vertical, and every industry. There is an archiving need not only for companies that have been around for a while but also for digital native businesses.

Lots of AWS customers such as Nasdaq, Electronic Arts, and NASCAR have used S3 Glacier storage classes for their backup and archiving workloads. The following are some additional recent customer-authored blogs focusing on AWS archiving best practices from customers in the financial, media, gaming, and software industries.

A big thank you to all of our S3 Glacier customers from around the world! Over 90 percent of S3’s roadmap has come directly from feedback from customers like you. We will never stop listening to you, as your feedback and ideas are essential to how we improve the service. Thank you for trusting us and for constantly raising the bar and pushing us to improve to lower costs, simplify your storage, increase your agility, and allow you to innovate faster.

In accordance with Customer Obsession, one of the Amazon Leadership Principles, your feedback is always welcome! If you want to see new S3 Glacier features and capabilities, please send any feedback to AWS re:Post for S3 Glacier or through your usual AWS Support contacts.

– Channy

[$] LRU-list manipulation with DAMON

Post Syndicated from original https://lwn.net/Articles/905370/

The DAMON
subsystem, which entered the
kernel during the 5.15 release cycle, uses various heuristics to determine
which pages of memory are in active use. Since the beginning, the intent
has been to use this information to influence memory management. The 6.0
kernel contains another step in this direction, giving DAMON the ability to
actively reorder pages on the kernel’s least-recently-used (LRU) lists.

Network Access for Sale: Protect Your Organization Against This Growing Threat

Post Syndicated from Jeremy Makowski original https://blog.rapid7.com/2022/08/22/network-access-for-sale-protect-your-organization-against-this-growing-threat/

Network Access for Sale: Protect Your Organization Against This Growing Threat

Vulnerable network access points are a potential gold mine for threat actors who, once inside, can exploit them persistently. Many cybercriminals are not only interested in obtaining personal information but also seek corporate information that could be sold to the highest bidder.

Infiltrating corporate networks

To infiltrate corporate networks, threat actors typically use several techniques, including:

Social engineering and phishing attacks

Threat actors collect email addresses, phone numbers, and information shared on social media platforms to target key people within an organization using phishing campaigns to collect credentials. Moreover, many threat actors managed to find the details of potential victims via leaked databases posted on dark web forums.

Malware infection and remote access

Another technique used by threat actors to gain access to corporate networks is malware infection. This technique consists of spreading malware, such as trojans, through a network of botnets to infect thousands of computers around the world.

Once infected, a computer can be remotely controlled to gain full access to the company network that it is connected to. It is not rare to find threat actors with botnets on hacking forums looking for partnerships to target companies.

Network Access for Sale: Protect Your Organization Against This Growing Threat

Network and system vulnerabilities

Some threat actors will prefer to take advantage of vulnerabilities within networks or systems rather than developing offensive cyber tools or using social engineering techniques. The vulnerabilities exploited are usually related to:

  • Outdated or unpatched software that exposes systems and networks
  • Misconfigured operating systems or firewalls allowing default policies to be enabled
  • Ports that are open by default on servers
  • Poor network segmentation with unsecured interconnections

Selling network access on underground forums and markets

Since gaining access to corporate networks can take a lot of effort, some cybercriminals prefer to simply buy access to networks that have already been compromised or information that was extracted from them. As a result, it has become common for cybercriminals to sell access to corporate networks on cybercrime forms.

Usually, the types of access that are sold on underground hacking forums are SSH, cPanels, RDP, RCE, SH, Citrix, SMTP, and FTP. The price of network access is usually based on a few criteria, such as the size and revenue of the company, as well as the number of devices connected to the network. It usually goes from a few hundred dollars to a couple thousand dollars. Companies in all industries and sectors have been impacted.

Network Access for Sale: Protect Your Organization Against This Growing Threat

Network Access for Sale: Protect Your Organization Against This Growing Threat

For these reasons, it is increasingly important for organizations to have visibility into external threats. Threat intelligence solutions can deliver 360-degree visibility of what is happening on forums, markets, encrypted messaging applications, and other deep and darknet platforms where many cybercriminals operate tirelessly.

In order to protect your internal assets, ensure the following measures exist within the company and are implemented correctly.

  • Keep all systems and network updated.
  • Implement a network and systems access control solution.
  • Implement a two-factor authentication solution.
  • Use an encrypted VPN.
  • Perform network segmentation with security interfaces between networks.
  • Perform periodic internal security audit.
  • Use a threat intelligence solution to keep updated on external threats.

Additional reading:

NEVER MISS A BLOG

Get the latest stories, expertise, and news about security today.

Security updates for Monday

Post Syndicated from original https://lwn.net/Articles/905590/

Security updates have been issued by Debian (jetty9 and kicad), Fedora (community-mysql and trafficserver), Gentoo (chromium, gettext, tomcat, and vim), Mageia (apache-mod_wsgi, libitrpc, libxml2, teeworlds, wavpack, and webkit2), Red Hat (podman), Slackware (vim), SUSE (java-1_8_0-openjdk, nodejs10, open-iscsi, rsync, and trivy), and Ubuntu (exim4).

Hyundai Uses Example Keys for Encryption System

Post Syndicated from Bruce Schneier original https://www.schneier.com/blog/archives/2022/08/hyundai-uses-example-keys-for-encryption-system.html

This is a dumb crypto mistake I had not previously encountered:

A developer says it was possible to run their own software on the car infotainment hardware after discovering the vehicle’s manufacturer had secured its system using keys that were not only publicly known but had been lifted from programming examples.

[…]

“Turns out the [AES] encryption key in that script is the first AES 128-bit CBC example key listed in the NIST document SP800-38A [PDF]”.

[…]

Luck held out, in a way. “Greenluigi1” found within the firmware image the RSA public key used by the updater, and searched online for a portion of that key. The search results pointed to a common public key that shows up in online tutorials like “RSA Encryption & Decryption Example with OpenSSL in C.

EDITED TO ADD (8/23): Slashdot post.

The collective thoughts of the interwebz

By continuing to use the site, you agree to the use of cookies. more information

The cookie settings on this website are set to "allow cookies" to give you the best browsing experience possible. If you continue to use this website without changing your cookie settings or you click "Accept" below then you are consenting to this.

Close