Сирия винаги е оставала някак си „незабелязана“ на фона на останалата част от Близкия изток, като причините за това са много. Най-очевидната от тях е навикът на Великите сили да използват страната като буфер за военните си авантюри през десетилетията, още от времето на древните империи до наши дни. Това е и причината, поради която Сирия е толкова „желана“ от всеки завоевател, който разбира геостратегическото ѝ значение – на юг тя е вход към едни от най-плодородните земи в Близкия изток, а контролът над пристанището ѝ дава възможност и на най-слабия флот да получи директен достъп до Средиземно море. Въпреки древната си история и хилядолетното съжителство на много култури на територията ѝ, страната така и не успява да изгради самостоятелна политическа идентичност, а независимостта ѝ става факт едва след края на Втората световна война, когато арабските държави в региона се превръщат в една от многото арени на сблъсък между САЩ и СССР.
Модерната сирийска държавност и външна политика
Когато Сирия става най-сетне част от ООН през 1945 г., тя все още няма свой покровител сред суперсилите и след кратковремения си политически флирт с Египет тръгва по трудния път на независимостта си. Политическата система на младата нация е сложен компромис от присъствието на мюсюлмани, християни и друзи. Пръв СССР проявява интерес към Сирия, възприемайки я като отправна точка за своя нов политически експеримент – панарабизмът. Това е идеология, която призовава за обединението на всички арабски народи в Близкия изток под знака на социализма в една славна арабска нация, която да се противопостави на американското влияние в региона и на най-близкия съюзник на САЩ – Израел.
Парадоксално, панарабизмът за кратко време се радва на подкрепа дори и от страна на президента Айзенхауер, който вижда в него възможност за частично овладяване на конфликта между Израел и останалите арабски държави. Уви, мечтите на Москва и Вашингтон рухват през 60-те години, когато панарабизмът е в упадък, а апетитите към Сирия са откраднати от Египет, който става първата арабска държава, осмелила се да започне мирен диалог с Израел.
Провалът на панарабизма води до рязко увеличаване на влиянието на движения като „Мюсюлмански братя“, които се стремят към възстановяване на халифата от времето на Османската империя и към пълна ревизия на исляма. Последното е много важно, защото то включва приемане на тълкуванието на някои влиятелни египетски шейхове, виждащи джихада като шести стълб на исляма, а т.нар. „голям джихад“ (ал-джихад ал-акбар) се схваща като неотменимо свързан с „малкия джихад“ (ал-джихад ал-асгар) – свещената война, и като религиозно задължение (фарида), върху което се поставя изключителен акцент.
Тези идеи стават особено популярни сред мюсюлманите в Сирия, но не успяват да спечелят политическа подкрепа в региона в условията на двуполюсна геополитическа надпревара, доминирана от ядрените оръжия и опитите на САЩ и СССР да избегнат Трета световна война. Малко след като планът на Москва да създаде „арабска Югославия“ рухва, остатъците от него дават възможност на партията „Баас“ да установи династична социалистическа диктатура в Сирия, което донякъде тушира набиращия сила политически ислям.
Парадоксалното е, че съществуването на Сирия идеално устройва и САЩ, и СССР, тъй като, въпреки социалистическата формула на властта, династията на Асад няма намерение да разработва ядрено оръжие. Нещо повече, революцията в Иран и заявките на ислямската република, че ще се бори да получи ядрен арсенал, далеч надхвърлят политическите амбиции на сирийците, които се оказват един малък детайл в геополитическата мозайка на региона. На фона на Иран, Афганистан и Ирак, Сирия и Египет попадат в графата на „стабилните държави“, които Москва и Вашингтон могат да използват като балансьори при прокарването на своите геополитически интереси в Близкия изток. А самата династия Асад, от друга страна, няма как да толерира сунитските терористични групировки, защото, за разлика от мнозинството сирийски мюсюлмани, младият Башар Асад и неговото семейство са алавити.
Разривът между Сирия и „големите“
След края на Студената война Сирия тръгва в посока, която все повече започва да я конфронтира с интересите на САЩ в региона. Разпадът на СССР слага край на всяка надежда за възраждане на панарабистката идеология, а терористичните атентати от 11 септември 2001 г. поставят страната пред дилемата дали да подкрепи американския президент Джордж Буш-младши в кръстоносния му поход срещу „Ал-Кайда“. Сложността на този избор се обуславя и от факта, че Сирия е най-дълго присъстващият член в списъка на Държавния департамент на САЩ с държави спонсори на тероризма, тъй като американското правителство от Ислямската революция в Иран насам винаги е приемало Дамаск като сухопътен коридор, по който Техеран доставя оръжия за терористичните мрежи в региона. Тези опасения на САЩ не са безпочвени, защото за доста дълго време алавитският елит в Сирия намира своя естествен съюзник в шиитското русло на аятоласите. В опита си да спаси режима си през 2003–2004 г. Асад сътрудничи последователно на САЩ да разследват ядрата на „Ал-Кайда“ на сирийска територия. В замяна републиканците решават да си затворят очите за нарастващото неодобрение срещу сирийското управление.
Тук е мястото да кажем няколко думи за самата фигура на Башар Асад. Предвид неговото образование и ценз, той определено може да бъде причислен към едни от най-образованите политици в Близкия изток. Ловките му политически маневри и светският му маниер успяват да превърнат Сирия в централизирана политически държава, където политическият ислям не успява да пусне дълбоки корени. Как тогава следва да окачествим управлението му – като диктатура или като някакъв особен тип идеология на Третия свят, която се бори за оцеляване? Отговорът е недвусмислен: Башар Асад се превърна в диктатор и терорист тогава, когато нареди употребата на химическо оръжие срещу собственото си население. Кошмарът продължи цели седем години и беше мълчаливо подминат от много страни членки на Европейския съюз, които виждаха в сирийските бежанци евтина работна ръка. Именно поради тази причина САЩ, Великобритания и Франция не успяха да съберат мнозинство за втора коалиция на желаещите, която да свали Асад още когато той започна репресиите срещу сирийците.
Още големи грешки Башар Асад допусна в края на своето управление. Една от тях беше да се довери на Русия, която му обеща подкрепа срещу ограничено военно присъствие в Сирия. Този крехък баланс можеше да бъде поддържан до момента, в който „Хамас“ не взе решение да удари Израел на 7 октомври. Тук Асад направи и друга грешка – той се довери на Иран и аятоласите, смятайки, че те ще се застъпят за него и ще влязат във война с Израел. По това време недоволството срещу режима на Асад вече достигаше рекордни нива, а израелският премиер Бенямин Нетаняху на няколко пъти предупреди, че едно от условията за траен мир в Близкия изток е пълната демилитаризация на Южна Сирия. Падането на Асад се оказа неизбежно и от любимец на сирийския народ и приемлив за САЩ „светски“ диктатор той се превърна във военнопрестъпник. Съвсем отделен е въпросът, че най-голяма роля за края на режима изигра религиозният кливидж в Сирия между богатото алавитско малцинство начело с Асад и мнозинството бедни сунити в страната, които станаха жертва на политическите амбиции на своя лидер.
„Нова“ Сирия на кръстопът
Когато един диктаторски режим си отиде, логично възниква въпросът защо беше всичко и сега накъде. Новините за Сирия отново не са оптимистични поради няколко основни причини. Първо, исторически факт е, че след Арабската пролет мнозинството от диктаторските режими в Близкия изток и Северна Африка бяха заменени с емирати и халифати. Такава беше съдбата на Либия и Ирак, а Египет остана единственото изключение от това правило заради военното управление на полковник Сиси.
Казано с други думи, бившите диктатури в Близкия изток не подлежат на демократизация и либерализация, защото гражданите им винаги разпознават шариата като алтернатива на диктаторите. Затова и не знаем дали сирийският сценарий няма да се повтори един ден и в Египет, когато властта на Сиси падне. Арабската пролет, с други думи, е един от най-грандиозните провали на Запада, тъй като днес по тези земи властва политическият ислям, а той е в пъти по-опасен от политическите амбиции на хора като Кадафи. Същевременно беше ясно, че не може да се разчита на диктаторите да уважават човешките права, защото и в тяхното съзнание те не значат нищо.
Оптимистичните сценарии за Сирия се свиват и поради факта, че южната ивица от територията ѝ включва земи, исторически принадлежащи на Израел. Лошото е, че точно тези обширни части от Сирия бяха използвани като коридор за иранските оръжия, с които се въоръжават „Хамас“ и „Хизбула“. В този смисъл, за да има траен мир по границата, е необходимо новият политически елит в Сирия да се договори с Израел за поддържането на ограничено военно присъствие в региона, което да отчита както историческите претенции на израелците, така и реалните геополитически възможности за разрешаването на териториалните спорове.
Но най-важно от всичко е да се дадат трайни гаранции на сирийците, че срещу тях няма да бъдат използвани химически оръжия (защото такива в Сирия все още има) и че новата власт, независимо от политическата си формула, няма да осъществява репресии над цивилното население. Единственият гарант за такова обещание може да бъде ООН, която обаче е изключително разделена по въпроса и очевидно не желание да се нагърби с разрешаването му.
Второто важно уточнение е, че за разлика от талибаните в Афганистан, новият лидер на Сирия Ахмад ал-Шараа и неговият най-близък съветник Абдулхамид ал-Ауак имат далеч по-светска биография. Ал-Ауак, който е и автор на новата сирийска Конституция, е преподавал дълги години конституционно право в Турция и е добре запознат със съдбата на Афганистан и Ирак, както и с грешките, които допуснаха Хамид Карзай и иракските управляващи след Саддам Хюсейн. И все пак тези факти не могат да бъдат стабилни аргументи в полза на твърдението, че сценариите от Афганистан и Ирак няма да се повторят в Сирия. В страната все още има американски войски, а бъдещето на руските бази е неясно.
Същевременно лоялистите на Асад лесно могат да се превърнат в нова версия на талибаните, проповядвайки, че страната е сменила една „благословия“ – руската, с друга – американската. Неясно е и бъдещето на отношенията с Иран – въпрос, който новото правителство в Сирия последователно пренебрегва с аргумента, че приоритет е стабилизацията на страната и премахването на всички остатъци от режима на Асад и че на този етап тези отношения ще се свеждат единствено до изискване на компенсации от Техеран за хаоса, създаден в Сирия. Опасността надеждите на сирийците да бъдат предадени за пореден път все още не е напълно отминала.
Вместо заключение: кой е големият победител?
Естественият печеливш от станалото в Сирия е Република Турция. Падането на алавитския режим и установяването на стабилно сунитско управление работи за интересите на Ердоган, който вижда в новата Сирия възможност да възстанови влиянието на Анкара по тези земи, загубено след разпада на Османската империя. Неоосманизмът като ключова променлива в доктрината на Ердоган до голяма степен е постигнал целите си на Балканите и сега предстои да се насочи към Близкия изток. Тук той неизбежно ще се сблъска с интересите на Израел, което може да стане причина за нова голяма криза в региона.
Дали Турция ще намери баланса между желанието за сбъдването на неоосманския идеал и отношенията с Израел, зависи от политическата воля на Ердоган, който може да стигне много далеч в амбициите си. Втората държава, която определено няма да е доволна от ставащото, е Кралство Саудитска Арабия, което неведнъж е спорило с Турция в рамките на организацията „Ислямска конференция“ за това кой е неформалният лидер в сунитския ислямски свят. Напрежението между Анкара и Рияд е реалност, която също не бива да се пренебрегва.
Сирийският народ, от друга страна, спечели много с падането на Асад, но не е големият победител в тази битка, защото все още не знаем кой ще влезе в ролята на талибаните – новото правителство или старите лоялисти на Асад. И в двата случая предстои дълъг период на стабилизация, който няма как да приключи без още кръвопролития. Липсата на ясен ангажимент от страна на САЩ или Русия, съчетана с мълчанието на ООН, не вещае скорошна стабилност за региона.
Не се знае и как ще реагира Иран – в един момент той може да реши просто да анексира част от сирийските територии, на което правителството няма как да се противопостави, особено ако иранската гвардия е подкрепяна от поддръжниците на Асад и „Хизбула“. Този сценарий, разбира се, е малко вероятен, докато на територията на страната има американски войски, но те няма да са там дългосрочно, тъй като не се знае в какво ще прерасне търговската война срещу Китай, поведена от администрацията на Тръмп.
В тези условия единственият надежден съюзник на Сирия остава Турция, и то докато Ердоган все още управлява. След като десетилетия наред страната е част от геополитическите проекти на СССР за панарабизъм и на САЩ за войната срещу терора, днес Дамаск вече е сегмент на турския неоосманизъм. Дали сирийското правителство ще се примири с тази роля, зависи от два фактора: доколко има възможността да се защитава и доколко може да балансира в отношенията си с Турция и Израел. Предвид ограничената му способност да изгради свой отбранителен потенциал, по всяка вероятност ще се наложи то да лавира между регионалните актьори в Близкия изток – тъжна реалност за сирийците, която сега ги връхлита за трети път.
For years, Cloudflare has helped organizations modernize their access to internal resources by delivering identity-aware access controls through our Zero Trust Network Access (ZTNA) service, Cloudflare Access. Our customers have accelerated their ZTNA implementations for web-based applications in particular, using our intuitive workflows for Access applications tied to public hostnames.
However, given our architecture design, we have primarily handled private network application access (applications tied to private IP addresses or hostnames) through the network firewall component of our Secure Web Gateway (SWG) service, Cloudflare Gateway. We provided a small wrapper from Access to connect the two experiences. While this implementation technically got the job done, there were some clear downsides, and our customers have frequently cited the inconsistency.
Today, we are thrilled to announce that we have redesigned the self-hosted private application administrative experience within Access to match the experience for web-based apps on public hostnames. We are introducing support for private hostname and IP address-defined applications directly within Access, as well as reusable access policies. Together, these updates make ZTNA even easier for our customers to deploy and streamline ongoing policy management.
A private application in this context, is any application that is only accessible through a private IP address or hostname.
Private IP addresses
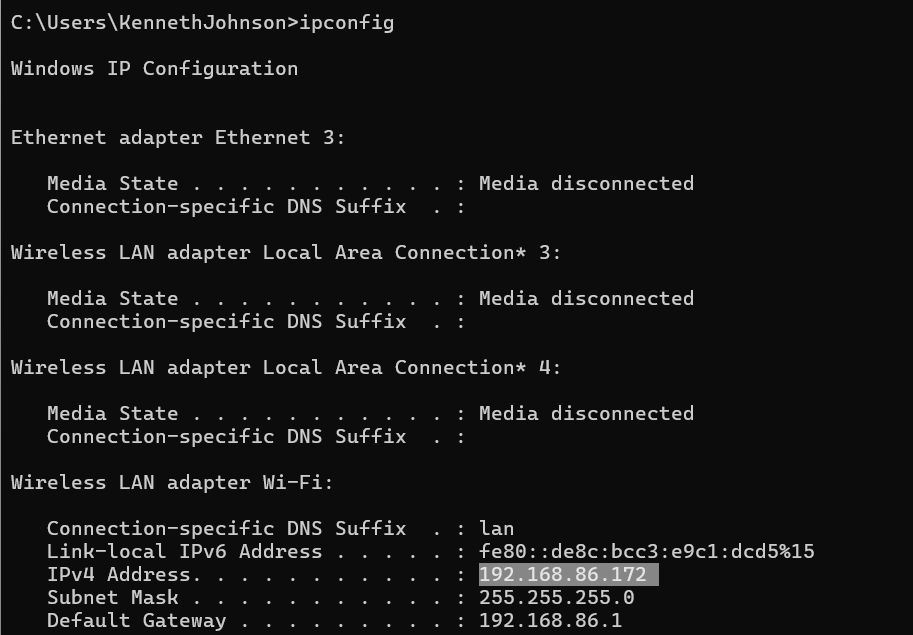
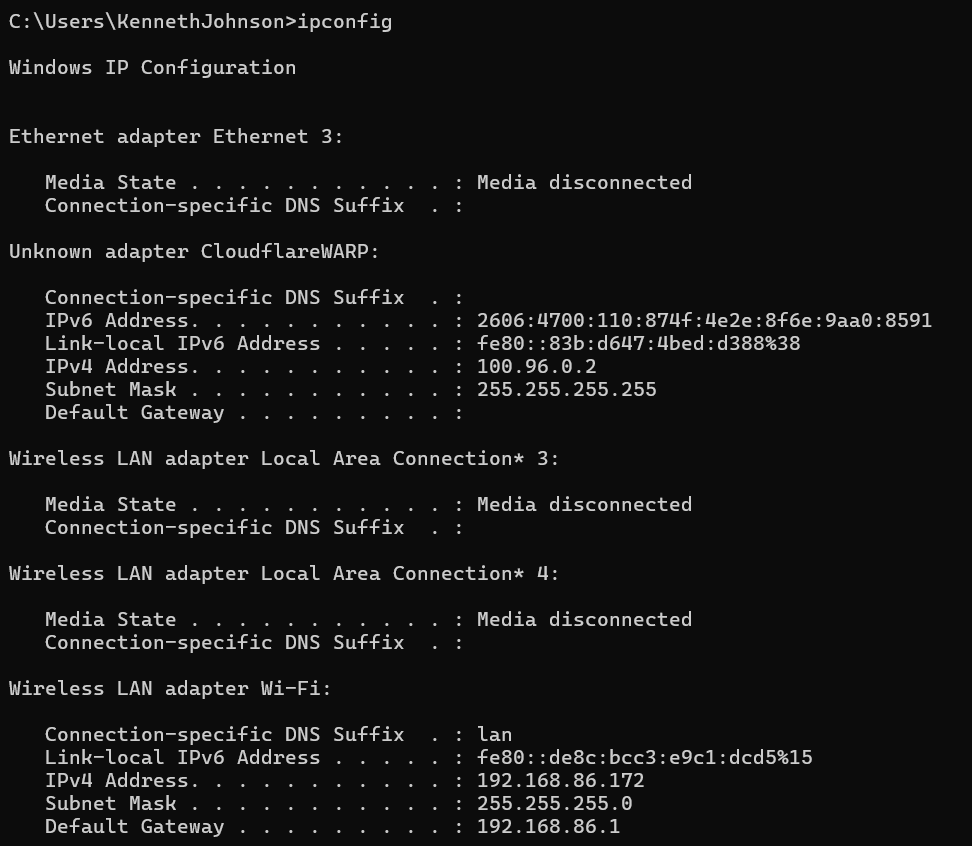
Private IP addresses, often referred to as RFC 1918 IP addresses, are scoped to a specific network and can only be reached by users on that network. While public IP addresses must be unique across the entire Internet, private IP addresses can be reused across networks. Any device or virtual machine will have a private IP address. For example, if I run ipconfig on my own Windows machine, I can see an address of 192.168.86.172.
This is the address that any other machine on my own network can use to reference and communicate with this specific machine. Private IP addresses are useful for applications and ephemeral infrastructure (systems that spin up and down dynamically) because they can be reused and only have to be unique within their specific network. This is much easier to manage than issuing a public IPv4 address to resources – we’ve actually run out of available public IPv4 address space!
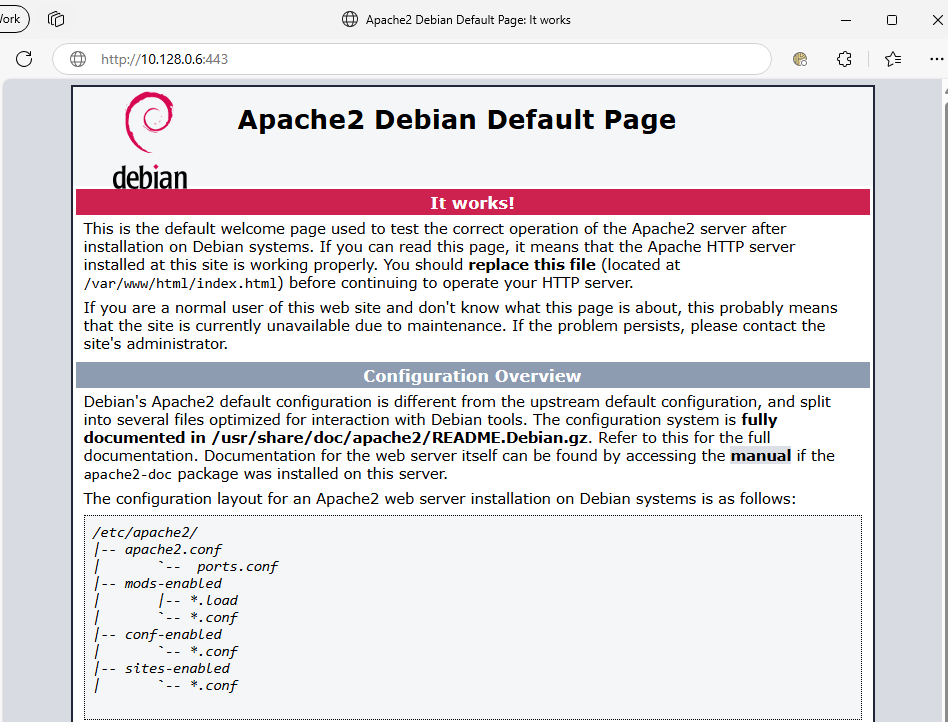
In order to host an application on a machine in my network, I need to make that application available to other machines in the network. Typically, this is done by assigning the application to a specific port. A request to that application might then look something like this: http://10.128.0.6:443 which in plain English is saying “Using the hypertext transfer protocol, reach out to the machine at an address of 10.128.0.6 in my network, and connect to port 443.” Connecting to an application can be done in a browser, over SSH, over RDP, through a thick client application, or many other methods of accessing a resource over an IP address.
In this case, we have an Apache2 example web server, running at that address and port combination.
If I attempt to access this IP address outside of the same network as this machine running the web server, then I will either get no result, or a completely different application, if I have something else running on that IP address/port combination in that other network.
Private hostnames
We don’t want to remember 10.128.0.6 every time we want to access this application. Just like the Internet, we can use DNS in our private network. While public DNS serves as the phone book for the entire Internet, private DNS is more like a school directory that is only valid for phone numbers within the campus.
For a private application, I can configure a DNS record, very similar to how I might expose a public website to the world. But instead, I will map my DNS record to a private IP address that is only accessible within my own network. Additionally, private DNS does not require registering a domain with a registrar or adhering to defined top level domains. I can host an application on application.mycompany, and it is a valid internal DNS record.
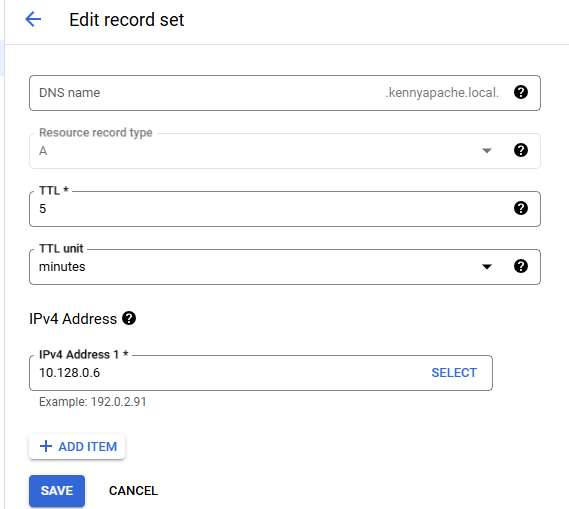
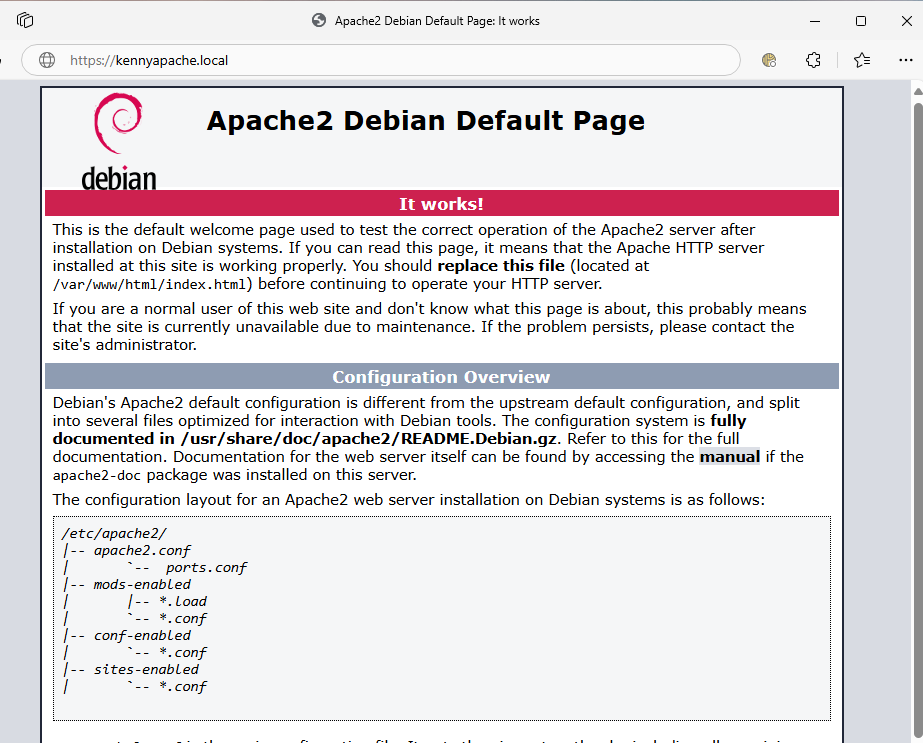
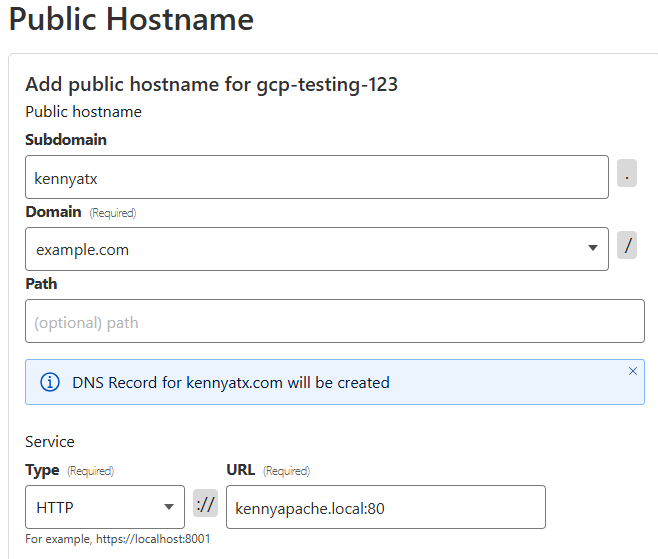
In this example, I am running my web server on Google Cloud and will call the application kennyapache.local. In my local DNS, kennyapache.local has an A record mapping it to an IPv4 address within my private network on Google Cloud (GCP).
This means that any machine within my network can use https://kennyapache.local instead of having to remember the explicit IP address.
Accessing private applications outside the private network
Private networks require your machine, or virtual machine, to be connected directly to the same network as the target private IP address or hostname. This is a helpful property to keep unauthorized users from accessing applications, but presents a challenge if the application you want to use is outside your local network.
Virtual Private Networks (VPNs), forward proxies, and proxy protocols (aka “PAC files”) are all methods to enable a machine outside your private network to reach a private IP address/hostname within the private network. These tools work by adding an additional network interface to the machine and specifying that certain requests need to be routed through a remote private network, not the local network the machine is currently connected to, or out to the public Internet.
When I connect my machine to a forward proxy, in this case Cloudflare’s device client, WARP, and run ipconfig I can see a new network interface and IP address added to the list:
This additional network interface will take control of specific network requests and route those to an external private network instead of the default behavior of my machine, which would be to route to that IP address on my own local network.
A look back: protecting private applications with Cloudflare Zero Trust before Access Private IP Address and Hostname support
We will continue to use our Apache2 server hosted on a GCP private domain as an example private application. We will briefly touch on how Cloudflare Zero Trust was previously used to protect private applications and why this new feature is a huge step forward. Cloudflare Zero Trust has two primary components used to protect application traffic: Cloudflare Access and Gateway.
Cloudflare Access
Cloudflare Access is designed to protect internal applications and resources without the need for a traditional VPN. Access allows organizations to authenticate and authorize users through identity providers — such as Okta, Azure AD, or Google Workspace — before granting them entry to internal systems or web-based applications.
Until now, Access required that an application had to be defined using a public DNS record. This means that a user had to expose their application to the Internet in order to leverage Access and use all of its granular security features. This isn’t quite as scary as it sounds, because Access allows you to enforce strong user, device, and network security controls. In fact, NIST and many other major security organizations support this model.
In practice, an administrator would map their internal IP address or hostname to a public URL using our app connector, Cloudflare Tunnel.
Then, the administrator would create an Access application corresponding to that public URL. Cloudflare then sends a user through a single sign-on flow for any request made to that application.
However, this approach does not work for organizations that have strict requirements to never expose an application over public DNS. Additionally, this does not work for applications outside the browser like SSH, RDP, FTP and other thick client applications, which are all options to connect to private applications.
If I tried to SSH to my Access-protected public hostname, I would get an error message with no way to authenticate, since there is no easy way to do a single sign-on through the browser in conjunction with SSH.
Access Private Network applications
Until now, because Access operated using public hostnames, we have handled private network access for our customers using the network firewall piece of Cloudflare Gateway. A few years ago, we launched Access Private Network applications, which automatically generate the required Gateway block policies. However, this was a limited approach that was ultimately just a wrapper in front of two Gateway policies.
Cloudflare Gateway
Cloudflare Gateway is a secure web gateway that protects users from threats on the public Internet by filtering and securing DNS and web traffic. Gateway acts as a protective layer between end users and online resources by enforcing security controls, like blocking malicious domains, restricting access to risky categories of sites, and preventing data exfiltration.
Gateway is also used to route user traffic into private networks and acts as a forward proxy. It allows customers to create policies for private IP addresses and hostnames. This is because Gateway relies on traffic being proxied from the user’s machine to the Gateway service itself. This is most commonly done with the Cloudflare WARP client. WARP enables the configuration of which IP addresses and hostnames to send to Gateway for filtering and routing.
Once connected to a private network, through Gateway, a user can directly connect to private IP addresses and hostnames that are configured for that network.
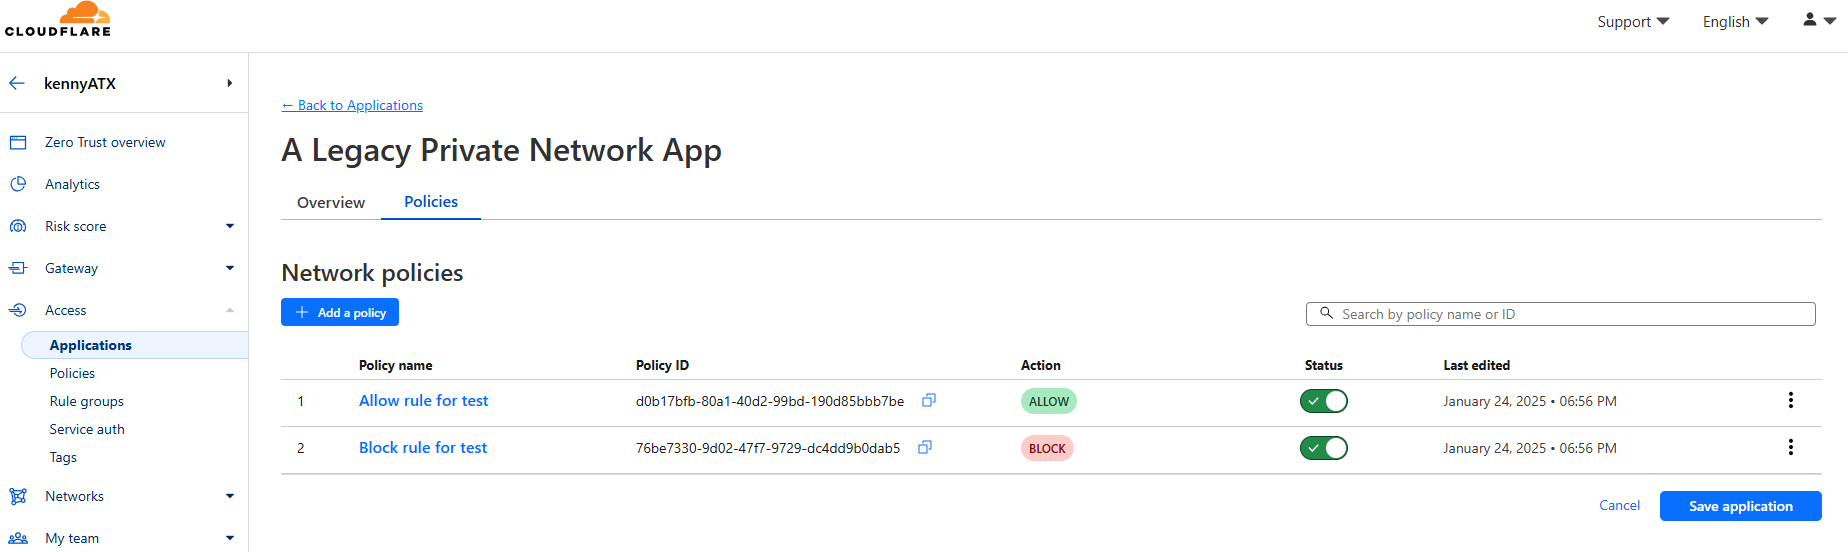
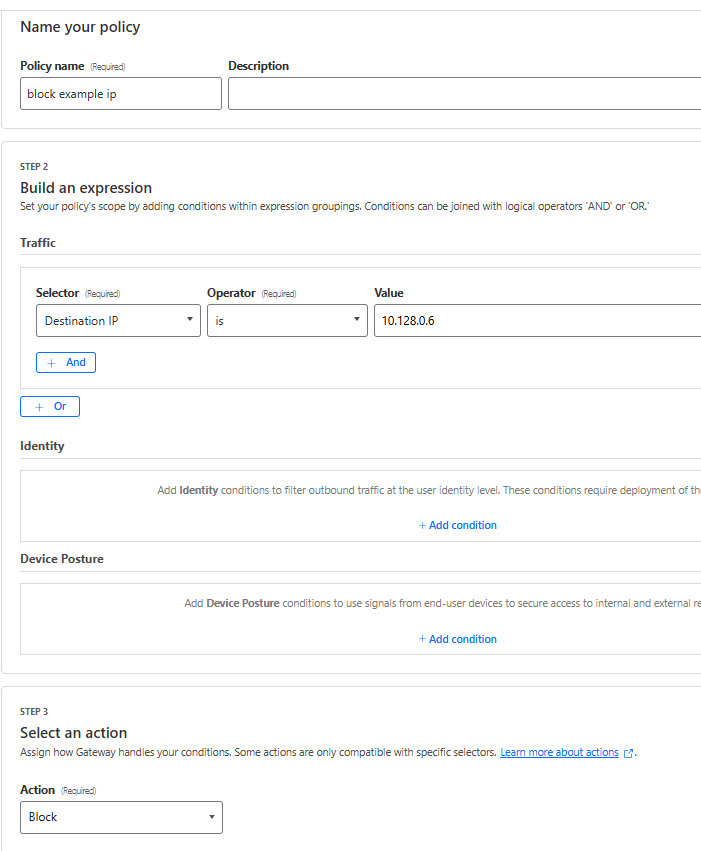
I can then configure specific network firewall policies to allow or block traffic destined to private IP addresses.
Great! Looks like we’ve solved protecting private applications using Gateway. Not quite, unfortunately, as there are a few components of Gateway that are not an ideal model for an application-focused security model. While not discussed above, a few of the challenges we encountered when using Gateway for application access control included:
Private applications were mixed in with general Gateway network firewall rules, complicating configuration and maintenance
Defining and managing private applications was not possible in Terraform
Application access logs were buried in general network firewall logs (these logs can contain all Internet traffic for an organization!)
Enforcement within Gateway relied on specific WARP client sessions, which lacked granular identity details
Administrators couldn’t use Access Rule Groups or other Access features built specifically for managing application access controls
We knew we could do better.
A unified approach to application access
Knowing these limitations, we set out to extend Access to support any application, regardless of whether it is public or private. This principle guided our efforts to create a unified application definition in Cloudflare Access. Any self-hosted application, regardless of whether it is public or privately routable, should be defined in a single application type. The result is quite straightforward: Access Applications now support private IP addresses and hostnames.
However, the engineering work was not as simple as adding a private IP address and hostname option to Cloudflare Access. Given our platform’s architecture, Access does not have any way to route private requests by itself. We still have to rely on Gateway and the WARP client for that component.
An application-aware firewall
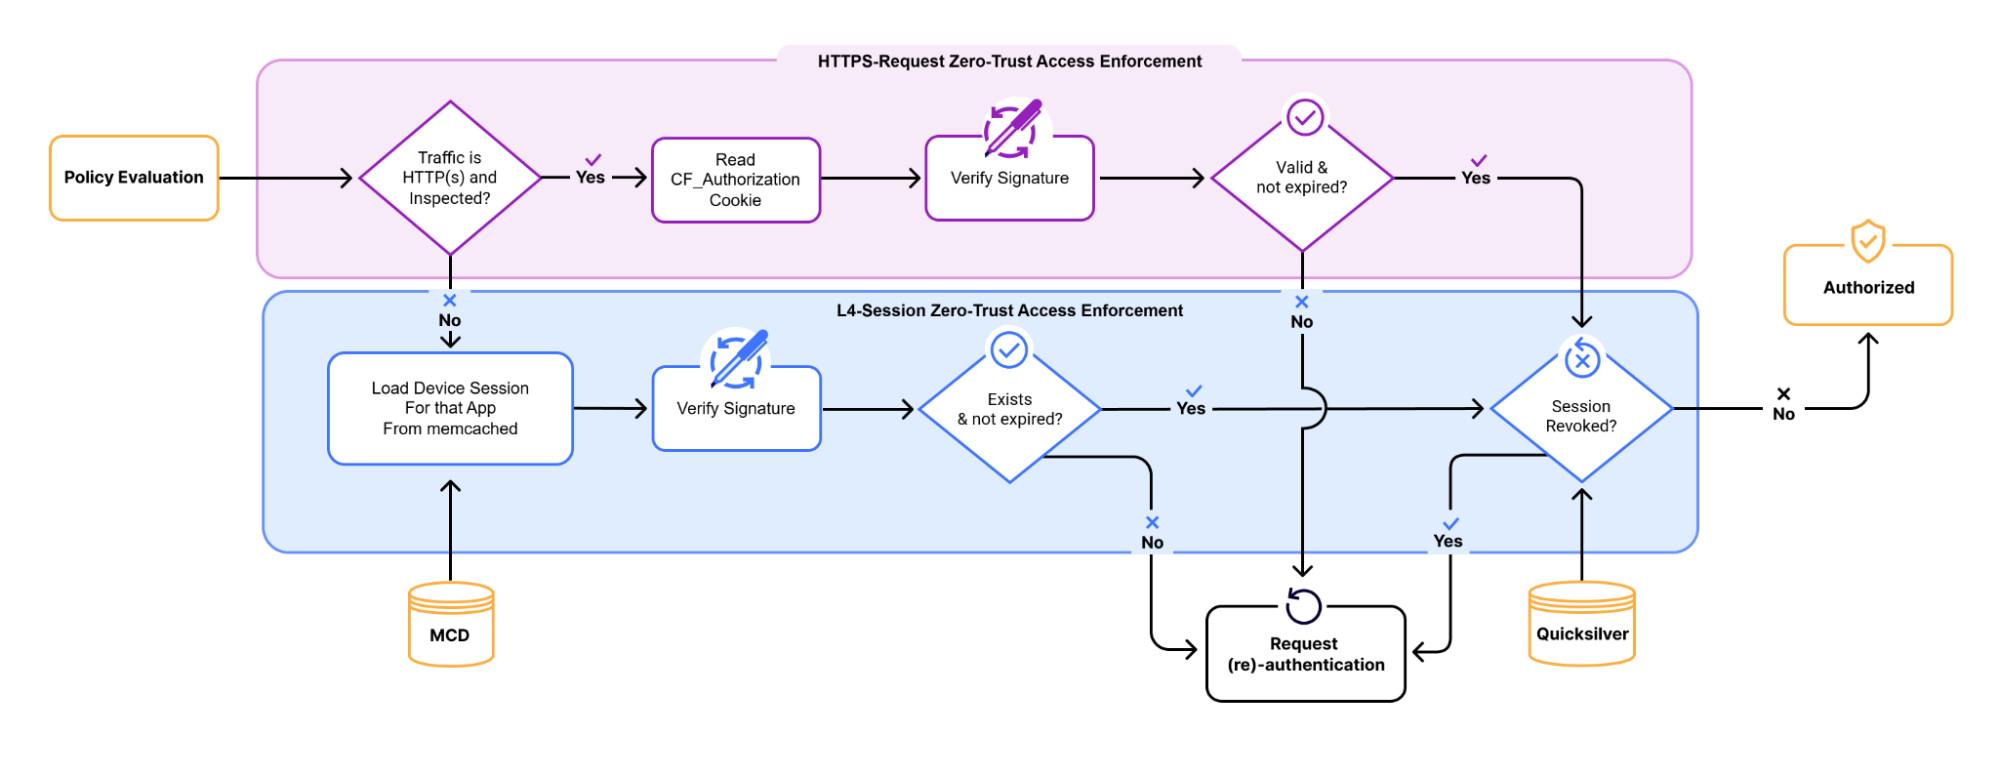
This meant that we needed to add an application-specific phase to Gateway’s firewall. The new phase detects whether a user’s traffic matches a defined application, and if so it sends the traffic to Access for authentication and authorization of a user and their session. This required extending Gateway’s network firewall to have knowledge of which private IP addresses and hostnames are defined as applications.
Thanks to this new firewall phase, now an administrator can configure exactly where they want their private applications to be evaluated in their overall network firewall.
Private application sessions
The other component we had to solve was per-application session management. In an Access public application, we issue a JSON Web Token (JWT) as a cookie which conveniently has an expiration associated. That acts as a session expiration. For private applications, we do not always have the ability to store a cookie. If the request is not over a browser, there is nowhere to put a cookie.
For browser-based private applications, we follow the exact same pattern as a public application and issue a JWT as a means to track the session. App administrators get the additional benefit of being able to do JWT validation for these apps as well. Non-browser based applications required adding a new per-application session to Gateway’s firewall. These application sessions are bound to a specific device and track the next time a user has to authenticate before accessing the application.
Access private applications
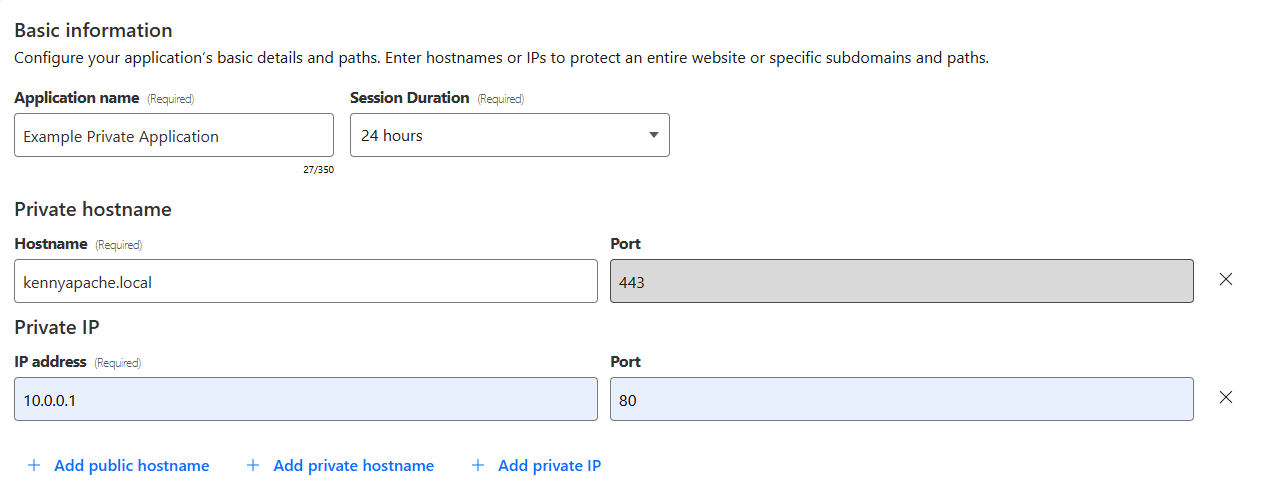
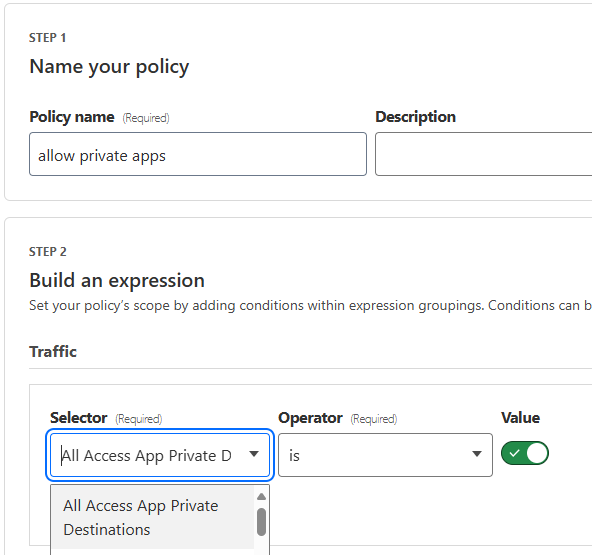
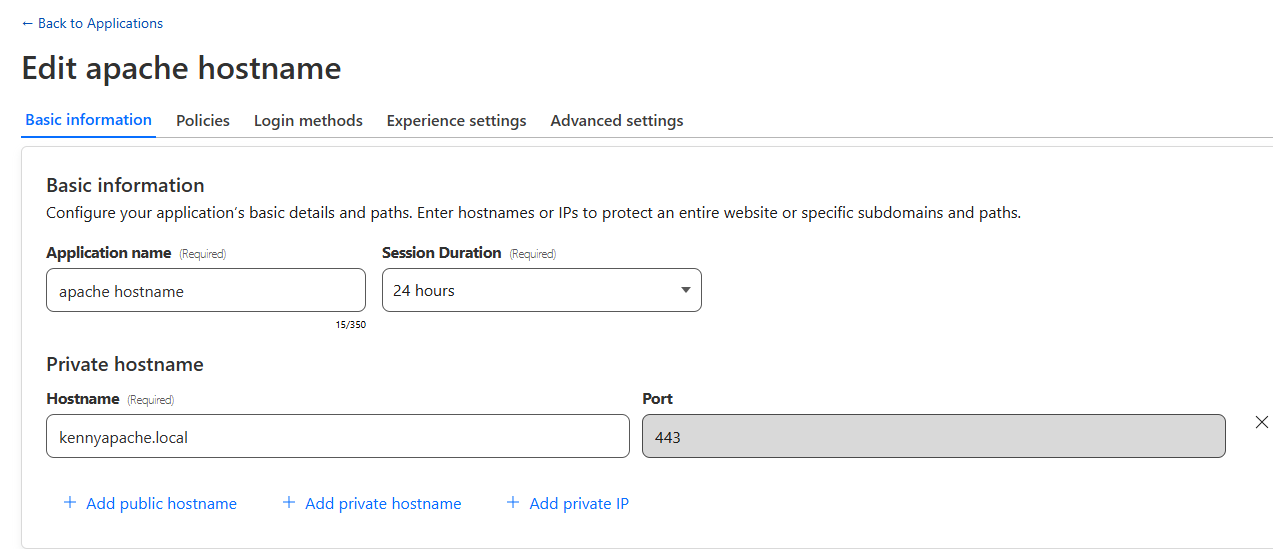
Once we solved application awareness and session management in Gateway’s firewall, we could extend Access to support private IP address- and hostname-defined applications. Administrators can now directly define Access applications using private IP addresses and hostnames:
You can see that private hostname and private IP address are now configuration options when defining an Access application.
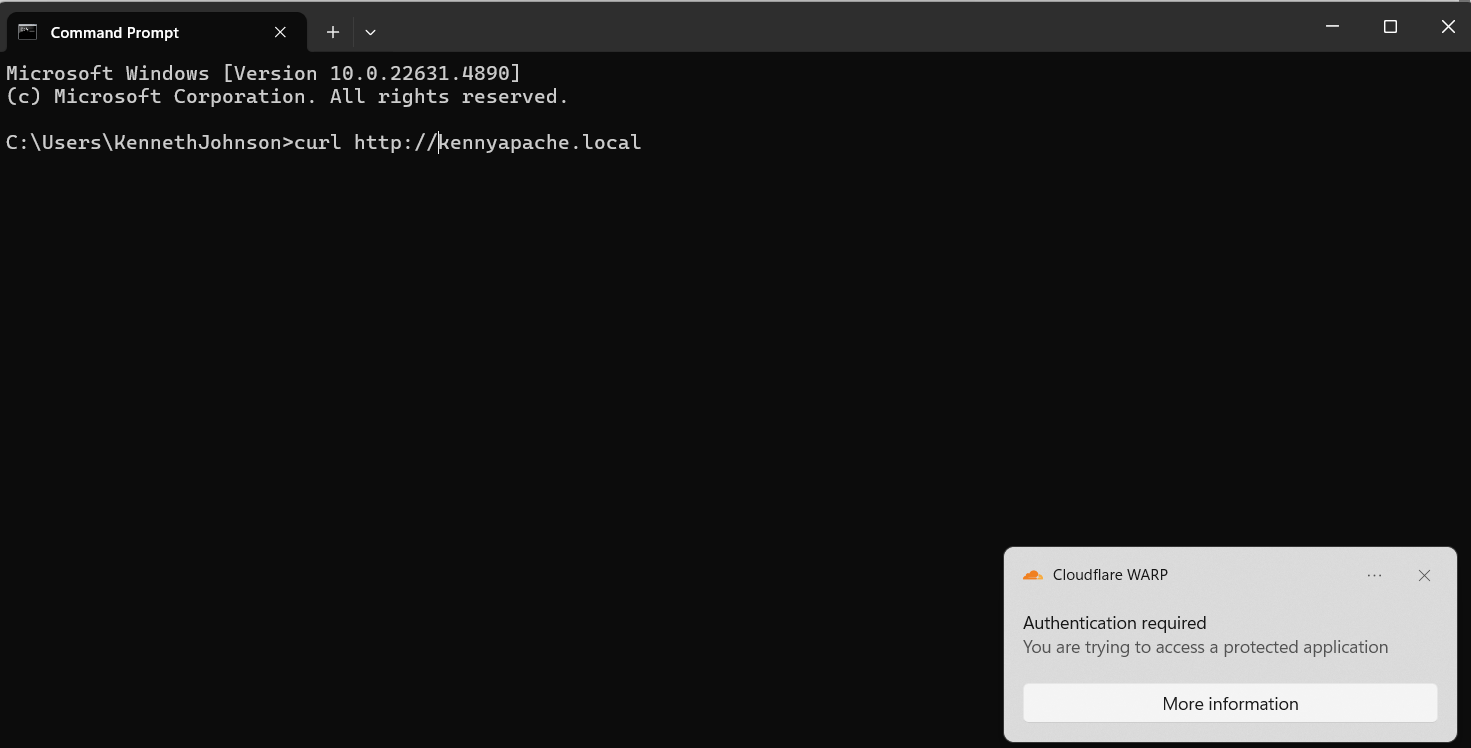
If it is a non-HTTPS application (whether HTTP or non-browser), the user will receive a client pop-up prompting a re-authentication:
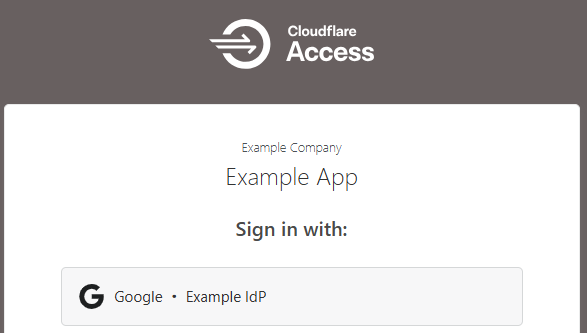
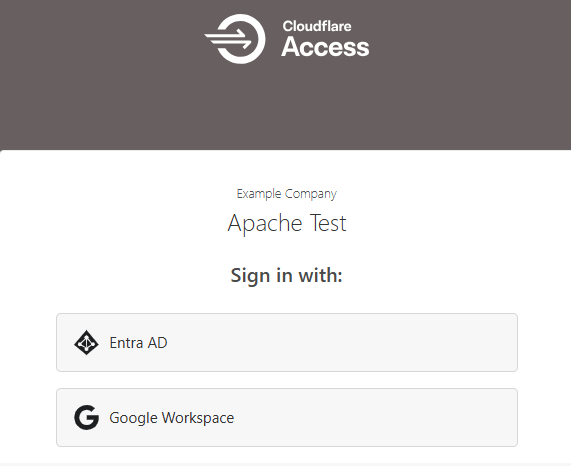
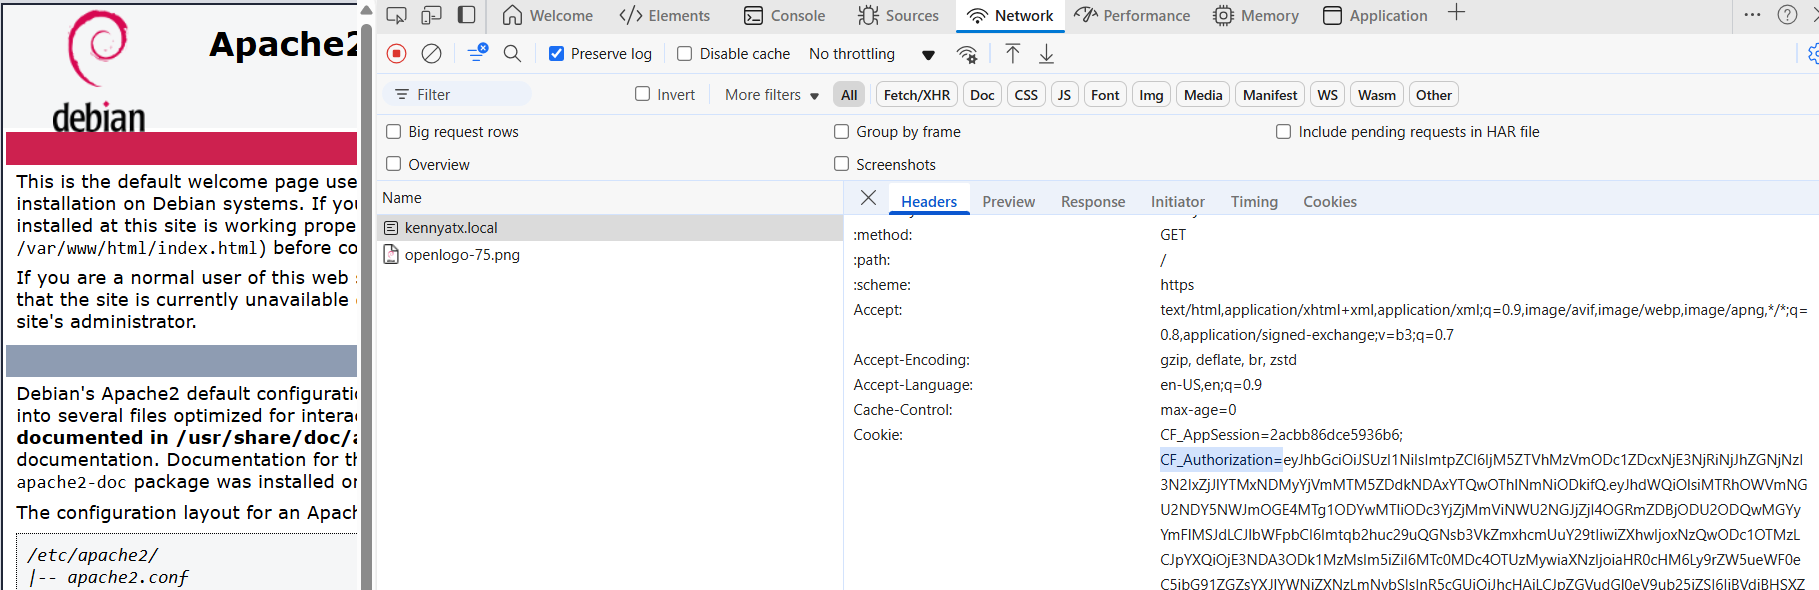
HTTPS applications will behave exactly the same as an Access application with a public hostname. The user will be prompted to log in via single sign-on, and then a JWT will be issued to that specific domain.
Then we see a JWT issued to the application itself.
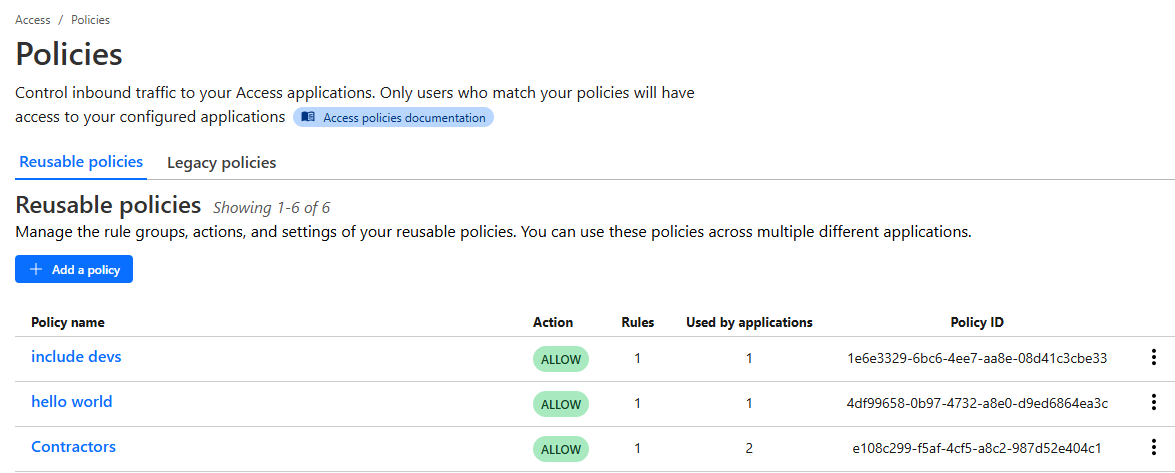
Introducing Reusable Policies
As part of this work, we were able to address another long-standing pain point in Access —– managing policies across multiple applications was a time-consuming and error-prone process. Policies were nested objects under individual applications, requiring administrators to either rely heavily on Access Groups or repeat identical configurations for each application.
With Reusable Policies, administrators can now create standardized policies — such as high, medium, or low risk — and assign them across multiple applications. A single change to a reusable policy will propagate to all associated applications, significantly simplifying management. With this new capability, we anticipate that many of our customers will be able to move from managing hundreds of access policies to a small handful. We’ve also renamed “Access Groups” to “Rule Groups,” aligning with their actual function and reducing confusion with identity provider (IdP) groups.
A redesigned user interface
Alongside these functional updates, we’ve launched a significant UI refresh based on years of user feedback. The new interface offers more information at a glance and provides consistent, intuitive workflows for defining and managing applications.
Looking ahead
While today’s release is a major step forward, there’s more to come. Currently, private hostname support is limited to port 443 with TLS inspection enabled. Later in 2025, we plan to extend support to arbitrary private hostnames on any port and protocol, further broadening Access’s capabilities.
Get started today
These new Access features are live and ready for you to explore. If you haven’t yet started modernizing remote access at your organization, sign up for a free account to test it out. Whether you’re securing private resources or simplifying policy management, we’re excited to see how these updates enhance your Zero Trust journey. As always, we’re here to help — reach out to your account team with any questions or feedback.
Hugo plays a pivotal role in enabling data ingestion for Grab’s data lake, managing over 4,000 pipelines onboarded by users. The stability of Hugo pipelines is contingent upon the health of both the data sources and various Hugo components. Given the complexity of this system, pipeline failures occasionally occur, necessitating user intervention when retry mechanisms prove insufficient. These incidents present challenges such as:
Limited user visibility into pipeline issues.
Uncertainty about resolution steps due to extensive documentation.
An overwhelmed Hugo on-call team dealing with ad-hoc requests and growing infrastructure dependencies.
Raised Data Production Issues (DPIs) lacking clear Root Cause Analysis (RCA), hindering effective management.
Such challenges ultimately increase data downtime due to prolonged issue triage and resolution times.
To address these problems, we conducted a thorough analysis of failure modes and the efforts required to resolve them. Based on our findings, we propose a comprehensive automation solution.
This blog outlines the architecture and implementation of our proposed solution, consisting of modules like Signal, Diagnosis, RCA Table, Auto-resolution, Data Health API, and Data Health WorkBench, each with a specific function to enhance Hugo’s monitoring, diagnosis, and resolution capabilities.
The blog further details the impact of these automated features, such as enhanced data visibility, reduced on-call workload, and concludes with our next steps, which focus on advancing auto-resolution strategies, enriching the Data Health Workbench, and broadening diagnostics to include more infrastructure components, like Flink, for comprehensive coverage.
Architecture details
We designed the solution based on these principles:
Identify different failure modes based on past issues and analysis from first principles.
Analyse temporal relationships of pipeline execution steps to diagnose issues to failure modes.
Focus on auto-resolution, and add additional features to cover gaps which can’t be immediately addressed by auto-resolution or diagnosis.
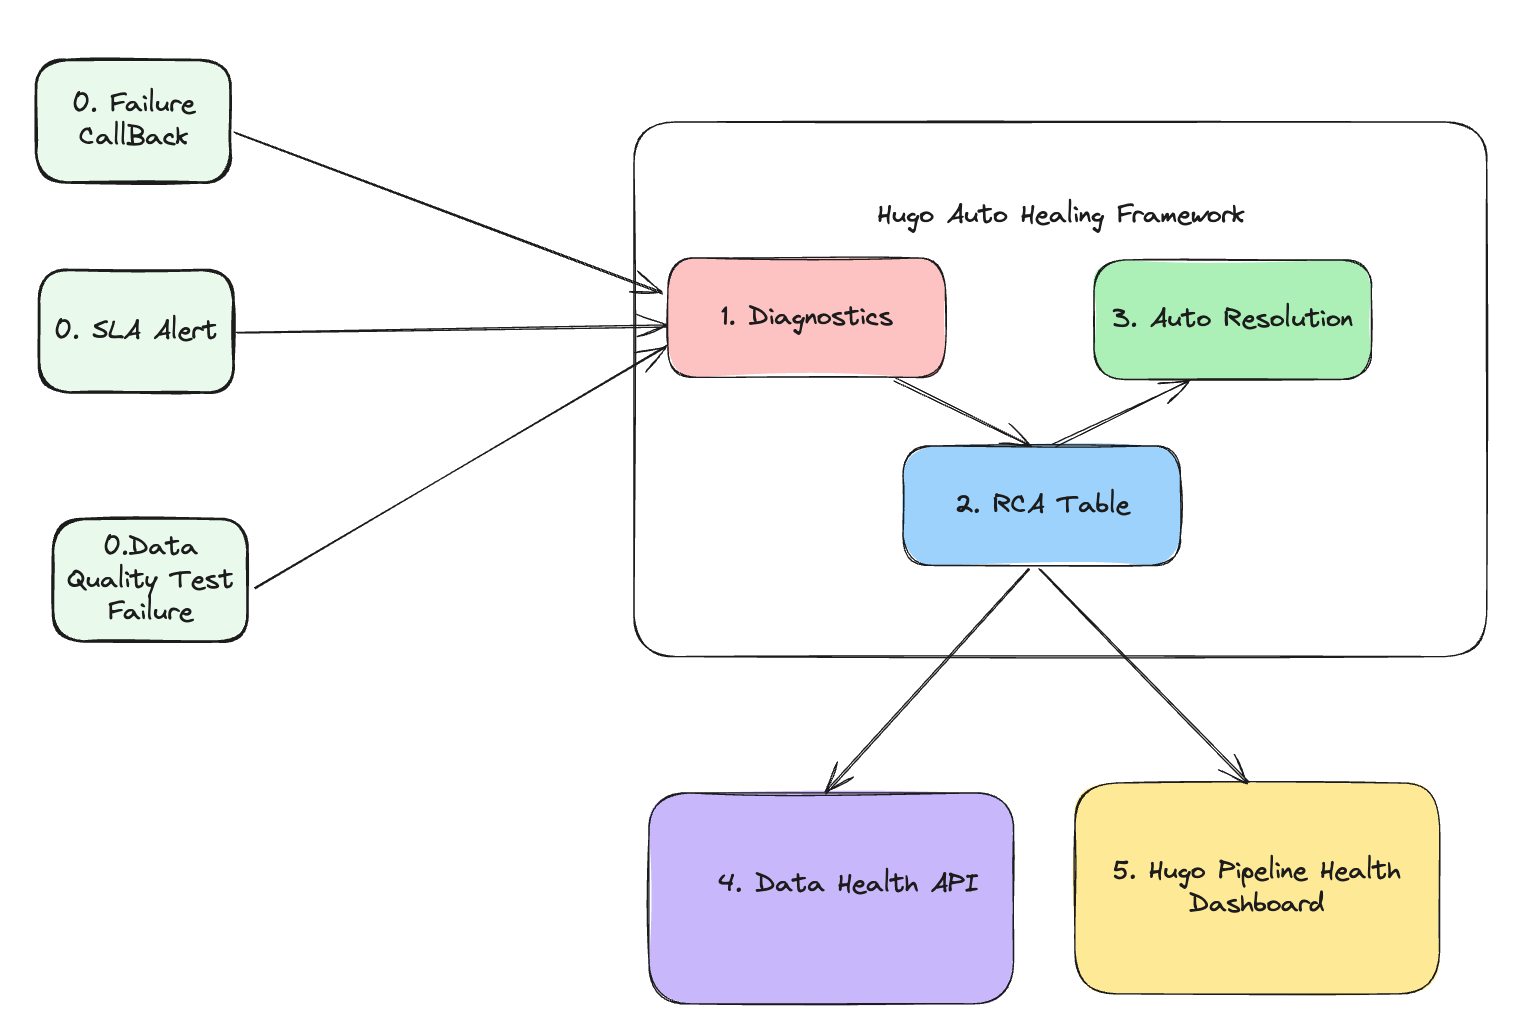
The following diagram shows the solution we proposed.
Figure 1. Architecture
The architecture consists of five core modules, each with a specific function:
Signal module: This module is responsible for collecting signals. It gathers three different types of signals that collectively define the health status of the data lake table. The signals include:
Failure callback signal: This indicates whether the pipeline runs involving this data lake table are successful or not.
SLA alert signal: This indicates whether the pipeline execution involving this data lake table meets the Service Level Agreement (SLA). For an hourly batch job, the expectation is to complete within one hour.
Data quality test failure signal: This represents various types of completeness checks to ensure that data lake tables are consistent with the source tables based on their pipeline strategies.
Diagnosis module: This is the core module responsible for diagnosing the root cause of 3 types of failures collected in the Signal module. It determines:
The root cause of the failure.
The assignee responsible for fixing the error.
The auto-resolution method to fix the issue.
Manual resolution steps if the auto-resolution fails.
RCA table: This module stores the following information:
Signals
Assignee information
Diagnosis results
Auto-resolution methods
Manual resolution steps
Auto-resolution module: This module executes the auto-resolution methods to resolve issues automatically.
Data health API: This module provides API access to other platforms. External platforms or pipelines that rely on Hugo onboarded tables can subscribe to the health status and investigate the root cause when a table is deemed unhealthy.
Hugo pipeline health dashboard: A centralised dashboard for Hugo users to visualise the health status of tables, auto resolution status, and manual fix button.
By leveraging these modules, the architecture ensures robust monitoring, diagnosis, and resolution of issues, leading to improved data health and operational efficiency.
Implementation
Signal module
There are two methods for generating these three signals. The failure signal is generated through an airflow callback, while the SLA miss and data completeness test signals are produced by Genchi. Genchi is a data quality observability platform at Grab that performs data quality checks and acts as a crucial enabler for the enforcement of data contracts.
Diagnosis module
As soon as an alert is created, the diagnosis begins. To avoid lengthy diagnosis times, Hugo has developed an innovative approach that eliminates the requirement for parsing extensive logs, such as Spark executor logs or Airflow logs. Instead, it gathers signals transmitted by the computation engine or Grab’s internal platforms.
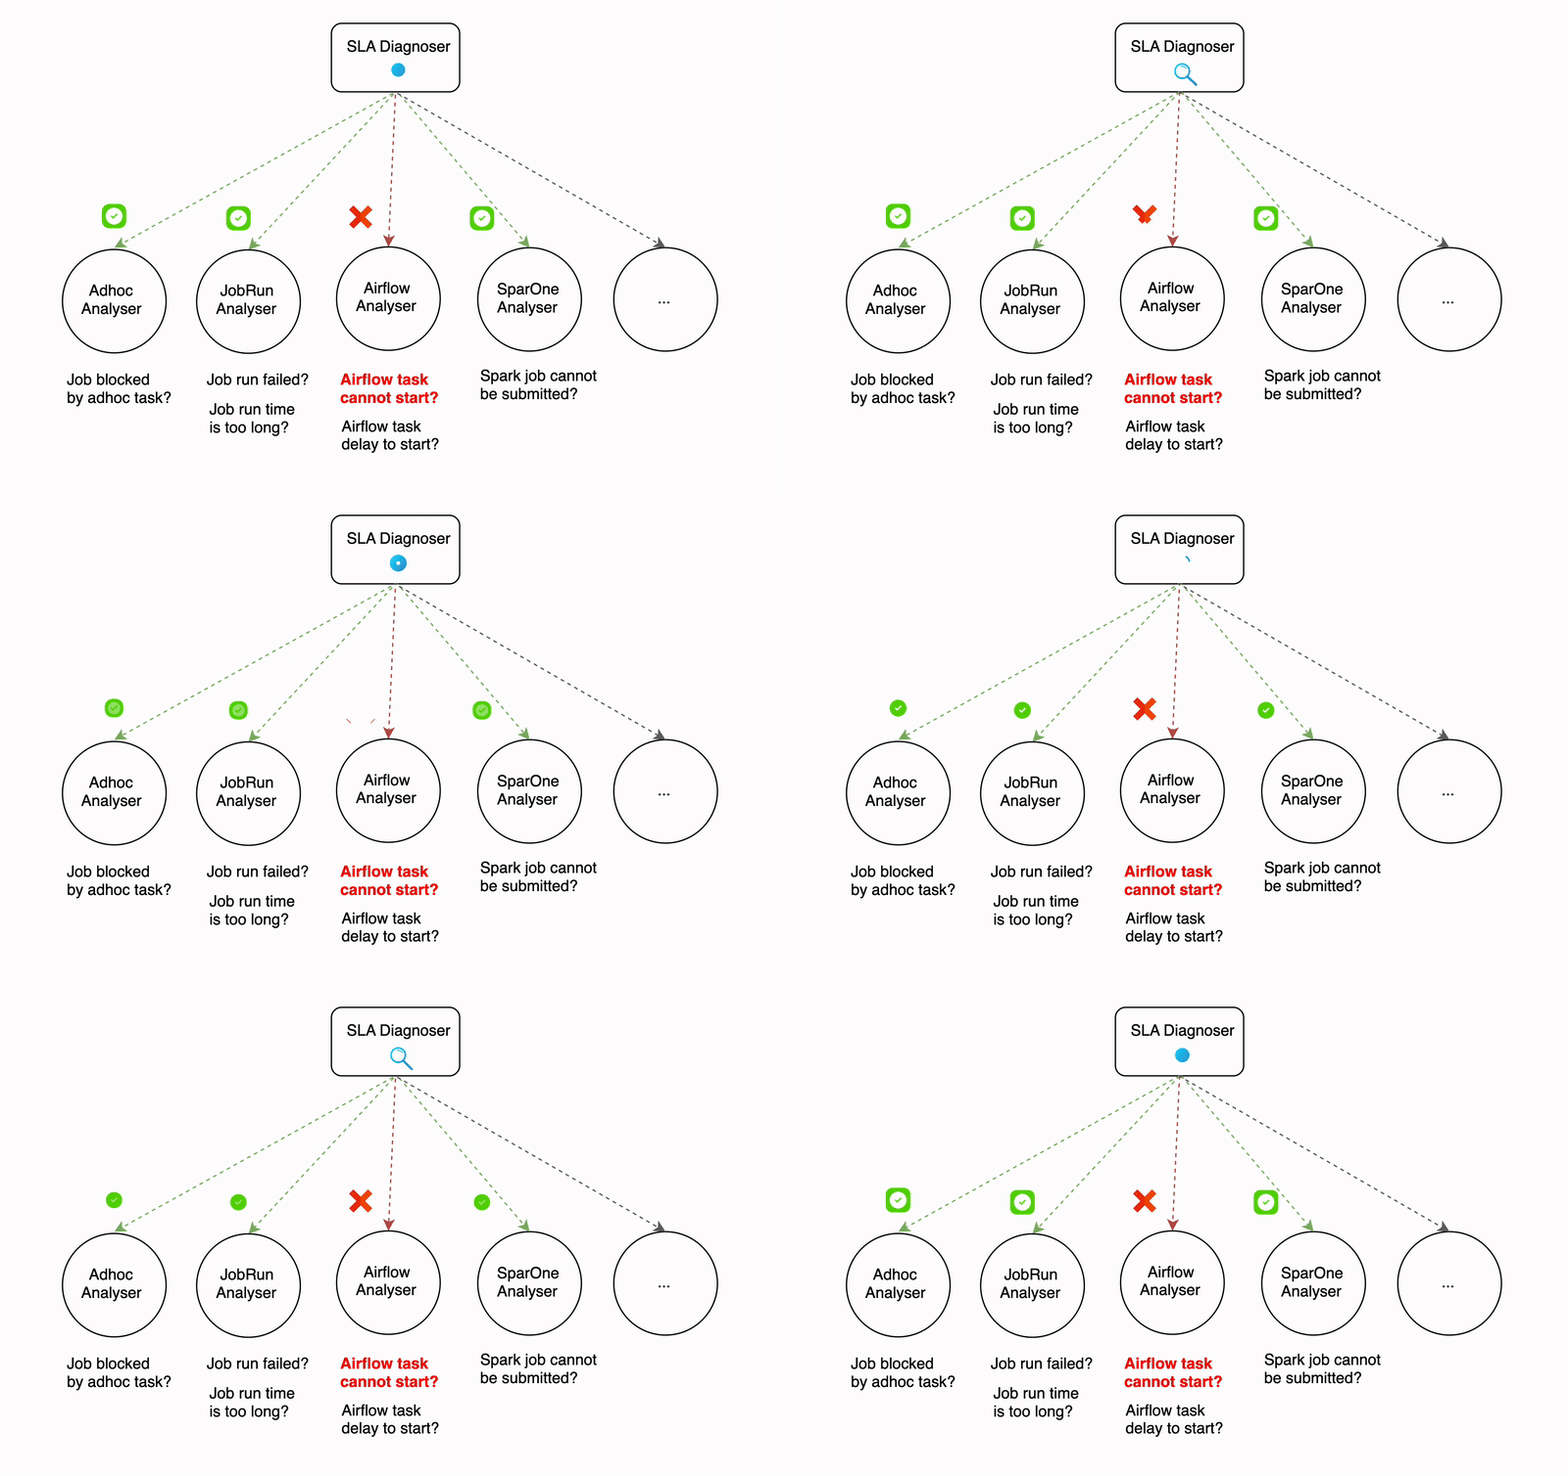
The diagnosis process can be time-consuming, even with efforts to reduce the time it takes. For example, the SLA diagnoser uses multiple analysers that run sequentially, and some of these analysers (like the Airflow analyser) make API calls that can take a significant amount of time. The more analysers that are involved in the diagnosis process, the longer it can take.
Figure 2. Diagnosis process
Parallelism in diagnosis serves as a solution to lower the overall latency when there is a surge in error traffic. The degree of parallelism differs based on the type of signal. For example, the failure signal diagnosis can be executed in thousands of processes at once, while for SLA miss and data quality test failures signals, the parallelism is determined by the number of partitions in the Kafka topic since these signals are received from Kafka.
Auto-resolution module
Auto-resolution is a flexible framework that enables the implementation of custom handlers for various types of failures. One of the common handlers employs a retry mechanism with backoff for transient errors. For instance, if Hugo receives a failure callback indicating that the root cause is a database replica lag, it would wait for an hour before re-triggering the job. This auto-resolution process runs asynchronously with the diagnosis process.
Data health API
The data health information includes a unique identifier, current status, error details, and the time of the last health check, providing a comprehensive snapshot of the dataset’s health.
Hugo converts the detailed information available in its internal data health API to the data health API specification format to be consumed by Kinabalu, our internal system designed to automate and streamline incident management processes by integrating with multiple systems such as Slack, Jira, Splunk on-call, and Datadog.
Hugo pipeline health dashboard
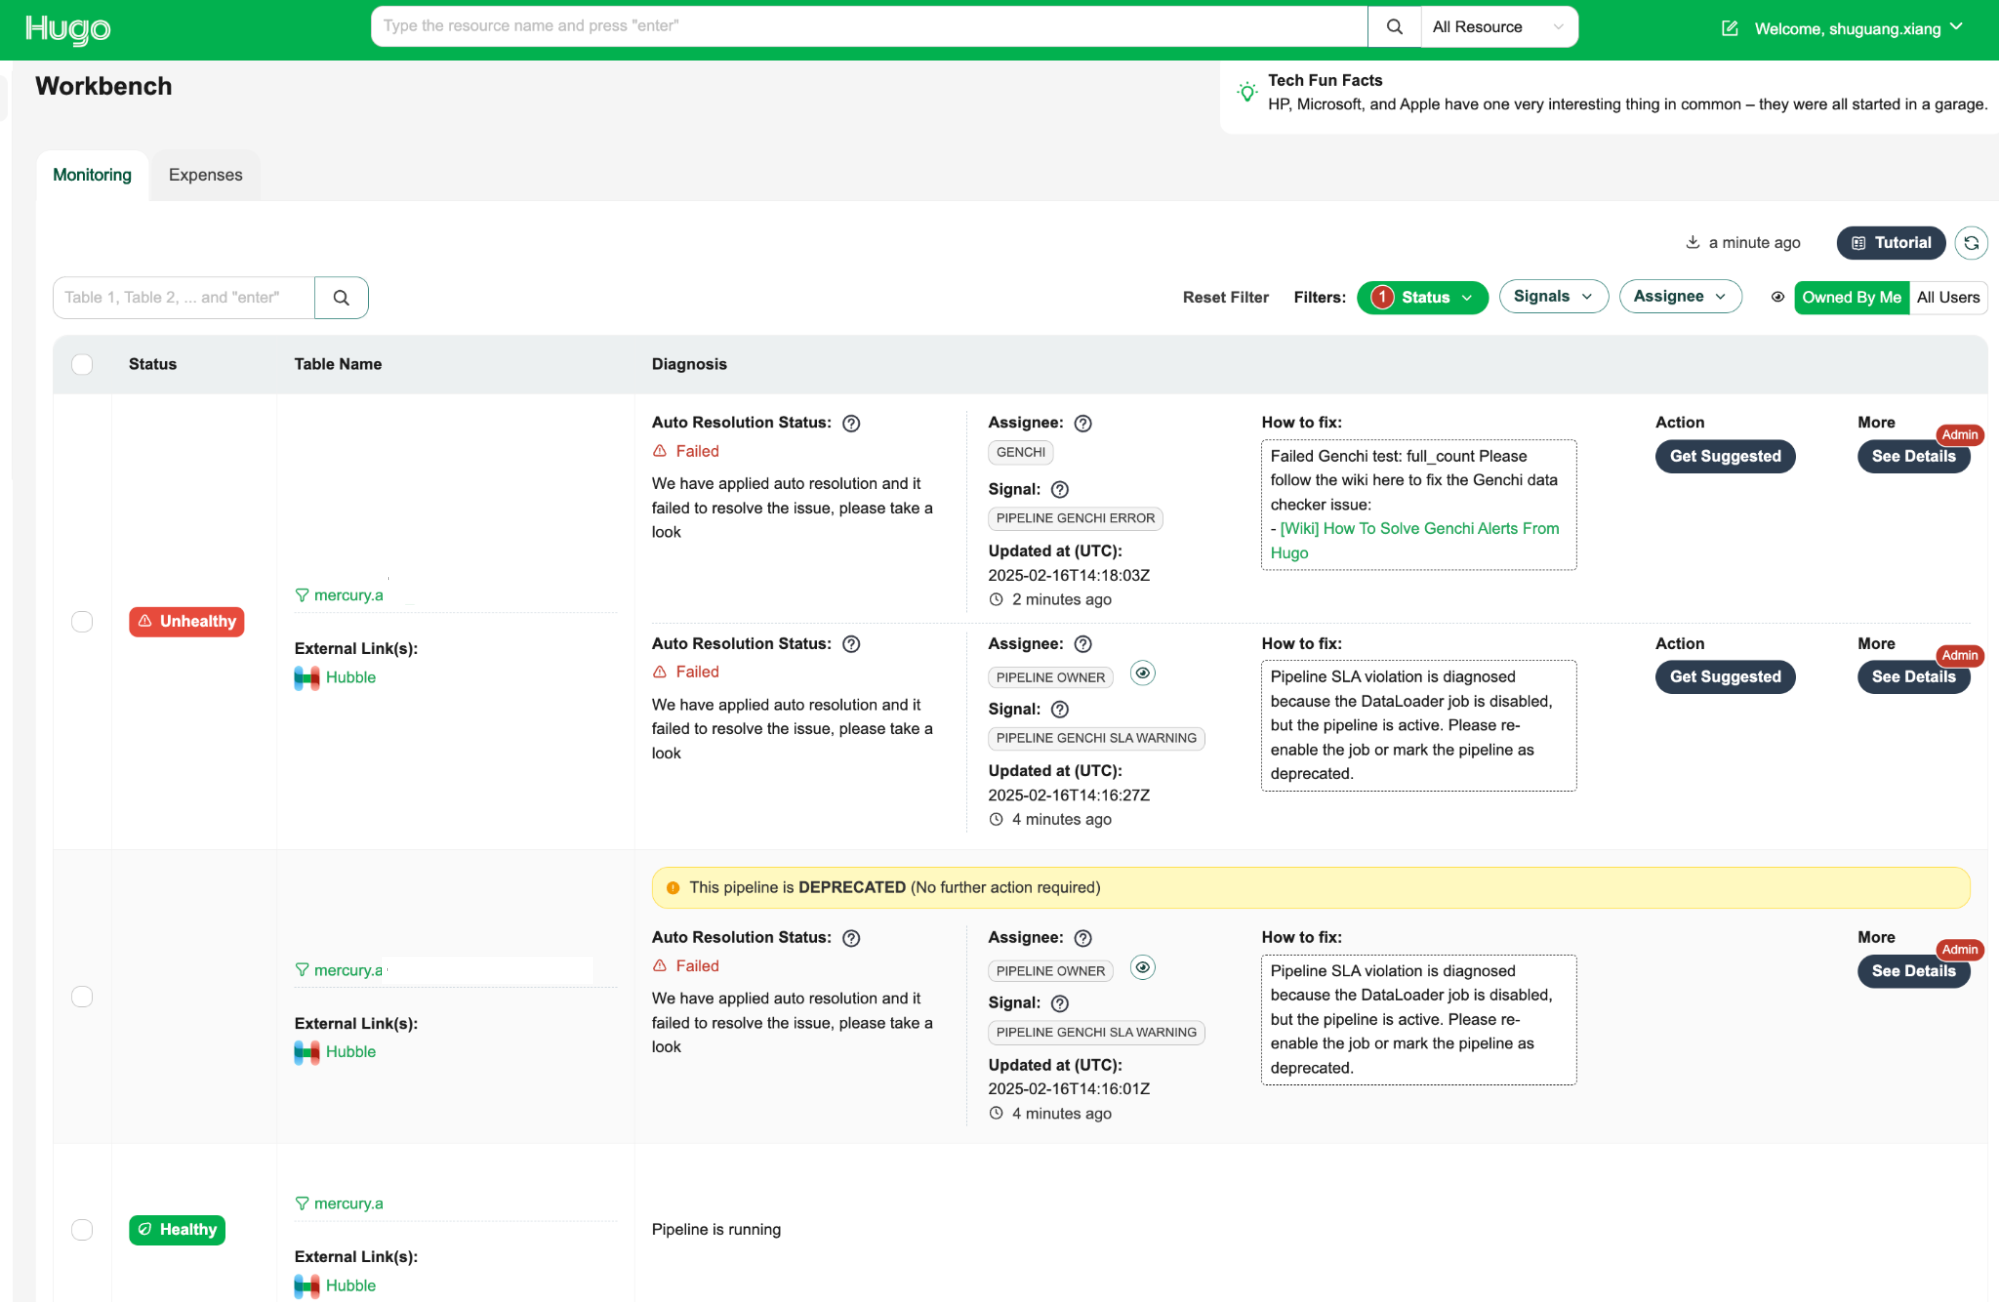
The Data Health Workbench is a centralised dashboard for Hugo users to visualise the health status of tables, auto-resolution status, and manual fix buttons. It provides a comprehensive view of data health and facilitates efficient issue resolution.
The key features are as follows:
Health status visualisation: Displays the current health status of tables, making it easy to identify unhealthy tables.
Assignee information: Indicates the assignee responsible for fixing the issue, ensuring clear accountability.
How-to-fix guide: Provides step-by-step instructions on how to resolve the issue, empowering users to take immediate action.
Action: Offers an action button to initiate the resolution process with a single click, streamlining issue resolution.
Admin feature with detailed diagnosis information: Provides admins supplementary information, including the reasoning behind the root cause identification and assignee determination, which allows for a deeper understanding of the root cause of issues.
By leveraging the Data Health Workbench, Hugo users can efficiently monitor and manage data health, ensuring data integrity and operational efficiency.
Figure 3. Data Health Workbench
Impact
The implementation of Hugo’s auto-healing and diagnosis features has resulted in significant improvements in stability and operational efficiency for our data pipelines. Here are some key outcomes:
Enhanced data visibility: We’ve improved the visibility into the health of datasets, allowing for quick identification of issues and more informed decision-making.
Timely resolution of data issues: With automated diagnostic and resolution processes, we ensure that data issues are addressed promptly, minimising data downtime and enhancing overall data availability.
Reduced on-call workload: By automating many of the common failure resolutions, the workload on Hugo on-call teams has been significantly reduced. This allows teams to focus on more complex and impactful tasks.
Scalable solution for managing complexity: The auto-resolution framework is well-equipped to handle the increasing complexity of data infrastructure, offering scalable solutions for transient errors through custom handlers and retry mechanisms.
Improved data contract management: By providing detailed pipeline health information via the Data Health API, we enable precise and accurate DPIs, complete with root cause analysis and assignee information, enhancing the management and resolution of data contract breaches.
Valuable reference for other platforms: The insights and methodologies developed through this initiative provide a valuable reference for other platform teams at Grab looking to implement similar automation and diagnostic capabilities.
Support for Grab’s success: These enhancements support Grabbers by ensuring easy access to the datasets they need and contribute to the overall success of Grab through reliable data availability.
Next steps
Our next steps involve advancing auto-resolution strategies by focusing on complex solutions like pipeline runtime optimisation to boost efficiency and minimise processing delays. We will enrich the Data Health Workbench with detailed information, enabling users to visualise and understand pipeline health more effectively and make informed corrective actions. Additionally, we plan to broaden our diagnosis capabilities by integrating more infrastructure components, such as Flink health information, to ensure a comprehensive and holistic monitoring approach for all engines within Hugo.
Join us
Grab is a leading superapp in Southeast Asia, operating across the deliveries, mobility and digital financial services sectors. Serving over 800 cities in eight Southeast Asian countries, Grab enables millions of people everyday to order food or groceries, send packages, hail a ride or taxi, pay for online purchases or access services such as lending and insurance, all through a single app. Grab was founded in 2012 with the mission to drive Southeast Asia forward by creating economic empowerment for everyone. Grab strives to serve a triple bottom line – we aim to simultaneously deliver financial performance for our shareholders and have a positive social impact, which includes economic empowerment for millions of people in the region, while mitigating our environmental footprint.
Powered by technology and driven by heart, our mission is to drive Southeast Asia forward by creating economic empowerment for everyone. If this mission speaks to you, join our team today!
On Wednesday, March 19, 2025, backup and recovery software provider Veeam published a security advisory for a critical remote code execution vulnerability tracked as CVE-2025-23120. The vulnerability affects Backup & Replication systems that are domain joined. Veeam explicitly mentions that domain-joined backup servers are against security and compliance best practices, but in reality, we believe this is likely to be a relatively common configuration.
Veeam’s advisory indicates that the vulnerability is authenticated, though the CVSS score for CVE-2025-23120 is listed as 9.9. The advisory itself states that “authenticated domain users” can exploit the vulnerability but says little else — it’s possible that additional exploitation criteria will be published later on. According to Veeam, all supported versions of Backup & Replication are affected.
No public proof-of-concept exploit has been released (at time of this blog’s publication). Veeam Backup & Replication has a very large deployment footprint, and backup solutions are commonly targeted by threat actors. Veeam Backup & Replication should not be exposed to the internet and makes for a more effective internal attack vector than an external vector. Still, plenty of previous Veeam Backup & Replication vulnerabilities have been exploited in the wild, including by ransomware groups.
As we have mentioned previously, more than 20% of Rapid7 incident response cases in 2024 involved Veeam being accessed or exploited in some manner, typically once an adversary has already established a foothold in the target environment.
Mitigation guidance
Veeam Backup & Replication 12.3.0.310 and all earlier version 12 builds are vulnerable to CVE-2025-23120, per the vendor advisory.
Customers should update to the latest version of the software (12.3 build 12.3.1.1139) immediately, without waiting for a regular patch cycle to occur. Per the vendor, unsupported software versions were not tested but should be considered vulnerable.
Rapid7 customers
InsightVM and Nexpose customers will be able to assess their exposure to CVE-2025-23120 with a vulnerability check expected to be available in tomorrow’s (Thursday, March 20) content release.
GNOME 48 (“Bengaluru”)
has been released. As usual, this release includes a number of new
features and enhancements including support for shortcuts in the Orca
screen reader on Wayland, new fonts, addition of image editing to Image Viewer, and more.
GNOME 48 includes a number of notable performance improvements. The
most significant of these is the introduction of dynamic triple
buffering. This change has undergone significant review and testing
over a period of five years and improves the perceived smoothness of
changes on screen, with fewer skipped frames and more fluid
animations. This has been achieved by enhancing the concurrency
capabilities of Mutter, the GNOME display manager, and is particularly
effective at handling sudden bursts of activity.
The GNOME 48 release also adds new applications to the GNOME Circle collection,
such as Drum Machine
and the Iotas note-taking
application. See “What’s new
for developers” a rundown of improvements for developers in
GNOME 48.
Here at Rapid7, our usual bar for calling a vulnerability an emergent threat is either known exploitation at scale, or likelihood of exploitation at scale. Apache Tomcat CVE-2025-24813 fulfills neither of these criteria, despite a variety of news headlines alleging broad exploitation in the wild. Tomcat is widely deployed and has seen a number of severe vulnerabilities over the years that have had specific configuration dependencies for successful exploitation — this one follows the same pattern.
TL;DR: Patch, but there’s no need to panic. Here’s what you need to know:
CVE-2025-24813 is an unauthenticated remote code execution vulnerability in Apache Tomcat’s partial PUT feature disclosed on March 10, 2025. Fixed versions are available.
Under specific circumstances, successful exploitation allows attackers to execute code remotely on target systems via unsafe deserialization.
Vulnerability details and proof-of-concept (PoC) exploit code are both publicly available.
Based on our analysis and those of other research firms, the conditions required for successful exploitation appear to be specific, non-default, and uncommon.
CVE-2025-24813 has reportedly been exploited in the wild; however, Rapid7 has been unable to confirm any successful exploitation occurring against real-world production environments. We assess that “exploitation” in this context likely means unsuccessful exploit attempts rather than successful compromise of production systems.
Broad exploitation is unlikely given the specific vulnerable configuration requirements (see Exploitability requirements below).
Rapid7 researchers have tested publicly available PoC code and investigated the conditions Apache indicated were required for exploitation. Like other researchers, our team found that the vendor’s exploitable configuration information differs from what we observed during testing. Additionally, our team assessed the exploitable configuration to be relatively uncommon. Based on a GitHub code search query, only a small number of open-source Tomcat projects published publicly on GitHub are using write-enabled default servlet configurations (a pre-requisite for exploitation) — approximately 200, and most have fewer than 30 stars. Rapid7’s vulnerability research team has a full testing report here.
Exploitability requirements
Per the advisory, an attacker could view security sensitive files and/or inject content into those files if ALL of the following were true:
writes enabled for the default servlet (disabled by default)
support for partial PUT (enabled by default)
a target URL for security sensitive uploads that was a sub-directory of a target URL for public uploads (ed: Rapid7 and other researchers found this to be unnecessary for exploitation)
attacker knowledge of the names of security sensitive files being uploaded (ed: Rapid7 and other researchers found this to be unnecessary for exploitation)
the security sensitive files also being uploaded via partial PUT (ed: Rapid7 and other researchers found this to be unnecessary for exploitation)
An attacker could achieve remote code execution if ALL of the following were true:
writes enabled for the default servlet (disabled by default)
support for partial PUT (enabled by default)
application was using Tomcat’s file-based session persistence (ed: disabled by default) with the default storage location
application included a library that may be leveraged in a deserialization attack (ed: this is the case for many Java applications)
Mitigation guidance
The following versions of Apache Tomcat are affected:
Apache Tomcat 11.0.0-M1 to 11.0.2 (fixed in 11.0.3 or later)
Apache Tomcat 10.1.0-M1 to 10.1.34 (fixed in 10.1.35 or later)
Apache Tomcat 9.0.0.M1 to 9.0.98 (fixed in 9.0.99 or later)
For the latest information, please see the Apache Software Foundation’s advisory.
Rapid7 customers
InsightVM and Nexpose customers can assess their exposure to CVE-2025-24813 with pre-existing vulnerability checks.
Software development is filled with repetitive tasks—managing issues, handling approvals, triggering CI/CD workflows, and more. But what if you could automate these types of tasks directly within GitHub Issues? That’s the promise of IssueOps, a methodology that turns GitHub Issues into a command center for automation.
Whether you’re a solo developer or part of an engineering team, IssueOps helps you streamline operations without ever leaving your repository.
In this article, I’ll explore the concept of IssueOps using state-machine terminology and strategies to help you work more efficiently on GitHub. After all, who doesn’t love automation?
What is IssueOps?
IssueOps is the practice of using GitHub Issues, GitHub Actions, and pull requests (PR) as an interface for automating workflows. Instead of switching between tools or manually triggering actions, you can use issue comments, labels, and state changes to kick off CI/CD pipelines, assign tasks, and even deploy applications.
Much like the various other *Ops paradigms (ChatOps, ClickOps, and so on), IssueOps is a collection of tools, workflows, and concepts that, when applied to GitHub Issues, can automate mundane, repetitive tasks. The flexibility and power of issues, along with their relationship to pull requests, create a near limitless number of possibilities, such as managing approvals and deployments. All of this can really help to simplify your workflows on GitHub. I’m speaking from personal experience here.
It’s important to note that IssueOps isn’t just a DevOps thing! Where DevOps offers a methodology to bring developers and operations into closer alignment, IssueOps is a workflow automation practice centered around GitHub Issues. IssueOps lets you run anything from complex CI/CD pipelines to a bed and breakfast reservation system. If you can interact with it via an API, there’s a good chance you can build it with IssueOps!
So, why use IssueOps?
There are lots of benefits to utilizing IssueOps. Here’s how it’s useful in practice:
It’s event driven, so you can automate the boring stuff: IssueOps lets you automate workflows directly from GitHub Issues and pull requests, turning everyday interactions—from kicking off a CI/CD pipeline and managing approvals to updating project boards—into powerful triggers for GitHub Actions.
It’s customizable, so you can tailor workflows to your needs: No two teams work the same way, and IssueOps is flexible enough to adapt. Whether you’re automating bug triage or triggering deployments, you can customize workflows based on event type and data provided.
It’s transparent, so you can keep a record: All actions taken on an issue are logged in its timeline, creating an easy-to-follow record of what happened and when.
It’s immutable, so you can audit whenever you need: Because IssueOps uses GitHub Issues and pull requests as a source of truth, every action leaves a record. No more chasing approvals in Slack or manually triggering workflows: IssueOps keeps everything structured, automated, and auditable right inside GitHub.
Defining IssueOps workflows and how they’re like finite-state machines
Most IssueOps workflows follow the same basic pattern:
A user opens an issue and provides information about a request
The issue is validated to ensure it contains the required information
The issue is submitted for processing
Approval is requested from an authorized user or team
The request is processed and the issue is closed
Suppose you’re an administrator of an organization and want to reduce the overhead of managing team members. In this instance, you could use IssueOps to build an automated membership request and approval process. Within a workflow like this, you’d have several core steps:
A user creates a request to be added to a team
The request is validated
The request is submitted for approval
An administrator approves or denies this request
The request is processed
If approved, the user is added to the team
If denied, the user is not added to the team
The user is notified of the outcome
When designing your own IssueOps workflows, it can be very helpful to think of them as a finite-state machine: a model for how objects move through a series of states in response to external events. Depending on certain rules defined within the state machine, a number of different actions can take place in response to state changes. If this is a little too complex, you can also think of it like a flow chart.
To apply this comparison to IssueOps, an issue is the object that is processed by a state machine. It changes state in response to events. As the object changes state, certain actions may be performed as part of a transition, provided any required conditions (guards) are met. Once an end state is reached, the issue can be closed.
This breaks down into a few key concepts:
State: A point in an object’s lifecycle that satisfies certain condition(s).
Event: An external occurrence that triggers a state change.
Transition: A link between two states that, when traversed by an object, will cause certain action(s) to be performed.
Action: An atomic task that is performed when a transition is taken.
Guard: A condition that is evaluated when a trigger event occurs. A transition is taken only if all associated guard condition(s) are met.
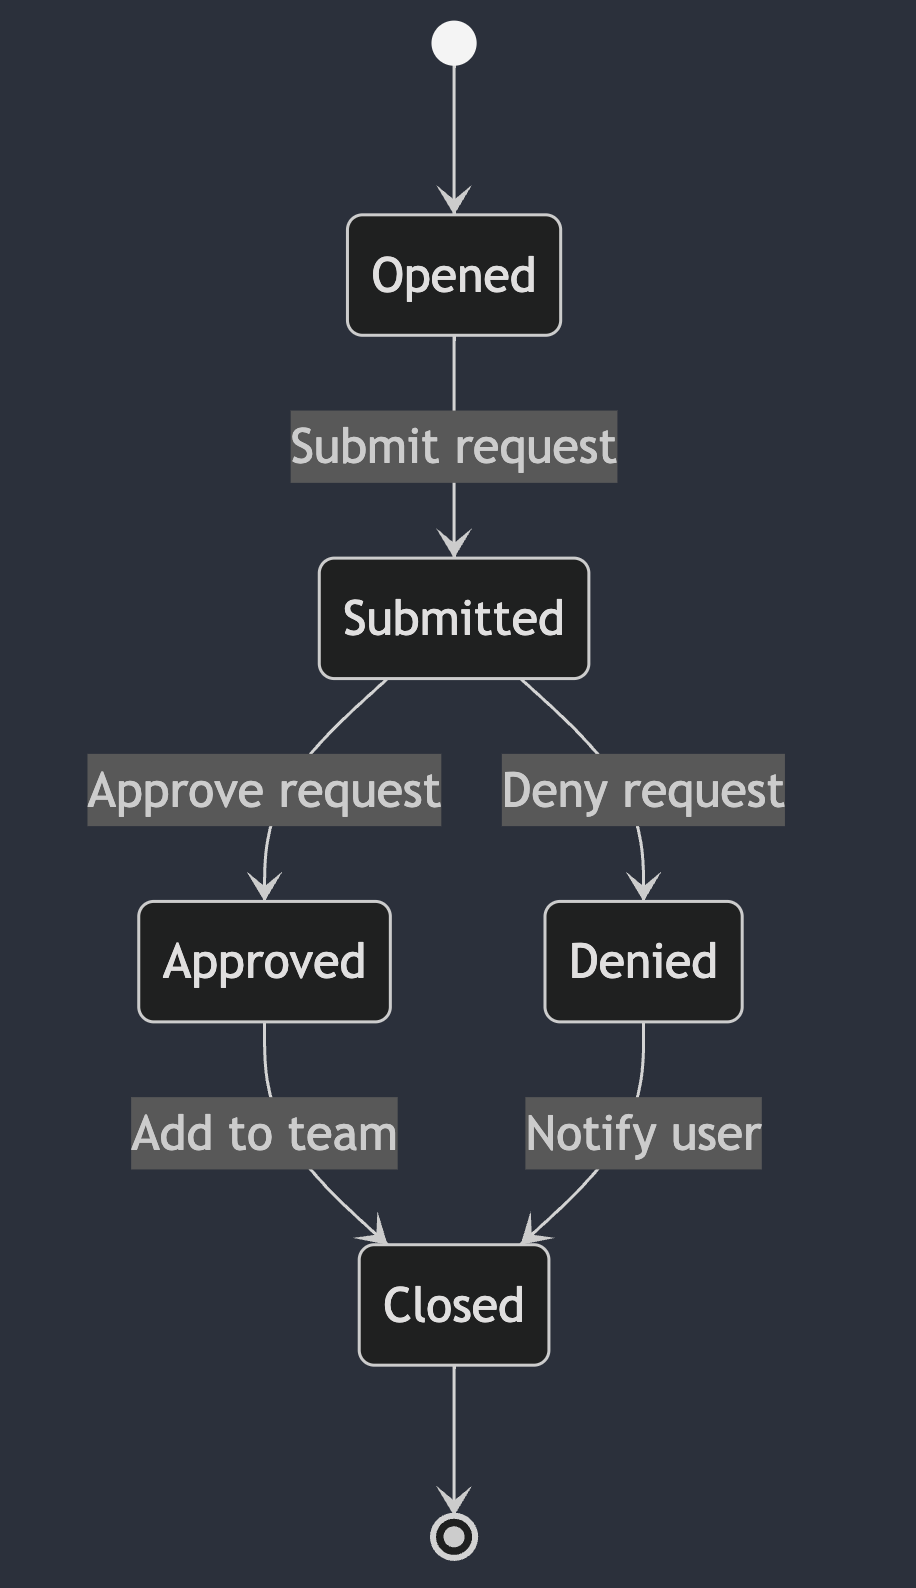
Here’s a simple state diagram for the example I discussed above.
Now, let’s dive into the state machine in more detail!
Key concepts behind state machines
The benefit of breaking your workflow down into these components is that you can look for edge cases, enforce conditions, and create a robust, reliable result.
States
Within a state machine, a state defines the current status of an object. As the object transitions through the state machine, it will change states in response to external events. When building IssueOps workflows, common states for issues include opened, submitted, approved, denied, and closed.
These should suffice as the core states to consider when building our workflows in our team membership example above.
Events
In a state machine, an event can be any form of interaction with the object and its current state. When building your own IssueOps, you should consider events from both the user and GitHub points of view.
In our team membership request example, there are several events that can trigger a change in state. The request can be created, submitted, approved, denied, or processed.
In this example, a user interacting with an issue—such as adding labels, commenting, or updating milestones—can also change its state. In GitHub Actions, there are many events that can trigger your workflows (see events that trigger workflows).
Here are a few interactions, or events, that would affect our example IssueOps workflow when it comes to managing team members:
Request
Event
State
Request is created
issues
opened
Request is approved
issue_comment
created
Request is denied
issue_comment
created
As you can see, the same GitHub workflow trigger can apply to multiple events in our state machine. Because of this, validation is key. Within your workflows, you should check both the type of event and the information provided by the user. In this case, we can conditionally trigger different workflow steps based on the content of the issue_comment event.
A transition is simply the change from one state to another. In our example, for instance, a transition occurs when someone opens an issue. When a request meets certain conditions, or guards, the change in state can take place. When the transition occurs, some actions or processing may take place, as well.
With our example workflow, you can think of the transitions themselves as the lines connecting different nodes in the state diagram. Or the lines connecting boxes in a flow chart.
Guards
Guards are conditions that must be verified before an event can trigger a transition to a different state. In our case, we know the following guards must be in place:
A request should not transition to an Approved state unless an administrator comments .approve on the issue.
A request should not transition to a Denied state unless an administrator comments .deny on the issue.
What about after the request is approved and the user is added to the team? This is referred to as an unguarded transition. There are no conditions that must be met, so the transition happens immediately!
Actions
Lastly, actions are specific tasks that are performed during a transition. They may affect the object itself, but this is not a requirement in our state machine. In our example, the following actions may take place at different times:
Administrators are notified that a request has been submitted
The user is added to the requested team
The user is notified of the outcome
A real-world example: Building a team membership workflow with IssueOps
Now that all of the explanation is out of the way, let’s dive into building our example! For reference, we’ll focus on the GitHub Actions workflows involved in building this automation. There are some additional repository and permissions settings involved that are discussed in more detail in these IssueOps docs.
Step 1: Issue form template
GitHub issue forms let you create standardized, formatted issues based on a set of form fields. Combined with the issue-ops/parser action, you can get reliable, machine-readable JSON from issue body Markdown. For our example, we are going to create a simple form that accepts a single input: the team where we want to add the user.
name: Team Membership Request
description: Submit a new membership request
title: New Team Membership Request
labels:
  - team-membership
body:
  - type: input
    id: team
    attributes:
      label: Team Name
      description: The team name you would like to join
      placeholder: my-team
    validations:
      required: true
When issues are created using this form, they will be parsed into JSON, which can then be passed to the rest of the IssueOps workflow.
{
  "team": "my-team"
}
Step 2: Issue validation
With a machine-readable issue body, we can run additional validation checks to ensure the information provided follows any rules we might have in place. For example, we can’t automatically add a user to a team if the team doesn’t exist yet! That is where the issue-ops/validator action comes into play. Using an issue form template and a custom validation script, we can confirm the existence of the team ahead of time.
module.exports = async (field) => {
  const { Octokit } = require('@octokit/rest')
  const core = require('@actions/core')

  const github = new Octokit({
    auth: core.getInput('github-token', { required: true })
  })

  try {
    // Check if the team exists
    core.info(`Checking if team '${field}' exists`)

    await github.rest.teams.getByName({
      org: process.env.GITHUB_REPOSITORY_OWNER ?? '',
      team_slug: field
    })

    core.info(`Team '${field}' exists`)
    return 'success'
  } catch (error) {
    if (error.status === 404) {
      // If the team does not exist, return an error message
      core.error(`Team '${field}' does not exist`)
      return `Team '${field}' does not exist`
    } else {
      // Otherwise, something else went wrong...
      throw error
    }
  }
}
When included in our IssueOps workflow, this adds any validation error(s) to the comment on the issue.
Step 3: Issue workflows
The main “entrypoint” of this workflow occurs when a user creates or edits their team membership request issue. This workflow should focus heavily on validating any user inputs! For example, what should happen if the user inputs a team that does not exist?
In our state machine, this workflow is responsible for handling everything up to the opened state. Any time an issue is created, edited, or updated, it will re-run validation to ensure the request is ready to be processed. In this case, an additional guard condition is introduced. Before the request can be submitted, the user must comment with .submit after validation has passed.
name: Process Issue Open/Edit

on:
  issues:
    types:
      - opened
      - edited
      - reopened

permissions:
  contents: read
  id-token: write
  issues: write

jobs:
  validate:
    name: Validate Request
    runs-on: ubuntu-latest

    # This job should only be run on issues with the `team-membership` label.
    if: ${{ contains(github.event.issue.labels.*.name, 'team-membership') }}

    steps:
      # This is required to ensure the issue form template and any validation
      # scripts are included in the workspace.
      - name: Checkout
        id: checkout
        uses: actions/checkout@v4

      # Since this workflow includes custom validation scripts, we need to
      # install Node.js and any dependencies.
      - name: Setup Node.js
        id: setup-node
        uses: actions/setup-node@v4

      # Install dependencies from `package.json`.
      - name: Install Dependencies
        id: install
        run: npm install

      # GitHub App authentication is required if you want to interact with any
      # resources outside the scope of the repository this workflow runs in.
      - name: Get GitHub App Token
        id: token
        uses: actions/create-github-app-token@v1
        with:
          app-id: ${{ vars.ISSUEOPS_APP_ID }}
          private-key: ${{ secrets.ISSUEOPS_APP_PRIVATE_KEY }}
          owner: ${{ github.repository_owner }}

      # Remove any labels and start fresh. This is important because the
      # issue may have been closed and reopened.
      - name: Remove Labels
        id: remove-label
        uses: issue-ops/labeler@v2
        with:
          action: remove
          github_token: ${{ steps.token.outputs.token }}
          labels: |
            validated
            approved
            denied
          issue_number: ${{ github.event.issue.number }}
          repository: ${{ github.repository }}

      # Parse the issue body into machine-readable JSON, so that it can be
      # processed by the rest of the workflow.
      - name: Parse Issue Body
        id: parse
        uses: issue-ops/parser@v4
        with:
          body: ${{ github.event.issue.body }}
          issue-form-template: team-membership.yml
          workspace: ${{ github.workspace }}

      # Validate early and often! Validation should be run any time an issue is
      # interacted with, to ensure that any changes to the issue body are valid.
      - name: Validate Request
        id: validate
        uses: issue-ops/validator@v3
        with:
          add-comment: true
          github-token: ${{ steps.token.outputs.token }}
          issue-form-template: team-membership.yml
          issue-number: ${{ github.event.issue.number }}
          parsed-issue-body: ${{ steps.parse.outputs.json }}
          workspace: ${{ github.workspace }}

      # If validation passes, add the validated label to the issue.
      - if: ${{ steps.validate.outputs.result == 'success' }}
        name: Add Validated Label
        id: add-label
        uses: issue-ops/labeler@v2
        with:
          action: add
          github_token: ${{ steps.token.outputs.token }}
          labels: |
            validated
          issue_number: ${{ github.event.issue.number }}
          repository: ${{ github.repository }}

      # The `issue-ops/validator` action will automatically notify the user that
      # the request was validated. However, you can optionally add instruction
      # on what to do next.
      - if: ${{ steps.validate.outputs.result == 'success' }}
        name: Notify User (Success)
        id: notify-success
        uses: peter-evans/create-or-update-comment@v4
        with:
          issue-number: ${{ github.event.issue.number }}
          body: |
            Hello! Your request has been validated successfully!

            Please comment with `.submit` to submit this request.
Step 4: Issue comment workflows
Once the issue is created, any further processing is triggered using issue comments—and this can be done with one workflow. However, to make things a bit easier to follow, we’ll break this into a few separate workflows.
Submit workflow
The first workflow handles the user submitting the request. The main task it performs is validating the issue body against the form template to ensure it hasn’t been modified.
name: Process Submit Comment

on:
  issue_comment:
    types:
      - created

permissions:
  contents: read
  id-token: write
  issues: write

jobs:
  submit:
    name: Submit Request
    runs-on: ubuntu-latest

    # This job should only be run when the following conditions are true:
    #
    # - A user comments `.submit` on the issue.
    # - The issue has the `team-membership` label.
    # - The issue has the `validated` label.
    # - The issue does not have the `approved` or `denied` labels.
    # - The issue is open.
    if: |
      startsWith(github.event.comment.body, '.submit') &&
      contains(github.event.issue.labels.*.name, 'team-membership') == true &&
      contains(github.event.issue.labels.*.name, 'approved') == false &&
      contains(github.event.issue.labels.*.name, 'denied') == false &&
      github.event.issue.state == 'open'

    steps:
      # First, we are going to re-run validation. This is important because
      # the issue body may have changed since the last time it was validated.

      # This is required to ensure the issue form template and any validation
      # scripts are included in the workspace.
      - name: Checkout
        id: checkout
        uses: actions/checkout@v4

      # Since this workflow includes custom validation scripts, we need to
      # install Node.js and any dependencies.
      - name: Setup Node.js
        id: setup-node
        uses: actions/setup-node@v4

      # Install dependencies from `package.json`.
      - name: Install Dependencies
        id: install
        run: npm install

      # GitHub App authentication is required if you want to interact with any
      # resources outside the scope of the repository this workflow runs in.
      - name: Get GitHub App Token
        id: token
        uses: actions/create-github-app-token@v1
        with:
          app-id: ${{ vars.ISSUEOPS_APP_ID }}
          private-key: ${{ secrets.ISSUEOPS_APP_PRIVATE_KEY }}
          owner: ${{ github.repository_owner }}

      # Remove the validated label. This will be re-added if validation passes.
      - name: Remove Validated Label
        id: remove-label
        uses: issue-ops/labeler@v2
        with:
          action: remove
          github_token: ${{ steps.token.outputs.token }}
          labels: |
            validated
          issue_number: ${{ github.event.issue.number }}
          repository: ${{ github.repository }}

      # Parse the issue body into machine-readable JSON, so that it can be
      # processed by the rest of the workflow.
      - name: Parse Issue Body
        id: parse
        uses: issue-ops/parser@v4
        with:
          body: ${{ github.event.issue.body }}
          issue-form-template: team-membership.yml
          workspace: ${{ github.workspace }}

      # Validate early and often! Validation should be run any time an issue is
      # interacted with, to ensure that any changes to the issue body are valid.
      - name: Validate Request
        id: validate
        uses: issue-ops/validator@v3
        with:
          add-comment: false # Don't add another validation comment.
          github-token: ${{ steps.token.outputs.token }}
          issue-form-template: team-membership.yml
          issue-number: ${{ github.event.issue.number }}
          parsed-issue-body: ${{ steps.parse.outputs.json }}
          workspace: ${{ github.workspace }}

      # If validation passed, add the validated and submitted labels to the issue.
      - if: ${{ steps.validate.outputs.result == 'success' }}
        name: Add Validated Label
        id: add-label
        uses: issue-ops/labeler@v2
        with:
          action: add
          github_token: ${{ steps.token.outputs.token }}
          labels: |
            validated
            submitted
          issue_number: ${{ github.event.issue.number }}
          repository: ${{ github.repository }}

      # If validation succeeded, alert the administrator team so they can
      # approve or deny the request.
      - if: ${{ steps.validate.outputs.result == 'success' }}
        name: Notify Admin (Success)
        id: notify-success
        uses: peter-evans/create-or-update-comment@v4
        with:
          issue-number: ${{ github.event.issue.number }}
          body: |
            👋 @issue-ops/admins! The request has been validated and is
            ready for your review. Please comment with `.approve` or `.deny`
            to approve or deny this request.
Deny workflow
If the request is denied, the user should be notified and the issue should close.
name: Process Denial Comment

on:
  issue_comment:
    types:
      - created

permissions:
  contents: read
  id-token: write
  issues: write

jobs:
  submit:
    name: Deny Request
    runs-on: ubuntu-latest

    # This job should only be run when the following conditions are true:
    #
    # - A user comments `.deny` on the issue.
    # - The issue has the `team-membership` label.
    # - The issue has the `validated` label.
    # - The issue has the `submitted` label.
    # - The issue does not have the `approved` or `denied` labels.
    # - The issue is open.
    if: |
      startsWith(github.event.comment.body, '.deny') &&
      contains(github.event.issue.labels.*.name, 'team-membership') == true &&
      contains(github.event.issue.labels.*.name, 'submitted') == true &&
      contains(github.event.issue.labels.*.name, 'validated') == true &&
      contains(github.event.issue.labels.*.name, 'approved') == false &&
      contains(github.event.issue.labels.*.name, 'denied') == false &&
      github.event.issue.state == 'open'

    steps:
      # This time, we do not need to re-run validation because the request is
      # being denied. It can just be closed.

      # However, we do need to confirm that the user who commented `.deny` is
      # a member of the administrator team.
      # GitHub App authentication is required if you want to interact with any
      # resources outside the scope of the repository this workflow runs in.
      - name: Get GitHub App Token
        id: token
        uses: actions/create-github-app-token@v1
        with:
          app-id: ${{ vars.ISSUEOPS_APP_ID }}
          private-key: ${{ secrets.ISSUEOPS_APP_PRIVATE_KEY }}
          owner: ${{ github.repository_owner }}

      # Check if the user who commented `.deny` is a member of the
      # administrator team.
      - name: Check Admin Membership
        id: check-admin
        uses: actions/github-script@v7
        with:
          github-token: ${{ steps.token.outputs.token }}
          script: |
            try {
              await github.rest.teams.getMembershipForUserInOrg({
                org: context.repo.owner,
                team_slug: 'admins',
                username: context.actor,
              })
              core.setOutput('member', 'true')
            } catch (error) {
              if (error.status === 404) {
                core.setOutput('member', 'false')
              }
              throw error
            }

      # If the user is not a member of the administrator team, exit the
      # workflow.
      - if: ${{ steps.check-admin.outputs.member == 'false' }}
        name: Exit
        run: exit 0

      # If the user is a member of the administrator team, add the denied label.
      - name: Add Denied Label
        id: add-label
        uses: issue-ops/labeler@v2
        with:
          action: add
          github_token: ${{ steps.token.outputs.token }}
          labels: |
            denied
          issue_number: ${{ github.event.issue.number }}
          repository: ${{ github.repository }}

      # Notify the user that the request was denied.
      - name: Notify User
        id: notify
        uses: peter-evans/create-or-update-comment@v4
        with:
          issue-number: ${{ github.event.issue.number }}
          body: |
            This request has been denied and will be closed.

      # Close the issue as not planned.
      - name: Close Issue
        id: close
        uses: actions/github-script@v7
        with:
          script: |
            await github.rest.issues.update({
              issue_number: ${{ github.event.issue.number }},
              owner: context.repo.owner,
              repo: context.repo.repo,
              state: 'closed',
              state_reason: 'not_planned'
            })
Approve workflow
Finally, we need to handle request approval. In this case, we need to add the user to the team, notify them, and close the issue.
name: Process Approval Comment

on:
  issue_comment:
    types:
      - created

permissions:
  contents: read
  id-token: write
  issues: write

jobs:
  submit:
    name: Approve Request
    runs-on: ubuntu-latest

    # This job should only be run when the following conditions are true:
    #
    # - A user comments `.approve` on the issue.
    # - The issue has the `team-membership` label.
    # - The issue has the `validated` label.
    # - The issue has the `submitted` label.
    # - The issue does not have the `approved` or `denied` labels.
    # - The issue is open.
    if: |
      startsWith(github.event.comment.body, '.approve') &&
      contains(github.event.issue.labels.*.name, 'team-membership') == true &&
      contains(github.event.issue.labels.*.name, 'submitted') == true &&
      contains(github.event.issue.labels.*.name, 'validated') == true &&
      contains(github.event.issue.labels.*.name, 'approved') == false &&
      contains(github.event.issue.labels.*.name, 'denied') == false &&
      github.event.issue.state == 'open'

    steps:
      # This time, we do not need to re-run validation because the request is
      # being approved. It can just be processed.

      # This is required to ensure the issue form template is included in the
      # workspace.
      - name: Checkout
        id: checkout
        uses: actions/checkout@v4

      # We do need to confirm that the user who commented `.approve` is a member
      # of the administrator team. GitHub App authentication is required if you
      # want to interact with any resources outside the scope of the repository
      # this workflow runs in.
      - name: Get GitHub App Token
        id: token
        uses: actions/create-github-app-token@v1
        with:
          app-id: ${{ vars.ISSUEOPS_APP_ID }}
          private-key: ${{ secrets.ISSUEOPS_APP_PRIVATE_KEY }}
          owner: ${{ github.repository_owner }}

      # Check if the user who commented `.approve` is a member of the
      # administrator team.
      - name: Check Admin Membership
        id: check-admin
        uses: actions/github-script@v7
        with:
          github-token: ${{ steps.token.outputs.token }}
          script: |
            try {
              await github.rest.teams.getMembershipForUserInOrg({
                org: context.repo.owner,
                team_slug: 'admins',
                username: context.actor,
              })
              core.setOutput('member', 'true')
            } catch (error) {
              if (error.status === 404) {
                core.setOutput('member', 'false')
              }
              throw error
            }

      # If the user is not a member of the administrator team, exit the
      # workflow.
      - if: ${{ steps.check-admin.outputs.member == 'false' }}
        name: Exit
        run: exit 0

      # Parse the issue body into machine-readable JSON, so that it can be
      # processed by the rest of the workflow.
      - name: Parse Issue body
        id: parse
        uses: issue-ops/parser@v4
        with:
          body: ${{ github.event.issue.body }}
          issue-form-template: team-membership.yml
          workspace: ${{ github.workspace }}

      - name: Add to Team
        id: add
        uses: actions/github-script@v7
        with:
          github-token: ${{ steps.token.outputs.token }}
          script: |
            const parsedIssue = JSON.parse('${{ steps.parse.outputs.json }}')

            await github.rest.teams.addOrUpdateMembershipForUserInOrg({
              org: context.repo.owner,
              team_slug: parsedIssue.team,
              username: '${{ github.event.issue.user.login }}',
              role: 'member'
            })

      - name: Notify User
        id: notify
        uses: peter-evans/create-or-update-comment@v4
        with:
          issue-number: ${{ github.event.issue.number }}
          body: |
            This request has been processed successfully!

      - name: Close Issue
        id: close
        uses: actions/github-script@v7
        with:
          script: |
            await github.rest.issues.update({
              issue_number: ${{ github.event.issue.number }},
              owner: context.repo.owner,
              repo: context.repo.repo,
              state: 'closed',
              state_reason: 'completed'
            })
Take this with you
And there you have it! With a handful of standardized workflows, you have an end-to-end, issue-driven process in place to manage team membership. This can be extended as far as you want, including support for removing users, auditing access, and more. With IssueOps, the sky is the limit!
Here’s the best thing about IssueOps: It brings another level of automation to a surface I’m constantly using—and that’s GitHub. By using issues and pull requests as control centers for workflows, teams can reduce friction, improve efficiency, and keep everything transparent. Whether you want to automate deployments, approvals, or bug triage, IssueOps makes it all possible, without ever leaving your repo.
In my experience, it’s always best to start small and experiment with what works best for you. With just a bit of time, you’ll see your workflows get smoother with every commit (I know I have). Happy coding! ✨
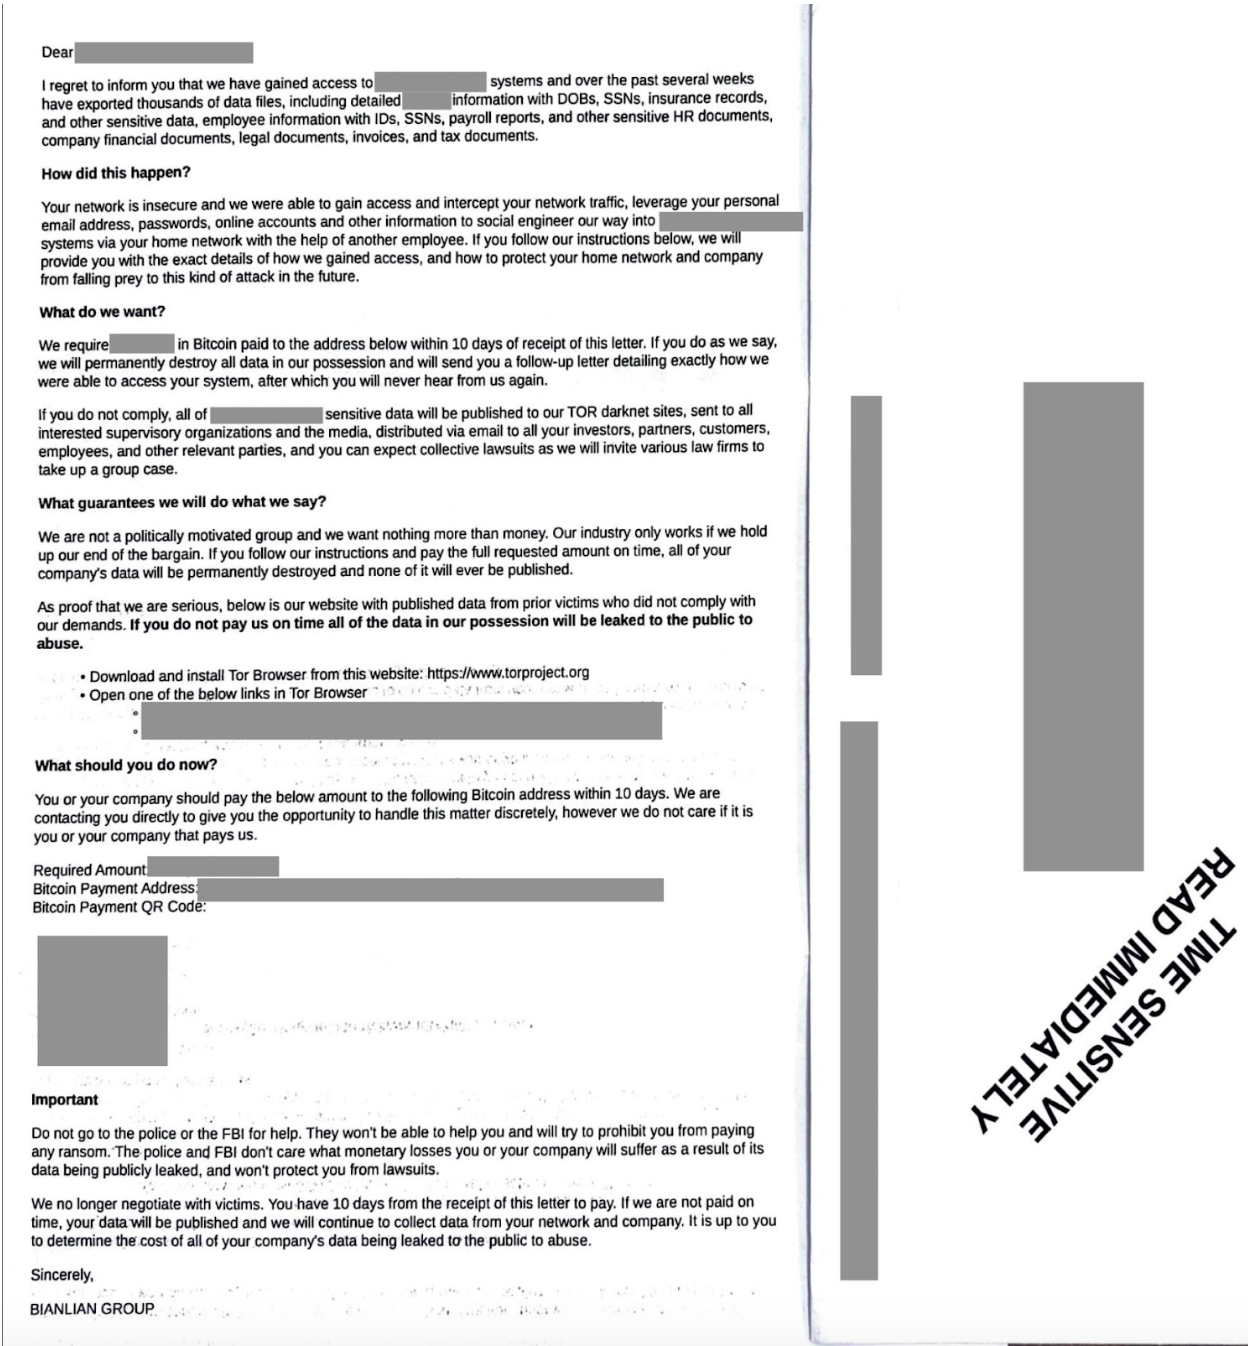
The FBI is warning of a mail-based fraud involving letters sent to businesses in the U.S. These letters resemble online ransomware notes demanding payment via Bitcoin.
Rapid7 examined a mail-based ransom demand sent to a customer from a local postcode.
There is no evidence that any of the recipients have been compromised by BianLian.
From BianLian: “Time Sensitive, Read Immediately”
On March 5, the FBI issued an alert regarding a mail scam targeting U.S. business executives with extortion. The letters claim to be from noted ransomware group BianLian, demanding a payment in Bitcoin ranging from $250,000 to $500,000 within ten days of receipt.
The FBI alert reads as follows:
“Stamped “Time Sensitive Read Immediately”, the letter claims the “BianLian Group” gained access into the organization’s network and stole thousands of sensitive data files. The letter then goes on to threaten that the victim’s data will be published to BianLian’s data leak sites if recipients do not use an included QR code linked to a Bitcoin wallet to pay between $250,000 and $500,000 within ten days from receipt of the letter, claiming the group will not negotiate further with victims.”
The ransom note also warns recipients not to contact law enforcement, stressing that the FBI “does not care” about victims and will not help in the event of a lawsuit — a classic social engineering pressure tactic.
Rapid7 has observed that these letters are still in circulation, with one such letter received by a Rapid7 customer highlighted below. While we have redacted parts of the letter to protect the customer’s identity and other sensitive information, you can see that it follows the pattern of others seen in the wild, falsely claiming to be from BianLian:
It reads:
“I regret to inform you that we have gained access to [redacted] systems and over the past several weeks have exported thousands of data files, including detailed [redacted] information with DOBs, SSNs, insurance records, and other sensitive data, employee information with IDs, SSNs, payroll reports, and other sensitive HR documents, company financial documents, legal documents, invoices, and tax documents.
How did this happen?
Your network is insecure and we were able to gain access and intercept your network traffic, leverage your personal email address, passwords, online accounts and other information to social engineer our way into [redacted] systems via your home network with the help of another employee. If you follow our instructions below, we will provide you with the exact details of how we gained access, and how to protect your home network and company from falling prey to this kind of attack in the future.
What do we want?
We require [redacted] in Bitcoin paid to the address below within 10 days of receipt of this letter. If you do as we say, we will permanently destroy all data in our possession and will send you a follow-up letter detailing exactly how we were able to access your system, after which you will never hear from us again.
If you do not comply, all of [redacted] sensitive data will be published to our TOR darknet sites, sent to all interested supervisory organizations and the media, distributed via email to all your investors, partners, customers, employees, and other relevant parties, and you can expect collective lawsuits as we will invite various law firms to take up a group case.”
The above letter is a match for those received by multiple businesses. Similarly, the Bitcoin payment address does not appear to be connected to the genuine BianLian group—just like several other examples highlighted online.
What you need to do
The FBI has issued the following advice, which is still applicable to this example of mail-based fraud:
Notify corporate executives and the organization of the scam for awareness.
Ensure employees are educated on what to do if they receive a ransom threat.
If you or your organization receive one of these letters, ensure your network defenses are up to date and that there are no active alerts regarding malicious activity.
If you discover you are a victim of BianLian ransomware, please visit [the FBI’s] Joint Cybersecurity Awareness Bulletin for recent tactics, techniques, and procedures and indicators of compromise to help organizations protect against ransomware.The FBI also requests that victims report any incident to their local FBI Field Office or the Internet Crime Complaint Center (IC3).
Additionally, Rapid7 recommends the following:
Do not scan any QR codes or go to any web links within the letter.
Do not pay any ransom.
Secure both the letter and envelope in a chain of custody evidence bag, or a ziplock if unavailable.
While ransomware actually was sent through the mail via infected USB sticks in 2022 by threat actor FIN7, that is not the case here. Recipients have not been compromised by BianLian despite what said letters claim. While your business is unlikely to receive one of these letters, other fraudsters may follow suit so a few moments spent warning of the dangers of this tactic may help to prevent an avoidable financial loss.
Modern CPUs all have multiple hardware vulnerabilities that the kernel needs to mitigate;
the 6.13 kernel has workarounds for 14 security-sensitive CPU bugs just on x86_64.
Several of those have multiple variants,
or multiple mitigations that apply on different microarchitectures. There are
different kernel command-line options for each of these mitigations, which leads
to a confusing situation for users trying to figure out how to configure their
systems. David Kaplan recently posted
a patch set that adds a single, unified command-line option for controlling
mitigations and
simplifies the logic for detecting, configuring, and
applying them as well.
If it is merged, the patch set could
make it much easier for users to navigate the complicated web of CPU
vulnerabilities and their mitigations.
Version 7.1
of PeerTube, a tool for
sharing videos online, has been released. Notable features in this
release include improved support for the Podcast 2.0 standard, better
playback stability, and a new view protocol enabled by default to
allow PeerTube to handle more simultaneous viewers. See the release
notes for more details.
/e/OS is a
privacy-centric, open-source mobile operating system that
has primarily been targeted at mobile phones, with only a few
community supported images available for tablet devices. In December, Murena—a company that sells devices with /e/OS
preinstalled—announced
that /e/OS now officially supports tablets as well, starting with the
Pixel tablet. The user experience is close enough to
mainstream alternatives to make it attractive, but there are some
under-the-hood problems that may give users pause.
A security company called Fenrisk has posted an overview of a pair
of claimed successful supply-chain attacks on the Fedora and openSUSE
distributions.
We successfully identified vulnerabilities in the Pagure, the Git
forge used by Fedora to store their package definitions. We also
compromised Open Build Service, the all-in-one toolchain used and
developed by the openSUSE project for compilation and packaging.
Their exploitation by malicious actors would have led to the
compromise of all the packages of the distributions Fedora and
openSUSE, as well as their downstream distributions, impacting
millions of Linux servers and desktops.
Security updates have been issued by Debian (tzdata), Fedora (expat and tigervnc), Red Hat (kernel, kernel-rt, thunderbird, and webkit2gtk3), SUSE (dcmtk), and Ubuntu (restrictedpython and uriparser).
Within the Cloudflare Application Security team, every machine learning model we use is underpinned by a rich set of static rules that serve as a ground truth and a baseline comparison for how our models are performing. These are called heuristics. Our Bot Management heuristics engine has served as an important part of eight global machine learning (ML) models, but we needed a more expressive engine to increase our accuracy. In this post, we’ll review how we solved this by moving our heuristics to the Cloudflare Ruleset Engine. Not only did this provide the platform we needed to write more nuanced rules, it made our platform simpler and safer, and provided Bot Management customers more flexibility and visibility into their bot traffic.
Bot detection via simple heuristics
In Cloudflare’s bot detection, we build heuristics from attributes like software library fingerprints, HTTP request characteristics, and internal threat intelligence. Heuristics serve three separate purposes for bot detection:
Bot identification: If traffic matches a heuristic, we can identify the traffic as definitely automated traffic (with a bot score of 1) without the need of a machine learning model.
Train ML models: When traffic matches our heuristics, we create labelled datasets of bot traffic to train new models. We’ll use many different sources of labelled bot traffic to train a new model, but our heuristics datasets are one of the highest confidence datasets available to us.
Validate models: We benchmark any new model candidate’s performance against our heuristic detections (among many other checks) to make sure it meets a required level of accuracy.
While the existing heuristics engine has worked very well for us, as bots evolved we needed the flexibility to write increasingly complex rules. Unfortunately, such rules were not easily supported in the old engine. Customers have also been asking for more details about which specific heuristic caught a request, and for the flexibility to enforce different policies per heuristic ID. We found that by building a new heuristics framework integrated into the Cloudflare Ruleset Engine, we could build a more flexible system to write rules and give Bot Management customers the granular explainability and control they were asking for.
The need for more efficient, precise rules
In our previous heuristics engine, we wrote rules in Lua as part of our openresty-based reverse proxy. The Lua-based engine was limited to a very small number of characteristics in a rule because of the high engineering cost we observed with adding more complexity.
With Lua, we would write fairly simple logic to match on specific characteristics of a request (i.e. user agent). Creating new heuristics of an existing class was fairly straight forward. All we’d need to do is define another instance of the existing class in our database. However, if we observed malicious traffic that required more than two characteristics (as a simple example, user-agent and ASN) to identify, we’d need to create bespoke logic for detections. Because our Lua heuristics engine was bundled with the code that ran ML models and other important logic, all changes had to go through the same review and release process. If we identified malicious traffic that needed a new heuristic class, and we were also blocked by pending changes in the codebase, we’d be forced to either wait or rollback the changes. If we’re writing a new rule for an “under attack” scenario, every extra minute it takes to deploy a new rule can mean an unacceptable impact to our customer’s business.
More critical than time to deploy is the complexity that the heuristics engine supports. The old heuristics engine only supported using specific request attributes when creating a new rule. As bots became more sophisticated, we found we had to reject an increasing number of new heuristic candidates because we weren’t able to write precise enough rules. For example, we found a Golang TLS fingerprint frequently used by bots and by a small number of corporate VPNs. We couldn’t block the bots without also stopping the legitimate VPN usage as well, because the old heuristics platform lacked the flexibility to quickly compile sufficiently nuanced rules. Luckily, we already had the perfect solution with Cloudflare Ruleset Engine.
Our new heuristics engine
The Ruleset Engine is familiar to anyone who has written a WAF rule, Load Balancing rule, or Transform rule, just to name a few. For Bot Management, the Wireshark-inspired syntax allows us to quickly write heuristics with much greater flexibility to vastly improve accuracy. We can write a rule in YAML that includes arbitrary sub-conditions and inherit the same framework the WAF team uses to both ensure any new rule undergoes a rigorous testing process with the ability to rapidly release new rules to stop attacks in real-time.
Writing heuristics on the Cloudflare Ruleset Engine allows our engineers and analysts to write new rules in an easy to understand YAML syntax. This is critical to supporting a rapid response in under attack scenarios, especially as we support greater rule complexity. Here’s a simple rule using the new engine, to detect empty user-agents restricted to a specific JA4 fingerprint (right), compared to the empty user-agent detection in the old Lua based system (left):
--- Adds heuristic to be used for inference in `detect` method
-- @param heuristic schema.Heuristic table
function EmptyUserAgentHeuristic:add(heuristic)
self.heuristic = heuristic
end
--- Detect runs empty user agent heuristic detection
-- @param ctx context of request
-- @return schema.Heuristic table on successful detection or nil otherwise
function EmptyUserAgentHeuristic:detect(ctx)
local ua = ctx.user_agent
if not ua or ua == '' then
return self.heuristic
end
end
return _M
ref: empty-user-agent
description: Empty or missing
User-Agent header
action: add_bot_detection
action_parameters:
active_mode: false
expression: http.user_agent eq
"" and cf.bot_management.ja4 = "t13d1516h2_8daaf6152771_b186095e22b6"
The Golang heuristic that captured corporate proxy traffic as well (mentioned above) was one of the first to migrate to the new Ruleset engine. Before the migration, traffic matching on this heuristic had a false positive rate of 0.01%. While that sounds like a very small number, this means for every million bots we block, 100 real users saw a Cloudflare challenge page unnecessarily. At Cloudflare scale, even small issues can have real, negative impact.
When we analyzed the traffic caught by this heuristic rule in depth, we saw the vast majority of attack traffic came from a small number of abusive networks. After narrowing the definition of the heuristic to flag the Golang fingerprint only when it’s sourced by the abusive networks, the rule now has a false positive rate of 0.0001% (One out of 1 million). Updating the heuristic to include the network context improved our accuracy, while still blocking millions of bots every week and giving us plenty of training data for our bot detection models. Because this heuristic is now more accurate, newer ML models make more accurate decisions on what’s a bot and what isn’t.
New visibility and flexibility for Bot Management customers
While the new heuristics engine provides more accurate detections for all customers and a better experience for our analysts, moving to the Cloudflare Ruleset Engine also allows us to deliver new functionality for Enterprise Bot Management customers, specifically by offering more visibility. This new visibility is via a new field for Bot Management customers called Bot Detection IDs. Every heuristic we use includes a unique Bot Detection ID. These are visible to Bot Management customers in analytics, logs, and firewall events, and they can be used in the firewall to write precise rules for individual bots.
Detections also include a specific tag describing the class of heuristic. Customers see these plotted over time in their analytics.
To illustrate how this data can help give customers visibility into why we blocked a request, here’s an example request flagged by Bot Management (with the IP address, ASN, and country changed):
Before, just seeing that our heuristics gave the request a score of 1 was not very helpful in understanding why it was flagged as a bot. Adding our Detection IDs to Firewall Events helps to paint a better picture for customers that we’ve identified this request as a bot because that traffic used an empty user-agent.
In addition to Analytics and Firewall Events, Bot Detection IDs are now available for Bot Management customers to use in Custom Rules, Rate Limiting Rules, Transform Rules, and Workers.
Account takeover detection IDs
One way we’re focused on improving Bot Management for our customers is by surfacing more attack-specific detections. During Birthday Week, we launched Leaked Credentials Check for all customers so that security teams could help prevent account takeover (ATO) attacks by identifying accounts at risk due to leaked credentials. We’ve now added two more detections that can help Bot Management enterprise customers identify suspicious login activity via specific detection IDs that monitor login attempts and failures on the zone. These detection IDs are not currently affecting the bot score, but will begin to later in 2025. Already, they can help many customers detect more account takeover events now.
Detection ID 201326592 monitors traffic on a customer website and looks for an anomalous rise in login failures (usually associated with brute force attacks), and ID 201326593 looks for an anomalous rise in login attempts (usually associated with credential stuffing).
Protect your applications
If you are a Bot Management customer, log in and head over to the Cloudflare dashboard and take a look in Security Analytics for bot detection IDs 201326592 and 201326593.
These will highlight ATO attempts targeting your site. If you spot anything suspicious, or would like to be protected against future attacks, create a rule that uses these detections to keep your application safe.
The collective thoughts of the interwebz
Manage Consent
To provide the best experiences, we use technologies like cookies to store and/or access device information. Consenting to these technologies will allow us to process data such as browsing behavior or unique IDs on this site. Not consenting or withdrawing consent, may adversely affect certain features and functions.
Functional
Always active
The technical storage or access is strictly necessary for the legitimate purpose of enabling the use of a specific service explicitly requested by the subscriber or user, or for the sole purpose of carrying out the transmission of a communication over an electronic communications network.
Preferences
The technical storage or access is necessary for the legitimate purpose of storing preferences that are not requested by the subscriber or user.
Statistics
The technical storage or access that is used exclusively for statistical purposes.The technical storage or access that is used exclusively for anonymous statistical purposes. Without a subpoena, voluntary compliance on the part of your Internet Service Provider, or additional records from a third party, information stored or retrieved for this purpose alone cannot usually be used to identify you.
Marketing
The technical storage or access is required to create user profiles to send advertising, or to track the user on a website or across several websites for similar marketing purposes.