Post Syndicated from BeardedTinker original https://www.youtube.com/watch?v=1ggyF8pM4EE
Free data transfer out to internet when moving out of AWS
Post Syndicated from Sébastien Stormacq original https://aws.amazon.com/blogs/aws/free-data-transfer-out-to-internet-when-moving-out-of-aws/
You told us one of the primary reasons to adopt Amazon Web Services (AWS) is the broad choice of services we offer, enabling you to innovate, build, deploy, and monitor your workloads. AWS has continuously expanded its services to support virtually any cloud workload. It now offers over 200 fully featured services for compute, storage, databases, networking, analytics, machine learning (ML) and artificial intelligence (AI), and many more. For example, Amazon Elastic Compute Cloud (Amazon EC2) offers over 750 generally available instances—more than any other major cloud provider—and you can choose from numerous relational, analytics, key-value, document, or graph databases.
We believe this choice must include the one to migrate your data to another cloud provider or on-premises. That’s why, starting today, we’re waiving data transfer out to the internet (DTO) charges when you want to move outside of AWS.
Over 90 percent of our customers already incur no data transfer expenses out of AWS because we provide 100 gigabytes per month free from AWS Regions to the internet. This includes traffic from Amazon EC2, Amazon Simple Storage Service (Amazon S3), Application Load Balancer, among others. In addition, we offer one terabyte of free data transfer out of Amazon CloudFront every month.
If you need more than 100 gigabytes of data transfer out per month while transitioning, you can contact AWS Support to ask for free DTO rates for the additional data. It’s necessary to go through support because you make hundreds of millions of data transfers each day, and we generally do not know if the data transferred out to the internet is a normal part of your business or a one-time transfer as part of a switch to another cloud provider or on premises.
We will review requests at the AWS account level. Once approved, we will provide credits for the data being migrated. We don’t require you to close your account or change your relationship with AWS in any way. You’re welcome to come back at any time. We will, of course, apply additional scrutiny if the same AWS account applies multiple times for free DTO.
We believe in customer choice, including the choice to move your data out of AWS. The waiver on data transfer out to the internet charges also follows the direction set by the European Data Act and is available to all AWS customers around the world and from any AWS Region.
Freedom of choice is not limited to data transfer rates. AWS also supports Fair Software Licensing Principles, which make it easy to use software with other IT providers of your choice. You can read this blog post for more details.
You can check the FAQ for more information, or you can contact AWS Customer Support to request credits for DTO while switching.
But I sincerely hope you will not.
Secure your unprotected assets with Security Center: quick view for CISOs
Post Syndicated from Alexandra Moraru original https://blog.cloudflare.com/security-insights-quick-ciso-view
We understand that one of the significant hurdles faced by our customers, especially larger organizations, is obtaining a clear view of the deployment of Cloudflare services throughout their vast and complex infrastructures. The question isn’t just whether Cloudflare is deployed, but whether it’s fully optimized across every asset and service. Addressing this challenge head-on, we’re rolling out a new feature set designed to provide better visibility and control over your security posture.
The problem we are addressing
The core problem we’re tackling is the growing complexity of cyber threats and the expanding attack surface, which complicates maintaining a strong security posture for our customers.
It’s not uncommon for organizations to deploy a variety of security solutions, including ours, without fully optimizing and implementing their configurations. This results in a false sense of security, underutilized investments and, more critically, exposed vulnerabilities. Our customers frequently express concerns about not having a clear picture of their security posture across their entire infrastructure, uncertain if critical assets are adequately protected or if specific Cloudflare security features could be better leveraged.
We want to bring users comprehensive visibility into their security configurations and the state of their deployments across Cloudflare’s suite of products. By providing actionable insights into underconfigured areas, unassigned resources, or unutilized features, we aim to close the security gaps and enhance the overall defense mechanisms of our customers’ digital ecosystems. This improvement is not just about leveraging technology but about promoting a culture of proactive security management, where every piece of the digital infrastructure is consistently and optimally protected.
How we’re solving this inside Security Center
More than two years ago, we took on the mission to consolidate our extensive suite of security products, security expertise, and our unique insights into Internet threats into one comprehensive solution — the Cloudflare Security Center. Launched with the vision to simplify attack surface management and make advanced security intelligence actionable for organizations of all sizes, Security Center has since become the one-stop quick view to evaluate your security posture.
Today, we build on this foundation to address a pain point for many of our large customers: ensuring complete Cloudflare protection across their entire digital infrastructure.
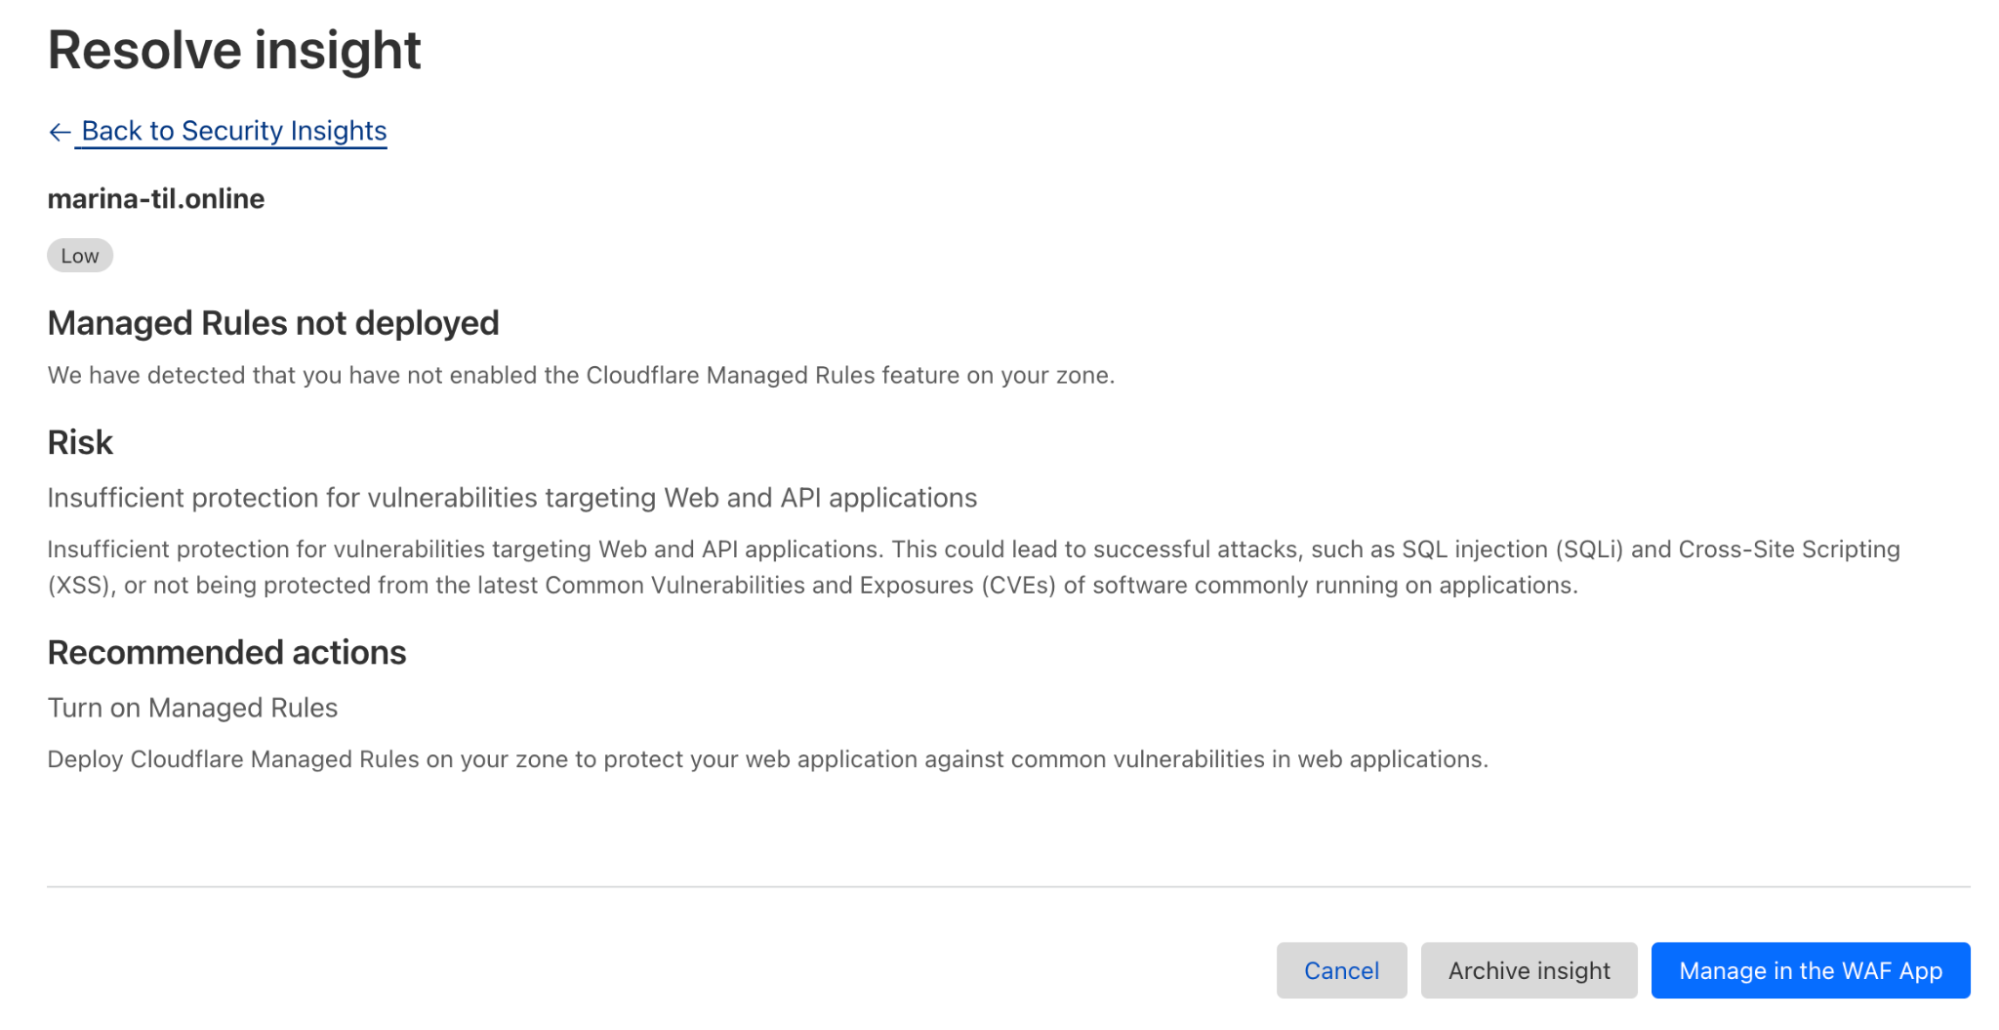
Our latest update in the Security Center focuses on delivering detailed insights into Cloudflare’s deployment status across your digital assets. This encompasses identifying applications where critical services like WAF, Access, and other security protection tools might not be fully configured or optimized, thereby weakening your security posture.
In addition to these insights, we are introducing a quick view within Security Center Insights, designed to offer CISOs and security teams a quick and comprehensive view of their current Cloudflare product configurations at any given moment, along with recommendations for enhancements, under the Security optimization snapshot on the dashboard.
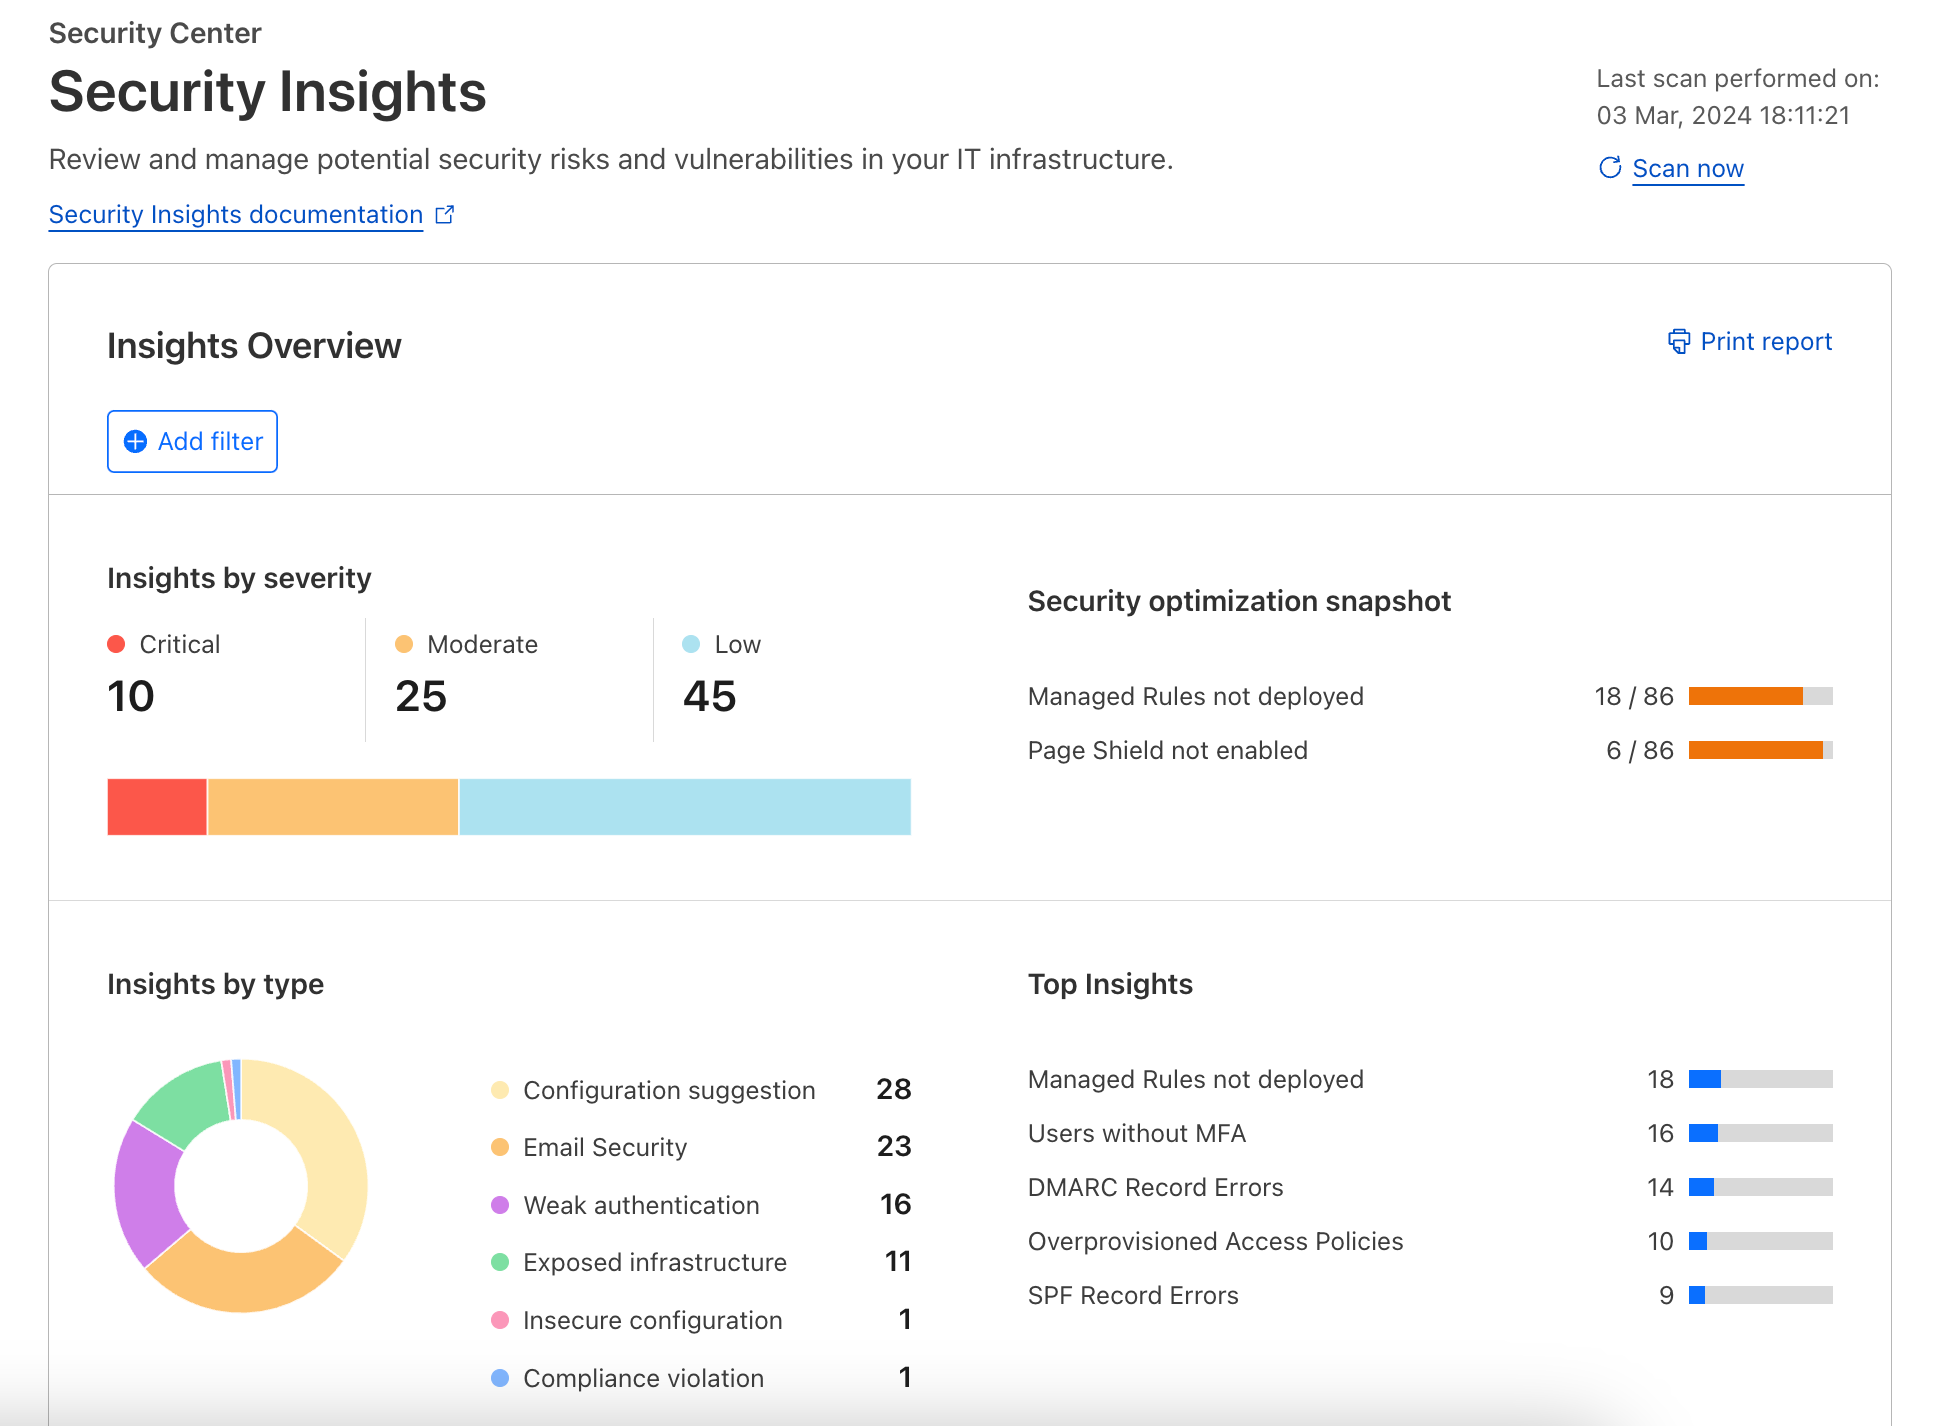
Leveraging these new insights, Cloudflare users can now take proactive steps to close any gaps in their security framework. By offering a granular view of where specific Cloudflare services can be better utilized, we’re not just solving a visibility problem — we’re delivering actionable security intelligence. This means decisions can be made swiftly, ensuring that your defenses not only keep pace with, but stay ahead of, potential threats.
For instance, we’ll highlight if WAF is deployed on only a portion of your zones, where Email Security could be leveraged, or if certain assets are unprotected by Access controls. We’re also making it easier for you to see if you are missing any critical setup like Page Shield, ensuring the product is configured, so you are not just one step closer to becoming compliant with standards like PCI DSS, but are also protected against evolving threats. We are outlining newly discovered API endpoints that require your attention as well.
Finally, users can now export their Security Insights using our public API, and will soon be able to do the same directly from the Cloudflare Dashboard, with a simple click of a button!
Accessing Security Center Insights
Security Center Insights is available to all Cloudflare dashboard users that are Administrators of their Cloudflare account.
Regardless of the size or scope of your deployment, our goal is to empower every user with the tools needed to achieve a robust security posture, which they can continuously influence by improving existing configurations, adding new solutions, and discovering new vulnerabilities.
Future Security Center roadmap
We’re constantly adding other relevant security insights to help improve your security posture, covering exposed infrastructure, insecure configurations, optimisations, new products, and more, including the ability to easily export these for reporting purposes. Moreover, stay tuned for a completely new reporting platform that will automatically deliver curated and contextualized security insights directly into your inbox — showcasing the power of Cloudflare’s security portfolio. The periodic reports will be complemented by a personalized interactive in-dashboard reporting experience.
Check out your security insights under your account’s Security Center now and take action to improve your security posture with Cloudflare!
If you would like to join us in building the Security Center or other exciting Cloudflare products, see our open positions and learn more about life@Cloudflare.
Securing Cloudflare with Cloudflare: a Zero Trust journey
Post Syndicated from Derek Pitts original https://blog.cloudflare.com/securing-cloudflare-with-cloudflare-zero-trust

Cloudflare is committed to providing our customers with industry-leading network security solutions. At the same time, we recognize that establishing robust security measures involves identifying potential threats by using processes that may involve scrutinizing sensitive or personal data, which in turn can pose a risk to privacy. As a result, we work hard to balance privacy and security by building privacy-first security solutions that we offer to our customers and use for our own network.
In this post, we’ll walk through how we deployed Cloudflare products like Access and our Zero Trust Agent in a privacy-focused way for employees who use the Cloudflare network. Even though global legal regimes generally afford employees a lower level of privacy protection on corporate networks, we work hard to make sure our employees understand their privacy choices because Cloudflare has a strong culture and history of respecting and furthering user privacy on the Internet. We’ve found that many of our customers feel similarly about ensuring that they are protecting privacy while also securing their networks.
So how do we balance our commitment to privacy with ensuring the security of our internal corporate environment using Cloudflare products and services? We start with the basics: We only retain the minimum amount of data needed, we de-identify personal data where we can, we communicate transparently with employees about the security measures we have in place on corporate systems and their privacy choices, and we retain necessary information for the shortest time period needed.
How we secure Cloudflare using Cloudflare
We take a comprehensive approach to securing our globally distributed hybrid workforce with both organizational controls and technological solutions. Our organizational approach includes a number of measures, such as a company-wide Acceptable Use Policy, employee privacy notices tailored by jurisdiction, required annual and new-hire privacy and security trainings, role-based access controls (RBAC), and least privilege principles. These organizational controls allow us to communicate expectations for both the company and the employees that we can implement with technological controls and that we enforce through logging and other mechanisms.
Our technological controls are rooted in Zero Trust best practices and start with a focus on our Cloudflare One services to secure our workforce as described below.
Securing access to applications
Cloudflare secures access to self-hosted and SaaS applications for our workforce, whether remote or in-office, using our own Zero Trust Network Access (ZTNA) service, Cloudflare Access, to verify identity, enforce multi-factor authentication with security keys, and evaluate device posture using the Zero Trust client for every request. This approach evolved over several years and has enabled Cloudflare to more effectively protect our growing workforce.
Defending against cyber threats
Cloudflare leverages Cloudflare Magic WAN to secure our office networks and the Cloudflare Zero Trust agent to secure our workforce. We use both of these technologies as an onramp to our own Secure Web Gateway (also known as Gateway) to secure our workforce from a rise in online threats.
As we have evolved our hybrid work and office configurations, our security teams have benefited from additional controls and visibility for forward-proxied Internet traffic, including:
- Granular HTTP controls: Our security teams inspect HTTPS traffic to block access to specific websites identified as malicious by our security team, conduct antivirus scanning, and apply identity-aware browsing policies.
- Selectively isolating Internet browsing: With remote browser isolated (RBI) sessions, all web code is run on Cloudflare’s network far from local devices, insulating users from any untrusted and malicious content. Today, Cloudflare isolates social media, news outlets, personal email, and other potentially risky Internet categories, and we have set up feedback loops for our employees to help us fine-tune these categories.
- Geography-based logging: Seeing where outbound requests originate helps our security teams understand the geographic distribution of our workforce, including our presence in high-risk areas.
- Data Loss Prevention: To keep sensitive data inside our corporate network, this tool allows us to identify data we’ve flagged as sensitive in outbound HTTP/S traffic and prevent it from leaving the network.
- Cloud Access Security Broker: This tool allows us to monitor our SaaS apps for misconfigurations and sensitive data that is potentially exposed or shared too broadly.
Protecting inboxes with cloud email security
Additionally, we have deployed our Cloud Email Security solution to protect our workforce from increased phishing and business email compromise attacks that we have not only seen directed against our employees, but that are plaguing organizations globally. One key feature we use is email link isolation, which uses RBI and email security functionality to open potentially suspicious links in an isolated browser. This allows us to be slightly more relaxed with blocking suspicious links without compromising security. This is a big win for productivity for our employees and the security team, as both sets of employees aren’t having to deal with large volumes of false positives.
More details on our implementation can be found in our Securing Cloudflare with Cloudflare One case study.
How we respect privacy
The very nature of these powerful security technologies Cloudflare has created and deployed underscores the responsibility we have to use privacy-first principles in handling this data, and to recognize that the data should be respected and protected at all times.
The journey to respecting privacy starts with the products themselves. We develop products that have privacy controls built in at their foundation. To achieve this, our product teams work closely with Cloudflare’s product and privacy counsels to practice privacy by design. A great example of this collaboration is the ability to manage personally identifiable information (PII) in the Secure Web Gateway logs. You can choose to exclude PII from Gateway logs entirely or redact PII from the logs and gain granular control over access to PII with the Zero Trust PII Role.
In addition to building privacy-first security products, we are also committed to communicating transparently with Cloudflare employees about how these security products work and what they can – and can’t – see about traffic on our internal systems. This empowers employees to see themselves as part of the security solution, rather than set up an “us vs. them” mentality around employee use of company systems.
For example, while our employee privacy policies and our Acceptable Use Policy provide broad notice to our employees about what happens to data when they use the company’s systems, we thought it was important to provide even more detail. As a result, our security team collaborated with our privacy team to create an internal wiki page that plainly explains the data our security tools collect and why. We also describe the privacy choices available to our employees. This is particularly important for the “bring your own device” (BYOD) employees who have opted for the convenience of using their personal mobile device for work. BYOD employees must install endpoint management (provided by a third party) and Cloudflare’s Zero trust client on their devices if they want to access Cloudflare systems. We described clearly to our employees what this means about what traffic on their devices can be seen by Cloudflare teams, and we explained how they can take steps to protect their privacy when they are using their devices for purely personal purposes.
For the teams that develop for and support our Zero Trust services, we ensure that data is available only on a strict, need-to-know basis and is restricted to Cloudflare team members that require access as an essential part of their job. The set of people with access are required to take training that reminds them of their responsibility to respect this data and provides them with best practices for handling sensitive data. Additionally, to ensure we have full auditability, we log all the queries run against this database and by whom they are run.
Cloudflare has also made it easy for our employees to express any concerns they may have about how their data is handled or what it is used for. We have mechanisms in place that allow employees to ask questions or express concerns about the use of Zero Trust Security on Cloudflare’s network.
In addition, we make it easy for employees to reach out directly to the leaders responsible for these tools. All of these efforts have helped our employees better understand what information we collect and why. This has helped to expand our strong foundation for security and privacy at Cloudflare.
Encouraging privacy-first security for all
We believe firmly that great security is critical for ensuring data privacy, and that privacy and security can co-exist harmoniously. We also know that it is possible to secure a corporate network in a way that respects the employees using those systems.
For anyone looking to secure a corporate network, we encourage focusing on network security products and solutions that build in personal data protections, like our Zero Trust suite of products. If you are curious to explore how to implement these Cloudflare services in your own organizations, request a consultation here.
We also urge organizations to make sure they communicate clearly with their users. In addition to making sure company policies are transparent and accessible, it is important to help employees understand their privacy choices. Under the laws of almost every jurisdiction globally, individuals have a lower level of privacy on a company device or a company’s systems than they do on their own personal accounts or devices, so it’s important to communicate clearly to help employees understand the difference. If an organization has privacy champions, works councils, or other employee representation groups, it is critical to communicate early and often with these groups to help employees understand what controls they can exercise over their data.
Simpler migration from Netskope and Zscaler to Cloudflare: introducing Deskope and a Descaler partner update
Post Syndicated from Corey Mahan original https://blog.cloudflare.com/deskope-program-and-asdp-for-desclaer

Today, Cloudflare is launching early access to the Deskope Program, a new set of tooling to help migrate existing Netskope customers to Cloudflare One for a faster and easier security experience. In addition, we’re also thrilled to announce the expansion of the Descaler Program to Authorized Service Delivery Partners, who will now have exclusive access to the Descaler toolkit to help customers move safely and quickly to Cloudflare.
Introducing Deskope — Migrate from Netskope to Cloudflare One
To set the stage, Cloudflare One is our Secure Access Service Edge (SASE) platform that combines network connectivity services with Zero Trust security on one of the fastest, most resilient, and most composable global networks. The Descaler Program was announced in early 2023 as a frictionless path to migrate existing Zscaler customers to Cloudflare One. Today, we are announcing the Deskope Program as a new and equally effortless path to migrate existing Netskope customers to Cloudflare One.
The Deskope Program follows the same approach as the Descaler process, including the tools, process, and partners you need for a frictionless technical migration. This program is completed through architecture workshops, technical migration tooling, and when requested, trusted partner engagements.
Deskope’s approach is based on minimizing manual effort and reducing the potential for error, allowing for a migration experience that is both fast and reliable. Combining automated tools and expert support, we ensure that your Netskope configurations are accurately translated and optimized for Cloudflare’s environment. Following an extract, transform, and load sequence using API calls to your current Netskope account, the Deskope toolkit will export your current Netskope Next Gen Secure Web Gateway (SWG) configuration and transform it to be Cloudflare One-compatible before migrating it into a new Cloudflare One account (or an existing one, if you’d prefer).
Drawing from the success of the Descaler process and migrating customers in just a few hours, Cloudflare is now expanding the offering to customers who wish to migrate from Netskope to Cloudflare One.
Why Deskope? Speed and simplicity
When it comes to speed, Cloudflare Gateway, our secure web gateway, is simply faster.
During 2023’s Speed Week, we published a blog called Spotlight on Zero Trust: we’re fastest and here’s the proof comparing secure web gateway products. This data shows that Cloudflare’s Gateway is faster to more websites from more places than any of our competitors. To quote from the blog:
“In one exercise we pitted the Cloudflare Gateway and WARP client against Zscaler, Netskope, and Palo Alto which all have products that perform the same functions. Cloudflare users benefit from Gateway and Cloudflare’s network being embedded deep into last mile networks close to users, being peered with over 12,000 networks. That heightened connectivity shows because Cloudflare Gateway is the fastest network in 42% of tested scenarios:”
But speed without control can be dangerous. The good news is that all the speed is easy to manage and deploy.
When it comes to simplicity, Cloudflare One is a unified, cloud-native platform that is easy to set up and manage, with a single onboarding wizard that further streamlines setup for both policy and the single-agent deployment to endpoints. This is in contrast to Netskope, where the policy creation process can slow administrators down as they have to first build reusable objects from scratch, so even a basic Secure Web Gateway policy requires many different elements to get started. Cloudflare’s Gateway policy builder is streamlined to allow administrators to quickly set a policy’s scope by defining conditions for Gateway to match traffic against. Traffic, identity, and even device posture conditions can be joined with logical operators ‘AND’ or ‘OR’ to easily manage what would otherwise be complex filtering controls.
Cloudflare is equally committed to making the migration process as cost-effective as possible using flexible financial options for customers wanting to migrate over.
As we introduce the Deskope Program, we are equally excited to accelerate Descaler even further by inviting Authorized Service Delivery Partners to leverage the Descaler toolkit to help more customers move to Cloudflare One.
Welcome Authorized Service Delivery Partners to Descaler
In a May 2023 blog post detailing our global services partner strategy and the momentum of our Authorized Service Delivery Partner program, we showcased our partnership with service providers all around the world, highlighting the strategic importance of the program in delivering unparalleled Cloudflare solutions through our trusted network of service providers.
We are thrilled to announce that our Authorized Service Delivery Partners now have the option to access the Descaler toolkit, along with training and support materials we have developed from our global experience with key customers. This initiative is designed to empower our authorized partners, complementing their existing skills and unique service offerings.
With access to the Descaler tool, our partners will be even better equipped to assist with your critical migration requirements to Cloudflare. Plans are underway to launch exclusive Descaler training for our partners in March 2024. Access to this training, as well as the Descaler tool itself, will be by invitation only, extended to our authorized partners.
How to get started Deskoping (or Descaling)
For customers and prospects, joining the Descaler or early access Deskope Programs are as easy as signing up using the link below. From there, the Cloudflare team will reach out to you for further enrollment details. By providing details about your current SSE deployment, ongoing challenges, and future Zero Trust or SASE goals, we’ll be able to hit the ground running. To get started, sign up here.
For partners, to get detailed information and to express interest in participating, connect with your assigned Channel Account Manager or Partner Service Delivery Manager. We look forward to supporting our partners in delivering high-quality services and enhancing their capability to meet the evolving needs of the market. If you are a partner with experience in delivering Cloudflare services and would like to become an Authorized Service Delivery Partner, please use this checklist to get started.

Protecting APIs with JWT Validation
Post Syndicated from John Cosgrove original https://blog.cloudflare.com/protecting-apis-with-jwt-validation

Today, we are happy to announce that Cloudflare customers can protect their APIs from broken authentication attacks by validating incoming JSON Web Tokens (JWTs) with API Gateway. Developers and their security teams need to control who can communicate with their APIs. Using API Gateway’s JWT Validation, Cloudflare customers can ensure that their Identity Provider previously validated the user sending the request, and that the user’s authentication tokens have not expired or been tampered with.
What’s new in this release?
After our beta release in early 2023, we continued to gather feedback from customers on what they needed from JWT validation in API Gateway. We uncovered four main feature requests and shipped updates in this GA release to address them all:
| Old, Beta limitation | New, GA release capability |
|---|---|
| Only supported validating the raw JWT | Support for the Bearer token format |
| Only supported one JWKS configuration | Create up to four different JWKS configs to support different environments per zone |
| Only supported validating JWTs sent in HTTP headers | Validate JWTs if they are sent in a cookie, not just an HTTP header |
| JWT validation ran on all requests to the entire zone | Exclude any number of managed endpoints in a JWT validation rule |
What is the threat?
Broken authentication is the #1 threat on the OWASP Top 10 and the #2 threat on the OWASP API Top 10. We’ve written before about how flaws in API authentication and authorization at Optus led to a threat actor offering 10 million user records for sale, and government agencies have warned about these exact API attacks.
According to Gartner®1, “attacks and data breaches involving poorly secured application programming interfaces (APIs) are occurring frequently.” Getting authentication correct for your API users can be challenging, but there are best practices you can employ to cover your bases. JSON Web Token Validation in API Gateway fulfills one of these best practices by enforcing a positive security model for your authenticated API users.
A primer on authentication and authorization
Authentication establishes identity. Imagine you’re collaborating with multiple colleagues and writing a document in Google Docs. When you’re all authors of the document, you have the same privileges, and you can overwrite each other’s text. You can all see each other’s name next to your respective cursor while you’re typing. You’re all authenticated to Google Docs, so Docs can show all the users on a document who everyone is.
Authorization establishes ownership or permissions to objects. Imagine you’re collaborating with your colleague in Docs again, but this time they’ve written a document ahead of time and simply wish for you to review it and add comments without changing the document. As the owner of the document, your colleague sets an authorization policy to only allow you ‘comment’ access. As such, you cannot change their writing at all, but you can still view the document and leave comments.
While the words themselves might sound similar, the differences between them are hugely important for security. It’s not enough to simply check that a user logging in has the correct login credentials (authentication). If you never check their permissions (authorization), they would be free to overwrite, add, or delete other users’ content. When this happens for APIs, OWASP calls it a Broken Object Level Authorization attack.
A primer on API access tokens
Users authenticate to services in many different ways on the web today. Let’s take a look at the history of authentication with username and password authentication, API key authentication, and JWT authentication before we mention how JWTs can help stop API attacks.
In the early days, the web used HTTP Basic Authentication, where browsers transmitted username and password pairs as an HTTP header, posing significant security risks and making credentials visible to any observer when the application failed to adopt SSL/TLS certificates. Basic authentication also complicated API access, requiring hard-coded credentials and potentially giving broad authorization policies to a single user.
The introduction of API access keys improved security by detaching authentication from user credentials and instead sending secret text strings along with requests. This approach allowed for more nuanced access control by key instead of by user ID, though API keys still faced risks from man-in-the-middle attacks and problematic storage of secrets in source code.
JSON Web Tokens (JWTs) address these issues by removing the need to send long-lived secrets on every request, introducing cryptographically verifiable, auto-expiring, short-lived sessions. Think of a JWT like a tamper-evident seal on a bottle of medication. Along with the seal, medication also has an expiration date printed on it. Users notice when the seal is tampered with or missing altogether, and when the medication expires.

These attributes enhance security any time a JWT is used instead of a long-lived shared secret. JWTs are not an end-all-be-all solution, but they do represent an evolution in authentication technology and are widely used for authentication and authorization on the Internet today.
What’s the structure of a JWT?
JWTs are composed of three fields separated by periods. The first field is a header, the second a payload, and the third a signature:
eyJhbGciOiJSUzI1NiIsInR5cCI6IkpXVCJ9.eyJpc3MiOiJNeURlbW9JRFAiLCJzdWIiOiJqb2huZG9lIiwiYXVkIjoiTXlBcHAiLCJpYXQiOjE3MDg5ODU2MDEsImV4cCI6MTcwODk4NjIwMSwiY2xhc3MiOiJhZG1pbiJ9.v0nywcQemlEU4A18QD9UTgJLyH4ZPXppuW-n0iOmtj4x-hWJuExlMKeNS-vMZt4K6n0pDCFIAKo7_VZqACx4gILXObXMU4MEleFoKKd0f58KscNrC3BQqs3Gnq-vb5Ut9CmcvevQ5h9cBCI4XhpP2_LkYcZiuoSd3zAm2W_0LNZuFXp1wo8swDoKETYmtrdTjuF-IlVjLDAxNsWm2e7T5A8HmCnAWRItEPedm_8XVJAOemx_KqIH5w6zHY1U-M6PJkHK6D2gDU5eiN35A4FCrC5bQ1-0HSTtJkLIed2-1mRO1oANWHpscvpNLQBWQLLiIZ_evbcq_tnwh1X1sA3uxQ
If we base64 decode the first two sections, we arrive at the following structure (comments added for clarity):
{
  "alg": "RS256",     // JWT signature algorithm
  "typ": "JWT"        // JWT type
}

{
  "iss": "MyDemoIDP", // Which identity provider issued this JWT
  "sub": "johndoe",   // Which user this JWT identifies
  "aud": "MyApp",     // Which app this JWT is destined for
  "iat": 1708985601,  // When this JWT was issued
  "exp": 1709986201,  // When this JWT expires
  "class": "admin"    // Extra, customer-defined metadata
}
We can then use the algorithm mentioned in the header (RS256) as well as the Identity Provider’s public key (example below) to check the last segment in the JWT, the signature (code not shown).
-----BEGIN PUBLIC KEY-----
MIIBIjANBgkqhkiG9w0BAQEFAAOCAQ8AMIIBCgKCAQEA3exXmNOELAnrtejo3jb2
S6p+GFR5FFlO0AqC4lA4HjNX9stgxX8tcbzv1yl5CT6VWl4kpnBweJzdBsNOauPz
uiCFQ0PtTfS0wDZm3inRPR1bTvJEuqsRTbsCxw/nRLU2+Dvu0zF41Wo4OkAbuKGS
3FwfdKOY/rX5tzjhnTe7uhWTarJG3nVnwmuD03INeNI+fbTgbUrOaVFT06Ussb9L
NNe6BHGQjs6NfG037Jk36dGY1Yiy/rutj6nJ7WkEK5ktQgWrvMMoXW9TfpYHi6sC
mnSEdaxNS8jtFodqpURUaLDIdTOGGgpUZsvzv3jDMYo5IxQK+6y+HUV8eRyDYd/o
rQIDAQAB
-----END PUBLIC KEY-----
The signature is what makes a JWT special. The token issuer, taking into account the claims, generates a signature based on a private secret or a public/private key pair. The public key can be published online, allowing anyone to check if a JWT was legitimately issued by an organization.
Proper authentication and authorization stop API attacks
No developer wants to release an insecure application, and no security team wants their developers to skip secure coding practices, but we know both happen. In the Enterprise Strategy Group report “Securing the API Attack Surface”2, a survey found that 39% of developers skip security processes due to the faster development cycles of continuous integration and continuous delivery (CI/CD). The same survey found more than half (57%) of responding organizations faced multiple security incidents related to insecure APIs in the last 12 months, and 35% of responding organizations faced at least one incident within the last year.
Along with its accompanying database, permissions, and user roles, your origin application is the ultimate security backstop of your API. However, Cloudflare can assist in keeping attacks away from your origin when you configure API Gateway with the correct context. Let’s examine three different API attacks and how to protect against them.
Missing or broken authentication
The ability for a user to send or receive data to an API and entirely bypass authentication falls into ‘broken authentication’. It’s easy to think of the expected use cases your users will take with your application. You may assume that just because a user logs in and your application is written so that users can only access their own data in their dashboard, that all users are logged in and would only access their own data. This assumption fails to account for a user making an HTTP request outside your application requesting or modifying another user’s data and there being nothing in the way to stop your API from replying. In the worst case, a lack of authorization policy checks can enable an API client to change data without an authentication token at all!
Ensuring that incoming requests have an authentication token attached to them and dropping the requests that don’t is a great way to stop the simplest API attacks.

Expired token reuse
Maybe your application already uses JWTs for user authentication. Your application decodes the JWT and looks for user claims for group membership, and you validate the claims before allowing customers access to your API. But are you checking the JWT expiration time?
Imagine a user pays for your service, but they secretly know they will soon downgrade to a free account. If the user’s tier is stored within the JWT and the application or gateway doesn’t validate the expiration time of the JWT, the user could save an old JWT and replay it to continue their access to their paid benefits. Validating JWT expiration time can prevent this type of replay attack.

Broken Function Level Authorization attacks: Tampering with claims
Let’s say you’re using JWTs for authentication, validating the claims inside them, and also validating expiration time. But do you verify the JWT signature? Practically every JWT is signed by its issuer such that API admins and security teams that know the issuer’s signing key can verify that the JWT hasn’t been tampered with. Without the API Gateway or application checking the JWT signature, a malicious user could change their JWT claims, elevating their privileges to assume an administrator role in an application by starting with a normal, non-privileged user account.
JWT Validation from API Gateway safeguards your API from broken authentication and authorization attacks by checking that JWT signatures are intact, expiry times haven’t yet passed, and that authentication tokens are present to begin with.

Don’t other Cloudflare products do this?
Other Cloudflare products also use JWTs. Cloudflare Access is part of our suite of Zero Trust products, and is meant to tie into your Identity Provider. As a best practice, customers should validate the JWT that Access creates and sends to the origin.
Conversely, JWT Validation for API Gateway is a security layer compatible with any API without changing the setup, management, or expectation of the existing user flow. API Gateway’s JWT Validation is meant to validate pre-existing JWTs that may be used by any number of services at your API origin. You really need both: Access for your internal users or employees and API Gateway for your external users.
In addition, some customers use a custom Cloudflare Worker to validate JWTs, which is a great use case for the Workers platform. However, for straightforward use cases customers may find the JWT Validation experience of API Gateway easier to interact with and manage over the lifecycle of their application. If you are validating JWTs with a Worker and today’s release of JWT Validation isn’t yet at feature parity for your custom Worker, let your account representative know. We’re interested in expanding our capabilities to meet your requirements.
What’s next?
In a future release, we will go beyond checking pre-existing JWTs, and customers will be able to generate and enforce authorization policies entirely within API Gateway. We’ll also upgrade our on-demand developer portal creation with the ability to issue keys and authentication tokens to your development team directly, streamlining API management with Cloudflare.
In addition, stay tuned for future API Gateway feature launches where we’ll use our knowledge of API traffic norms to automatically suggest security policies that highlight and stop Broken Object/Function Level Authorization attacks outside the JWT Validation use case.
Existing API Gateway customers can try the new feature now. Enterprise customers without API Gateway should sign up for the trial to try the latest from API Gateway.
—
1Gartner, “API Security: What You Need to Do to Protect Your APIs”, Analyst(s) Mark O’Neill, Dionisio Zumerle, Jeremy D’Hoinne, January 13, 2023
2Enterprise Strategy Group, “Securing the API Attack Surface”, Analyst, Melinda Marks, May 2023
Announcing two highly requested DLP enhancements: Optical Character Recognition (OCR) and Source Code Detections
Post Syndicated from Noelle Kagan original https://blog.cloudflare.com/dlp-ocr-sourcecode
We are excited to announce two enhancements to Cloudflare’s Data Loss Prevention (DLP) service: support for Optical Character Recognition (OCR) and predefined source code detections. These two highly requested DLP features make it easier for organizations to protect their sensitive data with granularity and reduce the risks of breaches, regulatory non-compliance, and reputational damage:
- With OCR, customers can efficiently identify and classify sensitive information contained within images or scanned documents.
- With predefined source code detections, organizations can scan inline traffic for common code languages and block those HTTP requests to prevent data leaks, as well as detecting the storage of code in repositories such as Google Drive.
These capabilities are available now within our DLP engine, which is just one of several Cloudflare services, including cloud access security broker (CASB), Zero Trust network access (ZTNA), secure web gateway (SWG), remote browser isolation (RBI), and cloud email security, that help organizations protect data everywhere across web, SaaS, and private applications.
About Optical Character Recognition (OCR)
OCR enables the extraction of text from images. It converts the text within those images into readable text data that can be easily edited, searched, or analyzed, unlike images.
Sensitive data regularly appears in image files. For example, employees are often asked to provide images of identification cards, passports, or documents as proof of identity or work status. Those images can contain a plethora of sensitive and regulated classes of data, including Personally Identifiable Information (PII) — for example, passport numbers, driver’s license numbers, birthdates, tax identification numbers, and much more.
OCR can be leveraged within DLP policies to prevent the unauthorized sharing or leakage of sensitive information contained within images. Policies can detect when sensitive text content is being uploaded to cloud storage or shared through other communication channels, and block the transaction to prevent data loss. This assists in enforcing compliance with regulatory requirements related to data protection and privacy.
About source code detection
Source code fuels digital business and contains high-value intellectual property, including proprietary algorithms and encrypted secrets about a company’s infrastructure. Source code has been and will continue to be a target for theft by external attackers, but customers are also increasingly concerned about the inadvertent exposure of this information by internal users. For example, developers may accidentally upload source code to a publicly available GitHub repository or to generative AI tools like ChatGPT. While these tools have their place (like using AI to help with debugging), security teams want greater visibility and more precise control over what data flows to and from these tools.
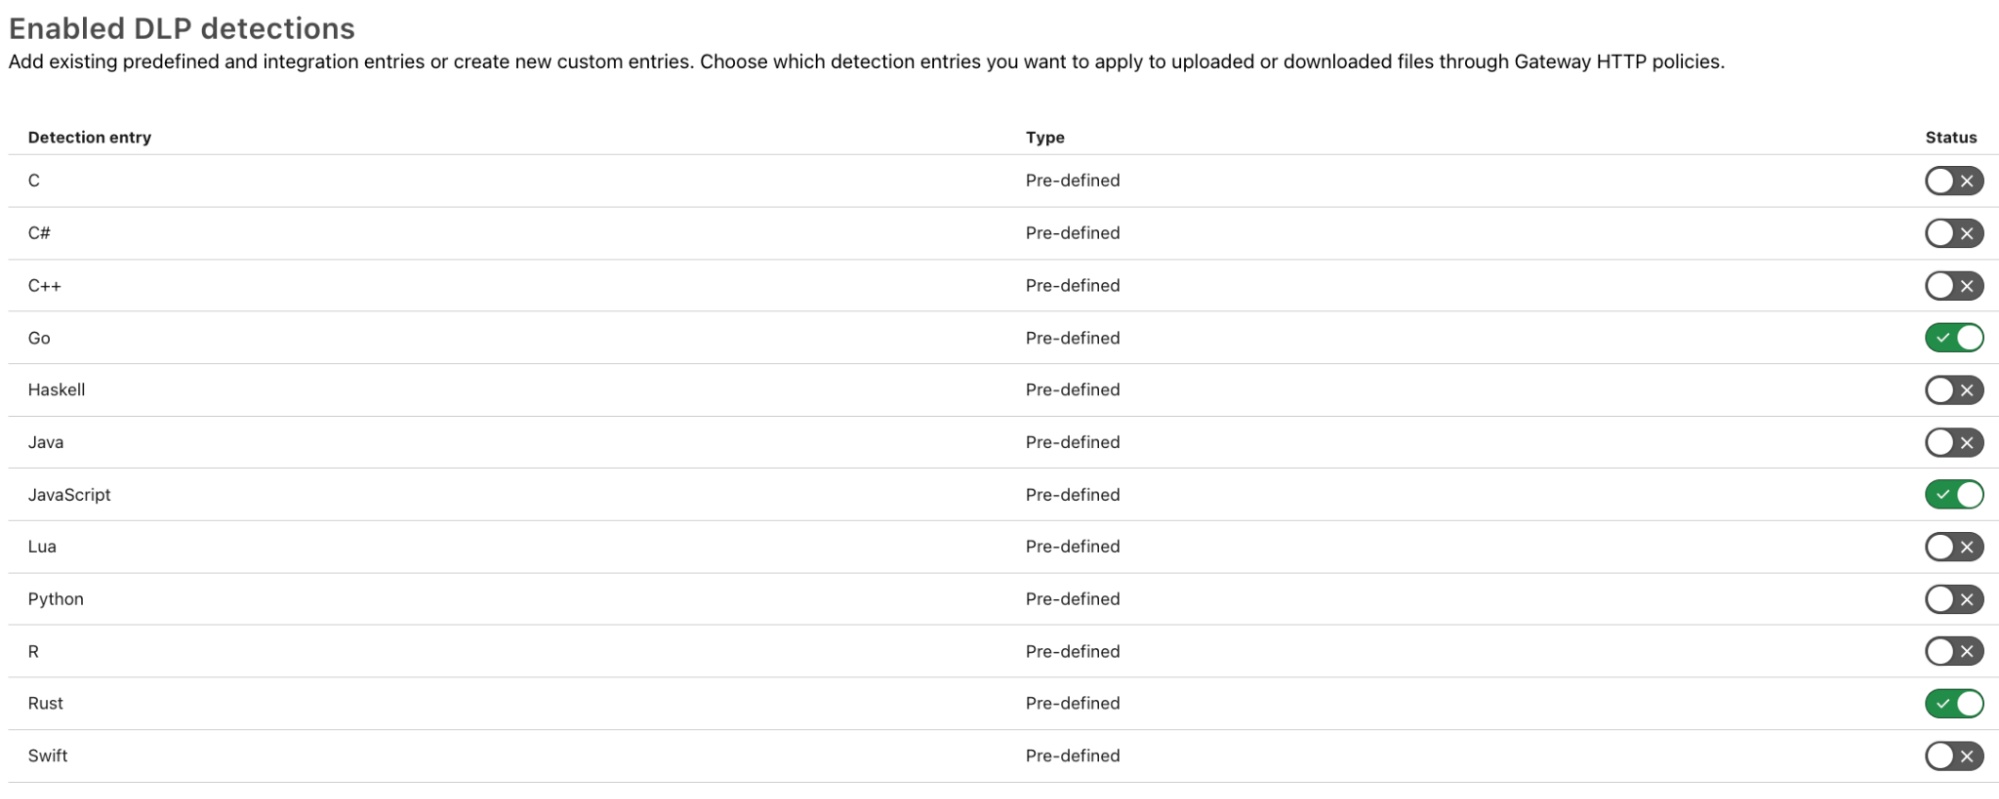
To help customers, Cloudflare now offers predefined DLP profiles for common code languages — specifically C, C++, C#, Go, Haskell, Java, Javascript, Lua, Python, R, Rust, and Swift. These machine learning-based detections train on public repositories for algorithm development, ensuring they remain up to date. Cloudflare’s DLP inspects the HTTP body of requests for these DLP profiles, and security teams can block traffic accordingly to prevent data leaks.
How to use these capabilities
Cloudflare offers you flexibility to determine what data you are interested in detecting via DLP policies. You can use predefined profiles created by Cloudflare for common types of sensitive or regulated data (e.g. credentials, financial data, health data, identifiers), or you can create your own custom detections.
To implement inline blocking of source code, simply select the DLP profiles for the languages you want to detect. For example, if my organization uses Rust, Go, and JavaScript, I would turn on those detections:
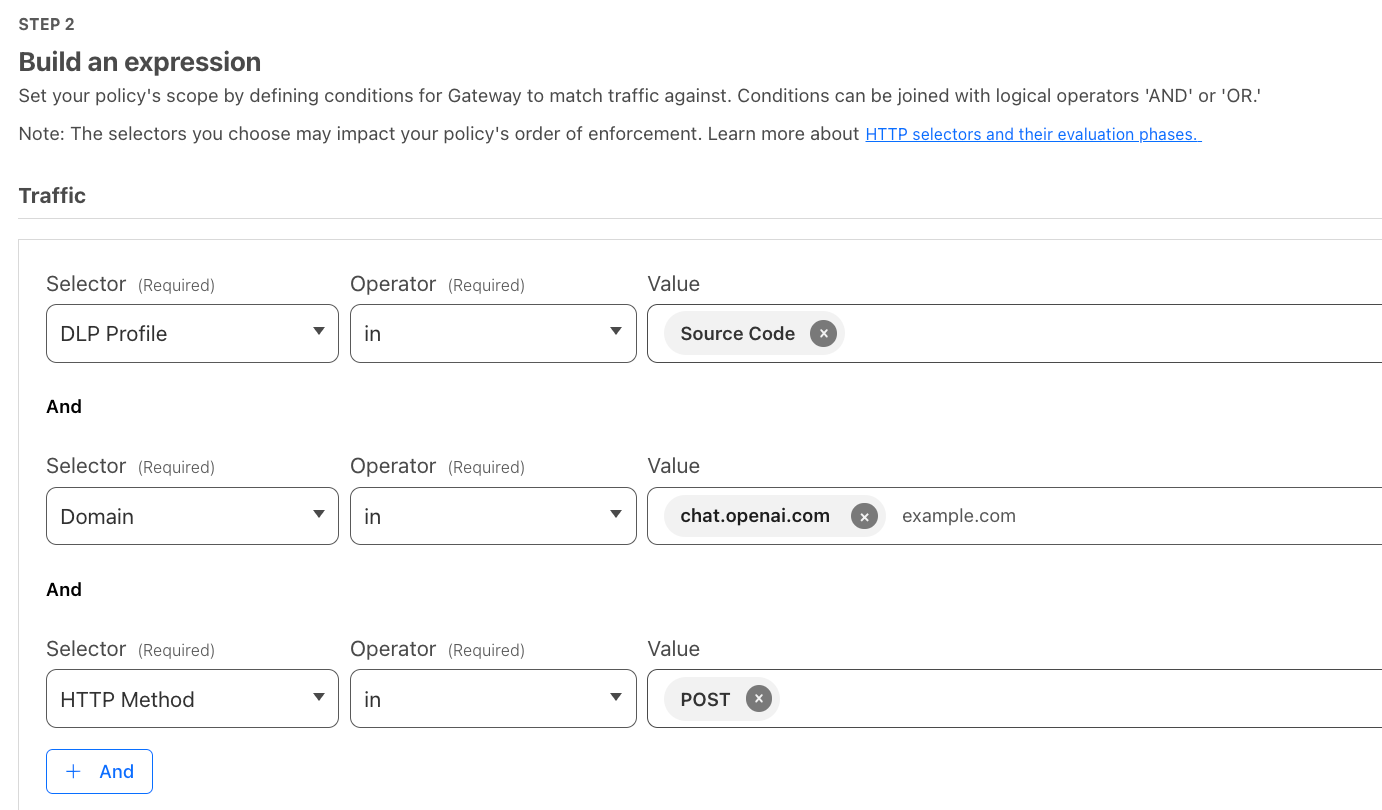
I would then create a blocking policy via our secure web gateway to prevent traffic containing source code. Here, we block source code from being uploaded to ChatGPT:
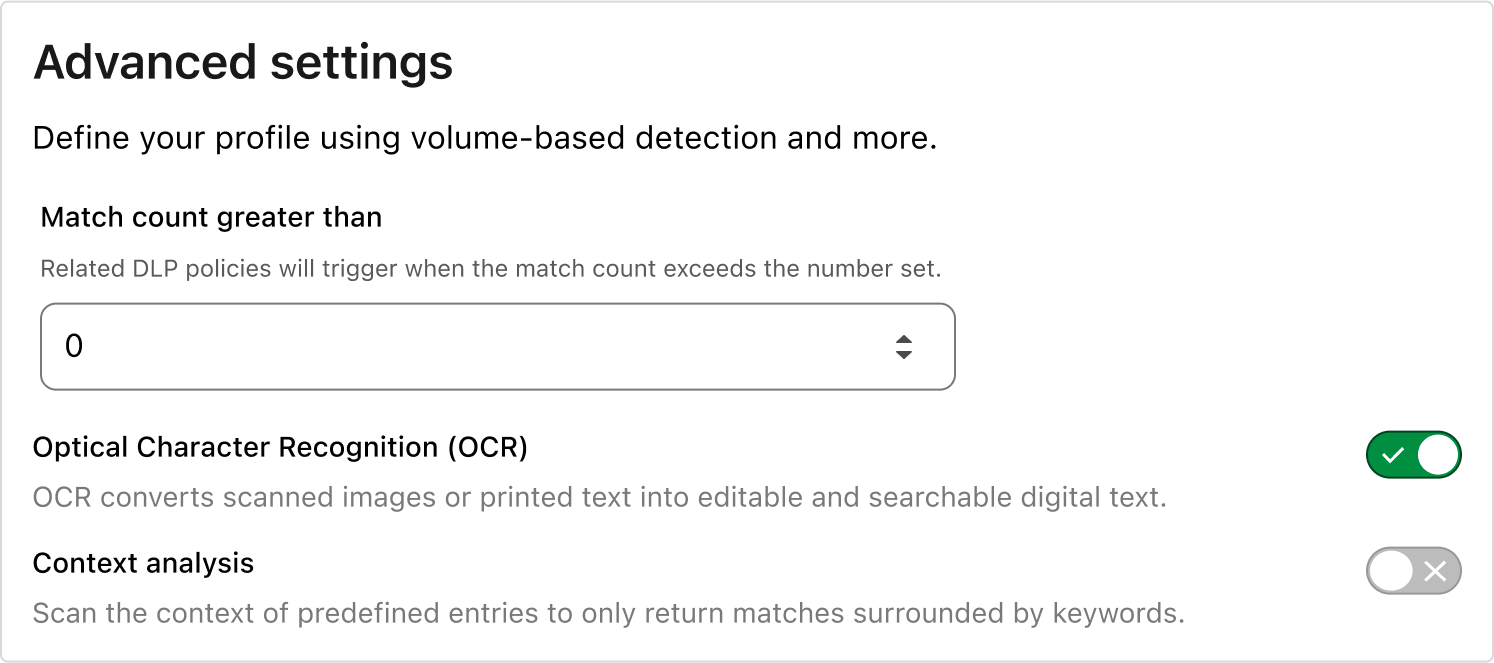
Adding OCR to any detection is similarly easy. Below is a profile looking for sensitive data that could be stored in scanned documents.

With the detections selected, simply enable the OCR toggle, and wherever you are applying DLP inspections, images in your content will be scanned for sensitive data. The detections work the same in images as they do in the text, including Match Counts and Context Analysis, so no additional logic or settings are needed.
Consistency across use cases is a core principle of our DLP solution, so as always, this feature is available for both data at rest, available via CASB, and data in transit, available via Gateway.
How do I get started?
DLP is available with other data protection services as part of Cloudflare One, our Secure Access Service Edge (SASE) platform that converges Zero Trust security and network connectivity services. To get started protecting your sensitive data, reach out for a consultation, or contact your account manager.
The state of the post-quantum Internet
Post Syndicated from Bas Westerbaan original https://blog.cloudflare.com/pq-2024

Today, nearly two percent of all TLS 1.3 connections established with Cloudflare are secured with post-quantum cryptography. We expect to see double-digit adoption by the end of 2024. Apple announced in February 2024 that it will secure iMessage with post-quantum cryptography before the end of the year, and Signal chats are already secured. What once was the topic of futuristic tech demos will soon be the new security baseline for the Internet.
A lot has been happening in the field over the last few years, from mundane name changes (ML-KEM is the new name for Kyber), to new proposed algorithms in the signatures onramp, to the catastrophic attack on SIKE. Plenty that has been written merely three years ago now feels quite out of date. Thus, it is high time for an update: in this blog post we’ll take measure of where we are now in early 2024, what to expect for the coming years, and what you can do today.

The quantum threat
First things first: why are we migrating our cryptography? It’s because of quantum computers. These marvelous devices, instead of restricting themselves to zeroes and ones, compute using more of what nature actually affords us: quantum superposition, interference, and entanglement. This allows quantum computers to excel at certain very specific computations, notably simulating nature itself, which will be very helpful in developing new materials.
Quantum computers are not going to replace regular computers, though: they’re actually much worse than regular computers at most tasks. Think of them as graphic cards — specialized devices for specific computations.
Unfortunately, quantum computers also excel at breaking key cryptography that’s in common use today. Thus, we will have to move to post-quantum cryptography: cryptography designed to be resistant against quantum attack. We’ll discuss the exact impact on the different types of cryptography later on. For now quantum computers are rather anemic: they’re simply not good enough today to crack any real-world cryptographic keys.
That doesn’t mean we shouldn’t worry yet: encrypted traffic can be harvested today, and decrypted with a quantum computer in the future.
Quantum numerology
When will they be good enough? Like clockwork, every year there are news stories of new quantum computers with record-breaking number of qubits. This focus on counting qubits is quite misleading. To start, quantum computers are analogue machines, and there is always some noise interfering with the computation.
There are big differences between the different types of technology used to build quantum computers: silicon-based quantum computers seem to scale well, are quick to execute instructions, but have very noisy qubits. This does not mean they’re useless: with quantum error correcting codes one can effectively turn tens of millions of noisy silicon qubits into a few thousand high-fidelity ones, which could be enough to break RSA. Trapped-ion quantum computers, on the other hand, have much less noise, but have been harder to scale. Only a few hundred-thousand trapped-ion qubits could potentially draw the curtain on RSA.
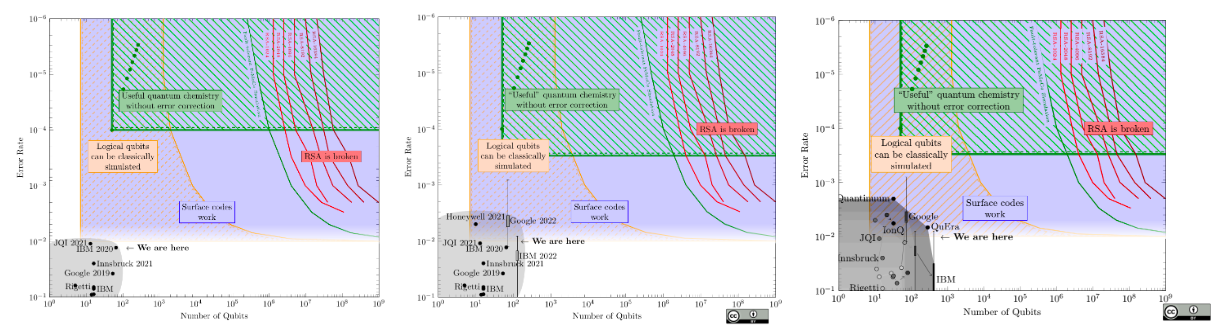
We’re only scratching the surface with the number of qubits and noise. For instance, a quirk of many quantum computers is that only adjacent qubits can interact — something that most estimates do not take into account. On the other hand, for a specific quantum computer, a tailored algorithm can perform much better than a generic one. We can only guess what a future quantum computer will look like, and today’s estimates are most likely off by at least an order of magnitude.
When will quantum computers break real-world cryptography?
So, when do we expect the demise of RSA-2048 which is in common use today? In a 2022 survey, over half the interviewed experts thought it’d be more probable than not that by 2037 such a cryptographically relevant quantum computer would’ve been built.
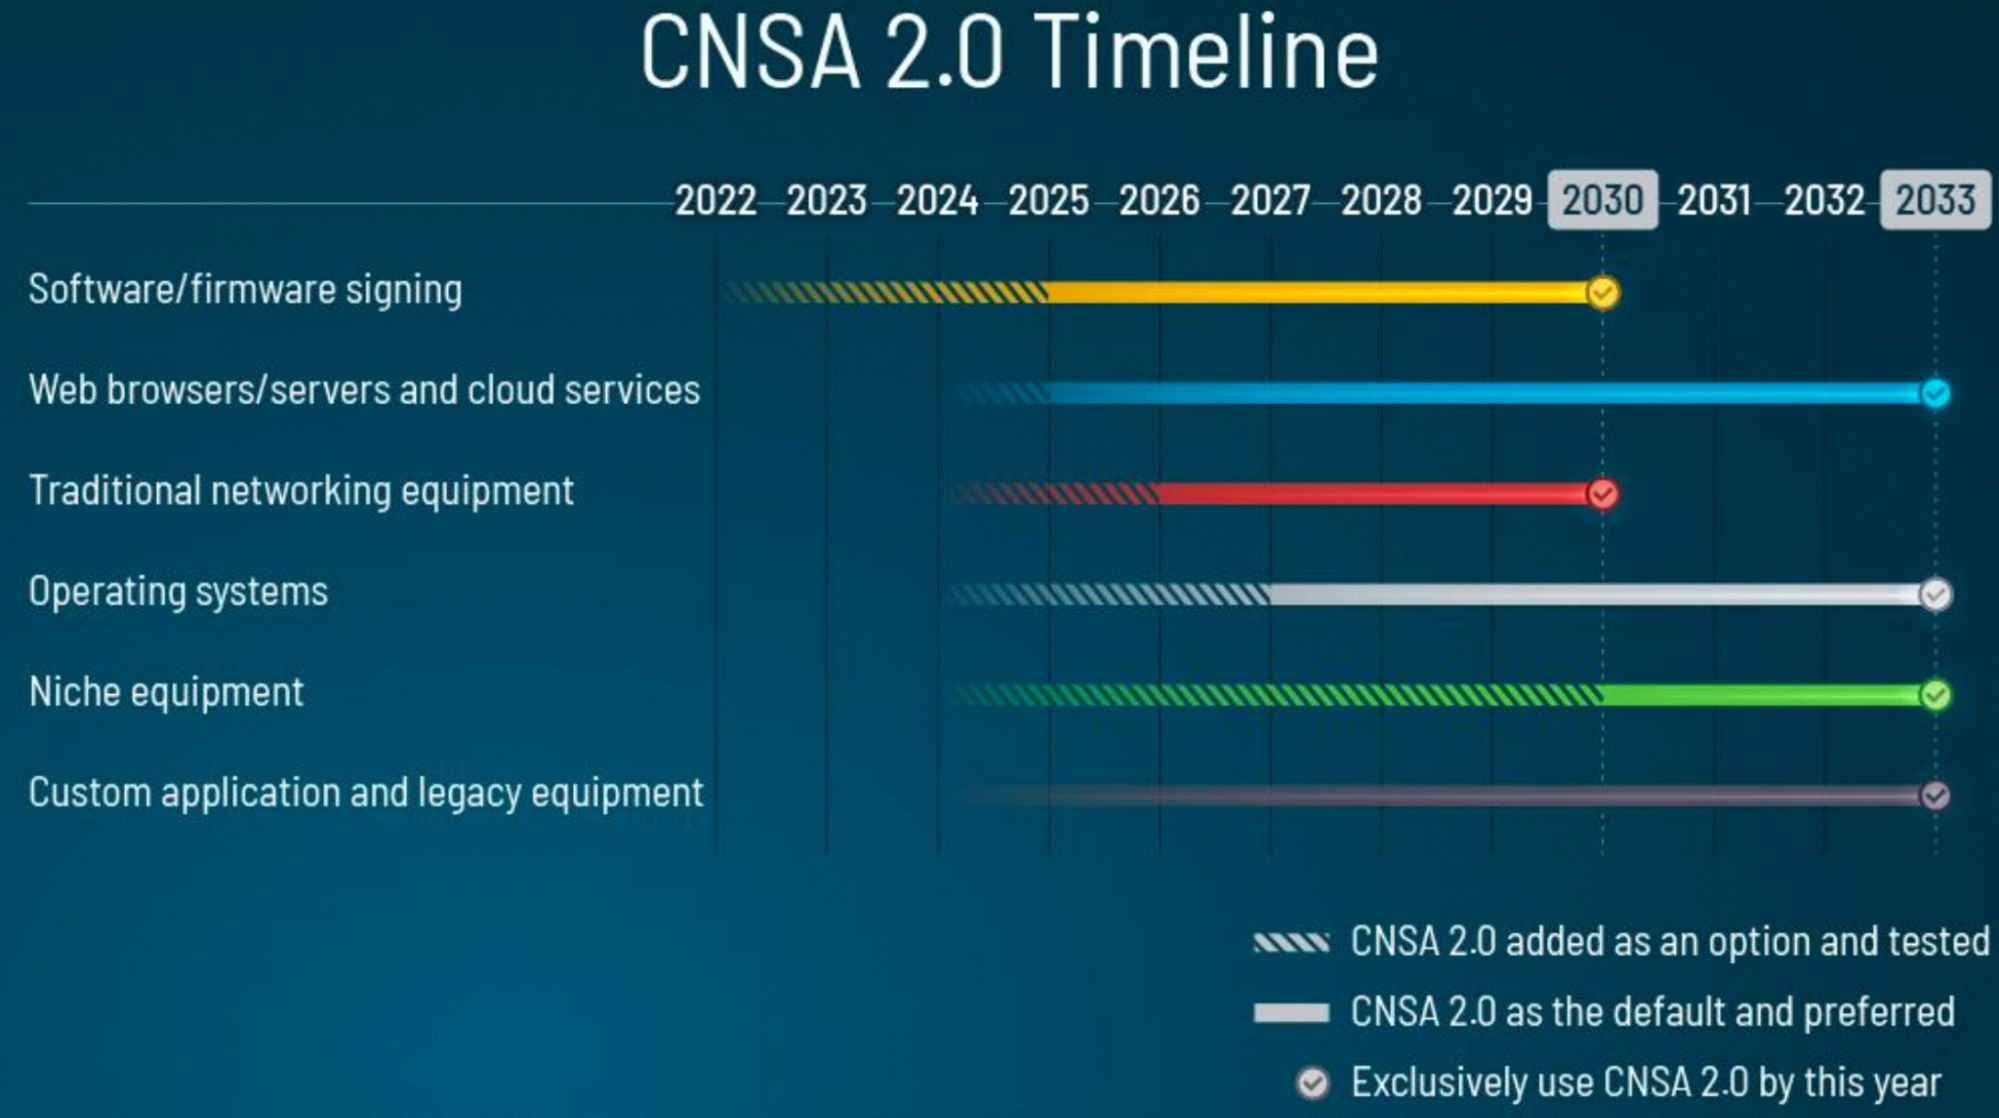
We can also look at the US government’s timeline for the migration to post-quantum cryptography. The National Security Agency (NSA) aims to finish its migration before 2033, and will start to prefer post-quantum ready vendors for many products in 2025. The US government has a similarly ambitious timeline for the country as a whole: the aim is to be done by 2035.
More anecdotally, at industry conferences on the post-quantum migration, I see particularly high participation of the automotive branch. Not that surprising, considering that the median age of a car on the road is 14 years, a lot of money is on the line, and not all cryptography used in cars can be upgraded easily once on the road.
So when will it arrive? Whether it’s 2034 or 2050, it will be too soon. The immense success of cryptography means it’s all around us now, from dishwasher, to pacemaker, to satellite. Most upgrades will be easy, and fit naturally in the product’s lifecycle, but there will be a long tail of difficult and costly upgrades.
Two migrations
To help prioritize, it is important to understand that there is a big difference in the difficulty, impact, and urgency of the post-quantum migration for the different kinds of cryptography required to create secure connections. In fact, for most organizations there will be two post-quantum migrations: key agreement and signatures / certificates.
Already post-quantum secure: symmetric cryptography
Let’s explain this for the case of creating a secure connection when visiting a website in a browser. The workhorse is a symmetric cipher such as AES-GCM. It’s what you would think of when thinking of cryptography: both parties, in this case the browser and server, have a shared key, and they encrypt / decrypt their messages with the same key. Unless you have that key, you can’t read anything, or modify anything.
The good news is that symmetric ciphers, such as AES-GCM, are already post-quantum secure. There is a common misconception that Grover’s quantum algorithm requires us to double the length of symmetric keys. On closer inspection of the algorithm, it’s clear that it is not practical. The way NIST, the US National Institute for Standards and Technology (who have been spearheading the standardization of post-quantum cryptography) defines their post-quantum security levels is very telling. They define a specific security level by saying the scheme should be as hard to crack using either a classical or quantum computer as an existing symmetric cipher as follows:
| Level | Definition, as least as hard to break as … | Example |
|---|---|---|
| 1 | To recover the key of AES-128 by exhaustive search | ML-KEM-512, SLH-DSA-128s |
| 2 | To find a collision in SHA256 by exhaustive search | ML-DSA-44 |
| 3 | To recover the key of AES-192 by exhaustive search | ML-KEM-768 |
| 4 | To find a collision in SHA384 by exhaustive search | |
| 5 | To recover the key of AES-256 by exhaustive search | ML-KEM-1024, SLH-DSA-256s |
NIST PQC security levels, higher is harder to break (“more secure”). The examples ML-DSA, SLH-DSA and ML-KEM are covered below.
There are good intentions behind suggesting doubling the key lengths of symmetric cryptography. In many use cases, the extra cost is not that high, and it mitigates any theoretical risk completely. Scaling symmetric cryptography is cheap: double the bits is typically far less than half the cost. So on the surface, it is simple advice.
But if we insist on AES-256, it seems only logical to insist on NIST PQC level 5 for the public key cryptography as well. The problem is that public key cryptography does not scale very well. Depending on the scheme, going from level 1 to level 5 typically more than doubles data usage and CPU cost. As we’ll see, deploying post-quantum signatures at level 1 is already painful, and deploying them at level 5 is problematic.
A second reason is that upgrading symmetric cryptography isn’t always easy. If it requires replacing hardware, it can be costly indeed. An organization that cannot migrate all its cryptography in time simply can’t afford to waste its time doubling symmetric key lengths.
First migration: key agreement
Symmetric ciphers are not enough on their own: how do I know which key to use when visiting a website for the first time? The browser can’t just send a random key, as everyone listening in would see that key as well. You’d think it’s impossible, but there is some clever math to solve this, so that the browser and server can agree on a shared key. Such a scheme is called a key agreement mechanism, and is performed in the TLS handshake. Today almost all traffic is secured with X25519, a Diffie–Hellman-style key agreement, but its security is completely broken by Shor’s algorithm on a quantum computer. Thus, any communication secured today with Diffie–Hellman, when stored, can be decrypted in the future by a quantum computer.
This makes it urgent to upgrade key agreement today. As we will see, luckily, post-quantum key agreement is relatively straight-forward to deploy.
Second migration: signatures / certificates
The key agreement allows secure agreement on a key, but there is a big gap: we do not know with whom we agreed on the key. If we only do key agreement, an attacker in the middle can do separate key agreements with the browser and server, and re-encrypt any exchanged messages. To prevent this we need one final ingredient: authentication.
This is achieved using signatures. When visiting a website, say cloudflare.com, the web server presents a certificate signed by a certification authority (CA) that vouches that the public key in that certificate is controlled by cloudflare.com. In turn, the web server signs the handshake and shared key using the private key corresponding to the public key in the certificate. This allows the client to be sure that they’ve done a key agreement with cloudflare.com.
RSA and ECDSA are commonly used traditional signature schemes. Again, Shor’s algorithm makes short work of them, allowing a quantum attacker to forge any signature. That means that a MitM (man-in-the-middle) can break into any connection that uses a signature scheme that is not post-quantum secure. This is of course an active attack: if the attacker isn’t in the middle as the handshake happens, the connection is not affected.
This makes upgrading signature schemes for TLS on the face of it less urgent, as we only need to have everyone migrated by the time the cryptographically-relevant quantum computer arrives. Unfortunately, we will see that migration to post-quantum signatures is much more difficult, and will require more time.
Timeline
Before we dive into the technical challenges of migrating the Internet to post-quantum cryptography, let’s have a look at how we got here, and what to expect in the coming years. Let’s start with how post-quantum cryptography came to be.
Origin of post-quantum cryptography
Physicists Feynman and Manin independently proposed quantum computers around 1980. It took another 14 years before Shor published his algorithm attacking public key cryptography. Most post-quantum cryptography predates Shor’s famous algorithm.
There are various branches of post-quantum cryptography, of which the most prominent are lattice-based, hash-based, multivariate, code-based, and isogeny-based. Except for isogeny-based cryptography, none of these were initially conceived as post-quantum cryptography. In fact, early code-based and hash-based schemes are contemporaries of RSA, being proposed in the 1970s, and comfortably predate the publication of Shor’s algorithm in 1994. Also, the first multivariate scheme from 1988 is comfortably older than Shor’s algorithm. It is a nice coincidence that the most successful branch, lattice-based cryptography, is Shor’s closest contemporary, being proposed in 1996. For comparison, elliptic curve cryptography, which is widely used today, was first proposed in 1985.
In the years after the publication of Shor’s algorithm, cryptographers took measure of the existing cryptography: what’s clearly broken, and what could be post-quantum secure? In 2006, the first annual International Workshop on Post-Quantum Cryptography took place. From that conference, an introductory text was prepared, which holds up rather well as an introduction to the field. A notable caveat is the demise of the Rainbow signature scheme. In that same year, the elliptic-curve key-agreement X25519 was proposed, which now secures the vast majority of all Internet connections.
NIST PQC competition
Ten years later, in 2016, NIST, the US National Institute of Standards and Technology, launched a public competition to standardize post-quantum cryptography. They’re using a similar open format as was used to standardize AES in 2001, and SHA3 in 2012. Anyone can participate by submitting schemes and evaluating the proposals. Cryptographers from all over the world submitted algorithms. To focus attention, the list of submissions were whittled down over three rounds. From the original 82, based on public feedback, eight made it into the final round. From those eight, in 2022, NIST chose to pick four to standardize first: one KEM (for key agreement) and three signature schemes.
| Old name | New name | Branch |
|---|---|---|
| Kyber | ML-KEM (FIPS 203) Module-lattice based Key-Encapsulation Mechanism Standard |
Lattice-based |
| Dilithium | ML-DSA (FIPS 204) Module-lattice based Digital Signature Standard |
Lattice-based |
| SPHINCS+ | SLH-DSA (FIPS 205) Stateless Hash-Based Digital Signature Standard |
Hash-based |
| Falcon | FN-DSA FFT over NTRU lattices Digital Signature Standard |
Lattice-based |
First four selected post-quantum algorithms from NIST competition.
ML-KEM is the only post-quantum key agreement close to standardization now, and despite some occasional difficulty with its larger key sizes, in many cases it allows for a drop-in upgrade.
The situation is rather different with the signatures: it’s quite telling that NIST chose to standardize three already. And there are even more signatures set to be standardized in the future. The reason is that none of the proposed signatures are close to ideal. In short, they all have much larger keys and signatures than we’re used to. From a security standpoint SLH-DSA is the most conservative choice, but also the worst performer. For public key and signature sizes, FN-DSA is the best of the worst, but is difficult to implement safely because of floating-point arithmetic. This leaves ML-DSA as the default pick. More in depth comparisons are included below.
Name changes
Undoubtedly Kyber is the most familiar name, as it’s a preliminary version of Kyber that has already been deployed by Chrome and Cloudflare among others to counter store-now/decrypt-later. We will have to adjust, though. Just like Rijndael is most well-known as AES, and Keccak is SHA3 to most, ML-KEM is set to become the catchy new moniker for Kyber going forward.
Final standards
Although we know NIST will standardize these four, we’re not quite there yet. In August 2023, NIST released three draft standards for the first three with minor changes, and solicited public feedback. FN-DSA is delayed for now, as it’s more difficult to standardize and deploy securely.
For timely adopters, it’s important to be aware that based on the feedback on the first three drafts, there might be a few small tweaks before the final standards are released. These changes will be minor, but the final versions could well be incompatible on the wire with the current draft standards. These changes are mostly immaterial, only requiring a small update, and do not meaningfully affect the brunt of work required for the migration, including organizational engagement, inventory, and testing. Before shipping, there can be good reasons to wait for the final standards: support for preliminary versions is not widespread, and it might be costly to support both the draft and final standards. Still, many organizations have not started work on the post-quantum migration at all, citing the lack of standards — a situation that has been called crypto procrastination.
So, when can we expect the final standards? There is no set timeline, but we expect the first three standards to be out around mid-2024.
Predicting protocol and software support
Having NIST’s final standards is not enough. The next step is to standardize the way the new algorithms are used in higher level protocols. In many cases, such as key agreement in TLS, this is as simple as assigning an identifier to the new algorithms. In other cases, such as DNSSEC, it requires a bit more thought. Many working groups at the IETF have been preparing for years for the arrival of NIST’s final standards, and I expect that many protocol integrations will be available before the end of 2024. For the moment, let’s focus on TLS.
The next step is software support. Not all ecosystems can move at the same speed, but we have seen a lot of preparation already. We expect several major open ecosystems to have post-quantum cryptography and TLS support available early 2025, if not earlier.
Again, for TLS there is a big difference again between key agreement and signatures. For key agreement, the server and client can add and enable support for post-quantum key agreement independently. Once enabled on both sides, TLS negotiation will use post-quantum key agreement. We go into detail on TLS negotiation in this blog post. If your product just uses TLS, your store-now/decrypt-now problem could be solved by a simple software update of the TLS library.
Post-quantum TLS certificates are more of a hassle. Unless you control both ends, you’ll need to install two certificates: one post-quantum certificate for the new clients, and a traditional one for the old clients. If you aren’t using automated issuance of certificates yet, this might be a good reason to check that out. TLS allows the client to signal which signature schemes it supports so that the server can choose to serve a post-quantum certificate only to those clients that support it. Unfortunately, although almost all TLS libraries support setting up multiple certificates, not all servers expose that configuration. If they do, it will still require a configuration change in most cases. (Although undoubtedly caddy will do it for you.)
Talking about post-quantum certificates: it will take some time before Certification Authorities (CAs) can issue them. Their HSMs will first need (hardware) support, which then will need to be audited. Also, the CA/Browser forum needs to approve the use of the new algorithms. Of these, the audits are likely to be the bottleneck, as there will be a lot of submissions after the publication of the NIST standards. It’s unlikely we will see a post-quantum certificate issued by a CA before 2026.
This means that it is not unlikely that come 2026, we are in an interesting in-between time, where almost all Internet traffic is protected by post-quantum key agreement, but not a single public post-quantum certificate is used.
More post-quantum standards
NIST is not quite done standardizing post-quantum cryptography. There are two more post-quantum competitions running: round 4 and the signatures onramp.
Round 4
From the post-quantum competition, NIST is still considering standardizing one or more of the code-based key agreements BIKE, HQC, Classic McEliece in a fourth round. The performance of BIKE and HQC, both in key sizes and computational efficiency, is much worse than ML-KEM. NIST is considering standardizing one as a backup KEM, in case there is a cryptanalytic breakthrough against lattice-based cryptography, such as ML-KEM.
Classic McEliece does not compete with ML-KEM directly as a general purpose KEM. Instead, it’s a specialist: Classic McEliece public keys are very large (268kB), but it has (for a post-quantum KEM) very small ciphertexts (128 bytes). This makes Classic McEliece very attractive for use cases where the public key can be distributed in advance, such as to secure a software update mechanism.
Signatures onramp
In late 2022, after announcing the first four picks, NIST also called a new competition, dubbed the signatures onramp, to find additional signature schemes. The competition has two goals. The first is hedging against cryptanalytic breakthroughs against lattice-based cryptography. NIST would like to standardize a signature that performs better than SLH-DSA, but is not based on lattices. Secondly, they’re looking for a signature scheme that might do well in use cases where the current roster doesn’t do well: we will discuss those at length later on in this post.
In July 2023, NIST posted the 40 submissions they received for a first round of public review. The cryptographic community got to work, and as is quite normal for a first round, at the time of writing (February 2024) have managed to break 10 submissions completely, and weaken a couple of others drastically. Thom Wiggers maintains a useful website comparing the submissions.
There are some very promising submissions. We will touch briefly upon them later on. It is worth mentioning that just like the main post-quantum competition, the selection process will take many years. It is unlikely that any of these onramp signature schemes will be standardized before 2027 — if they’re not broken in the first place.
Before we dive into the nitty-gritty of migrating the Internet to post-quantum cryptography, it’s instructive to look back at some past migrations.
Looking back: migrating to TLS 1.3
One of the big recent migrations on the Internet was the switch from TLS 1.2 to TLS 1.3. Work on the new protocol started around 2014. The goal was ambitious: to start anew, cut a lot of cruft, and have a performant clean transport protocol of the future. After a few years of hard work, the protocol was ready for field tests. In good spirits, in September 2016, we announced that we support TLS 1.3.
The followup blog in December 2017 had a rather different tone: “Why TLS 1.3 isn’t in browsers yet”.
It turned out that revision 11 of TLS 1.3 was completely undeployable in practice, breaking a few percent of all users. The reason? Protocol ossification. TLS was designed with flexibility in mind: the client sends a list of TLS versions it supports, so that the connection can be smoothly upgraded to the newest crypto. That’s the theory, but if you never move the joint, it rusts: for one, it turned out that a lot of server software and middleware simply crashed on just seeing an unknown version. Others would ignore the version number completely, and try to parse the messages as if it was TLS 1.2 anyway. In practice, the version negotiation turned out to be completely broken. So how was this fixed?
In revision 22 of the TLS 1.3 draft, changes were made to make TLS 1.3 look like TLS 1.2 on the wire: in particular TLS 1.3 advertises itself as TLS 1.2 with the normal version negotiation. Also, a lot of unnecessary fields are included in the TLS 1.3 ClientHello just to appease any broken middleboxes that might be peeking in. A server that doesn’t understand TLS 1.3 wouldn’t even see that an attempt was made to negotiate TLS 1.3. Using a sneaky new extension, a second version negotiation mechanism was added. For the details, check out the December 2017 blog post linked above.
Today TLS 1.3 is a huge success, and is used by more than 93% of the connections.
To help prevent ossification in the future, new protocols such as TLS 1.3 and QUIC use GREASE, where clients send unknown identifiers on purpose, including cryptographic algorithm identifiers, to help catch similar bugs, and keep the flexibility.
Migrating the Internet to post-quantum key agreement
Now that we understand what we’re dealing with on a high level, let’s dive into upgrading key agreement on the Internet. First, let’s have a closer look at NIST’s first and so far only post-quantum key agreement: ML-KEM.
ML-KEM was submitted under the name CRYTALS-Kyber. Even though it will be a US standard, its designers work in industry and academia across France, Switzerland, the Netherlands, Belgium, Germany, Canada, and the United States. Let’s have a look at its performance.
ML-KEM versus X25519
Today the vast majority of clients use the traditional key agreement X25519. Let’s compare that to ML-KEM.
| Keyshares size(in bytes) | Ops/sec (higher is better) | ||||
|---|---|---|---|---|---|
| Algorithm | PQ | Client | Server | Client | Server |
| ML-KEM-512 | ✅ | 800 | 768 | 45,000 | 70,000 |
| ML-KEM-768 | ✅ | 1,184 | 1,088 | 29,000 | 45,000 |
| ML-KEM-1024 | ✅ | 1,568 | 1,568 | 20,000 | 30,000 |
| X25519 | ❌ | 32 | 32 | 19,000 | 19,000 |
Size and CPU compared between X25519 and ML-KEM. Performance varies considerably by hardware platform and implementation constraints, and should be taken as a rough indication only.
ML-KEM-512, -768 and -1024 aim to be as resistant to (quantum) attack as AES-128, -192 and -256 respectively. Even at the AES-128 level, ML-KEM is much bigger than X25519, requiring 1,568 bytes over the wire, whereas X25519 requires a mere 64 bytes.
On the other hand, even ML-KEM-1024 is typically significantly faster than X25519, although this can vary quite a bit depending on your platform.
ML-KEM-768 and X25519
At Cloudflare, we are not taking advantage of that speed boost just yet. Like many other early adopters, we like to play it safe and deploy a hybrid key-agreement combining X25519 and (a preliminary version of) ML-KEM-768. This combination might surprise you for two reasons.
- Why combine X25519 (“128 bits of security”) with ML-KEM-768 (“192 bits of security”)?
- Why bother with the non post-quantum X25519?
The apparent security level mismatch is a hedge against improvements in cryptanalysis in lattice-based cryptography. There is a lot of trust in the (non post-quantum) security of X25519: matching AES-128 is more than enough. Although we are comfortable in the security of ML-KEM-512 today, over the coming decades cryptanalysis could improve. Thus, we’d like to keep a margin for now.
The inclusion of X25519 has two reasons. First, there is always a remote chance that a breakthrough renders all variants of ML-KEM insecure. In that case, X25519 still provides non post-quantum security, and our post-quantum migration didn’t make things worse.
More important is that we do not only worry about attacks on the algorithm, but also on the implementation. A noteworthy example where we dodged a bullet is that of KyberSlash, a timing attack that affected many implementations of Kyber (an earlier version of ML-KEM), including our own. Luckily KyberSlash does not affect Kyber as it is used in TLS. A similar implementation mistake that would actually affect TLS, is likely to require an active attacker. In that case, the likely aim of the attacker wouldn’t be to decrypt data decades down the line, but steal a cookie or other token, or inject a payload. Including X25519 prevents such an attack.
So how well do ML-KEM-768 and X25519 together perform in practice?
Performance and protocol ossification
Browser experiments
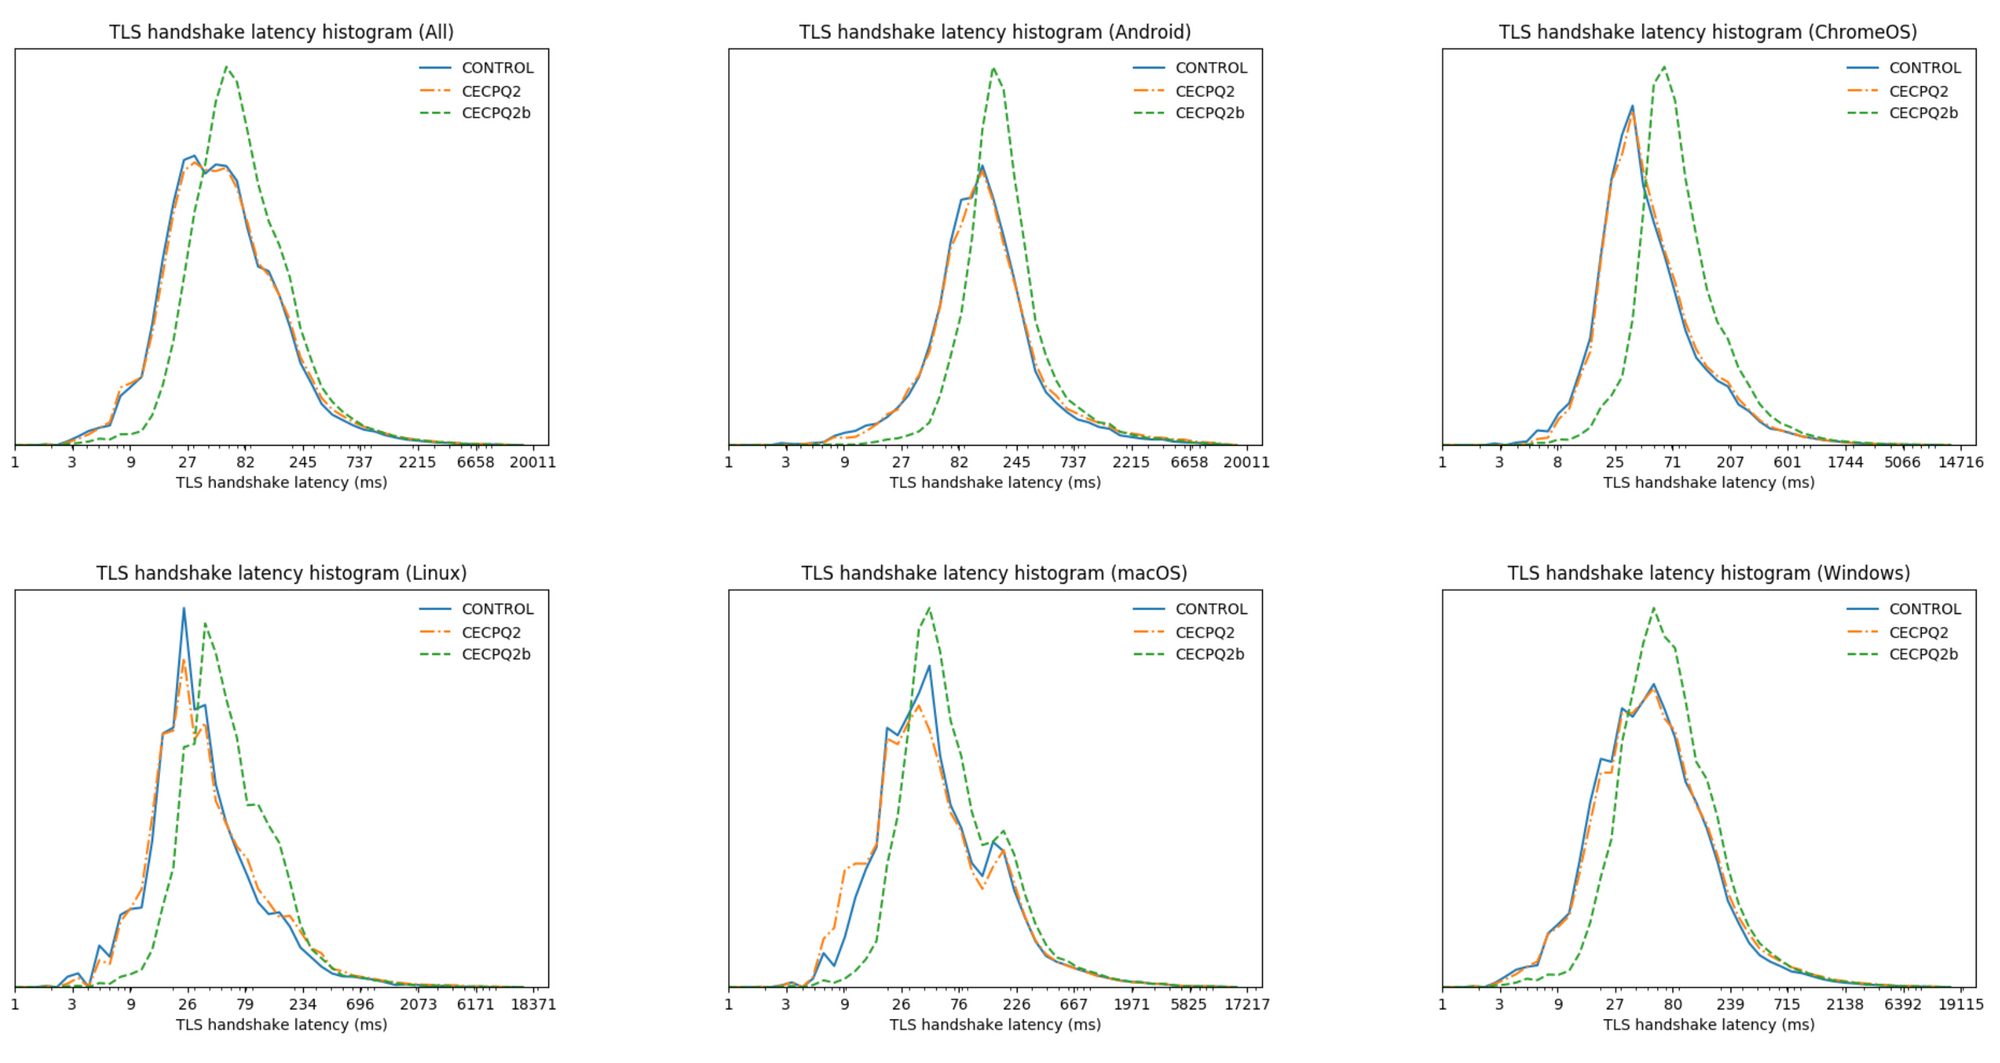
Being well aware of potential compatibility and performance issues, Google started a first experiment with post-quantum cryptography back in 2016, the same year NIST started their competition. This was followed up by a second larger joint experiment by Cloudflare and Google in 2018. We tested two different hybrid post-quantum key agreements: CECPQ2, which is a combination of the lattice-based NTRU-HRSS and X25519, and CECPQ2b, a combination of the isogeny-based SIKE and again X25519. NTRU-HRSS is very similar to ML-KEM in size, but is computationally somewhat more taxing on the client-side. SIKE on the other hand, has very small keys, is computationally very expensive, and was completely broken in 2022. With respect to TLS handshake times, X25519+NTRU-HRSS performed very well, being hard to distinguish by eye from the control connections.
Unfortunately, a small but significant fraction of clients experienced broken connections with NTRU-HRSS. The reason: the size of the NTRU-HRSS keyshares. In the past, when creating a TLS connection, the first message sent by the client, the so-called ClientHello, almost always fit within a single network packet. The TLS specification allows for a larger ClientHello, however no one really made use of that. Thus, protocol ossification strikes again as there are some middleboxes, load-balancers, and other software that tacitly assume the ClientHello always fits in a single packet.
Over the subsequent years, Chrome kept running their PQ experiment at a very low rate, and did a great job reaching out to vendors whose products were incompatible. If it were not for these compatibility issues, we would’ve likely seen Chrome ramp up post-quantum key agreement five years earlier.
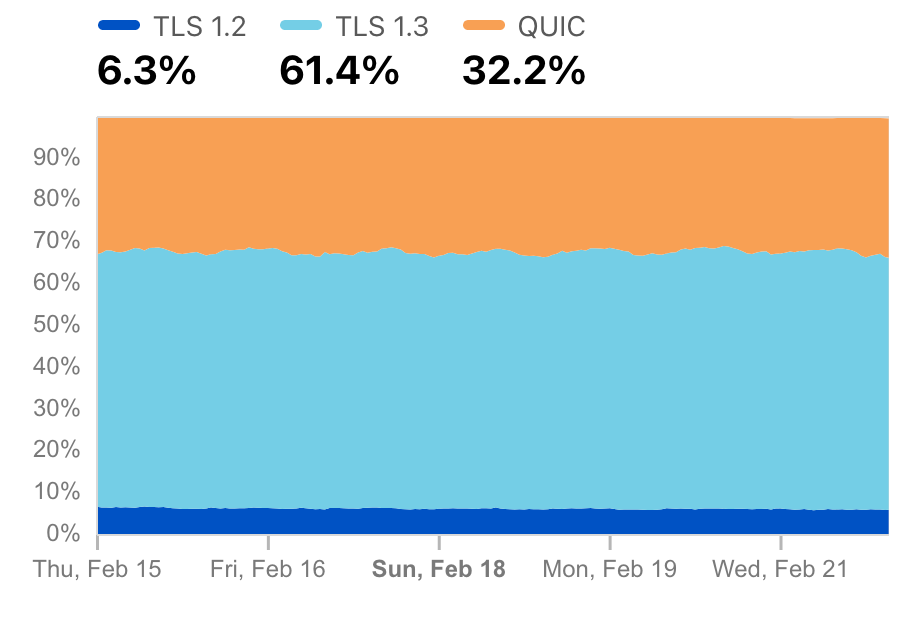
Today the situation looks better. At the time of writing, Chrome has enabled post-quantum key-agreement for 10% of all users. That accounts for about 1.8% of all our TLS 1.3 connections, as shown in the figure below. That’s a lot, but we’re not out of the woods yet. There could well be performance and compatibility issues that prevent a further rollout.
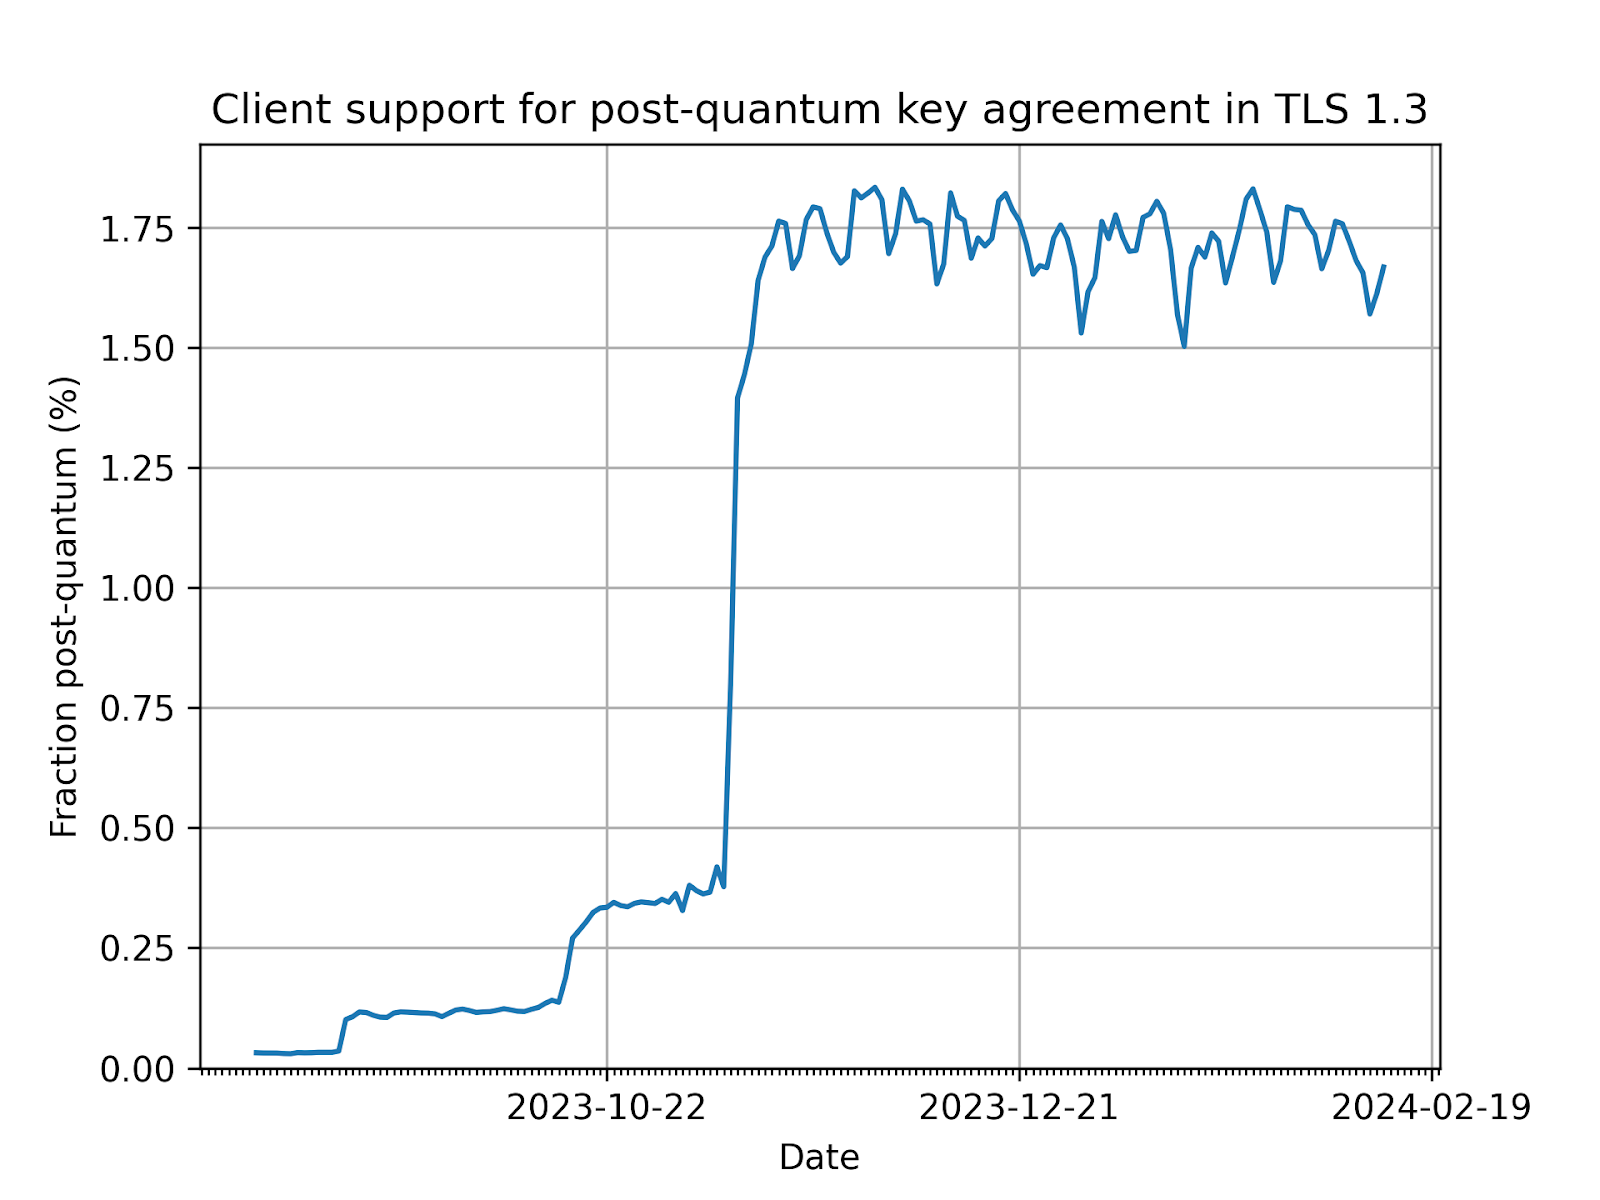
Nonetheless, we feel it’s more probable than not that we will see Chrome enable post-quantum key agreement for more users this year.
Other browsers
In January 2024, Firefox landed the code to support post-quantum key agreement in nightly, and it’s likely it will land in Firefox proper later in 2024. For Chrome-derived browsers, such as Edge and Brave, it’s easy to piggyback on the work of Chrome, and we could well see them follow suit when Chrome turns on post-quantum key-agreement by default.
However, browser to server connections aren’t the only connections important to the Internet.
Testing connections to customer origins
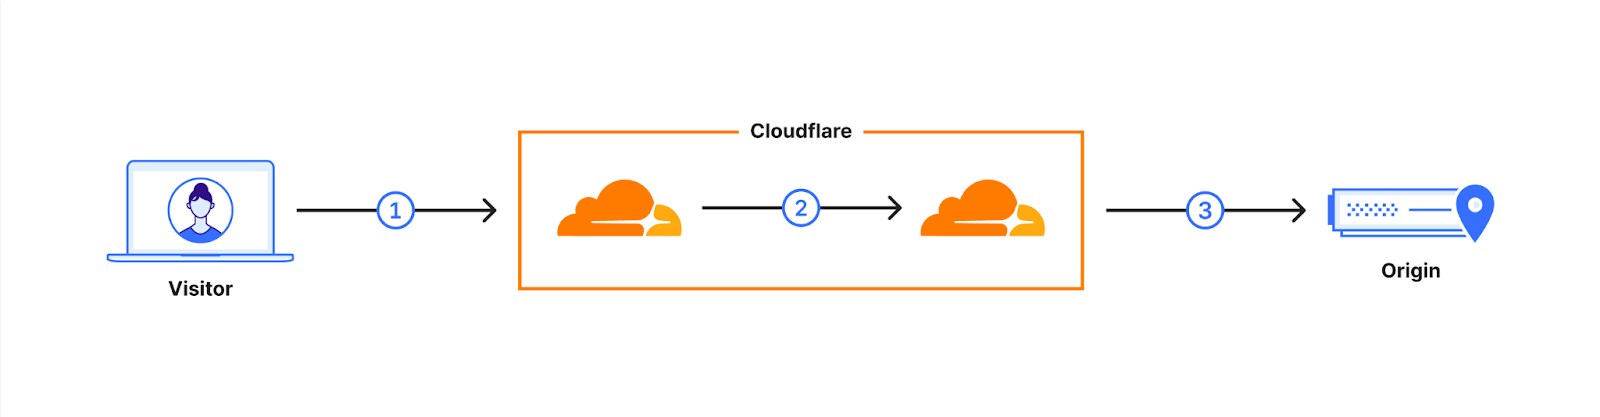
In September 2023, we added support for our customers to enable post-quantum key agreement on connections from Cloudflare to their origins. That’s connection (3) in the following diagram. This can be done in two ways: the fast way, and the slow but safer way. In both cases, if the origin does not support it, we fall back to traditional key-agreement. We explain the details of these in the blog post, but in short, in the fast way we send the post-quantum keyshare immediately, and in the slow but safe way we let the origin ask for post-quantum using a HelloRetryRequest message. Chrome, by the way, is deploying post-quantum key agreement the fast way.
At the same time, we started regularly testing our customer origins to see if they would support us offering post-quantum key agreement. We found all origins supported the safe but slow method. The fast method didn’t fare as well, as we found that 0.34% of connections would break. That’s higher than the failure rates seen by browsers.
Unsurprisingly, many failures seem to be caused by the large ClientHello. Interestingly, the majority are caused by servers not correctly implementing HelloRetryRequest. To investigate the cause, we have reached out to customers to ascertain the cause. We’re very grateful to those that have responded, and we’re currently working through the data.
Outlook
As we’ve seen, post-quantum key agreement, despite protocol ossification, is relatively straightforward to deploy. We’re also on a great trajectory, as we might well see double-digit client support for post-quantum key agreement later this year.
Let’s turn to the second, more difficult migration.
Migrating the Internet to post-quantum signatures
Now, we’ll turn our attention to upgrading the signatures used on the Internet.
The zoo of post-quantum signatures
Let’s start by sizing up the post-quantum signatures we have available today at the AES-128 security level: ML-DSA-44, FN-DSA-512, and the two variants of SLH-DSA. As a comparison, we also include the venerable Ed25519 and RSA-2048 in wide use today, as well as a sample of five promising signature schemes from the signatures onramp.
| Sizes (bytes) | CPU time (lower is better) | |||||
|---|---|---|---|---|---|---|
| PQ | Public key | Signature | Signing | Verification | ||
| Standardized | Ed25519 | ❌ | 32 | 64 | 1 (baseline) | 1 (baseline) |
| RSA-2048 | ❌ | 256 | 256 | 70 | 0.3 | |
| NIST drafts | ML-DSA-44 | ✅ | 1,312 | 2,420 | 4.8 | 0.5 |
| FN-DSA-512 | ✅ | 897 | 666 | 8 ⚠️ | 0.5 | |
| SLH-DSA-128s | ✅ | 32 | 7,856 | 8,000 | 2.8 | |
| SLH-DSA-128f | ✅ | 32 | 17,088 | 550 | 7 | |
| Sample from signatures onramp | MAYOone | ✅ | 1,168 | 321 | 4.7 | 0.3 |
| MAYOtwo | ✅ | 5,488 | 180 | 5 | 0.2 | |
| SQISign I | ✅ | 64 | 177 | 60,000 | 500 | |
| UOV Is-pkc | ✅ | 66,576 | 96 | 2.5 | 2 | |
| HAWK512 | ✅ | 1,024 | 555 | 2 | 1 |
Comparison of various signature schemes at the security level of AES-128. CPU times vary significantly by platform and implementation constraints and should be taken as a rough indication only. ⚠️FN-DSA signing time when using fast but dangerous floating-point arithmetic — see warning below.
It is immediately clear that none of the post-quantum signature schemes comes even close to being a drop-in replacement for Ed25519 (which is comparable to ECDSA P-256) as most of the signatures are simply much bigger. The exceptions are SQISign, MAYO, and UOV from the onramp, but they’re far from ideal. MAYO and UOV have large public keys, and SQISign requires an immense amount of computation.
When to use SLH-DSA
As mentioned before, today we only have drafts for SLH-DSA and ML-DSA. In every relevant performance metric, ML-DSA beats SLH-DSA handily. (Even the small public keys of SLH-DSA are not any advantage. If you include the ML-DSA public key with its signature, it’s still smaller than an SLH-DSA signature, and in that case you can use the short hash of the ML-DSA public key as a short public key.)
The advantage of SLH-DSA is that there is a lot of trust in its security. To forge an SLH-DSA signature you need to break the underlying hash function quite badly. It is not enough to break the collision resistance of the hash, as has been done with SHA-1 and MD5. In fact, as of February 2024, an SHA-1 based SLH-DSA would still be considered secure. Of course, SLH-DSA does not use SHA-1, and instead uses SHA2 and SHA3, against which not a single practical attack is known.
If you can shoulder the cost, SLH-DSA has the best security guarantee, which might be crucial when dealing with long-lasting signatures, or deployments where upgrades are impossible.
Be careful with FN-DSA
Looking ahead a bit: the best of the worst seems to be FN-DSA-512. FN-DSA-512’s signatures and public key together are only 1,563 bytes, with somewhat reasonable signing time. FN-DSA has an achilles heel though — for acceptable signing performance, it requires fast floating-point arithmetic. Without it, signing is about 20 times slower. But speed is not enough, as the floating-point arithmetic has to run in constant time — without it, the FN-DSA private key can be recovered by timing signature creation. Writing safe FN-DSA implementations has turned out to be quite challenging, which makes FN-DSA dangerous when signatures are generated on the fly, such as in a TLS handshake. It is good to stress that this only affects signing. FN-DSA verification does not require floating-point arithmetic (and during verification there wouldn’t be a private key to leak anyway.)
There are many signatures on the web
The biggest pain-point of migrating the Internet to post-quantum signatures, is that there are a lot of signatures even in a single connection. When you visit this very website for the first time, we send six signatures and two public keys.
The majority of these are for the certificate chain: the CA signs the intermediate certificate, which signs the leaf certificate, which in turn signs the TLS transcript to prove the authenticity of the server. If you’re keeping count: we’re still three signatures short.
Two of these are for SCTs required for certificate transparency. Certificate transparency is a key, but lesser known, part of the Web PKI, the ecosystem that secures browser connections. Its goal is to publicly log every certificate issued, so that misissuances can be detected after the fact. It works by having independent parties run CT logs. Before issuing a certificate, a CA must first submit it to at least two different CT logs. An SCT is a signature of a CT log that acts as a proof, a receipt, that the certificate has been logged.
The final signature is an OCSP staple, which proves that the leaf certificate hasn’t been revoked in the last few days.
Tailoring signature schemes
There are two aspects of how a signature can be used that are worthwhile to highlight: whether the public key is included with the signature, and whether the signature is online or offline.
For the SCTs and the signature of the root on the intermediate, the public key is not transmitted during the handshake. Thus, for those, a signature scheme with smaller signatures but larger public keys, such as MAYO or UOV, would be particularly well-suited. For the other signatures, the public key is included, and it’s more important to minimize the sizes of the combined public key and signature.
The handshake signature is the only signature that is created online — all the other signatures are created ahead of time. The handshake signature is created and verified only once, whereas the other signatures are typically verified many times by different clients. This means that for the handshake signature, it’s advantageous to balance signing and verification time which are both in the hot path, whereas for the other signatures having better verification time at the cost of slower signing is worthwhile. This is one of the advantages RSA still enjoys over elliptic curve signatures today.
Putting together different signature schemes is a fun puzzle, but it also comes with some drawbacks. Using multiple different schemes increases the attack surface because an algorithmic or implementation vulnerability in one compromises the whole. Also, the whole ecosystem needs to implement and optimize multiple algorithms, which is a significant burden.
Putting it together
So, what are some reasonable combinations to try?
With NIST’s current picks
With the draft standards available today, we do not have a lot of options.
If we simply switch to ML-DSA-44 for all signatures, we’re adding 17kB of data that needs to be transmitted from the server to the client during the TLS handshake. Is that a lot? Probably. We will address that later on.
If we wait a bit and replace all but the handshake signature with FN-DSA-512, we’re looking at adding only 8kB. That’s much better, but I have to repeat that it’s difficult to implement FN-DSA-512 signing safely without timing side channels, and there is a good chance we’ll shoot ourselves in the foot if we’re not careful.
Another way to shoot ourselves in the foot today is with stateful hash-based signatures.
Stateful hash-based signatures
Apart from symmetric cryptography, there are already post-quantum signature schemes standardized today: LMS / HRSS and XMSS(MT). Just like SLH-DSA, these are hash-based signature schemes, and thus, algorithmically they’re very conservative.
But they come with a major drawback: you need to remember the state. What is this state? When generating a keypair, you prepare a fixed number of one-time-use slots, and you need to remember which one you’ve used. If you use the same prepared slot twice, then anyone can create a forgery with those two. Managing this state is not impossible, but quite tricky. What if the server was restored from a backup? The state can be distributed over multiple servers, but that changes the usual signature flow quite a bit, and it’s unclear whether regulators will allow this approach, as the state is typically considered part of the private key.
So, how do they perform? It’s hard to give a definite answer. These hash-based signature schemes have a lot of knobs to turn and can be fine-tuned to their use case. You can see for yourself, and play around with the parameters on this website. With standardized variants (with security parameter n=24) for the offline signatures, we can beat ML-DSA-44 in data on the wire, but can’t outperform FN-DSA-512. With security parameter n=16, which has not been standardized, stateful hash-based signatures are competitive with FN-DSA-512, and can even beat it on size. However, n=16 comes with yet another footgun: it allows the signer to create a single signature that validates two different messages — there is no non-repudiation.
All in all, FN-DSA-512 and stateful hash-based signatures tempt us with a similar and clear performance benefit over ML-DSA-44, but are difficult to use safely.
Signatures on the horizon
There are some very promising new signature schemes submitted to the NIST onramp.
UOV (unbalanced oil and vinegar) is an old multivariate scheme with a large public key (66.5kB), but small signatures (96 bytes). If we combine UOV for the root and SCTs with ML-DSA-44 for the others, we’re looking at only 10kB — close to FN-DSA-512.
Over the decades, there have been many attempts to add some structure to UOV public keys, to get a better balance between public key and signature size. Many of these so-called structured multivariate schemes, which includes Rainbow and GeMMS, unfortunately have been broken.
MAYO is the latest proposal for a structured multivariate scheme, designed by the cryptographer that broke Rainbow. As a structured multivariate scheme, its security requires careful scrutiny, but its utility (given it is not broken) is very appealing.
MAYO allows for a fine-grained tradeoff between signature and public key size. For the submission, to keep things simple, the authors proposed two concrete variants: MAYOone with balanced signature (321 bytes) and public key (1.1kB) sizes, and MAYOtwo that has signatures of 180 bytes, while keeping the public key manageable at 5.4kB. Verification times are excellent, while signing times are somewhat slower than ECDSA, but far better than RSA. Combining both variants in the obvious way, we’re only looking at 3.3kB.
Purely looking at sizes, SQISign I is the clear winner, even beating RSA-2048. Unfortunately, the computation required for signing, and crucially verification, are way too high. For niche applications, SQISign might be useful, but for general adoption verification times need to improve significantly, even if that requires a larger signature.
Finally, I would like to mention HAWK512. HAWK is a lattice-based scheme similar to FN-DSA-512, but does not require floating-point arithmetic. This makes HAWK an appealing alternative to FN-DSA. NIST has repeatedly stated that the main purpose of the onramp is to standardize a signature scheme that is not based on lattices — a description HAWK does not fit. We might see some innovations of HAWK be included in the final version of FN-DSA, but it is unclear whether that will solve all of FN-DSA implementation concerns.
There are more promising submissions in the onramp, but those discussed are a fairly representative sample of those interesting to TLS. For instance, SNOVA is similar to MAYO, and TUOV is similar to UOV. Explore the submissions for yourself on Thom’s webpage.
Do we really care about the extra bytes?
It will take 17kB extra to swap in ML-DSA-44. That’s a lot compared to the typical handshake today, but it’s not a lot compared to the JavaScript and images served on many web pages. The key point is that the change we must make here affects every single TLS connection, whether it’s used for a bloated website, or a time-critical API call. Also, it’s not just about waiting a bit longer. If you have spotty cellular reception, that extra data can make the difference between being able to load a page, and having the connection time out. (As an aside, talking about bloat: many apps perform a surprisingly high number of TLS handshakes.)
Just like with key agreement, performance isn’t our only concern: we also want the connection to succeed in the first place. Back in 2021, we ran an experiment artificially enlarging the certificate chain to simulate larger post-quantum certificates. We give a short summary of the key result below, but for the details, check out the full blog post.
Initially, we wanted to run the experiment on a small sample of regular traffic, in order to get unbiased data. Unfortunately, we found that large certificate chains broke some connections. Thus, to avoid breaking customer connections, we set up the experiment to use background connections launched from our challenge pages. For each participant, we launched two background connections: one with a larger certificate chain (live) and one with a normal chain(control). The graph on the right shows the number of control connections that are missing a corresponding live connection. There are jumps around 10kB and 30kB, suggesting that there are clients or middleboxes that break when certificate chains grow by more than 10kB or 30kB.
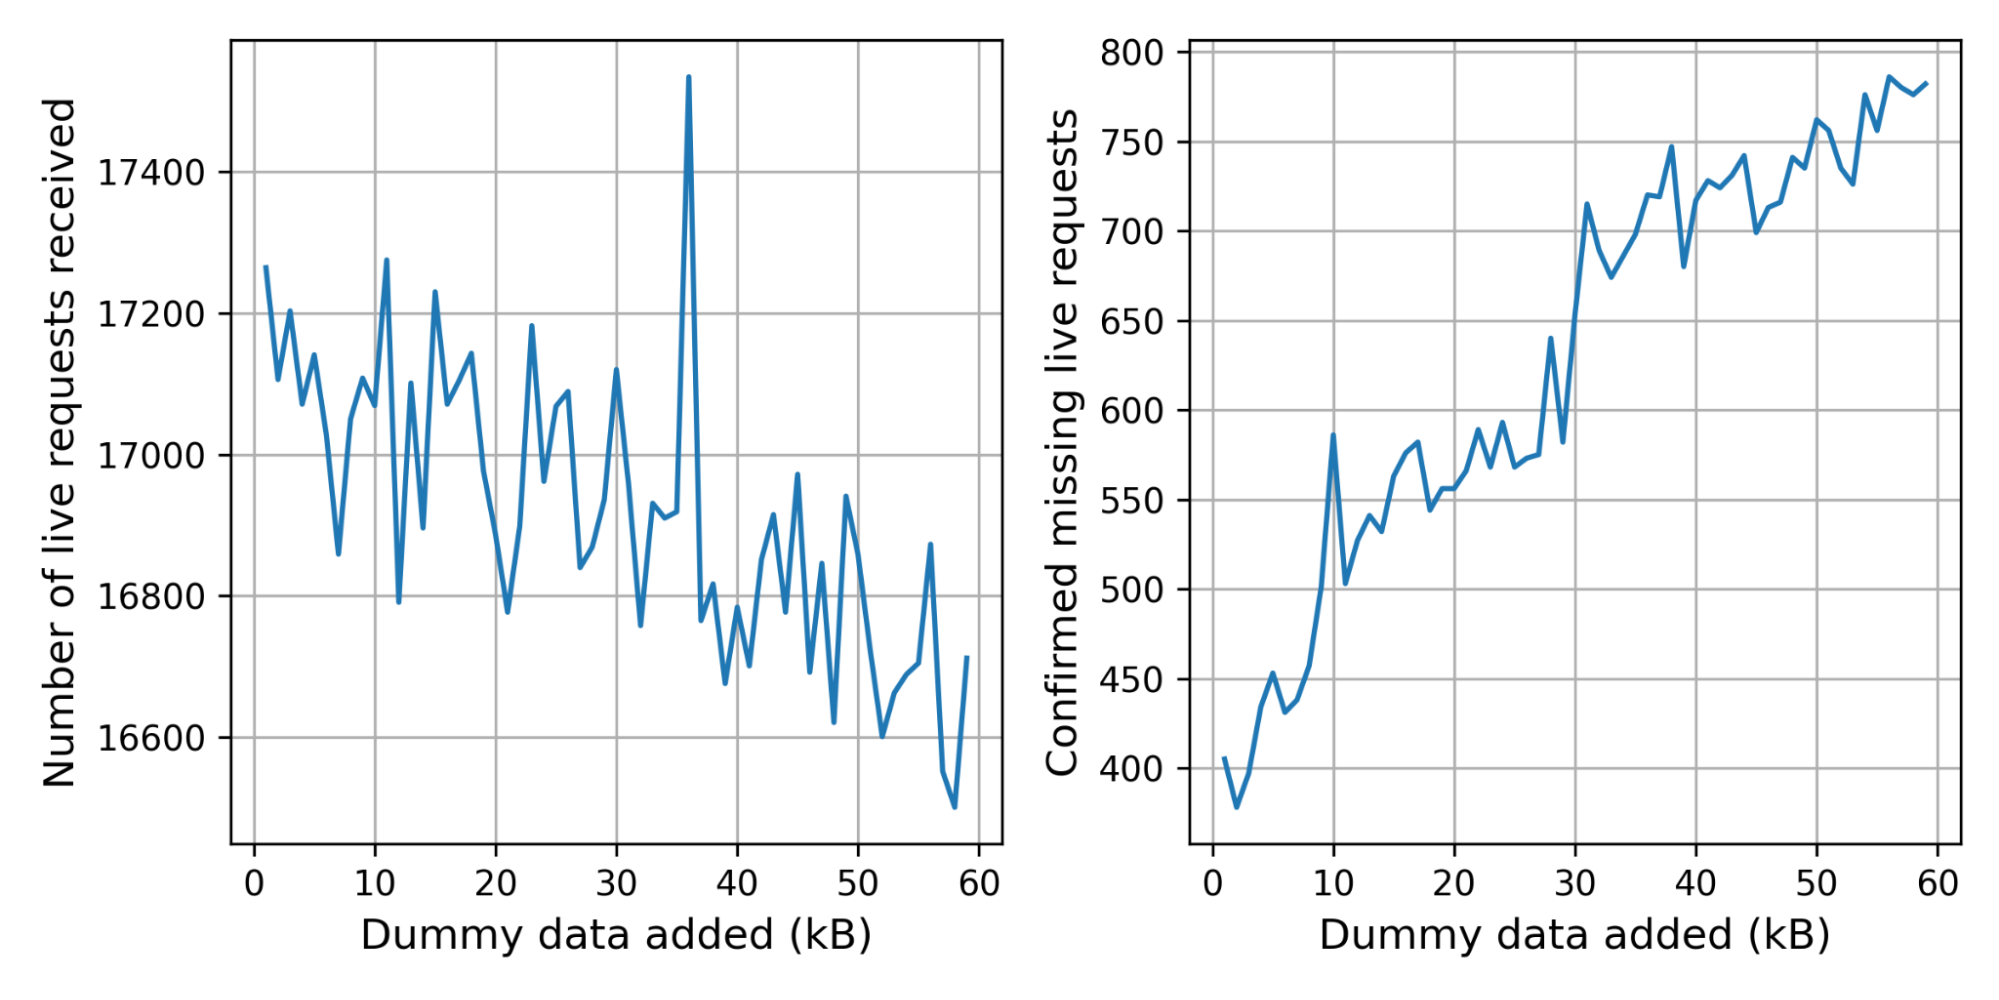
This does not mean that the ML-DSA-44-only route is necessarily unviable. Just like with key agreement, browsers can slowly turn on support for post-quantum certificates. As we hit issues with middleboxes, we can work with vendors to fix what is broken. It is crucial here that servers are configured to be able to serve either a small traditional chain, or a larger post-quantum chain.
These issues are problematic for a single-certificate migration strategy. In this approach, the server installs a single traditional certificate that contains a separate post-quantum certificate in a so-called non-critical extension. A client that does not support post-quantum certificates will ignore the extension. In this approach, installing the single certificate will immediately break all clients with compatibility issues, making it a non-starter.
What about performance? We saw the following impact on TLS handshake time.
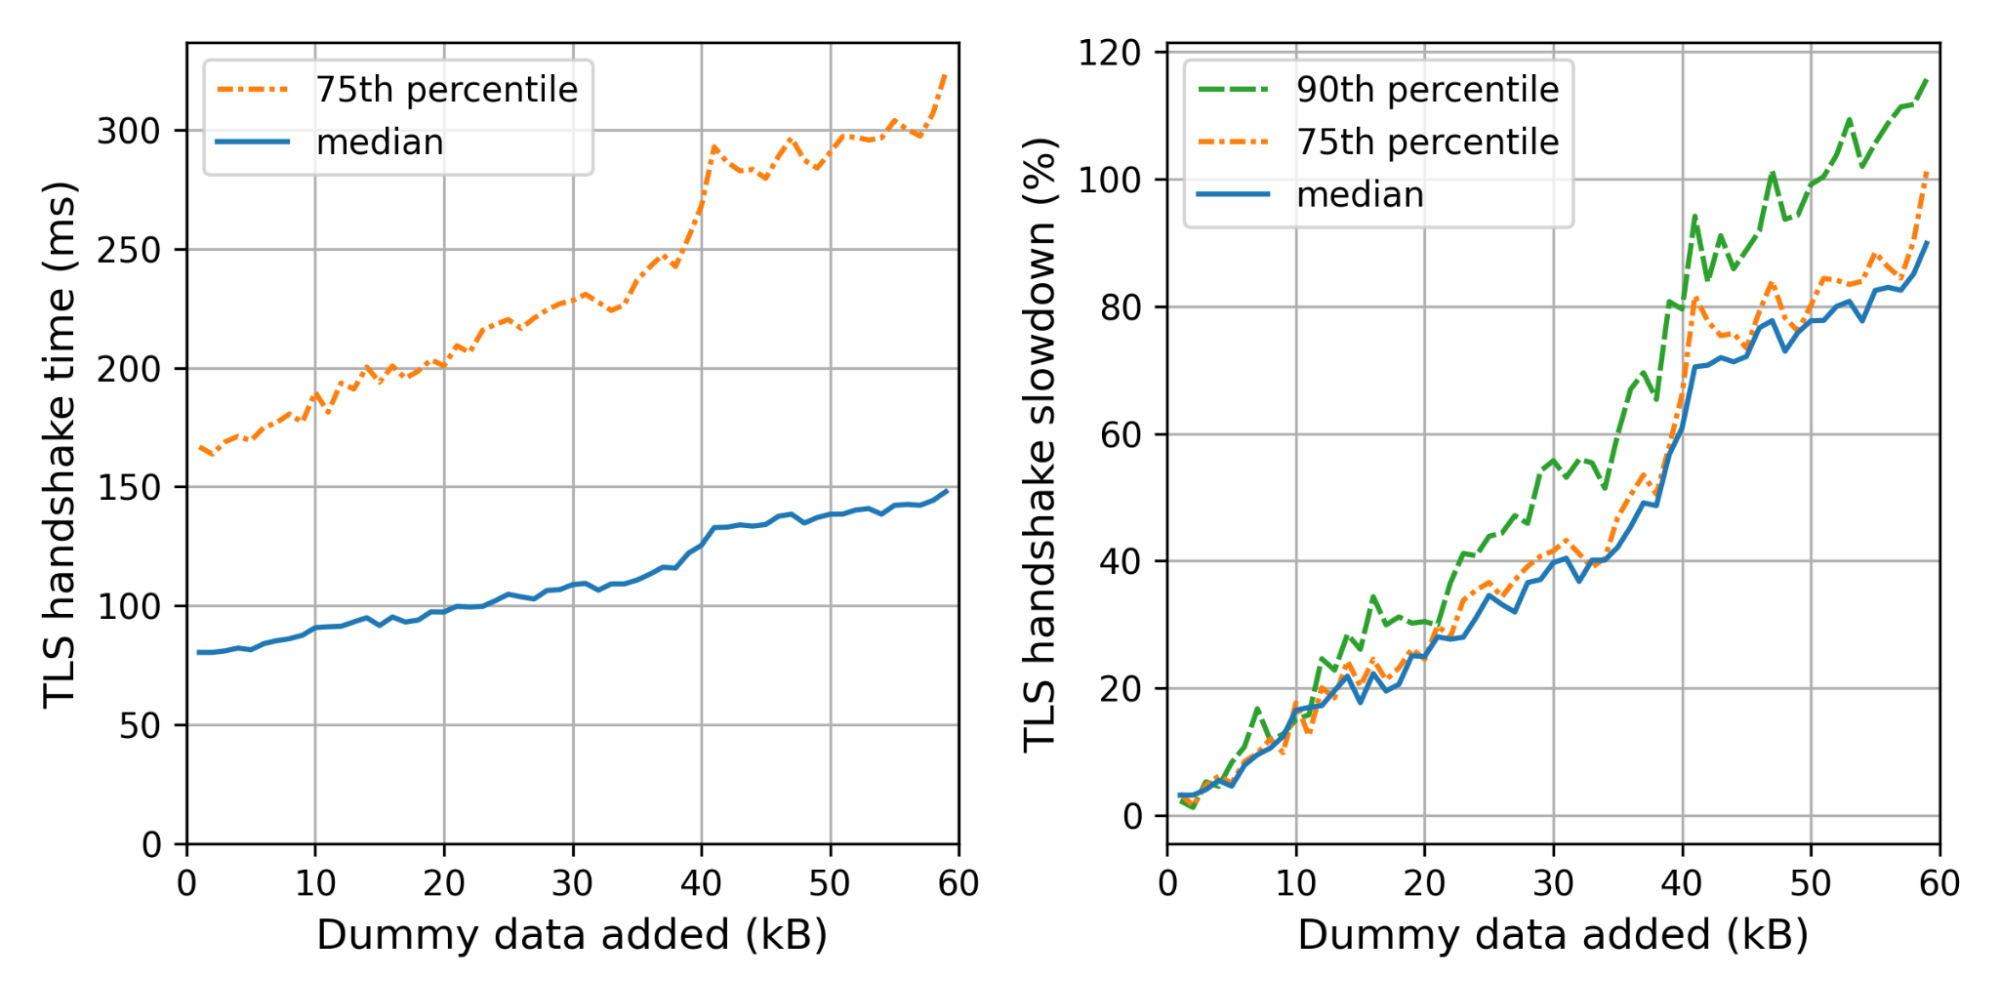
The jump at around 40kB is caused by an extra round-trip due to a full congestion window. In the 2021 blog post we go into detail on what that is all about. There is an important caveat: at Cloudflare, because we’re close to the client, we use a larger congestion window. With a typical congestion window, the jump would move to around 10kB. Also, the jump would be larger as typical round-trip times are higher.
Thus, when adding 9KB, we’re looking at a slowdown of about 15%. Crossing the 10kB boundary, we are likely to incur an extra roundtrip, which could well lead to a slowdown of more than 60%. That completely negates the much touted performance benefit that TLS 1.3 has over TLS 1.2, and it’s too high to be enabled by default.
Is 9kB too much? Enabling post-quantum key agreement wasn’t free either, but enabling post-quantum key agreement was cheaper and actually gets us a tangible security benefit today. However, this thinking is dangerous. If we wait too long before enabling post-quantum certificates by default, we might find ourselves out of time when the quantum computer arrives.
Way forward
Over the coming years, we’ll be working with browsers to test the viability and performance impact of post-quantum authentication in TLS. We expect to add support for post-quantum certificates as soon as they arrive (probably around 2026), but not enable them by default.
At the same time, we’re exploring various ideas to reduce the number of signatures.
Reducing number of signatures
Over the last few years, there have been several proposals to reduce the number of signatures used.
Leaving out intermediate certificates
CAs report the intermediate certificates they use in the CCADB. Most browsers ship with the list of intermediates (of CAs they trust). Using that list, a browser is able to establish a connection with a server that forgot to install the intermediate. If a server can leave out the intermediate, then why bother with it?
There are three competing proposals to leave out the intermediate certificate. The original 2019 proposal is by Martin Thomson, who suggests simply having the browser send a single bit to indicate that it has an up-to-date list of all intermediates. In that case, the server will leave out the intermediates. This will work well in the majority of cases, but could lead to some hard-to-debug issues in corner cases. For one, not all intermediates are listed in the CCADB, and these missing intermediates aren’t even from custom CAs. Another reason is that the browser could be mistaken about whether it’s up-to-date. A more esoteric issue is that the browser could reconstruct a different chain of certificates than the server had in mind.
To address these issues, in 2023, Dennis Jackson put forward a more robust proposal. In this proposal, every year a fixed list of intermediates is compiled from the CCADB. Instead of a single flag, the browser will send the named lists of intermediates it has. The server will not simply leave out matching intermediates, but rather replace them by the sequence number at which they appear in the list. He also did a survey of the most popular websites, and found that just by leaving out the intermediates today, we can save more than 2kB compared to certificate compression for half of them. That’s with today’s certificates: yes, X509 certificates are somewhat bloated.
Finally, there is the more general TLS trust expressions proposal that allows a browser to signal more in a more fine-grained manner which CAs and intermediates it trusts.
It’s likely some form of intermediate suppression will be adopted in the coming years. This will push the cost of a ML-DSA-44-only deployment down to less than 13kB.
KEMTLS
Another approach is to change TLS more rigorously by replacing the signature algorithm in the leaf certificate by a KEM. This is called KEMTLS (or AuthKEM at the IETF). The server proves it controls the leaf certificate, by being able to decrypt a challenge sent by the client. This is not an outlandishly new idea, as older versions of TLS would encrypt a shared key to an RSA certificate.
KEMTLS does add quite a bit of complexity to TLS 1.3, which was purposely designed to simplify TLS 1.2. Adding complexity adds security concerns, but we soften that by extending TLS 1.3 machine-checked security proof to KEMTLS. Nonetheless, adopting KEMTLS will be a significant engineering effort, and its gains should be worthwhile.
If we replace an ML-DSA-44 handshake signature of 2,420 bytes by KEMTLS using ML-KEM-512, we save 852 bytes in the total bytes transmitted by client and server. Looking just at the server, we save 1,620 bytes. If that’s 1.6kB saved on 17kB, it’s not very impressive. Also, KEMTLS is of little benefit if small post-quantum signatures such as MAYOone are available for the handshake.
KEMTLS shines in the case that 1.6kB savings pushes the server within the congestion window, such as when UOV is used for all but the handshake and leaf signature. Another advantage of KEMTLS, especially for embedded devices, is that it could reduce the number of algorithms that need to be implemented: you need a KEM for the key agreement anyway, and that could replace the signature scheme you would’ve only used for the handshake signature.
At the moment, deploying KEMTLS isn’t the lowest hanging fruit, but it could well come into its own, depending on which signature schemes are standardized, and which other protocol changes are made.
Merkle tree certificates
An even more ambitious and involved proposal is Merkle tree certificates (MTC). In this proposal, all signatures except the handshake signature are replaced by a short <800 byte Merkle tree certificate. This sounds too good to be true, and there is indeed a catch. MTC doesn’t work in all situations, and for those you will need to fall back to old-fashioned X509 certificates and certificate transparency. So, what’s assumed?
- No direct certificate issuance. You can’t get a Merkle tree certificate immediately: you will have to ask for one, and then wait for at least a day before you can use it.
- Clients (in MTC parlance relying parties) can only check a Merkle tree certificate if they stay up to date with a transparency service. Browsers have an update-mechanism that can be used for this, but a browser that hasn’t been used in a while might be stale.
MTC should be seen as an optimisation for the vast majority of cases.
Summary
So, how does it actually work? I’ll try to give a short summary — for a longer introduction check out David Benjamin’s IETF presentation, or get your hands dirty by setting up your own MTC CA.
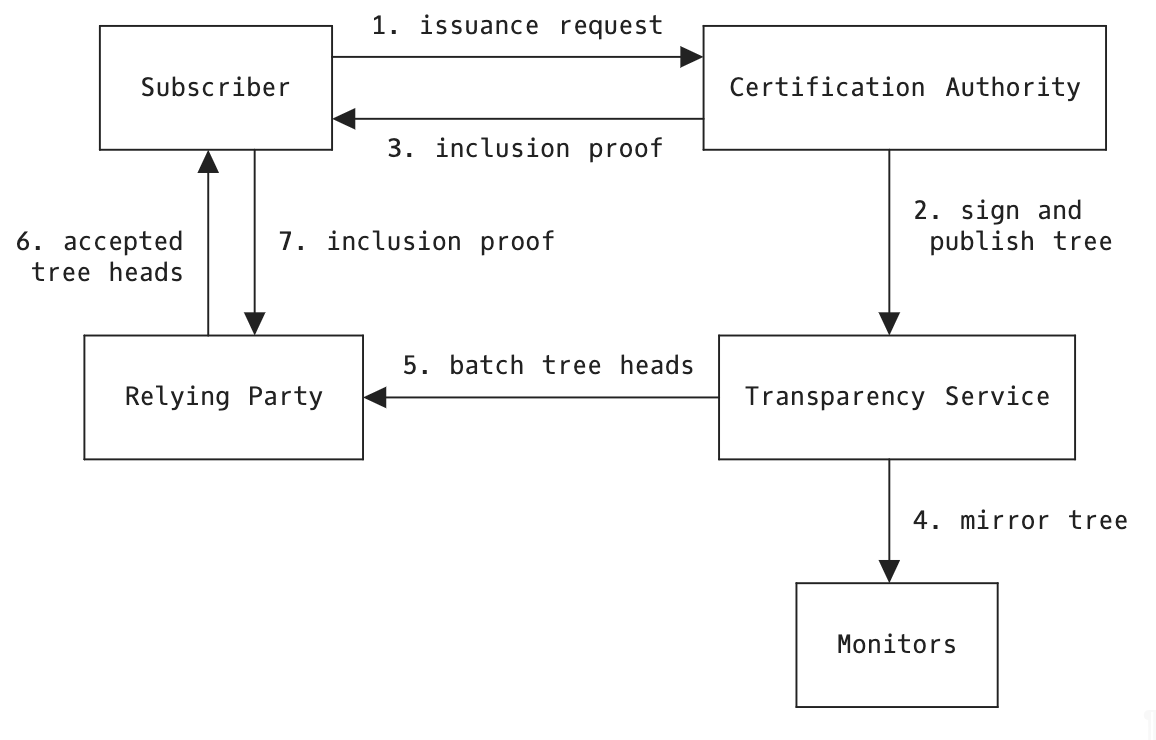
In MTC, CAs issues assertions in a batch in a fixed rhythm. Say once every hour. An example of an assertion is “you can trust P-256 public key ab….23 when connecting to example.com”. Basically an assertion is a certificate without the signature. If a subscriber wants to get a certificate, it sends the assertion to the CA, which vets it, and then queues it for issuance.
On this batch of assertions, the CA computes a Merkle tree. We have an explainer of Merkle trees in our blog post introducing certificate transparency. The short of it is that you can summarize a batch into a single hash by creating a tree hashing pairwise. The root is the summary. The nice thing about Merkle trees is that you can prove that something was in the batch to someone who only has the root, by revealing just a few hashes up the tree, which is called the Merkle tree certificate.
Each assertion is valid for a fixed number of batches — say 336 batches for a validity of two weeks. This is called the validity window. When issuing a batch, the CA not only publishes the assertions, but also a signature on the roots of all batches that are currently valid, called the signed validity window.
After the MTC CA has issued the new batch, the subscriber that asked for the certificate to be issued can pull the Merkle tree certificate from the CA. The subscriber can then install it, next to its X509 certificate, but will have to wait a bit before it’s useful.
Every hour, the transparency services, including those run by browser vendors, pull the new assertions and signed validity window from the CAs they trust. They check whether everything is consistent, including whether the new signed validity window matches with the old one. When satisfied, they republish the batches and signed validity window themselves.
Every hour, browsers download the latest roots from their trusted transparency service. Now, when connecting to a server, the client will essentially advertise which CAs it trusts, and the sequence number of the latest batch for which it has the roots. The server can then send either a new MTC, an older MTC (if the client is a bit stale), or fall back to a X509 certificate.
Outlook
The path for migrating the Internet to post-quantum authentication is much less clear than with key agreement. In the short term, we expect early adoption of post-quantum authentication across the Internet around 2026, but few will turn it on by default. Unless we can get performance much closer to today’s authentication, we expect the vast majority to keep post-quantum authentication disabled, unless motivated by regulation.
Not just TLS, authentication, and key agreement
Despite its length, in this blog post, we have only really touched upon migrating TLS. And even TLS we did not cover completely, as we have not discussed Encrypted ClientHello (we didn’t forget about it). Although important, TLS is not the only protocol key to the security of the Internet. We want to briefly mention a few other challenges, but cannot go into detail. One particular challenge is DNSSEC, which is responsible for securing the resolution of domain names.
Although key agreement and signatures are the most widely used cryptographic primitives, over the last few years we have seen the adoption of more esoteric cryptography to serve more advanced use cases, such as unlinkable tokens with Privacy Pass / PAT, anonymous credentials, and attribute based encryption to name a few. For most of these advanced cryptographic schemes, there is no known practical post-quantum alternative yet.
What you can do today
To finish, let’s review what you can do today. For most organizations the brunt of the work is in the preparation. Where is cryptography used in the first place? What software libraries / what hardware? What are the timelines of your vendors? Do you need to hire expertise? What’s at risk, and how should it be prioritized? Even before you can answer all those, create engagement within the organization. All this work can be started before NIST finishes their standards or software starts shipping with post-quantum cryptography.
You can also start testing right now since the performance characteristics of the final standards will not be meaningfully different from the preliminary ones available today. If it works with the preliminary ones today in your test environment, the final standards will most likely work just fine in production. We’ve collected a list of software and forks that already support preliminary post-quantum key agreement here.
Also on that page, we collected instructions on how to turn on post-quantum key agreement in your browser today. (For Chrome it’s enable-tls13-kyber in chrome://flags.)
If you’re a Cloudflare customer, you can check out how to enable post-quantum key agreement to your origin, and our products that are secured against store-now/decrypt-later today.
Good luck with your migration, and if you hit any issues, do reach out: [email protected]
7 Rapid Questions with #77 Ray Bourque
Post Syndicated from Rapid7 original https://blog.rapid7.com/2024/03/05/7-rapid-questions-with-77-ray-bourque/

We couldn’t pass up the opportunity to bring Boston Bruins legend Ray Bourque into the herd as we continue to expand our Bruins jersey sponsorship.
Ray is an absolute hero to Bruins fans everywhere. He has cemented his status in the annals of Boston sports history through 21 seasons in the black and gold and completely reinvented the game. He holds NHL records for goals, assists, and more for a defenseman. Ray’s relentless offense and tireless defense helped the Bruins command the attack surface. To top it off, he’s worn numbers 7 and 77, making this partnership feel like kismet.
In the spirit of our shared numeric connection, we’ve asked Ray to answer seven rapid questions about his time on the ice, his work off the ice, and his partnership with Rapid7.
What is your favorite memory of your days on the ice for the Bruins? (Maybe your top 3?)
Playing in Boston for 21 years, it’s hard to narrow it down to just one. There are a few moments from my time playing in Boston that really stand out. One of those being my first game. That was the most surreal feeling, realizing that I had made it to the NHL, which had been a dream of mine for as long as I can remember.
Another night that stands out is the night the Bruin’s surprised Phil Esposito with the retirement of his #7 jersey and we revealed my new number, 77. That was such a special moment.
An evening I will hold on to forever is the closing of The Garden. So many amazing alumni came out onto the ice after the game and took their last skate on The Garden ice. The last player they announced was Normand Leveille, who had suffered a brain aneurysm that ended his career. His dream was to skate one more time. Normand and I had a special relationship, as he did not speak English when coming to Boston. We would be roommates, sit next to each other at dinner, he would order the same meals as me because he couldn’t understand the menu. Being able to take him on his final skate around The Garden ice was one of my favorite moments as a Boston Bruin.
It’s the Bruins Centennial Year. What does 100 years of hockey history in Boston mean to you?
Anyone who has had the opportunity to play for one of the Original 6 teams understands how much of an impact that history and energy has on a team. Making it 100 years is an incredible feat, and having such an incredible city support a team for that long is impressive. It speaks so much to the dedication of the fans, ownership, management, and the culture built around the Boston Bruins. I am grateful for the opportunity to have played for an Original 6 team for 21 years of my career and be a part of such a unique and inspiring culture for so much of my career.
How important is the work the Bruins are doing in the community to engage youth from all backgrounds to grow the sport of hockey?
The NHL as a whole has done a great job at working on inclusivity, and this initiative wouldn’t be possible without the support of each team and their supporters who expand upon these efforts like Rapid7. So many people from so many different backgrounds have flourished in the sport and it is becoming something that is available to everyone. Having new teams and expanding the game has opened hockey to so many new regions. That has allowed kids to grow up with hockey in their community and give them the opportunity to dream of playing in the NHL.
Doors are wide open for anyone that wants to get involved and enjoy the game of hockey, at any level, and I think that is so important because there is so much to learn and take away from the sport at all levels.
It’s probably hard for you to imagine, but just go with us for a minute here: If professional hockey had never worked out, what sort of career would you have liked to have?
I don’t know what I would do, you’re right, it’s hard to imagine. I never thought about doing anything else. At 13 years old, I started separating myself from my teammates. I found another gear in my development that allowed me to advance my skills, and at 15 years old I started playing up, joining a Junior’s team of 16-20 year old’s. That is when it became realistic to me that I could make it to the NHL.
If I wasn’t a professional hockey player, I think I would still be involved in sports in some way. Sports were a huge part of my youth, playing hockey and baseball, and I would want to have the same impact on young athletes that my coaches and trainers had on me. I am not sure where that would have taken me, but it is something I am passionate about and would have enjoyed spending my time on.
As a legend in the sport, you’ve had your pick of organizations to align yourself with. What about Rapid7 speaks to you?
From the beginning of our conversations, Rapid7 has come across with a great energy that stuck out to me. It is clear that this team is pulling in the same direction, and it just feels like a team you want to be on and a part of. Their positive and inclusive culture makes it an environment you are excited to be a part of. On top of that, what they are doing is so important to today’s world and their work can truly make a difference.
What are the most important aspects of the Bourque Family Foundation you would like people to understand? How can they get involved?
Giving back is something that has been a significant part of my family since we moved to Boston when I was 18. The Boston Bruins are an extremely charitable team, and as a young player I quickly became involved in the community through the charitable efforts we did as a team.
Raising our family, my wife and I instilled the same values in our children, and all of us have played our own part in giving back to our community. The Bourque Family Foundation is a way for us to come together and combine our charitable efforts. My family and I are truly passionate about the work we do, from supporting individuals with spinal cord injuries to having an ongoing initiative to support the fight against ALS. We are able to touch so many different parts of our community and so many causes. Being able to bring our grandchildren into this as well is just a very special feeling, and I look forward to seeing the continued impact we can all make together with the amount of passion and love for this work that exists in my family.
We have 3 core events that are a great way to get involved; the 7.7K Road Race, Bourque Golf, and The Captain’s Ball in honor of Pete Frates. On top of that, there are some 3rd party initiatives as well that we are a part of that allow our community to raise funds. If you’re getting involved with any of the Bourque Family Foundation events, we can promise you’ll have fun and we’ll raise good money while doing it.
As the sport of hockey continues to spread further around North America and the world, any advice for those talented youngsters who dream of taking up the sport and making it to the NHL someday?
The most important thing I can say is work hard and have fun. Believe in yourself and in your dream. Being dedicated in terms of your work ethic and preparation will get you far and so will doing so with open eyes and open ears. There is so much value to be learned by everything that is happening around you. Hockey is a great game to be a part of, regardless of where it takes you. You can learn a lot of lessons about teamwork, leadership, work ethic, and everything that comes with being a part of a team. Approaching the game being willing to work hard, learn, and dedication will get you far, no matter where you end up.
And there you have it, NHL great and Boston sports legend Ray Bourque answering seven rapid questions from Rapid7. If you’d like, you can also learn more about how Ray and Rapid7 are working together to support hockey and continue icing out cyber threats everywhere.
Can We Keep Time?
Post Syndicated from The Atlantic original https://www.youtube.com/watch?v=gPv81fjHWFg
[$] Formalizing policy zones for memory
Post Syndicated from corbet original https://lwn.net/Articles/964239/
The kernel’s memory-management subsystem is built on the concept of
“zones”, which were initially added to describe the physical
characteristics of the memory pages contained within them. Over time,
zones have taken on more of a policy-related role as well. With a patch
set called THP
allocator optimizations, Yu Zhao has set out to better define the role
of policy-related zones on the path toward adding two more of them, with
the ultimate purpose of improving the kernel’s support for transparent huge
pages (THPs).
Security updates for Tuesday
Post Syndicated from corbet original https://lwn.net/Articles/964450/
Security updates have been issued by Debian (yard), Oracle (buildah and kernel), Red Hat (389-ds:1.4, edk2, frr, gnutls, haproxy, libfastjson, libX11, postgresql:12, sqlite, squid, squid:4, tcpdump, and tomcat), SUSE (apache2-mod_auth_openidc and glibc), and Ubuntu (linux-gke, python-cryptography, and python-django).
The Insecurity of Video Doorbells
Post Syndicated from Bruce Schneier original https://www.schneier.com/blog/archives/2024/03/the-insecurity-of-video-doorbells.html
Consumer Reports has analyzed a bunch of popular Internet-connected video doorbells. Their security is terrible.
First, these doorbells expose your home IP address and WiFi network name to the internet without encryption, potentially opening your home network to online criminals.
[…]
Anyone who can physically access one of the doorbells can take over the device—no tools or fancy hacking skills needed.
fill out the form
Post Syndicated from turnoff.us original http://turnoff.us/geek/fill-out-the-form/

Comic for 2024.03.05 – Breaking Up
Post Syndicated from Explosm.net original https://explosm.net/comics/breaking-up
New Cyanide and Happiness Comic
Lessons from video game companies: automation unleashes robust monitoring & observability
Post Syndicated from Rapid7 original https://blog.rapid7.com/2024/03/04/lessons-from-video-game-companies-automation-unleashes-robust-monitoring-observability/

Video game organizations need robust monitoring and observability solutions to stay one step ahead of cyber adversaries. Chances are, so do we all.
In this blog post, we’ll delve into how monitoring and observability capabilities enable video game organizations to bolster their cybersecurity defenses – and provide a better, more reliable gaming experience. Before we delve into the specific use case, let’s establish a foundation with a few definitions.
Monitoring involves actively tracking and analyzing events within an environment to identify potential security threats around the game and the player. Observability, on the other hand, goes beyond monitoring. It provides a holistic view of the entire system’s behavior, enabling video game organizations to understand and troubleshoot complex issues effectively. Together, robust monitoring and observability create a proactive cybersecurity stance that lets teams stop threats from escalating.
Automated Threat Detection: Automation with AI empowers Video game organizations to automate the detection of threats based on ML-predefined rules and behavioral analytics. This proactive approach ensures that potential security incidents are identified promptly, reducing the dwell time of threats within the network.
Real-time Response: Event-driving harvesting accelerates response with predefined actions in real-time. This includes isolating compromised endpoints, blocking malicious IP addresses, or executing custom response actions tailored to the organization’s security policies. The result is a swift and efficient containment of security incidents.
Adaptive Alerting: In addition to traditional alerting, automation can dynamically adjust alert thresholds and criteria based on historical data. This means that security teams can receive alerts for anomalous activities without being overwhelmed by false positives. This not only saves time and resources but also ensures that critical threats are not missed.
Contextual Enrichment: To enhance observability, Layered Context provides a holistic view of the most critical resources found in all environments; it is an enrichment of security alerts with contextual information. This includes user and asset details, historical behavior, and threat intelligence feeds. The enriched data provides security analysts with a comprehensive understanding of the security incident, enabling more informed and effective decision-making.
Customizable Process Workflows: Process-automated workflow capabilities are highly customisable, allowing video game organizations to create tailored workflows that align with their unique security requirements. This flexibility ensures that automation is not a one-size-fits-all solution but a dynamic tool that adapts to the specific needs of each organization.
In theory, this means you are adding protection and improving preventive measures while getting better at detecting threats that slip past our defenses. In reality, it means the security team has more and more tools for learning, configuring, monitoring and using.
In a digital landscape where cyber threats are becoming more sophisticated and prevalent, video game organizations must leverage advanced solutions that provide robust monitoring and observability. Rapid7, with its powerful automation features, is at the forefront of this cybersecurity evolution. Automating threat detection, incident response, alerting, contextual enrichment, and workflows empowers Video game organizations to enhance their cybersecurity defenses and respond effectively to the ever-changing threat landscape.
The ULTRA Lineup: Which is Best for You?
Post Syndicated from Crosstalk Solutions original https://www.youtube.com/watch?v=9TfpeJmI6Dw
AWS CloudHSM architectural considerations for crypto user credential rotation
Post Syndicated from Shankar Rajagopalan original https://aws.amazon.com/blogs/security/aws-cloudhsm-architectural-considerations-for-crypto-user-credential-rotation/
This blog post provides architectural guidance on AWS CloudHSM crypto user credential rotation and is intended for those using or considering using CloudHSM. CloudHSM is a popular solution for secure cryptographic material management. By using this service, organizations can benefit from a robust mechanism to manage their own dedicated FIPS 140-2 level 3 hardware security module (HSM) cluster in the cloud and a client SDK that enables crypto users to perform cryptographic operations on deployed HSMs.
Credential rotation is an AWS Well-Architected best practice as it helps reduce the risks associated with the use of long-term credentials. Additionally, organizations are often required to rotate crypto user credentials for their HSM clusters to meet compliance, regulatory, or industry requirements. Unlike most AWS services that use AWS Identity and Access Management (IAM) users or IAM policies to access resources within your cluster, HSM users are directly created and maintained on the HSM cluster. As a result, how the credential rotation operation is performed might impact the workload’s availability. Thus, it’s important to understand the available options to perform crypto user credential rotation and the impact each option has in terms of ease of implementation and downtime.
In this post, we dive deep into the different options, steps to implement them, and their related pros and cons. We finish with a matrix of the relative downtime, complexity, and cost of each option so you can choose which best fits your use case.
Solution overview
In this document, we consider three approaches:
Approach 1 — For a workload with a defined maintenance window. You can shut down all client connections to CloudHSM, change the crypto user’s password, and subsequently re-establish connections to CloudHSM. This option is the most straightforward, but requires some application downtime.
Approach 2 — You create an additional crypto user (with access to all cryptographic materials) with a new password and from which new client instances are deployed. When the new user and instances are in place, traffic is rerouted to the new instances through a load balancer. This option involves no downtime but requires additional infrastructure (client instances) and a process to share cryptographic material between the crypto users.
Approach 3 — You run two separate and identical environments, directing traffic to a live (blue) environment while making and testing the changes on a secondary (green) environment before redirecting traffic to the green environment. This option involves no downtime, but requires additional infrastructure (client instances and an additional CloudHSM cluster) to support the blue/green deployment strategy.
Solution prerequisites
- A network path to a CloudHSM cluster. To learn more, see Launch an Amazon Elastic Compute Cloud (Amazon EC2) client instance.
- Install and configure the CloudHSM command line interface(CLI).
- Access to the crypto user password.
Approach 1
The first approach uses an application’s planned maintenance window to enact necessary crypto user password changes. It’s the most straightforward of the recommended options, with the least amount of complexity because no additional infrastructure is needed to support the password rotation activity. However, it requires downtime (preferably planned) to rotate the password and update the client application instances; depending on how you deploy a client application, you can shorten the downtime by automating the application deployment process. The main steps for this approach are shown in Figure 1:

Figure 1: Approach 1 to update crypto user password
To implement approach 1:
- Terminate all client connections to a CloudHSM cluster. This is necessary because you cannot change a password while a crypto user’s session is active.
- You can query an Amazon CloudWatch log group for your CloudHSM cluster to find out if any user session is active. Additionally, you can audit Amazon Virtual Private Cloud (Amazon VPC) Flow Logs by enabling them for the elastic network interfaces (ENIs) related to the CloudHSM cluster. See where the traffic is coming from and link that to the applications.
- Change the crypto user password
- Use the following command to start CloudHSM CLI interactive mode.
Windows: C:\Program Files\Amazon\CloudHSM\bin\> .\cloudhsm-cli.exe interactiveLinux: $ /opt/cloudhsm/bin/cloudhsm-cli interactive
- Use the login command and log in as the user with the password you want to change.
aws-cloudhsm > login --username <USERNAME> --role <ROLE> - Enter the user’s password.
- Enter the user change-password command.
aws-cloudhsm > user change-password --username <USERNAME> --role <ROLE> - Enter the new password.
- Re-enter the new password.
- Use the following command to start CloudHSM CLI interactive mode.
- Update the client connecting to CloudHSM to use the new credentials. Follow the SDK documentation for detailed steps if you are using PKCS # 11, OpenSSL Dynamic Engine, JCE provider or KSP and CNG provider.
- Resume all client connections to CloudHSM cluster
Approach 2
The second approach employs two crypto users and a blue/green deployment strategy, that is, a deployment strategy in which you create two separate but identical client environments. One environment (blue) runs the current application version with crypto user 1 (CU1) and handles live traffic, while the other environment (green) runs a new application version with the updated crypto user 2 (CU2) password. After testing is complete on the green environment, traffic is directed to the green environment and the blue environment is deprecated. In this approach, both crypto users have access to the required cryptographic material. When rotating the crypto user password, you spin up new client instances and swap connection credentials to use the second crypto user. Because the client application only uses one crypto user at a time, the second user can remain dormant and be reused in the future as well. When compared to the first approach, this approach adds complexity to your architecture so that you can redirect live application traffic to the new environment by deploying additional client instances without having to restart. You also need to be aware that a shared user can only perform sign, encrypt, decrypt, verify, and HMAC operations with the shared key. Currently, export, wrap, modify, delete, and derive operations aren’t allowed with a shared user. This approach has the advantages of a classic blue/green deployment (no downtime and low risk), in addition to adding redundancy at the user management level by having multiple crypto users with access to the required cryptographic material. Figure 2 depicts a possible architecture:

Figure 2: Approach 2 to update crypto user password
To implement Approach 2:
- Set up two crypto users on the CloudHSM cluster, for example CU1 and CU2.
- Create cryptographic material required by your application.
- Use the key share command to share the key with the other user so that both users have access to all the keys.
- Start by running the key list command with a filter to return a specific key.
- View the
shared-usersoutput to identify whom the key is currently shared with. - To share this key with a crypto user, enter the following command:
aws-cloudhsm > aws-cloudhsm > key share --filter attr.label="rsa_key_to_share" attr.class=private-key --username <USERNAME> --role crypto-user
- If CU1 is used to make client (that is, blue environment) connections to a CloudHSM cluster then change the password for CU2.
- Follow the instructions in To change HSM user passwords or step 2 of Approach 1 to change the password assigned to CU2.
- Spin up new client instances and use CU2 to configure the connection credentials (that is, green environment).
- Add the new client instances to a new target group for the existing Application Load Balancer (ALB).
- Next use the weighted target groups routing feature of ALB to route traffic to the newly configured environment.
- You can use forward actions of the ALB listener rules setting to route requests to one or more target groups.
- If you specify multiple target groups for a forward action, you must specify a weight for each target group. Each target group weight is a value from 0 to 999. Requests that match a listener rule with weighted target groups are distributed to these target groups based on their weights. For example, if you specify one with a weight of 10 and the other with a weight of 20, the target group with a weight of 20 receives twice as many requests as the other target group.
- You can make these changes to the ALB setting using the AWS Command Line Interface (AWS CLI), AWS Management Console, or supported infrastructure as code (IaC) tools.
- For more information, see Fine-tuning blue/green deployments on application load balancer.
- For the next password rotation iteration, you can switch back to using CU1 with updated credentials by updating your client instances and redeploying using steps 6 and 7.
Approach 3
The third approach is a variation of the previous approach as you build an identical environment (blue/green deployment) and change the crypto user password on the new environment to achieve zero downtime for the workload. You create two separate but identical CloudHSM clusters, with one serving as the live (blue) environment, and another as the test (green) environment in which changes are tested prior to deployment. After testing is complete in the green environment, production traffic is directed to the green environment and the blue environment is deprecated. Again, this approach adds complexity to your architecture so that you can redirect live application traffic to the new environment by deploying additional client instances and a CloudHSM cluster during the deployment and cutover window without having to restart. Additionally, changes made to the blue cluster after the green cluster was created won’t be available in the green cluster—something that can be mitigated by a brief embargo on changes while this cutover process is in progress. A key advantage to this approach is that it increases application availability without the need for a second crypto user, while still reducing deployment risk and simplifying the rollback process if a deployment fails. Such a deployment pattern is typically automated using continuous integration and continuous delivery (CI/CD) tools such as AWS CodeDeploy. For detailed deployment configuration options, see deployment configurations in CodeDeploy. Figure 3 depicts a possible architecture:

Figure 3: Approach 3 to update crypto user password
To implement approach 3:
- Create a cluster from backup. Make sure you restore the new cluster in the same Availability Zone as the existing CloudHSM cluster. This will be your green environment.
- Spin up new application instances (green environment) and configure them to connect to the new CloudHSM cluster.
- Take note of the new CloudHSM cluster security group and attach it to the new client instances.
- Follow the steps in To change HSM user passwords or Approach 1 step 2 to change the crypto user password on the new cluster.
- Update the client connecting to CloudHSM with the new password.
- Add the new client to the existing Application Load Balancer by following Approach 2 steps 6 and 7.
- After the deployment is complete, you can delete the old cluster and client instances (blue environment).
- To delete the CloudHSM cluster using the console.
- Open the AWS CloudHSM console.
- Select the old cluster and then choose Delete cluster.
- Confirm that you want to delete the cluster, then choose Delete.
- To delete the cluster using the AWS Command Line Interface (AWS CLI), use the following command:
aws cloudhsmv2 delete-cluster --cluster-id <cluster ID>
- To delete the CloudHSM cluster using the console.
How to choose an approach
To better understand which approach is the best fit for your use case, consider the following criteria:
- Downtime: What is the acceptable amount of downtime for your workload?
- Implementation complexity: Do you need to make architecture changes to your workload and how complex is the implementation effort?
- Cost: Is the additional cost required for the approach acceptable to the business?
| Downtime | Relative Implementation complexity | Relative infrastructure cost | |
| Approach 1 | Yes | Low | None |
| Approach 2 | No | Medium | Medium |
| Approach 3 | No | Medium | High |
Approach 1 — especially when run within a scheduled maintenance window—is the most straightforward of the three approaches because there’s no additional infrastructure required, and workload downtime is the only tradeoff. This is best suited for applications where planned downtime is acceptable and you need to keep solution complexity low.
Approach 2 involves no downtime for the workload and the second crypto user serves as a backup for future password updates (such as if credentials are lost, or in case there are personnel changes). The downside is the initial planning required to set up the workload to handle multiple CUs, share all keys among the crypto users, and the additional cost. This is best suited for workloads that require zero downtime and an architecture that supports hot swapping of incoming traffic.
Approach 3 also supports zero downtime for the workload, with a complex implementation and some cost to set up additional infrastructure. This is best suited for workloads that have require zero downtime, have an architecture supports hot swapping of incoming traffic, and you don’t want to maintain a second crypto user that has shared access to all required cryptographic material.
Conclusion
In this post, we covered three approaches you can take to rotate the crypto user password on your CloudHSM cluster to align with AWS security best practices of the Well-Architected Framework and to meet your compliance, regulatory, or industry requirements. Each has considerations in terms of relative cost, complexity, and downtime. We recommend carefully considering mapping them to your workload and picking the approach best suited for your business and workload needs.
If you have feedback about this post, submit comments in the Comments section below. If you have questions about this post, start a new thread on the AWS CloudHSM re:Post or contact AWS Support.
Keeping repository maintainer information accurate
Post Syndicated from Zack Koppert original https://github.blog/2024-03-04-keeping-repository-maintainer-information-accurate/
Companies and their structures are always evolving. Regardless of the reason, with people and information exchanging places, it’s easy for maintainership/ownership information about a repository to become outdated or unclear. Maintainers play a crucial role in guiding and stewarding a project, and knowing who they are is essential for efficient collaboration and decision-making. This information can be stored in the CODEOWNERS file but how can we ensure that it’s up to date? Let’s delve into why this matters and how the GitHub OSPO’s tool, cleanowners, can help maintainers achieve accurate ownership information for their projects.
The importance of accurate maintainer information
In any software project, having clear ownership guidelines is crucial for effective collaboration. Maintainers are responsible for reviewing contributions, merging changes, and guiding the project’s direction. Without clear ownership information, contributors may be unsure of who to reach out to for guidance or review. Imagine that you’ve discovered a high-risk security vulnerability and nobody is responding to your pull request to fix it, let alone coordinating that everyone across the company gets the patches needed for fixing it. This ambiguity can lead to delays and confusion, unfortunately teaching teams that it’s better to maintain control than to collaborate. These are not the outcomes we are hoping for as developers, so it’s important for us to consider how we can ensure active maintainership especially of our production components.
CODEOWNERS files
Solving this problem starts with documenting maintainers. A CODEOWNERS file, residing in the root of a repository, allows maintainers to specify individuals or teams who are responsible for reviewing and maintaining specific areas of the codebase. By defining ownership at the file or directory level, CODEOWNERS provides clarity on who is responsible for reviewing changes within each part of the project.
CODEOWNERS not only streamlines the contribution process but also fosters transparency and accountability within the organization. Contributors know exactly who to contact for feedback, escalation, or approval, while maintainers can effectively distribute responsibilities and ensure that every part of the codebase has proper coverage.
Ensuring clean and accurate CODEOWNERS files with cleanowners
While CODEOWNERS is a powerful tool for managing ownership information, maintaining it manually can be tedious and easily-overlooked. To address this challenge, the GitHub OSPO developed cleanowners: a GitHub Action that automates the process of keeping CODEOWNERS files clean and up to date. If it detects that something needs to change, it will open a pull request so this problem gets addressed sooner rather than later.
Here’s how cleanowners works:
---
name: Weekly codeowners cleanup
on:
  workflow_dispatch:
  schedule:
    - cron: '3 2 * * 6'

permissions:
  issues: write

jobs:
  cleanowners:
    name: cleanowners
    runs-on: ubuntu-latest

    steps:
      - name: Run cleanowners action
        uses: github/cleanowners@v1
        env:
          GH_TOKEN: ${{ secrets.GH_TOKEN }}
          ORGANIZATION: <YOUR_ORGANIZATION_GOES_HERE>
This workflow, triggered by scheduled runs, ensures that the CODEOWNERS file is cleaned automatically. By leveraging cleanowners, maintainers can rest assured that ownership information is accurate, or it will be brought to the attention of the team via an automatic pull request requesting an update to the file. Here is an example where @zkoppert and @no-longer-in-this-org used to both be maintainers, but @no-longer-in-this-org has left the company and no longer maintains this repository.
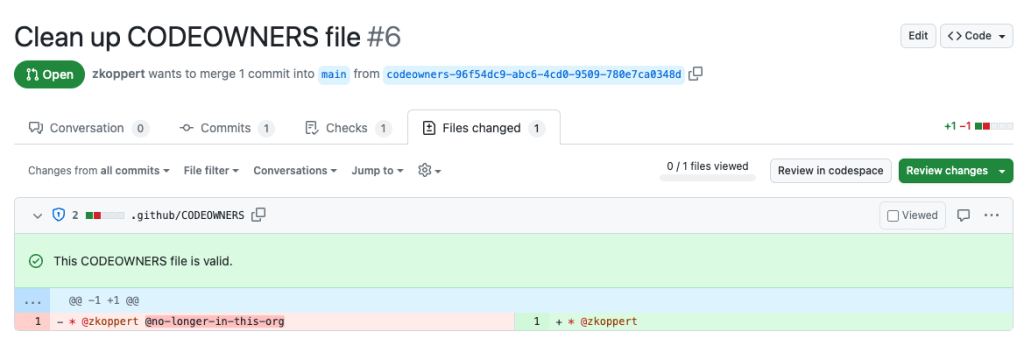
Dive in
With tools like cleanowners, the task of managing CODEOWNERS files becomes actively managed instead of ignored, allowing maintainers to focus on what matters most: building and nurturing thriving software projects. By embracing clear and accurate ownership documentation practices, software projects can continue to flourish, guided by clear ownership and collaboration principles.
Check out the repository for more information on how to configure and set up the action.
The post Keeping repository maintainer information accurate appeared first on The GitHub Blog.
Use AWS Glue ETL to perform merge, partition evolution, and schema evolution on Apache Iceberg
Post Syndicated from Satyanarayana Adimula original https://aws.amazon.com/blogs/big-data/use-aws-glue-etl-to-perform-merge-partition-evolution-and-schema-evolution-on-apache-iceberg/
As enterprises collect increasing amounts of data from various sources, the structure and organization of that data often need to change over time to meet evolving analytical needs. However, altering schema and table partitions in traditional data lakes can be a disruptive and time-consuming task, requiring renaming or recreating entire tables and reprocessing large datasets. This hampers agility and time to insight.
Schema evolution enables adding, deleting, renaming, or modifying columns without needing to rewrite existing data. This is critical for fast-moving enterprises to augment data structures to support new use cases. For example, an ecommerce company may add new customer demographic attributes or order status flags to enrich analytics. Apache Iceberg manages these schema changes in a backward-compatible way through its innovative metadata table evolution architecture.
Similarly, partition evolution allows seamless adding, dropping, or splitting partitions. For instance, an ecommerce marketplace may initially partition order data by day. As orders accumulate, and querying by day becomes inefficient, they may split to day and customer ID partitions. Table partitioning organizes big datasets most efficiently for query performance. Iceberg gives enterprises the flexibility to incrementally adjust partitions rather than requiring tedious rebuild procedures. New partitions can be added in a fully compatible way without downtime or having to rewrite existing data files.
This post demonstrates how you can harness Iceberg, Amazon Simple Storage Service (Amazon S3), AWS Glue, AWS Lake Formation, and AWS Identity and Access Management (IAM) to implement a transactional data lake supporting seamless evolution. By allowing for painless schema and partition adjustments as data insights evolve, you can benefit from the future-proof flexibility needed for business success.
Overview of solution
For our example use case, a fictional large ecommerce company processes thousands of orders each day. When orders are received, updated, cancelled, shipped, delivered, or returned, the changes are made in their on-premises system, and those changes need to be replicated to an S3 data lake so that data analysts can run queries through Amazon Athena. The changes can contain schema updates as well. Due to the security requirements of different organizations, they need to manage fine-grained access control for the analysts through Lake Formation.
The following diagram illustrates the solution architecture.

The solution workflow includes the following key steps:
- Ingest data from on premises into a Dropzone location using a data ingestion pipeline.
- Merge the data from the Dropzone location into Iceberg using AWS Glue.
- Query the data using Athena.
Prerequisites
For this walkthrough, you should have the following prerequisites:
Set up the infrastructure with AWS CloudFormation
To create your infrastructure with an AWS CloudFormation template, complete the following steps:
- Log in as an administrator to your AWS account.
- Open the AWS CloudFormation console.
- Choose Launch Stack:

- For Stack name, enter a name (for this post, icebergdemo1).
- Choose Next.
- Provide information for the following parameters:
DatalakeUserNameDatalakeUserPasswordDatabaseNameTableNameDatabaseLFTagKeyDatabaseLFTagValueTableLFTagKeyTableLFTagValue
- Choose Next.

- Choose Next again.
- In the Review section, review the values you entered.
- Select I acknowledge that AWS CloudFormation might create IAM resources with custom names and choose Submit.

In a few minutes, the stack status will change to CREATE_COMPLETE.
You can go to the Outputs tab of the stack to see all the resources it has provisioned. The resources are prefixed with the stack name you provided (for this post, icebergdemo1).
Create an Iceberg table using Lambda and grant access using Lake Formation
To create an Iceberg table and grant access on it, complete the following steps:
- Navigate to the Resources tab of the CloudFormation stack icebergdemo1 and search for logical ID named
LambdaFunctionIceberg. - Choose the hyperlink of the associated physical ID.


You’re redirected to the Lambda function icebergdemo1-Lambda-Create-Iceberg-and-Grant-access.

- On the Configuration tab, choose Environment variables in the left pane.


- On the Code tab, you can inspect the function code.
The function uses the AWS SDK for Python (Boto3) APIs to provision the resources. It assumes the provisioned data lake admin role to perform the following tasks:
- Grant DATA_LOCATION_ACCESS access to the data lake admin role on the registered data lake location
- Create Lake Formation Tags (LF-Tags)
- Create a database in the AWS Glue Data Catalog using the AWS Glue create_database API
- Assign LF-Tags to the database
- Grant DESCRIBE access on the database using LF-Tags to the data lake IAM user and AWS Glue ETL IAM role
- Create an Iceberg table using the AWS Glue create_table API:
- Assign LF-Tags to the table
- Grant DESCRIBE and SELECT on the Iceberg table LF-Tags for the data lake IAM user
- Grant ALL, DESCRIBE, SELECT, INSERT, DELETE, and ALTER access on the Iceberg table LF-Tags to the AWS Glue ETL IAM role
- On the Test tab, choose Test to run the function.


When the function is complete, you will see the message “Executing function: succeeded.”
Lake Formation helps you centrally manage, secure, and globally share data for analytics and machine learning. With Lake Formation, you can manage fine-grained access control for your data lake data on Amazon S3 and its metadata in the Data Catalog.
To add an Amazon S3 location as Iceberg storage in your data lake, register the location with Lake Formation. You can then use Lake Formation permissions for fine-grained access control to the Data Catalog objects that point to this location, and to the underlying data in the location.
The CloudFormation stack registered the data lake location.

Data location permissions in Lake Formation enable principals to create and alter Data Catalog resources that point to the designated registered Amazon S3 locations. Data location permissions work in addition to Lake Formation data permissions to secure information in your data lake.

Lake Formation tag-based access control (LF-TBAC) is an authorization strategy that defines permissions based on attributes. In Lake Formation, these attributes are called LF-Tags. You can attach LF-Tags to Data Catalog resources, Lake Formation principals, and table columns. You can assign and revoke permissions on Lake Formation resources using these LF-Tags. Lake Formation allows operations on those resources when the principal’s tag matches the resource tag.
Verify the Iceberg table from the Lake Formation console
To verify the Iceberg table, complete the following steps:
- On the Lake Formation console, choose Databases in the navigation pane.
- Open the details page for
icebergdb1.
You can see the associated database LF-Tags.

- Choose Tables in the navigation pane.
- Open the details page for
ecomorders.
In the Table details section, you can observe the following:
- Table format shows as Apache Iceberg
- Table management shows as Managed by Data Catalog
- Location lists the data lake location of the Iceberg table
In the LF-Tags section, you can see the associated table LF-Tags.

In the Table details section, expand Advanced table properties to view the following:
metadata_locationpoints to the location of the Iceberg table’s metadata filetable_typeshows asICEBERG


On the Schema tab, you can view the columns defined on the Iceberg table.

Integrate Iceberg with the AWS Glue Data Catalog and Amazon S3
Iceberg tracks individual data files in a table instead of directories. When there is an explicit commit on the table, Iceberg creates data files and adds them to the table. Iceberg maintains the table state in metadata files. Any change in table state creates a new metadata file that atomically replaces the older metadata. Metadata files track the table schema, partitioning configuration, and other properties.
Iceberg requires file systems that support the operations to be compatible with object stores like Amazon S3.
Iceberg creates snapshots for the table contents. Each snapshot is a complete set of data files in the table at a point in time. Data files in snapshots are stored in one or more manifest files that contain a row for each data file in the table, its partition data, and its metrics.
The following diagram illustrates this hierarchy.

When you create an Iceberg table, it creates the metadata folder first and a metadata file in the metadata folder. The data folder is created when you load data into the Iceberg table.

Contents of the Iceberg metadata file
The Iceberg metadata file contains a lot of information, including the following:
- format-version –Version of the Iceberg table
- Location – Amazon S3 location of the table
- Schemas – Name and data type of all columns on the table
- partition-specs – Partitioned columns
- sort-orders – Sort order of columns
- properties – Table properties
- current-snapshot-id – Current snapshot
- refs – Table references
- snapshots – List of snapshots, each containing the following information:
- sequence-number – Sequence number of snapshots in chronological order (the highest number represents the current snapshot, 1 for the first snapshot)
- snapshot-id – Snapshot ID
- timestamp-ms – Timestamp when the snapshot was committed
- summary – Summary of changes committed
- manifest-list – List of manifests; this file name starts with snap-< snapshot-id >
- schema-id – Sequence number of the schema in chronological order (the highest number represents the current schema)
- snapshot-log – List of snapshots in chronological order
- metadata-log – List of metadata files in chronological order
The metadata file has all the historical changes to the table’s data and schema. Reviewing the contents on the metafile file directly can be a time-consuming task. Fortunately, you can query the Iceberg metadata using Athena.
Iceberg framework in AWS Glue
AWS Glue 4.0 supports Iceberg tables registered with Lake Formation. In the AWS Glue ETL jobs, you need the following code to enable the Iceberg framework:
For read/write access to underlying data, in addition to Lake Formation permissions, the AWS Glue IAM role to run the AWS Glue ETL jobs was granted lakeformation: GetDataAccess IAM permission. With this permission, Lake Formation grants the request for temporary credentials to access the data.
The CloudFormation stack provisioned the four AWS Glue ETL jobs for you. The name of each job starts with your stack name (icebergdemo1). Complete the following steps to view the jobs:
- Log in as an administrator to your AWS account.
- On the AWS Glue console, choose ETL jobs in the navigation pane.
- Search for jobs with
icebergdemo1in the name.


Merge data from Dropzone into the Iceberg table
For our use case, the company ingests their ecommerce orders data daily from their on-premises location into an Amazon S3 Dropzone location. The CloudFormation stack loaded three files with sample orders for 3 days, as shown in the following figures. You see the data in the Dropzone location s3://icebergdemo1-s3bucketdropzone-kunftrcblhsk/data.


The AWS Glue ETL job icebergdemo1-GlueETL1-merge will run daily to merge the data into the Iceberg table. It has the following logic to add or update the data on Iceberg:
- Create a Spark DataFrame from input data:
- For a new order, add it to the table
- If the table has a matching order, update the status and
shipping_id:
Complete the following steps to run the AWS Glue merge job:
- On the AWS Glue console, choose ETL jobs in the navigation pane.
- Select the ETL job
icebergdemo1-GlueETL1-merge. - On the Actions dropdown menu, choose Run with parameters.
- On the Run parameters page, go to Job parameters.
- For the
--dropzone_pathparameter, provide the S3 location of the input data (icebergdemo1-s3bucketdropzone-kunftrcblhsk/data/merge1). - Run the job to add all the orders: 1001, 1002, 1003, and 1004.
- For the
--dropzone_path parameter, change the S3 location toicebergdemo1-s3bucketdropzone-kunftrcblhsk/data/merge2. - Run the job again to add orders 2001 and 2002, and update orders 1001, 1002, and 1003.
- For the
--dropzone_pathparameter, change the S3 location toicebergdemo1-s3bucketdropzone-kunftrcblhsk/data/merge3. - Run the job again to add order 3001 and update orders 1001, 1003, 2001, and 2002.
Go to the data folder of table to see the data files written by Iceberg when you merged the data into the table using the Glue ETL job icebergdemo1-GlueETL1-merge.

Query Iceberg using Athena
The CloudFormation stack created the IAM user iceberguser1, which has read access on the Iceberg table using LF-Tags. To query Iceberg using Athena via this user, complete the following steps:
- Log in as
iceberguser1to the AWS Management Console. - On the Athena console, choose Workgroups in the navigation pane.
- Locate the workgroup that CloudFormation provisioned (
icebergdemo1-workgroup) - Verify Athena engine version 3.
The Athena engine version 3 supports Iceberg file formats, including Parquet, ORC, and Avro.

- Go to the Athena query editor.
- Choose the workgroup icebergdemo1-workgroup on the dropdown menu.
- For Database, choose
icebergdb1. You will see the tableecomorders. - Run the following query to see the data in the Iceberg table:

- Run the following query to see table’s current partitions:


Partition-spec describes how table is partitioned. In this example, there are no partitioned fields because you didn’t define any partitions on the table.
Iceberg partition evolution
You may need to change your partition structure; for example, due to trend changes of common query patterns in downstream analytics. A change of partition structure for traditional tables is a significant operation that requires an entire data copy.
Iceberg makes this straightforward. When you change the partition structure on Iceberg, it doesn’t require you to rewrite the data files. The old data written with earlier partitions remains unchanged. New data is written using the new specifications in a new layout. Metadata for each of the partition versions is kept separately.
Let’s add the partition field category to the Iceberg table using the AWS Glue ETL job icebergdemo1-GlueETL2-partition-evolution:
On the AWS Glue console, run the ETL job icebergdemo1-GlueETL2-partition-evolution. When the job is complete, you can query partitions using Athena.


You can see the partition field category, but the partition values are null. There are no new data files in the data folder, because partition evolution is a metadata operation and doesn’t rewrite data files. When you add or update data, you will see the corresponding partition values populated.
Iceberg schema evolution
Iceberg supports in-place table evolution. You can evolve a table schema just like SQL. Iceberg schema updates are metadata changes, so no data files need to be rewritten to perform the schema evolution.
To explore the Iceberg schema evolution, run the ETL job icebergdemo1-GlueETL3-schema-evolution via the AWS Glue console. The job runs the following SparkSQL statements:
In the Athena query editor, run the following query:

You can verify the schema changes to the Iceberg table:
- A new column has been added called
shipping_carrier - The column
shipping_idhas been renamed totracking_number - The data type of the column
ordernumhas changed from int to bigint

Positional update
The data in tracking_number contains the shipping carrier concatenated with the tracking number. Let’s assume that we want to split this data in order to keep the shipping carrier in the shipping_carrier field and the tracking number in the tracking_number field.
On the AWS Glue console, run the ETL job icebergdemo1-GlueETL4-update-table. The job runs the following SparkSQL statement to update the table:
Query the Iceberg table to verify the updated data on tracking_number and shipping_carrier.

Now that the data has been updated on the table, you should see the partition values populated for category:

Clean up
To avoid incurring future charges, clean up the resources you created:
- On the Lambda console, open the details page for the function
icebergdemo1-Lambda-Create-Iceberg-and-Grant-access. - In the Environment variables section, choose the key
Task_To_Performand update the value toCLEANUP. - Run the function, which drops the database, table, and their associated LF-Tags.
- On the AWS CloudFormation console, delete the stack icebergdemo1.
Conclusion
In this post, you created an Iceberg table using the AWS Glue API and used Lake Formation to control access on the Iceberg table in a transactional data lake. With AWS Glue ETL jobs, you merged data into the Iceberg table, and performed schema evolution and partition evolution without rewriting or recreating the Iceberg table. With Athena, you queried the Iceberg data and metadata.
Based on the concepts and demonstrations from this post, you can now build a transactional data lake in an enterprise using Iceberg, AWS Glue, Lake Formation, and Amazon S3.
About the Author
 Satya Adimula is a Senior Data Architect at AWS based in Boston. With over two decades of experience in data and analytics, Satya helps organizations derive business insights from their data at scale.