Post Syndicated from Vinodh Subramanian original https://www.backblaze.com/blog/kubernetes-data-protection-how-to-safeguard-your-containerized-applications/
Kubernetes, originally embraced by DevOps teams for its seamless application deployment, has become the go-to operating system for deploying and managing cloud-native applications at scale. Kubernetes as a container orchestrator gives your infrastructure significant advantages, but you have to balance its ephemeral benefits with protecting your application from data loss, misconfigurations, and system failures by keeping cluster backup data in a stateful repository. Or, to stick with the nautical theme in the Kubernetes ecosystem, let’s call it mooring cluster backup data.
However, backing up Kubernetes can be challenging. The environment’s dynamic nature, with containers constantly being created and destroyed, presents a unique set of challenges. When traditional backup solutions don’t work for Kubernetes’s complexities, using S3 compatible object storage as the destination for a customized approach allows developers to retain complete control over backing up and protecting Kubernetes environments from a wide range of threats, from misconfigurations to ransomware.
Meet Backblaze at KubeCon + CloudNativeCon North America 2025
Backblaze is sponsoring KubeCon for the first time. Stop by booth #1742 to learn how scalable, S3 compatible storage helps cloud-native developers leverage a stateful repository for K8s cluster backups and more.

Understanding Kubernetes architecture
Kubernetes has a fairly straightforward architecture that is designed to automate the deployment, scaling, and management of application containers across infrastructure clusters. Understanding this architecture is not only essential for deploying and managing applications, but also for implementing effective security and backup measures. Here’s a breakdown of Kubernetes hierarchical components and concepts.
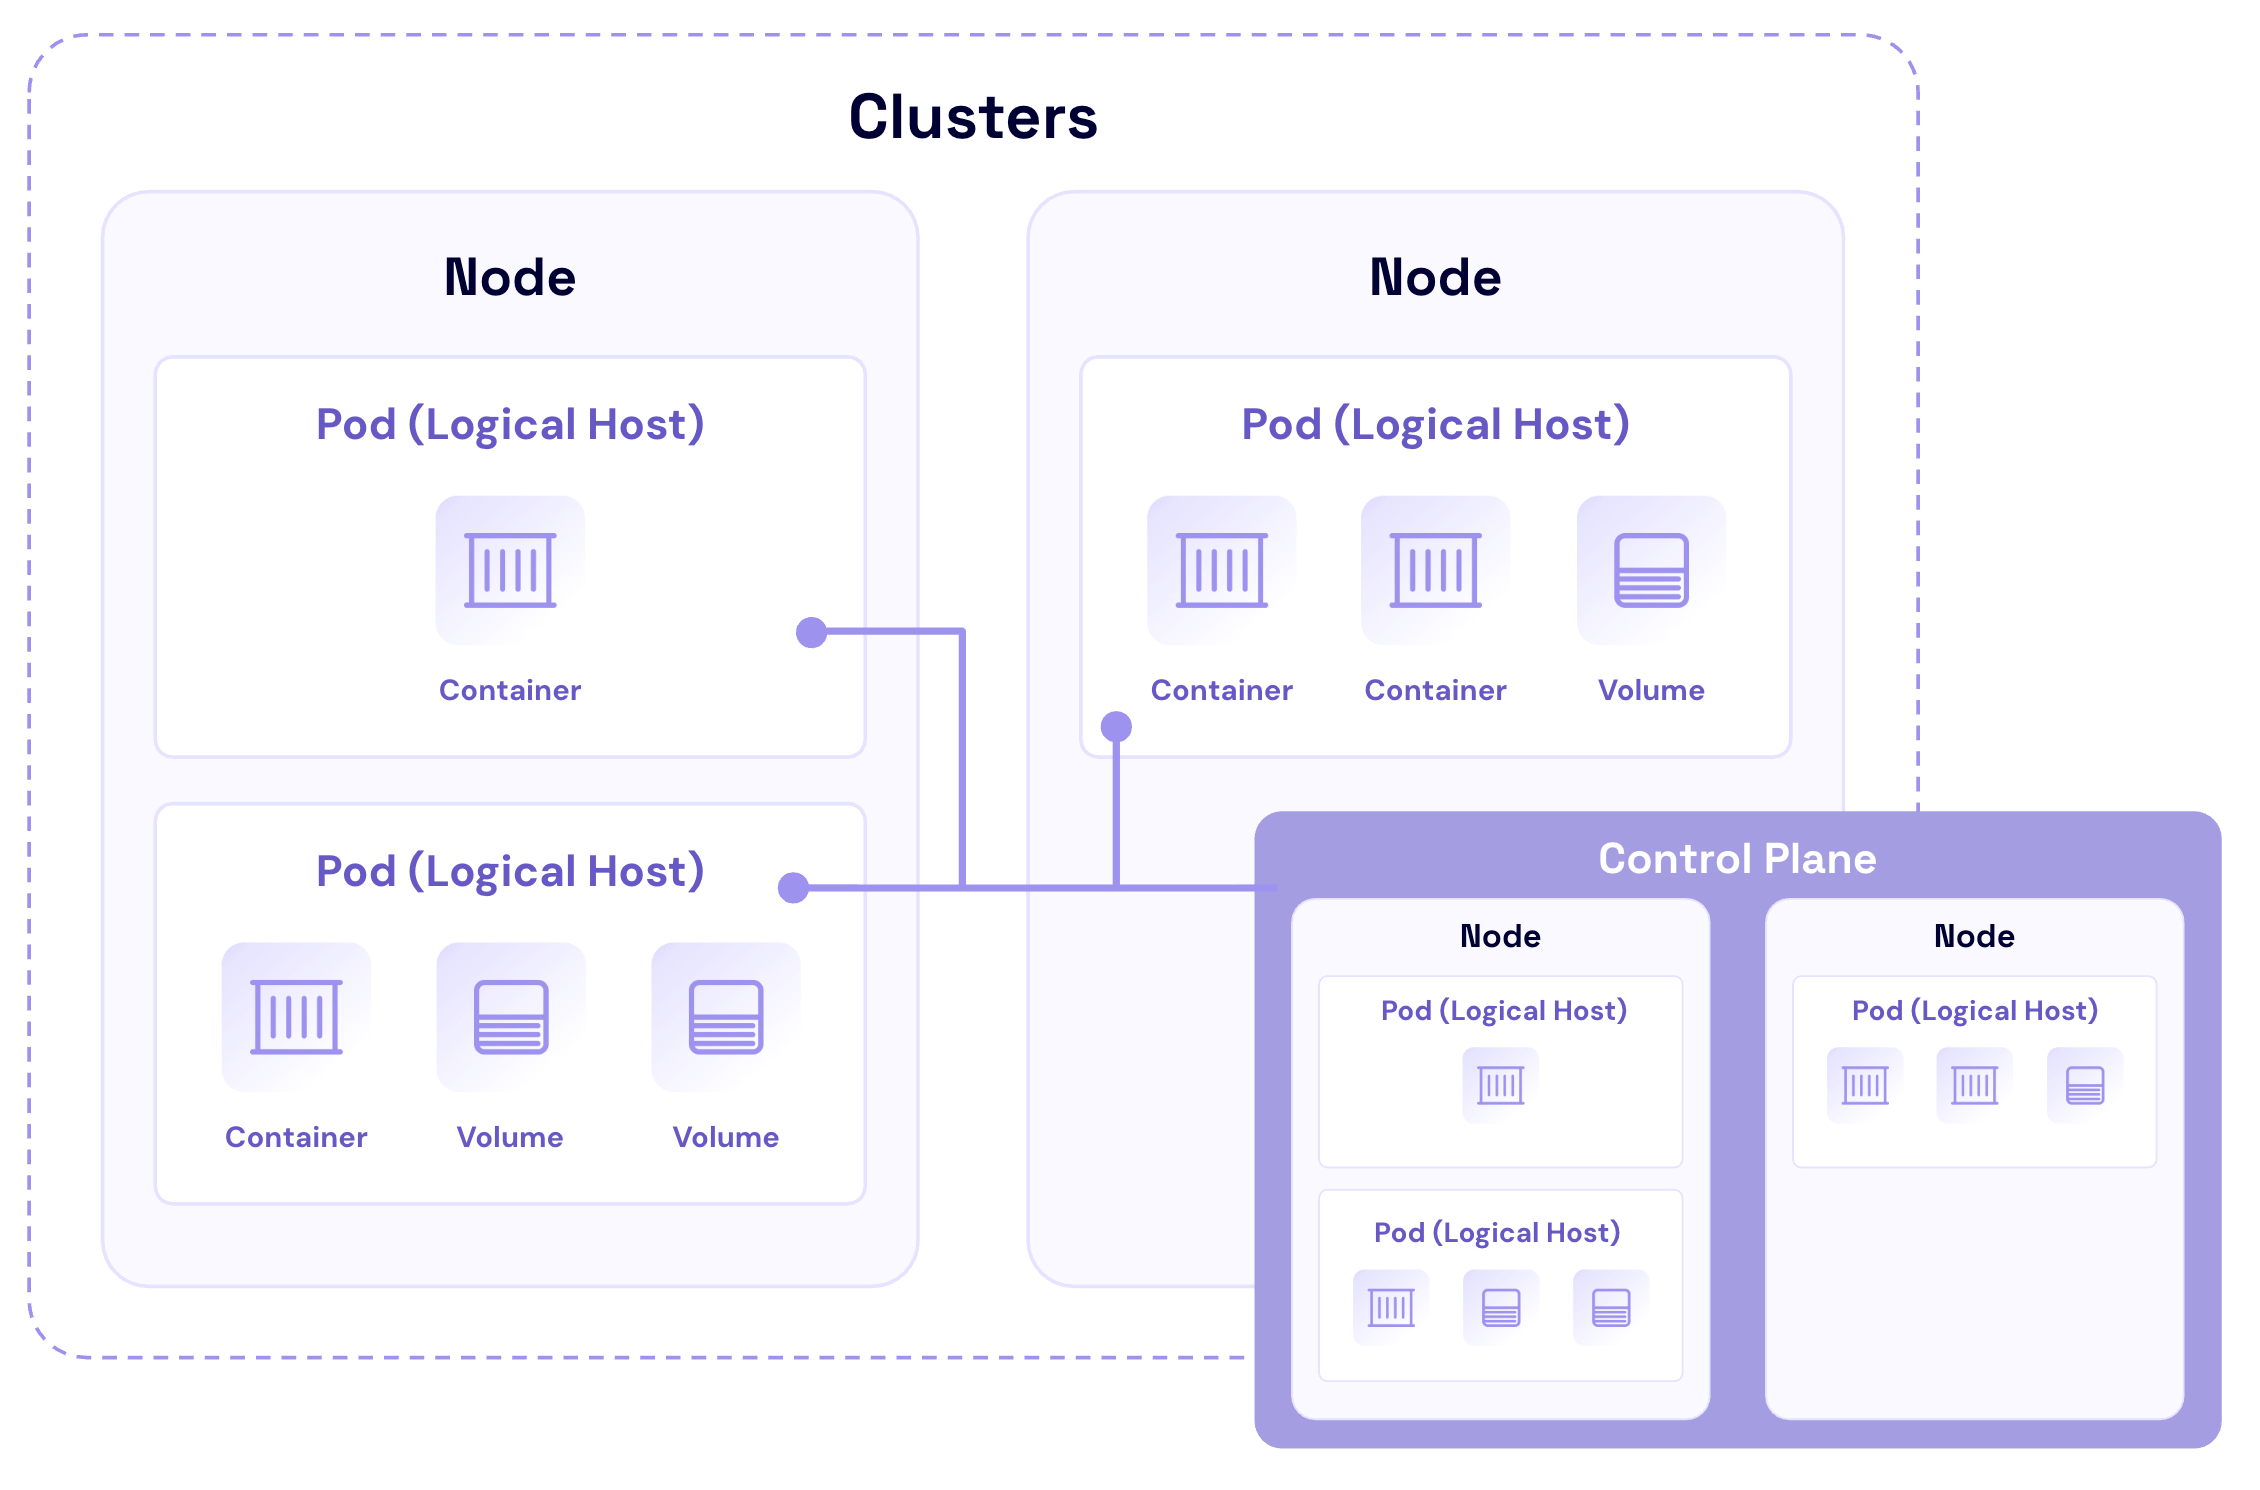
Containers: The foundation of Kubernetes
Containers are lightweight, virtualized environments designed to run application code. They encapsulate an application’s code, libraries, and dependencies into a single object. This makes containerized applications easy to deploy, scale, and manage across different environments.
Pods: The smallest deployable units
Pods are often described as logical hosts that can contain one or multiple containers that share storage, network, and specifications on how to run the containers. They are ephemeral by nature—temporary storage for a container that gets wiped out and lost when the container is stopped or restarted.
Nodes: The workhorses of Kubernetes
Nodes represent the physical or virtual machines that run the containerized applications. Each node is managed by the control plane components and contains the services necessary to run Pods.
Cluster: The heart of Kubernetes
A cluster is a collection of nodes that run containerized applications. Clusters provide the high-level structure within which Kubernetes manages the containerized applications. They enable Kubernetes to orchestrate containers’ deployment, scaling, and management across multiple nodes seamlessly.
Control plane: The brain behind the operation
The control plane is responsible for managing the worker nodes and the Pods in the cluster. It includes several components, such as Kubernetes API server, scheduler, controller manager, and etcd (a key-value store for cluster data). The control plane makes global decisions about the cluster, and keeping the control plane readily accessible to validated users for cluster recovery paramount as it’s the central point of management for the cluster.
kubeconfig: The instruction manual
The kubeconfig is a declaratively written configuration file (usually YAML) that provides instructions for Kubernetes tools to connect to clusters, and defines user roles and permissions. The kubeconfig essentially acts as a skeleton key for connecting to and managing clusters. Securely storing multiple copies of your kubeconfig allows you to more rapidly recover from credential rotations or cluster-wide configurations that break access. As multi-cloud Kubernetes deployments continue to grow in popularity for both application redundancy and cost savings purposes, including the kubeconfig in your disaster recovery (DR) plan is essential.
What needs to be protected in Kubernetes?
In Kubernetes, securing your environment is not just about safeguarding the data; it’s about protecting the entire ecosystem that interacts with and manages the data. Here’s an overview of the key components that require protection.
Workloads and applications
- Containers and Pods: Protecting containers involves securing the container images from vulnerabilities and ensuring runtime security. For pods, it’s crucial to manage security contexts and network policies effectively to prevent unauthorized access and ensure that sensitive data isn’t exposed to other Pods or services unintentionally.
- Deployments and StatefulSets: These are higher-level constructs that manage the deployment and scaling of Pods. Protecting these components involves ensuring that only authorized users can create, update, or delete deployments.
Data and storage
- PersistentVolumes (PVs) and PersistentVolumeClaims (PVCs): Persistent storage in Kubernetes is managed through PVs and PVCs, and protecting them is essential to ensure data integrity and confidentiality. This includes securing access to the data they contain, encrypting data at rest and transit, and properly managing storage access permissions.
- ConfigMaps and Secrets: While ConfigMaps might contain general configuration settings, Secrets are used to store sensitive data such as passwords, OAuth tokens, and SSH keys.
Network configuration
- Services and ingress: Services in Kubernetes provide a way to expose an application on a set of Pods as a network service. Ingress, on the other hand, manages external access to the services within a cluster, typically HTTP. Protecting these components involves securing the communication channels, implementing network policies to restrict access to and from the services, and ensuring that only authorized services are exposed to the outside world.
- Network policies: Network policies define how groups of Pods are allowed to communicate with each other and other network endpoints. Securing them is essential for creating a controlled, secure networking environment with your Kubernetes cluster.
Access controls and user management
- Role-based access control (RBAC): RBAC in Kubernetes helps define who can access what within a cluster. It allows administrators to regulate access to Kubernetes resources and namespaces based on the roles assigned to users. Protecting your cluster with RBAC users and applications having only the access they need while minimizing the potential impact of compromised credentials or insider threats.
- Service accounts: Service accounts provide an identity for processes that run in a Pod, allowing them to interact with the Kubernetes API. Managing and securing these accounts is crucial to prevent unauthorized API access, which could lead to data leakage or unauthorized modifications of the cluster state.
Cluster infrastructure
- Nodes and the control plane: The nodes run the containerized applications and are controlled by the control plane, which includes the API server, scheduler, controller manager, and etcd database. Securing the nodes involves hardening the underlying operating system (OS), ensuring secure communication between the nodes and the control plane, and protecting control plane components from unauthorized access and tampering.
- Kubernetes Secrets management: Managing Secrets securely in Kubernetes is critical for protecting sensitive data. This includes implementing best practices for Secrets encryption, both at rest and in transit, and limiting Secrets exposure to only those Pods that require access.
Protecting these components is crucial for maintaining both the security and operational integrity of your Kubernetes environment. A breach in any of these areas can compromise your entire cluster, leading to data loss and causing service disruption and financial damage. Implementing a layered security approach that addresses the vulnerabilities of the Kubernetes architecture is essential for building a resilient, secure deployment.
Challenges in Kubernetes data protection
Securing the Kubernetes components we discussed above poses unique challenges due to the platform’s dynamic nature and the diverse types of workloads it supports. Understanding these challenges is the first step toward developing effective strategies for safeguarding your applications and data. Here are some of the key challenges:
Dynamic nature of container environments
Kubernetes’s fluid landscape, with containers constantly being created and destroyed, makes traditional data protection methods less effective. The rapid pace of change demands backup solutions that can adapt just as quickly to avoid data loss.
Statelessness vs. statefulness
- Stateless applications: These don’t retain data, pushing the need to safeguard the external persistent storage they rely on.
- Stateful applications: Managing data across sessions involves intricate handling of PVs and PVCs, which can be challenging in a system where Pods and nodes are frequently changing.
Data consistency
Maintaining data consistency across distributed replicas in Kubernetes is complex, especially for stateful sets with persistent data needs. Strategies for consistent snapshot or application specific replication are vital to ensure integrity.
Scalability concerns
The scalability of Kubernetes, while a strength, introduces data protection complexities. As clusters grow, ensuring efficient and scalable backup solutions becomes critical to prevent performance degradation and data loss.
Security and regulatory compliance
Ensuring compliance with the appropriate standards—GDPR, HIPAA, or SOC 2 standards, for instance—always requires keeping track of storage and management of sensitive data. In a dynamic environment like Kubernetes, which allows for frequent creation and destruction of containers, enforcing persistent security measures can be a challenge. Also, the sensitive data that needs to be encrypted and protected may be hosted in portions across multiple containers. Therefore, it’s important to not only track what is currently existent but also anticipate possible iterations of the environment by ensuring continuous monitoring and the implementation of robust data management practices.
As you can see, Kubernetes data protection requires navigating its dynamic nature and the dichotomy of stateless and stateful applications while addressing the consistency and scalability challenges. A strategic approach to leveraging Kubernetes-native solutions and best practices is essential for effective data protection.
Choosing the right Kubernetes backup solution: Strategies and considerations
When it comes to protecting your Kubernetes environments, selecting the right backup solution is important. Solutions like Kasten by Veeam, Rubrik, and Commvault are some of the top Kubernetes container backup solutions that offer robust support for Kubernetes backup.
Here are some essential strategies and considerations for choosing a solution that supports your needs.
- Assess your workload types: Different applications demand different backup strategies. Stateful applications, in particular, require backup solutions that can handle persistent storage effectively.
- Evaluate data consistency needs: Opt for backup solutions that offer consistent backup capabilities, especially for databases and applications requiring strict data consistency. Look for features that support application-consistent backups, ensuring that data is in a usable state when restored.
- Scalability and performance: The backup solution should seamlessly scale with your Kubernetes deployment without impacting performance. Consider solutions that offer efficient data deduplication, compressions, and incremental backup capabilities to handle growing data volumes.
- Recovery objectives: Define clear recovery objectives. Look for solutions that offer granular recovery options, minimizing downtime by allowing for precise restoration of applications or data, aligning with recovery time objectives (RTOs) and recovery point objectives (RPOs).
- Integration and automation: Choose a backup solution that integrates well or natively with Kubernetes, offering automation capabilities for backup schedules, policy management, and recovery processes. This integration simplifies operations and enhances reliability.
- Vendor support and community: Consider the vendor’s reputation, the level of support provided, and the solution’s community engagement. A strong support system and active community can be invaluable for troubleshooting and best practices.
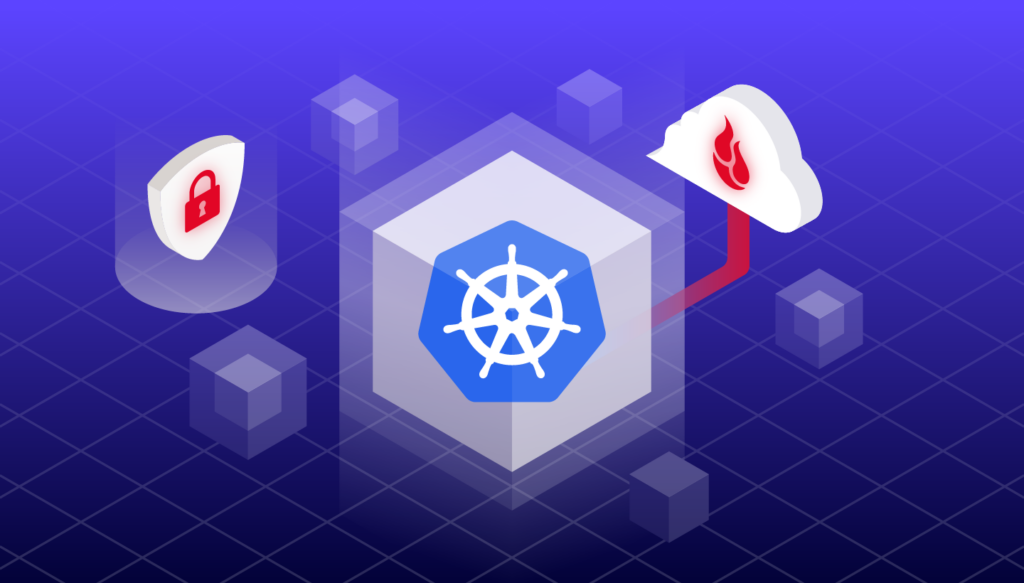
As the Kubernetes ecosystem continues to grow and evolve, a growing number of comprehensive cluster backup tools support integrations with S3 compatible storage providers like Backblaze to enable access to highly scalable and affordable unstructured data backup. For example, Velero is an open source, Kubernetes-native disaster recovery tool designed to make backing up entire Kubernetes clusters intuitive for disaster recovery, migration, and archiving purposes. Managed Kubernetes services offered by cloud providers typically have a backup function, but that’s often limited in terms of capacity, scheduling, and retention. Velero makes it possible for cloud native developers to design their own backup strategy with object storage as the destination so clusters can rapidly be redeployed and recovered in any cloud environment.
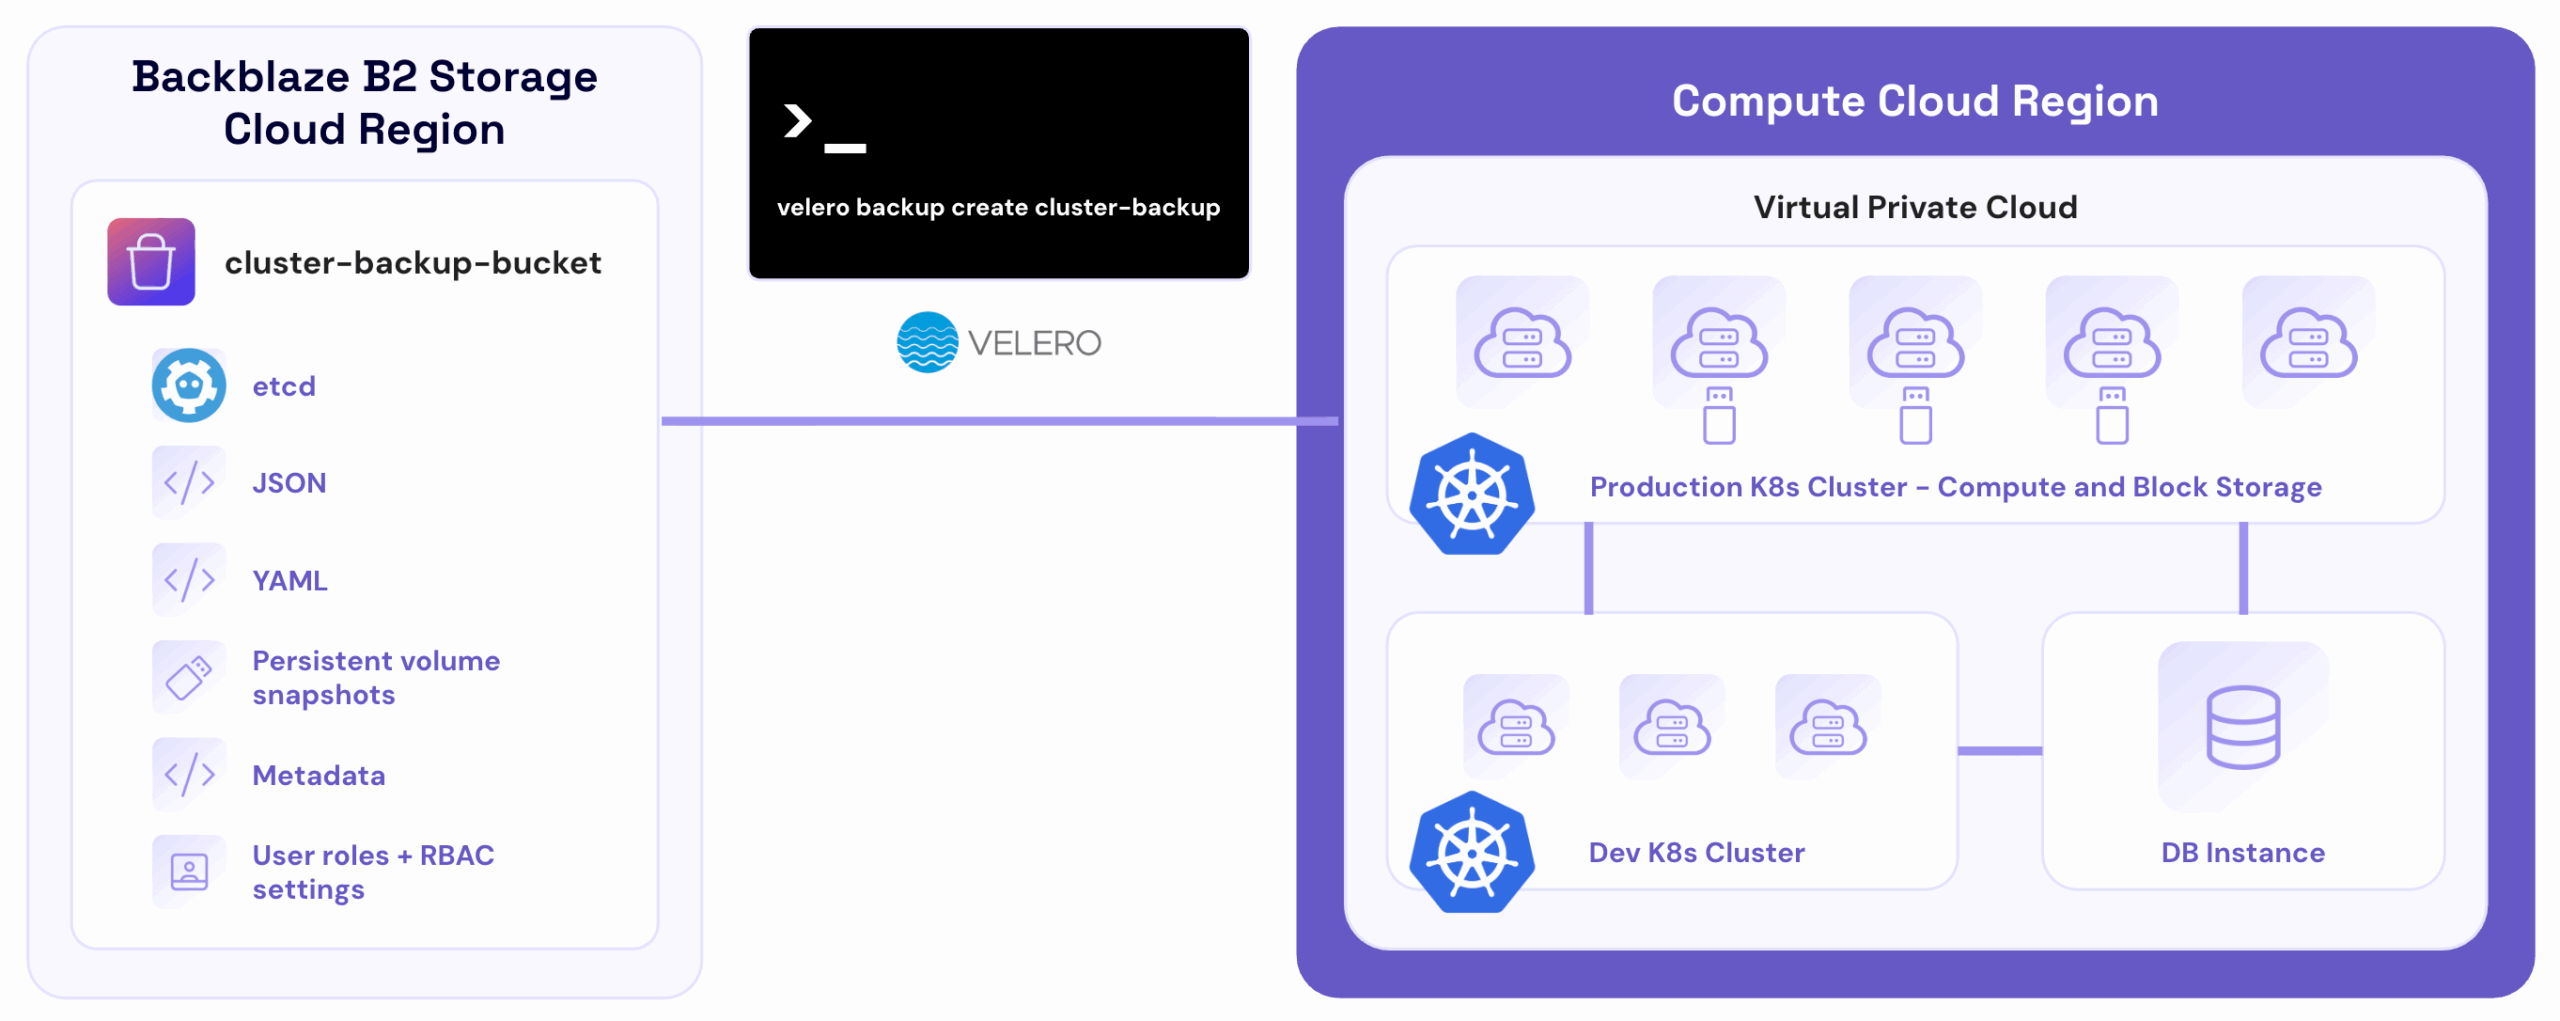
In the diagram above, a managed Kubernetes cluster runs an application in the cloud. Local backups are enabled for rapid cluster recovery in the same data center.
Kubernetes cluster admin installs and runs Velero to act as an intermediary between the Kubernetes cluster and Backblaze B2 with the command velero backup create cluster-backup and uploads cluster snapshots and JSON/YAML manifests to the selected object storage bucket.
After provisioning a new cluster and installing Velero, the admin runs velero restore create --from-backup cluster-backup to completely restore the cluster as it was when the last Velero backup was captured.
Read Velero’s documentation to learn more.
Leveraging cloud storage for comprehensive Kubernetes data protection
After choosing a Kubernetes backup application, integrating cloud storage such as Backblaze B2 with your application offers a flexible, secure, scalable approach to data protection. By leveraging cloud storage solutions, organizations can enhance their Kubernetes data protection strategy, ensuring data durability and availability across a distributed environment. This integration facilitates off-site backups, which are essential for disaster recovery and compliance with data protection policies, providing a robust layer of security against data loss, configuration errors, and breaches.
Protect your Kubernetes data
In summary, understanding the intricacies of Kubernetes components, acknowledging the challenges in Kubernetes backup, selecting the appropriate backup solution, and effectively integrating cloud storage are pivotal steps in crafting a comprehensive Kubernetes backup strategy. These measures ensure data protection, operational continuity, and compliance. The right backup solution, tailored to Kubernetes’s distinctive needs, coupled with the scalability and resiliency of cloud storage, provides a robust framework for safeguarding against data loss or breaches. This multi-faceted approach not only safeguards critical data but also supports the agility and scalability that modern IT environments demand.
The post Mooring Your Kubernetes Cluster Data: Safeguarding Containerized Applications with Cluster Backups appeared first on Backblaze Blog | Cloud Storage & Cloud Backup


 Alternatively, you can run the following command:


 Harshida Patel is a Analytics Specialist Principal Solutions Architect, with AWS.
 Srividya Parthasarathy is a Senior Big Data Architect on the AWS Lake Formation team. She enjoys building data mesh solutions and sharing them with the community.
 Maneesh Sharma is a Senior Database Engineer at AWS with more than a decade of experience designing and implementing large-scale data warehouse and analytics solutions. He collaborates with various Amazon Redshift Partners and customers to drive better integration.
 Poulomi Dasgupta is a Senior Analytics Solutions Architect with AWS. She is passionate about helping customers build cloud-based analytics solutions to solve their business problems. Outside of work, she likes travelling and spending time with her family.