Post Syndicated from The Atlantic original https://www.youtube.com/watch?v=HS9Lh09_Ayk
Intel E-Core Evolution 2013-2023
Post Syndicated from Patrick Kennedy original https://www.servethehome.com/intel-e-core-evolution-2013-2023/
As we get ready for cloud-native waves in 2024, we take a look at the Intel E-core evolution from 2013-2023 to see massive gains
The post Intel E-Core Evolution 2013-2023 appeared first on ServeTheHome.
Kernel prepatch 6.7-rc7
Post Syndicated from corbet original https://lwn.net/Articles/956092/
The 6.7-rc7 kernel prepatch is out for
testing.
Anyway, rc7 itself looks fairly normal. It’s actually a bit bigger
than rc6 was, but not hugely so, and nothing in here looks at all
strange. Please do give it a whirl if you have the time and the
energy, but let’s face it, I expect things to be very quiet and
this to be one of those “nothing happens” weeks. Because even if
you aren’t celebrating this time of year, you might take advantage
of the peace and quiet.
Comic for 2023.12.24 – Xmas Farter
Post Syndicated from Explosm.net original https://explosm.net/comics/xmas-farter
New Cyanide and Happiness Comic
Stable kernel 5.15.145
Post Syndicated from corbet original https://lwn.net/Articles/956082/
The 5.15.145 stable kernel has been
released. It consists mostly of fixes to the ksmbd subsystem, which has
been marked as broken due to (until now) a lack of support for the 5.15.x
kernels.
A Military Loyal to Trump
Post Syndicated from The Atlantic original https://www.youtube.com/watch?v=FO4A1pyJmmU
Karaoke 8-Track Christmas
Post Syndicated from Techmoan original https://www.youtube.com/watch?v=6P0s4dkpOTI
Седмицата (18–23 декември)
Post Syndicated from Надежда Радулова original https://www.toest.bg/sedmitsata-18-23-dekemvri/

Да си попееш в трескавите предколедни дни, когато един кош с подаръ…, пардон, с работа, ти се изсипе на главата… та, да си попееш предколедно – под душа, в колата, с детето, с приятели, – ако и да не помага, то със сигурност не вреди.
Когато в едно интервю питат Пол Саймън на коя песен от цялата история на музиката би искал да е автор, той отвръща „Тиха нощ, свята нощ“ (от Йозеф Мор и Франц Грубер, изпълнена за първи път през 1818 г., навръх Коледа). За феновете на Саймън и Гарфънкъл това едва ли е учудващ отговор, предвид че през 1966 г. фолк-рок дуото включва кавър на песента в третия си студиен албум Parsley, Sage, Rosemary, and Thyme („Магданоз, салвия, розмарин и мащерка“ – цитат от прочутото им парче за панаира в Скарбъро). Само че добре познатата ни светла и въздигаща духа коледна мелодия е превърната във фон на вечерен осведомителен бюлетин, сиреч в политическо послание.
И така, докато вестта за раждането на Младенеца, а с него и на надеждата, обикаля света, по радиовълните и на крилете на кавъра на Саймън и Гарфънкъл до нас достигат други едни вести от бурната 1966 година – за повдигнатото обвинение срещу убиеца Ричард Спек, за преждевременната смърт на комика Лени Брус, за похода за граждански права в Сисеро, Илинойс, организиран от д-р Мартин Лутър Кинг-младши и пр.
Едва ли ще ви изненадам, като ви кажа, че през годините експериментът на Саймън и Гарфънкъл е повтарян и от други музиканти, които избират ефектната и мощна формула на въздействие – да стоплят сърцето с ангелската мелодия, за да го разбият в следващия миг с кошмара на случващото се по света, като че ли все по-немислимо и по-невъобразимо с всяка настъпваща година.
Няма да прибягвам до този „специален ефект“ точно сега, макар, признавам си, да се изкушавам. И няма да го сторя не поради еснафската причина да не скапвам предколедното ви настроение, а просто защото, така или иначе, цяла година ние правим точно това – не ви спестяваме нищо. Отваряме страниците си за гласове, които по смислен и аналитичен начин разбулват близкия и далечен свят. А това, освен яснота, често води след себе си горчивина, тревога, гняв, болка, съпричастност. Но и просветляващото чувство – че знаем повече, че не сме сами в узнаването и осъзнаването, че сме направили избор да не си затваряме очите.
Такъв е и последният ни брой за тази година. Започваме с гражданските права – тема, която е особено чувствителна в България и която традиционно следим отблизо. В „Да изтеглиш късата клечка, или за (не)възможната смяна на юридическия пол в България“ Светла Енчева за пореден път и с абсолютно право ни връща към многобройните проблеми, произтичащи от упоритото демонизиране на Истанбулската конвенция и на пустия местен „джендър“ – понятие, което едва ли не смени речниковата си дефиниция благодарение на безценния български „принос“.
Един от тези проблеми е подробно описан в новоизлязлата книга „Юридическото признаване на пола в България. Настояще и перспективи“, издание на Фондация „Ресурсен център Билитис“. Това е първият мащабен правен анализ на юридическата смяна на пола – дело на юристите Радослав Стоянов, Силвия Петкова, Галина Чеширова и Велина Тодорова. За всички транс хора в България, в момента потърпевши от безобразното решение на ВКС от 2023 г., според което българското материално право не допуска промяната на юридическия пол (въпреки наличната многогодишна съдебна практика), тази книга указва някакъв път за действие и дава повод за надежда.
Друг знаков за края на годината текст от тази седмица е анализът на Иво Илиев „Демонтаж на паметници или циментиране на митовете“. Как паметта, съдържаща се в паметниците, се втвърдява в изкривяващи историята идеологически наративи, приложими за различни политически програми? И не беше ли по-разумно МОЧА осъзнато и консенсусно да се деконструира като символ, преди да се демонтира физически и пространствено? Въпроси, чиито отговори ще продължават още дълго да търсят отговори сред разделеното и подвластно на манипулации общество.
Рамкираме 2023 година и я закачаме на стената, за да ни държи влага, както се казва, с обзорния текст „Даровете на политиците“, в който Емилия Милчева ни качва на екстремен ролъркоустър и шеметно ни превежда през войни, парламентарни и местни избори, детрониране на главен прокурор, коалиции и не-коалиции, сглобки и разглобки, промени в Конституцията, санкции срещу „Лукойл“, демонтиране на МОЧА и пр., и пр. Фюуууу!
Отново на земята ни сваля поредното интервю от рубриката „Разговори за образованието“. Надежда Цекулова ни среща с детската психоложка Нора Гавазова от Фондация „Калейдоскоп“, която в началото на декември внесе в парламента т.нар. Визия за детето. В този документ Гавазова заедно със свои колеги изследва нагласите и възможностите българската образователна система спешно да се демократизира. Защото остарелите дидактични методи, важни в една съвсем различна обществена ситуация, вече част от историята, днес произвеждат лесно управляеми граждани, неспособни на критически оценки и жестове.
И пак по темата за образованието, което все пак не започва и не свършва с училището, няма как да излезем в коледна ваканция без препоръки за книги! В колонката си „По буквите“ Зорница Христова ни потапя в дълбоките, мрачнокрасиви води на приказното и песенното, от които изплуват и повечето съвременни жанрове.
И тъй като започнах последния седмичен обзор с песен, време е отново да се върнем към музиката, неизменна част от всеки празник, но и винаги налична възможност за озаряване на делника.
В началото на тази година изгубихме един от колосите на джаз музиката – Уейн Шортър. Разказът на Таня Иванова е посветен не просто на гениалните му творения, но и на безстрашното му сърце, отворено за ближните, за света, за звездите и… за бъдещите поколения. Чуйте музиката в празничната седмица – наистина възвисява!
Сърцето на още един велик музикант спря да тупти в най-късите дни на годината. Ирландският пънк артист, бунтар и enfаnt terrible Шейн Макгоуън, автор на най-яката съвременна коледна песен A Fairytale of New York, беше изпратен под звуците ѝ в последния си път – с песни и танци, както се полага по ирландски.
И като сме заговорили за изпращания, нека и ние изпратим 2023 година, както се полага – с едно светло и смешно коледно стихотворение за всички възрасти, великолепно преведено от Мария Змийчарова – „Посещението на свети Николай“ от Клемънт Мур. За да му се насладите истински, прочетете го на глас. Ако наоколо има деца, повикайте и тях. А ако искате да добиете представа и от оригинала, чуйте го в забележителното изпълнение на Луис Армстронг.
Нека да си пожелаем и през следващата година да останем свързани тук! И както в едно друго, неколедно стихотворение, този път от Дилън Томас, да останем на светлата страна. И въпреки всичко да не се отказваме – да вием срещу смъртта на светлината. И воят ни да бъде песен.
Touring the NVIDIA AI Servers at the ASUS SC23 Booth
Post Syndicated from John Lee original https://www.servethehome.com/touring-the-ai-servers-at-the-asus-sc23-booth-nvidia/
We tour the NVIDIA AI servers in the ASUS SC23 booth. This includes HGX H100 platforms, L40S platforms, and a special liquid cooling option
The post Touring the NVIDIA AI Servers at the ASUS SC23 Booth appeared first on ServeTheHome.
Comic for 2023.12.23 – Christmas Cringe
Post Syndicated from Explosm.net original https://explosm.net/comics/christmas-cringe
New Cyanide and Happiness Comic
Friday Squid Blogging: Squid Parts into Fertilizer
Post Syndicated from Bruce Schneier original https://www.schneier.com/blog/archives/2023/12/friday-squid-blogging-squid-parts-into-fertilizer.html
It’s squid parts from college dissections, so it’s not a volume operation.
As usual, you can also use this squid post to talk about the security stories in the news that I haven’t covered.
Read my blog posting guidelines here.
Ben Rothke’s Review of A Hacker’s Mind
Post Syndicated from Bruce Schneier original https://www.schneier.com/blog/archives/2023/12/ben-rothkes-review-of-a-hackers-mind.html
Ben Rothke chose A Hacker’s Mind as “the best information security book of 2023.”
Best Practices to help secure your container image build pipeline by using AWS Signer
Post Syndicated from Jorge Castillo original https://aws.amazon.com/blogs/security/best-practices-to-help-secure-your-container-image-build-pipeline-by-using-aws-signer/
AWS Signer is a fully managed code-signing service to help ensure the trust and integrity of your code. It helps you verify that the code comes from a trusted source and that an unauthorized party has not accessed it. AWS Signer manages code signing certificates and public and private keys, which can reduce the overhead of your public key infrastructure (PKI) management. It also provides a set of features to simplify lifecycle management of your keys and certificates so that you can focus on signing and verifying your code.
In June 2023, AWS announced Container Image Signing with AWS Signer and Amazon EKS, a new capability that gives you native AWS support for signing and verifying container images stored in Amazon Elastic Container Registry (Amazon ECR).
Containers and AWS Lambda functions are popular serverless compute solutions for applications built on the cloud. By using AWS Signer, you can verify that the software running in these workloads originates from a trusted source.
In this blog post, you will learn about the benefits of code signing for software security, governance, and compliance needs. Flexible continuous integration and continuous delivery (CI/CD) integration, management of signing identities, and native integration with other AWS services can help you simplify code security through automation.
Background
Code signing is an important part of the software supply chain. It helps ensure that the code is unaltered and comes from an approved source.
To automate software development workflows, organizations often implement a CI/CD pipeline to push, test, and deploy code effectively. You can integrate code signing into the workflow to help prevent untrusted code from being deployed, as shown in Figure 1. Code signing in the pipeline can provide you with different types of information, depending on how you decide to use the functionality. For example, you can integrate code signing into the build stage to attest that the code was scanned for vulnerabilities, had its software bill of materials (SBOM) approved internally, and underwent unit and integration testing. You can also use code signing to verify who has pushed or published the code, such as a developer, team, or organization. You can verify each of these steps separately by including multiple signing stages in the pipeline. For more information on the value provided by container image signing, see Cryptographic Signing for Containers.
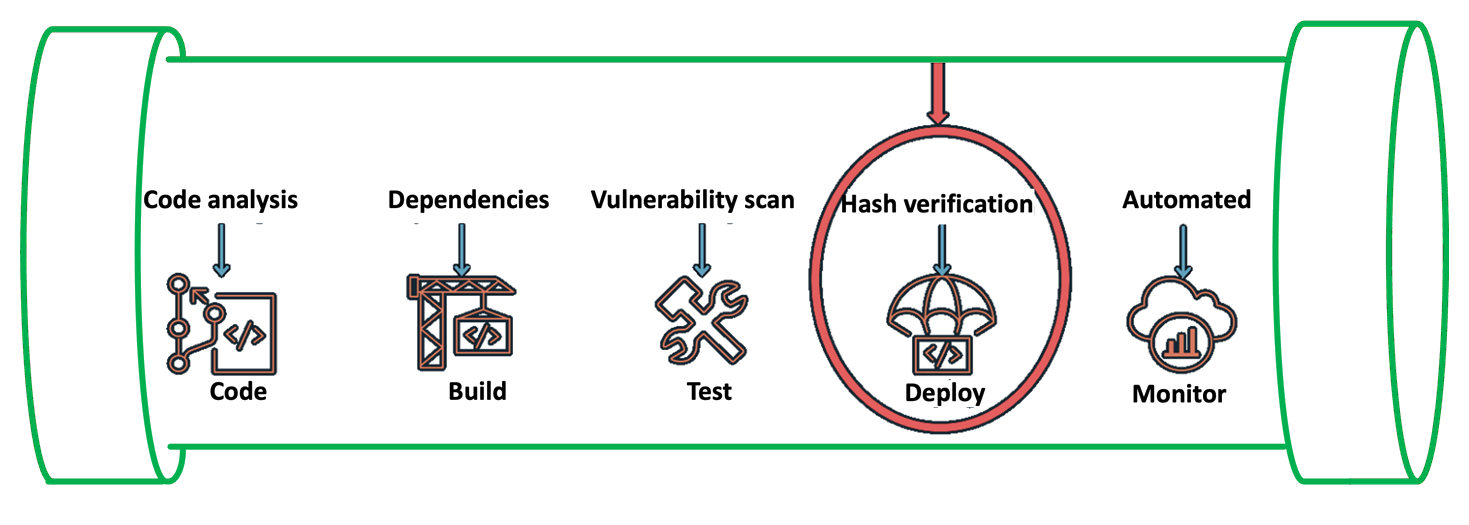
Figure 1: Security IN the pipeline
In the following section, we will walk you through a simple implementation of image signing and its verification for Amazon Elastic Kubernetes Service (Amazon EKS) deployment. The signature attests that the container image went through the pipeline and came from a trusted source. You can use this process in more complex scenarios by adding multiple AWS CodeBuild code signing stages that make use of various AWS Signer signing profiles.
Services and tools
In this section, we discuss the various AWS services and third-party tools that you need for this solution.
CI/CD services
For the CI/CD pipeline, you will use the following AWS services:
- AWS CodePipeline — a fully managed continuous delivery service that you can use to automate your release pipelines for fast and reliable application and infrastructure updates.
- AWS CodeCommit — a fully managed source control service that hosts secure Git-based repositories.
- AWS Signer — a fully managed code-signing service that you can use to help ensure the trust and integrity of your code.
- AWS CodeBuild — A fully managed continuous integration service that compiles source code, runs tests, and produces software packages that are ready to deploy.
Container services
You will use the following AWS services for containers for this walkthrough:
- Amazon EKS — a managed Kubernetes service to run Kubernetes in the AWS Cloud and on-premises data centers.
- Amazon ECR — a fully managed container registry for high-performance hosting, so that you can reliably deploy application images and artifacts anywhere.
Verification tools
The following are publicly available sign verification tools that we integrated into the pipeline for this post, but you could integrate other tools that meet your specific requirements.
- Notation — A publicly available Notary project within the Cloud Native Computing Foundation (CNCF). With contributions from AWS and others, Notary is an open standard and client implementation that allows for vendor-specific plugins for key management and other integrations. AWS Signer manages signing keys, key rotation, and PKI management for you, and is integrated with Notation through a curated plugin that provides a simple client-based workflow.
- Kyverno — A publicly available policy engine that is designed for Kubernetes.
Solution overview
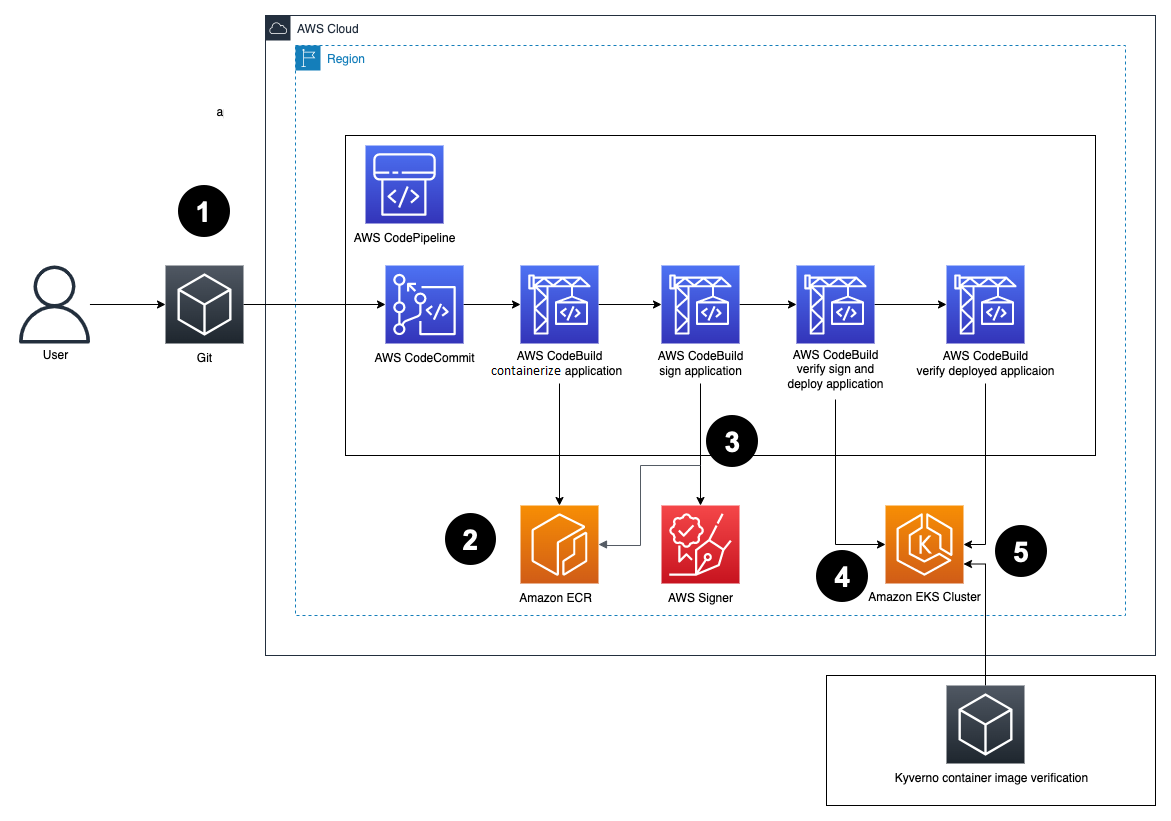
Figure 2: Solution architecture
Here’s how the solution works, as shown in Figure 2:
- Developers push Dockerfiles and application code to CodeCommit. Each push to CodeCommit starts a pipeline hosted on CodePipeline.
- CodeBuild packages the build, containerizes the application, and stores the image in the ECR registry.
- CodeBuild retrieves a specific version of the image that was previously pushed to Amazon ECR. AWS Signer and Notation sign the image by using the signing profile established previously, as shown in more detail in Figure 3.

Figure 3: Signing images described
- AWS Signer and Notation verify the signed image version and then deploy it to an Amazon EKS cluster.
If the image has not previously been signed correctly, the CodeBuild log displays an output similar to the following:
If there is a signature mismatch, the CodeBuild log displays an output similar to the following:
- Kyverno verifies the container image signature for use in the Amazon EKS cluster.
Figure 4 shows steps 4 and 5 in more detail.
Figure 4: Verification of image signature for Kubernetes


Prerequisites
Before getting started, make sure that you have the following prerequisites in place:
- An Amazon EKS cluster provisioned.
- An Amazon ECR repository for your container images.
- A CodeCommit repository with your application code. For more information, see Create an AWS CodeCommit repository.
- A CodePipeline pipeline deployed with the CodeCommit repository as the code source and four CodeBuild stages: Build, ApplicationSigning, ApplicationDeployment, and VerifyContainerSign. The CI/CD pipeline should look like that in Figure 5.
Figure 5: CI/CD pipeline with CodePipeline

Walkthrough
You can create a signing profile by using the AWS Command Line Interface (AWS CLI), AWS Management Console or the AWS Signer API. In this section, we’ll walk you through how to sign the image by using the AWS CLI.
To sign the image (AWS CLI)
- Create a signing profile for each identity.
- Sign the image from the CodeBuild build—your buildspec.yaml configuration file should look like the following:
The commands in the buildspec.yaml configuration file do the following:
- Sign you in to Amazon ECR to work with the Docker images.
- Reference the specific image that will be signed by using the commit hash (or another versioning strategy that your organization uses). This gets the digest.
- Sign the container image by using the notation sign command. This command uses the container image digest, instead of the image tag.
- Install the Notation CLI. In this example, you use the installer for Linux. For a list of installers for various operating systems, see the AWS Signer Developer Guide,
- Sign the image by using the notation sign command.
- Inspect the signed image to make sure that it was signed successfully by using the notation inspect command.
- To verify the signed image, use the notation verify command. The output should look similar to the following:
- (Optional) For troubleshooting, print the notation policy from the pipeline itself to check that it’s working as expected by running the notation policy show command:
For this, include the command in the pre_build phase after the notation version command in the buildspec.yaml configuration file.
After the notation policy show command runs, CodeBuild logs should display an output similar to the following:
- To verify the image in Kubernetes, set up both Kyverno and the Kyverno-notation-AWS Signer in your EKS cluster. To get started with Kyverno and the Kyverno-notation-AWS Signer solution, see the installation instructions.
- After you install Kyverno and Kyverno-notation-AWS Signer, verify that the controller is running—the STATUS should show Running:
- Configure the CodeBuild buildspec.yaml configuration file to verify that the images deployed in the cluster have been previously signed. You can use the following code to configure the buildspec.yaml file.
The commands in the buildspec.yaml configuration file do the following:
- Set up the environment variables, such as the ECR repository URI and the Commit hash, to build the image tag. The kubectl tool will use this later to reference the container image that will be deployed with the Kubernetes objects.
- Use kubectl to connect to the EKS cluster and insert the container image reference in the deployment.yaml file.
- After the container is deployed, you can observe the kyverno-notation-aws controller and access its logs. You can check if the deployed image is signed. If the logs contain an error, stop the pipeline run with an error code, do a rollback to a previous version, or delete the deployment if you detect that the image isn’t signed.
Decommission the AWS resources
If you no longer need the resources that you provisioned for this post, complete the following steps to delete them.
To clean up the resources
- Delete the EKS cluster and delete the ECR image.
- Delete the IAM roles and policies that you used for the configuration of IAM roles for service accounts.
- Revoke the AWS Signer signing profile that you created and used for the signing process by running the following command in the AWS CLI:
- Delete signatures from the Amazon ECR repository. Make sure to replace <AWS_ACCOUNT_ID> and <AWS_REGION> with your own information.
Note: Using the ORAS project’s oras client, you can delete signatures and other reference type artifacts. It implements deletion by first removing the reference from an index, and then deleting the manifest.
Conclusion
In this post, you learned how to implement container image signing in a CI/CD pipeline by using AWS services such as CodePipeline, CodeBuild, Amazon ECR, and AWS Signer along with publicly available tools such as Notary and Kyverno. By implementing mandatory image signing in your pipelines, you can confirm that only validated and authorized container images are deployed to production. Automating the signing process and signature verification is vital to help securely deploy containers at scale. You also learned how to verify signed images both during deployment and at runtime in Kubernetes. This post provides valuable insights for anyone looking to add image signing capabilities to their CI/CD pipelines on AWS to provide supply chain security assurances. The combination of AWS managed services and publicly available tools provides a robust implementation.
If you have feedback about this post, submit comments in the Comments section below. If you have questions about this post, contact AWS Support.
Want more AWS Security news? Follow us on Twitter.
Darktable 4.6.0 released
Post Syndicated from corbet original https://lwn.net/Articles/956017/
Version
4.6.0 of the darktable photo editor has been released. Changes include
a new “rgb primaries” module that “can be used for delicate color
“, enhancements to the
corrections as well as creative color grading
sigmoid module, some performance improvements, and more. (LWN looked at darktable in 2022).
Scott Shigeoka | Seek: How Curiosity Can Transform Your Life and Change The World | Talks at Google
Post Syndicated from Talks at Google original https://www.youtube.com/watch?v=2nL6Ukd4Q9M
Metasploit Weekly Wrap-Up
Post Syndicated from Zachary Goldman original https://blog.rapid7.com/2023/12/22/metasploit-weekly-wrap-up-39/
Getting Looney with Privilege Escalation
As if Metasploit couldn’t get any loonier, this release adds a brand new exploit module for Glibc Tunables Privilege Escalation aka Looney Tunables. Now, using linux/local/glibc_tunables_priv_esc, you can check your target’s glibc version to see if it’s vulnerable to buffer overflow, as outlined in CVE-2023-4911. If so, the module will drop a python script and escalate your privilege to the root user, allowing you to execute malicious code. Happy Tuning!
New module content (3)
Vinchin Backup and Recovery Command Injection
Authors: Gregory Boddin (LeakIX) and Valentin Lobstein
Type: Exploit
Pull request: #18542 contributed by Chocapikk
Path: linux/http/vinchin_backup_recovery_cmd_inject
Description: This adds an exploit module for a command injection vulnerability in Vinchin Backup & Recovery versions v5.0, v6.0, v6.7, and v7.0. This leverages two vulnerabilities identified as CVE-2023-45499 and CVE-2023-45498.
Glibc Tunables Privilege Escalation CVE-2023-4911 (aka Looney Tunables)
Authors: Qualys Threat Research Unit, blasty [email protected], and jheysel-r7
Type: Exploit
Pull request: #18541 contributed by jheysel-r7
Path: linux/local/glibc_tunables_priv_esc
Description: This adds an exploit module for the "Looney Tunables" Linux LPE, identified as CVE-2023-4911. It checks the version of glibc running on the target to make sure it is vulnerable and, once verified, it drops a python script that exploits the vulnerability and returns a session running in the context of the root user.
Atlassian Confluence Unauth JSON setup-restore Improper Authorization leading to RCE (CVE-2023-22518)
Authors: jheysel-r7
Type: Exploit
Pull request: #18566 contributed by jheysel-r7
Path: multi/http/atlassian_confluence_unauth_backup
Description:
This adds an exploit module for CVE-2023-22518, an Improper Authorization vulnerability in Confluence which allows an attacker to upload and restore a .zip backup file to the server containing a known user name and password. The attacker can then login with the credentials from the backup file to gain administrative access to the server.
Enhancements and features (2)
- #18622 from zeroSteiner – Updates the
auxiliary/scanner/dcerpc/petitpotammodule to work with newer Windows Server releases. - #18623 from gardnerapp – This updates the file handling of the
generatecommand’s-oparameter to expand file system paths.
Bugs fixed (1)
- #18619 from adfoster-r7 – Fixed a crash when running the
favoritescommand.
Documentation added (1)
- #18477 from AleksaZatezalo – This adds documentation for the
auxiliary/scanner/nessus/nessus_rest_loginmodule.
You can always find more documentation on our docsite at docs.metasploit.com.
Get it
As always, you can update to the latest Metasploit Framework with msfupdate
and you can get more details on the changes since the last blog post from
GitHub:
If you are a git user, you can clone the Metasploit Framework repo (master branch) for the latest.
To install fresh without using git, you can use the open-source-only Nightly Installers or the
commercial edition Metasploit Pro
Have your data and hide it too: An introduction to differential privacy
Post Syndicated from Pierre Tholoniat original http://blog.cloudflare.com/have-your-data-and-hide-it-too-an-introduction-to-differential-privacy/

Many applications rely on user data to deliver useful features. For instance, browser telemetry can identify network errors or buggy websites by collecting and aggregating data from individuals. However, browsing history can be sensitive, and sharing this information opens the door to privacy risks. Interestingly, these applications are often not interested in individual data points (e.g. whether a particular user faced a network error while trying to access Wikipedia) but only care about aggregated data (e.g. the total number of users who had trouble connecting to Wikipedia).
The Distributed Aggregation Protocol (DAP) allows data to be aggregated without revealing any individual data point. It is useful for applications where a data collector is interested in general trends over a population without having access to sensitive data. There are many use cases for DAP, from COVID-19 exposure notification to telemetry in Firefox to personalizing photo albums in iOS. Cloudflare is helping to standardize DAP and its underlying primitives. We are working on an open-source implementation of DAP and building a service to run with current and future partners. Check out this blog post to learn more about how DAP works.
DAP takes a significant step in the right direction, but private aggregation alone is often not sufficient to protect privacy. In this post, we explain the shortcomings of DAP, and how we can improve it by adding differential privacy.
The problem: private aggregation is not enough
DAP uses a cryptographic technique called multi-party computation. At a high-level, multi-party computation increases privacy by distributing the computation of the aggregate across multiple servers such that no server sees any individual’s data in the clear. (See our earlier blog post on DAP for a primer on multi-party computation.) At first, it may seem like this ought to be sufficient to protect the privacy of each individual user: the data collector learns only the information it needs (namely, the aggregate), and not the underlying data used to compute it. Unfortunately this is often not the case because the aggregate itself can sometimes reveal lots of private information.

As a trivial example, computing an average over a set of numbers with just one input in it reveals the value of the unique element in the set. But even learning the sum of some numbers can also reveal whether there is a particularly large or small number in the set. For example, suppose we’re computing the average height of a group of people. If a member of the group is particularly tall (as illustrated above), then knowing how many people are in the group and the expected average height, we can infer a significant amount of information about that individual’s height.
More generally, releasing too many accurate aggregates about a database can allow an attacker to reconstruct the whole database.
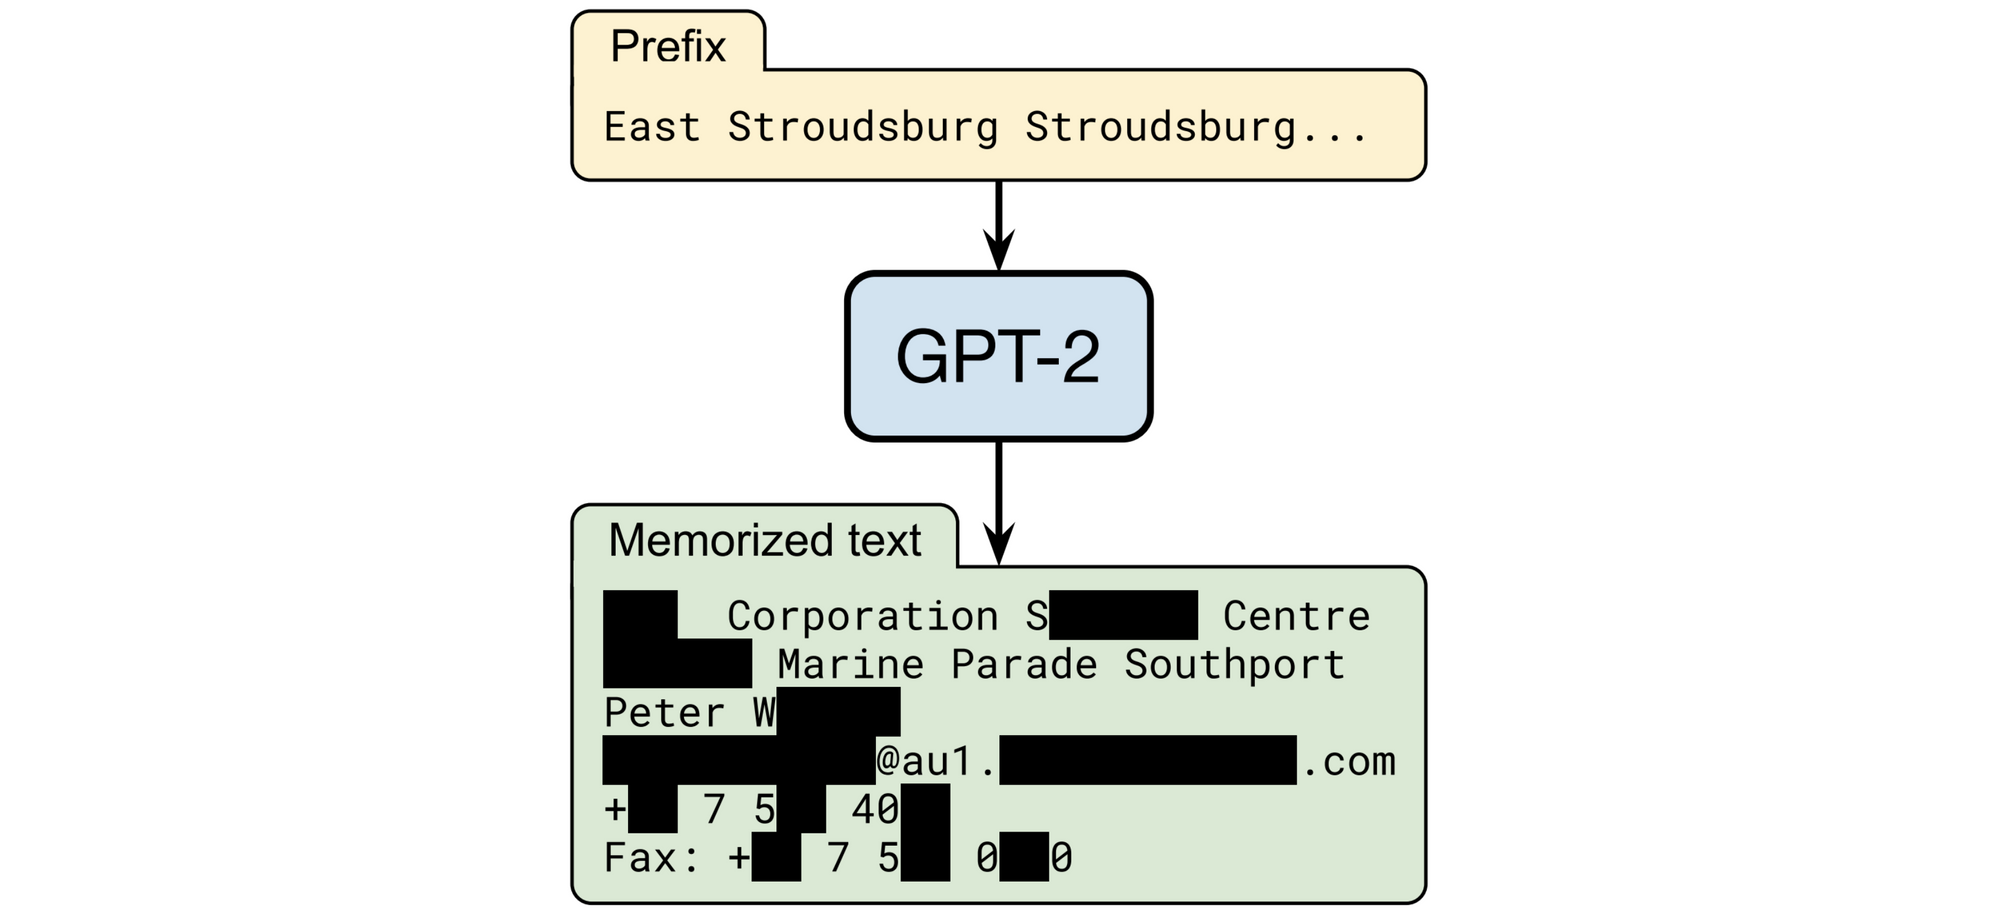
Such attacks exist in real life. For instance, deanonymization attacks against the U.S. Census have been credibly demonstrated. Large language models, such as ChatGPT, are also vulnerable; a machine learning model can be seen as a particular type of statistical aggregate computed over a training dataset. Here is an example of an attack, where researchers gave a special instruction to GPT-2 and extracted the name, address and phone number of a real individual whose data appeared only once in the training dataset:
One way of protecting the inputs to model training is a technique called federated learning, where the data are kept on end user devices and model updates are aggregated by a central server. (The aggregation step can even be done in DAP.) Yet even these systems are vulnerable to clever attacks that can leverage the final model, along with some intermediate versions, to reconstruct sensitive data.
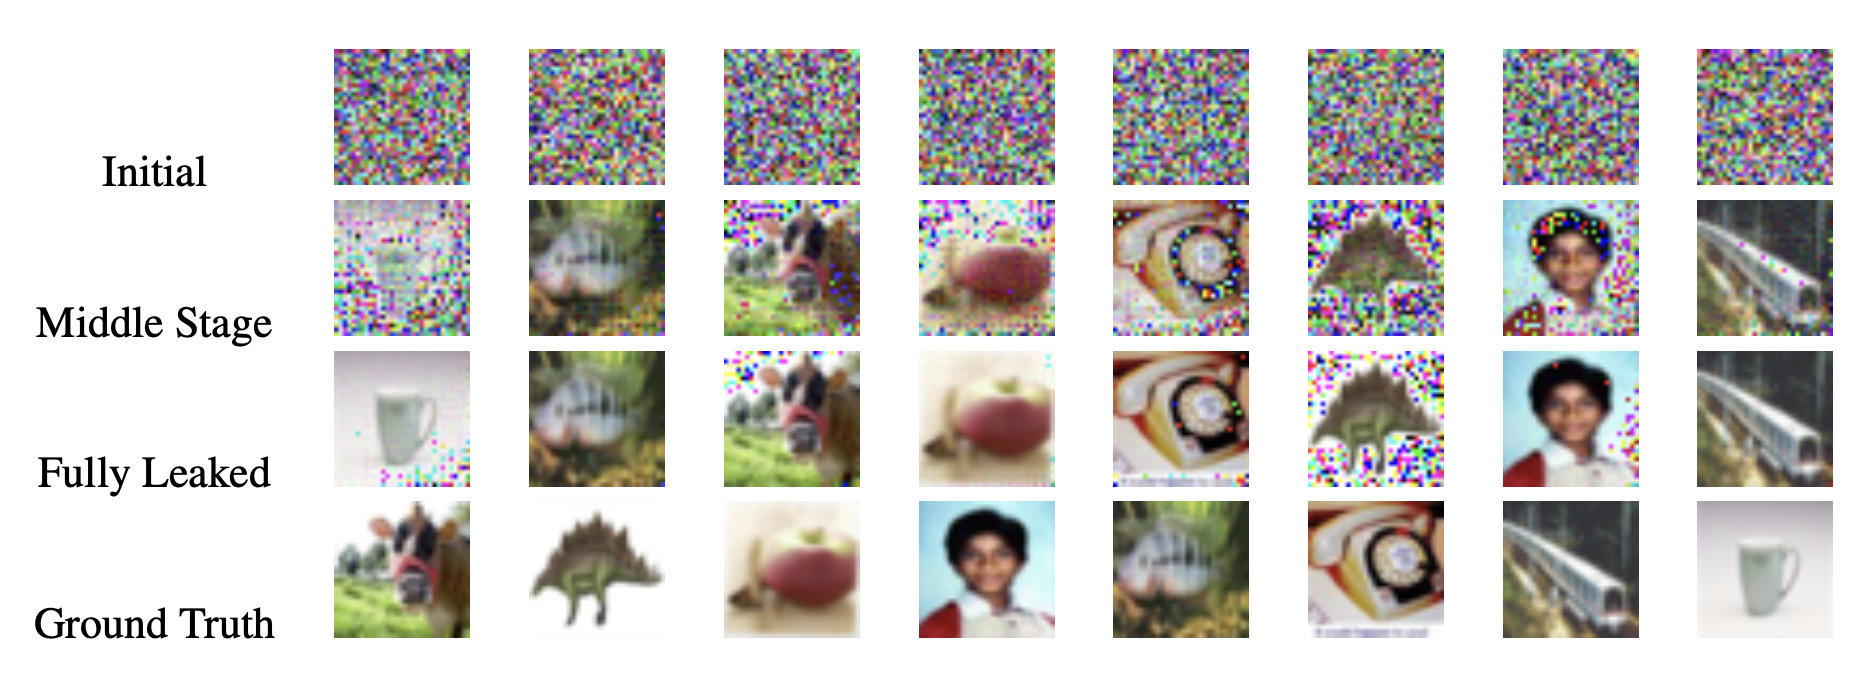
We illustrate this idea in the figure below, which comes from a recent paper describing an attack on a machine learning model being trained for image classification. In this example we begin with 8 users, each of whom has one labeled image (e.g. an image of a cat that has been labeled “Cat”). These starting images are referred to as the Ground Truth. Each user runs their image through the image classification model to see if it can accurately label what is in the photograph. When the model misses, it generates a model update — a set of data that tells the model how to improve itself, so that it more reliably recognizes that user’s photo next time.
All eight users generate their own model update locally, and then federated learning is used to take the average of those model improvements, in a manner ostensibly designed to avoid any individual update or photograph from being extracted. However, researchers were able to exploit this approach.
The goal of the attack is to reconstruct the 8 Ground Truth images in the bottom row of the figure, with only access to the federated, average update. The attacker starts from a random guess (“Initial”), and progressively improves it by moving the guess in a direction that would give an update similar to the true average update. After enough iterations, we see that the images in the attacker’s guess (“Fully Leaked”) are close to the images in the true Ground Truth dataset, although the order can be different.
These attacks suggest that private aggregation (with DAP or by some other means) is not sufficient for privacy. Luckily there is a way forward: a variety of organizations, including Apple, and Google, the U.S. Census Bureau and a growing set of industry and government actors, now use differential privacy to protect their data.
Differential privacy
Differential privacy (DP) is a statistical framework that provides an extra layer of data protection for secure aggregation systems. It adds noise to aggregates, to prevent attackers from learning too much about any individual. Roughly speaking, the amount of randomness added is inversely proportional to a privacy parameter, typically denoted by the Greek letter 𝜖 (pronounced “epsilon”): a small 𝜖 is more private but has noisy results, while a large 𝜖 is less private but more accurate. In this way, 𝜖 rigorously quantifies the amount of information revealed by the aggregate.
To be fair, even without differential privacy, some deployments of computing statistics on sensitive datasets already provide guardrails against the most blatant privacy violations, by imposing certain restrictions. For instance, DAP has a mechanism for preventing the data collector from aggregating batches of inputs that are too small. In other settings, it’s possible to redact certain attributes when they do not appear often in the dataset, or to limit the number of times a data point can be aggregated. However, it is easy for such ad-hoc privacy protections to make assumptions about the data that turn out to be invalid.
First, these restrictions are essentially “patches” against some obvious attacks, but do not necessarily cover every possible attack. For instance, some aggregation tasks are particularly sensitive to outliers could still leak whether a particularly unusual measurement is part of the aggregation set. Moreover, while simple aggregates such as sums are easier to protect with handcrafted rules, multidimensional and structured statistics such as (averaged) neural network updates can leak a surprisingly large amount of information, as shown in the previous section. On the contrary, differential privacy is a general property that protects complex statistics even against adversaries we know nothing about.
Second, another benefit of differential privacy is that it harmonizes the security parameters across applications: the privacy guarantees are expressed as a particular value for 𝜖, that can be compared across use cases going from bit counts to federated learning. The value of 𝜖 can also be communicated publicly or discussed with DP experts. While setting 𝜖 is still a complicated matter (see below), it is at least less application-dependent than setting parameters such as the number of measurements to aggregate. In fact, the differential privacy parameter constitutes an extra degree of freedom which disentangles privacy from other application-specific parameters, giving more control over tradeoffs between utility and privacy (e.g. it is possible to fix 𝜖 first, and then independently decide on the batch size for an aggregation task).
Finally, most handcrafted protection and anonymity techniques do not offer the same elegant and practical properties as differential privacy. For instance, DP guarantees degrade gracefully when groups of reports are correlated, or when the same underlying data is aggregated multiple times (which is essential in some applications like federated learning), while ad-hoc methods or definitions such as k-anonymity can fail catastrophically in these cases. DP has other desirable properties, such as resilience to side information (for instance, some real-life privacy attacks can leverage datasets purchased from data brokers).
Fundamentally, differential privacy transforms the cat-and-mouse game of privacy engineering into a rigorous, mathematical framework in which privacy is proven, not merely claimed.
The science of privacy engineering: Making DAP differentially private
As an intern at Cloudflare (Summer 2023), my task was to devise a strategy for endowing DAP with differential privacy, while optimizing for some of Cloudflare’s use cases for DAP that we’ll explore in this post. There are many ways to do this. We highlight three techniques, that come with different threat models:
- The simplest way is to compute the aggregate as usual, and then add noise to that. The DAP protocol defines a role known as the “Collector”, who is the intended recipient of the aggregate result. The Collector could add noise itself (which we might call Collector Randomization or Central DP). The problem of course is that the aggregate result is not DP from the point of view of the Collector.
- Another method – called Local DP, or Client Randomization in the DAP context – is to ask each client to add noise to its report before submitting it. This provides strong privacy guarantees (DP holds even if all the Aggregators and the Collector are malicious) but usually comes at a cost in accuracy. This is because more noise has to be added to each measurement in order to achieve privacy. Though recent advances make such protocols practical in some cases.
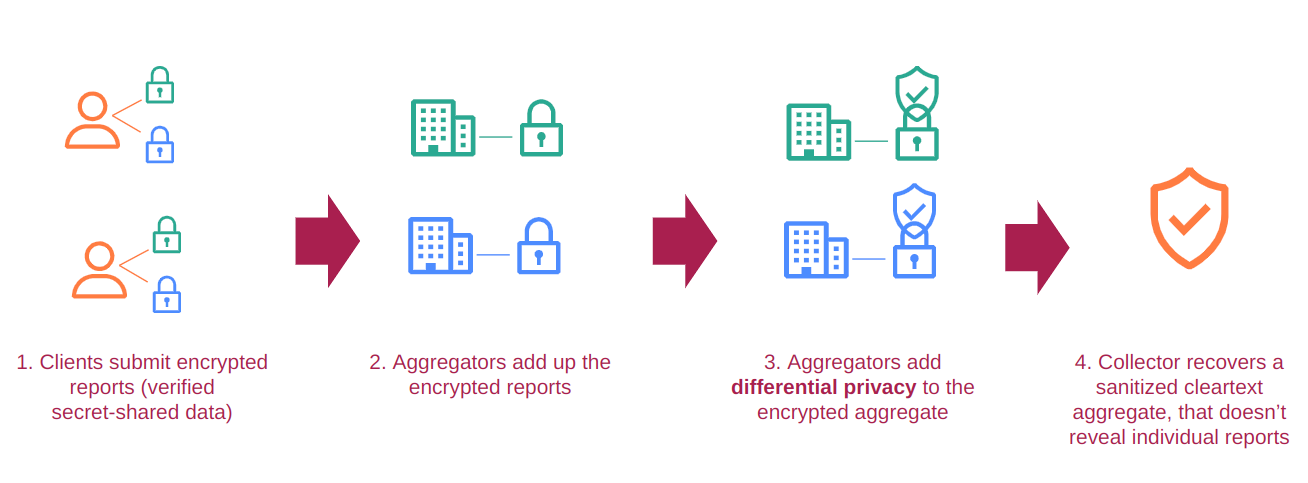
- DAP involves another role, called an “Aggregator”, that computes a share of the aggregate result. (Combining the Aggregators’ share yields the aggregate result.) As a middle-ground, we can have each Aggregator add noise to its aggregate share, thereby ensuring that the aggregate is DP from the point of view of the Collector. We must trust, of course, that at least one Aggregator is honest and adds noise from the proper distribution.
This third method, which we’ll call Aggregator Randomization, is the method we decided to investigate during my internship. It is straightforward to implement, has about the same computational overhead as basic Central DP, and satisfies the same threat model as DAP (more on that later!). Aggregator Randomization is illustrated below.
Although our Aggregator-Randomization version of DAP seems straightforward, we need to be convinced that it provides the privacy guarantees we expect. That means writing down the protocol and carrying out a formal analysis of its guarantees.
Interestingly, the traditional definition of DP and the standard proof techniques do not apply immediately to our setting. Indeed, unlike most DP mechanisms, DAP is an interactive protocol involving many parties (Clients, Aggregators, Collector) distributed across the Internet, and some of them might be malicious. Moreover, DAP’s security is based on computational assumptions (we assume that certain cryptographic problems, like cracking AES, are prohibitively costly), which consider adversaries that might run in a “reasonable” amount of time. Standard notions of DP consider adversaries that have arbitrary run time.
Luckily, other protocols combining differential privacy with multiparty computation have been studied in the past, and there are suitable definitions under the umbrella of Computational Differential Privacy. This definition of DP makes it possible to model a computationally bounded adversary interacting with a real-world protocol containing cryptographic components. However, more work needs to be done to build a generic framework for composing DP mechanisms with existing DAP subroutines (that already come with proven security guarantees).
Example: Making Network Error Logging private
To keep things concrete and get some experimental data, we looked for real-life DAP use cases where differential privacy could be useful and immediately applicable. Consider a protocol that privately aggregates and reports client-side connection errors to an origin, as a privacy-preserving alternative to Network Error Logging (NEL). It is a good use-case for DAP, because it is desirable to collect aggregate statistics (e.g. number of tcp.timed_out errors for a particular domain, or domains with the most errors in the past 24 hours), but individual reports may reveal sensitive information about browsing habits.
For simplicity, let’s focus on the case where the list of domains is already known, e.g., to track connection errors for a single domain, or across a closed set of paying customers. For the rest of the blog post, you can assume that we are using a DAP deployment to compute a histogram of connection errors for a single domain (but other statistics from the DAP specification share the same structure, which makes them suitable for similar DP mechanisms). The true aggregate might look something like this:
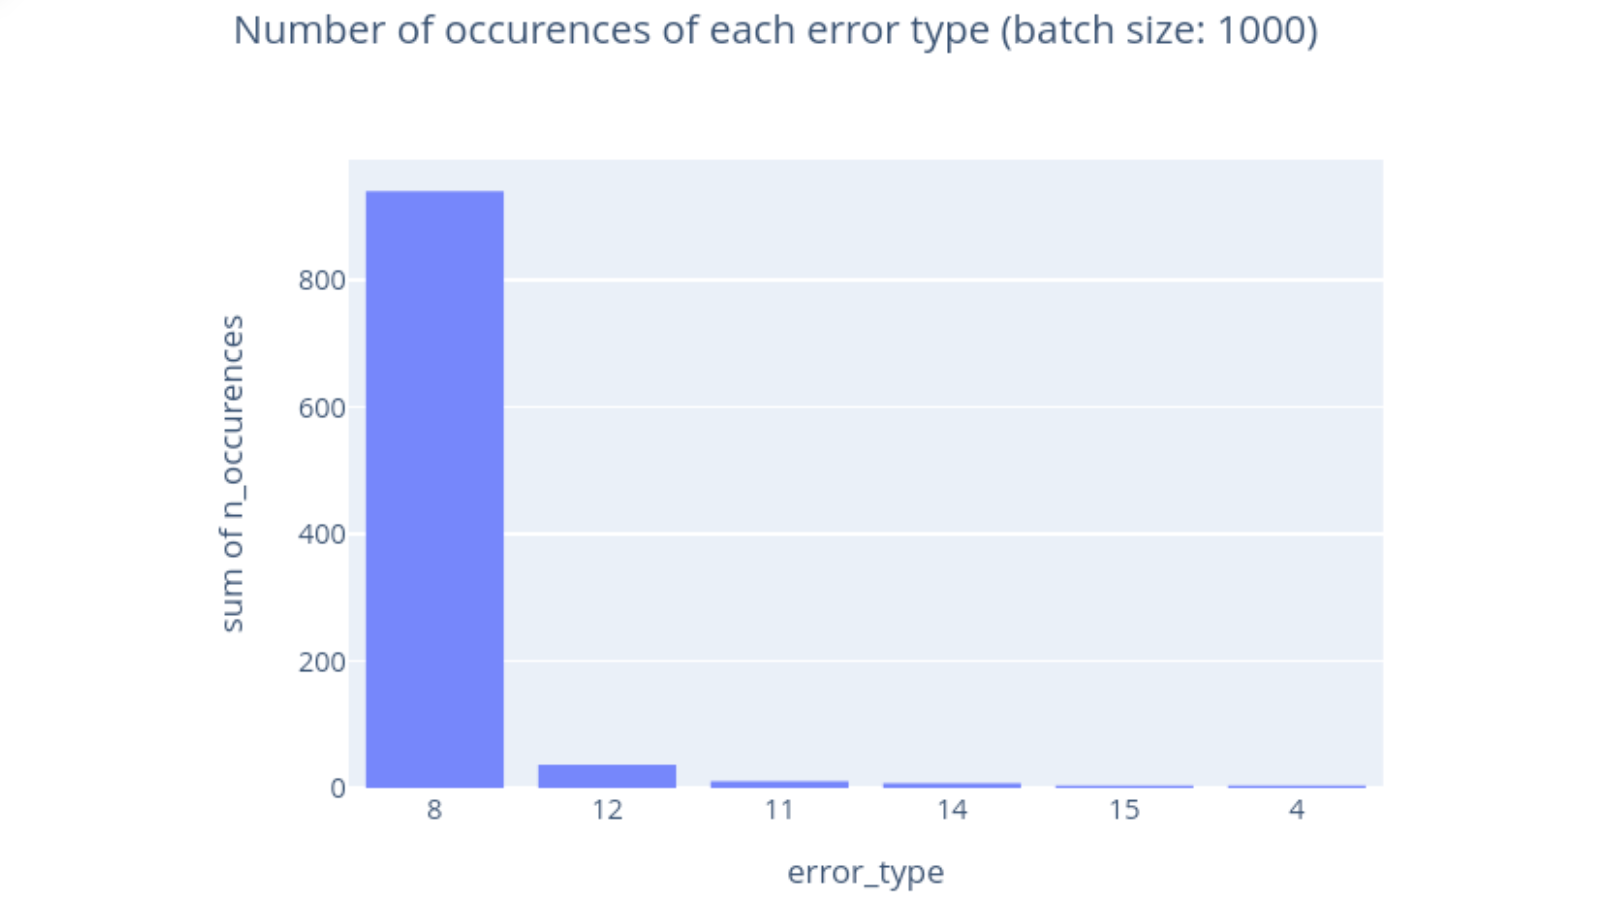
In this figure, we see a typical distribution of errors from 1,000 reports. The actual error types are irrelevant, and thus are just represented by numbers here. error_type = 8 is by far the most common, but we observe a smattering of other error types as well.
As we saw earlier, this aggregate information might still leak sensitive information – for instance, if an error type occurs only once, we might be able to tell whether a particular user visited a certain website. Now, our goal is to modify DAP to output a slightly noisy version of the histogram, so that it doesn’t leak information about individual reports.
libprio-rs is a widely-used Rust implementation of the cryptographic primitives used in DAP. To add DP, we started by designing a general API that any Aggregator Randomization scheme should satisfy, with objects to represent privacy budget and noise addition. Then, we implemented the DP API for concrete statistical aggregates. After reviewing various DP mechanisms, we settled on the discrete Gaussian and the discrete Laplace mechanisms, because of their clear guarantees and their suitability for modular ring arithmetic. We leveraged a secure noise sampler written in Rust by the OpenDP library. After adapting the Daphne implementation of DAP, we were able to run a toy deployment of DAP with differential privacy on network error logging data!
The art of privacy engineering: Exploring the privacy-utility trade-off
Recall that differential privacy involves a parameter, 𝜖, that determines the degree of privacy our system can achieve. From the code’s perspective, any positive real number is a valid choice here: smaller is more private, but also less useful. So what should we pick for 𝜖?
Up until this point, we have treated DP engineering as a science, but choosing 𝜖 remains somewhat of an art. To illustrate, let’s go back to our NEL data and compute some DP histograms for the network errors on one domain. Here are noisy histograms for different values of 𝜖:
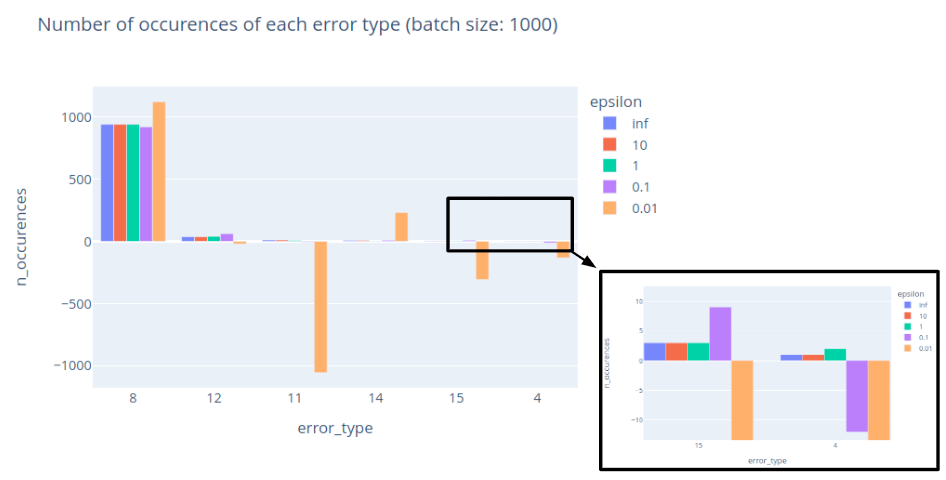
We observe that decreasing 𝜖 yields noisier results, even giving negative counts in some cases – although we can always truncate or round results without losing privacy. Since this example has many reports and a few possible errors, it is reasonably easy to mask the contribution of any single individual. Here we see that 𝜖 = 1 seems to be a reasonable choice for this use case. We can still observe that the relative error is higher for rare events (such as error_type = 15) than for common errors (such as error_type = 8).
Let’s focus on these two events, and look at how 𝜖 impacts accuracy:
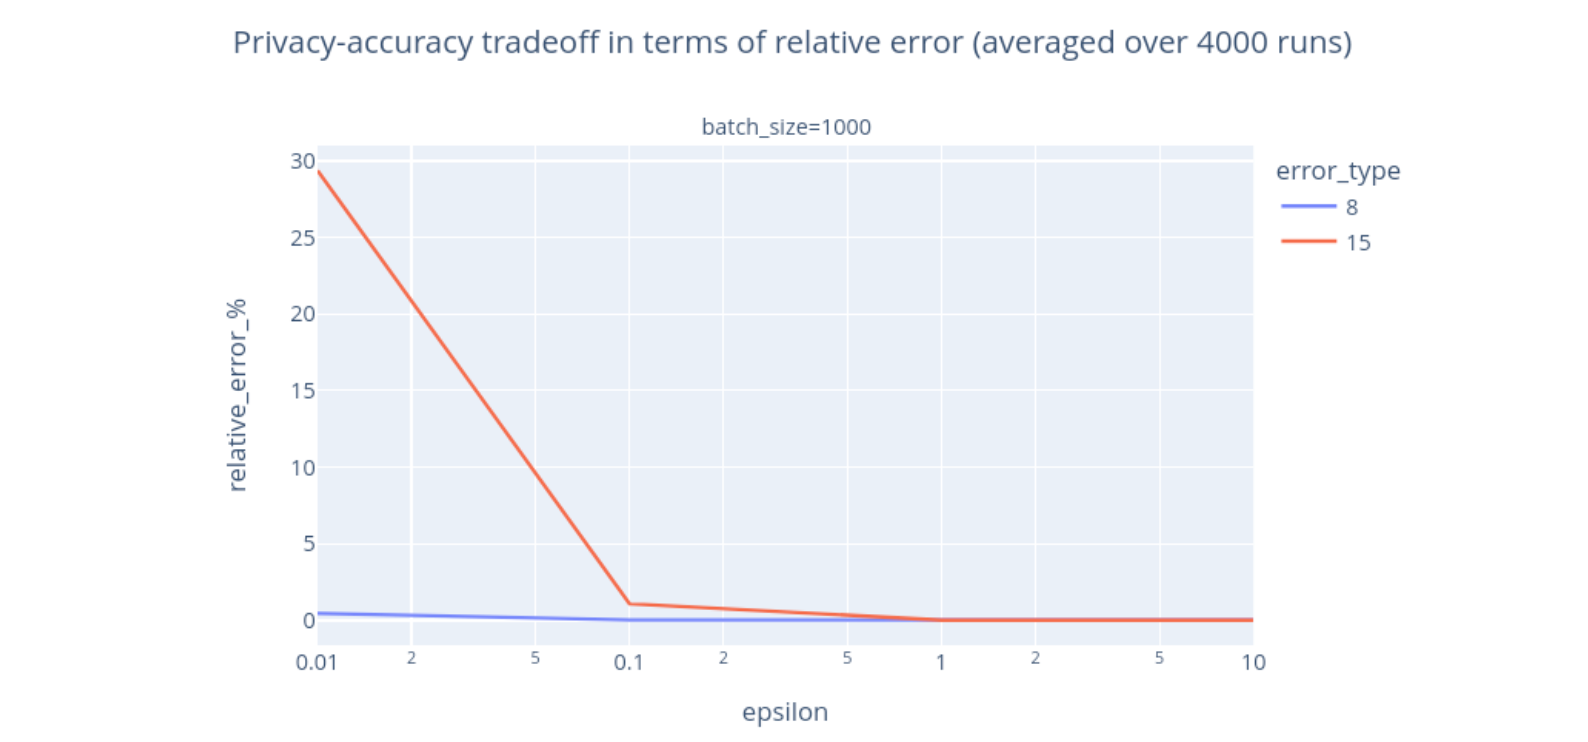
It becomes clearer that the accuracy increases with 𝜖 – an aggregate that is less noisy is also less private and more accurate. This tradeoff is known as the privacy-utility tradeoff. You can notice that the tradeoff depends on what we are measuring. If we are only interested in error_type = 8 and can tolerate at most 2% of relative error, then using 𝜖 = 0.01 would be sufficient. If we are interested in error_type = 15, then we would need to use 𝜖 = 0.1 to reach the same level of accuracy.
We can also look at how other parameters, such as batch size, can impact accuracy for a fixed privacy guarantee:
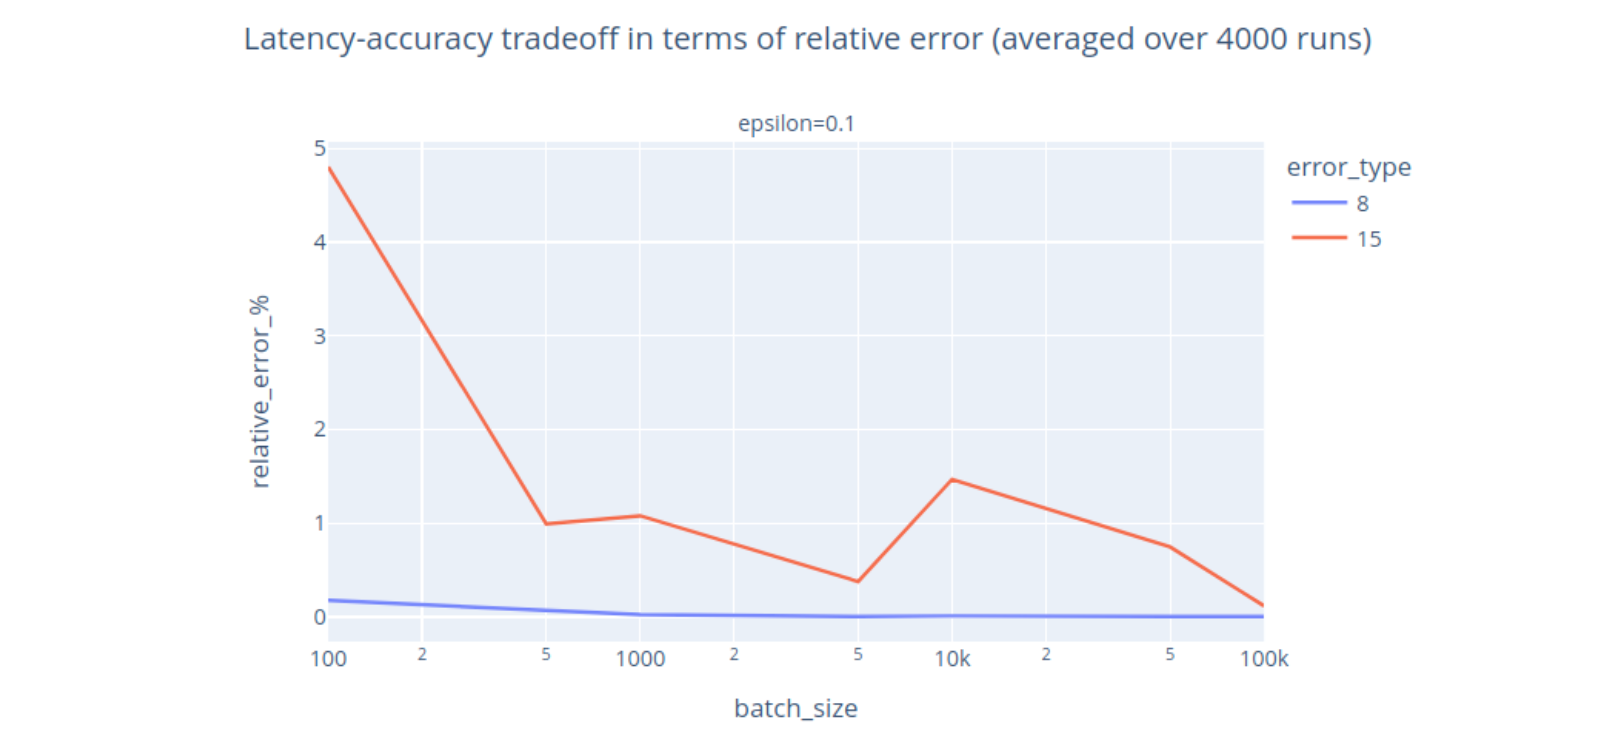
Intuitively, if we wait longer before computing an aggregate, we can get more accurate results for the same privacy level, because it is easier to mask a contribution if it is drowned in a large batch. As noted previously, we can set the privacy level upfront and adjust aggregation parameters later. If we try to collect an aggregate over a batch of size 1, the DP result will simply be close to random, and therefore protect the value of the single report in that batch. This graceful degradation – output useless results rather than breaking privacy on small batches – can be a problem in applications where accuracy is particularly important, but it can be controlled by choosing an 𝜖 that satisfies a comfortable accuracy-privacy tradeoff. It is always possible to get more accurate results, if we are willing to pay the privacy price for it.
Which brings us back to the question: what is a good value for 𝜖? Unfortunately, experts still haven’t reached a consensus on the right method to find 𝜖, as noted in this 2019 paper by Cynthia Dwork (one of the inventors of DP), Kohli and Mulligan. Indeed, some values of 𝜖 are suitable for certain deployments, algorithms, datasets or threat models, but not others. Unlike cryptographic applications that force attackers to guess a key that might have 2^128 values, 𝜖 has to be set to some non-negligible value in order to learn anything useful from the data. Ultimately, the notion of usefulness and what constitutes a privacy harm is dependent on the application.
Until we have a better understanding, a simple approach for non-experts is to search for the “standard” 𝜖 used in similar applications, and maximize accuracy under that privacy constraint. This method works if we have access to an “𝜖 Registry”, a detailed list of deployments for various use-cases and threat models. The US Census Bureau has an internal registry, but only some use cases are published so far. NIST gives some recommended ranges in this informal blog post (tldr: 0 < 𝜖 < 5 is strong, 5 < 𝜖 < 20 can be enough in practice). This blog post lists 𝜖s for deployments from Apple, Google and others.
There are additional strategies to set or evaluate the empirical guarantees of 𝜖. A complementary approach is to determine the maximum error you are willing to accept (e.g. 5% relative error on a count) and use simple properties of standard DP mechanisms to find the corresponding value of 𝜖 and check that it falls within an acceptable range.
Conclusion
As secure aggregation protocols such as DAP are increasingly deployed in real-world applications, it is important to remember that secure aggregation is not always enough to satisfy the users’ expectations of privacy. Differential privacy adds an extra layer of protection to these protocols. In short, secure aggregation protects the “how” (how to compute an aggregate from a set of reports), and DP protects the “what” (what kind of noisy aggregate we should release to avoid leaking too much information).
Thanks to the growing number of open-source implementations, applied research and standardization efforts for differential privacy and secure aggregation, there is now a clear path to integrate DP and DAP, thereby strengthening the privacy guarantees of practical measurement tasks. Interestingly, during our analysis we identified some parts of the DAP protocol that could pose problems with some forms of DP guarantees, such as the fact that Aggregators have access to the number of measurements or to the IP addresses of Clients. These findings, along with more thinking about the protocol logic, nourished debate around this and other topics at the IETF.
We also encountered many details that are often overlooked in the DP literature, such as modular arithmetic, API considerations, secure sampling or timing attacks. Overall, there is space for fruitful collaborations between cryptography and differential privacy experts, on protocols that can have a real impact.
If you’re interested in getting hands on with differential privacy, DAP, or any of Cloudflare’s other privacy-focused projects, consider applying for an internship on the Research team.
Acknowledgements
I’d like to thank my fantastic mentor Christopher Patton for guiding me during the summer – I learned many things from cryptographic details to IETF standards, and had a lot of fun along the way. Thanks to Josh Brown and Tanya Verma for our discussions, and to Avani Wildani and the rest of the Research team for their incredible support!
Securely Build AI/ML Applications in the Cloud with Rapid7 InsightCloudSec
Post Syndicated from Kathryn Lynas-Blunt original https://blog.rapid7.com/2023/12/22/securely-build-ai-ml-applications-in-the-cloud-with-rapid7-insightcloudsec/

It’s been little over a year since ChatGPT was released, and oh how much has changed. Advancements in Artificial Intelligence and Machine Learning have marked a transformative era, influencing virtually every facet of our lives. These innovative technologies have reshaped the landscape of natural language processing, enabling machines not only to understand but also to generate human-like text with unprecedented fluency and coherence. As society embraces these advancements, the implications of Generative AI and LLMs extend across diverse sectors, from communication and content creation to education and beyond.
With AI service revenue increasing over six fold within five years, it’s not a surprise that cloud providers are investing heavily in expanding their capabilities in this area. Users can now customize existing foundation models with their own training data for improved performance and customer experience using AWS’ newly released Bedrock, Azure OpenAI Service and GCP Vertex AI.
Ungoverned Adoption of AI/ML Creates Security Risks
With the market projected to be worth over $1.8 trillion by 2030, AI/ML continues to play a crucial role in threat detection and analysis, anomaly and intrusion detection, behavioral analytics, and incident response. It’s estimated that half of organizations are already leveraging this technology. In contrast, only 10% have a formal policy in place regulating its use.
Ungoverned adoption therefore poses significant security risks. A lack of oversight through Shadow AI can lead to privacy breaches, non-compliance with regulations, and biased model outcomes, fostering unfair or discriminatory results. Inadequate testing may expose AI models to adversarial attacks, and the absence of proper monitoring can result in model drift, impacting performance over time. Increasingly prevalent, security incidents stemming from ungoverned AI adoption can damage an organization’s reputation, eroding customer trust.
Safely Developing AI/ML In the Cloud Requires Visibility and Effective Guardrails
To address these concerns, organizations should establish robust governance frameworks, encompassing data protection, bias mitigation, security assessments, and ongoing compliance monitoring to ensure responsible and secure AI/ML implementation. Knowing what’s present in your environment is step 1, and we all know how hard that can be.
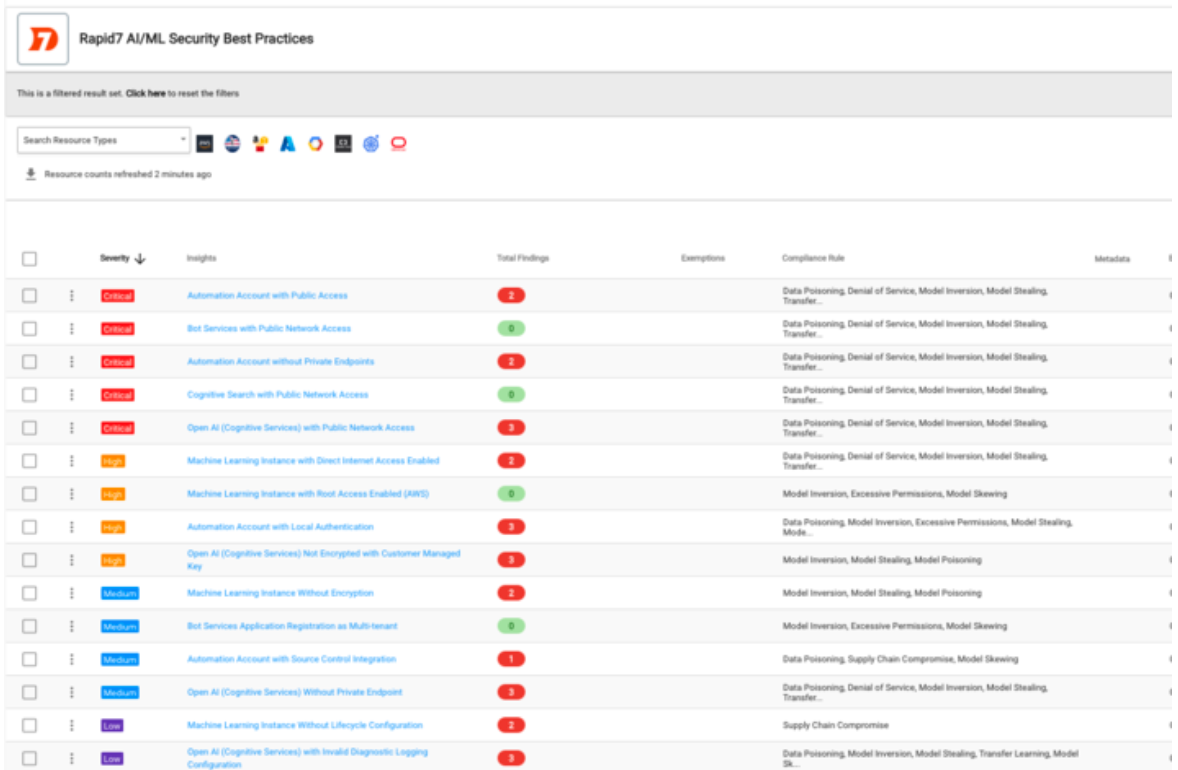
InsightCloudSec has introduced a specialized inventory page designed exclusively for the effective management of your AI/ML assets. Encompassing a diverse array of services, spanning from content moderation and translation to model customization, our platform now includes support for Generative AI across AWS, GCP, and Azure.
Once you’ve got visibility into what AI/ML projects you have running in your cloud environment, the next step is to establish and set up mechanisms to continuously enforce some guardrails and policies to ensure development is happening in a secure manner.
Introducing Rapid7’s AI/ML Security Best Practices Compliance Pack
We’re excited to unveil our newest compliance pack within InsightCloudSec: Rapid7 AI/ML Security Best Practices. The new pack is derived from the OWASP Top 10 Vulnerabilities for Machine Learning, the OWASP Top 10 for LLMs, and additional CSP-specific recommendations. With this pack, you can check alignment with each of these controls in one place, enabling a holistic view of your compliance landscape and facilitating better strategic planning and decision-making. Automated alerting and remediation can also be set up as drift detection and prevention mechanisms.
This pack introduces 11 controls, centered around data and model security:
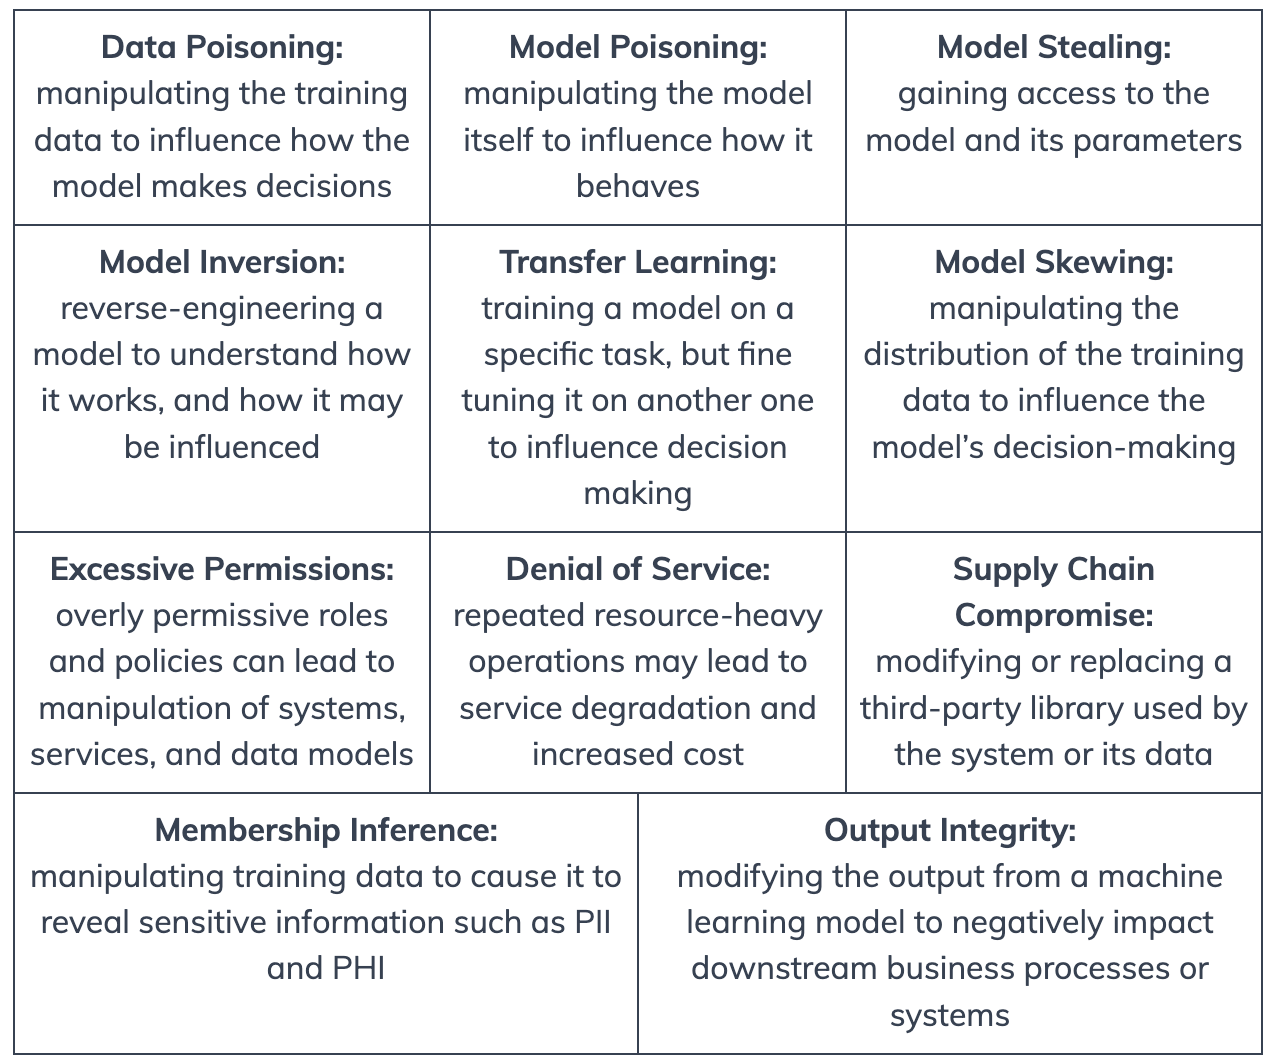
The Rapid7 AI/ML Security Best Practices compliance pack currently includes 15 checks across six different AI/ML services and three platforms, with additional coverage for Amazon Bedrock coming in our first January release.
For more information on our other compliance packs, and leveraging automation to enforce these controls, check out our docs page.
The Sims 2 Holiday Edition is HIGHLY Confusing
Post Syndicated from LGR original https://www.youtube.com/watch?v=CmIloB1q-l8
Comic for 2023.12.22 – Waifu Pillow
Post Syndicated from Explosm.net original https://explosm.net/comics/waifu-pillow
New Cyanide and Happiness Comic