Post Syndicated from Curious Droid original https://www.youtube.com/watch?v=x1StXVDRXyg
Friday Squid Blogging: Underwater Sculptures Use Squid Ink for Coloring
Post Syndicated from Bruce Schneier original https://www.schneier.com/blog/archives/2023/12/friday-squid-blogging-underwater-sculptures-use-squid-ink-for-coloring.html
The Molinière Underwater Sculpture Park has pieces that are colored in part with squid ink.
As usual, you can also use this squid post to talk about the security stories in the news that I haven’t covered.
Read my blog posting guidelines here.
Metasploit Weekly Wrap-Up
Post Syndicated from Brendan Watters original https://blog.rapid7.com/2023/12/15/metasploit-weekly-wrap-up-38/
Continuing the 12th Labor of Metasploit

Metasploit continues its Herculean task of increasing our toolset to tame Kerberos by adding support for AS_REP Roasting, which allows retrieving the password hashes of users who have Do not require Kerberos preauthentication set on the domain controller. The setting is disabled by default, but it is enabled in some environments.
Attackers can request the hash for any user with that option enabled, and worse (or better?) you can query the DC to determine which accounts have this setting, so not only can you get these hashes, the DC will tell you which users are vulnerable to the attack. Metasploit’s AS_REP roasting module will both gather the users and pull the authentication information, or pull information on a select set of users.
Ticket Management
This week’s release includes a brand new post module for enumerating and dumping Kerberos tickets from a compromised Windows host. This module will copy all of the tickets that are accessible based on the current privilege level to Metasploit’s own cache, where they can then be used in a Pass-The-Ticket (PTT) style attack. This notably enables Metasploit users to execute the entire workflow necessary to exploit Unconstrained Delegation right from with Metasploit, there’s even new documentation which outlines the entire process.
New module content (3)
Find Users Without Pre-Auth Required (ASREP-roast)
Author: smashery
Type: Auxiliary
Pull request: #18569 contributed by smashery
Path: gather/asrep
Description: This adds a module to gather credential material from accounts with "Requires Pre-Authentication" disabled. The module supports two mechanisms, brute forcing using a list of usernames or using a LDAP query to request the relevant usernames, followed by requesting TGTs.
Splunk Authenticated XSLT Upload RCE
Authors: Valentin Lobstein, h00die, and nathan
Type: Exploit
Pull request: #18577 contributed by Chocapikk
Path: unix/http/splunk_xslt_authenticated_rce
Description: This PR adds a Remote Code Execution (RCE) module for Splunk Enterprise using CVE-2023-46214. This module exploits a vulnerability in the XSLT transformation functionality of certain versions of Splunk Enterprise, allowing for authenticated remote code execution.
Kerberos Ticket Management
Authors: Spencer McIntyre and Will Schroeder
Type: Post
Pull request: #18488 contributed by zeroSteiner
Path: windows/manage/kerberos_tickets
Description: This PR adds a module to manage Kerberos tickets from a compromised host. This notably allows Kerberos tickets to be exported from the target and then added to Metasploit’s own cache, allowing them to be used for the duration in which they are valid.
Enhancements and features (3)
- #18539 from dwelch-r7 – This adds a new session type for SMB sessions. The smb session is behind a feature flag and can be enabled by setting
features set smb_session_type truein msfconsole. - #18598 from bwatters-r7 – :
This bumps the Metasploit-payload version to bring in one fix and one enhancement. The fix is to standardize the behavior of Java Meterpreter to only listen on IPv4 interfaces when binding to 0.0.0.0. The enhancement is to better align pretty OS names on Windows for Windows Kernel 10 releases, AKA Windows server 2016-present or Windows 10/11+. - #18601 from MikeAnast – Adds arm64 support to Metasploit’s Dockerfile. This new image is available from Dockerhub via
docker pull metasploitframework/metasploit-framework:6.3.47or through the wrapper script./docker/bin/msfconsole.
Bugs fixed (4)
- #18606 from Lorenyx –
rpc_pluginhas been updated to correctly use the provided plugin options. - #18609 from adfoster-r7 – This fixes an issue in the
cmd/windows/powershell/download_execpayload module that was preventing it from executing correctly due to an architecture check. - #18613 from dwelch-r7 – Ensures that after listing files within an SMB directory that the handle is closed.
- #18614 from sjanusz-r7 – Fixes a crash in the
auxiliary/scanner/ssh/ssh_identify_pubkeysmodule, as well as adding new module documentation.
Documentation
You can find the latest Metasploit documentation on our docsite at docs.metasploit.com.
Get it
As always, you can update to the latest Metasploit Framework with msfupdate
and you can get more details on the changes since the last blog post from
GitHub:
If you are a git user, you can clone the Metasploit Framework repo (master branch) for the latest.
To install fresh without using git, you can use the open-source-only Nightly Installers or the
commercial edition Metasploit Pro
Beginner’s Guide to ESPHome ESP8266, ESP32, Beken Devices and more
Post Syndicated from digiblurDIY original https://www.youtube.com/watch?v=AAMMob9f-mk
Automatically detect Personally Identifiable Information in Amazon Redshift using AWS Glue
Post Syndicated from Manikanta Gona original https://aws.amazon.com/blogs/big-data/automatically-detect-personally-identifiable-information-in-amazon-redshift-using-aws-glue/
With the exponential growth of data, companies are handling huge volumes and a wide variety of data including personally identifiable information (PII). PII is a legal term pertaining to information that can identify, contact, or locate a single person. Identifying and protecting sensitive data at scale has become increasingly complex, expensive, and time-consuming. Organizations have to adhere to data privacy, compliance, and regulatory requirements such as GDPR and CCPA, and it’s important to identify and protect PII to maintain compliance. You need to identify sensitive data, including PII such as name, Social Security Number (SSN), address, email, driver’s license, and more. Even after identification, it’s cumbersome to implement redaction, masking, or encryption of sensitive data at scale.
Many companies identify and label PII through manual, time-consuming, and error-prone reviews of their databases, data warehouses and data lakes, thereby rendering their sensitive data unprotected and vulnerable to regulatory penalties and breach incidents.
In this post, we provide an automated solution to detect PII data in Amazon Redshift using AWS Glue.
Solution overview
With this solution, we detect PII in data on our Redshift data warehouse so that the we take and protect the data. We use the following services:
- Amazon Redshift is a cloud data warehousing service that uses SQL to analyze structured and semi-structured data across data warehouses, operational databases, and data lakes, using AWS-designed hardware and machine learning (ML) to deliver the best price/performance at any scale. For our solution, we use Amazon Redshift to store the data.
- AWS Glue is a serverless data integration service that makes it straightforward to discover, prepare, and combine data for analytics, ML, and application development. We use AWS Glue to discover the PII data that is stored in Amazon Redshift.
- Amazon Simple Storage Services (Amazon S3) is a storage service offering industry-leading scalability, data availability, security, and performance.
The following diagram illustrates our solution architecture.

The solution includes the following high-level steps:
- Set up the infrastructure using an AWS CloudFormation template.
- Load data from Amazon S3 to the Redshift data warehouse.
- Run an AWS Glue crawler to populate the AWS Glue Data Catalog with tables.
- Run an AWS Glue job to detect the PII data.
- Analyze the output using Amazon CloudWatch.
Prerequisites
The resources created in this post assume that a VPC is in place along with a private subnet and both their identifiers. This ensures that we don’t substantially change the VPC and subnet configuration. Therefore, we want to set up our VPC endpoints based on the VPC and subnet we choose to expose it in.
Before you get started, create the following resources as prerequisites:
- An existing VPC
- A private subnet in that VPC
- A VPC gateway S3 endpoint
- A VPC STS gateway endpoint
Set up the infrastructure with AWS CloudFormation
To create your infrastructure with a CloudFormation template, complete the following steps:
- Open the AWS CloudFormation console in your AWS account.
- Choose Launch Stack:

- Choose Next.
- Provide the following information:
- Stack name
- Amazon Redshift user name
- Amazon Redshift password
- VPC ID
- Subnet ID
- Availability Zones for the subnet ID
- Choose Next.

- On the next page, choose Next.
- Review the details and select I acknowledge that AWS CloudFormation might create IAM resources.
- Choose Create stack.
- Note the values for
S3BucketNameandRedshiftRoleArnon the stack’s Outputs tab.

Load data from Amazon S3 to the Redshift Data warehouse
With the COPY command, we can load data from files located in one or more S3 buckets. We use the FROM clause to indicate how the COPY command locates the files in Amazon S3. You can provide the object path to the data files as part of the FROM clause, or you can provide the location of a manifest file that contains a list of S3 object paths. COPY from Amazon S3 uses an HTTPS connection.
For this post, we use a sample personal health dataset. Load the data with the following steps:
- On the Amazon S3 console, navigate to the S3 bucket created from the CloudFormation template and check the dataset.
- Connect to the Redshift data warehouse using the Query Editor v2 by establishing a connection with the database you creating using the CloudFormation stack along with the user name and password.

After you’re connected, you can use the following commands to create the table in the Redshift data warehouse and copy the data.
- Create a table with the following query:
- Load the data from the S3 bucket:
Provide values for the following placeholders:
- RedshiftRoleArn – Locate the ARN on the CloudFormation stack’s Outputs tab
- S3BucketName – Replace with the bucket name from the CloudFormation stack
- aws region – Change to the Region where you deployed the CloudFormation template
- To verify the data was loaded, run the following command:

Run an AWS Glue crawler to populate the Data Catalog with tables
On the AWS Glue console, select the crawler that you deployed as part of the CloudFormation stack with the name crawler_pii_db, then choose Run crawler.

When the crawler is complete, the tables in the database with the name pii_db are populated in the AWS Glue Data Catalog, and the table schema looks like the following screenshot.

Run an AWS Glue job to detect PII data and mask the corresponding columns in Amazon Redshift
On the AWS Glue console, choose ETL Jobs in the navigation pane and locate the detect-pii-data job to understand its configuration. The basic and advanced properties are configured using the CloudFormation template.

The basic properties are as follows:
- Type – Spark
- Glue version – Glue 4.0
- Language – Python
For demonstration purposes, the job bookmarks option is disabled, along with the auto scaling feature.

We also configure advanced properties regarding connections and job parameters.
To access data residing in Amazon Redshift, we created an AWS Glue connection that utilizes the JDBC connection.

We also provide custom parameters as key-value pairs. For this post, we sectionalize the PII into five different detection categories:
- universal –
PERSON_NAME,EMAIL,CREDIT_CARD - hipaa –
PERSON_NAME,PHONE_NUMBER,USA_SSN,USA_ITIN,BANK_ACCOUNT,USA_DRIVING_LICENSE,USA_HCPCS_CODE,USA_NATIONAL_DRUG_CODE,USA_NATIONAL_PROVIDER_IDENTIFIER,USA_DEA_NUMBER,USA_HEALTH_INSURANCE_CLAIM_NUMBER,USA_MEDICARE_BENEFICIARY_IDENTIFIER - networking –
IP_ADDRESS,MAC_ADDRESS - united_states –
PHONE_NUMBER,USA_PASSPORT_NUMBER,USA_SSN,USA_ITIN,BANK_ACCOUNT - custom – Coordinates
If you’re trying this solution from other countries, you can specify the custom PII fields using the custom category, because this solution is created based on US regions.
For demonstration purposes, we use a single table and pass it as the following parameter:
--table_name: table_nameFor this post, we name the table personal_health_identifiable_information.

You can customize these parameters based on the individual business use case.
Run the job and wait for the Success status.
The job has two goals. The first goal is to identify PII data-related columns in the Redshift table and produce a list of these column names. The second goal is the obfuscation of data in those specific columns of the target table. As a part of the second goal, it reads the table data, applies a user-defined masking function to those specific columns, and updates the data in the target table using a Redshift staging table (stage_personal_health_identifiable_information) for the upserts.
Alternatively, you can also use dynamic data masking (DDM) in Amazon Redshift to protect sensitive data in your data warehouse.
Analyze the output using CloudWatch
When the job is complete, let’s review the CloudWatch logs to understand how the AWS Glue job ran. We can navigate to the CloudWatch logs by choosing Output logs on the job details page on the AWS Glue console.

The job identified every column that contains PII data, including custom fields passed using the AWS Glue job sensitive data detection fields.

Clean up
To clean up the infrastructure and avoid additional charges, complete the following steps:
- Empty the S3 buckets.
- Delete the endpoints you created.
- Delete the CloudFormation stack via the AWS CloudFormation console to delete the remaining resources.

Conclusion
With this solution, you can automatically scan the data located in Redshift clusters using an AWS Glue job, identify PII, and take necessary actions. This could help your organization with security, compliance, governance, and data protection features, which contribute towards the data security and data governance.
About the Authors
 Manikanta Gona is a Data and ML Engineer at AWS Professional Services. He joined AWS in 2021 with 6+ years of experience in IT. At AWS, he is focused on Data Lake implementations, and Search, Analytical workloads using Amazon OpenSearch Service. In his spare time, he love to garden, and go on hikes and biking with his husband.
 Denys Novikov is a Senior Data Lake Architect with the Professional Services team at Amazon Web Services. He is specialized in the design and implementation of Analytics, Data Management and Big Data systems for Enterprise customers.
 Anjan Mukherjee is a Data Lake Architect at AWS, specializing in big data and analytics solutions. He helps customers build scalable, reliable, secure and high-performance applications on the AWS platform.
Four use cases for GuardDuty Malware Protection On-demand malware scan
Post Syndicated from Eduardo Ortiz Pineda original https://aws.amazon.com/blogs/security/four-use-cases-for-guardduty-malware-protection-on-demand-malware-scan/
Amazon GuardDuty is a threat detection service that continuously monitors your Amazon Web Services (AWS) accounts and workloads for malicious activity and delivers detailed security findings for visibility and remediation. GuardDuty Malware Protection helps detect the presence of malware by performing agentless scans of the Amazon Elastic Block Store (Amazon EBS) volumes that are attached to Amazon Elastic Compute Cloud (Amazon EC2) instances and container workloads. GuardDuty findings for identified malware provide additional insights of potential threats related to EC2 instances and containers running on an instance. Malware findings can also provide additional context for EC2 related threats identified by GuardDuty such as observed cryptocurrency-related activity and communication with a command and control server. Examples of malware categories that GuardDuty Malware Protection helps identify include ransomware, cryptocurrency mining, remote access, credential theft, and phishing. In this blog post, we provide an overview of the On-demand malware scan feature in GuardDuty and walk through several use cases where you can use On-demand malware scanning.
GuardDuty offers two types of malware scanning for EC2 instances: GuardDuty-initiated malware scans and On-demand malware scans. GuardDuty initiated malware scans are launched after GuardDuty generates an EC2 finding that indicates behavior typical of malware on an EC2 instance or container workload. The initial EC2 finding helps to provide insight that a specific threat is being observed based on VPC Flow Logs and DNS logs. Performing a malware scan on the instance goes beyond what can be observed from log activity and helps to provide additional context at the instance file system level, showing a connection between malware and the observed network traffic. This additional context can also help you determine your response and remediation steps for the identified threat.
There are multiple use cases where you would want to scan an EC2 instance for malware even when there’s no GuardDuty EC2 finding for the instance. This could include scanning as part of a security investigation or scanning certain instances on a regular schedule. You can use the On-demand malware scan feature to scan an EC2 instance when you want, providing flexibility in how you maintain the security posture of your EC2 instances.
On-demand malware scanning
To perform on-demand malware scanning, your account must have GuardDuty enabled. If the service-linked role (SLR) permissions for Malware Protection don’t exist in the account the first time that you submit an on-demand scan, the SLR for Malware Protection will automatically be created. An on-demand malware scan is initiated by providing the Amazon Resource Name (ARN) of the EC2 instance to scan. The malware scan of the instance is performed using the same functionality as GuardDuty-initiated scans. The malware scans that GuardDuty performs are agentless and the feature is designed in a way that it won’t affect the performance of your resources.
An on-demand malware scan can be initiated through the GuardDuty Malware Protection section of the AWS Management Console for GuardDuty or through the StartMalwareScan API. On-demand malware scans can be initiated from the GuardDuty delegated administrator account for EC2 instances in a member account where GuardDuty is enabled, or the scan can be initiated from a member account or a stand-alone account for Amazon EC2 instances within that account. High-level details for every malware scan that GuardDuty runs are reported in the Malware scans section of the GuardDuty console. The Malware scans section identifies which EC2 instance the scan was initiated for, the status of the scan (completed, running, skipped, or failed), the result of the scan (clean or infected), and when the malware scan was initiated. This summary information on malware scans is also available through the DescribeMalwareScans API.
When an on-demand scan detects malware on an EC2 instance, a new GuardDuty finding is created. This finding lists the details about the impacted EC2 instance, where malware was found in the instance file system, how many occurrences of malware were found, and details about the actual malware. Additionally, if malware was found in a Docker container, the finding also lists details about the container and, if the EC2 instance is used to support Amazon Elastic Kubernetes Service (Amazon EKS) or Amazon Elastic Container Service (Amazon ECS) container deployments, details about the cluster, task, and pod are also included in the finding. Findings about identified malware can be viewed in the GuardDuty console along with other GuardDuty findings or can be retrieved using the GuardDuty APIs. Additionally, each finding that GuardDuty generates is sent to Amazon EventBridge and AWS Security Hub. With EventBridge, you can author rules that allow you to match certain GuardDuty findings and then send the findings to a defined target in an event-driven flow. Security Hub helps you include GuardDuty findings in your aggregation and prioritization of security findings for your overall AWS environment.
GuardDuty charges for the total amount of Amazon EBS data that’s scanned. You can use the provisioned storage for an Amazon EBS volume to get an initial estimate on what the scan will cost. When the actual malware scan runs, the final cost is based on the amount of data that was actually scanned by GuardDuty to perform a malware scan. To get a more accurate estimate of what a malware scan on an Amazon EBS volume might cost, you must obtain the actual storage amount used from the EC2 instance that the volume is attached to. There are multiple methods available to determine the actual amount of storage currently being used on an EBS volume including using the CloudWatch Logs agent to collect disk-used metrics, and running individual commands to see the amount of free disk space on Linux and Windows EC2 instances.
Use cases using GuardDuty On-demand malware scan
Now that you’ve reviewed the on-demand malware scan feature and how it works, let’s walk through four use cases where you can incorporate it to help you achieve your security goals. In use cases 1 and 2, we provide you with deployable assets to help demonstrate the solution in your own environment.
Use case 1 – Initiating scans for EC2 instances with specific tags
This first use case walks through how on-demand scanning can be performed based on tags applied to an EC2 instance. Each tag is a label consisting of a key and an optional value to store information about the resource or data retained on that resource. Resource tagging can be used to help identify a specific target group of EC2 instances for malware scanning to meet your security requirements. Depending on your organization’s strategy, tags can indicate the data classification strategy, workload type, or the compliance scope of your EC2 instance, which can be used as criteria for malware scanning.
In this solution, you use a combination of GuardDuty, an AWS Systems Manager document (SSM document), Amazon CloudWatch Logs subscription filters, AWS Lambda, and Amazon Simple Notification Service (Amazon SNS) to initiate a malware scan of EC2 instances containing a specific tag. This solution is designed to be deployed in a member account and identifies EC2 instances to scan within that member account.
Solution architecture
Figure 1 shows the high-level architecture of the solution which depicts an on-demand malware scan being initiated based on a tag key.
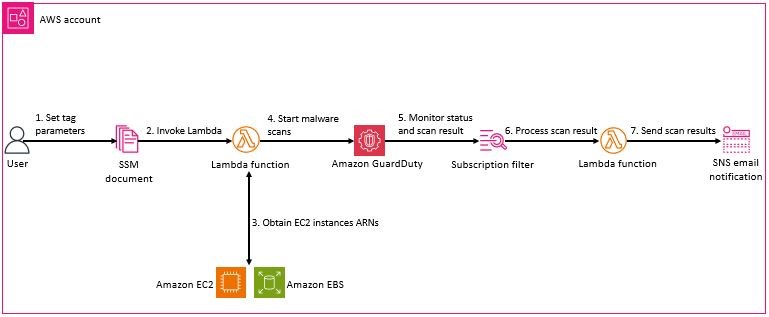
Figure 1: Tag based on-demand malware scan architecture
The high-level workflow is:
- Enter the tag scan parameters in the SSM document that’s deployed as part of the solution.
- When you initiate the SSM document, the GuardDutyMalwareOnDemandScanLambdaFunction Lambda function is invoked, which launches the collection of the associated Amazon EC2 ARNs that match your tag criteria.
- The Lambda function obtains ARNs of the EC2 instances and initiates a malware scan for each instance.
- GuardDuty scans each instance for malware.
- A CloudWatch Logs subscription filter created under the log group /aws/guardduty/malware-scan-events monitors for log file entries of on-demand malware scans which have a status of COMPLETED or SKIPPED. If a scan matches this filter criteria, it’s sent to the GuardDutyMalwareOnDemandNotificationLambda Lambda function.
- The GuardDutyMalwareOnDemandNotificationLambda function parses the information from the scan events and sends the details to an Amazon SNS topic if the result of the scan is clean, skipped, or infected.
- Amazon SNS sends the message to the topic subscriptions. Information sent in the message will contain the account ID, resource ID, status, volume, and result of the scan.
Systems Manager document
AWS Systems Manager is a secure, end-to-end management solution for resources on AWS and in multi-cloud and hybrid environments. The SSM document feature is used in this solution to provide an interactive way to provide inputs to the Lambda function that’s responsible for identifying EC2 instances to scan for malware.
Identify Amazon EC2 targets Lambda
The GuardDutyMalwareOnDemandScanLambdaFunction obtains the ARN of the associated EC2 instances that match the tag criteria provided in the Systems Manager document parameters. For the EC2 instances that are identified to match the tag criteria, an On-demand malware scan request is submitted by the StartMalwareScan API.
Monitoring and reporting scan status
The solution deploys an Amazon CloudWatch Logs subscription filter that monitors for log file entries of on-demand malware scans which have a status of COMPLETED or SKIPPED. See Monitoring scan status for more information. After an on-demand malware scan finishes, the filter criteria are matched and the scan result is sent to its Lambda function destination GuardDutyMalwareOnDemandNotificationLambda. This Lambda function generates an Amazon SNS notification email that’s sent by the GuardDutyMalwareOnDemandScanTopic Amazon SNS topic.
Deploy the solution
Now that you understand how the on-demand malware scan solution works, you can deploy it to your own AWS account. The solution should be deployed in a single member account. This section walks you through the steps to deploy the solution and shows you how to verify that each of the key steps is working.
Step 1: Activate GuardDuty
The sample solution provided by this blog post requires that you activate GuardDuty in your AWS account. If this service isn’t activated in your account, learn more about the free trial and pricing or this service, and follow the steps in Getting started with Amazon GuardDuty to set up the service and start monitoring your account.
Note: On-demand malware scanning is not part of the GuardDuty free trial.
Step 2: Deploy the AWS CloudFormation template
For this step, deploy the template within the AWS account and AWS Region where you want to test this solution.
- Choose the following Launch Stack button to launch an AWS CloudFormation stack in your account. Use the AWS Management Console navigation bar to choose the Region you want to deploy the stack in.

- Set the values for the following parameters based on how you want to use the solution:
- Create On-demand malware scan sample tester condition — Set the value to True to generate two EC2 instances to test the solution. These instances will serve as targets for an on-demand malware scan. One instance will contain EICAR malware sample files, which contain strings that will be detected as malware but aren’t malicious. The other instance won’t contain malware.
- Tag key — Set the key that you want to be added to the test EC2 instances that are launched by this template.
- Tag value — Set the value that will be added to the test EC2 instances that are launched by this template.
- Latest Amazon Linux instance used for tester — Leave as is.
- Scroll to the bottom of the Quick create stack screen and select the checkbox next to I acknowledge that AWS CloudFormation might create IAM resources.
- Choose Create stack. The deployment of this CloudFormation stack will take 5–10 minutes.
After the CloudFormation stack has been deployed successfully, you can proceed to reviewing and interacting with the deployed solution.
Step 3: Create an Amazon SNS topic subscription
The CloudFormation stack deploys an Amazon SNS topic to support sending notifications about initiated malware scans. For this post, you create an email subscription for receiving messages sent through the topic.
- In the Amazon SNS console, navigate to the Region that the stack was deployed in. On the Amazon SNS topics page, choose the created topic that includes the text GuardDutyMalwareOnDemandScanTopic.

Figure 2: Amazon SNS topic listing
- On the Create subscription page, select Email for the Protocol, and for the Endpoint add a valid email address. Choose Create subscription.
Figure 3: Amazon SNS topic subscription


After the subscription has been created, an email notification is sent that must be acknowledged to start receiving malware scan notifications.
Amazon SNS subscriptions support many other types of subscription protocols besides email. You can review the list of Amazon SNS event destinations to learn more about other ways that Amazon SNS notifications can be consumed.
Step 4: Provide scan parameters in an SSM document
After the AWS CloudFormation template has been deployed, the SSM document will be in the Systems Manager console. For this solution, the TagKey and TagValue parameters must be entered before you can run the SSM document.
- In the Systems Manager console choose the Documents link in the navigation pane.
- On the SSM document page, select the Owned by me tab and choose GuardDutyMalwareOnDemandScan. If you have multiple documents, use the search bar to search for the GuardDutyMalwareOnDemandScan document.
Figure 4: Systems Manager documents listing
- In the page for the GuardDutyMalwareOnDemandScan, choose Execute automation.
- In the Execute automation runbook page, follow the document description and input the required parameters. For this blog example, use the same tags as in the parameter section of the initial CloudFormation template. When you use this solution for your own instances, you can adjust these parameters to fit your tagging strategy.
Figure 5: Automation document details and input parameters
- Choose Execute to run the document. This takes you to the Execution detail page for this run of the automation document. In a few minutes the Execution status should update its overall status to Success.
Figure 6: Automation document execution detail


Step 5: Receive status messages about malware scans
- Upon completion of the scan, you should get a status of Success and email containing the results of the on-demand scan along with the scan IDs. The scan result includes a message for an INFECTED instance and one message for a CLEAN instance. For EC2 instances without a tag key, you will receive an Amazon SNS notification that says “No instances found that could be scanned.” Figure 7 shows an example email for an INFECTED instance.
Figure 7: Example email for an infected instance

Step 6: Review scan results in GuardDuty
In addition to the emails that are sent about the status of a malware scan, the details about each malware scan and the findings for identified malware can be viewed in GuardDuty.
- In the GuardDuty console, select Malware scans from the left navigation pane. The Malware scan page provides you with the results of the scans performed. The scan results, for the instances scanned in this post, should match the email notifications received in the previous step.
Figure 8: GuardDuty malware scan summary
- You can select a scan to view its details. The details include the scan ID, the EC2 instance, scan type, scan result (which indicates if the scan is infected or clean), and the scan start time.
Figure 9: GuardDuty malware scan details
- In the details for the infected instance, choose Click to see malware findings. This takes you to the GuardDuty findings page with a filter for the specific malware scan.
Figure 10: GuardDuty malware findings
- Select the finding for the MalicousFile finding to bring up details about the finding. Details of the Execution:EC2/Malicious file finding include the severity label, the overview of the finding, and the threats detected. We recommend that you treat high severity findings as high priority and immediately investigate and, if necessary, take steps to prevent unauthorized use of your resources.
Figure 11: GuardDuty malware finding details


Use case 2 – Initiating scans on a schedule
This use case walks through how to schedule malware scans. Scheduled malware scanning might be required for particularly sensitive workloads. After an environment is up and running, it’s important to establish a baseline to be able to quickly identify EC2 instances that have been infected with malware. A scheduled malware scan helps you proactively identify malware on key resources and that maintain the desired security baseline.
Solution architecture
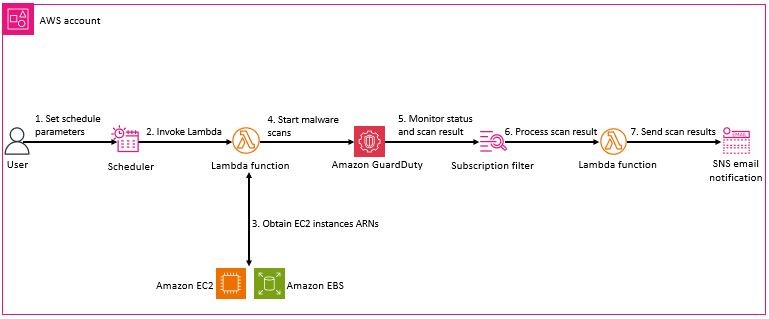
Figure 12: Scheduled malware scan architecture
The architecture of this use case is shown in figure 12. The main difference between this and the architecture of use case 1 is the presence of a scheduler that controls submitting the GuardDutyMalwareOnDemandObtainScanLambdaFunction function to identify the EC2 instances to be scanned. This architecture uses Amazon EventBridge Scheduler to set up flexible time windows for when a scheduled scan should be performed.
EventBridge Scheduler is a serverless scheduler that you can use to create, run, and manage tasks from a central, managed service. With EventBridge Scheduler, you can create schedules using cron and rate expressions for recurring patterns or configure one-time invocations. You can set up flexible time windows for delivery, define retry limits, and set the maximum retention time for failed invocations.
Deploying the solution
Step 1: Deploy the AWS CloudFormation template
For this step, you deploy the template within the AWS account and Region where you want to test the solution.
- Choose the following Launch Stack button to launch an AWS CloudFormation stack in your account. Use the AWS Management Console navigation bar to choose the Region you want to deploy the stack in.
- Set the values for the following parameters based on how you want to use the solution:
- On-demand malware scan sample tester — Amazon EC2 configuration
- Create On-demand malware scan sample tester condition — Set the value to True to generate two EC2 instances to test the solution. These instances will serve as targets for an on-demand malware scan. One instance will contain EICAR malware sample files, which contain strings that will be detected as malware but aren’t malicious. The other instance won’t contain malware.
- Tag key — Set the key that you want to be added to the test EC2 instances that are launched by this template.
- Tag Value — Set the value that will be added to the test EC2 instances that are launched by this template.
- Latest Amazon Linux instance used for tester — Leave as is.
- Scheduled malware scan parameters
- Tag keys and values parameter — Enter the tag key-value pairs that the scheduled scan will look for. If you populated the tag key and tag value parameters for the sample EC2 instance, then that should be one of the values in this parameter to ensure that the test instances are scanned.
- EC2 instances ARNs to scan — [Optional] EC2 instances ID list that should be scanned when the scheduled scan runs.
- EC2 instances state — Enter the state the EC2 instances can be in when selecting instances to scan.
- AWS Scheduler parameters
- Rate for the schedule scan to be run — defines how frequently the schedule should run. Valid options are minutes, hours, or days.
- First time scheduled scan will run — Enter the day and time, in UTC format, when the first scheduled scan should run.
- Time zone — Enter the time zone that the schedule start time should be applied to. Here is a list of valid time zone values.
- On-demand malware scan sample tester — Amazon EC2 configuration
- Scroll to the bottom of the Quick create stack screen and select the checkbox for I acknowledge that AWS CloudFormation might create IAM resources.
- Choose Create stack. The deployment of this CloudFormation stack will take 5–10 minutes.
After the CloudFormation stack has been deployed successfully, you can review and interact with the deployed solution.
Step 2: Amazon SNS topic subscription
As in use case 1, this solution supports using Amazon SNS to send a notification with the results of a malware scan. See the Amazon SNS subscription set up steps in use case 1 for guidance on setting up a subscription for receiving the results. For this use case, the naming convention of the Amazon SNS topic will include GuardDutyMalwareOnDemandScheduledScanTopic.
Step 3: Review scheduled scan configuration
For this use case, the parameters that were filled in during submission of the CloudFormation template build out an initial schedule for scanning EC2 instances. The following details describe the various components of the schedule and where you can make changes to influence how the schedule runs in the future.
- In the console, go to the EventBridge service. On the left side of the console under Scheduler, select Schedules. Select the scheduler that was created as part of the CloudFormation deployment.
Figure 13: List of EventBridge schedules
- The Specify schedule detail page is where you can set the appropriate Timezone, Start date and time. In this walkthrough, this information for the schedule was provided when launching the CloudFormation template.
Figure 14: EventBridge schedule detail
- On the Invoke page, the JSON will include the instance state, tags, and IDs, as well as the tags associated with the instance that were filled in during the deployment of the CloudFormation template. Make additional changes, as needed, and choose Next.
Figure 15: EventBridge schedule Lambda invoke parameters
- Review and save schedule.
Figure 16: EventBridge schedule summary


Step 4: Review malware scan results from GuardDuty
After a scheduled scan has been performed, the scan results will be available in the GuardDuty Malware console and generate a GuardDuty finding if malware is found. The output emails and access to the results in GuardDuty is the same as explained in use case 1.
Use case 3 – Initiating scans to support a security investigation
You might receive security signals or events about infrastructure and applications from multiple tools or sources in addition to Amazon GuardDuty. Investigations that arise from these security signals necessitate malware scans on specific EC2 instances that might be a source or target of a security event. With GuardDuty On-demand malware scan, you can incorporate a scan as part of your investigation workflow and use the output of the scan to drive the next steps in your investigation.
From the GuardDuty delegated administrator account, you can initiate a malware scan against EC2 instances in a member account which is associated with the administrator account. This enables you to initiate your malware scans from a centralized location and without the need for access to the account where the EC2 instance is deployed. Initiating a malware scan for an EC2 instance uses the same StartMalwareScan API described in the other use cases of this post. Depending on the tools that you’re using to support your investigations, you can also use the GuardDuty console to initiate a malware scan.
After a malware scan is run, malware findings will be available in the delegated administrator and member accounts, allowing you to get details and orchestrate the next steps in your investigation from a centralized location.
Figure 17 is an example of how a security investigation, using an on-demand malware scan, might function.
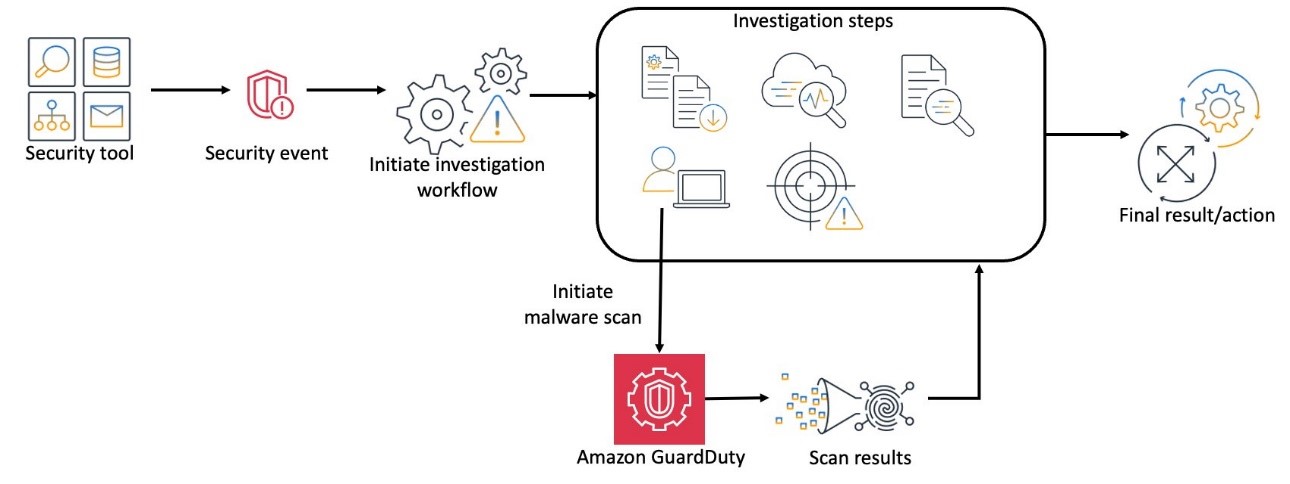
Figure 17: Example security investigation using GuardDuty On-demand malware scans
If you’re using GuardDuty as your main source of security findings for EC2 instances, the GuardDuty-initiated malware scan feature can also help facilitate an investigation workflow. With GuardDuty initiated malware scans, you can reduce the time between when an EC2 instance finding is created and when a malware scan of the instance is initiated, making the scan results available to your investigation workflows faster, helping you develop a remediation plan sooner.
Use case 4 – Malware scanning in a deployment pipeline
If you’re using deployment pipelines to build and deploy your infrastructure and applications, you want to make sure that what you’re deploying is secure. In cases where deployments involve third-party software, you want to be sure that the software is free of malware before deploying into environments where the malware could be harmful. This applies to software deployed directly onto an EC2 instance as well as containers that are deployed on an EC2 instance. In this case, you can use the on-demand malware scan in an EC2 instance in a secure test environment prior to deploying it in production. You can use the techniques described earlier in this post to design your deployment pipelines with steps that call the StartMalwareScan API and then check the results of the scan. Based on the scan results, you can decide if the deployment should continue or be stopped due to detected malware.
Running these scans before deployment into production can help to ensure the integrity of your applications and data and increase confidence that the production environment is free of significant security issues.
Figure 18 is an example of how malware scanning might look in a deployment pipeline for a containerized application.
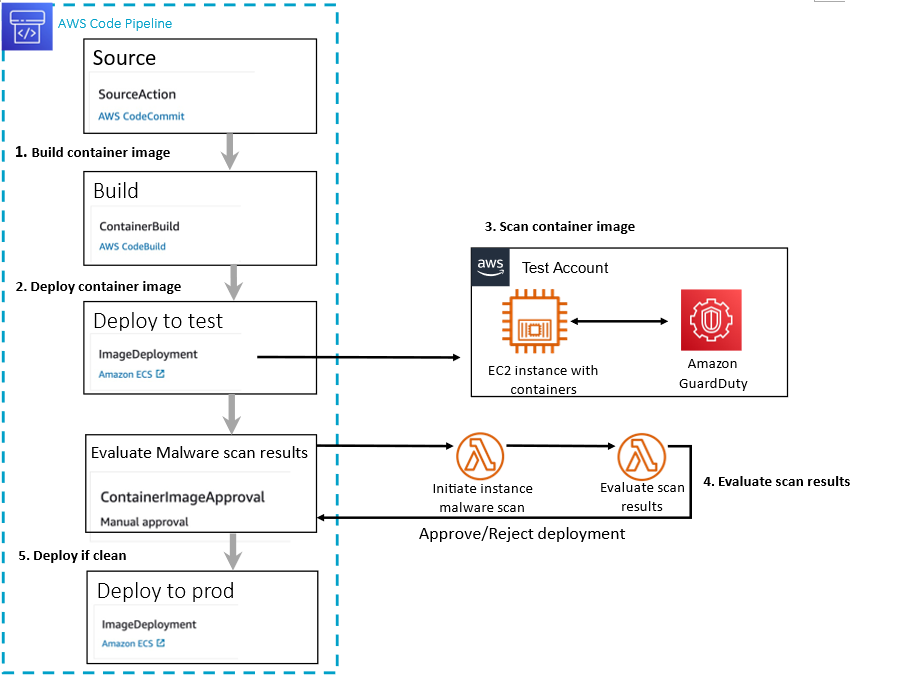
Figure 18: Example deployment pipeline incorporating GuardDuty On-demand malware scan
In the preceding example the following steps are represented:
- A container image is built as part of a deployment pipeline.
- The container image is deployed into a test environment.
- From the test environment, a GuardDuty On-demand malware scan is initiated against the EC2 instance where the container image has been deployed.
- After the malware scan is complete, the results of the scan are evaluated.
- A decision is made on allowing the image to be deployed into production. If the image is approved, it’s deployed to production. If it’s rejected, a message is sent back to the owner of the container image for remediation of the identified malware.
Conclusion
Scanning for malware on your EC2 instances is key to maintaining that your instances are free of malware before they’re deployed to production, and if malware does find its way onto a deployed instance, it’s quickly identified so that it can be investigated and remediated.
This post outlines four use cases you can use with the On-demand malware scan feature: Scan based on tag, scan on a schedule, scan as part of an investigation, and scan in a deployment pipeline. The examples provided in this post are intended to provide a foundation that you can build upon to meet your specific use cases. You can use the provided code examples and sample architectures to enhance your operational and deployment processes.
To learn more about GuardDuty and its malware protection features, see the feature documentation and the service quotas for Malware protection.
If you have feedback about this post, submit comments in the Comments section below. If you have questions about this post, start a new thread on the AWS Security, Identity, & Compliance re:Post or contact AWS Support.
Want more AWS Security news? Follow us on Twitter.
The 5th Gen Intel Xeon Video with Two Supermicro Server Generations Compared
Post Syndicated from Patrick Kennedy original https://www.servethehome.com/the-5th-gen-intel-xeon-video-with-two-supermicro-server-generations-compared/
Our video delves into the details of the new 5th Gen Intel Xeon CPUs and server-level differences between the new Supermicro X13 and 2nd Gen Xeon X11 systems
The post The 5th Gen Intel Xeon Video with Two Supermicro Server Generations Compared appeared first on ServeTheHome.
Lily Gladstone | Elevating Inspired Natives | Talks at Google
Post Syndicated from Talks at Google original https://www.youtube.com/watch?v=b8AyQJbWTaU
Научни новини: Молекулярни терапии, CRISPR и една златна къртица
Post Syndicated from Михаил Ангелов original https://www.toest.bg/nauchni-novini-molekulyarni-terapii-crispr-i-edna-zlatna-kurtitsa/
Молекулярна терапия за молекулярно заболяване

Терминът „молекулярно заболяване“ е въведен през 1949 г. в статията „Сърповидноклетъчна анемия, молекулярно заболяване“. Сравнявайки хемоглобин от здрави и болни хора, учените установяват, че между двете форми има малка разлика в подвижността им в електрическо поле, което предполага промяна в аминокиселинния им състав. В същото издание на Science е публикуван и генеалогичен анализ, показващ наследствения характер на заболяването. Тези разработки се правят само няколко години след като ДНК е доказана като носител на наследствената информация и преди да бъде описана нейната структура.
Сърповидноклетъчната анемия (СКА) е генетично заболяване, при което червените кръвни телца се деформират и придобиват С-образна форма. Поради това те не могат да снабдяват добре организма с кислород и започват да се слепват едно за друго. Въпреки че са разработени поддържащи терапии, които намаляват риска от инфаркт, инсулт и други остри прояви на заболяването, и продължителността на живот на пациентите е удължена значително, те все пак не живеят добре поради хронични пристъпи на остра болка, невъзможност за усилена физическа активност, бъбречна недостатъчност и др. Впечатляващото е, че всичко това е следствие от точкова мутация (промяната на нуклеотид) в ген, кодиращ един от протеините, които изграждат хемоглобин А. Това е като да се подмени една буква в първите три параграфа на тази статия.
Заболяването се проявява, когато дефектният ген е с две копия (хомозиготно състояние), получени от двамата родители. Интересен детайл е, че хората, носещи едно копие на дефектния ген (хетерозиготно състояние), имат повишена устойчивост към паразита, причиняващ малария. При заразяване червените кръвни телца се разпукват преждевременно, нарушавайки жизнения му цикъл. Счита се, че това е една от причините мутацията да се среща по-често в популации, където маларията е сериозен проблем, като Западна Африка и Индия.
Един от основните изводи в статията е нуждата от разработване на молекулярна медицина и 50 години по-късно това става реалност. Една от разновидностите ѝ са генните терапии, които бързо добиват популярност и вече има одобрени за редица заболявания. В общия случай при тях се използват вирусни вектори, които носят работеща версия на повреден ген, водещ до заболяване. Вирусите вмъкват работещата версия в генома на пациента и така възстановяват нормалното функциониране на организма. Механизмът е сходен с векторните ваксини, познати от пандемията от COVID-19. Може да се каже, че те, както и иРНК ваксините, също са вид молекулярна терапия.
В началото на месеца в САЩ одобриха Lyfgenia – генна терапия за пациенти, страдащи от СКА, базирана на използването на вирус носител. Терапията се прилага върху хематопоетични стволови клетки – те се намират в костния мозък и са отговорни за създаването на нови червени кръвни телца. След извличането им от пациента се третират с лентивирус, носещ леко променена версия на хемоглобин А, която функционира коректно. Получените генномодифицирани клетки следва да са абсолютно идентични с пациентските, с изключение на промяната в споменатия ген. Това почти премахва опасността от отхвърлянето им при обратната трансплантация. За съжаление, преди новите модифицирани клетки да бъдат върнати в пациента, всички стари трябва да бъдат премахнати. Това се извършва с помощта на висока доза химиотерапия, която унищожава стволовите клетки в костния им мозък.
Одобрението се базира на клинично изследване, включващо 32 пациенти, които са проследени за период между 6 и 18 месеца, като през това време 88% от тях не са имали пристъпи на болка. Съобщава се и за негативни ефекти, но те са свързани с химиотерапията и самото заболяване. Притеснителното е, че трима от пациентите са починали – един поради усложнения от заболяването, но при другите двама причината е остра форма на левкемия. Компанията изтъква, че пациентите с това заболяване са по-предразположени към развитие на злокачествени процеси, и споменава, че левкемията може да се дължи и на цялата процедура по трансплантиране. Починалите пациенти са били подложени на по-стара версия на терапията, при която производството и трансплантацията са извършени по различен начин. Въпреки тези обяснения Американската агенция по храните и лекарствата поставя знак за особено внимание върху продукта.
Добрата новина е, че има и алтернативна генна терапия, базирана на CRISPR. Името на продукта е Casgevy и е разработен от Vertex Pharmaceuticals Inc. в партньорство с швейцарската Crispr Therapeutics. В средата на ноември той беше одобрен в Обединеното кралство, а в началото на декември получи зелена светлина и в САЩ (заедно с Lyfgenia). Това е първата одобрена генна терапия, базирана на системата за генетични редакции.
Подходът е подобен – от пациента се изолират стволови клетки, които вместо на вирусна трансформация се подлагат на генна редакция с CRISPR. Така в клетките не се вмъква вирусният генетичен материал, а само се променя функцията на един ген, като в случая учените са избрали малко по-различен метод. Вместо да коригират функцията на хемоглобин А, те активират производството на хемоглобин F (фетален хемоглобин). Той се произвежда в ембриона от около шестата седмица на бременността до няколко месеца след раждането, когато бива изместен от хемоглобин А, срещан при възрастните. Превключването между двата вида хемоглобин става след активирането на един ген – BCL11A. Чрез дезактивирането му с помощта на CRISPR синтезът на хемоглобин F се възобновява. Въпреки че не е типичен за възрастните, той успява да компенсира действието на увредения хемоглобин А и намалява симптомите от СКА.
Интересното е, че терапията е приложима и при друго заболяване, причинено от мутация в хемоглобин А – бета-таласемия. И при нея хемоглобинът не функционира правилно и също се наблюдава анемия, която в най-острата си форма води до смърт. За момента подходът за поддържане на пациентите се изразява в чести кръвопреливания, които носят своите усложнения.
В клиничното проучване са включени 45 пациенти със СКА, 29 от които проследени за над 18 месеца. 28 от тях не са имали пристъпи на болка поне една година, след като са получили модифицираните клетки. Резултатите са добри и при пациентите с бета-таласемия. 39 от 42 не са имали нужда от кръвопреливане поне една година след терапията, а при останалите трима нуждата от трансфузия е спаднала със 70%. Страничните ефекти се припокриват с тези, причинени от химиотерапията. Пациентите продължават да бъдат наблюдавани за забавени негативни ефекти, както и за да се установи колко дълготрайно е действието на терапията.
Компанията, разработила Lyfgenia (Bluebird Bio Inc.), също има продукт, който може да се прилага за бета-таласемия – Zyngeglo. Механизмът му на действие е почти идентичен, като разликата е в модифицирания ген. Той получава одобрение в Европа през 2019 г., а в САЩ – през 2022 г. В началото на 2021 г., след фаталните случаи в клиничното изпитване за СКА, приложението му е спряно временно, но след преглед на наличната информация Европейската комисия по лекарствата дава становище, че няма доказателства за връзка между развиването на левкемия и терапията, и продуктът отново е разрешен.
Въпреки че се прилагат еднократно, и двете терапии не са евтини поради сложната процедура по трансплантация и обработка на стволовите клетки. Цената за Lyfgenia е 3,1 млн. долара, а за Casgevy е с около 40% по-ниска – 2,2 млн. Куриозното е, че въпреки очаквания скок след полученото одобрение от Комисията по храните и лекарствата акциите и на двете компании са спаднали.
Преди разработването на тези терапии единствената възможност за облекчаване на заболяването е била трансплантацията на костен мозък от здрав донор. За съжаление, откриването на съвместими донори е рядко и процедурата за извличане на костен мозък включва сравнително тежка операция. Въпреки недостатъци си новите терапии имат огромен потенциал да са по-щадящи и надеждни. Най-вероятно ще бъдат подобрени, и то за много по-кратко време от 70-те години, изминали от установяването на причината за заболяването и възможността за модифициране на единични бази в ДНК на пациентите.
Сходно мнение изказва и една от откривателките на CRISPR – нобеловата лауреатка Дженифър Даудна. В интервю за WIRED тя споделя, че тези терапии ще стават все по-неинвазивни и въпреки че в момента може да ни се струва като фантастика, най-вероятно в бъдеще ще се приемат под формата на таблетка.
CRISPR е многолик и навсякъде
Както вече сме споменавали, всички организми оставят издайнически следи под формата на ДНК в околната среда (environmental DNA). При микроорганизмите това е малко по-различен процес, тъй като те просто се отлагат по повърхностите, от които се вземат проби. Въпреки това наличието им в събрания материал може да бъде много интересно. Не само за определяне на разпространението им и за следене на потенциални огнища на заболявания, но и за откриване на нови или слабо познати видове. Поради все по-голямата достъпност на услугите за секвениране броят на секвенирани проби расте. В комбинация с огромния брой микроорганизми около нас, които попадат в пробите, се стига до главоломно нарастване на микробиални ДНК секвенции в базите данни. Така обработването и търсенето на интересни фрагменти в тях става все по-сложна задача за биоинформатиците.
За справяне с този проблем екип от Масачузетския технологичен институт предлага нов подход, базиран на алгоритми, които се използват и в момента. Първо последователностите се отделят в обособени групи, които са съставени от секвенции с висока сходност. След това групите се сравняват една с друга, което помага за откриване на взаимовръзки и еволюционни промени. По този начин се използват предимствата и на двата алгоритъма, като се избягват недостатъците им – трудното откриване на прилика между участъци с по-малка сходност на първия и по-бавната работа на втория.
С помощта на този алгоритъм се откриват 188 нови системи, в които CRISPR взема участие. Във формата, използвана в съвременните биотехнологии, той най-често е свързан с Cas9 – ензим, който има способността да реже молекулата на ДНК. Но към него може да се прикачат редица други молекули. Лабораторно разработен вариант е комплексът от CRISPR и флуоресцентно багрило, позволяващ да се „освети“ строго специфичен участък от ДНК, което може да е полезно при определяне на точното му местоположение в клетките. Но природата разполага с много по-богато въображение.
Част от описаните варианти имат ензим, който може да реже РНК вместо ДНК. При други ензимът е от групата на транспозазите – те имат способността да „преместят“ участък ДНК от едно място на друго в генома. Тези комбинации не са непознати, но откриването на нови примери показва, че разнообразието най-вероятно е голямо. Интересна изненада е вирусен протеин, който може да се свърже с CRISPR и да го дезактивира, като така блокира защитната система на бактериите.
Както отбелязват авторите, тези открития могат да бъдат изключително ценни за биотехнологиите и да дадат път на нови терапии или да бъдат приложени в земеделието и да са от помощ за намаляване на ефекта от глобалните климатични промени. Откритията също показват колко ценно може да бъде събирането и секвенирането на ДНК от околната среда.
Напредъкът в технологиите за секвениране и биоинформатичната обработка на данните разкриват нови хоризонти пред нас и постоянно ни носят изненади за света, който ни заобикаля. А понякога дават шанс за разплитането на почти столетни мистерии.
Златна изненада под пясъка
Къртицата на Де Уинтън принадлежи към семейство Златни къртици и е ендемична за западните брегове на Южна Африка. За последен път такава къртица е била забелязана през 1937 г., което ѝ осигурява място в списъка на критично застрашени или предполагаемо изчезнали видове. Като цяло това не е чак толкова учудващо – бозайникът е с размер на мишка и козината му е пясъчнозлатиста, поради което се открива трудно.
За да проверят дали могат да го намерят, екип учени решава да използва ДНК, събрана от околната среда. Най-лесният начин да се открият къртиците е да се намерят техните къртичини. За съжаление, това не е така за хората, защото в повечето случаи леговищата трудно се забелязват на повърхността. На помощ се притичва куче търсач на име Джеси, което насочва изследователите. Щом намерят къртичините, учените вземат от тях почвени проби, от които е изолирана ДНК и после я сравняват с известните секвенции на представители на семейството. Това не е лесна задача, защото в него има видове, които се срещат по-често, и повечето сигнали са от тях. Но в данните учените откриват златна нишка – митохондриална ДНК, която съвпада с тази на къртицата на Де Уинтън.
Учените не само доказват, че видът все още се среща, но и определят сравнително широк ареал на обитание, който обаче има малък брой представители. Откритието е повод за радост, но също така насочва вниманието към неотложната нужда от по-задълбочени проучвания на местността. Новооткритата популация е застрашена както от предполагаемо ограничения брой индивиди, така и от дейността на човека – в района активно се добиват диаманти, което е причина за разрушаване на множество екосистеми.
Водещо изображение: Chrysochloris holosericea – рисунка от колекцията на Университета в Амстердам. Източник: Wikimedia Commons
Getting started with Projen and AWS CDK
Post Syndicated from Michael Tran original https://aws.amazon.com/blogs/devops/getting-started-with-projen-and-aws-cdk/
In the modern world of cloud computing, Infrastructure as Code (IaC) has become a vital practice for deploying and managing cloud resources. AWS Cloud Development Kit (AWS CDK) is a popular open-source framework that allows developers to define cloud resources using familiar programming languages. A related open source tool called Projen is a powerful project generator that simplifies the management of complex software configurations. In this post, we’ll explore how to get started with Projen and AWS CDK, and discuss the pros and cons of using Projen.
What is Projen?
Building modern and high quality software requires a large number of tools and configuration files to handle tasks like linting, testing, and automating releases. Each tool has its own configuration interface, such as JSON or YAML, and a unique syntax, increasing maintenance complexity.
When starting a new project, you rarely start from scratch, but more often use a scaffolding tool (for instance, create-react-app) to generate a new project structure. A large amount of configuration is created on your behalf, and you get the ownership of those files. Moreover, there is a high number of project generation tools, with new ones created almost everyday.
Projen is a project generator that helps developers to efficiently manage project configuration files and build high quality software. It allows you to define your project structure and configuration in code, making it easier to maintain and share across different environments and projects.
Out of the box, Projen supports multiple project types like AWS CDK construct libraries, react applications, Java projects, and Python projects. New project types can be added by contributors, and projects can be developed in multiple languages. Projen uses the jsii library, which allows us to write APIs once and generate libraries in several languages. Moreover, Projen provides a single interface, the projenrc file, to manage the configuration of your entire project!
The diagram below provides an overview of the deployment process of AWS cloud resources using Projen:

- In this example, Projen can be used to generate a new project, for instance, a new CDK Typescript application.
- Developers define their infrastructure and application code using AWS CDK resources. To modify the project configuration, developers use the projenrc file instead of directly editing files like package.json.
- The project is synthesized to produce an AWS CloudFormation template.
- The CloudFormation template is deployed in a AWS account, and provisions AWS cloud resources.

Diagram 1 – Projen packaged features: Projen helps gets your project started and allows you to focus on coding instead of worrying about the other project variables. It comes out of the box with linting, unit test and code coverage, and a number of Github actions for release and versioning and dependency management.
Pros and Cons of using Projen
Pros
- Consistency: Projen ensures consistency across different projects by allowing you to define standard project templates. You don’t need to use different project generators, only Projen.
- Version Control: Since project configuration is defined in code, it can be version-controlled, making it easier to track changes and collaborate with others.
- Extensibility: Projen supports various plugins and extensions, allowing you to customize the project configuration to fit your specific needs.
- Integration with AWS CDK: Projen provides seamless integration with AWS CDK, simplifying the process of defining and deploying cloud resources.
- Polyglot CDK constructs library: Build once, run in multiple runtimes. Projen can convert and publish a CDK Construct developed in TypeScript to Java (Maven) and Python (PYPI) with JSII support.
- API Documentation : Generate API documentation from the comments, if you are building a CDK construct
Cons
- Microsoft Windows support. There are a number of open issues about Projen not completely working with the Windows environment (https://github.com/projen/projen/issues/2427 and https://github.com/projen/projen/issues/498).
- The framework, Projen, is very opinionated with a lot of assumptions on architecture, best practices and conventions.
- Projen is still not GA, with the version at the time of this writing at v0.77.5.
Walkthrough
Step 1: Set up prerequisites
- An AWS account
- Download and install Node
- Install yarn
- AWS CLI : configure your credentials
- Deploying stacks with the AWS CDK requires dedicated Amazon S3 buckets and other containers to be available to AWS CloudFormation during deployment (More information).
Note: Projen doesn’t need to be installed globally. You will be using npx to run Projen which takes care of all required setup steps. npx is a tool for running npm packages that:
- live inside of a local node_modules folder
- are not installed globally.
npx comes bundled with npm version 5.2+
Step 2: Create a New Projen Project
You can create a new Projen project using the following command:
mkdir test_project && cd test_projectnpx projen new awscdk-app-ts
This command creates a new TypeScript project with AWS CDK support. The exhaustive list of supported project types is available through the official documentation: Projen.io, or by running the npx projen new command without a project type. It also supports npx projen new awscdk-construct to create a reusable construct which can then be published to other package managers.
The created project structure should be as follows:
test_project| .github/| .projen/| src/| test/| .eslintrc| .gitattributes| .gitignore| .mergify.yml| .npmignore| .projenrc.js| cdk.json| LICENSE| package.json| README.md| tsconfig.dev.json| yarn.lock
Projen generated a new project including:
- Initialization of an empty git repository, with the associated GitHub workflow files to build and upgrade the project. The release workflow can be customized with projen tasks.
.projenrc.jsis the main configuration file for project- tasks.json file for integration with Visual Studio Code
srcfolder containing an empty CDK stackLicenseandREADMEfiles- A projen configuration file: projenrc.js
package.jsoncontains functional metadata about the project like name, versions and dependencies..gitignore,.gitattributesfile to manage your files with git..eslintrcidentifying and reporting patterns on javascript..npmignoreto keep files out of package manager..mergify.ymlfor managing the pull requests.tsconfig.jsonconfigure the compiler options
Most of the generated files include a disclaimer:
# ~~ Generated by projen. To modify, edit .projenrc.js and run "npx projen".
Projen’s power lies in its single configuration file, .projenrc.js. By editing this file, you can manage your project’s lint rules, dependencies, .gitignore, and more. Projen will propagate your changes across all generated files, simplifying and unifying dependency management across your projects.
Projen generated files are considered implementation details and are not meant to be edited manually. If you do make manual changes, they will be overwritten the next time you run npx projen.
To edit your project configuration, simply edit .projenrc.js and then run npx projen to synthesize again. For more information on the Projen API, please see the documentation: http://projen.io/api/API.html.
Projen uses the projenrc.js file’s configuration to instantiate a new AwsCdkTypeScriptApp with some basic metadata: the project name, CDK version and the default release branch. Additional APIs are available for this project type to customize it (for instance, add runtime dependencies).
Let’s try to modify a property and see how Projen reacts. As an example, let’s update the project name in projenrc.js :
name: 'test_project_2',
and then run the npx projen command:
npx projen
Once done, you can see that the project name was updated in the package.json file.
Step 3: Define AWS CDK Resources
Inside your Projen project, you can define AWS CDK resources using familiar programming languages like TypeScript. Here’s an example of defining an Amazon Simple Storage Service (Amazon S3) bucket:
1. Navigate to your main.ts file in the src/ directory
2. Modify the imports at the top of the file as follow:
import { App, CfnOutput, Stack, StackProps } from 'aws-cdk-lib';import * as s3 from 'aws-cdk-lib/aws-s3';import { Construct } from 'constructs';
1. Replace line 9 “// define resources here…” with the code below:
const bucket = new s3.Bucket(this, 'MyBucket', {
  versioned: true,
});

new CfnOutput(this, 'TestBucket', { value: bucket.bucketArn });
Step 4: Synthesize and Deploy
Next we will bootstrap our application. Run the following in a terminal:
$ npx cdk bootstrap
Once you’ve defined your resources, you can synthesize a cloud assembly, which includes a CloudFormation template (or many depending on the application) using:
$ npx projen build
npx projen build will perform several actions:
- Build the application
- Synthesize the CloudFormation template
- Run tests and linter
The synth() method of Projen performs the actual synthesizing (and updating) of all configuration files managed by Projen. This is achieved by deleting all Projen-managed files (if there are any), and then re-synthesizing them based on the latest configuration specified by the user.
You can find an exhaustive list of the available npx projen commands in .projen/tasks.json. You can also use the projen API project.addTask to add a new task to perform any custom action you need ! Tasks are a project-level feature to define a project command system backed by shell scripts.
Deploy the CDK application:
$ npx projen deploy
Projen will use the cdk deploy command to deploy the CloudFormation stack in the configured AWS account by creating and executing a change set based on the template generated by CDK synthesis. The output of the step above should look as follow:
deploy | cdk deploy
✨ Synthesis time: 3.28s
toto-dev: start: Building 387a3a724050aec67aa083b74c69485b08a876f038078ec7ea1018c7131f4605:263905523351-us-east-1toto-dev: success: Built 387a3a724050aec67aa083b74c69485b08a876f038078ec7ea1018c7131f4605:263905523351-us-east-1toto-dev: start: Publishing 387a3a724050aec67aa083b74c69485b08a876f038078ec7ea1018c7131f4605:263905523351-us-east-1toto-dev: success: Published 387a3a724050aec67aa083b74c69485b08a876f038078ec7ea1018c7131f4605:263905523351-us-east-1toto-dev: deploying... [1/1]toto-dev: creating CloudFormation changeset...
✅ testproject-dev
✨ Deployment time: 33.48s
Outputs:testproject-dev.TestBucket = arn:aws:s3:::testproject-dev-mybucketf68f3ff0-1xy2f0vk0ve4rStack ARN:arn:aws:cloudformation:us-east-1:263905523351:stack/testproject-dev/007e7b20-48df-11ee-b38d-0aa3a92c162d
✨ Total time: 36.76s
The application was successfully deployed in the configured AWS account! Also, the Amazon Resource Name (ARN) of the S3 bucket created is available through the CloudFormation stack Outputs tab, and displayed in your terminal under the ‘Outputs’ section.
Clean up
Delete CloudFormation Stack
To clean up the resources created in this section of the workshop, navigate to the CloudFormation console and delete the stack created. You can also perform the same task programmatically:
$ npx projen destroy
Which should produce the following output:
destroy | cdk destroyAre you sure you want to delete: testproject-dev (y/n)? ytestproject-dev: destroying... [1/1]
 testproject-dev: destroyed
Delete S3 Buckets
The S3 bucket will not be deleted since its retention policy was set to RETAIN. Navigate to the S3 console and delete the created bucket. If you added files to that bucket, you will need to empty it before deletion. See the Deleting a bucket documentation for more information.
Conclusion
Projen and AWS CDK together provide a powerful combination for managing cloud resources and project configuration. By leveraging Projen, you can ensure consistency, version control, and extensibility across your projects. The integration with AWS CDK allows you to define and deploy cloud resources using familiar programming languages, making the entire process more developer-friendly.
Whether you’re a seasoned cloud developer or just getting started, Projen and AWS CDK offer a streamlined approach to cloud resource management. Give it a try and experience the benefits of Infrastructure as Code with the flexibility and power of modern development tools.
DeMaio: Insights from the openSUSE Logo Contest
Post Syndicated from corbet original https://lwn.net/Articles/955366/
In response to the expressed unhappiness over the recent logo-selection
process in the openSUSE project (covered in this article), the project has announced
that there will be a new vote:
During the community meeting this week where the results were
discussed, participants expressed the view that members of the
openSUSE Project have an opportunity to participate in the
selection of our new logo, and that SUSE, which holds the trademark
to the openSUSE logo, be involved with the process for selecting a
branding decision with regard to the results. After all, this
decision impacts the collective identity.To facilitate this, there is a plan to organize a vote between the
current logo and the proposed new design, allowing our community to
have a say in this important decision. Furthermore, members of the
project are collaborating with SUSE on the implications of the
branding initiatives and some have expressed the desire for SUSE’s
input to ensure there is an aligned vision for the future of
openSUSE.
The Nevada Test Site: Nuclear Weapon Testing in America
Post Syndicated from Geographics original https://www.youtube.com/watch?v=WamNzzIkD5o
Евроизборите – равнис по шпагина
Post Syndicated from Емилия Милчева original https://www.toest.bg/evroizborite-ravnis-po-shpagina/

С отрязаната ръка с шпагин при демонтажа на МОЧА на практика започна кампанията за европейските избори през май 2024-та. Про-ЕС и европейската интеграция vs. анти-ЕС; традиционни ценности vs. либерални ценности; Русия vs. Украйна – тези разделителни линии вече са ясно различими.
Операцията по премахването на паметника наля бензин в политическите страсти и оформи два лагера – на защитниците на демонтажа му, в който отново заедно са евроатлантиците и конституционалисти реформатори ГЕРБ–СДС, ПП–ДБ и ДПС, и на противниците, представени от БСП и „Възраждане“. „Има такъв народ“ уж не защитават МОЧА, но пък провалят заседания на парламента заедно със социалистите и депутатите на Костадин Костадинов. Но в този лагер има и други, като наредилите се да го бранят Мая Манолова от „Изправи се.БГ“ и още политици от обединението „Левицата“, включващо АБВ, „Движение 21“, а също и лица, свързвани с новия политически проект Движение „Трети март“.
Кристализация вдясно, пренаселване вляво
Преди вота за Европейски парламент (ЕП) политическият терен в България се променя. Докато в център-дясното започва идеологическа верификация, вляво се пренаселва и накрая някой ще е излишен. Принадлежност към европейските политически семейства означава влияние върху процесите и решенията в Общността. От парламентарно представените партии европейски излаз ще търсят политическите сили от управляващата коалиция „Демократична България“ (ДБ) и „Продължаваме промяната“ (ПП), прокремълската „Възраждане“ и „Има такъв народ“ (ИТН).
С обявения нов курс за център-дясно и единен бранд ДБ ще се стремят към Европейската народна партия, където отдавна са ГЕРБ и „Демократи за силна България“, една от трите партии в ДБ. Така че от гледна точка на Брюксел няма нищо по-нормално от настоящата коалиция, която в България наричаме „сглобка“. Сглобена е посемейному. Какво ще се случи със „Зелено движение“ при десния завой, заявка за който даде водещата политическа сила в ДБ „Да, България“? Или ще се отцепят, или част от тях ще останат в ДБ, а другите ще търсят път към левия спектър, където е родословието на всички зелени движения.
ПП са избрали либералите, където са и ДПС. „Възраждане“, третата политическа сила в българския парламент, ще търси съмишленици в сегашната група на крайнодесните „Идентичност и демокрация“, петата по големина в ЕП. Амбициите на крайнодесните обаче са да станат трета политическа сила след евроизборите догодина. В декларация, огласена в Народното събрание преди седмица, от „Възраждане“ обявиха, че „това са партньори, с които споделят общи цели, и ще работят съвместно за опазване на традиционните ценности на нашите народи“.
Нашата мисия и историческата ни отговорност, също като тази на нашите съмишленици, са общоевропейски, надхвърлящи националните граници. Така както ние отстояваме българския национален интерес, така и нашите партньори отстояват националните си интереси – италиански, френски, германски, холандски и др.
„Възраждане“ е създала контакти и с евроскептиците от „Алтернатива за Германия“, вече присъединила се към „Идентичност и демокрация“, където са и италианската „Лига“, и френският „Национален сбор“ на Марин Льо Пен. Сред заявените цели на крайнодесните са да реформират политиките на ЕС за имиграцията и да облекчат изискванията за борба с климатичните промени, за да подпомогнат индустрията. Но партиите не са така единни по отношение на руската агресия в Украйна – водената от бившия вицепремиер и вътрешен министър Матео Салвини „Лига“ подкрепя Киев и помощите за Украйна, а представителите на Германия и Австрия заемат проруски позиции.
Болката отляво
За БСП, останала на предпоследното, пето място на последните парламентарни избори, предстоящият европейски вот ще е голямо изпитание – заради конкуренцията, която ще се появи, и обтегнатите отношения с европейските социалисти. Наскоро Euractiv съобщи, че БСП е заплашена от изключване от ПЕС, след като „Позитано“ 20 даде заявка за широка коалиция с проруски националистически партии. Родов белег на българския национализъм в най-новата история е, че всички националисти са и русофили – обратното не е задължително.
Българските евродепутати социалисти неизменно са на проруски позиции и не подкрепят резолюции, насочени срещу Москва. От 12-те евродепутати от Прогресивния алианс на социалистите и демократите, гласували преди година против резолюцията, с която Русия се обявява за спонсор на тероризма, петима са българските социалисти. Петимата бяха и против резолюцията за нова стратегия на ЕС в отношенията с Русия. Не подкрепиха и документа, с който ЕП настоява да бъде освободен бившият лидер на движението „Отворена Русия“ Андрей Пивоваров, свален през май от самолет за Варшава на летището в Санкт Петербург.
А БСП обяви, че ще работи за ляво-центристко-патриотичен фронт, и вече се срещна с 16 формации – сред тях Партията на зелените, „Български социалдемократи“, „Свобода“, „Български възход“, ВМРО, няколко земеделски съюза, но не и „Атака“ и „Възраждане“.
Напусналите или изключени от БСП социалисти обаче обмислят алтернатива на партията на Корнелия Нинова. Напусналата преди дни БСП Весела Лечева, депутатка от левицата в няколко парламента, даде да се разбере, че такава предстои, тъй като не вижда светлина в тунела за БСП, но не губи надежда, че ще дойдат по-добри дни за социалистите в страната. Изявлението ѝ бе тутакси обвързано с политическия проект, свързван с президента Румен Радев – Движение „Трети март“. Не е тайна, че Лечева е от президентския кръг, тя беше министър на младежта и спорта в назначените от него служебни кабинети.
Засега новата икона на лявото в България – Ваня Григорова, останала втора на кметския пост в София с по-малко от 5000 гласа след кандидата на ПП–ДБ Васил Терзиев, ще трупа още рейтинг като общински съветник в СОС. Нейният потенциал ще бъде изпробван на парламентарни избори. Един от навигаторите ѝ в политиката – председателят на столичната организация на БСП Иван Таков, я държи встрани от по-чести и активни коментари за МОЧА.
Въпреки изказванията за газовата политика и с колко са ощетени българските данъкоплатци след спиране на руския газ, Григорова е по-умерена от социалистите, разярени срещу демонтажа на паметника. Добре избрана тактика – тя е позиционирана като защитник на оскърбените и унижените, борец за социални права и свободи, нейният профил на синдикалист е по-широк от този на партиен апаратчик. Нека „другарите“ дават политическите оценки.
Колко ляво обаче е съхранено в БСП, която остави на заден план традиционни за левите партии икономически теми и вместо тях извади борбата за национални празници, евроскептицизма, Истанбулската конвенция, традиционните ценности, вкопчила се в шпагина на съветския войник? Но шпагинът вече е на земята, а същият сюжет е захапан и от „Възраждане“, така че на български терен е трудно да различиш леви от крайнодесни. Едните ще станат излишни.
[$] Progress toward a GCC-based Rust compiler
Post Syndicated from corbet original https://lwn.net/Articles/954787/
The gccrs project is an ambitious
effort started in 2014 to implement a Rust compiler within The GNU Compiler
Collection (GCC). Even though the task is far from complete, progress has
been made since LWN’s previous coverage,
according to reports from the project. Meanwhile, another hybrid and more
mature approach to GCC Rust code generation is available in rust_codegen_gcc.
LGR – Christmas Flash Games
Post Syndicated from LGR original https://www.youtube.com/watch?v=R9_uRLlnXSY
AWS Security Profile: Arynn Crow, Sr. Manager for AWS User AuthN
Post Syndicated from Maddie Bacon original https://aws.amazon.com/blogs/security/aws-security-profile-arynn-crow-sr-manager-for-aws-user-authn/
AWS Security Profile series, I interview some of the humans who work in AWS Security and help keep our customers safe and secure. In this profile, I interviewed Arynn Crow, senior manager for AWS User AuthN in AWS Identity.
How long have you been at AWS, and what do you do in your current role?
I’ve been at Amazon for over 10 years now, and AWS for three of those years. I lead a team of product managers in AWS Identity who define the strategy for our user authentication related services. This includes internal and external services that handle AWS sign-in, account creation, threat mitigation, and underlying authentication components that support other AWS services. It’s safe to say that I’m thinking about something different nearly every day, which keeps it fun.
How do you explain your job to non-technical friends and family?
I tell people that my job is about figuring out how to make sure that people are who they say they are online. If they want to know a bit more, sometimes I will relate this to examples they’re increasingly likely to encounter in their everyday lives—getting text or email messages for additional security when they try to sign in to their favorite website, or using their fingerprint or facial scan to sign in instead of entering a password. There’s a lot more to identity and authentication, of course, but this usually gets the point across!
You haven’t always been in security. Tell me a little bit about your journey and how you got started in this space?
More than 10 years ago now, I started in one of our call centers as a temporary customer service agent. I was handling Kindle support calls (this was back when our Kindles still had physical keyboards on them, and “Alexa” wasn’t even part of our lexicon yet). After New Year’s 2013, I was converted to a full-time employee and resumed my college education—I earned both of my degrees (a BA in International Affairs, and MA in political science) while working at Amazon. Over the next few years, I moved into different positions including our Back Office team, a Kindle taskforce role supporting the launch of a new services, and Executive Customer Relations. Throughout these roles, I continued to manage projects related to anti-abuse and security. I got a lot of fulfillment out of these projects—protecting our customers, employees, and business against fraud and data loss is very gratifying work. When a position opened up in our Customer Service Security team, I got the role thanks in part to my prior experience working with that team to deliver security solutions within our operations centers.
After that, things moved fast—I started first with a project on account recovery and access control for our internal workforce, and continuously expanded my portfolio into increasingly broad and more technical projects that all related to what I now know is the field of Identity and Access Management. Eventually, I started leading our identity strategy for customer service as a whole, including our internal authentication and access management as well as external customer authentication to our call centers. I also began learning about and engaging more with the security and identity community that existed outside of Amazon by attending conferences and getting involved with organizations working on standards development like the FIDO Alliance. Moving to AWS Identity a few years later was an obvious next step to gain exposure to broader applications of identity.
What advice do you have for people who want to get into security but don’t have the traditional background?
First, it can be hard. This journey wasn’t easy for me, and I’m still working to learn more every day. I want to say that because if someone is having trouble landing their first security job, or feeling like they still don’t “fit” at first when they do get the job, they should know it doesn’t mean they’re failing. There are a lot of inspiring stories out there about people who seemingly naturally segued into this field from other projects and work, but there are just as many people working very hard to find their footing. Everyone doubts themselves sometimes. Don’t let it hold you back.
Next for the practical advice, whatever you’re doing now, there are probably opportunities to begin looking at your space with a security lens, and start helping wherever you find problems to address or processes to improve by bringing them to your security teams. This will help your organization while also helping you build relationships. Be insatiably curious! Cybersecurity is community-oriented, and I find that people in this field are very passionate about what we do. Many people I met were excited that I was interested in learning about what they do and how they do it. Sometimes, they’d agree to take a couple hours with me each month for me to ask questions about how things worked, and narrow down what resources were the best use of my time.
Finally, there are a lot of resources for learning. We have highly competent, successful security professionals that learned on the job and don’t hold a roster of certifications, so I don’t think these are essential for success. But, I do think these programs can be beneficial to familiarize you with basic concepts and give you access to a common language. Various certification and training courses exist, from basic, free computer science courses online to security-specific ones like CISSP, SANS, COMPTIA Security+, and CIDPro, to name just a few. AWS offers AWS-specific cloud security training, too, like our Ramp-Up Guide. You don’t have to learn to code beautifully to succeed in security, but I think developing a working understanding of systems and principles will help build credibility and extract deeper learning out of experiences you have.
In your opinion, why is it important to have people with different backgrounds working in security?
Our backgrounds color the way we think about and approach problems, and considering all of these different approaches helps make us well-rounded. And particularly in the current context, in which women and marginalized communities are underrepresented in STEM, expanding our thinking about what skills make a good security practitioner makes room for more people at the table while giving us a more comprehensive toolkit to tackle our toughest problems. As for myself, I apply my training in political science. Security sometimes looks like a series of technical challenges and solutions, but it’s interwoven with a complex array of regulatory and social considerations, too—this makes the systems-based and abstract thinking I honed in my education useful. I know other folks who came to identity from social science, mathematics, and biology backgrounds who feel the same about skills learned from their respective fields.
Pivoting a bit, what’s something that you’re working on right now that you’re excited about?
It’s a very interesting time to be working on authentication, many people who aren’t working in enterprises or regulated industries are still hesitant to adopt controls like multi-factor authentication. And beyond MFA, organizations like NIST and CISA are emphasizing the importance of phishing-resistant MFA. So, at the same time we’re continuously working to innovate in our MFA and other authentication offerings to customers, we’re collaborating with the rest of the industry to advance technologies for strong authentication and their adoption across sectors. I represent Amazon to the FIDO Alliance, which is an industry association that supports the development of a set of protocols collectively known as FIDO2 for strong, phishing-resistant authentication. With FIDO and its various member companies, we’re working to increase the usability, awareness, and adoption of FIDO2 security keys and passkeys, which are a newer implementation of FIDO2 that improves ease of use by enabling customers to use phishing-resistant keys across devices and platforms.
In your opinion, what is the coolest thing happening in identity right now?
What I think is the most important thing happening in identity is the convergence of digital and “traditional” identities. The industry is working through challenging questions with emerging technology right now to bring forth innovation balanced with concern for equity, privacy, and sustainability. Ease of use and improved security for users as well as abuse prevention for businesses is driving conversion of real-life identities and credentials (such as peoples’ driver’s licenses as one example) to a digital format, such as digital driver’s licenses, wallets, and emerging verifiable credentials.
What are you most proud of in your career?
I’m most grateful for the opportunities I’ve had to help define the next chapter of the AWS account protection strategy. Some of our work also translates to features we get to ship to customers, like when we extended support for multiple MFA devices for AWS Identity and Access Management (IAM) late last year, and this year we announced that in 2024 we will require MFA when customers sign in to the AWS Management Console. Seeing how excited people were for a security feature was really awesome. Account protection has always been important, but this is especially true in the years following the COVID-19 outbreak when we saw a rapid acceleration of resources going digital. This kind of work definitely isn’t a one-person show, and as fulfilling as it is to see the impact I have here, what I’m really proud of is that I get to work with and learn from so many really smart, competent, and kind team members that are just as passionate about this space as I am.
If you were to do anything other than security, what would you want to do?
Before I discovered my interest for security, I was trying to decide if I would continue on from my master’s program in political science to do a PhD in either political science or public health. Towards the end of my degree program, I became really interested in how research-driven public policy could drive improvements in maternal and infant health outcomes in areas with acute opioid-related health crises, which is an ongoing struggle for my home place. I’m still very invested in that topic and try to keep on top of the latest research—I could easily see myself moving back towards that if I ever decide it’s time to close this chapter.
If you have feedback about this post, submit comments in the Comments section below. If you have questions about this post, contact AWS Support.
Want more AWS Security news? Follow us on Twitter.
Security updates for Friday
Post Syndicated from jake original https://lwn.net/Articles/955336/
Security updates have been issued by Debian (bluez and haproxy), Fedora (curl, dotnet6.0, dotnet7.0, tigervnc, and xorg-x11-server), Red Hat (avahi and gstreamer1-plugins-bad-free), Slackware (bluez), SUSE (cdi-apiserver-container, cdi-cloner-container, cdi- controller-container, cdi-importer-container, cdi-operator-container, cdi- uploadproxy-container, cdi-uploadserver-container, cont, cosign, curl, gstreamer-plugins-bad, haproxy, ImageMagick, kernel, kernel-firmware, libreoffice, tiff, traceroute, tracker-miners, webkit2gtk3, and xrdp), and Ubuntu (audiofile, budgie-extras, libreoffice, strongswan, vim, and yajl).
Comic for 2023.12.15 – Frosty
Post Syndicated from Explosm.net original https://explosm.net/comics/frosty
New Cyanide and Happiness Comic
Fighting Filth: Street Sweeping
Post Syndicated from The History Guy: History Deserves to Be Remembered original https://www.youtube.com/watch?v=aKl5zWUEuU4
A Robot the Size of the World
Post Syndicated from Bruce Schneier original https://www.schneier.com/blog/archives/2023/12/a-robot-the-size-of-the-world.html
In 2016, I wrote about an Internet that affected the world in a direct, physical manner. It was connected to your smartphone. It had sensors like cameras and thermostats. It had actuators: Drones, autonomous cars. And it had smarts in the middle, using sensor data to figure out what to do and then actually do it. This was the Internet of Things (IoT).
The classical definition of a robot is something that senses, thinks, and acts—that’s today’s Internet. We’ve been building a world-sized robot without even realizing it.
In 2023, we upgraded the “thinking” part with large-language models (LLMs) like GPT. ChatGPT both surprised and amazed the world with its ability to understand human language and generate credible, on-topic, humanlike responses. But what these are really good at is interacting with systems formerly designed for humans. Their accuracy will get better, and they will be used to replace actual humans.
In 2024, we’re going to start connecting those LLMs and other AI systems to both sensors and actuators. In other words, they will be connected to the larger world, through APIs. They will receive direct inputs from our environment, in all the forms I thought about in 2016. And they will increasingly control our environment, through IoT devices and beyond.
It will start small: Summarizing emails and writing limited responses. Arguing with customer service—on chat—for service changes and refunds. Making travel reservations.
But these AIs will interact with the physical world as well, first controlling robots and then having those robots as part of them. Your AI-driven thermostat will turn the heat and air conditioning on based also on who’s in what room, their preferences, and where they are likely to go next. It will negotiate with the power company for the cheapest rates by scheduling usage of high-energy appliances or car recharging.
This is the easy stuff. The real changes will happen when these AIs group together in a larger intelligence: A vast network of power generation and power consumption with each building just a node, like an ant colony or a human army.
Future industrial-control systems will include traditional factory robots, as well as AI systems to schedule their operation. It will automatically order supplies, as well as coordinate final product shipping. The AI will manage its own finances, interacting with other systems in the banking world. It will call on humans as needed: to repair individual subsystems or to do things too specialized for the robots.
Consider driverless cars. Individual vehicles have sensors, of course, but they also make use of sensors embedded in the roads and on poles. The real processing is done in the cloud, by a centralized system that is piloting all the vehicles. This allows individual cars to coordinate their movement for more efficiency: braking in synchronization, for example.
These are robots, but not the sort familiar from movies and television. We think of robots as discrete metal objects, with sensors and actuators on their surface, and processing logic inside. But our new robots are different. Their sensors and actuators are distributed in the environment. Their processing is somewhere else. They’re a network of individual units that become a robot only in aggregate.
This turns our notion of security on its head. If massive, decentralized AIs run everything, then who controls those AIs matters a lot. It’s as if all the executive assistants or lawyers in an industry worked for the same agency. An AI that is both trusted and trustworthy will become a critical requirement.
This future requires us to see ourselves less as individuals, and more as parts of larger systems. It’s AI as nature, as Gaia—everything as one system. It’s a future more aligned with the Buddhist philosophy of interconnectedness than Western ideas of individuality. (And also with science-fiction dystopias, like Skynet from the Terminator movies.) It will require a rethinking of much of our assumptions about governance and economy. That’s not going to happen soon, but in 2024 we will see the first steps along that path.
This essay previously appeared in Wired.