Post Syndicated from Chris Sciarrino original https://aws.amazon.com/blogs/security/set-up-aws-private-certificate-authority-to-issue-certificates-for-use-with-iam-roles-anywhere/
Traditionally, applications or systems—defined as pieces of autonomous logic functioning without direct user interaction—have faced challenges associated with long-lived credentials such as access keys. In certain circumstances, long-lived credentials can increase operational overhead and the scope of impact in the event of an inadvertent disclosure.
To help mitigate these risks and follow the best practice of using short-term credentials, Amazon Web Services (AWS) introduced IAM Roles Anywhere, a feature of AWS Identity and Access Management (IAM). With the introduction of IAM Roles Anywhere, systems running outside of AWS can exchange X.509 certificates to assume an IAM role and receive temporary IAM credentials from AWS Security Token Service (AWS STS).
You can use IAM Roles Anywhere to help you implement a secure and manageable authentication method. It uses the same IAM policies and roles as within AWS, simplifying governance and policy management across hybrid cloud environments. Additionally, the certificates used in this process come with a built-in validity period defined when the certificate request is created, enhancing the security by providing a time-limited trust for the identities. Furthermore, customers in high security environments can optionally keep private keys for the certificates stored in PKCS #11-compatible hardware security modules for extra protection.
For organizations that lack an existing public key infrastructure (PKI), AWS Private Certificate Authority allows for the creation of a certificate hierarchy without the complexity of self-hosting a PKI.
With the introduction of IAM Roles Anywhere, there is now an accompanying requirement to manage certificates and their lifecycle. AWS Private CA is an AWS managed service that can issue x509 certificates for hosts. This makes it ideal for use with IAM Roles Anywhere. However, AWS Private CA doesn’t natively deploy certificates to hosts.
Certificate deployment is an essential part of managing the certificate lifecycle for IAM Roles Anywhere, the absence of which can lead to operational inefficiencies. Fortunately, there is a solution. By using AWS Systems Manager with its Run Command capability, you can automate issuing and renewing certificates from AWS Private CA. This simplifies the management process of IAM Roles Anywhere on a large scale.
In this blog post, we walk you through an architectural pattern that uses AWS Private CA and Systems Manager to automate issuing and renewing x509 certificates. This pattern smooths the integration of non-AWS hosts with IAM Roles Anywhere. It can help you replace long-term credentials while reducing operational complexity of IAM Roles Anywhere with certificate vending automation.
While IAM Roles Anywhere supports both Windows and Linux, this solution is designed for a Linux environment. Windows users integrating with Active Directory should check out the AWS Private CA Connector for Active Directory. By implementing this architectural pattern, you can distribute certificates to your non-AWS Linux hosts, thereby enabling them to use IAM Roles Anywhere. This approach can help you simplify certificate management tasks.
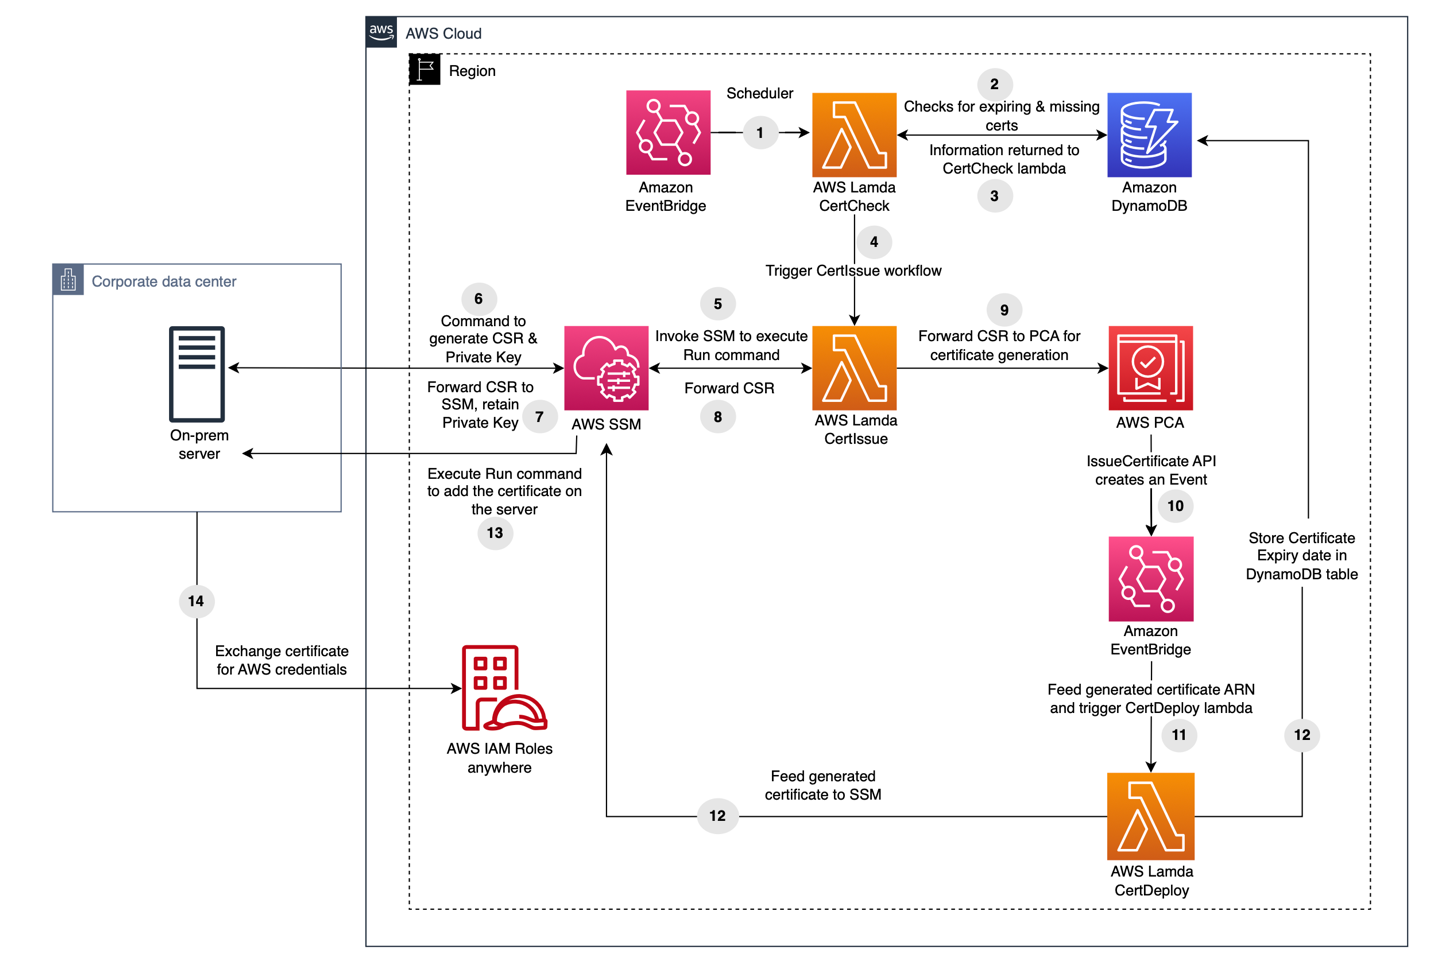
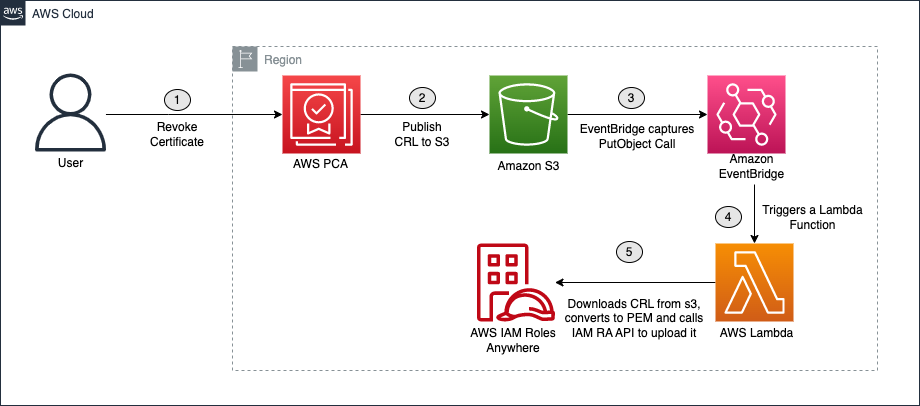
Architecture overview

Figure 1: Architecture overview
The architectural pattern we propose (Figure 1) is composed of multiple stages, involving AWS services including Amazon EventBridge, AWS Lambda, Amazon DynamoDB, and Systems Manager.
- Amazon EventBridge Scheduler invokes a Lambda function called CertCheck twice daily.
- The Lambda function scans a DynamoDB table to identify instances that require certificate management. It specifically targets instances managed by Systems Manager, which the administrator populates into the table.
- The information about the instances with no certificate and instances requiring new certificates due to expiry of existing ones is received by CertCheck.
- Depending on the certificate’s expiration date for a particular instance, a second Lambda function called CertIssue is launched.
- CertIssue instructs Systems Manager to apply a run command on the instance.
- Run Command generates a certificate signing request (CSR) and a private key on the instance.
- The CSR is retrieved by Systems Manager, the private key remains securely on the instance.
- CertIssue then retrieves the CSR from Systems Manager.
- CertIssue uses the CSR to request a signed certificate from AWS Private CA.
- On successful certificate issuance, AWS Private CA creates an event through EventBridge that contains the ID of the newly issued certificate.
- This event subsequently invokes a third Lambda function called CertDeploy.
- CertDeploy retrieves the certificate from AWS Private CA and invokes Systems Manager to launch Run Command with the certificate data and updates the certificate’s expiration date in the DynamoDB table for future reference.
- Run Command conducts a brief test to verify the certificate’s functionality, and upon success, stores the signed certificate on the instance.
- The instance can then exchange the certificate for AWS credentials through IAM Roles Anywhere.
Additionally, on a certificate rotation failure, an Amazon Simple Notification Service (Amazon SNS) notification is delivered to an email address specified during the AWS CloudFormation deployment.
The solution enables periodic certificate rotation. If a certificate is nearing expiration, the process initiates the generation of a new private key and CSR, thus issuing a new certificate. Newly generated certificates, private keys, and CSRs replace the existing ones.
With certificates in place, they can be used by IAM Roles Anywhere to obtain short-term IAM credentials. For more details on setting up IAM Roles Anywhere, see the IAM Roles Anywhere User Guide.
Costs
Although this solution offers significant benefits, it’s important to consider the associated costs before you deploy. To provide a cost estimate, managing certificates for 100 hosts would cost approximately $85 per month. However, for a larger deployment of 1,100 hosts with the Systems Manager advanced tier, the cost would be around $5937 per month. These pricing estimates include the rotation of certificates six times a month.
AWS Private CA in short-lived mode incurs a monthly charge of $50, and each certificate issuance costs $0.058. Systems Manager Hybrid Activation standard has no additional cost for managing fewer than 1,000 hosts. If you have more than 1,000 hosts, the advanced plan must be used at an approximate cost of $5 per host per month. DynamoDB, Amazon SNS, and Lambda costs should be under $5 per month per service for under 1000 hosts. For environments with over 1,000 hosts, it might be worthwhile to explore other options of machine to machine authentication or another option for distributing certificates.
Please note that the estimated pricing mentioned here is specific to the us-east-1 AWS Region and can be calculated for other regions using the AWS Pricing Calculator.
Prerequisites
You should have several items already set up to make it easier to follow along with the blog.
Enabling Systems manager hybrid activation
To create a hybrid activation, follow these steps:
- Open the AWS Management Console for Systems Manager, go to Hybrid activations and choose Create an Activation.

Figure 2: Hybrid activation page
- Enter a description [optional] for the activation and adjust the Instance limit value to the maximum you need, then choose Create activation.

Figure 3: Create hybrid activation
- This gives you a green banner with an Activation Code and Activation ID. Make a note of these.

Figure 4: Successful hybrid activation with activation code and ID
- Install the AWS Systems Manager Agent (SSM Agent) on the hosts to be managed. Follow the instructions for the appropriate operating system. In the example commands, replace <activation-code>, <activation-id>, and <region> with the activation code and ID from the previous step and your Region. Here is an example of commands to run for an Ubuntu host:
mkdir /tmp/ssm

curl https://s3.amazonaws.com/ec2-downloads-windows/SSMAgent/latest/debian_amd64/amazon-ssm-agent.deb -o /tmp/ssm/amazon-ssm-agent.deb

sudo dpkg -i /tmp/ssm/amazon-ssm-agent.deb

sudo service amazon-ssm-agent stop

sudo -E amazon-ssm-agent -register -code "<activation-code>" -id "<activation-id>" -region <region>

sudo service amazon-ssm-agent start
You should see a message confirming the instance was successfully registered with Systems Manager.
Note: If you receive errors during Systems Manager registration about the Region having invalid characters, verify that the Region is not in quotation marks.
Deploy with CloudFormation
We’ve created a Git repository with a CloudFormation template that sets up the aforementioned architecture. An existing S3 bucket is required for CloudFormation to upload the Lambda package.
To launch the CloudFormation stack:
- Clone the Git repository that contains the CloudFormation template and the Lambda function code.
git clone https://github.com/aws-samples/aws-privateca-certificate-deployment-automator.git
- cd into the directory created by Git.
cd aws-privateca-certificate-deployment-automator
- Launch the CloudFormation stack within the cloned Git directory using the cf_template.yaml file, replacing <DOC-EXAMPLE-BUCKET> with the name of your S3 bucket from the prerequisites.
aws cloudformation package --template-file cf_template.yaml --output-template-file packaged.yaml --s3-bucket <DOC-EXAMPLE-BUCKET>
Note: These commands should be run on the system you plan to use to deploy the CloudFormation and have the Git and AWS CLI installed.
After successfully running the CloudFormation package command, run the CloudFormation deploy command. The template supports various parameters to change the path where the certificates and keys will be generated. Adjust the paths as needed with the parameter-overrides flag, but verify that they exist on the hosts. Replace the <email> placeholder with one that you want to receive alerts for failures. The stack name must be in lower case.
aws cloudformation deploy --template packaged.yaml --stack-name ssm-pca-stack --capabilities CAPABILITY_NAMED_IAM --parameter-overrides SNSSubscriberEmail=<email>
The available CloudFormation parameters are listed in the following table:
| Parameter |
Default value |
Use |
| AWSSigningHelperPath |
/root |
Default path on the host for the AWS Signing Helper binary |
| CACertPath |
/tmp |
Default path on the host the CA certificate will be created in |
| CACertValidity |
10 |
Default CA certificate length in years |
| CACommonNam |
ca.example.com |
Default CA certificate common name |
| CACountry |
US |
Default CA certificate country code |
| CertPath |
/tmp |
Default path on the host the certificates will be created in |
| CSRPath |
/tmp |
Default path on the host the certificates will be created in |
| KeyAlgorithm |
RSA_2048 |
Default algorithm use to create the CA private key |
| KeyPath |
/tmp |
Default path on the host the private keys will be created in |
| OrgName |
Example Corp |
Default CA certificate organization name |
| SigningAlgorithm |
SHA256WITHRSA |
Default CA signing algorithm for issued certificates |
After the CloudFormation stack is ready, manually add the hosts requiring certificate management into the DynamoDB table.
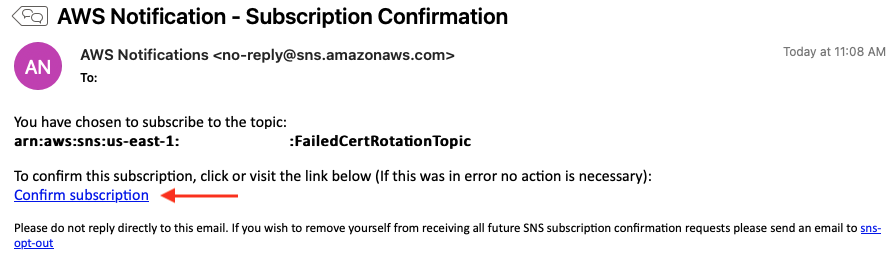
You will also receive an email at the email address specified to accept the SNS topic subscription. Make sure to choose the Confirm Subscription link as shown in Figure 5.

Figure 5: SNS topic subscription confirmation
Add data to the DynamoDB table
- Open the AWS Systems Manager console and select Fleet Manager.
- Choose Managed Nodes and copy the Node ID value. The node ID value in the Fleet Manager as shown in Figure 6 will be the host ID to be used in a subsequent step.

Figure 6: Systems Manager Node ID
- Open the DynamoDB console and select Dashboard and then Tables in the left navigation pane.

Figure 7: DynamoDB menu
- Select the certificates table.

Figure 8: DynamoDB tables
- Choose Explore table items and then choose Create item.
- Enter the node ID as a value for the hostID attribute as copied in step 2.

Figure 9: DynamoDB table hostID attribute creation
Additional string attributes listed in the following table can be added to the item to specify paths for the certificates on a per host basis. If these attributes aren’t created, either the default paths or overrides in the CloudFormation parameters will be used.
| Additional supported attributes |
Use |
| certPath |
Path on the host the certificate will be created in |
| keyPath |
Path on the host the private key will be created in |
| signinghelperPath |
Path on the host for the AWS Signing Helper binary |
| cacertPath |
Path on the host the CA certificate will be created in |
The CertCheck Lambda function created by the CloudFormation template runs twice daily to verify that the certificates for these hosts are kept up to date. If necessary, you can use the Lambda invoke command to run the Lambda function on-demand.
aws lambda invoke --function-name CertCheck-Trigger --cli-binary-format raw-in-base64-out response.json
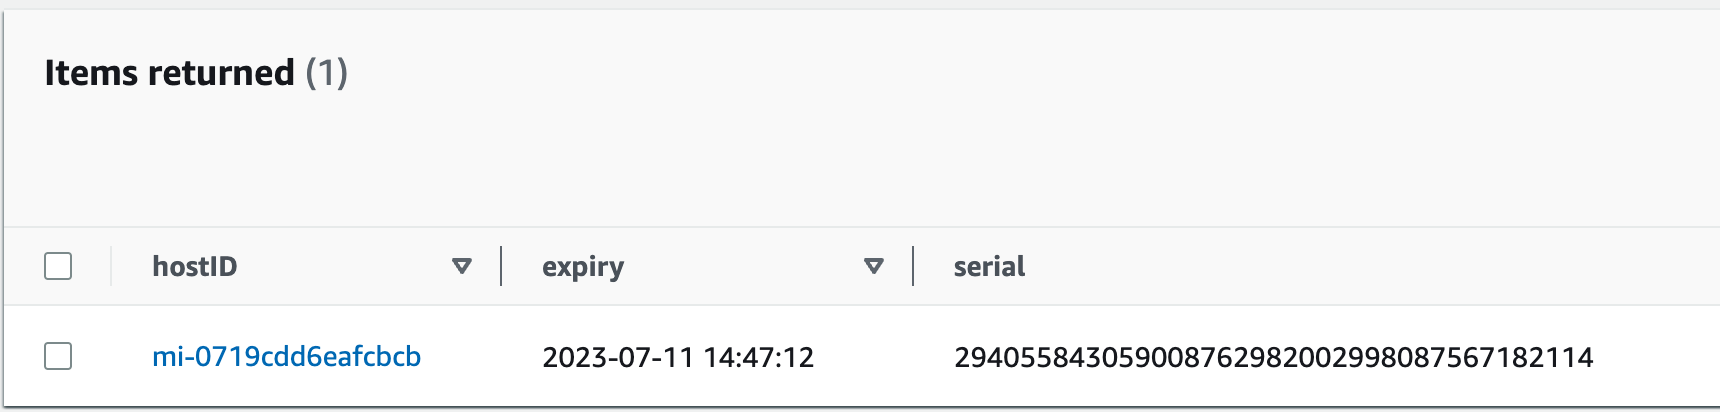
The certificate expiration and serial number metadata are stored in the DynamoDB table certificate. Select the certificates table and choose Explore table items to view the data.

Figure 10: DynamoDB table item with certificate expiration and serial for a host
Validation
To validate successful certificate deployment, you should find four files in the location specified in the CloudFormation parameter or DynamoDB table attribute, as shown in the following table.
| File |
Use |
Location |
| {host}.crt |
The certificate containing the public key, signed by AWS Private CA. |
certPath attribute in DynamoDB. Otherwise, default specified by the certPath CF parameter. |
| ca_chain_certificate.crt |
The certificate chain including intermediates from AWS Private CA. |
cacertPath attribute in DynamoDB. Otherwise, default specified by the CACertPath CF parameter. |
| {host}.key |
The private key for the certificate. |
keyPath attribute in DynamoDB. Otherwise, default specified by the KeyPath CF parameter. |
| {host}.csr |
The CSR used to generate the signed certificate. |
Default specified by the CSRPath CF parameter. |
These certificates can now be used to configure the host for IAM Roles Anywhere. See Obtaining temporary security credentials from AWS Identity and Access Management Roles Anywhere for using the signing helper tool provided by IAM Roles Anywhere. The signing helper must be installed on the instance for the validation to work. You can pass the location of the signing helper as a parameter to the CloudFormation template.
Note: As a security best practice, it’s important to use permissions and ACLs to keep the private key secure and restrict access to it. The automation will create and set the private key with chmod 400 permissions. Chmod command is used to change the permission for a file or directory. Chmod 400 permission will allow owner of the file to read the file while restricting others from reading, writing, or running the file.
Revoke a certificate
AWS Private CA also supports generating a certificate revocation list (CRL), which can be imported to IAM Roles Anywhere. The CloudFormation template automatically sets up the CRL process between AWS Private CA and IAM Roles Anywhere.

Figure 11: Certificate revocation process
Within 30 minutes after revocation, AWS Private CA generates a CRL file and uploads it to the CRL S3 bucket that was created by the CloudFormation template. Then, the CRLProcessor Lambda function receives a notification through EventBridge of the new CRL file and passes it to the IAM Roles Anywhere API.
To revoke a certificate, use the AWS CLI. In the following example, replace <certificate-authority-arn>, <certificate-serial>, and<revocation-reason> with your own information.
aws acm-pca revoke-certificate --certificate-authority-arn <certificate-authority-arn> --certificate-serial <certificate-serial> --revocation-reason <revocation-reason>
The AWS Private CA ARN can be found in the Cloudformation stack outputs under the name PCAARN. The certificate serial number are listed in the DynamoDB table for each host as previously mentioned. The revocation reasons can be one of these possible values:
- UNSPECIFIED
- KEY_COMPROMISE
- CERTIFICATE_AUTHORITY_COMPROMISE
- AFFILIATION_CHANGED
- SUPERSEDED
- CESSATION_OF_OPERATION
- PRIVILEGE_WITHDRAWN
- A_A_COMPROMISE
Revoking a certificate won’t automatically generate a new certificate for the host. See Manually rotate certificates.
Manually rotate certificates
The certificates are set to expire weekly and are rotated the day of expiration. If you need to manually replace a certificate sooner, remove the expiration date for the host’s record in the DynamoDB table (see Figure 12). On the next run of the Lambda function, the lack of an expiration date will cause the certificate for that host to be replaced. To immediately renew a certificate or test the rotation function, remove the expiration date from the DynamoDB table and run the following Lambda invoke command. After the certificates have been rotated, the new expiration date will be listed in the table.
aws lambda invoke --function-name CertCheck-Trigger --cli-binary-format raw-in-base64-out response.json
Conclusion
By using AWS IAM Roles Anywhere, systems outside of AWS can use short-term credentials in the form of x509 certificates in exchange for AWS STS credentials. This can help you improve your security in a hybrid environment by reducing the use of long-term access keys as credentials.
For organizations without an existing enterprise PKI, the solution described in this post provides an automated method of generating and rotating certificates using AWS Private CA and AWS Systems Manager. We showed you how you can use Systems Manager to set up a non-AWS host with certificates for use with IAM Roles Anywhere and ensure they’re rotated regularly.
Deploy this solution today and move towards IAM Roles Anywhere to remove long term credentials for programmatic access. For more information, see the IAM Roles Anywhere blog article or post your queries on AWS re:Post.
If you have feedback about this post, submit comments in the Comments section below. If you have questions about this post, start a new thread on IAM re:Post or contact AWS Support.
Want more AWS Security how-to content, news, and feature announcements? Follow us on Twitter.


 Prabhat Chaturvedi
 Rahul Pathak is VP of Relational Database Engines, leading Amazon Aurora, Amazon Redshift, and Amazon QLDB. Prior to his current role, he was VP of Analytics at AWS, where he worked across the entire AWS database portfolio. He has co-founded two companies, one focused on digital media analytics and the other on IP-geolocation.
 G2 Krishnamoorthy is VP of Analytics, leading AWS data lake services, data integration, Amazon OpenSearch Service, and Amazon QuickSight. Prior to his current role, G2 built and ran the Analytics and ML Platform at Facebook/Meta, and built various parts of the SQL Server database, Azure Analytics, and Azure ML at Microsoft.


 The pre-snapshot script is started from the SSM document.