Post Syndicated from Shane Queeney original https://blog.rapid7.com/2023/08/01/insightappsec-advanced-authentication-settings-token-replacement/

There are many different ways to use InsightAppSec to authenticate to web apps, but sometimes you need to go deeper into the advanced settings to fully automate your logins, especially with API scanning. Today, we’ll cover one of those advanced settings: Token Replacement.
InsightAppSec Token Replacement can be used to capture and replay Bearer Authentication tokens, JWT Authentication tokens, or any other type of session token.
The token replacement values are under your scan configs in the following location: Custom Options > Advanced > AuthConfig > TokenReplacementList
When you press Add, the following values can be set.
| Name | Description | Possible Values |
| ExtractionTokenLocation | Where the token you want to extract is located. | Request HeaderRequest BodyRequest URLResponse HeadersResponse Body |
| ExtractionTokenRegex | Regex used to extract the token. Anything placed in brackets can be returned in the InjectionTokenRegex using @token@. | Any regex, such as:”token”: ?”([^”]*)”access_token”: ?”([-a-f0-9]+)”[?]sessionId=([^&]*) |
| InjectionTokenLocation | Where the captured token should be injected. | Request URLRequest HeadersRequest Body |
| InjectionTokenRegex | The format in which the token should be sent to the web app. @token@ is replaced with the value captured by ExtractionTokenLocation. | Any string. @token@ is replaced with the captured value. Such as:Authorization: Bearer @token@Authorization: Token @token@&sessionId=@token@ |

Why Token Replacement?
Under Custom Options > HTTP Headers > Extra Header, you can manually pass an authentication token to your web app. While this is the easiest way to set up this form of authentication, unless you generate a token that will not expire, you will have to replace this token every scan. Automating this process using token replacement will save you time and effort in the long run, especially if you have multiple apps you need to generate tokens for.
For this example, we will be using the Rapid7 Hackazon web app. If you want to configure your own Hackazon instance, details around installation and setup can be found here.
Alternatively, there are free public test sites you can use instead, such as this one.
The main difference you’ll encounter when using the Hackazon web app is the API authentication does not have a UI, therefore we must record and pass a traffic file for InsightAppSec to authenticate.
We will use Postman to send the API request to the web app and Burp Suite to record the traffic. You could alternately use the Rapid7 Insight AppSec Toolkit, to record the traffic as well. Here is a video running through setup using the InsightAppSec Toolkit.
The first step is to set up your proxy settings. In Postman, you can go to Settings by clicking the gear icon in the upper right, and then clicking into the proxy settings. We’re going to set the proxy server to “localhost” and change the port to “5000”.

After setting the proxy in Postman, you must set it up in Burp Suite. In Burp, go to the Proxy tab, then click on Proxy Settings. Next, add a proxy listener, specifying port 5000 to match the setting in Postman. Then, set the interface to Loopback Only.

Go back to Postman, add your basic authentication, and then send the traffic. In Burp, click on the HTTP History tab, right click on the captured traffic, then click “Save Item”. Make sure you save the traffic as an xml file.


You can also record the traffic using the Rapid7 Insight AppSec Plugin, or from within the Chrome browser. Instructions for how to do this are located under Traffic Authentication or can be found here.

When recording using the Rapid7 Appsec Plugin, make sure that the recording includes the Bearer Auth or Token in the recorded details.

After recording the login, upload the traffic file to Site Authentication. Make sure you adjust the Logged-In Regex as well to make sure the scan doesn’t fail.


After authenticating to your web app and grabbing the token, the next step is to configure a regex to ensure the token is able to be extracted. There are a wide variety of ways to test the regex, but we will be using https://regex101.com/ for this example.
We will then grab the web app response containing the token info, paste it into the website, and configure a regular expression to ensure only the token is selected. In this use case, the expression “token”: ?”([^”]*) was successful in only highlighting the info we want to extract. We can ensure that only the token is selected in capture Group 1 as that will be returned when we specify @token@ under the InjectionTokenRegex.


Next, we want to configure the TokenReplacementList.
| Name | Value | Reason |
| ExtractionTokenLocation | Response Body | The token appeared in the body after authenticating |
| ExtractionTokenRegex | “token”: ?”([^”]*) | This successfully isolated the auth token |
| InjectionTokenLocation | Request Header | Where the web app is expecting the token |
| InjectionTokenRegex | Authorization: Token @token@ | The header format the web app is expecting |

Make sure you upload the swagger API file. You can either upload the file or point InsightAppSec to the specific URL. You can optionally restrict the scan to just the swagger file for more targeted scanning.

To ensure we were successful, click Download Additional Logs from the Scan Logs page after the scan is complete and open the Operation log file. You are looking for the log entry “[good]: Added imported token from response body”. Once you see this, you know the taken was imported into the scan properly and we were able to use it to log in to the API.
For further testing, you can look in the vulnerability traffic requests to ensure the Authorization: Token header has been passed successfully.


To detect if the token has expired, you can modify the sessionLossRegex and sessionLossHeaderRegex under Authentication > Additional Settings, or by using a CanaryPage if that has been set up. When configured correctly, the token replacement will grab the token again, ensuring we stay logged in to your API.
Further information on configuring Scan Authentication can be found here. When in doubt, please reach out to your web app developers and/or Rapid7 support for assistance.


 Tom Romano is a Sr. Solutions Architect for AWS World Wide Public Sector from Tampa, FL, and assists GovTech and EdTech customers as they create new solutions that are cloud native, event driven, and serverless. He is an enthusiastic Python programmer for both application development and data analytics, and is an Analytics Specialist. In his free time, Tom flies remote control model airplanes and enjoys vacationing with his family around Florida and the Caribbean.
 Shane Thompson is a Sr. Solutions Architect based out of San Luis Obispo, California, working with AWS Startups. He works with customers who use AI/ML in their business model and is passionate about democratizing AI/ML so that all customers can benefit from it. In his free time, Shane loves to spend time with his family and travel around the world.


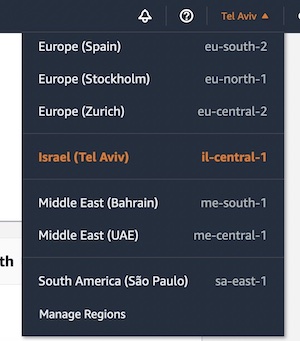 The new Tel Aviv Region is ready to support your business. You can find a detailed list of the services available in this Region on the


 Mitesh Patel is a Principal Solutions Architect at AWS with specialization in data analytics and machine learning. He is passionate about helping customers building scalable, secure and cost effective cloud native solutions in AWS to drive the business growth. He lives in DC Metro area with his wife and two kids.
 Sumitha AP is a Sr. Solutions Architect at AWS. She works with customers and help them attain their business objectives by designing secure, scalable, reliable, and cost-effective solutions in the AWS Cloud. She has a focus on data and analytics and provides guidance on building analytics solutions on AWS.
 Deepti Venuturumilli is a Sr. Solutions Architect in AWS. She works with commercial segment customers and AWS partners to accelerate customers’ business outcomes by providing expertise in AWS services and modernize their workloads. She focuses on data analytics workloads and setting up modern data strategy on AWS.
 Deepthi Paruchuri is an AWS Solutions Architect based in NYC. She works closely with customers to build cloud adoption strategy and solve their business needs by designing secure, scalable, and cost-effective solutions in the AWS cloud.