Post Syndicated from original https://lwn.net/Articles/938120/
Version
1.71.0 of the Rust language has been released. Changes this time
include the C-unwind
ABI, an upgrade to musl 1.2, and more.
Post Syndicated from original https://lwn.net/Articles/938120/
Version
1.71.0 of the Rust language has been released. Changes this time
include the C-unwind
ABI, an upgrade to musl 1.2, and more.
Post Syndicated from original https://lwn.net/Articles/937943/
The kernel-development process routinely absorbs large changes to
fundamental subsystems and still produces stable releases every nine or ten
weeks. On occasion, though, the development community’s luck runs out.
The per-VMA locking work that went into the
6.4 release is a case in point; it looked like a well-tested change that
improved page-fault scalability. There turned out to be a few demons
hiding in that code, though, that made life difficult for early adopters of
the 6.4 kernel.
Post Syndicated from Jason Yung original https://aws.amazon.com/blogs/big-data/how-aws-helped-altron-group-accelerate-their-vision-for-optimized-customer-engagement/
This is a guest post co-authored by Jacques Steyn, Senior Manager Professional Services at Altron Group.
Altron is a pioneer of providing data-driven solutions for their customers by combining technical expertise with in-depth customer understanding to provide highly differentiated technology solutions. Alongside their partner AWS, they participated in AWS Data-Driven Everything (D2E) workshops and a bespoke AWS Immersion Day workshop that catered to their needs to improve their engagement with their customers.
This post discusses the journey that took Altron from their initial goals, to technical implementation, to the business value created from understanding their customers and their unique opportunities better. They were able to think big but start small with a working solution involving rich business intelligence (BI) and insights provided to their key business areas.
Altron has provided information technology services since 1965 across South Africa, the Middle East, and Australia. Although the group saw strong results at 2022-year end, the region continues to experience challenging operating conditions with global supply chains disrupted, electronic component shortages, and scarcity of IT talent.
To reflect the needs of their customers spread across different geographies and industries, Altron has organized their operating model across individual Operating Companies (OpCos). These are run autonomously with different sales teams, creating siloed operations and engagement with customers and making it difficult to have a holistic and unified sales motion.
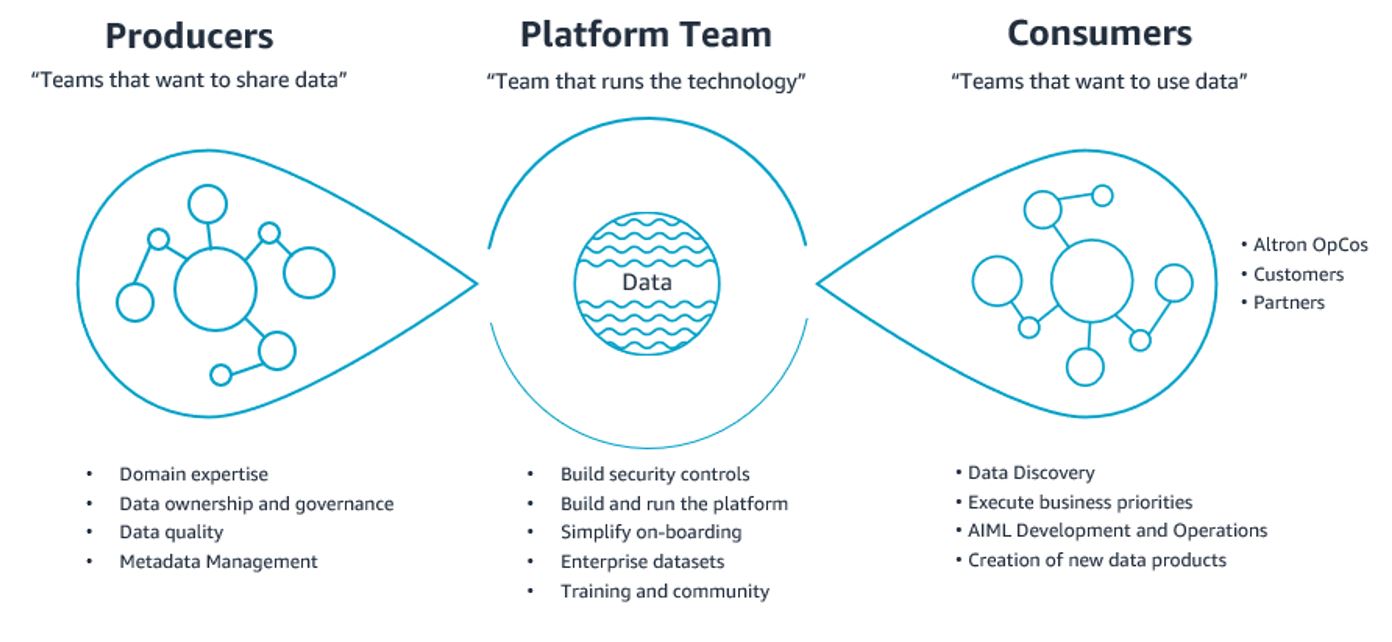
To succeed further, their vision of data requires it to be accessible and actionable to all, with key roles and responsibilities defined by those who produce and consume data, as shown in the following figure. This allows for transparency, speed to action, and collaboration across the group while enabling the platform team to evangelize the use of data:
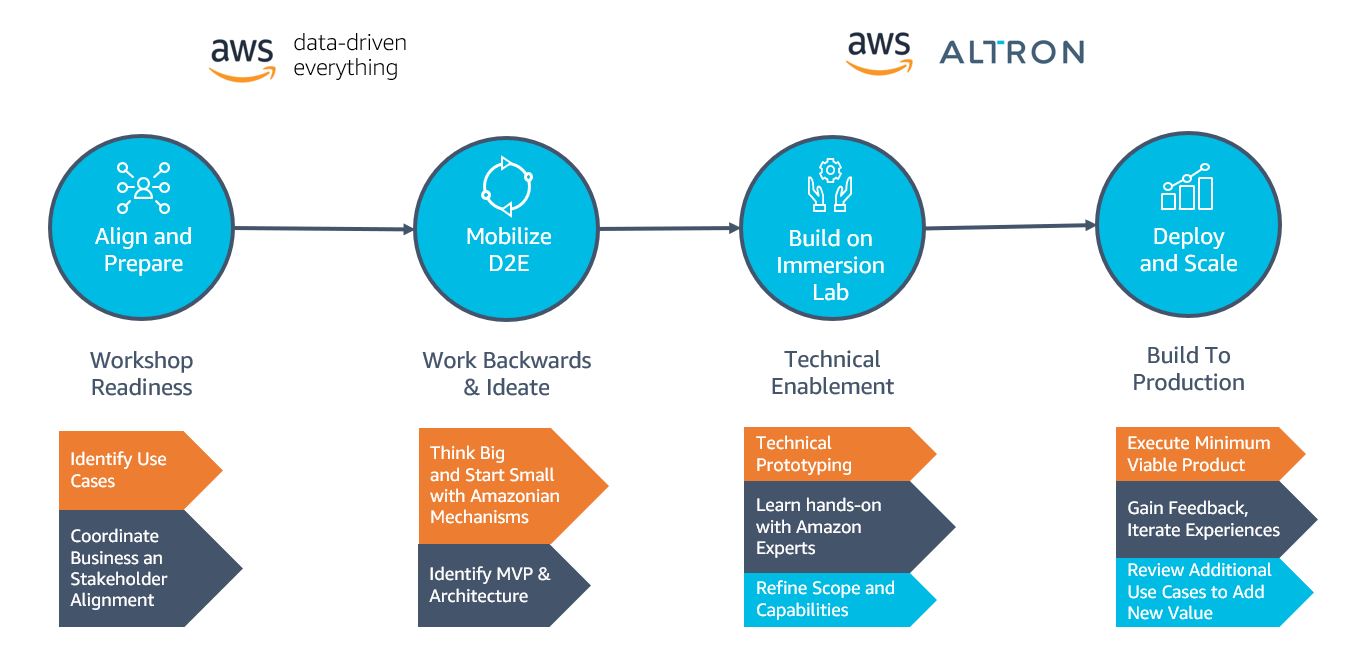
Altron engaged with AWS to seek advice on their data strategy and cloud modernization to bring their vision to fruition. The D2E program was selected to help identify the best way to think big but start small by working collaboratively to ideate on the opportunities to build data as a product, particularly focused on federating customer profile data in an agile and scalable approach.
Amazon mechanisms such as Working Backwards were employed to devise the most delightful and meaningful solution and put customers at the heart of the experience. The workshop helped devise the think big solution that starting with the Systems Integration (SI) OpCo as the first flywheel turn would be the best way to start small and prototype the initial data foundation collaboratively with AWS Solutions Architects.
The typical preparation of an AWS Immersion Day involves identifying examples of common use case patterns and utilizing demonstration data. To maximize its success, the Immersion Day was stretched across multiple days as a hands-on workshop to enable Altron to bring their own data, build a robust data pipeline, and scale their long-term architecture. In addition, AWS and Altron identified and resolved any external dependencies, such as network connectivity to data sources and targets, where Altron was able to put the connectivity to the sources in place.
After a number of preparation meetings to discuss business and technical aspects of the use case, AWS and Altron identified two uses cases to resolve their two business challenges:
Altron set aside 4 days for their Immersion Day, during which time AWS had assigned a dedicated Solutions Architect to work alongside them to build the following prototype architecture:

This solution includes the following components:
In 4 days, the Altron SI team left the Immersion Day workshop with the following:
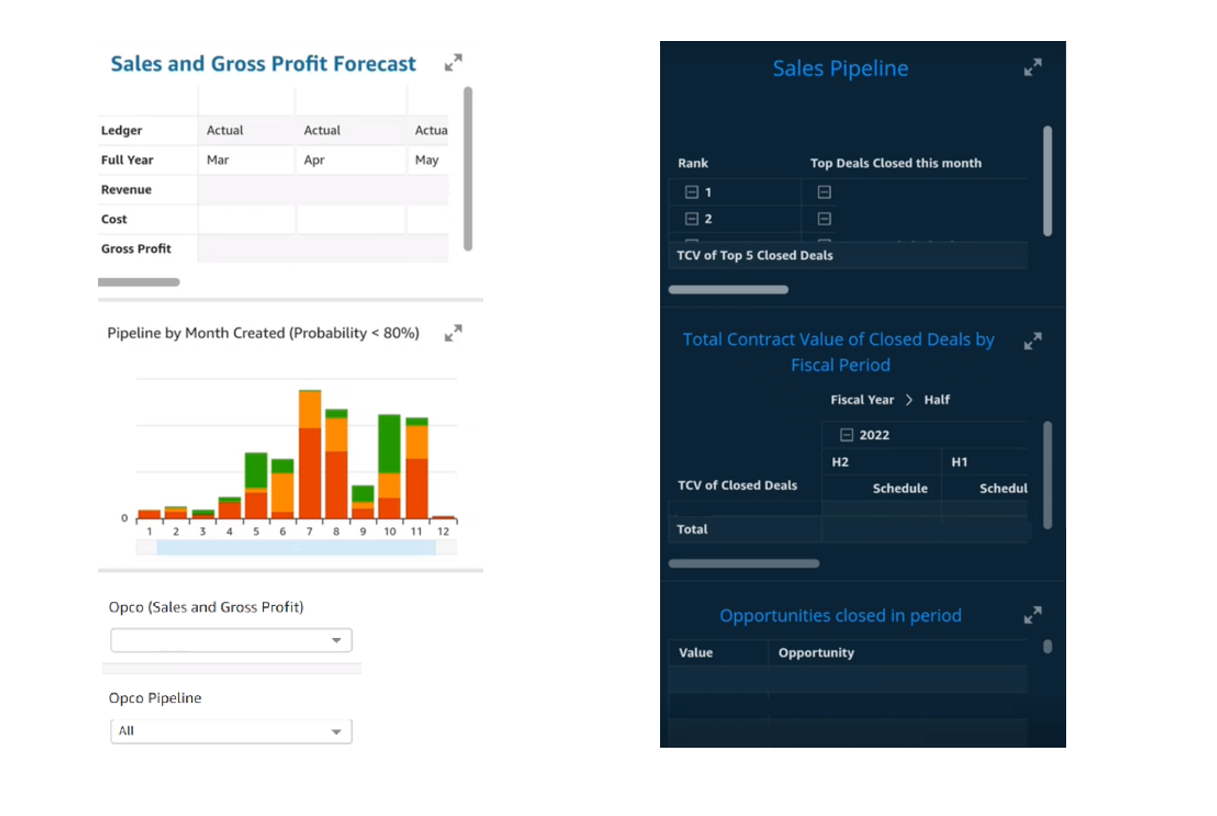
Altron’s sales teams are now able to quickly refresh dashboards encompassing previously disparate datasets that are now centralized to get insights about sales pipelines and forecasts on their desktop or mobile. The technical teams are equally adept at adjusting to business needs by autonomously onboarding new data sources and further enriching the user experience and trust in the data.
In this post, we walked you through the journey the Altron team took with AWS. The outcomes to identify the opportunities that were most pressing to Altron, applying a working backward approach and coming up with a best-fit architecture, led to the subsequent AWS Immersion Day to implement a working prototype that helped them become more data-driven.
With their new focus on AWS skills and mechanisms, increasing trust in their internal data, and understanding the importance of driving change in data literacy and mindset, Altron is better set up for success to best serve their customers in the region.
To find out more about how Altron and AWS can help work backward on your data strategy and employ the agile methodologies discussed in this post, check out Data Management. To learn more about how can help you turn your ideas into solutions, visit the D2E website and the series of AWS Immersion Days that you can choose from. For more hands-on bespoke options, contact your AWS Account Manager, who can provide more details.
Special thanks to everyone at Altron Group who helped contribute to the success of the D2E and Build Lab workshops:
 Jacques Steyn runs the Altron Data Analytics Professional Services. He has been leading the building of data warehouses and analytic solutions for the past 20 years. In his free time, he spends time with his family, whether it be on the golf , walking in the mountains, or camping in South Africa, Botswana, and Namibia.
 Jason Yung is a Principal Analytics Specialist with Amazon Web Services. Working with Senior Executives across the Europe and Asia-Pacific Regions, he helps customers become data-driven by understanding their use cases and articulating business value through Amazon mechanisms. In his free time, he spends time looking after a very active 1-year-old daughter, alongside juggling geeky activities with respectable hobbies such as cooking sub-par food.
 Michele Lamarca is a Senior Solutions Architect with Amazon Web Services. He helps architect and run Solutions Accelerators in Europe to enable customers to become hands-on with AWS services and build prototypes quickly to release the value of data in the organization. In his free time, he reads books and tries (hopelessly) to improve his jazz piano skills.
 Hamza is a Specialist Solutions Architect with Amazon Web Services. He runs Solutions Accelerators in EMEA regions to help customers accelerate their journey to move from an idea into a solution in production. In his free time, he spends time with his family, meets with friends, swims in the municipal swimming pool, and learns new skills.
Post Syndicated from Kris Bliesner original https://aws.amazon.com/blogs/big-data/vega-cloud-brings-finops-solutions-to-their-customers-faster-by-embedding-amazon-quicksight/
This is a guest post authored by Kris Bliesner and Mike Brown from Vega Cloud.
Vega Cloud is a premier member of the FinOps Foundation, a program by Linux Foundation supporting FinOps practitioners on cloud financial management best practices. Vega Cloud provides a place where finance, engineers, and innovators come together to accelerate the business value of the cloud with concrete curated data, context-relevant recommendations, and automation to achieve cost savings. Vega Cloud’s platform is based on the FinOps Foundation’s best practices and removes the confusion behind the business value of cloud services and accelerates strategic decisions while maintaining cost optimization. Vega’s curated reports provide actionable insights to accelerate time-to-value from years into days. On average, Vega’s customers immediately identify 15–25% of underutilized cloud spend with a clear direction on how to reallocate the funds to maximize business impact.
Vega Cloud has been growing rapidly and saw an opportunity to accelerate cloud intelligence at hyperscale. Engineering leadership chose Amazon QuickSight, which allowed Vega to add insightful analytics into its platform with customized interactive visuals and dashboards, while scaling at a lower cost without the need to manage infrastructure.
In this post, we discuss how Vega uses QuickSight to bring cloud intelligence solutions to our customers.
The Vega Cloud Platform was designed from the start by cloud pioneers to enable businesses to get the most value out of their cloud spend. This is done by a multi-step process that starts with data analytics and ends with automation to remediate inefficiencies. The Vega Cloud Platform consumes customer billing and usage information from cloud providers and third parties, and uses that data to show customers what they are spending and which services they are consuming, with business context to help the customer with chargebacks and cost inquiries. The Vega Cloud Platform then analyzes the data collected and produces context relevant recommendations across five major categories: financial, waste elimination, utilization, process, and architecture. Finally, the Vega Cloud Platform enables customers to choose which recommendations to implement through automated processes and immediately receive cost benefits without massive amounts of work by end developers or app teams.
Vega is constantly updating and improving the platform by adding more recommendation types, deeper analytics, and easier automation to save time. When looking for an embedded analytics solution to bring these insights to customers, Vega looked for a tool that would allow us to keep up with our rapid growth and iterate quickly. With QuickSight, Vega has been able to scale from the proof of concept stage to enterprise-level analytics and visualizations as the company grows. QuickSight enables our product team to ship product quickly and rapidly test customer feedback and assumptions. Vega has tremendously reduced the time from idea to implementation for the analytics solutions by using QuickSight.

Using embedded QuickSight saved Vega 6–12 months of development time, allowing us to go to market sooner. Vega Cloud’s team of certified FinOps practitioners—a unique combination of finance professionals, architects, FinOps practitioners, educators, engineers, financial analysts, and data analysts with deep expertise in multi-cloud environments—can focus on driving business growth and meeting customer needs. QuickSight gives the Vega team one place to build reports and dashboards, allowing the Vega Cloud Platform to deliver data analytics to customers quickly and consistently. The Vega Cloud Platform uses QuickSight APIs to seamlessly onboard new users. In addition to the cost savings Vega Cloud has achieved by saving development time, QuickSight doesn’t require licensing or maintenance costs. The AWS pay-as-you-go pricing model allowed Vega Cloud to hit the ground running and scale with real-time demand.
By embedding QuickSight, Vega Cloud has been able to bring a wealth of information to cloud consumers, helping them gain value and efficiencies. For example, an enterprise customer in the energy industry engaged Vega for cloud cost optimization and saw monthly savings exceeding 25% with cumulative savings of over $1.36 million over 11 months. They moved from 24% Reserved Instance/Savings Plans (RI/SP) coverage to 53% coverage. Their optimization efforts led them to increase their cloud commit by 10 times over 5 years.
The Vega Cloud Platform has two SKUs that use embedded QuickSight: Vega Inform and Vega Optimize. Vega Inform is about cost allocation, chargebacks and showbacks, anomaly detection, spend analysis, and deep usage analytics. Vega Optimize is an easy-to-use set of dashboards to help customers better understand the optimization opportunities they have across their entire enterprise. In the Vega Inform SKU, the Vega Cloud Platform provides true multi-cloud cost reporting with cash and fiscal views and the ability to switch between them seamlessly. The Vega Cloud Platform is a curated data platform to ensure customers avoid garbage in/garbage out scenarios. Vega curates customer usage and billing data to verify billing rates, usage, and credit allocation, and then enables retroactive cleanups to historical spend.
Vega Optimize is a core piece of the Vega Cloud Platform and allows end-users to see cost-optimization recommendations with business context added using the embedded QuickSight dashboards. The Vega Cloud Platform enables end-users to self-manage and approve optimization recommendations for implementation—ensuring that businesses are taking the actions they need to better manage their cloud investments.
Vega customers can identify and act upon near-term optimization opportunities prioritized by business impact and level of effort, as well as identify, purchase, and track committed use resources. QuickSight enables end-users to easily filter down data to exactly what the user wants to see. Doing so enables questions to be answered more quickly, which ensures the right optimization takes place in a timely manner. The depth and breadth of data the Vega Cloud Platform consumes and surfaces to end-users via QuickSight provides customers with a platform approach to enabling FinOps within their organizations.

The Vega Cloud Platform ingests billions of lines of data on behalf of customers, which must be converted into actionable insight and personalized to a decision-maker’s role inside the organization. Processing terabytes of data can lead to delayed and infrequent reports, slowing down an organization’s ability to respond and compete in their respective markets. It is paramount that customers have consistent, dependable access to timely reports with the correct business context. QuickSight is powered by SPICE (Super-fast, Parallel, In-memory Calculation Engine), a robust in-memory engine that now supports up to 1 billion rows of data. Thanks to the Vega Cloud Platform’s implementation of QuickSight, Vega has offloaded the responsibility including engineering from customers to ingest and curate billions of rows of data every day. The Vega Cloud Platform uses role-based permissions, with row-level security from QuickSight, to centralize and tailor data to prioritize actionable insights with the ability to quickly investigate details to provide evidence-based decisions to customers.

QuickSight allows Vega to highlight data that is considered high-cost or high-value to its customers so that they can take quick action. This is accomplished by purpose-built dashboards based on over a decade of experience to ensure customers see the items that will be most impactful in their optimization efforts. The advanced visualizations, sorting, and filtering capabilities of QuickSight allow the Vega Cloud Platform to scale usage by multiple groups within a business, including finance, DevOps, IT and many others. Along with QuickSight, the Vega Cloud Platform uses many other AWS services, including but not limited to Amazon Relational Database Service (Amazon RDS), Amazon Redshift, Amazon Athena, AWS Glue, and more.
Vega is focused on continuing to provide customers with cloud intelligence at hyperscale using QuickSight. The Vega Cloud Platform roadmap includes a proof of concept for Amazon QuickSight Q, which would give customers the ability to ask questions in natural language and receive accurate answers with relevant visualizations that help users gain insights from the data. This also includes paginated reports, which makes it easier for customers to create, schedule, and share reports.
QuickSight has enabled Vega Cloud to grow rapidly, while saving time and money and delivering FinOps solutions to businesses in any and every vertical industry consuming cloud at scale.
To learn more about how you can embed customized data visuals and interactive dashboards into any application, visit Amazon QuickSight Embedded.
 Kris Bliesner, CEO, Vega Cloud is a seasoned technology leader with over 25 years of experience in IT management, cloud computing, and consumer-based technology. As the co-founder and CEO of Vega Cloud, Kris continues to be at the forefront of revolutionizing cloud infrastructure optimization.
 Mike Brown, CTO, Vega Cloud is a highly-skilled technology leader and co-founder of Vega Cloud, where he currently serves as the Chief Technology Officer (CTO). With a proven track record in driving technological innovation, Mike has been instrumental in shaping the application architecture and solutions for the company.
Post Syndicated from Caitlin Condon original https://blog.rapid7.com/2023/07/13/etr-sonicwall-recommends-urgent-patching-for-gms-and-analytics-cves/

On Wednesday, July 12, 2023, security firm SonicWall published an urgent security advisory warning customers of 15 new vulnerabilities affecting on-premise instances of their Global Management System (GMS) and Analytics products. Four of the vulnerabilities carry critical severity ratings:
The rest of the vulnerabilities include a predictable password reset key issue and a hard-coded Tomcat credentials issue, in addition to command injection, file write, file upload, password hash read, and other issues. SonicWall took the unusual (but not unprecedented) step of issuing an urgent security notice for the new CVEs.
Per the company’s advisory, the various vulnerabilities could allow an attacker to view data that they would not normally be able to retrieve, including data belonging to other users or other data that the application itself is able to access. Attackers may be able to modify or delete this data, causing persistent changes to the application’s content or behavior. At least on the surface, the potential for data exposure and theft as a result of these flaws sounds reminiscent of the recent MOVEit Transfer vulnerabilities — we expect these CVEs to be extremely attractive to adversaries, including those looking to extort victims after executing smash-and-grab attacks.
While the vulnerabilities are not known to be exploited in the wild as of July 13, 2023, SonicWall vulnerabilities, including Rapid7-discovered vulnerabilities, have been popular targets for adversaries in the past (including ransomware groups). The urgent nature of SonicWall’s warning reflects that history and should be heeded.
The affected products are:
The vulnerabilities are fixed in SonicWall GMS 9.3.3 and SonicWall Analytics 2.5.2. We urge on-prem customers to update immediately, without waiting for a regular patch cycle to occur. See SonicWall’s advisory for full details.
Our engineering team expects to ship remote vulnerability checks for the vulnerabilities affecting SonicWall GMS in today’s (July 13) content release. We are investigating the feasibility of adding checks for SonicWall Analytics.
Post Syndicated from original https://lwn.net/Articles/938108/
Security updates have been issued by Debian (ruby-doorkeeper), Fedora (mingw-nsis and thunderbird), Red Hat (bind9.16, nodejs, nodejs:16, nodejs:18, python38:3.8 and python38-devel:3.8, and rh-nodejs14-nodejs), Slackware (krb5), SUSE (geoipupdate, installation-images, libqt5-qtbase, python-Django1, and skopeo), and Ubuntu (knot-resolver, lib3mf, linux, linux-aws, linux-kvm, linux-lowlatency, linux-raspi, linux, linux-aws, linux-kvm, linux-lts-xenial, linux-azure, linux-gcp, linux-ibm, linux-oracle, linux-azure-fde, linux-xilinx-zynqmp, and scipy).
Post Syndicated from Nivetha Chandran original https://aws.amazon.com/blogs/security/spring-2023-pci-dss-and-3ds-compliance-packages-available-now/
Amazon Web Services (AWS) is pleased to announce that seven additional AWS services have been added to the scope of our Payment Card Industry Data Security Standard (PCI DSS) and Payment Card Industry Three-Domain Secure (PCI 3DS) certifications.
The compliance package for PCI DSS and 3DS includes the Attestation of Compliance (AOC), which shows that AWS has been successfully validated against these standards; and the AWS Responsibility Summary, which customers can use to better understand their responsibility regarding operating controls to effectively develop and operate a secure environment on AWS.
These are the seven additional services that have been added to the scope:
For the full list of services in scope, see AWS Services in Scope by Compliance Program.
Coalfire, a third-party Qualified Security Assessor (QSA), evaluated AWS. Customers can access the AOC and the Responsibility Summary through AWS Artifact, a self-service portal for on-demand access to AWS compliance reports.
To learn more about our PCI program and other compliance and security programs, see the AWS Compliance Programs page. As always, we value your feedback and questions; reach out to the AWS Compliance team through the Contact Us page.
If you have feedback about this post, submit comments in the Comments section below. If you have questions about this post, contact AWS Support.
Want more AWS Security news? Follow us on Twitter.
Post Syndicated from Noelle Kagan original http://blog.cloudflare.com/edm-beta/


The most famous data breaches–the ones that keep security practitioners up at night–involved the leak of millions of user records. Companies have lost names, addresses, email addresses, Social Security numbers, passwords, and a wealth of other sensitive information. Protecting this data is the highest priority of most security teams, yet many teams still struggle to actually detect these leaks.
Cloudflare’s Data Loss Prevention suite already includes the ability to identify sensitive data like credit card numbers, but with the volume of data being transferred every day, it can be challenging to understand which of the transactions that include sensitive data are actually problematic. We hear customers tell us, “I don’t care when one of my employees uses a personal credit card to buy something online. Tell me when one of my customers’ credit cards are leaked.”
In response, we looked for a method to distinguish between any credit card and one belonging to a specific customer. We are excited to announce the launch of our newest Data Loss Prevention feature, Exact Data Match. With Exact Data Match (EDM), customers securely tell us what data they want to protect, and then we identify, log, and block the presence or movement of that data. For example, if you provide us with a set of credit card numbers, we will DLP scan your traffic or repositories for only those cards. This allows you to create targeted DLP detections for your organization.
Many Data Loss Prevention (DLP) detections begin with a generic identification of a pattern, often using a regular expression, and then are validated by additional criteria. Validation can leverage a wide range of techniques from checksums to machine learning models. However, this validates that the pattern is a credit card, not that it is your credit card.
With Exact Data Match, you tell us exactly the data you want to protect, but we never see it in cleartext. You provide a list of data of your choosing, such as a list of names, addresses, or credit card numbers, and that data is hashed before ever reaching Cloudflare. We store the hashes and scan your traffic or content for matches of the hashes. When we find a match, we log or block it according to your policy.
By using a finite list of data, we drastically reduce false positives compared to generic pattern matching. Meanwhile, hashing the data maintains your data privacy. Our goal is to meet your data protection and privacy needs.
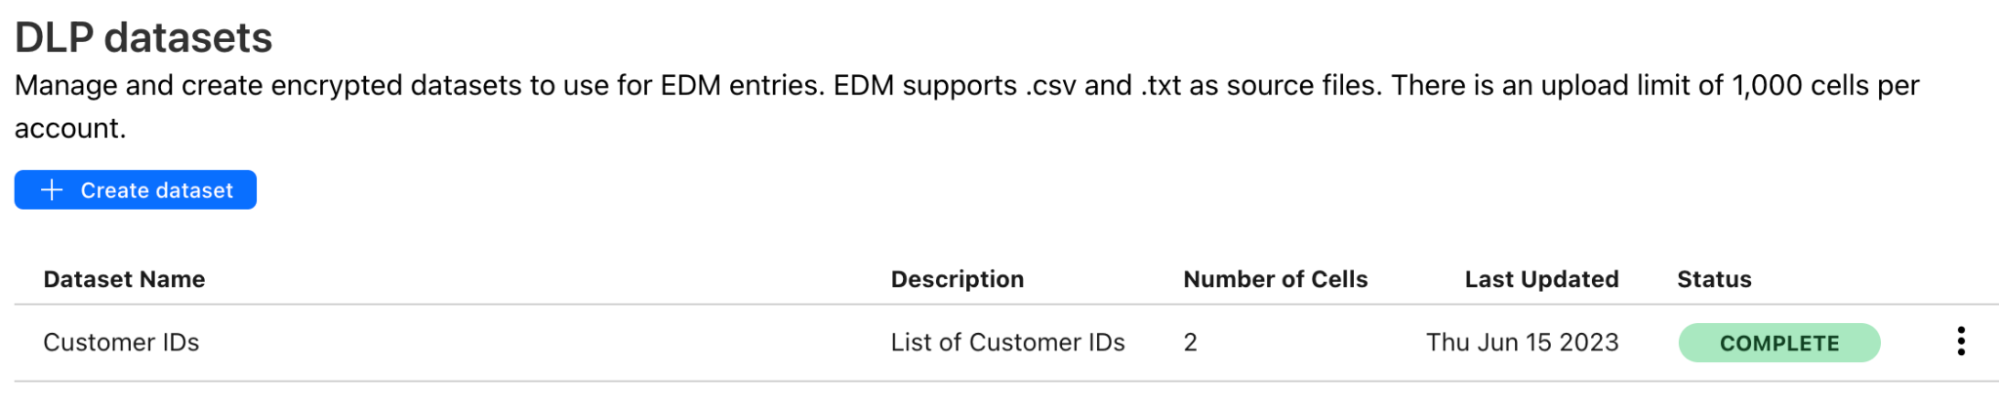
We now offer you the ability to upload DLP datasets. These allow you to provide batches of data to be used for your DLP detections.

When creating a dataset, provide a name, description, and a file containing the data to match.
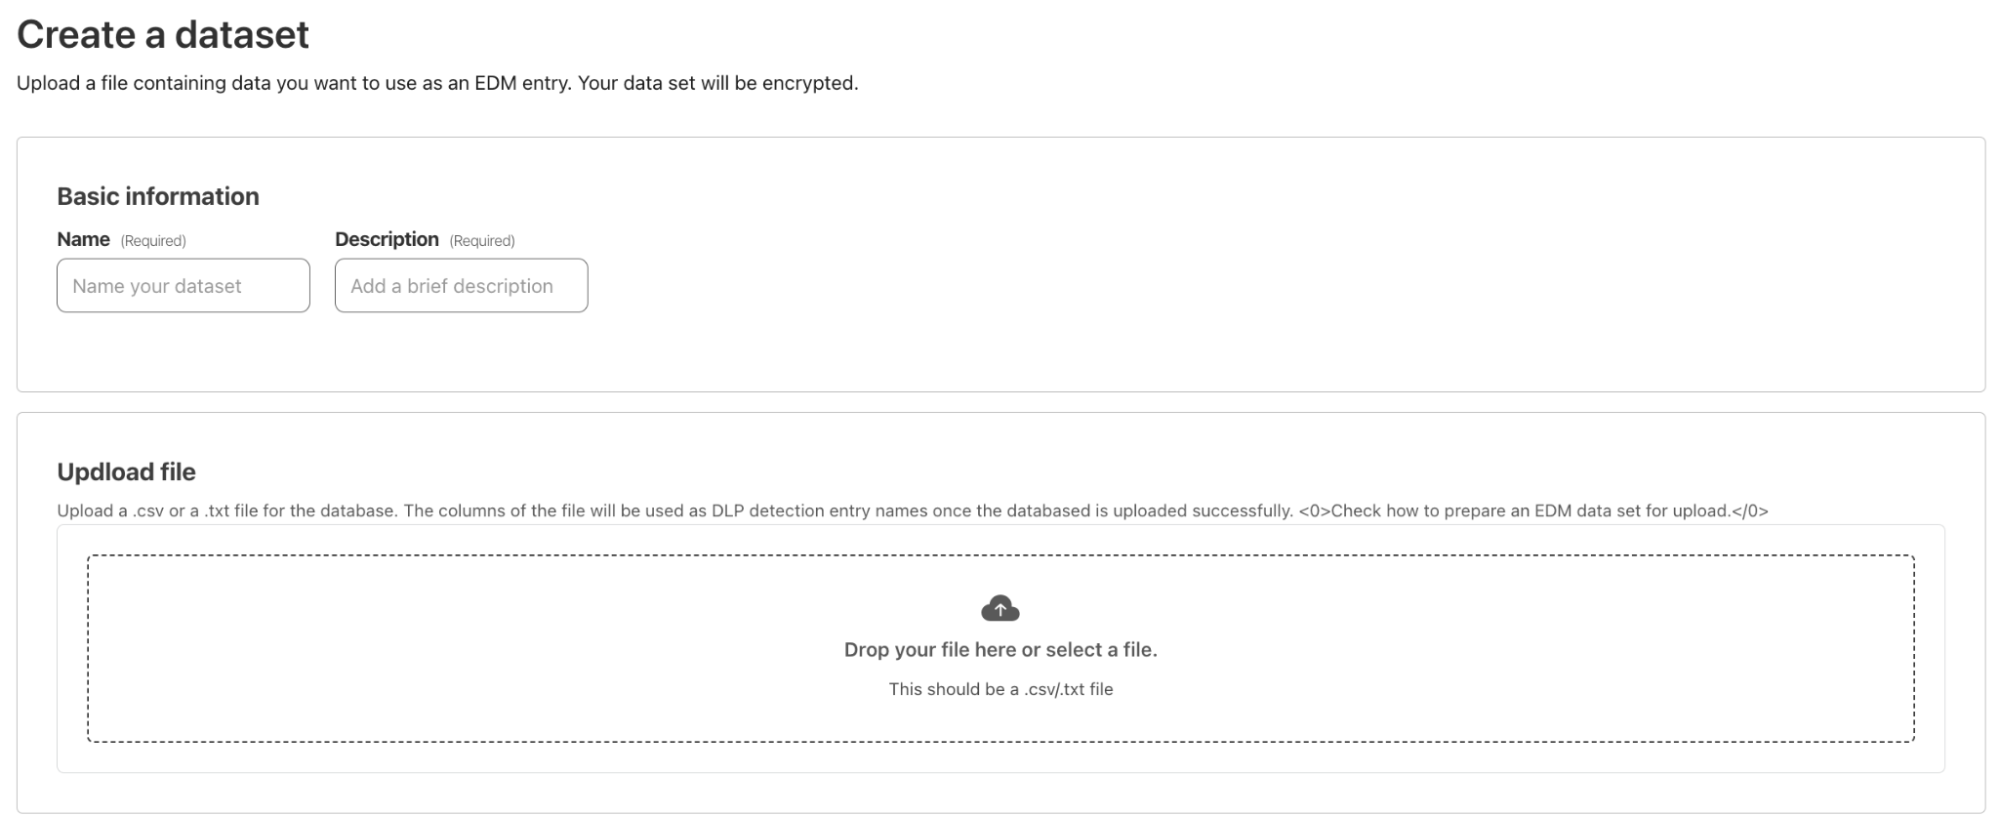
When you upload the file, Cloudflare one-way hashes the data right in your browser. The hashed data is then transferred via API to Cloudflare, while the cleartext data never leaves the browser.
You can see the status of the upload in the datasets table.
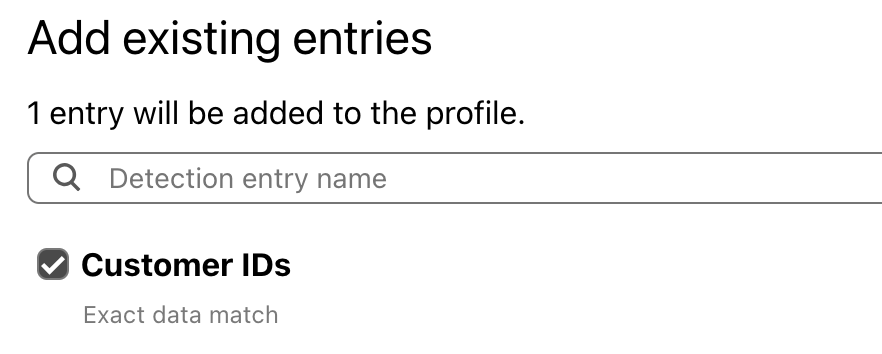
The dataset can now be added to a DLP profile for detection. You can also add other predefined and custom entries to the same DLP profile.
DLP Profiles can be used for inline scanning and protection with Cloudflare Gateway or scanning your data at rest with Cloudflare CASB.
Exact data match is now available for every DLP customer. If you are not a DLP customer but would like to learn more about Cloudflare One and DLP, reach out for a consultation.
Customers have many different formats to store data, and many different ways in which they want to monitor it. Our goal is to offer as much flexibility as your organization needs to meet your data protection goals.
Post Syndicated from Bineesh Ravindran original https://aws.amazon.com/blogs/devops/directing_ml-powered_operational_insights_from_amazon_devops_guru_to_your_datadog_event_stream/
Amazon DevOps Guru is a fully managed AIOps service that uses machine learning (ML) to quickly identify when applications are behaving outside of their normal operating patterns and generates insights from its findings. These insights generated by DevOps Guru can be used to alert on-call teams to react to anomalies for business mission critical workloads. If you are already utilizing Datadog to automate infrastructure monitoring, application performance monitoring, and log management for real-time observability of your entire technology stack, then this blog is for you.
You might already be using Datadog for a consolidated view of your Datadog Events interface to search, analyze and filter events from many different sources in one place. Datadog Events are records of notable changes relevant for managing and troubleshooting IT Operations, such as code, deployments, service health, configuration changes and monitoring alerts.
Wherever DevOps Guru detects operational events in your AWS environment that could lead to outages, it generates insights and recommendations. These insights/recommendations are then pushed to a user specific Datadog endpoint using Datadog events API. Customers can then create dashboards, incidents, alarms or take corrective automated actions based on these insights and recommendations in Datadog.
Datadog collects and unifies all of the data streaming from these complex environments, with a 1-click integration for pulling in metrics and tags from over 90 AWS services. Companies can deploy the Datadog Agent directly on their hosts and compute instances to collect metrics with greater granularity—down to one-second resolution. And with Datadog’s out-of-the-box integration dashboards, companies get not only a high-level view into the health of their infrastructure and applications but also deeper visibility into individual services such as AWS Lambda and Amazon EKS.
This blogpost will show you how to utilize Amazon DevOps guru with Datadog to get real time insights and recommendations on their AWS Infrastructure. We will demonstrate how an insight generated by Amazon DevOps Guru for an anomaly can automatically be pushed to Datadog’s event streams which can then be used to create dashboards, create alarms and alerts to take corrective actions.
Solution Overview
When an Amazon DevOps Guru insight is created, an Amazon EventBridge rule is used to capture the insight as an event and routed to an AWS Lambda Function target. The lambda function interacts with Datadog using a REST API to push corresponding DevOps Guru events captured by Amazon EventBridge
The EventBridge rule can be customized to capture all DevOps Guru insights or narrowed down to specific insights. In this blog, we will be capturing all DevOps Guru insights and will be performing actions on Datadog for the below DevOps Guru events:

Figure 1: Amazon DevOps Guru Integration with Datadog with Amazon EventBridge and AWS.
Pre-requisites
Before you deploy the solution, complete the following steps.

Figure 2: Create new API Key.
Add application keys
Add Application Key and API Key to AWS Secrets Manager : Secrets Manager enables you to replace hardcoded credentials in your code, including passwords, with an API call to Secrets Manager to retrieve the secret programmatically. This helps ensure the secret can’t be compromised by someone examining your code,because the secret no longer exists in the code.
Follow below steps to create a new secret in AWS Secrets Manager.

Figure 3: Create new secret in Secret Manager.
Click next and enter “DatadogSecretManager” as the secret name followed by Review and Finish

Figure 4: Configure secret in Secret Manager.
The DevOps Guru Datadog Connector application is available on the AWS Serverless Application Repository which is a managed repository for serverless applications. The application is packaged with an AWS Serverless Application Model (SAM) template, definition of the AWS resources used and the link to the source code. Follow the steps below to quickly deploy this serverless application in your AWS account

Figure 5: DevOps Guru Datadog connector.

Figure 6: Serverless Application DevOps Guru Datadog connector.
As you have seen above, you can directly deploy the sample serverless application form the Serverless Repository with one click deployment. Alternatively, you can choose to clone the GitHub source repository and deploy using the SAM CLI from your terminal.
The Serverless Application Model Command Line Interface (SAM CLI) is an extension of the AWS CLI that adds functionality for building and testing serverless applications. The CLI provides commands that enable you to verify that AWS SAM template files are written according to the specification, invoke Lambda functions locally, step-through debug Lambda functions, package and deploy serverless applications to the AWS Cloud, and so on. For details about how to use the AWS SAM CLI, including the full AWS SAM CLI Command Reference, see AWS SAM reference – AWS Serverless Application Model.
Before you proceed, make sure you have completed the pre-requisites section in the beginning which should set up the AWS SAM CLI, Maven and Java on your local terminal. You also need to install and set up Docker to run your functions in an Amazon Linux environment that matches Lambda.
Clone the source code from the github repo
git clone https://github.com/aws-samples/amazon-devops-guru-connector-datadog.git
Build the sample application using SAM CLI
$cd DatadogFunctions

$sam build
Building codeuri: $\amazon-devops-guru-connector-datadog\DatadogFunctions\Functions runtime: java11 metadata: {} architecture: x86_64 functions: Functions
Running JavaMavenWorkflow:CopySource
Running JavaMavenWorkflow:MavenBuild
Running JavaMavenWorkflow:MavenCopyDependency
Running JavaMavenWorkflow:MavenCopyArtifacts

Build Succeeded

Built Artifacts  : .aws-sam\build
Built Template   : .aws-sam\build\template.yaml

Commands you can use next
=========================
[*] Validate SAM template: sam validate
[*] Invoke Function: sam local invoke
[*] Test Function in the Cloud: sam sync --stack-name {{stack-name}} --watch
[*] Deploy: sam deploy --guided
This command will build the source of your application by installing dependencies defined in Functions/pom.xml, create a deployment package and saves it in the. aws-sam/build folder.
Deploy the sample application using SAM CLI
$sam deploy --guided
This command will package and deploy your application to AWS, with a series of prompts that you should respond to as shown below:
--capabilities CAPABILITY_IAM to the sam deploy command.After you enter your parameters, you should see something like this if you have provided Y to view and confirm ChangeSets. Proceed here by providing ‘Y’ for deploying the resources.
Initiating deployment
=====================

        Uploading to sam-app-datadog/0c2b93e71210af97a8c57710d0463c8b.template  1797 / 1797  (100.00%)


Waiting for changeset to be created..

CloudFormation stack changeset
---------------------------------------------------------------------------------------------------------------------
Operation                     LogicalResourceId             ResourceType                  Replacement
---------------------------------------------------------------------------------------------------------------------
+ Add                         FunctionsDevOpsGuruPermissi   AWS::Lambda::Permission       N/A
                              on
+ Add                         FunctionsDevOpsGuru           AWS::Events::Rule             N/A
+ Add                         FunctionsRole                 AWS::IAM::Role                N/A
+ Add                         Functions                     AWS::Lambda::Function         N/A
---------------------------------------------------------------------------------------------------------------------


Changeset created successfully. arn:aws:cloudformation:us-east-1:867001007349:changeSet/samcli-deploy1680640852/bdc3039b-cdb7-4d7a-a3a0-ed9372f3cf9a


Previewing CloudFormation changeset before deployment
======================================================
Deploy this changeset? [y/N]: y

2023-04-04 15:41:06 - Waiting for stack create/update to complete

CloudFormation events from stack operations (refresh every 5.0 seconds)
---------------------------------------------------------------------------------------------------------------------
ResourceStatus                ResourceType                  LogicalResourceId             ResourceStatusReason
---------------------------------------------------------------------------------------------------------------------
CREATE_IN_PROGRESS            AWS::IAM::Role                FunctionsRole                 -
CREATE_IN_PROGRESS            AWS::IAM::Role                FunctionsRole                 Resource creation Initiated
CREATE_COMPLETE               AWS::IAM::Role                FunctionsRole                 -
CREATE_IN_PROGRESS            AWS::Lambda::Function         Functions                     -
CREATE_IN_PROGRESS            AWS::Lambda::Function         Functions                     Resource creation Initiated
CREATE_COMPLETE               AWS::Lambda::Function         Functions                     -
CREATE_IN_PROGRESS            AWS::Events::Rule             FunctionsDevOpsGuru           -
CREATE_IN_PROGRESS            AWS::Events::Rule             FunctionsDevOpsGuru           Resource creation Initiated
CREATE_COMPLETE               AWS::Events::Rule             FunctionsDevOpsGuru           -
CREATE_IN_PROGRESS            AWS::Lambda::Permission       FunctionsDevOpsGuruPermissi   -
                                                            on
CREATE_IN_PROGRESS            AWS::Lambda::Permission       FunctionsDevOpsGuruPermissi   Resource creation Initiated
                                                            on
CREATE_COMPLETE               AWS::Lambda::Permission       FunctionsDevOpsGuruPermissi   -
                                                            on
CREATE_COMPLETE               AWS::CloudFormation::Stack    sam-app-datadog               -
---------------------------------------------------------------------------------------------------------------------


Successfully created/updated stack - sam-app-datadog in us-east-1
Once the deployment succeeds, you should be able to see the successful creation of your resources. Also, you can find your Lambda, IAM Role and EventBridge Rule in the CloudFormation stack output values.
You can also choose to test and debug your function locally with sample events using the SAM CLI local functionality.Test a single function by invoking it directly with a test event. An event is a JSON document that represents the input that the function receives from the event source. Refer the Invoking Lambda functions locally – AWS Serverless Application Model link here for more details.
$ sam local invoke Functions -e ‘event/event.json’
Once you are done with the above steps, move on to “Test the Solution” section below to trigger some DevOps Guru insights and validate that the events are created and pushed to Datadog.
Test the Solution
To test the solution, we will simulate a DevOps Guru Insight. You can also simulate an insight by following the steps in this blog. After an anomaly is detected in the application, DevOps Guru creates an insight as shown below

Figure 7: DevOps Guru insight for DynamoDB
For the DevOps Guru insight shown above, a corresponding event is automatically created and pushed to Datadog as shown below. In addition to the events creation, any new anomalies and recommendations from DevOps Guru is also associated with the events

Figure 8 : DevOps Guru Insight pushed to Datadog event stream.
Cleaning Up
To delete the sample application that you created, In your Cloud 9 environment open a new terminal. Now type in the AWS CLI command below and pass the stack name you provided in the deploy step
aws cloudformation delete-stack --stack-name <Stack Name>
Alternatively ,you could also use the AWS CloudFormation Console to delete the stack
Conclusion
This article highlights how Amazon DevOps Guru monitors resources within a specific region of your AWS account, automatically detecting operational issues, predicting potential resource exhaustion, identifying probable causes, and recommending remediation actions. It describes a bespoke solution enabling integration of DevOps Guru insights with Datadog, enhancing management and oversight of AWS services. This solution aids customers using Datadog to bolster operational efficiencies, delivering customized insights, real-time alerts, and management capabilities directly from DevOps Guru, offering a unified interface to swiftly restore services and systems.
To start gaining operational insights on your AWS Infrastructure with Datadog head over to Amazon DevOps Guru documentation page.
About the authors:
Post Syndicated from Matt Granger original https://www.youtube.com/watch?v=i0WYIgqj8LA
Post Syndicated from Bruce Schneier original https://www.schneier.com/blog/archives/2023/07/french-police-will-be-able-to-spy-on-people-through-their-cell-phones.html
The French police are getting new surveillance powers:
French police should be able to spy on suspects by remotely activating the camera, microphone and GPS of their phones and other devices, lawmakers agreed late on Wednesday, July 5.
[…]
Covering laptops, cars and other connected objects as well as phones, the measure would allow the geolocation of suspects in crimes punishable by at least five years’ jail. Devices could also be remotely activated to record sound and images of people suspected of terror offenses, as well as delinquency and organized crime.
[…]
During a debate on Wednesday, MPs in President Emmanuel Macron’s camp inserted an amendment limiting the use of remote spying to “when justified by the nature and seriousness of the crime” and “for a strictly proportional duration.” Any use of the provision must be approved by a judge, while the total duration of the surveillance cannot exceed six months. And sensitive professions including doctors, journalists, lawyers, judges and MPs would not be legitimate targets.
Post Syndicated from original https://lwn.net/Articles/937458/
The LWN.net Weekly Edition for July 13, 2023 is available.
Post Syndicated from original https://lwn.net/Articles/937830/
The kdevops
kernel-testing framework has come up at several earlier summits, including
in two separate sessions at last year’s event.
Testing kernel filesystems and the block layer, not to mention lots of
other kernel subsystems, has become increasingly
important over time.
So it was no
surprise that Luis Chamberlain led a
combined storage and filesystem session at the
2023 Linux Storage, Filesystem,
Memory-Management and BPF Summit to talk more about testing, the
resources needed for it, and what can be done to improve it. It was the
final session for this year’s summit, so this article completes our coverage.
Post Syndicated from original https://lwn.net/Articles/938021/
Over on the Open Source Initiative (OSI) blog, the organization has announced the Open Policy Alliance (OPA), which is meant to bring together various non-profit organizations to help educate and inform US policy makers about open-source software and its needs:
The need to create such a program is more urgent today due to the rise of new regulations in the software industry and adjacent open domains around the world. Cyber security, the societal impact of AI, data and privacy are important issues for legislators globally. At the same time, the COVID-19 pandemic drove collaborative development to unprecedented levels and took Open Source software, open research, open content and data from mainstream to main stage. Moving forward, developing these important public policies whilst not harming the ecosystem requires an understanding of how the Open Source ecosystem works. Ensuring stakeholders without historic benefit of representation are included in those discussions becomes paramount to that end.
The OPA will focus on educating public policy makers on Open Source to inform their development and deliberation of new policy concepts. There are unintended consequences that come from a lack of understanding of how open collaboration works in practice. The OPA will address this as well as the historic absence of contribution from underrepresented groups. The interest areas of the OPA community will complement those of Digitable Public Goods Alliance, a UNICEF multi-stakeholder initiative with a mission to accelerate the attainment of sustainable development goals in low- and middle-income countries that OSI joined earlier this year.
Post Syndicated from Zygimantas Koncius original https://aws.amazon.com/blogs/big-data/configure-end-to-end-data-pipelines-with-etleap-amazon-redshift-and-dbt/
This blog post is co-written with Zygimantas Koncius from Etleap.
Organizations use their data to extract valuable insights and drive informed business decisions. With a wide array of data sources, including transactional databases, log files, and event streams, you need a simple-to-use solution capable of efficiently ingesting and transforming large volumes of data in real time, ensuring data cleanliness, structural integrity, and data team collaboration.
In this post, we explain how data teams can quickly configure low-latency data pipelines that ingest and model data from a variety of sources, using Etleap’s end-to-end pipelines with Amazon Redshift and dbt. The result is robust and flexible data products with high scalability and best-in-class query performance.
Amazon Redshift is a fast, fully-managed, self-learning, self-tuning, petabyte-scale, ANSI-SQL compatible, and secure cloud data warehouse. Thousands of customers use Amazon Redshift to analyze exabytes of data and run complex analytical queries. Amazon Redshift Serverless makes it straightforward to run and scale analytics in seconds without having to manage the data warehouse. It automatically provisions and scales the data warehouse capacity to deliver high performance for demanding and unpredictable workloads, and you only pay for the resources you use. Amazon Redshift helps you break down the data silos and allows you to run unified, self-service, real-time, and predictive analytics on all data across your operational databases, data lake, data warehouse, and third-party datasets with built-in governance. Amazon Redshift delivers up to five times better price performance than other cloud data warehouses out of the box and helps you keep costs predictable.
dbt is a SQL-based transformation workflow that is rapidly emerging as the go-to standard for data analytics teams. For straightforward use cases, dbt provides a simple yet robust SQL transformation development pattern. For more advanced scenarios, dbt models can be expanded using macros created with the Jinja templating language and external dbt packages, providing additional functionality.
One of the key advantages of dbt is its ability to foster seamless collaboration within and across data analytics teams. A strong emphasis on version control empowers teams to track and review the history of changes made to their models. A comprehensive testing framework ensures that your models consistently deliver accurate and reliable data, while modularity enables faster development via component reusability. Combined, these features can improve your data team’s velocity, ensure higher data quality, and empower team members to assume ownership.
dbt is popular for transforming big datasets, so it’s important that the data warehouse that runs the transformations provide a lot of computational capacity at the lowest possible cost. Amazon Redshift is capable of fulfilling both of these requirements, with features such as concurrency scaling, RA3 nodes, and Redshift Serverless.
To take advantage of dbt’s capabilities, you can use dbt Core, an open-source command-line tool that serves as the interface to using dbt. By running dbt Core along with dbt’s Amazon Redshift adapter, you can compile and run your models directly within your Amazon Redshift data warehouse.
Etleap is an AWS Advanced Technology Partner with the AWS Data & Analytics Competency and Amazon Redshift Service Ready designation. Etleap simplifies the data pipeline building experience. A cloud-native platform that seamlessly integrates with AWS infrastructure, Etleap consolidates data without the need for coding. Automated issue detection pinpoints problems so data teams can stay focused on analytics initiatives, not data pipelines. Etleap integrates key Amazon Redshift features into its product, such as streaming ingestion, Redshift Serverless, and data sharing.
In Etleap, pre-load transformations are primarily used for cleaning and structuring data, whereas post-load SQL transformations enable multi-table joins and dataset aggregations. Bridging the gap between data ingestion and SQL transformations comes with multiple challenges, such as dependency management, scheduling issues, and monitoring the data flow. To help you address these challenges, Etleap introduced end-to-end pipelines that use dbt Core models to combine data ingestion with modeling.
The following diagram illustrates Etleap’s end-to-end pipeline architecture and an example data flow.

Etleap end-to-end data pipelines combine data ingestion with modeling in the following way: a cron schedule first triggers ingestion of data required by the models. Once all the ingestion is complete, a user-defined dbt build is run, which performs post-load SQL transformations and aggregations on the data that has just been ingested by ingestion pipelines.
End-to-end pipelines offer several advantages over running dbt workflows in isolation, including dependency management, scheduling and latency, Amazon Redshift workload synchronization, and managed infrastructure.
In a typical dbt use case, the data that dbt performs SQL transformations on is ingested by an extract, transform, and load (ETL) tool such as Etleap. Tables ingested by ETL processes in dbt projects are usually referenced as dbt sources. Those source references need to be maintained either manually or using custom solutions. This is often a laborious and error-prone process. Etleap eliminates these processes by automatically keeping your dbt source list up to date. Additionally, any changes made to the dbt project or ingestion pipeline will be validated by Etleap, ensuring that the changes are compatible and won’t disrupt your dbt builds.
End-to-end pipelines allow you to monitor and minimize end-to-end latency. This is achieved by using a single end-to-end pipeline schedule, which eliminates the need for an independent ingestion pipeline and dbt job-level schedules. When the schedule triggers the end-to-end pipeline, the ingestion processes will run. The dbt workflow will start only after the data for every table used in the dbt SQL models is up to date. This removes the need for additional scheduling components outside of Etleap, which reduces data stack complexity. It also ensures that all data involved in dbt transformations is at least as recent as the scheduled trigger time. Consequently, data in all the final tables or views will be up to date as of the scheduled trigger time.
Due to pipelines and dbt builds running on the same schedule and triggering only the required parts of data ingestion and dbt transformations, higher workload synchronization is achieved. This means that customers using Redshift Serverless can further minimize their compute usage, driving their costs down further.
One of the challenges when using dbt Core is the need to set up and maintain your own infrastructure in which the dbt jobs can be run efficiently and securely. As a software as a service (SaaS) provider, Etleap provides highly scalable and secure dbt Core infrastructure out of the box, so there’s no infrastructure management required by your data teams.
To illustrate how end-to-end pipelines can address a data analytics team’s needs, we use an example based on Etleap’s own customer success dashboard.
For Etleap’s customer success team, it’s important to track changes in the number of ingestion pipelines customers have. To meet the team’s requirements, the data analyst needs to ingest the necessary data from internal systems into an Amazon Redshift cluster. They then need to develop dbt models and schedule an end-to-end pipeline. This way, Etleap’s customer success team has dashboard-ready data that is consistently up to date.
In Etleap’s case, the internal entities are stored in a MySQL database, and customer relationships are managed via HubSpot. Therefore, the data analyst must first ingest all data from the MySQL user and pipeline tables as well as the companies entity from HubSpot into their Amazon Redshift cluster. They can achieve this by logging into Etleap and configuring ingestion pipelines through the UI.
After the data has been loaded into Amazon Redshift, the data analyst can begin creating dbt models by using queries that join the HubSpot data with internal entities. The first model, user_pipelines.sql, joins the users table with the pipelines table based on the foreign key user_id stored in the pipelines table, as shown in the following code. Note the use of source notation to reference the source tables, which were ingested using ingestion pipelines.
The second model, company_pipelines.sql, joins the HubSpot companies table with the user_pipelines table, which is created by the first dbt model, based on the email domain. Note the usage of ref notation to reference the first model:
After creating these models in the dbt project, the data analyst will have achieved the data flow summarized in the following figure.

Finally, the data analyst can define a dbt selector to select the newly created models and run the dbt workflow locally. This creates the views and tables defined by the models in their Amazon Redshift cluster.
The resulting company_pipelines table enables the team to track metrics, such as the number of pipelines created by each customer or the number of pipelines created on any particular day.
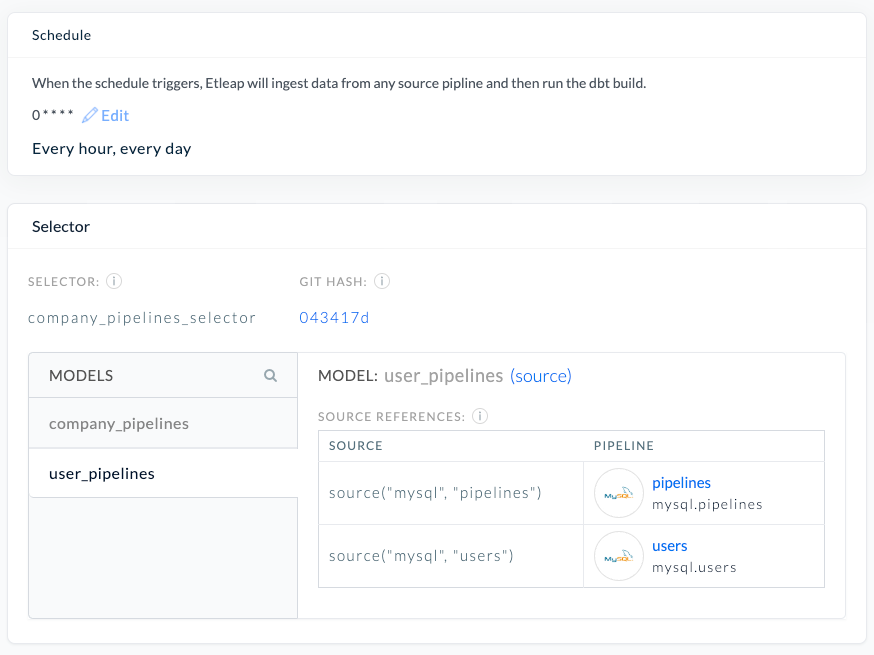
After the data analyst has developed the initial models and queries, they can schedule an Etleap end-to-end pipeline by choosing the selector and defining a desired cron schedule. The end-to-end pipeline matches the sources to pipelines and takes care of running the ingestion pipelines as well as dbt builds on a defined schedule, ensuring high freshness of the data.
The following screenshot of the Etleap UI shows the configuration of an end-to-end pipeline, including its cron schedule, which models are included in the dbt build, and the mapping of inferred dbt sources to Etleap pipelines.
In this post, we described how Etleap’s end-to-end pipelines enable data teams to simplify their data integration and transformation workflows as well as achieve higher data freshness. In particular, we illustrated how data teams can use Etleap with dbt and Amazon Redshift to run their data ingestion pipelines with post-load SQL transformations with minimal effort required by the team.
Start using Amazon Redshift or Amazon Redshift Serverless to take advantage of their powerful SQL transformations. To get started with Etleap, start a free trial or request a tailored demo.
 Zygimantas Koncius is an engineer at Etleap with 3 years of experience in developing robust and performant ETL software. In addition to development work, he maintains Etleap infrastructure and provides deep-level technical customer support.
 Sudhir Gupta is a Principal Partner Solutions Architect, Analytics Specialist at AWS with over 18 years of experience in Databases and Analytics. He helps AWS partners and customers design, implement, and migrate large-scale data & analytics (D&A) workloads. As a trusted advisor to partners, he enables partners globally on AWS D&A services, builds solutions/accelerators, and leads go-to-market initiatives.
Post Syndicated from Jakub Oleksy original https://github.blog/2023-07-12-github-availability-report-june-2023/
In June, we experienced two incidents that resulted in degraded performance across GitHub services.
On June 7 at 16:11 UTC, GitHub started experiencing increasing delays in an internal job queue used to process Git pushes. Our monitoring systems alerted our first responders after 19 minutes. During this incident, customers experienced GitHub Actions workflow run and webhook delays as long as 55 minutes, and pull requests did not accurately reflect new commits.
We immediately began investigating and found that the delays were caused by a customer making a large number of pushes to a repository with a specific data shape. The jobs processing these pushes became throttled when communicating with the Git backend, leading to increased job execution times. These slow jobs exhausted a worker pool, starving the processing of pushes for other repositories. Once the source was identified and temporarily disabled, the system gradually recovered as the backlog of jobs was completed. To prevent a recurrence, we updated the Git backend’s throttling behavior to fail faster and reduced the Git client timeout within the job to prevent it from hanging. We have additional repair items in place to reduce the times to detect, diagnose, and recover.
On June 29, starting from 17:39 UTC, GitHub was down in parts of North America, particularly the US East coast and South America, for approximately 32 minutes.
GitHub takes measures to ensure that we have redundancy in our system for various disaster scenarios. We have been working on building redundancy to an earlier single point of failure in our network architecture at a second Internet edge facility. This facility was completed in January and has been actively routing production traffic since then in a high availability (HA) architecture alongside the first edge facility. As part of the facility validation steps, we performed a live failover test in order to verify that we could use this second Internet edge facility if the primary were to fail. Unfortunately, during this failover test we inadvertently caused a production outage.
The test exposed a network path configuration issue in the secondary side that prevented it from properly functioning as a primary, which resulted in the outage. This has since been fixed. We were immediately notified of the issue and within two minutes of being alerted we reverted the change and brought the primary facility back online. Once online it took time for traffic to be rebalanced and for our border routers to reconverge restoring public connectivity to GitHub systems.
This failover test helped expose the configuration issue, and we are addressing the gaps in both configuration and our failover testing, which will help make GitHub more resilient. We recognize the severity of this outage and the importance of keeping GitHub available. Moving forward, we will continue our commitment to high availability, improving these tests and scheduling them in a way where potential customer impact is minimized as much as possible.
Please follow our status page for real-time updates on status changes. To learn more about what we’re working on, check out the GitHub Engineering Blog.
Post Syndicated from Ram Ramani original https://aws.amazon.com/blogs/security/how-to-enforce-multi-party-approval-for-creating-matter-compliant-certificate-authorities/
Customers who build smart home devices using the Matter protocol from the Connectivity Standards Alliance (CSA) need to create and maintain digital certificates, called device attestation certificates (DACs), to allow their devices to interoperate with devices from other vendors. DACs must be issued by a Matter device attestation certificate authority (CA). The CSA mandates multi-party approval for creating Matter compliant CAs. You can use AWS Private CA to create your Matter device attestation CA, which will store two important certificates: the product attestation authority (PAA) and product attestation intermediate (PAI) certificate. The PAA is the root CA that signs the PAI; the PAI is the intermediate CA that issues DACs. In this blog post, we will show how to implement multi-party approval for creation of these two certificates within AWS Private CA.
The CSA allows the use of delegated service providers (DSP) to provide you with public key infrastructure (PKI) services to create your Matter device attestation CA. You can use AWS Private CA as a DSP to create a Matter device attestation CA to issue DACs.
You should carefully plan to implement and demonstrate compliance with the Matter PKI Certificate Policy (CP) requirements when you issue Matter certificates by using the CA infrastructure services provided by AWS Private CA. Matter PKI CP is not just a technical standard; it also covers people, processes, and technology. For information about the requirements to comply with the Matter PKI CP and a reference list of acronyms, see the Matter PKI Compliance Guide. In this blog post, we address one of the Matter requirements for technical security controls for implementing multi-party approval for the creation of PAA and PAI certificates
Note: The solution presented in this post uses AWS Systems Manager Change Manager, a capability of AWS Systems Manager, for demonstrating multi-party approval as required by the Matter CP for the creation of the PAA and PAI. Additionally, the solution also uses AWS Systems Manager documents (SSM documents), which contain the code to automate the creation of PAA and PAI DAC certificates.
For the process of achieving the multi-party approval required for Matter compliance, we will use the following human personas:
AWS offers support for identity federation to enable federated single sign-on (SSO). This allows users to sign into the AWS Management Console or call AWS API operations by using the credentials of an IAM role. To establish a secure authentication and authorization model, we highly recommend that you map the identities of the human personas to IAM roles.
As a prerequisite, Shirley Rodriguez will create the following AWS Identity and Access Management (IAM) roles that support the multi-party approval operations:
Note: It’s important that one person cannot approve an action by themselves. If a person is allowed to assume the MatterCA-Admin-1 role, they must not be allowed to assume the MatterCA-Admin-2 role also. If the same person can assume both roles, then that person can bypass the requirement for two different people to approve.
{

    "Version": "2012-10-17",
    "Statement": [
        {
            "Effect": "Allow",
            "Principal": {
                "AWS": "aws:PrincipalARN":"arn:aws:iam::<AccountNumber>:role/<Role-Name>"
            },
            "Action": "sts:AssumeRole"
        }
    ]
}{
"Version": "2012-10-17",
"Statement": [
{
"Sid": "TemplateReviewer",
"Effect": "Allow",
"Action": "ssm:UpdateDocumentMetadata",
"Resource": "*"
}
]
}{
"Version": "2012-10-17",
"Statement": [
{
"Effect": "Allow",
"Principal": {
"AWS":"aws:PrincipalARN":"arn:aws:iam::<AccountNumber>:role/<Role-Name>"
},
"Action": "sts:AssumeRole"
}
]
}{
"Version": "2012-10-17",
"Statement": [
{
"Effect": "Allow",
"Action": [
"acm-pca:ImportCertificateAuthorityCertificate",
"acm-pca:IssueCertificate",
"acm-pca:CreateCertificateAuthority",
"acm-pca:GetCertificate",
"acm-pca:GetCertificateAuthorityCsr",
"acm-pca:DescribeCertificateAuthority"
],
"Resource": "*"
}
]
}{
"Version": "2012-10-17",
"Statement": [
{
"Effect": "Allow",
"Principal": {
"Service": "ssm.amazonaws.com"
},
"Action": "sts:AssumeRole",
"Condition": {}
}
]{
"Version": "2012-10-17",
"Statement": [
{
"Effect": "Allow",
"Action": [
"acm-pca:ImportCertificateAuthorityCertificate",
"acm-pca:CreateCertificateAuthority",
"acm-pca:GetCertificateAuthorityCsr",
"acm-pca:DescribeCertificateAuthority"
],
"Resource": "*"
},
{
"Effect": "Allow",
"Action": [
"acm-pca:GetCertificateAuthorityCertificate",
"acm-pca:GetCertificate",
"acm-pca:IssueCertificate"
],
"Resource": “*”
}
]
}{
"Version": "2012-10-17",
"Statement": [
{
"Effect": "Allow",
"Principal": {
"Service": "ssm.amazonaws.com"
},
"Action": "sts:AssumeRole",
"Condition": {}
}
]
}
We recommend that you apply the following security controls for this solution:
The following example SCP will enforce this type of restriction. Make sure to replace <AccountNumber> with your own information. With a strong SCP, even the root account will not be able to perform these operations or change these security controls.
{
    "Version": "2012-10-17",
    "Statement": [
        {
            "Sid": "RestrictCACreation",
            "Effect": "Deny",
            "Action": ["acm-pca:CreateCertificateAuthority"],
            "Resource": "*",
            "Condition": {
                "StringNotLike": {
                    "aws:PrincipalARN": [
                        "arn:aws:iam::<AccountNumber>:role/CreatePAA-Role",
                        "arn:aws:iam::<AccountNumber>:role/CreatePAI-Role"
                    ]
                }
            }
        }
    ]
}Shirley Rodriguez will download the following sample Systems Manager (SSM) documents from our GitHub repository and perform the listed steps in this section.
The content in these yaml files will be used in the next steps to create SSM documents.
The first step is to create the SSM document that automates resource creation of the PAA and PAI in AWS Private CA.

Figure 1: Create the automation document

Figure 2: Automation document editor

Figure 3: Successful creation of the CreatePAA document

Figure 4: Successful creation of the PAA and PAI documents
You’ve now completed the creation of an SSM document that contains the automation code to create certificate authorities PAA and PAI. The next step is to create Change Manager templates, which will use the SSM document and apply multi-party approval before the creation of the PAA and PAI.
Shirley Rodriguez will next create two change templates that run the SSM documents: one for the PAA and one for the PAI.

Figure 5: Select the runbook CreatePAA in the change template

Figure 6: Add first level approver for the template

Figure 7: Add second level approver for the template.

Figure 8: Template with a status of pending review

Figure 9: Both templates ready for review
You’ve successfully created two change templates, CreatePAATemplate and CreatePAITemplate, that generate a change request that contains an SSM document with automation code for building the PAA and PAI. These change requests are configured with multi-party approval before running the SSM document. However, before you can proceed with running the change template, it must undergo review and approval by the template reviewer Richard Roe.
First you need to make sure that TmpltReview-Role is added as a reviewer and approver of change templates. Shirley Rodriguez will follow the steps in this section to add TmpltReview-Role as change template reviewer.

Figure 10: The template reviewer role in Settings
Now you have TmpltReview-Role added as a reviewer. Change templates that are created or modified will now need to be reviewed and approved by this role. Richard Roe will use the role TmpltReview-Role for governance of change templates, to make sure changes made by Shirley Rodriguez are in alignment with the organization’s compliance needs for Matter.

Figure 11: Change template approval details
You now have the change templates CreatePAATemplate and CreatePAITemplate in approved status.
Up to this point, these instructions have described one-time configurations of AWS Systems Manager to set up the IAM roles, SSM documents, and change templates that are required to enforce multi-party approval. Now you are ready to use these change templates to create the PAA and PAI and perform multi-party approval.
Shirley Rodriguez will generate change requests that require approval from Jane Doe and Paulo Santos. This manual approval process will then run the SSM documents to create the PAA and PAI.
Perform the following steps to create a change request for the PAA.

Figure 12: Change request approvers

Figure 13: Change request role
You have successfully created a change request that is currently awaiting approval from Jane Doe and Paulo Santos. Let’s now move on to the approval steps.
Each of the approvers should now follow the steps in this section for approval. Jane Doe will use the IAM role MatterCA-Admin-1, while Paulo Santos will need to use the IAM role MatterCA-Admin-2.

Figure 14: Change request approval
After Jane Doe and Paulo Santos each follow these steps to approve the change request, the change request will run and will complete with status “Success,” and the PAA will be created in AWS Private CA.

Figure 15: The change request ran successfully
Next, you need to validate that the PAA was created successfully and copy its Amazon Resource Name (ARN) to use for PAI creation.

Figure 16: ARN of the PAA root CA PAA
After successfully completing these steps, you have created the certificate authority PAA by using AWS Private CA with multi-party approval. You can now proceed to the next section, where we will demonstrate how to use this PAA to issue a CA for PAI.
Perform the following steps to create a change request for the PAI.
Note: Creation of a valid PAA is a prerequisite for creating the PAI in the following steps.

Figure 17: CreatePAITemplate template

Figure 18: Change request IAM role selection
Each of the approvers should now follow the steps in this section for approval for the PAI. Jane Doe will need to use IAM role MatterCA-Admin-1, and Paulo Santos will need to use IAM role MatterCA-Admin-2.
After both approvers (Jane Doe and Paulo Santos) approve the change request, the change request will run, and the PAA will be created inside AWS Private CA.

Figure 19: The change requests for the PAA and PAI have run successfully

Figure 20: PAA and PAI in AWS Private CA
After successfully completing these steps, you have created the certificate authority PAI by using AWS Private CA with multi-party approval. You can now issue DAC certificates by using this PAI. Next, we will show how to validate the logs to confirm multi-party approval.
To keep audit records that show that multi-party approval was used to create the PAA and PAI to issue DACs, you can use the Change Manager timeline.

Figure 21: Audit trail for approval and creation of the PAA
Likewise, Figure 22 shows an example of a timeline with complete runbook steps for creating the PAI by using multi-party approval.

Figure 22: Audit trail for approval and creation of the PAI
In this post, you learned how to use AWS Private CA to facilitate the creation of Matter CAs in compliance with the Matter PKI CP. By using AWS Systems Manager, you can effectively fulfill the technical security control outlined in the Matter PKI CP for implementing multi-party approval for the creation of PAA and PAI certificates.
If you have feedback about this post, submit comments in the Comments section below. If you have questions about this post, start a new thread on the AWS Private Certificate Authority re:Post or contact AWS Support.
Want more AWS Security news? Follow us on Twitter.
Post Syndicated from Emmanuel Isimah original https://aws.amazon.com/blogs/security/consolidating-controls-in-security-hub-the-new-controls-view-and-consolidated-findings/
In this blog post, we focus on two recently released features of AWS Security Hub: the consolidated controls view and consolidated control findings. You can use these features to manage controls across standards and to consolidate findings, which can help you significantly reduce finding noise and administrative overhead.
Security Hub is a cloud security posture management service that you can use to apply security best practice controls, such as “EC2 instances should not have a public IP address.” With Security Hub, you can check that your environment is properly configured and that your existing configurations don’t pose a security risk. Security Hub has more than 200 controls that cover more than 30 AWS services, such as Amazon Elastic Compute Cloud (Amazon EC2), Amazon Simple Storage Service (Amazon S3), and AWS Lambda. In addition, Security Hub has integrations with more than 85 partner products. Security Hub can centralize findings across your AWS accounts and AWS Regions into a single delegated administrator account in your aggregation Region of choice, creating a single pane of glass to view findings. This can help you to triage, investigate, and respond to findings in a simpler way and improve your security posture.
The Security Hub controls are grouped into the following security standards:
With the new features — consolidated controls view and consolidated control findings—you can now do the following:
Now we’ll discuss some of the details of how you can use the two new features to streamline the management of controls.
On the new Controls page, now available in the Security Hub console as shown in Figure 1, you can view and configure security controls across standards from one central location.

Figure 1: Security Hub Controls page
Before this release, controls had to be managed within the context of individual security standards. Even if the same control was part of multiple standards, the control had different IDs in each of them. With this recent release, Security Hub now assigns controls a unique security control ID across standards, so that it’s simpler for you to reference the controls and view their findings. Following the current naming convention of the AWS FSBP standard, the consolidated control IDs start with the relevant service in scope for the control. In fact, whenever possible, the new consolidated control ID is the same as the previous FSBP control ID.
For example, before this release, control IAM.6 in FSBP was also referenced as 1.14 in CIS 1.2, and 1.6 in CIS 1.4, PCI.IAM.4, and CT.IAM.6. After the release, the control is now referenced as IAM.6 in the Security Hub standards. This change does not affect the pre-existing API calls for Security Hub, such as UpdateStandardsControl, where you can still provide the previous StandardControlARN in order to make the call.
By using the new Controls view, you can understand the status of controls across your system, view control findings, and prioritize next steps without context switching. The following information is available on the Controls page of the Security Hub console:
From the controls page, you can select a control to view its details (including its title and the standards it belongs to), and view and act on the findings generated by the control.
Security Hub also offers new API operations that match the capabilities of the controls page. Unlike the pre-existing API operations, these new API operations use the consolidated control IDs (also known as security control IDs) to provide a way to know and manage the relationship between controls and standards. You can use these API operations to manage each Security Hub control across standards, to make sure that the status of controls in the standards is aligned. The new API operations include the following:
We also provide an example script that makes use of these API calls and applies them across accounts and Regions so that your configuration is consistent. You can use our script to enable or disable Security Hub controls across your various accounts or Regions.
Before we released the consolidated control findings feature, Security Hub generated separate findings per standard for each related control. Now, you can turn on consolidated control findings, and after doing so, Security Hub will produce a single finding per security check, even when the underlying control is shared across multiple standards. Having a single finding per check across standards will help you investigate, update, and remediate failed findings more quickly, while also reducing finding noise.
As an example, we can look at control CloudTrail.2, which is shared between standards supported by Security Hub. Before you turn on this capability, you might potentially receive up to six findings for each security check generated by this control—with one finding for each security standard. After you turn on consolidated control findings, these older findings will be archived and Security Hub will generate one finding per security check in this control, regardless of how many security standards you have enabled. For an example of how the standard-specific findings compare to the new consolidated finding, see Sample control findings. The following is an example of a consolidated finding for the CloudTrial.2 control; we’ve highlighted the part that shows this finding is shared across standards.

Figure 2: Turn on consolidated control findings
If you are using the Security Hub integration with AWS Organizations or have invited member accounts through a manual invitation process, consolidated control findings can only be turned on by the administrator account. When this action is taken in the administrator account, the action will also be reflected in each member account in the current Region. It can take up to 18 hours for Security Hub to archive existing standard-specific findings and generate the new, standard-agnostic, findings.
You can also enable consolidated control findings by using the API (calling the UpdateSecurityHubConfiguration API with the ControlFindingGenerator parameter equal to SECURITY_CONTROL), or by using the AWS CLI (running the update-security-hub-configuration command with control-finding-generator equal to SECURITY_CONTROL), as in the following example.
Much like the console behavior, if you have an organizational setup in Security Hub, this API action can only be taken by the administrator, and it will be reflected in each member account in the same Region.
To allow for these new capabilities to be launched, changes to the AWS Security Finding Format (ASFF) are required. This format is used by Security Hub for findings it generates from its controls or ingests from external providers. When you turn on finding consolidation, Security Hub will archive old standard-specific findings and generate standard-agnostic findings instead. This action will only affect control findings that Security Hub generates, and it will not affect findings ingested from partner products. However, in Security Hub findings, turning on consolidated control findings might cause some updates that you previously made to findings to be archived. Despite this one-time change, after the migration is complete (it can take up to 18 hours), you will be able to update finding fields in a single action and the updates will apply across standards, without the need to make multiple updates.
One field affected by the new capabilities is the Workflow field, which provides information about the status of the investigation into a finding. Manipulating this field can also update the overall compliance status of the control that the finding is related to. For example, if you have a control with one failed finding (and the rest have passed), and the failed finding comes from a resource for which you’d like to make an exception, you can decide to suppress that failed finding by updating the Workflow field. If you suppress failed findings in a control, its compliance status can change to pass.
Before turning on consolidated control findings, if you want to maintain an aligned compliance status in controls that belong to multiple standards, you have to update the Workflow status of findings in each standard. After turning on finding consolidation, you will only have to update the Workflow status once, and the suppression will be applied across standards, helping you to reduce the number of steps needed to suppress the same findings across standards.
As mentioned earlier, when you turn on this new capability, some updates made to the previous, standard-specific findings will be archived and will not be included in the new consolidated control findings generated by Security Hub. In the case of the Workflow status, the new consolidated findings will be created with a value of NEW (for failed findings) or RESOLVED (for new findings) in the Workflow field. However, after you have onboarded to the new finding format, you can update the value of the Workflow field, as well as other fields, and this value will be maintained without requiring you to make continuous updates. For the full list of fields that can be affected by the migration to the consolidated finding format, see Consolidated control findings – ASFF changes. Before you turn on finding consolidation, we suggest that you check if your custom automations refer to those affected fields. If they do, you can update your automations and test them by using the Sample control findings in the documentation.
This blog post covers new Security Hub features that make it simpler for you to manage controls across standards. With the new consolidated control findings feature, you can focus on the most relevant findings and reduce noise, which is why we recommend that you review the new feature and its associated changes and turn it on at your earliest convenience.
If you have feedback about this blog post, submit comments in the Comments section below. If you have questions about this blog post, start a new thread on the Security Hub forum or contact AWS Support.
Want more AWS Security news? Follow us on Twitter.
Post Syndicated from Rohit Kumar original https://www.servethehome.com/finally-a-cheap-8-port-10gbase-t-managed-poe-switch-the-hasivo-s1100wp-8xgt-se/
We finally found a cheap, managed, 8-port 10Gbase-T switch with PoE in the Hasivo S1100WP-8XGT-SE at only $278, a fraction of the competition
The post Finally A Cheap 8-Port 10Gbase-T Managed PoE Switch the Hasivo S1100WP-8XGT-SE appeared first on ServeTheHome.
Post Syndicated from Bruce Schneier original https://www.schneier.com/blog/archives/2023/07/google-is-using-its-vast-data-stores-to-train-ai.html
No surprise, but Google just changed its privacy policy to reflect broader uses of all the surveillance data it has captured over the years:
Research and development: Google uses information to improve our services and to develop new products, features and technologies that benefit our users and the public. For example, we use publicly available information to help train Google’s AI models and build products and features like Google Translate, Bard, and Cloud AI capabilities.
(I quote the privacy policy as of today. The Mastodon link quotes the privacy policy from ten days ago. So things are changing fast.)