[$] Retrieving mount and filesystem information in user space

Post Syndicated from original https://lwn.net/Articles/934469/

In something of a follow-on from the mount-operation monitoring session the
previous day, Christian Brauner led another discussion about providing user
space with a mechanism to get current mount information on day two of the
2023 Linux Storage, Filesystem,
Memory-Management and BPF Summit
. The session also continued on from
one at last year’s
summit
—and likely others before that.
There are two separate proposals for ways to retrieve this kind of
information, one from Miklos Szeredi and another from David Howells, both
of whom were present this year; Brauner’s intent was to try to reach some
kind of agreement on the way forward in the session.

Disaster Recovery for Oracle Database on Amazon EC2 with Fast-Start Failover

Post Syndicated from Harshad Gohil original https://aws.amazon.com/blogs/architecture/disaster-recovery-for-oracle-database-on-amazon-ec2-with-fast-start-failover/

High availability is non-negotiable for organizations today to prevent business-critical application disruptions. Enterprises must prioritize database scalability and availability to avoid downtime in their databases, network, servers, or storage environments.

For organizations that want to avoid required application changes, Oracle Real Application Clusters (RAC) is an option for providing high availability and scalability to the Oracle database. While the RAC feature is not supported by Oracle databases on Amazon Elastic Compute Cloud (Amazon EC2), Oracle Active Data Guard helps achieve high availability on AWS cloud.

The Oracle Data Guard feature helps customers survive disasters and data corruption while creating, maintaining, and managing one or more synchronized standby databases. But further, configuring Oracle Data Guard Fast-Start Failover (FSFO) helps achieve high availability.

In this blog post, we provide an architectural solution to achieve database high availability when running Oracle Database on Amazon EC2 with Oracle Data Guard along with Fast-Start Failover to address Availability Zones (AZs) or Amazon EC2 instance failures. We also introduce the steps you can take to make database failover happen without manual intervention, and offer recommendations for cross-Region disaster recovery.

Solution overview

Let’s explore this solution by discussing the architecture and two alternate options for securing high availability using Oracle Data Guard, along with the advantages and limitations of each. We will then offer a walkthrough of steps to make database failover happen without manual intervention.

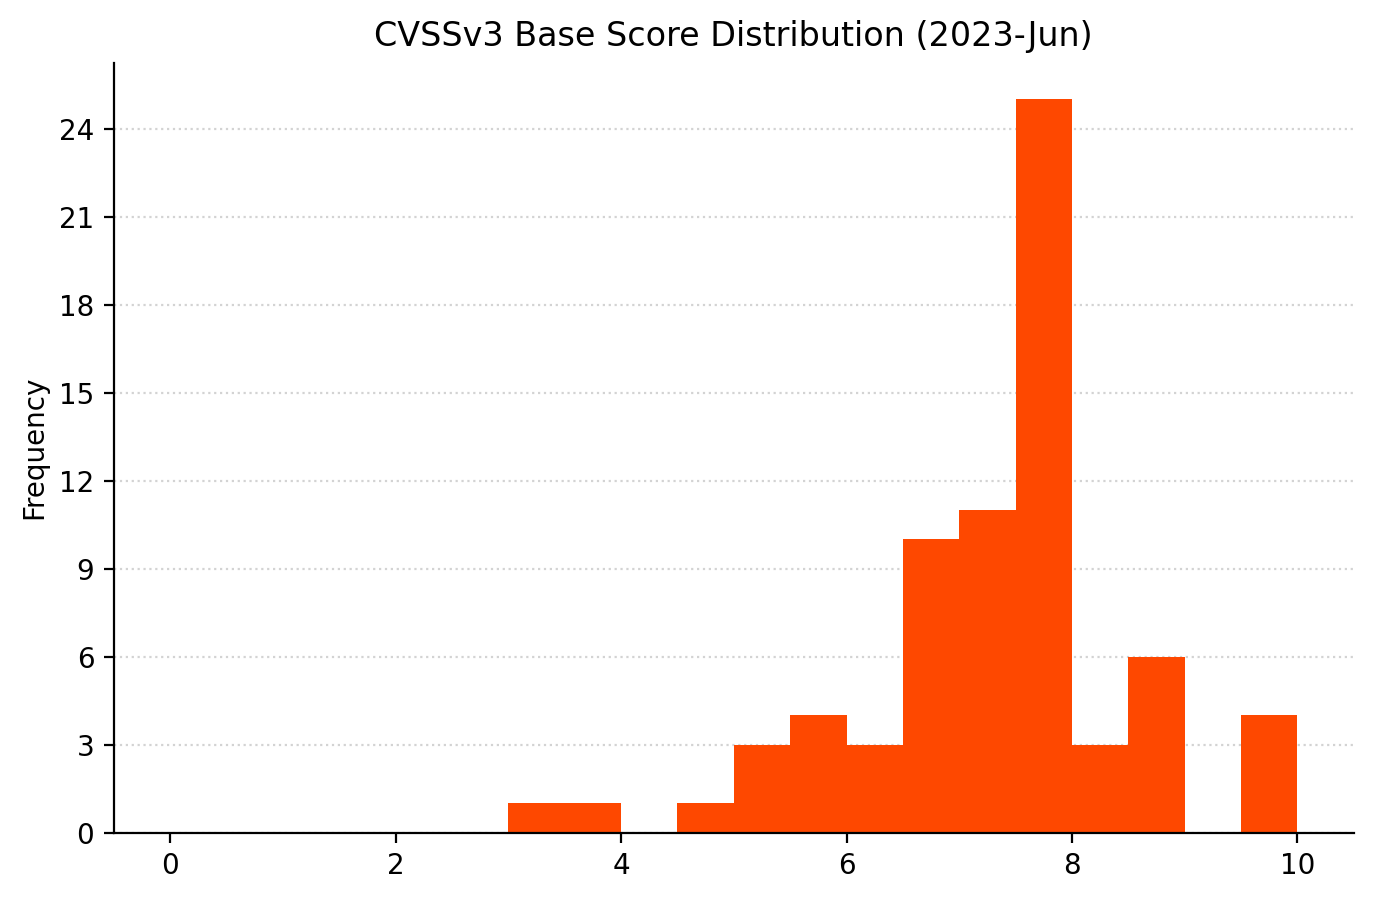
Oracle high availability using Oracle Data Guard with multi-AZ and multi-Region with multi-AZ setup

This architecture is recommended to maintain high availability for Oracle databases on Amazon EC2 with protection against Amazon EC2 service outages in a Region. A disaster recovery environment and higher resiliency are provided after an Amazon EC2 service outage. This protects against Amazon EC2 service outages in an AWS Region and maintains resiliency due to the multi-AZ setup in a secondary Region.

In this architecture, Oracle Data Guard Fast Sync replication exists between the Primary database in AZ 1 in Region A, with standbys in AZ 2 Region A (Fast Sync), AZ1 in Region B (ASYNC), and AZ2 in Region B (ASYNC). There is an asynchronous cascading replication setup between standby databases to avoid network latency issues across regions.

Should Region A experience an Amazon EC2 service outage, the Oracle observer, a client software that monitors Oracle Data Guard and initiate failover to the Standby database in Region B. Applications can continue to connect to the database resulting in high availability with limited/minimal data loss based on the data change rate amount, as in Figure 1.

Oracle with cascading standby databases across regions

Figure 1. Oracle with cascading standby databases across regions

Using Oracle RedoRoutes, the default behavior of Data guard can be controlled and it can be set using the following example during setup.

Oracle RedoRoutes setup example:

dgmgrl > edit database DB_1A set property RedoRoutes= ‘ (LOCAL: DB_1B FASTSYNC PRIORITY=1, DB_2A ASYNC PRIORITY=2,DB_2B ASYNC PRIORITY=3)) (DB_1B: (DB_2A ASYNC PRIORITY=1, DB_2B ASYNC PRIORITY=2)) (DB_2A: DB_1B ASYNC) (DB_2B: DB_1B ASYNC)’

dgmgrl > edit database DB_1B set property RedoRoutes= ‘(LOCAL: (DB_1A FASTSYNC PRIORITY=1, DB_2A ASYNC PRIORITY=2,DB_2B ASYNC PRIORITY=3))(DB_1A: (DB_2A ASYNC PRIORITY=1, DB_2B ASYNC PRIORITY=2)) ‘

dgmgrl > edit database DB_1B set property RedoRoutes= ‘(LOCAL: (DB_2B FASTSYNC PRIORITY=1, DB_1A ASYNC PRIORITY=2, DB_1B ASYNC PRIORITY=3))(DB_2B: (DB_1A ASYNC PRIORITY=1, DB_1B ASYNC PRIORITY=2)) (DB_1A: DB_2B ASYNC)(DB_1B: DB_2B ASYNC )’

dgmgrl > edit database DB_1B set property RedoRoutes= ‘(LOCAL: (DB_2A FASTSYNC PRIORITY=1, DB_1A ASYNC PRIORITY=2, DB_1B ASYNC PRIORITY=3))(DB_2A: (DB_1A ASYNC PRIORITY=1, DB_1B ASYNC PRIORITY=2))’

For more information on Oracle RedoRoutes setup for Oracle Cascading Standby, refer to this step-by-step configuration documentation.

Database failover with Amazon Route 53 and Oracle Data Guard

The following walkthrough defines the steps you can take to make database failover happen without manual intervention using Amazon Route 53 and Oracle Data Guard.

Prerequisites

Before getting started, review the following prerequisites for this solution:

Walkthrough

Step 1. Create Oracle Database Service

For applications to connect without manual intervention on event of failure, we recommend creating an Oracle database service using the Oracle DBMS_Package called DBMS_SERVICE.

exec dbms_service.CREATE_SERVICE(SERVICE_NAME=>'DB_SERVICE_FOR_APP', NETWORK_NAME=>'DB_SERVICE_FOR_APP');

exec dbms_service.START_SERVICE('DB_SERVICE_FOR_APP');

Step 2. Network configuration

Applications can connect to the database seamlessly without manual intervention in an event of a failover from the Primary database to Standby using the Oracle Transparent Application Failover (TAF) approach, though TAF requires updating application connection strings in case of a host IP change.

The following approach using Amazon Route 53 is recommended for added flexibility and scalability. Route 53 has DNS A records that map to the database instance IPs and CNAME records that can redirect DNS queries to A records. The following depicts the DNS mapping. The CNAME, along with the database service name, can be used by the application in its network configuration.

Database_Name =
 (DESCRIPTION =
    (ADDRESS_LIST =
       (ADDRESS = (PROTOCOL = TCP)(HOST = <db_cname>)(PORT = 1521))
   (connect_data = 
       (service_name = <db_service_name>)
   )) )

To update the CNAME in Route 53 to map to the Primary host automatically in the event of failure, follow these steps.

Step 3. Route 53 setup

Create a script named route53update.sh and place it on the database hosts using the following code.

#!/bin/bash

export ORACLE_HOME="<<change>> "

export LD_LIBRARY_PATH=$ORACLE_HOME/lib

export PATH=$ORACLE_HOME/bin:$PATH:/usr/local/bin:/usr/bin

LOG_FILE="/tmp/switch_dns_$$.log"

DNS_DOMAIN="<<change>> "

ACTIVE_DB_CNAME="<<change>> "

HOSTED_ZONE_ID="<<change>> "

TTL="<<change>> "

update_dns () {

TMPFILE="/tmp/route53_dns_$$.log"

 cat > ${TMPFILE} << EOF

    {

      "Comment":"Updating DNS of record ${1}.${DNS_DOMAIN}",

      "Changes":[

        {

          "Action":"UPSERT",

          "ResourceRecordSet":{

            "ResourceRecords":[

              {

                "Value":"$2"

              }

            ],

            "Name":"${1}.${DNS_DOMAIN}.",

            "Type":"CNAME",

            "TTL":$TTL

          }

        }

      ]

    }

EOF

  /usr/local/bin/aws route53 change-resource-record-sets \

        --hosted-zone-id $HOSTED_ZONE_ID \

        --change-batch file://"$TMPFILE" >> "$LOG_FILE"

}

prim_uniq_sid=`$ORACLE_HOME/bin/sqlplus -s  / as sysdba <<EOF

set feedback off echo off lines 2000 head off

select upper(db_unique_name) from  v\\$dataguard_config where DEST_ROLE='PRIMARY DATABASE';

EOF`

prim_uniq_sid=`echo $prim_uniq_sid| sed 's/^[ \t]*//;s/[ \t]*$//'`

host_current=`$ORACLE_HOME/bin/tnsping ${prim_uniq_sid}|sed -n 's/\(.*Host\)\([^)]*\)\(.*\)/\2/pi' |sed 's/=//g'|sed 's/^[ \t]*//;s/[ \t]*$//'`

dns_current_host=`/usr/local/bin/aws route53 list-resource-record-sets --hosted-zone-id $HOSTED_ZONE_ID --query  "ResourceRecordSets[?Name == '${ACTIVE_DB_CNAME}.${DNS_DOMAIN}.'].ResourceRecords" --output text`

if [ "$host_current" != "$dns_current_host" ]; then

        update_dns ${ACTIVE_DB_CNAME} $host_current

fi

Step 4. Database job setup

Create a job in the Oracle Primary database to execute the shell script just introduced to initiate in the event of failover using the following code.

begin
  dbms_scheduler.create_job
  (
    job_name             => 'route53update',
    job_type             => 'executable',
    number_of_arguments  => 0,
    job_action           => '/<<location of script>>/ route53update.sh',
    auto_drop            => false
  );

  dbms_scheduler.enable('route53update');
end;
/

Step 5. Database trigger setup

In an event of a failure, the Primary will failover and the Standby starts up as the new Primary. A trigger needs to be created on the Primary database to execute the job on any failover to update the Route53 CNAME using the following code.

create or replace trigger SYS.Update_Route53_Record
AFTER STARTUP ON DATABASE
DECLARE
db_role varchar2(16);
db_mode varchar2(20);BEGIN
select database_role, open_mode into db_role, db_mode from v$database;
if db_role = 'PRIMARY' then
dbms_scheduler.run_job('route53update') ;
END IF;
END;
/

Alternate Option 1: Single Region with multi-AZ

This option is a minimum recommended configuration to maintain high availability for Oracle databases on Amazon EC2 for customers who do not have a multi-region setup.

  • Advantage: Protects against Amazon EC2 service outage in a single AZ.
  • Limitation: Does not protect against Amazon EC2 service outages in a single Region.

In this architecture, Oracle Data Guard Fast Sync replication exists between the Oracle database instance in a multi-AZ setup with the Primary database (Read Write) in AZ 1 and the Standby database (Read Only) in AZ 2.

If the primary database is unreachable due to any failure, the observer will failover to the standby database in a different AZ. Applications can continue to connect to the database with zero data loss due to synchronous replication between AZ using the Maximum Availability/Maximum Protection mode setup in Oracle Data Guard. If the primary database is in us-east-1a and standby in us-east-1b, the RedoRoutes property can be defined as follows.

Oracle RedoRoutes setup example:

dgmgrl> edit database DB_1A set property RedoRoutes= '(LOCAL: (DB_1B FASTSYNC)'

dgmgrl>  edit database DB_1B set property RedoRoutes= '(LOCAL: (DB_1A FASTSYNC)'

For more information on how disaster recovery works in the AWS Cloud, visit the Disaster recovery is different in the cloud section of the AWS Well-Architected Framework. For more on Oracle RedoRoutes setup, refer to the Oracle Redo Routing Rules documentation.

Alternate Option 2: Multi-AZ with multi-Region with single AZ

This option is recommended to maintain high availability for an Oracle database on Amazon EC2 for customers who need multi-region availability. It provides protection against the rare unavailability of Amazon EC2 instances in the primary Region, in which case a disaster recovery environment is provided.

  • Advantage: Protects against Amazon EC2 service outages in a 2 AZ or AWS Region.
  • Limitation: Decreased resiliency without high availability on Amazon EC2 service outage in an entire Region

In this architecture, Oracle Data Guard Fast Sync replication exists between the Oracle database instance in multi-AZ within the single Region, with the Primary database in AZ 1 in Region A and Standby database in AZ 2 in Region A. There is an asynchronous replication setup between the Standby database cross-Region.

Asynchronous replication is recommended between Region replication to avoid network latency issue. A cascading standby setup ensures there is no additional performance impact on the primary database to send data to multiple standbys.

If the primary database is unreachable, failover happens between AZs in Region A. In the event of an Amazon EC2 service outage in a Region, failover occurs to Region B, resulting in high availability with minimal data loss based on the data change rate amount. If the primary database is in us-east-1a and standby in us-east-1b (Fast Sync) and us-east-2a (Async), the RedoRoutes property can be defined as follows.

Oracle RedoRoutes setup example:

dgmgrl > edit database DB_1A set property RedoRoutes= '(LOCAL: (DB_1B FASTSYNC PRIORITY=1, DB_2A ASYNC PRIORITY=2))(DB_1B: DB_2A ASYNC)(DB_2A: DB_1B ASYNC)'

dgmgrl > edit database DB_1B set property RedoRoutes= '(LOCAL: (DB_1A FASTSYNC PRIORITY=1, DB_2A ASYNC  PRIORITY=2)) (DB_1A: DB_2A ASYNC)'

dgmgrl > edit database DB_1B set property RedoRoutes= '(LOCAL: (DB_1A FASTSYNC PRIORITY=1, DB_1B ASYNC  PRIORITY=2))'

Cleaning up

The services involved in this solution incur costs. When you’re done using this solution, clean up the following resources:

  • Amazon EC2 instances – Stop or delete (terminate) the Amazon EC2 instances that you provisioned.
  • Route53 – Delete the hosted Zone ID and A records/CNAMEs created.

Conclusion

This blog post demonstrates how high availability and disaster recovery can be achieved for an Oracle database on an Amazon EC2 instance using Oracle Data Guard. Using the architectures in this post, you can achieve zero data loss with the Oracle Fast-Start Failover option within the same Region or cross-Region on Amazon EC2.

You can also use this architecture to replicate data from an Oracle database on Amazon EC2 to an Oracle database hosted outside of the AWS cloud. With Oracle Cascading Standby and Oracle RedoRoutes, you can remove high dependency on the Primary database to improve overall performance.

[$] Hardening magic links

Post Syndicated from original https://lwn.net/Articles/934460/

There are some “magic links” in kernel pseudo-filesystems, like procfs,
that can be—have been—(ab)used to cause security problems, such as a
container-confinement breach in 2019.
Aleksa Sarai has long been working on ways to blunt the impact of these
magic links. He led a filesystem session at the
2023 Linux Storage, Filesystem,
Memory-Management and BPF Summit
to discuss the status of those efforts.

Simplify fine-grained authorization with Amazon Verified Permissions and Amazon Cognito

Post Syndicated from Phil Windley original https://aws.amazon.com/blogs/security/simplify-fine-grained-authorization-with-amazon-verified-permissions-and-amazon-cognito/

AWS customers already use Amazon Cognito for simple, fast authentication. With the launch of Amazon Verified Permissions, many will also want to add simple, fast authorization to their applications by using the user attributes that they have in Amazon Cognito. In this post, I will show you how to use Amazon Cognito and Verified Permissions together to add fine-grained authorization to your applications.

Fine-grained authorization

With Verified Permissions, you can write policies to use fine-grained authorization in your applications. Policy-based access control helps you secure your applications without embedding complicated access control code in the application logic. Instead, you write policies that say who can take what actions on which resources, and you evaluate the policies by using the Verified Permissions API. The API evaluates access control policies in the context of an access request: Who’s making the request? What do they want to do? What do they want to access? Under what conditions are they making the request?

AWS has removed the work needed to create context about who is making the request by using data from Amazon Cognito. By using Amazon Cognito as your identity store and integrating Verified Permissions with Amazon Cognito, you can use the ID and access tokens that Amazon Cognito returns in the authorization decisions in your applications. You provide Amazon Cognito tokens to Verified Permissions, which uses the attributes that the tokens contain to represent the principal and identify the principal’s entitlements.

Make access requests

To write policies for Verified Permissions, you use a policy language called Cedar. The examples in this post are modified from those in the Cedar language tutorial; I recommend that you review this tutorial for a comprehensive introduction on how to build and use Cedar policies. The following is an example of what a Cedar policy in a photo-sharing application might look like:

permit(
  principal == User::"alice", 
  action    == Action::"update", 
  resource  == Photo::"VacationPhoto94.jpg"
);

This policy states that Alice—the principal—is permitted to update the resource named VacationPhoto94.jpg. You place the policies for your application in a dedicated policy store. To ask Verified Permissions for an authorization decision, use the isAuthorized operation from the API. For example, the following request asks if user alice is permitted to update VacationPhoto94.jpg. Note that I’ve left out details like the policy store identifier for clarity.

// JS pseudocode
const authResult = await avp.isAuthorized({
    principal: 'User::"alice"',
    action: 'Action::"update"',
    resource: 'Photo::"VacationPhoto94.jpg"'
});

This request returns a decision of allow because the principal, action, and resource all match those in the policy. If a user named bob tries to update the photo, the request returns a decision of deny because the policy only allows user alice. For requests that only need values for the principal, action, and resource, you can generally use values from the data in the application.

Things get more interesting when you build policies that use attributes of the principal to make the decision. In these cases, it can be challenging to assemble a complete and accurate authorization context. Policies might refer to attributes of the principal, such as their geographic location or whether they are paid subscribers. Fine-grained access control requires that you write good policies, properly format the access request, and provide the needed attributes for the policies to be evaluated. To get needed attributes, you must often make inline requests to other systems and then transform the results to meet the policy requirements.

The following policy uses an attribute requirement to allow any principal to view any resource as long as they are located in the United States.

permit(
  principal,
  action == Action::"view",
  resource
)
when {principal.location == "USA"};

To make an authorization request, you must supply the needed attributes for the principal. The following code shows how to do that by using the isAuthorized operation:

const authResult = await avp.isAuthorized({
    principal: 'User::"alice"',
    action: 'Action::"view"',
    resource: 'Photo::"VacationPhoto94.jpg"',
    // whenever our policy references attributes of the entity,
    // isAuthorized needs an entity argument that provides    
    // those attributes
    entities: [
        {
            "identifier": {
                "entityType": "User",
                "entityId": "alice"
            },
            "attributes": {
                "location": {
                    "String": "USA"
                }
            }
        ]
});

The authorization request now includes the context that Alice is located in the USA. According to the preceding policy, she should be allowed to view VacationPhoto94.jpg. To make this request, you must gather this information so that you can include it in the request.

Use Amazon Cognito

If the photo-sharing application uses Amazon Cognito for user authentication, then Amazon Cognito will pass an ID token to it when the authentication is successful. For more information about the format and encoding of ID tokens, see the OpenID Connect Core specification. For our purposes, it’s enough to know that after the ID token is verified and decoded, it contains a JSON structure with named attributes.

When you configure Amazon Cognito, you can specify the fields that are contained in the ID token. These might be user editable, but they can also be programmatically generated from other sources. Suppose that you have configured your Amazon Cognito user pool to also include a custom location attribute, custom:location. When Alice logs in to the photo-sharing application, the ID token that Amazon Cognito provides for her contains the following fields. Note that I’ve made the sub (subject) field human readable, but it would actually be a Amazon Cognito entity identifier.

{
 ...
 “iss”: “User”,
 “sub”: “alice”,
 “custom:location”: “USA”,
 ...
}

If the needed attributes are in Amazon Cognito, you can use them to create the attributes that isAuthorized needs to render an access decision.

Figure 1: Steps to use Amazon Cognito with isAuthorized

Figure 1: Steps to use Amazon Cognito with isAuthorized

As shown in Figure 1, you need to complete the following six steps to use isAuthorized with Amazon Cognito:

  1. Get the token from Amazon Cognito when the user authenticates
  2. Verify the token to authenticate the user
  3. Decode the token to retrieve attribute information
  4. Create the policy principal from information in the token or from other sources
  5. Create the entities structure by using information in the token or from other sources
  6. Call Amazon Verified Permissions by using isAuthorized

Now that you understand how to make a request by manually creating the context using data provided by an identity provider, I’ll share how the AWS integration of Amazon Cognito and Verified Permissions can help reduce your workload.

Use isAuthorizedWithToken

In addition to isAuthorized, the Verified Permissions API provides the isAuthorizedWithToken operation that accepts Amazon Cognito tokens. If your application uses Amazon Cognito for authentication, then Amazon Cognito provides the ID token after the user logs in. Let’s assume that you have stored this token in a variable named cognito_id_token. Because you are using an attribute from Amazon Cognito, you modify the previous policy to accommodate the namespace that the Amazon Cognito attributes are in, as shown in the following:

permit(
  principal,
  action == Action::"view",
  resource
)
when {principal.custom.location == "USA"};

With this policy, the photo-sharing application can use the ID token to make an authorization request using isAuthorizedWithToken:

Using this call, you don’t have to supply the principal or construct the entities argument for the principal. Instead, you just pass in the ID token that Amazon Cognito provides. When you call isAuthorizedWithToken, it constructs the principal by using information in the token and creates an entity context that includes Alice’s location from the attributes in the ID token.

Figure 2: Use isAuthorizedWithToken

Figure 2: Use isAuthorizedWithToken

As shown in Figure 2, when you use isAuthorizedWithToken, you only need to complete two steps:

  1. Get the token from Amazon Cognito when the user authenticates
  2. Call Verified Permissions using isAuthorizedWithToken, passing in the token

Optionally, your application might need to verify the token to authenticate the user and avoid unnecessary work, or it can rely on isAuthorizedWithToken to do that. Similarly, you might also decode the token if you need its values for the application logic.

Configure isAuthorizedWithToken

You can use the Verified Permissions console to tell the API which Amazon Cognito user pool you’re using for your application. This is called an identity source.

To create an identity source for use with Verified Permissions (console):

  1. Sign in to the AWS Management Console and open the Amazon Cognito console.
  2. Choose Identity source. You will see a list showing the sources that you have already configured.
  3. To create a new identity source, choose Create identity source.
  4. Enter the User pool ID.
  5. Enter the Principal type.
  6. Select whether or not to validate Client application IDs for this source.
  7. (Optional) Enter Tags.
  8. Choose Create identity source to add a new identity source to Verified Permissions with the given client ID.

The isAuthorizedWithToken operation uses the configuration information to get the public keys from Amazon Cognito to validate and decode the token. It also uses the configuration information to validate that the user pool for the token is associated with the policy store that the API is using.

Add resource entity attributes

ID tokens provide attributes about the principal, but they don’t provide information about the resource. Policies will often reference resource attributes, as shown in the following policy:

permit(
  principal,
  action == Action::"view",
  resource
)
when {resource.accessLevel == "public" && 
      principal.custom.location == "USA"};

Like the previous example, this policy requires that photo viewers are located in the US, but it also requires that the resource has a public attribute. The isAuthorizedWithToken operation can augment the entity information in the token by using the same entities argument that isAuthorized uses. You can add the resource entity information to the call, as shown in the following call to isAuthorizedWithToken:

const authResult = await avp.isAuthorized({
    principal: 'User::"alice"',
    action: 'Action::"view"',
    resource: 'Photo::"VacationPhoto94.jpg"',
    // whenever our policy references attributes of the entity,
    // isAuthorized needs an entity argument that provides    
    // those attributes
    entities: [
        {
            "identifier": {
                "entityType": "User",
                "entityId": "alice"
            },
            "attributes": {
                "location": {
                    "String": "USA"
                }
            }
        }
    ]
});

The isAuthorizedWithToken operation combines the entity information that it gleans from the ID token with the explicit entities information provided in the call to construct the context needed for the authorization request.

Conclusion

Discussions about access control tend to focus on the policies: how you can use them to make the code cleaner, and the value of moving the authorization logic out of the code. But that often ignores the work needed to create meaningful authorization requests. Assembling the information about the entities is a big part of making the request. If you use both Amazon Cognito and Verified Permissions, the integration discussed in this blog post can help relieve you of the work needed to build entity information about principals and help provide you with assurance that the assembly is happening consistently and securely.

 
If you have feedback about this post, submit comments in the Comments section below. If you have questions about this post, contact AWS Support.

Want more AWS Security news? Follow us on Twitter.

Phil Windley

Phil Windley

Phil is a Senior Software Development Manager in AWS Identity. He and his team work to make access management both easier to use and easier to understand. Phil has been working in digital identity for many years, and recently wrote Learning Digital Identity from O’Reilly Media. Outside of work, Phil loves to bike, read, and spend time with grandkids.

On the Need for an AI Public Option

Post Syndicated from Bruce Schneier original https://www.schneier.com/blog/archives/2023/06/on-the-need-for-an-ai-public-option.html

Artificial intelligence will bring great benefits to all of humanity. But do we really want to entrust this revolutionary technology solely to a small group of US tech companies?

Silicon Valley has produced no small number of moral disappointments. Google retired its “don’t be evil” pledge before firing its star ethicist. Self-proclaimed “free speech absolutist” Elon Musk bought Twitter in order to censor political speech, retaliate against journalists, and ease access to the platform for Russian and Chinese propagandists. Facebook lied about how it enabled Russian interference in the 2016 US presidential election and paid a public relations firm to blame Google and George Soros instead.

These and countless other ethical lapses should prompt us to consider whether we want to give technology companies further abilities to learn our personal details and influence our day-to-day decisions. Tech companies can already access our daily whereabouts and search queries. Digital devices monitor more and more aspects of our lives: We have cameras in our homes and heartbeat sensors on our wrists sending what they detect to Silicon Valley.

Now, tech giants are developing ever more powerful AI systems that don’t merely monitor you; they actually interact with you—and with others on your behalf. If searching on Google in the 2010s was like being watched on a security camera, then using AI in the late 2020s will be like having a butler. You will willingly include them in every conversation you have, everything you write, every item you shop for, every want, every fear, everything. It will never forget. And, despite your reliance on it, it will be surreptitiously working to further the interests of one of these for-profit corporations.

There’s a reason Google, Microsoft, Facebook, and other large tech companies are leading the AI revolution: Building a competitive large language model (LLM) like the one powering ChatGPT is incredibly expensive. It requires upward of $100 million in computational costs for a single model training run, in addition to access to large amounts of data. It also requires technical expertise, which, while increasingly open and available, remains heavily concentrated in a small handful of companies. Efforts to disrupt the AI oligopoly by funding start-ups are self-defeating as Big Tech profits from the cloud computing services and AI models powering those start-ups—and often ends up acquiring the start-ups themselves.

Yet corporations aren’t the only entities large enough to absorb the cost of large-scale model training. Governments can do it, too. It’s time to start taking AI development out of the exclusive hands of private companies and bringing it into the public sector. The United States needs a government-funded-and-directed AI program to develop widely reusable models in the public interest, guided by technical expertise housed in federal agencies.

So far, the AI regulation debate in Washington has focused on the governance of private-sector activity—which the US Congress is in no hurry to advance. Congress should not only hurry up and push AI regulation forward but also go one step further and develop its own programs for AI. Legislators should reframe the AI debate from one about public regulation to one about public development.

The AI development program could be responsive to public input and subject to political oversight. It could be directed to respond to critical issues such as privacy protection, underpaid tech workers, AI’s horrendous carbon emissions, and the exploitation of unlicensed data. Compared to keeping AI in the hands of morally dubious tech companies, the public alternative is better both ethically and economically. And the switch should take place soon: By the time AI becomes critical infrastructure, essential to large swaths of economic activity and daily life, it will be too late to get started.

Other countries are already there. China has heavily prioritized public investment in AI research and development by betting on a handpicked set of giant companies that are ostensibly private but widely understood to be an extension of the state. The government has tasked Alibaba, Huawei, and others with creating products that support the larger ecosystem of state surveillance and authoritarianism.

The European Union is also aggressively pushing AI development. The European Commission already invests 1 billion euros per year in AI, with a plan to increase that figure to 20 billion euros annually by 2030. The money goes to a continent-wide network of public research labs, universities, and private companies jointly working on various parts of AI. The Europeans’ focus is on knowledge transfer, developing the technology sector, use of AI in public administration, mitigating safety risks, and preserving fundamental rights. The EU also continues to be at the cutting edge of aggressively regulating both data and AI.

Neither the Chinese nor the European model is necessarily right for the United States. State control of private enterprise remains anathema in American political culture and would struggle to gain mainstream traction. The tech companies—and their supporters in both US political parties—are opposed to robust public governance of AI. But Washington can take inspiration from China and Europe’;s long-range planning and leadership on regulation and public investment. With boosters pointing to hundreds of trillions of dollars of global economic value associated with AI, the stakes of international competition are compelling. As in energy and medical research, which have their own federal agencies in the Department of Energy and the National Institutes of Health, respectively, there is a place for AI research and development inside government.

Beside the moral argument against letting private companies develop AI, there’s a strong economic argument in favor of a public option as well. A publicly funded LLM could serve as an open platform for innovation, helping any small business, nonprofit, or individual entrepreneur to build AI-assisted applications.

There’s also a practical argument. Building AI is within public reach because governments don’t need to own and operate the entire AI supply chain. Chip and computer production, cloud data centers, and various value-added applications—such as those that integrate AI with consumer electronics devices or entertainment software—do not need to be publicly controlled or funded.

One reason to be skeptical of public funding for AI is that it might result in a lower quality and slower innovation, given greater ethical scrutiny, political constraints, and fewer incentives due to a lack of market competition. But even if that is the case, it would be worth broader access to the most important technology of the 21st century. And it is by no means certain that public AI has to be at a disadvantage. The open-source community is proof that it’s not always private companies that are the most innovative.

Those who worry about the quality trade-off might suggest a public buyer model, whereby Washington licenses or buys private language models from Big Tech instead of developing them itself. But that doesn’t go far enough to ensure that the tools are aligned with public priorities and responsive to public needs. It would not give the public detailed insight into or control of the inner workings and training procedures for these models, and it would still require strict and complex regulation.

There is political will to take action to develop AI via public, rather than private, funds—but this does not yet equate to the will to create a fully public AI development agency. A task force created by Congress recommended in January a $2.6 billion federal investment in computing and data resources to prime the AI research ecosystem in the United States. But this investment would largely serve to advance the interests of Big Tech, leaving the opportunity for public ownership and oversight unaddressed.

Nonprofit and academic organizations have already created open-access LLMs. While these should be celebrated, they are not a substitute for a public option. Nonprofit projects are still beholden to private interests, even if they are benevolent ones. These private interests can change without public input, as when OpenAI effectively abandoned its nonprofit origins, and we can’t be sure that their founding intentions or operations will survive market pressures, fickle donors, and changes in leadership.

The US government is by no means a perfect beacon of transparency, a secure and responsible store of our data, or a genuine reflection of the public’s interests. But the risks of placing AI development entirely in the hands of demonstrably untrustworthy Silicon Valley companies are too high. AI will impact the public like few other technologies, so it should also be developed by the public.

This essay was written with Nathan Sanders, and appeared in Foreign Policy.

Security updates for Wednesday

Post Syndicated from original https://lwn.net/Articles/934619/

Security updates have been issued by Debian (ffmpeg, owslib, php7.4, and php8.2), Fedora (ntp-refclock, php, and python3.7), Red Hat (c-ares, firefox, and thunderbird), SUSE (kernel, openldap2, and tomcat), and Ubuntu (binutils, dotnet6, dotnet7, node-fetch, and python-tornado).

Интересно как най-големите корумпета изведнъж – най-активни борци срещу Гешев

Post Syndicated from Екип на Биволъ original https://bivol.bg/korumpeta-geshev.html

сряда 14 юни 2023


Интересно как най-големите корумпета в България изведнъж станаха най-активни борци срещу главния прокурор Иван Гешев. Неслучайно и Висшият съдебен съвет (ВСС) разкри марионетната си същност и зависимост от  Мафията, експресно…

Prevent account creation fraud with AWS WAF Fraud Control – Account Creation Fraud Prevention

Post Syndicated from David MacDonald original https://aws.amazon.com/blogs/security/prevent-account-creation-fraud-with-aws-waf-fraud-control-account-creation-fraud-prevention/

Threat actors use sign-up pages and login pages to carry out account fraud, including taking unfair advantage of promotional and sign-up bonuses, publishing fake reviews, and spreading malware.

In 2022, AWS released AWS WAF Fraud Control – Account Takeover Prevention (ATP) to help protect your application’s login page against credential stuffing attacks, brute force attempts, and other anomalous login activities.

Today, we introduce AWS WAF Fraud Control – Account Creation Fraud Prevention (ACFP) to help protect your application’s sign-up pages against fake account creation by detecting and blocking fake account creation requests.

You can now get comprehensive account fraud prevention by combining AWS WAF Account Creation Fraud Prevention and Account Takeover Prevention in your AWS WAF web access control list (web ACL). In this post, we will show you how to set up AWS WAF with ACFP for your application sign-up pages.

Overview of Account Creation Fraud Prevention for AWS WAF

ACFP helps protect your account sign-up pages by continuously monitoring requests for anomalous digital activity and automatically blocking suspicious requests based on request identifiers, behavioral analysis, and machine learning.

ACFP uses multiple capabilities to help detect and block fake account creation requests at the network edge before they reach your application. An automated vetting process for account creation requests uses rules based on reputation and risk to protect your registration pages against use of stolen credentials and disposable email domains. ACFP uses silent challenges and CAPTCHA challenges to identify and respond to sophisticated bots that are designed to actively evade detection.

ACFP is an AWS Managed Rules rule group. If you already use AWS WAF, you can configure ACFP without making architectural changes. On a single configuration page, you specify the registration page request inspection parameters that ACFP uses to detect fake account creation requests, including user identity, address, and phone number.

ACFP uses session tokens to separate legitimate client sessions from those that are not. These tokens allow ACFP to verify that the client applications that sign up for an account are legitimate. The AWS WAF Javascript SDK automatically generates these tokens during the frontend application load. We recommend that you integrate the AWS WAF Javascript SDK into your application, particularly for single-page applications where you don’t want page refreshes.

Walkthrough

In this walkthrough, we will show you how to set up ACFP for AWS WAF to help protect your account sign-up pages against account creation fraud. This walkthrough has two main steps:

  1. Set up an AWS managed rule group for ACFP in the AWS WAF console.
  2. Add the AWS WAF JavaScript SDK to your application pages.

Set up Account Creation Fraud Prevention

The first step is to set up ACFP by creating a web ACL or editing an existing one. You will add the ACFP rule group to this web ACL.

The ACFP rule group requires that you provide your registration page path, account creation path, and optionally the sign-up request fields that map to user identity, address, and phone number. ACFP uses this configuration to detect fraudulent sign-up requests and then decide an appropriate action, including blocking, challenging interstitial during the frontend application load, or requiring a CAPTCHA.

To set up ACFP

  1. Open the AWS WAF console, and then do one of the following:
    • To create a new web ACL, choose Create web ACL.
    • To edit an existing web ACL, choose the name of the ACL.
  2. On the Rules tab, for the Add Rules dropdown, select Add managed rule groups.
  3. Add the Account creation fraud prevention rule set to the web ACL. Then, choose Edit to edit the rule configuration.
  4. For Rule group configuration, provide the following information that the ACFP rule group requires to inspect account creation requests, as shown in Figure 1.
    • For Registration page path, enter the path for the registration page website for your application.
    • For Account creation path, enter the path of the endpoint that accepts the completed registration form.
    • For Request inspection, select whether the endpoint that you specified in Account creation path accepts JSON or FORM_ENCODED payload types.
    Figure 1: Account creation fraud prevention - Add account creation paths

    Figure 1: Account creation fraud prevention – Add account creation paths

  5. (Optional): Provide Field names used in submitted registration forms, as shown in Figure 2. This helps ACFP more accurately identify requests that contain information that is considered stolen, or with a bad reputation. For each field, provide the relevant information that was included in your account creation request. For this walkthrough, we use JSON pointer syntax.
     
    Figure 2: Account creation fraud prevention - Add optional field names

    Figure 2: Account creation fraud prevention – Add optional field names

  6. For Account creation fraud prevention rules, review the actions taken on each category of account creation fraud, and optionally customize them for your web applications. For this walkthrough, we leave the default rule action for each category set to the default action, as shown in Figure 3. If you want to customize the rules, you can select different actions for each category based on your application security needs:
    • Allow — Allows the request to be sent to the protected resource.
    • Block — Blocks the request, returning an HTTP 403 (Forbidden) response.
    • Count — Allows the request to be sent to the protected resource while counting detections. The count shows you bot activity that is occurring without blocking or challenging. When you turn on rules for the first time, this information can help you see what the detections are, before you change the actions.
    • CAPTCHA and Challenge — use CAPTCHA puzzles and silent challenges with tokens to track successful client responses.
    Figure 3: Account creation fraud prevention - Select actions for each category

    Figure 3: Account creation fraud prevention – Select actions for each category

  7. To save the configuration, choose Save.
  8. To add the ACFP rule group to your web ACL, choose Add rules.
  9. (Optional) Include additional rules in your web ACL, as described in the Best practices section that follows.
  10. To create or edit your web ACL, proceed through the remaining configuration pages.

Add the AWS WAF JavaScript SDK to your application pages

The next step is to find the AWS WAF JavaScript SDK and add it to your application pages.

The SDK injects a token in the requests that you send to your protected resources. You must use the SDK integration to fully enable ACFP detections.

To add the SDK to your application pages

  1. In the AWS WAF console, in the left navigation pane, choose Application integration.
  2. Under Web ACLs that are enabled for application integration, choose the name of the web ACL that you created previously.
  3. Under JavaScript SDK, copy the provided code snippet. This code snippet allows for creation of the cryptographic token in the background when the application loads for the first time. Figure 4 shows the SDK link.
    Figure 4: Application integration – Add JavaScript SDK link to application pages

    Figure 4: Application integration – Add JavaScript SDK link to application pages

  4. Add the code snippet to your pages. For example, paste the provided script code within the <head> section of the HTML. For ACFP, you only need to add the code snippet to the registration page, but if you are using other AWS WAF managed rules such as Account Takeover Protection or Targeted Bots on other pages, you will also need to add the code snippet to those pages.
  5. To validate that your application obtains tokens correctly, load your application in a browser and verify that a cookie named aws-waf-token has been set during page load.

Review metrics

Now that you’ve set up the web ACL and integrated the SDK with the application, you can use the bot visualization dashboard in AWS WAF to review fraudulent account creation traffic patterns. ACFP rules emit metrics that correspond to their labels, helping you identify which rule within the ACFP rule group initiated an action. You can also use labels and rule actions to filter AWS WAF logs so that you can further examine a request.

To view AWS WAF metrics for the distribution

  1. In the AWS WAF console, in the left navigation pane, select Web ACLs.
  2. Select the web ACL for which ACFP is enabled, and then choose the Bot Control tab to view the metrics.
  3. In the Filter metrics by dropdown, select Account creation fraud prevention to see the ACFP metrics for your web ACL.
Figure 5: Account creation fraud prevention – Review web ACL metrics

Figure 5: Account creation fraud prevention – Review web ACL metrics

Best practices

In this section, we share best practices for your ACFP rule group setup.

Limit the requests that ACFP evaluates to help lower costs

ACFP evaluates web ACL rules in priority order and takes the action associated with the first rule that a request matches. Requests that match and are blocked by a rule will not be evaluated against lower priority rules. ACFP only evaluates an ACFP rule group if a request matches the registration and account creation URI paths that are specified in the configuration.

You will incur additional fees for requests that ACFP evaluates. To help reduce ACFP costs, use higher priority rules to block requests before the ACFP rule group evaluates them. For example, you can add a higher priority AWS Managed Rules IP reputation rule group to block account creation requests from bots and other threats before ACFP evaluates them. Rate-based rules with a higher priority than the ACFP rule group can help mitigate volumetric account creation attempts by limiting the number of requests that a single IP can make in a five-minute period. For further guidance on rate-based rules, see The three most important AWS WAF rate-based rules.

If you are using the AWS WAF Bot Control rule group, give it a higher priority than the ACFP rule group because it’s less expensive to evaluate.

Use SDK integration

ACFP requires the tokens that the SDK generates. The SDK can generate these tokens silently rather than requiring a redirect or CAPTCHA. Both AWS WAF Bot Control and AWS WAF Fraud Control use the same SDK if both rule groups are in the same web ACL.

These tokens have a default immunity time (otherwise knowns as a timeout) of 5 minutes, after which AWS WAF requires the client to be challenged again. You can use the AWS WAF integration fetch wrapper in your single-pane application to help ensure that the token retrieval completes before the client sends requests to your account creation API without requiring a page refresh. Alternatively, you can use the getToken operation if you are not using fetch.

You can continue to use the CAPTCHA JavaScript API instead if you’ve already integrated this into your application.

Use both ACFP and ATP for comprehensive account fraud prevention

You can help prevent account fraud for both sign-up and login pages by enabling the ATP rule group in the same web ACL as ACFP.

Test ACFP before you deploy it to production

Test and tune your ACFP implementation in a staging or testing environment to help avoid negatively impacting legitimate users. We recommend that you start by deploying your rules in count mode in production to understand potential impact to your traffic before switching them back to the default rule actions. Use the default ACFP rule group actions when you deploy the web ACL to production. For further guidance, see Testing and Deploying ACFP.

Pricing and availability

ACFP is available today on Amazon CloudFront and in 22 AWS Regions. For information on availability and pricing, see AWS WAF Pricing.

Conclusion

In this post, we showed you how to use ACFP to protect your application’s sign-up pages against fake account creation. You can now combine ACFP with ATP managed rules in a single web ACL for comprehensive account fraud prevention. For more information and to get started today, see the AWS WAF Developer Guide.

If you have feedback about this post, submit comments in the Comments section below. If you have questions about this post, start a new thread on the AWS Security, Identity, & Compliance re:Post or contact AWS Support.

Want more AWS Security news? Follow us on Twitter.

David MacDonald

David MacDonald

David is a Senior Solutions Architect focused on helping New Zealand startups build secure and scalable solutions. He has spent most of his career building and operating SaaS products that serve a variety of industries. Outside of work, David is an amateur farmer, and tends to a small herd of alpacas and goats.

Geary Scherer

Geary Scherer

Geary is a Solutions Architect focused on Travel and Hospitality customers in the Southeast US. He holds all 12 current AWS certifications and loves to dive into complex Edge Services use cases to help AWS customers, especially around Bot Mitigation. Outside of work, Geary enjoys playing soccer and cheering his daughters on at dance and softball competitions.

Patch Tuesday – June 2023

Post Syndicated from Adam Barnett original https://blog.rapid7.com/2023/06/13/patch-tuesday-june-2023/

Patch Tuesday - June 2023

It’s June, and it’s Patch Tuesday. The volume of fixes this month is typical compared with recent history: 94 in total (including Edge-on-Chromium). For the first time in a while, Microsoft isn’t offering patches for any zero-day vulnerabilities, but we do get fixes for four critical Remote Code Execution (RCE) vulnerabilities: one in .NET/Visual Studio, and three in Windows Pragmatic General Multicast (PGM). Also patched: a critical SharePoint Elevation of Privilege vulnerability.

SharePoint: Critical EoP via JWT spoofing

SharePoint administrators should start by looking at critical Elevation of Privilege vulnerability CVE-2023-29357, which provides attackers with a chance at Administrator privileges on the SharePoint host, provided they come prepared with spoofed JWT tokens. Microsoft isn’t aware of public disclosure or in-the-wild exploitation, but considers exploitation more likely.

The FAQ provided with Microsoft’s advisory suggests that both SharePoint Enterprise Server 2016 and SharePoint Server 2019 are vulnerable. So far so good for SharePoint 2019, but there is a lack of clarity around a patch for SharePoint 2016.

Initially, neither the advisory nor the SharePoint 2016 Release history listed a relevant patch for SharePoint 2016. Microsoft has since updated both the SharePoint 2016 release history to include a link to the June security update for SharePoint Enterprise Server 2016; however, the link incorrectly points to the May advisory, and should instead point to the June 2023 security update for SharePoint 2016 KB5002404.

Complicating matters further, KB5002404 does not mention CVE-2023-29357, and the advisory for CVE-2023-29357 still does not mention any patch for SharePoint 2016. Defenders responsible for SharePoint 2016 will no doubt wish to follow developments here closely; on present evidence, the only safe assumption is that there is no patch yet which addresses CVE-2023-29357 for SharePoint 2016.

Microsoft also mentions that there may be more than one patch listed for a particular version of SharePoint, and that every patch for a particular version of SharePoint must be installed to remediate this vulnerability (although order of patching doesn’t matter).

Windows PGM: Critical RCE

This is the third month in a row where Patch Tuesday features at least one critical RCE in Windows PGM, and June adds three to the pile. Microsoft hasn’t detected exploitation or disclosure for any of these, and considers exploitation less likely, but a trio of critical RCEs with CVSS 3.1 base score of 9.8 will deservedly attract a degree of attention.

All three PGM critical RCEs – CVE-2023-29363, CVE-2023-32014, and CVE-2023-32015 – require an attacker to send a specially-crafted file over the network in the hope of executing malicious code on the target asset. Defenders who successfully navigated last month’s batch of PGM vulnerabilities will find both risk profile and mitigation/remediation guidance very similar; indeed, CVE-2023-29363 was reported to Microsoft by the same researcher as last month’s CVE-2023-28250.

As with previous similar vulnerabilities, Windows Message Queueing Service (MSMQ) must be enabled for an asset to be exploitable, and MSMQ isn’t enabled by default. As Rapid7 has noted previously, however, a number of applications – including Microsoft Exchange – quietly introduce MSMQ as part of their own installation routine. With several prolific researchers active in this area, we should expect further PGM vulnerabilities in the future.

.NET & Visual Studio: Critical RCE

Rounding out this month’s critical RCE list is CVE-2023-24897: a flaw in .NET, .NET Framework and Visual Studio. Exploitation requires an attacker to convince the victim to open a specially-crafted malicious file, typically from a website.

Although Microsoft has no knowledge of public disclosure or exploitation in the wild, and considers exploitation less likely, the long list of patches – going back as far as .NET Framework 3.5 on Windows 10 1607 – means that this vulnerability has been present for years. Somewhat unusually for this class of vulnerability, Microsoft doesn’t give any indication of filetype. However, the Arbitrary Code Execution (ACE) boilerplate qualifier is present: “remote” refers here to the location of the attacker, rather than the attack, since local user interaction is required.

Exchange: Important RCEs; Exploitation More Likely

After a brief reprieve last month, Exchange admins will want to patch a pair of RCE vulnerabilities this month. While neither CVE-2023-28310 nor CVE-2023-32031 quite manages to rank as critical vulnerabilities, either via CVSSv3 base score, or via Microsoft’s proprietary severity scale, they’re not far off. Only the requirement that the attacker has previously achieved an authenticated role on the Exchange server prevents these vulnerabilities from scoring higher – but that’s just the sort of issue that exploit chains are designed to overcome.

Microsoft expects to see exploitation for both of these vulnerabilities. Successful exploitation will make use of PowerShell remoting sessions to achieve remote code execution.

Azure DevOps: spoofing, information disclosure

A vulnerability in Azure DevOps server could lead to an attacker accessing detailed data such as organization/project configuration, groups, teams, projects, pipelines, boards, and wiki. CVE-2023-21565 requires an attacker to have existing valid credentials for the service, but no elevated privilege is required. The advisory lists  patches for 2020.1.2, 2022 and 2022.0.1.

Summary Charts

Patch Tuesday - June 2023
Visual Studio making quite a splash this month.
Patch Tuesday - June 2023
Even if some of the RCE are ACE, that’s still a lot of RCE.
Patch Tuesday - June 2023
A cluster of vulnerabilities around 8.0 is unsurprising.
Patch Tuesday - June 2023
Patch Visual Studio. Also, all the things!

Summary Tables

Browser vulnerabilities

CVE Title Exploited? Publicly disclosed? CVSSv3 base score
CVE-2023-33143 Microsoft Edge (Chromium-based) Elevation of Privilege Vulnerability No No 7.5
CVE-2023-33145 Microsoft Edge (Chromium-based) Information Disclosure Vulnerability No No 6.5
CVE-2023-29345 Microsoft Edge (Chromium-based) Security Feature Bypass Vulnerability No No 6.1
CVE-2023-3079 Chromium: CVE-2023-3079 Type Confusion in V8 No No N/A
CVE-2023-2941 Chromium: CVE-2023-2941 Inappropriate implementation in Extensions API No No N/A
CVE-2023-2940 Chromium: CVE-2023-2940 Inappropriate implementation in Downloads No No N/A
CVE-2023-2939 Chromium: CVE-2023-2939 Insufficient data validation in Installer No No N/A
CVE-2023-2938 Chromium: CVE-2023-2938 Inappropriate implementation in Picture In Picture No No N/A
CVE-2023-2937 Chromium: CVE-2023-2937 Inappropriate implementation in Picture In Picture No No N/A
CVE-2023-2936 Chromium: CVE-2023-2936 Type Confusion in V8 No No N/A
CVE-2023-2935 Chromium: CVE-2023-2935 Type Confusion in V8 No No N/A
CVE-2023-2934 Chromium: CVE-2023-2934 Out of bounds memory access in Mojo No No N/A
CVE-2023-2933 Chromium: CVE-2023-2933 Use after free in PDF No No N/A
CVE-2023-2932 Chromium: CVE-2023-2932 Use after free in PDF No No N/A
CVE-2023-2931 Chromium: CVE-2023-2931 Use after free in PDF No No N/A
CVE-2023-2930 Chromium: CVE-2023-2930 Use after free in Extensions No No N/A
CVE-2023-2929 Chromium: CVE-2023-2929 Out of bounds write in Swiftshader No No N/A

Developer Tools vulnerabilities

CVE Title Exploited? Publicly disclosed? CVSSv3 base score
CVE-2023-24936 .NET, .NET Framework, and Visual Studio Elevation of Privilege Vulnerability No No 8.1
CVE-2023-24897 .NET, .NET Framework, and Visual Studio Remote Code Execution Vulnerability No No 7.8
CVE-2023-24895 .NET, .NET Framework, and Visual Studio Remote Code Execution Vulnerability No No 7.8
CVE-2023-29326 .NET Framework Remote Code Execution Vulnerability No No 7.8
CVE-2023-33141 Yet Another Reverse Proxy (YARP) Denial of Service Vulnerability No No 7.5
CVE-2023-29331 .NET, .NET Framework, and Visual Studio Denial of Service Vulnerability No No 7.5
CVE-2023-32030 .NET and Visual Studio Denial of Service Vulnerability No No 7.5
CVE-2023-33126 .NET and Visual Studio Remote Code Execution Vulnerability No No 7.3
CVE-2023-33128 .NET and Visual Studio Remote Code Execution Vulnerability No No 7.3
CVE-2023-33135 .NET and Visual Studio Elevation of Privilege Vulnerability No No 7.3
CVE-2023-29337 NuGet Client Remote Code Execution Vulnerability No No 7.1
CVE-2023-32032 .NET and Visual Studio Elevation of Privilege Vulnerability No No 6.5
CVE-2023-33139 Visual Studio Information Disclosure Vulnerability No No 5.5
CVE-2023-29353 Sysinternals Process Monitor for Windows Denial of Service Vulnerability No No 5.5
CVE-2023-33144 Visual Studio Code Spoofing Vulnerability No No 5
CVE-2023-29012 GitHub: CVE-2023-29012 Git CMD erroneously executes doskey.exe in current directory, if it exists No No N/A
CVE-2023-29011 GitHub: CVE-2023-29011 The config file of connect.exe is susceptible to malicious placing No No N/A
CVE-2023-29007 GitHub: CVE-2023-29007 Arbitrary configuration injection via git submodule deinit No No N/A
CVE-2023-25815 GitHub: CVE-2023-25815 Git looks for localized messages in an unprivileged place No No N/A
CVE-2023-25652 GitHub: CVE-2023-25652 "git apply –reject" partially-controlled arbitrary file write No No N/A
CVE-2023-27911 AutoDesk: CVE-2023-27911 Heap buffer overflow vulnerability in Autodesk® FBX® SDK 2020 or prior No No N/A
CVE-2023-27910 AutoDesk: CVE-2023-27910 stack buffer overflow vulnerability in Autodesk® FBX® SDK 2020 or prior No No N/A
CVE-2023-27909 AutoDesk: CVE-2023-27909 Out-Of-Bounds Write Vulnerability in Autodesk® FBX® SDK 2020 or prior No No N/A

Developer Tools Azure vulnerabilities

CVE Title Exploited? Publicly disclosed? CVSSv3 base score
CVE-2023-21565 Azure DevOps Server Spoofing Vulnerability No No 7.1
CVE-2023-21569 Azure DevOps Server Spoofing Vulnerability No No 5.5

ESU Windows vulnerabilities

CVE Title Exploited? Publicly disclosed? CVSSv3 base score
CVE-2023-29363 Windows Pragmatic General Multicast (PGM) Remote Code Execution Vulnerability No No 9.8
CVE-2023-32014 Windows Pragmatic General Multicast (PGM) Remote Code Execution Vulnerability No No 9.8
CVE-2023-32015 Windows Pragmatic General Multicast (PGM) Remote Code Execution Vulnerability No No 9.8
CVE-2023-29362 Remote Desktop Client Remote Code Execution Vulnerability No No 8.8
CVE-2023-29372 Microsoft WDAC OLE DB provider for SQL Server Remote Code Execution Vulnerability No No 8.8
CVE-2023-29373 Microsoft ODBC Driver Remote Code Execution Vulnerability No No 8.8
CVE-2023-29351 Windows Group Policy Elevation of Privilege Vulnerability No No 8.1
CVE-2023-29365 Windows Media Remote Code Execution Vulnerability No No 7.8
CVE-2023-29358 Windows GDI Elevation of Privilege Vulnerability No No 7.8
CVE-2023-29371 Windows GDI Elevation of Privilege Vulnerability No No 7.8
CVE-2023-29346 NTFS Elevation of Privilege Vulnerability No No 7.8
CVE-2023-32017 Microsoft PostScript Printer Driver Remote Code Execution Vulnerability No No 7.8
CVE-2023-29359 GDI Elevation of Privilege Vulnerability No No 7.8
CVE-2023-32011 Windows iSCSI Discovery Service Denial of Service Vulnerability No No 7.5
CVE-2023-29368 Windows Filtering Platform Elevation of Privilege Vulnerability No No 7
CVE-2023-29364 Windows Authentication Elevation of Privilege Vulnerability No No 7
CVE-2023-32016 Windows Installer Information Disclosure Vulnerability No No 5.5
CVE-2023-32020 Windows DNS Spoofing Vulnerability No No 3.7

Exchange Server vulnerabilities

CVE Title Exploited? Publicly disclosed? CVSSv3 base score
CVE-2023-32031 Microsoft Exchange Server Remote Code Execution Vulnerability No No 8.8
CVE-2023-28310 Microsoft Exchange Server Remote Code Execution Vulnerability No No 8

Microsoft Dynamics vulnerabilities

CVE Title Exploited? Publicly disclosed? CVSSv3 base score
CVE-2023-24896 Dynamics 365 Finance Spoofing Vulnerability No No 5.4
CVE-2023-32024 Microsoft Power Apps Spoofing Vulnerability No No 3

Microsoft Office vulnerabilities

CVE Title Exploited? Publicly disclosed? CVSSv3 base score
CVE-2023-29357 Microsoft SharePoint Server Elevation of Privilege Vulnerability No No 9.8
CVE-2023-33131 Microsoft Outlook Remote Code Execution Vulnerability No No 8.8
CVE-2023-33146 Microsoft Office Remote Code Execution Vulnerability No No 7.8
CVE-2023-32029 Microsoft Excel Remote Code Execution Vulnerability No No 7.8
CVE-2023-33137 Microsoft Excel Remote Code Execution Vulnerability No No 7.8
CVE-2023-33133 Microsoft Excel Remote Code Execution Vulnerability No No 7.8
CVE-2023-33130 Microsoft SharePoint Server Spoofing Vulnerability No No 7.3
CVE-2023-33142 Microsoft SharePoint Server Elevation of Privilege Vulnerability No No 6.5
CVE-2023-33129 Microsoft SharePoint Denial of Service Vulnerability No No 6.5
CVE-2023-33140 Microsoft OneNote Spoofing Vulnerability No No 6.5
CVE-2023-33132 Microsoft SharePoint Server Spoofing Vulnerability No No 6.3

Windows vulnerabilities

CVE Title Exploited? Publicly disclosed? CVSSv3 base score
CVE-2023-32009 Windows Collaborative Translation Framework Elevation of Privilege Vulnerability No No 8.8
CVE-2023-29367 iSCSI Target WMI Provider Remote Code Execution Vulnerability No No 7.8
CVE-2023-29360 Windows TPM Device Driver Elevation of Privilege Vulnerability No No 7.8
CVE-2023-32008 Windows Resilient File System (ReFS) Remote Code Execution Vulnerability No No 7.8
CVE-2023-29370 Windows Media Remote Code Execution Vulnerability No No 7.8
CVE-2023-32018 Windows Hello Remote Code Execution Vulnerability No No 7.8
CVE-2023-29366 Windows Geolocation Service Remote Code Execution Vulnerability No No 7.8
CVE-2023-32022 Windows Server Service Security Feature Bypass Vulnerability No No 7.6
CVE-2023-32021 Windows SMB Witness Service Security Feature Bypass Vulnerability No No 7.1
CVE-2023-29361 Windows Cloud Files Mini Filter Driver Elevation of Privilege Vulnerability No No 7
CVE-2023-32010 Windows Bus Filter Driver Elevation of Privilege Vulnerability No No 7
CVE-2023-29352 Windows Remote Desktop Security Feature Bypass Vulnerability No No 6.5
CVE-2023-32013 Windows Hyper-V Denial of Service Vulnerability No No 6.5
CVE-2023-24937 Windows CryptoAPI Denial of Service Vulnerability No No 6.5
CVE-2023-24938 Windows CryptoAPI Denial of Service Vulnerability No No 6.5
CVE-2023-29369 Remote Procedure Call Runtime Denial of Service Vulnerability No No 6.5
CVE-2023-32012 Windows Container Manager Service Elevation of Privilege Vulnerability No No 6.3
CVE-2023-29355 DHCP Server Service Information Disclosure Vulnerability No No 5.3
CVE-2023-32019 Windows Kernel Information Disclosure Vulnerability No No 4.7

AMD Instinct MI300 is THE Chance to Chip into NVIDIA AI Share

Post Syndicated from Patrick Kennedy original https://www.servethehome.com/amd-instinct-mi300-is-the-chance-to-chip-into-nvidia-ai-share/

The AMD Instinct MI300 is a family of CPU and GPU offerings that embodies a next-generation approach for AI and high-performance computing

The post AMD Instinct MI300 is THE Chance to Chip into NVIDIA AI Share appeared first on ServeTheHome.

AMD EPYC Bergamo Launched 128 Cores Per Socket and 1024 Threads Per 1U

Post Syndicated from Patrick Kennedy original https://www.servethehome.com/amd-epyc-bergamo-launched-128-cores-per-socket-and-1024-threads-per-1u/

The new AMD EPYC Bergamo will have 128 cores, 256 threads per socket meaning a common 2U 4-node platform will have 2048 threads

The post AMD EPYC Bergamo Launched 128 Cores Per Socket and 1024 Threads Per 1U appeared first on ServeTheHome.

AWS Security Hub launches a new capability for automating actions to update findings

Post Syndicated from Stuart Gregg original https://aws.amazon.com/blogs/security/aws-security-hub-launches-a-new-capability-for-automating-actions-to-update-findings/

If you’ve had discussions with a security organization recently, there’s a high probability that the word automation has come up. As organizations scale and consume the benefits the cloud has to offer, it’s important to factor in and understand how the additional cloud footprint will affect operations. Automation is a key enabler for efficient operations and can help drive down the number of repetitive tasks that the operational teams have to perform.

Alert fatigue is caused when humans work on the same repetitive tasks day in and day out and also have a large volume of alerts that need to be addressed. The repetitive nature of these tasks can cause analysts to become numb to the importance of the task or make errors due to manual processing. This can lead to misclassification of security alerts or higher-severity alerts being overlooked due to investigation times. Automation is key here to reduce the number of repetitive tasks and give analysts time to focus on other areas of importance.

In this blog post, we’ll walk you through new capabilities within AWS Security Hub that you can use to take automated actions to update findings. We’ll show you some example scenarios that use this capability and set you up with the knowledge you need to get started with creating automation rules.

Automation rules in Security Hub

AWS Security Hub is available globally and is designed to give you a comprehensive view of your security posture across your AWS accounts. With Security Hub, you have a single place that aggregates, organizes, and prioritizes your security alerts, or findings, from multiple AWS services, including Amazon GuardDuty, Amazon Inspector, Amazon Macie, AWS Firewall Manager, AWS Systems Manager Patch Manager, AWS Config, AWS Health, and AWS Identity and Access Management (IAM) Access Analyzer, as well as from over 65 AWS Partner Network (APN) solutions.

Previously, Security Hub could take automated actions on findings, but this involved going to the Amazon EventBridge console or API, creating an EventBridge rule, and then building an AWS Lambda function, an AWS Systems Manager Automation runbook, or an AWS Step Functions step as the target of that rule. If you wanted to set up these automated actions in the administrator account and home AWS Region and run them in member accounts and in linked Regions, you would also need to deploy the correct IAM permissions to enable the actions to run across accounts and Regions. After setting up the automation flow, you would need to maintain the EventBridge rule, Lambda function, and IAM roles. Such maintenance could include upgrading the Lambda versions, verifying operational efficiency, and checking that everything is running as expected.

With Security Hub, you can now use rules to automatically update various fields in findings that match defined criteria. This allows you to automatically suppress findings, update findings’ severities according to organizational policies, change findings’ workflow status, and add notes. As findings are ingested, automation rules look for findings that meet defined criteria and update the specified fields in findings that meet the criteria. For example, a user can create a rule that automatically sets the finding’s severity to “Critical” if the finding account ID is of a known business-critical account. A user could also automatically suppress findings for a specific control in an account where the finding represents an accepted risk.

With automation rules, Security Hub provides you a simplified way to build automations directly from the Security Hub console and API. This reduces repetitive work for cloud security and DevOps engineers and can reduce the mean time to response.

Use cases

In this section, we’ve put together some examples of how Security Hub automation rules can help you. There’s a lot of flexibility in how you can use the rules, and we expect there will be many variations that your organization will use when contextual information about security risk has been added.

Scenario 1: Elevate finding severity for specific controls based on account IDs

Security Hub offers protection by using hundreds of security controls that create findings that have a severity associated with them. Sometimes, you might want to elevate that severity according to your organizational policies or according to the context of the finding, such as the account it relates to. With automation rules, you can now automatically elevate the severity for specific controls when they are in a specific account.

For example, the AWS Foundational Security Best Practices control GuardDuty.1 has a “High” severity by default. But you might consider such a finding to have “Critical” severity if it occurs in one of your top production accounts. To change the severity automatically, you can choose GeneratorId as a criteria and check that it’s equal to aws-foundational-security-best-practices/v/1.0.0/GuardDuty.1, and also add AwsAccountId as a criteria and check that it’s equal to YOUR_ACCOUNT_IDs. Then, add an action to update the severity to “Critical,” and add a note to the person who will look at the finding that reads “Urgent — look into these production accounts.”

You can set up this automation rule through the AWS CLI, the console, the Security Hub API, or the AWS SDK for Python (Boto3), as follows.

To set up the automation rule for Scenario 1 (AWS CLI)

  • In the AWS CLI, run the following command to create a new automation rule with a specific Amazon Resource Name (ARN). Note the different modifiable parameters:
    • Rule-name — The name of the rule that will be created.
    • Rule-status — An optional parameter. Specify whether you want Security Hub to activate and start applying the rule to findings after creation. If no value is specified, the default value is ENABLED. A value of DISABLED means that the rule will be paused after creation.
    • Rule-order — Provide the processing order for the rule. Security Hub applies rules with a lower numerical value for this parameter first.
    • Criteria — Provide the criteria that you want Security Hub to use to filter your findings. The rule action will be applied to findings that match the criteria. For a list of supported criteria, see Criteria and actions for automation rules. In this example, the criteria are placeholders and should be replaced.
    • Actions — Provide the actions that you want Security Hub to take when there’s a match between a finding and your defined criteria. For a list of supported actions, see Criteria and actions for automation rules. In this example, the actions are placeholders and should be replaced.
    aws securityhub create-automation-rule \—rule-name "Elevate severity for findings in production accounts - GuardDuty.1" \—rule-status "ENABLED"" \—rule-order 1 \—description "Elevate severity for findings in production accounts - GuardDuty.1" \—criteria '{"GeneratorId": [{"Value": "aws-foundational-security-best-practices/v/1.0.0/GuardDuty.1","Comparison": "EQUALS"}, "AwsAccountId": [{"Value": "<111122223333>","Comparison": "EQUALS"},]}' \—actions '[{"Type": "FINDING_FIELDS_UPDATE","FindingFieldsUpdate": {"Severity": {"Label": "CRITICAL"},"Note": {"Text": "Urgent – look into these production accounts","UpdatedBy": "sechub-automation"}}}]' \—region us-east-1

To set up the automation rule for Scenario 1 (console)

  1. Open the Security Hub console, and in the left navigation pane, choose Automations.
    Figure 1: Automation rules in the Security Hub console

    Figure 1: Automation rules in the Security Hub console

  2. Choose Create rule, and then choose Create a custom rule to get started with creating a rule of your choice. Add a rule name and description.
    Figure 2: Create a new custom rule

    Figure 2: Create a new custom rule

  3. Under Criteria, add the following information.
    • Key 1
      • Key = GeneratorID
      • Operator = EQUALS
      • Value = aws-foundational-security-best-practices/v/1.0.0/GuardDuty.1
    • Key 2
      • Key = AwsAccountId
      • Operator = EQUALS
      • Value = Your AWS account ID
    Figure 3: Information added for the rule criteria

    Figure 3: Information added for the rule criteria

  4. You can preview which findings will match the criteria by looking in the preview section.
    Figure 4: Preview section

    Figure 4: Preview section

  5. Next, under Automated action, specify which finding value to update automatically when findings match your criteria.
    Figure 5: Automated action to be taken against the findings that match the criteria

    Figure 5: Automated action to be taken against the findings that match the criteria

  6. For Rule status, choose Enabled, and then choose Create rule.
    Figure 6: Set the rule status to Enabled

    Figure 6: Set the rule status to Enabled

  7. After you choose Create rule, you will see the newly created rule within the Automations portal.
    Figure 7: Newly created rule within the Security Hub Automations page

    Figure 7: Newly created rule within the Security Hub Automations page

    Note: In figure 7, you can see multiple automation rules. When you create automation rules, you assign each rule an order number. This determines the order in which Security Hub applies your automation rules. This becomes important when multiple rules apply to the same finding or finding field. When multiple rule actions apply to the same finding field, the rule with the highest numerical value for rule order is applied last and has the ultimate effect on that field.

Additionally, if your preferred deployment method is to use the API or AWS SDK for Python (Boto3), we have information on how you can use these means of deployment in our public documentation.

Scenario 2: Change the finding severity to high if a resource is important, based on resource tags

Imagine a situation where you have findings associated to a wide range of resources. Typically, organizations will attempt to prioritize which findings to remediate first. You can achieve this prioritization through Security Hub and the contextual fields that are available for you to use — for example, by using the severity of the finding or the account ID the resource is sitting in. You might also have your own prioritization based on other factors. You could add this additional context to findings by using a tagging strategy. With automation rules, you can now automatically elevate the severity for specific findings based on the tag value associated to the resource.

For example, if a finding comes into Security Hub with the severity rating “Medium,” but the resource in question is critical to the business and has the tag production associated to it, you could automatically raise the severity rating to “High.”

Note: This will work only for findings where there is a resource tag associated with the finding.

Scenario 3: Suppress GuardDuty findings with a severity of “Informational”

GuardDuty provides an overarching view of the state of threats to deployed resources in your organization’s cloud environment. After evaluation, GuardDuty produces findings related to these threats. The findings produced by GuardDuty have different severities, to help organizations with prioritization. Some of these findings will be given an “Informational” severity. “Informational” indicates that no issue was found and the content of the finding is purely to give information. After you have evaluated the context of the finding, you might want to suppress any additional findings that match the same criteria.

For example, you might want to set up a rule so that new findings with the generator ID that produced “Informational” findings are suppressed, keeping only the findings that need action.

Templates

When you create a new rule, you can also choose to create a rule from a template. These templates are regularly updated with use cases that are applicable for many customers.

To set up an automation rule by using a template from the console

  1. In the Security Hub console, choose Automations, and then choose Create rule.
  2. Choose Create a rule from a template to get started with creating a rule of your choice.
  3. Select a rule template from the drop-down menu.
    Figure 8: Select an automation rule template

    Figure 8: Select an automation rule template

  4. (Optional) If necessary, modify the Rule, Criteria, and Automated action sections.
  5. For Rule status, choose whether you want the rule to be enabled or disabled after it’s created.
  6. (Optional) Expand the Additional settings section. Choose Ignore subsequent rules for findings that match these criteria if you want this rule to be the last rule applied to findings that match the rule criteria.
  7. (Optional) For Tags, add tags as key-value pairs to help you identify the rule.
  8. Choose Create rule.

Multi-Region deployment

For organizations that operate in multiple AWS Regions, we’ve provided a solution that you can use to replicate rules created in your central Security Hub admin account into these additional Regions. You can find the sample code for this solution in our GitHub repo.

Conclusion

In this blog post, we’ve discussed the importance of automation and its ability to help organizations scale operations within the cloud. We’ve introduced a new capability in AWS Security Hub, automation rules, that can help reduce the repetitive tasks your operational teams may be facing, and we’ve showcased some example use cases to get you started. Start using automation rules in your environment today. We’re excited to see what use cases you will solve with this feature and as always, are happy to receive any feedback.

If you have feedback about this post, submit comments in the Comments section below. If you have questions about this post, start a new thread on the AWS Security, Identity, & Compliance re:Post or contact AWS Support.

Stuart Gregg

Stuart Gregg

Stuart enjoys providing thought leadership and being a trusted advisor to customers. In his spare time Stuart can be seen either training for an Ironman or snacking.

Shachar Hirshberg

Shachar Hirshberg

Shachar is a Senior Product Manager at AWS Security Hub with over a decade of experience in building, designing, launching, and scaling enterprise software. He is passionate about further improving how customers harness AWS services to enable innovation and enhance the security of their cloud environments. Outside of work, Shachar is an avid traveler and a skiing enthusiast.

Migrating Critical Traffic At Scale with No Downtime — Part 2

Post Syndicated from Netflix Technology Blog original https://netflixtechblog.com/migrating-critical-traffic-at-scale-with-no-downtime-part-2-4b1c8c7155c1

Migrating Critical Traffic At Scale with No Downtime — Part 2

Shyam Gala, Javier Fernandez-Ivern, Anup Rokkam Pratap, Devang Shah

Picture yourself enthralled by the latest episode of your beloved Netflix series, delighting in an uninterrupted, high-definition streaming experience. Behind these perfect moments of entertainment is a complex mechanism, with numerous gears and cogs working in harmony. But what happens when this machinery needs a transformation? This is where large-scale system migrations come into play. Our previous blog post presented replay traffic testing — a crucial instrument in our toolkit that allows us to implement these transformations with precision and reliability.

Replay traffic testing gives us the initial foundation of validation, but as our migration process unfolds, we are met with the need for a carefully controlled migration process. A process that doesn’t just minimize risk, but also facilitates a continuous evaluation of the rollout’s impact. This blog post will delve into the techniques leveraged at Netflix to introduce these changes to production.

Sticky Canaries

Canary deployments are an effective mechanism for validating changes to a production backend service in a controlled and limited manner, thus mitigating the risk of unforeseen consequences that may arise due to the change. This process involves creating two new clusters for the updated service; a baseline cluster containing the current version running in production and a canary cluster containing the new version of the service. A small percentage of production traffic is redirected to the two new clusters, allowing us to monitor the new version’s performance and compare it against the current version. By collecting and analyzing key performance metrics of the service over time, we can assess the impact of the new changes and determine if they meet the availability, latency, and performance requirements.

Some product features require a lifecycle of requests between the customer device and a set of backend services to drive the feature. For instance, video playback functionality on Netflix involves requesting URLs for the streams from a service, calling the CDN to download the bits from the streams, requesting a license to decrypt the streams from a separate service, and sending telemetry indicating the successful start of playback to yet another service. By tracking metrics only at the level of service being updated, we might miss capturing deviations in broader end-to-end system functionality.

Sticky Canary is an improvement to the traditional canary process that addresses this limitation. In this variation, the canary framework creates a pool of unique customer devices and then routes traffic for this pool consistently to the canary and baseline clusters for the duration of the experiment. Apart from measuring service-level metrics, the canary framework is able to keep track of broader system operational and customer metrics across the canary pool and thereby detect regressions on the entire request lifecycle flow.

Sticky Canary

It is important to note that with sticky canaries, devices in the canary pool continue to be routed to the canary throughout the experiment, potentially resulting in undesirable behavior persisting through retries on customer devices. Therefore, the canary framework is designed to monitor operational and customer KPI metrics to detect persistent deviations and terminate the canary experiment if necessary.

Canaries and sticky canaries are valuable tools in the system migration process. Compared to replay testing, canaries allow us to extend the validation scope beyond the service level. They enable verification of the broader end-to-end system functionality across the request lifecycle for that functionality, giving us confidence that the migration will not cause any disruptions to the customer experience. Canaries also provide an opportunity to measure system performance under different load conditions, allowing us to identify and resolve any performance bottlenecks. They enable us to further fine-tune and configure the system, ensuring the new changes are integrated smoothly and seamlessly.

A/B Testing

A/B testing is a widely recognized method for verifying hypotheses through a controlled experiment. It involves dividing a portion of the population into two or more groups, each receiving a different treatment. The results are then evaluated using specific metrics to determine whether the hypothesis is valid. The industry frequently employs the technique to assess hypotheses related to product evolution and user interaction. It is also widely utilized at Netflix to test changes to product behavior and customer experience.

A/B testing is also a valuable tool for assessing significant changes to backend systems. We can determine A/B test membership in either device application or backend code and selectively invoke new code paths and services. Within the context of migrations, A/B testing enables us to limit exposure to the migrated system by enabling the new path for a smaller percentage of the member base. Thereby controlling the risk of unexpected behavior resulting from the new changes. A/B testing is also a key technique in migrations where the updates to the architecture involve changing device contracts as well.

Canary experiments are typically conducted over periods ranging from hours to days. However, in certain instances, migration-related experiments may be required to span weeks or months to obtain a more accurate understanding of the impact on specific Quality of Experience (QoE) metrics. Additionally, in-depth analyses of particular business Key Performance Indicators (KPIs) may require longer experiments. For instance, envision a migration scenario where we enhance the playback quality, anticipating that this improvement will lead to more customers engaging with the play button. Assessing relevant metrics across a considerable sample size is crucial for obtaining a reliable and confident evaluation of the hypothesis. A/B frameworks work as effective tools to accommodate this next step in the confidence-building process.

In addition to supporting extended durations, A/B testing frameworks offer other supplementary capabilities. This approach enables test allocation restrictions based on factors such as geography, device platforms, and device versions, while also allowing for analysis of migration metrics across similar dimensions. This ensures that the changes do not disproportionately impact specific customer segments. A/B testing also provides adaptability, permitting adjustments to allocation size throughout the experiment.

We might not use A/B testing for every backend migration. Instead, we use it for migrations in which changes are expected to impact device QoE or business KPIs significantly. For example, as discussed earlier, if the planned changes are expected to improve client QoE metrics, we would test the hypothesis via A/B testing.

Dialing Traffic

After completing the various stages of validation, such as replay testing, sticky canaries, and A/B tests, we can confidently assert that the planned changes will not significantly impact SLAs (service-level-agreement), device level QoE, or business KPIs. However, it is imperative that the final rollout is regulated to ensure that any unnoticed and unexpected problems do not disrupt the customer experience. To this end, we have implemented traffic dialing as the last step in mitigating the risk associated with enabling the changes in production.

A dial is a software construct that enables the controlled flow of traffic within a system. This construct samples inbound requests using a distribution function and determines whether they should be routed to the new path or kept on the existing path. The decision-making process involves assessing whether the distribution function’s output aligns within the range of the predefined target percentage. The sampling is done consistently using a fixed parameter associated with the request. The target percentage is controlled via a globally scoped dynamic property that can be updated in real-time. By increasing or decreasing the target percentage, traffic flow to the new path can be regulated instantaneously.

Dial

The selection of the actual sampling parameter depends on the specific migration requirements. A dial can be used to randomly sample all requests, which is achieved by selecting a variable parameter like a timestamp or a random number. Alternatively, in scenarios where the system path must remain constant with respect to customer devices, a constant device attribute such as deviceId is selected as the sampling parameter. Dials can be applied in several places, such as device application code, the relevant server component, or even at the API gateway for edge API systems, making them a versatile tool for managing migrations in complex systems.

Traffic is dialed over to the new system in measured discrete steps. At every step, relevant stakeholders are informed, and key metrics are monitored, including service, device, operational, and business metrics. If we discover an unexpected issue or notice metrics trending in an undesired direction during the migration, the dial gives us the capability to quickly roll back the traffic to the old path and address the issue.

The dialing steps can also be scoped at the data center level if traffic is served from multiple data centers. We can start by dialing traffic in a single data center to allow for an easier side-by-side comparison of key metrics across data centers, thereby making it easier to observe any deviations in the metrics. The duration of how long we run the actual discrete dialing steps can also be adjusted. Running the dialing steps for longer periods increases the probability of surfacing issues that may only affect a small group of members or devices and might have been too low to capture and perform shadow traffic analysis. We can complete the final step of migrating all the production traffic to the new system using the combination of gradual step-wise dialing and monitoring.

Migrating Persistent Stores

Stateful APIs pose unique challenges that require different strategies. While the replay testing technique discussed in the previous part of this blog series can be employed, additional measures outlined earlier are necessary.

This alternate migration strategy has proven effective for our systems that meet certain criteria. Specifically, our data model is simple, self-contained, and immutable, with no relational aspects. Our system doesn’t require strict consistency guarantees and does not use database transactions. We adopt an ETL-based dual-write strategy that roughly follows this sequence of steps:

  • Initial Load through an ETL process: Data is extracted from the source data store, transformed into the new model, and written to the newer data store through an offline job. We use custom queries to verify the completeness of the migrated records.
  • Continuous migration via Dual-writes: We utilize an active-active/dual-writes strategy to migrate the bulk of the data. As a safety mechanism, we use dials (discussed previously) to control the proportion of writes that go to the new data store. To maintain state parity across both stores, we write all state-altering requests of an entity to both stores. This is achieved by selecting a sampling parameter that makes the dial sticky to the entity’s lifecycle. We incrementally turn the dial up as we gain confidence in the system while carefully monitoring its overall health. The dial also acts as a switch to turn off all writes to the new data store if necessary.
  • Continuous verification of records: When a record is read, the service reads from both data stores and verifies the functional correctness of the new record if found in both stores. One can perform this comparison live on the request path or offline based on the latency requirements of the particular use case. In the case of a live comparison, we can return records from the new datastore when the records match. This process gives us an idea of the functional correctness of the migration.
  • Evaluation of migration completeness: To verify the completeness of the records, cold storage services are used to take periodic data dumps from the two data stores and compared for completeness. Gaps in the data are filled back with an ETL process.
  • Cut-over and clean-up: Once the data is verified for correctness and completeness, dual writes and reads are disabled, any client code is cleaned up, and read/writes only occur to the new data store.
Migrating Stateful Systems

Clean-up

Clean-up of any migration-related code and configuration after the migration is crucial to ensure the system runs smoothly and efficiently and we don’t build up tech debt and complexity. Once the migration is complete and validated, all migration-related code, such as traffic dials, A/B tests, and replay traffic integrations, can be safely removed from the system. This includes cleaning up configuration changes, reverting to the original settings, and disabling any temporary components added during the migration. In addition, it is important to document the entire migration process and keep records of any issues encountered and their resolution. By performing a thorough clean-up and documentation process, future migrations can be executed more efficiently and effectively, building on the lessons learned from the previous migrations.

Parting Thoughts

We have utilized a range of techniques outlined in our blog posts to conduct numerous large, medium, and small-scale migrations on the Netflix platform. Our efforts have been largely successful, with minimal to no downtime or significant issues encountered. Throughout the process, we have gained valuable insights and refined our techniques. It should be noted that not all of the techniques presented are universally applicable, as each migration presents its own unique set of circumstances. Determining the appropriate level of validation, testing, and risk mitigation requires careful consideration of several factors, including the nature of the changes, potential impacts on customer experience, engineering effort, and product priorities. Ultimately, we aim to achieve seamless migrations without disruptions or downtime.

In a series of forthcoming blog posts, we will explore a selection of specific use cases where the techniques highlighted in this blog series were utilized effectively. They will focus on a comprehensive analysis of the Ads Tier Launch and an extensive GraphQL migration for various product APIs. These posts will offer readers invaluable insights into the practical application of these methodologies in real-world situations.


Migrating Critical Traffic At Scale with No Downtime — Part 2 was originally published in Netflix TechBlog on Medium, where people are continuing the conversation by highlighting and responding to this story.

New – Amazon S3 Dual-Layer Server-Side Encryption with Keys Stored in AWS Key Management Service (DSSE-KMS)

Post Syndicated from Irshad Buchh original https://aws.amazon.com/blogs/aws/new-amazon-s3-dual-layer-server-side-encryption-with-keys-stored-in-aws-key-management-service-dsse-kms/

Today, we are launching Amazon S3 dual-layer server-side encryption with keys stored in AWS Key Management Service (DSSE-KMS), a new encryption option in Amazon S3 that applies two layers of encryption to objects when they are uploaded to an Amazon Simple Storage Service (Amazon S3) bucket. DSSE-KMS is designed to meet National Security Agency CNSSP 15 for FIPS compliance and Data-at-Rest Capability Package (DAR CP) Version 5.0 guidance for two layers of CNSA encryption. Using DSSE-KMS, you can fulfill regulatory requirements to apply multiple layers of encryption to your data.

Amazon S3 is the only cloud object storage service where customers can apply two layers of encryption at the object level and control the data keys used for both layers. DSSE-KMS makes it easier for highly regulated customers to fulfill rigorous security standards, such as US Department of Defense (DoD) customers.

With DSSE-KMS, you can specify dual-layer server-side encryption (DSSE) in the PUT or COPY request for an object or configure your S3 bucket to apply DSSE to all new objects by default. You can also enforce DSSE-KMS using IAM and bucket policies. Each layer of encryption uses a separate cryptographic implementation library with individual data encryption keys. DSSE-KMS helps protect sensitive data against the low probability of a vulnerability in a single layer of cryptographic implementation.

DSSE-KMS simplifies the process of applying two layers of encryption to your data, without having to invest in infrastructure required for client-side encryption. Each layer of encryption uses a different implementation of the 256-bit Advanced Encryption Standard with Galois Counter Mode (AES-GCM) algorithm. DSSE-KMS uses the AWS Key Management Service (AWS KMS) to generate data keys, allowing you to control your customer managed keys by setting permissions per key and specifying key rotation schedules. With DSSE-KMS, you can now query and analyze your dual-encrypted data with AWS services such as Amazon Athena, Amazon SageMaker, and more.

With this launch, Amazon S3 now offers four options for server-side encryption:

  1. Server-side encryption with Amazon S3 managed keys (SSE-S3)
  2. Server-side encryption with AWS KMS (SSE-KMS)
  3. Server-side encryption with customer-provided encryption keys (SSE-C)
  4. Dual-layer server-side encryption with keys stored in KMS (DSSE-KMS)

Let’s see how DSSE-KMS works in practice.

Create an S3 Bucket and Turn on DSSE-KMS
To create a new bucket in the Amazon S3 console, I choose Buckets in the navigation pane. I choose Create bucket, and I select a unique and meaningful name for the bucket. Under Default encryption section, I choose DSSE-KMS as the encryption option. From the available AWS KMS keys, I select a key for my requirements. Finally, I choose Create bucket to complete the creation of the S3 bucket, encrypted by DSSE-KMS encryption settings.

Encryption

Upload an Object to the DSSE-SSE enabled S3 Bucket
In the Buckets list, I choose the name of the bucket that I want to upload an object to. On the Objects tab for the bucket, I choose Upload. Under Files and folders, I choose Add files. I then choose a file to upload, and then choose Open. Under Server-side encryption, I choose Do not specify an encryption key. I then choose Upload.

Server Side Encryption

Once the object is uploaded to the S3 bucket, I notice that the uploaded object inherits the Server-side encryption settings from the bucket.

Server Side Encryption Setting

Download a DSSE-KMS Encrypted Object from an S3 Bucket
I select the object that I previously uploaded and choose Download or choose Download as from the Object actions menu. Once the object is downloaded, I open it locally, and the object is decrypted automatically, requiring no change to client applications.

Now Available
Amazon S3 dual-layer server-side encryption with keys stored in AWS KMS (DSSE-KMS) is available today in all AWS Regions. You can get started with DSSE-KMS via the AWS CLI or AWS Management Console. To learn more about all available encryption options on Amazon S3, visit the Amazon S3 User Guide. For pricing information on DSSE-KMS, visit the Amazon S3 pricing page (Storage tab) and the AWS KMS pricing page.

— Irshad

The collective thoughts of the interwebz