Field Notes: Migrating File Servers to Amazon FSx and Integrating with AWS Managed Microsoft AD

Post Syndicated from Kyaw Soe Hlaing original https://aws.amazon.com/blogs/architecture/field-notes-migrating-file-servers-to-amazon-fsx-and-integrating-with-aws-managed-microsoft-ad/

Amazon FSx provides AWS customers with the native compatibility of third-party file systems with feature sets for workloads such as Windows-based storage, high performance computing (HPC), machine learning, and electronic design automation (EDA).  Amazon FSx automates the time-consuming administration tasks such as hardware provisioning, software configuration, patching, and backups. Since Amazon FSx integrates the file systems with cloud-native AWS services, this makes them even more useful for a broader set of workloads.

Amazon FSx for Windows File Server provides fully managed file storage that is accessible over the industry-standard Server Message Block (SMB) protocol. Built on Windows Server, Amazon FSx delivers a wide range of administrative features such as data deduplication, end-user file restore, and Microsoft Active Directory (AD) integration.

In this post, I explain how to migrate files and file shares from on-premises servers to Amazon FSx with AWS DataSync in a domain migration scenario. Customers are migrating their file servers to Amazon FSx as part of their migration from an on-premises Active Directory to AWS managed Active Directory. Their plan is to replace their file servers with Amazon FSx during Active Directory migration to AWS Managed AD.

Arhictecture diagram

Prerequisites

Before you begin, perform the steps outlined in this blog to migrate the user accounts and groups to the managed Active Directory.

Walkthrough

There are numerous ways to perform the Active Directory migration. Generally, the following five steps are taken:

  1. Establish two-way forest trust between on-premises AD and AWS Managed AD
  2. Migrate user accounts and group with the ADMT tool
  3. Duplicate Access Control List (ACL) permissions in the file server
  4. Migrate files and folders with existing ACL to Amazon FSx using AWS DataSync
  5. Migrate User Computers

In this post, I focus on duplication of ACL permissions and migration of files and folders using Amazon FSx and AWS DataSync. In order to perform duplication of ACL permission in file servers, I use SubInACL tool, which is available from the Microsoft website.

Duplication of the ACL is required because users want to seamlessly access file shares once their computers are migrated to AWS Managed AD. Thus all migrated files and folders have permission with Managed AD users and group objects. For enterprises, the migration of user computers does not happen overnight. Normally, migration takes place in batches or phases. With ACL duplication, both migrated and non-migrated users can access their respective file shares seamlessly during and after migration.

Duplication of Access Control List (ACL)

Before we proceed with ACL duplication, we must ensure that the migration of user accounts and groups was completed. In my demo environment, I have already migrated on-premises users to the Managed Active Directory. In the meantime, we presume that we are migrating identical users to the Managed Active Directory. There might be a scenario where migrated user accounts have different naming such as samAccount name. In this case, we will need to handle this during ACL duplication with SubInACL. For more information about syntax, refer to the SubInACL documentation.

As indicated in following screenshots, I have two users created in the on-premises Active Directory (onprem.local) and those two identical users have been created in the Managed Active Directory too (corp.example.com).

Screenshot of on-premises Active Directory (onprem.local)


Screenshot of Active Directory

In the following screenshot, I have a shared folder called “HR_Documents” in an on-premises file server. Different users have different access rights to that folder. For example, John Smith has “Full Control” but Onprem User1 only have “Read & Execute”. Our plan is to add same access right to identical users from the Managed Active Directory, here corp.example.com, so that once John Smith is migrated to managed AD, he can access to shared folders in Amazon FSx using his Managed Active Directory credential.

Let’s verify the existing permission in the “HR_Documents” folder. Two users from onprem.local are found with different access rights.

Screenshot of HR docs

Screenshot of HR docs

Now it’s time to install SubInACL.

We install it in our on-premises file server. After the SubInACL tool is installed, it can be found under “C:\Program Files (x86)\Windows Resource Kits\Tools” folder by default. To perform an ACL duplication, run command prompt as administrator and run the following command;

Subinacl /outputlog=C:\temp\HR_document_log.txt /errorlog=C:\temp\HR_document_Err_log.txt /Subdirectories C:\HR_Documents\* /migratetodomain=onprem=corp

There are several parameters that I am using in the command:

  • Outputlog = where log file is saved
  • ErrorLog = where error log file is saved
  • Subdirectories = to apply permissions including subfolders and files
  • Migratetodomain= NetBIOS name of source domain and destination domain

Screenshot windows resources kits

screenshot of windows resources kit

If the command is run successfully, you should able to see a summary of the results. If there is no error or failure, you can verify whether ACL permissions are duplicated as expected by looking at the folders and files. In our case, we can see that there is one ACL entry of identical account from corp.example.com is added.

Note: you will always see two ACL entries, one from onprem.local and another one from corp.example.com domain in all the files and folders that you used during migration.  Permissions are now applied to both at the folder and file level.

screenshot of payroll properties

screenshot of doc 1 properties

Migrate files and folders using AWS DataSync

AWS DataSync is an online data transfer service that simplifies, automates, and accelerates moving data between on-premises storage systems and AWS Storage services such as Amazon S3, Amazon Elastic File System (Amazon EFS), or Amazon FSx for Windows File Server. Manual tasks related to data transfers can slow down migrations and burden IT operations. AWS DataSync reduces or automatically handles many of these tasks, including scripting copy jobs, scheduling and monitoring transfers, validating data, and optimizing network utilization.

Create an AWS DataSync agent

An AWS DataSync agent deploys as a virtual machine in an on-premises data center. An AWS DataSync agent can be run on ESXi, KVM, and Microsoft Hyper-V hypervisors. The AWS DataSync agent is used to access on-premises storage systems and transfer data to the AWS DataSync managed service running on AWS. AWS DataSync always performs incremental copies by comparing from a source to a destination and only copying files that are new or have changed.

AWS DataSync supports the following SMB (Server Message Block) locations to migrate data from:

  • Network File System (NFS)
  • Server Message Block (SMB)

In this blog, I use SMB as the source location, since I am migrating from an on-premises Windows File server. AWS DataSync supports SMB 2.1 and SMB 3.0 protocols.

AWS DataSync saves metadata and special files when copying to and from file systems. When files are copied from a SMB file share and Amazon FSx for Windows File Server, AWS DataSync copies the following metadata:

  • File timestamps: access time, modification time, and creation time
  • File owner and file group security identifiers (SIDs)
  • Standard file attributes
  • NTFS discretionary access lists (DACLs): access control entries (ACEs) that determine whether to grant access to an object

Data Synchronization with AWS DataSync

When a task starts, AWS DataSyc goes through different stages. It begins with examining file system follows by data transfer to destination. Once data transfer is completed, it performs verification for consistency between source and destination file systems. You can review detailed information about the data synchronization stages.

DataSync Endpoints

You can activate your agent by using one of the following endpoint types:

  • Public endpoints – If you use public endpoints, all communication from your DataSync agent to AWS occurs over the public internet.
  • Federal Information Processing Standard (FIPS) endpoints – If you need to use FIPS 140-2 validated cryptographic modules when accessing the AWS GovCloud (US-East) or AWS GovCloud (US-West) Region, use this endpoint to activate your agent. You use the AWS CLI or API to access this endpoint.
  • Virtual private cloud (VPC) endpoints – If you use a VPC endpoint, all communication from AWS DataSync to AWS services occurs through the VPC endpoint in your VPC in AWS. This approach provides a private connection between your self-managed data center, your VPC, and AWS services. It increases the security of your data as it is copied over the network.

In my demo environment, I have implemented AWS DataSync as indicated in following diagram. The DataSync Agent can be run either on VMware or Hyper-V and KVM platform in a customer on-premises data center.

Datasync Agent Arhictecture

Once the AWS DataSync Agent setup is completed and the task that defined the source file servers and destination Amazon FSx server is added, you can verify agent status in the AWS Management Console.

Console screenshot

Select Task and then choose Start to start copying files and folders. This will start the replication task (or you can wait until the task runs hourly). You can check the History tab to see a history of the replication task executions.

Console screenshot

Congratulations! You have replicated the contents of an on-premises file server to Amazon FSx. Let’s look and make sure the ACL permissions are still intact in their destination after migration. As shown in the following screenshots, the ACL permissions in the Payroll folder still remains as is, both on-premises users and Managed AD users are inside. Once the user’s computers are migrated to the Managed AD, they can access the same file share in Amazon FSx server using Managed AD credentials.

Payroll properties screenshot

Payroll properties screenshot

Cleaning up

If you are performing testing by following the preceding steps in your own account, delete the following resources, to avoid incurring future charges:

  • EC2 instances
  • Managed AD
  • Amazon FSx file system
  • AWS Datasync

Conclusion

You have learned how to duplicate ACL permissions and shared folder permissions during migration of file servers to Amazon FSx. This process provides a seamless migration experience for users. Once the user’s computers are migrated to the Managed AD, they only need to remap shared folders from Amazon FSx. This can be automated by pushing down shared folders mapping with a Group Policy. If new files or folders are created in the source file server, AWS Datasync will synchronize to Amazon FSx server.

For customers who are planning to do a domain migration from on-premises to AWS Managed Microsoft AD, migration of resources like file servers are common. Handling ACL permissions plays a vital role in providing a seamless migration experience. The duplication of ACL can be an option, otherwise, the ADMT tool can be used to migrate SID information from the source Domain to destination Domain. To migrate SID history, SID filtering needs to be disabled during migration.

If you want to provide feedback about this post, you are welcome to submit in the comments section below.


Field Notes provides hands-on technical guidance from AWS Solutions Architects, consultants, and technical account managers, based on their experiences in the field solving real-world business problems for customers.

Едни (не)отворени данни за язовирите

Post Syndicated from original https://yurukov.net/blog/2020/opendata-qzoviri/

Вече два пъти споделям данни, които съм събрал, но нямам време да обработя и използвам. Първия път беше през 2017-та с отчетите искани по ЗДОИ от всички РЗИ в страната относно проверките и глобите за пушене в заведенията. Другите данни пуснах през 2018-та и съдържаха информацията от регистъра за жертвите от войните, в които сме участвали през 20-ти век, но представена в машинно-четим вид.

Днес пускам данни, които събрах в последните дни. За разлика от предишните не съм се отказал да обработя тези и да ги представя в разбираем вид. Смятам обаче, че са важни и ги пускам веднага свободно в случай, че някой иска да ги използва. Докато информацията в тях е вече налична в мрежата, тя е трудна за намиране и използване.

Първият ресурс идва от дневния бюлетин на МОСВ за състоянието на язовирите в страната. Ще го намерите на страницата на министерството. От няколко дни се публикува и в профила на @GovAlertEu:

Тъй като бюлетинът е във PDF формат, числата в него не може да се използват свободно. Не се и публикуват в машинно-четим формат на сайта им или в портала за отворени данни. Затова свалих всички доклади от началото на май, когато е започнал бюлетина и ги свалих в по-лесна за обработване таблица. Може да я свалите тук. Колоните са същите, както таблицата след трета страница. Това, което липсва като информация е класификацията по цвят кои язовири са предназначени за питейни, кои за напояване и кои за производство на енергия.

Другият източник са гаранциите за възобновяема енергия. Те се издават от Агенцията за устойчиво енергийно развитие и ще намерите в регистъра им. Той всъщност е обновен в лесен за търсене и филтриране формат и е прекрасно, че позволява сваляне на справките. Преди седем години беше просто една Excel таблица пълна с грешки, която тогава свалих и показах в интерактивен инструмент. Сега извадих в таблица всички гаранции за енергия на ВЕЦ-ове заедно с произведената енергия по месеци. Може да я свалите тук. Това, което не е удобно е, че няма разбивка по дни кога точно е произведена тази енергия, за да може да съпоставим с изпускане на вода от язовирите.

Друг липсващ елемент, който се опитам сега да събера, е информация кои ВЕЦ-ве са на и надолу по течението на кои язовири. С други думи изпускане на вода от кои язовири би помогнало на кой ВЕЦ точно да произведе повече ток и колко повече. Така може да направим относително точна преценка намаление къде е докарало какви пари на кого. В таблицата виждаме имена на фирми и точни периоди и количества енергия. Тук може би ще е полезен този регистър, но трябва да се изчистят имената, да се вземат координатите и да се съпоставят ВЕЦ-ове с язовири. За доста от гаранциите се вижда, че нямат схема на подпомагане. Затова, макар, че нямаме информация как са продадени и в кой конкретен ден, може да използваме интервалите на спот цените за дадения месец за приблизителна оценка.

Ако някой има идея как може да съберем лесно информация в табличен вид кои от тези язовири имат ВЕЦ-ове надолу по течението и доколко изпусканията на вода ще увеличи производството им, ще се радвам да сподели. Аналогично, ако някой има поглед над сферата и иска да сподели какви проблеми може да има с конкретните справки и разбирането ни за тях. Също, както преди, може да използвате данните по какъвто и да е начин, тъй като са публична информация. Ще се радвам да споделите резултатът в коментарите.

Снимки от Tama66 и pxhere.

The post Едни (не)отворени данни за язовирите first appeared on Блогът на Юруков.

Designing the Raspberry Pi Case Fan

Post Syndicated from original https://www.raspberrypi.org/blog/designing-the-raspberry-pi-case-fan/

When I first investigated inserting a fan into the standard Raspberry Pi case there were two main requirements. The first was to keep the CPU cool in all usage scenarios. The second was to reduce or eliminate any changes to the current case and therefore avoid costly tool changes.

The case fan and heatsink

As I had no experience developing a fan, I did what all good engineers do and had a go anyway. We had already considered opening the space above the Ethernet connector to create a flow of air into the case. So, I developed my first prototype from a used Indian takeaway container (I cleaned it first), but the below card version was easier to recreate

The first prototype

Input port over the Ethernet connector
Air duct taped into the top of the case

The above duct is what remains from my first effort, the concept is relatively simple, draw air in over the Ethernet port, and then drive the air down onto the CPU. But it wasn’t good enough, running CPU-burn on all four cores required a fan which sounded like it was about to take off. So I spoke to a professional who did some computational fluid dynamics (CFD) analysis for us.

It’s a kind of magic

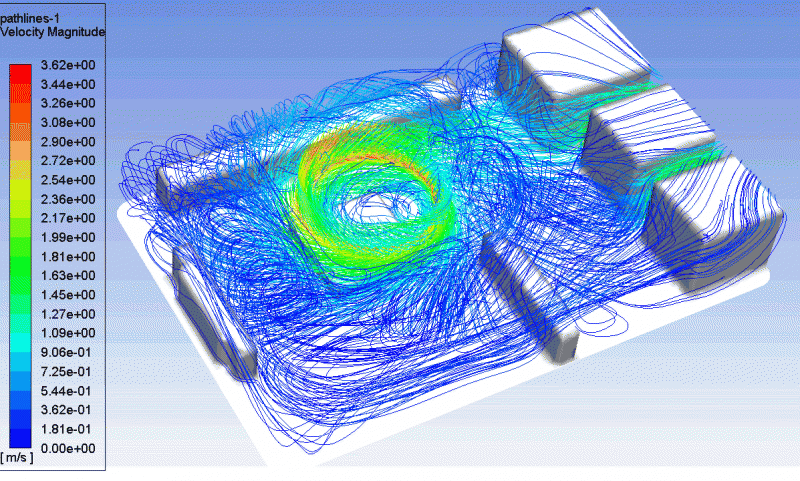
CFD analysis of a cross section of the case

CFD analysis takes a 3D description of the volume and calculates a simulation of fluid flow (the air) through the volume. The result shows where the air moves fastest (the green and red areas)

What this showed us is the position of the fan is important since the fastest moving bit of air is actually quite far from the centre of the processor, also:

Bulk analysis of the air flow through the case

The picture above shows how most of the moving air (green and red) is mainly spinning around inside the fan. This happens because there is a pressure difference between the input and output sides of the fan (the sucky end and the blowy end). Fans just don’t work well that way, they are most efficient when unrestricted. I needed to go back to the drawing board. My next experiment was to add holes into the case to understand how much the airflow could be changed.

Improving airflow

Holes
More holes!

After running the tests with additional holes in both the lid and the base I concluded the issue wasn’t really getting air unrestricted in and out of the case (although the holes did make a small difference) but the effect the air duct was having on restricting the flow into the fan itself. Back to the drawing board…

During a long run in the fens, I thought about the airflow over the Ethernet connector and through the narrow duct, wondering how we can open this up to reduce the constriction. I realised it might be possible to use the whole ‘connector end’ of the case as the inlet port.

The breakthrough

My first cardboard ‘bulkhead’

Suddenly, I had made a big difference… By drawing air from around the USB and Ethernet connectors the lid has been left un-modified but still achieves the cooling effect I was looking for. Next was to reduce the direction changes in the air flow and try to make the duct simpler.

The bulkhead

The cardboard bulkhead does exactly what you need to do and nothing more. It separates the two halves of the case, and directs the air down directly at the processor. Using this design and the heatsink, I was able to achieve a cooling capable of easily running the cpuburn application but with an even smaller (quieter) fan.

The next job is to develop a plastic clip to attach the fan into the lid. That’s where our friends at Kinneir Dufort came in. They designed the injection moulded polycarbonate that makes an accurate interface with the Raspberry Pi’s PCB. The ‘bulkhead’ clips neatly into the slots in the lid, almost like it was planned!

The Raspberry Pi Case Fan has been developed with an advanced user in mind. It allows them to use the Raspberry Pi at its limits whilst retaining the unique finished exterior of the Raspberry Pi Case.

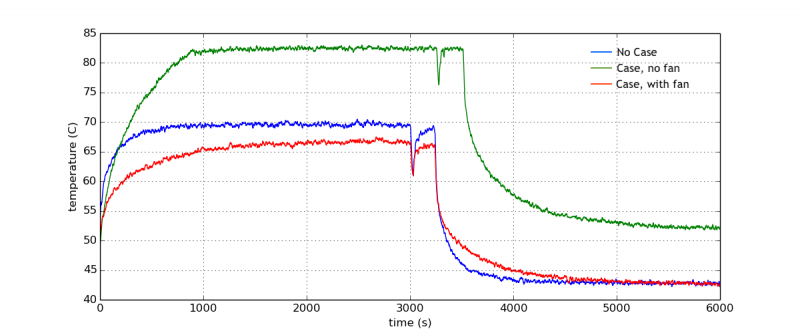
For those who love a good graph, here are the temperature results during a quad-core compile of the Linux kernel, as demonstrated in Eben’s launch post on Monday.

Buy your Raspberry Pi 4 Case Fan today

Raspberry Pi Case Fan is available from our Raspberry Pi Approved Resellers. Simply head over to the Case Fan page and select your country from the drop-down menu.

The post Designing the Raspberry Pi Case Fan appeared first on Raspberry Pi.

Amazon S3 Update – Strong Read-After-Write Consistency

Post Syndicated from Jeff Barr original https://aws.amazon.com/blogs/aws/amazon-s3-update-strong-read-after-write-consistency/

When we launched S3 back in 2006, I discussed its virtually unlimited capacity (“…easily store any number of blocks…”), the fact that it was designed to provide 99.99% availability, and that it offered durable storage, with data transparently stored in multiple locations. Since that launch, our customers have used S3 in an amazing diverse set of ways: backup and restore, data archiving, enterprise applications, web sites, big data, and (at last count) over 10,000 data lakes.

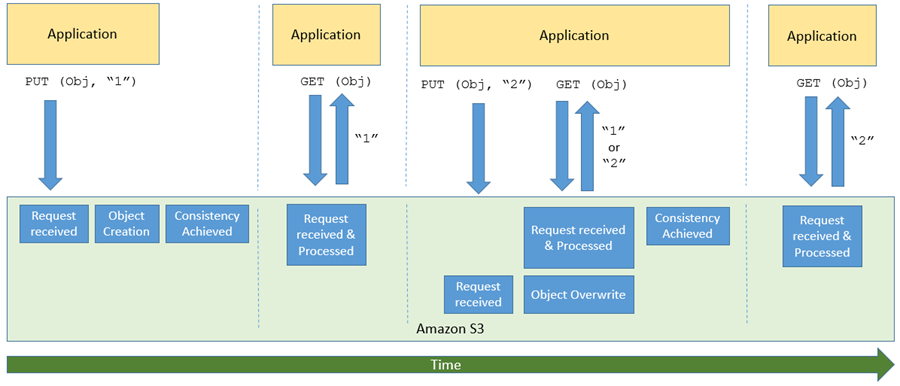
One of the more interesting (and sometimes a bit confusing) aspects of S3 and other large-scale distributed systems is commonly known as eventual consistency. In a nutshell, after a call to an S3 API function such as PUT that stores or modifies data, there’s a small time window where the data has been accepted and durably stored, but not yet visible to all GET or LIST requests. Here’s how I see it:

This aspect of S3 can become very challenging for big data workloads (many of which use Amazon EMR) and for data lakes, both of which require access to the most recent data immediately after a write. To help customers run big data workloads in the cloud, Amazon EMR built EMRFS Consistent View and open source Hadoop developers built S3Guard, which provided a layer of strong consistency for these applications.

S3 is Now Strongly Consistent
After that overly-long introduction, I am ready to share some good news!

Effective immediately, all S3 GET, PUT, and LIST operations, as well as operations that change object tags, ACLs, or metadata, are now strongly consistent. What you write is what you will read, and the results of a LIST will be an accurate reflection of what’s in the bucket. This applies to all existing and new S3 objects, works in all regions, and is available to you at no extra charge! There’s no impact on performance, you can update an object hundreds of times per second if you’d like, and there are no global dependencies.

This improvement is great for data lakes, but other types of applications will also benefit. Because S3 now has strong consistency, migration of on-premises workloads and storage to AWS should now be easier than ever before.

We’ve been working with the Amazon EMR team and developers in the open-source community to ensure that customers can take advantage of this update with their big data workloads. As a result of that you no longer need to use EMRFS Consistent View or S3Guard, further reducing the cost to run big data workloads in AWS.

A Word From Dropbox
Long-time AWS customer Dropbox recently migrated a 34 PB analytics data lake from on-premises Hadoop clusters to S3. Watch this video to learn more about strong consistency and how it has allowed Dropbox to simplify their data lake:

Jeff;


New – Amazon S3 Replication Adds Support for Multiple Destination Buckets

Post Syndicated from Marcia Villalba original https://aws.amazon.com/blogs/aws/new-amazon-s3-replication-adds-support-for-multiple-destination-buckets/

Amazon Simple Storage Service (S3) supports many types of replication, including S3 Same-Region Replication (SRR), which launched in 2019 and S3 Cross-Region Replication (CRR), which has been around since 2015. Today, we are happy to announce S3 Replication support for multiple destination buckets. S3 Replication now gives you the ability to replicate data from one source bucket to multiple destination buckets. With S3 Replication (multi-destination) you can replicate data in the same AWS Regions using S3 SRR or across different AWS Regions by using S3 CRR, or a combination of both.

Before this launch, if you needed to have multiple copies of your data in different S3 buckets, you had to build your own S3 replication service by monitoring S3 events, identifying created objects, and using AWS Lambda functions to copy objects to each destination bucket.

This launch removes the need for you to develop your own solutions to replicate the data across multiple destinations. You can use the flexibility of S3 Replication (multi-destination) to store multiple copies of your data in different storage classes, with different encryption types, or across different accounts depending on its intended use. Additionally, when replicating to multiple destinations, you can use CloudWatch metrics to track replication progress for each region pair.

S3 Replication (multi-destination) is an extension to S3 Replication, and it supports all existing S3 Replication features like Replication Time Control (RTC) and delete marker replication. If you need a predictable replication time backed by a Service Level Agreement, you can use RTC to replicate objects in less than 15 minutes.

How to Get Started With S3 Replication (multi-destination)
In order to get S3 Replication working, all the buckets involved in the replication (source and destinations) must have bucket versioning enabled.

To setup S3 Replication (multi-destination), you need to define replication rules. You can create a new rule in the bucket Management page, under Replication Rules.

Screenshot of adding a rule

When creating a new replication rule, one very important step is to set up permissions for replication, as S3 will need to replicate objects on your behalf. To do that, you can follow the instructions available in the S3 documentation page.

To create the replication rule, just follow the steps in the console. You can specify to which objects of the bucket this rule applies, the destination bucket, if you want to change the storage class of the replicated objects and many other preferences for your replicated objects.

Screenshot configuring the replication rule

One thing to have in mind when activating a rule is that the replication will start for all new objects added to the bucket from that moment. Objects uploaded to the bucket before the rule was created need to be copied using one time operations like S3 batch operations or S3 copy.

If you want to monitor the progress of your replication using CloudWatch metrics, don’t forget to click the Replication metrics and notifications checkbox.

Screenshot of configuring replication rules metrics

Now that we support multiple destinations for replication, rule priorities are used when there are two or more rules with the same destination. When that happens, the rule with the highest priority will be applied. For the same destination bucket, a lower priority rule will not be applied when the replication configuration has two or more rules with overlapping scope. If there are two or more rules with the same scope and different destinations, both rules will be applied.

You can see a summary of all your rules in the Replication rules listing under the bucket Management page.

Screenshot of replication rules listing

Monitoring Replication
When you have all the rules configured, you can start uploading objects to the source bucket and monitor how they get replicated in all the different destinations.

To know the replication status of an object in the source bucket, you can see the Replication status in the object Details. The status types are:

  • COMPLETED: The replication was successful in all the destinations.
  • PENDING: The replication is still in progress.
  • FAILED: The replication failed to replicate in at least one of the destinations. When there is a failure in replication, the only way to fix it is by uploading the object again.

screenshot of object metadata

For replicated objects, you will see the REPLICA status under the Replication status.

You can also use CloudWatch metrics to monitor the replication. First, you need to enable metrics for each of the rules. And then in the bucket Metrics, you can choose which rules you want to see the metrics of and see the charts for each of them; the metrics are also available in the CloudWatch console.

Screenshot of replication metrics

Availability
S3 Replication (multi-destination) is available today in all AWS Regions. To get started, you can use the AWS Management Console, SDKs, S3 API, or AWS CloudFormation to create replication rules from one source bucket to multiple destination buckets.

Pricing for S3 Replication (multi-destination) applies for each rule. For pricing information, please visit the Amazon S3 pricing page.

For more information about this new feature visit the S3 Replication page.

Marcia


New AWS Amplify Admin UI Helps You Develop App Backends, No Cloud Experience Required

Post Syndicated from Marcia Villalba original https://aws.amazon.com/blogs/aws/aws-amplify-admin-ui-helps-you-develop-app-backends-no-cloud-experience-required/

Today AWS Amplify announces new Admin UI to configure an application backend, and manage app users and content outside the AWS console. This new feature makes it easier to use AWS services and accelerates the development and management of full-stack web and mobile apps.

We launched AWS Amplify in November 2018, and since then it has been helping front-end web and mobile developers to quickly develop and deploy cloud-connected web and mobile applications. In order to stay ahead of the curve and deliver innovation to customers, businesses need to ship features fast. However, developers and non-developers who are unfamiliar with AWS fundamentals require training, which slows the entire process down.

AWS Amplify today launches a new Admin UI that enables team members to interface with AWS without requiring an AWS account (only the first deployment requires an AWS account).

The Admin UI provides simple yet powerful tools to model database tables, add authentication and authorization, and manage app content, users, and groups. It also offers the ability to manage the application users and content. The AWS Amplify Admin UI focuses on data types rather than backend infrastructure. All the backend resources generate infrastructure as code (IaC) templates that can be committed in the team repository and integrated with AWS Amplify continuous deployment workflow to manage the different environments.

Let’s Look at an Example Using the New AWS Amplify Admin UI
Imagine that you are a front-end web developer creating a website for a local restaurant. The restaurant owner wants to have a website where they can show their daily menu, and wants a simple way to update the content of the page every day.

There are many ways to solve this problem. You can spin up a server and install a CMS for the restaurant owner to manage the menu. For this particular use case, having a server exclusively to do this is just over-provisioning resources. Or, you can create the CMS yourself using serverless tools; however, this adds a lot of complexity and extra time to the development cycle.

Another option is to use the new AWS Amplify Admin UI that allows you to take advantage of many AWS managed services to create the backend quickly and also provides the ability to manage the application users and content.

The first thing you need to do is to create a new AWS Amplify app backend in the AWS Console. AWS Amplify will create a backend environment called staging. When, your app backend is ready, open the new Admin UI. If you would like to get another developer working on this application who doesn’t have experience with AWS, nor access to the AWS account, now you can grant access to them so they can continue the work on the UI. But for now, let’s imagine that you are going to do all the development.

Screenshot of opening the admin ui

The Admin UI contains all the tools that application developers need to configure the application backend and that content managers need to update the application content.

In the sidebar of the Admin UI (as shown in the following illustration), you can find all the different options for setting up your application.

To get started with the restaurant website, you need a menu data model. For that, first go to Data (1), then create a new data model call Menu (2), add the necessary fields and Save and deploy (3) the model. Saving and deploying the model will create all the needed AWS resources in the backend, like an AWS AppSync API and a Amazon DynamoDB table to host the menu items. Deploying takes a few minutes.

Screenshot for data modeling

After your model is deployed, you can start working on your website. For this example I will be using React, one of the web frameworks supported by AWS Amplify, but you can do the same example with any of the supported frameworks.

First, you need to install the AWS Amplify CLI:

npm install -g @aws-amplify/cli

Then create a new React application:

npx create-react-app react-amplified
cd react-amplified

When your application is created, you can configure it with the AWS Amplify application we just created. For that, go back to the Admin UI and select Local setup instructions (1), and execute the amplify command (2) in the directory where the web application is stored in your computer.

Screenshot of pulling amplify configuration

When you execute that command, a browser window will open that asks you if you are sure that you want to log in to the AWS Amplify Admin UI. Selecting yes will grant the AWS Amplify CLI access to deploy updates to the backend directly from your local desktop. The CLI will prompt you with a few questions about your local environment, and finally will ask if you plan to modify this backend locally. Choose yes.

When that process ends, you will notice some changes in your web application directory: a couple of new directories were created (amplify and src/models) and also a new file (aws-exports.js). These files and directories hold all the configuration for your AWS Amplify application.

Now it’s time to develop your application. To access the menu data model you created in the first steps, you will use the DataStore library from AWS Amplify. DataStore allows you to connect to your deployed database and perform CRUD, sort and filter operations from your UI to manipulate backend data. In the Admin UI, you can see some examples on how to create, update, delete and query the model.

Screenshot of using the data model

When the website is ready, it’s time to add some content. The restaurant owner is the one adding the menu items. In order for them to be able to add items, they need to have permissions to access the Admin UI for this application.

To do this, you need to create a new Admin UI account for the restaurant owner with the correct permissions. Go to the AWS Amplify console for your application and then to the Admin UI management and invite users.

When adding new users to the Admin UI you can define their permission scope. If you want to grant them full access, they will be able to configure and manage the application backend environment, and if you want them just to be able to edit the content, you can give them the manage only access scope. For the restaurant owner grant manage only permissions.

Screenshot for inviting new users to the AdminUI

After sending the invite, the restaurant owner will receive an email with a link to access the Admin UI and a username and password to log in. When they log in, they can go to the Content tab (1) and start adding items in their menu (2) and they can see the items available in the table in the screen (3).

Screenshot adding new content

From this screen, the restaurant owner can add, delete and edit items in their menu whenever they want to. These changes are reflected in the website immediately after they save.

The use cases for Admin UI are endless, such as blogs, e-commerce sites, planning apps, etc. Developers can build complex and feature-rich apps by focusing on their domain-specific data model instead of spending hours deploying and stitching together cloud infrastructure. AWS Amplify gives front-end developers the fastest and easiest way to develop mobile and web apps. And all accessible to developers that are not familiar with the cloud and without the need to give AWS access to everybody in the team.

Availability
AWS Amplify Admin UI is available at launch in: US East (N. Virginia), US East (Ohio), US West (Oregon), Asia Pacific (Mumbai), Asia Pacific (Seoul), Asia Pacific (Singapore), Asia Pacific (Sydney), Asia Pacific (Tokyo), Canada (Central), Europe (Frankfurt), Europe (Ireland), and Europe (London).

For more information, visit the Amplify service page. Get started building a data model without an AWS account in the sandbox experience.

Marcia

Configuring AWS VPN for UK public sector use

Post Syndicated from Charlie Llewellyn original https://aws.amazon.com/blogs/security/configuring-aws-vpn-for-uk-public-sector-use/

In this post, we explain the United Kingdom (UK) National Cyber Security Centre (NCSC)’s guidance on VPN profiles configuration, and how the configuration parameters for the AWS Virtual Private Network (AWS VPN) align with the NCSC guidance. At the end of the post, there are links to code to deploy the AWS VPN in line with those parameters.

Many public sector organizations in the UK need to connect their existing on-premises facilities, data centers, or offices to the Amazon Web Services (AWS) cloud so they can take advantage of the broad set of services AWS provides to help them deliver against their mission.

This can be achieved using the AWS VPN service. However some customers find it difficult to know the exact configuration parameters that they should choose when establishing the VPN connection in-line with guidance for the UK public sector.

AWS VPN services enable organizations to establish secure connections between their on-premises networks, remote offices, and client devices and the AWS global network. AWS VPN comprises two services: AWS Site-to-Site VPN and AWS Client VPN. Together, they deliver a highly available, fully managed, elastic cloud VPN solution to protect your network traffic.

For the purposes of this post, we focus on the Site-to-Site VPN configuration, not Client VPN because the NCSC guidance we’re discussing is specifically related to site-to-site VPNs. This post covers two areas:

  • An overview of the current guidance for VPN configurations for the public sector.
  • Recommendations on how to configure AWS VPN to meet or exceed the current guidance.

VPN guidance for UK public sector organizations

The starting point for security guidance for the UK public sector is often the NCSC. The role of the NCSC includes:

  • Protecting government systems and information.
  • Planning for and responding to cyber incidents.
  • Working with providers of critical national infrastructure to improve the protection and computer security of such infrastructure against cyber-borne threats.

Specifically, for guidance on the configuration of VPNs for the UK public sector to support data at OFFICIAL, the NCSC has created detailed guidance on the technical configurations to support two different profiles: PRIME and Foundation. These two profiles provide different technical implementations to support different equipment and are both suitable for use with OFFCICIAL data. Beyond these technical differences, NCSC also documents that Foundation is expected to provide suitable protection for OFFICIAL information until at least December 31, 2023, while PRIME has no review date specified at the time of writing.

This guidance is available in Using IPsec to protect data.

Let’s start by debunking a few myths.

Myth 1: I have to adhere exactly to the NCSC technical configuration or I cannot use a VPN for OFFICIAL data

It’s a common misconception that a public sector organization must adhere exactly to the configuration of either PRIME or Foundation in order to use a VPN for OFFICIAL data, even if other configuration options available—such as a longer key length—offer a higher security baseline.

Note that the NCSC isn’t mandating the use of the configuration in their guidance. They’re offering a configuration that provides a useful baseline, but you must assess your use of the NCSC guidance in context of the risks. To help with these risk-based decisions, the NCSC has developed a series of guidance documents to help organizations make risk-based decisions. A common consideration that might require deviating from the guidance would be supporting interoperability with legacy systems where the suggested algorithms aren’t supported. In this case, a risk-based decision should be made—including accounting for other factors such as cost.

It’s also worth noting that the NCSC creates guidance designed to be useful to as many organizations as possible. The NCSC balances adopting the latest possible configurations with backwards compatibility and vendor support. For example, the NCSC suggests AES-128 where—in theory—AES-256 could also be a good choice. Organizations need to be aware that if they choose to adopt devices that support only AES-256 and later need to connect in devices capable of only AES-128, there could be significant investment to replace the legacy devices with ones that support AES-256. However, AWS provides both AES-128 and AES-256, so if the remote device supports it, AWS would recommend opting for AES-256.

The NCSC also tries to develop advice that has some longevity. For example, the guidance suggesting use of AES-128 was created in 2012 with a view to providing solid guidance over a number of years. This means customers can choose different configuration parameters that offer increased levels of security if both sides of the VPN can support it.

It’s possible for a customer to choose options that might lower the security of the connection, provided that risks are identified and appropriately managed by the customers assurance team. This might be needed to support interoperability between existing systems where the cost of an upgrade outweighs the risk.

Myth 2: Foundation has been deprecated and I must use PRIME

Another common misconception is that Foundation has been deprecated in favor of PRIME. This is not the case. The NCSC has stated that Foundation is expected to provide suitable protection for OFFICIAL information until at least December 31, 2023. The security provided by both solutions provides commensurate security for accessing data classified as OFFICIAL. One of the main differences between PRIME and Foundation is the choice of signature algorithm: RSA or ECDSA. This difference can be helpful in enabling an organization to choose which profile to adopt. For example, if the organization already has a private key infrastructure (PKI), then the decision regarding which signature algorithm to use is based on what existing systems support.

Myth 3: I can’t use Foundation for accessing OFFICIAL SENSITIVE data

A final point that often causes confusion is the classifying of data at OFFICIAL SENSITIVE because it isn’t a classification, but a handling caveat. The data would be classified as OFFICIAL and marked as OFFICIAL SENSITIVE, meaning that systems handling the data need risk-appropriate security measures. A system that can handle OFFICIAL data might be appropriate to handle sensitive information. Hence Foundation could be suitable for accessing OFFICIAL SENSITIVE data, depending on the risks identified.

Deep-dive into the technical specifications

Now that you know a little more about how the guidance should be viewed, let’s look more closely at the technical configurations for each VPN profile.

The following table shows the configuration parameters suggested by the NCSC VPN guidance discussed previously.

Technical detail Foundation PRIME
IKEv* – Encryption IKEv1 – AES with 128-bit keys in CBC mode (RFC3602) IKEv2 – AES-128 in GCM-128 (and optionally CBC)
IKEv2 – Pseudo-random function HMAC-SHA256 HMAC-SHA256
IKEv2 – Diffie-Hellman group Group 14 (2048-bit MODP group) (RFC3526) 256 bit random ECP (RFC5903) Group 19
IKEv2 – Authentication X.509 certificates with RSA signatures (2048 bits) and SHA-256 (RFC4945 and RFC4055) X.509 certificates with ECDSA-256 with SHA256 on P-256 curve
ESP – Encryption AES with 128-bit keys in CBC mode (RFC3602)
SHA-256 (RFC4868)
AES-128 in GCM-128
SHA-256 (RFC4868)

Recommended AWS VPN configuration for public sector

Bearing in mind these policies, and remembering that the configuration is only guidance, you must make a risk-based decision. AWS recommends the following configuration as a starting point for the configuration of the AWS VPN.

Technical detail AWS configuration Adherence
IKEv* – Encryption IKEv2 – AES-256-GCM Suitable for Foundation and PRIME
IKEv2 – Pseudo-random function HMAC-SHA256 Meets Foundation and PRIME
IKEv2 – Diffie-Hellman group Group 19 Suitable for Foundation and matches PRIME
IKEv2 – Authentication RSA 2048 SHA2-512 Suitable for Foundation
ESP – Encryption AES-256-GCM Suitable for PRIME and Foundation

In the table above, we use the term suitable for where the protocol doesn’t match the guidance exactly but the AWS configuration options provide equivalent or stronger security—for example, by using a longer key length.

With the configuration defined above, the AWS VPN service is suitable for use under the Foundation profile in all areas. It can also be made suitable for PRIME in all areas apart from IKEv2 encryption. The use of RSA or ECDSA is the main difference between the AWS VPN and PRIME configurations. This makes the current AWS VPN solution closer to Foundation than PRIME.

When considering which options are available to you, the starting point should be the capabilities of your current—and possible future—VPN devices. Based on its capabilities, you can use the NCSC guidance and preceding tables to choose the protocols that match or are suitable for the NCSC guidance.

Summary

To review:

  • The NCSC provides guidance for the VPN configuration, not a mandate.
  • An organization is free to decide not to use the guidance, but should consider risks when they make that decision.
  • The AWS VPN meets or is suitable for the configuration options for Foundation.

After reviewing the details contained in this blog, UK public sector organizations should have the confidence to use the AWS VPN service with systems running at OFFICIAL.

If you’re interested in deploying the AWS VPN configuration described in this post, you can download instructions and AWS CloudFormation templates to configure the AWS VPN service. The AWS VPN configuration can be deployed to either connect directly to a single Amazon Virtual Private Cloud (Amazon VPC) using a virtual private gateway, or to an AWS Transit Gateway to enable its use by multiple VPCs.

If you’re interested in configuring your AWS VPN tunnel options manually, you can follow Modifying Site-to-Site VPN tunnel options.

If you have feedback about this post, submit comments in the Comments section below.

Want more AWS Security how-to content, news, and feature announcements? Follow us on Twitter.

Author

Charlie Llewellyn

Charlie is a Solutions Architect working in the Public Sector team with Amazon Web Services. He specializes in data analytics and enjoys helping customers use data to make better decisions. In his spare time he avidly enjoys mountain biking and cooking.

Author

Muhammad Khas

Muhammad Khas is a Solutions Architect working in the Public Sector team at Amazon Web Services. He enjoys supporting customers in using artificial intelligence and machine learning to enhance their decision making. Outside of work, Muhammad enjoys swimming, and horse riding.

Amazon EKS Distro: The Kubernetes Distribution Used by Amazon EKS

Post Syndicated from Martin Beeby original https://aws.amazon.com/blogs/aws/amazon-eks-distro-the-kubernetes-distribution-used-by-amazon-eks/

Our customers have told us that they want to focus on building innovative solutions for their customers, and focus less on the heavy lifting of managing Kubernetes infrastructure. That is why Amazon Elastic Kubernetes Service (EKS) has been so popular; we remove the burden of managing Kubernetes while our customers glean the benefits.

However, not all customers choose to use Amazon EKS. For example, they may have existing infrastructure investments, data residency requirements or compliance obligations that lead them to operate Kubernetes on-premises. Customers in these situations tell us that they spend a lot of effort to track updates, figure out compatible versions of Kubernetes and the complicated matrix of underlying components, test them for compatibility, and keep pace with the Kubernetes release cadence, which can be as frequent as every three to four months. If customers are not able to maintain pace for testing and qualifying new versions, they risk breaking changes, version compatibility issues, and running unsupported versions of Kubernetes lacking critical security patches.

We have learned a lot while providing Amazon EKS at AWS and have developed a deep understanding of how to deliver Kubernetes with operational security, stability, and reliability. Today we are sharing Amazon EKS Distro, which we built using that knowledge.

EKS Distro is a distribution of the same version of Kubernetes deployed by Amazon EKS, which you can use to manually create your own Kubernetes clusters anywhere you choose. EKS Distro provides the installable builds and code of open source Kubernetes used by Amazon EKS, including the dependencies and AWS-maintained patches. Using a choice of cluster creation and management tooling, you can create EKS Distro clusters in AWS on Amazon Elastic Compute Cloud (EC2), in other clouds, and on your on-premises hardware.

EKS Distro includes upstream open source Kubernetes components and third-party tools including configuration database, network, and storage components necessary for cluster creation. They include Kubernetes control plane components (kube-controller-manager, etcd, and CoreDNS) and Kubernetes worker node components (kubelet, CNI plugins, CSI Sidecar images, Metrics Server and AWS-IAM-authenticator).

Building a Cluster
The EKS Distro repository has everything you need to build and create Kubernetes clusters. The repository contains the raw documentation for EKS Distro, and it has been built and published at https://distro.eks.amazonaws.com.

To create a new cluster, I follow this section of the documentation. The guide explains how I can build all of the parts and ultimately deploy a cluster to some EC2 instances on AWS using the open source tool kOps. EKS Distro works with many other tools besides kOps. You can find the details in the partner section of the documentation, and many partners have released blogs today that explain how you can deploy using their tooling.

The guide explains that before I can build my cluster, I need to get several container images. I can get them from the EKS Distro Container repository, download them as a tarball, or build them from scratch. I opt to build my containers from scratch and follow the Build Guide. An hour later, I have managed to create twenty containers and have pushed them into Amazon Elastic Container Registry.

The instructions detail several prerequisites that are required by both the build and deploy stages. I follow the guide and install all of the tools suggested.

Next, as per the guide, I locate the kops.sh script in the development folder of the EKS Distro repository. After running the script, it prompts me to enter a Fully Qualified Domain Name (FQDN). I provide newsblog.thebeebs.net.

This script does several things, including creating an S3 bucket in my account to store artifacts required by kOps. Also, it creates a file called newsblog.thebeebs.net.yaml. I edit this file and replace the container Image URLs with ones that point to my images in Elastic Container Registry.

I continue to follow the guide, which now instructs me to run some kOps commands to create my cluster. These commands use the newsblog.thebeebs.net.yaml file, which was an output of the previous step.

CLUSTER_NAME=newsblog.thebeebs.net
kops create -f ./$CLUSTER_NAME.yaml
kops create secret --name $CLUSTER_NAME sshpublickey admin -i ~/.ssh/id_rsa.pub
kops update cluster $CLUSTER_NAME --yes
kops validate cluster --wait 10m
cat << EOF > aws-iam-authenticator.yaml
apiVersion: v1
kind: ConfigMap
metadata:
  name: aws-iam-authenticator
  namespace: kube-system
  labels:
    k8s-app: aws-iam-authenticator
data:
  config.yaml: |
    clusterID: $CLUSTER_NAME
EOF

One of these commands creates a file called aws-iam-authenticator.yaml. I will apply this file to my kubernetes cluster so that it works correctly with the aws-iam-authenticator.

kubectl apply -f aws-iam-authenticator.yaml

I can now verify that my Kubernetes cluster is using the EKS Distro images by using kubectl to list all of the namespaces.

kubectl get po --all-namespaces -o json | jq -r .items[].spec.containers[].image | sort

Lastly, I delete my cluster by using kOps and issuing a delete command.

kops delete -f ./newsblog.thebeebs.net.yaml --yes

Updates
New versions of EKS Distro will be released soon after we make releases to Amazon EKS. The source code, open source tools, and settings are provided for reproducible builds so you can be assured EKS Distro matches what is deployed by Amazon EKS.

Things to Know
EKS Distro supports the same versions of Kubernetes and point releases that Amazon EKS uses. EKS Distro provides the same upstream versions of Kubernetes and dependencies that operating system vendors have tested and confirmed work with Kubernetes. This means that EKS Distro already works with common operating systems, such as CentOS, Canonical Ubuntu, Red Hat Enterprise Linux, Suse, and more.

Pricing and Support
EKS Distro is an open source project and will be distributed for free. Please collaborate with us on GitHub to make it even better. For example, if you find any issues, please submit them or create a pull request and we will fix them on a best effort basis. Partners will receive support through the Amazon Partner Network program and customers that adopt EKS Distro through partners will receive support from those providers.

What is Coming Next?
In 2021 we will be launching EKS Anywhere, which will provide an installable software package for creating and operating Kubernetes clusters on-premises and automation tooling for cluster lifecycle support, it will enable you to centrally backup, recover, patch, and upgrade your production clusters with minimal disruption. EKS Anywhere creates clusters based on EKS Distro, and so you will have version consistency with Amazon EKS. This version and tooling consistency will reduce support costs, and eliminate the redundant effort of using multiple tools for managing your on-premises and Amazon EKS clusters.

Available Now
EKS Distro is available today for download and you can get the source and builds from GitHub. To help you get started, check out the documentation.

Happy Deploying!

— Martin

[$] Challenges in protecting virtual machines from untrusted entities

Post Syndicated from original https://lwn.net/Articles/838488/rss

As an ever-growing number of workloads are being moved to the cloud, CPU
vendors have begun to roll out purpose-built hardware features to isolate
virtual machines (VMs) from potentially hostile parties. These processor
features, and their extensions, enable the notion of “secure VMs” (or
“confidential VMs”) — where a VM’s “sensitive state” needs to be protected
from untrusted entities. Drawing from his experience
contributing to the secure VM implementation for the s390 architecture, Janosch Frank described
the challenges involved in a talk at the 2020 (virtual) KVM
Forum. Though the implementations across CPU vendors may vary, there are
many shared problems, which opens up possibilities for collaboration.

AWS re:Invent: Top Announcements for 2020

Post Syndicated from AWS News Blog Team original https://aws.amazon.com/blogs/aws/aws-reinvent-announcements-2020/

Compute | Containers | Customer Engagement | Database | Machine Learning |

Below are the major launch and preview announcements happening at re:Invent 2020, organized by category. We’ll update this page daily over the course of the event, which takes place Nov. 30-Dec. 18. For a list of re:Invent launch posts by date, you can find the full list here.

Compute

New – Use Amazon EC2 Mac Instances to Build and Test macOS, iOS, ipadOS, tvOS, and watchOS Apps
Over the last couple of years, AWS users have told us that they want to be able to run macOS on Amazon Elastic Compute Cloud (EC2). We’ve asked a lot of questions to learn more about their needs, and today we introduce you to the new Mac instance!

re:Invent 2020 Pre-announcements for Tuesday, December 1
Here’s a sneak peek at some good things to come, including: AWS Outpost Servers, Amazon ECS Anywhere and Amazon EKS Anywhere.

Coming Soon – Amazon EC2 G4ad Instances Featuring AMD GPUs for Graphics Workloads
Customers with high performance graphic workloads, such as those in game streaming, animation, and video rendering, are always looking for higher performance at less cost. Today, we announce that new Amazon Elastic Compute Cloud (EC2) instances in the G4 instance family will be available soon to improve performance and reduce cost for graphics-intensive workloads.

New EC2 C6gn Instances – 100 Gbps Networking with AWS Graviton2 Processors
Today, we’re expanding our broad Arm-based Graviton2 portfolio with C6gn instances that deliver up to 100 Gbps network bandwidth, up to 38 Gbps Amazon Elastic Block Store (EBS) bandwidth, up to 40% higher packet processing performance, and up to 40% better price/performance versus comparable current generation x86-based network optimized instances.

EC2 Update – D3 / D3en Dense Storage Instances
We have launched several generations of EC2 instances with dense storage including the HS1 in 2012 and the D2 in 2015. Today we are launching the D3 and D3en instances. Like their predecessors, they give you access to massive amounts of low-cost on-instance HDD storage.

New – Amazon EC2 R5b Instances Provide 3x Higher EBS Performance
R5 instances are designed for memory-intensive applications such as high-performance databases, distributed web scale in-memory caches, in-memory databases, real time big data analytics, and other enterprise applications. Today, we announce the new R5b instance, which provides the best network-attached storage performance available on EC2.

New for AWS Lambda – 1ms Billing Granularity Adds Cost Savings
Since Lambda was launched in 2014, pricing has been based on the number of times code is triggered (requests) and the number of times code executes, rounded up to the nearest 100ms (duration). Starting today, we are rounding up duration to the nearest millisecond with no minimum execution time.

In the Works – 3 More AWS Local Zones in 2020, and 12 More in 2021
We launched the first AWS Local Zone in Los Angeles last December, and added a second one (also in Los Angeles) in August of 2020. With 3 more available today and 12 planned next year, we are choosing the target cities with the goal of allowing you to provide access with single-digit millisecond latency to the vast majority of users in the Continental United States.

New for AWS Lambda – Container Image Support
With Lambda, you upload your code and run it without thinking about servers. Many customers enjoy the way this works, but if you’ve invested in container tooling for your development workflows, it’s not easy to use the same approach to build applications using Lambda. To help you with that, you can now package and deploy Lambda functions as container images of up to 10 GB in size.

Containers

Amazon ECR Public: A New Public Container Registry
You have long been able to host private container images on AWS with Amazon Elastic Container Registry, and now with the release of Amazon Elastic Container Registry Public, you can host public ones too, enabling anyone (with or without an AWS account) to browse and pull your published containers.

Preview of AWS Proton – Automated Management for Container and Serverless Deployments
Maintaining hundreds – or sometimes thousands – of microservices with constantly changing infrastructure resources and configurations is a challenging task for even the most capable teams. AWS Proton enables infrastructure teams to define standard templates centrally and make them available for developers in their organization. This allows infrastructure teams to manage and update infrastructure without impacting developer productivity.

Customer Engagement

Amazon Connect – Now Smarter and More Integrated With Third-Party Tools
We launched Amazon Connect in 2017 and, since then, thousands of customers have created their own contact centers in the cloud. Amazon Connect makes it easy for non-technical customers to design interaction flows, manage agents, and track performance metrics. Today, we announce a new set of capabilities to make Amazon Connect smarter and more integrated with third-party tools.

Database

New – Amazon QuickSight Q Answers Natural-Language Questions About Business Data
Today, we are happy to announce the preview of Amazon QuickSight Q, a Natural Language Query (NLQ) feature powered by machine learning (ML). With Q, business users can now use QuickSight to ask questions about their data using everyday language and receive accurate answers in seconds.

Now in Preview – Larger and Faster io2 Block Express EBS Volumes with Higher Throughput
Earlier this year we launched io2 volumes with 100x higher durability and 10x more IOPS/GiB than the earlier io1 volumes. Today we are opening up a preview of io2 Block Express volumes that are designed to deliver even higher performance!

New – Amazon EBS gp3 Volume Lets You Provision Performance Apart From Capacity
When using general purpose SSD gp2 volumes with EBS, performance is associated with storage capacity. Today we announce the new gp3 volume that lets customers increase IOPS and throughput without having to provision additional block storage capacity, paying only for the resources they need.

Machine Learning

New- Amazon DevOps Guru Helps Identify Application Errors and Fixes
Today, we are announcing Amazon DevOps Guru, a fully managed operations service that makes it easy for developers and operators to improve application availability by automatically detecting operational issues and recommending fixes.

Amazon Lookout for Equipment Analyzes Historical Sensor Data to Help Detect Equipment Failure
Companies that operate industrial equipment are constantly working to improve operational efficiency and avoid unplanned downtime due to component failure. Amazon Lookout for Equipment is an API-based machine learning (ML) service that detects abnormal equipment behavior and helps companies monitor the health of their assets.

Amazon Lookout for Vision Simplifies Defect Detection for Manufacturing
Lookout for Vision is a new machine learning service that helps increase industrial product quality and reduce operational costs by automating visual inspection of product defects across production processes. Using Lookout for Vision, you can detect damages to manufactured parts, identify missing components or parts, and uncover underlying process-related issues in your manufacturing lines.

AWS Panorama Appliance – Bringing Computer Vision Applications to the Edge
Today we preview the AWS Panorama Appliance and its associated console. You can now develop a computer vision model using Amazon SageMaker and then deploy it to a Panorama Appliance that can then run the model on video feeds from multiple network and IP cameras.

Amazon Monitron is a Simple and Cost-Effective Service Enabling Predictive Maintenance
Monitron is an easy and cost-effective condition monitoring service that allows you to monitor the condition of equipment in your facilities, enabling the implementation of a predictive maintenance program.

Incorporating security in code-reviews using Amazon CodeGuru Reviewer

Post Syndicated from Nikunj Vaidya original https://aws.amazon.com/blogs/devops/incorporating-security-in-code-reviews-using-amazon-codeguru-reviewer/

Today, software development practices are constantly evolving to empower developers with tools to maintain a high bar of code quality. Amazon CodeGuru Reviewer offers this capability by carrying out automated code-reviews for developers, based on the trained machine learning models that can detect complex defects and providing intelligent actionable recommendations to mitigate those defects. A quick overview of CodeGuru is covered in this blog post.

Security analysis is a critical part of a code review and CodeGuru Reviewer offers this capability with a new set of security detectors. These security detectors introduced in CodeGuru Reviewer are geared towards identifying security risks from the top 10 OWASP categories and ensures that your code follows best practices for AWS Key Management Service (AWS KMS), Amazon Elastic Compute Cloud (Amazon EC2) API, and common Java crypto and TLS/SSL libraries. As of today, CodeGuru security analysis supports Java language, thus we will take an example of a Java application.

In this post, we will walk through the on-boarding workflow to carry out the security analysis of the code repository and generate recommendations for a Java application.


Security workflow overview:

The new security workflow, introduced for CodeGuru reviewer, utilizes the source code and build artifacts to generate recommendations. The security detector evaluates build artifacts to generate security-related recommendations whereas other detectors continue to scan the source code to generate recommendations. With the use of build artifacts for evaluation, the detector can carry out a whole-program inter-procedural analysis to discover issues that are caused across your code (e.g., hardcoded credentials in one file that are passed to an API in another) and can reduce false-positives by checking if an execution path is valid or not. You must provide the source code .zip file as well as the build artifact .zip file for a complete analysis.

Customers can run a security scan when they create a repository analysis. CodeGuru Reviewer provides an additional option to get both code and security recommendations. As explained in the following sections, CodeGuru Reviewer will create an Amazon Simple Storage Service (Amazon S3) bucket in your AWS account for that region to upload or copy your source code and build artifacts for the analysis. This repository analysis option can be run on Java code from any repository.


Prerequisites

Prepare the source code and artifact zip files: If you do not have your Java code locally, download the source code that you want to evaluate for security and zip it. Similarly, if needed, download the build artifact .jar file for your source code and zip it. It will be required to upload the source code and build artifact as separate .zip files as per the instructions in subsequent sections. Thus even if it is a single file (eg. single .jar file), you will still need to zip it. Even if the .zip file includes multiple files, the right files will be discovered and analyzed by CodeGuru. For our sample test, we will use src.zip and jar.zip file, saved locally.

Creating an S3 bucket repository association:

This section summarizes the high-level steps to create the association of your S3 bucket repository.

1. On the CodeGuru console, choose Code reviews.

2. On the Repository analysis tab, choose Create repository analysis.

Screenshot of initiating the repository analysis

Figure: Screenshot of initiating the repository analysis


3. For the source code analysis, select Code and security recommendations.

4. For Repository name, enter a name for your repository.

5. Under Additional settings, for Code review name, enter a name for trackability purposes.

6. Choose Create S3 bucket and associate.

Screenshot to show selection of Security Code Analysis

Figure: Screenshot to show selection of Security Code Analysis

It takes a few seconds to create a new S3 bucket in the current Region. When it completes, you will see the below screen.

Screenshot for Create repository analysis showing S3 bucket created

Figure: Screenshot for Create repository analysis showing S3 bucket created


7. Choose Upload to the S3 bucket option and under that choose Upload source code zip file and select the zip file (src.zip) from your local machine to upload.

Screenshot of popup to upload code and artifacts from S3 bucket

Figure: Screenshot of popup to upload code and artifacts from S3 bucket


8. Similarly, choose Upload build artifacts zip file and select the zip file (jar.zip) from your local machine and upload.


Screenshot for Create repository analysis showing S3 paths populated

Figure: Screenshot for Create repository analysis showing S3 paths populated


Alternatively, you can always upload the source code and build artifacts as zip file from any of your existing S3 bucket as below.

9. Choose Browse S3 buckets for existing artifacts and upload from there as shown below:


Screenshot to upload code and artifacts from S3 bucket

Figure: Screenshot to upload code and artifacts from an existing S3 bucket


10. Now click Create repository analysis and trigger the code review.

A new pending entry is created as shown below.


Screenshot of code review in Pending state

Figure: Screenshot of code review in Pending state

After a few minutes, you would see the recommendations generate that would include security analysis too. In the below case, there are 10 recommendations generated.

Screenshot of repository analysis being completed

Figure: Screenshot of repository analysis being completed


For the subsequent code reviews, you can use the same repository and upload new files or create a new repository as shown below:


Screenshot of subsequent code review making repository selection

Figure: Screenshot of subsequent code review making repository selection


Recommendations

Apart from detecting the security risks from the top 10 OWASP categories, the security detector, detects the deep security issues by analyzing data flow across multiple methods, procedures, and files.

The recommendations generated in the area of security are labelled as Security. In the below example we see a recommendation to remove hard-coded credentials and a non-security-related recommendation about refactoring of code for better maintainability.

Screenshot of Recommendations generated

Figure: Screenshot of Recommendations generated


Below is another example of recommendations pointing out the potential resource-leak as well as a security issue pointing to a potential risk of path traversal attack.

Screenshot of deep security recommendations

Figure: More examples of deep security recommendations


As this blog is focused on on-boarding aspects, we will cover the explanation of recommendations in more detail in a separate blog.

Disassociation of Repository (optional):

The association of CodeGuru to the S3 bucket repository can be removed by following below steps. Navigate to the Repositories page, select the repository and choose Disassociate repository.

Screenshot of disassociating the S3 bucket repo with CodeGuru

Figure: Screenshot of disassociating the S3 bucket repo with CodeGuru


Conclusion

This post reviewed the support for on-boarding workflow to carry out the security analysis in CodeGuru Reviewer. We initiated a full repository analysis for the Java code using a separate UI workflow and generated recommendations.

We hope this post was useful and would enable you to conduct code analysis using Amazon CodeGuru Reviewer.


About the Author

Author's profile photo


Nikunj Vaidya is a Sr. Solutions Architect with Amazon Web Services, focusing in the area of DevOps services. He builds technical content for the field enablement and offers technical guidance to the customers on AWS DevOps solutions and services that would streamline the application development process, accelerate application delivery, and enable maintaining a high bar of software quality.

Tightening application security with Amazon CodeGuru

Post Syndicated from Brian Farnhill original https://aws.amazon.com/blogs/devops/tightening-application-security-with-amazon-codeguru/

Amazon CodeGuru is a developer tool powered by machine learning (ML) that provides intelligent recommendations for improving code quality and identifies an application’s most expensive lines of code. To help you find and remediate potential security issues in your code, Amazon CodeGuru Reviewer now includes an expanded set of security detectors. In this post, we discuss the new types of security issues CodeGuru Reviewer can detect.

Time to read 9 minutes
Services used Amazon CodeGuru

The new security detectors are now a feature in CodeGuru Reviewer for Java applications. These detectors focus on finding security issues in your code before you deploy it. They extend CodeGuru Reviewer by providing additional security-specific recommendations to the existing set of application improvements it already recommends. When an issue is detected, a remediation recommendation and explanation is generated. This allows you to find and remediate issues before the code is deployed. These findings can help in addressing the OWASP top 10 web application security risks, with many of the recommendations being based on specific issues customers have had in this space.

You can run a security scan by creating a repository analysis. CodeGuru Reviewer now provides an additional option to get both code and security recommendations for Java codebases. Selecting this option enables you to find potential security vulnerabilities before they are promoted to production, and support users remaining secure when using your service.

Types of security issues CodeGuru Reviewer detects

Previously, CodeGuru Reviewer helped address security by detecting potential sensitive information leaks (such as personally identifiable information or credit card numbers). The additional CodeGuru Reviewer security detectors expand on this by addressing:

  • AWS API security best practices – Helps you follow security best practices when using AWS APIs, such as avoiding hard-coded credentials in API calls
  • Java crypto library best practices – Identifies when you’re not using best practices for common Java cryptography libraries, such as avoiding outdated cryptographic ciphers
  • Secure web applications – Inspects code for insecure handling of untrusted data, such as not sanitizing user-supplied input to protect against cross-site scripting, SQL injection, LDAP injection, path traversal injection, and more
  • AWS Security best practices – Developed in collaboration with AWS Security, these best practices help bring our internal expertise to customers

Examples of new security findings

The following are examples of findings that CodeGuru Reviewer security detectors can now help you identify and resolve.

AWS API security best practices

AWS API security best practice detectors inspect your code to identify issues that can be caused by not following best practices related to AWS SDKs and APIs. An example of a detected issue in this category is using hard-coded AWS credentials. Consider the following code:

import com.amazonaws.auth.AWSCredentials;
import com.amazonaws.auth.BasicAWSCredentials;

static String myKeyId ="AKIAX742FUDUQXXXXXXX";
static String mySecretKey = "MySecretKey";

public static void main(String[] args) {
    AWSCredentials creds = getCreds(myKeyId, mySecretKey);
}

static AWSCredentials getCreds(String id, String key) {
    return new BasicAWSCredentials(id, key);}
}

In this code, the variables myKeyId and mySecretKey are hard-coded in the application. This may have been done to move quickly, but it can also lead to these values being discovered and misused.

In this case, CodeGuru Reviewer recommends using environment variables or an AWS profile to store these values, because these can be retrieved at runtime and aren’t stored inside the application (or its source code). Here you can see an example of what this finding looks like in the console:

An example of the CodeGuru reviewer finding for IAM credentials in the AWS console

The recommendation suggests using environment variables or an AWS profile instead, and that after you delete or rotate the affected key you monitor it with CloudWatch for any attempted use. Following the learn more link, you’ll see additional detail and recommended approaches for remediation, such as using the DefaultAWSCredentialsProviderChain. An example of how to remediate this in the preceding code is to update the getCreds() function:

import com.amazonaws.auth.DefaultAWSCredentialsProviderChain;

static AWSCredentials getCreds() {
    DefaultAWSCredentialsProviderChain creds =
        new DefaultAWSCredentialsProviderChain();
    return creds.getCredentials();
}

Java crypto library best practices

When working with data that must be protected, cryptography provides mechanisms to encrypt and decrypt the information. However, to ensure the security of this data, the application must use a strong and modern cipher. Consider the following code:

import javax.crypto.Cipher;

static final String CIPHER = "DES";

public void run() {
    cipher = Cipher.getInstance(CIPHER);
}

A cipher object is created with the DES algorithm. CodeGuru Reviewer recommends a stronger cipher to help protect your data. This is what the recommendation looks like in the console:

An example of the CodeGuru reviewer finding for encryption ciphers in the AWS console

Based on this, one example of how to address this is to substitute a different cipher:

static final String CIPHER ="RSA/ECB/OAEPPadding";

This is just one option for how it could be addressed. The CodeGuru Reviewer recommendation text suggests several options, and a link to documentation to help you choose the best cipher.

Secure web applications

When working with sensitive information in cookies, such as temporary session credentials, those values must be protected from interception. This is done by flagging the cookies as secure, which prevents them from being sent over an unsecured HTTP connection. Consider the following code:

import javax.servlet.http.Cookie;

public static void createCookie() {
    Cookie cookie = new Cookie("name", "value");
}

In this code, a new cookie is created that is not marked as secure. CodeGuru Reviewer notifies you that you could make a correction by adding:

cookie.setSecure(true);

This screenshot shows you an example of what the finding looks like.

An example CodeGuru finding that shows how to ensure cookies are secured.

AWS Security best practices

This category of detectors has been built in collaboration with AWS Security and assists in detecting many other issue types. Consider the following code, which illustrates how a string can be re-encrypted with a new key from AWS Key Management Service (AWS KMS):

import java.nio.ByteBuffer;
import com.amazonaws.services.kms.AWSKMS;
import com.amazonaws.services.kms.AWSKMSClientBuilder;
import com.amazonaws.services.kms.model.DecryptRequest;
import com.amazonaws.services.kms.model.EncryptRequest;

AWSKMS client = AWSKMSClientBuilder.standard().build();
ByteBuffer sourceCipherTextBlob = ByteBuffer.wrap(new byte[]{1, 2, 3, 4, 5, 6, 7, 8, 9, 0});

DecryptRequest req = new DecryptRequest()
                         .withCiphertextBlob(sourceCipherTextBlob);
ByteBuffer plainText = client.decrypt(req).getPlaintext();

EncryptRequest res = new EncryptRequest()
                         .withKeyId("NewKeyId")
                         .withPlaintext(plainText);
ByteBuffer ciphertext = client.encrypt(res).getCiphertextBlob();

This approach puts the decrypted value at risk by decrypting and re-encrypting it locally. CodeGuru Reviewer recommends using the ReEncrypt method—performed on the server side within AWS KMS—to avoid exposing your plaintext outside AWS KMS. A solution that uses the ReEncrypt object looks like the following code:

import com.amazonaws.services.kms.model.ReEncryptRequest;

ReEncryptRequest req = new ReEncryptRequest()
                           .withCiphertextBlob(sourceCipherTextBlob)
                           .withDestinationKeyId("NewKeyId");

client.reEncrypt(req).getCiphertextBlob();

This screenshot shows you an example of what the finding looks like.

An example CodeGuru finding to show how to avoid decrypting and encrypting locally when it's not needed

Detecting issues deep in application code

Detecting security issues can be made more complex by the contributing code being spread across multiple methods, procedures and files. This separation of code helps ensure humans work in more manageable ways, but for a person to look at the code, it obscures the end to end view of what is happening. This obscurity makes it harder, or even impossible to find complex security issues. CodeGuru Reviewer can see issues regardless of these boundaries, deeply assessing code and the flow of the application to find security issues throughout the application. An example of this depth exists in the code below:

import java.io.UnsupportedEncodingException;
import javax.servlet.http.Cookie;
import javax.servlet.http.HttpServletRequest;
import javax.servlet.http.HttpServletResponse;

private String decode(final String val, final String enc) {
    try {
        return java.net.URLDecoder.decode(val, enc);
    } catch (UnsupportedEncodingException e) {
        e.printStackTrace();
    }
    return "";
}

public void pathTraversal(HttpServletRequest request) throws IOException {
    javax.servlet.http.Cookie[] theCookies = request.getCookies();
    String path = "";
    if (theCookies != null) {
        for (javax.servlet.http.Cookie theCookie : theCookies) {
            if (theCookie.getName().equals("thePath")) {
                path = decode(theCookie.getValue(), "UTF-8");
                break;
            }
        }
    }
    if (!path.equals("")) {
        String fileName = path + ".txt";
        String decStr = new String(org.apache.commons.codec.binary.Base64.decodeBase64(
            org.apache.commons.codec.binary.Base64.encodeBase64(fileName.getBytes())));
        java.io.FileOutputStream fileOutputStream = new java.io.FileOutputStream(decStr);
        java.io.FileDescriptor fd = fileOutputStream.getFD();
        System.out.println(fd.toString());
    }
}

This code presents an issue around path traversal, specifically relating to the Broken Access Control rule in the OWASP top 10 (specifically CWE 22). The issue is that a FileOutputStream is being created using an external input (in this case, a cookie) and the input is not being checked for invalid values that could traverse the file system. To add to the complexity of this sample, the input is encoded and decoded from Base64 so that the cookie value isn’t passed directly to the FileOutputStream constructor, and the parsing of the cookie happens in a different function. This is not something you would do in the real world as it is needlessly complex, but it shows the need for tools that can deeply analyze the flow of data in an application. Here the value passed to the FileOutputStream isn’t an external value, it is the result of the encode/decode line and as such, is a new object. However CodeGuru Reviewer follows the flow of the application to understand that the input still came from a cookie, and as such it should be treated as an external value that needs to be validated. An example of a fix for the issue here would be to replace the pathTraversal function with the sample shown below:

static final String VALID_PATH1 = "./test/file1.txt";
static final String VALID_PATH2 = "./test/file2.txt";
static final String DEFAULT_VALID_PATH = "./test/file3.txt";

public void pathTraversal(HttpServletRequest request) throws IOException {
    javax.servlet.http.Cookie[] theCookies = request.getCookies();
    String path = "";
    if (theCookies != null) {
        for (javax.servlet.http.Cookie theCookie : theCookies) {
            if (theCookie.getName().equals("thePath")) {
                path = decode(theCookie.getValue(), "UTF-8");
                break;
            }
        }
    }
    String fileName = "";
    if (!path.equals("")) {
        if (path.equals(VALID_PATH1)) {
            fileName = VALID_PATH1;
        } else if (path.equals(VALID_PATH2)) {
            fileName = VALID_PATH2;
        } else {
            fileName = DEFAULT_VALID_PATH;
        }
        String decStr = new String(org.apache.commons.codec.binary.Base64.decodeBase64(
            org.apache.commons.codec.binary.Base64.encodeBase64(fileName.getBytes())));
        java.io.FileOutputStream fileOutputStream = new java.io.FileOutputStream(decStr);
        java.io.FileDescriptor fd = fileOutputStream.getFD();
        System.out.println(fd.toString());
    }
}

The main difference in this sample is that the path variable is tested against known good values that would prevent path traversal, and if one of the two valid path options isn’t provided, the third default option is used. In all cases the externally provided path is validated to ensure that there isn’t a path through the code that allows for path traversal to occur in the subsequent call. As with the first sample, the path is still encoded/decoded to make it more complicated to follow the flow through, but the deep analysis performed by CodeGuru Reviewer can follow this and provide meaningful insights to help ensure the security of your applications.

Extending the value of CodeGuru Reviewer

CodeGuru Reviewer already recommends different types of fixes for your Java code, such as concurrency and resource leaks. With these new categories, CodeGuru Reviewer can let you know about security issues as well, bringing further improvements to your applications’ code. The new security detectors operate in the same way that the existing detectors do, using static code analysis and ML to provide high confidence results. This can help avoid signaling non-issue findings to developers, which can waste time and erode trust in the tool.

You can provide feedback on recommendations in the CodeGuru Reviewer console or by commenting on the code in a pull request. This feedback helps improve the performance of the reviewer, so the recommendations you see get better over time.

Conclusion

Security issues can be difficult to identify and can impact your applications significantly. CodeGuru Reviewer security detectors help make sure you’re following security best practices while you build applications.

CodeGuru Reviewer is available for you to try. For full repository analysis, the first 30,000 lines of code analyzed each month per payer account are free. For pull request analysis, we offer a 90 day free trial for new customers. Please check the pricing page for more details. For more information, see Getting started with CodeGuru Reviewer.

About the author

Brian Farnhill

Brian Farnhill is a Developer Specialist Solutions Architect in the Australian Public Sector team. His background is building solutions and helping customers improve DevOps tools and processes. When he isn’t working, you’ll find him either coding for fun or playing online games.

In the Works – 3 More AWS Local Zones in 2020, and 12 More in 2021

Post Syndicated from Jeff Barr original https://aws.amazon.com/blogs/aws/in-the-works-more-aws-local-zones/

We launched the first AWS Local Zone in Los Angeles last December, and added a second one (also in Los Angeles) in August of 2020. In my original post, I quoted Andy Jassy’s statement that we would be giving consideration to adding Local Zones in more geographic areas.

Our customers are using the EC2 instances and other compute services in these zones to host artist workstations, local rendering, sports broadcasting, online gaming, financial transaction processing, machine learning inferencing, virtual reality, and augmented reality applications, among others. These applications benefit from the extremely low latency made possible by geographic proximity.

More Local Zones
I’m happy to be able to announce that we are opening three more Local Zones today and plan to open twelve more in 2021.

Local Zones in Boston, Houston, and Miami are now available in preview form and you can request access now. In 2021, we plan to open Local Zones in other key cities and metropolitan areas including New York City, Chicago, and Atlanta.

We are choosing the target cities with the goal of allowing you to provide access with single-digit millisecond latency to the vast majority of users in the Continental United States. You can deploy the parts of your application that are the most sensitive to latency in Local Zones, and deliver amazing performance to your users. In addition to the use cases that I mentioned above, I expect to see many more that have yet to be imagined or built.

Using Local Zones
I stepped through the process of using a Local Zone in my original post, and all that I said there still applies. Here’s what you need to do:

  1. Request access to the preview and await a reply.
  2. Create a new VPC subnet for the Local Zone.
  3. Launch EC2 instances, create EBS volumes, and deploy your application.

Things to Know
Here are a couple of things that you should know about the new and upcoming Local Zones:

Instance Types – The Local Zones will have a wide selection of EC2 instance types including C5, R5, T3, and G4 instances..

Purchasing Models – You can use compute capacity in Local Zones on an On-Demand basis and you can also purchase a Savings Plan in order to receive discounts. Some of the Local Zones also support the use of Spot Instances, .

AWS Services – Local Zones support Amazon Elastic Compute Cloud (EC2), Amazon Elastic Block Store (EBS), Amazon Elastic Kubernetes Service (EKS), and Amazon Virtual Private Cloud, with the door open for other services in the future. You can use services such as Auto Scaling, AWS CloudFormation, and Amazon CloudWatch in the parent region to launch, control, and monitor the AWS resources in a Local Zone.

Direct Connect – As I mentioned earlier, some of our customers are using AWS Direct Connect to establish private connections between Local Zones and their existing on-premises or colo IT infrastructure. We are working with our Direct Connect Partners to make Direct Connect available for the new zones and the specifics will vary on a zone-by-zone basis.

The AWS Local Zones Features page contains additional zone-by-zone information on all of the items listed above.

Learn More
Here are some resources to help you to learn more about Local Zones:

Blog PostLow-Latency Computing with AWS Local Zones.

SitesAWS Local Zones home page, AWS Local Zones FAQ.

Jeff;

The collective thoughts of the interwebz

By continuing to use the site, you agree to the use of cookies. more information

The cookie settings on this website are set to "allow cookies" to give you the best browsing experience possible. If you continue to use this website without changing your cookie settings or you click "Accept" below then you are consenting to this.

Close