Tag Archives: Amazon Simple Email Service (SES)

Complying with DMARC across multiple accounts using Amazon SES

Post Syndicated from Brendan Paul original https://aws.amazon.com/blogs/messaging-and-targeting/complying-with-dmarc-across-multiple-accounts-using-amazon-ses/

Introduction

For enterprises of all sizes, email is a critical piece of infrastructure that supports large volumes of communication from an organization. As such, companies need a robust solution to deal with the complexities this may introduce. In some cases, companies have multiple domains that support several different business units and need a distributed way of managing email sending for those domains. For example, you might want different business units to have the ability to send emails from subdomains, or give a marketing company the ability to send emails on your behalf. Amazon Simple Email Service (Amazon SES) is a cost-effective, flexible, and scalable email service that enables developers to send mail from any application. One of the benefits of Amazon SES is that you can configure Amazon SES to authorize other users to send emails from addresses or domains that you own (your identities) using their own AWS accounts. When allowing other accounts to send emails from your domain, it is important to ensure this is done securely. Amazon SES allows you to send emails to your users using popular authentication methods such as DMARC. In this blog, we walk you through 1/ how to comply with DMARC when using Amazon SES and 2/ how to enable other AWS accounts to send authenticated emails from your domain.

DMARC: what is it, why is it important?

DMARC stands for “Domain-based Message Authentication, Reporting & Conformance”, and it is an email authentication protocol (DMARC.org). DMARC gives domain owners and email senders a way to protect their domain from being used by malicious actors in phishing or spoofing attacks. Email spoofing can be used as a way to compromise users’ financial or personal information by taking advantage of their trust of well-known brands. DMARC makes it easier for senders and recipients to determine whether or not an email was actually sent by the domain that it claims to have been sent by.

Solution Overview

In this solution, you will learn how to set up DKIM signing on Amazon SES, implement a DMARC Policy, and enable other accounts in your organization to send emails from your domain using Sending Authorization. When you set up DKIM signing, Amazon SES will attach a digital signature to all outgoing messages, allowing recipients to verify that the email came from your domain. You will then set your DMARC Policy, which tells an email receiver what to do if an email is not authenticated. Lastly, you will set up Sending Authorization so that other AWS accounts can send authenticated emails from your domain.

Prerequisites

In order to complete the example illustrated in this blog post, you will need to have:

  1. A domain in an Amazon Route53 Hosted Zone or third-party provider. Note: You will need to add/update records for the domain. For this blog we will be using Route53.
  2. An AWS Organization
  3. A second AWS account to send Amazon SES Emails within a different AWS Organizations OU. If you have not worked with AWS Organizations before, review the Organizations Getting Started Guide

How to comply with DMARC (DKIM and SPF) in Amazon SES

In order to comply with DMARC, you must authenticate your messages with either DKIM (DomainKeys Identified Mail), SPF (Sender Policy Framework), or both. DKIM allows you to send email messages with a cryptographic key, which enables email providers to determine whether or not the email is authentic. SPF defines what servers are allowed to send emails for their domain. To use SPF for DMARC compliance you need to set up a custom MAIL FROM domain in Amazon SES. To authenticate your emails with DKIM in Amazon SES, you have the option of:

In this blog, you will be setting up a sending identity.

Setting up DKIM Signing in Amazon SES

  1. Navigate to the Amazon SES Console 
  2. Select Verify a New Domain and type the name of your domain in
  3. Select Generate DKIM Settings
  4. Choose Verify This Domain
    1. This will generate the DNS records needed to complete domain verification, DKIM signing, and routing incoming mail.
    2. Note: When you initiate domain verification using the Amazon SES console or API, Amazon SES gives you the name and value to use for the TXT record. Add a TXT record to your domain’s DNS server using the specified Name and Value. Amazon SES domain verification is complete when Amazon SES detects the existence of the TXT record in your domain’s DNS settings.
  5. If you are using Route 53 as your DNS provider, choose the Use Route 53 button to update the DNS records automatically
    1. If you are not using Route 53, go to your third-party provider and add the TXT record to verify the domain as well as the three CNAME records to enable DKIM signing. You can also add the MX record at the end to route incoming mail to Amazon SES.
    2. A list of common DNS Providers and instructions on how to update the DNS records can be found in the Amazon SES documentation
  6. Choose Create Record Sets if you are using Route53 as shown below or choose Close after you have added the necessary records to your third-party DNS provider.


Note: in the case that you previously verified a domain, but did NOT generate the DKIM settings for your domain, follow the steps below. Skip these steps if this is not the case:

  1. Go to the Amazon SES Console, and select your domain
  2. Select the DKIM dropdown
  3. Choose Generate DKIM Settings and copy the three values in the record set shown
    1. You may also download the record set as a CSV file
  4. Navigate to the Route53 console or your third-party DNS provider. Instructions on how to update the DNS records in your third-party can be found in the Amazon SES documentation
  5. Select the domain you are using
  6. Choose Create Record

  1. Enter the values that Amazon SES has generated for you, and add the three CNAME records to your domain
  2. Wait a few minutes, and go back to your domain in the Amazon SES Console
  3. Check that the DKIM status is verified

You also want to set up a custom MAIL FROM domain that you will use later on. To do so, follow the steps in the documentation.

Setting up a DMARC policy on your domain

DMARC policies are TXT records you place in DNS to define what happens to incoming emails that don’t align with the validations provided when setting up DKIM and SPF. With this policy, you can choose to allow the email to pass through, quarantine the email into a folder like junk or spam, or reject the email.

As a best practice, you should start with a DMARC policy that doesn’t reject all email traffic and collect reports on emails that don’t align to determine if they should be allowed. You can also set a percentage on the DMARC policy to perform filtering on a subset of emails to, for example, quarantine only 50% of the emails that don’t align. Once you are in a state where you can begin to reject non-compliant emails, flip the policy to reject failed authentications. When you set the DMARC policy for your domain, any subdomains that are authorized to send on behalf of your domain will inherit this policy and the same rule will apply. For more information on setting up a DMARC policy, see our documentation.

In a scenario where you have multiple subdomains sending emails, you should be setting the DMARC policy for the organizational domain that you own. For example, if you own the domain example.com and also want to use the sub-domain sender.example.com to send emails you can set the organizational DMARC policy (as a DNS TXT record) to:

Name Type Value
1 _dmarc.example.com TXT “v=DMARC1;p=quarantine;pct=50;rua=mailto:[email protected]

This DMARC policy states that 50% of emails coming from example.com that fail authentication should be quarantined and you want to send a report of those failures to [email protected]. For your sender.example.com sub-domain, this policy will be inherited unless you specify another DMARC policy for our sub-domain. In the case where you want to be stricter on the sub-domain you could add another DMARC policy like you see in the following table.


Name Type Value
1 _dmarc.sender.example.com TXT “v=DMARC1;p=reject;pct=100;rua=mailto:[email protected];ruf=mailto:[email protected]

This policy would apply to emails coming from sender.example.com and would reject any email that fails authentication. It would also send aggregate feedback to [email protected] and detailed message-specific failure information to [email protected] for further analysis.

Sending Authorization in Amazon SES – Allowing Other Accounts to Send Authenticated Emails

Now that you have configured Amazon SES to comply with DMARC in the account that owns your identity, you may want to allow other accounts in your organization the ability to send emails in the same way. Using Sending Authorization, you can authorize other users or accounts to send emails from identities that you own and manage. An example of where this could be useful is if you are an organization which has different business units in that organization. Using sending authorization, a business unit’s application could send emails to their customers from the top-level domain. This application would be able to leverage the authentication settings of the identity owner without additional configuration. Another advantage is that if the business unit has its own subdomain, the top-level domain’s DKIM settings can apply to this subdomain, so long as you are using Easy DKIM in Amazon SES and have not set up Easy DKIM for the specific subdomains.

Setting up sending authorization across accounts

Before you set up sending authorization, note that working across multiple accounts can impact bounces, complaints, pricing, and quotas in Amazon SES. Amazon SES documentation provides a good understanding of the impacts when using multiple accounts. Specifically, delegated senders are responsible for bounces and complaints and can set up notifications to monitor such activities. These also count against the delegated senders account quotas. To set up Sending Authorization across accounts:

  1. Navigate to the Amazon SES Console from the account that owns the Domain
  2. Select Domains under Identity Management
  3. Select the domain that you want to set up sending authorization with
  4. Select View Details
  5. Expand Identity Policies and Click Create Policy
  6. You can either create a policy using the policy generator or create a custom policy. For the purposes of this blog, you will create a custom policy.
  7. For the custom policy, you will allow a particular Organization Unit (OU) from our AWS Organization access to our domain. You can also limit access to particular accounts or other IAM principals. Use the following policy to allow a particular OU to access the domain:

{
  “Version”: “2012-10-17”,
  “Id”: “AuthPolicy”,
  “Statement”: [
    {
      “Sid”: “AuthorizeOU”,
      “Effect”: “Allow”,
      “Principal”: “*”,
      “Action”: [
        “SES:SendEmail”,
        “SES:SendRawEmail”
      ],
      “Resource”: “<Arn of Verified Domain>”,
      “Condition”: {
        “ForAnyValue:StringLike”: {
          “aws:PrincipalOrgPaths”: “<Organization Id>/<Root OU Id>/<Organizational Unit Id>”
        }
      }
    }
  ]
}

9. Make sure to replace the escaped values with your Verified Domain ARN and the Org path of the OU you want to limit access to.


You can find more policy examples in the documentation. Note that you can configure sending authorization such that all accounts under your AWS Organization are authorized to send via a certain subdomain.

Testing

You can now test the ability to send emails from your domain in a different AWS account. You will do this by creating a Lambda function to send a test email. Before you create the Lambda function, you will need to create an IAM role for the Lambda function to use.

Creating the IAM Role:

  1. Log in to your separate AWS account
  2. Navigate to the IAM Management Console
  3. Select Role and choose Create Role
  4. Under Choose a use case select Lambda
  5. choose Next: Permissions
  6. In the search bar, type SES and select the check box next to AmazonSESFullAccess
  7. Choose Next:Tags and Review
  8. Give the role a name of your choosing, and choose Create Role

Navigate to Lambda Console

  1. Select Create Function
  2. Choose the box marked Author from Scratch
  3. Give the function a name of your choosing (Ex: TestSESfunction)
  4. In this demo, you will be using Python 3.8 runtime, but feel free to modify to your language of choice
  5. Select the Change default execution role dropdown, and choose the Use an existing role radio button
  6. Under Existing Role, choose the role that you created in the previous step, and create the function

Edit the function

  1. Navigate to the Function Code portion of the page and open the function python file
  2. Replace the default code with the code shown below, ensuring that you put your own values in based on your resources
  3. Values needed:
    1. Test Email Address: an email address you have access to
      1. NOTE: If you are still operating in the Amazon SES Sandbox, this will need to be a verified email in Amazon SES. To verify an email in Amazon SES, follow the process here. Alternatively, here is how you can move out of the Amazon SES Sandbox
    2. SourceArn: The arn of your domain. This can be found in Amazon SES Console → Domains → <YourDomain> → Identity ARN
    3. ReturnPathArn: The same as your Source ARN
    4. Source: This should be your Mail FROM Domain @ your domain
      1. Your Mail FROM Domain can be found under Domains → <YourDomain> → Mail FROM Domain dropdown
      2. Ex: [email protected]
    5. Use the following function code for this example

import json
import boto3
from botocore.exceptions import ClientError

client = boto3.client('ses')
def lambda_handler(event, context):
    # Try to send the email.
    try:
        #Provide the contents of the email.
        response = client.send_email(
            Destination={
                'ToAddresses': [
                    '<[email protected]>',
                ],
            },
            Message={
                'Body': {
                    'Html': {
                        'Charset': 'UTF-8',
                        'Data': 'This email was sent with Amazon SES.',
                    },
                },
                'Subject': {
                    'Charset': 'UTF-8',
                    'Data': 'Amazon SES Test',
                },
            },
            SourceArn='<your-ses-identity-ARN>',
            ReturnPathArn='<your-ses-identity-ARN>',
            Source='<[email protected]>',
             )
    # Display an error if something goes wrong.
    except ClientError as e:
        print(e.response['Error']['Message'])
    else:
        print("Email sent! Message ID:"),
        print(response['ResponseMetadata']['RequestId'])

  1. Once you have replaced the appropriate values, choose the Deploy button to deploy your changes

Run a Test invocation

  1. After you have deployed your changes, select the “Test” Panel above your function code

  1. You can leave all of these keys and values as default, as the function does not use any event parameters
  2. Choose the Invoke button in the top right corner
  3. You should see this above the test event window:

Verifying that the Email has been signed properly

Depending on your email provider, you may be able to check the DKIM signature directly in the application. As an example, for Outlook, right click on the message, and choose View Source from the menu. You should see line that shows the Authentication Results and whether or not the DKIM/SPF signature passed. For Gmail, go to your Gmail Inbox on the Gmail web app. Choose the message you wish to inspect, and choose the More Icon. Choose View Original from the drop-down menu. You should then see the SPF and DKIM “PASS” Results.

Cleanup

To clean up the resources in your account,

  1. Navigate to the Route53 Console
  2. Select the Hosted Zone you have been working with
  3. Select the CNAME, TXT, and MX records that you created earlier in this blog and delete them
  4. Navigate to the SES Console
  5. Select Domains
  6. Select the Domain that you have been working with
  7. Click the drop down Identity Policies and delete the one that you created in this blog
  8. If you verified a domain for the sake of this blog: navigate to the Domains tab, select the domain and select Remove
  9. Navigate to the Lambda Console
  10. Select Functions
  11. Select the function that you created in this exercise
  12. Select Actions and delete the function

Conclusion

In this blog post, we demonstrated how to delegate sending and management of your sub-domains to other AWS accounts while also complying with DMARC when using Amazon SES. In order to do this, you set up a sending identity so that Amazon SES automatically adds a DKIM signature to your messages. Additionally, you created a custom MAIL FROM domain to comply with SPF. Lastly, you authorized another AWS account to send emails from a sub-domain managed in a different account, and tested this using a Lambda function. Allowing other accounts the ability to manage and send email from your sub-domains provides flexibility and scalability for your organization without compromising on security.

Now that you have set up DMARC authentication for multiple accounts in your enviornment, head to the AWS Messaging & Targeting Blog to see examples of how you can combine Amazon SES with other AWS Services!

If you have more questions about Amazon Simple Email Service, check out our FAQs or our Developer Guide.

If you have feedback about this post, submit comments in the Comments section below.

Forwarding emails automatically based on content with Amazon Simple Email Service

Post Syndicated from Murat Balkan original https://aws.amazon.com/blogs/messaging-and-targeting/forwarding-emails-automatically-based-on-content-with-amazon-simple-email-service/

Introduction

Email is one of the most popular channels consumers use to interact with support organizations. In its most basic form, consumers will send their email to a catch-all email address where it is further dispatched to the correct support group. Often, this requires a person to inspect content manually. Some IT organizations even have a dedicated support group that handles triaging the incoming emails before assigning them to specialized support teams. Triaging each email can be challenging, and delays in email routing and support processes can reduce customer satisfaction. By utilizing Amazon Simple Email Service’s deep integration with Amazon S3, AWS Lambda, and other AWS services, the task of categorizing and routing emails is automated. This automation results in increased operational efficiencies and reduced costs.

This blog post shows you how a serverless application will receive emails with Amazon SES and deliver them to an Amazon S3 bucket. The application uses Amazon Comprehend to identify the dominant language from the message body.  It then looks it up in an Amazon DynamoDB table to find the support group’s email address specializing in the email subject. As the last step, it forwards the email via Amazon SES to its destination. Archiving incoming emails to Amazon S3 also enables further processing or auditing.

Architecture

By completing the steps in this post, you will create a system that uses the architecture illustrated in the following image:

Architecture showing how to forward emails by content using Amazon SES

The flow of events starts when a customer sends an email to the generic support email address like [email protected]. This email is listened to by Amazon SES via a recipient rule. As per the rule, incoming messages are written to a specified Amazon S3 bucket with a given prefix.

This bucket and prefix are configured with S3 Events to trigger a Lambda function on object creation events. The Lambda function reads the email object, parses the contents, and sends them to Amazon Comprehend for language detection.

Amazon DynamoDB looks up the detected language code from an Amazon DynamoDB table, which includes the mappings between language codes and support group email addresses for these languages. One support group could answer English emails, while another support group answers French emails. The Lambda function determines the destination address and re-sends the same email address by performing an email forward operation. Suppose the lookup does not return any destination address, or the language was not be detected. In that case, the email is forwarded to a catch-all email address specified during the application deployment.

In this example, Amazon SES hosts the destination email addresses used for forwarding, but this is not a requirement. External email servers will also receive the forwarded emails.

Prerequisites

To use Amazon SES for receiving email messages, you need to verify a domain that you own. Refer to the documentation to verify your domain with Amazon SES console. If you do not have a domain name, you will register one from Amazon Route 53.

Deploying the Sample Application

Clone this GitHub repository to your local machine and install and configure AWS SAM with a test AWS Identity and Access Management (IAM) user.

You will use AWS SAM to deploy the remaining parts of this serverless architecture.

The AWS SAM template creates the following resources:

  • An Amazon DynamoDB mapping table (language-lookup) contains information about language codes and associates them with destination email addresses.
  • An AWS Lambda function (BlogEmailForwarder) that reads the email content parses it, detects the language, looks up the forwarding destination email address, and sends it.
  • An Amazon S3 bucket, which will store the incoming emails.
  • IAM roles and policies.

To start the AWS SAM deployment, navigate to the root directory of the repository you downloaded and where the template.yaml AWS SAM template resides. AWS SAM also requires you to specify an Amazon Simple Storage Service (Amazon S3) bucket to hold the deployment artifacts. If you haven’t already created a bucket for this purpose, create one now. You will refer to the documentation to learn how to create an Amazon S3 bucket. The bucket should have read and write access by an AWS Identity and Access Management (IAM) user.

At the command line, enter the following command to package the application:

sam package --template template.yaml --output-template-file output_template.yaml --s3-bucket BUCKET_NAME_HERE

In the preceding command, replace BUCKET_NAME_HERE with the name of the Amazon S3 bucket that should hold the deployment artifacts.

AWS SAM packages the application and copies it into this Amazon S3 bucket.

When the AWS SAM package command finishes running, enter the following command to deploy the package:

sam deploy --template-file output_template.yaml --stack-name blogstack --capabilities CAPABILITY_IAM --parameter-overrides FromEmailAddress=info@ YOUR_DOMAIN_NAME_HERE CatchAllEmailAddress=catchall@ YOUR_DOMAIN_NAME_HERE

In the preceding command, change the YOUR_DOMAIN_NAME_HERE with the domain name you validated with Amazon SES. This domain also applies to other commands and configurations that will be introduced later.

This example uses “blogstack” as the stack name, you will change this to any other name you want. When you run this command, AWS SAM shows the progress of the deployment.

Configure the Sample Application

Now that you have deployed the application, you will configure it.

Configuring Receipt Rules

To deliver incoming messages to Amazon S3 bucket, you need to create a Rule Set and a Receipt rule under it.

Note: This blog uses Amazon SES console to create the rule sets. To create the rule sets with AWS CloudFormation, refer to the documentation.

  1. Navigate to the Amazon SES console. From the left navigation choose Rule Sets.
  2. Choose Create a Receipt Rule button at the right pane.
  3. Add info@YOUR_DOMAIN_NAME_HERE as the first recipient addresses by entering it into the text box and choosing Add Recipient.


Choose the Next Step button to move on to the next step.

  1. On the Actions page, select S3 from the Add action drop-down to reveal S3 action’s details. Select the S3 bucket that was created by the AWS SAM template. It is in the format of your_stack_name-inboxbucket-randomstring. You will find the exact name in the outputs section of the AWS SAM deployment under the key name InboxBucket or by visiting the AWS CloudFormation console. Set the Object key prefix to info/. This tells Amazon SES to add this prefix to all messages destined to this recipient address. This way, you will re-use the same bucket for different recipients.

Choose the Next Step button to move on to the next step.

In the Rule Details page, give this rule a name at the Rule name field. This example uses the name info-recipient-rule. Leave the rest of the fields with their default values.

Choose the Next Step button to move on to the next step.

  1. Review your settings on the Review page and finalize rule creation by choosing Create Rule

  1. In this example, you will be hosting the destination email addresses in Amazon SES rather than forwarding the messages to an external email server. This way, you will be able to see the forwarded messages in your Amazon S3 bucket under different prefixes. To host the destination email addresses, you need to create different rules under the default rule set. Create three additional rules for catchall@YOUR_DOMAIN_NAME_HERE , english@ YOUR_DOMAIN_NAME_HERE and french@YOUR_DOMAIN_NAME_HERE email addresses by repeating the steps 2 to 5. For Amazon S3 prefixes, use catchall/, english/, and french/ respectively.


Configuring Amazon DynamoDB Table

To configure the Amazon DynamoDB table that is used by the sample application

  1. Navigate to Amazon DynamoDB console and reach the tables view. Inspect the table created by the AWS SAM application.

language-lookup table is the table where languages and their support group mappings are kept. You need to create an item for each language, and an item that will hold the default destination email address that will be used in case no language match is found. Amazon Comprehend supports more than 60 different languages. You will visit the documentation for the supported languages and add their language codes to this lookup table to enhance this application.

  1. To start inserting items, choose the language-lookup table to open table overview page.
  2. Select the Items tab and choose the Create item From the dropdown, select Text. Add the following JSON content and choose Save to create your first mapping object. While adding the following object, replace Destination attribute’s value with an email address you own. The email messages will be forwarded to that address.

{

  “language”: “en”,

  “destination”: “english@YOUR_DOMAIN_NAME_HERE”

}

Lastly, create an item for French language support.

{

  “language”: “fr”,

  “destination”: “french@YOUR_DOMAIN_NAME_HERE”

}

Testing

Now that the application is deployed and configured, you will test it.

  1. Use your favorite email client to send the following email to the domain name info@ email address.

Subject: I need help

Body:

Hello, I’d like to return the shoes I bought from your online store. How can I do this?

After the email is sent, navigate to the Amazon S3 console to inspect the contents of the Amazon S3 bucket that is backing the Amazon SES Rule Sets. You will also see the AWS Lambda logs from the Amazon CloudWatch console to confirm that the Lambda function is triggered and run successfully. You should receive an email with the same content at the address you defined for the English language.

  1. Next, send another email with the same content, this time in French language.

Subject: j’ai besoin d’aide

Body:

Bonjour, je souhaite retourner les chaussures que j’ai achetées dans votre boutique en ligne. Comment puis-je faire ceci?


Suppose a message is not matched to a language in the lookup table. In that case, the Lambda function will forward it to the catchall email address that you provided during the AWS SAM deployment.

You will inspect the new email objects under english/, french/ and catchall/ prefixes to observe the forwarding behavior.

Continue experimenting with the sample application by sending different email contents to info@ YOUR_DOMAIN_NAME_HERE address or adding other language codes and email address combinations into the mapping table. You will find the available languages and their codes in the documentation. When adding a new language support, don’t forget to associate a new email address and Amazon S3 bucket prefix by defining a new rule.

Cleanup

To clean up the resources you used in your account,

  1. Navigate to the Amazon S3 console and delete the inbox bucket’s contents. You will find the name of this bucket in the outputs section of the AWS SAM deployment under the key name InboxBucket or by visiting the AWS CloudFormation console.
  2. Navigate to AWS CloudFormation console and delete the stack named “blogstack”.
  3. After the stack is deleted, remove the domain from Amazon SES. To do this, navigate to the Amazon SES Console and choose Domains from the left navigation. Select the domain you want to remove and choose Remove button to remove it from Amazon SES.
  4. From the Amazon SES Console, navigate to the Rule Sets from the left navigation. On the Active Rule Set section, choose View Active Rule Set button and delete all the rules you have created, by selecting the rule and choosing Action, Delete.
  5. On the Rule Sets page choose Disable Active Rule Set button to disable listening for incoming email messages.
  6. On the Rule Sets page, Inactive Rule Sets section, delete the only rule set, by selecting the rule set and choosing Action, Delete.
  7. Navigate to CloudWatch console and from the left navigation choose Logs, Log groups. Find the log group that belongs to the BlogEmailForwarderFunction resource and delete it by selecting it and choosing Actions, Delete log group(s).
  8. You will also delete the Amazon S3 bucket you used for packaging and deploying the AWS SAM application.


Conclusion

This solution shows how to use Amazon SES to classify email messages by the dominant content language and forward them to respective support groups. You will use the same techniques to implement similar scenarios. You will forward emails based on custom key entities, like product codes, or you will remove PII information from emails before forwarding with Amazon Comprehend.

With its native integrations with AWS services, Amazon SES allows you to enhance your email applications with different AWS Cloud capabilities easily.

To learn more about email forwarding with Amazon SES, you will visit documentation and AWS blogs.

Maintain consistency in emails with custom content using Amazon SES templates

Post Syndicated from Seth Theeke original https://aws.amazon.com/blogs/messaging-and-targeting/maintain-consistency-in-emails-with-custom-content-with-amazon-ses-templates/

When sending emails, content creators often want to add custom content such as images or videos while maintaining consistency in their messages. They also want to send those emails automatically once new content is ready. In this blog, we will show you how to create templates for emails with a common theme by combining Amazon Simple Email Service (Amazon SES) templates, AWS Lambda, Amazon Simple Storage Service (Amazon S3), and Amazon SES templates.

Promotional content (such as logos, images, videos, and more) can be stored, managed, and hosted in Amazon S3. You can then embed this content into promotional emails without making any changes to email templates or email processing. You can trigger a Lambda function to send promotional emails with the newly added content through using the Amazon SES SDK.

This post shows readers how to:

  • Create an Amazon SES email template with tags to be replaced by image URLs
  • Upload those templates to Amazon SES
  • Setup an AWS CloudFormation stack using the AWS Cloud Development Kit(AWS CDK)
  • Create a Lambda function and Amazon S3 bucket to send emails using the AWS SDK for Javascript

Solution Architecture

The proceeding image shows the architecture you will build as part of this post. You will use the AWS CDK to provision an Amazon S3 bucket, Lambda, and AWS Identity and Access Management(IAM) permissions. You will also use the AWS Command Line Interface(AWS CLI) to upload and manage our Amazon SES templates.

The architecture allows you to upload content to S3 which will trigger a Lambda function. That Lambda will form an Amazon SES request using the template you have uploaded and embed the S3 content as a parameter which will be sent to the user and render in their email client.

Metadata

Time to Read: ~ 20 minutes

Time to Complete: ~ 15 minutes

Cost to Complete: Free Tier

Learning Level: Intermediate

Services Used: Amazon Simple Email Service, Amazon Simple Storage Service, AWS Lambda

Prerequisites

For this walkthrough, you should have the following prerequisites:

Solution Overview

You will walk through creating Amazon SES templates and then a CloudFormation stack using the AWS CDK. You will then create a template file, a lambda directory, and a CDK application directory which should all be in the same level in your package structure in order to follow these steps explicitly.

Step 1: Create an Amazon SES template in JSON with a tag representing your image URL and upload via the CLI

Step 2: Initialize an AWS CDK package using the AWS CDK CLI and add necessary dependencies

Step 3: Initialize a NodeJS AWS Lambda package

Step 4: Provision an Amazon S3 bucket and Lambda in your AWS CDK app

Step 5: Configure your Lambda to be triggered when objects are added to S3

Step 6: Configure your Lambda’s IAM role to allow sending emails via Amazon SES

Step 7: Write necessary code for AWS Lambda to send emails via Amazon SES

Step 8: Deploy and Test!

Step 1: Create an Amazon SES Email template

Amazon SES Email templates are defined as a JSON object containing:

  • TemplateName – name of the template, must be unique across email templates and will be used by our Lambda to pass to Amazon SES
  • SubjectPart – represents the subject of the email
  • HtmlPart – represents the body of the email
  • TextPart – when email clients cannot render HTML, this is displayed instead of HtmlPart

More detailed information about email templates can be found in the Amazon SES Developer Guide.

1.     Open your text editor and save the empty file as email-template.json

2.     Paste the following into your json file and save your changes

{
  "Template": {
    "TemplateName": "MyTemplate",
    "SubjectPart": "Greetings Customer",
    "HtmlPart": "<img src={{imageURL}} alt=\"logo\" width=\"100\" height=\"100\">",
    "TextPart": "Dear Customer,\r\nCheck out our website for new promotional content."
  }
}

This template has a single tag called imageURL which will be replaced during execution with our content’s S3 URL.

3.     Run the following AWS CLI command to upload your template to Amazon SES

aws ses create-template --cli-input-json file://email-template.json

4.     Once your template has been uploaded, you can confirm its creation by logging into the AWS Console, navigating to Amazon SES, and then selecting Email Templates

Step 2: Initialize an AWS CDK package and add necessary dependencies

In this section, you will be using the AWS CDK CLI to initialize a new code package and add the dependencies for Lambda and Amazon S3.

1.     Create a new directory at the same level as email-template.json called email-infrastructure

2.     Navigate to the promotional-email-infrastructure directory and run the following CDK CLI command to generate the skeleton for your cdk application

cdk init app --language=typescript

3.     Add dependencies for Amazon S3, Lambda, and IAM by adding the following lines to your dependencies section of your package.json and then run npm install

"@aws-cdk/aws-lambda": "1.86.0"
"@aws-cdk/aws-lambda-event-sources": "1.86.0"
"@aws-cdk/aws-s3": "1.86.0"
"@aws-cdk/aws-iam": "1.86.0"

Make sure to install the version of these dependencies that matches the version of the aws-cdk stack so you don’t run into compatibility issues.

Step 3: Create a NodeJS Lambda package

In this step, you will create the barebones for our Lambda function that will call Amazon SES and revisit in step 7 to implement the handler

1.     Create a new directory at the same level as email-template.json called email-lambda

2.     Add a package.json file in the email-lambda directory that looks like the following

{
    "name": "email-lambda",
    "version": "1.0.0",
    "main": "index.js",
    "dependencies": {
        "aws-sdk": "2.831.0"
    }
}

3.     Add a file called index.js, this will be our Lambda handler and will look like the following for now. Make sure to insert your verified email address into the testAddress variable, this will be used later as both your to and from address for testing.

var AWS = require("aws-sdk");
var ses = new AWS.SES({apiVersion: "2010-12-01"});
var testAddress = "INSERT_VERIFIED_EMAIL_HERE";

exports.handler = async function(event) { 
    console.log(JSON.stringify(event));
    return "200";
}

4.     Finish this step by running npm install in the email-lambda directory to install the aws-sdk dependencies you will use in a later step. Your top-level directory structure should look like the following:

  • email-template.json – contains your email template from step 1
  • email-infrastructure – contains your CDK stack from step 2
  • email-lambda – contains your email lambda function code from step 3

Step 4: Provision an Amazon S3 bucket and Lambda function in your CDK app

In this step, you will add an Amazon S3 bucket and a NodeJS Lambda function into our CDK application based on what you setup in previous steps. After this, you will connect all the pieces together.

1.     Import all the services you need into our CDK stack construct. The imports you will need are listed below, copy them into your editor in the imports section.

import * as s3 from '@aws-cdk/aws-s3';
import * as lambda from '@aws-cdk/aws-lambda';
import * as lambdaEventSource from '@aws-cdk/aws-lambda-event-sources';
import * as iam from '@aws-cdk/aws-iam';
import path = require('path');

2.     Add S3 bucket to CDK App by adding an instance of the Bucket construct

const promotionalContentBucket = new s3.Bucket(this, "DOC-EXAMPLE-BUCKET");

3.     Similarly, add your Lambda function by creating an instance of the Function construct referencing your Lambda function package by path

const emailLambda = new lambda.Function(this, "EmailLambda", {
    code: lambda.Code.fromAsset(path.join(__dirname, "../../email-lambda")),
    handler: "index.handler",
    runtime: lambda.Runtime.NODEJS_12_X
});

4.     Execute npm run build in your CDK directory to ensure you’ve setup the package correctly. You can get additional help from the Troubleshooting Guide for CDK

Step 5: Configure Lambda with an S3 Event Source

In this step, you will configure your Lambda function to be triggered when objects are added to your Amazon S3 bucket by using the Lambda event sources module for CDK.

1.     Create an instance of the S3EventSource construct in your stack for OBJECT_CREATED events only because you don’t want to trigger a lambda invocation when an object is removed for this post

const s3EventSource = new lambdaEventSource.S3EventSource(promotionalContentBucket, {
    events: [s3.EventType.OBJECT_CREATED]
});

2.     Now that you have an event source defined, you need to add the event source to your Lambda function

emailLambda.addEventSource(s3EventSource);

3.     Add the Amazon S3 bucket’s domain name as an environment variable so you can reference objects by URL by adding the environment property to your Lambda function like below.

environment: {
    "BUCKET_DOMAIN_NAME": promotionalContentBucket.bucketDomainName
}

Step 6: Configure the email Lambda IAM role

In this step, you will add an IAM policy statement to your email Lambda’s execution role so it can call Amazon SES.

1.     Add an IAM PolicyStatement construct with effect ALLOW on all resources with SendTemplatedEmail action

const emailPolicyStatement = new iam.PolicyStatement({
    effect: iam.Effect.ALLOW,
    actions: ["ses:SendTemplatedEmail"],
    resources: ["*"]
});

2.     Finish this step by adding your newly created policy to the Lambda execution role

emailLambda.addToRolePolicy(emailPolicyStatement)

Step 7: Add Lambda implementation to send templated emails

You will use the AWS NodeJS Amazon SES SDK to send emails using the SendTemplatedEmail API. Our implementation will assume a batch of size 1 for each Lambda invocation for simplicity.

1.     Replace your function handler in the email Lambda function with the code below. This will read the S3Event’s first record, prepare parameters for the Amazon SES SDK call and invoke the sendTemplatedEmail function with the imageURL embedded into your previously created template.

exports.handler =  async function(event) {  
    console.log(JSON.stringify(event));
    let s3Object = event.Records[0];
    let sendEmailParams = {
        Destination: {
            ToAddresses: [testAddress]
        },
        Template: 'MyTemplate',
        TemplateData: JSON.stringify({
            "imageURL": process.env.BUCKET_DOMAIN_NAME + "/" + s3Object.s3.object.key,
        }),
        Source: testAddress
    };
    let response = await ses.sendTemplatedEmail(sendEmailParams).promise();
    return response;
}

2.     Deploy your stack with the CDK CLI by running cdk deploy, this may take a couple minutes. If you run into problems, see the Troubleshooting Guide for CDK.

Step 8: Test your System

At this point, you should have an Amazon SES template uploaded to your account as well as a CloudFormation stack that contains an Amazon S3 bucket and a Lambda function that is triggered when objects are added to that bucket and had permissions to invoke Amazon SES APIs. Now you will test the system by adding an image into our Amazon S3 bucket.

1.     Log in to the AWS Console

2.     Navigate to Amazon S3

3.     Select your promotional content bucket from the list of buckets

4.     Click Upload on the right-hand side of the screen

5.     Add an image from your computer by clicking Add files

6.     Scroll down to the bottom and expand Additional Upload Options

7.     Scroll down to Access Control List

8.     Select the check boxes for Read for Everyone(public access) so the images are accessible when the user opens their email

9.     Scroll down to the bottom and select Upload

10.     Done! You should have an email in your inbox shortly that renders the image you just uploaded. Check the Lambda logs and errors in case you don’t see your email.

Cleaning up

To avoid incurring future charges, delete your CloudFormation stack by running cdk destroy or manually through the AWS Console. Keep in mind, by default Amazon S3 buckets won’t be deleted so you will need to navigate to Amazon S3 in the AWS Console, clear the bucket of any objects and then manually delete the resource.

Conclusion

Congratulations! You now have an understanding of how to combine Amazon SES templates with Amazon S3 and Lambda to inject custom images into emails without the need for any servers and have launched this stack using the AWS Cloud Development Kit.

Author Bio

My name is Seth Theeke, I work as a Software Development Engineer in Amazon Freight. I’ve been working with AWS since 2016 and hold a Developer Associate Certification. I love soccer and I love software engineering, the simplest things in life!

Opt-in to the new Amazon SES console experience

Post Syndicated from Simon Poile original https://aws.amazon.com/blogs/messaging-and-targeting/amazon-ses-console-opt-in/

Amazon Web Services (AWS) is pleased to announce the launch of the newly redesigned Amazon Simple Email Service (SES) console. With its streamlined look and feel, the new console makes it even easier for customers to leverage the speed, reliability, and flexibility that Amazon SES has to offer. Customers can access the new console experience via an opt-in link on the classic console.

Amazon SES now offers a new, optimized console to provide customers with a simpler, more intuitive way to create and manage their resources, collect sending activity data, and monitor reputation health. It also has a more robust set of configuration options and new features and functionality not previously available in the classic console.

Here are a few of the improvements customers can find in the new Amazon SES console:

Verified identities

Streamlines how customers manage their sender identities in Amazon SES. This is done by replacing the classic console’s identity management section with verified identities. Verified identities are a centralized place in which customers can view, create, and configure both domain and email address identities on one page. Other notable improvements include:

  • DKIM-based verification
    DKIM-based domain verification replaces the previous verification method which was based on TXT records. DomainKeys Identified Mail (DKIM) is an email authentication mechanism that receiving mail servers use to validate email. This new verification method offers customers the added benefit of enhancing their deliverability with DKIM-compliant email providers, and helping them achieve compliance with DMARC (Domain-based Message Authentication, Reporting and Conformance).
  • Amazon SES mailbox simulator
    The new mailbox simulator makes it significantly easier for customers to test how their applications handle different email sending scenarios. From a dropdown, customers select which scenario they’d like to simulate. Scenario options include bounces, complaints, and automatic out-of-office responses. The mailbox simulator provides customers with a safe environment in which to test their email sending capabilities.

Configuration sets

The new console makes it easier for customers to experience the benefits of using configuration sets. Configuration sets enable customers to capture and publish event data for specific segments of their email sending program. It also isolates IP reputation by segment by assigning dedicated IP pools. With a wider range of configuration options, such as reputation tracking and custom suppression options, customers get even more out of this powerful feature.

  • Default configuration set
    One important feature to highlight is the introduction of the default configuration set. By assigning a default configuration set to an identity, customers ensure that the assigned configuration set is always applied to messages sent from that identity at the time of sending. This enables customers to associate a dedicated IP pool or set up event publishing for an identity without having to modify their email headers.

Account dashboard

There is also an account dashboard for the new SES console. This feature provides customers with fast access to key information about their account, including sending limits and restrictions, and overall account health. A visual representation of the customer’s daily email usage helps them ensure that they aren’t approaching their sending limits. Additionally, customers who use the Amazon SES SMTP interface to send emails can visit the account dashboard to obtain or update their SMTP credentials.

Reputation metrics

The new reputation metrics page provides customers with high-level insight into historic bounce and complaint rates. This is viewed at both the account level and the configuration set level. Bounce and complaint rates are two important metrics that Amazon SES considers when assessing a customer’s sender reputation, as well as the overall health of their account.

The redesigned Amazon SES console, with its easy-to-use workflows, will not only enhance the customers’ on-boarding experience, it will also change the paradigms used for their on-going usage. The Amazon SES team remains committed to investing on behalf of our customers and empowering them to be productive anywhere, anytime. We invite you to opt in to the new Amazon SES console experience and let us know what you think.

Amazon SES celebrates 10 years of email sending and deliverability

Post Syndicated from Simon Poile original https://aws.amazon.com/blogs/messaging-and-targeting/amazon-ses-celebrates-10-years-of-email-sending-and-deliverability/

Amazon Simple Email Service (Amazon SES) turns 10 years old today. Back on January 25th 2011, Amazon Web Services (AWS) had only 15 services. Today, AWS has grown to over 180 services. Jeff Barr launched Amazon SES as part of his web evangelist blog. Much of what he wrote about then is still true today. Even 10 years later, email is an important channel for customer communications. Developers still want to rely on a trusted global partner to deliver email at scale. However, mailbox providers are even more protective of their end users’ security. They actively work to ensure that any perceived, unwanted email doesn’t make it to the inbox.

Inbox providers use several factors to determine the legitimacy of email traffic. Over the last decade, we have worked diligently to measure many of those factors in Amazon SES to help our customers achieve great deliverability. The focus for much of that work has been a combination of investments into reputation, engagement, and trust. I want to outline what we’ve accomplished to improve your email sending over the last 10 years.

Reputation

Reputation is the measurement mailbox providers use to determine how closely you follow their sending standards. Amazon SES measures perceived reputation through metrics such as bounce rate or complaint rate in the reputation dashboard. The reputation dashboard also shares overall Amazon SES account sending status like “Healthy” or “Under Review.” Some Inbox providers, or ISPs, also provide feedback to help us measure the effectiveness of a specific IP or domain in sending trustworthy traffic.

You can influence reputation in Amazon SES through:

  • Setting up dedicated IPs: Set up IPs in Amazon SES for your own specific sending with appropriate warm-up plans. Split IPs out by use case such as separating password resets from marketing messages.
  • Customer owned IPs (New in 2020): You can now transition IPs you’ve invested in through your own data center or with another ESP to Amazon SES without interruption.
  • Following sending volume best practices: Nothing can flag your IP addresses faster than non-predictable sending patterns. We help you manage this through sending quotas.
  • Use our SES email simulator: Test your application sending without messages leaving the sandbox.


Engagement

Engagement is the rate by which customers are interacting with your content. Amazon SES helps you measure engagement through conversion rates (such as open or click-through) and unsubscribe rates. These are measured in the event publishing click stream. This area is more of an art in our deliverability calculus because success varies by industry and use case.

You can influence engagement in Amazon SES through:

  • Customizing content as much as possible, but follow content best practices to avoid setting off content filters. Mailbox providers often utilize behavioral content filtering using AI to determine if your content is relevant based on engagement behavior.
  • Use consent and list management (New in 2020) with customized topics and opt-out pages. It’s important to offer recipients a way to select what emails they want to receive from you and give them an option to opt-out. This is a great new feature that we’ve added based on customer feedback.
  • Remove emails that are not engaging from your lists. Some customers have a time limit, for example, 60 days, before they are automatically removed from an active email list.


Trust

Earning trust on email sending is done through the adherence to proper sending behavior, as measured by both individual ISPs as well as industry watch-groups. Trust is closely related to reputation.  We measure trust through messages in the reputation dashboard based on feedback loops, Real-time Blocklists (RBLs), and spam-traps. You can also see the complaint rate associated to your sending in the complaint area of the reputation dashboard. It has statuses like healthy or under review.

You can influence trust in Amazon SES through:


Deliverability is a multi-dimensional part of email sending, beyond just setting up an SMTP (Simple Mail Transfer Protocol) endpoint, with constant complexities. But, we’re here to help. In addition to these investments in deliverability, we’ve also expanded Amazon SES to 18 regions, including the government cloud. It’s been an exciting time at AWS, and we look forward to supporting all of our customers in the years to come with Amazon SES.


Strategies for list management with Amazon Pinpoint and Amazon Simple Email Service

Post Syndicated from Heidi Gloudemans original https://aws.amazon.com/blogs/messaging-and-targeting/strategies-for-list-management-with-amazon-pinpoint-and-amazon-simple-email-service/

Managing customer lists is a large part of any outbound customer communication program. From customer acquisition to ongoing engagement, locating the best sources for subscribers and respecting their contact preferences is key to maintaining healthy customer lists. This article will discuss recommendations for list building using Amazon Pinpoint and Amazon Simple Email Service (SES). We will provide recommendations for a subscription process, what information to ask for, how to manage opt-outs, and optimize lists over time.

Customer acquisition

Customer acquisition is the first part of any list activity. There are a few guidelines that all outbound marketers should follow during the list building process. First, do not use 3rd party, leased, or purchased lists. The use of 3rd party lists for email risks complaints, impact to sender reputation, and inclusion in monitoring functions like spam traps. Email service providers like Amazon Pinpoint and Amazon SES will discontinue service for accounts with poor sending behavior that results from use of 3rd party lists.

Second, if you plan on contacting customers across channels, make sure you acquire permission to contact users on each channel. There are many places you can acquire customer contacts, ranging from your website, social media presence, or a QR code on a physical sign. Amazon Pinpoint also has a solution called the Amazon Pinpoint Preference Center that you can deploy to gather and manage customer contact preferences across channels.

There are a few items that you want to include in any customer acquisition form. First, tell the customer how often they can expect communication from you. Is it a weekly newsletter? Monthly? Even better if you give them the option to select how often you communicate with them. Next, tell them what value they can expect from registration. For example, special deals, early access to sales, or even just product and industry news. While you can provide some incentives, avoid providing high-value incentives for registration. Over-the-top enticements like free products will always cause low-quality registrations and resulting low-quality lists.

In addition, make your sign-up forms as concise as possible. Only put high-value content behind registration, and minimize the amount of information customers must provide to register. Having a full profile makes your life as a marketer trying to segment your customers easier. However, it potentially adds friction to the sign-up process which can result in lost customers.

If you can, allow the customer to indicate their content preferences later or during onboarding communications. If you use Amazon SES, you can support up to 20 list topics per account in the Amazon SES list management. For example, if you are a sportswear company, interests could include topics like hiking, biking, or running. You should then send customers emails only about the specific topics that the recipient is interested in receiving. Make sure you retain preference data. All countries are different, but some require you to prove that you received permission to contact a customer.

Managing your customer contacts

Onboarding communication is an essential first step once a customer has submitted their initial registration. Some organizations use the first communication as a registration confirmation step, called a “double opt-in.” In addition to driving engagement and initial calls-to-action (“Confirm your email”), double opt-in emails have the added benefit of verifying that a bot did not submit your customer email.

From the first message you send to a new customer to the last, you should always include the unsubscribe option. Every country has different requirements, of which you should research and educate your organization. Amazon SES now supports subscription management for custom URLs in the footers of your emails. Amazon SES also now supports contact preferences in a custom landing page, where customers can adjust their contact list preferences.

Removing unengaged users

Both Amazon Pinpoint and Amazon SES enable visibility to the success of outbound communications through open rates and click-through rates at the account or campaign level. If time passes with limited engagement from an individual customer, (i.e., they do not open your mails or engage with the content) there is a risk the recipient mailbox provider will start marking your messages as spam. Work with your business to determine the period of time after which you should automatically remove unengaged users from your contact list. Many organizations will remove customers from their contact lists after 60 to 90 days of non-engagement.  If you need the ability to quickly query customers that are not engaging with your communications from your data store of choice, enable event stream data in Amazon Pinpoint or Amazon SES using Amazon Kinesis. Amazon Pinpoint also has a solution, the Digital User Engagement Events Stream Database that creates a data store for that purpose.

Amazon SES and Amazon Pinpoint both also have the concept of global and account suppression lists. Global suppression lists are managed across AWS accounts, while account-based suppression lists are associated to your AWS account. If a customer explicitly unsubscribes from your list using Amazon SES list management, or complains through their inbox provider, they will automatically be added to the respective account suppression list. Customers that are part of suppression lists are no longer sent messages from your account. Respecting contact preferences like unsubscribe is an opportunity to earn trust with that specific customer, the market, and the recipient mailbox provider.

Conclusion

There are a number of additional best practices to drive customer engagement across communications channels. They can include message headlines, copy, graphics/images, and adaptive design across various endpoints and clients. However, nothing is as important as maintaining the trust of end customers with their contact information. Sourcing contact information with the customer permission, respecting contact preferences, and maintaining list hygiene is the cornerstone to a successful customer communications program. Learn more today about Amazon Pinpoint and Amazon SES and customer communications.

How Amazon Simple Email Service supported the growth of email in 2020

Post Syndicated from Simon Poile original https://aws.amazon.com/blogs/messaging-and-targeting/how-amazon-simple-email-service-supported-the-growth-of-email-in-2020/

Over the last 12 months, organizations of all types have increasingly needed to stay connected to their customers. With the move to virtual interactions accelerating across industries, email has remained a trusted channel for customer communications. Amazon Simple Email Service (SES) has seen record outbound email traffic in 2020, supporting critical customer communications during COVID and commercial moments like Black Friday and Cyber Monday.

The importance of email during COVID

Unlike real-time communications like voice or live chat, email is asynchronous. It can be read and consumed at the customer’s leisure. In some geographies like North America, email also represents an individual’s unique identity, persisting longer than mobile phone numbers or social networking accounts. Even with the importance of email established before 2020, it was important to most organizations to send only the right messages during the COVID crisis.

Many organizations chose to decrease promotional or marketing emails during the pandemic voluntarily. This decrease in sending was to recognize the increased stress most individuals were facing in their personal lives. However, even with the drop in marketing emails across organizational types, there was an increased need to communicate and maintain customer engagement. Most organizations went through three distinct customer communication phases with email in 2020: React, Respond, and Reimagine.

  • React – These were the initial emails sent to acknowledge the COVID crisis, occurring early in 2020. These emails included messages reinforcing commitment to customer health, employee safety, or communicating new cleaning protocols.
  • Respond – These messages often included communication on the status of the business or event. Most businesses needed to communicate their transition to remote work, temporary closures, and many in-person events canceled.
  • Reimagine – Throughout the crisis, organizations were reimagining how to do business. Healthcare started operating video consultations, and restaurants shifted to pick up/take out only. Email communication was vital to take customers on the journey into this “new normal,” even as some businesses started to reopen.

To send these customer communications at scale, many organizations worked with Amazon SES.

How Amazon SES scaled and supported customers in 2020

Amazon SES saw several sending spikes that aligned with organizations working to communicate with their customers during COVID. Nine times in 2020, transactions per second (TPS) in Amazon SES exceeding 150% of the previous record held by 2019 Black Friday. This over 150% TPS spike also occurred on 2020 Black Friday and Cyber Monday.

In addition to supporting those upsurges in throughput, the Amazon SES team also responded to customer feedback on increasing the global footprint of Amazon SES. Since January, Amazon SES increased the total number of regions supported from 7 to 14, including the US government cloud. These additional regions were deployed during 2020 as the team worked remotely. This regional expansion enabled customers to adhere to local data sovereignty requirements for email sending while also improving performance.

Customers also told us they needed tools to help them manage compliance with important governance laws like CAN-SPAM and GDPR. Amazon SES released list management to help organizations manage their customer’s contact information and preferences.

Looking forward

As we move into 2021, email will remain at the forefront of customer communication channels. Enterprise customers like Netflix and Duolingo rely on Amazon SES to deliver their email at scale. For more information on how you can use Amazon SES, visit our website.

Auto-reply to incoming emails using Amazon Simple Email Service (SES)

Post Syndicated from Ilya Pupko original https://aws.amazon.com/blogs/messaging-and-targeting/auto-reply-to-incoming-emails-using-amazon-simple-email-service-ses/

Both Amazon Pinpoint and Amazon Simple Email Service (SES) are known for their ability to send out transactional and promotional emails at scale and with ease. However, both are often not set up to receive email replies. Owners often assume that the “no-reply” addresses they are using do not require much consideration. This means that if a customer does reply, they would get an unhelpful server rejection indicating that the address is invalid. They would also not be able to unsubscribe via the simple reply, which is an otherwise established common practice. Automated guidance that the address is not monitored and who and how to reach for assistance would never be provided. In summary, a very unprofessional experience.

If you do have full control over the DNS and are not already receiving emails at the subdomain used for these emails, you can follow this short guide. It walks you through all the setup needed to have automated and templated responses to any address at the domain. This includes the address you use to send emails. Follow this post to ensure that your Amazon SES and Amazon Pinpoint are set up in accordance with common configuration and best business practices to have professional auto-reply to emails sent to the configured sending email addresses.

Solution overview

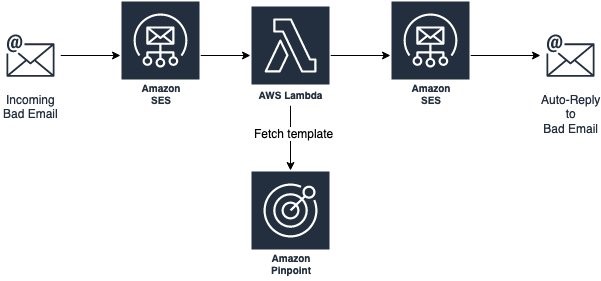
The proposed solution does not rely on any additional services. It does not add any additional charges beyond the cost directly associated with receiving and sending the emails and the minimal AWS Lambda function for the automated logic. It relies on SES built-in capability to receive emails, Amazon Pinpoint native templates, and uses Lambda for basic orchestration.

lambda diagram for response

Note, in this walkthrough and related code, we are using Amazon Pinpoint templates as they can be managed and maintained directly via the console, but you can choose to use SES templates (via the CreateTemplate API) or, if it makes better sense in your scenario, even just hardcode the template into the AWS Lambda function itself.

To complete the setup, all you must do is follow these steps:

      1. Confirm (Sub-) Domain setup in SES (even if you use Amazon Pinpoint to send your emails out, the SES portion of the console should show the validated domain as well). See SES Developer Guide.
      2. Ensure that your SES domain is verified and you are out of the sandbox. If still in the sandbox, you can only send emails to the Amazon SES mailbox simulator addresses and email addresses/domains that you have pre-verified. See Moving out of the Amazon SES sandbox.
      3. Configure SES to receive incoming emails. Please note that this must be done on the whole subdomain you use, not just a single email address. See Setting up Amazon SES email receiving.
      4. Create/add a new template you want to use via Amazon Pinpoint. Simply switch the console over to Amazon Pinpoint, select Message templates, click Create, select Email, and fill out the rest of the self-explanatory field.
        1. Plaintext portion is optional – you can either skip it or fill it out and enable in the Lambda function we are deploying in the next step.
        2. Similarly, if you prefer to use the SES template, you can instead. Just use the associated line in that same code.
        3. Same with a hardcoded template, if you prefer that for some reason.
      5. Have this pre-defined CloudFormation create the required SES receive rule, and Lambda function. This processes the incoming email and sends back the response, all using the code shared in the dedicated portion of our GitHub, AWS Digital User Engagement Reference Architectures repository. Specifically:
          1. Download the YAML from SES_Auto_Reply.yaml.
          2. Go to CloudFormation in AWS Management Console. (Remember to choose the region you want it deployed on)
          3. Click Create Stack and then choose With new resources
          4. Leave the default “Template is ready“, but switch to ”Upload a template file“ and choose the file you just downloaded
          5. Follow the wizard to give the “stack” a new name and enter the name of the template you created in step 4.
          6. Optionally you can also set the default response address, the addresses and/or domains you want to limit the auto-response to, and adjust the incoming email rule-set it should be stored under (the default should be fine, unless you have manually adjusted it in the past)
      6. Once deployed, the behavior is immediately active and you can further adjust any of these elements.


Conclusion and what’s next?

This architecture, once deployed, sends out the templated auto-response using the SES/Pinpoint domain/email address it received the original email on.

The new rule is added to the SES email receiving rule set to allow further customization:

  1. The rule can be limited to specific email address, specific domain, or just be set to be across all domains.
  2. It can also have the default response address set or reuse the address that the original rejected email was sent to.
  3. It can be moved down on the priority with other rules taking precedence and possibly even overriding it.
  4. It can have other actions added to it, like notifying SNS for additional tracking.

The Lambda function looks up the chosen Amazon Pinpoint template and uses it to reply. Here are some of the customizations you may want to consider within this function and the template:

  1. When sending the automated reply, by default, the template’s configured subject is appended with the original incoming email subject. You can adjust this to fit your company’s brand better.
  2. By default, the function supports an optional template tag %%NAME%% and %%ID%%. If the first appears in the template, it is automatically replaced with the original email’s FROM address. And if %%ID%% appears in the template, it is replaced with the SES’s original email message id, to help with any required audits.
  3. It is assumed that no additional tracking and actions are needed on such rejected and auto-replied emails, but you can further modify the flow by moving the rule around and adding more actions (as mentioned above), and even specify a particular/different SES Configuration Set for the outgoing emails.

Are you using this flow as a baseline for a more complex business flow or have other questions about it? We want to hear back – please comment here or file an issue in the GitHub repository. If you want to file a pull request to make it even more useful for others, please do so, we do appreciate community participation.

If you liked this article, we are continually expanding our Amazon Pinpoint and SES Architecture References and publish new solutions for these and other services. For most recent SES documentation, please see official SES documentation site, and for Amazon Pinpoint, please see Amazon Pinpoint documentation site.


Analyze and improve email campaigns with Amazon Simple Email Service and Amazon QuickSight

Post Syndicated from Apoorv Gakhar original https://aws.amazon.com/blogs/messaging-and-targeting/analyze-and-improve-email-campaigns-with-amazon-simple-email-service-and-amazon-quicksight/

Email is a popular channel for applications, used in both marketing campaigns and other outbound customer communications. The challenge with email is that it can become increasingly complex to manage for companies that must send large quantities of messages per month. This complexity is especially true when companies need to measure detailed email engagement metrics to track campaign success.

As a marketer, you want to monitor several metrics, including open rates, click-through rates, bounce rates, and delivery rates. If you do not track your email results, you could potentially be wasting your campaign resources. Monitoring and interpreting your sending results can help you deliver the best content possible to your subscribers’ inboxes, and it can also ensure that your IP reputation stays high. Mailbox providers prioritize inbox placement for senders that deliver relevant content. As a business professional, tracking your emails can also help you stay on top of hot leads and important clients. For example, if someone has opened your email multiple times in one day, it might be a good idea to send out another follow-up email to touch base.

Building a large-scale email solution is a complex and expensive challenge for any business. You would need to build infrastructure, assemble your network, and warm up your IP addresses. Alternatively, working with some third-party email solutions require contract negotiations and upfront costs.

Fortunately, Amazon Simple Email Service (SES) has a highly scalable and reliable backend infrastructure to reduce the preceding challenges. It has improved content filtering techniques, reputation management features, and a vast array of analytics and reporting functions. These features help email senders reach their audiences and make it easier to manage email channels across applications. Amazon SES also provides API operations to monitor your sending activities through simple API calls. You can publish these events to Amazon CloudWatch, Amazon Kinesis Data Firehose, or by using Amazon Simple Notification Service (SNS).

In this post, you learn how to build and automate a serverless architecture that analyzes email events. We explore how to track important metrics such as open and click rate of the emails.

Solution overview


The metrics that you can measure using Amazon SES are referred to as email sending events. You can use Amazon CloudWatch to retrieve Amazon SES event data. You can also use Amazon SNS to interpret Amazon SES event data. However, in this post, we are going to use Amazon Kinesis Data Firehose to monitor our user sending activity.

Enable Amazon SES configuration sets with open and click metrics and publish email sending events to Amazon Kinesis Data Firehose as JSON records. A Lambda function is used to parse the JSON records and publish the content in the Amazon S3 bucket.

Ingested data lands in an Amazon S3 bucket that we refer to as the raw zone. To make that data available, you have to catalog its schema in the AWS Glue data catalog. You create and run the AWS Glue crawler that crawls your data sources and construct your Data Catalog. The Data Catalog uses pre-built classifiers for many popular source formats and data types, including JSON, CSV, and Parquet.

When the crawler is finished creating the table definition and schema, you analyze the data using Amazon Athena. It is an interactive query service that makes it easy to analyze data in Amazon S3 using SQL. Point to your data in Amazon S3, define the schema, and start querying using standard SQL, with most results delivered in seconds.

Now you can build visualizations, perform ad hoc analysis, and quickly get business insights from the Amazon SES event data using Amazon QuickSight. You can easily run SQL queries using Amazon Athena on data stored in Amazon S3, and build business dashboards within Amazon QuickSight.


Deploying the architecture:

Configuring Amazon Kinesis Data Firehose to write to Amazon S3:

  1. Navigate to the Amazon Kinesis in the AWS Management Console. Choose Kinesis Data Firehose and create a delivery stream.
  2. Enter delivery stream name as “SES_Firehose_Demo”.
  3. Under the source category, select “Direct Put or other sources”.
  4. On the next page, make sure to enable Data Transformation of source records with AWS Lambda. We use AWS Lambda to parse the notification contents that we only process the required information as per the use case.
  5. Click the “Create New” Lambda function.
  6. Click on “General Kinesis Data FirehoseProcessing” Lambda blueprint and this opens up the Lambda console. Enter following values in Lambda
    • Name: SES-Firehose-Json-Parser
    • Execution role: Create a new role with basic Lambda permissions.
  7. Click “Create Function”. Now replace the Lambda code with the following provided code and save the function.
    • 'use strict';
      console.log('Loading function');
      exports.handler = (event, context, callback) => {
         /* Process the list of records and transform them */
          const output = event.records.map((record) => {
              console.log(record.recordId);
              const payload =JSON.parse((Buffer.from(record.data, 'base64').toString()))
              console.log("payload : " + payload);
              
              if (payload.eventType == "Click") {
              const resultPayLoadClick = {
                      eventType : payload.eventType,
                      destinationEmailId : payload.mail.destination[0],
                      sourceIp : payload.click.ipAddress,
                  };
              console.log("resultPayLoad : " + resultPayLoadClick.eventType + resultPayLoadClick.destinationEmailId + resultPayLoadClick.sourceIp);
              
              //const parsed = resultPayLoad[0];
              //console.log("parsed : " + (Buffer.from(JSON.stringify(resultPayLoad))).toString('base64'));
              
              
              return{
                  recordId: record.recordId,
                  result: 'Ok',
                  data: (Buffer.from(JSON.stringify(resultPayLoadClick))).toString('base64'),
              };
              }
              else {
                  const resultPayLoadOpen = {
                      eventType : payload.eventType,
                      destinationEmailId : payload.mail.destination[0],
                      sourceIp : payload.open.ipAddress,
                  };
              console.log("resultPayLoad : " + resultPayLoadOpen.eventType + resultPayLoadOpen.destinationEmailId + resultPayLoadOpen.sourceIp);
              
              //const parsed = resultPayLoad[0];
              //console.log("parsed : " + (Buffer.from(JSON.stringify(resultPayLoad))).toString('base64'));
              
              
              return{
                  recordId: record.recordId,
                  result: 'Ok',
                  data: (Buffer.from(JSON.stringify(resultPayLoadOpen))).toString('base64'),
              };
              }
          });
          console.log("Output : " + output.data);
          console.log(`Processing completed.  Successful records ${output.length}.`);
          callback(null, { records: output });
      };

      Please note:

      For this blog, we are only filtering out three fields i.e. Eventname, destination_Email, and SourceIP. If you want to store other parameters you can modify your code accordingly. For the list of information that we receive in notifications, you may check out the following document.

      https://docs.aws.amazon.com/ses/latest/DeveloperGuide/event-publishing-retrieving-firehose-examples.html

  8. Now, navigate back to your Amazon Kinesis Data Firehose console and choose the newly created Lambda function.
  9. Keep the convert record format disabled and click “Next”.
  10. In the destination, choose Amazon S3 and select a target Amazon S3 bucket. Create a new bucket if you do not want to use the existing bucket.
  11. Enter the following values for Amazon S3 Prefix and Error Prefix. When event data is published.
    • Prefix:
      fhbase/year=!{timestamp:yyyy}/month=!{timestamp:MM}/day=!{timestamp:dd}/hour=!{timestamp:HH}/
    • Error Prefix:
      fherroroutputbase/!{firehose:random-string}/!{firehose:error-output-type}/!{timestamp:yyyy/MM/dd}/
  12. You may utilize the above values in the Amazon S3 prefix and error prefix. If you use your own prefixes make sure to accordingly update the target values in AWS Glue which you will see in further process.
  13. Keep the Amazon S3 backup option disabled and click “Next”.
  14. On the next page, under the Permissions section, select create a new role. This opens up a new tab and then click “Allow” to create the role.
  15. Navigate back to the Amazon Kinesis Data Firehose console and click “Next”.
  16. Review the changes and click on “Create delivery stream”.

Configure Amazon SES to publish event data to Kinesis Data Firehose:

  1. Navigate to Amazon SES console and select “Email Addresses” from the left side.
  2. Click on “Verify a New Email Address” on the top. Enter your email address to which you send a test email.
  3. Go to your email inbox and click on the verify link. Navigate back to the Amazon SES console and you will see verified status on the email address provided.
  4. Open the Amazon SES console and select Configuration set from the left side.
  5. Create a new configuration set. Enter “SES_Firehose_Demo”  as the configuration set name and click “Create”.
  6. Choose Kinesis Data Firehose as the destination and provide the following details.
    • Name: OpenClick
    • Event Types: Open and Click
  7. In the IAM Role field, select ‘Let SES make a new role’. This allows SES to create a new role and add sufficient permissions for this use case in that role.
  8. Click “Save”.

Sending a Test email:

  1. Navigate to Amazon SES console, click on “Email Addresses” on the left side.
  2. Select your verified email address and click on “Send a Test email”.
  3. Make sure you select the raw email format. You may use the following format to send out a test email from the console. Make sure you send out this email to a recipient inbox to which you have the access.
    • X-SES-CONFIGURATION-SET: SES_Firehose_Demo
      X-SES-MESSAGE-TAGS: Email=NULL
      From: [email protected]
      To: [email protected]
      Subject: Test email
      Content-Type: multipart/alternative;
          		boundary="----=_boundary"
      
      ------=_boundary
      Content-Type: text/html; charset=UTF-8
      Content-Transfer-Encoding: 7bit
      This is a test email.
      
      <a href="https://aws.amazon.com/">Amazon Web Services</a>
      ------=_boundary
  4. Once the email is received in the recipient’s inbox, open the email and click the link present in the same. This generates a click and open event and send the response back to SES.

Creating Glue Crawler:

  1. Navigate to the AWS Glue console, select “crawler” from the left side, and then click on “Add crawler” on the top.
  2. Enter the crawler name as “SES_Firehose_Crawler” and click “Next”.
  3. Under Crawler source type, select “Data stores” and click “Next”.
  4. Select Amazon S3 as the data source and prove the required path. Include the path until the “fhbase” folder.
  5. Select “no” under Add another data source section.
  6. In the IAM role, select the option to ‘Create an IAM role’. Enter the name as “SES_Firehose-Crawler”. This provides the necessary permissions automatically to the newly created role.
  7. In the frequency section, select run on demand and click “Next”. You may choose this value as per your use case.
  8. Click on add Database and provide the name as “ses_firehose_glue_db”. Click on create and then click “Next”.
  9. Review your Glue crawler setting and click on “Finish”.
  10. Run the above-created crawler. This crawls the data from the specified Amazon S3 bucket and create a catalog and table definition.
  11. Now navigate to “tables” on the left, and verify a “fhbase” table is created after you run the crawler.

If you want to analyze the data stored until now, you can use Amazon Athena and test the queries. If not, you can move to the Amazon Quicksight directly.

Analyzing the data using Amazon Athena:

  1. Open Athena console and select the database, which is created using AWS Glue
  2. Click on “setup a query result location in Amazon S3” as shown in the following screenshot.
  3. Navigate to the Amazon S3 bucket created in earlier steps and create a folder called “AthenaQueryResult”. We store our Athena query result in this bucket.
  4. Now navigate back to Amazon Athena and select the Amazon S3 bucket with the folder location as shown in the following screenshot and click “Save”.
  5. Run the following query to test the sample output and accordingly modify your SQL query to get the desired output.
    • Select * from “ses_firehose_glue_db”.”fhbase”

Note: If you want to track the opened emails by unique Ip addresses then you can modify your SQL query accordingly. This is because every time an email gets opened, you will receive a notification even if the same email was previously opened.


Visualizing the data in Amazon QuickSight dashboards:

  1. Now, let’s analyze this data using Amazon Athena via Amazon Quicksight.
  2. Log into Amazon Quicksight and choose Manage data, New dataset. Choose Amazon Athena as a new data source.
  3. Enter the data source name as “SES-Demo” and click on “Create the data source”.
  4. Select your database from the drop-down as “ses_firehose_glue_db” and table “fhbase” that you have created in AWS Glue.
  5. And add a custom SQL based on your use case and click on “Confirm query”. Refer to the example below.
  6. You can perform ad hoc analysis and modify your query according to your business needs as shown in the following image. Click “Save & Visualize”.
  7. You can now visualize your event data on Amazon Quicksight dashboard. You can use various graphs to represent your data. For this demo, the default graph is used and two fields are selected to populate on the graph, as shown below.


Conclusion:

This architecture shows how to track your email sending activity at a granular level. You set up Amazon SES to publish event data to Amazon Kinesis Data Firehose based on fine-grained email characteristics that you define. You can also track several types of email sending events, including sends, deliveries, bounces, complaints, rejections, rendering failures, and delivery delays. This information can be useful for operational and analytical purposes.

To get started with Amazon SES, follow this quick start guide and you can learn more about monitoring sending activity here.

About the Authors

Chirag Oswal is a solutions architect and AR/VR specialist working with the public sector India. He works with AWS customers to help them adopt the cloud operating model on a large scale.

Apoorv Gakhar is a Cloud Support Engineer and an Amazon SES Expert. He is working with AWS to help the customers integrate their applications with various AWS Services.


Additional Resources:

Amazon SES Dedicated IP Pools

Amazon Personalize optimizer using Amazon Pinpoint events

Template Personalization using Amazon Pinpoint