Tag Archives: AWS Control Tower

Journey to Adopt Cloud-Native Architecture Series: #4 – Governing Security at Scale and IAM Baselining

Post Syndicated from Anuj Gupta original https://aws.amazon.com/blogs/architecture/journey-to-adopt-cloud-native-architecture-series-4-governing-security-at-scale-and-iam-baselining/

In Part 3 of this series, Improved Resiliency and Standardized Observability, we talked about design patterns that you can adopt to improve resiliency, achieve minimum business continuity, and scale applications with lengthy transactions (more than 3 minutes).

As a refresher from previous blogs in this series, our example ecommerce company’s “Shoppers” application runs in the cloud. The company experienced hypergrowth, which posed a number of platform and technology challenges, namely, they needed to scale on the backend without impacting users.

Because of this hypergrowth, distributed denial of service (DDoS) attacks on the ecommerce company’s services increased 10 times in 6 months. Some of these attacks led to downtime and loss of revenue. This blog post shows you how we addressed these threats by implementing a multi-account strategy and applying AWS Identity and Access Management (IAM) best practices.

A multi-account strategy ensures security at scale

Originally, the company’s production and non-production services were running in a single account. This meant non-production vulnerabilities like frequently changing code or privileged access could impact the production environment. Additionally, the application experienced issues due to unexpectedly reaching service quotas. These include (but are not limited to) number of read replicas per master in Amazon Relational Database Service (Amazon RDS) and total storage for all DB instances in Auto Scaling Service Quotas for Amazon Elastic Compute Cloud (Amazon EC2).

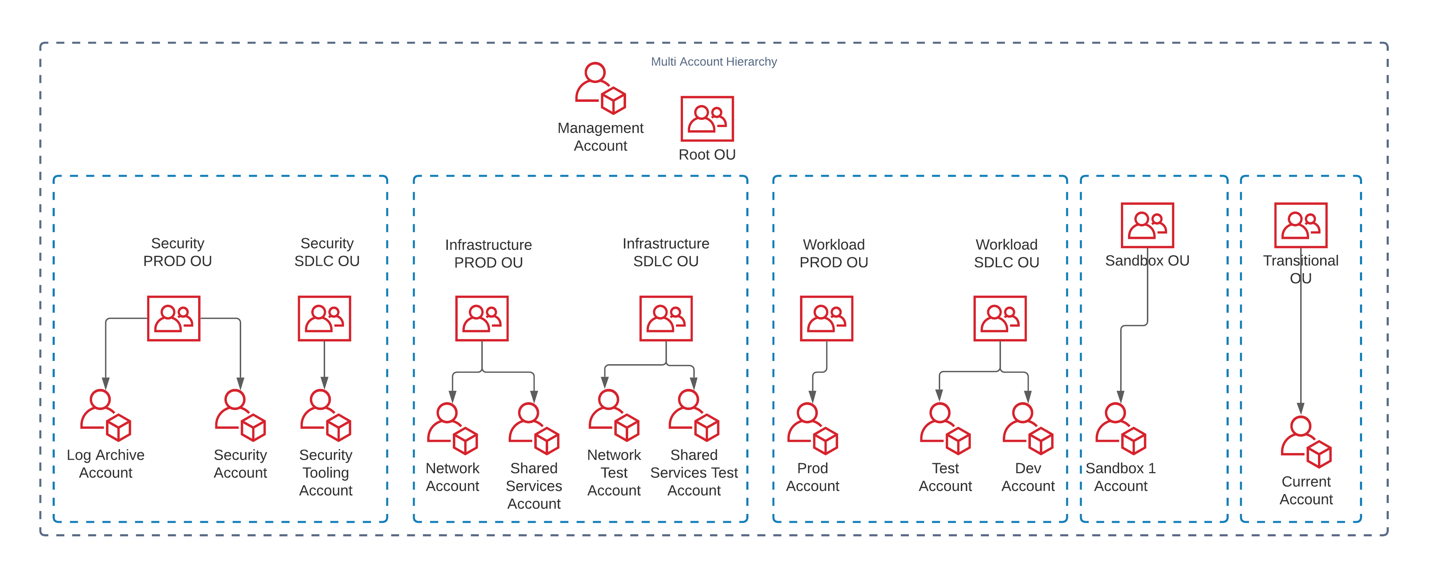
To address these issues, we followed multi-account strategy best practices. We established the multi-account hierarchy shown in Figure 1 that includes the following eight organizational units (OUs) to meet business requirements:

  1. Security PROD OU
  2. Security SDLC OU
  3. Infrastructure PROD OU
  4. Infrastructure SDLC OU
  5. Workload PROD OU
  6. Workload SDLC OU
  7. Sandbox OU
  8. Transitional OU

To identify the right fit for our needs, we evaluated AWS Landing Zone and AWS Control Tower. To reduce operation overhead of maintaining a solution, we used AWS Control Tower to deploy guardrails as service control policies (SCPs). These guardrails were then separated into production and non-production environments, creating the hierarchy shown in Figure 1.

We created a new Payer (or Management) Account with Sandbox OU and Transitional OU under Root OU. We then moved existing AWS accounts under the Transitional OU and Sandbox OU. We provisioned new accounts with Account Factory and gradually migrated services from existing AWS accounts into the newly formed Log Archive Account, Security Account, Network Account, and Shared Services Account and applied appropriate guardrails. We then registered Sandbox OU with Control Tower. Additionally, we migrated the centralized logging solution from Part 3 of this blog series to the Security Account. We moved non-production applications into the Dev and Test Accounts, respectively, to isolate workloads. We then moved existing accounts that had production services from the Transitional OU to Workload PROD OU.

Multi-account hierarchy

Figure 1. Multi-account hierarchy

Implementing a multi-account strategy alleviated service quota challenges. It isolated variable demand non-production environments from more consistent production environments, which reduced the downtime caused by unplanned scaling events. The multi-account strategy enforces governance at scale, but also promotes innovation by allocating separate accounts with distinct security requirements for proof of concepts and experimentation. This reduces impact risks to production accounts and allows the required guardrails to be automatically applied.

Improving access management and least privilege access

When the company experienced hypergrowth, they not only had to scale their application’s infrastructure, but they also had to increase how often they release their code. They also hired and onboarded new internal teams.

To strengthen new/existing employees’ credentials, we used AWS Trusted Advisor for IAM Access Key Rotation. This identifies IAM users whose access keys have not been rotated for more than 90 days and created an automated way to rotate them. We then generated an IAM credential report to identify IAM users that don’t need console access or that don’t need access keys. We gradually assigned these users role-based access versus IAM access keys.

During a Well-Architected Security Pillar review, we identified some applications that used hardcoded passwords that hadn’t been updated for more than 90 days. We re-factored these applications to get passwords from AWS Secrets Manager and followed best practices for performance.

Additionally, we set up a system to automatically change passwords for RDS databases and wrote an AWS Lambda function to update passwords for third-party integration. Some applications on Amazon EC2 were using IAM access keys to access AWS services. We re-factored them to get permissions from the EC2 instance role attached to the EC2 instances, which reduced operational burden of rotating access keys.

Using IAM Access Analyzer, we analyzed AWS CloudTrail logs and generated policies for IAM roles. This helped us determine the least privilege permissions required for the roles as mentioned in the IAM Access Analyzer makes it easier to implement least privilege permissions by generating IAM policies based on access activity blog.

To streamline access for internal users, we migrated users to AWS Single Sign-On (AWS SSO) federated access. We enabled all features in AWS Organizations to use AWS SSO and created permission sets to define access boundaries for different functions. We assigned permission sets to different user groups and assigned users to user groups based on their job function. This allowed us to reduce the number of IAM policies and use tag-based control when defining AWS SSO permissions policies.

We followed the guidance in the Attribute-based Access Control with AWS SSO blog post to map user attributes and use tags to define permissions boundaries for user groups. This allowed us to provide access to users based on specific teams, projects, and departments. We enforced multi-factor authentication (MFA) for all AWS SSO users by configuring MFA settings to allow sign in only when an MFA device has been registered.

These improvements ensure that only the right people have access to the required resources for the right time. They reduce the risk of compromised security credentials by using AWS Security Token Service (AWS STS) to generate temporary credentials when needed. System passwords are better protected from unwanted access and automatically rotated for improved security. AWS SSO also allows us to enforce permissions at scale when people’s job functions change within or across teams.

Conclusion

In this blog post, we described design patterns we used to implement security governance at scale using multi-account strategy and AWS SSO integrations. We also talked about patterns you can adopt for IAM baselining that allow least privilege access, checking for IAM best practices, and proactively detecting unwanted access.

This blog post also covers why you need to refresh your threat model during hyperscale growth and how different services can make it easier to enforce security controls. In the next blog, we will talk about more security design patterns to improve infrastructure security and incident response during hyperscale.

Find out more

Other blogs in this series

Related information

Field Notes: Enroll Existing AWS Accounts into AWS Control Tower

Post Syndicated from Kishore Vinjam original https://aws.amazon.com/blogs/architecture/field-notes-enroll-existing-aws-accounts-into-aws-control-tower/

Originally published 21 April 2020 to the Field Notes blog, and updated in August 2020 with new prechecks to the account enrollment script. 

Since the launch of AWS Control Tower, customers have been asking for the ability to deploy AWS Control Tower in their existing AWS Organizations and to extend governance to those accounts in their organization.

We are happy that you can now deploy AWS Control Tower in your existing AWS Organizations. The accounts that you launched before deploying AWS Control Tower, what we refer to as unenrolled accounts, remain outside AWS Control Towers’ governance by default. These accounts must be enrolled in the AWS Control Tower explicitly.

When you enroll an account into AWS Control Tower, it deploys baselines and additional guardrails to enable continuous governance on your existing AWS accounts. However, you must perform proper due diligence before enrolling in an account. Refer to the Things to Consider section below for additional information.

In this blog, I show you how to enroll your existing AWS accounts and accounts within the unregistered OUs in your AWS organization under AWS Control Tower programmatically.

Background

Here’s a quick review of some terms used in this post:

  • The Python script provided in this post. This script interacts with multiple AWS services, to identify, validate, and enroll the existing unmanaged accounts into AWS Control Tower.
  • An unregistered organizational unit (OU) is created through AWS Organizations. AWS Control Tower does not manage this OU.
  • An unenrolled account is an existing AWS account that was created outside of AWS Control Tower. It is not managed by AWS Control Tower.
  • A registered organizational unit (OU) is an OU that was created in the AWS Control Tower service. It is managed by AWS Control Tower.
  • When an OU is registered with AWS Control Tower, it means that specific baselines and guardrails are applied to that OU and all of its accounts.
  • An AWS Account Factory account is an AWS account provisioned using account factory in AWS Control Tower.
  • Amazon Elastic Compute Cloud (Amazon EC2) is a web service that provides secure, resizable compute capacity in the cloud.
  • AWS Service Catalog allows you to centrally manage commonly deployed IT services. In the context of this blog, account factory uses AWS Service Catalog to provision new AWS accounts.
  • AWS Organizations helps you centrally govern your environment as you grow and scale your workloads on AWS.
  • AWS Single Sign-On (SSO) makes it easy to centrally manage access to multiple AWS accounts. It also provides users with single sign-on access to all their assigned accounts from one place.

Things to Consider

Enrolling an existing AWS account into AWS Control Tower involves moving an unenrolled account into a registered OU. The Python script provided in this blog allows you to enroll your existing AWS accounts into AWS Control Tower. However, it doesn’t have much context around what resources are running on these accounts. It assumes that you validated the account services before running this script to enroll the account.

Some guidelines to check before you decide to enroll the accounts into AWS Control Tower.

  1. An AWSControlTowerExecution role must be created in each account. If you are using the script provided in this solution, it creates the role automatically for you.
  2. If you have a default VPC in the account, the enrollment process tries to delete it. If any resources are present in the VPC, the account enrollment fails.
  3. If AWS Config was ever enabled on the account you enroll, a default config recorder and delivery channel were created. Delete the configuration-recorder and delivery channel for the account enrollment to work.
  4. Start with enrolling the dev/staging accounts to get a better understanding of any dependencies or impact of enrolling the accounts in your environment.
  5. Create a new Organizational Unit in AWS Control Tower and do not enable any additional guardrails until you enroll in the accounts. You can then enable guardrails one by one to check the impact of the guardrails in your environment.
  6. As an additional option, you can apply AWS Control Tower’s detective guardrails to an existing AWS account before moving them under Control Tower governance. Instructions to apply the guardrails are discussed in detail in AWS Control Tower Detective Guardrails as an AWS Config Conformance Pack blog.

Prerequisites

Before you enroll your existing AWS account in to AWS Control Tower, check the prerequisites from AWS Control Tower documentation.

This Python script provided part of this blog, supports enrolling all accounts with in an unregistered OU in to AWS Control Tower. The script also supports enrolling a single account using both email address or account-id of an unenrolled account. Following are a few additional points to be aware of about this solution.

  • Enable trust access with AWS Organizations for AWS CloudFormation StackSets.
  • The email address associated with the AWS account is used as AWS SSO user name with default First Name Admin and Last Name User.
  • Accounts that are in the root of the AWS Organizations can be enrolled one at a time only.
  • While enrolling an entire OU using this script, the AWSControlTowerExecution role is automatically created on all the accounts on this OU.
  • You can enroll a single account with in an unregistered OU using the script. It checks for AWSControlTowerExecution role on the account. If the role doesn’t exist, the role is created on all accounts within the OU.
  • By default, you are not allowed to enroll an account that is in the root of the organization. You must pass an additional flag to launch a role creation stack set across the organization
  • While enrolling a single account that is in the root of the organization, it prompts for additional flag to launch role creation stack set across the organization.
  • The script uses CloudFormation Stack Set Service-Managed Permissions to create the AWSControlTowerExecution role in the unenrolled accounts.

How it works

The following diagram shows the overview of the solution.

Account enrollment

  1. In your AWS Control Tower environment, access an Amazon EC2 instance running in the master account of the AWS Control Tower home Region.
  2. Get temporary credentials for AWSAdministratorAccess from AWS SSO login screen
  3. Download and execute the enroll_script.py script
  4. The script creates the AWSControlTowerExecution role on the target account using Automatic Deployments for a Stack Set feature.
  5. On successful validation of role and organizational units that are given as input, the script launches a new product in Account Factory.
  6. The enrollment process creates an AWS SSO user using the same email address as the AWS account.

Setting up the environment

It takes up to 30 minutes to enroll each AWS account in to AWS Control Tower. The accounts can be enrolled only one at a time. Depending on number of accounts that you are migrating, you must keep the session open long enough. In this section, you see one way of keeping these long running jobs uninterrupted using Amazon EC2 using the screen tool.

Optionally you may use your own compute environment where the session timeouts can be handled. If you go with your own environment, make sure you have python3, screen and a latest version of boto3 installed.

1. Prepare your compute environment:

  • Log in to your AWS Control Tower with AWSAdministratorAccess role.
  • Switch to the Region where you deployed your AWS Control Tower if needed.
  • If necessary, launch a VPC using the stack here and wait for the stack to COMPLETE.
  • If necessary, launch an Amazon EC2 instance using the stack here. Wait for the stack to COMPLETE.
  • While you are on master account, increase the session time duration for AWS SSO as needed. Default is 1 hour and maximum is 12 hours.

2. Connect to the compute environment (one-way):

  • Go to the EC2 Dashboard, and choose Running Instances.
  • Select the EC2 instance that you just created and choose Connect.
  • In Connect to your instance screen, under Connection method, choose EC2InstanceConnect (browser-based SSH connection) and Connect to open a session.
  • Go to AWS Single Sign-On page in your browser. Click on your master account.
  • Choose command line or programmatic access next to AWSAdministratorAccess.
  • From Option 1 copy the environment variables and paste them in to your EC2 terminal screen in step 5 below.

3. Install required packages and variables. You may skip this step, if you used the stack provided in step-1 to launch a new EC2 instance:

  • Install python3 and boto3 on your EC2 instance. You may have to update boto3, if you use your own environment.
$ sudo yum install python3 -y 
$ sudo pip3 install boto3
$ pip3 show boto3
Name: boto3
Version: 1.12.39
  • Change to home directory and download the enroll_account.py script.
$ cd ~
$ wget https://raw.githubusercontent.com/aws-samples/aws-control-tower-reference-architectures/master/customizations/AccountFactory/EnrollAccount/enroll_account.py
  • Set up your home Region on your EC2 terminal.
export AWS_DEFAULT_REGION=<AWSControlTower-Home-Region>

4. Start a screen session in daemon mode. If your session gets timed out, you can open a new session and attach back to the screen.

$ screen -dmS SAM
$ screen -ls
There is a screen on:
        585.SAM (Detached)
1 Socket in /var/run/screen/S-ssm-user.
$ screen -dr 585.SAM 

5. On the screen terminal, paste the environmental variable that you noted down in step 2.

6. Identify the accounts or the unregistered OUs to migrate and run the Python script provide with below mentioned options.

  • Python script usage:
usage: enroll_account.py -o -u|-e|-i -c 
Enroll existing accounts to AWS Control Tower.

optional arguments:
  -h, --help            show this help message and exit
  -o OU, --ou OU        Target Registered OU
  -u UNOU, --unou UNOU  Origin UnRegistered OU
  -e EMAIL, --email EMAIL
                        AWS account email address to enroll in to AWS Control Tower
  -i AID, --aid AID     AWS account ID to enroll in to AWS Control Tower
  -c, --create_role     Create Roles on Root Level
  • Enroll all the accounts from an unregistered OU to a registered OU
$ python3 enroll_account.py -o MigrateToRegisteredOU -u FromUnregisteredOU 
Creating cross-account role on 222233334444, wait 30 sec: RUNNING 
Executing on AWS Account: 570395911111, [email protected] 
Launching Enroll-Account-vinjak-unmgd3 
Status: UNDER_CHANGE. Waiting for 6.0 min to check back the Status 
Status: UNDER_CHANGE. Waiting for 5.0 min to check back the Status 
. . 
Status: UNDER_CHANGE. Waiting for 1.0 min to check back the Status 
SUCCESS: 111122223333 updated Launching Enroll-Account-vinjakSCchild 
Status: UNDER_CHANGE. Waiting for 6.0 min to check back the Status 
ERROR: 444455556666 
Launching Enroll-Account-Vinjak-Unmgd2 
Status: UNDER_CHANGE. Waiting for 6.0 min to check back the Status 
. . 
Status: UNDER_CHANGE. Waiting for 1.0 min to check back the Status 
SUCCESS: 777788889999 updated
  • Use AWS account ID to enroll a single account that is part of an unregistered OU.
$ python3 enroll_account.py -o MigrateToRegisteredOU -i 111122223333
  • Use AWS account email address to enroll a single account from an unregistered OU.
$ python3 enroll_account.py -o MigrateToRegisteredOU -e [email protected]

You are not allowed by default to enroll an AWS account that is in the root of the organization. The script checks for the AWSControlTowerExecution role in the account. If role doesn’t exist, you are prompted to use -c | --create-role. Using -c flag adds the stack instance to the parent organization root. Which means an AWSControlTowerExecution role is created in all the accounts with in the organization.

Note: Ensure installing AWSControlTowerExecution role in all your accounts in the organization, is acceptable in your organization before using -c flag.

If you are unsure about this, follow the instructions in the documentation and create the AWSControlTowerExecution role manually in each account you want to migrate. Rerun the script.

  • Use AWS account ID to enroll a single account that is in root OU (need -c flag).
$ python3 enroll_account.py -o MigrateToRegisteredOU -i 111122223333 -c
  • Use AWS account email address to enroll a single account that is in root OU (need -c flag).
$ python3 enroll_account.py -o MigrateToRegisteredOU -e [email protected] -c

Cleanup steps

On successful completion of enrolling all the accounts into your AWS Control Tower environment, you could clean up the below resources used for this solution.

If you have used templates provided in this blog to launch VPC and EC2 instance, delete the EC2 CloudFormation stack and then VPC template.

Conclusion

Now you can deploy AWS Control Tower in an existing AWS Organization. In this post, I have shown you how to enroll your existing AWS accounts in your AWS Organization into AWS Control Tower environment. By using the procedure in this post, you can programmatically enroll a single account or all the accounts within an organizational unit into an AWS Control Tower environment.

Now that governance has been extended to these accounts, you can also provision new AWS accounts in just a few clicks and have your accounts conform to your company-wide policies.

Additionally, you can use Customizations for AWS Control Tower to apply custom templates and policies to your accounts. With custom templates, you can deploy new resources or apply additional custom policies to the existing and new accounts. This solution integrates with AWS Control Tower lifecycle events to ensure that resource deployments stay in sync with your landing zone. For example, when a new account is created using the AWS Control Tower account factory, the solution ensures that all resources attached to the account’s OUs are automatically deployed.

Mergers and Acquisitions readiness with the Well-Architected Framework

Post Syndicated from Sushanth Mangalore original https://aws.amazon.com/blogs/architecture/mergers-and-acquisitions-readiness-with-the-well-architected-framework/

Introduction

Companies looking for an acquisition or a successful exit through a merger, undergo a technical assessment as part of the due diligence process. While being a profitable business by itself can attract interest, running a disciplined IT department within your organization can make the acquisition more valuable. As an entity operating cloud workloads on AWS, you can use the AWS Well-Architected Framework. This will demonstrate that your workloads are architected with industry best practices in mind. The Well-Architected Framework explains the pros and cons of decisions you make while building systems on AWS. It consistently measures architectures against best practices observed in customer workloads across several industries. These workloads have achieved continued success on AWS through architectures that are secure, high-performing, resilient, scalable, and efficient. The Well-Architected Framework evaluates your cloud workloads based on five pillars:

  • Operational Excellence: The ability to support development and run workloads effectively, gain insights into your operations, and continuously improve supporting processes and procedures to deliver business value.
  • Security: The ability to protect data, systems, and assets to take advantage of cloud technologies to improve your security.
  • Reliability: The ability of the workload to perform its intended function correctly and consistently. This includes the ability to operate and test the workload through its complete lifecycle.
  • Performance Efficiency: The ability to use computing resources efficiently to meet system requirements, and to maintain that efficiency as demand changes and technologies evolve.
  • Cost Optimization: The ability to run cost-aware workloads that achieve business outcomes while minimizing costs.

The Well-Architected Framework Value Proposition in Mergers & Acquisitions (M&A)

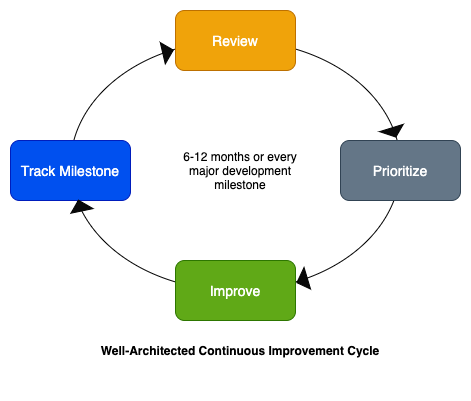
Continuously assess the pre-M&A state of cloud workloads – The Well-Architected state for a workload must be treated as a moving target. New cloud patterns and best practices emerge every day. The Well-Architected Framework constantly evolves to incorporate them. Your workloads can continuously grow, shrink, become more complex, or simpler. Mergers and acquisitions can be a long, drawn-out process, which can take can take months to complete. Well-Architected reviews are recommended for workloads every 6 months to 1 year, or with every major development milestone. This helps guard against IT inertia and allows emerging best practices to be accounted for in your continuously evolving workload architecture. The technical currency can be maintained throughout the M&A process by continuously assessing your workloads against the Well-Architected Framework. The accompanying AWS Well-Architected Tool (AWS WA Tool) helps you track milestones as you make improvements to and measure your progress.

Well-Architected Continuous Improvement Cycle

Standardize through a common framework – One of the biggest challenges in M&As is the standardization of the Enterprise IT post-merger. The IT departments of organizations can operate differently, and have vastly different IT assets, skill sets, and processes. According to a McKinsey article on the Strategic Value of IT in M&A, more than half the synergies available in a merger are related to IT. If the acquirer is also an AWS customer, this can enable the significant synergies in M&As. The Well-Architected Framework can be a foundation on which the two IT departments can find common ground. Even if the acquirer does not have a cloud-based environment like AWS, inheriting a Well-Architected AWS setup can help the post-merger IT landscape evolve.

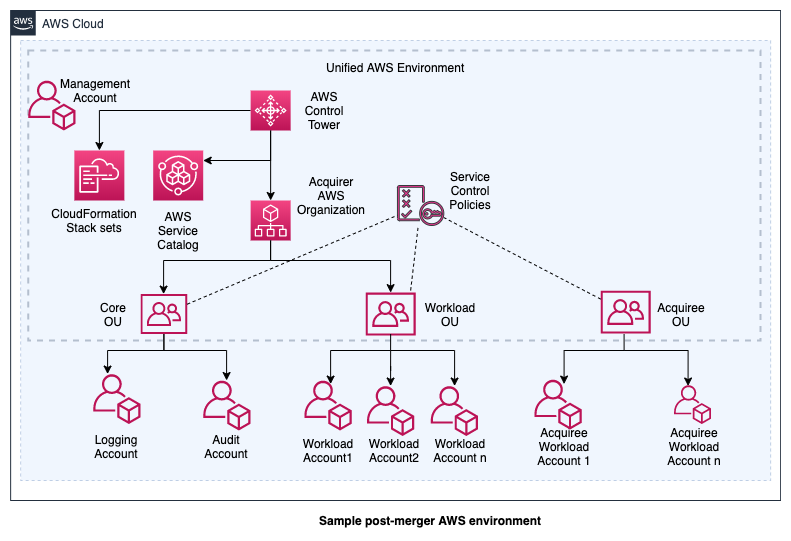
Integrate seamlessly through Well-Architected landing zones – AWS Control Tower service or AWS Landing Zone solution are options that can provision Well-Architected multi-account AWS environments. Together with AWS Organizations, this makes the IT integration a lot smoother for the AWS environments across enterprises. AWS accounts can detach from one AWS Organization and attach to another seamlessly. The latter can enroll with an existing Control Tower setup to benefit from the security and governance guardrails. In a Well-Architected landing zone, your management account will not have any workloads. As shown in the following diagram, you may move member accounts from your AWS Organization to your acquirer’s AWS Organization under the right Organizational Unit (OU). You can later decommission your AWS Organization and close your management AWS account.

Sample pre-merger AWS environments

Sample post-merger AWS environment

Benefit from faster migration to AWS – using the Well-Architected Framework, you can achieve faster migration to AWS. Workload risks can be mitigated beforehand by using best practices from AWS before the migration. Post migration, the workloads benefit from AWS offerings that already have many of the Well-Architected best practices built into them. The improvement plans from the Well-Architected tool include the recommended AWS services that can address identified risks. Physical IT assets are heavily depreciated during an acquisition and do not fetch valuations close to their original purchase price. AWS workloads that are Well-Architected should be evaluated by the actual business value they provide. By consolidating your IT needs on AWS, you are also decreasing the overhead of vendor consolidation for the acquirer. This can be challenging when multiple active contracts must transfer hands.

Overcome the innovation barrier – At the onset of an M&A, companies may be focusing too much on keeping the lights on through the process. Businesses that do not move forward may fall behind on continuous innovation. Not only can innovation open more business opportunities, but it can also influence the acquisition valuation. Well-Architected reviews can optimize costs. This can result in diverse benefits such as better agility and an increased use of advanced technologies. This can facilitate rapid innovation. Improvements gained in the security posture, reliability, and performance of the workload make it more valuable to the acquirer.

Demonstrate depth in your area of expertise – Well-Architected lenses help evaluate workloads for specific technology or business domains. Lenses dive deeper into the domain-specific best practices for the workload. If your business specializes in a domain for which a Well-Architected lens is available, doing a review with the specific lens will provide more value for your workload. Today, AWS has lenses for serverless, SaaS, High Performance Computing (HPC), the financial services industry, machine learning, IoT workloads and more. We recently announced a new Management and Governance Lens.

Build workloads using AWS vetted constructs – AWS Solutions Library provides you a repository of Well-Architected solutions across a range of technologies and industry verticals. The library includes reference architectures, implementations of reusable patterns, and fully baked end-to-end solution implementations. Use these building blocks to assemble your workloads. Include the AWS recommended best practices into them, and create an attractive proposition to an acquirer.

Conclusion

You can start taking advantage of the Well-Architected Framework today to improve your technical readiness for an acquisition. The Well-Architected Tool in the AWS Management Console allows you to review your workload at no cost. Engage with your AWS account team early, and we can provide the right guidance for your specific M&A, and plan your Well-Architected technical readiness. Using the Well-Architected Framework as the cornerstone, the AWS Solutions Architects and APN partners have guided thousands of customers through this journey. We are looking forward to helping you succeed.

Using Route 53 Private Hosted Zones for Cross-account Multi-region Architectures

Post Syndicated from Anandprasanna Gaitonde original https://aws.amazon.com/blogs/architecture/using-route-53-private-hosted-zones-for-cross-account-multi-region-architectures/

This post was co-written by Anandprasanna Gaitonde, AWS Solutions Architect and John Bickle, Senior Technical Account Manager, AWS Enterprise Support

Introduction

Many AWS customers have internal business applications spread over multiple AWS accounts and on-premises to support different business units. In such environments, you may find a consistent view of DNS records and domain names between on-premises and different AWS accounts useful. Route 53 Private Hosted Zones (PHZs) and Resolver endpoints on AWS create an architecture best practice for centralized DNS in hybrid cloud environment. Your business units can use flexibility and autonomy to manage the hosted zones for their applications and support multi-region application environments for disaster recovery (DR) purposes.

This blog presents an architecture that provides a unified view of the DNS while allowing different AWS accounts to manage subdomains. It utilizes PHZs with overlapping namespaces and cross-account multi-region VPC association for PHZs to create an efficient, scalable, and highly available architecture for DNS.

Architecture Overview

You can set up a multi-account environment using services such as AWS Control Tower to host applications and workloads from different business units in separate AWS accounts. However, these applications have to conform to a naming scheme based on organization policies and simpler management of DNS hierarchy. As a best practice, the integration with on-premises DNS is done by configuring Amazon Route 53 Resolver endpoints in a shared networking account. Following is an example of this architecture.

Route 53 PHZs and Resolver Endpoints

Figure 1 – Architecture Diagram

The customer in this example has on-premises applications under the customer.local domain. Applications hosted in AWS use subdomain delegation to aws.customer.local. The example here shows three applications that belong to three different teams, and those environments are located in their separate AWS accounts to allow for autonomy and flexibility. This architecture pattern follows the option of the “Multi-Account Decentralized” model as described in the whitepaper Hybrid Cloud DNS options for Amazon VPC.

This architecture involves three key components:

1. PHZ configuration: PHZ for the subdomain aws.customer.local is created in the shared Networking account. This is to support centralized management of PHZ for ancillary applications where teams don’t want individual control (Item 1a in Figure). However, for the key business applications, each of the teams or business units creates its own PHZ. For example, app1.aws.customer.local – Application1 in Account A, app2.aws.customer.local – Application2 in Account B, app3.aws.customer.local – Application3 in Account C (Items 1b in Figure). Application1 is a critical business application and has stringent DR requirements. A DR environment of this application is also created in us-west-2.

For a consistent view of DNS and efficient DNS query routing between the AWS accounts and on-premises, best practice is to associate all the PHZs to the Networking Account. PHZs created in Account A, B and C are associated with VPC in Networking Account by using cross-account association of Private Hosted Zones with VPCs. This creates overlapping domains from multiple PHZs for the VPCs of the networking account. It also overlaps with the parent sub-domain PHZ (aws.customer.local) in the Networking account. In such cases where there is two or more PHZ with overlapping namespaces, Route 53 resolver routes traffic based on most specific match as described in the Developer Guide.

2. Route 53 Resolver endpoints for on-premises integration (Item 2 in Figure): The networking account is used to set up the integration with on-premises DNS using Route 53 Resolver endpoints as shown in Resolving DNS queries between VPC and your network. Inbound and Outbound Route 53 Resolver endpoints are created in the VPC in us-east-1 to serve as the integration between on-premises DNS and AWS. The DNS traffic between on-premises to AWS requires an AWS Site2Site VPN connection or AWS Direct Connect connection to carry DNS and application traffic. For each Resolver endpoint, two or more IP addresses can be specified to map to different Availability Zones (AZs). This helps create a highly available architecture.

3. Route 53 Resolver rules (Item 3 in Figure): Forwarding rules are created only in the networking account to route DNS queries for on-premises domains (customer.local) to the on-premises DNS server. AWS Resource Access Manager (RAM) is used to share the rules to accounts A, B and C as mentioned in the section “Sharing forwarding rules with other AWS accounts and using shared rules” in the documentation. Account owners can now associate these shared rules with their VPCs the same way that they associate rules created in their own AWS accounts. If you share the rule with another AWS account, you also indirectly share the outbound endpoint that you specify in the rule as described in the section “Considerations when creating inbound and outbound endpoints” in the documentation. This implies that you use one outbound endpoint in a region to forward DNS queries to your on-premises network from multiple VPCs, even if the VPCs were created in different AWS accounts. Resolver starts to forward DNS queries for the domain name that’s specified in the rule to the outbound endpoint and forward to the on-premises DNS servers. The rules are created in both regions in this architecture.

This architecture provides the following benefits:

  1. Resilient and scalable
  2. Uses the VPC+2 endpoint, local caching and Availability Zone (AZ) isolation
  3. Minimal forwarding hops
  4. Lower cost: optimal use of Resolver endpoints and forwarding rules

In order to handle the DR, here are some other considerations:

  • For app1.aws.customer.local, the same PHZ is associated with VPC in us-west-2 region. While VPCs are regional, the PHZ is a global construct. The same PHZ is accessible from VPCs in different regions.
  • Failover routing policy is set up in the PHZ and failover records are created. However, Route 53 health checkers (being outside of the VPC) require a public IP for your applications. As these business applications are internal to the organization, a metric-based health check with Amazon CloudWatch can be configured as mentioned in Configuring failover in a private hosted zone.
  • Resolver endpoints are created in VPC in another region (us-west-2) in the networking account. This allows on-premises servers to failover to these secondary Resolver inbound endpoints in case the region goes down.
  • A second set of forwarding rules is created in the networking account, which uses the outbound endpoint in us-west-2. These are shared with Account A and then associated with VPC in us-west-2.
  • In addition, to have DR across multiple on-premises locations, the on-premises servers should have a secondary backup DNS on-premises as well (not shown in the diagram).
    This ensures a simple DNS architecture for the DR setup, and seamless failover for applications in case of a region failure.

Considerations

  • If Application 1 needs to communicate to Application 2, then the PHZ from Account A must be shared with Account B. DNS queries can then be routed efficiently for those VPCs in different accounts.
  • Create additional IP addresses in a single AZ/subnet for the resolver endpoints, to handle large volumes of DNS traffic.
  • Look at Considerations while using Private Hosted Zones before implementing such architectures in your AWS environment.

Summary

Hybrid cloud environments can utilize the features of Route 53 Private Hosted Zones such as overlapping namespaces and the ability to perform cross-account and multi-region VPC association. This creates a unified DNS view for your application environments. The architecture allows for scalability and high availability for business applications.

Field Notes: Customizing the AWS Control Tower Account Factory with AWS Service Catalog

Post Syndicated from Remek Hetman original https://aws.amazon.com/blogs/architecture/field-notes-customizing-the-aws-control-tower-account-factory-with-aws-service-catalog/

Many AWS customers who are managing hundreds or thousands of accounts know how complex and time consuming this process can be. To reduce the burden and simplify the process of creating new accounts, last year AWS released a new service, AWS Control Tower.

AWS Control Tower helps you automate the process of setting up a multi-account AWS environment (AWS Landing Zone) that is secure, well-architected, and ready to use. This Landing Zone is created following best practices established through AWS’ experience working with thousands of enterprises as they move to the cloud. This includes the configuration of AWS Organizations, centralized logging, federated access, mandatory guardrails, and networking.

Those elements are a good starting point to cover the initial configuration of the new account. For some organizations, the next step is to baseline a newly vended account to align it with the company policies and compliance requirements. This means create or deploy necessary roles, policies, governance controls, security groups and so on.

In this blog post, I describe a solution that helps achieve consistent governance and compliance requirements across accounts created by AWS Control Tower. The solution uses the AWS Service Catalog as the repository of products that will be deployed into the new accounts.

Prerequisites and assumptions

Before I get into how it works, let’s first review a few key AWS Service Catalog concepts:

  • An AWS Service Catalog product is a blueprint for building your AWS resources that you want to make available for deployment on AWS along with the configuration information.
  • A portfolio is a collection of products, together with the configuration information.
  • A provisioned product is an AWS CloudFormation stack.
  • Constraints control the way users can deploy a product. With launch constraints, you can specify a role that the AWS Service Catalog can assume to launch a product.
  • Review AWS Service Catalog reference blueprints for a quick way to set up and configure AWS Service Catalog portfolios and products.

You need an AWS Service Catalog portfolio with products that you plan to deploy to the accounts. The portfolio has to be created in the AWS Control Tower primary account. If you don’t have a portfolio, the starting point would be to review these resources:

Solution Overview

This solution supports the following scenarios:

  • Deployment of products to the newly vended AWS Control Tower account (Figure 1)
  • Update and deployment of products to existing accounts (Figure 2)
Figure 1 Deployment to new account

Figure 1 – Deployment to new account

The architecture diagram in figure 1 shows the process of deploying products to the new account.

  1. AWS Control Tower creates a new account
  2. Once an account is created successfully, Amazon CloudWatch Events trigger an AWS Lambda function
  3. The Lambda function pulls the configuration from an Amazon S3 bucket and:
    • Validates configuration
    • Grants Lambda role access to portfolio(s)
    • Creates StackSet constrains for products
  4. Lambda calls the AWS Step Function
  5. The AWS Step Function orchestrates deployment of the AWS Service Catalog products and monitors progress
Figure 2 Update or deployment to an existing account

Figure 2 – Update or deployment to an existing account

The architecture diagram in figure 2 shows process of updating product or deploying product to the existing account.

  1. User uploads update configuration to an Amazon S3 Bucket
  2. Update triggers AWS Lambda Function
  3. Lambda function reads uploaded configuration and:
    • Validates configuration
    • Grants Lambda role access to portfolio(s)
    • Creates StackSet constrains for products
  4. Calls AWS Step Function
  5. AWS Step Function orchestrate update/deployment of AWS Service Catalog products and monitoring progress

Deployment and configuration

Before proceeding with the deployment, you must install Python3.

Then, follow these steps:

  1. Download the solution from GitHub
  2. Go to folder src and run the following command:                                                                                    “pip3 install –r requirements.txt –t .”
  3.  Zip content of the src folder to “control-tower-account-factory-solution.zip” file
  4. Upload zip file to your Amazon S3 bucket created in the AWS Region where you want to deploy the solution
  5. Launch the AWS CloudFormation template

AWS CloudFormation Template Parameters:

  • ConfigurationBucketName – name of the Amazon S3 bucket from where AWS Lambda function should pull the configuration file. You can provide the name of an existing bucket.
  • CreateConfigurationBucket – set to true if you want to create a bucket specified in previous parameter. If a bucket exists, set value to false
  • ConfigurationFileName – name of the configuration file for a new account. Default value: config.yml
  • UpdateFileName – name of the configuration file for updates. Default value: update.yml
  • SourceCodeBucketName – name of the bucket where you uploaded the zipped Lambda code
  • SourceCodePackageName – name of the zipped file contain Lambda. If the file was uploaded to folder, include the name of folder(s) as well. Example: my_folder/control-tower-account-factory-solution.zip
  • BaselineFunctionName –name of the AWS Lambda function. Default value: control-tower- account-factory-lambda
  • BaselinetLambdaRoleName –name of the AWS Lambda function IAM role. Default value: control-tower- account-factory-lambda-role
  • StateMachineName  – name of the AWS Step Function. Default value: control-tower- account-factory-state-machine
  • StateMachineRoleName – name of the AWS Step Function IAM role. Default value: control-tower- account-factory-state-machine-role
  • TrackingTableName – name of the DynamoDB table to track all deployment and updates. Default value: control-tower-account-factory-tracking-table
  • MaxIterations –maximum iteration of the AWS Step Function before the reports time out. Default value: 30. It can be overwrite in configuration file. For more information see Configuration section.
  • TopicName – (optional) name of the SNS Topic that will be used for sending notification. Default value: control-tower- account-factory-account-notification
  • NotificationEmail – (optional) the email address where to send the notification. If this isn’t provided, the SNS topic won’t be created.

Configuration Files

The configuration files have to be in the YAML format, you can use the following schemas for new or existing accounts:

Configuration schema for new account:

The configuration can apply to all new accounts or can be divided based on the organization unit associated with the new account. Also, you can mix deployments where some products are always deployed and some only to specific organization units.

Example configuration file

Configuration schema for existing accounts

This configuration can be used to update provisioned products or deploy products into existing accounts. You can specify a target location either as account(s), organization unit(s) or both. If you specified an organization unit as a target, the product(s) will be updated/deployed to all accounts associated with organization unit.

If the product doesn’t exist in the account, the Lambda function attempts to deploy it. You can manage this by setting the parameter ‘deployifnotexist’ to true. If omitted or set to false, Lambda won’t provision the product to an existing account.

Example configuration file

All products deployed by the AWS Service Catalog are provisioned under their own name that has to be unique across all provisioned products. In this example, products are provisioned under the following naming convention:

<account id where product is provision>-<”provision_name” from configuration file>

Example:  123456789-my-product

In the configuration file you can specify dependencies between products. Dependencies need to be provided as the list of provisioned product name not a product name. If provided, deployment of the product will be suspended until all dependencies successfully deployed.

The Step Function is running in the loop with interval of 1 minute and checking if dependencies were deployed. In the event of an error in the dependency naming or configuration, the step function iterates only until it reaches the maximum iterations defined in the configuration file. If the maximum iterations are reached, the step function reports time out and interrupts the products’ deployment.

Important: if you updating a product by adding a new AWS Region, you cannot specify the dependency or run updates in existing regions the same time. In this scenario you should break the update as follows:

  • Upload configuration to create dependencies in the new region
  • Upload configuration to create products only in the new region

You can find different examples of configuration files in GitHub.

Note: The name of the configuration file and Amazon S3 location must match the values provided in the AWS CloudFormation template during solution deployment.

AWS Lambda functions deployment considerations

When deploying product is a Lambda function, you need to consider two requirements:

  1. The source code of the Lambda function needs to be in the Amazon S3 bucket created in the same AWS region where you are planning to deploy a Lambda function
  2. The destination account needs to have permission to the source Amazon S3 bucket

To accommodate both requirements, the approach is to create an Amazon S3 bucket under the AWS Control Tower primary account. There is one Amazon S3 bucket in each Region where the functions will be deployed.

Each deployment bucket should have attached the following policy:

{
    "Version": "2008-10-17",
    "Statement": [
        {
            "Effect": "Allow",
            "Principal": {
                "AWS": "*"
            },
            "Action": "s3:GetObject",
            "Resource": "arn:aws:s3:::<S3 bucket name>/*",
            "Condition": {
                "StringEquals": {
                    "aws:PrincipalOrgID": "<AWS Organizations Id>"
                },
                "StringLike": {
                    "aws:PrincipalArn": [
                        "arn:aws:iam::*:role/AWSControlTowerExecution",
        "arn:aws:iam::*:role/< name of the Lambda IAM role – default: control-tower-account-factory-lambda-role>"
                    ]
                }
            }
        }
    ]
}

This allows the deployment role to access Lambda’s source code from any account in your AWS Organizations.

Conclusion

In this blog post, I’ve outlined a solution to help you drive consistent governance and compliance requirements across accounts vended though AWS Control Tower. This solution provides enterprises with mechanisms to manage all deployments from a centralized account. Also, this reduces the need for maintaining multiple separate CI/CD pipelines.  Therefore you can simplify and reduce deployment time in a multi-account environment.

This solution allows you keep provisioned products up to date by updating existing products or bringing old accounts to the same compliance level as the new accounts.

Since this solution supports deployment to existing accounts and can be run without AWS Control Tower, it can be used for deployment of any AWS Service Catalog product either in single or multiple account environments. This solution then becomes an integral part of CI/CD pipeline.

For more information, review the AWS Control Tower documentation and AWS Service Catalog documentation. Also, review the links listed in the “Prerequisites and assumptions” section of this post.

Field Notes provides hands-on technical guidance from AWS Solutions Architects, consultants, and technical account managers, based on their experiences in the field solving real-world business problems for customers.

How to get read-only visibility into the AWS Control Tower console

Post Syndicated from Bruno Mendez original https://aws.amazon.com/blogs/security/how-to-get-read-only-visibility-into-aws-control-tower-console/

When you audit an environment governed by AWS Control Tower, having visibility into the AWS Control Tower console allows you to collect important configuration information, but currently there isn’t a read-only role installed by AWS Control Tower. In this post, I will show you how to create a custom permission set by using both a managed AWS policy and a custom permissions policy. This custom permission set will allow you to get the visibility you need, while still enforcing the principle of least privilege. You will have access to the read-only information you need, without asking your administrator to provide the attestation.

AWS Control Tower sets up AWS Single Sign-On (AWS SSO) with a native default directory. AWS Control Tower comes with a set of preconfigured permission sets available out-of-the-box. A permission set is a collection of administrator-defined policies that AWS SSO uses to determine a user’s effective permissions to access a specific AWS account. Permission sets can contain an AWS inline policy and you can also attach AWS managed policies. When you assign a permission set to a user or group in an account, AWS SSO creates an IAM role in the AWS account, configures the inline and AWS managed policies, and creates the trust policies that allow the assigned users to assume the role through AWS SSO.

To learn more about inline and AWS managed policies, see Managed Policies and Inline Policies and the IAM User Guide on AWS managed policies for job functions.

To create a custom permission set for AWS Control Tower

  1. Log into your AWS Control Tower environment as an administrator.
  2. Choose the AWS Single Sign-On service, then choose AWS accounts.
  3. On the AWS Accounts pane, choose the Permission sets tab, then choose Create permission set, as shown in the following figure.

    Figure 1: Permission sets tab in the SSO console

    Figure 1: Permission sets tab in the SSO console

  4. Select Create a custom permission set and enter a name in the Name field (in this example, I named mine Audit-enhanced), then enter text in the Description field, as shown in figure 2.

    Figure 2: AWS Single Sign-On console – Create new permission set workflow

    Figure 2: AWS Single Sign-On console – Create new permission set workflow

  5. Choose a value for Session duration (in this example I set the duration to 1 hour). Optionally, you can set a relay state (in this example, I left it blank), and select both Attach AWS managed policies and Create a custom permissions policy, as shown in the following figure.

    Figure 3: AWS Single Sign-On console – Setting additional permission set configurations

    Figure 3: AWS Single Sign-On console – Setting additional permission set configurations

  6. In the Attach AWS Managed policies dashboard, in the search bar, enter audit and select the SecurityAudit managed policy, as shown in figure 4.

    Figure 4: AWS Single Sign-On console – Attaching AWS managed policy

    Figure 4: AWS Single Sign-On console – Attaching AWS managed policy

  7. Copy the following JSON policy to your clipboard.
    
    {
                "Version": "2012-10-17",
                "Statement": [
                    {
                        "Effect": "Allow",
                        "Action": [
                          "controltower:Get*",
                          "controltower:List*",
                          "controltower:Describe*",
                          "sso:getpermissionset",
                          "sso:DescribeRegisteredRegions",
                          "sso:ListDirectoryAssociations",
                          "sso-directory:DescribeDirectory"		
                        ],
                        "Resource": "*"
                    }
                ]
         }
    

    This policy grants the following read-level permissions: Get, List, Describe API actions. This is the additional set of permissions necessary to enhance the SecurityAudit role, so that you can gain visibility into the AWS Control Tower console.

  8. Scroll down to the Create a custom permissions policy dashboard, paste the policy you previously copied into the field, as shown in figure 5, then choose Create.

    Figure 5: AWS Single Sign-On console – Entering JSON code for custom permission policy

    Figure 5: AWS Single Sign-On console – Entering JSON code for custom permission policy

Now, when you go to the Permission sets tab, you should see your newly created custom permission set.

To assign the newly created permission set access to your AWS Control Tower master account

  1. On the AWS organization tab, select the box for your AWS Control Tower master account (in this example, the account newControlTower), then choose Assign users, as shown in figure 6.

    Figure 6: AWS Single Sign-On console – AWS organization tab – Assign access workflow

    Figure 6: AWS Single Sign-On console – AWS organization tab – Assign access workflow

  2. On the Users tab, select your user (in this example, CT Tester) as shown in figure 7, and choose Next: Permission sets.

    Figure 7: AWS Single Sign-On console – Users tab – Assigning access to your user

    Figure 7: AWS Single Sign-On console – Users tab – Assigning access to your user

  3. Select the box next to the custom permission set you created earlier (in this example, Audit-enhanced), and choose Finish, as shown in figure 8.

    Figure 8: AWS Single Sign-On console – Select permission sets

    Figure 8: AWS Single Sign-On console – Select permission sets

You should see a Complete page, and the newControlTower account will show Status as Complete, as shown in figure 9.

Figure 9: AWS Single Sign-On console – Successful completion of permission set assignment

Figure 9: AWS Single Sign-On console – Successful completion of permission set assignment

You now have a permission set that enhances your SecurityAuditor role and gives you read-only visibility into your AWS Control Tower environment.

Summary

In this post, we’ve detailed how to enhance an “audit-like” role to incorporate additional permissions by using a custom permission set in AWS SSO, while enforcing the principle of least privilege to gain read-only capabilities into the AWS Control Tower console.

For more information on the technologies mentioned in this post, see the following links:

If you have feedback about this post, submit comments in the Comments section below.

Want more AWS Security how-to content, news, and feature announcements? Follow us on Twitter.

Author

Bruno Mendez

Bruno joined AWS as a Security Consultant in 2019 and has since worked with several global customers to enable and strengthen their cloud security posture as they embarked in their cloud transformational journeys. Bruno enjoys architecting, assessing, automating, improving, and discussing security. Outside of work Bruno loves playing soccer on the weekends and spending time with the family.

Architecture Patterns for Red Hat OpenShift on AWS

Post Syndicated from Ryan Niksch original https://aws.amazon.com/blogs/architecture/architecture-patterns-for-red-hat-openshift-on-aws/

Editor’s note: Although this blog post and its accompanying code make use of the word “Master,” Red Hat is making open source code more inclusive by eradicating “problematic language.” Read more about this.

Introduction

Red Hat OpenShift is an application platform that provides customers with turnkey application platform that is much more than a simple Kubernetes orchestration.

OpenShift customers choose AWS as their cloud of choice because of the efficiency, security, and reliability, scalability, and elasticity it provides. Customers seeking to modernize their business, process, and application stacks are drawn to the rich AWS service and feature sets.

As such, we see some customers migrate from on-premises to AWS or exist in a hybrid context with application workloads running in various locations. For OpenShift customers, this poses a few questions and considerations:

  • What are the recommendations for the best way to deploy OpenShift on AWS?
  • How is this different from what customers were used to on-premises?
  • How does this ensure resilience and availability?
  • Do customers need a multi-region, multi-account approach?

For hybrid customers, there are assumptions and misconceptions:

  • Where does the control plane exist?
  •  Is there replication, and if so, what are the considerations and ramifications?

In this post I will run through some of the more common questions and patterns for OpenShift on AWS, while looking at some of the terminology and conceptual differences of AWS. I’ll explore migration and hybrid use cases and address some misconceptions.

OpenShift building blocks

On AWS, OpenShift 4x is the norm. To that effect, I will focus on OpenShift 4, but many of the considerations will apply to both OpenShift 3 and OpenShift 4.

Let’s unpack some of the OpenShift building blocks. An OpenShift cluster consists of Master, infrastructure, and worker nodes. The Master forms the control plane and infrastructure nodes cater to a routing layer and additional functions, such as logging, monitoring etc. Worker nodes are the nodes that customer application container workloads will exist on.

When deployed on-premises, OpenShift nodes will be placed in separate network subnets. Depending on distance, latency, etc., a single OpenShift cluster may span two data centers that have some nodes in a subnet in one data center and other subnets in a different data center. This applies to customers with data centers within a few miles of each other with high-speed connectivity. An alternative would be an OpenShift cluster in each data center.

AWS concepts and terminology

At AWS, the concept of “region” is a geolocation, such as EMEA (Europe, Middle East, and Africa) or APAC (Asian Pacific) rather than a data center or specific building. An Availability Zone (AZ) is the closest construct on AWS that maps to a physical data center. Within each region you will find multiple (typically three or more) AZs. Note that a single AZ will contain multiple physical data centers but we treat it as a single point of failure. For example, an event that impacts an AZ would be expected to impact all the data centers within that AZ. To this effect, customers should deploy workloads spanning multiple AZs to protect against any event that would impact a single AZ.

Read more about Regions, Availability Zones, and Edge Locations.

Deploying OpenShift

When deploying an OpenShift cluster on AWS, we recommend starting with three Master nodes spread across three AWS AZs and three worker nodes spread across three AZs. This allows for the combination of resilience and availably constructs provided by AWS as well as Red Hat OpenShift. The OpenShift installer provides a means of deploying the underlying AWS infrastructure in two ways: IPI Installer-provisioned infrastructure and UPI user-provisioned infrastructure. Both Red Hat and AWS collect customer feedback and use this to drive recommended patterns that are then included in the OpenShift installer. As such, the OpenShift installer IPI mode becomes a living reference architecture for deploying OpenShift on AWS.

Deploying OpenShift

The installer will require inputs for the environment on which it’s being deployed. In this case, since I am deploying on AWS, I will need to provide the AWS region, AZs, or subnets that related to the AZs, as well as EC2 instance type. The installer will then generate a set of ignition files that will be used during the deployment of OpenShift:

apiVersion: v1
baseDomain: example.com 
controlPlane: 
  hyperthreading: Enabled   
  name: master
  platform:
    aws:
      zones:
      - us-west-2a
      - us-west-2b
      - us-west-2c
      rootVolume:
        iops: 4000
        size: 500
        type: io1
      type: m5.xlarge 
  replicas: 3
compute: 
- hyperthreading: Enabled 
  name: worker
  platform:
    aws:
      rootVolume:
        iops: 2000
        size: 500
        type: io1 
      type: m5.xlarge
      zones:
      - us-west-2a
      - us-west-2b
      - us-west-2c
  replicas: 3
metadata:
  name: test-cluster 
networking:
  clusterNetwork:
  - cidr: 10.128.0.0/14
    hostPrefix: 23
  machineNetwork:
  - cidr: 10.0.0.0/16
  networkType: OpenShiftSDN
  serviceNetwork:
  - 172.30.0.0/16
platform:
  aws:
    region: us-west-2 
    userTags:
      adminContact: jdoe
      costCenter: 7536
pullSecret: '{"auths": ...}' 
fips: false 
sshKey: ssh-ed25519 AAAA... 

What does this look like at scale?

For larger implementations, we would see additional worker nodes spread across three or more AZs. As more worker nodes are added, use of the control plane increases. Initially scaling up the Amazon Elastic Compute Cloud (EC2) instance type to a larger instance type is an effective way of addressing this. It’s possible to add more Master nodes, and we recommend that an odd number of nodes are maintained. It is more common to see scaling out of the infrastructure nodes before there is a need to scale Masters. For large-scale implementations, infrastructure functions such as the router, monitoring, and logging functions can be moved to separate EC2 instances from the Master nodes, as well as from each other. It is important to spread the routing layer across multiple AZs, which is critical to maintaining availability and resilience.

The process of resource separation is now controlled by infrastructure machine sets within OpenShift. An infrastructure machine set would need to be defined, then the infrastructure role edited to be moved from the default to this new infrastructure machine set. Read about this in greater detail.

OpenShift in a multi-account context

Using AWS accounts as a means of separation is a common well-architected pattern. AWS Organizations and AWS Control Tower are services that are commonly adopted as part of a multi-account strategy. This is very much the case when looking to enable teams to use their own accounts and when an account vending process is needed to cater for self-service account provisioning.

OpenShift in a multi-account context

OpenShift clusters are deployed into multiple accounts. An OpenShift dev cluster is deployed into an AWS Dev account. This account would typically have AWS Developer Support associated with it. A separate production OpenShift cluster would be provisioned into an AWS production account with AWS Enterprise Support. Enterprise support provides for faster support case response times, and you get the benefit of dedicated resources such as a technical account manager and solutions architect.

CICD pipelines and processes are then used to control the application life cycle from code to dev to production. The pipelines would push the code to different OpenShift cluster end points at different stages of the life cycle.

Hybrid use case implementation

A common misconception of hybrid implementations is that there is a single cluster or control plan that has worker nodes in various locations. For example, there could be a cluster where the Master and infrastructure nodes are deployed in one location, but also worker nodes registered with this cluster that exist on-premises as well as in the cloud.

Having a single customer control plane for a hybrid implementation, even if technically possible, introduces undesired risks.

There is the potential to take multiple environments with very different resilience characteristics and make them interdependent of each other. This can result in performance and reliability issues, and these may increase not only the possibility of the risk manifesting, but also increase in the impact or blast radius.

Instead, hybrid implementations will see separate OpenShift clusters deployed into various locations. A customer may deploy clusters on-premises to cater for a workload that can’t be migrated to the cloud in the short term. Separate OpenShift clusters can then deployed into accounts in AWS for workloads on the cloud. Customers can also deploy separate OpenShift clusters in different AWS regions to cater for proximity to the consuming customer.

Though adding multiple clusters doesn’t add significant administrative overhead, there is a desire to be able to gain visibility and telemetry to all the deployed clusters from a central location. This may see the OpenShift clusters registered with Red Hat Advanced Cluster Manager for Kubernetes.

Summary

Take advantage of the IPI model, not only as a guide but to also save time. Make AWS Organizations, AWS Control Tower, and the AWS Service catalog part of your cloud and hybrid strategies. These will not only speed up migrations but also form building blocks for a modernized business with a focus of enabling prescriptive self-service. Consider Red Hat advanced cluster manager for multi cluster management.