Tag Archives: AWS WAF

Centrally manage AWS WAF (API v2) and AWS Managed Rules at scale with Firewall Manager

Post Syndicated from Umesh Ramesh original https://aws.amazon.com/blogs/security/centrally-manage-aws-waf-api-v2-and-aws-managed-rules-at-scale-with-firewall-manager/

Since AWS Firewall Manager was introduced in 2018, it has evolved with many more features and today also supports the newest version of AWS WAF, as well as the latest AWS WAF APIs (AWS WAFV2), and AWS Managed Rules for AWS WAF. (Note that the original AWS WAF APIs are still available and supported under the name AWS WAF Classic. Firewall Manager already supported AWS WAF Classic and continues to do so.) In this blog, we walk you through the steps of setting up Firewall Manager policies for AWS WAF and highlight some of the options available. We also walk through how to use the recently launched feature that enables centralized logging for your AWS WAF policies. In addition, we share an AWS CloudFormation template that you can use to set up Firewall Manager policies, AWS WAF rule groups, and the related AWS WAF rules (both custom and managed rules). Before we get into the content of the blog, here’s some background information you should know.

AWS WAF rules define how to inspect web requests and what to do when a web request matches the inspection criteria. Firewall Manager simplifies the administration of AWS WAF rules at scale across multiple accounts.

Background

Web ACL capacity units

The web ACL capacity unit (WCU) is a new concept that we introduced to AWS WAF. WCU is a measurement that is used to calculate and control the operating resources that are used to run your rules with your web access control list (web ACL).

AWS Managed Rules

AWS Managed Rules (AMRs) are a set of AWS WAF rules curated and maintained by the AWS Threat Research Team. With just a few clicks, these rules can help protect your web applications from new and emerging risks, so you don’t need to spend time researching and writing your own rules. The core rule set covers some of the common security risks described in the OWASP Top 10 publication. AMRs also include IP reputation lists based on Amazon threat intelligence that can help reduce your exposure to bot traffic or exploitation attempts. You can add multiple AMRs to your web ACL or write hundreds of your own rules. Additional rule sets from AWS Marketplace sellers like Cyber Security Cloud and Fortinet are also available to use. If you subscribe to rules from an AWS Marketplace seller, you will be charged the managed rules price set by the seller.

Rule groups

A rule group is a group of AWS WAF rules. In the new AWS WAF, a rule group is defined under AWS WAF, and you can add rule groups as a reusable set of rules under a web ACL. With the addition of AMRs, customers can select from AWS Managed Rule groups in addition to Partner Managed and Custom Configured rule groups. So, you now have the option to create Firewall Manager policies by using either AWS WAF Classic rule groups or new AWS WAF rule groups.

Firewall Manager policy

A Firewall Manager policy is an entity that contains a set of rule groups that can be associated to and applied to your resources. In this policy, you also specify the resource types you want to protect in specific or all accounts. Based on the policy, Firewall Manager creates a Firewall Manager web ACL in the corresponding accounts. In addition, individual application teams can add more rules or rule groups to this web ACL.

Firewall Manager prerequisites

Firewall Manager has the following prerequisites:

  • AWS Organizations: Your organization must be using AWS Organizations to manage your accounts, and All Features must be enabled. If you’re new to Organizations, use these steps to enable AWS Organizations in your account. For more information, see Creating an organization and Enabling all features in your organization.
  • A Firewall Manager administrator account: You must designate one of the AWS accounts in your organization as the administrator for Firewall Manager. This gives the account permission to deploy AWS WAF rules across the organization. On the web console of the AWS account that you want to designate as the Firewall Manager administrator, go to the Firewall Manager service, and on the Settings tab, choose Set administrator account to set that account as the administrator, as shown in figure 1.
     
    Figure 1: Firewall Manager administrator account

    Figure 1: Firewall Manager administrator account

  • AWS Config: You must enable AWS Config for all the accounts in your organization so that Firewall Manager can detect newly created resources. To enable AWS Config for all the accounts in your organization, you can use the Enable AWS Config template on the StackSets Sample Templates page. For more information, see Getting Started with AWS Config.

Walkthrough: Set up Firewall Manager policies

In the following steps, we walk you through the steps of creating and applying a Firewall Manager policy across AWS accounts, explaining the implications of the options you can choose. This policy uses AWS WAF rules that include AMRs such as the core rule set, Amazon’s IP reputation list and SQL injection.

To create and apply Firewall Manager policies

  1. In the AWS Management Console, navigate to the Firewall Manager service, choose Security Policies, and then choose the appropriate Region.
  2. Choose the Create Policy button. Under Policy type, you can see four options to choose from, as shown in figure 2. For this walkthrough, choose AWS WAF, which is the most recent version of AWS WAF, and then choose Next.
     
    Figure 2: Choosing the policy type

    Figure 2: Choosing the policy type

  3. You can now see options to add two sets of rule groups, first rule groups and last rule groups, as shown in figure 3.
    • First rule groups: When the web ACL inspects a web request, these are the set of rule groups that are prioritized to be evaluated at the very beginning. Note that these rules could be either custom build rules, or managed AWS WAF rules offered by AWS or other sellers.
    • Last rule groups: If the web request makes it through the first rule set and the AWS WAF rules defined for this web ACL (which will be in the format FMManagedWebACLV2PartialRuleName-policyXXXX), then it is evaluated against this last set of rule groups, before resulting in the action defined in this rule set.
    • Default web ACL action: This option specifies whether you want the web request evaluated by the rule to be allowed or blocked.
    Figure 3: Updating Rule groups

    Figure 3: Updating Rule groups

  4. See the AWS Managed Rules rule groups list to understand the rules that are defined in the managed rule set. You can choose to override the default action set and instead apply the “count” setting to monitor the traffic for the rule group. This will help customers to monitor for false positives before deciding to allow or reject certain web-requests.
     
    You can apply this count mode to specific rules of the rule set by selecting the rule, choosing the Edit button, as shown in figure 4, and then setting the toggle for individual rules.
     
    Figure 4: Edit rule group to override the default action set

    Figure 4: Edit rule group to override the default action set

    Figure 5 shows the Override rules action setting toggled on and off for various rules. AWS Core Rule set contains rules to protect against commonly occurring vulnerabilities described in OWASP publications. The two parameters, “SizeRestrictions_QUERYSTRING” and “SizeRestrictions_BODY” are set to monitoring mode which helps verify that the URI query string length and request body size are within the standard boundary for web applications.
     

    Figure 5: Example of setting a managed rule to override the rules action

    Figure 5: Example of setting a managed rule to override the rules action

  5. On the same page, under Policy action, you can also set the policy action to either identify the resources and monitor those that don’t comply with the policy rules, without auto-remediation, OR choose to auto-remediate any of the non-compliant resources. This option is shown in figure 6.
     
    Auto-remediation: Here is where you can get creative in using Firewall Manager policies based on various requirements. For example, you can create policies for specific departments using AWS tags OR all applications deployed in specific accounts, where you want to enforce certain AWS WAF rules to meet requirements to protect all the resources. Notice in figure 6 that you can choose to auto-remediate. What this means is that these AWS WAF rules are not only applied to all the resources types that you select to protect, but if someone tampers with this Firewall Manager web ACL by deleting the rule group, Firewall Manager creates this rule group again within a few minutes. In the background, Firewall Manager has a tight integration with AWS Config to monitor all the resources across other accounts in that parent organization. Similarly, in the same account, you could create another policy for a different department or team where you don’t want to enforce the AWS WAF rules but instead let the application teams in these departments create their own web ACLs to use.
     
    Figure 6: Setting the default web ACL and auto-remediate actions

    Figure 6: Setting the default web ACL and auto-remediate actions

    In figure 6, you see an option to replace the existing web ACLs. You may have created custom AWS WAF rules and applied those to the resources by using a custom web ACL. With this option, you can either choose not to alter such existing resources that are already protected by another custom web ACL (and not by Firewall Manager–created web ACLs), or to disassociate the resources and have them protected by the new web ACLs created by this policy.

  6. In this last step, under Policy scope, you can decide to apply the policy to specific types of AWS resources, either to all accounts in that organization or just to some of them, and also filter based on tags. This option is shown in figure 7. In the below example, you will see that the policy is restricted to two accounts, and two corresponding OU’s with tags limiting to “DeptName: PCI”.
     
    Figure 7: Defining policy scope for specific accounts

    Figure 7: Defining policy scope for specific accounts

Once these changes are applied, then in the background, with AWS Config enabled in the child accounts that are included in the policy, AWS WAF rules are created in the format “FMManagedWebACLV2<rulegroupname>XXXXXXXXXXXXX”. All resources that meet the conditions called out in the policy are automatically protected.

Validation: You can now log in to one of the child accounts to verify whether the resources are created. In our example, all the Application Load Balancers with the tag name DepName:PCI will be associated to this web ACL. You can also add more AWS WAF rules to this web ACL.
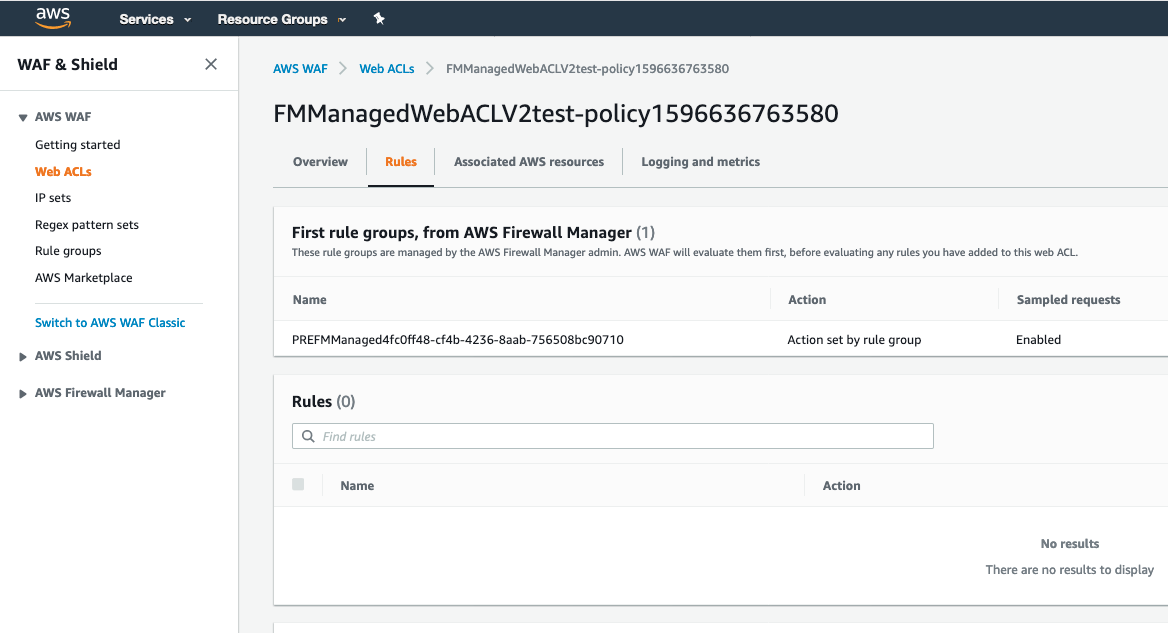
 

Figure 8: Reviewing and managing web ACLs in participating child accounts

Figure 8: Reviewing and managing web ACLs in participating child accounts

Firewall Manager logging capability

As part of the AWS WAF capability you want to make sure that logging is enabled with the recently announced feature for centralized logging of your AWS WAF policies. With this logging feature, you get detailed information about traffic within your organization.

The steps are similar to enabling logging for AWS WAF, and consists of two steps. In the first step, Amazon Kinesis Data Firehose is used to capture logs from your policy’s web ACLs to a configured storage destination through the HTTPS endpoint. In the second step, you enable logging in a Firewall Manager policy and select the Firehose stream you created in the first step.

Step 1: Set up a new Kinesis Data Firehose delivery stream

Amazon Kinesis Data Firehose is a fully managed service for delivering real-time streaming data to destinations such as Amazon Simple Storage Service (Amazon S3), Amazon Elasticsearch Service (ES), Splunk, and Amazon Redshift. With Kinesis Data Firehose, you don’t need to write applications or manage resources. You configure your data producers to send data to Kinesis Data Firehose, and it automatically delivers the data to the destination that you specified. You can also configure Kinesis Data Firehose to transform your data before delivering it.

To set up the delivery stream

  1. In the AWS Management Console, using your Firewall Manager administrator account, open the Amazon Kinesis Data Firehose service and choose the button to create a new delivery stream.
    1. For Delivery stream name, enter a name for your new stream that starts with aws-waf-logs- as shown in figure 9. AWS WAF filters all streams starting with the keyword aws-waf-logs when it displays the delivery streams. Note the name of your stream since you’ll need it again later in the walkthrough.
    2. For Source, choose Direct PUT, since AWS WAF logs will be the source in this walkthrough.
    3. We recommend that you also enable server-side encryption. You can either choose to use AWS-owned keys or the customer-managed keys. In this example, we have chosen AWS owned Customer master keys (CMKs). If you have your own CMK’s, you can select the 2nd option of the customer-managed keys and pick your corresponding key from the dropdown list.
       
      Figure 9: Setting the source for the Kinesis Data Firehose delivery stream

      Figure 9: Setting the source for the Kinesis Data Firehose delivery stream

  2. Next, you have the option to enable AWS Lambda if you need to transform your data before transferring it to your destination. (You can learn more about data transformation in the Amazon Kinesis Data Firehose documentation.) In this walkthrough, there are no transformations that need to be performed, so for Data transformation, choose Disabled. You also have the option to convert the JSON object to Apache Parquet or Apache ORC format for better query performance. In this example, for Record format conversion, choose Disabled. Figure 10 shows these options.
     
    Figure 10: Setting data transformation and format conversion

    Figure 10: Setting data transformation and format conversion

  3. On the Select destination screen, for Destination, choose Amazon S3, as shown in figure 11.
    1. For the S3 destination, you can either enter the name of an existing S3 bucket or create a new S3 bucket. Note the name of the S3 bucket, since you’ll need the bucket name in a later step in this walkthrough.
    2. (Optional) Set the S3 prefix and error bucket for logs.
       
      Figure 11: Selecting the destination

      Figure 11: Selecting the destination

    3. On the Configure Settings screen, shown in figure 12, choose other S3 options, such as encryption and compression, and creation of an IAM role for granting access to the Firehose delivery stream.
      1. You can leave the default values for S3 buffer values. We also recommend enabling compression and encryption.
      2. Either choose the option to create a new IAM role, or choose an existing role if you’ve already created one.
      Figure 12: Setting S3 options and IAM role

      Figure 12: Setting S3 options and IAM role

  4. In the next screen, review all the options you selected and choose the Create Delivery Stream button to create a Kinesis Data Firehose delivery stream.

Step 2: Enable logging for an AWS WAF policy

In this step, you configure Firewall Manager policy to direct the log ingestion to the Kinesis Data Firehose delivery stream that you created in the previous step.

To enable logging for an AWS WAF policy

  1. On the AWS Management Console, search for AWS Firewall Manager and in the navigation pane, choose Security Policies.
  2. Choose the AWS WAF policy that you want to enable logging for, and on the Policy details tab, in the Policy rules section, choose Edit. For Logging configuration status, choose Enabled.
  3. Choose the Kinesis Data Firehose that you created for your logging. You must choose a firehose that begins with “aws-waf-logs-”.
     
    Figure 13: Enable Firewall Manager logs

    Figure 13: Enable Firewall Manager logs

  4. Review your settings, and then choose Save to save your changes to the policy.

    Note: Firewall Manager supports this option for the latest version of AWS WAF, but not for AWS WAF Classic.

With these two steps, you now have logging enabled for your Firewall Manager policies.

Deploy Firewall Manager policy with a CloudFormation template

In this section, we provide you with an example CloudFormation template that deploys Firewall Manager policy with a rule group that consists of both an AWS Managed rule set and a custom AWS WAF rule. As a part of the custom AWS WAF rule, this template creates an IP set in which you specify the list of IP addresses from which you want to block traffic. It also creates a rule with an AND statement that blocks cross-site scripting requests and requests that originate from the IP addresses that you specified. You will also notice that this rule is applied to specific accounts that are entered in the parameters as comma-delimited values. Out of many available AWS Managed Rules, we used two rules: AWSManagedRulesCommonRuleSet and AWSManagedRulesSQLiRuleSet. For the former rule, we set the override action to count, which means the requests won’t be blocked but will be counted for further investigation. The latter rule contains rules to block request patterns associated with exploitation of SQL databases, such as SQL injection attacks. This can help prevent remote injection of unauthorized queries.

As a best practice, before using a rule group in production, test it in a non-production environment, with the action override set to count. Evaluate the rule group using Amazon CloudWatch metrics combined with AWS WAF sampled requests or AWS WAF logs. When you’re satisfied that the rule group does what you want, remove the override on the group.

To deploy the CloudFormation template

  1. Copy the following template code and save it in a file named deploy-firewall-manager-policy.yaml.
    Description: Create IPSet, RuleGroup and Firewall Manager Policy. Firewall Policy contains two AWS managed rule groups and one custom rule group.
    Parameters:
      BlockIpAddressCIDR:
        Type: CommaDelimitedList
        Description: "Enter IP Address range by using CIDR notation separated by comma to block incoming traffic originating from them. For eg: To specify the IPV4 address 192.0.2.44 type 192.0.2.44/32 or 10.0.2.0/24"
      AWSAccountIds:
        Type: CommaDelimitedList
        Description: "Enter AWS Account IDs separated by comma in which you want to apply Firewall Manager policy"
    
    Resources:
      WAFIPSetFMS:
          Type: 'AWS::WAFv2::IPSet'
          Properties:
            Description: Block ranges of IP addresses using this IP Set
            Name: WAFIPSetFMS
            Scope: REGIONAL
            IPAddressVersion: IPV4	
            Addresses: !Ref BlockIpAddressCIDR
      RuleGroupXssFMS:
        Type: 'AWS::WAFv2::RuleGroup'
        DependsOn: WAFIPSetFMS
        Properties: 
          Capacity: 500
          Description: AWS WAF Rule Group to block web requests that contain cross site scripting injection attacks and originate from specific IP ranges.
          Name: RuleGroupXssFMS
          Scope: REGIONAL
          VisibilityConfig:
              SampledRequestsEnabled: true
              CloudWatchMetricsEnabled: true
              MetricName: RuleGroupXssFMS
          Rules: 
            - Name: xssException
              Priority: 0
              Action:
                Block: {}
              VisibilityConfig:
                  SampledRequestsEnabled: true
                  CloudWatchMetricsEnabled: true
                  MetricName: xssException
              Statement:
                AndStatement:
                  Statements:
                  - XssMatchStatement:
                      FieldToMatch:
                        Body: {}
                      TextTransformations:
                      - Type: HTML_ENTITY_DECODE
                        Priority: 0
                      - Type: LOWERCASE
                        Priority: 1
                  - IPSetReferenceStatement:
                      Arn: !GetAtt WAFIPSetFMS.Arn
      PolicyWAFv2:
        Type: AWS::FMS::Policy
        Properties:
          ExcludeResourceTags: false
          PolicyName: WAF-Policy
          IncludeMap: 
            ACCOUNT: !Ref AWSAccountIds
          RemediationEnabled: true
          ResourceType: AWS::ElasticLoadBalancingV2::LoadBalancer 
          SecurityServicePolicyData: 
            Type: WAFV2
            ManagedServiceData: !Sub '{"type":"WAFV2", 
                                      "preProcessRuleGroups":[{ 
                                      "ruleGroupType":"RuleGroup",
                                      "ruleGroupArn":"${RuleGroupXssFMS.Arn}",
                                      "overrideAction":{"type":"NONE"}},{
                                      "managedRuleGroupIdentifier":{
                                      "managedRuleGroupName":"AWSManagedRulesCommonRuleSet", 
                                      "vendorName":"AWS"},
                                      "overrideAction":{"type":"COUNT"}, 
                                      "excludeRules":[],"ruleGroupType":"ManagedRuleGroup"},{
                                      "managedRuleGroupIdentifier":{
                                      "managedRuleGroupName":"AWSManagedRulesSQLiRuleSet", 
                                      "vendorName":"AWS"},
                                      "overrideAction":{"type":"NONE"}, 
                                      "excludeRules":[],"ruleGroupType":"ManagedRuleGroup"}],
                                      "postProcessRuleGroups":[],
                                      "defaultAction":{"type":"BLOCK"}}'


  2. Execute the following AWS CLI command to deploy the stack. If you haven’t configured AWS CLI, refer to this quickstart.
    aws cloudformation create-stack --stack-name firewall-manager-policy-stack \
          --template-body file://deploy-firewall-manager-policy.yaml \
          --parameters \
    ParameterKey=BlockIpAddressCIDR,ParameterValue=<Enter-BlockIpAddressCIDR>
    ParameterKey= AWSAccountIds,ParameterValue=<Enter-AWSAccountIds>
    

Pricing

As of today, price per AWS WAF protection policy per Region is $100.00. To get an overall idea on pricing, we recommend that you review this AWS Firewall Manager pricing guide that covers a few scenarios.

AWS WAF charges based on the number of web access control lists (web ACLs) that you create, the number of rules that you add per web ACL, and the number of web requests that you receive. There are no upfront commitments. Learn more about AWS WAF pricing.

There is no additional charge for using AWS Managed Rules for AWS WAF. When you subscribe to a Managed Rule Group provided by an AWS Marketplace seller, you will be charged additional fees based on the price set by the seller.

AWS Shield Advanced customers can use Firewall Manager to apply AWS Shield Advanced and AWS WAF protections across their entire organization at no additional cost.

Conclusion

This blog post describes how you can create Firewall Manager policies with the new version of AWS WAF rules, by using the web console or AWS CloudFormation. You can also create these rules by using the command line interface (CLI), or programmatically with the SDK and other similar scripting tools. Using both AWS WAF and Firewall Manager, you can create a deployment strategy to safeguard all your accounts centrally at the organization level, and also choose to automatically remediate the AWS WAF rules if anything is changed after deployment.

For further reading, see the AWS Firewall Manager Developer Guide.

If you have feedback about this post, submit comments in the Comments section below. If you have questions about this post, start a new thread on the AWS Firewall Manager forum or contact AWS Support.

Want more AWS Security how-to content, news, and feature announcements? Follow us on Twitter.

Author

Umesh Kumar Ramesh

Umesh is a Senior Cloud Infrastructure Architect with AWS who delivers proof-of-concept projects and topical workshops, and leads implementation projects. He holds a bachelor’s degree in Computer Science & Engineering from the National Institute of Technology, Jamshedpur (India). Outside of work, he enjoys watching documentaries, biking, practicing meditation and discussing spirituality.

Author

Mahek Pavagadhi

Mahek is a Cloud Infrastructure Architect at AWS in San Francisco, CA. She has a master’s degree in Software Engineering with a major in Cloud Computing. She is passionate about cloud services and building solutions with it. Outside of work, she is an avid traveler who loves to explore local cafeterias.

Field Notes: How to Identify and Block Fake Crawler Bots Using AWS WAF

Post Syndicated from Vijay Menon original https://aws.amazon.com/blogs/architecture/field-notes-how-to-identify-and-block-fake-crawler-bots-using-aws-waf/

In this blog post, we focus on how to identify fake bots using these AWS services: AWS WAF, Amazon Kinesis Data Firehose, Amazon S3 and AWS Lambda. We use fake Google/Bing bots to demonstrate, but the principles can be applied to other popular crawlers like Slurp Bot from Yahoo, DuckDuckBot from DuckDuckGo, Alexa crawler from Alexa internet ranking service.

For industries like media, online retailors, news or social websites, content is critical and often sets them apart from other competitors. These companies put in a significant amount of effort to make the content as visible and accessible as possible. To do that these companies rely on crawler bots, so that legitimate users searching for content can find the content easily. Crawler bots are useful for indexing the site pages and helping make the content more searchable and improve rankings.

However, this capability can be misused. So it is important to distinguish between genuine crawler bots and fake ones that are doing more than just indexing your site. It’s important to properly identify good and bad actors so that you can stop the bad ones without impacting the ability of good ones, and at scale. This helps in driving more traffic, visitors, and more revenue from your websites.

Identifying bots

There are two primary sources of information required to identify a fake bot:

  • HTTP Header User-Agent: Fake bots try to present themselves as real bots, for example as Google or Bing, by using the same user agent string used by Google or Bing.
  • IP Address: You can look at the source IP address of the incoming request and determine if it belongs to the search engine provider network like Google or Bing. You can do this by performing a forward and reverse look up and comparing the results. These methods are well documented by the search engine providers Google and Bing.

Solution Overview

The solution leverages the capabilities of AWS WAF. Our demonstration application is a static website hosted on Amazon S3 fronted by Amazon CloudFront. This means that we can provide permission of access to the S3 bucket only to CloudFront using origin access identity.

The logs are streamed in near real time using Amazon Kinesis Data Firehose, inspected using a Lambda function to help identify fake bots before storing the logs on Amazon S3. The Lambda function does two things:

  1. Inspect the traffic using the rules to identify bad or fake bots. In this case it uses forward and reverse DNS lookup results of the Client IP address of packets with User-Agent string resembling GoogleBot or BingBot.
  2. Once identified as a fake bot, the Lambda function updates AWS WAF IP-Set to permanently block the requests coming from IP addresses of fake bots.

Note: For the sake of this demonstration, we are using a static website hosted on Amazon S3 with CloudFront. This requires the AWS WAF and IP-Set used by AWS WAF to be of scope ‘CLOUDFRONT’. You can modify it to use scope ‘REGIONAL’ if you chose to protect your web properties behind Application Load Balancer or API Gateway.

Solution Architecture

WAF Solution Architecture

Prerequisites

Readers of this blog post should be familiar with HTTP and the following AWS services:

For this walkthrough, you should have the following:

  • AWS Account
  • AWS Command Line Interface (AWS CLI): You need AWS CLI installed and configured on the workstation from where you are going to try the steps mentioned below.
  • Credentials configured in AWS CLI should have the required IAM permissions to spin up and modify the resources mentioned in this post.
  • Make sure that you deploy the solution to us-east-1 Region and your AWS CLI default Region is us-east-1. If us-east-1 is not the default Region, reference the Regions explicitly while executing AWS CLI commands using --region us-east-1 switch.
  • Amazon S3 bucket in us-east-1 region

Walkthrough

1.     Create an Amazon S3 static Website and put it behind an Amazon CloudFront distribution. You can follow these steps. Note down the CloudFront distribution ID. We will use it in subsequent steps.

2.     Download and unzip the file containing CloudFormation template and lambda function code from here to a folder in your local workstation. You will need to run all of the subsequent commands from this folder.

3.     Zip the lambda function lambda_function.py and upload it to an Amazon S3 bucket of your choice in us-east-1. Note the bucket name as it will be used in the subsequent steps. The blog uses waf-logs-fake-bots-us-east-1 for reference as the S3 bucket name.

$ zip lambda_function.py lambda_function.py.zip
$ aws s3 cp lambda_function.py.zip s3://waf-logs-fake-bots-us-east-1/

4.     Create the resources required for this blog post by deploying the AWS CloudFormation template and running the below command:

aws cloudformation create-stack \
--stack-name FakeBotBlockBlog \
--template-body file://BotBlog.yml \
--parameters ParameterKey=KinesisBufferIntervalSeconds,ParameterValue=900 ParameterKey=KinesisBufferSizeMB,ParameterValue=3 ParameterKey=IPSetName,ParameterValue=BlockFakeBotIPSet ParameterKey=IPSetScope,ParameterValue=CLOUDFRONT ParameterKey=S3BucketWithDeploymentPackage,ParameterValue=waf-logs-fake-bots-us-east-1 ParameterKey=DeploymentPackageZippedFilename,ParameterValue=lambda_function.py.zip \
--capabilities CAPABILITY_IAM \
--region us-east-1

You need to provide the following information, and you can change the parameters based on your specific needs:

a.     KinesisBufferIntervalSeconds and KinesisBufferSizeMB. These will define the interval at which Kinesis Firehose ships the logs to Amazon S3, the Default is 900 seconds and 3MB respectively, whichever is met first.

b.     IPSetName. Name of the IP Set which will be used to record the client IP address of fake bots. Default value is BlockFakeBotIPSet.

c.     IPSetScope. Scope of the IP Set. I am using CLOUDFRONT and associate it with the CloudFront distribution created in step 1. You can choose to make it REGIONAL in which case WebACLassociation will need to be with an ALB or an API Gateway.

d.     S3BucketWithDeploymentPackage. Name of S3 bucket used in step 3. The blog assumes waf-logs-fake-bots-us-east-1.

e.     DeploymentPackageZipedFilename. Lambda function filename without the file extension. For example, the blog assumes lambda_function.py.zip is available on the Amazon S3 bucket and uses this value for this parameter.

Some stack templates might include resources that can affect permissions in your AWS account, for example, by creating new AWS Identity and Access Management (IAM) role. For those stacks, you must explicitly acknowledge this by specifying CAPABILITY_IAM or CAPABILITY_NAMED_IAM value for the –capabilities parameter.

Stack creation will take you approximately 5-7 minutes. Check the status of the stack by executing the below command every few minutes. You should see StackStatus value as CREATE_COMPLETE.

Example:

aws cloudformation describe-stacks --stack-name FakeBotBlockBlog | grep StackStatus

The CloudFormation template will create the following resources:

  • IP Set for AWS WAF
  • WebACL with rules to block the client IP addresses of fake bots, and an AWS-managed common rule set.
  • Lambda function to help detect fake bots and modify the AWS WAF IP Set to block them
  • Kinesis Firehose delivery stream, which will use the above Lambda function for processing
  • IAM roles with required permissions for the Lambda function and Kinesis Firehose
  • S3 bucket for AWS WAF logs

5.     Enable logging for the WebACL using AWS CLI. For this you need the ARN of the WebACL and Kinesis Firehose. You can find that information from the output of the CloudFormation stack created in step 4 using the below AWS CLI command

aws cloudformation describe-stacks --stack-name FakeBotBlockBlog

Please note the 2 ARNs and run the following commands by replacing (1) ResourceArn value with WebACL ARN and (2) LogDestinationConfigs value with Kinesis Firehose delivery stream ARN.

Example:

aws wafv2 put-logging-configuration –-logging-configuration ResourceArn=arn:aws:wafv2:us-east-1:123456789012:global/webacl/FakeBotWebACL/259ea98f-24ba-4acd-8803-3e7d02e8d482,LogDestinationConfigs=arn:aws:firehose:us-east-1:123456789012:deliverystream/aws-waf-logs-FakeBotBlockBlog --region us-east-1

6.     Associate CloudFront distribution with this WebACL: Sign in to the AWS Management Console and open the AWS WAF and Shield console at https://console.aws.amazon.com/wafv2/homev2/web-acls?region=global .

  • Click on the WebACL created earlier in this procedure
  • Navigate to ‘Associated AWS resources’ tab and select Add AWS resources
  • In the subsequent screen, select the CloudFront distribution created in step 1
  • Select Add

Note: If you are using an ALB or API Gateway for your web property, then you need to use REGIONAL WebACL and IP Set.  Review the procedure to associate an ALB or API Gateway to the WebACL.

You can monitor WebACL performance from the Overview section of WebACL from the AWS WAF and Shield console.

Testing

To test, you will need to generate some traffic which will trigger the lambda function to detect and block the fake bots created earlier in this blog. The web traffic can be generated from the local machine or from an EC2 instance with access to the internet using curl. Manually set the user agent to resemble Googlebot by running the following command from shell:

Replace http://www.awsdemodesign.com/ with the URL of your CloudFront distribution you created in step 1 of the walkthrough.

for i in {1..1000}; do curl -I -A "Mozilla/5.0 (compatible; Googlebot/2.1; +http://www.google.com/bot.html)" http://www.awsdemodesign.com/; done

Initially you will see HTTP1.1/ 200 OK response. This will trigger Lambda and modify the IP Set to include your public IP address to be blocked. You can verify that by inspecting the IP set from AWS WAF and Shield console.

  • Sign in to the AWS Management Console and open the AWS WAF and Shield console
  • Click on IP Set created earlier in this blog. In the subsequent screen you can see your public IP address in the list of IP addresses.

If you run the curl command again, you will see that the response now is HTTP/1.1 403 Forbidden.

Clean Up

  • Disassociate the CloudFront Distribution from WebACL
  • Delete the S3 bucket and CloudFront Distribution created in Step 1
  • Empty and delete the S3 bucket created by the CloudFormation stack for AWS WAF logs.
  • Delete CloudFormation stack created in Step 4.

Conclusion

In this blog post, we demonstrated how you can set up and inspect incoming web traffic using AWS Lambda, AWS WAF native logging capabilities, and Kinesis Firehose to help detect and block bad or fake bots at scale. Furthermore, the solution outlined in this post provides a framework which can be extended to identify similar unwanted traffic impersonating as other good bots.

Field Notes provides hands-on technical guidance from AWS Solutions Architects, consultants, and technical account managers, based on their experiences in the field solving real-world business problems for customers.


How to enhance Amazon CloudFront origin security with AWS WAF and AWS Secrets Manager

Post Syndicated from Cameron Worrell original https://aws.amazon.com/blogs/security/how-to-enhance-amazon-cloudfront-origin-security-with-aws-waf-and-aws-secrets-manager/

Whether your web applications provide static or dynamic content, you can improve their performance, availability, and security by using Amazon CloudFront as your content delivery network (CDN). CloudFront is a web service that speeds up distribution of your web content through a worldwide network of data centers called edge locations. CloudFront ensures that end-user requests are served by the closest edge location. As a result, viewer requests travel a short distance, improving performance for your viewers. When you deliver web content through a CDN such as CloudFront, a best practice is to prevent viewer requests from bypassing the CDN and accessing your origin content directly. In this blog post, you’ll see how to use CloudFront custom headers, AWS WAF, and AWS Secrets Manager to restrict viewer requests from accessing your CloudFront origin resources directly.

You can configure CloudFront to add custom HTTP headers to the requests that it sends to your origin. HTTP header fields are components of the header section of request and response messages in the Hypertext Transfer Protocol (HTTP). These custom headers enable you to send and gather information from your origin that isn’t included in typical viewer requests. You can use custom headers to control access to content. By configuring your origin to respond to requests only when they include a custom header that was added by CloudFront, you prevent users from bypassing CloudFront and accessing your origin content directly. In addition to offloading traffic from your origin servers, this also helps enforce web traffic being processed at CloudFront edge locations according to your AWS WAF rules prior to being forwarded to your origin.

AWS WAF is a web application firewall that helps protect your web applications from common web exploits that could affect application availability, compromise security, or consume excessive resources. It supports managed rules as well as a powerful rule language for custom rules. AWS WAF is tightly integrated with CloudFront and the Application Load Balancer (ALB). AWS Secrets Manager helps you protect the secrets needed to access your applications, services, and IT resources. This service enables you to easily rotate, manage, and retrieve database credentials, API keys, and other secrets throughout their lifecycle.

Solution overview

This blog post includes a sample solution you can deploy to see how its components integrate to implement the origin access restriction. The sample solution includes a web server deployed on Amazon Elastic Compute Cloud (Amazon EC2) Linux instances running in an AWS Auto Scaling group. Elastic Load Balancing distributes the incoming application traffic across the EC2 instances by using an ALB. The ALB is associated with an AWS WAF web access control list (web ACL), which is used to validate the incoming origin requests. Finally, a CloudFront distribution is deployed with an AWS WAF web ACL and configured to point to the origin ALB.

Although the sample solution is designed for deployment with CloudFront with an AWS WAF–associated ALB as its origin, the same approach could be used for origins that use Amazon API Gateway. A custom origin is any origin that is not an Amazon Simple Storage Service (Amazon S3) bucket, with one exception. An S3 bucket that is configured with static website hosting is a custom origin. You can refer to the CloudFront Developer Guide for more information on securing content that CloudFront delivers from S3 origins.

This solution is intended to enhance security for CloudFront custom origins that support AWS WAF, such as ALB, and is not a substitute for authentication and authorization mechanisms within your web applications. In this solution, Secrets Manager is used to control, audit, monitor, and rotate a random string used within your CloudFront and AWS WAF configurations. Although most of these lifecycle attributes could be set manually, Secrets Manager makes it easier.

Figure 1 shows how the provided AWS CloudFormation template creates the sample solution.
 

Figure 1: How the CloudFormation template works

Figure 1: How the CloudFormation template works

Here’s how the solution works, as shown in the diagram:

  1. A viewer accesses your website or application and requests one or more files, such as an image file and an HTML file.
  2. DNS routes the request to the CloudFront edge location that can best serve the request—typically the nearest CloudFront edge location in terms of latency.
  3. At the edge location, AWS WAF inspects the incoming request according to configured web ACL rules.
  4. At the edge location, CloudFront checks its cache for the requested content. If the content is in the cache, CloudFront returns it to the user. If the content isn’t in the cache, CloudFront adds the custom header, X-Origin-Verify, with the value of the secret from Secrets Manager, and forwards the request to the origin.
  5. At the origin Application Load Balancer (ALB), AWS WAF inspects the incoming request header, X-Origin-Verify, and allows the request if the string value is valid. If the header isn’t valid, AWS WAF blocks the request.
  6. At the configured interval, Secrets Manager automatically rotates the custom header value and updates the origin AWS WAF and CloudFront configurations.

Solution deployment

This sample solution includes seven main steps:

  1. Deploy the CloudFormation template.
  2. Confirm successful viewer access to the CloudFront URL.
  3. Confirm that direct viewer access to the origin URL is blocked by AWS WAF.
  4. Review the CloudFront origin custom header configuration.
  5. Review the AWS WAF web ACL header validation rule.
  6. Review the Secrets Manager configuration.
  7. Review the Secrets Manager AWS Lambda rotation function.

Step 1: Deploy the CloudFormation template

The stack will launch in the N. Virginia (us-east-1) Region. It takes approximately 10 minutes for the CloudFormation stack to complete.

Note: The sample solution requires deployment in the N. Virginia (us-east-1) Region. Although out of scope for this blog post, an additional sample template is available in this solution’s GitHub repository for testing this solution with an existing CloudFront distribution and regional AWS WAF web ACL. Refer to the AWS regional service support information for more details on regional service availability.

To launch the CloudFormation stack

  1. Choose the following Launch Stack icon to launch a CloudFormation stack in your account in the N. Virginia Region.
     
    Select the Launch Stack button to launch the template
  2. In the CloudFormation console, leave the configured values, and then choose Next.
  3. On the Specify Details page, provide the following input parameters. You can modify the default values to customize the solution for your environment.

    Input parameter Input parameter description
    EC2InstanceSize The instance size for EC2 web servers.
    HeaderName The HTTP header name for the secret string.
    WAFRulePriority The rule number to use for the regional AWS WAF web ACL. 0 is recommended, because rules are evaluated in order based on the value of priority.
    RotateInterval The rotation interval, in days, for the origin secret value. Full rotation requires two intervals.
    ArtifactsBucket The S3 bucket with artifact files (Lambda functions, templates, HTML files, and so on). Keep the default value.
    ArtifactsPrefix The path for the S3 bucket that contains artifact files. Keep the default value.

    Figure 2 shows an example of values entered under Parameters.
     

    Figure 2: Input parameters for the CloudFormation stack

    Figure 2: Input parameters for the CloudFormation stack

  4. Enter values for all of the input parameters, and then choose Next.
  5. On the Options page, keep the defaults, and then choose Next.
  6. On the Review page, confirm the details, acknowledge the statements under Capabilities and transforms as shown in Figure 3, and then choose Create stack.
     
    Figure 3: CloudFormation Capabilities and Transforms acknowledgments

    Figure 3: CloudFormation Capabilities and Transforms acknowledgments

Step 2: Confirm access to the website through CloudFront

Next, confirm that website access through CloudFront is functioning as intended. After the CloudFormation stack completes deployment, you can access the test website using the domain name that was automatically assigned to the distribution.

To confirm viewer access to the website through CloudFront

  1. In the CloudFormation console, choose Services > CloudFormation > CFOriginVerify stack. On the stack Outputs tab, look for the cfEndpoint entry, similar to that shown in Figure 4.
     
    Figure 4: CloudFormation cfEndpoint stack output

    Figure 4: CloudFormation cfEndpoint stack output

  2. The cfEndpoint is the URL for the site, and it is automatically assigned by CloudFront. Choose the cfEndpoint link to open the test page, as shown in Figure 5.
     
    Figure 5: CloudFormation cfEndpoint test page

    Figure 5: CloudFormation cfEndpoint test page

In this step, you’ve confirmed that website accessibility through CloudFront is functioning as intended.

Step 3: Confirm that direct viewer access to the origin URL is blocked by AWS WAF

In this step, you confirm that direct access to the test website is blocked by the regional AWS WAF web ACL.

To test direct access to the origin URL

  1. In the CloudFormation console, choose Services > CloudFormation > CFOriginVerify stack. On the stack Outputs tab, look for the albEndpoint entry.
  2. Choose the albEndpoint link to go to the test site URL that was automatically assigned to the ALB. Choosing this link will result in a 403 Forbidden response. When AWS WAF blocks a web request based on the conditions that you specify, it returns HTTP status code 403 (Forbidden).

In this step, you’ve confirmed that website accessibility directly to the origin ALB is blocked by the regional AWS WAF web ACL.

Step 4: Review the CloudFront origin custom header configuration

Now that you’ve confirmed that the test website can only be accessed through CloudFront, you can review the detailed CloudFront, WAF, and Secrets Manager configurations that enable this restriction.

To review the custom header configuration

  1. In the CloudFormation console, choose Services > CloudFormation > CFOriginVerify stack. On the stack Outputs tab, look for the cfDistro entry.
  2. Choose the cfDistro link to go to this distribution’s configuration in the CloudFront console. On the Origin Groups tab, under Origins, select the origin as shown in Figure 6.
     
    Figure 6: CloudFront Origins and Origin Groups settings

    Figure 6: CloudFront Origins and Origin Groups settings

  3. Choose Edit to go to the Origin Settings section, scroll to the bottom and review the Origin Custom Headers as shown in Figure 7.
     
    Figure 7: CloudFront Origin Custom Headers settings

    Figure 7: CloudFront Origin Custom Headers settings

    You can see that the custom header, X-Origin-Verify, has been configured using Secrets Manager with a random 32-character alpha-numeric value. This custom header will be added to web requests that are forwarded from CloudFront to your origin. As you learned in steps 2 and 3, requests without this header are blocked by AWS WAF at the origin ALB. In the next two steps, you will dive deeper into how this works.

Step 5: Review the AWS WAF web ACL header validation rule

In this step, you review the AWS WAF rule configuration that validates the CloudFront custom header X-Origin-Verify.

To review the header validation rule

  1. In the CloudFormation console, select Services > CloudFormation > CFOriginVerify stack. On the stack Outputs tab, look for the wafWebACLR entry.
  2. Choose the wafWebACLR link to go to the origin ALB web ACL configuration in the WAF and Shield console. On the Overview tab, you can view the Requests per 5 minute period chart and the Sampled requests list, which shows requests from the last three hours that the ALB has forwarded to AWS WAF for inspection. The sample of requests includes detailed data about each request, such as the originating IP address and Uniform Resource Identifier (URI). You also can view which rule the request matched, and whether the rule Action is configured to ALLOW, BLOCK, or COUNT requests. You can enable AWS WAF logging to get detailed information about traffic that’s analyzed by your web ACL. You send logs from your web ACL to an Amazon Kinesis Data Firehose with a configured storage destination such as Amazon S3. Information that’s contained in the logs includes the time that AWS WAF received the request from your AWS resource, detailed information about the request, and the action for the rule that each request matched.
  3. Choose the Rules tab to review the rules for this web ACL, as shown in Figure 8.
     
    Figure 8: AWS WAF web ACL rules

    Figure 8: AWS WAF web ACL rules

    On the Rules tab, you can see that the CFOriginVerifyXOriginVerify rule has been configured with the Allow action, while the Default web ACL action is Block. This means that any incoming requests that don’t match the conditions in this rule will be blocked.

    In every AWS WAF rule group and every web ACL, rules define how to inspect web requests and what to do when a web request matches the inspection criteria. Each rule requires one top-level statement, which might contain nested statements at any depth, depending on the rule and statement type. You can learn more about AWS WAF rule statements in the AWS WAF Developer Guide, AWS Online Tech Talks, and samples on GitHub.

  4. Choose the CFOriginVerifyXOriginVerify rule, and then choose Edit to bring up the Rule Builder tool. In the Rule Builder, you can see that a rule has been created with two Rule Statements similar to those in Figure 9.
     
    Figure 9: AWS WAF web ACL rule statement

    Figure 9: AWS WAF web ACL rule statement

    In the Rule Builder configuration for Statement 1, you can see that the request Header is being inspected for the x-origin-verify Header field name (HTTP header field names are case insensitive), and the String to match value is set to the value you reviewed in step 4. In the Rule Builder, you can also see a logical OR with an additional rule statement, Statement 2. You will notice that the configuration for Statement 2 is the same as Statement 1, except that the String to match value is different. You will learn about this in detail in step 7, but Statement 2 helps to ensure that valid web requests are processed by your origin servers when Secrets Manager automatically rotates the value of the X-Origin-Verify header. The effect of this rule configuration is that inspected web requests will be allowed if they match either of the two statements.

    In addition to the visual web ACL representation you just reviewed in the WAF Rule visual editor, every web ACL also has a JSON format representation you can edit by using the WAF Rule JSON editor. You can retrieve the complete configuration for a web ACL in JSON format, modify it as you need, and then provide it to AWS WAF through the console, API, or command line interface (CLI).

    This step demonstrated how your request was allowed to access the test website in step 2 and why your request was blocked in step 3.

Step 6: Review Secrets Manager configuration

Now that you’re familiar with the CloudFront and AWS WAF configurations, you will learn how Secrets Manager creates and rotates the secret used for the X-Origin-Verify header field value. Secrets Manager uses an AWS Lambda function to perform the actual rotation of the secret used for the value and update the associated AWS WAF web ACL and CloudFront distribution.

To review the Secrets Manager configuration

  1. In the CloudFormation console, choose Services > CloudFormation > CFOriginVerify stack. On the stack Outputs tab, look for the OriginVerifySecret entry.
  2. Choose the OriginVerifySecret link to go to the configuration for the secret in the Secrets Manager console. Scroll down to the section titled Secret value, and then choose Retrieve secret value to display the Secret key/value as shown in Figure 10.
     
    Figure 10: Secrets Manager retrieve value

    Figure 10: Secrets Manager retrieve value

    When you retrieve the secret, Secrets Manager programmatically decrypts the secret and displays it in the console. You can see that the secret is stored as a key-value pair, where the secret key is HEADERVALUE, and the secret value is the string used in the CloudFront and WAF configurations you reviewed in steps 3 and 4.

  3. While you’re in the Secrets Manager console, review the Rotation configuration section, as shown in Figure 11.
     
    Figure 11: Secrets Manager rotation configuration

    Figure 11: Secrets Manager rotation configuration

    You can see that rotation was enabled for this secret at an interval of one day. This configuration also includes a Lambda rotation function. Secrets Manager uses a Lambda function to perform the actual rotation of a secret. If you use your secret for one of the supported Amazon Relational Database Service (Amazon RDS) databases, then Secrets Manager provides the Lambda function for you. If you use your secret for another service, then you must provide the code for the Lambda function, as we’ve done in this solution.

Step 7: Review the Secrets Manager Lambda rotation function

In this step, you review the Secrets Manager Lambda rotation function.

To review the Secrets Manager Lambda rotation function

  1. In the CloudFormation console, choose Services > CloudFormation > CFOriginVerify stack. In the stack Outputs tab, look for the OriginSecretRotateFunction entry.
  2. Choose the OriginSecretRotateFunction link to go to the Lambda function that is configured for this secret. The code used for this secrets rotation function is based on the AWS Secrets Manager Rotation Template. Choose the Monitoring tab and review the Invocations graph as shown in Figure 12.
     
    Figure 12: Monitoring tab for the Lambda rotation function

    Figure 12: Monitoring tab for the Lambda rotation function

    Shortly after the CloudFormation stack creation completes, you should see several invocations in the Invocations graph. When a configured rotation schedule or a manual process triggers rotation, Secrets Manager calls the Lambda function several times, each time with different parameters. The Lambda function performs several tasks throughout the process of rotating a secret. This includes the following steps: createSecret, setSecret, testSecret, and finishSecret. Secrets Manager uses staging labels, a simple text string, to enable you to identify different versions of a secret during rotation. This includes the following staging labels: AWSPENDING, AWSCURRENT, and AWSPREVIOUS, which are covered in the following step.

  3. To learn more about the rotation steps configured for this solution, choose View logs in CloudWatch on the Monitoring tab.
    1. On the Log streams tab, select the top entry in the list.
    2. Enter Event in the Filter events field, and then choose the arrows to expand the details for each event as shown in Figure 13.
       
      Figure 13: CloudWatch event logs for the Lambda rotation function

      Figure 13: CloudWatch event logs for the Lambda rotation function

The four rotation steps annotated in Figure 13 work as follows:

Note: This section provides an overview of the rotation process for this solution. For more detailed information about the Lambda rotation function, see the Secrets Manager User Guide.

  1. The createSecret step: In this step, the Lambda function generates a new version of the secret. The rotation Lambda function calls the GetRandomPassword method to generate a new random string, and then labels the new version of the secret with the staging label AWSPENDING to mark it as the in-process version of the secret.
  2. The SetSecret step: In this step, the rotation function retrieves the version of the secret labeled AWSPENDING from Secrets Manager and updates the web ACL rule for the AWS WAF associated with the origin ALB. The two rule statements you reviewed in step 5 of this blog post are updated with the AWSPENDING and AWSCURRENT values. The rotation function also updates the value for the Origin Custom Header X-Origin-Verify. When the rotation function updates your distribution configuration, CloudFront starts to propagate the changes to all edge locations. Maintaining both the AWSPENDING and AWSCURRENT secret values helps to ensure that web requests forwarded to your origin by CloudFront are not blocked. Therefore, once a secret value is created, two rotation intervals are required for it to be removed from the configuration.
  3. The testSecret step: This step of the Lambda function verifies the AWSPENDING version of the secret by using it to access the origin ALB endpoint with the X-Origin-Verify header. Both AWSPENDING and AWSCURRENT X-Origin-Verify header values are tested to confirm a “200 OK” response from the origin ALB endpoint.
  4. The finishSecret step: In the last step, the Lambda function moves the label AWSCURRENT from the current version to this new version of the secret. The old version receives the AWSPREVIOUS staging label, and is available for recovery as the last known good version of the secret, if needed. The old version with the AWSPREVIOUS staging label no longer has any staging labels attached, so Secrets Manager considers the old version deprecated and subject to deletion.

When the finishSecret step has successfully completed, Secrets Manager schedules the next rotation by adding the rotation interval (number of days) to the completion date. This automated process causes the values used for the validation headers to be updated at the configured interval. Although out of scope for this blog post, you should monitor your secrets to ensure usage of your secrets and log any changes to them. This helps you to make sure that any unexpected usage or change can be investigated, and unwanted changes can be rolled back.

Summary

You’ve learned how to use Amazon CloudFront, AWS WAF and AWS Secrets Manager to prevent web requests from directly accessing your CloudFront origin resources. You can use this solution to improve security for CloudFront custom origins that support AWS WAF, such as ALB, Amazon API Gateway, and AWS AppSync.

When using this solution, you will incur AWS WAF usage charges for both the ALB and CloudFront associated AWS WAF web ACLs. You might wish to consider subscribing to AWS Shield Advanced, which provides higher levels of protection against distributed denial of service (DDoS) attacks and includes AWS WAF and AWS Firewall Manager at no additional cost for usage on resources protected by AWS Shield Advanced. You can also learn more about pricing for CloudFront, AWS WAF, Secrets Manager, and AWS Shield Advanced.

You can review more options for restricting access to content with CloudFront, additional AWS WAF security automations, or managed rules for AWS WAF. You can explore solutions for using AWS IP address ranges to enhance CloudFront origin security. You might also wish to learn more about Secrets Manager best practices. This code for this solution is available on GitHub.

If you have feedback about this post, submit comments in the Comments section below. If you have questions about using this solution, you can start a thread in the CloudFront, WAF, or Secrets Manager forums, review or open an issue in this solution’s GitHub repository, or contact AWS Support.

Want more AWS Security how-to content, news, and feature announcements? Follow us on Twitter.

Cameron Worrell

Cameron Worrell

Cameron is a Solutions Architect with a passion for security and enterprise transformation. He joined AWS in 2015.

Automate AWS Firewall Manager onboarding using AWS Centralized WAF and VPC Security Group Management solution

Post Syndicated from Satheesh Kumar original https://aws.amazon.com/blogs/security/automate-aws-firewall-manager-onboarding-using-aws-centralized-waf-and-vpc-security-group-management-solution/

Many customers—especially large enterprises—run workloads across multiple AWS accounts and in multiple AWS regions. AWS Firewall Manager service, launched in April 2018, enables customers to centrally configure and manage AWS WAF rules, audit Amazon VPC security group rules across accounts and applications in AWS Organizations, and protect resources against distributed DDoS attacks.

In this blog post, we show you how to onboard your accounts and your AWS Organizations into the AWS Firewall Manager service and start centrally managing the security policies of your AWS Organizations member accounts. We also show you examples of how to perform operations on the Firewall Manager policies after you’ve deployed the solution, so you can adjust your security posture over time.

As more and more customers began using Firewall Manager for centralized management, they gave us feedback on how it could be improved. We heard that the process of defining policies and configuring rule sets can be challenging and time consuming, especially in a multi-account, multi-region scenario. We built the AWS Centralized WAF and VPC Security Group Management solution to make it easier and faster.

Solution overview

The AWS Centralized WAF and VPC Security Group Management solution fully automates the deployment of Firewall Manager with a set of opinionated defaults for the policies. We call it “opinionated,” because there’s no set of security rules that is right for absolutely every customer. We’re providing an example opinion, but you might have a different opinion, given your unique circumstance. Our examples block traffic that you might have a reason to allow. We install the following policies when you deploy this solution:

  • AWS WAF global policy for Amazon CloudFront distributions and regional policy for Application Load Balancer and Amazon API Gateway: Both the AWS WAF policies include the following AWS Managed Rules for AWS WAF. You can further customize these rules to suit your WAF requirements.
    • AWSManagedRulesCommonRuleSet
    • AWSManagedRulesAdminProtectionRuleSet
    • AWSManagedRulesKnownBadInputsRuleSet
    • AWSManagedRulesSQLiRuleSet
  • Amazon VPC security group usage audit and content audit policy: These policies flag security groups that are unused or redundant. Automatic remediation is turned off by default, but you can turn it on by customizing the solution.
  • AWS Shield Advanced policy: If your account has enabled Shield Advanced, then Shield Advanced protection is enabled for CloudFront, Application Load Balancer, and Elastic IPs.

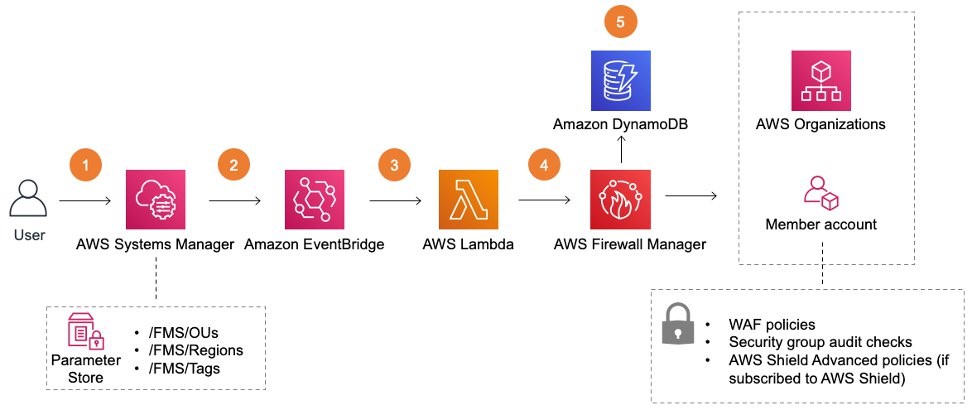
The core of the solution is the AWS CloudFormation template aws-centralized-waf-and-security-group-management. This template deploys the components shown in Figure 1:

Figure 1: Main solutions template - aws-centralized-waf-and-vpc-security-group-management.template

Figure 1: Main solutions template – aws-centralized-waf-and-vpc-security-group-management.template

  1. After deployment, you can update the three AWS Systems Manager parameters—/FMS/OUs, /FMS/Regions, and /FMS/Tags—with appropriate values to control the scope and applicability of the Firewall Manager security policies.
  2. On update of the values in the Systems Manager parameters, the Amazon EventBridge rule captures the parameter update event.
  3. Amazon EventBridge triggers an AWS Lambda function to deploy the Firewall Manager policies.
  4. The AWS Lambda function will deploy the Firewall manager security policies across the OUs and regions specified in step 1.
  5. The lambda function updates the Amazon DynamoDB table with Firewall manager policies metadata.

Configuring Prerequisites Automatically

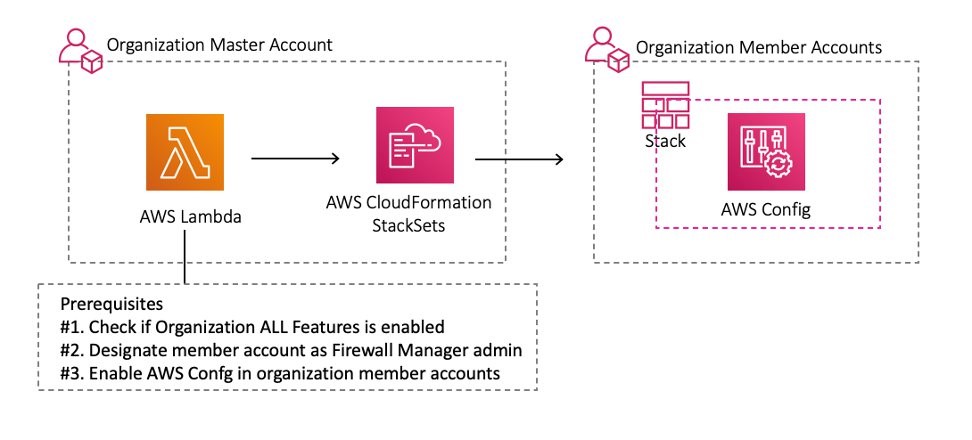
There are a few important prerequisites that must be configured in your account before you deploy this solution. We have built a template called aws-fms-prereq that will launch the solution prerequisites.

When you execute the aws-fms-prereq template, the following things will happen:

Note: If the Firewall Manager prerequisites described above are already met, you can skip this step and go directly to next step: Deploy the solution template.

If you run this prerequisite template in the Organization primary account that is also your Firewall Manager admin account, the solution template will be deployed automatically. If you do this, you can skip the step of deploying the solution template and jump straight to Manage your Firewall manager security policies.

Figure 2 shows how the prerequisite template creates a Lambda function. That function validates and installs the prerequisites and AWS CloudFormation stack sets to enable AWS Config across all member accounts in the organization.

Figure 2: Solution prerequisites

Figure 2: Solution prerequisites

Installing Prerequisites

If the Firewall Manager prerequisites are already met, skip this step and go directly to next step, below: Deploy the solution template.

  1. Install the AWS CLI

    Note: If you already have the AWS Command Line Interface v2 installed on your workstation, you can skip this step.

    The template deployment can be done using the AWS Management Console or the AWS CLI. This procedure uses the AWS CLI to do the deployment. To get started, install the AWS CLI and configure it with credentials that have the required IAM permissions to create resources.

  2. Deploy the prerequisite templateIf this is the first time you’re using Firewall Manager, download the aws-fms-prereq.template, and run the following AWS CLI command in the primary account of your AWS Organization to check for and complete the prerequisites.Replace the variable <your_FW_account_ID> with the account ID of your AWS Firewall Admin. This deployment typically takes 2–3 minutes, but sometimes a little longer if there are a large number of member accounts in your organization. If you want AWS Config to be enabled in your member accounts, then set the EnableConfig parameter to Yes; however, if AWS Config is already enabled, then set it to No.
    aws cloudformation create-stack \
    --stack-name fms-prereq-stack \
    --template-body file://aws-fms-prereq.template \
    --parameters ParameterKey=FMSAdmin,ParameterValue=<your_FW_account_ID> ParameterKey=EnableConfig,ParameterValue=Yes
    

Deploy the solution template

Deploy the solution using aws-centralized-waf-and-vpc-security-group-management.template—an AWS CloudFormation template—in your Firewall Manager admin account that was created by the prerequisite template.

This template deploys the AWS Centralized WAF and VPC Security Group Management solution shown in Figure 1, with all the resources and integrations.

The following AWS CLI command will deploy the solution template:

aws cloudformation create-stack \
--stack-name fms-central-policy-mgmt-stack \
--template-body file://aws-centralized-waf-and-vpc-security-group-management.template \
--capabilities CAPABILITY_IAM

The command will print very basic output, simply identifying the stack’s name, as shown below.

{
 "StackId": "arn:aws:cloudformation:us-east-1:<your_FW_admin_account_ID>:stack/fms-central-policy-mgmt-stack/<stack ARN>"
}

You can run the following CLI command to check the status of the stack deployment. Once you see that “StackStatus” is set to “CREATE_COMPLETE” in the output, you can proceed to the next step.

aws cloudformation describe-stacks \
--stack-name fms-central-policy-mgmt-stack

Manage your Firewall manager security policies

Once the solution is deployed, you can deploy the Firewall Manager policies to the organization member accounts, which will be reflected in the Parameter Store. These changes to the Parameter Store are picked up by the EventBridge rule, which triggers the Lambda function to automatically create, delete, or modify the policies as required.

Note: All of the following commands must be executed in the Firewall manager admin account, which might not be the root account of your AWS Organization.

  1. Add OUs to the scope of Firewall Manager policiesTo begin, define the OUs that the Firewall Manager policies should apply to. Store the list of OUs in a parameter named /FMS/OUs. The following AWS CLI command stores a comma-separated list of OU IDs in the right parameter.
    aws ssm put-parameter \
     --name "/FMS/OUs" \
     --type "StringList" \
     --value "<comma_separated_list_of_your_OU_IDs>" \
     --overwrite
    

    If it is successful, the output of the command will be a simple acknowledgement, like the following:

    {
    "Version": 2,
     "Tier": "Standard"
    }
    

  2. Add AWS Regions to the scope of Firewall Manager policiesNext you need to add the AWS regions where you want these policies to be applied. In the AWS CLI command that follows, you can customize the AWS region list depending on where you run your workloads. If, for example, you want to use us-west-2, us-east-1, and eu-west-1, then you need to provide us-west-2,us-east-1,eu-west-1 as your value in the command below.
    aws ssm put-parameter \
     --name "/FMS/Regions" \
     --type "StringList" \
     --value "<comma_separated_list_of_your_regions>" \
     --overwrite
    

    If it is successful, the output of the command will be a simple acknowledgement, like the following:

    {
    "Version": 2,
     "Tier": "Standard"
    }
    

  3. (Optional) Add resource tagsPlease note that this is an optional step. Resource tags are a way to apply these Firewall Manager policies to some resources, but not others. Imagine that we only want to apply these policies to resources that have the tag Environment set to the value Prod. The following command will do that:
    aws ssm put-parameter \
     --name "/FMS/Tags" \
     --type "String" \
     --value "{\"ResourceTags\":[{\"Key\":\"Environment\",\"Value\":\"Prod\"}],\"ExcludeResourceTags\":false}" \
     --overwrite
    

    If it is successful, the output of the command will be a simple acknowledgement, like the following:

    {
     "Version": 2,
     "Tier": "Standard"
    }
    

Test the solution

Test the solution by creating a global CloudFront distribution and an Amazon VPC security group in one of your member accounts, and configure these resources to be noncompliant with the policies enforced by Firewall Manager.

Deploy test resources in one of your member accounts

Run the following AWS CLI command to deploy the demo template in one of the member accounts to create a sample CloudFront distribution and an Amazon VPC security group that aren’t compliant with the default Firewall Manager policies.

aws cloudformation create-stack \
  --stack-name demo-stack \
  --template-body file://aws-fms-demo.template \
  --capabilities CAPABILITY_IAM

Check for web ACL and security group audit results

To check the webACL resource association in the member account, follow these steps:

  1. Log in to your member account management console where you had deployed your demo-template and go to the WAF & Shield service page.
  2. You will see the WebACL with the prefix “FMManagedWebACLV2FMS-WAF-01“ , select that webACL.
  3. Go to the tab Associated AWS resources.
  4. You should see the newly created CloudFront distribution listed here.

To check the compliance status of the newly created security group, follow these steps:

  1. Log in to the Firewall manager admin account management console and go to the AWS Firewall Manager service page.
  2. In the Security policies section, you will find the FMS-SecGroup-02 policy. Select the policy FMS-SecGroup-02.
  3. You will see that the member account (where the demo template was deployed) is marked as non-compliant. Select the member account number to see the newly created security group along with the reason for the noncompliant finding.

Clean-up test resources in member account

Follow these steps to clean up the test resources that the demo template would have created in your member account:

  1. Log in to member account management console, and go to Cloudfront service page.
  2. Select the CloudFront distribution. (Origin would have the stack name as its prefix.)
  3. Go to “Behaviours,” select the one and select Edit.
  4. Remove the lambda function association and save changes.
  5. Run this CLI command to delete the stack that you had created earlier:
    aws cloudformation delete-stack \
      --stack-name demo-stack
    

Customizing the solution’s source code

This solution deploys Firewall Manager policies with some opinionated default rules defined in the manifest.json file. They probably aren’t all that you will need. You could customize these policies to fit your own needs, but it takes a bit of development skill. Also, the steps are too long to include here. If, for example, you want to add another AWS WAF rule group to the default AWS WAF security policy, you’ll need to edit the manifest and redeploy the solution. See how to do this customization and several others.

(Optional) Clean-up resources

Once you’ve tried the solution, if you want to clean up the stack you can do so in two steps:

  1. Go to the Firewall Manager admin account management console, navigate to the Parameter Store, and update the /FMS/OU parameter with the value delete. This ensures that the Firewall Manager policies and their related resources are deleted.
  2. Run the following AWS CLI command in the Firewall manager admin account to delete the solution stack you deployed earlier:
    aws cloudformation delete-stack --stack-name fms-central-policy-mgmt-stack
    

Conclusion

The AWS Centralized WAF and VPC Security Group Management solution addresses the feedback we heard from you, our customer. You told us the process of defining policies and configuring rule sets is challenging and time consuming, so we wrote this to make it easier and faster. In this post, we showed you how to deploy the solution following a two-step process using AWS CloudFormation. We also showed you ways that you can use the solution to easily manage your Firewall Manager policies by updating values in Systems Manager Parameter Store. Updating the values automates the deployment based on your choice of OUs, Regions, and resources. Finally, we showed you how to further customize the solution to suit your needs.

This post is just an introduction to what is possible and the overall objective. Before you start using this solution for anything important, we recommend that you review the solution implementation guide. It contains step-by-step directions and more example use cases. The guide also includes security recommendations and some cost estimates for the various supported scenarios.

To learn more about other AWS solutions, visit the AWS Solutions Library.

If you have feedback about this post, submit comments in the Comments section below. If you have questions about this post, start a new thread on the AWS Firewall Manager forum or contact AWS Support.

Want more AWS Security how-to content, news, and feature announcements? Follow us on Twitter.

Author

Satheesh Kumar

Satheesh is a Senior Solutions Architect based out of Bangalore, India. He helps large enterprise customers build solutions using AWS services.

Author

Ramanan Kannan

Ramanan is a Senior Solutions Architect and works with large enterprise customers in the financial domain. He is based out of Chennai, India.

Automatically updating AWS WAF Rule in real time using Amazon EventBridge

Post Syndicated from Adam Cerini original https://aws.amazon.com/blogs/security/automatically-updating-aws-waf-rule-in-real-time-using-amazon-eventbridge/

In this post, I demonstrate a method for collecting and sharing threat intelligence between Amazon Web Services (AWS) accounts by using AWS WAF, Amazon Kinesis Data Analytics, and Amazon EventBridge. AWS WAF helps protect against common web exploits and gives you control over which traffic can reach your application.

Attempted exploitation blocked by AWS WAF provides a data source on potential attackers that can be shared proactively across AWS accounts. This solution can be an effective way to block traffic known to be malicious across accounts and public endpoints. AWS WAF managed rules provide an easy way to mitigate and record the details of common web exploit attempts. This solution will use the Admin protection managed rule for demonstration purposes.

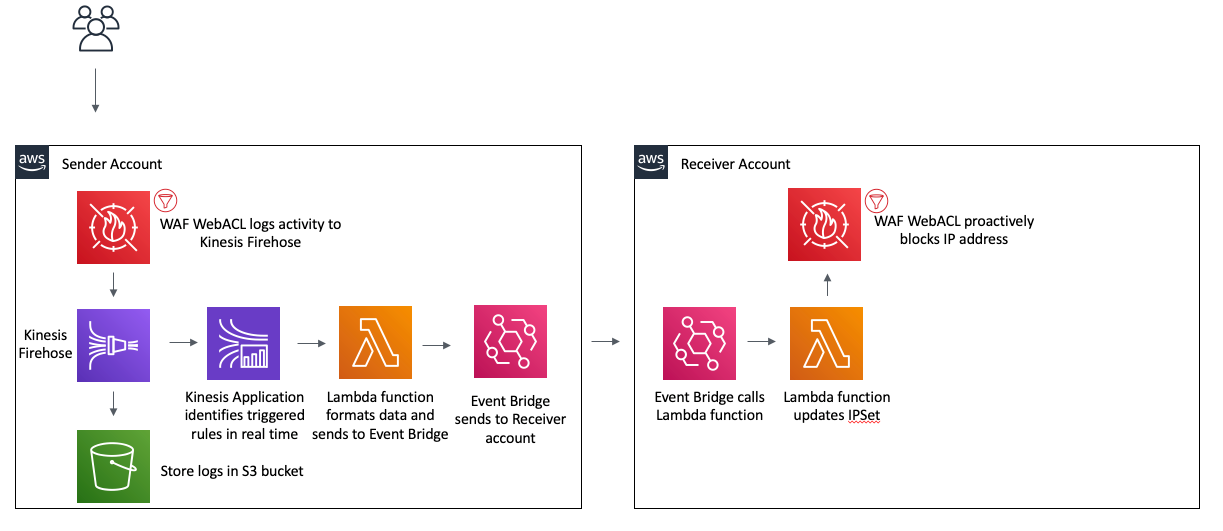
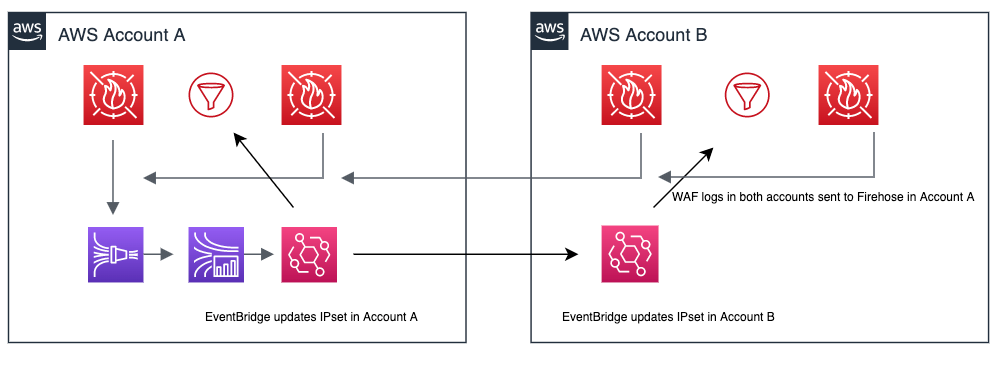
In this post you will see references to the Sender account and the Receiver account. There is only one receiver in this example, but the receiving process can be duplicated multiple times across multiple accounts. This post walks through how to set up the solution. You’ll notice there is also an AWS CloudFormation template that makes it easy to test the solution in your own AWS account. The diagram in figure 1 illustrates how this architecture fits together at a high level.
 

Figure 1: Architecture diagram showing the activity flow of traffic blocked on the Sender AWS WAF

Figure 1: Architecture diagram showing the activity flow of traffic blocked on the Sender AWS WAF

Prerequisites

You should know how to do the following tasks:

Extracting threat intelligence

AWS WAF logs using a Kinesis Data Firehose delivery stream. This allows you to not only log to a destination S3 bucket, but also act on the stream in real time using a Kinesis Data Analytics Application. The following SQL code demonstrates how to extract any unique IP addresses that have been blocked by AWS WAF. While this example returns all blocked IPs, more complex SQL could be used for a more granular result. The full list of log fields is included in the documentation.


CREATE OR REPLACE STREAM "wafstream" (
 "clientIp" VARCHAR(16),
 "action" VARCHAR(8),
 "time_stamp" TIMESTAMP
 );

CREATE OR REPLACE PUMP "WAFPUMP" as
INSERT INTO "wafstream" (
"clientIp",
"action",
"time_stamp"
) 

Select STREAM DISTINCT "clientIp", "action", FLOOR(WAF_001.ROWTIME TO MINUTE) as "time_stamp"
FROM "WAF_001"
WHERE "action" = 'BLOCK';

Proactively blocking unwanted traffic

After extracting the IP addresses involved in the abnormal traffic, you will want to proactively block those IPs on your other web facing resources. You can accomplish this in a scalable way using Amazon EventBridge. After the Kinesis Application extracts the IP address, it will use an AWS Lambda function to call PutEvents on an EventBridge event bus. This process will create the event pattern, which is used to determine when to trigger an event bus rule. This example uses a simple pattern, which acts on any event with a source of “custom.waflogs” as shown in Figure 2. A more complex pattern could be used to for finer grain control of when a rule triggers.
 

Figure 2: EventBridge Rule creation

Figure 2: EventBridge Rule creation

Once the event reaches the event bus, the rule will forward the event to an event bus in “Receiver” account, where a second rule will trigger to call a Lambda function to update a WAF IPSet. A Web ACL rule is used to block all traffic sourcing from an IP address contained in the IPSet.

Test the solution by using AWS CloudFormation

Now that you’ve walked through the design of this solution, you can follow these instructions to test it in your own AWS account by using CloudFormation stacks.

To deploy using CloudFormation

  1. Launch the stack to provision resources in the Receiver account.
  2. Provide the account ID of the Sender account. This will correctly configure the permissions for the EventBridge event bus.
  3. Wait for the stack to complete, and then capture the event bus ARN from the output tab.

    This stack creates the following resources:

    • An AWS WAF v2 web ACL
    • An IPSet which will be used to contain the IP addresses to block
    • An AWS WAF rule that will block IP addresses contained in the IPSet
    • A Lambda function to update the IPSet
    • An IAM policy and execution role for the Lambda function
    • An event bus
    • An event bus rule that will trigger the Lambda function
  4. Switch to the Sender account. This should be the account you used in step 2 of this procedure.
  5. Provide the ARN of the event bus that was captured in step 3. This stack will provision the following resources in your account:
    • A virtual private cloud (VPC) with public and private subnets
    • Route tables for the VPC resources
    • An Application Load Balancer (ALB) with a fixed response rule
    • A security group that allows ingress traffic on port 80 to the ALB
    • A web ACL with the AWS Managed Rule for Admin Protection enabled
    • An S3 bucket for AWS WAF logs
    • A Kinesis Data Firehose delivery stream
    • A Kinesis Data Analytics application
    • An EventBridge event bus
    • An event bus rule
    • A Lambda function to send information to the Receiver account event bus
    • A custom CloudFormation resource which enables WAF logging and starts the Kinesis Application
    • An IAM policy and execution role that allows a Lamba function to put events into the event bus
    • An IAM policy and role to allow the custom CloudFormation resource to enable WAF logging and start the Kinesis Application
    • An IAM policy and role that allows the Kinesis Firehose to put logs into S3
    • An IAM policy that allows the WAF Web ACL to put records into the Firehose
    • An IAM policy and role that allows the Kinesis Application to invoke a Lambda function and log to CloudWatch
    • An IAM policy and role that allows the “Sender” account to put events in the “Receiver” event bus

After the CloudFormation stack completes, you should test your environment. To test the solution, check the output tab for the DNS name of the Application Load Balancer and run the following command:

curl ALBDNSname/admin

You should be able to check the Receiver account’s AWS WAF IPSet named WAFBlockIPset and find your IP.

Conclusion

This example is intentionally simple to clearly demonstrate how each component works. You can take these principles and apply them to your own environment. Layering the Amazon managed rules with your own custom rules is the best way to get started with AWS WAF. This example shows how you can use automation to update your WAF rules without needing to rely on humans. A more complete solution would source log data from each Web ACL and update an active IP Set in each account to protect all resources. As seen in Figure 3, a more complete implementation would send all logs in a region to a centralized Kinesis Firehose to be processed by the Kinesis Analytics Application, EventBridge would be used to update a local IPset as well as forward the event to other accounts event buses for processing.
 

Figure 3: Updating across accounts

Figure 3: Updating across accounts

You can also add additional targets to the event bus to do things such as send to a Simple Notification Service topic for notifications, or run additional automation. To learn more about AWS WAF web ACLs, visit the AWS WAF Developer Guide. Using Amazon EventBridge opens up the possibility to send events to partner integrations. Customers or APN Partners like PagerDuty or Zendesk can enrich this solution by taking actions such as automatically opening a ticket or starting an incident. To learn more about the power of Amazon EventBridge, see the EventBridge User Guide.

If you have feedback about this post, submit comments in the Comments section below. If you have questions about this post, start a new thread on the AWS WAF forum or contact AWS Support.

Want more AWS Security how-to content, news, and feature announcements? Follow us on Twitter.

Author

Adam Cerini

Adam is a Senior Solutions Architect with Amazon Web Services. He focuses on helping Public Sector customers architect scalable, secure, and cost effective systems. Adam holds 5 AWS certifications including AWS Certified Solutions Architect – Professional and AWS Certified Security – Specialist.

Troubleshooting Amazon API Gateway with enhanced observability variables

Post Syndicated from Eric Johnson original https://aws.amazon.com/blogs/compute/troubleshooting-amazon-api-gateway-with-enhanced-observability-variables/

Amazon API Gateway is often used for managing access to serverless applications. Additionally, it can help developers reduce code and increase security with features like AWS WAF integration and authorizers at the API level.

Because more is handled by API Gateway, developers tell us they would like to see more data points on the individual parts of the request. This data helps developers understand each phase of the API request and how it affects the request as a whole. In response to this request, the API Gateway team has added new enhanced observability variables to the API Gateway access logs. With these new variables, developers can troubleshoot on a more granular level to quickly isolate and resolve request errors and latency issues.

The phases of an API request

API Gateway divides requests into phases, reflected by the variables that have been added. Depending upon the features configured for the application, an API request goes through multiple phases. The phases appear in a specific order as follows:

Phases of an API request

Phases of an API request

  • WAF: the WAF phase only appears when an AWS WAF web access control list (ACL) is configured for enhanced security. During this phase, WAF rules are evaluated and a decision is made on whether to continue or cancel the request.
  • Authenticate: the authenticate phase is only present when AWS Identity and Access Management (IAM) authorizers are used. During this phase, the credentials of the signed request are verified. Access is granted or denied based on the client’s right to assume the access role.
  • Authorizer: the authorizer phase is only present when a Lambda, JWT, or Amazon Cognito authorizer is used. During this phase, the authorizer logic is processed to verify the user’s right to access the resource.
  • Authorize: the authorize phase is only present when a Lambda or IAM authorizer is used. During this phase, the results from the authenticate and authorizer phase are evaluated and applied.
  • Integration: during this phase, the backend integration processes the request.

Each phrase can add latency to the request, return a status, or raise an error. To capture this data, API Gateway now provides enhanced observability variables based on each phase. The variables are named according to the phase they occur in and follow the naming structure, $context.phase.property. Therefore, you can get data about WAF latency by using $context.waf.latency.

Some existing variables have also been given aliases to match this naming schema. For example, $context.integrationErrorMessage has a new alias of $context.integration.error. The resulting list of variables is as follows:

Phases and variables for API Gateway requests

Phases and variables for API Gateway requests

API Gateway provides status, latency, and error data for each phase. In the authorizer and integration phases, there are additional variables you can use in logs. The $context.phase.requestId provides the request ID from that service and the $context.phase.integrationStatus provide the status code.

For example, when using an AWS Lambda function as the integration, API Gateway receives two status codes. The first, $context.integration.integrationStatus, is the status of the Lambda service itself. This is usually 200, unless there is a service or permissions error. The second, $context.integration.status, is the status of the Lambda function and reports on the success or failure of the code.

A full list of access log variables is in the documentation for REST APIs, WebSocket APIs, and HTTP APIs.

A troubleshooting example

In this example, an application is built using an API Gateway REST API with a Lambda function for the backend integration. The application uses an IAM authorizer to require AWS account credentials for application access. The application also uses an AWS WAF ACL to rate limit requests to 100 requests per IP, per five minutes. The demo application and deployment instructions can be found in the Sessions With SAM repository.

Because the application involves an AWS WAF and IAM authorizer for security, the request passes through four phases: waf, authenticate, authorize, and integration. The access log format is configured to capture all the data regarding these phases:

{
  "requestId":"$context.requestId",
  "waf-error":"$context.waf.error",
  "waf-status":"$context.waf.status",
  "waf-latency":"$context.waf.latency",
  "waf-response":"$context.wafResponseCode",
  "authenticate-error":"$context.authenticate.error",
  "authenticate-status":"$context.authenticate.status",
  "authenticate-latency":"$context.authenticate.latency",
  "authorize-error":"$context.authorize.error",
  "authorize-status":"$context.authorize.status",
  "authorize-latency":"$context.authorize.latency",
  "integration-error":"$context.integration.error",
  "integration-status":"$context.integration.status",
  "integration-latency":"$context.integration.latency",
  "integration-requestId":"$context.integration.requestId",
  "integration-integrationStatus":"$context.integration.integrationStatus",
  "response-latency":"$context.responseLatency",
  "status":"$context.status"
}

Once the application is deployed, use Postman to test the API with a sigV4 request.

Configuring Postman authorization

Configuring Postman authorization

To show troubleshooting with the new enhanced observability variables, the first request sent through contains invalid credentials. The user receives a 403 Forbidden error.

Client response view with invalid tokens

Client response view with invalid tokens

The access log for this request is:

{
    "requestId": "70aa9606-26be-4396-991c-405a3671fd9a",
    "waf-error": "-",
    "waf-status": "200",
    "waf-latency": "8",
    "waf-response": "WAF_ALLOW",
    "authenticate-error": "-",
    "authenticate-status": "403",
    "authenticate-latency": "17",
    "authorize-error": "-",
    "authorize-status": "-",
    "authorize-latency": "-",
    "integration-error": "-",
    "integration-status": "-",
    "integration-latency": "-",
    "integration-requestId": "-",
    "integration-integrationStatus": "-",
    "response-latency": "48",
    "status": "403"
}

The request passed through the waf phase first. Since this is the first request and the rate limit has not been exceeded, the request is passed on to the next phase, authenticate. During the authenticate phase, the user’s credentials are verified. In this case, the credentials are invalid and the request is rejected with a 403 response before invoking the downstream phases.

To correct this, the next request uses valid credentials, but those credentials do not have access to invoke the API. Again, the user receives a 403 Forbidden error.

Client response view with unauthorized tokens

Client response view with unauthorized tokens

The access log for this request is:

{
  "requestId": "c16d9edc-037d-4f42-adf3-eaadf358db2d",
  "waf-error": "-",
  "waf-status": "200",
  "waf-latency": "7",
  "waf-response": "WAF_ALLOW",
  "authenticate-error": "-",
  "authenticate-status": "200",
  "authenticate-latency": "8",
  "authorize-error": "The client is not authorized to perform this operation.",
  "authorize-status": "403",
  "authorize-latency": "0",
  "integration-error": "-",
  "integration-status": "-",
  "integration-latency": "-",
  "integration-requestId": "-",
  "integration-integrationStatus": "-",
  "response-latency": "52",
  "status": "403"
}

This time, the access logs show that the authenticate phase returns a 200. This indicates that the user credentials are valid for this account. However, the authorize phase returns a 403 and states, “The client is not authorized to perform this operation”. Again, the request is rejected with a 403 response before invoking downstream phases.

The last request for the API contains valid credentials for a user that has rights to invoke this API. This time the user receives a 200 OK response and the requested data.

Client response view with valid request

Client response view with valid request

The log for this request is:

{
  "requestId": "ac726ce5-91dd-4f1d-8f34-fcc4ae0bd622",
  "waf-error": "-",
  "waf-status": "200",
  "waf-latency": "7",
  "waf-response": "WAF_ALLOW",
  "authenticate-error": "-",
  "authenticate-status": "200",
  "authenticate-latency": "1",
  "authorize-error": "-",
  "authorize-status": "200",
  "authorize-latency": "0",
  "integration-error": "-",
  "integration-status": "200",
  "integration-latency": "16",
  "integration-requestId": "8dc58335-fa13-4d48-8f99-2b1c97f41a3e",
  "integration-integrationStatus": "200",
  "response-latency": "48",
  "status": "200"
}

This log contains a 200 status code from each of the phases and returns a 200 response to the user. Additionally, each of the phases reports latency. This request had a total of 48 ms of latency. The latency breaks down according to the following:

Request latency breakdown

Request latency breakdown

Developers can use this information to identify the cause of latency within the API request and adjust accordingly. While some phases like authenticate or authorize are immutable, optimizing the integration phase of this request could remove a large chunk of the latency involved.

Conclusion

This post covers the enhanced observability variables, the phases they occur in, and the order of those phases. With these new variables, developers can quickly isolate the problem and focus on resolving issues.

When configured with the proper access logging variables, API Gateway access logs can provide a detailed story of API performance. They can help developers to continually optimize that performance. To learn how to configure logging in API Gateway with AWS SAM, see the demonstration app for this blog.

#ServerlessForEveryone

Deploying defense in depth using AWS Managed Rules for AWS WAF (part 2)

Post Syndicated from Daniel Swart original https://aws.amazon.com/blogs/security/deploying-defense-in-depth-using-aws-managed-rules-for-aws-waf-part-2/

In this post, I show you how to use recent enhancements in AWS WAF to manage a multi-layer web application security enforcement policy. These enhancements will help you to maintain and deploy web application firewall configurations across deployment stages and across different types of applications.

In part 1 of this post I describe the technologies and methods that you can use to build and manage defense in depth for your network. In part 2, I will show you how to use those tools to build your defense in depth using AWS Managed Rules as the starting point and how it can be used for optimal effectiveness

Managing policies for multiple environments can be done with minimal administrative overhead and can now be part of a deployment pipeline where you programmatically enforce policies for broad edge network policy enforcements and protect production workloads without compromising on development speed or safety.

Building robust security policy enforcement relies on a layered approach and the same applies to securing your web applications. Having edge policies, application policies, and even private or internal policy enforcement layers adds to the visibility of communication requests as well as unified policy enforcement.

Using a layered AWS WAF deployment, such as is deployed by the procedure that follows, gives you greater flexibility in the amount of rules you can use and the option to standardize edge policies and production policies. This lets you test and develop new applications without comprising the production environments.

In the following example, the application load balancer is in us-east-1. To create a web ACL for Amazon CloudFront you need to deploy the stack in us-east-1. The Amazon-CloudFront-Application-Load-Balancer-AMR.yml template can create both web ACLs in this scenario.

Note: If you’re using CloudFront and hosting the origin in us-east-1, you only need to maintain one stack. If your origin is in another region, you need to deploy a stack in us-east-1 for CloudFront web ACLs and another in the region where your application load balancer is. That scenario isn’t covered in the following procedure. None of the underlying infrastructure would be deployed with the example AWS CloudFromation templates provided. Only the AWS WAF configurations would be deployed using the example templates.

Solution overview

The following diagram illustrates the traffic flow where traffic comes in via CloudFront and serves the traffic to the backend load balancers. Both CloudFront and the load balancers support AWS WAF. This is where dedicated web security policies can be enforced to build out a defense-in-depth, multi layered policy enforcement.
 

Figure 1: Defense in depth deployment on AWS WAF

Figure 1: Defense in depth deployment on AWS WAF

Creating AWS Managed Rule web ACLs

During this process we create two web ACLs that are designed for policy enforcement for two dedicated layers. The process won’t deploy the required infrastructure, such as the CloudFront distribution or application load balancers. This example template deploys a single stack in us-east-1 where the CloudFront origin load balancer is located.

To create AWS Managed Rule web ACLs

  1. Download the Amazon-CloudFront-Application-Load-Balancer-AMR.yml template.
  2. Open the AWS Management Console and select the region where the origin application load balancer is deployed. The Amazon-CloudFront-Application-Load-Balancer-AMR.yml template that you downloaded deploys both web ACLs for CloudFront and the application load balancer.
     
    Figure 2: Select a region from the console

    Figure 2: Select a region from the console

  3. Under Find Services enter AWS CloudFormation and select Enter.
     
    Figure 3: Find and select AWS CloudFormation

    Figure 3: Find and select AWS CloudFormation

  4. Select Create stack.
     
    Figure 4: Create stack

    Figure 4: Create stack

  5. Select a template file for the stack.
    1. In the Create stack window, select Template is ready and Upload a template file.
    2. Under Upload a template file, select Choose file and select the Amazon-CloudFront-Application-Load-Balancer-AMR.yml example AWS CloudFormation template you downloaded earlier.
    3. Choose Next.
    Figure 5: Prepare and choose a template

    Figure 5: Prepare and choose a template

  6. Add stack details.
    1. Enter a name for the stack in Stack name.
    2. Enter a name for the Edge Network AWS WAF WebACL and for the Public Layer AWS WAF WebACL.
    3. Set a rate-limit for HTTP GET requests in HTTP Get Flood Protection (this rate is applied per IP address over a 5 minute period).
    4. Set a rate limit for HTTP POST requests in HTTP Post Flood Protection.
    5. Use the Login URL to apply the limit to a targeted login page. If you want to rate-limit all HTTP POST requests, leave the login URL section blank.
    Figure 6: Set stack details

    Figure 6: Set stack details

  7. By default, all the rules within the rule-sets are in action override (count mode). This does not include the rate based rules. If you want to deploy selected rules in a block, remove them from the pre-populated list by highlighting and deleting them. It’s best practice to evaluate firewall rules before changing them from count to block mode. Choose Next to move to the next step.
     
    Figure 7: Default managed rules options

    Figure 7: Default managed rules options

  8. Here you can add tags to apply to the resources in the stack that these rules will be deployed to. Tagging is a recommended best practice as it enables you to add metadata information to resources during the creation. For more information on tagging please see the Tagging AWS resources documentation. Then choose Next. On the following page choose Create stack.
     
    Figure 8: Add tags

    Figure 8: Add tags

  9. Wait until the stack has been deployed. When deployment is complete, the status of the stack will change to CREATE_COMPLETE.
     
    Figure 9: Stack deployment status

    Figure 9: Stack deployment status

Associating the web ACLs to resources

During this process we associate the two newly created web ACLs to the corresponding infrastructure resources. In this example, it would be the CloudFront distribution and its origin load balancer which should have been created prior.

To associate the web ACLs to resources

  1. In the console search for and select WAF & Shield.
     
    Figure 10: Select WAF & Shield

    Figure 10: Select WAF & Shield

  2. Select Web ACLs from the list on the left.
     
    Figure 11: Select Web ACLs

    Figure 11: Select Web ACLs

  3. Select Global (CloudFront) from the drop down list at the top of the page. Choose the Edge-Network-Layer-WebACL name that you created in step 6 of the previous procedure (Creating AWS Managed Rule web ACLs).
     
    Figure 12: Select the web ACL

    Figure 12: Select the web ACL

  4. Next select Associated AWS and then choose Add AWS resources.
     
    Figure 13: Add AWS resources

    Figure 13: Add AWS resources

  5. Select the CloudFront distribution you want to protect. Choose Add.
     
    Figure 14: Select the CloudFront distribution to protect

    Figure 14: Select the CloudFront distribution to protect

  6. Select the region the application load balancer is deployed in—this example is us-east-1—and then repeat the same association process as in steps by selecting Web ACLs and now associating the Application Load Balancer similar to steps 3 and 4 above. However, this time, select the application load balancer that serves as the CloudFront Distribution origin. Select US East (N. Virginia) from the drop-down list at the top of the page. Choose the Public-Application-Layer-WebACL name that you created in step 6 of the previous procedure (Creating AWS Managed Rule web ACLs).
     
    Figure 15: Application layer Web ACL association

    Figure 15: Application layer Web ACL association

Conclusion

Using AWS WAF to manage a multi-layer web application security enforcement policy you are able to build defense in depth stack for each specific web application. The configuration will help you to maintain and deploy web application firewall configurations across deployment stages and across different types of applications. Now with AWS Managed Rules this has enabled customers to make use of prebuild rule sets that can easily be deployed to create a layered defense that will fit into customers web application deployment pipelines. For customers that would like to centrally manage and control WAF in their AWS Organization, consider AWS Firewall Manager.

The AWS CloudFormation templates used in this procedure are in this GitHub repository.

If you have feedback about this post, submit comments in the Comments section below. If you have questions about this post, start a new thread on the AWS WAF forum or contact AWS Support.

Want more AWS Security how-to content, news, and feature announcements? Follow us on Twitter.
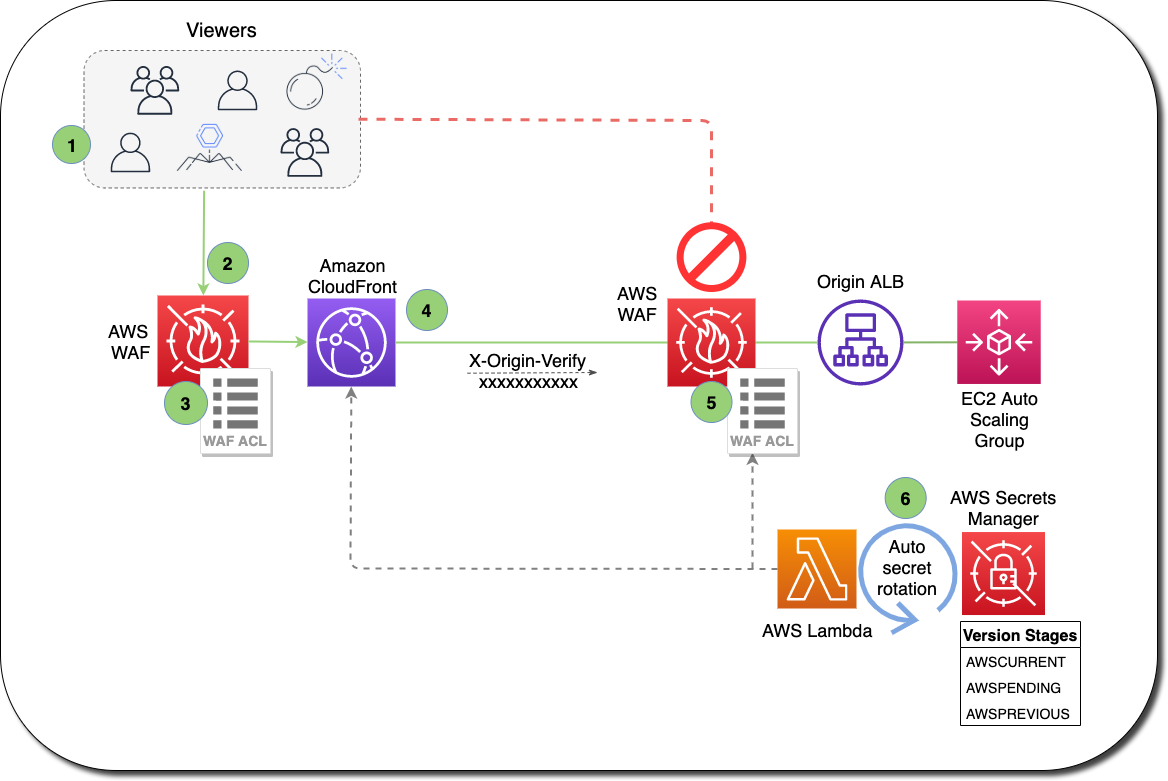
Author

Daniel Cisco Swart

The AWS Managed Rules was something Daniel worked on personally over a number of years during his time with the AWS Threat Research Team. Currently Daniel is working with Security competency technology partners from the AWS Partner Network as a Partner Solutions Architect enabling customer success through technical collaboration with AWS’s top security partners.

Defense in depth using AWS Managed Rules for AWS WAF (part 1)

Post Syndicated from Daniel Swart original https://aws.amazon.com/blogs/security/defense-in-depth-using-aws-managed-rules-for-aws-waf-part-1/

In this post, I discuss how you can use recent enhancements in AWS WAF to manage a multi-layer web application security enforcement policy. These enhancements will help you to maintain and deploy web application firewall configurations across deployment stages and across different types of applications.

The post is in two parts. This first part describes AWS Managed Rules for AWS WAF and how it can be used to provide defense in depth. The second part shows how to apply AWS Managed Rules for WAF.

AWS Managed Rules for AWS WAF is a service that provides groups of rules created by Amazon Web Services (AWS) or by an AWS technology partner. By using AWS Managed Rules, you can reduce the administrative overhead of configuring rules for AWS WAF. You still need a comprehensive strategy for web application policy enforcement to help you make the best use of AWS Managed Rules for your web applications.

By using a layered policy enforcement strategy, you can create policy enforcement that’s specific to each part of your applications. This helps you avoid having to maintain and manage monolithic AWS WAF configurations for each of your applications. When you can separate policies for the edge network and for the application layer network, replicating separate policies across larger workloads becomes modular. This makes your application security more agile and lets you protect public-facing web applications without writing new rules or including rules that aren’t relevant to your web application.

Policy enforcement becomes even less of an administrative burden when you use AWS Firewall Manager to enforce policies across all accounts. This helps ensure organizations have robust policy enforcement measures across multiple accounts, with increased application layer visibility.

The new AWS WAF JSON document-style configuration enables traditional code review processes. You can now easily manage AWS WAF configurations on multiple layers of your web applications. This has also enabled partners to create more dynamic and robust rules that they can deliver on AWS WAF, which ultimately helps those customers manage their web application security policies.

AWS WAF enhancements

AWS WAF uses web ACL capacity units (WCU) to calculate and control the operating resources that are used to run your rules, rule groups, and web ACLs.

You can use JSON key-value pair document-based configuration to more easily integrate AWS WAF into the development practices of your organization. As noted in the prior paragraph, using document-style configuration removes the need to use multiple API calls to create objects in the correct order before you can create and deploy a web ACL to protect your web applications.

Using this method lets firewall changes be implemented with normal development and operations best practices because it will be infrastructure as code. This enables version control and code review before deploying updates to your production environment.

Solution overview

The following diagram illustrates the layers and functions of a defense-in-depth solution. The text that follows describes each layer.
 

Figure 1: Solution overview diagram

Figure 1: Solution overview diagram

Edge network layer policy enforcement

The edge network is the first layer of policy enforcement and should be used for broad security policy enforcement. This is the ideal place for rules such as AWS Managed Rules Core rule set (CRS), geographical location blocks, IP reputational lists, anonymous IP lists, and basic rate limits enforcement. By limiting known bad traffic at the edge network, the CRS limits the exposure of the application layer to known bad IP address ranges, malicious requests, bad bots, and request floods. This provides broad protection to the inner application layer against malicious activity, which can be applied regardless of the web application being served at the application layer.

Combining Amazon CloudFront with the distributed denial of service (DDoS) mitigation capabilities of AWS Shield is supported by AWS WAF for your outer layer of web application security enforcement.

It’s a common misconception that CloudFront is only a content delivery platform, but it also has robust transparent reverse proxy capabilities. CloudFront can help protect your environment from a broad range of web application risks. For example, you can use CloudFront to ensure that HTTP requests conform to standards on the far outer layer of your web application environment while serving content closer to the user.

Application layer policy enforcement

The next level of enforcement should be an application load balancer in a public subnet with another web ACL at the CloudFront origin. This policy enforcement layer is where you create a regional web ACL for the CloudFront origin. In addition, this layer is where you apply application-specific rules. For example, if you have a web application that uses a LAMP stack, it would be best to use AWS Managed Rules for SQL Injection, Linux, and PHP as an enforcement layer.

Note: IP-based enforcement is not effective on this part of the environment. Consider making use of an origin custom header on the CloudFront distribution. Then using this custom header to create a BLOCK rule within this web ACL to deny any request without the origin custom header as the first rule in your web ACL list. This rule needs to be created manually and will not be configured by the supplied templates.

(Optional) Third-party web application firewall layer policy enforcement

AWS WAF enforces policies on inbound requests and doesn’t have outbound inspection capabilities. If you need to enforce policies based on outbound responses, you can use Amazon Machine Image (AMI) based web application firewalls, which are available via the AWS Marketplace.

Using an instance-based web application firewall is used here because most of the heavy lifting of computational expenditure is done on the AWS WAF enforcement layers. The third-party layer is where you can enforce policies that require requests to be stateful.

Using an AMI from AWS Marketplace also gives you access to capabilities such as higher visibility, threat intelligence, and robust firewall rules. This adds an additional layer of security enhancement to your environment.

(Optional) Private layer policy enforcement

When working with a traditional three-tier web architecture, you can add an additional layer of enforcement on the private layer, which can be used for the web front ends. This stage is where you would deploy an application load balancer in a private subnet serving your web front ends. This load balancer is there for any computational expensive regex-based rule enforcement that you don’t want to enforce on the instances-based WAF. This also gives you another layer of visibility before requests reaches the web front ends themselves. This example can be seen in Figure 2 below as a reference.

Use case examples

The AWS CloudFormation templates supplied can be deployed in a modular fashion. If the application load balancer is located in the us-east-1 region, you can deploy a single template called Amazon-CloudFront-Application-Load-Balancer-AMR.yml.

If the application load balancer isn’t located in us-east-1, you can use the Amazon-CloudFront-EdgeLayer-AMR.yml template to deploy the stack in us-east-1 to support the web ACL on CloudFront and then deploy ApplicationLayer-Load-Balancer-AMR.yml in the region the original application load balancer was deployed for its web ACL.

All CloudFormation templates are available on the Github project page and a summary of each can be found in the main readme.md file.

Note: All the individual rules in each rule set is set to ACTION OVERRIDE for initial deployment. If any of the rule actions in the group are set to block or allow, this override changes the behavior so that matching rules are only counted. You may change the setting to NO ACTION OVERRIDE after a period of evaluation to avoid disrupting production workloads with potential false positives.

Edge network and application load balancer origin using AWS Managed Rules for AWS WAF

When considering some of the web application best practices on AWS for resiliency and security, the recommendation is to use CloudFront where possible, because it can terminate TLS/SSL connections and serve cached content close to the end user. CloudFront has advanced mitigation capabilities such as SYN cookies and a massively distributed network separate from the traditional Amazon Elastic Compute Cloud (Amazon EC2) networking space. CloudFront also supports AWS WAF rate limits, IP blacklists, and broad security policies, which can be enforced at the edge network layer.

In the example Amazon-CloudFront-Application-Load-Balancer-AMR.yml template, we place a rate-limit for HTTP GET and HTTP POST methods. This is dependent upon expected traffic request rates. You can review Amazon CloudWatch metrics for your CloudFront distribution or application load balancer to determine the baseline for your rate limit based on the maximum expected requests per minute.

The rate limit is adjustable within the parameter options at deployment of the AWS CloudFormation template Amazon-CloudFront-Application-Load-Balancer-AMR.yml. The HTTP POST rate limit also helps to slow down credential stuffing attacks—a form of brute force attack—on login pages. The ApplicationLayer-Load-Balancer-AMR.yml template used in part 2 of this post also deploys the Amazon IP reputation list to drop IP addresses based on Amazon internal threat intelligence.

We also use the AWS Managed Rules CommonRuleSet that blocks cross-site scripting (XSS) attacks, request with no user-agents, requests with known bad user-agents, large queries, posts, cookies, and URLs, and known LFI/RFI attacks.

Note: The size constraint rules aren’t recommended for protecting APIs or web applications with large HTTP POSTs or long cookies. Evaluate the possible effects of size constraint rules thoroughly before setting them to block requests.

There is also an AWS Managed Rule for known bad inputs which is based on threat intelligence gathered by the AWS Threat Research Team. Finally, there is an admin protection rule set that drops requests to known management login pages. It’s not advised that web applications have front door access to admin controls.

At the origin, it’s a good idea to use an application load balancer that also supports AWS WAF. This is where you want to apply application-specific web policies. For example, this is where you would apply rules to protect against a SQL injection attack if your web application uses a SQL database.

In the example AWS CloudFormation template Amazon-CloudFront-Application-Load-Balancer-AMR.yml, for the origin application load balancer, we use AWS Managed Rules for SQL injections, Linux rule set, Unix rule set, PHP rule set, and the WordPress rule set to cover most eventualities customers could be using on their web applications.

For the example solution in part 2 of this post, if the origin application load balancer is in us-east-1, you can use Amazon-CloudFront-Application-Load-Balancer-AMR.yml, which will deploy both web ACLs.

If the origin is not in us-east-1, you can use two example templates which are Amazon-CloudFront-EdgeLayer-AMR.yml for the edge network and ApplicationLayer-Load-Balancer-AMR.yml in the origin region.

Using AWS Managed WAF Rules on public and private application load balancers

Some customers have reasons to not use CloudFront and will use two application load balancers. One load balancer for the public facing environment for web front ends and an internal load balancer for the application backends.

The following figure shows a deployment that uses two load balancers. A public load balancer works with the edge network WAF to connect to a web front end in a private subnet and an internal load balancer connects to the backend application.
 

Figure 2: Diagram of stacked load balancers

Figure 2: Diagram of stacked load balancers

In this use case, we can still use the same structure of edge network and application layer network, now only using load balancers. Using a three-tier web application approach to deploy web applications there will be an external facing and an internal application load balancer where you can deploy the same style of policy enforcement, but only on load balancers.

Note: To deploy something similar to this example, you can use the template EdgeLayerALB-PrivateLayerALB-AMR.yml in the relevant regions where the load balancers have been deployed.

Alarms and logging

After deploying these AWS CloudFormation templates you should consider setting CloudWatch alarms on certain metrics for the HTTP GET and HTTP POST flood rules as well as the reputation and anonymous IP lists. Customers that are familiar with developing may also opt to use Lambda responders to use CloudWatch Events to trigger and update to the rule change from COUNT to BLOCK. Also enabling full logging for each web ACL will give you higher visibility into each request and will make potential investigations easier.

Conclusion

Using the new enhancements of AWS WAF makes it easier to manage a multi-layer web application security enforcement policy by using AWS WAF to maintain and deploy web application firewall configurations across their different deployment stages, as well as across different types of applications. By making use of partner or AWS Managed Rules, administrative overhead can be significantly reduced, and with AWS Firewall Manager, customers can enforce these policies across all of an organization’s accounts. Part 2 of this post will show you one example of how this can be done.

If you have feedback about this post, submit comments in the Comments section below. If you have questions about this post, start a new thread on the AWS WAF forum or contact AWS Support.

Want more AWS Security how-to content, news, and feature announcements? Follow us on Twitter.

Author

Daniel Cisco Swart

The AWS Managed Rules was something Daniel worked on personally over a number of years during his time with the AWS Threat Research Team. Currently Daniel is working with Security competency technology partners from the AWS Partner Network as a Partner Solutions Architect enabling customer success through technical collaboration with AWS’s top security partners.