All too often we are confronted with the choice to move quickly or act responsibly. Whether the topic is safety, security, or in this case sustainability, we’re asked to make the trade off of halting innovation to protect ourselves, our users, or the planet. But what if that didn’t always need to be the case? At Cloudflare, our goal is to bring sustainable computing to you without the need for any additional time, work, or complexity.
Enter Green Compute on Cloudflare Workers.
Green Compute can be enabled for any Cron triggered Workers. The concept is simple: when turned on, we’ll take your compute workload and run it exclusively on parts of our edge network located in facilities powered by renewable energy. Even though all of Cloudflare’s edge network is powered by renewable energy already, some of our data centers are located in third-party facilities that are not 100% powered by renewable energy. Green Compute takes our commitment to sustainability one step further by ensuring that not only our network equipment but also the building facility as a whole are powered by renewable energy. There are absolutely no code changes needed. Now, whether you need to update a leaderboard every five minutes or do DNA sequencing directly on our edge (yes, that’s a real use case!), you can minimize the impact of any scheduled work, regardless of how complex or energy intensive.
How it works
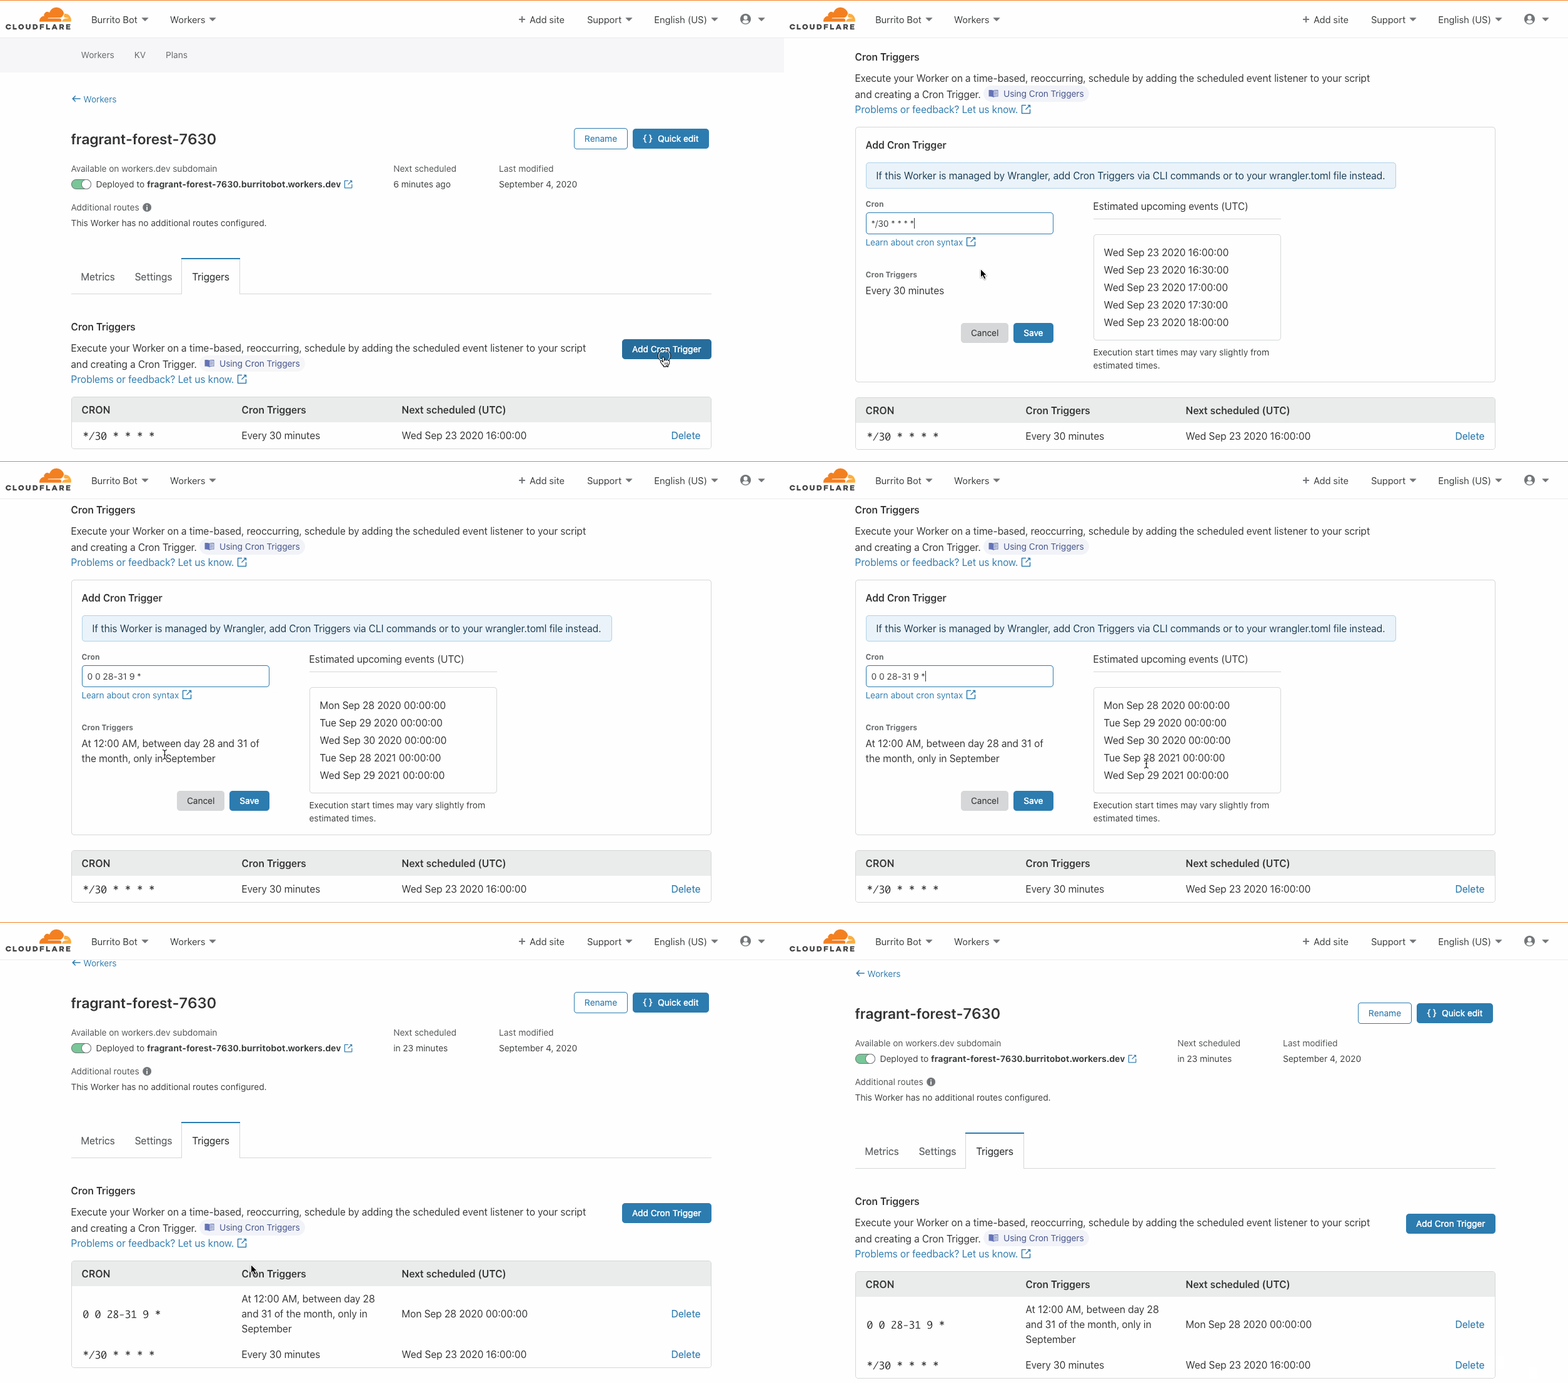
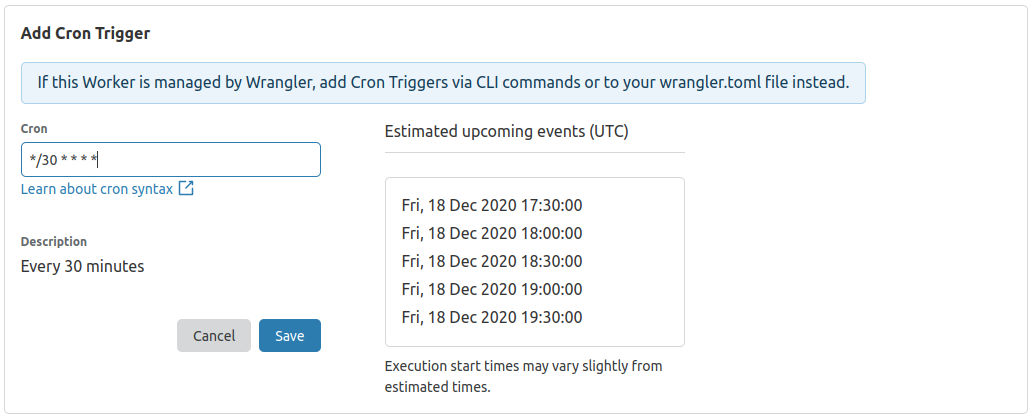
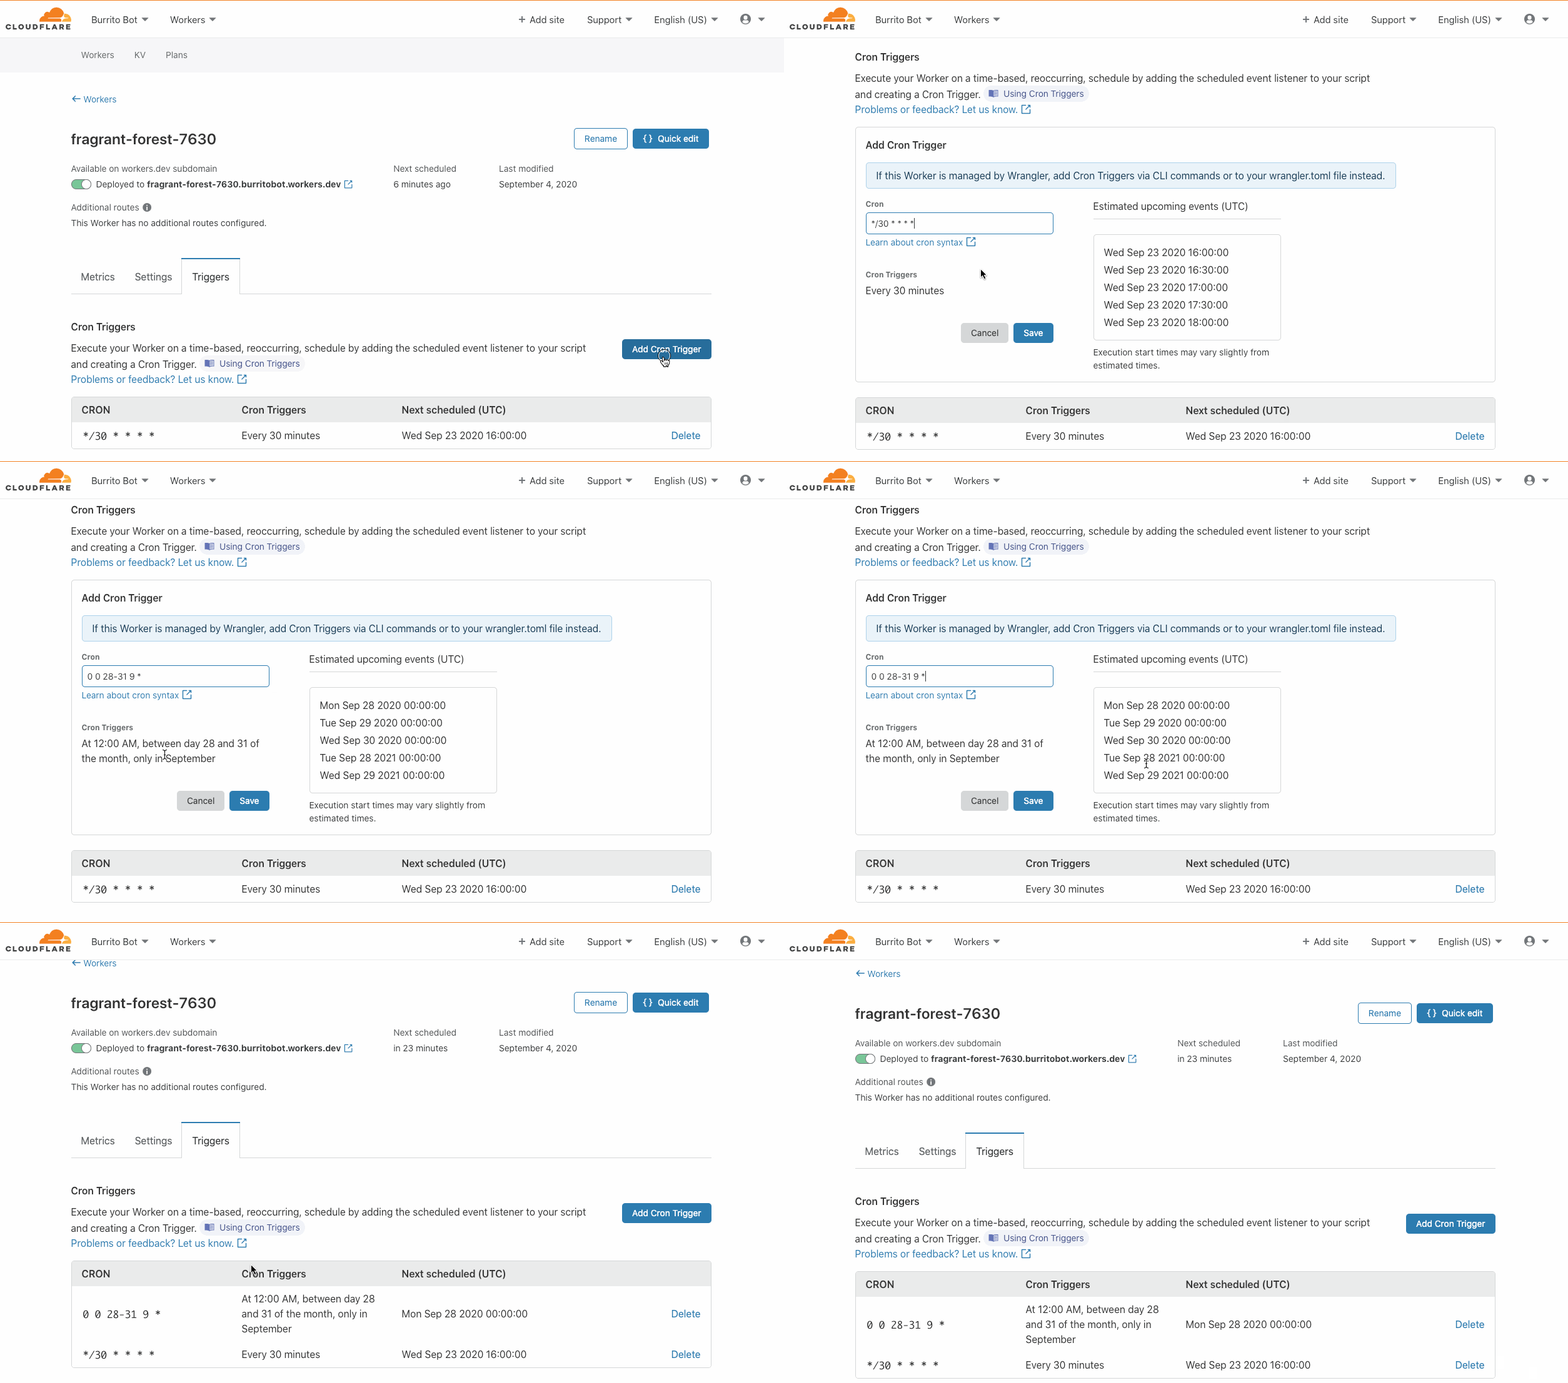
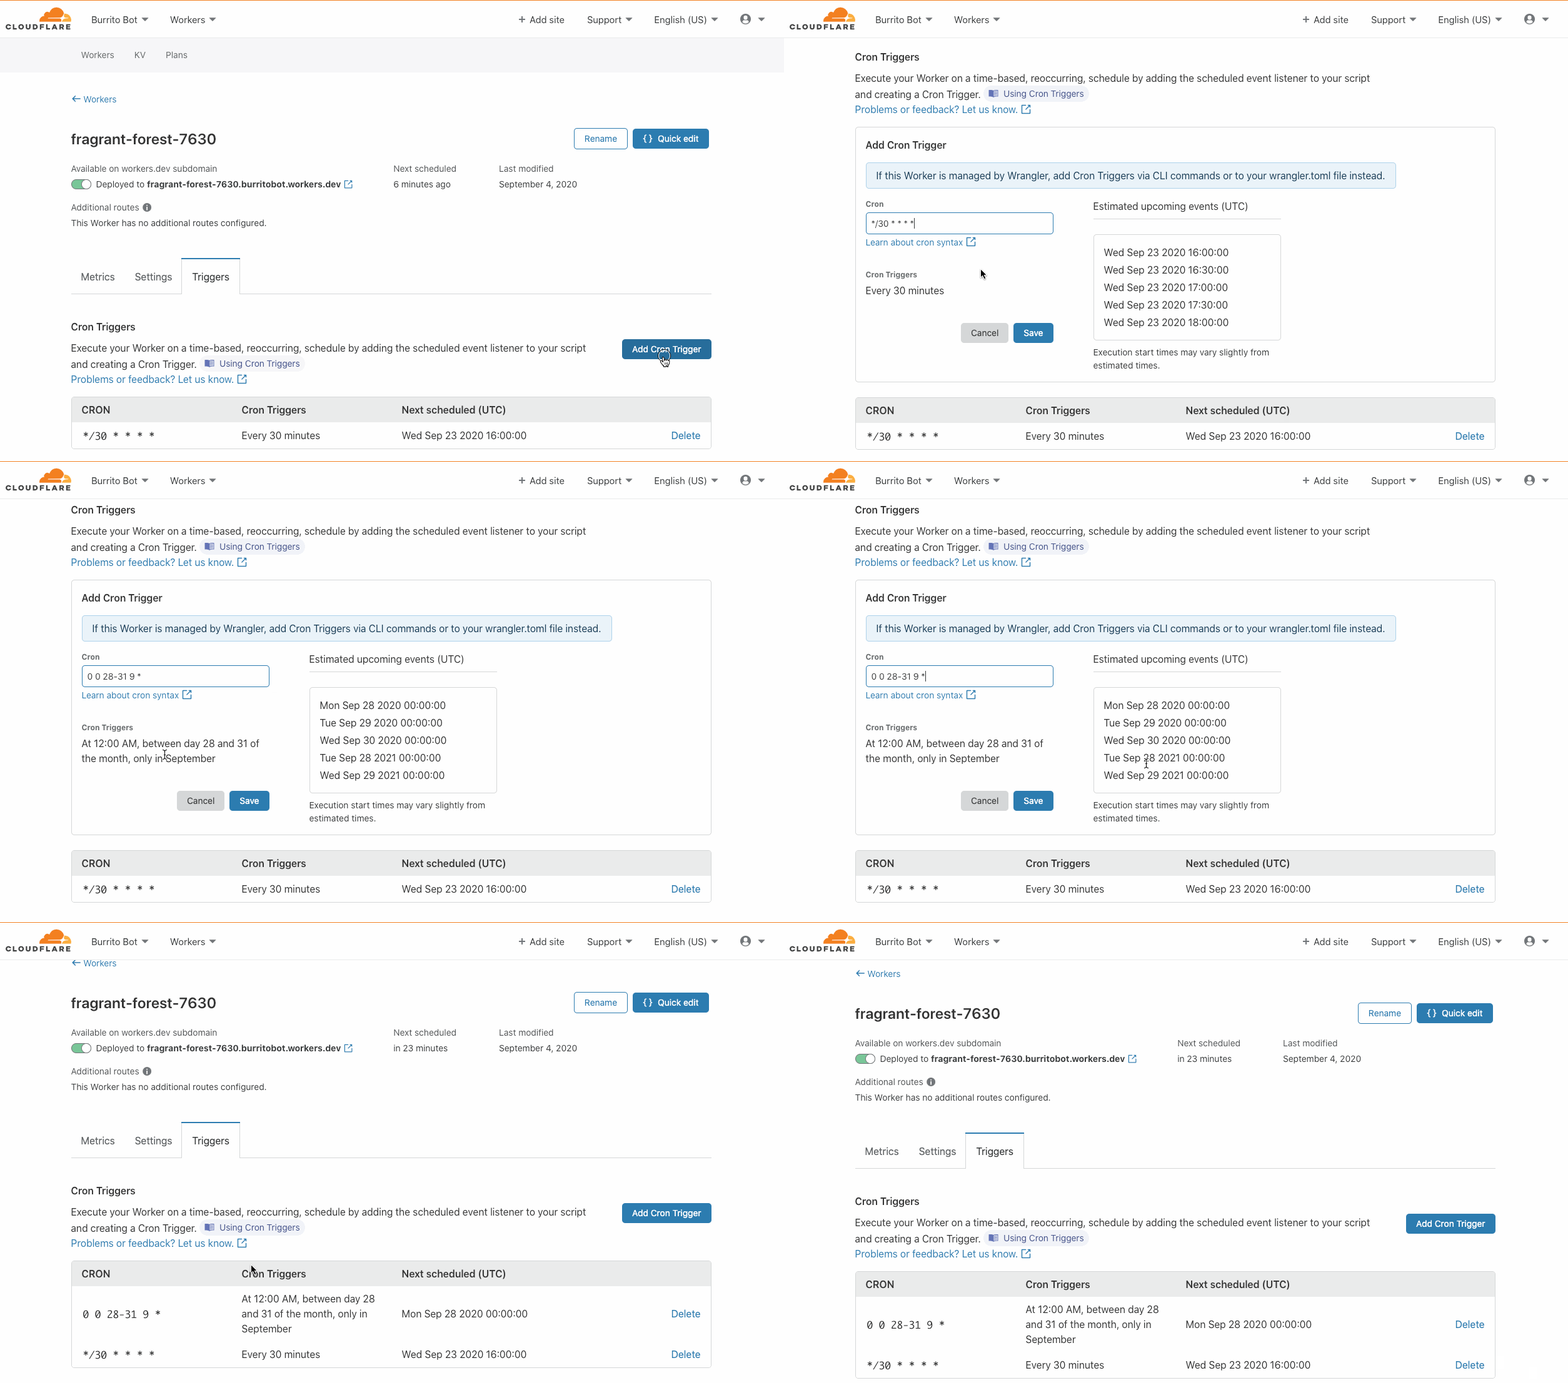
Cron triggers allow developers to set time-based invocations for their Workers. These Workers happen on a recurring schedule, as opposed to being triggered by application users via HTTP requests. Developers specify a job schedule in familiar cron syntax either through wrangler or within the Workers Dashboard. To set up a scheduled job, first create a Worker that performs a periodic task, then navigate to the ‘Triggers’ tab to define a Cron Trigger.
The great thing about cron triggered Workers is that there is no human on the other side waiting for a response in real time. There is no end user we need to run the job close to. Instead, these Workers are scheduled to run as (often computationally expensive) background jobs making them a no-brainer candidate to run exclusively on sustainable hardware, even when that hardware isn’t the closest to your user base.
Cloudflare’s massive global network is logically one distributed system with all the parts connected, secured, and trusted. Because our network works as a single system, as opposed to a system with logically isolated regions, we have the flexibility to seamlessly move workloads around the world keeping your impact goals in mind without any additional management complexity for you.
When you set up a Cron Trigger with Green Compute enabled, the Cloudflare network will route all scheduled jobs to green energy hardware automatically, without any application changes needed. To turn on Green Compute today, signup for our beta.
Real world use
If you haven’t ever had the pleasure of writing a cron job yourself, you might be wondering — what do you use scheduled compute for anyway?
There are a wide range of periodic maintenance tasks necessary to power any application. In my working life, I’ve built a scheduled job that ran every minute to monitor the availability of the system I was responsible for, texting me if any service was unavailable. In another instance, a job ran every five mins, keeping the core database and search feature in sync by pulling all new application data, transforming it, then inserting into a search database. In yet another example, a periodic job ran every half hour to iterate over all user sessions and cleanup sessions that were no longer active.
Scheduled jobs are the backbone of real world systems. Now, with Green Compute on Cloudflare Workers all these real world systems and their computationally expensive background maintenance tasks, can take advantage of running compute exclusively on machines powered by renewable energy.
The Green Network
Our mission at Cloudflare is to help you tackle your sustainability goals. Today, with the launch of the Carbon Impact Report we gave you visibility into your environmental impact. The collaboration with the Green Web Foundation gave green hosting certification for Cloudflare Pages. And our launch of Green Compute on Cloudflare Workers allows you to exclusively run on hardware powered by renewable energy. And the best part? No additional system complexity is required for any of the above.
Cloudflare is focused on making it easy to hit your ambitious goals. We are just getting started.
So you’ve built an application on the Workers platform. The first thing you might be wondering after pushing your code out into the world is “what does my production traffic look like?” How many requests is my Worker handling? How long are those requests taking? And as your production traffic evolves overtime it can be a lot to keep up with. The last thing you want is to be surprised by the traffic your serverless application is handling. But, you have a million things to do in your day job, and having to log in to the Workers dashboard every day to check usage statistics is one extra thing you shouldn’t need to worry about.
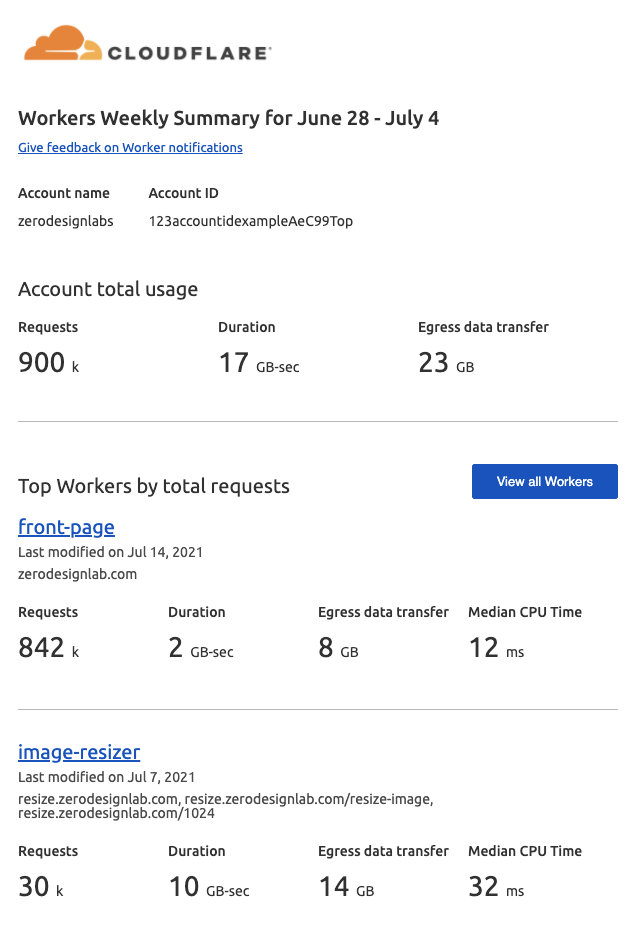
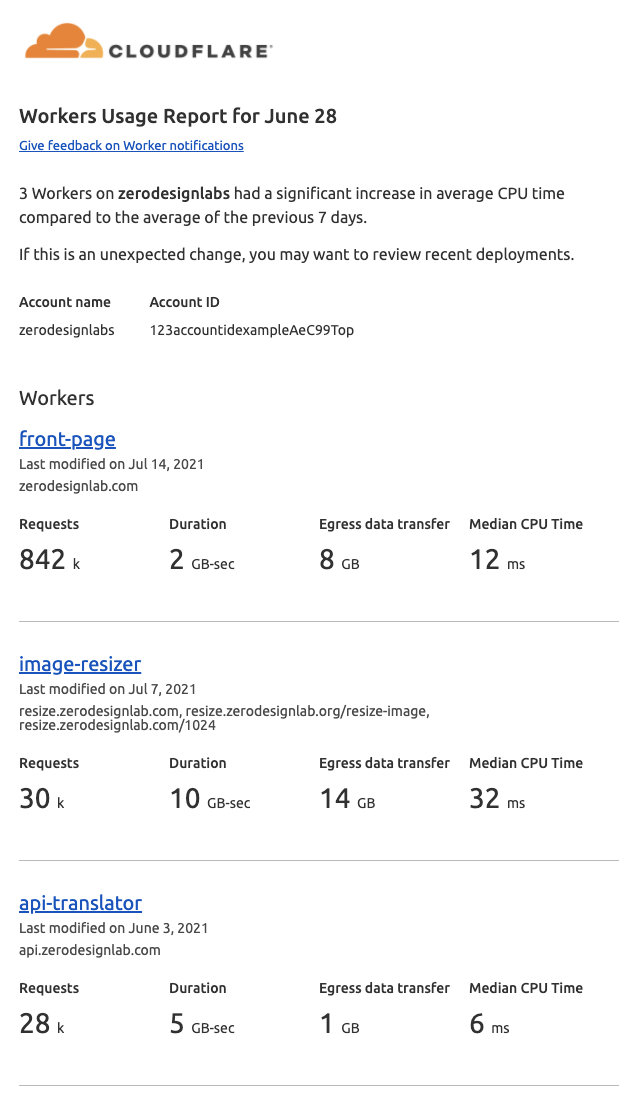
Today we’re excited to launch Workers usage notifications that proactively send relevant usage information directly to your inbox. Usage notifications come in two flavors. The first is a weekly summary of your Workers usage with a breakdown of your most popular Workers. The second flavor is an on-demand usage notification, triggered when a worker’s CPU usage is 25% above its average CPU usage over the previous seven days. This on-demand notification helps you proactively catch large changes in Workers usage as soon as those changes occur whether from a huge spike in traffic or a change in your code.
As of today, if you create a new free account with Workers, we’ll enable both the weekly summary and the CPU usage notification by default. All other account types will not have Workers usage notifications turned on by default, but the notifications can be enabled as needed. Once we collect substantial user feedback, our goal is to turn these notifications on by default for all accounts.
The Worker Weekly Summary
The mission of the Worker Weekly Summary is to give you a high-level view of your Workers usage automatically, in your inbox, without needing to sign in to the Worker’s dashboard. The summary includes valuable information such as total request counts, duration and egress data transfer, aggregated across your account, with breakouts for your most popular Workers that include median CPU time. Where duration accounts for the entire time your Worker spends responding to a request, CPU time is the time a script spends in computational work on the Cloudflare edge, discounting any time spent waiting on network requests, including requests to third-party APIs.
Workers Usage Report
Where the Workers Weekly Summary provides a high-level view of your account usage statistics, the Workers Usage Report is targeted, event-driven and potentially actionable. It identifies those Workers with greater than a 25% increase in CPU time compared to the average of the previous 7 days (i.e., those Workers taking significantly more CPU resources now than in the recent past).
While sometimes these increases may be no surprise, perhaps because you’ve recently pushed a new deployment that you expected to do more CPU heavy work, at other times they may indicate a bug or reveal that a script is unintentionally expensive. The Workers Usage Report gives us an opportunity to let you know when a noticeable change in your compute footprint occurs, so that you can remedy any potential problems right away.
Enabling Notifications
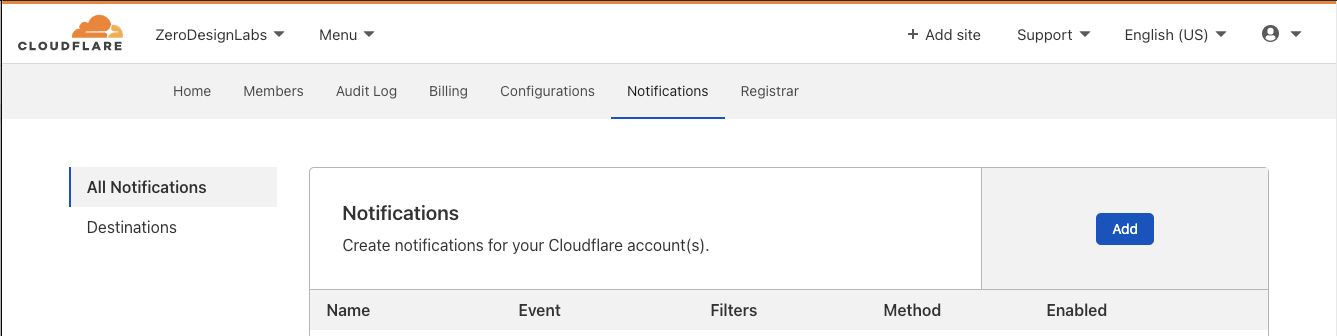
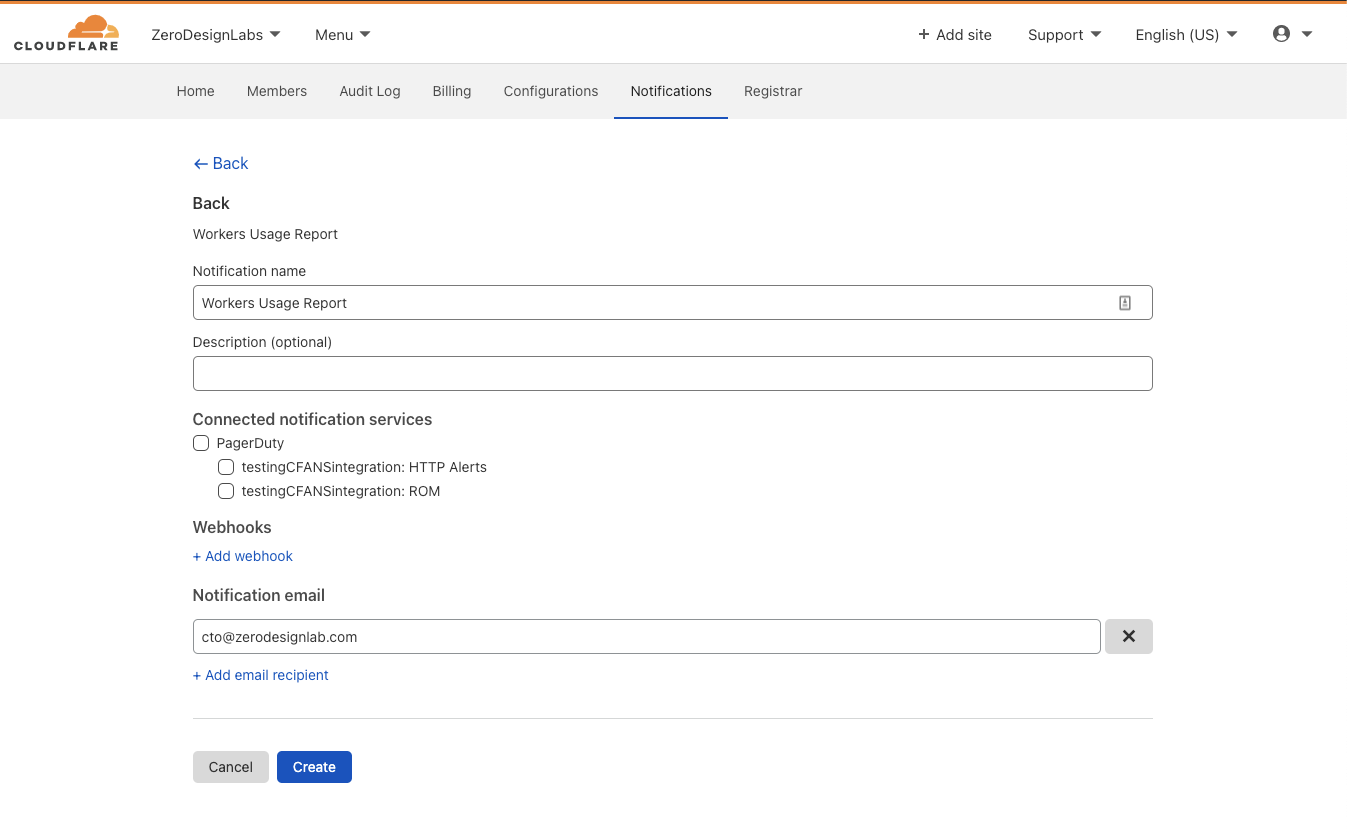
If you’d like to explicitly opt in to notifications, you can start off by clicking Add in the Notifications section of the Cloudflare zone dashboard.
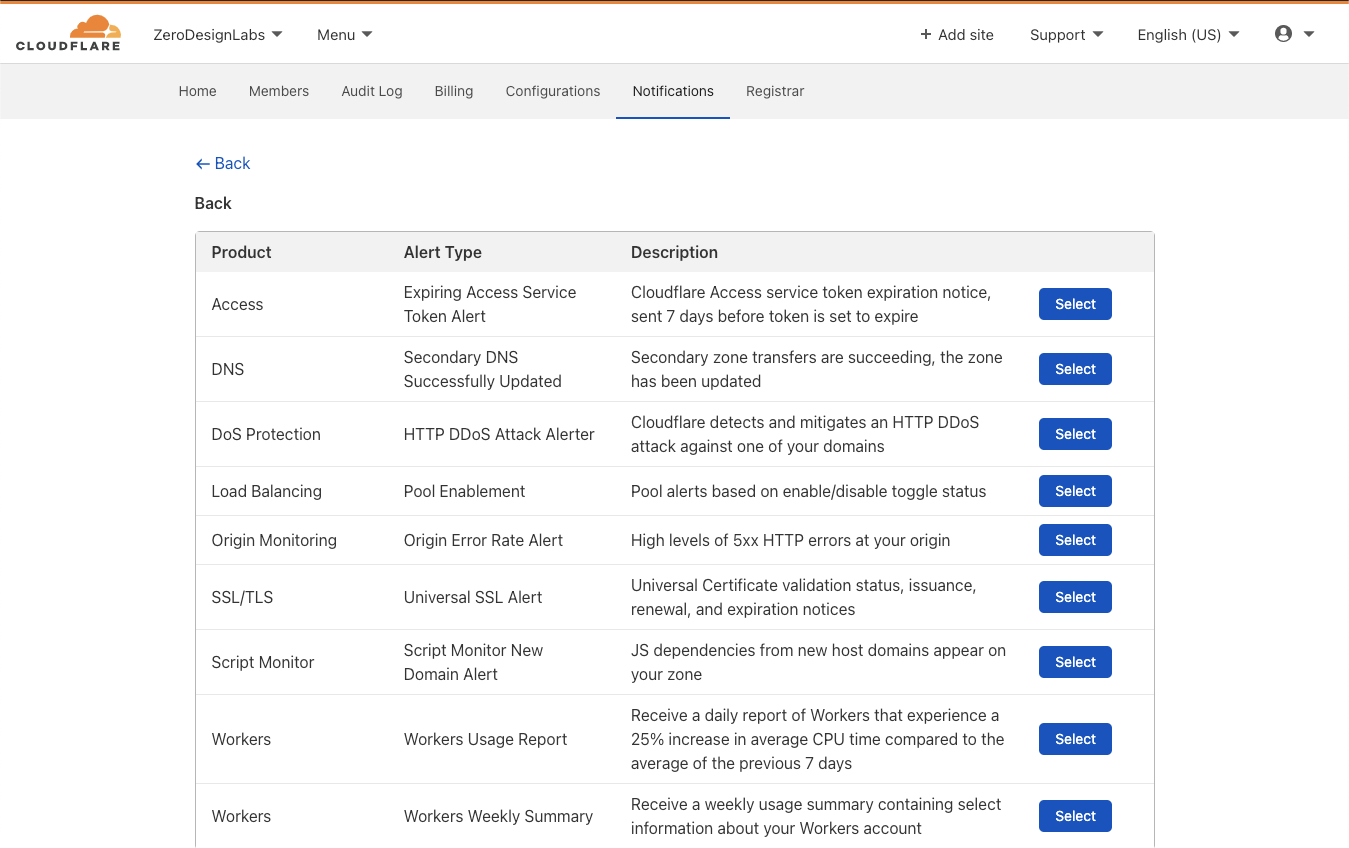
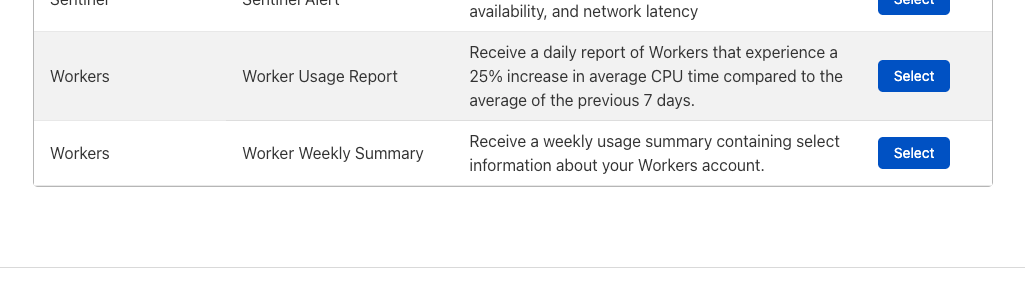
After clicking Add, note the two new entries below “Create Notifications” under the “Workers” Product:
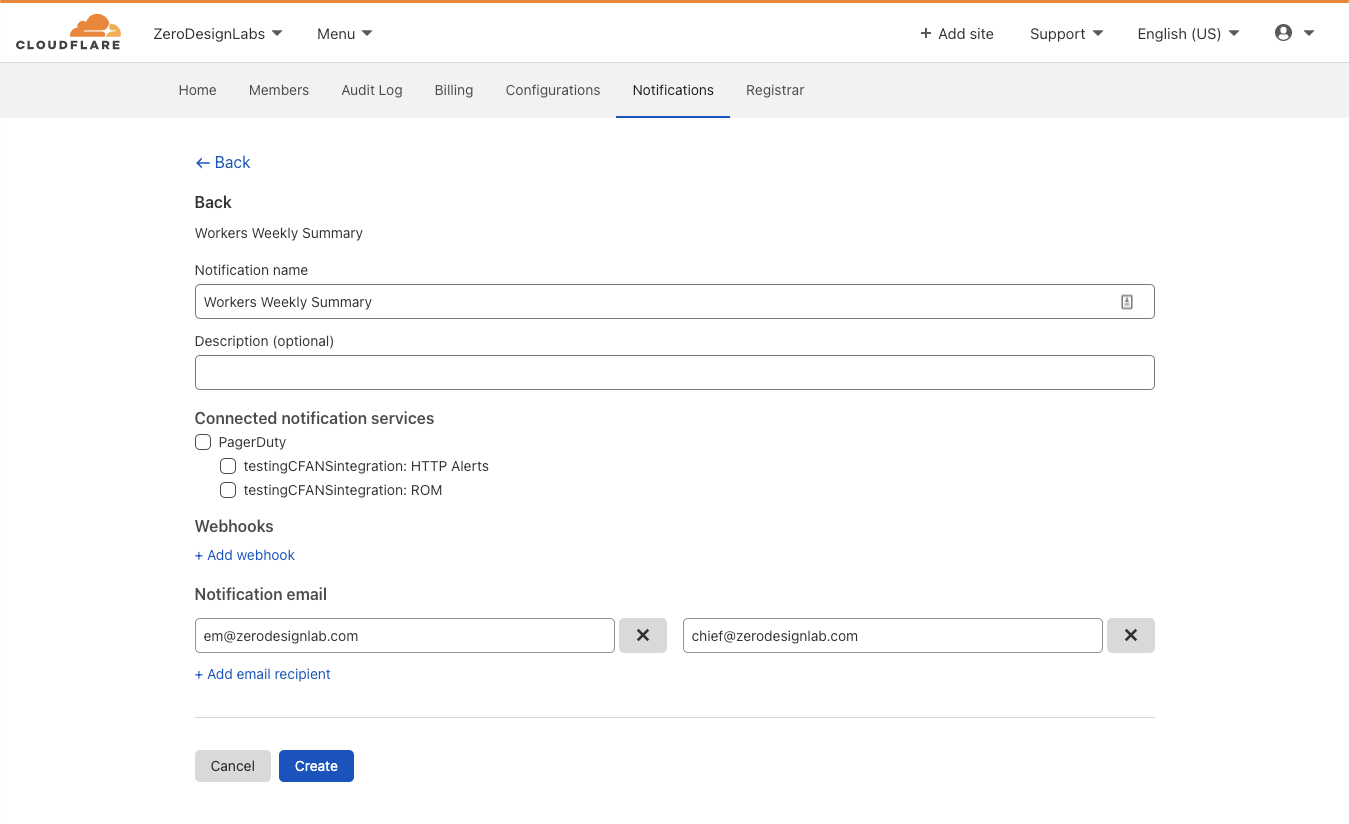
Click on the Select box in line with “ Weekly Summary” for the weekly roll-up, which will then allow you to configure email recipients, webhooks or connect the notification to PagerDuty.
Clicking Select next to “Usage Report” for CPU threshold notifications will send you to a similar configuration experience where you can customize email recipients and other integrations.
What’s next?
As mentioned above, we’re enabling notifications by default for all new free plans on Workers. Before rolling out these notifications by default to all our users, we want to hear from you. Let us know your experience with our Workers usage notifications by joining our Developer Community discord or by sending feedback via the survey in the email notifications.
Our Workers Weekly Summary and on-demand CPU usage notification are just the beginning of our journey to support a wide range of useful, relevant notifications that help you get visibility into your deployments. We want to surface the right usage information, exactly when you need it.
In January, we announced the Cloudflare Waiting Room, which has been available to select customers through Project Fair Shot to help COVID-19 vaccination web applications handle demand. Back then, we mentioned that our system was built on top of Cloudflare Workers and the then brand new Durable Objects. In the coming days, we are making Waiting Room available to customers on our Business and Enterprise plans. As we are expanding availability, we are taking this opportunity to share how we came up with this design.
What does the Waiting Room do?
You may have seen lines of people queueing in front of stores or other buildings during sales for a new sneaker or phone. That is because stores have restrictions on how many people can be inside at the same time. Every store has its own limit based on the size of the building and other factors. If more people want to get inside than the store can hold, there will be too many people in the store.
The same situation applies to web applications. When you build a web application, you have to budget for the infrastructure to run it. You make that decision according to how many users you think the site will have. But sometimes, the site can see surges of users above what was initially planned. This is where the Waiting Room can help: it stands between users and the web application and automatically creates an orderly queue during traffic spikes.
The main job of the Waiting Room is to protect a customer’s application while providing a good user experience. To do that, it must make sure that the number of users of the application around the world does not exceed limits set by the customer. Using this product should not degrade performance for end users, so it should not add significant latency and should admit them automatically. In short, this product has three main requirements: respect the customer’s limits for users on the web application, keep latency low, and provide a seamless end user experience.
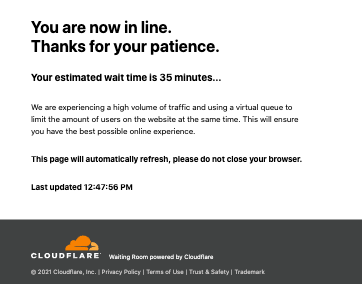
When there are more users trying to access the web application than the limits the customer has configured, new users are given a cookie and greeted with a waiting room page. This page displays their estimated wait time and automatically refreshes until the user is automatically admitted to the web application.
Configuring Waiting Rooms
The important configurations that define how the waiting room operates are:
Total Active Users – the total number of active users that can be using the application at any given time
New Users Per Minute – how many new users per minute are allowed into the application, and
Session Duration – how long a user session lasts. Note: the session is renewed as long as the user is active. We terminate it after Session Duration minutes of inactivity.
How does the waiting room work?
If a web application is behind Cloudflare, every request from an end user to the web application will go to a Cloudflare data center close to them. If the web application enables the waiting room, Cloudflare issues a ticket to this user in the form of an encrypted cookie.
Waiting Room Overview
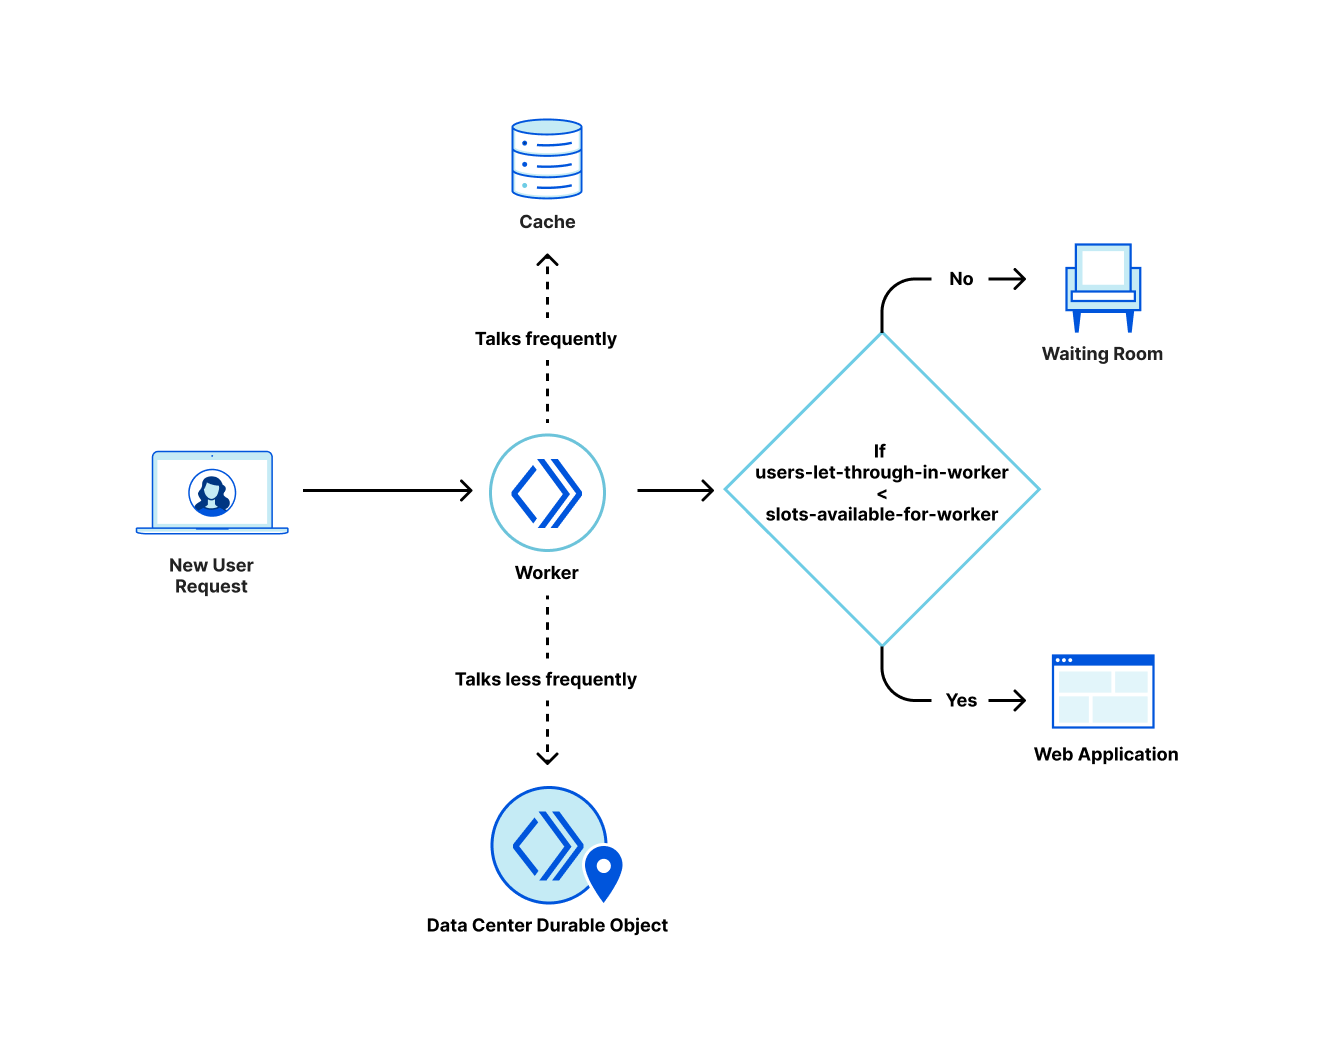
At any given moment, every waiting room has a limit on the number of users that can go to the web application. This limit is based on the customer configuration and the number of users currently on the web application. We refer to the number of users that can go into the web application at any given time as the number of user slots. The total number of users slots is equal to the limit configured by the customer minus the total number of users that have been let through.
When a traffic surge happens on the web application the number of user slots available on the web application keeps decreasing. Current user sessions need to end before new users go in. So user slots keep decreasing until there are no more slots. At this point the waiting room starts queueing.
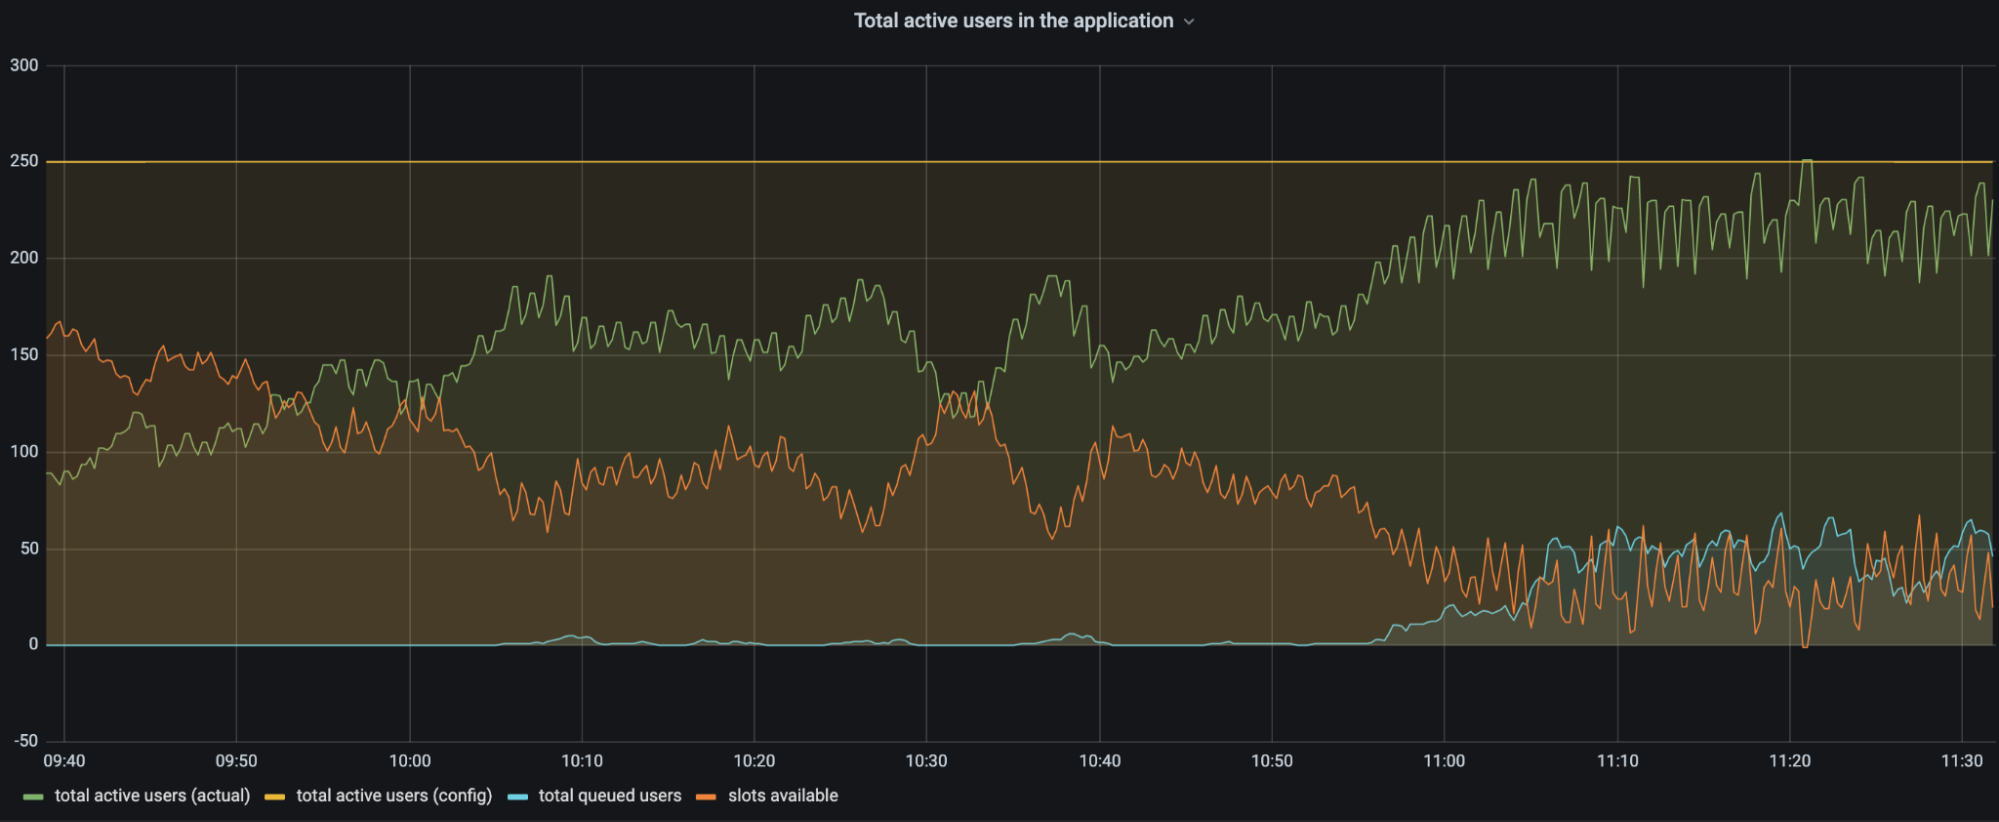
The chart above is a customer’s traffic to a web application between 09:40 and 11:30. The configuration for total active users is set to 250 users (yellow line). As time progresses there are more and more users on the application. The number of user slots available (orange line) in the application keeps decreasing as more users get into the application (green line). When there are more users on the application, the number of slots available decreases and eventually users start queueing (blue line). Queueing users ensures that the total number of active users stays around the configured limit.
To effectively calculate the user slots available, every service at the edge data centers should let its peers know how many users it lets through to the web application.
Coordination within a data center is faster and more reliable than coordination between many different data centers. So we decided to divide the user slots available on the web application to individual limits for each data center. The advantage of doing this is that only the data center limits will get exceeded if there is a delay in traffic information getting propagated. This ensures we don’t overshoot by much even if there is a delay in getting the latest information.
The next step was to figure out how to divide this information between data centers. For this we decided to use the historical traffic data on the web application. More specifically, we track how many different users tried to access the application across every data center in the preceding few minutes. The great thing about historical traffic data is that it’s historical and cannot change anymore. So even with a delay in propagation, historical traffic data will be accurate even when the current traffic data is not.
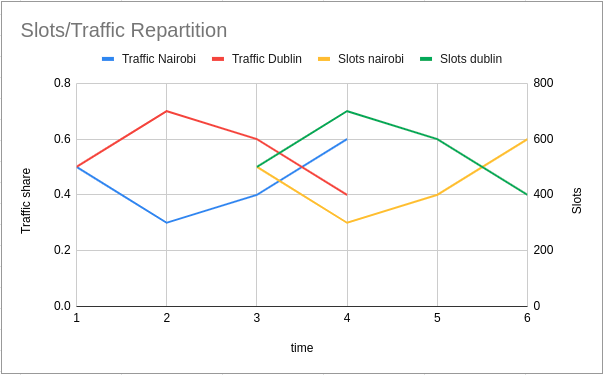
Let’s see an actual example: the current time is Thu, 27 May 2021 16:33:20 GMT. For the minute Thu, 27 May 2021 16:31:00 GMT there were 50 users in Nairobi and 50 in Dublin. For the minute Thu, 27 May 2021 16:32:00 GMT there were 45 users in Nairobi and 55 in Dublin. This was the only traffic on the application during that time.
Every data center looks at what the share of traffic to each data center was two minutes in the past. For Thu, 27 May 2021 16:33:20 GMT that value is Thu, 27 May 2021 16:31:00 GMT.
For the minute Thu, 27 May 2021 16:33:00 GMT, the number of user slots available will be divided equally between Nairobi and Dublin as the traffic ratio for Thu, 27 May 2021 16:31:00 GMT is 0.5 and 0.5. So, if there are 1000 slots available, Nairobi will be able to send 500 and Dublin can send 500.
For the minute Thu, 27 May 2021 16:34:00 GMT, the number of user slots available will be divided using the ratio 0.45 (Nairobi) to 0.55 (Dublin). So if there are 1000 slots available, Nairobi will be able to send 450 and Dublin can send 550.
The service at the edge data centers counts the number of users it let into the web application. It will start queueing when the data center limit is approached. The presence of limits for the data center that change based on historical traffic helps us to have a system that doesn’t need to communicate often between data centers.
Clustering
In order to let people access the application fairly we need a way to keep track of their position in the queue. A bucket has an identifier (bucketId) calculated based on the time the user tried to visit the waiting room for the first time. All the users who visited the waiting room between 19:51:00 and 19:51:59 are assigned to the bucketId 19:51:00. It’s not practical to track every end user in the waiting room individually. When end users visit the application around the same time, they are given the same bucketId. So we cluster users who came around the same time as one time bucket.
What is in the cookie returned to an end user?
We mentioned an encrypted cookie that is assigned to the user when they first visit the waiting room. Every time the user comes back, they bring this cookie with them. The cookie is a ticket for the user to get into the web application. The content below is the typical information the cookie contains when visiting the web application. This user first visited around Wed, 26 May 2021 19:51:00 GMT, waited for around 10 minutes and got accepted on Wed, 26 May 2021 20:01:13 GMT.
{
  "bucketId": "Wed, 26 May 2021 19:51:00 GMT",
  "lastCheckInTime": "Wed, 26 May 2021 20:01:13 GMT",
  "acceptedAt": "Wed, 26 May 2021 20:01:13 GMT",
 }
Here
bucketId – the bucketId is the cluster the ticket is assigned to. This tracks the position in the queue.
acceptedAt – the time when the user got accepted to the web application for the first time.
lastCheckInTime – the time when the user was last seen in the waiting room or the web application.
Once a user has been let through to the web application, we have to check how long they are eligible to spend there. Our customers can customize how long a user spends on the web application using Session Duration. Whenever we see an accepted user we set the cookie to expireSession Duration minutes from when we last saw them.
Waiting Room State
Previously we talked about the concept of user slots and how we can function even when there is a delay in communication between data centers. The waiting room state helps to accomplish this. It is formed by historical data of events happening in different data centers. So when a waiting room is first created, there is no waiting room state as there is no recorded traffic. The only information available is the customer’s configured limits. Based on that we start letting users in. In the background the service (introduced later in this post as Data Center Durable Object) running in the data center periodically reports about the tickets it has issued to a co-ordinating service and periodically gets a response back about things happening around the world.
As time progresses more and more users with different bucketIds show up in different parts of the globe. Aggregating this information from the different data centers gives the waiting room state.
Let’s look at an example: there are two data centers, one in Nairobi and the other in Dublin. When there are no user slots available for a data center, users start getting queued. Different users who were assigned different bucketIds get queued. The data center state from Dublin looks like this:
This information from data centers are reported in the background and aggregated to form a data structure similar to the one below:
activeUsers: 201, // 151(Nairobi) + 50(Dublin)
buckets:
[
  {
    key: "Thu, 27 May 2021 15:54:00 GMT",
    data:
    {
      waiting: 2, // 2 users from (Nairobi)
    },
  }
  {
    key: "Thu, 27 May 2021 15:55:00 GMT",
    data:
    {
      waiting: 50, // 20 from Nairobi and 30 from Dublin
    }
  },
  {
    key: "Thu, 27 May 2021 15:56:00 GMT",
    data:
    {
      waiting: 60, // 20 from Nairobi and 40 from Dublin
    }
  }
]
The data structure above is a sorted list of all the bucketIds in the waiting room. The waiting field has information about how many people are waiting with a particular bucketId. The activeUsers field has information about the number of users who are active on the web application.
Imagine for this customer, the limits they have set in the dashboard are
Total Active Users – 200 New Users Per Minute – 200
As per their configuration only 200 customers can be at the web application at any time. So users slots available for the waiting room state above are 200 – 201(activeUsers) = -1. So no one can go in and users get queued.
Now imagine that some users have finished their session and activeUsers is now 148.
Now userSlotsAvailable = 200 – 148 = 52 users. We should let 52 of the users who have been waiting the longest into the application. We achieve this by giving the eligible slots to the oldest buckets in the queue. In the example below 2 users are waiting from bucket Thu, 27 May 2021 15:54:00 GMT and 50 users are waiting from bucket Thu, 27 May 2021 15:55:00 GMT. These are the oldest buckets in the queue who get the eligible slots.
If there are eligible slots available for all the users in their bucket, then they can be sent to the web application from any data center. This ensures the fairness of the waiting room.
There is another case that can happen where we do not have enough eligible slots for a whole bucket. When this happens things get a little more complicated as we cannot send everyone from that bucket to the web application. Instead, we allocate a share of eligible slots to each data center.
As we did before, we use the ratio of past traffic from each data center to decide how many users it can let through. So if the current time is Thu, 27 May 2021 16:34:10 GMT both data centers look at the traffic ratio in the past at Thu, 27 May 2021 16:32:00 GMT and send a subset of users from those data centers to the web application.
When a request comes from a user we look at their bucketId. Based on the bucketId it is possible to know how many people are in front of the user’s bucketId from the sorted list. Similar to how we track the activeUsers we also calculate the average number of users going to the web application per minute. Dividing the number of people who are in front of the user by the average number of users going to the web application gives us the estimated time. This is what is shown to the user who visits the waiting room.
In the case above for a user with bucketId Thu, 27 May 2021 15:56:00 GMT, there are 60 users ahead of them. With 30 activeUsersToWebApplication per minute, the estimated time to get into the web application is 60/30 which is 2 minutes.
Implementation with Workers and Durable Objects
Now that we have talked about the user experience and the algorithm, let’s focus on the implementation. Our product is specifically built for customers who experience high volumes of traffic, so we needed to run code at the edge in a highly scalable manner. Cloudflare has a great culture of building upon its own products, so we naturally thought of Workers. The Workers platform uses Isolates to scale up and can scale horizontally as there are more requests.
The Workers product has an ecosystem of tools like wrangler which help us to iterate and debug things quickly.
Workers also reduce long-term operational work.
For these reasons, the decision to build on Workers was easy. The more complex choice in our design was for the coordination. As we have discussed before, our workers need a way to share the waiting room state. We need every worker to be aware of changes in traffic patterns quickly in order to respond to sudden traffic spikes. We use the proportion of traffic from two minutes before to allocate user slots among data centers, so we need a solution to aggregate this data and make it globally available within this timeframe. Our design also relies on having fast coordination within a data center to react quickly to changes. We considered a few different solutions before settling on Cache and Durable Objects.
Idea #1: Workers KV
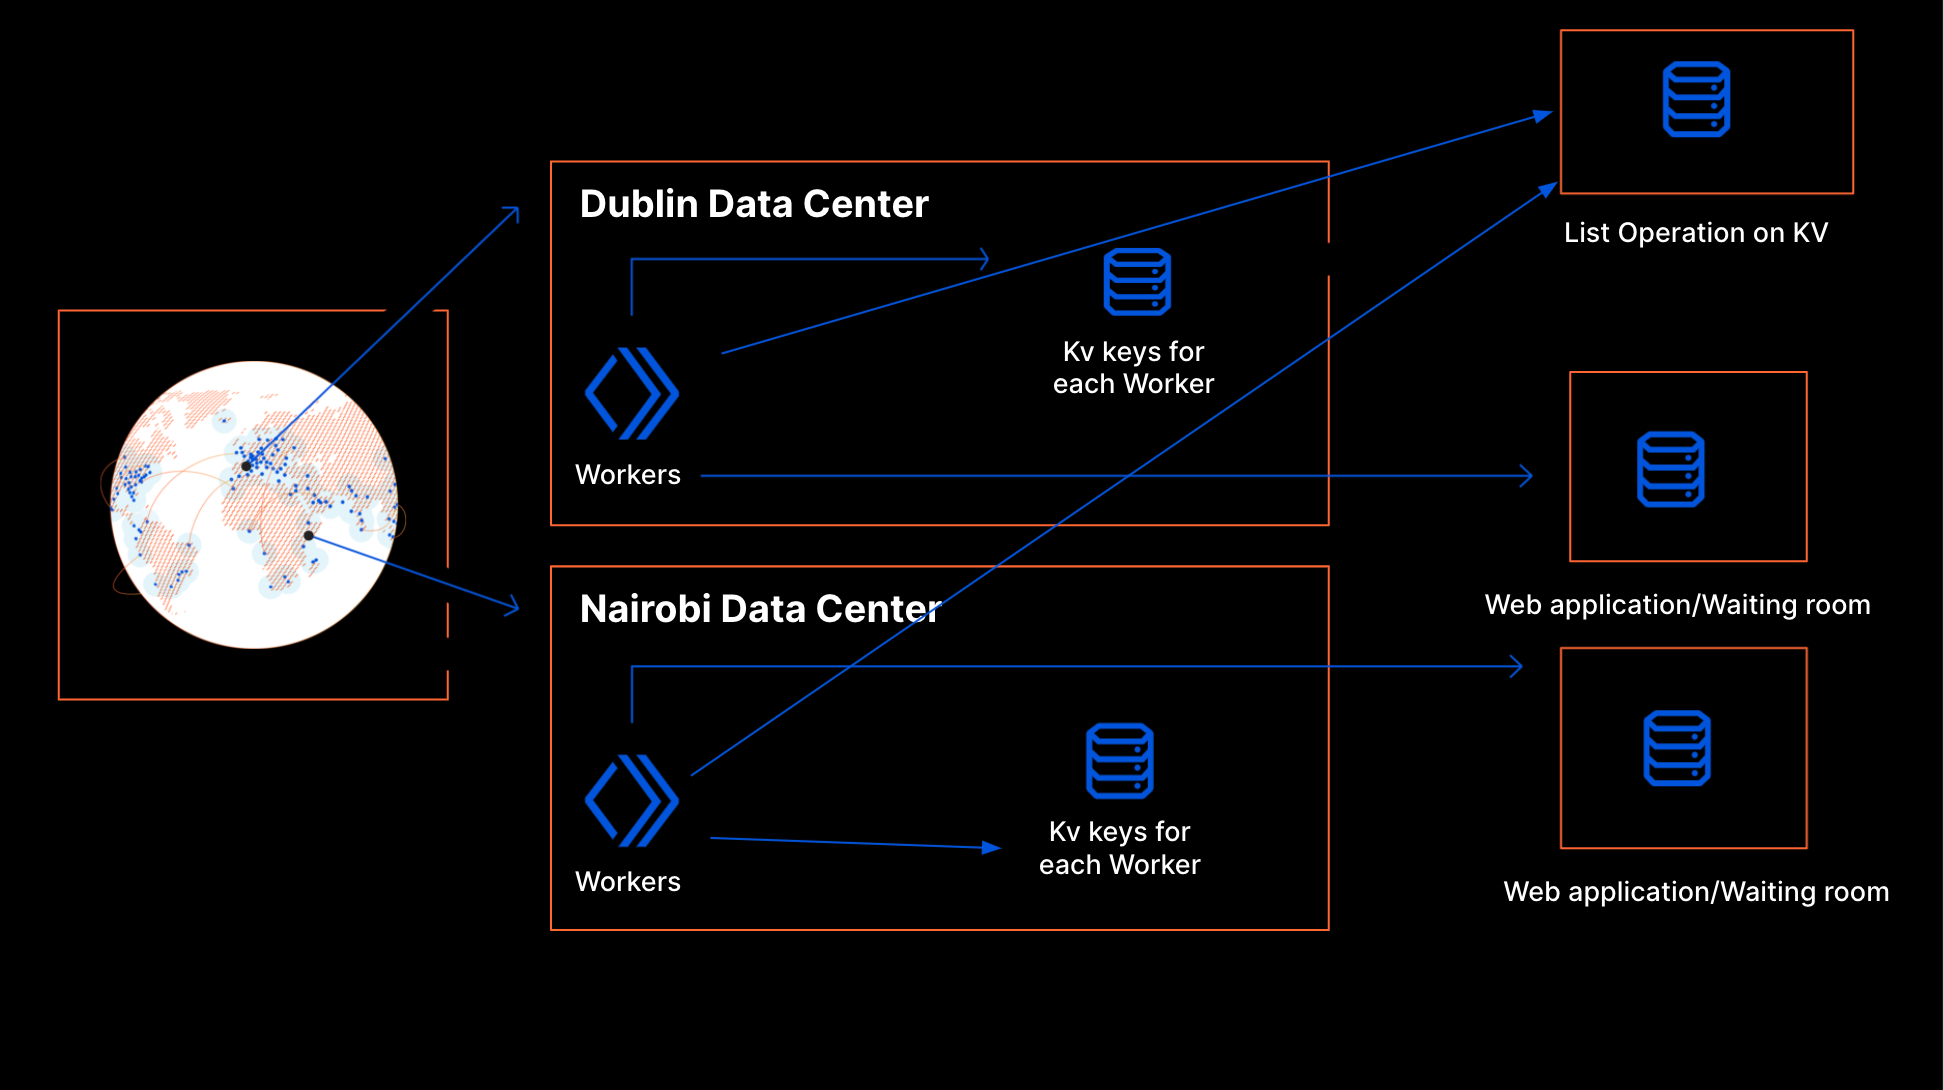
We started to work on the project around March 2020. At that point, Workers offered two options for storage: the Cache API and KV. Cache is shared only at the data center level, so for global coordination we had to use KV. Each worker writes its own key to KV that describes the requests it received and how it processed them. Each key is set to expire after a few minutes if the worker stopped writing. To create a workerState, the worker periodically does a list operation on the KV namespace to get the state around the world.
Design using KV
This design has some flaws because KV wasn’t built for a use case like this. The state of a waiting room changes all the time to match traffic patterns. Our use case is write intensive and KV is intended for read-intensive workflows. As a consequence, our proof of concept implementation turned out to be more expensive than expected. Moreover, KV is eventually consistent: it takes time for information written to KV to be available in all of our data centers. This is a problem for Waiting Room because we need fine-grained control to be able to react quickly to traffic spikes that may be happening simultaneously in several locations across the globe.
Idea #2: Centralized Database
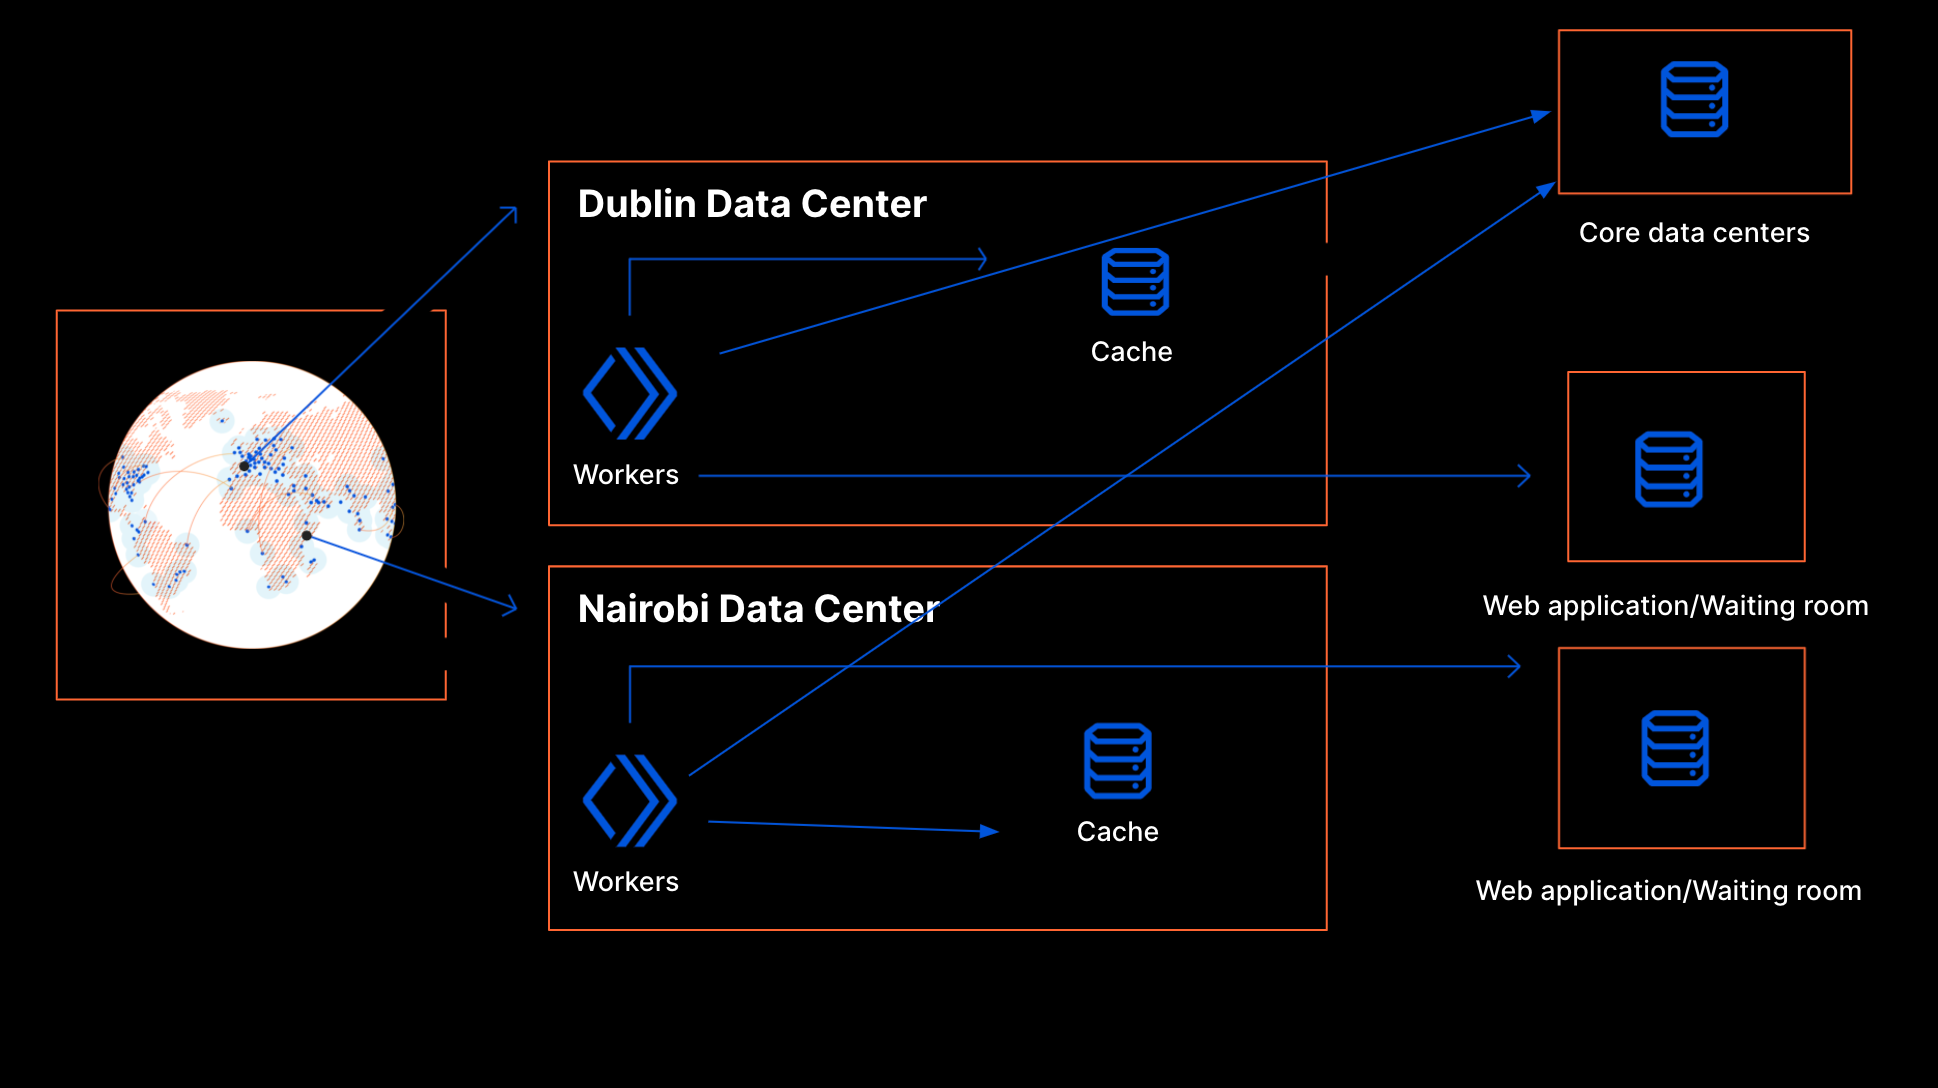
Another alternative was to run our own databases in our core data centers. The Cache API in Workers lets us use the cache directly within a data center. If there is frequent communication with the core data centers to get the state of the world, the cached data in the data center should let us respond with minimal latency on the request hot path. There would be fine-grained control on when the data propagation happens and this time can be kept low.
Design using Core Data centers
As noted before, this application is very write-heavy and the data is rather short-lived. For these reasons, a standard relational database would not be a good fit. This meant we could not leverage the existing database clusters maintained by our in-house specialists. Rather, we would need to use an in-memory data store such as Redis, and we would have to set it up and maintain it ourselves. We would have to install a data store cluster in each of our core locations, fine tune our configuration, and make sure data is replicated between them. We would also have to create a proxy service running in our core data centers to gate access to that database and validate data before writing to it.
We could likely have made it work, at the cost of substantial operational overhead. While that is not insurmountable, this design would introduce a strong dependency on the availability of core data centers. If there were issues in the core data centers, it would affect the product globally whereas an edge-based solution would be more resilient. If an edge data center goes offline Anycast takes care of routing the traffic to the nearby data centers. This will ensure a web application will not be affected.
The Scalable Solution: Durable Objects
Around that time, we learned about Durable Objects. The product was in closed beta back then, but we decided to embrace Cloudflare’s thriving dogfooding culture and did not let that deter us. With Durable Objects, we could create one global Durable Object instance per waiting room instead of maintaining a single database. This object can exist anywhere in the world and handle redundancy and availability. So Durable Objects give us sharding for free. Durable Objects gave us fine-grained control as well as better availability as they run in our edge data centers. Additionally, each waiting room is isolated from the others: adverse events affecting one customer are less likely to spill over to other customers.
Implementation with Durable Objects Based on these advantages, we decided to build our product on Durable Objects.
As mentioned above, we use a worker to decide whether to send users to the Waiting Room or the web application. That worker periodically sends a request to a Durable Object saying how many users it sent to the Waiting Room and how many it sent to the web application. A Durable Object instance is created on the first request and remains active as long as it is receiving requests. The Durable Object aggregates the counters sent by every worker to create a count of users sent to the Waiting Room and a count of users on the web application.
A Durable Object instance is only active as long as it is receiving requests and can be restarted during maintenance. When a Durable Object instance is restarted, its in-memory state is cleared. To preserve the in-memory data on Durable Object restarts, we back up the data using the Cache API. This offers weaker guarantees than using the Durable Object persistent storage as data may be evicted from cache, or the Durable Object can be moved to a different data center. If that happens, the Durable Object will have to start without cached data. On the other hand, persistent storage at the edge still has limited capacity. Since we can rebuild state very quickly from worker updates, we decided that cache is enough for our use case.
Scaling up When traffic spikes happen around the world, new workers are created. Every worker needs to communicate how many users have been queued and how many have been let through to the web application. However, while workers automatically scale horizontally when traffic increases, Durable Objects do not. By design, there is only one instance of any Durable Object. This instance runs on a single thread so if it receives requests more quickly than it can respond, it can become overloaded. To avoid that, we cannot let every worker send its data directly to the same Durable Object. The way we achieve scalability is by sharding: we create per data center Durable Object instances that report up to one global instance.
Durable Objects implementation
The aggregation is done in two stages: at the data-center level and at the global level.
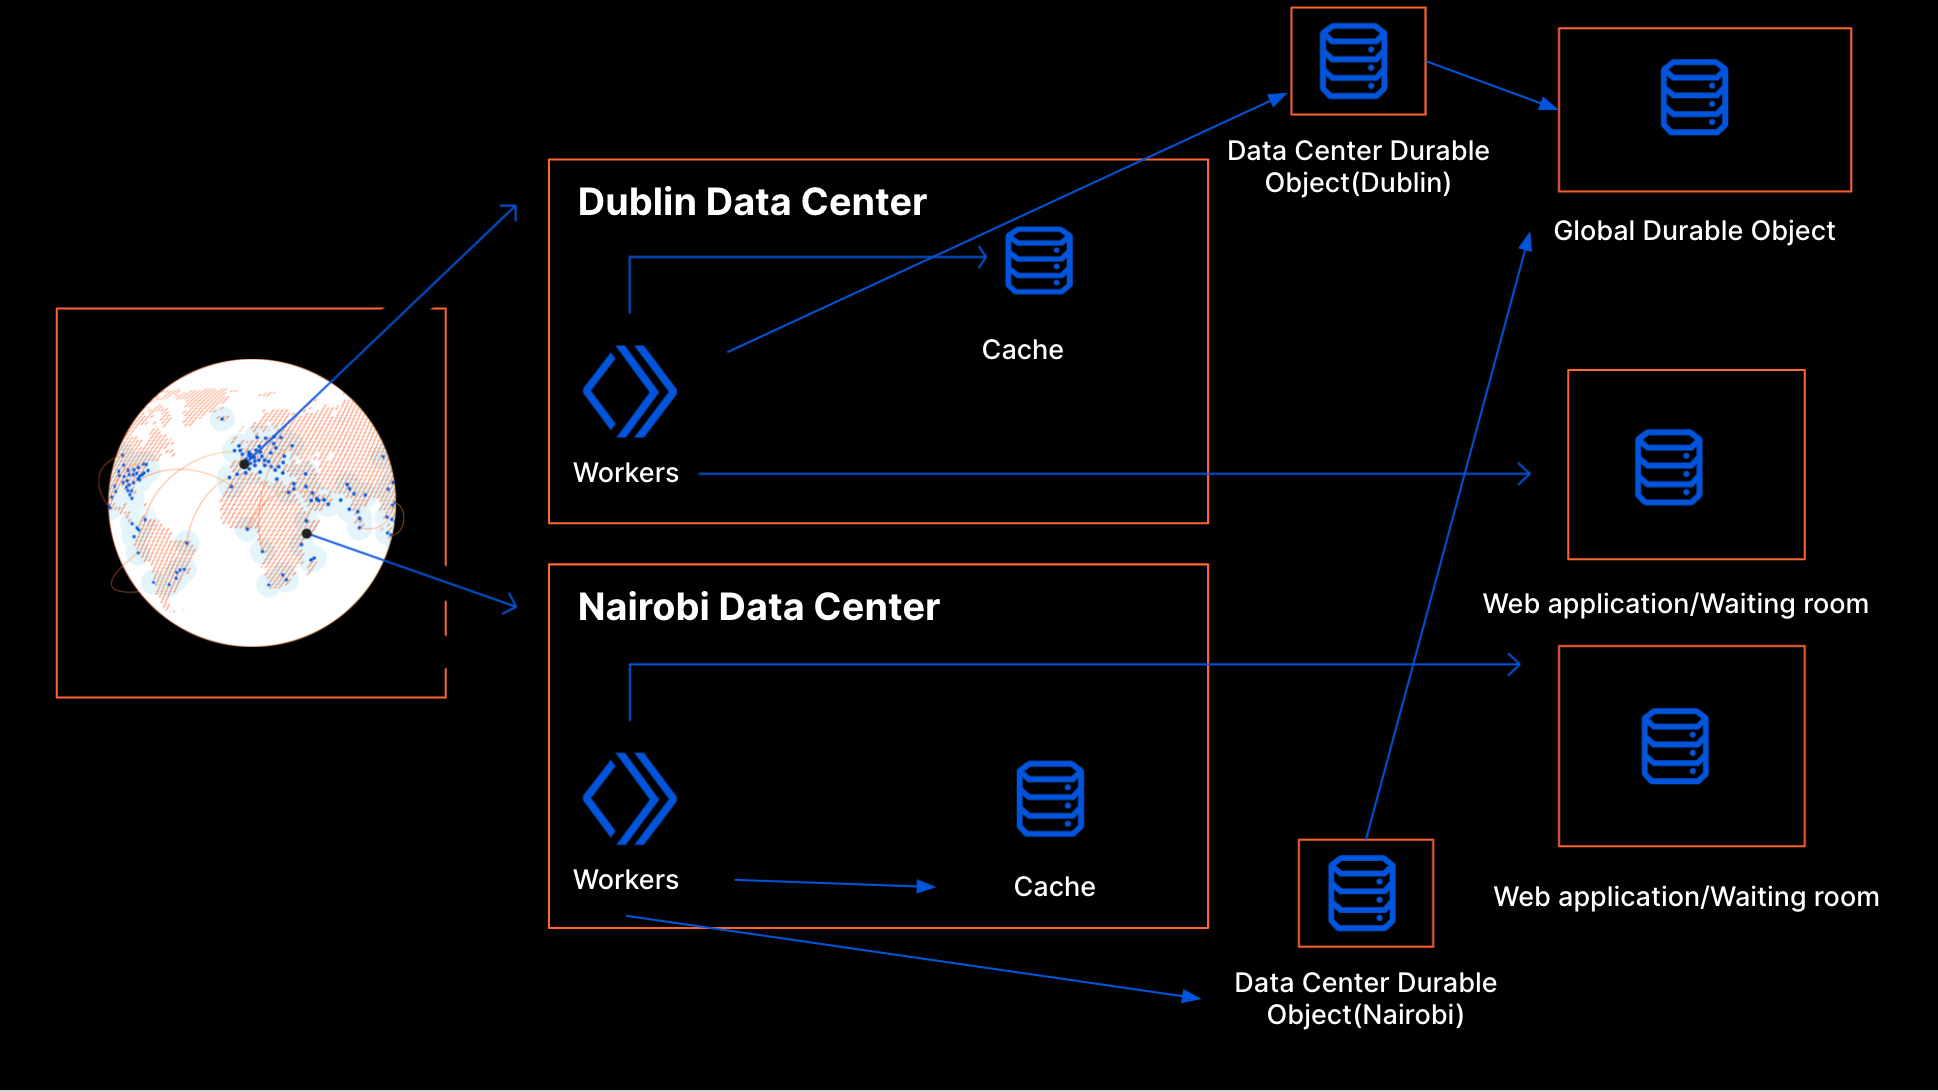
Data Center Durable Object When a request comes to a particular location, we can see the corresponding data center by looking at the cf.colo field on the request. The Data Center Durable Object keeps track of the number of workers in the data center. It aggregates the state from all those workers. It also responds to workers with important information within a data center like the number of users making requests to a waiting room or number of workers. Frequently, it updates the Global Durable Object and receives information about other data centers as the response.
Worker User Slots
Above we talked about how a data center gets user slots allocated to it based on the past traffic patterns. If every worker in the data center talks to the Data Center Durable Object on every request, the Durable Object could get overwhelmed. Worker User Slots help us to overcome this problem.
Every worker keeps track of the number of users it has let through to the web application and the number of users that it has queued. The worker user slots are the number of users a worker can send to the web application at any point in time. This is calculated from the user slots available for the data center and the worker count in the data center. We divide the total number of user slots available for the data center by the number of workers in the data center to get the user slots available for each worker. If there are two workers and 10 users that can be sent to the web application from the data center, then we allocate five as the budget for each worker. This division is needed because every worker makes its own decisions on whether to send the user to the web application or the waiting room without talking to anyone else.
Waiting room inside a data center
When the traffic changes, new workers can spin up or old workers can die. The worker count in a data center is dynamic as the traffic to the data center changes. Here we make a trade off similar to the one for inter data center coordination: there is a risk of overshooting the limit if many more workers are created between calls to the Data Center Durable Object. But too many calls to the Data Center Durable Object would make it hard to scale. In this case though, we can use Cache for faster synchronization within the data center.
Cache
On every interaction to the Data Center Durable Object, the worker saves a copy of the data it receives to the cache. Every worker frequently talks to the cache to update the state it has in memory with the state in cache. We also adaptively adjust the rate of writes from the workers to the Data Center Durable Object based on the number of workers in the data center. This helps to ensure that we do not take down the Data Center Durable Object when traffic changes.
Global Durable Object
The Global Durable Object is designed to be simple and stores the information it receives from any data center in memory. It responds with the information it has about all data centers. It periodically saves its in-memory state to cache using the Workers Cache API so that it can withstand restarts as mentioned above.
Components of waiting room
Recap
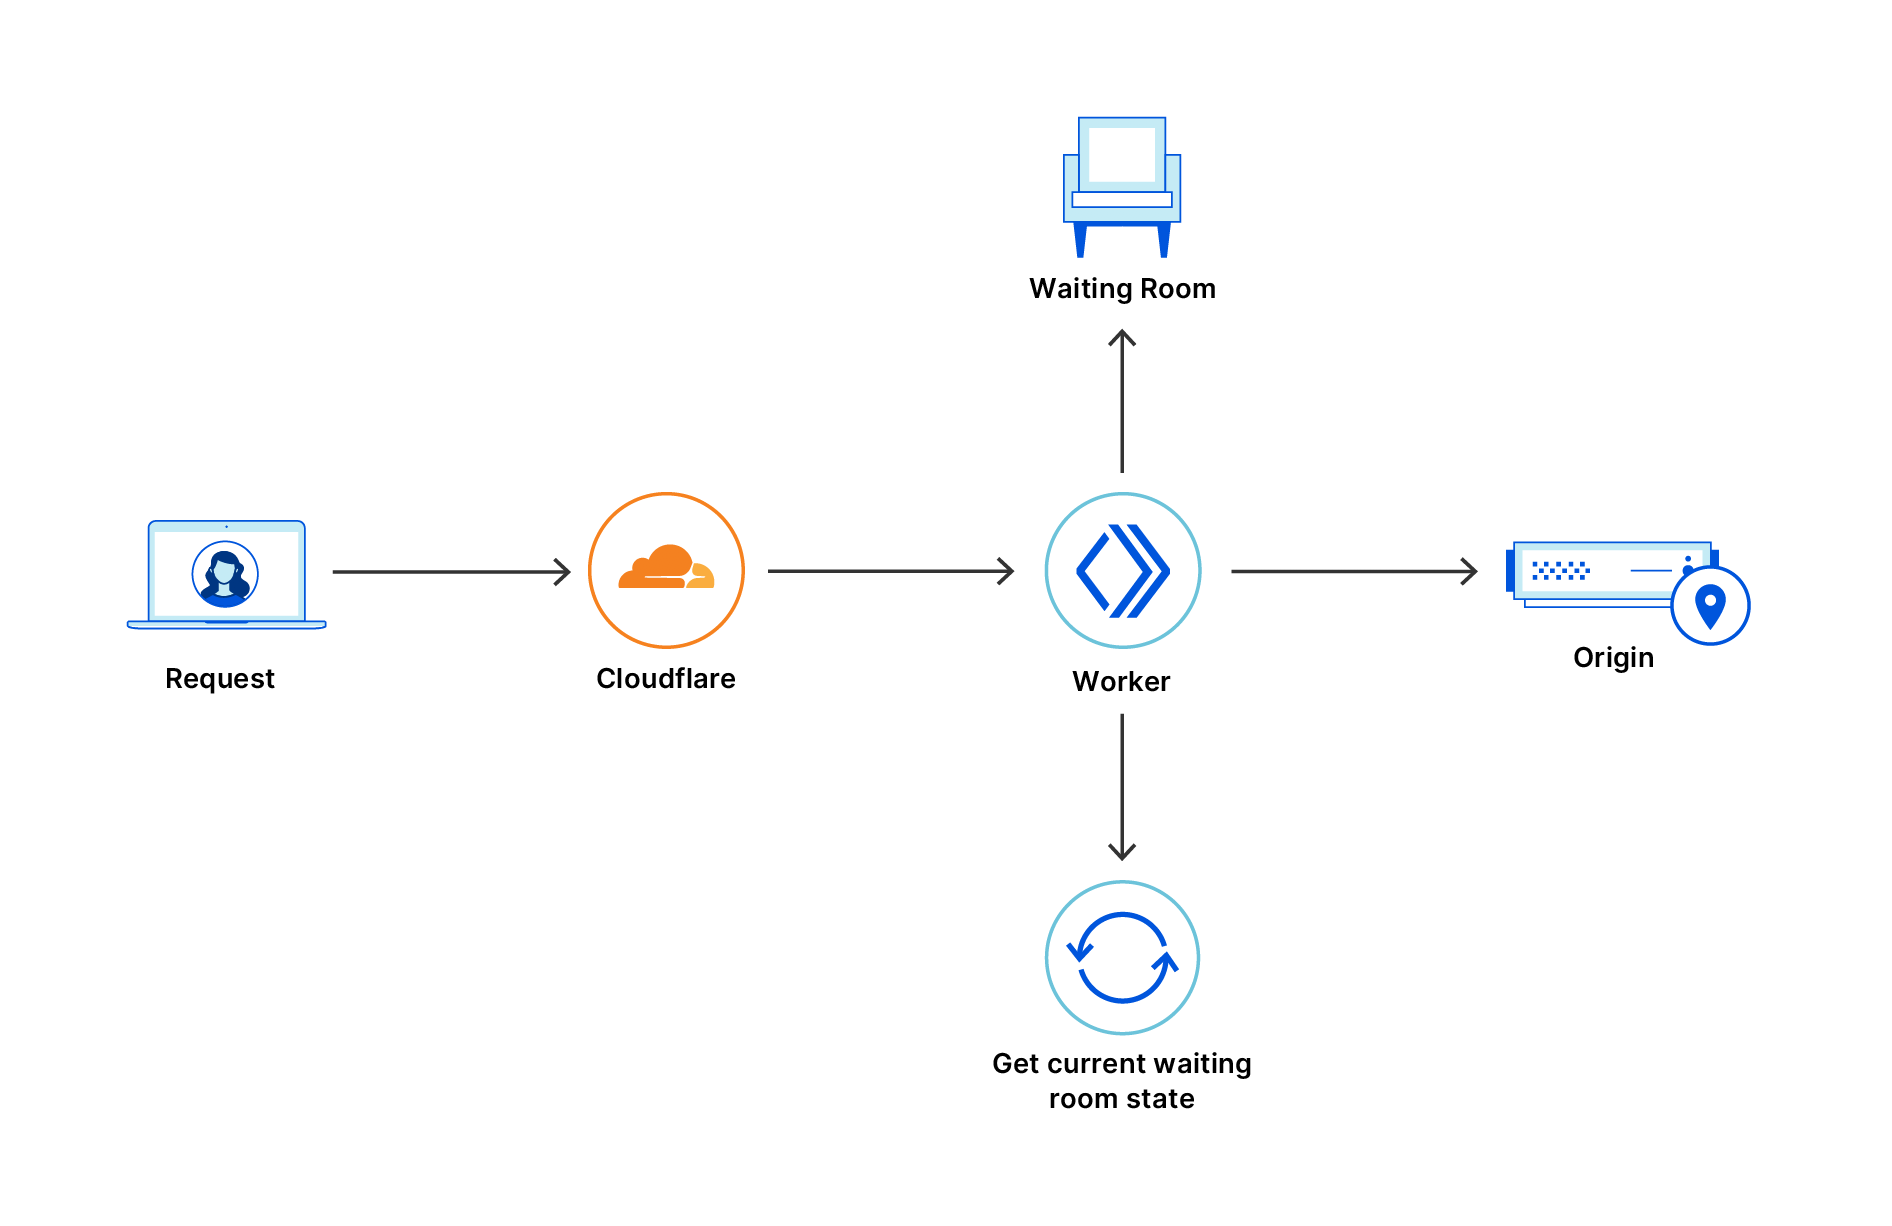
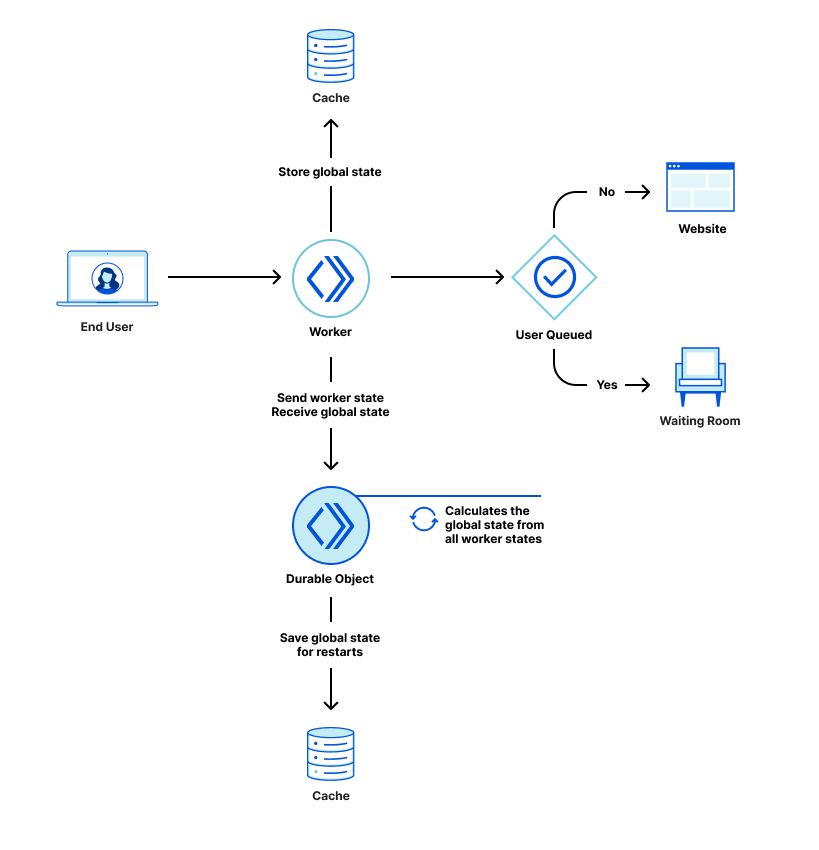
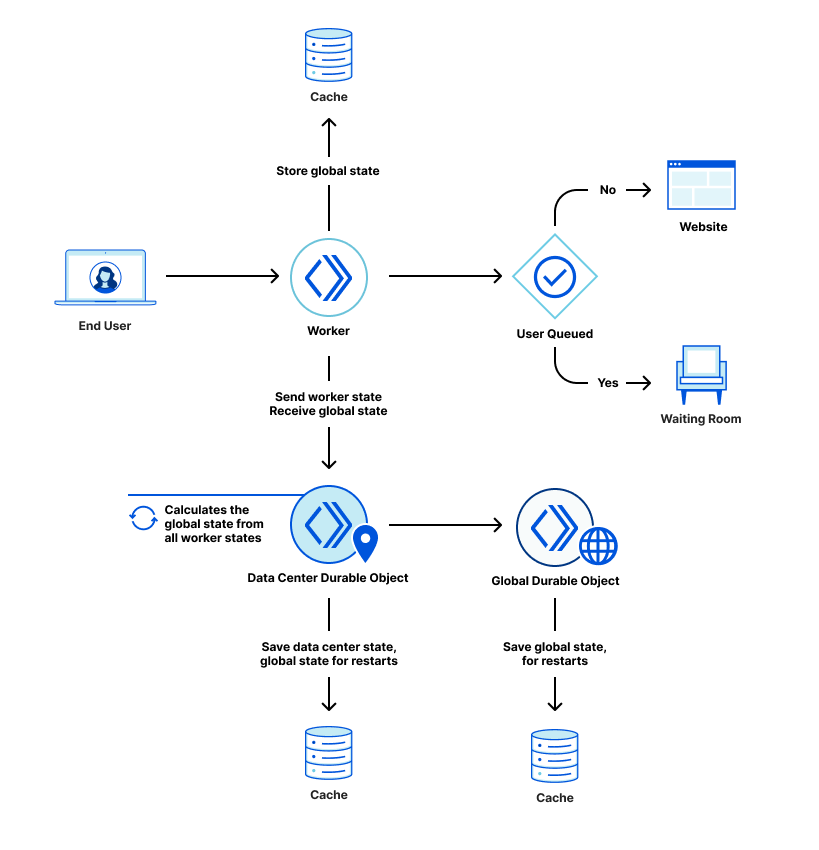
This is how the waiting room works right now. Every request with the enabled waiting room goes to a worker at a Cloudflare edge data center. When this happens, the worker looks for the state of the waiting room in the Cache first. We use cache here instead of Data Center Durable Object so that we do not overwhelm the Durable Object instance when there is a spike in traffic. Plus, reading data from cache is faster. The workers periodically make a request to the Data Center Durable Object to get the waiting room state which they then write to the cache. The idea here is that the cache should have a recent copy of the waiting room state.
Workers can examine the request to know which data center they are in. Every worker periodically makes a request to the corresponding Data Center Durable Object. This interaction updates the worker state in the Data Center Durable Object. In return, the workers get the waiting room state from the Data Center Durable Object. The Data Center Durable Object sends the data center state to the Global Durable Object periodically. In the response, the Data Center Durable Object receives all data center states globally. It then calculates the waiting room state and returns that state to a worker in its response.
The advantage of this design is that it’s possible to adjust the rate of writes from workers to the Data Center Durable Object and from the Data Center Durable Object to the Global Durable Object based on the traffic received in the waiting room. This helps us respond to requests during high traffic without overloading the individual Durable Object instances.
Conclusion
By using Workers and Durable Objects, Waiting Room was able to scale up to keep web application servers online for many of our early customers during large spikes of traffic. It helped keep vaccination sign-ups online for companies and governments around the world for free through Project Fair Shot: Verto Health was able to serve over 4 million customers in Canada; Ticket Tailor reduced their peak resource utilization from 70% down to 10%; the County of San Luis Obispo was able to stay online during traffic surges of up to 23,000 users; and the country of Latvia was able to stay online during surges of thousands of requests per second. These are just a few of the customers we served and will continue to serve until Project Fair Shot ends.
In the coming days, we are rolling out the Waiting Room to customers on our business plan. Sign up today to prevent spikes of traffic to your web application. If you are interested in access to Durable Objects, it’s currently available to try out in Open Beta.
We try to make Cloudflare’s onboarding experience as accessible as possible. For this reason, many customers are able to set up Cloudflare, configure their accounts and products, and discover additional products entirely on their own in our dashboard. Our Customer Onboarding team builds the dashboard experiences that make this possible.
The Onboarding team is data-driven, so we use data to validate our ideas. Rather than shipping the implementation of some idea right away, we run A/B tests with a small percentage of our customers. The results of these tests tell us what we should do with our idea next – either ship it to everyone, try to improve it (and run the test again), or discard it. This practice helps us with hedging our efforts so we don’t waste time on an idea that isn’t fruitful, and it provides us a method to reliably gather more information about needs of our customers. We use a third-party analytics tool to produce data for these A/B tests. This tool helps us to collect and analyse data about how our customers interact with the experiences that we build.
The onboarding experience in the dashboard is just one of many places where our customers interact with Cloudflare. Other Product teams, Customer Success team, and Marketing team build their own experiences in the dashboard and beyond, and they use their own analytics tools that best suit their needs. Each of those teams has different goals, but we all have one thing in common – we want to understand our customers.
For example, knowing how our customers interact with campaigns and emails that Marketing teams build can help us on the Onboarding team to build a better, more personalized onboarding experience. Similarly, understanding how our customers interact with the onboarding experience in the dashboard can help our Marketing team to create more personalized emails and campaigns.
Using multiple third-party analytics tools across multiple teams created many challenges related to data integrity, security, privacy and performance. In this blogpost, we are going to talk about how we used Cloudflare Workers to build our product intelligence platform to overcome these challenges, serving hundreds of millions of requests per month from over 200 cities over the world, close to our customers, all without having to configure and maintain infrastructure.
Motivation: Data integrity, security, privacy, and performance
In the past, teams at Cloudflare used third-party scripts provided by analytics platforms like Google Analytics and Heap to measure user behavior. These scripts presented multiple challenges:
Data Integrity
In the product analytics world, an “event” is any user interaction with the product. Because we were using third-party scripts to send event data to varied analytics destinations, it was hard to make sure that these event data are consistent across all these destinations. In our case, our analytics tools categorized event data in different ways, creating confusion for our teams. For example, if a Cloudflare customer purchased our Workers product, Heap would send an event named “Purchase Workers”, while Google Analytics called it “Product Purchase Success” with a data attribute label: “workers”. Nobody trusted this data, so they sought out more reliable sources, such as billing databases.
Security and privacy
Third-party analytics vendors use third-party scripts to track end-user behavior. We take security and data privacy very seriously, and these scripts pose risks to us and our customers. They are hard to audit, and make it hard to ensure they don’t send data we don’t want them to send. They also change over time, and can be buggy, inefficient, and hard to test.
Performance
We want to give Cloudflare dashboard users a highly performant experience, but third-party scripts can cause slowdowns. For example, they can have a significant size because they try to do a lot of things automatically. Having to load and parse too much JavaScript can extend page load and render times, delay user interaction, and drain more battery. They can also fire too many network requests to multiple servers.
Vendor lock-in
Cloudflare’s dashboard codebase is massive, and hardcoded tracking calls tied to a specific analytics vendor makes that vendor difficult to replace. Moreover, adding a new vendor would require significant effort to add that vendor’s tracking calls everywhere, and would have a negative impact on performance on the frontend.
We wanted to solve these problems by creating a system that would decouple what we measure from how we measure it. The requirements were:
Unified API: a single API that all clients adhere to regardless of the vendor they primarily use. Engineers don’t need to understand how analytics vendors work and what data they require.
Secure and compliant: we fully own and control the code, protecting our customers from vulnerabilities in third-party code. We fully control how our data is measured, distributed, and stored.
Performant: lightweight, fast, and non-blocking on the frontend. Move as much logic as we can to the backend.
Flexible: ability to add/replace/remove vendors with relatively small effort on the backend, and no effort on the frontend.
We chose to use Cloudflare Workers, which deploys serverless code on the edge across the globe, as our backend infrastructure. Workers offers the following advantages:
Nimbleness through serverless development: Our team is small, and analytics wasn’t our primary focus at the time, so we wanted to create something quickly without having to worry about setting up and maintaining the infrastructure. With Workers, we never have to look at things like system health status, or load balancing and scaling, or how fast it is across the world. Everything is included in the package, and works really well.
JavaScript support: Since we work on user experiences, we are mostly UI-engineering focused and use React+TypeScript every day. Our team can write frontend and backend code in the same language, which reduces cognitive load.
Dogfooding opportunities: We help to test Workers at scale, which makes the product stronger.
Iteration #1: Sparrow and Trace Worker
Our analytics platform has gone through multiple iterations. The first version had two components – a JavaScript SDK called Sparrow, and a corresponding worker we call Trace.
Sparrow
The Sparrow SDK turns various data about product events into a consistent format, so internal users don’t need to understand API requirements further down the data pipeline.
The pageview function can be run whenever a page loads in an application, which allows us to track where users navigate.
The track function is more generic. We can send any event name with any metadata. For example, the event name can be “purchase product” with properties: { product: “workers” }.
Both functions create a JSON object with the following interface and send it to the Trace Worker, which forwards it along to various analytics platforms:
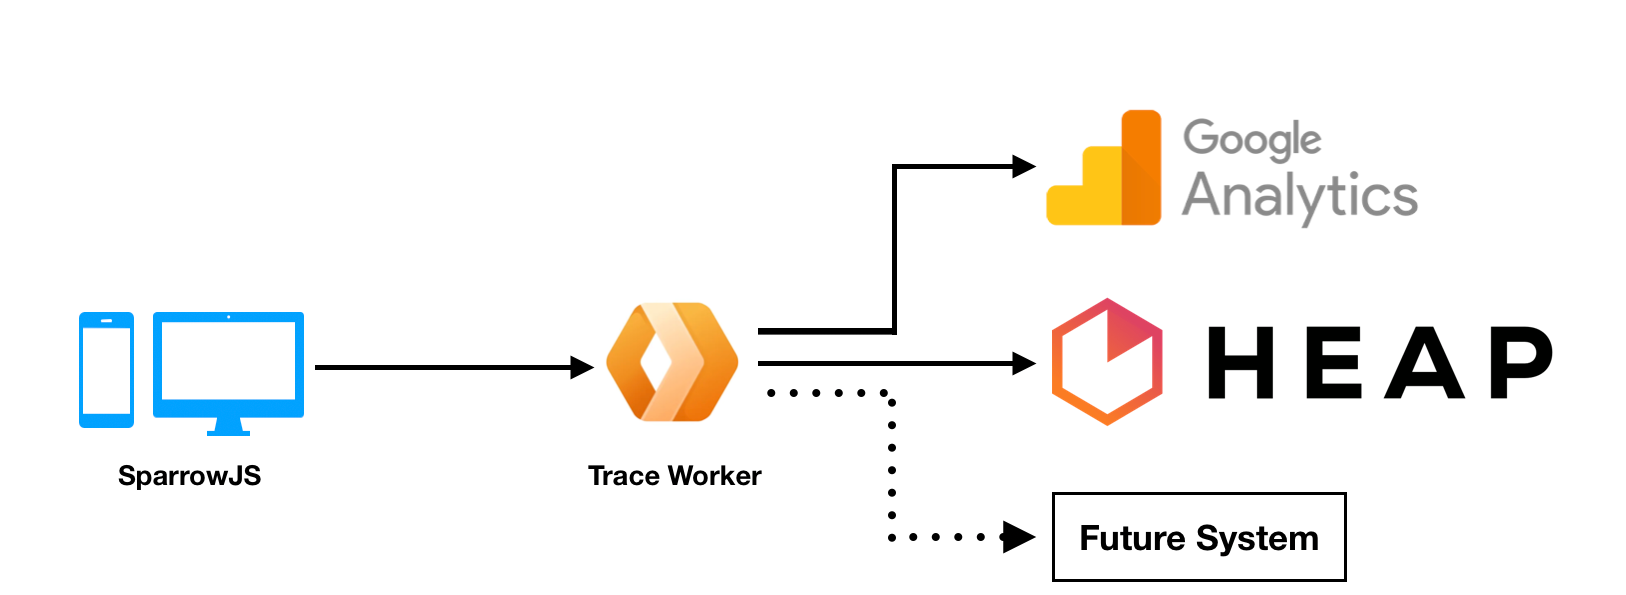
The Trace Worker receives event data from Sparrow, checks payload correctness to make sure the request came from valid sources, and fans out the data to all connected analytics providers. The following diagram shows the pipeline.
Any third-party vendor can be added to Trace Worker, as long as that vendor provides a REST API. How the data are parsed, transformed, and sent to those APIs is implemented by us in our custom functions we call trackers. Trackers aim to replicate the behavior of third-party scripts provided by these vendors. Why are we doing this when we can just use third-party scripts? The main reasons are security and data privacy.
We use allowlists to explicitly define event names and event properties that can be sent further upstream. This helps us to prevent sending potentially sensitive information from cookies, URL query parameters, or data payloads. Every event and data property that is not in the allowlist is ignored.
On top of that, all allowed properties are sanitized by our internal data scrubber.
Always HTTPS: Some third-party scripts still use non-secure HTTP protocol. Trace Worker runs on HTTPS, and we make sure that outgoing requests are also using HTTPS.
We fully control the code, which means there are no surprises – the code cannot update without us knowing it.
Because the logic lives in the worker, our customers are not exposed to unnecessary client-side risks from using eval or document.write.
Another benefit is performance – because most of our analytics framework’s logic lives in the worker, there’s less JavaScript we need to send to the client, which means faster load times! SparrowJS on its own is super lightweight.
Here’s the simplified implementation of Trace Worker:
import trackers from ‘./trackers;
import { generateContext } from ‘./utils’;
Import { sanitize } from ‘./sanitizer’;

addEventListener(‘fetch’, event => {
  event.respondWith(handle(event));
}

async function handle(event: FetchEvent) {
  try {
    const payload = sanitize(await event.request.json());

    const context = await generateContext(event);


    // fan out
    event.waitUntil(Promise.allSettled(trackers.map(tracker => tracker[payload.event === “pageview” ? “pageview” : “event”](payload, context))));

    // return new Response(“OK”, { status:”OK”, statusCode: 200  })
  } catch (err) {
    // logging
    return new Response(“Something went wrong”, {
      status:”Internal Server Error”,
      statusCode: 500
    })
  }
}
trackers is an array of tracking functions for each third-party vendor. Under the hood, they transform the incoming requests from Sparrow and send them to each vendor’s REST APIs. For example, this is a simplified implementation of Google Analytics tracker that transforms Sparrow payloads to adhere to Measurement Protocol:
As you may have noticed, Trace Worker is not your typical service worker. There is no origin service – Trace Worker is the service, except it runs everywhere in the network.
Problem: Nobody (still) trusts the data
Iteration #1 of our data analytics’ platform worked well for a while, but as more product teams used Sparrow to run their own analyses, we started getting reports of data not looking right. The reports were along the lines of:
“Google Analytics underreports Heap by x percent…”
“Product purchases are not consistent with DB…”
“Signup conversion dropped by x percent, but we don’t think that’s actually happening…”
At the same time, we added another vendor – Amplitude, which made these problems even more complicated, because we now had three systems out of sync.
Due to the distributed nature of our analytics platform, we had a lot of potential breaking points. To find a solution, we needed to answer questions like:
Dashboard/Sparrow problems
Are product teams using Sparrow correctly?
Do we have any hard redirects that cause request cancellation? Should we try Beacon API and see what changes?
How does Trace Worker respond?
Trace Worker problems
Are we not catching some exceptions?
Are we exceeding runtime limits?
Are we hitting firewall/DDoS protection?
Third-party vendors problems
Are they silently rejecting or not storing some payloads sent from Trace Worker? Google Analytics always responds with 200 OK to any request. How are other vendors handling requests?
Are they having internal issues? How can we know, since these systems are blackboxes?
Can we recover any lost data?
If we release Trace Worker and our event volume takes a nosedive, it’s a pretty strong clue that it’s caused by us and we should roll back.
But what if nothing unusual happens for a while, and then page views drop by 20%? 10%? 5%? Is it us, or third-party vendors, or just a nice sunny day in Europe and so people are not sitting behind their desks? As we had no source of truth to compare these data against, this was impossible to answer.
Regardless, we knew we had to get serious about observability before we even begin asking these questions. At the time, there was no wrangler tail or Workers analytics (there are now!). Also, even though we used Sentry, an app monitoring platform, our logger was a very basic wrapper around Sentry’s REST API, because there was no full-blown Sentry SDK for Workers runtime – the current SDKs use globals, causing race-conditions in Workers.
The goals were:
1. Get better at diagnosing our own problems – catch every exception in Trace Worker and every non-200 HTTP response from third-party vendors, and log it to some visible source, with some helpful stack-traces and other metadata like request headers and body.
2. Be able to isolate problems that may be happening outside of our codebase – have a single source of truth for all incoming/outgoing requests which we can query and compare against data in our third-party tools. This would help us discover dropped requests that weren’t represented with an error state.
Iteration #2: New Sentry SDK for Workers
To meet these goals, we implemented and open-sourced a new Sentry SDK for Workers called toucan-js. Toucan adheres to the Sentry unified API guidelines, so the interface is familiar from other SDKs (node/browser). It currently supports capturing errors and messages with stack-traces that can be enhanced with source maps, breadcrumbs, request data/headers/cookies, tags, and extra metadata.
Since we replaced our simple Sentry logger with toucan-js, every single log started having:
Full request payload and some allowed headers
Stack-trace with source maps
Response status code and body (if applicable)
If anything goes wrong, we have all the information we need to reproduce and fix it – request body, headers, stack-trace, and all necessary context.
At the same time, we started sending cloned requests to the /debug/collect endpoint in Google Analytics Tracker that, combined with Sentry alerts, helped us find many dropped requests due to schema adherence problems such as “The value provided for parameter ‘cid’ is invalid.”
Iteration #3: The single source of truth
Better Sentry logs helped us with major drifts, but the data were still slightly off. While we observed some intermittent HTTP errors in Sentry, when we compared the number of these alerts with differences between different analytics platforms the numbers didn’t add up.
Due to this uncertainty, we decided to own the data layer, and create our own database – the single source of truth of all incoming payloads sent from Sparrow to Trace Worker before any transformation.
In order for us to trust the data in this ‘single source of truth’ database, the database needed to receive Sparrow payloads from outside of Trace Worker, preferably from a system that sits right in front of it, with minimal logic, that changes rarely, and that is highly available. Ideally, this system was to do three things – grab the incoming request payload, log it, and forward it to Trace Worker. These payloads should be logged raw, untouched, corresponding to whatever is sent from clients (SparrowJS).
The nice thing about this solution is that even if Trace Worker gets a bad release, we will not lose any data. Another strong case for us owning the data is that incidents in third-party vendors will not affect us anymore, because the solution will open the door for backfilling of dropped requests.
We considered Workers KV — Cloudflare’s low latency key-value store hosted at the network edge — for our storage needs, but being able to query the data was really important for us, because we wanted to diagnose complex problems quickly and select the data based on some property. For this reason, we went in a different direction.
Google BigQuery was our storage solution
We decided to use Google BigQuery for our ‘single source of truth’ database because:
It was designed for big data
It lets us use SQL to query what we need
We can use REST API in our new system to send the logs
Of course, Google BigQuery is a columnar database. How would we use it to store JSON data?
The first option was to write some kind of transformer that would map every object property to a column, but that was against our requirement of a system with minimal logic. The set of allowed characters we could use to name a column was also limited, so we wouldn’t be able to map column names back to original properties.
Due to these limitations we decided to store raw json strings, and use JSON functions to build views on top of these data.
First, we created a partitioned-by-day table called raw with the following schema:
Field name
Type
eventId
STRING
timestamp
TIMESTAMP
data
STRING
Sparrow’s payloads are stored in the data field as stringified JSON.
We don’t run queries against this table directly. Instead, we built a view called raw_normalized that looks something like this:
select
  json_extract_scalar(data, '$.event') as event,
  json_extract_scalar(data, '$.deviceId') as deviceId,
  json_extract_scalar(data, '$.userId') as userId,
  json_extract_scalar(data, '$.properties.category') as category,
  json_extract_scalar(data, '$.properties.productName) as productName
from raw;
With this setup, we can write complex SQL queries while retaining the original JSON values. To demonstrate on a simple example, when we insert a row with data being:
select * from data_normalized where event = ‘purchase product’;
we get:
event
deviceId
userId
category
productName
purchase product
desktop1
michelle1
billing
workers
We had our data layer prepared. But how to actually push the data into BigQuery?
Dispatcher Worker
We created another worker, the Dispatcher, that sits in front of Trace Worker! As we said earlier, the sole purpose of Dispatcher Worker is to:
Read the incoming request body
Send it to BigQuery
Forward the incoming request to Trace Worker
The architecture changed to:
Here’s a simplified implementation:
import Toucan from 'toucan-js';
import { BigQueryClient } from “./bigquery”;

const bigQuery = new BigQueryClient({
  serviceAccountEmail: SERVICE_ACCOUNT_EMAIL,
  serviceAccountSecret: SERVICE_ACCOUNT_SECRET,
  projectId: PROJECT_ID,
  datasetId: DATASET_ID
});

addEventListener('fetch', event => {
  const toucan = new Toucan({dsn: DSN, event});

  // do the work without blocking the response
  event.waitUntil(dispatch(event, biqQuery, toucan));

  event.respondWith(return new Response('OK', {
      status: 200,
      statusText: 'OK'
  });
});

async function dispatch(event: FetchEvent, bigQuery: BigQueryClient, toucan: Toucan) {
  try {
     // Original request to be sent to Trace Worker
    const requestOriginal = event.request;

    // We clone the request here to allow multiple uses of Body
    const requestClone = requestOriginal.clone();

    // read the request payload
    const payload = await requestClone.text();

    // create a timestamp
    const timestamp = Date.now();

    // send to BQ
    const bigQueryResponse = await bigQuery.insertRow({timestamp, json: payload});

    // log failed logs
    if (!bigQueryResponse.ok) {
       sentry.captureException(await HttpError.fromResponse(bigQueryResponse));
    }

    // send to trace worker
    const traceResponse = await fetch(TRACE_WORKER_URL, requestOriginal)

    // log failed logs
    if (!traceResponse.ok) {
       toucan.captureException(await HttpError.fromResponse(traceResponse));
    }
  } catch (err) {
   toucan.captureException(err);
  }
}
BigQueryClient is a lightweight SDK we implemented to be able to send data to BigQuery. Internally, it builds a request and sends it to Google Cloud Platform using their Stream API. We won’t go into details, but we want to briefly cover how we handle authentication.
Google Cloud APIs use the OAuth 2.0 protocol for authenticating both user accounts and service accounts. In short, the protocol involves building a signed JWT (JSON Web Token), sending it to Google Authorization Server to obtain access token, and sending that access token with all requests to GCP API.
We tried a few libraries to help us build that JWK (such as jsonwebtoken), but they were too slow due to their RSA implementation, and we were hitting runtime limits. So we implemented our own JWT builder using SubtleCrypto, which is a web standard that is also implemented in Cloudflare Workers!
The access token doesn’t need to be requested with every FetchEvent – it can be reused until it expires. Caching the token helps with performance, because RSA encryption is costly.
BigQueryClient stores the access token in a global variable, so all isolates that share the environment can use it. In fact, that’s the reason we initialize BigQueryClient outside of addEventListener. The SDK manages the token internally and handles the OAuth2 ceremony for the clients – the first call of insertAll generates a JWT to retrieve and store an access token, but subsequent calls of insertAll use the access token from the memory.
With all the pieces put together, this is the state of our analytics pipeline today.
Future work: Risk management
Logging all data gives us great visibility and makes debugging easier. We now have a clear picture of where in the pipeline the problems are, and we have all possible information to fix them. We can react to problems pretty well, but we would like to get better at preventing problems in production before they happen.
We currently have two environments: staging and production. Our staging environment is behind Cloudflare Access, only accessible to Cloudflare employees. When we merge our changes, the CI pipeline automatically deploys them to the staging environment where we can test these changes before they get to production.
While our staging environment helps us with catching catastrophic errors early, it’s not too great for finding errors that may cause partial data drops, because the staging traffic is generally very low, which makes it harder to spot changes in data patterns. From this perspective, our releases are very risky.
To reduce these risks, we need to test our changes with production traffic. We can achieve that with a variant of blue-green deployment approach, ensuring we have two production environments, as identical as possible. We could use another Worker, sitting in front of Blue and Green Dispatcher Workers, receiving live traffic and duplicating all requests to blue/green variants. One of these variants, green for example, would be using live code and live data sources, and the other one, blue, would be in the final stage of testing, with our new code, logging to the staging data sources. Once we validate the data in staging data sources, we can easily cut-over by switching data sources between green and blue.
Future work: Durability
Outages of third-party vendors don’t affect us anymore, since we essentially own the data layer and can backfill dropped events once a vendor is fixed and back online.
This presents us with a question: How can we automate this with Workers?
How can we make sure that everything in our source of truth will eventually get stuffed to the analytics tools?
Can we implement a true distributed and durable streaming platform like Kafka at the edge?
The Cloudflare Workers team is excited to announce the opening of our Discord channel! You can join right away by going here.
Through our Discord channel, you can now connect with the team to ask questions, show off what you’re building, and discuss the platform with other developers.
Sometimes you just need to talk to another human being. Our developer docs will always be the source of truth on the mechanics of Workers, but we want to provide quicker help if you need it.
Growing The Workers Community
Over the past three years, Cloudflare Workers evolved from an initial sandbox for enterprise customers writing edge code to a developer platform for creating new applications and systems.
“We bet our whole business on Workers and it paid off big time,” said Hamlet Batista, CEO of RankSense, a SEO automation platform. “We’ve been saving a lot of money on infrastructure costs and DevOps resources we no longer need.”
Our team is constantly surprised by the palette of use cases from those developing on Workers. For example, a developer in Belgium created a static Workers site that teaches an online tutorial in three different languages on how to make your own face mask, which earned the approval of the Belgian government.
Why Discord?
Discord provides a medium that allows users to openly share their thoughts while maintaining anonymity. It’s also really fast — partially due to Discord’s use of Workers and Cloudflare’s network.
“Workers are in the path of virtually all Discord requests,” said Mark Smith, Director of Infrastructure at Discord. “We are longtime users of Workers and big fans of the power and flexibility they give us to continue building great things for our users.”
As we continue to build the ecosystem of developer tools, we’d love to hear what you’re building, whether it’s a personal site of your pet or an API gateway. Come say hi today.
As part of the development for Cron Triggers on Cloudflare Workers, we had an interesting problem to tackle relating to parsers and the cron expression format. Cron expressions are the format used to write schedules in Cron Triggers, and extensions for cron expressions are everywhere. They vary between parsers and platforms as well, and aren’t standardized by a governing body, which means most parsers out there support many different feature sets, which isn’t good if you’d like something off the shelf that just works.
It can be tough to find the right parser for each part of the Cron Triggers stack, when its user interface, API, and edge service are all written in different languages. On top of that, it isn’t practical to reinvent the wheel multiple times by writing the same parser in different languages and make sure they all match perfectly. So you’re likely stuck with a less-than-perfect solution.
However, in the end, because we wrote our backend service in Rust, it took much less effort to solve this problem. Rust has a great ecosystem for working across multiple languages, which allows us to write a parser once and pull it from the backend to the frontend and everywhere in between with minimal glue code.
The Trouble with Cron
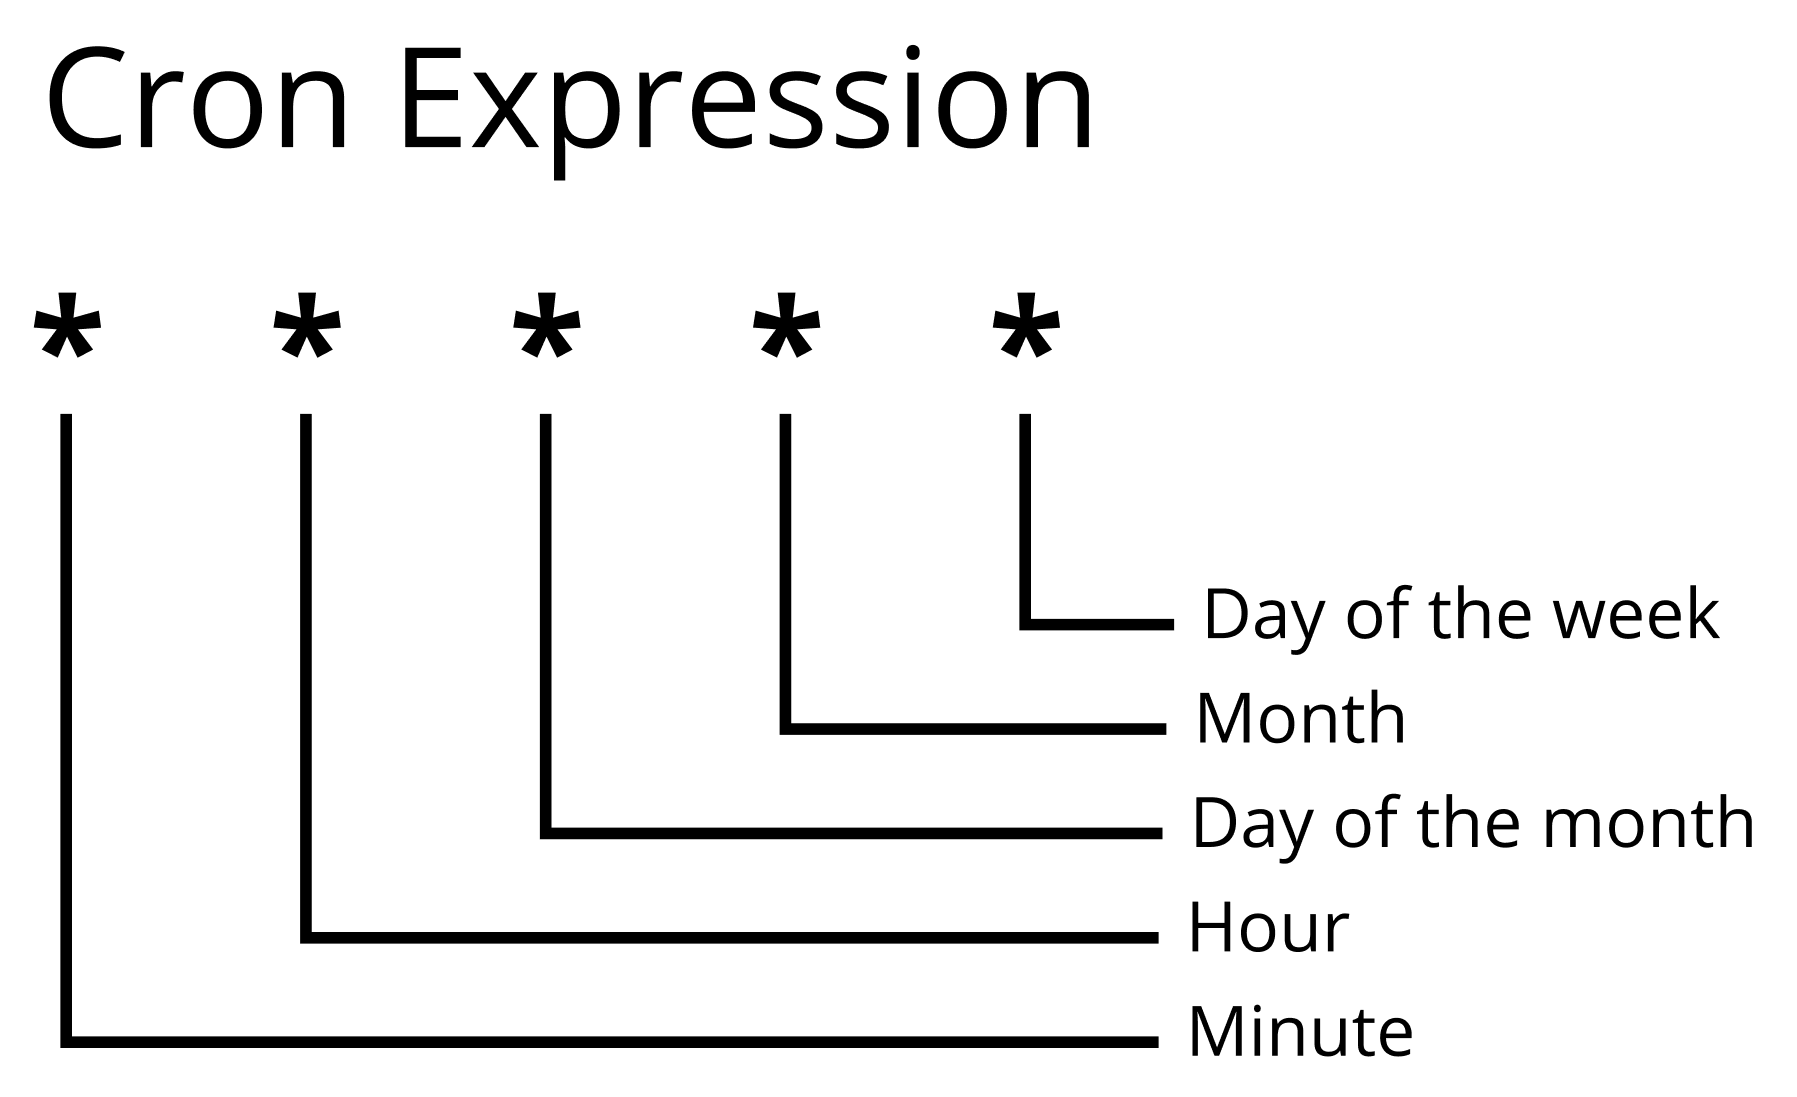
Cron expressions are a set of fields that represent a set of times. They act as a pattern that matches over the minute, hour, day of the month, month, and day of the week of a given time. Since cron is a simple format, it’s easy to extend with extra fields, so some parsers and platforms allow specifying seconds and years as well. However, seconds are a bit too granular and years are a bit too long, so we opted to not support them as part of Cron Triggers.
In the original cron program, the expressions supported were simple, each field could contain either:
A star (‘*’) representing all values,
A value (a number for all fields or a 3 letter abbreviation for months or days of the week, like JUN or FRI)
A range of values (i.e. ‘0-30’), or
A set of ranges and/or values (i.e. ‘0-15,30,45-50,55’)
This is a good start for specifying most time patterns, but many extensions exist out there to fill in some gaps. For example,
‘L’ can be used for the day of the month position to specify the last day of the month, or in the day of the week position with a day value to specify the last of that weekday during the month (i.e. 7L, the last Saturday of the month).
‘W’ can be used for the day of the month, and lets you specify “the closest weekday (MON-FRI) to a given day”, like 15W, or the closest weekday to the 15th of the month.
‘/’ can be used for step values in any field. For example, */5 in the minute field is every 5th minute in the hour. This can be combined with a range to specify things such as ‘30-59/5’, or every 5th minute from minute 30 to minute 59 in the hour.
‘#’ can be used with a day of the week value to specify the “nth day of the month”, such as ‘5#3’, or the 3rd Thursday of the month.
So far I’ve only listed extensions we currently support on Workers, but others exist such as ‘H’ in Jenkins and ‘?’ in some cron implementations for start-up time. Most libraries don’t support said extensions, however ‘?’ is used in some implementations in certain circumstances, but not as start-up time. With all these extensions and a lack of standardization, some libraries aren’t guaranteed to support them all.
The Multitude of Libraries
During the development of Cron Triggers, we needed some things to just work, and to do that, we opted to pull some libraries off the shelf from package repositories for different parts of the stack.
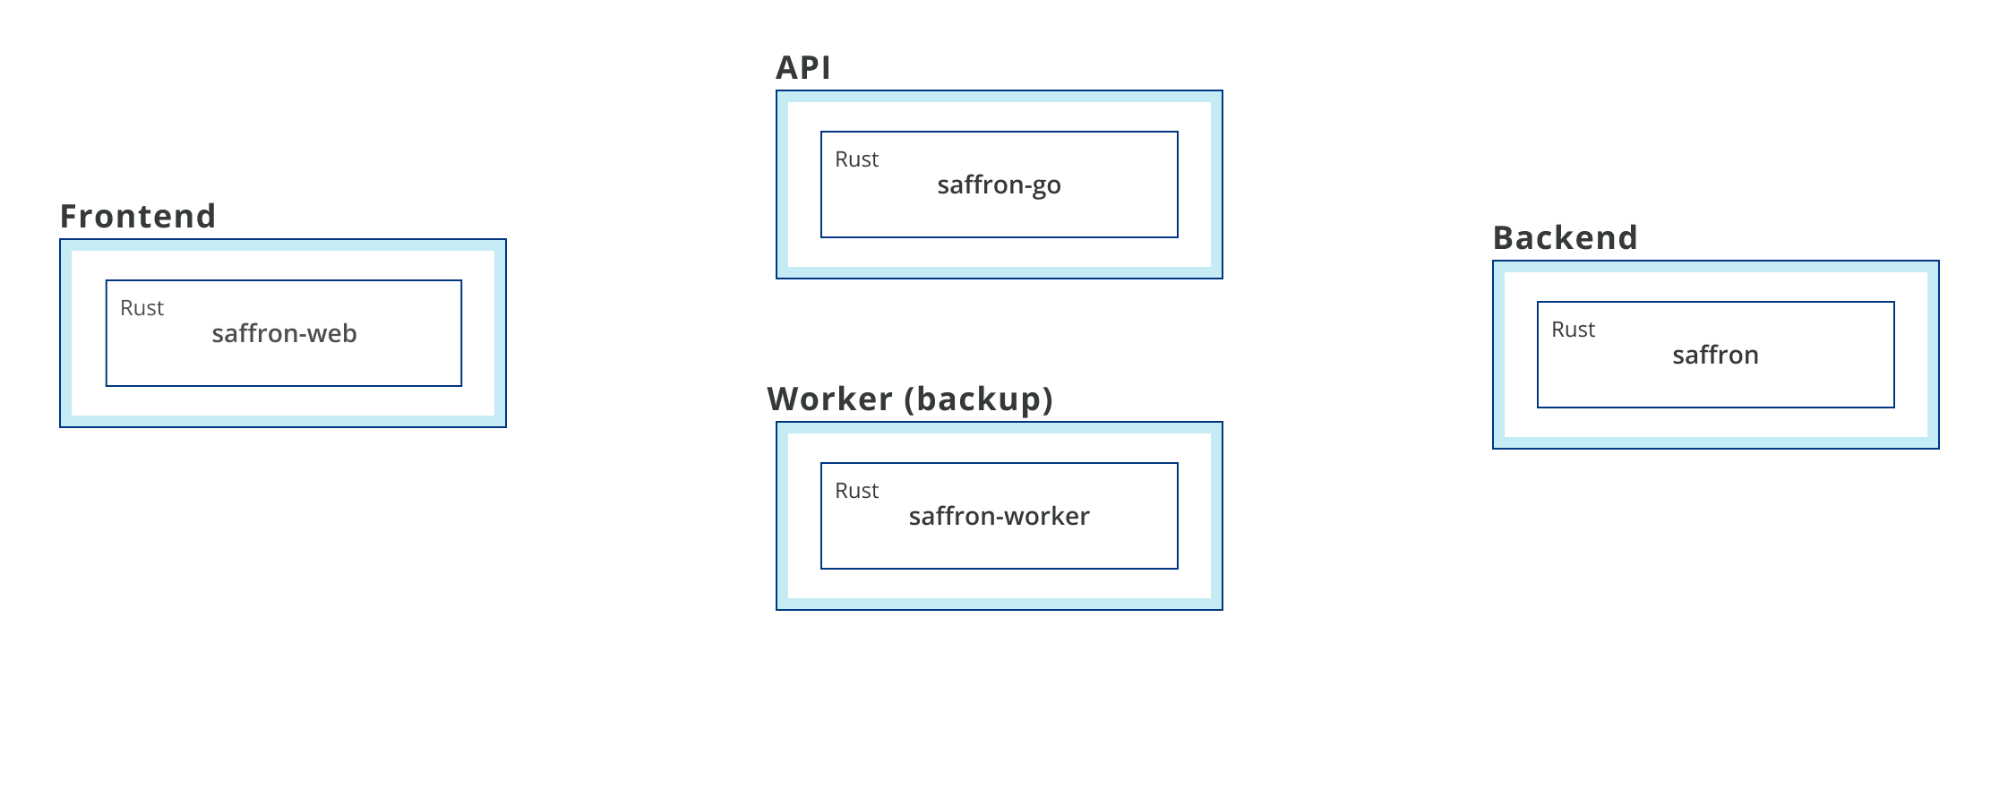
In the Rust backend, we needed a cron library that supported all the extensions we wanted, while also leaving off other field extensions like seconds and years, and had an API that let us simply check if a given time matched the expression pattern. None of the crates on crates.io offered these, so we had to write it ourselves. Using the nom crate, it was easy to draft a simple, fast, safe parser, named ‘saffron’. As time went on and we got closer to release, it became clearer which extensions we really wanted to support. It was incredibly easy to add support for the new features without worrying about safety since the compiler checked it for us, so all we had to do was extensive logic testing. Last offset weekdays (“L-XW”) and leap years were difficult to get right the first time, but testing them was easy with Rust.
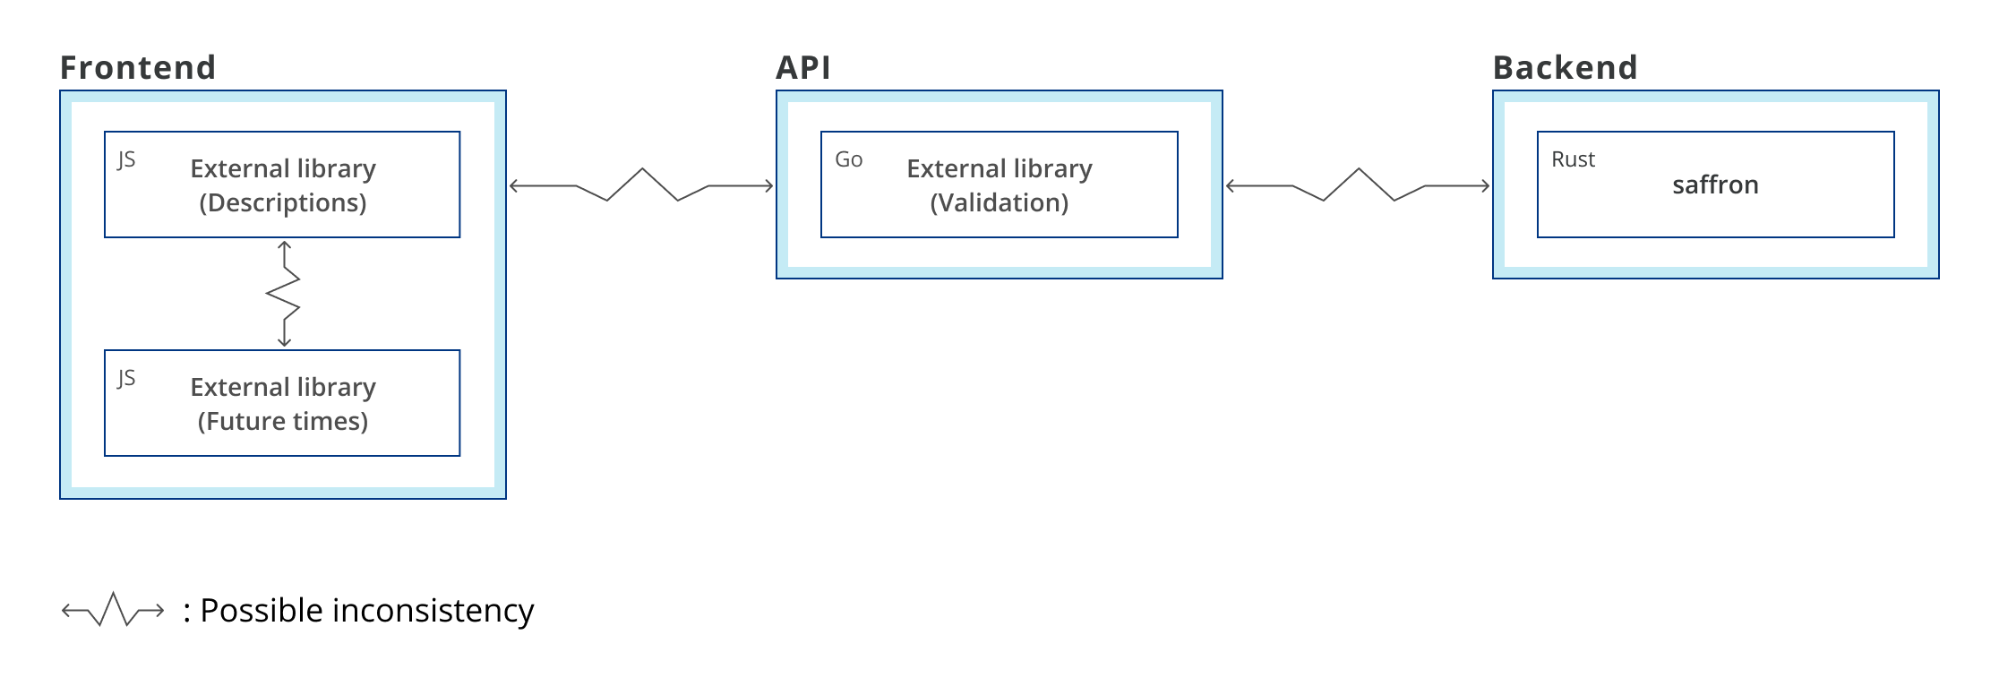
However, the UI had a different set of requirements. It didn’t need to know whether a given time matched a cron pattern — we wanted to provide information to the user about the cron expression they’d written, so it needed to provide a more human readable translation (description) of their cron expression and show them their next five executions (future times). But we were on a limited time budget — we needed something off the shelf.
We used two different JavaScript libraries for displaying info about given cron expressions: one gave us descriptions, the other gave us future times. Since these two libraries were tasked with parsing cron expressions, they also acted as validation; however, just using these two libraries for validation proved to be less than optimal. Both of the libraries supported extensions that were different both from each other and from the backend. Because of that they’d sometimes allow users to add schedules that would be rejected by the API on submit, which doesn’t translate into a good user experience. This validation should happen while the user writes their cron expression, not after they already hit submit! Because of this fracture in extension support, the UI parsers also sometimes didn’t parse expressions that should be supported and were accepted by the API!
Before release on the API side, we simply used a Go library for validation. This proved to be an easy solution, but we quickly noticed that the API accepted more than the schedule runner supported. This caused some triggers to be successfully added to the schedule, but were ignored by the runner because they failed to parse.
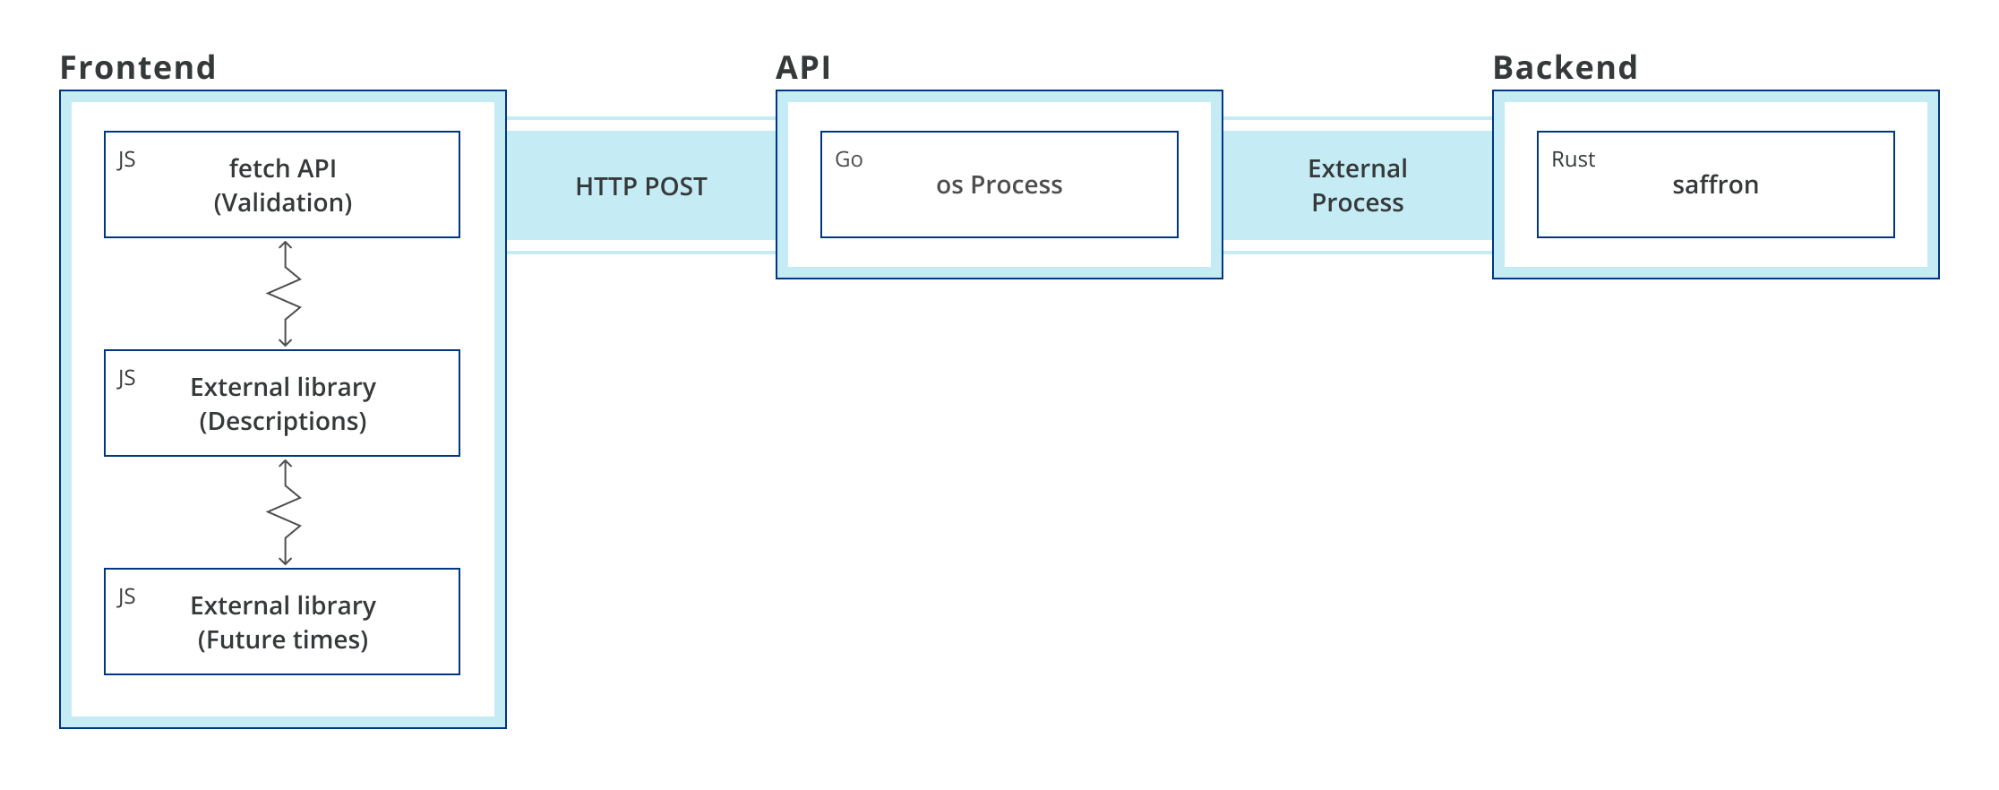
So before launch, we were using four completely different parsers! This probably wouldn’t be much of an issue if cron expressions were standardized. But because they aren’t, inconsistencies could exist at every step in the trigger creation process: between the two libraries we used on the frontend, between the frontend and API, and between the API and the backend.
To solve these issues in the UI and API before release, we synced the API and backend with another schedule runner entrypoint that simply read a cron expression from stdio, parsed it, and returned whether it was valid, to make sure they perfectly matched. We also added a validation endpoint to the API that could be used by the UI to check a cron expression, to make sure the backend actually accepted it. This fixed all cases of the API and UI being too accepting of expressions that weren’t supported, but neither of these solutions were optimal.
For one, they weren’t performant. Each time we wanted to validate a cron expression in the UI, we’d have to parse the expression twice in JavaScript (once for a description, and again for future times) and make an request to the API, which would start an instance of the schedule runner, parse the expression, and return whether it properly parsed.
Another reason this was nonoptimal is we were still limited in the features we supported by one library. One of our UI libraries didn’t support the ‘L’ and ‘W’ extensions, and since we also programmed the UI to accept expressions based on whether all parsers accepted it, expressions that used those extensions couldn’t be added.
So even though we dropped it to three parsers before release, it still didn’t seem good enough. Soon after release, I made plans to remedy it and started working on saffron (originally this project was called cfron but Cloudflare’s CTO couldn’t resist suggesting renaming it to saffron because he loves puns) to fill in for the one library holding us back in the UI. It would’ve been OK if missing extension support was the only thing wrong after release, but soon some other issues came up.
Off By One
Saffron is based on the Quartz open source scheduler’s cron parser, which makes days of the week when specified as integers start from 1 (Sunday) and go to 7 (Saturday). Both parsers on the frontend follow the original values for cron, where days start from 0 and go to 6, and 7 could be used for Sunday as well. So when users entered 1-5, the UI told them they were entering a schedule from Monday to Friday, and the backend ended up executing Sunday to Thursday! This was missed when testing Cron Triggers initially and was caught by observant community members on the forum.
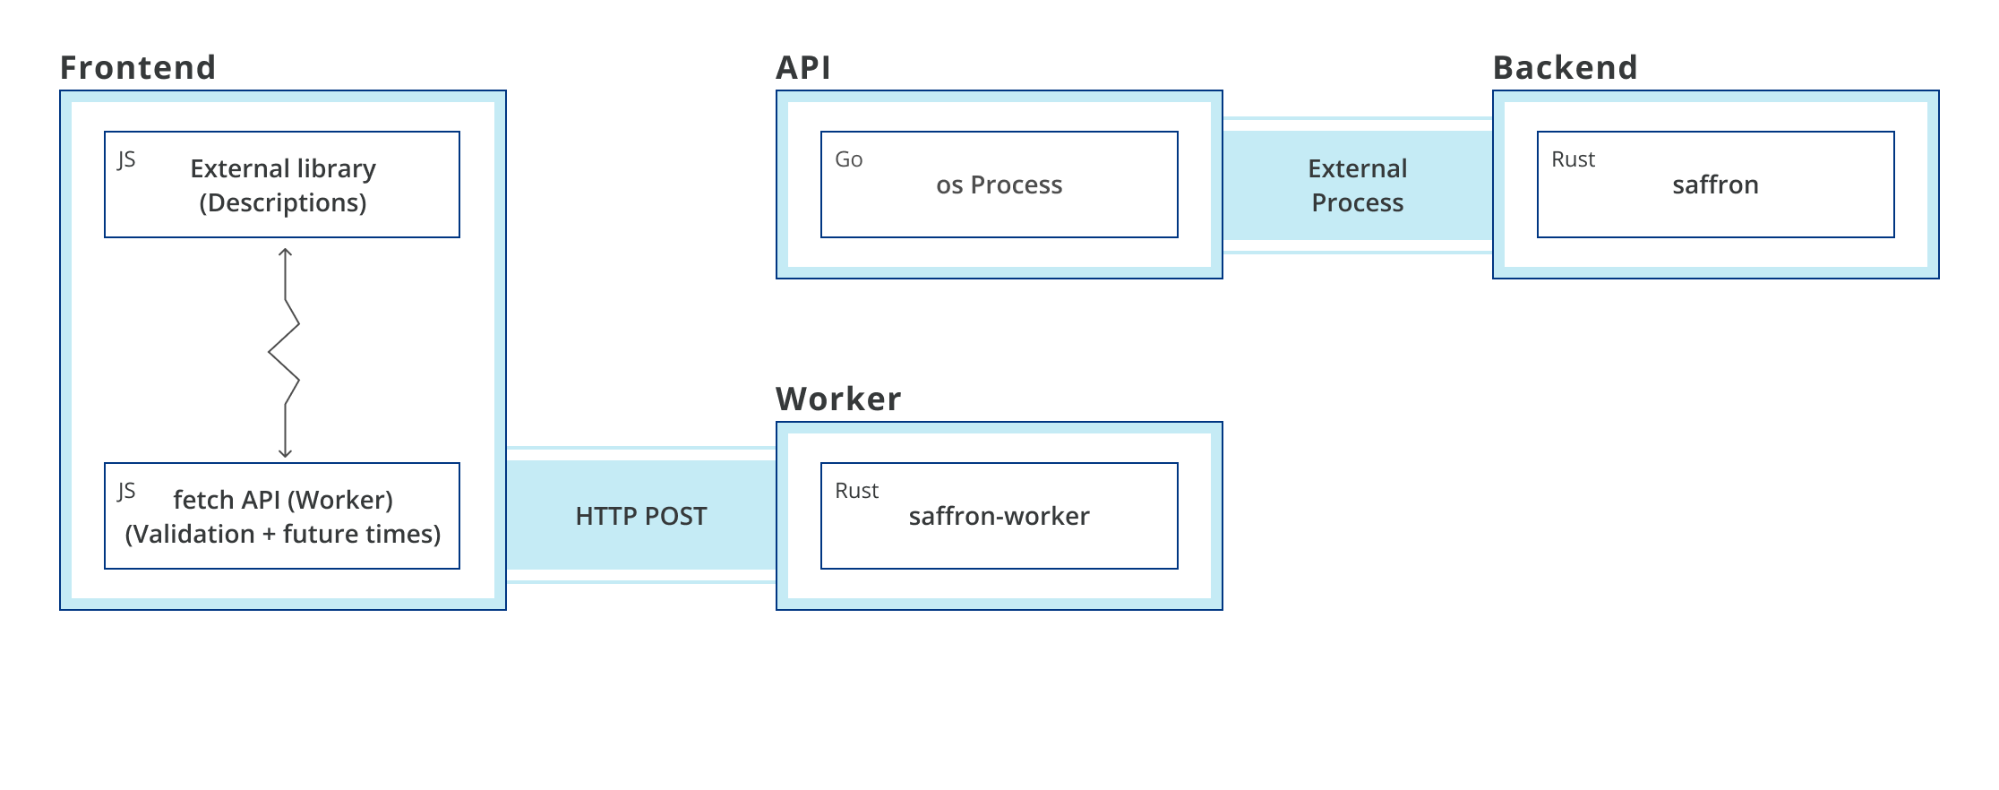
Fixing the issue turned out to be a bit difficult. While the library we were using for descriptions had the option to simply switch from 0-6 to 1-7 days of the week, our future times library did not have that option. Luckily, development was already halfway through with replacing it in Saffron. However, we couldn’t place it directly on the frontend yet, since web bindings didn’t exist and I didn’t have time to write them. We needed something easier to develop quickly.
Reintroducing: Cloudflare Workers!
Workers made it incredibly easy to take the existing code, add some wasm entry points for a makeshift API, and call with JavaScript. No need to build a whole separate API in Go! Just take your existing code and put it directly within 100ms of nearly everyone on the Internet. Why call all the way back home when the nearest PoP works just as well?
Plus, we don’t have to worry about building and publishing, wrangler does it for us! For example, our validation code is all written in Rust:
#[wasm_bindgen]
#[derive(Clone, Debug)]
pub struct ValidationResult {
   errors: Option<Vec<String>>,
}

#[wasm_bindgen]
pub fn validate(crons: JsArray) -> ValidationResult {
   set_panic_hook();

   let len = crons.length();
   let mut map = HashMap::with_capacity(len as usize);
   for i in 0..len {
       let string = match crons.get(i).as_string() {
           Some(string) => string,
           None => {
               return ValidationResult {
                   errors: Some(vec![format!("Element '{}' is not a string", i)]),
               }
           }
       };

       let cron: Cron = match string.parse() {
           Ok(cron) => cron,
           Err(err) => {
               return ValidationResult {
                   errors: Some(vec![format!(
                       "Failed to parse expression at index '{}': {}",
                       i, err
                   )]),
               }
           }
       };

       if let Some(old_str) = map.insert(cron, string.clone()) {
           return ValidationResult {
               errors: Some(vec![format!(
                   "Expression '{}' already exists in the form of '{}'",
                   string, old_str
               )]),
           };
       }
   }

   ValidationResult { errors: None }
}
and our code to handle processing the request and response is written in JavaScript:
  const path = new URL(request.url).pathname;
 switch (path) {
   case "/validate": {
     let body;
     try {
       body = await request.json()
     } catch (e) {
       return status(400, "Bad Request");
     }
     let crons = body.crons;
     if (!Array.isArray(crons)) {
       return status(400, "Bad Request");
     }

     let result = validate(crons).errors();
     let success = result == null;
     return apiResponse({}, success, result);
   }
After a week of dedicated development, a Worker was written, the future times were calculated, and the UI was fixed! On top of that, we also implicitly introduced support for more extensions by removing the old parser and replacing it with the same one used on the backend as part of the fix itself. But we’re still using two parsers, so inconsistencies may still exist out there that we haven’t seen yet (that we don’t already know about).
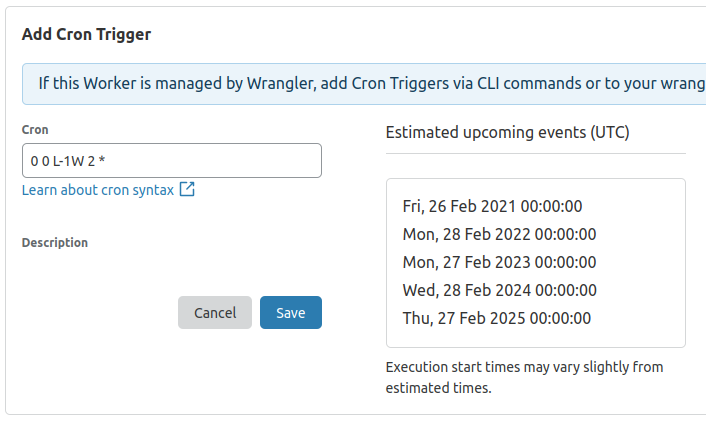
For example, this expression “0 0 L-1W 2 *”, or “12:00 AM on the closest weekday to the 2nd to last day of the month in February” cannot be parsed by the parser we use for descriptions, but it’s accepted by the API, backend, and Worker, so you can use it in your cron triggers, but the UI won’t give you a description for it.
The Quest for the One True Parser
This brings us to today. In the search of better and faster, we want to bring the number of parsers down from two to one. One source of truth for the entire stack. To make it all faster, we should do parsing on the frontend locally instead of making a call to a remote Worker (if possible). In the API, the separate entry point was a nice easy solution, but starting the schedule runner just to check if a cron string is valid every time a user adds one doesn’t seem like it’s the best it could be.
Luckily Rust has a vibrant ecosystem that can meet all these needs! To bring the parser to the UI, we can compile saffron to wasm and use generated bindings created with wasm-pack. This can be easily integrated with our existing webpack setup, making it simple to get future times and create descriptions of cron strings on the frontend. Then, to bring the parser closer to the API, we can use Rust’s ability to create C APIs that we can then integrate with Go using cgo.
With our parser everywhere, we can then focus exclusively on cron descriptions to replace the one other parser we’re using in the UI. At that point we will have one parser for the whole stack, a single source of truth that anyone can reference to understand how the frontend, API, and backend all work together. It also simplifies our graph. Now instead of multiple libraries written in different languages, we have one library with multiple language wrappers, each serving a different part of the stack. No inconsistencies will exist since they’re all using the same parser!
However, we wanted to do something before that…
We made it open source!
I think this project serves as a great example of Rust’s type system, its safety, and its extensibility across the entire stack. The project itself is simple, easy to understand, and easy to port and provide bindings for. By open sourcing, we can publish packages for these bindings on npm and crates.io, allowing anyone to use these bindings for whatever they want. It also means you can also follow along with development to see the finishing touches get added and maybe make some suggestions for future improvements in the UI and the parser itself.
Cloudflare has always been about democratizing the Internet. For us, that means bringing the most powerful tools used by the largest of enterprises to the smallest development shops. Sometimes that looks like putting our global network to work defending against large-scale attacks. Other times it looks like giving Internet users simple and reliable privacy services like 1.1.1.1. Last week, it looked like Cloudflare Pages — a fast, secure and free way to build and host your JAMstack sites.
We see a huge opportunity with Cloudflare Pages. It goes beyond making it as easy as possible to deploy static sites, and extending that same ease of use to building full dynamic applications. By creating a seamless integration between Pages and Cloudflare Workers, we will be able to host the frontend and backend together, at the edge of the Internet and close to your users. The Linc team is joining Cloudflare to help us do just that.
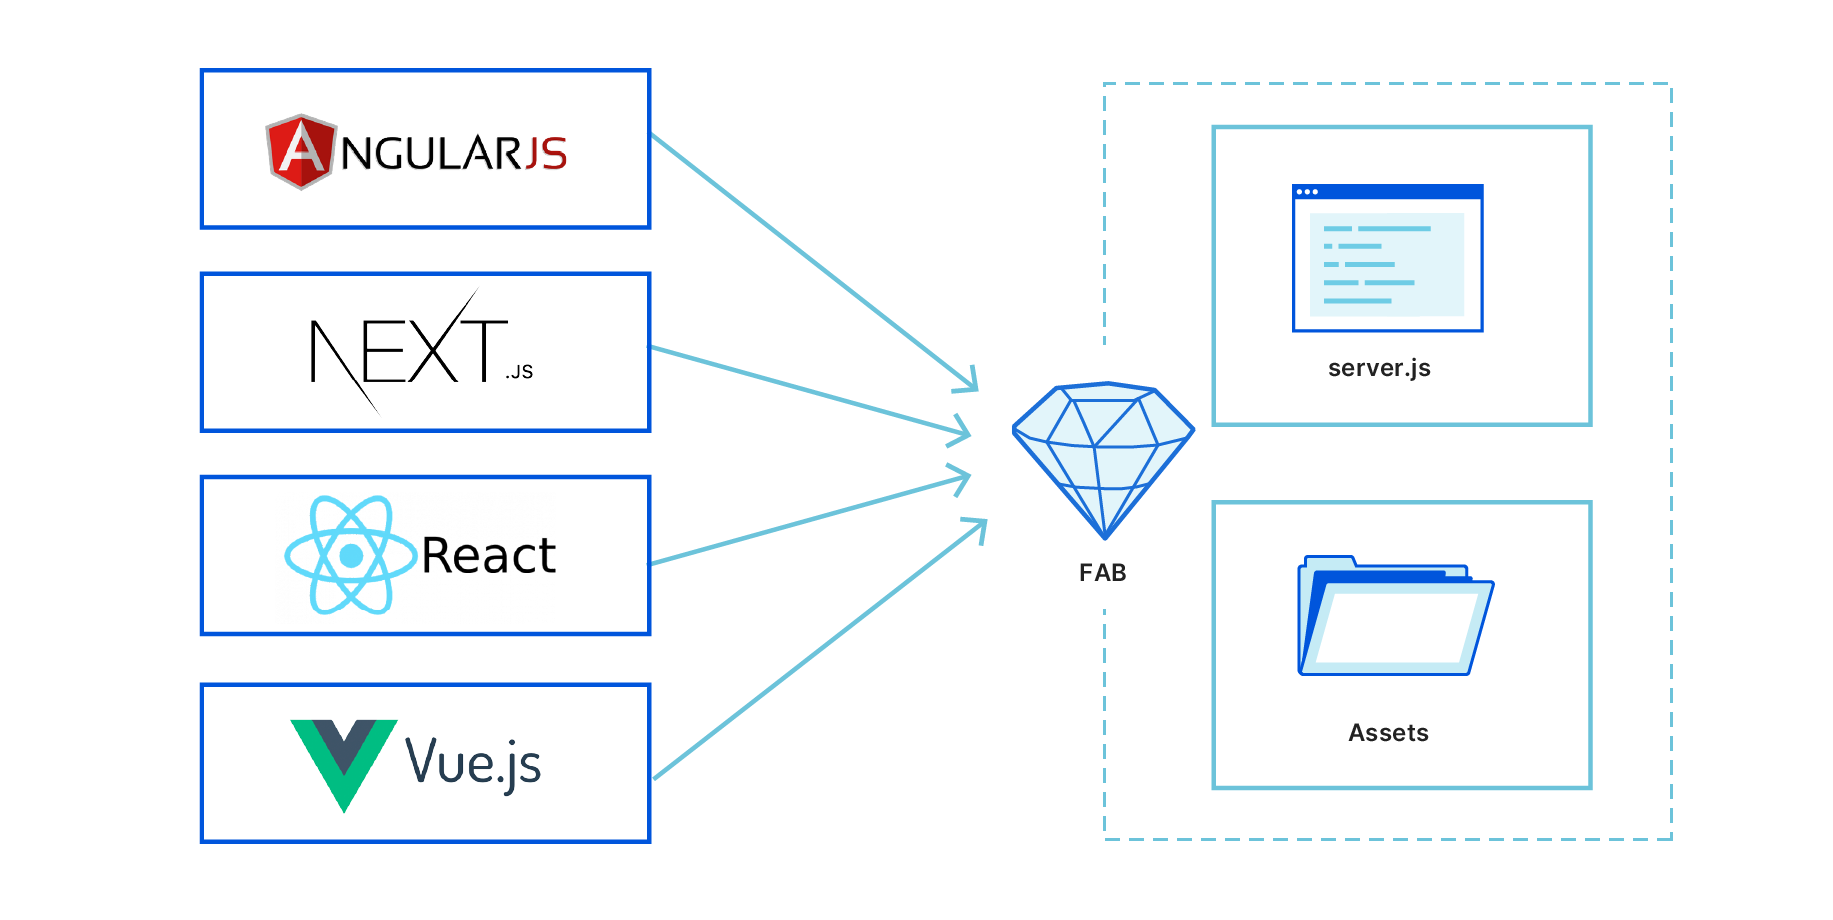
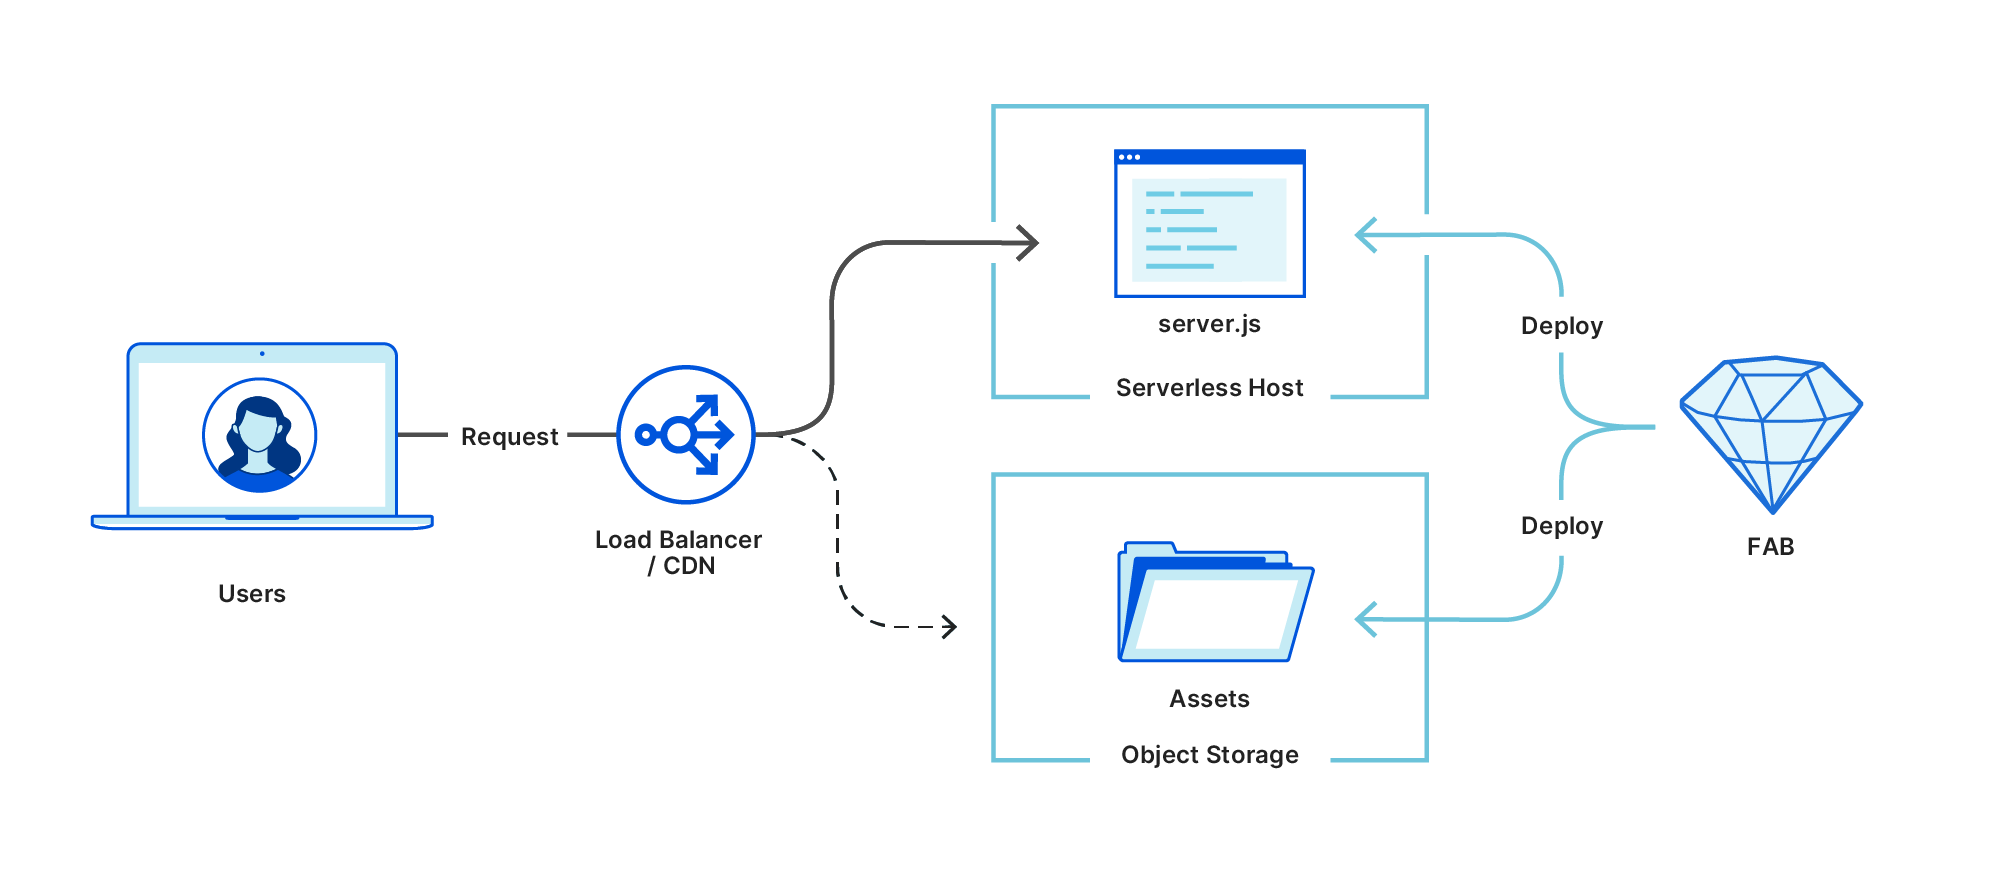
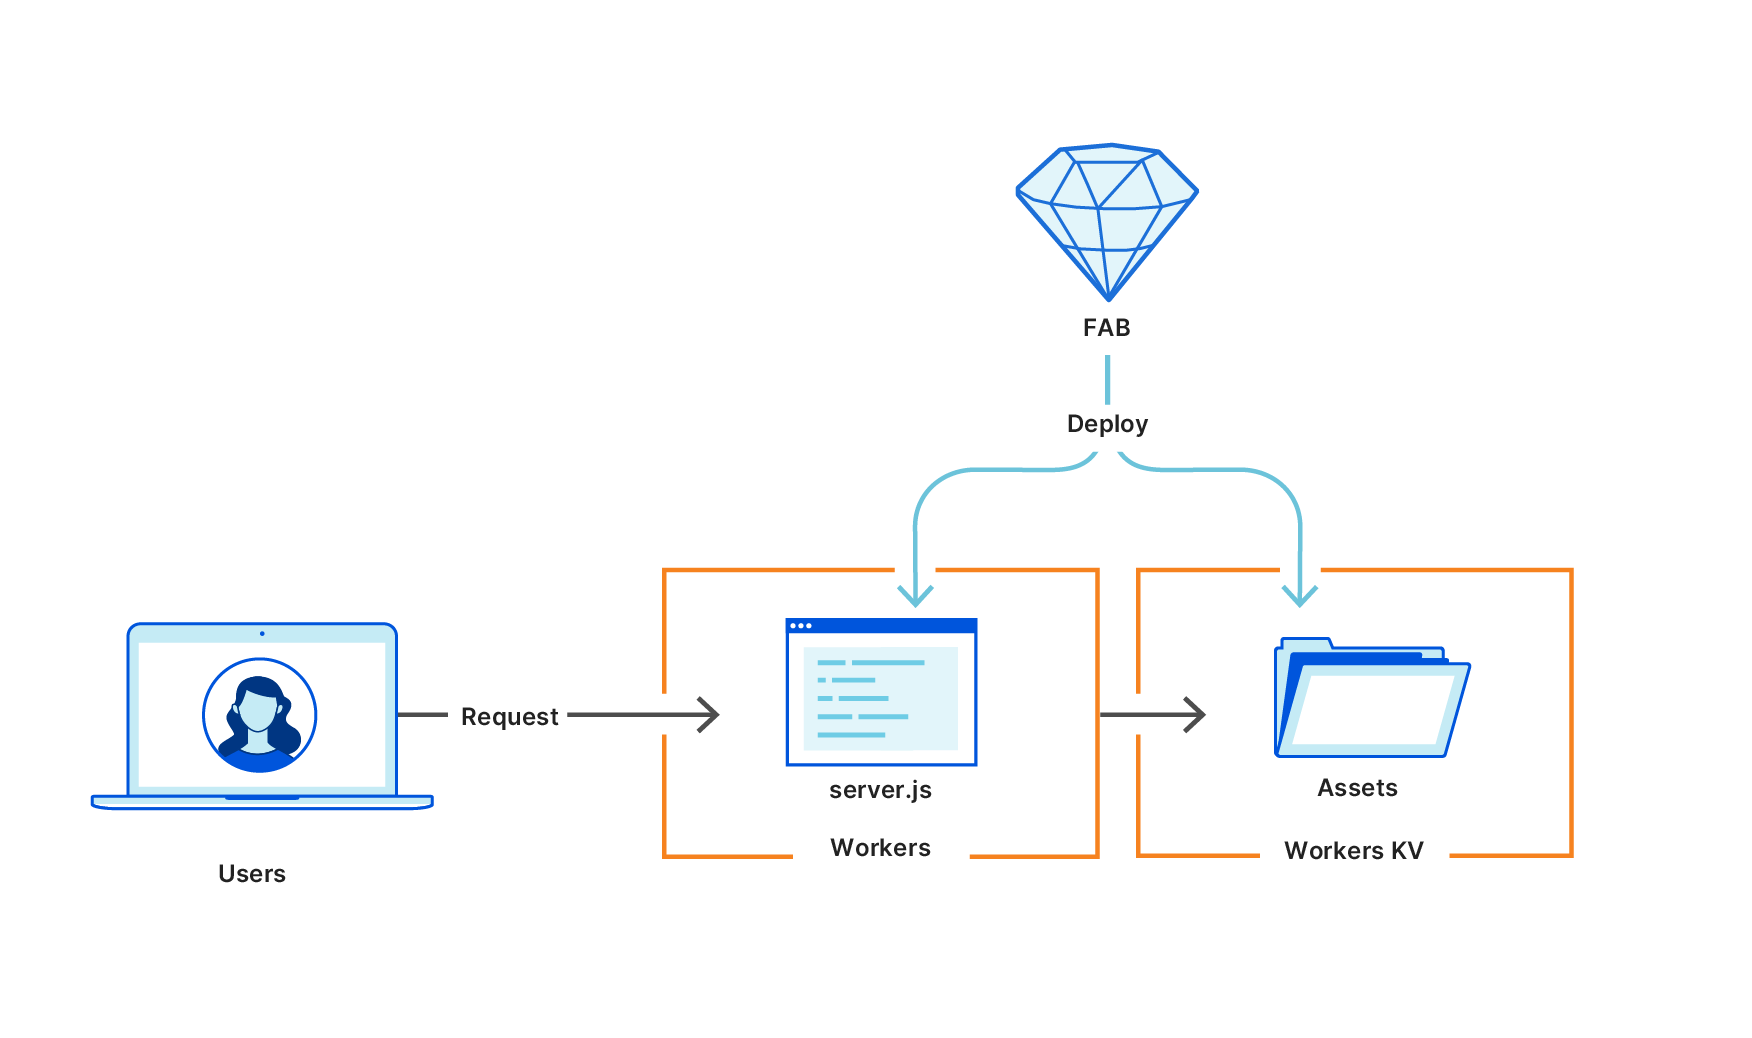
Today, we’re excited to announce the acquisition of Linc, an automation platform to help front-end developers collaborate and build powerful applications. Linc has done amazing work with Frontend Application Bundles (FABs), making dynamic backends more accessible to frontend developers. Their approach offers a straightforward path to building end-to-end applications on Pages, with both frontend logic and powerful backend logic in one bundle. With the addition of Linc, we will accelerate Pages to enable richer and more powerful full-stack applications.
Combining Cloudflare’s edge network with Linc’s approach to server-side rendering, we’re able to set a new standard for performance on the web by delivering the speed of powerful servers close to users. Now, I’ll hand it over to Glen Maddern, who was the CTO of Linc, to share why they joined Cloudflare.
Linc and the Frontend Application Bundle (FAB) specification were designed with a single goal in mind: to give frontend developers the best possible tools to build, review, refine, and deploy their applications. An important piece of that is making server-side logic and rendering much more accessible, regardless of what type of app you’re building.
Static vs Dynamic frontends
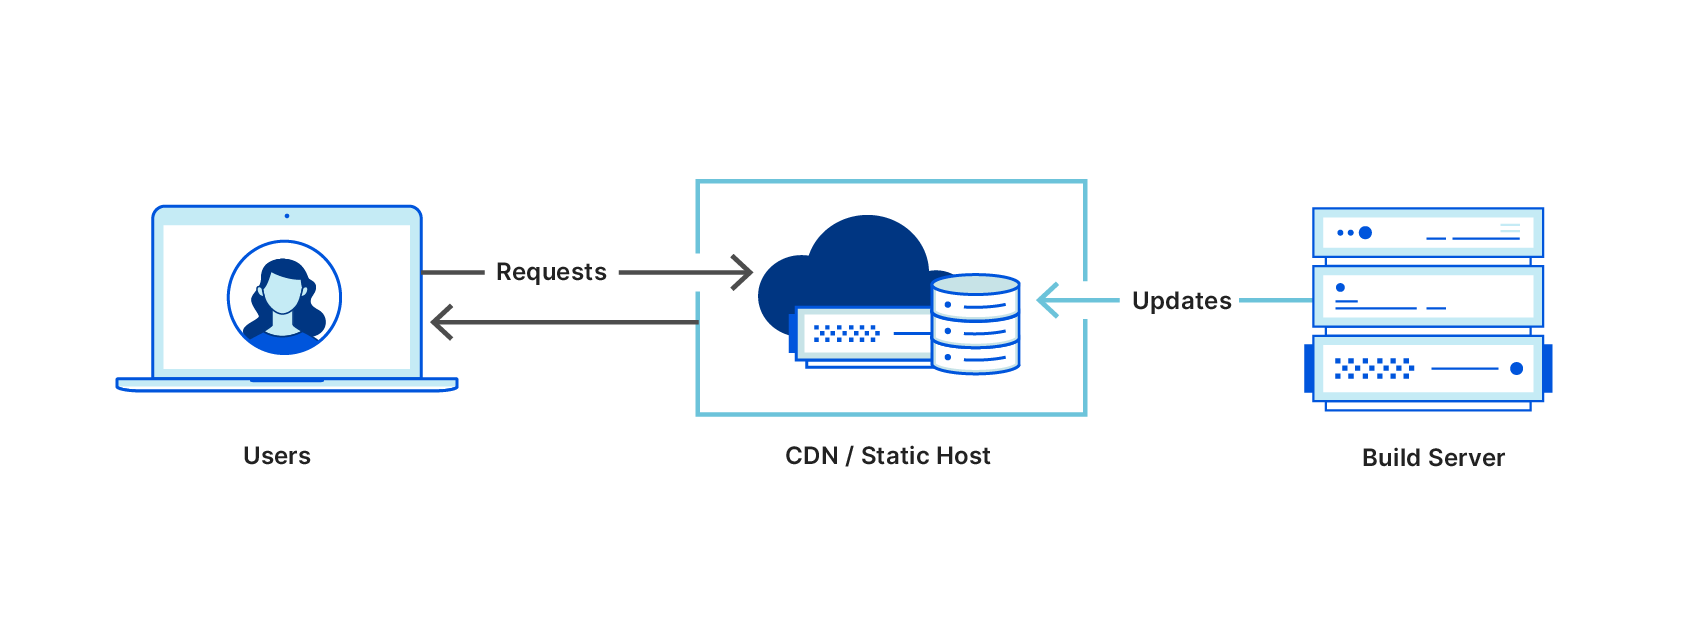
One of the biggest problems in frontend web development today is the dramatic difference in complexity when moving from generating static sites (e.g. building a directory full of HTML, JS, and CSS files) to hosting a full application (traditionally using NodeJS and a web server like Express). While you gain the flexibility of being able to render everything on-demand and customised for the current user, you increase your maintenance cost — you now have servers that you need to keep running. And unless you’re operating at a global scale already, you’ll often see worse end-user performance as your requests are only being served from one or maybe a couple of locations worldwide.
While serverless platforms have arisen to solve these problems for backend services and can be brought to bear on frontend apps, they’re much less cost-effective than using static hosting, especially if the bulk of your frontend assets are static. As such, we’ve seen a rise of technologies under the umbrella term of “JAMstack”; they aim at making static sites more powerful (like rebuilding based off CMS updates), or at making it possible to deploy small pieces of server-side APIs as “cloud functions”, along with each update of your app. But it’s still fundamentally a limited architecture — you always have a static layer between you and your users, so the more dynamic your needs, the more complex your build pipeline becomes, or the more you’re forced to rely on client-side logic.
FABs took a different approach: a deployment artefact that could support the full range of server-side needs, from entirely static sites, apps with some API routes or cloud functions, all the way to full server-side streaming rendering. We also made it compatible with all the cloud hosting providers you might want, so that deploying becomes as easy as uploading a ZIP file. Then, as your needs change, as dynamic content becomes more important, as new frameworks arise that offer increasing performance or you look at moving which provider you’re hosting with, you never need to change your tooling and deployment processes.
The FAB approach
Regardless of what framework you’re working with, the FAB compiler generates a fab.zip file that has two components: a server.js file that acts as a server-side entry point, and an _assets directory that stores the HTML, CSS, JS, images, and fonts that are sent to the client.
This simple structure gives us enough flexibility to handle all kinds of apps. For example, a static site will have a server.js of only a few auto-generated lines of server-side code, just enough to add redirects for any files outside the _assets directory. On the other end of the spectrum, an app with full server rendering looks and works exactly the same. It just has a lot more code inside its server.js file.
On a server running NodeJS, serving a compiled FAB is as easy as fab serve fab.zip, but FABs are really designed with production class hosting in mind. They make use of world-class CDNs and the best serverless hosting platforms around.
When a FAB is deployed, it’s often split into these component parts and deployed separately. Assets are sent to a low-cost object storage platform with a CDN in front of it, and the server component is sent to dedicated serverless hosting. It’s all deployed in an atomic, idempotent manner that feels as simple as uploading static files, but completely unlocks dynamic server-side code as part of your architecture.
That generic architecture works great and is compatible with virtually every hosting platform around, but it works slightly differently on Cloudflare Workers.
Workers, unlike other serverless platforms, truly runs at the edge: there is no CDN or load balancer in front of it to split off /_assets routes and send them directly to the Assets storage. This means that every request hits the worker, whether it’s triggering a full page render or piping through the bytes for an image file. It might feel like a downside, but with Workers’ performance and cost profile, it’s quite the opposite — it actually gives us much more flexibility in what we end up building, and gets us closer to the goal of fully unlocking server-side code.
To give just one example, we no longer need to store our asset files on a dedicated static file host — instead, we can use Cloudflare’s global key-value storage: Workers KV. Our server.js running inside a Worker can then map /_assets requests directly into the KV store and stream the result to the user. This results in significantly better performance than proxying to a third-party asset host.
What we’ve found is that Cloudflare offered the most “FAB-native” hosting option, and so it’s very exciting to have the opportunity to further develop what they can do.
Linc + Cloudflare
As we stated above, Linc’s goal was to give frontend developers the best tooling to build and refine their apps, regardless of which hosting they were using. But we started to notice an important trend — if a team had a free choice for where to host their frontend, they inevitably chose Cloudflare Workers. In some cases, for a period, teams even used Linc to deploy a FAB to Workers alongside their existing hosting to demonstrate the performance improvement before migrating permanently.
At the same time, we started to see more and more opportunities to fully embrace edge-rendering and make global serverless hosting more powerful and accessible. But the most exciting ideas required deep integration with the hosting providers themselves. Which is why, when we started talking to Cloudflare, everything fell into place.
We’re so excited to join the Cloudflare effort and work on expanding Cloudflare Pages to cover the full spectrum of applications. Not only do they share our goal of bringing sophisticated technology to every development team, but with innovations like Durable Objects starting to offer new storage paradigms, the potential for a truly next-generation deployment, review & hosting platform is tantalisingly close.
Across multiple cultures around the world, this time of year is a time of celebration and sharing of gifts with the people we care the most about. In that spirit, we thought we’d take this time to give back to the developer community that has been so supportive of Cloudflare for the last 10 years.
Today, the path from an idea to a website is paved with good intentions
Websites are the way we express ourselves on the web. It doesn’t matter if you’re a hobbyist with a blog, or the largest of corporations with millions of customers — if you want to reach people outside the confines of 140 280 characters, the web is the place to be.
As a frontend developer, it’s your responsibility to bring this expression to life. And make no mistake — with so many frontend frameworks, tooling, and static site generators at your disposal — it’s a great time to be in your line of work.
That is, of course, right up until the point when you’re ready to show your work off to the world. That’s when things can start to get a little hairy.
At this point, continuing to keep things local rather than committing to source starts to become… irresponsible. But then: how do you quickly iterate and maintain momentum? As you change things, you need to make sure those changes don’t get lost — saving them to source control — while keeping in sync with what’s currently deployed to production.
There are no great solutions.
If you’re in a larger organization, you might have a DevOps organization devoted to exactly that: automating deployments using Continuous Integration (CI) tooling.
Most CI tooling, however, is quite cumbersome, and for good reason — to allow organizations to customize their automation, regardless of their stack and setup. But for the purpose of developing a website, it can still feel like an unnecessary and frustrating diversion on the road to delivering your web project. Configuring a .yaml file, adding and removing commands, waiting minutes for each build to run, and praying to the CI gods at each one that these are the right commands. Hopelessly rerunning the same build over and over, and expecting a different result.
Often, hours are lost. The process stands in the way of you and doing your best work.
Cloudflare Pages: letting frontend devs do what they do best
We think there’s a better way.
With Cloudflare Pages, we set out to simplify every step along the journey by tying deployment to your existing development workflow.
Seamless Git integration, with builds built-in
With Cloudflare Pages, all you have to do is select your repo, and tell us which framework you’re using. We’ll take care of chanting CI incantations on your behalf, while you keep doing what you were already doing: git commit and git push your changes — we’ll build and deploy them for you.
As the project grows, so do the stakes, and the number of collaborators.
For a site in production, changes need to be reviewed thoroughly. As the reviewer, looking at the code, and skimming for red flags only gets you so far. To thoroughly review, you have to commit or git stash your changes, pull down locally, get it running to make sure it actually works — looking at code alone won’t catch everything!
The other developers on the team are not the only stakeholders. There are designers, marketers, PMs who want to provide feedback before the changes go out.
Unique preview URLs
With Cloudflare Pages, each commit gets its own unique URL. Preview URLs make it easier to get meaningful code reviews without the overhead of pulling down the branch. They also make it easier to get feedback from PMs, designers and marketers on the latest iteration, bridging the gap between mocks and code.
Infinite staging
“Does anyone mind if I take over staging?” might also sound like a familiar question. With Cloudflare Pages, each feature branch will have its own dedicated consistent alias, allowing you to have a consistent URL for the latest changes.
With Preview and Production environments, all feature branches and preview links will be built with preview variables, so you can experiment without impacting production data.
When you’re ready to deploy to production, we’ll redeploy to production for you with the updated production environment variables.
Collaboration for all
Collaboration is the key to building amazing websites and products — the more the merrier! As a security company, we definitely don’t want you sharing password and credentials. Which is why we provide multi user access for free for unlimited users — invite all your friends, on us!
Modern sites with modern standards
We all know premature optimization is a cardinal sin, but once your project is in front of customers you want to have the best performance possible. If it’s successful, you also want it to be available!
Today, this is time you have to spend optimizing performance (chasing those 100 lighthouse scores), and scaling, from a few to millions of users.
Luckily, we happen to know a thing or two about running a global network of 200 data centers though, so we’ve got you covered.
With Pages, your site is deployed directly to our edge, milliseconds away from customers, and at global scale.
The latest web standards are fun to read about on Hacker News but not fun to implement yourself. With Cloudflare Pages, we’ll do the heavy lifting to keep you ahead of the curve: IPv6, HTTP/3, TLS 1.3, all the latest image formats.
Oh, and one more thing
We’re really excited for developers and their teams to use Cloudflare Pages to collaborate on the best static sites together. There’s just one thing that didn’t sit quite right with us: why stop at static sites?
What if we could make building full-blown, dynamic applications just as easy?
Although APIs are a core part of the JAMstack, today that refers primarily to the robust API economy developers have access to. And while that’s great, it’s not always enough. If you want to build your own APIs, and store user or application data, you need more than third party APIs. What to do, though?
Well, this is the point at which it’s mighty helpful we’ve already built a global serverless platform: Cloudflare Workers. Workers allows frontend developers to easily write scalable backends to their applications in the same language as the frontend, JavaScript.
Over the coming months, we’ll be working on integrating Workers and Pages into a seamless experience. It’ll work the exact same way Pages does: just write your code, git push, and we’ll deploy it for you. The only difference is, it won’t just be your frontend, it’ll be your backend, too. And just to be clear: this is not just for stateless functions. With Workers KV and Durable Objects, we see a huge opportunity to really enable any web application to be built on this platform.
We’re super excited about the future of Pages, and how with the power of Cloudflare Workers behind it, it represents a bold vision for how new applications are going to be built on the web.
But you know the thing about gifts? They’re no good without someone to receive them. We’d love for you to sign up for our beta and try out Cloudflare Pages!
PS: we’re hiring!
Want to help us shape the future of development on the web? Join our team.
Over the past week, you’ve heard how Cloudflare is making it easy for our customers to control where their data is stored and protected.
We’re not the only ones building these data controls. Around the world, companies are working to figure out where and how to store customer data in a way that is compliant with data localization obligations. For developers, this means new deployment models and new headaches — wrangling infrastructure in multiple regions, partitioning user data based on location, and staying on top of the latest rules from regulators.
Durable Objects, currently in limited beta, already make it easy for customers to manage state on Cloudflare Workers without worrying about provisioning infrastructure. Today, we’re announcing Jurisdictional Restrictions for Durable Objects, which ensure that a Durable Object only stores and processes data in a given geographical region. Jurisdictional Restrictions make it easy for developers to build serverless, stateful applications that not only comply with today’s regulations, but can handle new and updated policies as new regulations are added.
How Jurisdictional Restrictions Work
When creating a Durable Object, developers generate a unique ID that lets a Cloudflare Worker communicate with the Object.
Let’s say I want to create a Durable Object that represents a specific user of my application:
async function handle(request) {
    let objectId = USERS.newUniqueId();
    let user = await USERS.get(objectId);
}
The unique ID encodes metadata for the Workers runtime, including a mapping to a specific Cloudflare data center. That data center is responsible for handling the creation of the Object and maintaining a routing table entry, so that a Worker can communicate with the Object if the Object migrates to another Cloudflare data center.
If the user is an EU data subject, I may want to ensure that the Durable Object that handles their data only stores and processes data inside of the EU. I can do that when I generate their Object ID, which encodes a restriction that this Durable Object can only be handled by a data center in the EU.
async function handle(request) {
    let objectId = USERS.newUniqueId({jurisdiction: "eu"});
    let user = await USERS.get(objectId);
}
There are no servers to spin up and no databases to maintain. Handling a new set of regional restrictions will be as easy as passing a different string at ID generation.
Today, we only support the EU jurisdiction, but we’ll be adding more based on developer demand.
By setting restrictions at a per-object level, it becomes easy to ensure compliance without sacrificing developer productivity. Applications running on Durable Objects just need to identify the jurisdictional rules a given Object should follow and set the corresponding rule at creation time. Gone is the need to run multiple clusters of infrastructure across cloud provider regions to stay compliant — Durable Objects are both globally accessible and capable of partitioning state with no infrastructure overhead.
In the future, we’ll add additional features to Jurisdictional Restrictions — including the ability to migrate your Objects between Jurisdictions to handle changes in regulations.
Under the hood with Durable Object ID generation
Durable Objects support two types of IDs: system-generated, where the system creates a unique ID for you, and user-generated, where a user passes in an identifier to access the Durable Object. You can think of the user-provided identifier as a seed to a hash function that determines the data center the object starts in.
By default with system-generated IDs, we construct the ID so that it maps to a data center near the Worker that generated the ID. This data center is responsible for creating the Object and storing a routing record if that Object migrates.
If the user passes in a Jurisdictional Restriction, we instead encode in the ID a mapping to a jurisdiction, which encodes a list of data centers that adhere to the rules of the Jurisdictional Restriction. We guarantee that the data center we select for creating the Object is in this list and that we will not migrate the Object to a data center that isn’t in this list. In the case of the ‘eu’ jurisdiction, that maps to one of Cloudflare’s data centers in the EU.
For user-generated IDs, though, we cannot encode this data in the ID, since we must use the string the user passed us to generate the ID! This is because requests may originate anywhere in the world, and they need to know where to find an Object without depending on coordination. For now, this means we do not support Jurisdictional Restrictions in combination with user-generated IDs.
Join the Durable Objects limited beta
Durable Objects are currently in an invite-only beta, while we scale up our systems and build out additional features. If you’re interested in using Durable Objects to meet your compliance requirements, reach out to us with your use case!
The idea of serverless is to allow developers to focus on writing code rather than operations — the hardest of which is scaling applications. A predictably great deal of traffic that flows through Cloudflare’s network every year is Black Friday. As John wrote at the end of last year, Black Friday is the Internet’s biggest online shopping day. In a past case study, we talked about how Cordial, a marketing automation platform, used Cloudflare Workers to reduce their API server latency and handle the busiest shopping day of the year without breaking a sweat.
The ability to handle immense scale is well-trodden territory for us on the Cloudflare blog, but scale is not always the first thing developers think about when building an application — developer experience is likely to come first. And developer experience is something Workers does just as well; through Wrangler and APIs like Workers KV, Workers is an awesome place to hack on new projects.
Over the past few weeks, I’ve been working ona sample open-source e-commerce app for selling software, educational products, and bundles. Inspired by Humble Bundle, it’s built entirely on Workers, and it integrates powerfully with all kinds of first-class modern tooling: Stripe, an API for accepting payments (both from customers and to authors, as we’ll see later), and Sanity.io, a headless CMS for data management.
This kind of project is perfectly suited for Workers. We can lean into Workers as a static site hosting platform (via Workers Sites), API server, and webhook consumer, all within a single codebase, and deployed instantly around the world on Cloudflare’s network.
In this blog post, I’ll dive deeper into the implementation details of the site, covering how Workers continues to excel as a JAMstack deployment platform. I’ll also cover some new territory in integrating Workers with Stripe. The project is open-source on GitHub, and I’m actively working on improving the documentation, so that you can take the codebase and build on it for your own e-commerce sites and use cases.
The frontend
As I wrote last year, Workers continues to be an amazing platform for JAMstack apps. When I started building this template, I wanted to use some things I already knew — Sanity.io for managing data, and of course, Workers Sites for deploying — but some new tools as well.
Workers Sites is incredibly simple to use: just point it at a directory of static assets, and you’re good to go. With this project, I decided to try out Nuxt.js, a Vue-based static site generator, to power the frontend for the application.
Using Sanity.io, the data representing the bundles (and the products inside of those bundles) is stored on Sanity.io’s own CDN, and retrieved client-side by the Nuxt.js application.
Managing data inside Sanity.io’s headless CMS interface.
When a potential customer visits a bundle, they’ll see a list of products from Sanity.io, and a checkout button provided by Stripe.
Responding to new checkout sessions and purchases
Making API requests with Stripe’s Node SDK isn’t currently supported in Workers (check out the GitHub issue where we’re discussing a fix), but because it’s just REST underneath, we can easily make REST requests using the library.
When a user clicks the checkout button on a bundle page, it makes a request to the Cloudflare Workers API, and securely generates a new session for the user to checkout with Stripe.
This is where Workers excels as a JAMstack platform. Yes, it can do static site hosting, but with just a few extra lines of routing code, I can deploy a highly scalable API right alongside my Nuxt.js application.
Webhooks and working with external services
This idea extends throughout the rest of the checkout process. When a customer is successfully charged for their purchase, Stripe sends a webhook back to Cloudflare Workers. In order to complete the transaction on our end, the Workers application:
Validates the incoming data from Stripe to ensure that it’s legitimate. This means that every incoming webhook request is explicitly validated using your Stripe account details, and can be confirmed to be valid before the function acts on it.
Distributes payments to the authors using Stripe Connect. When a customer buys a bundle for $20, that $20 (minus Stripe fees) gets distributed evenly between the authors in that bundle — all of this calculation and the associated transfer requests happen inside the Worker.
Sends a unique download link to the customer. Using Workers KV, a unique token is set up that corresponds to the customer’s email, which can be used to retrieve the content the customer purchased. This integration uses Mailgun to construct an email and send it entirely over REST APIs.
By the time the purchase is complete, the Workers serverless API will have interfaced with four distinct APIs, persisting records, sending emails, and handling and distributing payments to everyone involved in the e-commerce transaction. With Workers, this all happens in a single codebase, with low latency and a superb developer experience. The entire API is type-checked and validated before it ever gets shipped to production, thanks to our TypeScript template.
Each of these tasks involves a pretty serious level of complexity, but by using Workers, we can abstract each of them into smaller pieces of functionality, and compose powerful, on-demand, and infinitely scalable webhooks directly on the serverless edge.
Conclusion
I’m really excited about the launch of this template and, of course, it wouldn’t have been possible to ship something like this in just a few weeks without using Cloudflare Workers. If you’re interested in digging into how any of the above stuff works, check out the project on GitHub!
With the recent announcement of our Workers KV free tier, this project is perfect to fork and build your own e-commerce products with. Let me know what you build and say hi on Twitter!
Check out our twenty-first edition of The Serverlist below. Get the latest scoop on the serverless space, get your hands dirty with new developer tutorials, engage in conversations with other serverless developers, and find upcoming meetups and conferences to attend.
Sign up below to have The Serverlist sent directly to your mailbox.
This is a guest post by Videet Parekh, Abelardo Lopez-Lagunas, Sek Chai at Latent AI.
Edge networks present a significant opportunity for Artificial Intelligence (AI) performance and applicability. AI technologies already make it possible to run compelling applications like object and voice recognition, navigation, and recommendations.
AI at the edge presents a host of benefits. One is scalability—it is simply impractical to send all data to a centralized cloud. In fact, one study has predicted a global scope of 90 zettabytes generated by billions of IoT devices by 2025. Another is privacy—many users are reluctant to move their personal data to the cloud, whereas data processed at the edge are more ephemeral.
When AI services are distributed away from centralized data centers and closer to the service edge, it becomes possible to enhance the overall application speed without moving data unnecessarily. However, there are still challenges to make AI from the deep-cloud run efficiently on edge hardware. Here, we use the term deep-cloud to refer to highly centralized, massively-sized data centers. Deploying edge AI services can be hard because AI is both computational and memory bandwidth intensive. We need to tune the AI models so the computational latency and bandwidth can be radically reduced for the edge.
The Case for Distributed AI Services
Edge network infrastructure for distributed AI is already widely available. Edge networks like Cloudflare serve a significant proportion of today’s Internet traffic, and can serve as the bridge between devices and the centralized cloud. Highly-performant AI services are possible because of the distributed processing that has excellent spatial proximity to the edge data.
We at Latent AI are exploring ways to deploy AI at the edge, with technology that transforms and compresses AI models for the edge. The size of our edge AI model is many orders of magnitudes smaller than the sensor data (e.g., kilobytes or megabytes for the edge AI model, compared to petabytes of edge data). We are exploring using WebAssembly (WASM) within the Cloudflare Workers environment. We want to identify possible operating points for the distributed AI services by exploring achievable performance on the available edge infrastructure.
Architectural Approach for Exploration
WebAssembly (WASM) is a new open-standard format for programs that run on the Web. It is a popular way to enable high-performance web-based applications. WASM is closer to machine code, and thus faster than JavaScript (JS) or JIT. Compiler optimizations, already done ahead of time, reduce the overhead in fetching and parsing application code. Today, WASM offers the flexibility and portability of JS at the near-optimum performance of compiled machine code.
AI models have notoriously large memory usage demands because configuring them requires high parameter counts. Cloudflare already extends support for WASM using their Wrangler CLI, and we chose to use it for our exploration. Wrangler is the open-source CLI tool used to manage Workers, and is designed to enable a smooth developer experience.
How Latent AI Accelerates Distributed AI Services
Latent AI’s mission is to enable ambient computing, regardless of any resource constraints. We develop developer tools that greatly reduce the computing resources needed to process AI on the edge while being completely hardware-agnostic.
Latent AI’s tools significantly compress AI models to reduce their memory size. We have shown up to 10x compression for state-of-the-art models. This capability addresses the load time latencies challenging many edge network deployments. We also offer an optimized runtime that executes a neural network natively. Results are a 2-3x speedup on runtime without any hardware-specific accelerators. This dramatic performance boost offers fast and efficient inferences for the edge.
Our compression uses quantization algorithms to convert parameters for the AI model from 32-bit floating-point toward 16-bit or 8-bit models, with minimal loss of accuracy. The key benefit of moving to lower bit-precision is the higher power efficiency with less storage needed. Now AI inference can be processed using more efficient parallel processor hardware on the continuum of platforms at the distributed edge.
Optimized AI services can process data closest to the source and perform inferences at the distributed edge.
Selecting Real-World WASM Neural Network Examples
For our exploration, we use state-of-the-art deep neural networks called MobileNet. MobileNets are designed specifically for embedded platforms such as smartphones, and can achieve high recognition accuracy in visual object detection. We compress MobileNets AI models to be small fast, in order to represent the variety of use cases that can be deployed as distributed AI services. Please see this blog for more details on the AI model architecture.
We use the MobileNetV2 model variant for our exploration. The models are trained with different visual objects that can be detected: (1) a larger sized model with 10 objects derived from ImageNet dataset, and (2) a smaller version with just two classes derived from the COCO dataset. The COCO dataset are public open-source databases of images that are used as benchmarks for AI models. Images are labeled with detected objects such as persons, vehicles, bicycles, traffic lights, etc. Using Latent AI’s compression tool, we were able to compress and compile the MobileNetV2 models into WASM programs. In the WASM form, we can achieve fast and efficient processing of the AI model with a small storage footprint.
We want WASM neural networks to be as fast and efficient as possible. We spun up a Workers app to accept an image from a client, convert and preprocess the image into a cleaned data array, run it through the model and then return a class for that image. For both the large and small MobileNetv2 models, we create three variants with different bit-precision (32-bit floating point, 16-bit integer, and 8-bit integer). The average memory and inference times for the large AI model are 110ms and 189ms, respectively; And for the smaller AI model, they are 159ms and 15ms, respectively.
Our analysis suggests that overall processing can be improved by reducing the overhead for memory operations. For the large model, lowering bit precision to 8-bits reduces memory operations from 48% to 26%. For the small model, the memory load times dominate over the inference computation with over 90% of the latency in memory operations.
It is important to note that our results are based on our initial exploration, which is focused more on functionality rather than optimization. We make sure the results are consistent by averaging our measurements over 50-100 iterations. We do acknowledge that there are still network and system related latencies that can be further optimized, but we believe that the early results described here show promise with respect to AI model inferences on the distributed edge.
Comparison of memory and inference processing times for large and small DNNs.
Learning from Real-World WASM Neural Network Example
What lessons can we draw from our example use case?
First of all, we recommend a minimal compute and memory footprint for AI models deployed to the network edge. A small footprint allows for better line up of data types for WASM AI models to reduce memory load overhead. WASM practitioners know that WASM speed-ups come from the tighter coupling of the API between JavaScript API and native machine code. Because WASM code does not need to speculate on data types, parallelizing compilation for WASM can achieve better optimization.
Furthermore, we encourage the use of running AI models at 8-bit precision to reduce the overall size. These 8-bit AI models are readily compressed and compiled for the target hardware to greatly reduce the overhead in hosting the models for inference. Furthermore, for video imagery, there is no overhead to convert digitized raw data (e.g. image files digitized and stored as integers) to floating-point values for use with floating point AI models.
Finally, we suggest the use of a smart cache for AI models so that Workers can essentially reduce memory load times and focus solely on neural network inferences at runtime. Again, 8-bit models allow more AI models to be hosted and ready for inference. Referring to our exploratory results, hosted small AI models can be served at approximately 15ms inference time, offering a very compelling user experience with low latency and local processing. The WASM API provides a significant performance increase over pure-JS toolchains like Tensorflow.js. For example, for inference time for the large AI model of 189ms on WASM, we have observed a range of 1500ms on Tensorflow.js workflow, which is approximately an 8X difference in compute latency.
Unlocking the Future of the Distributed Edge
With exceedingly optimized WASM neural networks, distributed edge networks can move the inference closer to users, offering new edge AI services closer to the source of the data. With Latent AI technology to compress and compile WASM neural networks, the distributed edge networks can (1) host more models, (2) offer lower latency responses, and (3) potentially lower power utilization with more efficient computing.
Example person detected using a small AI model, 10x compressed to 150KB.
Imagine for example that the small AI model described earlier can distinguish if a person is in a video feed. Digital systems, e.g. door bell and doorway entry cameras, can hook up to Cloudflare Workers to verify if a person is present in the camera field of view. Similarly, other AI services could conduct sound analyses to check for broken windows and water leaks. With these distributed AI services, applications can run without access to deep cloud services. Furthermore, the sensor platform can be made with ultra low cost, low power hardware, in very compact form factors.
Application developers can now offer AI services with neural networks trained, compressed, and compiled natively as a WASM neural network. Latent AI developer tools can compress WASM neural networks and provide WASM runtimes offering blazingly fast inferences for the device and infrastructure edge. With scale and speed baked in, developers can easily create high-performance experiences for their users, wherever they are, at any scale. More importantly, we can scale enterprise applications on the edge, while offering the desired return on investments using edge networks.
About Latent AI
Latent AI is an early-stage venture spinout of SRI International. Our mission is to enable developers and change the way we think about building AI for the edge. We develop software tools designed to help companies add AI to edge devices and to empower users with new smart IoT applications. For more information about the availability of LEIP SDK, please feel free to contact us at [email protected] or check out our website.
This is a guest post by Cristhian Motoche of Stack Builders.
At Stack Builders, we believe that Haskell’s system of expressive static types offers many benefits to the software industry and the world-wide community that depends on our services. In order to fully realize these benefits, it is necessary to have proper training and access to an ecosystem that allows for reliable deployment of services. In exploring the tools that help us run our systems based on Haskell, our developer Cristhian Motoche has created a tutorial that shows how to compile Haskell to WebAssembly using Asterius for deployment on Cloudflare.
What is a Cloudflare Worker?
Cloudflare Workers is a serverless platform that allows us to run our code on the edge of the Cloudflare infrastructure. It’s built on Google V8, so it’s possible to write functionalities in JavaScript or any other language that targets WebAssembly.
WebAssembly is a portable binary instruction format that can be executed fast in a memory-safe sandboxed environment. For this reason, it’s especially useful for tasks that need to perform resource-demanding and self-contained operations.
Why use Haskell to target WebAssembly?
Haskell is a pure functional languages that can target WebAssembly. As such, It helps developers break down complex tasks into small functions that can later be composed to do complex tasks. Additionally, it’s statically typed and has type inference, so it will complain if there are type errors at compile time. Because of that and much more, Haskell is a good source language for targeting WebAssembly.
From Haskell to WebAssembly
We’ll use Asterius to target WebAssembly from Haskell. It’s a well documented tool that is updated often and supports a lot of Haskell features.
First, as suggested in the documentation, we’ll use podman to pull the Asterius prebuilt container from Docker hub. In this tutorial, we will use Asterius version 200617, which works with GHC 8.8.
podman run -it --rm -v $(pwd):/workspace -w /workspace terrorjack/asterius:200617
Now we’ll create a Haskell module called fact.hs file that will export a pure function:
module Factorial (fact) where

fact :: Int -> Int
fact n = go n 1
  where
    go 0 acc = acc
    go n acc = go (n - 1) (n*acc)

foreign export javascript "fact" fact :: Int -> Int
In this module, we define a pure function called fact, optimized with tail recursion and exported using the Asterius JavaScript FFI, so that it can be called when a WebAssembly module is instantiated in JavaScript.
Next, we’ll create a JavaScript file called fact_node.mjs that contains the following code:
import * as rts from "./rts.mjs";
import module from "./fact.wasm.mjs";
import req from "./fact.req.mjs";

async function handleModule(m) {
  const i = await rts.newAsteriusInstance(Object.assign(req, {module: m}));
  const result = await i.exports.fact(5);
  console.log(result);
}

module.then(handleModule);
This code imports rts.mjs (common runtime), WebAssembly loaders, and the required parameters for the Asterius instance. It creates a new Asterius instance, it calls the exported function fact with the input 5, and prints out the result.
You probably have noted that fact is done asynchronously. This happens with any exported function by Asterius, even if it’s a pure function.
Next, we’ll compile this code using the Asterius command line interface (CLI) ahc-link, and we’ll run the JavaScript code in Node:
This command takes fact.hs as a Haskell input file, specifies that no main function is exported, and exports the fact function. Additionally, it takes fact_node.mjs as the entry JavaScript file that replaces the generated file by default, and it places the generated code in a directory called node.
Running the ahc-link command from above will print the following output in the console:
[INFO] Compiling fact.hs to WebAssembly
...
[INFO] Running node/fact.mjs
120
As you can see, the result is executed in node and it prints out the result of fact in the console.
Push your code to Cloudflare Workers
Now we’ll set everything up for deploying our code to Cloudflare Workers.
First, let’s add a metadata.json file with the following content:
This file is needed to specify the wasm_module binding. The name value corresponds to the global variable to access the WebAssembly module from your Worker code. In our example, it’s going to have the name WASM.
Our next step is to define the main point of the Workers script.
import * as rts from "./rts.mjs";
import fact from "./fact.req.mjs";

async function handleFact(param) {
  const i = await rts.newAsteriusInstance(Object.assign(fact, { module: WASM }));
  return await i.exports.fact(param);
}

async function handleRequest(req) {
  if (req.method == "POST") {
    const data = await req.formData();
    const param = parseInt(data.get("param"));
    if (param) {
      const resp = await handleFact(param);
      return new Response(resp, {status: 200});
    } else {
      return new Response(
        "Expecting 'param' in request to be an integer",
        {status: 400},
      );
    }
  }
  return new Response("Method not allowed", {status: 405});
}

addEventListener("fetch", event => {
  event.respondWith(handleRequest(event.request))
})
There are a few interesting things to point out in this code:
We import rts.mjs and fact.req.mjs to load the exported functions from our WebAssembly module.
handleFact is an asynchronous function that creates an instance of Asterius with the global WASM module, as a Workers global variable, and calls the exported function fact with some input.
handleRequest handles the request of the Worker. It expects a POST request, with a parameter called param in the request body. If param is a number, it calls handleFact to respond with the result of fact.
Using the Service Workers API, we listen to the fetch event that will respond with the result of handleRequest.
We need to build and bundle our code in a single JavaScript file, because Workers only accepts one script per worker. Fortunately, Asterius comes with Parcel.js, which will bundle all the necessary code in a single JavaScript file.
ahc-link will generate some files inside a directory called worker. For our Workers, we’re only interested in the JavaScript file (fact.js) and the WebAssembly module (fact.wasm). Now, it’s time to submit both of them to Workers. We can do this with the provided REST API.
Make sure you have an account id ($CF_ACCOUNT_ID), a name for your script ($SCRIPT_NAME), and an API Token ($CF_API_TOKEN):
Now, visit the Workers UI, where you can use the editor to view, edit, and test the script. Also, you can enable it to on a workers.dev subdomain ($CFW_SUBDOMAIN); in that case, you could then simply:
So far, we’ve created a WebAssembly module that exports a pure Haskell function we ran in Workers. However, we can also create and build a Cabal project using Asterius ahc-cabal CLI, and then use ahc-dist to compile it to WebAssembly.
First, let’s create the project:
ahc-cabal init -m -p cabal-cfw-example
Then, let’s add some dependencies to our cabal project. The cabal file will look like this:
It’s a simple cabal file, except for the -optl--export-function=handleReq ghc flag. This is necessary when exporting a function from a cabal project.
In this example, we’ll define a simple User record, and we’ll define its instance automatically using Template Haskell!
{-# LANGUAGE OverloadedStrings #-}
{-# LANGUAGE TemplateHaskell   #-}

module Main where

import           Asterius.Types
import           Control.Monad
import           Data.Aeson                 hiding (Object)
import qualified Data.Aeson                 as A
import           Data.Aeson.TH
import qualified Data.ByteString.Lazy.Char8 as B8
import           Data.Text


main :: IO ()
main = putStrLn "CFW Cabal"

data User =
  User
    { name :: Text
    , age  :: Int
    }

$(deriveJSON defaultOptions 'User)
NOTE: It’s not necessary to create a Cabal project for this example, because the prebuilt container comes with a lot of prebuilt packages (aesona included). Nevertheless, it will help us show the potential of ahc-cabal and ahc-dist.
Next, we’ll define handleReq, which we’ll export using JavaScript FFI just like we did before.
handleReq :: JSString -> JSString -> IO JSObject
handleReq method rawBody =
  case fromJSString method of
    "POST" ->
      let eitherUser :: Either String User
          eitherUser = eitherDecode (B8.pack $ fromJSString rawBody)
       in case eitherUser of
            Right _  -> js_new_response (toJSString "Success!") 200
            Left err -> js_new_response (toJSString err) 400
    _ -> js_new_response (toJSString "Not a valid method") 405

foreign export javascript "handleReq" handleReq :: JSString -> JSString -> IO JSObject

foreign import javascript "new Response($1, {\"status\": $2})"
  js_new_response :: JSString -> Int -> IO JSObject
This time, we define js_new_response, a Haskell function that creates a JavaScript object, to create a Response. handleReq takes two string parameters from JavaScript and it uses them to prepare a response.
Now let’s build and install the binary in the current directory:
cabal_cfw_example.mjs contains the following code:
import * as rts from "./rts.mjs";
import cabal_cfw_example from "./cabal_cfw_example.req.mjs";

async function handleRequest(req) {
  const i = await rts.newAsteriusInstance(Object.assign(cabal_cfw_example, { module: WASM }));
  const body = await req.text();
  return await i.exports.handleReq(req.method, body);
}

addEventListener("fetch", event => {
  event.respondWith(handleRequest(event.request))
});
Finally, we can deploy our code to Workers by defining a metadata.json file and uploading the script and the WebAssembly module using Workers API as we did before.
Caveats
Workers limits your JavaScript and WebAssembly in file size. Therefore, you need to be careful with any dependencies you add.
Conclusion
Stack Builders builds better software for better living through technologies like expressive static types. We used Asterius to compile Haskell to WebAssembly and deployed it to Cloudflare Workers using the Workers API. Asterius supports a lot of Haskell features (e.g. Template Haskell) and it provides an easy-to-use JavaScript FFI to interact with JavaScript. Additionally, it provides prebuilt containers that contain a lot of Haskell packages, so you can start writing a script right away.
Following this approach, we can write functional type-safe code in Haskell, target it to WebAssembly, and publish it to Workers, which runs on the edge of the Cloudflare infrastructure.
This post explains how we implemented the Automatic Platform Optimization for WordPress. In doing so, we have defined a new place to run WordPress plugins, at the edge written with Cloudflare Workers. We provide the feature as a Cloudflare service but what’s exciting is that anyone could build this using the Workers platform.
The service is an evolution of the ideas explained in an earlier zero-config edge caching of HTML blog post. The post will explain how Automatic Platform Optimization combines the best qualities of the regular Cloudflare cache with Workers KV to improve cache cold starts globally.
The optimization will work both with and without the Cloudflare for WordPress plugin integration. Not only have we provided a zero config edge HTML caching solution but by using the Workers platform we were also able to improve the performance of Google font loading for all pages.
We are launching the feature first for WordPress specifically but the concept can be applied to any website and/or content management system (CMS).
A new place to run WordPress plugins?
There are many individual WordPress plugins for performance that use similar optimizations to existing Cloudflare services. Automatic Platform Optimization is bringing them all together into one easy to use solution, deployed at the edge.
Traditionally you have to maintain server plugins with your WordPress installation. This comes with maintenance costs and can require a deep understanding of how to fine tune performance and security for each and every plugin. Providing the optimizations on the client side can also lead to performance problems due to the costs of JavaScript execution. In contrast most of the optimizations could be built-in in Cloudflare’s edge rather than running on the server or the client. Automatic Platform Optimization will be always up to date with the latest performance and security best practices.
How to optimize for WordPress
By default Cloudflare CDN caches assets based on file extension and doesn’t cache HTML content. It is possible to configure HTML caching with a Cache Everything Page rule but it is a manual process and often requires additional features only available on the Business and Enterprise plans. So for the majority of the WordPress websites even with a CDN in front them, HTML content is not cached. Requests for a HTML document have to go all the way to the origin.
Even if a CDN optimizes the connection between the closest edge and the website’s origin, the origin could be located far away and also be slow to respond, especially under load.
Move content closer to the user
One of the primary recommendations for speeding up websites is to move content closer to the end-user. This reduces the amount of time it takes for packets to travel between the end-user and the web server – the round-trip time (RTT). This improves the speed of establishing a connection as well as serving content from a closer location.
We have previously blogged about the benefits of edge caching HTML. Caching and serving from HTML from the Cloudflare edge will greatly improve the time to first byte (TTFB) by optimizing DNS, connection setup, SSL negotiation, and removing the origin server response time.If your origin is slow in generating HTML and/or your user is far from the origin server then all your performance metrics will be affected.
Most HTML isn’t really dynamic. It needs to be able to change relatively quickly when the site is updated but for a huge portion of the web, the content is static for months or years at a time. There are special cases like when a user is logged-in (as the admin or otherwise) where the content needs to differ but the vast majority of visits are of anonymous users.
Zero config edge caching revisited
The goal is to make updating content to the edge happen automatically. The edge will cache and serve the previous version content until there is new content available. This is usually achieved by triggering a cache purge to remove existing content. In fact using a combination of our WordPress plugin and Cloudflare cache purge API, we already support Automatic Cache Purge on Website Updates. This feature has been in use for many years.
Building automatic HTML edge caching is more nuanced than caching traditional static content like images, styles or scripts. It requires defining rules on what to cache and when to update the content. To help with that task we introduced a custom header to communicate caching rules between Cloudflare edge and origin servers.
The Cloudflare Worker runs from every edge data center, the serverless platform will take care of scaling to our needs. Based on the request type it will return HTML content from Cloudflare Cache using Worker’s Cache API or serve a response directly from the origin. Specifically designed custom header provides information from the origin on how the script should handle the response. For example worker script will never cache responses for authenticated users.
HTML Caching rules
With or without Cloudflare for WordPress plugin, HTML edge caching requires all of the following conditions to be met:
Origin responds with 200 status
Origin responds with "text/html" content type
Request method is GET.
Request path doesn’t contain query strings
Request doesn’t contain any WordPress specific cookies: "wp-*", "wordpress*", "comment_*", "woocommerce_*" unless it’s "wordpress_eli" or "wordpress_test_cookie".
Request doesn’t contain any of the following headers:
"Cache-Control: no-cache"
"Cache-Control: private"
"Pragma:no-cache"
"Vary: *"
Note that the caching is bypassed if the devtools are open and the “Disable cache” option is active.
Bypass HTML caching based on presence of WordPress specific cookies
Decrease load on origin servers. If a request is fetched from Cloudflare CDN Cache we skip the request to the origin server.
How is this implemented?
When an eyeball requests a page from a website and Cloudflare doesn’t have a copy of the content it will be fetched from the origin. As the response is sent from the origin and goes through Cloudflare’s edge, Cloudflare for WordPress plugin adds a custom header: cf-edge-cache. It allows an origin to configure caching rules applied on responses.
Based on the X-HTML-Edge-Cache proposal the plugin adds a cf-edge-cache header to every origin response. There are 2 possible values:
cf-edge-cache: no-cache
The page contains private information that shouldn’t be cached by the edge. For example, an active session exists on the server.
cf-edge-cache: cache, platform=wordpress
This combination of cache and platform will ensure that the HTML page is cached. In addition, we ran a number of checks against the presence of WordPress specific cookies to make sure we either bypass or allow caching on the Edge.
If the header isn’t present we assume that the Cloudflare for WordPress plugin is not installed or up-to-date. In this case the feature operates without a plugin support.
Edge caching without plugin
Using the Automatic Platform Optimization feature in combination with Cloudflare for WordPress plugin is our recommended solution. It provides the best feature set together with almost instant cache invalidation. Still, we wanted to provide performance improvements without the need for any installation on the origin server.
We provide the following features set when the plugin is not activated:
HTML edge caching with 30 days TTL
Cache invalidation may take up to 30 minutes. A manual cache purge could be triggered to speed up cache invalidation
Bypass HTML caching based on presence of WordPress specific cookies
No decreased load on origin servers. If a request is fetched from Cloudflare CDN Cache we still require an origin response to apply cache invalidation logic.
Without Cloudflare for WordPress plugin we still cache HTML on the edge and serve the content from the cache when possible. The logic of cache revalidation happens after serving the response to the eyeball. Worker’s waitUntil() callback allows the user to run code without affecting the response to the eyeball and is run in background.
We rely on the following headers to detect whether the content is stale and requires cache update:
ETag. If the cached version and origin response both include ETag and they are different we replace cached version with origin response. The behavior is the same for strong and weak ETag values.
Last-Modified. If the cached version and origin response both include Last-Modified and origin has a later Last-Modified date we replace cached version with origin response.
Date. If no ETag or Last-Modified header is available we compare cached version and origin response Date values. If there was more than a 30 minutes difference we replace cached version with origin response.
Getting content everywhere
Cloudflare Cache works great for the frequently requested content. Regular requests to the site make sure the content stays in cache. For a typical personal blog, it will be more common that the content stays in cache only in some parts of our vast edge network. With the Automatic Platform Optimization release we wanted to improve loading time for cache cold start from any location in the world. We explored different approaches and decided to use Workers KV to improve Edge Caching.
In addition to Cloudflare’s CDN cache we put the content into Workers KV. It only requires a single request to the page to cache it and within a minute it is made available to be read back from KV from any Cloudflare data center.
Updating content
After an update has been made to the WordPress website the plugin makes a request to Cloudflare’s API which both purges cache and marks content as stale in KV. The next request for the asset will trigger revalidation of the content. If the plugin is not enabled cache revalidation logic is triggered as detailed previously.
We serve the stale copy of the content still present in KV and asynchronously fetch new content from the origin, apply possible optimizations and then cache it (both regular local CDN cache and globally in KV).
To store the content in KV we use a single namespace. It’s keyed with a combination of a zone identifier and the URL. For instance:
For marking content as stale in KV we write a new key which will be read from the edge. If the key is present we will revalidate the content.
stale:1:example.com/blog-post-1.html => ""
Once the content was revalidated the stale marker key is deleted.
Moving optimizations to the edge
On top of caching HTML at the edge, we can pre-process and transform the HTML to make the loading of websites even faster for the user. Moving the development of this feature to our Cloudflare Workers environment makes it easy to add performance features such as improving Google Font loading. Using Google Fonts can cause significant performance issues as to load a font requires loading the HTML page; then loading a CSS file and finally loading the font. All of these steps are using different domains.
The solution is for the worker to inline the CSS and serve the font directly from the edge minimizing the number of connections required.
If you read through the previous blog post’s implementation it required a lot of manual work to provide streaming HTML processing support and character encodings. As the set of worker APIs have improved over time it is now much simpler to implement. Specifically the addition of a streaming HTML rewriter/parser with CSS-selector based API and the ability to suspend the parsing to asynchronously fetch a resource has reduced the code required to implement this from ~600 lines of source code to under 200.
The HTML transformation doesn’t block the response to the user. It’s running as a background task which when complete will update kv and replace the global cached version.
Making edge publishing generic
We are launching the feature for WordPress specifically but the concept can be applied to any website and content management system (CMS).
Today the Cloudflare Workers team is thrilled to announce the launch of Cron Triggers. Before now, Workers were triggered purely by incoming HTTP requests but starting today you’ll be able to set a scheduler to run your Worker on a timed interval. This was a highly requested feature that we know a lot of developers will find useful, and we’ve heard your feedback after Serverless Week.
We are excited to offer this feature at no additional cost, and it will be available on both the Workers free tier and the paid tier, now called Workers Bundled. Since it doesn’t matter which city a Cron Trigger routes the Worker through, we are able to maximize Cloudflare’s distributed system and send scheduled jobs to underutilized machinery. Running jobs on these quiet machines is both efficient and cost effective, and we are able to pass those cost savings down to you.
What is a Cron Trigger and how might I use such a feature?
In case you’re not familiar with Unix systems, the cron pattern allows you to schedule jobs to run periodically at fixed intervals or at scheduled times. Cron Triggers in the context of Workers allow users to set time-based invocations for the job. These Workers happen on a recurring schedule, and differ from traditional Workers in that they do not fire on HTTP requests.
Most developers are familiar with the cron pattern and its usefulness across a wide range of applications. Pulling the latest data from APIs or running regular integration tests on a preset schedule are common examples of this.
“We’re excited about Cron Triggers. Workers is crucial to our stack, so using this feature for live integration tests will boost the developer experience.” – Brian Marks, Software Engineer at Bazaarvoice
How much does it cost to use Cron Triggers?
Triggers are included at no additional cost! Scheduled Workers count towards your request cap for both the free tier and Workers Bundled, but rest assured that there will be no hidden or extra fees. Our competitors charge extra for cron events, or in some cases offer a very limited free tier. We want to make this feature widely accessible and have decided not to charge on a per-trigger basis. While there are no limits for the number of triggers you can have across an account, note that there is a limit of 3 triggers per Worker script for this feature. You can read more about limits on Workers plans in this documentation.
How are you able to offer this feature at no additional cost?
Cloudflare supports a massive distributed system that spans the globe with 200+ cities. Our nodes are named for the IATA airport code that they are closest to. Most of the time we run Workers close to the request origin for performance reasons (ie SFO if you are in the Bay Area, or CDG if you are lucky enough to be in Paris 🥐🍷🧀). In a typical HTTP Worker, we do this because we know that performance is of material importance when someone is waiting for the response.
In the case of Cron Triggers, where the user is running a task on a timed basis, those performance needs are different. A few milliseconds of extra latency do not matter as much when the user isn’t actively waiting for the response. The nature of the feature gives us much more flexibility on where to run the job, since it doesn’t have to necessarily be in a city close to the end user.
Cron Triggers are run on underutilized machines to make the best use of our capacity and route traffic efficiently. For example, a job scheduled from San Francisco at 7pm Pacific Time might be sent to Paris because it’s 4am there and traffic across Europe is low. Sending traffic to these machines during quiet hours is very efficient, and we are more than happy to pass those cost savings down to you. Aside from this scheduling optimization, Workers that are called by Cron Triggers behave similarly to and have all of the same performance and security benefits as typical HTTP Workers.
What’s happening below the hood?
At a high level, schedules created through our API create records in our database. These records contain the information necessary to execute the Worker on the given cron schedule. These records are then picked up by another service which continuously evaluates the state of our edge and distributes the schedules among cities. Once the schedules have been distributed to the edge, a service running in the node polls for changes to the schedules and makes sure they get sent to our runtime at the appropriate time.
If you want to know more details about how we implemented this feature, please refer to the technical blog.
What’s coming next?
With this feature, we’ve expanded what’s possible to build with Workers, and further simplified the developer experience. While Workers previously only ran on web requests, we believe the future of edge computing isn’t strictly tied to HTTP requests and responses. We want to introduce more types of Workers in the future.
We plan to expand out triggers to include different types, such as data or event-based triggers. Our goal is to give users more flexibility and control over when their Workers run. Cron Triggers are our first step in this direction. In addition, we plan to keep iterating on Cron Triggers to make edge infrastructure selection even more sophisticated and optimized — for example, we might even consider triggers that allow our users to run in the most energy-efficient data centers.
How to try Cron Triggers
Cron triggers are live today! You can try it in the Workers dashboard by creating a new Worker and setting up a Cron Trigger.
Today, we are excited to launch Cron Triggers to the Cloudflare Workers serverless compute platform. We’ve heard the developer feedback, and we want to give our users the ability to run a given Worker on a scheduled basis. In case you’re not familiar with Unix systems, the cron pattern allows developers to schedule jobs to run at fixed intervals. This pattern is ideal for running any types of periodic jobs like maintenance or calling third party APIs to get up-to-date data. Cron Triggers has been a highly requested feature even inside Cloudflare and we hope that you will find this feature as useful as we have!
Where are Cron Triggers going to be run?
Cron Triggers are executed from the edge. At Cloudflare, we believe strongly in edge computing and wanted our new feature to get all of the performance and reliability benefits of running on our edge. Thus, we wrote a service in core that is responsible for distributing schedules to a new edge service through Quicksilver which will then trigger the Workers themselves.
What’s happening under the hood?
At a high level, schedules created through our API create records in our database with the information necessary to execute the Worker and the given cron schedule. These records are then picked up by another service which continuously evaluates the state of our edge and distributes the schedules between cities.
Once the schedules have been distributed to the edge, a service running in the edge node polls for changes to the schedules and makes sure they get sent to our runtime at the appropriate time.
New Event Type
Cron Triggers gave us the opportunity to finally recognize a new Worker ‘type’ in our API. While Workers currently only run on web requests, we have lots of ideas for the future of edge computing that aren’t strictly tied to HTTP requests and responses. Expect to see even more new handlers in the future for other non-HTTP events like log information from your Worker (think custom wrangler tail!) or even TCP Workers.
Where event has the following interface in Typescript:
interface ScheduledEvent {
  type: 'scheduled';
  scheduledTime: int; // milliseconds since the Unix epoch
}
As long as your Worker has a handler for this new event type, you’ll be able to give it a schedule.
New APIs
PUT /client/v4/accounts/:account_identifier/workers/scripts/:name
The script upload API remains the same, but during script validation we now detect and return the registered event handlers.
PUT /client/v4/accounts/:account_identifier/workers/scripts/:name/schedules
Body
[
 {"cron": "* * * * *"},
 ...
]
This will create or modify all schedules for a script, removing all schedules not in the list. For now, there’s a limit of 3 distinct cron schedules. Schedules can be set to run as often as one minute and don’t accept schedules with years in them (sorry, you’ll have to run your Y3K migration script another way).
GET /client/v4/accounts/:account_identifier/workers/scripts/:name/schedules
The Scheduler service is responsible for reading the schedules from Postgres and generating per-node schedules to place into Quicksilver. For now, the service simply avoids trying to execute your Worker on an edge node that may be disabled for some reason, but such an approach also gives us a lot of flexibility in deciding where your Worker executes.
In addition to edge node availability, we could optimize for compute cost, bandwidth, or even latency in the future!
What’s actually executing these schedules?
To consume the schedules and actually trigger the Worker, we built a new service in Rust and deployed to our edge using HashiCorp Nomad. Nomad ensures that the schedule runner remains running in the edge node and can move it between machines as necessary. Rust was the best choice for this service since it needed to be fast with high availability and Cap’n Proto RPC support for calling into the runtime. With Tokio, Anyhow, Clap, and Serde, it was easy to quickly get the service up and running without having to really worry about async, error handling, or configuration.
On top of that, due to our specific needs for cron parsing, we built a specialized cron parser using nom that allowed us to quickly parse and compile expressions into values that check against a given time to determine if we should run a schedule.
Once the schedule runner has the schedules, it checks the time and selects the Workers that need to be run. To let the runtime know it’s time to run, we send a Cap’n Proto RPC message. The runtime then does its thing, calling the new ‘scheduled’ event handler instead of ‘fetch’.
How can I try this?
As of today, the Cron Triggers feature is live! Please try it out by creating a Worker and finding the Triggers tab – we’re excited to see what you build with it!
We launched Cloudflare Workers® in 2017 with a radical vision: code running at the network edge could not only improve performance, but also be easier to deploy and cheaper to run than code running in a single datacenter. That vision means Workers is about more than just edge compute — we’re rethinking how applications are built.
Using a “serverless” approach has allowed us to make deploys dead simple, and using isolate technology has allowed us to deliver serverless more cheaply and without the lengthy cold starts that hold back other providers. We added easy-to-use eventually-consistent edge storage to the platform with Workers KV.
But up until today, it hasn’t been possible to manage state with strong consistency, or to coordinate in real time between multiple clients, entirely on the edge. Thus, these parts of your application still had to be hosted elsewhere.
Durable Objects provide a truly serverless approach to storage and state: consistent, low-latency, distributed, yet effortless to maintain and scale. They also provide an easy way to coordinate between clients, whether it be users in a particular chat room, editors of a particular document, or IoT devices in a particular smart home. Durable Objects are the missing piece in the Workers stack that makes it possible for whole applications to run entirely on the edge, with no centralized “origin” server at all.
Today we are beginning a closed beta of Durable Objects.
I’m going to be honest: naming this product was hard, because it’s not quite like any other cloud technology that is widely-used today. This proverbial bike shed has many layers of paint, but ultimately we settled on “Unique Durable Objects”, or “Durable Objects” for short. Let me explain what they are by breaking that down:
Objects: Durable Objects are objects in the sense of Object-Oriented Programming. A Durable Object is an instance of a class — literally, a class definition written in JavaScript (or your language of choice). The class has methods which define its public interface. An object is an instance of this class, combining the code with some private state.
Unique: Each object has a globally-unique identifier. That object exists in only one location in the whole world at a time. Any Worker running anywhere in the world that knows the object’s ID can send messages to it. All those messages end up delivered to the same place.
Durable: Unlike a normal object in JavaScript, Durable Objects can have persistent state stored on disk. Each object’s durable state is private to it, which means not only that access to storage is fast, but the object can even safely maintain a consistent copy of the state in memory and operate on it with zero latency. The in-memory object will be shut down when idle and recreated later on-demand.
What can they do?
Durable Objects have two primary abilities:
Storage: Each object has attached durable storage. Because this storage is private to a specific object, the storage is always co-located with the object. This means the storage can be very fast while providing strong, transactional consistency. Durable Objects apply the serverless philosophy to storage, splitting the traditional large monolithic databases up into many small, logical units. In doing so, we get the advantages you’ve come to expect from serverless: effortless scaling with zero maintenance burden.
Coordination: Historically, with Workers, each request would be randomly load-balanced to a Worker instance. Since there was no way to control which instance received a request, there was no way to force two clients to talk to the same Worker, and therefore no way for clients to coordinate through Workers. Durable Objects change that: requests related to the same topic can be forwarded to the same object, which can then coordinate between them, without any need to touch storage. For example, this can be used to facilitate real-time chat, collaborative editing, video conferencing, pub/sub message queues, game sessions, and much more.
The astute reader may notice that many coordination use cases call for WebSockets — and indeed, conversely, most WebSocket use cases require coordination. Because of this complementary relationship, along with the Durable Objects beta, we’ve also added WebSocket support to Workers. For more on this, see the Q&A below.
Region: Earth
When using Durable Objects, Cloudflare automatically determines the Cloudflare datacenter that each object will live in, and can transparently migrate objects between locations as needed.
Traditional databases and stateful infrastructure usually require you to think about geographical “regions”, so that you can be sure to store data close to where it is used. Thinking about regions can often be an unnatural burden, especially for applications that are not inherently geographical.
With Durable Objects, you instead design your storage model to match your application’s logical data model. For example, a document editor would have an object for each document, while a chat app would have an object for each chat. There is no problem creating millions or billions of objects, as each object has minimal overhead.
Let’s say you have a spreadsheet editor application — or, really, any kind of app where users edit a complex document. It works great for one user, but now you want multiple users to be able to edit it at the same time. How do you accomplish this?
For the standard web application stack, this is a hard problem. Traditional databases simply aren’t designed to be real-time. When Alice and Bob are editing the same spreadsheet, you want every one of Alice’s keystrokes to appear immediately on Bob’s screen, and vice versa. But if you merely store the keystrokes to a database, and have the users repeatedly poll the database for new updates, at best your application will have poor latency, and at worst you may find database transactions repeatedly fail as users on opposite sides of the world fight over editing the same content.
The secret to solving this problem is to have a live coordination point. Alice and Bob connect to the same coordinator, typically using WebSockets. The coordinator then forwards Alice’s keystrokes to Bob and Bob’s keystrokes to Alice, without having to go through a storage layer. When Alice and Bob edit the same content at the same time, the coordinator resolves conflicts instantly. The coordinator can then take responsibility for updating the document in storage — but because the coordinator keeps a live copy of the document in-memory, writing back to storage can happen asynchronously.
Every big-name real-time collaborative document editor works this way. But for many web developers, especially those building on serverless infrastructure, this kind of solution has long been out-of-reach. Standard serverless infrastructure — and even cloud infrastructure more generally — just does not make it easy to assign these coordination points and direct users to talk to the same instance of your server.
Durable Objects make this easy. Not only do they make it easy to assign a coordination point, but Cloudflare will automatically create the coordinator close to the users using it and migrate it as needed, minimizing latency. The availability of local, durable storage means that changes to the document can be saved reliably in an instant, even if the eventual long-term storage is slower. Or, you can even store the entire document on the edge and abandon your database altogether.
With Durable Objects lowering the barrier, we hope to see real-time collaboration become the norm across the web. There’s no longer any reason to make users refresh for updates.
Example: An atomic counter
Here’s a very simple example of a Durable Object which can be incremented, decremented, and read over HTTP. This counter is consistent even when receiving simultaneous requests from multiple clients — none of the increments or decrements will be lost. At the same time, reads are served entirely from memory, no disk access needed.
export class Counter {
  // Constructor called by the system when the object is needed to
  // handle requests.
  constructor(controller, env) {
    // `controller.storage` is an interface to access the object's
    // on-disk durable storage.
    this.storage = controller.storage
  }

  // Private helper method called from fetch(), below.
  async initialize() {
    let stored = await this.storage.get("value");
    this.value = stored || 0;
  }

  // Handle HTTP requests from clients.
  //
  // The system calls this method when an HTTP request is sent to
  // the object. Note that these requests strictly come from other
  // parts of your Worker, not from the public internet.
  async fetch(request) {
    // Make sure we're fully initialized from storage.
    if (!this.initializePromise) {
      this.initializePromise = this.initialize();
    }
    await this.initializePromise;

    // Apply requested action.
    let url = new URL(request.url);
    switch (url.pathname) {
      case "/increment":
        ++this.value;
        await this.storage.put("value", this.value);
        break;
      case "/decrement":
        --this.value;
        await this.storage.put("value", this.value);
        break;
      case "/":
        // Just serve the current value. No storage calls needed!
        break;
      default:
        return new Response("Not found", {status: 404});
    }

    // Return current value.
    return new Response(this.value);
  }
}
Once the class has been bound to a Durable Object namespace, a particular instance of Counter can be accessed from anywhere in the world using code like:
// Derive the ID for the counter object named "my-counter".
// This name is associated with exactly one instance in the
// whole world.
let id = COUNTER_NAMESPACE.idFromName("my-counter");

// Send a request to it.
let response = await COUNTER_NAMESPACE.get(id).fetch(request);
Demo: Chat
Chat is arguably real-time collaboration in its purest form. And to that end, we have built a demo open source chat app that runs entirely at the edge using Durable Objects.
This chat app uses a Durable Object to control each chat room. Users connect to the object using WebSockets. Messages from one user are broadcast to all the other users. The chat history is also stored in durable storage, but this is only for history. Real-time messages are relayed directly from one user to others without going through the storage layer.
Additionally, this demo uses Durable Objects for a second purpose: Applying a rate limit to messages from any particular IP. Each IP is assigned a Durable Object that tracks recent request frequency, so that users who send too many messages can be temporarily blocked — even across multiple chat rooms. Interestingly, these objects don’t actually store any durable state at all, because they only care about very recent history, and it’s not a big deal if a rate limiter randomly resets on occasion. So, these rate limiter objects are an example of a pure coordination object with no storage.
This chat app is only a few hundred lines of code. The deployment configuration is only a few lines. Yet, it will scale seamlessly to any number of chat rooms, limited only by Cloudflare’s available resources. Of course, any individual chat room’s scalability has a limit, since each object is single-threaded. But, that limit is far beyond what a human participant could keep up with anyway.
Other use cases
Durable Objects have infinite uses. Here are just a few ideas, beyond the ones described above:
Shopping cart: An online storefront could track a user’s shopping cart in an object. The rest of the storefront could be served as a fully static web site. Cloudflare will automatically host the cart object close to the end user, minimizing latency.
Game server: A multiplayer game could track the state of a match in an object, hosted on the edge close to the players.
IoT coordination: Devices within a family’s house could coordinate through an object, avoiding the need to talk to distant servers.
Social feeds: Each user could have a Durable Object that aggregates their subscriptions.
Comment/chat widgets: A web site that is otherwise static content can add a comment widget or even a live chat widget on individual articles. Each article would use a separate Durable Object to coordinate. This way the origin server can focus on static content only.
The Future: True Edge Databases
We see Durable Objects as a low-level primitive for building distributed systems. Some applications, like those mentioned above, can use objects directly to implement a coordination layer, or maybe even as their sole storage layer.
However, Durable Objects today are not a complete database solution. Each object can see only its own data. To perform a query or transaction across multiple objects, the application needs to do some extra work.
That said, every big distributed database – whether it be relational, document, graph, etc. – is, at some low level, composed of “chunks” or “shards” that store one piece of the overall data. The job of a distributed database is to coordinate between chunks.
We see a future of edge databases that store each “chunk” as a Durable Object. By doing so, it will be possible to build databases that operate entirely at the edge, fully distributed with no regions or home location. These databases need not be built by us; anyone can potentially build them on top of Durable Objects. Durable Objects are only the first step in the edge storage journey.
Join the Beta
Storing data is a big responsibility which we do not take lightly. Because of the critical importance of getting it right, we are being careful. We will be making Durable Objects available gradually over the next several months.
As with any beta, this product is a work in progress, and some of what is described in this post is not fully enabled yet. Full details of beta limitations can be found in the documentation.
If you’d like to try out Durable Objects now, tell us about your use case. We’ll be selecting the most interesting use cases for early access.
As part of the Durable Objects beta, we’ve made it possible for Workers to act as WebSocket endpoints — including as a client or as a server. Before now, Workers could proxy WebSocket connections on to a back-end server, but could not speak the protocol directly.
While technically any Worker can speak WebSocket in this way, WebSockets are most useful when combined with Durable Objects. When a client connects to your application using a WebSocket, you need a way for server-generated events to be sent back to the existing socket connection. Without Durable Objects, there’s no way to send an event to the specific Worker holding a WebSocket. With Durable Objects, you can now forward the WebSocket to an Object. Messages can then be addressed to that Object by its unique ID, and the Object can then forward those messages down the WebSocket to the client.
Two years ago, we introduced Workers KV, a global key-value data store. KV is a fairly minimalist global data store that serves certain purposes well, but is not for everyone. KV is eventually consistent, which means that writes made in one location may not be visible in other locations immediately. Moreover, it implements “last write wins” semantics, which means that if a single key is being modified from multiple locations in the world at once, it’s easy for those writes to overwrite each other. KV is designed this way to support low-latency reads for data that doesn’t frequently change. However, these design decisions make KV inappropriate for state that changes frequently, or when changes need to be immediately visible worldwide.
Durable Objects, in contrast, are not primarily a storage product at all — many use cases for them do not actually utilize durable storage. To the extent that they do provide storage, Durable Objects sit at the opposite end of the storage spectrum from KV. They are extremely well-suited to workloads requiring transactional guarantees and immediate consistency. However, since transactions inherently must be coordinated in a single location, and clients on the opposite side of the world from that location will experience moderate latency due to the inherent limitations of the speed of light. Durable Objects will combat this problem by auto-migrating to live close to where they are used.
In short, Workers KV remains the best way to serve static content, configuration, and other rarely-changing data around the world, while Durable Objects are better for managing dynamic state and coordination.
Going forward, we plan to utilize Durable Objects in the implementation of Workers KV itself, in order to deliver even better performance.
Why not use CRDTs?
You can build CRDT-based storage on top of Durable Objects, but Durable Objects do not require you to use CRDTs.
Conflict-free Replicated Data Types (CRDTs), or their cousins, Operational Transforms (OTs), are a technology that allows data to be edited from multiple places in the world simultaneously without synchronization, and without data loss. For example, these technologies are commonly used in the implementation of real-time collaborative document editors, so that a user’s keypresses can show up in their local copy of the document in real time, without waiting to see if anyone else edited another part of the document first. Without getting into details, you can think of these techniques like a real time version of “git fork” and “git merge”, where all merge conflicts are resolved automatically in a deterministic way, so that everyone ends up with the same state in the end.
CRDTs are a powerful technology, but applying them correctly can be challenging. Only certain kinds of data structures lend themselves to automatic conflict resolution in a way that doesn’t lead to easy data loss. Any developer familiar with git can see the problem: arbitrary conflict resolution is hard, and any automated algorithm for it will likely get things wrong sometimes. It’s all the more difficult if the algorithm has to handle merges in arbitrary order and still get the same answer.
We feel that, for most applications, CRDTs are overly complex and not worth the effort. Worse, the set of data structures that can be represented as a CRDT is too limited for many applications. It’s usually much easier to assign a single authoritative coordination point for each document, which is exactly what Durable Objects accomplish.
With that said, CRDTs can be used on top of Durable Objects. If an object’s state lends itself to CRDT treatment, then an application could replicate that object into several objects serving different regions, which then synchronize their states via CRDT. This would make sense for applications to implement as an optimization if and when they find it is worth the effort.
Last thoughts: What does it mean for state to be “serverless”?
Traditionally, serverless has focused on stateless compute. In serverless architectures, the logical unit of compute is reduced to something fine-grained: a single event, such as an HTTP request. This works especially well because events just happened to be the logical unit of work that we think about when designing server applications. No one thinks about their business logic in units of “servers” or “containers” or “processes” — we think about events. It is exactly because of this semantic alignment that serverless succeeds in shifting so much of the logistical burden of maintaining servers away from the developer and towards the cloud provider.
However, serverless architecture has traditionally been stateless. Each event executes in isolation. If you wanted to store data, you had to connect to a traditional database. If you wanted to coordinate between requests, you had to connect to some other service that provides that ability. These external services have tended to re-introduce the operational concerns that serverless was intended to avoid. Developers and service operators have to worry not just about scaling their databases to handle increasing load, but also about how to split their database into “regions” to effectively handle global traffic. The latter concern can be especially cumbersome.
So how can we apply the serverless philosophy to state? Just like serverless compute is about splitting compute into fine-grained pieces, serverless state is about splitting state into fine-grained pieces. Again, we seek to find a unit of state that corresponds to logical units in our application. The logical unit of state in an application is not a “table” or a “collection” or a “graph”. Instead, it depends on the application. The logical unit of state in a chat app is a chat room. The logical unit of state in an online spreadsheet editor is a spreadsheet. The logical unit of state in an online storefront is a shopping cart. By making the physical unit of storage provided by the storage layer match the logical unit of state inherent in the application, we can allow the underlying storage provider (Cloudflare) to take responsibility for a wide array of logistical concerns that previously fell on the developer, including scalability and regionality.
Imagine you’re the maintainer of a high-traffic media website, and your DNS is already hosted on Cloudflare.
Page speed is critical. You need to get content to your audience as quickly as possible on every device. You also need to render ads in a speedy way to maintain a good user experience and make money to support your journalism.
One solution would be to render your site statically and cache it at the edge. This would help ensure you have top-notch delivery speed because you don’t need a server to return a response. However, your site has decades worth of content. If you wanted to make even a small change to the site design, you would need to regenerate every single page during your next deploy. This would take ages.
Another issue is that your site would be static — and future updates to content or new articles would not be available until you deploy again.
That’s not going to work.
Another solution would be to render each page dynamically on your server. This ensures you can return a dynamic response for new or updated articles.
However, you’re going to need to pay for some beefy servers to be able to handle spikes in traffic and respond to requests in a timely manner. You’ll also probably need to implement a system of internal caches to optimize the performance of your app, which could lead to a more complicated development experience. That also means you’ll be at risk of a thundering herd problem if, for any reason, your cache becomes invalidated.
Neither of these solutions are great, and you’re forced to make a tradeoff between one of these two approaches.
Thankfully, you’ve recently come across a project like Next.js which offers a hybrid approach: static-site generation along with incremental regeneration. You’re in love with the patterns and developer experience in Next.js, but you’d also love to take advantage of the Cloudflare Workers platform to host your site.
Cloudflare Workers allow you to run your code on the edge quickly, efficiently and at scale. Instead of paying for a server to host your code, you can host it directly inside the datacenter — reducing the number of network trips required to load your application. In a perfect world, we wouldn’t need to find hosting for a Next.js site, because Cloudflare offers the same JavaScript hosting functionality with the Workers platform. With their dynamic runtime and edge caching capabilities, we wouldn’t need to worry about making a tradeoff between static and dynamic for our site.
Unfortunately, frameworks like Next.js and Cloudflare Workers don’t mesh together particularly well due to technical constraints. Until now:
I’m excited to announce Flareact, a new open-source React framework built for Cloudflare Workers.
With Flareact, you don’t need to make the tradeoff between a static site and a dynamic application.
Flareact allows you to render your React apps at the edge rather than on the server. It is modeled after Next.js, which means it supports file-based page routing, dynamic page paths and edge-side data fetching APIs.
Not only are Flareact pages rendered at the edge — they’re also cached at the edge using the Cache API. This allows you to provide a dynamic content source for your app without worrying about traffic spikes or response times.
With no servers or origins to deal with, your site is instantly available to your audience. Cloudflare Workers gives you a 0ms cold start and responses from the edge within milliseconds.
You can check out the docs and get started now by clicking the button below:
To get started manually, install the latest wrangler, and use the handy wrangler generate command below to create your first project:
npm i @cloudflare/wrangler -g
wrangler generate my-project https://github.com/flareact/flareact-template
What’s the big deal?
Hosting React apps on Cloudflare Workers Sites is not a new concept. In fact, you’ve always been able to deploy a create-react-app project to Workers Sites in addition to static versions of other frameworks like Gatsby and Next.js.
However, Flareact renders your React application at the edge. This allows you to provide an initial server response with HTML markup — which can be helpful for search engine crawlers. You can also cache the response at the edge and optionally invalidate that cache on a timed basis — meaning your static markup will be regenerated if you need it to be fresh.
This isn’t a new pattern: Next.js has done the hard work in defining the shape of this API with SSG support and Incremental Static Regeneration. While there are nuanced differences in the implementation between Flareact and Next.js, they serve a similar purpose: to get your application to your end-user in the quickest and most-scalable way possible.
As a longtime fan and user of Next.js, I wanted to experiment with running the framework on Cloudflare Workers. However, Next.js and its APIs are framed around the Node.js HTTP Server API, while Cloudflare Workers use V8 isolates and are modeled after the FetchEvent type.
Since we don’t have typical access to a filesystem inside V8 isolates, it’s tough to mimic the environment required to run a dynamic Next.js server at the edge. Though projects like Fab have come up with workarounds, I decided to approach the project with a clean slate and use existing patterns established in Next.js in a brand-new framework.
As a developer, I absolutely love the simplicity of exporting an asynchronous function from my page to have it supply props to the component. Flareact implements this pattern by allowing you to export a getEdgeProps function. This is similar to getStaticProps in Next.js, and it matches the expected return shape of that function in Next.js — including a revalidate parameter. Learn more about data fetching in Flareact.
I hope porting over an existing Next.js project to Flareact is a breeze!
How it works
When a FetchEvent request comes in, Flareact inspects the URL pathname to decide how to handle it:
If the request is for a page or for page props, it checks the cache for that request and returns it if there’s a hit. If there is a cache miss, it generates the page request or props function, stores the result in the cache, and returns the response.
If the request is for an API route, it sends the entire FetchEvent along to the user-defined API function, allowing the user to respond as they see fit.
If you want your cached page to be revalidated after a certain amount of time, you can return an additional revalidate property from getEdgeProps(). This instructs Flareact to cache the endpoint for that number of seconds before generating a new response.
Finally, if the request is for a static asset, it returns it directly from the Workers KV.
The Worker
The core responsibilities of the Worker — or in a traditional SSR framework, the server —are to:
Render the initial React page component into static HTML markup.
Provide the initial page props as a JSON object, embedded into the static markup in a script tag.
Load the client-side JavaScript bundles and stylesheets necessary to render the interactive page.
One challenge with building Flareact is that the Webpack targets the webworker output rather than the node output. This makes it difficult to inform the worker which pages exist in the filesystem, since there is no access to the filesystem.
To get around this, Flareact leverages require.context, a Webpack-specific API, to inspect the project and build a manifest of pages on the client and the worker. I’d love to replace this with a smarter bundling strategy on the client-side eventually.
The Client
In addition to handling incoming Worker requests, Flareact compiles a client bundle containing the code necessary for routing, data fetching and more from the browser.
The core responsibilities of the client are to:
Listen for routing events
Fetch the necessary page component and its props from the worker over AJAX
Building a client router from scratch has been a challenge. It listens for changes to the internal route state, updates the URL pathname with pushState, makes an AJAX request to the worker for the page props, and then updates the current component in the render tree with the requested page.
It was fun building a flareact/link component similar to next/link:
import Link from "flareact/link";

export default function Index() {
  return (
    <div>
      <Link href="/about">
        <a>Go to About</a>
      </Link>
    </div>
  );
}
I also set out to build a custom version of next/head for Flareact. As it turns out, this was non-trivial! With lots of interesting stuff going on behind the scenes to support SSR and client-side routing events, I decided to make flareact/head a simple wrapper around react-helmet instead:
import Head from "flareact/head";

export default function Index() {
  return (
    <div>
      <Head>
        <title>My page title</title>
      </Head>
      <h1>Hello, world.</h1>
    </div>
  );
}
Local Development
The local developer experience of Flareact leverages the new wrangler dev command, sending server requests through a local tunnel to the Cloudflare edge and back to your machine.
This is a huge win for productivity, since you don’t need to manually build and deploy your application to see how it will perform in a production environment.
It’s also a really exciting update to the serverless toolchain. Running a robust development environment in a serverless world has always been a challenge, since your code is executing in a non-traditional context. Tunneling local code to the edge and back is such a great addition to Cloudflare’s developer experience.
Use cases
Flareact is a great candidate for a lot of Jamstack-adjacent applications, like blogs or static marketing sites.
It could also be used for more dynamic applications, with robust API functions and authentication mechanisms — all implemented using Cloudflare Workers.
Imagine building a high-traffic e-commerce site with Flareact, where both site reliability and dynamic rendering for things like price changes and stock availability are crucial.
There are also untold possibilities for integrating the Workers KV into your edge props or API functions as a first-class database solution. No need to reach for an externally-hosted database!
While the project is still in its early days, here are a couple real-world examples:
I have to be honest: creating a server-side rendered React framework with little prior knowledge was very difficult. There’s still a ton to learn, and Flareact has a long way to go to reach parity with Next.js in the areas of optimization and production-readiness.
Here’s what I’m hoping to add to Flareact in the near future:
Smarter client bundling and Webpack chunks to reduce individual page weight
A more feature-complete client-side router
The ability to extend and customize the root document of the app
Support for more style frameworks (CSS-in-JS, Sass, CSS modules, etc)
A more stable development environment
Documentation and support for environment variables, secrets and KV namespaces
A guide for deploying from GitHub Actions and other CI tools
Last year, we launched HTMLRewriter for Cloudflare Workers, which enables developers to make streaming changes to HTML on the edge. Unlike a traditional DOM parser that loads the entire HTML document into memory, we developed a streaming parser written in Rust. Today, we’re announcing support for asynchronous handlers in HTMLRewriter. Now you can perform asynchronous tasks based on the content of the HTML document: from prefetching fonts and image assets to fetching user-specific content from a CMS.
How can I use HTMLRewriter?
We designed HTMLRewriter to have a jQuery-like experience. First, you define a handler, then you assign it to a CSS selector; Workers does the rest for you. You can look at our new and improved documentation to see our supported list of selectors, which now include nth-child selectors. The example below changes the alternative text for every second image in a document.
async function editHtml(request) {
  return new HTMLRewriter()
     .on("img:nth-child(2)", new ElementHandler())
     .transform(await fetch(request))
}

class ElementHandler {
   element(e) {
      e.setAttribute("alt", "A very interesting image")
   }
}
Since these changes are applied using streams, we maintain a low TTFB (time to first byte) and users never know the HTML was transformed. If you’re interested in how we’re able to accomplish this technically, you can read our blog post about HTML parsing.
What’s new with HTMLRewriter?
Now you can define an async handler which allows any code that uses await. This means you can make dynamic HTML injection, based on the contents of the document, without having prior knowledge of what it contains. This allows you to customize HTML based on a particular user, feature flag, or even an integration with a CMS.
class UserCustomizer {
   // Remember to add the `async` keyword to the handler method
   async element(e) {
      const user = await fetch(`https://my.api.com/user/${e.getAttribute("user-id")}/online`)
      if (user.ok) {
         // Add the user’s name to the element
         e.setAttribute("user-name", await user.text())
      } else {
         // Remove the element, since this user not online
         e.remove()
      }
   }
}
What can I build with HTMLRewriter?
To illustrate the flexibility of HTMLRewriter, I wrote an example that you can deploy on your own website. If you manage a website, you know that old links and images can expire with time. Here’s an excerpt from a years’ old post I wrote on the Cloudflare Blog:
As you might see, that missing image is not the prettiest sight. However, we can easily fix this using async handlers in HTMLRewriter. Using a service like the Internet Archive API, we can check if an image no longer exists and rewrite the URL to use the latest archive. That means users don’t see an ugly placeholder and won’t even know the image was replaced.
async function fetchAndFixImages(request) {
   return new HTMLRewriter()
      .on("img", new ImageFixer())
      .transform(await fetch(request))
}

class ImageFixer {
   async element(e) {
    var url = e.getAttribute("src")
    var response = await fetch(url)
    if (!response.ok) {
       var archive = await fetch(`https://archive.org/wayback/available?url=${url}`)
       if (archive.ok) {
          var snapshot = await archive.json()
          e.setAttribute("src", snapshot.archived_snapshots.closest.url)
       } else {
          e.remove()
       }
    }
  }
}
Using the Workers Playground, you can view a working sample of the above code. A more complex example could even alert a service like Sentry when a missing image is detected. Using the previous missing image, now you can see the image is restored and users are none of the wiser.
If you’re interested in deploying this to your own website, click on the button below:
What else can I build with HTMLRewriter?
We’ve been blown away by developer projects using HTMLRewriter. Here are a few projects that caught our eye and are great examples of the power of Cloudflare Workers and HTMLRewriter:
If you’re interested in using HTMLRewriter, check out our documentation. Also be sure to share any creations you’ve made with @CloudflareDev, we love looking at the awesome projects you build.
Cloudflare Workers — our serverless platform — allows developers around the world to run their applications from our network of 200 datacenters, as close as possible to their users.
A few weeks ago we announced a release candidate for wrangler dev — today, we’re excited to take wrangler dev, the world’s first edge-based development environment, to GA with the release of wrangler 1.11.
Think locally, develop globally
It was once assumed that to successfully run an application on the web, one had to go and acquire a server, set it up (in a data center that hopefully you had access to), and then maintain it on an ongoing basis. Luckily for most of us, that assumption was challenged with the emergence of the cloud. The cloud was always assumed to be centralized — large data centers in a single region (“us-east-1”), reserved for compute. The edge? That was for caching static content.
Again, assumptions are being challenged.
Cloudflare Workers is about moving compute from a centralized location to the edge. And it makes sense: if users are distributed all over the globe, why should all of them be routed to us-east-1, on the opposite side of the world, causing latency and degrading user experience?
But challenging one assumption caused others to come into view. One of the most obvious ones was: would a local development environment actually provide the best experience for someone looking to test their Worker code? Trying to fit the entire Cloudflare edge, with all its dependencies onto a developer’s machine didn’t seem to be the best approach. Especially given that the place the developer was going to run that code in production was mere milliseconds away from the computer they were running on.
When I was in college, getting started with programming, one of the biggest barriers to entry was installing all the dependencies required to run a single library. I would go as far as to say that the third, and often forgotten hardest problem in computer science is dependency management.
We’ve not the first to try and unify development environments across machines — tools such as Docker aim to solve this exact problem by providing a prepackaged development environment.
Yet, packaging up the Workers runtime is not quite so simple.
Beyond the Workers runtime, there are many components that make up Cloudflare’s edge, including DNS resolution, the Cloudflare cache — all of those parts are what makes Cloudflare Workers so powerful. That means that without those components, a standalone runtime is insufficient to represent the behavior of Worker request handling. The reason to develop locally first is to have the opportunity to experiment without affecting production. Thus, having a local development environment that truly reflects production is a requirement.
wrangler dev
wrangler dev provides all the convenience of a local development environment, without the headache of trying to reproduce the reality of production locally — and then having to keep the two environments in sync.
By running at the edge, it provides a high fidelity, consistent experience for all developers, without sacrificing the speedy feedback loop of a local development environment.
Live reloading
As you update your code, wrangler dev will detect changes, and push the new version of your code to the edge.
console.log() at your fingertips
Previously to extract your console logs from the Workers runtime, you had to have the Workers Preview open in a browser window at all times. With wrangler dev, you can receive your own logs, directly to your terminal of choice.
Cache API, KV, and more!
Since wrangler dev runs on the edge, you can now easily test the state of a cache.put(), without having to deploy your Worker to production.
wrangler dev will spin up a new KV namespace for development, so you don’t have to worry about affecting your production data.
And if you’re looking to test out some of the features provided on request.cf that provide rich information about the request such as geo-location — they will all be provided from the Cloudflare data center.
Get started
wrangler dev is now available in the latest version of Wrangler, the official Cloudflare Workers CLI.
To get started, follow our installation instructions here.
What’s next?
wrangler dev is just our first foray into giving our developers more visibility and agility with their development process.
We recognize that we have a lot more work to do to meet our developers needs, including providing an easy testing framework for Workers, and allowing our customers to observe their Workers’ behavior in production.
Just as wrangler dev provides a quick feedback loop between our developers and their code, we love to have a tight feedback loop between our developers and our product. We love to hear what you’re building, how you’re building it, and how we can help you build it better.
The collective thoughts of the interwebz
Manage Consent
To provide the best experiences, we use technologies like cookies to store and/or access device information. Consenting to these technologies will allow us to process data such as browsing behavior or unique IDs on this site. Not consenting or withdrawing consent, may adversely affect certain features and functions.
Functional
Always active
The technical storage or access is strictly necessary for the legitimate purpose of enabling the use of a specific service explicitly requested by the subscriber or user, or for the sole purpose of carrying out the transmission of a communication over an electronic communications network.
Preferences
The technical storage or access is necessary for the legitimate purpose of storing preferences that are not requested by the subscriber or user.
Statistics
The technical storage or access that is used exclusively for statistical purposes.The technical storage or access that is used exclusively for anonymous statistical purposes. Without a subpoena, voluntary compliance on the part of your Internet Service Provider, or additional records from a third party, information stored or retrieved for this purpose alone cannot usually be used to identify you.
Marketing
The technical storage or access is required to create user profiles to send advertising, or to track the user on a website or across several websites for similar marketing purposes.