Tag Archives: generative AI

Simplifying sustainability reporting using AWS and generative AI in banking

Post Syndicated from Sachin Kulkarni original https://aws.amazon.com/blogs/architecture/simplifying-sustainability-reporting-using-aws-and-generative-ai-in-banking/

European banks face a new challenge with the European Commission’s transition from the Non-Financial Reporting Directive (NFRD) to the Corporate Sustainability Reporting Directive (CSRD) regulations. This transition represents an expansion in sustainability reporting scope that will affect approximately 50,000 companies, a significant increase from the previous 11,700.

This means that banks themselves need to file sustainability reports because they will now be one of those 50,000 companies, but for their own reporting, they also need to assess their clients’ sustainability reports because they lend or finance those companies.

In this post, you learn how you can use generative AI services on Amazon Web Services (AWS) to automate your sustainability reporting requirements, reduce manual effort, and improve accuracy. You do this by implementing an automated solution for extracting, processing, and validating data from corporate reports.

The challenge

Financial institutions and sustainability teams managing sustainability reporting face three critical challenges:

  • Scale and complexity: Banks and financial institutions must process thousands of annual reports and sustainability documents, often spanning hundreds of pages each. This process requires extensive data extraction, complex EU Taxonomy alignment calculations, and resource-intensive validation steps. Manual processing introduces significant risks of errors and consumes valuable team resources.
  • Regulatory compliance: Banks must now implement detailed CSRD requirements, track specific metrics for turnover, capital expenditure (CapEx), and operating expenses (OpEx), and calculate their Green Asset Ratio (GAR) as well as environmental risks that come with their loans, debt, or equity investments. These new requirements demand robust data collection and processing capabilities.
  • Data management: Processing Green House Gas (GHG) emissions data across Scope 1, 2, and 3 categories requires analyzing complex lending and investment activities. With strict reporting deadlines, organizations need efficient tools to process this expanding volume of sustainability data.

The sustainability team point of view

Banks finance a large variety of counterparties and economic activities. While their carbon footprint is primarily linked to the greenhouse gas (GHG) emissions of their counterparties (Scope 3), The direct GHG emissions (Scope 1) of financial institutions or the GHG emissions linked to their energy consumption (Scope 2) are usually limited. For banks, the most critical key performance indicator (KPI) is the GAR, which measures the proportion of a bank’s taxonomy-aligned balance sheet exposures versus its total eligible exposures, as shown in the following figure.

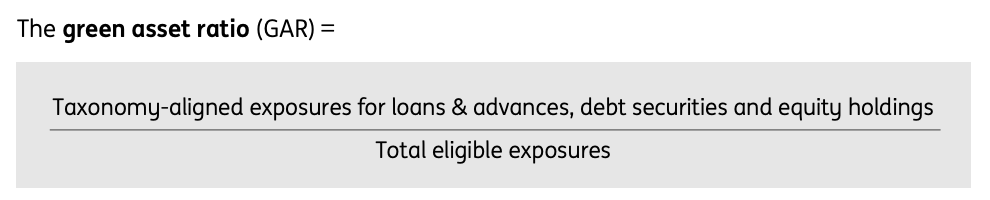
To calculate their GAR, banks must obtain and use sustainability data from annual reports or sustainability reports of up to 50,000 companies (many of which are subject to NFRD and CSRD reporting), and understand how much of their activities are linked to EU Taxonomy.

The manual process

In the example that follows, we use the Amazon 2023 Annual Report. Some of the data that teams would have to manually extract includes: Revenue, Scope 1, Scope 2, and Scope 3 emissions.

Amazon Annual Report

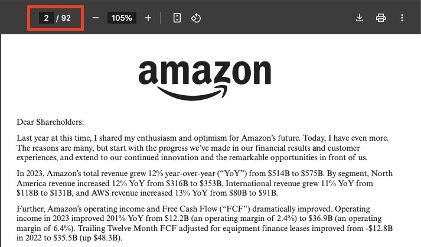
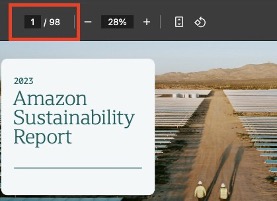
As you can see from the page count at the top of the preceding figure, people manually searching for this data would have to go through 92 pages to find the parameters they’re looking for. Next, we might determine that some of the data we need (Scope 1, Scope 2, Scope 3) isn’t available in the annual report, so we need to analyze the sustainability report. As shown in the following figure, to manually retrieve the relevant data from this report, we would have to go through 98 pages of information.

amazon sustainability report

To prepare a GAR, we would have to repeat this process across hundreds or even thousands of companies.

A solution using AWS and generative AI

To address these challenges, we propose an automated approach using AWS services. This approach can help banks streamline their sustainability reporting processes.

high level flow

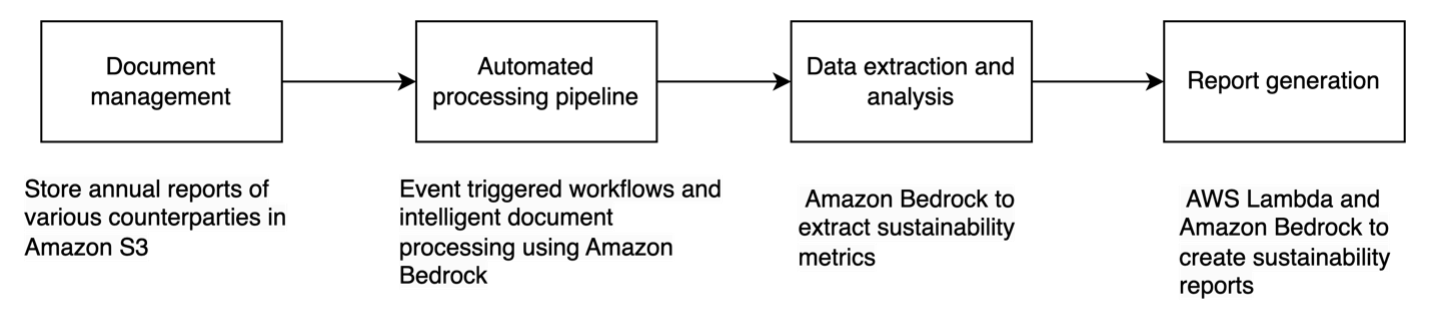
Here’s how this solution works— as shown in the preceding figure:

  1. Upload your counterparties’ reports to Amazon Simple Storage Service (Amazon S3).
  2. Amazon Bedrock automatically:
    1. Determines NFRD eligibility.
    2. Extracts relevant sustainability data.
    3. Organizes information for GAR calculations.
  3. Review and validate the extracted data.
  4. Generate required regulatory reports.

Architecture

We divide the architecture into two areas:

  1. Data ingestion flow
  2. Report generation flow

Data ingestion flow

We use Amazon Bedrock Knowledge Bases to build an automated data ingestion flow. See Prerequisites for your Amazon Bedrock knowledge base data to understand supported document formats and limits for knowledge base data.

Data Ingestion flow

The workflow, shown in the preceding figure, is:

  1.  Annual reports or sustainability reports are uploaded into an S3 bucket.
  2. On the S3 bucket, we enable event notifications for events such as addition, change, or deletion of the reports.
  3. These events are sent to Amazon Event Bridge, which trigger an AWS Lambda function.
  4. The Lambda function syncs the data source to an Amazon Bedrock knowledge base.
  5. Amazon Bedrock Knowledge Bases processes the documents and converts it into vector embeddings. For more information, see Amazon Bedrock Knowledge Bases supports advanced parsing, chunking, and query reformulation giving greater control of accuracy in RAG based applications
  6. Amazon Bedrock Knowledge Bases stores the vector embeddings in the vector database of your choice, such as in an Amazon OpenSearch Serverless collection.

Now the data is read, broken into chunks, converted to embeddings and stored in a vector store. You use a report generation flow to ask questions about the information in the knowledge base.

Report generation flow

To automate the report generation for sustainability teams, we created the report generation flow shown in the following figure.

report generation flow

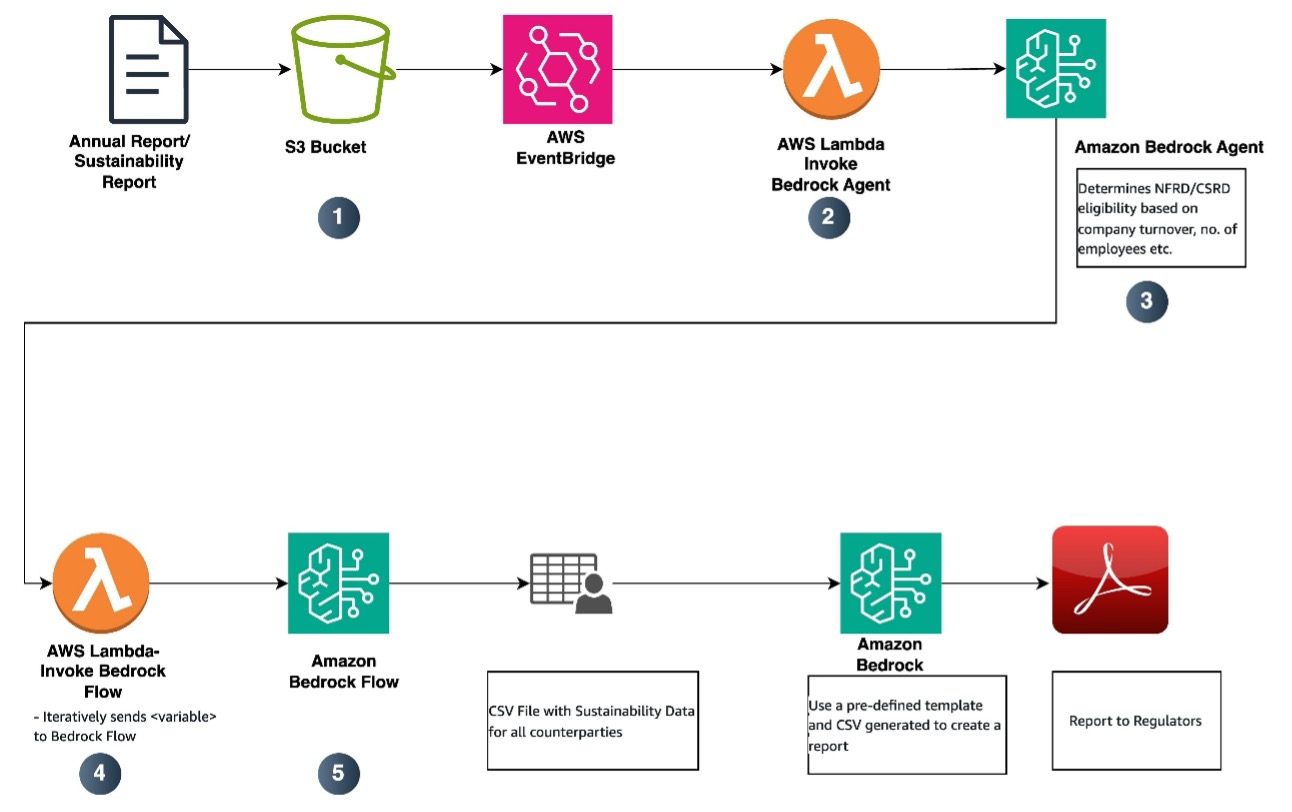
The report generation flow includes the following steps:

  1. When user uploads an annual report, the data from the report is ingested into the knowledge base, as shown in the data ingestion flow.
  2. A Lambda function—Invoke Bedrock Agent—is triggered to invoke an Amazon Bedrock agent.
  3. The Amazon Bedrock agent determines NFRD or CSRD applicability based on various parameters such as employee numbers and annual revenues. This agent then passes on what kind of regulation to apply to a Lambda function.
  4. The Lambda function Retrieve Sustainability Metrics retrieves various parameters needed for NFRD or CSRD from the annual report.
    1. The function receives NFRD or CSRD applicability from the Amazon Bedrock agent.
    2. Based on NFRD or CSRD applicability, there are specific sustainability metrics that need to be retrieved. For NFRD, there are about 15 metrics that need to be retrieved, and for CSRD, there are about 30 metrics.
    3.  The function iteratively sends {variable} to the Amazon Bedrock flow. For example, if the metric to be retrieved is Scope 1 emission, then the Lambda function will send variable=‘Scope 1 emission’
    4. The function gets the metric value from the Amazon Bedrock flow and when the required metrics are retrieved, creates a CSV file with the details.
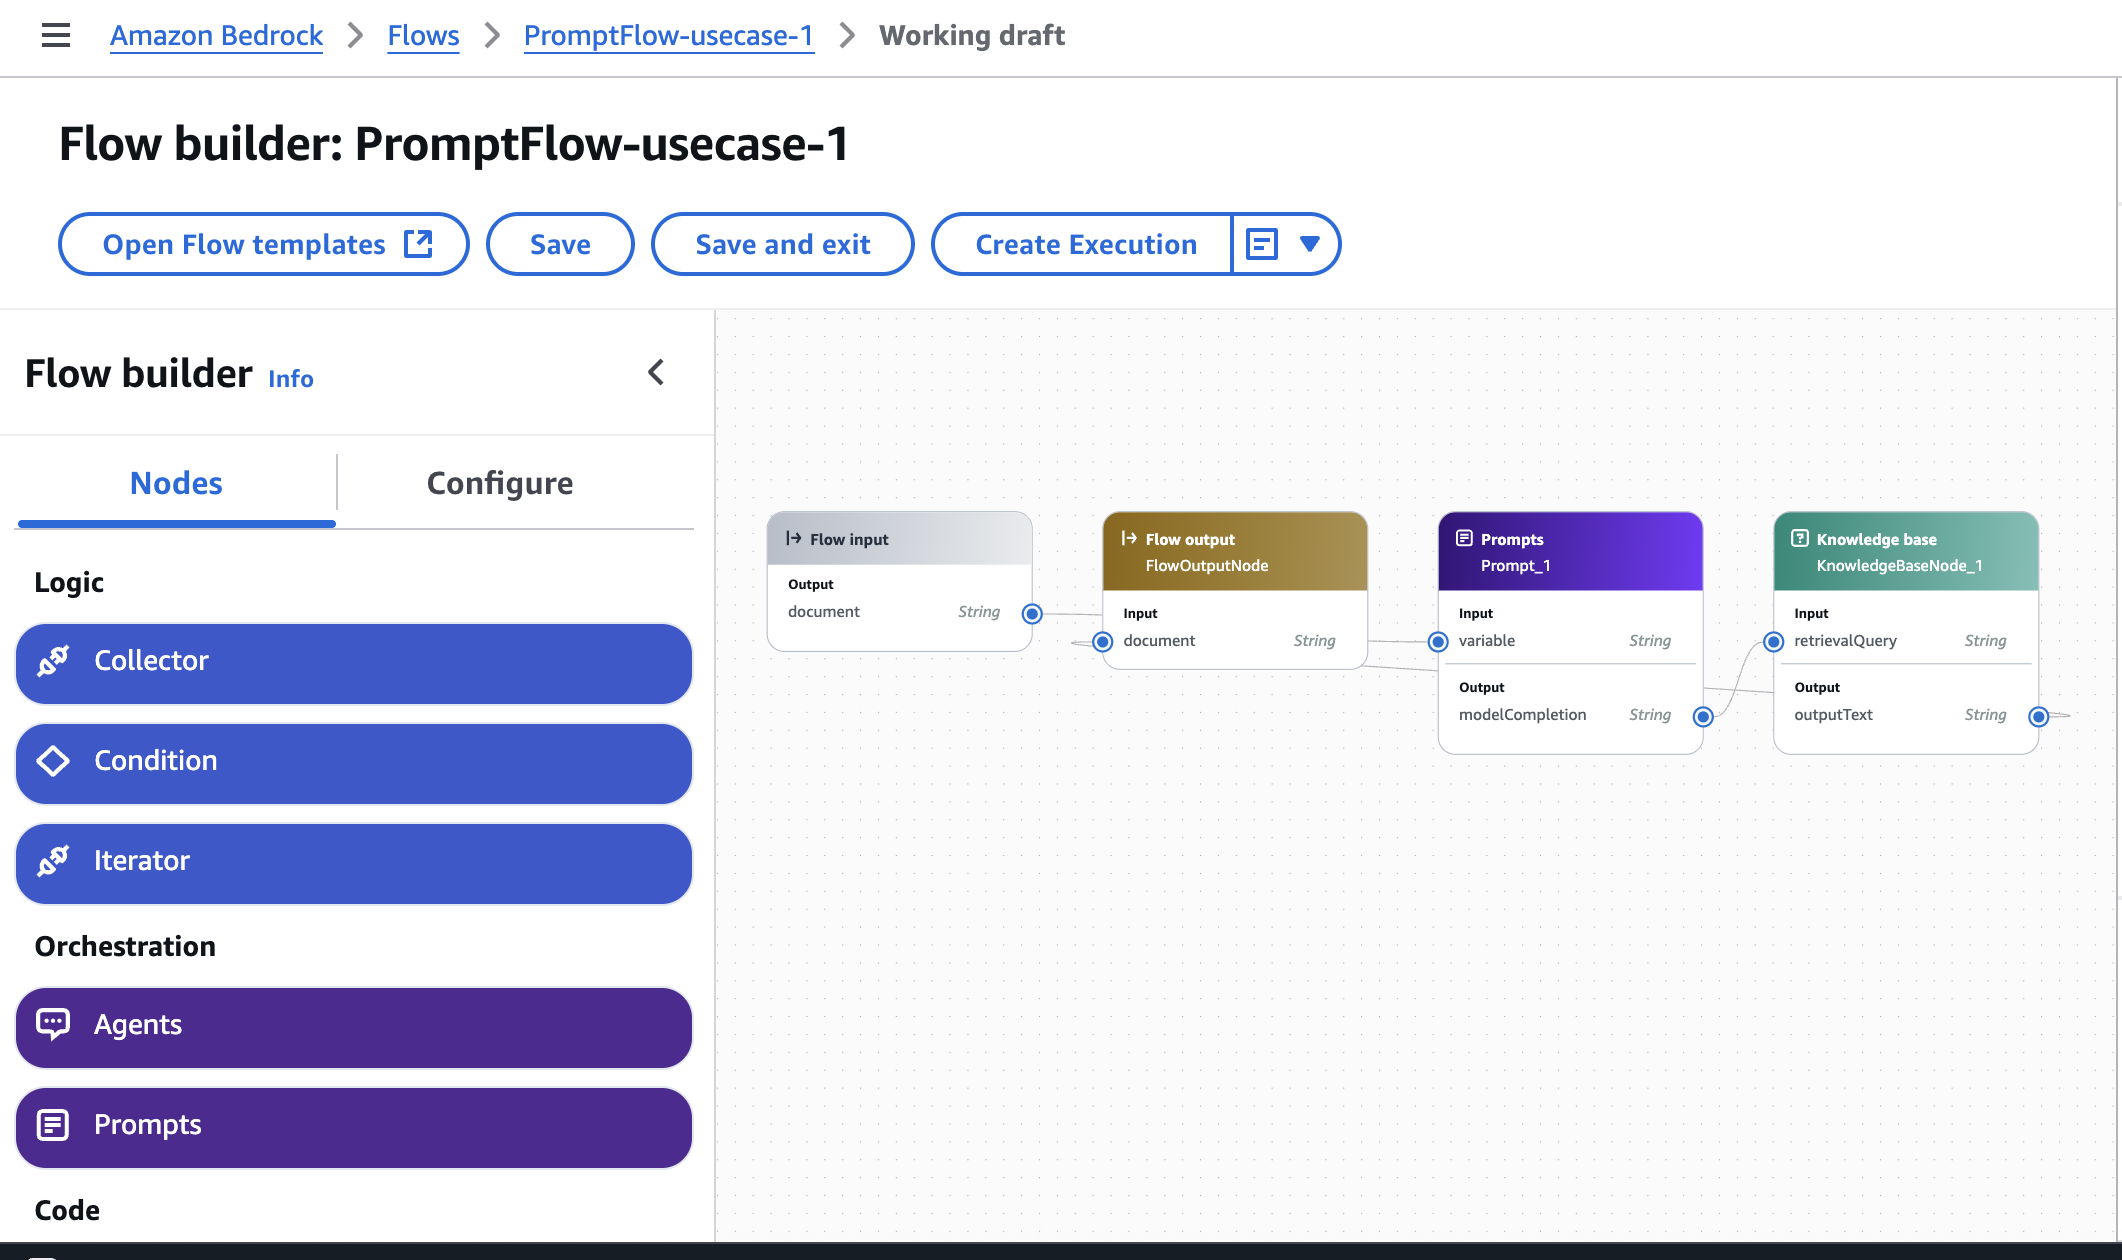
  5. Amazon Bedrock flow:
    1. Retrieve {variable} (for example, ‘Scope 1 emission’) from the annual report. For this, we create a prompt, as shown in the following diagram.
    2. Use the prompt to fetch the value from the knowledge base.
        • Prompt:
          <query> You are an intelligent agent that helps retrieve information from a knowledgebase. Please find {{variable}}. Please return only a number and not any additional text. I only need the value so you will return one word</query>

    3. Return the value to the Lambda function in Step 4.

Breakdown of key components

Amazon S3 is used for storing annual statements and sustainability reports, providing highly durable and secure object storage that facilitate immediate access when needed for processing.

Amazon Bedrock Knowledge Bases enables using Retrieval-Augmented Generation (RAG) to optimize the output of a large language model by giving it the context of companies’ annual reports and regulatory requirements. It does so by creating chunks and vector embeddings from the annual reports to enable efficient information retrieval from a vector database of your choice.

Amazon Bedrock foundation models (FMs) extract information from an Amazon Bedrock knowledge base and generate standardized PDF reports for regulators, providing consistent formatting and alignment with CSRD requirements. We encourage you to choose the best foundational model for your use case through the flexibility and enterprise-grade controls of Amazon Bedrock. For this solution, we used Anthropic’s Claude Sonnet 3.5 as the model, but by using Amazon Bedrock, you can choose from over 50 different models to see which one best fits your use case.

Amazon Bedrock Flows orchestrates the document processing pipeline, coordinating between services to automatically extract required sustainability metrics and validate compliance requirements. This feature helps us manage the workflow from initial document ingestion through to final report generation.

Amazon Bedrock Prompt Management creates and helps manage precise prompts that help retrieve multiple sustainability metrics from reports for example: turnover, Scope 1, Scope 2, and Scope 3 emissions data. These structured prompts facilitate consistent data extraction across different document formats.

Amazon Bedrock Agents evaluates each uploaded document to determine NFRD or CSRD eligibility by analyzing company revenue, employee count, and incorporation details. The agents retrieve these parameters by using a Lambda function that’s part of the actions the agent can perform.

Lambda handles event-driven processing when new documents are uploaded. Lambda functions are also used by the agent to retrieve data from companies’ annual reports and trigger the appropriate workflows based on document type.

Amazon EventBridge is used to build event-driven applications at scale across AWS and manages workflow orchestration, automatically initiating document processing when new reports are uploaded through S3 event notifications.

This architecture enables banks to process thousands of sustainability reports efficiently. The solution scales automatically to handle increasing document volumes while keeping security a top priority.

Additional considerations

You can use the following additional AWS service to help further increase the accuracy of information retrieval from sustainability documents.

Amazon Bedrock Guardrails to make sure that the solution caters to responsible AI policies. Specifically, we have added contextual grounding checks to reduce hallucinations. This is important for the solution because we’re trying to find a few specific values in a large document, and these checks make sure that the metrics retrieved are based on the documents.

Automated reasoning checks which help to verify the metrics returned by the solution. Consider the metric Number of employees. There can be multiple places in the annual report where the number of employees is mentioned; for example, temporary workers, part-time employees, employees from various departments, employees from a company that was taken over last year, and so on. To arrive at the right number, automated reasoning checks help.

Benefits

This sustainability reporting solution cuts document processing time from 8—10 weeks to few hours. Banks get clear audit trails showing exactly how they extracted and validated sustainability data. When regulations are updated, the system adapts through its knowledge base without disrupting operations. Built-in security protects company data through the entire process. Access controls and encryption are in place to secure information. The output delivers standardized, accurate reports. This automation lets sustainability teams concentrate on environmental improvements rather than paperwork. Teams can instead analyze trends and develop initiatives instead of hunting through reports for data points.

Conclusion

As sustainability reporting requirements evolve, having a flexible and automated solution will become crucial. While we focused on NFRD reporting, the same pattern can be adapted for CSRD compliance reporting, SFDR reporting requirements, and Internal sustainability metrics, or EU Taxonomy alignment.

Customers looking to build their products in the Financial Services industry have access to industry and domain AWS specialists; contact us for help in your cloud journey.

You can also learn more about AWS services and solutions for financial services by visiting AWS for Financial Services and Generative AI on AWS.


About the authors

Amazon Bedrock baseline architecture in an AWS landing zone

Post Syndicated from Abdel-Rahman Awad original https://aws.amazon.com/blogs/architecture/amazon-bedrock-baseline-architecture-in-an-aws-landing-zone/

As organizations increasingly adopt Amazon Bedrock to build and deploy large-scale AI applications, it’s important that they understand and adopt critical network access controls to protect their data and workloads. These generative AI-enabled applications might have access to sensitive or confidential information within their knowledge bases, Retrieval Augmented Generation (RAG) data sources, or models themselves, which could pose a risk if exposed to unauthorized parties. Additionally, organizations might want to limit access to certain AI models to specific teams or services, making sure only authorized users can use the most powerful capabilities. Another important consideration is cost optimization, because organizations need to be able to monitor and control access to manage various aspects of their cloud spending.

In this post, we explore the Amazon Bedrock baseline architecture and how you can secure and control network access to your various Amazon Bedrock capabilities within AWS network services and tools. We discuss key design considerations, such as using Amazon VPC Lattice auth policies, Amazon Virtual Private Cloud (Amazon VPC) endpoints, and AWS Identity and Access Management (IAM) to restrict and monitor access to your Amazon Bedrock capabilities.

By the end of this post, you will have a better understanding of how to configure your AWS landing zone to establish secure and controlled network connectivity to Amazon Bedrock across your organization using VPC Lattice.

Solution overview

Addressing the aforementioned challenges requires a well-designed network architecture and security controls. For this, we use the standard AWS Landing Zone Accelerator networking configuration. It provides a good starting point for managing network communication across multiple accounts. On top of the AWS Landing Zone Accelerator network design, we add two shared accounts.

In this solution design, we create a centralized architecture for managing organization AI capabilities across different accounts. The architecture consists of three main parts that work together to provide secure and controlled access to AI services:

  • Service network account – This account serves as the central networking hub for the organization, managing network connectivity and access policies. Through this account, network administrators can centrally manage and control access to AI services across the organization. The account follows AWS Landing Zone Accelerator networking practices that scale with enterprise organizational needs.
  • Generative AI account – This account hosts the organization’s Amazon Bedrock capabilities and serves as the central point for AI/ML management. The organization’s AI/ML scientists and prompt engineers will centrally build and manage Amazon Bedrock capabilities. The account provides access to various large language models (LLMs) through Amazon Bedrock by using VPC interface endpoints, while also enabling centralized monitoring of cost consumption and access patterns.
  • Workload accounts (dev, test, prod) – These accounts represent different environments where teams develop and deploy applications that consume AI services. Through secure network connections established through the service network account, these workload accounts can access the AI capabilities hosted in the generative AI account. This separation enforces proper isolation between development, testing, and production workloads while maintaining secure access to AI services.
Amazon Bedrock baseline architecture in an AWS landing zone

Amazon Bedrock baseline architecture in an AWS landing zone

The following diagram illustrates the solution architecture.

The service network account has its own VPC Lattice service network—a centralized networking construct that enables service-to-service communication across your organization, which is shared with workload accounts using AWS Resource Access Manager (AWS RAM) to enable VPC Lattice Service network sharing.

Workload accounts (dev, test, prod) establish VPC associations with the shared VPC Lattice service network by creating a service network association in their VPC. When an application in these accounts makes a request, it first queries the VPC resolver for DNS resolution. The resolver routes the traffic to the VPC Lattice service network.

Access control is implemented through an VPC Lattice auth policy. The service network policies determine which accounts can access the VPC Lattice service network, and service-level policies control access to specific AI services and define what actions each account can perform.

In the central AI services account, we find the proxy layer, we create a VPC Lattice service that points to a proxy layer, which acts as a single entry point, providing workload accounts access to Amazon Bedrock. This proxy layer then connects to Amazon Bedrock through VPC endpoints. Through this setup, the AI team can configure which foundation models (FMs) are available and manage access permissions for different workload accounts. After the necessary policies and connections are in place, workload accounts can access Amazon Bedrock capabilities through the established secure pathway. This setup enables secure, cross-account access to AI services while maintaining centralized control and monitoring.

Network components

We use VPC Lattice, which is a fully managed application networking service that helps you simplify network connectivity, security, and monitoring for service-to-service communication needs. With VPC Lattice, organizations can achieve a centralized connectivity pattern to control and monitor access to the services required for building generative AI applications.

For details about VPC Lattice, refer to the Amazon VPC Lattice User Guide. The following is an overview of the constructs you can use in setting up the centralized pattern in this solution:

  • VPC Lattice service network – You can use the VPC Lattice service network to provide central connectivity and security to the central AI services account. The service network is a logical grouping mechanism that simplifies how you can enable connectivity across VPCs or accounts, and apply common security policies for application communication patterns. You can create a service network in an account and share it with other accounts within or outside AWS Organizations using AWS RAM.
  • VPC Lattice service – In a service network, you can associate a VPC Lattice service, which consists of a listener (protocol and port number), routing rules that allow for control of the application flow (for example, path, method, header-based, or weighted routing), and target group, which defines the application infrastructure. A service can have multiple listeners to meet various client capabilities. Supported protocols include HTTP, HTTPS, gRPC, and TLS. The path-based routing allows control to various high-performing FMs and other capabilities you would need to build a generative AI application.
  • Proxy layer – You use a proxy layer for the VPC Lattice service target group. The proxy layer can be built based on your organization’s preference of AWS services, such as AWS Lambda, AWS Fargate, or Amazon Elastic Kubernetes Service (Amazon EKS). The purpose of the proxy layer is to provide a single entry point to access LLMs, knowledge bases, and other capabilities that are tested and approved according to your organization’s compliance requirements.
  • VPC Lattice auth policies – For security, you use VPC Lattice auth policies. VPC Lattice auth policies are specified using the same syntax as IAM policies. You can apply an auth policy to VPC Lattice service network as well as to the VPC Lattice service.
  • Fully Qualified Domain Names –To facilitate service discovery, VPC Lattice supports custom domain names for your services and resources, and maintains a Fully Qualified Domain Name (FQDN) for each VPC Lattice service and resource you define. You can use these FQDNs in your Amazon Route 53 private hosted zone configurations, and empower business units or teams to discover and access services and resources.
  • Service network VPC – Business units or teams can access generative AI services in a service network using service network VPC associations or a service network VPC endpoint.
  • Monitoring – You can choose to enable monitoring at the VPC Lattice service network level and VPC Lattice service level. VPC Lattice generates metrics and logs for requests and responses, making it more efficient to monitor and troubleshoot applications

The preceding guidance takes a “secure by default” approach—you must be explicit about which features, models, and so on should be accessed by which business unit. The setup also enables you to implement a defense-in-depth strategy at multiple layers of the network:

  • The first level of defense is that business team needs to connect to the service network in order to get access to the generative AI service through the central AI service account.
  • The second level includes network-level security protections in the business team’s VPC for the service network, such as security groups and network access control lists (ACLs). By using these, you can allow access to specific workloads or teams in a VPC.
  • The third level is through the VPC Lattice auth policy, which you can apply at two layers: at the service network level to allow authenticated requests within the organization, and at the service level to allow access to specific models and features.

VPC Lattice auth policy

This solution makes it possible to centrally manage access to Amazon Bedrock resources across your organization. This approach uses an VPC Lattice auth policy to centrally control Amazon Bedrock resources and manage it from one location across all the organization accounts.

Typically, the auth policy on the service network is operated by the network or cloud administrator. For example, allowing only authenticated requests from specific workloads or teams in your AWS organization. In the following example, access is granted to invoke the generated AI service for authenticated requests and to principals that are part of the o-123456example organization:

{
   "Version": "2012-10-17",
   "Statement": [
      {
         "Effect": "Allow",
         "Principal": "*",
         "Action": "vpc-lattice-svcs:Invoke",
         "Resource": "*",
         "Condition": {
            "StringEquals": {
               "aws:PrincipalOrgID": [ 
                  "o-123456example"
               ]
            }
         }
      }
   ]
}

The auth policy at the service level is managed by the central AI service team to set fine-grained controls, which can be more restrictive than the coarse-grained authorization applied at the service network level. For example, the following policy restricts access to claude-3-haiku for only business-team1:

{
   "Version":"2012-10-17",
   "Statement":[
      {
         "Effect": "Allow",
         "Principal": {
            "AWS": [
               "arn:aws:iam::<account-number>:role/businss-team1"
            ]
         },
         "Action": "vpc-lattice-svcs:Invoke",
         "Resource": [
            "arn:aws:vpc-lattice:<aws-region>:<account-number>:service/svc-0123456789abcdef0/*"
         ],
         "Condition": {
            "StringEquals": {
               "vpc-lattice-svcs:RequestQueryString/modelid": "claude-3-haiku"            }
         }
      }
   ]
}

Monitoring and tracking

This design employs three monitoring approaches, using Amazon CloudWatch, AWS CloudTrail, and VPC Lattice access logs. This strategy provides a view of service usage, security, and performance.

CloudWatch metrics offer real-time monitoring of VPC Lattice service performance and usage. CloudWatch tracks metrics such as request counts and response times for Amazon Bedrock related endpoints, allowing for the setup of alarms for proactive management of service health and capacity. This enables monitoring of overall usage patterns of Amazon Bedrock models across different business units, facilitating capacity planning and resource allocation. CloudTrail provides detailed API-level auditing of Amazon Bedrock related actions. It logs cross-account access attempts and interactions with Amazon Bedrock services, providing a compliance and security audit trail. This tracking of who is accessing which Amazon Bedrock models, when, and from which accounts helps organizations adhere to their organizational policies.VPC Lattice access logs provide detailed insights into HTTP/HTTPS requests to Amazon Bedrock services, capturing specific usage patterns of AI models by different business teams. These logs contain client-specific information, which for example can be used to enable organizations to implement capabilities such as charge-back models. This allows for accurate attribution of AI service usage to specific teams or departments, facilitating fair cost allocation and responsible resource utilization across the organization. These services work together to enhance security, optimize performance, and provide valuable insights for managing cross-account Amazon Bedrock access.

Conclusion

In this post, we explored the importance of securing and controlling network access to Amazon Bedrock capabilities within an organization’s AWS landing zone. We discussed the key business challenges, such as the need to protect sensitive information in Amazon Bedrock knowledge bases, limit access to AI models, and optimize cloud costs by monitoring and controlling Amazon Bedrock capabilities. To address these challenges, we outlined a multi-layered network solution that uses AWS networking services, including a VPC Lattice auth policy to restrict and monitor access to Amazon Bedrock capabilities. Try out this solution for your own use case, and share your feedback in the comments.


About the authors

AWS Weekly Roundup: re:Inforce re:Cap, Valkey GLIDE 2.0, Avro and Protobuf or MCP Servers on Lambda, and more (June 23, 2025)

Post Syndicated from Sébastien Stormacq original https://aws.amazon.com/blogs/aws/aws-weekly-roundup-reinforce-recap-valkey-glide-2-0-avro-and-protobuf-or-mcp-servers-on-lambda-and-more-june-23-2025/

Last week’s hallmark event was the security-focused AWS re:Inforce conference.


AWS re:Inforce 2025

AWS re:Inforce 2025

Now a tradition, the blog team wrote a re:Cap post to summarize the announcements and link to some of the top blog posts.

To further summarize, several new security innovations were announced, including enhanced IAM Access Analyzer capabilities, MFA enforcement for root users, and threat intelligence integration with AWS Network Firewall. Other notable updates include exportable public SSL/TLS certificates from AWS Certificate Manager, a simplified AWS WAF console experience, and a new AWS Shield feature for proactive network security (in preview). Additionally, AWS Security Hub has been enhanced for risk prioritization (Preview), and Amazon GuardDuty now supports Amazon EKS clusters.

But my favorite announcement came from the Amazon Verified Permissions team. They released an open source package for Express.js, enabling developers to implement external fine-grained authorization for web application APIs. This simplifies authorization integration, reducing code complexity and improving application security.

The team also published a blog post that outlines how to create a Verified Permissions policy store, add Cedar and Verified Permissions authorisation middleware to your app, create and deploy a Cedar schema, and create and deploy Cedar policies. The Cedar schema is generated from an OpenAPI specification and formatted for use with the AWS Command Line Interface (CLI).

Let’s look at last week’s other new announcements.

Last week’s launches
Apart from re:Inforce, here are the launches that got my attention.

Kafka customers use Avro and Protobuf formats for efficient data storage, fast serialization and deserialization, schema evolution support, and interoperability between different programming languages. They utilize schema registries to manage, evolve, and validate schemas before data enters processing pipelines. Previously, you were required to write custom code within your Lambda function to validate, deserialize, and filter events when using these data formats. With this launch, Lambda natively supports Avro and Protobuf, as well as integration with GSR, CCSR, and SCSR. This enables you to process your Kafka events using these data formats without writing custom code. Additionally, you can optimize costs through event filtering to prevent unnecessary function invocations.

  • Amazon S3 Express One Zone now supports atomic renaming of objects with a single API call – The RenameObject API simplifies data management in S3 directory buckets by transforming a multi-step rename operation into a single API call. This means you can now rename objects in S3 Express One Zone by specifying an existing object’s name as the source and the new name as the destination within the same S3 directory bucket. With no data movement involved, this capability accelerates applications like log file management, media processing, and data analytics, while also lowering costs. For instance, renaming a 1-terabyte log file can now complete in milliseconds, instead of hours, significantly accelerating applications and reducing costs.
  • Valkey introduces GLIDE 2.0 with support for Go, OpenTelemetry, and pipeline batching – AWS, in partnership with Google and the Valkey community, announces the general availability of General Language Independent Driver for the Enterprise (GLIDE) 2.0. This is the latest release of one of AWS’s official open-source Valkey client libraries. Valkey, the most permissive open-source alternative to Redis, is stewarded by the Linux Foundation and will always remain open-source. Valkey GLIDE is a reliable, high-performance, multi-language client that supports all Valkey commands

GLIDE 2.0 introduces new capabilities that expand developer support, improve observability, and optimise performance for high-throughput workloads. Valkey GLIDE 2.0 extends its multi-language support to Go (contributed by Google), joining Java, Python, and Node.js to provide a consistent, fully compatible API experience across all four languages. More language support is on the way. With this release, Valkey GLIDE now supports OpenTelemetry, an open-source, vendor-neutral framework that enables developers to generate, collect, and export telemetry data and critical client-side performance insights. Additionally, GLIDE 2.0 introduces batching capabilities, reducing network overhead and latency for high-frequency use cases by allowing multiple commands to be grouped and executed as a single operation.

You can discover more about Valkey GLIDE in this recent episode of the AWS Developers Podcast: Inside Valkey GLIDE: building a next-gen Valkey client library with Rust.

Podcast episode on Valkey Glide

For a full list of AWS announcements, be sure to keep an eye on the What’s New at AWS page.

Some other reading
My Belgian compatriot Alexis has written the first article of a two-part series explaining how to develop an MCP Tool server with a streamable HTTP transport and deploy it on Lambda and API Gateway. This is a must-read for anyone implementing MCP servers on AWS. I’m eagerly looking forward to the second part, where Alexis will discuss authentication and authorization for remote MCP servers.

Other AWS events
Check your calendar and sign up for upcoming AWS events.

AWS GenAI Lofts are collaborative spaces and immersive experiences that showcase AWS expertise in cloud computing and AI. They provide startups and developers with hands-on access to AI products and services, exclusive sessions with industry leaders, and valuable networking opportunities with investors and peers. Find a GenAI Loft location near you and don’t forget to register.

AWS Summits are free online and in-person events that bring the cloud computing community together to connect, collaborate, and learn about AWS. Register in your nearest city: Japan (this week June 25 – 26), Online in India (June 26), New-York City (July 16).

Save the date for these upcoming Summits in July and August: Taipei (July 29), Jakarta (August 7), Mexico (August 8), São Paulo (August 13), and Johannesburg (August 20) (and more to come in September and October).

Browse all upcoming AWS led in-person and virtual events here.

That’s all for this week. Check back next Monday for another Weekly Roundup!

— seb

This post is part of our Weekly Roundup series. Check back each week for a quick roundup of interesting news and announcements from AWS!

Accelerate development with secure access to Amazon Q Developer using PingIdentity

Post Syndicated from Sid Vantair original https://aws.amazon.com/blogs/devops/accelerate-development-with-secure-access-to-amazon-q-developer-using-pingidentity/

 Overview

Customers adopting Amazon Q Developer, a generative AI-powered coding companion, often need authentication through existing identity providers like PingIdentity. By leveraging AWS IAM Identity Center, organizations can enable their developers to access Amazon Q Developer with their existing PingIdentity credentials, streamlining authentication and removing the need for separate login procedures. Amazon Q Developer can chat about code, provide inline code completions, and generate new code. It also scans your code for security vulnerabilities and makes code improvements, including language updates, debugging, and optimizations. Amazon Q Developer comes in two tiers. The Free Tier is available at no cost for individual use. The Pro Tier is a paid version offering enterprise access controls, an analytics dashboard, customization, and higher usage limits. Organizations that enable the Pro tier of Amazon Q Developer for their developers typically authenticate with AWS IAM Identity Center. This approach is popular due to its ability to federate with external identity providers. In this blog, we will show you how to set up PingIdentity as an external IdP for IAM Identity Center and allow developers to access Amazon Q Developer using their existing PingIdentity login credentials.

How it works

AWS authentication flow diagram: Developers interact with Amazon Q Developer and AWS IAM Identity Center, integrating with Ping Identity for SAML-based access.

Figure 1 – Solution Overview

The authentication workflow is as follows:

  1. The developer initiates an access request to Amazon Q Developer.
  2. IAM Identity center checks authentication status.
  3. If not authenticated, redirects to PingIdentity login.
  4. Developer provides PingIdentity Credentials.
  5. PingIdentity validates credentials and sends SAML response.
  6. IAM Identity Center verifies the SAML response.
  7. Upon successful verification, grants Amazon Q Developer access.
  8. Developer begins using Amazon Q Developer.

Prerequisites

  • AWS account
  • PingIdentity environment with users and groups already setup for Amazon Q Developer access
  • IAM identity center
  • Pro Tier subscription of Amazon Q Developer

Walkthrough

In this section, we demonstrate how to create a SAML-based connection between PingIdentity and IAM Identity Center, enabling you to access Amazon Q Developer seamlessly using your PingIdentity credentials.

Note: You will need to switch between PingIdentity portal and IAM Identity Center in your browser. We recommend opening a new browser tab for each console.

Step 1: Enable AWS Single Sign-On in PingIdentity

This step involves enabling AWS Single Sign-On application within PingIdentity.

    1. In the PingIdentity console, Navigate to the Applications Tab > Application Catalog
    2. Browse catalog for AWS Single Sign-On and select + to start the Quick Setup.
Screenshot of the PingIdentity Application Catalog interface. The search term "aws" is entered in the search bar, displaying three results: Amazon Web Services – AWS, AWS Gov-Cloud, and AWS Single Sign-On. The "AWS Single Sign-On" option is outlined with a red box and includes a plus button to add the application

Figure 2 – PingIdentity Application Catalog

Alt Text: Screenshot of the PingIdentity Application Catalog interface. The search term “aws” is entered in the search bar, displaying three results: Amazon Web Services – AWS, AWS Gov-Cloud, and AWS Single Sign-On. The “AWS Single Sign-On” option is outlined with a red box and includes a plus button to add the application

    1. Provide Name, SSO Region and SSO Tenant ID and choose Next
      • Name – Input an appropriate name for the connection
      • SSO Region – Input the appropriate region
      • Tenant ID – Identity Store ID
        You can run the following CLI command to retrieve the value. It’s a 10-digit alphanumeric prefixed by “d-“.
aws sso-admin list-instances –query ‘Instances[0].IdentityStoreId’Output: “d-XXXXXXXXXX”
    1. Navigate to PingOne Mappings and select Email Address from the drop down.
Screenshot of the AWS Single Sign-On configuration in PingIdentity. The screen shows Step 2 of the setup process where the SAML attribute SAML_SUBJECT is mapped to the PingOne attribute "Email Address". A red box highlights the mapping section under "PingOne Mappings".

Figure 3 – AWS Single Sign-On attribute mapping

Alt Text: Screenshot of the AWS Single Sign-On configuration in PingIdentity. The screen shows Step 2 of the setup process where the SAML attribute SAML_SUBJECT is mapped to the PingOne attribute “Email Address”. A red box highlights the mapping section under “PingOne Mappings”.

    1. Search and select the group that you have created earlier for enabling access to Amazon Q Developer and select + to add the group.
    2. Choose Save
Screenshot of Step 3 in the AWS Single Sign-On setup process in PingIdentity. The screen shows the group selection interface where the "Amazon Q" group is listed. A plus icon is shown next to the group to add it, and a blue "Save" button is highlighted in the bottom-right corner to confirm the configuration.

Figure 4 – Select PingIdentity directory Groups for Amazon Q Developer access

Alt Text: Screenshot of Step 3 in the AWS Single Sign-On setup process in PingIdentity. The screen shows the group selection interface where the “Amazon Q” group is listed. A plus icon is shown next to the group to add it, and a blue “Save” button is highlighted in the bottom-right corner to confirm the configuration.

Step 2: Connecting PingIdentity with IAM identity Center

This step involves configuring PingIdentity with the AWS IAM Identity Center sign-on details to complete the authentication setup.

  1. In the PingIdentity console, Navigate to the Applications Tab > Applications and select the application you created earlier in Step 1
  2. Select Enable Advanced Configuration and choose Enable.
Screenshot of the PingIdentity Applications dashboard showing the AWS Single Sign-On application selected. The overview panel displays key configuration sections including protocol (SAML), mapped attributes, selected policies, and access group (Amazon Q). The option "Enable Advanced Configuration" is highlighted near the bottom of the panel.

Figure 5 – Enable Advanced configuration for AWS single Sign-On application

Alt Text: Screenshot of the PingIdentity Applications dashboard showing the AWS Single Sign-On application selected. The overview panel displays key configuration sections including protocol (SAML), mapped attributes, selected policies, and access group (Amazon Q). The option “Enable Advanced Configuration” is highlighted near the bottom of the panel.

  1. Scroll down and select Download Metadata. This will save the Metadata file to your local computer, which you will use later during the configuration process.
  2. In another browser tab login to your AWS IAM Identity Center console and Select Choose your identity source.
  3. Under Identity source, select Change identity source from the Actions drop-down menu.
Screenshot of the IAM Identity Center settings page, focused on the "Identity source" tab. The page displays details such as identity source, authentication method, AWS access portal URL, issuer URL, and identity store ID. A dropdown menu labeled "Actions" is expanded in the top-right corner, showing options to "Customize AWS access portal URL" and "Change identity source," highlighted with a red box.

Figure 6 – Change identity source in IAM Identity Center Console

Alt Text: Screenshot of the IAM Identity Center settings page, focused on the “Identity source” tab. The page displays details such as identity source, authentication method, AWS access portal URL, issuer URL, and identity store ID. A dropdown menu labeled “Actions” is expanded in the top-right corner, showing options to “Customize AWS access portal URL” and “Change identity source,” highlighted with a red box.

  1. On the next page, select External identity provider and choose Next.
  2. Under Service provider metadata copy the IAM Identity Center Assertion Consumer Service (ACS) URL.

    Screenshot of the "Configure external identity provider" step in the AWS IAM Identity Center setup process. The screen displays service provider metadata including the AWS access portal sign-in URL, IAM Identity Center Assertion Consumer Service (ACS) URL (highlighted with a red box), and IAM Identity Center issuer URL. A button labeled "Download metadata file" is shown in the upper right.

    Figure 7 – Copy IAM Identity Center ACS URL

Alt Text: Screenshot of the “Configure external identity provider” step in the AWS IAM Identity Center setup process. The screen displays service provider metadata including the AWS access portal sign-in URL, IAM Identity Center Assertion Consumer Service (ACS) URL (highlighted with a red box), and IAM Identity Center issuer URL. A button labeled “Download metadata file” is shown in the upper right.

  1. Now go back to the PingIdentity browser tab and Navigate to the Configuration tab and select pencil icon to edit the details.
  2. Paste the ACS URL you copied from the IAM identity center console and choose Save.
Screenshots showing the configuration and editing of SAML settings for AWS Single Sign-On in PingIdentity. The first image displays the static configuration view, listing the ACS URL, signing key ("PingOne SSO Certificate for Administrators environment"), signing method ("Response"), and signing algorithm. The second image shows the editable configuration screen with the ACS URL input field highlighted in red, alongside dropdowns for selecting the signing key, options for signing method (Assertion, Response, or both), and the RSA_SHA256 signing algorithm. These screens guide users through setting up secure SAML integration with AWS SSO.

Figure 8 – Configuring AWS Single Sign-On SAML Settings in PingIdentity console

Alt Text: Two screenshots showing the configuration and editing of SAML settings for AWS Single Sign-On in PingIdentity. The first image displays the static configuration view, listing the ACS URL, signing key (“PingOne SSO Certificate for Administrators environment”), signing method (“Response”), and signing algorithm. The second image shows the editable configuration screen with the ACS URL input field highlighted in red, alongside dropdowns for selecting the signing key, options for signing method (Assertion, Response, or both), and the RSA_SHA256 signing algorithm. These screens guide users through setting up secure SAML integration with AWS SSO.

Step 3: Configure PingIdentity as external IdP in IAM identity Center

This step involves setting up PingIdentity as an external IdP in IAM Identity Center to enable federated access.

  1. Navigate back to the previous browser tab where you had IAM Identity Center console open.
  2. Upload the downloaded PingIdentity IdP SAML metadata file from step 3 of previous section and select Next.
Screenshot of the AWS Identity Center configuration screen where the user uploads the IdP SAML metadata XML file. The metadata file is shown as successfully selected. Below are empty fields for optional manual entry of IdP sign-in URL, IdP issuer URL, and IdP certificate. The "Next" button is highlighted in orange at the bottom right, indicating the next step in the setup process.

Figure 9 – AWS IAM Identity Center metadata

Alt Text: Screenshot of the AWS Identity Center configuration screen where the user uploads the IdP SAML metadata XML file. The metadata file is shown as successfully selected. Below are empty fields for optional manual entry of IdP sign-in URL, IdP issuer URL, and IdP certificate. The “Next” button is highlighted in orange at the bottom right, indicating the next step in the setup process.

  1. Review the list of changes. Once you are ready to proceed, type ACCEPT, then select Change identity source.

Step 4: Enable provisioning and identity-aware sessions in IAM identity Center

This step involves configuring user provisioning and enabling identity-aware sessions in AWS IAM Identity Center to support dynamic access control.

  1. In IAM Identity Center Console, Choose Settings in the left navigation pane.
  2. On the Settings page, locate and enable automatic provisioning. This immediately enabled automatic provisioning in IAM Identity Center and displays the necessary SCIM endpoint and access token information.
  3. In the Inbound automatic provisioning dialog box, copy each of the values for the following options. You will need to paste these later when you configure provisioning in PingIdentity.
    • SCIM endpoint
    • Access token
  4. Choose Close.
  5. Next enable identity-aware sessions and automatic provisioning.
Two options are displayed for further configuration: "Enable identity-aware sessions" and "Automatic provisioning." Both options have an "Enable" button on the right-hand side, highlighted in red.

Figure 10 – IAM Identity Center Settings for identity aware sessions and automatic provisioning

Alt Text: Two options are displayed for further configuration: “Enable identity-aware sessions” and “Automatic provisioning.” Both options have an “Enable” button on the right-hand side, highlighted in red.

Step 5: Configure connections provisioning in PingIdentity

This step involves setting up connection provisioning in PingIdentity to enable automatic user and group management.

  1. In the PingIdentity console, Navigate to the Integrations > Provisioning.
  2. Select plus icon > New Connection
  3. Under connection type Select Identity Store.
PingIdentity Provisioning configuration screen. The left sidebar highlights the "Provisioning" tab. The main panel shows the "Create a New Connection" dialog with two connection type options: "Identity Store" and "Gateway." The "Identity Store" option is selected using the "Select" button on the right. A plus (+) icon at the top indicates the option to add a new provisioning connection.

Figure 11 – PingIdentity connection provisioning

Alt Text: PingIdentity Provisioning configuration screen. The left sidebar highlights the “Provisioning” tab. The main panel shows the “Create a New Connection” dialog with two connection type options: “Identity Store” and “Gateway.” The “Identity Store” option is selected using the “Select” button on the right. A plus (+) icon at the top indicates the option to add a new provisioning connection.

  1. Select SCIM outbound from the list of options and select Next.
  2. Provide a name for the connection and select Next.
  3. Paste the SCIM endpoint URL into the SCIM BASE URL field.
  4. Navigate to Authentication Method and select OAuth 2 Bearer Token.
  5. Paste the Access token into the Oauth Access Token field.
  6. Select Test Connection to validate the connectivity and select Next.
PingIdentity interface showing the "Configure Authentication" step in the "Create a New Connection" wizard. Key fields include the SCIM Base URL, SCIM Version (2.0), Authentication Method (OAuth 2 Bearer Token), OAuth Access Token (obscured), and resource paths for Users and Groups. The "Test Connection" and "Next" buttons are visible at the bottom.

Figure 12 – Configure authentication details

Alt Text: PingIdentity interface showing the “Configure Authentication” step in the “Create a New Connection” wizard. Key fields include the SCIM Base URL, SCIM Version (2.0), Authentication Method (OAuth 2 Bearer Token), OAuth Access Token (obscured), and resource paths for Users and Groups. The “Test Connection” and “Next” buttons are visible at the bottom.

  1. Navigate to User Filter Expression and change to userName Eq “%s”.
  2. Choose Save. By default, the connection is created in a Disabled state.
Final step in the PingIdentity "Create a New Connection" wizard showing the "Configure Preferences" screen. The highlighted fields include "User Filter Expression" with the value userName Eq "%s", "User Identifier" set to userName, and group membership handling options ("Merge" and "Overwrite" with "Overwrite" selected). A "Save" button is highlighted at the bottom right.

Figure 13 – Edit UserFilter Expressions for the connection

Alt Text: Final step in the PingIdentity “Create a New Connection” wizard showing the “Configure Preferences” screen. The highlighted fields include “User Filter Expression” with the value userName Eq “%s”, “User Identifier” set to userName, and group membership handling options (“Merge” and “Overwrite” with “Overwrite” selected). A “Save” button is highlighted at the bottom right.

  1. Select the connection you created and select the toggle switch to enable the connection.
PingIdentity configuration screen showing the IAM Identity Store integration. The page displays the identity store name, and tabs for "Overview" and "Configuration." A toggle switch in the top-right corner is highlighted, indicating the integration is currently enabled.

Figure 14 – Enable the connection

Alt Text: PingIdentity configuration screen showing the IAM Identity Store integration. The page displays the identity store name, and tabs for “Overview” and “Configuration.” A toggle switch in the top-right corner is highlighted, indicating the integration is currently enabled.

Step 6: Configure rules provisioning in PingIdentity

This step involves setting up provisioning rules in PingIdentity to define how users and groups are synchronized.

  1. In the PingIdentity console, Navigate to the Integrations > Provisioning.
  2. Select plus icon > New Rule
  3. Provide a Name and Description for the rule.
  4. Choose Create.
  5. Select plus icon to select the Connection you created in the previous step.
  6. Choose Save.
Alt Text: Screenshots showing the final steps in connecting the IAM Identity Center to the IAM identity store using PingIdentity. The first image shows the IAM Identity Store connection listed under "Available Connections" with a plus (+) icon to initiate the link. The second image shows the selected connection from the PingOne Directory (P1) as the source and IAM identity store (SCIM) as the target, with the option to "Save" the configuration.

Figure 15 – Add the IAM identity center connection to the rule

Alt Text: Screenshots showing the final steps in connecting the IAM Identity Center to the IAM identity store using PingIdentity. The first image shows the IAM Identity Store connection listed under “Available Connections” with a plus (+) icon to initiate the link. The second image shows the selected connection from the PingOne Directory (P1) as the source and IAM identity store (SCIM) as the target, with the option to “Save” the configuration.

  1. If you want to sync users from your PingIdentity directory, create a user filter. To do so, navigate to User Filter and select pencil icon to edit the settings.
  2. Choose the appropriate filter from the drop down based on your use case and select Save. I have chosen Group Name which has been designated for Amazon Q Developer access.
Screenshot of the "Edit User Filter" interface in IAM Identity Center. The user filter is configured to provision users who belong to a group with names that contain "Amazon Q Developer." The condition logic is set to match if "Any" of the conditions are true.

Figure 16 – PingIdentity user filter

Alt Text: Screenshot of the “Edit User Filter” interface in IAM Identity Center. The user filter is configured to provision users who belong to a group with names that contain “Amazon Q Developer.” The condition logic is set to match if “Any” of the conditions are true.

  1. If you want to sync a group from your PingIdentity directory, create group provisioning. To do so, navigate to Group Provisioning and select pencil icon to edit the settings.
  2. Select the appropriate group which has been designated for Amazon Q Developer access and choose Save.
Screenshot of the "Edit Group Provisioning" screen in IAM Identity Center. The group "Amazon Q Developer" is selected for outbound provisioning. A "Save" button is highlighted in the bottom-left corner.

Figure 17 – PingIdentity Group Provisioning

Alt Text: Screenshot of the “Edit Group Provisioning” screen in IAM Identity Center. The group “Amazon Q Developer” is selected for outbound provisioning. A “Save” button is highlighted in the bottom-left corner.

  1. Navigate to Attribute Mapping and select the pencil icon to edit the settings.
  2. Delete the PingOne Directory attribute Primary Phone.
  3. Add a new attribute and select Username as PingOne Directory and displayName as IAM identity Store.
  4. Choose Save.
Two screenshots showing the editing of attribute mappings in IAM Identity Center. The first image displays default mappings such as 'Email Address' to 'workEmail' and 'Username' to 'userName', with an option to delete or update each field. The second image shows the addition of a new attribute mapping from 'Username' to 'displayName', along with highlighted 'Add' and 'Save' buttons.

Figure 18 – PingIdentity attribute mapping

Alt Text: Two screenshots showing the editing of attribute mappings in IAM Identity Center. The first image displays default mappings such as ‘Email Address’ to ‘workEmail’ and ‘Username’ to ‘userName’, with an option to delete or update each field. The second image shows the addition of a new attribute mapping from ‘Username’ to ‘displayName’, along with highlighted ‘Add’ and ‘Save’ buttons.

  1. Select the rule you created and select the toggle switch to enable the rule.
  2. This automatically provisions the users/groups from PingIdentity to IAM identity Center using SCIM.
IAM Identity Center sync summary showing successful user and group provisioning. The first image highlights two users impacted and successfully synced. The second image highlights one group impacted and successfully synced. Sync status is marked 'ACTIVE' in both views, confirming successful integration between PingOne and AWS IAM Identity Center.

Figure 19 – PingIdentity Users and Groups Sync status using SCIM

Alt Text: IAM Identity Center sync summary showing successful user and group provisioning. The first image highlights two users impacted and successfully synced. The second image highlights one group impacted and successfully synced. Sync status is marked ‘ACTIVE’ in both views, confirming successful integration between PingOne and AWS IAM Identity Center.

Step 7: Provide access to Amazon Q Developer

This step involves locating and subscribing the groups that need permission to use Amazon Q Developer.

  1. In the Amazon Q Developer console, under Subscriptions add the IAM identity center groups which require access to Amazon Q Developer.
  2. Select Subscribe and search for the group name.
  3. Select Assign.
Screenshot of the Amazon Q Developer Subscriptions page in the AWS Management Console. The "Groups" tab is selected, displaying “Amazon Q Developer,” with a subscription status of “Subscribed.” The “Amazon Q Developer” group is highlighted with a red box.

Figure 20 – Amazon Q Developer subscriptions page

Alt Text: Screenshot of the Amazon Q Developer Subscriptions page in the AWS Management Console. The “Groups” tab is selected, displaying “Amazon Q Developer,” with a subscription status of “Subscribed.” The “Amazon Q Developer” group is highlighted with a red box.

Setup Amazon Q Developer with IAM Identity Center

This section guides you through installing the Amazon Q Developer extension and setting up authentication with IAM Identity Center.

  1. To set up Amazon Q Developer extension in your integrated development environment (IDE), complete the steps in AWS documentation.
  2. Once extension is installed Choose Amazon Q icon in your IDE.
  3. Choose a sign-in option.
  4. Select Use with Pro license and choose
  5. Continue.
  6. Provide the Start URL. You can retrieve this AWS access portal URL from the IAM Identity Center Console.
Screenshot of the IAM Identity Center settings page in the AWS Console, displaying the identity source configuration. It shows that the identity source is set to "External identity provider" with SAML 2.0 authentication and SCIM provisioning. The highlighted section includes the AWS access portal URL and the Identity Store ID. The "Settings" tab is selected in the left navigation pane.

Figure 21 – IAM identity center access portal URL

Alt Text: Screenshot of the IAM Identity Center settings page in the AWS Console, displaying the identity source configuration. It shows that the identity source is set to “External identity provider” with SAML 2.0 authentication and SCIM provisioning. The highlighted section includes the AWS access portal URL and the Identity Store ID. The “Settings” tab is selected in the left navigation pane.

  1. Provide the region that hosts the identity directory and choose Continue
  2. Select Open on the resulting pop up which redirects to your browser.
  3. The browser redirects you to the Pingone URL where you enter your PingIdentity credentials and select Sign On.
  4. Upon successful authentication, select Allow access on the resulting pop up to login successfully.
A screen recording of Visual Studio Code where the user selects the Amazon Q icon from the sidebar. The screen transitions to a login prompt indicating that the user must authenticate using their PingIdentity credentials via IAM Identity Center before accessing Amazon Q Developer features. The message highlights that authentication is required to continue.

Figure 22 – Setup Visual Studio Code Amazon Q Developer extension

Alt Text: A screen recording of Visual Studio Code where the user selects the Amazon Q icon from the sidebar. The screen transitions to a login prompt indicating that the user must authenticate using their PingIdentity credentials via IAM Identity Center before accessing Amazon Q Developer features. The message highlights that authentication is required to continue.

Test Configuration

Upon successfully completing the previous step, you can now leverage the code suggestions by Amazon Q Developer.

A screen recording of Visual Studio Code where Amazon Q Developer generates a sample code inline.

Figure 23 – Amazon Q Developer example

Alt Text: A screen recording of Visual Studio Code where Amazon Q Developer generates a sample code inline.

Clean Up

To avoid ongoing charges after testing this solution, follow these steps to remove all provisioned resources:1. Remove PingIdentity Application Configuration

  • In the PingIdentity console, navigate to Applications.
  • Locate and delete the AWS Single Sign-On application that was configured for IAM Identity Center integration.

2. Reset IAM Identity Center Configuration

  • In the AWS IAM Identity Center console:
    • Navigate to Settings > Identity source.
    • Change the identity source back to the default IAM Identity Center directory if no longer using PingIdentity.
    • Remove any external metadata and configuration uploaded during the setup.

3. Revoke Subscriptions and Access

  • In the Amazon Q Developer console:
    • Go to Subscriptions and remove assigned groups such as Amazon Q Developer or code whisperer trial.
    • This will deactivate access and prevent any future charges tied to those subscriptions.

4. Remove Amazon Q Developer Extension

  • If desired, uninstall the Amazon Q Developer extension from Visual Studio Code to fully revert the development environment.

Conclusion

In this post, we demonstrated how to use existing PingIdentity credentials to access Amazon Q Developer through integration with IAM Identity Center. We provided a step-by-step guide for configuring PingIdentity as an external identity provider (IdP) with IAM Identity Center. Lastly, we demonstrated how to connect Amazon Q Developer extension within your IDE to AWS using your PingIdentity credentials, allowing seamless access to Amazon Q Developer.If you have any comments or questions, share them in the comments section.

To learn more about AWS Services

Amazon Q Developer

IAM Identity Center

AWS Toolkit for Visual Studio Code


About the author

Sid Vantair is a Solutions Architect with AWS covering Strategic accounts. He thrives on resolving complex technical issues to overcome customer hurdles. Outside of work, he cherishes spending time with his family and fostering inquisitiveness in his children.

AI security strategies from Amazon and the CIA: Insights from AWS Summit Washington, DC

Post Syndicated from Danielle Ruderman original https://aws.amazon.com/blogs/security/ai-security-strategies-from-amazon-and-the-cia-insights-from-aws-summit-washington-dc/

Speakers during AWS Summit Washington, DC 2025 on June 10, 2025.

At this year’s AWS Summit in Washington, DC, I had the privilege of moderating a fireside chat with Steve Schmidt, Amazon’s Chief Security Officer, and Lakshmi Raman, the CIA’s Chief Artificial Intelligence Officer. Our discussion explored how AI is transforming cybersecurity, threat response, and innovation across the public and private sectors. The conversation highlighted several key themes: how organizations can leverage AI to improve security outcomes, the rise of agentic AI and its impact on security, the importance of maintaining human oversight in AI systems, workforce development strategies, and practical approaches to implementing AI securely in enterprise environments. Below are a few excerpts from our conversation.

On leveraging AI to improve security outcomes

Steve Schmidt: “We’ve applied AI internally at Amazon in a couple of places that led to some significant benefits, including in the application security review process. By training our large language models internally on prior security reviews that we’ve done, it has allowed us to apply the knowledge and learning that our more senior staff have embodied in the documents that the LLM was trained on and expose that to our more junior staff. It really raises the bar on the absolute level of security that we can offer.”

Lakshmi Raman: “In the cybersecurity realm, we’re thinking about how AI helps us in our accreditation and authorization process, helping us ensure that the process to get systems accredited is going as quickly as possible, because the industry is moving so fast. Another area that we’re applying AI and machine learning is triaging data. We have vast amounts of data that comes in at an exponential rate, so we need to be able to go through it quickly so that we can surface insights. You can imagine a cybersecurity analyst who traditionally has gone through network data manually in order to think about blocking suspicious IP addresses or connections. Now there’s an opportunity to do all of that really efficiently and let the security analysts make the decision.”

On the rise of agentic AI and its implications for security

Steve Schmidt: “The biggest change we’re seeing right now in AI is the rise of agentic AI. The reason agentic AI is particularly interesting is that it brings with it a set of challenges about ensuring the software is taking actions within the context of the person who’s asking it…Think about that in the context of a government organization, where you have sets of information that are restricted to certain populations, there are classification decisions, access control limitations, and reasons that you can access certain data that have to be present before you can do so. Agentic AI brings opportunities—you can take actions using software automatically—but also challenges: how do we make sure that the software is doing exactly the right thing every single time, and more importantly, that we can prove what it did to stakeholders and regulators?”

Lakshmi Raman: “AI agents definitely have an opportunity to transform enterprise automation. Leveraging them to do complex multi-step workflows—to do tool calling across a variety of databases and other foundational tools—has tremendous potential, with a human as a crucial step to review what’s going on.”

On the importance of maintaining human oversight with AI

Lakshmi Raman: “In my world, I spend a lot of time thinking about how AI is impacting the workforce. One of the areas we’re looking at is the intersection between AI and our people. AI is able to speed up the processing and do automation, but at the end of the day, it’s really about who is taking on the risk, or deciding the intents and making the decisions. Whatever the machine output happens to be, really it’s about the human who’s deciding the level of oversight, the risk to take, and even whether to intervene.”

Steve Schmidt: “One thing that many people don’t realize about AI systems is that they’re nondeterministic. What nondeterminism means is you can ask an AI model the same question 100 times, and you will not get the same answer every time. So, having a human who can make a judgment about what the AI comes up with is critically important. We look at it this way: if you’re just asking a question and getting an answer, that may be one set of scrutiny that you have to get assistance. But if you’re going to take an action, you’ve got to be really sure the AI is correct. There has to be that skilled person that Lakshmi spoke about, at the end of the AI use process saying, ‘Yes, this is the right thing to do at this point in time with this context.’”

On building an AI-savvy security workforce

Steve Schmidt: “There’s a real problem in our industry: we don’t have enough security people. We simply can’t hire enough people with the right skills to do this job. What we’ve we found is that AI allows us to do a lot of the heavy lifting for the security staff, using tooling that used to have to be done by humans. Our staff is actually materially happier with their jobs if we remove a lot of that grunt work from them, which is super important. You want to keep the employees you have, so you give them tooling that helps them get the job done more efficiently, and they enjoy their job.”

Lakshmi Raman: “We’re looking for people who can live between the intersection of technology and social intelligence, people who can understand how those two areas can potentially interact around human behavior and how to think about future activities. When we’re thinking about analysts, for example, we’re thinking about people who have critical thinking skills, who can demonstrate analytic rigor, who can think multiple steps ahead with incomplete information. We’re also looking for people who have digital acumen with an understanding of cloud and cyber and AI, so that we have those technical skills in house. And finally, people who are interested in lifelong learning and curiosity, because threats change over the years. We need people who understand and are willing to learn about that.”

On advice for security leaders as AI accelerates

Steve Schmidt: “When you’re looking at making a decision, ask the person who’s bringing the information to you: ‘Why can’t AI do this?’ And if they don’t have an answer, ask ‘When will it be able to and under what condition?’ Move it into the now, the probable, the possible, and make it real for all of your staff all the time. If they’re not intentionally making that decision, they’re missing an opportunity.”

Lakshmi Raman: “You’ve got to get training out there for your users. We think of it at three different levels. First is our general workforce—which might be the most important user base—people who are sitting side by side with our AI practitioners and can help describe the workflows that need automation. Then we think about it for our practitioners, so they are keeping up with the latest. And then finally, our senior executives, who can think about how they can transform their organization with AI and generate that buy-in from the top level.”

AI is not just changing what we can do, but how we work. As Steve and Lakshmi emphasized, the most successful AI implementations will be those that thoughtfully balance automation with human oversight, focusing on use cases that deliver tangible value while managing risks appropriately. For security professionals, understanding both the technical and human dimensions of AI will be critical as we navigate this changing space.

Danielle Ruderman

Danielle Ruderman

Danielle is a Senior Manager for the AWS Worldwide Security Specialist Organization, where she leads a team that enables global CISOs and security leaders to better secure their cloud environments. Danielle is passionate about improving security by building company security culture that starts with employee engagement.

Use Model Context Protocol with Amazon Q Developer for context-aware IDE workflows

Post Syndicated from Ritik Khatwani original https://aws.amazon.com/blogs/devops/use-model-context-protocol-with-amazon-q-developer-for-context-aware-ide-workflows/

Earlier today, Amazon Q Developer announced Model Context Protocol (MCP) support in their Integrated Development Environment (IDE) plugins for Visual Studio Code and JetBrains. This allows developers to connect external tools or MCP servers to Q Developer, enabling more context-aware responses and complex workflows. MCP support has already been available in Amazon Q Developer for Command Line since April 29, 2025.

Introduction

Q Developer already had the ability to use tools within the IDE such as executing shell commands, reading local files, and generating code with the addition of the agentic coding experience. Now, developers have the ability to add additional tools that support MCP to their toolkit. MCP is an open protocol that standardizes how Large Language Models (LLMs) integrate with applications. It provides a way to share context, access data sources, and interact with APIs. You can read more about MCP in this introduction.

This ability to add additional context and tools allows Q Developer to write more accurate code, integrate with your planning tools, create UI components from designs, generate database documentation by examining your actual schema, and execute complex multi-tool tasks – all without the need for custom integration code. I’m excited to see this functionality coming to Q Developer IDE plugins, enhancing the development process right where developers spend most of their time.

In this post, I’ll walk you through a common scenario where I, as a developer, am tasked with working on an issue defined in a project management tool like Jira. The issue contains a user story, acceptance criteria, a link to a Figma design of the user interface, and additional technical implementation notes. To accomplish this efficiently, I’ll demonstrate how Q Developer can streamline the entire process by using two separate MCP servers to interact with Jira and Figma independently. Rather than manually switching between browser tabs, copying information, and trying to keep track of requirements across multiple tools, I’ll show how Q Developer can automatically fetch details using MCP and help me implement the feature while maintaining context across both platforms as shown in the figure below.

Q Developer extension in Visual Studio Code interacting with external tools using MCP servers

Figure 1: Q Developer extension in Visual Studio Code interacting with external tools using MCP servers

Configuring MCP Servers

To begin setup, click on the Configure MCP servers button at the top of the Chat tab bar as shown in the image below. This will bring up the list of MCP servers currently configured. Click the + (Add new MCP) button to add a new server.

Add MCP server configuration in Visual Studio Code’s Q Developer extension

Figure 2: Add MCP server configuration in Visual Studio Code’s Q Developer extension

You will set the scope of your MCP servers during configuration. A Global scope allows you to use the MCP server across all your projects, whereas a Workspace scope sets it up for only the current IDE workspace. Here’s an example configuration for the Atlassian and Figma MCPs I’ll be using:

Atlassian
Scope: This workspace
Name: Atlassian
Transport: stdio
Command: npx
Arguments:
-y
mcp-remote
https://mcp.atlassian.com/v1/sse
Figma
Scope: This workspace
Name: Figma
Transport: stdio
Command: npx
Arguments:
-y
mcp-remote
http://127.0.0.1:3845/sse

Note: The first time you set up the Atlassian MCP server, you’ll be asked to complete the OAuth authentication flow in your browser and provide access permissions to your Jira projects. Similarly, to connect to the Figma Dev Mode MCP server, you’ll need to enable it via the Figma desktop app.

Q Developer’s MCP management window showing configured Figma and Atlassian MCPs servers

Figure 3: Q Developer’s MCP management window showing configured Figma and Atlassian MCPs servers

To understand an MCP server’s individual tools, click on the expand icon next to its name as shown in the image below. Tools are executable functions exposed by the MCP server. They enable Q Developer’s agentic chat to perform actions and interact with external systems on your behalf. You can also configure permissions for individual tools. Each tool presents the option to Ask, Always allow, or Deny it such that Q Developer can’t invoke it. In my example, I’ll set all tools that only read data to Always allow for my workspace and set the rest of the tools to Ask.

MCP tool descriptions and configuration dropdown with options to Ask, Always allow or Deny

Figure 4: MCP tool descriptions and configuration dropdown with options to Ask, Always allow or Deny

With the MCP servers configured, let’s see how I can integrate them into my workflow.

Walkthrough

Q Developer is now enriched with additional information and tools available via the configured MCP servers. To demonstrate how this accelerates my developer productivity, I’ll be working with the Q Words game.

Scenario

Q-Words is an interactive word guessing game used in our customers’ workshops to demonstrate Q Developer’s capabilities. I’ve been tasked by the Product Manager to add a dark mode to the game. The User Story is logged in Jira and links to a Figma design that our designers have prepared.

Jira ticket showing user story and acceptance criteria for adding dark mode to a Q-Words game application

Figure 5: Jira ticket showing user story and acceptance criteria for adding dark mode to a Q-Words game application

Figma design showing dark and light mode interfaces for a QWords game application

Figure 6: Figma design showing dark and light mode interfaces for a QWords game application

Integrating MCPs into your development workflow

Let’s begin by asking Q Developer to check on tasks assigned to me in Jira by typing the following prompt in the agentic chat:

List issues that I need to work on

Q Developer will understand your intent and interact with your Atlassian MCP server to filter and show Jira issues that are assigned to you and in the To Do state. You can optionally prompt Q Developer to use a particular MCP server. Just as with any prompt, providing clear instructions will yield better results. In the image below, Q Developer retrieves details for the issue I’m assigned to work on.

Q Developer retrieves and describes issues assigned to me in Jira using the Atlassian MCP server

Figure 7: Q Developer retrieves and describes issues assigned to me in Jira using the Atlassian MCP server

Let’s begin work on the issue with the following prompt:

Move issue CRM-9 to In Progress and checkout a new git branch named after the issue id to begin working on it

Prompt Q Developer to begin working on an assigned issue

Figure 8: Prompt Q Developer to begin working on an assigned issue

Next, I’d like to understand the impact of the design changes on the current application. I can use the following prompt to accomplish this:

Analyze the Jira User Story and linked Figma design. Give me a technical implementation plan explaining the UI components that will need to be modified in the existing code.

Prompt Q Developer to help you analyze changes in existing code to implement the new UI

Figure 9: Prompt Q Developer to help you analyze changes in existing code to implement the new UI

Q Developer automatically pulls in issue details from Jira, along with the design specifics like colors from Figma. Before MCP, I would have had to add those details directly into the prompt or provided them as context from a local file. Now, my prompt only includes the description of the task whereas the context is enriched with details from the MCP servers. Review the proposed plan and suggest edits if needed. Once satisfied, prompt Q Developer to begin working on the changes:

Implement the plan

The diff view of changes by Q Developer to implement a dark mode feature in HTML and CSS

Figure 10: The diff view of changes by Q Developer to implement a dark mode feature in HTML and CSS

After reviewing the diff of the files changed by Q Developer, I can verify that the new Dark Mode feature has been implemented as desired. Let’s test the changes and ensure all acceptance criteria is met. To run the application, I use the following prompt:

Run the application locally

Q Developer will ask permission and run commands to spin up the local web server. I can then test the changes in my browser.

Updated application with dark mode toggle button implemented by Q Developer using MCP

Figure 11: Updated application with dark mode toggle button implemented by Q Developer using MCP

After a bit of testing, I can confirm that we’ve met all the acceptance criteria for the story. Let’s update the rest of the team on what we’ve accomplished with the following prompt:

Update the Jira issue status to Done and add a comment summarizing the changes made.

This convenient integration between Q Developer and Jira via MCP, saves me the back and forth between different tools to document the work accomplished.

A Jira ticket comment detailing the completed implementation of dark mode features, including theme toggle, CSS variables, and UI components

Figure 12: A Jira ticket comment detailing the completed implementation of dark mode features, including theme toggle, CSS variables, and UI components

Conclusion

The addition of MCP support in Amazon Q Developer for the IDE provides a standardized way to share context and interact with additional tools. In this post, I’ve demonstrated how I can use Q Developer in the IDE to interact with Atlassian Jira for task management and Figma for UI updates. I was able to do this without explicitly including user story details in my prompts or separately downloading design assets from UI mockups. Instead, Q Developer could automatically access user story context and easily integrate design assets using tools exposed by MCP servers. I encourage you to explore the new MCP capabilities and also check out the AWS MCP Servers repository on GitHub. Refer MCP configuration for Q Developer in the IDE to learn more.

To learn more about Amazon Q Developer’s features and pricing details, visit the Amazon Q Developer product page.

About the Author

Ritik Khatwani

Ritik Khatwani

Ritik is a Generative AI Specialist Solutions Architect at AWS based in New York City. He has deep expertise in building products as an engineer, architect, and founder. At AWS, he previously advised startups on how to build and grow in the cloud and now works with developers to reimagine their software development lifecycle using Amazon Q Developer.

Access Claude Sonnet 4 in Amazon Q Developer CLI

Post Syndicated from Kirankumar Chandrashekar original https://aws.amazon.com/blogs/devops/access-claude-sonnet-4-in-amazon-q-developer-cli/

Amazon Q Developer now supports Claude Sonnet 4 within the CLI, bringing advanced coding and reasoning capabilities to your development workflows at no additional cost. This latest model excels in coding with a state-of-the-art 72.7% for agentic coding on the SWE-bench (see Claude 4 announcement for more information). With enhanced coding and reasoning capabilities, it helps you analyze complex code, optimize everyday development tasks, implementing bug fixes, running bash commands, and developing new features with immediate feedback loops and more precise responses.

To help you leverage Claude Sonnet 4, Amazon Q Developer lets you easily select specific Claude Sonnet models, giving you increased flexibility the CLI.

  • Claude Sonnet 4: High-performance model with balanced intelligence
  • Claude Sonnet 3.7: High-performance model with extended thinking capability
  • Claude Sonnet 3.5: High-performance intelligent model

For detailed information about Claude model capabilities and comparison, refer to the Anthropic models overview.

In this blog, I will show you how to select Claude Sonnet 4 as your model within the Q Developer CLI and then walk you through a quick demo.

How to Choose Claude Sonnet 4

Make sure to update to the latest version (v1.11.0 onwards) of Amazon Q Developer CLI. Refer installing Amazon Q for command line for installation instructions. You can access Claude Sonnet 4 through these options:

  • During an active chat, use the /model command and select claude-4-sonnet
  • Start a new chat with q chat --model claude-4-sonnet
  • Set it as your default model using q settings chat.defaultModel claude-4-sonnet.

The supported model names for the --model parameter and settings are:

  • claude-3.5-sonnet
  • claude-3.7-sonnet (default)
  • claude-4-sonnet

Model Selection Priority Order

Q Developer CLI selects models in the following order:

  1. Current session model selections (via /model or --model)
  2. User-configured preferences in settings
  3. System default (Claude 3.7 Sonnet)

Key Behaviors

The Q Developer CLI agent defaults to Claude 3.7 Sonnet when no specific model is selected. During active chat sessions, you can seamlessly switch between models using the /model command. Chat continuity is maintained across sessions, with the system retaining the previously selected model when conversations are resumed. If you prefer Claude Sonnet 4, setting it as the default model in user settings will automatically apply to all new chat sessions, though this can be overridden with specific model selections as needed.

qcli-model-selection

Figure 1: Q Developer CLI showing the model loaded for the session

Claude Sonnet 4 with Q Developer CLI in Action

After switching to Claude Sonnet 4 in Q Developer CLI, let’s explore its capabilities with a practical coding example. Here’s the prompt I’ll use for this demonstration:

Create a Python command-line to-do list app with these features:
- Add tasks with descriptions and priorities (low/medium/high)
- Mark tasks as complete by index
- Display tasks sorted by priority, then insertion order
- Show completion status ([x] done, [ ] pending)
- Handle errors for empty tasks and invalid indices
- Store tasks in memory only
Please provide the code to implement this application.

qcli-model-selection-claude-sonnet-in-action

Figure 2: Q Developer CLI interface showing Claude Sonnet 4 in action

In the above demonstration, Q Developer CLI with Claude Sonnet 4 went beyond what was asked in the provided requirements in the prompt by implementing sophisticated command parsing with quoted descriptions, comprehensive error handling, and clean object-oriented design enhanced by type hints. The interface features a helpful guidance system with clear error messages, elegant enum-based priority management, and formatted output for clear task representation.

Additionally, Q Developer CLI with Claude Sonnet 4 also generated documentation in the README for the to-do application, including practical error handling examples and clear usage instructions – transforming the prompt requirements into a well-structured, user-friendly application.

Conclusion

The availability of Claude Sonnet 4 represents a significant advancement in Amazon Q Developer’s capabilities. From intricate code refactoring to streamlined documentation creation, Claude Sonnet 4 helps you accomplish both complex and routine development tasks efficiently.

Whether selecting Claude Sonnet 4 for complex tasks or using other models for specific needs, Amazon Q Developer adapts to your preferences, optimizing AI assistance while maintaining efficiency in your workflow.

The latest version(v1.11.0) of Amazon Q Developer awaits in the CLI, ready to support your development journey with enhanced model capabilities and selection options. Refer Installing Amazon Q for Command line for installation instructions.

To learn more about Amazon Q Developer’s features and pricing details, visit the Amazon Q Developer product page.

About the Author

kirankumar.jpeg

Kirankumar Chandrashekar is a Generative AI Specialist Solutions Architect at AWS, focusing on Amazon Q Developer. Bringing deep expertise in AWS cloud services, DevOps, modernization, and infrastructure as code, he helps customers enhance their development workflows using Amazon Q Developer. Kirankumar is passionate about solving complex customer challenges and enjoys music, cooking, and traveling.

Analyze media content using AWS AI services

Post Syndicated from Jack Bradham original https://aws.amazon.com/blogs/architecture/analyze-media-content-using-aws-ai-services/

Organizations managing large audio and video archives face significant challenges in extracting value from their media content. Consider a radio network with thousands of broadcast hours across multiple stations and the challenges they face to efficiently verify ad placements, identify interview segments, and analyze programming patterns.

In this post, we demonstrate how you can automatically transform unstructured media files into searchable, analyzable content. By combining Amazon Transcribe, Amazon Bedrock, Amazon QuickSight, and Amazon Q, organizations can achieve the following:

  • Process and transcribe media files upon upload
  • Identify commercials, interviews, and program segments
  • Extract insights using foundation models (FMs)
  • Create a searchable knowledge base
  • Generate rich visualizations for decision-making
  • Enable natural language queries across their media archive
  • Visualize complex information with intuitive graphics

In the following sections, we explore how these AWS services work together to help organizations unlock the full potential of their media content, whether for advertising compliance, content analysis, or discovering specific segments within thousands of hours of recordings.

Solution overview

This solution provides an event-driven media analysis pipeline that transforms how you manage and extract value from your content:

  • Streamline content management – Automatically process media files the moment they’re uploaded, saving time and reducing manual work
  • Unlock deeper insights – Generate accurate transcriptions that capture not just words, but the full context of your content—including speakers, timing, and key moments
  • Harness AI – Automatically extract meaningful insights and uncover hidden patterns in your media without extensive manual review
  • Build a searchable knowledge base – Turn scattered media files into a discoverable catalog that your entire team can use
  • Build a customizable interface – Create a customizable UI to search the catalog
  • Create powerful visualizations – Bring your insights to life with intuitive visualizations that make complex information immediately understandable

The following diagram illustrates our architecture.

Media Analysis Architecture

This event-driven architecture automatically processes and analyzes multimedia content using AWS services. The workflow consists of the following steps:

  1. A user uploads media files to an Amazon Simple Storage Service (Amazon S3) bucket. A “New Media” event triggers the first AWS Step Functions workflow. This workflow handles the initial cataloging based on values in the file name and launches the transcription process.
  2. Amazon Transcribe converts the audio into accurate, readable text. The transcribed content is securely saved to an S3 bucket for further analysis. A “Transcription Complete” event triggers the next step.
  3. A second Step Functions workflow processes the transcription. Using predefined prompts, Amazon Bedrock analyzes the transcripts to extract meaningful information. Key insights extracted from the transcript are stored in an S3 data lake.
  4. The processed results are organized systematically, structured by date (year/month/day) and tagged with relevant attributes. This organized data enables natural language queries through Amazon Q when used as a knowledge base, interactive visualizations using QuickSight, and straightforward content discovery and analysis.
  5. Amazon Athena serves as the data exploration tool to query the data lake. Athena is used as the data source in QuickSight, which turns complex data into clear, compelling visuals.

This architecture automatically transforms raw media content into searchable, analyzable data while maintaining an organized hierarchy for efficient access and analysis. The event-driven design provides automatic processing of new content as it arrives, and the combination of AWS AI services enables deep content understanding and insight extraction. Each AWS service plays a crucial role in transforming your media content:

  • Amazon Bedrock – Reviews content after transcription for insights and entity extraction:
    • Uses advanced FMs to analyze transcripts
    • Identifies commercials, interviews, and program segments
    • Extracts meaningful insights from content
  • Amazon EventBridge – Triggers actions in the cataloging workflow:
    • Monitors for new media files and completed transcriptions
    • Automatically triggers Step Functions workflows
  • AWS Lambda – Handles custom code actions needed in the workflow:
    • Facilitates interaction with Amazon Bedrock
    • Executes custom prompts on transcripts
    • Enables flexible, scalable processing
  • Amazon Q – Serves as the frontend and Retrieval Augmented Generation (RAG) engine:
    • Addresses enterprise generative AI needs by providing a turnkey solution with built-in security features like single sign-on (SSO) integration and responsible AI governance policies
    • Allows businesses to quickly deploy AI assistance while maintaining compliance, data privacy, and security standards
    • Enables natural language queries across the media archive
    • Links results to the source media files
    • Provides conversational access to content
  • Amazon QuickSight – Turns insights in beautiful visualization for better consumption:
    • Creates interactive dashboards and visualizations
    • Displays comprehensive media analytics
    • Helps track advertising, programming, and content patterns
  • Amazon S3 – Stores assets and the catalog:
    • Securely stores raw media files, transcripts, and processed data
    • Automatically triggers processing when new content is uploaded
  • AWS Step Functions – Orchestrates the entire content processing workflow:
    • Manages transcription and AI analysis steps
    • Provides robust error handling and automatic retries
  • Amazon Transcribe – Converts speech to accurate, readable text:
    • Identifies speakers and timestamps
    • Provides accurate transcriptions of audio content

Security considerations

Although this post focuses on the technical implementation of media content analysis, it’s important to acknowledge that production deployments should include comprehensive security measures:

  • Data storage security (Amazon S3):
    • Enable server-side encryption using AWS Key Management Service (AWS KMS) keys
    • Apply bucket policies restricting access to authorized principals only
    • Enable Amazon S3 Block Public Access at account and bucket levels
    • Enable versioning for data recovery
    • Implement lifecycle policies for data retention
    • Enable S3 access logging
    • Use presigned URLs for temporary access
  • Identity and Access Management (IAM):
    • Create dedicated service roles with minimum required permissions for:
      • Step Functions execution
      • Amazon Transcribe jobs
      • Amazon Bedrock API calls
      • Athena queries
    • Implement role-based access control
    • Regularly rotate credentials
    • Enable multi-factor authentication (MFA) for all users
    • Use AWS Organizations for multi-account management
  • Network security:
    • Deploy virtual private cloud (VPC) endpoints for:
      • Amazon S3
      • Athena
      • QuickSight
    • Implement network access control lists (ACLs) and security groups
    • Enable VPC Flow Logs
    • Use AWS PrivateLink where applicable
    • Configure route tables to control traffic flow
  • Data encryption:
    • Implement AWS KMS encryption for S3 objects
    • Use TLS 1.2+ for all API communications
    • Enable automatic key rotation in AWS KMS
    • Implement envelope encryption for sensitive data
  • Monitoring and detection:
    • Enable AWS CloudTrail for API activity logging
    • Configure Amazon GuardDuty for threat detection
    • Set up Amazon CloudWatch:
      • Metrics for service health
      • Alarms for security events
      • Log groups for application logs
    • Enable S3 server access logging
    • Configure VPC Flow Logs
  • Access controls:
    • Implement fine-grained access controls for:
      • Amazon Bedrock model access
      • Athena query permissions
      • QuickSight dashboard sharing
    • Conduct regular access reviews

Additionally, compliance requirements and data governance policies might impact how you implement this solution in your environment.

These security considerations are crucial but beyond the scope of this post. We recommend consulting AWS security best practices and working with your security team to implement appropriate measures for your specific use case. For more information on AWS security best practices, refer to Best Practices for Security, Identity, & Compliance.

The following sections walk you through setting up each component of the architecture to help you transform raw media into actionable insights.

Prerequisites

The following are the prerequisites to follow along this post:

Create S3 buckets

For this solution, we create three distinct buckets to support the media analytics workflow:

  • Raw media bucket for incoming files
  • Transcription outputs bucket
  • Processed insights bucket

For instructions on creating buckets, refer to Creating a general purpose bucket.

Configure EventBridge

You can enable event notifications on the raw media bucket to trigger your automated workflow through EventBridge. Establish your automation backbone by monitoring S3 bucket activities. When new media arrives or transcription completes, EventBridge will trigger the appropriate workflow, providing continuous processing. For further instructions, refer to Creating rules that react to events in Amazon EventBridge.

The following are two example triggers that can be used to filter events and trigger Step Functions workflows. The following is an example filter for new media files:

{
  "source": ["aws.s3"],
  "detail-type": ["Object Created"],
  "detail": {
    "bucket": {
      "name": ["rawinputbucket"]
    }
  }
}

The following is an example filter for new transcripts added to the data lake:

{
  "source": ["aws.s3"],
  "detail-type": ["Object Created"],
  "detail": {
    "bucket": {
      "name": ["business-data-lake"]
    },
    "object": {
      "key": [{
        "suffix": ".transcription"
      }]
    }
  }
}

Create Step Functions workflows

We design the orchestration layer with two key workflows. The first handles media intake and transcription, and the second manages AI analysis. Each workflow includes safeguards for potential failures and retry mechanisms. For further instructions, refer to Learn how to get started with Step Functions.

The following diagram shows an example of processing new media uploads for indexing and transcription.

Media Analysis - Step Function Example

The following diagram shows an example of the Step Functions workflow that analyzes the transcription.

Set up Amazon Transcribe

To create an Amazon Transcribe job, you need permissions to do so. You can implement a speech-to-text conversion with powerful features like language detection, speaker identification, and custom vocabulary support to provide accurate transcription of your media content. For further instructions, refer to How Amazon Transcribe works.

Configure Amazon Bedrock

You can power your AI analysis engine by setting up precise prompts that extract meaningful insights. Amazon Bedrock processes transcripts to identify key segments, speakers, and topics, transforming raw text into structured data. For instructions, refer to Design a prompt.

The following is a sample prompt:

You will be reviewing a radio transcription to identify advertisements and extract relevant details. Your task is to analyze the provided transcript and output the results in a specific JSON format based on a given schema.
Please follow these steps to complete the task:
1. Carefully read through the entire transcript.
2. Identify all advertisements within the transcript. Look for clear indicators such as product mentions, promotional language, or transitions from regular content to commercial content.
3. For each advertisement you identify, determine the following information:
    - Company: The name of the company being advertised
    - Start time: The timestamp in the transcript where the ad begins
    - End time: The timestamp in the transcript where the ad ends
    - Product: The specific product or service being advertised
4. Format your findings into a JSON object that follows the provided schema. Each advertisement should be a separate object within an array.
5. Ensure these fields in your response are provided for each advertisement.. All are required fields: company, starttime, endtime, product. 
6. Use precise timestamps for start and end times. If exact times are not available, make a best estimate based on the transcript's context.
7. If a particular field is unclear or not explicitly mentioned in the transcript, you may use "Unknown" as the value.
8. Only respond with json and nothing else. Do not provide comments or explain your answer. 
9. Surround the JSON response with standard ```json markers
Here's an example of how your output should be formatted:
{
"advertisements": [
        {
            "company": "TechGadgets Inc.",
            "starttime": "00:05:30",
            "endtime": "00:06:15",
            "product": "SmartHome Hub"
        },
        {
            "company": "FreshFoods Market",
            "starttime": "00:15:45",
            "endtime": "00:16:30",
            "product": "Organic Produce Delivery Service"
        }
    ]
}
Do not add any fields that are not specified in the schema, and ensure all required fields are present for each advertisement.

Create a structured data lake

We create a hierarchical data organization strategy that enables efficient access and analysis. You can use AWS Glue crawlers to automatically discover and catalog your media metadata. For instructions, refer to Using crawlers to populate the Data Catalog. Configure Athena tables to enable SQL-based querying of your media insights:

CREATE OR REPLACE VIEW "commercials_view" AS 
SELECT
  metadata.market market
, metadata.station_call station_call
, metadata.format_type format_type
, CAST(metadata.timestamp AS timestamp) timestamp
, ads.company adCompany
, ads.product adProduct
, ads.starttime
, ads.endtime
FROM
  (commercials
CROSS JOIN UNNEST(advertisements) t (ads))

Set Up Amazon Q

You can enable natural language interaction with your media archive using Amazon Q Business. Configure the knowledge base and metadata to make your content searchable and accessible through conversational queries. Use the processed insights S3 buckets to configure the knowledge base. For instructions, refer to Getting started with Amazon Q Business.

The following screenshot shows example conversations with an AI assistant.

Build QuickSight dashboards

With QuickSight, you can create visual analytics that bring your data to life. Connect to Athena views to display advertising patterns, content analysis, and performance metrics in interactive dashboards. For more information, refer to Tutorial: Create an Amazon QuickSight dashboard.

The following screenshots are a few examples of dashboards created for a fictitious radio station as part of our use case.

Validate and optimize your media analytics solution

After you implement your media analytics architecture, follow these critical steps to achieve robust performance and alignment with your organization’s needs. First, configure a comprehensive testing approach. Imagine you’re preparing to launch your media analysis solution. Your testing journey begins with accuracy validation:

  • Compare transcription outputs against original media
  • Verify AI-generated insights for precision
  • Use representative sample sets from your content library

You start by taking a recently processed radio show and comparing its transcription against the original broadcast. Your team meticulously reviews the AI-generated insights, checking if key moments like ad transitions or interview segments are correctly identified. To make sure your system works across all content types, you select diverse samples from your library—perhaps a morning talk show, an evening news segment, and a weekend sports broadcast. Next, you delve into performance benchmarking:

  • Measure processing time for different media types
  • Evaluate resource utilization across AWS services
  • Identify potential bottlenecks in the workflow

Time how long it takes to process different types of media files, from short commercial segments to lengthy program recordings. As you watch how your AWS services respond under various loads, you can monitor resource consumption patterns. This helps you identify processing bottlenecks—for instance, you might discover that certain file types take longer to transcribe or that concurrent processing needs optimization. Finally, you put yourself in your users’ shoes for a thorough user experience assessment:

  • Test natural language queries with Amazon Q
  • Validate search result relevance
  • Gather feedback from potential end-users

Team members can interact with Amazon Q, asking questions they would naturally pose when searching for specific content. For example, you can test whether searching for “interviews about climate change last week” returns relevant results. Gathering feedback from potential users—perhaps a content manager with different needs than a compliance officer—provides invaluable insights. Their real-world experiences guide your refinements and make sure the system serves its intended purpose. This comprehensive testing approach, combining structured evaluation with real-world scenarios, sets the stage for a robust and user-friendly media analysis solution. As your media analysis solution moves from initial deployment to production, optimizing its performance becomes crucial for both cost-efficiency and user satisfaction. A radio network processing thousands of hours of content weekly might find that even small improvements in transcription accuracy or processing speed can lead to significant cost savings and better content discoverability. Similarly, a marketing team analyzing ad placements across multiple stations needs precise insights to make data-driven decisions about advertising effectiveness. With these business imperatives in mind, consider the following configuration optimization strategies:

  • Transcription refinement:
    • Adjust language models for domain-specific terminology
    • Fine-tune speaker identification settings
    • Implement custom vocabularies for improved accuracy
  • AI insight generation:
    • Refine prompts for more targeted analysis
    • Experiment with different AI models
    • Align extraction parameters with business objectives
  • Scalability considerations:
    • Test workflow performance with increasing media volumes
    • Implement appropriate auto scaling configurations
    • Monitor cost-effectiveness of your architecture
  • Continuous improvement:
    • Establish regular review cycles
    • Track key performance metrics
    • Iterate on your solution based on real-world usage

We recommend starting with a pilot implementation and gradually expanding your media analytics capabilities.

Clean up

To avoid incurring ongoing charges, clean up the resources you created as part of this solution:

  1. Delete QuickSight resources:
    1. Delete dashboards created for media analytics.
    2. Delete the datasets connected to Athena.
    3. If no longer needed, delete the QuickSight Enterprise subscription.
  2. Delete S3 buckets:
    1. Empty and delete the raw media bucket, transcription outputs bucket, and processed insights bucket.
  3. Remove EventBridge rules:
    1. Delete the rules created for monitoring S3 bucket activities.
    2. Remove targets associated with these rules.
  4. Delete Step Functions workflows:
    1. Delete the media intake and transcription workflow.
    2. Delete the AI analysis workflow.
  5. Remove Lambda functions:
    1. Delete Lambda functions created for interaction with Amazon Bedrock.
    2. Remove associated IAM roles and policies.
  6. Clean up data lake components:
    1. Delete Athena views and tables.
    2. Remove AWS Glue crawlers and databases.
    3. Delete stored query results.
  7. Remove Amazon Q configurations:
    1. Delete knowledge bases created.
    2. Remove custom configurations.
  8. Remove Amazon Bedrock settings:
    1. Remove custom prompts.
    2. Disable access to FMs if no longer needed.
  9. Delete Amazon Transcribe settings:
    1. Remove custom vocabularies.
    2. Delete stored transcription jobs.
  10. Remove IAM resources:
    1. Delete custom IAM roles created for this solution.
    2. Remove associated IAM policies.
  11. Complete additional cleanup:
    1. Delete CloudWatch Logs groups associated with Lambda functions.
    2. Remove CloudWatch alarms or metrics created for monitoring.
    3. Delete saved queries in Athena.

Common use cases

Organizations in different sectors can use this architecture to unlock value from their audio and video content. You can adapt this solution to meet your specific needs, such as managing broadcast media, corporate communications, educational materials, and more. Let’s explore how different industries might apply this technology:

  • Media and broadcasting:
    • Track advertising compliance
    • Verify media placement accuracy
    • Analyze broadcast content at scale
  • Corporate and enterprise:
    • Convert meeting recordings into searchable knowledge bases
    • Identify key decisions and action items
    • Enhance organizational knowledge management
  • Education and training:
    • Create comprehensive, topic-based course catalogs
    • Index training materials for quick retrieval
    • Support continuous learning initiatives
  • Legal services:
    • Generate precise, timestamped transcripts
    • Develop searchable legal proceeding archives
    • Improve document review efficiency
  • Healthcare:
    • Extract critical medical insights from consultations
    • Categorize patient interaction data
    • Support clinical documentation processes
  • Government and public sector:
    • Build comprehensive public meeting archives
    • Implement automated topic categorization
    • Enhance transparency and accessibility
  • Customer service:
    • Analyze call recordings for quality improvement
    • Identify service trends and customer pain points
    • Drive continuous customer experience enhancement

This media analytics architecture demonstrates notable versatility. By using AI, organizations can transform raw audio and video content into structured, meaningful insights that drive decision-making across industries.

Conclusion

In this post, we demonstrated how to use AWS services to convert unstructured media content into actionable intelligence. By combining Amazon Transcribe, Amazon Bedrock, QuickSight, and Amazon Q, you can create a scalable, automated solution for media analysis that adapts to your organizational needs.

This solution offers the following key architectural advantages:

  • Automated media file processing at scale
  • AI-powered insight generation
  • Natural language search capabilities
  • Interactive decision-making visualizations
  • Flexible, maintainable infrastructure

Organizations can now convert content into searchable knowledge, extract insights automatically, develop data-driven content strategies, and enhance operational efficiency through automation.

As audio and video content generation continues to accelerate, the ability to efficiently process and extract value becomes increasingly critical. This architecture provides a robust foundation for current needs while remaining adaptable to future technological innovations.

We invite you to explore how this media analytics solution can address your organization’s unique challenges. Consider your specific use cases and unlock the insights waiting to be discovered in your media archives.


About the authors

AWS Weekly Roundup: Amazon Aurora DSQL, MCP Servers, Amazon FSx, AI on EKS, and more (June 2, 2025)

Post Syndicated from Prasad Rao original https://aws.amazon.com/blogs/aws/aws-weekly-roundup-amazon-aurora-dsql-mcp-servers-amazon-fsx-ai-on-eks-and-more-june-2-2025/

It’s AWS Summit Season! AWS Summits are free in-person events that take place across the globe in major cities, bringing cloud expertise to local communities. Each AWS Summit features keynote presentations highlighting the latest innovations, technical sessions, live demos, and interactive workshops led by Amazon Web Services (AWS) experts. Last week, events took place at AWS Summit Tel Aviv and AWS Summit Singapore.

The following photo shows the packed keynote at AWS Summit Tel Aviv.

AWS Summit Tel Aviv Keynote

Find an AWS Summit near you and join thousands of AWS customers and cloud professionals taking the next step in their cloud journey.

Last week, the announcement that piqued my interest most was the general availability of Amazon Aurora DSQL, which was introduced in preview at re:Invent 2024. Aurora DSQL is the fastest serverless distributed SQL database that enables you to build always available applications with virtually unlimited scalability, the highest availability, and zero infrastructure management.

Aurora DSQL active-active distributed architecture is designed for 99.99% single-Region and 99.999% multi-Region availability with no single point of failure and automated failure recovery. This means your applications can continue to read and write with strong consistency, even in the rare case an application is unable to connect to a Region cluster endpoint.

Single and multi region deployment of Amazon Aurora DSQL

What’s more fascinating is the journey behind building Aurora DSQL, a story that goes beyond the technology in the pursuit of engineering efficiency. Read the full story in Dr. Werner Vogels’ blog post, Just make it scale: An Aurora DSQL story.

Last week’s launches
Here are the other launches that got my attention:

  • Announcing new Model Context Protocol (MCP) servers for AWS Serverless and Containers – MCP servers are now available for AWS Lambda, Amazon Elastic Container Service (Amazon ECS), Amazon Elastic Kubernetes Service (Amazon EKS), and Finch. With MCP servers, you can get from idea to production faster by giving your AI assistants access to an up-to-date framework on how to correctly interact with your AWS service of choice. To download and try out the open source MCP servers, visit the aws-labs GitHub repository.
  • Announcing the general availability of Amazon FSx for Lustre Intelligent-Tiering – FSx for Lustre Intelligent-Tiering, a new storage class, automatically optimizes costs by tiering cold data to the applicable lower-cost storage tier based on access patterns and includes an optional SSD read cache to improve performance for your most latency-sensitive workloads.
  • Amazon FSx for NetApp ONTAP now supports write-back mode for ONTAP FlexCache volumes – Write-back mode is a new ONTAP capability that helps you achieve faster performance for your write-intensive workloads that are distributed across multiple AWS Regions and on-premises file systems.
  • AWS Network Firewall Adds Support for Multiple VPC Endpoints – AWS Network Firewall now supports configuring up to 50 Amazon Virtual Private Cloud (Amazon VPC) endpoints per Availability Zone for a single firewall. This new capability gives you more options to scale your Network Firewall deployment across multiple VPCs, using a centralized security policy.
  • Cost Optimization Hub now supports Savings Plans and reservations preferences – You can now use Cost Optimization Hub, a feature within the Billing and Cost Management Console, to configure preferred Savings Plans and reservation term and payment options preferences, so you can see your resulting recommendations and savings potential based on your preferred commitments.
  • AWS Neuron introduces NxD Inference GA, new features, and improved tools – With the release of Neuron 2.23, the NxD Inference library (NxDI) moves from beta to general availability and is now recommended for all multi-chip inference use cases. Neuron 2.23 also introduces new training capabilities, including context parallelism and Odds Ratio Preference Optimization (ORPO), and adds support for PyTorch 2.6 and JAX 0.5.3.
  • AWS Pricing Calculator, now generally available, supports discounts and purchase commitment – We announced the general availability of the AWS Pricing Calculator in the AWS console. You can now create more accurate and comprehensive cost estimates by providing two types of cost estimates: cost estimation for a workload, and estimation of a full AWS bill. You can also import your historical usage or create net new usage when creating a cost estimate. Additionally, with the new rate configuration inclusive of both pricing discounts and purchase commitments, you can gain a clearer picture of potential savings and cost optimizations for your cost scenarios.
  • AWS CDK Toolkit Library is now generally available – AWS CDK Toolkit Library provides programmatic access to core AWS CDK functionalities such as synthesis, deployment, and destruction of stacks. You can use this library to integrate CDK operations directly into your applications, custom CLIs, and automation workflows, offering greater flexibility and control over infrastructure management.
  • Announcing Red Hat Enterprise Linux for AWS – Red Hat Enterprise Linux (RHEL) for AWS, starting with RHEL 10, is now generally available, combining Red Hat’s enterprise-grade Linux software with native AWS integration. RHEL for AWS is built to achieve optimum performance of RHEL running on AWS.

For a full list of AWS announcements, be sure to keep an eye on the What’s New with AWS? page.

Additional updates
Here are some additional projects, blog posts, and news items that you might find interesting:

  • Introducing AI on EKS: powering scalable AI workloads with Amazon EKS – AI on EKS is a new open source initiative from AWS designed to help you deploy, scale, and optimize AI/ML workloads on Amazon EKS. AI on EKS repository includes deployment-ready blueprints for distributed training, LLM inference, generative AI pipelines, multi-model serving, agentic AI, GPU and Neuron-specific benchmarks, and MLOps best practices.
  • Revolutionizing earth observation with geospatial foundation models on AWS – Emerging transformer-based vision models for geospatial data—also called geospatial foundation models (GeoFMs)—offer a new and powerful technology for mapping the earth’s surface at a continental scale. This post explores how Clay Foundation’s Clay foundation model can be deployed for large-scale inference and fine-tuning on Amazon SageMaker. You can use the ready-to-deploy code samples to get started quickly with deploying GeoFMs in your own applications on AWS.

High level solution flow for inference and fine tuning using Geospatial Foundation Models

  • Going beyond AI assistants: Examples from Amazon.com reinventing industries with generative AI – Non-conversational applications offer unique advantages, such as higher latency tolerance, batch processing, and caching, but their autonomous nature requires stronger guardrails and exhaustive quality assurance compared to conversational applications, which benefit from real-time user feedback and supervision. This post examines four diverse Amazon.com examples of non-conversational generative AI applications.

Upcoming AWS events
Check your calendars and sign up for these upcoming AWS events:

  • AWS Summits – Join free online and in-person events that bring the cloud computing community together to connect, collaborate, and learn about AWS. Register in your nearest city: Stockholm (June 4), Sydney (June 4–5), Hamburg (June 5), Washington (June 10–11), Madrid (June 11), Milan (June 18), Shanghai (June 19–20), and Mumbai (June 19).
  • AWS re:Inforce – Mark your calendars for AWS re:Inforce (June 16–18) in Philadelphia, PA. AWS re:Inforce is a learning conference focused on AWS security solutions, cloud security, compliance, and identity.
  • AWS Community Days – Join community-led conferences that feature technical discussions, workshops, and hands-on labs led by expert AWS users and industry leaders from around the world: Milwaukee, USA (June 5), Mexico (June 14), Nairobi, Kenya (June 14), and Colombia (June 28).

That’s all for this week. Check back next Monday for another Weekly Roundup!

Prasad

New and improved Amazon Q Developer experience in the AWS Management Console

Post Syndicated from Brendan Jenkins original https://aws.amazon.com/blogs/devops/new-and-improved-amazon-q-developer-experience-in-the-aws-management-console/

Amazon Q Developer just launched a new agentic experience within the AWS Management Console, that enables builders to get deeper insights about their AWS resources and improve their operational troubleshooting efficiency. This expands the agentic capabilities of Amazon Q Developer from both the integrated development environment (IDE) and command line interface (CLI) to the AWS console. Amazon Q Developer now functions as a resource analysis and operational troubleshooting assistant, able to consult multiple information sources and resolve complex queries, to get deeper insight into AWS environments faster and more easily than before. These capabilities are also available in chat applications such as Microsoft Teams and Slack. Now users can ask any question about AWS services and their resources, leaving Amazon Q Developer to automatically identify appropriate tools for the task, selecting from any AWS API across all services. It breaks queries into executable steps, asks for clarification when needed and combines information from multiple services to solve the task at hand. It can help analyze relationships between resources across multiple AWS services, examine configurations spanning different parts of infrastructure, synthesize information from various data sources to provide comprehensive insights, and respond to complex queries with detailed, actionable information.

For example, while troubleshooting an AWS Lambda function, a builder can simply ask, “How is this Lambda function getting invoked?” or “What are the IAM roles and permissions of my Lambda function?” and Amazon Q Developer will provide insights about the dependencies and interdependencies, evaluating their integration with other AWS services – all from a single natural language prompt. This enhancement allows builders to quickly obtain nuanced, contextual information about their AWS environment, significantly reducing the time and effort required for complex infrastructure analysis.

In this blog post, I’ll showcase several examples of complex prompts to demonstrate how Amazon Q Developer now delivers relevant and insightful responses based on the builder’s specific resources. Specifically, we’ll deep-dive into two main use cases: deeper resource introspection analysis and increased operational troubleshooting efficiency.

Deeper resource introspection and analysis

Amazon Q Developer now offers enhanced capabilities that make it even easier for builders to understand their AWS resources. With a single prompt, builders can now get comprehensive insights about their AWS services that previously required multiple steps. For example, when analyzing Amazon Simple Notification Service (SNS) topics and their subscribers, builders can simply ask “Show me all my SNS topics and their subscribers” to get a complete view of their configurations. This streamlined approach saves valuable time and effort, allowing developers to focus on building rather than navigating through multiple queries.

These new enhanced capabilities enable builders to simply ask for the insight needed, and Amazon Q Developer will perform the necessary multi-step reasoning based on a builder’s prompt. When the request is made, Amazon Q Developer determines the analytical steps required, retrieves information about the resources from multiple data sources, analyzes the relationships and configurations, and provides a comprehensive answer that addresses the need. Rather than builders having to think about which APIs to call or which services to check, Amazon Q Developer handles the complexity of the analysis, allowing builders to focus on understanding infrastructure rather than querying it.

To illustrate Amazon Q Developer’s capability in handling complex queries, let’s consider an example. Suppose a builder has a three-tier web application in an AWS account and they need to identify which Amazon Elastic Compute Cloud (Amazon EC2) instances, based on their Amazon Machine Images (AMIs) in the application layer, are actively communicating with Amazon Relational Database (RDS) in the backend. With this new update, a builder could open a new Amazon Q Developer chat in the AWS Management Console, and enter a prompt such as “List the AMIs used by my running EC2 instances in us-west-2 that can communicate with my RDS cluster”.

User prompts Amazon Q Developer about which Amazon EC2 AMIs are being used that communicate with Amazon RDS in the backend

Figure 1: Prompt to Amazon Q Developer and Amazon RDS database

Based on Amazon Q Developer’s response shown in figure 1 above, Amazon Q Developer was able to list the steps it took to gather the information, pulled applicable information from each service API, and gave one comprehensive and detailed insight about which AMIs were being used to communicate with the Amazon RDS cluster. This shows how Amazon Q Developer can take a single prompt, pull in information from multiple resources and give a comprehensive insight.

Let’s move to another example around AWS Lambda. Suppose a builder wants to know which AWS CloudFormation stacks are managing Lambda function resources. To do this, a builder could enter a prompt such as “List my AWS Lambda functions and the CloudFormation stacks that manage those resources”.

User prompts Amazon Q Developer to see what AWS CloudFormation Stacks are managing their AWS Lambda resources.

Figure 2: Prompt to Amazon Q Developer about Lambda and AWS CloudFormation

As shown above in figure 2, Amazon Q Developer was able to pull AWS CloudFormation information related to the AWS Lambda resources, and list each stack that was associated with the Lambda functions in the account. This, for example, can help many development and IT professionals better understand and manage their account resources by leveraging the complex reasoning of Amazon Q Developer.

Proceeding with one more example around AWS Lambda, let’s now suppose a builder wants to use Amazon Q Developer to see if there are any Amazon Simple Storage Service (Amazon S3) buckets invoking an AWS Lambda function in their AWS account. To identify this, a builder could enter a prompt such as “What AWS Lambda functions do I have in us-east-1 and are any of them invoked by an Amazon S3 bucket in the same region?”.

User prompts Amazon Q Developer to see if they have any AWS Lambda functions with Amazon S3 buckets as a trigger in their AWS account.User prompts Amazon Q Developer to see if they have any AWS Lambda functions with Amazon S3 buckets as a trigger in their AWS account.

Figure 3: Prompt and response from Amazon Q Developer about Amazon S3 and AWS Lambda

As shown in figure 3 above, Amazon Q Developer again called applicable service APIs to analyze Amazon S3 and AWS Lambda resources and was able to find that there was one AWS Lambda function with S3 as an event trigger.

Furthermore, building on our previous example, builders can try prompts around costs as well. For example, a builder can now prompt Amazon Q Developer “How much did I spend on Lambda functions that are invoked by my S3 bucket?” and Amazon Q will use its deeper resource introspection to tie costs to the resources that are connected.

These examples demonstrate Amazon Q Developer’s enhanced capability to process complex prompts involving multiple resource relationships. This improvement allows builders to obtain comprehensive answers with fewer steps, streamlining the overall process of asking questions about resources in accounts and making it easier to understand and manage AWS resources.

Improved Operational Troubleshooting

Amazon Q Developer can not only discover resources, their configurations, and their relationships, but also correlate that information with logs, metrics, and events to identify, analyze, and determine the root cause while troubleshooting operational issues in the AWS console. This helps streamline the process of resolving issues to enable quick troubleshooting.

To illustrate Amazon Q Developer’s capability in improved operational troubleshooting, let’s consider an example. Suppose a builder has a simple payment processing application consisting of Amazon API Gateway, AWS Lambda, and Amazon RDS in the backend. Furthermore, the application is returning 500 internal server errors causing downstream issues. Now, a builder can prompt Amazon Q Developer “Why is my user-profile-service-prod Lambda function throwing a 500 Internal server error?”.

User prompts Amazon Q Developer to see why their AWS Lambda functions are facing 500 internal server errors.

Figure 4: Prompt to Amazon Q Developer about internal server error

As shown above in figure 4, Amazon Q Developer automatically begins to gather relevant Amazon CloudWatch metrics, examines the function’s configuration and permissions, checks connected services like API Gateway and Amazon RDS, and analyzes recent changes

Response from Amazon Q after its analysis of various data sources.

Figure 5: Response from Q Developer for database timeouts

As shown above in figure 5, after querying applicable resources, Amazon Q Developer identified the root cause of the 500 internal server error. It shared information it pulled from the database and Lambda function logs and referenced a custom CloudWatch metric dashboard for evidence that the issue is due to database connection timeouts. Lastly, Amazon Q Developer also provided a list of ways to resolve the issue it identified. This example showcases how this new capability streamlines the process of analyzing operational issues, enabling quick troubleshooting.

Conclusion

The examples we’ve shown demonstrate how Amazon Q Developer handles the heavy lifting for users even better than before – from breaking down requests into analytical steps, to gathering data from multiple sources, to delivering meaningful insights about infrastructure, costs, and providing troubleshooting assistance.

As we continue to enhance Amazon Q Developer’s multi-step reasoning capabilities, builders will see it tackle even more complex analysis scenarios, helping them better understand and optimize AWS environments. Whether analyzing security configurations, examining resource relationships, or troubleshooting infrastructure issues, Amazon Q Developer can help save time and provide deeper insights into AWS resources.

To learn more and get started, visit Amazon Q Developer and Chatting with Amazon Q Developer in AWS Console Documentation.

About the authors

Brendan Jenkins

Brendan Jenkins is a Tech Lead Solutions Architect at Amazon Web Services (AWS) working with Enterprise AWS customers providing them with technical guidance and helping achieve their business goals. He has an area of specialization in DevOps and Machine Learning technology.

Optimizing fleet operations using Amazon SageMaker AI and Amazon Bedrock

Post Syndicated from Manny Sidhu original https://aws.amazon.com/blogs/architecture/optimizing-fleet-operations-using-amazon-sagemaker-ai-and-amazon-bedrock/

Every year in the United States, distracted driving claims thousands of lives and causes immense financial damage. More than 1.6 million accidents annually are caused by cell phone use while driving, and another 1.5 million result from drowsy drivers falling asleep at the wheel. These devastating—and preventable—accidents have sparked a major push for enhanced driver safety.

This initiative is particularly crucial in the commercial fleet industry, as accidents involving a large truck are often more dangerous and can cost hundreds of thousands of dollars. This post explores an innovative solution that leverages Amazon SageMaker AI and Amazon Bedrock to revolutionize driver coaching and enhance fleet efficiency. By harnessing the power of machine learning and artificial intelligence, we demonstrate how fleet operators can transform raw dashcam footage into actionable insights, empowering real-time driver monitoring and proactive safety measures – reducing costly accidents. Our approach combines AWS Artificial Intelligence (AI) and Internet of Things (IoT) services to create a comprehensive solution that not only detects distracted driving but also continuously improves its performance over time. Through this solution, we aim to show how fleet managers can significantly reduce distracted driving incidents, improve operational efficiency, and ultimately drive down costs in their commercial vehicle operations.

The Challenge: Effectively managing multiple dashcam feeds from commercial vehicle fleet

Today’s commercial vehicles are equipped with multi-camera systems that provide comprehensive coverage: inward-facing cameras monitor driver behavior, outward-facing cameras track oncoming traffic, and side/rear cameras detect cross-traffic and potential rear-end collisions. The sheer volume of video data generated by thousands of vehicles daily creates significant management and analysis challenges. While fleet operators traditionally use this dashcam footage for reactive purposes – such as law enforcement reporting, insurance claims, and driver exoneration – many organizations are missing a significant opportunity to leverage this data. As commercial fleets accumulate more miles, they generate rich datasets that can be used to train AI models capable of facilitating proactive safety improvements.

In this post, we’ll explore how to maximize the value of dashcam footage through best practices for implementing and managing Computer Vision systems in commercial fleet operations. We’ll demonstrate how to build and deploy edge-based machine learning models that provide real-time alerts for distracted driving behaviors, while effectively collecting, processing, and analyzing footage to train these AI models. This approach transforms fleet operations from reactive incident management to proactive safety enhancement, helping organizations convert raw video data into actionable insights that reduce safety incidents and improve overall fleet operational efficiency and cost-effectiveness.

Solution overview

A Distracted Driving Incident can occur when drivers engage in unsafe behaviors such as speeding, rolling stops, harsh braking, and aggressive acceleration. Fleet managers need to understand not just what happened during these incidents, but also the driver’s state of attention – whether they were focused on the road or distracted by activities like using a cellphone, eating, drinking, or experiencing fatigue common in long-haul driving.

Our solution leverages AWS services to create an end-to-end workflow capable of detecting and mitigating distracted driving. The steps involved include:

  1. Incident capture, ingestion, and labeling
  2. Model training, optimization, and deployment
  3. Continuous testing and improvement

Solution deep dive

This solution relies on a mix of AWS IoT, AI and generative AI services to build a scalable and cost-effective solution. Let’s start by looking at high level solution architecture and build the solution step-by-step.

Incident capture, ingestion, and labeling

To start the process of ingesting videos from a driver’s dashboard camera into the cloud, we capture the dashcam’s feed using the IoT Greengrass Kinesis Video Streamer Component. The video is streamed into the AWS Cloud using Kinesis Video Streams and stored in Amazon S3 by leveraging Kinesis Firehose. The videos are then converted into individual frames, analyzed by the Amazon Bedrock Nova Pro model to determine driver distraction, and sorted by an AWS Lambda function into an S3 bucket based on the analysis results. The sorted frames will next be used to train an AI model for edge deployment to detect distracted driving.

From a security perspective, it’s good practice to encrypt data in Amazon S3 buckets using AWS Key Management Service (KMS). You can enforce this by setting up SSE-KMS as the default encryption method to automatically encrypt uploaded objects. We also recommend implementing fine-grained AWS Identity & Access Management (IAM) roles to grant scoped access to images and videos. For data in transit between the edge and the cloud, you can use AWS IoT Greengrass certificates to encrypt your data and enforce identity verification. These measures can help protect against unauthorized access.

Edge-to-cloud architecture for real-time driver monitoring using AWS IoT, Kinesis, and ML services

With this process in place, we are continually collecting data from our fleet of commercial vehicles (while keeping security in mind). This data is automatically categorized and labeled based on the analysis from our Nova Pro model, and conveniently stored in S3, enabling us to seamlessly train an AI model – a process which we will describe next.

Model training, optimization, and deployment

The following diagram illustrates the process of training and deploying a distracted driver detection model. The process runs inside of an Amazon SageMaker Pipelines Workflow, which allows for seamless orchestration of other Amazon SageMaker AI services. This workflow begins with labeled driver images stored in Amazon S3, generated from the previously described workflow. This labeled dataset – consisting of driver images labeled as “distracted” or “not distracted’ – is used to train a ResNet50 model using Amazon SageMaker Training Jobs running on a Trn1 instance for price performance. As we train, the model learns how to identify distracted drivers. Once complete, the trained model is then quantized to INT8 using SageMaker Processing Jobs, and optimized for our specific type of edge hardware using SageMaker Neo. The optimized model is then stored in the SageMaker Model Registry for version control and governance (this will be helpful later when we iterate on our model with new training data). Finally, the model is pushed to S3 where AWS IoT Greengrass can initiate a deployment to the fleet of edge devices.

Running on the edge, the model performs inference multiple times a second on frames from the inward facing dashcam. (Inference speed calculated assuming edge compute has specs comparable to a Raspberry-Pi class of device.) If the driver is found to be distracted, the system alerts the driver by means of a noise. (ex. driver was falling asleep, and alert awakens them).

End-to-end AWS architecture for distracted driver detection: from model training to edge deployment

With this process in place, we have successfully leveraged the dataset we generated in the first diagram to train, optimize, and deploy our custom model to the ‘edge’ – in this case, to each vehicle in our fleet. Our model is now alerting drivers of dangerous behavior and helping to proactively prevent collisions. But our model likely isn’t perfect – perhaps it misses a dangerous behavior that wasn’t in the training dataset, or alerts unnecessarily. To validate our model is working well and further improve it to reduce errors, we implement continuous testing and improvement procedures.

Continuous testing and improvement

We need to continue to ingest driver dashcam data and compare our edge model’s predictions with our original source of ‘ground truth’ – Nova Pro.

The system collects frames for model validation in two scenarios: when vehicle telemetry detects incidents (hard braking, crashes) or when the edge model identifies distracted driving. These frames are sent to Amazon Bedrock for a ‘fact check’ to see if the edge model performed optimally. The comparative results between Amazon Bedrock and the edge model are stored in a dedicated S3 bucket for model evaluation. When sufficient new validated data is collected, or when the model’s agreement with Amazon Bedrock falls below a threshold, Amazon EventBridge triggers the previously described SageMaker Pipelines Workflow to fine tune, optimize, and re-deploy the improved model to the edge, now powered by our newly collected ‘disagreement data’.

Edge-to-cloud feedback loop for ML model validation using AWS IoT, Bedrock, and SageMaker services

We should also perform comparative analysis of our new model against our historical models stored in the Amazon SageMaker Model Registry to validate that our latest model actually performs better than historical models, verifying we don’t see a regression. If our latest model doesn’t outperform historical models, we should not deploy it, and instead investigate if we are suffering from overfitting or bad training data. In summary, we now have a model running inside fleet vehicles capable of alerting drivers to unsafe behavior. This could effectively reduce drowsy driving accidents by keeping drivers awake and alert, while also warning drivers about unsafe decisions like eating or using a cell phone while driving. This system is also self-training and self-improving, so it will continue to get better over time. Additionally, fleet management companies could aggregate safety data and reward top drivers to further incentivize safe driving habits.

Conclusion

In this post, we’ve explored an innovative solution that leverages AWS services to revolutionize driver coaching and fleet operations. By combining the power of Amazon SageMaker and Amazon Bedrock with AWS IoT and edge computing capabilities, we’ve demonstrated how to create a comprehensive, scalable solution for monitoring and improving driver behavior in real-time. This solution addresses the challenges of managing vast amounts of dashcam footage from commercial vehicle fleets, transforming raw video data into actionable insights. By implementing an end-to-end workflow that includes incident capture, categorization, model training, deployment, and continuous improvement, fleet operators can shift from reactive incident management to proactive safety enhancement. The benefits of this approach include:

  1. Enhanced safety: Real-time detection of distracted driving behaviors allows for immediate intervention and coaching.
  2. Improved efficiency: Automated analysis of dashcam footage reduces manual review time and costs.
  3. Scalability: The solution can handle large fleets and growing datasets with ease.
  4. Continuous improvement: The system learns and adapts over time, becoming more accurate and effective.
  5. Cost-effectiveness: By leveraging edge computing and optimized models, the solution minimizes compute costs.

As the transportation industry continues to evolve, solutions like this will play a crucial role in improving road safety, reducing operational costs, and enhancing overall fleet performance. By harnessing the power of AI and cloud computing, fleet operators can create safer, more efficient driving environments that benefit not only their businesses but also society as a whole. The future of fleet operations is here, and it’s driven by intelligent, data-driven systems that turn every mile driven into an opportunity for improvement and innovation.

Learn more by exploring AWS code samples to build hands-on SageMaker expertise. See the service in action through practical examples that demonstrate how to optimize model training and deployment across various use cases. Understand the financial advantages by conducting a cloud economics TCO analysis comparing traditional infrastructure against SageMaker’s managed services. This exercise reveals how SageMaker alleviates hidden costs while accelerating your ML development cycle.

Ready to take the next step? Connect with your AWS Solutions Architect to arrange a SageMaker AI Immersion Day tailored to your team’s specific challenges. These expert-led sessions provide personalized guidance that will help you implement SageMaker effectively within your organization’s unique context. For deeper dive into other relevant services Amazon Kinesis Video Streams, AWS IoT Greengrass, Amazon Bedrock


About the authors

AWS Weekly Roundup: Claude 4 in Amazon Bedrock, EKS Dashboard, community events, and more (May 26, 2025)

Post Syndicated from Veliswa Boya original https://aws.amazon.com/blogs/aws/aws-weekly-roundup-claude-4-in-amazon-bedrock-eks-dashboard-community-events-and-more-may-26-2025/

As the tech community we continue to have many opportunities to learn and network with other like-minded folks. This past week AWS customers attended the AWS Summit Dubai for an action-packed day featuring live demos, hands-on experiences with cutting-edge AI/ML tools, and more. Right here in South Africa I attended the Data & AI Community in Durban for a day of inspiration and learning from the community. In India, the AWS Community Day Bengaluru brought together hundreds of passionate tech enthusiasts for a day of learning and networking.

Last week’s launches
Here are the launches that got my attention:

For a full list of AWS announcements, be sure to keep an eye on the What’s New with AWS? page.

Additional updates
Here are some additional projects, blog posts, and news items that you might find interesting:

Upcoming AWS events
Check your calendars and sign up for these upcoming AWS events:

  • AWS Summits – Join free online and in-person events that bring the cloud computing community together to connect, collaborate, and learn about AWS. Register in your nearest city: Tel Aviv (May 28), Singapore (May 29), Stockholm (June 4), Sydney (June 4–5), Washington (June 10-11), and Madrid (June 11).
  • AWS re:Inforce – Mark your calendars for AWS re:Inforce (June 16–18) in Philadelphia, PA. AWS re:Inforce is a learning conference focused on AWS security solutions, cloud security, compliance, and identity.
  • AWS Community Days – Join community-led conferences that feature technical discussions, workshops, and hands-on labs led by expert AWS users and industry leaders from around the world: Milwaukee, USA (June 5), and Nairobi, Kenya (June 14).

That’s all for this week. Check back next Monday for another Weekly Roundup!

Veliswa.

Empower financial analytics by creating structured knowledge bases using Amazon Bedrock and Amazon Redshift

Post Syndicated from Nita Shah original https://aws.amazon.com/blogs/big-data/empower-financial-analytics-by-creating-structured-knowledge-bases-using-amazon-bedrock-and-amazon-redshift/

Traditionally, financial data analysis could require deep SQL expertise and database knowledge. Now with Amazon Bedrock Knowledge Bases integration with structured data, you can use simple, natural language prompts to query complex financial datasets. By combining the AI capabilities of Amazon Bedrock with an Amazon Redshift data warehouse, individuals with varied levels of technical expertise can quickly generate valuable insights, making sure that data-driven decision-making is no longer limited to those with specialized programming skills.

With the support for structured data retrieval using Amazon Bedrock Knowledge Bases, you can now use natural language querying to retrieve structured data from your data sources, such as Amazon Redshift. This enables applications to seamlessly integrate natural language processing capabilities on structured data through simple API calls. Developers can rapidly implement sophisticated data querying features without complex coding—just connect to the API endpoints and let users explore financial data using plain English. From customer portals to internal dashboards and mobile apps, this API-driven approach makes enterprise-grade data analysis accessible to everyone in your organization. Using structured data from a Redshift data warehouse, you can efficiently and quickly build generative AI applications for tasks such as text generation, sentiment analysis, or data translation.

In this post, we showcase how financial planners, advisors, or bankers can now ask questions in natural language, such as, “Give me the name of the customer with the highest number of accounts?” or “Give me details of all accounts for a specific customer.” These prompts will receive precise data from the customer databases for accounts, investments, loans, and transactions. Amazon Bedrock Knowledge Bases automatically translates these natural language queries into optimized SQL statements, thereby accelerating time to insight, enabling faster discoveries and efficient decision-making.

Solution overview

To illustrate the new Amazon Bedrock Knowledge Bases integration with structured data in Amazon Redshift, we will build a conversational AI-powered assistant for financial assistance that is designed to help answer financial inquiries, like “Who has the most accounts?” or “Give details of the customer with the highest loan amount.”

We will build a solution using sample financial datasets and set up Amazon Redshift as the knowledge base. Users and applications will be able to access this information using natural language prompts.

The following diagram provides an overview of the solution.

For building and running this solution, the steps include:

  1. Load sample financial datasets.
  2. Enable Amazon Bedrock large language model (LLM) access for Amazon Nova Pro.
  3. Create an Amazon Bedrock knowledge base referencing structured data in Amazon Redshift.
  4. Ask queries and get responses in natural language.

To implement the solution, we use a sample financial dataset that is for demonstration purposes only. The same implementation approach can be adapted to your specific datasets and use cases.

Download the SQL script to run the implementation steps in Amazon Redshift Query Editor V2. If you’re using another SQL editor, you can copy and paste the SQL queries either from this post or from the downloaded notebook.

Prerequisites

Make sure your meet the following prerequisites:

  1. Have an AWS account.
  2. Create an Amazon Redshift Serverless workgroup or provisioned cluster. For setup instructions, see Creating a workgroup with a namespace or Create a sample Amazon Redshift database, respectively. The Amazon Bedrock integration feature is supported in both Amazon Redshift provisioned and serverless.
  3. Create an AWS Identity and Access Management (IAM) role. For instructions, see Creating or updating an IAM role for Amazon Redshift ML integration with Amazon Bedrock.
  4. Associate the IAM role to a Redshift instance.
  5. Set up the required permissions for Amazon Bedrock Knowledge Bases to connect with Amazon Redshift.

Load sample financial data

To load the finance datasets to Amazon Redshift, complete the following steps:

  1. Open the Amazon Redshift Query Editor V2 or another SQL editor of your choice and connect to the Redshift database.
  2. Run the following SQL to create the finance data tables and load sample data:
    -- Create table
    CREATE TABLE accounts (
        id integer ,
        account_id integer PRIMARY KEY,
        customer_id integer,
        account_type character varying(256),
        opening_date date,
        balance bigint,
        currency character varying(256)
    );
    
    CREATE TABLE customer (
        id integer,
        customer_id integer PRIMARY KEY ,
        name character varying(256) ,
        age integer,
        gender character varying(256) ,
        address character varying(256) ,
        phone character varying(256) ,
        email character varying(256)
    );
    
    CREATE TABLE investments (
        id integer ,
        investment_id integer PRIMARY KEY,
        customer_id integer ,
        investment_type character varying(256) ,
        investment_name character varying(256) ,
        purchase_date date ,
        purchase_price bigint ,
        quantity integer 
    );
    
    
    CREATE TABLE loans (
        id integer ,
        loan_id integer PRIMARY KEY,
        customer_id integer ,
        loan_type character varying(256) ,
        loan_amount bigint ,
        interest_rate integer ,
        start_date date ,
        end_date date 
    );
    
    CREATE TABLE orders (
        id integer ,
        order_id integer PRIMARY KEY,
        customer_id integer ,
        order_type character varying(256) ,
        order_date date ,
        investment_id integer ,
        quantity integer ,
        price integer 
    );
    
    CREATE TABLE transactions (
        id integer ,
        transaction_id integer PRIMARY KEY ,
        account_id integer REFERENCES accounts(account_id),
        transaction_type character varying(256) ,
        transaction_date date ,
        amount integer ,
        description character varying(256) 
    );

  3. Download the sample financial dataset to your local storage and unzip the zipped folder.
  4. Create an Amazon Simple Storage Service (Amazon S3) bucket with a unique name. For instructions, refer to Creating a general purpose bucket.
  5. Upload the downloaded files into your newly created S3 bucket.
  6. Using the following COPY command statements, load the datasets from Amazon S3 into the new tables you created in Amazon Redshift. Replace <<your_s3_bucket>> with the name of your S3 bucket and <<your_region>> with your AWS Region.
    -- Load sample data
    COPY accounts FROM 's3://<<your_s3_bucket>>/accounts.csv' IAM_ROLE DEFAULT FORMAT AS CSV DELIMITER ',' QUOTE '"' IGNOREHEADER 1 REGION AS '<<your_region>>';
    
    COPY customer FROM 's3://<<your_s3_bucket>>/customer.csv' IAM_ROLE DEFAULT FORMAT AS CSV DELIMITER ',' QUOTE '"' IGNOREHEADER 1 REGION AS '<<your_region>>';
    COPY investments FROM 's3://<<your_s3_bucket>>/investments.csv' IAM_ROLE DEFAULT FORMAT AS CSV DELIMITER ',' QUOTE '"' IGNOREHEADER 1 REGION AS '<<your_region>>';
    COPY loans FROM 's3://<<your_s3_bucket>>/loans.csv' IAM_ROLE DEFAULT FORMAT AS CSV DELIMITER ',' QUOTE '"' IGNOREHEADER 1 REGION AS '<<your_region>>';
    COPY orders FROM 's3://<<your_s3_bucket>>/orders.csv' IAM_ROLE DEFAULT FORMAT AS CSV DELIMITER ',' QUOTE '"' IGNOREHEADER 1 REGION AS '<<your_region>>';
    COPY transactions FROM 's3://<<your_s3_bucket>>/transactions.csv' IAM_ROLE DEFAULT FORMAT AS CSV DELIMITER ',' QUOTE '"' IGNOREHEADER 1 REGION AS '<<your_region>>';

Enable LLM access

With Amazon Bedrock, you can access state-of-the-art AI models from providers like Anthropic, AI21 Labs, Stability AI, and Amazon’s own foundation models (FMs). These include Anthropic’s Claude 2, which excels at complex reasoning and content generation; Jurassic-2 from AI21 Labs, known for its multilingual capabilities; Stable Diffusion from Stability AI for image generation; and Amazon Titan models for various text and embedding tasks. For this demo, we use Amazon Bedrock to access the Amazon Nova FMs. Specifically, we use the Amazon Nova Pro model, which is a highly capable multimodal model designed for a wide range of tasks like video summarization, Q&A, mathematical reasoning, software development, and AI agents, including high speed and accuracy for text summarization tasks.

Make sure you have the required IAM permissions to enable access to available Amazon Bedrock Nova FMs. Then complete the following steps to enable model access in Amazon Bedrock:

  1. On the Amazon Bedrock console, in the navigation pane, choose Model access.
  2. Choose Enable specific models.
  3. Search for Amazon Nova models, select Nova Pro, and choose Next.
  4. Review the selection and choose Submit.

Create an Amazon Bedrock knowledge base referencing structured data in Amazon Redshift

Amazon Bedrock Knowledge Bases uses Amazon Redshift as the query engine to query your data. It reads metadata from your structured data store to generate SQL queries. There are different supported authentication methods to create the Amazon Bedrock knowledge base using Amazon Redshift. For more information, refer to the Set up query engine for your structured data store in Amazon Bedrock Knowledge Bases.

For this post, we create an Amazon Bedrock knowledge base for the Redshift database and sync the data using IAM authentication.

If you’re creating an Amazon Bedrock knowledge base through the AWS Management Console, you can skip the service role setup mentioned in the previous section. It automatically creates one with the necessary permissions for Amazon Bedrock Knowledge Bases to retrieve data from your new knowledge base and generate SQL queries for structured data stores.

When creating an Amazon Bedrock knowledge base using an API, you must attach IAM policies that grant permissions to create and manage knowledge bases with connected data stores. Refer to Prerequisites for creating an Amazon Bedrock Knowledge Base with a structured data store for instructions.

Complete the following steps to create an Amazon Bedrock knowledge base using structured data:

  1. On the Amazon Bedrock console, choose Knowledge Bases in the navigation pane.
  2. Choose Create and choose Knowledge Base with structure data store from the dropdown menu.
  3. Provide the following details for your knowledge base:
    1. Enter a name and optional description.
    2. Select Amazon Redshift as the query engine.
    3. Select Create and use a new service role for resource management.
    4. Make note of this newly created IAM role.
    5. Choose Next to proceed to the next part of the setup process.
    6. Configure the query engine:
      • Select Redshift Serverless (Amazon Redshift provisioned is also supported).
      • Choose your Redshift workgroup.
      • Use the IAM role created earlier.
      • Under Default storage metadata, select Amazon Redshift databases and for Database, choose dev.
      • You can customize settings by adding specific contexts to enhance the accuracy of the results.
      • Choose Next.
    7. Complete creating your knowledge base.
    8. Record the generated service role details.
    9. Next, grant appropriate access to the service role for Amazon Bedrock Knowledge Bases through the Amazon Redshift Query Editor V2. Update <your Service Role name> in the following statements with your service role, and update the value for <your schema>.
      CREATE USER "IAMR:<your Service Role name>" WITH PASSWORD DISABLE;
      SELECT * FROM PG_USER; -- To verify that the user is created.
      GRANT SELECT ON ALL TABLES IN SCHEMA <your schema> TO "IAMR:<your Service Role name>";
      --You can also Restricting access to certain tables for finer-grained control on the tables that can be accessed as shown below
      GRANT SELECT ON TABLE customer to "IAMR:<your Service Role name>";
      GRANT SELECT ON TABLE loan to "IAMR:<your Service Role name>";

Now you can update the knowledge base with the Redshift database.

  1. On the Amazon Bedrock console, choose Knowledge Bases in the navigation pane.
  2. Open the knowledge base you created.
  3. Select the dev Redshift database and choose Sync.

It may take a few minutes for the status to display as COMPLETE.

Ask queries and get responses in natural language

You can set up your application to query the knowledge base or attach the knowledge base to an agent by deploying your knowledge base for your AI application. For this demo, we use a native testing interface on the Amazon Bedrock Knowledge Bases console.

To ask questions in natural language on the knowledge base for Redshift data, complete the following steps:

  1. On the Amazon Bedrock console, open the details page for your knowledge base.
  2. Choose Test.
  3. Choose your category (Amazon), model (Nova Pro), and inference settings (On demand), and choose Apply.
  4. In the right pane of the console, test the knowledge base setup with Amazon Redshift by asking a few simple questions in natural language, such as “How many tables do I have in the database?” or “Give me list of all tables in the database.

The following screenshot shows our results.

  1. To view the generated query from your Amazon Redshift based knowledge base, choose Show details next to the response.
  2. Next, ask questions related to the financial datasets loaded in Amazon Redshift using natural language prompts, such as, “Give me the name of the customer with the highest number of accounts” or “Give the details of all accounts for customer Deanna McCoy.

The following screenshot shows the responses in natural language.

Using natural language queries in Amazon Bedrock, you were able to retrieve responses from the structured financial data stored in Amazon Redshift.

Considerations

In this section, we discuss some important considerations when using this solution.

Security and compliance

When integrating Amazon Bedrock with Amazon Redshift, implementing robust security measures is crucial. To protect your systems and data, implement essential safeguards including restricted database roles, read-only database instances, and proper input validation. These measures help prevent unauthorized access and potential system vulnerabilities. For more information, see Allow your Amazon Bedrock Knowledge Bases service role to access your data store.

Cost

You incur a cost for converting natural language to text based on SQL. To learn more, refer to Amazon Bedrock pricing.

Use custom contexts

To improve query accuracy, you can enhance SQL generation by providing custom context in two key ways. First, specify which tables to include or exclude, focusing the model on relevant data structures. Second, supply curated queries as examples, demonstrating the types of SQL queries you expect. These curated queries serve as valuable reference points, guiding the model to generate more accurate and relevant SQL outputs tailored to your specific needs. For more information, refer to Create a knowledge base by connecting to a structured data store.

For different workgroups, you can create separate knowledge bases for each group, with access only to their specific tables. Control data access by setting up role-based permissions in Amazon Redshift, verifying each role can only view and query authorized tables.

Clean up

To avoid incurring future charges, delete the Redshift Serverless instance or provisioned data warehouse created as part of the prerequisite steps.

Conclusion

Generative AI applications provide significant advantages in structured data management and analysis. The key benefits include:

  • Using natural language processing – This makes data warehouses more accessible and user-friendly
  • Enhancing customer experience – By providing more intuitive data interactions, it boosts overall customer satisfaction and engagement
  • Simplifying data warehouse navigation – Users can understand and explore data warehouse content through natural language interactions, improving ease of use
  • Improving operational efficiency – By automating routine tasks, it allows human resources to focus on more complex and strategic activities

In this post, we showed how the natural language querying capabilities of Amazon Bedrock Knowledge Bases when integrated with Amazon Redshift enables rapid solution development. This is particularly valuable for the finance industry, where financial planners, advisors, or bankers face challenges in accessing and analyzing large volumes of financial data in a secured and performant manner.

By enabling natural language interactions, you can bypass the traditional barriers of understanding database structures and SQL queries, and quickly access insights and provide real-time support. This streamlined approach accelerates decision-making and drives innovation by making complex data analysis accessible to non-technical users.

For additional details on Amazon Bedrock and Amazon Redshift integration, refer to Amazon Redshift ML integration with Amazon Bedrock.


About the authors

Nita Shah is an Analytics Specialist Solutions Architect at AWS based out of New York. She has been building data warehouse solutions for over 20 years and specializes in Amazon Redshift. She is focused on helping customers design and build enterprise-scale well-architected analytics and decision support platforms.

Sushmita Barthakur is a Senior Data Solutions Architect at Amazon Web Services (AWS), supporting Strategic customers architect their data workloads on AWS. With a background in data analytics, she has extensive experience helping customers architect and build enterprise data lakes, ETL workloads, data warehouses and data analytics solutions, both on-premises and the cloud. Sushmita is based in Florida and enjoys traveling, reading and playing tennis.

Jonathan Katz is a Principal Product Manager – Technical on the Amazon Redshift team and is based in New York. He is a Core Team member of the open source PostgreSQL project and an active open source contributor, including PostgreSQL and the pgvector project.

AWS Weekly Roundup: Strands Agents, AWS Transform, Amazon Bedrock Guardrails, AWS CodeBuild, and more (May 19, 2025)

Post Syndicated from Danilo Poccia original https://aws.amazon.com/blogs/aws/aws-weekly-roundup-strands-agents-aws-transform-amazon-bedrock-guardrails-aws-codebuild-and-more-may-19-2025/

Many events are taking place in this period! Last week I was at the AI Week in Italy. This week I’ll be in Zurich for the AWS Community Day – Switzerland. On May 22, you can join us remotely for AWS Cloud Infrastructure Day to learn about cutting-edge advances across compute, AI/ML, storage, networking, serverless technologies, and global infrastructure. Look for events near you for an opportunity to share your knowledge and learn from others.

What got me particularly excited last Friday was the introduction of Strands Agents, an open source SDK that you can use to build and run AI agents in just a few lines of code. It can scale from simple to complex use cases, including local development and production deployment. By default, it uses Amazon Bedrock as model provider, but many others are supported, including Ollama (to run models locally), Anthropic, Llama API, and LiteLLM (to provide a unified interface for other providers such as Mistral). With Strands, you can use any Python function as a tool for your agent with the @tool decorator. Strands provides many example tools for manipulating files, making API requests, and interacting with AWS APIs. You can also choose from thousands of published Model Context Protocol (MCP) servers, including this suite of specialized MCP servers that help you get the most out of AWS. Multiple teams at AWS already use Strands for their AI agents in production, including Amazon Q Developer, AWS Glue, and VPC Reachability Analyzer. Read it all in Clare’s post.

Strands Agents SDK agentic loop

Last week’s launches
Here are the other launches that got my attention:

Additional updates
Here are some additional projects, blog posts, and news items that you might find interesting:

  • Securing Amazon S3 presigned URLs for serverless applications – Focusing on the security ramifications of using Amazon S3 presigned URLs, explaining mitigation steps that developers can take to improve the security of their systems using S3 presigned URLs, and walking through an AWS Lambda function that adheres to the provided recommendations.
    Architectural diagram.
  • Running GenAI Inference with AWS Graviton and Arcee AI Models – While large language models (LLMs) are capable of a wide variety of tasks, they require compute resources to support hundreds of billions and sometimes trillions of parameters. Small language models (SLMs) in contrast typically have a range of 3 to 15 billion parameters and can provide responses more efficiently. In this post, we share how to optimize SLM inference workloads using AWS Graviton based instances.
    AWS Graviton processors.

Upcoming AWS events
Check your calendars and sign up for these upcoming AWS events:

  • AWS Summits – Join free online and in-person events that bring the cloud computing community together to connect, collaborate, and learn about AWS. Register in your nearest city: Dubai (May 21), Tel Aviv (May 28), Singapore (May 29), Stockholm (June 4), Sydney (June 4–5), Washington (June 10-11), and Madrid (June 11)
  • AWS Cloud Infrastructure Day – On May 22, discover the latest innovations in AWS Cloud infrastructure technologies at this exclusive technical event.
  • AWS re:Inforce – Mark your calendars for AWS re:Inforce (June 16–18) in Philadelphia, PA. AWS re:Inforce is a learning conference focused on AWS security solutions, cloud security, compliance, and identity.
  • AWS Partners Events – You’ll find a variety of AWS Partner events that will inspire and educate you, whether you’re just getting started on your cloud journey or you’re looking to solve new business challenges.
  • AWS Community Days – Join community-led conferences that feature technical discussions, workshops, and hands-on labs led by expert AWS users and industry leaders from around the world: Zurich, Switzerland (May 22), Bengaluru, India (May 23), Yerevan, Armenia (May 24), Milwaukee, USA (June 5), and Nairobi, Kenya (June 14)

That’s all for this week. Check back next Monday for another Weekly Roundup!

Danilo

How Smartsheet boosts developer productivity with Amazon Bedrock and Roo Code

Post Syndicated from Rony Blum original https://aws.amazon.com/blogs/architecture/how-smartsheet-boosts-developer-productivity-with-amazon-bedrock-and-roo-code/

This post was co-written with JB Brown from Smartsheet.

Organizations are often seeking ways to enhance developer productivity while maintaining cost-efficiency. AI-powered coding assistants are effective solutions to accelerate development cycles, but implementing these solutions at scale while managing costs presents unique challenges. Roo Code, an AI-powered autonomous coding agent located directly in developers’ editors, represents the latest evolution in AI-assisted development. It helps developers code faster and smarter by offering capabilities ranging from code generation and refactoring to documentation writing and code base analysis through natural language interaction. This post explores how Smartsheet successfully deployed Roo Code with Amazon Bedrock and Anthropic’s Claude, achieving significant improvements in developer efficiency while optimizing costs through innovative caching strategies.

The Amazon Bedrock prompt caching capability, which became generally available in April 2025, represents a significant advancement in optimizing AI model interactions. With this feature, organizations can cache frequently used prompts across multiple API calls, reducing costs by up to 90% and lowing latency by up to 85%. The technology is particularly valuable for applications that repeatedly use similar context, such as coding assistants that need to maintain context about code files. Prompt caching supports multiple foundation models (FMs), including Anthropic’s Claude 3.5 Haiku and Anthropic’s Claude 3.7 Sonnet, as well as the Amazon Nova family of models. The cached context remains available for up to 5 minutes after each access, with each cache hit resetting this countdown. For organizations implementing AI-assisted development workflows, they can use this capability to balance performance with cost-efficiency.

Benefits of Amazon Bedrock prompt caching

Smartsheet is a leading cloud-based enterprise work management service, enabling millions of users worldwide to plan, manage, track, automate, and report on work at scale. Their engineering team identified an opportunity to enhance developer productivity by implementing AI-assisted coding capabilities across their organization. The solution needed to scale efficiently while maintaining reasonable costs, leading them to choose Roo Code with Amazon Bedrock with Anthropic’s Claude as their FM provider.

“Our engineering team has achieved a 60% reduction in operational costs and 20% improvement in response latency when using Roo Code with Amazon Bedrock prompt caching. These improvements directly translate to enhanced developer productivity across our organization,” says JB Brown, VP of Engineering at Smartsheet.

This fact is underscored by the team’s ability to rapidly generate comprehensive code documentation and architecture diagrams in a mere four hours, a task that previously consumed 2 weeks of manual effort. This newfound efficiency extends to critical areas like AWS cost management, where a vital analysis tool was built in just 30 minutes, and is projected to save Smartsheet $450,000 annually. Furthermore, the speed and accessibility of information have been significantly amplified, as evidenced by the 6–8 hours of senior engineer time saved by quickly explaining complex Terraform/Terragrunt infrastructure. These examples highlight how Amazon Bedrock prompt caching is not just about incremental gains, but about unlocking substantial time and resource savings, empowering our developers to focus on innovation rather than time-consuming manual processes.

Solution overview

When implementing AI-assisted coding at scale, Smartsheet faced several key challenges around managing costs associated with large language model (LLM) API calls, reducing latency for developer interactions and handling repetitive elements in prompts efficiently. The development team recognized that a significant portion of the prompts sent to Amazon Bedrock were repeated elements: the system prompt and the continuously building message history, presenting an opportunity for optimization.

To address these challenges, Smartsheet implemented a comprehensive solution centered around Roo Code integration with Amazon Bedrock and prompt caching. Smartsheet deployed Roo Code, powered by Amazon Bedrock and Anthropic’s Claude 3.7, across the organization and integrated seamlessly into existing development workflows. This provided developers with immediate access to AI assistance for code writing, reviewing, and debugging tasks.

The team then contributed a sophisticated Amazon Bedrock prompt caching system to Roo Code that identifies and stores common prompt elements, significantly reducing redundant data transmission to Bedrock. This caching layer proved crucial in optimizing both cost and performance metrics. The caching decision flow incorporates two key checks: first, it verifies if the selected model supports prompt caching, then it makes sure the system prompt meets a minimum token threshold to make caching worthwhile.

The solution integrates Roo Code directly into developers’ integrated development environments (IDE), using the Amazon Bedrock prompt caching capabilities. The architecture separates content into static elements (like system instructions and code context) and dynamic elements (like user queries). When a developer makes a request, static content is automatically marked with cache checkpoints and stored for 5 minutes, with each access refreshing this window.

For subsequent queries, the system checks for matching cached content before processing. When matches are found, it bypasses recomputation of these sections, significantly reducing both response time and costs.

The following diagram shows the integration points between Roo Code and Amazon Bedrock.

Technical workflow diagram showing data flow between user query, cache decision logic, and Amazon Bedrock with response handling

The following screenshot highlights the model provider settings and connection parameters required for implementation.

Amazon Bedrock configuration interface showing AWS authentication, region settings, and Claude model with caching enabled

Optimizing performance with prompt caching

When analyzing code files, much of the context—such as file contents and environment details—remains consistent across multiple queries. By caching this content, subsequent requests can reuse it from the cache, significantly reducing cost and latency.

In our example, we first asked Roo Code to analyze a Python file. We then sent multiple follow-up queries about different aspects of the code. The first query explained the overall structure, followed by questions about specific classes, unused modules, and potential improvements.

The usage section of the responses showed significant improvements through caching. During the first query, the model processed the input and wrote the cached content. For subsequent queries, 90% of the input was served from the cache. Because cache reads are 90% cheaper than processing new input tokens, this resulted in an 83% cost reduction for follow-up queries.

Here’s how the caching worked across queries:

  • First query – The model processed the entire file content and environment details, writing them to cache
  • Subsequent queries – The model loaded the cached content, only processing the new question text

To illustrate this, let’s look at the usage statistics from a series of queries:

Query 1: "Explain my @/src/models/product.py code"
{
    "inputTokens": 1051,
    "outputTokens": 902,
    "totalTokens": 19374,
    "cacheReadInputTokenCount": 0,
    "cacheWriteInputTokenCount": 12421
}

Query 2: "Describe what is ProductUpdate class used for"
{
    "inputTokens": 1078,
    "outputTokens": 694,
    "totalTokens": 21664,
    "cacheReadInputTokenCount": 19892,
    "cacheWriteInputTokenCount": 0
}

Query 3: "Which module is not in use?"
{
    "inputTokens": 4,
    "outputTokens": 774,
    "totalTokens": 22753,
    "cacheReadInputTokenCount": 19892,
    "cacheWriteInputTokenCount": 2083
}

Query 4: "Any improvement to implement to my code making it more efficient?"
{
    "inputTokens": 1097,
    "outputTokens": 1270,
    "totalTokens": 24342,
    "cacheReadInputTokenCount": 21975,
    "cacheWriteInputTokenCount": 0
} 

We can see from the results that the first query didn’t return cacheReadInputTokenCount but wrote to the cache the whole input. For subsequent queries, most of the input was read from the cache, except for the specific question.

The results clearly demonstrate the benefits of prompt caching:

  • 70% of total input was served from cache across queries
  • 90% of input for follow-up queries came from cache
  • Overall input costs reduced by 60%
  • Follow-up query costs reduced by 83%

This approach is particularly effective for development workflows where developers frequently query the same code base with different questions. The cached content provides necessary context for each query while significantly reducing processing overhead.

The following screenshot displays Roo Code’s interface, showing detailed metrics including token usage, cache hit rates, and associated API costs. The interface presents the cost savings achieved through caching and provides comprehensive usage analytics.

IDE showing Roo Code analysis with metrics, API costs, and detailed Python code explanation

Results and future innovation

The following line graph demonstrates the cost reduction trend over multiple queries runs, having the first query uncached, and the subsequent input using significant query responses from the cache. The y-axis shows costs in dollars, and the x-axis shows the cost per query. The graph shows a clear downward trend, with costs decreasing by 60% from the baseline.

Dual-axis graph displaying per-query and cumulative costs, demonstrating cost savings through caching over 4 queries

The implementation delivered remarkable improvements across key metrics. The prompt caching system achieved a 60% reduction in operational costs while simultaneously improving response latency by 20%.

The choice of Amazon Bedrock prompt caching proved particularly effective for Smartsheet’s coding assistance workflows. The 5-minute cache Time to Live (TTL) aligns perfectly with the natural rhythm of developer interactions with Roo Code, where multiple related queries typically occur within short timeframes. During active coding sessions, developers engage in rapid back-and-forth exchanges with the AI assistant—reviewing code, asking follow-up questions, and requesting modifications—while maintaining context through the cache. This agentic workflow, where each interaction builds upon previous context, takes full advantage of the prompt caching mechanism—each query refreshes the cache timer while preserving valuable context about the code being discussed.

Best practices and lessons learned

Through their implementation journey, Smartsheet developed several key best practices for organizations looking to implement similar solutions. Early implementation of prompt caching proved crucial, allowing the team to analyze prompt patterns and design efficient caching strategies from the start. The team found that focusing on developer experience through response time optimization and seamless tool integration was essential for successful adoption.

Continuous monitoring and analysis of usage patterns became a cornerstone of their optimization strategy. By tracking key metrics like response times and costs, the team could identify opportunities for further optimization and regularly adjust their caching strategies to maintain optimal performance.

Looking ahead

Smartsheet continues to innovate with Amazon Bedrock and Roo Code, exploring new ways to enhance developer productivity. Their engineering team is investigating advanced caching strategies and evaluating new FMs as they become available on Amazon Bedrock. The success of this implementation has established a strong foundation for future AI-assisted development initiatives.

Conclusion

Smartsheet’s implementation of Roo Code with Amazon Bedrock and prompt caching demonstrates how organizations can successfully deploy AI-assisted coding solutions while maintaining cost-efficiency. Their approach provides a blueprint for others looking to enhance developer productivity through AI while optimizing operational costs. The combination of strategic implementation, innovative caching solutions, and continuous optimization has enabled Smartsheet to achieve significant improvements in performance and cost metrics.

To learn more about implementing AI solutions at scale, refer to the Amazon Bedrock documentation and explore the AWS Machine Learning Blog. The frameworks and strategies outlined in this post can help organizations of varying size implement efficient, cost-effective AI-assisted development workflows.


About the Authors

Mastering Amazon Q Developer Part 1: Crafting Effective Prompts

Post Syndicated from Will Matos original https://aws.amazon.com/blogs/devops/mastering-amazon-q-developer-part-1-crafting-effective-prompts/

As organizations increasingly adopt AI-powered tools to enhance developer productivity, your ability to effectively communicate with these assistants becomes a valuable skill. This guide explores how you can craft prompts that deliver accurate, useful results when working with Amazon Q Developer.

Your success with Amazon Q Developer depends directly on how well you communicate with it. Through my work as a Principal Specialist Solutions Architect on the Next Generation Developer Experience team at AWS, I’ve observed that developers experience varying degrees of success based primarily on their approach to prompt construction. The difference between a vague request and a well-structured prompt can be the difference between wasted time and a productivity breakthrough.

Recent McKinsey research reveals that developers can complete tasks up to twice as fast with generative AI when using proper prompting techniques [1]. Even more impressive, developers tackling complex tasks are 25-30% more likely to complete them within given time-frames when using these tools effectively. These productivity gains aren’t automatic—they depend on mastering the art and science of prompt engineering.

Based on patterns observed across numerous customer interactions, this guide provides practical techniques to help you maximize the value of your AI-assisted development experience. You’ll learn how to transform your interactions to consistently produce helpful, relevant assistance that can dramatically improve your development workflow.

Key Takeaways

  • Structure your prompts with clear context, specific requirements, and desired output format
  • Include relevant technical details about your environment and constraints
  • Avoid vague requests and provide specific examples when possible
  • Use the provided prompt template to ensure consistent results

Getting Started with Amazon Q Developer

Already using Amazon Q Developer? Great! This guide will help you get more value from your interactions. If you haven’t set up Amazon Q Developer yet, check out the getting started guide.

Understanding the Impact of Good Prompts

The rapid adoption of AI technologies makes prompt engineering skills essential for today’s developers. McKinsey’s latest global survey reveals that 65% of organizations regularly use generative AI, nearly double from their previous survey. When developers master prompt engineering, they’re 25-30% more likely to complete complex tasks within given timeframes.

What Makes an Effective Prompt?

  • Specific Request: State exactly what you need
  • Clear Background: Describe your project, requirements, and constraints
  • Additional Context: Provide code, configuration, or other additional context
  • Expected Output: Specify how you want the information presented

Here’s how this works in practice:

Poor prompt:

How do I deploy a container on AWS?

Effective prompt:


I need to deploy a containerized Node.js e-commerce application that handles 
50,000 daily users with peak loads during promotional events.
Requirements:
- High availability across multiple regions
- MongoDB for persistence
- Auto-scaling capabilities

Please provide:
1. AWS architecture diagram
2. List of required services with configurations
3. Security best practices
4. Operational monitoring recommendations

Common Patterns to Avoid

Short or Vague Requests:

  • Add Docs
  • Make this better
  • Check this
'Add docs' simple prompt with generic response.

Not much to go on here. Amazon Q Developer will likely provide generic documentation.

'Check this' simple prompt with generic response.

Another vague prompt with a generic response.

Overly Broad Questions:

  • How do I use AWS?
  • What's the best practice?
  • Help with Lambda
Image showing the Amazon Q Developer IDE Chat panel where the user entered the vague prompt: 'Help with Lambda'. Amazon Q Developer responds by asking clarifying questions.

The prompt is so vague that Amazon Q Developer responds by asking clarifying questions.

Image showing the Amazon Q Developer chat pane where the user entered the prompt: "Create a Lambda function that processes S3 events."

The more specific prompt allows Amazon Q Developer to provide a more precise response.

Remember: The quality of information you receive directly correlates with the quality of the information you provide.

Proven Techniques for Better Results

To help you apply these principles consistently, I’ve developed a template structure that incorporates all the key elements of an effective prompt. This framework can be adapted for various scenarios and serves as a starting point for your interactions with Amazon Q Developer. While Amazon Q Developer will fill in some parts of this context (see the next post in this series), you just need to make sure this information is available.

These are the principles demonstrated in the template:

  • Technical Context Requirements
    1. Specify your technology stack and versions
    2. Include environment details
    3. Mention compliance requirements
    4. Define scale expectations
  • Example Specifications
    1. Include relevant code snippets
    2. Paste error messages
    3. Reference configuration files
    4. Show current architecture
  • Output Format Guidelines
    1. Request specific documentation formats
    2. Ask for diagrams when needed
    3. Specify code language preferences
    4. Indicate level of detail needed
Image showing the Amazon Q Developer chat panel with the user submitted prompt: "Document the requirements for an application that will process images. Format as a technical requirements document using markdown markup. Output as a single markdown code-block." The response is much more detailed, and aligns with the user's request.

The specification of the output format ensure the response is what you expect.

Quick Reference Prompt Template

Use this template to structure your prompts:


[Business Context] 
- Project description: 
- Performance requirements: 
- Compliance needs: 
- Scale expectations: 

[Technical Details] 
- Current technology stack: 
- Versions/dependencies: 
- Technical constraints: 
- Environment details: 

[Specific Request] 
- Task description: 
- Expected outcome: 
- Special considerations: 

[Output Format] 
- Desired format: 
- Level of detail: 
-  Examples needed: 
- Additional requirements:

Best Practices for Daily Use

Successfully working with Amazon Q Developer requires consistent application of proven practices. These guidelines, developed through extensive customer interactions, will help you maximize the value of your AI-assisted development experience.

  • Start with clear business objectives
  • Include relevant technical constraints
  • Specify performance requirements
  • Request specific output formats
  • Provide examples when possible

Through extensive customer interactions, we’ve found that following these practices consistently produces better results and reduces the need for follow-up clarification.

Take Action Now

Additional Resources

What’s Next?

In the next part of this series, we’ll explore advanced context management in Amazon Q Developer and dive into the new prompt catalog features. You’ll learn how to:

  • Build and maintain context across multiple interactions
  • Use the prompt catalog effectively
  • Handle complex, multi-step development tasks
  • Optimize responses for your specific use cases

Stay tuned, and start applying these techniques today to transform how you build on AWS!

About the author:

Will Matos

Will Matos is a Principal Specialist Solutions Architect at AWS, revolutionizing developer productivity through Generative AI, AI-powered chat interfaces, and code generation. With 25 years of tech experience, he collaborates with product teams to create intelligent solutions that streamline workflows and accelerate software development cycles. A thought leader engaging early adopters, Will bridges innovation and real-world needs.

Revolutionizing agricultural knowledge management using a multi-modal LLM: A reference architecture

Post Syndicated from Nitin Eusebius original https://aws.amazon.com/blogs/architecture/revolutionizing-agricultural-knowledge-management-using-a-multi-modal-llm-a-reference-architecture/

Handwritten documents are still an important form of data capture in agribusiness. Paper-based handwritten documents can be the result of business culture, lack of internet connectivity, lack of mobile devices or computers, or environmental conditions in the field or in an industrial setting. Because of the physical nature of the document, there might be a delay in transcription or even no transcription into a digital system for enterprise reporting, causing critical information to be unavailable. Using generative AI, handwritten notes can be scanned to record and analyze the document and establish automated workflows for product procurement, the supply chain, and entry into customer relationship management (CRM), enterprise resource planning (ERP), and farm management information systems (FMIS).

Multi-modal large language models (LLMs) are transforming the agriculture industry by integrating diverse data types such as text, images, video, and audio. This approach enhances AI’s understanding and decision-making in farming contexts. For example, a multi-modal LLM can analyze images to identify crop issues, then generate targeted recommendations for irrigation or pest control. Combining handwritten documents and satellite imagery with the power of LLMs can lead to better crop analytics and better yields.

In this blog post, we introduce a reference architecture that offers an intelligent document digitization solution that converts handwritten notes, scanned documents, and images into editable, searchable, and accessible formats. Powered by Anthropic’s Claude 3 on Amazon Bedrock, the solution uses the sophisticated vision capabilities of LLMs to process a wide range of visual formats, preserving the original formatting while extracting text, tables, and images. This enables businesses to digitize their knowledge bases, facilitate seamless collaboration, and integrate the digitized content into their existing digital workflows, enhancing productivity and unlocking the full potential of their information assets.

A comprehensive solution and reference architecture

This reference architecture helps agricultural companies to automatically capture, analyze, and process handwritten notes and images with data and reports that are generated by individuals working in farm fields. This is an example of how to create an end-to-end solution to ingest these documents in image format with Amazon Bedrock. The processed information can be consumed by downstream systems such as CRM, ERP, and FMIS to make better data driven decisions.

The solution uses Anthropic’s Claude 3 multi modal model hosted in Amazon Bedrock. Amazon Bedrock is a fully managed service that offers a choice of high-performing foundation models (FMs) from leading AI companies through a single API, along with a broad set of capabilities to build generative AI applications with security, privacy, and responsible AI. Claude is Anthropic’s state-of-the-art LLM that offers important features for enterprises such as advanced reasoning, generating text from images, code generation, and multilingual processing. Claude 3 models have sophisticated vision capabilities and can process a wide range of visual formats, including photos, charts, graphs and technical diagrams. You can also use other models such as Llama 3.2 11B and 90B, which also support vision tasks.

The following diagram illustrates the reference solution.

Revolutionizing agricultural knowledge management using a multi-modal LLM: A reference architecture

The process includes the following steps:

  1. A field worker uploads handwritten notes in an image format using a static website on their mobile device. The static website is accessed through Amazon CloudFront and hosted in Amazon Simple Storage Service (Amazon S3).
  2. The worker is securely authenticated using Amazon Cognito.
  3. After the worker is authenticated, the uploaded handwritten notes are sent to Amazon Bedrock for processing using Amazon API Gateway.
  4. An AWS Lambda function stores and reads the image from Amazon S3. It sends the uploaded image and associated prompt information to Anthropic’s Claude 3 hosted in Amazon Bedrock.
  5. Anthropic’s Claude 3 processes the image. It recognizes the handwritten text and analyzes the converted text based on the given prompt.
  6. The converted digital text and analyzed information provided by Anthropic’s Claude 3 are stored in Amazon DynamoDB for further downstream processing.
  7. The field worker uses an app to access the converted digital text and newly processed information stored in Amazon DynamoDB through API Gateway.
  8. The processed information is published to Amazon Simple Notification Service (Amazon SNS) and is consumed by downstream systems.
  9. The field worker’s location details and processed image information are consumed by two different Amazon Simple Queue Service (Amazon SQS) queues to be stored in downstream systems.
  10. The downstream systems can include CRM, FMS, and FMIS.

Additionally, using this solution, geospatial information such as GPS and GIS information can be sent to the FMIS. This can help farmers in many ways including crop monitoring, soil health and nutrient management, pest control, water management, farm mapping, and much more.

Best practices and implementation guidelines

To implement a production-ready system, it’s important to consider the following best practices.

Responsible AI: Deployment of customer facing generative AI solutions raises concerns about responsible AI practices. To mitigate risks such as biased outputs, exposure of sensitive information, or misuse for malicious purposes, it’s crucial to implement robust safeguards and validation mechanisms. Amazon Bedrock Guardrails is a set of tools and services provided by AWS that you can use to implement safeguards and responsible AI practices when building applications with generative AI models.

Security: Follow secure coding practices throughout the development lifecycle to minimize vulnerabilities. Protect your web applications from common exploits by integrating with AWS WAF. The OWASP Top 10 for Large Language Model Applications is a set of guidelines that address the unique security risks associated with generative AI solutions. It covers vulnerabilities such as model inversion, membership inference, and adversarial attacks—all of which can compromise the confidentiality, integrity, and availability of LLMs.

Observability: Monitor all layers of a generative AI solution, including the application, prompt, LLM, knowledgebase, and response provided by the LLM. You can monitor health and performance using Amazon CloudWatch.

LLMOps: Implementing LLM operations (LLMOps) will help to scale your GenAI solutions. See FMOps/LLMOps: Operationalize generative AI and differences with MLOps for additional information.

Conclusion

In this post, we introduced a reference architecture for an intelligent document digitization solution in agriculture. This system uses Amazon Bedrock and the multi-modal capabilities of LLMs such as Anthropic’s Claude 3 to transform handwritten notes and multi-modal data into searchable, digital formats. We explored how this architecture bridges the gap between traditional field documentation and modern digital systems, enhancing data accessibility and decision-making in agribusiness.

The possibilities for customization and expansion are vast. For specific use cases, you can fine-tune the multi-modal model on your unique agricultural business data. You can also implement a combination of multi-modal processing and a specialized knowledge base using Amazon Bedrock Knowledge Bases, further enhancing the system’s accuracy and relevance.


About the Authors

AWS Transform for .NET, the first agentic AI service for modernizing .NET applications at scale

Post Syndicated from Prasad Rao original https://aws.amazon.com/blogs/aws/aws-transform-for-net-the-first-agentic-ai-service-for-modernizing-net-applications-at-scale/

I started my career as a .NET developer and have seen .NET evolve over the last couple of decades. Like many of you, I also developed multiple enterprise applications in .NET Framework that ran only on Windows. I fondly remember building my first enterprise application with .NET Framework. Although it served us well, the technology landscape has significantly shifted. Now that there is an open source and cross-platform version of .NET that can run on Linux, these legacy enterprise applications built on .NET Framework need to be ported and modernized.

The benefits of porting to Linux are compelling: applications cost 40 percent less to operate because they save on Windows licensing costs, run 1.5–2 times faster with improved performance, and handle growing workloads with 50 percent better scalability. Having helped port several applications, I can say the effort is worth the rewards.

However, porting .NET Framework applications to cross-platform .NET is a labor-intensive and error-prone process. You have to perform multiple steps, such as analyzing the codebase, detecting incompatibilities, implementing fixes while porting the code, and then validating the changes. For enterprises, the challenge becomes even more complex because they might have hundreds of .NET Framework applications in their portfolio.

At re:Invent 2024, we previewed this capability as Amazon Q Developer transformation capabilities for .NET to help port your .NET applications at scale. The experience is available as a unified web experience for at-scale transformation and within your integrated development environment (IDE) for individual project and solution porting.

Now that we’ve incorporated your valuable feedback and suggestions, we’re excited to announce today the general availability of AWS Transform for .NET. We’ve also added new capabilities to support projects with private NuGet packages, port model-view-controller (MVC) Razor views to ASP .NET Core Razor views, and execute the ported unit tests.

I’ll expand on the key new capabilities in a moment, but let’s first take a quick look at the two porting experiences of AWS Transform for .NET.

Large-scale porting experience for .NET applications
Enterprise digital transformation is typically driven by central teams responsible for modernizing hundreds of applications across multiple business units. Different teams have ownership of different applications and their respective repositories. Success requires close coordination between these teams and the application owners and developers across business units. To accelerate this modernization at scale, AWS Transform for .NET provides a web experience that enables teams to connect directly to source code repositories and efficiently transform multiple applications across the organization. For select applications requiring dedicated developer attention, the same agent capabilities are available to developers as an extension for Visual Studio IDE.

Let’s start by looking at how the web experience of AWS Transform for .NET helps port hundreds of .NET applications at scale.

Web experience of AWS Transform for .NET
To get started with the web experience of AWS Transform, I onboard using the steps outlined in the documentation, sign in using my credentials, and create a job for .NET modernization.

Create a new job for .NET Transformation

AWS Transform for .NET creates a job plan, which is a sequence of steps that the agent will execute to assess, discover, analyze, and transform applications at scale. It then waits for me to set up a connector to connect to my source code repositories.

Setup connector to connect to source code repository

After the connector is in place, AWS Transform begins discovering repositories in my account. It conducts an assessment focused on three key areas: repository dependencies, required private packages and third-party libraries, and supported project types within your repositories.

Based on this assessment, it generates a recommended transformation plan. The plan orders repositories according to their last modification dates, dependency relationships, private package requirements, and the presence of supported project types.

AWS Transform for .NET then prepares for the transformation process by requesting specific inputs, such as the target branch destination, target .NET version, and the repositories to be transformed.

To select the repositories to transform, I have two options: use the recommended plan or customize the transformation plan by selecting repositories manually. For selecting repositories manually, I can use the UI or download the repository mapping and upload the customized list.

select the repositories to transform

AWS Transform for .NET automatically ports the application code, builds the ported code, executes unit tests, and commits the ported code to a new branch in my repository. It provides a comprehensive transformation summary, including modified files, test outcomes, and suggested fixes for any remaining work.

While the web experience helps accelerate large-scale porting, some applications may require developer attention. For these cases, the same agent capabilities are available in the Visual Studio IDE.

Visual Studio IDE experience of AWS Transform for .NET
Now, let’s explore how AWS Transform for .NET works within Visual Studio.

To get started, I install the latest version of AWS Toolkit extension for Visual Studio and set up the prerequisites.

I open a .NET Framework solution, and in the Solution Explorer, I see the context menu item Port project with AWS Transform for an individual project.

Context menu for Port project with AWS Transform in Visual Studio

I provide the required inputs, such as the target .NET version and the approval for the agents to autonomously transform code, execute unit tests, generate a transformation summary, and validate Linux-readiness.

Transformation summary after the project is transformed in Visual Studio

I can review the code changes made by the agents locally and continue updating my codebase.

Let’s now explore some of the key new capabilities added to AWS Transform for .NET.

Support for projects with private NuGet package dependencies 
During preview, only projects with public NuGet package dependencies were supported. With general availability, we now support projects with private NuGet package dependencies. This has been one of the most requested features during the preview.

The feature I really love is that AWS Transform can detect cross-repository dependencies. If it finds the source code of my private NuGet package, it automatically transforms that as well. However, if it can’t locate the source code, in the web experience, it provides me the flexibility to upload the required NuGet packages.

AWS Transform displays the missing package dependencies that need to be resolved. There are two ways to do this: I can either use the provided PowerShell script to create and upload packages, or I can build the application locally and upload the NuGet packages from the packages folder in the solution directory.

Upload packages to resolve missing dependencies

After I upload the missing NuGet packages, AWS Transform is able to resolve the dependencies. It’s best to provide both the .NET Framework and cross platform .NET versions of the NuGet packages. If the cross platform .NET version is not available, then at a minimum the .NET Framework version is required for AWS Transform to add it as an assembly reference and proceed for transformation.

Unit test execution
During preview, we supported porting unit tests from .NET Framework to cross-platform .NET. With general availability, we’ve also added support for executing unit tests after the transformation is complete.

After the transformation is complete and the unit tests are executed, I can see the results in the dashboard and view the status of the tests at each individual test project level.

Dashboard after successful transformation in web showing exectuted unit tests

Transformation visibility and summary
After the transformation is complete, I can download a detailed report in JSON format that gives me a list of transformed repositories, details about each repository, and the status of the transformation actions performed for each project within a repository. I can view the natural language transformation summary at the project level to understand AWS Transform output with project-level granularity. The summary provides me with an overview of updates along with key technical changes to the codebase.

detailed report of transformed project highlighting transformation summary of one of the project

Other new features
Let’s have a quick look at other new features we’ve added with general availability:

  • Support for porting UI layer – During preview, you could only port the business logic layers of MVC applications using AWS Transform, and you had to port the UI layer manually. With general availability, you can now use AWS Transform to port MVC Razor views to ASP.NET Core Razor views.
  • Expanded connector support – During preview, you could connect only to GitHub repositories. Now with general availability, you can connect to GitHub, GitLab, and Bitbucket repositories.
  • Cross repository dependency – When you select a repository for transformation, dependent repositories are automatically selected for transformation.
  • Download assessment report – You can download a detailed assessment report of the identified repositories in your account and private NuGet packages referenced in these repositories.
  • Email notifications with deep links – You’ll receive email notifications when a job’s status changes to completed or stopped. These notifications include deep links to the transformed code branches for review and continued transformation in your IDE.

Things to know
Some additional things to know are:

  • Regions – AWS Transform for .NET is generally available today in the Europe (Frankfurt) and US East (N. Virginia) Regions.
  • Pricing – Currently, there is no additional charge for AWS Transform. Any resources you create or continue to use in your AWS account using the output of AWS Transform will be billed according to their standard pricing. For limits and quotas, refer to the documentation.
  • .NET versions supported – AWS Transform for .NET supports transforming applications written using .NET Framework versions 3.5+, .NET Core 3.1, and .NET 5+, and the cross-platform .NET version, .NET 8.
  • Application types supported – AWS Transform for .NET supports porting C# code projects of the following types: console application, class library, unit tests, WebAPI, Windows Communication Foundation (WCF) service, MVC, and single-page application (SPA).
  • Getting started – To get started, visit AWS Transform for .NET User Guide.
  • Webinar – Join the webinar Accelerate .NET Modernization with Agentic AI to experience AWS Transform for .NET through a live demonstration.

– Prasad


How is the News Blog doing? Take this 1 minute survey!

(This survey is hosted by an external company. AWS handles your information as described in the AWS Privacy Notice. AWS will own the data gathered via this survey and will not share the information collected with survey respondents.)

How to enhance your application resiliency using Amazon Q Developer

Post Syndicated from Dr. Rahul Sharad Gaikwad original https://aws.amazon.com/blogs/devops/how-to-enhance-your-application-resiliency-using-amazon-q-developer/

“Everything fails, all the time” – Werner Vogels, Amazon.com CTO

In today’s digital landscape, designing applications with resilience in mind is crucial. Resiliency is the ability of applications to handle failures gracefully, adapt to changing conditions, and recover swiftly from disruptions. By integrating resilience into your application architecture, you can minimize downtime, mitigate the impact of failures, and ensure continuous availability and performance for end-users.

Amazon Q Developer, a generative AI-powered assistant for software development lifecycle (SDLC), helps design resilient architectures and enhance application availability. It recommends best practices, analyzes code, and identifies potential failure points, serving as an expert companion to strengthen application architecture and boost system availability through the following key resiliency practices.

  • Resilient design pattern recommendations: Access tailored design patterns like distributed systems, microservices, and serverless architectures. Amazon Q offers recommendations across redundancy, robust failovers, and circuit breakers to boost resilience in your environment.
  • Disaster Recovery planning: Amazon Q offers expert guidance on comprehensive disaster recovery (DR), including efficient backups, systematic restorations, strategic data replication, and seamless failovers to ensure rapid recovery from disruptions with minimal impact.
  • Customized Resiliency testing frameworks: Create custom templates to simulate diverse failure scenarios, such as network degradation and infrastructure outages. This streamlines thorough resilience verification across your systems.
  • Failure mode evaluation: Use Amazon Q to conduct comprehensive Failure Mode and Effects Analysis (FMEA) identifying infrastructure vulnerabilities and assessing their impact. Amazon Q then ranks these issues by severity, enabling you to prioritize and address the most critical risks to protect your production environment.

In the following sections, we will demonstrate how Amazon Q improves the resiliency of a foundational application architecture.

Prerequisites

To begin using Amazon Q, the following are required:

Application Overview

We have a three-tier web application shown below that is running on AWS in a single Availability Zone (AZ). The architecture consists of Application Layer hosted on Amazon Elastic Kubernetes Service (Amazon EKS) cluster with two Amazon Elastic Compute Cloud (Amazon EC2) nodes in a single-AZ and the Data Layer uses Amazon Relational Database Service (Amazon RDS) instance deployed in single-AZ configuration. The architecture is functional but has several limitations. It poses a single point of failure and offers limited application availability with no fault tolerance. High response times may occur because there is no caching layer in front of the database. Additionally, the lack of auto-scaling can lead to resource contention.

A three-tier web application basic architecture running on AWS in a single Availability Zone.

Basic Application Overview

Enhance Application Resiliency

Let’s explore how Amazon Q helps incorporate resiliency best practices that enhance system availability in our basic application architecture.

Resilient architecture recommendations

The initial architecture faced challenges with reliability, performance and scalability, largely due to its single-point of failure and lacked redundancy. To address this, we described the existing application design and its challenges to Amazon Q using a natural language prompt to seek resiliency recommendations.

Prompt for improving the architecture design:

I have manually setup an application that runs within an EKS cluster on two EC2 nodes in single AZ. My application is not highly available and scalable. It talks to an RDS database which is single AZ. However, there is high response times from database. Provide me only the recommendations to re-design this application architecture at each layer that will addresses all these issues.

Amazon Q offering resiliency architecture recommendations

Amazon Q offering resiliency architecture recommendations

Amazon Q analyzed the provided context and recommended improvements such as introducing Multi-AZ deployments for high availability, adding auto-scaling groups for elasticity, and incorporating caching layers to enhance performance. These targeted recommendations helped redesign the architecture to be more resilient and scalable, directly addressing the initial shortcomings.

Disaster Recovery (DR) recommendations to improve the architecture

To further enhance resiliency, we prompted Amazon Q for disaster recovery (DR) recommendations. We asked for guidance aligned with the AWS Well-Architected Framework. This built upon the previously improved architecture design.

Prompt for recommendations on Disaster Recovery (DR) and architecture based on RTO/RPO

Based on the above improvements on AWS architecture design, share recommendations for Disaster Recovery (DR) based on AWS Well Architected Framework

Optionally, we can use advanced prompts like the below with additional context:

Please provide a recommendations to redesign my application that is running on an EKS cluster with two EC2 nodes and a single-AZ RDS database, addressing high database latency, low availability, and scalability issues. Suggest improvements across all architectural layers including presentation tier, application tier and data tier to enhance performance, resiliency, and scalability. Also, recommend DR strategies aligned with the AWS Well-Architected Framework focusing on resilience, data protection, and recovery.

Amazon Q tailoring recommendations based on business requirements using  AWS Well-Architected Framework

Amazon Q tailoring recommendations based on business requirements using AWS Well-Architected Framework

Amazon Q provided detailed DR strategies. These included multi-region configuration, backup and restore procedures, and best practices for meeting specific Recovery Time Objective (RTO) and Recovery Point Objective (RPO) requirements.

Prepare DR strategy based on RTO and RPO requirements:

Diving further, asking for a specific disaster recovery strategy that meets the application RTO requirements of 2 hours and RPO requirements of 30 minutes.

Prompt for DR strategy based on RTO/RPO values

Which DR strategy should I use if my RTO is less than 2 hours and RPO is less than 30 minutes?

Amazon Q recommending disaster recovery strategy

Amazon Q recommending disaster recovery strategy

Amazon Q recommended a Pilot light approach, detailing the setup and components needed to achieve the specified disaster recovery objectives.

Define resiliency testing workflow, identify key metrics and tools

As we incorporate resiliency best practices into the application architecture, its is important to employ a resiliency test workflow to ensure application’s resiliency requirements are met. To do this, we are asking for guidance to define an end-to-end resiliency testing process workflow. We also want to identify the key metrics and tools needed to test the resilience of each AWS service involved in the architecture.

Prompt for defining the resiliency testing workflow:

Define the end-to-end resiliency testing process workflow. Also, identify the key metrics and tools that should be used to test the resilience of each AWS service involved in the improved architecture design.

Amazon Q offering resiliency testing best practices and tools

Amazon Q offering resiliency testing best practices and tools

Amazon Q offers a step-by-step approach to define resiliency testing experiments and prepare the environment for testing.

Failure mode evaluation to prioritize resiliency tests

Failure Mode and Effects Analysis (FMEA) can further assist with designing the resiliency tests. It is a proactive method to identify potential failures in processes or systems, assess their impact, and prioritize critical issues. It evaluates failure modes across hardware, software, human factors, and external events, enabling teams to develop strategies for prevention, detection, and mitigation, ultimately enhancing system resilience.

Leveraging Amazon Q, we requested a comprehensive FMEA report that includes components, cause, effect and their respective Risk Priority Numbers (RPN). RPNs are calculated by multiplying three key factors: Severity (S), Occurrence (O), and Detection (D). It helps organizations understand and prioritize which risks to address first.

Prompt for designing the FMEA template and scoring:

Create the FMEA in tabular format with scoring for improved architecture design above keeping in mind the RTO/RPO values and provide the steps for execution as well.

Amazon Q assisting with systematic risk assessment and FMEA report

Amazon Q assisting with systematic risk assessment and FMEA report

Amazon Q intelligently incorporated previously defined RTO and RPO requirements to identify critical failure scenarios and calculated RPN for each potential incident.

Enhanced Architecture Implementing Resiliency Best Practices

After identifying the key pain points in our original architecture such as single points of failure, limited scalability, and lack of automated recovery, we leveraged Amazon Q to analyze our architecture to get targeted recommendations to elevate the resiliency. By describing our requirements and challenges to Amazon Q, we received actionable guidance on AWS best practices and service configurations, which we then implemented to transform our infrastructure for high resilience and availability.

Resilient Application Architecture

Resilient Application Architecture

The original Application Layer was running in a single Availability Zone without auto-scaling, leading to potential downtime and performance bottlenecks. Amazon Q recommended distributing Amazon EKS worker nodes across multiple Availability Zones and enabling the Cluster Autoscaler to dynamically adjust node capacity based on traffic patterns. Additionally, it suggested implementing horizontal pod autoscaling within Amazon EKS to automatically scale application resources according to CPU utilization and custom metrics. Following these recommendations, we deployed Amazon EKS worker nodes across three Availability Zones, configured Cluster Autoscaler and horizontal pod autoscaling, and integrated an Application Load Balancer, to intelligently distribute incoming traffic. These changes significantly improved scalability, fault tolerance, and performance.

The Data Layer initially relied on a single-instance Amazon RDS deployment, which posed a risk of downtime and limited read performance. Upon review, Amazon Q advised implementing a Multi-AZ Amazon RDS configuration to enable automated failover and improve availability. It also recommended deploying read replicas to offload read-heavy workloads and enhance performance. Furthermore, Amazon Q suggested adding a Multi-AZ Amazon ElastiCache for Redis to reduce database load and speed up data access. We incorporated these recommendations, resulting in a more resilient and performant data layer capable of handling failover scenarios and scaling read operations efficiently.

The Presentation Layer lacked an optimized content delivery mechanism and comprehensive security controls. Amazon Q recommended integrating Amazon CloudFront as a content delivery network to accelerate the delivery of static content and reduce load on application servers. It also suggested deploying AWS WAF to protect against common web exploits. To improve operational visibility, Amazon Q emphasized the importance of comprehensive monitoring using Amazon CloudWatch, combining logs, metrics, and traces for rapid issue detection and resolution. Implementing these recommendations enhanced both the performance and security posture of the presentation layer.

Conclusion

Amazon Q Developer transforms how teams build resilient applications by serving as your expert companion throughout the development journey. Its guidance helps create systems that excel in resilience, scalability, and availability—critical factors for today’s demanding digital landscape. Amazon Q goes beyond theoretical advice by providing practical, step-by-step implementation guidance. In the above, we’ve witnessed how Amazon Q’s expertise can transform basic architectures into robust, failure-resistant systems. Its recommendations such as Multi-AZ redundancy, elastic scaling, strategic caching, and proactive resilience testing create applications that maintain performance and availability even during significant disruptions.

Ready to strengthen your applications against unexpected challenges? Harness Amazon Q’s capabilities to create resilient infrastructure that consistently delivers for your customers, regardless of conditions. Unlock the full potential of your AWS infrastructure and deliver uninterrupted service to your customers, today. To learn more about Amazon Q refer to the documentation.

About the authors:

Dr. Rahul Sharad Gaikwad

Dr. Rahul is a Solutions Architect at AWS, driving cloud innovation through migration and modernization of customer workloads. A Generative AI and DevOps enthusiast, he architects cutting-edge solutions and is recognized as an APJC HashiCorp Ambassador. He earned his Ph.D. in AIOps and he is recipient of the Man of Excellence Award , Indian Achievers’ Award , Best PhD Thesis Award, Research Scholar of the Year Award and Young Researcher Award.

Janardhan Molumuri

Janardhan Molumuri is a Principal Technical Leader at AWS, comes with over two decades of Engineering leadership experience, advising customers on Cloud Adoption strategies and emerging technologies including generative AI. He has passion for thought leadership, speaking, writing, and enjoys exploring technology trends to solve problems at scale.

AI lifecycle risk management: ISO/IEC 42001:2023 for AI governance

Post Syndicated from Abdul Javid original https://aws.amazon.com/blogs/security/ai-lifecycle-risk-management-iso-iec-420012023-for-ai-governance/

As AI becomes central to business operations, so does the need for responsible AI governance. But how can you make sure that your AI systems are ethical, resilient, and aligned with compliance standards?

ISO/IEC 42001, the international management system standard for AI, offers a framework to help organizations implement AI governance across the lifecycle. In this post, we walk through how ISO/IEC 42001 enables effective AI governance, review the risk management requirements, and explore how you can use threat modeling as a practical technique to meet those expectations.

AI governance

AI governance refers to the organizational structures, policies, and controls that enable AI systems to be used responsibly, ethically, and safely. Governance spans the entire AI lifecycle and includes the following activities:

  • Setting the intended purpose and stakeholder alignment
  • Managing data, models, and deployment risks
  • Designing in explainability, bias mitigation, and traceability
  • Establishing accountability, monitoring, and decommissioning practices

These activities are the foundation of a formal framework that you can use to establish governance processes, identify and manage risk, and implement processes for continuous improvement

AI lifecycle

While ISO 42001 provides a framework for AI governance, ISO/IEC 22989:2022 describes what an AI system is and how it evolves. Governance should be implemented at every stage of the AI lifecycle to manage AI risks effectively. According to the ISO/IEC 22989:2022 standard, an organization’s AI life cycle might include these stages:

  1. Inception: Identifying needs, goals, and feasibility
  2. Design and development: Defining system architecture, data flows, and training models
  3. Verification and validation: Testing and confirming that the system meets requirements and performs as intended
  4. Deployment: Releasing the system into its operational environment
  5. Operation and monitoring: Running the system, logging activity, and monitoring performance and outcomes
  6. Re-evaluation: Assessing whether the system continues to meet objectives under changing conditions
  7. Retirement: Decommissioning the system and addressing long-term data and access risks

Understanding the AI lifecycle, shown in Figure 1 that follows, is critical for identifying and mitigating AI risks. While these seven stages are provided directly in ISO 22989:2022, your organization might define its AI lifecycle stages differently to suit its business context. We refer to these stages as we explore the components of an AI management system, from initial AI system scoping, through threat monitoring and risk assessment, to monitoring the established governance program.

Figure 1: Example of AI system lifecycle model stages and high-level processes based on ISO/IEC 22989:2022

Figure 1: Example of AI system lifecycle model stages and high-level processes based on ISO/IEC 22989:2022

Risk management in ISO/IEC 42001:2023

After an organization has identified and assessed AI risks (Clause 6.1 of ISO/IEC 42001:2023), operational controls to mitigate those risks must be implemented (Clause 8.2), and those controls and the AI system itself should be continuously monitored, documented, and improved (Clauses 9 and 10). AI impact assessments (AIIAs) are critical in high-risk use cases, complementing baseline risk assessments by focusing on societal, ethical, and legal impacts. AIIAs are like data protection impact assessments (DPIAs) for high-risk personal data processing under many privacy regulations. DPIAs are specifically designed to assess risks to individuals’ privacy and data protection rights under laws such as the GDPR. While AIIAs help organizations maintain responsible AI governance, DPIAs can be used in parallel to help verify that AI systems comply with data protection laws, together providing a holistic view of risks and safeguards across both ethical and legal dimensions.

You are free to select the AIIA tools or methodologies that best fit your use case. Two widely accepted frameworks are:

  • ISO 31000: A general-purpose enterprise risk management standard that helps identify, evaluate, and treat risks in a structured and repeatable way. It aligns well with organizations seeking to embed AI risk into their broader enterprise risk management (ERM) programs.
  • NIST AI Risk Management Framework (AI RMF): A NIST framework specifically designed for AI systems. It introduces tailored concepts such as explainability, robustness, fairness, and accountability, with actionable guidance organized into four core functions: Map, measure, manage, and govern.

ISO 42001 provides structured methods to conduct risk and impact assessments. Threat modeling tools such as:

  • STRIDE (spoofing, tampering, repudiation, information disclosure, denial of service, and elevation of privilege). STRIDE aims to make sure that a system meets security requirements for confidentiality, integrity and availability.
  • DREAD (damage potential, reproducibility, exploitability, affected users, and discoverability) is a framework that can assess severity of individual threats.
  • OWASP (Open Worldwide Application Security Project) for machine learning (ML) enables analysis of AI system vulnerabilities, adversarial risks, and privacy threats.

Trustworthy AI is the result of strategic governance, structured methodologies, and technical analysis.

Figure 2 that follows shows the tiered structure of AI risk governance, moving from high-level governance to detailed technical assessments. On the left side, there’s a downward flow representing the increasing depth of controls, while the right side shows an upward scale indicating escalating AI risks.

  • At the top layer, ISO/IEC 42001:2023 defines formal requirements for AI governance, including risk assessment mandates, control implementation, and lifecycle oversight.
  • The middle layer features widely adopted risk assessment methodologies and frameworks, such as ISO 31000 and the NIST AI Risk Management Framework (RMF), which provide structured methods to identify, evaluate, and mitigate AI risks.
  • At the base, are detailed threat modeling tools—including STRIDE, DREAD, PASTA, LINDDUN, and OWASP for ML—that support deep analysis of AI systems for vulnerabilities related to security, privacy, data protection, and adversarial threats.

Together, these layers form a comprehensive approach to AI risk governance, aligning strategic oversight with operational and technical defenses.

Figure 2: A layered approach to AI risk management aligned with ISO/IEC 42001. ISO/IEC 42001 defines AI governance for responsible AI

Figure 2: A layered approach to AI risk management aligned with ISO/IEC 42001. ISO/IEC 42001 defines AI governance for responsible AI

Threat modeling for AI risk identification

Threat modeling identifies AI lifecycle technical risks such as exploit surfaces, adversarial threats, and misuse scenarios that complement organizational risk analysis and impact assessments. This post takes a broader AI lifecycle view, showing you how threat modeling complements other risk strategies within the context of ISO/IEC 42001:2023. Additionally, AWS has published AI threat modeling guidance, such as:

The following table is an example STRIDE threat model for a generative AI resource using AWS services by AI lifecycle stage and risk type. This illustrates technical threat remediation through AWS cloud native governance features.

STRIDE category Example threat Lifecycle stage Risk type AWS feature for governance
Spoofing A fake identity uses the AI system to generate phishing emails or misinformation Inception Security AWS IAM Identity Center and Amazon Cognito for multi-factor authentication (MFA), Amazon GuardDuty for threat detection
Tampering A malicious prompt injection or API injection alters the model behavior or bypasses filters Design development Integrity Amazon Bedrock Guardrails, Amazon API Gateway and AWS WAF rules, AWS CloudTrail for input auditing
Repudiation Users deny prompt activity or content creation, and there’s no logging Verification and validation Accountability CloudTrail, Amazon Bedrock invocation logs, Amazon SageMaker ML Lineage Tracking for traceability
Information disclosure Sensitive internal data—such as code or personally identifiable information (PII)—accidentally learned and reproduced by the large language model (LLM) Operation and monitoring Privacy, Security SageMaker Clarify, AWS VPC PrivateLink, AWS Key Management Service (AWS KMS) encryption, Amazon Bedrock data handling commitments
Denial of service Bad actors overload the AI endpoint with prompt spam, degrading service Deployment Availability AWS Shield, API rate limiting using API Gateway, auto scaling with SageMaker endpoints
Elevation of privilege An internal user modifies system prompts or updates to override content filters Reevaluation Ethics and access control AWS Identity and Access Management (IAM) roles, Amazon Bedrock Guardrails, AWS Config, service control policies (SCPs)

While STRIDE is used here for illustrative clarity, it’s just one of several threat modeling approaches that can be applied depending on the system context. Other widely recognized methods include:

By integrating these threat modeling practices into ISO/IEC 42001’s risk-based approach, organizations are not just “checking compliance boxes” they’re operationalizing trustworthy, secure, and accountable AI governance throughout the full system lifecycle.

Threat modeling touchpoints across the AI lifecycle

ISO 42001:2023 uses the STRIDE threat modeling framework to align specific security threats to each stage. Each lifecycle stage is associated with particular threat types, relevant Annex references from the ISO standard, and examples of what to monitor.

  • Inception (Annex A.8.1): Focuses on spoofing and fake identity input risks.
  • Design and Development (Annex A.9.1): Linked to tampering threats.
  • Verification and Validation (Annex A.7.1): Concerns around repudiation, such as lack of model decision logs.
  • Deployment (Annex A.5.1): Addresses information disclosure vulnerabilities.
  • Operation and Monitoring (Annex A.10.3): Maps to denial-of-service attacks.
  • Re-evaluation (Annex A.8.6): Highlights risks of privilege escalation.

AI threat modeling isn’t a one-time task but must be applied continuously across each lifecycle stage, supported by ISO 42001’s annexes and STRIDE categories.

Figure 3: An illustration of how organizations can use ISO/IEC 42001:2023 as a structured framework for AI risk management, using threat modeling as a key technique across the AI lifecycle

Figure 3: An illustration of how organizations can use ISO/IEC 42001:2023 as a structured framework for AI risk management, using threat modeling as a key technique across the AI lifecycle

AWS tools for AI governance and risk management

AWS governance service capabilities support the controls required in the Statement of Applicability (SoA) under ISO/IEC 42001. These services and features help organizations operationalize responsible AI practices at scale and align with ISO/IEC 42001’s emphasis on structured, accountable AI lifecycle management.

  • Amazon SageMaker Model Cards: Provides standardized documentation for ML models including purpose, performance, and limitations. In the governance context, model cards help maintain transparency, accountability, and auditability of model behavior and use.
  • Amazon SageMaker Clarify: Detects bias in datasets and models and supports explainability of predictions. This directly supports governance controls related to fairness, non-discrimination, and explainability.
  • Amazon SageMaker Ground Truth: Provides high-quality, human-in-the-loop data labeling workflows. It supports data governance by making sure labeled datasets are accurate, consistent, and traceable.
  • Amazon Bedrock Guardrails: Can be used to define safety filters for generative AI, such as avoiding toxic content or harmful outputs. This facilitates alignment with ethical and content governance policies.
  • AWS CloudTrail and AWS Config: Enable audit logging and continuous monitoring of system changes. These are essential for accountability, traceability, and compliance reporting within AI governance frameworks.
  • AWS Identity and Access Management (IAM), AWS Key Management Service (AWS KMS), and AWS PrivateLink: IAM controls access, AWS KMS provides encryption and key management, and PrivateLink enables private connectivity. These features are critical for enforcing access governance, securing data, and maintaining privacy standards.
  • AWS Generative AI Lens: A part of the AWS Well-Architected Framework tool. It provides structured guidance for evaluating and improving the design of generative AI systems. It helps organizations implement responsible AI practices, manage risks

Conducting AI impact assessments for high risk use cases

While general risk assessments (Clause 6.1 of ISO/IEC 42001) are required for AI systems, ISO/IEC 42001 also calls for AIIAs in situations where the AI system poses high potential impact to individuals, groups, or society. AIIAs should result in a documented report of identified risks associated with the target AI activity, in addition to the severity of potential negative outcomes. These risks should be integrated into the AI management system (AIM) and monitored over time. Several stakeholders and specialists might need to provide input in the assessment process, such as legal, risk, compliance, data management, and security teams. Identified risks should be mitigated where possible, and a determination made about whether the residual risk is acceptable.

AIIAs help answer questions such as:

  • Is the AI use justifiable, ethical, and proportionate?
  • Could the system cause discrimination, exclusion, or loss of rights?
  • What safeguards should be built to protect affected people?

AIIA is required:

  • If the system makes or informs decisions that materially affect people
  • If the system is deployed in sensitive domains (such as healthcare, finance, or public services)
  • If risks to fundamental rights, fairness, or trust are flagged during initial risk assessments

AIAA should cover:

  • Purpose and scope of the AI system
  • Stakeholder and impact mapping
  • Legal, ethical, and social risk evaluation
  • Transparency and recourse mechanisms
  • Recommendations for mitigation

AIIA process workflow

Figure 4 that follows illustrates a generic AIIA workflow that includes initiating, scoping, assessing impact, planning mitigation, and documenting the outcome to evaluate how an AI system can affect individuals, groups, and society. Organizations can tailor this process to the AI system context, business objectives, and compliance requirements for their use case.

Figure 4: Sample prescriptive process with key phases on conducting an AIIA

Figure 4: Sample prescriptive process with key phases on conducting an AIIA

AIIA outcome

AIIA reports should capture the core purpose of the exercise: to evaluate how an AI system might affect individuals, communities, and society at large and to make sure that potential risks are addressed through appropriate mitigation strategies. While formats might vary across industries, an AIIA outcome typically includes key sections such as summary of system purpose, a mapping of affected stakeholders, a contextual analysis of legal and social factors, an evaluation of likely impacts (including fairness, bias, and autonomy risks) and a plan for a mitigation, oversight, and monitoring. Governance details such as sign off responsibility and reassessment triggers should also be included.

Whether you’re starting from scratch or adapting an existing template, these foundational elements will help make sure that your documentation supports transparency, accountability, and ethical AI deployment.

Templates:

Mapping AI lifecycle risks to ISO/IEC 42001 controls

After you have identified risks through techniques such as threat modeling and impact assessments, the next step is to make sure that they’re mitigated through the appropriate ISO/IEC 42001 controls. Using the lifecycle stages defined in ISO/IEC 22989:2022, you can map AI risks identified during the threat hunting process to the corresponding ISO/IEC 42001:2023 clauses and Annex A controls. This mapping helps you align your AI development and governance efforts with a standards-based risk framework.

AI lifecycle stage Identified risk Relevant ISO/IEC 42001 clauses Risk mitigation – Annex A controls
Inception Spoofing: Impersonation Clause 4, Clause 5 A.6.1 (Governance roles), A.5.1
Design and development Tampering: Unauthorized changes Clause 6.1, Clause 8.2 A.8.2, A.9.1
Verification and validation Repudiation: No traceability Clause 8.2 A.8.5, A.7.1
Deployment Elevation of privilege: Unauthorized model tweaks Clause 8.2, Clause 9.1 A.10.2, A.6.1
Operation and monitoring Denial of service: System overload Clause 9.1, Clause 10.1 A.8.3, A.10.3
Re-evaluation Drift and new threat vectors Clause 9.3, Clause 10.2 A.10.2, A.6.4
Retirement Information disclosure: Residual risks Clause 8.3, Clause 10.2 A.9.4, A.5.2

Maintaining AI governance

Like most technology risk and governance programs, AI management must be continuously monitored and maintained. ISO 42001 requires an organization to have leadership support and sufficient resources to operate effectively over time. This means that AI governance should be built into every process in the AI development and maintenance journey. AIIAs and threat modeling should be conducted at least annually on existing systems, and prior to the deployment of any new AI function. Policies should be reviewed at least annually and after major change to the AI system. Internal audits should review and monitor compliance with controls continuously, and organizations seeking ISO certification will require annual external audits. Progress toward governance goals and metrics on the status of known AI risks should be reported to the highest level of leadership in a live dashboard, and incidents of negative outcomes related to AI use should be tracked and analyzed to improve the AI system.

Conclusion

Managing AI risk effectively means aligning technical, organizational, and ethical considerations throughout the AI system lifecycle. ISO/IEC 42001 provides structure and accountability. Threat modeling techniques such as STRIDE, MITRE ATLAS, and OWASP for LLM surface deep technical risks. AWS services and features such as SageMaker Model Cards, SageMaker Clarify, and Amazon Bedrock Guardrails help embed governance into layers of AI development.

By combining technical tools, structured assessments, and standards-driven controls, you can build AI systems that are trustworthy, resilient, and aligned with societal expectations.

For additional guidance on achieving, maintaining, and automating compliance in the cloud, contact AWS Security Assurance Services (AWS SAS) or their account team. AWS SAS is a PCI QSAC and HITRUST Assessor Firm that can help by tying together applicable audit standards to AWS service specific features and functionality. They help you build on frameworks such as ISO 42001, PCI DSS, HITRUST CSF, NIST-CSF and Privacy Framework, SOC 2, HIPAA, ISO 27001 and 27701, and more. In addition, AWS Professional Services can also help you plan and map your compliance journey.

Disclaimer: The risk strategies and threat modeling guidance shared in this blog are intended to provide general direction and practical insight into implementing AI risk management under ISO/IEC 42001:2023. However, organizations are responsible for conducting their own context-specific risk assessments, as mandated by the standard. This blog should not be interpreted as an exhaustive approach to or guarantee of compliance with ISO/IEC 42001.

If you have feedback about this post, submit comments in the Comments section below.

Abdul Javid

Abdul Javid

Abdul is a Senior Security Assurance Consultant and a PECB ISO 42001 Lead Auditor and IAPP Certified AI Governance Professional. He draws on his extensive experience to guide AWS customers on compliance matters. He holds an M.S. in Computer Science from IIT Chicago and numerous certifications from IAPP, AWS, ISO, HITRUST, ISACA, PMI, PCI DSS, and ISC2.

Amber Welch

Amber Welch

Amber is a Senior Privacy Consultant with AWS Security Assurance Services and a PECB-certified ISO 42001 Lead Auditor. With extensive security and privacy management experience across industries, she advises AWS customers on compliance and risk management. She holds an M.A. in English – Technical Communication, CIPM and CIPP-E certifications, and is a thought leader in AI privacy, contributing to the AWS Privacy Reference Architecture.