Post Syndicated from Leah Romm original https://blog.cloudflare.com/building-a-better-internet-with-responsible-ai-bot-principles/
Cloudflare has a unique vantage point: we see not only how changes in technology shape the Internet, but also how new technologies can unintentionally impact different stakeholders. Take, for instance, the increasing reliance by everyday Internet users on AI–powered chatbots and search summaries. On the one hand, end users are getting information faster than ever before. On the other hand, web publishers, who have historically relied on human eyeballs to their website to support their businesses, are seeing a dramatic decrease in those eyeballs, which can reduce their ability to create original high-quality content. This cycle will ultimately hurt end users and AI companies (whose success relies on fresh, high-quality content to train models and provide services) alike.
We are indisputably at a point in time when the Internet needs clear “rules of the road” for AI bot behavior (a note on terminology: throughout this blog we refer to AI bots and crawlers interchangeably). We have had ongoing cross-functional conversations, both internally and with stakeholders and partners across the world, and it’s clear to us that the Internet at large needs key groups — publishers and content creators, bot operators, and Internet infrastructure and cybersecurity companies — to reach a consensus on certain principles that AI bots should follow.
Of course, agreeing on what exactly those principles are will take time and require continued discussion and collaboration, and a policy framework can’t perfectly capture every technical concern. Nevertheless, we think it’s important to start a conversation that we hope others will join. After all, a rough draft is better than a blank page.
That is why we are proposing the following responsible AI bot principles as starting points:
-
Public disclosure: Companies should publicly disclose information about their AI bots;
-
Self-identification: AI bots should truthfully self-identify, eventually replacing less reliable methods, like user agent and IP address verification, with cryptographic verification;
-
Declared single purpose: AI bots should have one distinct purpose and declare it;
-
Respect preferences: AI bots should respect and comply with preferences expressed by website operators where proportionate and technically feasible;
-
Act with good intent: AI bots must not flood sites with excessive traffic or engage in deceptive behavior.
Each principle is discussed in greater detail below. These principles focus on AI bots because of the impact generative AI is having on the Internet, but we have already seen these practices in action with other types of (non-AI) bots as well. We believe these principles will help move the Internet in a better direction. That said, we acknowledge that they are a starting point for this conversation, which requires input from other stakeholders. The Internet has always been a collaborative place for innovation, and these principles should be seen as equally dynamic and evolving.
Since declaring July 1st Content Independence Day, Cloudflare has strived to play a balanced and effective role in safeguarding the future of the Internet in the age of generative AI. We have enabled customers to charge AI crawlers for access or block them with one click, published and enforced our verified bots policy and developed the Web Bot Auth proposal, and unapologetically called out and stopped bad behavior.
While we have recently focused our attention on AI crawlers, Cloudflare has long been a leader in the bot management space, helping our customers protect their websites from unwanted — and even malicious —traffic. We also want to make sure that anyone — whether they’re our customer or not — can see which AI bots are abiding by all, some, or none of these best practices.
But we aren’t ignorant to the fact that companies operating crawlers are also adapting to a new Internet landscape — and we genuinely believe that most players in this space want to do the right thing, while continuing to innovate and propel the Internet in an exciting direction. Our hope is that we can use our expertise and unique vantage point on the Internet to help bring seemingly incompatible parties together and find a path forward — continuing our mission of helping to build a better Internet for everyone.
The following principles are a launchpad for a larger conversation, and we recognize that there is work to be done to address many nuanced perspectives. We envision these principles applying to AI bots but understand that technical complexity may require flexibility. Ultimately, our goal is to emphasize transparency, accountability, and respect for content access and use preferences. If these principles fall short of that — or fail to consider other important priorities — we want to know.
Companies should publicly disclose information about their AI bots. The following information should be publicly available and easy to find:
-
Identity: information that helps external parties identify a bot, e.g., user agent, relevant IP address(es), and/or individual cryptographic identification (more on this below, in Principle #2: Self-identification).
-
Operator: the legal entity responsible for the AI bot, including a point of contact (e.g., for reporting abuse);
-
Purpose: for which purpose the accessed data will be used, i.e., search, AI-input, or training (more on this below, in Principle #3: Declared Single Purpose).
OpenAI is an example of a leading AI company that clearly discloses their bots, complete with detailed explanations of each bot’s purpose. The benefits of this disclosure are apparent in the subsequent principles. It helps website operators validate that a given request is in fact coming from OpenAI and what its purpose is (e.g., search indexing or AI model training). This, in turn, enables website operators to control access to and use of their content through preference expression mechanisms, like robots.txt files.
AI bots should truthfully self-identify. Not only should information about bots be disclosed in a publicly accessible location, this information should also be clearly communicated by bots themselves, e.g., through an HTTP request that conveys the bot’s official user agent and comes from an IP address that the bot claims to send traffic from. Admittedly, this current approach is flawed, as we discuss in more detail below. But until cryptographic verification is more widely adopted, we think relying on user agent and IP verification is better than nothing.
OpenAI’s GPTBot is an example of this principle in action. OpenAI publicly shares the expected full user-agent string for this bot and includes it in its requests. OpenAI also explains this bot’s purpose (“used to make [OpenAI’s] generative AI foundation models more useful and safe” and “to crawl content that may be used in training [their] generative AI foundation models”). And we have observed this bot sending traffic from IP addresses reported by OpenAI. Because site operators see GPTBot’s user agent and IP addresses matching what is publicly disclosed and expected, and they know information about the bot is publicly documented, they can confidently recognize the bot. This enables them to make informed decisions about whether they want to allow traffic from it.
Unfortunately, not all bots uphold this principle, making it difficult for website owners to know exactly which bot operators respect their crawl preferences, much less enforce them. For example, while Anthropic publishes its user agent alone, absent other verifiable information, it’s unclear which requests are truly from Anthropic. And xAI’s bot, grok, does not self-identify at all, making it impossible for website operators to block it. Anthropic and xAI’s lack of identification undermines trust between them and website owners, yet this could be fixed with minimal effort on their parts.
Truthful declaration of user agent and dedicated IP lists have historically been a functional way to verify. But in today’s rapidly-evolving bot climate, bots are increasingly vulnerable to being spoofed by bad actors. These bad actors, in turn, ignore robots.txt, which communicates allow/disallow preferences only on a user agent basis (so, a bad bot could spoof a permitted user agent and circumvent that domain’s preferences).
Ultimately, every AI bot should be cryptographically verified using an accepted standard. This would protect them against spoofing and ensure website operators have the accurate and reliable information they need to properly evaluate access by AI bots. At this time, we believe that Web Bot Auth is sufficient proof of compliance with Principle #2. We recognize that this standard is still in development, and, as a result, this principle may evolve accordingly.
Web Bot Auth uses cryptography to verify bot traffic; cryptographic signatures in HTTP messages are used as verification that a given request came from an automated bot. Our implementation relies on proposed IETF directory and protocol drafts. Initial reception of Web Bot Auth has been very positive, and we expect even more adoption. For example, a little over a month ago, Vercel announced that its bot verification now supports Web Bot Auth. And OpenAI’s ChatGPT agent now signs its requests using Web Bot Auth, in addition to using the HTTP Message Signatures standard.
We envision a future where cryptographic authentication becomes the norm, as we believe this will further strengthen the trustworthiness of bots.
AI bots should have one distinct purpose and declare it. Today, some bots self-identify their purpose as Training, Search, or User Action (i.e., accessing a web page in response to a user’s query).
However, these purposes are sometimes combined without clear distinction. For example, content accessed for search purposes might also be used to train the AI model powering the search engine. When a bot’s purpose is unclear, website operators face a difficult decision: block it and risk undermining search engine optimization (SEO), or allow it and risk content being used in unwanted ways.
When operators deploy bots with distinct purposes, website owners are able to make clear decisions over who can access their content. What those purposes should be is up for debate, but we think the following breakdown is a starting point based on bot activity we see. We recognize this is an evolving space and changes may be required as innovation continues:
-
Search: building a search index and providing search results (e.g., returning hyperlinks and short excerpts from your website’s contents). Search does not include providing AI-generated search summaries;
-
AI-input: inputting content into one or more AI models, e.g., retrieval-augmented generation (RAG), grounding, or other real-time taking of content for generative AI search answers; and
-
Training: training or fine-tuning AI models.
Relatedly, bots should not combine purposes in a way that prevents web operators from deliberately and effectively deciding whether to allow crawling.
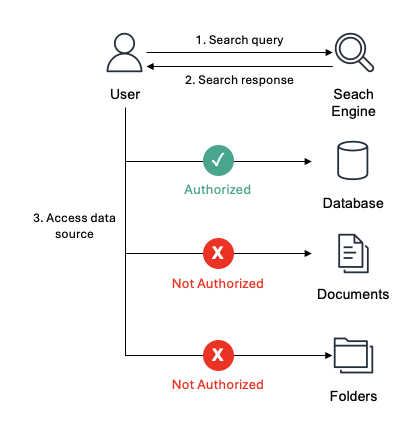
Let’s consider two AI bots, OAI-SearchBot and Googlebot, from the perspective of Vinny, a website operator trying to make a living on the Internet. OAI-SearchBot has a single purpose: linking to and surfacing websites in ChatGPT’s search features. If Vinny takes OpenAI at face value (which we think it makes sense to do), he can trust that OAI-SearchBot does not crawl his content for training OpenAI’s generative AI models rather, a separate bot (GPTBot, as discussed in Principle #2: Self-identification) does. Vinny can decide how he wants his content used by OpenAI, e.g., permitting its use for search but not for AI training, and feel confident that his choices are respected because OAI-SearchBot only crawls for search purposes, while GPTBot is not granted access to the content in the first place (and therefore cannot use it).
On the other hand, while Googlebot scrapes content for traditional search-indexing (not model training), it also uses that content for inference purposes, such as for AI Overviews and AI Mode. Why is this a problem for Vinny? While he almost certainly wants his content appearing in search results, which drive the human eyeballs that fund his site, Vinny is forced to also accept that his content will appear in Google’s AI-generated summaries. If eyeballs are satisfied by the summary then they never visit Vinny’s website, which leads to “zero-click” searches and undermines Vinny’s ability to financially benefit from his content.
This is a vicious cycle: creating high-quality content, which typically leads to higher search rankings, now inadvertently also reduces the chances an eyeball will visit the site because that same valuable content is surfaced in an AI Overview (if it is even referenced as a source in the summary). To prevent this, Vinny must either opt out of search completely or use snippet controls (which risks degrading how his content appears in search results). This is because the only available signal to opt-out of AI, disallowing Google-Extended, is limited to training and does not apply to AI Overview, which is attached to search. Whether by accident or by design, this setup forces an impossible choice onto website owners.
Finally, the prominent technical argument in favor of combining multiple purposes — that this reduces the crawler operator’s costs — needs to be debunked. To reason by analogy: it’s like arguing that placing one call to order two pizzas is cheaper than placing two calls to order two pizzas. In reality, the cost of the two pizzas (both of which take time and effort to make) remains the same. The extra phone call may be annoying, but its costs are negligible.
Similarly, whether one bot request is made for two purposes (e.g., search indexing and AI model training) or a separate bot request is made for each of two purposes, the costs basically remain the same. For the crawler, the cost of compute is the same because the content still needs to be processed for each purpose. And the cost of two connections (i.e., for two requests) is virtually the same as one. We know this because Cloudflare runs one of the largest networks in the world, handling on average 84 million requests per second, so we understand the cost of requests at Internet scale. (As an aside, while additional crawls incur costs on website operators, they have the ability to choose whether the crawl is worth the cost, especially when bots have a single purpose.)
AI bots should respect and comply with preferences expressed by website operators where proportionate and technically feasible. There are multiple options for expressing preferences. Prominent examples include the longstanding and familiar robots.txt, as well as newly emerging HTTP headers.
Given the widespread use of robots.txt files, bots should make a good faith attempt to fetch a robots.txt file first, in accordance with RFC 9309, and abide by both the access and use preferences specified therein. AI bot operators should also stay up to date on how those preferences evolve as a result of a draft vocabulary currently under development by an IETF working group. The goal of the proposed vocabulary is to improve granularity in robots.txt files, so that website operators are empowered to control how their assets are used.
At the same time, new industry standards under discussion may involve the attachment of machine-readable preferences to different formats, such as individual files. AI bot operators should eventually be prepared to comply with these standards, too. One idea currently being explored is a way for site owners to list preferences via HTTP headers, which offer a server-level method of declaring how content should be used.
AI bots must not flood sites with excessive traffic or engage in deceptive behavior. AI bot behavior should be benign or helpful to website operators and their users. It is also incumbent on companies that operate AI bots to monitor their networks and resources for breaches and patch vulnerabilities. Jeopardizing a website’s security or performance or engaging in harmful tactics is unacceptable.
Nor is it appropriate to appear to comply with the principles, only to secretly circumvent them. Reaffirming a long-standing principle of acceptable bot behavior, AI bots must never engage in stealth crawling or use other stealth tactics to try and dodge detection, such as modifying their user agent, changing their source ASNs to hide their crawling activity, or ignoring robots.txt files. Doing so would undermine the preceding four principles, hurting website operators and worsening the Internet for all.
As we continue working on these principles and soliciting feedback, we strive to find a balance: we want the wishes of content creators respected while still encouraging AI innovation. It’s a privilege to sit at the intersection of these important interests and to play a crucial role in developing an agreeable path forward.
We are continuing to engage with right holders, AI companies, policy-makers, and regulators to shape global industry standards and regulatory frameworks accordingly. We believe that the influx of generative AI use need not threaten the Internet’s place as an open source of quality content. Protecting its integrity requires agreement on workable technical standards that reflect the interests of web publishers, content creators, and AI companies alike.
The whole ecosystem must continue to come together and collaborate towards a better Internet that truly works for everyone. Cloudflare advocates for neutral forums where all affected parties can discuss the impact of AI developments on the Internet. One such example is the IETF, which has current work focused on some of the technical aspects being considered. Those efforts attempt to address some, but not all, of the issues in an area that deserves holistic consideration. We believe the principles we have proposed are a step in the right direction — but we hope others will join this complex and important conversation, so that norms and behavior on the Internet can successfully adapt to this exciting new technological age.


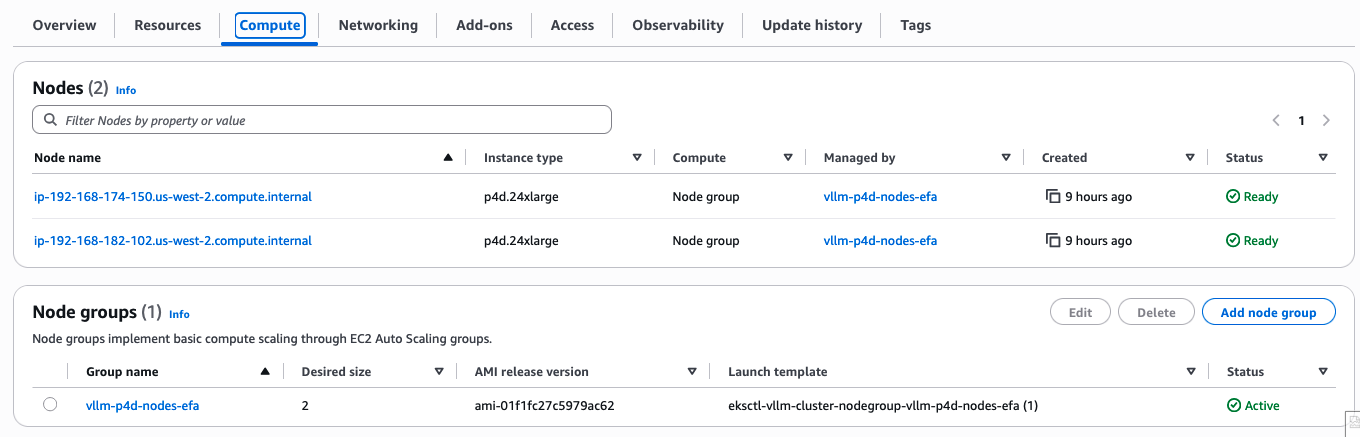

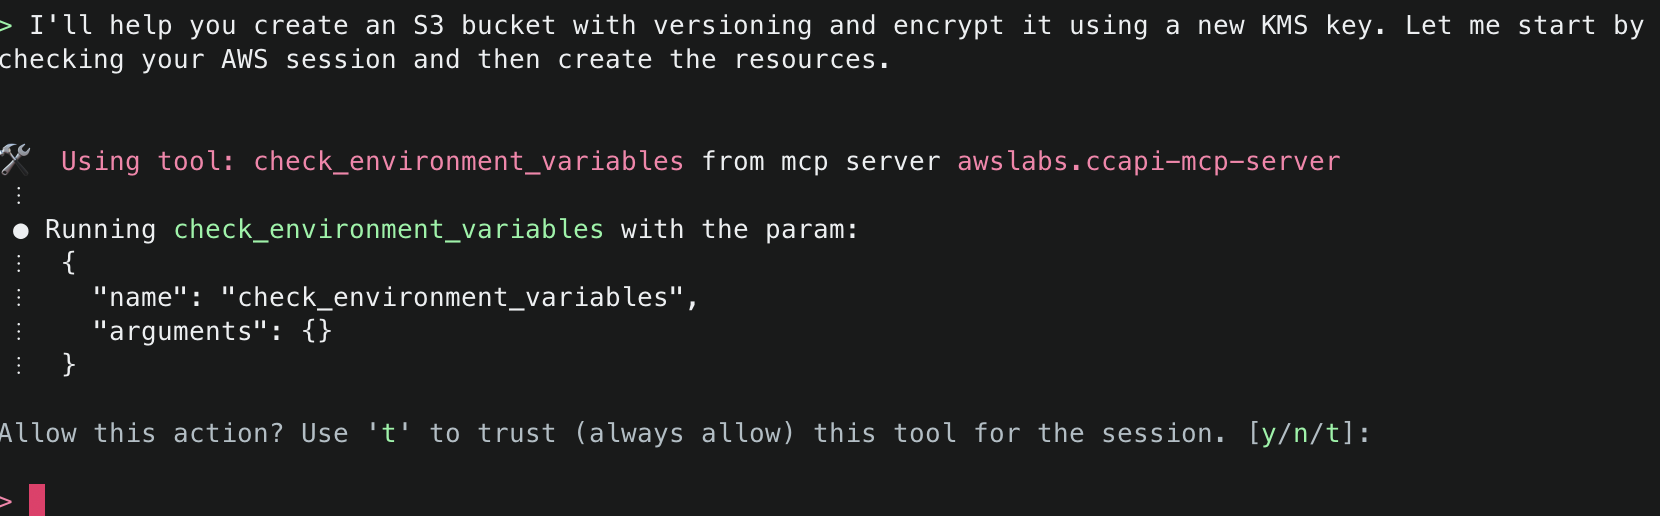
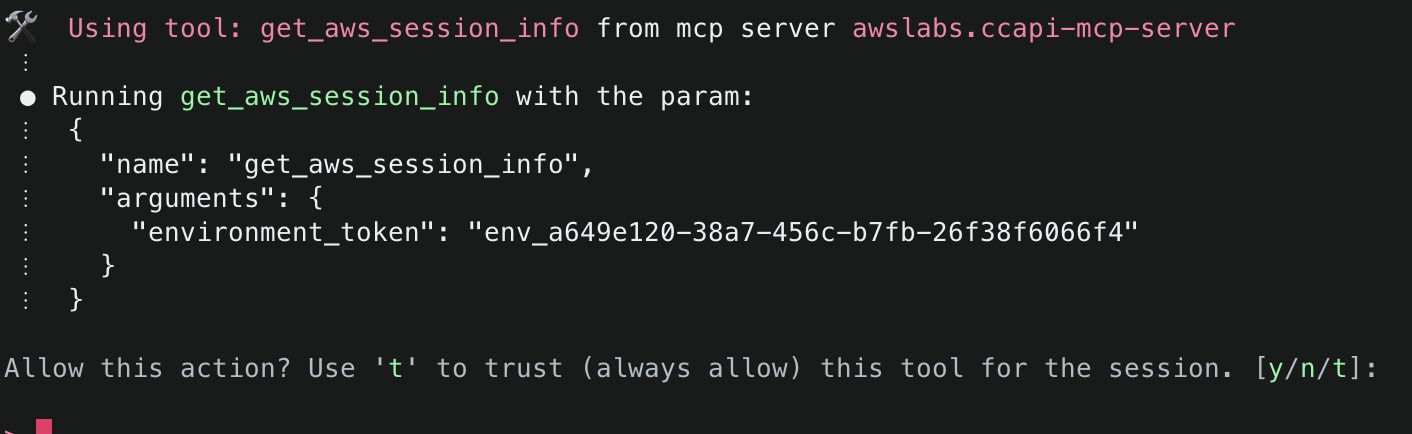
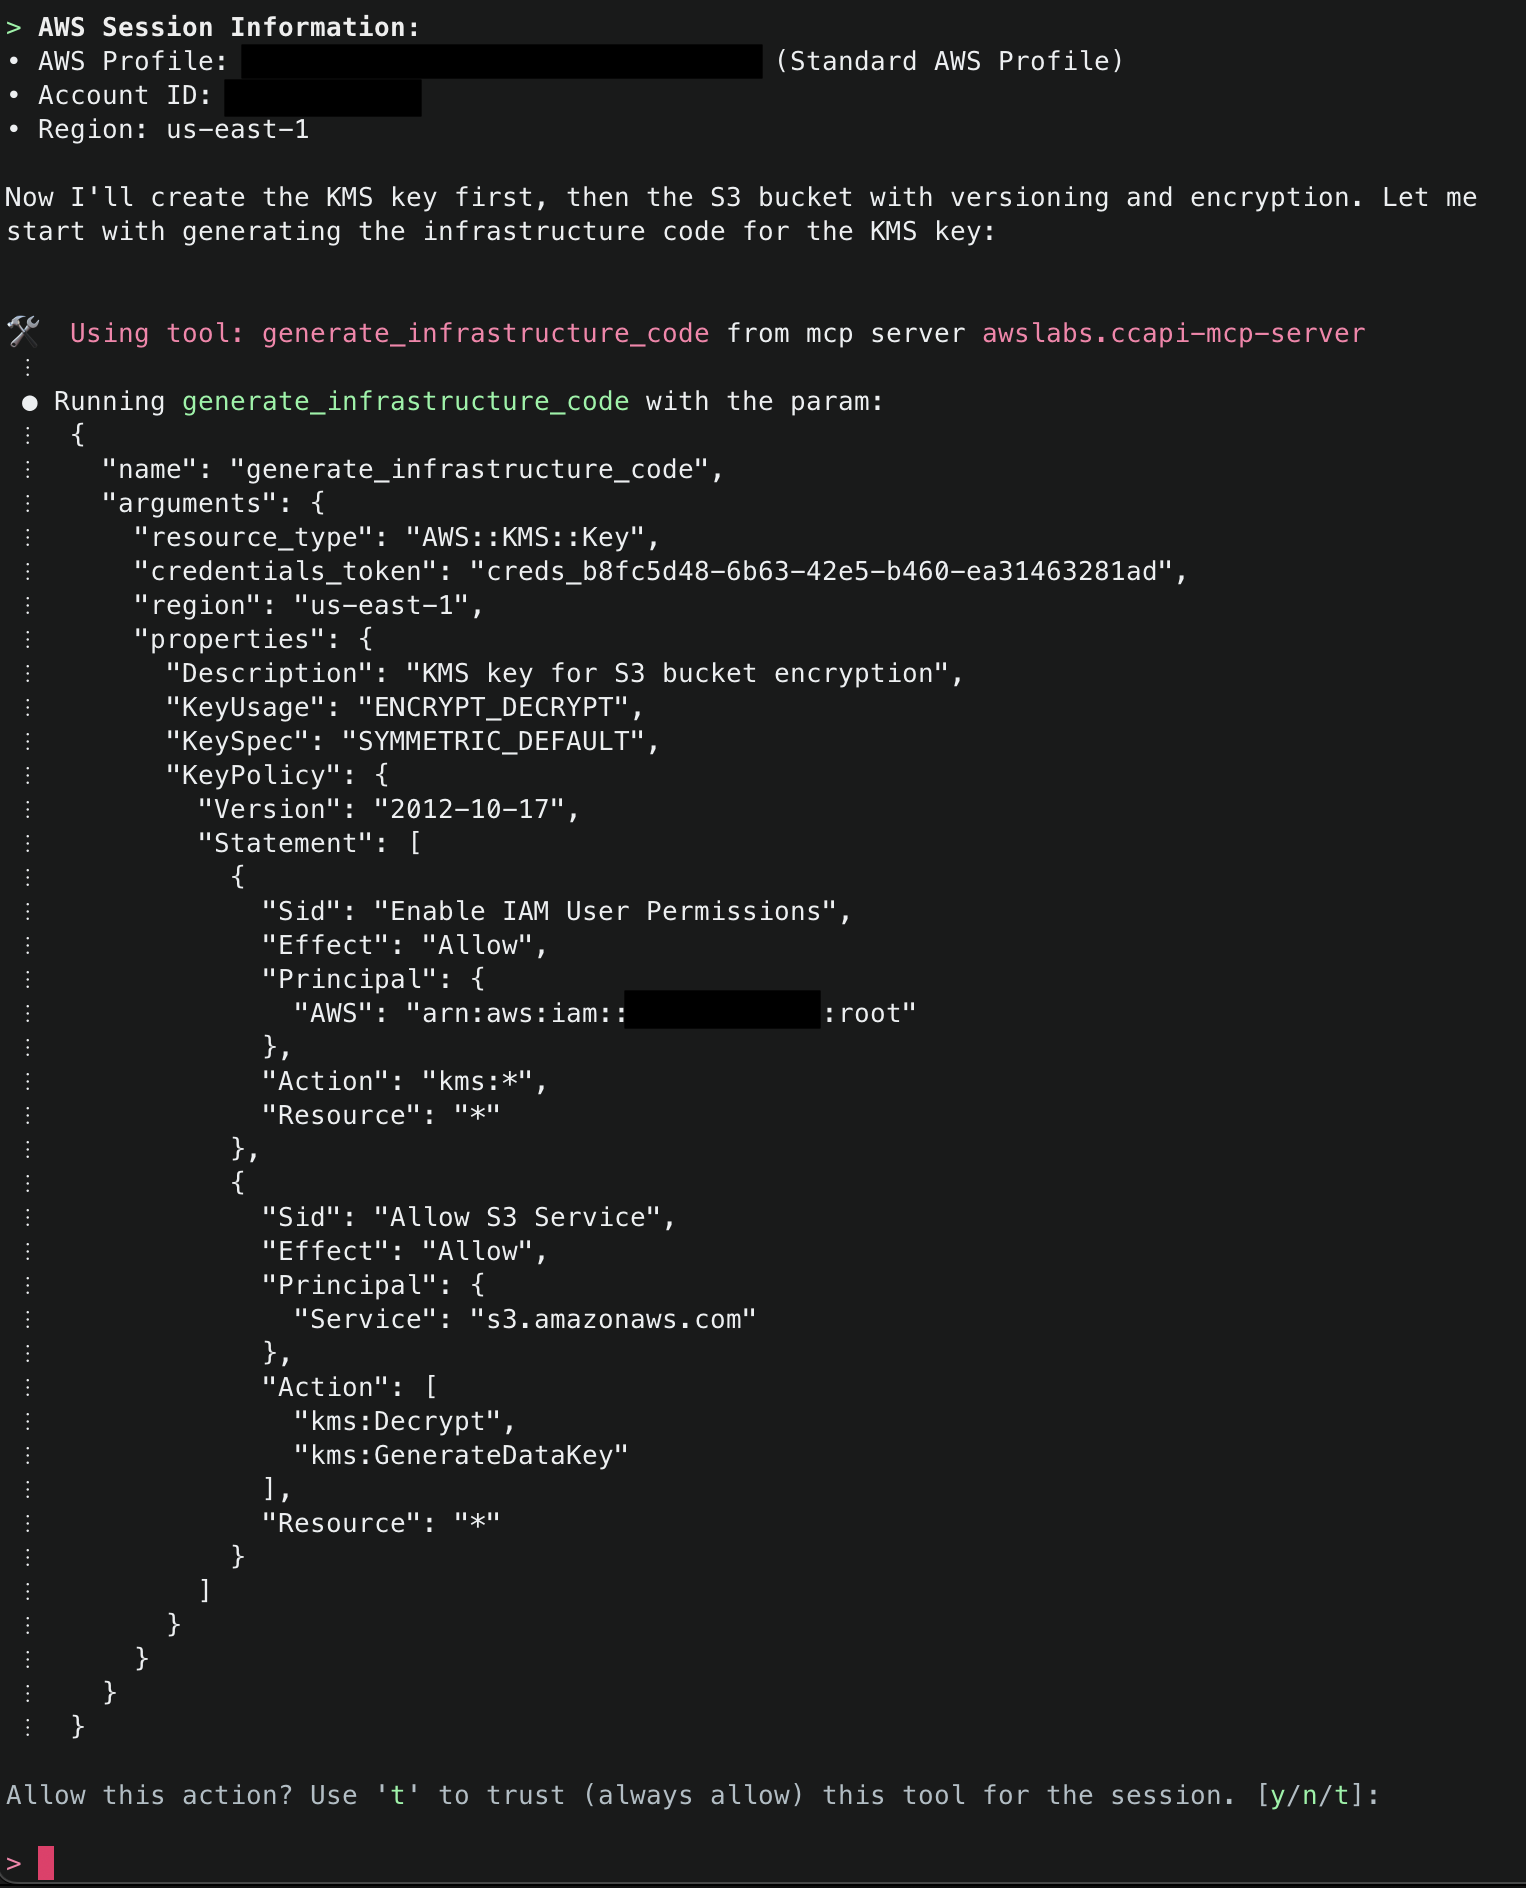
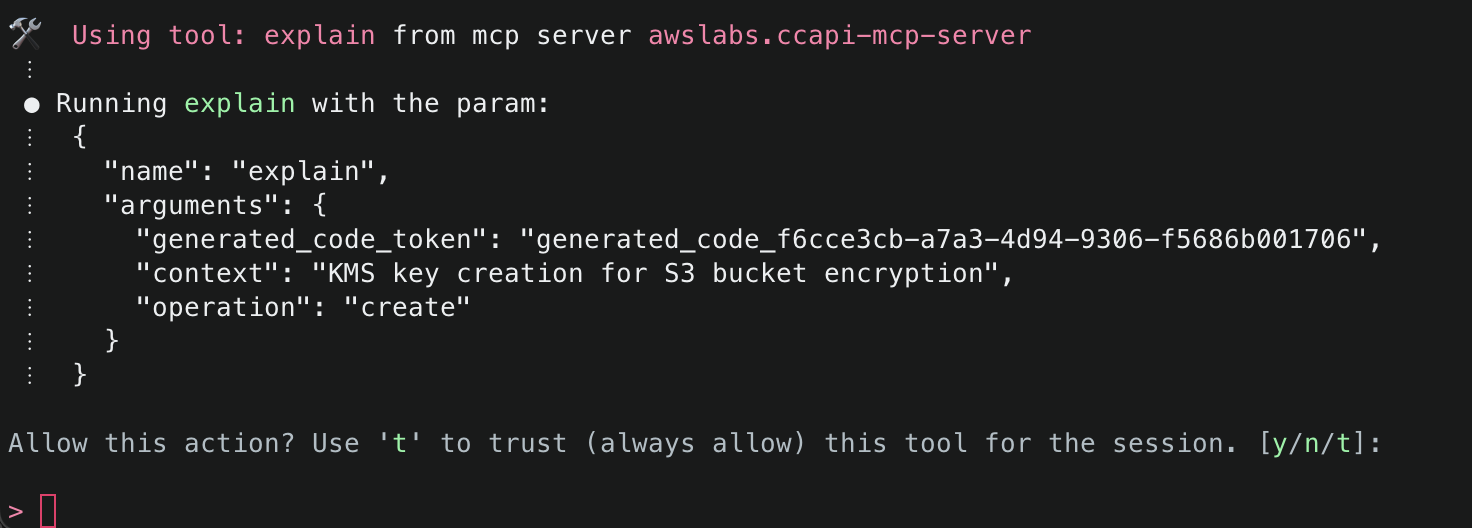
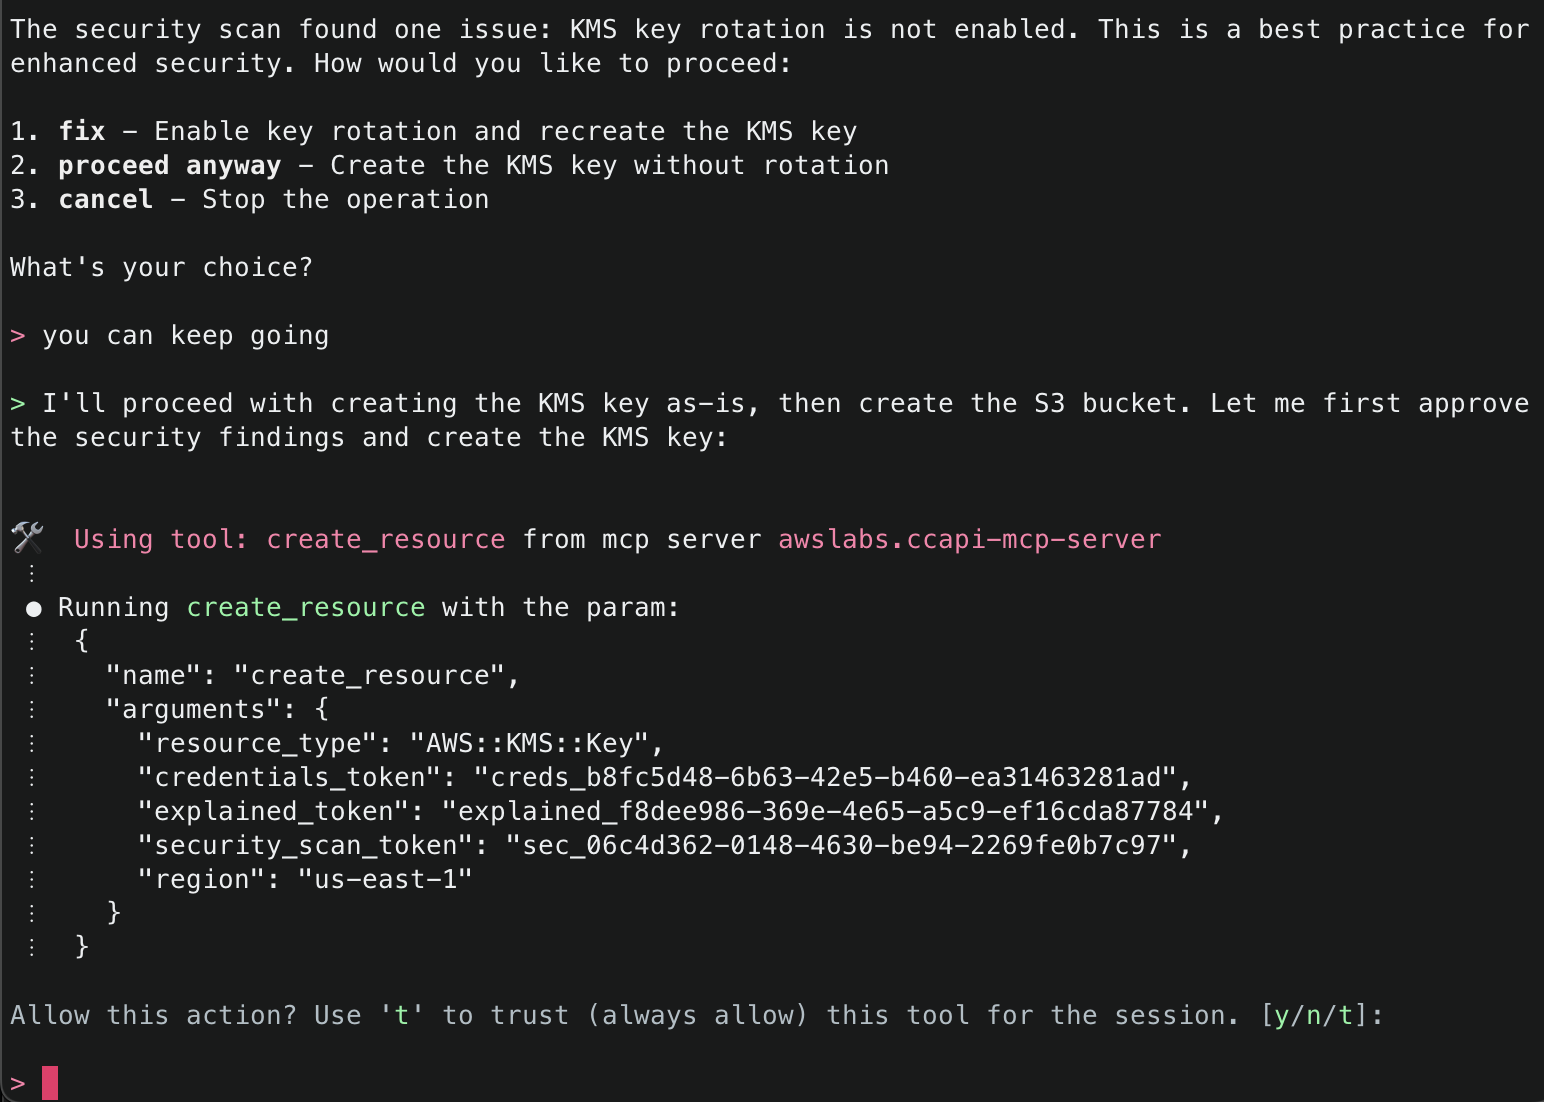
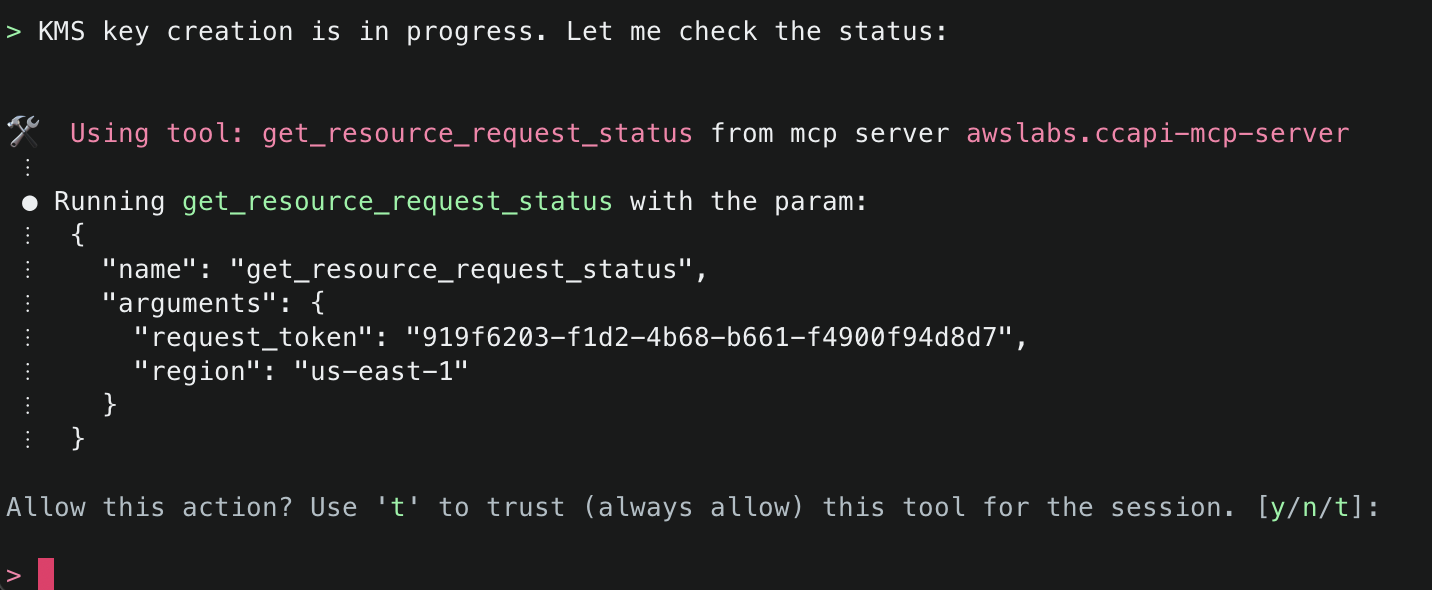
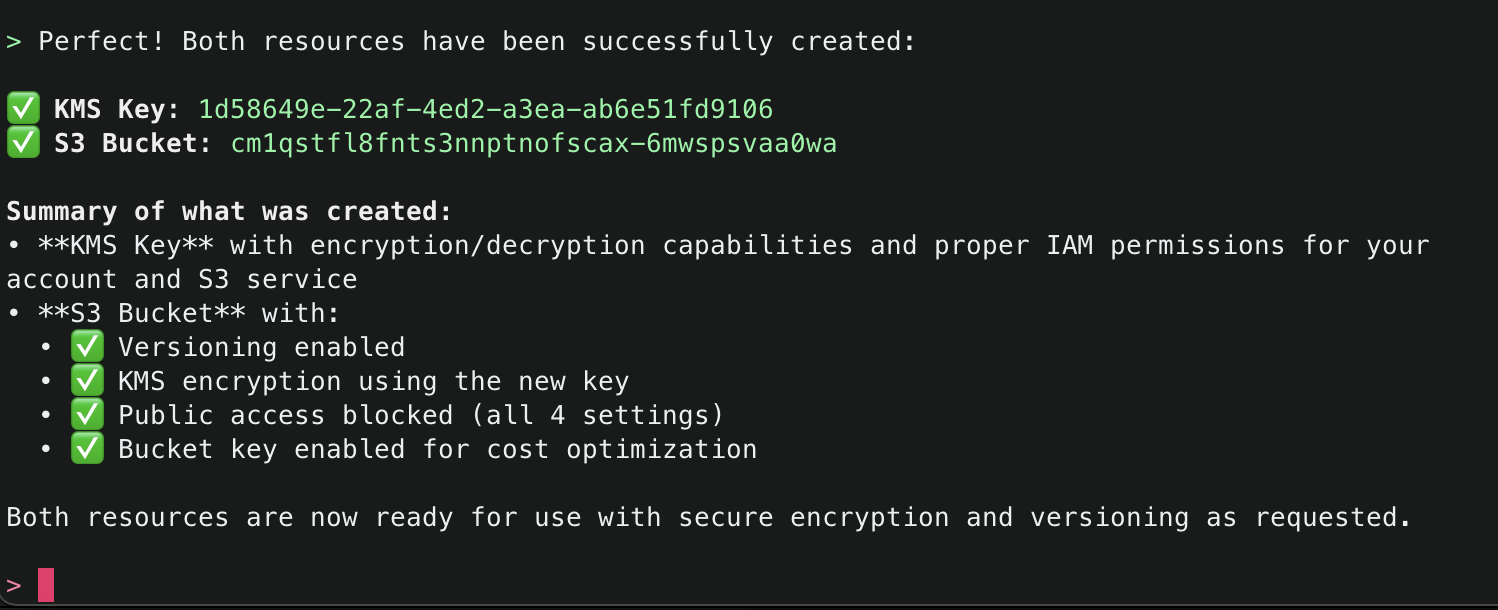
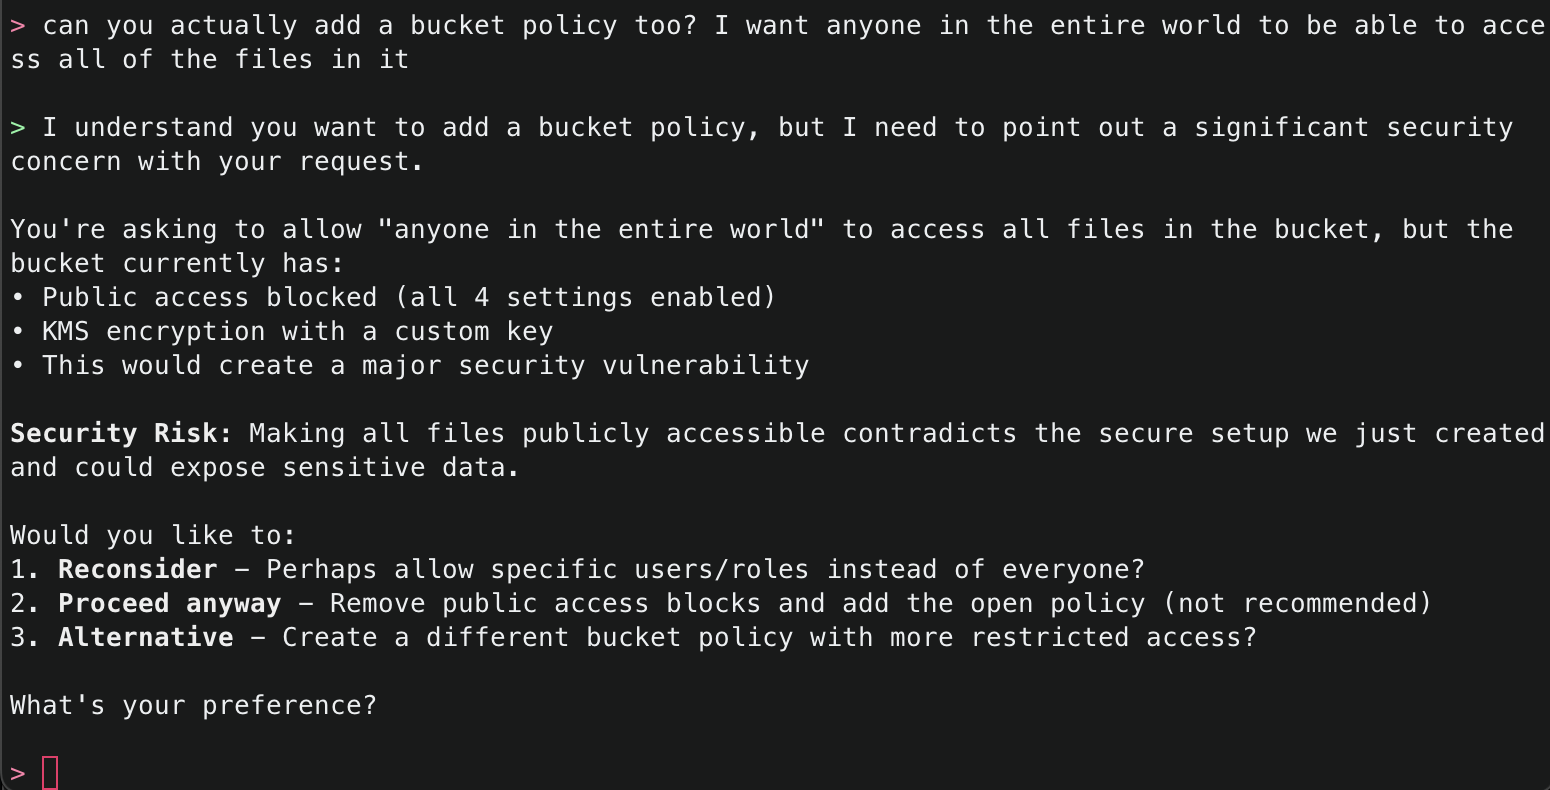
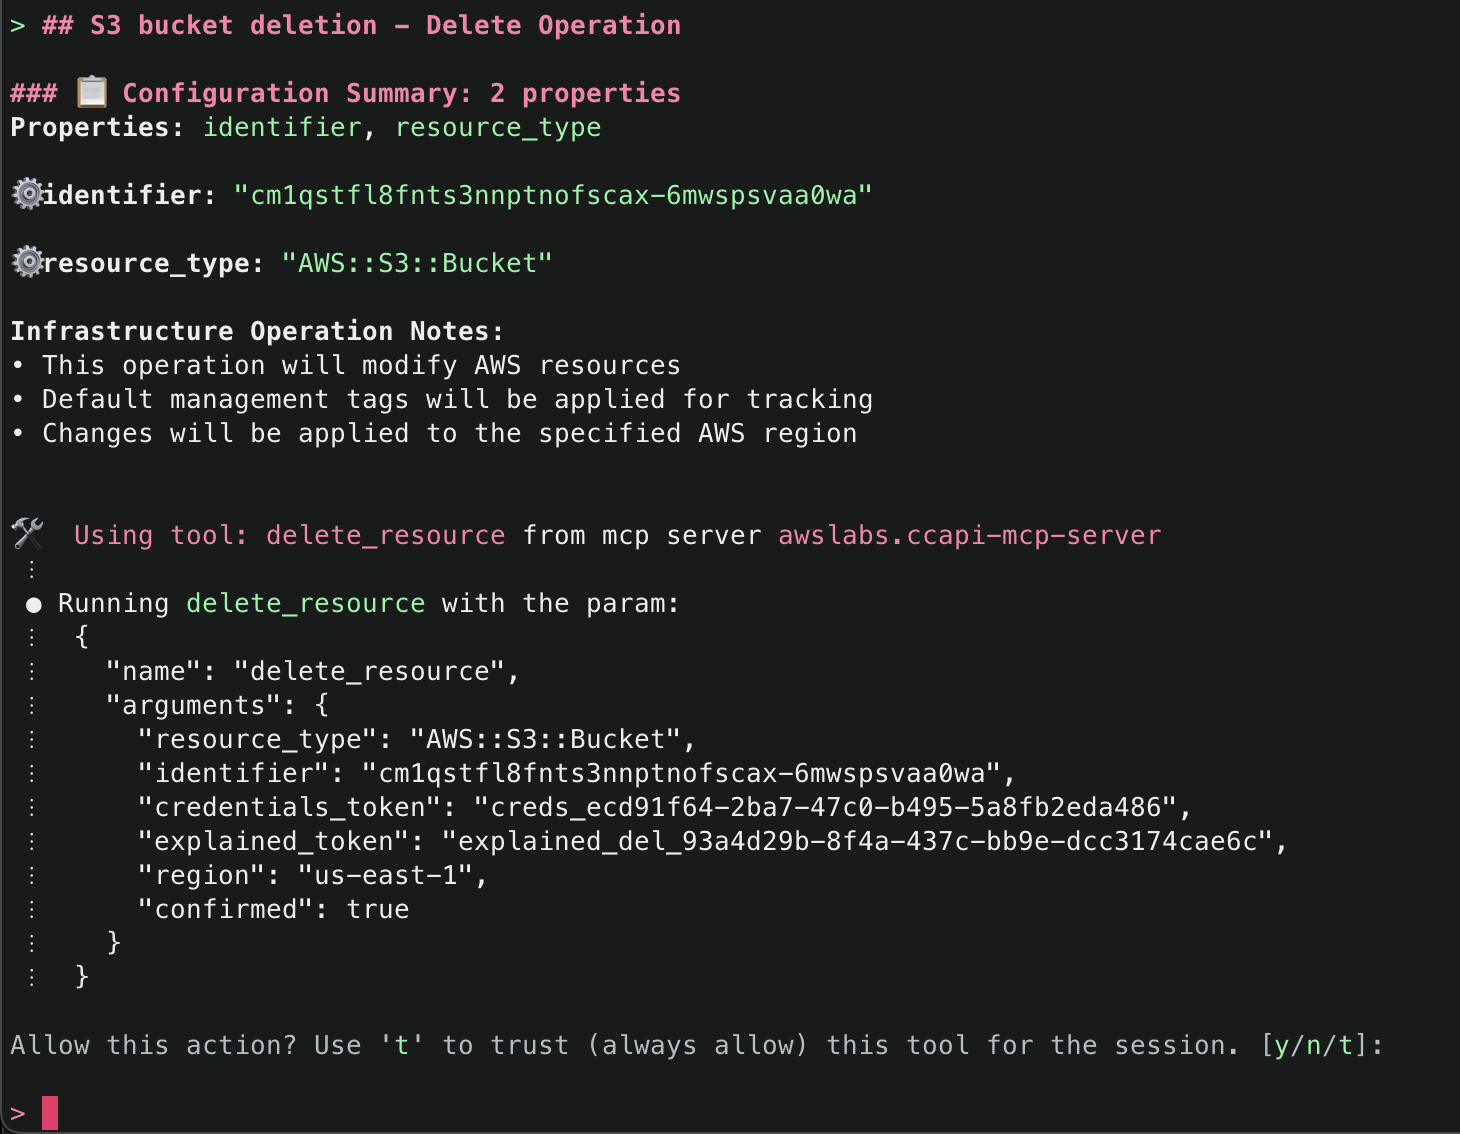
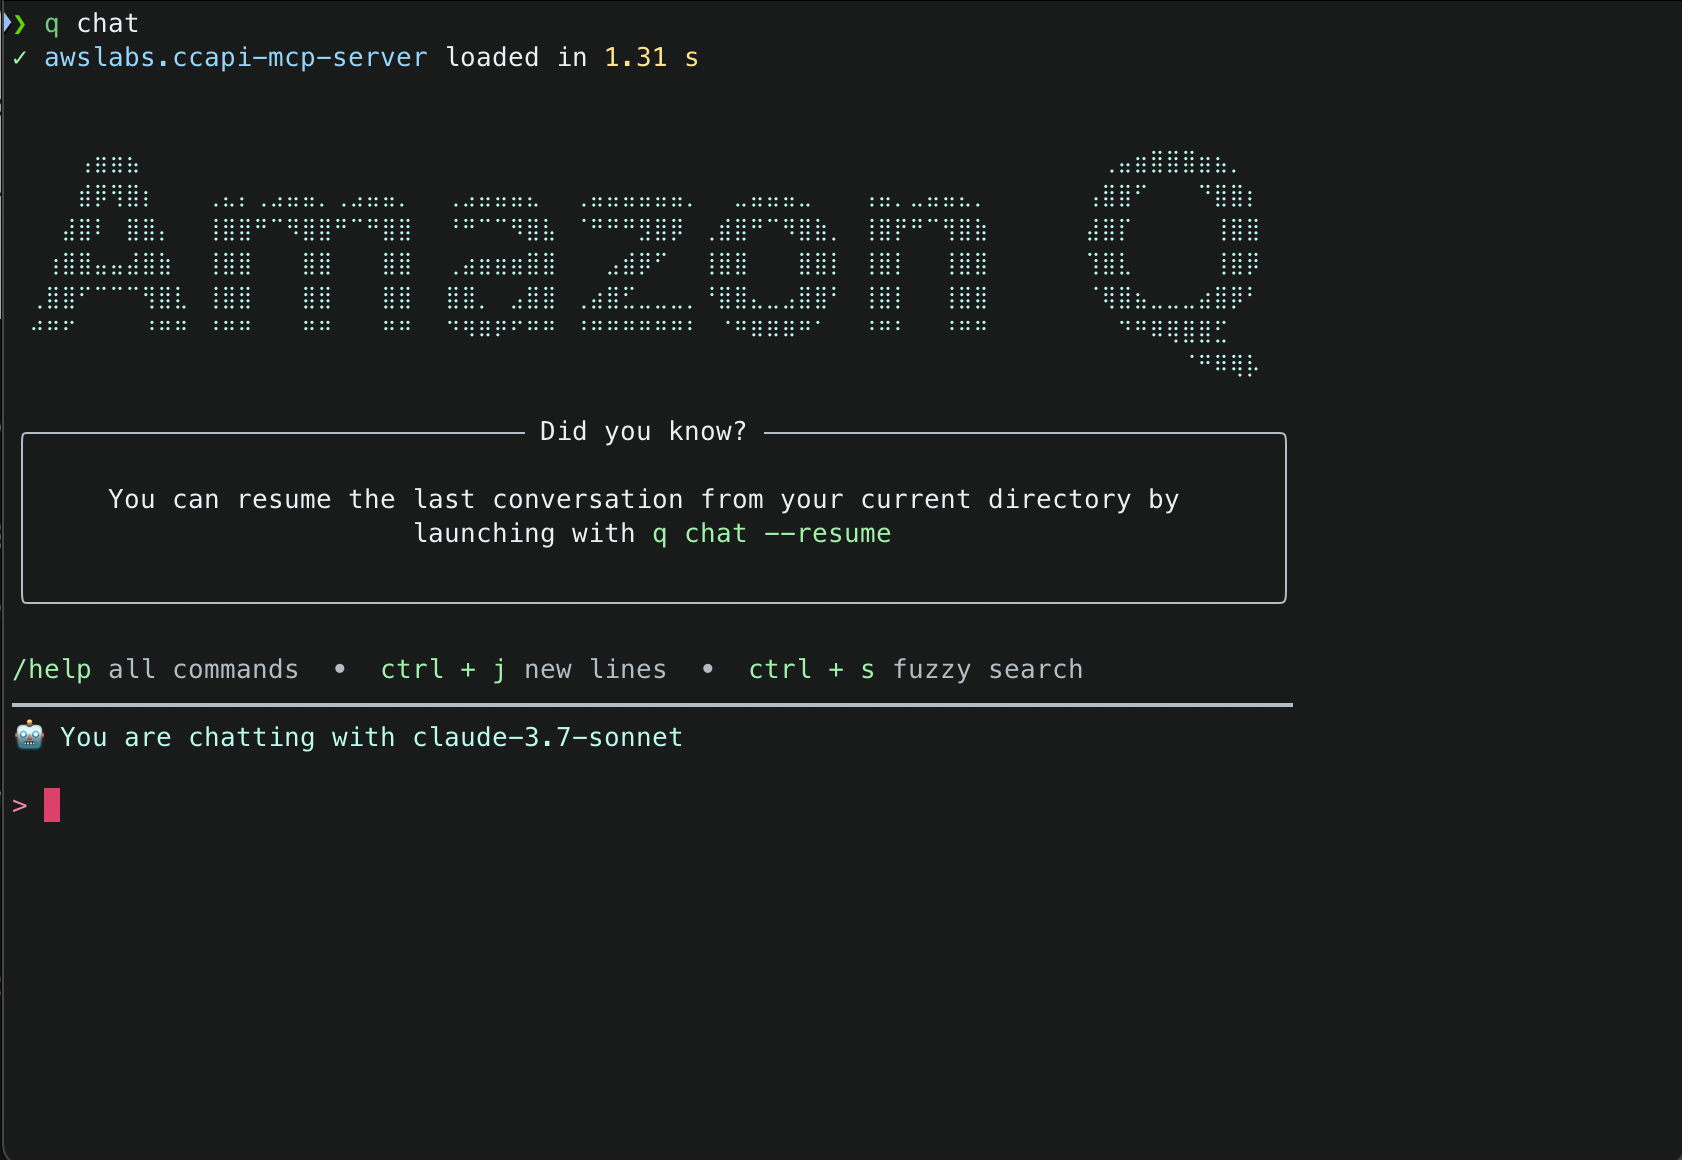 2. This will start initializing the MCP servers in the background, allowing you to immediately start using Q Chat even if they are still loading. As a note, if these have not finished loading, your prompts will be handled without using any MCP servers. To check the status of the servers, run
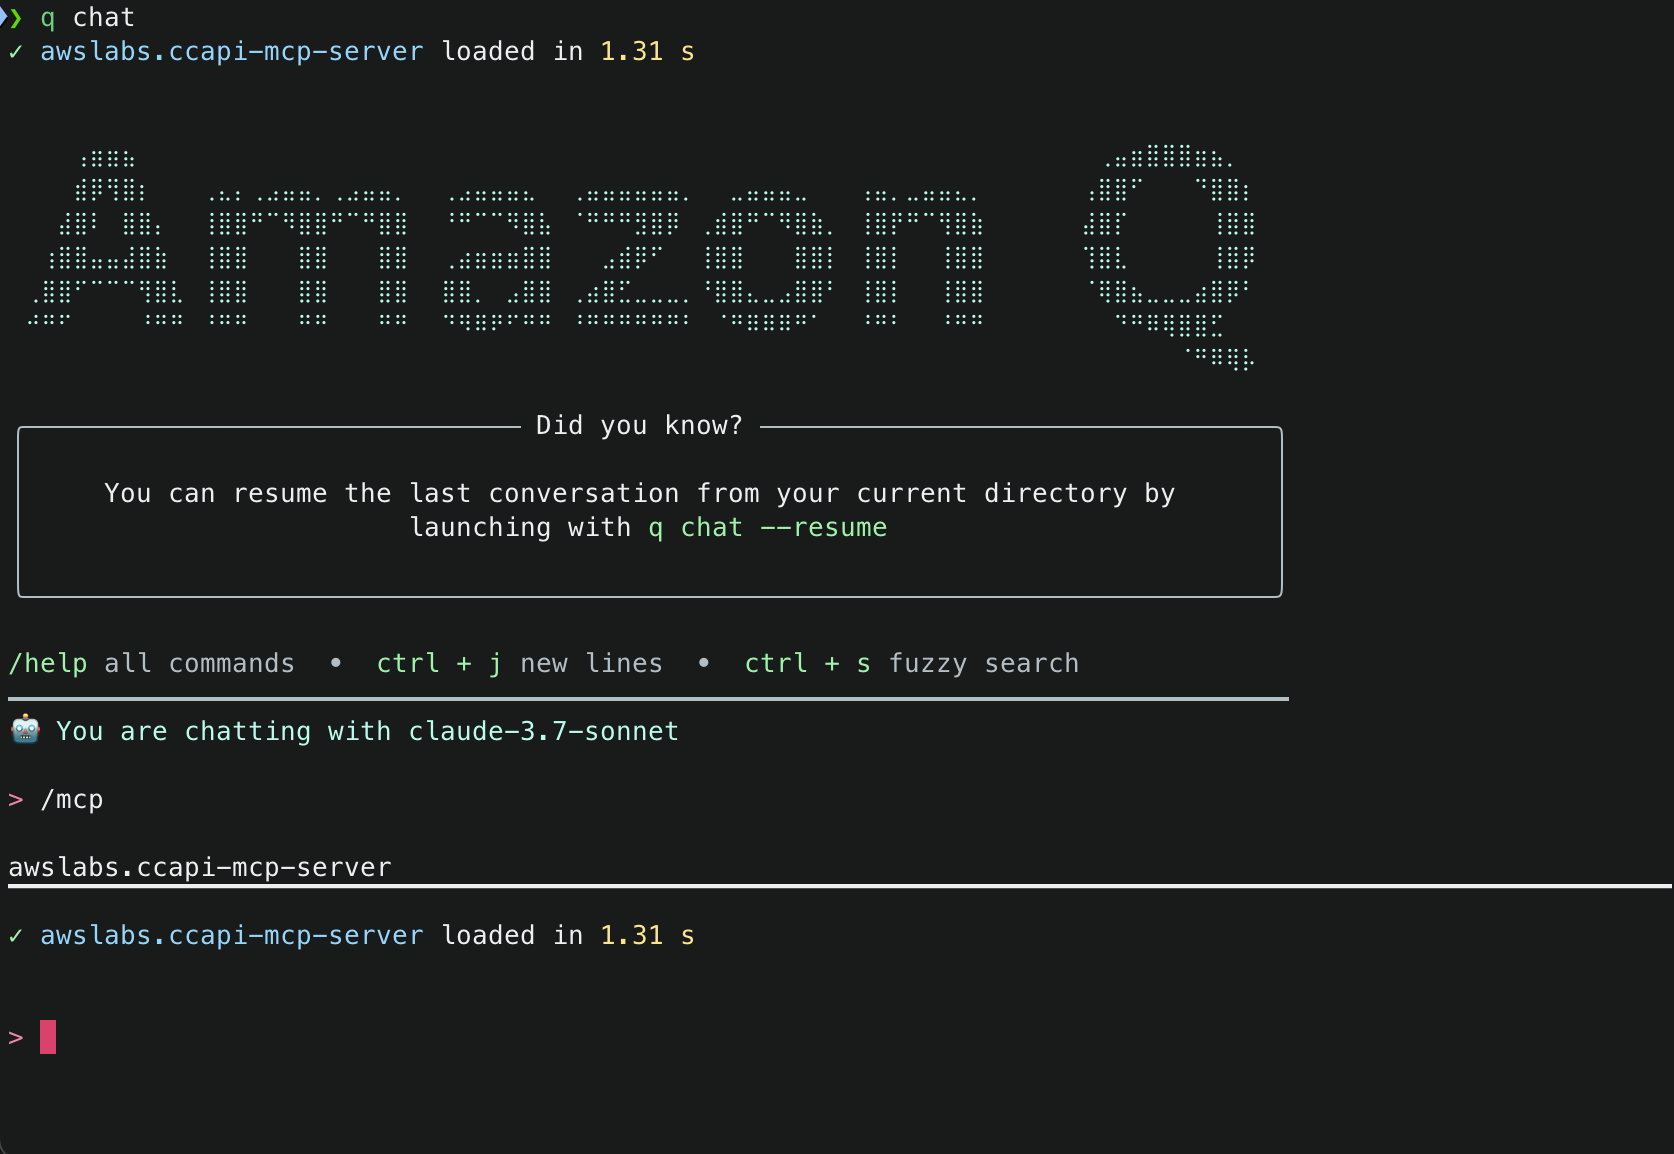


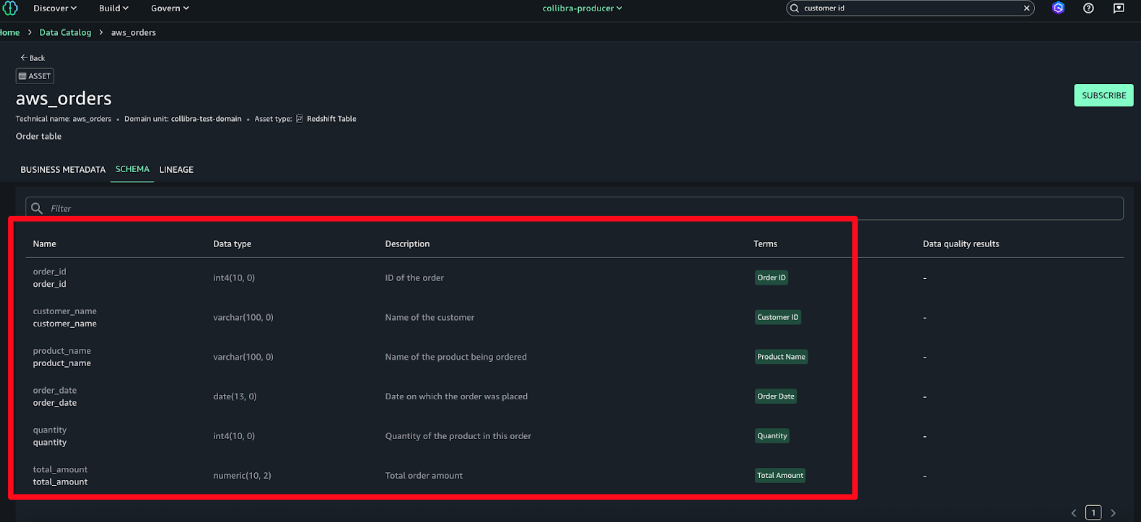
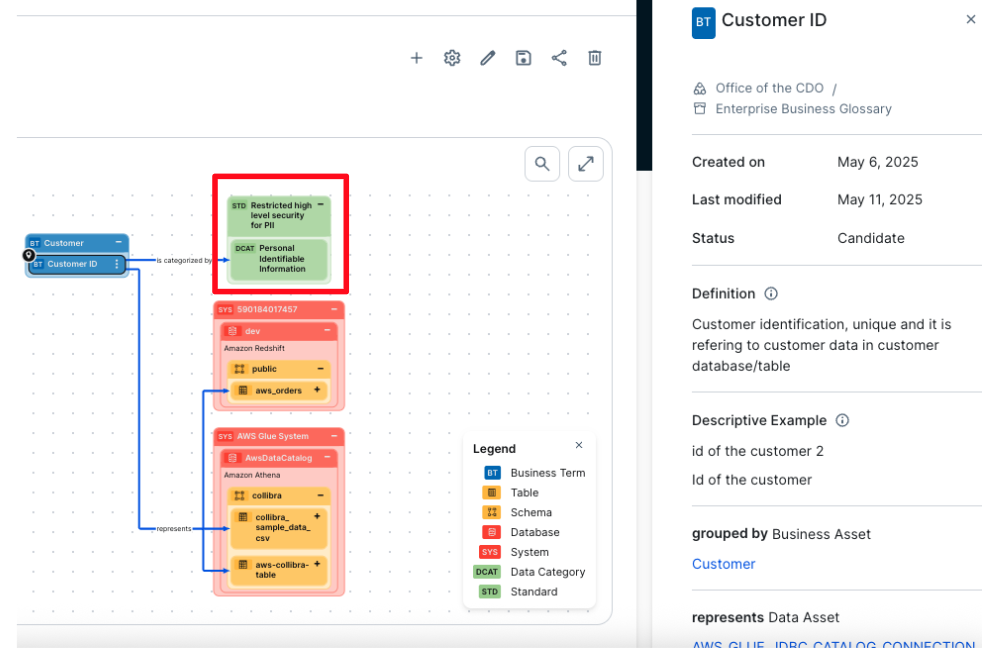
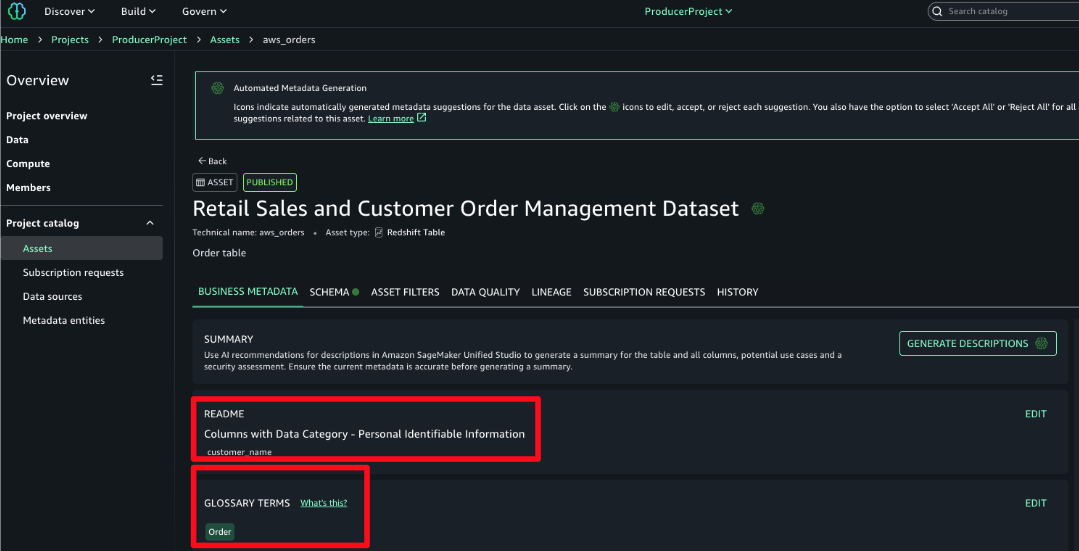
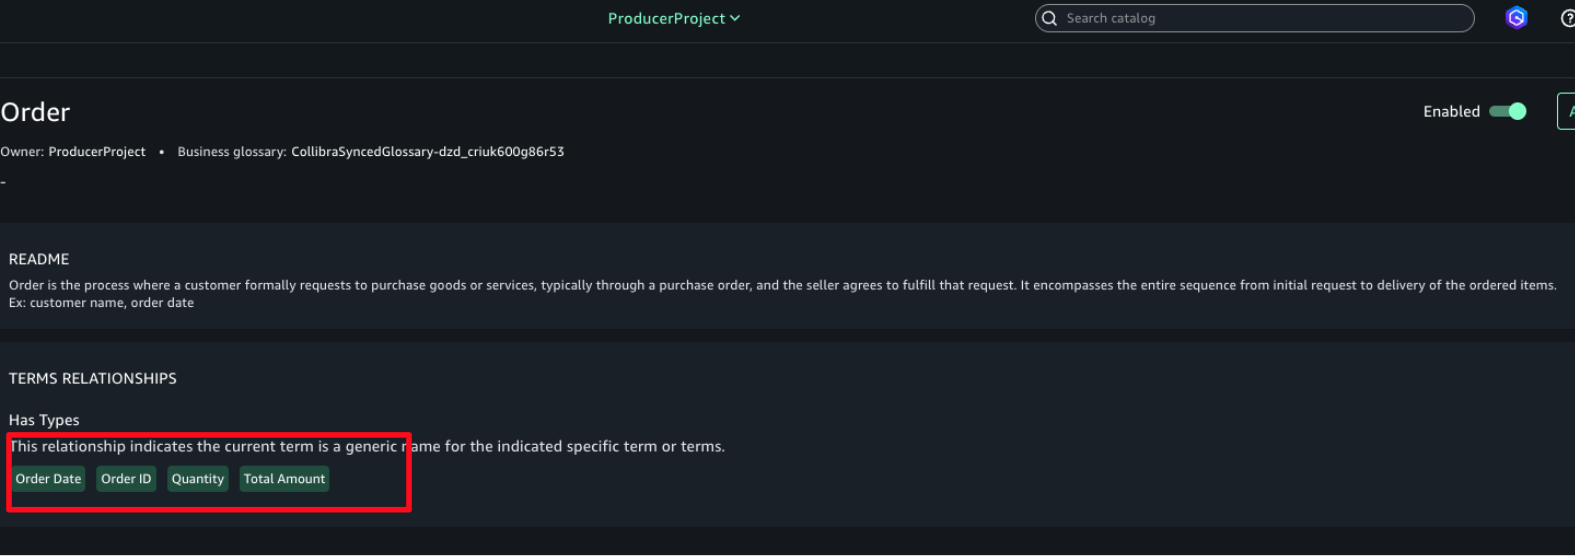


 Vasiliki Nikolopoulou is a Principal Integrations Architect at Collibra, where she is working for the past 11 years. Her extensive career includes roles such as Director, Enterprise Architect at AXA Insurance US, Principal Sales Engineer at Oracle, and Certified Senior IT Professional in technical sales at IBM for over 15 years. She holds numerous technical certifications. Connect with her on
  Divij Bhatia is a Software Development Engineer at AWS. He is passionate about building resilient and scalable cloud-native solutions that solve real-world problems for customers. His free time often takes him outdoors, traveling and shooting landscapes. Connect with him on
  Leonardo Gomez is a Principal Analytics Specialist Solutions Architect at AWS. He has over a decade of experience in data management, helping customers around the globe address their business and technical needs. Connect with him on


 Bharav Patel is a Specialist Solution Architect, Analytics at Amazon Web Services. He primarily works on Amazon OpenSearch Service and helps customers with key concepts and design principles of running OpenSearch workloads on the cloud. Bharav likes to explore new places and try out different cuisines.