Ransomware attacks over the last couple years have been traumatic, impacting nearly every business sector and costing billions of dollars. The targets have mostly been our data: steal it, encrypt it, and then charge us a fee to get it back.
Over the last several years, there’s been concern across the security community about the risks related to the Internet of Things (IoT) being impacted by ransomware. For the most part, this has not occurred — although I wouldn’t be surprised if IoT has played a role as the entry point that malicious actors have used, on occasion, to gain access to plant their ransomware on critical systems. Also, we do know of examples where IoT technologies, such as those used within medical and industrial control environments, were impacted during ransomware attacks through key components of their ecosystem involving standard Windows server and desktop solutions.
IoT ransomware risk and its implications
So, what would it take for IoT to be the target of ransomware? First, the IoT being attacked would need to be a large deployment with significant importance in its functions and capabilities. The attack would also need to be disruptive enough that an organization would be willing to pay.
Personally, I’m not confident such an environment exists, at least as it would apply to the average organization. But let’s step back and look at this from the perspective of the vendor who remotely manages, controls, and updates their products over the Internet. For example, imagine what would happen if a malicious actor successfully breached an automotive organization with smart-capable cars — could they shut down every car and lock the company and owner out of fixing them?
If we apply that train of thought across the board for all IoT deployed out there, it becomes very concerning. What if we shut down every multifunction printer by a major manufacturer, home thermostat, building HVAC, or building lighting solution? What happens if the target is a smart city and traffic lights are impacted? We could go on all day talking about the impact from smart city breaches or attacks against small deployed IoT solutions from major brands with global footprints.
Building a threat model
So, are there steps we can take to head off such an event? The answer is yes. I believe IoT vendors and solution owners could best accomplish this by identifying the potential attack vector and risk through threat modeling.
As part of building out a threat model, the first step would be to identify and map out a complete conceptual structure of the IoT system that could be potentially targeted. In the case of IoT technology, this should consist of all components of the system ecosystem that make the solution function as intended, which would include:
Embedded hardware system actuators, sensors, and gateways
Management and control applications, such as mobile and cloud services, as well as thick clients on servers, desktops, and laptops systems
Communication infrastructure used for data and operational controls including Ethernet, Wi-Fi, and other radio frequency (RF)
Any component or subcomponent of this ecosystem is at potential risk for being targeted. Mapping out this information gives us the ability to better understand and consider the potential points of attack that a malicious actor could use to deliver or execute a ransomware style attack against IoT.
In the second step of this threat modeling process, we need to understand the possible goals of a malicious actor who would be targeting an IoT ecosystem, who they may be, and what their end game and potential methods of attack would look like. The threat actors would likely look very similar to any malicious actor or group that carries out ransomware attacks. I think the big difference would be how they would approach attacking IoT ecosystems.
This is the phase where creative thinking plays a big role, and having the right people involved can make all the difference. This means having people on the threat modeling team who can take an attacker mindset and apply that thinking against the IoT ecosystems to map out as many potential attack vectors as possible.
Mapping out the threat and response
The third step in the threat modeling process is building a list of threats we would expect to be used against the above IoT ecosystems. One example, which is also common with typical ransomware attacks, is locking. By locking a component of the IoT solutions ecosystem, a malicious actor could prevent the IoT ecosystem from properly functioning or communicating with other key components, completely taking the technology out of service or preventing it from functioning as intended.
In the final part, we take the detailed information we’ve put together and map out specific attack scenarios with the greatest chance of success. Each scenario should define the various components of the IoT ecosystem potentially at risk, along with the perceived attacker motives, methods, and threats that can lead to the attacker being successful. Once you’ve mapped out these various scenarios in detail, you can use them to define and implement specific controls to mitigate or reduce the probability of success for those attack scenarios.
Using these threat modeling methods will help IoT solution vendors and the organizations that use their products identify and mitigate the risk and impact of ransomware attacks against IoT solutions before they happen.
NEVER MISS A BLOG
Get the latest stories, expertise, and news about security today.
What is AI thinking? What concepts should we introduce to young people related to AI, including machine learning (ML), and data science? Should we teach with a glass-box or an opaque-box approach? These are the questions we’ve been grappling with since we started our online research seminar series on AI education at the Raspberry Pi Foundation, co-hosted with The Alan Turing Institute.
Dave Touretzky
Fred G. Martin
Over the past few months, we’d already heard from researchers from the UK, Germany, and Finland. This month we virtually travelled to the USA, to hear from Prof. Dave Touretzky (Carnegie Mellon University) and Prof. Fred G. Martin (University of Massachusetts Lowell), who have pioneered the influential AI4K12 project together with their colleagues Deborah Seehorn and Christina Gardner-McLure.
The AI4K12 project
The AI4K12 project focuses on teaching AI in K-12 in the US. The AI4K12 team have aligned their vision for AI education to the CSTA standards for computer science education. These Standards, published in 2017, describe what should be taught in US schools across the discipline of computer science, but they say very little about AI. This was the stimulus for starting the AI4K12 initiative in 2018. A number of members of the AI4K12 working group are practitioners in the classroom who’ve made a huge contribution in taking this project from ideas into the classroom.
Dave gave us an overview of the AI4K12 project (click to enlarge)
The project has a number of goals. One is to develop a curated resource directory for K-12 teachers, and another to create a community of K-12 resource developers. On the AI4K12.org website, you can find links to many resources and sign up for their mailing list. I’ve been subscribed to this list for a while now, and fascinating discussions and resources have been shared.
Five Big Ideas of AI4K12
If you’ve heard of AI4K12 before, it’s probably because of the Five Big Ideas the team has set out to encompass the AI field from the perspective of school-aged children. These ideas are:
Perception — the idea that computers perceive the world through sensing
Representation and reasoning — the idea that agents maintain representations of the world and use them for reasoning
Learning — the idea that computers can learn from data
Natural interaction — the idea that intelligent agents require many types of knowledge to interact naturally with humans
Societal impact — the idea that artificial intelligence can impact society in both positive and negative ways
Sometimes we hear concerns that resources being developed to teach AI concepts to young people are narrowly focused on machine learning, particularly supervised learning for classification. It’s clear from the AI4K12 Five Big Ideas that the team’s definition of the AI field encompasses much more than one area of ML. Despite being developed for a US audience, I believe the description laid out in these five ideas is immensely useful to all educators, researchers, and policymakers around the world who are interested in AI education.
Fred explained how ‘representation and reasoning’ is a big idea in the AI field (click to enlarge)
During the seminar, Dave and Fred shared some great practical examples. Fred explained how the big ideas translate into learning outcomes at each of the four age groups (ages 5–8, 9–11, 12–14, 15–18). You can find out more about their examples in their presentation slides or the seminar recording (see below).
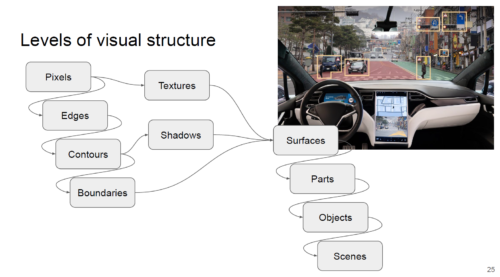
I was struck by how much the AI4K12 team has thought about progression — what you learn when, and in which sequence — which we do really need to understand well before we can start to teach AI in any formal way. For example, looking at how we might teach visual perceptionto young people, children might start when very young by using a tool such as Teachable Machine to understand that they can teach a computer to recognise what they want it to see, then move on to building an application using Scratch plugins or Calypso, and then to learning the different levels of visual structure and understanding the abstraction pipeline — the hierarchy of increasingly abstract things. Talking about visual perception, Fred used the example of self-driving cars and how they represent images.
Fred used this slide to describe how young people might learn abstracted elements of visual structure
AI education with an age-appropriate, glass-box approach
Dave and Fred support teaching AI to children using a glass-box approach. By ‘glass-box approach’ we mean that we should give students information about how AI systems work, and show the inner workings, so to speak. The opposite would be a ‘opaque-box approach’, by which we mean showing students an AI system’s inputs and the outputs only to demonstrate what AI is capable of, without trying to teach any technical detail.
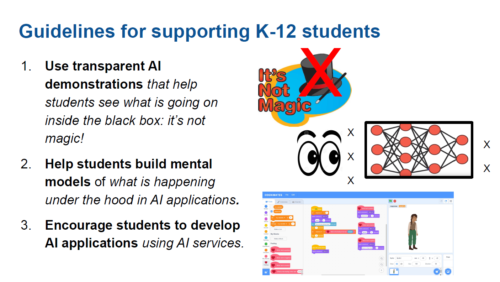
AI4K12 teacher guidelines for AI education
Our speakers are keen for learners to understand, at an age-appropriate level, what is going on “inside” an AI system, not just what the system can do. They believe it’s important for young people to build mental models of how AI systems work, and that when the young people get older, they should be able to use their increasing knowledge and skills to develop their own AI applications. This aligns with the views of some of our previous seminar speakers, including Finnish researchers Matti Tedre and Henriikka Vartiainen, who presented at our seminar series in November.
What is AI thinking?
Dave addressed the question of what AI thinking looks like in school. His approach was to start with computational thinking (he used the example of the Barefoot project’s description of computational thinking as a starting point) and describe AI thinking as an extension that includes the following skills:
Perception
Reasoning
Representation
Machine learning
Language understanding
Autonomous robots
Dave described AI thinking as furthering the ideas of abstraction and algorithmic thinking commonly associated with computational thinking, stating that in the case of AI, computation actually is thinking. My own view is that to fully define AI thinking, we need to dig a bit deeper into, for example, what is involved in developing an understanding of perception and representation.
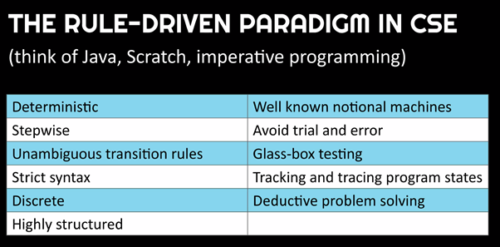
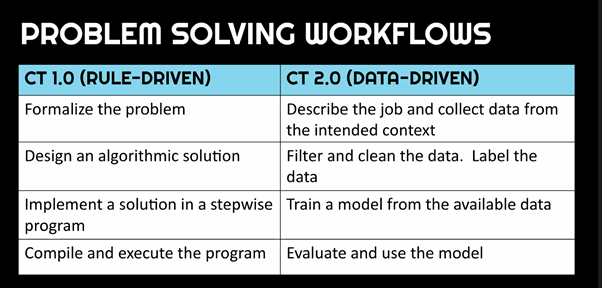
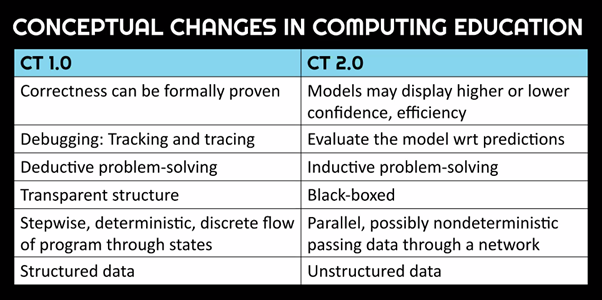
Thinking back to Matti Tedre and Henriikka Vartainen’s description of CT 2.0, which focuses only on the ‘Learning’ aspect of the AI4K12 Five Big Ideas, and on the distinct ways of thinking underlying data-driven programming and traditional programming, we can see some differences between how the two groups of researchers describe the thinking skills young people need in order to understand and develop AI systems. Tedre and Vartainen are working on a more finely granular description of ML thinking, which has the potential to impact the way we teach ML in school.
What I take from this is that there is much still to research and discuss in this area! It’s a real privilege to be able to hear from experts in the field and compare and contrast different standpoints and views.
Resources for AI education
The AI4K12 project has already made a massive contribution to the field of AI education, and we were delighted to hear that Dave, Fred, and their colleagues have just been awarded the AAAI/EAAI Outstanding Educator Award for 2022 for AI4K12.org. An amazing achievement! Particularly useful about this website is that it links to many resources, and that the Five Big Ideas give a framework for these resources.
Through our seminars series, we are developing our own list of AI education resources shared by seminar speakers or attendees, or developed by us. Please do take a look.
Join our next seminar
Through these seminars, we’re learning a lot about AI education and what it might look like in school, and we’re having great discussions during the Q&A section.
The past few weeks have shown us the importance and wide reach of open-source security. In December 2021, public disclosure of the Log4Shell vulnerability in Log4j, an open-source logging library, caused a cascade of dependency analysis by developers in organizations around the world. The incident was so wide-reaching that representatives from federal agencies and large private-sector companies gathered on January 13, 2022, at a White House meeting to discuss initiatives for securing open-source software.
A large percentage of the software we rely on today is proprietary or closed-source, meaning that the software is fully controlled by the company and closed for independent review. But in most cases, all of the code written to build the proprietary software is not entirely produced by the companies that provide the products and services; instead, they use a third-party library or a component piece of software to help them assemble their solution.
Many of those third-party components are classified as open-source software, meaning the source code is freely available for anyone to use, view, change to correct issues, or enhance to add new functionality. Open-source software projects are frequently maintained by volunteers, and a community of developers and users forms around a shared passion for the software. It’s their passion and collaboration that help projects grow and remain supported.
Finding the resources for open-source security
Yet for the majority of open-source projects that do not have a large corporate backer, the role these individuals play is frequently overlooked by software consumers, and as a result, many open-source projects face maintenance challenges.
Limited resources impose a variety of constraints on projects, but the implications are particularly wide-reaching when we look at the challenge of securing open-source software. Vulnerabilities discovered in proprietary software are the responsibility of the software vendor, frequently better funded than open-source software, with teams available to triage and resolve defects. Better — or any — funding, or broader community participation, may also increase the chance of avoiding vulnerabilities during development or discovering them during quality assurance checks. It can also help developers more quickly identify and resolve vulnerabilities discovered at a future date.
Increasing open-source project funding is a wonderful idea, and it’s in the best interest of companies using such software to build their products and services. However, funding alone won’t increase security in open-source projects, just as the greater source code visibility in open-source hasn’t necessarily resulted in fewer defects or shortened times between defect introduction and resolution.
For example, the vulnerability in Microsoft’s Server Message Block (SMB) protocol implementation (CVE-2017-0144) was around for many years before the defect was resolved in 2017. Similarly, the Log4Shell (CVE-2021-44228) vulnerability in the Log4j project was introduced in 2013, and it remained undiscovered and unresolved until December 2021. There is clearly a massive difference in both funding and available resources to those involved in these projects, and yet both were able to have vulnerable defects exist for years before resolution.
Solving the problem at the source (code)
Accidental software vulnerabilities share similar root causes whether they’re found in proprietary or open-source software. When developers create new features or modify existing ones, we need code reviews that look beyond feature functionality confirmation. We need to inspect the code changes for security issues but also perform a deeper analysis, with attention to the security implications of these changes within the greater scope of the complete project.
The challenge is that not all developers are security practitioners, and that is not a realistic expectation. The limited resources of open-source projects compound the problem, increasing the likelihood that contribution reviews focus primarily on functionality. We should encourage developer training in secure coding practices but understand that mistakes are still possible. That means we need processes and tooling to assist with secure coding.
Security in open-source software carries some other unique challenges due to the open environment. Projects tend to accept a wide variety of contributions from anyone. A new feature might not have enough of a demand to get time from the primary developers, but anyone who takes the time to develop the feature while staying within the bounds of the project’s goals and best practices may very well have their contribution accepted and merged into the project. Projects may find themselves the target of malicious contributions through covert defect introduction. The project may even be sabotaged by a project maintainer, or the original maintainer may want to retire from the project and end up handing it over to another party that — intentionally or not — introduces a defect.
It’s important for us to identify open-source projects that are critical to the software supply chain and ensure these projects are sustainably maintained for the future. These goals would benefit from increased adoption of secure coding practices and infrastructure that ensures secure distribution and verification of software build artifacts.
NEVER MISS A BLOG
Get the latest stories, expertise, and news about security today.
During the British rule of India, the British government became concerned about the number of cobras in the city of Delhi. The ambitious bureaucrats came up with what they thought was the perfect solution, and they issued a bounty for cobra skins. The plan worked wonderfully at first, as cobra skins poured in and reports of cobras in Delhi declined.
However, it wasn’t long before some of the Indian people began breeding these snakes for their lucrative scales. Once the British discovered this scheme, they immediately cancelled the bounty program, and the Indian snake farmers promptly released their now-worthless cobras into the wild.
Now, the cobra conundrum was even worse than before the bounty was offered, giving rise to the term “the cobra effect.” Later, the economist Charles Goodhart coined the closely related Goodhart’s Law, widely paraphrased as, “When a measure becomes a target, it ceases to be a good measure.”
Creating metrics in cybersecurity is hard enough, but creating metrics that matter is a harder challenge still. Any business-minded person can tell you that effective metrics (in any field) need to meet these 5 criteria:
Cheap to create
Consistently measured
Quantifiable
Significant to someone
Tied to a business need
If your proposed metrics don’t meet any one of the above criteria, you are setting yourself up for a fantastic failure. Yet if they do meet those criteria, you aren’t totally out of the woods yet. You must still avoid the cobra effect.
A case study
I’d like to take a moment to recount a story from one of the more effective security operations centers (SOCs) I’ve had the pleasure of working with. They had a quite well-oiled 24/7 operation going. There was a dedicated team of data scientists who spent their time writing custom tooling and detections, as well as a wholly separate team of traditional SOC analysts, who were responsible for responding to the generated alerts. The data scientists were judged by the number of new threat detections they were able to come up with. The analysts were judged by the number of alerts they were able to triage, and they were bound by a (rather rapid) service-level agreement (SLA).
This largely worked well, with one fairly substantial caveat. The team of analysts had to sign off on any new detection that entered the production alerting system. These analysts, however, were largely motivated by being able to triage a new issue quickly.
I’m not here to say that I believe they were doing anything morally ambiguous, but the organizational incentive encouraged them to accept detections that could quickly and easily be marked as false positives and reject detections that took more time to investigate, even if they were more densely populated with true positives. The end effect was a system structured to create a success condition that was a massive number of false-positive alerts that could be quickly clicked away.
Avoiding common pitfalls
The most common metrics used by SOCs are number of issues closed and mean time to close.
While I personally am not in love with these particular quantifiers, there is a very obvious reason these are the go-to data points. They very easily fit all 5 criteria listed above. But on their own, they can lead you down a path of negative incentivization.
So how can we take metrics like this, and make them effective? Ideally, we could use these in conjunction with some analysis on false/true positivity rate to arrive at an efficacy rate that will maximize your true positive detections per dollar.
Arriving at efficacy
Before we get started, let’s make some assumptions. We are going to talk about SOC alerts that must be responded to by a human being. The ideal state is for high-fidelity alerting with automated response, but there is always a state where human intervention is necessary to make a disposition. We are also going to assume that there are a variety of types of detections that have different false-positive and true-positive rates, and for the sheer sake of brevity, we are going to pretend that false negatives incur no cost (an obvious absurdity, but my college physics professor taught me that this is fine for demonstration purposes). We are also going to assume, safely, I imagine, that reviewing these alerts takes time and that time incurs a dollars-and-cents cost.
For any alert type, you would want to establish the number of expected true positives, which is the alert rate multiplied by the true-positive rate (which you must be somehow tracking, by the way). This will give you the expected number of true positives over the alert rate period.
Great! So we know how many true positives to expect in a big bucket of alerts. Now what? Well, we need to know how much it costs to look through the alerts in that bucket! Take the alert rate, multiply by the alert review time, and if you are feeling up to it, multiply by the cost of the manpower, and you’ll arrive at the expected cost to review all the alerts in that bucket.
But the real question you want to know is, is the juice worth the squeeze? The detection efficacy will tell you the cost of each true positive and can be calculated by dividing the number of expected true positives by the expected cost. Or to simplify the whole process, divine the true-positive rate by the average alert review time, and multiply by the manpower cost.
If you capture detection efficacy this way, you can effectively discover which detections are costing you the most and which are most effective.
Dragging down distributions
Another important option to consider is the use of distributions in your metric calculation. We all remember mean, median, and mode from grade school — these and other statistics are tools we can use to tell us how effective we are. In particular, we want to ask whether our measure should be sensitive to outliers — data points that don’t look typical. We should also consider whether our mean and median are being dragged down by our distribution.
As a quick numerical example, assume we have 100 alerts come in, and we bulk-close 75 of them based on some heuristic. The other 25 alerts are all reviewed, taking 15 minutes each, and handed off as true positives. Then our median time to close is 0 minutes, and our mean time to close is 3 minutes and 45 seconds.
Those numbers are great, right? Well, not exactly. They tell us what “normal” looks like but give us no insight into what is actually happening.
To that end, we have two options. Firstly, we can remove zero values from our data! This is typical in data science as a way to clean data, since in most cases, zeros are values that are either useless or erroneous. This gives us a better idea of what “normal” looks like.
Second, we can use a value like the upper quartile to see that the 75th-percentile time to close is 15 minutes, which in this case is a much more representative example of how long an analyst would expect to spend on events. In particular, it’s easy to drag down the average — just close false positives quickly! But it’s much harder to drag down the upper quartile without making some real improvements.
3 keys to keep in mind
When creating metrics for your security program, there are a lot of available options. When choosing your metrics, there are a few keys:
Watch out for the cobra effect. Your metrics should describe something meaningful, but they should be hard to game. When in doubt, remember Goodhart’s Law — if it’s a target, it’s not a good metric.
Remember efficacy.In general, we are aiming to get high-quality responses to alerts that require human expertise. To that point, we want our analysts to be as efficient and our detections to be as effective as possible. Efficacy gives us a powerful metric that is tailor-made for this purpose.
When in doubt, spread it out.A single number is rarely able to give a truly representative measure of what is happening in your environment. However, having two or more metrics — such as mean time to response and upper-quartile time to response — can make those metrics more robust to outliers and against being gamed, ensuring you get better information.
NEVER MISS A BLOG
Get the latest stories, expertise, and news about security today.
Editor’s note: We had planned to publish our Hacky Holidays blog series throughout December 2021 – but then Log4Shell happened, and we dropped everything to focus on this major vulnerability that impacted the entire cybersecurity community worldwide. Now that it’s 2022, we’re feeling in need of some holiday cheer, and we hope you’re still in the spirit of the season, too. Throughout January, we’ll be publishing Hacky Holidays content (with a few tweaks, of course) to give the new year a festive start. So, grab an eggnog latte, line up the carols on Spotify, and let’s pick up where we left off.
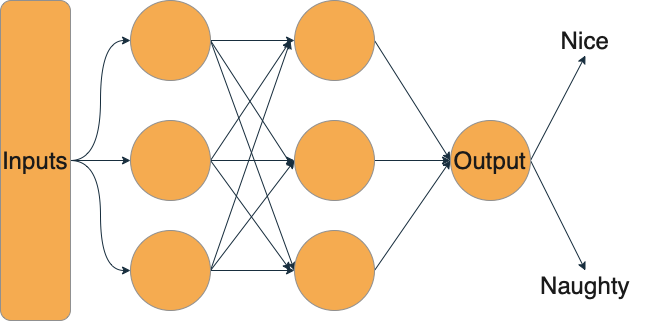
Santa’s task of making the nice and naughty list has gotten a lot harder over time. According to estimates, there are around 2.2 billion children in the world. That’s a lot of children to make a list of, much less check it twice! So like many organizations with big data problems, Santa has turned to machine learning to help him solve the issue and built a classifier using historical naughty and nice lists. This makes it easy to let the algorithm decide whether they’ll be getting the gifts they’ve asked for or a lump of coal.
Santa’s lists have long been a jealously guarded secret. After all, being on the naughty list can turn one into a social pariah. Thus, Santa has very carefully protected his training data — it’s locked up tight. Santa has, however, made his model’s API available to anyone who wants it. That way, a parent can check whether their child is on the nice or naughty list.
Santa, being a just and equitable person, has already asked his data elves to tackle issues of algorithmic bias. Unfortunately, these data elves have overlooked some issues in machine learning security. Specifically, the issues of membership inference and model inversion.
Membership inference attacks
Membership inference is a class of machine learning attacks that allows a naughty attacker to query a model and ask, in effect, “Was this example in your training data?” Using the techniques of Salem et al. or a tool like PrivacyRaven, an attacker can train a model that figures out whether or not a model has seen an example before.
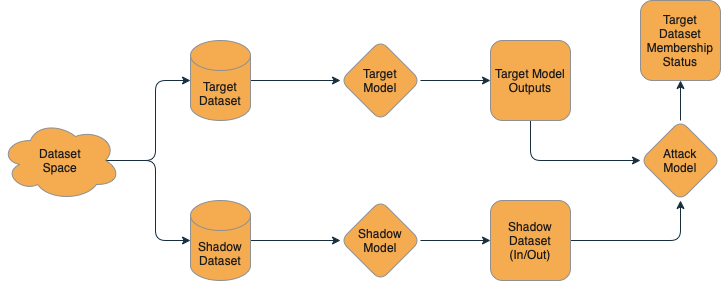
From a technical perspective, we know that there is some amount of memorization in models, and so when they make their predictions, they are more likely to be confident on items that they have seen before — in some ways, “memorizing” examples that have already been seen. We can then create a dataset for our “shadow” model — a model that approximates Santa’s nice/naughty system, trained on data that we’ve collected and labeled ourselves.
We can then take the training data and label the outputs of this model with a “True” value — it was in the training dataset. Then, we can run some additional data through the model for inference and collect the outputs and label it with a “False” value — it was not in the training dataset. It doesn’t matter if these in-training and out-of-training data points are nice or naughty — just that we know if they were in the “shadow” training dataset or not. Using this “shadow” dataset, we train a simple model to answer the yes or no question: “Was this in the training data?” Then, we can turn our naughty algorithm against Santa’s model — “Dear Santa, was this in your training dataset?” This lets us take real inputs to Santa’s model and find out if the model was trained on that data — effectively letting us de-anonymize the historical nice and naughty lists!
Model inversion
Now being able to take some inputs and de-anonymize them is fun, but what if we could get the model to just tell us all its secrets? That’s where model inversion comes in! Fredrikson et al. proposed model inversion in 2015 and really opened up the realm of possibilities for extracting data from models. Model inversion seeks to take a model and, as the name implies, turn the output we can see into the training inputs. Today, extracting data from models has been done at scale by the likes of Carlini et al., who have managed to extract data from large language models like GPT-2.
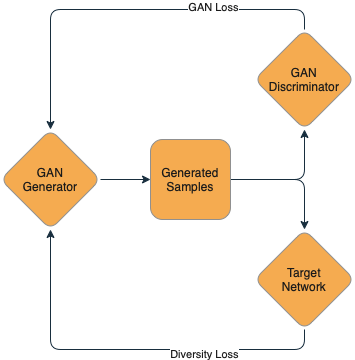
In model inversion, we aim to extract memorized training data from the model. This is easier with generative models than with classifiers, but a classifier can be used as part of a larger model called a Generative Adversarial Network (GAN). We then sample the generator, requesting text or images from the model. Then, we use the membership inference attack mentioned above to identify outputs that are more likely to belong to the training set. We can iterate this process over and over to generate progressively more training set-like outputs. In time, this will provide us with memorized training data.
Note that model inversion is a much heavier lift than membership inference and can’t be done against all models all the time — but for models like Santa’s, where the training data is so sensitive, it’s worth considering how much we might expose! To date, model inversion has only been conducted in lab settings on models for text generation and image classification, so whether or not it could work on a binary classifier like Santa’s list remains an open question.
Mitigating model mayhem
Now, if you’re on the other side of this equation and want to help Santa secure his models, there are a few things we can do. First and foremost, we want to log, log, log! In order to carry out the attacks, the model — or a very good approximation — needs to be available to the attacker. If you see a suspicious number of queries, you can filter IP addresses or rate limit. Additionally, limiting the return values to merely “naughty” or “nice” instead of returning the probabilities can make both attacks more difficult.
For extremely sensitive applications, the use of differential privacy or optimizing with DPSGD can also make it much more difficult for attackers to carry out their attacks, but be aware that these techniques come with some accuracy loss. As a result, you may end up with some nice children on the naughty list and a naughty hacker on your nice list.
Santa making his list into a model will save him a whole lot of time, but if he’s not careful about how the model can be queried, it could also lead to some less-than-jolly times for his data. Membership inference and model inversion are two types of privacy-related attacks that models like this may be susceptible to. As a best practice, Santa should:
Log information about queries like:
IP address
Input value
Output value
Time
Consider differentially private model training
Limit API access
Limit the information returned from the model to label-only
NEVER MISS A BLOG
Get the latest stories, expertise, and news about security today.
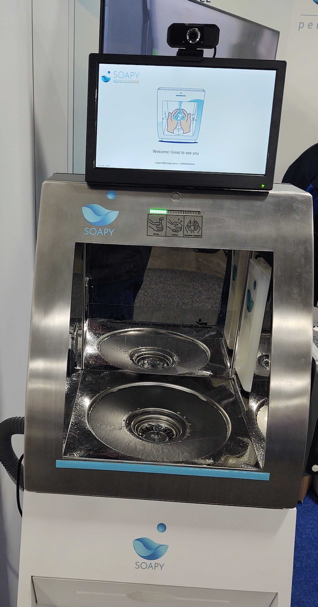
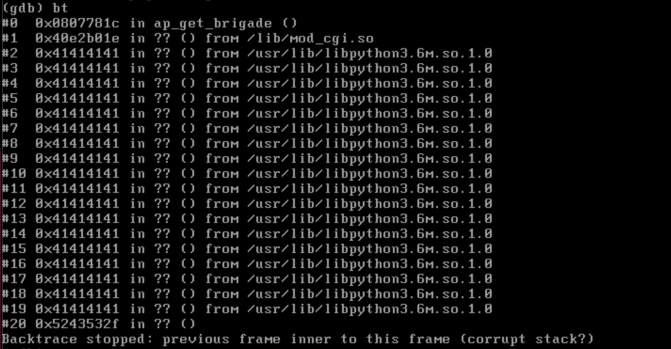
The first thing I noticed about CES this year was COVID’s impact on the event, which was more than just attendance size. A large amount of the technology focused on sanitation, everything from using light to sanitize surfaces on point-of-sale systems to hand-washing stations.
When I attend events such as this, which are not 100% security-related, I still approach them with a very strong security mindset and take the opportunity to talk to many of the vendors about the subject of security within their products. This often has mixed results, with many of those working the booths at CES having more focused knowledge on product functionality and capabilities, not technical questions related to product security. This year was no different, but I still had fun talking about security with many of those working their product booth, and as usual, I had some great conversations.
For example, I love when I see a product that typically wouldn’t be considered smart technology, but then see that it has been retrofitted with some level of smart tech to expand its usefulness, like a toothbrush. This year, I headed right to those booths and started asking security questions, and I was surprised at the responses I got, even though security was not their area of expertise as, say, an oral hygienist. They were still interested in talking about security and made every effort to either answer my question or find the answer. They also were quick to start asking me questions around what they should be concerned with and how would products like theirs be properly tested.
A healthy curiosity
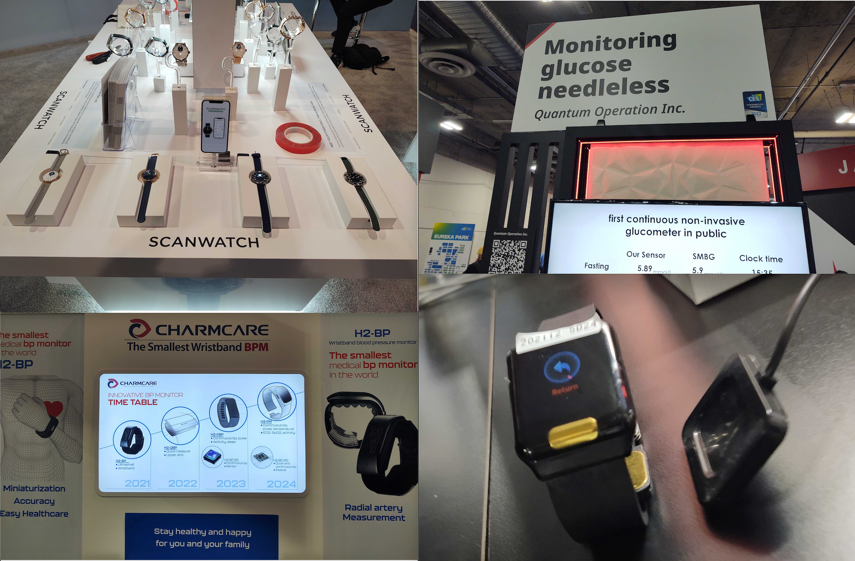
Moving on from there, as usual, I encountered wearable smart technology, which has always been a big item at CES. Going beyond the typical devices to track your steps, smartwatches continue to be improved with a focus on monitoring key health stats including blood pressure, oxygen levels, heart rate, EKG, and even blood sugar levels for diabetics.
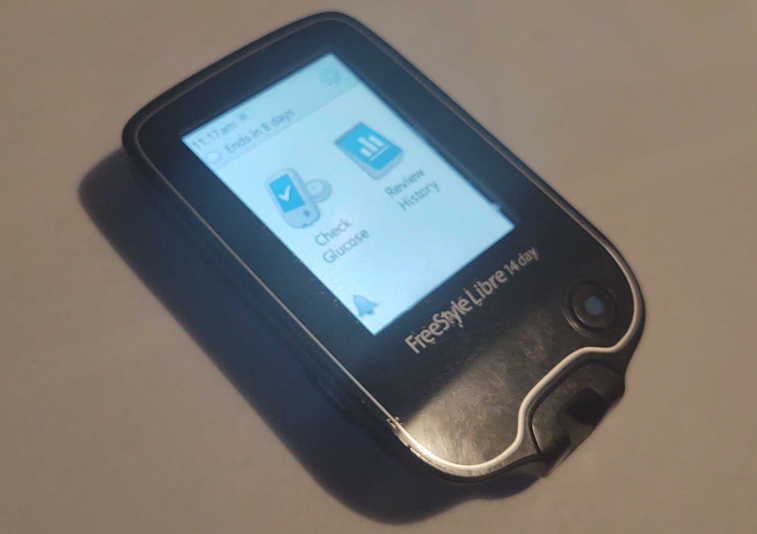
At Abbott’s booth, which had several products including the Libre Freestyle for monitoring blood glucose level, which is a product I use. Abbott is releasing a new sensor for this product that has a much smaller profile, and I’m looking forward to that. Since they had no live demos of their currently marketed Libre FreeStyle product, I volunteered to demo my unit for another CES attendee.
One of the Abbott booth employees asked me why I still use their handheld unit and haven’t switched to their mobile application, which was perfect timing for me to start talking security. During the conversation, I told them that I hadn’t personally tested their mobile application and regularly avoid placing apps on my phone that I haven’t security-tested. They all chimed in and recommended that I test their mobile application and let them know if it has any issues that they need to fix. So, I guess I need to add that to my to-do list.
Facing the future
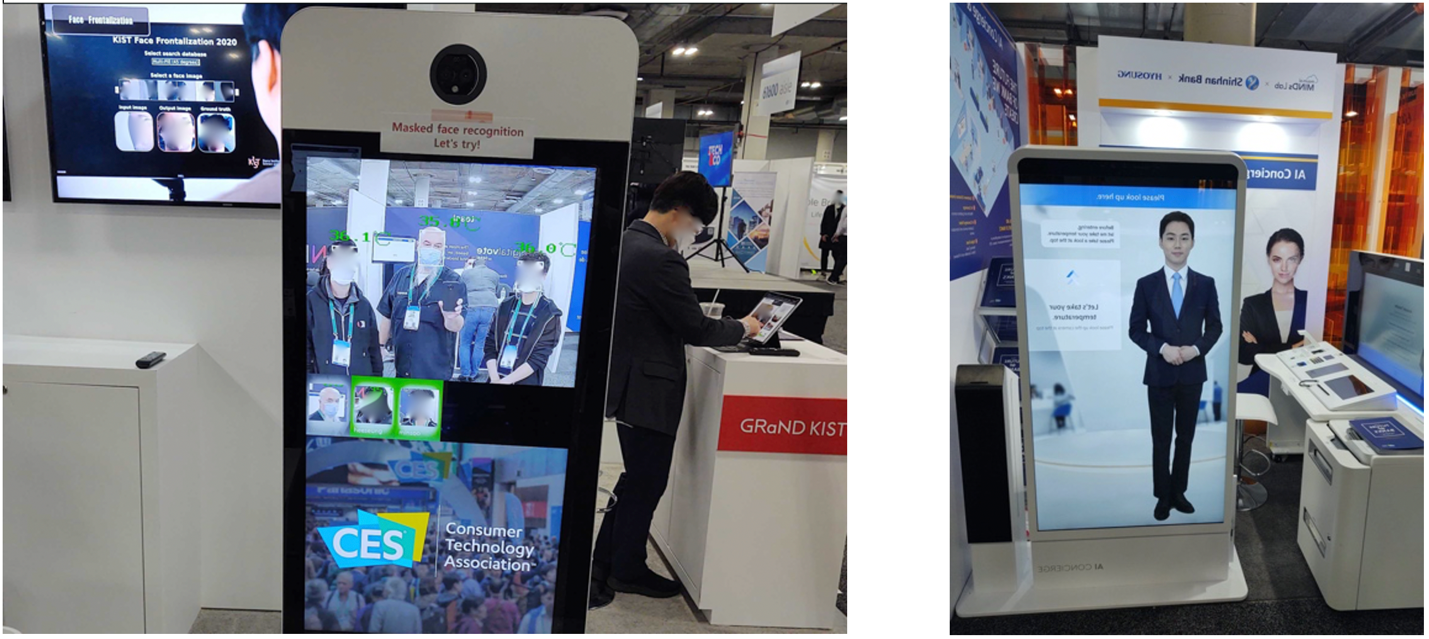
Next, I encountered the typical facial recognition systems we regularly see at CES — but now, they all appear to be able to measure body temperatures and identify you despite wearing a mask. Of course, they also now support contract tracing to help identify if you’ve encountered someone who is COVID-positive. Also, many companies have made their devices more friendly by enabling them to automatically greet you at the door.
Personally, I always have reservations when it comes to facial recognition systems. Don’t get me wrong: I get the value they can bring. But sadly, in the long haul, I expect the data gathered will end up being misused, just like data gathered using other methods. Someone will find a way to commoditize this data if they aren’t already.
Charged up
Another area I expected to see at CES was electric-vehicle (EV) technology, and I wasn’t disappointed. Some may think I’m weird, but my focus wasn’t necessarily on the expensive cars and flying vehicles, although they’re very interesting — it was the charging stations.
With US plans to deploy charging stations across the nation, there’s a large marketplace to support public and home charging systems, and there were many solutions of this kind on display at CES. Several of the vendors indicated they were looking to snap up some of that market share and were actively working to have their products certified in the US.
With EV chargers most likely all being connected or potentially having the ability to impact the electric grid in various ways, I think security should play a big role in their design and deployment, and I took the opportunity to have some security discussions with several vendors. One vendor specifically designed and produced only EV charging hardware, not the software, and had staff at the event who could engage comfortably on the subject of security. Even though this organization hadn’t yet conducted any independent security testing on their product, they understood the value of doing so and asked a number of questions, including details on the processes and methodologies.
Robots: Convenient or creepy?
What would CES be if we didn’t take a quick look at robot technology?
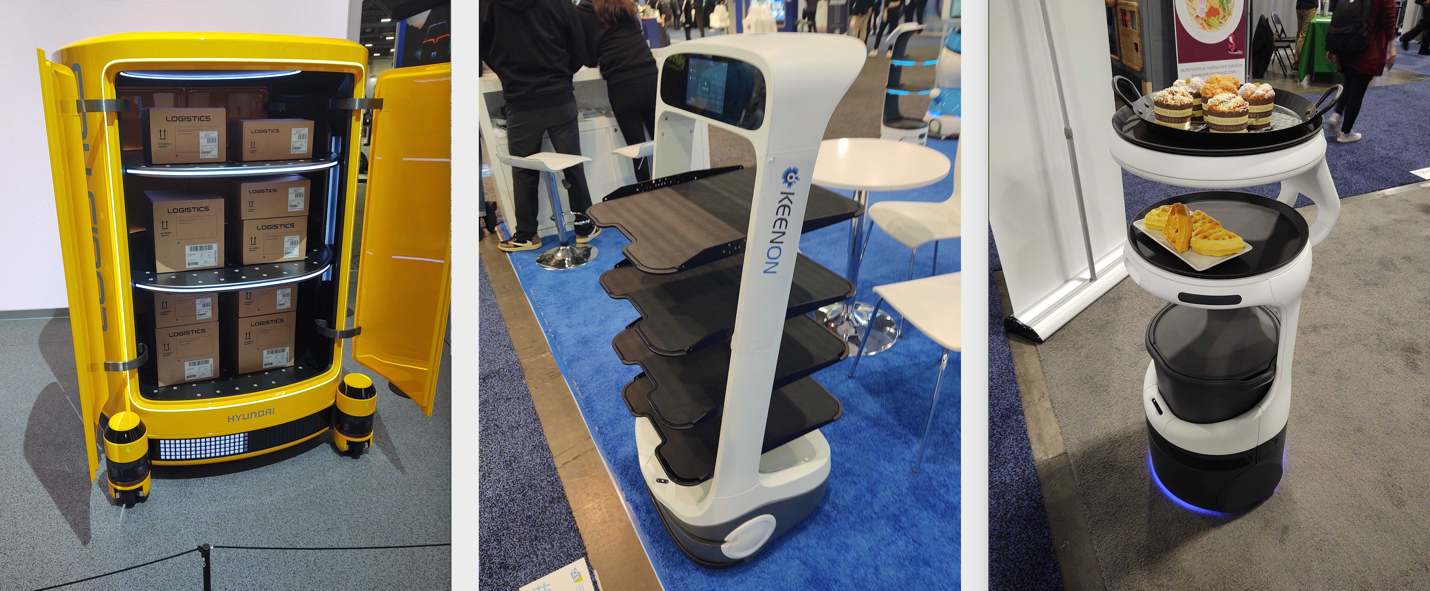
Like many, I’m intrigued and freaked out by robots at the same time. The first ones to look at were the service robots, which are less creepy than others and could be very useful in activities like delivering parts on a shop floor or serving up refreshments at a party.
The convenience of using robots for these tasks is great, and I look forward to seeing this play out some day at a party I am attending. Although, with the typical crowds I run with, I expect everyone will be trying to hack on it and paying very little attention to the food it’s serving.
Finally, I looked at the creepier side of robots. The UK pavilion had a robot that was able to have lifelike facial and hand gestures. I found these features to be very impressive. If this tech could be built to be mobile and handle human interactions, I would say we have advanced to a new level, but I expect this is only mimicking these features, and we still have further to go before we will be living the Jetsons.
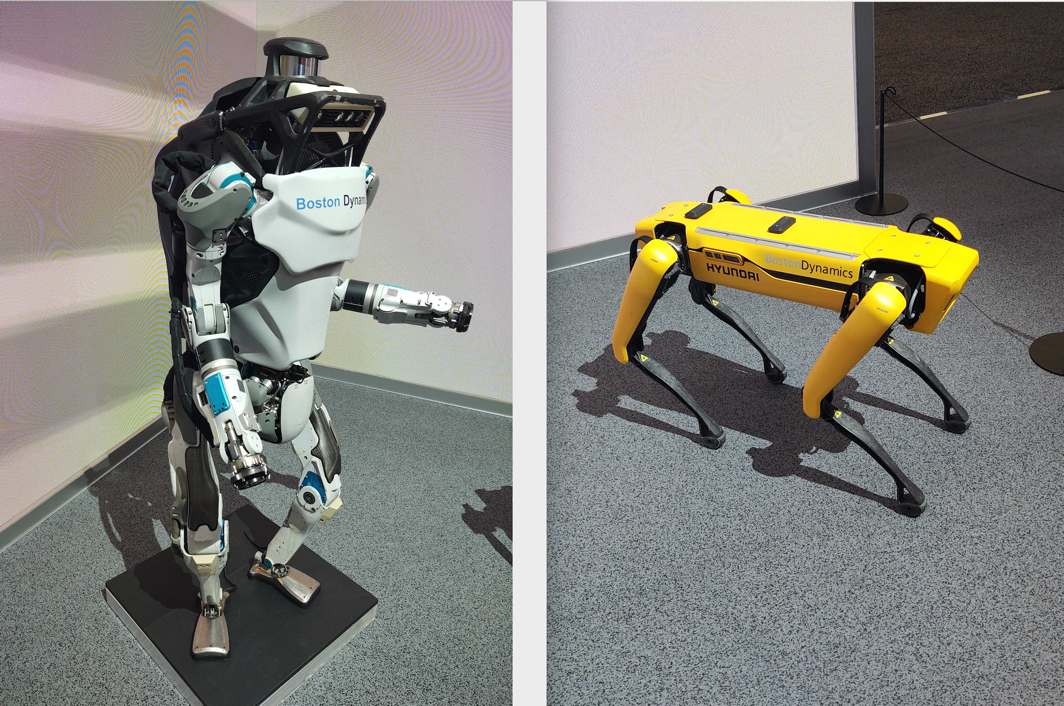
Also, Boston Dynamics and Hyundai were at CES. Their advanced robotics work always impresses and also scares me a little, and I’m not alone. My only disappointment was that I couldn’t get into the live demo of the technology. I waited in line, but the interest in the live show was high, and space was limited.
With advancements in robotics like these, we must all give this some deep consideration and answer the questions: What will this tech be used for? And how can we properly secure it? Because if it’s misused or not properly secured, it can lead to issues we never want to deal with. With that said, this robot tech is amazing, and I expect it can be a real game-changer in a number of positive areas.
NEVER MISS A BLOG
Get the latest stories, expertise, and news about security today.
Over the course of routine security research, Rapid7 researcher Jake Baines discovered and reported five vulnerabilities involving the SonicWall Secure Mobile Access (SMA) 100 series of devices, which includes SMA 200, 210, 400, 410, and 500v. The most serious of these issues can lead to unauthenticated remote code execution (RCE) on affected devices. We reported these issues to SonicWall, who published software updates and have released fixes to customers and channel partners on December 7, 2021. Rapid7 urges users of the SonicWall SMA 100 series to apply these updates as soon as possible. The table below summarizes the issues found.
The rest of this blog post goes into more detail about the issues. Vulnerability checks are available to InsightVM and Nexpose customers for all five of these vulnerabilities.
Product description
The SonicWall SMA 100 series is a popular edge network access control system, which is implemented as either a standalone hardware device, a virtual machine, or a hosted cloud instance. More about the SMA 100 series of products can be found here.
Testing was performed on the SMA 500v firmware versions 9.0.0.11-31sv and 10.2.1.1-19sv. CVE-2021-20038 and CVE-2021-20040 affect only devices running version 10.2.x, while the remaining issues affect both firmware versions. Note that the vendor has released updates and at their KB article, SNWLID-2021-0026, to address all these issues.
CVE-2021-20038: Stack-based buffer overflow in httpd
Affected version: 10.2.1.2-24sv
The web server on tcp/443 (/usr/src/EasyAccess/bin/httpd) is a slightly modified version of the Apache httpd server. One of the notable modifications is in the mod_cgi module (/lib/mod_cgi.so). Specifically, there appears to be a custom version of the cgi_build_command function that appends all the environment variables onto a single stack-based buffer using strcat.
There is no bounds-checking on this environment string buildup, so if a malicious attacker were to generate an overly long QUERY_STRING, they can overflow the stack-based buffer. The buffer itself is declared at the top of the cgi_handler function as a 202 byte character array (although, it’s followed by a lot of other stack variables, so the depth to cause the overflow is a fair amount more).
Regardless, the following curl command demonstrates the crash when sent by a remote and unauthenticated attacker:
curl --insecure "https://10.0.0.7/?AAAA[1794 more A's here for a total of 1798 A's]"
The above will trigger the following crash and backtrace:
Technically, the above crash is due to an invalid read, but you can see the stack has been successfully overwritten above. A functional exploit should be able to return to an attacker’s desired address. The system does have address space layout randomization (ASLR) enabled, but it has three things working against this protection:
httpd’s base address is not randomized.
When httpd crashes it is auto restarted by the server, giving the attacker opportunity to guess library base addresses, if needed.
SMA 100 series are 32 bit systems and ASLR entropy is low enough that guessing library addresses a feasible approach to exploitation.
Because of these factors, a reliable exploit for this issue is plausible. It’s important to note that httpd is running as the “nobody” user, so attackers don’t get to go straight to root access, but it’s one step away, as the exploit payload can su to root using the password “password.”
CVE-2021-20038 exploitation impact
This stack-based buffer overflow has a suggested CVSS score of 9.8 out of 10 — by exploiting this issue, an attack can get complete control of the device or virtual machine that’s running the SMA 100 series appliance. This can allow attackers to install malware to intercept authentication material from authorized users, or reach back into the networks protected by these devices for further attack. Edge-based network control devices are especially attractive targets for attackers, so we expect continued interest in these kinds of devices by researchers and criminal attackers alike.
CVE-2021-20039: Command injection in cgi-bin
Affected versions: 9.0.0.11-31sv, 10.2.0.8-37sv, and 10.2.1.2-24sv
The web interface uses a handful of functions to scan user-provided strings for shell metacharacters in order to prevent command injection vulnerabilities. There are three functions that implement this functionality (all of which are defined in libSys.so): isSafeCommandArg, safeSystemCmdArg, and safeSystemCmdArg2.
These functions all scan for the normal characters (&|$><;’ and so on), but they do not scan for the new line character (‘\n’). This is problematic because, when used in a string passed to system, it will act as a terminator. There are a variety of vectors an attacker could use to bypass these checks and hit system, and one (but certainly not the only) example is /cgi-bin/viewcert, which we’ll describe in more detail here.
The web interface allows authenticated individuals to upload, view, or delete SSL certificates. When deleting a certificate, the user provides the name of the directory that the certificate is in. These names are auto-generated by the system in the format of newcert-1, newcert-2, newcert-3, etc. A normal request would define something like CERT=newcert-1. The CERT variable makes it to a system call as part of an rm -rf %s command. Therefore, an attacker can execute arbitrary commands by using the ‘\n’ logic in CERT. For example, the following would execute ping to 10.0.0.9:
CERT=nj\n ping 10.0.0.9 \n
To see that in a real request, we have to first log in:
The system will set a swap cookie. That’s your login token, which can be copied into the following request. The following requests executes ping via viewcert:
It’s important to note that viewcert elevates privileges so that when the attacker hits system, they have root privileges.
CVE-2021-20039 exploitation impact
Note that this vulnerability is post-authentication and leverages the administrator account (only administrators can manipulate SSL certificates). An attacker would already need to know (or guess) a working username and password in order to elevate access from administrator to root-level privileges. In the ideal case, this is a non-trivial barrier to entry for attackers. That said, the SMA 100 series does ship with a default password for the administrator account, and most organizations allow administrators to choose their own password, and we also know that the number of users for any device that stick with the default or easily guessed passwords is non-zero.
CVE-2021-20040: Upload path traversal in sonicfiles
Affected version: 10.2.0.8-37sv and 10.2.1.2-34sv
The SMA 100 series allows users to interact with remote SMB shares through the HTTPS server. This functionality resides in the endpoint https://address/fileshare/sonicfiles/sonicfiles. Most of the functionality simply flows through the SMA series device and doesn’t actually leave anything on the device itself, with the notable exception of RacNumber=43. That is supposed to write a file to the /tmp directory, but it is vulnerable to path traversal attacks.
To be a bit more specific, RacNumber=43 takes two parameters:
swcctn: This value gets combined with /tmp/ + the current date to make a filename.
A JSON payload. The payload is de-jsonified and written to the swcctn file.
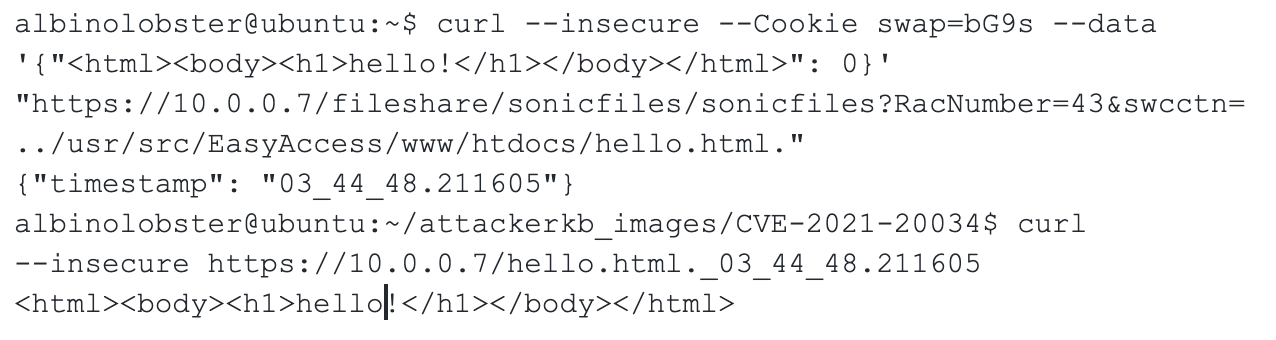
There is no validation applied to swcctn, so an attacker can provide arbitrary code. The example below writes the file "hello.html.time" to the web server’s root directory:
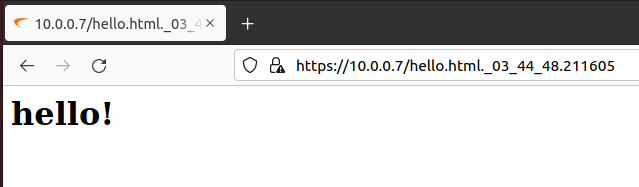
This results in:
CVE-2021-20040 exploitation impact
There are some real limitations to exploiting CVE-2021-20040:
File writing is done with nobody privileges. That limits where an attacker can write significantly, although being able to write to the web server’s root feels like a win for the attacker.
The attacker can’t overwrite any existing file due to the random digits attached to the filename.
Given these limitations, an attack scenario will likely involve tricking users into believing their custom-created content is a legitimate function of the SMA 100, for example, a password "reset" function that takes a password.
CVE-2021-20041: CPU exhaustion in sonicfiles
Affected versions: 9.0.0.11-31sv, 10.2.0.8-37sv, and 10.2.1.2-24sv
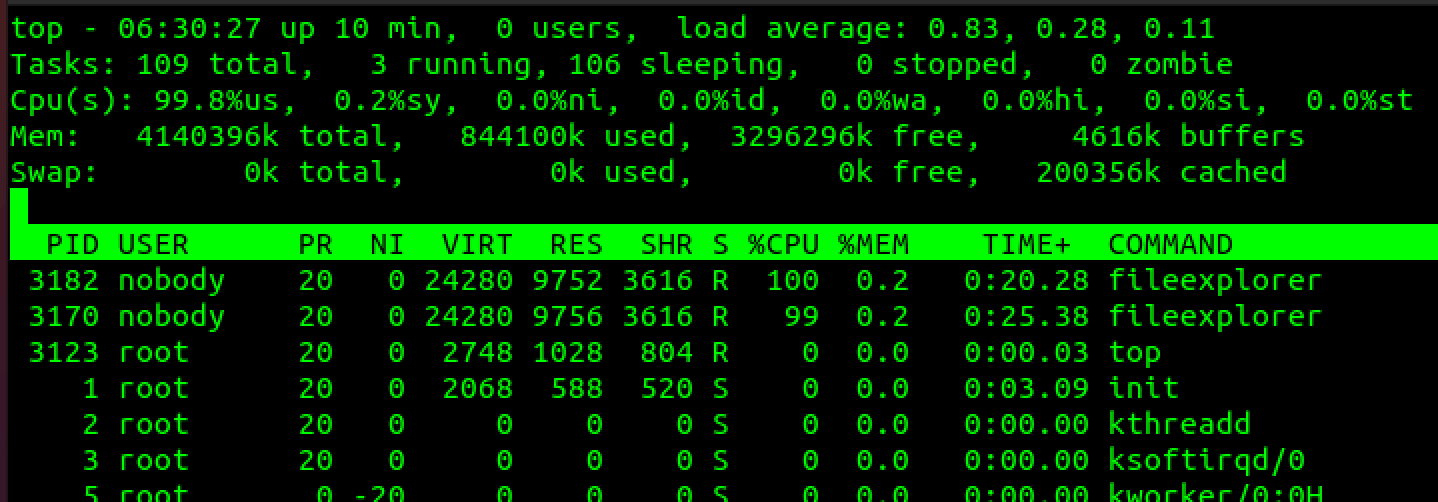
An unauthenticated, remote adversary can consume all of the device’s CPU due to crafted HTTP requests sent to hxxps://address/fileshare/sonicfiles/sonicfiles, resulting in an infinite loop in the fileexplorer process. The infinite loop is due to the way fileexplorer parses command line options. When parsing an option that takes multiple parameters, fileexplorer incorrectly handles parameters that lack spaces or use the = symbol with the parameter. For example, the following requests results in the infinite loop:
Parsing the "-elol" portion triggers the infinite loop. Each new request will spin up a new fileexplorer process. Technically speaking, on the SMA 500v, only two such requests will result in ~100% CPU usage indefinitely. Output from top:
CVE-2021-20041 exploitation impact
A number of additional requests are required to truly deny availability, as this is not a one-shot denial of service request. It should also be noted that this is a parameter injection issue — specifically, the -e parameter is injected, and if the injection in this form didn’t result in an infinite loop, the attack would have been able to exfiltrate arbitrary files (which of course would be more useful to an attacker).
CVE-2021-20042: Confused deputy in sonicfiles
Affected versions: 9.0.0.11-31sv, 10.2.0.8-37sv, and 10.2.1.2-24sv
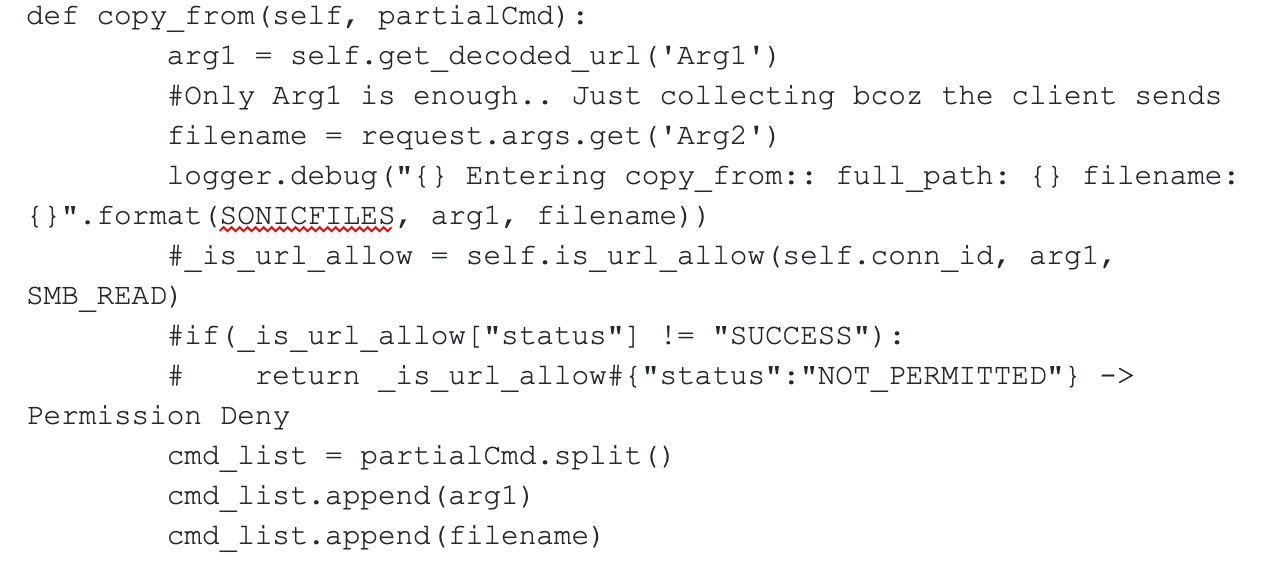
An unauthenticated, remote attack can use SMA 100 series devices as an "unintended proxy or intermediary," also known as a Confused Deputy attack. In short, that means an outside attacker can use the SMA 100 series device to access systems reachable via the device’s internal facing network interfaces. This is due to the fact that the sonicfiles component does not appear to validate the requestor’s authentication cookie until after the fileexplorer request is made on the attacker’s behalf. Furthermore, the security check validating that the endpoint fileexplorer is accessing is allowed is commented out from RacNumber 25 (aka COPY_FROM). Note the "_is_url_allow" logic below:
This results in the following:
An attacker can bypass the SMA 100 series device’s firewall with SMB-based requests.
An attacker can make arbitrary read/write SMB requests to a third party the SMA 100 series device can reach. File creation, file deletion, and file renaming are all possible.
An attacker can make TCP connection requests to arbitrary IP:port on a third party, allowing the remote attacker to map out available IP/ports on the protected network.
Just as a purely theoretical example, the following requests sends a SYN to 8.8.8.8:80:
There are two significant limitations to this attack:
The attacker does have to honor the third-party SMB server’s authentication. So to read/write, they’ll need credentials (or anonymous/guest access).
An unauthenticated attacker will not see responses, so the attack will be blind. Determining the result of an attack/scan will rely on timing and server error codes.
Given these constraints, an attacker does not command complete control of resources on the protected side of the network with this issue and is likely only able to map responsive services from the protected network (with the notable exception of being able to write to, but not read from, unprotected SMB shares).
Vendor statement
SonicWall routinely collaborates with third-party researchers, penetration testers, and forensic analysis firms to ensure that its products meet or exceed security best practices. One of these valued allies, Rapid7, recently identified a range of vulnerabilities to the SMA 100 series VPN product line, which SonicWall quickly verified. SonicWall designed, tested, and published patches to correct the issues and communicated these mitigations to customers and partners. At the time of publishing, there are no known exploitations of these vulnerabilities in the wild.
Remediation
As these devices are designed to be exposed to the internet, the only effective remediation for these issues is to apply the vendor-supplied updates.
Disclosure timeline
October, 2021: Issues discovered by Jake Baines of Rapid7
Mon, Oct 18, 2021: Initial disclosure to SonicWall via [email protected]
Mon, Oct 18, 2021: Acknowledgement from the vendor
Thu, Oct 28, 2021: Validation completed and status update provided by the vendor
Thu, Nov 9, 2021: Test build with updates provided by the vendor
We are hosting a series of free research seminars about how to teach artificial intelligence (AI) and data science to young people, in partnership with The Alan Turing Institute.
In the fifth seminar of this series, we heard from Rose Luckin, Professor of Learner Centred Design at the University College London (UCL) Knowledge Lab. Rose is Founder of EDUCATE Ventures Research Ltd., a London consultancy service working with start-ups, researchers, and educators to develop evidence-based educational technology.
Rose Luckin, UCL
Based on her experience at EDUCATE, Rose spoke about how AI-based analysis could help educators gain a deeper understanding of their students, and how educators could work with AI systems to provide better learning resources to their students. This provided us with a different angle to the first four seminars in our current series, where we’ve been thinking about how young peoplelearn to understand AI systems.
Rose’s definition of artificial intelligence for this presentation.
Education and AI systems
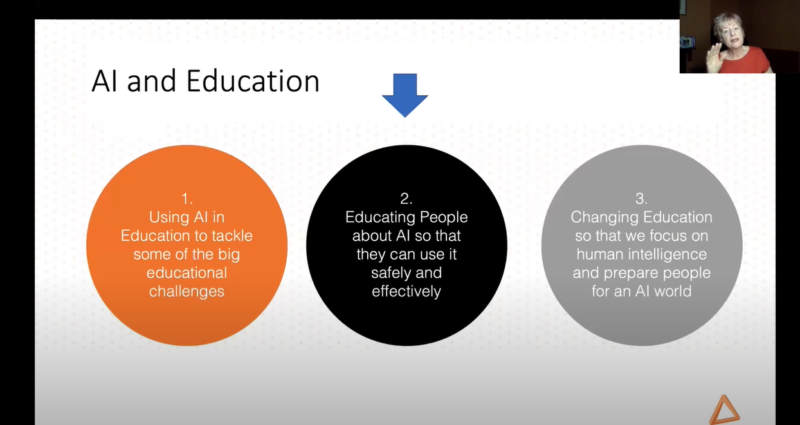
AI systems have the potential to impact education in a number of different ways, which Rose distilled into three areas:
Using AI in education to tackle some of the big educational challenges
Educating teachers about AI so that they can use it safely and effectively
Changing education so that we focus on human intelligence and prepare people for an AI world
It is clear that the three areas are interconnected, meaning developments in one area will affect the others. Rose’s focus during the seminar was the second area: educating people about AI.
What can AI systems do in education?
Through giving examples of existing AI-based systems used for education, Rose described what in particular it is about AI systems that can be useful in an education setting. The first point she raised was that AI systems can adapt based on learning from data. Her main example was the AI-based platform ENSKILLS, which detects the user’s level of competency with spoken English through the user’s interactions with a virtual character, and gradually adapts the character to the user’s level. Other examples of adaptive AI systems for education include Carnegie Learning and Century Intelligent Learning.
We know that AI systems can respond to different forms of data. Rose introduced the example of OyaLabs to demonstrate how AI systems can gather and process real-time sensory data. This is an app that parents can use in a young child’s room to monitor the child’s interactions with others. The app analyses the data it gathers and produces advice for parents on how they can support their child’s language development.
AI system creators can also combine adaptivity and real-time sensory data processing in their systems. One example Rosa gave of this was SimSensei from the University of Southern California. This is a simulated coach, which a student can interact with and which gathers real-time data about how the student is speaking, including their tone, speed of speech, and facial expressions. The system adapts its coaching advice based on these interactions and on what it learns from interactions with other students.
Getting ready for AI systems in education
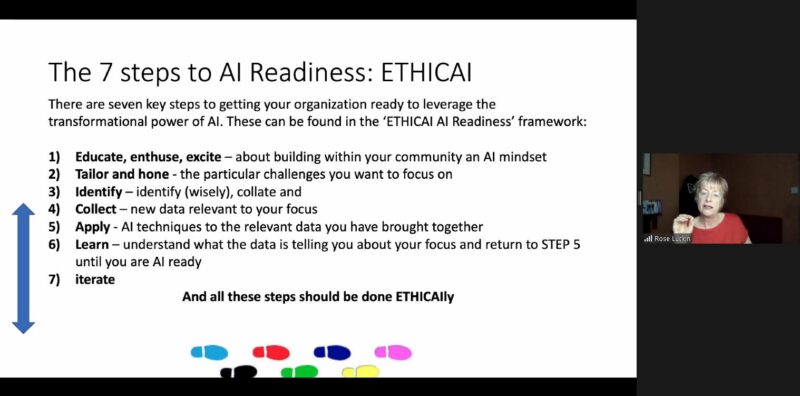
For the remainder of her presentation, Rose focused on the framework she is involved in developing, as part of the EDUCATE service, to support organisations to prepare for implementing AI systems, including educators within these organisations. The aim of this ETHICAI framework is to enable organisations and educators to understand:
What AI systems are capable of doing
The strengths and weaknesses of AI systems
How data is used by AI systems to learn
Rose described the seven steps of the framework as:
Educate, enthuse, excite – about building an AI mindset within your community
Tailor and Hone – the particular challenges you want to focus on
Identify – identify (wisely), collate and …
Collect – new data relevant to your focus
Apply – AI techniques to the relevant data you have brought together
Learn – understand what the data is telling you about your focus and return to step 5 until you are AI ready
Iterate
She then went on to demonstrate how the framework is applied using the example of online teaching. Online teaching has been a key part of education throughout the coronavirus pandemic; AI systems could be used to analyse datasets generated during online teaching sessions, in order to make decisions for and recommendations to educators.
The first step of the ETHICAI framework is educate, enthuse, excite. In Rose’s example, this step consisted of choosing online teaching as a scenario, because it is very pertinent to a teacher’s practice. The second step is to tailor and hone in on particular challenges that are to be the focus, capitalising on what AI systems can do. In Rose’s example, the challenge is assessing the quality of online lessons in a way that would be useful to educators. The third step of the framework is to identify what data is required to perform this quality assessment.
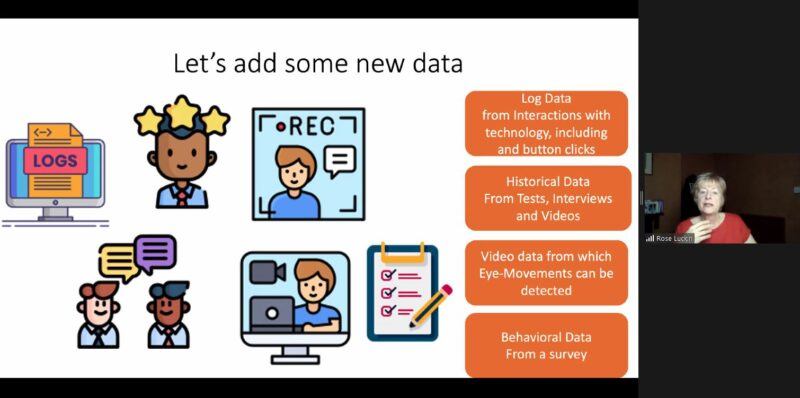
The fourth step is the collection of new data relevant to the focus of the project. The aim is to gain an increased understanding of what happens in online learning across thousands of schools. Walking through the online learning example, Rose suggested we might be able to collect the following types of data:
Log data
Audio data
Performance data
Video data, which includes eye-movement data
Historical data from tests and interviews
Behavioural data from surveying teachers and parents about how they felt about online learning
It is important to consider the ethical implications of gathering all this data about students, something that was a recurrent theme in both Rose’s presentation and the Q&A at the end.
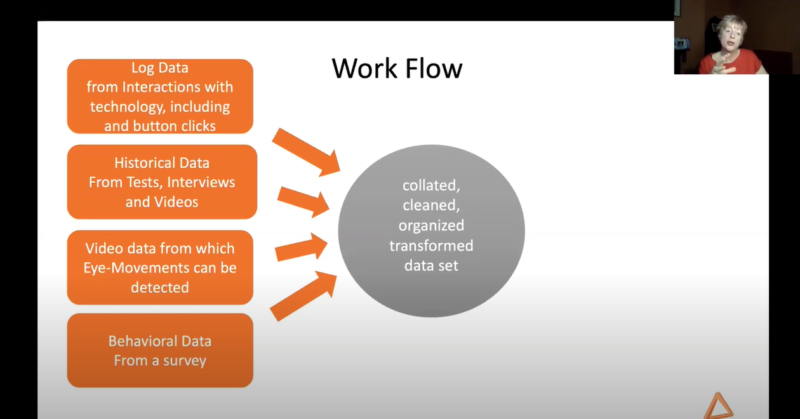
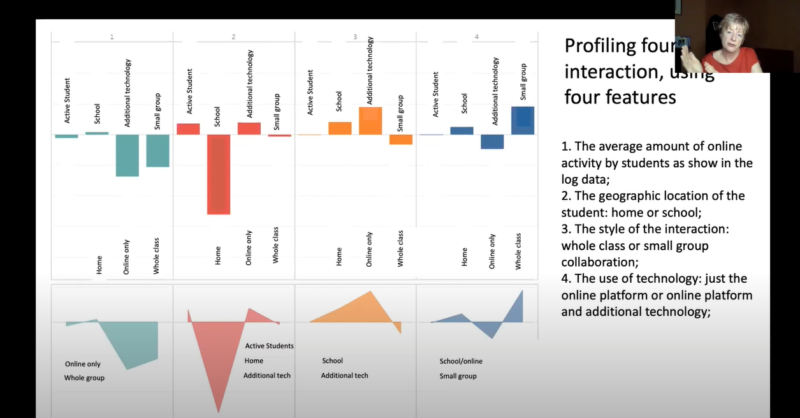
Step five of the ETHICAI framework focuses on applying AI techniques to the relevant data to combine and process it. The figure below shows that in preparation, the various data sets need to be collated, cleaned, organised, and transformed.
From the correctly prepared data, interaction profiles can be produced in order to put characteristics from different lessons into groups/profiles. Rose described how cluster analysis using a combination of both AI and human intelligence could be used to sort lessons into groups based on common features.
Thesixth step in Rose’s example focused on what may be learned from analysing collected data linked to the particular challenge of online teaching and learning. Rose said that applying an AI system to students’ behavioural data could, for example, give indications about students’ focus and confidence, and make or recommend interventions to educators accordingly.
Where might we take applications of AI systems in education in the future?
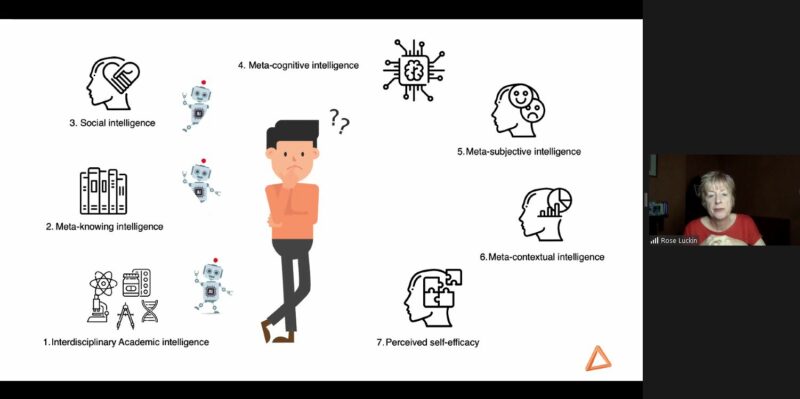
Rose described that AI systems can possess some types of intelligence humans have or can develop: interdisciplinary academic intelligence, meta-knowing intelligence, and potentially social intelligence. However, there are types such as meta-contextual intelligence and perceived self-efficacy that AI systems are not able to demonstrate in the way humans can.
The use of AI systems in education can cause ethical issues. As an example, Rose pointed out the use of virtual glasses to identify when students need help, even if they do not realise it themselves. A system like this could help educators with assessing who in their class needs more help, and could link this back to student performance. However, using such a system like this has obvious ethical implications, and some of these were the focus of the Q&A that followed Rose’s presentation.
It’s clear that, in the education domain as in all other domains, both positive and negative outcomes of integrating AI are possible. In a recent paper written by Wayne Holmes (also from the UCL Knowledge Lab) and co-authors, ‘Ethics of AI in Education: Towards a Community Wide Framework’ [1], the authors suggest that the interpretation of data, consent and privacy, data management, surveillance, and power relations are all ethical issues that should be taken into consideration. Finding consensus for a practical ethical framework or set of principles, with all stakeholders, at the very start of an AI-related project is the only way to ensure ethics are built into the project and the AI system itself from the ground up.
Ethical issues of AI systems more broadly, and how to involve young people in discussions of AI ethics, were the focus of our seminar with Dr Mhairi Aitken back in September. You can revisit the seminar recording, presentation slides, and summary blog post.
I really enjoyed both the focus and content of Rose’s talk: educators understanding how AI systems may be applied to education in order to help them make more informed decisions about how to best support their students. This is an important factor to consider in the context of the bigger picture of what young people should be learning about AI. The work that Rose and her colleagues are doing also makes an important contribution to translating research into practical models that teachers can use.
Join our next free seminars
You may still have time to sign up for our Tuesday 11 January seminar, today at 17:00–18:30 GMT, where we will welcome Dave Touretzky and Fred Martin, founders of the influential AI4K12 framework, which identifies the five big ideas of AI and how they can be integrated into education.
If you want to join any of our seminars, click the button below to sign up and we will send you information on how to join. We look forward to seeing you there!
Thanks to thesunRider. you too can experience the wonder of this mystical duo. The sole new metasploit module this release adds a file format attack to generate a very special document. By utilizing Javascript embedded in a Word document to trigger a chain of events that slip through various Windows facilities, a session as the user who opened the document can be yours.
Do you like spiders?
It has been 3 years since SMB2 support was added to smb share enumeration and over a year ago SMB3 support was added, yet the spiders are not done spinning their webs. Thanks to sjanusz-r7 the spiders have evolved to take advantage of these new skills and the webs can span new doorways. Updates to scanner/smb/smb_enumshares improve enumeration support for the latest Windows targets that deploy with SMB3 only by default.
#15854 from sjanusz-r7 – This updates the SpiderProfiles option as part of the scanner/smb/smb_enumshares module to now work against newer SMB3 targets, such as windows 10, Windows Server 2016, and above.
#15888 from sjanusz-r7 – This adds anonymised database statistics to msfconsole’s debug command, which is used to help developers track down database issues as part of user generated error reports.
#15929 from bcoles – This adds nine new Windows 2003 SP2 targets that the exploit/windows/smb/ms08_067_netapi module can exploit.
Bugs fixed
#15808 from timwr – This fixes a compatibility issue with Powershell read_file on Windows Server 2012 by using the old style Powershell syntax (New-Object).
#15937 from adfoster-r7 – This removes usage of SortedSet to improve support for Ruby 3.
#15939 from zeroSteiner – This fixes a bug where the Meterpreter dir/ls function would show the creation date instead of the modified date for the directory contents.
Get it
As always, you can update to the latest Metasploit Framework with msfupdate
and you can get more details on the changes since the last blog post from
GitHub:
If you are a git user, you can clone the Metasploit Framework repo (master branch) for the latest.
To install fresh without using git, you can use the open-source-only Nightly Installers or the binary installers (which also include the commercial edition).
It’s that time of year again! Time for the 2021 Metasploit Community CTF. Earlier today over 1,100 users in more than 530 teams were registered and opened for participation to solve this year’s 18 challenges. Next week a recap and the winners will be announced, so stay tuned for more information.
Overlayfs LPE
This week Metasploit shipped an exploit for the recent Overlayfs vulnerability in Ubuntu Linux. The exploit works on Ubuntu 14.04 through 20.10, for both the x64 and aarch64 architectures making it very accessible. The vulnerability leverages a lack of verification within the Overlayfs implementation and can be exploited reliably.
Older Exploit Improvements
Community member bcoles made a number of improvements to some older Windows exploits this week. The exploit for MS-03-026 now includes a check method along with modules docs. MS-05-039 was tested and found to be reliable regardless of the target language pack so the target was updated to reflect this. Additionally, MS-07-029 has 13 new targets for different Server 2000 and Server 2003 language packs. This set of improvements will go a long way in helping users test these critical vulnerabilities in older versions of Windows.
New module content (1)
2021 Ubuntu Overlayfs LPE by bwatters-r7 and ssd-disclosure, which exploits CVE-2021-3493 – Adds a module for the CVE-2021-3493 overlay fs local privilege escalation for Ubuntu versions 14.04 – 20.10.
Enhancements and features
#15914 from bcoles – This improves upon the exploit/windows/dcerpc/ms03_026_dcom module by adding a check method, documentation, and cleaning up the code.
#15915 from bcoles – This renames the Windows 2000 SP4 Languages targets in thems05_039_pnp exploit to Windows 2000 SP4 Universal. It has been tested and was determined to not be language pack dependent.
#15918 from bcoles – This adds 13 new language pack-specific targets to the ms07_029_msdns_zonename exploit.
#15920 from smashery – This adds tab completion support to the powershell_import command.
#15928 from jmartin-r7 – This updates Metasploit Framework’s default Ruby version from 2.7 to 3. There should be no end-user impact.
Bugs fixed
#15897 from timwr – This fixes modules that check the return value of write_file() calls by returning a boolean value instead of nil.
#15913 from timwr – This fixes handling for shellwords parsing of malformed user-supplied input, such as unmatched quotes, when interacting with command shell sessions.
#15917 from smashery – This fixes a tab completion bug in Meterpreter.
Get it
As always, you can update to the latest Metasploit Framework with msfupdate
and you can get more details on the changes since the last blog post from
GitHub:
If you are a git user, you can clone the Metasploit Framework repo (master branch) for the latest.
To install fresh without using git, you can use the open-source-only Nightly Installers or the binary installers (which also include the commercial edition).
AI is a broad and rapidly developing field of technology. Our goal is to make sure all young people have the skills, knowledge, and confidence to use and create AI systems. So what should AI education in schools look like?
To hear a range of insights into this, we organised a panel discussion as part of our seminar series on AI and data science education, which we co-host with The Alan Turing Institute. Here our panel chair Tabitha Goldstaub, Co-founder of CogX and Chair of the UK government’s AI Council, summarises the event. You can also watch the recording below.
As part of the Raspberry Pi Foundation’s monthly AI education seminar series, I was delighted to chair a special panel session to broaden the range of perspectives on the subject. The members of the panel were:
Chris Philp, UK Minister for Tech and the Digital Economy
Philip Colligan, CEO of the Raspberry Pi Foundation
Danielle Belgrave, Research Scientist, DeepMind
Caitlin Glover, A level student, Sandon School, Chelmsford
Alice Ashby, student, University of Brighton
Tabitha Goldstaub
Chris Philp
Danielle Belgrave
Alice Ashby
Caitlin Glover
Philip Colligan
The session explored the UK government’s commitment in the recently published UK National AI Strategy stating that “the [UK] government will continue to ensure programmes that engage children with AI concepts are accessible and reach the widest demographic.” We discussed what it will take to make this a reality, and how we will ensure young people have a seat at the table.
Why AI education for young people?
It was clear that the Minister felt it is very important for young people to understand AI. He said, “The government takes the view that AI is going to be one of the foundation stones of our future prosperity and our future growth. It’s an enabling technology that’s going to have almost universal applicability across our entire economy, and that is why it’s so important that the United Kingdom leads the world in this area. Young people are the country’s future, so nothing is complete without them being at the heart of it.”
Our panelist Caitlin Glover, an A level student at Sandon School, reiterated this from her perspective as a young person. She told us that her passion for AI started initially because she wanted to help neurodiverse young people like herself. Her idea was to start a company that would build AI-powered products to help neurodiverse students.
What careers will AI education lead to?
A theme of the Foundation’s seminar series so far has been how learning about AI early may impact young people’s career choices. Our panelist Alice Ashby, who studies Computer Science and AI at Brighton University, told us about her own process of deciding on her course of study. She pointed to the fact that terms such as machine learning, natural language processing, self-driving cars, chatbots, and many others are currently all under the umbrella of artificial intelligence, but they’re all very different. Alice thinks it’s hard for young people to know whether it’s the right decision to study something that’s still so ambiguous.
When I asked Alice what gave her the courage to take a leap of faith with her university course, she said, “I didn’t know it was the right move for me, honestly. I took a gamble, I knew I wanted to be in computer science, but I wanted to spice it up.” The AI ecosystem is very lucky that people like Alice choose to enter the field even without being taught what precisely it comprises.
We also heard from Danielle Belgrave, a Research Scientist at DeepMind with a remarkable career in AI for healthcare. Danielle explained that she was lucky to have had a Mathematics teacher who encouraged her to work in statistics for healthcare. She said she wanted to ensure she could use her technical skills and her love for math to make an impact on society, and to really help make the world a better place. Danielle works with biologists, mathematicians, philosophers, and ethicists as well as with data scientists and AI researchers at DeepMind. One possibility she suggested for improving young people’s understanding of what roles are available was industry mentorship. Linking people who work in the field of AI with school students was an idea that Caitlin was eager to confirm as very useful for young people her age.
We need investment in AI education in school
The AI Council’s Roadmap stresses how important it is to not only teach the skills needed to foster a pool of people who are able to research and build AI, but also to ensure that every child leaves school with the necessary AI and data literacy to be able to become engaged, informed, and empowered users of the technology. During the panel, the Minister, Chris Philp, spoke about the fact that people don’t have to be technical experts to come up with brilliant ideas, and that we need more people to be able to think creatively and have the confidence to adopt AI, and that this starts in schools.
Caitlin is a perfect example of a young person who has been inspired about AI while in school. But sadly, among young people and especially girls, she’s in the minority by choosing to take computer science, which meant she had the chance to hear about AI in the classroom. But even for young people who choose computer science in school, at the moment AI isn’t in the national Computing curriculum or part of GCSE computer science, so much of their learning currently takes place outside of the classroom. Caitlin added that she had had to go out of her way to find information about AI; the majority of her peers are not even aware of opportunities that may be out there. She suggested that we ensure AI is taught across all subjects, so that every learner sees how it can make their favourite subject even more magical and thinks “AI’s cool!”.
Philip Colligan, the CEO here at the Foundation, also described how AI could be integrated into existing subjects including maths, geography, biology, and citizenship classes. Danielle thoroughly agreed and made the very good point that teaching this way across the school would help prepare young people for the world of work in AI, where cross-disciplinary science is so important. She reminded us that AI is not one single discipline. Instead, many different skill sets are needed, including engineering new AI systems, integrating AI systems into products, researching problems to be addressed through AI, or investigating AI’s societal impacts and how humans interact with AI systems.
On hearing about this multitude of different skills, our discussion turned to the teachers who are responsible for imparting this knowledge, and to the challenges they face.
The challenge of AI education for teachers
When we shifted the focus of the discussion to teachers, Philip said: “If we really want to equip every young person with the knowledge and skills to thrive in a world that shaped by these technologies, then we have to find ways to evolve the curriculum and support teachers to develop the skills and confidence to teach that curriculum.”
I asked the Minister what he thought needed to happen to ensure we achieved data and AI literacy for all young people. He said, “We need to work across government, but also across business and society more widely as well.” He went on to explain how important it was that the Department for Education (DfE) gets the support to make the changes needed, and that he and the Office for AI were ready to help.
Philip explained that the Raspberry Pi Foundation is one of the organisations in the consortium running the National Centre for Computing Education (NCCE), which is funded by the DfE in England. Through the NCCE, the Foundation has already supported thousands of teachers to develop their subject knowledge and pedagogy around computer science.
A recent study recognises that the investment made by the DfE in England is the most comprehensive effort globally to implement the computing curriculum, so we are starting from a good base. But Philip made it clear that now we need to expand this investment to cover AI.
Young people engaging with AI out of school
Philip described how brilliant it is to witness young people who choose to get creative with new technologies. As an example, he shared that the Foundation is seeing more and more young people employ machine learning in the European Astro Pi Challenge, where participants run experiments using Raspberry Pi computers on board the International Space Station.
Philip also explained that, in the Foundation’s non-formal CoderDojo club network and its Coolest Projects tech showcase events, young people build their dream AI products supported by volunteers and mentors. Among these have been autonomous recycling robots and AI anti-collision alarms for bicycles. Like Caitlin with her company idea, this shows that young people are ready and eager to engage and create with AI.
We closed out the panel by going back to a point raised by Mhairi Aitken, who presented at the Foundation’s research seminar in September. Mhairi, an Alan Turing Institute ethics fellow, argues that children don’t just need to learn about AI, but that they should actually shape the direction of AI. All our panelists agreed on this point, and we discussed what it would take for young people to have a seat at the table.
Alice advised that we start by looking at our existing systems for engaging young people, such as Youth Parliament, student unions, and school groups. She also suggested adding young people to the AI Council, which I’m going to look into right away! Caitlin agreed and added that it would be great to make these forums virtual, so that young people from all over the country could participate.
The panel session was full of insight and felt very positive. Although the challenge of ensuring we have a data- and AI-literate generation of young people is tough, it’s clear that if we include them in finding the solution, we are in for a bright future.
What’s next for AI education at the Raspberry Pi Foundation?
In the coming months, our goal at the Foundation is to increase our understanding of the concepts underlying AI education and how to teach them in an age-appropriate way. To that end, we will start to conduct a series of small AI education research projects, which will involve gathering the perspectives of a variety of stakeholders, including young people. We’ll make more information available on our research pages soon.
This week, our own @wvu-r7 added an exploit module that achieves unauthenticated remote code execution in ManageEngine ADSelfService Plus, a self-service password management and single sign-on solution for Active Directory. This new module leverages a REST API authentication bypass vulnerability identified as CVE-2021-40539, where an error in the REST API URL normalization routine makes it possible to bypass security filters and upload arbitrary files on the target. wvu’s new module simply uploads a Java payload to the target and executes it, granting code execution as SYSTEM if ManageEngine ADSelfService Plus was started as a service.
Storm Alert
Warning, this is not a drill! A critical unauthenticated command injection vulnerability is approaching the Nimbus service component of Apache Storm and has been given the name CVE-2021-38294. A new exploit module authored by our very own zeroSteiner has landed and will exploit this vulnerability to get you OS command execution as the user that started the Nimbus service. Please, evacuate the area immediately!
Metasploit Community CTF 2021
We’re happy to announce this year’s CTF will start on Friday, December 3, 2021! Similar to last year, the game has been designed to be accessible to beginners who want to learn and connect with the community. Keep in mind that while a team can have unlimited members, only 1,000 team spots are available, and once they’re gone you will have to join someone else’s team. You can find the full details in our blog post.
New module content (2)
Apache Storm Nimbus getTopologyHistory Unauthenticated Command Execution by Alvaro Muñoz and Spencer McIntyre, which exploits CVE-2021-38294 – This adds an exploit for CVE-2021-38294 which is an unauthenticated remote command execution vulnerability within the getTopologyHistory() RPC method that is provided by the Nimbus service which is a component of the Apache Storm project. In order to be exploitable, at least one topology must have been submitted to the Storm cluster. It may be active or inactive but one must be present.
#15887 from smashery – The path expansion code has been expanded to support path-based tab completion. Users should now tab-complete things such as cat ~/some_filenam<tab>.
#15889 from dwelch-r7 – An update has been made to library code so that terminal resize events are only sent if the Meterpreter client supports it. Additionally, extra feedback is now provided to users on whether or not terminal resizing is handled automatically or if they should adjust it manually.
#15898 from jmartin-r7 – Ruby 3.x removes support for URI.encode and URI.escape. This PR replaces uses of these functions in modules with calls to URI::DEFAULT_PARSER.escape so that Ruby 3 can run these modules instead of raising errors about missing functions.
#15899 from dwelch-r7 – This improves the user experience when shell is invoked from a Meterpreter session. Now, when the fully_interactive_shells feature is enabled, a message is displayed to inform the operator that a fully interactive TTY is supported. Note that you can start it by invoking shell -it.
Bugs fixed
#15864 from timwr – A bug has been fixed whereby the sessions -u command would not return a x64 Meterpreter session on a x64 Windows host, and would instead return a x86 session. This issue has now been addressed so that sessions -u will determine the architecture of the target host prior to upgrading and will generate a new Meterpreter session of the appropriate architecture.
Get it
As always, you can update to the latest Metasploit Framework with msfupdate
and you can get more details on the changes since the last blog post from
GitHub:
If you are a git user, you can clone the Metasploit Framework repo (master branch) for the latest.
To install fresh without using git, you can use the open-source-only Nightly Installers or the binary installers (which also include the commercial edition).
Community contributor k0pak4 added a new login scanner module for Azure Active Directory. This module exploits a vulnerable authentication endpoint in order to enumerate usernames without generating log events. The error code returned by the endpoint can be used to discover the validity of usernames in the target Azure tenant. If a tenant’s domain is known, the module can also be used to brute-force login credentials by providing a list of usernames and passwords.
Aerohive NetConfig RCE module
Also new this week, community contributor Erik Wynter added an exploit module for Aerohive NetConfig, versions 10.0r8a build-242466 and below. These versions are vulnerable to local file inclusion and log poisoning, as they rely on a version of PHP 5 that is affected by string truncation attacks. This allows users to achieve unauthenticated remote code execution as root on vulnerable systems.
2021 Metasploit community CTF
In case you missed the announcement earlier this week, the 2021 edition of the Metasploit community CTF is set to kick off two weeks from today! Registration starts Monday, November 22 for up to 750 teams, with capacity for an additional 250 teams once play starts on Friday, December 3. Many thanks to TryHackMe for sponsoring the event and providing some great prizes. Find some teammates and mark your calendars, because this year’s event should be a great challenge and a lot of fun for both beginners and CTF veterans!
New module content (4)
Jetty WEB-INF File Disclosure by Mayank Deshmukh, cangqingzhe, charlesk40, h00die, and lachlan roberts, which exploits CVE-2021-28164 – This adds an auxiliary module that retrieves sensitive files from Jetty versions 9.4.37.v20210219, 9.4.38.v20210224, 9.4.37-9.4.42, 10.0.1-10.0.5, and 11.0.1-11.0.5 . Protected resources behind the WEB-INF path can be accessed due to servlet implementations improperly handling URIs containing certain encoded characters.
Microsoft Azure Active Directory Login Enumeration by Matthew Dunn – k0pak4 – This adds an auxiliary scanner module that leverages Azure Active Directory authentication flaw to enumerate usernames without generating log events. The module also supports brute-forcing passwords against this tenant.
Aerohive NetConfig 10.0r8a LFI and log poisoning to RCE by Erik Wynter and Erik de Jong, which exploits CVE-2020-16152 – This change adds a new module to exploit LFI and log poisoning vulnerabilities (CVE-2020-16152) in Aerohive NetConfig, version 10.0r8a build-242466 and older in order to achieve unauthenticated remote code execution as the root user.
Sitecore Experience Platform (XP) PreAuth Deserialization RCE by AssetNote and gwillcox-r7, which exploits CVE-2021-42237 – This adds an exploit for CVE-2021-42237 which is an unauthenticated RCE within the Sitecore Experience Platform. The vulnerability is due to the deserialization of untrusted data submitted by the attacker.
Enhancements and features
#15796 from zeroSteiner – Support for pivoted SSL server connections as used by capture modules and listeners has been added to Metasploit. The support works for both Meterpreter sessions and SSH sessions.
#15851 from smashery – Update several modules and core libraries so that now when sending HTTP requests that include user agents, the user agents are modernized, and are randomized at msfconsole start time. Users can also now request Rex to generate a random user agent from one of the ones in the User Agent pool should they need a random user agent for a particular module.
#15862 from smashery – Updates have been made to Linux Meterpreter libraries to support expanding environment variables in several different commands. This should provide users with a smoother experience when using environment variables in commands such as cd, ls, download, upload, mkdir and similar commands.
#15867 from h00die – The example modules have been updated to conform to current RuboCop rules and to better reflect recent changes in the Metasploit Framework coding standards, as well as to better showcase various features that may be needed when developing exploits.
#15878 from smashery – This fixes an issue whereby tab-completing a remote folder in Meterpreter would append a space onto the end. This change resolves that by not appending the space if we’re potentially in the middle of a tab completion journey, and adding a slash if we’ve completed a directory, providing a smoother tab completion experience for users.
Bugs fixed
#15875 from smashery – This fixes an issue with the reverse Bash command shell payloads where they would not work outside of the context of bash.
#15879 from jmartin-r7 – Updates batch scanner modules to no longer crash when being able to unable to correctly calculate a scanner thread’s batch size
Get it
As always, you can update to the latest Metasploit Framework with msfupdate
and you can get more details on the changes since the last blog post from
GitHub:
If you are a git user, you can clone the Metasploit Framework repo (master branch) for the latest.
To install fresh without using git, you can use the open-source-only Nightly Installers or the binary installers (which also include the commercial edition).
A research publication authored by Tenindra Abeywickrama (Grab), Victor Liang (Grab) and Kian-Lee Tan (NUS) based on their work, which was awarded the Best Scalable Data Science Paper Award for 2021.
Matching the right passengers to the right driver-partners is a critically important task in ride-hailing services. Doing this suboptimally can lead to passengers taking longer to reach their destinations and drivers losing revenue. Perhaps, the most challenging of all is that this is a continuous process with a constant stream of new ride requests and new driver-partners becoming available. This makes computing matchings a very computationally expensive task requiring high throughput.
We discovered that one component of the typically used algorithm to find matchings has a significant impact on efficiency that has hitherto gone unnoticed. However, we also discovered a useful property of real-world optimal matchings that allows us to improve the algorithm, in an interesting scenario of practice informing theory.
A real-world example
Let us consider a simple matching algorithm as depicted in Figure 1, where passengers and driver-partners are matched by travel time. In the figure, we have three driver-partners (D1, D2, and D3) and three passengers (P1, P2, and P3).
Finding the travel time involves computing the fastest route from each driver-partner to each passenger, for example the dotted routes from D1 to P1, P2 and P3 respectively. Finding the assignment of driver-partners to passengers that minimise the overall travel time involves representing the problem in a more abstract way as a bipartite graph shown below.
In the bipartite graph, the set of passengers and the set of driver-partners form the two bipartite sets, respectively. The edges connecting them represent the travel time of the fastest routes, and their costs are shown in the cost matrix on the right.
Figure 1. Example driver-to-passenger matching scenario
Finding the optimal assignment is known as solving the minimum weight bipartite matching problem (also known as the assignment problem). This problem is often solved using a technique called the Kuhn-Munkres (KM) algorithm1 (also known as the Hungarian Method).
If we were to run the algorithm on the scenario shown in Figure 1, we would find the optimal matching highlighted in red on the cost matrix shown in the figure. However, there is an important step that we have not paid great attention to so far, and that is the computation of the cost matrix. As it turns out, this step has quite a significant impact on performance in real-world settings.
Impact of the cost matrix
Past work that solves the assignment problem assumes the cost matrix is given as input, but we observe that the time taken to compute the cost matrix is not always trivial. This is especially true in our real-world scenario. Firstly, matching driver-partners and passengers is a continuous process, as we mentioned earlier. Costs are not fixed; they change over time as driver-partners move and new passenger requests are received.
This means the matrix must be recomputed each time we attempt a matching (for example every X seconds). Not only is finding the shortest path between a single passenger and driver-partner computationally expensive, we must do this for all pairs of passengers and driver-partners. In fact, in the real world, the time taken to compute the matrix is longer than the time taken to compute the optimal assignment! A simple consideration of time complexity suggests that this is true.
If m is the number of driver-partners/passengers we are trying to match, the KM algorithm typically runs in O(m^3). If n is the number of nodes in the road network, then computing the cost matrix runs in O(m x n log n) using Dijkstra’s algorithm2.
We know that n is around 400,000 for Singapore’s road network (and much larger for bigger cities), thus we can reasonably expect O(m x n log n) to dominate O(m^3) for m < 1500, which is the kind of value for m we expect in the real-world. We ran experiments on Singapore’s road network to verify this, as shown in Figure 2.
Figure 2. Proportion of time to compute the matrix vs. assignment for varying m on the Singapore road network
In Figure 2a, we can see that m must be greater than 2500, before the assignment time overtakes the matrix computation time. Even if we use a modern and advanced technique like Contraction Hierarchies3 to compute the fastest path, the observation holds, as shown in Figure 2b. This shows we can significantly improve overall matching performance if we can reduce the matrix computation time.
A redeeming intuition: Spatial locality of matching
While studying real-world locations of passengers and driver-partners, we observed an interesting property, which we dubbed “spatial locality of matching”. We find that the passenger assigned to each driver-partner in an optimal matching is one of the nearest passengers to the driver-partner (it might not be the nearest). This makes intuitive sense as passengers and driver-partners will be distributed throughout a city and it’s unlikely that the best match for a particular driver-partner is on the other side of the city.
In Figure 3, we see an example scenario exhibiting spatial locality of matching. While this is an idealised case to demonstrate the principle, it is not a significant departure from the real-world. From the cost matrix shown, it is very easy to see which assignment will give the lowest total travel time.
Figure 3. Example driver-partner to passenger matching scenario exhibiting spatial locality of matching
Now, it begs the question, do we even need to compute the other costs to find the optimal matching? For example, can we avoid computing the cost from D3 to P1, which are very far apart and unlikely to be matched?
Incremental Kuhn-Munkres
As it turns out, there is a way to take advantage of spatial locality of matching to reduce cost computation time. We propose an Incremental KM algorithm that computes costs only when they are required, and (hopefully) avoids computing all of them. Our modified KM algorithm incorporates an inexpensive lower-bounding technique to achieve this without adding significant overhead, as we will elaborate in the next section.
Figure 4. System overview of Incremental Kuhn-Munkres implementation
Retrieving objects nearest to a query point by their fastest route is a very well studied problem (commonly referred to as k-Nearest Neighbour search)4. We employ this concept to implement a priority queue Qi for each driver ui, as displayed in Figure 4. These priority queues allow retrieving the nearest passengers by a lower-bound on the travel time. The top of a priority queue implies a lower-bound on the travel time for all passengers that have not been retrieved yet. We can then use this minimum lower-bound as a lower-bound edge cost for all bipartite edges associated with that driver-partner for which we have not computed the exact cost so far.
Now, the KM algorithm can proceed as usual, using the virtual edge cost implied by the relevant priority queue, to avoid computing the exact edge cost. Of course, there may be circumstances where the virtual edge cost is insufficiently accurate for KM to compute the optimal matching. To solve this, we propose refinement rules that detect when a virtual edge cost is insufficient.
If a rule is triggered, we refine the queue by retrieving the top element and computing its exact edges; this is where the “incremental” part comes from. In almost all cases, this will also increase the minimum key (lower-bound) in the priority queue.
If you’re interested in finding out more, you can delve deeper into the pruning rules, inner workings of the algorithm and mathematical proofs of correctness by reading our research paper5.
For now, it suffices to say that the Incremental KM algorithm produces the exact same result as the original KM algorithm. It just does so in an optimistic incremental way, hoping that we can find the result without computing all possible costs. This is perfectly suited to take advantage of spatial locality of matching. Moreover, not only do we save time by avoiding computing exact costs, we avoid computing longer fastest paths/travel times to further away passengers that are more computationally expensive than those for nearby passengers.
Experimental investigation
Competition
We conducted a thorough experimental investigation to verify the practical performance of the proposed techniques. We implemented two variants of our Incremental KM technique, differing in the implementation of the priority queue and the shortest path technique used.
IKM-DIJK: Uses Dijkstra’s algorithm to compute shortest paths. Priority queues are simply the priority queue of the Dijkstra’s search from each driver-partner. This adds no overhead over the regular KM algorithm, so any speedup comes for free.
IKM-GAC: Uses state-of-the-art lower-bound technique COLT6 to implement the priority queues and G-tree4, a fast technique to compute shortest paths. The COLT index must be built for each assignment, and this overhead is included in all running times.
We compared our proposed variants against the regular KM algorithm using Dijkstra and G-tree, respectively, to compute the entire cost matrix up front. Thus, we can make an apples-to-apples comparison to see how effective our techniques are.
Datasets
We ran experiments using the real-world road network for Singapore. For the Singapore dataset, we also use a real production workload consisting of Grab bookings over a 7-day period from December 2018.
Performance evaluation
To test our technique on the Singapore workload, we created an assignment problem by first choosing the window size W in seconds. Then, we batched all the bookings in a randomly selected window of that size and used the passenger and driver-partner locations from these bookings to create the bipartite sets. Next, we found an optimal matching using each technique and reported the results averaged over several randomly selected windows for several metrics.
Figure 5. Average percentage of the cost matrix computed by each technique vs. batching window size
In Figure 5, we verify that our proposed techniques are indeed computing fewer exact costs compared to their counterparts. Naturally, the original KM variants compute 100% of the matrix.
Figure 6. Average running time to find an optimal assignment by each technique vs. batching window size
In Figure 6, we can see the running times of each technique. The results in the figure confirm that the reduced computation of exact costs translates to a significant reduction of running time by over an order of magnitude. This verifies that the time saved is greater than any overhead added. Remember, the improvement of IKM-DIJK comes essentially for free! On the other hand, using IKM-GAC can achieve very low running times.
Figure 7. Maximum throughput supported by each technique vs. batching window size
In Figure 7, we report a slightly different metric. We measure m, the maximum number of passengers/driver-partners that can be batched within the time window W. This can be considered as the maximum throughput of each technique. Our technique supports significantly higher throughput.
Note that the improvement is smaller than in other cases because real-world values of m rarely reach these levels, where the assignment time starts to take up a greater proportion of the overall computation time.
Conclusion
In summary, computing assignment costs do indeed have a significant impact on the running time of finding optimal assignments. However, we show that by utilising the spatial locality of matching inherent in real-world assignment problems, we can avoid computing exact costs, unless absolutely necessary, by modifying the KM algorithm to work incrementally.
We presented an interesting case where practice informs the theory, with our novel modifications to the classical KM algorithm. Moreover, our technique can be potentially applied beyond driver-partner and passenger matching in ride-hailing services.
For example, the Route Inspection algorithm also uses shortest path edge costs to find a minimum-weight bipartite matching, and our technique could be a drop-in replacement. It would also be interesting to see if these principles can be generalised and applied to other domains where the assignment problem is used.
Acknowledgements
This research was jointly conducted between Grab and the Grab-NUS AI Lab within the Institute of Data Science at the National University of Singapore (NUS). Tenindra Abeywickrama was previously a postdoctoral fellow at the lab and now a data scientist with Grab.
Special thanks to Kian-Lee Tan from NUS for co-authoring this paper.
Join us
Grab is a leading superapp in Southeast Asia, providing everyday services that matter to consumers. More than just a ride-hailing and food delivery app, Grab offers a wide range of on-demand services in the region, including mobility, food, package and grocery delivery services, mobile payments, and financial services across over 400 cities in eight countries.
Powered by technology and driven by heart, our mission is to drive Southeast Asia forward by creating economic empowerment for everyone. If this mission speaks to you, join our team today!
References
H. W. Kuhn. 1955. The Hungarian method for the assignment problem. Naval Research Logistics Quarterly 2, 1-2 (1955), 83–97 ↩
Dijkstra, E.W. A note on two problems in connexion with graphs. Numer. Math. 1, 269–271 (1959) ↩
Robert Geisberger, Peter Sanders, Dominik Schultes, and Daniel Delling. 2008. Contraction Hierarchies: Faster and Simpler Hierarchical Routing in Road Networks. In WEA. 319–333 ↩
Ruicheng Zhong, Guoliang Li, Kian-Lee Tan, Lizhu Zhou, and Zhiguo Gong. 2015. G-Tree: An Efficient and Scalable Index for Spatial Search on Road Networks. IEEE Trans. Knowl. Data Eng. 27, 8 (2015), 2175–2189 ↩↩2
Tenindra Abeywickrama, Victor Liang, and Kian-Lee Tan. 2021. Optimizing bipartite matching in real-world applications by incremental cost computation. Proc. VLDB Endow. 14, 7 (March 2021), 1150–1158 ↩
Tenindra Abeywickrama, Muhammad Aamir Cheema, and Sabine Storandt. 2020. Hierarchical Graph Traversal for Aggregate k Nearest Neighbors Search in Road Networks. In ICAPS. 2–10 ↩
How does teaching children and young people about machine learning (ML) differ from teaching them about other aspects of computing? Professor Matti Tedre and Dr Henriikka Vartiainen from the University of Eastern Finland shared some answers at our latest research seminar.
We need to determine how to teach young people about machine learning, and what teachers need to know to help their learners form correct mental models.
Their presentation, titled ‘ML education for K-12: emerging trajectories’, had a profound impact on my thinking about how we teach computational thinking and programming. For this blog post, I have simplified some of the complexity associated with machine learning for the benefit of readers who are new to the topic.
Machine learning is not magic — what needs to change in computing education to make sure learners don’t see ML systems as magic boxes?
Our seminars on teaching AI, ML, and data science
We’re currently partnering with The Alan Turing Institute to host a series of free research seminars about how to teach artificial intelligence (AI) and data science to young people.
The seminar with Matti and Henriikka, the third one of the series, was very well attended. Over 100 participants from San Francisco to Rajasthan, including teachers, researchers, and industry professionals, contributed to a lively and thought-provoking discussion.
Matti Tedre
Henriikka Vartiainen
Representing a large interdisciplinary team of researchers, Matti and Henriikka have been working on how to teach AI and machine learning for more than three years, which in this new area of study is a long time. So far, the Finnish team has written over a dozen academic papers based on their pilot studies with kindergarten-, primary-, and secondary-aged learners.
Current teaching in schools: classical rule-driven programming
Matti and Henriikka started by giving an overview of classical programming and how it is currently taught in schools. Classical programming can be described as rule-driven. Example features of classical computer programs and programming languages are:
A classical language has a strict syntax, and a limited set of commands that can only be used in a predetermined way
A classical language is deterministic, meaning we can guarantee what will happen when each line of code is run
A classical program is executed in a strict, step-wise order following a known set of rules
When we teach this type of programming, we show learners how to use a deductive problem solving approach or workflow: defining the task, designing a possible solution, and implementing the solution by writing a stepwise program that is then run on a computer. We encourage learners to avoid using trial and error to write programs. Instead, as they develop and test a program, we ask them to trace it line by line in order to predict what will happen when each line is run (glass-box testing).
The features of classical (rule-driven) programming approaches as taught in computer science education (CSE) (Tedre & Vartiainen, 2021).
Classical programming underpins the current view of computational thinking (CT). Our speakers called this version of CT ‘CT 1.0’. So what’s the alternative Matti and Henriikka presented, and how does it affect what computational thinking is or may become?
Machine learning (data-driven) models and new computational thinking (CT 2.0)
Rule-based programming languages are not being eradicated. Instead, software systems are being augmented through the addition of machine learning (data-driven) elements. Many of today’s successful software products, such as search engines, image classifiers, and speech recognition programs, combine rule-driven software and data-driven models. However, the workflows for these two approaches to solving problems through computing are very different.
Problem solving is very different depending on whether a rule-driven computational thinking (CT 1.0) approach or a data-driven computational thinking (CT 2.0) approach is used (Tedre & Vartiainen,2021).
Significantly, while in rule-based programming (and CT 1.0), the focus is on solving problems by creating algorithms, in data-driven approaches, the problem solving workflow is all about the data. To highlight the profound impact this shift in focus has on teaching and learning computing, Matti introduced us to a new version of computational thinking for machine learning, CT 2.0, which is detailed in a forthcoming research paper.
Because of the focus on data rather than algorithms, developing a machine learning model is not at all like developing a classical rule-driven program. In classical programming, programs can be traced, and we can predict what will happen when they run. But in data-driven development, there is no flow of rules, and no absolutely right or wrong answer.
There are major differences between rule-driven computational thinking (CT 1.0) and data-driven computational thinking (CT 2.0), which impact what computing education needs to take into account (Tedre & Vartiainen,2021).
Machine learning models are created iteratively using training data and must be cross-validated with test data. A tiny change in the data provided can make a model useless. We rarely know exactly why the output of an ML model is as it is, and we cannot explain each individual decision that the model might have made. When evaluating a machine learning system, we can only say how well it works based on statistical confidence and efficiency.
Machine learning education must cover ethical and societal implications
The ethical and societal implications of computer science have always been important for students to understand. But machine learning models open up a whole new set of topics for teachers and students to consider, because of these models’ reliance on large datasets, the difficulty of explaining their decisions, and their usefulness for automating very complex processes. This includes privacy, surveillance, diversity, bias, job losses, misinformation, accountability, democracy, and veracity, to name but a few.
I see the shift in problem solving approach as a chance to strengthen the teaching of computing in general, because it opens up opportunities to teach about systems, uncertainty, data, and society.
Jane Waite
Teaching machine learning: the challenges of magic boxes and new mental models
For teaching classical rule-driven programming, much time and effort has been put into researching learners’ understanding of what a program will do when it is run. This kind of understanding is called a learner’s mental model or notional machine. An approach teachers often use to help students develop a useful mental model of a program is to hide the detail of how the program works and only gradually reveal its complexity. This approach is described with the metaphor of hiding the detail of elements of the program in a box.
Data-driven models in machine learning systems are highly complex and make little sense to humans. Therefore, they may appear like magic boxes to students. This view needs to be banished. Machine learning is not magic. We have just not figured out yet how to explain the detail of data-driven models in a way that allows learners to form useful mental models.
An example of a representation of a machine learning model in TensorFlow, an online machine learning tool (Tedre & Vartiainen,2021).
Some existing ML tools aim to help learners form mental models of ML, for example through visual representations of how a neural network works (see Figure 2). But these explanations are still very complex. Clearly, we need to find new ways to help learners of all ages form useful mental models of machine learning, so that teachers can explain to them how machine learning systems work and banish the view that machine learning is magic.
Some tools and teaching approaches for ML education
Matti and Henriikka’s team piloted different tools and pedagogical approaches with different age groups of learners. In terms of tools, since large amounts of data are needed for machine learning projects, our presenters suggested that tools that enable lots of data to be easily collected are ideal for teaching activities. Media-rich education tools provide an opportunity to capture still images, movements, sounds, or sense other inputs and then use these as data in machine learning teaching activities. For example, to create a machine learning–based rock-paper-scissors game, students can take photographs of their hands to train a machine learning model using Google Teachable Machine.
Photos of hands are used to train a Teachable Machine machine learning model as part of a project to create a rock-paper-scissors game (Tedre & Vartiainen, 2021).
Similar to tools that teach classic programming to novice students (e.g. Scratch), some of the new classroom tools for teaching machine learning have a drag-and-drop interface (e.g. Cognimates). Using such tools means that in lessons, there can be less focus on one of the more complex aspects of learning to program, learning programming language syntax. However, not all machine learning education products include drag-and-drop interaction, some instead have their own complex languages (e.g. Wolfram Programming Lab), which are less attractive to teachers and learners. In their pilot studies, the Finnish team found that drag-and-drop machine learning tools appeared to work well with students of all ages.
The different pedagogical approaches the Finnish research team used in their pilot studies included an exploratory approach with preschool children, who investigated machine learning recognition of happy or sad faces; and a project-based approach with older students, who co-created machine learning apps with web-based tools such as Teachable Machine and Learn Machine Learning (built by the research team), supported by machine learning experts.
Example of a middle school (age 8 to 11) student’s design for a machine learning app that recognises different instruments and chords (Tedre & Vartiainen, 2021).
What impact these pedagogies have on students’ long-term mental models about machine learning has yet to be researched. If you want to find out more about the classroom pilot studies, the academic paper is a very accessible read.
My take-aways: new opportunities, new research questions
We all learned a tremendous amount from Matti and Henriikka and their perspectives on this important topic. Our seminar participants asked them many questions about the pedagogies and practicalities of teaching machine learning in class, and raised concerns about squeezing more into an already packed computing curriculum.
For me, the most significant take-away from the seminar was the need to shift focus from algorithms to data and from CT 1.0 to CT 2.0. Learning how to best teach classical rule-driven programming has been a long journey that we have not yet completed. We are forming an understanding of what concepts learners need to be taught, the progression of learning, key mental models, pedagogical options, and assessment approaches. For teaching data-driven development, we need to do the same.
The question of how we make sure teachers have the necessary understanding is key.
Jane Waite
I see the shift in problem solving approach as a chance to strengthen the teaching of computing in general, because it opens up opportunities to teach about systems, uncertainty, data, and society. I think it will help us raise awareness about design, context, creativity, and student agency. But I worry about how we will introduce this shift. In my view, there is a considerable risk that we will be sucked into open-ended, project-based learning, with busy and fun but shallow learning experiences that result in restricted conceptual development for students.
I also worry about how we can best help teachers build up the knowledge and experience to support their students. In the Q&A after the seminar, I asked Matti and Henriikka about the role of their team’s machine learning experts in their pilot studies. It seemed to me that without them, the pilot lessons would not have worked, as the participating teachers and students would not have had the vocabulary to talk about the process and would not have known what was doable given the available time, tools, and student knowledge.
The question of how we make sure teachers have the necessary understanding is key. Many existing professional development resources for teachers wanting to learn about ML seem to imply that teachers will all need a PhD in statistics and neural network optimisation to engage with machine learning education. This is misleading. But teachers do need to understand the machine learning concepts that their students need to learn about, and I think we don’t yet know exactly what these concepts are.
In summary, clearly more research is needed. There are fundamental questions still to be answered about what, when, and how we teach data-driven approaches to software systems development and how this impacts what we teach about classical, rule-based programming. But to me, that is exciting, and I am very much looking forward to the journey ahead.
We have another four seminars in our monthly series on AI, machine learning, and data science education. Find out more about them on this page, and catch up on past seminar blogs and recordings here.
At our next seminar on Tuesday 7 December at 17:00–18:30 GMT, we will welcome Professor Rose Luckin from University College London. She will be presenting on what it is about AI that makes it useful for teachers and learners.
PS You can build your understanding of machine learning by joining our latest free online course, where you’ll learn foundational concepts and train your own ML model!
Once you’re logged on in single-user mode (root), I recommend taking a quick look at a few other things that are interesting. For example, look at the partition layout on the flash chips. This can be done by running cat against /proc/mtd. (MTD stands for Memory Technology Devices.) Enter the command “cat /proc/mtd”and hit enter. This should return the list of MTDs (Figure 25), which list their dev number, size, and names.
As you can see, there are a couple of partitions that appear to have similar names, such as “kernel” and “kernel1,” as well as “ubi_rootfs” and “ubi_rootfs1.” The purpose of having duplicate file system partitions is to allow system firmware updates without potentially bricking the device if there were issues during the update process, such as a power failure. During normal operation, one of these partition pairs is online, while the others are offline. So, when a firmware update is done, the offline partitions are updated and then placed online, and the others are taken offline during a system reboot. If there is a failure during the update process, the system can safely roll back to the partition pair that was not corrupted.
Figure 25: /proc/mtd
To gain full running root access on the LUMA, we’re interested in the rootfs_data partition file system (Figure 26).
Figure 26: rootfs_data Partition
This file system “rootfs_data” is used to hold the dynamically configurable system data and user configuration information, which is typically removed if you do a factory reset on the device. This data partition filesystem is typically on all IoT devices but often has different names.
Earlier in this blog series, while reviewing the captured UART console logs, we made note of what UBIFS device number and volume number this partition was mounted on. With that information, our next step will be to mount the rootfs_data partition and create a shadow and passwd file with account information, so when we reboot the system, we’ll be able to gain full root access on a fully operational device. To make this happen, the first step is to create a writable directory that we can mount this file system to. The best place for doing this on an IoT device will always be the /tmp folder, which is a temporary location in RAM and is always read/writable.
To accomplish this, I typically change directory to /tmp and create a folder for a mount point on the device using the following commands:
cd /tmp
mkdir ubifs
Now, use the correct UBIFS device number and volume number we observed in the boot logs:
device 0, volume 2 = /dev/ubi0_2
device 0, volume 3 = /dev/ubi0_3
Enter the following command corrected to either (/dev/ubi0_2 or /dev/ubi0_3) to mount the partition to the mount point you created at /tmp/ubifs:
mount -t ubifs /dev/ubi0_3 /tmp/ubifs/
This command should return results that look similar to Figure 27 without any errors. The only time I have encountered errors was when the rootfs_data volume was corrupted. I was able to correct that by conducting a factory reset on the device and starting over.
Figure 27: Mount UBIFS Partition
If successful, you should be able to change directory to this mounted volume and list the files and folders using the following commands:
cd /tmp/ubifs
ls -al
If the partition was properly mounted, you should see folders and files within the mount point that may look similar to the example shown in Figure 28. Also note that if the device has been factory reset, it may show far fewer folders and files. Although, with the LUMA device, it should at least show the /etc folder.
Figure 28: Mounted rootfs_data Partition
Once you’ve mounted the rootfs_data volume, the next step is to change the directory to the “/tmp/ubifs/etc” folder and create and/or alter the passwd and shadow file to add an account to allow root access privileges. You can do this by entering the following commands, which will create a root account with the username of defcon with a blank password, which we used for the Defcon IoT Village exercises.
The reason why this works is the data volume — in this case, rootfs_data — contains all dynamic configurations and settings for the device, so anything typically added to this volume will take precedence over any setting on the core root filesystem.
As a quick check to make sure everything was done correctly, run the following commands, and make sure the shadow and passwd file were created and the contents are correct.
cat shadow
cat passwd
If correct, the output should look like the following example in Figure 30:
Figure 30: Content of shadow and passwd Files
Reboot and log in
If everything looks good, you’re ready to reboot the system and gain full root access. To reboot the system, you can just enter “reboot” on the UART console or power cycle the device.
Once the system appears to be close to being booted, a good indication on LUMA is seeing the message “Please press Enter to activate this console” in the console. You can then hit the return key to see a login prompt. There may be a lot of log message noise in the console, but you can still enter the configured username defcon that was created during the creation of the shadow and passwd file, followed by the enter key. If everything was configured correctly, you should login without the need of a password as shown in Figure 31:
Figure 31: Login with defcon
If this fails and you’re prompted for a password, the most common cause is that you entered the commands to create the “passwd” and “shadow” files incorrectly. If you logged in, then you’re now fully authenticated as root, and the system should be in the full operational mode. Also, it’s not uncommon to see a lot of output messages to the UART console, which can be a pain and prevent you from easily interacting with the console. To get around this issue, you can temporarily disable most of the messages. Try entering the following command to make it a little quieter:
dmesg -n 1
Once you’ve run that command, it should be much easier to see what’s going on. At this point, you can interact with the system as root. For example, by running the commands below, you can see running processes and show current network open ports and connections.
ps -ef “ List the processes running on the system”
netstat -an “ Shows UDP/TCP ports and connection”
I often get asked during this exercise, “What do we gain from getting this level of root access to an IoT device?” I think the best answer is that this level of access allows us to do more advanced and detailed security testing on a device. This is not as easily done when setting on the outside of the IoT devices or attempting to emulate on some virtual machine, because often, the original hardware contains components and features that are difficult to emulate. With root-level access, we can interact more directly with running services and applications and better monitor the results of any testing we may be conducting.
NEVER MISS A BLOG
Get the latest stories, expertise, and news about security today.
Ready or not, the cloud is here. Across the board, an overwhelming majority of organizations recognize the value of the cloud. According to a recent survey conducted by Rapid7, 90% of respondents believe that cloud operations are critical to the competitiveness of their business. Analysts agree — Gartner recently forecasted that by 2026, cloud end-user spending will make up to 45% of overall IT spend.
We’ve established that the industry accepts the shift toward the cloud, so today we’re taking that a step further, specifically looking at attitudes toward automation in cloud security. To set the scene, 86% of respondents to our recent survey say they trust automation in their cloud security at least as much as manual effort by humans. Yet less than half (47%) have actually implemented automation in their cloud security program.
So what gives? Why does this gap exist between trust and actual adoption?
Attitudes toward automation
There’s a variety of factors that impact trust in automation, such as vendor relationships and breach history. For example, when surveying organizations about their trust in automation versus skilled professionals, 18% of those that reported a breach said they don’t trust automation. If you compare this to organizations that did not report a breach, only 14% stated they don’t trust automation. This slight uptick shows that organizations who already suffered a security incident are slightly more gun-shy of implementing automated security solutions as compared to those who didn’t.
Luckily for organizations hesitant to trust automation in the cloud, it is not an all-or-nothing exercise. There are different actions and levels of automation that can be experimented with until greater trust is achieved. For example, organizations can start with a cloud security solution automatically performing only one of monitoring, reporting, or remediation.
However, if you’re looking to benchmark against what other leading companies are doing, 56% of respondents trust automation in their cloud security program to do all three of the above — monitoring, reporting, and remediation.
Looking ahead
This growing level of trust in cloud security automation is reflected in many companies’ future plans as well. Another 25% of organizations are planning on implementing automation into their cloud security program over the next 12 months. Implementation may be lagging behind, but it’s still a goal many organizations are striving for. It’s clear that while trust must continue to be earned, the time is now for automation adoption in order to drive cloud security forward.
If you’re interested in exploring the topic of belief, trust, and reliance on automation, we recommend checking out our new report, Trust in the Cloud. This report covers many data points and survey responses, diving into the gap between automation attitudes and implementation.
Quantum computers are a boon and a bane. Originally conceived by Manin and Feyman to simulate nature efficiently, large-scale quantum computers will speed-up innovation in material sciences by orders of magnitude. Consider the technical advances enabled by the discovery of new materials (with bronze, iron, steel and silicon each ascribed their own age!); quantum computers could help to unlock the next age of innovation. Unfortunately, they will also break the majority of the cryptography that’s currently used in TLS to protect our web browsing. They fall in two categories:
Digital signatures, such as RSA, which ensure you’re talking to the right server.
Key exchanges, such as Diffie–Hellman, which are used to agree on encryption keys.
A moderately-sized stable quantum computer will easily break the signatures and key exchanges currently used in TLS using Shor’s algorithm. Luckily this can be fixed: over the last two decades, there has been great progress in so-called post-quantum cryptography. “Post quantum”, abbreviated PQ, means secure against quantum computers. Five years ago, the standards institute NIST started a public process to standardise post-quantum signature schemes and key exchanges. The outcome is expected to be announced early 2022.
At Cloudflare, we’re not just following this process closely, but are also testing the real-world performance of PQ cryptography. In our 2019 experiment with Google, we saw that we can switch to a PQ key exchange with little performance impact. Among the NIST finalists, there are many with even better performance. This is good news, as we would like to switch to PQ key exchanges as soon as possible — indeed, an attacker could intercept sensitive data today, then keep and decrypt it years into the future using a quantum computer.
Why worry about PQ signatures today
One would think we can take it easy with signatures for TLS: we only need to have them replaced before a large quantum computer is built. The situation, however, is more complicated.
The lead time to change signatures is higher. Not only do we need to change the browsers and servers, we also need to change certificate authorities (CAs) and everyone’s certificate management.
TLS is addicted to small and fast signatures. For this page that you’re viewing we sent six signatures: two in the certificate chain; one handshake signature; one OCSP staple and finally two SCTs used for certificate transparency.
PQ signature schemes have wildly varying performance trade-offs and quirks (as we’ll see below) which stack up quickly with six signatures, which all have slightly different requirements.
One might ask: can’t we be clever and get rid of some of these signatures? We think so! For instance, we can replace the handshake signature with a smaller key exchange or suppress intermediate certificates. Such fundamental changes take years to be adopted. That is why we are also investigating the performance of plain TLS with drop-inPQ signatures.
So, what are our options?
The zoo of PQ signatures
The three finalists of the NIST competition are Dilithium, Falcon and Rainbow. In the table below we compare them against RSA and ECDSA, both of which are in common use today, and a selection of other PQ schemes that might see standardisation in the future.
(* There are many caveats to this table. We compare instances of PQC security level 1. Signing and verification times vary considerably by hardware platform and implementation constraints. They should be taken as a rough indication only. The signing time of Falcon512 is discussed later on. We do not list all relevant variants of the NIST alternates or promising schemes. This instance of XMSS can only sign a million messages, is stateful, requires quite a bit of storage for quick signing, is not standardised and thus far from a drop-in replacement. Rainbow has one other variant, which has smaller private keys.)
None of these PQ signatures are a clear-cut drop-in replacement. To start, all have (much) larger signatures, except for Rainbow, GeMMS and SQISign. Rainbow and GeMMS have huge public keys and SQISign is very slow.
TLS signatures
To confuse matters even more, the signatures within TLS are not all the same:
Online. Only the handshake signature is created with every incoming TLS connection, and so signing needs to be fast. Dilithium fits this role well.
Offline. All other signatures are made months/years in advance, and so signing time is not that important. This group splits in two:
With a public key. The certificate chain includes signatures and their public keys. Here Falcon seems most suited.
Without a public key. The remaining three (SCTs and OCSP staple) are just signatures. For these, Rainbow seems optimal, as its large public keys are not transmitted.
Using Dilithium, Falcon, and Rainbow, together, allows optimization for both speed and size simultaneously, which seems like a great idea. However, combining different signatures at the same time has disadvantages:
A security issue in the design or implementation of one of the signatures compromises the whole.
Clients need to implement multiple cryptographic algorithms, in this case three of them, which is troublesome for smaller devices — especially if separate hardware support is needed for each of them.
So do we really need to eke out every byte and every cycle of performance? Or can we stick to a single signature scheme for simplicity and security?
Can we pick just one?
If we stick to one signature scheme, looking just at the numbers, Falcon512 seems like a reasonable option. It needs 5KB of extra space (compared to a classical handshake), about the same as the Dilithium–Falcon–Rainbow chimera of before. Unfortunately Falcon comes with a caveat: creating signatures efficiently requires constant-time 64-bit floating point arithmetic. Without it, signing is 20x slower. But speed alone is not enough; it has to run inconstant time. Without that, one can slowly learn the secret key by measuring the time it takes to create a signature.
Although PCs typically have a sufficiently constant-time floating-point unit, many smaller devices do not. Thus, Falcon seems ill-suited for general purpose online signatures.
What about Dilithium2? It needs 17KB extra — let’s find out if that makes a big difference.
Evidence by Experiment
All the different variables and constraints clearly complicate an already challenging puzzle. The best thing is to just try the options. Over the last few years several interesting papers have appeared studying the various options, such as SKD20, PST20, SKD21 and PKNLN22. These are great starts, but don’t provide a complete picture:
SCTs and OCSP staples have yet to be considered. Leaving half (three) of the signatures out changes the results significantly.
The networks tested or emulated offer insights, but are far from representative of real-world conditions. All tests were conducted between two datacenters (which does not include real-world last-mile conditions such as Wi-Fi or spotty mobile connections); or a network was simulated with unrealistic packet loss rates.
Here, Cloudflare can contribute. One of the things we like to do is to put new ideas in the community to the test on a global scale.
In this case we’re just taking a first step. Setting up a real-world experiment with a modified browser is quite involved, especially when we consider the many possible variations. Instead, as a first step, we decided first to investigate the most striking variable, the size, and try to answer the question:
How do larger signatures affect the TLS handshake?
There are two parts to this: how fast are they, and, more importantly, do they work at all?
Experimental setup
We need some way to emulate bigger signatures without having to modify the clients. We considered several options. The first idea we had was to pad a valid certificate with a dummy extension. That would require a custom certificate for each size to test, which is cumbersome. Then we considered responding with a dummy ServerHello extension. This is, however, not allowed by TLS 1.2 without a corresponding ClientHello extension. In the end, we went for adding dummy certificates.
Dummy certificates
These dummy certificates are 1kB self-signed invalid certificates that have nothing to do with the certificate chain. To vary the size to test, we simply add more copies. Adding unrelated certificates to the certificate chain is a common misconfiguration and clients have learnt to ignore them. In fact, TLS 1.3 stipulates that these (in rfc-speak) SHOULD be ignored by the client. Testing out hundreds of browsers, we saw no issues.
Standards and reality don’t always agree: when inserting dummy certificates on actual traffic, we saw issues with a small, but not insignificant number of clients. We don’t want to ruin anyone’s connection, and so we decided to use separate connections for this purpose.
Using challenge pages to launch probes
So what did we actually do? On a small percentage of the challenge pages (those with the CAPTCHA), we pick a number n and a random key and send this key in two separate background requests to:
0.tls-size-experiment-c.cloudflareresearch.com
[n].tls-size-experiment-1.cloudflareresearch.com
The first, the control, is a normal webpage that stores the TLS handshake time under the key that’s been sent. The real action happens at the second, the live, which adds the n dummy certificates to its chain. The live also stores handshake time under the given key. We could call it “experimental” instead of “live”, but the benign control connection is also an important part of the experiment. Indeed, it allows us to see if live connections are missing. These endpoints were a breeze to write using Cloudflare Workers and KV.
How much dummy data to test?
Before launching the experiment, we tested several libraries and browsers on the live endpoint to see whether they would error due to the dummy certificates. None rejected a single certificate, but how far can we go? TLS 1.3 theoretically allows a certificate chain of 16MB, but in practice many clients reject a much shorter chain. OpenSSL, for instance, rejects one of 102kB. The most stingy we found is Go’s TLS client, which rejects a handshake larger than 64kB. Because of this, we tested with between 1 and 59 dummy certificates.
Intermezzo: TCP’s congestion window
So, what did we find? The graphs are in the next section, have a peek! Before diving right in, we would like to explain a crucial concept, the TCP congestion window, that helps us read the results.
Data sent over the Internet is broken down in packets of around 1.4kB that traverse many routers to reach their destination. Sometimes a router has more incoming packets than it can handle and it has to drop them — this is called congestion. To avoid causing congestion, TCP initially sends just a few packets (typically ten, so ~14kB). Then, with every acknowledgement received in return, the TCP sender will very quickly ramp up the number of packets that it keeps in flight. This number is called the congestion window (cwnd). When it gets too high, congestion occurs, packets are dropped and in response the sender backs off by dialing down the congestion window. Any dropped packet is seen as a sign of congestion by TCP. For this reason, Wi-Fi has its own retransmission mechanism transparent to TCP.
Considering all this, we would expect to see two effects with larger signatures:
Gentle slope. Every single packet needs some extra time to transmit, due to limited bandwidth and possible physical-layer retransmissions. This slope isn’t so gentle if your internet connection is slow or spotty.
cwnd wall. Once we fill the congestion window, we have to wait for a whole roundtrip before we can continue. This effect is stronger if the roundtrip time (RTT) is higher.
The strength of the two effects can differ. With a fast connection and high RTT we expect to see the graph below on the left. With a slow connection and low RTT, we expect the one on the right.
There might be other unknown effects. The best thing is to have a look.
In PQ research, the second effect has gained the most attention. The larger signatures simply do not fit in the initial congestion windows used today. A common suggestion in response has been to simply increase the initial congestion window to accommodate the larger signatures. This is far from a simplechange to make globally, and we have to understand if this solves the problem to begin with.
Results
Over 24 days we’ve received 964,499 live connections from 454,218 different truncated IPs (to 24 bits, “/24”, for IPv4 and 48 bits for IPv6) and 11,239 different ASNs. First, let’s check how many clients had trouble with the bigger handshakes.
Can clients handle the larger handshakes?
The control connection was missing for 2.4% of the live connections. This is not alarming: we expect some connections to be missing for harmless reasons, such as the user browsing away from the challenge page. There are, however, significantly more live connections without control connection at 3.6%.
In the graph below on the left we break the number of received live connections down by the number of dummy certificates added. Because we pick the number of certificates randomly, the graph is noisy. To get a clearer picture, we started storing the number of certificates added in the corresponding control request, which gives us the graph on the right. The bumps at 10kB and 30kB suggest that there are clients or middleboxes that cannot handle these handshake sizes.
Handshake times with larger signatures
What is the effect on the handshake time? The graph on the left shows the weighted median and 75th percentile TLS handshake times for different amounts of dummy data added. We use the weight so that every truncated IP contributes equally. On the right we show the slowdowns for each size, relative to the handshake time of the control connection.
We can see the not-so-gentle slope until 40kB, where we hit a littlewall that corresponds to Cloudflare’s default initial congestion window of 30 packets.
Adding 35kB fits within our initial congestion window. Nonetheless, the median handshake with 35kB extra is 40% slower. The slowest 10% are even worse off, taking 60% as much time. Thus even though we stay within the congestion window, the added data is not for free at all.
We can now translate these insights back to concrete PQ signatures. For example, using Dilithium2 as a drop-in replacement, we need around 17kB extra. That also fits within our initial congestion window with a median slowdown of 20%, which gets worse for the tail-end of users. For the normal initial congestion window of ten, we expect the slowdown to be much worse — around 60–80%.
There are several caveats to point out:
These experiments used an initial congestion window of 30 packets instead of ten. With a smaller initial congestion window of ten, which is the default for most systems, we would expect the wall to move from 40kB to around 10kB.
Because of our presence all across the world, our RTTs are fairly low. Thus the effect of the cwnd wall is smaller for us.
Challenge pages are served, by design, to those clients that we expect to be bots. This adds a significant bias because bots are generally hosted at well-connected providers, and so are closer than users.
HTTP/3 was not supported by the server we used for the endpoint. Support for IPv6 was only added ten days into the experiment and accounts for 10.9% of the measurements.
Actual TLS handshakes differ in size much more than tested in this setup due to differences in certificate sizes and extensions and other factors.
What have we learned?
The TLS handshake is just one step (~5–20%) in a long chain required to show you a webpage. Casually browsing, it would be hard to notice a TLS handshake that’s 60% slower. But such differences add up. To make a website really fast, you need many seemingly insignificant speedups. Browser developers take this seriously: only in exceptional cases does Chrome allow a change that slows down any microbenchmark by even a percent.
Because of the many parties and complexities involved, we should avoid waiting too long to adopt post-quantum signatures in TLS. That’s a hard sell if it comes at the price of a double-digit slowdown, not least to content servers but also to browser vendors and clients.
A timely adoption of PQ signatures on the web would be great. Our evidence so far suggests that this will be easiest, if six signatures and two public keys would fit in 9kB.
We will continue our efforts to help build a post-quantum secure Internet. To follow along, keep an eye on this blog or have a look at research.cloudflare.com.
Bas Westerbaan is co-submitter of the SPHINCS+ signature scheme.
New Rapid7 team member jbaines-r7 wrote an exploit targeting GitLab via the ExifTool command. Exploiting this vulnerability results in unauthenticated remote code execution as the git user. What makes this module extra neat is the fact that it chains two vulnerabilities together to achieve this desired effect. The first vulnerability is in GitLab itself that can be leveraged to pass invalid image files to the ExifTool parser which contained the second vulnerability whereby a specially-constructed image could be used to execute code. For even more information on these vulnerabilities, check out Rapid7’s post.
Less Than BulletProof
This week community member h00die submitted another WordPress module. This one leverages an information disclosure vulnerability in the WordPress BulletProof Security plugin that can disclose user credentials from a backup file. These credentials could then be used by a malicious attacker to login to WordPress if the hashed password is able to be cracked in an offline attack.
Each Meterpreter implementation is a unique snowflake that often incorporates API commands that others may not. A great example of this are all the missing Kiwi commands in the Linux Meterpreter. Metasploit now has much better support for modules to identify the functionality they require a Meterpreter session to have in order to run. This will help alleviate frustration encountered by users when they try to run a post module with a Meterpreter type that doesn’t offer functionality that is needed. This furthers the Metasploit project goal of providing more meaningful error information regarding post module incompatibilities which has been an ongoing effort this year.
New module content (3)
WordPress BulletProof Security Backup Disclosure by Ron Jost (Hacker5preme) and h00die, which exploits CVE-2021-39327 – This adds an auxiliary module that leverages an information disclosure vulnerability in the BulletproofSecurity plugin for WordPress. This vulnerability is identified as CVE-2021-39327. The module retrieves a backup file, which is publicly accessible, and extracts user credentials from the database backup.
GitLab Unauthenticated Remote ExifTool Command Injection by William Bowling and jbaines-r7, which exploits CVE-2021-22204 and CVE-2021-22205 – This adds an exploit for an unauthenticated remote command injection in GitLab via a separate vulnerability within ExifTool. The vulnerabilities are identified as CVE-2021-22204 and CVE-2021-22205.
WordPress Plugin Pie Register Auth Bypass to RCE by Lotfi13-DZ and h00die – This exploits an authentication bypass which leads to arbitrary code execution in versions 3.7.1.4 and below of the WordPress plugin, pie-register. Supplying a valid admin id to the user_id_social_site parameter in a POST request now returns a valid session cookie. With that session cookie, a PHP payload as a plugin is uploaded and requested, resulting in code execution.
Enhancements and features
#15665 from adfoster-r7 – This adds additional metadata to exploit modules to specify Meterpreter command requirements. Metadata information is used to add a descriptive warning when running modules with a Meterpreter implementation that doesn’t support the required command functionality.
#15782 from k0pak4 – This updates the iis_internal_ip module to include coverage for the PROPFIND internal IP address disclosure as described by CVE-2002-0422.
Bugs fixed
#15805 from timwr – This bumps the metasploit-payloads version to include two bug fixes for the Python Meterpreter.
Get it
As always, you can update to the latest Metasploit Framework with msfupdate
and you can get more details on the changes since the last blog post from
GitHub:
If you are a git user, you can clone the Metasploit Framework repo (master branch) for the latest.
To install fresh without using git, you can use the open-source-only Nightly Installers or the binary installers (which also include the commercial edition).
In our first post in this series, we covered the setup of Rapid7’s hands-on exercise at Defcon 29’s IoT Village. Last week, we discussed how to determine the UART status of the header we created and how to actually start hacking on the IoT device. The goal in this next phase of the IoT hacking exercise is to turn the console back on.
To accomplish this, we need to reenter the bootargs variable without the console setting. To change the bootargs variable, the “setenv” command should be used. In the case of this exercise, enter the following command as shown in Figure 16. You can see that the “console=off” has been removed. This will overwrite the current bootargs environment variable setting.
Figure 16: setenv command
Once you’ve run this command, we recommend verifying that you’ve correctly made the changes to the bootargs variable by running the “printenv” command again and observing that the output shows that “console=off” has been removed. It is very common to accidentally mistype an environment variable, which will cause errors on reboot or just create an entirely new variable that has no usable value. The correct bootargs variable line should read as shown in Figure 17:
Figure 17: bootargs setting
Once you’re sure the changes made to bootargs are correct, you’ll need to save the environment variable settings. To do this, you’ll use the “saveenv” command. Enter this command in the UART console, and hit enter. If you miss this step, then none of the changes made to the environment variables of U-Boot will be saved and all will be lost on reboot.
The saveenv should cause the U-Boot environment variables to be written to flash and return a response indicating it is being saved. An example of this is shown in Figure 18:
Figure 18: saveenv command response
Reboot and capture logs for review
Once you’ve made all the needed changes to the U-Boot environment variables and saved them, you can reboot the device, observe console logs from the boot process, and save the console log data to a file for further review. The boot log data from the console will play a critical role in the next steps as you work toward gaining full root access to the device.
Next, reboot the systems. You can do this in a couple of different ways. You can either type the “reset” command within the U-Boot console and hit enter, which tells the MCU to reset and causes the system to restart, or just cycle the power on the device. After entering the reset command or power cycling the device, the device should reboot. The console should now be unlocked, and you should see the kernel boot up. If you still do not have a functioning console, you either entered the wrong data for bootargs or failed to save the settings with the “saveenv” command. I must admit I am personally guilty of both many times.
During the Defcon IoT Village exercise, we had the attendees capture console logs to a file for review using the following process in GtkTerm. If you are using a different serial console application, this process will be different for capture and saving logs.
In GtkTerm, to capture logs for review, select “Log” on the task bar pulldown menu on GtkTerm as shown below in Figure 19:
Figure 19: Enable logging
Once “Log” is selected, a window will pop up. From here, you need to select the file to write out the logs to. In this case, we had the attendees select the defcon_log.txt file on the laptops desktop as shown below in Figure 20:
Figure 20: Select defcon_log.txt file
Once you’ve selected a log file, you should now start capturing logs to that file. From here, the device can be powered back on or restarted to start capturing logs for review. Let the system boot up completely. Once it appears to be up and running, you can turn off logging by selecting “Log” and then selecting “Stop” in the dropdown, as shown in Figure 21:
Figure 21: Stop log capture
Once logging is stopped, you can open the captured log file and review the contents. During the Defcon IoT Village exercise, we had the participants search for the keyword “failsafe” in the captured logs. Searching for failsafe should take you to the log entry containing the line:
“Press the [f] key and hit [enter] to enter failsafe mode”
This is a prompt that allows you to hit the “f” key followed by return to boot the system into single-user mode. You won’t find this mode on all IoT devices, but you will find it on some, like in this case with the LUMA device. Single-user mode will start the system up with limited functionality and is often used for conducting maintenance on an operating system — and, yes, this is root-level access to the device, but with none of the critical system function running that would allow network service, USB access, and applications that are run as part of the device’s normal operation features. Our goal later is to use this access and the following data to eventually gain full running system root access.
There is also another critical piece of data in the log file just shortly after the failsafe mode prompt, which we need to note. Approximately 8 lines below failsafe prompt, there is a reference to “rootfs_data” as shown in Figure 22:
Figure 22: Log review
The piece of data we need from this line is the Unsorted Block Image File System (UBIFS) device number and the volume number. This will let us properly mount the rootfs_data partition later. With the LUMA, we found this to be one of the two following values.
Device 0, volume 2
Device 0, volume 3
Boot into single-user mode
Now that the captured logs have been reviewed, allowing us to identify the failsafe mode and the UBIFS mount data. The next step is to reboot the system into single-user mode, so we can work on getting full root access to the devices. To do this, you’ll need to monitor the system booting up in the UART console, watching for the failsafe mode prompt as shown below in Figure 23:
Figure 23: Failsafe mode prompt
When this prompt shows up, you will only have a couple of seconds to press the “f” key followed by the return key to get the system to launch into single-user root access mode. If you miss this, you’ll need to reboot and start over. If you’re successful, the UART console should show the following prompt (Figure 24):
Figure 24: Single-user mode
In single-user mode, you’ll have root access, although most of the partitions, applications, networks, and associated functions will not be loaded or running. Our goal will be to make changes so you can boot the device up into full operation system mode and have root access.
In our fourth and final installment of this series, we’ll go over how to configure user accounts, and finally, how to reboot the device and login. Check back with us next week!
NEVER MISS A BLOG
Get the latest stories, expertise, and news about security today.
To provide the best experiences, we use technologies like cookies to store and/or access device information. Consenting to these technologies will allow us to process data such as browsing behavior or unique IDs on this site. Not consenting or withdrawing consent, may adversely affect certain features and functions.
Functional
Always active
The technical storage or access is strictly necessary for the legitimate purpose of enabling the use of a specific service explicitly requested by the subscriber or user, or for the sole purpose of carrying out the transmission of a communication over an electronic communications network.
Preferences
The technical storage or access is necessary for the legitimate purpose of storing preferences that are not requested by the subscriber or user.
Statistics
The technical storage or access that is used exclusively for statistical purposes.The technical storage or access that is used exclusively for anonymous statistical purposes. Without a subpoena, voluntary compliance on the part of your Internet Service Provider, or additional records from a third party, information stored or retrieved for this purpose alone cannot usually be used to identify you.
Marketing
The technical storage or access is required to create user profiles to send advertising, or to track the user on a website or across several websites for similar marketing purposes.