Post Syndicated from Explosm.net original https://explosm.net/comics/weightlifting
New Cyanide and Happiness Comic
Post Syndicated from Explosm.net original https://explosm.net/comics/weightlifting
New Cyanide and Happiness Comic
Post Syndicated from Zip Zieper original https://aws.amazon.com/blogs/messaging-and-targeting/how-to-use-ses-mail-manager-smtp-relay-action-to-deliver-inbound-email-to-google-workspace-and-microsoft-365/
Customers often ask us if the Amazon Simple Email Service (SES) inbound capabilities they use with applications hosted on AWS infrastructure can also be used to process and automate employee email hosted on public services like Google Workspace and Microsoft 365. The answer has typically been “yes, but with some limitations”, as until now, SES inbound has been somewhat constrained by the fact that it didn’t support relaying messages for an existing domain. This limitation makes it very difficult to fully manage email flows across hybrid email environments.
Such conversations led the SES team to create Amazon Simple Email Service (SES) Mail Manager which offers a set of capabilities that simplify managing large volumes of email communications within an organization. Mail Manager’s rules set conditions and actions can optimize routing for improved delivery and communication flow, both for incoming and outgoing emails. Mail Manager’s email security features can be augmented by optional add-ons from industry-leading, vetted third-party providers. Flexible archiving features help organizations meet stringent compliance and record-keeping requirements.
In this blog, we position Mail Manager as a central ingress gateway for a fictitious company, Nutrition.co, that is based on real-world AWS customers. We discuss the customer challenges and explain how to configure Mail Manager’s SMTP Relay action to intercept, archive then deliver emails destined for employees’ Google Workspace hosted Gmail and Microsoft 365 hosted Exchange Online mailboxes. Similar mail flows can be used to process, automate and archive emails destined for their AWS hosted apps.
You can learn more about all of Mail Manager’s capabilities here.
Our fictitious company, Nutrition.co, is an online retail business with multiple employee departments, including administration, marketing, sales and fulfillment. The company has acquired several smaller rivals that use both Google Workspace and Microsoft 365 to host their employee inboxes, and plan to consolidate all users onto the same domain ( such as [email protected] and [email protected]). They also host several applications on Amazon Web Services (AWS) that use Amazon SES’ inbound capability to receive emails using a subdomain *customer-support*.nutrition.co, such as orders@*customer-support*.nutrition.co and returns@*customer-support*.nutrition.co.
Nutrition.co is looking for a solution to unify all their email domain routing, security and archiving processes onto one centralized management system to simplify their email infrastructure. They want an approach that provides more flexibility to control which addresses and domains are used for apps and automation as well as employee mail. They also want to enhance email compliance and governance with a flexible solution for screening, processing and archiving inbound emails to both employees and applications, before delivering those emails to recipient inboxes on Google Workspace and Microsoft 365 and applications hosted on AWS.
The SES Mail Manger based central ingress and egress gateway architecture we propose will allow Nutrition.co to manage their peer-to-peer and application-driven emails in one place, Amazon SES. It will simplify email security and management, and make it easy to unlock new cloud-enabled email use cases. The architecture can be modified to acommodate a wide variety of email infrastructure, including fully cloud hosted, on-premises, and hybrid mailbox hosting environments.
An Inbound SMTP Gateway is an SMTP server that accepts inbound email via an Open Ingress Point, and then delivers those messages to another email environment’s inbound SMTP server. In the diagram below, Mail Manger is configured as an inbound SMTP Gateway:
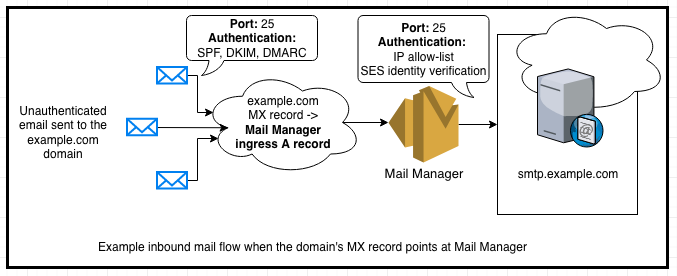
Figure 1: Diagram of the inbound gateway mail flow to a mailbox hosting environment
“Inbound email” refers to email traffic flows where the originator of the message can be either a trusted (for example: the UK division of Nutrition.co) or an untrusted (for example: a Nutrition.co customer or vendor) entity. To send an email, the originating email system looks up the recipient domain’s MX record in the global DNS system to determine the address for the recipient’s inbound mail server. Once a connection is established on port 25, the originating server delivers the email message using the SMTP protocol typically using STARTTLS for transport level encryption. Inbound messages are typically authenticated using the SPF, DKIM, and DMARC industry standard protocols, which help ensure the messages are coming from the legitimate sender’s domain.
An Inbound SMTP gateway can act on messages, for example to process and/or archive, before passing them along to the end recipient’s email server. To learn more about archiving emails in transit, visit this blog.
Before we can configure Mail Manager as an Inbound Gateway for Nutrition.co’s Google Workspace and Microsoft 365 hosted mailboxes, we need to “allow-list” Mail Manager in Nutrition.co’s Google Workspace and Microsoft 365 settings. Allow-listing in this context refers to configuring the hosted mailbox environments such that Mail Manager is not identified as the source of messages, but rather as an SMTP relay.
This configuration is necessary because the messages being relayed through Mail Manager originate from both trusted and untrusted senders. This mail flow will contain both wanted and, potentially, unwanted messages. Mail Manager is the intermediary, not the source of potentially unwanted email passing through Mail Manager’s Open Ingress Point before being relayed to the destination mailbox environment.
If Mail Manager is not allow-listed, inbound email that is relayed thru Mail Manager’s Open Ingress Point will fail SPF checks because the IP addresses of the intermediary server are not authorized by the domain’s SPF policy. Since DMARC relies on SPF, messages from intermediary mail servers will fail the domain’s DMARC policy if they are not signed with a domain-aligned DKIM signature.
Mailbox hosting environments and their anti-spam algorithms rely on SPF, DKIM and DMARC for authenticating different inbound mail flow configurations before making an assessment about the message’s disposition. Properly authenticated messages, if not otherwise identified as unwanted by recipients and their security administrator, are delivered to Inboxes. Messages that are not authenticated are more likely to be treated as spam. Messages from intermediary servers can sometimes be mistaken as spoofed or unwanted messages.
By allow-listing the egress IP addresses of the Mail Manager servers, Nutrition.co’s Google Workspace and Microsoft 365 hosting environments will be able to assess the correct SPF result when receiving inbound email from Mail Manager.
Note: Do not include Mail Manager’s IP addresses in the domain’s SPF policy, These IP addresses are shared by other Mail Manager customers so including them in the domain’s SPF policy can introduce a security risk.
Note: It is also possible to use DKIM and ARC for allow-listing mail streams, but Gmail and Exchange Online both support IP allow-listing.
Note: Nutrition.co’s Google Workspace and Microsoft 365 hosting environments may still make a spam assessment about the messages under the context that Mail Manager is not the original sender, but this is not common.
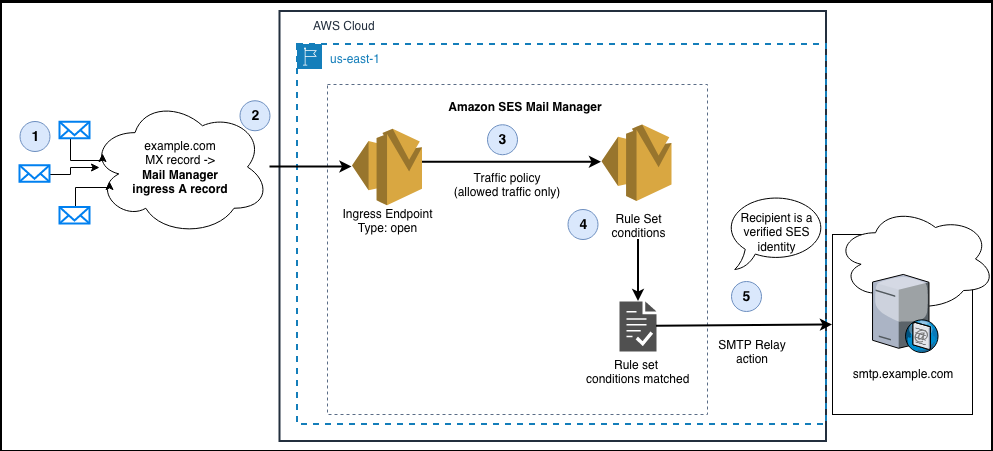
Figure 2: Diagram of the SES Mail Manager architecture to accept inbound email via an open Ingress endpoint and configured with a Rule set condition to relay messages with the SMTP Relay action.
In the diagram above, the interaction points are as follows:
1. Email senders look in DNS to discover the MX record for example.com.
2. The value of the domain’s MX record is the A record of the Mail Manager Ingress endpoint. The Ingress endpoint is configured as an ‘open’ Ingress endpoint so that it can receive inbound email without requiring SMTP Auth
3. The Ingress endpoint traffic policy is configured to allow and deny traffic
4. The Rule Set conditions determine which messages are to be relayed
5. The SMTP Relay action relays messages for recipients that are SES verified identities
Prerequisites
Step 1: Allow-list the regional Mail Manager IP addresses in Nutrition.co’s Google Workspace and Microsoft 365, and create the Mail Manager relay action(s) in AWS SES console.
Step 1-a: Follow the instructions to allow-list Mail Manager to relay email to Nutrition.co’s Google Workspace and Microsoft 365 environments.
Step1-b: Create an SMTP relay for your mailbox hosting environment
* See Creating an SMTP relay in the SES console
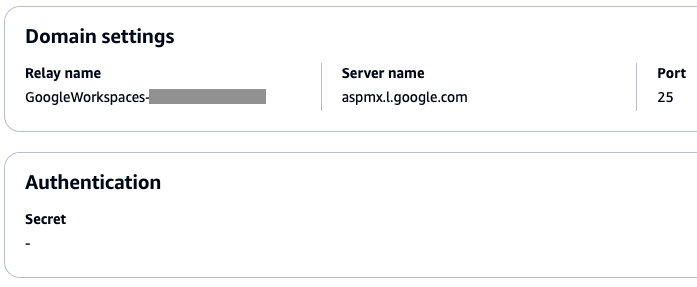
Figure 3: Screenshot of an SMTP Relay rule action configured for Microsoft 365 Exchange Online inbound receiving

Figure 4: Screenshot of an SMTP Relay rule action configured for Google Workspaces Gmail inbound receiving
Because Nutrition.co hosts email in both Google Workspace and Microsoft 365, we must create SMTP Relay actions for both.
Step 2: In SES console, verify Nutrition.co’s email domain, which is nutrition.co
SES needs to prove that Nutrition.co owns the domain of each of the recipient addresses before it will begin relaying inbound email. If you cannot verify ownership of the recipient email destinations, SES will not relay messages.
Follow the instructions to verify Nutrition.co’s SES domain identity for the recipient email addresses within Nutrition.co’s Google Workspace and Microsoft 365 environments. (*note that subdomains such as customer-support.nutrition.co inherit verification from the parent domain*).
Figure 5: Screenshot of a successfully verified domain in the SES console.
Step 3: Configure Mail Manager with an Open Ingress Point and Rule Set Action to relay inbound email to the mailbox hosting environment.
Step 3-a: See Create a Traffic Policy to accept inbound email from the internet.
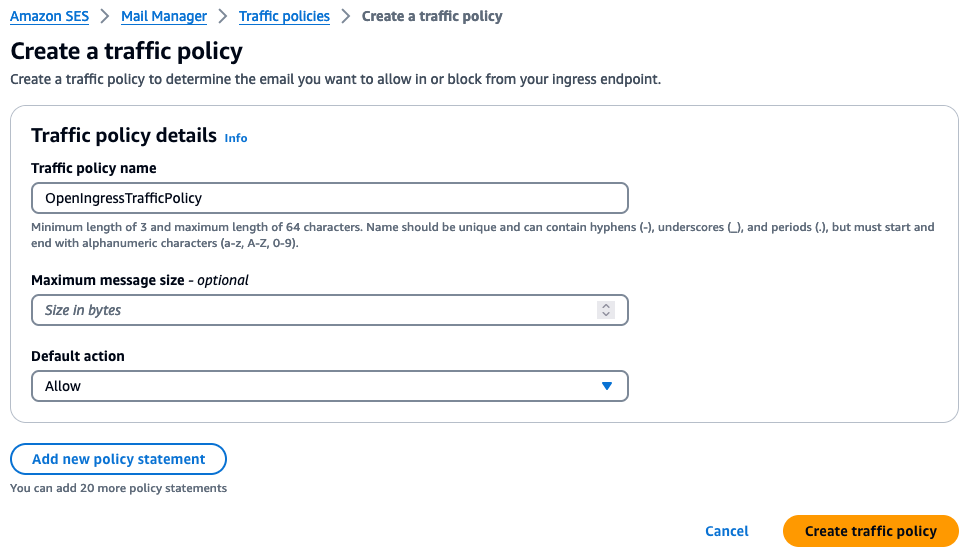
Figure 6: Screenshot of a traffic policy for accepting all email from the internet
Step 3-b: Follow the instructions for creating rule sets and rules in the SES console.
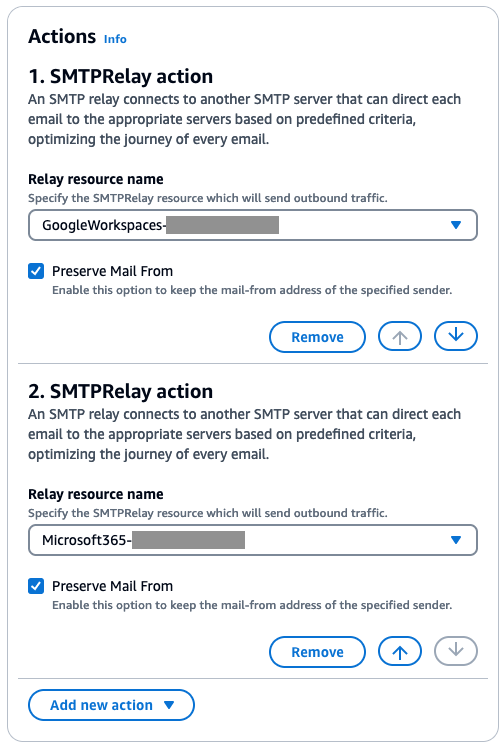
Figure 7: A Mail Manager rule configured with an SMTP Relay action for Google Workspaces and another SMTP Relay actions for Microsoft 365
Step 3-c: Follow the documentation for Creating an Ingress Point.
The Mail Manager Ingress point needs to be ‘Open“ for this use case because internet mail senders need to connect to port 25 and send without SMTP authentication for inbound mail flows.
After saving the ingress endpoint settings, you should see something similar in the console.
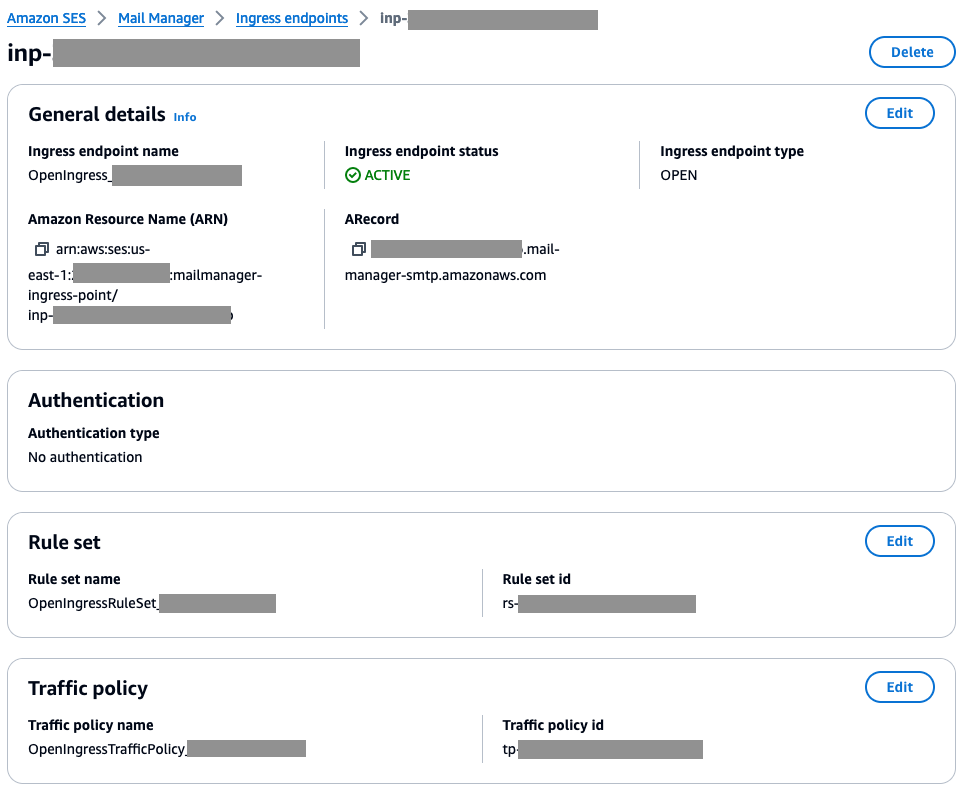
Figure 8: Screenshot of an ‘open’ Mail Manager Ingress endpoint configured with a rule set and traffic policy
Step 4. Verify your configuration and change your domain’s MX record
Once you have finished configuring Mail Manager with an Inbound Gateway configuration you will have:
Step 4-a: Test your configuration


Step 4-b: Change the MX record for your domain.
Note: We recommend using a new subdomain so that you can test this mail flow configuration for a period of time prior to changing the MX record for the primary domain that is actively being used by end users and applications.
Once you have finished testing, you can change the MX record for the domain. The value of the MX record should be the **A Record** of the Open Ingress point along with the priority value.
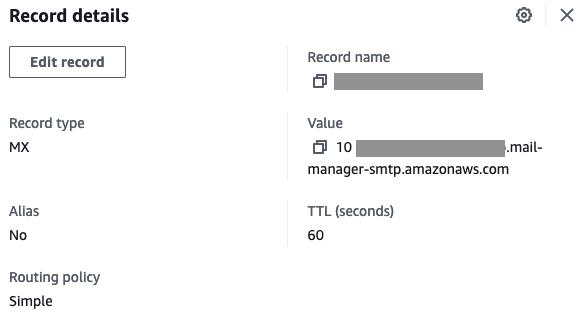
Figure 13: A screenshot of an MX record configured in Amazon Route 53
In this blog post, we’ve explored how to leverage SES Mail Manager’s SMTP Relay action to simplify the handling of inbound email for organizations that use a mix of email hosting environments, specifically Google Workspace and Microsoft 365. By configuring Mail Manager as an inbound SMTP gateway, our fictitious customer, Nutrition.co was able to centralize the management of their email flows, enhance security through features like traffic policies and rule sets, and ensure compliance through flexible archiving.
The key steps involved setting up allow-listing in the Google Workspace and Microsoft 365 environments, creating SMTP relay configurations in Mail Manager, and updating Nutrition.co domain’s MX record to point to the Mail Manager ingress endpoint. This allowed Nutrition.co to seamlessly route inbound emails destined for both their cloud-hosted employee mailboxes and on-premises applications, processing and archiving the messages before final delivery.
The flexibility of Mail Manager’s SMTP Relay action makes it a powerful tool for organizations looking to unify their email infrastructure, especially in hybrid environments. By acting as a centralized ingress and egress gateway, Mail Manager can help streamline email management, improve security, and unlock new cloud-enabled email use cases. As email continues to be a critical communication channel, solutions like Mail Manager will become increasingly important for businesses looking to maximize the value of their email ecosystem.
Please visit AWS Re:Post to ask and find answers to questions about SES Mail Manager. Talk with your AWS account team if you are interested in exploring Mail Manager in more depth.
Additional blogs related to Mail Manager:
About the Authors


Alexey is a Senior Software Development Engineer at AWS, specializing in building distributed and scalable services. Outside of work, he enjoys exploring nature thru hiking as well as playing guitar.

Zip is a Sr. Specialist Solutions Architect at AWS, working with Amazon Pinpoint and Simple Email Service and WorkMail. Outside of work he enjoys time with his family, cooking, mountain biking, boating, learning and beach plogging.
Post Syndicated from Zip Zieper original https://aws.amazon.com/blogs/messaging-and-targeting/email-archiving-with-mail-manager-why-to-archive-in-transit-vs-at-the-mailbox/
When designing Amazon Simple Email Service’s (SES) Mail Manager, we often heard from customers about the “PST-file problem” inherent with user-side mailbox-based archiving. This occurs when, for a variety of reasons, end users decide to archive their emails to local PST files or other local storage. These PST files are fragile and easily corrupted. Furthermore, they are subject to the backup practices of individual workstations. Lastly, PST files are readily are portable and can be easily copied and moved outside the visibility of the email system and your IT and IP controls.
We developed Amazon Simple Email Service (SES) Mail Manager archiving features in response to this problem, and based on additional customer feedback: the need for consistent email retention behaviors, for all email. Customers also wanted the flexibility to determine which messages to archive, where to put them, and how long to retain those messages.
To make the feature applicable to the widest set of use cases, we designed Mail Manager to be able to archive any email traversing the SES service, not just those that have already been delivered to a user’s mailbox. This added flexibility ensures organizations can maintain a complete record of exactly those email communications they wish to preserve. Rather than require external tools to search and export Mail Manager’s archives, we built these functions directly into the SES console.
In fact, the entire Media Manager archiving solution is fully managed by SES within the customer’s Mail Manager account, reducing the operational overhead traditionally associated with email archiving and compliance.

Figure 1 – Mail Manager Archiving
At the core of the SES Mail Manager archiving solution is the ability to capture and retain any message, regardless of its source or destination, as it flows through the service’s rules engine. This design approach ensures that every email message traversing Mail Manager can be subject to archiving and retention policies, rather than requiring organizations to manage different systems and tools for mail flowing through mail servers, internal relays and other email infrastructure. The result is a unified, comprehensive compliance solution that provides visibility and control over an organization’s email archiving.
SES also published a detailed overview of the Archiving feature, which is available here: Archiving and sending to final SMTP server.
Archiving on its own isn’t an innovation; it’s an email primitive – an essential capability that can be used to enable other, more complex solutions. Historically, retention of email was configured as a function of your on-premises mail server, where your mailboxes themselves were resident. Personally-authored emails were considered the high-value material to retain, and adding archiving as a function of mailbox configurations was the simplest approach.
In practice, we find that the mail captured at the mailbox server, or end user’s inbox, represents only a fraction of of the mail a typical enterprise generates. As organizations grow, the number of applications generating Application To Person (A2P) messages tends to increase dramatically. Similarly, as corporate environments become more complex, SaaS-based solutions that are external to the primary email infrastructure often use email to update employees along with workflow-management systems. Much of that mail eludes archiving as it bypasses individual user mailboxes.
The SES strategy for archiving is to capture mail from anywhere, to anywhere, as long as it transits an ingress endpoint as part of your Mail Manager configuration. You have two choices: you can write those messages directly to an S3 bucket you control, and then ingest it into any other tool you like. Alternately, you can send messages into a managed archive within Mail Manager, and gain access to search, export, and configurable retention features. By default, SES configures retention for 6 months, but it’s adjustable up to permanent retention for customers who require it.
Mail Manager’s archiving feature captures any message which matches your rule, or all messages traversing any ingress endpoint. You can choose to write all messages to or from your senior leadership team into one archive, or you can organize by other envelope metadata. The rules operate the same way whether the message is A2P or Person to Person (P2P), ensuring uniform policies and retention options.
With Mail Manager’s managed archives, you pay for each gigabyte ingested, indexed, and available for search, and a separate storage fee for each gigabyte retained every month. Note that the storage fee includes both the raw content of the messages, and the size of the computed index required for search and export functions.
For messages you write to your S3 buckets, you also have the option to invoke an S3 trigger action that calls an Amazon Lambda to drive various automatation workflows. Regulated industries might want to write all messages to S3 to leverage S3’s glacier storage option for very long-term storage.
You can even split your workload between Mail Manager’s managed archive, for emails you are likely to need readily discoverable, and the Write to S3 option, for content which you don’t expect to ever need to search with granularity, but still needs to be archived to “check the box” for your retention policy. In fact, AWS encourages such a builder-oriented approach, because it rewards thoughtful decisions and resource utilization, and conforms to the broad goal of consumption-based pricing, which Mail Manager embraces fully at every step.

Figure 2 – Rule Set with conditions for archivingMail Manager provides a more comprehensive, resilient archiving approach that increases both the overall scope of mail that can be captured, and the fidelity of the archived data. You don’t need any special adapters or plugins to capture mail from any source. All email that comes through your Mail Manager Ingress Endpoint can be archived.

Figure 3 – Create archive
Why not try Mail Manager today and experience the benefits of a centralized, scalable email archiving solution? You’ll pay only for the data you ingest and retain each month, without the fragility and visibility issues of user-managed archives. Visit the SES website to start your free trial of Mail Manager and take control of your organization’s critical email records. To start with Mail Manager, visit https://aws.amazon.com/ses/, click on Mail Manager, and set up your first workload today.
If you have any questions or need further guidance, feel free to reach out to us via the SES Forums or in the comments section of this blog post. We’re here to help you navigate the evolving email landscape and unlock the full potential of your Amazon SES investment.
About the Authors

Toby is a Principal Product Manager for Amazon SES and WorkMail. He joined AWS in January 2021 and has significant experience in both business and consumer information security products and services. His focus on email solutions at SES is all about tackling a product that everyone uses and finding ways to bring innovation and improved performance to one of the most ubiquitous IT tools.

Brett is an Amazon Pinpoint and Amazon Simple Email Service Specialist Solutions Architect at AWS. As a Navy veteran, he joined AWS in 2020 through an AWS technical military apprenticeship program. When he isn’t deep diving into solutions for customer challenges, Brett spends his time collecting vinyl, attending live music, and training at the gym. An admitted comic book nerd, he feeds his addiction every Wednesday by combing through his local shop for new books.
Zip is a Sr. Specialist Solutions Architect at AWS, working with Amazon Pinpoint and Simple Email Service and WorkMail. Outside of work he enjoys time with his family, cooking, mountain biking, boating, learning and beach plogging.
Post Syndicated from Subham Rakshit original https://aws.amazon.com/blogs/big-data/configure-a-custom-domain-name-for-your-amazon-msk-cluster/
Amazon Managed Streaming for Kafka (Amazon MSK) is a fully managed service that enables you to build and run applications that use Apache Kafka to process streaming data. It runs open-source versions of Apache Kafka. This means existing applications, tooling, and plugins from partners and the Apache Kafka community are supported without requiring changes to application code.
Customers use Amazon MSK for real-time data sharing with their end customers, who could be internal teams or third parties. These end customers manage Kafka clients, which are deployed in AWS, other managed cloud providers, or on premises. When migrating from self-managed to Amazon MSK or moving clients between MSK clusters, customers want to avoid the need for Kafka client reconfiguration, to use a different Domain Name System (DNS) name. Therefore, it’s important to have a custom domain name for the MSK cluster that the clients can communicate to. Also, having a custom domain name makes the disaster recovery (DR) process less complicated because clients don’t need to change the MSK bootstrap address when either a new cluster is created or a client connection needs to be redirected to a DR AWS Region.
MSK clusters use AWS-generated DNS names that are unique for each cluster, containing the broker ID, MSK cluster name, two service generated sub-domains, and the AWS Region, ending with amazonaws.com. The following figure illustrates this naming format.

MSK brokers use the same DNS name for the certificates used for Transport Layer Security (TLS) connections. The DNS name used by clients with TLS encrypted authentication mechanisms must match the primary Common Name (CN), or Subject Alternative Name (SAN) of the certificate presented by the MSK broker, to avoid hostname validation errors.
The solution discussed in this post provides a way for you to use a custom domain name for clients to connect to their MSK clusters when using SASL/SCRAM (Simple Authentication and Security Layer/ Salted Challenge Response Mechanism) authentication only.
Network Load Balancers (NLBs) are a popular addition to the Amazon MSK architecture, along with AWS PrivateLink as a way to expose connectivity to an MSK cluster from other virtual private clouds (VPCs). For more details, see How Goldman Sachs builds cross-account connectivity to their Amazon MSK clusters with AWS PrivateLink. In this post, we run through how to use an NLB to enable the use of a custom domain name with Amazon MSK when using SASL/SCRAM authentication.
The following diagram shows all components used by the solution.

SASL/SCRAM uses TLS to encrypt the Kafka protocol traffic between the client and Kafka broker. To use a custom domain name, the client needs to be presented with a server certificate matching that custom domain name. As of this writing, it isn’t possible to modify the certificate used by the MSK brokers, so this solution uses an NLB to sit between the client and MSK brokers.
An NLB works at the connection layer (Layer 4) and routes the TCP or UDP protocol traffic. It doesn’t validate the application data being sent and forwards the Kafka protocol traffic. The NLB provides the ability to use a TLS listener, where a certificate is imported into AWS Certificate Manager (ACM) and associated with the listener and enables TLS negotiation between the client and the NLB. The NLB performs a separate TLS negotiation between itself and the MSK brokers. This NLB TLS negotiation to the target works exactly the same irrespective of whether certificates are signed by a public or private Certificate Authority (CA).
For the client to resolve DNS queries for the custom domain, an Amazon Route 53 private hosted zone is used to host the DNS records, and is associated with the client’s VPC to enable DNS resolution from the Route 53 VPC resolver.
Kafka listeners (listeners) are the lists of addresses that Kafka binds to for listening. A Kafka listener is composed of a hostname or IP, port, and protocol: <protocol>://<hostname>:<port>.
The Kafka client uses the bootstrap address to connect to one of the brokers in the cluster and issues a metadata request. The broker provides a metadata response containing the address information of each broker that the client needs to connect to talk to these brokers. Advertised listeners (advertised.listeners) is a configuration option used by Kafka clients to connect to the brokers. By default, an advertised listener is not set. After it’s set, Kafka clients will use the advertised listener instead of listeners to obtain the connection information for brokers.
When Amazon MSK multi-VPC private connectivity is enabled, AWS sets the advertised.listeners configuration option to include the Amazon MSK multi-VPC DNS alias.
MSK brokers use the listener configuration to tell clients the DNS names to use to connect to the individual brokers for each authentication type enabled. Therefore, when clients are directed to use the custom domain name, you need to set a custom advertised listener for SASL/SCRAM authentication protocol. Advertised listeners are unique to each broker; the cluster won’t start if multiple brokers have the same advertised listener address.
A Kafka client uses the bootstrap addresses to get the metadata from the MSK cluster, which in response provides the broker hostname and port (the listeners information by default or the advertised listener if it’s configured) that the client needs to connect to for subsequent requests. Using this information, the client connects to the appropriate broker for the topic or partition that it needs to send to or fetch from. The following diagram shows the default bootstrap and topic or partition connectivity between a Kafka client and MSK broker.

You have two options when using a custom domain name with Amazon MSK.
You can use a custom domain name only for the bootstrap connection, where the advertised listeners are not set, so the client is directed to the default AWS cluster DNS name. This option is beneficial when the Kafka client has direct network connectivity to both the NLB and the MSK broker’s Elastic Network Interface (ENI). The following diagram illustrates this setup.

No changes are required to the MSK brokers, and the Kafka client has the custom domain set as the bootstrap address. The Kafka client uses the custom domain bootstrap address to send a get metadata request to the NLB. The NLB sends the Kafka protocol traffic received by the Kafka client to a healthy MSK broker’s ENI. That broker responds with metadata where only listeners is set, containing the default MSK cluster DNS name for each broker. The Kafka client then uses the default MSK cluster DNS name for the appropriate broker and connects to that broker’s ENI.
Alternatively, you can use a custom domain name for the bootstrap and the brokers, where the custom domain name for each broker is set in the advertised listeners configuration. You need to use this option when Kafka clients don’t have direct network connectivity to the MSK brokers ENI. For example, Kafka clients need to use an NLB, AWS PrivateLink, or Amazon MSK multi-VPC endpoints to connect to an MSK cluster. The following diagram illustrates this setup.

The advertised listeners are set to use the custom domain name, and the Kafka client has the custom domain set as the bootstrap address. The Kafka client uses the custom domain bootstrap address to send a get metadata request, which is sent to the NLB. The NLB sends the Kafka protocol traffic received by the Kafka client to a healthy MSK broker’s ENI. That broker responds with metadata where advertised listeners is set. The Kafka client uses the custom domain name for the appropriate broker, which directs the connection to the NLB, for the port set for that broker. The NLB sends the Kafka protocol traffic to that broker.
The following diagram illustrates the NLB port and target configuration. A TLS listener with port 9000 is used for bootstrap connections with all MSK brokers set as targets. The listener uses TLS target type with target port as 9096. A TLS listener port is used to represent each broker in the MSK cluster. In this post, there are three brokers in the MSK cluster with TLS 9001, representing broker 1, up to TLS 9003, representing broker 3.

For all TLS listeners on the NLB, a single imported certificate with the domain name bootstrap.example.com is attached to the NLB. bootstrap.example.com is used as the Common Name (CN) so that the certificate is valid for the bootstrap address, and Subject Alternative Names (SANs) are set for all broker DNS names. If the certificate is issued by a private CA, clients need to import the root and intermediate CA certificates to the trust store. If the certificate is issued by a public CA, the root and intermediate CA certificates will be in the default trust store.
The following table shows the required NLB configuration.
| NLB Listener Type | NLB Listener Port | Certificate | NLB Target Type | NLB Targets |
| TLS | 9000 | bootstrap.example.com | TLS | All Broker ENIs |
| TLS | 9001 | bootstrap.example.com | TLS | Broker 1 |
| TLS | 9002 | bootstrap.example.com | TLS | Broker 2 |
| TLS | 9003 | bootstrap.example.com | TLS | Broker 3 |
For this post, a Route 53 private hosted zone is used to host the DNS records for the custom domain, in this case example.com. The private hosted zone is associated with the Amazon MSK VPC, to enable DNS resolution for the client that is launched in the same VPC. If your client is in a different VPC than the MSK cluster, you need to associate the private hosted zone with that client’s VPC.
The Route 53 private hosted zone is not a required part of the solution. The most crucial part is that the client can perform DNS resolution against the custom domain and get the required responses. You can instead use your organization’s existing DNS, a Route 53 public hosted zone or Route 53 inbound resolver to resolve Route 53 private hosted zones from outside of AWS, or an alternative DNS solution.
The following figure shows the DNS records used by the client to resolve to the NLB. We use bootstrap for the initial client connection, and use b-1, b-2, and b-3 to reference each broker’s name.

The following table lists the DNS records required for a three-broker MSK cluster when using a Route 53 private or public hosted zone.
| Record | Record Type | Value |
| bootstrap | A | NLB Alias |
| b-1 | A | NLB Alias |
| b-2 | A | NLB Alias |
| b-3 | A | NLB Alias |
The following table lists the DNS records required for a three-broker MSK cluster when using other DNS solutions.
| Record | Record Type | Value |
| bootstrap | C | NLB DNS A Record (e.g. name-id.elb.region.amazonaws.com) |
| b-1 | C | NLB DNS A Record |
| b-2 | C | NLB DNS A Record |
| b-3 | C | NLB DNS A Record |
In the following sections, we go through the steps to configure a custom domain name for your MSK cluster and clients connecting with the custom domain.
To deploy the solution, you need the following prerequisites:
Complete the following steps to deploy the CloudFormation template:
![]()
msk-custom-domain.The CloudFormation template will deploy the following resources:
Complete the following steps to configure your EC2 instance:
msk-custom-domain-KafkaClientInstance1 using Session Manager, a capability of AWS Systems Manager.ec2-user:
customer:
For this post, we use self-signed certificates. However, it’s recommended to use either a public certificate or a certificate signed by your organization’s private key infrastructure (PKI).
If you’re are using an AWS private CA for the private key infrastructure, refer to Creating a private CA for instructions to create and install a private CA.
Use the openSSL command to create a self-signed certificate. Modify the following command, adding the country code, state, city, and company:
You can check the created certificate using the following command:
To use the self-signed certificate for the solution, you need to import the certificate to ACM:
After it’s imported, you can see the certificate in ACM.
For the client to validate the server SSL certificate during the TLS handshake, you need to import the self-signed certificate to the client’s trust store.
changeit.
To set up DNS resolution for clients, create a private hosted zone for the domain and associate the hosted zone with the VPC where the client is deployed:
Target groups route requests to individual registered targets, such as EC2 instances, using the protocol and port number that you specify. You can register a target with multiple target groups and you can register multiple targets to one target group.
For this post, you need four target groups: one for each broker instance and one that will point to all the brokers and will be used by clients for Amazon MSK connection bootstrapping.
The target group will receive traffic on port 9096 (SASL/SCRAM authentication) and will be associated with the Amazon MSK VPC:
You need to associate each target group with the broker instance (target) in the MSK cluster so that the traffic going through the target group can be routed to the individual broker instance.
Complete the following steps:
This should show the brokers, which are part of bootstrap address. The hostname of broker 1 looks like the following code:
To get the hostname of other brokers in the cluster, replace b-1 with values like b-2, b-3, and so on. For example, if you have six brokers in the cluster, you will have six broker hostnames starting with b-1 to b-6.
nslookup command:Next, you need to register the broker IP with the target group. For broker b-1, you will register the IP address with target group b-1.
b-1 to get the target group ARN. Then register the broker IP address with the target group.b-2 and b-3:Now that you have the target groups created and certificate imported, you’re ready to create the NLB and listeners.
Create the NLB with the following code:
Next, you configure the listeners that will be used by the clients to communicate with the MSK cluster. You need to create four listeners, one for each target group for ports 9000–9003. The following table lists the listener configurations.
| Protocol | Port | Certificate | NLB Target Type | NLB Targets |
| TLS | 9000 | bootstrap.example.com | TLS | b-all-bootstrap |
| TLS | 9001 | bootstrap.example.com | TLS | b-1 |
| TLS | 9002 | bootstrap.example.com | TLS | b-2 |
| TLS | 9003 | bootstrap.example.com | TLS | b-3 |
Use the following code for port 9000:
Use the following code for port 9001:
Use the following code for port 9002:
Use the following code for port 9003:
By default, cross-zone load balancing is disabled on NLBs. When disabled, each load balancer node distributes traffic to healthy targets in the same Availability Zone. For example, requests that come into the load balancer node in Availability Zone A will only be forwarded to a healthy target in Availability Zone A. If the only healthy target or the only registered target associated to an NLB listener is in another Availability Zone than the load balancer node receiving the traffic, the traffic is dropped.
Because the NLB has the bootstrap listener that is associated with a target group that has all brokers registered across multiple Availability Zones, Route 53 will respond to DNS queries against the NLB DNS name with the IP address of NLB ENIs in Availability Zones with healthy targets.
When the Kafka client tries to connect to a broker through the broker’s listener on the NLB, there will be a noticeable delay in receiving a response from the broker as the client tries to connect to the broker using all IPs returned by Route 53.
Enabling cross-zone load balancing distributes the traffic across the registered targets in all Availability Zones.
Create DNS A records to route the traffic to the network load balancer. The following table lists the records.
| Record | Record Type | Value |
| bootstrap | A | NLB Alias |
| b-1 | A | NLB Alias |
| b-2 | A | NLB Alias |
| b-3 | A | NLB Alias |
Alias record types will be used, so you need the NLB’s DNS name and hosted zone ID:
Create the bootstrap record, and then repeat this command to create the b-1, b-2, and b-3 records, modifying the Name field:
Optionally, to optimize cross-zone data charges, you can set b-1, b-2, and b-3 to the IP address of the NLB’s ENI that is in the same Availability Zone as each broker. For example, if b-2 is using an IP address that is in subnet 172.16.2.0/24, which is in Availability Zone A, you should use the NLB ENI that is in the same Availability Zone as the value for the DNS record.
The next step details how to use a custom domain name for bootstrap connectivity only. If all Kafka traffic needs to go through the NLB, as discussed earlier, proceed to the subsequent section to set up advertised listeners.
To get the listener details for broker 1, you provide entity-type as brokers and entity-name as 1 for the broker ID:
You will get an output like the following:
Going forward, clients will connect through the custom domain name. Therefore, you need to configure the advertised listeners to the custom domain hostname and port. For this, you need to copy the listener details and change the CLIENT_SASL_SCRAM listener to b-1.example.com:9001.
While you’re configuring the advertised listener, you also need to preserve the information about other listener types in the advertised listener because inter-broker communications also use the addresses in the advertised listener.
Based on our configuration, the advertised listener for broker 1 will look like the following code, with everything after sensitive=false removed:
Modify the following command as follows:
REPLICATIONREPLICATION_SECUREThe command should look something like the following example:
Run the command to add the advertised listener for broker 1.
You need to get the listener details for the other brokers and configure the advertised.listener for each.
Set the bootstrap address to the custom domain. This is the A record created in the private hosted zone.
List the MSK topics using the custom domain bootstrap address:
You should see the topic customer.
To stop incurring costs, it’s recommended to manually delete the private hosted zone, NLB, target groups, and imported certificate in ACM. Also, delete the CloudFormation stack to remove any resources provisioned by CloudFormation.
Use the following code to manually delete the aforementioned resources:
You need to wait up to 5 minutes for the completion of the NLB deletion:
Now you can delete the CloudFormation stack.
This post explains how you can use an NLB, Route 53, and the advertised listener configuration option in Amazon MSK to support custom domain names with MSK clusters when using SASL/SCRAM authentication. You can use this solution to keep your existing Kafka bootstrap DNS name and reduce or remove the need to change client applications because of a migration, recovery process, or multi-cluster high availability. You can also use this solution to have the MSK bootstrap and broker names under your custom domain, enabling you to bring the DNS name in line with your naming convention (for example, msk.prod.example.com).
Try the solution out for yourself, and leave your questions and feedback in the comments section.
 Subham Rakshit is a Senior Streaming Solutions Architect for Analytics at AWS based in the UK. He works with customers to design and build streaming architectures so they can get value from analyzing their streaming data. His two little daughters keep him occupied most of the time outside work, and he loves solving jigsaw puzzles with them. Connect with him on LinkedIn.
 Mark Taylor is a Senior Technical Account Manager at Amazon Web Services, working with enterprise customers to implement best practices, optimize AWS usage, and address business challenges. Prior to joining AWS, Mark spent over 16 years in networking roles across industries, including healthcare, government, education, and payments. Mark lives in Folkestone, England, with his wife and two dogs. Outside of work, he enjoys watching and playing football, watching movies, playing board games, and traveling.
Post Syndicated from Garrett Galow original https://blog.cloudflare.com/helping-keep-customers-safe-with-leaked-password-notification

Password reuse is a real problem. When people use the same password across multiple services, it creates a risk that a breach of one service will give attackers access to a different, apparently unrelated, service. Attackers know people reuse passwords and build giant lists of known passwords and known usernames or email addresses.
If you got to the end of that paragraph and realized you’ve reused the same password multiple places, stop reading and go change those passwords. We’ll wait.
To help protect Cloudflare customers who have used a password attackers know about, we are releasing a feature to improve the security of the Cloudflare dashboard for all our customers by automatically checking whether their Cloudflare user password has appeared in an attacker’s list. Cloudflare will securely check a customer’s password against threat intelligence sources that monitor data breaches in other services.
If a customer logs in to Cloudflare with a password that was leaked in a breach elsewhere on the Internet, Cloudflare will alert them and ask them to choose a new password.
For some customers, the news that their password was known to hackers will come as a surprise – no one wants to intentionally use passwords that they know have been leaked elsewhere. To help customers avoid being locked out when they urgently need to use their Cloudflare dashboard, the leaked password check will provide a warning to the customer for the first three login attempts. After those three attempts, Cloudflare will require that the customer reset their password.
Resetting a leaked password is just the first step in Internet account security. The best way to protect your Cloudflare account, or any account, is to add two-factor authentication, such as using a hardware security key or an authenticator application, or to rely on a single sign-on integration. Cloudflare makes it easy for any user to add two-factor authentication security to their account through app-based codes, hardware keys, or passkeys. Cloudflare account Super Administrators can also require that all members enable two-factor authentication.
Whether or not a user has been impacted in a data breach, we encourage everyone to add two-factor authentication security to their Cloudflare account.
Each time you authenticate to a service on the Internet with a username and password, that service can take a range of steps to protect your credentials.
More secure providers will hash the passwords. Hashing uses a cryptographic algorithm to convert the password into a random string of characters. Some platforms will layer on additional safeguards like a salt mechanism that introduces a random value to each password before the hashing process to ensure that two identical passwords do not have identical hashes.
These protections, combined with rate limits on login attempts, prevent brute force attacks. However, even for providers that adopt these best practices, users can still become victims of determined attackers when bad actors gain access to breached password databases. Attackers can collect compromised email password pairs to gain access to user accounts elsewhere as part of targeted attacks.
When vendors discover these kinds of compromised accounts, in many cases they will quickly force a password reset. However, resetting a leaked password in one application can still leave you vulnerable in other applications if you reused that password in other places and do not change your credentials everywhere.
That kind of password reuse means that an attacker can steal your credentials from one Internet service and try them against dozens of other popular destinations to see where you reuse the same password.
These so-called credential stuffing attacks have become more prevalent as breaches pile up. Attackers can sit on large troves of credentials for months or years, waiting to sell them to another bad actor or to use them in targeted attacks. For customers who want to protect themselves from these and other attacks that can compromise their end customer’s accounts, Cloudflare has solutions like bot management, exposed credential checks, and rate limiting available to help defend against these kinds of attacks
If every password you use is unique, then a data breach in one vendor will be limited to just that particular system. For that reason, we encourage users to adopt a password manager that can create and remember unique passwords for each service that you use. Thankfully, the most popular operating systems now include password managers by default, and multiplatform third party options also make it easy for users to adopt this practice.
However, unique passwords are still vulnerable to phishing attacks. The best way to protect any Internet account is to add two-factor authentication (2FA). Two-factor authentication provides a comprehensive defense against credential stuffing attacks. When using two-factor authentication to log in, you must use your password and, for example, a one-time code from an app or a tap on a physical hardware key. The password alone is not enough to access your account.
Adoption of two-factor authentication, specifically hardware keys, has been shown to be able to eliminate 99.9% of account takeovers, since the attacker must also get access to your second factor in addition to your password. In the case of hardware keys, they need to physically obtain the key.
When a user attempts to log into Cloudflare, we will check if the password used has been leaked in a known data breach of another service or application on the Internet. We maintain data on breaches of Internet services that we can use to search against. Because we use password hashes, scrambled versions of the original password that can’t be easily reversed, we compare a hash of the password to hashes of compromised passwords found in these lists from other attacks. An additional benefit, beside the security of hashes, is the ability to perform fast lookups, much faster than plaintext searches. This means that we can perform these checks without adding significant latency to the login process for users.
Because of the potential impact of a Cloudflare account being compromised, we opt for a more secure approach of disallowing leaked credentials regardless of whether they were associated with the specific user’s email or not. Unfortunately, data breaches are likely to continue to happen. Therefore, being proactive helps reduce the risk of new breaches that contain the email and password pair allowing for an account to be compromised before the data is available to us.
If we detect a match, the user will be prompted with the following warning. We will also send an email notification with instructions on what to do and a unique link in order to reset the password.

At this point, the user will still be able to log in to their Cloudflare account. We strongly encourage users to reset their password immediately. However, we know that in some cases you need to reach the Cloudflare dashboard immediately or do not have convenient access to the email used for the account. Cloudflare will allow two additional login attempts to succeed with the same compromised password before forcing the user to reset their password.
To reset a password in Cloudflare Dashboard, navigate to the Authentication page in My Profile. From here, select Change Password and enter both the current password to authenticate and a new, non-compromised password. Alternatively, for those whose password was leaked, upon login an email will be sent with a unique link to reset the password.
Forcing users to reset compromised credentials helps prevent attacks from spreading on the Internet, but it’s just a small piece of improved account security. We know that adding the next step, second factor authentication, can be cumbersome. We have committed to CISA’s Secure by Design Pledge, which includes working to increase 2FA adoption across the industry. We will share our plans on how we will be implementing the pledge by mid-2025.
Adding multifactor authentication to every one of your accounts on the Internet can still be a chore, no matter how much the experience is improved. It’s much easier if you can just do it with one account and use that account to authenticate into other services and applications – a single-sign on (SSO) flow. Right now, our SSO feature is limited to enterprise accounts, and we plan to change that. We will allow users to access Cloudflare through other providers like Google, GitHub, and more. Allowing users to reduce how many unique password and 2FA combinations they have to keep track of helps to reduce the likelihood of being impacted by future password breaches.
Post Syndicated from Patrick Kennedy original https://www.servethehome.com/asrock-rack-1u24e1s-genoa-2l2t-review-e1-s-amd-epyc-broadcom-micron-kioxia-ssd-edsff/
In our ASRock Rack 1U24E1S-GENOA/2L2T review, we see how this 1U AMD EPYC 9004 server uses unique cooling concepts and 24x E1.S SSD bays
The post ASRock Rack 1U24E1S-GENOA/2L2T Review A Single Socket E1.S Monster appeared first on ServeTheHome.
Post Syndicated from corbet original https://lwn.net/Articles/979532/
Changwoo Min has posted an
introduction to writing custom schedulers with sched_ext.
In a particular situation, when each scheduling policy needs its
specific action, the core kernel scheduler calls an operation
defined in struct sched_class. For example, when the core
kernel scheduler needs to select a task to be scheduled, it calls
the sched_class.pick_next_task(rq) callback of a concrete
scheduling policy. When a task becomes runnable, the core kernel
scheduler calls sched_class.enqueue(rq, p, flags) so the
concrete scheduling policy enqueues task p to run queue
rq. When a task’s runtime state needs to be updated, the
core kernel scheduler calls sched_class.update_curr(rq).
Post Syndicated from The Atlantic original https://www.youtube.com/watch?v=XhpXRU9UEcY
Post Syndicated from The Atlantic original https://www.youtube.com/watch?v=dfBFjS8wI2A
Post Syndicated from The Atlantic original https://www.youtube.com/watch?v=R7yYCXl_6l4
Post Syndicated from Danilo Poccia original https://aws.amazon.com/blogs/aws/aws-weekly-roundup-claude-3-5-sonnet-in-amazon-bedrock-codecatalyst-updates-sagemaker-with-mlflow-and-more-june-24-2024/
This week, I had the opportunity to try the new Anthropic Claude 3.5 Sonnet model in Amazon Bedrock just before it launched, and I was really impressed by its speed and accuracy! It was also the week of AWS Summit Japan; here’s a nice picture of the busy AWS Community stage.

Last week’s launches
With many new capabilities, from recommendations on the size of your Amazon Relational Database Services (Amazon RDS) databases to new built-in transformations in AWS Glue, here’s what got my attention:
Amazon Bedrock – Now supports Anthropic’s Claude 3.5 Sonnet and compressed embeddings from Cohere Embed.
AWS CodeArtifact – With support for Rust packages with Cargo, developers can now store and access their Rust libraries (known as crates).
Amazon CodeCatalyst – Many updates from this unified software development service. You can now assign issues in CodeCatalyst to Amazon Q and direct it to work with source code hosted in GitHub Cloud and Bitbucket Cloud and ask Amazon Q to analyze issues and recommend granular tasks. These tasks can then be individually assigned to users or to Amazon Q itself. You can now also use Amazon Q to help pick the best blueprint for your needs. You can now securely store, publish, and share Maven, Python, and NuGet packages. You can also link an issue to other issues. This allows customers to link issues in CodeCatalyst as blocked by, duplicate of, related to, or blocks another issue. You can now configure a single CodeBuild webhook at organization or enterprise level to receive events from all repositories in your organizations, instead of creating webhooks for each individual repository. Finally, you can now add a default IAM role to an environment.
Amazon EC2 – C7g and R7g instances (powered by AWS Graviton3 processors) are now available in Europe (Milan), Asia Pacific (Hong Kong), and South America (São Paulo) Regions. C7i-flex instances are now available in US East (Ohio) Region.
AWS Compute Optimizer – Now provides rightsizing recommendations for Amazon RDS MySQL, and RDS PostgreSQL. More info in this Cloud Financial Management blog post.
Amazon OpenSearch Service – With JSON Web Token (JWT) authentication and authorization, it’s now easier to integrate identity providers and isolate tenants in a multi-tenant application.
Amazon SageMaker – Now helps you manage machine learning (ML) experiments and the entire ML lifecycle with a fully managed MLflow capability.
AWS Glue – The serverless data integration service now offers 13 new built-in transforms: flag duplicates in column, format Phone Number, format case, fill with mode, flag duplicate rows, remove duplicates, month name, iIs even, cryptographic hash, decrypt, encrypt, int to IP, and IP to int.
Amazon MWAA – Amazon Managed Workflows for Apache Airflow (MWAA) now supports custom domain names for the Airflow web server, allowing to use private web servers with load balancers, custom DNS entries, or proxies to point users to a user-friendly web address.
For a full list of AWS announcements, be sure to keep an eye on the What’s New at AWS page.
Other AWS news
Here are some additional projects, blog posts, and news items that you might find interesting:
AWS re:Inforce 2024 re:Cap – A summary of our annual, immersive, cloud-security learning event by my colleague Wojtek.
Three ways Amazon Q Developer agent for code transformation accelerates Java upgrades – This post offers interesting details on how Amazon Q Developer handles major version upgrades of popular frameworks, replacing deprecated API calls on your behalf, and explainability on code changes.
Five ways Amazon Q simplifies AWS CloudFormation development – For template code generation, querying CloudFormation resource requirements, explaining existing template code, understanding deployment options and issues, and querying CloudFormation documentation.
Improving air quality with generative AI – A nice solution that uses artificial intelligence (AI) to standardize air quality data, addressing the air quality data integration problem of low-cost sensors.
Deploy a Slack gateway for Amazon Bedrock – A solution bringing the power of generative AI directly into your Slack workspace.
An agent-based simulation of Amazon’s inbound supply chain – Simulating the entire US inbound supply chain, including the “first-mile” of distribution and tracking the movement of hundreds of millions of individual products through the network.
AWS CloudFormation Linter (cfn-lint) v1 – This upgrade is particularly significant because it converts from using the CloudFormation spec to using CloudFormation registry resource provider schemas.
A practical approach to using generative AI in the SDLC – Learn how an AI assistant like Amazon Q Developer helps my colleague Jenna figure out what to build and how to build it.
AWS open source news and updates – My colleague Ricardo writes about open source projects, tools, and events from the AWS Community. Check out Ricardo’s page for the latest updates.
Upcoming AWS events
Check your calendars and sign up for upcoming AWS events:
AWS Summits – Join free online and in-person events that bring the cloud computing community together to connect, collaborate, and learn about AWS. This week, you can join the AWS Summit in Washington, DC, June 26–27. Learn here about future AWS Summit events happening in your area.
AWS Community Days – Join community-led conferences that feature technical discussions, workshops, and hands-on labs led by expert AWS users and industry leaders from around the world. This week there are AWS Community Days in Switzerland (June 27), Sri Lanka (June 27), and the Gen AI Edition in Ahmedabad, India (June 29).
Browse all upcoming AWS led in-person and virtual events and developer-focused events.
That’s all for this week. Check back next Monday for another Weekly Roundup!
— Danilo
This post is part of our Weekly Roundup series. Check back each week for a quick roundup of interesting news and announcements from AWS!
Post Syndicated from jzb original https://lwn.net/Articles/978837/
GhostBSD is a
desktop-oriented operating system based on FreeBSD and the MATE Desktop Environment. The
goal of the project is to lower the barrier to entry of using FreeBSD
on a desktop or laptop system, and it largely succeeds at this. While it has a few rough edges
that make it hard to recommend for the average desktop user, it is
a fine choice for users who want a desktop with FreeBSD underpinnings
such as the Z File System (ZFS), and the Ports (source) and Packages (binary) software collections.
Post Syndicated from jake original https://lwn.net/Articles/979520/
Security updates have been issued by AlmaLinux (ipa and libreswan), Debian (netty), Fedora (python-PyMySQL, tomcat, and webkitgtk), Gentoo (Flatpak, GLib, JHead, LZ4, and RDoc), Mageia (thunderbird), Oracle (nghttp2 and thunderbird), Red Hat (dnsmasq, libreswan, pki-core, and python3.11), Slackware (emacs), SUSE (gnome-settings-daemon, libarchive, qpdf, vte, and wget), and Ubuntu (libhibernate3-java).
Post Syndicated from corbet original https://lwn.net/Articles/979491/
Version
29.4 of the Emacs editor has been released. This is “an emergency
” fixing a vulnerability that can cause
bugfix release
the editor to execute arbitrary shell code in Org mode. Anybody who runs Emacs on
untrusted files — including those using Gnus or one of the Emacs mail modes
— should be looking to update. For those who cannot update, a pair of
messages from Russ
Allbery and Florian Weimer
investigates how to disable the Org-mode evaluation, a task that is
seemingly more complicated than it should be.
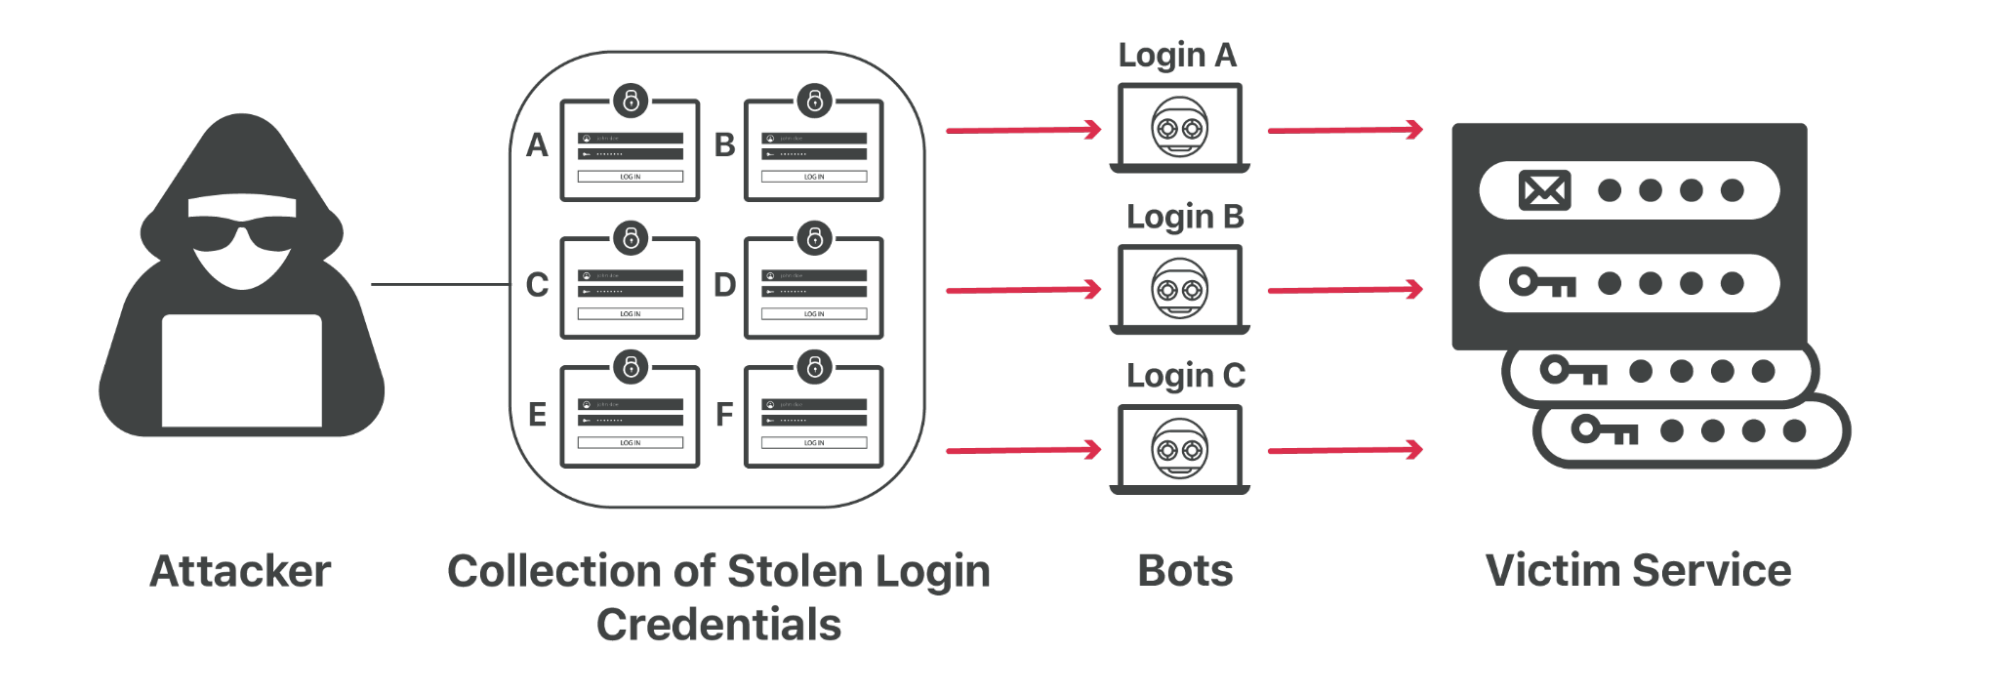
Post Syndicated from Bob AminAzad original https://blog.cloudflare.com/residential-proxy-bot-detection-using-machine-learning

Bots using residential proxies are a major source of frustration for security engineers trying to fight online abuse. These engineers often see a similar pattern of abuse when well-funded, modern botnets target their applications. Advanced bots bypass country blocks, ASN blocks, and rate-limiting. Every time, the bot operator moves to a new IP address space until they blend in perfectly with the “good” traffic, mimicking real users’ behavior and request patterns. Our new Bot Management machine learning model (v8) identifies residential proxy abuse without resorting to IP blocking, which can cause false positives for legitimate users.
One of the main sources of Cloudflare’s bot score is our bot detection machine learning model which analyzes, on average, over 46 million HTTP requests per second in real time. Since our first Bot Management ML model was released in 2019, we have continuously evolved and improved the model. Nowadays, our models leverage features based on request fingerprints, behavioral signals, and global statistics and trends that we see across our network.
Each iteration of the model focuses on certain areas of improvement. This process starts with a rigorous R&D phase to identify the emerging patterns of bot attacks by reviewing feedback from our customers and reports of missed attacks. In v8, we mainly focused on two areas of abuse. First, we analyzed the campaigns that leverage residential IP proxies, which are proxies on residential networks commonly used to launch widely distributed attacks against high profile targets. In addition to that, we improved model accuracy for detecting attacks that originate from cloud providers.
Proxies allow attackers to hide their identity and distribute their attack. Moreover, IP address rotation allows attackers to directly bypass traditional defenses such as IP reputation and IP rate limiting. Knowing this, defenders use a plethora of signals to identify malicious use of proxies. In its simplest forms, IP reputation signals (e.g., data center IP addresses, known open proxies, etc.) can lead to the detection of such distributed attacks.
However, in the past few years, bot operators have started favoring proxies operating in residential network IP address space. By using residential IP proxies, attackers can masquerade as legitimate users by sending their traffic through residential networks. Nowadays, residential IP proxies are offered by companies that facilitate access to large pools of IP addresses for attackers. Residential proxy providers claim to offer 30-100 million IPs belonging to residential and mobile networks across the world. Most commonly, these IPs are sourced by partnering with free VPN providers, as well as including the proxy SDKs into popular browser extensions and mobile applications. This allows residential proxy providers to gain a foothold on victims’ devices and abuse their residential network connections.
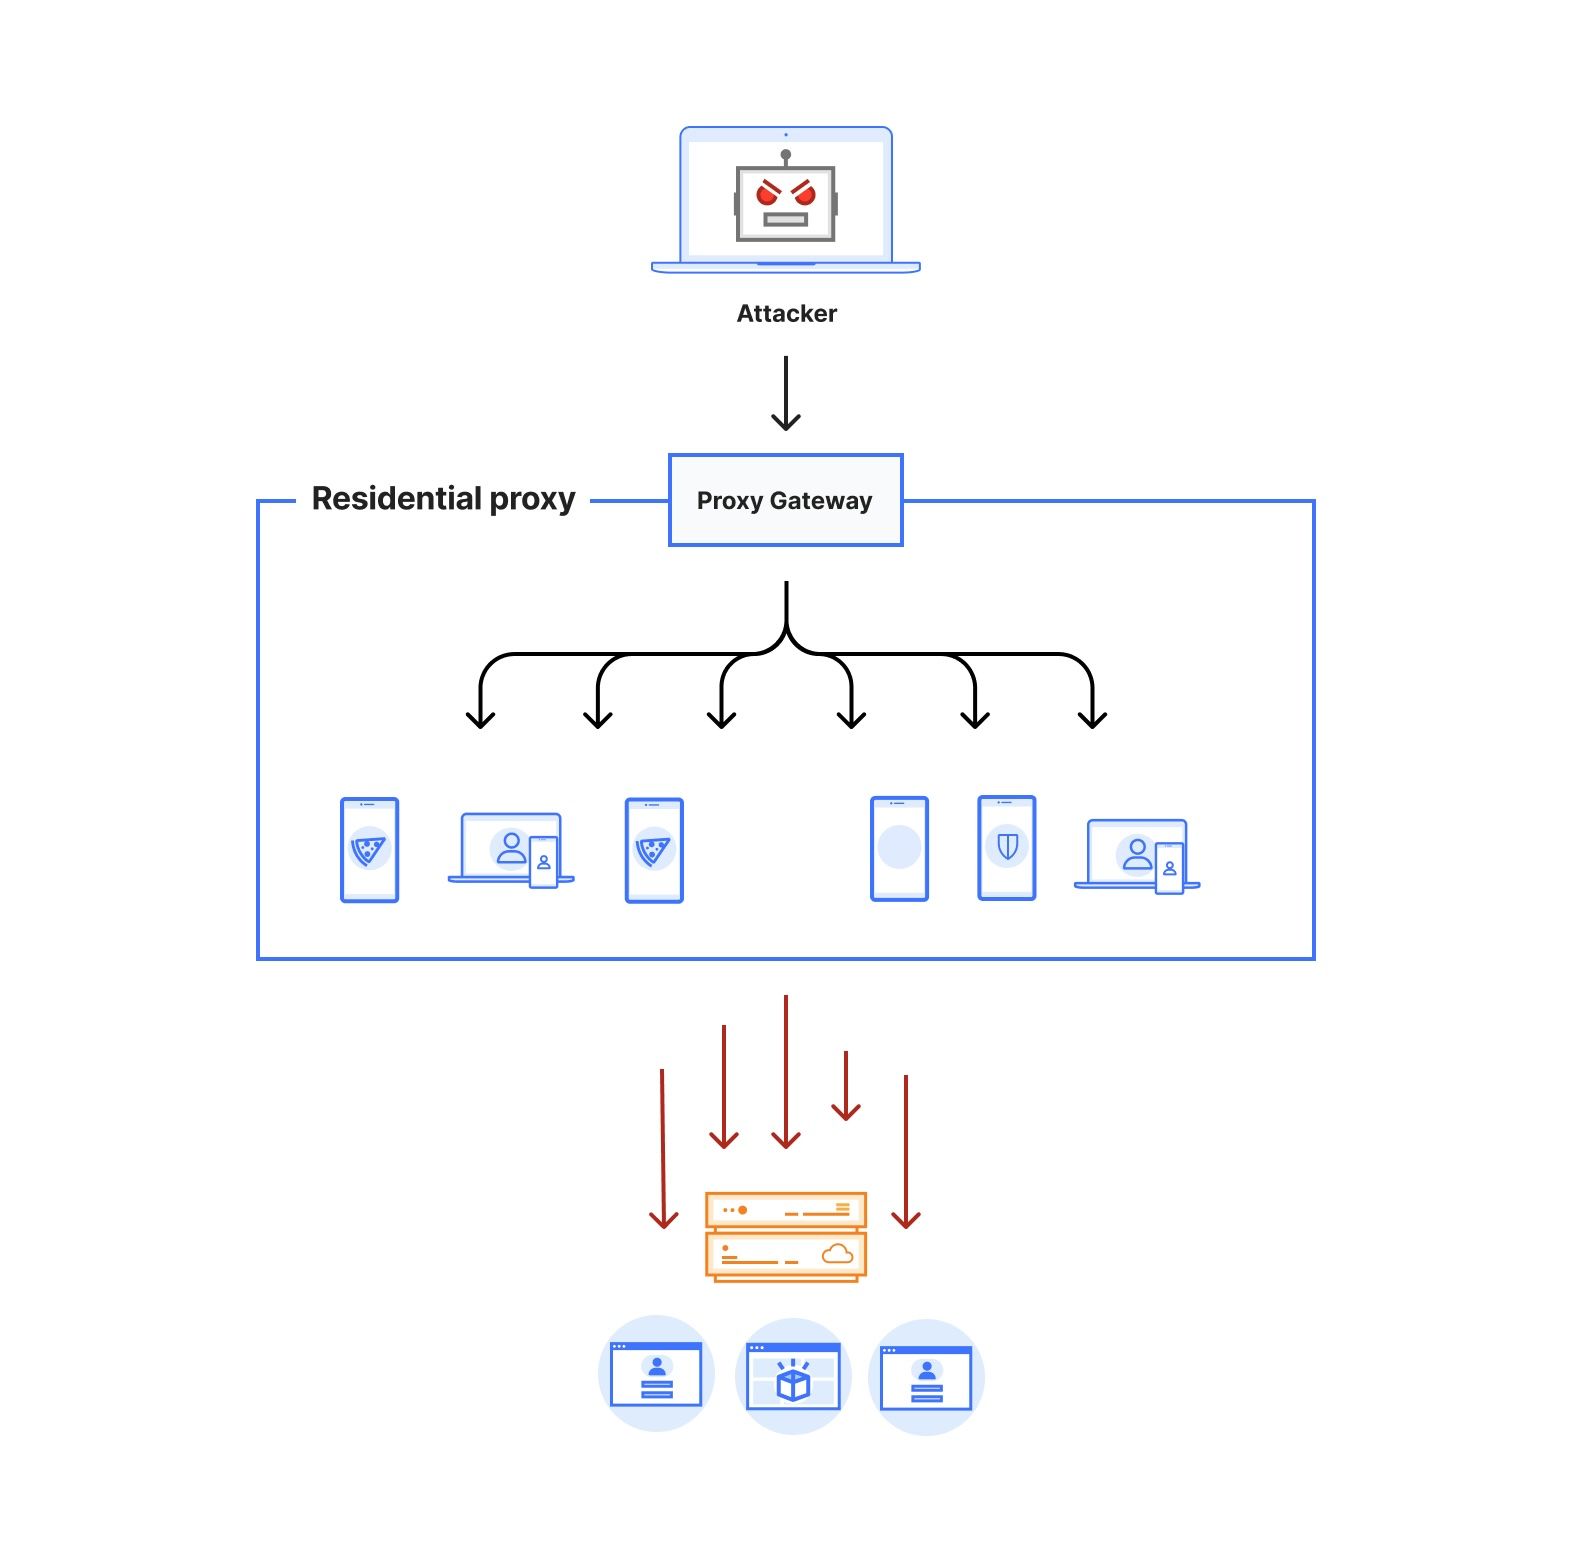
Figure 1 depicts the architecture of a residential proxy. By subscribing to these services, attackers gain access to an authenticated proxy gateway address commonly using the HTTPS/SOCKS5 proxy protocol. Some residential proxy providers allow their users to select the country or region for the proxy exit nodes. Alternatively, users can choose to keep the same IP address throughout their session or rotate to a new one for each outgoing request. Residential proxy providers then identify active exit nodes on their network (on devices that they control within residential networks across the world) and route the proxied traffic through them.
The large pool of IP addresses and the diversity of networks poses a challenge to traditional bot defense mechanisms that rely on IP reputation and rate limiting. Moreover, the diversity of IPs enables the attackers to rotate through them indefinitely. This shrinks the window of opportunity for bot detection systems to effectively detect and stop the attacks. Effective defense against residential proxy attacks should be able to detect this type of bot traffic either based on single request features to stop the attack immediately, or identify unique fingerprints from the browsing agent to track and mitigate the bot traffic regardless of the IP source. Overly broad blocking actions, such as IP block-listing, by definition, would result in blocking legitimate traffic from residential networks where at least one device is acting as a residential proxy node.
At its heart, our model is built using a chain of modules that work together. Initially, we fetch and prepare training and validation datasets from our Clickhouse data storage. We use datasets with high confidence labels as part of our training. For model validation, we use datasets consisting of missed attacks reported by our customers, known sources of bot traffic (e.g., verified bots), and high confidence detections from other bot management modules (e.g., heuristics engine). We orchestrate these steps using Apache Airflow, which enables us to customize each stage of the ML model training and define the interdependencies of our training, validation, and reporting modules in the form of directed acyclic graphs (DAGs).
The first step of training a new model is fetching labeled training data from our data store. Under the hood, our dataset definitions are SQL queries that will materialize by fetching data from our Clickhouse cluster where we store feature values and calculate aggregates from the traffic on our network. Figure 2 depicts these steps as train and validation dataset fetch operations. Introducing new datasets can be as straightforward as writing the SQL queries to filter the desired subset of requests.
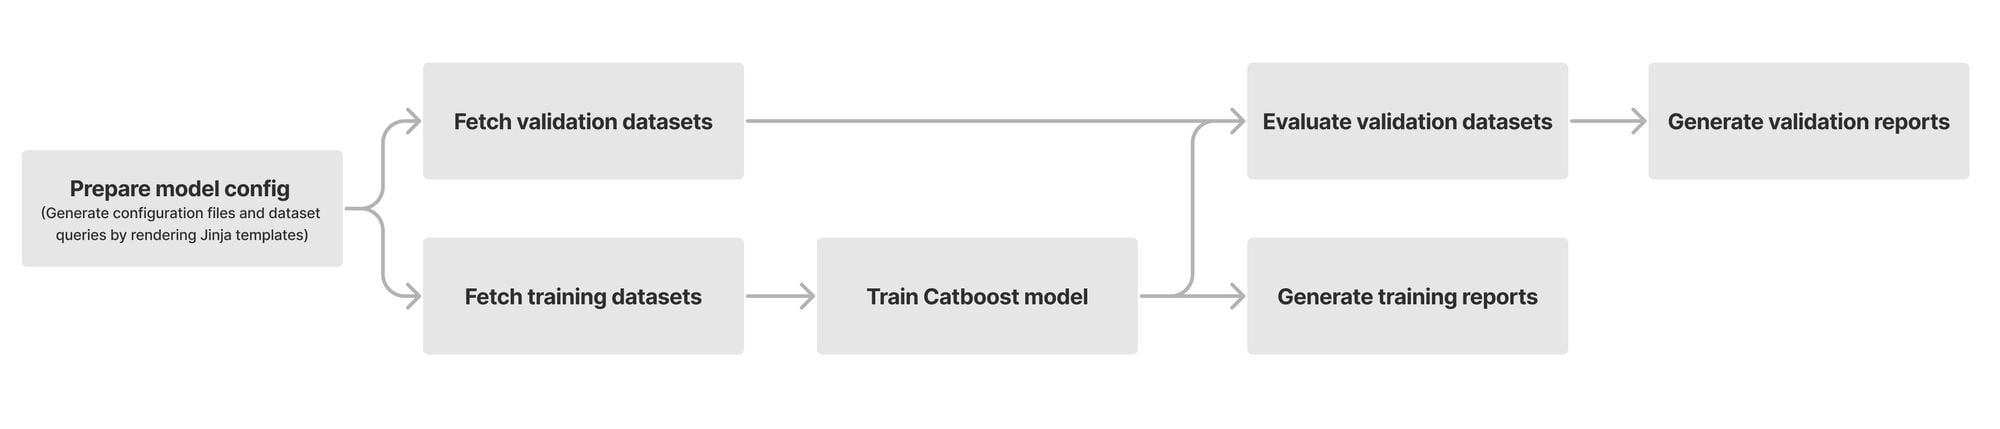
After fetching the datasets, we train our Catboost model and tune its hyper parameters. During evaluation, we compare the performance of the newly trained model against the current default version running for our customers. To capture the intricate patterns in subsets of our data, we split certain validation datasets into smaller slivers called specializations. For instance, we use the detections made by our heuristics engine and managed rulesets as ground truth for bot traffic. To ensure that larger sources of traffic (large ASNs, different HTTP versions, etc.) do not mask our visibility into patterns for the rest of the traffic, we define specializations for these sources of traffic. As a result, improvements in accuracy of the new model can be evaluated for common patterns (e.g., HTTP/1.1 and HTTP/2) as well as less common ones. Our model training DAG will provide a breakdown report for the accuracy, score distribution, feature importance, and SHAP explainers for each validation dataset and its specializations.
Once we are happy with the validation results and model accuracy, we evaluate our model against a checklist of steps to ensure the correctness and validity of our model. We start by ensuring that our results and observations are reproducible over multiple non-overlapping training and validation time ranges. Moreover, we check for the following factors:
After the model passes the readiness checks, we deploy it in shadow mode. We can observe the behavior of the model on live traffic in log-only mode (i.e., without affecting the bot score). After gaining confidence in the model’s performance on live traffic, we start onboarding beta customers, and gradually switch the model to active mode all while closely monitoring the real-world performance of our new model.
Each of our models uses a set of features to make inferences about the incoming requests. We compute our features based on single request properties (single request features) and patterns from multiple requests (i.e., inter-request features). We can categorize these features into the following groups:
Our Bot Management system (named BLISS) is responsible for fetching and computing these feature values and making them available on our servers for inference by active versions of our ML models.
Attacks originating from residential IP addresses are commonly characterized by a spike in the overall traffic towards sensitive endpoints on the target websites from a large number of residential ASNs. Our approach for detecting residential IP proxies is twofold. First, we start by comparing direct vs proxied requests and looking for network level discrepancies. Revisiting Figure 1, we notice that a request routed through residential proxies (red dotted line) has to traverse through multiple hops before reaching the target, which affects the network latency of the request.
Based on this observation alone, we are able to characterize residential proxy traffic with a high true positive rate (i.e., all residential proxy requests have high network latency). While we were able to replicate this in our lab environment, we quickly realized that at the scale of the Internet, we run into numerous exceptions with false positive detections (i.e., non-residential proxy traffic with high latency). For instance, countries and regions that predominantly use satellite Internet would exhibit a high network latency for the majority of their requests due to the use of performance enhancing proxies.
Realizing that relying solely on network characteristics of connections to detect residential proxies is inadequate given the diversity of the connections on the Internet, we switched our focus to the behavior of residential IPs. To that end, we observe that the IP addresses from residential proxies express a distinct behavior during periods of peak activity. While this observation singles out highly active IPs over their peak activity time, given the pool size of residential IPs, it is not uncommon to only observe a small number of requests from the majority of residential proxy IPs.
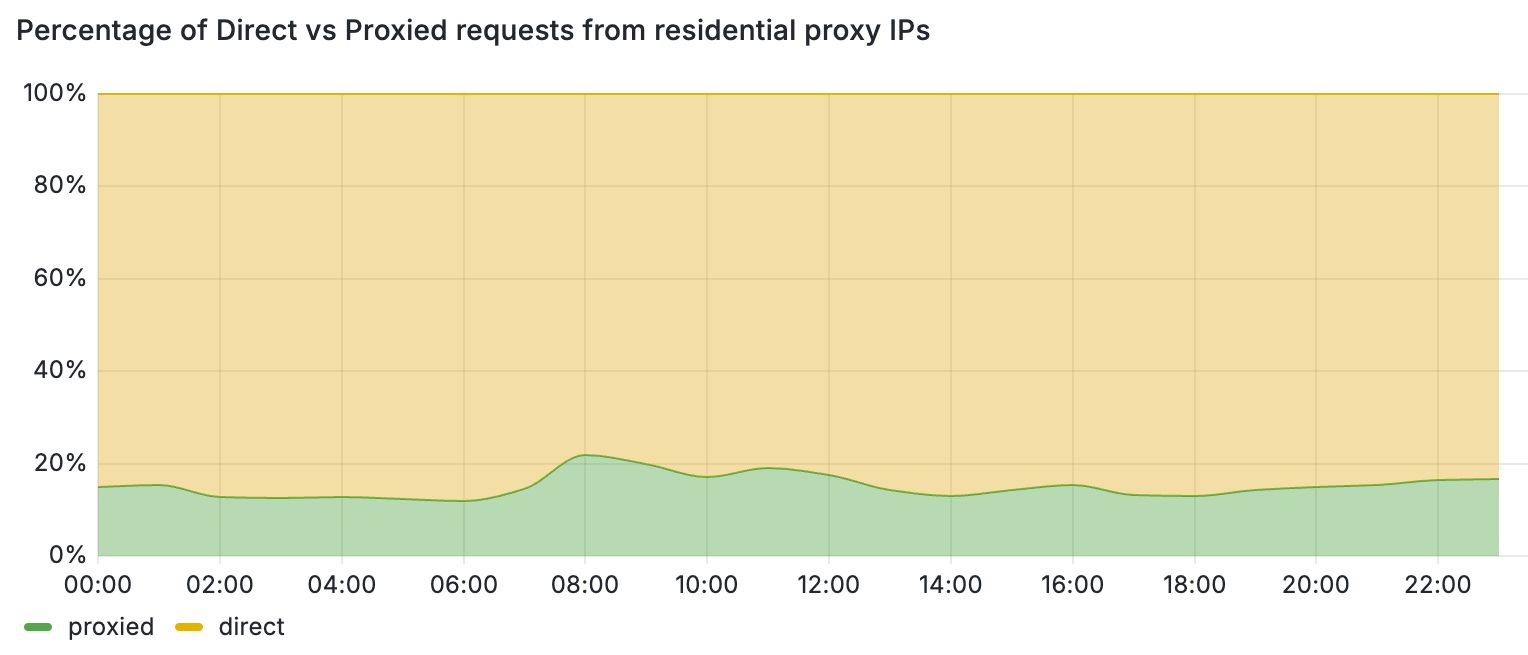
These periods of inactivity can be attributed to the temporary nature of residential proxy exit nodes. For instance, when the client software (i.e., browser or mobile application) that runs the exit nodes of these proxies is closed, the node leaves the residential proxy network. One way to filter out periods of inactivity is to increase the monitoring time and punish each IP address that exhibits residential proxy behavior for a period of time. This block-listing approach, however, has certain limitations. Most importantly, by relying only on IP-based behavioral signals, we would block traffic from legitimate users that may unknowingly run mobile applications or browser extensions that turn their devices into proxies. This is further detrimental for mobile networks where many users share their IPs behind CGNATs. Figure 3 demonstrates this by comparing the share of direct vs proxied requests that we received from active residential proxy IPs over a 24-hour period. Overall, we see that 4 out of 5 requests from these networks belong to direct and benign connections from residential devices.
Using this insight, we combined behavioral and latency-based features along with new datasets to train a new machine learning model that detects residential proxy traffic on a per-request basis. This scheme allows us to block residential proxy traffic while allowing benign residential users to visit Cloudflare-protected websites from the same residential network.
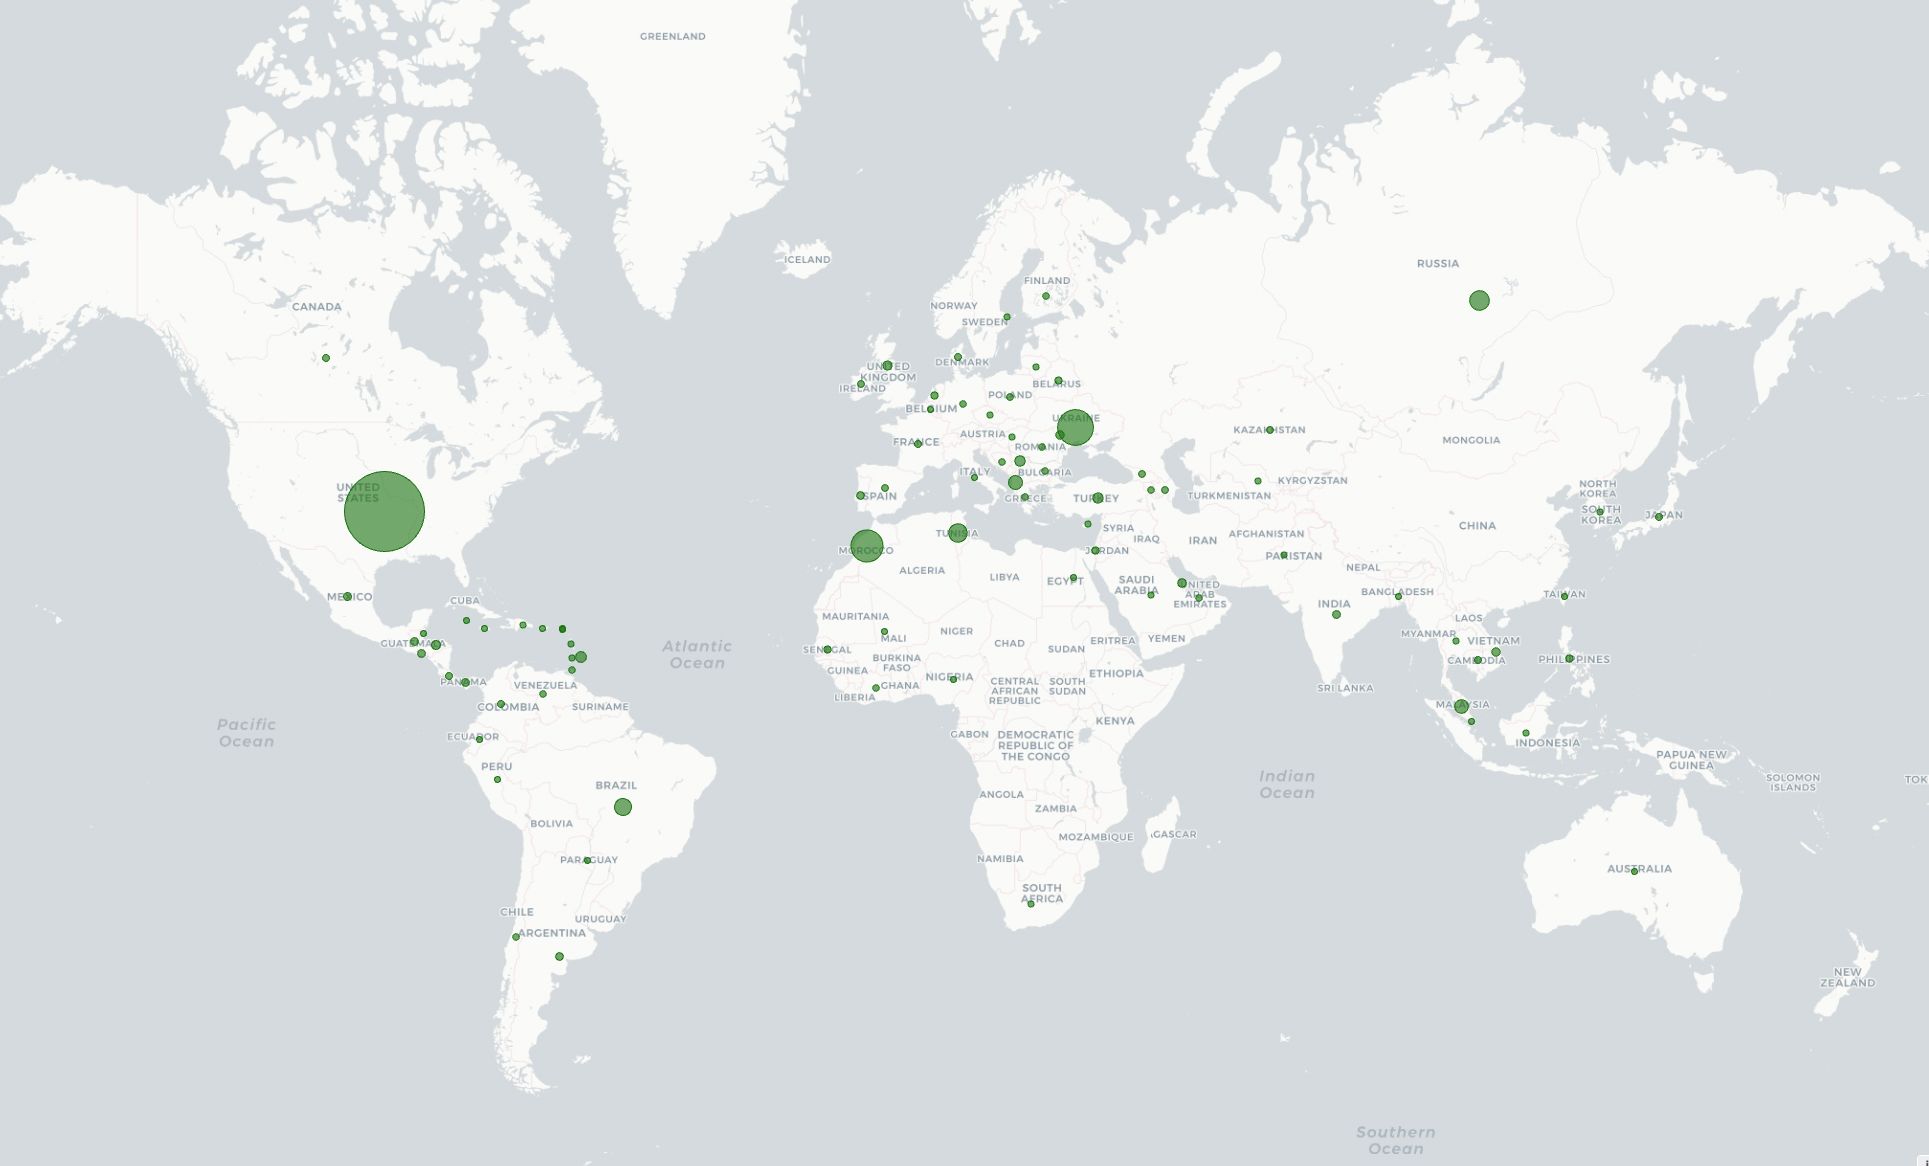
We started testing v8 in shadow mode in March 2024. Every hour, v8 is classifying more than 17 million unique IPs that participate in residential proxy attacks. Figure 4 shows the geographic distribution of IPs with residential proxy activity belonging to more than 45 thousand ASNs in 237 countries/regions. Among the most commonly requested endpoints from residential proxies, we observe patterns of account takeover attempts, such as requests to /login, /auth/login, and /api/login.
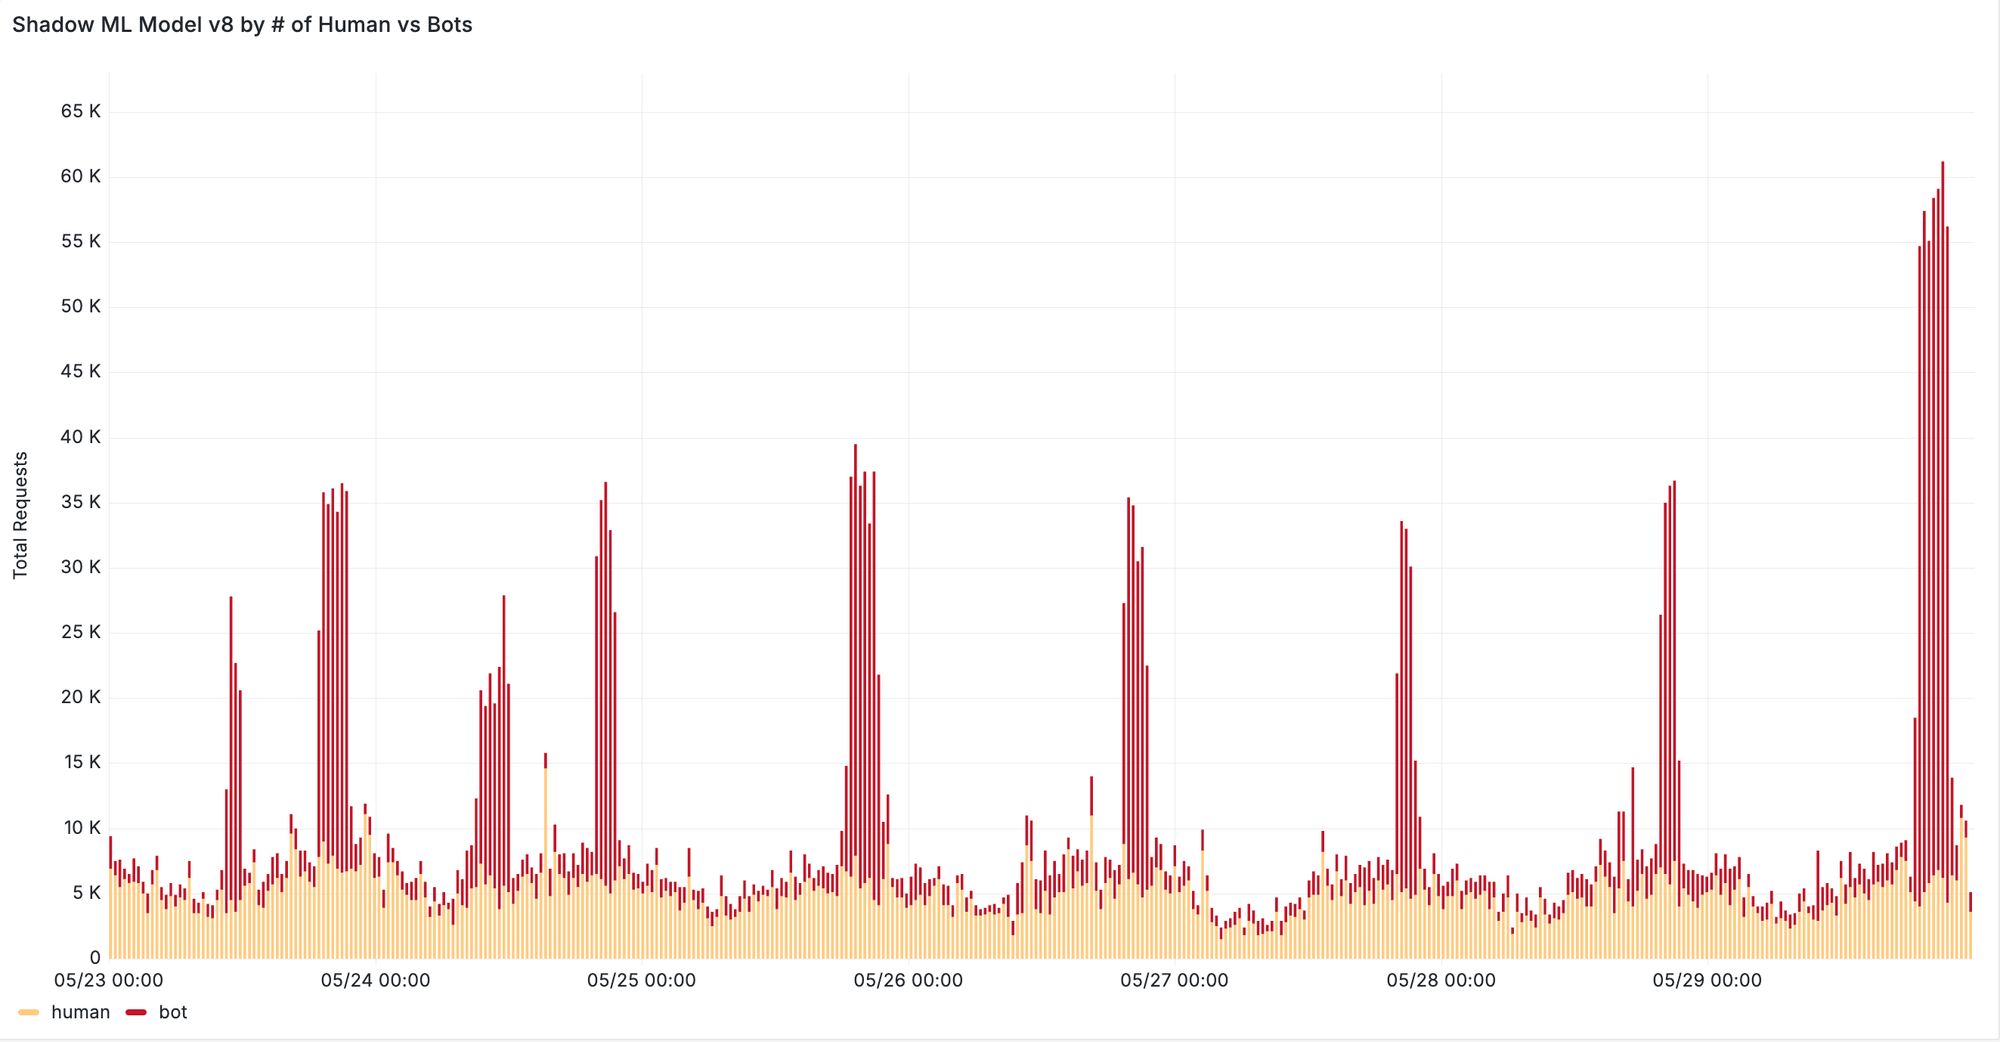
Furthermore, we see significant improvements when evaluating our new machine learning model on previously missed attacks reported by our customers. In one case, v8 was able to correctly classify 95% of requests from distributed residential proxy attacks targeting the voucher redemption endpoint of the customer’s website. In another case, our new model successfully detected a previously missed content scraping attack evident by increased detection during traffic spikes depicted in Figure 5. We are continuing to monitor the behavior of residential proxy attacks in the wild and work with our customers to ensure that we can provide robust detection against these distributed attacks.
In addition to residential IP proxies, bot operators commonly use cloud providers to host and run bot scripts that attack our customers. To combat these attacks, we improved our ground truth labels for cloud provider attacks in our latest ML training datasets. Early results show that v8 detects 20% more bots from cloud providers, with up to 70% more bots detected on zones that are marked as under attack. We further plan to expand the list of cloud providers that v8 detects as part of our ongoing updates.
For existing Bot Management customers we recommend toggling “Auto-update machine learning model” to instantly gain the benefits of ML v8 and its residential proxy detection, and to stay up to date with our future ML model updates. If you’re not a Cloudflare Bot Management customer, contact our sales team to try out Bot Management.
Post Syndicated from The History Guy: History Deserves to Be Remembered original https://www.youtube.com/watch?v=zgwfGDGHOIs
Post Syndicated from Bruce Schneier original https://www.schneier.com/blog/archives/2024/06/paul-nakasone-joins-openais-board-of-directors.html
Former NSA Director Paul Nakasone has joined the board of OpenAI.
Post Syndicated from LastWeekTonight original https://www.youtube.com/watch?v=NP8IWBOmc_g
Post Syndicated from Rohit Kumar original https://www.servethehome.com/nicgiga-nic-s250402-4-port-2-5gbe-and-2-port-10gbe-switch-review/
The Nicgiga NIC-S250402 is an interesting 4-port 2.5GbE and 2-port SFP+ 10G switch because it is often the cheapest sometimes falling to $35
The post Nicgiga NIC-S250402 4-port 2.5GbE and 2-port 10GbE Switch Review appeared first on ServeTheHome.
Post Syndicated from Explosm.net original https://explosm.net/comics/recommend
New Cyanide and Happiness Comic