On Friday, March 29, after investigating anomalous behavior in his Debian sid environment, developer Andres Freund contacted an open-source security mailing list to share that he had discovered an upstream backdoor in widely used command line tool XZ Utils (liblzma). The backdoor, added by an open-source committer who had been working on the tool for several years, affects XZ Utils versions 5.6.0 and 5.6.1. It has been assigned CVE-2024-3094.
“The malicious injection present in the xz versions 5.6.0 and 5.6.1 libraries is obfuscated and only included in full in the download package – the Git distribution lacks the M4 macro that triggers the build of the malicious code. The second-stage artifacts are present in the Git repository for the injection during the build time, in case the malicious M4 macro is present.
The resulting malicious build interferes with authentication in sshd via systemd. SSH is a commonly used protocol for connecting remotely to systems, and sshd is the service that allows access. Under the right circumstances this interference could potentially enable a malicious actor to break sshd authentication and gain unauthorized access to the entire system remotely.”
Community analysis of the backdoor is ongoing. Fortunately, thanks to Freund’s discovery, the backdoored version of the utility did not affect stable branches of most major Linux distributions and is unlikely to have made it into any production systems. The most at-risk category of users is likely developers, many of whom tend to run bleeding-edge versions of Linux.
Mitigation Guidance
XZ Utils users should downgrade to an older version of the utility immediately (i.e., any version before 5.6.0) and update their installations and packages according to distribution maintainer directions.
Major Linux distributions and package maintainers have published guidance on updating. Below is a list of affected and unaffected distributions — please refer to individual distribution and package advisories for the latest information and remediation guidance.
Please note that information on affected versions or requirements for exploitability may change as we learn more about the threat.
Rapid7 Customers
Our vulnerability coverage team is currently investigating the breadth of affected distributions and looks to provide InsightVM and Nexpose coverage for supported distributions within the next 48 hours.
Continually reviewing your organization’s incident response capabilities can be challenging without a mechanism to create security findings with actual Amazon Web Services (AWS) resources within your AWS estate. As prescribed within the AWS Security Incident Response whitepaper, it’s important to periodically review your incident response capabilities to make sure your security team is continually maturing internal processes and assessing capabilities within AWS. Generating sample security findings is useful to understand the finding format so you can enrich the finding with additional metadata or create and prioritize detections within your security information event management (SIEM) solution. However, if you want to conduct an end-to-end incident response simulation, including the creation of real detections, sample findings might not create actionable detections that will start your incident response process because of alerting suppressions you might have configured, or imaginary metadata (such as synthetic Amazon Elastic Compute Cloud (Amazon EC2) instance IDs), which might confuse your remediation tooling.
In this post, we walk through how to deploy a solution that provisions resources to generate simulated security findings for actual provisioned resources within your AWS account. Generating simulated security findings in your AWS account gives your security team an opportunity to validate their cyber capabilities, investigation workflow and playbooks, escalation paths across teams, and exercise any response automation currently in place.
Important: It’s strongly recommended that the solution be deployed in an isolated AWS account with no additional workloads or sensitive data. No resources deployed within the solution should be used for any purpose outside of generating the security findings for incident response simulations. Although the security findings are non-destructive to existing resources, they should still be done in isolation. For any AWS solution deployed within your AWS environment, your security team should review the resources and configurations within the code.
Conducting incident response simulations
Before deploying the solution, it’s important that you know what your goal is and what type of simulation to conduct. If you’re primarily curious about the format that active Amazon GuardDuty findings will create, you should generate sample findings with GuardDuty. At the time of this writing, Amazon Inspector doesn’t currently generate sample findings.
If you want to validate your incident response playbooks, make sure you have playbooks for the security findings the solution generates. If those playbooks don’t exist, it might be a good idea to start with a high-level tabletop exercise to identify which playbooks you need to create.
Because you’re running this sample in an AWS account with no workloads, it’s recommended to run the sample solution as a purple team exercise. Purple team exercises should be periodically run to support training for new analysts, validate existing playbooks, and identify areas of improvement to reduce the mean time to respond or identify areas where processes can be optimized with automation.
Now that you have a good understanding of the different simulation types, you can create security findings in an isolated AWS account.
Prerequisites
[Recommended] A separate AWS account containing no customer data or running workloads
[Optional] AWS Security Hub can be enabled to show a consolidated view of security findings generated by GuardDuty and Inspector
Solution architecture
The architecture of the solution can be found in Figure 1.
Figure 1: Sample solution architecture diagram
A user specifies the type of security findings to generate by passing an AWS CloudFormation parameter.
An Amazon Simple Notification Service (Amazon SNS) topic is created to subscribe to findings for notifications. Subscribed users are notified of the finding through the deployed SNS topic.
Upon user selection of the CloudFormation parameter, EC2 instances are provisioned to run commands to generate security findings.
Note: If the parameter inspector is provided during deployment, then only one EC2 instance is deployed. If the parameter guardduty is provided during deployment, then two EC2 instances are deployed.
The Lambda function, ecr_cleanup_function, cleans up the vulnerable images in the deployed Amazon ECR repository based on applied tags and sends a notification to the Amazon SNS topic.
Note: The ecr_cleanup_function Lambda function is also invoked as a custom resource to clean up vulnerable images during deployment. If there are issues with cleanup, the EventBridge rule continually attempts to clean up vulnerable images.
For GuardDuty, the following actions are taken and resources are deployed:
An AWS Systems Manager parameter stores the IAM access key for guardduty-demo-user.
An AWS Secrets Manager secret stores the inactive IAM secret access key for guardduty-demo-user.
An Amazon DynamoDB table is created, and the table name is stored in a Systems Manager parameter to be referenced within the EC2 user data.
An Amazon Simple Storage Service (Amazon S3) bucket is created, and the bucket name is stored in a Systems Manager parameter to be referenced within the EC2 user data.
A Lambda function adds a threat list to GuardDuty that includes the IP addresses of the EC2 instances deployed as part of the sample.
EC2 user data generates GuardDuty findings for the following:
Updates EKS cluster configuration to make a dashboard public.
DynamoDB
Adds an item to the DynamoDB table for Joshua Tree.
EC2
Creates an AWS CloudTrail trail named guardduty-demo-trail-<GUID> and subsequently deletes the same CloudTrail trail. The <GUID> is randomly generated by using the $RANDOM function
Runs portscan on 172.31.37.171 (an RFC 1918 private IP address) and private IP of the EKS Deployment EC2 instance provisioned as part of the sample. Port scans are primarily used by bad actors to search for potential vulnerabilities. The target of the port scans are internal IP addresses and do not leave the sample VPC deployed.
Curls DNS domains that are labeled for bitcoin, command and control, and other domains associated with known threats.
Amazon S3
Disables Block Public Access and server access logging for the S3 bucket provisioned as part of the solution.
IAM
Deletes the existing account password policy and creates a new password policy with a minimum length of six characters.
guardduty_remediation_eks_rule – When a GuardDuty finding for EKS is created, a Lambda function attempts to delete the EKS resources. Subscribed users are notified of the finding through the deployed SNS topic.
guardduty_remediation_credexfil_rule – When a GuardDuty finding for InstanceCredentialExfiltration is created, a Lambda function is used to revoke the IAM role’s temporary security credentials and AWS permissions. Subscribed users are notified of the finding through the deployed SNS topic.
guardduty_respond_IAMUser_rule – When a GuardDuty finding for IAM is created, subscribed users are notified through the deployed SNS topic. There is no remediation activity triggered by this rule.
Guardduty_notify_S3_rule – When a GuardDuty finding for Amazon S3 is created, subscribed users are notified through the deployed Amazon SNS topic. This rule doesn’t invoke any remediation activity.
The following Lambda functions are created:
guardduty_iam_remediation_function – This function revokes active sessions and sends a notification to the SNS topic.
eks_cleanup_function – This function deletes the EKS resources in the EKS CloudFormation template.
Note: Upon attempts to delete the overall sample CloudFormation stack, this runs to delete the EKS CloudFormation template.
An S3 bucket stores EC2 user data scripts run from the EC2 instances
Option 1: Deploy the solution with AWS CloudFormation using the console
Use the console to sign in to your chosen AWS account and then choose the Launch Stack button to open the AWS CloudFormation console pre-loaded with the template for this solution. It takes approximately 10 minutes for the CloudFormation stack to complete.
Option 2: Deploy the solution by using the AWS CDK
To build the app when navigating to the project’s root folder, use the following commands:
npm install -g aws-cdk-lib
npm install
Run the following command in your terminal while authenticated in your separate deployment AWS account to bootstrap your environment. Be sure to replace <INSERT_AWS_ACCOUNT> with your account number and replace <INSERT_REGION> with the AWS Region that you want the solution deployed to.
After the solution successfully deploys, security findings should start appearing in your AWS account’s GuardDuty console within a couple of minutes.
Amazon GuardDuty findings
In order to create a diverse set of GuardDuty findings, the solution uses Amazon EC2 user data to run scripts. Those scripts can be found in the sample repository. You can also review and change scripts as needed to fit your use case or to remove specific actions if you don’t want specific resources to be altered or security findings to be generated.
A comprehensive list of active GuardDuty finding types and details for each finding can be found in the Amazon GuardDuty user guide. In this solution, activities which cause the following GuardDuty findings to be generated, are performed:
To generate the EKS security findings, the EKS Deployment EC2 instance is running eksctl commands that deploy CloudFormation templates. If the EKS cluster doesn’t deploy, it might be because of capacity restraints in a specific Availability Zone. If this occurs, manually delete the failed EKS CloudFormation templates.
If you want to create the EKS cluster and security findings manually, you can do the following:
Connect to the EKS Deployment EC2 instance using an IAM role that has access to start a session through Systems Manager. After connecting to the ssm-user, issue the following commands in the Session Manager session:
The findings for Amazon Inspector are generated by using the open source Vulhub collection. The open source collection has pre-built vulnerable Docker environments that pull images into Amazon ECR.
The Amazon Inspector findings that are created vary depending on what exists within the open source library at deployment time. The following are examples of findings you will see in the console:
If you deployed the security finding generator solution by using the Launch Stack button in the console or the CloudFormation template security_finding_generator_cfn, do the following to clean up:
In the CloudFormation console for the account and Region where you deployed the solution, choose the SecurityFindingGeneratorStack stack.
Choose the option to Delete the stack.
If you deployed the solution by using the AWS CDK, run the command cdk destroy.
Important: The solution uses eksctl to provision EKS resources, which deploys additional CloudFormation templates. There are custom resources within the solution that will attempt to delete the provisioned CloudFormation templates for EKS. If there are any issues, you should verify and manually delete the following CloudFormation templates:
In this blog post, I showed you how to deploy a solution to provision resources in an AWS account to generate security findings. This solution provides a technical framework to conduct periodic simulations within your AWS environment. By having real, rather than simulated, security findings, you can enable your security teams to interact with actual resources and validate existing incident response processes. Having a repeatable mechanism to create security findings also provides your security team the opportunity to develop and test automated incident response capabilities in your AWS environment.
If you have feedback about this post, submit comments in the Comments section below. If you have questions about this post, start a new thread on the Incident Response re:Post or contact AWS Support.
Version 10.0 of the NetBSD system has been released.
The netbsd-10 release branch is more than a year old now, so it is
high time the 10.0 release makes it to the front stage. This
matches the long time it took for the development branch to get
ready for branching, a lot of development went into this new
release.
This also caused the release announcement to be one of the longest
we ever did.
Security updates have been issued by Arch Linux (xz), Debian (libvirt, mediawiki, util-linux, and xz-utils), Fedora (apache-commons-configuration, cockpit, ghc-base64, ghc-hakyll, ghc-isocline, ghc-toml-parser, gitit, gnutls, pandoc, pandoc-cli, patat, podman-tui, prometheus-podman-exporter, seamonkey, suricata, and xen), Gentoo (XZ utils), Mageia (aide & mhash, emacs, microcode, opensc, and squid), Red Hat (ruby:3.1), and SUSE (kanidm and qpid-proton).
Developers who build Worker applications focus on what they’re creating, not the infrastructure required, and benefit from the global reach of Cloudflare’s network. Many applications require persistent data, from personal projects to business-critical workloads. Workers offer various database and storage options tailored to developer needs, such as key-value and object storage.
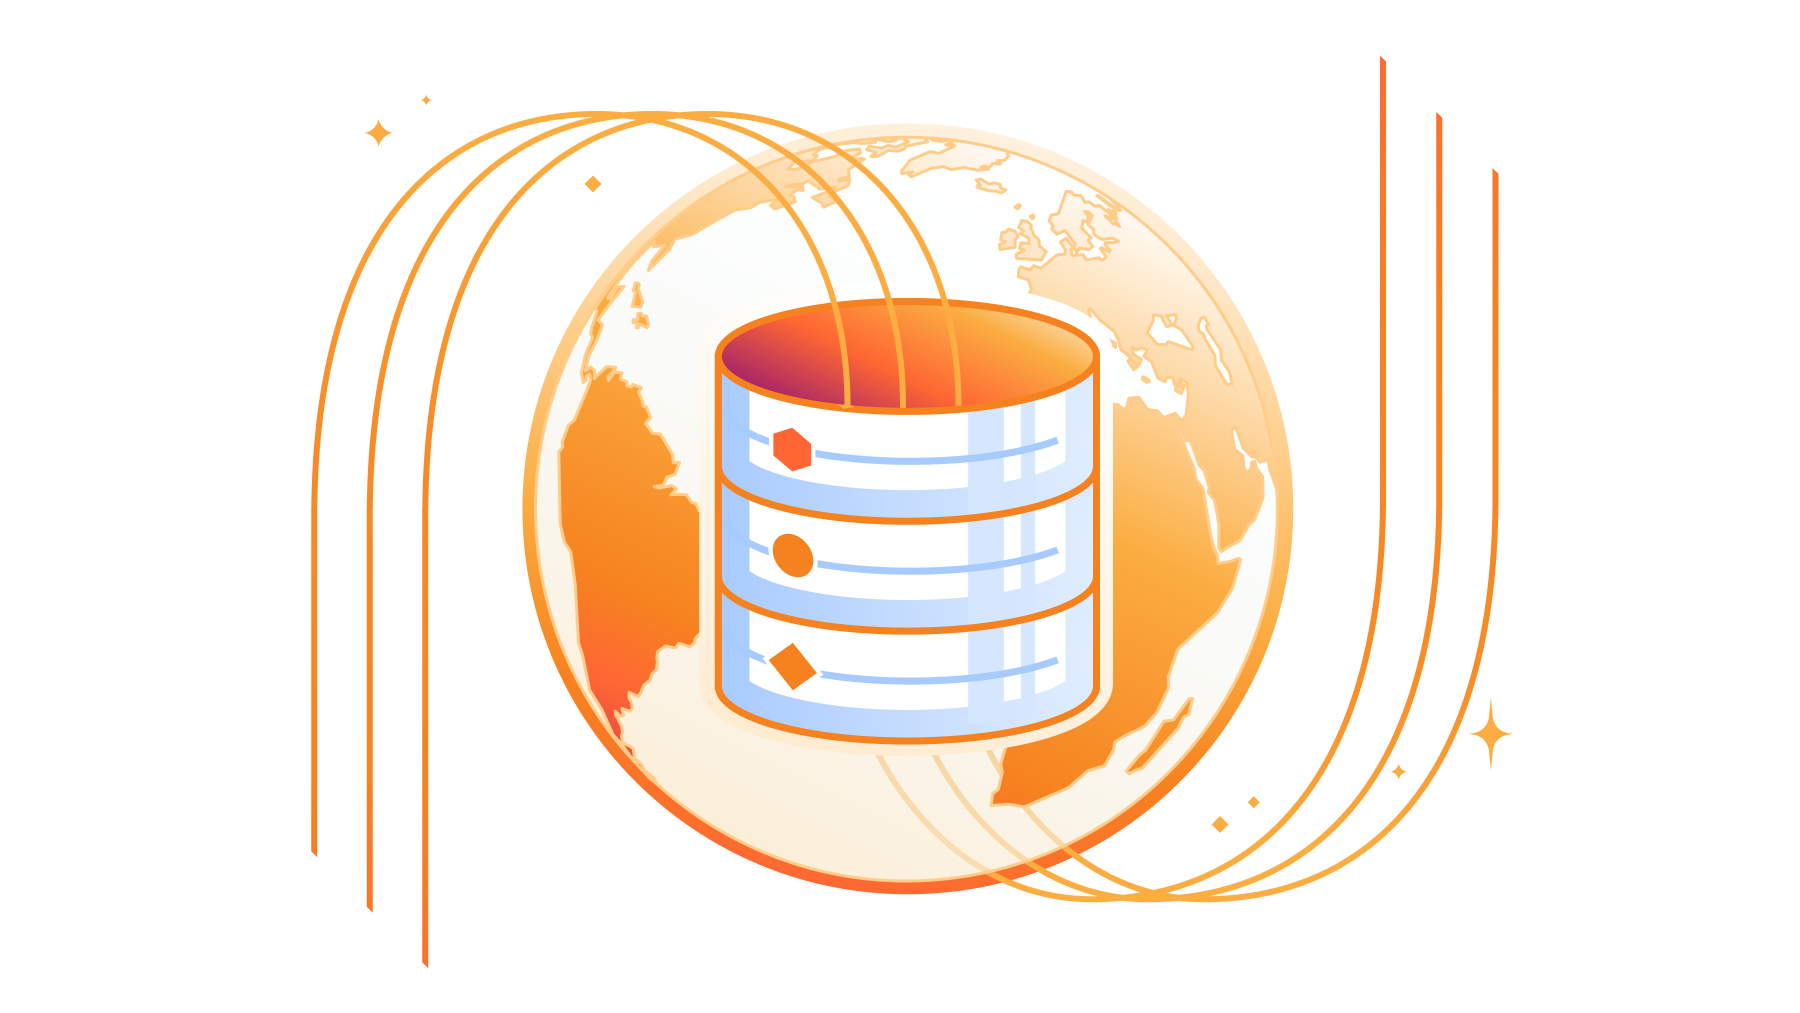
Relational databases are the backbone of many applications today. D1, Cloudflare’s relational database complement, is now generally available. Our journey from alpha in late 2022 to GA in April 2024 focused on enabling developers to build production workloads with the familiarity of relational data and SQL.
What’s D1?
D1 is Cloudflare’s built-in, serverless relational database. For Worker applications, D1 offers SQL’s expressiveness, leveraging SQLite’s SQL dialect, and developer tooling integrations, including object-relational mappers (ORMs) like Drizzle ORM. D1 is accessible via Workers or an HTTP API.
Serverless means no provisioning, default disaster recovery with Time Travel, and usage-based pricing. D1 includes a generous free tier that allows developers to experiment with D1 and then graduate those trials to production.
How to make data global?
D1 GA has focused on reliability and developer experience. Now, we plan on extending D1 to better support globally-distributed applications.
In the Workers model, an incoming request invokes serverless execution in the closest data center. A Worker application can scale globally with user requests. Application data, however, remains stored in centralized databases, and global user traffic must account for access round trips to data locations. For example, a D1 database today resides in a single location.
Workers support Smart Placement to account for frequently accessed data locality. Smart Placement invokes a Worker closer to centralized backend services like databases to lower latency and improve application performance. We’ve addressed Workers placement in global applications, but need to solve data placement.
The question, then, is how can D1, as Cloudflare’s built-in database solution, better support data placement for global applications? The answer is asynchronous read replication.
What is asynchronous read replication?
In a server-based database management system, like Postgres, MySQL, SQL Server, or Oracle, a read replica is a separate database server that serves as a read-only, almost up-to-date copy of the primary database server. An administrator creates a read replica by starting a new server from a snapshot of the primary server and configuring the primary server to send updates asynchronously to the replica server. Since the updates are asynchronous, the read replica may be behind the current state of the primary server. The difference between the primary server and a replica is called replica lag. It’s possible to have more than one read replica.
Asynchronous read replication is a time-proven solution for improving the performance of databases:
It’s possible to increase throughput by distributing load across multiple replicas.
It’s possible to lower query latency when the replicas are close to the users making queries.
Note that some database systems also offer synchronous replication. In a synchronous replicated system, writes must wait until all replicas have confirmed the write. Synchronous replicated systems can run only as fast as the slowest replica and come to a halt when a replica fails. If we’re trying to improve performance on a global scale, we want to avoid synchronous replication as much as possible!
Consistency models & read replicas
Most database systems provide read committed, snapshot isolation, or serializable consistency models, depending on their configuration. For example, Postgres defaults to read committed but can be configured to use stronger modes. SQLite provides snapshot isolation in WAL mode. Stronger modes like snapshot isolation or serializable are easier to program against because they limit the permitted system concurrency scenarios and the kind of concurrency race conditions the programmer has to worry about.
Read replicas are updated independently, so each replica’s contents may differ at any moment. If all of your queries go to the same server, whether the primary or a read replica, your results should be consistent according to whatever consistency model your underlying database provides. If you’re using a read replica, the results may just be a little old.
In a server-based database with read replicas, it’s important to stick with the same server for all of the queries in a session. If you switch among different read replicas in the same session, you compromise the consistency model provided by your application, which may violate your assumptions about how the database acts and cause your application to return incorrect results!
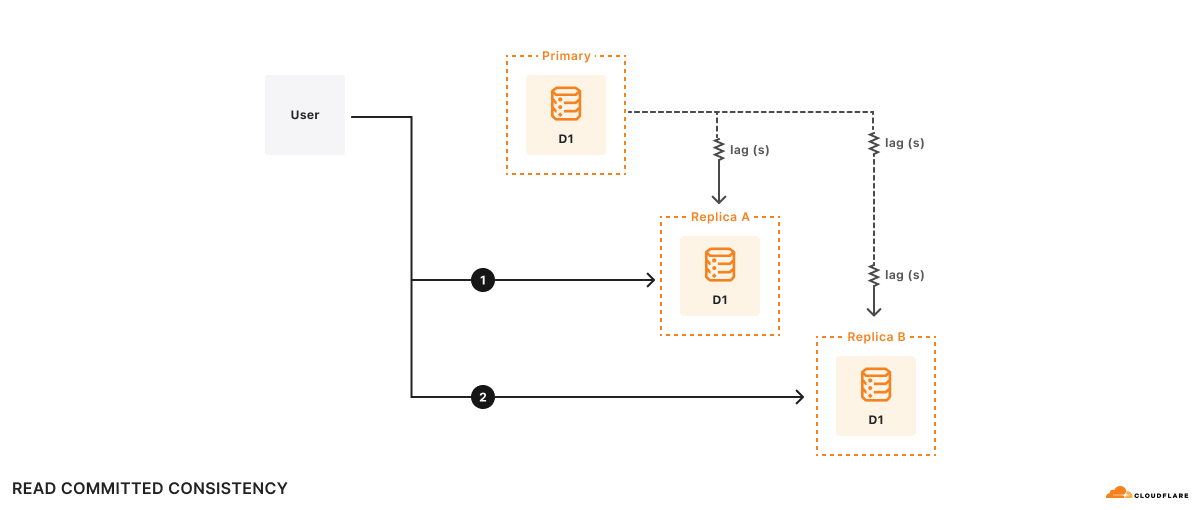
Example For example, there are two replicas, A and B. Replica A lags the primary database by 100ms, and replica B lags the primary database by 2s. Suppose a user wishes to:
Execute query 1
1a. Do some computation based on query 1 results
Execute query 2 based on the results of the computation in (1a)
At time t=10s, query 1 goes to replica A and returns. Query 1 sees what the primary database looked like at t=9.9s. Suppose it takes 500ms to do the computation, so at t=10.5s, query 2 goes to replica B. Remember, replica B lags the primary database by 2s, so at t=10.5s, query 2 sees what the database looks like at t=8.5s. As far as the application is concerned, the results of query 2 look like the database has gone backwards in time!
Formally, this is read committed consistency since your queries will only see committed data, but there’s no other guarantee – not even that you can read your own writes. While read committed is a valid consistency model, it’s hard to reason about all of the possible race conditions the read committed model allows, making it difficult to write applications correctly.
Snapshot isolation is a familiar consistency model that most developers find easy to use. We implement this consistency model in D1 by ensuring at most one active copy of the D1 database and routing all HTTP requests to that single database. While ensuring that there’s at most one active copy of the D1 database is a gnarly distributed systems problem, it’s one that we’ve solved by building D1 using Durable Objects. Durable Objects guarantee global uniqueness, so once we depend on Durable Objects, routing HTTP requests is easy: just send them to the D1 Durable Object.
This trick doesn’t work if you have multiple active copies of the database since there’s no 100% reliable way to look at a generic incoming HTTP request and route it to the same replica 100% of the time. Unfortunately, as we saw in the previous section’s example, if we don’t route related requests to the same replica 100% of the time, the best consistency model we can provide is read committed.
Given that it’s impossible to route to a particular replica consistently, another approach is to route requests to any replica and ensure that the chosen replica responds to requests according to a consistency model that “makes sense” to the programmer. If we’re willing to include a Lamport timestamp in our requests, we can implement sequential consistency using any replica. The sequential consistency model has important properties like “read my own writes” and “writes follow reads,” as well as a total ordering of writes. The total ordering of writes means that every replica will see transactions commit in the same order, which is exactly the behavior we want in a transactional system. Sequential consistency comes with the caveat that any individual entity in the system may be arbitrarily out of date, but that caveat is a feature for us because it allows us to consider replica lag when designing our APIs.
The idea is that if D1 gives applications a Lamport timestamp for every database query and those applications tell D1 the last Lamport timestamp they’ve seen, we can have each replica determine how to make queries work according to the sequential consistency model.
A robust, yet simple, way to implement sequential consistency with replicas is to:
Associate a Lamport timestamp with every single request to the database. A monotonically increasing commit token works well for this.
Send all write queries to the primary database to ensure the total ordering of writes.
Send read queries to any replica, but have the replica delay servicing the query until the replica receives updates from the primary database that are later than the Lamport timestamp in the query.
What’s nice about this implementation is that it’s fast in the common case where a read-heavy workload always goes to the same replica and will work even if requests get routed to different replicas.
Sneak Preview: bringing read replication to D1 with Sessions
To bring read replication to D1, we will expand the D1 API with a new concept: Sessions. A Session encapsulates all the queries representing one logical session for your application. For example, a Session might represent all requests coming from a particular web browser or all requests coming from a mobile app. If you use Sessions, your queries will use whatever copy of the D1 database makes the most sense for your request, be that the primary database or a nearby replica. D1’s Sessions implementation will ensure sequential consistency for all queries in the Session.
Since the Sessions API changes D1’s consistency model, developers must opt-in to the new API. Existing D1 API methods are unchanged and will still have the same snapshot isolation consistency model as before. However, only queries made using the new Sessions API will use replicas.
Here’s an example of the D1 Sessions API:
export default {
  async fetch(request: Request, env: Env) {
    // When we create a D1 Session, we can continue where we left off
    // from a previous Session if we have that Session's last commit
    // token.  This Worker will return the commit token back to the
    // browser, so that it can send it back on the next request to
    // continue the Session.
    //
    // If we don't have a commit token, make the first query in this
    // session an "unconditional" query that will use the state of the
    // database at whatever replica we land on.
    const token = request.headers.get('x-d1-token') ?? 'first-unconditional'
    const session = env.DB.withSession(token)


    // Use this Session for all our Workers' routes.
    const response = await handleRequest(request, session)


    if (response.status === 200) {
      // Set the token so we can continue the Session in another request.
      response.headers.set('x-d1-token', session.latestCommitToken)
    }
    return response
  }
}


async function handleRequest(request: Request, session: D1DatabaseSession) {
  const { pathname } = new URL(request.url)


  if (pathname === '/api/orders/list') {
    // This statement is a read query, so it will execute on any
    // replica that has a commit equal or later than `token` we used
    // to create the Session.
    const { results } = await session.prepare('SELECT * FROM Orders').all()


    return Response.json(results)
  } else if (pathname === '/api/orders/add') {
    const order = await request.json<Order>()


    // This statement is a write query, so D1 will send the query to
    // the primary, which always has the latest commit token.
    await session
      .prepare('INSERT INTO Orders VALUES (?, ?, ?)')
      .bind(order.orderName, order.customer, order.value)
      .run()


    // In order for the application to be correct, this SELECT
    // statement must see the results of the INSERT statement above.
    // The Session API keeps track of commit tokens for queries
    // within the session and will ensure that we won't execute this
    // query until whatever replica we're using has seen the results
    // of the INSERT.
    const { results } = await session
      .prepare('SELECT COUNT(*) FROM Orders')
      .all()


    return Response.json(results)
  }


  return new Response('Not found', { status: 404 })
}
D1’s implementation of Sessions makes use of commit tokens. Commit tokens identify a particular committed query to the database. Within a session, D1 will use commit tokens to ensure that queries are sequentially ordered. In the example above, the D1 session ensures that the “SELECT COUNT(*)” query happens after the “INSERT” of the new order, even if we switch replicas between the awaits.
There are several options on how you want to start a session in a Workers fetch handler. db.withSession(<condition>) accepts these arguments:
condition argument
Behavior
<commit_token>
(1) starts Session as of given commit token
(2) subsequent queries have sequential consistency
first-unconditional
(1) if the first query is read, read whatever current replica has and use the commit token of that read as the basis for subsequent queries. If the first query is a write, forward the query to the primary and use the commit token of the write as the basis for subsequent queries.
(2) subsequent queries have sequential consistency
first-primary
(1) runs first query, read or write, against the primary
(2) subsequent queries have sequential consistency
null or missing argument
treated like first-unconditional
It’s possible to have a session span multiple requests by “round-tripping” the commit token from the last query of the session and using it to start a new session. This enables individual user agents, like a web app or a mobile app, to make sure that all of the queries the user sees are sequentially consistent.
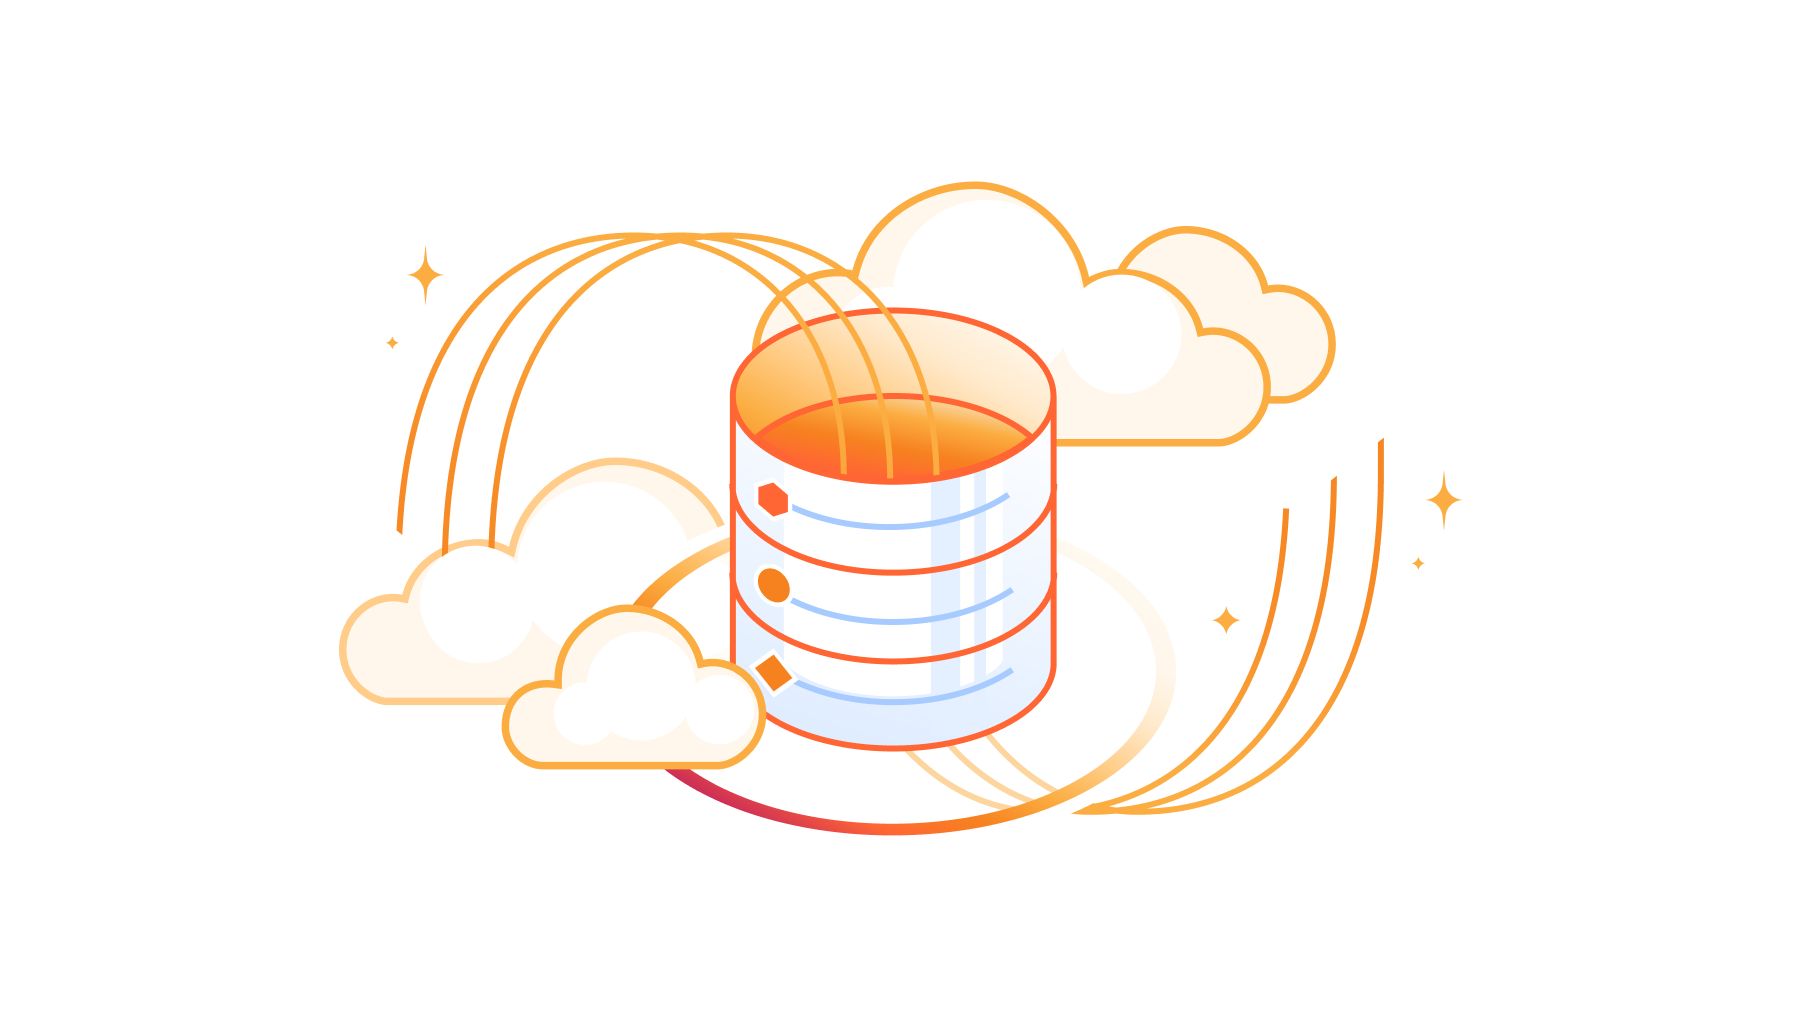
D1’s read replication will be built-in, will not incur extra usage or storage costs, and will require no replica configuration. Cloudflare will monitor an application’s D1 traffic and automatically create database replicas to spread user traffic across multiple servers in locations closer to users. Aligned with our serverless model, D1 developers shouldn’t worry about replica provisioning and management. Instead, developers should focus on designing applications for replication and data consistency tradeoffs.
We’re actively working on global read replication and realizing the above proposal (share feedback In the #d1 channel on our Developer Discord). Until then, D1 GA includes several exciting new additions.
Check out D1 GA
Since D1’s open beta in October 2023, we’ve focused on D1’s reliability, scalability, and developer experience demanded of critical services. We’ve invested in several new features that allow developers to build and debug applications faster with D1.
Build bigger with larger databases We’ve listened to developers who requested larger databases. D1 now supports up to 10GB databases, with 50K databases on the Workers Paid plan. With D1’s horizontal scaleout, applications can model database-per-business-entity use cases. Since beta, new D1 databases process 40x more requests than D1 alpha databases in a given period.
Import & export bulk data Developers import and export data for multiple reasons:
Database migration testing to/from different database systems
Data copies for local development or testing
Manual backups for custom requirements like compliance
While you could execute SQL files against D1 before, we’re improving wrangler d1 execute –file=<filename> to ensure large imports are atomic operations, never leaving your database in a halfway state. wrangler d1 execute also now defaults to local-first to protect your remote production database.
To import our Northwind Traders demo database, you can download the schema & data and execute the SQL files.
npx wrangler d1 create northwind-traders

# omit --remote to run on a local database for development
npx wrangler d1 execute northwind-traders --remote --file=./schema.sql

npx wrangler d1 execute northwind-traders --remote --file=./data.sql
D1 database data & schema, schema-only, or data-only can be exported to a SQL file using:
# database schema & data
npx wrangler d1 export northwind-traders --remote --output=./database.sql

# single table schema & data
npx wrangler d1 export northwind-traders --remote --table='Employee' --output=./table.sql

# database schema only
npx wrangler d1 export <database_name> --remote --output=./database-schema.sql --no-data=true
Debug query performance Understanding SQL query performance and debugging slow queries is a crucial step for production workloads. We’ve added the experimental wrangler d1 insights to help developers analyze query performance metrics also available via GraphQL API.
# To find top 10 queries by average execution time:
npx wrangler d1 insights <database_name> --sort-type=avg --sort-by=time --count=10
Developer tooling Various community developer projects support D1. New additions include Prisma ORM, in version 5.12.0, which now supports Workers and D1.
Next steps
The features available now with GA and our global read replication design are just the start of delivering the SQL database needs for developer applications. If you haven’t yet used D1, you can get started right now, visit D1’s developer documentation to spark some ideas, or join the #d1 channel on our Developer Discord to talk to other D1 developers and our product engineering team.
If you’ve ever written a Cloudflare Worker using Workers KV for storage, you may have noticed something unsettling.
// A simple Worker that always returns the value named "content",
// read from Workers KV storage.
export default {
  async fetch(request, env, ctx) {
    return new Response(await env.MY_KV.get("content"));
  }
}
Do you feel something is… missing? Like… Where is the setup? The authorization keys? The client library instantiation? Aren’t environment variables normally strings? How is it that env.MY_KV seems to be an object with a get() method that is already hooked up?
Coming from any other platform, you might expect to see something like this instead:
// How would a "typical cloud platform" do it?

// Import KV client library?
import { KV } from "cloudflare:kv";

export default {
  async fetch(request, env, ctx) {
    // Connect to the database?? Using my secret auth key???
    // Which comes from an environment variable????
    let myKv = KV.connect("my-kv-namespace", env.MY_KV_AUTHKEY);

    return new Response(await myKv.get("content"));
  }
}
As another example, consider service bindings, which allow a Worker to send requests to another Worker.
// A simple Worker that greets an authenticated user, delegating to a
// separate service to perform authentication.
export default {
  async fetch(request, env, ctx) {
    // Forward headers to auth service to get user info.
    let authResponse = await env.AUTH_SERVICE.fetch(
        "https://auth/getUser",
        {headers: request.headers});
    let userInfo = await authResponse.json();
    return new Response("Hello, " + userInfo.name);
  }
}
Notice in particular the use of env.AUTH_SERVICE.fetch() to send the request. This sends the request directly to the auth service, regardless of the hostname we give in the URL.
On “typical” platforms, you’d expect to use a real (perhaps internal) hostname to route the request instead, and also include some credentials proving that you’re allowed to use the auth service API:
// How would a "typical cloud platform" do it?
export default {
  async fetch(request, env, ctx) {
    // Forward headers to auth service, via some internal hostname?
    // Hostname needs to be configurable, so get it from an env var.
    let authRequest = new Request(
        "https://" + env.AUTH_SERVICE_HOST + "/getUser",
        {headers: request.headers});

    // We also need to prove that our service is allowed to talk to
    // the auth service API. Add a header for that, containing a
    // secret token from our environment.
    authRequest.headers.set("X-Auth-Service-Api-Key",
        env.AUTH_SERVICE_API_KEY);

    // Now we can make the request.
    let authResponse = await fetch(authRequest);
    let userInfo = await authResponse.json();
    return new Response("Hello, " + userInfo.name);
  }
}
As you can see, in Workers, the “environment” is not just a bunch of strings. It contains full-fledged objects. We call each of these objects a “binding“, because it binds the environment variable name to a resource. You configure exactly what resource a name is bound to when you deploy your Worker – again, just like a traditional environment variable, but not limited to strings.
We can clearly see above that bindings eliminate a little bit of boilerplate, which is nice. But, there’s so much more.
Bindings don’t just reduce boilerplate. They are a core design feature of the Workers platform which simultaneously improve developer experience and application security in several ways. Usually these two goals are in opposition to each other, but bindings elegantly solve for both at the same time.
Security
It may not be obvious at first glance, but bindings neatly solve a number of common security problems in distributed systems.
SSRF is Not A Thing
Bindings, when used properly, make Workers immune to Server-Side Request Forgery (SSRF) attacks, one of the most common yet deadly security vulnerabilities in application servers today. In an SSRF attack, an attacker tricks a server into making requests to other internal services that only it can see, thus giving the attacker access to those internal services.
As an example, imagine we have built a social media application where users are able to set their avatar image. Imagine that, as a convenience, instead of uploading an image from their local disk, a user can instead specify the URL of an image on a third-party server, and the application server will fetch that image to use as the avatar. Sounds reasonable, right? We can imagine the app contains some code like:
let resp = await fetch(userAvatarUrl);
let data = await resp.arrayBuffer();
await setUserAvatar(data);
One problem: What if the user claims their avatar URL is something like “https://auth-service.internal/status”? Whoops, now the above code will actually fetch a status page from the internal auth service, and set it as the user’s avatar. Presumably, the user can then download their own avatar, and it’ll contain the content of this status page, which they were not supposed to be able to access!
But using bindings, this is impossible: There is no URL that the attacker can specify to reach the auth service. The application must explicitly use the binding env.AUTH_SERVICE to reach it. The global fetch() function cannot reach the auth service no matter what URL it is given; it can only make requests to the public Internet.
A legacy caveat: When we originally designed Workers in 2017, the primary use case was implementing a middleware layer in front of an origin server, integrated with Cloudflare’s CDN. At the time, bindings weren’t a thing yet, and we were primarily trying to implement the Service Workers interface. To that end, we made a design decision: when a Worker runs on Cloudflare in front of some origin server, if you invoke the global fetch() function with a URL that is within your zone’s domain, the request will be sent directly to the origin server, bypassing most logic Cloudflare would normally apply to a request received from the Internet. Sadly, this means that Workers which run in front of an origin server are not immune to SSRF – they must worry about it just like traditional servers on private networks must. Although this puts Workers in the same place as most servers, we now see a path to make SSRF a thing you never have to worry about when writing Workers. We will be introducing “origin bindings”, where the origin server is represented by an explicit binding. That is, to send a request to your origin, you’d need to do env.ORIGIN.fetch(). Then, the global fetch() function can be restricted to only talk to the public Internet, fully avoiding SSRF. This is a big change and we need to handle backwards-compatibility carefully – expect to see more in the coming months. Meanwhile, for Workers that do not have an origin server behind them, or where the origin server does not rely on Cloudflare for security, global fetch() is SSRF-safe today.
And a reminder: Requests originating from Workers have a header, CF-Worker, identifying the domain name that owns the Worker. This header is intended for abuse mitigation: if your server is receiving abusive requests from a Worker, it tells you who to blame and gives you a way to filter those requests. This header is not intended for authorization. You should not implement a private API that grants access to your Workers based solely on the CF-Worker header matching your domain. If you do, you may re-open the opportunity for SSRF vulnerabilities within any Worker running on that domain.
You can’t leak your API key if there is no API key
Usually, if your web app needs access to a protected resource, you will have to obtain some sort of an API key that grants access to the resource. But typically anyone who has this key can access the resource as if they were the Worker. This makes handling auth keys tricky. You can’t put it directly in a config file, unless the entire config file is considered a secret. You can’t check it into source control – you don’t want to publish your keys to GitHub! You probably shouldn’t even store the key on your hard drive – what if your laptop is compromised? And so on.
Even if you have systems in place to deliver auth keys to services securely (like Workers Secrets), if the key is just a string, the service itself can easily leak it. For instance, a developer might carelessly insert a log statement for debugging which logs the service’s configuration – including keys. Now anyone who can access your logs can discover the secret, and there’s probably no practical way to tell if such a leak has occurred.
With Workers bindings, we endeavor for bindings to be live objects, not secret keys. For instance, as seen in the first example in this post, when using a Workers KV binding, you never see a key at all. It’s therefore impossible for a Worker to accidentally leak access to a KV namespace.
No certificate management
This is similar to the API key problem, but arguably worse. When internal services talk to each other over a network, you presumably want them to use secure transports, but typically that requires that every service have a certificate and a private key signed by some CA, and clients must be configured to trust that CA. This is all a big pain to manage, and often the result is that developers don’t bother; they set up a VPC and assume the network is trusted.
In Workers, since all intra-service communications happen over a binding, the system itself can take on all the work of ensuring the transport is secure and goes to the right place.
No frustrating ACL management – but also no lazy “allow all”
At this point you might be thinking: Why are we talking about API keys at all? Cloudflare knows which Worker is sending any request. Can’t it handle the authentication that way?
Consider the earlier example where we imagined that KV namespaces could be opened by name:
// Imagine KV namespaces could be open by name?
let myKv = KV.connect("my-kv-namespace", env.MY_KV_AUTHKEY);
What if we made it simply:
// No authkey, because the system knows whether the Worker has
// permission?
let myKv = KV.connect("my-kv-namespace");
We could then imagine that we could separately configure each KV namespace with an Access Control List (ACL) that specifies which Workers can access it.
Of course, the first problem with this is that it’s vulnerable to SSRF. But, we discussed that already, so let’s discuss another problem.
Many platforms use ACLs for security, but have you ever noticed how everyone hates them? You end up with two choices:
Tediously maintain ACLs on every resource. Inevitably, this is always a huge pain. First you deploy your code, which you think is properly configured. Then you discover that it’s failing with permissions errors causing a production outage! So you go fiddle with the IAM system. There are 533,291 roles to choose from and none of them are actually what you want. It turns out you’re supposed to create a custom role, but that’s not obvious, and once you get there, the UI is confusing. Also it’s easy to confuse your team’s service account with your team’s email group, so you give the permissions to the wrong principal, but it takes you an hour of staring at it to realize what you did wrong. Then somehow you manage to remove your own access to the resource and you can’t add it back even though you’re a project admin? (Why yes, all this did in fact happen to me, while using a cloud provider that shall remain nameless.)
Give up and grant everything access to everything. Just put all your services in a single VPC where they can all freely talk to each other. This is what most developers are inclined to do, if their security team doesn’t step in to stop them.
Much of this pain comes about because connecting a server to a resource today involves two steps that should really be one step:
Configure the server to point at the resource.
Configure the resource to accept requests from the server.
Developers are primarily concerned with step 1, and forget that step 2 exists until it blows up in their faces. Then it’s a mad scramble to learn how step 2 even works.
What if step 1 just implied step 2? Obviously, if you’re trying to configure a service to access a resource, then you also want the resource to allow access to the service. As long as the person trying to set this up has permissions to both, then there is no reason for this to be a two-step process.
But in typical platforms, the platform itself has no way of knowing that a service has been configured to talk to a resource, because the configuration is just a string.
Bindings fix that. When you define a binding from a Worker to a particular KV namespace, the platform inherently understands that you are telling the Worker to use the KV namespace. Therefore, it can implicitly ensure that the correct permissions are granted. There is no step 2.
And conversely, if no binding is configured, then the Worker does not have access. That means that every Worker starts out with no access by default, and only receives access to exactly the things it needs. Secure by default.
As a related benefit, you can always accurately answer the question “What services are using this resource?” based on bindings. Since the system itself understands bindings and what they point to, the system can answer the query without knowing anything about the service’s internals.
Developer Experience
We’ve seen that bindings improve security in a number of ways. Usually, people expect security and developer friendliness to be a trade-off, with each security measure making life harder for developers. Bindings, however, are entirely the opposite! They actually make life easier!
Easier setup
As we saw in the intro, using a binding reduces setup boilerplate. Instead of receiving an environment variable containing an API key which must be passed into some sort of library, the environment variable itself is an already-initialized client library.
Observability
Because the system understands what bindings a Worker has, and even exactly when those bindings are exercised, the system can answer a lot of questions that would normally require more manual instrumentation or analysis to answer, such as:
For a given Worker, what resources does it use? Since the system understands the types of all bindings and what they point to (it doesn’t just see them as opaque strings), it can answer this question.
For a given resource, which Workers use it? This is the reverse query. The system can maintain an index of bindings in order to find ones pointing at a given resource.
How often does a particular Worker use a particular resource? Since bindings are invoked by calling methods on the binding itself, the system can observe these calls, log them, collect metrics, etc.
Testability via dependency injection
When you deploy a test version of your service, you probably want it to operate on test resources rather than real production resources. For instance, you might have a separate testing KV namespace for storage. But, you probably want to deploy exactly the same code to test that you will eventually deploy to production. That means the names of these resources cannot be hard-coded.
On traditional platforms, the obvious way to avoid hard-coding resource names is to put the name in an environment variable. Going back to our example from the intro, if KV worked in a traditional way not using bindings, you might end up with code like this:
// Hypothetical non-binding-based KV.
let myKv = KV.connect(env.MY_KV_NAMESPACE, env.MY_KV_AUTHKEY);
At best, you now have two environment variables (which had better stay in sync) just to specify what namespace to use.
But at worst, developers might forget to parameterize their resources this way.
A developer may write new code that is hard-coded to use a test database, and then forget to update it before pushing it to production, accidentally using the test database in prod.
A developer might prototype a new service using production resources from the start (or using new resources which become production resources), only later on deciding that they need to create a new deployment for testing. But by then, it may be a pain to find and parameterize all the different resources used.
With bindings, it’s impossible to have this problem. Since you can only connect to a KV namespace through a binding, it’s always possible to make a separate deployment of the same code which talks to a test namespace instead of production, e.g. using Wrangler Environments.
In the testing world, this is sometimes called “dependency injection”. With bindings, dependencies are always injectable.
Adaptability
Dependency injection isn’t just for tests. A service whose dependencies can be changed out easily will be easier to deploy into new environments, including new production environments.
Say, for instance, you have a service that authenticates users. Now you are launching a new product, which, for whatever reason, has a separate userbase from the original product. You need to deploy a new version of the auth service that uses a different database to implement a separate user set. As long as all dependencies are injectable, this should be easy.
Again, bindings are not the only way to achieve dependency injection, but a bindings-based system will tend to lead developers to write dependency-injectable code by default.
Q&A
Has anyone done this before?
You have. Every time you write code.
As it turns out, this approach is used all the time at the programming language level. Bindings are analogous to parameters of a function, or especially parameters to a class constructor. In a memory-safe programming language, you can’t access an object unless someone has passed you a pointer or reference to that object. Objects in memory don’t have URLs that you use to access them.
Programming languages work this way because they are designed to manage complexity, and this proves to be an elegant way to do so. Yet, this style which we’re used to using at the programming language level is much less common at the distributed system level. The Cloudflare Workers platform aims to treat the network as one big computer, and so it makes sense to extend programming language concepts across the network.
Of course, we’re not the first to apply this to distributed systems, either. The paradigm is commonly called “capability-based security”, which brings us to the next question…
Is this capability-based security?
Bindings are very much inspired by capability-based security.
At present, bindings are not a complete capability system. In particular, there is currently no particular mechanism for a Worker to pass a binding to another Worker. However, this is something we can definitely imagine adding in the future.
Imagine, for instance, you want to call another Worker through a service binding, and as you do, you want to give that other Worker temporary access to a KV namespace for it to operate on. Wouldn’t it be nice if you could just pass the object, and have it auto-revoked at the end of the request? In the future, we might introduce a notion of dynamic bindings which can bind to different resources on a per-request basis, where a calling Worker can pass in a particular value to use for a given request.
For the time being, bindings cannot really be called object capabilities. However, many of the benefits of bindings are the same benefits commonly attributed to capability systems. This is because of some basic similarities:
Like a capability, a binding simultaneously designates a resource and also confers permission to access that resource, without referencing any separate ACL.
Like capabilities, bindings do not exist in any global namespace: they are scoped to the env object passed to a specific Worker.
Like a capability, to use a binding, the application must explicitly specify which binding it is trying to use, and only specifies the binding. In particular, the application does not separately specify the name of the resource in any other namespace (no URL, no global ID, etc.). The existence of the binding only affects the application’s behavior when the application explicitly invokes that binding.
Why is env a parameter to fetch(), not global?
This is a bit wonky, but the goal is to enable composition of Workers.
Imagine you have two Workers, one which implements your API, mapped to api.example.com, and one which serves static assets, mapped to assets.example.com. One day, for whatever reason, you decide you want to combine these two Workers into a single Worker. So you write this code:
import apiWorker from "api-worker.js";
import assetWorker from "asset-worker.js";

export default {
  async fetch(req, env, ctx) {
    let url = new URL(req.url);
    if (url.hostname == "api.example.com") {
      return apiWorker.fetch(req, env, ctx);
    } else if (url.hostname == "assets.example.com") {
      return assetWorker.fetch(req, env, ctx);
    } else {
      return new Response("Not found", {status: 404});
    }
  }
}
This is great! No code from either Worker needed to be modified at all. We just create a new file containing a router Worker that delegates to one or the other.
But, you discover a problem: both the API Worker and the assets Worker use a KV namespace binding, and it turns out that they both decided to name the binding env.KV, but these bindings are meant to point to different namespaces used for different purposes. Does this mean I have to go edit the Workers to change the name of the binding before I can merge them?
No, it doesn’t, because I can just remap the environments before delegating:
import apiWorker from "api-worker.js";
import assetWorker from "asset-worker.js";

export default {
  async fetch(req, env, ctx) {
    let url = new URL(req.url);
    if (url.hostname == "api.example.com") {
      let subenv = {KV: env.API_KV};
      return apiWorker.fetch(req, subenv, ctx);
    } else if (url.hostname == "assets.example.com") {
      let subenv = {KV: env.ASSETS_KV};
      return assetWorker.fetch(req, subenv, ctx);
    } else {
      return new Response("Not found", {status: 404});
    }
  }
}
If environments were globals, this remapping would not be possible.
In fact, this benefit goes much deeper than this somewhat-contrived example. The fact that the environment is not a global essentially forces code to be internally designed for dependency injection (DI). Designing code to be DI-friendly sometimes seems tedious, but every time I’ve done it, I’ve been incredibly happy that I did. Such code tends to be much easier to test and to adapt to new circumstances, for the same reasons mentioned when we discussed dependency injection earlier, but applying at the level of individual modules rather than whole Workers.
With that said, if you really insist that you don’t care about making your code explicitly DI-friendly, there is an alternative: Put your env into AsyncLocalStorage. That way it is “ambiently” available anywhere in your code, but you can still get some composability.
import { AsyncLocalStorage } from 'node:async_hooks';

// Allocate a new AsyncLocalStorage to store the value of `env`.
const ambientEnv = new AsyncLocalStorage();

// We can now define a global function that reads a key from env.MY_KV,
// without having to pass `env` down to it.
function getFromKv(key) {
  // Get the env from AsyncLocalStorage.
  return ambientEnv.getStore().MY_KV.get(key);
}

export default {
  async fetch(req, env, ctx) {
    // Put the env into AsyncLocalStorage while we handle the request,
    // so that calls to getFromKv() work.
    return ambientEnv.run(env, async () => {
      // Handle request, including calling functions that may call
      // getFromKv().

      // ... (code) ...
    });
  }
};
How does a KV binding actually work?
Under the hood, a Workers KV binding encapsulates a secret key used to access the corresponding KV namespace. This key is actually the encryption key for the namespace. The key is distributed to the edge along with the Worker’s code and configuration, using encrypted storage to keep it safe.
Although the key is distributed with the Worker, the Worker itself has no way to access the key. In fact, even the owner of the Cloudflare account cannot see the key – it is simply never revealed outside of Cloudflare’s systems. (Cloudflare employees are also prevented from viewing these keys.)
Even if an attacker somehow got ahold of the key, it would not be useful to them as-is. Cloudflare’s API does not provide any way for a user to upload a raw key to use in a KV binding. The API instead has the client specify the public ID of the namespace they want to use. The deployment system verifies that the KV namespace in question is on the same account as the Worker being uploaded (and that the client is authorized to deploy Workers on said account).
Get Started
To learn about all the types of bindings offered by Workers and how to use them, check out the documentation.
Today might be April Fools, and while we like to have fun as much as anyone else, we like to use this day for serious announcements. In fact, as of today, there are over 2 million developers building on top of Cloudflare’s platform — that’s no joke!
To kick off this Developer Week, we’re flipping the big “production ready” switch on three products: D1, our serverless SQL database; Hyperdrive, which makes your existing databases feel like they’re distributed (and faster!); and Workers Analytics Engine, our time-series database.
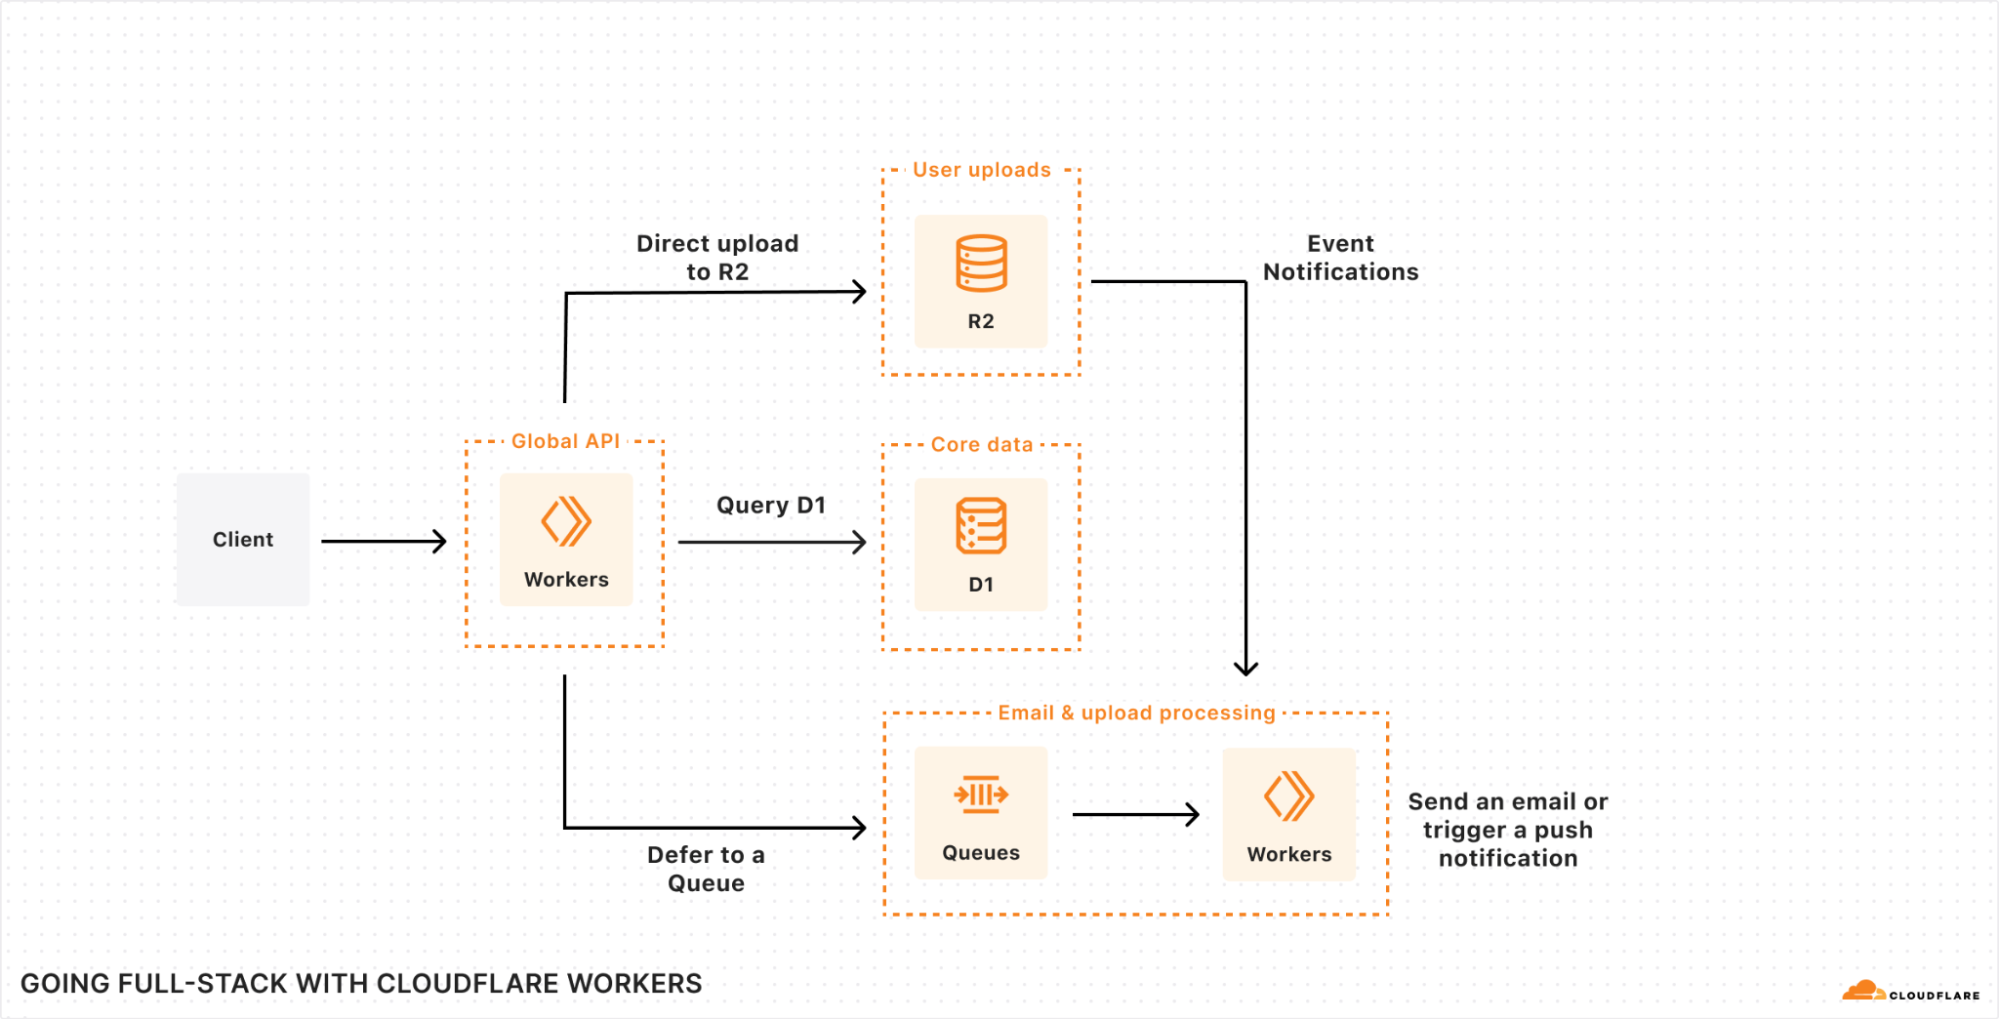
We’ve been on a mission to allow developers to bring their entire stack to Cloudflare for some time, but what might an application built on Cloudflare look like?
The diagram itself shouldn’t look too different from the tools you’re already familiar with: you want a database for your core user data. Object storage for assets and user content. Maybe a queue for background tasks, like email or upload processing. A fast key-value store for runtime configuration. Maybe even a time-series database for aggregating user events and/or performance data. And that’s before we get to AI, which is increasingly becoming a core part of many applications in search, recommendation and/or image analysis tasks (at the very least!).
Yet, without having to think about it, this architecture runs on Region: Earth, which means it’s scalable, reliable and fast — all out of the box.
D1: Production Ready
Your core database is one of the most critical pieces of your infrastructure. It needs to be ultra-reliable. It can’t lose data. It needs to scale. And so we’ve been heads down over the last year getting the pieces into place to make sure D1 is production-ready, and we’re extremely excited to say that D1 — our global, serverless SQL database — is now Generally Available.
The GA for D1 lands some of the most asked-for features, including:
Support for 10GB databases — and 50,000 databases per account;
New data export capabilities; and
Enhanced query debugging (we call it “D1 Insights”) — that allows you to understand what queries are consuming the most time, cost, or that are just plain inefficient…
… to empower developers to build production-ready applications with D1 to meet all their relational SQL needs. And importantly, in an era where the concept of a “free plan” or “hobby plan” is seemingly at risk, we have no intention of removing the free tier for D1 or reducing the 25 billion row reads included in the $5/mo Workers Paid plan:
Plan
Rows Read
Rows Written
Storage
WorkersPaid
First 25 billion / month included + $0.001 / million rows
First 50 million / month included + $1.00 / million rows
First 5 GB included
+ $0.75 / GB-mo
Workers Free
5 million / day
100,000 / day
5 GB (total)
For those who’ve been following D1 since the start: this is the same pricing we announced at open beta
But things don’t just stop at GA: we have some major new features lined up for D1, including global read replication, even larger databases, more Time Travel capabilities that will allow you to branch your database, and new APIs for dynamically querying and/or creating new databases-on-the-fly from within a Worker.
D1’s read replication will automatically deploy read replicas as needed to get data closer to your users: and without you having to spin up, manage scaling, or run into consistency (replication lag) issues. Here’s a sneak preview of what D1’s upcoming Replication API looks like:
export default {
  async fetch(request: Request, env: Env) {
    const {pathname} = new URL(request.url);
    let resp = null;
    let session = env.DB.withSession(token); // An optional commit token or mode

    // Handle requests within the session.
    if (pathname === "/api/orders/list") {
      // This statement is a read query, so it will work against any
      // replica that has a commit equal or later than `token`.
      const { results } = await session.prepare("SELECT * FROM Orders");
      resp = Response.json(results);
    } else if (pathname === "/api/orders/add") {
      order = await request.json();

      // This statement is a write query, so D1 will send the query to
      // the primary, which always has the latest commit token.
      await session.prepare("INSERT INTO Orders VALUES (?, ?, ?)")
        .bind(order.orderName, order.customer, order.value);
        .run();

      // In order for the application to be correct, this SELECT
      // statement must see the results of the INSERT statement above.
      //
      // D1's new Session API keeps track of commit tokens for queries
      // within the session and will ensure that we won't execute this
      // query until whatever replica we're using has seen the results
      // of the INSERT.
      const { results } = await session.prepare("SELECT COUNT(*) FROM Orders")
        .run();
      resp = Response.json(results);
    }

    // Set the token so we can continue the session in another request.
    resp.headers.set("x-d1-token", session.latestCommitToken);
    return resp;
  }
}
Importantly, we will give developers the ability to maintain session-based consistency, so that users still see their own changes reflected, whilst still benefiting from the performance and latency gains that replication can bring.
You can learn more about how D1’s read replication works under the hood in our deep-dive post, and if you want to start building on D1 today, head to our developer docs to create your first database.
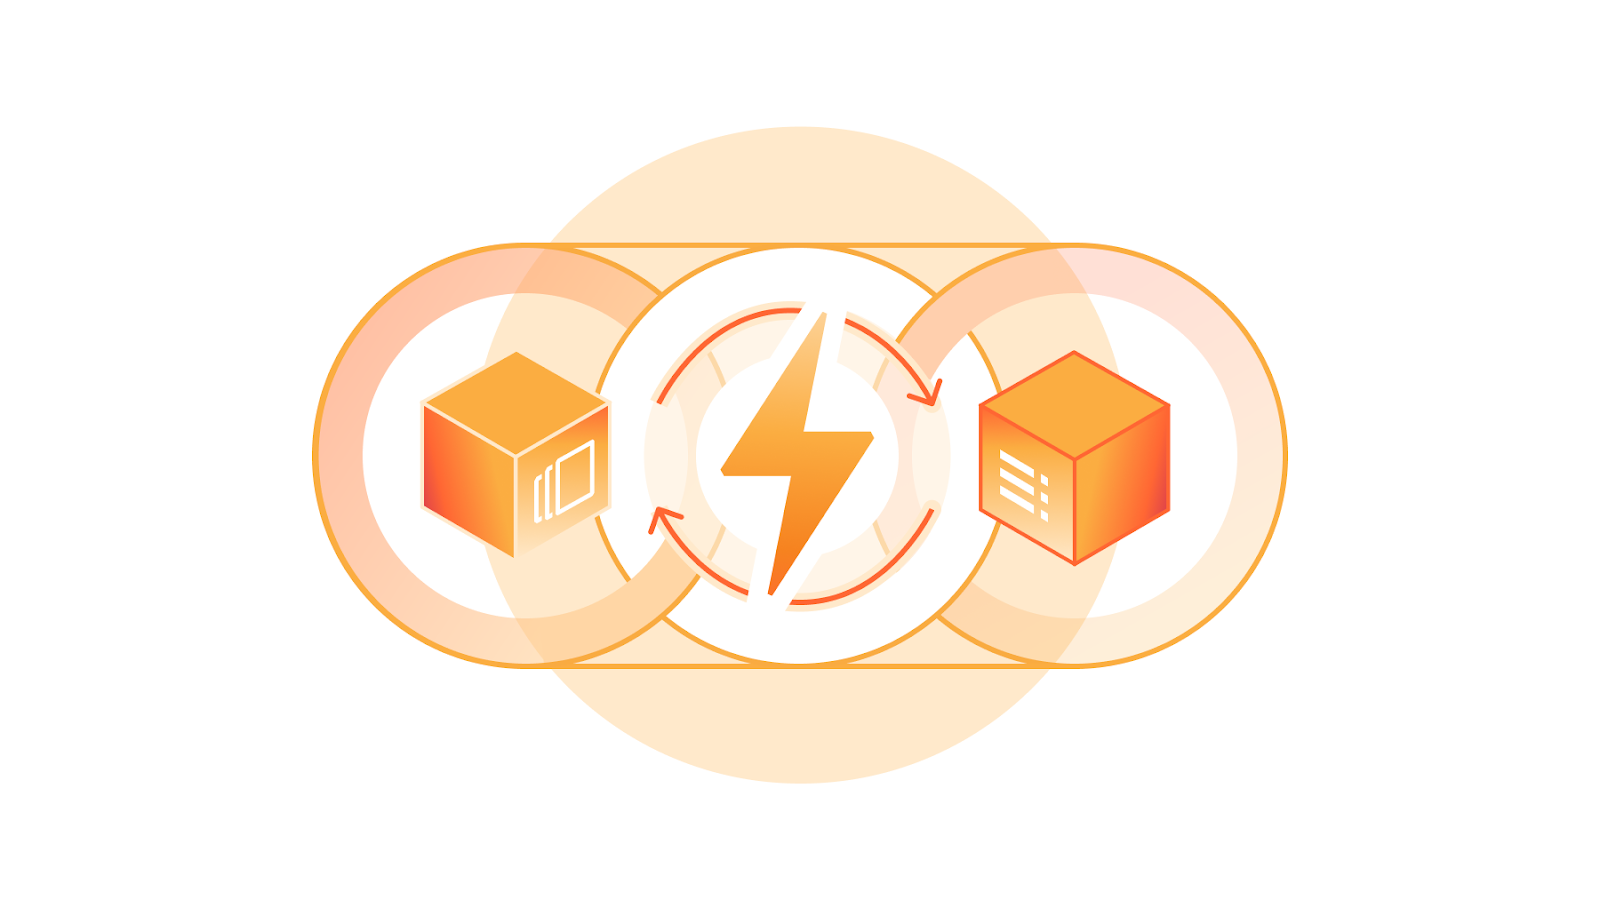
Hyperdrive: GA
We launched Hyperdrive into open beta last September during Birthday Week, and it’s now Generally Available — or in other words, battle-tested and production-ready.
If you’re not caught up on what Hyperdrive is, it’s designed to make the centralized databases you already have feel like they’re global. We use our global network to get faster routes to your database, keep connection pools primed, and cache your most frequently run queries as close to users as possible.
Importantly, Hyperdrive supports the most popular drivers and ORM (Object Relational Mapper) libraries out of the box, so you don’t have to re-learn or re-write your queries:
// Use the popular 'pg' driver? Easy. Hyperdrive just exposes a connection string
// to your Worker.
const client = new Client({ connectionString: env.HYPERDRIVE.connectionString });
await client.connect();

// Prefer using an ORM like Drizzle? Use it with Hyperdrive too.
// https://orm.drizzle.team/docs/get-started-postgresql#node-postgres
const client = new Client({ connectionString: env.HYPERDRIVE.connectionString });
await client.connect();
const db = drizzle(client);
But the work on Hyperdrive doesn’t stop just because it’s now “GA”. Over the next few months, we’ll be bringing support for the other most widely deployed database engine there is: MySQL. We’ll also be bringing support for connecting to databases inside private networks (including cloud VPC networks) via Cloudflare Tunnel and Magic WAN On top of that, we plan to bring more configurability around invalidation and caching strategies, so that you can make more fine-grained decisions around performance vs. data freshness.
As we thought about how we wanted to price Hyperdrive, we realized that it just didn’t seem right to charge for it. After all, the performance benefits from Hyperdrive are not only significant, but essential to connecting to traditional database engines. Without Hyperdrive, paying the latency overhead of 6+ round-trips to connect & query your database per request just isn’t right.
And so we’re happy to announce that for any developer on a Workers Paid plan, Hyperdrive is free. That includes both query caching and connection pooling, as well as the ability to create multiple Hyperdrives — to separate different applications, prod vs. staging, or to provide different configurations (cached vs. uncached, for example).
Plan
Price per query
Connection Pooling
WorkersPaid
$0
$0
To get started with Hyperdrive, head over to the docs to learn how to connect your existing database and start querying it from your Workers.
Queues: Pull From Anywhere
The task queue is an increasingly critical part of building a modern, full-stack application, and this is what we had in mind when we originally announced the open beta of Queues. We’ve since been working on several major Queues features, and we’re launching two of them this week: pull-based consumers and new message delivery controls.
Any HTTP-speaking client can now pull messages from a queue: call the new /pull endpoint on a queue to request a batch of messages, and call the /ack endpoint to acknowledge each message (or batch of messages) as you successfully process them:
// Pull and acknowledge messages from a Queue using any HTTP client
$  curl "https://api.cloudflare.com/client/v4/accounts/${CF_ACCOUNT_ID}/queues/${QUEUE_ID}/messages/pull" -X POST --data '{"visibilityTimeout":10000,"batchSize":100}}' \
     -H "Authorization: Bearer ${QUEUES_TOKEN}" \
     -H "Content-Type:application/json"

// Ack the messages you processed successfully; mark others to be retried.
$ curl "https://api.cloudflare.com/client/v4/accounts/${CF_ACCOUNT_ID}/queues/${QUEUE_ID}/messages/ack" -X POST --data '{"acks":["lease-id-1", "lease-id-2"],"retries":["lease-id-100"]}' \
     -H "Authorization: Bearer ${QUEUES_TOKEN}" \
     -H "Content-Type:application/json"
A pull-based consumer can run anywhere, allowing you to run queue consumers alongside your existing legacy cloud infrastructure. Teams inside Cloudflare adopted this early on, with one use-case focused on writing device telemetry to a queue from our 310+ data centers and consuming within some of our back-of-house infrastructure running on Kubernetes. Importantly, our globally distributed queue infrastructure means that messages are retained within the queue until the consumer is ready to process them.
Queues also now supports delaying messages, both when sending to a queue, as well as when marking a message for retry. This can be useful to queue (pun intended) tasks for the future, as well apply a backoff mechanism if an upstream API or infrastructure has rate limits that require you to pace how quickly you are processing messages.
// Apply a delay to a message when sending it
await env.YOUR_QUEUE.send(msg, { delaySeconds: 3600 })

// Delay a message (or a batch of messages) when marking it for retry
for (const msg of batch.messages) {
	msg.retry({delaySeconds: 300})
}
We’ll also be bringing substantially increased per-queue throughput over the coming months on the path to getting Queues to GA. It’s important to us that Queues is extremely reliable: lost or dropped messages means that a user doesn’t get their order confirmation email, that password reset notification, and/or their uploads processed — each of those are user-impacting and hard to recover from.
Workers Analytics Engine
Workers Analytics Engine provides unlimited-cardinality analytics at scale, via a built-in API to write data points from Workers, and a SQL API to query that data.
Workers Analytics Engine is backed by the same ClickHouse-based system we have depended on for years at Cloudflare. We use it ourselves to observe the health of our own services, to capture product usage data for billing, and to answer questions about specific customers’ usage patterns. At least one data point is written to this system on nearly every request to Cloudflare’s network. Workers Analytics Engine lets you build your own custom analytics using this same infrastructure, while we manage the hard parts for you.
Since launching in beta, developers have started depending on Workers Analytics Engine for these same use cases and more, from large enterprises to open-source projects like Counterscale. Workers Analytics Engine has been operating at production scale with mission-critical workloads for years — but we hadn’t shared anything about pricing, until today.
We are keeping Workers Analytics Engine pricing simple, and based on two metrics:
Data points written — every time you call writeDataPoint() in a Worker, this counts as one data point written. Every data point costs the same amount — unlike other platforms, there is no penalty for adding dimensions or cardinality, and no need to predict what the size and cost of a compressed data point might be.
Read queries — every time you post to the Workers Analytics Engine SQL API, this counts as one read query. Every query costs the same amount — unlike other platforms, there is no penalty for query complexity, and no need to reason about the number of rows of data that will be read by each query.
Both the Workers Free and Workers Paid plans will include an allocation of data points written and read queries, with pricing for additional usage as follows:
Plan
Data points written
Read queries
WorkersPaid
10 million included per month
+$0.25 per additional million
1 million included per month
+$1.00 per additional million
Workers Free
100,000 included per day
10,000 included per day
With this pricing, you can answer, “how much will Workers Analytics Engine cost me?” by counting the number of times you call a function in your Worker, and how many times you make a request to a HTTP API endpoint. Napkin math, rather than spreadsheet math.
This pricing will be made available to everyone in coming months. Between now and then, Workers Analytics Engine continues to be available at no cost. You can start writing data points from your Worker today — it takes just a few minutes and less than 10 lines of code to start capturing data. We’d love to hear what you think.
The week is just getting started
Tune in to what we have in store for you tomorrow on our second day of Developer Week. If you have questions or want to show off something cool you already built, please join our developer Discord.
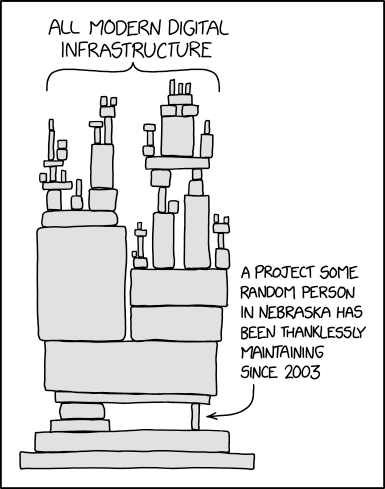
A few days ago a significant supply chain attack attempt was accidentally revealed – the xz utiliy was compromised, likely by a nation state, in order to plant a backdoor which allows sniffing on encrypted traffic.
The xz library is a building block of many other packages and is basically ubiquitous. A famous XKCD strip describes the situation graphically:
This means that if it wasn’t accidentally discovered due to worsened performance, we would eventually have a carefully planted backdoor on practically every Linux server out there. This is a major issue and even though open source security is better than closed source security, even if just by allowing backdoors to be discovered by anyone, we need to address such nation state attempts of planting backdoors.
I propose two complementary measures:
Public funding for open source – the EU and the US need to create a structured, not overly bureaucratic process to fund the maintenance of core open source projects (like xz). Germany has done a good job in setting up its Sovereign tech fund, but we need broader instruments that make sure there is no open source abandonware on which many other projects depend. Currently large corporations often fund the development of open source, but xz is an example that the little building blocks may fall through the cracks. Open source funding can also be directed at systematic security analysis of open source projects (like the one in point 2, but not limited the security services).
Analyzing high-risk project – security services and other public and private organizations need to first pinpoint high-risk projects (ones that if compromised, cause a huge risk that trickles down to the whole ecosystem), rank projects based on risk, and then analyze no just source code, but also maintenance activities, maintainer recruitment and churn, commit patterns and so on. In hindsight, the xz backdoor could have been caught by monitoring such metadata and the suspicious activities by the “hacker”. We, of course, need (open source) tools to do these analysis, but also highly-skilled people in the security services of larger countries.
Overall, we can and should learn lessons and take measures based on this incident. Because the next one might not cause noticeable performance degradation and get into actual production, which will be devastating.
I can’t remember when I first met Ross. Of course it was before 2008, when we created the Security and Human Behavior workshop. It was well before 2001, when we created the Workshop on Economics and Information Security. (Okay, he created both—I helped.) It was before 1998, when we wrote about the problems with key escrow systems. I was one of the people he brought to the Newton Institute, at Cambridge University, for the six-month cryptography residency program he ran (I mistakenly didn’t stay the whole time)—that was in 1996.
I know I was at the first Fast Software Encryption workshop in December 1993, another conference he created. There I presented the Blowfish encryption algorithm. Pulling an old first-edition of Applied Cryptography (the one with the blue cover) down from the shelf, I see his name in the acknowledgments. Which means that sometime in early 1993—probably at Eurocrypt in Lofthus, Norway—I, as an unpublished book author who had only written a couple of crypto articles for Dr. Dobb’s Journal, asked him to read and comment on my book manuscript. And he said yes. Which means I mailed him a paper copy. And he read it. And mailed his handwritten comments back to me. In an envelope with stamps. Because that’s how we did it back then.
I have known Ross for over thirty years, as both a colleague and a friend. He was enthusiastic, brilliant, opinionated, articulate, curmudgeonly, and kind. Pick up any of his academic papers—there are many—and odds are that you will find a least one unexpected insight. He was a cryptographer and security engineer, but also very much a generalist. He published on block cipher cryptanalysis in the 1990s, and the security of large-language models last year. He started conferences like nobody’s business. His masterwork book, Security Engineering—now in its third edition—is as comprehensive a tome on cybersecurity and related topics as you could imagine. (Also note his fifteen-lecture video series on that same page. If you have never heard Ross lecture, you’re in for a treat.) He was the first person to understand that security problems are often actually economic problems. He was the first person to make a lot of those sorts of connections. He fought against surveillance and backdoors, and for academic freedom. He didn’t suffer fools in either government or the corporate world.
He’s listed in the acknowledgments as a reader of every one of my books from Beyond Fear on. Recently, we’d see each other a couple of times a year: at this or that workshop or event. The last time I saw him was last June, at SHB 2023, in Pittsburgh. We were having dinner on Alessandro Acquisti‘s rooftop patio, celebrating another successful workshop. He was going to attend my Workshop on Reimagining Democracy in December, but he had to cancel at the last minute. (He sent me the talk he was going to give. I will see about posting it.) The day before he died, we were discussing how to accommodate everyone who registered for this year’s SHB workshop. I learned something from him every single time we talked. And I am not the only one.
My heart goes out to his wife Shireen and his family. We lost him much too soon.
EDITED TO ADD (4/10): I wrote a longer version for Communications of the ACM.
To provide the best experiences, we use technologies like cookies to store and/or access device information. Consenting to these technologies will allow us to process data such as browsing behavior or unique IDs on this site. Not consenting or withdrawing consent, may adversely affect certain features and functions.
Functional
Always active
The technical storage or access is strictly necessary for the legitimate purpose of enabling the use of a specific service explicitly requested by the subscriber or user, or for the sole purpose of carrying out the transmission of a communication over an electronic communications network.
Preferences
The technical storage or access is necessary for the legitimate purpose of storing preferences that are not requested by the subscriber or user.
Statistics
The technical storage or access that is used exclusively for statistical purposes.The technical storage or access that is used exclusively for anonymous statistical purposes. Without a subpoena, voluntary compliance on the part of your Internet Service Provider, or additional records from a third party, information stored or retrieved for this purpose alone cannot usually be used to identify you.
Marketing
The technical storage or access is required to create user profiles to send advertising, or to track the user on a website or across several websites for similar marketing purposes.