Post Syndicated from Robin Geddes original https://aws.amazon.com/blogs/architecture/automating-multi-az-high-availability-for-weblogic-administration-server-with-dns-part-2/
In Part 1 of this series, we used a floating virtual IP (VIP) to achieve hands-off high availability (HA) of WebLogic Admin Server. In Part 2, we’ll achieve an arguably superior solution using Domain Name System (DNS) resolution.
Using a DNS to resolve the address for WebLogic admin server
Let’s look at the reference WebLogic deployment architecture on AWS shown in Figure 1.
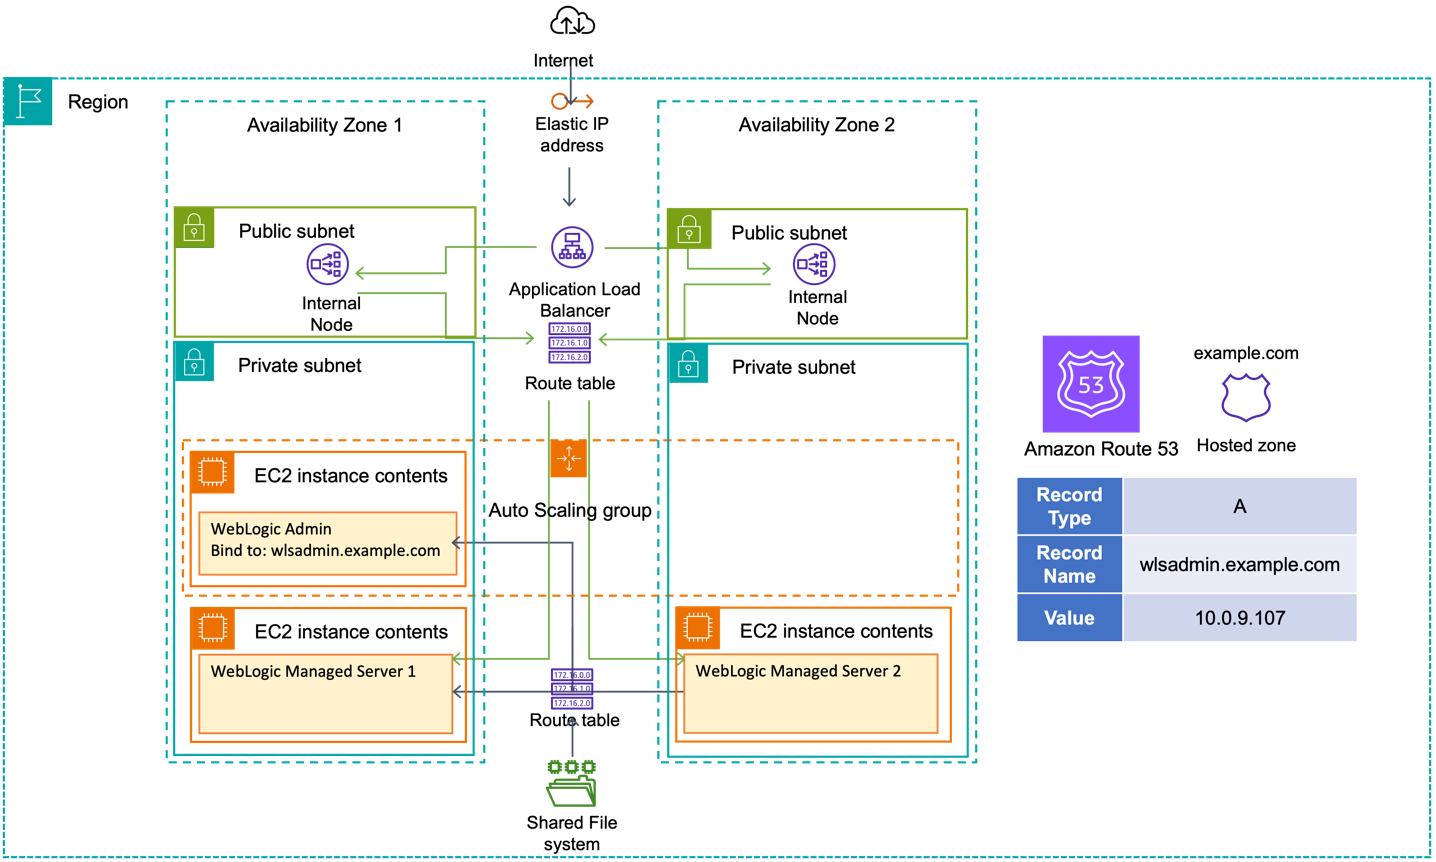
Figure 1. Reference WebLogic deployment with multi-AZ admin HA capability
This solution comes in two parts:
- Configure the environment to use DNS to locate the admin server.
- Create a mechanism to automatically update the DNS entry when the admin server is launched.
Environment configuration
A WebLogic domain resides in private subnets of a Virtual Private Cloud (VPC). The admin server resides in one of the private subnets on its own Amazon Elastic Compute Cloud (Amazon EC2) instance. In this scenario, the admin server is bound to the private IP address of the EC2 host associated with a hostname/DNS record (configured in Amazon Route53).
We deploy WebLogic in multi-Availability Zone (multi-AZ) active-active stretch architecture. For this simple example, there is only one WebLogic domain and one admin server. To meet this requirement, we:
- create an EC2 launch template for the admin server, and then
- associate the launch template to an Amazon EC2 Auto Scaling group named wlsadmin-asg with min, max, and desired capacity of 1. Note we will need the group name later.
The Auto Scaling group detects EC2 and Availability Zone degradation and launches a new instance – in a different AZ if the current one becomes unavailable.
To enable access, we create two route tables: one for the private subnets, and the other for public subnets.
Next, we use the Amazon Route 53 DNS service to abstract the IPv4 address of the WebLogic admin server:
- Create a private hosted zone in Amazon Route 53; in this example, we use example.com.
- Create an A record for the admin server; in this example, example.com, pointing to the IP address of the EC2 instance hosting the admin server. Set the TTL to 60 seconds so the managed servers’ DNS records will be propagated before the admin server has finished starting.
- Note the ID of the hosted zone, it will be required later in two places: to create an IAM role with permissions to update the DNS A record, and as an environment variable for an AWS Lambda function to perform the update.
We then update the WebLogic domain configuration and set the WebLogic Admin server listen address to the DNS name we chose. In this example, we set the line of WebLogic Admin server configuration to <listen-address>wlsadmin.example.com</listen-address> in WebLogic domain configuration file $DOMAIN_HOME/config/config.xml.
Automatically updating the DNS A record upon admin server launch
On-premises, it would often be a cultural anathema to update a DNS record as part of a server’s lifecycle. Operations that cut across team boundaries and responsibilities can be difficult to orchestrate. In the cloud, we have tools and a security model to enable such operations.
There are several approaches for this, and it is important to understand the patterns we prototyped and why they were rejected before we describe our recommended implementation pattern:
- Rejected Option 1 – Simple: The user data script makes an API call to update the A record (with suitable IAM instance policy). However, a compromised server could update that A record for nefarious means; hence, we reject this option.
- Rejected Option 2 – Better: The user data script calls a Lambda function to update the A record and include suitable checks to prevent misuse of the A record, such as setting it to a public address. This still requires granting permission for instance to call the lambda function and determining the correct logic to validate the IP address.
- Accepted Option 3 – Best: We do not grant the EC2 instance any additional permission to update the DNS A Record. We rely on the event lifecycle of the Auto Scaling group as shown in Figure 2.
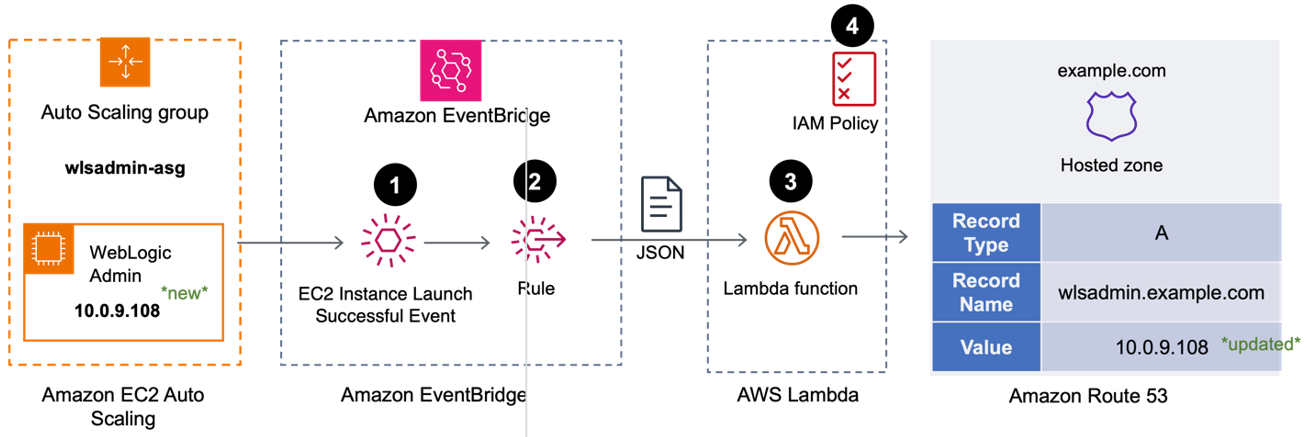
Figure 2. Triggering the DNS A record update from EventBridge using Lambda
- When the Auto Scaling group successfully launches a new admin server through a scale-out action, an “EC2 Instance Launch Successful” event is created in Amazon EventBridge.
- An EventBridge rule calls an AWS Lambda function, passing the event data as a JSON object.
- The Lambda function:
- parses the event data to determine the EC2 Instance ID,
- obtains the IP address of new server using the Instance ID, then
- updates the DNS A Record for the admin server in Hosted Zone we created above with the IP address.
- The Lambda function needs permissions to:
- describe EC2 instances within the account (to get the IP address).
- update the A-record in (only) the Hosted Zone we created earlier.
Working backwards, first we create the IAM Policy; second, we create the Lambda function (which references the policy); finally, we create the EventBridge rule (which references the Lambda function).
Policy
Create a policy “AllowWeblogicAdminServerUpdateDNS“ with the following JSON. Replace <MY_HOSTED_ZONE_ID> with the ID you recorded earlier.
{
	"Version": "2012-10-17",
	"Statement": [
		{
			"Effect": "Allow",
			"Action": [
				"route53:ChangeResourceRecordSets"
			],
			"Resource": "arn:aws:route53:::hostedzone/<MY_HOSTED_ZONE_ID>",
			"Condition": {
				"ForAllValues:StringLike": {
					"route53:ChangeResourceRecordSetsNormalizedRecordNames": [
						"wlsadmin.example.com"
					]
				},
				"ForAnyValue:StringEquals": {
					"route53:ChangeResourceRecordSetsRecordTypes": "A"
				}
			}
		},
		{
			"Effect": "Allow",
			"Action": [
				"ec2:DescribeInstances"
			],
			"Resource": "*"
		}
	]
}
Lambda function
We create a Lambda function named “wlsAdminARecordUpdater” with the default settings for runtime (Node.js), architecture (x86_64) and permissions.
Add an environment variable named WLSHostedZoneID and value of the Hosted Zone ID created earlier.
A role will have been created for the Lambda function with a name beginning with “wlsAdminARecordUpdater-role-“. Add the policy AllowWeblogicAdminServerUpdateDNS to this role.
Finally, add the following code then save and deploy the Lambda function.
import { EC2Client, DescribeInstancesCommand } from "@aws-sdk/client-ec2";
import { Route53Client, ChangeResourceRecordSetsCommand } from "@aws-sdk/client-route-53";

export const handler = async (event, context, callback) => {

  const ec2input = {
    "InstanceIds": [
      event.detail.EC2InstanceId
    ]
  };

  const ec2client = new EC2Client({region: event.region});
  const route53Client = new Route53Client({region: event.region});

  const ec2command = new DescribeInstancesCommand(ec2input);
  const ec2data = await ec2client.send(ec2command);
  const ec2privateip = ec2data.Reservations[0].Instances[0].PrivateIpAddress;

  const r53input = {
  "ChangeBatch": {
    "Changes": [
      {
        "Action": "UPSERT",
        "ResourceRecordSet": {
          "Name": "wlsadmin.weblogic.com",
          "ResourceRecords": [
            {
              "Value": ec2privateip
            }
          ],
          "TTL": 60,
          "Type": "A"
        }
      }
    ],
    "Comment": "weblogic admin server"
    },
    "HostedZoneId": process.env.WLSHostedZoneID
  };
 const r53command = new ChangeResourceRecordSetsCommand(r53input);

 return await route53Client.send(r53command);

};
EventBridge rule
We create an EventBridge rule, “wlsAdminASG-ScaleOut”, enabled on the default event bus.
- Rule type: “Rule with an event pattern”
- Event Source: AWS Events or EventBridge partner events
- Creation Method – Use pattern Form
- Event Pattern
- Event Source: AWS Services
- AWS Service: Auto Scaling
- Event Type: Instance Launch and Terminate
- Event Type Specification 1: Specific instance event(s)
- Event Type Specification 2: wlsadmin-asg
The event definition should look like the following example, scoped only to the Auto Scaling group wlsadmin-asg we created earlier.{ "source": ["aws.autoscaling"], "detail-type": ["EC2 Instance Launch Successful"], "detail": { "AutoScalingGroupName": ["wlsadmin-asg"] } }
- Target 1: AWS Service
- Select a target: Lambda Service
- Function: wlsAdminARecordUpdater
Review and create the rule. Note that “EventBridge (CloudWatch Events): wlsAdminASG-ScaleOut” will be added as a trigger to the Lambda function.
If you cycle the Auto Scaling group (set min and desired to 0, let the admin server terminate, then set min and desired to 1), you will observe that after the new server is successfully launched, the value of the DNS A record wlsadmin.example.com matches the IP of the new WebLogic Admin server.
Enabling internet access to the admin server
If we want to enable internet access to the admin server, we need to create an internet-facing Application Load Balancer (ALB) attached to the public subnets. With the route to the admin server, the ALB can forward traffic to it.
- Create an IP-based target group that points to the wlsadmin.example.com.
- Add a forwarding rule in the ALB to route WebLogic admin traffic to the admin server.
Conclusion
AWS has a successful track record of running Oracle applications, Oracle EBS, PeopleSoft, and mission critical JEE workloads. In this post, we delved into leveraging DNS for the WebLogic admin server location, and using Auto Scaling groups to ensure an available and singular admin server. We showed how to automate the DNS A record update for the admin server. We also covered enabling public access to the admin server. This solution showcases multi-AZ resilience for WebLogic admin server with automated recovery.


 Roman Martynenko is a Senior Solutions Architect at Amazon Web Services with over 20 years of experience in Software Engineering, Architecture and Cloud technologies. Roman is helping Canadian public sector customers with their cloud journey. He focuses on next-generation developer experience, helping organizations re-imagine the entire Software Development Lifecycle. Outside of work, he enjoys hiking, home automation, and DIY projects.
 Karthik Chemudupati is a Principal Technical Account Manager (TAM) with AWS, focused on helping customers achieve cost optimization and operational excellence. He has more than 20 years of IT experience in software engineering, cloud operations and automations. Karthik joined AWS in 2016 as a TAM and worked with more than dozen Enterprise Customers across US-West. Outside of work, he enjoys spending time with his family.
 Shardul Vaidya is a Worldwide Partner Solutions Architect with AWS, focused on helping partners and customers build and effectively use Generative AI powered developer experiences. Shardul joined AWS in 2020 as part of their early career talent Solutions Architect team and worked with over a hundred modernization and DevOps partners across the world. Outside of work, he’s a music lover and collects records.