Post Syndicated from original https://xkcd.com/2805/

Post Syndicated from original https://xkcd.com/2805/
Post Syndicated from Sébastien Stormacq original https://aws.amazon.com/blogs/aws/amazon-route-53-resolver-now-available-on-aws-outposts-rack/
Starting today, Amazon Route 53 Resolver is now available on AWS Outposts rack, providing your on-premises services and applications with local DNS resolution directly from Outposts. Local Route 53 Resolver endpoints also enable DNS resolution between Outposts and your on-premises DNS server. Route 53 Resolver on Outposts helps to improve your on-premises applications availability and performance.
AWS Outposts provides a hybrid cloud solution that allows you to extend your AWS infrastructure and services to your on-premises data centers. This enables you to build and operate hybrid applications that seamlessly integrate with your existing on-premises infrastructure. Your applications deployed on Outposts benefit from low-latency access to on-premises systems. You also get a consistent management experience across AWS Regions and your on-premises environments. This includes access to the same AWS management tools, APIs, and services that you use when managing AWS services in a Region. Outposts uses the same security controls and policies as AWS in the cloud, providing you with a consistent security posture across your hybrid cloud environment. This includes data encryption, identity and access management, and network security.
One of the typical use cases for Outposts is to deploy applications that require low-latency access to on-premises systems, such as factory equipment, high-frequency trading applications, or medical diagnosis systems.
DNS stands for Domain Name System, which is the system that translates human-readable domain names like “example.com” into IP addresses like “93.184.216.34” that computers use to communicate with each other on the internet. A Route 53 Resolver is a component that is responsible for resolving domain names to IP addresses.
Until today, applications and services running on an Outpost forwarded their DNS queries to the parent AWS Region the Outpost is connected to. But remember, as Amazon CTO Dr Werner Vogels says: everything fails all the time. There can be temporary site disconnections—think about fiber cuts or weather events. When the on-premises facility becomes temporarily disconnected from the internet, local DNS resolution fails, making it difficult for applications and services to discover other services, even when they are running on the same Outposts rack. For example, applications running locally on the Outpost won’t be able to discover the IP address of a local database running on the same Outpost, or a microservice won’t be able to locate other microservices running locally.
Starting today, when you opt in for local Route 53 Resolvers on Outposts, applications and services will continue to benefit from local DNS resolution to discover other services—even in a parent AWS Region connectivity loss event. Local Resolvers also help to reduce latency for DNS resolutions as query results are cached and served locally from the Outposts, eliminating unnecessary round-trips to the parent AWS Region. All the DNS resolutions for applications in Outposts VPCs using private DNS are served locally.
In addition to local Resolvers, this launch also enables local Resolver endpoints. Route 53 Resolver endpoints are not new; creating inbound or outbound Resolver endpoints in a VPC has been available since November 2018. Today, you can also create endpoints inside the VPC on Outposts. Route 53 Resolver outbound endpoints enable Route 53 Resolvers to forward DNS queries to DNS resolvers that you manage, for example, on your on-premises network. In contrast, Route 53 Resolver inbound endpoints forward the DNS queries they receive from outside the VPC to the Resolver running on Outposts. It allows sending DNS queries for services deployed on a private Outposts VPC from outside of that VPC.
Let’s See It in Action
To create and test a local Resolver on Outposts, I first connect to the Outpost section of the AWS Management Console. I navigate to the Route 53 Outposts section and select Create Resolver.

I select the Outpost on which I want to create the Resolver and enter a Resolver name. Then, I select the size of the instances to deploy the Resolver and the number of instances. The selection of instance size impacts the performance of the Resolver (the number of resolutions it can process per second). The default is an m5.large instance able to handle up to 7,000 queries per second. The number of instances impacts the availability of the Resolver, the default is four instances. I select Create Resolver to create the Resolver instances.
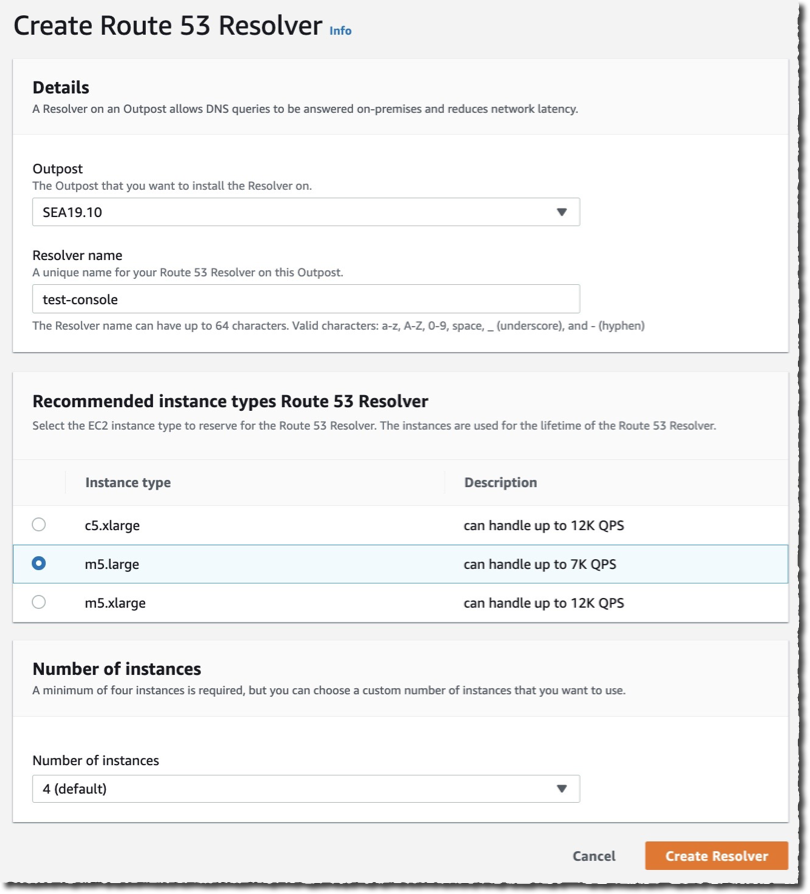
After a few minutes, I should see the Resolver status becoming  Operational.
 The next step is to create the Resolver endpoint. Inbound endpoints allow to forward external DNS queries to the local Resolver on the Outpost. Outbound endpoints allow to forward locally initiated DNS queries to external DNS resolvers you manage. For this demo, I choose to create an inbound endpoint.
Under the Inbound endpoints section, I select Create inbound endpoint.

I enter an Endpoint name, I choose the VPC in the Region to attach this endpoint to, and I select the previously created Security group for this endpoint.

I select the IP address the endpoint will consume in each subnet. I can select to Use an IP address that is selected automatically or Use an IP address that I specify.
 Finally, I select the instance type to bind to the inbound endpoint. The larger the instance, the more queries per second it will handle. The service creates two endpoint instances for high availability.
When I am ready, I select the Create inbound endpoint to start the creation process.

After a few minutes, the endpoint Status becomes Operational.

The setup is now ready to test. I therefore SSH-connect to an EC2 instance running on the Outpost, and I test the time it takes to resolve an external DNS name. Local Resolvers cache queries on the Outpost itself. I therefore expect my first query to take a few milliseconds and the second one to be served immediately from the cache.
Indeed, the first query resolves in 13 ms (see the line ;; Query time: 13 msec).
➜  ~ dig amazon.com

; <<>> DiG 9.16.38-RH <<>> amazon.com
;; global options: +cmd
;; Got answer:
;; ->>HEADER<<- opcode: QUERY, status: NOERROR, id: 35859
;; flags: qr rd ra; QUERY: 1, ANSWER: 3, AUTHORITY: 0, ADDITIONAL: 1

;; OPT PSEUDOSECTION:
; EDNS: version: 0, flags:; udp: 1232
;; QUESTION SECTION:
;amazon.com.			IN	A

;; ANSWER SECTION:
amazon.com.		797	IN	A	52.94.236.248
amazon.com.		797	IN	A	205.251.242.103
amazon.com.		797	IN	A	54.239.28.85

;; Query time: 13 msec
;; SERVER: 10.0.0.2#53(10.0.0.2)
;; WHEN: Sun May 28 09:47:27 CEST 2023
;; MSG SIZE  rcvd: 87
And when I repeat the same query, it resolves in zero milliseconds, showing it is now served from a local cache.
➜  ~ dig amazon.com

; <<>> DiG 9.16.38-RH <<>> amazon.com
;; global options: +cmd
;; Got answer:
;; ->>HEADER<<- opcode: QUERY, status: NOERROR, id: 63500
;; flags: qr rd ra; QUERY: 1, ANSWER: 3, AUTHORITY: 0, ADDITIONAL: 1

;; OPT PSEUDOSECTION:
; EDNS: version: 0, flags:; udp: 1232
;; QUESTION SECTION:
;amazon.com.			IN	A

;; ANSWER SECTION:
amazon.com.		586	IN	A	54.239.28.85
amazon.com.		586	IN	A	205.251.242.103
amazon.com.		586	IN	A	52.94.236.248

;; Query time: 0 msec
;; SERVER: 10.0.0.2#53(10.0.0.2)
;; WHEN: Sun May 28 09:50:58 CEST 2023
;; MSG SIZE  rcvd: 87
Pricing and Availability
Remember that only the Resolver and the VPC endpoints are deployed on your Outposts. You continue to manage your Route 53 zones and records from the AWS Regions. The local Resolver and its endpoints will consume some capacity on the Outposts. You will need to provide four EC2 instances from your Outposts for the Route 53 Resolver and two other instances for each Resolver endpoint.
Your existing Outposts racks must have the latest Outposts software for you to use the local Route 53 Resolver and the Resolver endpoints. You can raise a ticket with us to have your Outpost updated (the console will also remind you to do so when needed).
The local Resolvers are provided without additional cost. The endpoints are charged per elastic network interface (ENI) per hour, as is already the case today.
You can configure local Resolvers and local endpoints in all AWS Regions where Outposts racks are available, except in AWS GovCloud (US) Regions. That’s a list of 22 AWS Regions as of today.
Go and configure local Route 53 Resolvers on Outposts now!
P.S. We’re focused on improving our content to provide a better customer experience, and we need your feedback to do so. Please take this quick survey to share insights on your experience with the AWS Blog. Note that this survey is hosted by an external company, so the link does not lead to our website. AWS handles your information as described in the AWS Privacy Notice.
Post Syndicated from Benjamin Smith original https://aws.amazon.com/blogs/compute/implementing-patterns-that-exit-early-out-of-a-parallel-state-in-aws-step-functions/
This post is written by Madhav Vishnubhatta, Senior Technical Account Manager, Enterprise Support.
This blog post explains how to implement patterns in AWS Step Functions that control the break out of a parallel state as soon as a minimum requirement is met. The parallel state usually completes only when all the parallel flows inside it are completed. But if you do not want to wait for all of the parallel flows to complete before moving to the next step, this post provides patterns to help implement this functionality.
You can use AWS Step Functions to set up visual serverless workflows that orchestrate and coordinate multiple AWS services into a serverless workflow. This allows you to build complex, stateful, and scalable applications without managing the underlying infrastructure. In Step Functions, the individual steps are called states.
Step Functions offers multiple types of states. Some states help control the logic of the workflow. For example, the choice state enables conditional logic to control the flow to any one of the multiple possible next states, depending on the conditions defined in the state. The parallel state helps control the logic, but rather than choose one of multiple next states (as the choice state does), the parallel state allows all the branches to run as parallel flows concurrently. When all the parallel flows are complete, control moves on to the Parallel state’s next state.
Consider a scenario where the Step Functions workflow represents the process of an employee requesting a laptop in your organization. The process begins with a request from the employee as the first step, but the approval of this request could come from either of two IT managers.
In this case there could be two parallel flows, each waiting for an approval from one IT manager. But, as soon as one person provides approval, the workflow can move forward to the next step of actually issuing a laptop to the employee. This is an “either-or” pattern.
Consider a similar use-case but with a slightly different requirement. Instead of just one person’s approval being enough to issue a laptop, what if approval is needed from a minimum of two out of three IT managers before the laptop is issued. This is the “quorum” pattern.
The parallel state does not directly support these two patterns because the state waits for all the flows to complete. In this case, that means all the managers must provide an approval before a laptop can be issued.
Step Functions provides an error handling mechanism with the fail state, which can be used to fail the workflow with an error. This error can be caught downstream in the workflow and handled as needed. Both the either-or and the quorum patterns can be implemented with this fail state along with the error handling capability.
In case of either-or, as soon as the parallel flow is finished, the fail state can throw an error, which is caught outside the parallel state for further processing. Even though it is the fail state, it might not represent an error scenario in your use-case.
The quorum pattern needs an additional mechanism to store the status of each parallel flow, using an Amazon DynamoDB table. The quorum pattern creates an item in the DynamoDB table at the beginning of the workflow that is updated by each parallel flow as soon as it has completed. Each parallel flow checks the DynamoDB table to look at the number of processes that have completed and compare it against the quorum. If the quorum is met, that flow raises an error with a fail state that can be caught outside the parallel step.
Both of these patterns are published on Serverless Land:
To deploy and use these patterns, you need:
To deploy the Either-or pattern, follow the deployment Instructions section in the GitHub repo. This deployment creates the following resources:
Navigate to the AWS CloudFormation page in the AWS Management Console and choose the stack with the name provided during deployment. Choose the State Machine resource in the Resources section of the CloudFormation stack to go to the Step Functions console. Choose Edit and then choose WorkflowStudio to see a visual representation of the workflow.
You can see the exported workflow in the GitHub repo. This is the logic of the workflow:
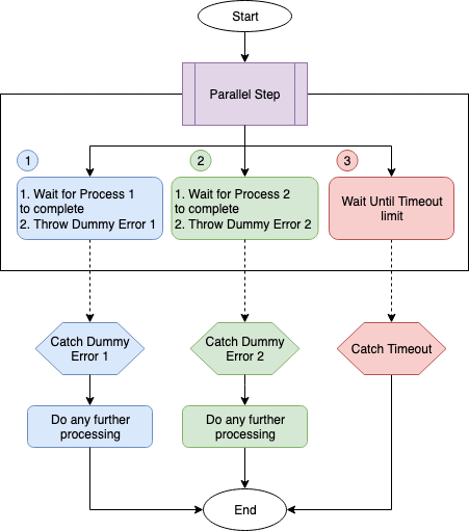
Either-or patter. Conceptual flow.
To test the workflow, follow the instructions provided in the Testing section of the README file at the GitHub repo.
To clean up the resources created, run:
sam deleteTo deploy the Quorum pattern, follow the Deployment Instructions section in the GitHub repo. This deployment creates the following resources:
Navigate to CloudFormation in the AWS Management Console and choose the stack with the name provided during deployment. Choose the state machine resource in the Resources section of the CloudFormation stack to go to the Step Functions console.
Choose Edit and then choose WorkflowStudio to see a visual representation of the workflow.
You can see the the exported workflow in the GitHub repo. This is the logic of the workflow:
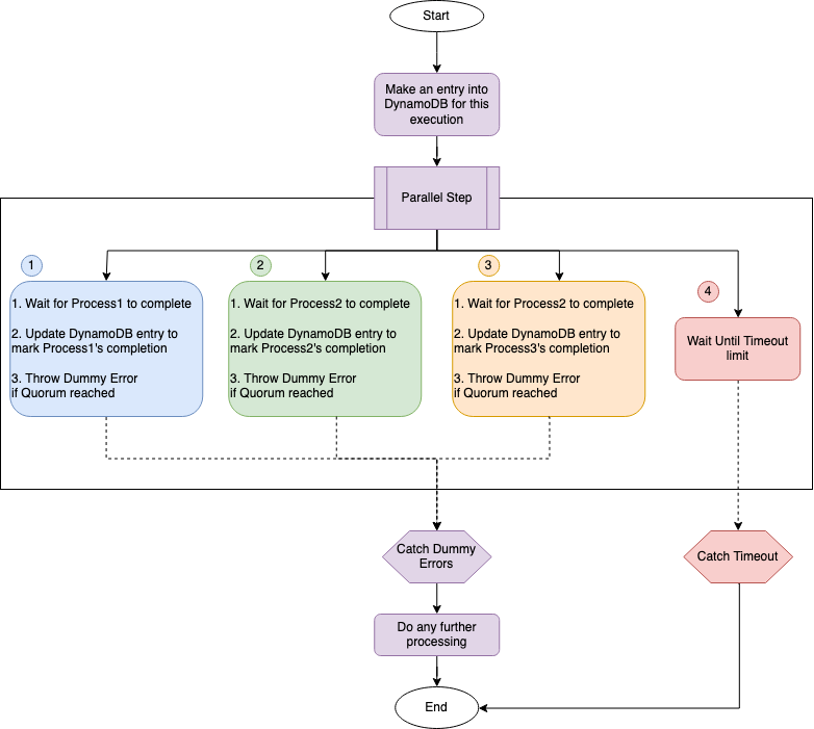
Quorum pattern. Conceptual flow.
To test the workflow, follow the instructions provided in the Testing section of the README file at the GitHub repo.
To clean up the resources created, run:
sam deleteThis blog post shows how you can implement patterns that must exit early out of a parallel state in an AWS Step Functions workflow.
The use-cases for this approach are not limited to these two patterns. More complicated use-cases like having different combinations of conditions to exit a parallel state can all be implemented using parallel and fail states.
Visit Serverless Land for more Step Functions workflow patterns.
Post Syndicated from Home Assistant original https://www.youtube.com/watch?v=5b7nqGZyeVU
Post Syndicated from Home Assistant original https://www.youtube.com/watch?v=8TsutVHj7LQ
Post Syndicated from Bruce Schneier original https://www.schneier.com/blog/archives/2023/07/kevin-mitnick-died.html
Post Syndicated from Joseph Goh original https://aws.amazon.com/blogs/security/ospar-2023-report-now-available-with-153-services-in-scope/
We’re pleased to announce the completion of our annual Outsourced Service Provider’s Audit Report (OSPAR) audit cycle on July 1, 2023. The 2023 OSPAR certification cycle includes the addition of nine new services in scope, bringing the total number of services in scope to 153 in the AWS Asia Pacific (Singapore) Region.
Newly added services in scope include the following:
Issued by the Association of Banks in Singapore (ABS), the Guidelines on Control Objectives and Procedures for Outsourced Service Providers provide baseline control criteria that outsourced service providers (OSPs) operating in Singapore should have in place. Successful completion of the OSPAR assessment demonstrates that AWS has implemented a system of controls that meet the guidelines and our commitment to fulfil the security expectations for cloud service providers set by the financial services industry in Singapore.
Customers can use the OSPAR assessment to conduct due diligence and to help reduce the effort and costs required for compliance. An independent third-party auditor, selected from the ABS list of approved auditors, performs the OSPAR assessment.
You can download the latest OSPAR report from AWS Artifact, a self-service portal for on-demand access to AWS compliance reports. Sign in to AWS Artifact in the AWS Management Console, or learn more at Getting Started with AWS Artifact. The list of services in scope for OSPAR is available in the report, and is also available on the AWS Services in Scope by Compliance Program webpage.
As always, we’re committed to bringing new services into the scope of our OSPAR program based on your architectural, business, and regulatory needs. If you have questions about the OSPAR report, contact your AWS account team.
If you have feedback about this post, submit comments in the Comments section below.
Want more AWS Security how-to content, news, and feature announcements? Follow us on Twitter.
Post Syndicated from Aarthi Srinivasan original https://aws.amazon.com/blogs/big-data/query-your-apache-hive-metastore-with-aws-lake-formation-permissions/
Apache Hive is a SQL-based data warehouse system for processing highly distributed datasets on the Apache Hadoop platform. There are two key components to Apache Hive: the Hive SQL query engine and the Hive metastore (HMS). The Hive metastore is a repository of metadata about the SQL tables, such as database names, table names, schema, serialization and deserialization information, data location, and partition details of each table. Apache Hive, Apache Spark, Presto, and Trino can all use a Hive Metastore to retrieve metadata to run queries. The Hive metastore can be hosted on an Apache Hadoop cluster or can be backed by a relational database that is external to a Hadoop cluster. Although the Hive metastore stores the metadata of tables, the actual data of the table could be residing on Amazon Simple Storage Service (Amazon S3), the Hadoop Distributed File System (HDFS) of the Hadoop cluster, or any other Hive-supported data stores.
Because Apache Hive was built on top of Apache Hadoop, many organizations have been using the software from the time they have been using Hadoop for big data processing. Also, Hive metastore provides flexible integration with many other open-source big data software like Apache HBase, Apache Spark, Presto, and Apache Impala. Therefore, organizations have come to host huge volumes of metadata of their structured datasets in the Hive metastore. A metastore is a critical part of a data lake, and having this information available, wherever it resides, is important. However, many AWS analytics services don’t integrate natively with the Hive metastore, and therefore, organizations have had to migrate their data to the AWS Glue Data Catalog to use these services.
AWS Lake Formation has launched support for managing user access to Apache Hive metastores through a federated AWS Glue connection. Previously, you could use Lake Formation to manage user permissions on AWS Glue Data Catalog resources only. With the Hive metastore connection from AWS Glue, you can connect to a database in a Hive metastore external to the Data Catalog, map it to a federated database in the Data Catalog, apply Lake Formation permissions on the Hive database and tables, share them with other AWS accounts, and query them using services such as Amazon Athena, Amazon Redshift Spectrum, Amazon EMR, and AWS Glue ETL (extract, transform, and load). For additional details on how the Hive metastore integration with Lake Formation works, refer to Managing permissions on datasets that use external metastores.
Use cases for Hive metastore integration with the Data Catalog include the following:
In this post, we demonstrate how to apply Lake Formation permissions on a Hive metastore database and tables and query them using Athena. We illustrate a cross-account sharing use case, where a Lake Formation steward in producer account A shares a federated Hive database and tables using LF-Tags to consumer account B.
Producer account A hosts an Apache Hive metastore in an EMR cluster, with underlying data in Amazon S3. We launch the AWS Glue Hive metastore connector from AWS Serverless Application Repository in account A and create the Hive metastore connection in account A’s Data Catalog. After we create the HMS connection, we create a database in account A’s Data Catalog (called the federated database) and map it to a database in the Hive metastore using the connection. The tables from the Hive database are then accessible to the Lake Formation admin in account A, just like any other tables in the Data Catalog. The admin continues to set up Lake Formation tag-based access control (LF-TBAC) on the federated Hive database and share it to account B.
The data lake users in account B will access the Hive database and tables of account A, just like querying any other shared Data Catalog resource using Lake Formation permissions.
The following diagram illustrates this architecture.
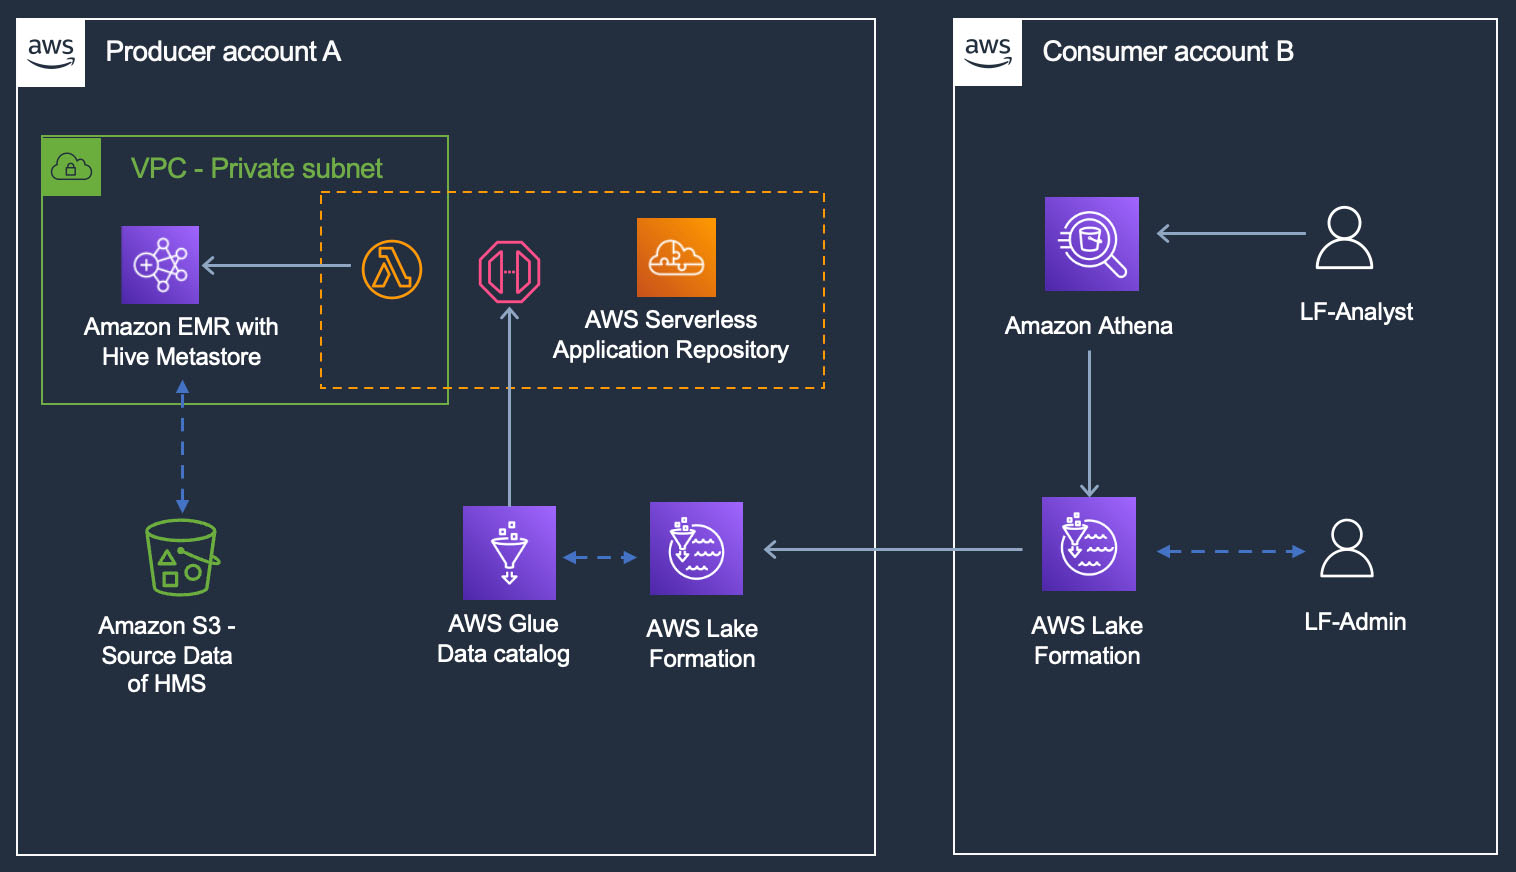
The solution consists of steps in both accounts. In account A, perform the following steps:
In account B, perform the following steps:
Account A has the following personas:
Account B has the following personas:
To follow the tutorial in this post, you need the following:
To keep the setup simple, we have an IAM admin registered as the data lake admin. Complete the following steps:
us-west-2 Region.
Stack creation takes about 10 minutes. The stack establishes the producer account A setup as follows:
hmsblog-producersteward) and sets this user as Lake Formation administratorLFHiveBlogCampaignRole = Admin, Analyst)To review the output of your CloudFormation stack, complete the following steps:

ProducerStewardCredentials.This will open the AWS Secrets Manager console.
hmsblog-producersteward.

To set up a federated AWS Glue connection, complete the following steps:
This will list various applications.
GlueDataCatalogFederation-HiveMetastore.This will open the AWS Lambda console configuration page for a Lambda function that runs the connector application code.

To configure the Lambda function, you need details of the EMR cluster launched by the CloudFormation stack.


hive-metastore-connection.thrift://<Primary-node-public-DNS-of your-EMR>:9083. For example, thrift://ec2-54-70-203-146.us-west-2.compute.amazonaws.com:9083, where 9083 is the Hive metastore port in EMR cluster.
Wait for the Create Completed status of the Lambda application. You can review the details of the Lambda application on the Lambda console.

You should see hive-metastore-connection under Connections.


You should see the created LF-tag LFHiveBlogCampaignRole with two values: Analyst and Admin.

hmsblog-producersteward.LFHiveBlogCampaignRole for Key and enter Analyst and Admin for Values.
This gives LF-Tags permissions for the producer steward.
Complete the following steps:
hmsblog-producersteward, using the credentials from the CloudFormation stack Output tab that you noted down earlier.
hmsblog-producersteward as a database creator.
hive-metastore-connection hyperlink.
federated_emrhivedb.This is the federated database in the local AWS Glue Data Catalog that will point to a Hive metastore database. This is a one-to-one mapping of a database in the Data Catalog to a database in the external Hive metastore.
emrhms_salesdb.
federated_emrhivedb and choose View tables.This will fetch the database and table metadata from the Hive metastore on the EMR cluster and display the tables created by the Hive script.

Now you associate the LF-Tags created by the CloudFormation script on this federated database and share it to the consumer account B using LF-Tag expressions.
federated_emrhivedb and on the Actions menu, choose Edit LF-Tags.LFHiveBlogCampaignRole for Assigned keys and Admin for Values, then choose Save.
LFHiveBlogCampaignRole for Key and Admin for Values.

LFHiveBlogCampaignRole for Key and enter Analyst and Admin for Values.
You can review and verify the permissions granted to account B.

You can review and verify the permissions granted to account B.

To keep the setup simple, we use an IAM admin registered as the data lake admin.
us-west-2 Region.
Stack creation should take about 5 minutes. The stack establishes the producer account B setup as follows:
hmsblog-consumersteward and sets this user as Lake Formation administratorhmsblog-analystListBucket and write object permissions to both hmsblog-consumersteward and hmsblog-analystNote down the stack output details.

Sign in to the console as hmsblog-consumersteward and complete the following steps:
ConsumerStewardCredentials to be redirected to the Secrets Manager console.ConsoleIAMLoginURL value from the CloudFormation template Output to log in to account B with the consumer steward user name hmsblog-consumersteward and the password you copied from Secrets Manager.You should see two resource share invitations from producer account A: one for a database-level share and one for a table-level share.


After you accept the invitations, the status of the resource shares changes from Pending to Active.
You should see the shared database federated_emrhivedb from producer account A.

You should see the four tables of the Hive database that is hosted on the EMR cluster in the producer account.

To grant permissions in account B, complete the following steps as hmsblog-consumersteward:

hmsblog-consumersteward.
This allows hmsblog-consumersteward to create a database resource link.
federated_emrhivedb and on the Actions menu, choose Create resource link.
rl_federatedhivedb for Resource link name and choose Create.
rl_federatedhivedb and on the Actions menu, choose Grant.hmsblog-analyst for IAM users and roles.

rl_federatedhivedb and on the Actions menu, choose Grant on target.hmsblog-analyst for IAM users and roles.hms_productcategory and hms_supplier for Tables.

hms-analyst.
Complete the following steps:

hmsblog-athenaresults-<your-account-B>-us-west-2 that the CloudFormation template created.
hmsblog-consumersteward has access to all four tables under federated_emrhivedb from the producer account.
rl_federatedhivedb and run a query on any of the tables.
You were able to query an external Apache Hive metastore database of the producer account through the AWS Glue Data Catalog and Lake Formation permissions using Athena from the recipient consumer account.
hmsblog-consumersteward and sign back in as hmsblog-analyst.hmsblog-analyst has Describe permissions on the resource link and access to two of the four Hive tables. You can verify that you see them on the Databases and Tables pages on the Lake Formation console.


On the Athena console, you now configure the Athena query results bucket, similar to how you configured it as hmsblog-consumersteward.
hmsblog-athenaresults-<your-account-B>-us-west-2 that the CloudFormation template created.rl_federatedhivedb and run a query on the two tables.
hmsblog-analyst.You were able to restrict sharing the external Apache Hive metastore tables using Lake Formation permissions from one account to another and query them using Athena. You can also query the Hive tables using Redshift Spectrum, Amazon EMR, and AWS Glue ETL from the consumer account.
To avoid incurring charges on the AWS resources created in this post, you can perform the following steps.
There are two CloudFormation stacks associated with producer account A. You need to delete the dependencies and the two stacks in the correct order.
federated_emrhivedb.
federated_emrhivedb and on the Actions menu, choose Delete to delete the federated database that is associated with the Hive metastore connection.This makes the AWS Glue connection’s CloudFormation stack ready to be deleted.

hmsblog-producersteward permissions.serverlessrepo-GlueDataCatalogFederation-HiveMetastore first.This is the one created by your AWS SAM application for the Hive metastore connection. Wait for it to complete deletion.
This deletes the S3 buckets, EMR cluster, custom IAM roles and policies, and the LF-Tags, database, tables, and permissions.
Complete the following steps in account B:
hmsblog-consumersteward as database creator, similar to the steps in the previous section.This deletes the IAM users, S3 bucket, and all the permissions from Lake Formation.
If there are any resource links and permissions left, delete them manually in Lake Formation from both accounts.
In this post, we showed you how to launch the AWS Glue Hive metastore federation application from AWS Serverless Application Repository, configure it with a Hive metastore running on an EMR cluster, create a federated database in the AWS Glue Data Catalog, and map it to a Hive metastore database on the EMR cluster. We illustrated how to share and access the Hive database tables for a cross-account scenario and the benefits of using Lake Formation to restrict permissions.
All Lake Formation features such as sharing to IAM principals within same account, sharing to external accounts, sharing to external account IAM principals, restricting column access, and setting data filters work on federated Hive database and tables. You can use any of the AWS analytics services that are integrated with Lake Formation, such as Athena, Redshift Spectrum, AWS Glue ETL, and Amazon EMR to query the federated Hive database and tables.
We encourage you to check out the features of the AWS Glue Hive metastore federation connector and explore Lake Formation permissions on your Hive database and tables. Please comment on this post or talk to your AWS Account Team to share feedback on this feature.
For more details, see Managing permissions on datasets that use external metastores.
 Aarthi Srinivasan is a Senior Big Data Architect with AWS Lake Formation. She likes building data lake solutions for AWS customers and partners. When not on the keyboard, she explores the latest science and technology trends and spends time with her family.
Post Syndicated from Kari Rivas original https://www.backblaze.com/blog/secure-your-saas-tools-back-up-microsoft-365-to-the-cloud/
Have you ever had that nagging feeling that you are forgetting something important? It’s like when you were back in school and sat down to take a test, only to realize you studied the wrong material. Worrying about your business data can feel like that. Are you fully protected? Are you doing all you can to ensure your data is backed up, safe, and easily restorable?
If you aren’t backing up your Microsoft 365 data, you could be leaving yourself unprepared and exposed. It’s a common misconception that data stored in software as a service (SaaS) products like Microsoft 365 is already backed up because it’s in a cloud application. But, anyone who’s tried to restore an entire company’s Microsoft 365 instance can tell you that’s not the case.
In this post, you’ll get a better understanding of how your Microsoft 365 data is stored and how to back it up so you can reliably and quickly restore it should you ever need to.
More than one million companies worldwide use Microsoft 365 (formerly Office 365). Microsoft 365 is a cloud-based productivity platform that includes a suite of popular applications like Outlook, Teams, Word, Excel, PowerPoint, Access, OneDrive, Publisher, SharePoint, and others.
Chances are that if you’re using Microsoft 365, you use it daily for all your business operations and rely heavily on the information stored within the cloud. But have you ever checked out the backup policies in Microsoft 365?
If you are not backing up your Microsoft 365 data, you have a gap in your backup strategy which may put your business at risk. If you suffer a malware or ransomware attack, natural disaster, or even accidental deletion by an employee, you could lose that data. In addition, it may cost you a lot of time and money trying to restore from Microsoft after a data emergency.
You might assume that, because it’s in the cloud, your SaaS data is backed up automatically for you. In reality, SaaS companies and products like Microsoft 365 operate on a shared responsibility model, meaning they back up the data and infrastructure to maintain uptime, not to help you in the event you need to restore. Practically speaking, that means that they may not back up your data as often as you would like or archive it for as long as you need. Microsoft does not concern itself with fully protecting your files. Most importantly, they may not offer a timely recovery option if you lose the data, which is critical to getting your business back online in the event of an outage.
The bottom line is that Microsoft’s top priority is to keep its own services running. They replicate data and have redundancy safeguards in place to ensure you can access your data through the platform reliably, but they do not assume responsibility for their users’ data.
All this to say, you are ultimately responsible for backing up your data and files in Microsoft 365.
But wait—what about Microsoft 365’s native backup tools? If you are relying on native backup support for your crucial business data, let’s talk about why that may not be the best way to make sure your data is protected.
First, there are default settings within Microsoft 365 that dictate how long items are retained in the Recycle Bin and Deleted Items folders. You can tweak those settings for a longer retention period, but there is also a storage limit, so you might run out of space quickly. To keep your data longer, you must upgrade your license type and purchase additional storage, which could quickly become costly. Additionally, if an employee accidentally or purposefully deletes items from the trash bin, the item may be gone forever.
Microsoft replicates data as part of its responsibility, but this doesn’t help you meet the requirements of a solid 3-2-1 strategy, where there are three copies of your data, one of which is off-site. So Microsoft doesn’t fully protect you and doesn’t support compliance standards that call for immutability. When Microsoft replicates data, they’re only making a second copy, and that copy is designed to be in sync with your production data. This means that an item gets corrupted and then replicated, the archive version is also corrupted, and you could lose crucial data. You can’t bank on M365’s replication to protect you.
Similarly, syncing is not backup protection and could end up hurting you. Syncing is designed to have a single copy of a file always up-to-date with changes you or other users have made on different devices. For example, if you use OneDrive as your cloud backup service, the bad news is that OneDrive will sync corrupted files overwriting your healthy ones. Essentially, if a file is deleted or infected, it will be infected or deleted on all synchronized devices. In contrast, a true backup allows you to restore from a specific point in time and provides access to previous versions of data, which can be useful in case of a ransomware attack or deletion.
Lastly, one of the biggest drawbacks of relying on Microsoft’s built-in backup tools is that you lack the ability to dial in your backup system the way you may want or need. There are several rules to follow in order to be able to recover or restore files in Microsoft 365. For instance, it’s strongly recommended that you save your documents in the cloud, both for syncing purposes and to enable things like Version History. But, if you delete an online-only file, it doesn’t go to your Recycle Bin, which means there’s no way to recover it.
And, there are limits to the maximum numbers of versions saved when using Version History, the period of time a file is recoverable for, and so on. Some of the recovery periods even change depending on file type. For example, you can’t restore email after 30 days, but if you have an enterprise-level account, other file types are stored in your Recycle Bin or trash for up to 93 days.
Backups may not be created as often as you like, and the recovery process isn’t quick or easy. For example, Microsoft backs up your data every 12 hours and retains it for 14 days. If you need to restore files, you must contact Microsoft Support, and they will perform a “full restore,” overwriting everything, not just the specific information you need. The recovery process probably won’t meet your recovery time objective (RTO) requirements.
Many people want more control over their backups than what Microsoft offers, especially for mission-critical business data. In addition to having clarity and control over the backup and recovery process, data storage and backups are often an essential element in supporting compliance needs, particularly if your business stores personal identifiable information (PII). Different industries and regions will have different standards that need to be enforced, so it’s always a good idea to have your legal or compliance team involved in the conversation.
Similarly, with the increasing frequency of ransomware attacks, many businesses are adding cyber insurance. Cyber insurance provides protection for a variety of things, including legal fees, expenditure related to breaches, court-ordered judgments, and forensic post-break review expenses. As a result, they often have stipulations about how and when you’re backing up to mitigate the fallout of business downtime.
Instead of the native Microsoft 365 backup tool, you could use one of the many popular backup applications that provide Microsoft 365 backup support. Options include:
Note that some of these applications include Microsoft 365 protection with their standard license, but it’s an optional add-on module with others. Be sure to check licensing and pricing before choosing an option.
One thing to keep in mind with these tools: if you store on-premises, the backup data they generate can be vulnerable to local disasters like fire or earthquakes and to cyberattacks. For example, if you keep backups on network attached storage (NAS) that doesn’t tier to the cloud, then your data would not be fully protected
Backing your data up to the cloud puts a copy off-site and geographically distant from your production data, so it’s better protected from things like natural disasters. When you’re choosing a cloud storage provider, make sure you check out where they store their data—if their data center is just down the road, then you’ll want to pick a different region.
Backblaze B2 Cloud Storage is reliable, affordable, and secure backup cloud storage, and it integrates seamlessly with the third party applications listed above for backing up Microsoft 365. Some of the benefits of using Backblaze B2 include:
Check out our Help Center for Quick-Start Guides from partners like Veeam and MSP360.
Start backing up your Microsoft 365 data to Backblaze B2 today.
Whether you are a business professional or an IT director, your goal is to protect your company data. Backing up your Microsoft 365 data to the cloud satisfies your RTO goals and better protects you against various threats.
Relying on Microsoft 365 native tools is inefficient and slow, which means you could blow your RTO targets. Backing up to the cloud allows you to meet retention requirements, ensuring that you retain the data you need for as long as required without destroying your operational budget.
Your business-critical data is too important to trust to a native backup tool that doesn’t meet your needs. In the event of a catastrophic situation, you need complete control and quick access to all your files from a specific point in time. Backing your Microsoft 365 data up to the cloud gives you more control, more freedom, and better protection.
The post Secure Your SaaS Tools: Back Up Microsoft 365 to the Cloud appeared first on Backblaze Blog | Cloud Storage & Cloud Backup.
Post Syndicated from Yonatan Dolan original https://aws.amazon.com/blogs/big-data/orca-securitys-journey-to-a-petabyte-scale-data-lake-with-apache-iceberg-and-aws-analytics/
This post is co-written with Eliad Gat and Oded Lifshiz from Orca Security.
With data becoming the driving force behind many industries today, having a modern data architecture is pivotal for organizations to be successful. One key component that plays a central role in modern data architectures is the data lake, which allows organizations to store and analyze large amounts of data in a cost-effective manner and run advanced analytics and machine learning (ML) at scale.
Orca Security is an industry-leading Cloud Security Platform that identifies, prioritizes, and remediates security risks and compliance issues across your AWS Cloud estate. Orca connects to your environment in minutes with patented SideScanning technology to provide complete coverage across vulnerabilities, malware, misconfigurations, lateral movement risk, weak and leaked passwords, overly permissive identities, and more.
The Orca Platform is powered by a state-of-the-art anomaly detection system that uses cutting-edge ML algorithms and big data capabilities to detect potential security threats and alert customers in real time, ensuring maximum security for their cloud environment. At the core of Orca’s anomaly detection system is its transactional data lake, which enables the company’s data scientists, analysts, data engineers, and ML specialists to extract valuable insights from vast amounts of data and deliver innovative cloud security solutions to its customers.
In this post, we describe Orca’s journey building a transactional data lake using Amazon Simple Storage Service (Amazon S3), Apache Iceberg, and AWS Analytics. We explore why Orca chose to build a transactional data lake and examine the key considerations that guided the selection of Apache Iceberg as the preferred table format.
In addition, we describe the Orca Platform architecture and the technologies used. Lastly, we discuss the challenges encountered throughout the project, present the solutions used to address them, and share valuable lessons learned.
Prior to the creation of the data lake, Orca’s data was distributed among various data silos, each owned by a different team with its own data pipelines and technology stack. This setup led to several issues, including scaling difficulties as the data size grew, maintaining data quality, ensuring consistent and reliable data access, high costs associated with storage and processing, and difficulties supporting streaming use cases. Moreover, running advanced analytics and ML on disparate data sources proved challenging. To overcome these issues, Orca decided to build a data lake.
A data lake is a centralized data repository that enables organizations to store and manage large volumes of structured and unstructured data, eliminating data silos and facilitating advanced analytics and ML on the entire data. By decoupling storage and compute, data lakes promote cost-effective storage and processing of big data.
Orca considered several table formats that have evolved in recent years to support its transactional data lake. Amongst the options, Apache Iceberg stood out as the ideal choice because it met all of Orca’s requirements.
First, Orca sought a transactional table format that ensures data consistency and fault tolerance. Apache Iceberg’s transactional and ACID guarantees, which allow concurrent read and write operations while ensuring data consistency and simplified fault handling, fulfill this requirement. Furthermore, Apache Iceberg’s support for time travel and rollback capabilities makes it highly suitable for addressing data quality issues by reverting to a previous state in a consistent manner.
Second, a key requirement was to adopt an open table format that integrates with various processing engines. This was to avoid vendor lock-in and allow teams to choose the processing engine that best suits their needs. Apache Iceberg’s engine-agnostic and open design meets this requirement by supporting all popular processing engines, including Apache Spark, Amazon Athena, Apache Flink, Trino, Presto, and more.
In addition, given the substantial data volumes handled by the system, an efficient table format was required that can support querying petabytes of data very fast. Apache Iceberg’s architecture addresses this need by efficiently filtering and reducing scanned data, resulting in accelerated query times.
An additional requirement was to allow seamless schema changes without impacting end-users. Apache Iceberg’s range of features, including schema evolution, hidden partitions, and partition evolution, addresses this requirement.
Lastly, it was important for Orca to choose a table format that is widely adopted. Apache Iceberg’s growing and active community aligned with the requirement for a popular and community-backed table format.
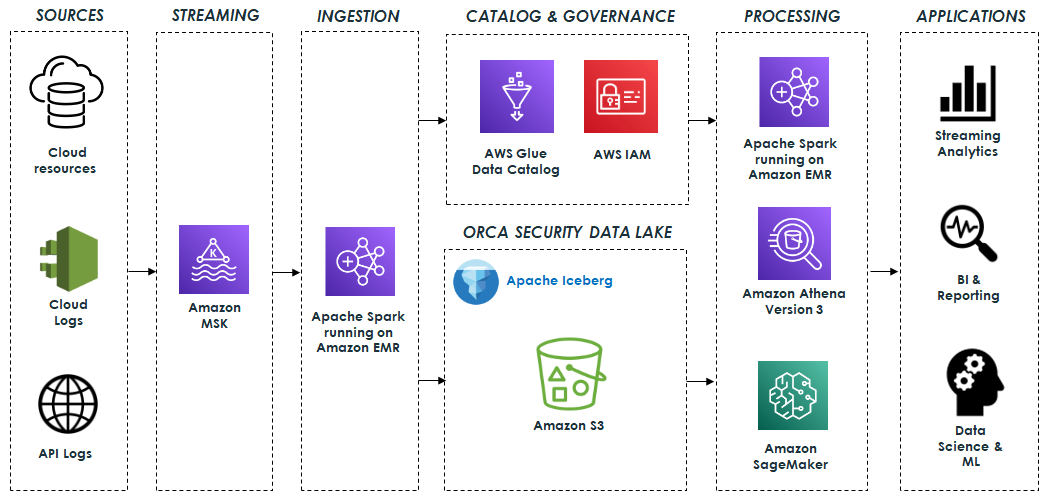
Orca’s data lake is based on open-source technologies that seamlessly integrate with Apache Iceberg. The system ingests data from various sources such as cloud resources, cloud activity logs, and API access logs, and processes billions of messages, resulting in terabytes of data daily. This data is sent to Apache Kafka, which is hosted on Amazon Managed Streaming for Apache Kafka (Amazon MSK). It is then processed using Apache Spark Structured Streaming running on Amazon EMR and stored in the data lake. Amazon EMR streamlines the process of loading all required Iceberg packages and dependencies, ensuring that the data is stored in Apache Iceberg format and ready for consumption as quickly as possible.
The data lake is built on top of Amazon S3 using Apache Iceberg table format with Apache Parquet as the underlying file format. In addition, the AWS Glue Data Catalog enables data discovery, and AWS Identity and Access Management (IAM) enforces secure access controls for the lake and its operations.
The data lake serves as the foundation for a variety of capabilities that are supported by different engines.
Data pipelines built on Apache Spark and Athena SQL analyze and process the data stored in the data lake. These data pipelines generate valuable insights and curated data that are stored in Apache Iceberg tables for downstream usage. This data is then used by various applications for streaming analytics, business intelligence, and reporting.
Amazon SageMaker is used to build, train, and deploy a range of ML models. Specifically, the system uses Amazon SageMaker Processing jobs to process the data stored in the data lake, employing the AWS SDK for Pandas (previously known as AWS Wrangler) for various data transformation operations, including cleaning, normalization, and feature engineering. This ensures that the data is suitable for training purposes. Additionally, SageMaker training jobs are employed for training the models. After the models are trained, they are deployed and used to identify anomalies and alert customers in real time to potential security threats. The following diagram illustrates the solution architecture.
Orca faced several challenges while building its petabyte-scale data lake, including:
In this section, we describe each of these challenges and the solutions implemented to address them.
Determining optimal partitioning for each table is very important in order to optimize query performance and minimize the impact on teams querying the tables when partitioning changes. Apache Iceberg’s hidden partitions combined with partition transformations proved to be valuable in achieving this goal because it allowed for transparent changes to partitioning without impacting end-users. Additionally, partition evolution enables experimentation with various partitioning strategies to optimize cost and performance without requiring a rewrite of the table’s data every time.
For example, with these features, Orca was able to easily change several of its table partitioning from DAY to HOUR with no impact on user queries. Without this native Iceberg capability, they would have needed to coordinate the new schema with all the teams that query the tables and rewrite the entire data, which would have been a costly, time-consuming, and error-prone process.
As mentioned previously, the system ingests billions of messages daily, resulting in terabytes of data processed and stored each day. Therefore, optimizing the EMR clusters for this type of load while maintaining high throughput and low costs has been an ongoing challenge. Orca addressed this in several ways.
First, Orca chose to use instance fleets with its EMR clusters because they allow optimized resource allocation by combining different instance types and sizes. Instance fleets improve resilience by allowing multiple Availability Zones to be configured. As a result, the cluster will launch in an Availability Zone with all the required instance types, preventing capacity limitations. Additionally, instance fleets can use both Amazon Elastic Compute Cloud (Amazon EC2) On-Demand and Spot instances, resulting in cost savings.
The process of sizing the cluster for high throughput and lower costs involved adjusting the number of core and task nodes, selecting suitable instance types, and fine-tuning CPU and memory configurations. Ultimately, Orca was able to find an optimal configuration consisting of on-demand core nodes and spot task nodes of varying sizes, which provided high throughput but also ensured compliance with SLAs.
Orca also found that using different Kafka Spark Structured Streaming properties, such as minOffsetsPerTrigger, maxOffsetsPerTrigger, and minPartitions, provided higher throughput and better control of the load. Using minPartitions, which enables better parallelism and distribution across a larger number of tasks, was particularly useful for consuming high lags quickly.
Lastly, when dealing with a high data ingestion rate, Amazon S3 may throttle the requests and return 503 errors. To address this scenario, Iceberg offers a table property called write.object-storage.enabled, which incorporates a hash prefix into the stored S3 object path. This approach effectively mitigates throttling problems.
A common challenge often encountered when ingesting streaming data into the data lake is the creation of many small files. This can have a negative impact on read performance when querying the data with Athena or Apache Spark. Having a high number of files leads to longer query planning and runtimes due to the need to process and read each file, resulting in overhead for file system operations and network communication. Additionally, this can result in higher costs due to the large number of S3 PUT and GET requests required.
To address this challenge, Apache Spark Structured Streaming provides the trigger mechanism, which can be used to tune the rate at which data is committed to Apache Iceberg tables. The commit rate has a direct impact on the number of files being produced. For instance, a higher commit rate, corresponding to a shorter time interval, results in lots of data files being produced.
In certain cases, launching the Spark cluster on an hourly basis and configuring the trigger to AvailableNow facilitated the processing of larger data batches and reduced the number of small files created. Although this approach led to cost savings, it did involve a trade-off of reduced data freshness. However, this trade-off was deemed acceptable for specific use cases.
In addition, to address preexisting small files within the data lake, Apache Iceberg offers a data files compaction operation that combines these smaller files into larger ones. Running this operation on a schedule is highly recommended to optimize the number and size of the files. Compaction also proves valuable in handling late-arriving data and enables the integration of this data into consolidated files.
Orca was an early adopter of Athena version 3, Amazon’s implementation of the Trino query engine, which provides extensive support for Apache Iceberg. Whenever possible, Orca preferred using Athena over Apache Spark for data processing. This preference was driven by the simplicity and serverless architecture of Athena, which led to reduced costs and easier usage, unlike Spark, which typically required provisioning and managing a dedicated cluster at higher costs.
In addition, Orca used Athena as part of its model training and as the primary engine for ad hoc exploratory queries conducted by data scientists, business analysts, and engineers. However, for maintaining Iceberg tables and updating table properties, Apache Spark remained the more scalable and feature-rich option.
Ensuring optimal query performance and minimizing storage overhead became a significant challenge as the data lake grew to a petabyte scale. To address this challenge, Apache Iceberg offers several maintenance procedures, such as the following:
Running these maintenance procedures efficiently and cost-effectively using Apache Spark, particularly the compaction operation, which operates on terabytes of data daily, requires careful consideration. This entails appropriately sizing the Spark cluster running on EMR and adjusting various settings such as CPU and memory.
In addition, using Apache Iceberg’s metadata tables proved to be very helpful in identifying issues related to the physical layout of Iceberg’s tables, which can directly impact query performance. Metadata tables offer insights into the physical data storage layout of the tables and offer the convenience of querying them with Athena version 3. By accessing the metadata tables, crucial information about tables’ data files, manifests, history, partitions, snapshots, and more can be obtained, which aids in understanding and optimizing the table’s data layout.
For instance, the following queries can uncover valuable information about the underlying data:
Effective management of data retention in a petabyte-scale data lake is crucial to ensure low storage costs as well as to comply with GDPR. However, implementing such a process can be challenging when dealing with Iceberg data stored in S3 buckets, because deleting files based on simple S3 lifecycle policies could potentially cause table corruption. This is because Iceberg’s data files are referenced in manifest files, so any changes to data files must also be reflected in the manifests.
To address this challenge, certain considerations must be taken into account while handling data retention properly. Apache Iceberg provides two modes for handling deletes, namely copy-on-write (CoW), and merge-on-read (MoR). In CoW mode, Iceberg rewrites data files at the time of deletion and creates new data files, whereas in MoR mode, instead of rewriting the data files, a delete file is written that lists the position of deleted records in files. These files are then reconciled with the remaining data during read time.
In favor of faster read times, CoW mode is preferable and when used in conjunction with the expiring old snapshots operation, it allows for the hard deletion of data files that have exceeded the set retention period.
In addition, by storing the data sorted based on the field that will be utilized for deletion (for example, organizationID), it’s possible to reduce the number of files that require rewriting. This optimization significantly enhances the efficiency of the deletion process, resulting in improved deletion times.
Managing a data lake infrastructure is challenging due to the various components it encompasses, including those responsible for data ingestion, storage, processing, and querying.
Effective monitoring of all these components involves tracking resource utilization, data ingestion rates, query runtimes, and various other performance-related metrics, and is essential for maintaining optimal performance and detecting issues as soon as possible.
Monitoring Amazon EMR was crucial because it played a vital role in the system for data ingestion, processing, and maintenance. Orca monitored the cluster status and resource usage of Amazon EMR by utilizing the available metrics through Amazon CloudWatch. Furthermore, it used JMX Exporter and Prometheus to scrape specific Apache Spark metrics and create custom metrics to further improve the pipelines’ observability.
Another challenge emerged when attempting to further monitor the ingestion progress through Kafka lag. Although Kafka lag tracking is the standard method for monitoring ingestion progress, it posed a challenge because Spark Structured Streaming manages its offsets internally and doesn’t commit them back to Kafka. To overcome this, Orca utilized the progress of the Spark Structured Streaming Query Listener (StreamingQueryListener) to monitor the processed offsets, which were then committed to a dedicated Kafka consumer group for lag monitoring.
In addition, to ensure optimal query performance and identify potential performance issues, it was essential to monitor Athena queries. Orca addressed this by using key metrics from Athena and the AWS SDK for Pandas, specifically TotalExecutionTime and ProcessedBytes. These metrics helped identify any degradation in query performance and keep track of costs, which were based on the size of the data scanned.
Apache Iceberg’s capabilities and overall architecture played a key role in mitigating data quality challenges.
One of the ways Apache Iceberg addresses these challenges is through its schema evolution capability, which enables users to modify or add columns to a table’s schema without rewriting the entire data. This feature prevents data quality issues that may arise due to schema changes, because the table’s schema is managed as part of the manifest files, ensuring safe changes.
Furthermore, Apache Iceberg’s time travel feature provides the ability to review a table’s history and roll back to a previous snapshot. This functionality has proven to be extremely useful in identifying potential data quality issues and swiftly resolving them by reverting to a previous state with known data integrity.
These robust capabilities ensure that data within the data lake remains accurate, consistent, and reliable.
Data lakes are an essential part of a modern data architecture, and now it’s easier than ever to create a robust, transactional, cost-effective, and high-performant data lake by using Apache Iceberg, Amazon S3, and AWS Analytics services such as Amazon EMR and Athena.
Since building the data lake, Orca has observed significant improvements. The data lake infrastructure has allowed Orca’s platform to have seamless scalability while reducing the cost of running its data pipelines by over 50% utilizing Amazon EMR. Additionally, query costs were reduced by more than 50% using the efficient querying capabilities of Apache Iceberg and Athena version 3.
Most importantly, the data lake has made a profound impact on Orca’s platform and continues to play a key role in its success, supporting new use cases such as change data capture (CDC) and others, and enabling the development of cutting-edge cloud security solutions.
If Orca’s journey has sparked your interest and you are considering implementing a similar solution in your organization, here are some strategic steps to consider:
Embarking on a journey to a transactional data lake using Amazon S3, Apache Iceberg, and AWS Analytics can vastly improve your organization’s data infrastructure, enabling advanced analytics and machine learning, and unlocking insights that drive innovation.
 Eliad Gat is a Big Data & AI/ML Architect at Orca Security. He has over 15 years of experience designing and building large-scale cloud-native distributed systems, specializing in big data, analytics, AI, and machine learning.
 Oded Lifshiz is a Principal Software Engineer at Orca Security. He enjoys combining his passion for delivering innovative, data-driven solutions with his expertise in designing and building large-scale machine learning pipelines.
 Yonatan Dolan is a Principal Analytics Specialist at Amazon Web Services. He is located in Israel and helps customers harness AWS analytical services to leverage data, gain insights, and derive value. Yonatan also leads the Apache Iceberg Israel community.
 Carlos Rodrigues is a Big Data Specialist Solutions Architect at Amazon Web Services. He helps customers worldwide build transactional data lakes on AWS using open table formats like Apache Hudi and Apache Iceberg.
 Sofia Zilberman is a Sr. Analytics Specialist Solutions Architect at Amazon Web Services. She has a track record of 15 years of creating large-scale, distributed processing systems. She remains passionate about big data technologies and architecture trends, and is constantly on the lookout for functional and technological innovations.
Post Syndicated from Matt Granger original https://www.youtube.com/watch?v=_sbMU3mB-Ic
Post Syndicated from Crosstalk Solutions original https://www.youtube.com/watch?v=7pnPeQsLS4Q
Post Syndicated from The Hook Up original https://www.youtube.com/watch?v=XeR2uPPCA2k
Post Syndicated from Aaron Tennison original https://blog.rapid7.com/2023/07/20/pentales-testing-security-health-for-a-healthcare-company/

At Rapid7 we love a good pen test story. So often they show the cleverness, skill, resilience, and dedication to our customer’s security that can only come from actively trying to break it! In this series, we’re going to share some of our favorite tales from the pen test desk and hopefully highlight some ways you can improve your own organization’s security.
Rapid7 was tasked with testing a provider website in the healthcare industry. Providers had the ability on the website to apply for jobs, manage time cards, connect with employers needing help at hospitals, apply for contracts, as well as manage certificates and documents that were needed to perform duties. The provider website was interested to see if their web application had any flaws that could be leveraged as an attacker, as the application was heavily customized.
I began by testing input fields for any vulnerabilities. If an input field does not sanitize user input correctly this could open the web application for potential attacks that allow an attacker to inject code. The vulnerable form with injected code could then be used to attack the web application or target users. An input field can be anything that allows you to enter information into the web application, like your name or email address. I discovered a field that was not correctly sanitizing input and when submitted, was viewed by accounts with administrative access.
Using the leverage gained from the vulnerable field I was able to perform a Cross Site Scripting (XSS) attack which stores JavaScript in a vulnerable form and returns the JavaScript to users. When a user views a vulnerable form with injected code, the code is executed inside the victim’s browser. An XSS payload was created that, when viewed by users, sent a refresh token to a server under our control. This allowed us to collect administrative tokens for accounts that viewed the vulnerable form, resulting in account takeovers. I also discovered that the refresh token was misconfigured and allowed indefinite access to the web application once obtained. With said refresh token in hand I could log in to the account indefinitely even if the password was changed.
I then turned my attention to authorization issues on the web application. As a non-privileged user, I discovered a dashboard that allowed providers to view expiring documents. The request was vulnerable to Broken Object-Level Authorization and Insecure Direct Object Reference (IDOR). so I was able to manipulate the request to access streams of all uploaded documents for all end users with accounts on the web applications. These documents included all healthcare documents uploaded to the application including background checks, Social Security information, addresses, physician documents, and more.
Further analysis of the application showed that unprivileged users could access calls that were being utilized by administrative users. These calls disclosed sensitive information including usernames and passwords for vendors and staff associated with contracted hospitals on the application. As a non-privileged user account, I utilized this authorization issue in combination with an IDOR vulnerability to scrape usernames and passwords from the vulnerable endpoint for over 15,000 accounts in minutes.
Chasing a hunch that there would be more misconfigurations to exploit, I discovered that candidates for hospital positions at multiple locations had cleartext Social Security numbers stored in an administrative portion of the web application. An API endpoint was used to retrieve the information, and the endpoint was vulnerable to IDOR. I performed a brute force attack to retrieve names and cleartext Social Security numbers from hundreds of accounts being stored in the application.
This test highlighted some issues present in a large amount of web applications. We demonstrated just how quickly adversaries could exfiltrate sensitive data from an application that did not have safeguards in place. We also demonstrated just how important ensuring user input is sanitized correctly in an application and how failing to do so correctly can put users and the company at risk. Ensuring users are isolated and authorization is implemented appropriately is another major factor to consider when operating in the healthcare industry, as protecting client data is critical when dealing with protected health information and personally identifiable information.
The client was shocked at the results of testing the security of the application. The test disclosed some serious vulnerabilities that were not previously discovered by past testing from other security vendors, highlighting the importance of continuous testing especially for a customized application that was constantly evolving.
Check us out at this year’s Black Hat USA in Las Vegas! Our experts will be giving talks and our booth will be staffed with many members of our team. Stop by and say hi.
Post Syndicated from BeardedTinker original https://www.youtube.com/watch?v=_GugECYVXjc
Post Syndicated from original https://lwn.net/Articles/938422/
Sometimes, the shortest patches lead to the longest threads; for a case in
point, see this
three-line change posted by Emanuele Giuseppe Esposito. The purpose of
this change is to improve the security of locked-down systems by adding a
“revocation number” to the kernel image. But, as the discussion revealed,
both the cost and the value of this feature are seen differently across the
kernel-development community.
Post Syndicated from original https://lwn.net/Articles/938711/
Security updates have been issued by Debian (chromium), Fedora (sysstat), Gentoo (openssh), Mageia (firefox/nss, kernel, kernel-linus, maven, mingw-nsis, mutt/neomutt, php, qt4/qtsvg5, and texlive), Red Hat (java-1.8.0-openjdk, java-11-openjdk, java-17-openjdk, and kpatch-patch), Slackware (curl and openssh), SUSE (curl, grafana, kernel, mariadb, MozillaFirefox, MozillaFirefox-branding-SLE, poppler, python-Flask, python310, samba, SUSE Manager Client Tools, and texlive), and Ubuntu (curl, ecdsautils, and samba).
Post Syndicated from Shahna Campbell original https://aws.amazon.com/blogs/security/how-to-manage-certificate-lifecycles-using-acm-event-driven-workflows/
With AWS Certificate Manager (ACM), you can simplify certificate lifecycle management by using event-driven workflows to notify or take action on expiring TLS certificates in your organization. Using ACM, you can provision, manage, and deploy public and private TLS certificates for use with integrated AWS services like Amazon CloudFront and Elastic Load Balancing (ELB), as well as for your internal resources and infrastructure. For a full list of integrated services, see Services integrated with AWS Certificate Manager.
By implementing event-driven workflows for certificate lifecycle management, you can help increase the visibility of upcoming and actual certificate expirations, and notify application teams that their action is required to renew a certificate. You can also use event-driven workflows to automate provisioning of private certificates to your internal resources, like a web server based on Amazon Elastic Compute Cloud (Amazon EC2).
In this post, we describe the ACM event types that Amazon EventBridge supports. EventBridge is a serverless event router that you can use to build event-driven applications at scale. ACM publishes these events for important occurrences, such as when a certificate becomes available, approaches expiration, or fails to renew. We also highlight example use cases for the event types supported by ACM. Lastly, we show you how to implement an event-driven workflow to notify application teams that they need to take action to renew a certificate for their workloads. You can also use these types of workflows to send the relevant event information to AWS Security Hub or to initiate certificate automation actions through AWS Lambda.
To view a video walkthrough and demo of this workflow, see AWS Certificate Manager: How to create event-driven certificate workflows.
In October 2022, ACM released support for three new event types:
Before this release, ACM had a single event type: ACM Certificate Approaching Expiration. By default, ACM creates Certificate Approaching Expiration events daily for active, ACM-issued certificates starting 45 days prior to their expiration. To learn more about the structure of these event types, see Amazon EventBridge support for ACM. The following examples highlight how you can use the different event types in the context of certificate lifecycle operations.
ACM emits an ACM Certificate Renewal Action Required event when customer action must be taken before a certificate can be renewed. For instance, if permissions aren’t appropriately configured to allow ACM to renew private certificates issued from AWS Private Certificate Authority (AWS Private CA), ACM will publish this event when automatic renewal fails at 45 days before expiration. Similarly, ACM might not be able to renew a public certificate because an administrator needs to confirm the renewal by email validation, or because Certification Authority Authorization (CAA) record changes prevent automatic renewal through domain validation. ACM will make further renewal attempts at 30 days, 15 days, 3 days, and 1 day before expiration, or until customer action is taken, the certificate expires, or the certificate is no longer eligible for renewal. ACM publishes an event for each renewal attempt.
It’s important to notify the appropriate parties — for example, the Public Key Infrastructure (PKI) team, security engineers, or application developers — that they need to take action to resolve these issues. You might notify them by email, or by integrating with your workflow management system to open a case that the appropriate engineering or support teams can track.
You can use the ACM Certificate Expired event type to notify application teams that a certificate associated with their workload has expired. The teams should quickly investigate and validate that the expired certificate won’t cause an outage or cause application users to see a message stating that a website is insecure, which could impact their trust. To increase visibility for support teams, you can publish this event to Security Hub or a support ticketing system. For an example of how to publish these events as findings in Security Hub, see Responding to an event with a Lambda function.
ACM sends an ACM Certificate Available event when a managed public or private certificate is ready for use. ACM publishes the event on issuance, renewal, and import. When a private certificate becomes available, you might still need to take action to deploy it to your resources, such as installing the private certificate for use in an EC2 web server. This includes a new private certificate that AWS Private CA issues as part of managed renewal through ACM. You might want to notify the appropriate teams that the new certificate is available for export from ACM, so that they can use the ACM APIs, AWS Command Line Interface (AWS CLI), or AWS Management Console to export the certificate and manually distribute it to your workload (for example, an EC2-based web server). For integrated services such as ELB, ACM binds the renewed certificate to your resource, and no action is required.
You can also use this event to invoke a Lambda function that exports the private certificate and places it in the appropriate directory for the relevant server, provide it to other serverless resources, or put it in an encrypted Amazon Simple Storage Service (Amazon S3) bucket to share with a third party for mutual TLS or a similar use case.
In this section, we’ll show you how to configure notifications to alert the appropriate stakeholders that they need to take an action to successfully renew an ACM certificate.
To follow along with this walkthrough, make sure that you have an AWS Identity and Access Management (IAM) role with the appropriate permissions for EventBridge and Amazon Simple Notification Service (Amazon SNS). When a rule runs in EventBridge, a target associated with that rule is invoked, and in order to make API calls on Amazon SNS, EventBridge needs a resource-based IAM policy.
The following IAM permissions work for the example below (and for tidying up afterwards):
The following is a sample resource-based policy that allows EventBridge to publish to an Amazon SNS topic. Make sure to replace <region>, <account-id>, and <topic-name> with your own data.
The first step is to create an SNS topic by using the console to link multiple endpoints such as AWS Lambda and Amazon Simple Queue Service (Amazon SQS), or send a notification to an email address.
When the topic has been successfully created, a notification bar appears at the top of the screen, and you will be routed to the page for the newly created topic. Note the Amazon Resource Name (ARN) listed in the Details panel because you’ll need it for the next section.
Next, you need to create a subscription to the topic to set a destination endpoint for the messages that are pushed to the topic to be delivered.
Next, create the EventBridge rule that will be invoked when an ACM Certificate Renewal Action Required event occurs. This rule uses the SNS topic that you just created as a target.
Now you are listening to this event and will be notified when a customer action must be taken before a certificate can be renewed.
For another example of how to use Amazon SNS and email notifications, see How to monitor expirations of imported certificates in AWS Certificate Manager (ACM). For an example of how to use Lambda to publish findings to Security Hub to provide visibility to administrators and security teams, see Responding to an event with a Lambda function. Other options for responding to this event include invoking a Lambda function to export and distribute private certificates, or integrating with a messaging or collaboration tool for ChatOps.
In this blog post, you learned about the new EventBridge event types for ACM, and some example use cases for each of these event types. You also learned how to use these event types to create a workflow with EventBridge and Amazon SNS that notifies the appropriate stakeholders when they need to take action, so that ACM can automatically renew a TLS certificate.
By using these events to increase awareness of upcoming certificate lifecycle events, you can make it simpler to manage TLS certificates across your organization. For more information about certificate management on AWS, see the ACM documentation or get started using ACM today in the AWS Management Console.
If you have feedback about this post, submit comments in the Comments section below. If you have questions about this post, contact AWS Support.
Want more AWS Security news? Follow us on Twitter.
Post Syndicated from Patrick Kennedy original https://www.servethehome.com/100m-usd-cerebras-ai-cluster-makes-it-the-post-legacy-silicon-ai-winner/
Cerebras announced a $100M+ AI Cluster using its huge AI chips and plans for two more in 2023 making it a winner of the new AI silicon makers
The post 100M USD Cerebras AI Cluster Makes it the Post-Legacy Silicon AI Winner appeared first on ServeTheHome.
Post Syndicated from Svenja Raether original https://aws.amazon.com/blogs/devops/how-to-write-and-execute-integration-tests-for-aws-cdk-applications/
Automated integration testing validates system components and boosts confidence for new software releases. Performing integration tests on resources deployed to the AWS cloud enables the validation of AWS Identity and Access Management (IAM) policies, service limits, application configuration, and runtime code. For developers that are currently leveraging AWS Cloud Development Kit (AWS CDK) as their Infrastructure as Code tool, there is a testing framework available that makes integration testing easier to implement in the software release.
AWS CDK is an open-source framework for defining and provisioning AWS cloud infrastructure using supported programming languages. The framework includes constructs for writing and running unit and integration tests. The assertions construct can be used to write unit tests and assert against the generated CloudFormation templates. CDK integ-tests construct can be used for defining integration test cases and can be combined with CDK integ-runner for executing these tests. The integ-runner handles automatic resource provisioning and removal and supports several customization options. Unit tests using assertion functions are used to test configurations in the CloudFormation templates before deploying these templates, while integration tests run assertions in the deployed resources. This blog post demonstrates writing automated integration tests for an example application using AWS CDK.
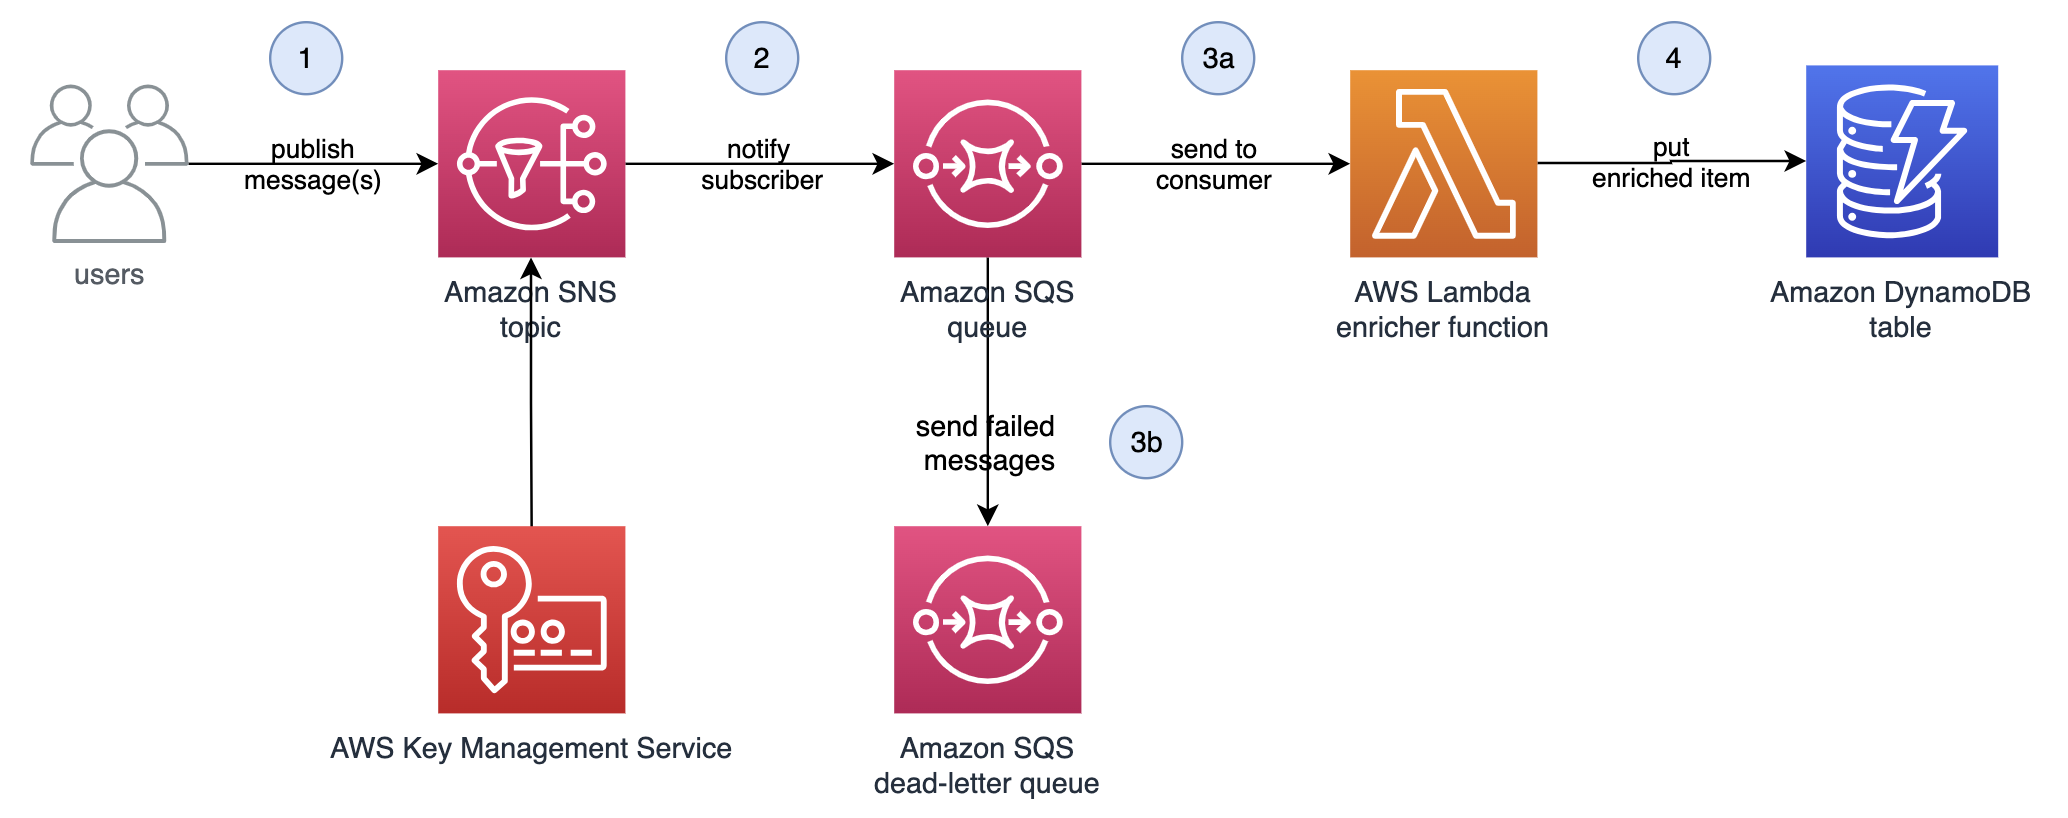
Figure 1: Serverless data enrichment application
The example application shown in Figure 1 is a sample serverless data enrichment application. Data is processed and enriched in the system as follows:
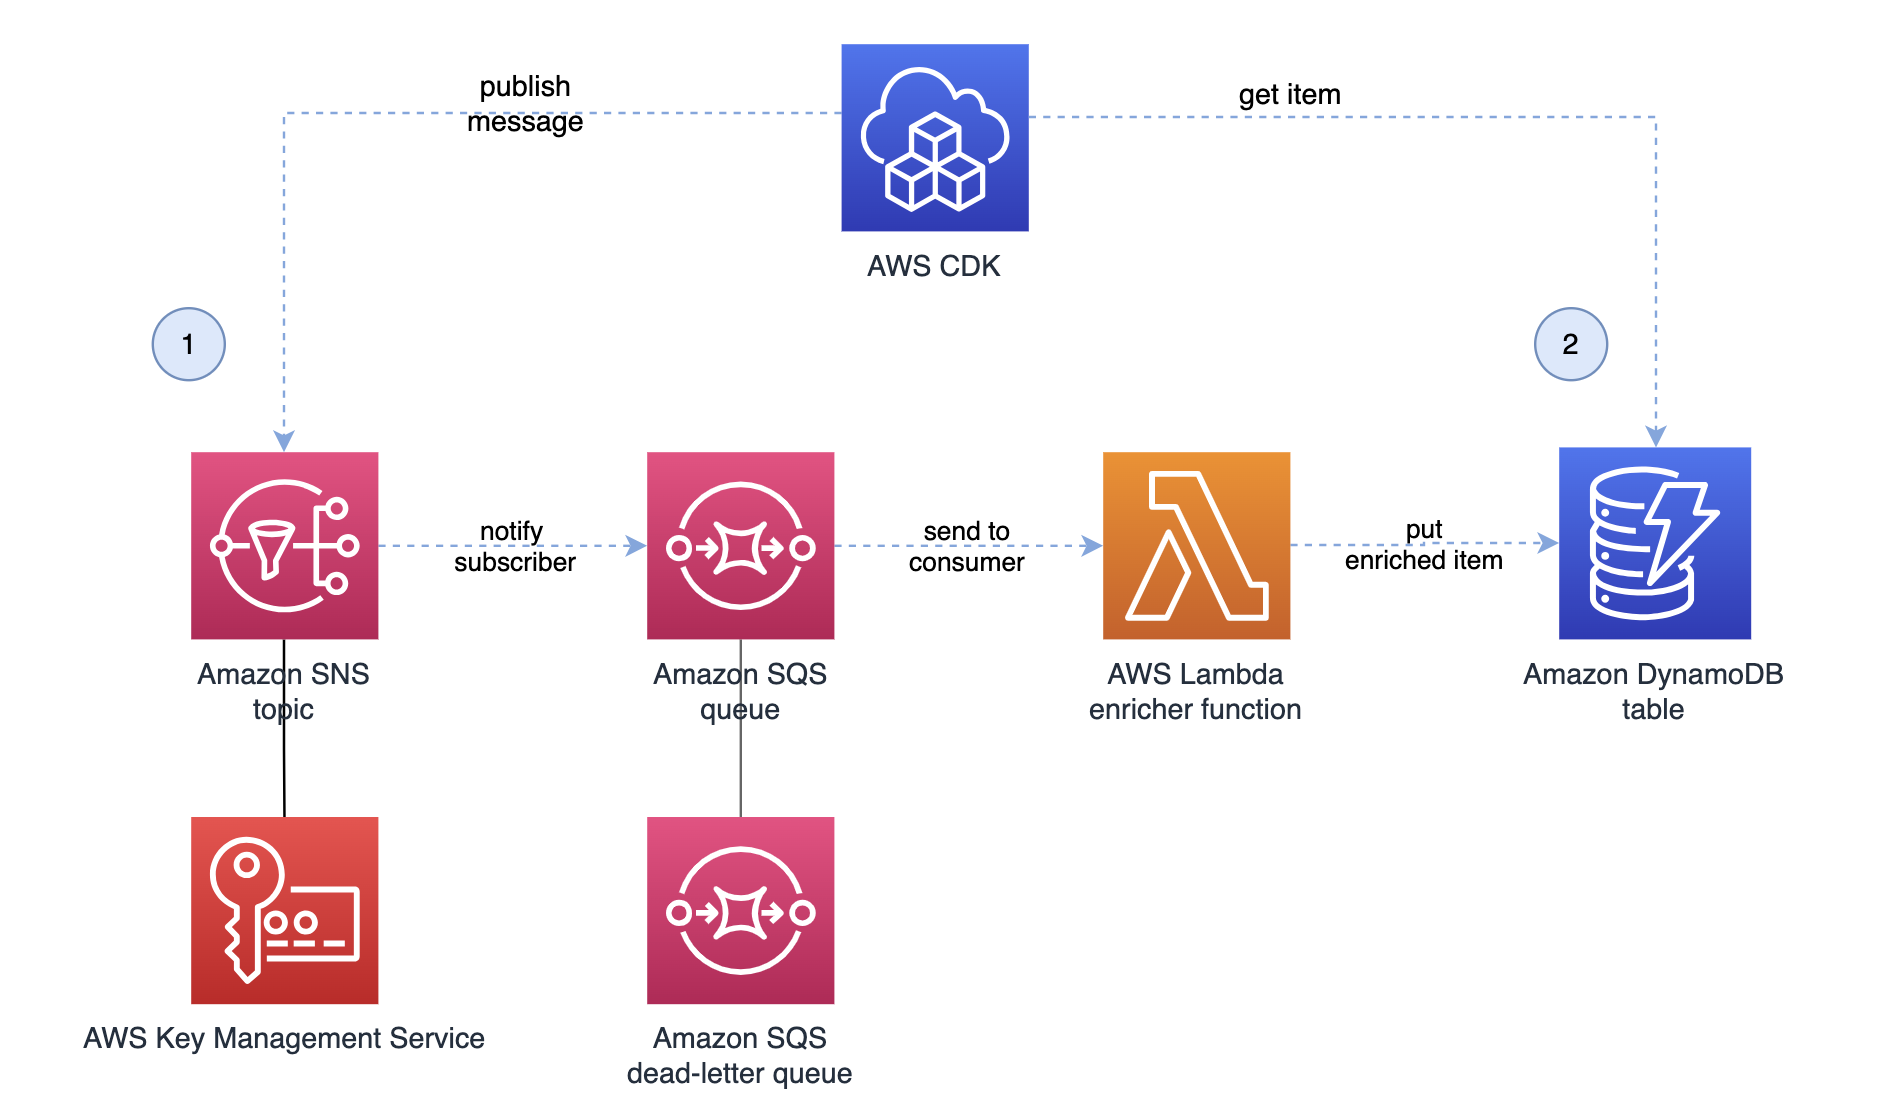
Figure 2: Integration test with one assertion
For this sample application, we will use AWS CDK’s integration testing framework to validate the processing for a single message as shown in Figure 2. To run the test, we configure the test framework to do the following steps:
The following are the required to deploy this solution:
The structure of the sample AWS CDK application repository is as follows:
The repository is a typical AWS CDK application except that it has one additional directory for the test case definitions. For the remainder of this blog post, we focus on the integration test definition in /integ-tests/integ.sns-sqs-ddb.ts and walk you through its creation and the execution of the integration test.
An integration test should validate expected behavior of your AWS CDK application. You can define an integration test for your application as follows:
// CDK App for Integration Tests
const app = new cdk.App();

// Stack under test
const stackUnderTest = new CdkIntegTestsDemoStack(app, ‘IntegrationTestStack’, {
  setDestroyPolicyToAllResources: true,
  description:
    “This stack includes the application’s resources for integration testing.”,
});// Initialize Integ Test construct
const integ = new IntegTest(app, ‘DataFlowTest’, {
testCases: [stackUnderTest], // Define a list of cases for this test
cdkCommandOptions: {
// Customize the integ-runner parameters
destroy: {
args: {
force: true,
},
},
},
regions: [stackUnderTest.region],
});/**
* Assertion:
* The application should handle single message and write the enriched item to the DynamoDB table.
*/
const id = 'test-id-1';
const message = 'This message should be validated';
/**
* Publish a message to the SNS topic.
* Note - SNS topic ARN is a member variable of the
* application stack for testing purposes.
*/
const assertion = integ.assertions
.awsApiCall('SNS', 'publish', {
TopicArn: stackUnderTest.topicArn,
Message: JSON.stringify({
id: id,
message: message,
}),
})/**
* Validate that the DynamoDB table contains the enriched message.
*/
.next(
integ.assertions
.awsApiCall('DynamoDB', 'getItem', {
TableName: stackUnderTest.tableName,
Key: { id: { S: id } },
})
/**
* Expect the enriched message to be returned.
*/
.expect(
ExpectedResult.objectLike({
Item: { id: { S: id, },
message: { S: message, },
additionalAttr: { S: 'enriched', },
},
}),
)/**
* Timeout and interval check for assertion to be true.
* Note - Data may take some time to arrive in DynamoDB.
* Iteratively executes API call at specified interval.
*/
.waitForAssertions({
totalTimeout: Duration.seconds(25),
interval: Duration.seconds(3),
}),
);// Add the required permissions to the api call
assertion.provider.addToRolePolicy({
Effect: 'Allow',
Action: [
'kms:Encrypt',
'kms:ReEncrypt*',
'kms:GenerateDataKey*',
'kms:Decrypt',
],
Resource: [stackUnderTest.kmsKeyArn],
});The full code for this blog is available on this GitHub project.
In this section, we show how to run integration test for the introduced sample application using the integ-runner to execute the test case and report on the assertion results.
Install and build the project.
npm install

npm run build
Run the following command to initiate the test case execution with a list of options.
npm run integ-testThe directory option specifies in which location the integ-runner needs to recursively search for test definition files. The parallel-regions option allows to define a list of regions to run tests in. We set this to us-east-1 and ensure that the AWS CDK bootstrapping has previously been performed in this region. The update-on-failed option allows to rerun the integration tests if the snapshot fails. A full list of available options can be found in the integ-runner Github repository.
Hint: if you want to retain your test stacks during development for debugging, you can specify the no-clean option to retain the test stack after the test run.
The integ-runner initially checks the integration test snapshots to determine if any changes have occurred since the last execution. Since there are no previous snapshots for the initial run, the snapshot verification fails. As a result, the integ-runner begins executing the integration tests using the ephemeral test stack and displays the result.
Verifying integration test snapshots...

  NEW        integ.sns-sqs-ddb 2.863s

Snapshot Results:

Tests:    1 failed, 1 total

Running integration tests for failed tests...

Running in parallel across regions: us-east-1
Running test <your-path>/cdk-integ-tests-demo/integ-tests/integ.sns-sqs-ddb.js in us-east-1
  SUCCESS    integ.sns-sqs-ddb-DemoTest/DefaultTest 587.295s
       AssertionResultsAwsApiCallDynamoDBgetItem - success

Test Results:

Tests:    1 passed, 1 total
Figure 3: AWS CloudFormation deploying the IntegrationTestStack and DataFlowDefaultTestDeployAssert stacks
The integ-runner generates two AWS CloudFormation stacks, as shown in Figure 3. The IntegrationTestStack stack includes the resources from our sample application, which serves as an isolated application representing the stack under test. The DataFlowDefaultTestDeployAssert stack contains the resources required for executing the integration tests as shown in Figure 4.
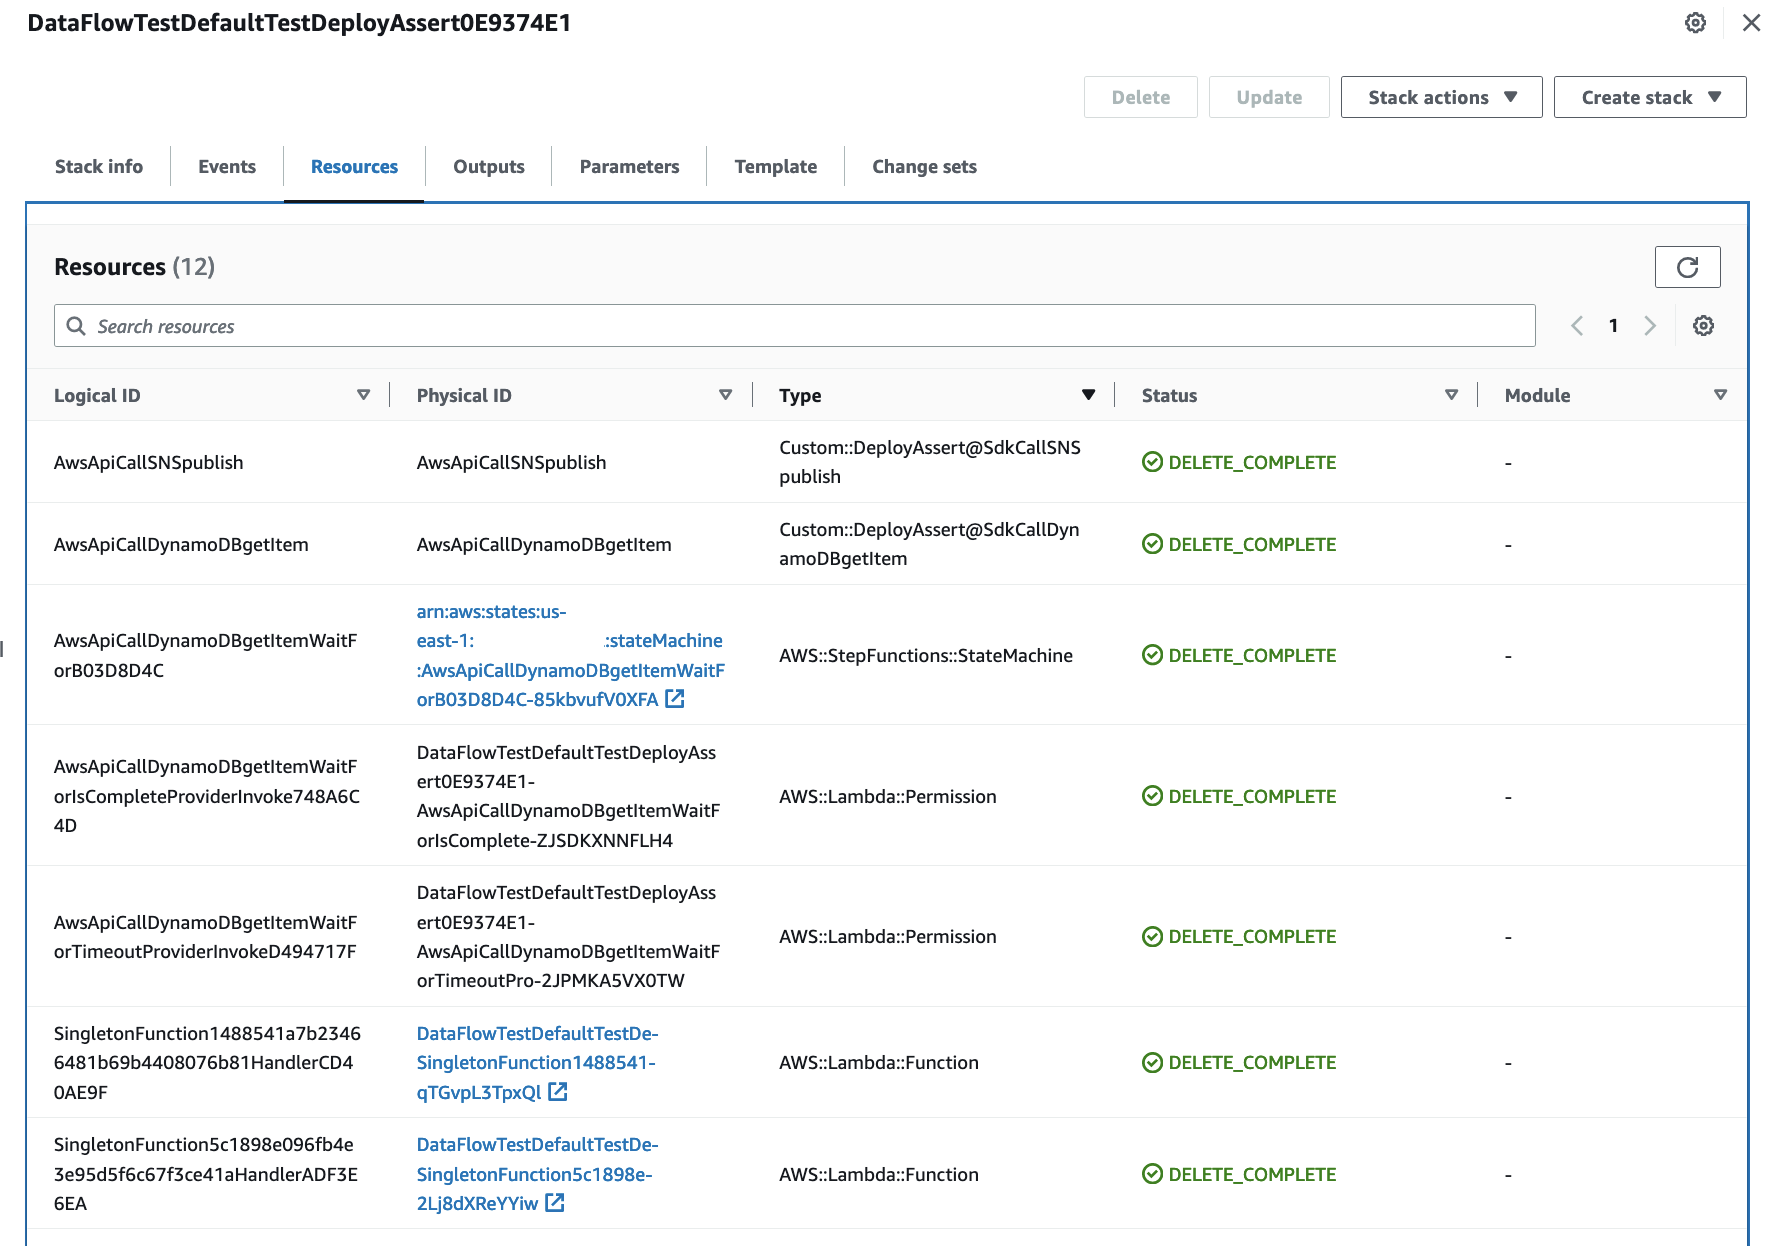
Figure 4: AWS CloudFormation resources for the DataFlowDefaultTestDeployAssert stack
Based on the specified RemovalPolicy, the resources are automatically destroyed as the stack is removed. Some resources such as Amazon DynamoDB tables have the default RemovalPolicy set to Retain in AWS CDK. To set the removal policy to Destroy for the integration test resources, we leverage Aspects.
/**
 * Aspect for setting all removal policies to DESTROY
 */
class ApplyDestroyPolicyAspect implements cdk.IAspect {
  public visit(node: IConstruct): void {
    if (node instanceof CfnResource) {
      node.applyRemovalPolicy(cdk.RemovalPolicy.DESTROY);
    }
  }
}
Figure 5: Deleting AWS CloudFormation stacks from the AWS Console
If you set the no-clean argument as part of the integ-runner CLI options, you need to manually destroy the stacks. This can be done from the AWS Console, via AWS CloudFormation as shown in Figure 5 or by using the following command.
cdk destroy --allTo clean up the code repository build files, you can run the following script.
npm run cleanThe AWS CDK integ-tests construct is a valuable tool for defining and conducting automated integration tests for your AWS CDK applications. In this blog post, we have introduced a practical code example showcasing how AWS CDK integration tests can be used to validate the expected application behavior when deployed to the cloud. You can leverage the techniques in this guide to write your own AWS CDK integration tests and improve the quality and reliability of your application releases.
For information on how to get started with these constructs, please refer to the following documentation.
Integ-runner and integ-tests constructs are experimental and subject to change. The release notes for both stable and experimental modules are available in the AWS CDK Github release notes. As always, we welcome bug reports, feature requests, and pull requests on the aws-cdk GitHub repository to further shape these alpha constructs based on your feedback.

