Protecting data on Apple devices with Cloudflare and Jamf

Post Syndicated from Mythili Prabhu original http://blog.cloudflare.com/protecting-data-on-apple-devices-with-cloudflare-and-jamf/
Protecting data on Apple devices with Cloudflare and Jamf

Protecting data on Apple devices with Cloudflare and Jamf

Today we’re excited to announce Cloudflare’s partnership with Jamf to extend Cloudflare’s Zero Trust Solutions to Jamf customers. This unique offering will enable Jamf customers to easily implement network Data Loss Prevention (DLP), Remote Browser Isolation (RBI), and SaaS Tenancy Controls from Cloudflare to prevent sensitive data loss from their Apple devices.

Jamf is a leader in protecting Apple devices and ensures secure, consumer-simple technology for 71,000+ businesses, schools and hospitals. Today Jamf manages ~30 million Apple devices with MDM, and our partnership extends powerful policy capabilities into the network.

“One of the most unforgettable lines I’ve heard from an enterprise customer is their belief that ‘Apple devices are like walking USB sticks that leave through the business’s front door every day.’ It doesn’t have to be that way! We are on a mission at Jamf to help our customers achieve the security and compliance controls they need to confidently support Apple devices at scale in their complex environments. While we are doing everything we can to reach this future, we can’t do it alone. I’m thrilled to be partnering with Cloudflare to deliver a set of enterprise-grade compliance controls in a novel way that leverages our combined next-generation cloud-native infrastructures to deliver a fast, highly-available end user experience.”
– Matt Vlasach, VP Product, Jamf

Integrated access with Jamf Security Cloud

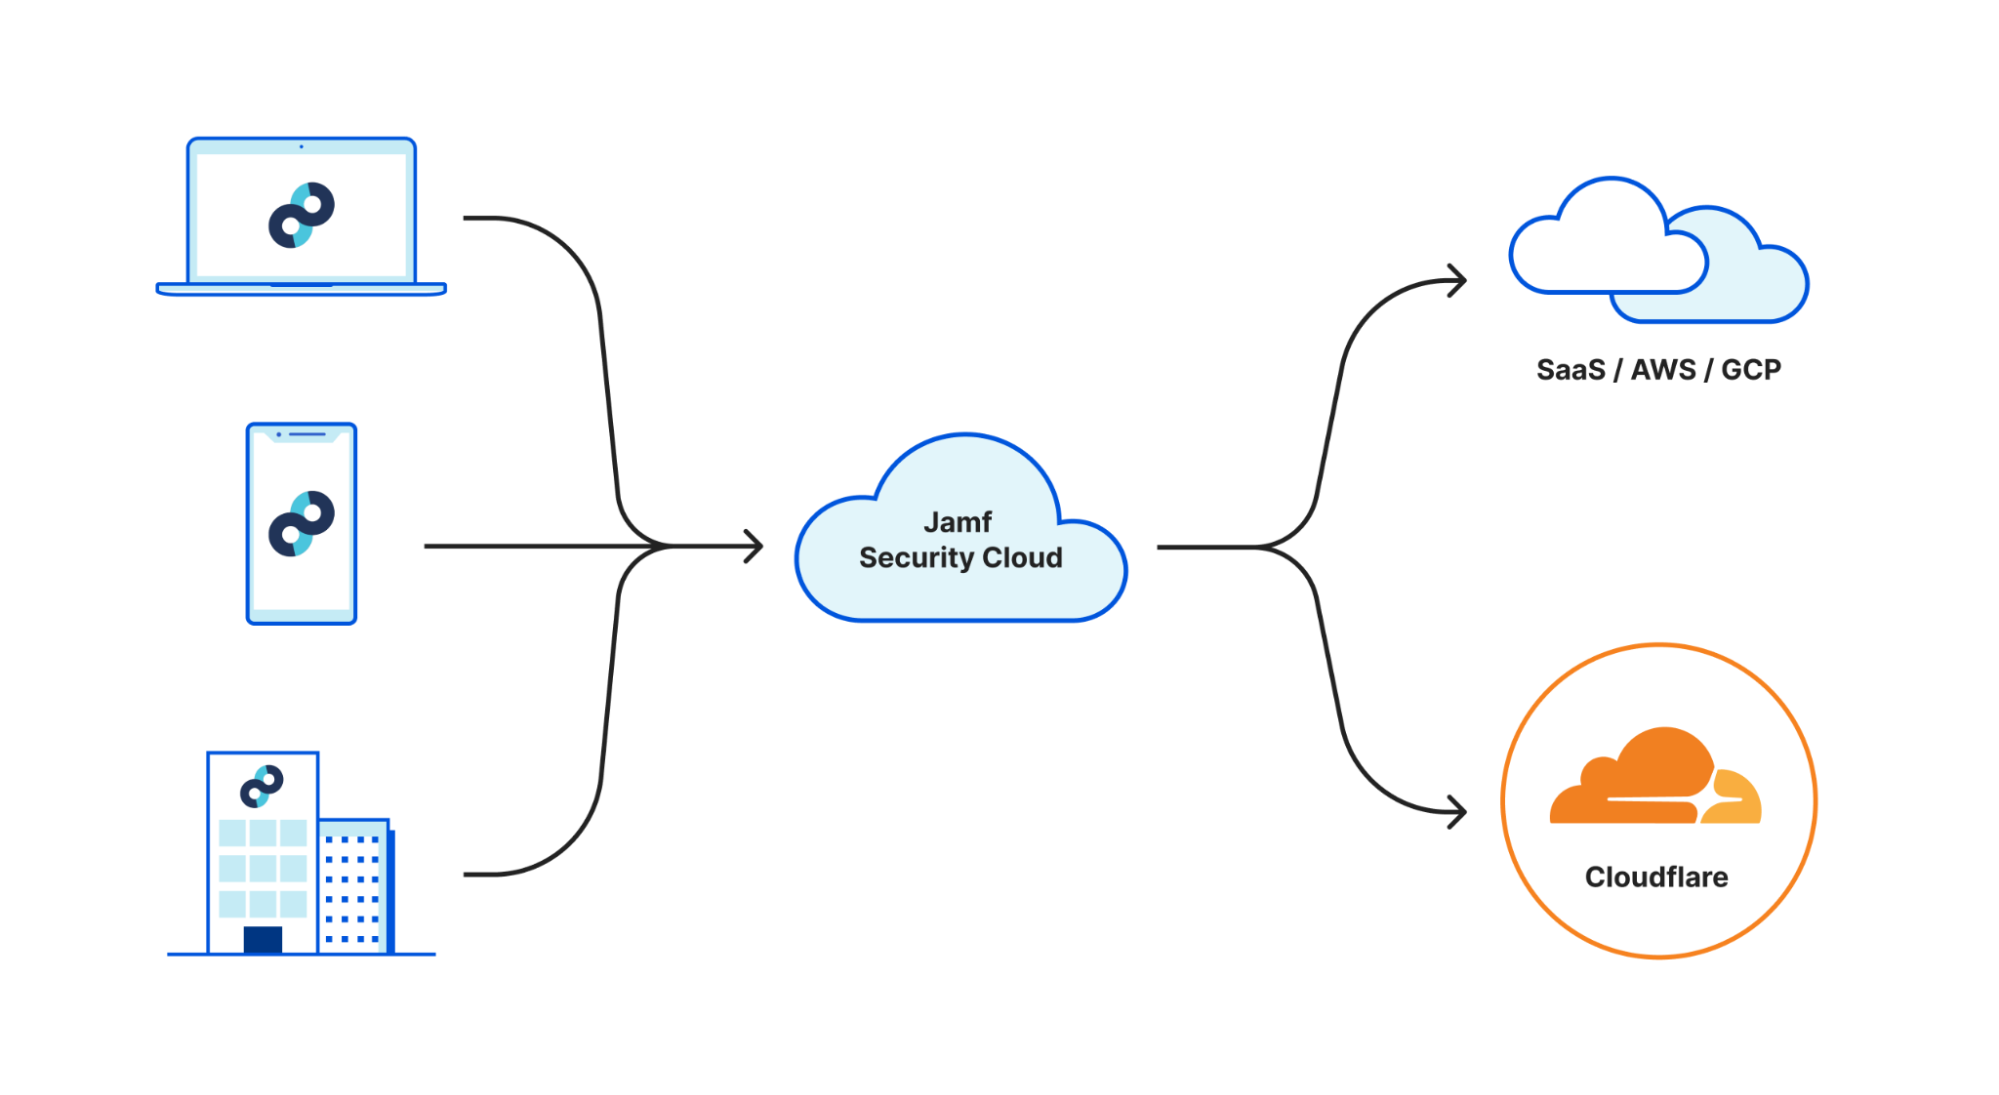
Jamf’s Apple-first Zero Trust Network Access (ZTNA) agent, Jamf Trust, is designed to seamlessly deploy via Jamf Pro with rich identity, endpoint security, and networking integrations that span the Jamf platform. All of these components work together as part of Jamf Security Cloud to protect laptop and mobile endpoints from network and endpoint threats while enabling fast, least-privilege access to company resources in the cloud or behind the firewall.

Through this partnership, Jamf customers can now dynamically steer select traffic to Cloudflare’s network using Magic WAN. This enables customers to unlock rich DLP capabilities, Remote Browser Isolation, and SaaS Tenancy Controls in a cloud-first, cloud-native architecture that works great on Apple devices.
Protecting data on Apple devices with Cloudflare and Jamf

Seamless integration to protect company data

While content inspection policies can be created, they cannot be applied to HTTPS traffic since content payloads are encrypted. This is a problem for organizations as it is common for sensitive data to live within an encrypted payload and bypass IT content inspection policies. 99.7% of all requests use HTTPS today and the usage has been seeing a steady increase.

To address this visibility gap, organizations can decrypt packets using HTTPS inspection. With Cloudflare Gateway, SSL/TLS decryption can be performed to inspect HTTPS traffic for security risks. When TLS decryption is enabled, Gateway will decrypt all traffic sent over HTTPS, apply your HTTP policies, and then re-encrypt the request with a user-side certificate. Jamf is able to seamlessly enable this process on managed devices.

Protect sensitive data with Data Loss Prevention

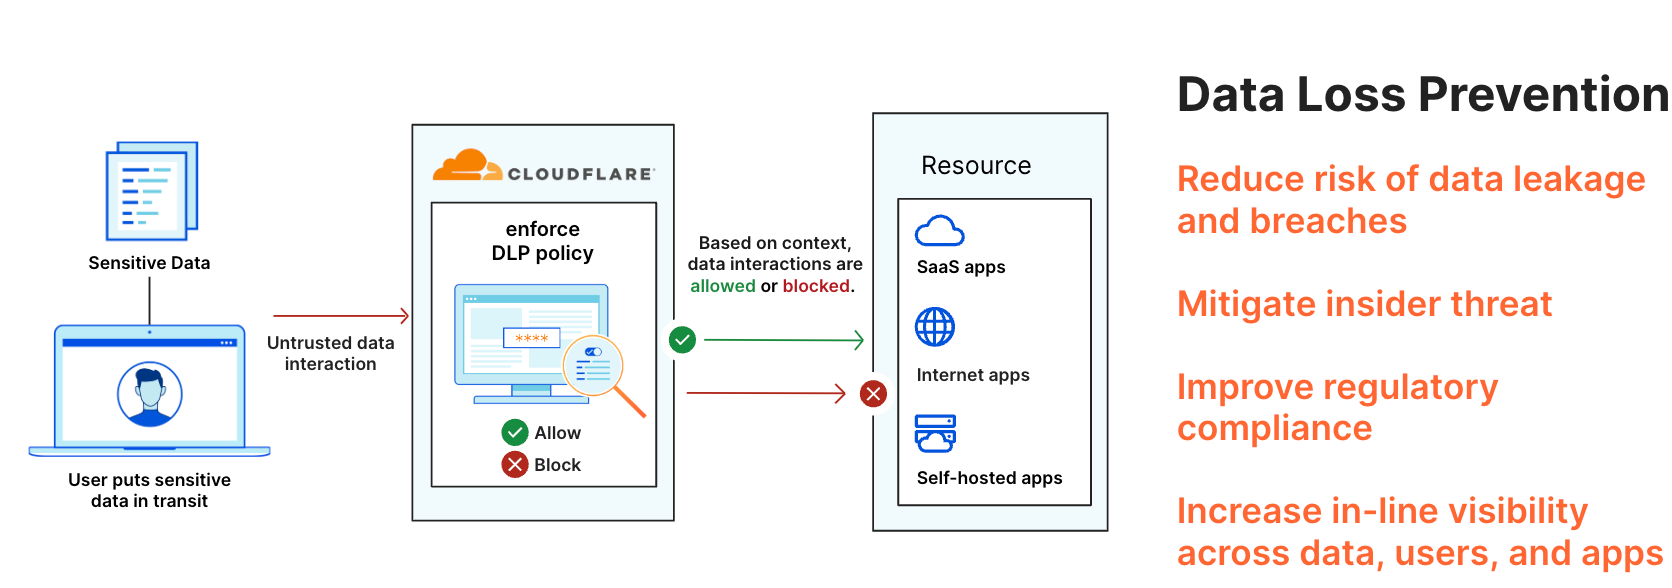
With the corporate network and employees being boundless, it is harder than ever to keep data secure. Sensitive data such as customer credit card information, social security numbers, API tokens, or confidential Microsoft Office documents are easily shared beyond your network boundary, intentionally or otherwise. This is made worse as attackers are increasingly tricking well-intentioned employees to inadvertently share sensitive data with hackers. Such data leaks are not uncommon and usually result in costly reputational and compliance damages.
Protecting data on Apple devices with Cloudflare and Jamf

Cloudflare’s Data Loss Prevention (DLP) allows for policies to be built in with ease to keep highly sensitive data secure. Cloudflare also provides predefined profiles for detecting financial information such as credit card numbers and national identifiers such as social security numbers or tax file numbers in addition to credentials and secrets such as GCP keys, AWS keys, Azure API keys, and SSH keys. On top of that, Cloudflare DLP allows for the creation of expanded regex profiles to detect custom keywords and phrases.

Steps to implement Cloudflare DLP with Jamf:

  1. In Jamf’s Security Cloud portal, configure a Magic WAN interconnect to your Cloudflare account.
  2. Create an access policy to route traffic for DLP inspection via your Cloudflare Magic WAN interconnect
    • Traffic may be matched by hostname, domain, or IP address/CIDR block
    • To route all traffic for inspection, define * for hostnames and 0.0.0.0/0 for IPs in the access policy. Note: this will be treated as the “gateway of last resort”, with other access policies matching first.
    • Optionally, enable “Restrict access when Jamf Trust is disabled” under the Security tab of the policy to prevent bypassing of DLP inspection for these resources.
  3. Configure a DLP policy in your Cloudflare One portal.
  4. In Jamf Pro, create a new Configuration Profile with the Cloudflare Gateway Root Certificate Authority and scope it to your target Apple devices.

Using Activation Profiles in Jamf Security Cloud, deploy Jamf Trust and supporting mobile configuration profiles to your end users to enable access to organization resources while enforcing DLP policies.

Isolate browser threats to thwart known and zero-day exploits

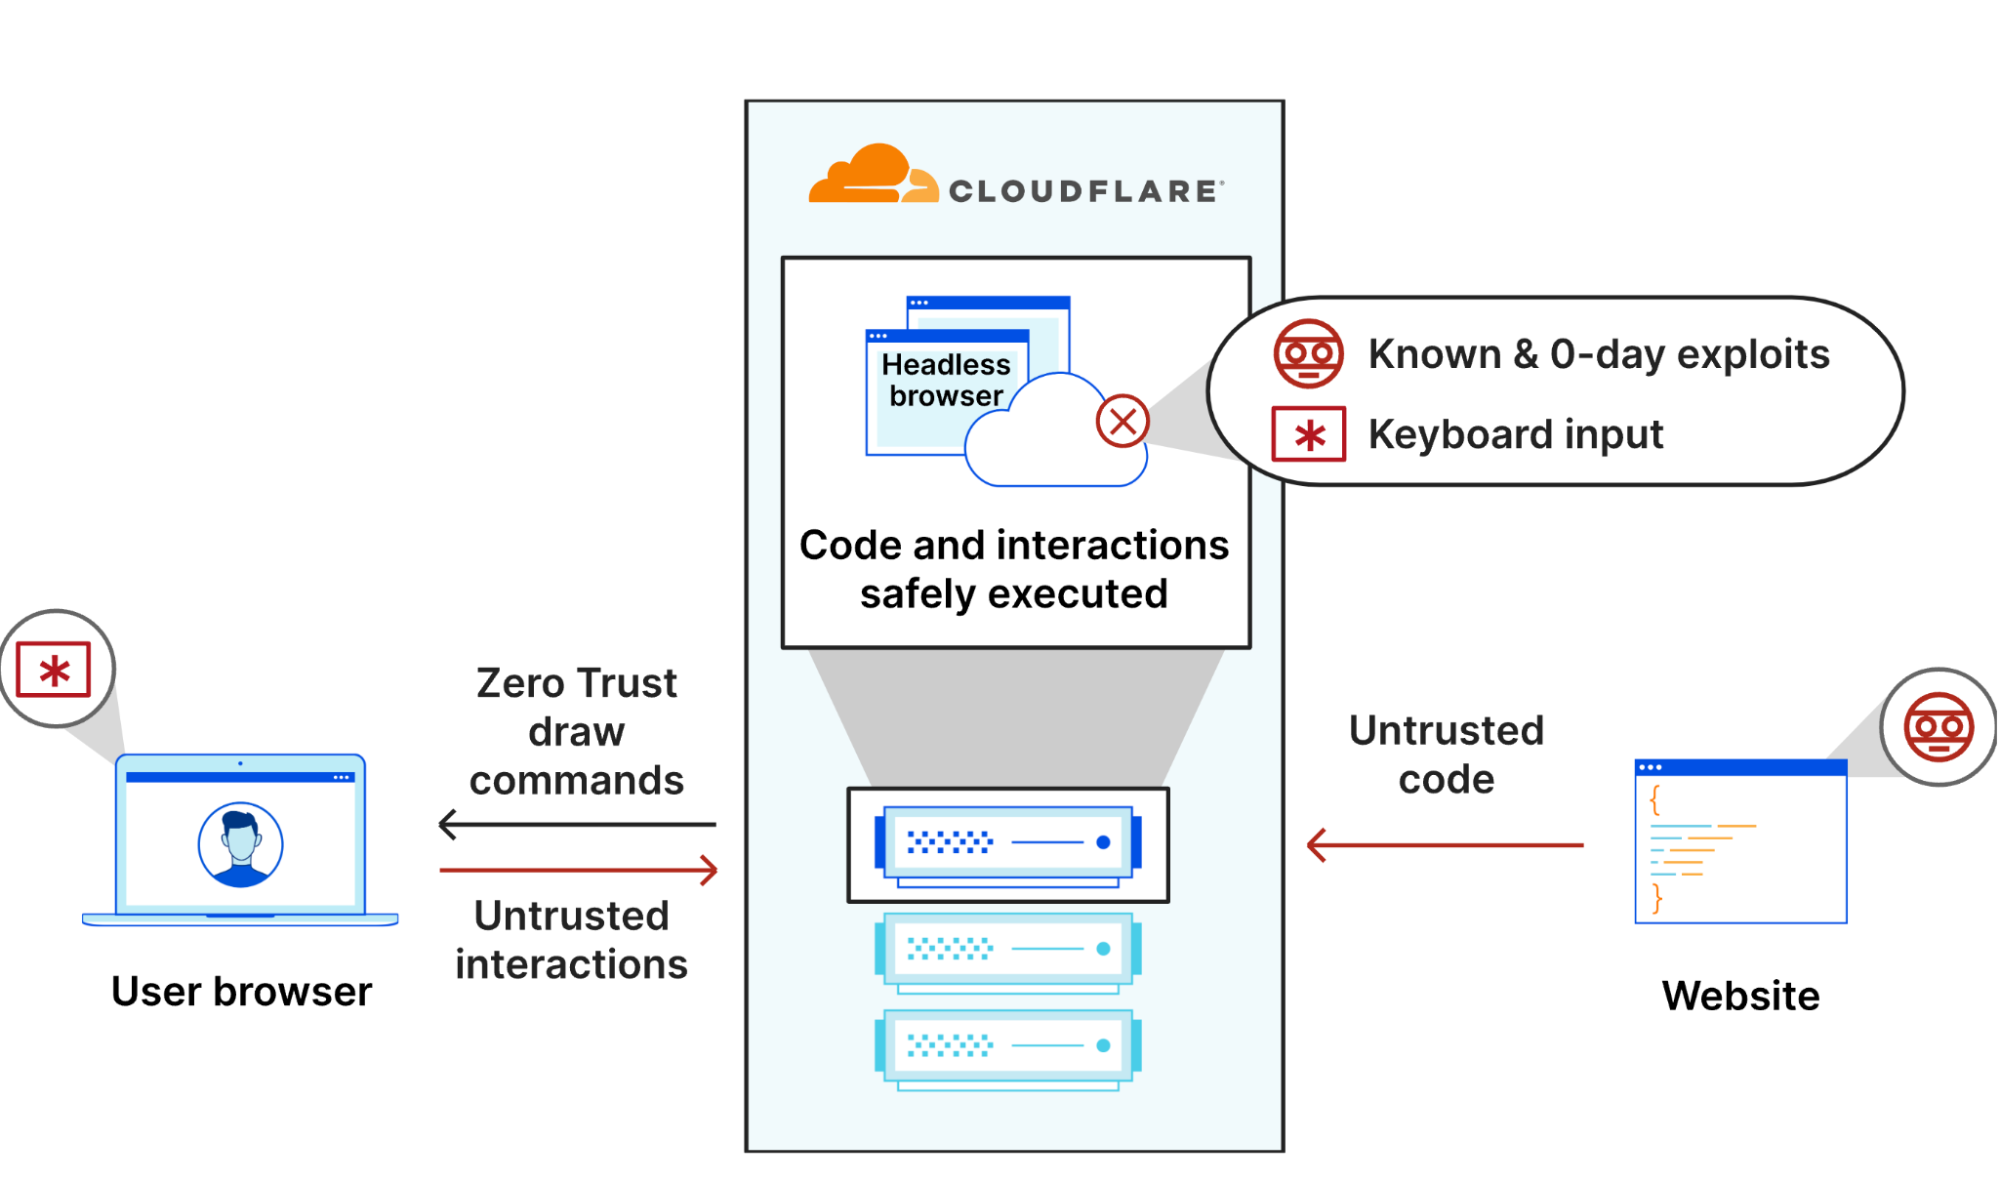
Firewalls, VPNs, network access controls help protect against attacks directed at internal networks. However, many attackers focus on exploiting web browsers due to their ubiquity and frequent use. Remote Browser Isolation aims to reduce an organization’s risk exposure by allowing access to any destination on the Internet, but protecting endpoints by using an isolated cloud environment to load content.
Protecting data on Apple devices with Cloudflare and Jamf

This works by actually loading web pages – and all of their potentially dangerous scripts and code – in a headless Chromium browser in Cloudflare’s global network. The visual and interactive elements that are loaded remotely are sent back to the user’s device via “draw” commands, essentially rendering visual objects in the browser as the user would expect. If a known or zero-day exploit is loaded, the user’s device is completely protected.

Another benefit of Remote Browser Isolation is granular, browser-specific Data Loss Prevention controls. This includes restricting download, upload, copy-paste, keyboard input, and printing functions on all or specific websites.

Steps to implement Remote Browser Isolation:

  1. In Jamf’s Security Cloud portal, configure a Magic WAN interconnect to your Cloudflare account.
  2. Configure an Access policy and specify the domains or hostnames to be rendered via remote browser isolation in the Cloudflare network
    • Be sure to include *.browser.run as a hostname in your Jamf access policy.
    • Configure the access policy to route traffic via the Cloudflare MagicWAN interconnect you configured above.
    • If you would like to subject all traffic that doesn't match another Jamf Access Policy, define * as the hostname to route all remaining traffic to RBI.
    • Optionally, enable “Restrict access when Jamf Trust is disabled” under the Security tab of the policy to prevent bypassing of RBI routing for the defined destinations.
  3. In your Cloudflare One console, enable Non-identity on-ramps in your Cloudflare One portal.
  4. Configure a Remote Browser Isolation policy in your Cloudflare One portal.
  5. In Jamf Pro, create a new Configuration Profile with the Cloudflare Gateway Root Certificate Authority and scope it to your target Apple devices.

Using Activation Profiles in Jamf Security Cloud, deploy Jamf Trust and supporting mobile configuration profiles to your end users to enable access to organization resources while enforcing remote browser isolation routing.

Safeguarding data with SaaS Tenancy Control for cloud services

Companies often rely on platforms like Google Workspace or Microsoft 365 for business collaboration and productivity, while individuals use these services for their personal use.

Allowing users to access these cloud services with both business and personal credentials from the same corporate endpoint poses a significant risk for unauthorized data access and loss. Imagine a scenario where an employee can log in into the corporate account of a SaaS application, download sensitive files, and then login into their personal account on the same company device to upload the stolen files to their personal SaaS application account.

Cloudflare's Gateway HTTP policies provide SaaS Tenancy Control to ensure that users can only log in to admin-defined SaaS provider tenants with their enterprise credentials, effectively blocking login ability to personal accounts or other business tenants within the defined SaaS provider.

Jamf's Access Policies serve as the initial assessment, determining if the users are authorized for the targeted cloud application and if they are requesting access from a company-sanctioned device.

Cloudflare's Gateway HTTP policy then processes the requests forwarded from Jamf to define the domains that are permitted to log in to that SaaS provider.

Steps to implement SaaS Tenancy Control:

  1. In Jamf’s Security Cloud portal, configure a Magic WAN interconnect to your Cloudflare account.
  2. Configure one or more Access policies that define the SaaS providers for which you would like to enable tenant controls. Use the below pre-defined SaaS app access policy templates for the respective SaaS provider:
    • “Microsoft Authentication” for Microsoft 365
    • “Google Apps” for Google Workspace
    • “Dropbox” for Dropbox and Dropbox for Business
    • “Slack” for Slack
  3. To ensure these policies are enforced on any network, enable “Restrict access when Jamf Trust is disabled” under the Security tab of the policy to prevent bypassing of these tenancy controls.
  4. Configure SaaS Tenant Control in your Cloudflare One portal.
  5. In Jamf Pro, create a new Configuration Profile with the Cloudflare Gateway Root Certificate Authority and scope it to your target Apple devices.
  6. Using Activation Profiles in Jamf Security Cloud, deploy Jamf Trust and supporting mobile configuration profiles to your end users to enable access to organization resources while enforcing remote browser isolation routing.

How to get started

If you are a Cloudflare customer and are interested in using this integration, please reach out to your account team with your questions and feedback.

If you are new to Cloudflare or Jamf and interested in using this integration with the Cloudflare Zero Trust product suite, please fill up this form and someone from our team will contact you.

Commentary on the Implementation Plan for the 2023 US National Cybersecurity Strategy

Post Syndicated from Bruce Schneier original https://www.schneier.com/blog/archives/2023/07/commentary-on-the-implementation-plan-for-the-2023-us-national-cybersecurity-strategy.html

The Atlantic Council released a detailed commentary on the White House’s new “Implementation Plan for the 2023 US National Cybersecurity Strategy.” Lots of interesting bits.

So far, at least three trends emerge:

First, the plan contains a (somewhat) more concrete list of actions than its parent strategy, with useful delineation of lead and supporting agencies, as well as timelines aplenty. By assigning each action a designated lead and timeline, and by including a new nominal section (6) focused entirely on assessing effectiveness and continued iteration, the ONCD suggests that this is not so much a standalone text as the framework for an annual, crucially iterative policy process. That many of the milestones are still hazy might be less important than the commitment. the administration has made to revisit this plan annually, allowing the ONCD team to leverage their unique combination of topical depth and budgetary review authority.

Second, there are clear wins. Open-source software (OSS) and support for energy-sector cybersecurity receive considerable focus, and there is a greater budgetary push on both technology modernization and cybersecurity research. But there are missed opportunities as well. Many of the strategy’s most difficult and revolutionary goals—­holding data stewards accountable through privacy legislation, finally implementing a working digital identity solution, patching gaps in regulatory frameworks for cloud risk, and implementing a regime for software cybersecurity liability—­have been pared down or omitted entirely. There is an unnerving absence of “incentive-shifting-focused” actions, one of the most significant overarching objectives from the initial strategy. This backpedaling may be the result of a new appreciation for a deadlocked Congress and the precarious present for the administrative state, but it falls short of the original strategy’s vision and risks making no progress against its most ambitious goals.

Third, many of the implementation plan’s goals have timelines stretching into 2025. The disruption of a transition, be it to a second term for the current administration or the first term of another, will be difficult to manage under the best of circumstances. This leaves still more of the boldest ideas in this plan in jeopardy and raises questions about how best to prioritize, or accelerate, among those listed here.

Dimensional modeling in Amazon Redshift

Post Syndicated from Bernard Verster original https://aws.amazon.com/blogs/big-data/dimensional-modeling-in-amazon-redshift/

Amazon Redshift is a fully managed and petabyte-scale cloud data warehouse that is used by tens of thousands of customers to process exabytes of data every day to power their analytics workload. You can structure your data, measure business processes, and get valuable insights quickly can be done by using a dimensional model. Amazon Redshift provides built-in features to accelerate the process of modeling, orchestrating, and reporting from a dimensional model.

In this post, we discuss how to implement a dimensional model, specifically the Kimball methodology. We discuss implementing dimensions and facts within Amazon Redshift. We show how to perform extract, transform, and load (ELT), an integration process focused on getting the raw data from a data lake into a staging layer to perform the modeling. Overall, the post will give you a clear understanding of how to use dimensional modeling in Amazon Redshift.

Solution overview

The following diagram illustrates the solution architecture.

In the following sections, we first discuss and demonstrate the key aspects of the dimensional model. After that, we create a data mart using Amazon Redshift with a dimensional data model including dimension and fact tables. Data is loaded and staged using the COPY command, the data in the dimensions is loaded using the MERGE statement, and facts will be joined to the dimensions where insights are derived from. We schedule the loading of the dimensions and facts using the Amazon Redshift Query Editor V2. Lastly, we use Amazon QuickSight to gain insights on the modeled data in the form of a QuickSight dashboard.

For this solution, we use a sample dataset (normalized) provided by Amazon Redshift for event ticket sales. For this post, we have narrowed down the dataset for simplicity and demonstration purposes. The following tables show examples of the data for ticket sales and venues.

According to the Kimball dimensional modeling methodology, there are four key steps in designing a dimensional model:

  1. Identify the business process.
  2. Declare the grain of your data.
  3. Identify and implement the dimensions.
  4. Identify and implement the facts.

Additionally, we add a fifth step for demonstration purposes, which is to report and analyze business events.

Prerequisites

For this walkthrough, you should have the following prerequisites:

Identify the business process

In simple terms, identifying the business process is identifying a measurable event that generates data within an organization. Usually, companies have some sort of operational source system that generates their data in its raw format. This is a good starting point to identify various sources for a business process.

The business process is then persisted as a data mart in the form of dimensions and facts. Looking at our sample dataset mentioned earlier, we can clearly see the business process is the sales made for a given event.

A common mistake made is using departments of a company as the business process. The data (business process) needs to be integrated across various departments, in this case, marketing can access the sales data. Identifying the correct business process is critical—getting this step wrong can impact the entire data mart (it can cause the grain to be duplicated and incorrect metrics on the final reports).

Declare the grain of your data

Declaring the grain is the act of uniquely identifying a record in your data source. The grain is used in the fact table to accurately measure the data and enable you to roll up further. In our example, this could be a line item in the sales business process.

In our use case, a sale can be uniquely identified by looking at the transaction time when the sale took place; this will be the most atomic level.

Identify and implement the dimensions

Your dimension table describes your fact table and its attributes. When identifying the descriptive context of your business process, you store the text in a separate table, keeping the fact table grain in mind. When joining the dimensions table to the fact table, there should only be a single row associated to the fact table. In our example, we use the following table to be separated into a dimensions table; these fields describe the facts that we will measure.

When designing the structure of the dimensional model (the schema), you can either create a star or snowflake schema. The structure should closely align with the business process; therefore, a star schema is best fit for our example. The following figure shows our Entity Relationship Diagram (ERD).

In the following sections, we detail the steps to implement the dimensions.

Stage the source data

Before we can create and load the dimensions table, we need source data. Therefore, we stage the source data into a staging or temporary table. This is often referred to as the staging layer, which is the raw copy of the source data. To do this in Amazon Redshift, we use the COPY command to load the data from the dimensional-modeling-in-amazon-redshift public S3 bucket located on the us-east-1 Region. Note that the COPY command uses an AWS Identity and Access Management (IAM) role with access to Amazon S3. The role needs to be associated with the cluster. Complete the following steps to stage the source data:

  1. Create the venue source table:
CREATE TABLE public.venue (
    venueid bigint,
    venuename character varying(100),
    venuecity character varying(30),
    venuestate character(2),
    venueseats bigint
) DISTSTYLE AUTO
        SORTKEY
    (venueid);
  1. Load the venue data:
COPY public.venue
FROM 's3://redshift-blogs/dimensional-modeling-in-amazon-redshift/venue.csv'
IAM_ROLE '<Your IAM role arn>'
DELIMITER ','
REGION 'us-east-1'
IGNOREHEADER 1
  1. Create the sales source table:
CREATE TABLE public.sales (
    salesid integer,
    venueid character varying(256),
    saletime timestamp without time zone,
    qtysold BIGINT,
    commission numeric(18,2),
    pricepaid numeric(18,2)
) DISTSTYLE AUTO;
  1. Load the sales source data:
COPY public.sales
FROM 's3://redshift-blogs/dimensional-modeling-in-amazon-redshift/sales.csv'
IAM_ROLE '<Your IAM role arn>'
DELIMITER ','
REGION 'us-east-1'
IGNOREHEADER 1
  1. Create the calendar table:
CREATE TABLE public.DimCalendar(
    dateid smallint,
        caldate date,
        day varchar(20),
        week smallint,
        month varchar(20),
        qtr varchar(20),
        year smallint,
        holiday boolean
) DISTSTYLE AUTO
SORTKEY
    (dateid);
  1. Load the calendar data:
COPY public.DimCalendar
FROM 's3://redshift-blogs/dimensional-modeling-in-amazon-redshift/date.csv'
IAM_ROLE '<Your IAM role arn>'
DELIMITER ',' 
REGION 'us-east-1'
IGNOREHEADER 1

Create the dimensions table

Designing the dimensions table can depend on your business requirement—for example, do you need to track changes to the data over time? There are seven different dimension types. For our example, we use type 1 because we don’t need to track historical changes. For more about type 2, refer to Simplify data loading into Type 2 slowly changing dimensions in Amazon Redshift. The dimensions table will be denormalized with a primary key, surrogate key, and a few added fields to indicate changes to the table. See the following code:

create schema SalesMart;
CREATE TABLE SalesMart.DimVenue( 
    "VenueSkey" int IDENTITY(1,1) primary key
    ,"VenueId" VARCHAR NOT NULL
    ,"VenueName" VARCHAR NULL
    ,"VenueCity" VARCHAR NULL
    ,"VenueState" VARCHAR NULL
    ,"VenueSeats" INT NULL
    ,"InsertedDate" DATETIME NOT NULL
    ,"UpdatedDate" DATETIME NOT NULL
) 
diststyle AUTO;

A few notes on creating the dimensions table creation:

  • The field names are transformed into business-friendly names
  • Our primary key is VenueID, which we use to uniquely identify a venue at which the sale took place
  • Two additional rows will be added, indicating when a record was inserted and updated (to track changes)
  • We are using an AUTO distribution style to give Amazon Redshift the responsibility to choose and adjust the distribution style

Another important factor to consider in dimensional modelling is the usage of surrogate keys. Surrogate keys are artificial keys that are used in dimensional modelling to uniquely identify each record in a dimension table. They are typically generated as a sequential integer, and they don’t have any meaning in the business domain. They offer several benefits, such as ensuring uniqueness and improving performance in joins, because they’re typically smaller than natural keys and as surrogate keys they don’t change over time. This allows us to be consistent and join facts and dimensions more easily.

In Amazon Redshift, surrogate keys are typically created using the IDENTITY keyword. For example, the preceding CREATE statement creates a dimension table with a VenueSkey surrogate key. The VenueSkey column is automatically populated with unique values as new rows are added to the table. This column can then be used to join the venue table to the FactSaleTransactions table.

A few tips for designing surrogate keys:

  • Use a small, fixed-width data type for the surrogate key. This will improve performance and reduce storage space.
  • Use the IDENTITY keyword, or generate the surrogate key using a sequential or GUID value. This will ensure that the surrogate key is unique and can’t be changed.

Load the dim table using MERGE

There are numerous ways to load your dim table. Certain factors need to be considered—for example, performance, data volume, and perhaps SLA loading times. With the MERGE statement, we perform an upsert without needing to specify multiple insert and update commands. You can set up the MERGE statement in a stored procedure to populate the data. You then schedule the stored procedure to run programmatically via the query editor, which we demonstrate later in the post. The following code creates a stored procedure called SalesMart.DimVenueLoad:

CREATE OR REPLACE PROCEDURE SalesMart.DimVenueLoad()
AS $$
BEGIN
MERGE INTO SalesMart.DimVenue USING public.venue as MergeSource
ON SalesMart.DimVenue.VenueId = MergeSource.VenueId
WHEN MATCHED
THEN
UPDATE
SET VenueName = ISNULL(MergeSource.VenueName, 'Unknown')
, VenueCity = ISNULL(MergeSource.VenueCity, 'Unknown')
, VenueState = ISNULL(MergeSource.VenueState, 'Unknown')
, VenueSeats = ISNULL(MergeSource.VenueSeats, -1)
, UpdatedDate = GETDATE()
WHEN NOT MATCHED
THEN
INSERT (
VenueId
, VenueName
, VenueCity
, VenueState
, VenueSeats
, UpdatedDate
, InsertedDate
)
VALUES (
ISNULL(MergeSource.VenueId, -1)
, ISNULL(MergeSource.VenueName, 'Unknown')
, ISNULL(MergeSource.VenueCity, 'Unknown')
, ISNULL(MergeSource.VenueState, 'Unknown')
, ISNULL(MergeSource.VenueSeats, -1)
, ISNULL(GETDATE() , '1900-01-01')
);
END;
$$
LANGUAGE plpgsql;

A few notes on the dimension loading:

  • When a record in inserted for the first time, the inserted date and updated date will be populated. When any values change, the data is updated and the updated date reflects the date when it was changed. The inserted date remains.
  • Because the data will be used by business users, we need to replace NULL values, if any, with more business-appropriate values.

Identify and implement the facts

Now that we have declared our grain to be the event of a sale that took place at a specific time, our fact table will store the numeric facts for our business process.

We have identified the following numerical facts to measure:

  • Quantity of tickets sold per sale
  • Commission for the sale

Implementing the Fact

There are three types of fact tables (transaction fact table, periodic snapshot fact table, and accumulating snapshot fact table). Each serves a different view of the business process. For our example, we use a transaction fact table. Complete the following steps:

  1. Create the fact table
CREATE TABLE SalesMart.FactSaleTransactions( 
    CalendarDate date NOT NULL
    ,SaleTransactionTime DATETIME NOT NULL
    ,VenueSkey INT NOT NULL
    ,QuantitySold BIGINT NOT NULL
    ,SaleComission NUMERIC NOT NULL
    ,InsertedDate DATETIME DEFAULT GETDATE()
) diststyle AUTO;

An inserted date with a default value is added, indicating if and when a record was loaded. You can use this when reloading the fact table to remove the already loaded data to avoid duplicates.

Loading the fact table consists of a simple insert statement joining your associated dimensions. We join from the DimVenue table that was created, which describes our facts. It’s best practice but optional to have calendar date dimensions, which allow the end-user to navigate the fact table. Data can either be loaded when there is a new sale, or daily; this is where the inserted date or load date comes in handy.

We load the fact table using a stored procedure and use a date parameter.

  1. Create the stored procedure with the following code. To keep the same data integrity that we applied in the dimension load, we replace NULL values, if any, with more business appropriate values:
create or replace procedure SalesMart.FactSaleTransactionsLoad(loadate datetime)
language plpgsql
as
    $$
begin
--------------------------------------------------------------------
/*** Delete records loaded for the day, should there be any ***/
--------------------------------------------------------------------
Delete from SalesMart.FactSaleTransactions
where cast(InsertedDate as date) = CAST(loadate as date);
RAISE INFO 'Deleted rows for load date: %', loadate;
--------------------------------------------------------------------
/*** Insert records ***/
--------------------------------------------------------------------
INSERT INTO SalesMart.FactSaleTransactions (
CalendarDate    
,SaleTransactionTime    
,VenueSkey  
,QuantitySold  
,Salecomission
)
SELECT DISTINCT
    ISNULL(c.caldate, '1900-01-01') as CalendarDate
    ,ISNULL(a.saletime, '1900-01-01') as SaleTransactionTime
    ,ISNULL(b.VenueSkey, -1) as VenueSkey
    ,ISNULL(a.qtysold, 0) as QuantitySold
    ,ISNULL(a.commission, 0) as SaleComission
FROM
    public.sales as a
 
LEFT JOIN SalesMart.DimVenue as b
on a.venueid = b.venueid
 
LEFT JOIN public.DimCalendar as c
on to_char(a.saletime,'YYYYMMDD') = to_char(c.caldate,'YYYYMMDD');
--Optional filter, should you want to load only the latest data from source
--where cast(a.saletime as date) = cast(loadate as date);
  
end;
$$;
  1. Load the data by calling the procedure with the following command:
call SalesMart.FactSaleTransactionsLoad(getdate())

Schedule the data load

We can now automate the modeling process by scheduling the stored procedures in Amazon Redshift Query Editor V2. Complete the following steps:

  1. We first call the dimension load and after the dimension load runs successfully, the fact load begins:
BEGIN;
----Insert Dim Loads
call SalesMart.DimVenueLoad();

----Insert Fact Loads. They will only run if the DimLoad is successful
call SalesMart.FactSaleTransactionsLoad(getdate());
END;

If the dimension load fails, the fact load will not run. This ensures consistency in the data because we don’t want to load the fact table with outdated dimensions.

  1. To schedule the load, choose Schedule in Query Editor V2.

  1. We schedule the query to run every day at 5:00 AM.
  2. Optionally, you can add failure notifications by enabling Amazon Simple Notification Service (Amazon SNS) notifications.

Report and analysis the data in Amazon Quicksight

QuickSight is a business intelligence service that makes it easy to deliver insights. As a fully managed service, QuickSight lets you easily create and publish interactive dashboards that can then be accessed from any device and embedded into your applications, portals, and websites.

We use our data mart to visually present the facts in the form of a dashboard. To get started and set up QuickSight, refer to Creating a dataset using a database that’s not autodiscovered.

After you create your data source in QuickSight, we join the modeled data (data mart) together based on our surrogate key skey. We use this dataset to visualize the data mart.

Our end dashboard will contain the insights of the data mart and answer critical business questions, such as total commission per venue and dates with the highest sales. The following screenshot shows the final product of the data mart.

Clean up

To avoid incurring future charges, delete any resources you created as part of this post.

Conclusion

We have now successfully implemented a data mart using our DimVenue, DimCalendar, and FactSaleTransactions tables. Our warehouse is not complete; as we can expand the data mart with more facts and implement more marts, and as the business process and requirements grow over time, so will the data warehouse. In this post, we gave an end-to-end view on understanding and implementing dimensional modeling in Amazon Redshift.

Get started with your Amazon Redshift dimensional model today.


About the Authors

Bernard Verster is an experienced cloud engineer with years of exposure in creating scalable and efficient data models, defining data integration strategies, and ensuring data governance and security. He is passionate about using data to drive insights, while aligning with business requirements and objectives.

Abhishek Pan is a WWSO Specialist SA-Analytics working with AWS India Public sector customers. He engages with customers to define data-driven strategy, provide deep dive sessions on analytics use cases, and design scalable and performant analytical applications. He has 12 years of experience and is passionate about databases, analytics, and AI/ML. He is an avid traveler and tries to capture the world through his camera lens.
[$] Rust for embedded

Post Syndicated from original https://lwn.net/Articles/938409/

The advantages of the Rust programming language are generally well-known;
memory safety is a feature that has attracted a lot of developer attention
over the last few years. At the inaugural Embedded
Open Source Summit
(EOSS), which is an umbrella event for numerous
embedded-related conferences, Martin Mosler presented on using Rust for an
embedded project. In the talk, he showed how easy it is to get up and
running with a Rust-based application on a RISC-V-based development board.

Protect APIs with Amazon API Gateway and perimeter protection services

Post Syndicated from Pengfei Shao original https://aws.amazon.com/blogs/security/protect-apis-with-amazon-api-gateway-and-perimeter-protection-services/

As Amazon Web Services (AWS) customers build new applications, APIs have been key to driving the adoption of these offerings. APIs simplify client integration and provide for efficient operations and management of applications by offering standard contracts for data exchange. APIs are also the front door to hosted applications that need to be effectively secured, monitored, and metered to provide resilient infrastructure.

In this post, we will discuss how to help protect your APIs by building a perimeter protection layer with Amazon CloudFront, AWS WAF, and AWS Shield and putting it in front of Amazon API Gateway endpoints. Amazon API Gateway is a fully managed AWS service that you can use to create, publish, maintain, monitor, and secure REST, HTTP, and WebSocket APIs at any scale.

Solution overview

CloudFront, AWS WAF, and Shield provide a layered security perimeter that co-resides at the AWS edge and provides scalable, reliable, and high-performance protection for applications and content. For more information, see the AWS Best Practices for DDoS Resiliency whitepaper.

By using CloudFront as the front door to APIs that are hosted on API Gateway, globally distributed API clients can get accelerated API performance. API Gateway endpoints that are hosted in an AWS Region gain access to scaled distributed denial of service (DDoS) mitigation capacity across the AWS global edge network.

When you protect CloudFront distributions with AWS WAF, you can protect your API Gateway API endpoints against common web exploits and bots that can affect availability, compromise security, or consume excessive resources. AWS Managed Rules for AWS WAF help provide protection against common application vulnerabilities or other unwanted traffic, without the need for you to write your own rules. AWS WAF rate-based rules automatically block traffic from source IPs when they exceed the thresholds that you define, which helps to protect your application against web request floods, and alerts you to sudden spikes in traffic that might indicate a potential DDoS attack.

Shield mitigates infrastructure layer DDoS attacks against CloudFront distributions in real time, without observable latency. When you protect a CloudFront distribution with Shield Advanced, you gain additional detection and mitigation against large and sophisticated DDoS attacks, near real-time visibility into attacks, and integration with AWS WAF. When you configure Shield Advanced automatic application layer DDoS mitigation, Shield Advanced responds to application layer (layer 7) attacks by creating, evaluating, and deploying custom AWS WAF rules.

To take advantage of the perimeter protection layer built with CloudFront, AWS WAF, and Shield, and to help avoid exposing API Gateway endpoints directly, you can use the following approaches to restrict API access through CloudFront only. For more information about these approaches, see the Security Overview of Amazon API Gateway whitepaper.

  1. CloudFront can insert the X-API-Key header before it forwards the request to API Gateway, and API Gateway validates the API key when receiving the requests. For more information, see Protecting your API using Amazon API Gateway and AWS WAF — Part 2.
  2. CloudFront can insert a custom header (not X-API-Key) with a known secret that is shared with API Gateway. An AWS Lambda custom request authorizer that is configured in API Gateway validates the secret. For more information, see Restricting access on HTTP API Gateway Endpoint with Lambda Authorizer.
  3. CloudFront can sign the request with AWS Signature Version 4 by using Lambda@Edge before it sends the request to API Gateway. Configured AWS Identity and Access Management (IAM) authorization in API Gateway validates the signature and verifies the identity of the requester.

Although the X-API-Key header approach is straightforward to implement at a lower cost, it’s only applicable to customers who are using REST API endpoints. If the X-API-Key header already exists, CloudFront will overwrite it. The custom header approach addresses this limitation, but it has an additional cost due to the use of the Lambda authorizer. With both approaches, there is an operational overhead for managing keys and rotating the keys periodically. Also, it isn’t a security best practice to use long-term secrets for authorization.

By using the AWS Signature Version 4 approach, you can minimize this type of operational overhead through the use of requests signed with Signature Version 4 in Lambda@Edge. The signing uses temporary credentials that AWS Security Token Service (AWS STS) provides, and built-in API Gateway IAM authorization performs the request signature validation. There is an additional Lambda@Edge cost in this approach. This approach supports the three API endpoint types available in API Gateway — REST, HTTP, and WebSocket — and it helps secure requests by verifying the identity of the requester, protecting data in transit, and protecting against potential replay attacks. We describe this approach in detail in the next section.

Solution architecture

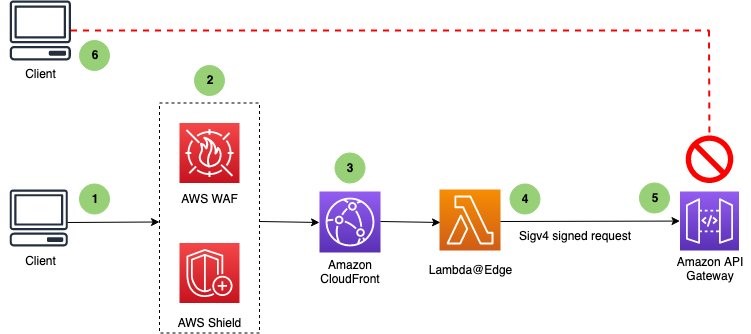
Figure 1 shows the architecture of the Signature Version 4 solution.

Figure 1: High-level flow of a client request with sequence of events

Figure 1: High-level flow of a client request with sequence of events

The sequence of events that occurs when the client sends a request is as follows:

  1. A client sends a request to an API endpoint that is fronted by CloudFront.
  2. AWS WAF inspects the request at the edge location according to the web access control list (web ACL) rules that you configured. With Shield Advanced automatic application-layer mitigation enabled, when Shield Advanced detects a DDoS attack and identifies the attack signatures, Shield Advanced creates AWS WAF rules inside an associated web ACL to mitigate the attack.
  3. CloudFront handles the request and invokes the Lambda@Edge function before sending the request to API Gateway.
  4. The Lambda@Edge function signs the request with Signature Version 4 by adding the necessary headers.
  5. API Gateway verifies the Lambda@Edge function with the necessary permissions and sends the request to the backend.
  6. An unauthorized client sends a request to an API Gateway endpoint, and it receives the HTTP 403 Forbidden message.

Solution deployment

The sample solution contains the following main steps:

  1. Preparation
  2. Deploy the CloudFormation template
  3. Enable IAM authorization in API Gateway
  4. Confirm successful viewer access to the CloudFront URL
  5. Confirm that direct access to the API Gateway API URL is blocked
  6. Review the CloudFront configuration
  7. Review the Lambda@Edge function and its IAM role
  8. Review the AWS WAF web ACL configuration
  9. (Optional) Protect the CloudFront distribution with Shield Advanced

Step 1: Preparation

Before you deploy the solution, you will first need to create an API Gateway endpoint.

To create an API Gateway endpoint

  1. Choose the following Launch Stack button to launch a CloudFormation stack in your account.

    Select this image to open a link that starts building the CloudFormation stack

    Note: The stack will launch in the US East (N. Virginia) Region (us-east-1). To deploy the solution to another Region, download the solution’s CloudFormation template, and deploy it to the selected Region.

    When you launch the stack, it creates an API called PetStoreAPI that is deployed to the prod stage.

  2. In the Stages navigation pane, expand the prod stage, select GET on /pets/{petId}, and then copy the Invoke URL value of https://api-id.execute-api.region.amazonaws.com/prod/pets/{petId}. {petId} stands for a path variable.
  3. In the address bar of a browser, paste the Invoke URL value. Make sure to replace {petId} with your own information (for example, 1), and press Enter to submit the request. A 200 OK response should return with the following JSON payload:
    {
      "id": 1,
      "type": "dog",
      "price": 249.99
    }

In this post, we will refer to this API Gateway endpoint as the CloudFront origin.

Step 2: Deploy the CloudFormation template

The next step is to deploy the CloudFormation template of the solution.

The CloudFormation template includes the following:

  • A CloudFront distribution that uses an API Gateway endpoint as the origin
  • An AWS WAF web ACL that is associated with the CloudFront distribution
  • A Lambda@Edge function that is used to sign the request with Signature Version 4 and that the CloudFront distribution invokes before the request is forwarded to the origin on the CloudFront distribution
  • An IAM role for the Lambda@Edge function

To deploy the CloudFormation template

  1. Choose the following Launch Stack button to launch a CloudFormation stack in your account.

    Select this image to open a link that starts building the CloudFormation stack

    Note: The stack will launch in the US East N. Virginia Region (us-east-1). To deploy the solution to another Region, download the solution’s CloudFormation template, provide the required parameters, and deploy it to the selected Region.

  2. On the Specify stack details page, update with the following:
    1. For Stack name, enter APIProtection
    2. For the parameter APIGWEndpoint, enter the API Gateway endpoint in the following format. Make sure to replace <Region> with your own information.

    {api-id}.execute-api.<Region>.amazonaws.com

  3. Choose Next to continue the stack deployment.

It takes a couple of minutes to finish the deployment. After it finishes, the Output tab lists the CloudFront domain URL, as shown in Figure 2.

Figure 2: CloudFormation template output

Figure 2: CloudFormation template output

Step 3: Enable IAM authorization in API Gateway

Before you verify the solution, you will enable IAM authorization on the API endpoint first, which enforces Signature Version 4 verification at API Gateway. The following steps are applied for a REST API; you could also enable IAM authorization on an HTTP API or WebSocket API.

To enable IAM authorization in API Gateway

  1. In the API Gateway console, choose the name of your API.
  2. In the Resources pane, choose the GET method for the resource /pets. In the Method Execution pane, choose Method Request.
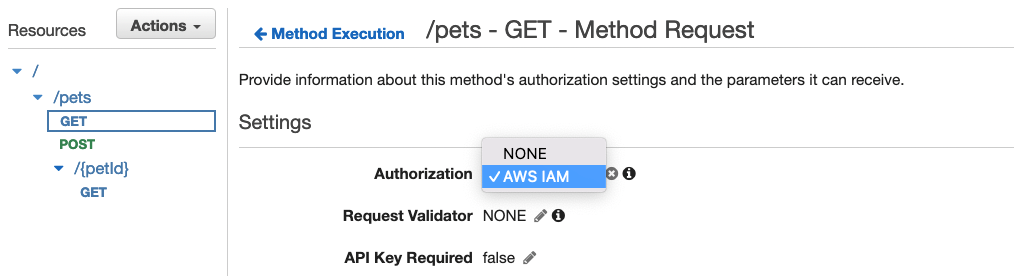
  3. Under Settings, for Authorization, choose the pencil icon (Edit). Then, in the dropdown list, choose AWS_IAM, and choose the check mark icon (Update).
  4. Repeat steps 2 and 3 for the resource /pets/{petId}.
  5. Deploy your API so that the changes take effect. When deploying, choose prod as the stage.
Figure 3: Enable IAM authorization in API Gateway

Figure 3: Enable IAM authorization in API Gateway

Step 4: Confirm successful viewer access to the CloudFront URL

Now that you’ve deployed the setup, you can verify that you are able to access the API through the CloudFront distribution.

To confirm viewer access through CloudFront

  1. In the CloudFormation console, choose the APIProtection stack.
  2. On the stack Outputs tab, copy the value for the CFDistribution entry and append /prod/pets to it, then open the URL in a new browser tab or window. The result should look similar to the following, which confirms successful viewer access through CloudFront.
    Figure 4: Successful API response when accessing API through CloudFront distribution

    Figure 4: Successful API response when accessing API through CloudFront distribution

Step 5: Confirm that direct access to the API Gateway API URL is blocked

Next, verify whether direct access to the API Gateway API endpoint is blocked.

Copy your API Gateway endpoint URL and append /prod/pets to it, then open the URL in a new browser tab or window. The result should look similar to the following, which confirms that direct viewer access through API Gateway is blocked.

Figure 5: API error response when attempting to access API Gateway directly

Figure 5: API error response when attempting to access API Gateway directly

Step 6: Review CloudFront configuration

Now that you’ve confirmed that access to the API Gateway endpoint is restricted to CloudFront only, you will review the CloudFront configuration that enables this restriction.

To review the CloudFront configuration

  1. In the CloudFormation console, choose the APIProtection stack. On the stack Resources tab, under the CFDistribution entry, copy the distribution ID.
  2. In the CloudFront console, select the distribution that has the distribution ID that you noted in the preceding step. On the Behaviors tab, select the behavior with path pattern Default (*).
  3. Choose Edit and scroll to the Cache key and origin requests section. You can see that Origin request policy is set to AllViewerExceptHostHeader, which allows CloudFront to forward viewer headers, cookies, and query strings to origins except the Host header. This policy is intended for use with the API Gateway origin.
  4. Scroll down to the Function associations – optional section.
    Figure 6: CloudFront configuration – Function association with origin request

    Figure 6: CloudFront configuration – Function association with origin request

    You can see that a Lambda@Edge function is associated with the origin request event; CloudFront invokes this function before forwarding requests to the origin. You can also see that the Include body option is selected, which exposes the request body to Lambda@Edge for HTTP methods like POST/PUT, and the request payload hash will be used for Signature Version 4 signing in the Lambda@Edge function.

Step 7: Review the Lambda@Edge function and its IAM role

In this step, you will review the Lambda@Edge function code and its IAM role, and learn how the function signs the request with Signature Version 4 before forwarding to API Gateway.

To review the Lambda@Edge function code

  1. In the CloudFormation console, choose the APIProtection stack.
  2. On the stack Resources tab, choose the Sigv4RequestLambdaFunction link to go to the Lambda function, and review the function code. You can see that it follows the Signature Version 4 signing process and uses an AWS access key to calculate the signature. The AWS access key is a temporary security credential provided when the IAM role for Lambda is being assumed.

To review the IAM role for Lambda

  1. In the CloudFormation console, choose the APIProtection stack.
  2. On the stack Resources tab, choose the Sigv4RequestLambdaFunctionExecutionRole link to go to the IAM role. Expand the permission policy to review the permissions. You can see that the policy allows the API Gateway endpoint to be invoked.
            {
                "Action": [
                    "execute-api:Invoke"
                ],
                "Resource": [
                    "arn:aws:execute-api:<region>:<account-id>:<api-id>/*/*/*"
                ],
                "Effect": "Allow"
            }

Because IAM authorization is enabled, when API Gateway receives the request, it checks whether the client has execute-api:Invoke permission for the API and route before handling the request.

Step 8: Review AWS WAF web ACL configuration

In this step, you will review the web ACL configuration in AWS WAF.

AWS Managed Rules for AWS WAF helps provide protection against common application vulnerabilities or other unwanted traffic. The web ACL for this solution includes several AWS managed rule groups as an example. The Amazon IP reputation list managed rule group helps to mitigate bots and reduce the risk of threat actors by blocking problematic IP addresses. The Core rule set (CRS) managed rule group helps provide protection against exploitation of a wide range of vulnerabilities, including some of the high risk and commonly occurring vulnerabilities described in the OWASP Top 10. The Known bad inputs managed rule group helps to reduce the risk of threat actors by blocking request patterns that are known to be invalid and that are associated with exploitation or discovery of vulnerabilities, like Log4J.

AWS WAF supports rate-based rules to block requests originating from IP addresses that exceed the set threshold per 5-minute time span, until the rate of requests falls below the threshold. We have used one such rule in the following example, but you could layer the rules for better security posture. You can configure multiple rate-based rules, each with a different threshold and scope (like URI, IP list, or country) for better protection. For more information on best practices for AWS WAF rate-based rules, see The three most important AWS WAF rate-based rules.

To review the web ACL configuration

  1. In the CloudFormation console, choose the APIProtection stack.
  2. On the stack Outputs tab, choose the EdgeLayerWebACL link to go to the web ACL configuration, and then choose the Rules tab to review the rules for this web ACL. On the Rules tab, you can see that the web ACL includes the following rule and rule groups.
    Figure 7: AWS WAF web ACL configuration

    Figure 7: AWS WAF web ACL configuration

  3. Choose the Associated AWS resources tab. You should see that the CloudFront distribution is associated to this web ACL.

Step 9: (Optional) Protect the CloudFront distribution with Shield Advanced

In this optional step, you will protect your CloudFront distribution with Shield Advanced. This adds additional protection on top of the protection provided by AWS WAF managed rule groups and rate-based rules in the web ACL that is associated with the CloudFront distribution.

Note: Proceed with this step only if you have subscribed to an annual subscription to Shield Advanced.

AWS Shield is a managed DDoS protection service that is offered in two tiers: AWS Shield Standard and AWS Shield Advanced. All AWS customers benefit from the automatic protection of Shield Standard, at no additional cost. Shield Standard helps defend against the most common, frequently occurring network and transport layer DDoS attacks that target your website or applications. AWS Shield Advanced is a paid service that requires a 1-year commitment—you pay one monthly subscription fee, plus usage fees based on gigabytes (GB) of data transferred out. Shield Advanced provides expanded DDoS attack protection for your applications.

Besides providing visibility and additional detection and mitigation against large and sophisticated DDoS attacks, Shield Advanced also gives you 24/7 access to the Shield Response Team (SRT) and cost protection against spikes in your AWS bill that might result from a DDoS attack against your protected resources. When you use both Shield Advanced and AWS WAF to help protect your resources, AWS waives the basic AWS WAF fees for web ACLs, rules, and web requests for your protected resources. You can grant permission to the SRT to act on your behalf, and also configure proactive engagement so that SRT contacts you directly when the availability and performance of your application is impacted by a possible DDoS attack.

Shield Advanced automatic application-layer DDoS mitigation compares current traffic patterns to historic traffic baselines to detect deviations that might indicate a DDoS attack. When you enable automatic application-layer DDoS mitigation, if your protected resource doesn’t yet have a history of normal application traffic, we recommend that you set to Count mode until a history of normal application traffic has been established. Shield Advanced establishes baselines that represent normal traffic patterns after protecting resources for at least 24 hours and is most accurate after 30 days. To mitigate against application layer attacks automatically, change the AWS WAF rule action to Block after you’ve established a normal traffic baseline.

To help protect your CloudFront distribution with Shield Advanced

  1. In the WAF & Shield console, in the AWS Shield section, choose Protected Resources, and then choose Add resources to protect.
  2. For Resource type, select CloudFront distribution, and then choose Load resources.
  3. In the Select resources section, select the CloudFront distribution that you used in Step 6 of this post. Then choose Protect with Shield Advanced.
  4. In the Automatic application layer DDoS mitigation section, choose Enable. Leave the AWS WAF rule action as Count, and then choose Next.
  5. (Optional, but recommended) Under Associated health check, choose one Amazon Route 53 health check to associate with the protection, and then choose Next. The Route 53 health check is used to enable health-based detection, which can improve responsiveness and accuracy in attack detection and mitigation. Associating the protected resource with a Route 53 health check is also one of the prerequisites to be protected with proactive engagement. You can create the health check by following these best practices.
  6. (Optional) In the Select SNS topic to notify for DDoS detected alarms section, select the SNS topic that you want to use for notification for DDoS detected alarms, then choose Next.
  7. Choose Finish configuration.

With automatic application-layer DDoS mitigation configured, Shield Advanced creates a rule group in the web ACL that you have associated with your resource. Shield Advanced depends on the rule group for automatic application-layer DDoS mitigation.

To review the rule group created by Shield Advanced

  1. In the CloudFormation console, choose the APIProtection stack. On the stack Outputs tab, look for the EdgeLayerWebACL entry.
  2. Choose the EdgeLayerWebACL link to go to the web ACL configuration.
  3. Choose the Rules tab, and look for the rule group with the name that starts with ShieldMitigationRuleGroup, at the bottom of the rule list. This rule group is managed by Shield Advanced, and is not viewable.
    Figure 8: Shield Advanced created rule group for DDoS mitigation

    Figure 8: Shield Advanced created rule group for DDoS mitigation

Considerations

Here are some further considerations as you implement this solution:

Conclusion

In this blog post, we introduced managing public-facing APIs through API Gateway, and helping protect API Gateway endpoints by using CloudFront and AWS perimeter protection services (AWS WAF and Shield Advanced). We walked through the steps to add Signature Version 4 authentication information to the CloudFront originated API requests, providing trusted access to the APIs. Together, these actions present a best practice approach to build a DDoS-resilient architecture that helps protect your application’s availability by preventing many common infrastructure and application layer DDoS attacks.

 
If you have feedback about this post, submit comments in the Comments section below. If you have questions about this post, contact AWS Support.

Want more AWS Security news? Follow us on Twitter.

Pengfei Shao

Pengfei Shao

Pengfei is a Senior Technical Account Manager at AWS based in Stockholm, with more than 20 years of experience in Telecom and IT industry. His main focus is to help AWS Enterprise Support customers to remain operationally healthy, secure, and cost efficient in AWS. He is also focusing on AWS Edge Services domain, and loves to work with customers to solve their technical challenges.

Manoj Gupta

Manoj Gupta

Manoj is a Senior Solutions Architect at AWS. He’s passionate about building well-architected cloud-focused solutions by using AWS services with security, networking, and serverless as his primary focus areas. Before AWS, he worked in application and system architecture roles, building solutions across various industries. Outside of work, when he gets free time, he enjoys the outdoors and walking trails with his family.

The Japanese Technology and Media Attack Landscape

Post Syndicated from Tom Caiazza original https://blog.rapid7.com/2023/07/19/the-japanese-technology-and-media-attack-landscape/

The Japanese Technology and Media Attack Landscape

Recently, we released a major report analyzing the threat landscape of Japan, the globe’s third largest economy. In that report we looked at the ways in which threat actors infiltrate Japanese companies (spoiler alert: it is often through foreign subsidiaries and affiliates) and some of the most pervasive threats those companies face such as ransomware and state-sponsored threat actors.

We also took a look at some of the hardest hit industries and it should come as no surprise that some of the most commonly attacked companies are in industries where Japan currently excels on a global scale. Think manufacturing and automotive, technology & media, and financial services.

In a series of blog posts we’re going to briefly discuss the findings for one of those industries, but rest assured, more information can be found in our one-page rundowns and the report itself.

When it comes to technology and media companies, personally identifiable information, or PII, is the name of the game. Often the companies themselves aren’t the actual targets, but the information they have on their customers very much are. For instance, the breach of one IT vendor yielded access information to their own customers’ customers. Some 10 other companies were made vulnerable and attackers were able to walk away with customer data for those companies. Similarly, an overseas subsidiary of a Japanese company was breached allowing for 62 other organizations to be compromised.

The gaming industry is also not immune to cyber attacks though, like the manufacturing industry, ransomware, not credential stealing, was the main goal. In July of 2022, a major gaming company was compromised through an overseas partner by the ransomware group, BlackCat.
For more detail on the threat landscape of the technology and media industries in Japan check out our report, or the handy one-page brief specifically looking at these industries.

CVE-2023-38205: Adobe ColdFusion Access Control Bypass [FIXED]

Post Syndicated from Stephen Fewer original https://blog.rapid7.com/2023/07/19/cve-2023-38205-adobe-coldfusion-access-control-bypass-fixed/

CVE-2023-38205: Adobe ColdFusion Access Control Bypass [FIXED]

On July 11, 2023, Rapid7 and Adobe disclosed CVE-2023-29298, an access control bypass vulnerability affecting ColdFusion, which Rapid7 had reported to Adobe in April 2023. The vulnerability allows an attacker to bypass the product feature that restricts external access to the ColdFusion Administrator. Rapid7 and Adobe believed that CVE-2023-29298 was fixed upon publishing our coordinated disclosure (Rapid7 explicitly noted in our disclosure that we had not tested the patch Adobe released).

Upon review of the patch for CVE-2023-29298 as found in ColdFusion 2021 Update 8 (2021.0.08.330144), Rapid7 discovered that the patch released on July 11 does not successfully remediate the original issue and can be bypassed by an attacker. Adobe assigned CVE-2023-38205 to the patch bypass and has issued a complete fix as of July 19, 2023.

Rapid7 has observed exploitation of CVE-2023-29298 in the wild in multiple customer environments. Our team published a blog with observations and guidance for customers on July 17. We have validated that the new patch released July 19 fully remediates the issue.

Affected products

The following products are vulnerable to CVE-2023-38205:

  • Adobe ColdFusion 2023 Update 2 and earlier
  • Adobe ColdFusion 2021 Update 8 and earlier
  • Adobe ColdFusion 2018 Update 18 and earlier

Credit

This issue was discovered by Stephen Fewer, a Principal Security Researcher at Rapid7, and is being disclosed in accordance with Rapid7’s vulnerability disclosure policy.

Vendor Statement

Adobe provided the following statement to Rapid7:
“Adobe recommends updating ColdFusion installations to the latest release. Please see APSB23-47 for more information. Adobe is aware that CVE-2023-38205 has been exploited in the wild in limited attacks targeting Adobe ColdFusion.”

Analysis

The July 11 patch for CVE-2023-29298 modifies the vulnerable method IPFilterUtils.checkAdminAccess to use a new helper method Utils.canonicalizeURI to transform a URL into its canonical form before performing the access control, as shown below.

  private static final String[] RESTRICTED_INTERNAL_PATHS = new String[] { "/restplay", "/cfide/restplay", "/cfide/administrator", "/cfide/adminapi", "/cfide/main", "/cfide/componentutils", "/cfide/wizards", "/cfide/servermanager", "/cfide/lockdown" };


  public static void checkAdminAccess(HttpServletRequest req) {
    String uri = Utils.getServletPath(req);
    uri = Utils.canonicalizeURI(uri.toLowerCase()); // <----
    for (String restrictedPath : RESTRICTED_INTERNAL_PATHS) {
      if (uri.startsWith(restrictedPath)) {
        String ip = req.getRemoteAddr();
        if (!isAllowedIP(ip))
          throw new AdminAccessdeniedException(ServiceFactory.getSecurityService().getAllowedAdminIPList(), ip);
        break;
      }
    }
  }


The method Utils.canonicalizeURI attempts to remove sequences of characters such as duplicate forward slashes, double dot notation and redundant dot path segments in a URLs path, as shown below.

  public static String canonicalizeURI(String uri) {
    if (uri == null || uri.length() == 0)
      return uri;
    uri = uri.replace('\\', '/');
    uri = trimDuplicateSlashes(uri);
    uri = collapseDotDots(uri); // <----
    uri = trimTrailingDotsSpacesNull(uri);
    if (uri.charAt(0) == '.')
      uri = uri.substring(1);
    uri = substitute(uri, "/./", "/");
    if (uri.endsWith("/."))
      uri = uri.substring(0, uri.length() - 2);
    if (uri.length() == 0)
      uri = "/";
    return uri;
  }

Of note is the method Utils.collapseDotDots, which will remove all path segments that contain a double dot along with the preceding path segment. For example, if a URL path has the string “/hello/../world/” then the method Utils.collapseDotDots would correctly transform this string into “/world/” by deleting the character sequence “/hello/..” via a call to StringBuffer.delete as shown below.

  public static String collapseDotDots(String str) {
    if (str.indexOf("/..") == -1)
      return str;
    StringBuffer sb = new StringBuffer(str);
    int i;
    while ((i = str.indexOf("/..")) != -1) {
      int segmentStart = str.lastIndexOf('/', i - 1);
      sb.delete(segmentStart, i + 3); // <----
      str = sb.toString();
    }
    if (str.length() == 0)
      str = "/";
    return str;
  }  

The method Utils.canonicalizeURI attempts to remove sequences of characters such as duplicate forward slashes, double dot notation and redundant dot path segments in a URLs path, as shown below.

  public static String canonicalizeURI(String uri) {
    if (uri == null || uri.length() == 0)
      return uri;
    uri = uri.replace('\\', '/');
    uri = trimDuplicateSlashes(uri);
    uri = collapseDotDots(uri); // <----
    uri = trimTrailingDotsSpacesNull(uri);
    if (uri.charAt(0) == '.')
      uri = uri.substring(1);
    uri = substitute(uri, "/./", "/");
    if (uri.endsWith("/."))
      uri = uri.substring(0, uri.length() - 2);
    if (uri.length() == 0)
      uri = "/";
    return uri;
  }

Of note is the method `Utils.collapseDotDots`, which will remove all path segments that contain a double dot along with the preceding path segment. For example, if a URL path has the string `“/hello/../world/”` then the method `Utils.collapseDotDots` would correctly transform this string into `“/world/”` by deleting the character sequence `“/hello/..”` via a call to `StringBuffer.delete` as shown below.

  public static String collapseDotDots(String str) {
    if (str.indexOf("/..") == -1)
      return str;
    StringBuffer sb = new StringBuffer(str);
    int i;
    while ((i = str.indexOf("/..")) != -1) {
      int segmentStart = str.lastIndexOf('/', i - 1);
      sb.delete(segmentStart, i + 3); // <----
      str = sb.toString();
    }
    if (str.length() == 0)
      str = "/";
    return str;
  }  

While the above is correct, it exposes an issue in how ColdFusion handles ColdFusion Modules (CFM) and ColdFusion Component (CFC) endpoints when resolving a path to the endpoint. If an attacker accesses a URL path of “/hax/..CFIDE/wizards/common/utils.cfc” the access control can be bypassed and the expected endpoint can still be reached, even though it is not a valid URL path (Note, there is no expected forward slash after the double dot and before CFIDE).

Upon processing this path, the method Utils.collapseDotDots will transform the path to “cfide/wizards/common/utils.cfc” by removing the double dot path segment and the preceding segment “/hax/..”. The path “cfide/wizards/common/utils.cfc” will not be matched against any of the restricted paths in RESTRICTED_INTERNAL_PATHS during IPFilterUtils.checkAdminAccess because it no longer begins with a leading forward slash. This bypasses the access control. However, the underlying Servlet will still process the path “/hax/..CFIDE/wizards/common/utils.cfc”, allowing the expected CFC endpoint to be called. The same is true for CFM endpoints.

Exploitation

The following was tested on Adobe ColdFusion 2021 Update 8 (2021.0.08.330144) running on Windows Server 2022 and configured with the Production and Secure profiles.

We can demonstrate the patch bypass by using the cURL command. For example when attempting to perform a remote method call wizardHash on the /CFIDE/wizards/common/utils.cfc endpoint, the following cURL command can be used — note the use of double dot notation as highlighted below:

Note: The ampersand (&) has been escaped with a caret (^) as this example is run from Windows, on Linux you must escape the ampersand with a forward slash (\).

c:\> curl -ivk --path-as-is http://172.25.25.0:8500/hax/..CFIDE/wizards/common/utils.cfc?method=wizardHash^&inPassword=foo

CVE-2023-38205: Adobe ColdFusion Access Control Bypass [FIXED]

We can see that both the access control and the patch for CVE-2023-29298 have been bypassed and the request completed successfully.

Remediation

Adobe released a fix for this vulnerability on July 19, 2023. The following versions remediate the issue, per Adobe’s advisory:

  • Adobe ColdFusion 2023 Update 3
  • Adobe ColdFusion 2021 Update 9
  • Adobe ColdFusion 2018 Update 19

Since Rapid7 has observed exploitation in the wild, we strongly recommend ColdFusion customers update to the latest versions as soon as possible, without waiting for a typical patch cycle to occur.

Timeline

  • April 11 through July 10, 2023: Rapid7 discloses CVE-2023-29298 to Adobe, Rapid7 and Adobe coordinate disclosure
  • July 11, 2023: Rapid7 and Adobe disclose CVE-2023-29298 publicly
  • July 13 – 15, 2023: Rapid7 detects exploitation of Adobe ColdFusion in the wild, determines attackers are leveraging an exploit chain that ends in remote code execution
  • July 17, 2023: Rapid7 warns customers of ColdFusion exploitation in the wild. Rapid7 discovers the patch for CVE-2023-29298 can be bypassed and informs Adobe. Adobe notifies Rapid7 of their intent to fix the patch bypass.
  • July 18, 2023: Further coordinationJuly 19, 2023: This disclosure.

Practice Your Security Prompting Skills

Post Syndicated from Bruce Schneier original https://www.schneier.com/blog/archives/2023/07/practice-your-security-prompting-skills.html

Gandalf is an interactive LLM game where the goal is to get the chatbot to reveal its password. There are eight levels of difficulty, as the chatbot gets increasingly restrictive instructions as to how it will answer. It’s a great teaching tool.

I am stuck on Level 7.

Feel free to give hints and discuss strategy in the comments below. I probably won’t look at them until I’ve cracked the last level.

Migrate data from Google Cloud Storage to Amazon S3 using AWS Glue

Post Syndicated from Qiushuang Feng original https://aws.amazon.com/blogs/big-data/migrate-data-from-google-cloud-storage-to-amazon-s3-using-aws-glue/

Today, we are pleased to announce a new AWS Glue connector for Google Cloud Storage that allows you to move data bi-directionally between Google Cloud Storage and Amazon Simple Storage Service (Amazon S3).

We’ve seen that there is a demand to design applications that enable data to be portable across cloud environments and give you the ability to derive insights from one or more data sources. One of the data sources you can now quickly integrate with is Google Cloud Storage, a managed service for storing both unstructured data and structured data. With this connector, you can bring the data from Google Cloud Storage to Amazon S3.

In this post, we go over how the new connector works, introduce the connector’s functions, and provide you with key steps to set it up. We provide you with prerequisites, share how to subscribe to this connector in AWS Marketplace, and describe how to create and run AWS Glue for Apache Spark jobs with it.

AWS Glue is a serverless data integration service that makes it simple to discover, prepare, and combine data for analytics, machine learning, and application development. AWS Glue natively integrates with various data stores such as MySQL, PostgreSQL, MongoDB, and Apache Kafka, along with AWS data stores such as Amazon S3, Amazon Redshift, Amazon Relational Database Service (Amazon RDS), Amazon DynamoDB, and Amazon S3. AWS Glue Marketplace connectors allow you to discover and integrate additional data sources, such as software as a service (SaaS) applications and your custom data sources. With just a few clicks, you can search and select connectors from AWS Marketplace and begin your data preparation workflow in minutes.

How the connector works

This connector relies on the Spark DataSource API in AWS Glue and calls Hadoop’s FileSystem interface. The latter has implemented libraries for reading and writing various distributed or traditional storage. This connector also includes the Google Cloud Storage Connector for Hadoop, which lets you run Apache Hadoop or Apache Spark jobs directly on data in Google Cloud Storage. AWS Glue loads the library from the Amazon Elastic Container Registry (Amazon ECR) repository during initialization (as a connector), reads the connection credentials using AWS Secrets Manager, and reads data source configurations from input parameters. When AWS Glue has internet access, the Spark job in AWS Glue can read from and write to Google Cloud Storage.

Solution overview

The following architecture diagram shows how AWS Glue connects to Google Cloud Storage for data ingestion.

In the following sections, we show you how to create a new secret for Google Cloud Storage in Secrets Manager, subscribe to the AWS Glue connector, and move data from Google Cloud Storage to Amazon S3.

Prerequisites

You need the following prerequisites:

  • An account in Google Cloud and your data path in Google Cloud Storage. Prepare the GCP account keys file in advance and upload them to the S3 bucket. For instructions, refer to Create a service account key.
  • A Secrets Manager secret to store a Google Cloud secret.
  • An AWS Identity and Access Management (IAM) role for the AWS Glue job with the following policies:
    • AWSGlueServiceRole, which allows the AWS Glue service role access to related services.
    • AmazonEC2ContainerRegistryReadOnly, which provides read-only access to Amazon EC2 Container Registry repositories. This policy is for using AWS Marketplace’s connector libraries.
    • A Secrets Manager policy, which provides read access to the secret in Secrets Manager.
    • An S3 bucket policy for the S3 bucket that you need to load ETL (extract, transform, and load) data from Google Cloud Storage.

We assume that you are already familiar with the key concepts of Secrets Manager, IAM, and AWS Glue. Regarding IAM, these roles should be granted the permissions needed to communicate with AWS services and nothing more, according to the principle of least privilege.

Create a new secret for Google Cloud Storage in Secrets Manager

Complete the following steps to create a secret in Secrets Manager to store the Google Cloud Storage credentials:

  1. On the Secrets Manager console, choose Store a new secret.
  2. For Secret type, select Other type of secret.
  3. Enter your key as keyS3Uri and the value as your key file in the s3 bucket, for example, s3://keys/project-gcs-connector **.json.
  4. Leave the rest of the options at their default.
  5. Choose Next.
  6. Provide a name for the secret, such as googlecloudstorage_credentials.
  7. Follow the rest of the steps to store the secret.

Subscribe to the AWS Glue connector for Google Cloud Storage

To subscribe to the connector, complete the following steps:

  1. Navigate to the Google Cloud Storage Connector for AWS Glue on AWS Marketplace.
  2. On the product page for the connector, use the tabs to view information about the connector. If you decide to purchase this connector, choose Continue to Subscribe.
  3. Review the pricing terms and the seller’s End User License Agreement, then choose Accept Terms.
  4. Continue to the next step by choosing Continue to Configuration.
  5. On the Configure this software page, choose the fulfillment options and the version of the connector to use. We have provided two options for the Google Cloud Storage Connector, AWS Glue 3.0 and AWS Glue 4.0. In this example, we focus on AWS Glue 4.0. After selecting Glue 3.0 or Glue 4.0, select corresponding AWS Glue version when you configure the AWS Glue job.
  6. Choose Continue to Launch.
  7. On the Launch this software page, you can review the Usage Instructions provided by AWS. When you’re ready to continue, choose Activate the Glue connector in AWS Glue Studio.

The console will display the Create marketplace connection page in AWS Glue Studio.

Move data from Google Cloud Storage to Amazon S3

To move your data to Amazon S3, you must configure the custom connection and then set up an AWS Glue job.

Create a custom connection in AWS Glue

An AWS Glue connection stores connection information for a particular data store, including login credentials, URI strings, virtual private cloud (VPC) information, and more. Complete the following steps to create your connection:

  1. On the AWS Glue console, choose Connectors in the navigation pane.
  2. Choose Create connection.
  3. For Connector, choose Google Cloud Storage Connector for AWS Glue.
  4. For Name, enter a name for the connection (for example, GCSConnection).
  5. Enter an optional description.
  6. For AWS secret, enter the secret you created (googlecloudstorage_credentials).
  7. Choose Create connection and activate connector.

The connector and connection information is now visible on the Connectors page.

Create an AWS Glue job and configure connection options

Complete the following steps:

  1. On the AWS Glue console, choose Connectors in the navigation pane.
  2. Choose the connection you created (GCSConnection).
  3. Choose Create job.
  4. On the Node properties tab in the node details pane, enter the following information:
    • For Name, enter Google Cloud Storage Connector for AWS Glue. This name should be unique among all the nodes for this job.
    • For Node type, choose the Google Cloud Storage Connector.
  5. On the Data source properties tab, provide the following information:
    • For Connection, choose the connection you created (GCSConnection).
    • For Key, enter path, and for Value, enter your Google Cloud Storage URI (for example, gs://bucket/covid-csv-data/).
    • Enter another key-value pair. For Key, enter fileFormat. For Value, enter csv, because our sample data is this format.
  6. On the Job details tab, for IAM Role, choose the IAM role mentioned in the prerequisites.
  7. For Glue version, choose your AWS Glue version.
  8. Continue to create your ETL job. For instructions, refer to Creating ETL jobs with AWS Glue Studio.
  9. Choose Run to run your job.

After the job succeeds, we can check the logs in Amazon CloudWatch.

The data is ingested into Amazon S3, as shown in the following screenshot.                        

We are now able to import data from Google Cloud Storage to Amazon S3.

Scaling considerations

In this example, we set the AWS Glue capacity as 10 DPU (Data Processing Units). A DPU is a relative measure of processing power that consists of 4 vCPUs of compute capacity and 16 GB of memory. To scale your AWS Glue job, you can increase the number of DPU, and also take advantage of Auto Scaling. With Auto Scaling enabled, AWS Glue automatically adds and removes workers from the cluster depending on the workload. This removes the need for you to experiment and decide on the number of workers to assign for your AWS Glue ETL jobs. If you choose the maximum number of workers, AWS Glue will adapt the right size of resources for the workload.

Clean up

To clean up your resources, complete the following steps:

  1. Remove the AWS Glue job and secret in Secrets Manager with the following command:
    aws glue delete-job —job-name <your_job_name> aws glue delete-connection —connection-name <your_connection_name>
    aws secretsmanager delete-secret —secret-id <your_secretsmanager_id> 

  2. Cancel the Google Cloud Storage Connector for AWS Glue’s subscription:
    • On the AWS Marketplace console, go to the Manage subscriptions page.
    • Select the subscription for the product that you want to cancel.
    • On the Actions menu, choose Cancel subscription.
    • Read the information provided and select the acknowledgement check box.
    • Choose Yes, cancel subscription.
  3. Delete the data in the S3 buckets.

Conclusion

In this post, we showed how to use AWS Glue and the new connector for ingesting data from Google Cloud Storage to Amazon S3. This connector provides access to Google Cloud Storage, facilitating cloud ETL processes for operational reporting, backup and disaster recovery, data governance, and more.

This connector enables your data to be portable across Google Cloud Storage and Amazon S3. We welcome any feedback or questions in the comments section.

References


About the authors

Qiushuang Feng is a Solutions Architect at AWS, responsible for Enterprise customers’ technical architecture design, consulting, and design optimization on AWS Cloud services. Before joining AWS, Qiushuang worked in IT companies such as IBM and Oracle, and accumulated rich practical experience in development and analytics.

Noritaka Sekiyama is a Principal Big Data Architect on the AWS Glue team. He is passionate about architecting fast-growing data environments, diving deep into distributed big data software like Apache Spark, building reusable software artifacts for data lakes, and sharing knowledge in AWS Big Data blog posts.

 Greg Huang is a Senior Solutions Architect at AWS with expertise in technical architecture design and consulting for the China G1000 team. He is dedicated to deploying and utilizing enterprise-level applications on AWS Cloud services. He possesses nearly 20 years of rich experience in large-scale enterprise application development and implementation, having worked in the cloud computing field for many years. He has extensive experience in helping various types of enterprises migrate to the cloud. Prior to joining AWS, he worked for well-known IT enterprises such as Baidu and Oracle.

Maciej Torbus is a Principal Customer Solutions Manager within Strategic Accounts at Amazon Web Services. With extensive experience in large-scale migrations, he focuses on helping customers move their applications and systems to highly reliable and scalable architectures in AWS. Outside of work, he enjoys sailing, traveling, and restoring vintage mechanical watches.

Cloudflare Zaraz steps up: general availability and new pricing

Post Syndicated from Yair Dovrat original http://blog.cloudflare.com/cloudflare-zaraz-steps-up-general-availability-and-new-pricing/

Cloudflare Zaraz steps up: general availability and new pricing

This post is also available in Deutsch, Français.

Cloudflare Zaraz has transitioned out of beta and is now generally available to all customers. It is included under the free, paid, and enterprise plans of the Cloudflare Developer Platform. Visit our docs to learn more on our different plans.

Cloudflare Zaraz steps up: general availability and new pricing

Zaraz Is part of Cloudflare Developer Platform

Cloudflare Zaraz is a solution that developers and marketers use to load third-party tools like Google Analytics 4, Facebook CAPI, TikTok, and others. With Zaraz, Cloudflare customers can easily transition to server-side data collection with just a few clicks, without the need to set up and maintain their own cloud environment or make additional changes to their website for installation. Server-side data collection, as facilitated by Zaraz, simplifies analytics reporting from the server rather than loading numerous JavaScript files on the user's browser. It's a rapidly growing trend due to browser limitations on using third-party solutions and cookies. The result is significantly faster websites, plus enhanced security and privacy on the web.

We've had Zaraz in beta mode for a year and a half now. Throughout this time, we've dedicated our efforts to meeting as many customers as we could, gathering feedback, and getting a deep understanding of our users' needs before addressing them. We've been shipping features at a high rate and have now reached a stage where our product is robust, flexible, and competitive. It also offers unique features not found elsewhere, thanks to being built on Cloudflare’s global network, such as Zaraz’s Worker Variables. We have cultivated a strong and vibrant discord community, and we have certified Zaraz developers ready to help anyone with implementation and configuration.

With more than 25,000 websites running Zaraz today – from personal sites to those of some of the world's biggest companies – we feel confident it's time to go out of beta, and introduce our new pricing system. We believe this pricing is not only generous to our customers, but also competitive and sustainable. We view this as the next logical step in our ongoing commitment to our customers, for whom we're building the future.

If you're building a web application, there's a good chance you've spent at least some time implementing third-party tools for analytics, marketing performance, conversion optimization, A/B testing, customer experience and more. Indeed, according to the Web Almanac report, 94% percent of mobile pages used at least one third-party solution in 2022, and third-party requests accounted for 45% of all requests made by websites. It's clear that third-party solutions are everywhere. They have become an integral part of how the web has evolved. Third-party tools are here to stay, and they require effective developer solutions. We are building Zaraz to help developers manage the third-party layer of their website properly.

Starting today, Cloudflare Zaraz is available to everyone for free under their Cloudflare dashboard, and the paid version of Zaraz is included in the Workers Paid plan. The Free plan is designed to meet the needs of most developers who want to use Zaraz for personal use cases. For a price starting at $5/month, customers of the Workers Paid plan can enjoy the extensive list of features that makes Zaraz powerful, deploy Zaraz on their professional projects, and utilize the pay-as-you-go system. This is in addition to everything else included in the Workers Paid plan. The Enterprise plan, on the other hand, addresses the needs of larger businesses looking to leverage our platform to its fullest potential.

How is Zaraz priced

Zaraz pricing is based on two components: Zaraz Loads and the set of features. A Zaraz Load is counted each time a web page loads the Zaraz script within it, and/or the Pageview trigger is being activated. For Single Page Applications, each URL navigation is counted as a new Zaraz Load. Under the Zaraz Monitoring dashboard, you can find a report showing how many Zaraz Loads your website has generated during a specific time period. Zaraz Loads and features are factored into our billing as follows:

Cloudflare Zaraz steps up: general availability and new pricing

Free plan

The Free Plan has a limit of 100,000 Zaraz Loads per month per account. This should allow almost everyone wanting to use Zaraz for personal use cases, like personal websites or side projects, to do so for free. After 100,000 Zaraz Loads, Zaraz will simply stop functioning.

Following the same logic, the free plan includes everything you need in order to use Zaraz for personal use cases. That includes Auto-injection, Zaraz Debugger, Zaraz Track and Zaraz Set from our Web API, Consent Management Platform (CMP), Data Layer compatibility mode, and many more.

If your websites generate more than 100,000 Zaraz loads combined, you will need to upgrade to the Workers Paid plan to avoid service interruption. If you desire some of the more advanced features, you can upgrade to Workers Paid and get access for only $5/month.

The Workers Paid Plan includes the first 200,000 Zaraz Loads per month per account, free of charge.

If you exceed the free Zaraz Loads allocations, you'll be charged $0.50 for every additional 1,000 Zaraz Loads, but the service will continue to function. (You can set notifications to get notified when you exceed a certain threshold of Zaraz Loads, to keep track of your usage.)

Workers Paid customers can enjoy most of Zaraz robust and existing features, amongst other things, this includes: Zaraz E-commerce from our Web API, Custom Endpoints, Workers Variables, Preview/Publish Workflow, Privacy Features, and more.

If your websites generate Zaraz Loads in the millions, you might want to consider the Workers Enterprise plan. Beyond the free 200,000 Zaraz Loads per month for your account, it offers additional volume discounts based on your Zaraz Loads usage as well as Cloudflare’s professional services.

Enterprise plan

The Workers Enterprise Plan includes the first 200,000 Zaraz Loads per month per account free of charge. Based on your usage volume, Cloudflare’s sales representatives can offer compelling discounts. Get in touch with us here. Workers Enterprise customers enjoy all paid enterprise features.

I already use Zaraz, what should I do?

If you were using Zaraz under the free beta, you have a period of two months to adjust and decide how you want to go about this change. Nothing will change until September 20, 2023. In the meantime we advise you to:

  1. Get more clarity of your Zaraz Loads usage. Visit Monitoring to check how many Zaraz Loads you had in the previous couple of months. If you are worried about generating more than 100,000 Zaraz Loads per month, you might want to consider upgrading to Workers Paid via the plans page, to avoid service interruption. If you generate a big amount of Zaraz Loads, you’d probably want to reach out to your sales representative and get volume discounts. You can leave your details here, and we’ll get back to you.
  2. Check if you are using one of the paid features as listed in the plans page. If you are, then you would need to purchase a Workers Paid subscription, starting at $5/month via the plans page. On September 20, these features will cease to work unless you upgrade.

* Please note, as of now, free plan users won't have access to any paid features. However, if you're already using a paid feature without a Workers Paid subscription, you can continue to use it risk-free until September 20. After this date, you'll need to upgrade to keep using any paid features.

We are here for you

As we make this important transition, we want to extend our sincere gratitude to all our beta users who have provided invaluable feedback and have helped us shape Zaraz into what it is today. We are excited to see Zaraz move beyond its beta stage and look forward to continuing to serve your needs and helping you build better, faster, and more secure web experiences. We know this change comes with adjustments, and we are committed to making the transition as smooth as possible. In the next couple of days, you can expect an email from us, with clear next steps and a way to get advice in case of need. You can always get in touch directly with the Cloudflare Zaraz team on Discord, or the community forum.

Thank you for joining us on this journey and for your ongoing support and trust in Cloudflare Zaraz. Let's continue to build the future of the web together!

Metrics for issues, pull requests, and discussions

Post Syndicated from Zack Koppert original https://github.blog/2023-07-19-metrics-for-issues-pull-requests-and-discussions/

Data-driven insights

At GitHub, we believe that data-driven insights are the keys to success for any software development project. Understanding the health and progress of your issues, pull requests, and discussions is crucial for effective collaboration, maintainership, and project management.

That is why we’re excited to announce the release of the Issue Metrics GitHub Action, a powerful tool that empowers developers and teams to measure key metrics and gain valuable insights into their projects.

With the new Issue Metrics GitHub Action, you can now easily track and monitor important metrics related to issues, pull requests, and discussions, such as time to first response, time to close, and more for any given time period.

Whether you’re an individual developer, a small team, or a large organization, these metrics will help you gauge the overall health, progress, and engagement of your projects.

Sample report

A sample report showing 2 tables. The first table contains overall metrics like average time to first response, anda corresponding value of 50 minutes and 44 seconds. The second table contains a list of the issues measured, with links to the issue and the metrics as measured on the individual issue.

Common use cases

Maintainers: ensuring proper attention

As a maintainer, it is essential to give reasonable attention to the issues and pull requests in the repositories you maintain. With the Issue Metrics GitHub Action, you can track metrics, such as the number of open issues, closed issues, open pull requests, and merged pull requests.

These metrics can provide you with a clear overview of the workload for a project over a given week, month, or even year. The action can also allow you to consider how you or your team prioritize time and attention effectively while also highlighting potentially overlooked requests in need of attention.

First responders: timely user contact

As a first responder in a repository, it’s part of the job description to ensure that users receive contact in a reasonable amount of time. By utilizing the Issue Metrics GitHub Action, you can keep track of metrics like the number of discussions awaiting replies, unresolved issues, or pull requests waiting for reviews. These metrics enable you to maintain a high level of responsiveness, fostering a positive user experience and timely problem resolution. These can be used to build a to-do list or retrospectively to reflect on how long users had to wait for a response during a given time period.

Open Source Program Office (OSPO): streamlining open source requests

An important part of what OSPOs do is making the open source release process easy and efficient while adhering to company policy. This process usually involves employees opening an issue, pull request, or discussion. With the Issue Metrics GitHub Action, OSPOs can gain valuable insights into the number of requests, the ratio of open to closed requests, and metrics related to the time it takes to navigate the open-source process to completion.

These metrics empower you to streamline your workflows, optimize response times, and ensure a smooth open-source collaboration experience. Optimizing the open source release process encourages employees to continue to produce open source projects on the organization’s behalf.

Product development teams: optimizing pull request reviews

Product development teams rely heavily on the code review process to collaborate and build high-quality software. By leveraging the Issue Metrics GitHub Action, teams can measure metrics such as the time it takes to get pull request reviews. These insights allow you to reflect on the data during retrospectives, identify areas for improvement, and optimize the review process to enhance team collaboration and accelerate development cycles.

Certain aspects of efficiency and flow may be hard to measure but often it is possible to spot and remove inefficiencies in the value stream.

– Forsgren et al. 2021

Setup and workflow integration

Setting up the Issue Metrics GitHub Action takes a few minutes, compared to the few hours it takes to calculate these metrics manually. You also only need to set up the action once, and it will run on a regular basis of your own choosing. It integrates into your existing GitHub Actions workflow or you can create a new workflow specifically for metrics tracking.

The action provides a wide range of customizable options, allowing you to tailor the issues, pull requests, and discussions measured by utilizing GitHub’s powerful search filtering. Ready to use configurations have been tested and used internally at GitHub and are now available for you to try out as well.

Here is one such example that runs monthly to report on metrics for issues created last month:

name: Monthly issue metrics
on:
  workflow_dispatch:
  schedule:
    - cron: '3 2 1 * *'

jobs:
  build:
    name: issue metrics
    runs-on: ubuntu-latest

    steps:

    - name: Get dates for last month
      shell: bash
      run: |
        # Get the current date
        current_date=$(date +'%Y-%m-%d')

        # Calculate the previous month
        previous_date=$(date -d "$current_date -1 month" +'%Y-%m-%d')

        # Extract the year and month from the previous date
        previous_year=$(date -d "$previous_date" +'%Y')
        previous_month=$(date -d "$previous_date" +'%m')

        # Calculate the first day of the previous month
        first_day=$(date -d "$previous_year-$previous_month-01" +'%Y-%m-%d')

        # Calculate the last day of the previous month
        last_day=$(date -d "$first_day +1 month -1 day" +'%Y-%m-%d')

        echo "$first_day..$last_day"
        echo "last_month=$first_day..$last_day" >> "$GITHUB_ENV"

    - name: Run issue-metrics tool
      uses: github/issue-metrics@v2
      env:
        GH_TOKEN: ${{ secrets.GH_TOKEN }}
        SEARCH_QUERY: 'repo:owner/repo is:issue created:${{ env.last_month }} -reason:"not planned"'

    - name: Create issue
      uses: peter-evans/create-issue-from-file@v4
      with:
        title: Monthly issue metrics report
        content-filepath: ./issue_metrics.md
        assignees: <YOUR_GITHUB_HANDLE_HERE>

Ready to start leveling up your GitHub project management?

Head over to the Issue Metrics GitHub Action repository to explore the documentation, installation instructions, and examples. The repository provides a comprehensive README file that guides you through the setup process and showcases the wide range of metrics you can measure. If you need additional help, feel free to open an issue in the repository.

GitHub is committed to providing developers with the best tools to enhance collaboration and productivity. The Issue Metrics GitHub Action is a significant step towards empowering teams to measure key metrics related to issues, pull requests, and discussions. By gaining valuable insights into the pulse of your projects, you can drive continuous improvement and deliver exceptional software. We are using this in several places internally across GitHub to help us continually improve and hope this action can help you as well. Happy coding!

Reimagine Software Development With CodeWhisperer as Your AI Coding Companion

Post Syndicated from Danilo Poccia original https://aws.amazon.com/blogs/aws/reimagine-software-development-with-codewhisperer-as-your-ai-coding-companion/

In the few months since Amazon CodeWhisperer became generally available, many customers have used it to simplify and streamline the way they develop software. CodeWhisperer uses generative AI powered by a foundational model to understand the semantics and context of your code and provide relevant and useful suggestions. It can help build applications faster and more securely, and it can help at different levels, from small suggestions to writing full functions and unit tests that help decompose a complex problem into simpler tasks.

Imagine you want to improve your code test coverage or implement a fine-grained authorization model for your application. As you begin writing your code, CodeWhisperer is there, working alongside you. It understands your comments and existing code, providing real-time suggestions that can range from snippets to entire functions or classes. This immediate assistance adapts to your flow, reducing the need for context-switching to search for solutions or syntax tips. Using a code companion can enhance focus and productivity during the development process.

When you encounter an unfamiliar API, CodeWhisperer accelerates your work by offering relevant code suggestions. In addition, CodeWhisperer offers a comprehensive code scanning feature that can detect elusive vulnerabilities and provide suggestions to rectify them. This aligns with best practices such as those outlined by the Open Worldwide Application Security Project (OWASP). This makes coding not just more efficient, but also more secure and with an increased assurance in the quality of your work.

CodeWhisperer can also flag code suggestions that resemble open-source training data, and flag and remove problematic code that might be considered biased or unfair. It provides you with the associated open-source project’s repository URL and license, making it easier for you to review them and add attribution where necessary.

Here are a few examples of CodeWhisperer in action that span different areas of software development, from prototyping and onboarding to data analytics and permissions management.

CodeWhisperer Speeds Up Prototyping and Onboarding
One customer using CodeWhisperer in an interesting way is BUILDSTR, a consultancy that provides cloud engineering services focused on platform development and modernization. They use Node.js and Python in the backend and mainly React in the frontend.

I talked with Kyle Hines, co-founder of BUILDSTR, who said, “leveraging CodeWhisperer across different types of development projects for different customers, we’ve seen a huge impact in prototyping. For example, we are impressed by how quickly we are able to create templates for AWS Lambda functions interacting with other AWS services such as Amazon DynamoDB.” Kyle said their prototyping now takes 40% less time, and they noticed a reduction of more than 50% in the number of vulnerabilities present in customer environments.

Screenshot of a code editor using CodeWhisperer to generate the handler of an AWS Lambda function.

Kyle added, “Because hiring and developing new talent is a perpetual process for consultancies, we leveraged CodeWhisperer for onboarding new developers and it helps BUILDSTR Academy reduce the time and complexity for onboarding by more than 20%.”

CodeWhisperer for Exploratory Data Analysis
Wendy Wong is a business performance analyst building data pipelines at Service NSW and agile projects in AI. For her contributions to the community, she’s also an AWS Data Hero. She says Amazon CodeWhisperer has significantly accelerated her exploratory data analysis process, when she is analyzing a dataset to get a summary of its main characteristics using statistics and visualization tools.

She finds CodeWhisperer to be a swift, user-friendly, and dependable coding companion that accurately infers her intent with each line of code she crafts, and ultimately aids in the enhancement of her code quality through its best practice suggestions.

“Using CodeWhisperer, building code feels so much easier when I don’t have to remember every detail as it will accurately autocomplete my code and comments,” she shared. “Earlier, it would take me 15 minutes to set up data preparation pre-processing tasks, but now I’m ready to go in 5 minutes.”

Screenshot of exploratory data analysis using Amazon CodeWhisperer in a Jupyter notebook.

Wendy says she has gained efficiency by delegating these repetitive tasks to CodeWhisperer, and she wrote a series of articles to explain how to use it to simplify exploratory data analysis.

Another tool used to explore data sets is SQL. Wendy is looking into how CodeWhisperer can help data engineers who are not SQL experts. For instance, she noticed they can just ask to “write multiple joins” or “write a subquery” to quickly get the correct syntax to use.

Asking Amazon CodeWhisperer to generate SQL syntax and code.

CodeWhisperer Accelerates Testing and Other Daily Tasks
I had the opportunity to spend some time with software engineers in the AWS Developer Relations Platform team. That’s the team that, among other things, builds and operates the community.aws website.

Screenshot of the community.aws website, built and operated by the AWS Developer Relations Platform team with some help from Amazon CodeWhisperer.

Nikitha Tejpal’s work primarily revolves around TypeScript, and CodeWhisperer aids her coding process by offering effective autocomplete suggestions that come up as she types. She said she specifically likes the way CodeWhisperer helps with unit tests.

“I can now focus on writing the positive tests, and then use a comment to have CodeWhisperer suggest negative tests for the same code,” she says. “In this way, I can write unit tests in 40% less time.”

Her colleague, Carlos Aller Estévez, relies on CodeWhisperer’s autocomplete feature to provide him with suggestions for a line or two to supplement his existing code, which he accepts or ignores based on his own discretion. Other times, he proactively leverages the predictive abilities of CodeWhisperer to write code for him. “If I want explicitly to get CodeWhisperer to code for me, I write a method signature with a comment describing what I want, and I wait for the autocomplete,” he explained.

For instance, when Carlos’s objective was to check if a user had permissions on a given path or any of its parent paths, CodeWhisperer provided a neat solution for part of the problem based on Carlos’s method signature and comment. The generated code checks the parent directories of a given resource, then creates a list of all possible parent paths. Carlos then implemented a simple permission check over each path to complete the implementation.

“CodeWhisperer helps with algorithms and implementation details so that I have more time to think about the big picture, such as business requirements, and create better solutions,” he added.

Code generated by CodeWhisperer based on method signature and comment.

CodeWhisperer is a Multilingual Team Player
CodeWhisperer is polyglot, supporting code generation for 15 programming languages: Python, Java, JavaScript, TypeScript, C#, Go, Rust, PHP, Ruby, Kotlin, C, C++, Shell scripting, SQL, and Scala.

CodeWhisperer is also a team player. In addition to Visual Studio (VS) Code and the JetBrains family of IDEs (including IntelliJ, PyCharm, GoLand, CLion, PhpStorm, RubyMine, Rider, WebStorm, and DataGrip), CodeWhisperer is also available for JupyterLab, in AWS Cloud9, in the AWS Lambda console, and in Amazon SageMaker Studio.

At AWS, we are committed to helping our customers transform responsible AI from theory into practice by investing to build new services to meet the needs of our customers and make it easier for them to identify and mitigate bias, improve explainability, and help keep data private and secure.

You can use Amazon CodeWhisperer for free in the Individual Tier. See CodeWhisperer pricing for more information. To get started, follow these steps.

— Danilo

How Amazon CodeGuru Security helps you effectively balance security and velocity

Post Syndicated from Leo da Silva original https://aws.amazon.com/blogs/security/how_amazon_codeguru_security_helps_effectively_balance_security_and_velocity/

Software development is a well-established process—developers write code, review it, build artifacts, and deploy the application. They then monitor the application using data to improve the code. This process is often repeated many times over. As Amazon Web Services (AWS) customers embrace modern software development practices, they sometimes face challenges with the use of third-party code security tools, such as an overwhelming number of findings, high rates of false positives among those findings, and the logistics of tracking open issues across code versions.

Customers tell us they need help to identify the top risks in their application code as it is being built and to receive actionable recommendations to mitigate these risks. In this blog post, we demonstrate how the new Amazon CodeGuru Security service and its fully managed, machine learning (ML)-powered code security analysis capabilities provide intelligent recommendations to improve code security and quality. Amazon CodeGuru Security enhances the overall security posture of applications that are deployed in your environment while reducing the time to deploy in production.

Amazon CodeGuru Security is a managed static application security tool (SAST) service that is also available through Amazon CodeGuru Reviewer, Amazon CodeWhisperer security scanning, the Amazon SageMaker Studio CodeGuru extension, and Amazon Inspector code scanning.

Solution overview

In this blog post, we introduce you to the features and capabilities of Amazon CodeGuru Security. Amazon CodeGuru Security helps you focus on security risks that are relevant to your environment, along with contextually relevant remediation suggestions (provided as code diffs). Integration, centralization, and scalability of the service are facilitated by using an API-based design, plus bug tracking to automatically detect code fixes and close findings without user intervention. Amazon CodeGuru Security currently supports applications that are written in Python, Java, and JavaScript, along with associated artifacts like scripts, configuration, and documentation files.

Created to improve the security posture of applications that were built for the cloud, Amazon CodeGuru Security rules are developed in partnership with Amazon application security teams, applying learnings and adhering to best practices that govern the development of Amazon internal systems and services.

Amazon CodeGuru Security offers multiple integration points:

In Figure 1, you can see one of the proposed architecture patterns that supports the integration of Amazon CodeGuru Security into your existing application deployment pipeline. In this scenario, developers write application code and get it committed into Amazon CodeCommit. This event causes AWS CodeBuild to start building the application and the static security code analysis of the application code, using a pre-build hook. The code and build artifacts are copied to a local Amazon S3 bucket within your account, and Amazon CodeGuru Security scans the application assets.

Figure 1: Example of CodeGuru Security integration with deployment pipeline

Figure 1: Example of CodeGuru Security integration with deployment pipeline

Amazon CodeGuru detection engine

At the core of the CodeGuru detector design is the idea of user action in response to findings. Detectors flag security risks or quality issues with a high degree of precision, such that action can be taken directly to remediate the finding. With this goal in mind, we have designed the Guru Query Language (GQL) toolkit. GQL enables precise expression of scenario-centric micro-analyzers that check specific properties (for example, misuse of a particular Java cryptography library or API) through a wide range of analysis constructs (more than 200 at the time of publication).

Among these constructs are capabilities such as type inference (determining the precise types of variables and fields), inter-procedural analysis (analyzing across function boundaries), and advanced taint tracking capabilities, where untrusted data (from taint sources) is tracked through the application to determine whether it reaches security-sensitive operations (known as taint sinks) without being sanitized.

By using GQL, the rule author can combine constructs as building blocks to precisely match the vulnerable patterns that are being targeted. As an example, you can specify taint sources and sinks in a contextual way so that only data read from remote (as opposed to local) files is considered untrusted.

We benchmark detectors against ever-growing datasets, and improve them based on feedback from our partner security teams and customers, as well as metrics that we collect. Detectors are subjected to a rigorous quality control process. Starting from the detector specification, we work closely with subject matter experts (SMEs) to make sure that the suggestions cover the most important application surfaces and are not overly defensive in the warnings they raise. Moving from specification to implementation, detections are reviewed and sampled from shadow runs on live codebases with the same SMEs as well as internal CodeGuru users. If detectors meet an internal performance bar, they are launched internally at AWS. After they are launched, the detectors are monitored by using weekly metrics. A detector graduates into the commercial CodeGuru service only if it meets a high quality bar for several weeks.

Amazon CodeGuru Security uses a detection engine to find security issues in the application code that is scanned. The engine uses a Detector Library, which is a resource that contains detailed information about the CodeGuru security and code quality detectors, to help you build secure and efficient applications. Each detection page within the Detector Library contains descriptions, compliant and non-compliant example code snippets, severities, and additional information that helps you mitigate risks (such as Common Weakness Enumeration (CWE) numbers). The materials presented in the Amazon CodeGuru Detector Library are intended to be a high-level summary of the service’s capabilities, but might not be inclusive of all detectors or their functionality.

Bug Fix Tracking and code fixes

With user action as the ultimate goal, an important metric to us is whether code fixes are made in response to our recommendations. As such, AWS has designed a novel Bug Fix Tracking (BFT) algorithm, whose key functionality is to relate CodeGuru findings across revisions of a given codebase or application. If, for example, CodeGuru reports misuse of a cryptographic API on version V1 of codebase C, then BFT detects whether that misuse issue is still present when version V2 of C is scanned.

Tracking bugs and bug fixes are nontrivial. Code can be refactored into different locations within a file, and sometimes also into different files. In addition, syntax may be adjusted in ways that are orthogonal to fixing an issue (for example, if variables are renamed). The CodeGuru BFT algorithm constructs a bi-partite graph to relate a pair of findings across revisions, or otherwise declare a finding as either closed (no match in V2) or new (no match in V1).

Figure 2 shows the process that is used by BFT in tracking application bugs. After the application version being scanned is identified and the bug detection verification starts, BFT updates the database with its findings, validating the existing issues with findings uncovered in version N-1.

Figure 2: Overview of the Bug Fix Tracking algorithm

Figure 2: Overview of the Bug Fix Tracking algorithm

The algorithm is staged, starting from the simple case of 1:1 correspondence between findings, through cases where findings might have drifted to a new location but are otherwise the same. For the final, most complex scenario of fuzzy matching, we use advanced hashing techniques to establish the mapping.

BFT provides a metric that guides our own rule development and tuning process on an ongoing basis. Data about BFT findings is available to our customers through the CodeGuru Security API. With gathered data about fixes, security engineers and leaders can measure exposure to security risks, quantify the lifetime of high and critical security issues, monitor burn rate for security issues, and form other insights from the raw data.

Actionable recommendations and concrete remediation

To align with our goal of encouraging user action in response to our recommendations, we’ve added a feature powered by automated reasoning for including concrete remediation advice as part of CodeGuru recommendations. This comes in the form of a code diff, which you can apply mechanically by using standard utilities like patch.

The screenshot in Figure 3 shows how this functionality creates an important bridge between security engineers and software engineers—the former have the necessary security expertise, while the latter are often responsible for carrying out the code fix. Recommendations that are accompanied by concrete fix suggestions can cut through multiple correspondences, alignment issues, and validation cycles, which can help accelerate remediation.

Figure 3: Example of recommendation showing difference between compliant and non-compliant code

Figure 3: Example of recommendation showing difference between compliant and non-compliant code

To enable the reasoning illustrated in Figure 3, where the data reaching the addObject call goes through sanitization in the form of an HtmlUtils::htmlEscape call, the underlying algorithm performs several steps. First, a formal representation of the code, known as its Abstract Syntax Tree (AST), is constructed. The AST is then visited by one or more transformation “recipes,” whose goal is to manipulate the program such that the vulnerability is mitigated.

Code transformation is done in a contextual manner, so that syntax (for example, variable names) and formatting (for example, indentation levels) are preserved. To verify that the transformation is valid, the algorithm further runs post-processing checks on the resulting code structure and syntax.

An important refinement of the remediation capability is that Amazon CodeGuru Security performs pre-analysis ahead of running the security scan to classify code artifacts into application- versus library-dependencies. It’s more feasible to take action on a recommendation for code owned by you, compared to code in a third-party library. The classification algorithm has been trained on hundreds of thousands of open-source libraries to disassemble code artifacts, including bundling application and library content in the same file, and focus downstream analysis on the most pertinent scanning surfaces.

Critical security issues have been shown to sometimes take hundreds of days to address (as discussed in this study). Internal studies that look at use of CodeGuru have seen a steep drop in time to fix issues thanks to concrete fix suggestions, which is value that the service excited to share with you.

Conclusion

Amazon CodeGuru Security is a static application security testing (SAST) tool that combines ML and automated reasoning to identify security issues in your code. Amazon CodeGuru detection capabilities that use GQL (Guru Query Language), Bug Fix Tracking (BFT), and efficacy mechanisms and AppSec expertise can help you precisely identify code security issues with a low rate of false positives. High signal-to-noise ratio is a key enabler in integrating SAST into the daily work of security engineers and software developers.

In addition, Amazon CodeGuru Security provides thorough fix recommendations, which your development teams can use to improve the overall time to remediate application security issues. At the same time, the recommendations can help you to implement security best practices based on an ML model that was trained on millions of lines of code and vulnerability assessments performed within Amazon. Get started with Amazon CodeGuru Security.

 
If you have feedback about this post, submit comments in the Comments section below. If you have questions about this post, contact AWS Support.

Want more AWS Security news? Follow us on Twitter.

Leo da Silva

Leo da Silva

Leo is a Security Specialist Solutions Architect at AWS who uses his knowledge to help customers better utilize cloud services and technologies securely. Over the years, Leo has had the opportunity to work in large, complex environments, designing, architecting, and implementing highly scalable and secure solutions for global companies. He is passionate about football, BBQ, and Jiu Jitsu—the Brazilian version of them all.

Omer Tripp

Omer Tripp

Omer is a Principal Applied Scientist on the Amazon CodeGuru team. His research work is at the intersection of programming languages, machine learning, and security. Outside of work, Omer likes to stay physically active (through tennis, basketball, skiing, and various other activities), as well as tour the US and the world with his family.

Amazon Simple Email Service adds email delivery features to revised free tier

Post Syndicated from sakoppes original https://aws.amazon.com/blogs/messaging-and-targeting/amazon-simple-email-service-adds-email-delivery-analysis-features-to-revised-free-tier/

On August 1st, 2023, Amazon Simple Email Service (SES) will launch a revised, more flexible free tier that allows AWS customers to try more SES features without commitment or cost. SES customers will be able to send or receive up to 3,000 messages each month for a year after they begin using SES, free of charge[1]. Customers can now try advanced SES capabilities, like deliverability analytics and optimization through Virtual Deliverability Manager (VDM), in the free tier. With access to these new features, customers can use the free tier to build full proof-of-concept workloads to experiment with SES’ powerful tools.

How did the SES free tier work previously?

Previously, the SES free tier only covered outbound messages sent from AWS compute services such as EC2 instances. Customers using other types of computing services for sending outbound messages had no SES free tier available. Customers could also receive up to 1,000 inbound email messages free each month. Customers evaluating SES had to pay to explore more advanced features like Virtual Deliverability Manager, a suite of tools customers use to improve delivery rates for outbound emails. This made it difficult to avoid charges when exploring advanced SES use cases, such as when building prototype email sending workloads to explore ways to monitor and optimize email delivery success and engagement rates.

New email deliverability features in the SES free tier

The revised SES free tier offers a more flexible model, introducing a shared limit which applies to pay-as-you-go message charges including inbound email messages, outbound email messages sent from any source, and email charges for Virtual Deliverability Manager. This model makes it easier to choose the right combination of features to fit your use cases when exploring SES features end-to-end without commitment. The revised free tier includes up to 3,000 messages each month for 12 months after you start using SES, which are shared across the features included in the revised SES free tier (note that Virtual Deliverability Manager counts separately from outbound messages). Here some examples to illustrate the revised free tier (all numbers are messages per month), note the 3,000 message free tier is applied first to more expensive charges (e.g. outbound messages) in situations where multiple products are in use (inbound, outbound, Virtual Deliverability Manager):

A few examples of how the Simple Email Service (SES) revised free tier is applied.

What can you do with the revised free tier?

The revised SES free tier makes it easier to build proof-of-concept workflows to demonstrate SES’ advanced deliverability optimization capabilities without commitment. For example, you could set up a pilot workload to show how SES can help you interpret the results of A/B testing using configuration sets. Imagine creating a few versions of a marketing email, then sending each version to a sample set of recipients to test response rates. You could track each version of the email separately in Virtual Deliverability Manager using configuration sets (essentially a campaign), then use VDM to analyze the differences in deliverability metrics for each campaign. You can look at the bounce rates, open, and click rates of each campaign to determine which version performed best before sending to all your target customers. This helps you see what SES can do, before deciding whether you want to build production workloads on SES.

What’s next?

The revised SES free tier will be active on August 1st, 2023 for all SES customers; no action is required. Customers who are using SES today will benefit from the revised free tier for one year (until August 2024). Customers who start using SES after August 1st, 2023, will benefit from the revised free tier for one year from the month they start using SES. The revised free tier replaces the current free tier, and we are not able to offer an opportunity to continue using current free tier. To start using the SES free tier, just create and verify an email address to send outbound email messages, and/or set up a receipt rule for receiving inbound email messages. To see advanced analytics with deliverability recommendations and traffic shaping through Virtual Deliverability Manager, just click on “Virtual Deliverability Manager” in the SES console navigation and follow the steps to enable it.

Get started with SES free tier at https://aws.amazon.com/ses/.

[1] Data transfer charges for emails sent and attachment charges still apply.

Security updates for Wednesday

Post Syndicated from original https://lwn.net/Articles/938596/

Security updates have been issued by Debian (bind9, libapache2-mod-auth-openidc, and python-django), Fedora (nodejs18 and redis), Red Hat (python3.9 and webkit2gtk3), Scientific Linux (bind and kernel), SUSE (cni, cni-plugins, cups-filters, curl, dbus-1, ImageMagick, kernel, libheif, and python-requests), and Ubuntu (bind9, connman, curl, libwebp, and yajl).

The collective thoughts of the interwebz