Post Syndicated from Home Assistant original https://www.youtube.com/watch?v=8Zj0JiVoRNs
Home Assistant Local Thermostats – Venstar, Meross, vs Ecobee
Post Syndicated from digiblur DIY original https://www.youtube.com/watch?v=65pSKJZmi8k
Racket 9.0 released
Post Syndicated from jake original https://lwn.net/Articles/1047549/
The Racket programming language
project has released Racket
version 9.0. Racket is a descendant of Scheme, so it is part of the Lisp family of languages. The headline feature in the release is parallel
threads, which adds to the concurrency tools in the language: “While
”
Racket has had green threads for some time, and supports parallelism via
futures and places, we feel parallel threads is a major addition.
Other new features include the black-box
wrapper to prevent the compiler from optimizing calculations away, the decompile-linklet
function to map linklets
back to an s-expression, the
addition of Weibull
distributions to the math library, and more.
Improving GCC Buffer Overflow Detection for C Flexible Array Members (Oracle)
Post Syndicated from corbet original https://lwn.net/Articles/1047547/
The Oracle blog has a
lengthy article on enhancements to GCC to help detect overflows of
flexible array members (FAMs) in C programs.
We describe here two new GNU extensions which specify size
information for FAMs. These are a new attribute,
“counted_by” and a new builtin function,
“__builtin_counted_by_ref“. Both extensions can be used in
GNU C applications to specify size information for FAMs, improving
the buffer overflow detection for FAMs in general.
This work has been covered on LWN as well.
Join us for UNCUT Behind-The-Scenes Model Shoots — Exclusive Black Friday Offers
Post Syndicated from Matt Granger original https://www.youtube.com/watch?v=8Y2VG1_bUTA
The 2025 Linux Foundation Technical Advisory Board election
Post Syndicated from corbet original https://lwn.net/Articles/1047546/
The call for
candidates for the 2025 election for the Linux Foundation Technical
Advisory Board has been posted.
The TAB exists to provide advice from the kernel community to the
Linux Foundation and holds a seat on the LF’s board of directors;
it also serves to facilitate interactions both within the community
and with outside entities. Over the last year, the TAB has
overseen the organization of the Linux Plumbers Conference, advised
on the setup of the kernel CVE numbering authority, worked behind
the scenes to help resolve a number of contentious community
discussions, worked with the Linux Foundation on community
conference planning, and more.
Nominations close on December 13.
November
Post Syndicated from Oglaf! -- Comics. Often dirty. original https://www.oglaf.com/november/


How Trump Could Subvert the Midterms
Post Syndicated from The Atlantic original https://www.youtube.com/shorts/mUlfDasBuk4
BrosTrend S2 5-port 2.5GbE Switch Review
Post Syndicated from Rohit Kumar original https://www.servethehome.com/brostrend-s2-5-port-2-5gbe-switch-review/
We review the BrosTrend S2, a 5-port 2.5GbE switch that has become quite popular recently for its low-power operation
The post BrosTrend S2 5-port 2.5GbE Switch Review appeared first on ServeTheHome.
Panasonic GNW30 Personal Surround Sound, but not for me
Post Syndicated from Techmoan original https://www.youtube.com/watch?v=T8FRXN0Ag6g
Седмицата (17–22 ноември)
Post Syndicated from Боряна Телбис original https://www.toest.bg/sedmitsata-17-22-noiemvri/

Е.Т. ни определя среща на майната си, закъдето и бездруго сме тръгнали. Не се бутайте, на майната си има достатъчно място за всички!
Почвам бюлетина с един от последните материали в „Тоест“ за тази седмица, за да съм абсолютно в тренда нищо да не е както трябва и всичко да е отзад напред. И продължавам с текста на Емилия Милчева „Гневни ли сте?“, от който става ясно, че всички са недоволни посвоему, но това не е достатъчно за обединение на недоволствата и за взрив на обществото, макар социолозите да казват, че сме на една крачка от „много лошо“. Но нищо не плаши душите наши, затова продължаваме смело напред.
Или назад. (1997-ма, ти ли си?)
Обърках се.
Но то кой не е. А и живеем в объркващи времена. Хем сме много по-емпатични и етични, и коректни („коректна фирма“, нали знаете), хем ползваме все повече съдържание, в което няма нищо етично. „Сълзичка – паричка. Журналистическа етика за оплакване“ е тазседмичният текст на Светла Енчева, в който, както става ясно от заглавието, се говори за журналистическата етика, която липсва все повече в медиите, дори в онези с претенция за висок професионализъм. Малък откъс от него:
Преди близо 15 години се самоуби най-добрият ми приятел. Смъртта му предизвика медиен интерес – държавен служител, ерудит, с много последователи в Twitter, отнема живота си по особено мъчителен начин, ако използваме юридическото клише. Вестник „Труд“ публикува статия, която наред с хвалебствия за личността на починалия, с представянето на предположения като факти (включително в заглавието) и с фриволни интерпретации на туитове на различни хора и публикация от блога ми съдържаше скрупульозно описани детайли. Например с какво точно се е самоубил, конкретните стъпки на изпълнението – първо, второ, трето. Че по всяка вероятност е припаднал от болка.
С този откъс поздравявам всички колеги журналисти, които вървят по пътя на „ексклузивността“ и „човешките истории“, още познати като „истории за малкия човек“ (?!), и им желая крепко здраве и творческо дръзновение.
Тук първо ще се хвана за творчеството, за да ви препоръчам текста на Стефан Иванов от рубриката ни „На второ четене“. „Изповедите на един буржоа. Исках да мълча“ от Шандор Мараи е книгата на фокус този месец – отрезвяваща изповед за разпадането на буржоазната вселена; за мълчанието, вината и емиграцията като избор; за личната и колективната отговорност.
Хората продължават да напускат не само по икономически, но и по морални причини. Именно защото не вярват, че обществото ще се промени. Защото усещат, че тяхната жизнена траектория е по-ясна другаде. Защото им липсва доверие в общия проект. При Мараи напускането е трагедия. При нас често е практическо решение, но и тук носи следа от вина и от чувство за изкореняване. И в двата случая е знак, че институциите не предлагат достатъчен смисъл. Нито достатъчно бъдеще.
А сега към здравето: рубриката на Надежда Цекулова „Анатомия на пола: Жена“ е обновена с още един текст, посветен на женското здраве, но този път като пазарна ниша. Има ли шанс женското здраве да излезе от периферията на медицината, без да потъне в маркетинг лабиринта, в който на милиони жени по света ежесекундно се продават милиони неща, които, освен че са по-скъпи просто защото са „женски“, понякога са и напълно излишни? Прочетете текста на Надежда – ще научите много интересни неща от него. Например, че в много щати в САЩ дамските хигиенни продукти се облагат с по-висок данък, понеже се смятат за „луксозни стоки“, а виаграта – не, защото е „лекарство от първа необходимост“.
Луксозно ми е някак.
Освен заради хигиенните продукти и заради факта, че „Тоест“ е една луксозна медия, в която можем да си позволим лукса да публикуваме каквото си искаме, защото го смятаме за важно и умно. Такива несъмнено са философските разговори за видеоигрите, които четем в рубриката „Игромислие“. Тази седмица излезе втората част от материала „Елегантната игра: Синхронизация и резонанс“, в която се говори за музиката в игрите.
От едно изкуство, каквото несъмнено са съвременните видеоигри, към друго, или по-скоро към други, с текста на Александър Драганов „Скритият океан на фен културата“. В статията си той се гмурка в сложните отношения между фенско и „официално“ изкуство, като използва за отправна точка абсолютния световен хит „Алхимизирани“ на СенЛинЮ.
Завършвам с информация за посрещачите, както се казваше навремето по гарите: предстои новият епизод на „Тоест разговаряме“, в който този път ще участва Йовко Ламбрев – компютърен инженер, съосновател на „Тоест” и автор в рубриката „Аз, киборгът“, в която на достъпен език представя темите за живота ни в дигиталната ера. Разговорът ще е за медии, за демокрация, за данни, за изкуствен интелект, за дигитална хигиена – изобщо за всичко, което интересува страшно много хора, а добрите говорители по тези теми не са бог знае колко. Йовко категорично е един от тях. И ако искате, в тази анкета може да му зададете въпрос, на който да отговори по време на ефира.
Срещата с него е на 22 ноември от 16:00 в YouTube Live.
Благодаря от името на целия екип на „Тоест“, че продължавате да подкрепяте медията и усилията ни.
New one-click onboarding and notebooks with a built-in AI agent in Amazon SageMaker Unified Studio
Post Syndicated from Channy Yun (윤석찬) original https://aws.amazon.com/blogs/aws/new-one-click-onboarding-and-notebooks-with-ai-agent-in-amazon-sagemaker-unified-studio/
Today we’re announcing a faster way to get started with your existing AWS datasets in Amazon SageMaker Unified Studio. You can now start working with any data you have access to in a new serverless notebook with a built-in AI agent, using your existing AWS Identity and Access Management (IAM) roles and permissions.
New updates include:
- One-click onboarding – Amazon SageMaker can now automatically create a project in Unified Studio with all your existing data permissions from AWS Glue Data Catalog, AWS Lake Formation, and Amazon Simple Storage Services (Amazon S3).
- Direct integration – You can launch SageMaker Unified Studio directly from Amazon SageMaker, Amazon Athena, Amazon Redshift, and Amazon S3 Tables console pages, giving a fast path to analytics and AI workloads.
- Notebooks with a built-in AI agent – You can use a new serverless notebook with a built-in AI agent, which supports SQL, Python, Spark, or natural language and gives data engineers, analysts, and data scientists one place to develop and run both SQL queries and code.
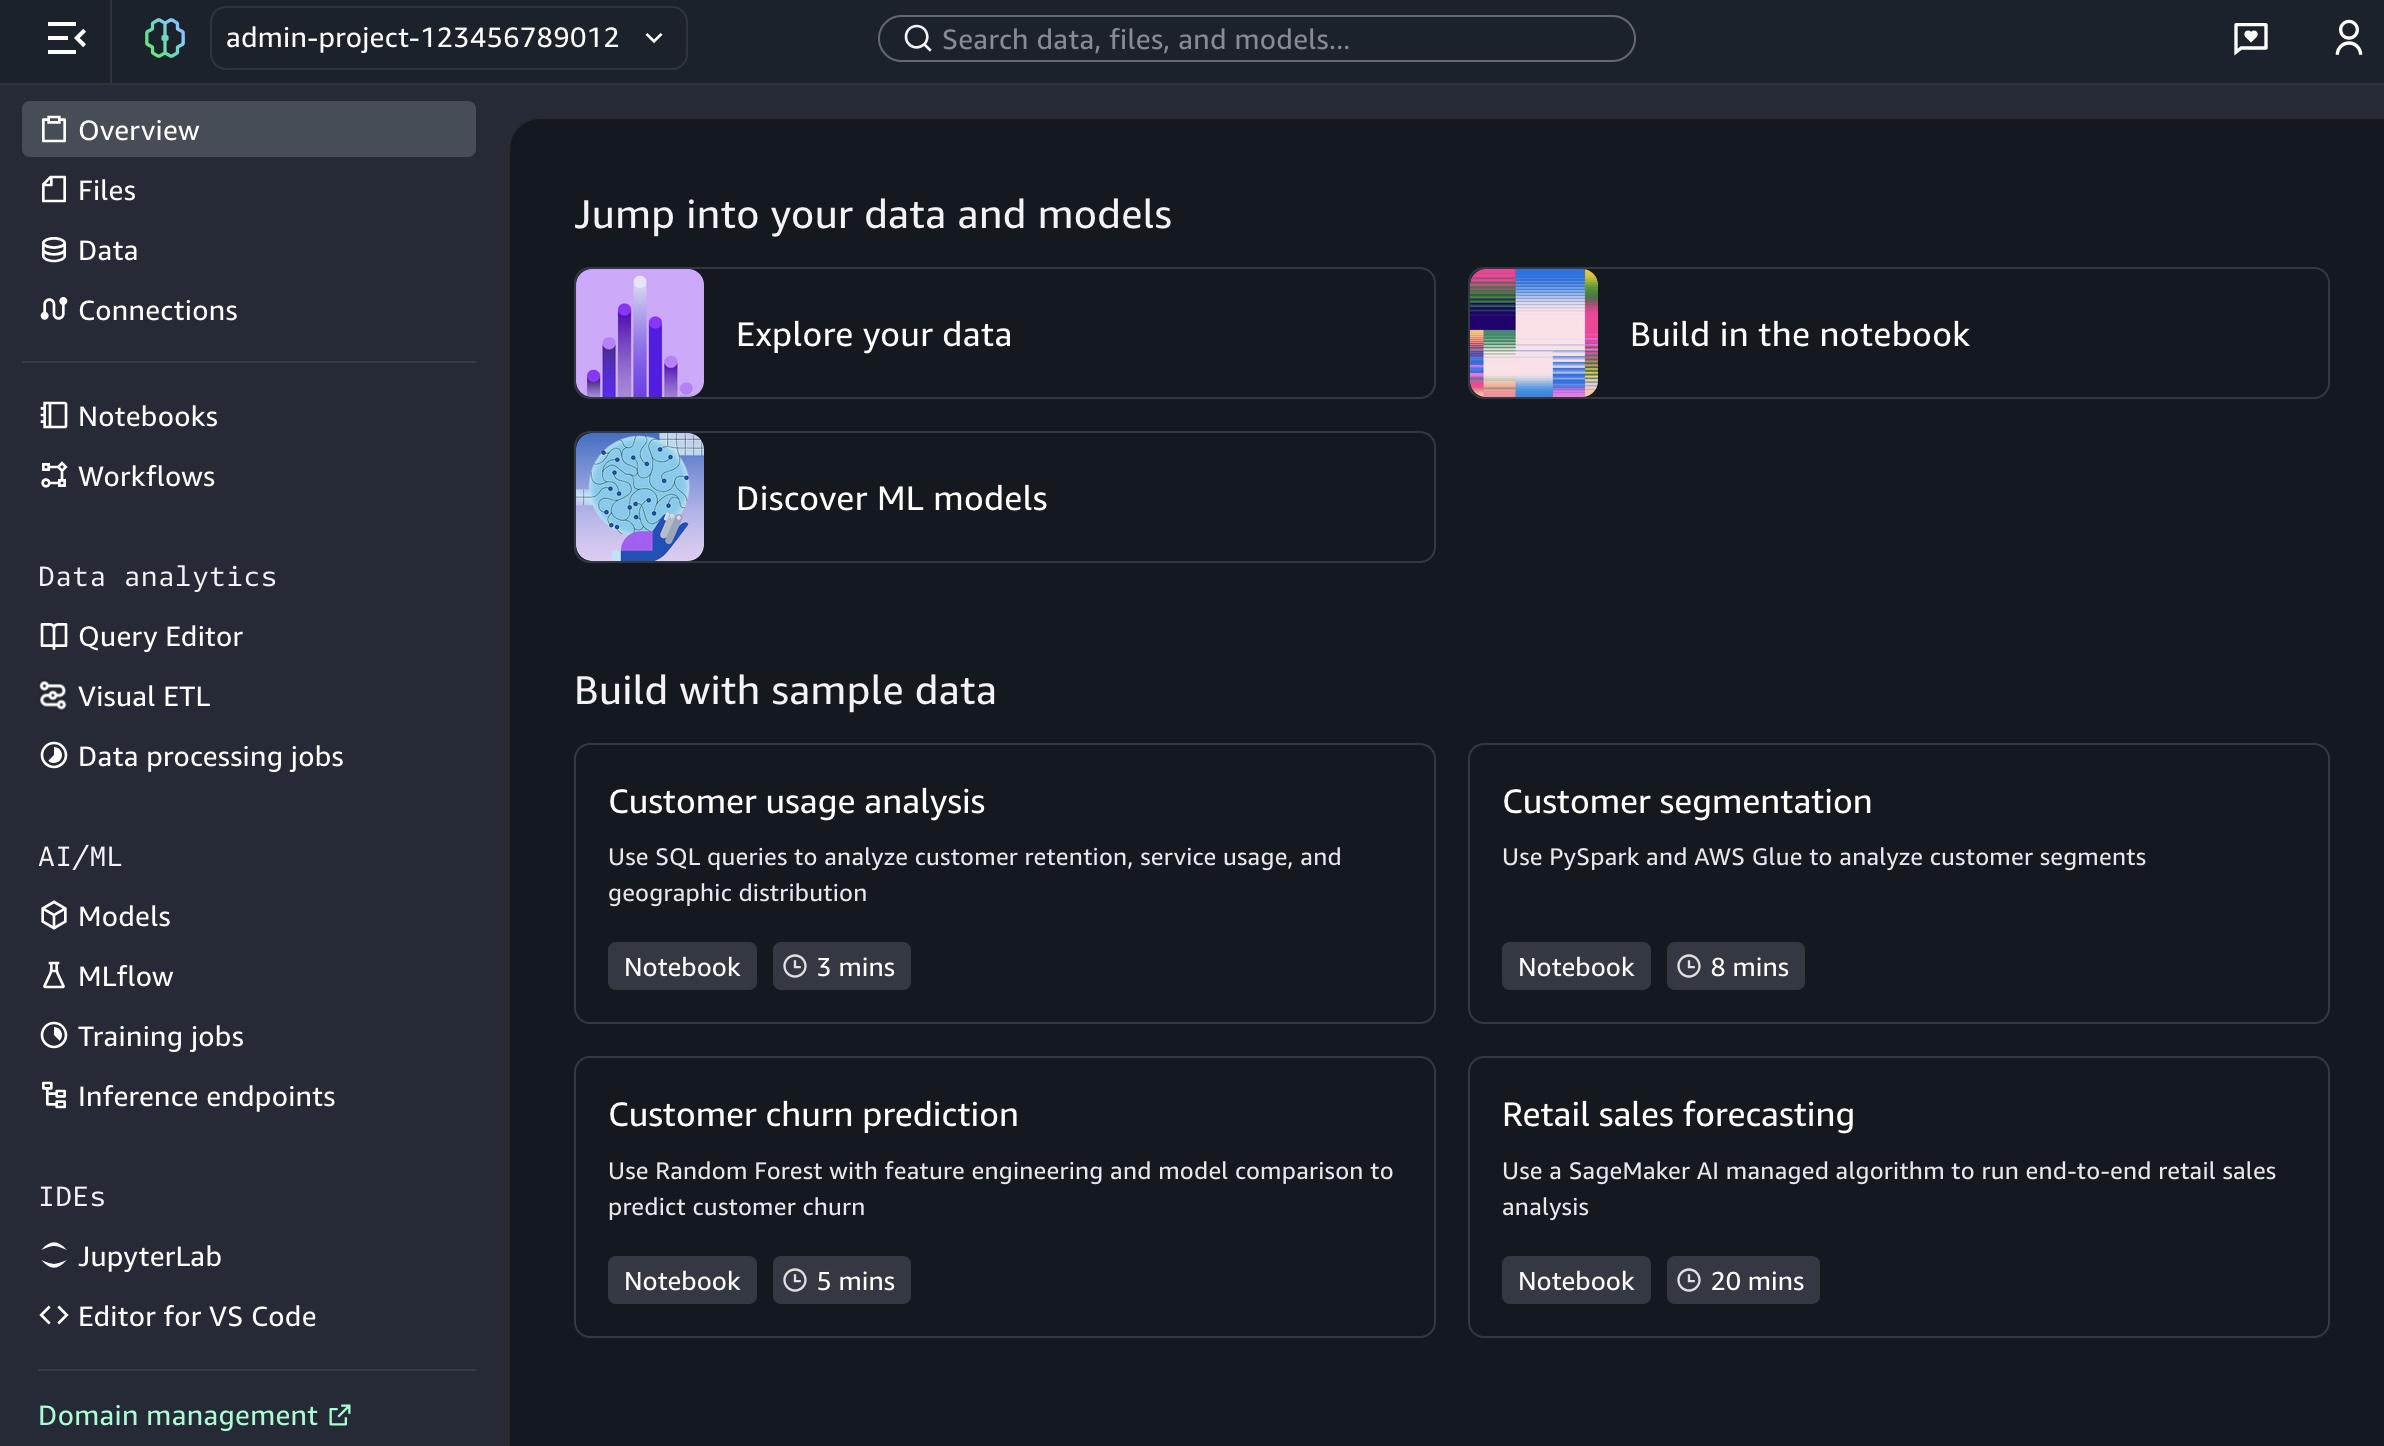
You also have access to other tools such as a Query Editor for SQL analysis, JupyterLab integrated developer environment (IDE), Visual ETL and workflows, and machine learning (ML) capabilities.
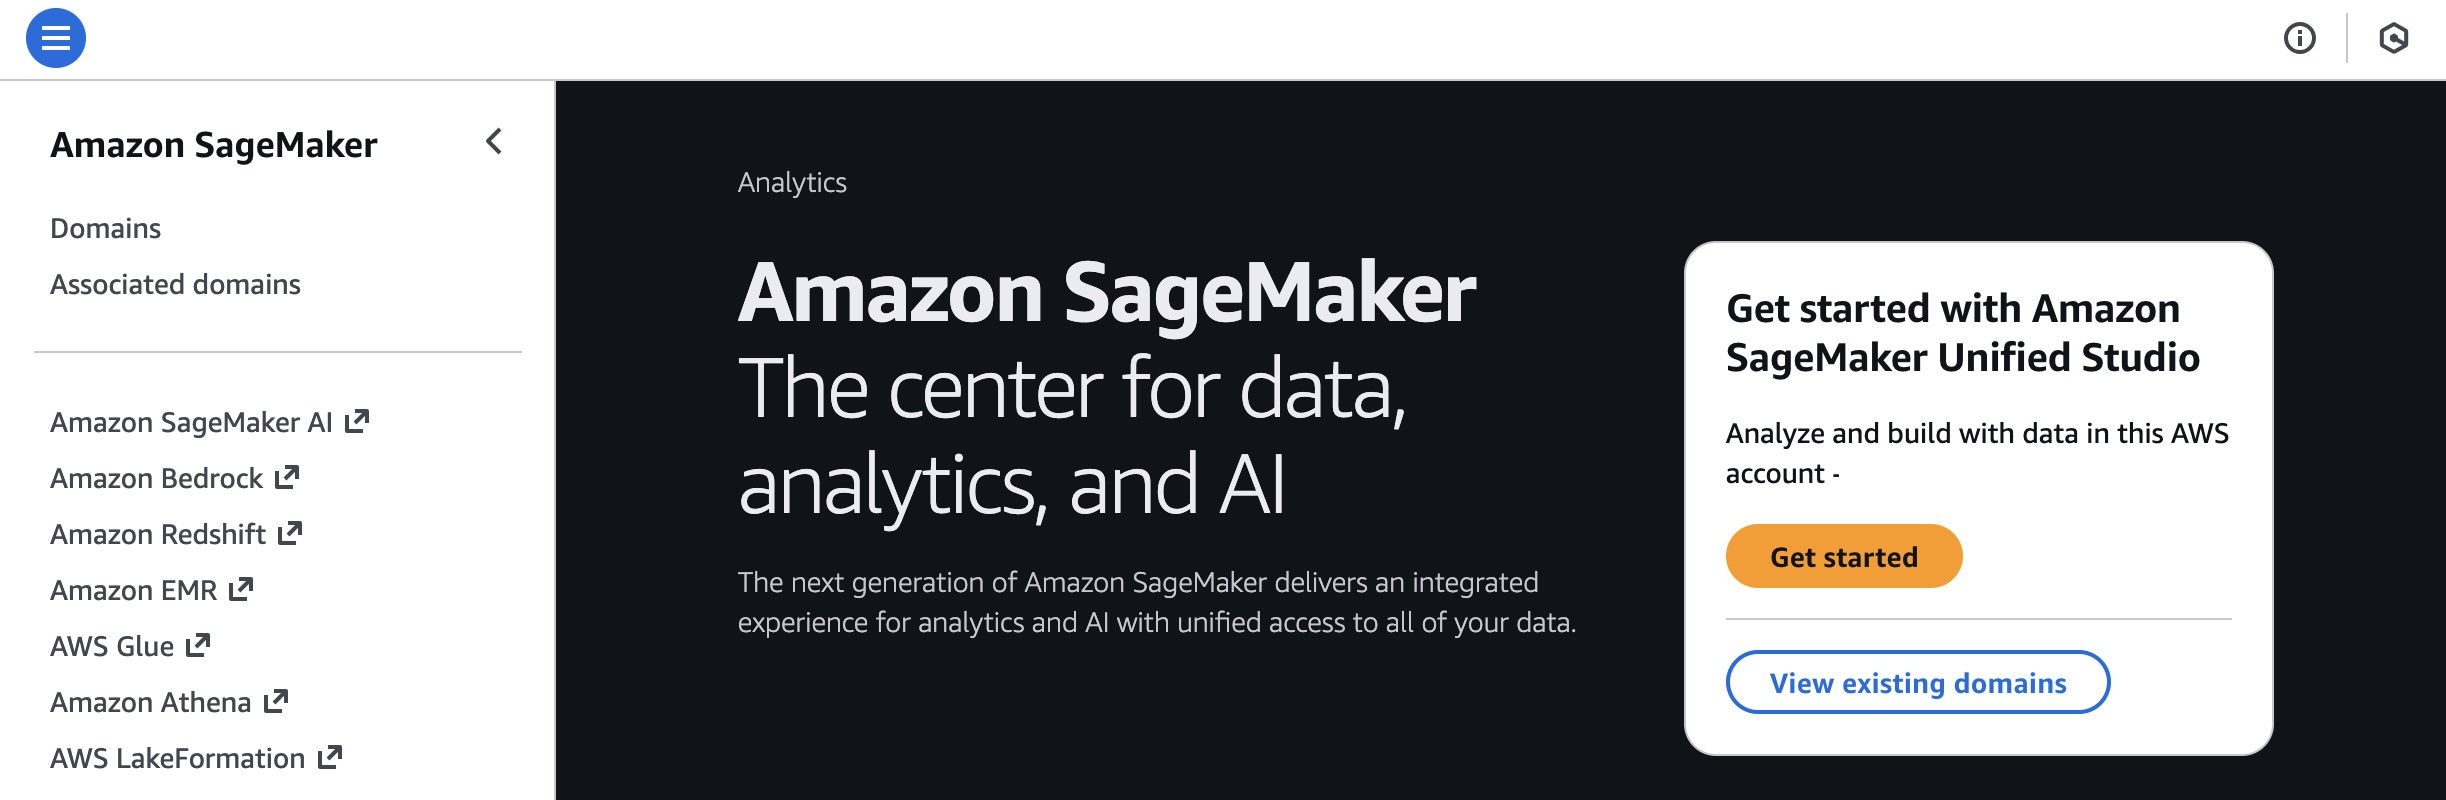
Try one-click onboarding and connect to Amazon SageMaker Unified Studio
To get started, go to the SageMaker console and choose the Get started button.
You will be prompted either to select an existing AWS Identity and Access Management (AWS IAM) role that has access to your data and compute, or to create a new role.
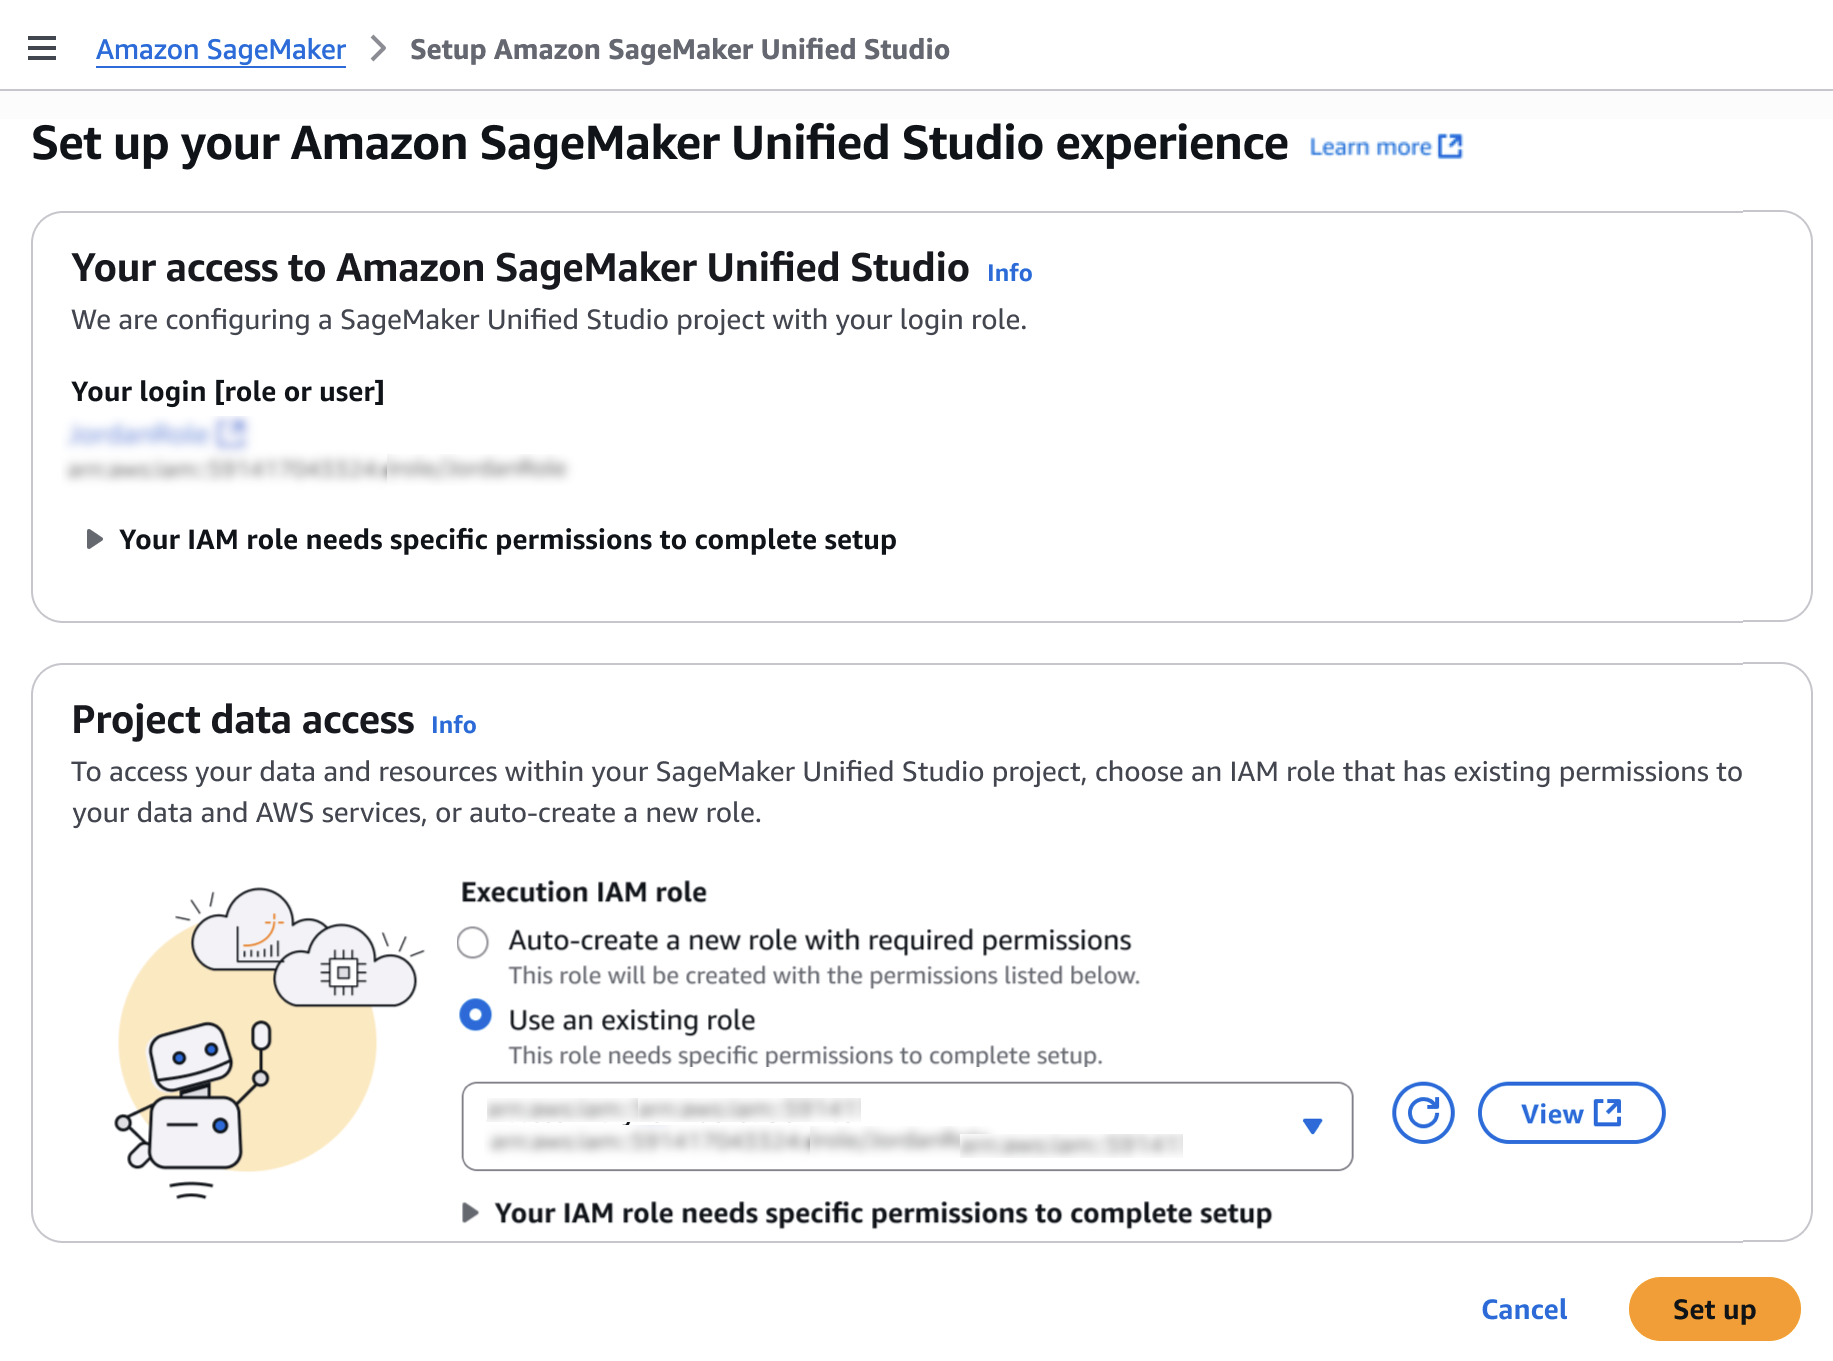
Choose Set up. It takes a few minutes to complete your environment. After this role is granted access, you’ll be taken to the SageMaker Unified Studio landing page where you will see the datasets that you have access to in AWS Glue Data Catalog as well as a variety of analytics and AI tools to work with.
This environment automatically creates the following serverless compute: Amazon Athena Spark, Amazon Athena SQL, AWS Glue Spark, and Amazon Managed Workflows for Apache Airflow (MWAA) serverless. This means you completely skip provisioning and can start working immediately with just-in-time compute resources, and it automatically scales back down when you finish, helping to save on costs.
You can also get started working on specific tables in Amazon Athena, Amazon Redshift, and Amazon S3 Tables. For example, you can select Query your data in Amazon SageMaker Unified Studio and then choose Get started in Amazon Athena console.
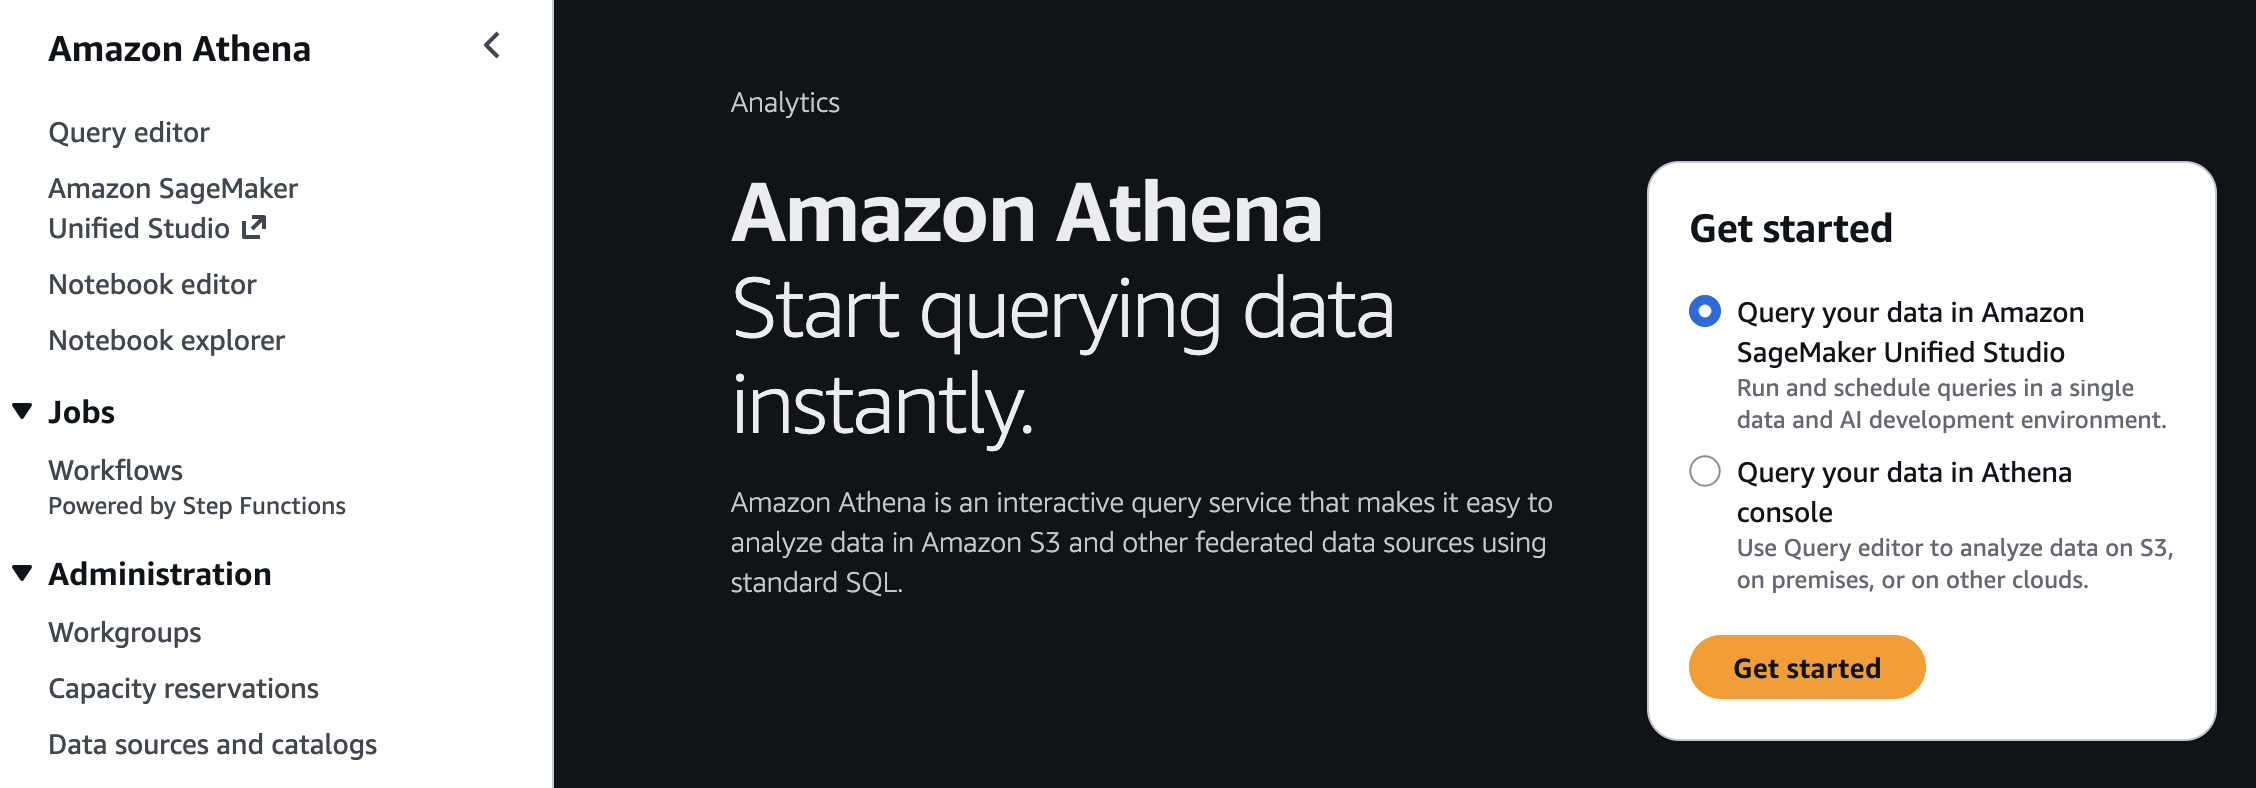
If you start from these consoles, you’ll connect directly to the Query Editor with the data that you were looking at already accessible, and your previous query context preserved. By using this context-aware routing, you can run queries immediately once inside the SageMaker Unified Studio without unnecessary navigation.
Getting started with notebooks with a built-in AI agent
Amazon SageMaker is introducing a new notebook experience that provides data and AI teams with a high-performance, serverless programming environment for analytics and ML jobs. The new notebook experience includes Amazon SageMaker Data Agent, a built-in AI agent that accelerates development by generating code and SQL statements from natural language prompts while guiding users through their tasks.
To start a new notebook, choose the Notebooks menu in the left navigation pane to run SQL queries, Python code, and natural language, and to discover, transform, analyze, visualize, and share insights on data. You can get started with sample data such as customer analytics and retail sales forecasting.
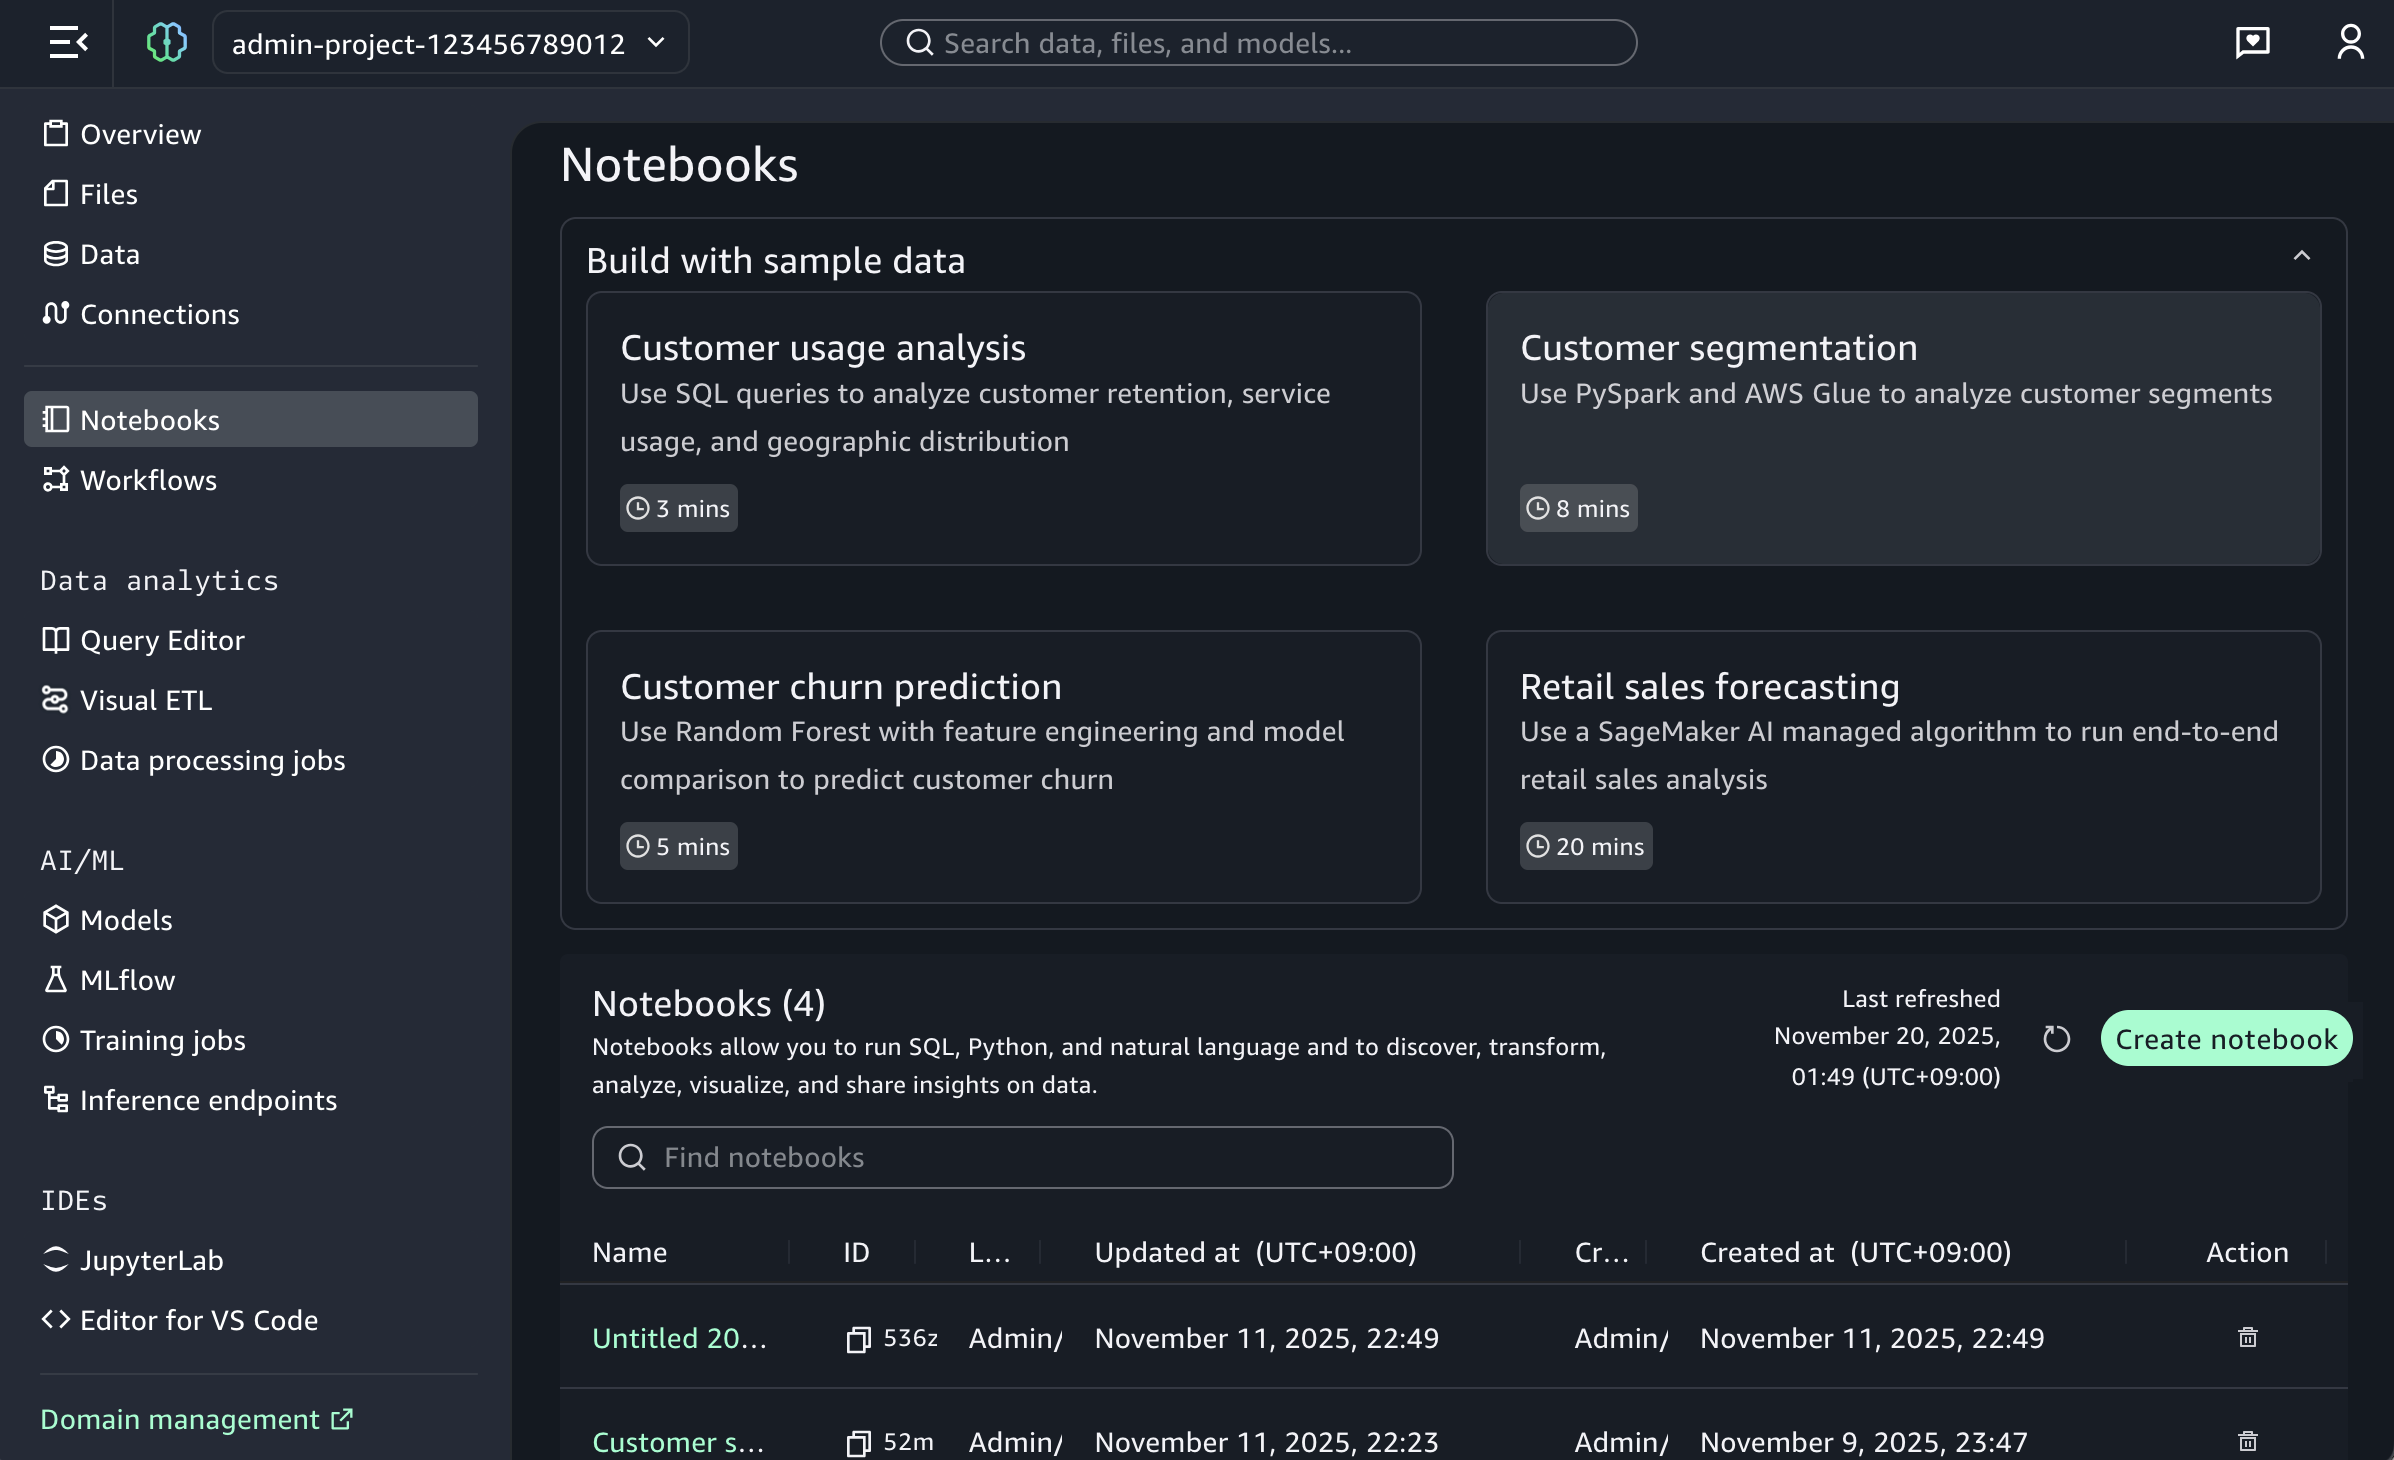
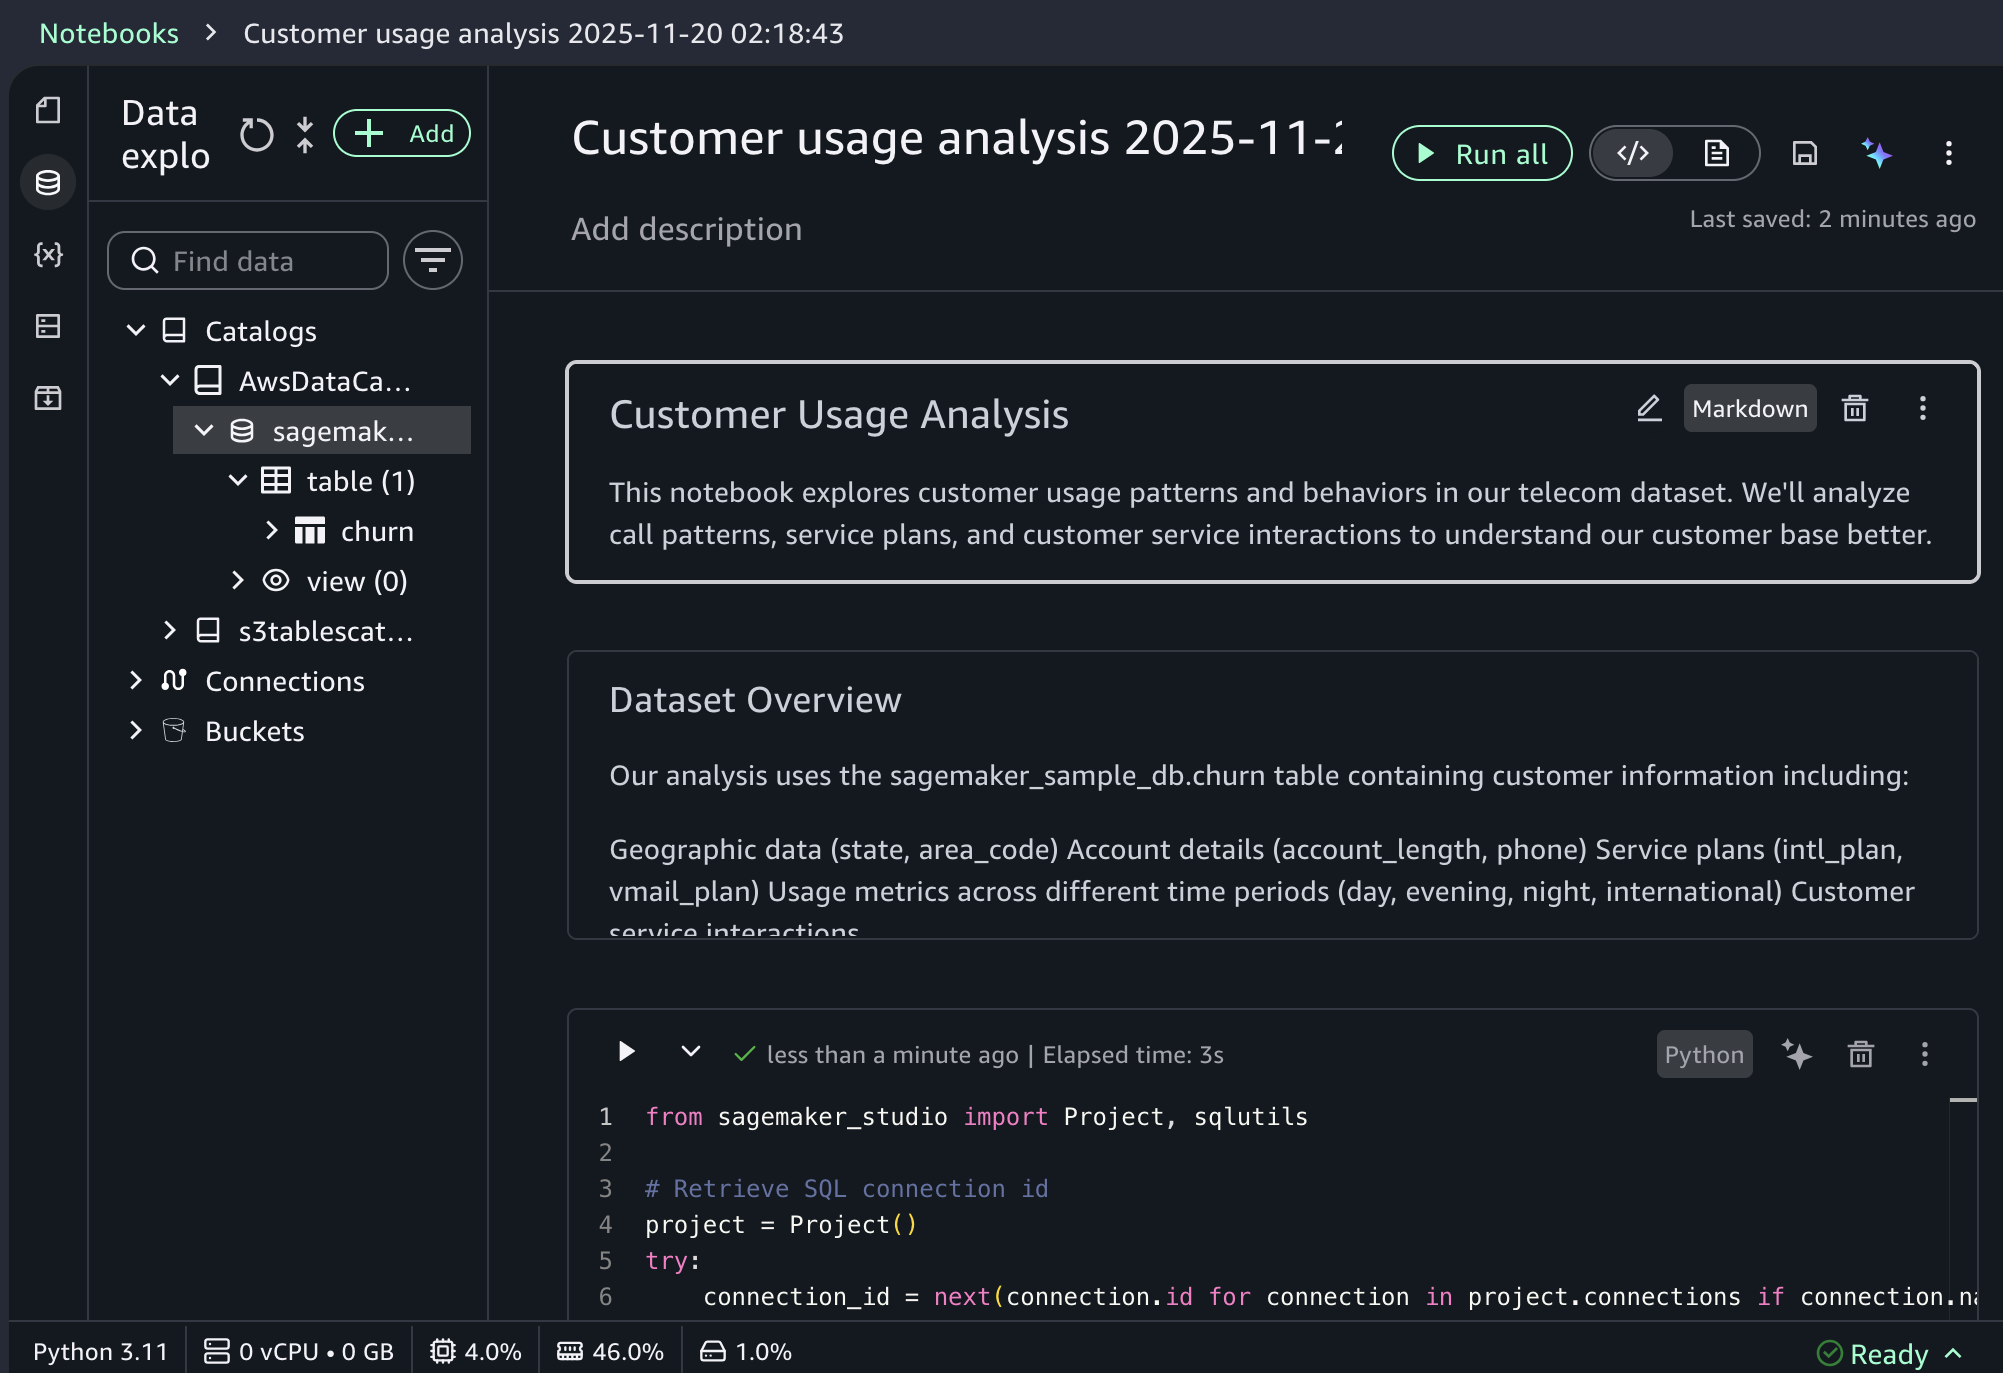
When you choose a sample project for customer usage analysis, you can open sample notebook to explore customer usage patterns and behaviors in a telecom dataset.
As I noted, the notebook includes a built-in AI agent that helps you interact with your data through natural language prompts. For example, you can start with data discovery using prompts like:
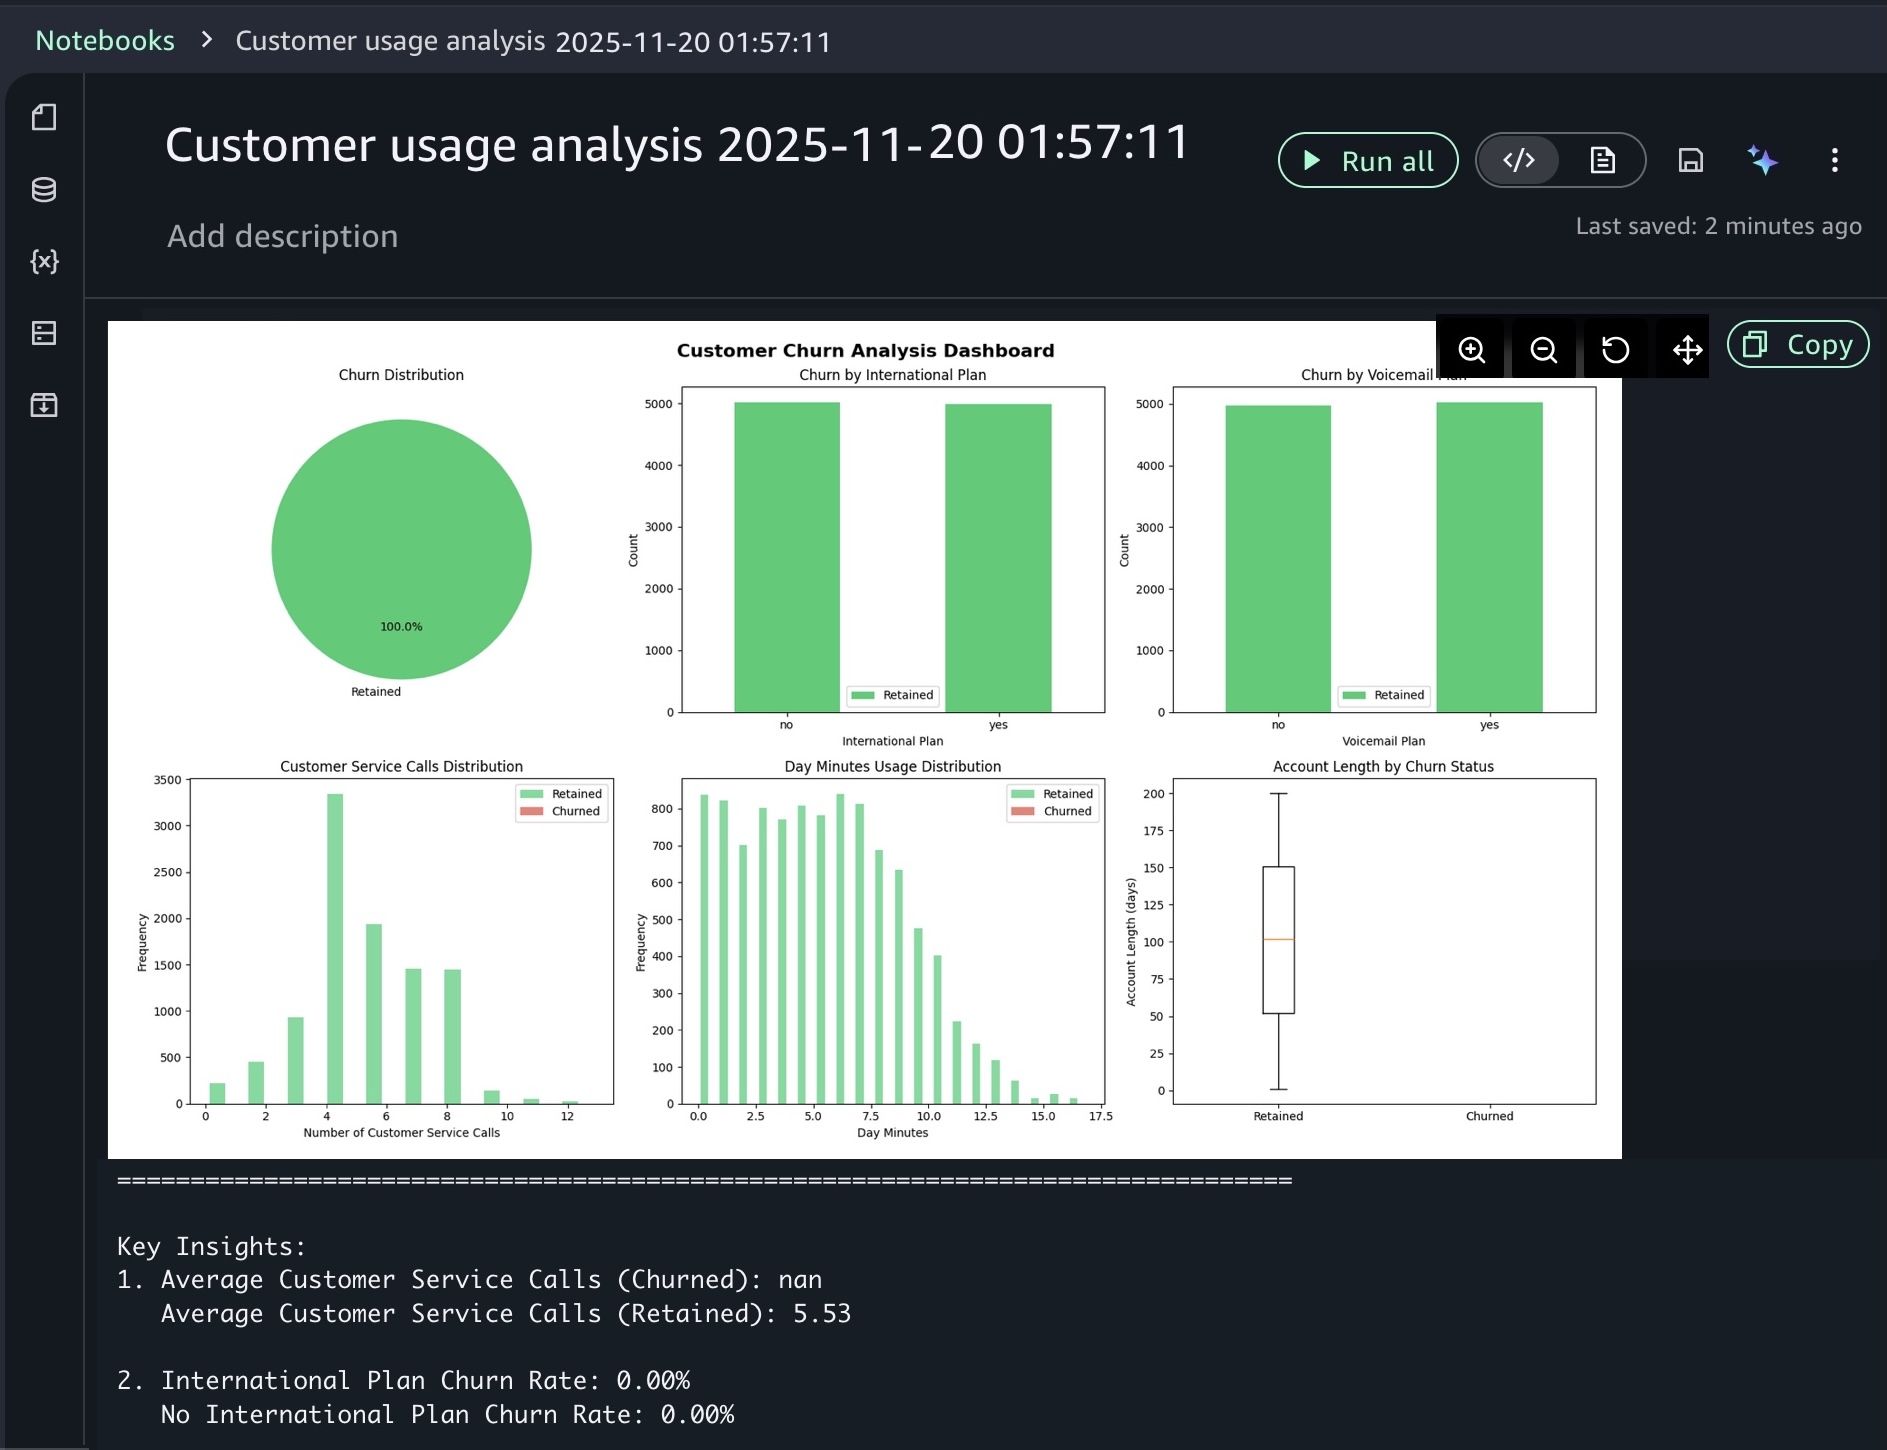
Show me some insights and visualizations on the customer churn dataset.
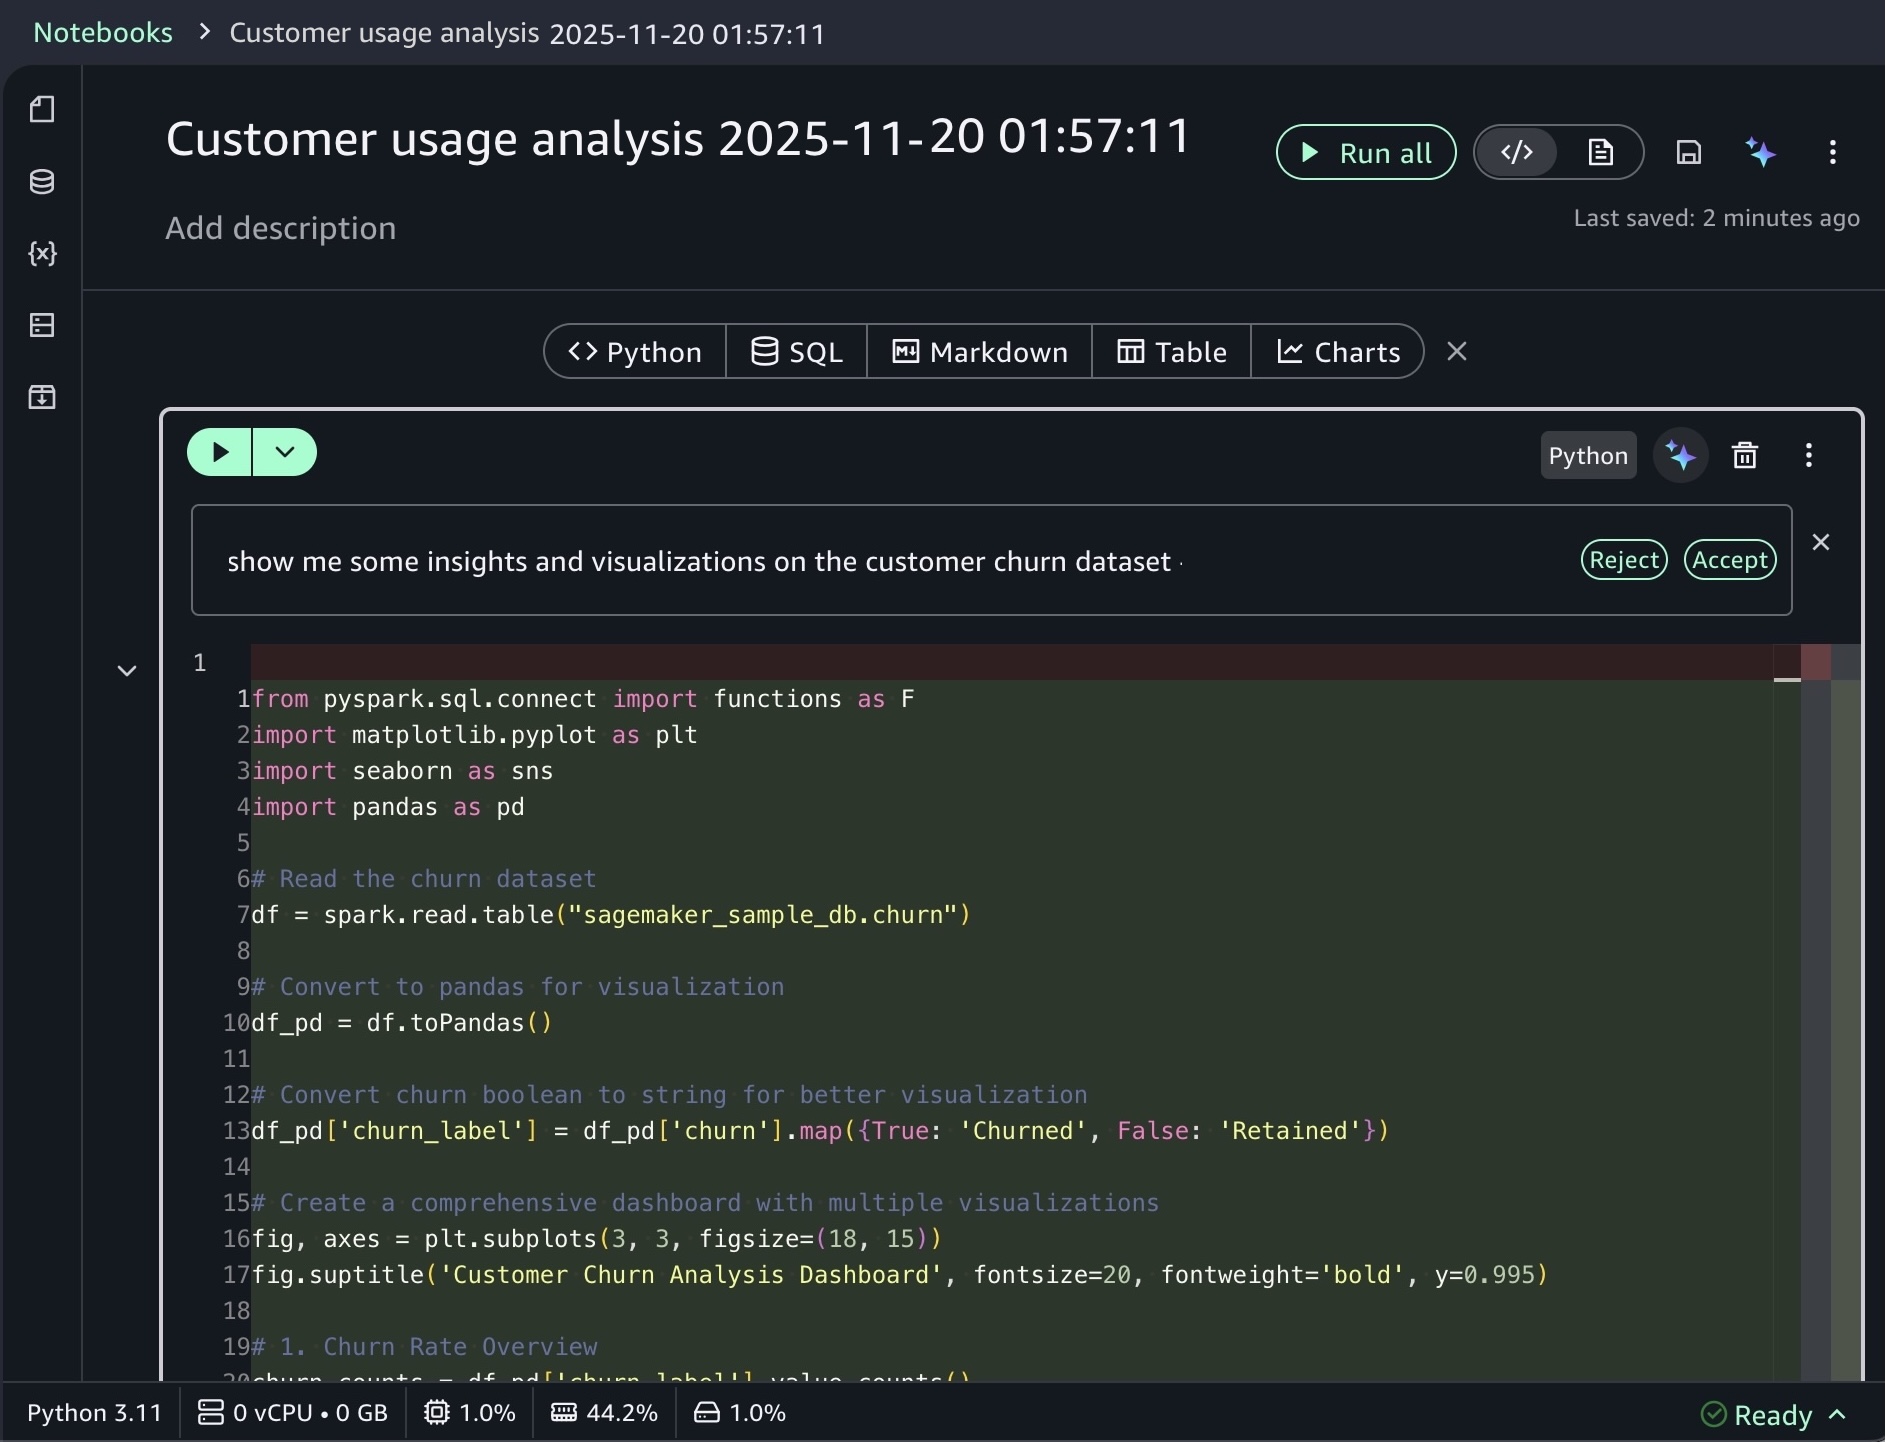
After you identify relevant tables, you can request specific analysis to generate Spark SQL. The AI agent creates step-by-step plans with initial code for data transformations and Python code for visualizations. If you see an error message while running the generated code, choose Fix with AI to get help resolving it. Here is a sample result:
For ML workflows, use specific prompts like:
Build an XGBoost classification model for churn prediction using the churn table, with purchase frequency, average transaction value, and days since last purchase as features.
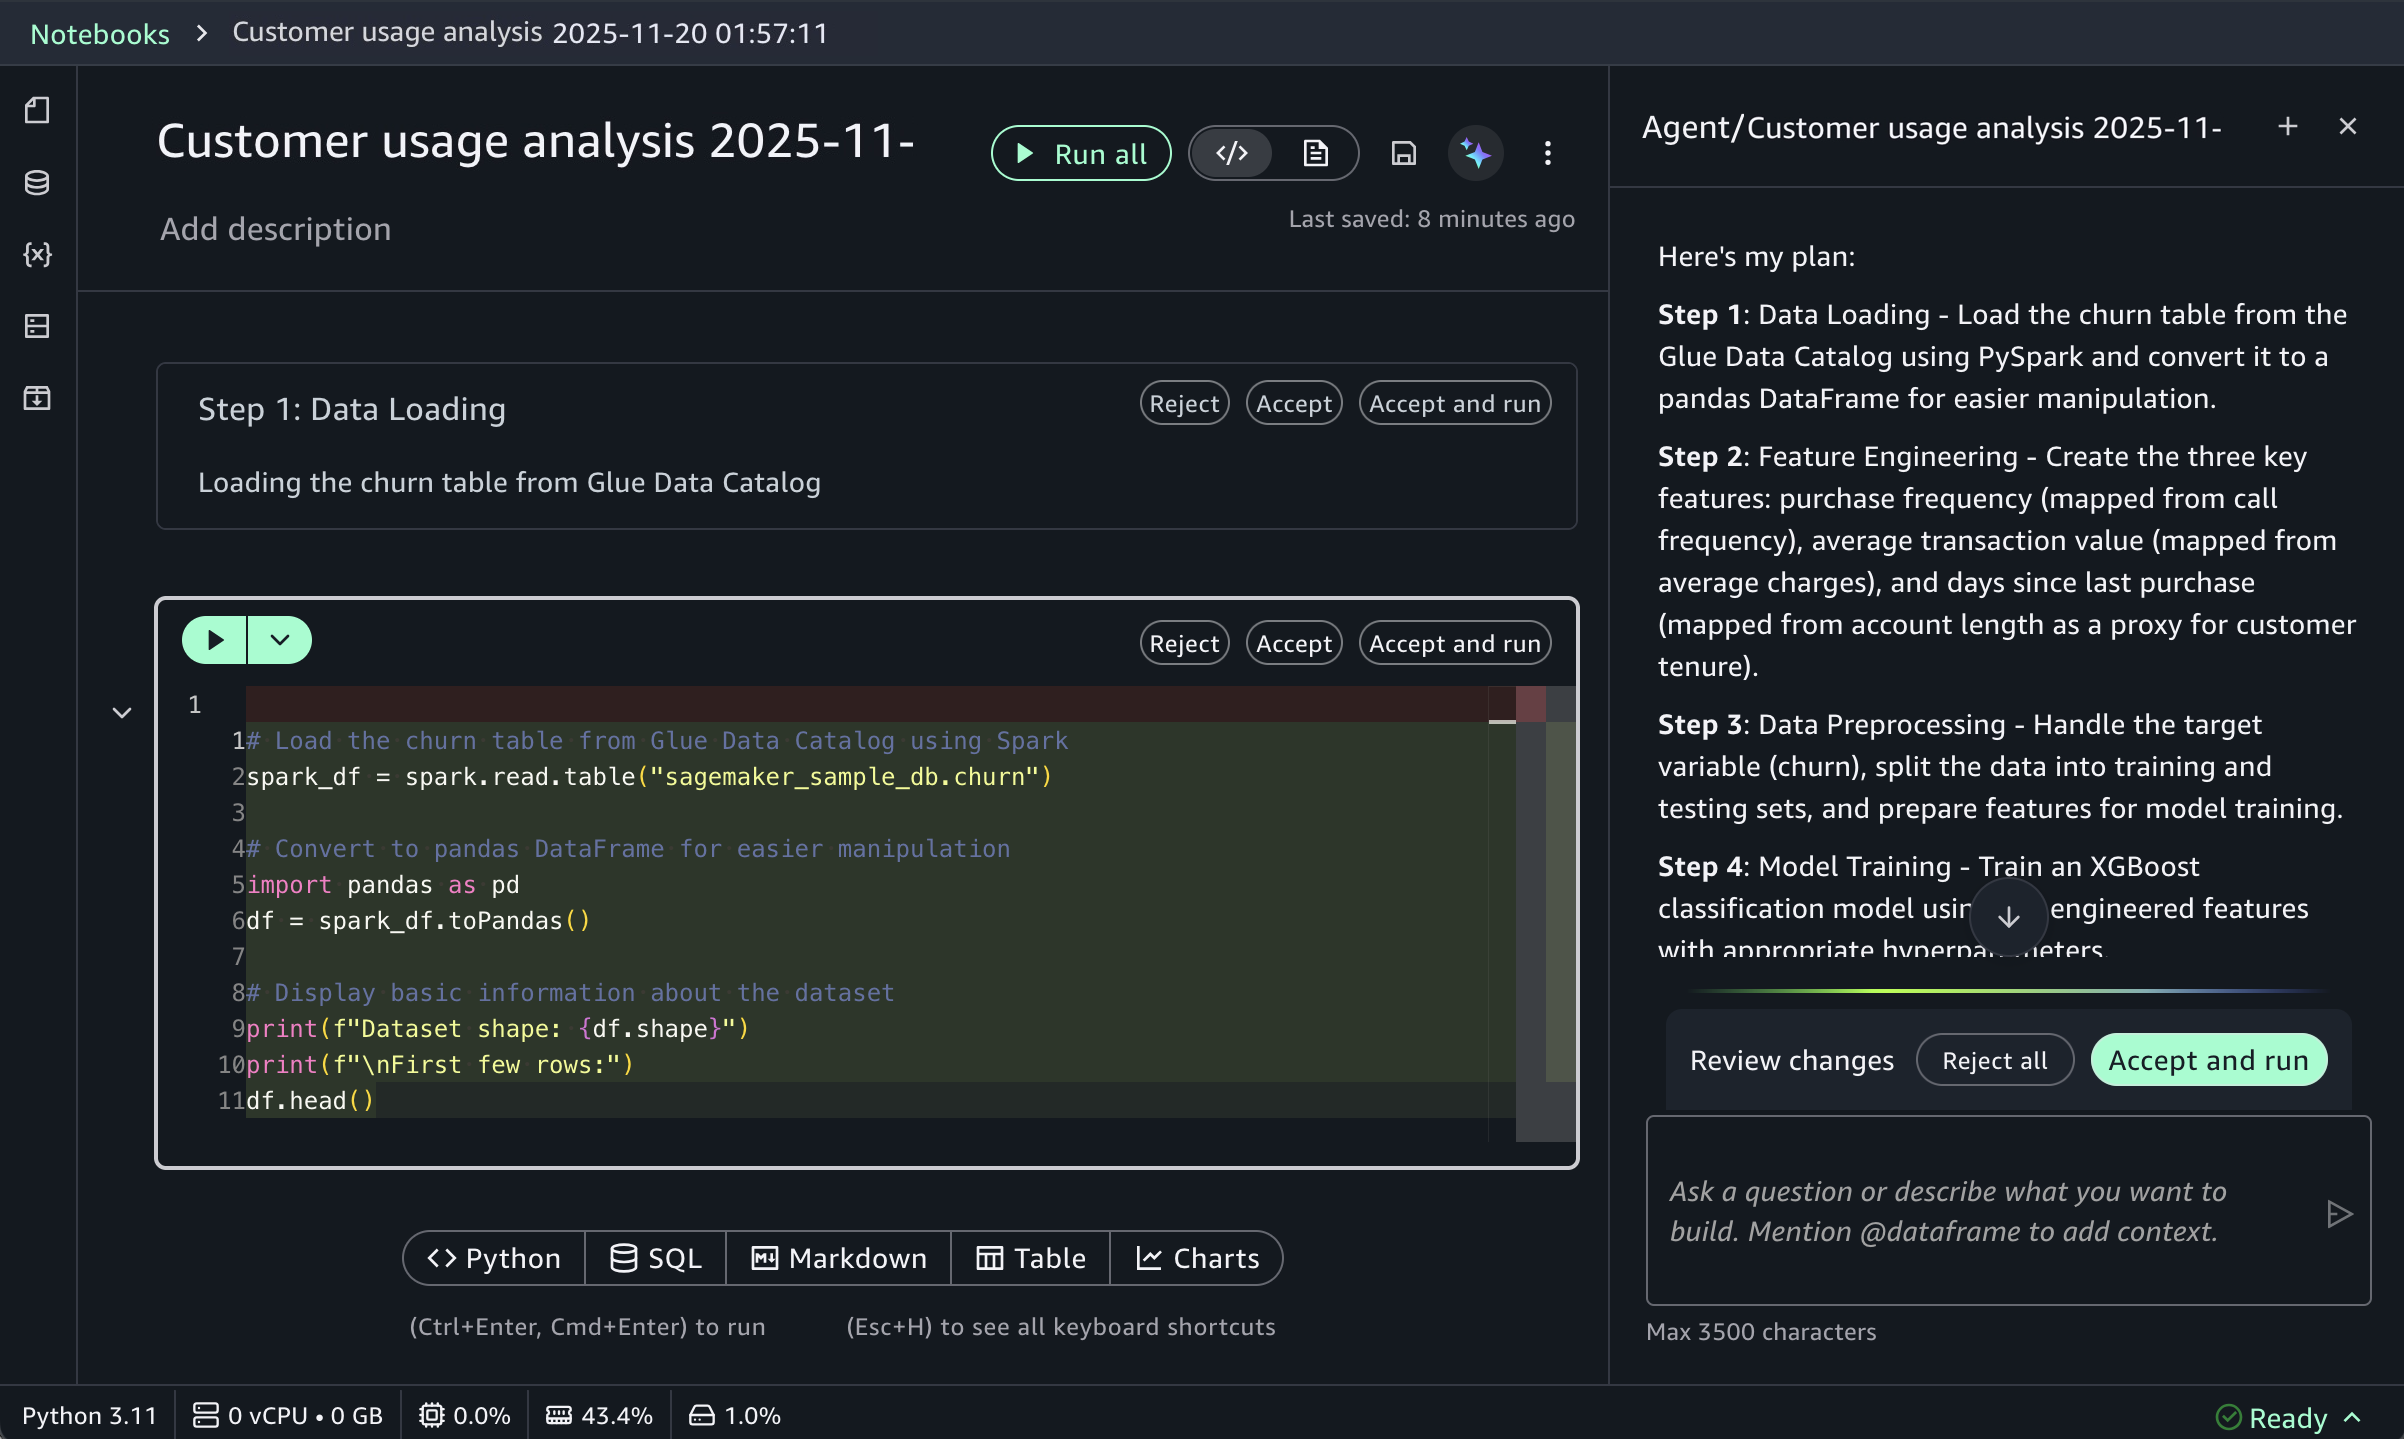
This prompt receives structured responses including a step-by-step plan, data loading, feature engineering, and model training code using the SageMaker AI capabilities, and evaluation metrics. SageMaker Data Agent works best with specific prompts and is optimized for AWS data processing services including Athena for Apache Spark and SageMaker AI.
To learn more about new notebook experience, visit the Amazon SageMaker Unified Studio User Guide.
Now available
One-click onboarding and the new notebook experience in Amazon SageMaker Unified Studio are now available in US East (Ohio), US East (N. Virginia), US West (Oregon), Asia Pacific (Mumbai), Asia Pacific (Singapore), and Asia Pacific (Sydney), Asia Pacific (Tokyo), Europe (Frankfurt), Europe (Ireland) Regions. To learn more, visit the SageMaker Unified Studio product page.
Give it a try in the SageMaker console and send feedback to AWS re:Post for SageMaker Unified Studio or through your usual AWS Support contacts.
— Channy
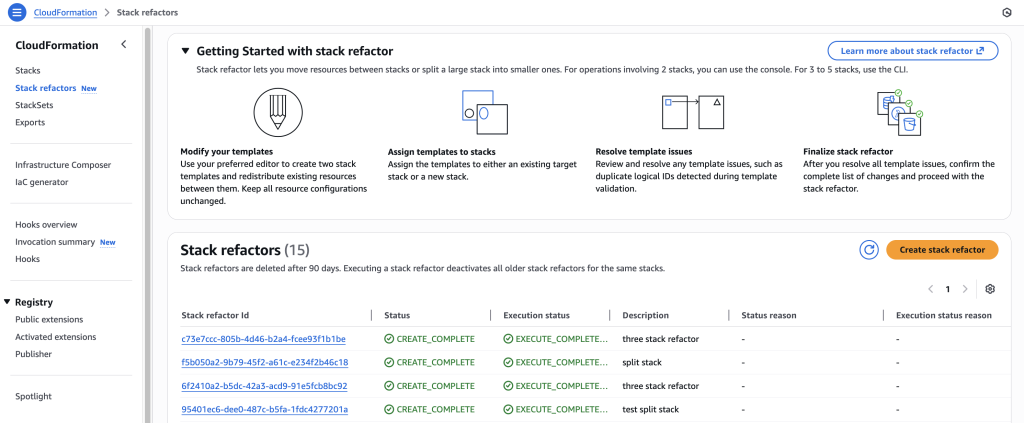
Introducing AWS CloudFormation Stack Refactoring Console Experience: Reorganize Your Infrastructure Without Disruption
Post Syndicated from Brian Terry original https://aws.amazon.com/blogs/devops/introducing-aws-cloudformation-stack-refactoring-reorganize-your-infrastructure-without-disruption/
AWS CloudFormation models and provisions cloud infrastructure as code, letting you manage entire lifecycle operations through declarative templates. Stack Refactoring console experience, announced today, extends the AWS CLI experience launched earlier. Now, you move resources between stacks, rename logical IDs, and decompose monolithic templates into focused components without touching the underlying infrastructure using the CloudFormation console. Your resources maintain stability and operational state throughout the reorganization. Whether you’re modernizing legacy stacks, aligning infrastructure with evolving architectural patterns, or improving long-term maintainability, Stack Refactoring adapts your CloudFormation stacks organization to changing requirements without forcing disruptive workarounds.
Stack Refactoring enables you to move resources between stacks, rename logical resource IDs, and split monolithic stacks into smaller, more manageable components—all while maintaining resource stability and preserving your infrastructure’s operational state. If you’re modernizing legacy infrastructure, aligning stack organization with evolving architectural patterns, or improving maintainability across your cloud resources, Stack Refactoring provides the flexibility you need to adapt your CloudFormation organization to changing
How It Works
Stack Refactoring operates through a controlled, multi-phase process designed around resource safety. When you initiate a refactor operation, CloudFormation analyzes both source and destination templates, constructs a detailed execution plan, then orchestrates resource movement without disrupting running infrastructure. Resource mappings define how assets transfer between stacks and how logical IDs should change. CloudFormation handles the orchestration complexity automatically – moving resources from source stacks, updating or creating destination stacks, and preserving all dependency relationships through exports and imports.
Each refactor operation receives a unique Stack Refactor ID for tracking progress, reviewing planned actions before execution, and monitoring the operation from initiation through completion. This preview-then-execute model gives you confidence in complex refactoring scenarios where dependencies span multiple stacks or templates.
Compared to the CLI, the console experience provides an easier way to view refactor actions, get automatic resource mapping, and easily rename logical IDs.
Example Scenario
Scenario 1: Splitting a Monolithic Stack
In this scenario, you have an Amazon Simple Notification Service (SNS) and AWS Lambda Function subscribed to it. As usage patterns evolve, you want to separate the subscriptions into a different stack for better organizational boundaries. You can also rename a resource’s logical ID to improve template clarity or align with naming conventions. Stack Refactoring handles this without recreating the underlying resource.
- Create a new template MySNS.yaml using the following :
# Original stack: MySns AWSTemplateFormatVersion: "2010-09-09" Resources: Topic: Type: AWS::SNS::Topic MyFunction: Type: AWS::Lambda::Function Properties: FunctionName: my-function Handler: index.handler Runtime: python3.12 Code: ZipFile: | import json def handler(event, context): print(json.dumps(event)) return event Role: !GetAtt FunctionRole.Arn Timeout: 30 Subscription: Type: AWS::SNS::Subscription Properties: Endpoint: !GetAtt MyFunction.Arn Protocol: lambda TopicArn: !Ref Topic FunctionInvokePermission: Type: AWS::Lambda::Permission Properties: Action: lambda:InvokeFunction Principal: sns.amazonaws.com FunctionName: !GetAtt MyFunction.Arn SourceArn: !Ref Topic FunctionRole: Type: AWS::IAM::Role Properties: AssumeRolePolicyDocument: Version: "2012-10-17" Statement: - Action: - sts:AssumeRole Effect: Allow Principal: Service: - lambda.amazonaws.com Condition: StringEquals: aws:SourceAccount: !Ref AWS::AccountId ArnLike: aws:SourceArn: !Sub "arn:${AWS::Partition}:lambda:${AWS::Region}:${AWS::AccountId}:function:my-function" Policies: - PolicyName: LambdaPolicy PolicyDocument: Version: "2012-10-17" Statement: - Action: - logs:CreateLogGroup - logs:CreateLogStream - logs:PutLogEvents Resource: - arn:aws:logs:*:*:* Effect: Allow - Create a new stack using this MySNS.yaml template:
aws cloudformation create-stack --stack-name MySns --template-body file://MySNS.yaml --capabilities CAPABILITY_IAM - Create a new template called
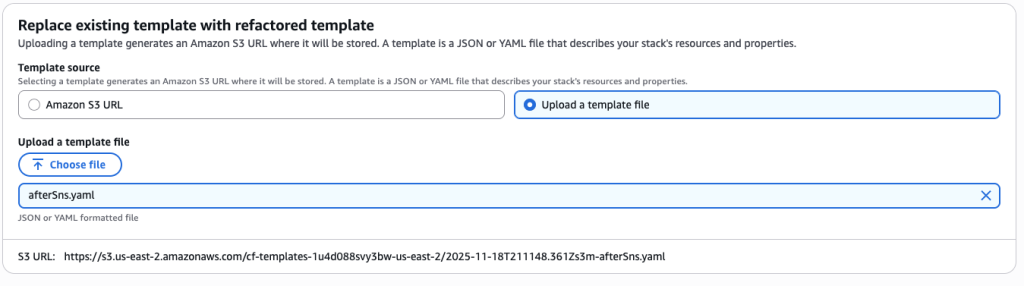
afterSns.yamlwith the content below. This template has your SNS topic in it and has a new export in it that will export the SNS topic ARN. This export will be used by your other templates to get the required SNS topic ARN.# afterSns.yaml - Focused SNS stack Resources: Topic: Type: AWS::SNS::Topic Outputs: TopicArn: Value: !Ref Topic Export: Name: TopicArn - Create a new template afterLambda.yaml with the following content. This template includes all the resources to create a Lambda subscription to your SNS topic. This template switched the
!Ref Topicto use the exported valued by using!ImportValue TopicArn. We are also updating the Logical Resource Id of Lambda function fromMyFunctiontoFunction
AWSTemplateFormatVersion: "2010-09-09" Resources: Function: Type: AWS::Lambda::Function Properties: FunctionName: my-function Handler: index.handler Runtime: python3.12 Code: ZipFile: | import json def handler(event, context): print(json.dumps(event)) return event Role: !GetAtt FunctionRole.Arn Timeout: 30 Subscription: Type: AWS::SNS::Subscription Properties: Endpoint: !GetAtt Function.Arn Protocol: lambda TopicArn: !ImportValue TopicArn FunctionInvokePermission: Type: AWS::Lambda::Permission Properties: Action: lambda:InvokeFunction Principal: sns.amazonaws.com FunctionName: !GetAtt Function.Arn SourceArn: !ImportValue TopicArn FunctionRole: Type: AWS::IAM::Role Properties: AssumeRolePolicyDocument: Version: "2012-10-17" Statement: - Action: - sts:AssumeRole Effect: Allow Principal: Service: - lambda.amazonaws.com Condition: StringEquals: aws:SourceAccount: !Ref AWS::AccountId ArnLike: aws:SourceArn: !Sub "arn:${AWS::Partition}:lambda:${AWS::Region}:${AWS::AccountId}:function:my-function" Policies: - PolicyName: LambdaPolicy PolicyDocument: Version: "2012-10-17" Statement: - Action: - logs:CreateLogGroup - logs:CreateLogStream - logs:PutLogEvents Resource: - arn:aws:logs:*:*:* Effect: Allow - Go to stack refactor home page, click on ‘create stack refactor’

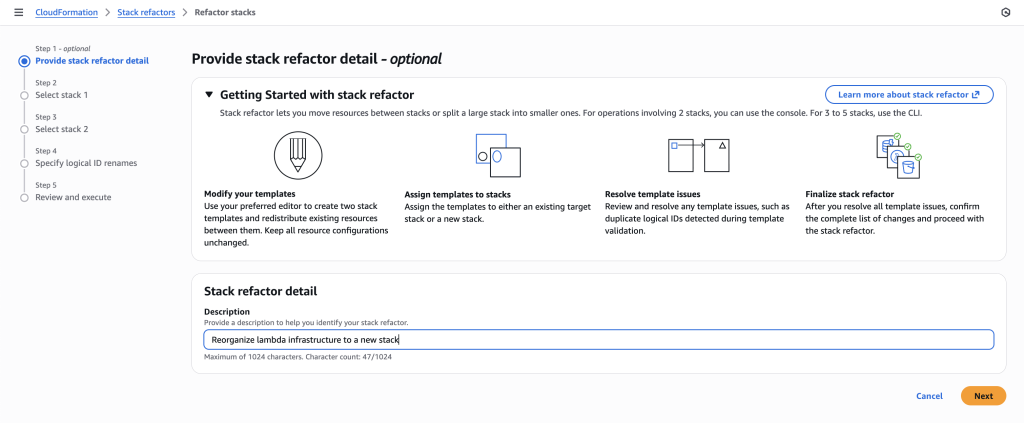
- Provide a description to help you identify your stack refactor.
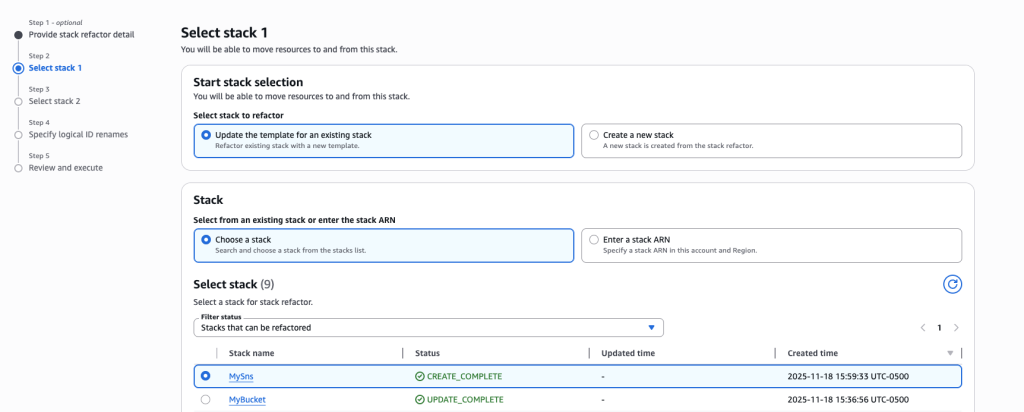
- For this scenario, we are splitting a monolithic stack so select ‘Update the template for an existing stack’ and ‘Choose a stack’ options.
- Search and choose the stack MySns that was created in Step 1.

- Upload the afterSns.yaml file

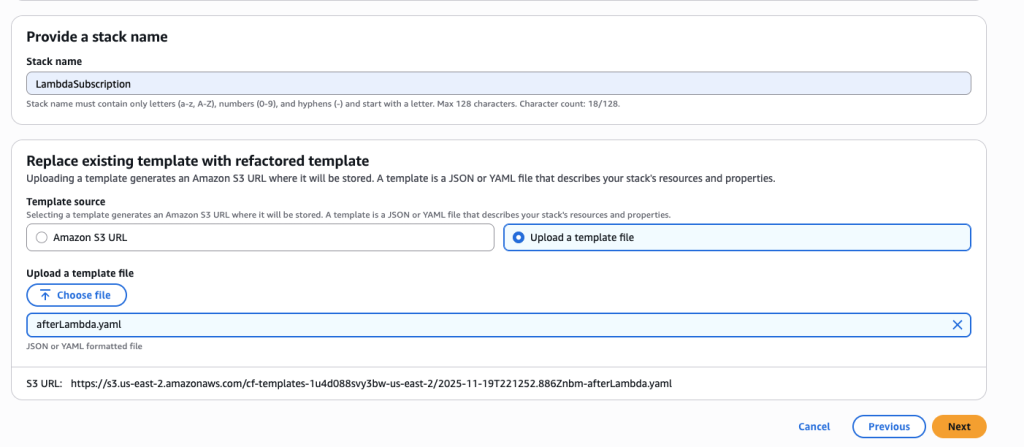
- You want to create a new stack to manage the Lambda function and SNS subscription resources. Choose ‘Create a new stack’ and name it ‘LambdaSubscription’.
- Upload afterLambda.yaml template file
 In some scenarios, CloudFormation console can automatically detect logical resource ID renames and pre-fill the mapping for you. The resource mapping is required when there are logical resource ID changes between the original stack and refactored template. Ensure that the mappings are correct before proceeding to the next step.

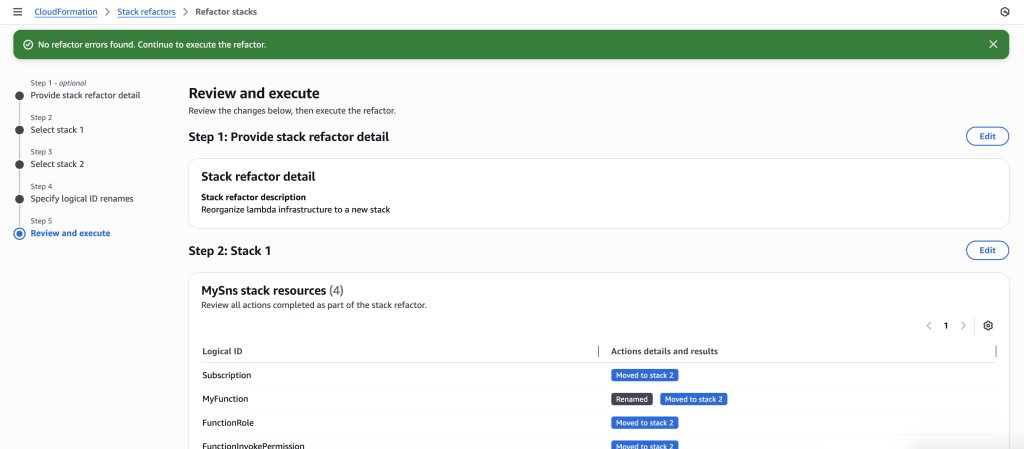
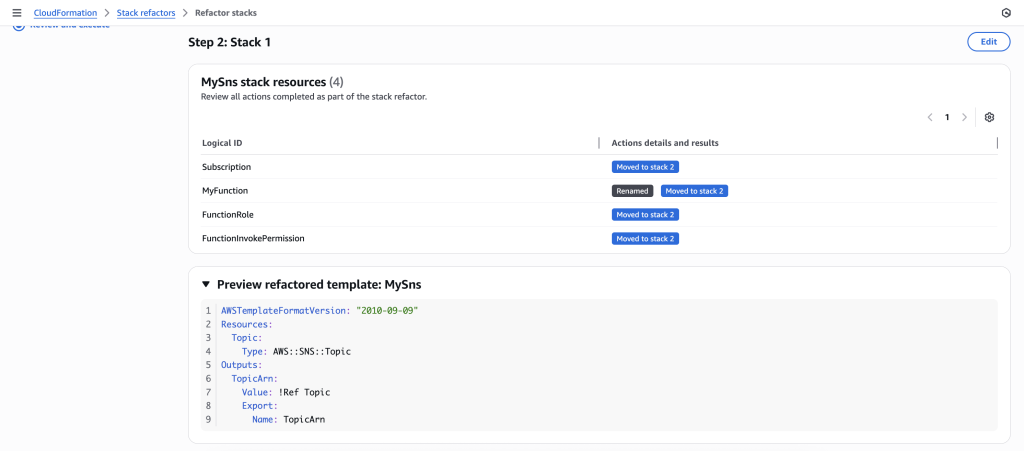
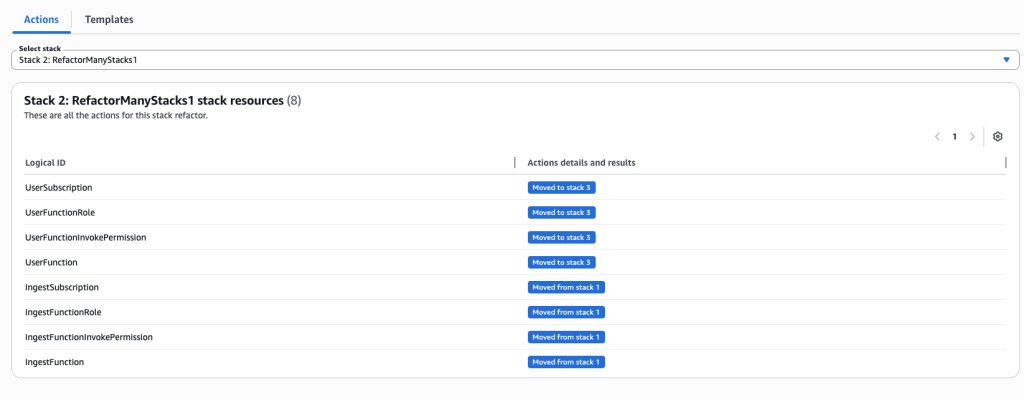
- The stack refactor preview will start generating. Wait for the preview to complete. You can verify actions under Stack 1 and Stack 2. It will show you the action for each resource.

- You can also preview the new Stack refactored templates

- Once you verify the details, go ahead and Execute Refactor. You should be redirected to the stack refactor details.
- Once the Stack refactor execution is complete you can view the actions and templates for each of the stacks in your stack refactor.

 In some scenarios, CloudFormation console can automatically detect logical resource ID renames and pre-fill the mapping for you. The resource mapping is required when there are logical resource ID changes between the original stack and refactored template. Ensure that the mappings are correct before proceeding to the next step.

Scenario 2: Move resources across multiple stacks.
This scenario demonstrates how to refactor resources across three stacks using the AWS CLI, then review and execute the operation in the CloudFormation console.
- Create a new template many-stacks-original.yaml and create a new stack named ‘RefactorManyStacks’ using AWS CLI. This template contains SNS topic (IngestTopic),Lambda function(IngestFunction) and SNS subscription.
AWSTemplateFormatVersion: "2010-09-09" Resources: IngestTopic: Type: AWS::SNS::Topic IngestFunction: Type: AWS::Lambda::Function Properties: FunctionName: many-stack-my-function Handler: index.handler Runtime: python3.12 Code: ZipFile: | import json def handler(event, context): print(json.dumps(event)) return event Role: !GetAtt IngestFunctionRole.Arn Timeout: 30 IngestSubscription: Type: AWS::SNS::Subscription Properties: Endpoint: !GetAtt IngestFunction.Arn Protocol: lambda TopicArn: !Ref IngestTopic IngestFunctionInvokePermission: Type: AWS::Lambda::Permission Properties: Action: lambda:InvokeFunction Principal: sns.amazonaws.com FunctionName: !GetAtt IngestFunction.Arn SourceArn: !Ref IngestTopic IngestFunctionRole: Type: AWS::IAM::Role Properties: AssumeRolePolicyDocument: Version: "2012-10-17" Statement: - Action: - sts:AssumeRole Effect: Allow Principal: Service: - lambda.amazonaws.com Condition: StringEquals: aws:SourceAccount: !Ref AWS::AccountId ArnLike: aws:SourceArn: !Sub "arn:${AWS::Partition}:lambda:${AWS::Region}:${AWS::AccountId}:function:many-stack-my-function" Policies: - PolicyName: LambdaPolicy PolicyDocument: Version: "2012-10-17" Statement: - Action: - logs:CreateLogGroup - logs:CreateLogStream - logs:PutLogEvents Resource: - arn:aws:logs:*:*:* Effect: Allow - Create another template many-stacks-original-1.yaml and run the AWS CLI command to create a new stack ‘RefactorManyStacks1’. This template creates another SNS topic (UserTopic), Lambda function (UserFunction) and SNS subscription.
aws cloudformation create-stack --stack-name RefactorManyStacks --template-body file://many-stacks-original.yaml --capabilities CAPABILITY_IAM - Create a new template many-stacks-original-2.yaml and run the AWS CLI command to create the stack RefactorManyStacks2. This template will also create SNS topic (ConsumerTopic), Lambda function (ConsumerFunction) and SNS subscription to lambda function.
AWSTemplateFormatVersion: "2010-09-09"

Resources:
  ConsumerTopic:
    Type: AWS::SNS::Topic

  ConsumerFunction:
    Type: AWS::Lambda::Function
    Properties:
      FunctionName: many-stack-my-function-2
      Handler: index.handler
      Runtime: python3.12
      Code:
        ZipFile: |
          import json
          def handler(event, context):
            print(json.dumps(event))
            return event
      Role: !GetAtt ConsumerFunctionRole.Arn
      Timeout: 30

  ConsumerSubscription:
    Type: AWS::SNS::Subscription
    Properties:
      Endpoint: !GetAtt ConsumerFunction.Arn
      Protocol: lambda
      TopicArn: !Ref ConsumerTopic

  ConsumerFunctionInvokePermission:
    Type: AWS::Lambda::Permission
    Properties:
      Action: lambda:InvokeFunction
      Principal: sns.amazonaws.com
      FunctionName: !GetAtt ConsumerFunction.Arn
      SourceArn: !Ref ConsumerTopic

  ConsumerFunctionRole:
    Type: AWS::IAM::Role
    Properties:
      AssumeRolePolicyDocument:
        Version: "2012-10-17"
        Statement:
          - Action:
              - sts:AssumeRole
            Effect: Allow
            Principal:
              Service:
                - lambda.amazonaws.com
            Condition:
              StringEquals:
                aws:SourceAccount: !Ref AWS::AccountId
              ArnLike:
                aws:SourceArn: !Sub "arn:${AWS::Partition}:lambda:${AWS::Region}:${AWS::AccountId}:function:many-stack-my-function-2"
      Policies:
        - PolicyName: LambdaPolicy
          PolicyDocument:
            Version: "2012-10-17"
            Statement:
              - Action:
                  - logs:CreateLogGroup
                  - logs:CreateLogStream
                  - logs:PutLogEvents
                Resource:
                  - arn:aws:logs:*:*:*
                Effect: Allow
aws cloudformation create-stack --stack-name RefactorManyStacks2 --template-body file://many-stacks-original-2.yaml --capabilities CAPABILITY_IAM
Once all 3 stacks have been created successfully. Create refactored templates.
- Create new template many-stacks-refactored.yaml This refactored template only contains SNS topic named IngestTopic and has a new export in it that will export the SNS topic ARN. This export will be used by your other templates to get the required SNS topic ARN.
AWSTemplateFormatVersion: "2010-09-09" Resources: IngestTopic: Type: AWS::SNS::Topic Outputs: IngestTopicArn: Value: !Ref IngestTopic Export: Name: IngestTopicArn - Create another template many-stacks-refactored-1.yaml. This template **** has the SNS topic UserTopic and contains the IngestFunction and IngestSubscription and required IAM resources from ‘RefactorManyStacks’. This template switched the
!Ref IngestTopicto use the exported valued by using!ImportValue IngestTopicArn. This refactored template also a new export in it that will export the UserTopic ARN.AWSTemplateFormatVersion: "2010-09-09" Resources: UserTopic: Type: AWS::SNS::Topic IngestFunction: Type: AWS::Lambda::Function Properties: FunctionName: many-stack-my-function Handler: index.handler Runtime: python3.12 Code: ZipFile: | import json def handler(event, context): print(json.dumps(event)) return event Role: !GetAtt IngestFunctionRole.Arn Timeout: 30 IngestSubscription: Type: AWS::SNS::Subscription Properties: Endpoint: !GetAtt IngestFunction.Arn Protocol: lambda TopicArn: !ImportValue IngestTopicArn IngestFunctionInvokePermission: Type: AWS::Lambda::Permission Properties: Action: lambda:InvokeFunction Principal: sns.amazonaws.com FunctionName: !GetAtt IngestFunction.Arn SourceArn: !ImportValue IngestTopicArn IngestFunctionRole: Type: AWS::IAM::Role Properties: AssumeRolePolicyDocument: Version: "2012-10-17" Statement: - Action: - sts:AssumeRole Effect: Allow Principal: Service: - lambda.amazonaws.com Condition: StringEquals: aws:SourceAccount: !Ref AWS::AccountId ArnLike: aws:SourceArn: !Sub "arn:${AWS::Partition}:lambda:${AWS::Region}:${AWS::AccountId}:function:many-stack-my-function" Policies: - PolicyName: LambdaPolicy PolicyDocument: Version: "2012-10-17" Statement: - Action: - logs:CreateLogGroup - logs:CreateLogStream - logs:PutLogEvents Resource: - arn:aws:logs:*:*:* Effect: Allow Outputs: UserTopicArn: Value: !Ref UserTopic Export: Name: UserTopicArn - Create another template many-stacks-refactored-2.yaml. This template has the Consumer* resources along with Lambda function (UserFunction) and SNS subscription (UserSubscription). The template is using exported value from many-stacks-refactored-1.yaml by using
!ImportValue UserTopicArn
AWSTemplateFormatVersion: "2010-09-09" Resources: ConsumerTopic: Type: AWS::SNS::Topic ConsumerFunction: Type: AWS::Lambda::Function Properties: FunctionName: many-stack-my-function-2 Handler: index.handler Runtime: python3.12 Code: ZipFile: | import json def handler(event, context): print(json.dumps(event)) return event Role: !GetAtt ConsumerFunctionRole.Arn Timeout: 30 ConsumerSubscription: Type: AWS::SNS::Subscription Properties: Endpoint: !GetAtt ConsumerFunction.Arn Protocol: lambda TopicArn: !Ref ConsumerTopic ConsumerFunctionInvokePermission: Type: AWS::Lambda::Permission Properties: Action: lambda:InvokeFunction Principal: sns.amazonaws.com FunctionName: !GetAtt ConsumerFunction.Arn SourceArn: !Ref ConsumerTopic ConsumerFunctionRole: Type: AWS::IAM::Role Properties: AssumeRolePolicyDocument: Version: "2012-10-17" Statement: - Action: - sts:AssumeRole Effect: Allow Principal: Service: - lambda.amazonaws.com Condition: StringEquals: aws:SourceAccount: !Ref AWS::AccountId ArnLike: aws:SourceArn: !Sub "arn:${AWS::Partition}:lambda:${AWS::Region}:${AWS::AccountId}:function:many-stack-my-function-2" Policies: - PolicyName: LambdaPolicy PolicyDocument: Version: "2012-10-17" Statement: - Action: - logs:CreateLogGroup - logs:CreateLogStream - logs:PutLogEvents Resource: - arn:aws:logs:*:*:* Effect: Allow UserFunction: Type: AWS::Lambda::Function Properties: FunctionName: many-stack-my-function-1 Handler: index.handler Runtime: python3.12 Code: ZipFile: | import json def handler(event, context): print(json.dumps(event)) return event Role: !GetAtt UserFunctionRole.Arn Timeout: 30 UserSubscription: Type: AWS::SNS::Subscription Properties: Endpoint: !GetAtt UserFunction.Arn Protocol: lambda TopicArn: !ImportValue UserTopicArn UserFunctionInvokePermission: Type: AWS::Lambda::Permission Properties: Action: lambda:InvokeFunction Principal: sns.amazonaws.com FunctionName: !GetAtt UserFunction.Arn SourceArn: !ImportValue UserTopicArn UserFunctionRole: Type: AWS::IAM::Role Properties: AssumeRolePolicyDocument: Version: "2012-10-17" Statement: - Action: - sts:AssumeRole Effect: Allow Principal: Service: - lambda.amazonaws.com Condition: StringEquals: aws:SourceAccount: !Ref AWS::AccountId ArnLike: aws:SourceArn: !Sub "arn:${AWS::Partition}:lambda:${AWS::Region}:${AWS::AccountId}:function:many-stack-my-function-1" Policies: - PolicyName: LambdaPolicy PolicyDocument: Version: "2012-10-17" Statement: - Action: - logs:CreateLogGroup - logs:CreateLogStream - logs:PutLogEvents Resource: - arn:aws:logs:*:*:* Effect: Allow - Start the stack refactor using AWS CLI.
aws cloudformation create-stack-refactor --stack-definitions StackName=RefactorManyStacks,TemplateBody@=file://many-stacks-refactored.yaml StackName=RefactorManyStacks1,TemplateBody@=file://many-stacks-refactored-1.yaml StackName=RefactorManyStacks2,TemplateBody@=file://many-stacks-refactored-2.yaml --description "three stack refactor" - Go to stack CloudFormation console and go to ‘Stack refactor’ homepage, click on the stack refactor you just created.

- Review actions for each resource and each stack. You can choose individual stacks from drop down.

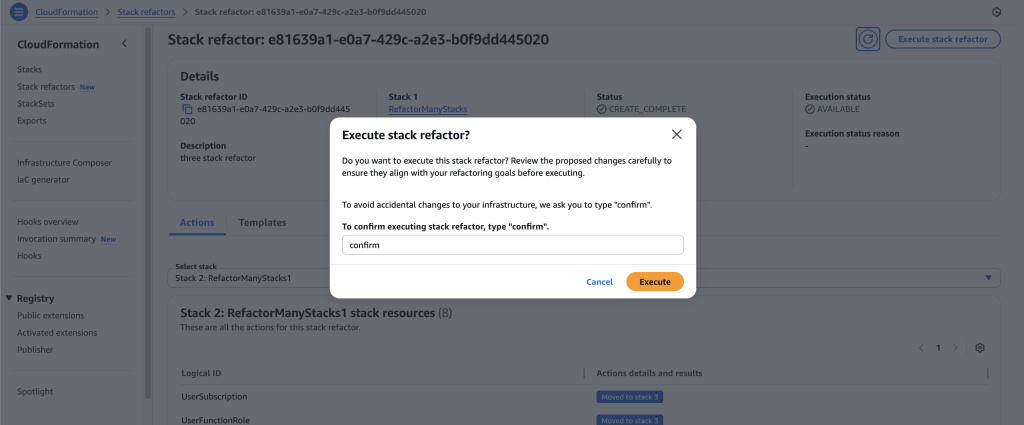
- Once you’re ready to execute the stack refactor, click on ‘Execute stack refactor’ and input the confirmation text.

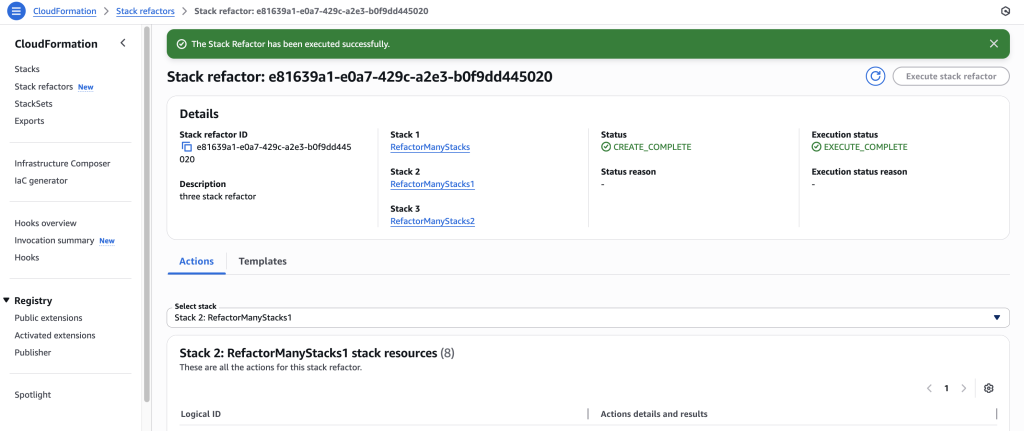
- Wait for stack refactor execution to finish.

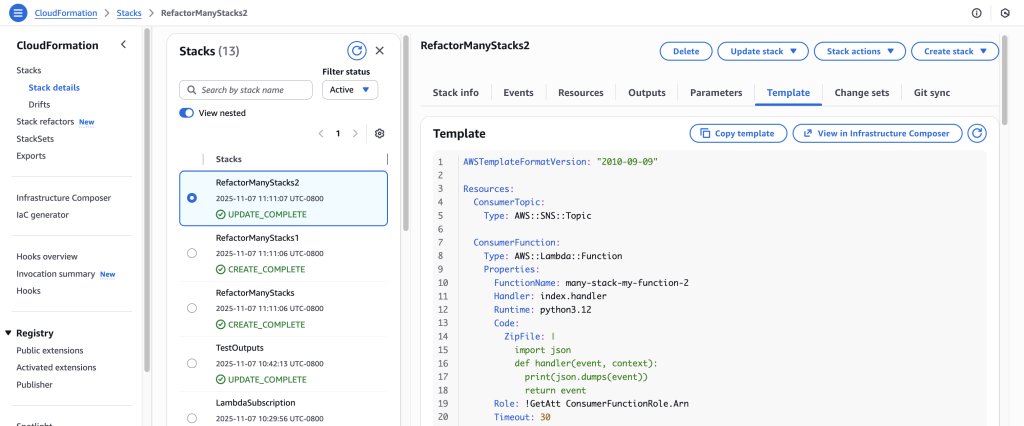
- Click on the stack in the details to navigate to the stack details. You can verify the refactor changes here.


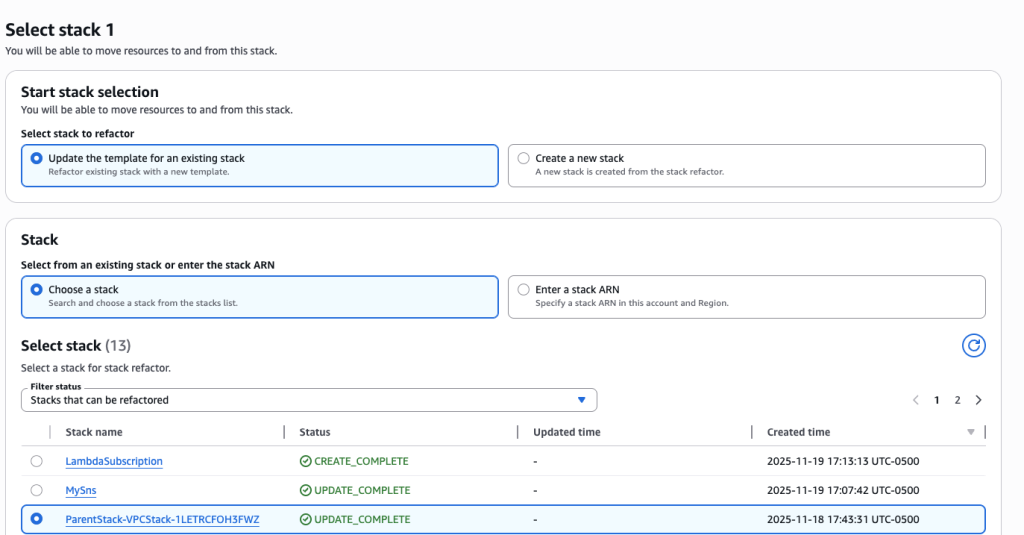
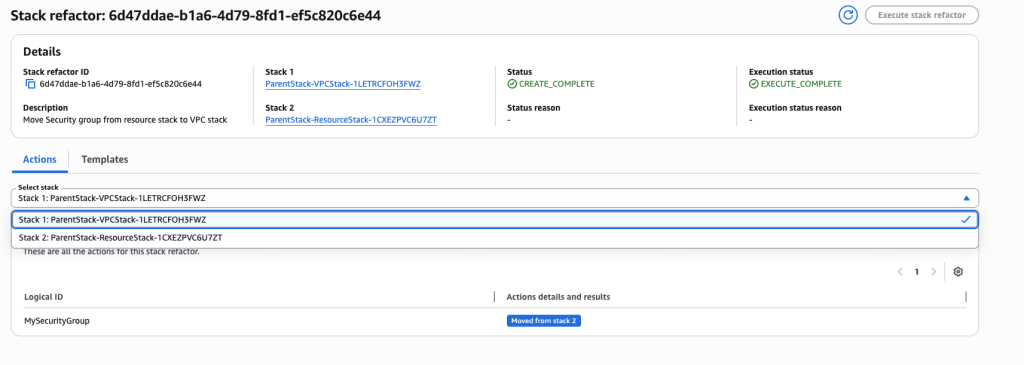
Scenario 3: Move stacks between 2 nested child stacks stacks
This scenario demonstrates how to move resources between child stacks in a nested stack architecture. Upload child stack templates toAmazon Simple Storage Service (Amazon S3), create a parent stack that references them, then use Stack Refactoring to move resources (like a security group) from one child stack to another. The key is to work directly with the child stack names (which CloudFormation auto-generates based on parent stack name and logical IDs) rather than the parent stack itself. After refactoring, update the parent stack to reference the new child template versions in S3.
This approach lets you reorganize nested stack architectures while maintaining the parent-child relationship structure.
- Create first child stack template vpc.yaml. This template creates a new Virtual Private Cloud(VPC). Upload this new template file to S3 bucket
AWSTemplateFormatVersion: '2010-09-09' Description: 'VPC Stack - Contains only VPC' Resources: MyVPC: Type: AWS::EC2::VPC Properties: CidrBlock: 10.0.0.0/16 Outputs: VPCId: Value: !Ref MyVPC - Create second child stack template resource.yaml . This template will create S3 bucket and EC2 Security Group. Once you create this template file, upload it to an S3 bucket
AWSTemplateFormatVersion: '2010-09-09' Description: ' Contains security group and S3 bucket' Resources: MySecurityGroup: Type: AWS::EC2::SecurityGroup Properties: GroupDescription: Security group for testing SecurityGroupIngress: - IpProtocol: tcp FromPort: 80 ToPort: 80 CidrIp: 0.0.0.0/0 MyS3Bucket: Type: AWS::S3::Bucket Outputs: SecurityGroupId: Value: !Ref MySecurityGroup S3BucketName: Value: !Ref MyS3Bucket - Create parent stack template file parent.yaml. Make sure to edit the TemplateURL with your S3 Object URL
AWSTemplateFormatVersion: '2010-09-09' Description: 'Parent stack for test' Resources: VPCStack: Type: AWS::CloudFormation::Stack Properties: TemplateURL: https://s3.amazonaws.com/<Bucket-Name>/vpc.yaml ResourceStack: Type: AWS::CloudFormation::Stack Properties: TemplateURL: https://s3.amazonaws.com/<Bucket-Name>/resource.yaml Outputs: VPCStackName: Value: !Ref VPCStack ResourceStackName: Value: !Ref ResourceStack - Create this new Parent stack using AWS CLI :
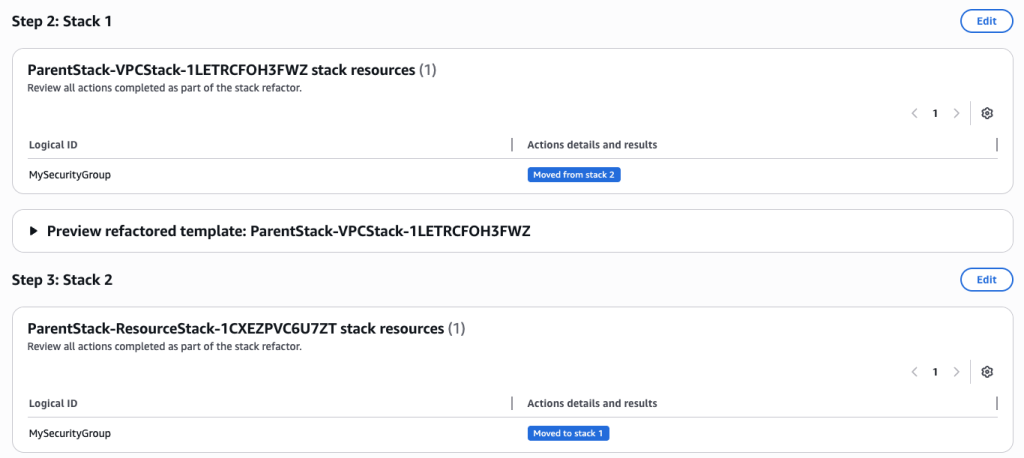
aws cloudformation create-stack --stack-name ParentStack --template-body file://parent.yaml --capabilities CAPABILITY_IAM - We will use stack refactor to move EC2 Security group from ResourceStack to VPCStack.
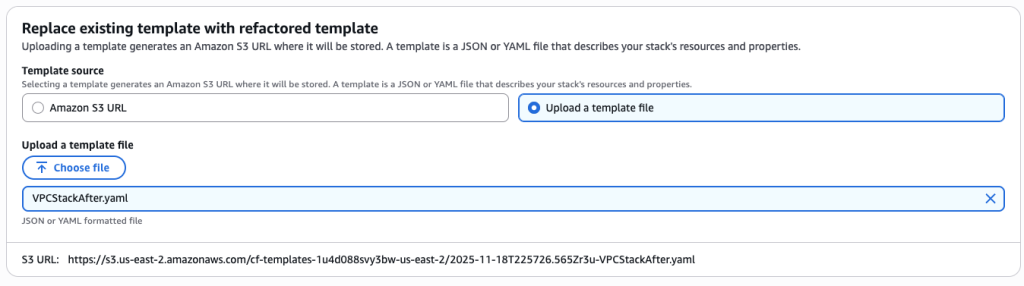
- Create new template file VPCStackAfter.yaml. This template now has VPC and EC2 Security group resources. Upload this template to S3 bucket
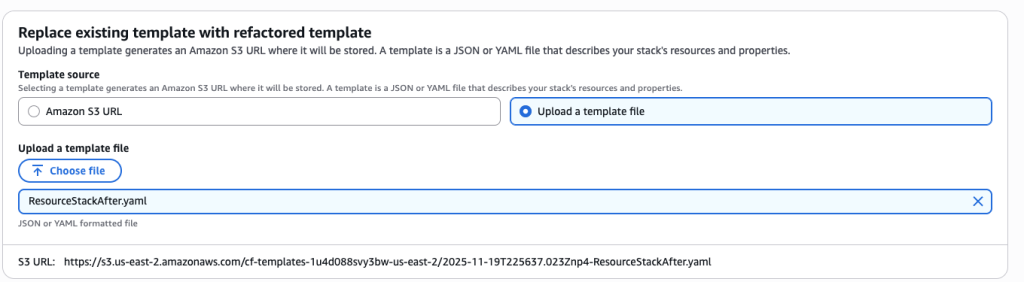
AWSTemplateFormatVersion: '2010-09-09' Description: ' VPC Stack AFTER - Contains VPC and security group' Resources: MyVPC: Type: AWS::EC2::VPC Properties: CidrBlock: 10.0.0.0/16 MySecurityGroup: Type: AWS::EC2::SecurityGroup Properties: GroupDescription: Security group for testing SecurityGroupIngress: - IpProtocol: tcp FromPort: 80 ToPort: 80 CidrIp: 0.0.0.0/0 Outputs: VPCId: Value: !Ref MyVPC SecurityGroupId: Value: !Ref MySecurityGroup - Create ResourceStackAfter.yaml The resource stack will only contain s3 bucket resource. Upload this template to S3 bucket
AWSTemplateFormatVersion: '2010-09-09' Description: 'Resource Stack AFTER - Contains only S3 bucket' Resources: MyS3Bucket: Type: AWS::S3::Bucket Outputs: S3BucketName: Value: !Ref MyS3Bucket - Navigate to CloudFormation Console and select Start stack refactor
- Add a description for Stack refactor:

- Choose “Update the template for an existing stack” and select child stack “ParentStack-VPCStack-12345”. Make sure to choose the child stack and not the Root/Parent stack.

- Upload the new template VPCStackAfter.yaml
- For Stack2, again select ‘Update the template for an existing stack’ and select to 2nd child stack “ParentStack-ResourceStack-12345”
- Upload the template
ResourceStackAfter.yaml

- Review the Stack refactor. Once you have verified all the actions and details choose ‘Execute Refactor’

- You can verify the refactor templates.

- Lastly, update your ParentStack.yaml to reference the new child template versions in S3 bucket.
AWSTemplateFormatVersion: '2010-09-09'
Description: 'Parent stack for test'

Resources:
  VPCStack:
    Type: AWS::CloudFormation::Stack
    Properties:
      TemplateURL: https://s3.amazonaws.com/<Bucket-Name>/VPCStackAfter.yaml

  ResourceStack:
    Type: AWS::CloudFormation::Stack
    Properties:
      TemplateURL: https://s3.amazonaws.com/<Bucket-Name>/ResourceStackAfter.yaml

Outputs:
  VPCStackName:
    Value: !Ref VPCStack
  ResourceStackName:
    Value: !Ref ResourceStack

Best Practices
Stack Refactoring offers powerful flexibility, but a few strategic considerations will help ensure smooth operations. Test your refactoring plans in non-production environments first, particularly when working with complex dependency chains or resources that have strict ordering requirements. The preview phase becomes your primary safety mechanism—treat it as a thorough code review, examining each planned action before execution. When moving resources between stacks, pay close attention to cross-stack references. Converting direct references to export/import patterns maintains loose coupling and prevents circular dependencies. CloudFormation will automatically manage these conversions during refactoring, but understanding the resulting architecture helps you avoid introducing fragility into your infrastructure.
For scenarios where you’re emptying a source stack entirely, remember that CloudFormation requires at least one resource per stack. This makes placeholder resources like AWS::CloudFormation::WaitConditionHandle a useful temporary measure—they consume no actual AWS resources and can be safely deleted along with the stack once the refactoring completes.
Document your refactoring decisions alongside the templates themselves. Future maintainers (including yourself in six months) will appreciate understanding why resources were organized in particular ways. Include comments in your templates explaining the reasoning behind stack boundaries and resource groupings.
Consider the operational impact of your refactoring. While resources themselves remain stable, monitoring dashboards, automation scripts, or other tooling that references stack names or logical IDs may need updates. Plan these ancillary changes as part of your refactoring workflow rather than discovering them afterward.
Finally, leverage refactoring as an opportunity to improve template quality more broadly. If you’re already reorganizing resources, consider also updating documentation, standardizing naming conventions, or adding tags for better resource management.
Conclusion
CloudFormation Stack Refactoring transforms how you organize and maintain infrastructure as code, enabling stack architecture to evolve alongside applications and organizational needs. This capability provides the flexibility to restructure without the risk and complexity of traditional resource recreation approaches. Whether you’re breaking apart monolithic stacks, consolidating fragmented infrastructure, or simply renaming resources to match current conventions, Stack Refactoring lets you adapt CloudFormation organization to changing requirements without operational disruption.
To get started, visit the CloudFormation console or explore the AWS CloudFormation API reference for programmatic access patterns. Stack Refactoring is available today in all commercial AWS regions.
Can Gen Z Get Rid of Its iPhones?
Post Syndicated from The Atlantic original https://www.youtube.com/shorts/dusPT9DNmGw
Take fine-grained control of your AWS CloudFormation StackSets Deployment with StackSet Dependencies
Post Syndicated from Tanvi Ravindra Malali original https://aws.amazon.com/blogs/devops/take-fine-grained-control-of-your-aws-cloudformation-stacksets-deployment-with-stackset-dependencies/
Introduction
AWS CloudFormation StackSets enable you to deploy CloudFormation stacks across multiple AWS accounts and regions with a single operation, providing centralized management of infrastructure at scale through AWS Organizations integration. In enterprise environments, multiple StackSet often need to deploy in a specific order. For example, networking infrastructure must be ready before applications can deploy successfully.
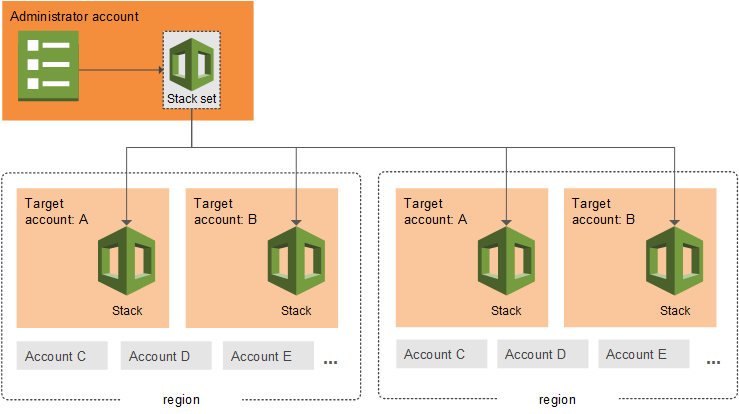
Figure 1: Example of a multi-region AWS CloudFormation StackSet architecture with an administrative account and target accounts
Previously, when multiple StackSets had auto-deployment enabled, they operated independently without coordination. This could cause deployment failures when dependent infrastructure wasn’t ready, forcing customers to implement complex workarounds or disable auto-deployment entirely.
We are announcing StackSets dependencies, a new feature that gives you fine-grained control over the deployment order of your auto-deployed StackSets, elegantly solving these orchestration challenges.
Feature Overview
This new feature introduces the ability to define dependencies between StackSets using the new DependsOn parameter in the AutoDeployment configuration. When accounts move between Organizational Units or are added to your organization, StackSets automatically orchestrates deployments according to your defined sequence, ensuring foundational infrastructure deploys before dependent applications.
Key capabilities include:
- Dependency Management: Define up to 10 dependencies per StackSet, with up to 100 dependencies per account. For example, if you have 5 StackSets with 5 dependencies each, you have 25 dependencies counting towards the 100 dependency limit. You can request a limit increase through the service quota console.
- Cycle Detection: Built-in validation prevents circular dependencies with error messages.
- Cross-Region Support: Dependencies work across regions.
- Automatic Cleanup: Dependencies are removed when StackSets are deleted or Organizations are deactivated.
How it works
Let’s walk through this feature with a practical example. Consider an infrastructure setup where you have: A central Infrastructure StackSet that creates IAM roles and networking components and multiple Application StackSets that depend on these foundational resources.
With StackSets dependencies, you can make sure the Infrastructure StackSet completes deployment before any Application StackSets begin, preventing deployment failures due to missing dependencies.
Implementation Scenarios
Let’s explore three common scenarios where StackSets Dependencies provides value:
Scenario 1: Foundation-First Deployment
Use Case: You have a foundational Infrastructure StackSet that creates IAM roles and networking components, and multiple Application StackSets that depend on these resources.
Setup:
- Infrastructure StackSet ARNs (creates IAM roles, VPCs, security groups)
- App1 StackSet (web application requiring IAM roles)
- App2 StackSet (API service requiring networking components)
- No additional permissions are required to use this feature.
Console Experience
The CloudFormation console provides an intuitive interface for managing StackSet dependencies. Log into the AWS console with your credentials, with an IAM user or administrative user, according to your access. Navigate to the Cloudformation service and create a new Stack or add a YAML/JSON template, where you will be configuring dependencies. In the Step 4 of the Create StackSet wizard, you’ll find a new “StackSet dependencies” form field in the Auto-deployment options section. You can use the attribute editor to add StackSet ARNs for dependencies. The console includes input validation for ARN format and helpful alerts about dependency behavior.
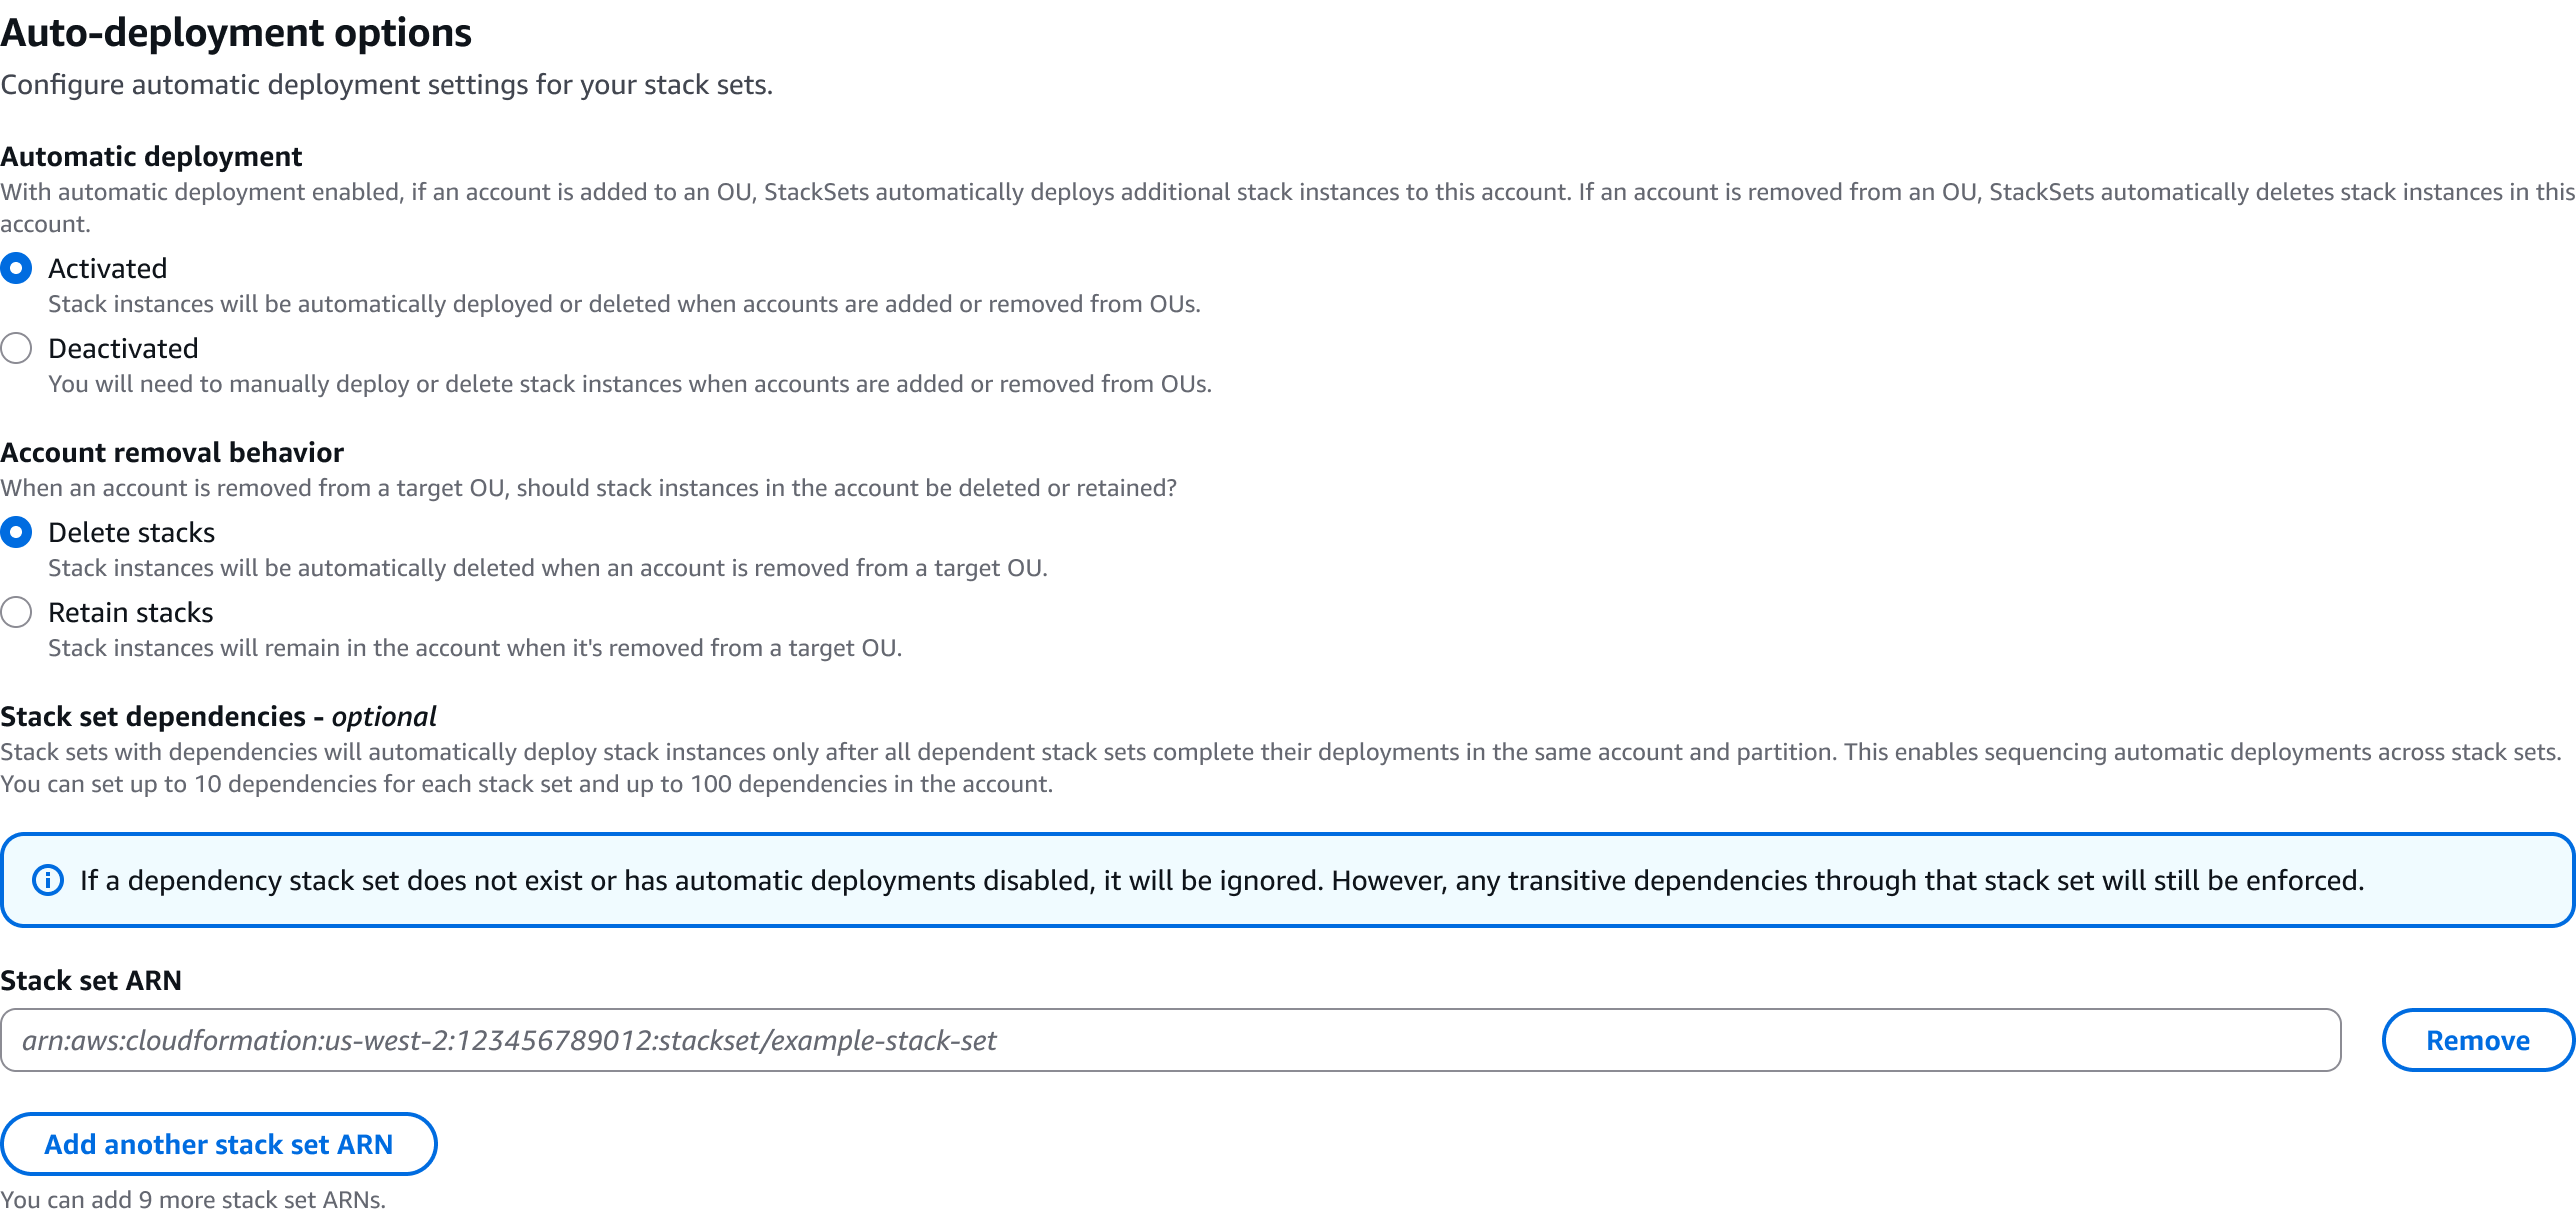
Figure 2: CloudFormation StackSets Console – Auto-deployment options view
AWS CLI Implementation:
- Create the foundational Infrastructure StackSet:
aws cloudformation create-stack-set \
--stack-set-name Infrastructure \
--permission-model SERVICE_MANAGED \
--auto-deployment Enabled=true,RetainStacksOnAccountRemoval=true \
--template-body file://infrastructure-template.yaml \
--region us-east-1
2. Create App1 with dependency on Infrastructure:
aws cloudformation create-stack-set \
--stack-set-name App1 \
--permission-model SERVICE_MANAGED \
--auto-deployment Enabled=true,RetainStacksOnAccountRemoval=true,\
DependsOn=arn:aws:cloudformation:us-east-1:123456789012:StackSet/Infrastructure:uuid \
--template-body file://app1-template.yaml \
--region us-east-1
3. Create App2 with dependency on Infrastructure:
aws cloudformation create-stack-set \
--stack-set-name App2 \
--permission-model SERVICE_MANAGED \
--auto-deployment Enabled=true,RetainStacksOnAccountRemoval=true,DependsOn=arn:aws:cloudformation:us-east-1:123456789012:StackSet/Infrastructure:uuid \
--template-body file://app2-template.yaml \
--region us-west-2
Now, when accounts are added to your organization, Infrastructure deploys first, then App1 and App2 deploy in parallel after Infrastructure completes.
Scenario 2: Multi-Dependency Application
Use Case: Your application requires both networking and security components to be ready before deployment.
Setup:
- Networking StackSet (VPCs, subnets, route tables)
- Security StackSet (security groups, NACLs, IAM policies)
- Application StackSet (requires both networking and security)
Implementation:
- Create Networking StackSet
aws cloudformation create-stack-set \
--stack-set-name Networking \
--permission-model SERVICE_MANAGED \
--auto-deployment Enabled=true,RetainStacksOnAccountRemoval=true \
--template-body file://networking-template.yaml \
--region us-east-1
2. Create Security StackSet
aws cloudformation create-stack-set \
--stack-set-name Security \
--permission-model SERVICE_MANAGED \
--auto-deployment Enabled=true,RetainStacksOnAccountRemoval=true \
--template-body file://security-template.yaml \
--region us-east-1
3. Create Application with dependencies on both Networking and Security
aws cloudformation create-stack-set \
--stack-set-name Application \
--permission-model SERVICE_MANAGED \
--auto-deployment Enabled=true,RetainStacksOnAccountRemoval=true,DependsOn=arn:aws:cloudformation:us-east-1:123456789012:StackSet/Networking:uuid,arn:aws:cloudformation:us-east-1:123456789012:Stackset/Security:uuid \
--template-body file://application-template.yaml \
--region us-east-1
As a result, Networking and Security StackSets deploy in parallel, and Application waits for both to complete before starting.
Scenario 3: Resolving Dependency Conflicts
Use Case: You need to update existing StackSets to fix incorrect dependency relationships.
Problem: You have App1 and App2 StackSets. There is an existing dependency that App2 has on App1, but you realize App1 should depend on App2, not the other way around.
Implementation:
First, try to set App1 to depend on App2 (this will fail due to cycle):
aws cloudformation update-stack-set \
--stack-set-name App1 \
--auto-deployment Enabled=true,RetainStacksOnAccountRemoval=true,DependsOn=arn:aws:cloudformation:us-east-1:123456789012:StackSet/App2:uuid \
--use-previous-template
This action will result in error: “Detected cycle(s) between auto-deployment dependencies”. If dependency validation cannot be completed, you’ll receive appropriate error messages to help troubleshoot configuration issues.
Now let’s remove the existing dependency from App2:
aws cloudformation update-stack-set \
--stack-set-name App2 \
--auto-deployment Enabled=true,RetainStacksOnAccountRemoval=true \
--use-previous-template
Now successfully set App1 to depend on App2:
aws cloudformation update-stack-set \
--stack-set-name App1 \
--auto-deployment Enabled=true,RetainStacksOnAccountRemoval=true,DependsOn=arn:aws:cloudformation:us-east-1:123456789012:StackSet/App2:uuid \
--use-previous-template
This scenario demonstrates cycle detection and how to resolve dependency conflicts.
Getting Started
StackSet dependencies is available now in all AWS Regions where CloudFormation StackSets are supported. To get started:
- Identify Dependencies: Determine which StackSets should deploy first in your infrastructure.
- Configure Relationships: Use the CloudFormation console or AWS CLI to set up dependencies using StackSet ARNs.
- Test Your Sequence: Validate your dependency configuration in a test environment.
- Monitor Deployments: Use CloudFormation events to track sequenced deployments.
Log into your account in the console and visit the AWS CloudFormation StackSets console or use the AWS CLI/SDK with AWS credentials configured to start controlling StackSet dependencies today.
Authors

Tanvi Ravindra Malali
Tanvi Ravindra Malali is an Associate Delivery Consultant in the AWS A2C team in ProServe. She is based in New York City. She handles customer projects and codebases, specializing in AI/ML, Data Engineering and Infrastructure as Code. Outside of work, she loves to paint landscapes, DJing her favorite songs, and dances Tango.

Idriss Laouali Abdou
Idriss Laouali Abdou is a Sr. Product Manager Technical on the AWS Infrastructure-as-Code team based in Seattle. He focuses on improving developer productivity through CloudFormation and StackSets Infrastructure provisioning experiences. Outside of work, you can find him creating educational content for thousands of students, cooking, or dancing.
Friday Squid Blogging: New “Squid” Sneaker
Post Syndicated from Bruce Schneier original https://www.schneier.com/blog/archives/2025/11/friday-squid-blogging-new-squid-sneaker.html
I did not know Adidas sold a sneaker called “Squid.”
As usual, you can also use this squid post to talk about the security stories in the news that I haven’t covered.
Build production-ready applications without infrastructure complexity using Amazon ECS Express Mode
Post Syndicated from Donnie Prakoso original https://aws.amazon.com/blogs/aws/build-production-ready-applications-without-infrastructure-complexity-using-amazon-ecs-express-mode/
Deploying containerized applications to production requires navigating hundreds of configuration parameters across load balancers, auto scaling policies, networking, and security groups. This overhead delays time to market and diverts focus from core application development.
Today, I’m excited to announce Amazon ECS Express Mode, a new capability from Amazon Elastic Container Service (Amazon ECS) that helps you launch highly available, scalable containerized applications with a single command. ECS Express Mode automates infrastructure setup including domains, networking, load balancing, and auto scaling through simplified APIs. This means you can focus on building applications while deploying with confidence using Amazon Web Services (AWS) best practices. Furthermore, when your applications evolve and require advanced features, you can seamlessly configure and access the full capabilities of the resources, including Amazon ECS.
You can get started with Amazon ECS Express Mode by navigating to the Amazon ECS console.

Amazon ECS Express Mode provides a simplified interface to the Amazon ECS service resource with new integrations for creating commonly used resources across AWS. ECS Express Mode automatically provisions and configures ECS clusters, task definitions, Application Load Balancers, auto scaling policies, and Amazon Route 53 domains from a single entry point.
Getting started with ECS Express Mode
Let me walk you through how to use Amazon ECS Express Mode. I’ll focus on the console experience, which provides the quickest way to deploy your containerized application.
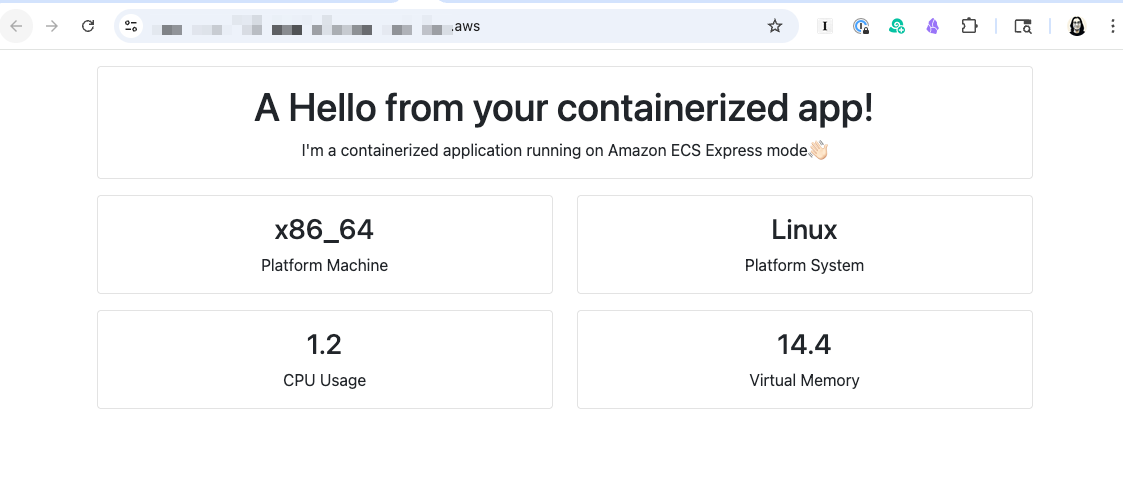
For this example, I’m using a simple container image application running on Python with the Flask framework. Here’s the Dockerfile of my demo, which I have pushed to an Amazon Elastic Container Registry (Amazon ECR) repository:
# Build stage
FROM python:3.6-slim as builder
WORKDIR /app
COPY requirements.txt .
RUN pip install --no-cache-dir --user -r requirements.txt gunicorn

# Runtime stage
FROM python:3.6-slim
WORKDIR /app
COPY --from=builder /root/.local /root/.local
COPY app.py .
ENV PATH=/root/.local/bin:$PATH
EXPOSE 80
CMD ["gunicorn", "--bind", "0.0.0.0:80", "app:app"]
On the Express Mode page, I choose Create. The interface is streamlined — I specify my container image URI from Amazon ECR, then select my task execution role and infrastructure role. If you don’t already have these roles, choose Create new role in the drop down to have one created for you from the AWS Identity and Access Management (IAM) managed policy.
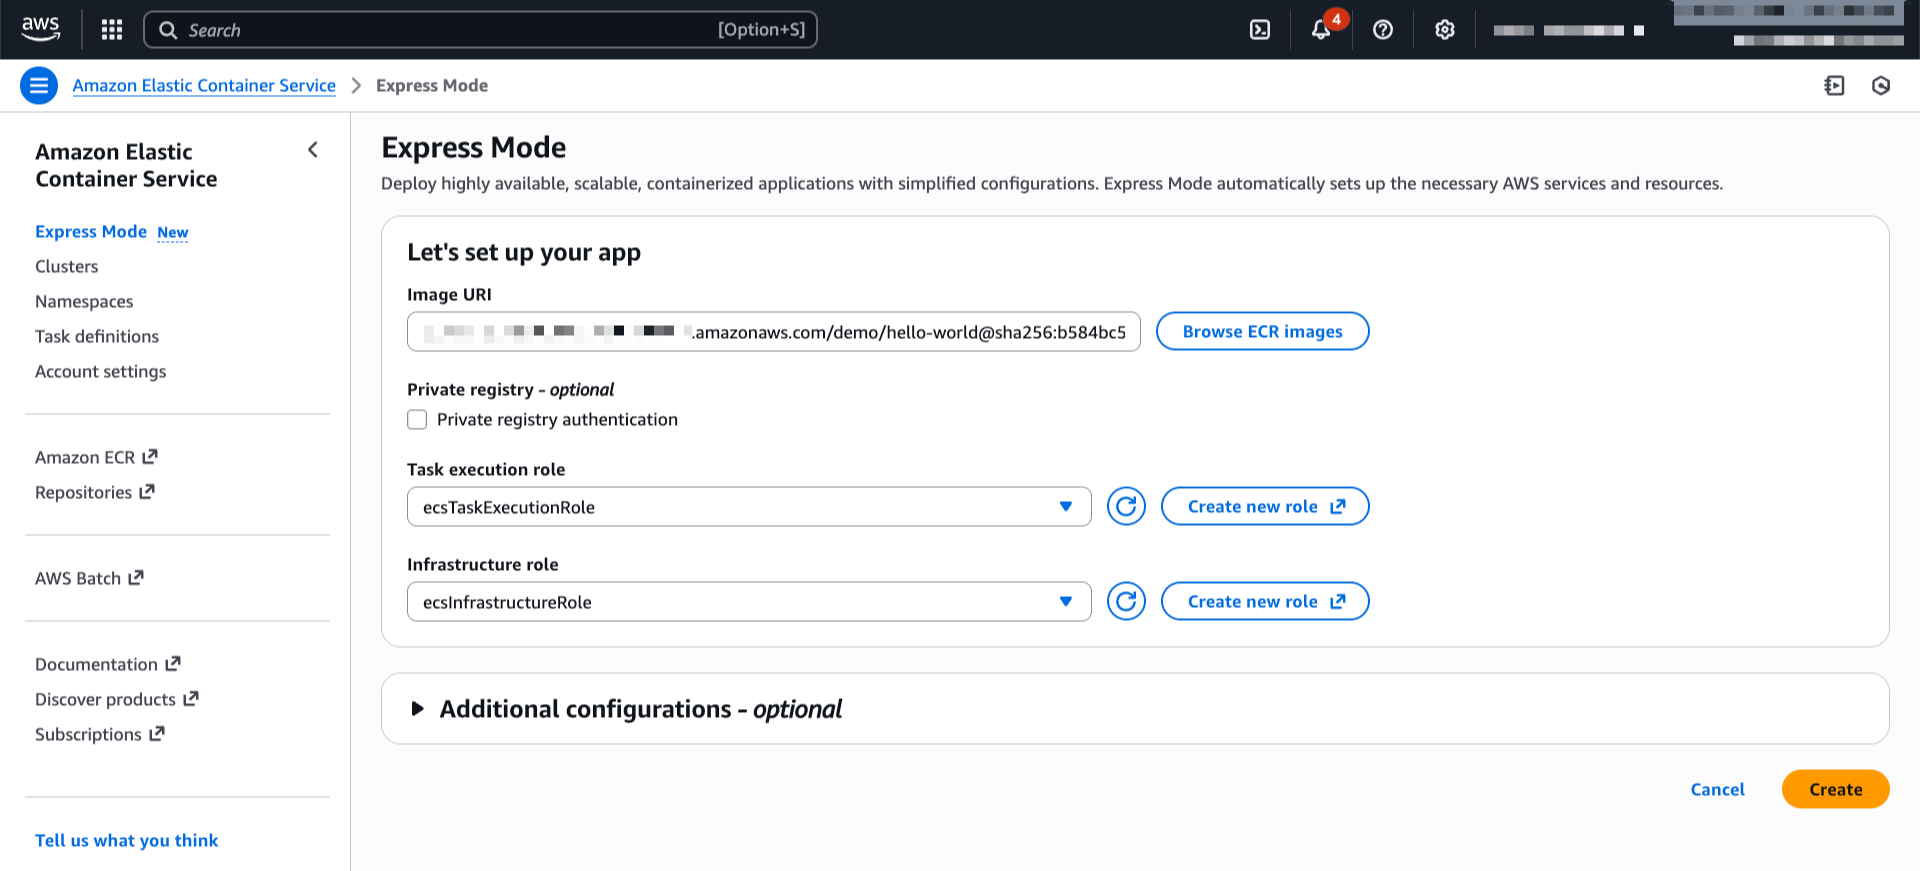
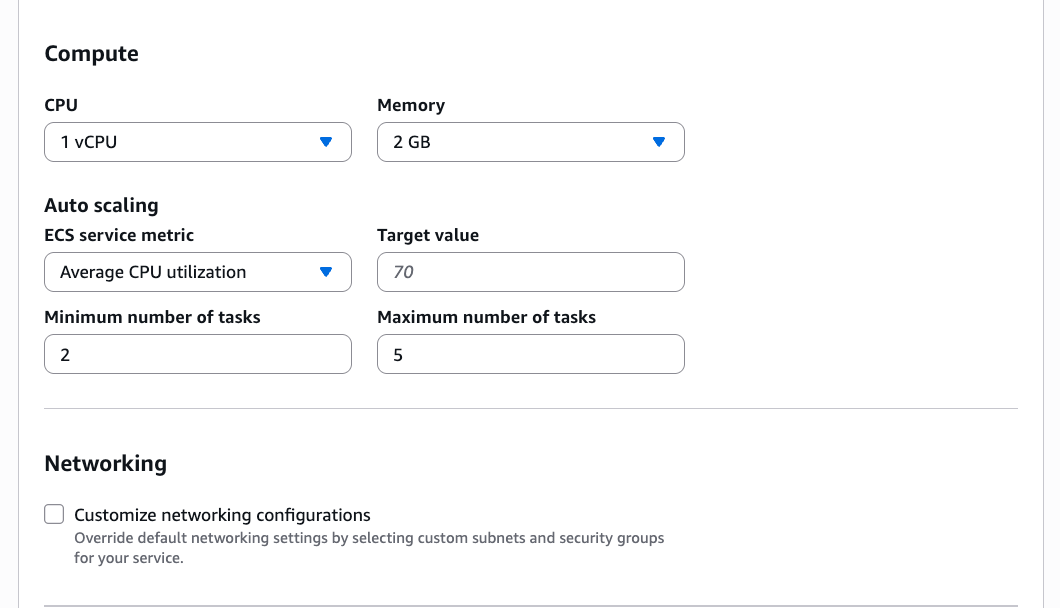
If I want to customize the deployment, I can expand the Additional configurations section to define my cluster, container port, health check path, or environment variables.
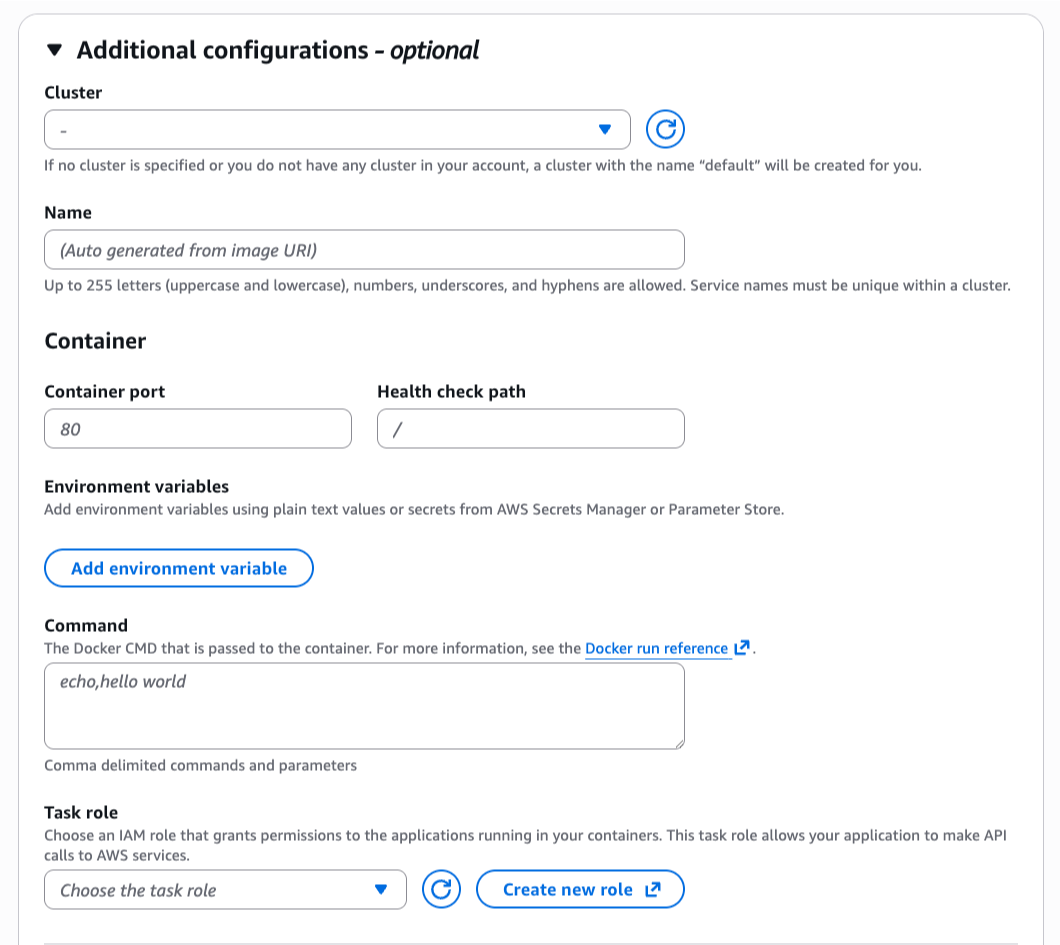
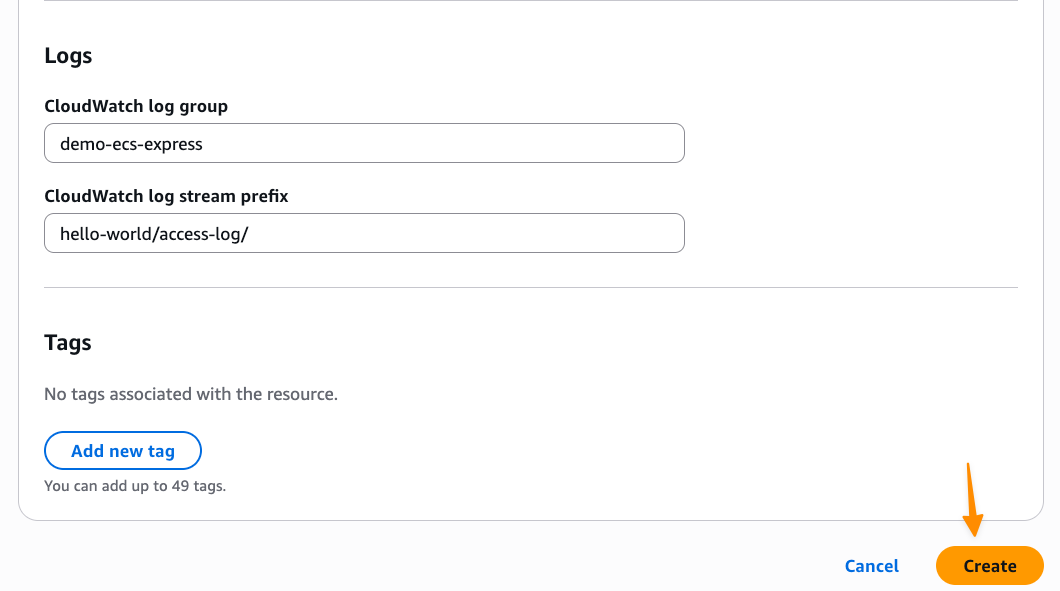
In this section, I can also adjust CPU, memory, or scaling policies.
Setting up logs in Amazon CloudWatch Logs is something I always configure so I can troubleshoot my applications if needed. When I’m happy with the configurations, I choose Create.
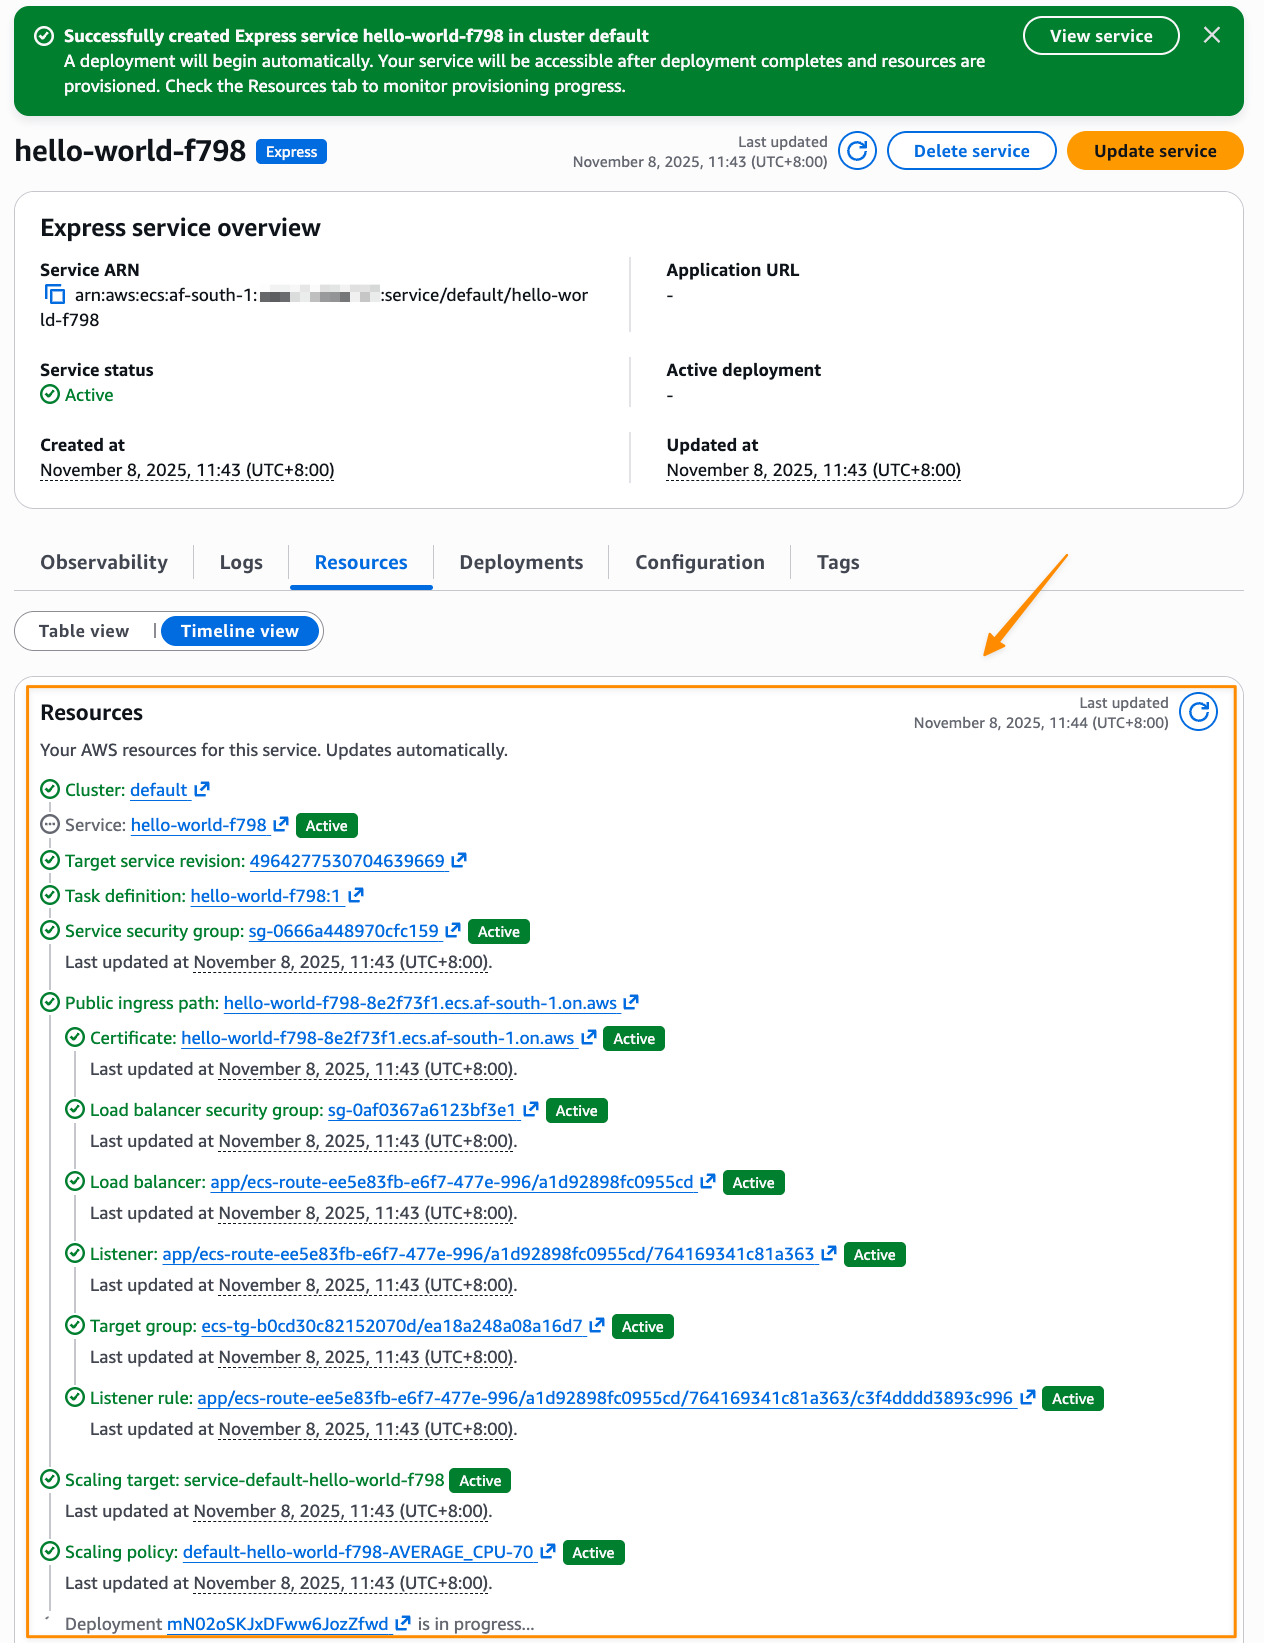
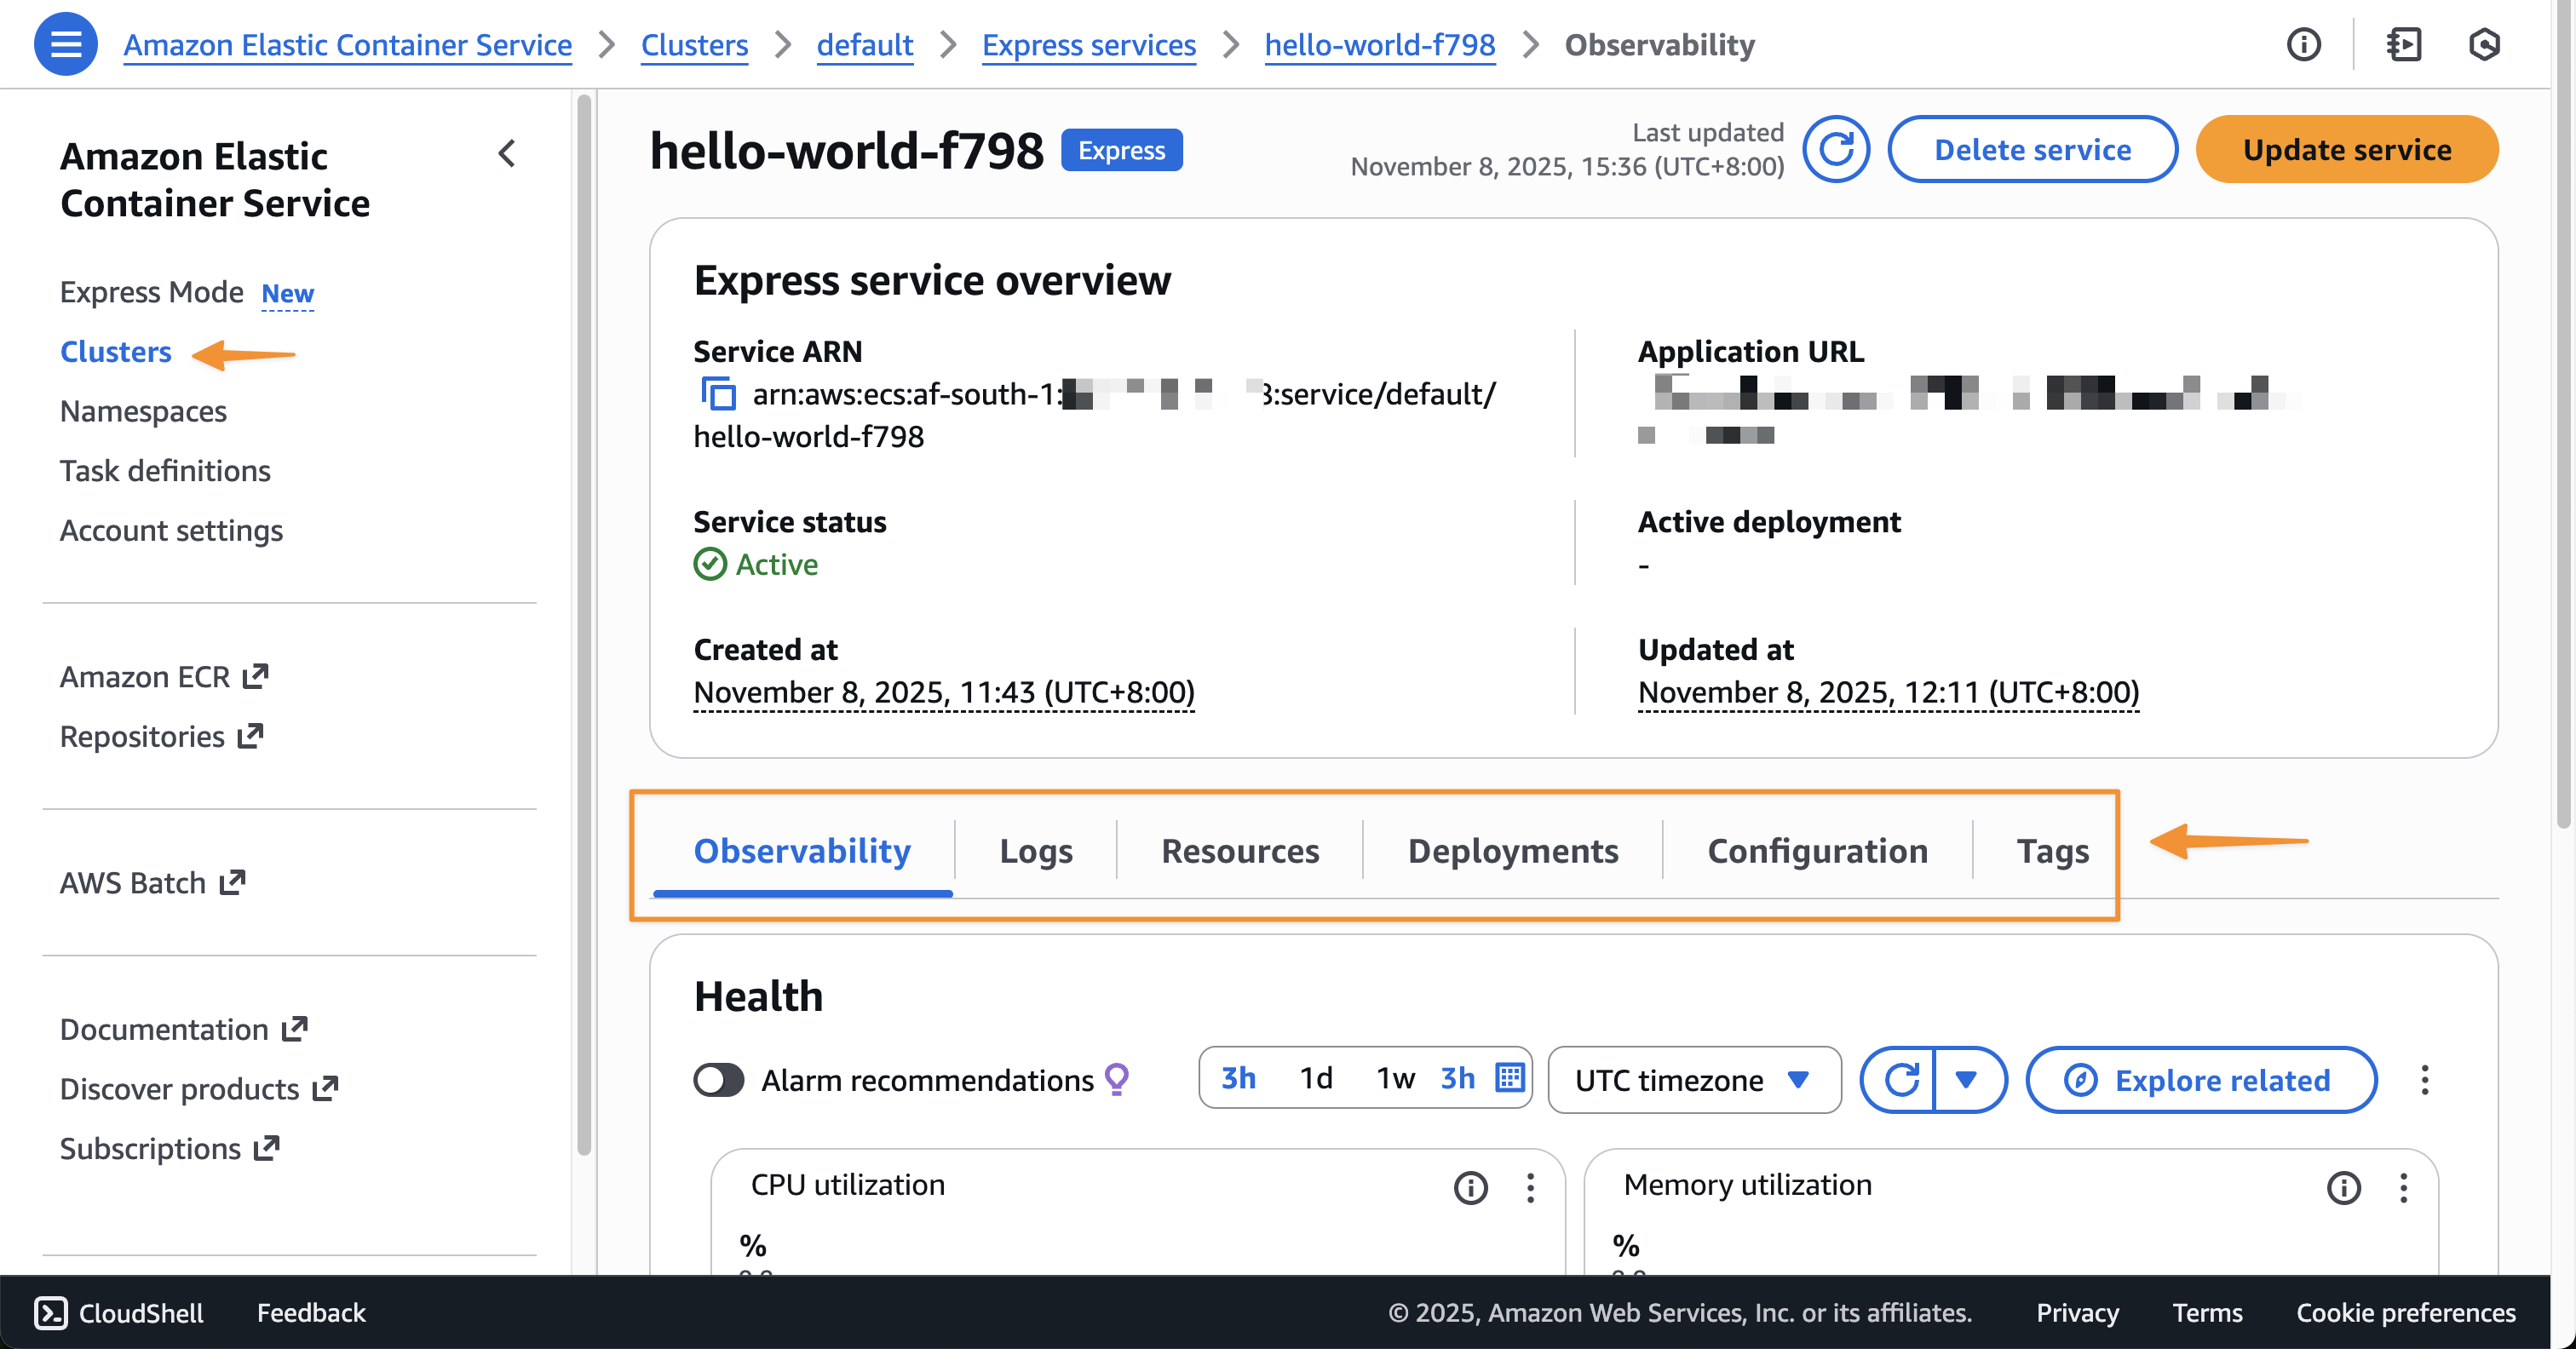
After I choose Create, Express Mode automatically provisions a complete application stack, including an Amazon ECS service with AWS Fargate tasks, Application Load Balancer with health checks, auto scaling policies based on CPU utilization, security groups and networking configuration, and a custom domain with an AWS provided URL. I can also follow the progress in Timeline view on the Resources tab.
If I need to do a programmatic deployment, the same result can be achieved with a single AWS Command Line Interface (AWS CLI) command:
aws ecs create-express-gateway-service \
--image [ACCOUNT_ID].ecr.us-west-2.amazonaws.com/myapp:latest \
--execution-role-arn arn:aws:iam::[ACCOUNT_ID]:role/[IAM_ROLE] \
--infrastructure-role-arn arn:aws:iam::[ACCOUNT_ID]:role/[IAM_ROLE]
After it’s complete, I can see my application URL in the console and access my running application immediately.
After the application is created, I can see the details by visiting the specified cluster, or the default cluster if I didn’t specify one, in the ECS service to monitor performance, view logs, and manage the deployment.
When I need to update my application with a new container version, I can return to the console, select my Express service, and choose Update. I can use the interface to specify a new image URI or adjust resource allocations.
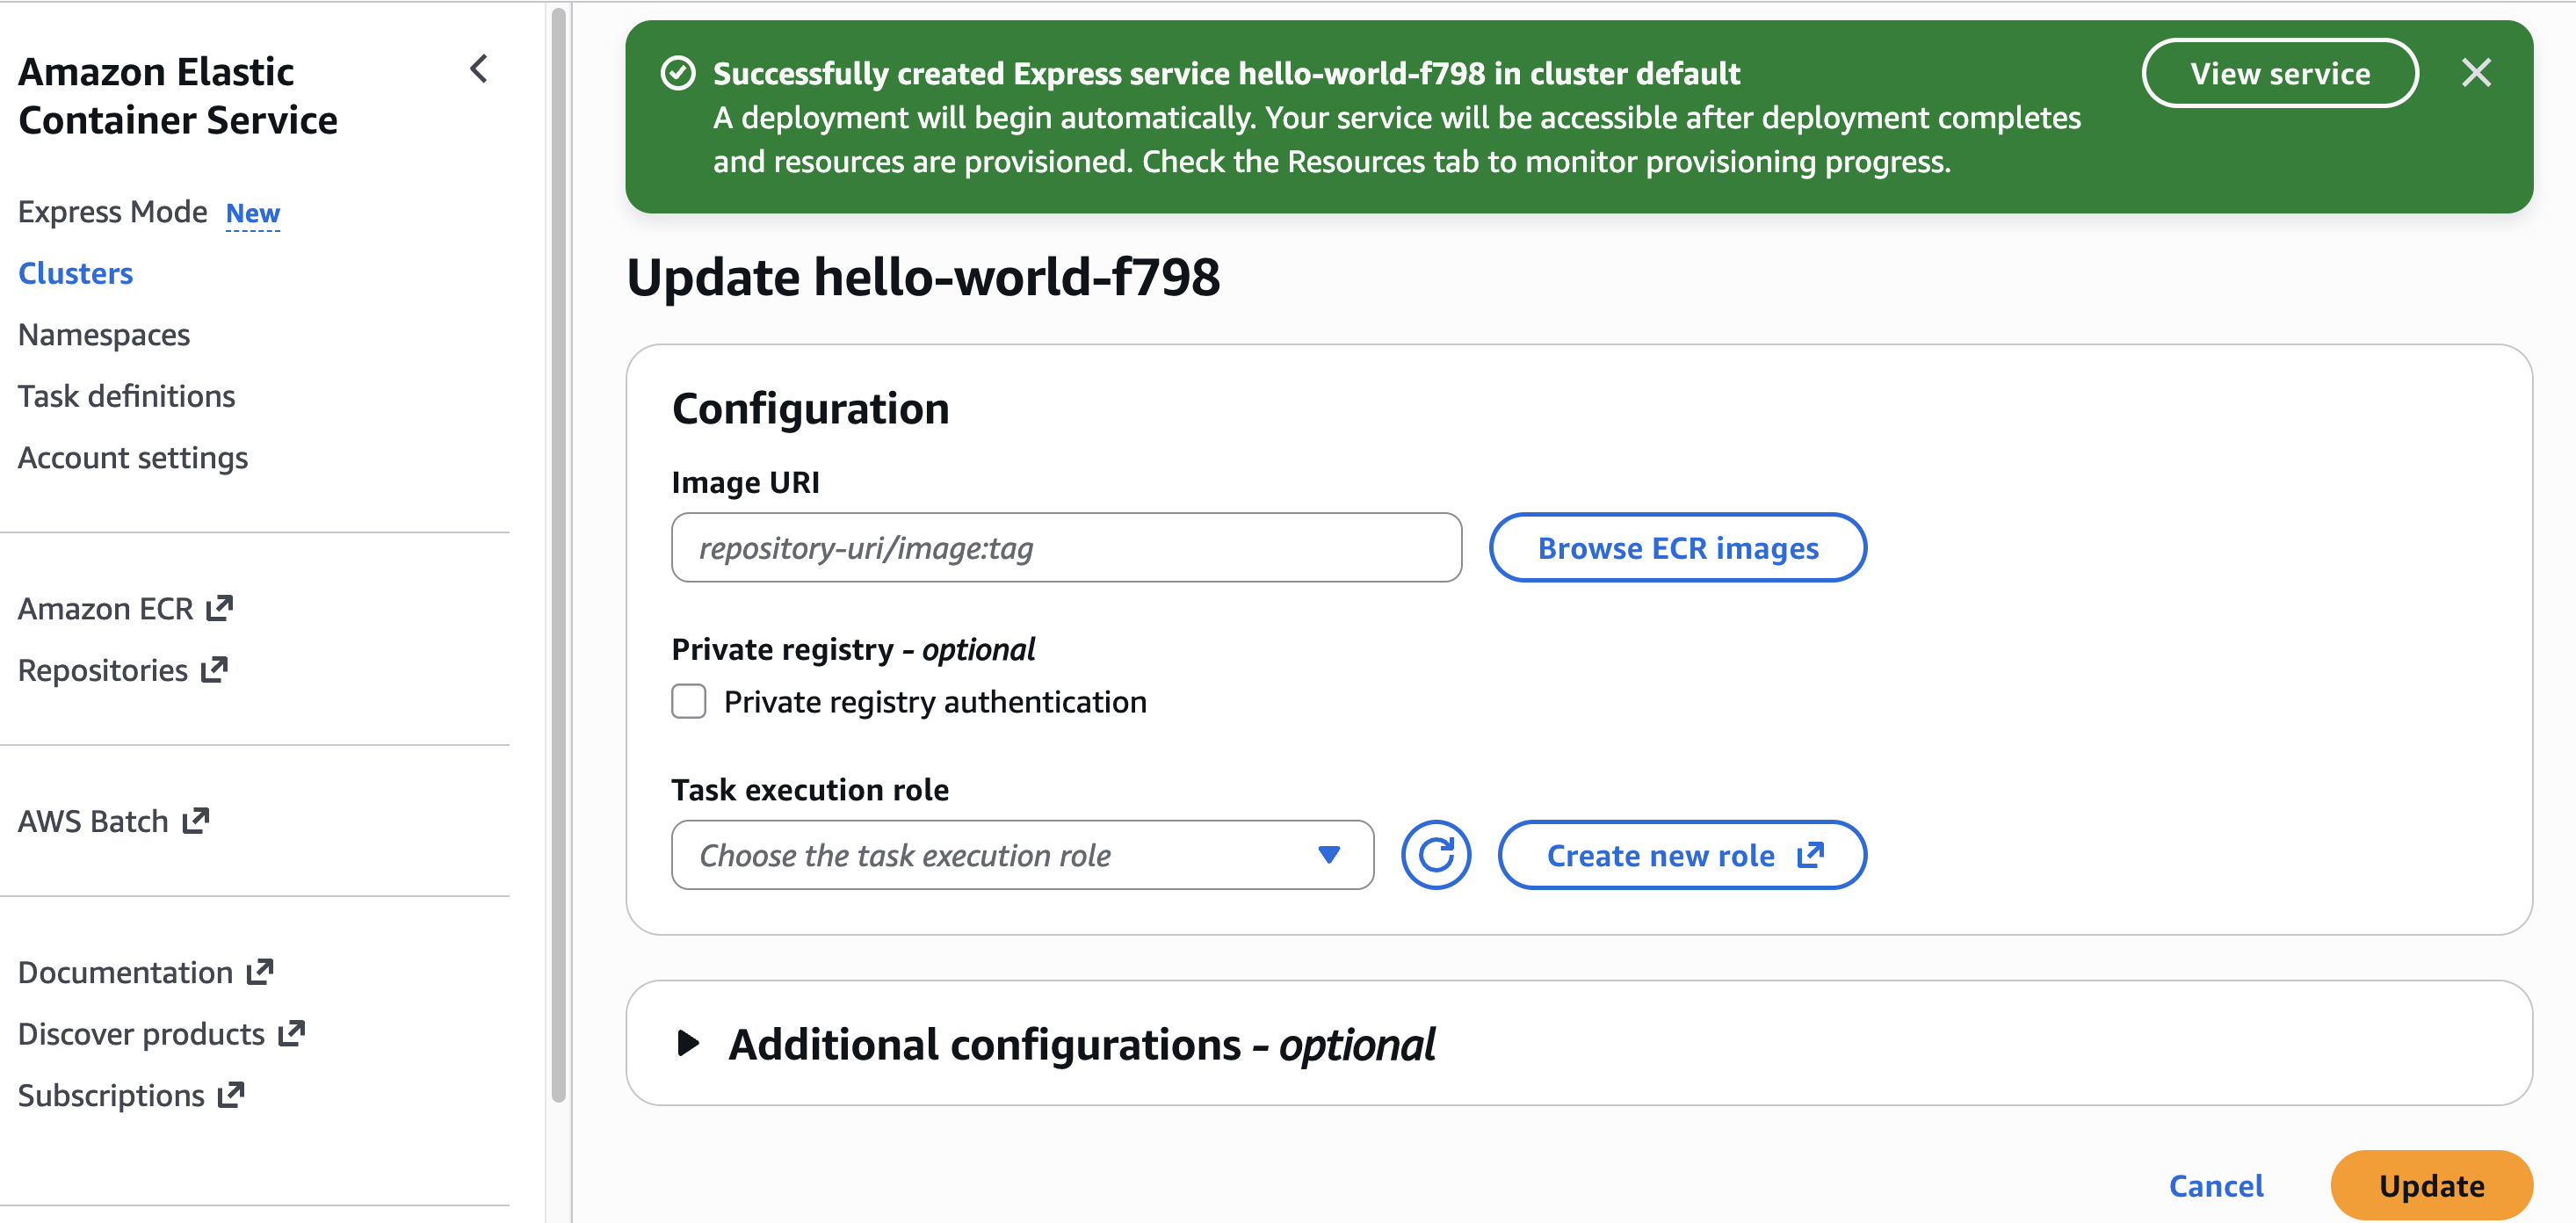
Alternatively, I can use the AWS CLI for updates:
aws ecs update-express-gateway-service \
  --service-arn arn:aws:ecs:us-west-2:[ACCOUNT_ID]:service/[CLUSTER_NAME]/[APP_NAME] \
  --primary-container '{
    "image": "[IMAGE_URI]"
  }'
I find the entire experience reduces setup complexity while still giving me access to all the underlying resources when I need more advanced configurations.
Additional things to know
Here are additional things about ECS Express Mode:
- Availability – ECS Express Mode is available in all AWS Regions at launch.
- Infrastructure as Code support – You can use IaC tools such as AWS CloudFormation, AWS Cloud Development Kit (CDK), or Terraform to deploy your applications using Amazon ECS Express Mode.
- Pricing – There is no additional charge to use Amazon ECS Express Mode. You pay for AWS resources created to launch and run your application.
- Application Load Balancer sharing – The ALB created is automatically shared across up to 25 ECS services using host-header based listener rules. This helps distribute the cost of the ALB significantly.
Get started with Amazon ECS Express Mode through the Amazon ECS console. Learn more on the Amazon ECS documentation page.
Happy building!
— Donnie
Enhancing API security with Amazon API Gateway TLS security policies
Post Syndicated from Anton Aleksandrov original https://aws.amazon.com/blogs/compute/enhancing-api-security-with-amazon-api-gateway-tls-security-policies/
As compliance frameworks evolve and cryptographic standards advance, organizations are looking for additional controls to improve their cloud security posture. One of the neccesary controls is a more granular TLS configuration, for example when regulatory requirements mandate disabling older ciphers like CBC or enforcing TLS 1.3 as a minimum version.
In this post, you will learn how the new Amazon API Gateway’s enhanced TLS security policies help you meet standards such as PCI DSS, Open Banking, and FIPS, while strengthening how your APIs handle TLS negotiation. This new capability increases your security posture without adding operational complexity, and provides you with a single, consistent way to standardize TLS configuration across your API Gateway infrastructure.
Overview
Previously, API Gateway offered limited control over TLS configuration, and only for custom domain names. Default endpoints used fixed security policies, which meant you often had to introduce additional infrastructure, such as custom Amazon CloudFront distributions, to meet your organization’s security or compliance requirements.
With this launch, you can configure TLS behavior directly on all REST API endpoint types, including Regional, edge-optimized, and private, and apply consistent TLS settings across both your APIs and their custom domain names. You can choose from predefined enhanced security policies to enforce the minimum TLS versions and cipher suites that your workloads require. For example, you can enforce TLS 1.3, use hardened TLS 1.2 without CBC ciphers, adopt FIPS-aligned suites for government workloads, or prepare for the future with policies that include post-quantum cryptography (PQC). The new security policies provide finer-grained control without adding operational complexity, helping you align your APIs with evolving security and compliance expectations.
Understanding API Gateway security policies
A security policy in API Gateway is a predefined combination of a minimum TLS version and a curated set of cipher suites. When a client connects to your REST API or custom domain name, API Gateway uses the selected policy to determine which protocol versions and ciphers it will accept during the TLS handshake. This gives you a predictable and enforceable way to control how clients establish encrypted connections to your APIs.
API Gateway supports two categories of security policies. Legacy policies, such as TLS_1_0 or TLS_1_2, remain available for backwards compatibility. Enhanced policies, identified by the SecurityPolicy_* prefix, provide stricter and more modern controls for regulated workloads, advanced governance, or cryptographic hardening. When you use an enhanced policy, you must also specify an endpoint access mode, which adds additional validation for how traffic reaches your API, as described in the following sections.
Enhanced policies follow a consistent naming patterns that helps you quickly understand what each policy enforces. For example, for REGIONAL and PRIVATE endpoint types, the following pattern applies:
SecurityPolicy_[TLS-Versions]_[Variant]_[YYYY-MM]
From this structure, you can identify the minimum TLS versions supported, any specialized cryptographic variants (such as FIPS, PFS, or PQ), and the release date of the policy. For example, SecurityPolicy_TLS13_1_3_2025_09 accepts only TLS 1.3 traffic, while SecurityPolicy_TLS13_1_2_PFS_PQ_2025_09 supports TLS 1.2 as lowest and TLS 1.3 as highest TLS version with forward secrecy and post-quantum enhancements.
Each policy maps to a curated combination of ciphers. For instance, SecurityPolicy_TLS13_1_3_2025_09 accepts only three TLS 1.3 cipher suites (TLS_AES_128_GCM_SHA256, TLS_AES_256_GCM_SHA384, and TLS_CHACHA20_POLY1305_SHA256) and rejects any other protocol versions or ciphers. For a full list of supported policies and ciphers, and naming pattern for the EDGE endpont type, see the API Gateway documentation.
How security policies apply to default endpoints and custom domains
You can use API Gateway to attach different security policies to your default API endpoint and custom domain names. During TLS negotiation, API Gateway selects the policy based on the Server Name Indication (SNI) value in the client’s TLS handshake, not the HTTP Host header. This means the policy depends on the hostname the client uses when initiating TLS.
For example, if a client connects directly to your default endpoint, such as:
https://abcdef1234.execute-api.us-east-1.amazonaws.com
API Gateway uses the policy attached to that default endpoint because the SNI value matches its hostname.
If the client instead connects through a custom domain name, such as:
https://api.example.com
API Gateway uses the policy attached to that custom domain. In this case, the SNI value api.example.com determines which policy is enforced.
This distinction is important even if you disable your default endpoint. TLS negotiation always occurs before API Gateway evaluates endpoint settings, so the default endpoint security policy still applies to clients that connect directly to its hostname. To avoid unexpected client behavior, you should keep the API and its custom domain name aligned with the same security policy whenever possible.
Understanding endpoint access mode
When you use an enhanced security policy (SecurityPolicy_*), you must also specify an endpoint access mode. Endpoint access mode defines how strictly API Gateway validates the network path a request takes before it reaches your API. This gives you an additional layer of governance and helps you prevent unauthorized or misrouted traffic.
You can choose between two modes:
- BASIC mode provides standard API Gateway behavior. It is the recommended starting point when you migrate an existing API to an enhanced security policy. Clients can continue reaching your API as they do today, without additional validation.
- STRICT mode adds enforcement checks to ensure that requests originate from the correct endpoint type, and TLS negotiation aligns with your configuration.
When you enable STRICT mode, API Gateway performs additional validations, such as:
- The SNI and HTTP Host header values match
- The request originates from the same endpoint type as your API (Regional, edge-optimized, or private)
If any of these validations fail, API Gateway rejects the request. STRICT is a viable choice when you need stronger security guarantees, such as when running regulated or sensitive workloads. See API Gateway documentation for additional details.
When you switch from BASIC to STRICT mode, it takes up to 15 minutes for the change to fully propagate. Your API remains available during this period. If your endpoint access mode is set to STRICT, you cannot change the endpoint type until you revert the mode back to BASIC.
Applying security policies to new and existing APIs
You can apply a security policy when you create a new REST API or custom domain name, or update an existing resource to use one of the enhanced SecurityPolicy_* options. When migrating existing APIs, the recommended approach is to start with BASIC mode, validate client behavior (SNI and HTTP Host header values match, request originates from the same endpoint type as your API), and then move to STRICT mode once you confirm compatibility.
The following code snippets illustrate how to apply security policies to different scenarios:
Create a REST API with a security policy and STRICT endpoint access mode
You can attach a security policy directly during API creation, removing the need for extra infrastructure just to control TLS negotiation.
Create a custom domain name with a security policy and STRICT endpoint access mode
You can also specify the security policy when creating a custom domain name. API Gateway applies the selected policy during TLS negotiation based on the SNI value the client provides.
Updating existing REST API
If you are migrating an existing API, start by applying the enhanced security policy with BASIC mode. After confirming that your clients can connect with BASIC mode as expected, proceed to enable the STRICT mode.
1. Apply the new policy with BASIC mode
Verify your clients can consume the API as expected using access logs and performance metrics in Amazon CloudWatch.
2. Enable the STRICT mode after validation
Updating existing custom domain name
Custom domain names follow the same migration approach as REST APIs.
1. Apply the new policy with BASIC mode and validate clients can successfully connect.
2. Enable the STRICT mode after validation
After you update your REST API or custom domain configuration, redeploy your API so that stages receive the new settings. When you change a security policy, the update takes up to 15 minutes to complete. The API status appears as UPDATING while the change propagates and returns to AVAILABLE when complete. Your API remains fully functional throughout this process.
Rolling back endpoint access mode
If you notice clients failing to connect to your API after applying the STRICT mode, you can revert the endpoint access mode back to BASIC at any time. Below code snippet illustrates doing this for a REST API.
You can use the same approach to update a custom domain name.
Monitoring TLS usage and policy migrations
As you adopt enhanced security policies, it is important to understand how clients negotiate encrypted connections with your API. Monitoring helps you verify client readiness, identify legacy consumers that may require updates, and validate that STRICT endpoint access mode behaves as expected during rollout. Use the following API Gateway access logs variables to monitor protocol and cipher usage over time.
- $context.tlsVersion – the negotiated TLS version
- $context.cipherSuite – the cipher suite selected during the handshake
You can use these variables to confirm that:
- Clients are using the expected minimum TLS version
- BC-based ciphers are no longer used after you move to a hardened policy
- PQC and FIPS-aligned policies are being exercised by the appropriate clients
Access logs are especially useful during migrations, where validating the actual client behavior is a prerequisite before enabling STRICT mode. For example, if you still observe live clients negotiating TLS 1.0 or TLS 1.2 CBC ciphers after applying a hardened policy in BASIC mode, you can identify the affected clients and plan remediation before switching to STRICT mode.
Future-proof security configurations
Some of the new policies combine TLS 1.3 with post-quantum cryptography (PQC) to help you prepare for a future where quantum-capable threat actors exist. With these policies you can start testing and adopting quantum-resistant algorithms without redesigning your API architecture.
As standards evolve and new cipher suites are introduced, API Gateway’s policy model provides you with a clear path for adding new variants while keeping your configuration simple and predictable.
Conclusion and next steps
Enhanced TLS security policies and endpoint access mode in the Amazon API Gateway gives you direct control over how clients establish secure connections to your APIs. You can choose the policies that match your compliance needs, such as PCI DSS, FIPS, Open Banking, PQC, and use STRICT mode to control how traffic reaches your endpoints and apply additional domain-level validations, further hardening security of your APIs
To get started:
- Review the list of available security policies in the API Gateway documentation.
- Identify which REST APIs and domains require stronger TLS controls.
- Apply an appropriate SecurityPolicy-* policy with BASIC mode.
- Validate client behavior using access logs and CloudWatch metrics.
- Move to STRICT mode when you are ready to enforce additional connection-level protection.
For more information about building Serverless architectures, see ServerlessLand.com
Practical steps to minimize key exposure using AWS Security Services
Post Syndicated from Jennifer Paz original https://aws.amazon.com/blogs/security/practical-steps-to-minimize-key-exposure-using-aws-security-services/
Exposed long-term credentials continue to be the top entry point used by threat actors in security incidents observed by the AWS Customer Incident Response Team (CIRT). The exposure and subsequent use of long-term credentials or access keys by threat actors poses security risks in cloud environments. Additionally, poor key rotation practices, sharing of access keys among multiple users, or failing to revoke unused credentials can leave systems exposed.
Using long-term credentials is strongly discouraged and presents an opportunity to migrate towards AWS Identity and Access Management (IAM) roles and federated access. While our recommended best practice is for customers to migrate away from long-term credentials, we recognize that this transition might not be immediately feasible for all organizations.
Building a comprehensive defense against unintended access to long-term credentials requires a strategic layered approach. This approach is intended to bridge the gap between ideal security practices and real-world operational constraints, providing actionable steps for teams managing legacy AWS workloads that require the use of long-term credentials.
In this post, you learn how to build your defense, starting with identifying existing risks and potential exposures through services such as Amazon CodeGuru Security and AWS IAM Access Analyzer, providing visibility into credential risks across the environment. This is then complemented by establishing strict boundaries through service control policies (SCPs) and data perimeters to control how and where credentials can be created and used. With these mechanisms in place, you can strengthen your position with network-level controls that help protect the infrastructure where access keys might be used, implementing services such as AWS WAF and Amazon Inspector to help protect against exploitation of vulnerabilities. Finally, you implement operational best practices such as automated secret rotation to maintain ongoing security hygiene and minimize the impact of potential compromise.
Detect current access keys and exposure
Audit current access keys
For comprehensive auditing, organizations should regularly generate credential reports to identify IAM user ownership of long-lived credentials and other relevant information such as the last time the key was rotated, last time it was used, last service used and last region used. These reports provide essential visibility into your credential landscape, enabling you to spot unused or potentially compromised credentials by focusing on access keys with stale activity, keys exceeding rotation policies, and unexpected usage patterns from unfamiliar regions.
Detect exposed access keys
A common source of credential compromise occurs through inadvertent commits to public repositories. When developers accidentally commit credentials to public repositories, these credentials can be harvested by automated scanning tools used by adversaries. Code scanning is a foundational step that helps catch these critical security issues early, before sensitive credentials can be accidentally committed to code repositories or deployed to production environments where they could be exploited.
You can use the secrets detection capability of CodeGuru Security to proactively identify exposed sensitive data in your codebase.
The tool integrates with AWS Secrets Manager, employing detection mechanisms to locate unencrypted secrets in your code, such as AWS secret access keys, embedded passwords, and database connection strings.
When CodeGuru Security discovers unprotected secrets during a scan, it creates a finding with recommended remediation to address the vulnerability.
AWS Trusted Advisor also contains an exposed access key check that checks popular code repositories for access keys that have been exposed to the public and for irregular Amazon Elastic Compute Cloud (Amazon EC2) usage that could be the result of a compromised access key.
Note that while these are valuable security tools, they cannot detect secrets or access keys stored in locations outside their scanning scope, such as local development machines or external systems. They should be used as part of a broader security strategy, not as the sole method for identifying and preventing credential exposure.
When addressing potentially compromised access keys, it is advised to immediately rotate the keys. See instructions on how to rotate access keys for IAM Users.
Detect unused access
Beyond identifying exposed credentials, detecting unused access keys helps minimize the attack surface. IAM Access Analyzer contains an unused access analyzer that looks for access permissions that are either overly generous or that have fallen into disuse, including unused IAM roles, access keys for IAM users, passwords for IAM users, and services and actions for active IAM roles and users. After reviewing the findings generated by an organization-wide or account-specific analyzer, you can remove or modify permissions that aren’t needed. By identifying and revoking unused credentials and access, you can limit the impact if credentials have been obtained by a threat actor.
By implementing these tools, you can gain insights into credential risks across your environment. The combined capabilities help surface embedded secrets, exposed access keys, and credentials requiring removal.
Preventive guardrails: Establish a data perimeter
Now that you’ve learned how to identify exposed or unused credentials, let’s explore how you can use SCPs and resource control policies (RCPs) to create a data perimeter and help make sure that only your trusted identities are accessing trusted resources from expected networks. Implementing preventive guardrails around your AWS environment is crucial for helping protect against unauthorized access and potential access key compromises. For more information on what a data perimeter is and how to establish one, see the Establishing a Data Perimeter on AWS blog post series.
The following SCP denies an IAM user’s credentials from being used outside of unexpected networks (corporate Classless Inter-Domain Routing (CIDR) or specific virtual private cloud (VPC)). This policy includes several actions in the NotAction element that would impact services access if not exempted. Examples of SCPs and RCPs can be found in the data-perimeter-policy-examples, which is the source of truth for newly revised policies. The following example has been updated to address the use case of user credentials being used outside of unexpected networks.
By implementing this network perimeter, you can reduce the risk of credential compromise leading to unauthorized access and data exposure. Threat actors attempting to use stolen credentials from a coffee shop or home network will be blocked, helping to limit the impact of unintended access to credentials.
To further increase your defense in depth, you can use RCPs to help protect your data, such as by using them to control which identities can access your resources. For example, you might want to allow identities in your organization to access resources in your organization. You might also want to prevent identities external to your organization from accessing your resources. You can enforce this control using RCPs. You can use RCPs to restrict the maximum available access to your resources and include which principals, both inside and outside your organization, can access your resources. SCPs can only impact the effective permissions for principals within your AWS organization.
By implementing the following RCP, you can help make sure that if long-lived credentials are accidentally exposed, unauthorized users from outside your organization will be blocked from using them to access your critical data and resources. The policy will deny Amazon Simple Storage Service (Amazon S3) actions unless requested from your corporate CIDR range (NotIpAddressIfExists with aws:SourceIp), or from your VPC (StringNotEqualsIfExists with aws:SourceVpc). See the list of AWS services that support RCPs. Examples of SCPs and RCPs can be found in this GitHub repository, which is the source of truth for newly revised policies. The following example has been updated to address the use case discussed in this post.
If you’re ready to begin migrating away from long-term credentials, using an SCP to deny access key creation and deny updates to existing keys helps enforce the use of more secure authentication methods like IAM roles and federated access. This policy denies principals from creating or updating an AWS access key.
In addition to establishing these data perimeter controls, let’s examine how network controls protect the runtime environments where access keys operate.
Network controls: Protecting the runtime environment for access keys
Beyond building a data perimeter and using SCPs and RCPs, protecting the compute and network infrastructure that uses these access keys is essential. The risk of credential exposure through compromised runtime environments makes infrastructure protection a critical component of access key security, because bad actors often target these environments to gain unauthorized access.
Security groups and network ACLs (NACLs)
Use network-level security protections that act as firewalls for varying levels, such as the instance level or the subnet level to help protect against unauthorized access.
- Restricting critical ports, such as SSH (port 22) and RDP (port 3306), is essential because they’re prime targets for bad actors seeking unauthorized system access. Open administrative ports in your security groups can increase your attack surface and security risk. Using AWS Systems Manager Session Manager helps provide secure remote access without exposing inbound ports, alleviating the need for bastion hosts or SSH key management.
- NACLs effectively block access at the subnet level by acting as stateless packet filters at subnet boundaries. Unlike security groups that protect individual instances, NACLs help secure entire subnets with explicit allow/deny rules for both inbound and outbound traffic. They create a critical perimeter defense layer that filters traffic before reaching your instances. When deployed as part of a defense-in-depth approach, NACLs provide subnet-level isolation between application tiers, block malicious traffic patterns at the network edge, and maintain protection even if other security layers are compromised, helping to facilitate comprehensive network security through multiple independent control points.
- For enhanced network protection beyond NACLs, AWS Network Firewall enables enterprise-grade perimeter defense through comprehensive VPC protection. It combines intrusion prevention systems, domain filtering, deep packet inspection, and geographic IP controls, while automatically safeguarding your cloud environment against emerging threats using global threat intelligence gathered by Amazon. By using Network Firewall and AWS Transit Gateway integration, you can implement consistent security policies across your VPCs and Availability Zones with centralized management.
- To automate and scale network security across your organization, AWS Firewall Manager provides centralized administration of both Network Firewall rules and security group policies. As your organization grows, Firewall Manager helps maintain security by automating the deployment of common security group policies, cleaning up unused groups, and remediating overly permissive rules across multiple accounts and organizational units.
Amazon Inspector
To help identify unintended network exposure at scale, consider using Amazon Inspector. Amazon Inspector continually scans AWS workloads for software vulnerabilities and unintended network exposure, helping you identify and remediate security vulnerabilities before they can be exploited.
Key capabilities include:
- Package vulnerability: Package vulnerability findings identify software packages in your AWS environment that are exposed to Common Vulnerabilities and Exposures (CVEs). Bad actors can exploit these unpatched vulnerabilities to compromise the confidentiality, integrity, or availability of data, or to access other systems.
- Code vulnerability: Code vulnerability findings identify lines in your AWS Lambda code that bad actors could exploit. Code vulnerabilities include injection flaws, data leaks, weak cryptography, or missing encryption in your code. It identifies policy violations and vulnerabilities based on internal detectors developed in collaboration with CodeGuru Security. For a list of possible detections, see the Amazon Q Detector Library.
- Network reachability: Network reachability findings show whether your ports are reachable from the internet through an internet gateway (including instances behind Application Load Balancers or Classic Load Balancers), a VPC peering connection, or a VPN through a virtual gateway. These findings highlight network configurations that may be overly permissive, such as mismanaged security groups, NACLs or internet gateways, or that might allow for potentially malicious access. It can help identify open SSH ports on your instance security groups.
AWS WAF
Complementing your network security controls and vulnerability management, AWS WAF provides an additional layer of defense by filtering malicious web traffic that could lead to credential exposure.
AWS WAF offers several managed rule groups to protect against unauthorized access and common vulnerabilities:
- AWS WAF Fraud Control account creation fraud prevention (ACFP) rule group: ACFP uses request tokens to gather information about the client browser and about the level of human interactivity in the creation of the account creation request. The rule group detects and manages bulk account creation attempts by aggregating requests by IP address and client session and aggregating by the provided account information such as the physical address and phone number. Additionally, the rule group detects and blocks the creation of new accounts using credentials that have been compromised, which helps protect the security posture of your application and of your new users.
- AWS WAF Fraud Control account takeover prevention (ATP) rule group: To help prevent account takeovers that might lead to fraudulent activity, ATP gives you visibility and control over anomalous sign-in attempts and sign-in attempts that use stolen credentials. For Amazon CloudFront distributions, in addition to inspecting incoming sign-in requests, the ATP rule group inspects your application’s responses to sign-in attempts to track success and failure rates. ATP checks email and password combinations against its stolen credential database, which is updated regularly as new leaked credentials are found on the dark web.
Operational best practices
To complement these protective layers and maintain ongoing security posture, implement automated credential management through Secrets Manager to help facilitate proper rotation and lifecycle management of access keys throughout your environment. This automation reduces human error, helps facilitate timely credential updates and limits the exposure window if credentials are compromised.
It’s recommended to rotate keys at least every 90 days. Secrets Manager helps by automating the process of rotating secrets on a schedule, helping to make sure that credentials are regularly updated without manual intervention. It also centralizes the storage of secrets, reducing the likelihood of sharing access keys among multiple users. With Secrets Manager, you can configure automatic key rotation using a Lambda integration.
There is also an existing solution that can be deployed to implement automatic access key rotation at scale. This pattern helps you automatically rotate IAM access keys by using AWS CloudFormation templates, which are provided in the GitHub IAM key rotation repository.
If you’re unable to implement automatic rotation and need a quicker way to identify access keys that need to be rotated, AWS Trusted Advisor has a security check for IAM access key rotation that checks for active IAM access keys that haven’t been rotated in the last 90 days. You can use the security check to drill down on which access keys in your environment need to be rotated if you need to perform manual rotation.
Detect anomalous IAM activity
Finally, while proactive measures to secure your IAM infrastructure are crucial, it’s equally important to have robust detection and alerting mechanisms in place. No matter how diligent your efforts, there is still a possibility of unforeseen threats or unauthorized activities. That’s why a comprehensive defense-in-depth strategy should include the ability to quickly identify and respond to anomalous IAM-related events. Amazon GuardDuty combines machine learning and integrated threat intelligence to help protect AWS accounts, workloads, and data from threats.
GuardDuty Extended Threat Detection automatically correlates multiple events across different data sources to identify potential threats within AWS environments. When Extended Threat Detection detects suspicious sequences of activities, it generates comprehensive attack sequence findings. The system analyzes individual API activities as weak signals, which might not indicate risks independently, but when observed together in specific patterns can reveal potential security issues.
This capability is enabled by default when GuardDuty is activated in an AWS account, helping provide protection without additional configuration.
The specific attack sequence finding related to compromised credentials is AttackSequence:IAM/CompromisedCredentials which is marked as Critical severity. This finding informs you that GuardDuty detected a sequence of suspicious actions made by using AWS credentials that impacts one or more resources in your environment. Multiple suspicious and anomalous threat behaviors were observed by the same credentials, resulting in higher confidence that the credentials are being misused.
Conclusion
The security best practices outlined in this post provide a comprehensive, multi-layered approach to mitigate the risks associated with long-term credentials. By implementing proactive code scanning, automated key rotation, network-level controls, data perimeter restrictions, and threat detection, you can significantly reduce the attack surface and better protect your organization’s AWS resources until a full migration to temporary credentials is feasible.
While the recommendations provided in this post represent an ample set of controls to put organizations in a good security posture, there might be additional security measures that can be taken depending on the specific needs and risk profile of each environment. The key is to adopt a holistic, layered approach to credential management and protection. By doing so, you can bridge the gap until a complete transition to temporary credentials becomes possible.
Implementing these security measures can help reduce risks, but long-term credentials inherently carry security risks. Even with strict best practices and comprehensive security controls, the possibility of credential compromise cannot be removed completely. You should consider evaluating your organization’s security posture and prioritizing temporary credentials through IAM roles and federation whenever possible. If you have questions or need help, AWS is here to support you.
Metasploit Wrap-Up 11/21/2025
Post Syndicated from Alan David Foster original https://www.rapid7.com/blog/post/pt-metasploit-wrap-up-11-21-2025
CVE-2025-64446 – Fortinet’s FortiWeb exploitation
A critical vulnerability in Fortinet’s FortiWeb Web Application Firewall, now assigned CVE-2025-64446 (CVSS 9.1), allows unauthenticated attackers to gain full administrator access to the FortiWeb Manager interface and its websocket CLI. The flaw became publicly known on October 6, 2025, after Defused shared a proof-of-concept exploit captured by their honeypots. Metasploit now has support for an auxiliary module admin/http/fortinet_fortiweb_create_admin which can be used to create a new administrative user, and an upcoming exploit module targeting Fortinet FortiWeb that exploits CVE-2025-64446 and CVE-2025-58034 for an authenticated command injection that allows for root OS command execution. For more details see Rapid7’s analysis on CVE-2025-64446
New module content (3)
Fortinet FortiWeb create new local admin
Authors: Defused and sfewer-r7
Type: Auxiliary Pull request: #20698 contributed by sfewer-r7
Path: admin/http/fortinet_fortiweb_create_admin
AttackerKB reference: CVE-2025-64446
Description: Adds a module for the recent FortiWeb 8.0.1 authentication bypass vulnerability allowing an attacker to create a new administrative user. The exploit is based on the PoC published by Defused.
Windows Persistent Service Installer
Authors: Green-m [email protected] and h00die
Type: Exploit Pull request: #20638 contributed by h00die
Path: windows/persistence/service
Description: Updates the Windows service persistence to use the new mixin, adds the ability to run as either Powershell or sc.exe, and uses more libraries.
Windows WSL via Registry Persistence
Authors: Joe Helle and h00die
Type: Exploit
Pull request: #20701 contributed by h00die
Path: windows/persistence/wsl/registry
Description: Adds a new Windows persistence module – the WSL registry module. The module will create registry entries (Run, RunOnce) to run a Linux payload stored in WSL.
Enhancements and features (5)
- #20560 from cdelafuente-r7 – Adds references to MITRE ATT&CK technique T1021 “Remote Services” and its sub-techniques.
- #20638 from h00die – Updates the windows service persistence to use the new mixin, adds the ability to run as either Powershell or sc.exe, and uses more libraries.
- #20689 from zeroSteiner – Add tests for socket channels in Meterpreter and SSH sessions.
- #20699 from sfewer-r7 – Adds the CVE number and further guidance on vulnerable versions for the vulnerability.
- #20707 from bcoles – Updates multiple Linux reboot payloads to note that CAP_SYS_BOOT privileges are required.
Bugs fixed (2)
- #20687 from dwelch-r7 – This updates the auxiliary/scanner/winrm/winrm_login module to catch access denied errors when trying to create a shell session. This is then used to inform the operator that the target account’s password is correct but they do not have permissions to start a shell with WinRM.
- #20695 from zeroSteiner – Updates the Java and PHP Meterpreter to send the local address and local port information back to Metasploit when opening TCP or UDP sockets on the remote host.
- #20708 from cdelafuente-r7 – Fixes a bug with msfdb when attempting to execute the program with bundle exec.
- #20711 from bcoles – Fixes description for AppendExit datastore option.
Documentation added (1)
- #20694 from cgranleese-r7 – Adds new documentation on Metasploit’s post module support. Additionally adds documentation for the new create_process API that supersedes the legacy cmd_exec API.
You can always find more documentation on our docsite at docs.metasploit.com.
Missing rn-* label on Github (4)
Get it
As always, you can update to the latest Metasploit Framework with msfupdate and you can get more details on the changes since the last blog post from GitHub:
If you are a git user, you can clone the Metasploit Framework repo (master branch) for the latest. To install fresh without using git, you can use the open-source-only Nightly Installers or the commercial edition Metasploit Pro