Post Syndicated from Crosstalk Solutions original https://www.youtube.com/watch?v=D2Z7NFZtkIU
The Big Story: Russia’s War on Ukraine
Post Syndicated from The Atlantic original https://www.youtube.com/watch?v=31nFDZqvmjY
Rust 1.59.0 released
Post Syndicated from original https://lwn.net/Articles/886056/
Version
1.59.0 of the Rust language has been released. There are a number of
new features, including support for inline assembly (in unsafe blocks,
naturally), the ability to use tuples and slices on the left-hand side of
an assignment, const generic defaults, and more. Incremental compilation
is also disabled by default in this release to work around a known bug.
Протестът пред Посолството на Русия – в снимки Украинци и българи – заедно срещу войната на Путин
Post Syndicated from Николай Марченко original https://bivol.bg/%D1%83%D0%BA%D1%80%D0%B0%D0%B8%D0%BD%D1%86%D0%B8-%D0%B8-%D0%B1%D1%8A%D0%BB%D0%B3%D0%B0%D1%80%D0%B8-%D0%B7%D0%B0%D0%B5%D0%B4%D0%BD%D0%BE-%D1%81%D1%80%D0%B5%D1%89%D1%83-%D0%B2%D0%BE%D0%B9%D0%BD%D0%B0.html
четвъртък 24 февруари 2022

Стотици украинци, както и пресъединилите се към тях българи и руснаци се събраха пред Посолството на Руската Федерация в София в четвъртък, на 24 февруари 2022 г., видя “Биволъ” на…
The Congo-Ocean Railway
Post Syndicated from The History Guy: History Deserves to Be Remembered original https://www.youtube.com/watch?v=NUToSJTY5F8
Automate your Data Extraction for Oil Well Data with Amazon Textract
Post Syndicated from Ashutosh Pateriya original https://aws.amazon.com/blogs/architecture/automate-your-data-extraction-for-oil-well-data-with-amazon-textract/
Traditionally, many businesses archive physical formats of their business documents. These can be invoices, sales memos, purchase orders, vendor-related documents, and inventory documents. As more and more businesses are moving towards digitizing their business processes, it is becoming challenging to effectively manage these documents and perform business analytics on them. For example, in the Oil and Gas (O&G) industry, companies have numerous documents that are generated through the exploration and production lifecycle of an oil well. These documents can provide many insights that can help inform business decisions.
As documents are usually stored in a paper format, information retrieval can be time consuming and cumbersome. Even those available in a digital format may not have adequate metadata associated to efficiently perform search and build insights.
In this post, you will learn how to build a text extraction solution using Amazon Textract service. This will automatically extract text and data from scanned documents and upload into Amazon Simple Storage Service (S3). We will show you how to find insights and relationships in the extracted text using Amazon Comprehend. This data is indexed and populated into Amazon OpenSearch Service to search and visualize it in a Kibana dashboard.
Figure 1 illustrates a solution built with AWS, which extracts O&G well data information from PDF documents. This solution is serverless and built using AWS Managed Services. This will help you to decrease system maintenance overhead while making your solution scalable and reliable.

Figure 1. Automated form data extraction architecture
Following are the high-level steps:
- Upload an image file or PDF document to Amazon S3 for analysis. Amazon S3 is a durable document storage used for central document management.
- Amazon S3 event initiates the AWS Lambda function Fn-A. AWS Lambda has functional logic to call the Amazon Textract and Comprehend services and processing.
- AWS Lambda function Fn-A invokes Amazon Textract to extract text as key-value pairs from image or PDF. Amazon Textract automatically extracts data from the scanned documents.
- Amazon Textract sends the extracted keys from image/PDF to Amazon SNS.
- Amazon SNS notifies Amazon SQS when text extraction is complete by sending the extracted keys to Amazon SQS.
- Amazon SQS initiates AWS Lambda function Fn-B with the extracted keys.
- AWS Lambda function Fn-B invokes Amazon Comprehend for the custom entity recognition. Comprehend uses custom-trained machine learning (ML) to find discrepancies in key names from Amazon Textract.
- The data is indexed and loaded into Amazon OpenSearch, which indexes and visualizes the data.
- Kibana processes the indexed data.
- User accesses Kibana to search documents.
Steps illustrated with more detail:
1. User uploads the document for analysis to Amazon S3. Uploaded document can be an image file or a PDF. Here we are using the S3 console for document upload. Figure 2 shows the sample file used for this demo.

Figure 2. Sample input form
2. Amazon S3 upload event initiates AWS Lambda function Fn-A. Refer to the AWS tutorial to learn about S3 Lambda configuration. View Sample code for Lambda FunctionA.
3. AWS Lambda function Fn-A invokes Amazon Textract. Amazon Textract uses artificial intelligence (AI) to read as a human would, by extracting text, layouts, tables, forms, and structured data with context and without configuration, training, or custom code.
4. Amazon Textract starts processing the file as it is uploaded. This process takes few minutes since the file is a multipage document.
5. Amazon SNS notifies Amazon Textract of completion. Amazon Textract processing works asynchronously, as we decouple our architecture using Amazon SQS. To configure Amazon SNS to send data to Amazon SQS:
- Create an SNS topic. ‘AmazonTextract-SNS’ is the SNS topic that we created for this demo.
- Then create an SQS queue. ‘AmazonTextract-SQS’ is the queue that we created for this demo.
- To receive messages published to a topic, you must subscribe an endpoint to the topic. When you subscribe an endpoint to a topic, the endpoint begins to receive messages published to the associated topic. Figure 3 shows the SNS topic ‘AmazonTextract-SNS’ subscribed to Amazon SQS queue.

Figure 3. Amazon SNS configuration

Figure 4. Amazon SQS configuration
6. Configure SQS queue to initiate the AWS Lambda function Fn-B. This should happen upon receiving extracted data via SNS topic. Refer to this SQS tutorial to learn about SQS Lambda configuration. See Sample code for Lambda FunctionB.
7. AWS Lambda function Fn-B invokes Amazon Comprehend for the custom entity recognition.

Figure 5. Lambda FunctionB configuration in Amazon Comprehend
- Configure Amazon Comprehend to create a custom entity recognition (text-job2) for the entities. These can be API Number, Lease_Number, Water_Depth, Well_Number, and can use the model created in previous step (well_no, well#, well num). For instructions on labeling your data, see Developing NER models with Amazon SageMaker Ground Truth and Amazon Comprehend.

Figure 6. Comprehend job
- Now create an endpoint for the custom entity recognition for the Lambda function, to send the data to Amazon Comprehend service, as shown in Figure 7 and 8.

Figure 7. Comprehend endpoint creation
- Copy the Amazon Comprehend endpoint ARN to include it in the Lambda function as an environment variable (see Figure 5).

Figure 8. Comprehend endpoint created successfully
8. Launch an Amazon OpenSearch domain. See Creating and managing Amazon OpenSearch Service domains. The data is indexed and populated into Amazon OpenSearch. The Amazon OpenSearch domain name is configured at Lambda FnB as an environment variable to push the extracted data to OpenSearch.
9. Kibana processes the indexed data from Amazon OpenSearch. Amazon OpenSearch data is populated on Kibana, shown in Figure 9.

Figure 9. Kibana dashboard showing Amazon OpenSearch data
10. Access Kibana for document search. The selected fields can be viewed as a table using filters, see Figure 10.

Figure 10. Kibana dashboard table view for selected fields
You can search the LEASE_NUMBER = OCS-031, as shown in Figure 11.

Figure 11. Kibana dashboard search on Lease Number
OR you can search all the information for the WATER_DEPTH = 60, see Figure 12.

Figure 12. Kibana dashboard search on Water Depth
Cleanup
- Shut down OpenSearch domain
- Delete the Comprehend endpoint
- Clear objects from S3 bucket
Conclusion
Data is growing at an enormous pace in all industries. As we have shown, you can build an ML-based text extraction solution to uncover the unstructured data from PDFs or images. You can derive intelligence from diverse data sources by incorporating a data extraction and optimization function. You can gain insights into the undiscovered data, by leveraging managed ML services, Amazon Textract, and Amazon Comprehend.
The extracted data from PDFs or images is indexed and populated into Amazon OpenSearch. You can use Kibana to search and visualize the data. By implementing this solution, customers can reduce the costs of physical document storage, in addition to labor costs for manually identifying relevant information.
This solution will drive decision-making efficiency. We discussed the oil and gas industry vertical as an example for this blog. But this solution can be applied to any industry that has physical/scanned documents such as legal documents, purchase receipts, inventory reports, invoices, and purchase orders.
For further reading:
Cloudflare re-enforces commitment to security in Germany via BSIG audit
Post Syndicated from Rebecca Rogers original https://blog.cloudflare.com/bsig-audit-and-beyond/


As a large data processing country, Germany is at the forefront of security and privacy regulation in Europe and sets the tone for other countries to follow. Analyzing and meeting the requirements to participate in Germany’s cloud security industry requires adherence to international, regional, and country-specific standards. Cloudflare is pleased to announce that we have taken appropriate organizational and technical precautions to prevent disruptions to the availability, integrity, authenticity, and confidentiality of Cloudflare’s production systems in accordance with BSI-KritisV. TÜViT, the auditing body tasked with auditing Cloudflare and providing the evidence to BSI every two years. Completion of this audit allows us to comply with the NIS Directive within Germany.
Why do cloud companies operating in Germany need to go through a BSI audit?
In 2019, Cloudflare registered as an Operator of Essential Services’ under the EU Directive on Security of Network and Information Systems (NIS Directive). The NIS Directive is cybersecurity legislation with the goal to enhance cybersecurity across the EU. Every member state has started to adopt national legislation for the NIS Directive and the criteria for compliance is set individually by each country. As an ‘Operator of Essential Services’ in Germany, Cloudflare is regulated by the Federal Office for Information Security (The BSI) and must adhere to the requirements set by The BSI.
What does the audit prove?
This audit includes a thorough review of Cloudflare’s security controls in the following areas:
- Asset Management
- Risk Analysis
- Business Continuity and Disaster Recovery
- Personnel and Organizational Security
- Encryption
- Network Security
- Security Authentication
- Incident Response
- Vendor Security
- Physical Security
In addition to an audit of Cloudflare’s security controls in the aforementioned areas, TÜViT also conducted a thorough review of Cloudflare’s Information Security Management System (ISMS).
By having these areas audited, German customers can rest assured that Cloudflare respects the requirements put forth by the governing bodies tasked with protecting their data.
Are there any additional German-specific audits on the horizon?
Yes. Cloudflare is currently undergoing an independent third-party audit for the Cloud Computing Compliance Criteria Catalog (C5) certification. The C5 was introduced by BSI Germany in 2016 and reviews operational security within cloud services. Industries that place a high level of importance on C5 include cloud computing and German federal agencies. Learn more here.
What other certifications does Cloudflare hold that demonstrate its dedication to privacy and security?
Different certifications measure different elements of a company’s security or privacy posture. Cloudflare has met the requirements of the following standards:
- ISO 27001 – Cloudflare has been ISO 27001 certified since 2019. Customers can be assured that Cloudflare has a formal information security management program that adheres to a globally recognized standard.
- SOC2 Type II – Cloudflare maintains SOC reports that include the security, confidentiality, and availability trust principles.
- PCI DSS – Cloudflare engages with a QSA (Qualified Security Assessor) on an annual basis to evaluate us as a Level 1 Merchant and a Service Provider.
- ISO 27701 – Cloudflare was one of the first companies in the industry to achieve ISO 27701 certification as both a data processor and controller. The certification provides assurance to our customers that we have a formal privacy program that is aligned to GDPR.
- FedRAMP In Process – Cloudflare hit a major milestone by being listed on the FedRAMP Marketplace as ‘In Process’ for receiving an agency authorization at a moderate baseline. Once an Authorization to Operate (ATO) is granted, it will allow agencies and other cloud service providers to leverage our product and services in a public sector capacity.
Pro, Business, and Enterprise customers now have the ability to obtain a copy of Cloudflare’s certifications, reports, and overview through the Cloudflare Dashboard. For the latest information about our certifications and reports, please visit our Trust Hub.
Building Confidence in Cryptographic Protocols
Post Syndicated from Thom Wiggers original https://blog.cloudflare.com/post-quantum-formal-analysis/

An introduction to formal analysis and our proof of the security of KEMTLS

Good morning everyone, and welcome to another Post-Quantum–themed blog post! Today we’re going to look at something a little different. Rather than look into the past or future quantum we’re going to look as far back as the ‘80s and ‘90s, to try and get some perspective on how we can determine whether a protocol is or is not secure. Unsurprisingly, this question comes up all the time. Cryptographers like to build fancy new cryptosystems, but just because we, the authors, can’t break our own designs, it doesn’t mean they are secure: it just means we are not smart enough to break them.
One might at this point wonder why in a post-quantum themed blog post we are talking about security proofs. The reason is simple: the new algorithms that claim to be safe against quantum threats need proofs showing that they actually are safe. In this blog post, not only are we going to introduce how we go about proving a protocol is secure, we’re going to introduce the security proofs of KEMTLS, a version of TLS designed to be more secure against quantum computers, and give you a whistle-stop tour of the formal analysis we did of it.
Let’s go back for the moment to not being smart enough to break a cryptosystem. Saying “I tried very hard to break this, and couldn’t” isn’t a very satisfying answer, and so for many years cryptographers (and others) have been trying to find a better one. There are some obvious approaches to building confidence in your cryptosystem, for example you could try all previously known attacks, and see if the system breaks. This approach will probably weed out any simple flaws, but it doesn’t mean that some new attack won’t be found or even that some new twist on an old one won’t be discovered.
Another approach you can take is to offer a large prize to anyone who can break your new system; but to do that not only do you need a big prize that you can afford to give away if you’re wrong, you can’t be sure that everyone would prefer your prize to, for example, selling an attack to cybercriminals, or even to a government.
Simply trying hard, and inducing other people to do so too still felt unsatisfactory, so in the late ‘80s researchers started trying to use mathematical techniques to prove that their protocol was secure. Now, if you aren’t versed in theoretical computer science you might not even have a clear idea of what it even means to “prove” a protocol is secure, let alone how you might go about it, so let’s start at the very beginning.
A proof
First things first: let’s nail down what we mean by a proof. At its most general level, a mathematical proof starts with some assumptions, and by making logical inferences it builds towards a statement. If you can derive your target statement from your initial assumptions then you can be sure that, if your assumptions are right, then your final statement is true.
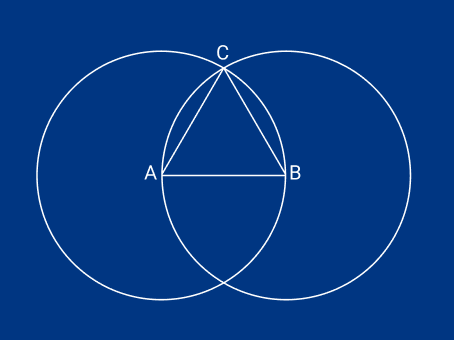
Euclid’s famous work, The Elements, a standard math textbook for over 2,000 years, is written in this style. Euclid gives five “postulates”, or assumptions, from which he can derive a huge portion of the geometry known in his day. Euclid’s first postulate, that you can draw a straight line between any two points, is never proven, but taken as read. You can take his first postulate, and his third, that you can draw a circle with any center and radius, and use it to prove his first proposition, that you can draw an equilateral triangle given any finite line. For the curious, you can find public-domain translations of Euclid’s work.
Whilst it’s fairly easy to intuit how such geometry proofs work, it’s not immediately clear how one could prove something as abstract as the security of a cryptographic protocol. Proofs of protocols operate in a similar way. We build a logical argument starting from a set of assumptions. Security proofs, however, can be much, much bigger than anything in The Elements (for example, our proof of the security properties of KEMTLS, which we will talk about later, is nearly 500,000 lines long) and the only reason we are able to do such complex proofs is that we have something of an advantage over Euclid. We have computers. Using a mix of human-guided theorem proving and automated algorithms we can prove incredibly complex things, such as the security of protocols as the one we will discuss.
Now we know that a proof is a set of logical steps built from a set of assumptions, let’s talk a bit about how security proofs work. First, we need to work out how to describe the protocol in terms that we can reason about. Over the years researchers have come up with many ways for describing computer processes mathematically, most famously Alan Turing defined a-machines, which we now know as Turing Machines, which describe a computer program in an algebraic form. A protocol is slightly more complex than a single program. A protocol can be seen as a number of computers running a set of computer programs that interact with each other.
We’re going to use a class of techniques called process algebras to describe the interacting processes of a protocol. At its most basic level, algebra is the art of generalizing a statement by replacing specific values with general symbols. In standard algebra, these specific values are numbers, so for example we can write (cos 37)² + (sin 37)² = 1, which is true, but we can generalize it to (cos θ)² + (sin θ)² = 1, replacing the specific value, 37, with the symbol θ.
Now you might be wondering why it’s useful to replace things with symbols. The answer is it lets us solve entire classes of problems instead of solving each individual instance. When it comes to security protocols, this is especially important. We can’t possibly try every possible set of inputs to a protocol and check nothing weird happens to one of them. In fact, one of the assumptions we’re going to make when we prove KEMTLS secure is that trying every possible value for some inputs is impossible1. By representing the protocol symbolically, we can write a proof that applies to all possible inputs of the protocol.
Let’s go back to algebra. A process algebra is similar to the kind of algebra you might have learnt in high school: we represent a computer program with symbols for the specific values. We also treat functions symbolically. Rather than try and compute what happens when we apply a function f to a value x, we just create a new symbol f(x). An algebra also provides rules for manipulating expressions. For example, in standard algebra we can transform y + 5 = x² - x into y = x² - x - 5. A process algebra is the same: it not only defines a language to describe interacting processes, it also defines rules for how we can manipulate those expressions.
We can use tools, such as the one we use called Tamarin, to help us do this reasoning. Every protocol has its own rules for what transformations are allowed. It is very useful to have a tool, like Tamarin, to which we can tell these rules and allow it to do all the work of symbol manipulation. Tamarin does far, far more than that, though.
A rule, that we tell Tamarin, might look like this:
rule Register_pk:
  [ Fr(~ltkA) ]
--[ GenLtk($A, ~ltkA)]->
  [ !Ltk($A, ~ltkA), !Pk($A, pk(~ltkA)), Out(pk(~ltkA)) ]
This rule is used to represent that a protocol participant has acquired a new public/private key pair. The rule has three parts:
- The first part lists the preconditions. In this case, there is only one: we take a
Fresh value called~ltkA, the “long-term key of A”. This precondition is always met, because Tamarin always allows us to generate fresh values. - The third part lists the postconditions (what we get back when we apply the rule). Rather than operating on an initial statement, as in high-school algebra, Tamarin instead operates on what we call a model of “bag of facts”. Instead of starting with
y + 5 = x² - x, we start with an empty “bag”, and from there, apply rules. These rules take facts out of the bag and put new ones in. In this case, we put in:!Ltk($A, ~ltkA)which represents the private portion of the key,~ltkA, and the name of the participant it was issued to,$A.!Pk($A, pk(~ltkA)), which represents the public portion of the key,pk(~ltkA), and the participant was issued to,$A.Out(pk(~ltkA)), which represents us publishing the public portion of the key,pk(~ltkA)to the network. Tamarin is based on the Dolev-Yao model, which assumes the attacker controls the network. Thus, this fact makes$A’s public key available to the attacker.
We can only apply a rule if the preconditions are met: the facts we need appear in the bag. By having rules for each step of the protocol, we can apply the rules in order and simulate a run of the protocol. But, as I’m sure you’ve noticed, we skipped the second part of the rule. The second part of the rule is where we list what we call actions.
We use actions to record what happened in a protocol run. In our example, we have the action GenLtk($A, ~ltkA). GenLtk means that a new Long-Term Key (LTK) has been Generated. Whenever we trigger the Register_pk rule, we note this with the two parameters:, $A, the party to whom the new key pair belongs; and ~ltkA, the private part of the generated key2.
If we simulate a single run of the protocol, we can record a list of all the actions executed and put them in a list. However, at any point in the protocol, there may be multiple rules that can be triggered. A list only captures a single run of a protocol, but we want to reason about all possible runs of the protocol. We can arrange our rules into a tree: every time we have multiple rules that could be executed, we give each one of them its own branch.
If we could write this entire tree, it would represent every possible run of the protocol. Because every possible run appears in this tree, if we can show that there are no “bad” runs on this tree, we can be sure that the protocol is “secure”. We put “bad” and “secure” in quotation marks here because we still haven’t actually defined what those terms actually mean.
But before we get to that, let’s quickly recap what we have so far. We have:
- A protocol we want to prove.
- A definition of protocol, as a number of computers running a set of computer programs that interact with each other.
- A technique, process algebras, to describe the interacting processes of the protocol: this technique provides us with symbols and rules for manipulating them.
- A tree that represents every possible run of the protocol.
We can reason about a protocol by looking at properties that our tree gives. As we are interested in cryptographic protocols, we would like to reason about its security. “Security” is a pretty abstract concept and its meaning changes in different contexts. In our case, to prove something is secure, we first have to say what our security goals are. One thing we might want to prove is, for example, that an attacker can never learn the encryption key of a session. We capture this idea with a reachability lemma.
A reachability lemma asks whether there is a path in the tree that leads to a specific state: can we “reach” this state? In this case, we ask: “can we reach a state where the attacker knows the session key?” If the answer is “no”, we are sure that our protocol has that property (an attacker never learns the session key), or at least that that property is true in our protocol model.
So, if we want to prove the security of a cryptographic protocol, we need to:
- Define the goals of the security that is being proven.
- Describe the protocol as an interacting process of symbols, rules, and expressions.
- Build a tree of all the steps the protocol can take.
- Check that the trees of protocol runs attain the goals of security we specified.
This process of creating a model of a program and writing rigorous proofs about that model is called “formal analysis”.
Writing formal proofs of protocol correctness has been very effective at finding and fixing all kinds of issues. During the design of TLS 1.3, for example, it uncovered a number of serious security flaws that were eventually fixed prior to standardization. However, something we need to be wary of with formal analysis is being over-reliant on its results. It’s very possible to be so taken with the rigour of the process and of its mathematical proofs, that the result gets overinterpreted. Not only can a mistake exist in a proof, even in a machine-checked one, the proof may not actually prove what you think it does. There are many examples of this: Needham-Schroeder had a proof of security written in the BAN logic, before Lowe found an attack on a case that the BAN logic did not cover.
In fact, the initial specification of the TLS 1.3 proof made the assumption that nobody uses the same certificate for both a client and a server, even though this is not explicitly disallowed in the specification. This gap led to the “Selfie” vulnerability where a client could be tricked into connecting to itself, potentially leading to resource exhaustion attacks.
Formal analysis of protocol designs also tells you nothing about whether a particular implementation correctly implements a protocol. In other blog posts, we will talk about this. Let’s now return to our core topic: the formal analysis of KEMTLS.
Proving KEMTLS’s security
Now that we have the needed notions, let’s get down to the nitty-gritty: we show you how we proved KEMTLS is secure. KEMTLS is a proposal to do authentication in TLS handshakes using key exchange (via key encapsulation mechanisms or KEMs). KEMTLS examines the trade-offs between post-quantum signature schemes and post-quantum key exchange, as we discussed in other blog posts.
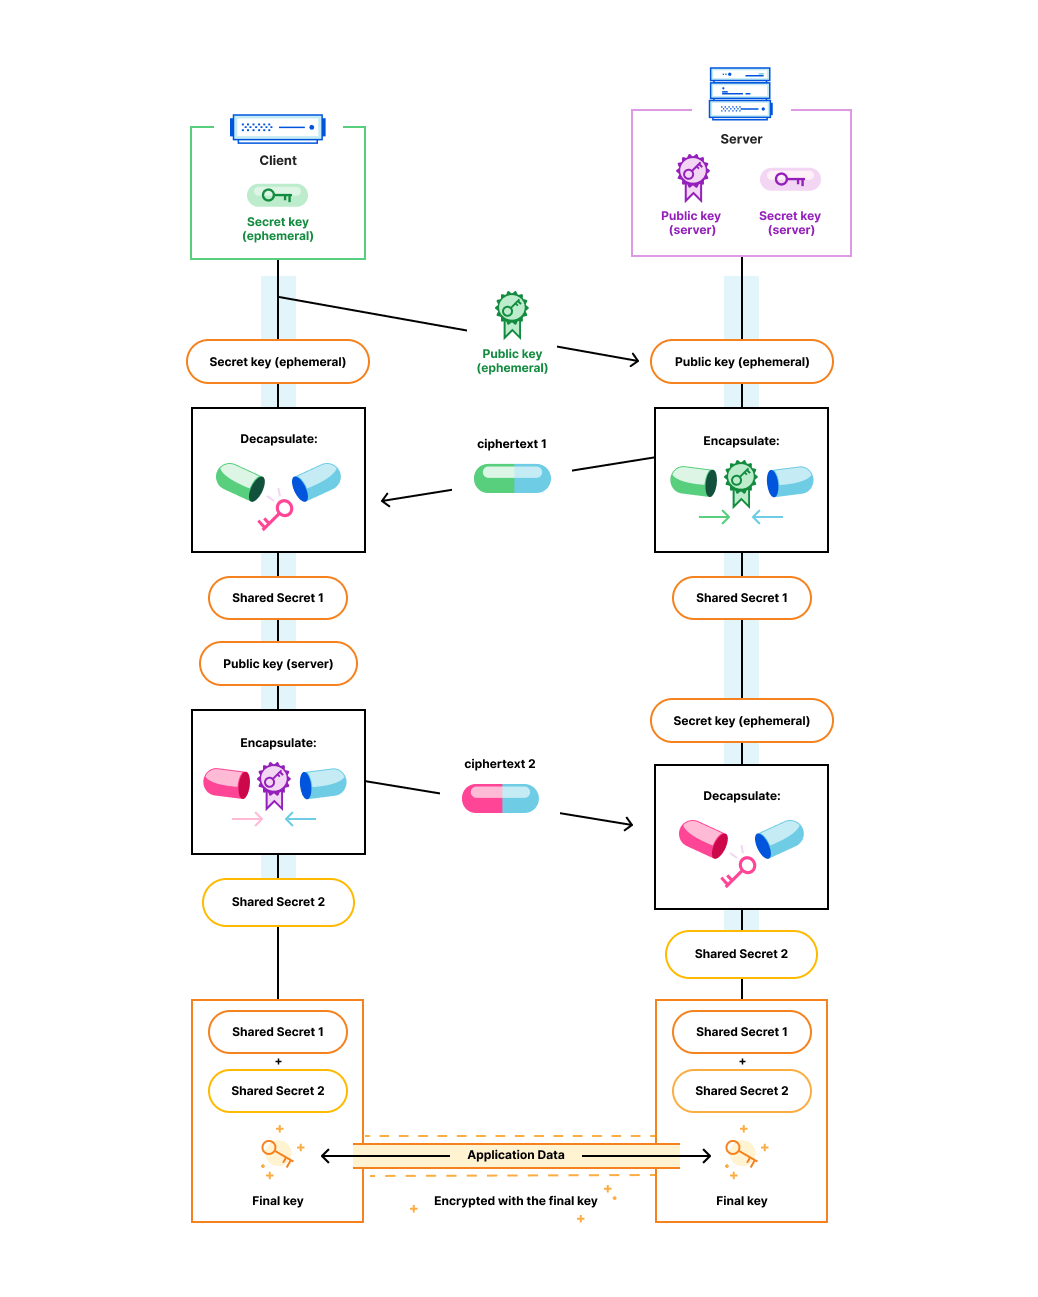
The main idea of KEMTLS is the following: instead of using a signature to prove that you have access to the private key that corresponds to the (signing) public key in the certificate presented, we derive a shared secret encapsulated to a (KEM) public key. The party that presented the certificate can only derive (decapsulate) it from the resulting encapsulation (often also called the ciphertext) if they have access to the correct private key; and only then can they read encrypted traffic. A brief overview of how this looks in the “traditional arrows on paper” form is given below.
We want to show that the KEMTLS handshake is secure, no matter how an adversary might mess with, reorder, or even create new protocol messages. Symbolic analysis tools such as Tamarin or ProVerif are well suited to this task: as said, they allow us to consider every possible combination or manipulation of protocol messages, participants, and key information. We can then write lemmas about the behavior of the protocol.
Why prove it in Tamarin?
There exists a pen-and-paper proof of the KEMTLS handshake. You might ask: why should we still invest the effort of modeling it in a tool like Tamarin?
Pen-and-paper proofs are in theory fairly straightforward. However, they are very hard to get right. We need to carefully express the security properties of the protocol, and it is very easy to let assumptions lead you to write something that your model does not correctly cover. Verifying that a proof has been done correctly is also very difficult and requires almost as much careful attention as writing the proof itself. In fact, several mistakes in definitions of the properties of the model of the original KEMTLS proof were found, after the paper had been accepted and published at a top-tier security conference.
💡 For those familiar with these kinds of game-based proofs, another “war story”: while modeling the ephemeral key exchange, the authors of KEMTLS initially assumed all we needed was an IND-CPA secure KEM. After writing out all the simulations in pseudo code (which is not part of the proof or the paper otherwise!), it turned out that we needed an additional oracle to answer a single decapsulation query, resulting in requiring a weaker variant of IND-CCA security of our KEM (namely, IND-1CCA security). Using an “only” IND-CPA-secure KEM turned out to not be secure!
Part of the problem with pen-and-paper proofs is perhaps the human nature to read between the lines: we quickly figure out what is intended by a certain sentence, even if the intent is not strictly clarified. Computers do not allow that: to everyone’s familiar frustration whenever a computer has not done what you wanted, but just what you told it to do.
A benefit of computer code, though, is that all the effort is in writing the instructions. A carefully constructed model and proof result in an executable program: verifying should be as simple as being able to run it to the end. However, as always we need to:
- Be very careful that we have modeled the right thing and,
- Note that even the machine prover might have bugs: this second computer-assisted proof is a complement to, and not a replacement of, the pen-and-paper proof.
Another reason why computer proofs are interesting is because they give the ability to construct extensions. The “pre-distributed keys” extension of KEMTLS, for example, has been only proven on paper in isolation. Tamarin allows us to construct that extension in the same space as the main proof, which will help rule out any cross-functional attacks. With this, the complexity of the proof is increased exponentially, but Tamarin allows us to handle that just by using more computer power. Doing the same on paper requires very, very careful consideration.
One final reason we wanted to perform this computer analysis is because whilst the pen-and-paper proof was in the computational model, our computer analysis is in the symbolic model. Computational proofs attain “high resolution” proofs, giving very tight bounds on exactly how secure a protocol is. Symbolic models are “low resolution”: giving a binary yes/no answer on whether a protocol meets the security goals (with the assumption that the underlying cryptographic primitives are secure). This might sound like computational proofs are the best: their downside is that one has to simplify the model in other areas. The computational proof of KEMTLS, for example, does not model TLS message formats, which a symbolic model can.
Modeling KEMTLS in Tamarin
Before we can start making security claims and asking Tamarin to prove them, we first need to explain to Tamarin what KEMTLS is. As we mentioned earlier, Tamarin treats the world as a “bag of facts”. Keys, certificates, identities, and protocol messages are all facts. Tamarin can take those facts and apply rules to them to construct (or deconstruct) new facts. Executing steps in the KEMTLS protocol is, in a very literal sense, just another way to perform such transformations — and if everything is well-designed, the only “honest” way to reach the end state of the protocol.
We need to start by modeling the protocol. We were fortunate to be able to reuse the work of Cremers et al., who contributed their significant modeling talent to the TLS 1.3 standardization effort. They created a very complete model of the TLS 1.3 protocol, which showed that the protocol is generally secure. For more details, see their paper.
We modified the ephemeral key exchange by substituting the Diffie-Hellman operations in TLS 1.3 with the appropriate KEM operations. Similarly, we modified the messages that perform the certificate handling: instead of verifying a signature, we send back a KemEncapsulation message with the ciphertext. Let’s have a look at one of the changed rules. Don’t worry, it looks a bit scary, but we’re going to break it down for you. And also, don’t worry if you do not grasp all the details: we will cover the most necessary bits when they come up again, so you can also just skip to the next section “Modeling the adversary” instead.
rule client_recv_server_cert_emit_kex:
let
  // … snip
  ss = kemss($k, ~saseed)
  ciphertext = kemencaps($k, ss, certpk)
  // NOTE: the TLS model uses M4 preprocessor macros for notation
  // We also made some edits for clarity
in
  [
    State(C2d, tid, $C, $S, PrevClientState),
    In(senc{<'certificate', certpk>}hs_keys),
    !Pk($S, certpk),
    Fr(~saseed)
  ]
  --[
    C2d(tid),
    KemEncap($k, certpk, ss)
  ]->
  [
    State(C3, tid, $C, $S, ClientState),
    Out(senc{<'encaps', ciphertext>}hs_keyc)
  ]
This rule represents the client getting the server’s certificate and encapsulating a fresh key to it. It then sends the encapsulated key back to the server.
Note that the let … in part of the rule is used to assign expressions to variables. The real meat of the rule starts with the preconditions. As we can see, in this rule there are four preconditions that Tamarin needs to already have in its bag for this rule to be triggered:
- The first precondition is
State(C2d, …). This condition tells us that we have some client that has reached the stageC2d, which is what we call this stage in our representation. The remaining variables define the state of that client. - The second precondition is an
Inone. This is how Tamarin denotes messages received from the network. As we mentioned before, we assume that the network is controlled by the attacker. Until we can prove otherwise, we don’t know whether this message was created by the honest server, if it has been manipulated by the attacker, or even forged. The message contents,senc{<'certificate', certpk>}hs_keys, is symmetrically encrypted (senc{}) under the server’s handshake key (we’ve slightly edited this message for clarity, and removed various other bits to keep this at least somewhat readable, but you can see the whole definition in our model). - The third precondition states the public key of the server,
!Pk(S, certpk). This condition is preceded by a!symbol, which means that it’s a permanent fact to be consumed many times. Usually, once a fact is removed from the bag, it is gone; but permanent facts remain.Sis the name of the server, andcertpkis the KEM public key. - The fourth precondition states the fresh random value,
~saseed.
The postconditions of this rule are a little simpler. We have:
State(C3, …), which represents that the client (which was at the start of the rule in stateC2d) is now in stateC3.Out(senc{<'encaps', ciphertext>}hs_keyc), which represents the action of the client sending the encapsulated key to the network, encrypted under the client’s handshake key.
The four actions recorded in this rule are:
- First, we record that the client with thread id
tidreached the stateC2d. - Second and third, we record that the client was running the protocol with various intermediate values. We use the phrase “running with” to indicate that although the client believes these values to be the correct, it can’t yet be certain that they haven’t been tampered with, so the client hasn’t committed yet to them.
- Finally, we record the parameters we put into the KEM with the
KemEncapaction.
We modify and add such rules to the TLS 1.3 model, so we can run KEMTLS instead of TLS 1.3. For a sanity check, we need to make sure that the protocol can actually be executed: a protocol that can not run, can not leak your secrets. We use a reachability lemma to do that:
lemma exists_C2d:
    exists-trace
    "Ex tid #j. C2d(tid)@#j"
This was the first lemma that we asked Tamarin to prove. Because we’ve marked this lemma exists-trace, it does not need to hold in all traces, all runs of the protocol. It just needs one. This lemma asks if there exists a trace ( exists-trace), where there exists ( Ex ) a variable tid and a time #j (times are marked with #) at which action C2d(tid) is recorded. What this captures is that Tamarin could find a branch of the tree where the rule described above was triggered. Thus, we know that our model can be executed, at least as far as C2d.
Modeling the adversary
In the symbolic model, all cryptography is perfect: if the adversary does not have a particular key, they can not perform any deconstructions to, for example, decrypt a message or decapsulate a ciphertext. Although a proof with this default adversary would show the protocol to be secure against, for example, reordering or replaying messages, we want it to be secure against a slightly stronger adversary. Fortunately, we can model this adversary. Let’s see how.
Let’s take an example. We have a rule that honestly generates long-term keys (certificates) for participants:
rule Register_pk:
  [ Fr(~ltkA) ]
  --[  GenLtk($A, ~ltkA)  ]->
  [ !Ltk($A, ~ltkA),
    !Pk($A, kempk($k, ~ltkA)),
    Out(kempk($k, ~ltkA))
  ]
This rule is very similar to the one we saw at the beginning of this blog post, but we’ve tweaked it to generate KEM public keys. It goes as follows: it generates a fresh value, and registers it as the actor $A’s long-term private key symbol !Ltk and $A’s public key symbol !Pk that we use to model our certificate infrastructure. It also sends ( Out ) the public key to the network such that the adversary has access to it.
The adversary can not deconstruct symbols like Ltk without rules to do so. Thus, we provide the adversary with a special Reveal query, that takes the !Ltk fact and reveals the private key:
rule Reveal_Ltk:
   [ !Ltk($A, ~ltkA) ] --[ RevLtk($A) ]-> [ Out(~ltkA) ]
Executing this rule registers the RevLtk($A) action, so that we know that $A’s certificate can no longer be trusted after RevLtk occurred.
Writing security lemmas
KEMTLS, like TLS, is a cryptographic handshake protocol. These protocols have the general goal to generate session keys that we can use to encrypt user’s traffic, preferably as quickly as possible. One thing we might want to prove is that these session keys are secret:
lemma secret_session_keys [/*snip*/]:
  "All tid actor peer kw kr aas #i.
      SessionKey(tid, actor, peer, <aas, 'auth'>, <kw, kr>)@#i &
      not (Ex #r. RevLtk(peer)@#r & #r < #i) &
      not (Ex tid3 esk #r. RevEKemSk(tid3, peer, esk)@#r & #r < #i) &
      not (Ex tid4 esk #r. RevEKemSk(tid4, actor, esk)@#r & #r < #i)
    ==> not Ex #j. K(kr)@#j"
This lemma states that if the actor has completed the protocol and the attacker hasn’t used one of their special actions, then the attacker doesn’t know the actor’s read key, kr. We’ll go through the details of the lemma in a moment, but first let’s address some questions you might have about this proof statement.
The first question that might arise is: “If we are only secure in the case the attacker doesn’t use their special abilities then why bother modeling those abilities?” The answer has two parts:
- We do not restrict the attacker from using their abilities: they can compromise every key except the ones used by the participants in this session. If they managed to somehow make a different participant use the same ephemeral key, then this lemma wouldn’t hold, and we would not be able to prove it.
- We allow the attacker to compromise keys used in this session after the session has completed. This means that what we are proving is: an attacker who recorded this session in the past and now has access to the long-term keys (by using their shiny new quantum computer, for example) can’t decrypt what happened in the session. This property is also known as forward secrecy.
The second question you might ask is: “Why do we only care about the read key?”. We only care about the read key because this lemma is symmetric, it holds for all actors. When a client and server have established a TLS session, the client’s read key is the server’s write key and vice versa. Because this lemma applies symmetrically to the client and the server, we prove that the attacker doesn’t know either of those keys.
Let’s return now to the syntax of this lemma.
This first line of this lemma is a “For all” statement over seven variables, which means that we are trying to prove that no matter what values these seven variables hold, the rest of the statement is true. These variables are:
- the thread id
tid, - a protocol participant,
actor, - the person they think they’re talking to,
peer, - the final read and write keys,
krandkwrespectively, - the actor’s authentication status,
aas, - and a time
#i.
The next line of the lemma is about the SessionKey action. We record the SessionKey action when the client or the server thinks they have completed the protocol.
The next lines are about two attacker abilities: RevLtk, as discussed earlier; and RevEKemSk, which the attacker can use to reveal ephemeral secrets. The K(x) action means that the attacker learns (or rather, Knows) x. We, then, assert that if there does not Exist a RevEKemSk or RevLtk action on one of the keys used in the session, then there also does not exist a time when K(kr) (when the attacker learns the read key). Quod erat demonstrandum. Let’s run the proofs now.
Proving lemmas in Tamarin
Tamarin offers two methods to prove security lemmas: it has an autoprover that can try to find the solution for you, or you can do it manually. Tamarin sometimes has a hard time figuring out what is important for proving a particular security property, and so manual effort is sometimes unavoidable.
The manual prover interface allows you to select what goal Tamarin should pursue step by step. A proof quickly splits into separate branches: in the picture, you see that Tamarin has already been able to prove the branches that are green, leaving us to make a choice for case 1.

Sometimes whilst working in the manual interface, you realize that there are certain subgoals that Tamarin is trying to prove while working on a bigger lemma. By writing what we call a helper lemma we can give Tamarin a shortcut of sorts. Rather than trying to solve all the subgoals of one big lemma, we can split the proof into more digestible chunks. Tamarin can then later reuse these helper lemmas when trying to prove bigger lemmas; much like factoring out functions while programming. Sometimes this even allows us to make lemmas auto-provable. Other times we can extract the kinds of decisions we’re making and heuristics we’re manually applying into a separate “oracle” script: a script that interacts with Tamarin’s prover heuristics on our behalf. This can also automate proving tricky lemmas.
Once you realize how much easier certain things are to prove with helper lemmas, you can get a bit carried away. However, you quickly find that Tamarin is being “distracted” by one of the helper lemmas and starts going down long chains of irrelevant reasoning. When this happens, you can hide the helper lemma from the main lemma you’re trying to prove, and sometimes that allows the autoprover to figure out the rest.
Unfortunately, all these strategies require a lot of intuition that is very hard to obtain without spending a lot of time hands-on with Tamarin. Tamarin can sometimes be a bit unclear about what lemmas it’s trying to apply. We had to resort to tricks, like using unique, highly recognizable variable names in lemmas, such that we can reconstruct where a certain goal in the Tamarin interface is coming from.
While doing this work, auto-proving lemmas has been incredibly helpful. Each time you make a tiny change in either a lemma (or any of the lemmas that are reused by it) or in the whole model, you have to re-prove everything. If we needed to put in lots of manual effort each time, this project would be nowhere near done.
This was demonstrated by two bugs we found in one of the core lemmas of the TLS 1.3 model. It turned out that after completing the proof, some refactoring changes were made to the session_key_agreement lemma. These changes seemed innocent, but actually changed the meaning of the lemma, so that it didn’t make sense anymore (the original definition did cover the right security properties, so luckily this doesn’t cause a security problem). Unfortunately, this took a lot of our time to figure out. However, after a huge effort, we’ve done it. We have a proof that KEMTLS achieves its security goals.
Conclusions
Formal methods definitely have a place in the development of security protocols; the development process of TLS 1.3 has really demonstrated this. We think that any proposal for new security protocols should be accompanied by a machine-verified proof of its security properties. Furthermore, because many protocols are currently specified in natural language, formal specification languages should definitely be under consideration. Natural language is inherently ambiguous, and the inevitable differences in interpretation that come from that lead to all kinds of problems.
However, this work cannot be done by academics alone. Many protocols come out of industry who will need to do this for themselves. We would be the first to admit that the usability of these tools for non-experts is not all the way there yet — and industry and academia should collaborate on making these tools more accessible for everyone. We welcome and look forward to these collaborations in the future!
References
- “Why does cryptographic software fail?: a case study and open problems” by David Lazar, Haogang Chen, Xi Wang and Nickolai Zeldovich
- “SoK: Computer-Aided Cryptography” by Manuel Barbosa, Gilles Barthe, Karthik Bhargavan, Bruno Blanchet, Cas Cremers, Kevin Liao and Bryan Parno
- “Post-quantum TLS without handshake signatures” by Peter Schwabe and Douglas Stebila and Thom Wiggers(*)
- “More efficient post-quantum KEMTLS with pre-distributed public keys” by Peter Schwabe and Douglas Stebila and Thom Wiggers (*)
- “On computable numbers, with an application to the Entscheidungsproblem.” by Alan Turing
- “A comprehensive symbolic analysis of TLS 1.3.” by Cas Cremers, Marko Horvat, Jonathan Hoyland, Sam Scott, and Thyla van der Merwe (*)
- “A Logic of Authentication” by Michael Burrows, Martin Abadi, and Roger Michael Needham
* The authors of this blog post were authors on these papers
…..
1Of course, trying every value isn’t technically impossible, it’s just infeasible, so we make the simplifying assumption that it’s impossible, and just say our proof only applies if the attacker can’t just try every value. Other styles of proof that don’t make that assumption are possible, but we’re not going to go into them.
2For simplicity, this representation assumes that the public portion of a key pair can be derived from the private part, which may not be true in practice. Usually this simplification won’t affect the analysis.
Introducing the .NET 6 runtime for AWS Lambda
Post Syndicated from James Beswick original https://aws.amazon.com/blogs/compute/introducing-the-net-6-runtime-for-aws-lambda/
This is written by Norm Johanson, Senior Software Dev Engineer.
You can now use the .NET 6 runtime to build AWS Lambda functions. The new managed runtime supports both x86 and Arm/Graviton2 processors. You can get started with .NET 6 and Lambda using your tool of choice, including Visual Studio 2022 with the AWS Toolkit for Visual Studio, the .NET CLI with the Amazon.Lambda.Tools global tool, and the AWS Serverless Application Model CLI (AWS SAM CLI).
.NET 6 has many new features for .NET developers including support for C# 10 and F# 6. In addition to these features in .NET 6, this blog post explains new features added to the .NET Lambda experience. You can use these to improve diagnostics and performance and use new coding patterns.
Improved logging
Logging in .NET Lambda functions has been improved for .NET 6, providing better traceability, and control of what is being logged. If you prefer the style of logging in previous .NET managed runtimes, set the environment variable AWS_LAMBDA_HANDLER_LOG_FORMAT to Unformatted.
Request ID
One of the common requested features for the previous .NET Lambda runtime is adding the Lambda request ID to logs for better traceability. This is available in the .NET 6 runtime, making the .NET logging format similar to other Lambda runtimes.
Log levels
.NET 6 logging uses log levels. The ILambdaLogger is accessed from the ILambdaContext and has the following new logging APIs:
- LogCritical(string message)
- LogError(string message)
- LogWarning(string message)
- LogInformation(string message)
- LogDebug(string message)
- LogTrace(string message)
- Log(LogLevel level, string message)
Levels for log messages are visible in Amazon CloudWatch Logs, like the request id. This makes it easier to filter and search the logs for particular types of messages, such as errors or warnings.
Console.WriteLine calls are written to CloudWatch Logs as an info level message; Console.Error.WriteLine calls are written as error level.
The following example shows using info messages for logging the fetched user object. It writes a warning message if the user is not found:
public APIGatewayProxyResponse Get(APIGatewayProxyRequest request, ILambdaContext context)
{
    User user = null;
    try
    {
        var id = request.PathParameters["id"];

        context.Logger.LogInformation($"Loading user {id}");
        user = FetchUser(id);
        context.Logger.LogInformation($"User: {user.Name}");
    }
    catch(Exception e)
    {
        context.Logger.LogWarning($"Unable to find user: {e.Message}");
    }

    ...

}
When the user cannot be fetched, this is the resulting log messages showing the log level and request id:

By default, info level messages or higher are written to CloudWatch Logs. You can adjust the level written to CloudWatch Logs using the AWS_LAMBDA_HANDLER_LOG_LEVEL environment variable. The value of the environment variable is set to the values of the LogLevel enum.
With this new filtering, you can instrument Lambda functions with additional logging using the debug and trace log levels. This allows you to turn on additional logging from Lambda functions for troubleshooting, without redeploying new code.
Using source generator for JSON serialization
C# 9 provides source generators, which allow code generation during compilation. This can reduce the use of reflection APIs and improve application startup time. .NET 6 updated the native JSON library System.Text.Json to use source generators, allowing JSON parsing without requiring reflection APIs.
When targeting .NET 6 support, you can take advantage of System.Text.Json’s source generator support to improve cold start performance. This is done using the Amazon.Lambda.Serialization.SystemTextJson package that handles the serialization of Lambda events and responses to .NET types.
To use the source generator, you must define a new empty class in your project that derives from System.Text.Json.Serialization.JsonSerializerContext. This class must be a partial class because the source generator adds code to this class to handle serialization. On the empty partial class, add the JsonSerializable attribute for each .NET type the source generator must generate the serialization code for.
Here is an example called HttpApiJsonSerializerContext that registers the Amazon API Gateway HTTP API event and response types to have the serialization code generated:
[JsonSerializable(typeof(APIGatewayHttpApiV2ProxyRequest))]
[JsonSerializable(typeof(APIGatewayHttpApiV2ProxyResponse))]
public partial class HttpApiJsonSerializerContext : JsonSerializerContext
{
}
Lambda functions using Amazon.Lambda.Serialization.SystemTextJson use the Amazon.Lambda.Core.LambdaSerializer attribute to register the serializer. Most commonly the DefaultLambdaJsonSerializer type is specified. To use the source generator, you must register SourceGeneratorLambdaJsonSerializer, passing the previously defined JsonSerializerContext subclass as the generic parameter.
Here is an example of registering the serializer using the HttpApiJsonSerializerContext type:
[assembly: LambdaSerializer(typeof(SourceGeneratorLambdaJsonSerializer<APIGatewayExampleImage.HttpApiJsonSerializerContext>))]After these steps, Lambda uses the source-generated JSON serialization code to handle all of the serialization of Lambda events and responses. Reflection API calls are not used for serialization, improving the Lambda function’s cold start performance.
Below is a full example of an API Gateway-based Lambda function using the source generator.
using System.Collections.Generic;
using System.Net;
using System.Text.Json.Serialization;


using Amazon.Lambda.Core;
using Amazon.Lambda.APIGatewayEvents;
using Amazon.Lambda.Serialization.SystemTextJson;

[assembly: LambdaSerializer(typeof(SourceGeneratorLambdaJsonSerializer<SourceGeneratorExample.HttpApiJsonSerializerContext>))]

namespace SourceGeneratorExample;

[JsonSerializable(typeof(APIGatewayHttpApiV2ProxyRequest))]
[JsonSerializable(typeof(APIGatewayHttpApiV2ProxyResponse))]
public partial class HttpApiJsonSerializerContext : JsonSerializerContext
{
}


public class Functions
{
    public APIGatewayProxyResponse Get(APIGatewayHttpApiV2ProxyRequest request, ILambdaContext context)
    {
        context.Logger.LogInformation("Get Request");

        var response = new APIGatewayHttpApiV2ProxyResponse
        {
            StatusCode = (int)HttpStatusCode.OK,
            Body = "Hello AWS Serverless",
            Headers = new Dictionary<string, string> { { "Content-Type", "text/plain" } }
        };

        return response;
    }
}
Top-level statements
The new .NET 6 Lambda runtime adds support for writing Lambda functions using C# 9’s top-level statements feature. Top-level statements allow you to remove much of the initial boilerplate code for a .NET project.
In a typical hello world example:
using System;

namespace Application
{
    class Program
    {
        static void Main(string[] args)
        {
            Console.WriteLine(“Enjoying .NET 6 in AWS Lambda”);
        }
    }
}
With top-level statements, you can write this in one line, removing brackets, indentations, namespaces, and type declarations:
Console.WriteLine(“Enjoying .NET 6 in AWS Lambda”);At a high level, the C# compiler generates the .NET assembly’s Main() method, with your top-level code within it.
Executable assemblies
With top-level statements, the Main() method has been generated by the compiler. This is different from the traditional way of writing .NET Lambda functions. Previously, a Lambda project is a class library and the Lambda function handler is set to the assembly, type, and method name that the Lambda runtime client invokes.
Here is an example of .NET Lambda function handler string:
LambdaProject::LambdaProject.Function::FunctionHandler
And here is what the code for this function handler could look like:
using System.IO;
using System.Threading.Tasks;

using Amazon.Lambda.Core;
using Amazon.Lambda.S3Events;
using Amazon.S3;

// Assembly attribute to enable the Lambda function’s JSON input to be converted into a .NET class.
[assembly: LambdaSerializer(typeof(Amazon.Lambda.Serialization.SystemTextJson.DefaultLambdaJsonSerializer))]

namespace LambdaProject
{
    public class Function
    {
        IAmazonS3 _s3Client;

        public Function()
        {
            _s3Client = new AmazonS3Client();
        }

        public async Task FunctionHandler(S3Event evnt, IlambdaContext context)
        {
            foreach (var record in evnt.Records)
            {
                using var response = await _s3Client.GetObjectAsync(record.S3.Bucket.Name, record.S3.Object.Key);
                using var reader = new StreamReader(response.ResponseStream);
                // Run business logic on the text contexts of the S3 object
            }
        }
    }
}
Using reflection, the .NET Lambda runtime client uses the function handler string to identify the method to call in the .NET assembly.
When using top-level statements, you instead tell Lambda to run the assembly, which runs the top-level statements. To indicate that you want Lambda to run the assembly, set the Lambda function handler to the assembly name only. Using the previous example, the .NET Lambda function handler string is LambdaProject.
With the .NET assembly containing the Lambda function being run at startup, instead of the Lambda runtime client, your function code must start the Lambda runtime client so that Lambda events are sent to your code.
To start the Lambda runtime client:
- Add the Amazon.Lambda.RuntimeSupport NuGet package to your project.
- In the file that defines all of your top-level statements add to the end of the file the code to start the Lambda runtime client. The exact code is shown at the end of the example below.
This is a full example of a C# Lambda function using top-level statements that processes Lambda events:
using Amazon.Lambda.Core;
using Amazon.Lambda.RuntimeSupport;
using Amazon.Lambda.Serialization.SystemTextJson;
using Amazon.Lambda.S3Events;
using Amazon.S3;

// Code outside of the handler will be executed during Lambda initialization
var s3Client = new AmazonS3Client();

// The function handler that will be called for each Lambda event
var handler = async (S3Event evnt, ILambdaContext context) =>
{
    foreach(var record in evnt.Records)
    {
        using var response = await s3Client.GetObjectAsync(record.S3.Bucket.Name, record.S3.Object.Key);
        using var reader = new StreamReader(response.ResponseStream);
        // Run business logic on the text contexts of the S3 object
    }
};

// Build the Lambda runtime client passing in the handler to call for each
// event and the JSON serializer to use for translating Lambda JSON documents
// to .NET types.
await LambdaBootstrapBuilder.Create(handler, new DefaultLambdaJsonSerializer())
        .Build()
        .RunAsync();
ASP.NET Core minimal APIs
Since the first .NET Lambda runtime, you can run ASP.NET Core applications as Lambda functions using the Amazon.Lambda.AspNetCoreServer NuGet package.
.NET 6 introduces a new style of writing ASP.NET Core applications called Minimal APIs. These take advantage of C# 9’s top-level statement support simplifying the initialization of an ASP.NET Core application, allowing you to define an entire ASP.NET Core application in a single file.
To deploy an ASP.NET Core application using Minimal APIs to Lambda:
- Add the Amazon.Lambda.AspNetCoreServer.Hosting NuGet package to your project.
- Add a call to
AddAWSLambdaHostingin your application when the services are being defined for the application. The argument forAddAWSLambdaHostingis the event source for the Lambda function. This can be an API Gateway REST or HTTP API, or an Application Load Balancer.
When the ASP.NET Core project is run locally, AddAWSLambdaHosting does nothing, allowing the normal .NET Kestrel web server to handle the local experience. When running in Lambda, AddAWSLambdaHosting swaps out Kestrel with Amazon.Lambda.AspNetCoreServer allowing Lambda and API Gateway to act as the web server instead of Kestrel. Since Minimal APIs take advantage of top-level statements, AddAWSLambdaHosting also starts the Lambda runtime client.
This example shows a Minimal API ASP.NET Core application. There is one Lambda-specific line calling AddAWSLambdaHosting that configures the project for Lambda support:
using Amazon.S3;
using Microsoft.AspNetCore.Mvc;

var builder = WebApplication.CreateBuilder(args);

// Add Swagger/OpenAPI support
builder.Services.AddEndpointsApiExplorer();
builder.Services.AddSwaggerGen();

builder.Services.AddControllers();

// Add S3 service client to dependency injection container
builder.Services.AddAWSService<IAmazonS3>();

// Add AWS Lambda support.
builder.Services.AddAWSLambdaHosting(LambdaEventSource.HttpApi);

var app = builder.Build();

app.UseSwagger();
app.UseSwaggerUI();

// Add support for controllers defined in other files
app.MapControllers();

// Example GET route
app.MapGet("/document/{name}", async ([FromServices] IAmazonS3 s3Client, string name) =>
{
    using var response = await s3Client.GetObjectAsync(app.Configuration["S3Bucket"], name);
    using var reader = new StreamReader(response.ResponseStream);
    var content = await reader.ReadToEndAsync();

    // Run business logic on the text contexts of the S3 object

    return content;
});

app.Run();
You must deploy as an executable assembly so the function handler string is set to the assembly name only. For example, this is how the preceding ASP.NET Core application is defined in AWS CloudFormation:
   ...

   "AspNetCoreFunction": {
      "Type": "AWS::Serverless::Function",
      "Properties": {
        "Handler": "AspNetCoreMinimalApiExample", // The assembly name only
        "Runtime": "dotnet6"
        "MemorySize": 256,
        "Timeout": 30,
        "Role": null,
        "Policies": [
          "AWSLambda_FullAccess",
          "AmazonS3ReadOnlyAccess"
        ],
        "Events": {
          "ProxyResource": {
            "Type": "HttpApi",
            "Properties": {
              "Path": "/{proxy+}",
              "Method": "ANY"
            }
          },
          "RootResource": {
            "Type": "HttpApi",
            "Properties": {
              "Path": "/",
              "Method": "ANY"
            }
          }
        }
      }
    }
  },

  ...
Open source Lambda runtime client
Over the last few years, AWS has open sourced more components of Lambda to help the community contribute to the Lambda experience. For .NET, you can find all the AWS client libraries in the aws/aws-lambda-dotnet GitHub repository.
For .NET 6, the managed runtime now uses the open source Lambda runtime client from the aws/aws-lambda-dotnet repository. Previously, the open source Lambda runtime client was used for functions that used Lambda’s custom runtime or container-image based support.
Now you have a consistent and transparent Lambda runtime client experience in all environments whether that is the managed runtime, container images or using the Lambda runtime client for .NET custom runtimes. The switch from the previous runtime client to the open source runtime client is transparent as Lambda functions are migrated to .NET 6.
The open source Lambda runtime client has different performance characteristics than the .NET Core 3.1 Lambda runtime client. This is because the open source client uses all managed code, whereas the .NET Core 3.1 client uses a mix of managed and native code. In our testing, cold starts for basic “Hello, world!” functions may be slightly faster in .NET Core 3.1. However, for Lambda functions that do real world work, the testing shows a significant cold start improvement in .NET 6. For example, a .NET 6 Lambda function that uses the AWS .NET SDK to retrieve an item from DynamoDB showed a 25% performance improvement.
Migrating to .NET 6
To migrate existing .NET Lambda functions to the new .NET 6 runtime:
- Open the csproj or fsproj file. Set the TargetFramework element to net6.0.
- Open the aws-lambda-tools-defaults.json file, if it exists:
- Set the function-runtime field to dotnet6
- Set the framework field to net6.0. If you remove the field, the value is inferred from the project file.
- If it exists, open the serverless.template file. For any AWS::Lambda::Function or AWS::Servereless::Function resource, set the Runtime property to dotnet6.
- Update all Amazon.Lambda.* NuGet package references to the latest versions.
Conclusion
We are excited to add support for .NET 6 to Lambda. It’s fast to get started or migrate existing functions to .NET 6, with many new features in .NET 6 to take advantage of. Read the Lambda Developer Guide for more getting started information.
To provide feedback for .NET on AWS Lambda, contact the AWS .NET team on the .NET Lambda GitHub repository.
For more serverless learning resources, visit Serverless Land.
Explore the Backblaze S3 Compatible API With Our New Postman Collection
Post Syndicated from Pat Patterson original https://www.backblaze.com/blog/explore-the-backblaze-s3-compatible-api-with-our-new-postman-collection/
Postman is a platform for building and using APIs. API providers such as Backblaze can use Postman to build API documentation and provide a live environment for developers to experiment with those APIs. Today, you can interact with Backblaze B2 Cloud Storage via our new Postman Collection for the Backblaze S3 Compatible API.
Using the Backblaze S3 Compatible API
The Backblaze S3 Compatible API implements the most commonly used S3 operations, allowing applications to integrate with Backblaze B2 in exactly the same way they do with Amazon S3. Many of our Alliance Partners have used the S3 Compatible API in integrating their products and services with Backblaze B2. Often, integration is as simple as allowing the user to specify a custom endpoint, for example, https://s3.us-west-001.backblazeb2.com, alongside their API credentials in the S3 settings, and verifying that the application works as expected with Backblaze B2.
The Backblaze B2 Native API, introduced alongside Backblaze B2 back in 2015, provides a low-level interface to B2 Cloud Storage. We generally recommend that developers use the S3 Compatible API when writing new applications and integrations, as it is supported by a wider range of SDKs and libraries, and many developers already have experience with Amazon S3. You can use the Backblaze B2 web console or the B2 Native API to access functionality, such as application key management and lifecycle rules, that is not covered by the S3 Compatible API.
Our post on the B2 Native and S3 Compatible APIs provides a more detailed comparison.
Our post on the B2 Native and S3 Compatible APIs provides a more detailed comparison.
Most applications and scripts use one of the AWS SDKs or the S3 commands in the AWS CLI to access Backblaze B2. All of the SDKs, and the CLI, allow you to override the default Amazon S3 endpoint in favor of Backblaze B2. Sometimes, though, you might want to interact directly with Backblaze B2 via the S3 Compatible API, perhaps in debugging an issue, or just to better understand how the service works.
Exploring the Backblaze S3 Compatible API in Postman
Our new Backblaze S3 Compatible API Documentation page is the definitive reference for developers wishing to access Backblaze B2 directly via the S3 Compatible API.

In addition to reading the documentation, you can click the Run in Postman button on the top right of the page, log in to the Postman website or desktop app (creating a Postman account is free), and interact with the API.
Integrate With Backblaze B2
Whether you are backing up, archiving data, or serving content via the web, Backblaze B2 is an easy to use and, at a quarter of the cost of Amazon S3, cost-effective cloud object storage solution. If you’re not already using Backblaze B2, sign up now and try it out—your first 10GB of storage is free!
The post Explore the Backblaze S3 Compatible API With Our New Postman Collection appeared first on Backblaze Blog | Cloud Storage & Cloud Backup.
Using EasyCrypt and Jasmin for post-quantum verification
Post Syndicated from Sofía Celi original https://blog.cloudflare.com/post-quantum-easycrypt-jasmin/


Cryptographic code is everywhere: it gets run when we connect to the bank, when we send messages to our friends, or when we watch cat videos. But, it is not at all easy to take a cryptographic specification written in a natural language and produce running code from it, and it is even harder to validate both the theoretical assumptions and the correctness of the implementation itself. Mathematical proofs, as we talked about in our previous blog post, and code inspection are simply not enough. Testing and fuzzing can catch common or well-known bugs or mistakes, but might miss rare ones that can, nevertheless, be triggered by an attacker. Static analysis can detect mistakes in the code, but cannot check whether the code behaves as described by the specification in natural-language (for functional correctness). This gap between implementation and validation can have grave consequences in terms of security in the real world, and we need to bridge this chasm.
In this blog post, we will be talking about ways to make this gap smaller by making the code we deploy better through analyzing its security properties and its implementation. This blog post continues our work on high assurance cryptography, for example, on using Tamarin to analyze entire protocol specifications. In this one, we want to look more on the side of verifying implementations. Our desire for high assurance cryptography isn’t specific to post-quantum cryptography, but because quantum-safe algorithms and protocols are so new, we want extra reassurance that we’re doing the best we can. The post-quantum era also gives us a great opportunity to try and apply all the lessons we’ve learned while deploying classical cryptography, which will hopefully prevent us from making the same mistakes all over again.
This blog post will discuss formal verification. Formal verification is a technique we can use to prove that a piece of code correctly implements a specification. Formal verification, and formal methods in general, have been around for a long time, appearing as early as the 1950s. Today, they are being applied in a variety of ways: from automating the checking of security proofs to automating checks for functional correctness and the absence of side-channels attacks. Code verified using such formal verification has been deployed in popular products like Mozilla Firefox and Google Chrome.
Formal verification, as opposed to formal analysis, the topic of other blog posts, deals with verifying code and checking that it correctly implements a specification. Formal analysis, on the other hand, deals with establishing that a specification has the desired properties, for example, having a specific security guarantee.
Let’s explore what it means for an algorithm to have a proof that it achieves a certain security goal and what it means to have an implementation we can prove correctly implements that algorithm.
Goals of a formal analysis and verification process
Our goal, given a description of an algorithm in a natural language, is to produce two proofs: first, one that shows that the algorithm has the security properties we want and, second, that we have a correct implementation of it. We can go about this in four steps:
- Turn the algorithm and its security goals into a formal specification. This is us defining the problem.
- Use formal analysis to prove, in our case using a computer-aided proof tooling, that the algorithm attains the specified properties.
- Use formal verification to prove that the implementation correctly implements the algorithm.
- Use formal verification to prove that our implementation has additional properties, like memory safety, running in constant time, efficiency, etc.
Interestingly we can do step 2 in parallel with steps 3 and 4, because the two proofs are actually independent. As long as they are both building from the same specification established in step 1, the properties we establish in the formal analysis should flow down to the implementation.
Suppose, more concretely, we’re looking at an implementation and specification of a Key Encapsulation Mechanism (a KEM, such as FrodoKEM). FrodoKEM is designed to achieve IND-CCA security, so we want to prove that it does, and that we have an efficient, side-channel resistant and correct implementation of it.
As you might imagine, achieving even one of these goals is no small feat. Achieving all, especially given the way they conflict (efficiency clashes with side-channel resistance, for example), is a Herculean task. Decades of research have gone into this space, and it is huge; so let’s carve out and examine a small subsection to look at: we’ll look at two tools, EasyCrypt and Jasmin.
Before we jump into the tools, let’s take a brief aside to discuss why we’re not using Tamarin, which we’ve talked about in our other blog posts. Like EasyCrypt, Tamarin is also a tool used for formal analysis, but beyond that, the two tools are quite different. Formal analysis broadly splits into two camps, symbolic analysis and computational analysis. Tamarin, as we saw, uses symbolic analysis, which treats all functions effectively as black boxes, whereas EasyCrypt uses computational analysis. Computational analysis is much closer to how we program, and functions are given specific implementations. This gives computational analysis a much higher “resolution”: we can study properties in much greater detail and, perhaps, with greater ease. This detail, of course, comes at a cost. As functions grow into full protocols, with multiple modes, branching paths, and in the case of the Transport Layer Security (TLS), sometimes even resumption, computational models become unwieldy and difficult to work with, even with computer-assisted tooling. We therefore have to pick the correct tool for the job. When we need maximum assurance, sometimes both computational and symbolic proofs are constructed, with each playing to its strengths and compensating for the other’s drawbacks.
EasyCrypt
EasyCrypt is a proof assistant for cryptographic algorithms and imperative programs. A proof is basically a formal demonstration that some statement is true. EasyCrypt is called a proof assistant because it “assists” you with creating a proof; it does not create a proof for you, but rather, helps you come to it and gives you the power to have a machine check that each step logically follows from the last. It provides a language to write definitions, programs, and theorems along with an environment to develop machine-checked proofs.
A proof starts from a set of assumptions, and by taking a series of logical steps demonstrates that some statement is true. Let’s imagine for a moment that we are the hero Perseus on a quest to kill a mythological being, the terrifying Medusa. How can we prove to everyone that we’ve succeeded? No one is going to want to enter Medusa’s cave to check that she is dead because they’ll be turned to stone. And we cannot just state, “I killed the Medusa.” Who will believe us without proof? After all, is this not a leap of faith?
What we can do is bring the head of the Medusa as proof. Providing the head as a demonstration is our proof because no mortal Gorgon can live without a head. Legend has it that Perseus completed the proof by demonstrating that the head was indeed that of the Medusa: Perseus used the head’s powers to turn Polydectes to stone (the latter was about to force Perseus’ mother to marry him, so let’s just say it wasn’t totally unprovoked). One can say that this proof was done “by hand” in that it was done without any mechanical help. For computer security proofs, sometimes the statements we want to prove are so cumberstone to prove and are so big that having a machine to help us is needed.
How does EasyCrypt achieve this? How does it help you? As we are dealing with cryptography here, first, let’s start by defining how one can reason about cryptography, the security it provides, and the proofs one uses to corroborate them.
When we encrypt something, we do this to hide whatever we want to send. In a perfect world, it would be indistinguishable from noise. Unfortunately, only the one-time-pad truly offers this property, so most of the time we make do with “close enough”: it should be infeasible to differentiate a true encrypted value from a random one.
When we want to show that a certain cryptographic protocol or algorithm has this property, we write it down as an “indistinguishability game.” The idea of the game is as follows:
Imagine a gnome is sitting in a box. The gnome takes a message as input to the box and produces a ciphertext. The gnome records each message and the ciphertext they see generated. A troll outside the box chooses two messages (m1 and m2) of the same length and sends them to the box. The gnome records the box operations and flips a coin. If the coin lands on its face, then the gnome sends the ciphertext (c1) corresponding to m1. Otherwise, they send c2 corresponding to m2. In order to win, the troll, knowing the messages and the ciphertext, has to guess which message was encrypted.
In this example, we can see two things: first, choices are random as the ciphertext sent is chosen by flipping a coin; second, the goal of the adversary is to win a game.
EasyCrypt takes this approach. Security goals are modeled as probabilistic programs (basically, as games) played by an adversary. Tools from program verification and programming language theory are used to justify the cryptographic reasoning. EasyCrypt relies on a “goal directed proof” approach, in which two important mechanisms occur: lemmas and tactics. Let’s see how this approach works (following this amazing paper):
- The prover (in this case, you) enters a small statement to prove. For this, one uses the command lemma (meaning this is a minor statement needed to be proven).
- EasyCrypt will display the formula as a statement to be proved (i.e the goal) and will also display all the known hypotheses (unproven lemmas) at any given point.
- The prover enters a command (a tactic) to either decompose the statement into simpler ones, apply a hypothesis, or make progress in the proof in some other way.
- EasyCrypt displays a new set of hypotheses and the parts that still need to be proved.
- Back to step 3.
Let’s say you want to prove something small, like the statement “if p in conjunction with q, then q in conjunction with p.” In predicate logic terms, this will be written as (p ∧ q) → (q ∧ p). If we translate this into English statements, as Alice will say in Alice in Wonderland, it could be:
p: I have a world of my own.
q: Everything is nonsense.
p∧q: I have a world of my own and everything is nonsense.
(p ∧ q) → (q ∧ p): If I have a world of my own and everything is nonsense, then, everything is nonsense, and I have a world of my own.
We will walk through such a statement and its proof in EasyCrypt. For more of these examples, see these given by the marvelous Alley Stoughton.
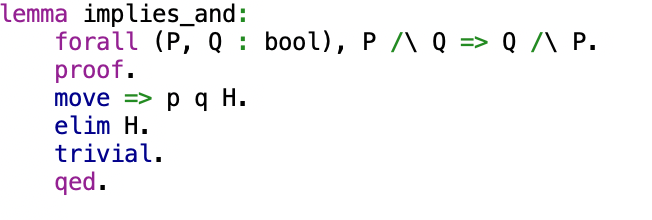
lemma implies_and () :

This line introduces the stated lemma and creatively calls it “implies_and”. It takes no parameters.

(forall (P, Q: bool) => P /\ Q => Q /\ P.

This is the statement we want to prove. We use the variables P and Q of type bool (booleans), and we state that if P and Q, then Q and P.
Up until now we have just declared our statement to prove to EasyCrypt. Let’s see how we write the proof:
proof.
This line demarcates the start of the proof for EasyCrypt.


move => p q H.
We introduce the hypothesis we want to prove (we move them to the “context”). We state that P and Q are both booleans, and that H is the hypothesis P /\ Q.


elim H.

We eliminate H (the conjunctive hypothesis) and we get the components: “p => q => q /\ p”.

trivial.

The proof is now trivial.

qed.
Quod erat demonstrandum (QED) denotes the end of the proof (if both are true, then the conjunction holds). Whew! For such a simple statement, this took quite a bit of work, because EasyCrypt leaves no stone unturned. If you get to this point, you can be sure your proof is absolutely correct, unless there is a bug in EasyCrypt itself (or unless we are proving something that we weren’t supposed to).
As you see, EasyCrypt helped us by guiding us in decomposing the statement into simpler terms, and stating what still needed to be proven. And by strictly following logical principles, we managed to realize a proof. If we are doing something wrong, and our proof is incorrect, EasyCrypt will let us know, saying something like:

What we have achieved is a computer-checked proof of the statement, giving us far greater confidence in the proof than if we had to scan over one written with pen and paper. But what makes EasyCrypt particularly attractive in addition to this is its tight integration with the Jasmin programming language as we will see later.
EasyCrypt will also interactively guide us to the proof, as it easily works with ProofGeneral in Emacs. In the image below we see, for example, that EasyCrypt is guiding us by showing the variables we have declared (p, q, and H) and what is missing to be proven (after the dashed line).
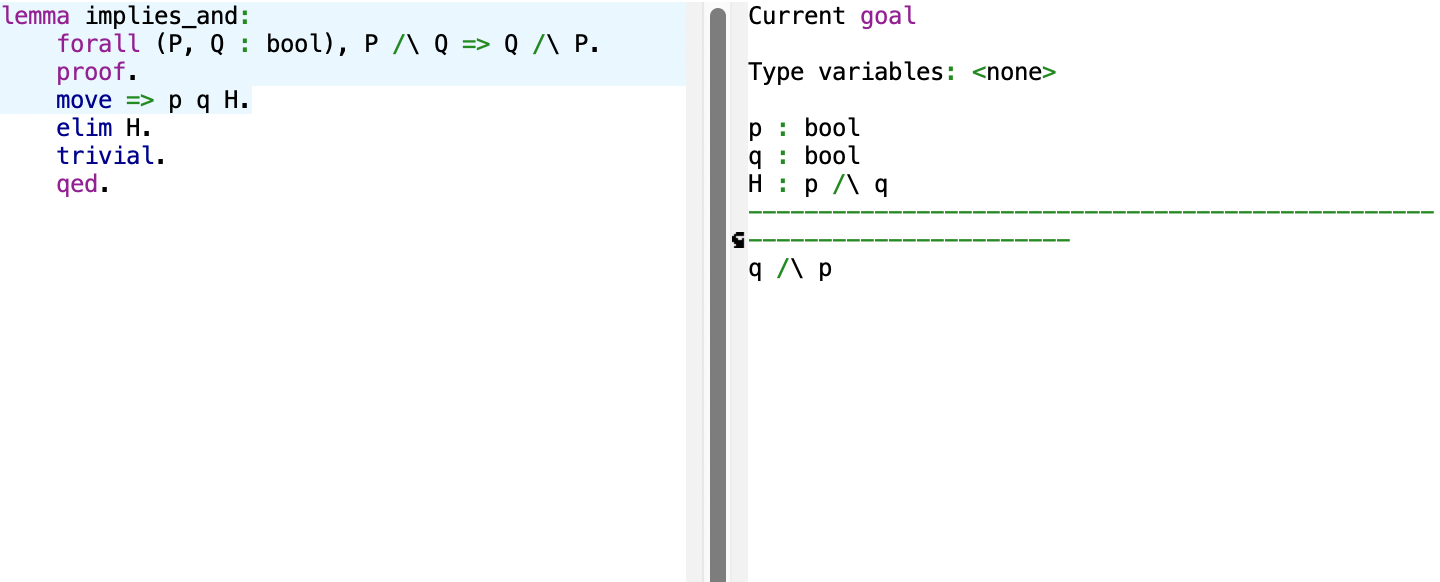
If one is more comfortable with Coq proof assistant (you can find very good tutorials of it), a similar proof can be given:
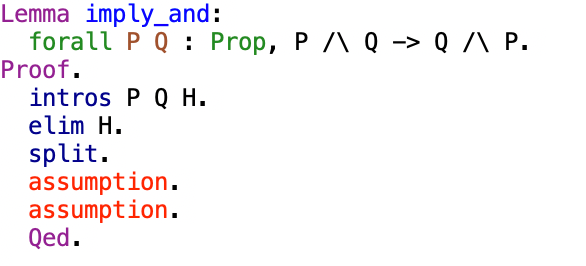
EasyCrypt allows us to prove statements in a faster and more assured manner than if we do proofs by hand. Proving the truthness of the statement we just showed would be easy with the usage of truth tables, for example. But, it is only easy to find these truth tables or proofs when the statement is small. If one is given a complex cryptography algorithm or protocol, the situation is much harder.
Jasmin
Jasmin is an assembly-like programming language with some high-level syntactic conveniences such as loops and procedure calls while using assembly-level instructions. It does support function calls and functional arrays, as well. The Jasmin compiler predictably transforms source code into assembly code for a chosen platform (currently only x64 is supported). This transformation is verified: the correctness of some compiler passes (like function inlining or loop unrolling) are proven and verified in the Coq proof assistant. Other passes are programmed in a conventional programming language and the results are validated in Coq. The compiler also comes with a built-in checker for memory safety and constant-time safety.
This assembly-like syntax, combined with the stated assurances of the compiler, means that we have deep control over the output, and we can optimize it however we like without compromising safety. Because low-level cryptographic code tends to be concise and non-branching, Jasmin doesn’t need full support for general purpose language features or to provide lots of libraries. It only needs to support a set of basic features to give us everything we need.
One reason Jasmin is so powerful is that it provides a way to formally verify low-level code. The other reason is that Jasmin code can be automatically converted by the compiler into equivalent EasyCrypt code, which lets us reason about its security. In general terms, whatever guarantees apply to the EasyCrypt code also flow into the Jasmin code, and subsequently into the assembly code.
Let’s use the example of a very simple Jasmin function that performs multiplication to see Jasmin in action:
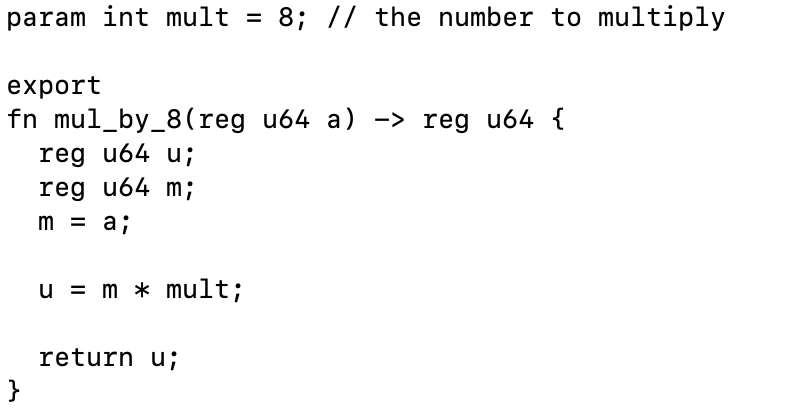
What the function (“fn”) “mul” does, in this case, is to multiply by whatever number is provided as an argument to the function (the variable a). The syntax of this small function should feel very familiar to anyone that has worked with the C family of programming languages. The only big difference is the use of the words reg and u64. What they state is that the variable a, for example, is allocated in registers (hence, the use of reg: this defines the storage of the variable) and that it is 64-bit machine-word (hence, the use of u64). We can convert now this to “pure” x64 assembly:
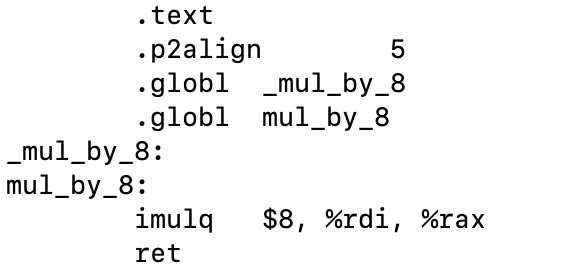
The first lines of the assembly code are just “setting all up”. They are then followed by the “imulq” instruction, which just multiplies the variable by the constant (which in this case is labeled as “param”). While this small function might not show the full power of having the ability of safely translating to assembly, it can be seen when more complex functions are created. Functions that use while loops, arrays, calls to other functions are accepted by Jasmin and will be safely translated to assembly.
Assembly language has a little bit of a bad reputation because it is thought to be hard to learn, hard to read, and hard to maintain. Having a tool that helps you with translation is very useful to a programmer, and it is also useful as you can manually or automatically check what the assembly code looks like.
We can further check the code for its safety:
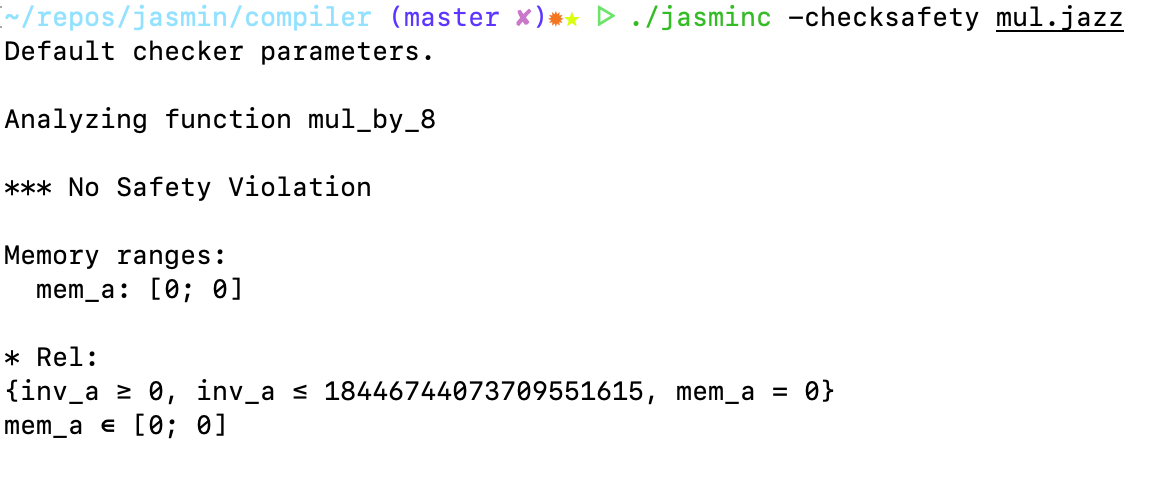
In this check, there are many things to understand. First, it checks that the inputs are allocated in a memory region of at least 0 bytes. Second, the “Rel” entry checks the allocated memory region safety pre-condition: for example, n must point to an allocated memory region of sufficient length.
You can then extract this functionality to EasyCrypt (and even configure EasyCrypt to verify Jasmin programs). Here is the corresponding EasyCrypt code, automatically produced by the Jasmin compiler:
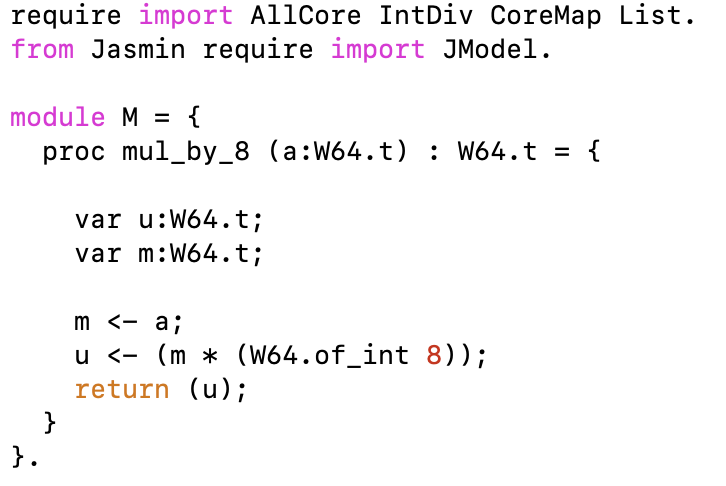
Here’s a slightly more involved example, that of a FrodoKEM utility function written in Jasmin.
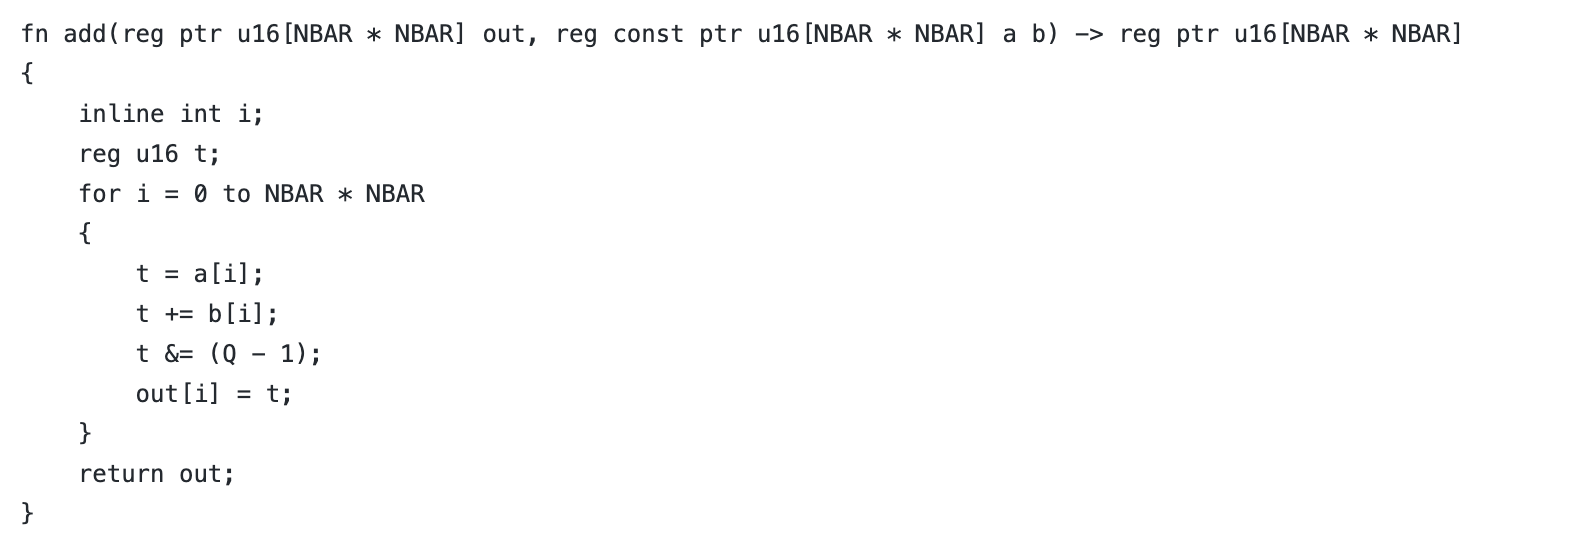
With a C-like syntax, this function adds two arrays (a and b), and returns the result (in out). The value NBAR is just a parameter you can specify in a C-like manner. You can then take this function and compile it to assembly. You can also use the Jasmin compiler to analyze the safety of the code (for example, that array accesses are in bounds, that memory accesses are valid, that arithmetic operations are applied to valid arguments) and verify the code runs in constant-time.
The addition function as used by FrodoKEM can also be extracted to EasyCrypt:
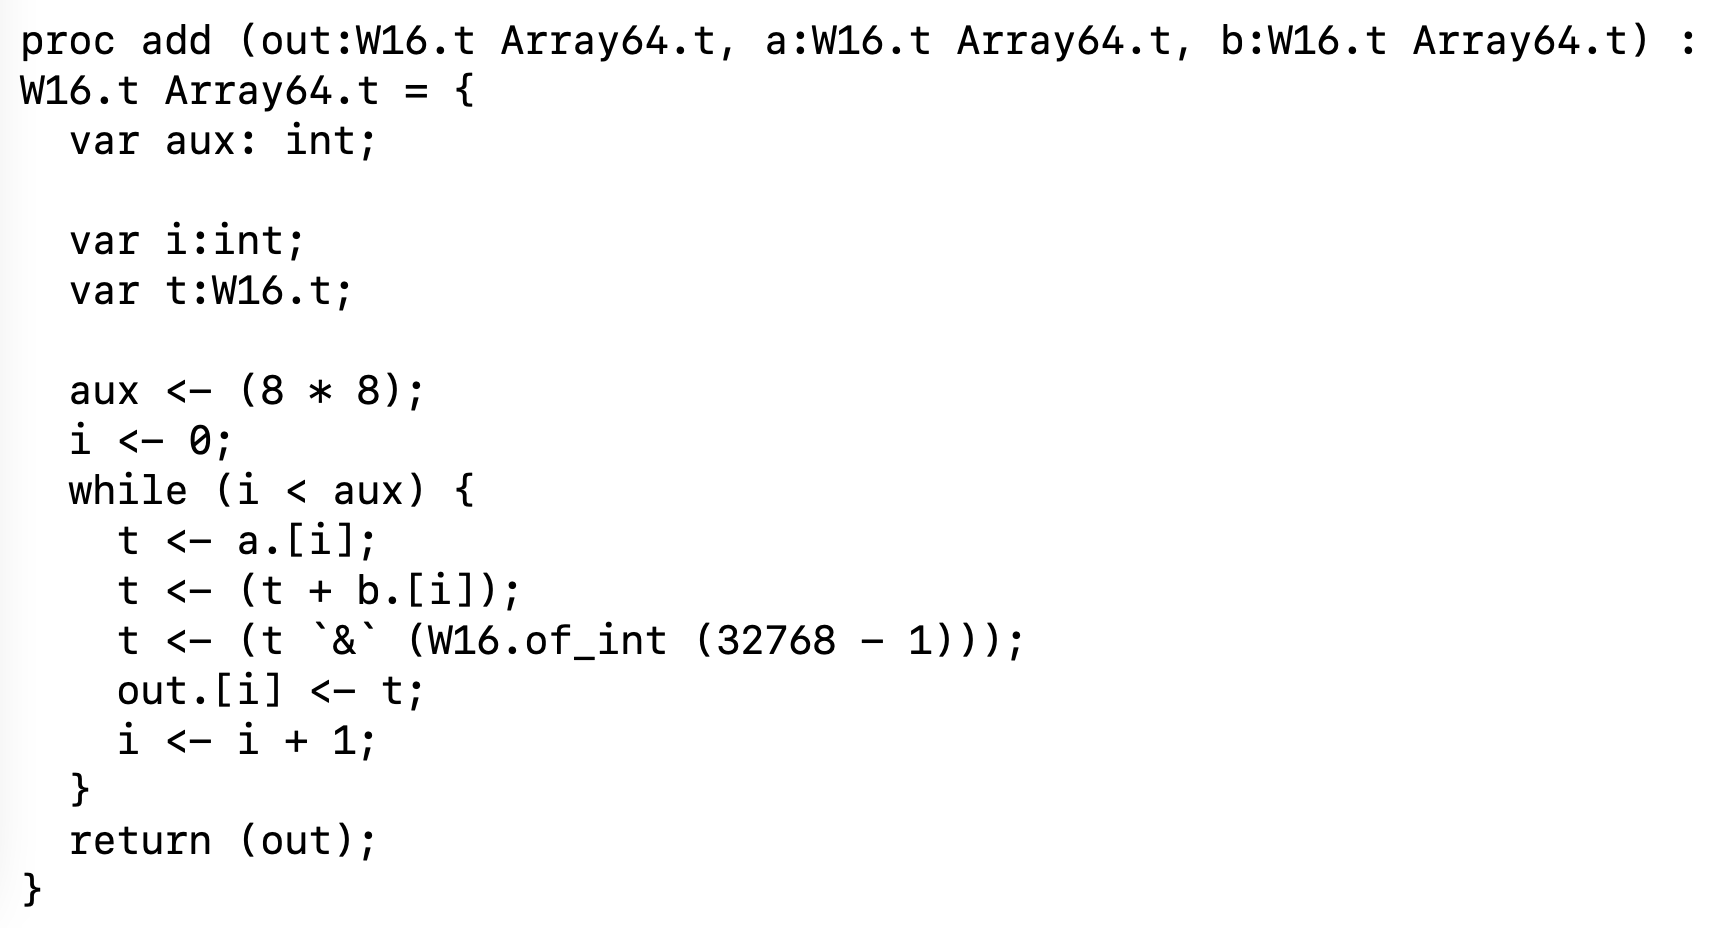
A theorem expressing the correctness (meaning that addition is correct) is expressed in EasyCrypt as so:

Note that EasyCrypt uses While Language and Hoare Logic. The corresponding proof that states that addition is correct:

Why formal verification for post-quantum cryptography?
As we have previously stated, cryptographic implementations are very hard to get right, and even if they are right, the security properties they claim to provide are sometimes wrong for their intended application. The reason why this matters so much is that post-quantum cryptography is the cryptography we will be using in the future due to the arrival of quantum computers. Deploying post-quantum cryptographic algorithms with bugs or flaws in their security properties would be a disaster because connections and data that travels through it can be decrypted or attacked. We are trying to prevent that.
Cryptography is difficult to get right, and it is not only difficult to get right by people new to it, but it is also difficult for anyone, even for the experts. The designs and code we write are error-prone as we all are, as humans, prone to errors. Some examples of when some designs got it wrong are as follows (luckily, these example were not deployed, and they did not have the usual disastrous consequences):
- Falcon (a post-quantum algorithm currently part of the NIST procedure), produced valid signatures “but leaked information on the private key,” according to an official comment posted to the NIST post-quantum process on the algorithm. The comment also noted that “the fact that these bugs existed in the first place shows that the traditional development methodology (i.e. “being super careful”) has failed.“
- “The De Feo–Jao–Plût identification scheme (the basis for SIDH signatures) contains an invalid assumption and provide[s] a counterexample for this assumption: thus showing the proof of soundness is invalid,” according to a finding that one proof of a post-quantum algorithm was not valid. This is an example of an incorrect proof, whose flaws were discovered and eliminated prior to any deployment.
Perhaps these two examples might convince the reader that formal analysis and formal verification of implementations are needed. While they help us avoid some human errors, they are not perfect. As for us, we are convinced of these methods. We are working towards a formally verified implementation of FrodoKEM (we have a first implementation of it in our cryptographic library, CIRCL), and we are collaborating to create a formally verified and implemented library we can run in real-world connections. If you are interested in learning more about EasyCrypt and Jasmin, visit the resources we have put together, try to install it following our guidelines, or follow some tutorials.
See you on other adventures in post-quantum (and some cat videos for you)!
References:
- “SoK: Computer-Aided Cryptography” by Manuel Barbosa, Gilles Barthe, Karthik Bhargavan, Bruno Blanchet, Cas Cremers, Kevin Liao and Bryan Parno: https://eprint.iacr.org/2019/1393.pdf
- “EasyPQC: Verifying Post-Quantum Cryptography” by Manuel Barbosa, Gilles Barthe, Xiong Fan, Benjamin Grégoire, Shih-Han Hung, Jonathan Katz, Pierre-Yves Strub, Xiaodi Wu and Li Zhou: https://eprint.iacr.org/2021/1253
- “Jasmin: High-Assurance and High-Speed Cryptography” by José Bacelar Almeida, Manuel Barbosa, Gilles Barthe, Arthur Blot, Benjamin Grégoire, Vincent Laporte, Tiago Oliveira, Hugo Pacheco, Benedikt Schmidt and Pierre-Yves Strub: https://dl.acm.org/doi/pdf/10.1145/3133956.3134078
- “The Last Mile: High-Assurance and High-Speed Cryptographic Implementations” by José Bacelar Almeida, Manuel Barbosa, Gilles Barthe, Benjamin Grégoire, Adrien Koutsos, Vincent Laporte,Tiago Oliveira and Pierre-Yves Strub: https://arxiv.org/pdf/1904.04606.pdf
Demystifying XDR: How Curated Detections Filter Out the Noise
Post Syndicated from Jesse Mack original https://blog.rapid7.com/2022/02/24/demystifying-xdr-how-curated-detections-filter-out-the-noise/

Extended detection and response (XDR) is, by nature, a forward-looking technology. By adding automation to human insight, XDR rethinks and redefines the work that has been traditionally ascribed to security information and event management (SIEM) and other well-defined, widely used tools within security teams. For now, XDR can work alongside SIEM — but eventually, it may replace SIEM, once some of XDR’s still-nascent use cases are fully realized.
But what about the pain points that security operations center (SOC) analysts already know so well and feel so acutely? How can XDR help alleviate those headaches right now and make analysts’ lives easier today?
Fighting false positives with XDR
One of the major pain points that Sam Adams, Rapid7’s VP for Detection and Response, brought to light in his recent conversation with Forrester Analyst Allie Mellen, is one that any SOC analyst is sure to know all too well: false positives. Not only does this create noise in the system, Sam pointed out, but it also generates unnecessary work and other downstream effects from the effort needed to untangle the web of confusion. To add to the frustration, you might have missed real alerts and precious opportunities to fight legitimate threats while you were spending time, energy, and money chasing down a false positive.
If, as Sam insisted, every alert is a burden, the burdens your team is bearing better be the ones that matter.
Allie offered a potential model for efficiency in the face of a noisy system: managed detection and response (MDR) providers.
“MDR providers are one of these groups that I get a lot of inspiration from when thinking about what an internal SOC should look like,” she said. While an in-house SOC might not lose money to the same extent an MDR vendor would when chasing down a false positive, they would certainly lose time — a precious resource among often-understaffed and thinly stretched security teams.

Got intel?
One of the things that MDR providers do well is threat intelligence — without the right intel feed, they’d be inundated with far too much noise. Sam noted that XDR and SIEM vendors like Rapid7 realize this, too — that’s why we acquired IntSights to deepen the threat intel capabilities of our security platform.
For Allie, the key is to operationalize threat intelligence to ensure it’s relevant to your unique detection and response needs.
“It is definitely not a good idea to just hook up a threat intel feed and hope for the best,” she said. The key is to keep up with the changing threat landscape and to stay ahead of bad actors rather than playing catch-up.
With XDR, curation is the cure
Of course, staying on top of shifting threat dynamics takes time — and it’s not as if analysts don’t already have enough on their plate. This is where XDR comes in. By bringing in a wide range of sources of telemetry, it helps SOC analysts bring together the many balls they’re juggling today so they can accomplish their tasks as effectively as possible.
Allie noted that curated detections have emerged as a key feature in XDR. If you can create detections that are as targeted as possible, this lowers the likelihood of false positives and reduces the amount of time security teams have to spend getting to the bottom of alerts that don’t turn out to be meaningful. Sam pointed out that one of the key ways to achieve this goal is to build detections that focus not on static indicators but on specific behaviors, which are less likely to change dramatically over time.
“Every piece of ransomware is going to try to delete the shadow copy on Windows,” he said, “so it doesn’t matter what the latest version of ransomware is out there – if it’s going to do these three things, we’re going to see it every time.”
Focusing on the patterns that matter in threats helps keep noise low and efficiency high. By putting targeted detections in security analysts’ hands, XDR can alleviate some of their stresses of false positives today and pave the way for the SOC to get even more honed-in in the future.
Want more XDR insights from our conversation with Allie? Check out the full talk.
Additional reading:
[$] Moving the kernel to modern C
Post Syndicated from original https://lwn.net/Articles/885941/
Despite its generally fast-moving nature, the kernel project relies on a
number of old tools. While critics like to focus on the community’s
extensive use of email, a possibly more significant anachronism is the use
of the 1989 version of the C language standard for kernel code — a standard
that was codified before the kernel project even began over 30 years ago.
It is looking like that longstanding practice could be coming to an end as
soon as the 5.18 kernel, which can be expected in May of this year.
Rust compiler ambitions for 2022 (Inside Rust)
Post Syndicated from original https://lwn.net/Articles/885971/
The Inside Rust Blog has posted the
Rust compiler team’s goals for this year in the hope of encouraging
others to help.
In theory, any unsoundness issue potentially undermines Rust’s
promise of reliability. We want, by the end of this year, to have a
clear understanding of how each of those I-unsound issues came to
be. We are looking into systematically detecting such issues and
whether we can deploy mitigations or fixes for entire classes of
issues, instead of addressing them on a case by case basis.
Security updates for Thursday
Post Syndicated from original https://lwn.net/Articles/885997/
Security updates have been issued by Debian (thunderbird), Fedora (php), openSUSE (jasper and thunderbird), Oracle (389-ds-base, kernel, openldap, and python-pillow), Red Hat (cyrus-sasl and samba), and SUSE (cyrus-sasl, firefox, jasper, kernel-rt, nodejs10, nodejs14, nodejs8, and thunderbird).
Computer science education for what purpose? Some perspectives
Post Syndicated from Janina Ander original https://www.raspberrypi.org/blog/computer-science-education-equity-change-purpose/
As we’re coming to the end of Black History Month in the USA this year, we’ve been amazed by the variety of work the computing education community is doing to address inequities in their classrooms. For our part, we have learned a huge amount about equitable STEM and computer science (CS) education from the community, and through our own research.

In this post, we want to highlight two particular pieces of work that have influenced our work over the last year, shared by Dr Tia C. Madkins (University of Texas at Austin), Dr Nicol R. Howard (University of Redlands), and Dr Jakita O. Thomas (Auburn University, blackcomputeHER.org) at our research seminars.


Moving beyond access and achievement, towards equity and justice
Tia C. Madkins and Nicol R. Howard described that educators in schools (and associated professionals) need to build an awareness of how the learning in their classrooms might be affected by:
- Personal beliefs, ways of knowing or thinking, stereotypes, and the cultural lens of the educator and the learners
- Power dynamics and intersectional identities
They say: “Instead of viewing learners as deficient individuals who we need to ‘fix’ in our classrooms, we use strengths-based approaches where we as educators learn to recognise, draw on, and build upon learners’ strengths and lived experiences.”
The researchers encourage educators to connect with learners’ cultural practices and lived experiences, and to foster and maintain relationships with learners’ families and communities, in order to work together to facilitate equitable, social justice–oriented CS learning
To hear from Tia, Nicol, and their collaborator Shomari Jones, watch their seminar. You can also read Tia and Nicol’s article in our seminar proceedings, where you’ll find a list of their recommended resources to explore this thinking further.
Valuing existing knowledge and lived experience as expertise
Jakita O. Thomas described findings from her research project based on a free enrichment programme exploring how Black middle-school girls develop computational algorithmic thinking skills in the context of game design.
The programme was intentionally designed to position Black girls as knowledge holders with valuable experiences, and to offer them opportunities to shape their identities as producers, innovators, and people who challenge deficit perspectives. These are perspectives that include implicit assumptions that privilege the values, beliefs, and practices of one group over another, especially where the groups are racially, ethnically, or culturally different.
Jakita emphasised that it’s very important for educators to ask the questions “STEM learning for what?”, “For whom?”, “How?”, and “To what ends?” when they consider how to bring STEM learning experiences to Black girls (or other young people with multiple marginal identities). Educators need an awareness that the economic reasons of STEM learning, which are commonly spotlighted, may not be sufficient to convince young people who are marginalised to engage in these subjects.
To hear more about this from Jakita directly, watch her seminar:
Empowering learners to be agents of change
One thing these researchers’ work makes clear is that the reasons for why learners choose to engage in CS education are many, and that gaining CS skills to prepare for the job market is only one of them.
In both seminars, the speakers emphasised how important it is for educators to contribute to their learners’ self-view as agents of change, not only by demonstrating how CS can be used to solve problems, but also by being open and direct about existing technological inequities. This teaches learners to use CS as a tool, and to also examine the social context in which CS is being applied, and the positive and negative consequences of these applications. Learning CS can empower young people to address challenges their communities face, and educators, learners, and families can work together through CS on social justice issues.
Putting the power of computing into the hands of young people is the core of our mission, and we have a research project underway right now that looks at equitable computing education in UK schools. Find out more about it here, and download our practical guide for teachers.
The post Computer science education for what purpose? Some perspectives appeared first on Raspberry Pi.
An Elaborate Employment Con in the Internet Age
Post Syndicated from Bruce Schneier original https://www.schneier.com/blog/archives/2022/02/an-elaborate-employment-con-in-the-internet-age.html
The story is an old one, but the tech gives it a bunch of new twists:
Gemma Brett, a 27-year-old designer from west London, had only been working at Madbird for two weeks when she spotted something strange. Curious about what her commute would be like when the pandemic was over, she searched for the company’s office address. The result looked nothing like the videos on Madbird’s website of a sleek workspace buzzing with creative-types. Instead, Google Street View showed an upmarket block of flats in London’s Kensington.
[…]
Using online reverse image searches they dug deeper. They found that almost all the work Madbird claimed as its own had been stolen from elsewhere on the internet — and that some of the colleagues they’d been messaging online didn’t exist.
[…]
At least six of the most senior employees profiled by Madbird were fake. Their identities stitched together using photos stolen from random corners of the internet and made-up names. They included Madbird’s co-founder, Dave Stanfield — despite him having a LinkedIn profile and Ali referring to him constantly. Some of the duped staff had even received emails from him.
Read the whole sad story. What’s amazing is how shallow all the fakery was, and how quickly it all unraveled once people started digging. But until there’s suspicion enough to dig, we take all of these things at face value. And in COVID times, there’s no face-to-face anything.
Handy Tips #24: Preventing downtimes with The Zabbix HA cluster
Post Syndicated from Arturs Lontons original https://blog.zabbix.com/handy-tips-24-preventing-downtimes-with-the-zabbix-ha-cluster/19712/
The post Handy Tips #24: Preventing downtimes with The Zabbix HA cluster appeared first on Zabbix Blog.
„Путин си търсеше повод за война.“ Разговор с Димо Гяуров
Post Syndicated from Венелина Попова original https://toest.bg/dimo-gyaurov-interview/
Димо Гяуров е политик и депутат в 37-мото и 41-вото Народно събрание, генерал-майор и председател на Националната разузнавателна служба в мандата на кабинета на ОДС. В периода 2003–2006 г. е извънреден и пълномощен посланик на България в Унгария. Венелина Попова разговаря с г-н Гяуров за Украинската криза и (не)възможните сценарии за нейното развитие.
Въпреки че интервюто е взето вчера, 23 февруари, преди руската армия да нападне Украйна в ранните часове на днешния ден, анализът и изводите в него не са изгубили своята актуалност.
Как очаквате да се развие украинската криза, след като Владимир Путин призна независимостта на двете сепаратистки републики в Донбас и решението на Съвета на Федерацията руската армия да бъде използвана зад граница?
Този въпрос е изключително труден и съм убеден, че в момента всички световни лидери и големи анализатори си блъскат главите с него. Едва ли имат еднозначен отговор, защото всичко е в ръцете на президента Путин, зависи от неговата воля и дори от моментното му настроение. Аз мисля, че едва ли той би спрял дотук. Възможни са различни опции. Едната е да стигне до административните граници на областите Донецк и Луганск, заявка за което даде вчера (22 февруари – б.р.). Което практически означава, че е склонен да завладее украински територии в размер още толкова, колкото са фактическите граници на двете т.нар. народни републики. Другата опция е да не се задоволи само с това, а да предприеме и някакви действия в Запорожката област с цел да осигури водоснабдяването на Крим и сухопътната му връзка с Русия. Това означава да отреже излаза на Украйна на Азовско море и да стигне чак до Одеса, с което би постигнал и друга стратегическа цел – да си осигури монополно предимство в акваторията на Черно море. Но да се предскажат бъдещите планове на Путин е трудно. Трябва да очакваме всичко.
Да, и от близо едночасовата изнервена реч на руския президент разбрахме, че в неговото съзнание Украйна е без граници. Но възможно ли е в желанието си да превърне краха на дипломацията си в победа, Владимир Путин да повтори в Донбас сценария от Крим? Руският президент знае, че няма кой да му попречи да анексира нови територии от Украйна – или греша?
Да, напълно е възможно. Според мен се повтарят същите вече установени през годините похвати, каквито наблюдавахме и по отношение на Крим, и по отношение на Молдова, и по отношение на Грузия: на базата на поискана помощ Русия влиза с войските си там като „освободител“ и забравя да си тръгне. Много показателно беше поведението на шефа на руското разузнаване по време на заседанието на Съвета за сигурност на Русия. Съжалих го искрено. Човекът беше много объркан и подсъзнателно каза онова, което всички знаем: „Аз съм съгласен областите Донецк и Луганск да бъдат присъединени към Руската федерация.“
А президентът Путин почервеня, засмя се и се опита да заглади гафа с думите, че не става дума за присъединяване на двете народни републики, а само за признаване на тяхната независимост…
Всъщност подсъзнателната реакция на силно смутения шеф на разузнаването показа какви са истинските намерения на Кремъл – завземане на тези територии и тяхното присъединяване към Русия. Практически осем години двете области в Донбас бяха необявена част от федерацията и там Русия действаше подмолно. Сега, с подписаните споразумения, в тях се въвежда рублата, цялата администрация ще функционира на основите на руското законодателство, руски банки ще управляват финансите им, образованието и здравеопазването им ще са по руски модел, а на територията им ще се изградят руски военни бази. Чисто анексиране.
Видео, как Путин отчитывает нерадивого ученика Нарышкина, войдет в историю. pic.twitter.com/wG7nvjhY0I
— Maxim Mironov (@mironov_fm) February 21, 2022
Съгласен ли сте с тезата на украинския политолог Владимир Пастухов, че руската колонизация винаги е имала военно-политически, а не икономически характер и затова често Русия решава свои геополитически проблеми, като поглъща територии по необходимост? Иначе защо Путин би приел да се дискредитира в очите на свободния свят за пореден път, а страната му да понесе тежки санкции, освен за да демонстрира сила, превъзходство и имперско самочувствие?
Склонен съм да приема такава теза, макар че още не мога да си отговоря дали онова, което руският президент изрече онзи ден в обръщението си към света и към собствения си народ, беше един лошо изигран етюд, или наистина вярва в казаното. Защото той изрече твърдения, които не отговарят нито на действителността, нито на историческата истина. После пък „предупреди“ руския народ, че има заплаха на НАТО към Русия и че трябва да се очакват остри удари по руски обекти от страна на Алианса и на САЩ. Това е или много нискокачествена пропаганда, или откровена лудост. Ако Путин наистина си вярва, това донякъде би могло да обясни желанието му за експанзия. Можем да търсим обяснение в евентуален шизофренен страх и стремеж да се обгради със сателитни режими, за какъвто приемаше и този в Украйна преди Майдана, които биха могли да го охраняват и да изиграят ролята на санитарна полоса между Русия и НАТО – това е страхът на диктатора.
Но тези присъединени територии само тежат на Русия, а не носят икономически облаги, затова и може би руският народ не се чувства колонизатор, за разлика от елитите. Но да продължим – намалява ли шансът за успех на мирните преговори след изявлението на Володимир Зеленски, че е възможно прекратяване на дипломатическите отношения с Русия, предвид заплашителния тон на Путин и Сергей Лавров относно държавния суверенитет на Украйна?
Според мен руският президент едностранно прекрати възможността за по-нататъшни дипломатически ходове и сам обяви скъсването на Минските споразумения. Няма как да преговаряш с човек, който действа задкулисно и лъже. В момента, в който Путин е приемал канцлера на Германия и президента на Франция и е разговарял с тях за деескалация на напрежението, той е организирал анексията на областите в Донбас. Иначе как щяха да бъдат подписани толкова бързо договорите с двете самопровъзгласили се народни републики, ако не бяха предварително подготвени и съгласувани? Затова мисля, че оттук нататък няма кой да вярва на руския президент. Времето на обещанията приключи.
Не че преди това някой от световните лидери особено му вярваше. Иначе Джо Байдън нямаше да предупреди, че вместо изтегляне на руските войски от украинската граница, по нея има съсредоточаване на нови бойни части и техника.
В ХХI век сателитите виждат всичко и е много глупаво да лъжеш, че се оттегляш, когато вкарваш в района нови батальони, когато строиш болници, когато попълваш резервите с кръвни продукти. Това е симптом за подготовка на военни действия.
Срещата между американския и руския президент се отлага, съобщиха от Белия дом. Но дори и тя да се състои, реалистично ли Ви изглежда Путин и индоктринираният кремълски елит да склонят на отстъпки от ултимативните си искания към НАТО, да развеят белия флаг и да оттеглят просто така многохилядната армия от украинската граница – с една дума, да си подвият опашката пред света?
Няма как това да се случи. Путин похарчи милиарди през последната година, за да разкарва военни части от единия до другия край на Русия. Затова ще се опита да извлече максимална полза от тези разходи и да се покаже като победител – най-малкото в очите на руския народ. Путин няма да отстъпи от своите искания. Нещо повече: мисля, че тези искания умишлено бяха поставени като неизпълними, защото президентът търсеше casus belli (повод за война) и оправдание за това, което направи. Той несъмнено знае добре, че няма как НАТО и САЩ да отстъпят от демократичните си ценности и базови принципи и да водят преговори за зачеркването им.
Дори да приемем, че е възможно САЩ и съюзниците им да кажат, че влизането на Украйна в НАТО не е на дневен ред, ще приеме ли Алиансът условието на Путин за демилитаризацията на Източна Европа?
Милитаризацията на държавите от Източна Европа е част от руските опорки. Путин говори за бази на НАТО и на Щатите на територията на Източна Европа, говори за разполагането на американски части и нападателни оръжия. Такива просто няма. Има малочислени ограничени формирования с изключително отбранителен характер.
Още след анексията на Крим през пролетта на 2014 г. НАТО планира разполагането на бази на територията на Латвия, Литва, Естония, Румъния и Полша. В Източна Европа има и военна инфраструктура на Алианса.
Военната инфраструктура е национална и натовска инфраструктура, а петте бази в страните от Източна Европа, които посочвате, бяха създадени в отговор на инвазията в Крим. Нито един елемент от тази инфраструктура няма нападателен характер. Няма нападателни оръжия и разположени ракети, нито многобройни части в жива сила. Когато говори за нападателни оръжия, Путин спекулира с разполагането на елементи от противоракетната система на „Иджис“ (в Румъния и Полша), чието единствено предназначение е да отбранява Европа от потенциална ракетна атака. А когато говори за американски части, трябва да уточним, че става дума за няколко хиляди военни в Германия и няколко хиляди в Прибалтика. Те как се съотнасят към стотиците хиляди на украинската граница? Никак! Когато Путин плаши руснаците, че времето за полет на натовските ракети до Москва е няколко минути, нека да кажем, че времето за полет до европейските столици на ракети, които бяха тествани буквално онзи ден на територията на Беларус по границата ѝ с Украйна, е още по-кратко. Говоренето за демилитаризиране на Източна Европа е пропагандно и е по-скоро предназначено за вътрешна употреба. То има за цел да всее страх в руското общество и да обясни дрънкането на оръжия.
Путин знае, че прекрояване на геополитическата карта на света днес предстои. Ще бъде ли заплаха за свободния свят един съюз на Русия с все по-силните във военно и икономическо отношение страни, като Китай, Индия и Бразилия, да речем, който изглежда все по-възможен? И Иран, който през септември м.г. се присъедини към Шанхайската организация за сътрудничество, ръководена от Русия и Китай?
Русия и Китай действително отдавна изграждат съюзнически отношения, включително и военно-технически. Но тезата, че Китай е безрезервен съюзник на Русия, е дълбоко невярна. От години азиатската държава следва собствена политика и си взаимодейства с Русия дотолкова, доколкото това отговаря на неговите интереси – главно на икономическите.
Да, но и отношението на Русия към Китай е симетрично.
Вярно е, но Русия става все по-зависима от Китай в икономически план. Прекомерното задълбочаване на отношенията и изграждането на стратегически съюзи носят риск и за двете страни. Затова не мисля, че отношенията помежду им ще се развиват еднозначно.
Очаквате ли в сегашната ситуация, която е благоприятна за Китай, той да се опита да си върне Тайван?
Не очаквам такова развитие. Нека не подценяваме китайския лидер Си Дзинпин, който е много интелигентен дипломат. Той не би си позволил действия, подобни на тези на руския президент.
Като човек, който е ръководил Националната служба за разузнаване, имате ли опасения за появата на подобни сепаратистки настроения в България и дали службите работят по тази тема?
Няма опасност у нас да се случи това, което стана в източната част на Украйна. Няма база за сепаратизъм. Но в България има насърчавана и платена русофилия, това е всеизвестен факт. Мисля, че българските контраразузнавателни служби са в дълг да изчистят този проблем.
Аз визирам възможност за възникване на сепаратистки настроения сред турско-мюсюлманското малцинство у нас. Свидетели сме как политическото му представителство в парламента неведнъж е използвало етническата карта, когато е в неизгодна позиция.
Не вярвам това да се случи у нас. Някои политици от Турция са изказвали тези, че у нас има изконно техни територии, виждали сме различни карти, на които част от българските земи са в границите на турската държава, но това не е повод за притеснение.
И това Ви се вижда конспиративно?
Не, не ми се вижда конспиративно. Това дори в отделни моменти е било част от политиката на Турция, но ми се струва, че у нас няма почва за поникването на такива политически тези и настроения. Има една политическа сила, която действително се заиграва с етническата карта, но го прави с оглед на постигането на други цели – предимно икономически. И за постигане на финансови изгоди.
Възможно ли е темата за украинската криза да разцепи управляващата коалиция, в която БСП има различна позиция от тази на останалите партии?
Не, не вярвам да се стигне дотам. Досега бяхме свидетели на сравнително еднозначно отношение към случващото се в Украйна. От друга страна, това, че вчера (22 февруари – б.р.) Народното събрание не можа да излезе с обща декларация, е крайно неприятен факт. Той е показателен, че България продължава да бъде „непълен“ член на НАТО и да има клатушкаща се позиция, когато става дума за теми, свързани с Русия.
Заглавна снимка: Стопкадър от интервю с Димо Гяуров по телевизия „Канал 3“
Canon MONSTER Telephoto lenses 1200mm & 800mm
Post Syndicated from Matt Granger original https://www.youtube.com/watch?v=XHBFXk8k_Bk