Now Available: Updated guidance on the Data Analytics Lens for AWS Well-Architected Framework

Post Syndicated from Wallace Printz original https://aws.amazon.com/blogs/big-data/now-available-updated-guidance-on-the-data-analytics-lens-for-aws-well-architected-framework/

Nearly all businesses today require some form of data analytics processing, from auditing user access to generating sales reports. For all your analytics needs, the Data Analytics Lens for AWS Well-Architected Framework provides prescriptive guidance to help you assess your workloads and identify best practices aligned to the AWS Well-Architected Pillars: Operational Excellence, Security, Reliability, Performance Efficiency, and Cost Optimization. Today, we’re pleased to announce a completely revised and updated version of the Data Analytics Lens whitepaper.

Self-assess with Well-Architected design principles

The updated version of the Data Analytics Lens whitepaper has been revised to provide guidance to CxOs as well as all data personas. Within each of the five Well-Architected Pillars, we provide top-level design principles for CxOs to quickly identify areas for teams and fundamental rules that analytics workloads designers should follow. Each design principle is followed by a series of questions and best practices that architects and system designers can use to perform self-assessments. Additionally, the Data Analytics Lens includes suggestions that prescriptively explain steps to implement best practices useful for implementation teams.

For example, the Security Pillar design principle “Control data access” works with the best practice to build user identity solutions that uniquely identify people and systems. The associated suggestion for this best practice is to centralize workforce identities, which details how to use this principle and includes links to more documentation on the suggestion.

“Building Data Analytics platform or workloads is one of the complex architecture patterns. It involves multi-layered approach such as Data Ingestion, Data Landing, Transformation Layer, Analytical/Insight and Reporting. Choices of technology and service for each of these layers are wide. The AWS Well-Architected Analytics Lens helps us to design and validate with great confidence against each of the pillars. Now Cognizant Architects can perform assessments using the Data Analytics Lens to validate and help build secure, scalable and innovative data solutions for customers.”

– Supriyo Chakraborty, Principal Architect & Head of Data Engineering Guild, Cognizant Germany
– Somasundaram Janavikulam, Cloud Enterprise Architect & Well Architected Partner Program Lead, Cognizant

In addition to performing your own assessment, AWS can provide a guided experience through reviewing your workload with a Well-Architected Framework Review engagement. For customers building data analytics workloads with AWS Professional Services, our teams of Data Architects can perform assessments using the Data Analytics Lens during the project engagements. This provides you with an objective assessment of your workloads and guidance on future improvements. The integration is available now for customers of the AWS Data Lake launch offering, with additional Data Analytics offerings coming in 2022. Reach out to your AWS Account Team if you’d like to know more about these guided Reviews.

Updated architectural patterns and scenarios

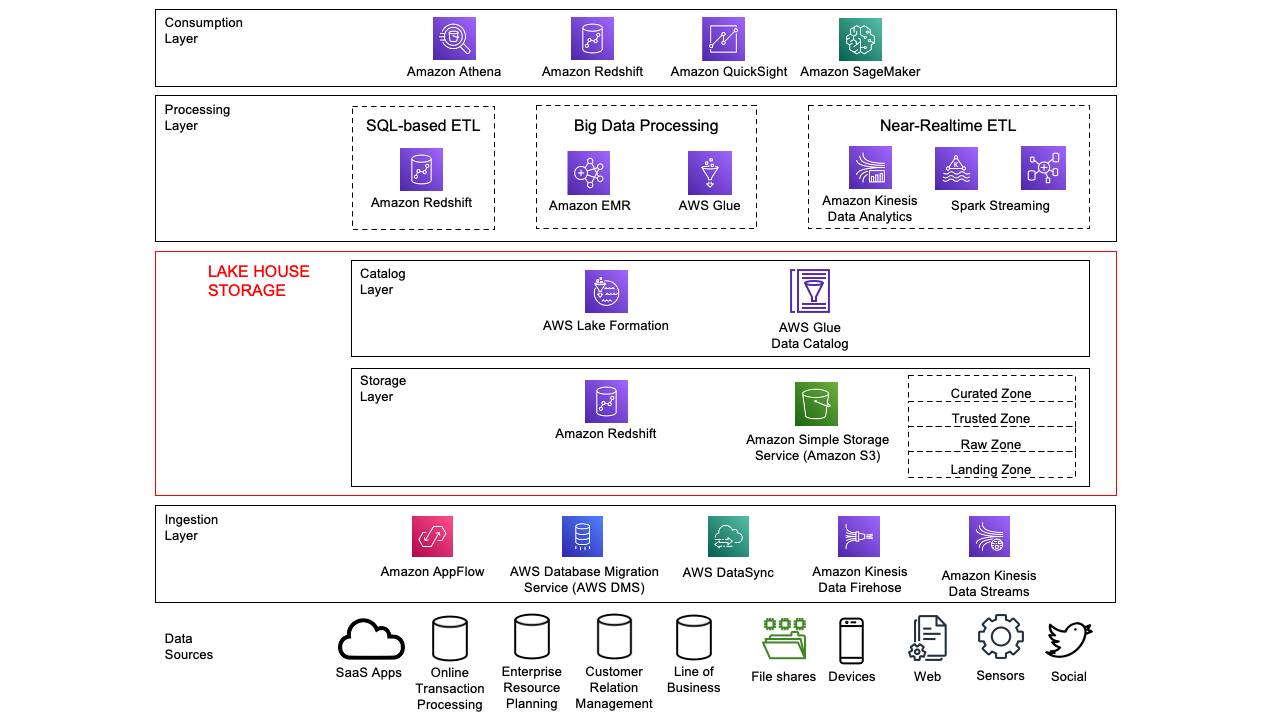
In this version of the Data Analytics Lens, we have also revised the discussion of data analytics patterns and scenarios to keep up with the industry and modern data analytics practices. Each scenario includes sections on characteristics that help you plan when developing systems for that scenario, a reference architecture to visualize and explain how the components work together, and configuration notes to help you properly configure your solution.

This version covers the following topics:

  • Building a modern data architecture (formerly Lake House Architecture)
  • Organize around data domains by delivering data as a product using a data mesh
  • Efficiently and securely provide batch data processing
  • Use streaming ingest and stream processing for real-time workloads
  • Build operational analytics systems to improve business processes and performance
  • Provide data visualization securely and cost-effectively at scale

Changed from the first release, the machine learning and tenant analytics scenarios have been migrated to a separate Machine Learning Lens whitepaper and SaaS Lens whitepaper.

Conclusion

We expect this updated version will provide better guidance to validate your existing architectures, as well as provide recommendations for any gaps that identified.

For more information about building your own Well-Architected systems using the Data Analytics Lens, see the Data Analytics Lens whitepaper.

Special thanks to everyone across the AWS Solution Architecture and Data Analytics communities who contributed. These contributions encompassed diverse perspectives, expertise, and experiences in developing the new AWS Well-Architected Data Analytics Lens.


About the Authors

Wallace Printz is a Senior Solutions Architect based in Austin, Texas. He helps customers across Texas transform their businesses in the cloud. He has a background in semiconductors, R&D, and machine learning.

Indira Balakrishnan is a Senior Solutions Architect in the AWS Analytics Specialist SA Team. She is passionate about helping customers build cloud-based analytics solutions to solve their business problems using data-driven decisions. Outside of work, she volunteers at her kids’ activities and spends time with her family.

Who Ya Gonna Call? Backblaze

Post Syndicated from original https://www.backblaze.com/blog/who-ya-gonna-call-backblaze/

Halloween and its surrounding spooky season is my favorite time of the year. As the Computer Backup Steward at Backblaze, I often read people’s notes to us, which detail how we’ve helped them recover their files. As I was thinking about their experiences and our past Halloween blog posts detailing spooky data loss stories (Truly, what’s scarier than data loss?), I recalled a personal story that happened to my sister a few years ago when she was interning here at Backblaze. It reminded me that Backblaze Computer Backup doesn’t just recover people’s data, but we also help access it in times of need—which can be equally important. Like the Ghostbusters, when there’s something strange in your (data’s) neighborhood, who ya gonna call? …Backblaze, it’s Backblaze. So, on this, the Friday before Halloween, let me recount that tiny spooky tale for you today…


A long time ago, my sister Lisa was an intern with us here at Backblaze. It was just for a month, but she helped us build desks, digitized business cards (The horror!), and generally helped out around the office while getting a feel for working at a Silicon Valley tech startup. Like any good startup techie, after joining us for the summer, she started using Backblaze to back up her computer files, which makes sense because as a 19-year-old—a lot can happen to your computer.

My sister and I are really close, and we try to go on little trips together whenever possible. One of these opportunities arose in the form of a road trip from the San Francisco Bay to Los Angeles to see a comedy show. (For those curious, it was Kevin Smith and Ralph Garman recording their “Hollywood Babble-On” podcast.)

Driving down from the Bay Area to Los Angeles takes about five to six hours, sometimes longer depending on the traffic and where you’re headed. As we passed hour four, my sister turned to me and said, ”Hey, do I need my ID for this?” Cue: creepy forewarning music.

Now, this comedy show was held, oddly enough, in a comedy club (this sometimes happens when comedy is involved). An important thing to know about comedy clubs in general is that often they require people to be over 18, and are very serious about asking for ID so that underage people don’t imbibe, which makes sense—safety first.

So, yes. An ID was required, and yes she would need it, but no, she did not have it—nor her purse in general. Being an older brother is like that sometimes. I wasn’t about to turn around and drive back to San Francisco—partly because we had the show to go to that night, but also because I would get a bit of enjoyment from her having to sit outside while I enjoyed some comedy as a “lesson.” A sinister brotherly thought.

Luckily, I remembered that a few months back, my sister had to scan her passport as a PDF so that we could have a digital copy on another trip. I called up the comedy club and asked if they’d take a digital ID if we didn’t have a physical one, and while they were confused, they did say yes, so long as it was official. Good news! Once we arrived at the hotel, she logged on to Backblaze, found her backed up passport PDF, and we printed it out in the lobby. And we made it to the show on time. Happily ever after!

OK, so maybe it wasn’t really a horror story and the prospect of not making it to a comedy show may not seem scary to some people, but our family dynamic would mean that if she wasn’t able to attend and had to sit outside, she’d never have lived it down—low stakes slightly spooky (the best kind).

The post Who Ya Gonna Call? Backblaze appeared first on Backblaze Blog | Cloud Storage & Cloud Backup.

How to Connect Your Synology NAS to Backblaze B2 Cloud Storage

Post Syndicated from Troy Liljedahl original https://www.backblaze.com/blog/how-to-connect-your-synology-nas-to-backblaze-b2-cloud-storage/

You’ve added a Synology Network Attached Storage (NAS) Device to your tech stack, but you may be wondering how to protect your files from ransomware, natural disasters, or accidental deletion. Saving your data to cloud storage can help protect you from the painful consequences of data loss. But now you may be wondering whether to backup or sync your data to the cloud. The answer to that question will largely depend on your own individual needs. If you are looking to keep an additional copy of your regularly changing data at an off-premise location to maintain the 3-2-1 backup strategy, then backing up your data to the cloud is the way to go.

If, however, you need your files in a place where everyone in the organization can access them at any moment, where edits to any files can be shown across all devices in real time or you need up-to-the-minute versions of your files off-site, then syncing your files to the cloud will be sufficient.

Your Synology NAS has applications for either backup—Hyper Backup—or sync—Cloud Sync—which we will explain in greater detail below. Understanding the distinction between the two functions is an important part of setting your tech stack up for success. And setting your tech stack up to connect to Backblaze B2 Cloud Storage, gives you greater security, accessibility and off-site peace of mind at a fifth of the cost of other cloud providers.

Read on to learn the differences between backup and sync, how they work with your Synology NAS, and how to connect your NAS to Backblaze B2.

Backup vs. Sync

As mentioned before, understanding the difference between backup and sync is a crucial step in determining how you will pair your NAS with an offsite cloud storage solution like Backblaze B2. As such, it may help you to have a full understanding of the difference between the two.

A backup lets you create copies of files and other digital assets, which are then sent from a NAS to another device or an off-site storage location such as a public cloud. Allowing for either incremental or full backups of the contents of your NAS on a customized schedule, this method allows you to retain a copy of the most recent version of a file, while also being able to retain previous versions. This can also be an effective strategy to combat malware or ransomware, as you can simply delete infected files and restore from a clean backup. In addition, maintaining storage off-site protects your data from any natural disasters that might befall your immediate vicinity.

By contrast, a sync strategy consists of one or more devices working in unison, updating files in the same way across each device and/or a cloud storage location. The benefits of syncing files come from the ability to instantly see updates on files and provide easy access to changes in files to people across your organization. If you connect your NAS to Backblaze B2, you can easily access and download files anywhere you are through native applications or another Backblaze partner integration like Veeam, Iconik, and Cyberduck. The drawback of syncing is that it does not offer effective protections against accidental deletions, unauthorized access or malware.

There are essentially two different ways to sync your files: one-way or two-way. In a one-way sync, when a file from Location A changes, the same file at Location B is updated; however, if something on the file changes in Location B, the file in Location A will not be updated. On the other hand, in a two-way sync, regardless of where the file changes, the other location will automatically update to mirror the other. And in most cases, this means the entire file will be re-uploaded.

It is not uncommon for an organization to use both backup and sync strategies simultaneously, relying on one over the other as needs change. Thankfully, Synology has two relevant proprietary applications that serve the various needs of backing up and syncing data which can be seen in the table below.  
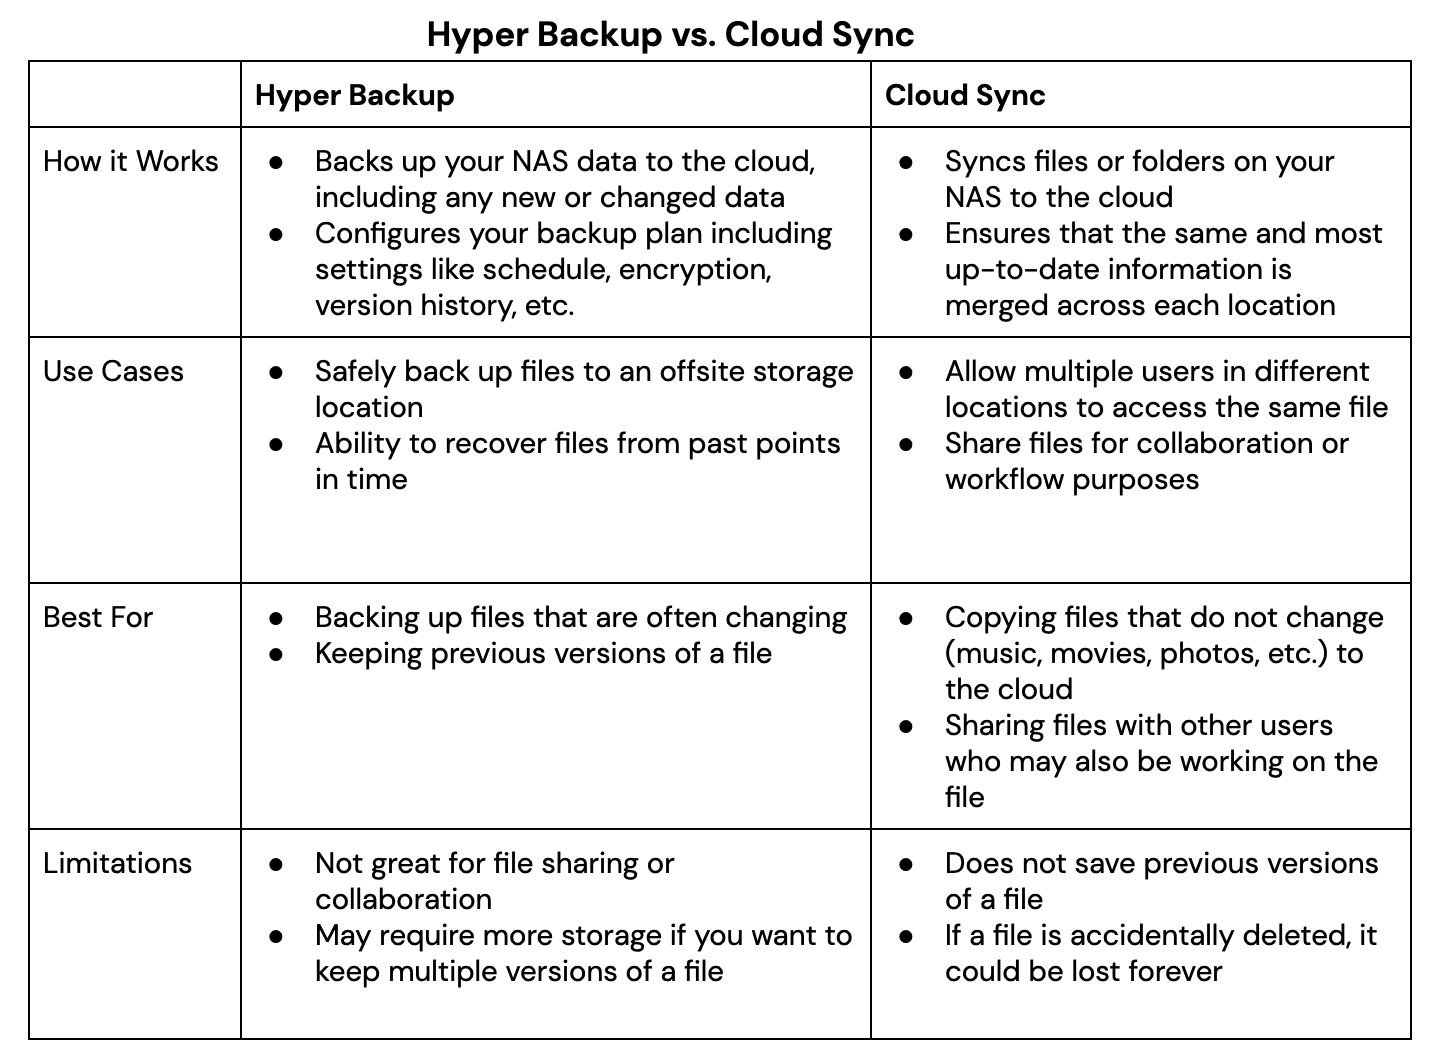
Whether you plan to utilize the backup and sync features Synology offers via Hyper Backup and Cloud Sync, securing your files to the cloud will help you create an effective 3-2-1 Backup Strategy, protecting your digital assets. Now we’ll take a closer look at how you can connect your Synology NAS to Backblaze B2 Cloud Storage.

Setting Up Your B2 Cloud Storage Account

Regardless of whether you use Hyper Backup or Cloud Sync, you can get set up in minutes with B2 Cloud Storage. You can follow along with the directions in this blog or take a look at our video guides. Pat Patterson, Chief Technical Evangelist, demonstrates how to get your data into B2 Cloud Storage in under 10 minutes using either Hyper Backup or Cloud Sync.

Here’s a video tutorial for Hyper Backup:

And here’s one for Cloud Sync:

The first step is to create a Backblaze B2 Cloud Storage account so your data has a location to be securely stored. You can sign up for an account and get started with 10GB of storage for free.

We’ll continue to show the steps after you’ve signed up for a Backblaze B2 Account in order to access your new bucket, Application Key ID, and Application Key. This will only take a few clicks, a couple names, and less than a minute.

  1. On the Buckets page of your account, click the Create a Bucket button.
  2. Give your bucket a name and enable encryption for added security.
  3. Click the Create a Bucket button and you should see your new Bucket on the Buckets page.
  4. Navigate to the App Keys page of your account and click the Add a New Application Key button.
  5. Name your Application Key and click the Create New Key button—make sure that your key has both Read and Write permissions (the default option).
  6. Your Application Key ID and Application Key will appear on your App Keys page. Make sure to copy these somewhere secure as the Application Key will not appear again!

Backing Up or Syncing Your Synology to Backblaze B2

By now you have created the location for your data to be either backed up or synced to and obtained your Application Key.

If you want to backup your data, then follow this integration guide or the video mentioned above that takes you step-by-step on how you can use Hyper Backup to backup your data from your Synology to B2 Cloud Storage.

If syncing your data is what you need, then follow this integration guide or the video mentioned above that takes you through how you can use Cloud Sync to sync your data from your Synology to B2 Cloud Storage.

Once you have built the connection between your Synology to B2 Cloud Storage either through Hyper Backup or Cloud Sync (or both!), you can begin backing up or syncing your data for greater protection and accessibility no matter the location.

Summary

Creating and implementing an effective backup strategy, sync strategy or hybrid of the two can be an effective way to protect your data. A thorough understanding of the benefits, drawbacks and strategies involved, and the ways your Synology NAS can utilize both Hyper Backup and Cloud Sync, will hopefully get you on your way to securing your data.

At a fifth of the price of competitors, with setup that takes less than 10 minutes, Backblaze B2 Cloud Storage is a great complement to your Synology NAS.

The post How to Connect Your Synology NAS to Backblaze B2 Cloud Storage appeared first on Backblaze Blog | Cloud Storage & Cloud Backup.

Cybersecurity Awareness Month: Learn about the job zero of securing your data using Amazon Redshift

Post Syndicated from Thiyagarajan Arumugam original https://aws.amazon.com/blogs/big-data/cybersecurity-awareness-month-learn-about-the-job-zero-of-securing-your-data-using-amazon-redshift/

Amazon Redshift is the most widely used cloud data warehouse. It allows you to run complex analytic queries against terabytes to petabytes of structured and semi-structured data, using sophisticated query optimization, columnar on high-performance storage, and massively parallel query execution.

At AWS, we embrace the culture that security is job zero, by which we mean it’s even more important than any number one priority. AWS provides comprehensive security capabilities to satisfy the most demanding requirements, and Amazon Redshift provides data security out of the box at no extra cost. Amazon Redshift uses the AWS security frameworks to implement industry-leading security in the areas of authentication, access control, auditing, logging, compliance, data protection, and network security.

Cybersecurity Awareness Month raises awareness about the importance of cybersecurity, ensuring everyone has the resources they need to be safer and more secure online. This post highlights some of the key out-of-the-box capabilities available in Amazon Redshift to manage your data securely.

Authentication

Amazon Redshift supports industry-leading security with built-in AWS Identity and Access Management (IAM) integration, identity federation for single sign-on (SSO), and multi-factor authentication. You can federate database user authentication easily with IAM and Amazon Redshift using IAM and a third-party SAML-2.0 identity provider (IdP), such as AD FS, PingFederate, or Okta.

To get started, see the following posts:

Access control

Granular row and column-level security controls ensure users see only the data they should have access to. You can achieve column-level access control for data in Amazon Redshift by using the column-level grant and revoke statements without having to implement views-based access control or use another system. Amazon Redshift is also integrated with AWS Lake Formation, which makes sure that column and row level access in Lake Formation is enforced for Amazon Redshift queries on the data in the data lake.

The following guides can help you implement fine-grained access control on Amazon Redshift:

Auditing and logging

To monitor Amazon Redshift for any suspicious activities, you can take advantage of the auditing and logging features. Amazon Redshift logs information about connections and user activities, which can be uploaded to Amazon Simple Storage Service (Amazon S3) if you enable the audit logging feature. The API calls to Amazon Redshift are logged to AWS CloudTrail, and you can create a log trail by configuring CloudTrail to upload to Amazon S3. For more details, see Database audit logging, Analyze logs using Amazon Redshift spectrum, Querying AWS CloudTrail Logs, and System object persistence utility.

Compliance

Amazon Redshift is assessed by third-party auditors for compliance with multiple programs. If your use of Amazon Redshift is subject to compliance with standards like HIPAA, PCI, or FedRAMP, you can find more details at Compliance validation for Amazon Redshift.

Data protection

To protect data both at rest and while in transit, Amazon Redshift provides options to encrypt the data. Although the encryption settings are optional, we highly recommend enabling them. When you enable encryption at rest for your cluster, it encrypts both the data blocks as well as the metadata, and there are multiple ways to manage the encryption key (see Amazon Redshift database encryption). To safeguard your data while it’s in transit from your SQL clients to the Amazon Redshift cluster, we highly recommend configuring the security options as described in Configuring security options for connections.

For additional data protection options, see the following resources:

Amazon Redshift enables you to use an AWS Lambda function as a UDF in Amazon Redshift. You can write Lambda UDFs to enable external tokenization of data dynamic data masking, as illustrated in Amazon Redshift – Dynamic Data Masking.

Network security

Amazon Redshift is a service that runs within your VPC. There are multiple configurations to ensure access to your Amazon Redshift cluster is secured, whether the connection is from an application within your VPC or an on-premises system. For more information, see VPCs and subnets. Amazon Redshift for AWS PrivateLink ensures that all API calls from your VPC to Amazon Redshift stay within the AWS network. For more information, see Connecting to Amazon Redshift using an interface VPC endpoint.

Customer success stories

You can run your security-demanding analytical workload using out-of-the-box features. For example, SoePay, a Hong Kong–based payments solutions provider, uses AWS Fargate and Amazon Elastic Container Service (Amazon ECS) to scale its infrastructure, AWS Key Management Service (AWS KMS) to manage cryptographic keys, and Amazon Redshift to store data from merchants’ smart devices.

With AWS services, GE Renewable Energy has created a data lake where it collects and analyses machine data captured at GE wind turbines around the world. GE relies on Amazon S3 to store and protect its ever-expanding collection of wind turbine data and Amazon Redshift to help them gain new insights from the data it collects.

For more customer stories, see Amazon Redshift customers.

Conclusion and Next Steps

In this post, we discussed some of the key out-of-the-box capabilities at no extra cost available in Amazon Redshift to manage your data securely, such as authentication, access control, auditing, logging, compliance, data protection, and network security.

You should periodically review your AWS workloads to ensure security best practices have been implemented. The AWS Well-Architected Framework helps you understand the pros and cons of decisions you make while building systems on AWS. This framework can help you learn architectural best practices for designing and operating reliable, secure, efficient, and cost-effective systems in the cloud. Review your security pillar provided in this framework.

In addition, AWS Security Hub, an AWS service, provides a comprehensive view of your security state within AWS that helps you check your compliance with security industry standards and best practices.

To adhere to the security needs of your organization, you can automate the deployment of an Amazon Redshift cluster in an AWS account using AWS CloudFormation and AWS Service Catalog. For more information, see Automate Amazon Redshift cluster creation using AWS CloudFormation and Automate Amazon Redshift Cluster management operations using AWS CloudFormation.


About the Authors

Kunal Deep Singh is a Software Development Manager at Amazon Web Services (AWS) and leads development of security features for Amazon Redshift. Prior to AWS he has worked at Amazon Ads and Microsoft Azure. He is passionate about building customer solutions for cloud, data and security.

Thiyagarajan Arumugam is a Principal Solutions Architect at Amazon Web Services and designs customer architectures to process data at scale. Prior to AWS, he built data warehouse solutions at Amazon.com. In his free time, he enjoys all outdoor sports and practices the Indian classical drum mridangam.

[$] Fedora considers removing NIS support

Post Syndicated from original https://lwn.net/Articles/874174/rss

For all of you youngsters out there, the Internet has always been
omnipresent, computers are something you carry in your pocket, the Unix
wars are about as relevant as the War of 1812, and the term “NIS” doesn’t
ring a bell. But, for a certain class of Unix old-timer, NIS has a distinct
place in history — and, perhaps, in still-deployed systems. So the
suggestion that Fedora might drop support for NIS has proved to be a bit of
a wakeup call for some.

Вододел ли е скандалното назначение за служебния кабинет? Ексгубернатор на Бургас от ерата Орешарски оглави областното РИОСВ в кабинета на Румен Радев

Post Syndicated from Екип на Биволъ original https://bivol.bg/%D0%B5%D0%BA%D1%81%D0%B3%D1%83%D0%B1%D0%B5%D1%80%D0%BD%D0%B0%D1%82%D0%BE%D1%80-%D0%BD%D0%B0-%D0%B1%D1%83%D1%80%D0%B3%D0%B0%D1%81-%D0%BE%D1%82-%D0%B5%D1%80%D0%B0%D1%82%D0%B0-%D0%BE%D1%80%D0%B5%D1%88.html

петък 29 октомври 2021


Скандално назначение на служебния кабинет на Стефан Янев в 12 без 5, буквално 2-3 седмици преди парламентарните избори, насрочени за 14 ноември 2021 г. В четвъртък, на 28 ноември 2021…

2022 Planning: Straight Talk on Zero Trust

Post Syndicated from boB Rudis original https://blog.rapid7.com/2021/10/29/2022-planning-straight-talk-on-zero-trust/

2022 Planning: Straight Talk on Zero Trust

“Zero trust” is increasingly being heralded as the ultimate solution for organizational cyber safety and resilience — but what does it really mean, and how can you assess if it has a practical place in your organization’s cybersecurity strategy for 2022?

In this post, we’ll answer those questions by taking a look at what problems the concept of zero trust is trying to solve, what types of people, process, and technology are necessary for successful zero-trust implementations, and what mindset changes your organization many need to make to be fully ready for this new defender paradigm in the year to come.

What is zero trust?

At the core, the concept of zero trust is just what those two words suggest: every human, endpoint, mobile device, server, network component, network connection, application workload, business process, and flow of data is inherently untrusted. As such, they each must be authenticated and authorized continuously as each transaction is performed, and all actions must be auditable in real time and after the fact. Zero trust is a living system, with all access rules under continuous review and modification, and all allowed transactions under constant re-inspection.

What problems is zero trust trying to solve?

Zero trust aims to finally shatter the mythical concept of “castle and moat” (i.e., assuming individuals and components on the intranet are inherently safe) and fully realize the power of least privilege — the concept that individuals and components should only have the most minimal access necessary to perform a required action. We can see it better through the lens of a practical example, such as one of the most typical ransomware attack scenarios: an attacker gains initial access to a corporate network through simple VPN credentials.

In most current implementations, a VPN has one interface that sits on the internet and one that sits on the intranet. Unfortunately, most VPNs are still accessed via simple credentials. Once authenticated, an attacker impersonating a user represented by those credentials has general network access. They’re free to replay the credentials (or attempt to use various tools to obtain other credentials or tokens) on any other connected system until they gain access to one where they can elevate privileges and begin exfiltrating data and corrupting the integrity of filesystems and databases.

In a zero-trust environment, the user identified by a set of credentials would also need a second authentication factor. The entire authentication attempt would be risk-assessed in real time to see if the individual’s connection is, say, in an allowed geofence and that the access time is within the usual operating mode of that person (and that the individual does not already have an established session).

Even if an attacker managed to obtain multi-factor codes — for example, SMS 2-factor authentication (2FA) has weaknesses but may be the only 2FA an organization can afford to implement — they may achieve a successful connection but would not have general access to all intranet systems and services. In fact, the VPN connection would only grant them access to a defined set of applications or services. If the attacker makes any attempt to try a network scan or perform other noisy network actions, monitoring systems would be alerted, and that individual and connection would be quarantined for investigation.

Each transaction has a defined set of authentication, authorization, and behavior auditing rules that continually let the overarching zero-trust system ensure the safety of the interactions.

What do you need to move to zero trust?

While this section could fill an entire book, we’ll work under the assumption that you are just beginning your zero-trust journey. To make this initial move, you’ll need to pick at least one business process or service access scenario to move to this new model.

Every component and individual that is responsible for enabling that business process or service must be identified and the architecture fully documented. At this point in the process, you may find that you need to reimagine the architecture to ensure you have the necessary control and audit points in place. You’ll then need authentication, authorization, auditing, risk-assessing, and enforcement solutions to support the access decisions at each connection in the process or service. Finally, you’ll need staffing to support creation and maintenance of the rules that are enforced, along with traditional patching, mitigation, and configuration management enforcement activities.

Then, lather, rinse, and repeat for all other processes and services. In other words, you need quite a bit.

However, you should not — and, in reality, cannot — move every business process and service to zero trust all at once. Once you’ve assessed that initial service, begin the groundwork of acquiring the necessary tools and hiring the necessary staff to ensure a successful outcome. Then, transition that initial service over to zero trust when funding and time are on your side, and leave it in place for a while as you evaluate what it takes to maintain safety and resilience. Adjust your tooling and staffing plans accordingly, and get to work on the remaining processes or services.

Thankfully, you may have many of these components and personnel in place within existing security and compliance solutions and processes, and you can finally employ more of your existing investments’ capabilities than the 5 to 15% that most organizations generally utilize.

Adopting the zero-trust mindset

One of the biggest mindset challenges to overcome when introducing zero trust into your organization is the fear that the constraints the model imposes will reduce productivity and hamper creativity. These fears can be overcome with the right framing of zero trust.

Start by performing a scenario-based risk assessment of a given business process. Do this with the business process owner(s) or stakeholder(s), and ensure you enumerate what actions threat actors could take at each transaction point in the process, ideally with some measurement to the costs due to loss of safety and resilience.

Then, show how each threat is reduced or eliminated with a zero-trust implementation of the same business process, and note how new processes — developed with a zero-trust mindset at the start — will have reduced implementation costs, be far more safe and resilient, and be much easier to enhance over time as they will have been established on a solid foundation.

Zero trust is not some sticker on some point solution’s brochure. It is a fundamental change to how your organization approaches access, authentication, authorization, auditing, and continuous monitoring. You won’t adopt zero trust overnight, but you can begin that journey today, knowing that you’re on the path to helping your organization protect itself from tomorrow’s threats, as well as today’s.

Want more 2022 planning tips from industry experts?

Sign up for our webinar series

Amazon Simple Email Service Celebrates 50 Years of Email

Post Syndicated from Matt Strzelecki original https://aws.amazon.com/blogs/messaging-and-targeting/amazon-simple-email-service-celebrates-50-years-of-email/

Email as we know it turns 50 years old this month (October 2021). The first email sent over a network — the beginning of email as we use it today — was sent in October 1971, by MIT graduate Ray Tomlinson (April 23, 1941–March 5, 2016). Tomlinson was the first to use the @ symbol to identify a message recipient on a remote computer system. Using this address format, he became the first person to send an email between two computers. That first email traveled 10 feet between two computers in Cambridge, Massachusetts. Tomlinson stated when interviewed that the first email was “something like QWERTYUIOP”.

Tomlinson leveraged existing software at the time, including SNDMSG and CPYNET, which allowed people to send messages to others who used the same computer, to send the first email over a network – back then multiple users would share computers, rather than having their own dedicated computers. His work enabled the exchange of messages between computers for the first time. Creating email was a side project at work for Tomlinson, and when he showed his work to another employee for the first time, he reportedly said: “Don’t tell anyone! This isn’t what we’re supposed to be working on.”

Ray Tomlinson was inducted into the Internet Hall of Fame in 2012, and his work is ranked fourth in Boston Globe’s top 150 MIT-related “Ideas, Inventions, and Innovators”.

According to the Guinness Book of Records, the first unsolicited email was sent in May 1978 to 397 recipients advertising an upcoming a product demonstration of computers. That’s right—spam is almost as old as email itself! In 1991, the first email was sent from space by astronauts on the NASA shuttle Atlantis. That message began with “Hello Earth!” and was delivered to Mission Control at the Johnson Space Center in Houston, Texas.

Over the past 50 years, there’s been a lot of firsts in email. For us at Amazon Simple Email Service (Amazon SES), our email first was when we launched our service back in January 2011. We initially started as a service that delivered email for Amazon.com, and grew over time into launching as a public service in Amazon Web Services (AWS).

Customers told us that building large-scale email solutions to send marketing and transactional messages was often a complex and costly challenge for businesses. Amazon SES eliminates these challenges and enables businesses to benefit from the years of experience and sophisticated email infrastructure Amazon.com has built to serve its own large-scale customer base. With Amazon.com being our first customer, from day one – scalability, reliability, and deliverability have been our highest priorities. This same service has also powered the email sending capabilities of Amazon Pinpoint since 2017, as well as email-related features in several other AWS services.

Today, Amazon SES is a cost-effective, flexible, and scalable email service that enables developers to send mail from within any application – supporting multiple email use cases, including transactional, marketing, or mass email communications, as well as inbound email.

We encourage our readers to share their own stories of their email firsts, or any other interesting email anecdotes. #QWERTYUIOP #50yrsofemail

New – Amazon EC2 C6i Instances Powered by the Latest Generation Intel Xeon Scalable Processors

Post Syndicated from Channy Yun original https://aws.amazon.com/blogs/aws/new-amazon-ec2-c6i-instances-powered-by-the-latest-generation-intel-xeon-scalable-processors/

We recently introduced Amazon EC2 M6i instances powered by the latest generation Intel® Xeon® Scalable processors with an all-core turbo frequency of 3.5 GHz, which offer customers up to 15% improvement in price performance compared to M5 instances.

Today, I am happy to announce the availability of the new compute-optimized Amazon EC2 C6i instances, which offer up to 15% improvement in price performance for a variety of workloads, versus comparable C5 instances. These instances are ideal for running compute-intensive workloads such as batch processing, machine learning, high-end gaming, high performance computing (HPC) workloads, ad serving, and video encoding.

Compared to C5 instances using an Intel processor, this new instance type provides:

  • Up to 15% improvement in compute price performance.
  • Up to 9% higher memory bandwidth.
  • Up to 40 Gbps for Amazon Elastic Block Store (EBS) and 50 Gbps for networking.
  • Always-on memory encryption.

Like M6i, C6i instances are available in 9 sizes:

Name vCPUs Memory
(GiB)
Network Bandwidth
(Gbps)
EBS Throughput
(Gbps)
c6i.large 2 4 Up to 12.5 Up to 10
c6i.xlarge 4 8 Up to 12.5 Up to 10
c6i.2xlarge 8 16 Up to 12.5 Up to 10
c6i.4xlarge 16 32 Up to 12.5 Up to 10
c6i.8xlarge 32 64 12.5 10
c6i.12xlarge 48 96 18.75 15
c6i.16xlarge 64 128 25 20
c6i.24xlarge 96 192 37.5 30
c6i.32xlarge 128 256 50 40

The new instances are built on the AWS Nitro System, a collection of building blocks that offloads many of the traditional virtualization functions to dedicated hardware for high performance, high availability, and highly secure cloud instances.

As you should do with M6i instances, for optimal networking performance, upgrade your Elastic Network Adapter (ENA) drivers to version 3. For more information, see this article about migrating an EC2 instance to a sixth-generation instance in the AWS Knowledge Center.

C6i instances support Elastic Fabric Adapter (EFA) on the c6i.32xlarge size for workloads that can benefit from lower network latency, such as HPC and video processing.

Available Now
C6i instances are available today in four AWS Regions: US East (N. Virginia, Ohio), US West (Oregon), and EU (Ireland). As usual with EC2, you pay for what you use. For more information, see the EC2 pricing page.

To learn more, visit the EC2 C6i instance page. You can send feedback to the AWS forum for Amazon EC2 or through your usual AWS Support contacts.

Channy

Software Freedom Conservancy’s DMCA Exemption Requests Granted

Post Syndicated from original https://lwn.net/Articles/874290/rss

Software Freedom Conservancy has had several exemptions granted that it requested to the Digital Millennium Copyright Act (DMCA) by the US Library of Congress for activities of interest to free-software developers:

Software Freedom Conservancy is proud to announce that its efforts to
stand up for the rights of FOSS developers have been successful and that
it has been granted almost all of the exemptions that it requested in
the Librarian of Congress’ recent rule making, according to the final
rule Exemption to Prohibition on Circumvention of Copyright Protection
Systems for Access Control Technologies
, which was published today.
Effective today, the Librarian of Congress (“LoC”) granted DMCA
exemptions for installing alternate firmwares on routers and for
investigating copyleft compliance, and the exemption that Software
Freedom Conservancy previously applied for and received on Smart TVs was
also expanded. While our formal request to extend the security research
exemption to include privacy research was not granted, the Register
clarified that privacy research is indeed included in security research.
Our executive director, Karen Sandler, also participated as an
individual in a request to expand the existing exemption for medical
devices which was also successful.

Goodbye Microsoft SQL Server, Hello Babelfish

Post Syndicated from Sébastien Stormacq original https://aws.amazon.com/blogs/aws/goodbye-microsoft-sql-server-hello-babelfish/

Many of our customers are telling us they want to move away from commercial database vendors to avoid expensive costs and burdensome licensing terms. But migrating away from commercial and legacy databases can be time-consuming and resource-intensive. When migrating your databases, you can automate the migration of your database schema and data using the AWS Schema Conversation Tool and AWS Database Migration Service. But there is always more work to do to migrate the application itself, including rewriting application code that interacts with the database. Motivation is there, but costs and risks are often limiting factors.

Today, we are making Babelfish for Aurora PostgreSQL available. Babelfish allows Amazon Aurora PostgreSQL-Compatible Edition to understand the SQL Server wire protocol. It allows you to migrate your SQL Server applications to PostgreSQL cheaper, faster, and with less risks involved with such change.

You can migrate your application in a fraction of the time that a traditional migration would require. You continue to use the existing queries and drivers your application uses today. Just point the application to an Amazon Aurora PostgreSQL database with Babelfish activated. Babelfish adds the capability to Amazon Aurora PostgreSQL to understand the SQL Server wire protocol Tabular Data Stream (TDS), as well as extending PostgreSQL to understand commonly used T-SQL commands used by SQL Server. Support for T-SQL includes elements such as the SQL dialect, static cursors, data types, triggers, stored procedures, and functions. Babelfish reduces the risk associated with database migration projects by significantly reducing the number of changes required to the application. When adopting Babelfish, you save on licensing costs of using SQL Server. Amazon Aurora provides the security, availability, and reliability of commercial databases at 1/10th the cost.

SQL Server has evolved over more than 30 years, and we do not expect to support all functionalities right away. Instead, we focused on the most common T-SQL commands and returning the correct response or an error message. For example, the MONEY datatype has different characteristics in SQL Server (with four decimals precision) and PostgreSQL (with two decimals precision). Such a subtle difference might lead to rounding errors and have a significant impact on downstream processes, such as financial reporting. In this case, and many others, Babelfish ensures the semantics of SQL Server data types and T-SQL functionality are preserved: we created a MONEY datatype that behaves as SQL Server apps would expect. When you create a table with this datatype through the Babelfish connection, you get this compatible datatype and behaviors that a SQL Server app would expect.

Create a Babelfish Cluster Using the Console
To show you how Babelfish works, let’s first connect to the console and create a new Amazon Aurora PostgreSQL cluster. The procedure is no different than for the regular Amazon Aurora database. In the RDS launch wizard, I first make sure I select an Aurora version compatible with PostgreSQL 13.4, or more recent. The updated console has additional filters to help you select the versions that are compatible with Babelfish.

Babelfish Create databaseThen, lower on the page, I select the option Turn on Babelfish.

Aurora turn on babelfish

Under Monitoring section, I also make sure I turn off Enable Enhanced monitoring. This option requires additional IAM permissions and preparation that are not relevant for this demo.

Enable Enhanced MonitoringAfter a couple of minutes, my cluster is created, it has two instances, one writer and one reader.

Babelfish cluster created

Create a Babelfish Cluster Using the CLI
Alternatively, I may use the CLI to create a cluster. I first create a parameter group to activate Babelfish (the console does it automatically):

aws rds create-db-cluster-parameter-group             \
    --db-cluster-parameter-group-name myapp-babelfish \
    --db-parameter-group-family aurora-postgresql13   \
    --description "babelfish APG 13"
aws rds modify-db-cluster-parameter-group             \
    --db-cluster-parameter-group-name myapp-babelfish \
    --parameters "ParameterName=rds.babelfish_status,ParameterValue=on,ApplyMethod=pending-reboot" \

Then I create the database cluster (when using the command below, adjust the security group id and the subnet group name) :

aws rds create-db-cluster \
    --db-cluster-identifier awsnewblog-cli-demo \
    --master-username postgres \  
    --master-user-password Passw0rd \
    --engine aurora-postgresql \
    --engine-version 13.4 \
    --vpc-security-group-ids sg-abcd1234 \
    --db-subnet-group-name default-vpc-1234abcd \
    --db-cluster-parameter-group-name myapp-babelfish
{
    "DBCluster": {
        "AllocatedStorage": 1,
        "AvailabilityZones": [
            "us-east-1c",
            "us-east-1d",
            "us-east-1a"
        ],
        "BackupRetentionPeriod": 1,
        "DBClusterIdentifier": "awsnewblog-cli-demo",
        "Status": "creating",
        ... <redacted for brevity> ...
    }
}

Once the cluster is created, I create an instance using

aws rds create-db-instance \
    --db-instance-identifier myapp-db1 \
    --db-instance-class db.r5.4xlarge \
    --db-subnet-group-name default-vpc-1234abcd \
    --db-cluster-identifier awsnewblog-cli-demo \
    --engine aurora-postgresql
{
    "DBInstance": {
        "DBInstanceIdentifier": "myapp-db1",
        "DBInstanceClass": "db.r5.4xlarge",
        "Engine": "aurora-postgresql",
        "DBInstanceStatus": "creating",
        ... <redacted for brevity> ...

Connect to the Babelfish Cluster
Once the cluster and instances are ready, I connect to the writer instance to create the database itself. I may connect to the instance using SQL Server Management Studio (SSMS) or other SQL client such as sqlcmd. The Windows client must be able to connect to the Babelfish cluster, I made sure the RDS security group authorizes connections from the Windows host.

Using SSMS on Windows, I select New Query in the toolbar, I enter the database DNS name as Server name. I select SQL Server Authentication and I enter the database Login and Password. I click on Connect.

Important: Do not connect via the SSMS Object Explorer. Be sure to connect using the query editor via the New Query button. At this time, Babelfish supports the query editor, but not the Object Explorer.

SSMS Connect to babelfish

Once connected, I check the version with select @@version statement and click the green Execute button in the toolbar. I can read the statement result on the bottom part of the screen.

Babelfish check version

Finally, I create the database on the instance with the create database demo statement.

babelfish create database

By default, Babelfish runs in single-db mode. Using this mode, you can have maximum one user database per instance. It allows to have a close mapping of schema names between SQL Server and PostgreSQL. Alternatively, you may turn on multi-db mode at cluster creation time. This allows you to create multiple user databases per instance. In PostgreSQL, user databases will be mapped to multiple schemas with the database name as a prefix.

Run an Application
For the purpose of this demo, I use a database schema provided by SQLServerTutorial.net as part of their SQL Server Tutorial to create a schema and populate it with data. The SQL script and application C# code I use in this demo are available on my GitHub repository. A big thanks to my colleague Anuja for providing me with a C# demo application.

In SQL Server Management Studio, I open the create_objects.sql script and I choose the green execute icon on the top toolbar. A confirmation message tells me the database schema is created.

babelfish create schema

I repeat the operation with the load_data.sql script to load data in the newly created tables. Data loading takes a few minutes to run.

Now the database is loaded, let’s open Anuja‘s  C# application developed to access a SQL Server database. I modify two lines of code:

  • line 12 : I type the DNS name of the Babelfish cluster I created earlier. Note that I use the DNS name of a “write” node from my cluster.
  • line 15 : I type the password I entered when I created the database cluster.

Visual Studio Code - Prepare app to connect to babelfish

And that’s it! No other modification is required on this app. This code written to query and interact with SQL Server is just working “as-is” on Aurora PostgreSQL with Babelfish.

babelfish application execution

Open Source Transparency
We decided to open-source the technology behind Babelfish to create the Babelfish for PostgreSQL open source project. It uses the permissive Apache 2.0 and PostgreSQL licenses, meaning you can modify or tweak or distribute Babelfish in whatever fashion you see fit. Over time, we are shifting Babelfish to fully open development on GitHub, so there is transparency from the start. Now, anyone, whether you are an AWS customer or not, can use Babelfish to leave behind SQL Server and quickly, easily, and cost-effectively migrate your applications to open source PostgreSQL. We believe Babelfish is going to make PostgreSQL accessible to a much wider group of customers and developers than ever before, particularly those with large numbers of complex applications originally written for SQL Server.

Availability
Babelfish for Aurora PostgreSQL is available today in all publicly available AWS Regions at no additional cost. Start your application migration today.

— seb

PS : if you wonder where the name Babelfish comes from, just remember the answer is 42. (Or you can read this slightly longer answer.)

The collective thoughts of the interwebz