Stocks & Storage: Demystifying Finance Jargon, One Acronym at a Time

Post Syndicated from James Kisner original https://www.backblaze.com/blog/stocks-storage-demystifying-finance-jargon-one-acronym-at-a-time/

Now that Backblaze [BLZE] is a public company, our team has been wrestling with lots of new Wall Street jargon: IPO, EBITDA, EPS—yes, these all mean things. And if you’ve ever thought to yourself, “I’d like to learn more about publicly traded companies,” or “I wonder what these tech earnings reports really mean,” only to be hit by a wall of acronyms like these when you try to do a little research: You’re not alone.

We figured, if these are going to be part of our lives now, why not share our growing understanding with you?

Enter: Stocks & Storage

This new video blog for average folks interested in investing in tech stocks. In this series, Yev Pusin, resident storage expert, and James Kisner, certified finance geek, will demystify the lingo that Wall Street and cloud storage businesses use to report on how and what they’re doing.

  • Their main goal: Simplify what should be simple.
  • Their secondary goal: Don’t be boring!

If you want to stay up to date on the latest videos, subscribe to our YouTube here, or scroll to the bottom of this page and enter your email address to get blog updates straight to your inbox.

The post Stocks & Storage: Demystifying Finance Jargon, One Acronym at a Time appeared first on Backblaze Blog | Cloud Storage & Cloud Backup.

Rust 1.65.0 released

Post Syndicated from original https://lwn.net/Articles/913635/

Version
1.65.0
of the Rust language has been released. Improvements include
generic associated types, a new let...else statement, and the
ability to break from labeled blocks:

Plain block expressions can now be labeled as a break
target, terminating that block early. This may sound a little like
a goto statement, but it’s not an arbitrary jump, only
from within a block to its end. This was already possible with
loop blocks, and you may have seen people write loops that
always execute only once, just to get a labeled break.

Create a Multi-Region Python Package Publishing Pipeline with AWS CDK and CodePipeline

Post Syndicated from Brian Smitches original https://aws.amazon.com/blogs/devops/create-a-multi-region-python-package-publishing-pipeline-with-aws-cdk-and-codepipeline/

Customers can author and store internal software packages in AWS by leveraging the AWS CodeSuite (AWS CodePipeline, AWS CodeBuild, AWS CodeCommit, and AWS CodeArtifact).  As of the publish date of this blog post, there is no native way to replicate your CodeArtifact Packages across regions. This blog addresses how a custom solution built with the AWS Cloud Development Kit and AWS CodePipeline can create a Multi-Region Python Package Publishing Pipeline.

Whether it’s for resiliency or performance improvement, many customers want to deploy their applications across multiple regions. When applications are dependent on custom software packages, the software packages should be replicated to multiple regions as well. This post will walk through how to deploy a custom package publishing pipeline in your own AWS Account. This pipeline connects a Python package source code repository to build and publish pip packages to CodeArtifact Repositories spanning three regions (the primary and two replica regions). While this sample CDK Application is built specifically for pip packages, the underlying architecture can be reused for different software package formats, such as npm, Maven, NuGet, etc.

Solution overview

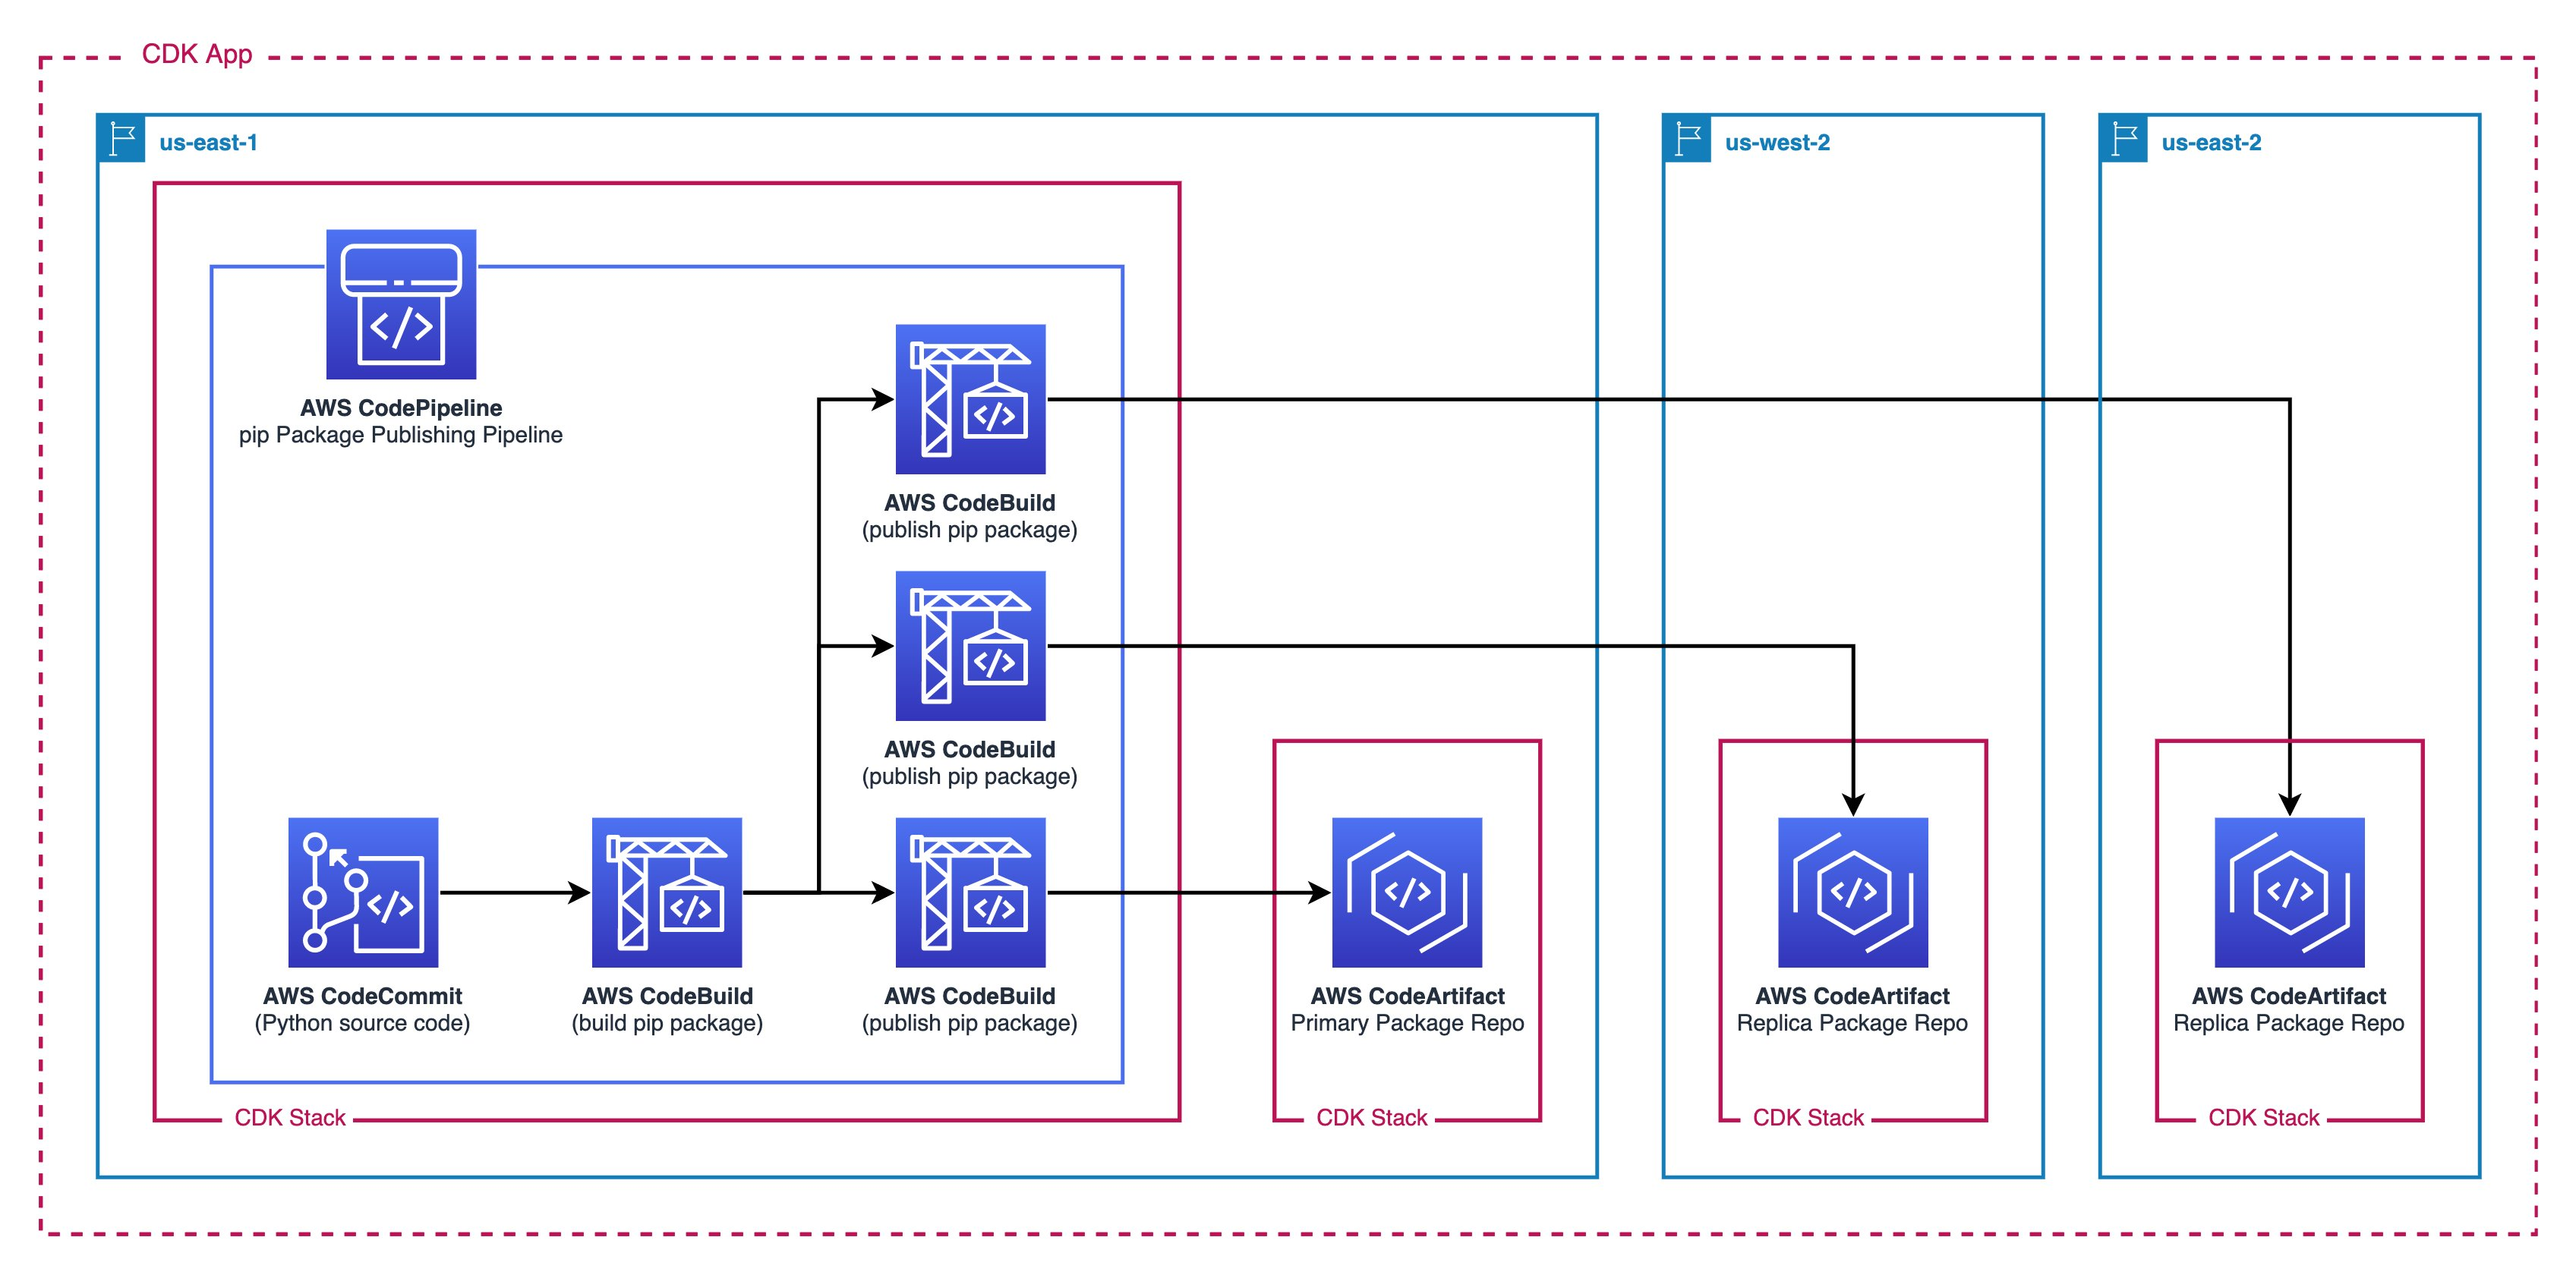
The following figure demonstrates the solution workflow:

  1. A CodePipeline pipeline orchestrates the building and publishing of the software package
    1. This pipeline is triggered by commits on the main branch of the CodeCommit repository
    2. A CodeBuild job builds the pip packages using twine to be distributed
    3. The publish stage (third column) uses three parallel CodeBuild jobs to publish the distribution package to the two CodeArtifact repositories in separate regions
  1. The first CodeArtifact Repository stores the package contents in the primary region.
  2. The second and third CodeArtifact Repository act as replicas and store the package contents in other regions.
Figure 1. A figure showing the architecture diagram

Figure 1.  Architecture diagram

All of these resources are defined in a single AWS CDK Application. The resources are defined in CDK Stacks that are deployed as AWS CloudFormation Stacks. AWS CDK can deploy the different stacks across separate regions.

Prerequisites

Before getting started, you will need the following:

  1. An AWS account
  2. An instance of the AWS Cloud9 IDE or an alternative local compute environment, such as your personal computer
  3. The following installed on your compute environment:
    1. AWS CDK
    2. AWS Command Line Interface (AWS CLI)
    3. npm
  1. The AWS Accounts must be bootstrapped for CDK in the necessary regions. The default configuration uses us-east-1, us-east-2 and us-west-2  as these three regions support CodeArtifact.

A new AWS Cloud9 IDE is recommended for this tutorial to isolate these actions in this post from your normal compute environment. See the Cloud9 Documentation for Creating an Environment.

Deploy the Python Package Publishing Pipeline into your AWS Account with the CDK

The source code can be found in this GitHub Repository.

  1. Fork the GitHub Repo into your account. This way you can experiment with changes as necessary to fit your workload.
  2. In your local compute environment, clone the GitHub Repository and cd into the project directory:
git clone [email protected]:<YOUR_GITHUB_USERNAME>/multi-region-
python-package-publishing-pipeline.git && cd multi-region-
python-package-publishing-pipeline
  1. Install the necessary node packages:
npm i
  1. (Optional) Override the default configurations for the CodeArtifact domainName, repositoryName, primaryRegion, and replicaRegions.
    1. navigate to ./bin/multiregion_package_publishing.ts and update the relevant fields.
    2. From the project’s root directory (multi-region-python-package-publishing-pipeline), deploy the AWS CDK application. This step may take 5-10 minutes.
cdk deploy --all
  1. When prompted “Do you wish to deploy these changes (y/n)?”, Enter y.

Viewing the deployed CloudFormation stacks

After the deployment of the AWS CDK application completes, you can view the deployed AWS CDK Stacks via CloudFormation. From the AWS Console, search “CloudFormation’ in the search bar and navigate to the service dashboard. In the primary region (us-east-1(N. Virginia)) you should see two stacks: CodeArtifactPrimaryStack-<region> and PackagePublishingPipelineStack.

Screenshot showing the CloudFormation Stacks in the primary region

Figure 2. Screenshot showing the CloudFormation Stacks in the primary region

Switch regions to one of the secondary regions us-west-2 (Oregon) or us-east-2 (Ohio) to see the remaining stacks named CodeArtifactReplicaStack-<region>. These correspond to the three AWS CDK Stacks from the architecture diagram.

Screenshot showing the CloudFormation stacks in a separate region

Figure 3. Screenshot showing the CloudFormation stacks in a separate region

Viewing the CodePipeline Package Publishing Pipeline

From the Console, select the primary region (us-east-1) and navigate to CodePipeline by utilizing the search bar. Select the Pipeline titled packagePipeline and inspect the state of the pipeline. This pipeline triggers after every commit from the CodeCommit repository named PackageSourceCode. If the pipeline is still in process, then wait a few minutes, as this pipeline can take approximately 7–8 minutes to complete all three stages (Source, Build, and Publish). Once it’s complete, the pipeline should reflect the following screenshot:

A screenshot showing the CodePipeline flow

Figure 4. A screenshot showing the CodePipeline flow

Viewing the Published Package in the CodeArtifact Repository

To view the published artifacts, go to the primary or secondary region and navigate to the CodeArtifact dashboard by utilizing the search bar in the Console. You’ll see a repository named package-artifact-repo. Select the repository and you’ll see the sample pip package named mypippackage inside the repository. This package is defined by the source code in the CodeCommit repository named PackageSourceCode in the primary region (us-east-1).

Screenshot of the package repository

Figure 5. Screenshot of the package repository

Create a new package version in CodeCommit and monitor the pipeline release

Navigate to your CodeCommit’s PackageSourceCode (us-east-1 CodeCommit > Repositories > PackageSourceCode. Open the setup.py file and select the Edit button. Make a simple modification, change the version = '1.0.0' to version = '1.1.0' and commit the changes to the Main branch.

A screenshot of the source package's code repository in CodeCommit

Figure 6. A screenshot of the source package’s code repository in CodeCommit

Now navigate back to CodePipeline and watch as the pipeline performs the release automatically. When the pipeline finishes, this new package version will live in each of the three CodeArtifact Repositories.

Install the custom pip package to your local Python Environment

For your development team to connect to this CodeArtifact Repository to download repositories, you must configure the pip tool to look in this repository. From your Cloud9 IDE (or local development environment), let’s test the installation of this package for Python3:

  1. Copy the connection instructions for the pip tool. Navigate to the CodeArtifact repository of your choice and select View connection instructions
    1. Select Copy to copy the snippet to your clipboard
Screenshot showing directions to connect to a code artifact repository

Figure 7. Screenshot showing directions to connect to a code artifact repository

  1. Paste the command from your clipboard
  2. Run pip install mypippackage==1.0.0
Screenshot showing CodeArtifact login

Figure 8. Screenshot showing CodeArtifact login

  1. Test the package works as expected by importing the modules
  2. Start the Python REPL by running python3 in the terminal
Screenshot of the package being imported

Figure 9. Screenshot of the package being imported

Clean up

Destroy all of the AWS CDK Stacks by running cdk destroy --all from the root AWS CDK application directory.

Conclusion

In this post, we walked through how to deploy a CodePipeline pipeline to automate the publishing of Python packages to multiple CodeArtifact repositories in separate regions. Leveraging the AWS CDK simplifies the maintenance and configuration of this multi-region solution by using Infrastructure as Code and predefined Constructs. If you would like to customize this solution to better fit your needs, please read more about the AWS CDK and AWS Developer Tools. Some links we suggest include the CodeArtifact User Guide (with sections covering npm, Python, Maven, and NuGet), the CDK API Reference, CDK Pipelines, and the CodePipeline User Guide.

About the authors:

Andrew Chen

Andrew Chen is a Solutions Architect with an interest in Data Analytics, Machine Learning, and DevOps. Andrew has previous experience in management consulting in which he worked as a technical architect for various cloud migration projects. In his free time, Andrew enjoys fishing, hiking, kayaking, and keeping up with financial markets.

Brian Smitches

Brian Smitches is a Solutions Architect with an interest in Infrastructure as Code and the AWS Cloud Development Kit. Brian currently supports Federal SMB Partners and has previous experience with Full Stack Application Development. In his personal time, Brian enjoys skiing, water sports, and traveling with friends and family.

Go Inside Rapid7 MDR: Timelines and Tick Tocks

Post Syndicated from Mikayla Wyman original https://blog.rapid7.com/2022/11/03/go-inside-rapid7-mdr-timelines-and-tick-tocks/

Go Inside Rapid7 MDR: Timelines and Tick Tocks

They say by 2025, half of all businesses will turn to a managed detection and response (MDR) service. Breaches are called “inevitable” now. And even with a blank check, most companies couldn’t hire their way to tight security: the expertise just isn’t out there.

In this new eBook you’ll find real life examples of common threats handled end-to-end by Rapid7 MDR. You can check out the speed and accuracy with which our global SOC experts identify, contain, and respond to attacks.

IBM says it takes an average of 287 days to identify a breach and about 75 to contain it. You can’t do that with the kind of attackers you’ll read about here, like the lethal More_Eggs malware. Or Solarmarker, which spawns hundreds of decoy files. Or EMOTET, finally disrupted in 2021 by international action coordinated by Europol.

We think that’s probably a good way to judge MDR: how well do you handle the worst?

Read the full eBook

Download now

How GitHub converts previously encrypted and unencrypted columns to ActiveRecord encrypted columns

Post Syndicated from Kylie Stradley original https://github.blog/2022-11-03-how-github-converts-previously-encrypted-and-unencrypted-columns-to-activerecord-encrypted-columns/

Background

In the first post in this series, we detailed how we designed our easy‐to‐use column encryption paved path. We found during the rollout that the bulk of time and effort was spent in robustly supporting the reading and upgrading of previous encryption formats/plaintext and key rotation. In this post, we’ll explain the design decisions we made in our migration plan and describe a simplified migration pattern you can use to encrypt (or re-encrypt) existing records in your Rails application.

We have two cases for encrypted columns data migration–upgrading plaintext or previously encrypted data to our new standard and key rotation.

Upon consulting the Rails documentation to see if there was any prior art we could use, we found the previous encryptor strategy but exactly how to migrate existing data is, as they say, an “exercise left for the reader.”

Dear reader, lace up your sneakers because we are about to exercise. 👟

To convert plaintext columns or columns encrypted with our deprecated internal encryption library, we used ActiveRecord::Encryption’s previous encryptor strategy, our existing feature flag mechanism and our own type of database migration called a transition. Transitions are used by GitHub to modify existing data, as opposed to migrations that are mainly used to add or change columns. To simplify things and save time, in the example migration strategy, we’ll rely on the Ruby gem, MaintenanceTasks.

Previous encryptor strategy

ActiveRecord::Encryption provides as a config option config.active_record.encryption.support_unencrypted_data that allows plaintext values in an encrypted_attribute to be read without error. This is enabled globally and could be a good strategy to use if you are migrating only plaintext columns and you are going to migrate them all at once. We chose not to use this option because we want to migrate columns to ActiveRecord::Encryption without exposing the ciphertext of other columns if decryption fails. By using a previous encryptor, we can isolate this “plaintext mode” to a single model.

In addition to this, GitHub’s previous encryptor uses a schema validator and regex to make sure that the “plaintext” being returned does not have the same shape as Rails encrypted columns data.

Feature flag strategy

We wanted to have fine-grained control to safely roll out our new encryption strategy, as well as the ability to completely disable it in case something went wrong, so we created our own custom type using the ActiveModel::Type API, which would only perform encryption when the feature flag for our new column encryption strategy was disabled.

A common feature flag strategy would be to start a feature flag at 0% and gradually ramp it up to 100% while you observe and verify the effects on your application. Once a flag is verified at 100%, you would remove the feature flag logic and delete the flag. To gradually increase a flag on column encryption, we would need to have an encryption strategy that could handle plaintext and encrypted records both back and forth because there would be no way to know if a column was encrypted without attempting to read it first. This seemed like unnecessary additional and confusing work, so we knew we’d want to use flagging as an on/off switch.

While a feature flag should generally not be long running, we needed the feature flag logic to be long running because we want it to be available for GitHub developers who will want to upgrade existing columns to use ActiveRecord::Encryption.

This is why we chose to inverse the usual feature flag default to give us the flexibility to upgrade columns incrementally without introducing unnecessary long‐running feature flags. This means we set the flag at 100% to prevent records from being encrypted with the new standard and set it to 0% to cause them to be encrypted with our new standard. If for some reason we are unable to prioritize upgrading a column, other columns do not need to be flagged at 100% to continue to be encrypted on our new standard.

We added this logic to our monkeypatch of ActiveRecord::Base::encrypts method to ensure our feature flag serializer is used:

Code sample 1

self.attribute(attribute) do |cast_type|
    GitHub::Encryption::FeatureFlagEncryptedType.new(cast_type: cast_type, attribute_name: attribute, model_name: self.name)
end

Which instantiates our new ActiveRecord Type that checks for the flag in its serialize method:

Code sample 2

# frozen_string_literal: true

module GitHub
  module Encryption
    class FeatureFlagEncryptedType < ::ActiveRecord::Type::Text
      attr_accessor :cast_type, :attribute_name, :model_name


      # delegate: a method to make a call to `this_object.foo.bar` into `this_object.bar` for convenience
      # deserialize: Take a value from the database, and make it suitable for Rails
      # changed_in_place?: determine if the value has changed and needs to be rewritten to the database
      delegate :deserialize, :changed_in_place?
, to: :cast_type

      def initialize(cast_type:, attribute_name:, model_name:)
        raise RuntimeError, "Not an EncryptedAttributeType" unless cast_type.is_a?(ActiveRecord::Encryption::EncryptedAttributeType)

        @cast_type = cast_type
        @attribute_name = attribute_name
        @model_name = model_name
      end


      # Take a value from Rails and make it suitable for the database
      def serialize(value)
        if feature_flag_enabled?("encrypt_as_plaintext_#{model_name.downcase}_#{attribute_name.downcase}")
          # Fall back to plaintext (ignore the encryption serializer)
          cast_type.cast_type.serialize(value)
        else
          # Perform encryption via active record encryption serializer
          cast_type.serialize(value)
        end
      end
    end
  end
end

A caveat to this implementation is that we extended from ActiveRecord::Type::Text which extends from ActiveModel::Type:String, which implements changed_in_place? by checking if the new_value is a string, and, if it is, does a string comparison to determine if the value was changed.

We ran into this caveat during our roll out of our new encrypted columns. When migrating a column previously encrypted with our internal encryption library, we found that changed_in_place? would compare the decrypted plaintext value to the encrypted value stored in the database, always marking the record as changed in place as these were never equal. When we migrated one of our fields related to 2FA recovery codes, this had the unexpected side effect of causing them to all appear changed in our audit log logic and created false-alerts in customer facing security logs. Fortunately, though, there was no impact to data and our authentication team annotated the false alerts to indicate this to affected customers.

To address the cause, we delegated the changed_in_place? to the cast_type, which in this case will always be ActiveRecord::Encryption::EncryptedAttributeType that attempts to deserialize the previous value before comparing it to the new value.

Key rotation

ActiveRecord::Encryption accommodates for a list of keys to be used so that the most recent one is used to encrypt records, but all entries in the list will be tried until there is a successful decryption or an ActiveRecord::DecryptionError is raised. On its own, this will ensure that when you add a new key, records that are updated after will automatically be re-encrypted with the new key.

This functionality allows us to reuse our migration strategy (see code sample 5) to re-encrypt all records on a model with the new encryption key. We do this simply by adding a new key and running the migration to re-encrypt.

Example migration strategy

This section will describe a simplified version of our migration process you can replicate in your application. We use a previous encryptor to implement safe plaintext support and the maintanence_tasks gem to backfill the existing records.

Set up ActiveRecord::Encryption and create a previous encryptor

Because this is a simplified example of our own migration strategy, we recommend using a previous encryptor to restrict the “plaintext mode” of ActiveRecord::Encryption to the specific model(s) being migrated.

Set up ActiveRecord::Encryption by generating random key set:

bin/rails db:encryption:init

And adding it to the encrypted Rails.application.credentials using:

bin/rails credentials:edit

If you do not have a master.key, this command will generate one for you. Remember never to commit your master key!

Create a previous encryptor. Remember, when you provide a previous strategy, ActiveRecord::Encryption will use the previous to decrypt and the current (in this case ActiveRecord’s default encryptor) to encrypt the records.

Code sample 3

app/lib/encryption/previous_encryptor.rb

# frozen_string_literal: true

module Encryption
  class PreviousEncryptor
    def encrypt(clear_text, key_provider: nil, cipher_options: {})
        raise NotImplementedError.new("This method should not be called")
    end

    def decrypt(previous_data, key_provider: nil, cipher_options: {})
      # JSON schema validation
        previous_data
    end
  end
end

Add the previous encryptor to the encrypted column

Code sample 4

app/models/secret.rb
class Secret < ApplicationRecord
  encrypts :code, previous: { encryptor: Encryption::PreviousEncryptor.new }
end

The PreviousEncryptor will allow plaintext records to be read as plaintext but will encrypt all new records up until and while the task is running.

Install the Maintenance Tasks gem and create a task

Install the Maintenance Tasks gem per the instructions and you will be ready to create the maintenance task.

Create the task.

bin/rails generate maintenance_tasks:task encrypt_plaintext_secrets

In day‐to‐day use, you shouldn’t ever need to call secret.encrypt because ActiveRecord handles the encryption before inserting into the database, but we can use this API in our task:

Code sample 5

app/tasks/maintenance/encrypt_plaintext_secrets_task.rb

# frozen_string_literal: true

module Maintenance
  class EncryptPlaintextSecretsTask < MaintenanceTasks::Task
    def collection
      Secret.all
    end

    def process(element)
      element.encrypt
    end
      …
  end
end

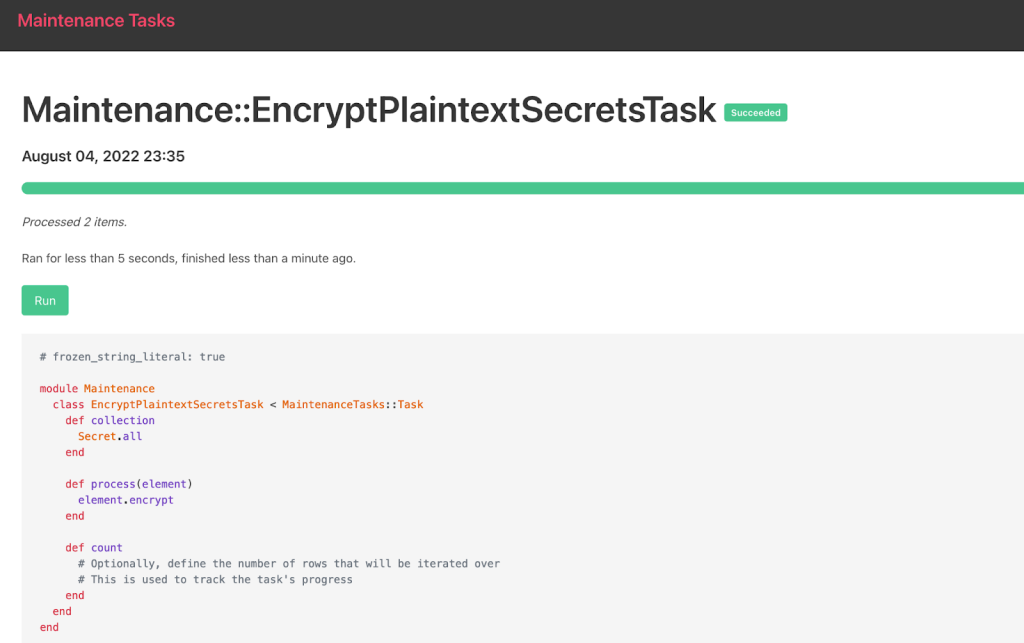
Run the Maintenance Task

Maintenance Tasks provides several options to run the task, but we use the web UI in this example:

Screenshot of the Maintenance Tasks web UI.

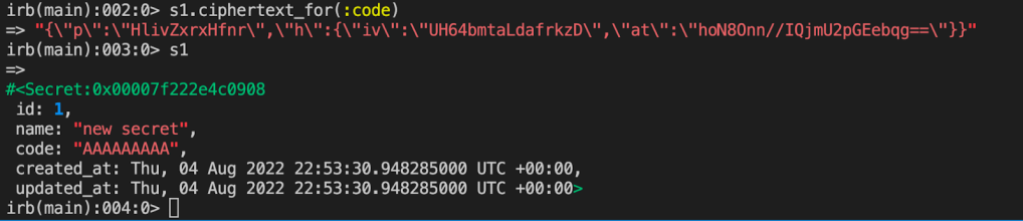
Verify your encryption and cleanup

You can verify encryption in Rails console, if you like:

Screenshot of the Rails console

And now you should be able to safely remove your previous encryptor leaving the model of your newly encrypted column looking like this:

Code sample 6

app/models/secret.rb

class Secret < ApplicationRecord
  encrypts :code
end

And so can you!

Encrypting database columns is a valuable extra layer of security that can protect sensitive data during exploits, but it’s not always easy to migrate data in an existing application. We wrote this series in the hope that more organizations will be able to plot a clear path forward to using ActiveRecord::Encryption to start encrypting existing sensitive values.

Get kids creating webpages with HTML and CSS

Post Syndicated from Rik Cross original https://www.raspberrypi.org/blog/learning-html-and-css/

With our new free ‘Introduction to web development’ path, young people are able to learn HTML and create their own webpages on topics that matter to them. The path is made up of six projects that show children and teenagers how to structure pages using HTML, and style them using CSS. 

At Coolest Projects, a young person explores a coding project.

With all the website tools available today, why learn HTML? 

Webpage creation has come a long way since the 1990s, but HTML is still the markup language that is used to display almost every page on the World Wide Web. By knowing how it works, you can deepen your understanding of the technology you use every day.

If you want to build your own website today, there are many tools to get you quickly up and running. These tools often involve dragging and dropping predefined elements and choosing from a wide collection of themed looks. Learning HTML and CSS skills is important for web designers, developers, and content creators who want to build unique webpage designs that make their content stand out.

Six webpages, each with a unique design and based on a topic important to the creator.
The path helps young people express themselves through their own webpages

With our new ‘Introduction to web development’ path, we want creators (the young people who use our projects) to be able to quickly make fantastic-looking websites that follow modern best practices, while they also learn how HTML and CSS work together to create a webpage. Creators write their own HTML to develop the content and structure of their webpages. And they customise our pre-built CSS style sheets to get their webpages to look like they imagine.

This really is a fun and unique approach to learning HTML and building a webpage, and we think young people will quickly engage with it. They start by finding out how to structure pages using HTML before applying CSS styles that bring their pages to life. Through the six projects, they build all the skills and independence they need to make webpages that matter to them. 

Accessibility first

We believe that young people should find out about website accessibility right from the start of their learning journey. That’s why the path for learning HTML shows creators how they can make their websites accessible to all their users regardless of the users’ needs or digital devices.

That’s why our new path uses semantic HTML. Older HTML tutorials might show you how to structure a webpage using tags like <div> and <span>. In contrast, the meaning and purpose of tags in semantic HTML is very clear. For example:

  • <main> is used to tag the main content for the webpage
  • <footer> is used for content to be displayed in the footer
  • <blockquote> contains a quote and typically the author of the quote
  • <section> contains a portion of content that usually sits within the main part of the webpage

Semantic HTML supports accessibility because it allows people who use a screen reader to more easily navigate a webpage and read it in a logical way. 

Another element of accessible design that the path introduces is the colour combinations used on webpages. It is really important that contrasting colours are used for the background and the text. High contrast makes the text more readable, which means the webpage is more suitable for visually impaired users. 

Good and bad examples of colour contrasting on webpages.
It’s very important to use contrasting colours on a webpage

The path also shows creators the importance of adding meaningful alternative text for images. Good alternative text helps visually impaired users, and users who have a very low bandwidth and therefore turn images off in their web browser. 

With the path, young people will learn how to design webpages that respond to the device of the user

Finally, our path for learning HTML introduces creators to the concept of responsive web design. Responsive design is helpful because websites can be viewed on thousands of different devices. Some people view pages on large, high-resolution monitors, and others view them on a mobile phone screen. We show learners how they can use HTML and CSS to make their pages responsive so they display in the way that works best for the specific screen on which a user is viewing them.

Key questions answered

Who is the ‘Intro to web development’ path for?

We have written the projects in this path with young people of around the age from 9 to 17 in mind. 

HTML and CSS are text-based markup languages. This means a young person who wants to start learning HTML needs to be familiar with typing on a keyboard. It would also be helpful to have experience of using the copy and paste function, which is useful when changing the layout of a page or copying similar pieces of code. 

Young people attending a Dojo.

If a young person is unsure whether they have the right skills to get started with the path, they can first try out a short ‘Discover’ project. With this Discover project, young people can choose between the themes ‘space’, ‘sunsets’, ‘forests’, or ‘animals’ to see how they can create their first webpage in just five steps. (We’re still working on the ‘Discover’ project type, so if you have any feedback about it, let us know.)

An example step from the Discover project, forest theme.
Young people can experiment with our Discover project to build their own webpage in just a few steps

What will young people learn with the path?

Creators will learn how to use HTML and CSS to build webpages that have:

  • Images
  • Lists
  • Quotes 
  • Links 
  • Animations
  • Imported fonts

They will also learn about how to make their webpages accessible to all through use of:

  • Semantic HTML
  • Alternative text for images
  • Colour contrast checking
  • Responsive design (means the webpage adapts to the device on which it is viewed)

How long does the path take to complete?

We’ve designed the path so young people can complete it in six one-hour sessions, with one hour for each project. Since the project instructions encourage creators to upgrade their projects, they may wish to go further and spend a little more time getting their projects exactly as they imagine them. 

A CoderDojo coding session for young people.

What software is needed to create the projects in the path?

Young people only need a standard web browser to follow the project instructions and use an online code editor to create their webpages. 

What can young people do next?

Explore our other projects for learning HTML

There are 28 other step-by-step projects for creators to choose from on our website. They can browse through these to see what cool things they’d like to make and what new skills they want to learn.

Build a webpage for Coolest Projects 

If your kid is proud of the webpage they create with the final ‘Invent’ project in the path, they can share it with a worldwide community of young creators in our free Coolest Projects tech showcase. Project registration will open again in spring 2023. You can sign up to hear news about the showcase on the Coolest Projects homepage.

Two teenage girls participating in Coolest Projects shows off their tech project.
Details about the projects in ‘Intro to web development’

The ‘Intro to web development’ path is structured according to our Digital Making Framework, with three Explore projects, two Design projects, and a final Invent project. You can also check out our learning graph to to see the progression of young people’s skills and knowledge throughout the path.

Explore project 1: Anime expressions


In the ‘Anime expressions’ project, creators build and style a webpage for an anime drawing tutorial. They learn how to use HTML tags to structure a webpage; use CSS to apply layout, colours, and fonts; and add images and text content to their page.  

Explore project 2: Top 5 emojis


With the ‘Top 5 emojis’ project, young people create a webpage displaying their top 5 list of emojis. They learn how to add emojis, create a list, use a block quote, and animate elements of the page. 

Explore project 3: Flip treat webcards


With the ‘Flip treat webcards’ project, creators make a webpage showing a flip card with a treat from around the world. They use CSS to make the card flip over when a user interacts with it. Creators also learn how to apply gradients and import fonts from Google Fonts. 

Design project 1: Mood board


This Design project gives creators the chance to develop the skills that they have learned in the three ‘Explore’ projects. With the ‘Mood board’ project, young people create a webpage to display a mood board for a real or imaginary project. The mood board could, for example, show ideas for a party, a fashion item, a redesign of their bedroom, or a website; or it could show reminders of all the things that make them happy. 

Design project 2: Sell me something


The ‘Sell me something’ project is another chance for creators to practise the skills that they have gained in the ‘Explore’ projects. They create a webpage to ‘sell something’ to the webpages visitors. It could be anything they like, from an object they love, to a game they like to play. 

Invent project: Build a webpage


The ‘Build a webpage’ project is the final project in the path and allows young people to independently build a webpage on any topic they’re interested in. This Invent project offers info cards to remind creators of the key skills they’ve learned with the path, and a light structure to support them through the process of making their webpage. Young people are encouraged to showcase their final webpages in the path gallery to inspire other creators. 

The post Get kids creating webpages with HTML and CSS appeared first on Raspberry Pi.

Linux Boot Partitions

Post Syndicated from original https://0pointer.net/blog/linux-boot-partitions.html

💽 Linux Boot Partitions and How to Set Them Up 🚀

Let’s have a look how traditional Linux distributions set up
/boot/ and the ESP, and how this could be improved.

How Linux distributions traditionally have been setting up their
“boot” file systems has been varying to some degree, but the most
common choice has been to have a separate partition mounted to
/boot/. Usually the partition is formatted as a Linux file system
such as ext2/ext3/ext4. The partition contains the kernel images, the
initrd and various boot loader resources. Some distributions, like
Debian and Ubuntu, also store ancillary files associated with the
kernel here, such as kconfig or System.map. Such a traditional
boot partition is only defined within the context of the distribution,
and typically not immediately recognizable as such when looking just
at the partition table (i.e. it uses the generic Linux partition type
UUID).

With the arrival of UEFI a new partition relevant for boot appeared,
the EFI System Partition (ESP). This partition is defined by the
firmware environment, but typically accessed by Linux to install or
update boot loaders. The choice of file system is not up to Linux, but
effectively mandated by the UEFI specifications: vFAT. In theory it
could be formatted as other file systems too. However, this would
require the firmware to support file systems other than vFAT. This is
rare and firmware specific though, as vFAT is the only file system
mandated by the UEFI specification. In other words, vFAT is the only
file system which is guaranteed to be universally supported.

There’s a major overlap of the type of the data typically stored in
the ESP and in the traditional boot partition mentioned earlier: a
variety of boot loader resources as well as kernels/initrds.

Unlike the traditional boot partition, the ESP is easily recognizable
in the partition table via its GPT partition type UUID. The ESP is
also a shared resource: all OSes installed on the same disk will
share it and put their boot resources into them (as opposed to the
traditional boot partition, of which there is one per installed Linux
OS, and only that one will put resources there).

To summarize, the most common setup on typical Linux distributions is
something like this:

Type Linux Mount Point File System Choice
Linux “Boot” Partition /boot/ Any Linux File System, typically ext2/ext3/ext4
ESP /boot/efi/ vFAT

As mentioned, not all distributions or local installations agree on
this. For example, it’s probably worth mentioning that some
distributions decided to put kernels onto the root file system of the
OS itself. For this setup to work the boot loader itself [sic!] must
implement a non-trivial part of the storage stack. This may have to
include RAID, storage drivers, networked storage, volume management,
disk encryption, and Linux file systems. Leaving aside the conceptual
argument that complex storage stacks don’t belong in boot loaders
there are very practical problems with this approach. Reimplementing
the Linux storage stack in all its combinations is a massive amount of
work. It took decades to implement what we have on Linux now, and it
will take a similar amount of work to catch up in the boot loader’s
reimplementation. Moreover, there’s a political complication: some
Linux file system communities made clear they have no interest in
supporting a second file system implementation that is not maintained
as part of the Linux kernel.

What’s interesting is that the /boot/efi/ mount point is nested
below the /boot/ mount point. This effectively means that to access
the ESP the Boot partition must exist and be mounted first. A system
with just an ESP and without a Boot partition hence doesn’t fit well
into the current model. The Boot partition will also have to carry an
empty “efi” directory that can be used as the inner mount point, and
serves no other purpose.

Given that the traditional boot partition and the ESP may carry
similar data (i.e. boot loader resources, kernels, initrds) one may
wonder why they are separate concepts. Historically, this was the
easiest way to make the pre-UEFI way how Linux systems were booted
compatible with UEFI: conceptually, the ESP can be seen as just a
minor addition to the status quo ante that way. Today, primarily two
reasons remained:

  • Some distributions see a benefit in support for complex Linux file
    system concepts such as hardlinks, symlinks, SELinux labels/extended
    attributes and so on when storing boot loader resources. – I
    personally believe that making use of features in the boot file
    systems that the firmware environment cannot really make sense of is
    very clearly not advisable. The UEFI file system APIs know no
    symlinks, and what is SELinux to UEFI anyway? Moreover, putting more
    than the absolute minimum of simple data files into such file
    systems immediately raises questions about how to authenticate them
    comprehensively (including all fancy metadata) cryptographically on
    use (see below).

  • On real-life systems that ship with non-Linux OSes the ESP often
    comes pre-installed with a size too small to carry multiple Linux
    kernels and initrds. As growing the size of an existing ESP is
    problematic (for example, because there’s no space available
    immediately after the ESP, or because some low-quality firmware
    reacts badly to the ESP changing size) placing the kernel in a
    separate, secondary partition (i.e. the boot partition) circumvents
    these space issues.

File System Choices

We already mentioned that the ESP effectively has to be vFAT, as that
is what UEFI (more or less) guarantees. The file system choice for the
boot partition is not quite as restricted, but using arbitrary Linux
file systems is not really an option either. The file system must be
accessible by both the boot loader and the Linux OS. Hence only file
systems that are available in both can be used. Note that such
secondary implementations of Linux file systems in the boot
environment – limited as they may be – are not typically welcomed
or supported by the maintainers of the canonical file system
implementation in the upstream Linux kernel. Modern file systems are
notoriously complicated and delicate and simply don’t belong in boot
loaders.

In a trusted boot world, the two file systems for the ESP and the
/boot/ partition should be considered untrusted: any code or
essential data read from them must be authenticated cryptographically
before use. And even more, the file system structures themselves are
also untrusted. The file system driver reading them must be careful
not to be exploitable by a rogue file system image. Effectively this
means a simple file system (for which a driver can be more easily
validated and reviewed) is generally a better choice than a complex
file system (Linux file system communities made it pretty clear that
robustness against rogue file system images is outside of their scope
and not what is being tested for.).

Some approaches tried to address the fact that boot partitions are
untrusted territory by encrypting them via a mechanism compatible to
LUKS, and adding decryption capabilities to the boot loader so it can
access it. This misses the point though, as encryption does not imply
authentication, and only authentication is typically desired. The boot
loader and kernel code are typically Open Source anyway, and hence
there’s little value in attempting to keep secret what is already
public knowledge. Moreover, encryption implies the existence of an
encryption key. Physically typing in the decryption key on a keyboard
might still be acceptable on desktop systems with a single human user
in front, but outside of that scenario unlock via TPM, PKCS#11 or
network services are typically required. And even on the desktop FIDO2
unlocking is probably the future. Implementing all the technologies
these unlocking mechanisms require in the boot loader is not
realistic, unless the boot loader shall become a full OS on its own as
it would require subsystems for FIDO2, PKCS#11, USB, Bluetooth
network, smart card access, and so on.

File System Access Patterns

Note that traditionally both mentioned partitions were read-only
during most parts of the boot. Only later, once the OS is up, write
access was required to implement OS or boot loader updates. In today’s
world things have become a bit more complicated. A modern OS might
want to require some limited write access already in the boot loader,
to implement boot counting/boot assessment/automatic fallback (e.g.,
if the same kernel fails to boot 3 times, automatically revert to
older kernel), or to maintain an early storage-based random seed. This
means that even though the file system is mostly read-only, we need
limited write access after all.

vFAT cannot compete with modern Linux file systems such as btrfs
when it comes to data safety guarantees. It’s not a journaled file
system, does not use CoW or any form of checksumming. This means when
used for the system boot process we need to be particularly careful
when accessing it, and in particular when making changes to it (i.e.,
trying to keep changes local to single sectors). It is essential to
use write patterns that minimize the chance of file system
corruption. Checking the file system (“fsck”) before modification
(and probably also reading) is important, as is ensuring the file
system is put into a “clean” state as quickly as possible after each
modification.

Code quality of the firmware in typical systems is known to not always
be great. When relying on the file system driver included in the
firmware it’s hence a good idea to limit use to operations that have a
better chance to be correctly implemented. For example, when writing
from the UEFI environment it might be wise to avoid any operation that
requires allocation algorithms, but instead focus on access patterns
that only override already written data, and do not require allocation
of new space for the data.

Besides write access from the boot loader code (as described above)
these file systems will require write access from the OS, to
facilitate boot loader and kernel/initrd updates. These types of
accesses are generally not fully random accesses (i.e., never partial
file updates) but usually mean adding new files as whole, and removing
old files as a whole. Existing files are typically not modified once
created, though they might be replaced wholly by newer versions.

Boot Loader Updates

Note that the update cycle frequencies for boot loaders and for
kernels/initrds are probably similar these days. While kernels are
still vastly more complex than boot loaders, security issues are
regularly found in both. In particular, as boot loaders (through
“shim” and similar components) carry certificate/keyring and denylist
information, which typically require frequent updates. Update cycles
hence have to be expected regularly.

Boot Partition Discovery

The traditional boot partition was not recognizable by looking just at
the partition table. On MBR systems it was directly referenced from
the boot sector of the disk, and on EFI systems from information
stored in the ESP. This is less than ideal since by losing this
entrypoint information the system becomes unbootable. It’s typically a
better, more robust idea to make boot partitions recognizable as such
in the partition table directly. This is done for the ESP via the GPT
partition type UUID. For traditional boot partitions this was not done
though.

Current Situation Summary

Let’s try to summarize the above:

  • Currently, typical deployments use two distinct boot partitions,
    often using two distinct file system implementations

  • Firmware effectively dictates existence of the ESP, and the use of
    vFAT

  • In userspace view: the ESP mount is nested below the general
    Boot partition mount

  • Resources stored in both partitions are primarily kernel/initrd, and
    boot loader resources

  • The mandatory use of vFAT brings certain data safety challenges,
    as does quality of firmware file system driver code

  • During boot limited write access is needed, during OS runtime
    more comprehensive write access is needed (though still not fully
    random).

  • Less restricted but still limited write patterns from OS
    environment
    (only full file additions/updates/removals, during
    OS/boot loader updates)

  • Boot loaders should not implement complex storage stacks.

  • ESP can be auto-discovered from the partition table, traditional
    boot partition cannot.

  • ESP and the traditional boot partition are not protected
    cryptographically neither in structure nor contents. It is expected
    that loaded files are individually authenticated after being read.

  • The ESP is a shared resource — the traditional boot partition a
    resource specific to each installed Linux OS on the same disk.

How to Do it Better

Now that we have discussed many of the issues with the status quo ante, let’s see how we can do things better:

  • Two partitions for essentially the same data is a bad idea. Given
    they carry data very similar or identical in nature, the common case
    should be to have only one (but see below).

  • Two file system implementations are worse than one. Given that vFAT
    is more or less mandated by UEFI and the only format universally
    understood by all players, and thus has to be used anyway, it might
    as well be the only file system that is used.

  • Data safety is unnecessarily bad so far: both ESP and boot partition
    are continuously mounted from the OS, even though access is pretty
    restricted: outside of update cycles access is typically not
    required.

  • All partitions should be auto-discoverable/self-descriptive

  • The two partitions should not be exposed as nested mounts to userspace

To be more specific, here’s how I think a better way to set this all up would look like:

  • Whenever possible, only have one boot partition, not two. On EFI
    systems, make it the ESP. On non-EFI systems use an XBOOTLDR
    partition instead (see below). Only have both in the case where a
    Linux OS is installed on a system that already contains an OS with
    an ESP that is too small to carry sufficient kernels/initrds. When a
    system contains a XBOOTLDR partition put kernels/initrd on that,
    otherwise the ESP.

  • Instead of the vaguely defined, traditional Linux “boot” partition
    use the XBOOTLDR partition type as defined by the Discoverable
    Partitions
    Specification
    . This
    ensures the partition is discoverable, and can be automatically
    mounted by things like
    systemd-gpt-auto-generator. Use
    XBOOTLDR only if you have to, i.e., when dealing with systems that
    lack UEFI (and where the ESP hence has no value) or to address the
    mentioned size issues with the ESP. Note that unlike the traditional
    boot partition the XBOOTLDR partition is a shared resource, i.e.,
    shared between multiple parallel Linux OS installations on the same
    disk. Because of this it is typically wise to place a per-OS
    directory at the top of the XBOOTLDR file system to avoid conflicts.

  • Use vFAT for both partitions, it’s the only thing
    universally understood among relevant firmwares and Linux. It’s
    simple enough to be useful for untrusted storage. Or to say this
    differently: writing a file system driver that is not easily
    vulnerable to rogue disk images is much easier for vFAT than for
    let’s say btrfs. – But the choice of vFAT implies some care needs to
    be taken to address the data safety issues it brings, see below.

  • Mount the two partitions via the “automount”
    logic. For example, via systemd’s
    automount
    units, with a very short idle time-out (one second or so). This
    improves data safety immensely, as the file systems will remain
    mounted (and thus possibly in a “dirty” state) only for very short
    periods of time, when they are actually accessed – and all that
    while the fact that they are not mounted continuously is mostly not
    noticeable for applications as the file system paths remain
    continuously around. Given that the backing file system (vFAT) has
    poor data safety properties, it is essential to shorten the access
    for unclean file system state as much as possible. In fact, this is
    what the aforementioned systemd-gpt-auto-generator
    logic actually does by default.

  • Whenever mounting one of the two partitions, do a file system check
    (fsck; in fact this is also what
    systemd-gpt-auto-generatordoes by default, hooked into
    the automount logic, to run on first access). This ensures that even
    if the file system is in an unclean state it is restored to be clean
    when needed, i.e., on first access.

  • Do not mount the two partitions nested, i.e., no
    more /boot/efi/. First of all, as mentioned above, it
    should be possible (and is desirable) to only have one of the
    two. Hence it is simply a bad idea to require the other as well,
    just to be able to mount it. More importantly though, by nesting
    them, automounting is complicated, as it is necessary to trigger the
    first automount to establish the second automount, which defeats the
    point of automounting them in the first place. Use the two distinct
    mount points /efi/ (for the ESP) and
    /boot/ (for XBOOTLDR) instead. You might have guessed,
    but that too is what systemd-gpt-auto-generator does by
    default.

  • When making additions or updates to ESP/XBOOTLDR from the OS make
    sure to create a file and write it in full, then
    syncfs() the whole file system, then rename to give it
    its final name, and syncfs() again. Similar when
    removing files.

  • When writing from the boot loader environment/UEFI to ESP/XBOOTLDR,
    do not append to files or create new files. Instead overwrite
    already allocated file contents (for example to maintain a random
    seed file) or rename already allocated files to include information
    in the file name (and ideally do not increase the file name in
    length; for example to maintain boot counters).

  • Consider adopting
    UKIs,
    which minimize the number of files that need to be updated on the
    ESP/XBOOTLDR during OS/kernel updates (ideally down to 1)

  • Consider adopting
    systemd-boot,
    which minimizes the number of files that need to be updated on boot
    loader updates (ideally down to 1)

  • Consider removing any mention of ESP/XBOOTLDR from
    /etc/fstab, and just let
    systemd-gpt-auto-generator do its thing.

  • Stop implementing file systems, complex storage, disk encryption, …
    in your boot loader.

Implementing things like that you gain:

  • Simplicity: only one file system implementation, typically only
    one partition and mount point

  • Robust auto-discovery of all partitions, no need to even
    configure /etc/fstab

  • Data safety guarantees as good as possible, given the
    circumstances

To summarize this in a table:

Type Linux Mount Point File System Choice Automount
ESP /efi/ vFAT yes
XBOOTLDR /boot/ vFAT yes

A note regarding modern boot loaders that implement the Boot Loader
Specification
:
both partitions are explicitly listed in the specification as sources
for both Type #1 and Type #2 boot menu entries. Hence, if you use such
a modern boot loader (e.g. systemd-boot) these two partitions are the
preferred location for boot loader resources, kernels and initrds
anyway.

Addendum: You got RAID?

You might wonder, what about RAID setups and the ESP? This comes up
regularly in discussions: how to set up the ESP so that (software)
RAID1 (mirroring) can be done on the ESP. Long story short: I’d
strongly advise against using RAID on the ESP. Firmware typically
doesn’t have native RAID support, and given that firmware and boot
loader can write to the file systems involved, any attempt to use
software RAID on them will mean that a boot cycle might corrupt the
RAID sync, and immediately requires a re-synchronization after
boot. If RAID1 backing for the ESP is really necessary, the only way
to implement that safely would be to implement this as a driver for
UEFI – but that creates certain bootstrapping issues (i.e., where to
place the driver if not the ESP, a file system the driver is supposed
to be used for), and also reimplements a considerable component of the
OS storage stack in firmware mode, which seems problematic.

So what to do instead? My recommendation would be to solve this via
userspace tooling. If redundant disk support shall be implemented for
the ESP, then create separate ESPs on all disks, and synchronize them
on the file system level instead of the block level. Or in other
words, the tools that install/update/manage kernels or boot loaders
should be taught to maintain multiple ESPs instead of one. Copy the
kernels/boot loader files to all of them, and remove them from all of
them. Under the assumption that the goal of RAID is a more reliable
system this should be the best way to achieve that, as it doesn’t
pretend the firmware could do things it actually cannot do. Moreover
it minimizes the complexity of the boot loader, shifting the syncing
logic to userspace, where it’s typically easier to get right.

Addendum: Networked Boot

The discussion above focuses on booting up from a local disk. When
thinking about networked boot I think two scenarios are particularly
relevant:

  1. PXE-style network booting. I think in this mode of operation focus
    should be on directly booting a single UKI image instead of a boot
    loader. This sidesteps the whole issue of maintaining any boot
    partition at all, and simplifies the boot process greatly. In
    scenarios where this is not sufficient, and an interactive boot
    menu or other boot loader features are desired, it might be a good
    idea to take inspiration from the UKI concept, and build a single
    boot loader EFI binary (such as systemd-boot), and include the UKIs
    for the boot menu items and other resources inside it via PE
    sections. Or in other words, build a single boot loader binary that
    is “supercharged” and contains all auxiliary resources in its own
    PE sections. (Note: this does not exist, it’s an idea I intend to
    explore with systemd-boot). Benefit: a single file has to be
    downloaded via PXE/TFTP, not more. Disadvantage: unused resources
    are downloaded unnecessarily. Either way: in this context there is
    no local storage, and the ESP/XBOOTLDR discussion above is without
    relevance.

  2. Initrd-style network booting. In this scenario the boot loader and
    kernel/initrd (better: UKI) are available on a local disk. The
    initrd then configures the network and transitions to a network
    share or file system on a network block device for the root file
    system. In this case the discussion above applies, and in fact the
    ESP or XBOOTLDR partition would be the only partition available
    locally on disk.

And this is all I have for today.
See yourself in cyber: Highlights from Cybersecurity Awareness Month

Post Syndicated from CJ Moses original https://aws.amazon.com/blogs/security/see-yourself-in-cyber-highlights-from-cybersecurity-awareness-month/

As Cybersecurity Awareness Month comes to a close, we want to share some of the work we’ve done and made available to you throughout October. Over the last four weeks, we have shared insights and resources aligned with this year’s theme—”See Yourself in Cyber”—to help advance awareness training, and inspire people to join the rapidly growing security industry. Here are a few highlights.

Roundtable with the Cybersecurity and Infrastructure Security Agency (CISA): Amazon Chief Security Officer Steve Schmidt hosted CISA director Jen Easterly in Seattle for a roundtable with leaders across higher education, state and local government, and private industry to discuss ways to develop the cybersecurity workforce through skills training, partnerships between government and industry, and creating pathways to cybersecurity careers.

How AWS, Cisco, Netflix & SAP Are Approaching Cybersecurity Awareness Month. I joined Cisco Chief Security and Trust Officer Brad Arkin, Netflix Head of Cloud Security Srinath Kuruvardi, and SAP Chief Trust Officer Elena Kvochko to describe how AWS, Cisco, Netflix, and SAP are instilling strong cybersecurity training and practices within our organizations, with the goal of inspiring other organizations to do the same.

Cybersecurity Awareness Month 2022 Briefing. Amazon Security Director Jenny Brinkley—who leads Amazon’s internal and external awareness training activities—participated in a Cybersecurity Awareness Month panel discussion hosted by the National Cybersecurity Alliance. Jenny met with executives from KnowBe4, Google, NortonLifeLock, and Dell and chatted about how the cybersecurity landscape has changed over the past few years, and how those changes have impacted the perception of security as a part of daily life.

Making Cybersecurity Relevant for Consumers: The Case for Personal Agency. In addition to the briefing, Jenny spoke to the National Cybersecurity Alliance about staying safe online. She highlighted simple steps that everyone can take to be safer online, including staying consistent on software updates for connected devices, using strong passwords, activating multi-factor authentication (MFA) on accounts when possible, and being on the lookout for phishing attempts.

National Cybersecurity Alliance and Nasdaq Cybersecurity Summit. Jenny and Amazon Head of Global Security Training Jyllian Clarke also joined the National Cybersecurity Alliance, Nasdaq, and public and private sector security leaders in New York City for a cybersecurity summit and got to ring the opening bell.

Resources

AWS offers free Cybersecurity Awareness Training to individuals and businesses around the world, and we’re providing complimentary MFA security keys to AWS account owners in the United States. More than 40 security-focused courses are available through AWS Skill Builder, ranging from foundational to advanced content. By subscribing to AWS Skill Builder, you gain access to security-related interactive challenges with AWS Jam, which guides you through solving real-world problems.

Additionally, Amazon and the National Cybersecurity Alliance launched a cybersecurity awareness campaign called Protect & Connect. The campaign includes a public service announcement featuring Prime Video actor Michael B. Jordan and actress-producer Tessa Thompson as “internet bodyguards,” as well as a Protect & Connect microsite for consumers, featuring additional videos on topics such as MFA and how to identify and avoid phishing attempts.

Humanizing security

Cybersecurity can seem like a complex subject but ultimately, it’s all about people. Most of today’s threats need people to activate them, so you need to train people to develop intuition, which is something that can’t be automated. By meeting employees where they are with an engaging approach to awareness training that moves security to the forefront of everything they do, you can promote positive behavioral change, and start building a security-first culture.

If you have feedback about this post, submit comments in the Comments section below.

Want more AWS Security news? Follow us on Twitter.

CJ Moses

CJ Moses

CJ is the Chief Information Security Officer (CISO) at AWS, where he leads product design and security engineering. His mission is to deliver the economic and security benefits of cloud computing to business and government customers. Previously, CJ led the technical analysis of computer and network intrusion efforts at the U.S. Federal Bureau of Investigation Cyber Division. He also served as a Special Agent with the U.S. Air Force Office of Special Investigations (AFOSI). CJ led several computer intrusion investigations seen as foundational to the information security industry today.

[$] Modernizing Fedora’s C code

Post Syndicated from original https://lwn.net/Articles/913505/

It is not often that you see a Fedora change proposal for a version of the
distribution that will not be available for 18 months or so, but that
is exactly what was recently posted to the mailing list.
The change targets the C source code in the myriad of packages that the
distribution ships; it would fix code that uses some ancient compatibility
features that were removed by the C99 standard but are still supported by
GCC. As might be guessed from the
long runway proposed, there is quite a bit of work to do to get there.

A new crop of malicious modules found on PyPI

Post Syndicated from original https://lwn.net/Articles/913555/

Phylum has posted an
article
with a detailed look at a set of malicious packages discovered
by an automated system they have developed.

Similar to this attacker’s previous attempts, this particular
attack starts by copying existing popular libraries and simply
injecting a malicious __import__ statement into an otherwise
healthy codebase. The benefit this attacker gained from copying an
existing legitimate package, is that because the PyPI landing page
for the package is generated from the setup.py and the README.md,
they immediately have a real looking landing page with mostly
working links and the whole bit. Unless thoroughly inspected, a
brief glance might lead one to believe this is also a legitimate
package.

How to control non-HTTP and non-HTTPS traffic to a DNS domain with AWS Network Firewall and AWS Lambda

Post Syndicated from Tyler Applebaum original https://aws.amazon.com/blogs/security/how-to-control-non-http-and-non-https-traffic-to-a-dns-domain-with-aws-network-firewall-and-aws-lambda/

Security and network administrators can control outbound access from a virtual private cloud (VPC) to specific destinations by using a service like AWS Network Firewall. You can use stateful rule groups to control outbound access to domains for HTTP and HTTPS by default in Network Firewall. In this post, we’ll walk you through how to accomplish this access control for non-HTTP and non-HTTPS traffic, such as SSH (Secure Shell). This solution is extensible to other protocols with static port assignments.

In the example scenario in this post, the network administrator needs to permit outbound SSH access on port 22/tcp to a third-party domain, example.org, from a group of Amazon Elastic Compute Cloud (Amazon EC2) instances that sits inside of a protected VPC that restricts outbound SSH traffic with Network Firewall. Non-HTTP traffic can’t currently be controlled with a domain rule in Network Firewall.

This solution allows administrators to control outbound access to a given domain in a granular way, by resolving the domain name inside of an AWS Lambda function, and updating a Network Firewall rule variable with the results of the DNS query. This solution further restricts specific non-HTTP and non-HTTPS traffic to those allowed domains to only what is explicitly specified by the administrator.
Solution overview

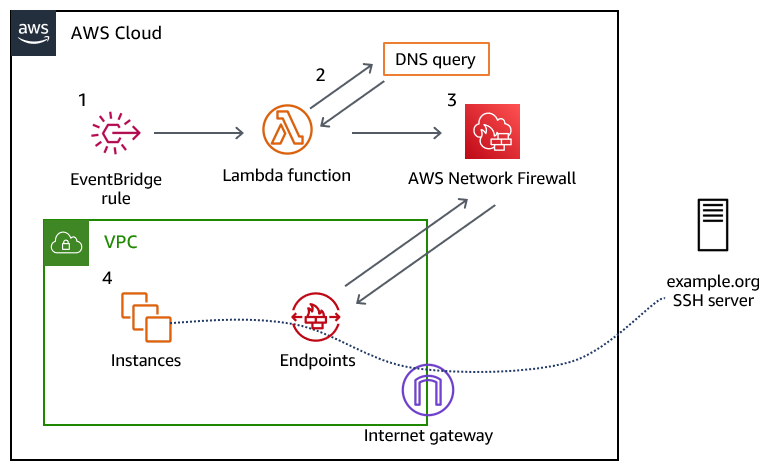
Figure 1 provides an overview of the solution and the resulting traffic flow.

Figure 1: Overview of the solution and the resulting traffic flow

Figure 1: Overview of the solution and the resulting traffic flow

The solution workflow is as follows:

  1. An Amazon EventBridge rule invokes the Lambda function every 10 minutes. You can modify this frequency to meet your needs. You should consider the time-to-live (TTL) record of the DNS record that you are configuring when choosing this interval.
  2. The Lambda function performs the DNS lookup for the provided domain, and updates a variable in an existing Network Firewall rule group. The rule group changes take a few seconds to fully apply to the nodes in your Network Firewall deployment.
  3. The newly created Network Firewall rule group is associated with the Network Firewall policy to control traffic.
  4. Traffic from the instances in your VPC flows through the Network Firewall endpoint, and if allowed, is routed through an internet gateway to the target server.

Prerequisites

This solution has the following prerequisites:

  1. An AWS account. If you don’t have an AWS account, create and activate one.
  2. An existing VPC with default routing to an internet gateway through a network firewall that has a firewall policy attached to it. The example rule included in the solution’s AWS CloudFormation template expects the firewall policy to use the default action order for stateful rule groups. If you don’t have an existing network firewall associated with your VPC, see the AWS Network Firewall Developer Guide to get started. For a walkthrough of the Network Firewall configuration and rules engine, see the blog post Hands-on walkthrough of the AWS Network Firewall flexible rules engine – Part 1.
  3. A DNS domain that you provide, which allows traffic for the protocol and port (or ports) that you plan to allow traffic to. This DNS domain needs to resolve to an IPv4 address or set of addresses; IPv6 is not supported, at this point.

Deploy the solution

We’ve provided a CloudFormation template to deploy this solution, which is located in the GitHub repository that accompanies this blog post.

To deploy the solution

  1. Download the CloudFormation template from our GitHub repository.
  2. Sign in to your AWS account and select the AWS Region where your Network Firewall is deployed.
  3. Navigate to the CloudFormation service.
  4. Choose Stacks > Create Stack > With new resources (standard).
  5. In the Specify template section, choose Upload a template file.
  6. Choose Choose file, navigate to where you saved the CloudFormation template, and upload it. Then choose Next.
  7. Specify a stack name for your CloudFormation stack.
  8. In the Parameters section, for the Domain parameter, specify the name of the domain to which you will control access. The default value is set to example.org; however, note that the actual example.org doesn’t allow SSH traffic.
  9. The remaining parameters have defaults to allow outbound SSH traffic to the specified domain. Adjust the LambdaJobFrequency variable so that it corresponds with the TTL of the DNS record that it will resolve. This allows the Lambda function to keep the IP address of the DNS record up to date, in the event that it changes. After you’ve configured the parameters, choose Next.
    Figure 2: CloudFormation stack parameters

    Figure 2: CloudFormation stack parameters

  10. On the Configure stack options page, specify any further options needed or keep the default options, and then choose Next.
  11. On the Review page, review the stack and parameters and select the check box to acknowledge that this template will create IAM resources. Choose Create Stack.
  12. Check the stack creation status. Upon successful completion, the status shows CREATE_COMPLETE.
    Figure 3: The successful creation of the CloudFormation stack

    Figure 3: The successful creation of the CloudFormation stack

Test the solution

Before you test the newly created rule, make sure that the Lambda function has been invoked at least once from the EventBridge rule.

To verify the Lambda function results

  1. In the AWS Management Console, navigate to the Lambda function Network-Firewall-Resolver-Function, and on the Monitor tab, choose View logs in CloudWatch.
    Figure 4: Navigating to view logs in CloudWatch

    Figure 4: Navigating to view logs in CloudWatch

  2. Select the most recent log stream.
  3. Verify that that a log line contains the entry StatefulRuleGroup updated successfully.
    Figure 5: Examining the CloudWatch logs to verify that the Lambda function ran successfully

    Figure 5: Examining the CloudWatch logs to verify that the Lambda function ran successfully

  4. Associate the stateful rule group that was created by the stack, Lambda-Managed-Stateful-Rule with the existing Network Firewall policy that is attached to your VPC. To do this:
    1. Navigate to VPC > Network Firewall > Firewall Policies and select your existing firewall policy.
    2. In the Stateful rule groups section, for Actions, choose Add unmanaged stateful rule groups.
  5. Select the check box for Lambda-Managed-Stateful-Rule, and then choose Add stateful rule group.
  6. When the newly provisioned Lambda function runs successfully, it will resolve the IPv4 address for the domain (example.org) and associate the address with the stateful rule variable IP_NET. To validate that this has happened, do the following:
    1. Navigate to VPC > Network Firewall > Network Firewall rule groups.
    2. Choose the Lambda-Managed-Stateful-Rule rule group.
    3. Navigate to the rule variable section, and choose IP_NET. If the Lambda function successfully resolved the provided domain name, the variable will contain the IPv4 addresses for the domain you provided, as shown in Figure 6.
      Figure 6: Validating the rule variable details

      Figure 6: Validating the rule variable details

  7. Test the rule by attempting to connect to the domain that you specified in the CloudFormation template. Use an EC2 instance within the VPC that the network firewall rule is associated with, and attempt to establish an SSH connection to the domain that you specified. As shown by the SSH key negotiation in Figure 7, traffic is allowed through the network firewall, as intended.
    Figure 7: SSH connectivity to the domain was successful

    Figure 7: SSH connectivity to the domain was successful

    You can also configure the rule to drop the SSH connection, rather than permit it. To do this:

    1. Navigate to VPC > Network Firewall > Network Firewall rule groups.
    2. Choose the Lambda-Managed-Stateful-Rule rule group. In the Rules section, choose Edit Rules.
    3. Modify the rule to take the Drop action, and save the rule group.

    As shown by the lack of response from the host in Figure 8, the SSH connection cannot be established anymore.

    Figure 8: An SSH connection cannot be established, due to the connection timing out

    Figure 8: An SSH connection cannot be established, due to the connection timing out

Cleanup

Follow the steps in this section to remove the resources created by this solution.

To remove the resources

  1. Sign in to your AWS account where you deployed the CloudFormation stack and navigate to the Network Firewall console.
  2. In the Stateful rule groups section, select the check box for Lambda-Managed-Stateful-Rule. For Actions, choose Disassociate from policy.
    Figure 9: Disassociating the stateful rule from the existing policy

    Figure 9: Disassociating the stateful rule from the existing policy

  3. Navigate to the CloudFormation console, select the stack that you created, and then choose Delete. Upon successful deletion, the resources created by the stack will be deleted.

Conclusion

In this post, we’ve demonstrated how security and network administrators have the ability to permit or restrict non-HTTP and non-HTTPS traffic to a given domain by using Network Firewall. With this solution, administrators can enforce granular port- and protocol-level control to third-party domains. To learn more about rule group configuration in AWS Network Firewall, see Managing your own rule groups in the Developer Guide.

 
If you have feedback about this post, submit comments in the Comments section below. If you have questions about this post, contact AWS Support. You can also start a new thread on AWS Network Firewall re:Post to get answers from the community.

Want more AWS Security news? Follow us on Twitter.

Tyler Applebaum

Tyler Applebaum

Tyler is a Sr. Solutions Architect in the Charlotte, NC area helping customers migrate to AWS and modernize their applications. He has previous experience as a network engineer working in healthcare and finance.

Bhavin Lakhani

Bhavin is a Technical Account Manager in the US West, Northern California, helping customers with their AWS Enterprise Support, Operational, and Architectural needs. He has cloud infrastructure and database platform leadership experience in his previous roles. He loves soccer and is an ardent “Arsenal” fan.

Amazon Simple Email Service (SES) helps improve inbox deliverability with new features

Post Syndicated from Lauren Cudney original https://aws.amazon.com/blogs/messaging-and-targeting/amazon-simple-email-service-ses-helps-improve-inbox-deliverability-with-new-features/

Email remains the core of any company’s communication stack, but emails cannot deliver maximum ROI unless they land in recipients’ inboxes. Email deliverability, or ensuring emails land in the inbox instead of spam, challenges senders because deliverability can be impacted by a number of variables, like sending identity, campaign setup, or email configuration. Today, email senders rely on dashboard metrics or deliverability consultants to optimize the inbox placement of their messages. However, the deliverability dashboards available today do not provide specific recommendations to improve deliverability. Consultants provide bespoke solutions, but can cost hundreds of dollars per hour and are not scalable.


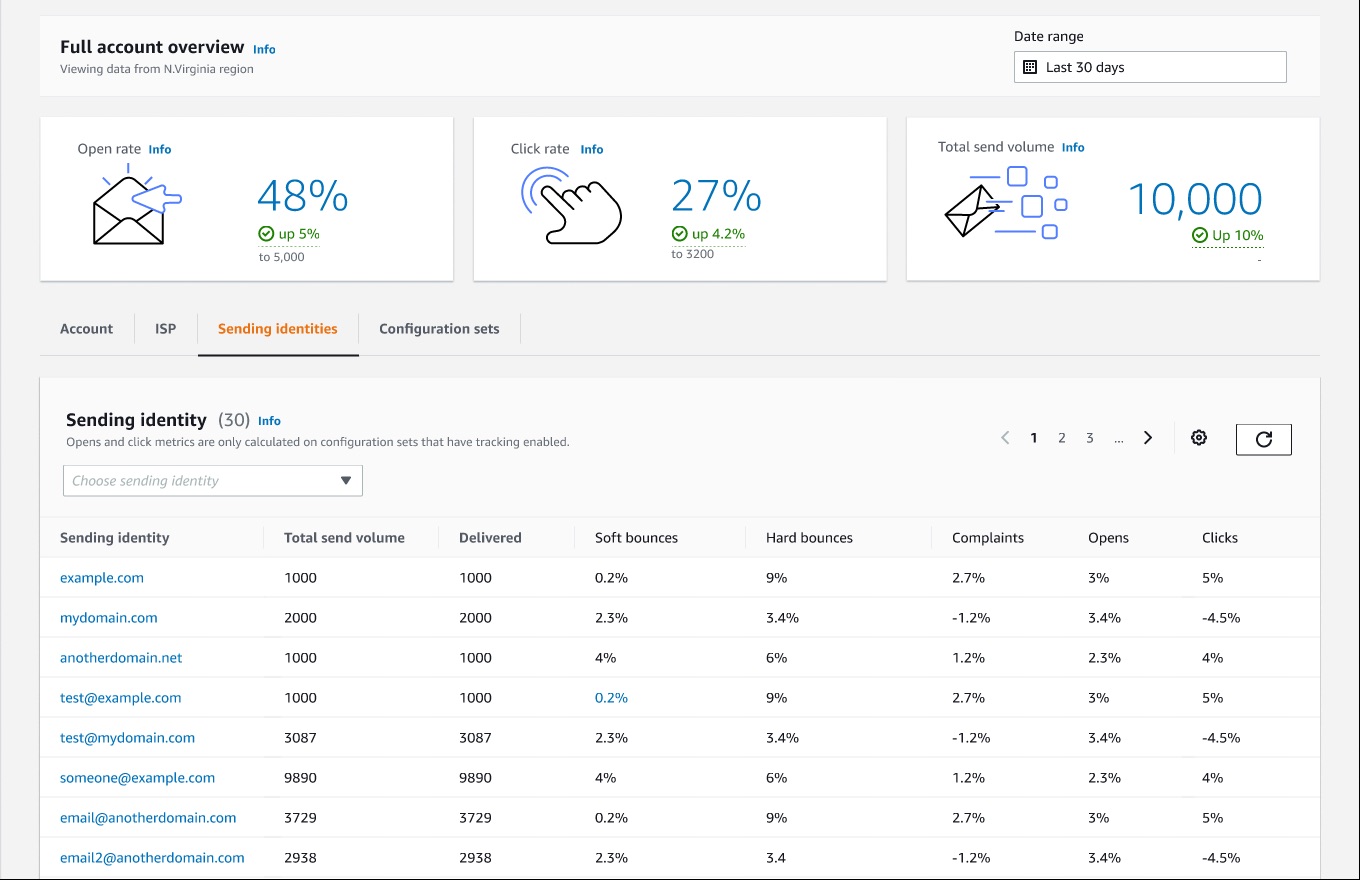
That’s why, today, we’re proud to announce virtual deliverability manager, a suite of new deliverability features in Amazon Simple Email Service (SES) that improve deliverability insights and recommendations. A new deliverability dashboard gives email senders more insights through a detailed dashboard of metrics on email deliverability. The “advisor” feature provides configuration recommendations to help improve inbox placement. SES’ “Guardian” can implement changes to email sending to help increase the percent of messages that land in the inbox. Deliverability metrics and recommendations are generated in real-time through Amazon SES, without the need for a human consultant or agency.

AWS Simple Email Service deliverability insights dashboard

The new SES feature reports email insights at-a-glance with metrics like open and click rate, but can also give deeper insights into individual ISP and configuration performance. SES will deliver specific configuration recommendations to improve deliverability based on a specific campaign’s setup, like DMARC (Domain-based Message Authentication Reporting and Conformance) or DKIM (DomainKeys Identified Mail) for a specific domain. Senders can turn on automatic implementation, which allows SES to intelligently adjust email sending configuration to maximize inbox placement.

AWS Simple Email Service deliverability recommendations to improve email sendingApplying new deliverability features is simple in the AWS console. Senders can log into their SES account dashboard to enable the virtual deliverability manager features. The features are billed as monthly subscription and can be turned on or off at any time. Once the features are activated, SES provides deliverability insights and recommendations in real time, allowing senders to improve performance of future sending batches or campaigns. Senders using Simple Email Service (SES) get reliable, scalable email at the lowest industry prices. SES is backed by AWS’ data security, and email through SES supports  compliance with HIPAA-eligible, FedRAMP-, GDPR-, and ISO-certified options.
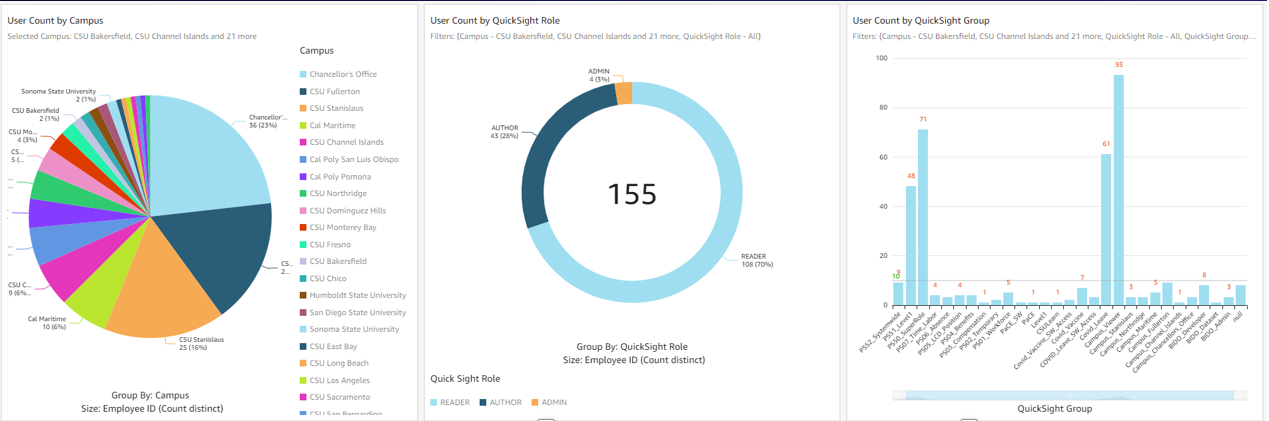
To learn more about virtual deliverability manager, visit https://aws.amazon.com/ses

California State University Chancellor’s Office reduces cost and improves efficiency using Amazon QuickSight for streamlined HR reporting in higher education

Post Syndicated from Madi Hsieh original https://aws.amazon.com/blogs/big-data/california-state-university-chancellors-office-reduces-cost-and-improves-efficiency-using-amazon-quicksight-for-streamlined-hr-reporting-in-higher-education/

The California State University Chancellor’s Office (CSUCO) sits at the center of America’s most significant and diverse 4-year universities. The California State University (CSU) serves approximately 477,000 students and employs more than 55,000 staff and faculty members across 23 universities and 7 off-campus centers. The CSU provides students with opportunities to develop intellectually and personally, and to contribute back to the communities throughout California. For this large organization, managing a wide system of campuses while maintaining the decentralized autonomy of each is crucial. In 2019, they needed a highly secure tool to streamline the process of pulling HR data. The CSU had been using a legacy central data warehouse based on data from their financial system, but it lacked the robustness to keep up with modern technology. This wasn’t going to work for their HR reporting needs.

Looking for a tool to match the cloud-based infrastructure of their other operations, the Business Intelligence and Data Operations (BI/DO) team within the Chancellor’s Office chose Amazon QuickSight, a fast, easy-to-use, cloud-powered business analytics service that makes it easy for all employees within an organization to build visualizations, perform ad hoc analysis, and quickly get business insights from their data, any time, on any device. The team uses QuickSight to organize HR information across the CSU, implementing a centralized security system.

“It’s easy to use, very straightforward, and relatively intuitive. When you couple the experience of using QuickSight, with a huge cost difference to [the BI platform we had been using], to me, it’s a simple choice,”

– Andy Sydnor, Director Business Intelligence and Data Operations at the CSUCO.

With QuickSight, the team has the capability to harness security measures and deliver data insights efficiently across their campuses.

In this post, we share how the CSUCO uses QuickSight to reduce cost and improve efficiency in their HR reporting.

Delivering BI insights across the CSU’s 23 universities

The CSUCO serves the university system’s faculty, students, and staff by overseeing operations in several areas, including finance, HR, student information, and space and facilities. Since migrating to QuickSight in 2019, the team has built dashboards to support these operations. Dashboards include COVID-related leaves of absence, historical financial reports, and employee training data, along with a large selection of dashboards to track employee data at an individual campus level or from a system-wide perspective.

The team created a process for reading security roles from the ERP system and then translating them using QuickSight groups for internal HR reporting. QuickSight allowed them to match security measures with the benefits of low maintenance and familiarity to their end-users.

With QuickSight, the CSUCO is able to run a decentralized security process where campus security teams can provision access directly and users can get to their data faster. Before transitioning to QuickSight, the BI/DO team spent hours trying to get to specific individual-level data, but with QuickSight, the retrieval time was shortened to just minutes. For the first time, Sydnor and his team were able to pinpoint a specific employee’s work history without having to take additional actions to find the exact data they needed.

Cost savings compared to other BI tools

Sydnor shares that, for a public organization, one of the most attractive qualities of QuickSight is the immense cost savings. The BI/DO team at the Chancellor’s Office estimates that they’re saving roughly 40% on costs since switching from their previous BI platform, which is a huge benefit for a public organization of this scale. Their previous BI tool was costing them extensive amounts of money on licensing for features they didn’t require; the CSUCO felt they weren’t getting the best use of their investment.

The functionality of QuickSight to meet their reporting needs at an affordable price point is what makes QuickSight the CSUCO’s preferred BI reporting tool. Sydnor likes that with QuickSight, “we don’t have to go out and buy a subscription or a license for somebody, we can just provision access. It’s much easier to distribute the product.” QuickSight allows the CSUCO to focus their budget in other areas rather than having to pay for charges by infrequent users.

Simple and intuitive interface

Getting started in QuickSight was a no-brainer for Sydnor and his team. As a public organization, the procurement process can be cumbersome, thereby slowing down valuable time for putting their data to action. As an existing AWS customer, the CSUCO could seamlessly integrate QuickSight into their package of AWS services. An issue they were running into with other BI tools was encountering roadblocks to setting up the system, which wasn’t an issue with QuickSight, because it’s a fully managed service that doesn’t require deploying any servers.

The following screenshot shows an example of the CSUCO security audit dashboard.

example of the CSUCO security audit dashboard.

Sydnor tells us, “Our previous BI tool had a huge library of visualization, but we don’t need 95% of those. Our presentations look great with the breadth of visuals QuickSight provides. Most people just want the data and ultimately, need a robust vehicle to get data out of a database and onto a table or visualization.”

Converting from their original BI tool to QuickSight was painless for his team. Sydnor tells us that he has “yet to see something we can’t do with QuickSight.” One of Sydnor’s employees who was a user of the previous tool learned QuickSight in just 30 minutes. Now, they conduct QuickSight demos all the time.

Looking to the future: Expanding BI integration and adopting Amazon QuickSight Q

With QuickSight, the Chancellor’s Office aims to roll out more HR dashboards across its campuses and extend the tool for faculty use in the classroom. In the upcoming year, two campuses are joining CSUCO in building their own HR reporting dashboards through QuickSight. The organization is also making plans to use QuickSight to report on student data and implement external-facing dashboards. Some of the data points they’re excited to explore are insights into at-risk students and classroom scheduling on campus.

Thinking ahead, CSUCO is considering Amazon QuickSight Q, a machine learning-powered natural language capability that gives anyone in an organization the ability to ask business questions in natural language and receive accurate answers with relevant visualizations. Sydnor says, “How cool would that be if professors could go in and ask simple, straightforward questions like, ‘How many of my department’s students are taking full course loads this semester?’ It has a lot of potential.”

Summary

The CSUCO is excited to be a champion of QuickSight in the CSU, and are looking for ways to increase its implementation across their organization in the future.

To learn more, visit the website for the California State University Chancellor’s Office. For more on QuickSight, visit the Amazon QuickSight product page, or browse other Big Data Blog posts featuring QuickSight.


About the authors

Madi Hsieh, AWS 2022 Summer Intern, UCLA.

Tina Kelleher, Program Manager at AWS.

Microservice observability with Amazon OpenSearch Service part 2: Create an operational panel and incident report

Post Syndicated from Marvin Gersho original https://aws.amazon.com/blogs/big-data/microservice-observability-with-amazon-opensearch-service-part-2-create-an-operational-panel-and-incident-report/

In the first post in our series , we discussed setting up a microservice observability architecture and application troubleshooting steps using log and trace correlation with Amazon OpenSearch Service. In this post, we discuss using PPL to create visualizations in operational panels, and creating a simple incident report using notebooks.

To try out the solution yourself, start from part 1 of the series.

Microservice observability with Amazon OpenSearch Service

Piped Processing Language (PPL)

PPL is a new query language for OpenSearch. It’s simpler and more straightforward to use than query DSL (Domain Specific Language), and a better fit for DevOps than ODFE SQL. PPL handles semi-structured data and uses a sequence of commands delimited by pipes (|). For more information about PPL, refer to Using pipes to explore, discover and find data in Amazon OpenSearch Service with Piped Processing Language.

The following PPL query retrieves the same record as our search on the Discover page in our previous post. If you’re following along, use your trace ID in place of <Trace-ID>:

source = sample_app_logs | where stream = 'stderr' and locate(‘<Trace-ID>’,`log`) > 0

The query has the following components:

  • | separates commands in the statement.
  • Source=sample_app_logs means that we’re searching sample_app_logs.
  • where stream = ‘stderr’, stream is a field in sample_app_logs. We’re matching the value to stderr.
  • The locate function allows us to search for a string in a field. For our query, we search for the trace_id in the log field. The locate function returns 0 if the string is not found, otherwise the character number where it is found. We’re testing that trace_id is in the log field. This lets us find the entry that has the payment trace_id with the error.

Note that log is PPL keyword, but also a field in our log file. We put backquotes around a field name if it’s also a keyword if we need to reference it in a PPL statement.

To start using PPL, complete the following steps:

  1. On OpenSearch Dashboards, choose Observability in the navigation pane.
  2. Choose Event analytics.
  3. Choose the calendar icon, then choose the time period you want for your query (for this post, Year to date).
  4. Enter your PPL statement.

Note that results are shown in table format by default, but you can also choose to view them in JSON format.

Monitor your services using visualizations

We can use the PPL on the Event analytics page to create real-time visualizations. We now use these visualizations to create a dashboard for real-time monitoring of our microservices on the Operational panels page.

Event analytics has two modes: events and visualizations. With events, we’re looking at the query results as a table or JSON. With visualizations, the results are shown as a graph. For this post, we create a PPL query that monitors a value over time, and see the results in a graph. We can then save the graph to use in our dashboard. See the following code:

source = sample_app_logs | where stream = 'stderr' and locate('payment',`log`) > 0 | stats count() by span(time, 5m)

This code is similar to the PPL we used earlier, with two key differences:

  • We specify the name of our service in the log field (for this post, payment).
  • We use the aggregation function stats count() by span(time, 5m). We take the count of matches in the log field and aggregate by 5-minute intervals.

The following screenshot shows the visualization.

OpenSearch Service offers a choice of several different visualizations, such as line, bar, and pie charts.

We now save the results as a visualization, giving it the name Payment Service Errors.

We want to create and save a visualization for each of the five services. To create a new visualization, choose Add new, then modify the query by changing the service name.

We save this one and repeat the process by choosing Add new again for each of the five micro-services. Each microservice is now available on its own tab.

Create an operational panel

Operational panels in OpenSearch Dashboards are collections of visualizations created using PPL queries. Now that we have created the visualizations in the Event analytics dashboard, we can create a new operational panel.

  1. On the Operational panel page, choose Create panel.
  2. For Name, enter e-Commerce Error Monitoring.
  3. Open that panel and choose Add Visualization.
  4. Choose Payment Service Errors.

The following screenshot shows our visualization.

We now repeat the process for our other four services. However, the layout isn’t good. The graphs are too big, and laid out vertically, so they can’t all be seen at once.

We can choose Edit to adjust the size of each visualization and move them around. We end up with the layout in the following screenshot.

We can now monitor errors over time for all of our services. Notice that the y axis of each service visualization adjusts based on the error count.

This will be a useful tool for monitoring our services in the future.

Next, we create an incident report on the error that we found.

Create an OpenSearch incident report

The e-Commerce Error Monitoring panel can help us monitor our application in the future. However, we want to send out an incident report to our developers about our current findings. We do this by using OpenSearch PPL and Notebooks features introduced in OpenSearch Service 1.3 to create an incident report. A notebook can be downloaded as a PDF. An incident report is useful to share our findings with others.

First, we need to create a new notebook.

  1. Under Observability in the navigation pane, choose Notebooks.
  2. Choose Create notebook.
  3. For Name, enter e-Commerce Error Report.
  4. Choose Create.

    The following screenshot shows our new notebook page.

    A notebook consists of code blocks: narrative, PPL, and SQL, and visualizations created on the Event analytics page with PPL.
  5. Choose Add code block.
    We can now write a new code block.

    We can use %md, %sql, or %ppl to add code. In this first block, we just enter text.
  6. Use %md to add narrative text.
  7. Choose Run to see the output.

    The following screenshot shows our code block.

    Now we want to add our PPL query to show the error we found earlier.
  8. On the Add paragraph menu, choose Code block.
  9. Enter our PPL query, then choose Run.

    The following screenshot shows our output.

    Let’s drill down on the log field to get details of the error.
    We could have many narrative and code blocks, as well as visualizations of PPL queries. Let’s add a visualization.
  10. On the Add paragraph menu, choose Visualization.
  11. Choose Payment Service Errors to view the report we created earlier.

    This visualization shows a pattern of payment service errors this afternoon. Note that we chose a date range because we’re focusing on today’s errors to communicate with the development team.

    Notebook visualizations can be refreshed to provide updated information. The following screenshot shows our visualization an hour later.
    We’re now going to take our completed notebook and export it as a PDF report to share with other teams.
  12. Choose Output only to make the view cleaner to share.
  13. On the Reporting actions menu, choose Download PDF.

We can send this PDF report to the developers supporting the payment service.

Summary

In this post, we used OpenSearch Service v1.3 to create a dashboard to monitor errors in our microservices application. We then created a notebook to use a PPL query on a specific trace ID for a payment service error to provide details, and a graph of payment service errors to visualize the pattern of errors. Finally, we saved our notebook as a PDF to share with the payment service development team. If you would like to explore these features further check out the latest Amazon OpenSearch Observability documentation or, for open source, OpenSearch Observability latest open source documentation. You can also contact your AWS Solutions Architects, who can be of assistance alongside your innovation journey.


About the Authors

Marvin Gersho is a Senior Solutions Architect at AWS based in New York City. He works with a wide range of startup customers. He previously worked for many years in engineering leadership and hands-on application development, and now focuses on helping customers architect secure and scalable workloads on AWS with a minimum of operational overhead. In his free time, Marvin enjoys cycling and strategy board games.

Subham Rakshit is a Streaming Specialist Solutions Architect for Analytics at AWS based in the UK. He works with customers to design and build search and streaming data platforms that help them achieve their business objective. Outside of work, he enjoys spending time solving jigsaw puzzles with his daughter.

Rafael Gumiero is a Senior Analytics Specialist Solutions Architect at AWS. An open-source and distributed systems enthusiast, he provides guidance to customers who develop their solutions with AWS Analytics services, helping them optimize the value of their solutions.

The collective thoughts of the interwebz