SMS remains a reliable workhorse for business-to-consumer reach, but it isn’t without its hurdles. Messages from unrecognized numbers are frequently ignored or flagged as spam, and the limitations of plain text can’t provide the interactive experiences modern customers expect. Rich Communication Services (RCS) on AWS End User Messaging addresses these challenges as the next generation of mobile messaging.
Before we get into the technical implementation, it is important to understand what RCS is, why it’s becoming the new standard for business-to-consumer (B2C) communication, and the strategic value it brings to your messaging stack.
The problem with traditional business messaging
Traditional SMS has long been confined to a “narrow lane” of one-directional alerts—think one-time passcodes (OTP) and basic shipment updates. Because these messages arrive from generic-looking short codes or long codes, recipients have no native way to verify the sender’s legitimacy. As a result, users often do the rational thing: they ignore the message or treat it with suspicion.
What is RCS?
RCS is the next-generation messaging protocol developed by the GSM Association (GSMA) to update traditional Short Message Service (SMS) and Multimedia Messaging Service (MMS). Unlike SMS, which relies on the cellular signaling channel, RCS is entirely IP-based, operating over data connectivity (Wi-Fi or mobile data). This shift allows RCS to bring high-resolution media and interactive capabilities directly to the default messaging application.
The core innovation is the RCS Agent—your verified sending identity. Instead of a random number, recipients see your brand name, logo, and a verified checkmark. This shift from “unknown sender” to “verified brand” transforms the recipient’s behavior from passive ignore to active engagement. When customers trust the sender, they stop only reading alerts and start completing workflows, asking questions, and engaging with AI-powered agents built on services like Amazon Bedrock.
The business case for RCS
We can see the future of RCS by looking at markets where over-the-top (OTT) apps like WhatsApp are dominant. In those regions, businesses use messaging for full-lifecycle order management, customer service, and complex scheduling. In markets without that OTT distribution, businesses have been stuck with one-way SMS notifications.
RCS levels this playing field. By bringing a branded, verified identity natively to the default messaging app, it opens up a range of interactive use cases previously reserved for dedicated apps or websites.
Where to start?
When evaluating RCS for your program, we recommend starting with your highest-volume transactional messages. These are often the easiest to migrate because they follow predictable templates. More importantly, they provide the most immediate ROI by maximizing the visibility of your verified identity across your largest customer touchpoints.
To illustrate the business impact across industries:
Ecommerce: Order confirmations arriving from a verified brand logo eliminate the “Is this legitimate?” hesitation customers have with SMS from generic numbers. Customers click tracking links confidently because they recognize the sender immediately.
Healthcare: Appointment reminders with verified provider identity reduce no-shows and eliminate verification calls. Patients respond more quickly to verified communications and handle appointment management through messaging rather than calling the office.
Financial services: Fraud alerts with verified bank identity increase response rates and reduce phishing confusion. Customers see their bank’s logo and verified badge and know the alert is legitimate — enabling faster fraud detection and prevention.
Prerequisites
Before you begin the registration process, make sure that you have the following prerequisites in place:
Existing SMS infrastructure to serve as a fallback.
A planned timeline that accounts for carrier approval lead times, which vary by country and carrier.
A budget for registration and verification fees.
Timeline, planning, and costs
Adopting RCS requires careful planning for both timelines and budgets. Carrier approval timelines vary by country and carrier — approval is not instant. Plan and verify that your processes, such as opt-in consent collection and brand asset preparation, are in place well before your intended launch date.
Registration and usage fees also differ significantly by market. Currently, AWS End User Messaging supports RCS in the United States and Canada, with additional countries planned for future rollout.
United States: This market uses a per-segment (160-character) pricing model similar to SMS. It features a higher initial barrier to entry, including a one-time agent setup fee and an annual brand vetting fee.
Canada: Canada utilizes a distinct message-based model (“Basic” vs. “Single” messages) rather than segments. Notably, it currently lacks the one-time setup and annual vetting fees found in the US, though a monthly maintenance fee applies globally to all active agents.
Also note that RCS is billed only upon successful delivery, whereas SMS is charged at the time of the request. For the latest rates and a breakdown of carrier-specific content violation fees, see AWS End User Messaging pricing.
Note: You are charged only for successfully delivered messages, not delivery attempts. In the United States, long messages are billed per 160-character segment; however, for the Rest of the World (ROW), messages exceeding 160 characters are billed as a single ‘RCS Single’ message. When automatic fallback occurs, you are typically charged only for the successful SMS delivery. While rare, note that if both the RCS and SMS messages reach the device (dual-delivery), charges for both may apply. For more details, see the RCS billing and pricing model.
RCS and SMS: Better together
RCS works alongside SMS to create a reliable messaging solution with automatic SMS fallback. AWS End User Messaging ensures reliable delivery by intelligently handling three common scenarios where RCS may be unavailable, triggering an automatic fallback to SMS:
Carrier-specific availability — Your RCS agent may be approved on some carriers but still pending on others, or a carrier may not have deployed RCS infrastructure yet. AWS detects this upfront using carrier lookup data and automatically routes via SMS so that the message is delivered.
Device compatibility — Not all devices support RCS, even if the carrier does. This includes older Android models, devices with RCS disabled, or iPhones running versions earlier than iOS 18. AWS detects this compatibility upfront where possible and automatically routes the message via SMS so that it reaches the recipient.
Temporary connectivity — A device may support RCS but lack data connectivity at the moment of delivery (for example, traveling through a tunnel or with data roaming turned off). The device still has cellular coverage for SMS. AWS falls back to SMS so that the message is delivered.
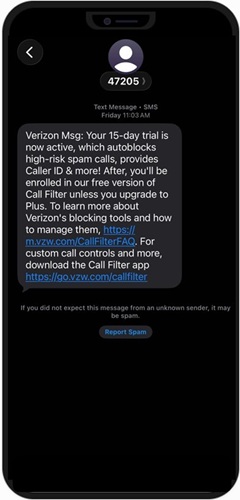
Figure 1: A typical SMS business message often appears from an unrecognizable short code, making it difficult for customers to verify the sender before clicking a link or replying.
When RCS delivery falls back to SMS because of a lack of data connectivity or other availability reasons, AWS uses sticky sending. The service prioritizes the origination number that most recently delivered successfully to that destination—maintaining that preference for 24 hours before retrying RCS. This ensures consistent, recognizable delivery across various connectivity and compatibility scenarios.
Effective phone number management is the foundation for fallback behavior. AWS provides three ways to send messages, each with different fallback behavior:
Pool-based sending — AWS selects from identities in a specific pool containing your RCS agent and SMS phone numbers. This is the recommended approach for production deployments. Pools give you precise control over which identities are used while AWS handles automatic routing and fallback.
Account-level sending — AWS automatically selects the best identity from your entire account. This is similar to the default behavior in Amazon Simple Notification Service (SNS), where you cannot isolate traffic into specific pools. This approach is ideal for development, testing, or simple deployments where a single identity is used for all messaging use cases within a country.
Direct send — You specify an exact RCS agent as the origination identity. The message fails if RCS isn’t available. Use this for testing or when you want to handle fallback yourself.
For production messaging where delivery is critical, use pool-based or account-level sending for reliable delivery. Pools route your fallback SMS messages through consistent, recognizable numbers your customers trust.
RCS vs. SMS at a glance
For a detailed comparison of capabilities, see the following table.
Feature
SMS
RCS
Character limit
160 characters
No practical limit
Media support
MMS (compressed)
High-resolution images, video, audio
Read receipts
No
Yes
Typing indicators
No
Yes
Interactive buttons
No
Yes
Branded identity
Basic (Sender ID)
Full (Verified Profile)
Delivery over internet
No
Yes
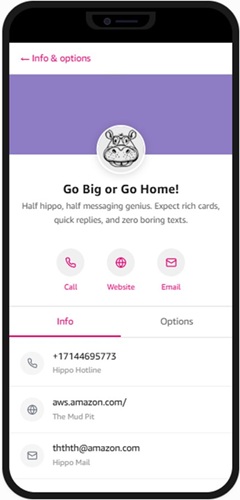
Figure 2: The final result – A verified brand profile featuring your high-resolution logo, banner image, and custom brand colors—elements that significantly increase trust and click-through rates compared to standard SMS.
The recommended adoption path
Consider a phased approach to RCS adoption that aligns with your operational readiness. First, register your brand and get carrier approval. Next, move your existing SMS use cases to RCS. Finally, after you are comfortable with the channel, test and expand with advanced use cases.
How to register
Brand asset requirements
Before submitting your registration, prepare the following brand assets. Carriers reject assets that don’t meet exact specifications, so verify these requirements before submitting.
Asset
Requirements
Logo
224×224 pixels, PNG with transparency, under 50 KB
Banner
1440×448 pixels, PNG or JPEG, under 200 KB
Brand Color
Hex format (e.g. #1A73E8), minimum 4.5:1 contrast ratio
Note: A 4.5:1 contrast ratio means your brand color must be at least 4.5 times brighter (or darker) than its background. This threshold meets WCAG 2.1 Level AA standards, ensuring your brand name is legible for users with moderate vision loss or color blindness. To verify compliance, use a Contrast Checker to test your hex code against a solid white background.
Use case selection
Your use case determines what types of messages you can send in production. Select carefully before submitting — the use case does not affect approval timeline, but it does determine your message restrictions and how carriers perceive your traffic.
Use Case
What you can send
OTP
Authentication codes and security verification only
Transactional
Order updates, shipping notifications, account alerts
Promotional
Marketing campaigns and offers (requires opt-in consent)
Multi-use
Combined transactional and promotional messaging
Why not just choose Multi-use for everything?
While Multi-use offers the most flexibility, it is often subject to stricter carrier scrutiny during the vetting process. Carriers prefer single-purpose agents (like OTP) because they provide a more predictable and trustworthy experience for the recipient. If you have a high-volume OTP use case, registering it separately can help protect your sender reputation from being impacted by the lower engagement rates typically associated with promotional marketing.
Important: Agents must be use-case specific. Sending message types that don’t match your registered use case could result in suspension.
Registration steps
To submit your registration, complete the following steps:
In the navigation pane, under Configurations, choose RCS agents.
Choose Create RCS Agent. This creates an AWS RCS Agent and then immediately guides you through creating a testing registration in a single workflow.
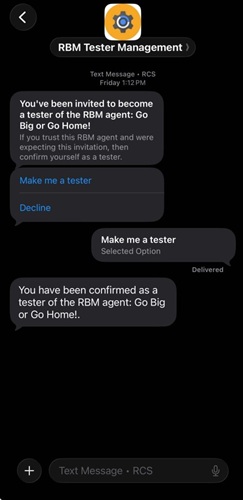
Figure 3: Once your agent is created in the AWS console, your registered test devices will receive an invitation like this one. Tapping ‘Make me a tester’ allows you to immediately see your branded content in action.
The next screen shows an introduction to RCS and explains the setup process. Review the information and choose Next to continue.
On the Agent details page, set the following:
Friendly name — A console-only label for your AWS RCS Agent. This is an internal name for your reference (stored as a tag) and is not the name displayed on recipients’ phones. The friendly name is not available through the API.
Deletion protection — (Optional) Enable to prevent accidental deletion of the agent.
Tags — (Optional) Add tags to organize and identify your agent.
In the Brand information section of the same page, enter the following:
Display name — The brand name that recipients see alongside your RCS messages.
Description — A brief description of your brand or business.
Use case — Select the primary use case for your RCS messaging (for example, transactional notifications, marketing, or customer support).
In the Brand assets section of the same page, upload the following:
Logo — 224 × 224 pixels, PNG with transparency, under 50 KB.
Banner image — 1440 × 448 pixels, PNG or JPEG, under 200 KB.
Brand color — A hex color code (for example, #1A73E8) with a minimum contrast ratio of 4.5:1 against a white background.
Important: Some brand assets cannot be changed after the agent is submitted for registration. Prepare your final brand assets before creating the agent. If you want to experiment first, you can quickly create a test agent using this flow, then create a fresh AWS RCS Agent with finalized brand assets later.
On the Compliance keywords page, configure your keywords and auto-response messages.
On the Review page, verify all your settings.
Choose Validate and submit to create the AWS RCS Agent and submit the testing registration.
Testing and production launch phases
Launching RCS follows a distinct path from testing to production:
Testing Registration: The initial guided console flow creates your AWS RCS Agent and a testing agent, or RBM Agent(RCS Business Messaging Agents). This allows you to validate your integration immediately by sending messages to registered test devices without waiting for carrier approval.
Country Launch Registrations: After testing is complete, you must submit separate country launch registrations for each production market.
Carrier review and approval
Independent Approval: Each country launch registration undergoes a separate review process by every carrier in that target country.
Partial Reach: Approval is per-carrier. You are considered “partially approved” as soon as at least one carrier approves your agent, allowing you to start sending production messages to recipients on that carrier’s network via the SendTextMessage API.
Timelines: For both the U.S. and Canada, expect the carrier approval process to take several months. To avoid delays, verify that all registration fields are accurate and, for U.S. launches, provide a clear screen recording demonstrating your intended use case.
Important considerations
Multi-level identity: Think of the AWS RCS Agent as your brand’s unified identity. Under this one resource, you will have multiple RCS for Business IDs: one for your testing agent and separate IDs for each country launch (e.g., one for the US and one for Canada).
Carrier approval is per-carrier, not all-at-once: You do not need to wait for every carrier to approve before you begin sending. As soon as an individual carrier approves your agent, you can reach that carrier’s subscribers.
Sandbox testing: Testing with sandbox agents does not require carrier approval and can begin immediately upon submission. Note that testing messages are charged at standard RCS rates.
Finality of configurations: Brand assets are defined on each specific registration and are final after submission. While minor updates are permitted through supporting documentation, significant structural changes require creating a new agent. Plan your configuration carefully before you submit.
Accuracy matters: Filling out registration forms incorrectly can result in lengthy delays or rejection. Double-check all information before submitting and verify that business documents are current and valid. In this early phase of RCS adoption, carriers have been approving recognizable brands more readily.
Managing costs and usage
Monitor your RCS message volume through Amazon CloudWatch metrics and set up billing alerts to track spending against your SMS baseline. For more information, see AWS End User Messaging pricing.
Conclusion
In this post, we showed you how RCS on AWS End User Messaging solves customer engagement challenges through verified branding, interactive features, and automatic SMS fallback. You get a branded messaging experience with the reliability of SMS built in. Evaluate your current SMS message volume and identify high-priority transactional messages that would benefit from verified branding. Consider migrating these high-impact use cases first to establish your brand presence and improve customer trust.
Get started today
Ready to implement RCS? Here are your next steps:
If you’re ready to register: Contact your AWS account team or AWS Support to begin the registration process.
If you’re still evaluating: Start by auditing your current SMS message volume and identifying high-priority transactional messages that would benefit from verified branding.
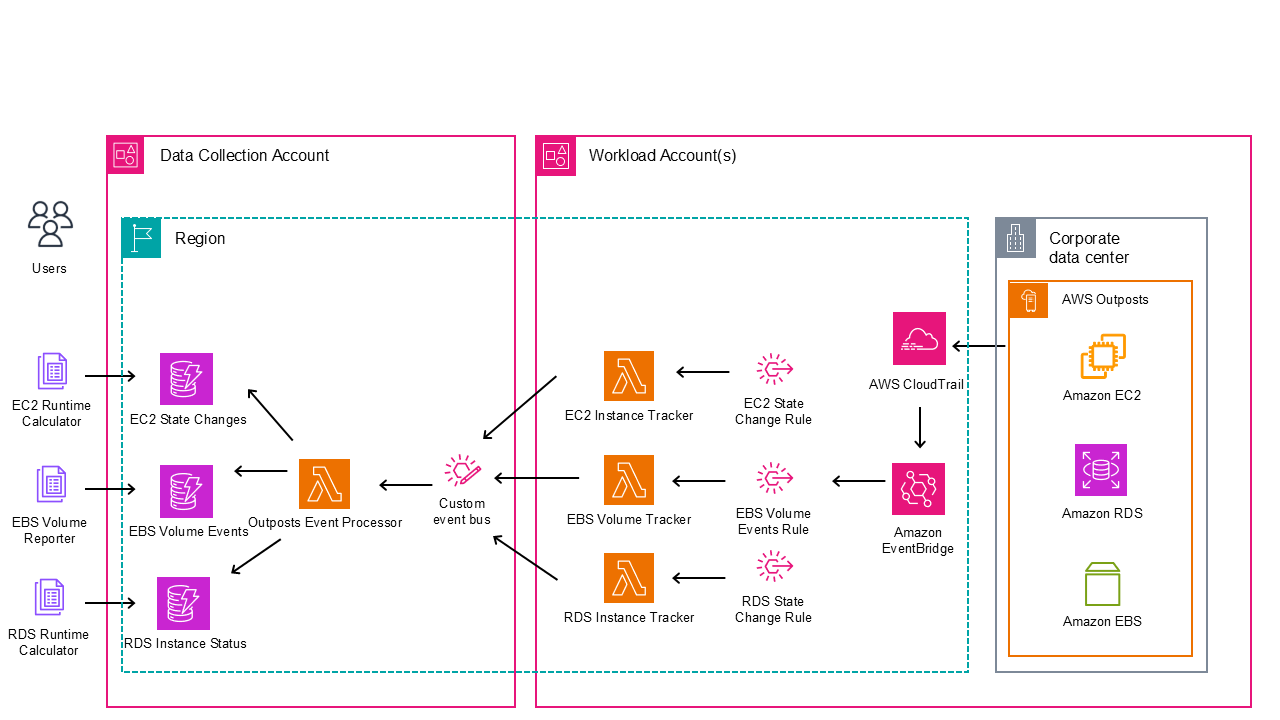
The following is the Terraform-based reference architecture used to represent the solution, including EventBridge, DynamoDB, and Lambda across a multi-account environment. Relevant launch events are tracked in EventBridge that invoke Lambda functions, which are logged in DynamoDB tables (see sample code). This allows reporting on captured event data through the AWS SDK for Python (Boto3). Figure 1: Reference architecture for reporting solution on AWS Outposts
Prerequisites
The following prerequisites are necessary to implement this solution:
At least two active AWS accounts in the same AWS Organization as the Outposts owner account.
One AWS account, which is the data collection account to store the event data (this doesn’t have to be the account that owns the Outposts).
Workload accounts where resources are deployed on Outposts.
Terraform installed on the same administrative instance. For more information, see the Terraform documentation.
Make sure that you have the necessary AWS Identity and Access Management (IAM) permissions necessary to create the AWS resources using Terraform in all accounts.
Prior Experience with Terraform deployments on AWS Cloud. To increase your familiarity, you can explore Get Started – AWS on the HashiCorp website.
Step 5: Modify the variables.tf.From the root directory of the cloned repository, modify the variables.tf file with the target Region and workload accounts as shown in the following example. The target Region is the collection destination.
variable "aws_region" {
  description = "AWS region for resources"
  type        = string
  default     = ""
}

variable "allowed_account_id" {
  description = "AWS account ID allowed to put events to the event bus"


}
Initialize the configuration directory of the data collection account to download and install the providers defined in the configuration by running the following command:
terraform init
All resources are deployed with minimal permissions to serve as an example. We recommend viewing all configurations to make sure that they meet your organizational security policies. Step 6: Deploy infrastructure in the data collection account.Run terraform plan on the configuration to and review which resources are created:
terraform plan
When you have reviewed the plan, run the following command and enter “yes” to accept the changes and deploy:
terraform apply
Deployment should take less than 5 minutes. If you receive any errors, review the previously mentioned steps to ensure that you followed them in their entirety. If the errors persist, reach out to AWS Support for additional guidance.
Deploying in workload account
The data collection account receives events from EventBridge and performs intelligent analysis and storage from the AWS Outposts resource data.Step 1: Navigate to the workload account directory by running the following command:
variable "aws_region" {
  description = "AWS region for resources"
  type        = string
  default     = ""
}

variable "event_bus_arn" {
  description = "target event bus arn"
  type        = string
  default     = ""
}
Edit the code to update the event bus name.
Step 3: Run the following command to create the backend.tf and create the Terraform state bucket for each workload account.
./init-backend.sh
This is an idempotent operation that creates a file from the template and a bucket with a fixed name including the account ID if it doesn’t exist.
Step 4: Initialize the configuration directory of the Data Collection Account to download and install the providers defined in the configuration by running the following command:
terraform init
Step 5: Deploy the infrastructure in the Data Collection Account.Run a terraform plan on the configuration and review which resources are created:
terraform plan
After you have reviewed the plan, run the following command and enter “yes” to accept the changes and deploy:
terraform apply
Deployment should take less than 5 minutes. If you receive any errors, follow the troubleshooting steps in the previous section.
At this point, any Amazon EC2 or Amazon RDS instances and Amazon EBS volumes are logged to the DynamoDB tables in the data collection account. Repeat Steps 3–5 for each workload account running resources on AWS Outposts with appropriate account credentials. If you’re deploying at scale and using AWS Control Tower consider using AWS Control Tower Account Factory for Terraform (AFT).
Running monthly reports
With this solution in place, reports can be generated on demand. These reports can be customized by modifying the Python example scripts shown to support your needs. Reports can be created from a local machine with credentials that have access to the DynamoDB tables in the data collection account. The examples were created from the source directory of the data collection account git repository. Run the following command to view the report for Amazon RDS usage in September 2025:
Complete the following steps to clean up the resources that were deployed by this solution. For each workload account, complete the following:
cd sample-outposts-monitoring-and-reports/workload_account
terraform destroy
Enter “yes” to proceed. You can then manually empty and remove the terraform state S3 bucket for that account.
For the data collection, complete the following:
cd ../data_collection
terraform destroy
Enter “yes” to proceed. You can then manually empty and remove the terraform state S3 bucket for that account.
Conclusion
Customers who have shared multi-account Outposts deployments can use this solution to create account level reporting for Outposts resources using real-time event capture and processing, state analysis and categorization, historical usage metrics, and serverless architecture. Teams can use this to visualize and report on the costs of running their workloads on Outposts. The event-driven design supports accurate tracking while maintaining low operational overhead. The solution scales effectively across multiple Outposts and accounts, providing a unified view of hybrid infrastructure. Keep in mind that you can extend the functionality described here to meet your business objectives.
Deploy this solution today using the GitHub repository to gain financial insights to share with the tenants of your Outposts workload accounts. Reach out to your AWS account team, or fill out this form to learn more about Outposts.
I’m speaking at RightsCon 2026 in Lusaka, Zambia, on May 6 and 7, 2026.
I’m giving a keynote address and participating in a panel discussion at an ICTLuxembourg event called “Europe at the Crossroads of AI, Power & the Future of Democracy.” The event will be held at the University of Luxembourg’s Belval Campus on May 12, 2026.
I’m speaking at the Potsdam Conference on National Cybersecurity at the Hasso Plattner Institut in Potsdam, Germany. The event runs June 24–25, 2026, and my talk will be the evening of June 24.
Part of the “fun” that comes with curating a self-hosted music library is tagging
music so that it has accurate and uniform metadata, such as the band names, album titles,
cover images, and so on. This can be a tedious endeavor, but there are quite a few
open-source tools to make this process easier. One of the best, or at least my
favorite, is MusicBrainz Picard. It is
a cross-platform music-tagging application that pulls information from the
well-curated, crowdsourced MusicBrainz
database project and writes it to almost any audio file format.
Version 4.0.0 of the OpenSSL cryptographic library has been released. This
release includes support for a number of new cryptographic algorithms and
has a number of incompatible changes as well; see the announcement for the
details.
Agents let you build software faster than ever, but securing your environment and the code you write — from both mistakes and malice — takes real effort. Open Web Application Security Project (OWASP) details a number of risks present in agentic AI systems, including the risk of credential leaks, user impersonation, and elevation of privilege. These risks can result in extreme damage to your environments including denial of service, data loss, or data leaks — which can do untold financial and reputational damage.
This is an identity problem. In modern development, “identities” aren’t just people — they are the agents, scripts, and third-party tools that act on your behalf. To secure these non-human identities, you need to manage their entire lifecycle: ensuring their credentials (tokens) aren’t leaked, seeing which applications have access via OAuth, and narrowing their permissions using granular RBAC.
Today, we are introducing updates to address these needs: scannable tokens to protect your credentials,OAuth visibility to manage your principals, and resource-scoped RBAC to fine-tune your policies.
Understanding identity: Principals, Credentials, and Policies
To secure the Internet in an era of autonomous agents, we have to rethink how we handle identity. Whether a request comes from a human developer or an AI agent, every interaction with an API relies on three core pillars:
The Principal (The Traveler): This is the identity itself — the “who.” It might be you logging in via OAuth, or a background agent using an API token to deploy code.
The Credential (The Passport): This is the proof of that identity. In this world, your API token is your passport. If it’s stolen or leaked, anyone can “wear” your identity.
The Policy (The Visa): This defines what that identity is allowed to do. Just because you have a valid passport doesn’t mean you have a visa to enter every country. A policy ensures that even a verified identity can only access the specific resources it needs.
When these three pillars aren’t managed together, security breaks down. You might have a valid Principal using a stolen Credential, or a legitimate identity with a Policy that is far too broad.
Leaked token detection
Agents and other third-party applications use API tokens to access the Cloudflare API. One of the simplest ways that we see people leaking their secrets is by accidentally pushing them to a public GitHub repository. GitGuardian reports that last year more than 28 million secrets were published to public GitHub repositories, and that AI is causing leaks to happen 5x faster than before.
If an API token is a digital passport, then leaking it on a public repository is like leaving your passport on a park bench. Anyone who finds it can impersonate that identity until the document is canceled. Our partnership with GitHub acts like a global “lost and found” for these credentials. By the time you realize your passport is missing, we’ve already identified the document, verified its authenticity via the checksum, and voided it to prevent misuse.
We’re partnering with several leading credential scanning tools to help proactively find your leaked tokens and revoke them before they could be used maliciously. We know it’s not a matter of if, but rather when, before you, an employee, or one of your agents makes a mistake and pushes a secret somewhere it shouldn’t be.
GitHub
We’ve partnered with GitHub and are participating in their Secret Scanning program to find your tokens in both public and private repositories. If we are notified that a token has leaked to a public repository, we will automatically revoke the token to prevent it from being used maliciously. For private repositories, GitHub will notify you about any leaked Cloudflare tokens and you can clean these up.
How it works
We’ve shared the new token formats (below!) with GitHub, and they now scan for them on every commit. If they find something that looks like a leaked Cloudflare token, they verify the token is real (using the checksum), send us a webhook to revoke it, and then we notify you via email so you can generate a new one in Dashboard settings.
This means we plug the hole as soon as it’s found. By the time you realize you made a mistake, we’ve already fixed it.
We hope this is the kind of feature you don’t need to use, but our partners are on the lookout for leaks to help keep you secure.
Cloudflare One
Cloudflare One customers are also protected from these leaks. By configuring the Credentials and Secrets DLP profile, organizations can activate prevention everywhere a credential can travel:
Network Traffic (Cloudflare Gateway): Apply these entries to a policy to detect and block Cloudflare API tokens moving across your network. A token in a file upload, an outbound request, or a download is stopped before it reaches its destination.
Outbound Email (Cloudflare Email Security): Microsoft 365 customers can extend this same prevention to Outlook. The DLP Assist add-in scans messages before delivery, catching a token before it’s sent externally.
Data at Rest (Cloudflare CASB): Cloudflare’s Cloud Access Security Broker applies the same profile to scan files across connected SaaS applications, catching tokens saved or shared in Google Drive, OneDrive, Dropbox, and other integrated services.
The most novel exposure vector, though, is AI traffic. Cloudflare AI Gateway integrates with the same DLP profiles to scan and block both incoming prompts and outgoing AI model responses in real time.
Other credential scanners
The only way credential scanning works is if we meet you where you are, so we are working with several open source and commercial credential scanners to ensure you are protected no matter what secret scanner you use.
How it works
Until now, Cloudflare’s API tokens were pretty generic looking, so they were hard for credential scanners to identify with high confidence. These automated security tools scan your code repositories looking for exposed credentials like API keys, tokens or passwords. The “cf” prefix makes Cloudflare tokens instantly recognizable with greater confidence, and the checksum makes it easy for tools to statically validate them. Your existing tokens will continue to work, but every new token you generate will use the scannable format so it’s easily detected with high confidence.
Credential Type
What it’s for
New Format
User API Key
Legacy global API key tied to your user account (full access)
cfk_[40 characters][checksum]
User API Token
Scoped token you create for specific permissions
cfut_[40 characters][checksum]
Account API Token
Token owned by the account (not a specific user)
cfat_[40 characters][checksum]
Getting started
If you have existing API tokens, you can roll the token to create a new, scannable API token. This is optional, but recommended to ensure that your tokens are easily discoverable in case they leak.
While API tokens are generally used by your own scripts and agents, OAuth is how you manage access for third-party platforms. Both require clear visibility to prevent unauthorized access and ensure you know exactly who — or what — has access to your data.
Improving the OAuth consent experience
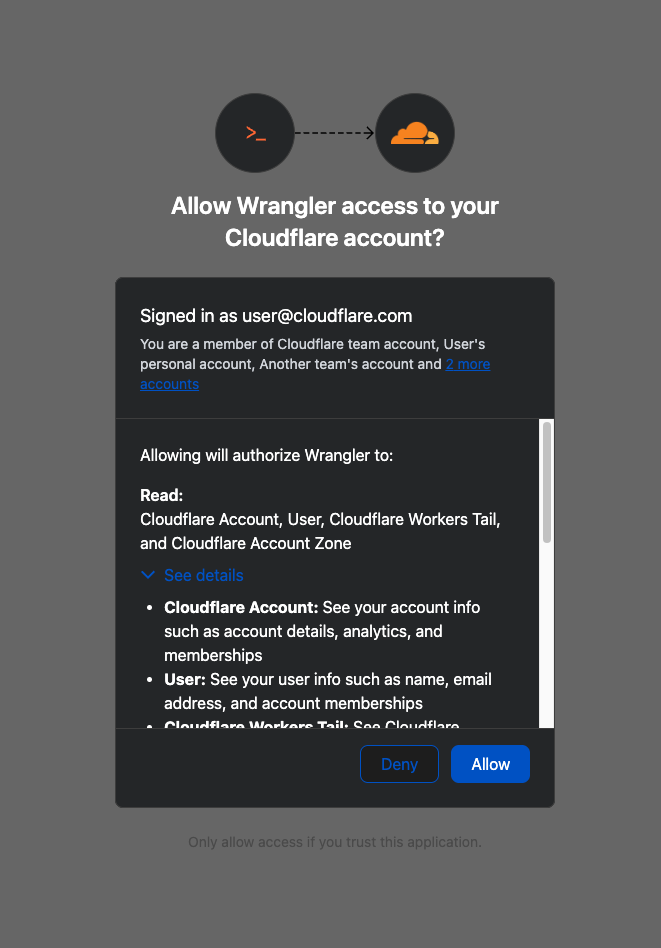
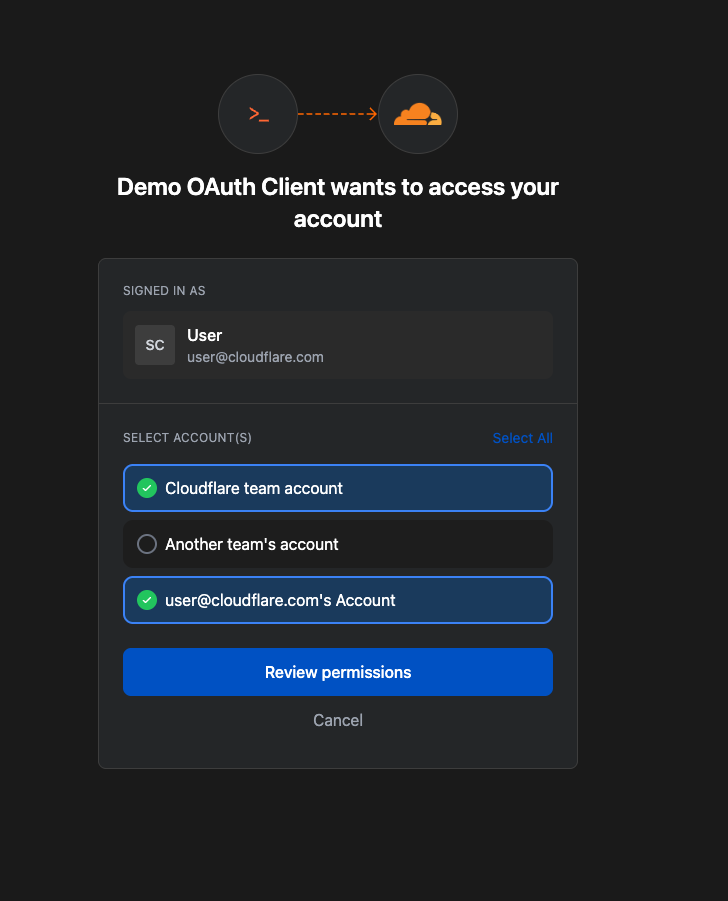
When you connect third-party applications like Wrangler to your Cloudflare Account using OAuth, you’re granting that application access to your account’s data. Over time, you may forget why you granted a third party application access to your Account in the first place. Previously, there was no central place to view & manage those applications. Starting today, there is.
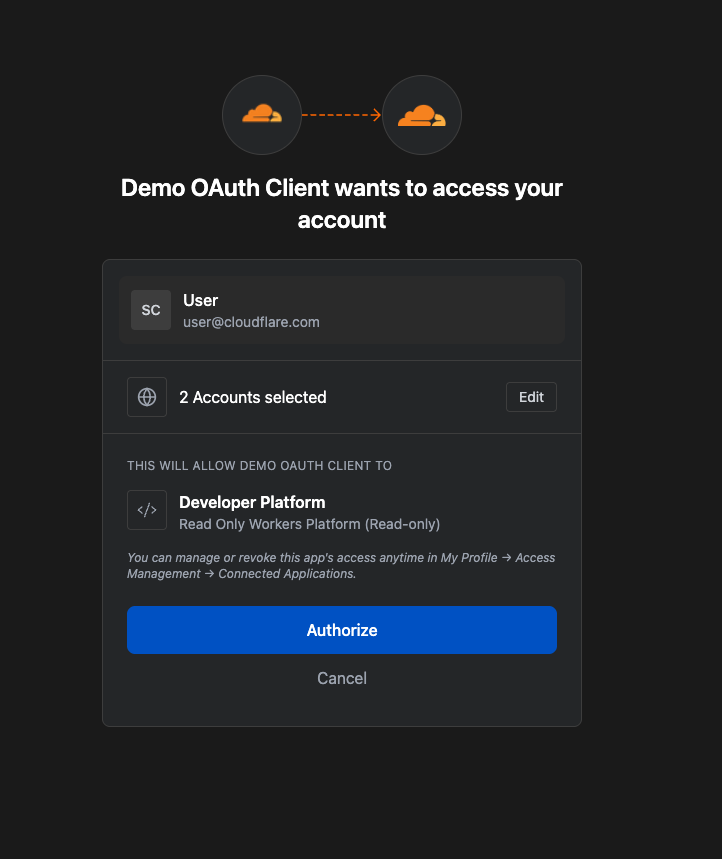
Going forward, when a third party application requests access to your Cloudflare account, you’ll be able to review:
Which third-party application is requesting access, along with information about the application like Name, Logo, and the Publisher.
Which scopes the third-party application is requesting access to.
Which accounts to grant the third party application access to.
Before
After
Not all applications require the same permissions; some only need to read data, others may need to make changes to your Account. Understanding these scopes before you grant access helps you maintain least-privilege.
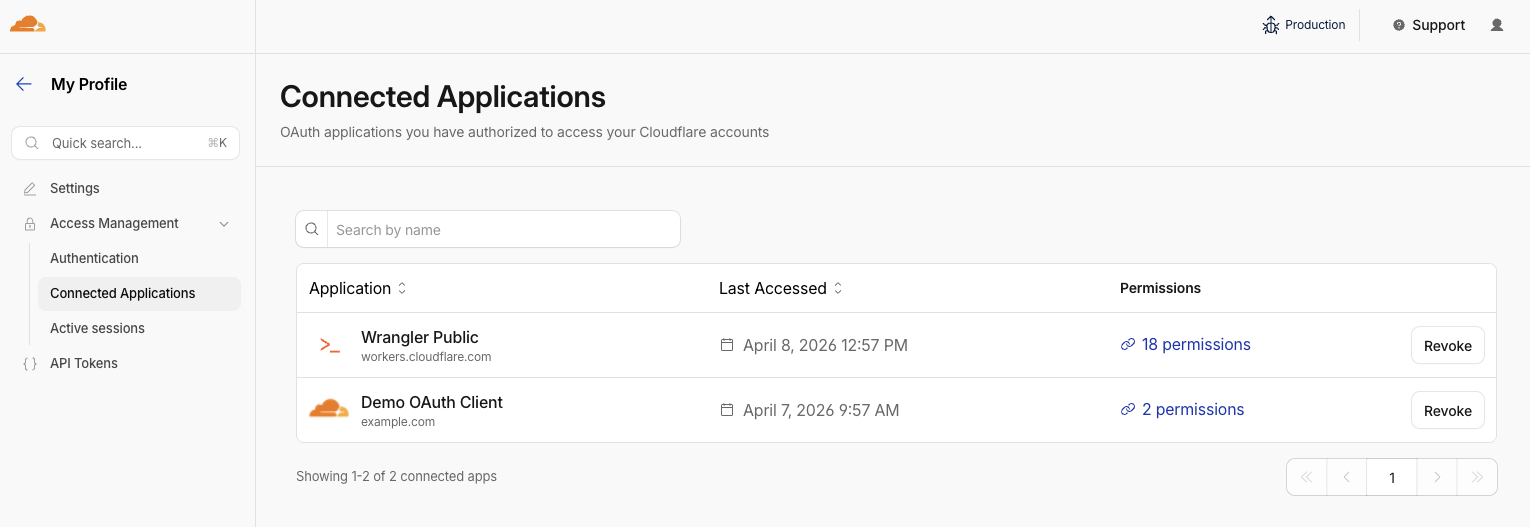
We also added a Connected Applications experience so you can see which applications have access to which accounts, what scopes/permissions are associated with that application, and easily revoke that access as needed.
Getting started
The OAuth consent and revocation improvements are available now. Check which apps currently have access to your accounts by visiting My Profile > Access Management > Connected Applications.
For developers building integrations with Cloudflare, keep an eye on the Cloudflare Changelog for more announcements around how you can register your own OAuth apps soon!
Fine-grained resource-level permissioning
If the token is the passport, then resource-scoped permissions are the visas inside it. Having a valid passport gets you through the front door, but it shouldn’t give you access to every room in the building. By narrowing the scope to specific resources — like a single Load Balancer pool or a specific Gateway policy — you are ensuring that even if an identity is verified, it only has the “visa” to go where it’s strictly necessary.
Last year, we announced support for resource scoped permissions in Cloudflare’s role-based access control (RBAC) system for several of our Zero Trust products. This enables you to right size permissions for both users and agents to minimize security risks. We’ve expanded this capability to several new resources-level permissions. The resource scope is now supported for:
Access Applications
Access Identity Providers
Access Policies
Access Service Tokens
Access Targets
We’ve also completely overhauled the API Token creation experience, making it easier for customers to provision and manage Account API Tokens right from the Cloudflare Dashboard.
How it works
When you add a member to your Cloudflare account or create an API Token, you typically assign that principal a policy. A Permission Policy is what gives a principal permission to take an action, whether that’s managing Cloudflare One Access Applications, or DNS Records. Without a policy, a principal can authenticate, but they are unauthorized to do any actions within an account.
Policies are made up of three components: a Principal, a Role, and a Scope. The Principal is who or what you’re granting access to, whether that’s a human user, a Non-Human Identity (NHI) like an API Token, or increasingly, an Agent acting on behalf of a user. The Role defines what actions they’re permitted to take. The Scope determines where those permissions apply, and historically, that’s been restricted to the entire account, or individual zones.
New permission roles
We’re also expanding the role surface more broadly at both the Account & Zone level with the introduction of a number of new roles for many products.
Account scope
CDN Management
MCP Portals
Radar
Request Tracer
SSL/TLS Management
Zone scope
Analytics
Logpush
Page Rules
Security Center
Snippets
Zone Settings
Getting started
The resource scope and all new account and zone-level roles are available today for all Cloudflare customers. You can assign account, zone, or resource-scoped policies through the Cloudflare Dashboard, the API, or Terraform.
For a full breakdown of all available roles and how scopes work, visit our roles and scope documentation.
Secure your accounts
These updates provide the granular building blocks needed for a true least-privilege architecture. By refining how we manage permissions and credentials, developers and enterprises can have greater confidence in their security posture across the users, apps, agents, and scripts that access Cloudflare. Least privilege isn’t a new concept, and for enterprises, it’s never been optional. Whether a human administrator is managing a zone or an agent is programmatically deploying a Worker, the expectation is the same, they should only be authorized to do the job it was given, and nothing else.
Following today’s announcement, we recommend customers:
Review your API tokens, and reissue with the new, scannable API tokens as soon as possible.
Review member & API Token permissions in your accounts and ensure that users are taking advantage of the new account, zone, or resource scoped permissions as needed to reduce your risk area.
We at Cloudflare have aggressively adopted Model Context Protocol (MCP) as a core part of our AI strategy. This shift has moved well beyond our engineering organization, with employees across product, sales, marketing, and finance teams now using agentic workflows to drive efficiency in their daily tasks. But the adoption of agentic workflow with MCP is not without its security risks. These range from authorization sprawl, prompt injection, and supply chain risks. To secure this broad company-wide adoption, we have integrated a suite of security controls from both our Cloudflare One (SASE) platform and our Cloudflare Developer platform, allowing us to govern AI usage with MCP without slowing down our workforce.
In this blog we’ll walk through our own best practices for securing MCP workflows, by putting different parts of our platform together to create a unified security architecture for the era of autonomous AI. We’ll also share two new concepts that support enterprise MCP deployments:
Remote MCP servers provide better visibility and control
MCP is an open standard that enables developers to build a two-way connection between AI applications and the data sources they need to access. In this architecture, the MCP client is the integration point with the LLM or other AI agent, and the MCP server sits between the MCP client and the corporate resources.
The separation between MCP clients and MCP servers allows agents to autonomously pursue goals and take actions while maintaining a clear boundary between the AI (integrated at the MCP client) and the credentials and APIs of the corporate resource (integrated at the MCP server).
Our workforce at Cloudflare is constantly using MCP servers to access information in various internal resources, including our project management platform, our internal wiki, documentation and code management platforms, and more.
Very early on, we realized that locally-hosted MCP servers were a security liability. Local MCP server deployments may rely on unvetted software sources and versions, which increases the risk of supply chain attacks or tool injection attacks. They prevent IT and security administrators from administrating these servers, leaving it up to individual employees and developers to choose which MCP servers they want to run and how they want to keep them up to date. This is a losing game.
Instead, we have a centralized team at Cloudflare that manages our MCP server deployment across the enterprise. This team built a shared MCP platform inside our monorepo that provides governed infrastructure out of the box. When an employee wants to expose an internal resource via MCP, they first get approval from our AI governance team, and then they copy a template, write their tool definitions, and deploy, all the while inheriting default-deny write controls with audit logging, auto-generated CI/CD pipelines, and secrets management for free. This means standing up a new governed MCP server is minutes of scaffolding. The governance is baked into the platform itself, which is what allowed adoption to spread so quickly.
Our CI/CD pipeline deploys them as remote MCP servers on custom domains on Cloudflare’s developer platform. This gives us visibility into which MCPs servers are being used by our employees, while maintaining control over software sources. As an added bonus, every remote MCP server on the Cloudflare developer platform is automatically deployed across our global network of data centers, so MCP servers can be accessed by our employees with low latency, regardless of where they might be in the world.
Cloudflare Access provides authentication
Some of our MCP servers sit in front of public resources, like our Cloudflare documentation MCP server or Cloudflare Radar MCP server, and thus we want them to be accessible to anyone. But many of the MCP servers used by our workforce are sitting in front of our private corporate resources. These MCP servers require user authentication to ensure that they are off limits to everyone but authorized Cloudflare employees. To achieve this, our monorepo template for MCP servers integrates Cloudflare Access as the OAuth provider. Cloudflare Access secures login flows and issues access tokens to resources, while acting as an identity aggregator that verifies end user single-sign on (SSO), multifactor authentication (MFA), and a variety of contextual attributes such as IP addresses, location, or device certificates.
MCP server portals centralize discovery and governance
MCP server portals unify governance and control for all AI activity.
As the number of our remote MCP servers grew, we hit a new wall: discovery. We wanted to make it easy for every employee (especially those that are new to MCP) to find and work with all the MCP servers that are available to them. Our MCP server portals product provided a convenient solution. The employee simply connects their MCP client to the MCP server portal, and the portal immediately reveals every internal and third-party MCP servers they are authorized to use.
Beyond this, our MCP server portals provide centralized logging, consistent policy enforcement and data loss prevention (DLP guardrails). Our administrators can see who logged into what MCP portal and create DLP rules that prevent certain data, like personally identifiable data (PII), from being shared with certain MCP servers.
We can also create policies that control who has access to the portal itself, and what tools from each MCP server should be exposed. For example, we could set up one MCP server portal that is only accessible to employees that are part of our finance group that exposes just the read-only tools for the MCP server in front of our internal code repository. Meanwhile, a different MCP server portal, accessible only to employees on their corporate laptops that are in our engineering team, could expose more powerful read/write tools to our code repository MCP server.
An overview of our MCP server portal architecture is shown above. The portal supports both remote MCP servers hosted on Cloudflare, and third-party MCP servers hosted anywhere else. What makes this architecture uniquely performant is that all these security and networking components run on the same physical machine within our global network. When an employee’s request moves through the MCP server portal, a Cloudflare-hosted remote MCP server, and Cloudflare Access, their traffic never needs to leave the same physical machine.
Code Mode with MCP server portals reduces costs
After months of high-volume MCP deployments, we’ve paid out our fair share of tokens. We’ve also started to think most people are doing MCP wrong.
The standard approach to MCP requires defining a separate tool for every API operation that is exposed via an MCP server. But this static and exhaustive approach quickly exhausts an agent’s context window, especially for large platforms with thousands of endpoints.
We previously wrote about how we used server-side Code Mode to power Cloudflare’s MCP server, allowing us to expose the thousands of end-points in Cloudflare API while reducing token use by 99.9%. The Cloudflare MCP server exposes just two tools: a search tool lets the model write JavaScript to explore what’s available, and an execute tool lets it write JavaScript to call the tools it finds. The model discovers what it needs on demand, rather than receiving everything upfront.
We like this pattern so much, we had to make it available for everyone. So we have now launched the ability to use the “Code Mode” pattern with MCP server portals. Now you can front all of your MCP servers with a centralized portal that performs audit controls and progressive tool disclosure, in order to reduce token costs.
Here is how it works. Instead of exposing every tool definition to a client, all of your underlying MCP servers collapse into just two MCP portal tools: portal_codemode_search and portal_codemode_execute. The search tool gives the model access to a codemode.tools() function that returns all the tool definitions from every connected upstream MCP server. The model then writes JavaScript to filter and explore these definitions, finding exactly the tools it needs without every schema being loaded into context. The execute tool provides a codemode proxy object where each upstream tool is available as a callable function. The model writes JavaScript that calls these tools directly, chaining multiple operations, filtering results, and handling errors in code. All of this runs in a sandboxed environment on the MCP server portal powered by Dynamic Workers.
Here is an example of an agent that needs to find a Jira ticket and update it with information from Google Drive. It first searches for the right tools:
The model now knows the exact tool names and parameters it needs, without the full schemas of tools ever entering its context. It then writes a single execute call to chain the operations together:
This is just two tool calls. The first discovers what’s available, the second does the work. Without Code Mode, this same workflow would have required the model to receive the full schemas of every tool from both MCP servers upfront, and then make three separate tool invocations.
Let’s put the savings in perspective: when our internal MCP server portal is connected to just four of our internal MCP servers, it exposes 52 tools that consume approximately 9,400 tokens of context just for their definitions. With Code Mode enabled, those 52 tools collapse into 2 portal tools consuming roughly 600 tokens, a 94% reduction. And critically, this cost stays fixed. As we connect more MCP servers to the portal, the token cost of Code Mode doesn’t grow.
Code Mode can be activated on an MCP server portal by adding a query parameter to the URL. Instead of connecting to your portal over its usual URL (e.g. https://myportal.example.com/mcp), you attach ?codemode=search_and_execute to the URL (e.g. https://myportal.example.com/mcp?codemode=search_and_execute).
AI Gateway provides extensibility and cost controls
We aren’t done yet. We plug AI Gateway into our architecture by positioning it on the connection between the MCP client and the LLM. This allows us to quickly switch between various LLM providers (to prevent vendor lock-in) and to enforce cost controls (by limiting the number of tokens each employee can burn through). The full architecture is shown below.
Cloudflare Gateway discovers and blocks shadow MCP
Now that we’ve provided governed access to authorized MCP servers, let’s look into dealing with unauthorized MCP servers. We can perform shadow MCP discovery using Cloudflare Gateway. Cloudflare Gateway is our comprehensive secure web gateway that provides enterprise security teams with visibility and control over their employees’ Internet traffic.
We can use the Cloudflare Gateway API to perform a multi-layer scan to find remote MCP servers that are not being accessed via an MCP server portal. This is possible using a variety of existing Gateway and Data Loss Prevention (DLP) selectors, including:
Using the Gateway httpRequestURI selector to scan for MCP-specific URL paths like /mcp and /mcp/sse
Using DLP-based body inspection to find MCP traffic, even if that traffic uses URI that do not contain the telltale mentions of mcp or sse. Specifically, we use the fact that MCP uses JSON-RPC over HTTP, which means every request contains a “method” field with values like “tools/call”, “prompts/get”, or “initialize.” Here are some regex rules that can be used to detect MCP traffic in the HTTP body:
The Gateway API supports additional automation. For example, one can use the custom DLP profile we defined above to block traffic, or redirect it, or just to log and inspect MCP payloads. Put this together, and Gateway can be used to provide comprehensive detection of unauthorized remote MCP servers accessed via an enterprise network.
For more information on how to build this out, see this tutorial.
Public-facing MCP Servers are protected with AI Security for Apps
So far, we’ve been focused on protecting our workforce’s access to our internal MCP servers. But, like many other organizations, we also have public-facing MCP servers that our customers can use to agentically administer and operate Cloudflare products. These MCP servers are hosted on Cloudflare’s developer platform. (You can find a list of individual MCPs for specific products here, or refer back to our new approach for providing more efficient access to the entire Cloudflare API using Code Mode.)
We believe that every organization should publish official, first-party MCP servers for their products. The alternative is that your customers source unvetted servers from public repositories where packages may contain dangerous trust assumptions, undisclosed data collection, and any range of unsanctioned behaviors. By publishing your own MCP servers, you control the code, update cadence, and security posture of the tools your customers use.
Since every remote MCP server is an HTTP endpoint, we can put it behind the Cloudflare Web Application Firewall (WAF). Customers can enable the AI Security for Apps feature within the WAF to automatically inspect inbound MCP traffic for prompt injection attempts, sensitive data leakage, and topic classification. Public facing MCPs are protected just as any other web API.
The future of MCP in the enterprise
We hope our experience, products, and reference architectures will be useful to other organizations as they continue along their own journey towards broad enterprise-wide adoption of MCP.
We’ve secured our own MCP workflows by:
Offering our developers a templated framework for building and deploying remote MCP servers on our developer platform using Cloudflare Access for authentication
Ensuring secure, identity-based access to authorized MCP servers by connecting our entire workforce to MCP server portals
Controlling costs using AI Gateway to mediate access to the LLMs powering our workforce’s MCP clients, and using Code Mode in MCP server portals to reduce token consumption and context bloat
Discovering shadow MCP usage by Cloudflare Gateway
For organizations advancing on their own enterprise MCP journeys, we recommend starting by putting your existing remote and third-party MCP servers behind Cloudflare MCP server portals and enabling Code Mode to start benefitting for cheaper, safer and simpler enterprise deployments of MCP.
Acknowledgements: This reference architecture and blog represents this work of many people across many different roles and business units at Cloudflare. This is just a partial list of contributors: Ann Ming Samborski, Kate Reznykova, Mike Nomitch, James Royal, Liam Reese, Yumna Moazzam, Simon Thorpe, Rian van der Merwe, Rajesh Bhatia, Ayush Thakur, Gonzalo Chavarri, Maddy Onyehara, and Haley Campbell.
We have thousands of internal apps at Cloudflare. Some are things we’ve built ourselves, others are self-hosted instances of software built by others. They range from business-critical apps nearly every person uses, to side projects and prototypes.
All of these apps are protected by Cloudflare Access. But when we started using and building agents — particularly for uses beyond writing code — we hit a wall. People could access apps behind Access, but their agents couldn’t.
Access sits in front of internal apps. You define a policy, and then Access will send unauthenticated users to a login page to choose how to authenticate.
Example of a Cloudflare Access login page
This flow worked great for humans. But all agents could see was a redirect to a login page that they couldn’t act on.
Providing agents with access to internal app data is so vital that we immediately implemented a stopgap for our own internal use. We modified OpenCode’s web fetch tool such that for specific domains, it triggered the cloudflared CLI to open an authorization flow to fetch a JWT (JSON Web Token). By appending this token to requests, we enabled secure, immediate access to our internal ecosystem.
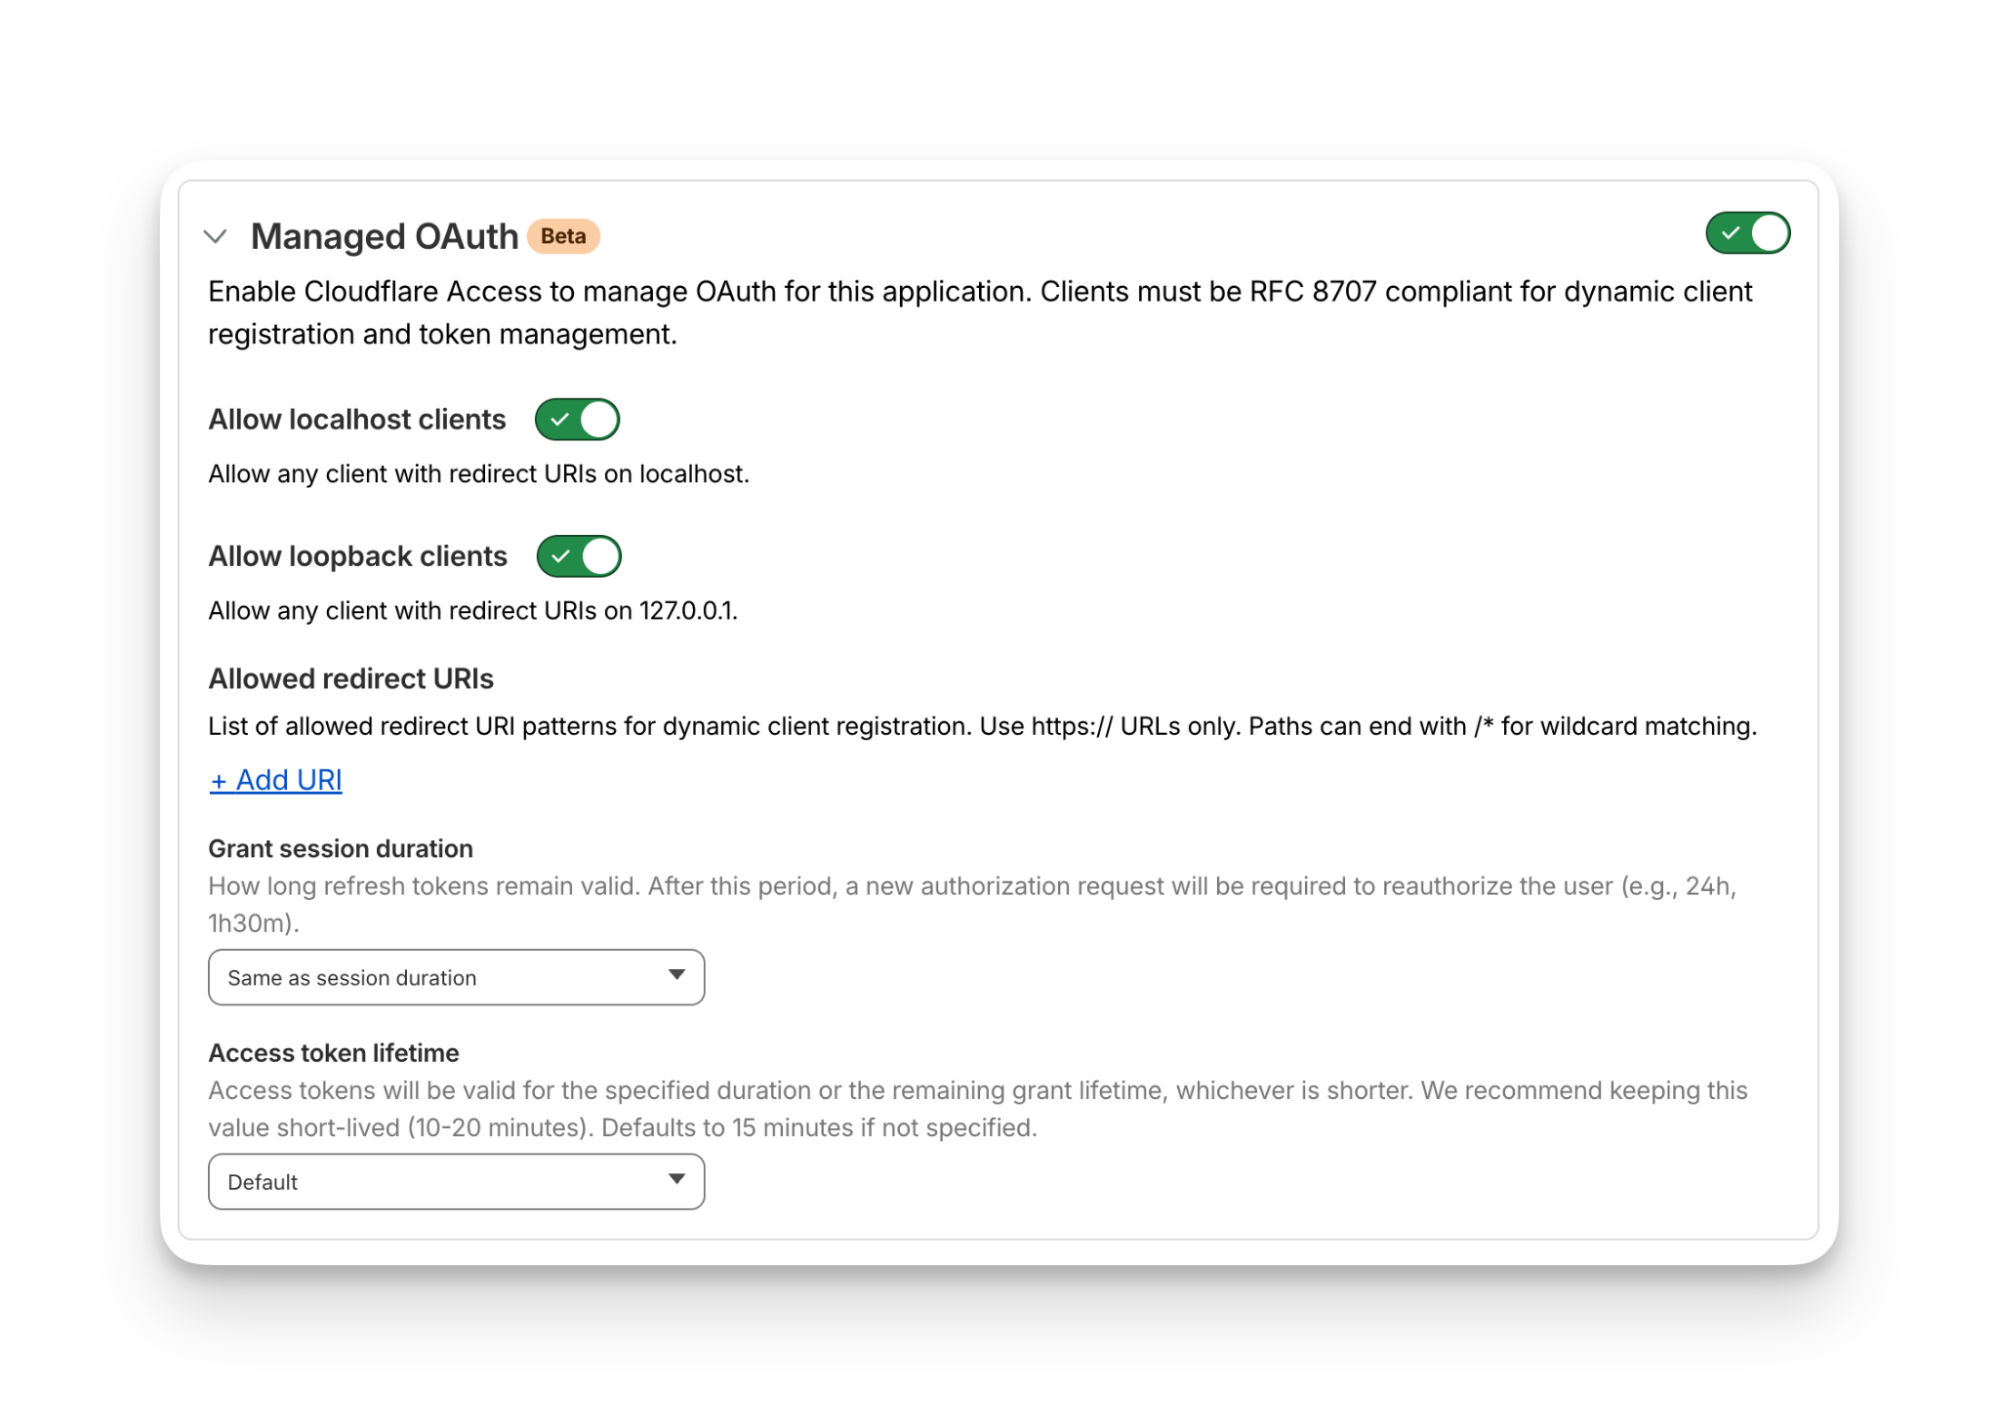
While this solution was a temporary answer to our own dilemma, today we’re retiring this workaround and fixing this problem for everyone. Now in open beta, every Access application supports managed OAuth. One click to enable it for an Access app, and agents that speak OAuth 2.0 can easily discover how to authenticate (RFC 9728), send the user through the auth flow, and receive back an authorization token (the same JWT from our initial solution).
Now, the flow works smoothly for both humans and agents. Cloudflare Access has a generous free tier. And building off our newly-introduced Organizations beta, you’ll soon be able to bridge identity providers across Cloudflare accounts too.
How managed OAuth works
For a given internal app protected by Cloudflare Access, you enable managed OAuth in one click:
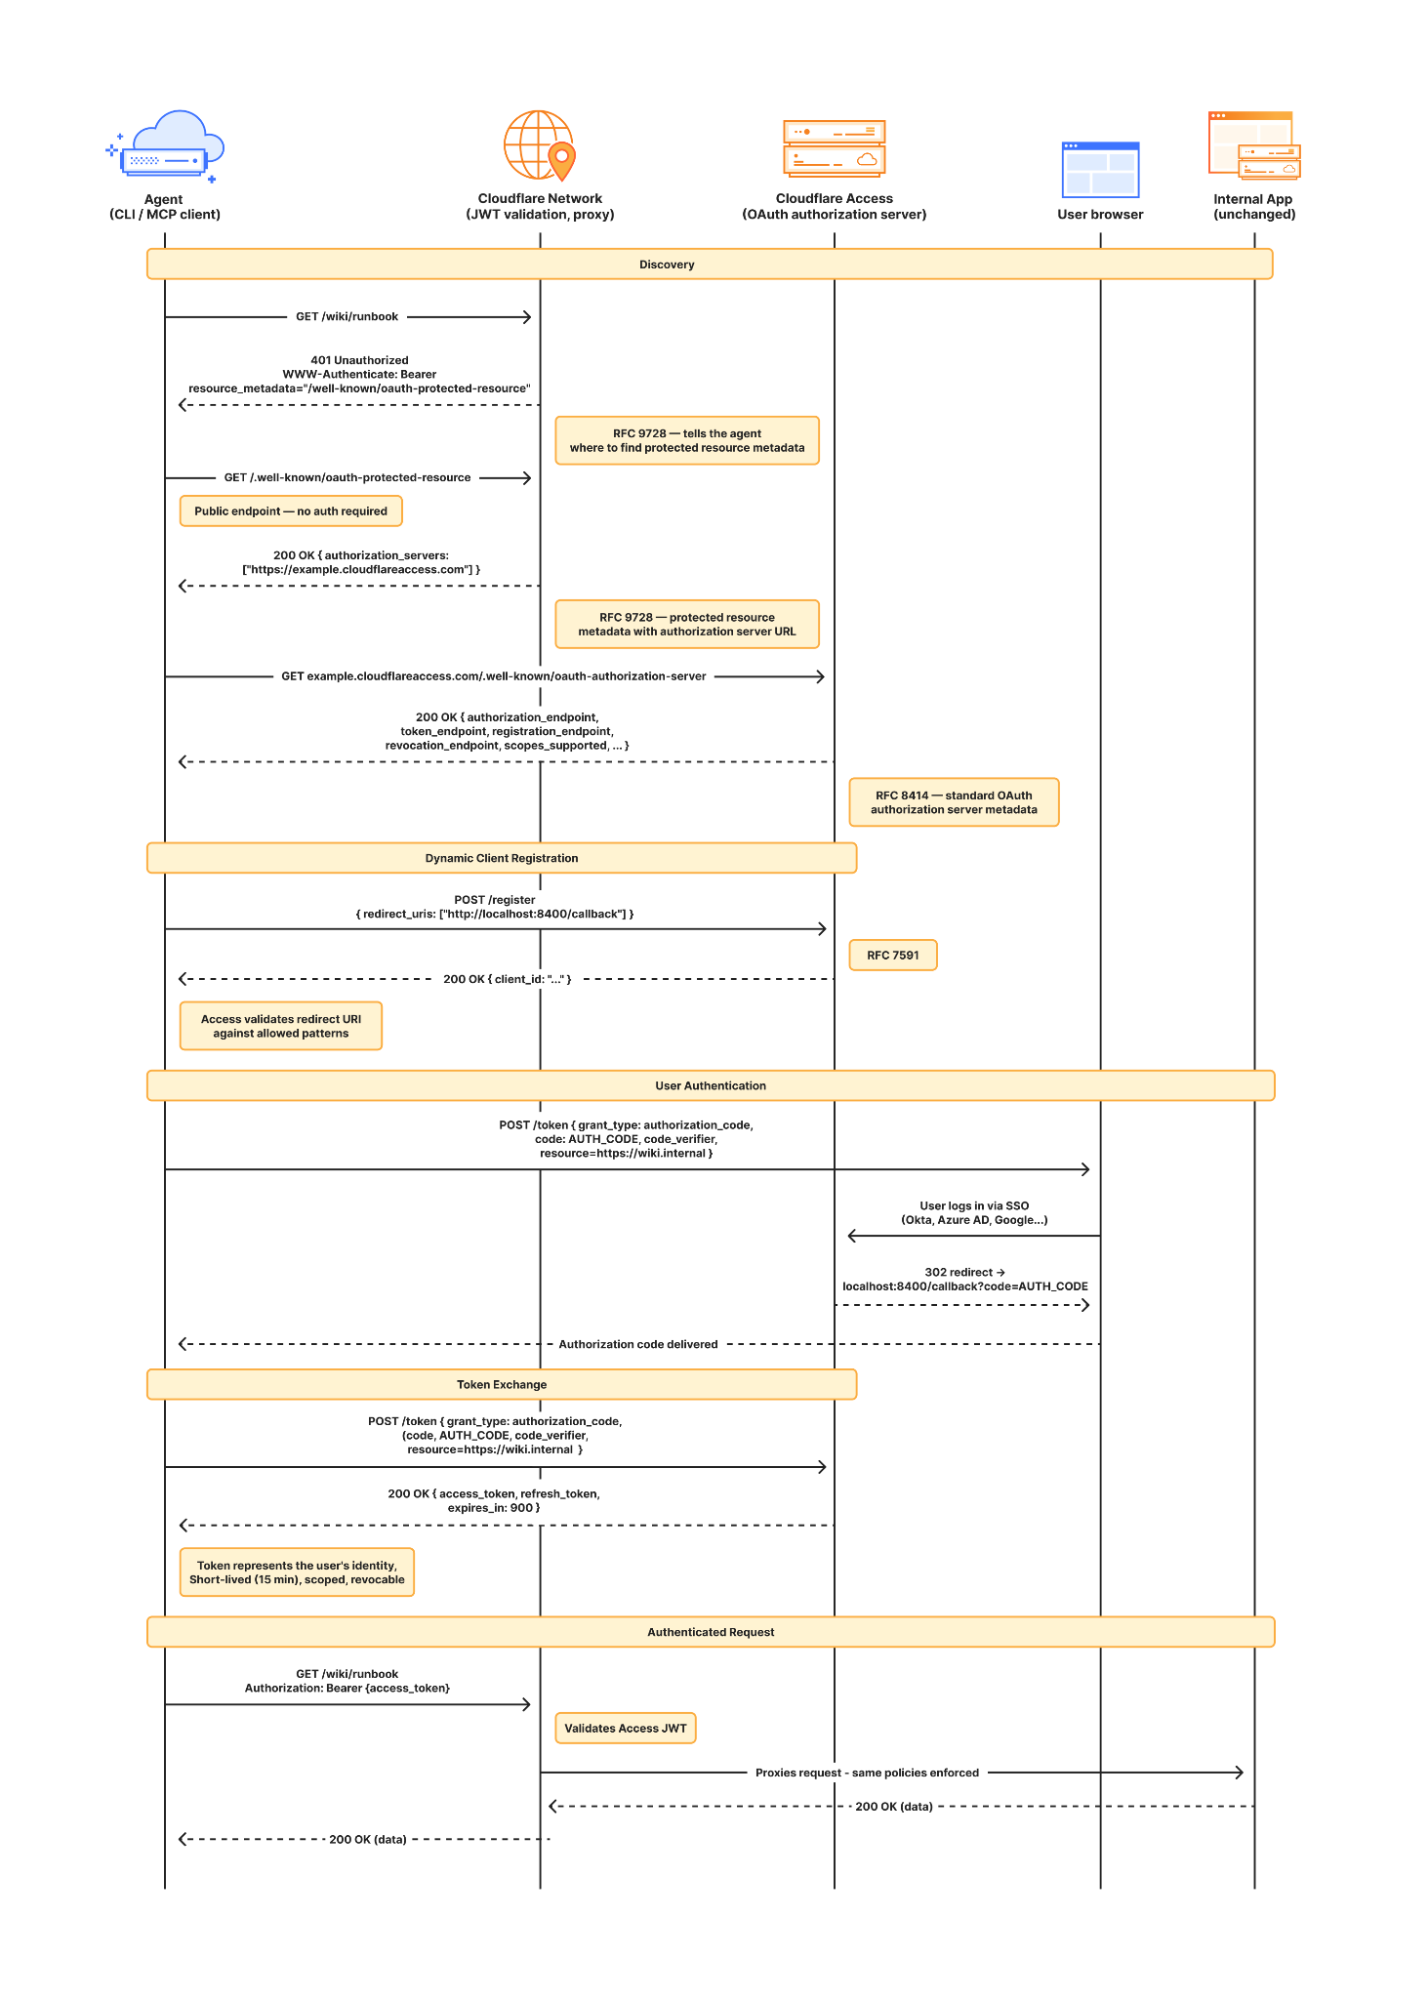
Once managed OAuth is enabled, Cloudflare Access acts as the authorization server. It returns the www-authenticate header, telling unauthorized agents where to look up information on how to get an authorization token. They find this at https://<your-app-domain>/.well-known/oauth-authorization-server. Equipped with that direction, agents can just follow OAuth standards:
The agent dynamically registers itself as a client (a process known as Dynamic Client Registration — RFC 7591),
The agent sends the human through a PKCE (Proof Key for Code Exchange) authorization flow (RFC 7636)
The human authorizes access, which grants a token to the agent that it can use to make authenticated requests on behalf of the user
Here’s what the authorization flow looks like:
If this authorization flow looks familiar, that’s because it’s what the Model Context Protocol (MCP) uses. We originally built support for this into our MCP server portals product, which proxies and controls access to many MCP servers, to allow the portal to act as the OAuth server. Now, we’re bringing this to all Access apps so agents can access not only MCP servers that require authorization, but also web pages, web apps, and REST APIs.
Mass upgrading your internal apps to be agent-ready
Upgrading the long tail of internal software to work with agents is a daunting task. In principle, in order to be agent-ready, every internal and external app would ideally have discoverable APIs, a CLI, a well-crafted MCP server, and have adopted the many emerging agent standards.
AI adoption is not something that can wait for everything to be retrofitted. Most organizations have a significant backlog of apps built over many years. And many internal “apps” work great when treated by agents as simple websites. For something like an internal wiki, all you really need is to enable Markdown for Agents, turn on managed OAuth, and agents have what they need to read protected content.
To make the basics work across the widest set of internal applications, we use Managed OAuth. By putting Access in front of your legacy internal apps, you make them agent-ready instantly. No code changes, no retrofitting. Instead, just immediate compatibility.
It’s the user’s agent. No service accounts and tokens needed
Agents need to act on behalf of users inside organizations. One of the biggest anti-patterns we’ve seen is people provisioning service accounts for their agents and MCP servers, authenticated using static credentials. These have their place in simple use cases and quick prototypes, and Cloudflare Access supports service tokens for this purpose.
But the service account approach quickly shows its limits when fine-grained access controls and audit logs are required. We believe that every action an agent performs must be easily attributable to the human who initiated it, and that an agent must only be able to perform actions that its human operator is likewise authorized to do. Service accounts and static credentials become points at which attribution is lost. Agents that launder all of their actions through a service account are susceptible to confused deputy problems and result in audit logs that appear to originate from the agent itself.
For security and accountability, agents must use security primitives capable of expressing this user–agent relationship. OAuth is the industry standard protocol for requesting and delegating access to third parties. It gives agents a way to talk to your APIs on behalf of the user, with a token scoped to the user’s identity, so that access controls correctly apply and audit logs correctly attribute actions to the end user.
Standards for the win: how agents can and should adopt RFC 9728 in their web fetch tools
RFC 9728 is the OAuth standard that makes it possible for agents to discover where and how to authenticate. It standardizes where this information lives and how it’s structured. This RFC became official in April 2025 and was quickly adopted by the Model Context Protocol (MCP), which now requires that both MCP servers and clients support it.
But outside of MCP, agents should adopt RFC 9728 for an even more essential use case: making requests to web pages that are protected behind OAuth and making requests to plain old REST APIs.
Most agents have a tool for making basic HTTP requests to web pages. This is commonly called the “web fetch” tool. It’s similar to using the fetch() API in JavaScript, often with some additional post-processing on the response. It’s what lets you paste a URL into your agent and have your agent go look up the content.
Today, most agents’ web fetch tools won’t do anything with the www-authenticate header that a URL returns. The underlying model might choose to introspect the response headers and figure this out on its own, but the tool itself does not follow www-authenticate, look up /.well-known/oauth-authorization-server, and act as the client in the OAuth flow. But it can, and we strongly believe it should! Agents already do this to act as remote MCP clients.
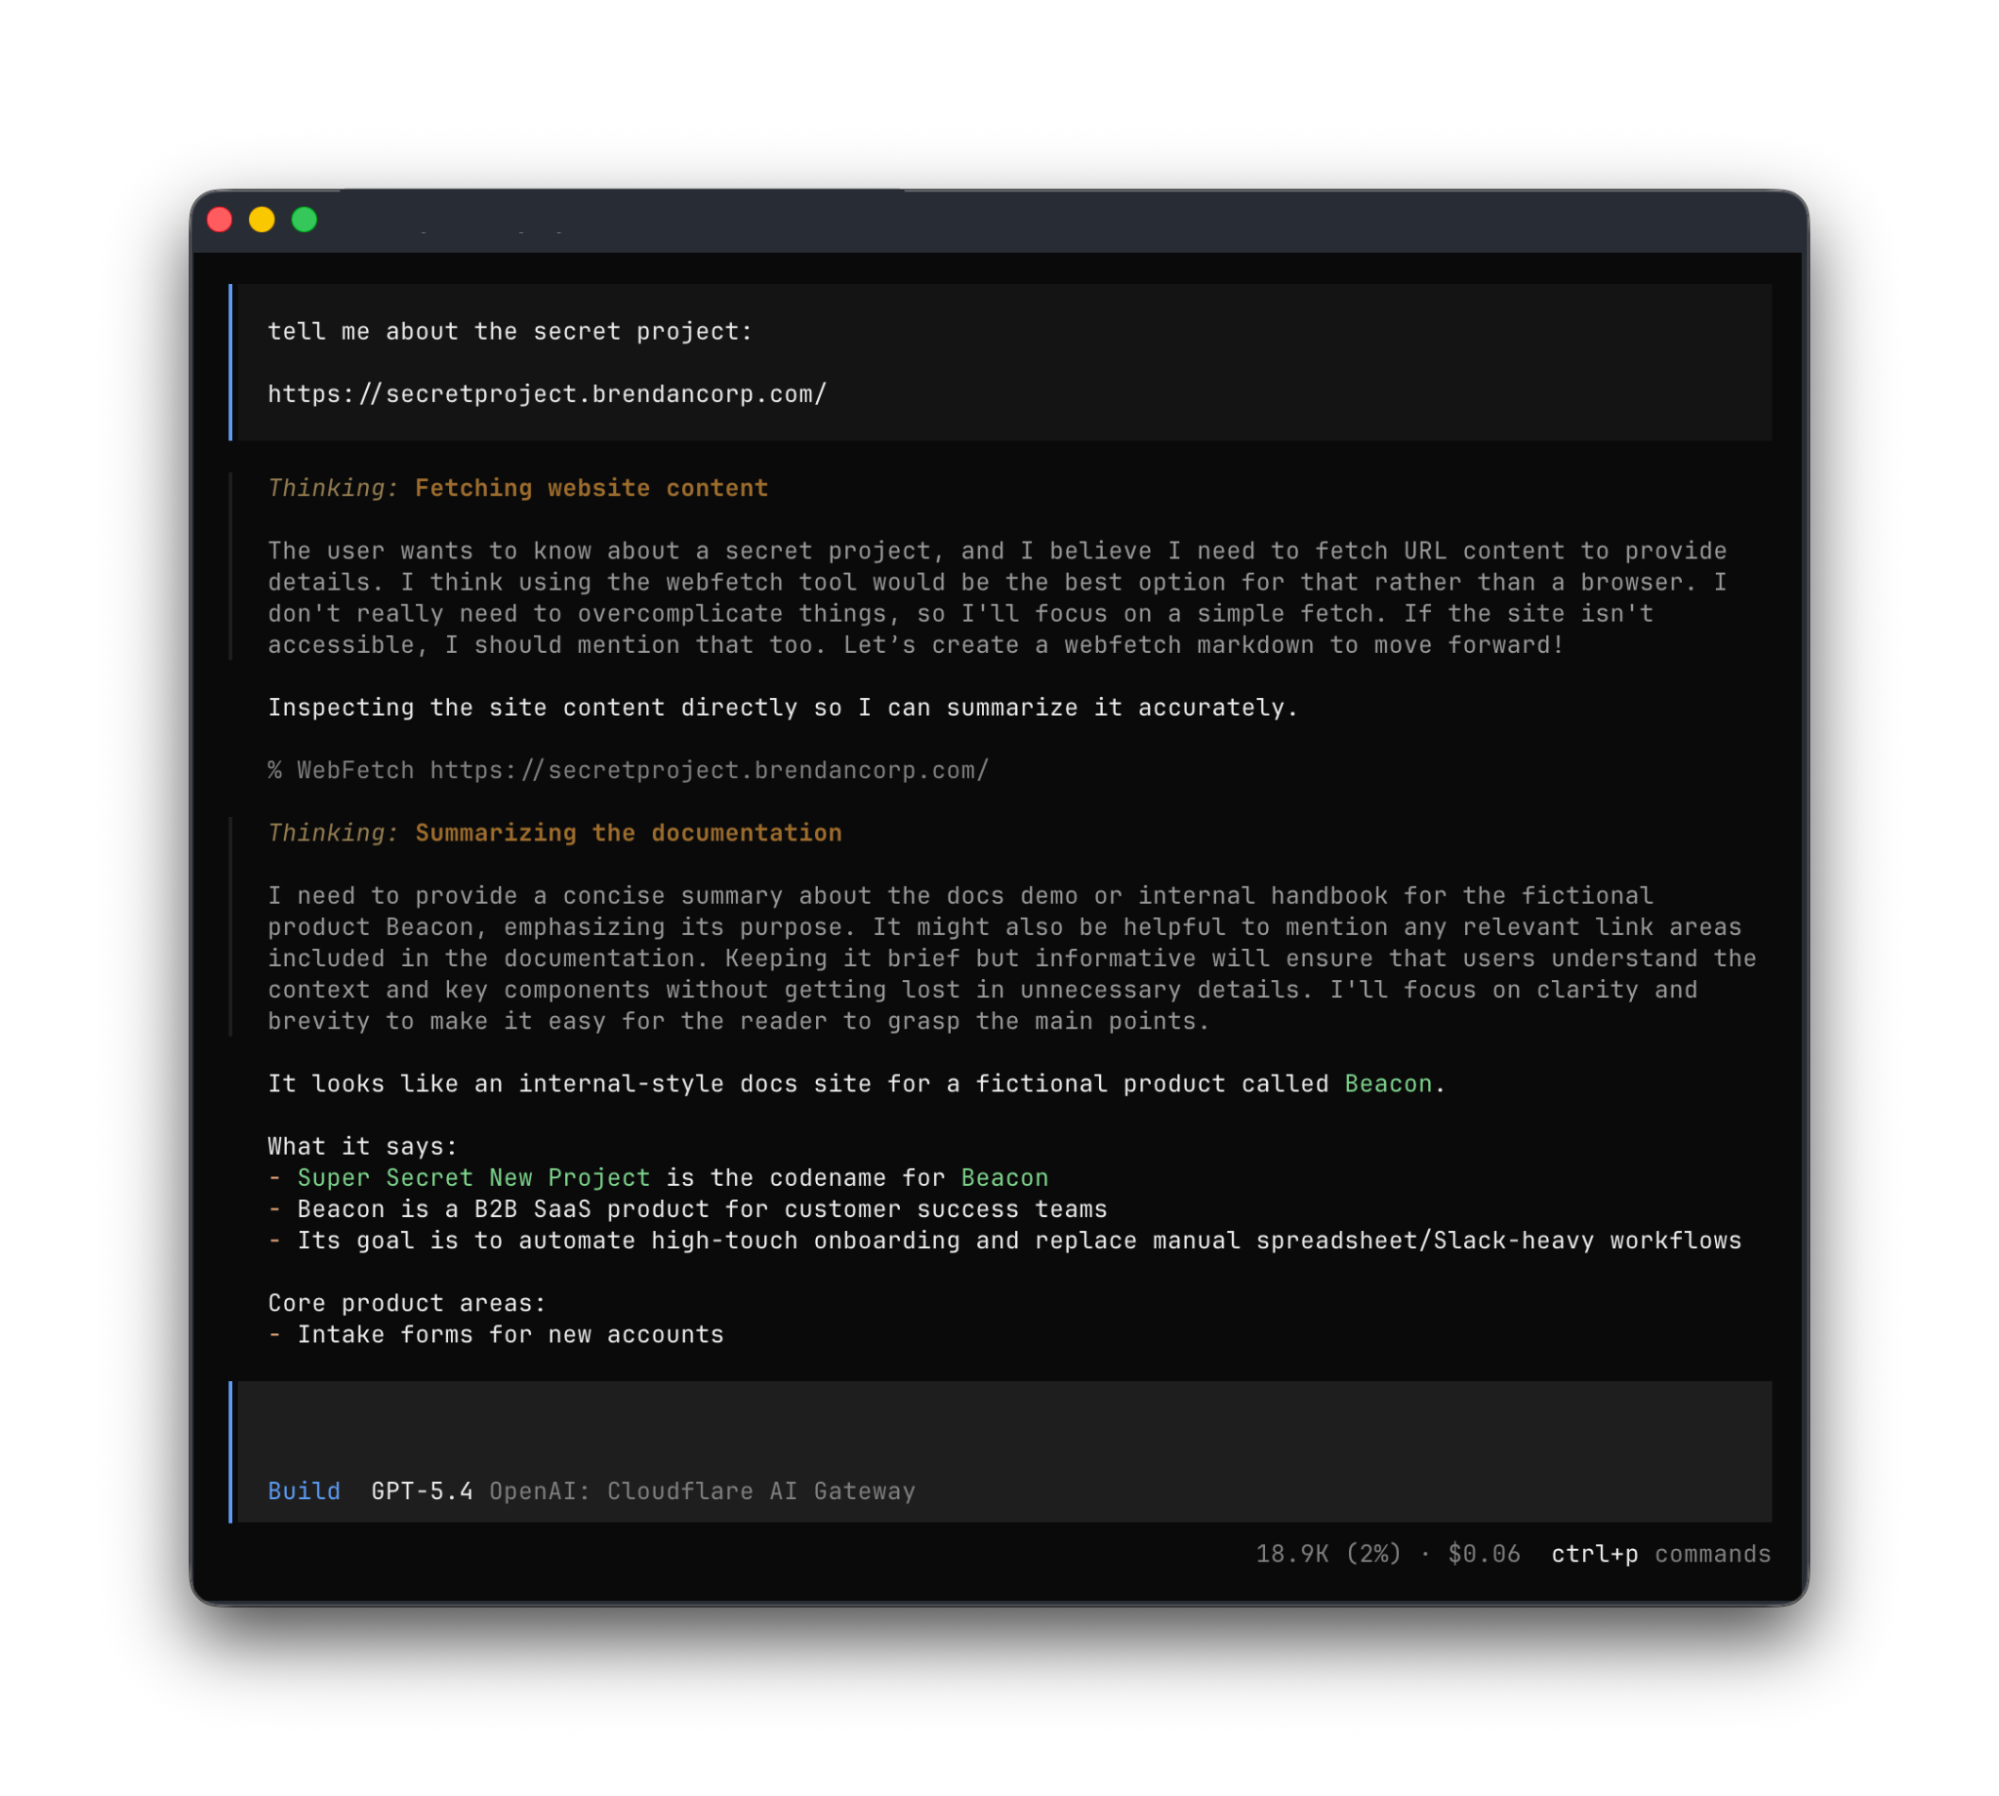
To demonstrate this, we’ve put up a draft pull request that adapts the web fetch tool in Opencode to show this in action. Before making a request, the adapted tool first checks whether it already has credentials ; if it does, it uses them to make the initial request. If the tool gets back a 401 or a 403 with a www-authenticate header, it asks the user for consent to be sent through the server’s OAuth flow.
Here’s how that OAuth flow works. If you give the agent a URL that is protected by OAuth and complies with RFC 9728, the agent prompts the human for consent to open the authorization flow:
…sending the human to the login page:
…and then to a consent dialog that prompts the human to grant access to the agent:
Once the human grants access to the agent, the agent uses the token it has received to make an authenticated request:
Any agent from Codex to Claude Code to Goose and beyond can implement this, and there’s nothing bespoke to Cloudflare. It’s all built using OAuth standards.
We think this flow is powerful, and that supporting RFC 9728 can help agents with more than just making basic web fetch requests. If a REST API supports RFC 9728 (and the agent does too), the agent has everything it needs to start making authenticated requests against that API. If the REST API supports RFC 9727, then the client can discover a catalog of REST API endpoints on its own, and do even more without additional documentation, agent skills, MCP servers or CLIs.
Each of these play important roles with agents — Cloudflare itself provides an MCP server for the Cloudflare API (built using Code Mode), Wrangler CLI, and Agent Skills, and a Plugin. But supporting RFC 9728 helps ensure that even when none of these are preinstalled, agents have a clear path forward. If the agent has a sandbox to execute untrusted code, it can just write and execute code that calls the API that the human has granted it access to. We’re working on supporting this for Cloudflare’s own APIs, to help your agents understand how to use Cloudflare.
Coming soon: share one identity provider (IdP) across many Cloudflare accounts
At Cloudflare our own internal apps are deployed to dozens of different Cloudflare accounts, which are all part of an Organization — a newly introduced way for administrators to manage users, configurations, and view analytics across many Cloudflare accounts. We have had the same challenge as many of our customers: each Cloudflare account has to separately configure an IdP, so Cloudflare Access uses our identity provider. It’s critical that this is consistent across an organization — you don’t want one Cloudflare account to inadvertently allow people to sign in just with a one-time PIN, rather than requiring that they authenticate via single-sign on (SSO).
To solve this, we’re currently working on making it possible to share an identity provider across Cloudflare accounts, giving organizations a way to designate a single primary IdP for use across every account in their organization.
As new Cloudflare accounts are created within an organization, administrators will be able to configure a bridge to the primary IdP with a single click, so Access applications across accounts can be protected by one identity provider. This removes the need to manually configure IdPs account by account, which is a process that doesn’t scale for organizations with many teams and individuals each operating their own accounts.
What’s next
Across companies, people in every role and business function are now using agents to build internal apps, and expect their agents to be able to access context from internal apps. We are responding to this step function growth in internal software development by making the Workers Platform and Cloudflare One work better together — so that it is easier to build and secure internal apps on Cloudflare.
Expect more to come soon, including:
More direct integration between Cloudflare Access and Cloudflare Workers, without the need to validate JWTs or remember which of many routes a particular Worker is exposed on.
wrangler dev –tunnel — an easy way to expose your local development server to others when you’re building something new, and want to share it with others before deploying
More announcements to come during Agents Week 2026
Enable Managed OAuth for your internal apps behind Cloudflare Access
Managed OAuth is now available, in open beta, to all Cloudflare customers. Head over to the Cloudflare dashboard to enable it for your Access applications. You can use it for any internal app, whether it’s one built on Cloudflare Workers, or hosted elsewhere. And if you haven’t built internal apps on the Workers Platform yet — it’s the fastest way for your team to go from zero to deployed (and protected) in production.
AI agents have changed how teams think about private network access. Your coding agent needs to query a staging database. Your production agent needs to call an internal API. Your personal AI assistant needs to reach a service running on your home network. The clients are no longer just humans or services. They’re agents, running autonomously, making requests you didn’t explicitly approve, against infrastructure you need to keep secure.
Each of these workflows has the same underlying problem: agents need to reach private resources, but the tools for doing that were built for humans, not autonomous software. VPNs require interactive login. SSH tunnels require manual setup. Exposing services publicly is a security risk. And none of these approaches give you visibility into what the agent is actually doing once it’s connected.
Today, we’re introducing Cloudflare Mesh to connect your private networks together and provide secure access for your agents. We’re also integrating Mesh with Cloudflare Developer Platform so that Workers, Durable Objects, and agents built with the Agents SDK can reach your private infrastructure directly.
If you’re using Cloudflare One’s SASE and Zero Trust suite, you already have access to Mesh. You don’t need a new technology paradigm to secure agentic workloads. You need a SASE that was built for the agentic era, and that’s Cloudflare One. Cloudflare Mesh is a new experience with a simpler setup that leverages the on-ramps you’re already familiar with: WARP Connector (now called a Cloudflare Mesh node) and WARP Client (now called Cloudflare One Client). Together, these create a private network for human, developer, and agent traffic. Mesh is directly integrated into your existing Cloudflare One deployment. Your existing Gateway policies, Access rules, and device posture checks apply to Mesh traffic automatically.
If you’re a developer who just wants private networking for your agents, services, and team, Mesh is where you start. Set it up in minutes, connect your networks, and secure your traffic. And because Mesh runs on the Cloudflare One platform, you can grow into more advanced capabilities over time: Gateway network, DNS, and HTTP policies for fine-grained traffic control, Access for Infrastructure for SSH and RDP session management, Browser Isolation for safe web access, DLP to prevent sensitive data from leaving your network, and CASB for SaaS security. You won’t have to plan for all of this on day one. You just don’t have to migrate when you need it.
New agentic workflows
Private networking has always been about connecting clients to resources — SSH into a server, query a database, access an internal API. What’s changed is who the clients are. A year ago, the answer was your developers and your services. Today, it’s increasingly your agents.
This isn’t theoretical. Look at the ecosystem: the explosion of MCP (Model Context Protocol) servers providing tool access, coding agents that need to read from private repos and databases, personal assistants running on home hardware. Each of these patterns assumes the agent can reach the resources it needs. When those resources are isolated in private networks, the agent is stuck.
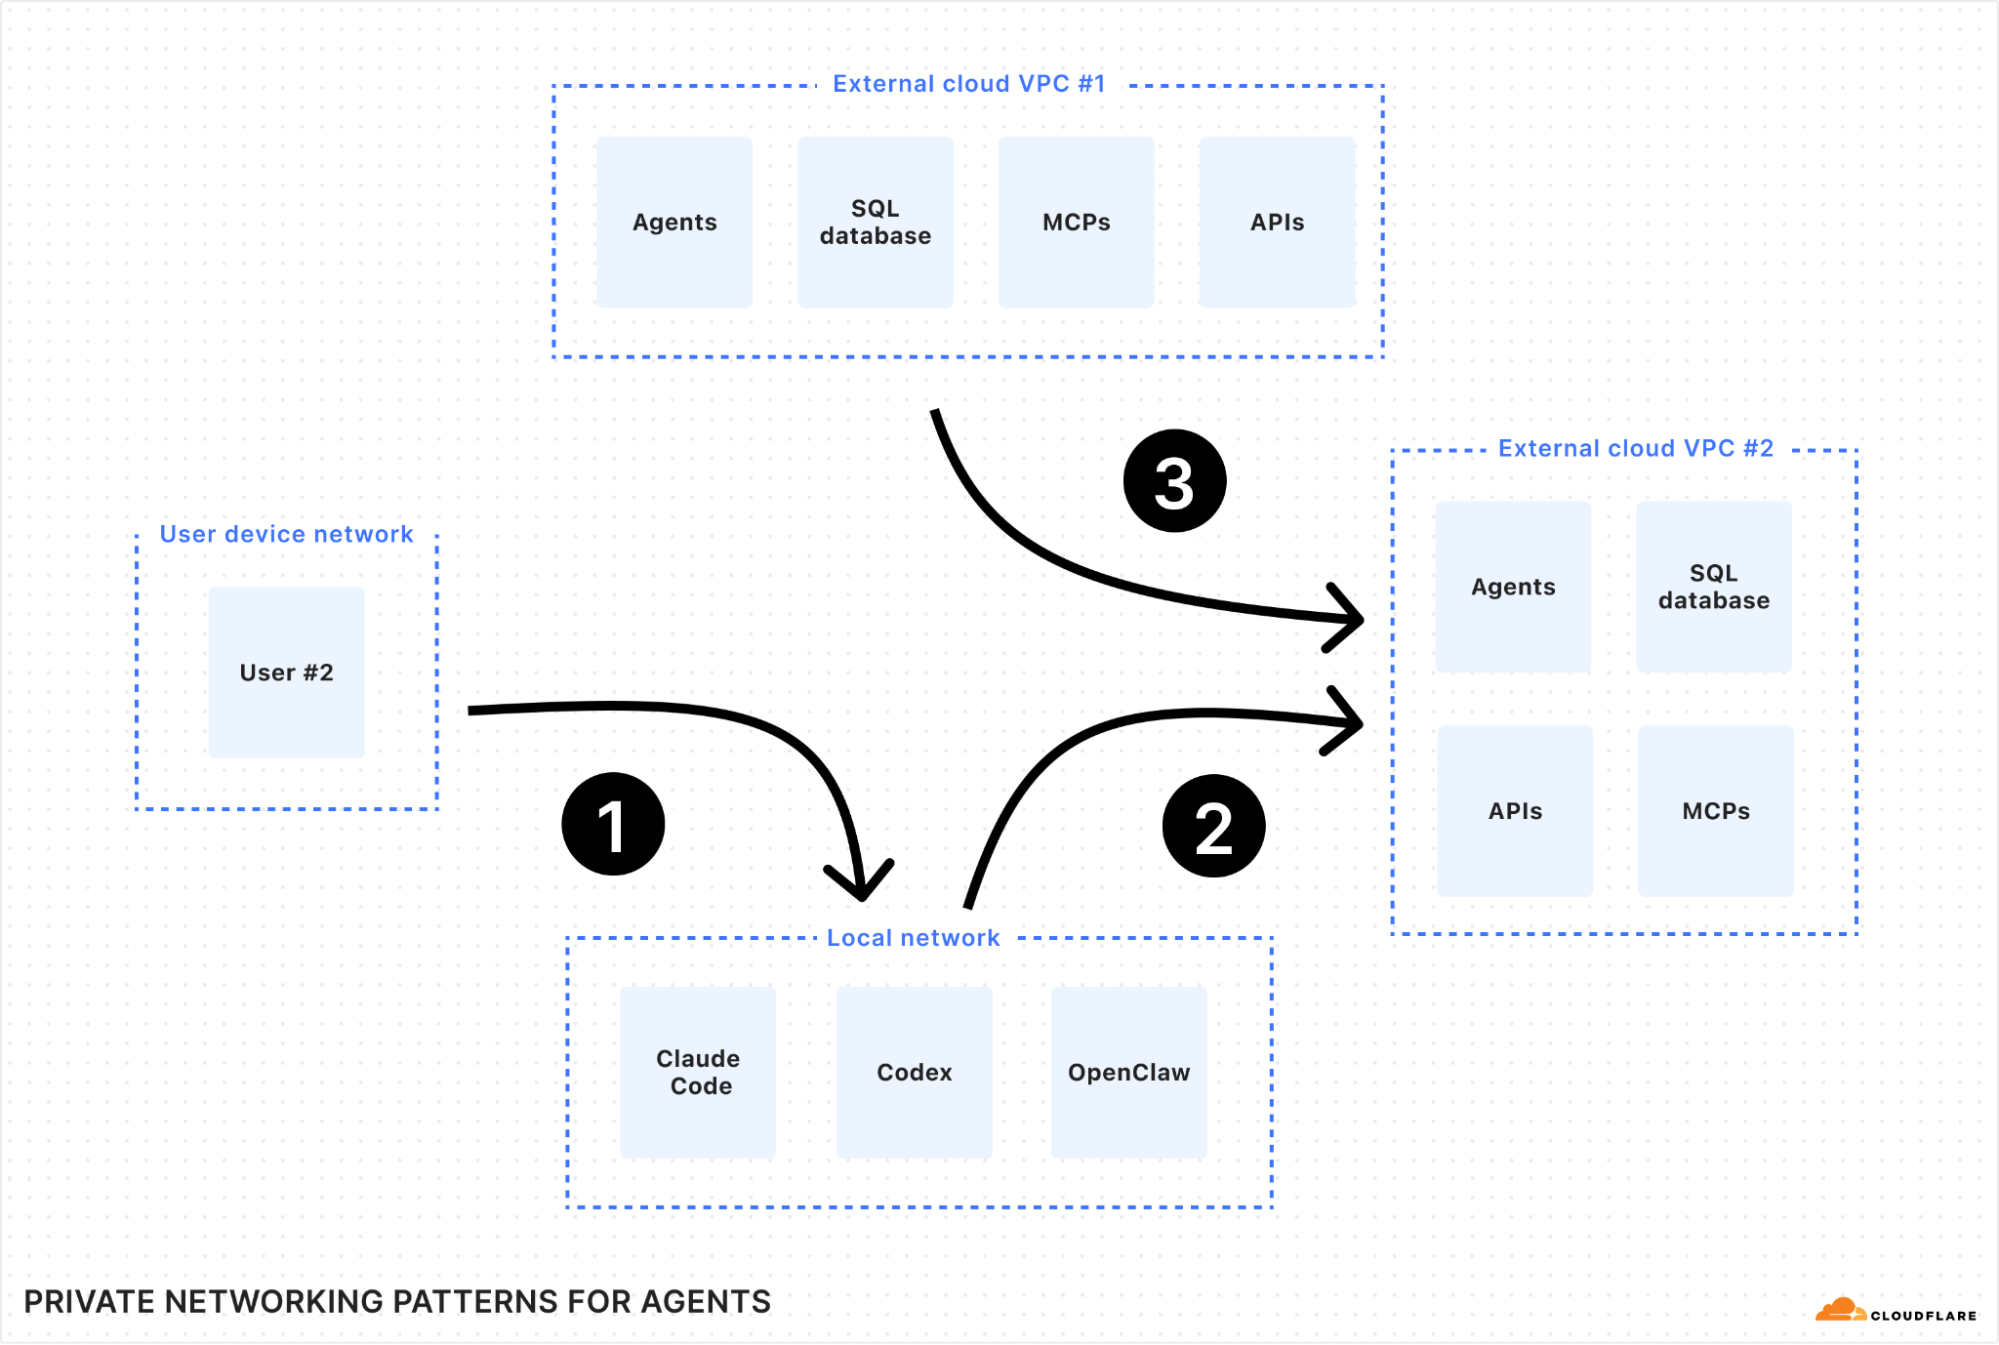
This creates three workflows that are hard to secure today:
Accessing a personal agent from a mobile device. You’re running OpenClaw on a Mac mini at home. You want to reach it from your phone, your laptop at a coffee shop, or your work machine. But exposing it to the public Internet (even behind a password) can leave some gaps exposed. Your agent has shell access, file system access, and network access to your home network. One misconfiguration and anyone can reach it.
Letting a coding agent access your staging environment. You’re using Claude Code, Cursor, or Codex on your laptop. You ask it to check deployment status, query analytics from a staging database, or read from an internal object store. But those services live in a private cloud VPC, so your agent can’t reach them without exposing them to the Internet or tunneling your entire laptop into the VPC.
Connecting deployed agents to private services. You’re building agents into your product using the Agents SDK on Cloudflare Workers. Those agents need to call internal APIs, query databases, and access services that aren’t on the public Internet. They need private access, but with scoped permissions, audit trails, and no credential leakage.
Cloudflare Mesh: one private network for users, nodes, and agents
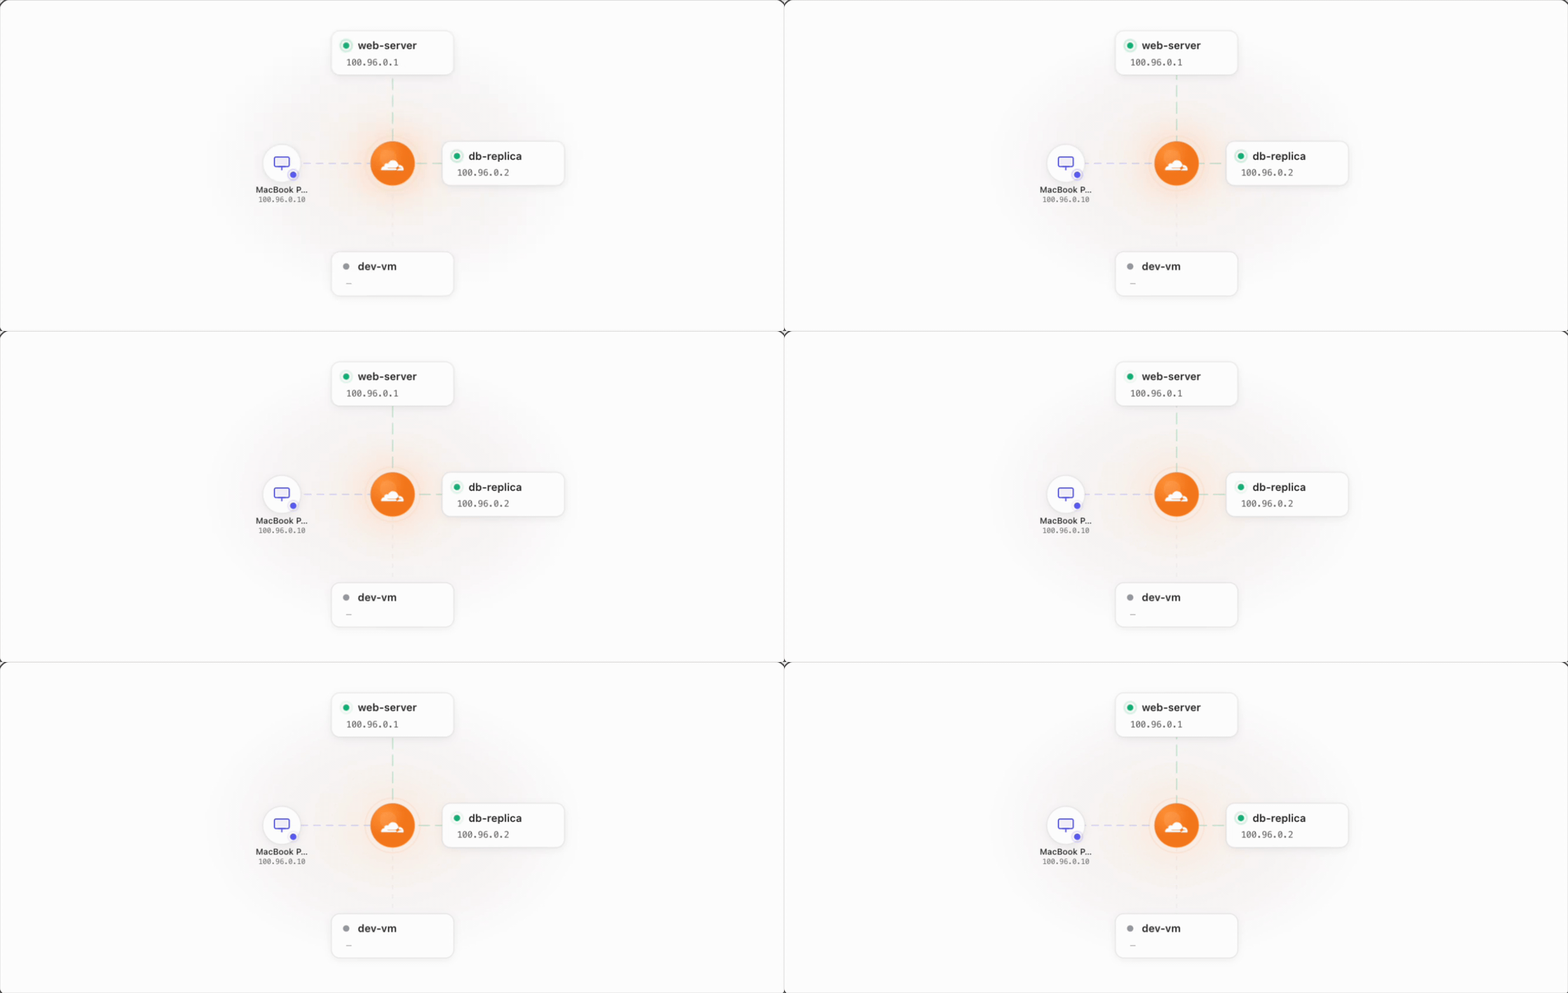
Cloudflare Mesh is developer-friendly private networking. One lightweight connector, one binary, connects everything: your personal devices, your remote servers, your user endpoints. You don’t need to install separate tools for each pattern. One connector on your network, and every access pattern works.
Once connected, devices in your private network can talk to each other over private IPs, routed through Cloudflare’s global network across 330+ cities giving you better reliability and control over your network.
Now, with Mesh, a single solution can solve all of the agent scenarios we mentioned above:
With Cloudflare One Client for iOS on your phone, you can securely connect your mobile devices to your local Mac mini running OpenClaw via a Mesh private network.
With Cloudflare One Client for macOS on your laptop, you can connect your laptop to your private network so your coding agents can reach staging databases or APIs and query them.
With Mesh nodes on your Linux servers, you can connect VPCs in external clouds together, letting agents access resources and MCPs in external private networks.
Because Mesh is powered by Cloudflare One Client, every connection inherits the security controls of the Cloudflare One platform. Gateway policies apply to Mesh traffic. Device posture checks validate connecting devices. DNS filtering catches suspicious lookups. You get this without additional configuration: the same policies that protect your human traffic protect your agent traffic.
Choosing between Mesh and Tunnel
With the introduction of Mesh, you might ask: when should I use Mesh instead of Tunnel? Both connect external networks privately to Cloudflare, but they serve different purposes. Cloudflare Tunnel is the ideal solution for unidirectional traffic, where Cloudflare proxies the traffic from the edge to specific private services (like a web server or a database).
Cloudflare Mesh, on the other hand, provides a full bidirectional, many-to-many network. Every device and node on your Mesh can access one another using their private IPs. An application or agent running in your network can discover and access any other resource on the Mesh without each resource needing its own Tunnel.
Using the power of Cloudflare’s network
Cloudflare Mesh gives you the benefits of a mesh network (resiliency, high scalability, low latency and high performance), but, by routing everything through Cloudflare, it resolves a key challenge of mesh networks: NAT traversal.
Most of the Internet is behind NAT (Network Address Translation). This mechanism allows an entire local network of devices to share a single public IP address by mapping traffic between public headers and private internal addresses. When two devices are behind NAT, direct connections can fail and traffic has to fall back to relay servers. If your relay infrastructure has limited points of presence, a meaningful fraction of your traffic hits those relays, adding latency and reducing reliability. And while it can be possible to self-host your own relay servers to compensate, that means taking on the burden of managing additional infrastructure just to connect your existing network.
Cloudflare Mesh takes a different approach. All Mesh traffic routes through Cloudflare’s global network, the same infrastructure that serves traffic for some of the largest websites of the Internet. For cross-region or multi-cloud traffic, this consistently beats public Internet routing. There’s no degraded fallback path, because the Cloudflare edge is the path.
Routing through Cloudflare also means every packet passes through Cloudflare’s security stack. This is the key advantage of building Mesh on the Cloudflare One platform: security isn’t a separate product you bolt on later. And by leveraging this same global backbone, we can provide these core pillars to every team from day one:
50 nodes and 50 users free. Your whole team and your whole staging environment on one private network, included with every Cloudflare account.
Global edge routing. 330+ cities, optimized backbone routing. No relay servers with limited points of presence. No degraded fallback paths.
Security controls from day one. Mesh runs on Cloudflare One. Gateway policies, DNS filtering, DLP, traffic inspection, and device posture checks are all available on the same platform. Start with simple private connectivity. Turn on Gateway policies when you need traffic filtering. Enable Access for Infrastructure when you need session-level controls for SSH and RDP. Add DLP when you need to prevent sensitive data from leaving your network. Every capability is one toggle away.
High availability. Create a Mesh node with high availability enabled and spin up multiple connectors using the same token in active-passive mode. They advertise the same IP routes, so if one goes down, traffic fails over automatically.
Integrated with the Developer Platform with Workers VPC
Mesh connects your agents and resources across external clouds, but you also need to be able to connect from your agents built on Workers with Agents SDK as well. To enable this, we’ve extended Workers VPC to make your entire Mesh network accessible to Workers and Durable Objects.
That means that you can connect to your Cloudflare Mesh network from Workers, making the entire network accessible from a single binding’s fetch() call. This complements Workers VPC’s existing support for Cloudflare Tunnel, giving you more choice over how you want to secure your networks. Now, you can specify entire networks that you want to connect to in your wrangler.jsonc file. To bind to your Mesh network, use the cf1:network reserved keyword that binds to the Mesh network of your account:
Then, you can use it within your Worker or agent code:
export default {
  async fetch(request: Request, env: Env, ctx: ExecutionContext) {
    // Reach any internal host on your Mesh, no pre-registration required
    const apiResponse = await env.MESH.fetch("http://10.0.1.50/api/data");

    // Internal hostname resolved via tunnel's private DNS resolver
    const dbResponse = await env.AWS_VPC.fetch("http://internal-db.corp.local:5432");

    return new Response(await apiResponse.text());
  },
};
By connecting the Developer Platform to your Mesh networks, you can build Workers that have secure access to your private databases, internal APIs and MCPs, allowing you to build cross-cloud agents and MCPs that provide agentic capabilities to your app. But it also opens up a world where agents can autonomously observe your entire stack end-to-end, cross-reference logs and suggest optimizations in real-time.
How it all fits together
Together, Cloudflare Mesh, Workers VPC, and the Agents SDK provide a unified private network for your agents that spans both Cloudflare and your external clouds. We’ve merged connectivity and compute so your agents can securely reach the resources they need, wherever they live, across the globe.
Mesh nodes are your servers, VMs, and containers. They run a headless version of Cloudflare One Client and get a Mesh IP. Services talk to services over private IPs, bidirectionally, routed through Cloudflare’s edge.
Devices are your laptops and phones. They run the Cloudflare One Client and reach Mesh nodes directly: SSH, database queries, API calls, all over private IPs. Your local coding agents use this connection to access private resources.
Agents on Workers reach private services through Workers VPC Network bindings. They get scoped access to entire networks, mediated by MCP. The network enforces what the agent can reach. The MCP server enforces what the agent can do.
What’s next
The current version of Mesh provides the foundation for secure, unified connectivity. But as agentic workflows become more complex, we’re focused on moving beyond simple connectivity toward a network that is more intuitive to manage and more granularly aware of who, or what, is talking to your services. Here is what we are building for the rest of the year.
Hostname routing
We’re extending Cloudflare Tunnel’s hostname routing to Mesh this summer. Your Mesh nodes will be able to attract traffic for private hostnames like wiki.local or api.staging.internal, without you having to manage IP lists or worry about how those hostnames resolve on the Cloudflare edge. Route traffic to services by name, not by IP. If your infrastructure uses dynamic IPs, auto-scaling groups, or ephemeral containers, this removes an entire class of routing headaches.
Mesh DNS
Today, you reach Mesh nodes by their Mesh IPs: ssh 100.64.0.5. That works, but it’s not how you think about your infrastructure. You think in names: postgres-staging, api-prod, nikitas-openclaw.
Later this year we’re building Mesh DNS so that every node and device that joins your Mesh automatically gets a routable internal hostname. No DNS configuration or manual records. Add a node named postgres-staging, and postgres-staging.mesh resolves to the right Mesh IP from any device on your Mesh.
Combined with hostname routing, you’ll be able to ssh postgres-staging.mesh or curl http://api-prod.mesh:3000/health without ever knowing or managing an IP address.
Identity-aware routing
Today, Mesh nodes authenticate to the Cloudflare edge, but they share an identity at the network layer. Devices authenticate with user identity via the Cloudflare One Client, but nodes don’t yet carry distinct, routable identities that Gateway policies can differentiate.
We want to change that. The goal is identity-aware routing for Mesh, where each node, each device, and eventually each agent gets a distinct identity that policies can evaluate. Instead of writing rules based on IP ranges, you write rules based on who or what is connecting.
This matters most for agents. Today, when an agent running on Workers calls a tool through a VPC binding, the target service sees a Worker making a request. It doesn’t know which agent is calling, who authorized it, or what scope was granted. On the Mesh side, when a local coding agent on your laptop reaches a staging service, Gateway sees your device identity but not the agent’s.
We’re working toward a model where agents carry their own identity through the network:
Principal / Sponsor: The human who authorized the action (Nikita from the platform team)
Agent: The AI system performing it (the deployment assistant, session #abc123)
Scope: What the agent is allowed to do (read deployments, trigger rollbacks, nothing else)
This would let you write policies like: reads from Nikita’s agents are allowed, but writes require Nikita directly. Agent traffic can be filtered independently from human traffic. An agent’s network access can be revoked without touching Nikita’s.
The infrastructure for this is in place. Mesh nodes provision with per-node tokens, devices authenticate with per-user identity, and Workers VPC bindings scope per-service access. The missing piece is making these identities visible to the policy layer so Gateway can make routing and access decisions based on them. That’s what we’re building.
Mesh in containers
Today, Mesh nodes run on VMs and bare-metal Linux servers. But modern infrastructure increasingly runs in containers: Kubernetes pods, Docker Compose stacks, ephemeral CI/CD runners. We’re building a Mesh Docker image that lets you add a Mesh node to any containerized environment.
This means you’ll be able to include a Mesh sidecar in your Docker Compose stack and give every service in that stack private network access. A microservice running in a container in your staging cluster could reach a database in your production VPC over Mesh, without either service needing a public endpoint.
It is also useful for CI/CD pipelines that can access private infrastructure during builds and tests: your GitHub Actions runner pulls the Mesh container image, joins your network, runs integration tests against your staging environment, and tears down. All without VPN credentials to manage or persistent tunnels to maintain: the node disappears when the container exits.
We expect the Mesh Docker image to be available later this year.
Get started
While we continue to evolve these identity and routing capabilities, the foundation for secure, unified networking is available today. You can start bridging your clouds and securing your agents in just a few minutes.
Get started Cloudflare Mesh: Head to Networking > Mesh in the Cloudflare dashboard. Free for up to 50 nodes and 50 users.
Build agents with Agents SDK and Workers VPC: Install the Agents SDK (`npm i agents`), follow the Workers VPC quickstart, and build a remote MCP server with private backend access.
Already on Cloudflare One? Mesh works with your existing setup. Your Gateway policies, device posture checks, and access rules apply to Mesh traffic automatically. See the Mesh documentation to add your first node.
Cloud environments have changed how security teams detect and respond to threats. Signals come from more places, identities are harder to track, and attacks rarely stay within a single system. For many teams, the challenge is no longer visibility. It is having the risk context to understand what matters and act on it quickly. This shift is reflected in the conversations shaping this year’s Rapid7 Global Cybersecurity Summit.
Taking place May 12-13, the summit explores how detection and response are evolving across cloud, identity, and endpoint environments. The focus is practical: how attacks actually unfold, how teams respond under pressure, and how detection strategies need to adapt.
Detection is no longer just about coverage
One of the clearest themes across the agenda is that traditional detection models are struggling to keep pace with attackers. Environments are more dynamic, and attackers are more targeted. Catching everything is no longer realistic, and in many cases it is not useful.
Sessions like The New Rules of Detection Engineering will examine this shift in detail. The focus moves away from volume and toward precision. It will ask questions like: What makes a detection meaningful? How should teams prioritize signals? And how can detection strategies support real outcomes rather than just generate alerts? This is especially important in cloud environments, where context changes quickly and signals are often incomplete.
Understanding how attacks actually unfold
To improve detection, teams need to understand how attacks behave in practice. Several sessions across the summit focus on this directly.
The Reality of Running a SOC in 2026 will explore how modern attacks begin — from identity misuse to cloud misconfigurations— and how they evolve over time. Rather than following a predictable path, attacks move across systems, taking advantage of gaps in visibility and delayed decisions.
This theme continues in sessions like Inside the Modern SOC, where attendees follow a real investigation from first alert to outcome. These walkthroughs show how signals are correlated across environments and how decisions are made when time and clarity are limited.
From exposure to runtime risk
Cloud security also requires a closer connection between exposure and detection. In many cases, incidents begin long before an alert is triggered.
Sessions such as From Cloud Exposure to Runtime Attack explore how misconfigurations, permissions, and overlooked risks lead to active threats. The focus is on how teams connect exposure insights with runtime behavior to improve prioritization and respond earlier in the attack lifecycle.
This is a practical shift. Detection is no longer a separate function but part of a broader process that starts with understanding exposure and continues through to response.
What this means for security teams
Across these sessions, a consistent message emerges: Detection strategies need to be grounded in how environments actually behave, not how they are expected to behave.
This means focusing on signal quality rather than volume, connecting data across cloud, identity, and endpoint, and building workflows that support faster decisions. It also means accepting that not all alerts have equal weight, and that prioritization is a core part of modern detection.
A preview of what’s to come
Cloud detection is just one part of a broader shift happening across the summit. Sessions on MDR, AI, and exposure management all connect back to the same idea. Security operations must move earlier, reduce noise, and act with greater confidence.
If you are rethinking how your team detects and responds to threats in cloud and hybrid environments, this is where those conversations come together.
Join us May 12–13 and see how security teams are evolving their detection strategies for 2026.
Abstract: The rapid expansion of artificial intelligence (AI) is raising concerns about its potential to transform cybercrime. Beyond empowering novice offenders, AI stands to intensify the scale and sophistication of attacks by seasoned cybercriminals. This paper examines the evolving relationship between cybercriminals and AI using a unique dataset from a cyber threat intelligence platform. Analyzing more than 160 cybercrime forum conversations collected over seven months, our research reveals how cybercriminals understand AI and discuss how they can exploit its capabilities. Their exchanges reflect growing curiosity about AI’s criminal applications through legal tools and dedicated criminal tools, but also doubts and anxieties about AI’s effectiveness and its effects on their business models and operational security. The study documents attempts to misuse legitimate AI tools and develop bespoke models tailored for illicit purposes. Combining the diffusion of innovation framework with thematic analysis, the paper provides an in-depth view of emerging AI-enabled cybercrime and offers practical insights for law enforcement and policymakers.
I’d like to know what the “best” compression tool is for storing archives
(backups, data files). So I wrote a tool to compare them: cmp-compress.
My tl;dr take-away is:
zstd -3 for fast compression (the default).
xz -7 for the best ratio use; -8 or -9sometimes compress better but
often don’t. You probably want to test this.
zstd -12 for a good trade-off that leans towards fast.
zstd -17 for a good trade-off that leans towards better ratio.
Add -T0 to zstd to use all cores if nothing else is running on the system
(or use the zstdmt wrapper).
For other use-cases all of this may of course be different.
Some tools like xz and zstd offer many differs knobs and levers; I’m sure these
are useful but did not bother with them and tested only the presets. I’m not
looking for an incantation to eek out the absolute best – I just want an
informed practical decision on which tool to use with which flags to compress
common stuff.
For the same reason I’m only comparing reasonably common compression tools
already in wide-spread use. There are many others that are very similar to those
listed here with minor differences (e.g. zip, 7zip), not considered stable (e.g.
bzip3), or just not widespread for one reason or the other.
If you’re interested in other tools or sets of flags then you can run
cmp-compress yourself.
The enwik files are from the Large Text Compression Benchmark; dickens is from
the Silesia compression corpus; QEMU is version 10.2.0; Docker is version
29.4.0, and vim is a private modified fork that’s not easy to exactly reproduce
but a statically linked huge build of Vim 9.1 should be close.
All of this is run on Void Linux with Linux 6.19.10 on a ThinkPad x13 with AMD
Ryzen 7 7840U (8 cores/16 threads) and 32G of memory. I ran all the tests twice
and discarded the first run (cmp-compress compare >/dev/null && cmp-compress compare >a.json).
gzip
The -# flag has a small effect and becomes useless above -6. Even the difference
between -5 and -6 is quite small, and arguably -5 would be a better default than
-6. -4 is a good setting if you want to be faster as it compresses a bit more
than -1, -2, and -3, but isn’t too much slower.
The -# flag makes no meaningful difference for decompression times.
In short, use only -4, -5, or -6.
pigz
The -# behaves identical to gzip: it has no meaningful difference from gzip
(in most cases pigz compresses slightly better – by a negligible amount but
still). It’s often faster when using multiple threads, but single-thread
compression is a bit slower.
It also adds a -11 flag to use the zopfli algorithm. The manpage says it “gives
a few percent better compression at a severe cost in execution time”. It’s not
exaggerating about the “severe cost”: it’s always the slowest of any tool by a
huge margin. I suppose that it can be useful if you’re serving things at
Google-scale, but you’re probably not, and other algorithms (brotli, zstd) are
now widely-implemented. I’m going to say that in 2026 it’s useless: bzip2, xz,
and zstd can all achieve better compression while being much much faster.
Aside: I kind of wish /bin/gzip would be replaced by pigz, or that gzip would
use zlib and incorporate multi-threaded code. pigz seems stable, reasonably
coded, and generally fairly good. I can’t find any reasons to not s/gzip/pigz/
other than vague concerns about “it’s different”, which is not entirely invalid
but pigz has been around for a long time and at some point things need to move
forward.
bzip2
The classic “I’m okay waiting a bit longer than gzip to get better ratios”. As a
rule, compression is ~1.5 times slower, and decompression is ~3 times slower. It
practically always gets a better compression ratio than gzip. More so on text
than on binary files.
The -# flags make a small difference in compression ratio or time. There is no
reason to use anything other than -9 (the default). bzip3 did away with -#
flags entirely.
Both xz and zstd compress better than bzip2, but do take longer. Only on the
dickens file does bzip2 give the same compression ratio as xz, but bzip2 is an
order of a magnitude faster. Overall I’m going to say that bzip2 is rarely worth
it, except perhaps if your data is primary text with minimal formatting (e.g.
Markdown files, or similar). I don’t know to what degree this holds true for
other languages or scripts as I only tested English.
xz
The newer “I’m okay waiting a bit longer than gzip to get better ratios”. Both
compression and decompression is fairly slow, but delivers the best ratios of
the common compression tools (zstd comes close, but xz is still meaningfully
better).
The -# flag does little above -5, albeit more than gzip and there is a small but
meaningful difference between the levels. For many files -8 and -9 are much
slower than -7 while having little to no effect on ratio. As a rule you want to
stick with the default of -6 unless you’ve tested it makes a meaningful
difference on your data.
On binary files it outperforms bzip2 even on -0, on code at around -1, and on
natural language it tends to outperform bzip2 at around -4 or -5,
Decompression speed decreases with higher -# flags, although this is not quite
linear and sometimes higher -# flags have faster decompression speeds.
Sometimes it’s very slow (e.g. enwik9 is almost two minutes to decompress,
which is by far the slowest other than pigz -11.
zstd
Unlike gzip and xz the -# flag makes a meaningful difference at any level. The
progression from -1 to -19 isn’t linear, but comes closer than anything else. In
particular, the gap between -12 to -13 is consistently large with -13 being two
to three times slower than -12.
Decompression is fast, although does take a noticeable hit at higher -# levels,
but even at -19 it’s always faster than xz -0.
It’s almost always faster than gzip -1 at lower -# levels while delivering a
better compression ratio. -12 is usually faster than gzip -6 (and -13 is slower,
due to aforementioned jump).
For natural language files it compresses better than bzip2 at around -16, while
being much slower. For code and binary files it’s around -6, while being faster.
xz still compresses ~10% better than zstd -19, but xz is slower (often a lot
slower).
The –ultra flags eeks out a slightly amount of extra compression ratio at the
expense of being a lot slower, although not quite as dramatic as pigz -11. The
compression ratio differences are small enough that for most cases it’s rarely
useful.
–fast is not that much faster than -1 and compression ratio suffers greatly,
and decompression performance is not significantly faster. There’s probably some uses cases where you really want to get the maximum compression
performance, but by and large, I’m going to say it’s not very useful for most
cases, outside of some streaming perhaps.
Conclusion
I’m going to say that “just use zstd” is probably decent advice: it doesn’t have
the absolute best compression ratio or performance, but for many use-cases the
trade-of it makes are quite good, and it has very fast decompression which is
nice. zstd also has a bewildering number of configuration options, making it
very flexible: e.g. for smaller files the ability to pre-train a dictionary will
make a big difference (not tested in this overview: based on previous
experience).
If you do need absolute maximum compression ratios then xz is often better, at
the expense of being much slower. In some cases that’s a good trade-off.
For natural language text bzip2 might still be worth it, but compression seems
to suffer if there’s too much formatting (which is often the case in real-world
files). bzip3 seems an interesting improvement over bzip2, but the big bold
“decompression may not work” disclaimer is rather a turn-off at the moment. I
suppose one could use a wrapper which compares the decompression results with
the input. That said, out of the tools not included here, bzip3 seems the most
interesting. Also see: An ode to bzip.
I want to stress once more that all of this may depend on your specific data,
system you’re using, planetary alignments, etc. “Most of the time”, “often”, and
“usually” do not equal “always”.
To provide the best experiences, we use technologies like cookies to store and/or access device information. Consenting to these technologies will allow us to process data such as browsing behavior or unique IDs on this site. Not consenting or withdrawing consent, may adversely affect certain features and functions.
Functional
Always active
The technical storage or access is strictly necessary for the legitimate purpose of enabling the use of a specific service explicitly requested by the subscriber or user, or for the sole purpose of carrying out the transmission of a communication over an electronic communications network.
Preferences
The technical storage or access is necessary for the legitimate purpose of storing preferences that are not requested by the subscriber or user.
Statistics
The technical storage or access that is used exclusively for statistical purposes.The technical storage or access that is used exclusively for anonymous statistical purposes. Without a subpoena, voluntary compliance on the part of your Internet Service Provider, or additional records from a third party, information stored or retrieved for this purpose alone cannot usually be used to identify you.
Marketing
The technical storage or access is required to create user profiles to send advertising, or to track the user on a website or across several websites for similar marketing purposes.