While there have been small improvements along the way, the interface of technical products has not really changed since the dawn of the Internet. It still remains: clicking five pages deep, cross-referencing logs across tabs, and hunting for hidden toggles.
AI gives us the opportunity to rethink all that. Instead of complexity spread over a sprawling graphical user interface: what if you could describe in plain language what you wanted to achieve?
This is the future — and we’re launching it today. We didn’t want to just put an agent in a dashboard. We wanted to create an entirely new way to interact with our entire platform. Any task, any surface, a single prompt.
Introducing Agent Lee.
Agent Lee is an in-dashboard AI assistant that understands your Cloudflare account.
It can help you with troubleshooting, which, today, is a manual grind. If your Worker starts returning 503s at 02:00 UTC, finding the root cause: be it an R2 bucket, a misconfigured route, or a hidden rate limit, you’re opening half a dozen tabs and hoping you recognize the pattern. Most developers don’t have a teammate who knows the entire platform standing over their shoulder at 2 a.m. Agent Lee does.
But it won’t just troubleshoot for you at 2 a.m. Agent Lee will also fix the problem for you on the spot.
Agent Lee has been running in an active beta during which it has served over 18,000 daily users, executing nearly a quarter of a million tool calls per day. While we are confident in its current capabilities and success in production, this is a system we are continuously developing. As it remains in beta, you may encounter unexpected limitations or edge cases as we refine its performance. We encourage you to use the feedback form below to help us make it better every day.
What Agent Lee can do
Agent Lee is built directly into the dashboard and understands the resources in your account. It knows your Workers, your zones, your DNS configuration, your error rates. The knowledge that today lives across six tabs and two browser windows will now live in one place, and you can talk to it.
With natural language, you can use it to:
Answer questions about your account: “Show me the top 5 error messages on my Worker.”
Debug an issue: “I can’t access my site with the www prefix.”
Apply a change: “Enable Access for my domain.”
Deploy a resource: “Create a new R2 bucket for my photos and connect it to my Worker.”
Instead of switching between products, you describe what you want to do, and Agent Lee helps you get there with instructions and visualizations. It retrieves context, uses the right tools, and creates dynamic visualizations based on the types of questions you ask. Ask what your error rate looks like over the last 24 hours, and it renders a chart inline, pulling from your actual traffic, not sending you to a separate Analytics page.
Agent Lee isn’t answering FAQ questions — it’s doing real work, against real accounts, at scale. Today, Agent Lee serves ~18,000 daily users, executing ~250k tool calls per day across DNS, Workers, SSL/TLS, R2, Registrar, Cache, Cloudflare Tunnel, API Shield, and more.
How we built it
Codemode
Rather than presenting MCP tool definitions directly to the model, Agent Lee uses Codemode to convert the tools into a TypeScript API and asks the model to write code that calls it instead.
This works better for a couple of reasons. LLMs have seen a huge amount of real-world TypeScript but very few tool call examples, so they’re more accurate when working in code. For multi-step tasks, the model can also chain calls together in a single script and return only the final result, ultimately skipping the round-trips.
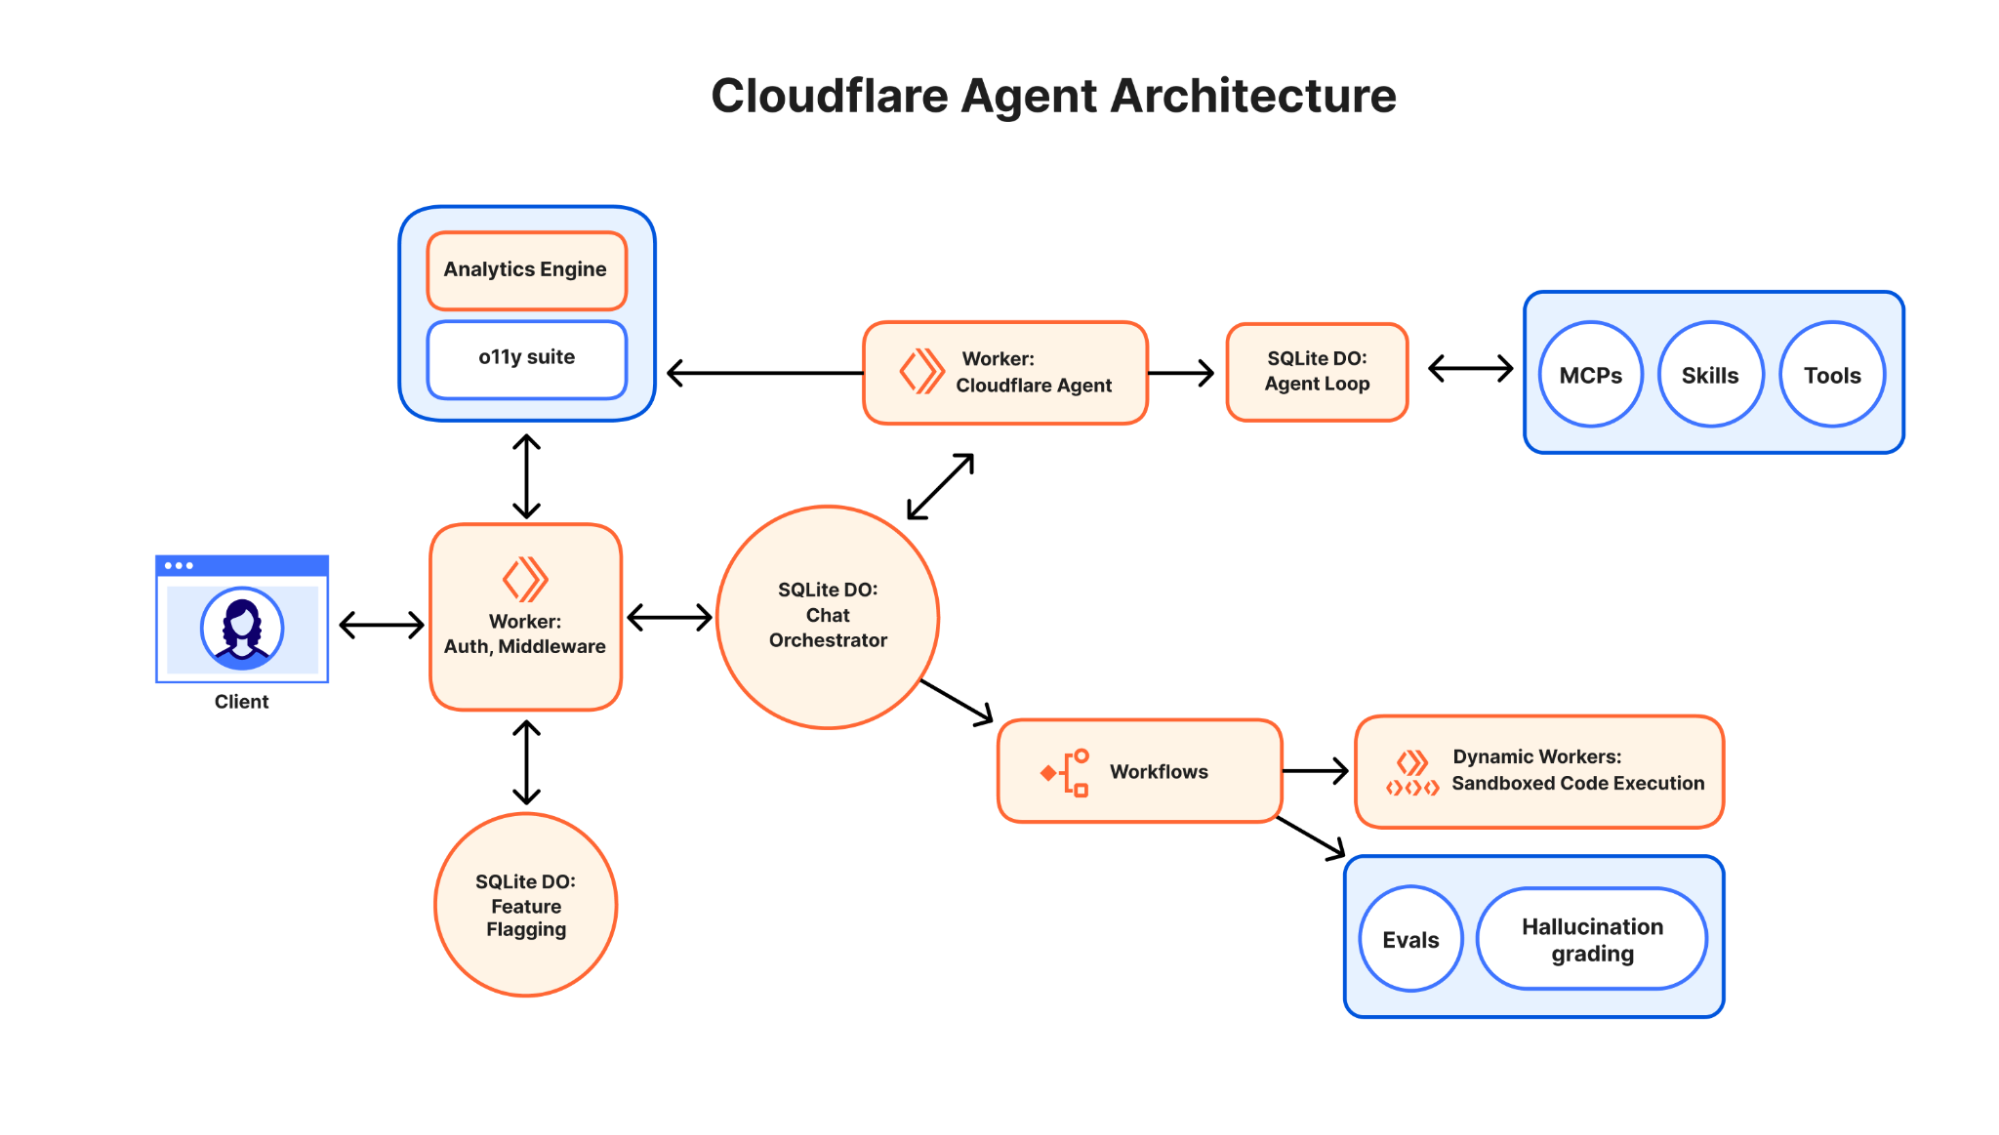
The generated code is sent to an upstream Cloudflare MCP server for sandboxed execution, but it goes through a Durable Object that acts as a credentialed proxy. Before any call goes out, the DO classifies the generated code as read or write by inspecting the method and body. Read operations are proxied directly. Write operations are blocked until you explicitly approve them through the elicitation gate. API keys are never present in the generated code — they’re held inside the DO and injected server-side when the upstream call is made. The security boundary isn’t just a sandbox that gets thrown away; it’s a permission architecture that structurally prevents writes from happening without your approval.
The MCP permission system
Agent Lee connects to Cloudflare’s own MCP server, which exposes two tools: a search tool for querying API endpoints and an execute tool for writing code that performs API requests. This is the surface through which Agent Lee reads your account and, when you approve, writes to it.
Write operations go through an elicitation system that surfaces the approval step before any code executes. Agent Lee cannot skip this step. The permission model is the enforcement layer, and the confirmation prompt you see is not a UX courtesy. It’s the gate.
Built on the same stack you can use
Every primitive Agent Lee is built on is available to all our customers: Agents SDK, Workers AI, Durable Objects, and the same MCP infrastructure available to any Cloudflare developer. We didn’t build internal tools that aren’t available to you — instead we built it with the same Cloudflare lego blocks that you have access to.
Building Agent Lee on our own primitives wasn’t just a design principle. It was the fastest way to find out what works and what doesn’t. We built this in production, with real users, against real accounts. That means every limitation we hit is a limitation we can fix in the platform. Every pattern that works is one we can make easier for the next team that builds on top of it.
These are not opinions. They’re what quarter of a million tool calls across 18,000 users a day are telling us.
Generative UI
Interacting with a platform should feel like collaborating with an expert. Conversations should transcend simple text. With Agent Lee, as your dialogue evolves, the platform dynamically generates UI components alongside textual responses to provide a richer, more actionable experience.
For example, if you ask about website traffic trends for the month, you won’t just get a paragraph of numbers. Agent Lee will render an interactive line graph, allowing you to visualize peaks and troughs in activity at a glance.
To give you full creative control, every conversation is accompanied within an adaptive grid. Here you can click and drag across the grid to carve out space for new UI blocks, then simply describe what you want to see and let the agent handle the heavy lifting.
Today, we support a diverse library of visual blocks, including dynamic tables, interactive charts, architecture maps, and more. By blending the flexibility of natural language with the clarity of structured UI, Agent Lee transforms your chat history into a living dashboard.
Measuring quality and safety
An agent that can take action on your account needs to be reliable and secure. Elicitations allow agentic systems to actively solicit information, preferences, or approvals from users or other systems mid-execution. When Agent Lee needs to take non-read actions on a user’s behalf we use elicitations by requiring an explicit approval action in the user interface. These guardrails allow Agent Lee to truly be a partner alongside you in managing your resource safely.
In addition to safety, we continuously measure quality.
Evals to measure conversation success rate and information accuracy.
Feedback signals from user interactions (thumbs up / thumbs down).
Tool call execution success rate and hallucination scorers.
Per-product breakdown of conversation performance.
These systems help us improve Agent Lee over time while keeping users in control.
Our vision ahead
Agent Lee in the dashboard is only the beginning.
The bigger vision is Agent Lee as the interface to the entire Cloudflare platform — from anywhere. The dashboard today, the CLI next, your phone when you’re on the go. The surface you use shouldn’t matter. You should be able to describe what you need and have it done, regardless of where you are.
From there, Agent Lee gets proactive. Rather than waiting to be asked, it watches what matters to you, your Workers, your traffic, your error thresholds and reaches out when something warrants attention. An agent that only responds is useful. One that notices things first is something different.
Underlying all of this is context. Agent Lee already knows your account configuration. Over time, it will know more, what you’ve asked before, what page you’re on, what you were debugging last week. That accumulated context is what makes a platform feel less like a tool and more like a collaborator.
We’re not there yet. Agent Lee today is the first step, running in production, doing real work at scale. The architecture is built to get to the rest.
Try it out
Agent Lee is available in beta for Free plan users. Log in to your Cloudflare dashboard and click Ask AI in the upper right corner to get started.
We’d love to know what you build and what you’d like to see in Agent Lee. Please share your feedback here.
Today we’re launching the next chapter of Cloudflare Registrar: the Registrar API in beta.
The Registrar API makes it possible to search for domains, check availability, and register them programmatically. Now, buying a domain the moment an idea starts to feel real no longer has to pull you out of the agentic workflow.
A Registrar API has been one of the clearest asks from builders using Cloudflare. As more of the agentic workflow has moved into editors, terminals, and agent-driven tools, domain registration became the obvious gap to close.
When we launched Cloudflare Registrar seven years ago, the idea was simple. Domains should be offered at cost, with no markup and no games. Since then, Cloudflare Registrar has become one of the fastest growing registrars in the world as more people choose Cloudflare as the place to build their next project.
Prompting an agent inside an AI code editor to generate name ideas, search, check, and purchase a domain.
Built for agents and automation
The Registrar API is designed to work well anywhere software is already being built: inside editors, deployment pipelines, backend services, and agent-driven workflows.
The workflow is intentionally simple and machine-friendly. Search returns candidate names. Check returns real-time availability and pricing. Register takes a minimal request and returns a workflow-shaped response that can complete immediately or be polled if it takes longer. That makes it straightforward to use for traditional API clients and for AI agents acting on a user’s behalf.
In practice, all this means that an agent can help with the full flow: suggest names, confirm which one is actually registrable, surface the price for approval, and then complete the purchase without forcing the user out of the tool they are already using.
The Registrar API
At its core, this first release of the Registrar API does three things
Search for domains
Check availability
Register domains
For a curated set of popular TLDs to start, see the Registrar API docs. When supported, premium domains can also be registered, but they require explicit fee acknowledgement.
The Registrar API is part of the full Cloudflare API, which means agents already have access to it today through the Cloudflare MCP. It does not require a separate integration or a custom tool definition. An agent working in Cursor, Claude Code, or any MCP-compatible environment can discover and call Registrar endpoints using the same search() and execute() pattern that covers the entire Cloudflare API surface. The moment the API was part of our spec, it was ready for agents.
What it looks like in practice:
You’re building a new project in your favorite AI code editor. Halfway through scaffolding, you ask your agent: “Find me a good .dev domain for this project and register it.”
The agent searches for candidate names based on your project. It checks real-time availability for the one you pick and confirms the price. You say yes. It registers the domain, using your account’s default contact info and payment method automatically. By the time you’ve read the response, the domain is registered, and privacy is on.
Three API calls. A few seconds.
What it looks like in code:
Step 1: Search for domain names
Use the search endpoint to submit a domain query, with or without a domain extension.
Search results are fast but non-authoritative; they’re based on cached data, and availability can change in seconds for popular names. Check queries the registry directly. Call it immediately before registering, and use its price response as the source of truth.
The only required field is the domain name. WHOIS privacy protection is enabled by default at no extra charge. If your account has a default registrant contact, the API uses it automatically; otherwise you can provide contact details inline in the request. Your default payment method is used automatically.
Registration typically completes synchronously within seconds. If it takes longer, the API returns a 202 Accepted with a workflow URL to poll. The response shape is the same either way, no special-casing needed. For premium domains, the Check response returns the exact registry-set price, and the Register request echoes that back as an explicit fee acknowledgement.
A note on agents and non-refundable purchases
When an agent registers a domain on your behalf, it charges your default payment method. Domain registrations are non-refundable once complete. A well-designed agent flow should confirm the domain name and price with the user before calling the registration endpoint. The Check step exists precisely to make that confirmation step explicit and unambiguous. The API gives you the tools to build it correctly; the responsibility to do so belongs in your agent’s logic.
By default, our API docs have explicit agent-facing instructions to seek permission from the user during the register API call. Still, it is the responsibility of the human to design an agent flow that will not buy domains without your approval.
Why Cloudflare can do this differently
What makes Cloudflare different from many developer platforms now adding domain workflows is that Cloudflare operates the registrar itself. That means the same platform where a project is built and deployed can also search for, register, and manage the domain — without adding markup on top.
At-cost pricing is at the core of Cloudflare’s registrar model. We charge exactly what the registry charges. That holds true whether you’re registering a domain through the dashboard, calling the API directly, or asking an agent to do it on your behalf.
Where the API goes next
This beta focuses on the first critical moment in the domain lifecycle: search, check, and registration. We are actively working on expanding the API to cover more of the core Registrar experience, so domains can be managed programmatically after they are purchased, not just at the moment they are created. This will include lifecycle elements like transfers, renewals, contact updates, and more.
The API is the first step toward a broader registrar-as-a-service offering. Development of that service is underway now, and we’re aiming to launch it later this year. As the API expands, platforms like website builders, hosting providers, AI products, and other multi-tenant applications will be able to make domain registration part of their own user experience. Users can search for a domain, buy it, and provision it without ever leaving the service or agent-driven workflow they are already building in.
Start building today
The Registrar API exists because builders asked for it. Now that it’s available as a beta, we’d love to see what you build, in the Cloudflare Community or on X, or on Discord.
Please let us know if something is missing, if a workflow breaks down, or if you are building toward a larger platform use case. We’re working quickly to expand the functionality of the API to support domain renewals, transfers, and more.
We can’t wait to see what you build!
Special thanks to Lucy Dryaeva and Fred Pinto for their valuable contributions to delivering the Registrar API beta.
Today, we’re introducing Project Think: the next generation of the Agents SDK. Project Think is a set of new primitives for building long-running agents (durable execution, sub-agents, sandboxed code execution, persistent sessions) and an opinionated base class that wires them all together. Use the primitives to build exactly what you need, or use the base class to get started fast.
Something happened earlier this year that changed how we think about AI. Tools like Pi, OpenClaw, Claude Code, and Codex proved a simple but powerful idea: give an LLM the ability to read files, write code, execute it, and remember what it learned, and you get something that looks less like a developer tool and more like a general-purpose assistant.
These coding agents aren’t just writing code anymore. People are using them to manage calendars, analyze datasets, negotiate purchases, file taxes, and automate entire business workflows. The pattern is always the same: the agent reads context, reasons about it, writes code to take action, observes the result, and iterates. Code is the universal medium of action.
Our team has been using these coding agents every day. And we kept running into the same walls:
They only run on your laptop or an expensive VPS: there’s no sharing, no collaboration, no handoff between devices.
They’re expensive when idle: a fixed monthly cost whether the agent is working or not. Scale that to a team, or a company, and it adds up fast.
They require management and manual setup: installing dependencies, managing updates, configuring identity and secrets.
And there’s a deeper structural issue. Traditional applications serve many users from one instance. As mentioned in our Welcome to Agents Week post, agents are one-to-one. Each agent is a unique instance, serving one user, running one task. A restaurant has a menu and a kitchen optimized to churn out dishes at volume. An agent is more like a personal chef: different ingredients, different techniques, different tools every time.
That fundamentally changes the scaling math. If a hundred million knowledge workers each use an agentic assistant at even modest concurrency, you need capacity for tens of millions of simultaneous sessions. At current per-container costs, that’s unsustainable. We need a different foundation.
That’s what we’ve been building.
Introducing Project Think
Project Think ships a set of new primitives for the Agents SDK:
Durable execution with fibers: crash recovery, checkpointing, automatic keepalive
Sub-agents: isolated child agents with their own SQLite and typed RPC
The execution ladder: workspace, isolate, npm, browser, sandbox
Self-authored extensions: agents that write their own tools at runtime
Each of these is usable directly with the Agent base class. Build exactly what you need with the primitives, or use the Think base class to get started fast. Let’s look at what each one does.
Long-running agents
Agents, as they exist today, are ephemeral. They run for a session, tied to a single process or device, and then they are gone. A coding agent that dies when your laptop sleeps, that’s a tool. An agent that persists — that can wake up on demand, continue work after interruptions, and carry forward the state without depending on your local runtime — that starts to look like infrastructure. And it changes the scaling model for agents completely.
The Agents SDK builds on Durable Objects to give every agent an identity, persistent state, and the ability to wake on message. This is the actor model: each agent is an addressable entity with its own SQLite database. It consumes zero compute when hibernated. When something happens (an HTTP request, a WebSocket message, a scheduled alarm, an inbound email) the platform wakes the agent, loads its state, and hands it the event. The agent does its work, then goes back to sleep.
VMs / Containers
Durable Objects
Idle cost
Full compute cost, always
Zero (hibernated)
Scaling
Provision and manage capacity
Automatic, per-agent
State
External database required
Built-in SQLite
Recovery
You build it (process managers, health checks)
Platform restarts, state survives
Identity / routing
You build it (load balancers, sticky sessions)
Built-in (name → agent)
10,000 agents, each active 1% of the time
10,000 always-on instances
~100 active at any moment
This changes the economics of running agents at scale. Instead of “one expensive agent per power user,” you can build “one agent per customer” or “one agent per task” or “one agent per email thread.” The marginal cost of spawning a new agent is effectively zero.
Surviving crashes: durable execution with fibers
An LLM call takes 30 seconds. A multi-turn agent loop can run for much longer. At any point during that window, the execution environment can vanish: a deploy, a platform restart, hitting resource limits. The upstream connection to the model provider is severed permanently, in-memory state is lost, and connected clients see the stream stop with no explanation.
runFiber() solves this. A fiber is a durable function invocation: registered in SQLite before execution begins, checkpointable at any point via stash(), and recoverable on restart via onFiberRecovered.
import { Agent } from "agents";

export class ResearchAgent extends Agent {
  async startResearch(topic: string) {
    void this.runFiber("research", async (ctx) => {
      const findings = [];

      for (let i = 0; i < 10; i++) {
        const result = await this.callLLM(`Research step ${i}: ${topic}`);
        findings.push(result);

        // Checkpoint: if evicted, we resume from here
        ctx.stash({ findings, step: i, topic });

        this.broadcast({ type: "progress", step: i });
      }

      return { findings };
    });
  }

  async onFiberRecovered(ctx) {
    if (ctx.name === "research" && ctx.snapshot) {
      const { topic } = ctx.snapshot;
      await this.startResearch(topic);
    }
  }
}
The SDK keeps the agent alive automatically during fiber execution, no special configuration needed. For work measured in minutes, keepAlive() / keepAliveWhile() prevents eviction during active work. For longer operations (CI pipelines, design reviews, video generation) the agent starts the work, persists the job ID, hibernates, and wakes on callback.
Delegating work: sub-agents via Facets
A single agent shouldn’t do everything itself. Sub-agents are child Durable Objects colocated with the parent via Facets, each with their own isolated SQLite and execution context:
Sub-agents are isolated at the storage level. Each one gets its own SQLite database, and there’s no implicit sharing of data between them. This is enforced by the runtime where sub-agent RPC latency is a function call. TypeScript catches misuse at compile time.
Conversations that persist: the Session API
Agents that run for days or weeks need more than the typical flat list of messages. The experimental Session API models this explicitly. Available on the Agent base class, conversations are stored as trees, where each message has a parent_id. This enables forking (explore an alternative without losing the original path), non-destructive compaction (summarize older messages rather than deleting them), and full-text search across conversation history via FTS5.
Session is usable directly with Agent, and it’s the storage layer that the Think base class builds on.
From tool calls to code execution
Conventional tool-calling has an awkward shape. The model calls a tool, pulls the result back through the context window, calls another tool, pulls that back, and so on. As the tool surface grows, this gets both expensive and clumsy. A hundred files means a hundred round-trips through the model.
// The LLM writes this. It runs in a sandboxed Dynamic Worker.
const files = await tools.find({ pattern: "**/*.ts" });
const results = [];
for (const file of files) {
  const content = await tools.read({ path: file });
  if (content.includes("TODO")) {
    results.push({ file, todos: content.match(/\/\/ TODO:.*/g) });
  }
}
return results;
Instead of 100 round-trips to the model, you just run a single program. This leads to fewer tokens used, faster execution, and better results. The Cloudflare API MCP server demonstrates this at scale. We expose only two tools (search() and execute()), which consume ~1,000 tokens, vs. ~1.17 million tokens for the naive tool-per-endpoint equivalent. This is a 99.9% reduction.
The missing primitive: safe sandboxes
Once you accept that models should write code on behalf of users, the question becomes: where does that code run? Not eventually, not after a product team turns it into a roadmap item. Right now, for this user, against this system, with tightly defined permissions.
Dynamic Workers are that sandbox. A fresh V8 isolate spun up at runtime, in milliseconds, with a few megabytes of memory. That’s roughly 100x faster and up to 100x more memory-efficient than a container. You can start a new one for every single request, run a snippet of code, and throw it away.
The critical design choice is the capability model. Instead of starting with a general-purpose machine and trying to constrain it, Dynamic Workers begin with almost no ambient authority (globalOutbound: null, no network access) and the developer grants capabilities explicitly, resource by resource, through bindings. We go from asking “how do we stop this thing from doing too much?” to “what exactly do we want this thing to be able to do?”
This is the right question for agent infrastructure.
The execution ladder
This capability model leads naturally to a spectrum of compute environments, an execution ladder that the agent escalates through as needed:
Tier 0 is the Workspace, a durable virtual filesystem backed by SQLite and R2. Read, write, edit, search, grep, diff. Powered by @cloudflare/shell.
Tier 1 is a Dynamic Worker: LLM-generated JavaScript running in a sandboxed isolate with no network access. Powered by @cloudflare/codemode.
Tier 2 adds npm. @cloudflare/worker-bundler fetches packages from the registry, bundles them with esbuild, and loads the result into the Dynamic Worker. The agent writes import { z } from "zod" and it just works.
Tier 3 is a headless browser via Cloudflare Browser Run. Navigate, click, extract, screenshot. Useful when the service doesn’t support agents yet via MCP or APIs.
Tier 4 is a Cloudflare Sandbox configured with your toolchains, repos, and dependencies: git clone, npm test, cargo build, synced bidirectionally with the Workspace.
The key design principle: the agent should be useful at Tier 0 alone, where each tier is additive. The user can add capabilities as they go.
Building blocks, not a framework
All of these primitives are available as standalone packages. Dynamic Workers, @cloudflare/codemode, @cloudflare/worker-bundler, and @cloudflare/shell (a durable filesystem with tools) are all usable directly with the Agent base class. You can combine them to give any agent a workspace, code execution, and runtime package resolution without adopting an opinionated framework.
The platform
Here’s the complete stack for building agents on Cloudflare:
Each of these is a building block. Together, they form something new: a platform where anyone can build, deploy, and run AI agents as capable as the ones running on your local machine today, but serverless, durable, and safe by construction.
The Think base class
Now that you’ve seen the primitives, here’s what happens when you wire them all together.
Think is an opinionated harness that handles the full chat lifecycle: agentic loop, message persistence, streaming, tool execution, stream resumption, and extensions. You focus on what makes your agent unique.
The minimal subclass looks like this:
import { Think } from "@cloudflare/think";
import { createWorkersAI } from "workers-ai-provider";

export class MyAgent extends Think<Env> {
  getModel() {
    return createWorkersAI({ binding: this.env.AI })(
      "@cf/moonshotai/kimi-k2.5"
    );
  }
}
That’s effectively all you need to have a working chat agent with streaming, persistence, abort/cancel, error handling, resumable streams, and a built-in workspace filesystem. Deploy with npx wrangler deploy.
Think makes decisions for you. When you need more control, you can override the ones you care about:
Override
Purpose
getModel()
Return the LanguageModel to use
getSystemPrompt()
System prompt
getTools()
AI SDK compatible ToolSet for the agentic loop
maxSteps
Max tool-call rounds per turn
configureSession()
Context blocks, compaction, search, skills
Under the hood, Think runs the complete agentic loop on every turn: it assembles the context (base instructions + tool descriptions + skills + memory + conversation history), calls streamText, executes tool calls (with output truncation to prevent context blowup), appends results, loops until the model is done or the step limit is reached. All messages are persisted after each turn.
Lifecycle hooks
Think gives you hooks at every stage of the chat turn, without requiring you to own the whole pipeline:
Switch to a lower cost model for follow-up turns, limit the tools it can use, and pass in client-side context on each turn. Also log every tool call to analytics and automatically trigger one more follow-up turn after the model completes, all without replacing onChatMessage.
Persistent memory and long conversations
Think builds on Session API as its storage layer, giving you tree-structured messages with branching built in.
On top of that, it adds persistent memory through context blocks. These are structured sections of the system prompt that the model can read and update over time, and they persist across hibernation.The model sees “MEMORY (Important facts, use set_context to update) [42%, 462/1100 tokens]” and can proactively remember things.
Sessions are flexible. You can run multiple conversations per agent and fork them to try a different direction without losing the original.
As context grows, Think handles limits with non-destructive compaction. Older messages are summarized instead of removed, while the full history remains stored in SQLite.
Search is built in as well. Using FTS5, you can query conversation history within a session or across all the sessions. The agent is also able to search its own past usingsearch_context tool.
The full execution ladder, wired in
Think integrates the entire execution ladder into a single getTools() return:
Think takes code execution one step further. An agent can write its own extensions: TypeScript programs that run in Dynamic Workers, declaring permissions for network access and workspace operations.
Think’s ExtensionManager bundles the extension (optionally with npm deps via @cloudflare/worker-bundler), loads it into a Dynamic Worker, and registers the new tools. The extension persists in DO storage and survives hibernation. The next time the user asks about pull requests, the agent has a github_create_pr tool that didn’t exist 30 seconds ago.
This is the kind of self-improvement loop that makes agents genuinely more useful over time. Not through fine-tuning or RLHF, but through code. The agent is able to write new capabilities for itself, all in sandboxed, auditable, and revocable TypeScript.
Sub-agent RPC
Think also works as a sub-agent, called via chat() over RPC from a parent, with streaming events via callback:
Each child gets its own conversation tree, memory, tools, and model. The parent doesn’t need to know the details.
Getting started
Project Think is experimental. The API surface is stable but will continue to evolve in the coming days and weeks. We’re already using it internally to build our own background agent infrastructure, and we’re sharing it early so you can build alongside us.
npm install @cloudflare/think agents ai @cloudflare/shell zod workers-ai-provider
// src/client.tsx
import { useAgent } from "agents/react";
import { useAgentChat } from "@cloudflare/ai-chat/react";

function Chat() {
  const agent = useAgent({ agent: "MyAgent" });
  const { messages, sendMessage, status } = useAgentChat({ agent });
  // Render your chat UI
}
Think speaks the same WebSocket protocol as @cloudflare/ai-chat, so existing UI components work out of the box. If you’ve built on AIChatAgent, your client code doesn’t change.
The third wave
We see three waves of AI agents:
The first wave was chatbots. They were stateless, reactive, and fragile. Every conversation started from scratch with no memory, no tools, and no ability to act. This made them useful for answering questions, but limited them to only answering questions.
The second wave was coding agents. These are stateful, tool-using and far more capable tools like Pi, Claude Code, OpenClaw, and Codex. These agents can read codebases, write code, execute it, and iterate. These proved that an LLM with the right tools is a general-purpose machine, but they run on your laptop, for one user, with no durability guarantees.
Now we are entering the third wave: agents as infrastructure. Durable, distributed, structurally safe, and serverless. These are agents that run on the Internet, survive failures, cost nothing when idle, and enforce security through architecture rather than behavior. Agents that any developer can build and deploy for any number of users.
This is the direction we’re betting on.
The Agents SDK is already powering thousands of production agents. With Project Think and the the primitives it introduces, we’re adding the missing pieces to make those agents dramatically more capable: persistent workspaces, sandboxed code execution, durable long-running tasks, structural security, sub-agent coordination, and self-authored extensions.
It’s available today in preview. We’re building alongside you, and we’d genuinely love to see what you (and your coding agent) create with it.
Think is part of the Cloudflare Agents SDK, available as @cloudflare/think. The features described in this post are in preview. APIs may change as we incorporate feedback. Check the documentation and example to get started.
AI agents need to interact with the web. To do that, they need a browser. They need to navigate sites, read pages, fill forms, extract data, and take screenshots. They need to observe whether things are working as expected, with a way for their humans to step in if needed. And they need to do all of this at scale.
Today, we’re renaming Browser Rendering to Browser Run, and shipping key features that make it the browser for AI agents. The name Browser Rendering never fully captured what the product does. Browser Run lets you run full browser sessions on Cloudflare’s global network, drive them with code or AI, record and replay sessions, crawl pages for content, debug in real time, and let humans intervene when your agent needs help.
Here’s what’s new:
Live View: see what your agent sees and is doing, in real time. Know instantly if things are working, and when they’re not, see exactly why.
Human in the Loop: when your agent hits a snag like a login page or unexpected edge case, it can hand off to a human instead of failing. The human steps in, resolves, then hands back control.
Chrome DevTools Protocol (CDP) Endpoint: the Chrome DevTools Protocol is how agents control browsers. Browser Run now exposes it directly, so agents get maximum control over the browser and existing CDP scripts work on Cloudflare.
MCP Client Support: AI coding agents like Claude Desktop, Cursor, and OpenCode can now use Browser Run as their remote browser.
WebMCP Support: agents will outnumber humans using the web. WebMCP allows websites to declare what actions are available for agents to discover and call, making navigation more reliable.
Session Recordings: capture every browser session for debugging purposes. When something goes wrong, you have the full recording with DOM changes, user interactions, and page navigation.
Higher limits: run more tasks at once with 120 concurrent browsers, up from 30.
An AI agent searching Amazon for an orange lava lamp, comparing options, and handing off to a human when sign-in is required to complete the purchase
Everything an agent needs
Let’s think about what agents need when browsing the web and how each feature fits in:
What an agent needs
Browser Run (formerly Browser Rendering)
1) Browsers on-demand
Chrome browser on Cloudflare’s global network
2) A way to control the browser
Take actions like navigate, click, fill forms, screenshot, and more with Puppeteer, Playwright, CDP (new), MCP Client Support (new) and WebMCP (new)
3) Observability
Live View (new), Session Recordings (new), and Dashboard redesign (new)
4) Human intervention
Human in the Loop (new)
5) Scale
10 requests/second for Quick Actions, 120 concurrent browsers (4x increase)
1) Open a browser
First, an agent needs a browser. With Browser Run, agents can spin up a headless Chrome instance on Cloudflare’s global network, on demand. No infrastructure to manage, no Chrome versions to maintain. Browser sessions open near users for low latency, and scale up and down as needed. Pair Browser Run with the Agents SDK to build long-running agents that browse the web, remember everything, and act on their own.
2) Take actions
Once your agent has a browser, it needs ways to control it. Browser Run supports multiple approaches: new low-level protocol access with the Chrome DevTools Protocol (CDP) and WebMCP, in addition to existing higher-level automation using Puppeteer and Playwright, and Quick Actions for simple tasks. Let’s look at the details.
Chrome DevTools Protocol (CDP) endpoint
The Chrome DevTools Protocol (CDP) is the low-level protocol that powers browser automation. Exposing CDP directly means the growing ecosystem of agent tools and existing CDP automation scripts can use Browser Run. When you open Chrome DevTools and inspect a page, CDP is what’s running underneath. Puppeteer, Playwright, and most agent frameworks are built on top of it.
Every way that you have been using Browser Run has actually been through CDP already. What’s new is that we’re now exposing CDP directly as an endpoint. This matters for agents because CDP gives agents the most control possible over the browser. Agent frameworks already speak CDP natively, and can now connect to Browser Run directly. CDP also unlocks browser actions that aren’t available through Puppeteer or Playwright, like JavaScript debugging. And because you’re working with raw CDP messages instead of going through higher-level libraries, you can pass messages directly to models for more token-efficient browser control.
If you already have CDP automation scripts running against self-hosted Chrome, they work on Browser Run with a one-line config change. Point your WebSocket URL at Browser Run and stop managing your own browser infrastructure.
The CDP endpoint also makes Browser Run more accessible. You can now connect from any language, any environment, without needing to write a Cloudflare Worker. (If you’re already using Workers, nothing changes.)
Using Browser Run with MCP Clients
Now that Browser Run exposes the Chrome DevTools Protocol (CDP), MCP clients including Claude Desktop, Cursor, Codex, and OpenCode can use Browser Run as their remote browser. The chrome-devtools-mcp package from the Chrome DevTools team is an MCP server that gives your AI coding assistant access to the full power of Chrome DevTools for reliable automation, in-depth debugging, and performance analysis.
Here’s an example of how to configure Browser Run for Claude Desktop:
The Internet was built for humans, so navigating as an AI agent today is unreliable. We’re betting on a future where more agents use the web than humans. In that world, sites need to be agent-friendly.
That’s why we’re launching support for WebMCP, a new browser API from the Google Chrome team that landed in Chromium 146+. WebMCP lets websites expose tools directly to AI agents, declaring what actions are available for agents to discover and call on each page. This helps agents navigate the web more reliably. Instead of agents needing to figure out how to use a site, websites can expose their tools for agents to discover and call
Two APIs make this work:
navigator.modelContext allows websites to register their tools
navigator.modelContextTesting allows agents to discover and execute those tools
Today, an agent visiting a travel booking site has to figure out the UI by looking at it. With WebMCP, the site declares “here’s a search_flights tool that takes an origin, destination, and date.” The agent calls it directly, without having to loop through slow screenshot-analyze-click loops. This makes navigation more reliable regardless of potential changes to the UI.
Tools are discovered on the page rather than preloaded. This matters for the long tail of the web, where preloading an MCP server for every possible site is not feasible and would bloat the context window.
Using WebMCP to book a hotel through the Chrome DevTools console, discovering available tools with listTools()
We have an experimental pool with browser instances running Chrome beta so you can test emerging browser features before they reach stable Chrome. We also just shipped Wrangler browser commands that let you manage browser sessions directly from the CLI, letting you create, manage, and view browser sessions directly from your terminal. To access WebMCP-enabled browsers, use the following Wrangler command to create a session in the experimental pool:
npm i -g wrangler@latest
wrangler browser create --lab --keepAlive 300
We also recently shipped a /crawl endpoint that lets you crawl entire sites with a single API call. Give it a starting URL and pages are automatically discovered and scraped, then returned in your preferred format (HTML, Markdown, and structured JSON), with additional parameters to control crawl depth and scope, skip pages that haven’t changed, and specify certain paths to include or exclude.
We intentionally built /crawl to be a well-behaved crawler. That means it respects site owner’s preferences out of the box, is a signed agent with a distinct bot ID that is cryptographically signed using Web Bot Auth, a non-customizable User-Agent, and follows robots.txt and AI Crawl Control. It does not bypass Cloudflare’s bot protections or CAPTCHAs. Site owners choose whether their content is accessible and /crawl respects it.
Things don’t always go right the first try. We kept hearing from customers that when their automations failed, they had no idea why. That’s why we’ve added multiple ways to observe what’s happening, so you can see exactly what your agent sees, both live and after the fact.
Live View
Live View lets you watch your agent’s browser session in real time. Whether you’re debugging an agent or running a long automation script, you see exactly what’s happening as it happens. This includes the page itself, as well as the DOM, console, and network requests. When something goes wrong — the expected button isn’t there, the page needs authentication, or a CAPTCHA appears — you can catch it immediately.
There are two ways to access Live View. From code, obtain the session_id of the browser you want to inspect and open the devtoolsFrontendURL from the response in Chrome. Or from the Cloudflare dashboard, open the new Live Sessions tab in the Browser Run section and click into any active session.
Live View of an AI agent booking a hotel, showing real-time browser activity
Session Recordings
Live View is great when you’re available, but you can’t watch every session. Session Recordings captures DOM changes, mouse and keyboard events, and page navigation as structured JSON so you can replay any session after it ends.
Enable Session Recordings by passing recording:true when launching a browser. After the session closes, you can access the recording in the Cloudflare dashboard from the Runs tab or retrieve recordings via API and replay them with the rrweb-player. Next, we’re adding the ability to inspect DOM state and console output at any point during the recording.
Session recording replay of a browser automation browsing the Sentry Shop and adding a bomber jacket to the cart
Dashboard Redesign
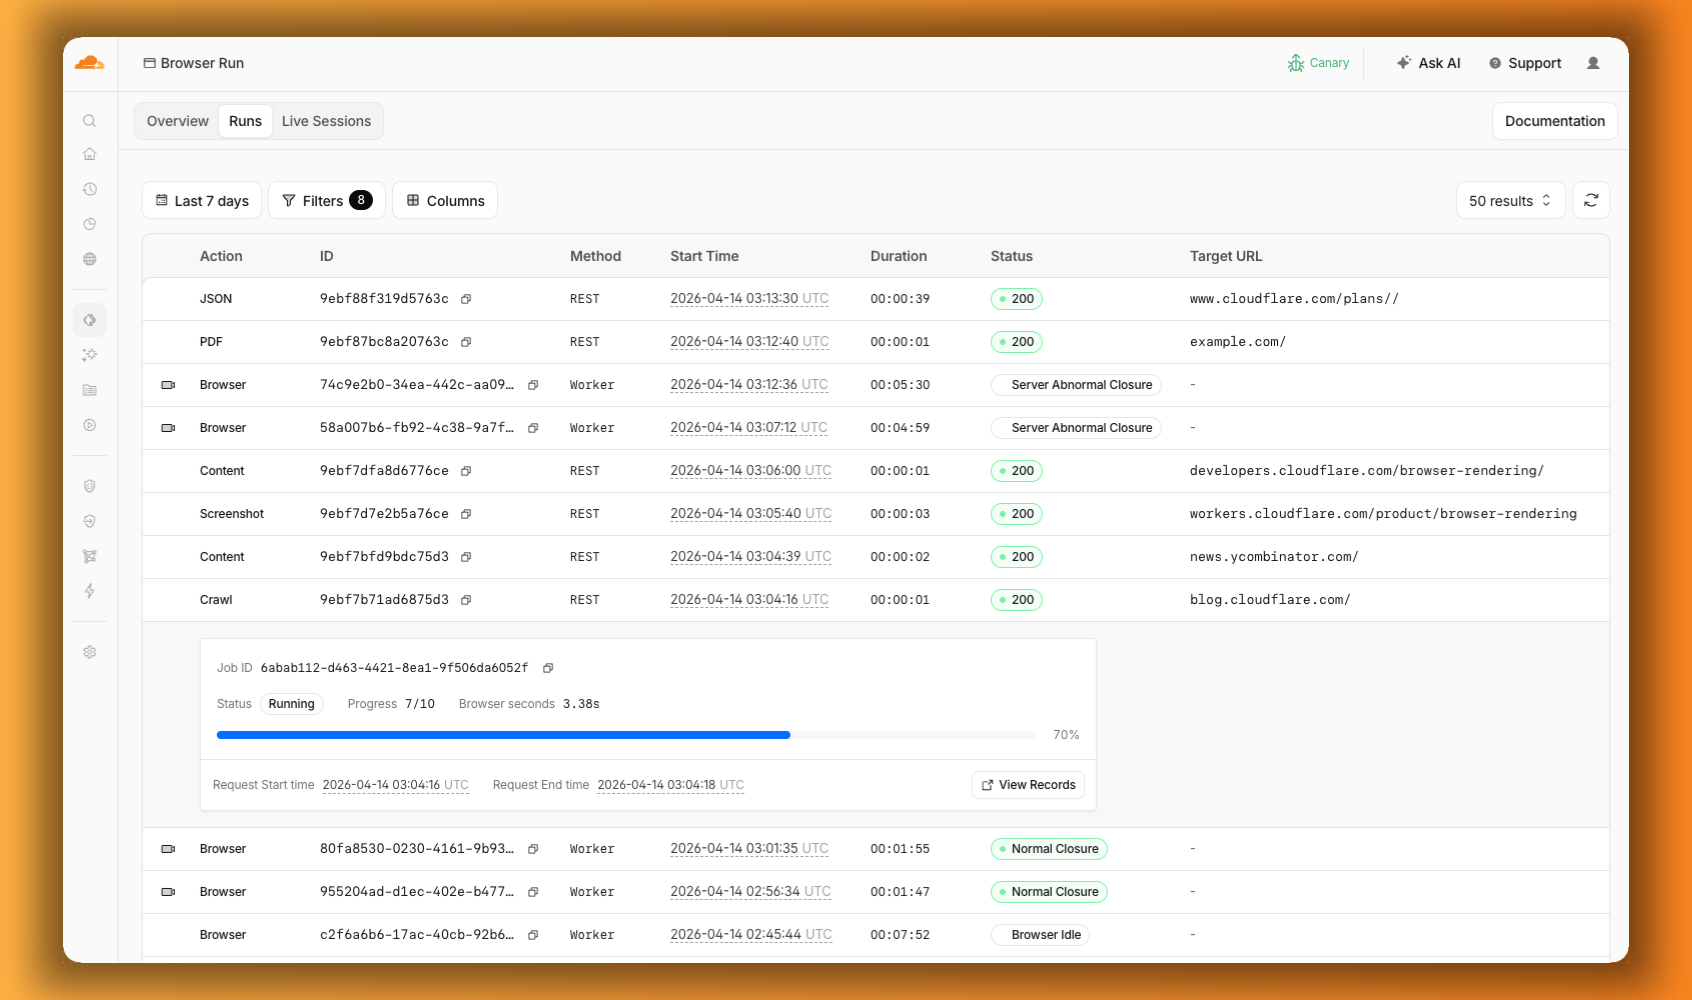
Previously, the Browser Run dashboard only showed logs from browser sessions. Requests for screenshots, PDFs, markdown, and crawls were not visible. The redesigned dashboard changes that. The new Runs tab shows every request. You can filter by endpoint and view details including target URLs, status, and duration.
The Browser Run dashboard Runs tab showing browser sessions and quick actions like PDF, Screenshot, and Crawl in a single view, with a crawl job expanded to show its progress
4) Intervene
Agents are good, but they’re not perfect. Sometimes they need their human to step in. Browser Run supports Human in the Loop workflows where a human can take control of a live browser session, handle what the automation cannot, then let the session continue.
Human in the Loop
When automation hits a wall, you don’t have to restart. With Human in the Loop, you can step in and interact with the page directly to click, type, navigate, enter credentials, or submit forms. This unlocks workflows that agents cannot handle.
Today, you can step in by opening the Live View URL for any active session. Next, we’re adding a handoff flow where the agent can signal that it needs help, notify a human to step in, then hand control back to the agent once the issue is resolved.
An AI agent searching Amazon for an orange lava lamp, comparing options, and handing off to a human when sign-in is required to complete the purchase
5) Scale
Customers have asked us to raise limits so that they can do more, faster.
Higher limits
We’ve quadrupled the default concurrent browser limit from 30 to 120. Every session gives you instant access to a browser from a global pool of warm instances, so there’s no cold start waiting for a browser to spin up. In March, we also increased limits for Quick Actions to 10 requests per second. If you need higher limits, they’re available by request.
What’s next
Human in the Loop Handoff: today you can intervene in a browser session through Live View. Soon, the agent will be able to signal when it needs help, so you can build in notifications to alert a human to step in.
Session Recordings Inspection: you can already scrub through the timeline and replay any session. Soon, you’ll be able to inspect DOM state and console output as well.
Traces and Browser Logs: access debugging information without instrumenting your code. Console logs, network requests, timing data. If something broke, you’ll know where.
Screenshot, PDF, and markdown directly from Workers: the same simple tasks available through the REST API are coming to Workers Bindings. env.BROWSER.screenshot() just works, with no API tokens needed.
Get started
Browser Run is available today on both the Workers Free and Workers Paid plans. Everything we shipped today — Live View, Human in the Loop, Session Recordings, and higher concurrency limits — is ready to use.
If you were already using Browser Rendering, everything works the same, just with a new name and more features.
When we originally built Workflows, our durable execution engine for multi-step applications, it was designed for a world in which workflows were triggered by human actions, like a user signing up or placing an order. For use cases like onboarding flows, workflows only had to support one instance per person — and people can only click so fast.
Over time, what we’ve actually seen is a quantitative shift in the workload and access pattern: fewer human-triggered workflows, and more agent-triggered workflows, created at machine speed.
As agents become persistent and autonomous infrastructure, operating on behalf of users for hours or days, they need a durable, asynchronous execution engine for the work they are doing. Workflows provides exactly that: every step is independently retryable, the workflow can pause for human-in-the-loop approval, and each instance survives failures without losing progress.
Moreover, workflows themselves are being used to implement agent loops and serve as the durable harnesses that manage and keep agents alive. OurAgents SDK integration accelerated this, making it easy for agents to spawn workflow instances and get real-time progress back. A single agent session can now kick off dozens of workflows, and many agents running concurrently means thousands of instances created in seconds. With Project Think now available, we anticipate that velocity will only increase.
To help developers scale their agents and applications on Workflows, we are excited to announce that we now support:
50,000 concurrent instances (number of workflow executions running in parallel), originally 4,500
300 instances/second created per account, previously 100
2 million queued instances (meaning instances that have been created or awoken and are waiting for a concurrency slot) per workflow, up from 1 million
We redesigned the Workflows control plane from usage data and first principles to support these increases. For V1 of the control plane, a single Durable Object (DO) could serve as the central registry and coordinator of an entire account. For V2, we built two new components to help horizontally scale the system and alleviate the bottlenecks that V1 introduced, before migrating all customers — with live traffic — seamlessly onto the new version.
V1: initial architecture of Workflows
As described in our public beta blog post, we built Workflows entirely on our own developer platform. Fundamentally, a workflow is a series of durable steps, each independently retryable, that can execute tasks, wait for external events, or sleep until a predetermined time.
To trigger each instance, execute its logic, and store its metadata, we leverage SQLite-backed Durable Objects, which are a simple but powerful primitive for coordination and storage within a distributed system.
In the control plane, some Durable Objects — like the Engine, which executes the actual workflow instance, including its step, retry, and sleep logic — are spun up at a ratio of 1:1 per instance. On the other hand, the Account is an account-level Durable Object that manages all workflows and workflow instances for that account.
After we launched Workflows into beta, we were thrilled to see customers quickly scaling their use of the product, but we also realized that having a single Durable Object to store all that account-level information introduced a bottleneck. Many customers needed to create and execute hundreds or even thousands of Workflow instances per minute, which could quickly overwhelm the Account in our original architecture. The original rate limits — 4,500 concurrency slots and 100 instance creations per 10 seconds — were a result of this limitation.
On the V1 control plane, these limits were a hard cap. Any and all operations depending on Account, including create, update, and list, had to go through that single DO. Users with high concurrency workloads could have thousands of instances starting and ending at any given moment, building up to thousands of requests per second to Account. To solve for this, we rearchitected the workflow control plane such that it horizontally scales to higher concurrency and creation rate limits.
V2: horizontal scale for higher throughput
For the new version, we rethought every single operation from the ground up with the goal of optimizing for high-volume workflows. Ultimately, Workflows should scale to support whatever developers need – whether that is thousands of instances created per second or millions of instances running at a time. We also wanted to ensure that V2 allowed for flexible limits, which we can toggle and continue increasing, rather than the hard cap which V1 limits imposed. After many design iterations, we settled on the following pillars for our new architecture:
The source of truth for the existence of a given instance should be its Engine and nothing else.
In the V1 control plane architecture, we lacked a check before queuing the instance as to whether its Engine actually existed. This allowed for a bad state where an instance may have been queued without its corresponding Engine having spun up.
Instance lifecycle and liveness mechanisms must be horizontally scalable per-workflow and distributed throughout many regions.
The new Account singleton should only store the minimum necessary metadata and have an invariant maximum amount of concurrent requests.
There are two new, critical components in the V2 control plane which allowed us to improve the scalability of Workflows: SousChef and Gatekeeper. The first component, SousChef, is a “second in command” to the Account. Recall that previously, the Account managed the metadata and lifecycle for all of the instances across all of the workflows within a given account. SousChef was introduced to keep track of metadata and lifecycle on a subset of instances in a given workflow. Within an account, a distribution of SousChefs can then report back to Account in a more efficient and manageable way. (An added benefit of this design: not only did we already have per-account isolation, but we also inadvertently gained “per-workflow” isolation within the same account, since each SousChef only takes care of one specific workflow).
The second component, Gatekeeper, is a mechanism to distribute concurrency “slots” (derived from concurrency limits) across all SousChefs within the account. It acts as a leasing system. When an instance is created, it is randomly assigned to one of the SousChefs within that account. Then the SousChef makes a request to Account to trigger that instance. Either a slot is granted, or the instance is queued. Once the slot is granted, the SousChef triggers execution of the instance and assumes responsibility that the instance never gets stuck.
Gatekeeper was needed to make sure that Engines never overloaded their Account (a pressing risk on V1) so every communication between SousChefs and their Account happens on a periodic cycle, once per second — each cycle will also batch all slot requests, ensuring that only one JSRPC call is made. This ensures the instance creation rate can never overload or influence the most important component, Account (as an aside: if the SousChef count is too high, we rate-limit calls or spread across different SousChefs throughout different time periods). Also, this periodic property allows us to preserve fairness on older instances and to ensure max-min fairness through the many SousChefs, allowing them all to progress. For example, if an instance wakes up, it should be prioritized for a slot over a newly created instance, but each SousChef ensures that its own instances do not get stuck.
This architecture is more distributed, and therefore, more scalable. Now, when an instance is created, the request path is:
Check control plane version
Check if a cached version of the workflow and version details is available in that location
If not, check Account to get workflow name, unique ID, and version, and cache that information
Store only necessary metadata (instance payload, creation date) onto its own Engine
So, how does Engine tell the control plane that it now exists? That happens in the background after instance metadata is set. As background operations on a Durable Object can fail, due to eviction or server failure, we also set an “alarm” on Engine in the creation hot-path. That way, if the background task does not finish, the alarm ensures that the instance will begin.
A Durable Object alarm allows a Durable Object instance to be awakened at a fine-grained time in the future with an at-least-once execution model, with automatic retries built in. We extensively use this combination of background “tasks” and alarms to remove operations off the hot-path while still ensuring that everything will happen as planned. That’s how we keep critical operations like creating an instance fast without ever compromising on reliability.
Other than unlocking scale, this version of the control plane means that:
Instance listing performance is faster, and actually consistent with cursor pagination;
Any operation on an instance does exactly one network hop (as it can go directly to its Engine, ensuring that eyeball request latency is as small as we can manage);
We can ensure that more instances are actually behaving correctly (by running on time) concurrently (and correct them if not, making sure that Engines are never late to continue execution).
V1 → V2 migration
Now that we had a new version of the Workflows control plane that can handle a higher volume of user load, we needed to do the “boring” part: migrating our customers and instances to the new system. At Cloudflare’s scale, this becomes a problem in and of itself, so the “boring” part becomes the biggest challenge. Well before its one-year mark, Workflows had already racked up millions of instances and thousands of customers. Also, some tech debt on V1’s control plane meant that a queued instance might not have its own Engine Durable Object created yet, complicating matters further.
Such a migration is tricky because customers might have instances running at any given moment; we needed a way to add the SousChef and Gatekeeper components into older accounts without causing any disruption or downtime.
We ultimately decided that we would migrate existing Accounts (which we’ll refer to as AccountOlds) to behave like SousChefs. By persisting the Account DOs, we maintained the instance metadata, and simply converted the DO into a SousChef “DO”:
// You might be wondering what's this SousChef class? This is the SousChef DO class!
import { SousChef } from "@repo/souschef";

class AccountOld extends DurableObject {
  constructor(state: DurableObjectState, env: Env) {
    // We added the following snippet to the end of our AccountOld DO's
    // constructor. This ensures that if we want, we can use any primitive
    // that is available on SousChef DO
    if (this.currentVersion === ControlPlaneVersions.SOUS_CHEFS) {
      this.sousChef = new SousChef(this.ctx, this.env);
      await this.sousChef.setup()
    }
  }

  async updateInstance(params: UpdateInstanceParams) {
    if (this.currentVersion === ControlPlaneVersions.SOUS_CHEFS) {
      assert(this.sousChef !== undefined, 'SousChef must exist on v2');
      return this.sousChef.updateInstance(params);
    }

    // old logic remains the same
  }

  @RequiresVersion<AccountOld>(ControlPlaneVersions.V1)
  async getMetadata() {
    // this method can only be run if
    // this.currentVersion === ControlPlaneVersions.V1
  }
}
We can instantiate the SousChef class within the AccountOld because the SQL tables that track instance metadata, on both SousChefs and AccountOld DOs, are the same on both. As such, we could just decide which version of the code to use. If this hadn’t been the case, we would have been forced to migrate the metadata of millions of instances, which would have made the migration more difficult and longer running for each account. So, how did the migration work?
First, we prepared AccountOld DOs to be switched to behave as SousChefs (which meant creating a release with a version of the snippet above). Then, we enabled control plane V2 per account, which triggered the next three steps roughly at the same time:
All new instance creation requests are now routed to the new SousChefs (SousChefs are created when they receive the first request), new instances never go to AccountOld again;
AccountOld DOs start migrating themselves to behave like SousChefs;
The new Account DO is spun up with the corresponding metadata.
After all accounts were migrated to the new control plane version, we were able to sunset AccountOld DOs as their instance retention periods expired. Once all instances on all accounts on AccountOlds were migrated, we could spin down those DOs permanently. The migration was completed with no downtime in a process that truly felt like changing a car’s wheels while driving.
If your use case requires higher limits than our new defaults — a concurrency limit of 50,000 slots and account-level creation rate limit of 300 instances per second, 100 per workflow — reach out via your account team or the Workers Limit Request Form. You can also reach out with feedback, feature requests, or just to share how you are using Workflows on our Discord server.
For many of us, our first experiences with AI agents have been through typing into a chat box. And for those of us using agents day to day, we have likely gotten very good at writing detailed prompts or markdown files to guide them.
But some of the moments where agents would be most useful are not always text-first. You might be on a long commute, juggling a few open sessions, or just wanting to speak naturally to an agent, have it speak back, and continue the interaction.
Adding voice to an agent should not require moving that agent into a separate voice framework. Today, we are releasing an experimental voice pipeline for the Agents SDK.
With @cloudflare/voice, you can add real-time voice to the same Agent architecture you already use. Voice just becomes another way you can talk to the same Durable Object, with the same tools, persistence, and WebSocket connection model that the Agents SDK already provides.
@cloudflare/voice is an experimental package for the Agents SDK that provides:
withVoice(Agent) for full conversation voice agents
withVoiceInput(Agent) for speech-to-text-only use cases, like dictation or voice search
useVoiceAgent and useVoiceInput hooks for React apps
VoiceClient for framework-agnostic clients
Built-in Workers AI providers, so that you can get started without external API keys:
This means you can now build an agent that users can talk to in real time over a single WebSocket connection, while keeping the same Agent class, Durable Object instance, and the same SQLite-backed conversation history.
Just as importantly, we want this to be bigger than one fixed default stack. The provider interfaces in @cloudflare/voice are intentionally small, and we want speech, telephony, and transport providers to build with us, so developers can mix and match the right components for their use case, instead of being locked into a single voice architecture.
Get started with voice
Here’s the minimal server-side pattern for a voice agent in the Agents SDK:
Here’s how the pipeline breaks down, step by step:
Audio transport: The browser captures microphone audio and streams 16 kHz mono PCM over the same WebSocket connection the agent already uses.
STT session setup: When the call starts, the agent creates a continuous transcriber session that lives for the duration of the call.
STT input: Audio streams continuously into that session.
STT turn detection: The speech-to-text model itself decides when the user has finished an utterance and emits a stable transcript for that turn.
LLM/application logic: The voice pipeline passes that transcript to your onTurn() method.
TTS output: Your response is synthesized to audio and sent back to the client. If onTurn() returns a stream, the pipeline sentence-chunks it and starts sending audio as sentences are ready.
Persistence: The user and agent messages are persisted in SQLite, so conversation history survives reconnections and deployments.
Why voice should grow with the rest of your agent
Many voice frameworks focus on the voice loop itself: audio in, transcription, model response, audio out. Those are important primitives, but there’s a lot more to an agent than just voice.
Real agents running in production will grow. They need state, scheduling, persistence, tools, workflows, telephony, and ways to keep all of that consistent across channels. As your agent grows in complexity, voice stops being a standalone feature and becomes part of a larger system.
We wanted voice in the Agents SDK to start from that assumption. Instead of building voice as a separate stack, we built it on top of the same Durable Object-based agent platform, so you can pull in the rest of the primitives you need without re-architecting the application later.
Voice and text share the same state
A user might start by typing, switch to voice, and go back to text. With Agents SDK, these are all just different inputs to the same agent. The same conversation history lives in SQLite, and the same tools are available. This gives you both a cleaner mental model and a much simpler application architecture to reason about.
Lower latency comes from…
a shorter network path
Voice experiences feel good or bad very quickly. Once a user stops speaking, the system needs to transcribe, think, and start speaking back fast enough to feel conversational.
A lot of voice latency is not pure model time. It’s the cost of bouncing audio and text between different services in different places. Audio needs to go to STT, transcripts go to an LLM, and responses go to a TTS model – and each handoff adds network overhead.
With the Agents SDK voice pipeline, the agent runs on Cloudflare’s network, and the built-in providers use Workers AI bindings. That keeps the pipeline tighter and reduces the amount of infrastructure you have to stitch together yourself.
built-in streaming
A voice agent interaction feels much more natural if it speaks the first sentence quickly (also called Time-to-First Audio). When onTurn() returns a stream, the pipeline chunks it into sentences and starts synthesis as sentences complete. That means the user can hear the beginning of the answer while the rest is still being generated.
A more realistic backend
Here is a fuller example that streams an LLM response and starts speaking it back, sentence by sentence:
import { Agent, routeAgentRequest } from "agents";
import {
  withVoice,
  WorkersAIFluxSTT,
  WorkersAITTS,
  type VoiceTurnContext
} from "@cloudflare/voice";
import { streamText } from "ai";
import { createWorkersAI } from "workers-ai-provider";

const VoiceAgent = withVoice(Agent);

export class MyAgent extends VoiceAgent<Env> {
  transcriber = new WorkersAIFluxSTT(this.env.AI);
  tts = new WorkersAITTS(this.env.AI);

  async onTurn(transcript: string, context: VoiceTurnContext) {
    const ai = createWorkersAI({ binding: this.env.AI });

    const result = streamText({
      model: ai("@cf/cloudflare/gpt-oss-20b"),
      system: "You are a helpful voice assistant. Be concise.",
      messages: [
        ...context.messages.map((m) => ({
          role: m.role as "user" | "assistant",
          content: m.content
        })),
        { role: "user" as const, content: transcript }
      ],
      abortSignal: context.signal
    });

    return result.textStream;
  }
}

export default {
  async fetch(request: Request, env: Env) {
    return (
      (await routeAgentRequest(request, env)) ??
      new Response("Not found", { status: 404 })
    );
  }
} satisfies ExportedHandler<Env>;
Context.messages gives you recent SQLite-backed conversation history, and context.signal lets the pipeline abort the LLM call if the user interrupts.
Voice as an input: withVoiceInput
Not every speech interface needs to speak back. Sometimes you might want dictation, transcription, or voice search. For these use cases, you can use withVoiceInput
import { Agent, type Connection } from "agents";
import { withVoiceInput, WorkersAINova3STT } from "@cloudflare/voice";

const InputAgent = withVoiceInput(Agent);

export class DictationAgent extends InputAgent<Env> {
  transcriber = new WorkersAINova3STT(this.env.AI);

  onTranscript(text: string, _connection: Connection) {
    console.log("User said:", text);
  }
}
On the client, useVoiceInput gives you a lightweight interface centered on transcriptions:
This is useful when speech is an input method, and you don’t need a full conversational loop.
Voice and text on the same connection
The same client can call sendText(“What’s the weather?”), which bypasses STT and sends the text directly to onTurn(). During an active call, the response can be spoken and shown as text. Outside a call, it can remain text-only.
This gives you a genuinely multimodal agent, without splitting the implementation into different code paths.
What else can you build?
Because a voice agent is still an agent, all the normal Agents SDK capabilities still apply.
Tools and scheduling
You can greet a caller when a session starts:
import { Agent, type Connection } from "agents";
import { withVoice, WorkersAIFluxSTT, WorkersAITTS } from "@cloudflare/voice";

const VoiceAgent = withVoice(Agent);

export class MyAgent extends VoiceAgent<Env> {
  transcriber = new WorkersAIFluxSTT(this.env.AI);
  tts = new WorkersAITTS(this.env.AI);

  async onTurn(transcript: string) {
    return `You said: ${transcript}`;
  }

  async onCallStart(connection: Connection) {
    await this.speak(connection, "Hi! How can I help you today?");
  }
}
You can schedule spoken reminders and expose tools to your LLM just like any other agent:
import { Agent } from "agents";
import {
  withVoice,
  WorkersAIFluxSTT,
  WorkersAITTS,
  type VoiceTurnContext
} from "@cloudflare/voice";
import { streamText, tool } from "ai";
import { createWorkersAI } from "workers-ai-provider";
import { z } from "zod";

const VoiceAgent = withVoice(Agent);

export class MyAgent extends VoiceAgent<Env> {
  transcriber = new WorkersAIFluxSTT(this.env.AI);
  tts = new WorkersAITTS(this.env.AI);

  async speakReminder(payload: { message: string }) {
    await this.speakAll(`Reminder: ${payload.message}`);
  }

  async onTurn(transcript: string, context: VoiceTurnContext) {
    const ai = createWorkersAI({ binding: this.env.AI });

    const result = streamText({
      model: ai("@cf/cloudflare/gpt-oss-20b"),
      messages: [
        ...context.messages.map((m) => ({
          role: m.role as "user" | "assistant",
          content: m.content
        })),
        { role: "user" as const, content: transcript }
      ],
      tools: {
        set_reminder: tool({
          description: "Set a spoken reminder after a delay",
          inputSchema: z.object({
            message: z.string(),
            delay_seconds: z.number()
          }),
          execute: async ({ message, delay_seconds }) => {
            await this.schedule(delay_seconds, "speakReminder", { message });
            return { confirmed: true };
          }
        })
      },
      abortSignal: context.signal
    });

    return result.textStream;
  }
}
Runtime model switching
The voice pipeline also lets you choose a transcription model dynamically per connection.
For example, you might prefer Flux for conversational turn-taking and Nova 3 for higher-accuracy dictation. You can switch at runtime by overriding createTranscriber():
import { Agent, type Connection } from "agents";
import {
  withVoice,
  WorkersAIFluxSTT,
  WorkersAINova3STT,
  WorkersAITTS,
  type Transcriber
} from "@cloudflare/voice";

export class MyAgent extends VoiceAgent<Env> {
  tts = new WorkersAITTS(this.env.AI);

  createTranscriber(connection: Connection): Transcriber {
    const url = new URL(connection.url ?? "http://localhost");
    const model = url.searchParams.get("model");
    if (model === "nova-3") {
      return new WorkersAINova3STT(this.env.AI);
    }
    return new WorkersAIFluxSTT(this.env.AI);
  }
}
On the client, you can pass query parameters through the hook:
This lets the same agent handle web voice, text input, and phone calls.
One caveat: the default Workers AI TTS provider returns MP3, while Twilio expects mulaw 8kHz audio. For production telephony, you may want to use a TTS provider that outputs PCM or mulaw directly.
WebRTC
If you need a transport that is better suited to difficult network conditions or will include multiple participants, the voice package also includes SFU utilities and supports custom transports. The default model is WebSocket-native today, but we plan to develop more adapters to connect to our global SFU infrastructure.
Build with us
The voice pipeline is provider-agnostic by design.
Under the hood, each stage is defined by a small interface: a transcriber opens a continuous session and accepts audio frames as they arrive, while a TTS provider takes text and returns audio. If a provider can stream audio output, the pipeline can use that too.
We didn’t want voice support in Agents SDK to only work with one fixed combination of models and transports. We wanted the default path to be simple, while still making it easy to plug in other providers as the ecosystem grows.
The built-in providers use Workers AI, so you can get started without external API keys:
WorkersAIFluxSTT for conversational streaming STT
WorkersAINova3STT for dictation-style streaming STT
WorkersAITTS for text-to-speech
But the bigger goal is interoperability. If you maintain a speech or voice service, these interfaces are small enough to implement without needing to understand the rest of the SDK internals. If your STT provider accepts streaming audio and can detect utterance boundaries, it can satisfy the transcriber interface. If your TTS provider can stream audio output, even better.
We would love to work on interoperability with:
STT providers like AssemblyAI, Rev.ai, Speechmatics, or any service with a real-time transcription API
TTS providers like PlayHT, LMNT, Cartesia, Coqui, Amazon Polly, or Google Cloud TTS
telephony adapters for platforms like Vonage, Telnyx, or Bandwidth
transport implementations for WebRTC data channels, SFU bridges, and other audio transport layers
We are also interested in collaborations that go beyond individual providers:
latency benchmarking across STT + LLM + TTS combinations
multilingual support and better documentation for non-English voice agents
accessibility work, especially around multimodal interfaces and speech impairments
If you are building voice infrastructure and want to see a first-class integration, open a PR or reach out.
Try it now
The voice pipeline is available today as an experimental package:
Add @cloudflare/voice, give your agent a transcriber and a TTS provider, deploy it, and start talking to it. You can also read the API reference.
If you build something interesting, open an issue or PR on github.com/cloudflare/agents. Voice should not require a separate stack, and we think the best voice agents will be the ones built on the same durable application model as everything else.
Security leaders know that reducing risk is not just about finding the right exposures, but helping the organization act on them before known issues turn into real incidents.
That is often where remediation gets harder. Security teams may know which actions matter most, but progress can slow when infrastructure, cloud, endpoint, and IT teams do not have the context needed to execute. Teams need clear asset detail to scope the work, trusted status signals to validate remediation, and usable reporting to track progress and stay aligned.
This is exactly the challenge Exposure Command is built to help solve. Exposure Command helps customers understand and prioritize the exposures that matter most, while Remediation Hub (a prioritized remediation view within Exposure Command) helps teams turn that prioritization into action. With new enhancements to Remediation Hub, customers can now do that with more context and confidence, along with better visibility into progress over time through exportable reports.
Why remediation work slows down
Prioritization is an important step, but remediation rarely happens in one place or with one team. Security, infrastructure, cloud, endpoint, and IT operations all need enough context to understand what is being asked of them.
When that context is hard to access, progress slows. Security teams may know what should be fixed, but asset owners still need the information required to assess impact, plan the work, and take action. Teams also need to understand whether assets are actually protected, whether patching has fully taken effect, and how remediation progress should be tracked over time. Without that clarity, remediation becomes harder to coordinate and harder to validate.
Making remediation more actionable
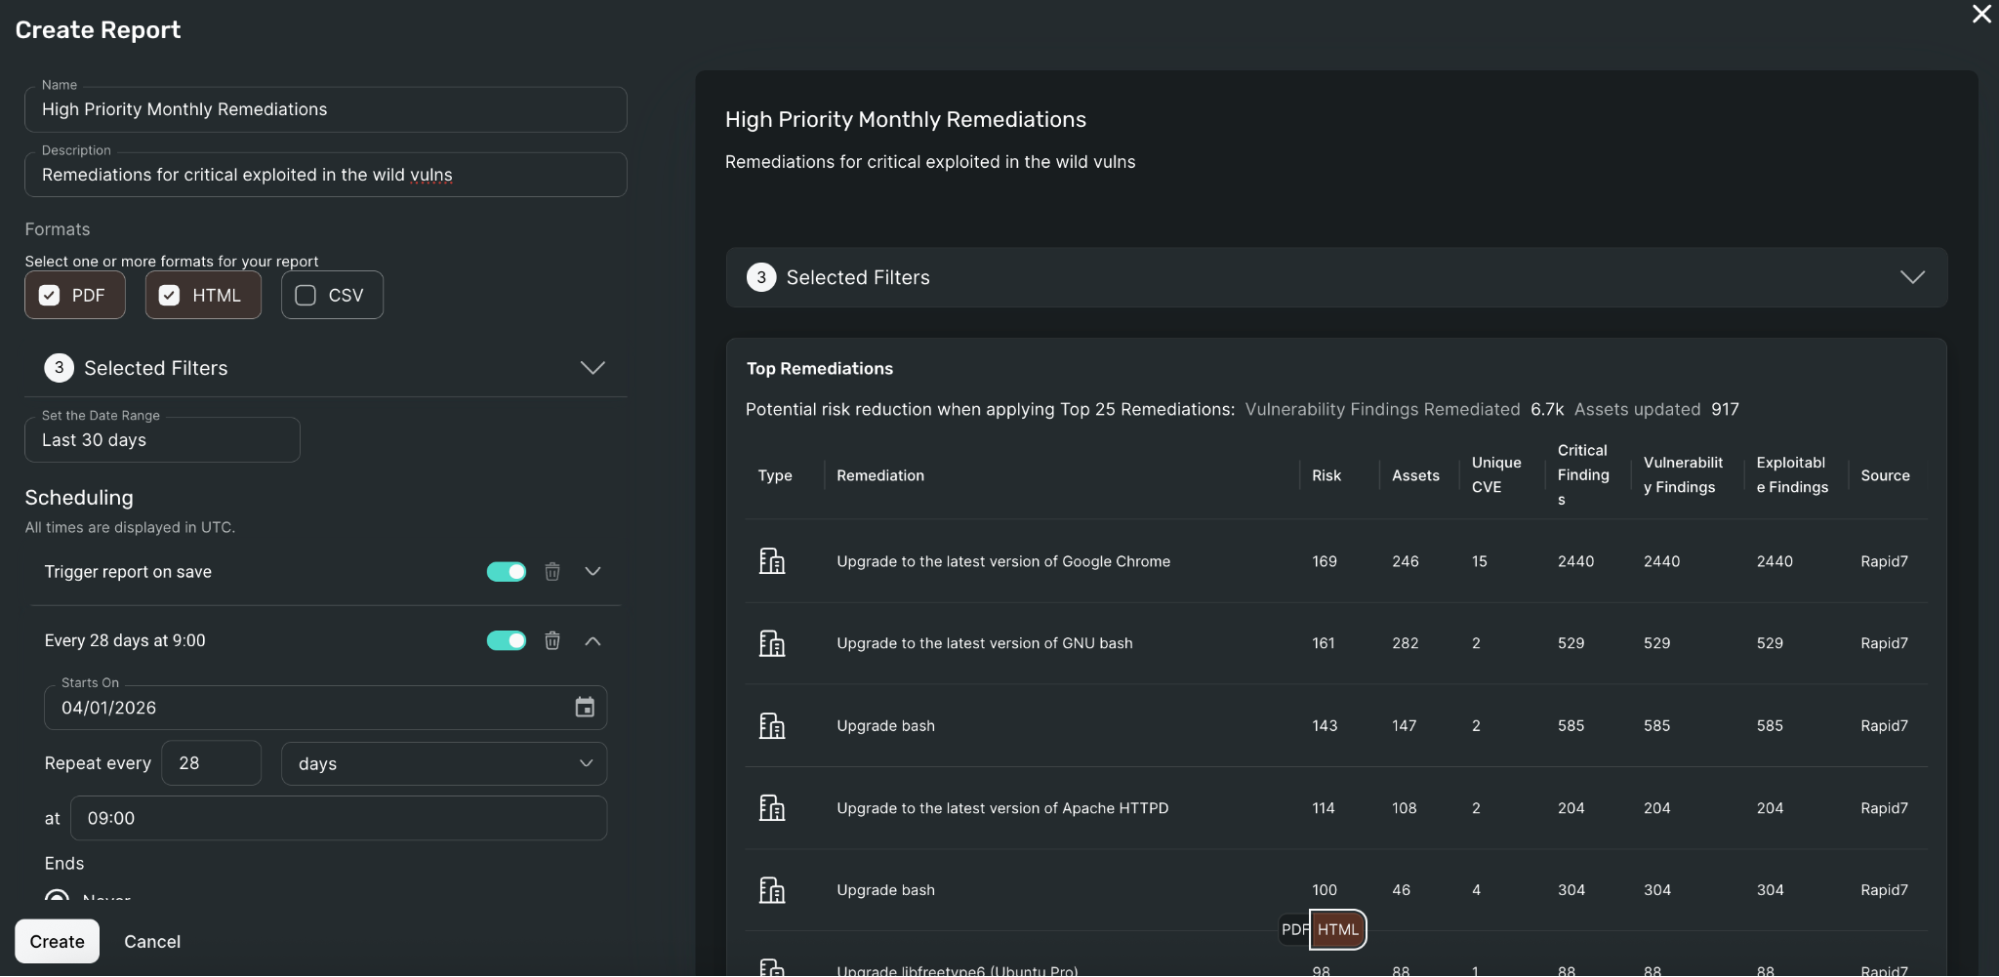
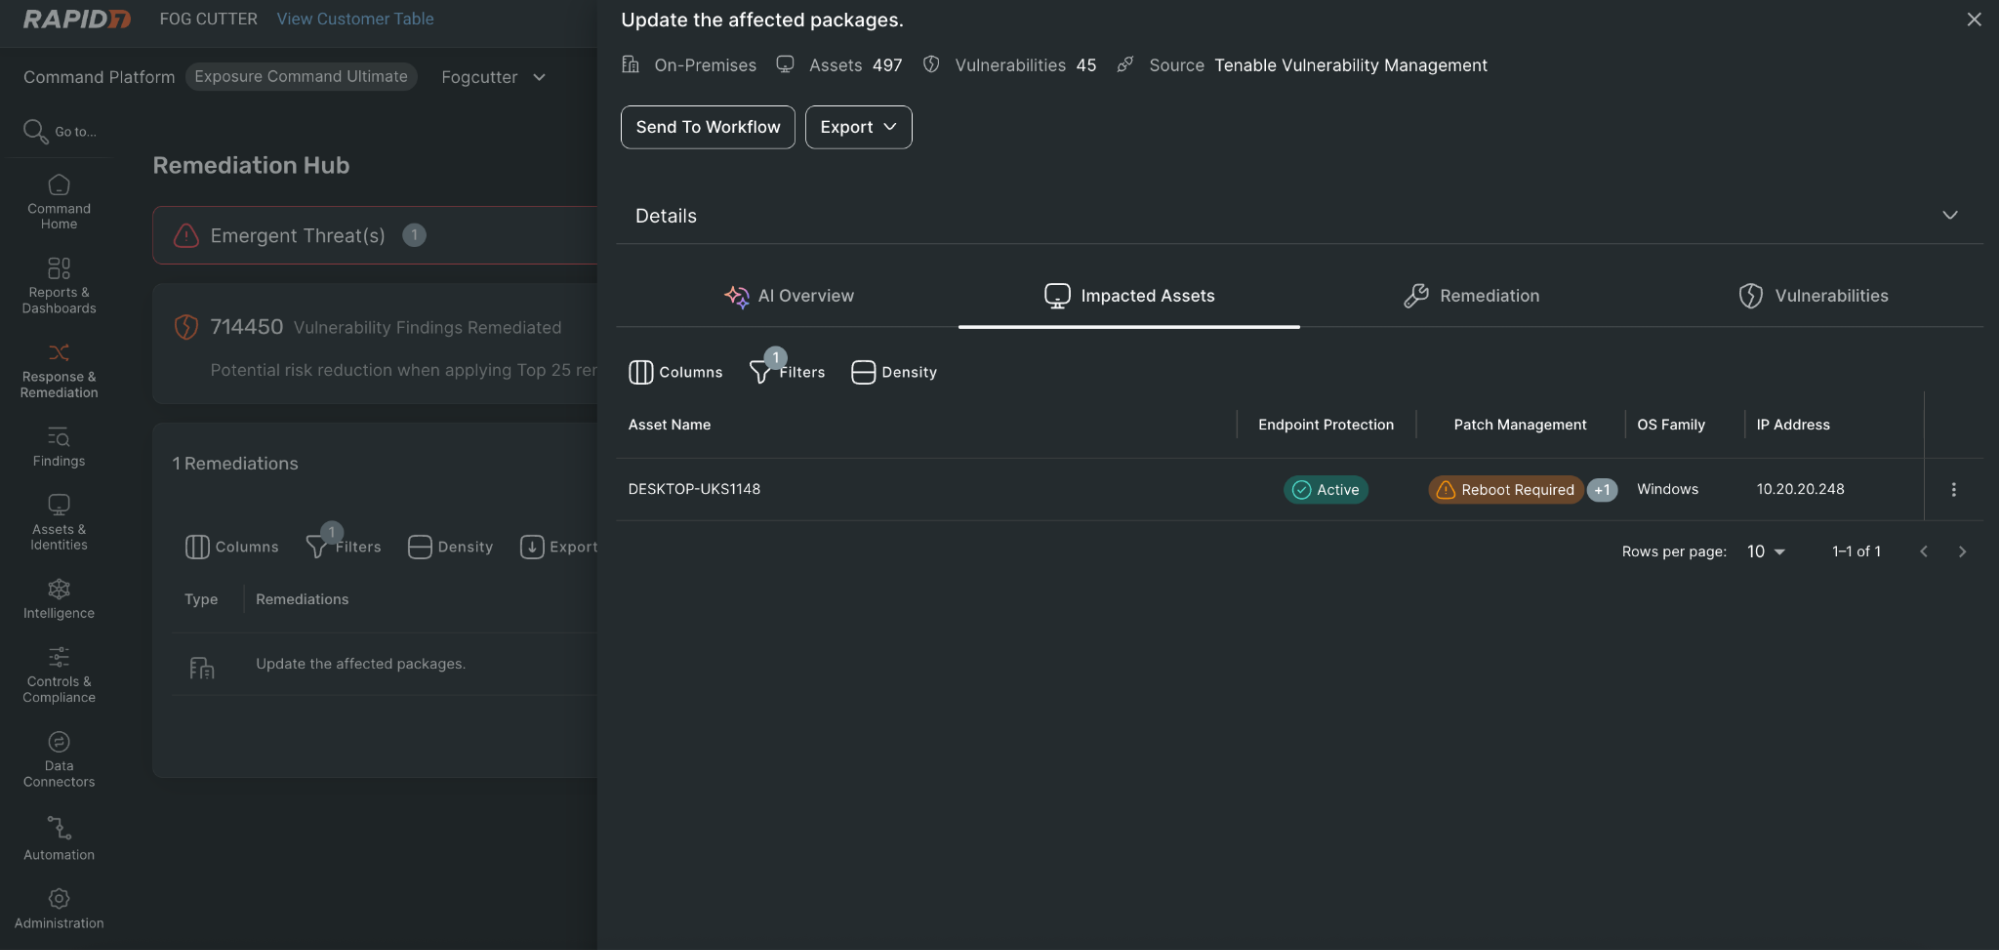
The Top Remediations Report helps close that gap by adding a comprehensive asset-level breakdown for each remediation. In addition to summary remediation information, customers can see source-specific metadata such as operating system, IP address, cloud provider, tags, endpoint protection, and patch management.
It can be used as a high-level summary of remediation priorities; many security teams use it to define remediation goals and share clear, actionable guidance with teams that may not work directly in security tools.
That gives teams a clearer view of the work behind each remediation and makes it easier to move from prioritization to execution.
Customers can also tailor reports to match the way they work, with customizable filters for specific environments, tags, or ownership groups. Reports can be exported in CSV, HTML, and PDF formats, shared with the teams responsible for action, and automatically generated and emailed on a schedule.
Building clearer visibility into patching and endpoint coverage
Action is only part of the equation, since teams also need clear, trustworthy context around asset posture.
Remediation Hub now shows the source of patch management and endpoint protection coverage directly in remediation details, giving customers clearer visibility into where that data comes from and which tools are protecting a given asset. This is especially helpful in environments with multiple solutions in use, and reduces confusion when missing integrations would otherwise make assets appear unprotected.
The update also surfaces whether an asset still requires a reboot after patching, helping explain why vulnerabilities may persist even when remediation work has already started. Together, these additions make it easier for teams to assess true exposure, validate remediation progress, and identify where follow-up is still needed.
Extending remediation data into operational workflows
Remediation does not stop once a team has identified what to fix or validated that a change has been made. Security leaders also need ways to track progress, measure performance, and share remediation outcomes across the organization. That is where exported remediation data becomes important.
By extending access to remediation data outside the platform, customers can more easily support the workflows across reporting, operations, and leadership teams. This makes it easier to analyze remediation activity over time, align to internal reporting needs, and give stakeholders a clearer view of progress.
For security leaders, that means better visibility into whether remediation efforts are moving the organization in the right direction. For operational teams, it means less manual work to assemble and share updates, and more flexibility in how remediation data is used.
What this looks like in practice
For vulnerability management teams, this means faster handoff. Instead of sharing a remediation recommendation and then answering follow-up questions, they can send a report that already includes the asset context needed to begin planning.
For infrastructure and cloud teams, it becomes easier to focus on the parts of the environment they own. Filters help narrow remediation data to the assets, environments, and ownership groups that matter most, reducing noise and making action more straightforward.
For endpoint and patching teams, greater visibility into coverage source and reboot status helps explain why exposure may still remain, even when remediation work is already underway. That makes validation easier and helps teams troubleshoot more effectively.
For security and IT leaders, scheduled reporting and exported remediation data improve shared visibility. Rather than relying on one-off exports or manual updates, teams can more consistently track prioritized remediation work and measure progress over time.
Better context, faster progress
These enhancements help customers do more than identify top remediation priorities. They help teams act on them, validate them, and track them with more confidence.
By bringing together deeper asset context, clearer patch and endpoint visibility, and more usable remediation reporting, Remediation Hub helps reduce the friction that often slows remediation down. The result is smoother collaboration across functional teams, less manual effort, and quicker progress on the remediation work that matters most.
Read more about how Exposure Command helps teams share remediation context, improve coordination, and move faster on risk reduction.
AI is shaping the world young people are growing up in, and understanding how it works, as well as its benefits and risks, is now essential.
That’s the goal of Experience AI, our global education programme created in collaboration with Google DeepMind. Today, as we celebrate three years of the programme, we’re sharing our latest impact report, highlighting how the programme is helping educators and young people around the world build the knowledge and confidence to engage with AI critically and responsibly.
From tens of thousands of educators to millions of learners
Since launching 3 years ago in April 2023, Experience AI has grown into a truly global initiative:
More than 30,000 educators trained, who can reach an estimated 2.9 million young people
Over 700,000 resource downloads across 180+ countries
A network of partners in 38 countries
Resources available in 19 languages
These numbers reflect the growing global demand for AI literacy teaching, and the power of partnerships to meet that need.
But the real impact is what happens in classrooms.
From “AI is complicated” to confident teaching
For John Pierce, a teacher at Mwingo Academy Primary School in Kenya, AI once felt out of reach. “I thought that AI was complicated — maybe a puzzle”
After taking part in Experience AI training, John’s perspective shifted. With structured lessons and ready-to-use resources, he now helps his students see AI as something they can understand and engage with.
“My learners are really enjoying the lessons… They keep asking, ‘Teacher, when are you having computer classes?’”
John’s experience reflects what we see across the programme: when teachers feel confident, students become curious, engaged, and motivated to learn more, often continuing those conversations beyond the classroom.
Building confidence, not just knowledge
A core focus of Experience AI is supporting educators, many of whom are new to teaching AI concepts. Our evaluation shows this approach is working:
93% of educators say the training increased their knowledge of AI concepts
87% report increased confidence in teaching AI
In Malaysia, educator Lee Siew Ling had previously struggled to explain AI concepts clearly. “Before this, I just shared simple examples… It was too hard to explain the concepts clearly to my students.”
With Experience AI resources, that changed. “The materials make it easier to teach AI… After using them, I became more confident to guide my students.”
By reducing preparation time and providing clear, structured lessons, the programme enables teachers to focus on what matters most: supporting their students’ learning.
Helping young people understand, and question, AI
The impact extends directly to learners. Across classrooms worldwide:
89% of students say they better understand what AI and machine learning are
87% say they better understand the benefits and risks of AI
This is critical. AI literacy isn’t just about using technology, it’s about understanding how it works, questioning it, and recognising its societal impact.
At Wymondham College in the UK, Head of Computing, Kim Williams highlights the value of having trusted, research-informed resources: “Experience AI gave us a real structure to follow… It helps us deal with misconceptions and gives students the right messages.”
Through these lessons, students are not just learning about AI, they are developing the critical thinking skills they need to navigate a world shaped by it.
A global effort to democratise AI education
Experience AI’s reach is only possible through collaboration. Working with partners around the world, we localise content to make it relevant to different cultures and contexts, ensuring that AI education is not only accessible, but meaningful.
We’re continuing to expand and evolve the programme, updating resources, developing new materials for different age groups, and growing our global partner network.
By the end of 2026, we expect to reach over 45,000 educators who can reach an estimated 4.4 million young people.
Because the challenge is clear: AI literacy should not be limited to a few. Every young person deserves the opportunity to understand and shape the technologies influencing their future.
Read the full Experience AI impact report to explore the data, stories, and insights behind this work. rpf.io/expai-impact
This article on the walls of Constantinople is fascinating.
The system comprised four defensive lines arranged in formidable layers:
The brick-lined ditch, divided by bulkheads and often flooded, 1520 meters wide and up to 7 meters deep.
A low breastwork, about 2 meters high, enabling defenders to fire freely from behind.
The outer wall, 8 meters tall and 2.8 meters thick, with 82 projecting towers.
The main wall—a towering 12 meters high and 5 meters thick—with 96 massive towers offset from those of the outer wall for maximum coverage.
Behind the walls lay broad terraces: the parateichion, 18 meters wide, ideal for repelling enemies who crossed the moat, and the peribolos, 15–20 meters wide between the inner and outer walls. From the moat’s bottom to the highest tower top, the defences reached nearly 30 meters—a nearly unscalable barrier of stone and ingenuity.
ICT Solutions is a managed service provider (MSP) specializing in fully managed IT Support, cloud, cybersecurity and more. Based in Liverpool, they offer IT support across the UK.
They work together with Zabbix Premium Delivery Partner Opensource ICT Solutions to make sure that their customers get solid insights into their environments.
The challenge
While a lot of companies realize the potential of hybrid environments as opposed to full-cloud environments, on-premise equipment (including local network and server equipment) is still a big part of what they do. It’s relatively easy to monitor cloud equipment with Zabbix proxies in the cloud, but not every customer has what it takes to run a Zabbix proxy on site.
ICT Solutions offers fully managed hybrid environments that include monitoring, so their customers have never had to worry about Zabbix proxies. As such, ICT Solutions has been running Raspberry PI 3 devices for years. Environments grow, however, and managing tens or hundreds of Zabbix proxies is something that can take time when not properly set up.
As an MSP, ICT Solutions looks after approximately 160 clients, 3,000 workstations and 1,300 network devices. These include firewalls, switches, access points, on-premise and hosted servers, network attached storage, CCTV, and door access – just to name a few. They have clients that they fully support, and clients that use them as an extension of their own IT teams.
The company also has a wide variety of templates and scripts set up in Zabbix, along with many dashboards so that when issues arise, they can see straight away where an issue exists or provide a more targeted fault-finding process. They also provide their clients’ IT departments with access to their Zabbix environment so they can visually display this on screens for purposes of working together.
The solution
With Zabbix environments growing over the years, Ansible was deployed and Semaphore was harnessed to keep things simple and manageable. This makes proxy management a breeze, as all the ICT team needs to do to deploy a proxy is have a field engineer install it and then push a button to install all the required software, which leads to the proxy being fully secured and automated into Zabbix.
Unfortunately, proxy performance was dropping over time. As monitoring needs got more extensive, the Raspberry PI 3 was showing its age, which led to Raspberry PI 5 devices being ordered and installed.
Another problem often attributed to Raspberry PI devices is their reliance on SD cards. SD cards are prone to failure when overloaded, which can become a problem as Zabbix stores its proxy database on the SD card.
Fortunately, Zabbix 7.0 introduced the “ProxyBufferMode=hybrid”, which allowed the ICT Solutions team to use the RAM of the Raspberry PIs instead of SD cards for the database. They now write the history metrics to the database on the SD card only in the case of a longer outage.
The results
The end result is a manageable and highly scalable setup that provides ICT Solutions and their customers with valuable insights into their hybrid environments as well as improved flexibility and enhanced security.
Today, we’re announcing the general availability of AWS Interconnect – multicloud, a managed private connectivity service that connects your Amazon Virtual Private Cloud (Amazon VPC) directly to VPCs on other cloud providers. We’re also introducing AWS Interconnect – last mile, a new capability that simplifies how you establish high-speed, private connections to AWS from your branch offices, data centers, and remote locations through your existing network providers.
Large enterprises increasingly run workloads across multiple cloud providers, whether to use specialized services, meet data residency requirements, or support teams that have standardized on different providers. Connecting those environments reliably and securely has historically required significant coordination: managing VPN tunnels, working with colocation facilities, and configuring third-party network fabrics. The result is that your networking team spends time on undifferentiated heavy lifting instead of focusing on the applications that matter to your business.
AWS Interconnect is the answer to these challenges. It is a managed connectivity service that simplifies connectivity into AWS. Interconnect provides you the ability to establish private, high-speed network connections with dedicated bandwidth to and from AWS across hybrid and multicloud environments. You can configure resilient, end-to-end connectivity with ease in a few clicks through the AWS Console by selecting your location, partner, or cloud provider, preferred Region, and bandwidth requirements, removing the friction of discovering partners and the complexity of manual network configurations.
It comes with two capabilities: multicloud connectivity between AWS and other cloud providers, and last-mile connectivity between AWS and your private on-premises networks. Both capabilities are built on the same principle: a fully managed, turnkey experience that removes the infrastructure complexity from your team.
AWS Interconnect – multicloud AWS Interconnect – multicloud gives you a private, managed Layer 3 connection between your AWS environment and other cloud providers, starting with Google Cloud, and Microsoft Azure coming later in 2026. Traffic flows entirely over the AWS global backbone and the partner cloud’s private network, so it never traverses the public internet. This means you get predictable latency, consistent throughput, and isolation from internet congestion without having to manage any physical infrastructure yourself.
Security is built in by default. Every connection uses IEEE 802.1AE MACsec encryption on the physical links between AWS routers and the partner cloud provider’s routers at the interconnection facilities. You don’t need to configure these separately. Note that each cloud provider manages encryption independently on its own backbone, so you should review the encryption documentation for your specific deployment to verify it meets your compliance requirements. Resiliency is also built in: each connection spans multiple logical links distributed across at least two physical facilities, so a single device or building failure does not interrupt your connectivity.
For monitoring, AWS Interconnect – multicloud integrates with Amazon CloudWatch. You get a Network Synthetic Monitor included with each connection to track round-trip latency and packet loss, and bandwidth utilization metrics to support capacity planning.
AWS has published the underlying specification on GitHub under the Apache 2.0 license, providing any cloud service provider the opportunity to collaborate with AWS Interconnect – multicloud. To become an AWS Interconnect partner, cloud providers must implement the technical specification and meet AWS operational requirements, including resiliency standards, support commitments, and service level agreements.
How it works Provisioning a connection takes minutes. I create the connection from the AWS Direct Connect console. I start from the AWS Interconnect section and select Google Cloud as the provider. I select my source and destination regions. I specify bandwidth, and provide my Google Cloud project ID. AWS generates an activation key that I use on the Google Cloud side to complete the connection. Routes propagate automatically in both directions, and my workloads can start exchanging data shortly after.
For this demo, I start with a single VPC and I connect it to a Google Cloud VPC. I use a Direct Connect Gateway. It’s the simplest path: one connection, one attachment, and my workloads on both sides can start talking to each other in minutes.
I navigate to AWS Direct Connect, AWS Interconnect and I select Create. I first choose the cloud provider I want to connect to. In this example, Google Cloud.
Then, I choose the AWS Region (eu-central-1) and the Google Cloud Region (europe-west3).
On step 3, I enter Description,I choose the Bandwidth, the Direct Connect gateway to attach, and the ID of my Google Cloud project.
After reviewing and confirming the request, the console gives me an activation key. I will use that key to validate the request on the Google cloud side.
Step 2: create the transport and VPC Peering resources on my Google Cloud Platform (GCP) account.
Now that I have the activation key, I continue the process on the GCP side. At the time of this writing, no web-based console was available. I choose to use the GCP command line (CLI) instead. I take note of the CIDR range in the GCP VPC subnet in the europe-west3 region. Then, I open a Terminal and type:
It takes a couple of minutes for the command to complete. Once the command returns, I create a peering between my GCP VPC and the new transport I just created. I can do that in the GCP console or with the gcloud command line. Because I was using the Terminal for the previous command, I continued with the command line:
The network name is the name of my GCP VPC. The peer network is given in the output of the previous command.
Once completed, I can verify the peering in the GCP console.
In the AWS Interconnect console, I verify the status is available.
In the AWS Direct Connect console, under Direct Connect gateways, I see the attachment to the new interconnect.
Step 3: associate the new gateway on the AWS side
I select Gateway associations and Associate gateway to attach the Virtual Private Gateway (VGW) that I created before starting this demo (pay attention to use a VGW in the same AWS Region as the interconnect)
You don’t need to configure the network routing on the GCP side. On AWS, there is a final step: add a route entry in your VPC Route tables to send all traffic to the GCP IP address range through the Virtual Gateway.
Once the network setup is done. I start two compute instances, one on AWS and one on GCP.
On AWS, I verify the Security Group accepts ingress traffic on TCP:8080. I connect to the machine and I start a minimal web server:
On the GCP side, I open a SSH session to the machine and I call the AWS web server by its private IP address.
Et voilà! I have a private network route between my two networks, entirely managed by the two Cloud Service Providers.
Things to know There are a couple of configuration options that you should keep in mind:
When connecting networks, pay attention to the IP addresses range on both sides. The GCP and AWS VPC ranges can’t overlap. For this demo, the default range on AWS was 172.31.0.0/16and the default on GCP was 10.156.0.0/20. I was able to proceed with these default values.
You can configure IPV4, IPV6, or both on each side. You must select the same option on both sides.
The Maximum Transmission Unit (MTU) must be the same on both VPC. The default values for AWS VPCs and GCP VPCs are not. MTU is the largest packet size, in bytes, that a network interface can transmit without fragmentation. Mismatched MTU sizes between peered VPCs cause packet drops or fragmentation, leading to silent data loss, degraded throughput, and broken connections across the interconnect.
Reference architectures When your deployment grows and you have multiple VPCs in a single region, AWS Transit Gateway gives you a centralized routing hub to connect them all through a single Interconnect attachment. You can segment traffic between environments, apply consistent routing policies, and integrate AWS Network Firewall if you need to inspect what crosses the cloud boundary.
And when you’re operating at global scale, with workloads spread across multiple AWS Regions and multiple Google Cloud environments, AWS Cloud WAN extends that same model across the world. Any region in your network can reach any Interconnect attachment globally, with centralized policy management and segment-based routing that applies consistently everywhere you operate.
AWS Interconnect – last mile Based on the same architecture and design as AWS Interconnect – multicloud, AWS Interconnect – last mile provides the ability to connect your on-premises or remote location to AWS through a participating network provider’s last-mile infrastructure, directly from the AWS Management Console.
The onboarding process mirrors AWS Interconnect – multicloud: you select a provider, authenticate, and specify your connection endpoints and bandwidth. AWS generates an activation key that you provide in the provider console to complete the configuration. AWS Interconnect – last mile automatically provisions four redundant connections across two physical locations, configures BGP routing, and activates MACsec encryption and Jumbo Frames by default. The result is a resilient private connection to AWS that aligns with best practices, without requiring you to manually configure networking components.
AWS Interconnect – last mile supports bandwidths from 1 Gbps to 100 Gbps, and you can adjust bandwidth from the console without reprovisioning. The service includes a 99.99% availability SLA up to the Direct Connect port and bundles CloudWatch Network Synthetic Monitor for connection health monitoring. Just like AWS Interconnect – multicloud, AWS Interconnect – last mile attaches to a Direct Connect Gateway, which connects to your Virtual Private Gateway, Transit Gateway, or AWS Cloud WAN deployment. For more details, refer to the AWS Interconnect User Guide.
Scott Yow, SVP Product at Lumen Technologies, wrote:
By combining AWS Interconnect – last mile with Lumen fiber network and Cloud Interconnect, we simplify the last-mile complexity that often slows cloud adoption and enable a faster, and more resilient path to AWS for customers.
Pricing and availability AWS Interconnect – multicloud and AWS Interconnect – last mile pricing is based on a flat hourly rate for the capacity you request, billed prorata by the hour. You select the bandwidth tier that fits your workload needs.
AWS Interconnect – multicloud pricing varies by region pair: a connection between US East (N. Virginia) and Google Cloud N. Virginia is priced differently from a connection between US East (N. Virginia) and a more distant region. When you use AWS Cloud WAN, the global any-to-any routing model means traffic can traverse multiple regions, which affects the total cost of your deployment. I recommend reviewing the AWS Interconnect pricing page for the full rate card by region pair and capacity tier before sizing your connection.
AWS Interconnect – multicloud is available today in five region pairs: US East (N. Virginia) to Google Cloud N. Virginia, US West (N. California) to Google Cloud Los Angeles, US West (Oregon) to Google Cloud Oregon, Europe (London) to Google Cloud London, and Europe (Frankfurt) to Google Cloud Frankfurt. Microsoft Azure support is coming later in 2026.
AWS Interconnect – last mile is launching in US East (N. Virginia) with Lumen as the initial partner. Additional partners, including AT&T and Megaport, are in progress, and additional regions are planned.
To get started with AWS Interconnect, visit the AWS Direct Connect console and select AWS Interconnect from the navigation menu.
I’d love to hear how you’re using AWS Interconnect in your environment. Leave a comment below or reach out through the AWS re:Post community.
AI agents and coding assistants interact with AWS resources through the Model Context Protocol (MCP). Unlike traditional applications with deterministic code paths, agents reason dynamically, choosing different tools or accessing different data depending on context. You must assume an agent can do anything within its granted entitlements, whether OAuth scopes, API keys, or AWS Identity and Access Management (IAM) permissions, and design your controls accordingly. Agents operate at machine speed, so the impact of misconfigured permissions scales quickly.
This blog post focuses on IAM as the authorization layer for AWS resource access and presents three security principles for building deterministic IAM controls for these non-deterministic AI systems. The principles apply whether you’re using AI coding assistants like Kiro and Claude Code, or deploying agents on hosting environments like Amazon Bedrock AgentCore. We cover deployment patterns, then explore each principle with concrete IAM policy examples and implementation guidance.
This post specifically addresses securing the MCP access path, where agents interact with AWS resources through MCP servers. AI coding assistants and agents can also access AWS service APIs directly through general-purpose tools like bash or shell execution, bypassing MCP servers entirely. For this reason, we recommend architecting agents to use MCP servers rather than direct service access where possible. MCP servers provide a layer of abstraction that enables the differentiation controls in principle 3 and creates additional monitoring capabilities through AWS CloudTrail. When agents bypass MCP, the differentiation mechanisms in principle 3 don’t apply, and principles 1 and 2 become your primary controls. We discuss this scope boundary in principle 3.
MCP deployment patterns
Your deployment pattern determines which security principles and implementation approaches apply. Three dimensions define this pattern, including where the agent runs, what type of MCP server offers the tools, and your level of control over the agent code. No matter how you connect to it, the MCP server needs AWS credentials to interact with AWS resources.
Where agents run
Agents access AWS resources from three locations: developer machines (where you control the infrastructure), hosting environments (where you control the infrastructure or significant aspects of it), and third-party agent platforms (where you do not control the infrastructure). This post focuses on the first two patterns. Each has a different credential model and different organizational control options.
AI coding assistants and local agents
AI coding assistants (Kiro, Claude Code) or local agent applications represent the first deployment pattern. These assistants run locally on developer machines and connect to MCP servers or use AWS Command Line Interface (AWS CLI) commands to access AWS resources. In this pattern, credentials come from the developer’s local environment. When a developer configures an MCP server in their mcp.json file, they specify which AWS credentials to use. Options include a named profile, which can use credential helpers and the credential provider chain for short-lived credentials, environment variables, or explicit credential configuration. This means the developer controls which IAM principal the agent uses to access AWS. This creates a governance challenge. Without additional controls, developers often use their developer admin credentials, shared development roles, or even production roles for agent access. Developer credentials often carry broad permissions designed for interactive use, where human judgment serves as a safeguard. When an agent inherits these permissions, it operates without that judgment at machine speed. Principle 1 explores this risk in detail.
Agents on hosting environments
Agents deployed on hosting environments represent the second deployment pattern. These agents run on infrastructure you manage, not on developer machines. This changes the credential management model. Using Amazon Bedrock AgentCore as an example, when an agent runs on AgentCore Runtime, it uses an execution IAM role that you configure when creating the runtime. The execution role’s permissions apply to all operations the agent performs and cannot be scoped down per-invocation at the runtime configuration level. For more granular control, agents can call AWS Security Token Service (AWS STS)AssumeRole or AssumeRoleWithWebIdentity (collectively referred to as AssumeRole in this post). This obtains temporary credentials with session policies that further restrict permissions beyond the role’s base permissions. Agents built with frameworks like Strands can also initialize individual MCP clients with different credential sets by calling AssumeRole and passing the resulting credentials to each client connection. This enables per-tool credential isolation within a single agent process. The same pattern applies to agents deployed on Amazon Elastic Compute Cloud (Amazon EC2) or Amazon Elastic Kubernetes Service (Amazon EKS).
With this centralized execution model, you can implement organizational controls. You define the available IAM roles through infrastructure configuration instead of relying on developer choice. However, you must design these roles carefully to prevent overly permissive access and implement session policies for tool-specific restrictions.
What type of MCP server
MCP servers come in two types, provider-managed and self-managed. AWS-managed servers are operated by AWS on your behalf. Self-managed servers are servers that you install and run yourself. The server type affects your operational overhead, available features, and how you implement security controls.
AWS offers fully managed MCP servers, including the AWS MCP Server, Amazon EKS MCP Server, and Amazon ECS MCP Server. These AWS-managed servers run on AWS infrastructure and require no installation or maintenance on your part. AWS-managed MCP servers automatically add IAM context keys (aws:ViaAWSMCPService and aws:CalledViaAWSMCP) to every downstream AWS service call. You can write IAM policies that check these keys to distinguish between AI-driven actions and human-initiated actions without any additional configuration.
Self-managed MCP servers include AWS-provided servers from the AWS MCP GitHub repository that you install and run yourself. They also include custom MCP servers that you build from scratch. With self-managed servers, you control the deployment location (local machine, Amazon EC2, Amazon EKS), the configuration, and the maintenance. These servers can be used with either AI coding assistants running locally or agents deployed on hosting environments. The key difference for security controls is that self-managed servers don’t automatically add IAM context keys for differentiation. You must configure the MCP server to add session tags when assuming IAM roles if you require differentiation between AI-driven and human-initiated actions. This requires modifying your MCP server code to call AWS STS AssumeRole with tags attached. You then write IAM policies that check for these tags using the aws:PrincipalTag condition key. Self-managed servers can also be extended to implement dynamic authorization flows, such as mapping inbound OAuth tokens to outbound IAM role assumptions, giving you control over the full authorization chain. Additionally, with AWS-managed MCP servers, AWS injects context keys at the service layer, so callers cannot spoof them. With self-managed servers, the entity calling AssumeRole sets the session tags, so you must trust that your MCP server code hasn’t been modified.
The responsibility model differs between server types. With AWS-managed MCP servers, AWS is responsible for server infrastructure, patching, and context key injection. You’re responsible for IAM policy design and credential configuration. With self-managed MCP servers, you’re additionally responsible for server patching, dependency and library supply chain security, session tag implementation, and verifying server integrity. This connects to the supply chain risk described in principle 1. While self-managed servers require more operational overhead to implement and maintain, they give you flexibility and control.
Level of client control
A third dimension shapes your security implementation, whether you control the agent and MCP client code (code-controlled) or are limited to configuring pre-built tools without modifying their runtime behavior (configuration-bound). This determines which security mechanisms are available to you at runtime.
In configuration-bound scenarios, you use an AI coding assistant such as Kiro or Claude Code and configure credentials in your mcp.json file. You select which IAM role or profile the agent uses, but you cannot modify the agent’s runtime behavior. The agent calls AWS APIs using whatever credentials you configured ahead of time, and you cannot inject session policies or tags into those calls programmatically. Your security controls must be in place before the agent runs. You select narrowly scoped roles at configuration time, and your organization enforces guardrails through permission boundaries and service control policies (SCPs). These mechanisms restrict what the agent can do regardless of which role the developer selects.
In code-controlled scenarios, you build or deploy a custom agent on Amazon Bedrock AgentCore, Amazon EC2, Amazon EKS, or your local machine, or you build and run a custom MCP server. Because you control the runtime code, you can implement credential management programmatically. For custom agents, this means calling AssumeRole with session policies scoped to each tool invocation, attaching session tags for differentiation, and obtaining temporary credentials with the minimum permissions each operation requires. For custom MCP servers, you can inject session policies into every AWS API call the server makes, applying a consistent set of restrictions across all operations. Both approaches give you runtime IAM controls that are not available in config-bound scenarios.
Deployment pattern summary
The following table summarizes how these dimensions combine.
Source type
MCP server type
Client control
Credential source
Differentiation mechanism
Example use case
AI coding assistant
AWS-managed MCP
Config-bound
Local (AWS CLI, env vars, )
Automatic context keys
Kiro calling AWS-managed MCP server
AI coding assistant
Self-managed MCP (local or remote)
Config-bound
Local (AWS CLI, env vars, )
Manual session tags or session policies
Kiro calling local AWS MCP server
Agent on hosting environment
AWS-managed MCP
Code-controlled
Execution role or AssumeRole
Automatic context keys
Amazon Bedrock AgentCore agent calling AWS-managed MCP server
Agent on hosting environment
Self-managed MCP (remote)
Code-controlled
Execution role or AssumeRole
Manual session tags or session policies
Agent calling AWS MCP server deployed on Amazon Bedrock AgentCore
Your deployment pattern and level of client control determine which of the following security principles apply and how you implement them.
Three security principles for agent access
With this understanding of deployment patterns, let’s explore the three security principles that apply across all patterns.
Principle 1 – Assume all granted permissions could be used: Design permissions based on the acceptable scope of impact, not intended functionality alone.
Principle 2 – Provide organizational guidance on role usage: Enforce permission design through role governance, session policies, permission boundaries, and organizational policies.
Principle 3 – Differentiate AI-driven from human-initiated actions: Apply different IAM rules based on whether the action comes from an agent or a human.
Security principle 1: Assume all granted permissions could be used
The first security principle is fundamental. Any permission you grant to an agent can be exercised, regardless of your intended use case. If you give an agent s3:DeleteObject permission with a tool that can call the API, you must assume it can delete any Amazon Simple Storage Service (Amazon S3) object it has access to. This can happen in ways you cannot predict or fully prevent through code review alone. This non-deterministic behavior requires a shift in your approach to IAM permissions.
Traditional applications follow deterministic code paths. You can review the source code, identify every API call, and grant the permissions needed. AI agents operate differently. They make decisions at runtime based on reasoning, context, and learned patterns. You cannot predict which AWS APIs or tools an agent will call or which resources it will access. Static analysis of agent code tells you what tools are available, but not which tools will be invoked or how they’ll be used.
This creates a challenge when developers configure agents to use AWS credentials. Developers commonly use existing IAM roles, such as the role their traditional application uses or their local admin role for the AWS CLI. These roles were designed assuming predictable behavior and human judgment. Your local admin role has s3:* permissions because you exercise judgment on what to delete and when. You understand the context, recognize production resources, and can assess the impact of your actions.
An agent with that same role operates at machine speed without human judgment. It can delete production data through hallucination or be directed through prompt injection to perform unintended actions. It can also make a logical error in its reasoning that leads to unintended operations. The speed and scale at which agents operate increases the potential scope of these issues. An agent can make thousands of API calls in seconds, so the impact of misconfigured permissions scales quickly.
Consider the following scenarios with overly permissive access.
Hallucination: The agent misinterprets a user request and performs the wrong action. An agent designed to clean up temporary files might hallucinate that production data is temporary and delete it.
Prompt injection: An outside party crafts unexpected input that influences the agent’s reasoning. An agent designed to query Amazon DynamoDB tables could be directed to call dynamodb:PutItem or dynamodb:DeleteItem on resources outside its intended scope.
Logic errors: The agent’s reasoning leads to an incorrect conclusion. An agent analyzing S3 storage costs might conclude that frequently accessed production data is unused and delete it to save costs.
Tool poisoning: A compromised MCP server or dependency performs unintended operations using the agent’s credentials. An agent with broad S3 and DynamoDB permissions connects to an MCP server whose dependency has been modified to exfiltrate data. The compromised tool reads sensitive objects and writes them to an attacker-controlled location, all within the agent’s granted permissions.
This security principle reframes how you approach IAM permissions for agents. Instead of asking what does the agent need to do?, ask what is the scope of impact if the agent acts outside its intended use case? Design permissions based on the acceptable scope of access, not only on intended functionality. If an agent needs to read S3 objects, grant s3:GetObject, not s3:*. If it needs to write to specific paths, use resource-level conditions to restrict access to those paths. Consider what tools the agent has access to and what API calls those tools can make. Design permissions that limit what the agent is allowed to perform based on organizational policy. This doesn’t mean agents can’t have write or delete permissions. It means you and your organization must consider what resources those permissions apply to and what safeguards are in place.
Beyond IAM policies, consider implementing data perimeters as an additional layer of defense. Data perimeters use VPC endpoint policies, resource control policies (RCPs), resource policies, and service control policies (SCPs) to restrict access based on identity, resource, and network boundaries. For agents, data perimeters help verify that even if IAM permissions are broader than intended, access is limited to trusted resources from expected networks. For more information, see Building a data perimeter on AWS.
Practical implementation guidance:
Apply least privilege rigorously: If an agent needs read access, grant read permissions. If it needs write access, grant write to specific resources, not all resources of that type.
Use resource-level restrictions: Employ IAM policy conditions to limit permissions to specific buckets, paths, tables, or other resources. Don’t grant blanket permissions across all resources.
Consider read-only alternatives: Evaluate whether the agent’s task can be accomplished with read-only access. Many analysis and reporting tasks don’t require write or delete permissions.
Implement comprehensive monitoring: Set up Amazon CloudWatch alarms for unexpected agent actions, unusual access patterns, or operations on sensitive resources. Monitor for sensitive operations like deletions or modifications to production resources.
Conduct regular permission audits: As agents gain new tools and capabilities, developers often add permissions incrementally without removing unused ones. An agent that started with read-only access can gradually accumulate write and delete permissions across multiple services. Review agent IAM roles and policies regularly to identify and remove permissions that are no longer needed.
Verify MCP server integrity: Verify the provenance and integrity of MCP servers before granting them access to AWS credentials. Maintain an organizational registry of approved MCP servers and their expected behavior, and monitor for unauthorized server deployments that might have assumed execution roles. For more on agentic application risks, see the OWASP Top 10 for Agentic Applications.
Security principle 1 establishes the foundation. Understand the scope of every permission you grant. The next two security principles build on this foundation.
Security principle 2: Provide organizational guidance on role usage
The second security principle addresses organizational governance. Principle 1 requires that you design permissions based on acceptable scope of impact. Principle 2 addresses how your organization enforces that design through role governance, session policies, permission boundaries, and organizational policies.
When developers adopt AI coding assistants and configure MCP servers, they choose which credentials to use. Without organizational controls, developers often use existing roles (such as personal admin roles, shared development roles, or production roles) that were designed for human use with far more permissions than agents need. For agents deployed on hosting environments, you configure execution roles, but the same question applies. What permissions should those roles have, and how do you enforce consistency across deployments? The answer depends on your level of client control.
When you control the agent code
When you build or deploy custom agents on Amazon Bedrock AgentCore, Amazon EC2, Amazon EKS, or locally, you control the runtime code and can implement dynamic credential management. This is the strongest enforcement model because you can scope permissions per tool invocation at runtime. The same applies if you build or modify a custom MCP server. Because you control the server code, you can inject session policies into every AWS API call the server makes.
The IAM role defines the permission ceiling for the agent across all its tools. Instead of creating a separate role for every tool or MCP server, you use session policies to scope down the role’s permissions per operation. When the agent invokes a specific tool, it calls AssumeRole with a session policy that restricts permissions to just what that tool requires. The effective permissions are the intersection of the role’s policies and the session policy. Session policies restrict permissions but never expand them. If a role grants broad permissions but you attach the ReadOnlyAccess managed policy as a session policy, the agent can only perform read operations. You can also use inline session policies for resource-specific restrictions, such as limiting access to specific S3 buckets or DynamoDB tables.
The following example shows how to implement session policies in agent code.
import boto3

# Uses the execution IAM role as part of AgentCore Runtime
sts = boto3.client('sts')

# Assume role with ReadOnlyAccess managed policy as session policy
response = sts.assume_role(
    RoleArn='arn:aws:iam::111122223333:role/AgentDataRole',
    RoleSessionName='agent-data-reader',
    PolicyArns=[
        {'arn': 'arn:aws:iam::aws:policy/ReadOnlyAccess'}
    ],
    DurationSeconds=3600
)

# Use the temporary credentials
credentials = response['Credentials']
s3 = boto3.client(
    's3',
    aws_access_key_id=credentials['AccessKeyId'],
    aws_secret_access_key=credentials['SecretAccessKey'],
    aws_session_token=credentials['SessionToken']
)
For agents on hosting environments like Amazon Bedrock AgentCore, the execution role serves two purposes. It’s the trust anchor that lets the agent call AssumeRole for tool-specific credentials, and it can supply baseline permissions that all operations need, such as writing logs to CloudWatch. For tool-specific operations that access customer resources, use AssumeRole with session policies to obtain scoped temporary credentials rather than using the execution role’s permissions directly. This centralized execution model simplifies enforcing consistent session policies across all agent deployments. Agents can also attach tags when assuming roles for differentiation purposes (covered in Security principle 3).
When you’re configuration bound
When you use an AI coding assistant like Kiro or Claude Code with off-the-shelf MCP servers, you configure credentials in your mcp.json file but cannot modify the agent’s runtime behavior. Your security controls must be established before the agent runs.
Your first control is role selection. As described in the preceding deployment patterns section, AI coding assistants use credentials from the developer’s local environment. Create agent-specific IAM roles with narrower permissions than equivalent human roles, and direct developers to use them. For self-managed MCP servers running locally, the developer specifies the role through environment variables in the mcp.json configuration.
Only role selection depends on developer compliance. IAM permission boundaries provide organizational enforcement without requiring code changes or developer cooperation. A permission boundary is a managed policy that your security team attaches to an IAM role to set the maximum permissions that role can grant. The effective permissions are the intersection of the role’s identity-based policies and the permission boundary. Permission boundaries are most effective on agent-specific roles that your organization creates for agent use. They ensure those roles cannot exceed their intended permissions even if misconfigured. If a developer configures their existing role in mcp.json instead, a permission boundary on that role restricts all use of the role, not just agent use. For AWS-managed MCP servers, principle 3’s context keys address this gap. They let you write IAM policies that restrict actions only when they come through an MCP server, leaving the developer’s direct use of the same role unaffected. For self-managed MCP servers, modifying the server code to AssumeRole into an organization-defined role provides a similar override, and session tags can be attached during that AssumeRole for differentiation (see principle 3). For multi-account environments, SCPs in AWS Organizations provide guardrails at the account or organizational unit level. SCPs set the maximum permissions for all principals in an account, giving your central governance team control over agent permissions across your organization.
Organizational governance at scale
Whether your agents are config-bound or code-controlled, you need organizational mechanisms to enforce consistent governance across teams and accounts.
Tag IAM roles intended for agent use with a consistent identifier, such as a tag key of Usage with a value of Agent. This lets your governance team inventory all agent roles across accounts, identify roles that don’t have permission boundaries, and distinguish agent roles from human roles in audit reports. You can also use tag-based conditions in SCPs to enforce that only properly tagged roles are used for agent operations. For AWS-managed MCP servers, the automatic context keys (principle 3) provide this identification without requiring role tags, but tagging remains useful for role inventory and audit purposes.
Use CloudTrail to monitor all API calls made by agent sessions and set up CloudWatch alarms for sensitive operations like resource deletion or permission changes. Principle 3 covers how to filter and analyze agent activity using context keys (AWS-managed MCP) and session tags (self-managed MCP).
For multi-account environments, combine SCPs with permission boundaries and resource control policies (RCPs) for layered enforcement. SCPs set the maximum permissions for principals within your organization at the account or organizational unit level, while permission boundaries constrain individual roles. RCPs enforce controls at the resource level regardless of the caller’s organizational membership, protecting resources even from cross-account access. Verify that the AWS services you use support MCP context keys in RCP evaluation. This layered approach gives your central governance team control over agent permissions across your organization, even when individual teams manage their own accounts and roles. Conduct quarterly reviews of agent roles and session policies to identify permissions that are no longer needed as agent capabilities evolve.
Practical implementation guidance:
For code controlled agents: Implement session policies for every tool invocation. Use AssumeRole with the minimum permissions each operation requires rather than relying on the execution role’s base permissions.
For config-bound agents: Create agent-specific IAM roles with narrower permissions than human roles or configure self-managed MCP servers to AssumeRole into an organization-defined role. Have your security team attach permission boundaries to agent-specific roles to enforce maximum permissions regardless of developer role selection.
At the organization level: Tag agent roles consistently, enforce guardrails through SCPs, and monitor agent activity through CloudTrail. Conduct quarterly reviews to remove unused permissions.
Security principle 2 gives you organizational control over agent permissions through mechanisms matched to your level of client control. Session policies and dynamic credential scoping enforce permissions at runtime for code-controlled agents. Permission boundaries and SCPs enforce permissions at the organizational level for config-bound agents. The next principle adds a complementary layer of governance at the resource level based on whether a human or agent is performing the action.
Security principle 3: Differentiate AI-driven from human-initiated actions
The third security principle adds an additional level of control on top of principle 2. Where principle 2 governs what permissions an agent has, this principle governs what the agent can do with those permissions based on whether the action is AI-driven or human-initiated.
This principle is essential for two reasons. For AWS-managed MCP servers, you cannot modify the server code to inject session policies or call AssumeRole with scoped credentials. The developer’s credentials flow through as-is. Context keys are your primary mechanism to restrict agent actions differently from human-initiated actions on the same role. For self-managed MCP servers where principle 2’s session policies are already in place, differentiation adds a second layer of defense at the resource level. Even if the session policy is broader than intended, differentiation policies can deny specific dangerous operations when performed through an agent.
For example, you can allow both humans and agents to read Amazon S3 objects, but deny delete operations when accessed through agents. Without a differentiation mechanism, IAM policies can’t distinguish between AI-driven actions and human-initiated actions. If a developer has s3:DeleteObject permission and uses an agent with their credentials, the agent also has s3:DeleteObject permission with no way to restrict it.
Differentiation gives you granular governance. Allow human-initiated actions with broad permissions while restricting agent actions to narrower permissions. Apply different rules based on context and implement progressive restrictions. Allow read operations for everyone, require approval for AI-driven write operations, and deny delete operations for agent actions entirely. Maintain audit trails showing which actions were AI-driven versus human-initiated, essential for compliance and security investigations.
When agents bypass MCP servers
Differentiation through condition keys and session tags applies when the agent accesses AWS through an MCP server. AI coding assistants like Kiro and Claude Code have access to general-purpose tools, including bash, shell, and code execution. When an agent uses a bash tool to run an AWS CLI command like aws s3 rm s3://my-bucket/my-object or executes a Python script that calls boto3 directly, the request goes straight to AWS using the developer’s existing credentials. The request bypasses MCP servers entirely. The aws:ViaAWSMCPService condition key isn’t set, session tags from MCP server AssumeRole calls aren’t applied, and IAM policies conditioned on these values don’t evaluate.
This means a deny policy like “Condition": {"Bool": {"aws:ViaAWSMCPService": “true"}} blocks the agent when it calls Amazon S3 through a managed MCP server, but doesn’t block the same agent when it runs the equivalent AWS CLI command through a bash tool. The agent has two paths to the same AWS API, and differentiation controls govern one path.
The condition keys work as designed, differentiating MCP-mediated access from direct access. This is a scope boundary. Differentiation controls secure the MCP access path. For the direct access path, principles 1 and 2 are your controls. Least privilege on the underlying IAM role (principle 1) and organizational guardrails like permission boundaries and SCPs (principle 2) apply regardless of how the agent reaches AWS. If the role doesn’t have s3:DeleteObject permission, the agent can’t delete objects through a bash tool or through an MCP server.
Restricting which tools an agent can access is a complementary control outside the scope of IAM. You can use agent frameworks and hosting environments such as Amazon Bedrock AgentCore to limit the set of available tools, removing general-purpose execution capabilities for agents that interact with AWS exclusively through MCP servers. When you combine tool restriction with the IAM controls in this post, you close the gap between the MCP access path and the direct access path.
AWS-managed MCP servers: Automatic context keys
AWS-managed MCP servers, including the AWS MCP Server, Amazon EKS MCP Server, and Amazon ECS MCP Server, offer differentiation by default. They automatically add IAM context keys to every downstream AWS service call. These context keys are aws:ViaAWSMCPService, a boolean set to true when the request comes through any AWS-managed MCP server. The second key is aws:CalledViaAWSMCP, a string containing the MCP server name like aws-mcp.amazonaws.com, eks-mcp.amazonaws.com, or ecs-mcp.amazonaws.com. No configuration is required on your part. You only need to write IAM policies that check for these keys to apply different rules for agent actions.
The following IAM policy denies delete operations when accessed through any AWS-managed MCP server.
When a request doesn’t come through an AWS-managed MCP server, the aws:ViaAWSMCPService condition key isn’t present in the request context. The Deny statement only applies when the key is explicitly set to true, so human-initiated actions are unaffected by this policy.
You can also restrict operations to specific MCP servers. With this policy, you can run EKS operations only when accessed through the EKS MCP server, not through the AWS API MCP server.
Self-managed MCP servers, whether AWS-provided servers from the AWS MCP GitHub repository or custom servers you build yourself, don’t automatically add IAM context keys. To implement differentiation with self-managed servers, you must configure the MCP server to add session tags when assuming IAM roles. This requires modifying your MCP server to call AWS STS AssumeRole with tags attached. The tags remain active for the duration of the assumed role session and can be referenced in IAM policies using the aws:PrincipalTag condition key. This approach gives you flexibility and control over the session tag configuration. To maintain consistency, verify that all MCP server instances add the appropriate tags.
The following example shows how to configure your MCP server to add session tags.
Session tags and session policies are both passed to AssumeRole, but serve different purposes. Session policies (covered in security principle 2) constrain what permissions the agent has. Session tags (covered here in security principle 3) mark the session as AI-driven, enabling IAM policies to differentiate between agent and human actions. You can use both in the same AssumeRole call for defense-in-depth. The session policy constrains what the agent can do. The session tags let IAM policies apply different rules based on the actor type.
The following example uses both session policies and session tags together.
Both differentiation mechanisms generate CloudTrail logs for audit trails. For AWS-managed MCP servers, downstream AWS API calls include the MCP service identifier in the invokedBy, sourceIPAddress, and userAgent fields. You can filter on these fields to isolate agent activity. MCP-originated downstream calls are classified as data events, so you must enable data event logging on your CloudTrail trail to capture them.
For self-managed MCP servers with session tags, the tags appear in the requestParameters.principalTags field of the AssumeRole CloudTrail event. You can correlate the session name from the AssumeRole event to downstream API calls to trace agent activity.
With these logs, you can query CloudTrail to find all AI-driven actions and analyze patterns of agent behavior. You can also identify unexpected or unauthorized operations and maintain compliance audit trails. Set up CloudWatch alarms to detect agent actions on sensitive resources or unusual patterns that indicate unintended access or misconfiguration.
Things to consider
When deciding between AWS-managed and self-managed MCP servers, consider the trade-offs. AWS-managed MCP servers offer the most straightforward path. Context keys are added automatically with no configuration on your part. Self-managed MCP servers require modifying code to add session tags. However, they give you complete control over the tags and let you implement custom functionality not available in AWS-managed servers. Organizations can use both approaches, AWS-managed servers for standard AWS operations and self-managed servers for specialized use cases.
Practical implementation guidance:
Assess direct access paths: Evaluate whether your agents have access to general-purpose tools (bash, shell, code execution) that can bypass MCP servers. If they do, rely on principles 1 and 2 for those paths and consider restricting tool availability where possible.
Choose a differentiation mechanism: Select based on your MCP server type (for managed, use context keys, for self-managed, use session tags).
For AWS-managed MCP: Write IAM policies that check aws:ViaAWSMCPService and aws:CalledViaAWSMCP condition keys. No MCP server configuration needed.
For self managed MCP: Modify MCP server code to add session tags when assuming roles. Verify consistent tag application across all instances.
Update IAM policies: Add differentiation conditions to existing policies. Test in non-production first to verify behavior.
Monitor CloudTrail logs: Verify differentiation is working by checking for context keys or session tags in CloudTrail events.
Set up alerts: Configure CloudWatch alarms for AI-driven sensitive operations or policy violations.
Perform regular audits: Review IAM policies quarterly to verify differentiation conditions remain correct as agent capabilities evolve.
Conclusion
Securing AI agent access to AWS resources requires building deterministic IAM controls for non-deterministic AI systems. The three security principles give you a defense-in-depth framework that adapts to your deployment pattern and level of client control.
Your implementation path depends on your situation. Start with principle 1. Audit current agent permissions and default to read-only access where possible. Next, implement principle 2. For config-bound scenarios, establish permission boundaries and select agent-specific roles. For code-controlled scenarios, implement dynamic session policies scoped to each tool invocation. Finally, add principle 3 differentiation based on your MCP server type. Use automatic context keys with AWS-managed MCP servers, or configure session tags with self-managed servers.
By applying these three security principles, you can use AI agents while maintaining the governance and compliance controls your organization requires.
Microsoft is publishing 167 vulnerabilities on April 2026 Patch Tuesday. Microsoft is aware of exploitation in the wild for one of today’s vulnerabilities, and public disclosure for one other. Microsoft evaluates 19 of the vulnerabilities published today as more likely to see future exploitation. So far this month, Microsoft has provided patches to address 80 browser vulnerabilities, which are not included in the Patch Tuesday count above.
Increasing volumes of vulnerabilities
Regular Patch Tuesday watchers will know that these vulnerability totals are significantly higher than usual, especially the browser numbers. Late last week, Microsoft published patches to resolve more than 60 browser vulnerabilities in a single day, which is a new record in that very specific category.
It might be tempting to imagine that this sudden spike was tied to the buzz around the announcement a week ago today of Project Glasswing, but this is not the case. Edge is based on the Chromium engine, and the Chromium maintainers acknowledge a wide range of researchers for the vulnerabilities which Microsoft republished last Friday. This reflects a significant industry-wide uptick in the volume of vulnerability reports over the past few weeks. A safe conclusion is that this increase in volume is driven by ever-expanding AI capabilities. We should expect to see further increases in vulnerability reporting volume as the impact of AI models extend further, both in terms of capability and availability.
SharePoint: zero-day spoofing
When everything is changing rapidly, it can be tempting to look to familiar things for comfort. SharePoint admins should start by addressing CVE-2026-32201, an exploited-in-the-wild spoofing vulnerability. The advisory doesn’t offer much detail, but does mention CWE-20: Improper Input Validation and low impact to confidentiality and integrity, with no impact to availability. Of course, the greatest attacker impact is typically achieved by chaining together multiple vulnerabilities that by themselves might not seem so bad.
Ever-increasing novel AI capabilities in offensive cybersecurity now appear to provide real competition for all but the most elite human researchers; if it was ever valid to suppose that a vulnerability with a CVSS v3 base score of 6.5 was unlikely to cause much pain, it’s certainly not a safe defensive assumption in 2026. Patches are available for all supported versions of SharePoint, including SharePoint 2016, which moves beyond extended support on July 14, 2026.
Defender: zero-day elevation of privilege
Microsoft Defender receives a patch today for CVE-2026-33825, a local privilege escalation vulnerability for which Microsoft is aware of public disclosure. Successful exploitation leads to SYSTEM privileges, so this is certainly worth patching sooner rather than later. Microsoft points out that no action should be required to install this update, since the Microsoft Defender Antimalware Platform automatically updates by default. A further silver lining is that systems that have disabled Microsoft Defender are not in an exploitable state. Hopefully, any such system is running a suitable third-party replacement for Defender’s capabilities.
Windows [I don’t like] IKE: zero-day pre-auth RCE
The Windows Internet Key Exchange (IKE) Services Extensions is the site of CVE-2026-33824, a critical unauthenticated remote code execution vulnerability. Exploitation requires an attacker to send specially crafted packets to a Windows machine with IKE v2 enabled, which could enable remote code execution. Vulnerabilities leading to unauthenticated RCE against modern Windows assets are relatively rare, or we’d see more wormable vulnerabilities self-propagating across the internet. However, since IKE provides secure tunnel negotiation services, for instance for VPNs, it is necessarily exposed to untrusted networks and reachable in a pre-authorization context. It’s hard to imagine this turning into a rampaging internet-wide worm, but there’s plenty of scope for initial access abuse, so this IKE vulnerability is still yikes.
The advisory does contain a section with potential mitigations for anyone unable to patch immediately, which center on least-privilege restriction of relevant UDP traffic. This same portion of the advisory also furnishes a helpful link to the definition of the word “mitigations” in the MSDN glossary. All versions of Windows back as far as Server 2016 and Windows 10 1607 LTSC receive patches.
The advisory credits both the WARP and MORSE (Microsoft Offensive Research & Security Engineering) teams at Microsoft. MORSE appears in Acknowledgements over the past few years, but today marks the first explicit mention of WARP in a Microsoft security advisory Acknowledgements section; we can speculate that WARP is an internal designator for the Microsoft Windows Enterprise Security Team.
Windows Internet Key Exchange (IKE) Service Extensions Remote Code Execution Vulnerability
Exploitation Less Likely
No
9.8
The collective thoughts of the interwebz
Manage Consent
To provide the best experiences, we use technologies like cookies to store and/or access device information. Consenting to these technologies will allow us to process data such as browsing behavior or unique IDs on this site. Not consenting or withdrawing consent, may adversely affect certain features and functions.
Functional
Always active
The technical storage or access is strictly necessary for the legitimate purpose of enabling the use of a specific service explicitly requested by the subscriber or user, or for the sole purpose of carrying out the transmission of a communication over an electronic communications network.
Preferences
The technical storage or access is necessary for the legitimate purpose of storing preferences that are not requested by the subscriber or user.
Statistics
The technical storage or access that is used exclusively for statistical purposes.The technical storage or access that is used exclusively for anonymous statistical purposes. Without a subpoena, voluntary compliance on the part of your Internet Service Provider, or additional records from a third party, information stored or retrieved for this purpose alone cannot usually be used to identify you.
Marketing
The technical storage or access is required to create user profiles to send advertising, or to track the user on a website or across several websites for similar marketing purposes.